40
lily lyp s Version 0.2.1 Urs Liska September ,
lilylyp sVersion 0.2.1
Urs Liska
September ,
Quick Start
lilylyp s enables LATEX to include arbitrary notational elements from the LilyPond notationsoftware like characters in continuous text. As it uses fontspec to access glyphs from anOpenType font lilylyp s works with XƎLATEX or LuaLATEX exclusively.
If you have obtained the package as part of a TEX distribution the following Minimal WorkingExample should get you going in a minute. If you have downloaded the package please refer tosection . on page for a few more preliminary steps.
\documentclass{article} % Should work with any documentclass
\usepackage{fontspec} % Is necessary to access OpenType fonts
\usepackage{lilyglyphs} % Currently there are no package options available
\begin{document}
\flatflat{} or \clefGInline. % Predefined commands,
% Use {} to allow trailing whitespace
\lilyGlyph{timesig.neomensural64} % Access ”Emmentaler” glyphs by their name
% Generic commands have one mandatory argument.
\lilyDynamics[scale=1.1,raise=−0.3]{mf} % Optional placement arguments.
\end{document}
In the text you can use predefined commands like or . Commands without the pair of curlybraces swallow any trailing whitespace – use these before punctuations or to combine symbols.For the available predefined commands consult the reference in chapter on page .
Glyphs that are part of LilyPond’s E font but not covered by a predefined commandyet can be accessed through the generic command \lilyGlyph{GLYPHNAME}, the glyph names be-ing listed in http://www.lilypond.org/doc/v2.16/Documentation/notation/the-feta-font.
html or in the file the-feta-font-2-16-2.html located in the the documentation directory ofthe package. As an example take this neomensural time signature .Dynamics have a special command \lilyDynamics{mf}which simply takes a string of Dynamicsletters as its argument.
lilylyp s elements automatically or manually scale with the text size commands.All commands accept an optional argument containing key=value pairs. Currently two keys
are supported: scale multiplies the size of the glyph by the given factor while raise shifts itvertically by the given amount interpreted as ex. Glyphs accessed individually generally needthese options, the above neomensural time signature having actually been scaled by . andraised by ..
Apart from the Emmentaler glyphs lilylyp s can include any notational construct that Lily-Pond can produce. Please refer to section . on page to learn about the generic access commandsand to section . on page for detailed instructions how to create custom commands.
http://www.lilypond.org
Contents
1 Introduction 5. Installation . . . . . . . . . . . . . . . . . . . . . . . . . . . . . . . . . . . . . . . License . . . . . . . . . . . . . . . . . . . . . . . . . . . . . . . . . . . . . . . .
2 Usage 8. Usage of Predefined Commands . . . . . . . . . . . . . . . . . . . . . . . . . . . Generic Access Commands . . . . . . . . . . . . . . . . . . . . . . . . . . . . . . The Optional Argument: Layout Adjustment . . . . . . . . . . . . . . . . . . . . Example: Define a Custom Command . . . . . . . . . . . . . . . . . . . . . . . . Dotted symbols . . . . . . . . . . . . . . . . . . . . . . . . . . . . . . . . . . . . Optical size . . . . . . . . . . . . . . . . . . . . . . . . . . . . . . . . . . . . . .
3 Reference of Predefined Commands 13. Single Notes . . . . . . . . . . . . . . . . . . . . . . . . . . . . . . . . . . . . . . Beamed notes . . . . . . . . . . . . . . . . . . . . . . . . . . . . . . . . . . . . . Clefs . . . . . . . . . . . . . . . . . . . . . . . . . . . . . . . . . . . . . . . . . . Time Signatures . . . . . . . . . . . . . . . . . . . . . . . . . . . . . . . . . . . . Numbers . . . . . . . . . . . . . . . . . . . . . . . . . . . . . . . . . . . . . . . . Accidentals . . . . . . . . . . . . . . . . . . . . . . . . . . . . . . . . . . . . . . . Rests . . . . . . . . . . . . . . . . . . . . . . . . . . . . . . . . . . . . . . . . . . Dynamic Text . . . . . . . . . . . . . . . . . . . . . . . . . . . . . . . . . . . . . Graphical Dynamic Symbols . . . . . . . . . . . . . . . . . . . . . . . . . . . . . Scripts . . . . . . . . . . . . . . . . . . . . . . . . . . . . . . . . . . . . . . . . . Fancy (Example) Commands . . . . . . . . . . . . . . . . . . . . . . . . . . . .
4 Internals 21. Documentation of the generic access commands . . . . . . . . . . . . . . . . .
.. Accessing E Glyphs . . . . . . . . . . . . . . . . . . . . . . .. Printing image files . . . . . . . . . . . . . . . . . . . . . . . . . . . . .
. The Package’s Directory Structure . . . . . . . . . . . . . . . . . . . . . . . . . .. “Private” Directory Structure . . . . . . . . . . . . . . . . . . . . . . .
. How to write predefined commands . . . . . . . . . . . . . . . . . . . . . . . .
5 Generating Commands with Python 30. Generating Commands for E Glyphs . . . . . . . . . . . . . . . . .
.. Preparing the Input File . . . . . . . . . . . . . . . . . . . . . . . . . . .. Generating the LATEX code . . . . . . . . . . . . . . . . . . . . . . . . . .. Fine-tuning the LATEX Commands . . . . . . . . . . . . . . . . . . . . . .. Finishing Off (and Contributing) . . . . . . . . . . . . . . . . . . . . .
. Generating Commands with Glyph Images . . . . . . . . . . . . . . . . . . . . .. Preparing the Input Files . . . . . . . . . . . . . . . . . . . . . . . . . . .. Running the Script . . . . . . . . . . . . . . . . . . . . . . . . . . . . . .. Utilizing the results . . . . . . . . . . . . . . . . . . . . . . . . . . . . . .. Partial processing of the input file . . . . . . . . . . . . . . . . . . . . . .. Recreating Image Files . . . . . . . . . . . . . . . . . . . . . . . . . . .
6 Contributing to lilylyp s 40
1 Introduction
lilylyp s came into existence when Urs Liska looked for a way to include arbitrary notationalelements in the continuous text of LATEX documents. Unfortunately all packages he could findwere quite restricted in the number of available symbols and/or their flexibility in scalingwith the text size. Moreover no solution came near the beauty of the engraving of LilyPond.Therefore Urs decided to “roll his own” package and make the notation font and notationalelements of LilyPond available to LATEX documents.
LilyPond is a promising competitor in producing the most beautiful musical engraving on themarket, and one of the foundations of this beauty is its E font. lilylyp s accesses theEmmentaler font through the fontspec package and inserts its glyphs in the continuous textapplying sophisticated control over scaling and spacing. Therefore it relies on a LATEX enginesupporting fontspec. It was written using XƎLATEX, but thanks to the contribution of DaveBellows it now also works with LuaLATEX.
The Emmentaler font only provides a subset of LilyPond’s notational capabilities, as LilyPonddraws many symbols itself. After some experiments with drawing such elements in LATEX itbecame clear that this approach isn’t really maintainable – and especially wouldn’t provide asufficient output quality. Therefore this kind of elements is included through small imagefiles that have explicitely been created with LilyPond.
Great care has been taken to make the notational elements scale well with the surroundingtext font size. Each single element can be scaled and vertically shifted, but the settings can alsobe done per document to accomodate for unusual body fonts that might not match too wellwith lilylyp s .
The coverage of glyphs is far from being comprehensive, but the package is already veryusable for real-world documents. Any Emmentaler glyph that isn’t covered yet by a predefinedcommand can be accessed by its name. Other – image based – commands (for example arbitrarilycomplex musical expressions) can be added through a process that has been made as simple aspossible (although it involves using external software such as LilyPond and possibly Python).Details about extending lilylyp s with additional commands can be found in chapter onpage .
As the number of possible commands seems endless we would be extremely happy aboutany contribution of new material. But there are also technical details with regard to LATEX
http://www.lilypond.org
http://www.davebellows.com
Principally it is possible to extend the functionality so it would also work with plain LATEX by accessing non-OpenType variants of the font, but as the package maintainer has neither experience nor active interest in thisarea this will only be implemented if there are volunteers who join us.
programming where additional competence would be highly welcome.
Originally lilylyp s was a single project but by now it is part of a rather large family of projectsaround engraving musical scores with LilyPond and typesetting with LATEX: openLilyLib. Ifyou have come here mainly as a LATEX document author you should also have a look at themusicexamples package. If you are also interested in LilyPond itself you might find the tutorialssection, lilylib and lilypond-doc interesting too .
lilylyp s is developed in a Git repository on GitHub. There you can inspect the source, cloneor fork the repository, and submit issue reports. If you are interested in participating in thedevelopment of lilylyp s , don’t hesitate to contact us directly.
1.1 Installation
Installation Options There are several ways to get lilylyp s up and running: As part of aTEX distribution, as a download from CTAN or through its development repository on GitHub,which is the recommended way if you’re familiar with Git. If it’s contained in your distributionyou should be able to simply use the package and start typing, e. g. with the example given inthe “Quick Start” at the beginning of this manual. Otherwise there are a few steps of manualinstallation.
lilylyp s is known to need fairly recent versions of fontspec and LuaLATEX. So if you haven’tgot lilylyp s through your LATEX distribution youmay have to take care that you use a sufficientlycurrent distribution.
CTAN Download If you’ve downloaded the package from CTAN you should extract thearchive to a location in the tex/latex/ directory of your (e.ġ. ~/texmf on Linux or~/Library/texmf on Mac OS X).
GitHub Download If you’re familiar with Git the recommended way to use lilylyp s is tocreate a fork of the GitHub repository (assuming you already have a Github account). Inside thesame tex/latex/ dir run git clone [email protected]:YOURUSERNAME/lilyglyphs.git – pleasedon’t provide an alternative destination name because the package should actually be in adirectory called lilyglyphs. Then cd into that directory and add the original repository withgit remote add upstream [email protected]:openlilylib/lilyglyphs.git. From now on youwill refer to your fork as origin and to the official repository as upstream.
The most immediate advantage of using lilylyp s through the Git repository is that it isthe easiest way to keep the package up to date. Each time someone adds new commands to
http://www.openlilylib.org
http://www.openlilylib.org/musicexamples
https://github.com/openlilylib/lilyglyphs
mailto:[email protected]
http://www.ctan.org/pkg/lilyglyphshttps://github.com/openlilylib/lilyglyphs
the package they will be instantly available through the repository while regular releaseswill happen much less frequently. And if updates should somehow break syntax in existingdocuments you can easily (and temporarily) check out the earlier version of the package youhad used when originally writing your documents. Another advantage of the repository versionis that you have “direct access” to extending the package with predefined commands in a waythat makes it easy for us to incorporate your contribution in the official package.
Font Considerations If you install lilylyp s manually you will have to make the includedE OpenType font available for LATEX. Copy the complete fonts/ folder from thepackage directory to TEXMFHOME/fonts/opentype (creating these subdirectories if they aren’talready present on your system) and rename it to a more explicit name such as ‘emmentaler’or ‘lilyglyphs’. An even better way would be not to copy the files but rather create a symlinkto it with cd TEXMFHOME/fonts/opentype and ln -s /path/to/lilyglyphs/fonts emmentaler
[TODO: check on Windows]. That way no manual adjustments have to be made whenlilylyp s is updated and might bring new versions of the font files with it.Note: the package probably won’t work with XƎLATEX if you also have installed E asa system font.Note: If you create a link instead of a copy you have to place this directly in the opentype/
directory and not in a subdirectory like opentype/lilyglyphs/ because LuaLATEX won’t findthe font otherwise. If you need this extra level of structure (for example because you have a lotof fonts) a workaround is to add an empty directory beside the link.
If you experience any issues with this or other topics during installation please give usfeedback so we can improve documentation .
1.2 License
lilylyp s is distributed under the LATEX Project Public License version . or (at your op-tion) any later version of this license. You may find the latest version of this license at http://www.latex-project.org/lppl.txt, and version . or later is part of all distributions of LaTeXversion // or later. A full copy of the license is enclosed in the file /license/COPY-
ING.LPPL of the package. The file /license/MANIFEST contains a list of all files affected by thislicensing.
The package is currently maintained by its original author Urs Liska, but its status issimply ‘maintained’.
lilylyp s contains the E OpenType font developed provided by the LilyPondproject (http://www.lilypond.org). It is redistributed unmodified under the SIL Open FontLicense, Version .. For details see /otf/LICENSE.OFL and /otf/FONTLOG.
2 Usage
As mentioned in the Quick Start at the beginning of this document you have to activatelilylyp s with \usepackage{fontspec} \usepackage{lilyglyphs}. This will give you access tothe predefined commands and some generic access commands.
2.1 Usage of Predefined Commands
A number of predefined commands is available for immediate use. To use them you just haveto enter the command to print the corresponding musical element, e. g. \lilyTimeC for a . Acomplete reference of these commands is available in chapter on page , along with anyspecific comments that might be necessary.
As you will see later there are some commands that take arguments and many that don’t.Commands without mandatory arguments behave like e. g. the well-known \LaTeX command inthat they swallow any whitespace entered after them. So in order to allow a space to be printedafterwards you have to supply a pair of curly braces, like \flat{} and more to print “ andmore”. Commands with arguments don’t need this special treatment, so you can simply write aspace character after them or not like \lilyDynamics{mf} or \lilyDynamics{pp}. to achievemf or pp.2.2 Generic Access Commands
There is a wealth of conceivable musical symbols and only a limited number of predefinedcommands. Even when this package will become more and more comprehensive there willalways be cases that haven’t been covered yet. For these cases lilylyp s provides four genericaccess commands:
• \lilyGlyph
• \lilyGlyphByNumber
• \lilyText
• \lilyImage.
They all accept one mandatory and one optional argument, the mandatory one being thecontent to be printed. This content has to be given in a form specific to the respective command.
\lilyGlyph expects the OpenType glyph name. You can look up the glyph names in theAppendix of LilyPond’s Notation Reference or in the somewhat reduced html page provided in
http://www.lilypond.org/doc/v2.16/Documentation/notation/the-feta-font

the /documentation directory of the package download.Please note that many Emmentaler glyphs, especially articulations, are aligned to their centerbecause that’s what they are used like in a score. So don’t be surprise if you need considerableextra space before such glyphs. This isn’t a bug but rather a characteristic of using the glyphs ina different context than they were designed for.
\lilyGlyphByNumber expects the Unicode code number of the glyph. You will generally notwant to use this as the code positions aren’t guaranteed to stay the same with new versionsof the fonts. There may be some uses for numerical access however, e. g. if you want to iterateover a range of glyphs.
\lilyText expects ordinary text as its argument. In fact it just switches the font to Emmentalerand then writes the string given as the argument. This only works for Dynamics letters, numbersand the glyphs + - , . – as these glyphs are located at their ordinary character position inthe font. But you can also enter any spacing commands (like \hspace or plain spaces) to controlthe spacing between glyphs. But keep in mind that this may result in line breaking inside yourexpression. If you need to prevent this you can surround your expression by an \mbox.(There is a special command provided – \lilyDynamics – which is essentially a wrapper around\lilyText and presets the character size to a suitable default.)
\lilyImage expects the basename of an image file your TEX system can process. It thenincludes this file using the same optional argument mechanism as the other commands. Whatsets this command apart from simply including an image is that it automatically scales the imagerelative to the current text font size, with being printed at its original size at \normalsize. Youhave to take care yourself that LATEX finds and can handle the image file. While this commandhas originally been created to print images generated by LilyPond you can actually print anyimage, e. g. scanned images from autographs, taking advantage of lilylyp s ’ infrastructure, forexample the optional arguments described in the following section.
2.3 The Optional Argument: Layout Adjustment
The generic access commands as well as the predefined commands allow an optional argumentto be passed. This can contain a list of comma-separated options in <key=value> form thatinfluence the appearance of the glyphs. Currently there are the scale and raise options.
scale changes the size of the glyph. As the Emmentaler glyphs are designed for a totallydifferent purpose they often don’t fit very well in the context of continuous text. scale isgiven as a factor by which the default size is multiplied. With Emmentaler glyphs this has tobe a positive number, otherwise you will get an error. But glyphs printed by \lilyImage (orpredefined commands based on it) can also be scaled negatively. This results in an image that isrotated around the center of the bottom line of the original. You will therefore have to add an
appropriate raise value (try e. g. as a starting point). You will have to take some care aboutthe horizontal spacing, as such a flipped image seems to use it with inverted direction. But youcan safely put extra horizontal space after the image, and it is a valid and practical way to createtwo symbols from one image file.
raise changes the vertical placement of the glyph. The majority of glyphs is placed too lowby default, so they need a positive raise value. raise is given as a decimal value without units,which is interpreted as ex, or x-height. As there is no x in a musical font, this is somewhatarbitrary, but it is a natural unit to scale with the surrounding font size. Usually you may starttrying raise values between and ..
These layout adjustments can be made at three different stages: at design time (of predefinedcommands), globally (per document), and at command invocation.
At design time a designer of a predefined command has already selected the optimal defaultvalues so the command will work out-of-the-box in most cases.
Globally the layout adjustments default to values that leave the glyphs unaltered (i. e. scale=1and raise=0). A document author can override these defaults at any time with \lilyGlobalOp-
tions{<options>}. This may for example be necessary if you use a text font which doesn’tharmonize well with lilylyp s ’ default settings, for example because of its unusual x-height.You can use this command at the beginning of the document to modify the appearance for thewhole document, or you can change its settings multiple times throughout the document. Thisis what you generally have to do when using \lilyGlyph for printing individual glyphs fromEmmentaler.
At command invocation you can pass the layout adjustment options for the specific instanceof the glyph.
The values that finally affect the layout of any given glyphs take all three stages into account.By passing an option at command invocation you don’t set absolute values, but modify thevalues already present. The effective scale value is designtime * global * invocation, theeffective raise is designtime + global + invocation. So passing a scale=1.1 will alwaysslightly increase the glyph’s size, no matter what settings are already in effect.Technically speaking lilylyp s applies a fourth layer of scaling with image files. It calculates a
last scaling factor by multiplying the result of the above considerations with the ratio of the currentfont size versus the size of the \normalsize font.
2.4 Example: Define a Custom Command
Now it’s time for an example that actually uses the generic access commands to print symbolsprovided by the Emmentaler font. It will walk you through the process up to defining a ‘local’
predefined command.We want to print the fermata sign which isn’t implemented yet as a predefined command.
In the documentation we have looked up the name of the glyph: scripts.ufermata, so youcan print it with \lilyGlyph{scripts.ufermata}: . While this gives us the right glyph itsappearance isn’t really what we’re after yet and we want to adjust its size and placement. Thisis done with the optional argument described in the previous subsection.
First we increase the size of the glyph with the scale argument. We find that a scaling factorof . seems suitable: \lilyGlyph[scale=1.4]{scripts.ufermata} –
As you can see the glyph is – as most Emmentaler glyphs are – placed too low, so you have toadd the raise argument. A value of . seems fine – remember, the raise argument is interpretedas ex, but you don’t write down the unit.\lilyGlyph[scale=1.4,raise=0.3]{scripts.ufermta} –
You can now further see that the glyph is placed too far to the left – which is a good exampleof the behaviour described earlier with the \lilyGlyph command. In fact it seems the point inthe middle of the fermata is placed where we would expect the glyph to start. So you have toadd some leading space, which might be practical to be entered in ex :\hspace{1ex}\lilyGlyph[scale=1.4,raise=0.3]{scripts.ufermta} –
If you want you can now simply enclose this definition in a \newcommand to be able to reuse it.\newcommand{\fermata}{hspace{1ex}\lilyGlyph[scale=1.4,raise=0.3]{scripts.ufermta}.After this you can enter your tweaked symbol by simply writing \fermata. However you areencouraged to create such a command the way we define predefined commands in lilylyp sitself. This way it will gain the flexibility of the predefined commands, and it will be easier to beincorporated in the package itself. See our instructions on how to create predefined commandsthe lilylyp s way in section . on page . If you manage to write a command that you finduseful for others also please submit it to us – or even better: if you figured out how to createcommands in general, please join us. As mentioned earlier the number of possible commandsis huge, and the value of the package will increase with each step towards a comprehensivecoverage.
2.5 Dotted symbols
There are commands that are accompanied by \...Dotted versions. While they can be usedlike any other commands there are some caveats because they are technically different fromnormal commands, actually appending a dot to normal commands.
If you use significant scaling factors for the commands you have to check carefully whetherthe gap and the position of the dot scale and move well. Unfortunately one can’t influence theparameters of the dot independently. We have worked hard to enable the designer of a commandto create rules how to scale the gap, but you still may run into problems here. In such a caseyou will have to either change the predefined command in the library or just create the dottedsymbol from scratch.
Immediately after having used a dotted symbol you can arbitrarily add more dots with the
\lilyPrintMoreDots command. This command uses the existing dot settings (scale and raise)and prints another dot. By default it has a gap of . ex, but you can override this by passing anumber as an optional argument, which is interpreted as ex.
For example if you take the command \halfNoteRestDotted, which prints a dotted half noterest: you can easily add more dots through \halfNoteRestDotted\lilyPrintMoreDots: .
Please note that you should only call \lilyPrintMoreDots immediately after calling a \...Dot-ted command. Otherwise you may get surprising results or even errors because the underlyingkey-value variables are inititialized wrongly or not at all.
2.6 Optical size
The E fonts come in a set of eight “optical sizes”. These are variations of the fontoriginally designed to be used at different point sizes. Generally you can assume that fonts forlarger sizes offer more detail and give a somewhat lighter appearance, while fonts for smallerpoint sizes give more weight on the paper but less detail to be readable at small sizes.
lilylyp s gives you the option to access the available font versions, but it maymakemore senseto appreciate them as “weights” – although this is technically speaking or even conceptionallyincorrect. The eight optical sizes of the Emmentaler font are: , , , , , , , . If youconceive these as weights you would somehow order them from black () to light (). You canswitch the used optical size at any time in a document using the command \lilyOpticalSize,giving the number as an option. You could for example use this feature to adapt the LilyPondglyphs to a darker or lighter default text font. Be sure to supply a number corresponding to afont actually available on your system. Maybe this will someday also be available as an optionto select for a single glyph, but for now you have to switch twice: before and after the glyph.
The optical size used by lilylyp s defaults to .
Known issues and warnings: Optical sizes don’t work with glyphs printed as images. Ifyou have to use these glyphs in different weights, you will have to take care for it yourself. Thegeneral plan would be to create different versions of the glyph by creating different glyphs inLilyPond (presumably by using different staff sizes).
3 Reference of Predefined Commands
The following sections document the predefined commands that already have been implemented.They generally contain explanations on the specific use of the commands (if necessary) and atable listing the implemented commands. Remember that any glyph of the Emmentaler fontwhich is not covered by a predefined command yet can be accessed by its name through the\lilyGlyph command. A full list of available glyphs is available in the documentation folder ofthe lilylyp s package or in LilyPond’s original documentation at http://www.lilypond.org/doc/v2.16/Documentation/notation/the-feta-font.html.
The documentation explicitely mentions if the commands are based on image files.
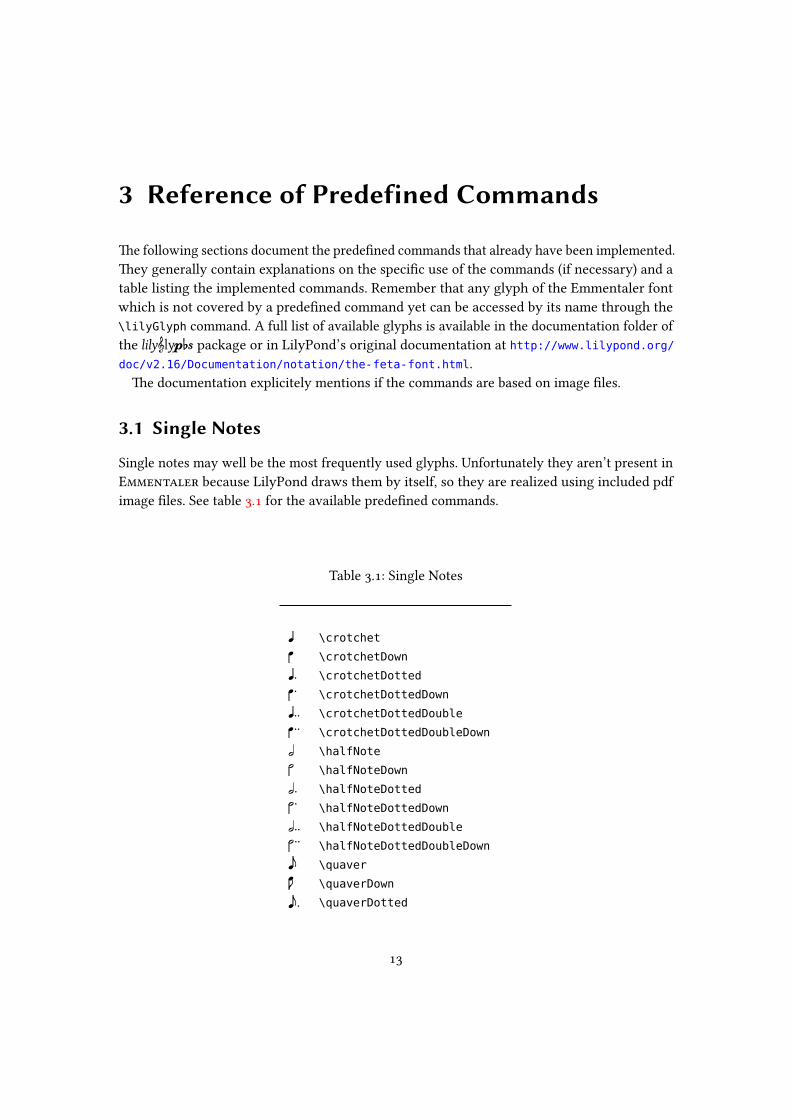
3.1 Single Notes
Single notes may well be the most frequently used glyphs. Unfortunately they aren’t present inE because LilyPond draws them by itself, so they are realized using included pdfimage files. See table . for the available predefined commands.
Table .: Single Notes
C \crotchetC
\crotchetDown
u� \crotchetDottedu�
\crotchetDottedDown
uu� \crotchetDottedDoubleuu�
\crotchetDottedDoubleDown
, \halfNote,
\halfNoteDown
u� \halfNoteDottedu�
\halfNoteDottedDown
uu� \halfNoteDottedDoubleuu�
\halfNoteDottedDoubleDown�� \quaver
��
\quaverDown��� \quaverDotted
���
\quaverDottedDown���� \quaverDottedDouble
����
\quaverDottedDoubleDown©� \semiquaver
��
\semiquaverDown©�� \semiquaverDotted
���
\semiquaverDottedDown©��� \semiquaverDottedDouble
����
\semiquaverDottedDoubleDown
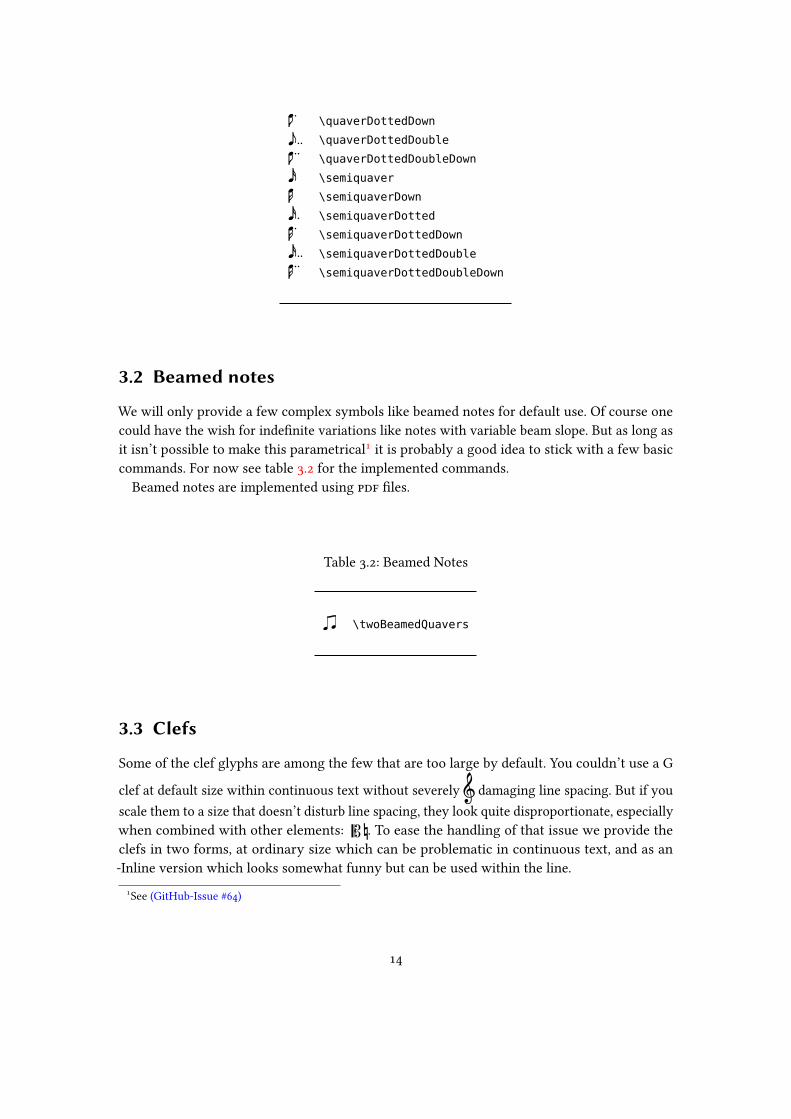
3.2 Beamed notes
We will only provide a few complex symbols like beamed notes for default use. Of course onecould have the wish for indefinite variations like notes with variable beam slope. But as long asit isn’t possible to make this parametrical it is probably a good idea to stick with a few basiccommands. For now see table . for the implemented commands.
Beamed notes are implemented using files.
Table .: Beamed Notes
C C \twoBeamedQuavers
3.3 Clefs
Some of the clef glyphs are among the few that are too large by default. You couldn’t use a G
clef at default size within continuous text without severely damaging line spacing. But if youscale them to a size that doesn’t disturb line spacing, they look quite disproportionate, especiallywhen combined with other elements: . To ease the handling of that issue we provide theclefs in two forms, at ordinary size which can be problematic in continuous text, and as an-Inline version which looks somewhat funny but can be used within the line.
See (GitHub-Issue #)
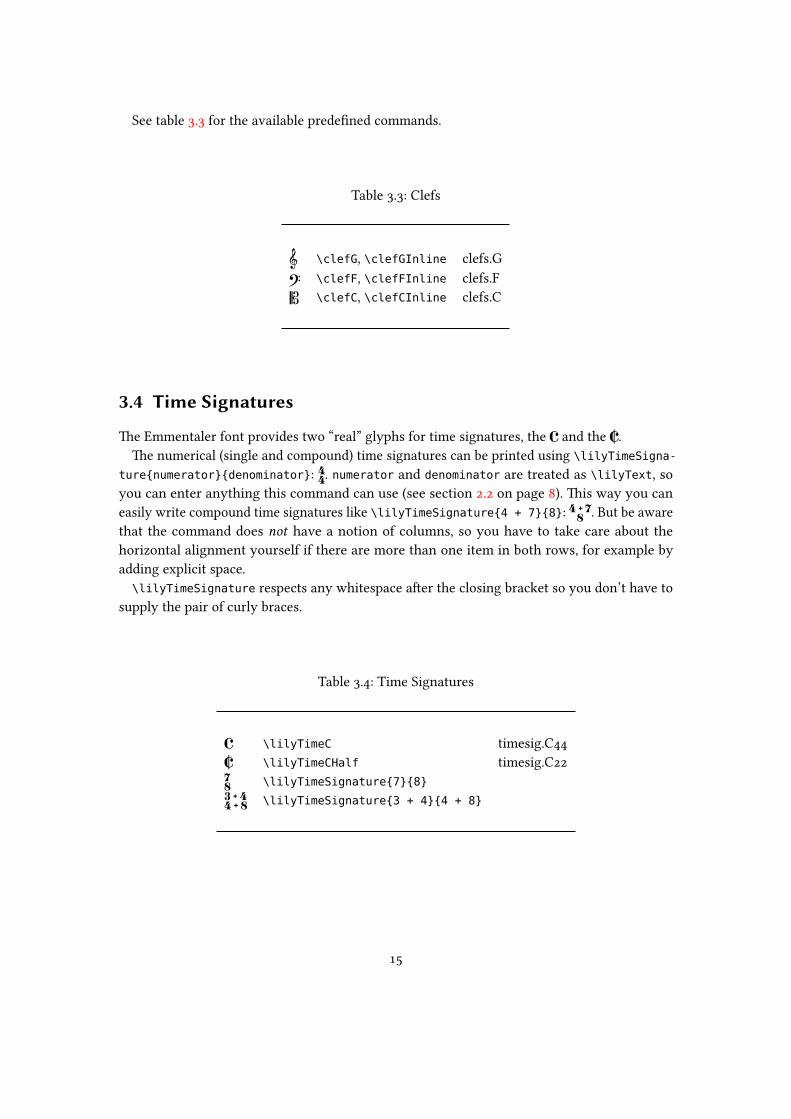
See table . for the available predefined commands.
Table .: Clefs
\clefG, \clefGInline clefs.G \clefF, \clefFInline clefs.F \clefC, \clefCInline clefs.C
3.4 Time Signatures
The Emmentaler font provides two “real” glyphs for time signatures, the and the .The numerical (single and compound) time signatures can be printed using \lilyTimeSigna-
ture{numerator}{denominator}: 44. numerator and denominator are treated as \lilyText, soyou can enter anything this command can use (see section . on page ). This way you caneasily write compound time signatures like \lilyTimeSignature{4 + 7}{8}: 4 + 78 . But be awarethat the command does not have a notion of columns, so you have to take care about thehorizontal alignment yourself if there are more than one item in both rows, for example byadding explicit space.\lilyTimeSignature respects any whitespace after the closing bracket so you don’t have to
supply the pair of curly braces.
Table .: Time Signatures
\lilyTimeC timesig.C \lilyTimeCHalf timesig.C78 \lilyTimeSignature{7}{8}3 + 44 + 8 \lilyTimeSignature{3 + 4}{4 + 8}
Known issues and warnings: \lilyTimeSignature also expects the optional argument asthe other commands, but it doesn’t understand the raise option correctly. The box with thetime signature is vertically centered so it should generally be OK, but if you for some reasonhave to change its vertical position you should manually surround the whole command by a\raisebox.
3.5 Numbers
Numbers can be entered with the already known \lilyText command. Access through theglyph names is possible but not necessary. Therefore we don’t provide predefined commandsfor them. With the default scaling of . they generally fit as lowercase letters like 0 1 2 3 4 5 6 7 8 9\lilyText{0 1 2 3 4 5 6 7 8 9}. For Uppercase letters you can start trying a scaling of ..A future version of the package may provide convenience commands with default scalings forupper/lowercase letters, fingerings, figured bass numbers, time signature numbers etc.
A special case are four glyphs that are related to numbers: + - . , (plus, hyphen, fullstopand comma). These are also accessible through \lilyText and their respective characters, theexample in the previous sentence being written as \lilyText[scale=1.5]{+ - . ,}.
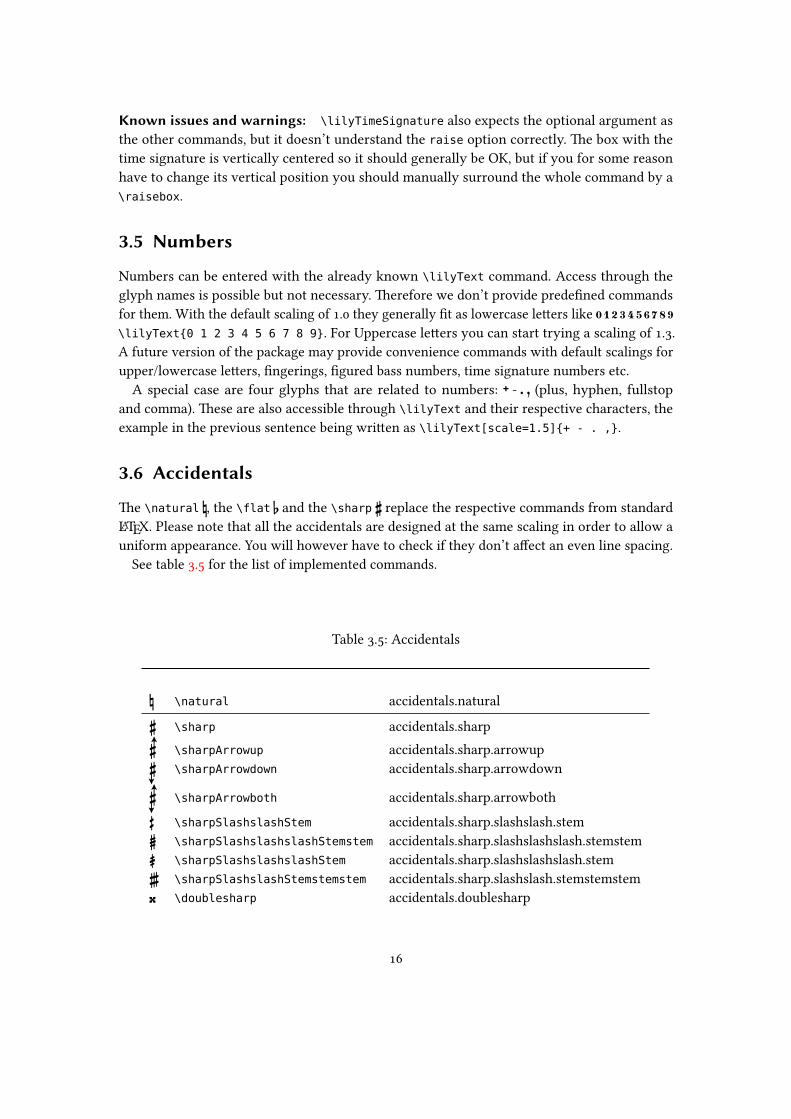
3.6 Accidentals
The \natural , the \flat and the \sharp replace the respective commands from standardLATEX. Please note that all the accidentals are designed at the same scaling in order to allow auniform appearance. You will however have to check if they don’t affect an even line spacing.
See table . for the list of implemented commands.
Table .: Accidentals
\natural accidentals.natural \sharp accidentals.sharp \sharpArrowup accidentals.sharp.arrowup \sharpArrowdown accidentals.sharp.arrowdown \sharpArrowboth accidentals.sharp.arrowboth \sharpSlashslashStem accidentals.sharp.slashslash.stem \sharpSlashslashslashStemstem accidentals.sharp.slashslashslash.stemstem \sharpSlashslashslashStem accidentals.sharp.slashslashslash.stem \sharpSlashslashStemstemstem accidentals.sharp.slashslash.stemstemstem \doublesharp accidentals.doublesharp

\flat accidentals.flat \flatflat accidentals.flatflat
3.7 Rests
See table . for the implemented rest commands.For more information on how to use \lilyPrintMoreDots to produce multiply dotted rests
please see section . on page .
Table .: Rests
\wholeNoteRest Whole Note Rest \wholeNoteRestDotted DottedWhole Note Rest \halfNoteRest Half Note Rest \halfNoteRestDotted Dotted Half Note Rest \halfNoteRestDotted\lilyPrintMoreDots Example of Double Dotted Rest \crotchetRest Crotchet Rest \crotchetRestDotted Dotted Crotchet Rest \quaverRest Quaver Rest \quaverRestDotted Dotted Quaver Rest \semiquaverRest Semiquaver Rest \semiquaverRestDotted Dotted Semiquaver Rest
3.8 Dynamic Text
As explained earlier the Dynamic Letters can be accessed through \lilyText without providingglyph names or numbers as argument. For the available letters see .. As a convenience thereis a predefined command \lilyDynamics, which is just a wrapper around \lilyText that setsthe Scale argument to a default value of ..
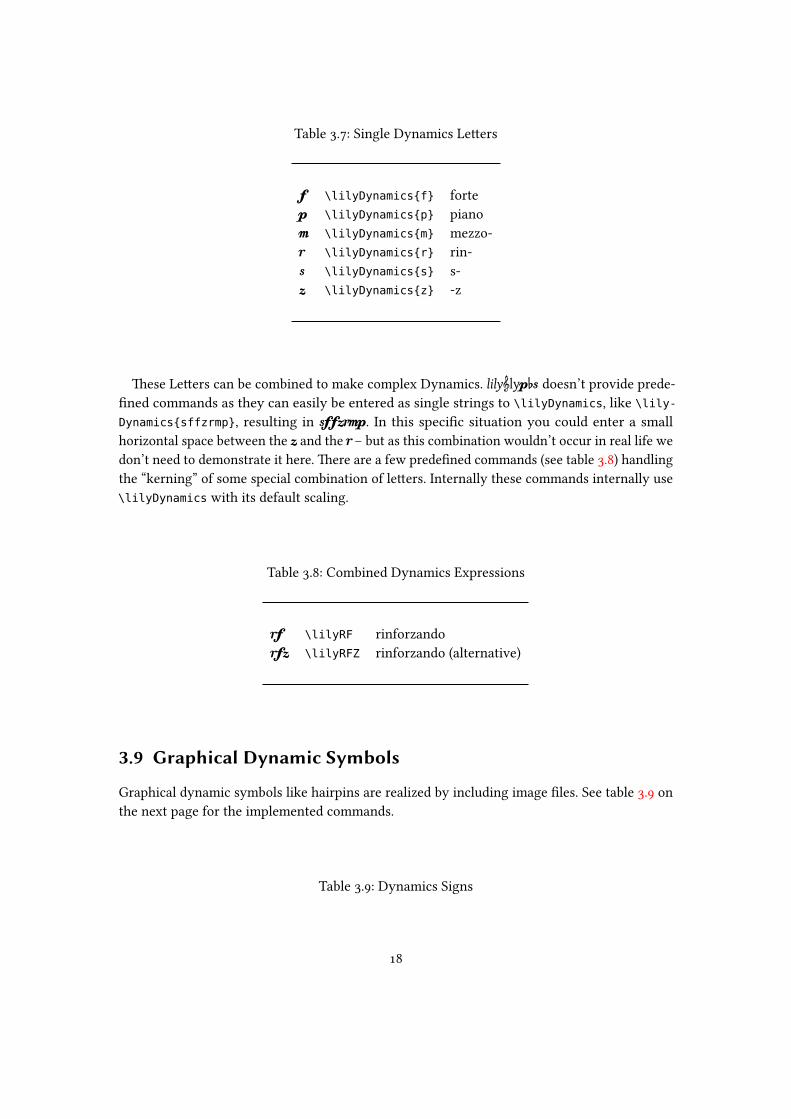
Table .: Single Dynamics Letters
f \lilyDynamics{f} fortep \lilyDynamics{p} pianom \lilyDynamics{m} mezzo-r \lilyDynamics{r} rin-s \lilyDynamics{s} s-z \lilyDynamics{z} -z
These Letters can be combined to make complex Dynamics. lilylyp s doesn’t provide prede-fined commands as they can easily be entered as single strings to \lilyDynamics, like \lily-
Dynamics{sffzrmp}, resulting in sffzrmp. In this specific situation you could enter a smallhorizontal space between the z and the r – but as this combination wouldn’t occur in real life wedon’t need to demonstrate it here. There are a few predefined commands (see table .) handlingthe “kerning” of some special combination of letters. Internally these commands internally use\lilyDynamics with its default scaling.
Table .: Combined Dynamics Expressions
rf \lilyRF rinforzandorfz \lilyRFZ rinforzando (alternative)
3.9 Graphical Dynamic Symbols
Graphical dynamic symbols like hairpins are realized by including image files. See table . onthe next page for the implemented commands.
Table .: Dynamics Signs
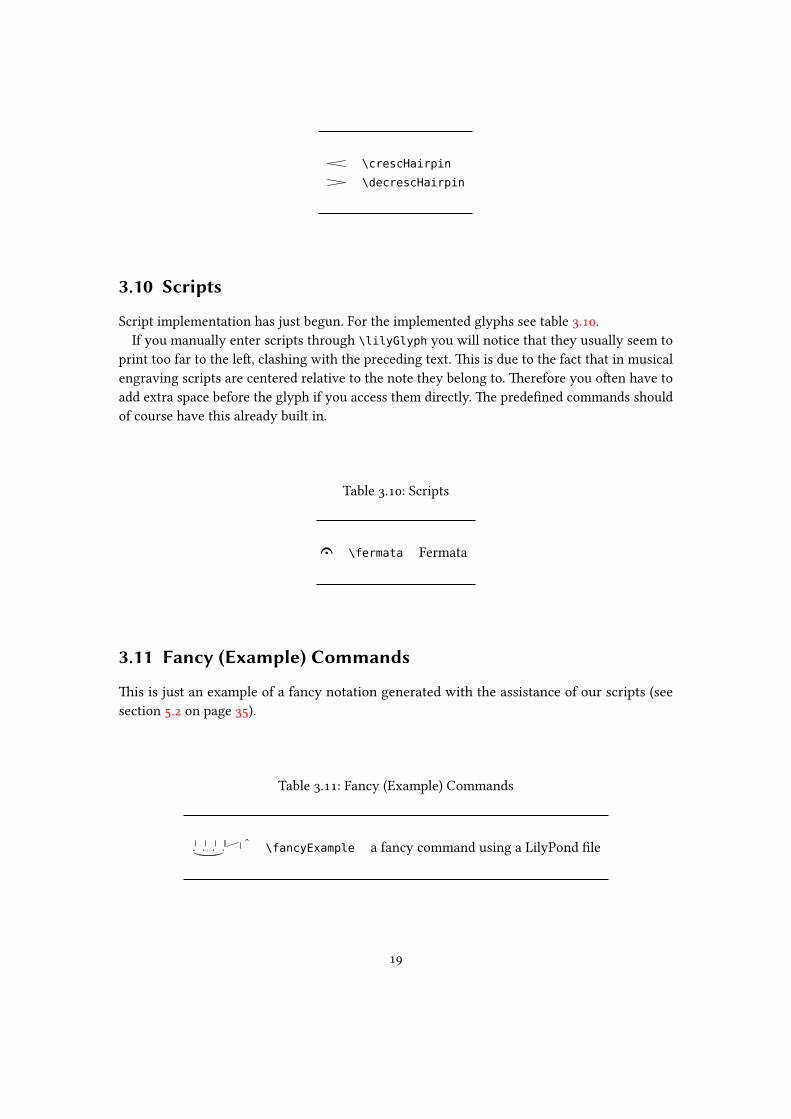
\crescHairpin
\decrescHairpin
3.10 Scripts
Script implementation has just begun. For the implemented glyphs see table ..If you manually enter scripts through \lilyGlyph you will notice that they usually seem to
print too far to the left, clashing with the preceding text. This is due to the fact that in musicalengraving scripts are centered relative to the note they belong to. Therefore you often have toadd extra space before the glyph if you access them directly. The predefined commands shouldof course have this already built in.
Table .: Scripts
\fermata Fermata
3.11 Fancy (Example) Commands
This is just an example of a fancy notation generated with the assistance of our scripts (seesection . on page ).
Table .: Fancy (Example) Commands
�� �� \fancyExample a fancy command using a LilyPond file

4 Internals
4.1 Documentation of the generic access commands
This section is essential for readers who want to understand how this package works internally,for example if they want to actively participate in its development. It is structured from theperspective of the package’s behaviour instead of from a user’s POV. If you simply want to addyour own predefined commands “the lilylyp s way” it is a good idea to read this section too,but you may also skip it and directly go to ..
In order to make the package’s .sty file easier to understand, its content is split into multipleinput files which are located in the /commands and /core subfolders. The most fundamentaldefinitions are in the core/keyval.inp and core/genericAccess.inp files.
4.1.1 Accessing E Glyphs
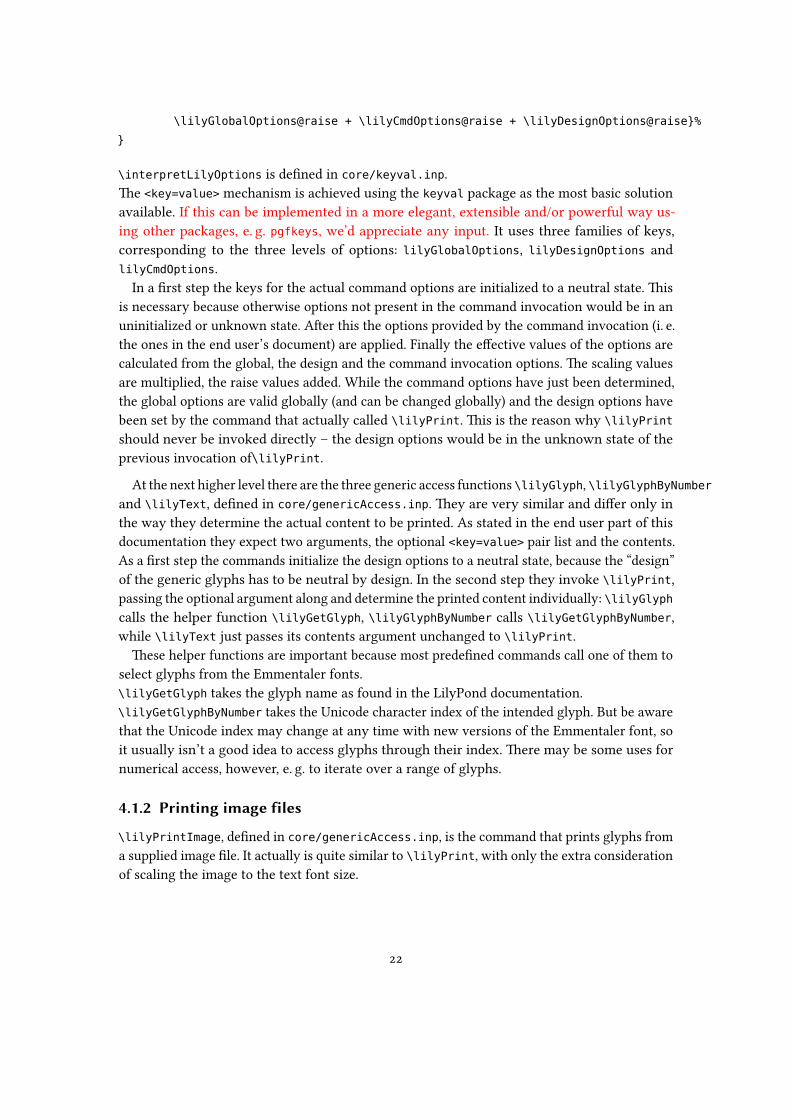
The command that actually prints glyphs from the Emmentaler font is \lilyPrint, definedin core/genericAccess.inp. It isn’t intended to be called directly within a document, butonly from the predefined commands. It takes two arguments, the first – optional – being thecomma-separated list of <key=value> pairs, the second the actual content to be printed.
\newcommand*{\lilyPrint}[2][]{%
\interpretLilyOptions{#1}%
\raisebox{{\lilyEffectiveRaise}ex}{%
{\fontspec[Scale=\lilyEffectiveScale]{emmentaler-\lilyOpticalSuffix.otf}#2}%
}%
}
At first the command \interpretLilyOptions is called, where the options of the differentlevels are evaluated and calculated to their effective values. Then the content of # is printed,within a \raisebox and with the currently selected opticals version of the E font.
\newcommand*{\interpretLilyOptions}[1]{%
\setkeys{lilyCmdOptions}{scale=1,raise=0}%
\setkeys{lilyCmdOptions}{#1}%
\pgfmathsetmacro{\lilyEffectiveScale}{%
\lilyGlobalOptions@scale * \lilyCmdOptions@scale * \lilyDesignOptions@scale}%
\pgfmathsetmacro{\lilyEffectiveRaise}{%
\lilyGlobalOptions@raise + \lilyCmdOptions@raise + \lilyDesignOptions@raise}%
}
\interpretLilyOptions is defined in core/keyval.inp.The <key=value> mechanism is achieved using the keyval package as the most basic solutionavailable. If this can be implemented in a more elegant, extensible and/or powerful way us-ing other packages, e. g. pgfkeys, we’d appreciate any input. It uses three families of keys,corresponding to the three levels of options: lilyGlobalOptions, lilyDesignOptions andlilyCmdOptions.
In a first step the keys for the actual command options are initialized to a neutral state. Thisis necessary because otherwise options not present in the command invocation would be in anuninitialized or unknown state. After this the options provided by the command invocation (i. e.the ones in the end user’s document) are applied. Finally the effective values of the options arecalculated from the global, the design and the command invocation options. The scaling valuesare multiplied, the raise values added. While the command options have just been determined,the global options are valid globally (and can be changed globally) and the design options havebeen set by the command that actually called \lilyPrint. This is the reason why \lilyPrint
should never be invoked directly – the design options would be in the unknown state of theprevious invocation of\lilyPrint.
At the next higher level there are the three generic access functions \lilyGlyph, \lilyGlyphByNumberand \lilyText, defined in core/genericAccess.inp. They are very similar and differ only inthe way they determine the actual content to be printed. As stated in the end user part of thisdocumentation they expect two arguments, the optional <key=value> pair list and the contents.As a first step the commands initialize the design options to a neutral state, because the “design”of the generic glyphs has to be neutral by design. In the second step they invoke \lilyPrint,passing the optional argument along and determine the printed content individually: \lilyGlyphcalls the helper function \lilyGetGlyph, \lilyGlyphByNumber calls \lilyGetGlyphByNumber,while \lilyText just passes its contents argument unchanged to \lilyPrint.
These helper functions are important because most predefined commands call one of them toselect glyphs from the Emmentaler fonts.\lilyGetGlyph takes the glyph name as found in the LilyPond documentation.\lilyGetGlyphByNumber takes the Unicode character index of the intended glyph. But be awarethat the Unicode index may change at any time with new versions of the Emmentaler font, soit usually isn’t a good idea to access glyphs through their index. There may be some uses fornumerical access, however, e. g. to iterate over a range of glyphs.
4.1.2 Printing image files
\lilyPrintImage, defined in core/genericAccess.inp, is the command that prints glyphs froma supplied image file. It actually is quite similar to \lilyPrint, with only the extra considerationof scaling the image to the text font size.
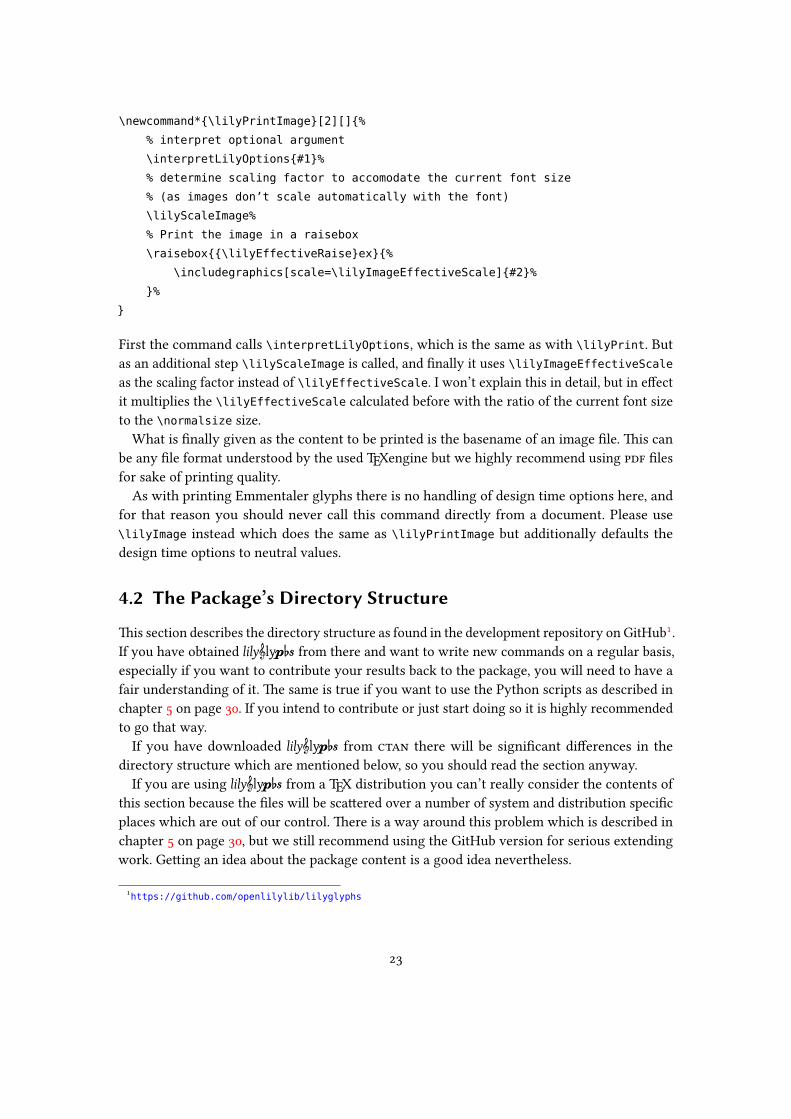
\newcommand*{\lilyPrintImage}[2][]{%
% interpret optional argument
\interpretLilyOptions{#1}%
% determine scaling factor to accomodate the current font size
% (as images don’t scale automatically with the font)
\lilyScaleImage%
% Print the image in a raisebox
\raisebox{{\lilyEffectiveRaise}ex}{%
\includegraphics[scale=\lilyImageEffectiveScale]{#2}%
}%
}
First the command calls \interpretLilyOptions, which is the same as with \lilyPrint. Butas an additional step \lilyScaleImage is called, and finally it uses \lilyImageEffectiveScaleas the scaling factor instead of \lilyEffectiveScale. I won’t explain this in detail, but in effectit multiplies the \lilyEffectiveScale calculated before with the ratio of the current font sizeto the \normalsize size.
What is finally given as the content to be printed is the basename of an image file. This canbe any file format understood by the used TEXengine but we highly recommend using filesfor sake of printing quality.
As with printing Emmentaler glyphs there is no handling of design time options here, andfor that reason you should never call this command directly from a document. Please use\lilyImage instead which does the same as \lilyPrintImage but additionally defaults thedesign time options to neutral values.
4.2 The Package’s Directory Structure
This section describes the directory structure as found in the development repository on GitHub.If you have obtained lilylyp s from there and want to write new commands on a regular basis,especially if you want to contribute your results back to the package, you will need to have afair understanding of it. The same is true if you want to use the Python scripts as described inchapter on page . If you intend to contribute or just start doing so it is highly recommendedto go that way.
If you have downloaded lilylyp s from there will be significant differences in thedirectory structure which are mentioned below, so you should read the section anyway.
If you are using lilylyp s from a TEX distribution you can’t really consider the contents ofthis section because the files will be scattered over a number of system and distribution specificplaces which are out of our control. There is a way around this problem which is described inchapter on page , but we still recommend using the GitHub version for serious extendingwork. Getting an idea about the package content is a good idea nevertheless.
https://github.com/openlilylib/lilyglyphs
The root directory contains the usual number of files such as , installation hints andlicensing information as well as the main package file lilyglyphs.sty.
/core 2 consists of include files for lilyglyphs.sty that contain the fundamental programlogic of the package.
The /commands directory contains files defining the predefined commands available to theend user of lilylyp s . If you are going to write new commands you will include them in thesefiles or add new files here.
/documentation contains this manual and an example document, boxth as .tex and filesas well as an document listing all glyphs of the E font.
The subdirectory resources contains included files for the document as well as helperpackages for the LATEX documents. The subdirectory lilyglyphs_logo contains the logo of thepackage in and format along with its .tex source.
/fonts contains the E font files, copied from LilyPond .. as the latest stableversion. This is the directory you will have copied or linked to during a manual installation ofthe package.
/glyphimages contains all material for the image based commands: original input files, gener-ated LilyPond source files and the resulting images. If you are going to create new commandsusing LilyPond generated images you will work in this directory. This is explained in moredetail in section . on page .
/license contains the full license for the package and the license for the includedEmmentaler fonts.
/scripts contains Python scripts that simplify the generation and management of new com-mands. In the archive the contents of this directory is distributed over two directories,/bin and /lib.
source contains the sources for the Emmentaler fonts. They are checked out fromthe LilyPond development repository at exactly the same state as the binary font files used.
4.2.1 “Private” Directory Structure
If you have obtained lilylyp s any other way than through its Git repository you probably can’tor don’t want to modify the package files directly. Instead we recommend you set up a private“shadow” search path where you can safely place your own additions. Apart from potential
For this section a leading “/” in directory names refer to the package root directory.
issues with write access to files in the TEX installation this procedure will avoid your changesbeing overwritten by package updates.
We have provided a skeleton directory structure in the file lilyglyphs_private.zip whichis located in the documentation/ directory of the package. Extract this archive somehwere inyour LATEX search path, e. g. to TEXMFHOME/tex/latex/lilyglyphs_private.
In the first level of this directory you’ll find two nearly empty stubs: lilyglyphsPrivate.styand lilyglyphsPrivate.tex. The first file is a LATEX package where you can store and organizeyour own predefined commands, the second a file where you can (and are strongly advised to)document your additions. If you make use of these files in a structured way (following the hintsin the comments in these files) it will be very easy for us to incorporate any additions you sendto us by email (if you don’t want to go the Git way).
The rest is a copy of the directory structure below /glyphimages. There you can store sourcesand results of commands generated with LilyPond. Please adhere to the model of the directoriesin the package for this. And please also see the chapter chapter on page on contributing.
4.3 How to write predefined commands
Writing your own predefined commands is actually quite straightforward – and identical if youwant to write a command for your document or for inclusion in the package. So if you findyourself creating predefined commands that you think are useful for general use, don’t hesitateto submit them to us.
Commands that print single glyphs
Let’s review an example of a predefined command, the \doublesharp.
% ”accidentals.doublesharp”
\newcommand*{\doublesharp}[1][]{%
\setkeys{lilyDesignOptions}{scale=1.5,raise=0.35}%
\lilyPrint[#1]{\lilyGetGlyph{accidentals.doublesharp}}%
}
We use the starred version of \newcommand, because a glyph command naturally doesn’tspan paragraphs. We declare to accept one optional argument, which defaults to empty. Thisargument can take the list of <key=value> options. When writing the commands, please takecare not to omit the % characters at the line endings, as they prevent unwanted whitespace tobe introduced in the output.
In the second line we define the design options for the command. In the example the designerhas decided that a doublesharp glyph should be scaled to . and raised . ex compared to itsdefault appearance.
Please consult the documentation of your TEX distribution where to find these. A good chance would be to runkpsewhich lilyglyphs.sty which should find the location of the main package file
Of course you will have to “use” this package to make the commands available to other documents
The third line calls the internal \lilyPrint command. It passes the optional argument, withwhich the end user can override (i. e. modify) the designed values. As the is a glyph that hasto be selected by its glyph name, we call \lilyGetGlyph, supplying the glyph name found inthe documentation. The result of this command is passed as the #2 to \lilyPrint.
To summarize: Writing a predefined command for printing an Emmentaler glyph involvesjust two steps, setting the design time options and calling \lilyPrint with the appropriate #argument.
If you know the Unicode number of the desired glyph you can call \lilyGetGlyphByNumberinstead of \lilyGetGlyph, but you can’t be sure this number will stay the same forever.
Creating commands using image files is practically the same and even simpler. If you look atthe definition of a \crotchet,
\newcommand*{\crotchet}[1][]{%
\setkeys{lilyDesignOptions}{scale=0.9,raise=-0.2}%
\lilyPrintImage[#1]{crotchet}%
}
youwill notice that the only differences are that the actual printing is donewith \lilyPrintImageinstead of \lilyPrint and that therefore the basename of the image file can be passed directly.In section . on page you will see a tool that allows to create numerous image commandsquite easily.
As a last example we will look at the definition of \lilyRFZ rfz.\newcommand{\lilyRFZ}[1][]{%
\mbox{%
\lilyDynamics[#1]{r\hspace{0.035ex}fz}%
}%
}
You may notice that we use \lilyDynamics here, one of the Generic Access Commands (seesection . on page ) instead of the low-level printing command. We can do this and also use theother ones: \lilyText, \lilyGlyph, \lilyGlyphByNumber or \lilyImage.This is actually simplerbecause we don’t have to set the design time options – but that’s also the main disadvantage:this way we can’t set them and have to use the given default parameters. As mentioned insection . on page , \lilyDynamics is just a wrapper around \lilyText, setting the scale
factor to .. While the other generic commands only print single glyphs, \lilyText can print‘plain text’, so usually there is no need to write predefined commands only to combine lettersto a single command. In some cases this may however be necessary. In the given exampleof \lilyRFZ we need to apply a little bit of extra space between the r and the f. We see thatwe can insert a \hspace command between the letters without any problems. But as it turnsout LATEX may now decide to insert a line break at its discretion, so we have to additionally
enclose this call to \lilyDynamics in a \mbox. The command just passes the optional argumentto \lilyDynamics, so you can use these arguments in your document as usual.
This example is meant to encourage you to experiment with the definition of new commands.All you have to deal with is setting the design time options and the optional argument, andchosing the appropriate input method for the second argument. Apart from this you can designcommands as you aanre used to.
Once you have defined your new command you of course have to make it av ailable to LATEX.If it is a “local” command that you just use for a specific document you can simply put it in thedocument’s preamble or a dedicated helper .sty file. If it is an image driven command you willhave created the image file before and will have to place this in a location where LATEX can findit. But the best place you can permanently store your new commands is the lilyglyphsPrivatepackage described in subsection .. on page . Please don’t forget to document your commandin lilyglyphsPrivate.tex. For more information on how to contribute your new commandsto the package see chapter on page .
Create Dotted Symbols
It is not exactly trivial to create dotted symbols as predefined commands. Of course you canalways use \lilyDot to print LilyPond’s dot glyph, but if you want to create commands thatcombine a glyph and one ore more dots you encounter two difficulties: You can’t apply theoptional arguments independently on the two items, and there may be issues with the scalingand the gap between the two glyphs.
There is some infrastructure in lilylyp s (defined in the file dotted.inp) to faciliate dealingwith dotted symbols, but this implementation isn’t completely satisfactory so far. Great carehas been taken to hide as much complexity as possible in the mentioned file, in order to makethe definition of actual commands as clean and concise as possible.
Let’s analyze the implementation of a dotted half note rest:
% Dotted half note rest
\newcommand*{\halfNoteRestDotted}[1][]{%
% define the optional arguments for the dot
\setkeys{lilyDesignOptions}{scale=0.8,raise=0.2}%
% Calculate effective scale/raise and the hspace for the dot
\lilySetDotOptions[#1]{0.05}{0.5}{0}%
% Print the rest and then the dot
\halfNoteRest[#1]\lilyDotSpace\lilyPrintDot
}
The command takes the usual optional argument that can contain <key=value> pairs. Thisapplies to the dotted symbol as a whole. Please note that in the last line the predefined command\halfNoteRest[#1] is called and passed the optional argument. You can only use this techniqueof creating dotted symbols on top of correctly implemented predefined commands.
The first thing you have to do is to define the DesignTimeOptions for the dot. They are relativeto the original design of \lilyDot, and you have to adjust them so the dot suits the main glyphin its size and vertical position (you can ignore the horizontal spacing for now):
% define the optional arguments for the dot
\setkeys{lilyDesignOptions}{scale=0.8,raise=0.2}%
You should always set these options because otherwise you might get strange results or errormessages.
The next step is to call a quite complex command \lilySetDotOptions that sets severaloptions for the dot:
% Calculate effective scale/raise and the hspace for the dot
\lilySetDotOptions[#1]{0}{0.5}{0.4}%
This command takes one optional and three mandatory arguments. The optional argumentis just the one that is written in the LATEX document and that is passed into the function. Theremaining three arguments control the horizontal spacing between the main glyph and the dot.As we now have two individual elements we have to control the gap between them explicitelyas it doesn’t scale relative to the scale argument by itself. The relation between the scale
factor and the horizontal gap can be understood as a curve (mathematically spoken: a nd orderfunction).
The first (mandatory) argument sets the intensity of the curve. A value of will result in alinear relation (no curve at all), that is when doubling scale the gap will be exactly twice aswide. Positive values will result in larger gaps for larger scales. As this is a quadratic functionyou will want to start with very small values or .
The second argument sets the general (linear) steepness of the curve. A value of means thatby increasing scale by the gap will be wider by ex. . seems a good starting point for thisargument.
The last argument is an offset in ex for the whole curve which is independent from the scaling.You can use it to accomodate specifically wide or narrow glyphs.\lilySetDotOptions takes all these informations, calculates some settings for the dot and
stores them in internal variables that can be used by subsequent commands. Please understandthat they may be partially or totally overwritten by the next use of any predefined command.So you have to call this command immediately before actually printing the dot, otherwise itmay or may not provide satisfying results.
The final line actually calls three commands:\halfNoteRest[#1] prints the already defined main glyph. \lilyDotSpace prints a horizontalspace that is determined by the previous call to \lilySetDotOptions, and \lilyPrintDot finallyprints the dot with the settings just defined.
% Print the rest and then the dot
\halfNoteRest*[#1]\lilyDotSpace\lilyPrintDot

This was an explanation from the perspective of designing new predefined commands. If youwant to know how this is implemented internally, please look at the generously commented filecore/dotted.inp.
Known issues and warning: One issue that hasn’t been addressed yet is the vertical place-ment of the dot when scaled. The dot is positioned relatively to the baseline of the text, and themain glyph may have a different center point. So when scaling the main glyph may seem tobehave differently from the dot.
If you want to create a dotted version of a glyph that is printed from an image file it willgenerally be easier and more reliable to create a command using a new image file.
Create Multiply Dotted Symbols
There is no need to define additional versions of glyphs with more than one dot. For thispurpose we have implemented the command \lilyPrintMoreDots. This prints a dot with thesame characteristics as the preceding one from a dotted command (but remember that thereshouldn’t be any calls to other predefined commands in betwen). The horizontal gap betweenthe dots scales linearly with a default of .ex per unit of scale. But if you pass an number asan optional argument this is interpreted as a different gap in ex.
5 Generating Commands with Python
As we just have seen in subsection . on page it is quite easy to create predefined commands.At least with regard to the Emmentaler glyphs it is really straightforward to simply create acommand based on existing models and the documentation. Nothing prevents you from simplyadding new commands to your document or helper package. Image driven commands areslightly more complex. The LATEX part is equally straightforward, but you also have to providethe image by creating a score with LilyPond and produce the right output file, whichinvolves a few steps.
Therefore we have developed a set of tools and templates to streamline the process of creatingnew commands even further. These tools are Python scripts, so in order to use them you willneed a working Python installation. They are located in the /scripts (GitHub version) or /bin( version) directory of the package. If you want to create image driven commands youwill of course have to have LilyPond installed too. In both cases the process basically consistsof writing a definitions file (something like a template), calling a script and then putting theresults to a useful place.
To summarize your options for extending the symbols coverage:
• If you only have the plain lilylyp s package you can create new commands using Em-mentaler glyphs.You can also create image driven commands using any preexisting images (e. g. scans oroutput from any software).
• If you also have LilyPond installed you can additionally create image driven commandsthat match the ones already present in the package.
• If you have Python working you can make use of our tools to generate Emmentaler andLilyPond commands (LilyPond presence provided).
The Python scripts expect to work inside either the package directory itself or in the private“shadow” directory described in subsection .. on page . They perform the check based onthe “lilygpyhs” part of the directory name, so for the scripts to work correctly it is crucial thatyou didn’t change their names during a manual installation.
All Python scripts handle -h/–help and -v/–version arguments, printing a short usage helpor the current lilylyp s version.5.1 Generating Commands for E Glyphs
Generating commands that print Emmentaler glyphs with our tools is a straightforward process.The steps involved are few: ) create an input definitions file, ) run a Python script on it,
) fine-tune the commands in the generated LATEX file, and ) move the resulting code to anappropriate place. We’ll go through these steps in the following subsections. Be assured thatalthough these instructions span several pages the actual process of creating new commands isvery fast once you have got used to it.
5.1.1 Preparing the Input File
The first step is to create a text file with entries for any number of new commands to be created.You can save it to any convenient location, and it is up to you to keep this file for reference ordrop it after use.
The input file consists of one ore more command definitions. Each command definition iscomposed of a set of lines with key=value pairs (please note that you shouldn’t use whitespacearound the equals sign). The end of the definition is indicated by an empty line, therefore it isimportant that your file ends with an empty line, otherwise the last entry will be discarded.Lines beginning with Python and LATEX style comments (% and #) are ignored, so you can usethem to document your file if you want.
A command entry consists of several mandatory or optional lines. The order doesn’t matter,but it is considered good practice to stick to one style.The following items are possible/necessary:
• cmd (mandatory): Specifies the command name. You have to make sure that it is a validLATEX name and that it isn’t in use already. lilylyp s prefixes commands that seem proneto ambiguity with “lily” followed by an uppercase letter: instead of \dynamics we used\lilyDynamics. You are encouraged to adhere to that convention.
• comment (optional): You can pass a single line comment that will be used before thecommand definition. (If you want to have a multiline comment instead you can insertline breaks with \n.)
• element (mandatory): The actual element to be passed to the internal printing functions.The possible type of its value depends on the type of the command, as described below.
• type (mandatory, but defaulted): The type determines the internal printing command to beused with the command. Please refer to section . on page for more information. Theoption is mandatory but defaults to “glyphname”, so you can skip it for the most commoncase that the glyph is called by name.
– glyphname: The glyph is selected by its glyphname, which is what you have tospecify as “element” (e. g. “accidentals.sharp“ (without the quotes)). You can look upthe glyph names in LilyPond’s documentation or in the glyph list contained in thepackage.
– number: The Unicode number is used to determine the glyph.
– text: The content is passed as plain text (works only for Dynamic letters, numbersand + - , .)
– dynamics: The content is also passed as plain text, but the \lilyDynamics functionis used to print it (applying the suitable default scaling).
– image: The command prints an image file.If you already have an image file created with LilyPond or obtained from any othersource than LilyPond (e. g. a scanned image from a printed edition or an autograph)this is the recommended way to create image driven commands. []You can even usethis to create non-musical commands that print images and profit from lilylyp s ’infrastructure (like the automatic scaling with text size).] For this purpose you canuse .pdf files (preferred) or any image files your LATEX installation can process.
The “element” for an image driven command is the plain file name without extensionor path. The file has to be stored in a location that is visible to LATEX, and you areresponsible for avoiding name clashes. If you have set up a private directory structureas recommended in subsection .. on page , its custom_images subdirectory is agood choice.
• scale / raise (optional): If a line contains one of the keys scale= or raise= the value afterthe equals sign is used for the design time options of the new command. These values arealso kept for subsequent command entries until the file is finished or the script finds anew entry – which would replace its value. The idea behind this option is to simplify the(likely) process of defining a set of related commands within an input file with its highprobability of sharing default values.
Here you can see two examples of command entries:
cmd=fermataDown
element=scripts.dfermata
comment=downward fermata
# type glyphname is implicitely used
cmd=rinforzando
type=dynamics
element=rfz
comment=Rinforzando (kerned)
In the following subsection you can see what these commands are processed to.
5.1.2 Generating the LATEX code
The Python script that processes your input file is lily-glyph-commands.py. It expects the(absolute or relative) filename of the input file as its first and single parameter (apart from thementioned standard arguments). The program parses the input file and creates a new file withthe same basename but a .tex extension, in the same folder where the input file is. Please notethat the script in its current implementation will silently overwrite any earlier file with that

name. So if you need to keep such a generated file for reference you’ll have to copy/move it to asafe location.
The resulting file is a working LATEX document that uses the lilylyp s package. It containsLATEX \newcommand definitions for each command definition in the input file. The visible part ofthe document contains a reference table (as used throughout this manual) with all generatedcommands and additionally example text for each generated command.
The examples above would be processed to the following two LATEX commands:
% downward fermata
\newcommand*{\fermataDown}[1][0]{%
\setkeys{lilyDesignOptions}{scale=1,raise=0}%
\lilyPrint[#1]{\lilyGetGlyphs{scripts.dfermata}}%
}
% Rinforzando (kerned)
\newcommand*{\rinforzando}[1][]{%
\setkeys{lilyDesignOptions}{scale=1,raise=0}%
\lilyDynamics{rfz}}%
}
5.1.3 Fine-tuning the LATEX Commands
So what are we going to do with the contents of this file? Well, it depends on how/where youwant to eventually use it, but the first step will be to fine-tune the commands.
The first thing the generated example text does is showing that the command actually works.But its more important purpose is to print the new glyph in different contexts: in continuoustext, before punctuations, at the beginning of a line etc. You should use these blocks of exampletext to adjust the arguments in the \setkeys{lilyDesignOptions} clause. The script generatesdefault values for the design time values of the optional argument, and it would of course bepurely random if they would be perfect right away. Even if you supplied scale and/or raisevalues in the input file you’re likely to have to tune the results. You should specifically keep aneye on spacing issues: Does the glyph affect line spacing, is the “kerning” of the glyph correct?On the other hand you should probably try to keep corresponding glyphs at an equal scaling.Besides tweaking the optional argument values you can add space before or after the glyph– keep in mind that you may as well use negative \hspace. And of course you can adjust thecommands any way you like, but if you are going to make experimental commands you willprobably rather write them manually as described in section . on page .
5.1.4 Finishing Off (and Contributing)
If you are satisfied with the new command(s) you will have to move them to a useful place.If you are just creating the commands for your personal or one-time use you can either copythe command definitions to the preamble of your current LATEX document or to any style
file you might maintain. A good choice would be the lilyglyphsPrivate.sty as described insubsection .. on page . In this case it is recommended to supply documentation in thelilyglyphsPrivate.tex file on the same directory for your own reference.
But of course we would be happy if you decided to contribute your commands as additions tothe package – we consider increasing coverage of glyphs through user contribution a naturalway of evolution for lilylyp s . Be prepared for compilation errors when your contributionreturns to you as package updates. Once this happens your own command definitions will tryto re-define the commands, and LATEX will throw out error messages. In that case you will haveto remove your definitions from your private packages (wherever you have put them) – theyare obsolete now anyway.
Probably the simplest way to contribute is sending the processed .tex file as an email to thepackage maintainer (currently [email protected]). He would then incorporate them into thepackage. Please keep the generated reference table in the file as we will need it to update thecommand reference in the manual. And please also add some information about your additionsin the file: where it belongs, where it should be documented etc. If your commands need anyspecial considerations (e. g. specific arguments) please also add some material suitable for themanual.
If you are working on a fork of the GitHub repository (as is recommended for potential con-tributors) you can incoporate the new commands directly and send us a pull request (preferablyas soon as possible to minimize risk of conflicts with others’ changes). This works by completingthe following steps:
• Create a new branch with a suitable name.
• Move/copy the command definitions (with all comments) to appropriate .inp files in thepackage’s /commands subdirectory. If you find you should create a new .inp file becauseyour commands belong to a new category please take the existing files as a model andadd an appropriate \input statement to lilyglyphs.sty. For any newly created filescopy&paste the usual copyright comment at the beginning from another file.
• Please add documentation for your commands in themanual (/documentation/lilyglyphs.tex).Find the appropriate subsection in the “Predefined commands” section (or create a newone) and add information to it. At least we need the entries in the reference table, but ifthere is anything special to note about the commands please explain this too. If you addto an existing subsection you may copy the rows from the table in the file generated bythe script, otherwise you should copy the whole table (but update the caption and labelfields appropriately).
• If you are happy with the result you can push to your fork of the repository and send apull request through the GitHub web site.
If you have any questions on these procedures it is certainly a good idea to get in contactwith us before starting any substantial work.

5.2 Generating Commands with Glyph Images
Creating commandswith images generated by LilyPond is a significantlymore complex task thansimply inserting Emmentaler glyphs, and therefore the Python script lily-image-commands.pyis a more complex one. But from the end user’s perspective the process is surprisingly similar:) create an input definitions file, ) run a Python script on it, ) fine-tune the commands in thegenerated LATEX file, and ) move the resulting code to an appropriate place. The main differencesto consider are the different structure of the input files and some considerations about filelocations.
But let us start with looking at the form of the input files.
5.2.1 Preparing the Input Files
lily-image-commands.py doesn’t expect regular LilyPond source files as its input, but rather afile with one or multiple ‘snippets’ in it, similar to those for lily-glyph-commands.py. We willlater see that it is possible and makes sense to provide compilable Lilypond files, though.
Depending on the type of your lilylyp s installation youmay work either in the /glyphimagesdirectory of the package or in the lilyglyphs_private directory you set up according tosubsection .. on page . So in the context of the following instructions / or ROOT refer to theappropriate one of these two directories.
Input definition files are to be stored in the /definitions subdirectory . Other than thefiles used for the generation of Emmentaler commands these files are considered persistentand should remain in place to be able to recreate the images at a later time. Therefore it isrecommended to define related commands in one file and give it an appropriate name. A filenameextension isn’t mandatory but you may use .ly as you will see later. The file name will also bereflected in the resulting file with the generated LATEX commands.
As with the Emmentaler commands the definitions file can contain any number of commandentries, although they are structured differently.
A command entry starts with the special key %%lilyglyphs on a single line.After this there may be any number of lines starting with a single % as a LilyPond comment.
These comment lines are used for commenting the command in the resulting LATEX file.If a line consists of the special key %%protected the script skips the entire command. You
should use this key whenever you consider a command finished because it will prevent LilyPondfrom recompiling that command and the script from re-generating the LATEX command.
If a line contains one of the keys scale= or raise= the value after the equals sign is usedfor the design time options of the new command. These values are also kept for subsequentcommand entries until the file is finished or the script finds a new entry – which would replaceits value. The idea behind this option is to simplify the (likely) process of defining a set ofrelated commands within an input file with its high probability of sharing default values. Thesetting of option defaults also works if a command is marked as “protected”. Generally this
This is especially important when working inside a Git repository. With any new or different LilyPond installationthe generated pdf files are likely to be different and would therefore be considered as ‘modified’ by Git
is an advantage since you don’t have to take care to correctly update the file when you marksomething as protected. But there may be cases where you will want to remove the defaultssetting from a %%protected clause.
Afterwards you provide the actual LilyPond command in the form of a variable holding amusical expression. The first line should contain exactly the name, the ’=’ and the opening curlybrace. The name of the variable is very important because it will also be used as the file name ofthe image file and the LATEX command name. The following lines are interpreted as LilyPondcode until the parser finds a line starting with the closing curly brace. This will also end thecommand entry, but for readability’s sake it is a good idea to enter at least one empty line afterthe entry.
One important thing to know is that by default the generated image will not print staff lines,a time signature and the clef.
This is a minimal working example of a lilylyp s entry section:
%%lilyglyphs
% crotchet with upward stem
crotchet = {
g’4
}
Warnings: So far the parser isn’t very smart. It just assumes that the input file it parses iscorrect. If you provide code with deviations from this explanation, the script will probablyproduce erroneous results or just stop working. Probably it won’t do any harm, but we can’tmake any promises on that. Please consider the script as being in a very experimental state.
In the current implementation you can’t create commands that do print staff lines, timesignatures or clefs. To achieve this you’d have to write the LilyPond input file(s) on your own.This issue is on the list for one of the next releases of lilylyp s .
You can define as many entries in one file as you like – they will all be processed at once. Ofcourse it is recommended to combine a coherent set of commands.
Everything that is outside of the lilyglyph entries is ignored by the script, so you can makeuse of these places to make a usable LilyPond file out of it. You can start off with the file/definitions/_template.ly to see how it works.
Basically you have to copy your definition to a new variable named symbol and then includea special include file score.ily (which is provided in that /definitions directory). This willprint your command definition as the only element in a new score block that is prepared notto print staff, time signature and clef. You can repeat this several times, inserting top-level\markups and have LilyPond produce a sheet with all defined symbols. This way you can finishyour design in “pure LilyPond” before actually going on to the LATEX part – and at the same timeprepare a reference sheet of your work.
\version ”2.16.2”
%%lilyglyphs
% crotchet with upward stem
crotchet = {
g’4
}
\markup ”Crotchet with upward stem”
symbol = \crotchet
\include ”score.ily”
% %lilyglyphs
% crotchet with downward stem
crotchetDown = {
\stemDown
c’4
}
\markup ”Crotchet with downward stem”
symbol = \crotchetDown
\include ”score.ily”
% and so on ...
5.2.2 Running the Script
If you have prepared your input file you can run the lily-image-commands.py script, passingit the complete file name (as a relative or absolute path) of your definitions file. The scripttries to check if the input file is in the correct location – which is considered true if it is in adefintions folder and has a lilyglyphs* directory in its path. This is valid both within thepackage directory and the private directory structure.
Now the script will do several things:
Generate LilyPond source files: In a first step the program parses the input file and extractsinformation about the command definitions that haven’t been marked as protected. For eachcommand definition it generates one compilable LilyPond source file in the /generated_src
directory, named with the command name. If there is such a file already (i. e. the command hadalready been processed before) you will be asked if you want to overwrite this file. If you arecurrently working on a command you will probably want the file to be overwritten, but if youaccidentally used a name that already exists you should of course keep the existing files andrename your new command.
Compile images with LilyPond: Now these generated source files are compiled usingLilyPond with the command line option -dpreview. The directory is then cleaned up, and the
resulting small PDF files are moved to the /pdfs directory.
Generate LATEX commands: Finally the script generates a LATEX file that is comparable tothe one generated by the Emmentaler command generation script. It will be stored in the/generated_cmd directory as a .tex file with the same basename as your original input file.Please note that these generated files aren’t considered persistent and will be overwritten if yourepeatedly process the same input file.
5.2.3 Utilizing the results
If you have successfully run the script you have the following results:
• LilyPond source files in the /generated_src folder (one for each command),
• corresponding PDF files in the /pdfs folder and
• the file /generated_cmd/INPUTFILENAME.tex.
You shouldn’t touch the first two items but go on and open the .tex file. This file is structuredidentically as the files generated by lily-glyph-commands.py, and also the way to finish offand possibly contribute your commands is essentially the same as described in subsection ..on page and subsection .. on page .
There are a few differences however:
• You should always keep the original definitions file so you can later re-generate the imagefrom it. This can happen when you need to modify it – or when you want to upgrade thepackage to a new version of E or LilyPond.
• Don’t forget to mark finished command definitions as ‘protected’.
• Keep in mind that the generated .tex file will be overwritten next time the same inputfile is processed by the script, so if you need to make any changes to the LATEX commanddefinitions you should immediately copy them to a safe place.
• Sometimes you will find that a rather tall glyph is difficult to accomodate because thenecessary scaling will make it look unnaturally small. In such a case you might considergoing back to the LilyPond side to review the design of your glyph (for example theglyphs for the single note commands have shortened stems). Please make sure that youunderstand the implications of the following section about partial processing.
• If you want to submit new commands by email we need ) the original definition, ) thegenerated LilyPond source, and ) the final LATEX command.
5.2.4 Partial processing of the input file
You are encouraged to put a coherent set of multiple command definitions in one definitions fileand keep this file, as it is the source from that everything can be rebuilt at any time. But therewill be occasions when you don’t want the Python script to do all the work over and over again.If you add a new command to the input file (and you should add it to an existing file if it belongsto the same category) you only want the new command to be processed. Or if you are workingon the fine-tuning of the commands (as described in the previous section) and decide that youhave to change the LilyPond definition of a single glyph you also only want to reprocess thisone. For this purpose you can mark entries in the input definitions file as “protected”, in orderto prevent them to be newly processed by the script. To do this you enter a line containing%%protected in your entry definition (note the double percent sign and the absence of a space
after them). You can see an example for this in the _template.ly file – because the exampleentry shouldn’t be processed at all. From now on the marked command won’t be processedanymore. This means that the LilyPond source file won’t be generated again, LilyPond isn’trun again for the script (which would be the most annoying thing), and the LATEX commandswon’t be generated again. The output file will of course be overwritten (you have renamed itbefore re-running the script, didn’t you?) but it won’t be cluttered with commands that youhave already dealt with earlier.
5.2.5 Recreating Image Files
There also are occasions when you might have to (re)create the files that serve as the glyphimages without having to regenerate the LATEX commands or the LilyPond source files. Oneexample would be the upgrade to a new an E version. In that case you can run thescript rebuild-pdfs.py. In order to work the script expects the current working directory tobe either the glyphimages subdirectory of the package or the root of the lilyglyphs_privatedirectory. This script essentially compares the directories with the generated LilyPond sourcesand with the created pdf files, and if it finds a source without a corresponding pdf it will callLilyPond to recreate it. If you don’t want to regenerate missing s but rather replace existingfiles you first have to delete the pdf files on disk so the script can detect them as missing. Ofcourse this script will only work with a working LilyPond installation.
Maybe in the future there will be functionality to detect changes in the glyphs’ definitions, orremove files that don’t have a corresponding source file anymore.
6 Contributing to lilylyp sThe original motivation to create lilylyp s was the need to include musical symbols in a criticalreport of a scholarly edition. Looking around on the internet and I didn’t find a solutionthat was even near the flexibility and output quality I wanted for this edition (and my workin general), so I came up with the idea of accessing the glyphs of LilyPond’s Efont. Fortunately I realized very early that I should make all this more generic and create apublic LATEX package. When I found the solution to incorporate non-Emmentaler glyphs throughLilyPond-generated images I saw that it worked out quite well. By now I have a solutionthat completely works for my personal needs and presumably is a useful package for any LATEXauthors interested in incorporating musical symbols in their documents.
But lilylyp s definitely is a package that lives on community contribution. Why? Becauseone of the main goals for continuing development is a growing coverage of glyphs. This taskis very “scalable“ and prone to “crowd-development” because any number of contributors canadd commands from the fields they are working on and need glyphs from. I personally willprobably only add new commands as I need them for my work, maybe sometimes getting thehang and complete a group. So anybody who uses the package to a more than casual degree ishighly encouraged to share his additions with me and the community.
There are also existing issues with the LATEX implementation that can be seen in the project’sissue tracker on GitHub (https://github.com/openlilylib/lilyglyphs). Furthermore I’msure there are quite a few things that could be implemented more elegantly, more efficiently, orwith less package dependencies – this package is actually my first serious work with LATEX …
And finally I have some ideas how lilylyp s ’ functionality could be enhanced, and otherscould come up with more ideas. For example I would be interested in having parametrizedcommands that can print a number of related glyphs, there could be more layout options, I wouldlike to be able to use global layout options for specific glyph groups (e.g. raise all accidentals bya certain amount) etc. And one day I would like to make the package compliant to the currentlyemerging SMuFL standard in order to allow using glyphs from different music fonts.
So if you think this package is interesting, please contact me so it can evolve over time! Ifyou’re just using it, please submit any additions you make for your own use (or start submittingarbitrary commands to enhance the package’s coverage). And if you’re a LATEX expert pleasedon’t hesitate to go right to the core and help me with the evolution of its code base …
http://www.smufl.org


