+ All Categories
Home > Documents > US Air Force Use of Force 31-222

US Air Force Use of Force 31-222

Date post: 30-May-2018
Category:
Upload: burt-gummer
View: 274 times
Download: 1 times
Share this document with a friend
129
NOTICE: This publication is available digitally on the AFDPO WWW site at: http://afpubs.hq.af.mil. COMPLIANCE WITH THIS PUBLICATION IS MANDATORY  BY ORDER OF THE SECRETAR Y OF THE AIR FORCE  AIR FORCE MANUAL 31-222 1 JUNE 2001 Security SECURITY FORCES USE OF FORCE MANUAL OPR: HQ AFSFC/SFOP (SMSgt Walter P. Filipiak) Certifie d by: HQ USAF/XOF (Brig Gen James M. Shamess) Intial Publication Pag es: 129 Distribution: F This manual complements Air Force Instruction 31-207,  Arming and Use of Force by Air Force Person- nel. It is an instructional guide for the application of various types of force. It applies to military, civilian, and contract security forces personnel as well as military personnel from other US military branches assigned or attached to Air Force security forces units. SUMMARY OF REVISIONS This is the initial publication of Air Force Manual (AFMAN) 31-222. It establishes procedures for the use of physical apprehension and restraint techniques, CAP-STUN pepper spray, impact weapons, personnel searches, handcuffing, and subject transportation. The use of the name or mark of any specific manufac- turer, commercial product, commodity, or service in this publication does not imply endorsement by the Air Force. Chapter 1 UNDERSTANDING USE OF FORCE 8 1.1. USAF Use of Forc e Policy. ....................................................................................... 8 Chapter 2—CONTACT AND APPROACH TECHNIQUES 9 2.1. Introduc tion. ............................................................................................................... 9 2.2. Challenging Individuals . ............................................................................................ 9 2.3. Alert Stance. ............................................................................................................... 10 2.4. Commun icat ion/ Con trol Member Pos ition ing . .......................................................... 11 Fig ure 2.1. Aler t Stan ce ............................................................................................................... 11 THIS DOCUMENT CONTAINS COPYRIGHTED MATERIAL
Transcript

8/14/2019 US Air Force Use of Force 31-222

http://slidepdf.com/reader/full/us-air-force-use-of-force-31-222 1/129

NOTICE: This publication is available digitally on the AFDPO WWW site at:

http://afpubs.hq.af.mil.

COMPLIANCE WITH THIS PUBLICATION IS MANDATORY

 BY ORDER OF THE

SECRETARY OF THE AIR FORCE

 AIR FORCE MANUAL 31-222

1 JUNE 2001

Security

SECURITY FORCES USE OF FORCE MANUAL

OPR: HQ AFSFC/SFOP

(SMSgt Walter P. Filipiak)

Certified by: HQ USAF/XOF

(Brig Gen James M. Shamess)

Intial Publication

Pages: 129

Distribution: F

This manual complements Air Force Instruction 31-207,  Arming and Use of Force by Air Force Person-

nel. It is an instructional guide for the application of various types of force. It applies to military, civilian,

and contract security forces personnel as well as military personnel from other US military branches

assigned or attached to Air Force security forces units.

SUMMARY OF REVISIONS

This is the initial publication of Air Force Manual (AFMAN) 31-222. It establishes procedures for the use

of physical apprehension and restraint techniques, CAP-STUN pepper spray, impact weapons, personnelsearches, handcuffing, and subject transportation. The use of the name or mark of any specific manufac-

turer, commercial product, commodity, or service in this publication does not imply endorsement by the

Air Force.

Chapter 1— UNDERSTANDING USE OF FORCE 8

1.1. USAF Use of Force Policy. ....................................................................................... 8

Chapter 2—CONTACT AND APPROACH TECHNIQUES 9

2.1. Introduction. ............................................................................................................... 9

2.2. Challenging Individuals. ............................................................................................ 9

2.3. Alert Stance. ............................................................................................................... 10

2.4. Communication/Control Member Positioning ........................................................... 11

Figure 2.1. Alert Stance ............................................................................................................... 11

THIS DOCUMENT CONTAINS COPYRIGHTED MATERIAL

8/14/2019 US Air Force Use of Force 31-222

http://slidepdf.com/reader/full/us-air-force-use-of-force-31-222 2/129

2 AFMAN31-222 1 June 2001

2.5. Body Clock/Risk Radius©. ........................................................................................ 12

Figure 2.2. Subject Risk Radius .................................................................................................. 12

Chapter 3—PHYSICAL APPREHENSION AND RESTRAINT TECHNIQUES (PART) 13

3.1. Introduction ................................................................................................................ 13

3.2. Physical Apprehension and Restraint Techniques. .................................................... 13

Figure 3.1. One Hand Grab Breakaway ...................................................................................... 14

Figure 3.2. One Hand Grab Breakaway ...................................................................................... 14

Figure 3.3. One Hand Grab Breakaway ...................................................................................... 15

Figure 3.4. One Hand Arm Grab With Face Smash .................................................................... 16

Figure 3.5. One Hand Arm Grab With Face Smash .................................................................... 17

Figure 3.6. Two Hand Grab With Face Smash ........................................................................... 17

Figure 3.7. Chest Grab ................................................................................................................ 18

Figure 3.8. Chest Grab ................................................................................................................ 18

Figure 3.9. Chest Grab ................................................................................................................ 19

Figure 3.10. Hair Grab .................................................................................................................. 20

Figure 3.11. Hair Grab .................................................................................................................. 20

Figure 3.12. Hair Grab .................................................................................................................. 21

Figure 3.13. Rear Grab .................................................................................................................. 22

Figure 3.14. Rear Grab .................................................................................................................. 23

Figure 3.15. Rear Grab .................................................................................................................. 24

Figure 3.16. Rear Grab .................................................................................................................. 25

3.3. IKKYO Techniques. .................................................................................................. 26

Figure 3.17. IKKYO Grip ............................................................................................................. 26

Figure 3.18. Two Directions of Pressure ....................................................................................... 27

Figure 3.19. Two Directions of Pressure ....................................................................................... 27

Figure 3.20. Two Directions of Pressure ....................................................................................... 28

Figure 3.21. Standing Arm Bar ..................................................................................................... 30

Figure 3.22. Standing Arm Bar ..................................................................................................... 31

Figure 3.23. Standing Arm Bar ..................................................................................................... 33

8/14/2019 US Air Force Use of Force 31-222

http://slidepdf.com/reader/full/us-air-force-use-of-force-31-222 3/129

AFMAN31-222 1 June 2001 3

Figure 3.24. Ikkyo Takedown ....................................................................................................... 35

Figure 3.25. Ikkyo Takedown ....................................................................................................... 36

Figure 3.26. Ikkyo Takedown ....................................................................................................... 36

Figure 3.27. Prone Arm Bar .......................................................................................................... 38

Figure 3.28. Prone Arm Bar .......................................................................................................... 38

Figure 3.29. Prone Arm Bar .......................................................................................................... 40

Figure 3.30. Prone Arm Bar .......................................................................................................... 40

Figure 3.31. Overcoming a Side Headlock ................................................................................... 42

Figure 3.32. Overcoming a Side Headlock ................................................................................... 43

Figure 3.33. Overcoming a Side Headlock ................................................................................... 45

Figure 3.34. Overcoming a Side Headlock ................................................................................... 46

Figure 3.35. Overcoming a Side Headlock ................................................................................... 47

Figure 3.36. Overcoming a Side Headlock ................................................................................... 47

Figure 3.37. Overcoming a Side Headlock ................................................................................... 48

Figure 3.38. Overcoming a Side Headlock ................................................................................... 48

Figure 3.39. Overcoming a Front Choke Hold .............................................................................. 50

Figure 3.40. Overcoming a Front Choke Hold .............................................................................. 50

Figure 3.41. Overcoming a Front Choke Hold .............................................................................. 51

Figure 3.42. Overcoming a Front Choke Hold .............................................................................. 53

Figure 3.43. Overcoming a Front Choke Hold .............................................................................. 54

Chapter 4—WEAPONS RETENTION 55

4.1. Weapons Retention Techniques. ................................................................................ 55

Figure 4.1. Lower Forearm Block ............................................................................................... 55

Figure 4.2. Lower Forearm Block ............................................................................................... 56

Figure 4.3. Lower Forearm Block ............................................................................................... 56

Figure 4.4. Rear Wrist Lock (Strong Hand Grab) #1 .................................................................. 57

Figure 4.5. Rear Wrist Lock (Strong Hand Grab) #1 .................................................................. 58

Figure 4.6. Rear Wrist Lock (Strong Hand Grab) #1 .................................................................. 59

Figure 4.7. Rear Wrist Lock (Strong Hand Grab) #1 .................................................................. 60

8/14/2019 US Air Force Use of Force 31-222

http://slidepdf.com/reader/full/us-air-force-use-of-force-31-222 4/129

4 AFMAN31-222 1 June 2001

Figure 4.8. Rear Wrist Lock (Strong Hand Grab) #1 .................................................................. 60

Figure 4.9. Rear Wrist Lock (Weak Hand Grab) #2 ................................................................... 62

Figure 4.10. Rear Wrist Lock (Weak Hand Grab) #2 ................................................................... 62

Figure 4.11. Rear Wrist Lock (Weak Hand Grab) #2 ................................................................... 63

Figure 4.12. Rear Wrist Lock (Weak Hand Grab) #2 ................................................................... 63

Chapter 5—USE OF CAP-STUNR¹ PEPPER SPRAY 64

5.1. Introduction. ............................................................................................................... 64

5.2. Characteristics. ........................................................................................................... 64

5.3. Nomenclature. ............................................................................................................ 64

5.4. Storing and Shipping OC Pepper Spray. ................................................................... 64

Figure 5.1. CAP-STUN Z-305R Nomenclature .......................................................................... 65

5.5. Training. ..................................................................................................................... 65

5.6. CAP-STUN R Utilization.¹ ........................................................................................ 66

Figure 5.2. CAP-STUN Z-305R Range And Spray Pattern ........................................................ 67

5.7. Special Considerations ............................................................................................... 67

5.8. Post-Use Care. ........................................................................................................... 68

5.9. OC Attack Upon Official. .......................................................................................... 69

5.10. Warnings. ................................................................................................................... 69

5.11. Reporting and Recording of OC Utilization. ............................................................. 70

Chapter 6—IMPACT WEAPONS 71

6.1. Overview. ................................................................................................................... 71

6.2. Nomenclature. ............................................................................................................ 71

6.3. Target Areas. .............................................................................................................. 71

6.4. Using and Carrying the Baton. .................................................................................. 71

Figure 6.1. Carrying the Baton .................................................................................................... 72

Figure 6.2. Carrying the Baton .................................................................................................... 72

Figure 6.3. Drawing the Baton .................................................................................................... 73

Figure 6.4. On-Guard Position .................................................................................................... 75

Figure 6.5. High Position ............................................................................................................ 75

Figure 6.6. Strong Side Baton Positioning .................................................................................. 76

8/14/2019 US Air Force Use of Force 31-222

http://slidepdf.com/reader/full/us-air-force-use-of-force-31-222 5/129

AFMAN31-222 1 June 2001 5

6.5. Baton Strikes. ............................................................................................................. 76

Figure 6.7. Strike Ready Position ................................................................................................ 78

Figure 6.8. Strong Side Downward Strike/Recovery/Weak Side Downward Strike .................. 79

Figure 6.9. Strong Side Downward Strike/Recovery/Weak Side Downward Strike .................. 80

Figure 6.10. Strong Side Downward Strike/Recovery/Weak Side Downward Strike .................. 81

6.6. Post-Use Care. ........................................................................................................... 82

6.7. Training. ..................................................................................................................... 82

Chapter 7—RIFLE FIGHTING 83

7.1. Overview. ................................................................................................................... 83

7.2. General Information. .................................................................................................. 83

7.3. Attack Position. .......................................................................................................... 83

7.4. Butt Stroke. ................................................................................................................ 83

7.5. Smash. ........................................................................................................................ 83

Figure 7.1. Attack Position .......................................................................................................... 84

Figure 7.2. Butt Stroke ................................................................................................................ 85

Figure 7.3. Smash ........................................................................................................................ 86

7.6. Slash. .......................................................................................................................... 86

7.7. Thrust. ........................................................................................................................ 86

7.8. High Block (Center/Right/Left). ................................................................................ 87

Figure 7.4. Slash .......................................................................................................................... 88

Figure 7.5. Thrust ........................................................................................................................ 89

Figure 7.6. Thrust ........................................................................................................................ 90

Figure 7.7. High Block ................................................................................................................ 91

7.9. Low Block (Center/Right/Left). ................................................................................ 91

7.10. Side Block (Right/Left). ............................................................................................ 91

Figure 7.8. Low Block ................................................................................................................. 92

Figure 7.9. Side Block ................................................................................................................. 92

Chapter 8—PERSONNEL SEARCHES 93

8.1. Suspect Searches. ....................................................................................................... 93

8.2. Types of Searches. ..................................................................................................... 93

8/14/2019 US Air Force Use of Force 31-222

http://slidepdf.com/reader/full/us-air-force-use-of-force-31-222 6/129

6 AFMAN31-222 1 June 2001

8.3. Standing Search. ........................................................................................................ 93

Figure 8.1. Standing Search ........................................................................................................ 95

Figure 8.2. Standing Search ........................................................................................................ 97

Figure 8.3. Standing Search ........................................................................................................ 98

Figure 8.4. Standing Search ........................................................................................................ 99

Figure 8.5. Standing Search ........................................................................................................ 101

Figure 8.6. Standing Search ........................................................................................................ 101

Figure 8.7. Standing Search ........................................................................................................ 103

Figure 8.8. Standing Search ........................................................................................................ 104

Figure 8.9. Standing Search ........................................................................................................ 105

Figure 8.10. Standing Search ........................................................................................................ 106

8.4. Prone Search. ............................................................................................................. 106

Figure 8.11. Prone Search ............................................................................................................. 107

Figure 8.12. Prone Search ............................................................................................................. 109

Figure 8.13. Prone Search ............................................................................................................. 109

Figure 8.14. Prone Search ............................................................................................................. 110

Figure 8.15. Prone Search ............................................................................................................. 110

Figure 8.16. Prone Search ............................................................................................................. 111

Figure 8.17. Prone Search ............................................................................................................. 113

Figure 8.18. Prone Search ............................................................................................................. 113

Figure 8.19. Prone Search ............................................................................................................. 114

Figure 8.20. Prone Search ............................................................................................................. 114

8.5. Opposite-Gender Searches. ........................................................................................ 115

8.6. Exigent Circumstances. ............................................................................................. 115

Chapter 9—HANDCUFFING AND SUBJECT TRANSPORTATION 116

9.1. Handcuffing Overview. ............................................................................................. 116

9.2. Misconceptions About Handcuffs. ............................................................................ 116

9.3. When to Handcuff. ..................................................................................................... 116

9.4. Handcuffing Approach. ............................................................................................. 117

9.5. Displaying Handcuffs. ............................................................................................... 117

8/14/2019 US Air Force Use of Force 31-222

http://slidepdf.com/reader/full/us-air-force-use-of-force-31-222 7/129

AFMAN31-222 1 June 2001 7

9.6. How to Apply the Handcuffs. .................................................................................... 117

Figure 9.1. Applying Handcuffs .................................................................................................. 118

9.7. Removing Handcuffs. ................................................................................................ 119

9.8. Transportation Procedures. ........................................................................................ 119

Figure 9.2. Removing Handcuffs ................................................................................................ 120

9.9. Other Considerations. ................................................................................................ 122

9.10. Opposite Gender Transporting. .................................................................................. 122

9.11. Escort Procedures. ..................................................................................................... 122

Figure 9.3. Standard Escort (No Handcuffs) ............................................................................... 123

Figure 9.4. Standard Escort (Handcuffed) .................................................................................. 123

Figure 9.5. Reverse Escort .......................................................................................................... 125

Attachment 1—GLOSSARY OF REFERENCES AND SUPPORTING INFORMATION 126

Attachment 2—USER FEEDBACK 127

8/14/2019 US Air Force Use of Force 31-222

http://slidepdf.com/reader/full/us-air-force-use-of-force-31-222 8/129

8 AFMAN31-222 1 June 2001

Chapter 1

UNDERSTANDING USE OF FORCE

1.1. USAF Use of Force Policy. Air Force personnel engaged in force protection duties will use only

that force which is reasonably necessary in conformity with the statutes and constitution of the United

States. They must avoid the use of force where it’s not essential to carrying out assigned responsibilities.

At times, Air Force personnel may need to use force to perform their assigned duties. Such use of force

will be appropriate provided they operate within the law…Air Force policies, guidance, and have received

appropriate training in its application. This manual was designed to assist in training on specific use of 

force techniques.

1.1.1. In cases warranting the use of force, you must use only that force reasonably necessary to reach

your objective. You must tailor the type and level of force to its necessity. You must base your use of 

force option on the actions of the individual(s) with whom you are in contact. Once a particular level

of force is no longer required, you must discontinue its use despite the fact a suspect ’s efforts to thwart

or evade a seizure may arouse normal passions of anger, fear, or frustration. If you use excessive force

in discharging your assigned responsibilities, you are subject to administrative or judicial action.Authority for such action is in the UCMJ, Article 92; or United States, local, or host-nation laws.

1.1.1.1. The Fourth Amendment to the US Constitution sets the limits for the use of force by per-

sonnel engaged in affecting arrests or other seizures of persons. In Graham v. Connor, 490 U.S.

386 (1989), the US Supreme Court established the Fourth Amendment standard of “objective rea-

sonableness” as the appropriate standard for assessing the use of force in the context of making an

arrest or other seizure of a person. It explained its application in these terms: “[T]he question is

whether the officers’ actions are ’objectively reasonable’ in light of the facts and circumstances

confronting them…. The reasonableness of a particular use of force must be judged from the per-

spective of a reasonable officer on the scene, rather than with the 20/20 vision of hindsight …the

’reasonableness’ inquiry…is an objective one….” 

1.1.1.2. The Supreme Court recognized in Graham v. Connor that law enforcement and security

personnel have to make “split-second judgments” concerning the use of force under “circum-

stances that are tense, uncertain and rapidly evolving….” The US Supreme Court has held that

reasonableness under the Fourth Amendment does not require you to choose the least intrusive

alternative, only a reasonable one. In effecting a seizure, individuals performing law enforcement

or security duties draw from a reservoir of options, ranging from simple displays of authority to

the application of various levels of non deadly force to the use of deadly force itself. Facts dictate

the appropriate response, and those facts—as well as the choice of response—are subject to close

scrutiny.

1.1.2.

1

The criteria supporting “objective reasonableness” is provided from three essential areaswithin the confrontational environment: The subject(s) action(s), risk perception, and officer response

initiated in order to gain compliance and control.

1. From Integrated Force Management-Use of Force Model, by Professor Gregory J. O’Connor,

Copyright ©1997 by Professor O’Connor. Reprinted by permission

8/14/2019 US Air Force Use of Force 31-222

http://slidepdf.com/reader/full/us-air-force-use-of-force-31-222 9/129

AFMAN31-222 1 June 2001 9

Chapter 2

CONTACT AND APPROACH TECHNIQUES

2.1. Introduction. As accomplished as we may be via education, training, and/or experience, we can

never totally predict the actions or responses within a confrontation. Therefore, in our effort to maximize

control, our approach toward the subject should be founded upon tactics consistent with the controlled

concept.

2.2. Challenging Individuals. The purpose of challenging an individual is to determine “friend from

foe” and make a positive identification.

2.2.1. Challenging individuals on foot. Once you determine you have reason to challenge a person

you should first use your radio to notify the Security Forces Control Center (SFCC) and request

backup if deemed necessary. Simultaneous to notifying the SFCC you should be using all available

cover. Once under cover, perform the challenge in the following manner:

2.2.1.1. Bring the Ml6 to port arms position or the 9mm to ready pistol (hand on the grip of 

weapon, in holster, and flap released).

2.2.1.2. If part of a team, only one person will issue commands.

2.2.1.3. Command “HALT” (blow whistle if appropriate).

2.2.1.4. Command “RAISE YOUR HANDS ABOVE YOUR HEAD, SPREAD YOUR FIN-

GERS AND SPREAD YOUR FEET.” This is the final challenge position.

2.2.1.5. If the individual is inside a restricted area, remove him/her from the restricted area. If this

isn’t feasible, then face individual(s) away from protection level resources.

2.2.1.6. Instruct person(s) to remove identification using the hand that is closest to identification.

2.2.1.7. Use the restricted area badge (RAB) in restricted areas, if used. Otherwise, use an autho-rized identification card with a photo ID.

2.2.1.8. Have individual(s) bend at the waist slowly and place identification on the ground.

2.2.1.9. Have individual(s) turn around and walk approximately six paces away. Return individ-

ual(s) to final challenge position and scan the surroundings for other suspects.

2.2.1.10. Move cautiously forward and check the credentials. (Insure you turn individual toward

you for picture identification). If more than one person is being challenged, identify each person

separately.

2.2.1.11. Once positive identification is verified, terminate the challenge and notify the SFCC. If 

positive identification can’t be verified, detain the individual(s), keep at a disadvantage, and waitfor backup.

2.2.2. Challenging individuals in vehicles. Once again you must notify the SFCC and take available

cover before performing the following:

2.2.2.1. Bring the M16 to port arms position or 9mm to ready pistol (hand on the grip of weapon,

in holster, and flap released).

2.2.2.2. Command “HALT” (blow whistle if appropriate).

8/14/2019 US Air Force Use of Force 31-222

http://slidepdf.com/reader/full/us-air-force-use-of-force-31-222 10/129

10 AFMAN31-222 1 June 2001

2.2.2.3. Command “TURN OFF THE ENGINE AND SET THE EMERGENCY BRAKE.” 

2.2.2.4. HOURS OF DARKNESS: Command “LEAVE THE HEADLIGHTS ON AND TURN

THE DOMELIGHTS ON.” Individuals challenged during hours of darkness will be removed

from the vehicle and placed so the headlights limit their view.

2.2.2.5. Command “PLACE YOUR HANDS ON THE DASH OR WINDSHIELD.” Rear seat

occupants place hands on the back of the front seat or roof.

2.2.2.6. Have person(s) dismount vehicle from the side nearest the security forces member.

Instruct the person(s) to leave the doors of the vehicle open.

2.2.2.7. Position person(s) approximately six paces in front of the vehicle with arms up, and fin-

gers and feet spread. During a daytime challenge, have individual(s) face away from the vehicle.

During hours of darkness, have individual(s) face the vehicle.

2.2.2.8. Once the individuals are in the final challenge position, scan the area and approach the

vehicle.

2.2.2.9. Inspect the trunk or truck bed and the interior of the vehicle.

2.2.2.10. Make positive identification of the individuals.

2.2.2.11. Once positive identification is made, terminate the challenge with the SFCC. If positive

identification cannot be made, detain the individuals, keep them at a disadvantage, and wait for

backup.

2.3. Alert Stance. Field analysis has indicated that the “alert stance” best exhibits the essential traits of 

caution and safety and should be incorporated through patterns of practice until it becomes conditioned

response. The essence of the “alert stance” is balance. Balance is best achieved by assuming the stance

with a solid base, in constant realization of the body’s center of gravity.

2.3.1. The “alert stance” places the member at a safe distance (5–8 feet) to the front/side of the subject

upon initial contact. From this position, the risk of being punched or kicked by the subject can be

somewhat reduced and the subject’s actions more easily detected. The contact itself may additionally

appear less confrontational to the subject and act as a true tenet of the Confrontation Equation ”.

2.3.2. The “alert stance” places the member’s weak foot forward, pointed toward the subject. The

member’s strong foot should be about a shoulder width behind the weak foot at an angle of 45 to 90×.

This foot positioning allows the officer the best options relative to balance, mobility, leverage, and

strength utilization.

2.3.3. The member’s upper torso should also mirror the status of safety, as well as the potential for the

initiation of effective countermeasure controls. This capability is best realized by the member keeping

his/her elbows close to the body, with the hands maintained above the waist. (Figure 2.1.)

2.3.4. The member should avoid looking only at the subject’s eyes during the confrontational contact,

thus preventing the potential for distractions (fakes, hostile expressions, etc.) and should place pri-

mary sight concentration on the subject’s upper chest area.

2.3.5. If the subject’s actions were to change, the member could better perceive the risks presented

and begin to initiate proper countermeasures to gain control.

8/14/2019 US Air Force Use of Force 31-222

http://slidepdf.com/reader/full/us-air-force-use-of-force-31-222 11/129

AFMAN31-222 1 June 2001 11

2.4. Communication/Control Member Positioning . Within each confrontation the principle of tactical

transition and the concept of the Confrontation Equation©2 must be integrated into the conditioning pro-

cess. In the following verbal illustration, two members approach an individual by extending the tradi-

tional triangle of contact further to the front/side of the subject.

Figure 2.1. Alert Stance

2.4.1. As a result of this extended position, the subject will most commonly begin to verbally or visu-

ally address one of the members. Dialog may also be initiated by one of the members during the

approach as part of a tactical plan. In either case, the member who is first to communicate with the

subject becomes the contact officer, continuing to maintain the subject’s attention and providing for an

avenue of potential verbal direction to the subject.

2.4.2. The supporting member now assumes an enhanced strategic position for potential countermea-

sure controlling techniques from the front/side, side, or side/rear of the subject, thus becoming the

cover officer. If the subject were to change his communicative direction to the opposite officer, tacti-

cal transition would call for each of the members to switch the communication and control roles so as

to continue to maximize the tactical advantage for both members.

2. The term “Confrontation Equation” is adopted from the “Integrated Force Management Reference

Guide” first developed in 1991, by Professor Gregory J. Connor, University of Illinois Police Training

Institute and the staff of the Federal Law Enforcement Training Center. Material presented in the manual

was copyrighted by Professor Connor in 1997 and is used with his permission.

8/14/2019 US Air Force Use of Force 31-222

http://slidepdf.com/reader/full/us-air-force-use-of-force-31-222 12/129

12 AFMAN31-222 1 June 2001

2.5. Body Clock/Risk Radius©. We have combined a time-proven method of tactical assessment called

the “body clock,” with a visualization tool called the Risk Radius in order to illustrate and reinforce the

status of risk relative to the positioning of the member and subject (Figure 2.2.)3  

2.5.1. If we were standing above the subject, looking down, we could identify risk potential by both

numerical clocklike reference as well as by coloration. We have learned that the 12 o ’clock or rear

position presents the lowest status of risk to the officer. As we move from the rear of the subject to thefront of the body, or 6 o’clock, we recognize the highest status of risk.

2.5.2. Also, one can see that the intensity of the risk corresponds to the intensity of the red as we

move from the rear to the front of the subject. Additionally, as we distance ourselves from the subject,

the status of risk also decreases.

Figure 2.2. Subject Risk Radius.

3. The Risk Radius Model (Figure 2.2.) is adopted from the “Integrated Force Management Reference

Guide” first developed in 1991, by Professor Gregory J. Connor, University of Illinois Police Training

Institute and the staff of the Federal Law Enforcement Training Center. Material presented in the manual

was copyrighted by Professor Connor in 1997 and is used with his permission. ² 

8/14/2019 US Air Force Use of Force 31-222

http://slidepdf.com/reader/full/us-air-force-use-of-force-31-222 13/129

AFMAN31-222 1 June 2001 13

Chapter 3

PHYSICAL APPREHENSION AND RESTRAINT TECHNIQUES (PART)

3.1. Introduction . In the performance of your official duties, you may be required to make physical con-

tact with a noncompliant subject in order to maintain or regain control. The essential elements in this pro-

cess can be described in two words: “when” and “how.” Each of the following PART will be presented in

a functional format founded upon assessment and application. The following techniques are only some of 

those that may be used and it’s important to remember that the minimum use of force necessary is always

the correct use of force. Generally, you can expect to use these techniques when the subject ’s actions are

located within the resistant (active) portion of the Use of Force Model.

3.2. Physical Apprehension and Restraint Techniques. These techniques depend on speed, surprise,

and skill. Begin PART from the alert stance discussed in Chapter 2.

3.2.1. One Hand Grab Breakaway.

3.2.1.1. STEP 1. Spread the fingers wide apart and rotate your thumb and hand 180 degrees over

the suspect’s hand. This will break the hold. (Figure 3.1., Figure 3.2., and Figure 3.3.)

8/14/2019 US Air Force Use of Force 31-222

http://slidepdf.com/reader/full/us-air-force-use-of-force-31-222 14/129

14 AFMAN31-222 1 June 2001

Figure 3.1. One Hand Grab Breakaway.

Figure 3.2. One Hand Grab Breakaway.

8/14/2019 US Air Force Use of Force 31-222

http://slidepdf.com/reader/full/us-air-force-use-of-force-31-222 15/129

AFMAN31-222 1 June 2001 15

Figure 3.3. One Hand Grab Breakaway.

3.2.1.2. STEP 2. Step to the rear with the same foot as the arm that was grabbed and pull up with

your arm and reestablish a reactionary gap.

3.2.2. One Hand Arm Grab With Face Smash.

3.2.2.1. STEP 1. Grab the attacker’s wrist with the same hand that was grabbed by the attacker(Figure 3.4.).

8/14/2019 US Air Force Use of Force 31-222

http://slidepdf.com/reader/full/us-air-force-use-of-force-31-222 16/129

16 AFMAN31-222 1 June 2001

Figure 3.4. One Hand Arm Grab With Face Smash

3.2.2.2. STEP 2. Step forward with the rear foot in the direction of the attacker. Then, using the

weapon hand, strike the suspect in the face area with the heel of your hand (Figure 3.5.).

3.2.2.3. A follow-up technique would be to apply an arm bar after the face smash.

3.2.3. Two Hand Grab With Face Smash.3.2.3.1. STEP 1. Grab the attacker’s wrist with the same hand that was grabbed by the attacker.

3.2.3.2. STEP 2. Step forward with the rear foot in the direction of the attacker. Then, using the

weapon hand, strike the suspect in the face area with the heel of your hand (Figure 3.6.).

3.2.3.3. An alternative technique would be to apply an arm bar after the face smash.

3.2.4. Chest Grab.

3.2.4.1. STEP 1. When being pushed/grabbed, you must quickly “trap” the suspect’s hand. This

“trap” is accomplished by grabbing the suspect’s arm below the elbow, your palms down, thumbs

down, and trapping their hand on your chest (Figure 3.7.).

3.2.4.2. STEP 2. Press the suspect’s hand firmly against your chest, take a step to the rear andbend forward slightly (Figure 3.8.).

3.2.4.3. STEP 3. Deliver a football style kick to the suspect’s groin area (Figure 3.9.).

3.2.4.4. An alternative technique would be to apply an arm bar after the kick.

8/14/2019 US Air Force Use of Force 31-222

http://slidepdf.com/reader/full/us-air-force-use-of-force-31-222 17/129

AFMAN31-222 1 June 2001 17

Figure 3.5. One Hand Arm Grab With Face Smash.

Figure 3.6. Two Hand Grab With Face Smash.

8/14/2019 US Air Force Use of Force 31-222

http://slidepdf.com/reader/full/us-air-force-use-of-force-31-222 18/129

18 AFMAN31-222 1 June 2001

Figure 3.7. Chest Grab.

Figure 3.8. Chest Grab.

8/14/2019 US Air Force Use of Force 31-222

http://slidepdf.com/reader/full/us-air-force-use-of-force-31-222 19/129

AFMAN31-222 1 June 2001 19

Figure 3.9. Chest Grab.

3.2.5. Hair Grab.

3.2.5.1. STEP 1. The reaction is similar to the chest push. When grabbed, trap the suspect’s hand

on your head using both of your hands (Figure 3.10.).

3.2.5.2. STEP 2. Take a step to the rear and tuck your chin into your neck (Figure 3.11.

).3.2.5.3. STEP 3. Deliver a football style kick to the suspect’s groin area with the strong foot (Fig-

ure 3.12.).

3.2.5.4. An alternative technique would be to apply an arm bar after the kick.

8/14/2019 US Air Force Use of Force 31-222

http://slidepdf.com/reader/full/us-air-force-use-of-force-31-222 20/129

20 AFMAN31-222 1 June 2001

Figure 3.10. Hair Grab.

Figure 3.11. Hair Grab.

8/14/2019 US Air Force Use of Force 31-222

http://slidepdf.com/reader/full/us-air-force-use-of-force-31-222 21/129

AFMAN31-222 1 June 2001 21

Figure 3.12. Hair Grab.

3.2.6. Rear Grab: This hold is overcome with a blow to the groin.

3.2.6.1. STEP 1. If a suspect wraps his/her arms around your body and over your arms, bring your

hands to waist level and spread your arms out. Immediately assume a crouched position (Figure

3.13.).

3.2.6.2. STEP 2. Make fist immediately, flex your arms out slightly, crouch down, and look at the

suspect’s feet (Figure 3.14.).

3.2.6.3. STEP 3. Step forward with the same foot the suspect has forward and pivot your hips

away from the suspect’s groin area (Figure 3.15.).

3.2.6.4. STEP 4. Once you have pivoted, strike the suspect’s groin area sharply with the hand

nearest that area (Figure 3.16.).

3.2.6.5. An alternative technique would be to apply an arm bar after the groin strike.

8/14/2019 US Air Force Use of Force 31-222

http://slidepdf.com/reader/full/us-air-force-use-of-force-31-222 22/129

22 AFMAN31-222 1 June 2001

Figure 3.13. Rear Grab.

8/14/2019 US Air Force Use of Force 31-222

http://slidepdf.com/reader/full/us-air-force-use-of-force-31-222 23/129

AFMAN31-222 1 June 2001 23

Figure 3.14. Rear Grab.

8/14/2019 US Air Force Use of Force 31-222

http://slidepdf.com/reader/full/us-air-force-use-of-force-31-222 24/129

24 AFMAN31-222 1 June 2001

Figure 3.15. Rear Grab.

8/14/2019 US Air Force Use of Force 31-222

http://slidepdf.com/reader/full/us-air-force-use-of-force-31-222 25/129

AFMAN31-222 1 June 2001 25

Figure 3.16. Rear Grab.

8/14/2019 US Air Force Use of Force 31-222

http://slidepdf.com/reader/full/us-air-force-use-of-force-31-222 26/129

26 AFMAN31-222 1 June 2001

3.3. IKKYO Techniques.

3.3.1. IKKYO Grip.

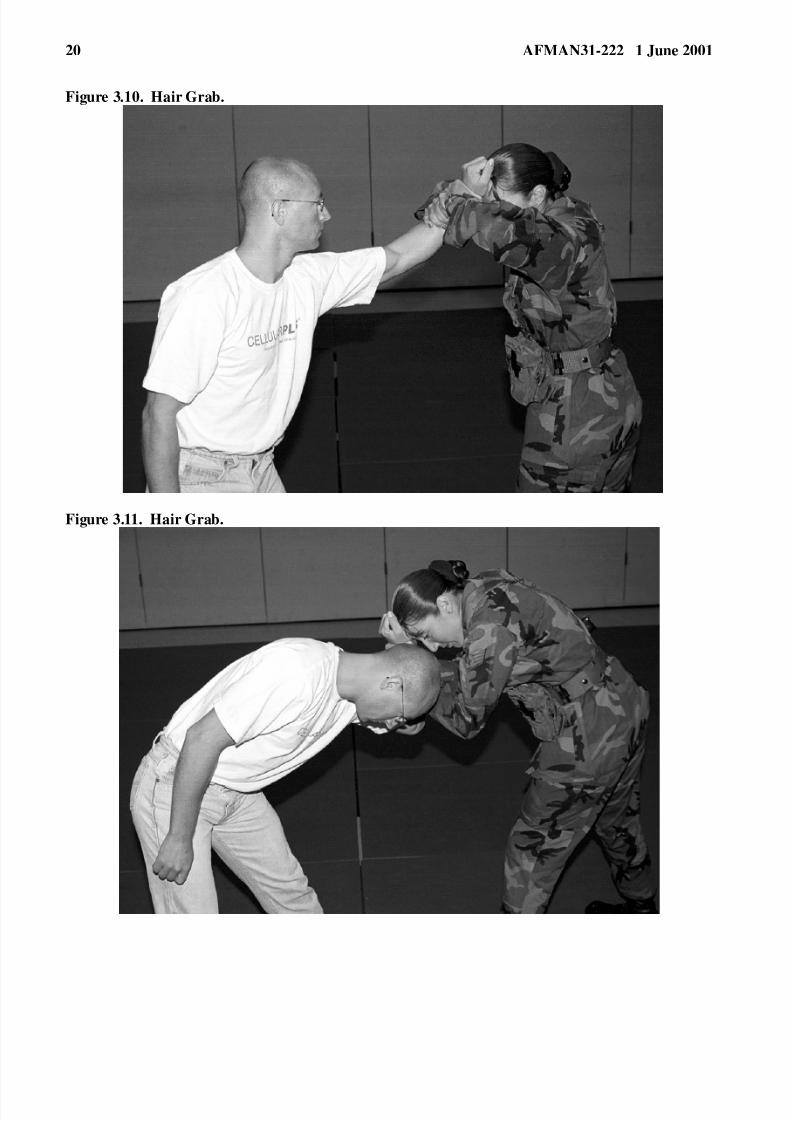
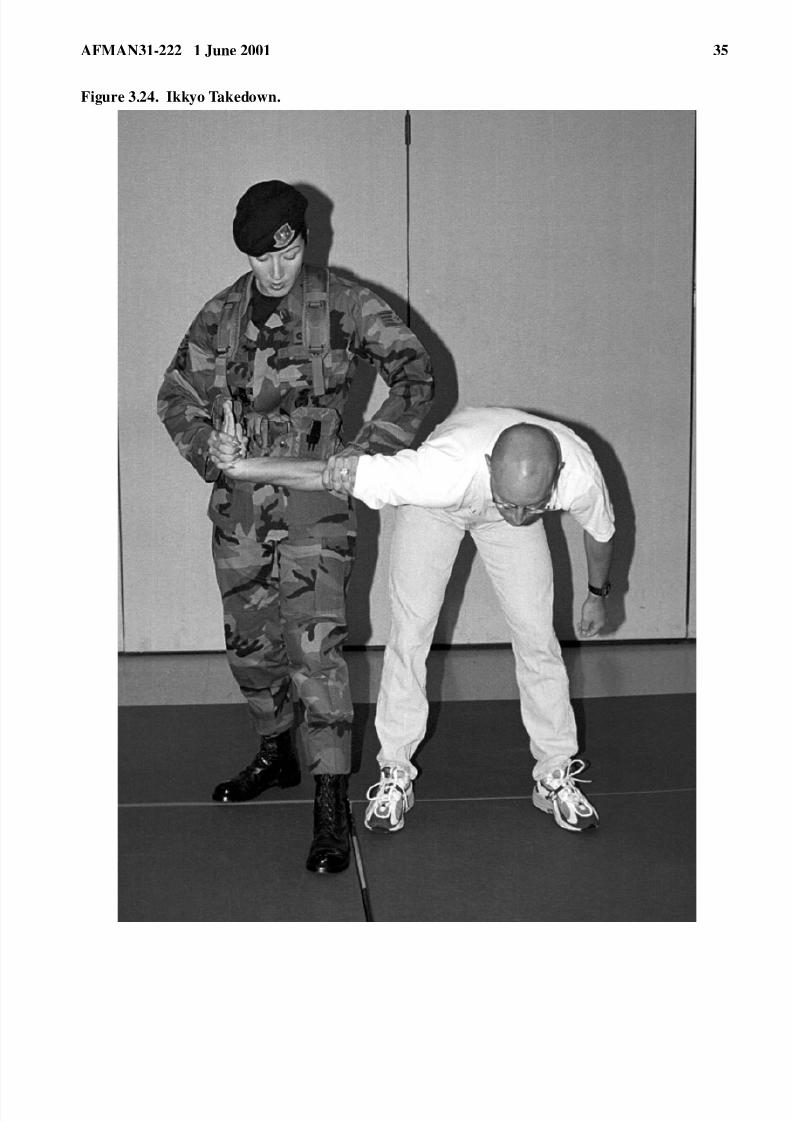
3.3.1.1. STEP 1. Grab the back of suspect’s right hand with your right hand palm down (or his left

hand with your left).

3.3.1.2. STEP 2. Wrap your thumb around the suspect’s thumb, then wrap the remaining four fin-gers around the suspect’s hand (Figure 3.17.).

Figure 3.17. IKKYO Grip.

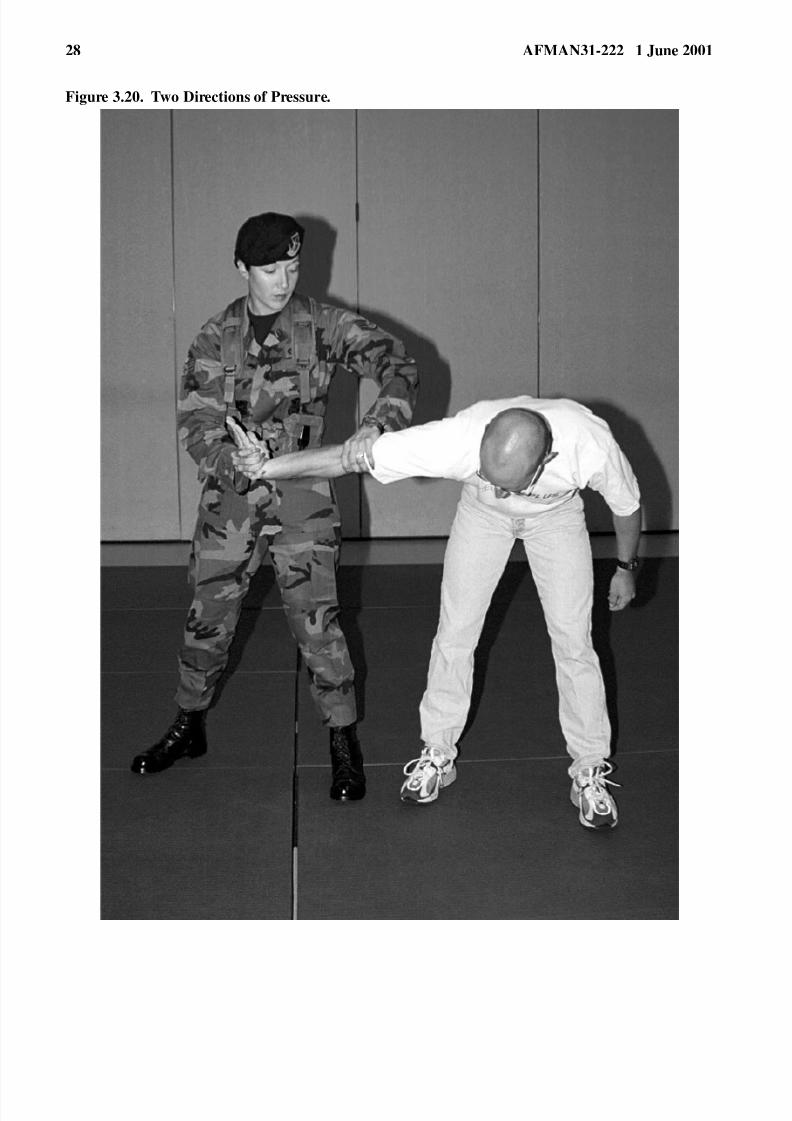
3.3.2. Two Directions of Pressure.

3.3.2.1. STEP 1. After placing the suspect in an IKKYO grip, twist the suspect’s right/left hand in

a clockwise/counterclockwise direction until the elbow is facing straight up (Figure 3.18.). Simul-

taneously pivot on the ball of your weak foot and step back with your strong foot so your feet are

aligned with the suspect’s and spread your feet one shoulder width apart.

3.3.2.2. STEP 2. Place your weak hand directly on top of the suspect’s right elbow and push the

suspect’s hand inward with your strong hand (Figure 3.19.).3.3.2.3. STEP 3. Apply downward pressure to the elbow with your weak hand, rotating the elbow

 joint rearward while pushing inward on the suspect’s hand. The suspect’s arm should be at waist

level and the fingers up (Figure 3.20.).

8/14/2019 US Air Force Use of Force 31-222

http://slidepdf.com/reader/full/us-air-force-use-of-force-31-222 27/129

AFMAN31-222 1 June 2001 27

Figure 3.18. Two Directions of Pressure.

Figure 3.19. Two Directions of Pressure.

8/14/2019 US Air Force Use of Force 31-222

http://slidepdf.com/reader/full/us-air-force-use-of-force-31-222 28/129

28 AFMAN31-222 1 June 2001

Figure 3.20. Two Directions of Pressure.

8/14/2019 US Air Force Use of Force 31-222

http://slidepdf.com/reader/full/us-air-force-use-of-force-31-222 29/129

AFMAN31-222 1 June 2001 29

3.3.3. Standing Arm Bar.

3.3.3.1. STEP 1. After placing the suspect in two directions of pressure, fold his/her hand inward

and place his/her wrist over and past the inside of your weak elbow. Remove your thumb from the

fold of the suspect’s arm and grab hold of their triceps just above the elbow (Figure 3.21.).

3.3.3.2. STEP 2. Move your inside foot to the rear of the suspect’s feet and step to the left/right.

At the same time, place your elbow into the small of the suspect’s back. Do not release the grip on

their triceps (Figure 3.22.).

8/14/2019 US Air Force Use of Force 31-222

http://slidepdf.com/reader/full/us-air-force-use-of-force-31-222 30/129

30 AFMAN31-222 1 June 2001

Figure 3.21. Standing Arm Bar.

8/14/2019 US Air Force Use of Force 31-222

http://slidepdf.com/reader/full/us-air-force-use-of-force-31-222 31/129

AFMAN31-222 1 June 2001 31

Figure 3.22. Standing Arm Bar.

8/14/2019 US Air Force Use of Force 31-222

http://slidepdf.com/reader/full/us-air-force-use-of-force-31-222 32/129

32 AFMAN31-222 1 June 2001

3.3.3.3. STEP 3. Simultaneously place the first two fingers of your strong hand under the sus-

pect’s nose and bring his/her head backwards, placing it on your right shoulder (Figure 3.23.).

Both of your feet should be outside of the suspect’s feet, your knees slightly bent, and your back 

straight to balance yourself. Your chest should be touching the suspect’s shoulders, but your pelvic

area should not be in contact with their buttocks. NOTE: If additional control is needed, raise the

suspect on his/her toes by applying upward pressure on the suspect’s restrained arm while pushing

inward and up with the two fingers under their nose.

8/14/2019 US Air Force Use of Force 31-222

http://slidepdf.com/reader/full/us-air-force-use-of-force-31-222 33/129

AFMAN31-222 1 June 2001 33

Figure 3.23. Standing Arm Bar.

8/14/2019 US Air Force Use of Force 31-222

http://slidepdf.com/reader/full/us-air-force-use-of-force-31-222 34/129

34 AFMAN31-222 1 June 2001

3.3.4. IKKYO Takedown.

3.3.4.1. STEP 1. Perform the Two Directions of Pressure (Figure 3.24.).

3.3.4.2. STEP 2. Apply straight downward pressure on the elbow while pushing up on the hand.

Simultaneously take a small step forward with your weak foot and a large step forward with your

outside foot while maintaining control of the suspect’s arm (Figure 3.25.). Keep the arm parallel

to the ground while you drop to your weak knee. Continue to drop the arm parallel until it is on the

ground. Failure to keep the suspect’s arm parallel to the ground may result in an injury (Figure

3.26.).

8/14/2019 US Air Force Use of Force 31-222

http://slidepdf.com/reader/full/us-air-force-use-of-force-31-222 35/129

AFMAN31-222 1 June 2001 35

Figure 3.24. Ikkyo Takedown.

8/14/2019 US Air Force Use of Force 31-222

http://slidepdf.com/reader/full/us-air-force-use-of-force-31-222 36/129

36 AFMAN31-222 1 June 2001

Figure 3.25. Ikkyo Takedown.

Figure 3.26. Ikkyo Takedown.

8/14/2019 US Air Force Use of Force 31-222

http://slidepdf.com/reader/full/us-air-force-use-of-force-31-222 37/129

AFMAN31-222 1 June 2001 37

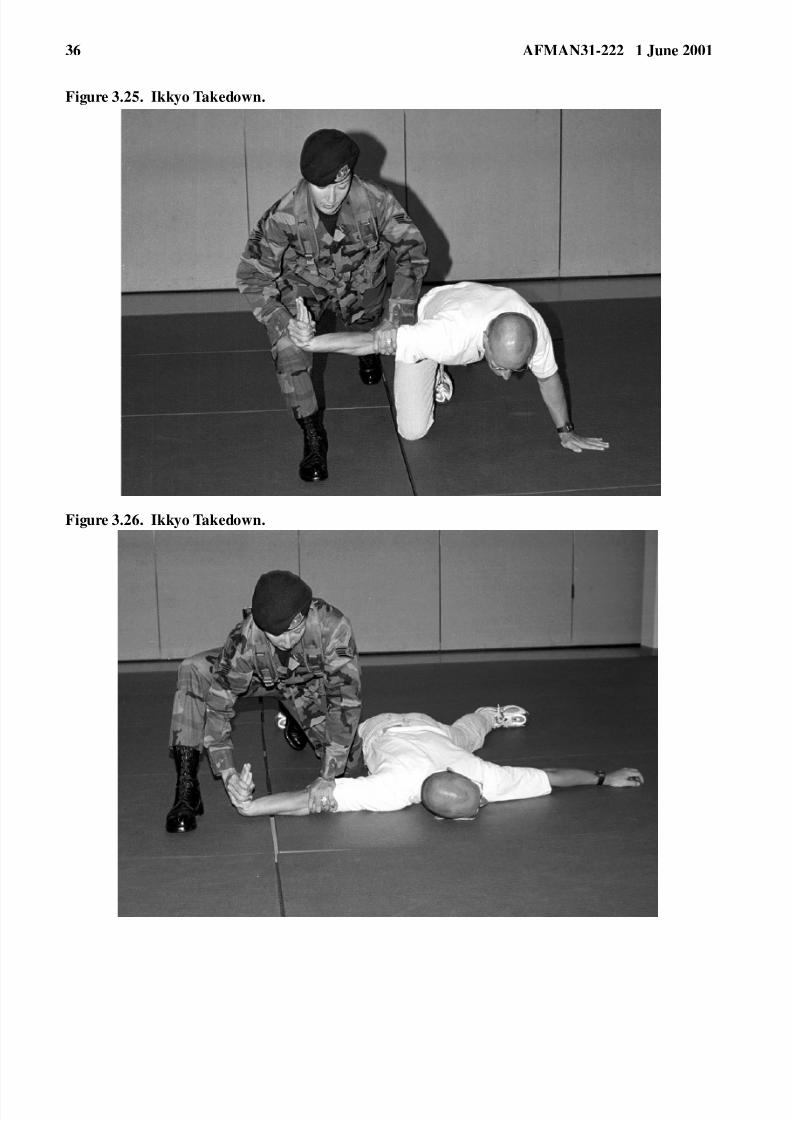
3.3.4.3. STEP 3. Place your inside knee beside the suspect’s waist area and place your outside leg

in a balanced kneeling position with your foot flat on the ground. (Figure 3.27.).

3.3.4.4. STEP 4. Place the suspect in the prone arm bar.

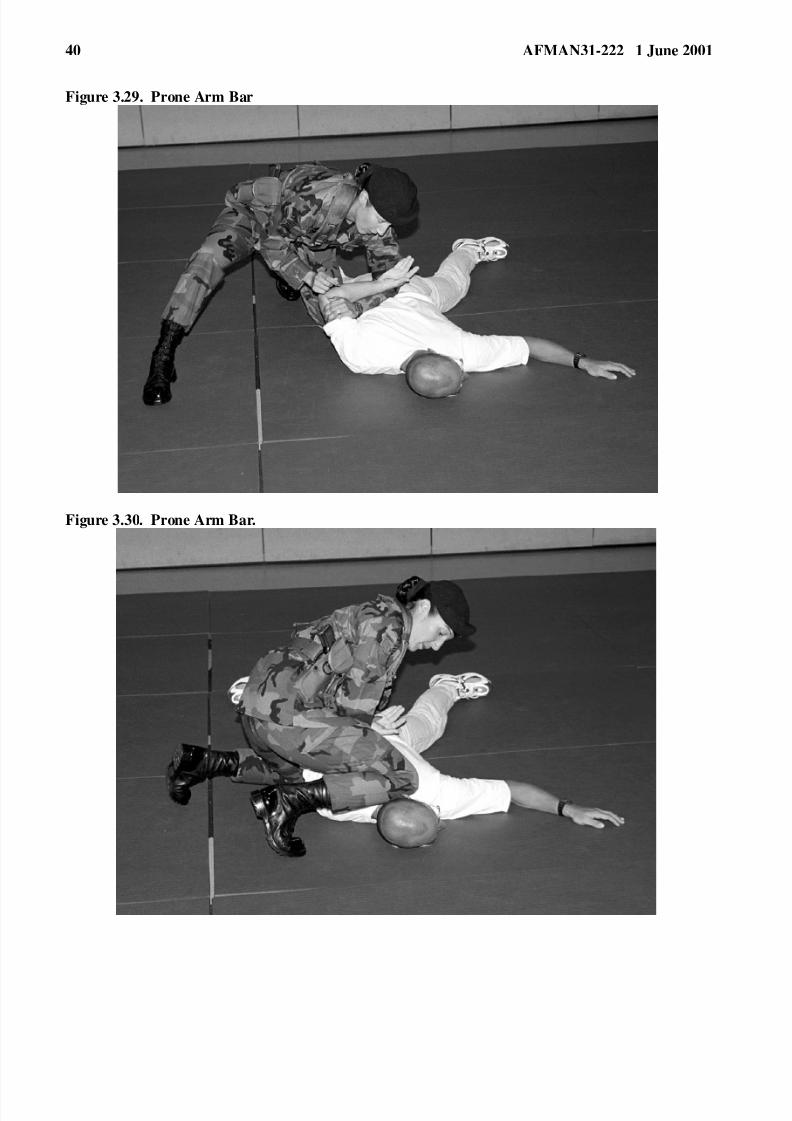
3.3.5. Prone arm bar.

3.3.5.1. STEP 1. While the suspect is in the prone position, lift the suspect’s arm upward bendingthe suspect’s arm at the elbow and rotating it clockwise (Figure 3.28.).

8/14/2019 US Air Force Use of Force 31-222

http://slidepdf.com/reader/full/us-air-force-use-of-force-31-222 38/129

38 AFMAN31-222 1 June 2001

Figure 3.27. Prone Arm Bar.

Figure 3.28. Prone Arm Bar.

8/14/2019 US Air Force Use of Force 31-222

http://slidepdf.com/reader/full/us-air-force-use-of-force-31-222 39/129

AFMAN31-222 1 June 2001 39

3.3.5.2. STEP 2. Remove your thumb from the fold of the suspect’s arm and grab his/her triceps

 just above the elbow. Place the suspect’s wrist over the top and outside of your weak elbow. Place

your elbow with the suspect’s wrist/arm in the small of the back (Figure 3.29.).

3.3.5.3. STEP 3. Pivot on the downed knee and place the other knee on the back of the suspect’s

neck (Figure 3.30.).

3.3.5.4. STEP 4. Use pain compliance and tell the suspect to place his/her hand on the small of 

their back. Handcuffing may be accomplished by cuffing the restrained hand first.

8/14/2019 US Air Force Use of Force 31-222

http://slidepdf.com/reader/full/us-air-force-use-of-force-31-222 40/129

40 AFMAN31-222 1 June 2001

Figure 3.29. Prone Arm Bar

Figure 3.30. Prone Arm Bar.

8/14/2019 US Air Force Use of Force 31-222

http://slidepdf.com/reader/full/us-air-force-use-of-force-31-222 41/129

AFMAN31-222 1 June 2001 41

3.3.6. Overcoming a side headlock (Figure 3.31.).

3.3.6.1. STEP 1. Place your inside foot behind the suspect’s inside foot (Figure 3.32.).

3.3.6.2. STEP 2. Reach over the back of the suspect’s closest shoulder with your near hand plac-

ing the middle and index finger under the suspect’s nose (Figure 3.33.).

8/14/2019 US Air Force Use of Force 31-222

http://slidepdf.com/reader/full/us-air-force-use-of-force-31-222 42/129

42 AFMAN31-222 1 June 2001

Figure 3.31. Overcoming a Side Headlock.

8/14/2019 US Air Force Use of Force 31-222

http://slidepdf.com/reader/full/us-air-force-use-of-force-31-222 43/129

AFMAN31-222 1 June 2001 43

Figure 3.32. Overcoming a Side Headlock.

8/14/2019 US Air Force Use of Force 31-222

http://slidepdf.com/reader/full/us-air-force-use-of-force-31-222 44/129

44 AFMAN31-222 1 June 2001

3.3.6.3. STEP 3. Force the suspect’s head to the rear by applying pressure to the nose and pulling

it to the rear (Figure 3.34.).

3.3.6.4. STEP 4. Strike the suspect’s groin area with your inside hand or fist (Figure 3.35.).

8/14/2019 US Air Force Use of Force 31-222

http://slidepdf.com/reader/full/us-air-force-use-of-force-31-222 45/129

AFMAN31-222 1 June 2001 45

Figure 3.33. Overcoming a Side Headlock.

8/14/2019 US Air Force Use of Force 31-222

http://slidepdf.com/reader/full/us-air-force-use-of-force-31-222 46/129

46 AFMAN31-222 1 June 2001

Figure 3.34. Overcoming a Side Headlock.

8/14/2019 US Air Force Use of Force 31-222

http://slidepdf.com/reader/full/us-air-force-use-of-force-31-222 47/129

AFMAN31-222 1 June 2001 47

Figure 3.35. Overcoming a Side Headlock.

3.3.6.5. STEP 5. Place your outside hand on the suspect’s wrist and pull the suspect’s hand away

from your neck (Figure 3.36.).

Figure 3.36. Overcoming a Side Headlock.

3.3.6.6. STEP 6. Duck your head under the suspect’s arm and step back with your inside foot,

pulling the suspect’s arm downward until it is at waist level (Figure 3.37.).

8/14/2019 US Air Force Use of Force 31-222

http://slidepdf.com/reader/full/us-air-force-use-of-force-31-222 48/129

48 AFMAN31-222 1 June 2001

3.3.6.7. STEP 7. Place the suspect’s arm into two directions of pressure (Figure 3.38.).

Figure 3.37. Overcoming a Side Headlock.

Figure 3.38. Overcoming a Side Headlock.

8/14/2019 US Air Force Use of Force 31-222

http://slidepdf.com/reader/full/us-air-force-use-of-force-31-222 49/129

AFMAN31-222 1 June 2001 49

3.3.6.8. STEP 8. Fold suspect’s arm into arm bar.

3.3.7. Overcoming a Front Choke Hold.

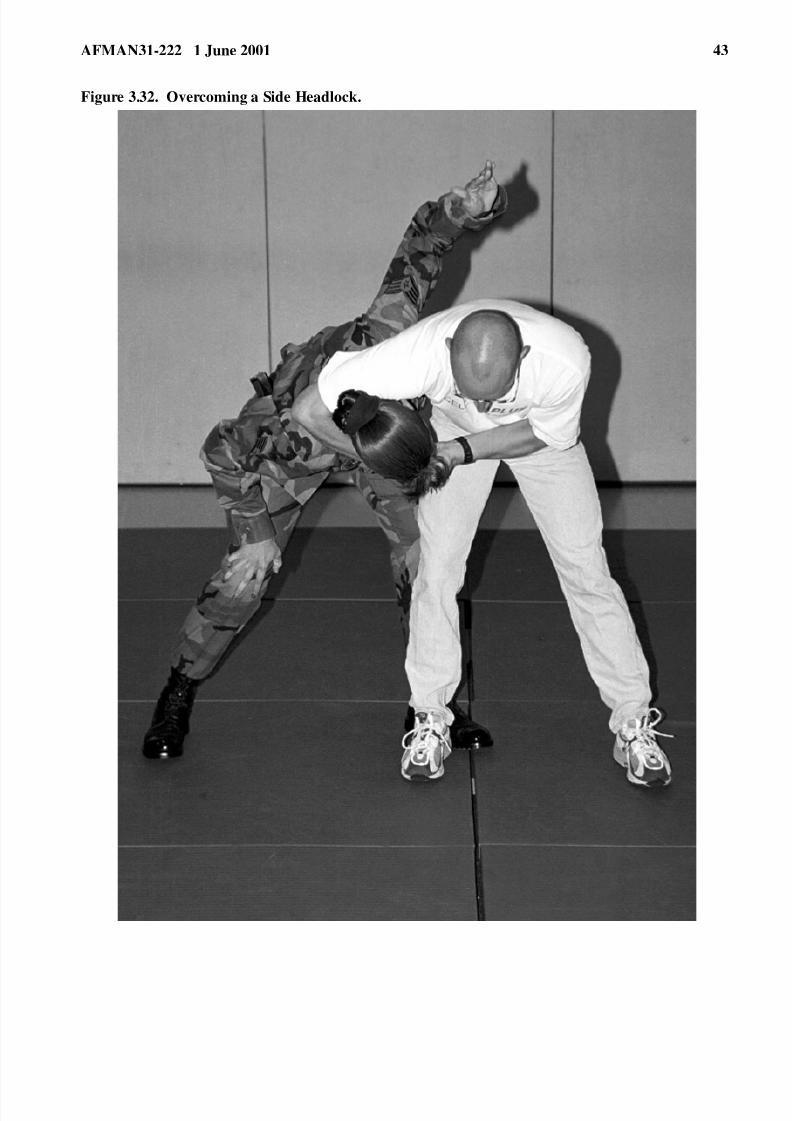
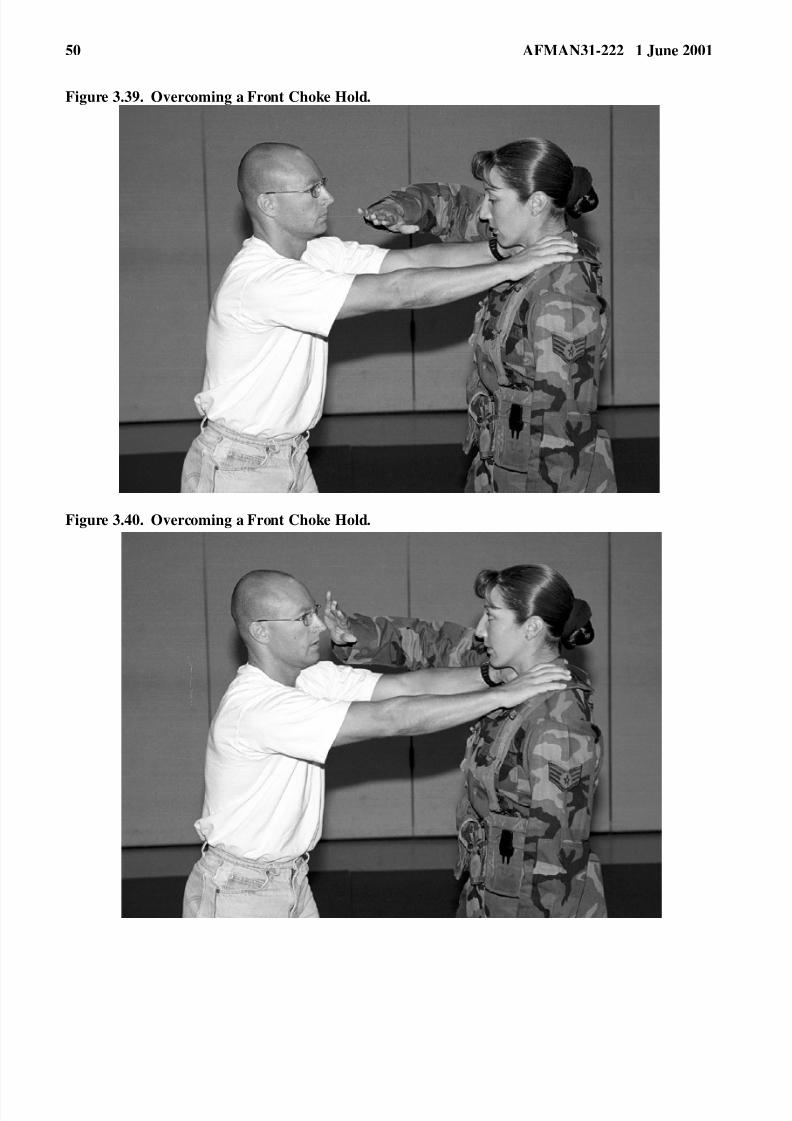
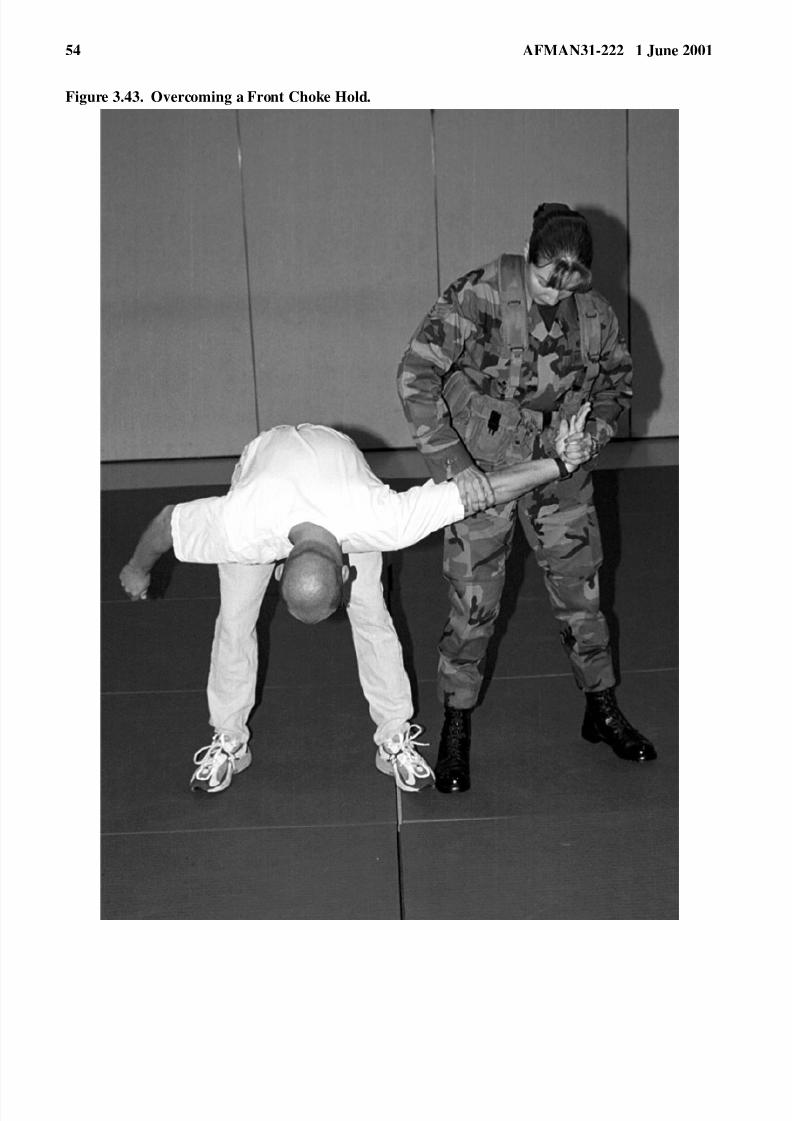
3.3.7.1. STEP 1. Tense the muscle in your neck and take a short step with your weak foot across

your front.

3.3.7.2. STEP 2. Vigorously twisting your upper body to the left or right, sweep your arm in frontand strike the suspect’s face, forcing the suspect’s hands from your throat. Trap the suspect’s

hands in your armpit (Figure 3.39., Figure 3.40., and Figure 3.41.).

8/14/2019 US Air Force Use of Force 31-222

http://slidepdf.com/reader/full/us-air-force-use-of-force-31-222 50/129

50 AFMAN31-222 1 June 2001

Figure 3.39. Overcoming a Front Choke Hold.

Figure 3.40. Overcoming a Front Choke Hold.

8/14/2019 US Air Force Use of Force 31-222

http://slidepdf.com/reader/full/us-air-force-use-of-force-31-222 51/129

AFMAN31-222 1 June 2001 51

Figure 3.41. Overcoming a Front Choke Hold.

8/14/2019 US Air Force Use of Force 31-222

http://slidepdf.com/reader/full/us-air-force-use-of-force-31-222 52/129

52 AFMAN31-222 1 June 2001

3.3.7.3. STEP 3. Grab the back of the suspect’s wrist with your free hand. Grab the same hand of 

the suspect that you are using to grab, i.e. your left hand grabs the suspect’s left hand (Figure

3.42.).

3.3.7.4. STEP 4. Place the suspect’s arm into two directions of pressure (Figure 3.43.).

3.3.7.5. STEP 5. Place the suspect in a standing arm bar.

8/14/2019 US Air Force Use of Force 31-222

http://slidepdf.com/reader/full/us-air-force-use-of-force-31-222 53/129

AFMAN31-222 1 June 2001 53

Figure 3.42. Overcoming a Front Choke Hold.

8/14/2019 US Air Force Use of Force 31-222

http://slidepdf.com/reader/full/us-air-force-use-of-force-31-222 54/129

54 AFMAN31-222 1 June 2001

Figure 3.43. Overcoming a Front Choke Hold.

8/14/2019 US Air Force Use of Force 31-222

http://slidepdf.com/reader/full/us-air-force-use-of-force-31-222 55/129

AFMAN31-222 1 June 2001 55

Chapter 4

WEAPONS RETENTION

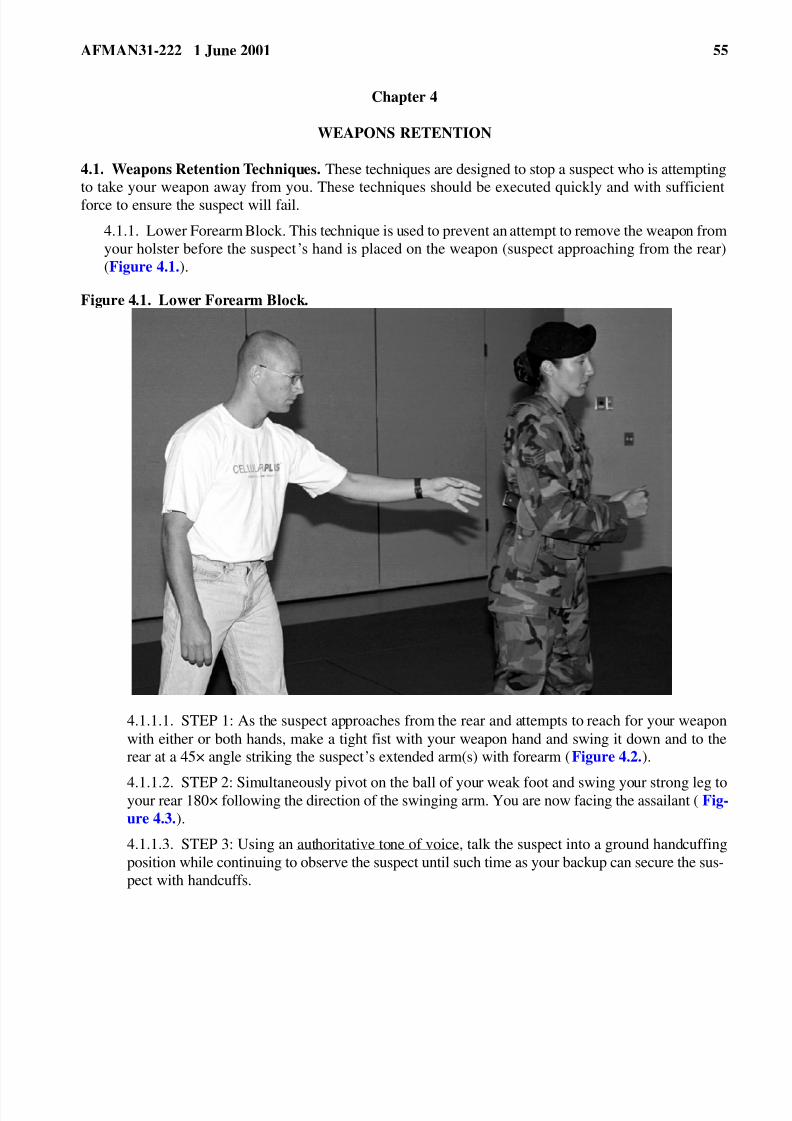
4.1. Weapons Retention Techniques. These techniques are designed to stop a suspect who is attempting

to take your weapon away from you. These techniques should be executed quickly and with sufficient

force to ensure the suspect will fail.

4.1.1. Lower Forearm Block. This technique is used to prevent an attempt to remove the weapon from

your holster before the suspect’s hand is placed on the weapon (suspect approaching from the rear)

(Figure 4.1.).

Figure 4.1. Lower Forearm Block.

4.1.1.1. STEP 1: As the suspect approaches from the rear and attempts to reach for your weapon

with either or both hands, make a tight fist with your weapon hand and swing it down and to the

rear at a 45× angle striking the suspect’s extended arm(s) with forearm (Figure 4.2.).

4.1.1.2. STEP 2: Simultaneously pivot on the ball of your weak foot and swing your strong leg toyour rear 180× following the direction of the swinging arm. You are now facing the assailant ( Fig-

ure 4.3.).

4.1.1.3. STEP 3: Using an authoritative tone of voice, talk the suspect into a ground handcuffing

position while continuing to observe the suspect until such time as your backup can secure the sus-

pect with handcuffs.

8/14/2019 US Air Force Use of Force 31-222

http://slidepdf.com/reader/full/us-air-force-use-of-force-31-222 56/129

56 AFMAN31-222 1 June 2001

Figure 4.2. Lower Forearm Block.

Figure 4.3. Lower Forearm Block.

8/14/2019 US Air Force Use of Force 31-222

http://slidepdf.com/reader/full/us-air-force-use-of-force-31-222 57/129

AFMAN31-222 1 June 2001 57

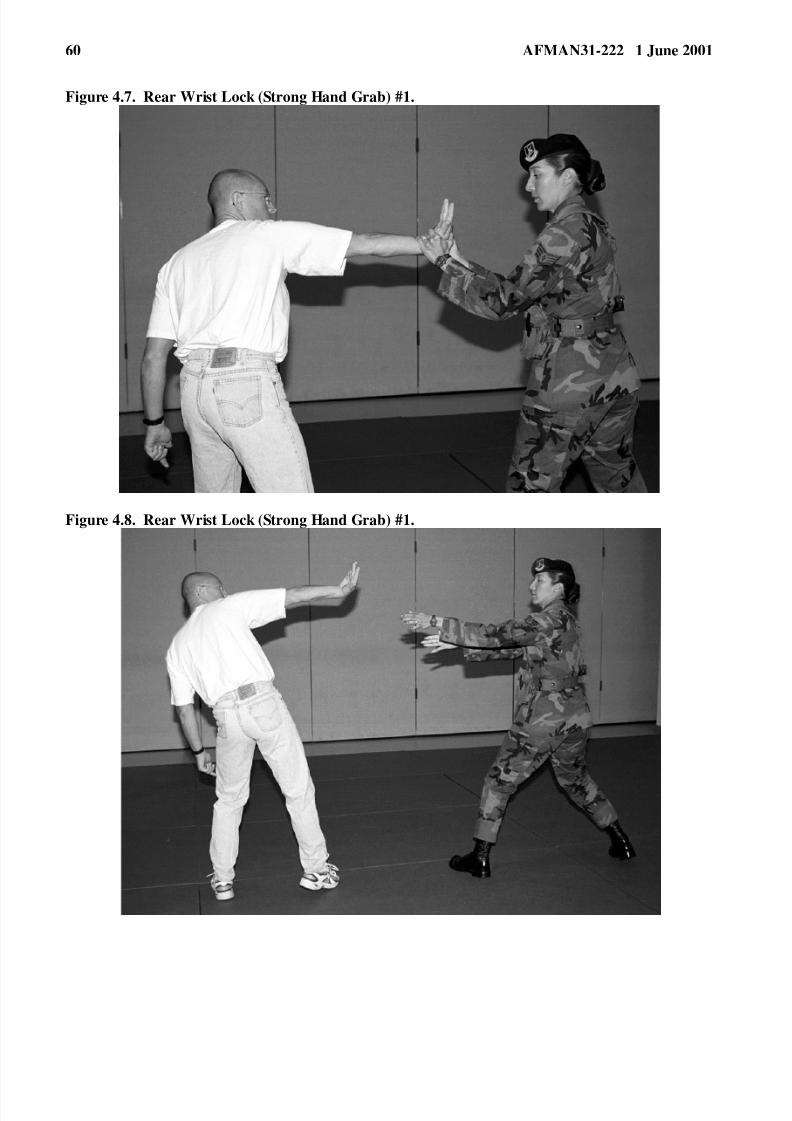
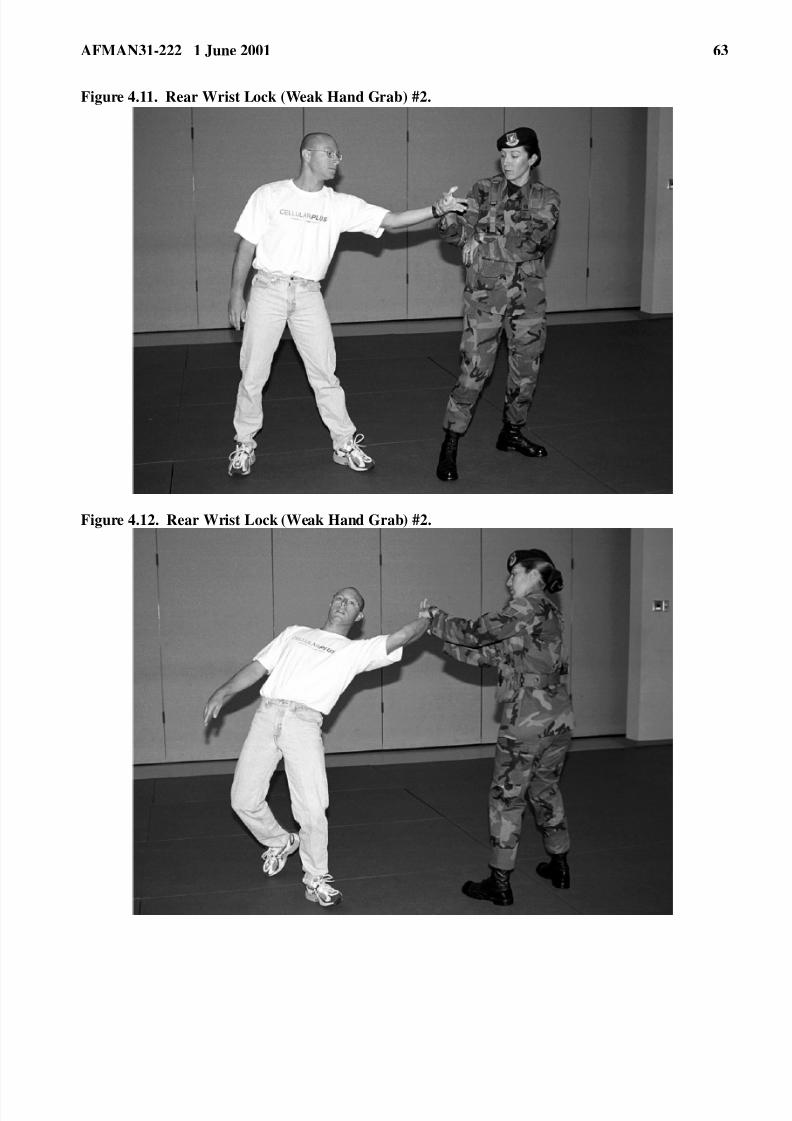
4.1.2. Rear Wrist Lock (Strong Hand Grab) #1. This technique is designed to prevent a suspect from

removing your weapon from the rear. The assumption is that the suspect will grab your weapon with

the same hand as your shooting hand (Figure 4.4.).

Figure 4.4. Rear Wrist Lock (Strong Hand Grab) #1.

4.1.2.1. STEP 1: As the suspect grabs the butt of the weapon, place your weapon hand palm downon top of the grabbing hand as though you were going to draw the weapon. Push down hard to pre-

vent the assailant from lifting the weapon (Figure 4.5.).

8/14/2019 US Air Force Use of Force 31-222

http://slidepdf.com/reader/full/us-air-force-use-of-force-31-222 58/129

58 AFMAN31-222 1 June 2001

Figure 4.5. Rear Wrist Lock (Strong Hand Grab) #1.

4.1.2.2. STEP 2: At the same time, place your weak hand (palm down) over the holster flap. At

this point you should be pressing down with both hands to prevent removal of the weapon from

the holster (Figure 4.6.).

4.1.2.3. STEP 3: Continue pushing down with the weak hand as you curl the fingers of your

weapon hand into the palm of the assailant’s gripping hand, weapon thumb pressing into the web-bing between the thumb and index finger of the suspect’s hand.

8/14/2019 US Air Force Use of Force 31-222

http://slidepdf.com/reader/full/us-air-force-use-of-force-31-222 59/129

AFMAN31-222 1 June 2001 59

Figure 4.6. Rear Wrist Lock (Strong Hand Grab) #1.

4.1.2.4. STEP 4: Continue pushing down with the weak hand as you twist the assailant’s palm

outward (as in IKKYO) to your side, causing their wrist to turn, releasing his/her grip from the

butt of the weapon (Figure 4.7.).

4.1.2.5. STEP 5: As the wrist is turned, take a short sliding step forward with your weak foot then

pivot on the ball of your weak foot and swing your strong leg to your rear 180 × as you face theassailant and withdraw your weapon side away from the assailant.

4.1.2.6. STEP 6: At this point the weak hand can be released from the weapon and placed along-

side the weapon hand to increase the pressure on the assailant’s wrist by pushing hard against the

back of the hand with your thumbs. The fingers of the weak hand will grab the palm of the assail-

ant, and the thumb of the weak hand will be on the back of the assailant ’s hand alongside your

strong thumb. NOTE: At this point the fingers on the suspect’s locked hand will point straight up.

4.1.2.7. STEP 7: As you grip the assailant’s hand with both your hands, apply extreme pressure

against his/her wrist with both of your thumbs. Increase pressure on the wrist until the suspect’s

shoulder is below your hand level.

4.1.2.8. STEP 8: At this point push off from the suspect (Figure 4.8.).

4.1.2.9. Repeat step 3 for lower forearm block.

8/14/2019 US Air Force Use of Force 31-222

http://slidepdf.com/reader/full/us-air-force-use-of-force-31-222 60/129

60 AFMAN31-222 1 June 2001

Figure 4.7. Rear Wrist Lock (Strong Hand Grab) #1.

Figure 4.8. Rear Wrist Lock (Strong Hand Grab) #1.

8/14/2019 US Air Force Use of Force 31-222

http://slidepdf.com/reader/full/us-air-force-use-of-force-31-222 61/129

AFMAN31-222 1 June 2001 61

4.1.3. Rear Wrist Lock (Weak Hand Grab) #2. This technique is to be used if an assailant grabs the

butt of your weapon from the rear with the hand opposite your shooting hand (Figure 4.9.).

4.1.3.1. STEP 1. Repeat steps 1-3 for the wrist lock #1, strong hand grab (Figure 4.10.).

4.1.3.2. STEP 4. Grasping the thumb and twisting the assailant’s hand palm up and rearward at a

45-degree angle from his/her shoulder (Figure 4.11.). Bring the weak hand up to mirror the strong

hand pushing down hard on the suspect’s hand. At the same time step back with your strong foot,

pivot on your weak foot, and force the assailant to the ground (Figure 4.12.).

4.1.3.3. STEP 5. After assailant is taken to the ground, push off.

4.1.3.4. Repeat step 3 for lower forearm block as in rear wrist lock (strong hand grab) #1.

8/14/2019 US Air Force Use of Force 31-222

http://slidepdf.com/reader/full/us-air-force-use-of-force-31-222 62/129

62 AFMAN31-222 1 June 2001

Figure 4.9. Rear Wrist Lock (Weak Hand Grab) #2.

Figure 4.10. Rear Wrist Lock (Weak Hand Grab) #2.

8/14/2019 US Air Force Use of Force 31-222

http://slidepdf.com/reader/full/us-air-force-use-of-force-31-222 63/129

AFMAN31-222 1 June 2001 63

Figure 4.11. Rear Wrist Lock (Weak Hand Grab) #2.

Figure 4.12. Rear Wrist Lock (Weak Hand Grab) #2.

8/14/2019 US Air Force Use of Force 31-222

http://slidepdf.com/reader/full/us-air-force-use-of-force-31-222 64/129

64 AFMAN31-222 1 June 2001

Chapter 5

USE OF CAP-STUN®4 PEPPER SPRAY

5.1. Introduction. Thorough training in the use of pepper spray is critical. Training enhances the spray’s

effectiveness, protects both the user and the Air Force against liability, and ensures the safety of the userand the subject. Comprehensive training should go beyond the technical application to include physiolog-

ical reactions, legal issues (use of force guidelines), tactical issues, and applications. MAJCOMs develop

procedures for reporting use and accounting/inventory of pepper spray. Units document all pepper spray

training. Generally, you can expect to use pepper spray when the subject ’s actions are located within the

resistant (active) portion of the Use of Force Model (refer to AFI 31-207, para 1.3). MAJCOMs in over-

seas areas must coordinate with the local SJA to ensure its use does not violate any status of forces agree-

ments.

5.2. Characteristics. Oleoresin capsicum (OC), commonly called pepper spray, is a highly concentrated

form of peppers or similar synthetic and a naturally occurring inflammatory agent affecting the mucous

membranes of humans and animals. It comes from the oily resin of cayenne and other varieties of peppersused in spicy foods. When applied to the face, OC causes swelling of the mucous membranes, involuntary

closing of the eyes, gagging, coughing, shortness of breath, and an intense burning feeling on exposed

skin. Typically, persons sprayed with OC involuntarily drop to their knees. OC is consistently effective

against persons with reduced sensitivity to pain, such as those under the influence of PCP and other drugs.

Symptoms are temporary, but may last up to 45 minutes when left untreated. OC spray is available in two

forms, water based or alcohol-based. Although the alcohol-based product is hazardous when used near

flame or spark producing devices, it is the standard for Air Force use as it is normally useable in the tem-

perature ranges we normally encounter. The aerosol product used in this instruction is CAP-STUN®. 4 

5.3. Nomenclature. The Z-305 CAP-STUN®4 pepper spray is a pressurized hand-held, nonlethal

weapon, which contains 28.08 grams of 5.5 percent oleoresin capsicum irritating agent suspended in iso-prophyl alcohol as an aerosol carrier. The dispenser body is aluminum with a plastic trigger lock which

can be snapped to either side of the holster. The holster comes with a belt clip and belt loop option.

5.4. Storing and Shipping OC Pepper Spray.

5.4.1. OC pepper spray must be stored at room temperature. It has a 5 year shelf life from the date of 

manufacture. The active agent tends to separate and collect at the top after about two years if left idle.

To prevent this and insure uniform potency of the mixture, shake vigorously before initial use and at

least once a year thereafter. The lot number stamped on the bottom of the canister provides the manu-

facturing date in Julienne date format. For example, the Julienne number 1355 means the product was

produced in 1991 (1) on the 355th

day of the year (355). Replace the canister when4

4. Excerpts from Zarc International, Inc. copyrighted materials.

8/14/2019 US Air Force Use of Force 31-222

http://slidepdf.com/reader/full/us-air-force-use-of-force-31-222 65/129

AFMAN31-222 1 June 2001 65

Figure 5.1. CAP-STUN Z-305® Nomenclature

NOTE: Excerpts from Zarc International, Inc. copyrighted materials.

it has exceeded its shelf life or when the contents have been expended beyond a safe operational level.

To verify safe operational level, the armorer should:

5.4.1.1. Fill a glass more than half full with water.

5.4.1.2. Place the OC pepper spray inside the glass, bottom down.

5.4.1.3. Gently and loosely hold and steady the unit upright inside the water to prevent toppling.

Do not push the canister into the water; let it float naturally.

5.4.1.4. Observe the water line in comparison with the level indicator on the canister label. If thewater line is near “Replace,” replace the unit.

5.4.2. Do not store OC pepper spray near a heat source or open flame.

5.4.3. Do not store OC pepper spray at temperatures above 120 degrees Fahrenheit as this may cause

the canister to burst.

5.4.4. Do not expose the OC pepper spray unit to temperatures below 32 degrees Fahrenheit for long

periods as this may cause slower discharge from the canister and weaken the effectiveness of the

spray.

5.4.5. New shipments of OC pepper spray have a small safety tab on the top of the canister. This

safety tab is designed for shipment and warehouse storage only. Remove the safety tab when placed inready-use storage within armories. Once the tab is removed, the Z-305 5 is immediately placed in the

safety-equipped holster. Armorers must ensure the safety properly engages the trigger mechanism and

the holster strap is firmly secured.

5.4.6. Ship OC pepper spray only by surface transportation.

5. Excerpts from Zarc International, Inc. copyrighted materials.

8/14/2019 US Air Force Use of Force 31-222

http://slidepdf.com/reader/full/us-air-force-use-of-force-31-222 66/129

66 AFMAN31-222 1 June 2001

5.5. Training.

5.5.1. All security forces members are trained with either the Z-305®6 pepper spray or baton for use

in non-lethal weapons situations. Use this manual for training source material.

5.5.2. Initial and annual refresher training on OC pepper spray is mandatory for those armed with it.

5.5.2.1. Initial training must address all topics in this chapter. Model T-3056 is the recommendedunit for training. It has the same delivery performance and features as Z-3056 with the exception

of the active ingredient. Do not spray security force members with the Z-3056 as part of familiar-

ization training.

5.5.2.2. Recertify the training annually during the standardization/evaluation process. Retrain

individuals that do not undergo stan/eval on an annual basis.

5.5.2.3. Document training as it occurs. Security force members may be armed with OC pepper

spray for twelve months after training or stan/eval.

5.5.3. Personnel who have attended the Principles of Instruction (POI) course and have been awarded

a “T” prefix are authorized to train personnel. These personnel must use this manual and the lessonplan posted on the HQ Air Forces Security Forces Center website at http://afsf.lackland.af.mil/ .

5.6. CAP-STUN R Utilization.6 

5.6.1. The holstered unit should be positioned tactically on the security force members belt per indi-

vidual preference. When you place the holster on your belt, ensure it is not close to other equipment

that may press against the trigger when you sit down or perform normal duties.

5.6.2. Once a subject is perceived as a resistant (active) subject (third level on the use of force model),

you should gain a tactical position relative to the subject.

5.6.3. You should indicate by sign or code word to the other security forces present that OC is to be

dispersed.

5.6.4. Consider the environment for use. The Z-305®6 uses isopropyl alcohol as the propellant and

should not be used near an open flame or spark source. Isopropyl alcohol within controlled environ-

ments does not cause flammability problems. However, just as any other commercially available

household aerosol, the spray should not be used at close range directly toward sparks or flames.

5.6.5. Remove the Z-305®6 canister from the holster and hold firmly in the upright position.

5.6.6. At this distance, the spray pattern will be approximately 32 inches. From a range of ideally 6-8

feet, the security force member should hold the unit close to his/her upper chest and target the sub-

 ject’s eye area.

5.6.7. Direct one-second bursts at the subject’s facial area (e.g., eyes, nose, and mouth). The

CAP-STUN6 pepper spray pattern delivers a full cone mist pattern rather than a solid stream. Due to

the relatively short range of pepper spray and close proximity to the subject, exercise extreme caution.

6. Excerpts from Zarc International, Inc. copyrighted materials.

8/14/2019 US Air Force Use of Force 31-222

http://slidepdf.com/reader/full/us-air-force-use-of-force-31-222 67/129

AFMAN31-222 1 June 2001 67

5.6.8. If used in a crowded area, be conscious of the effects of overspray on bystanders. Ideally, posi-

tion yourself upwind of the subject. Avoid traveling through areas recently contaminated with pepper

spray.

5.6.9. Be aware that continuous spraying will dilute the formulation and decrease effectiveness.

5.6.10. If the tool is effective, you should notice disorientation, closing of the eyes, difficulty breath-

ing, loss of motor control, and complaints of intense burning within about 2-3 seconds.

5.6.11. During this period, you should continue to communicate with the subject any additional con-

trolling directives.

5.6.12. Once the subject is debilitated, move in and establish a hand rotation position on the subject.

Figure 5.2. CAP-STUN Z-305® Range And Spray Pattern.

NOTE: Excerpts from Zarc International, Inc. copyrighted materials.

5.6.13. If continued noncompliance persists, initiate the hand rotation technique until full complianceis realized and the handcuff/searching process can be initiated.

5.7. Special Considerations . Although subjects have died after being sprayed with pepper spray, OC

pepper spray was not implicated as a lethal factor. These deaths share several common elements. All sub-

 jects were combative and resisted arrest. Drugs and/or alcohol were a factor in most cases. Restraint tech-

niques were employed after using pepper spray. Research shows four conditions account for the majority

of custody-related deaths: positional asphyxia, cocaine intoxication, excited delirium, and neuroleptic

malignant syndrome. Consider each of these factors when placing subjects in custody.

5.7.1. Positional asphyxia occurs when respiration is interrupted due to the position of the body. Sub-

 jects should remain in an upright seated position. Prone restraint techniques can have sudden lethalconsequences. Never place a restrained subject face down.

5.7.2. Cocaine stimulates both the central nervous and cardiovascular systems. It constricts the blood

vessels, elevates heart rate, raises blood pressure, and increases body temperature. These factors can

cause hemorrhage, stroke, kidney and intestinal failure.

5.7.3. Excited delirium induced by cocaine use manifests itself as impaired thinking, disorientation,

hallucinations, and illusions. Subjects suffering from this condition are often violent and unpredict-

8/14/2019 US Air Force Use of Force 31-222

http://slidepdf.com/reader/full/us-air-force-use-of-force-31-222 68/129

68 AFMAN31-222 1 June 2001

able. Excited delirium is usually regarded as a potentially lethal medical emergency. Symptoms

include intense paranoia, followed immediately by violent and bizarre behavior. Sufferers often dis-

play violence against glass objects, strip off their clothing, run, and scream uncontrollably. Treat these

subjects with extreme caution—they can become very violent. Restrain subjects exhibiting these

symptoms and promptly transport to a medical facility.

5.7.4. Neuroleptic malignant syndrome is characteristically similar to excited delirium and generallyoccurs in psychiatric patients who are taking medication. Physical exhaustion, dehydration, and

organic brain disease are additional symptoms. Stress associated with apprehension can exacerbate

the condition.

5.7.5. Awareness and recognition of risk indicators is necessary to ensure the safety of subjects in

custody. Provide continuous observation and monitoring of subjects displaying any of the indicators

discussed above. Avoid the use of prone restraint techniques on subjects displaying these danger

signs.

5.7.6. Avoid dispensing pepper spray inside a vehicle. The restricted space will drastically increase

the effects of the pepper spray. This does not absolutely preclude the use of pepper spray on actively

resistant subjects in vehicles however.5.7.7. Periodically check to ensure the holster safety is properly engaged and the flap is securely fas-

tened.

5.7.8. Federal Aviation Administration (FAA) and Air Force safety instructions prohibit pepper spray

from being carried or transported aboard aircraft engaged in flight operations.

5.7.9. Weather conditions such as rain and high winds may reduce the effectiveness of pepper spray.

5.7.10. Although pepper spray has been proven effective against animals, studies indicate it is less

effective against attack-trained dogs. Sprayed dogs may become more aggressive upon recovery.

5.7.11. Use of pepper spray in certain overseas areas may violate status of forces agreements. Confer

with your local judge advocate prior to ordering pepper spray.

5.8. Post-Use Care.

5.8.1. Once the subject has been sprayed and secured, act to calm the individual through directions:

“You have been sprayed with OC. Don’t panic, follow my instructions.” 

5.8.2. Remove the subject to an uncontaminated area as soon as practical.

5.8.3. Any subject sprayed with OC must be transported by two personnel to a hospital for medical

attention as soon as practical.

5.8.4. Once cleared by a health care professional, transport the subject to a holding facility. One of the

transporting security force members should continue to directly monitor the sprayed subject duringthe entire course of transport.

5.8.5. Upon arrival at the security forces facility, the receiving security forces should be advised that

the subject has been sprayed with OC.

5.8.6. The subject should be continually monitored for a minimum of one hour from the time of the

initial exposure. During this period, the subject should be encouraged to talk and express the nature of 

the effect of the OC to better monitor the subject.

8/14/2019 US Air Force Use of Force 31-222

http://slidepdf.com/reader/full/us-air-force-use-of-force-31-222 69/129

AFMAN31-222 1 June 2001 69

5.8.7. Emergency personnel should be called if during the monitoring period the subject displays any

of the following:

5.8.7.1. Complaint of a previous respiratory condition.

5.8.7.2. Loss of consciousness.

5.8.7.3. Stops breathing.5.8.7.4. Suddenly becomes incoherent.

5.8.7.5. Begins to hyperventilate.

5.8.7.6. Shows any signs of sickness.

5.8.7.7. Continues to have adverse effects from the OC past the period of three hours.

5.8.8. Move other personnel exposed to the agent to fresh air as soon as possible and flush contami-

nated areas with large amounts of water. Remove contact lenses and contaminated clothing, and wash

thoroughly before reuse. Do not apply salves, creams, oils or lotions to the skin as they trap the irri-

tant. Seek medical attention if irritation persists.

5.9. OC Attack Upon Official.

5.9.1. If you, as a security force member, are confronted by a subject utilizing OC as a weapon, real-

ize this assaultive subject can be perceived as an assaultive or lethal subject depending on your assess-

ment of risk potential.

5.9.2. Initially, increase your distance from the attacker.

5.9.3. Use the non weapon hand to attempt to shield your face, tip your head forward, or cover your

face with your shirt.

5.9.4. Maintain a secure grasp of your holstered weapon as you attempt to prevent debilitating expo-

sure via assaultive countermeasures (kicks, strikes, etc.).5.9.5. Constantly assess the nature of the attack in order to maintain the proper balance of threat and

appropriate design of countermeasures taken.

5.10. Warnings.

5.10.1. Avoid accidental contact with eyes, skin or mucous membranes.

5.10.2. Do not expose to heat, spark or flame or store above 120 degrees Farenheit.

5.10.3. Do not puncture or incinerate the can.

5.10.4. Do not spray against the wind.

5.10.5. Keep out of reach of children. OC pepper spray is not to be handled by minors.

5.10.6. Do not transport on military aircraft.

5.10.6.1. Transport is allowed on commercial aircraft. According to 49 CFR 175.10 (a) (4) (ii),

one self-defense spray, not to exceed 118 milliliters (4 fluid ounce) by volume, that incorporates a

positive means to prevent accidental discharge, may be carried in checked baggage only.

8/14/2019 US Air Force Use of Force 31-222

http://slidepdf.com/reader/full/us-air-force-use-of-force-31-222 70/129

70 AFMAN31-222 1 June 2001

5.10.6.1.1. A security forces member may pack one OC spray canister not exceeding 118 mil-

liliters (4 fluid ounces) in personal checked baggage. The member must declare the OC spray

canister to the airlines when checking baggage. OC spray is prohibited in the passenger com-

partment, either on one’s person or in carry-on baggage.

5.10.7. Do not use OC pepper spray against an attacker aiming a deadly weapon toward you. In this

situation another alternative or a higher level of force may be justified.

5.10.8. Do not handcuff the subject behind the back while laying him/her on their stomach or place

pressure on the subjects back in any position that may cause difficulty in breathing.

5.11. Reporting and Recording of OC Utilization. Units must develop local procedures for recording

OC utilization. MAJCOMs determine the need for any periodic reporting of OC utilization.

8/14/2019 US Air Force Use of Force 31-222

http://slidepdf.com/reader/full/us-air-force-use-of-force-31-222 71/129

AFMAN31-222 1 June 2001 71

Chapter 6

IMPACT WEAPONS

6.1. Overview. Impact weapons have a long history of effectiveness and application in law enforcement.

Over the years unique design changes have occurred, but the basic principle of impact, either by compres-

sion or concussion, has remained the same. The baton is a compact instrument that bridges the gap

between fists and firearms. Its design solves a major problem with batons because it’s compact enough to

wear in a belt holster. There’s also no problem with the baton hitting against the legs during a foot chase.

Because it’s compact and in a holster, it’s also less vulnerable to snatching by a suspect. Generally, you

can expect to use the baton against a subject whose actions place him/her within the assaultive (bodily

harm) portion of the Use of Force Model.

6.2. Nomenclature. The basic baton is available in black anodized or satin chrome finish. Various mod-

els are available from a number of manufacturers measuring from 6 to 11 inches collapsed and 16 to 31

inches deployed. All are equipped with locks that do not collapse when thrust into a suspect’s midsection.

6.3. Target Areas. There are three principal target areas for the baton. These are the areas surrounding

the arms, legs (thigh), and knee. These areas are primarily selected because of the physiological vulnera-

bility. Push strikes to the lower abdominal area can also be used. Strikes to the abdomen generate fluid

shock waves, usually causing an assailant to double over, while strikes to the arms, legs, and knees disable

the subject’s ’delivery system’. Do not strike the face, head, neck, kidney, solar plexus, or groin. Strikes to

these areas may produce fatal injuries or may not be effective in terminating the assailant’s unlawful

action.

6.4. Using and Carrying the Baton.

6.4.1. The baton is carried on an equipment belt in a leather or nylon case. The baton is positioned in

front of your service weapon. (Figure 6.1. and Figure 6.2.).

6.4.2. Initiate a baton draw by grasping the baton handle with your strong hand and pulling it from the

holster (Figure 6.3.).

6.4.3. Proper body mechanics form the foundation for all baton techniques. The importance of a good

stance can not be overemphasized. This stance is achieved by paying attention to four basic compo-

nents. The first component is to achieve a wide base. This is obtained by standing with feet shoulder

width apart. The next component is a deep base which is achieved by taking a step backward with

your weapon leg. The combination of these two components balances your body from all sides. To

further improve one’s balance it is necessary to bend your knees slightly, thus lowering your center of 

gravity. The last component is to keep your head over your center of gravity.

8/14/2019 US Air Force Use of Force 31-222

http://slidepdf.com/reader/full/us-air-force-use-of-force-31-222 72/129

72 AFMAN31-222 1 June 2001

Figure 6.1. Carrying the Baton.

Figure 6.2. Carrying the Baton.

8/14/2019 US Air Force Use of Force 31-222

http://slidepdf.com/reader/full/us-air-force-use-of-force-31-222 73/129

AFMAN31-222 1 June 2001 73

Figure 6.3. Drawing the Baton.

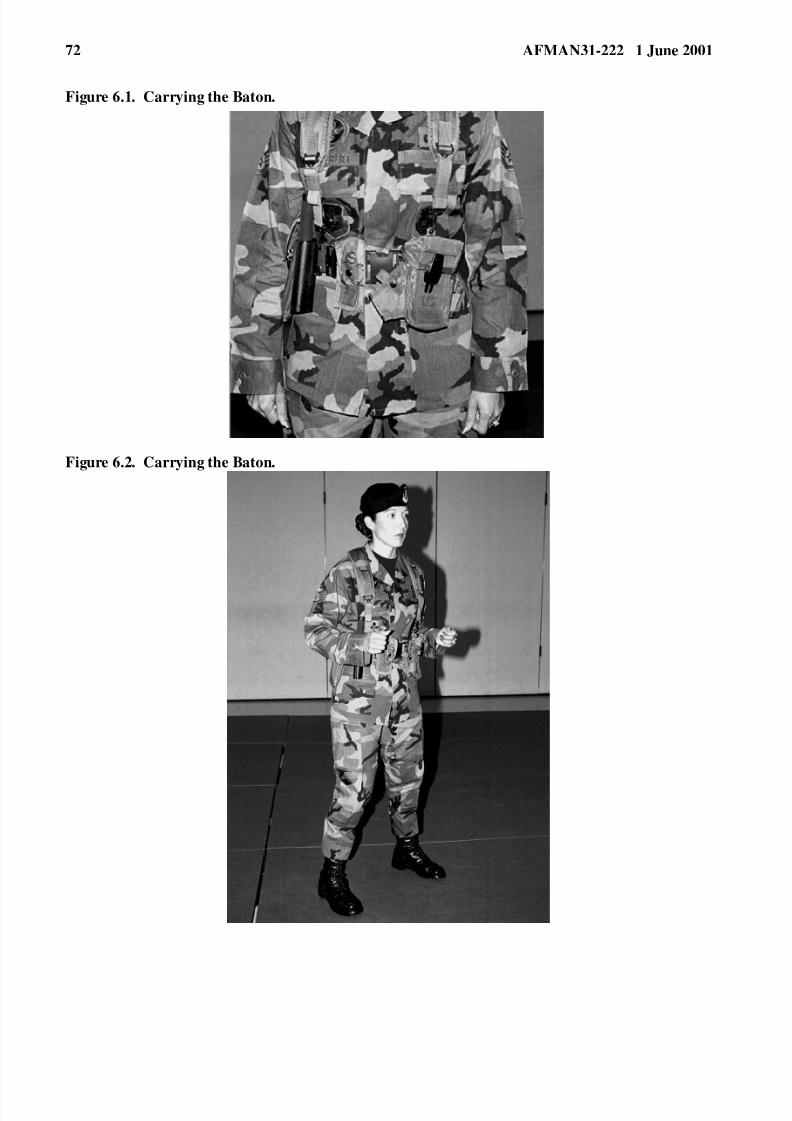
6.4.4. Once the baton is drawn from the holster, move the baton to the center of your body. In this

position, your strong hand is on the handle of the baton, while your weak hand is placed on the shaftof the baton with your palm directed away from you. This is known as the ’on-guard’ position (Figure

6.4.).

6.4.5. Bring the drawn baton to a position over your strong side shoulder while grasping the handle of 

the baton with your strong hand. Simultaneous to this movement, keep your weak hand raised to pro-

vide defensive protection. This is known as the ’high position’ (Figure 6.5.).

8/14/2019 US Air Force Use of Force 31-222

http://slidepdf.com/reader/full/us-air-force-use-of-force-31-222 74/129

74 AFMAN31-222 1 June 2001

6.4.6. Bring the drawn baton to a position to the side or rear of the strong leg with your strong hand

on the handle of the baton. You can reposition the baton based upon your perception of threat levels,

degree of deterrence sought, etc. (Figure 6.6.).

8/14/2019 US Air Force Use of Force 31-222

http://slidepdf.com/reader/full/us-air-force-use-of-force-31-222 75/129

AFMAN31-222 1 June 2001 75

Figure 6.4. On-Guard Position.

Figure 6.5. High Position.

8/14/2019 US Air Force Use of Force 31-222

http://slidepdf.com/reader/full/us-air-force-use-of-force-31-222 76/129

76 AFMAN31-222 1 June 2001

Figure 6.6. Strong Side Baton Positioning.

6.5. Baton Strikes.6.5.1. The baton is primarily used as an impact weapon by striking the baton against motor nerve

areas of the body. Strikes to the motor nerve areas do not rely on pain to stop an assailant’s actions

(although a hard strike will cause pain). Instead, the blow disrupts the muscular integrity of the sus-

pect. The results of motor nerve strikes are involuntary contractions of the affected muscles and sub-

sequent disorientation and loss of balance on the part of the suspect. The individual sustains no

orthopedic injuries.

8/14/2019 US Air Force Use of Force 31-222

http://slidepdf.com/reader/full/us-air-force-use-of-force-31-222 77/129

AFMAN31-222 1 June 2001 77

6.5.2. Wrist Snap Technique. Initiate a wrist snap technique to fully expand the baton into the open,

locked position.

6.5.3. Strike ready position. Initiate the high position with the expanded baton with your hand toward

the target area (Figure 6.7.).

6.5.4. Downward Strike. Initiate a downward motion with the expanded baton, with your palm

directed away from the target area (Figure 6.8., Figure 6.9., and Figure 6.10.).

8/14/2019 US Air Force Use of Force 31-222

http://slidepdf.com/reader/full/us-air-force-use-of-force-31-222 78/129

78 AFMAN31-222 1 June 2001

Figure 6.7. Strike Ready Position.

8/14/2019 US Air Force Use of Force 31-222

http://slidepdf.com/reader/full/us-air-force-use-of-force-31-222 79/129

AFMAN31-222 1 June 2001 79

Figure 6.8. Strong Side Downward Strike/Recovery/Weak Side Downward Strike.

8/14/2019 US Air Force Use of Force 31-222

http://slidepdf.com/reader/full/us-air-force-use-of-force-31-222 80/129

80 AFMAN31-222 1 June 2001

Figure 6.9. Strong Side Downward Strike/Recovery/Weak Side Downward Strike.

8/14/2019 US Air Force Use of Force 31-222

http://slidepdf.com/reader/full/us-air-force-use-of-force-31-222 81/129

AFMAN31-222 1 June 2001 81

Figure 6.10. Strong Side Downward Strike/Recovery/Weak Side Downward Strike .

8/14/2019 US Air Force Use of Force 31-222

http://slidepdf.com/reader/full/us-air-force-use-of-force-31-222 82/129

82 AFMAN31-222 1 June 2001

6.6. Post-Use Care.

6.6.1. Once the subject has been hit with a baton, the security force member should act to calm the

individual through directions.

6.6.2. Two personnel must transport any subject hit with a baton to a medical facility for attention by

a health care professional as soon as practical.

6.6.3. Once the subject is initially cleared by a health care professional, the subject should be trans-

ported to the detention facility.

6.6.4. Once the transportion process has been completed, receiving security forces at the detention

facility should be advised that the subject has been hit with a baton and where.

6.6.5. The subject should be continually monitored for a minimum of one hour from the time of the

initial baton strike.

6.6.6. Emergency personnel should be called during the monitoring period if the subject complains of 

any discomfort from the baton strike.

6.7. Training.

6.7.1. Initial and annual refresher training with the baton is mandatory for those armed with it. Initial

training must address all topics in this chapter. The use of local or state civilian training is authorized

provided it meets or exceeds the training requirements of this manual. Recertify the training annually

during the stan/eval process. Retrain individuals that do not undergo stan/eval on an annual basis.

Document training as it occurs. Security force members may be armed with the baton for twelve

months after training, or stan/eval.

6.7.1.1. Personnel who have attended the POI course and have been awarded a “T” prefix are

authorized to train personnel. These personnel must use this manual and the lesson plan posted on

the HQ Air Force Security Forces Center website at http://afsf.lackland.af.mil/ .

8/14/2019 US Air Force Use of Force 31-222

http://slidepdf.com/reader/full/us-air-force-use-of-force-31-222 83/129

AFMAN31-222 1 June 2001 83

Chapter 7

RIFLE FIGHTING

7.1. Overview. Employment of the rifle-fighting techniques is warranted when confronted with multiple

opponents, suspects who are physically superior, armed suspects where use of deadly force is not neces-

sary, or when time does not allow the charging and firing of the weapon. Generally, you can expect to use

these techniques against a subject whose actions place him/her within the assaultive (bodily harm) portion

of the Use of Force Model.

7.2. General Information. Rifle-fighting techniques must be applied with speed and surprise to be

effective. A loud yell should be emitted upon contact with the suspect. This will produce a build-up of 

body adrenaline and produce a psychological edge.

7.2.1. After the initial strike, always be prepared to follow up with another technique.

7.2.2. In any situation where the use of deadly force is authorized, any striking point is acceptable.

7.2.3. A physician should check a suspect after being subjected to these techniques.

7.3. Attack Position. All rifle-fighting techniques begin from this position.

7.3.1. Bring the rifle to port arms with feet shoulder width apart.

7.3.2. Place the left hand on the rifle hand guard and right hand on top of the rifle stock as close to the

charging handle as possible (Figure 7.1.).

7.4. Butt Stroke. The butt stroke is used to disarm or subdue an opponent.

7.4.1. Step forward with either foot and swing the rifle butt in an arc (Figure 7.2.).

7.4.2. Strike a target on the body (do not strike the head) with the swivel side of the rifle butt.7.4.3. Recover to the attack position or follow-up with another blow.

7.4.4. The butt stroke may be performed by using a vertical (upward), a horizontal (right to left)

swing, or somewhere in-between.

7.4.5. Effective striking points are the chest, stomach, arms, and shoulders.

7.5. Smash. The smash is used to subdue an opponent by delivering an accurate blow to the body or as a

follow-up technique.

7.5.1. Bring the rifle butt up and in front of you with the barrel of the weapon above your left shoul-

der, flash suppresser pointing to the rear.

7.5.2. Step forward with either foot and forcefully extend both arms out (Figure 7.3.).

7.5.3. Strike the opponent with the flat end of the rifle butt.

7.5.4. Recover to the attack position or follow up with another blow.

7.5.5. Effective striking points are the shoulders, arms, and chest.

8/14/2019 US Air Force Use of Force 31-222

http://slidepdf.com/reader/full/us-air-force-use-of-force-31-222 84/129

84 AFMAN31-222 1 June 2001

Figure 7.1. Attack Position

8/14/2019 US Air Force Use of Force 31-222

http://slidepdf.com/reader/full/us-air-force-use-of-force-31-222 85/129

AFMAN31-222 1 June 2001 85

Figure 7.2. Butt Stroke

8/14/2019 US Air Force Use of Force 31-222

http://slidepdf.com/reader/full/us-air-force-use-of-force-31-222 86/129

86 AFMAN31-222 1 June 2001

Figure 7.3. Smash

7.6. Slash. The slash is used to disarm an individual or strike an opponent in the shoulder area.

7.6.1. Step forward with either foot and swing the barrel in a diagonal/downward motion.

7.6.2. Strike the opponent with the swivel area of the barrel (Figure 7.4.).

7.6.3. Recover to the attack position or follow up with another blow.

7.6.4. This technique can also be executed by holding the rifle by the pistol grip. This is called the

’modified slash’.

7.6.5. Effective striking points are the shoulder and forearm when it is extended.

7.7. Thrust. The thrust is used to stop the forward advancement of a suspect or move an aggressive sus-

pect backwards.

7.7.1. Step forward with either foot and extend your arms straight out.

7.7.2. Push the rifle barrel into your opponent’s chest or shoulder area with enough force to push the

suspect backwards (Figure 7.5. and Figure 7.6.).

7.7.3. Recover to the attack position or follow up with another blow.

8/14/2019 US Air Force Use of Force 31-222

http://slidepdf.com/reader/full/us-air-force-use-of-force-31-222 87/129

AFMAN31-222 1 June 2001 87

7.7.4. The thrust can also be executed by holding the rifle with the pistol grip. This is called the ’mod-

ified thrust’.

7.7.5. Effective striking points are the chest, shoulders, and arms.

7.8. High Block (Center/Right/Left). The high block is used to block attacks from a high position com-

ing downward.

7.8.1. Step forward toward the attack and extend your arms upward and slightly forward using the

center of the rifle to block the attack. Do not wrap your fingers around the hand guard (Figure 7.7.).

7.8.2. After contact is made, an immediate follow-up technique may be used or you may recover to

the attack position.

8/14/2019 US Air Force Use of Force 31-222

http://slidepdf.com/reader/full/us-air-force-use-of-force-31-222 88/129

88 AFMAN31-222 1 June 2001

Figure 7.4. Slash.

8/14/2019 US Air Force Use of Force 31-222

http://slidepdf.com/reader/full/us-air-force-use-of-force-31-222 89/129

AFMAN31-222 1 June 2001 89

Figure 7.5. Thrust.

8/14/2019 US Air Force Use of Force 31-222

http://slidepdf.com/reader/full/us-air-force-use-of-force-31-222 90/129

90 AFMAN31-222 1 June 2001

Figure 7.6. Thrust.

8/14/2019 US Air Force Use of Force 31-222

http://slidepdf.com/reader/full/us-air-force-use-of-force-31-222 91/129

AFMAN31-222 1 June 2001 91

Figure 7.7. High Block.

7.9. Low Block (Center/Right/Left). The low block is used to block attacks from a low position coming

upward.

7.9.1. Step forward toward the attack and extend your arms downward and slightly forward using the

center of the rifle to block the attack. Do not wrap your fingers around the hand guard (Figure 7.8.).

7.9.2. After contact is made, an immediate follow-up technique may be used or you may recover to

the attack position.

7.10. Side Block (Right/Left). The side block is used to block a horizontal strike.

7.10.1. Step forward toward the attack with the weapon barrel up and butt down, and extend both

arms forward using the center of the rifle to block the attack. Do not wrap your fingers around the

hand guard (Figure 7.9.).

7.10.2. After contact is made, an immediate follow up technique may be used or you may recover to

the attack position.

8/14/2019 US Air Force Use of Force 31-222

http://slidepdf.com/reader/full/us-air-force-use-of-force-31-222 92/129

92 AFMAN31-222 1 June 2001

Figure 7.8. Low Block.

Figure 7.9. Side Block.

8/14/2019 US Air Force Use of Force 31-222

http://slidepdf.com/reader/full/us-air-force-use-of-force-31-222 93/129

AFMAN31-222 1 June 2001 93

Chapter 8

PERSONNEL SEARCHES

8.1. Suspect Searches. Security forces search suspects for weapons or evidence. All apprehended per-

sons must undergo a simple frisk or a search prior to transport. This emphasizes the safety of security

forces and apprehended individual. The apprehending security force member makes the decision to frisk 

or search. Base this decision on the situation at hand. Searching is the most potentially dangerous time for

the security force member and, if not properly conducted may result in serious bodily injury or death.

Search techniques exist to minimize these dangers. The person who fails to take full advantage of these

techniques poses a threat to themselves and their fellow security force members. A good rule of thumb is

to remember that all apprehended persons are potentially dangerous and you must afford yourself all pos-

sible protection.

8.1.1. Search apprehended personnel as soon as possible after apprehension unless the situation dic-

tates otherwise.

8.1.2. Always handcuff the suspect prior to the search.

8.1.3. You should not search an individual without the aid of another security force member. The

assisting security force member participating in the search provides additional subject control and

reduces the probability that the subject will escalate the risk. For military working dog teams, the dog

is considered the assisting member and is positioned as required.

8.1.4. Do not draw a weapon unless its use is imminent or the reason for apprehension would justify

its use.

8.1.5. You must make an on-the-scene decision and assessment of each search situation to decide

which search method to employ. No matter which one you use, conduct it quickly and thoroughly.

8.1.6. For quickness, search systematically; for thoroughness, never pat or run your hands over the

suspect lightly—grab or squeeze every inch of the suspect’s clothing as you search.

8.1.7. Although a single security forces member search can start from either side, it should always

start from the same side the hand rotation technique is applied to maintain effective control over the

suspect.

8.1.8. Make a ’precautionary check ’ of the suspect prior to the actual search. The precautionary check 

will consist of verbal communication with the suspect. Ask the suspect if he/she has any sharp objects

on their person (e.g., needles, razor blades, or knives). Regardless of the suspect’s reply, proceed with

caution to determine the location of any objects. Remember you are in a high-risk environment to

health hazards such as exposure to HIV, Hepatitis B Virus, or other blood-borne pathogens resulting

from a ’stick ’ or cut.

8.2. Types of Searches. There are three types of searches you should use; standing, kneeling and prone.

Apply handcuffs before beginning any search and in accordance with the procedures outlined in chapter

9. See AFMAN 31-219, USAF Military Working Dog Training Program, for detailed instructions on how

to conduct personnel searches with a military working dog.

8.3. Standing Search. The standing search is primarily used on suspects who do not appear dangerous,

or violent or are so drunk/drugged that they cannot stand under their own power.

8/14/2019 US Air Force Use of Force 31-222

http://slidepdf.com/reader/full/us-air-force-use-of-force-31-222 94/129

94 AFMAN31-222 1 June 2001

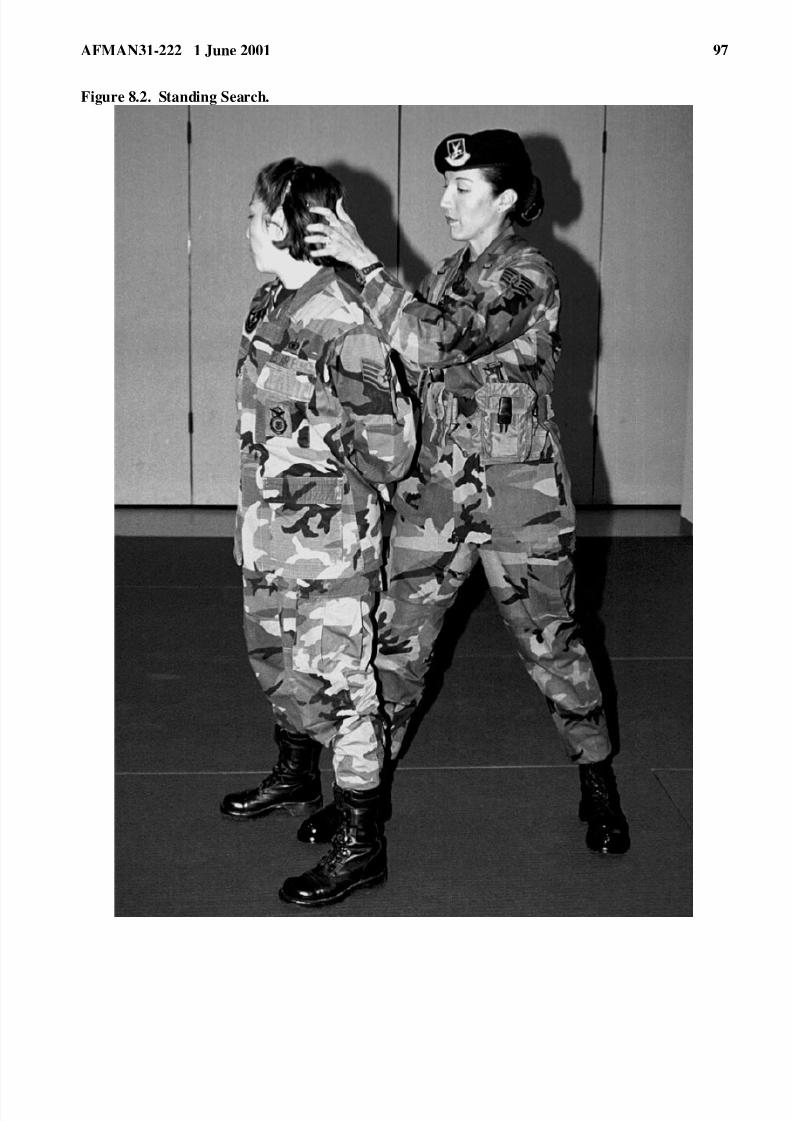
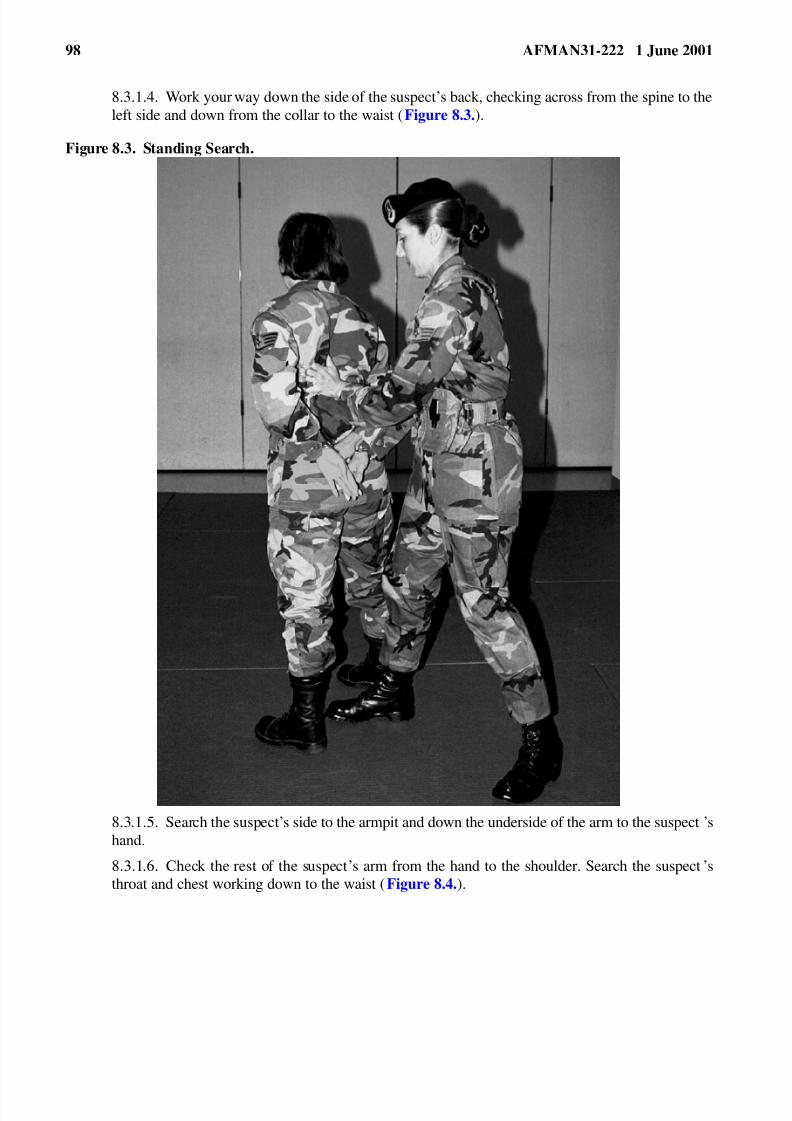
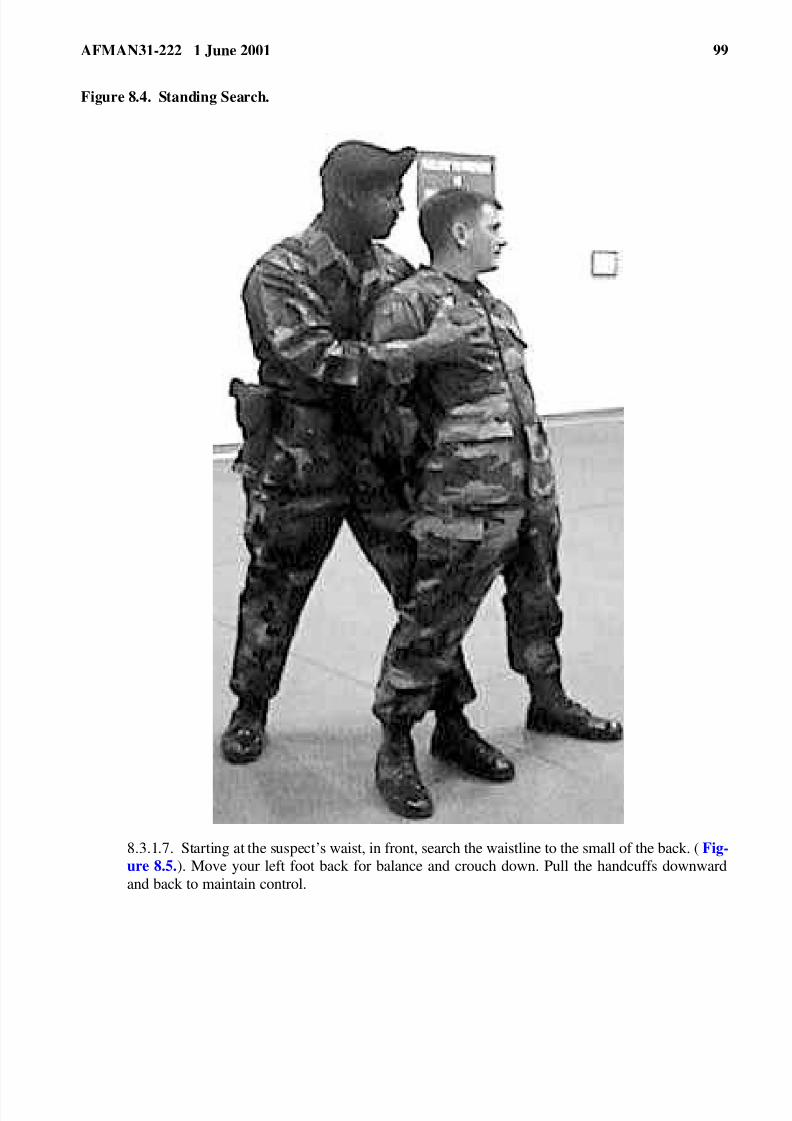
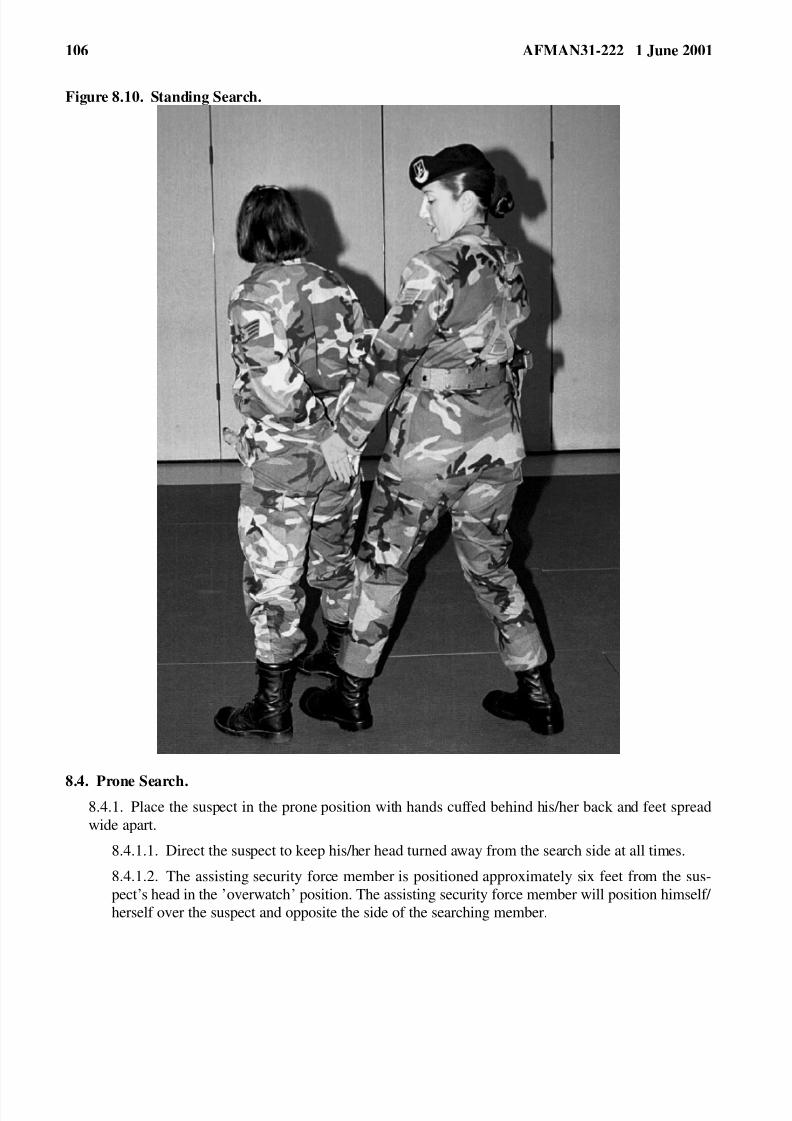
8.3.1. With the security force member at the suspect’s right rear, the assisting security forces member

should take an overwatch position in front of the suspect, opposite the side of the searching security

forces member, to maintain surveillance of the search procedure. The assistant must remain close

enough to physically aid the searching security force member if necessary. At this point, the suspect is

already handcuffed.

8.3.1.1. The searching security force member will instruct the suspect to turn his/her head facingthe opposite direction of intended approach. Next, grab the handcuff linking chain with your hand,

palm down. Keep your weapon or strong side away from the suspect while placing your foot

directly behind and centered between the suspect’s feet. Instruct the suspect to keep his/her head

up and his/her knees flexed. If the suspect becomes uncooperative or aggressive, control is gained

by pulling the handcuffs down and back to keep the suspect off balance. (Figure 8.1.)

8/14/2019 US Air Force Use of Force 31-222

http://slidepdf.com/reader/full/us-air-force-use-of-force-31-222 95/129

AFMAN31-222 1 June 2001 95

Figure 8.1. Standing Search.

8/14/2019 US Air Force Use of Force 31-222

http://slidepdf.com/reader/full/us-air-force-use-of-force-31-222 96/129

96 AFMAN31-222 1 June 2001

8.3.1.2. Search the suspect’s entire side from the position you are in. If the suspect is wearing a

hat, remove it, and have your overwatch carefully check the hat for sharp objects, weapons, or

contraband. Pay particular attention to the area beneath the sweatband and the seams. After

searching the hat, drop it on the ground behind the suspect or hand it to your assistant for a more

thorough examination. Use the hat as a container for any items taken from the suspect.

8.3.1.3. Run your fingers through the suspect’s hair and around the left side of the head. Thensearch the back of the suspect’s neck (Figure 8.2.).

8/14/2019 US Air Force Use of Force 31-222

http://slidepdf.com/reader/full/us-air-force-use-of-force-31-222 97/129

AFMAN31-222 1 June 2001 97

Figure 8.2. Standing Search.

8/14/2019 US Air Force Use of Force 31-222

http://slidepdf.com/reader/full/us-air-force-use-of-force-31-222 98/129

98 AFMAN31-222 1 June 2001

8.3.1.4. Work your way down the side of the suspect’s back, checking across from the spine to the

left side and down from the collar to the waist (Figure 8.3.).

Figure 8.3. Standing Search.

8.3.1.5. Search the suspect’s side to the armpit and down the underside of the arm to the suspect ’s

hand.

8.3.1.6. Check the rest of the suspect’s arm from the hand to the shoulder. Search the suspect’s

throat and chest working down to the waist (Figure 8.4.).

8/14/2019 US Air Force Use of Force 31-222

http://slidepdf.com/reader/full/us-air-force-use-of-force-31-222 99/129

AFMAN31-222 1 June 2001 99

Figure 8.4. Standing Search.

8.3.1.7. Starting at the suspect’s waist, in front, search the waistline to the small of the back. ( Fig-

ure 8.5.). Move your left foot back for balance and crouch down. Pull the handcuffs downward

and back to maintain control.

8/14/2019 US Air Force Use of Force 31-222

http://slidepdf.com/reader/full/us-air-force-use-of-force-31-222 100/129

100 AFMAN31-222 1 June 2001

8.3.1.8. Search the suspect’s buttocks and groin area. Search down the inside of the suspect ’s left

leg, inside the top of the left shoe, under the arch of the shoe, and back up the outside of the sus-

pect’s left leg to the waist (Figure 8.6., Figure 8.7., and Figure 8.8.).

8.3.1.9. After searching the suspect’s left side, assume the initial control position.

8/14/2019 US Air Force Use of Force 31-222

http://slidepdf.com/reader/full/us-air-force-use-of-force-31-222 101/129

AFMAN31-222 1 June 2001 101

Figure 8.5. Standing Search.

Figure 8.6. Standing Search.

8/14/2019 US Air Force Use of Force 31-222

http://slidepdf.com/reader/full/us-air-force-use-of-force-31-222 102/129

102 AFMAN31-222 1 June 2001

8.3.1.10. Place your left hand over your right hand and the handcuff linking chain. You are now

executing what is commonly known as the ’crossover’.

8.3.1.11. Slide your right hand out and grip the linking chain with your left hand (Figure 8.9.).

8.3.1.12. Turn your body so your left side is towards the suspect’s back and your right side is at a

45-degree angle from the suspect. Locate your left foot directly behind and centered between the

suspect’s feet. Again, direct the suspect to look away from the side you search (Figure 8.10.).

8.3.1.13. Search the suspect’s right side using the same procedures used for the left side. During

any part of your search, if the suspect violently resists, pull the handcuffs down and back to main-

tain control.

8/14/2019 US Air Force Use of Force 31-222

http://slidepdf.com/reader/full/us-air-force-use-of-force-31-222 103/129

AFMAN31-222 1 June 2001 103

Figure 8.7. Standing Search.

8/14/2019 US Air Force Use of Force 31-222

http://slidepdf.com/reader/full/us-air-force-use-of-force-31-222 104/129

104 AFMAN31-222 1 June 2001

Figure 8.8. Standing Search.

8/14/2019 US Air Force Use of Force 31-222

http://slidepdf.com/reader/full/us-air-force-use-of-force-31-222 105/129

AFMAN31-222 1 June 2001 105

Figure 8.9. Standing Search.

8/14/2019 US Air Force Use of Force 31-222

http://slidepdf.com/reader/full/us-air-force-use-of-force-31-222 106/129

106 AFMAN31-222 1 June 2001

Figure 8.10. Standing Search.

8.4. Prone Search.8.4.1. Place the suspect in the prone position with hands cuffed behind his/her back and feet spread

wide apart.

8.4.1.1. Direct the suspect to keep his/her head turned away from the search side at all times.

8.4.1.2. The assisting security force member is positioned approximately six feet from the sus-

pect’s head in the ’overwatch’ position. The assisting security force member will position himself/ 

herself over the suspect and opposite the side of the searching member.

8/14/2019 US Air Force Use of Force 31-222

http://slidepdf.com/reader/full/us-air-force-use-of-force-31-222 107/129

AFMAN31-222 1 June 2001 107

8.4.1.3. The searching security force member positions themself over the suspect on the right side

of the handcuffed suspect and searches the suspect’s left side.

8.4.1.4. The searching member will place his/her left knee on the suspect’s right leg at the knee

area and keep his/her right foot flat on the ground next to the suspect’s side (Figure 8.11.). The

searching member’s right hand is on the handcuff linking chain.

Figure 8.11. Prone Search.

8.4.1.5. If the suspect attempts to struggle, the searching member will drop their right knee onto

the suspect’s back. Grab the suspect’s hand and bend the palm into the wrist while pulling the

handcuffs toward the suspect’s head. Continue to apply pressure compliance techniques until con-

trol is regained.

8.4.1.6. If the suspect is wearing a hat, have the assisting security force member remove andsearch the hat before you begin your search. After the hat is searched, use it as a container for

items taken from the suspect. With your left hand, search the outer half of the suspect ’s left leg

from the waist down to the left knee (Figure 8.12.). Lay your palm down on the suspect’s knee

and instruct him to raise his left leg (Figure 8.13.). Use the palm to block a possible kick as the

suspect raises his/her leg.

8/14/2019 US Air Force Use of Force 31-222

http://slidepdf.com/reader/full/us-air-force-use-of-force-31-222 108/129

108 AFMAN31-222 1 June 2001

8.4.1.7. Search the outer leg to the foot, then shoe, and back up the inner leg. As you complete the

inner leg to the knee, have the suspect lower his/her foot to the ground. Search up the inner leg to

the groin and left buttock (Figure 8.14.).

8.4.1.8. Place your right arm in the crook of the suspect’s left arm and roll him/her back until their

left side is slightly off the surface. Lean your right knee against the suspect’s back for balance

(Figure 8.15.).

8/14/2019 US Air Force Use of Force 31-222

http://slidepdf.com/reader/full/us-air-force-use-of-force-31-222 109/129

AFMAN31-222 1 June 2001 109

Figure 8.12. Prone Search.

Figure 8.13. Prone Search.

8/14/2019 US Air Force Use of Force 31-222

http://slidepdf.com/reader/full/us-air-force-use-of-force-31-222 110/129

110 AFMAN31-222 1 June 2001

Figure 8.14. Prone Search.

Figure 8.15. Prone Search.

8.4.1.9. With your left hand, release the linking chain and search the suspect’s waistband from the

8/14/2019 US Air Force Use of Force 31-222

http://slidepdf.com/reader/full/us-air-force-use-of-force-31-222 111/129

AFMAN31-222 1 June 2001 111

middle of the back to the belt buckle (Figure 8.16.).

8.4.1.10. Search the suspect’s lower left abdomen and groin, then up the front side of the suspect’s

torso to the throat (Figure 8.17.).

Figure 8.16. Prone Search.

8.4.1.11. Return the suspect to the prone handcuffing position.

8.4.1.12. After searching the suspect’s left side, you are ready to search the suspect’s right side.

8.4.1.13. Cross your right hand over your left hand. Place your right hand in the small of the sus-

pect’s back while keeping your left hand on the linking chain (Figure 8.18.).

8.4.1.14. Maintain control by keeping pressure on the suspect’s back. Rise up and step over the

suspect’s buttocks (Figure 8.19.).

8.4.1.15. Rest your right knee on the suspect’s left leg just above the knee and your left foot flat

on the ground against the suspect’s right side (Figure 8.20.).

8.4.1.16. Instruct the suspect to turn his/her head to the opposite side you will search. Search the

suspect’s right side using the same procedures outlined for the search of the suspect ’s left side.

NOTE: The above search procedures are for a right-handed individual; left-handed persons may

start the procedures on the opposite side.

8/14/2019 US Air Force Use of Force 31-222

http://slidepdf.com/reader/full/us-air-force-use-of-force-31-222 112/129

112 AFMAN31-222 1 June 2001

8.4.1.17. Bring the subject to a standing position after the search. If the subject is unable to stand

alone, roll them onto their side.

8/14/2019 US Air Force Use of Force 31-222

http://slidepdf.com/reader/full/us-air-force-use-of-force-31-222 113/129

AFMAN31-222 1 June 2001 113

Figure 8.17. Prone Search.

Figure 8.18. Prone Search.

8/14/2019 US Air Force Use of Force 31-222

http://slidepdf.com/reader/full/us-air-force-use-of-force-31-222 114/129

114 AFMAN31-222 1 June 2001

Figure 8.19. Prone Search.

Figure 8.20. Prone Search.

8/14/2019 US Air Force Use of Force 31-222

http://slidepdf.com/reader/full/us-air-force-use-of-force-31-222 115/129

AFMAN31-222 1 June 2001 115

8.5. Opposite-Gender Searches. Offenders are not normally subjected to bodily search except by a

same-gender military member. Security forces may search any suspect’s handbag, briefcase, overcoat, or

luggage.

8.5.1. When a search is necessary, a same-gender patrol should conduct the search. If no same-gender

search elements are on scene and there is no immediate danger to the apprehending security forces,

the suspect will be:

8.5.1.1. Handcuffed with hands behind their back, palms out (except for pregnant women who are

handcuffed with their hands in front of their body).

8.5.1.2. Transported to a suitable location for a thorough search by a same-gender security forces

or medical personnel.

8.6. Exigent Circumstances. Security forces may perform a ’simple frisk ’ for weapons on opposite-gen-

der offenders if:

8.6.1. No same-gender security force member or medical personnel are available.

8.6.2. The situation is of such urgency that it warrants a frisk to prevent decreasing security or endan-gering the security force member performing the apprehension.

 NOTE: In situations where security forces must perform a frisk of an opposite-gender suspect, advise

the control center of the situation and have a security force member witness the frisk.

8/14/2019 US Air Force Use of Force 31-222

http://slidepdf.com/reader/full/us-air-force-use-of-force-31-222 116/129

116 AFMAN31-222 1 June 2001

Chapter 9

HANDCUFFING AND SUBJECT TRANSPORTATION

9.1. Handcuffing Overview. The decision to handcuff is subject to sound professional judgment based

on the facts of the specific incident. Security forces most commonly handcuff to effect an apprehension.

However, there is no defined criteria that can match your judgment. Handcuffing is never automatic. Key

considerations include:

9.1.1. Nature of the offense.

9.1.2. Demeanor/violence potential of the suspect (e.g., cooperative, hostile, threatening, frightened).

9.1.3. Number of suspects.

9.1.4. Need for control.

9.1.5. Your perception of the threat to your own personal safety and that of innocent third parties.

9.2. Misconceptions About Handcuffs. Handcuffs do restrain free movement. Yet handcuffs are not afoolproof restraining system. Many criminals have adapted techniques like ’stepping through the cuffs’,

which (just as the phrase infers) places the suspect’s hands in front of their body. From this position the

suspect could more effectively fight security force personnel. To prevent a suspect from stepping through

the cuffs, loop the cuffs through the suspect’s belt at a point below the small of their back prior to securing

the second cuff. Remember that a suspect with their hands cuffed in front poses a far greater threat. Con-

sider cuffing to the front only if the suspect is pregnant, wounded, or has a physical handicap that pre-

cludes cuffing behind the back. Another tactic criminals use is striking cuffs. Striking handcuffs sharply

on a solid object may cause ratchets to fail and release one or both cuffs. Even if only one ratchet fails

(i.e., opens), the suspect’s hands are free and, in the one cuff scenario, the suspect has a lethal weapon to

use against you. There are a number of recorded incidents where handcuffs have been used against law

enforcement officers with deadly effect. Never handcuff a suspect to a fixed object (i.e., a sign post,chain-link fence, vehicle door, aircraft seat). A suspect cuffed to a fixed object may be trapped in the case

of an accident or emergency circumstance. When you apprehend an individual, you are entirely

responsible for their safety. As an example, when you transport an apprehended person, place the seat

belt around them to ensure their safety. Never think that since a suspect is restrained they are no longer a

threat. Use care, common sense, and discretion anytime you handcuff a person.

9.3. When to Handcuff. The courts consider handcuffing a use of force. A U.S. Supreme Court deci-

sion, Graham vs. Connor (1969), held that a police officers’ decision to use force must be judged from the

“perspective of a reasonable officer, within circumstances that are often tense, uncertain, and rapidly

evolving.” This standard asks whether the security forces actions are objectively reasonable in light of the

facts and circumstances confronting them. So you must carefully weigh all factors before you handcuff someone you have apprehended. Analyze all force situations to assure that you use the minimum level of 

force which will safely protect you and others from injury. Do not use more force than is necessary to

complete an apprehension, yet keep yourself and others free of danger.

9.3.1. As stated in Chapter 8, you must search or frisk all apprehended persons prior to transport. If 

you decide to search a suspect then you have also decided to handcuff, as handcuffing is an integral

part of the search procedures outlined in Chapter 8. Remember your safety and the safety of the sus-

8/14/2019 US Air Force Use of Force 31-222

http://slidepdf.com/reader/full/us-air-force-use-of-force-31-222 117/129

AFMAN31-222 1 June 2001 117

pect are prime considerations. If the circumstances of the apprehension leave any doubt in your mind

as to your safety or the safety of the suspect, then handcuff the suspect using the minimum level of 

force necessary to complete the handcuffing procedure.

9.3.2. During an apprehension, you may apply handcuffs to assure control of apprehended persons at

the apprehension site and during transport. When applying handcuffs, use ’reasonable’ levels of force

to:

9.3.2.1. Achieve control of a resisting detainee.

9.3.2.2. Maintain control during the apprehension and detention.

9.3.3. If you decide to use restraining devices on a nonresisting suspect, accomplish the application of 

handcuffs with reason and without injury. Telling the suspect of your intent to apprehend and allowing

the person to cooperate minimizes the risk of injury.

9.3.4. If a person is injured during the handcuffing stage of an apprehension, the first step is to seek 

immediate medical attention for the injured. As soon as possible, provide a detailed written statement

of the techniques you used and action taken by the apprehended person that caused the injury.

9.4. Handcuffing Approach. Approach all suspects in the alert stance. This stance places your weak 

side towards an individual and your weapon/strong side 45 degrees away from the individual. Maintain a

distance of six feet or more between you and the suspect. This distance, known as the ’reactionary gap’,

allows you to react to any sudden or aggressive moves made by the suspect. Direct the suspect to assume

either the standing or prone position (explained in Chapter 8). If the suspect refuses, place them in the

prone position, using minimum force necessary. When you decide to apprehend an individual, you must

establish and maintain ’positive control’. Establish ’positive control’ with the hand rotation position

(explained in Chapter 2) while controlling the handcuffs secured on the individual’s wrist.

9.5. Displaying Handcuffs. You must be able to get to your handcuffs quickly. Place the ratchet cuffs in

their pouch, in a position most accessible to you. Keep the handcuffs in the pouch with the locks on oppo-site sides. Ready the handcuffs for application if you must react quickly. If flex cuffs are available, lace

them through your belt. The flex cuffs must not be visible but, with a straight pull, ready for application.

9.6. How to Apply the Handcuffs. Hold the handcuffs firmly in your strong hand with fingers around

the linking chain separating the handcuffs. The double bars are loaded in the ’V’ of your hand with the

single bar down by the index finger. Apply the handcuffs to the suspect with his hands behind his back,

palms out, thumbs up. Do not position a suspect on a wall or vertical object when handcuffing. When the

suspect is cooperative, handcuff in the standing position. Based on your discretion, you may inform the

suspect of your intentions to handcuff. Base the decision on circumstances that include, but are not limited

to, number of assisting security forces, attitude of suspect, physical location of the apprehension, and your

experience. The following handcuffing positions provide maximum safety for security forces by directingall commands from the reactionary gap and reinforcing compliance through positive control.

8/14/2019 US Air Force Use of Force 31-222

http://slidepdf.com/reader/full/us-air-force-use-of-force-31-222 118/129

118 AFMAN31-222 1 June 2001

Figure 9.1. Applying Handcuffs.

9.6.1. To place the suspect in the standing position and apply the handcuffs you must:9.6.1.1. Position the suspect away from you with their hands behind their back, palms out, thumbs

up. Spread their legs shoulder width apart with their toes pointing outward. Direct the suspect to

bend forward slightly at the waist with their head up and turned away from your selected avenue

of approach.

9.6.1.2. Direct the subject to interlace their fingers behind their back, palms out.

9.6.1.3. With the handcuffs in your strong hand, approach the suspect keeping your weak side

towards the suspect and extend your weak arm to maintain a reactionary gap.

9.6.1.4. Apply the hand rotation technique with your weak hand and place the single bar of the

lower cuff on top of the suspect’s nearest wrist. Push down sharply on the cuff and up on the handallowing the single bar to swing around the wrist (Figure 9.1.). Secure the ratchet by sliding your

weak hand up the suspect’s hand and close the cuff.  NOTE: This is one of the most dangerous

points in the cuffing procedure. Many suspects have attacked law enforcement personnel with the

ratchet of the free cuff inflicting serious injury. DO NOT DELAY/HESITATE AT THIS POINT

IN THE PROCEDURE.

9.6.1.5. Once the first cuff is secure, immediately apply the upper cuff to the suspect’s other wrist.

8/14/2019 US Air Force Use of Force 31-222

http://slidepdf.com/reader/full/us-air-force-use-of-force-31-222 119/129

AFMAN31-222 1 June 2001 119

9.6.1.6. Double lock the handcuffs by depressing the locking pins with the double locking tip of 

the handcuff key.

9.6.2. To place the suspect in the prone position and apply the handcuffs, you must:

9.6.2.1. Position the suspect away from you in the final challenge position. Instruct the suspect to

slowly drop to their knees then fall forward catching themselves with their hands. The suspect will

lower himself/herself to the ground and place their arms parallel to their shoulders with palms up.

Then direct the suspect to turn their head away from your selected avenue of approach.

9.6.2.2. You will take up a position 45 degrees to your strong side and to the rear of the suspect.

Direct the suspect to raise both hands off the ground and place them into the small of their back 

with palms out and thumbs up. Approach the suspect from your weak side and lower your center

of gravity. Avoid stepping between the suspect’s legs and be cautious to maintain your balance.

9.6.2.3. Grab the ring and middle finger of the suspect’s nearest hand and place the single bar of 

the cuff on top of the suspect’s wrist. Push down sharply on the cuff and up on the hand allowing

the single bar to swing around the suspect’s wrist. Secure the ratchet by sliding your weak hand up

the suspect’s hand and pushing up to close the cuff. Immediately grab the suspects other hand with

your weak hand and apply the remaining cuff in the same manner. Double lock the handcuffs bydepressing the locking pins with the double locking tip of the handcuff key.

9.7. Removing Handcuffs. Maintain control of the suspect until you determine removal of the handcuffs

is appropriate. To remove the ratchet cuffs from the suspect you must:

9.7.1. Place the suspect in the standing or prone position.

9.7.2. Approach and use tactical positioning for removal identical to placement.

9.7.3. Grab the linking chain, palm up. Tell the suspect, once you remove a cuff, to rotate the free arm

from the cuff slowly and place it on the back of their head and keep it there until told to do otherwise

(Figure 9.2.). Right-handed security forces remove the left cuff first. Left-handed security forcesremove the right cuff first. Regardless of which cuff is removed first, immediately close the removed

cuff so the suspect cannot use the open ratchet as a weapon against you. Keeping your weak hand on

the linking chain, remove the key and place it in the opposite lock with your strong hand. Repeat the

same directions to the suspect for the opposite hand. NOTE: Never let go of the linking chain.

9.7.4. With the key in your strong hand, unlock and remove the other cuff, and step back without

delay. Immediately close the second cuff so the suspect cannot use the open ratchet as a weapon if 

they break away.

9.7.5. Direct the suspect to remove their hands from the back of their head and release the individual

as instructed by higher, competent authority.

9.8. Transportation Procedures. The process of escorting and transporting subjects is one of the most

dangerous activities in which any officer may engage. It has many times been referred to as the “weakest

link in the realm of subject security.” It is generally viewed as the phase of officer/subject contact offering

the greatest potential for escape. Therefore, the officer must be highly vigilant and adhere to time proven

procedures and practices. In almost every case of an escape or injury during an escort or transport, the

subject has taken advantage of a procedural lapse on the part of the transporting officer(s). Remember,

you, as a security force member, must recognize that the ultimate goal of escorting and transporting is to

8/14/2019 US Air Force Use of Force 31-222

http://slidepdf.com/reader/full/us-air-force-use-of-force-31-222 120/129

120 AFMAN31-222 1 June 2001

reach the destination free of officer or subject incident or injury. Your safety is paramount when transport-

ing persons in custody. The transporting patrol should search the subject for weapons prior to placing

them in the transport vehicle and search the vehicle after transport to ensure the suspect has left nothing

behind.

Figure 9.2. Removing Handcuffs.

9.8.1. Subject transportation consists of the controlled and secure movement of a person(s) in custody

from one point to another. Remember transporting is dangerous. Carelessness and the failure to follow

established procedures are the major causes of security forces injuries.

9.8.2. As a transporting team member, you are both legally and professionally responsible for the

safety and security of the subject. This process should be conducted humanely, professionally, and

efficiently, with a minimum of public display.

9.8.3. Successful transporting consists of the following critical components:

9.8.3.1. Preparation of your attitude toward the serious nature of the activity, a proactive sense of 

risk assessment, and strict adherence to procedures.

9.8.3.2. As much as possible, preplan the specific route of the transport.

9.8.3.3. Establish a line of communication to be maintained throughout the transport activities.

Remember to keep the subject in sight constantly.

8/14/2019 US Air Force Use of Force 31-222

http://slidepdf.com/reader/full/us-air-force-use-of-force-31-222 121/129

AFMAN31-222 1 June 2001 121

9.8.3.4. Increase your attention as you approach your destination, since this may be the subject’s

“last chance” to act.

9.8.3.5. Never inform the subject of more than the required amount of information prior to trans-

port in order to minimize the risk of preplanning on the part of the subject.

9.8.3.6. You should personally conduct the search of the subject to be transported. Assume noth-

ing--verify everything.

9.8.3.7. You should personally apply the restraint devices after you have properly inspected them.

You personally check restraints during the transport to assure security. Keep the restraint key(s)

safeguarded in a location unknown to the subject.

9.8.3.8. Search and secure the transporting vehicle. You should personally search the transporting

vehicle prior to and after the transporting activity.

9.8.4. Transporting Procedures. The transporting vehicle is an integral part of the system of security

we deserve and desire. Transporting vehicles fall into two categories: standard passenger types and

those vehicles designed or adapted for transporting use. Based upon frequency of use, the passenger

type vehicle transporting techniques will be demonstrated. However, most of these principles and pro-cedures are generally adaptable to most of the contemporary transport vehicles utilized.

9.8.4.1. Inspect the vehicle. As the transporting officer your first task is to become totally familiar

with the transporting vehicle and specific security devices (shields, screens, radio, etc.) that

enhance your safety and security. Search the area of contact with the subject thoroughly. If the seat

can be removed for greater inspection ease or accuracy, do so as part of established protocol. Look 

for locations (seams, tears, crevices) in the area that could be used for contraband or weapon

placement. Remember that specialized security devices designed into the vehicle should augment

your safety. Never assume they will replace your need for constant awareness of risk.

9.8.4.2. Dual Officer/Single Subject Placement in Transporting Vehicle.

9.8.4.2.1. Once the subject has been searched and restrained following proper procedure, thesubject should be escorted to the area of the right rear seat. The officer shall still secure the

subject while opening the door for the subject.

9.8.4.2.2. During this phase of the escort/transport, the officer must remain conscious of 

remaining to the rear of the subject in order to prevent potential attack. The subject is now

advised to first sit on the seat and then to bring his legs into the vehicle.

9.8.4.2.3. The officer then proceeds to take his left forearm and place it under the subject’s

chin, verbally directing and slowly pushing his head backward while the officer applies the

subject’s seat belt.

9.8.4.2.4. The supportive transporting officer now enters the vehicle from the left rear and

remains seated during transport directly behind the driving officer. Primary attention for this

officer is directed toward the subject.

9.8.4.3. Dual Officer/Two Subject Placement.

9.8.4.3.1. Once searched and restrained, the first subject should be escorted to the right rear

passenger door. He should be placed into the vehicle following the earlier procedures but posi-

tioned into the middle rear seat area and secured with the seat belt.

8/14/2019 US Air Force Use of Force 31-222

http://slidepdf.com/reader/full/us-air-force-use-of-force-31-222 122/129

122 AFMAN31-222 1 June 2001

9.8.4.3.2. The second searched and restrained subject is now placed into the right rear seat

area , the seat belt is applied and the door closed.

9.8.4.3.3. The supporting officer now assumes a position in the left rear passenger seat behind

the driving officer.

9.8.4.4. Single Officer/One Subject Placement.

9.8.4.4.1. Once searched and restrained, the subject should be escorted to the right rear pas-

senger door and placed into the vehicle on the right rear passenger seat.

9.9. Other Considerations. Ideally, your vehicle should have a safety screen between the front and rear

seats. When you are working as a team in a patrol vehicle equipped with a safety screen, place the suspect

in the rear seat on the passenger side and the patrol rider in the front passenger seat next to the driver.

ALWAYS USE SEAT BELTS for every person in the vehicle. WARNING: At no time should a one-per-

son patrol transport more than one suspect if the vehicle is not equipped with a safety screen unless spe-

cifically approved by the supervisor on duty.

9.10. Opposite Gender Transporting. When transporting suspects of the opposite sex, you should ask another security force member or an NCO of the same gender as the suspect to accompany you. Follow

this procedure to preclude any charges of impropriety. If a same-gender individual is not available, notify

the control center of your location, approximate distance to the designated location, odometer reading,

and departure time. Upon arrival at the desk, notify the controller of arrival time and ending mileage.

9.11. Escort Procedures. Escorting is related most frequently to the movement of subjects on foot. Nor-

mally it is limited in distance, i.e., to and from the transporting vehicle, from an area of arrest to a secure

area, etc. It should be remembered that it does normally represent the initial continuation of contact

between officer and subject, now moving into the phase centered around the transportation process. For

this reason it should be used as a time to reinforce and/or establish strict adherence to the procedures by

both participants.

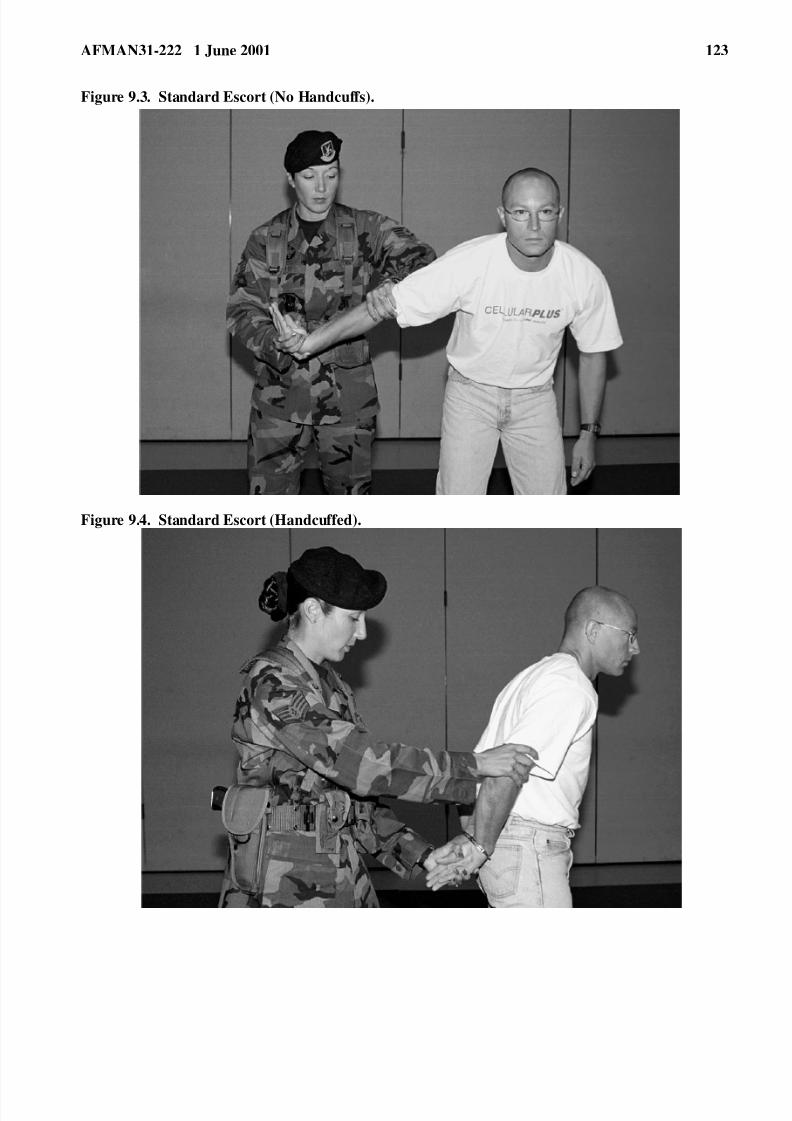
9.11.1. Standard Escort (Uncuffed).

9.11.1.1. The subject is approached from the side/rear by the officer(s) who initiates the WRIST/ 

ELBOW ESCORT TECHNIQUE (Figure 9.3.).

9.11.1.2. The subject is now guided to the appropriate destination in a relatively safe and secure

manner.

9.11.2. Standard Escort (Handcuffed).

9.11.2.1. The subject has already been handcuffed to the rear and searched thoroughly.

The officer(s) moves to the side/rear on the right side of the subject.

8/14/2019 US Air Force Use of Force 31-222

http://slidepdf.com/reader/full/us-air-force-use-of-force-31-222 123/129

8/14/2019 US Air Force Use of Force 31-222

http://slidepdf.com/reader/full/us-air-force-use-of-force-31-222 124/129

124 AFMAN31-222 1 June 2001

9.11.2.2. The officer rotates the subject’s right hand with the officer’s left hand.

9.11.2.3. The officer’s right hand is placed on the right elbow of the subject in order to stabilize

and secure the subject during escort (Figure 9.4.).

9.11.3. Reverse Escort (Handcuffed).

9.11.3.1. Once the subject has been thoroughly searched and handcuffed, the officer moves to theleft side/rear position of the subject.

9.11.3.2. The officer now slides his left arm under the subject’s left arm and initiates a REVERSE

WRIST LOCK POSITION on the subject’s left hand/arm.

9.11.3.3. The officer can additionally reinforce the subject’s captured left hand and arm with his

free right hand and arm (Figure 9.5.).

9.11.3.4. Or the officer can secure the subject and keep his right hand and arm free.

9.11.3.5. The additional positive aspect of this technique is the fact that the subject is continually

destabilized by walking backward throughout the entire escort sequence.

8/14/2019 US Air Force Use of Force 31-222

http://slidepdf.com/reader/full/us-air-force-use-of-force-31-222 125/129

AFMAN31-222 1 June 2001 125

Figure 9.5. Reverse Escort.

ROBERT H. FOGLESONG, Lt General, USAF

DCS/Air and Space Operations

8/14/2019 US Air Force Use of Force 31-222

http://slidepdf.com/reader/full/us-air-force-use-of-force-31-222 126/129

126 AFMAN31-222 1 June 2001

Attachment 1

GLOSSARY OF REFERENCES AND SUPPORTING INFORMATION

 References

Joint Publication 1-02, DoD Dictionary, Military and Associated Terms 

49 CFR 175.10(a)(4)(ii)

AFPD 31-2, Law Enforcement  

AFI 31-201 , Security Police Standards and Procedures 

AFI 31-207, Arming and Use of Force by Air Force Personnel 

AFMAN 31-219, USAF Military Working Dog Training Program 

CAP-STUN® Weapon System Technical Information Catalog, 1993

I.F.M. –  Integrated Force Management Reference Guide, 1991, Professor Gregory J. O’Connor, Univer-

sity of Illinois Police Training Institute

STP 19-95B1-SM, Soldier’s Manual MOS 95B Military Police 

 Abbreviations and Acronyms

AFMAN—Air Force Manual

CFR—Code of Federal Regulation

FAA—Federal Aviation Administration

HQ—Headquarters

MAJCOM—Major CommandOC—Oleoresin Capsicum

OPR—Office of Primary Responsibility

PART—Physical Apprehension and Restraint Techniques

POI—Principles of Instruction

SF—Security Forces

SFCC—Security Forces Control Center

SJAStaff Judge Advocate— 

UCMJ—Uniform Code of Military Justice

US—United States

8/14/2019 US Air Force Use of Force 31-222

http://slidepdf.com/reader/full/us-air-force-use-of-force-31-222 127/129

AFMAN31-222 1 June 2001 127

Attachment 2

USER FEEDBACK

1. Users in the field are highly encouraged to submit comments on this document by removing this

attachment and sending it to HQ AFSFC. NOTE: Add any additional information on bond paper

and include with this attachment. Please provide the following information as a minimum 

USER: ____________________________ UNIT: __________________________________

ADDRESS: _________________________ DSN: __________________________________

2. Content: 

____________________________________________________________________________

____________________________________________________________________________

____________________________________________________________________________

a. Is the information provided accurate? If not, what needs to be updated?_________________

____________________________________________________________________________

____________________________________________________________________________

b. Is this publication consistent with other AF documents? ____________________________

____________________________________________________________________________

____________________________________________________________________________

c. Can this instruction be better organized for better understanding of the material presented?

8/14/2019 US Air Force Use of Force 31-222

http://slidepdf.com/reader/full/us-air-force-use-of-force-31-222 128/129

128 AFMAN31-222 1 June 2001

____________________________________________________________________________

____________________________________________________________________________

d. Is the information provided useful? If not, how can we improve it? ____________________

____________________________________________________________________________

____________________________________________________________________________

3. Writing and Appearance. ___________________________________________________

____________________________________________________________________________

a. Where does the publication need revision to make the writing more clear and concise?

What words would you use?_____________________________________________________

____________________________________________________________________________

b. Are the charts and figures clear and understandable? How would you revise them?

____________________________________________________________________________

____________________________________________________________________________

____________________________________________________________________________

____________________________________________________________________________

4. Recommended Urgent Change(s), if any: _______________________________________

8/14/2019 US Air Force Use of Force 31-222

http://slidepdf.com/reader/full/us-air-force-use-of-force-31-222 129/129

AFMAN31-222 1 June 2001 129

__________________________________________________________________________

__________________________________________________________________________

__________________________________________________________________________

__________________________________________________________________________

5. Other Comments:_________________________________________________________

__________________________________________________________________________

__________________________________________________________________________

6. Send Responses TO: HQ AFSFC/SFOP

1720 Patrick Street

Lackland AFB TX 78236-5226


Recommended