52


Contents1 Introducing Your USB Digital Music Player . . . . . . . . . . . . . . . . . . . . . . 1
Features . . . . . . . . . . . . . . . . . . . . . . . . . . . . . . . . . . . . . . . . . . . . . . . . . . . . . . . . . . . 2Accessories . . . . . . . . . . . . . . . . . . . . . . . . . . . . . . . . . . . . . . . . . . . . . . . . . . . . . . . . 3Front . . . . . . . . . . . . . . . . . . . . . . . . . . . . . . . . . . . . . . . . . . . . . . . . . . . . . . . . . . . . . . 4
Display panel . . . . . . . . . . . . . . . . . . . . . . . . . . . . . . . . . . . . . . . . . . . . . . . . . . . . 5Joystick . . . . . . . . . . . . . . . . . . . . . . . . . . . . . . . . . . . . . . . . . . . . . . . . . . . . . . . . 7
Top . . . . . . . . . . . . . . . . . . . . . . . . . . . . . . . . . . . . . . . . . . . . . . . . . . . . . . . . . . . . . . . 8Back . . . . . . . . . . . . . . . . . . . . . . . . . . . . . . . . . . . . . . . . . . . . . . . . . . . . . . . . . . . . . . 9Connecting the neck strap . . . . . . . . . . . . . . . . . . . . . . . . . . . . . . . . . . . . . . . . . . . . 10Installing the battery . . . . . . . . . . . . . . . . . . . . . . . . . . . . . . . . . . . . . . . . . . . . . . . . . 11
2 Using Your Player. . . . . . . . . . . . . . . . . . . . . . . . . . . . . . . . . . . . . . . . . . . . . . . 13
Turning your player on and off . . . . . . . . . . . . . . . . . . . . . . . . . . . . . . . . . . . . . . . . 14Playing songs, Audible books and other files . . . . . . . . . . . . . . . . . . . . . . . . . . . . . 15Playing an FM radio station . . . . . . . . . . . . . . . . . . . . . . . . . . . . . . . . . . . . . . . . . . . 15
Programming favorite stations . . . . . . . . . . . . . . . . . . . . . . . . . . . . . . . . . . . . . . 16Adjusting the volume . . . . . . . . . . . . . . . . . . . . . . . . . . . . . . . . . . . . . . . . . . . . . . . . 17Locking controls . . . . . . . . . . . . . . . . . . . . . . . . . . . . . . . . . . . . . . . . . . . . . . . . . . . . 17Creating a play loop . . . . . . . . . . . . . . . . . . . . . . . . . . . . . . . . . . . . . . . . . . . . . . . . . 18Recording from the microphone . . . . . . . . . . . . . . . . . . . . . . . . . . . . . . . . . . . . . . . 18Recording a radio station . . . . . . . . . . . . . . . . . . . . . . . . . . . . . . . . . . . . . . . . . . . . . 19Erasing files . . . . . . . . . . . . . . . . . . . . . . . . . . . . . . . . . . . . . . . . . . . . . . . . . . . . . . . 20Using the on-screen menu . . . . . . . . . . . . . . . . . . . . . . . . . . . . . . . . . . . . . . . . . . . 21
3 Copying Music and Books to Your Player . . . . . . . . . . . . . . . . . . . . . . 23
Connecting your player . . . . . . . . . . . . . . . . . . . . . . . . . . . . . . . . . . . . . . . . . . . . . . 24Disconnecting your player . . . . . . . . . . . . . . . . . . . . . . . . . . . . . . . . . . . . . . . . . . . . 27Installing the driver (Windows 98SE only) . . . . . . . . . . . . . . . . . . . . . . . . . . . . . . . . 28Transferring music and data files . . . . . . . . . . . . . . . . . . . . . . . . . . . . . . . . . . . . . . 29
Transferring music files with Windows . . . . . . . . . . . . . . . . . . . . . . . . . . . . . . . 29Transferring music files with Musicmatch . . . . . . . . . . . . . . . . . . . . . . . . . . . . . 30Transferring music files downloaded from Napster . . . . . . . . . . . . . . . . . . . . . 33Transferring data files . . . . . . . . . . . . . . . . . . . . . . . . . . . . . . . . . . . . . . . . . . . . 34
Downloading audio books from Audible . . . . . . . . . . . . . . . . . . . . . . . . . . . . . . . . . 37
4 Troubleshooting. . . . . . . . . . . . . . . . . . . . . . . . . . . . . . . . . . . . . . . . . . . . . . . . . 39
Solutions . . . . . . . . . . . . . . . . . . . . . . . . . . . . . . . . . . . . . . . . . . . . . . . . . . . . . . . . . . 40Contacting Gateway . . . . . . . . . . . . . . . . . . . . . . . . . . . . . . . . . . . . . . . . . . . . . . . . . 42
iwww.gateway.com

A Specifications . . . . . . . . . . . . . . . . . . . . . . . . . . . . . . . . . . . . . . . . . . . . . . . . . . . 43
B Safety, Regulatory, and Legal Information . . . . . . . . . . . . . . . . . . . . . . 45
ii www.gateway.com

Chapter 1
Introducing Your USB DigitalMusic Player
■ Features
■ Player controls and components
■ Connecting the neck strap
■ Installing batteries
1

FeaturesYour player has the following features:
■ 64 MB, 128 MB, or 256 MB integrated memory, depending on the model you purchased (3 MB of memory is required for your player’s operating system and software)
■ Compact, two-piece design
■ Direct connection to almost any USB-equipped computer (driver required for Windows 98SE)
■ Quick transfer of music and data files
■ Convenient access to player controls for easy navigation
■ Large, backlit display panel with 132 × 48 resolution and 1.5-inch viewable area
■ Music track information displayed on the display panel (ID3 tag support)
■ Digital voice recorder for dictating personal notes or recording meetings
■ FM tuner for listening to your favorite radio stations and includes 10 progammable (preset) stations
■ Equalizer function with five modes (normal, classical, jazz, pop, and rock)
■ Storage or transfer of data files of any type using drag-and-drop
■ Lock slider to lock player controls and settings to keep them from changing accidentally
■ Cover lock to secure your player to the cover
■ Up to 10-hours of continuous playback using one AAA battery
■ Auto power down
■ Stores approximately one hour (64 MB), two hours (128 MB), or four hours (256 MB) of compressed digital music recorded at 128 kbps (recommended)
Important Downloading digital content without the permission of the copyright owner or copying CDs for sale or commercial use is a violation of copyright laws. We encourage you to download responsibly.
2 www.gateway.com

AccessoriesAccessories include:
■ Stereo headphones
■ USB extension cable
■ Neck strap
■ Carry case
■ 1 AAA battery
■ Setup poster
■ Installation CD
3www.gateway.com

Front
Component Description
Display panel Shows the status of your player. For more information, see “Display panel” on page 5.
Microphone Speak into the microphone to record voice files. For more information, see “Recording from the microphone” on page 18.
Joystick Press the middle of the joystick to turn your player on and off and to start and pause playback.
Press the sides of the joystick to perform different functions.
For more information, see “Joystick” on page 7.
Microphone
Joystick
Displaypanel
4 www.gateway.com

Display panel
Icon Description
Current mode Indicates the status of your player.■ – Playing ■ – Playing paused ■ – Playing stopped ■ – Recording
Play mode This icon indicates the play mode. – Repeat is active. Your player repeats all files (music
or voice). If the repeat icon is followed by a number (Repeat Track), your player repeats the currently playing file (song or voice) only.
– Shuffle is active. Your player randomly plays all files (music or voice) stored on your player. If the shuffle icon appears with the repeat icon ( ), your player randomly plays all the files. When the last file has played, your player starts playing the files again in a different order.
A-B – Loop mode is active. Your player is playing a loop that you created. For more information, see “Creating a play loop” on page 18.
M11Vol 003/033
04:02/04:03
A-B ROCK
The Rock Sergi Rachmaninoff
Current mode
Play mode
Equalizer Lock
Current file
Source
Battery
Artist
Volume
Title
Current time Total time
Total files
SH
SH
5www.gateway.com

Equalizer The equalizer icon indicates the currently selected equalizer mode. If no equalizer icon appears, the equalizer mode is normal. You can choose:■ No icon – Normal equalizer■ ROCK – Rock equalizer■ JAZZ – Jazz equalizer■ CLASS – Classical equalizer■ POP – Pop equalizer
Lock When the controls are locked the lock icon appears. Locking the controls keeps them from accidently being changed.
Current file Indicates the number of the currently playing file (music or voice).
Source Indicates the currently selected source.■ M – Playing music files stored on your player■ V – Playing voice files stored on your player■ FM – Playing an FM radio station
Battery Indicates the remaining charge in the battery.
Total files Indicates the total number of files (music or voice) stored on your player.
Total time Indicates the total seconds of playing time for the currently playing file.
Current time Indicates the elapsed seconds of playing time for the currently playing file.
Artist Indicates the artist for the currently playing music file.
Title Indicates the title for the currently playing music file.
Volume Indicates the current volume level.
Icon Description
6 www.gateway.com

JoystickThe joystick is the large button on the front of your player.
Icon Description
Volume up (+) Press on the top of the joystick to increase the volume.
Play/Pause When your player is off, press to turn on your player. When your player is on, press to start and pause playback. When your player is on, press and hold to turn off your player.
Next Press to go to the next file or radio station. When a file is playing, press and hold to fast-forward through the file.
Volume down (–) Press the on the bottom of the joystick to decrease the volume.
Previous Press to go to the previous file or radio station. When a file is playing, press and hold to fast-reverse through the file.
Volume up (+)
Play/Pause
Volume down (–)
NextPrevious
7www.gateway.com
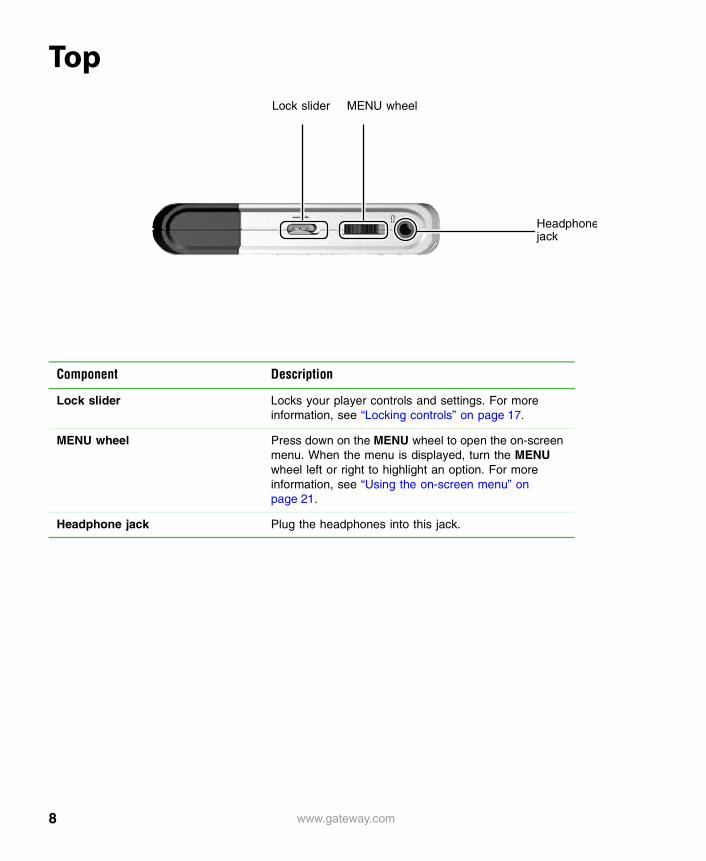
Top
Component Description
Lock slider Locks your player controls and settings. For more information, see “Locking controls” on page 17.
MENU wheel Press down on the MENU wheel to open the on-screen menu. When the menu is displayed, turn the MENU wheel left or right to highlight an option. For more information, see “Using the on-screen menu” on page 21.
Headphone jack Plug the headphones into this jack.
Lock slider MENU wheel
Headphonejack
8 www.gateway.com

Back
Component Description
Cover lock Slide this button to remove the cover.
Cover Remove the cover to access the USB connector and to install or replace the battery. For more information, see “Installing the battery” on page 11.
Strap connector Connect the carrying strap to this connector. For more information, see “Connecting the neck strap” on page 10.
Cover
Cover lock
Strap connector
9www.gateway.com

Connecting the neck strap
To connect the neck strap:
1 Thread the thin loop through the two strap connector holes on your player.
2 Thread the plastic connector through the thin loop, and pull tight.
3 Insert the plastic plug on the neck strap into the plastic connector attached to the thin loop.
10 www.gateway.com

Installing the battery
To install the battery:
1 Slide the cover lock on the back of your player into the unlocked position.
2 Pull the cover away from your player.
3 Slide the battery cover forward
11www.gateway.com

4 Lift the cover to open the battery compartment.
5 Insert the battery into the compartment. Make sure that you match the + and – on the battery with the + and – in the compartment.
6 Slide the battery compartment cover closed.
7 Replace the cover, then slide the cover lock into the locked position.
12 www.gateway.com

Chapter 2
Using Your Player■ Turn your player on and off
■ Play files and radio stations
■ Adjust the volume
■ Lock controls
■ Make recordings
■ Erase files
■ Use the on-screen menu
13

Turning your player on and off
To turn on your player:
■ Press down on the joystick until the Gateway logo appears.
To turn off your player:
■ Press down on the joystick until the Continue Holding To Power Off message disappears.
14 www.gateway.com

Playing songs, Audible books and other files
You can play music files you record from radio stations, audio books that you download from Audible.com, or music files you transfer from another player or a computer. You can also play voice files that you record from the built-in microphone.
To play a file:
1 Turn on your player. Your player starts playing the last song or radio station you were playing.
2 Press down on the MENU wheel again to open the menu. For the location of the wheel, see “Top” on page 8.
3 Turn the MENU wheel left or right to highlight Music or Voice, then press down on the MENU wheel. Your player switches to the mode you selected.
4 Press (play/pause) on the joystick to play the file.
- OR -
Press (previous) to go to the previous file stored on your player, or press (next) on the joystick to go to the next file stored on your player.
For the location of the joystick, see “Joystick” on page 7.
Playing an FM radio station
To play an FM radio station:1 Turn on your player.
2 Make sure that the Play mode is set to Normal (turn the MENU wheel one or more times until no Play mode icon appears). For the location of the Play mode icon, see “Display panel” on page 5.
Important Audio books you download from Audible.com appear as music files on your player. For more information about downloading books from Audible.com, see “Downloading audio books from Audible” on page 37
15www.gateway.com

3 Press down on the MENU wheel to open the menu. For the location of the MENU wheel, see “Top” on page 8.
4 Turn the MENU wheel left or right one or more times to highlight FM Tuner.
5 Press down on the MENU wheel to close the menu and select FM Tuner.
6 Press and hold (next) or (previous) on joystick for about one second to change stations. Your player scans for the next available station.
Programming favorite stationsYou can program as many as 10 FM stations. After you program a station, you can quickly tune to the station.
To program a favorite station:
1 Turn on your player, then press down on the MENU wheel to open the menu.
2 Turn the MENU wheel to the left or right one or more times to highlight FM Tuner.
3 Press down on the MENU wheel to switch to FM Tuner. Your player starts playing the last station you previously selected.
4 Turn the MENU wheel left or right one or more times until the preset number (P1 though P10) you want to program appears.
5 Press and hold (next) or (previous) on the joystick to tune to the station you want to program.
6 Turn the MENU wheel to the right for two to three seconds. Your player assigns the station to the favorite number (P1 through P10) you selected in Step 4.
7 To tune to a favorite station, press and hold (next) until the preset number you want appears.
Important The first time you select FM Tuner, your player presets 10 radio stations. This process may take 20 to 30 seconds. The next time you select FM Tuner, your player starts playing the last station you previously selected.
16 www.gateway.com

Adjusting the volume
To adjust the volume:
1 Turn on your player.
2 Start playing a file or radio station.
3 Press the on the top of the joystick to increase the volume.
- OR -
Press the on the bottom of the joystick to decrease the volume.
For the location of the joystick, see “Joystick” on page 7.
Locking controlsYou can lock the controls on your player so they do not change accidentally.
To lock controls:1 Turn on your player.
2 Select the Play mode and other settings you want to use.
3 Slide the lock slider on the top of your player to the locked position. After you lock the controls, you cannot change the Play mode or other settings until you unlock your player. For the location of the lock slider, see “Top” on page 8.
17www.gateway.com

Creating a play loopYou can create a loop of files that will play repeatedly. Your player plays the files in sequence. After your player plays the last file, it starts playing the first file again.
To create a play loop:
1 Turn on your player, then press down on the MENU wheel to open the menu.
2 Turn the MENU wheel to the left or right one or more times to highlight MUSIC, then press down on the MENU wheel to select MUSIC.
3 Select the music file you want to play first, then turn the MENU wheel left to set your starting point (A).
4 Continue playing music files until you come to the ending point (B) for your loop, then turn the MENU wheel left to set your ending point (B). The play loop starts playing.
5 To stop the loop, turn the MENU wheel left.
Recording from the microphoneYou can use the built-in microphone to make a recording.
To create a recording with the microphone:
1 Turn on your player.
2 Press down on the MENU wheel to open the menu.
18 www.gateway.com

3 Turn the MENU wheel to the right one or more times to highlight RECORD, then press down on the MENU wheel to start the recording.
4 Press (play/pause) on the joystick to stop the recording. You can press (play/pause) on the joystick again to add to the recording.
5 After you have finished recording, press down on the MENU wheel to open the menu, then turn the MENU wheel to the left or right one or more times to select the Play mode you want.
For information about how to play your recording, see “Playing songs, Audible books and other files” on page 15.
Recording a radio station
To record a radio station:
1 Turn on your player.
2 Tune to an FM station. For more information, see “Playing an FM radio station” on page 15.
3 Press (play/pause) on the joystick to start the recording.
4 Press (play/pause) on the joystick to stop the recording.
5 Press down on the MENU wheel to return to FM Tuner listening mode.
6 Press down on the MENU wheel again to return to Music mode.
19www.gateway.com

Erasing files
To erase files:
1 Turn on your player.
2 Press down on the MENU wheel to open the menu.
3 Turn the MENU wheel left or right one or more times to select Erase Files.
4 Turn the MENU wheel left or right to select the Music or Voice file option, then press down on the MENU wheel. The menu displays the name of the first file in the category you chose.
5 Press (next) or (previous) on the joystick to select the file you want to erase.
6 When the file you want to erase is displayed, turn the MENU wheel left or right to highlight Yes.
7 Press down on the MENU wheel to erase the file.
8 Press down on the MENU wheel to close the menu.
Tips & Tricks To close the menu without deleting a file, make sure that No is selected, then press down on the MENU wheel for about 2 seconds.
20 www.gateway.com

Using the on-screen menuYour player comes with an on-screen menu that lets you:
■ Select player modes
■ Change various settings, including power saving, backlight, contrast, equalizer, and record settings
■ Erase files
To use the menu:
1 Turn on your player.
2 Press down on the MENU wheel to open the menu.
3 Turn the MENU wheel to the left or right one or more times to highlight the option you want.
4 Press down on the MENU wheel to select the option.
5 If the option has sub-options, turn the MENU wheel to the left or right one or more times to select or adjust a sub-option.
6 Turn the MENU wheel to the left or right one or more times to highlight Exit, then press down on the MENU wheel to close the menu.
- OR -
Press down on the MENU wheel one or more times to close the menu.
Options Description
Music Select this option to play music files.
Voice Select this option to play voice files.
FM Tuner Select this option to listen to an FM radio station.
Record Select this option to create a voice file or record a radio station.
21www.gateway.com

Settings ■ Equalizer: Selects the Equalizer mode. You can choose Normal, Rock, Jazz, Classical, or Pop.
■ Play mode: Selects the Play mode for music files. You can choose Normal, Repeat Track, Repeat All, Shuffle, or Shuffle Repeat.
■ Contrast: Adjusts a contrast level for the display panel.■ Backlight: Turns the backlight on the display panel on
and off.■ Power Savings: When your player is not being used,
it can automatically enter standby mode to save battery power. Select the amount of time you want your player to wait before entering standby mode.
■ Record Settings:Source selects Microphone or FM so you can change the settings for recordings from the microphone or from the radio.
Encoder selects PCM, IM ADPCM, or MS ADPCM. This setting affects sampling rate of a recording. ADPCM allows smaller, lower-quality audio files than PCM. Unless you have special sampling rate requirements, we recommend you use the default setting.
Channel changes from stereo to mono if the Source is FM. If the source is Microphone, you can only record in mono.
■ Reset to Defaults: Returns the player to original settings.
■ Exit: Returns to the main menu.
Erase Files ■ Music: Deletes music files stored in memory.■ Voice: Deletes voice files stored in memory.■ Exit: Returns to the main menu.
About Displays the total memory and current firmware version.
Exit Closes the menu.
Options Description
22 www.gateway.com
Chapter 3
Copying Music and Books toYour Player
■ Connect your player to your computer
■ Install the driver for Windows 98SE
■ Transfer files to and from your player
■ Use Musicmatch
■ Use Audible audio books
23

Connecting your player
To connect your player to your computer:
1 Slide the cover lock into the unlocked position.
2 Pull the cover away from your player.
24 www.gateway.com

3 Plug your player’s USB connector into a USB port on your computer.
4 If you are using Windows 98SE, you need to install a driver for your player. Go to “Installing the driver (Windows 98SE only)” on page 28.
25www.gateway.com

5 Open the My Computer or Windows Explorer window. Your player appears as a removable drive.
Player icon
26 www.gateway.com

Disconnecting your player
To disconnect your player:
1 Click the remove hardware icon on the Windows task bar. The Safely Remove Hardware dialog box opens.
2 Click USB Mass Storage Device, then click Stop. The Stop a Hardware device dialog box opens.
3 Click Gateway DMP Player USB Device, then click OK.
4 Click Close.
5 Unplug your player.
27www.gateway.com

Installing the driver (Windows 98SE only)
To install the driver for Windows 98SE:1 Connect your player to your computer. For more information, see “Connecting your
player” on page 24.
2 Insert the installation CD into the CD or DVD drive on your computer.
3 Click Start, Settings, Control Panel, then double-click the Add New Hardware icon. The Add New Hardware Wizard opens.
4 Follow the on-screen instructions to install the driver. When you are prompted for the location of the driver, browse to the win98dvr folder on the CD.
Important If you are using Windows XP, Windows 2000, or Windows Me, Windows automatically recognizes your player as a removable drive in the My Computer and Windows Explorer windows. You do not need to install a driver.
Important We have provided the Window 98SE driver for your convenience. We do not provide support for the driver or Windows 98.
28 www.gateway.com

Transferring music and data files
Transferring music files with Windows
To copy a music file from your computer to your player:
1 Connect your player to your computer. For more information, see “Connecting your player” on page 24.
2 Open the My Computer or Windows Explorer window on your computer, then locate and select the music file(s) you want to copy to your player.
29www.gateway.com

3 Right-click the file(s), then click Copy to CD or Device. Windows Media Player opens.
4 In the Windows Media Player window, select your player from the list of devices. The player’s device icon is usually labeled “Removable Disk.”
5 Click the Copy button. Windows Media Player copies the playlist to your player.
6 Disconnect your player. For more information, see “Disconnecting your player” on page 27.
Transferring music files with MusicmatchMusicmatch is full-featured music player that lets you:
■ Play music CDs
■ Create MP3 music files from your music CDs
■ Edit music track information
■ Use your music files to build a music library
■ Copy music files from your computer to your player.
For more information on using Musicmatch, see its online help.
Copy
Removable Disk
30 www.gateway.com

Installing Musicmatch
To install Musicmatch:
1 Insert the USB Personal Music Player CD into the CD drive on your computer. The Gateway DMP Player Install window opens.
2 Click Musicmatch 8.2. The Musicmatch Jukebox Setup wizard opens.
3 Follow the on-screen instructions to install Musicmatch.
Upgrading Musicmatch
You can use the basic version of Musicmatch that you installed from the USB Personal Music Player CD, or you can upgrade Musicmatch to get additional features that let you buy songs online and get personal recommendations about song you may want. For more information about upgrading to Musicmatch Jukebox PLUS, visit www.musicmatch.com.
To upgrade to Musicmatch Jukebox PLUS:1 Click Start, All Programs, MUSICMATCH, then click MUSICMATCH Jukebox. Musicmatch
opens.
2 Click Upgrade to Plus - Click Here.
- OR -
Click Upgrade.
3 On the Web page that opens, click GET PLUS and follow the on-screen instructions to get your upgrade key.
4 In Musicmatch, click Help, Registration, then click Enter Key.
5 Type your key into the Enter the Key box, then click OK.
6 When a message tells you that the upgrade is complete, click Close.
Copying music tracks to your computer
Using Musicmatch, you can copy the tracks from a music CD to your computer’s hard drive as MP3 files.
31www.gateway.com

To create MP3 files:1 To have Musicmatch automatically list the album, artist, and track names of your CD,
then use that information for naming and storing your MP3 files, connect to the Internet before inserting your CD.
2 Insert a music CD into your CD or DVD drive.
3 If an Audio CD dialog box opens, click Play Audio CD using MUSICMATCH Jukebox, then click OK. The Gateway JUKEBOX by musicmatch window opens.
- OR -
If a dialog box does not open, click Start, All Programs, MUSICMATCH, then click MUSICMATCH Jukebox. The Gateway JUKEBOX by musicmatch window opens.
4 If the CD is playing, click the stop button.
5 In the MUSIC CENTER area, under COPY, click Rip From CD. The Musicmatch recorder opens.
6 Click to clear the check box for any track you do not want to record.
7 Click the start button.
8 When a message appears that tells you the CD drive needs to be configured, click OK. After the drive is configured, Musicmatch records the tracks to your hard drive as MP3 files. A progress bar appears next to each track as it is recorded.
9 Disconnect your player. For more information, see “Disconnecting your player” on page 27.
To copy files from Musicmatch to your player:
1 Connect your player to your computer. For more information, see “Connecting your player” on page 24.
2 Open Musicmatch on your computer.
3 In the MUSIC CENTER area, under COPY, click Send to Portable. The musicmatch PORTABLE DEVICE MANAGER dialog box opens.
Important Some music CDs have copy protection software. You cannot copy tracks from these CDs.
32 www.gateway.com

4 Browse to the file you want to copy to your player. By default, all files in your Musicmatch library are selected.
5 Click a file that you want to copy. Hold down the SHIFT or CTRL key to select multiple files.
6 Click Add. Musicmatch copies the files to your player.
7 Disconnect your player. For more information, see “Disconnecting your player” on page 27.
Transferring music files downloaded from NapsterSongs you download from Napster are encrypted. If you transfer the files from Windows Explorer or My Computer, the songs will not play on your player. You need to transfer the Napster files with Windows Media Player (version 9.0 or higher).
To transfer Napster files to your player:
1 Connect your player to your computer. For more information, see “Connecting your player” on page 24.
2 Open Windows Media Player (version 9.0 or higher).
3 Click Copy to CD or Device.
4 Open the Items to Copy list, then click the artist, album, or track you want to transfer. If you selected an artist or album, make sure that the tracks you want to copy have check marks next to them.
5 Click Copy in the upper-right corner of the Windows Media Player window. Media Player copies the songs to your player. A status bar appears next to each song as it is copied.
6 When all the songs have been copied, disconnect your player from your computer. For more information, see “Disconnecting your player” on page 27.
33www.gateway.com

Transferring data files
To copy or move a data file from your computer to your player:
1 Connect your player to your computer. For more information, see “Connecting your player” on page 24.
2 Open the My Computer or Windows Explorer window on your computer, then locate the file you want to copy to your player.
3 To copy the file, right-click the file, then click Copy.
- OR -
To move the file, right-click the file, then click Cut.
4 In the My Computer or Windows Explorer window, locate the icon for your player. This icon is usually labeled “Removable Disk.”
5 Double-click the icon for your player. Windows lists the folders stored on your player.
Player icon
34 www.gateway.com

6 Double-click the folder you want to copy the file to, right-click inside the folder, then click Paste. Windows copies the file to your player.
7 Disconnect your player. For more information, see “Disconnecting your player” on page 27.
After you copy or move a file to your player, you can connect your player to another computer and copy or move the file from your player to the other computer.
To copy or move a data file from your player to your computer:1 Connect your player to your computer. For more information, see “Connecting your
player” on page 24.
2 Open the My Computer or Windows Explorer window. Your player appears as a removable disk.
3 Double-click the icon for your player. Windows lists the folders stored on your player.
Player icon
35www.gateway.com

4 Double-click a folder that contains the file you want to copy or move, then locate the file.
5 To copy the file, right-click the file, then click Copy.
- OR -
To move the file, right-click the file, then click Cut.
6 Go to the folder on your computer where you want to copy or move the file to, right-click inside the folder, then click Paste. Windows copies or moves the file to your computer.
7 Disconnect your player. For more information, see “Disconnecting your player” on page 27.
36 www.gateway.com

Downloading audio books from AudibleYour player lets you play audio books from Audible.com.
To add an Audible audio book:
1 Insert the Gateway USB Personal Music Player CD into the CD drive on your computer.
2 Make sure that the Free Gateway Listener (Audible Books) check box is selected.
3 Click Install, then follow the on-screen instructions to install the AudibleManager.
4 Make sure that your computer is connected to the Internet.
5 Connect your player to your computer. For more information, see “Connecting your player” on page 24.
6 Access the Audible.com Web site and follow the on-screen instructions to set up your Audible account.
7 Purchase and download audio books from Audible.com. When you are prompted to select a format, select 2 or 3.
AudibleManager downloads the book to your computer and transfers it to your player.
8 Disconnect your player from your computer. For more information, see “Disconnecting your player” on page 27.
For more information about using AudibleManager, see the online help.
37www.gateway.com

38 www.gateway.com

Chapter 4
Troubleshooting■ Troubleshoot common problems
■ Contact Gateway Technical Support
39

SolutionsI cannot turn on my player■ Make sure that the battery is installed correctly. For more information, see “Installing
the battery” on page 11.
■ Make sure that the installed battery has a charge. Try installing a fresh battery.
■ Make sure that you press down on the joystick until the Gateway logo appears.
I cannot turn off my player■ Make sure that you press down on the joystick until the Continue Holding To Power Off
message disappears.
I cannot read the display■ The backlight may be turned off. Open the menu, select Settings, then select Backlight.
Make sure the setting is set to On. For more information, see “Using the on-screen menu” on page 21.
When I connect my player to my computer, I do not see my player in the My Computer or Windows Explorer window■ If you are using Windows XP, Windows Me, or Windows 2000, your computer should
automatically detect your player when you plug it in.
■ Disconnect and reconnect your player.
■ Connect your player to a different USB port on your computer.
■ Plug another USP device into the USB port on your computer to make sure that the port is working.
■ Restart your computer.
■ If you are using Window 98SE, you need to install the driver for the player. For more information, see “Installing the driver (Windows 98SE only)” on page 28.
40 www.gateway.com

I cannot transfer files from my computer to my player■ Your player may be out of storage space. In the My Computer window, right-click the
icon for your player, then click Properties. The amount of free space appears on the General tab. If you do not have any free space on your player, delete files from one of the folders on the player. Transfer any files you want to save to your computer before you delete them from your player.
My player locks up or does not play or record files■ Try deleting all the files on your player, then copy new files to your player.
■ If deleting all the files does not fix the problem, reformat the storage space on your player from Windows.
To reformat your player:1 Connect your player to a USB port on your computer. For more information, see
“Connecting your player” on page 24.
2 Insert the installation CD in your computer’s CD or DVD drive.
3 If the utility runs automatically, go to Step 7.
- OR -
If the utility does not run automatically, go to Step 4.
4 On your computer, click Start, then click Run. The Run dialog box opens.
5 In the Open text box, type d:\Launcher.exe (where d is the drive letter of your CD or DVD drive).
6 Click OK.
7 Click Install the Update Utility.
8 If you are prompted to restart your computer, do so. If a message tells you binary files are missing, click OK. This will not affect the formatting process.
9 Select Start-All Programs-Gateway DMP Player-DMP Format.
Caution When you format the storage space on your player, all files stored on the player are lost.
Important Make sure that you connect the player before starting the utility. Restart the utility if options are grayed out.
41www.gateway.com

10 Click Start. When the format is complete, you can copy files to your player.
Contacting GatewayIf you need non-tutorial help with your player, contact Gateway at:
1-888-737-6949, Monday through Friday, 7:00 a.m. through 9:00 p.m. Central Time.
42 www.gateway.com

Appendix A
Specifications43

Specifications are subject to change without notice or obligation.
Component Description
Audio Output Power: 12 mW (450 mV, 16 ohm)
Channel: Stereo
Signal-to-Noise: 85 dB
Total Harmonic Distortion: < 0.1%
Headphone Jack: 40 mW + 40 mW: 16 ohm
Microphone: HQ 16K/32 KB
FM Radio Frequency Range: 88-108MHz
Programmable stations: 10 (P-1 through P10)
Internal memory 64 MB (model DMP-110)
128 MB (model DMP-210)
256 MB (model DMP-310)
Note: 3 MB of memory required for player operating system and software
Dimensions 3.35 × 0.59 × 1.57 inches (L x W x H)
85 × 15 × 40 mm (L x W x H)
Weight Approximately 1.2 ounces (35 g) without battery
Approximately 1.8 ounces (50 g) with battery
Minimum PC System Requirements
Operating systems: Microsoft Windows XP, Windows Me, Window 2000, and Windows 98SE. Driver required for Windows 98SE (included on the CD).
Processor: Intel Pentium II 233 MHz
Hard drive space: 10 MB
Memory: 64 MB (128 MB recommended)
Connection type: USB port
44 www.gateway.com

Appendix B
Safety, Regulatory, and LegalInformation
45

Regulatory compliance statements
United States of AmericaFederal Communications Commission (FCC)Unintentional emitter per FCC Part 15
This device has been tested and found to comply with the limits for a Class B digital device, pursuant to Part 15 of the FCC rules. These limits are designed to provide reasonable protection against harmful interference in a residential installation.
This equipment generates, uses, and can radiate radio frequency energy and, if not installed and used in accordance with the instructions, may cause harmful interference to radio or television reception. However, there is no guarantee that interference will not occur in a particular installation. If this equipment does cause interference to radio and television reception, which can be determined by turning the equipment off and on, the user is encouraged to try to correct the interference by one or more of the following measures:
■ Reorient or relocate the receiving antenna■ Increase the separation between the equipment and receiver■ Connect the equipment to an outlet on a different circuit from that to which the receiver is connected■ Consult the dealer or an experienced radio/TV technician for help.
FCC declaration of conformityResponsible party:
Gateway Companies, Inc.610 Gateway Drive, North Sioux City, SD 57049(605) 232-2000 Fax: (605) 232-2023
Product:
■ DMP-110
■ DMP-210
■ DMP-310
This device complies with Part 15 of the FCC Rules. Operation of this product is subject to the following two conditions: (1) this device may not cause harmful interference, and (2) this device must accept any interference received, including interference that may cause undesired operation.
CanadaIndustry Canada (IC)Unintentional emitter per ICES-003
This digital apparatus does not exceed the Class B limits for radio noise emissions from digital apparatus as set out in the radio interference regulations of Industry Canada.
Le présent appareil numérique n’émet pas de bruits radioélectriques dépassant les limites applicables aux appareils numériques de Classe B prescrites dans le règlement sur le brouillage radioélectrique édicté par Industrie Canada.
Caution Changes or modifications not expressly approved by Gateway could void the FCC compliance and negate your authority to operate the product.
46 www.gateway.com

California Proposition 65 Warning
Caution This product contains chemicals, including lead, known to the State of California to cause cancer and/or birth defects or reproductive harm.
47www.gateway.com

NoticesCopyright © 2004 Gateway, Inc.All Rights Reserved14303 Gateway PlacePoway, CA 92064 USA
All Rights ReservedThis publication is protected by copyright and all rights are reserved. No part of it may be reproduced or transmitted by any means or in any form, without prior consent in writing from Gateway.
The information in this manual has been carefully checked and is believed to be accurate. However, changes are made periodically. These changes are incorporated in newer publication editions. Gateway may improve and/or change products described in this publication at any time. Due to continuing system improvements, Gateway is not responsible for inaccurate information which may appear in this manual. For the latest product updates, consult the Gateway Web site at www.gateway.com. In no event will Gateway be liable for direct, indirect, special, exemplary, incidental, or consequential damages resulting from any defect or omission in this manual, even if advised of the possibility of such damages.
In the interest of continued product development, Gateway reserves the right to make improvements in this manual and the products it describes at any time, without notices or obligation.
Trademark AcknowledgmentsGateway and the Black-and-White Spot Design are trademarks or registered trademarks in the U.S. and other countries. SpotShop, Spotshop.com, and Your:)Ware are trademarks of Gateway, Inc. Intel, Intel Inside logo, and Pentium are registered trademarks and MMX is a trademark of Intel Corporation. Microsoft, MS, MS-DOS, and Windows are trademarks or registered trademarks of Microsoft Corporation. All other product names mentioned herein are used for identification purposes only, and may be the trademarks or registered trademarks of their respective companies.
48 www.gateway.com

MAN DMP-110/210/310 GDE R1 02/04


