20
CS62US / CS64US USER MANUAL USB KVM Switch
| Date post: | 04-Aug-2018 |
| Category: |
Documents |
| Upload: | vuongxuyen |
| View: | 214 times |
| Download: | 0 times |

CS62US / CS64US
USER MANUAL
USB KVM Switch

EMC InformationFEDERAL COMMUNICATIONS COMMISSION INTERFERENCE STATEMENT: This equipment has been tested and found to comply with the limits for a Class B digital service, pursuant to Part 15 of the FCC rules. These limits are designed to provide reasonable protection against harmful interference in a residential installation. Any changes or modifications made to this equipment may void the user’s authority to operate this equipment. This equipment generates, uses, and can radiate radio frequency energy. If not installed and used in accordance with the instructions, may cause harmful interference to radio communications. However, there is no guarantee that interference will not occur in a particular installation. If this equipment does cause harmful interference to radio or television reception, which can be determined by turning the equipment off and on, the user is encouraged to try to correct the interference by one or more of the following measures:
Reorient or relocate the receiving antenna.Increase the separation between the equipment and receiver.Connect the equipment into an outlet on a circuit different from that to which the receiver is connected.Consult the dealer or an experienced radio/TV technician for help.
FCC Caution: Any changes or modifications not expressly approved by the party responsible for compliance could void the user's authority to operate this equipment.
KCC Statement
유선 제품용 / B 급 기기 ( 가정용 방송 통신 기기 )
이 기기는 가정용 (B 급 ) 전자파적합기기로서 주로 가정에서 사용하는 것을 목적으로 하며 , 모든 지역에서 사용할 수 있습니다 .
RoHSThis product is RoHS compliant.
SJ/T 11364-2006The following contains information that relates to China.

- 3 -
CS62US / CS64US User Manual
Online RegistrationYou can register your product at our online support center:
Online SupportInternational
North America
International http://support.aten.com
North America ATEN TECH http://www.aten-usa.com/product_registration
ATEN NJ http://support.aten.com
Email Support [email protected]
Online Support
Technical Support http://support.aten.com
TroubleshootingDocumentationSoftware Updates
http://www.aten.com
Telephone Support 886-2-8692-6959
Email Support ATEN TECH [email protected]
ATEN NJ [email protected]
Online Support
Technical Support
ATEN TECH http://www.aten-usa.com/support
ATEN NJ http://support.aten.com
TroubleshootingDocumentationSW Updates
ATEN TECH http://www.aten-usa.com
ATEN NJ http://www.aten.com
Telephone Support ATEN TECH 1-888-999-ATEN
ATEN NJ 1-732-356-1703

- 4 -
Package Contents
The CS62US / CS64US USB KVM Switch package contains the following items:
1 2-port CS62US USB KVM Switch or 1 4-port CS64US USB KVM Switch1 Quick Start Guide
Check to make sure that all the components are present and that nothing got damaged in shipping. If you encounter a problem, contact your dealer.
Read this manual thoroughly and follow the installation and operation procedures carefully to prevent any damage to the unit, and/or any of the devices connected to it.
Copyright © 2015 ATEN? International Co., Ltd.Manual Date: 2015-04-13
ATEN and the ATEN logo are trademarks of ATEN International Co., Ltd. All rightsreserved. All other trademarks are the property of their respective owners.

- 5 -
Overview
The CS62US / CS64US takes a giant step forward from prior cable KVM models in the Petite series, by offering built-in cables, USB peripheral sharing, and a firmware upgrade function that allows you to keep up with latest available versions.
The CS62US / CS64US also offers multiplatform support and computer selection via hotkeys to provide the ultimate in desktop convenience.
Furthermore, the CS62US / CS64US features enhanced Video DynaSyncTM technology, which stores the console monitor's EDID (Extended Display Identification Data) to optimize display resolution.
Featuring an unbeatable combination of design and functionality, USB peripheral sharing convenience, and enhanced user-friendly operations, the CS62US / CS64US allows users to keep up with the latest innovations in desktop multimedia applications.

- 6 -
FeaturesOne USB console controls two/four USB computersUSB mouse port can be used for USB hub and USB peripheral sharingComputer selection via hotkeysHotkey selection for OS and keyboard languageAudio-enabledMultiplatform support – Windows, Linux, Mac, and SunCompact design, built-in all-in-one cables Superior video quality – up to 2048 x 1536; DDC2BVideo DynaSyncTM – Exclusive ATEN technology eliminates boot-up display problems and optimizes resolution when switching between portsIndependent switching of the KVM and audio focusSupports multimedia keyboardsSupports wireless keyboards and miceSupports multifunction miceMac/Sun keyboard support and emulation1
Auto Scan function to monitor computer operationHDCP CompliantNon-PoweredFirmware upgradable2
Note: 1. PC keyboard combinations emulate Mac/Sun keyboards; Mac/Sun keyboards work only with their own computers.
2. Only CS64US supports firmware upgrade function.

- 7 -
System RequirementsConsole
A VGA, SVGA, or multisync monitor capable of the highest resolution that you will be using on any computer in the installationA USB Keyboard and a USB MouseSpeakers (optional)
ComputersThe following equipment must be installed on each computer that is to be connected to the system:
A VGA, SVGA, or multisync video portUSB Type A portSpeaker port (optional)
CablesThe CS62US / CS64US’s innovative design features built-in KVM and speaker cables for extra convenience. No further cables are necessary.

- 8 -
Operating Systems
Supported operating systems are shown in the table, below:
OS Version
Windows 2000 and higher
Linux RedHat 9.0 and higher
SuSE 10 and higher
Mandriva (Mandrake) 2006, 2007, 2008
Debian 3.1, 4.0
Ubuntu 7.04, 7.10
UNIX FreeBSD 5.5, 6.1, 6.2
Sun Solaris 9 and higher
Novell Netware 5.0 and higher
Mac OS 9 and higher
DOS 6.2 and higher

- 9 -
ComponentsCS62US
KVM Cable Connectors
Note: The KVM cable connectors are the same on both models.
1
2
3
4
5
6
7

- 10 -
CS64US
No. Component Description
1 Port LEDs The port LEDs light to indicate that the computer attached to its corresponding port has the KVM focus.
2 KVM Cables These cables attach to the computers in your installation.
3 Speaker Jack Your console speakers plug in here.
4 Console Ports The cables from your console monitor, USB keyboard, and USB mouse plug into these ports.
5 Speaker Plug The connectors on the KVM cables plug into the computers in your installation. See Installation Diagram, page 12, for more information.
6 Video Connector
7 USB Keyboard/Mouse connector
1
3
4
2

- 11 -
Installation
Setting up the CS62US / CS64US USB KVM Switch is quick and easy. Refer to the installation diagrams on the following pages (the numbers in the diagrams correspond to the steps, below) and do the following:
1. Plug your USB keyboard, USB mouse, and monitor into their ports on the CS62US / CS64US. These are located on the side of the CS62US and the front of the CS64US.
Note: When using a wireless keyboard and mouse combo, the dongle must plug into the CS62US / CS64US’s keyboard port in order for the hotkeys to function.
2. Plug your speakers into the speaker jack.
3. Plug the USB, video, and audio connectors of the attached KVM cables into their respective ports on the computers you are installing.
4. Power on the computers.
Note: The CS62US / CS64US’s power on default is to link to the first computer that is powered on.
1. Make sure that the power to any device that you connect to the installation has been turned off. You must unplug the power cords of any computers that have the Keyboard Power On function.
2. Make sure that all devices you will be installing are properly grounded.

- 12 -
Installation Diagram
2
3
1
3

- 13 -
Port Switching
All port switching operations begin by tapping the Scroll Lock key twice. See the following table for full details.
Hotkey Action
[Scroll Lock] [Scroll Lock] CS62US: Toggles the KVM and Audio focus between the two ports.
[Scroll Lock] [Scroll Lock] +
[Enter] CS64US: Brings the KVM and Audio focus from the port that currently has the KVM focus to the next port on the installation (1 to 2; 2 to 3; 3 to 4; 4 to 1)Note: If the KVM and Audio focus are on different ports, only the KVM focus switches.
[n] [Enter] Brings the KVM and Audio focus to the computer attached to the corresponding Port ID.Note: Replace n with the port number (1, 2, 3, 4).

- 14 -
Invoking Hotkey Setting Mode (HSM)All hotkey operations begin by holding the Num Lock key, pressing and releasing the Minus key, then releasing the Num Lock key. See the the following tables for full details.
Note: If using [Num Lock] [-] conflicts with other programs, [Ctrl] [F12] can be used instead. See Hotkey Summary Table, page 15, for details.
Auto Scanning
Note: To exit Auto Scan, press [Esc] or [Spacebar]. Auto Scanning stops when you exit Auto Scan mode.
Model Hotkey Action
CS62US [Num Lock] [-] [a]
Starts Auto Scan. The KVM focus cycles from port to port at 5-second intervals.
CS64US [Scroll Lock] [Scroll Lock] [a] [Enter]
Starts Auto Scan. The KVM focus cycles from port to port at 5-second intervals.
[Scroll Lock] [Scroll Lock] [a] [n] [Enter]
Starts Auto Scan. The KVM focus cycles from port to port at n-second intervals.Note: Replace n with a number between 1 and 99.

- 15 -
Hotkey Summary Table
Combination Function
[Num Lock] [-] + [H] Toggles between the default [Num Lock] [-] and alternate [Ctrl][F12] HSM invocation keys.
[T] Toggles between the default [Scroll Lock] [Scroll Lock] and alternate [Ctrl][Ctrl] port switching keys.
[F2] Activates Mac keyboard mapping.
[F3] Activates Sun keyboard mapping.
[F10] Auto detects keyboard operating platform.
[F4] Lists current switch settings via the paste function of a text editor.
[F5] Performs a USB keyboard and mouse reset.
[F6] [nn] [Enter] Sets the keyboard language layout. Note: nn is a two-digit number that represents one of the following keyboard language codes: US English 33; French 08; Japanese 15.
[r] [Enter] Resets hotkeys to the default setting.
[u] [p] [g] [r] [a] [d] [e] [Enter]
Invokes Firmware Upgrade Mode (CS64US only).
[Esc] or [Space Bar] Quits hotkey setting mode.

- 16 -
Keyboard Emulation
Note: When using key combinations, press and release the first key [Ctrl], then press and release the activation key.
Mac Sun
PC Keyboard Mac Keyboard PC Keyboard Sun Keyboard
[Shift] Shift [Ctrl] [T] Stop
[Ctrl] Ctrl [Ctrl] [F2] Again
[Ctrl] [F3] Props
[Ctrl] [1] [Ctrl] [F4] Undo
[Ctrl] [2] [Ctrl] [F5] Front
[Ctrl] [3] [Ctrl] [F6] Copy
[Ctrl] [4] [Ctrl] [F7] Open
[Alt] Alt [Ctrl] [F8] Paste
[Print Screen] F13 [Ctrl] [F9] Find
[Scroll Lock] F14 [Ctrl] [F10] Cut
= [Ctrl] [1]
[Enter] Return [Ctrl] [2]
[Backspace] Delete [Ctrl] [3]
[Insert] Help [Ctrl] [4]
[Ctrl] F15 [Ctrl] [H] Help
Compose
-
+

- 17 -
The Firmware Upgrade UtilityTo upgrade the CS62US / CS64US’s firmware, do the following:
1. From a computer that is not part of your KVM installation, download the latest Firmware Upgrade package for the CS62US / CS64US from our Internet support site (www.aten.com).
2. Invoke Firmware Upgrade Mode [Num Lock] [-] [Upgrade]. The LEDs flash together to indicate Firmware Upgrade Mode is in effect.
Note: While the switch is in Firmware Upgrade Mode, normal keyboard and mouse functions are suspended. You must complete the upgrade or exit Firmware Upgrade Mode to regain normal control of the console.
3. Run the Firmware Upgrade Package file. The Firmware Upgrade Utility Welcome screen appears.
4. Read the License Agreement and enable to I Agree button.
5. Click Next to continue. The Firmware Upgrade Utility main screen appears. All the devices capable of being upgraded by the package are listed in the Devices List panel.
6. Select your device. Its description appears in the Device Description panel. Click Next to perform the upgrade.As the upgrade proceeds, status messages appear in the Status Messages panel, and the progress towards completion is shown in the Progress bar.
7. After the upgrade has completed, a screen appears to inform you that procedure was successful. Click Finish to close the Firmware Upgrade Utility.
8. Set up your KVM installation again. See Installation, page 11.
Upgrade FailedIf the Upgrade Succeeded screen doesn’t appear, it means that the upgrade failed to complete successfully, in which case you should return the unit to your local service center for assistance.

- 18 -
Troubleshooting
Symptom Possible Cause Action
Mouse and/or Keyboard not responding.
Improper mouse and/or keyboard reset.
Unplug the cable(s) from the console port(s), then plug it/them back in.
KVM switch needs to be reset.
Power off all devices on the installation (see safety note, page 9); power off the KVM switch; wait five seconds; then power up
USB devices not responding.
USB ports need to reset.
Unplug the device’s USB cable from the USB port on the switch’s rear panel, then plug it back in.
Device not recognized (Windows).
Windows timing problem.
Unplug the KVM cable from the computer’s USB port; go into Windows’ System Settings and remove the Unknown Device entry; plug the KVM cable back in. Windows will now recognize the device.
Cannot switch ports by pressing [Scroll Lock] twice
Keyboard is incompatible with Scroll Lock invocation.
Switch to the Alternate HSM invocation keys using hotkey [T].
Cannot invoke HSM using [Num Lock][-]
Incorrect operation for invoking HSM.
Hold the [Num Lock] key, press and release the [Minus] key, then release the [Num Lock] key. The [Caps Lock] and [Scroll Lock] LEDS will flash together to indicate that the unit is in HSM.
Keyboard is incompatible with [Num Lock] invocation.
Switch to the alternate HSM invocation keys by using hotkey [H].
- 19 -
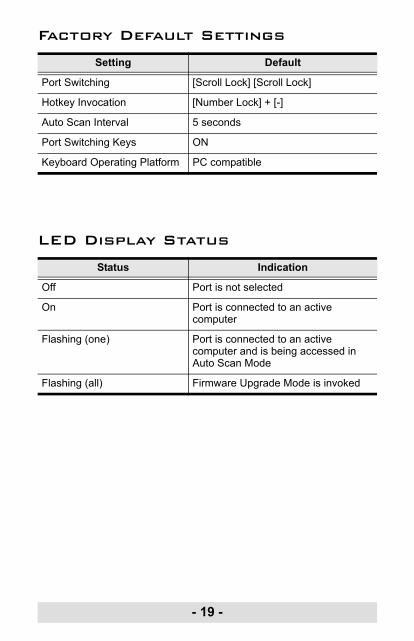
Factory Default Settings
LED Display Status
Setting Default
Port Switching [Scroll Lock] [Scroll Lock]
Hotkey Invocation [Number Lock] + [-]
Auto Scan Interval 5 seconds
Port Switching Keys ON
Keyboard Operating Platform PC compatible
Status Indication
Off Port is not selected
On Port is connected to an active computer
Flashing (one) Port is connected to an active computer and is being accessed in Auto Scan Mode
Flashing (all) Firmware Upgrade Mode is invoked

- 20 -
Specifications
Function CS62US CS64US
Computer Connections 2 4
Console Connections 1 1
Port Selection Hotkeys
Connectors Console Ports
Keyboard 1 x USB Type A Female (White)
Video 1 x HDB-15 Female (Blue)
Mouse 1 x USB Type A Female (White)
Speakers 1 x Mini Stereo Jack Female (Green)
KVM Ports Keyboard / Mouse
2 x USB Type A Male (White)
4 x USB Type A Male (White)
Video 2 x HDB-15 Male (Blue)
4 x HDB-15 Male (Blue)
Speakers 2 x Mini Stereo Jack Female (Green)
4 x Mini Stereo Jack Female (Green)
LEDs Selected 2 (Green) 4 (Green)
Cable Length 2 x 0.9 m 2 x 0.9 m; 2 x 1.2 m
Emulation Keyboard / Mouse USB
Video 2048 x 1536; DDC2B
Scan Interval 3, 5, 10, 20 secs. (default 5 secs.)
1–99 secs.(default 5 secs.)
Environment Operating Temp. 0–50ºC
Storage Temp. -20–60ºC
Humidity 0–80% RH, Non-condensing
Physical Properties
Housing Plastic
Weight 0.29 kg 0.77 kg
Dimensions (L x W x H) 8.10 x 6.90 x 2.60 cm 10.9 x 9.72 x 2.54 cm


