Page 1
University of Mississippi University of Mississippi
eGrove eGrove
Electronic Theses and Dissertations Graduate School
1-1-2019
Use of seismic refraction in determining rock mass anisotropy Use of seismic refraction in determining rock mass anisotropy
Mohammad Najmush Sakib Oyan
Follow this and additional works at: https://egrove.olemiss.edu/etd
Part of the Geological Engineering Commons, and the Geophysics and Seismology Commons
Recommended Citation Recommended Citation Oyan, Mohammad Najmush Sakib, "Use of seismic refraction in determining rock mass anisotropy" (2019). Electronic Theses and Dissertations. 1776. https://egrove.olemiss.edu/etd/1776
This Thesis is brought to you for free and open access by the Graduate School at eGrove. It has been accepted for inclusion in Electronic Theses and Dissertations by an authorized administrator of eGrove. For more information, please contact [email protected] .
Page 2
USE OF SEISMIC REFRACTION IN DETERMINING ROCK MASS ANISOTROPY
A Thesis
Presented in partial fulfillment of requirements
for the degree of Master’s in Engineering Science
in the Department of Geology and Geological Engineering
The University of Mississippi
by
MOHAMMAD NAJMUSH SAKIB OYAN
August 2019
Page 3
Copyright Mohammad Najmush Sakib Oyan 2019
ALL RIGHTS RESERVED
Page 4
ii
ABSTRACT
Seismic refraction is a popular method used by geological/geotechnical engineers to
understand subsurface conditions. This method, along with information collected from borings,
produce a realistic image of the ground beneath us. The goal of this study is to define and test a
set of procedures to use seismic refraction alone to create high quality images of subsurface
conditions. The focus is on areas with several meters of soil overlain by bedrock. The application
of these procedures will minimize construction costs by eliminating the need for multiple
boreholes. The results show that two important criteria must be met for successful application of
the method: a bedrock outcrop near the survey area and an area wide enough for geophone
spacing to reach the bedrock. Seismic profiles are to be laid radially in an orthogonal position,
preferably intersecting in the middle or in a quarter position but not at the end. Single channel
geode is used for data acquisition and Rayfract® for data processing. Surfer® and Voxler® are
used for graphical representations. Seismic refraction procedures are tested at two different sites:
a road cut and an abandoned quarry. In one case (road cut) analysis did not show any anisotropy,
which resulted from failure to meet the second criterion (geophone spacing). Analysis from
second area (quarry) exhibited a clear anisotropic nature of bedrock, confirmed by observations
on the exposed outcrop in the quarry. This is a qualitative study that can predict the orientation of
major joint sets if the above criteria have been met.
Page 5
iii
DEDICATION
I dedicate this thesis to my parents; their inspirations from the other side of the world
always motivate me in countless ways.
Page 6
iv
ACKNOWLEDGEMENTS
I would like to convey my utmost gratitude to my advisor Dr. Adnan Aydin for teaching
and guiding me throughout my whole master’s carrier so much. I would like to express my
special thanks to Dr. Lance D. Yarbrough for his valuable guidance about quarry locations and
3D graphical model software. I would also like to thank Dr. Louis G. Zachos for his valuable
advice. I am very grateful to Dr. Gifford for providing materials and reviewing the part ‘regional
structural pattern’ on Black Warrior basin carefully through her busy schedule.
We would like to express our gratitude to Mr. Jordan (Regional supervisor of Vulcan
Materials Co.) for giving us permission to work in one of their quarries and assisting us through
the whole work period. We are so grateful to Mr. Siegfried Rohdewald (Intelligent Resources
Inc.) and Mr. Dieter Martin (GeoExpert) for their technical supports. I would like to thanks all
the people who helped me in seismic data acquisition and processing: Dr. Adnan Aydin, Abdus
Samad, Tanner Avery, Kausik Sarker, Steven Terracina and Bram Allen. I would like to thanks
Sam Zachos for his continuous support on any software issues.
Last but not least, I would like to thank all other teachers, students, and staff members in
The Department of Geology and Geological Engineering, who helped me to make this
achievement possible.
Page 7
v
TABLE OF CONTENTS
ABSTRACT…………………………………………………………………………………… ii
DEDICATION………………………………………………………………………………… iii
ACKNOWLEDGEMENTS…………………………………………………………………… iv
CHAPTER 1: INTRODUCTION…………………………………………………………..….. 1
CHAPTER 2: BACKGROUND………………………………………………………..…….... 3
ROCK MASS……………………………………………………………………..……. 3
SEISMIC REFRCTION METHOD……………………………………………..…….. 9
SEISMIC WAVE PROPAGATION THROUGH ROCK MASS…………………….. 13
REGIONAL STRUCTURAL PATTERN……………………………………………...17
LITERATURE REVIEW……………………………………..………………………. 23
CHAPTER 3: METHODOLOGY…………………………………………………………...... 30
INITIAL TEST OF REFRACTION TOMOGRAOHY................................................. 30
LOCATION ………………….………………………………..…………………...…. 30
GEOLOGY…………………………………………………………………….……… 30
STUDY PLAN ……………………………………………………………………..… 31
Page 8
vi
RESULTS AND DISCUSSIONS……………………………………………..….….... 32
CONCLUSIONS…………………………………………………................................ 33
CONCEPTUAL DESIGN OF STUDY…………………………………………….…. 33
SITE SELECTION: STUDY AREA 1………………………………….……………. 35
SITE SELECTION: STUDY AREA 2…………………………………………….…. 35
DATA COLLECTION………………………………………………….…………….. 37
SEISMIC REFRACTION DATA ANALYSIS SOFTWARE: RAYFRACT®…….… 38
NOISE ANALYSIS…………………………………………………………...…........ 39
CHAPTER 4: RESULTS……………………………………………………………..………. 42
VELOCITY TOMOGRAM FROM FIRST STUDY AREA………………..……….. 42
VELOCITY TOMOGRAM FROM SECOND STUDY AREA…………….….……. 43
3D FENCE DIAGRAM (VELOCITY)……………………………………..…….….. 48
3D FENCE DIAGRAM (ROCK MASS QUALITY, Q)…………………..……….... 49
CHAPTER 5: DISCUSSIONS AND CONCLUSIONS……………………………………… 51
DISCUSSIONS…………………………………………………….…………………. 51
CONCLUSIONS……………………………………………………………..…….…. 56
Page 9
vii
REFERENCES…………………………………………………………………….………… 58
LIST OF APPENDICES……………………………………………………………..………. 67
APPENDIX A……………………………………………………………...………… 68
APPENDIX B……………………………………………………………..….……… 69
APPENDIX C……………………………………………………………..….……… 71
VITA………………………………………………………………………………..……….. 83
Page 10
viii
LIST OF TABLES
Table 1: Rock mass discontinuity types…………………………………………………….…. 3
Table 2: VS/VP for different rock types……………………………………………………….. 11
Table 3: Effect of foliation, cleavage, and schistosity on VP. Both dry and saturated state …. 24
Table 4: Rock mass quality, Q parameters…………………………………………………… 55
Table C1: Survey information……………………………………………………………….. 73
Page 11
ix
LIST OF FIGURES
Figure 1: Structural discontinuity (faults)………………………………………………………. 4
Figure 2: Metamorphic discontinuity (cleavage)……………………………………………….. 4
Figure 3: Sedimentary discontinuity (bedding planes)…………………………………………. 5
Figure 4: Igneous discontinuity (sills and dykes)………………………………………………. 5
Figure 5: Rock mass description……………………………………………………………..… 7
Figure 6: Integration of rock quality Q-VP-Emass in a model that incorporates depth,
porosity and rock strength adjustments………………………………………………………… 8
Figure 7: Basic components of a seismic refraction survey……………………………………. 9
Figure 8: Body waves propagation and particle vibration (top: P-wave, bottom: S-wave)…… 10
Figure 9: Surface waves propagation and particle vibration (top: Rayleigh-wave, bottom: Love-
wave)………………………………………………………………………………………….. 12
Figure 10: Partitioning of wave energy among reflected and refracted P and S-waves……… 14
Figure 11: Partitioning incident of P wave……………………………………………………. 15
Figure 12: Outline of regional structural setting of Black Warrior basin…………………….. 17
Figure 13: The geologic map of Mississippi…………………………………………………. 19
Page 12
x
Figure 14: Structural features of Mississippi……………………………………………….…. 20
Figure 15: North-south cross section A-A′ from the Mississippi-Tennessee state line to Horn
Island in the Gulf of Mexico……………………………………………………………….…. 21
Figure 16: Velocity anisotropy of slate due to cleavage……………………………………… 23
Figure 17: Velocity anisotropy with gypsum samples with deformable cracks and two jointed
granite sites in Japan………………………………………………………………………….. 25
Figure 18: sensitivity of the velocity anisotropy towards uniaxial loading………………….. 26
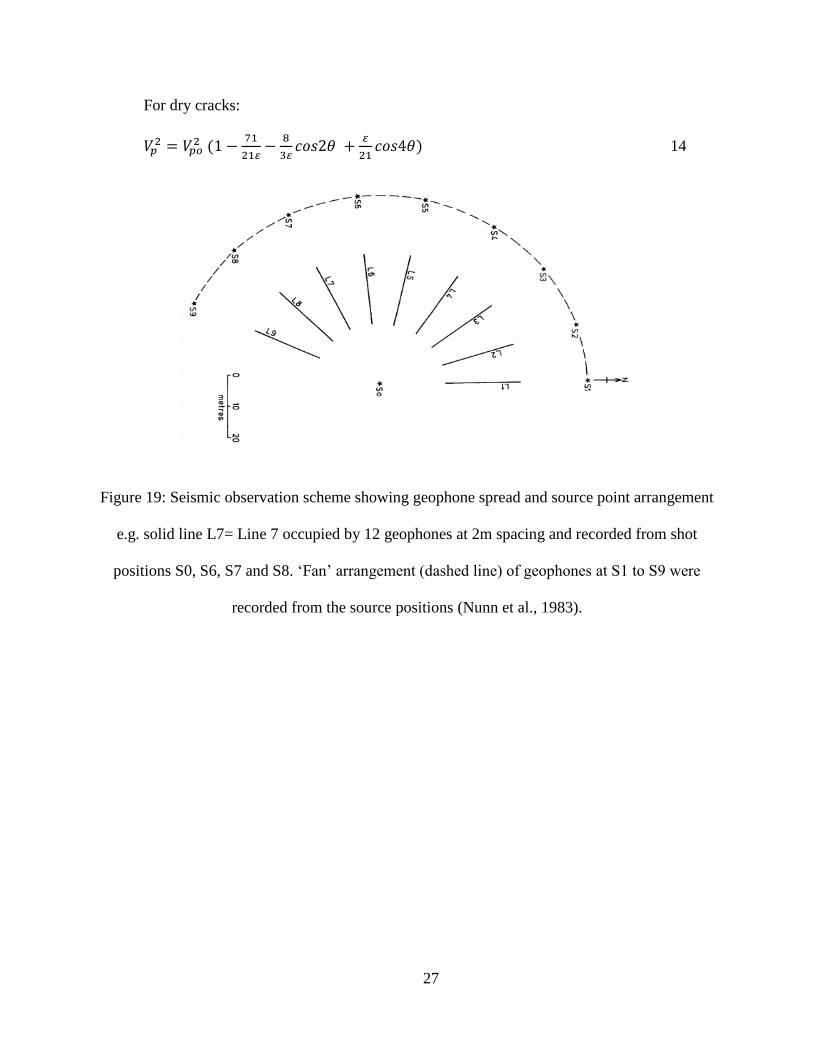
Figure 19: Seismic observation scheme showing geophone spread and source point arrangement
e.g. solid line L7= Line 7 occupied by 12 geophones at 2m spacing and recorded from shot
positions S0, S6, S7 and S8. ‘Fan’ arrangement (dashed line) of geophones at S1 to S9 were
recorded from the source positions……………………………………………………………. 27
Figure 20: Azimuthal VP anisotropy at jointed limestone sites in Lincolnshire, England…….. 28
Figure 21: Change in velocity anisotropy for different frequencies of jointing………………. 29
Figure 22: Location of the segment of levee at Tunica, Mississippi………………………….. 30
Figure 23: Sample diagram from initial study………………………………………………… 32
Figure 24: Schematic diagram hypothetical survey plan……………………………………… 34
Page 13
xi
Figure 25: First study area. 1) Aerial view of the area, 2) Survey plan, 3 & 4) Field observation
red elliptical boundary. The red arrows are indicating two features along the cut-face………. 36
Figure 26: Second study area. 1) Aerial view of the area, 2) Survey plan and 3 & 4) Field
observation…………………………………………………………………………………….. 37
Figure 27: SEG-2 to ASCII Decoder………………………………………………………….. 40
Figure 28: The apparent straight line in the seismic trace was not straight at all……………… 40
Figure 29: Study area 1 (Road cut site): Line 1 tomogram……………………………………. 42
Figure 30: Study area 1 (Road cut site): Line 2 tomogram……………………………………. 43
Figure 31: Study area 2 (Dolomite quarry), Intersection 1: Line 1 tomogram………………… 44
Figure 32: Study area 2 (Dolomite quarry), Intersection 1: Line 2 tomogram………………… 45
Figure 33: Study area 2 (Dolomite quarry), Intersection 2: Line 3 tomogram………………… 46
Figure 34: Study area 2 (Dolomite quarry), Intersection 2: Line 4 tomogram………………… 47
Figure 35: Study area 1 (Road cut site), Velocity fence diagram……………………………… 48
Figure 36: Study area 2 (Dolomite quarry), Intersection 1: Velocity fence diagram………….. 48
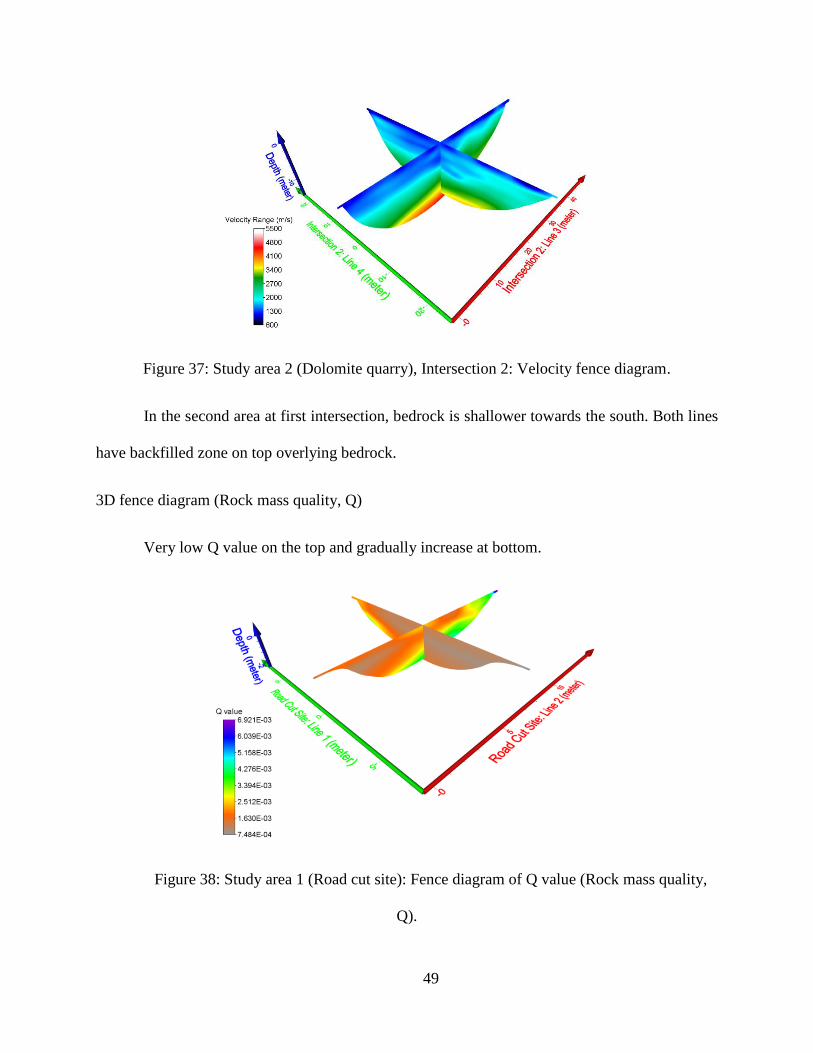
Figure 37: Study area 2 (Dolomite quarry), Intersection 2: Velocity fence diagram………….. 49
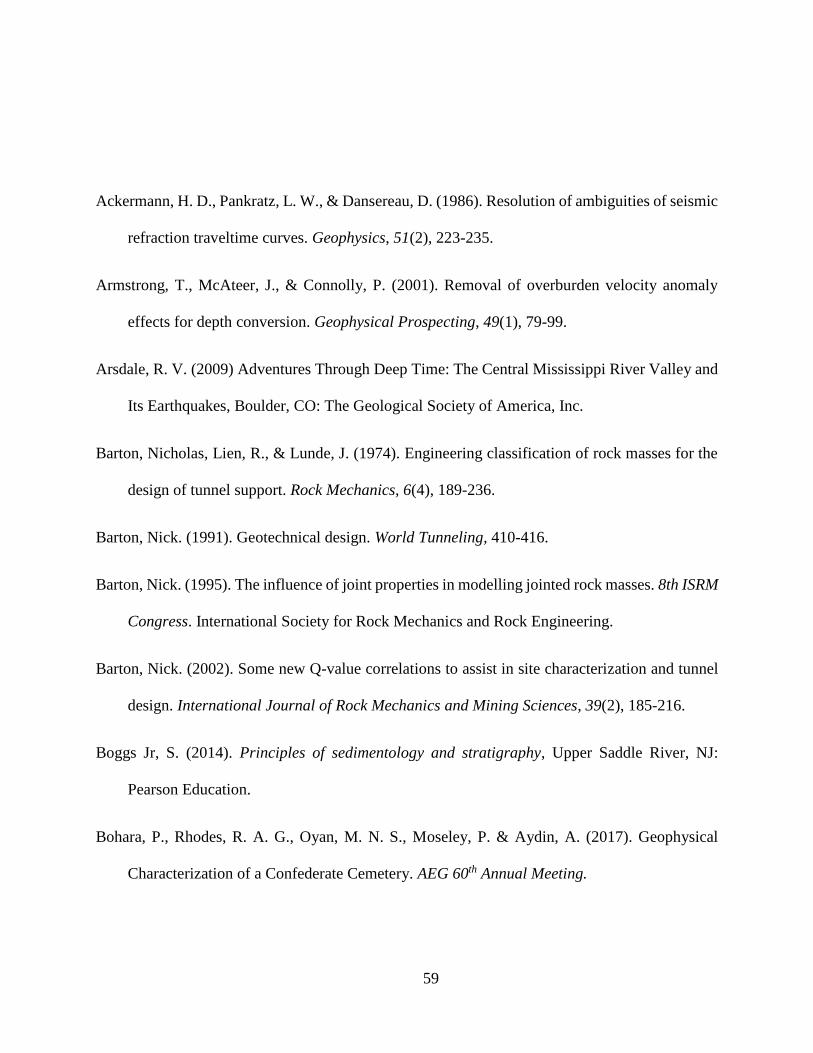
Figure 38: Study area 1 (Road cut site): Fence diagram of Q value (Rock mass quality, Q)….. 49
Page 14
xii
Figure 39: Study area 2 (Dolomite quarry), Intersection 1: Fence diagram of Q value (Rock mass
quality, Q)…………………………………………………………………………………….. 50
Figure 40: Study area 2 (Dolomite quarry), Intersection 2: Fence diagram of Q value (Rock mass
quality, Q)…………………………………………………………………………………….. 50
Figure 41: Observed joint system…………………………………………………………….. 54
Figure 42: Predicted joint system (Both white solid and dashed lines)……………………… 54
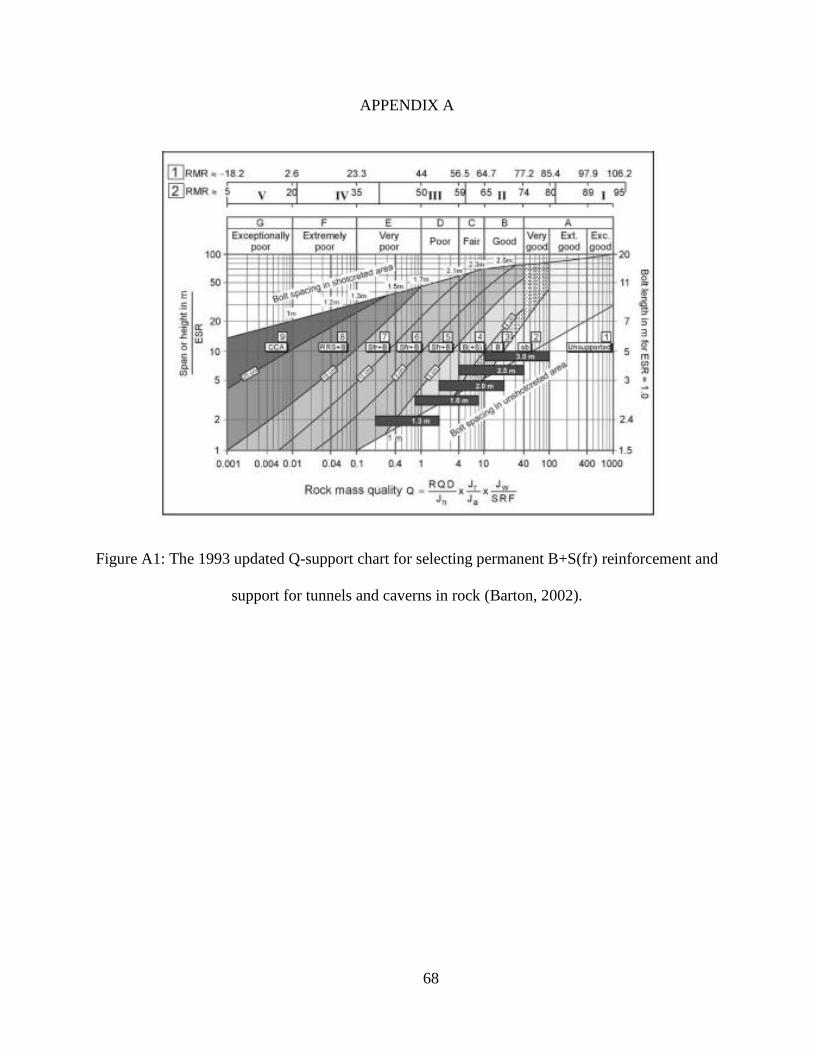
Figure A1: The 1993 updated Q-support chart for selecting permanent B+S(fr) reinforcement and
support for tunnels and caverns in rock………………………………………………………. 68
Figure B1: Riverside tomogram……………………………………………………………… 69
Figure B2: Landside tomogram……………………………………………………………… 70
Figure C1: Edit profile display………………………………………………………………. 71
Figure C2: Import shot display (Left) and Shot information display (Right)……………….. 72
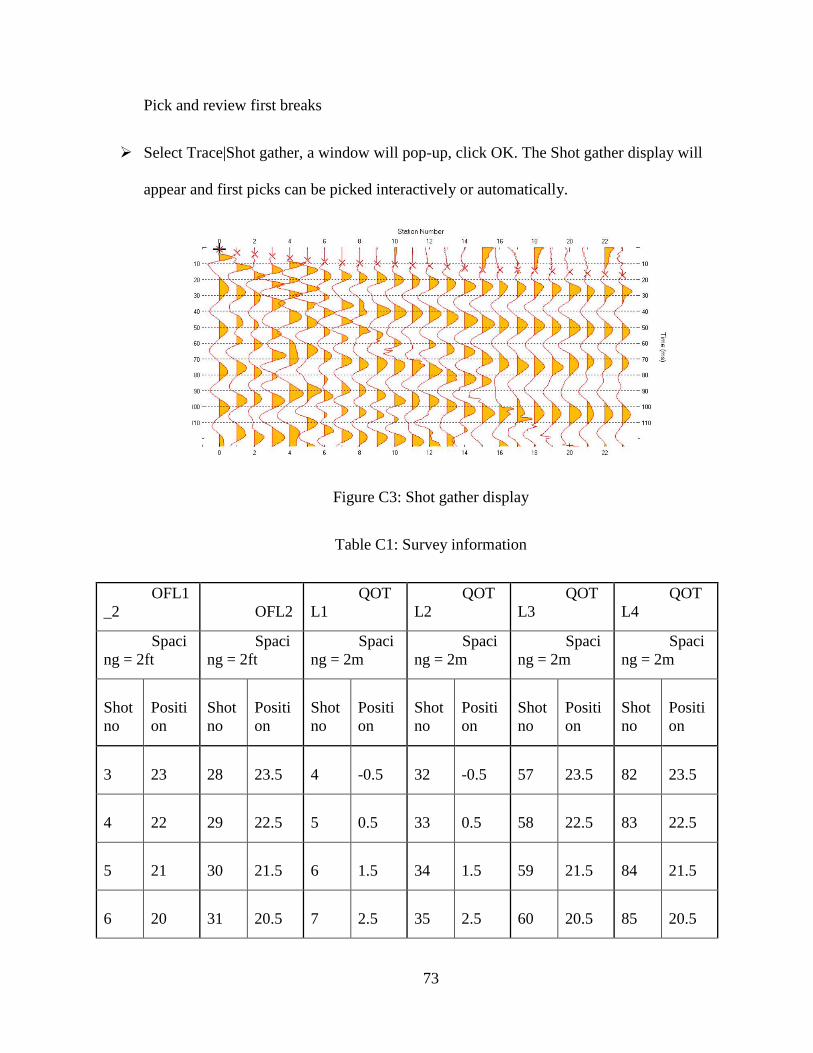
Figure C3: Shot gather display………………………………………………………………. 73
Figure C4: Shot breaks display………………………………………………………………. 76
Figure C5: WET parameter display………………………………………………………….. 77
Figure C6: File import display (Left) and Network manager (Right)……………………….. 80
Figure C7: Property manager (for scatter plot: left and for data: right)………………………80
Page 15
1
CHAPTER 1
INTRODUCTION
Anisotropy is a broad term which can be applied to subjects such as rock strength,
permeability, and seismic velocity. In this study, the emphasis is put on seismic velocity anisotropy
exclusively due to discontinuities such as joints and fractures. No anisotropy due to lithological
changes will be considered in this study. One of the key features of the rock strength is its
anisotropic behavior. The primary objective of this study is to evaluate the effectiveness of a quick,
budget-friendly, non-destructive seismic refraction method for determination of subsurface
anisotropic conditions.
In the seismic refraction method, direct and back propagating waves produced by a source
are received and analyzed to build a model of the ground. This method is based on the gradual
increase of seismic wave velocity with depth. A low-velocity layer between two high-velocity
zones cannot be seen or a thin, high-velocity layer can completely mask the layers below it, even
with wider geophone spacing. Existence of slow velocity channel or high-velocity zone can push
or pull the target horizon, which in our case is bedrock, respectively (Armstrong, McAteer, &
Connolly, 2001). Only major joint sets are considered in this study because seismic waves have a
large wavelength which is comparable in size with large discontinuities like joints. We have used
P-waves in our study, which are sensitive to the discontinuities of the rock mass as well as its
saturation. Earlier work has been done on The Confederate Cemetery located within The
Page 16
2
University of Mississippi premises and also on a segment of the Coldwater River located at Tunica,
Mississippi (Bohara et al., 2017; Rhodes et al., 2017 and 2018). In the cemetery, buried bodies
University of Mississippi premises and also on a segment of the Coldwater River located at Tunica,
Mississippi (Bohara et al., 2017; Rhodes et al., 2017 and 2018). In the cemetery, buried bodies
were looked for and, in the levee, the cover quality on the core was examined. Grid patterns have
been adopted there.
When identifying anisotropic features within rock mass a different pattern i.e. radial proves
useful in this kind of study (Nunn, Barker, & Bamford, 1983; Leary & Henyey, 1985). The velocity
tomogram changes as its orientation relative to major joint sets changes. Profiles that run along the
joint sets predict bedrock shallower than the profiles that run normal to joint sets. Profiles that are
not laid down at any angle other than orthogonal position show some intermediate images of
subsurface within this boundary. Due to the non-unique characteristic of the seismic refraction
method, an exposed cut-slope or outcrop is necessary to make our findings valid because non-
uniqueness is the fundamental characteristic of the seismic inversion algorithm (palmer, 2010).
Page 17
3
CHAPTER 2
BACKGROUND
Rock mass
The rock mass is defined as an interlocked aggregate of rock blocks separated or bounded
by planar discontinuities. Discontinuities are characterized in four types:
Table 1: Rock mass discontinuity types
Rock Mass Discontinuities
Sedimentary
discontinuity
Bedding planes
Sedimentary structures (mud cracks, ripple marks, cross
beds etc.)
Structural
discontinuity
Faults
Joints
Fissures and cracks
Metamorphic
discontinuity
Foliation
Cleavage
Igneous
discontinuity
Cooling joints
Flow contacts
Intrusive contacts
Dikes
Sills
Veins
Page 18
4
Figure 1: Structural discontinuity (faults) (Fossen, 2010).
Figure 2: Metamorphic discontinuity (cleavage) (Fossen, 2010).
Page 19
5
Figure 3: Sedimentary discontinuity (bedding planes) (Boggs, 2006).
Figure 4: Igneous discontinuity (sills and dykes) (Lutgens & Tarbuck, 2012).
Normally rock masses located with first several hundreds of meters act as a discontinuous
medium due to the presence of these features. A description of rock mass based on these
discontinuities is necessary to determine the rock mass strength and for the safety of construction.
This description mainly helps to understand its mechanical behavior and to establish an empirical
Page 20
6
formula. Such a well-developed empirical formula is rock mass quality, Q, which is described by
six parameters of discontinuity (Barton, Lien, & Lunde, 1974).
𝑄 = 𝑅𝑄𝐷
𝐽𝑛×
𝐽𝑟
𝐽𝑎×
𝐽𝑤
𝑆𝑅𝐹 1
Where, RQD = rock quality designation, the percentage of cored length that yields core in
segments longer than 10 cm (4 in) assuming the core diameter is 50 mm (2 in). More general
yielded core segments length should be longer than twice of its diameter; Jn = Joint set number, Jr
= Joint roughness number, Ja = Joint alteration (filling) number, Jw = Joint water reduction factor,
SRF = Stress reduction factor, a rating for faulting, strength/stress ratio in the hard massive rock
mass and for squeezing/swelling.
The first term of this relation RQD/Jn represents the overall structure of rock mass and it’s
a crude measure of the relative block size. The second term Jr/Ja represents the relative friction
angle of the least favorable joint sets which is an approximation of actual shear strength of the
joints with different combinations of wall roughness and filling materials. It is found that the
inverse tangent of this term gives the actual peak sliding angle of friction. The last term Jw/SRF is
a complicated empirical factor describing the active effective stress. The above relation was
developed using 212 Scandinavian tunneling case histories and subsequently applied in various
application. Combining the data of cross-hole seismic tomography 60m span Olympic ice-hockey
cavern at Gjøvik, Norway with Q system application and in situ testing results at the Yellow River
Page 21
7
Figure 5: Rock mass description (Wyllie, 1999).
Xiaolangdi dam site, NGI (Norwegian Geological Institute) proposed a correlation
between Q and P-wave velocity for ‘hard’ rock (Barton, 1991).
𝑉𝑃 = 3.5(𝐾𝑚. 𝑠−1) + 𝑙𝑜𝑔10 𝑄 2
Where, VP is in km/s. Each 1 km/s increase in seismic P-wave velocity will increase Q-
value by 10. Above equation was generalized to include weaker and stronger than the assume
‘hard’ rock (σc = 100 MPa). A new correlation was established between nominal rock strength (σ
= 100MPa) to the ‘hard’ rock (Barton, 2002). The rock mass quality Q value for ‘hard’ rock was
denoted by Qc in this relation.
𝑄𝑐 = 𝑄 × 𝜎𝑐
100 3
Where σc is the uniaxial compressive strength of rock and it is describing the quality of
rock mass. This parameter strongly correlates with Young’s modulus and has a tendency to
correlate with the density and porosity (Lashkaripour & Passaris, 1995; Barton, 2002). VP has a
Page 22
8
proportional relation to the density and Young’s modulus and inverse relation to porosity (Iliev,
1966; Grujíc, 1974.). So, a positive correction for depth and negative correction for porosity is
necessary to cover both high and low velocity, and significant and negligibly porous zone. VP
usually increases with depth even having unchanged RQD, joint frequency and Q-value of the rock
mass. This is due to the ‘seismic closure’ that takes place in weak rocks at shallow depth and in
stronger rocks at great depth.
𝑉𝑃 = 3.5(𝑘𝑚𝑠⁄ ) + 𝑙𝑜𝑔10 𝑄𝑐 4
Above equation is a revised version of equation 2 which has maintained consistency with
the soft rock when both depth and porosity correction was applied. The following graph is an
integration of seismic P-wave velocity, Qc and deformation modulus with depth, porosity
correction (Barton, 2002).
Figure 6: Integration of rock quality Q-VP-Emass in a model that incorporates depth,
porosity and rock strength adjustments (Barton, 1995).
Page 23
9
Seismic refraction method
These anisotropies possess important relations to elastic wave velocity, strength moduli,
permeability, and deformation and so on. Elastic waves i.e. P-wave and S-wave are useful
indicators to reveal those directional variances. In fact, propagation of these waves enlightens the
subsurface below us. The way to investigate the subsurface using elastic waves is popularly known
as seismic methods. This site exploration method is divided into two branches: Seismic reflection
method and Seismic refraction method.
Figure 7: Basic components of a seismic refraction survey (Park Seismic, LLC).
The above figure describes the summary of the seismic refraction method. The major
components are an energy source, geophones, a multi-channel seismograph, seismic cables to
connect geophones and source to the seismograph, a laptop to show seismogram is connected to
the seismograph. The energy source can be either hammer, air gun or explosive which generates
elastic energy propagating through the subsurface and gets received by geophones. Geophones are
installed in a predefined array depending on the aim of the survey. The frequency of them is
Page 24
10
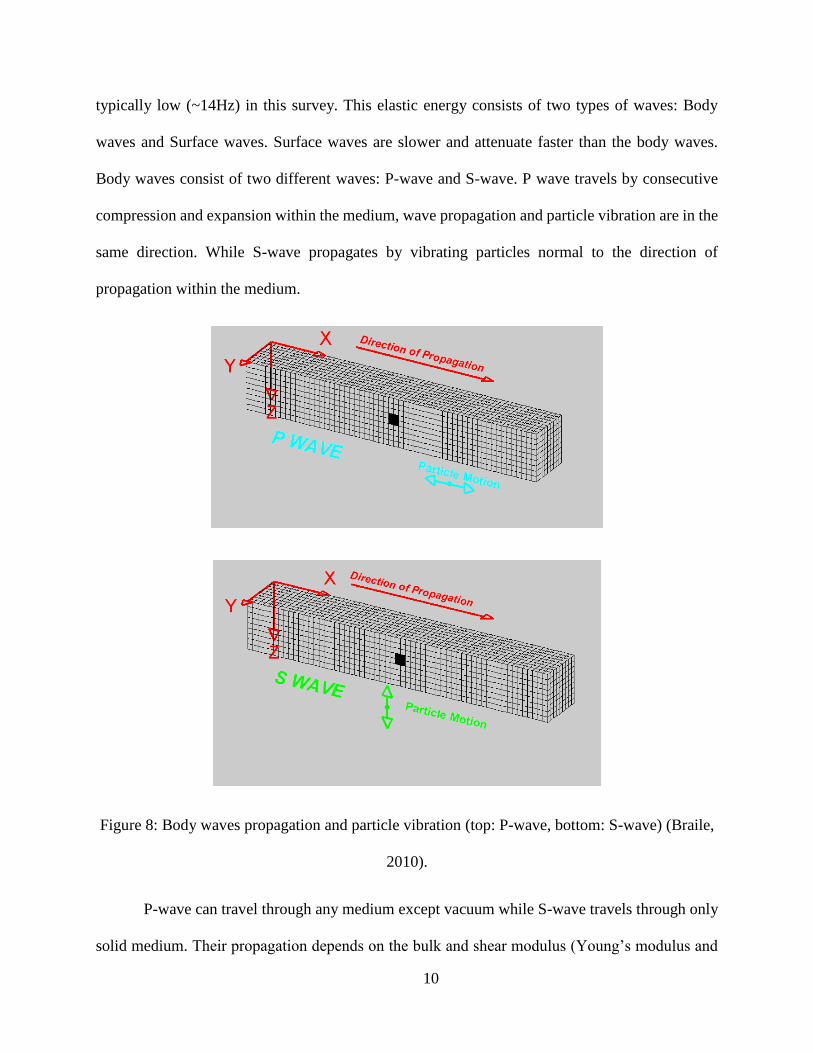
typically low (~14Hz) in this survey. This elastic energy consists of two types of waves: Body
waves and Surface waves. Surface waves are slower and attenuate faster than the body waves.
Body waves consist of two different waves: P-wave and S-wave. P wave travels by consecutive
compression and expansion within the medium, wave propagation and particle vibration are in the
same direction. While S-wave propagates by vibrating particles normal to the direction of
propagation within the medium.
Figure 8: Body waves propagation and particle vibration (top: P-wave, bottom: S-wave) (Braile,
2010).
P-wave can travel through any medium except vacuum while S-wave travels through only
solid medium. Their propagation depends on the bulk and shear modulus (Young’s modulus and
Page 25
11
Poisson’s ratio) and the density of the medium. As fluid has no shear strength, so, S-wave cannot
travel through it. The displacement of S-waves can have any direction in a plane normal to the
direction of propagation and is therefore normally divided into a vertically polarized component
(SV) and a horizontally polarized component (SH). P-wave travels faster than S-wave and the
following table shows the ratio of two body waves for different rock types:
Table 2: VS/VP for different rock types (Burger, Sheehan & Jones, 2006).
Rock Types VS/VP
Crystalline rocks 0.6
Sedimentary rocks 0.5
Soil and unconsolidated materials 0.4
Body waves (i.e. P- and S-waves) are the only wave types present within a continuous
unbounded medium. In a medium with a free surface Rayleigh waves which consist of
both longitudinal and lateral particle displacement (i.e. P- and S-waves) may appear. During the
passage of Rayleigh wave, particles move along retrograde ellipses in the plane parallel to the
direction of propagation. Its velocity is lower than the body waves. The amplitude of Rayleigh
waves decreases quickly as it travels into the solids; The amplitude is maximum at a depth of 0.2-
0.6 of the wavelengths and is almost zero at depth equal to the 1.3 of the wavelengths. This means
Rayleigh wave cannot propagate through the solids. Another surface wave called Love waves
appear within a thin layer having a density and elasticity that differs from the main medium
Page 26
12
(Eitzenberger, 2012). In case of Love wave particle motion is alternating transverse motion that
means motion is horizontal and perpendicular to the direction of propagation (Braile, 2010).
Figure 9: Surface waves propagation and particle vibration (top: Rayleigh-wave, bottom: Love-
wave) (Braile, 2010).
Geophones nearer to the source, receive P waves directly from the source and these signals
are known as direct wave. Some P-waves propagate through the subsurface, refracted by another
velocity layer and travel back to the geophones away from the source as head waves. All the
arrivals are displayed in the seismogram. The data analyst looks for the first arrivals in the
seismogram and inverts these data to produce a velocity-depth model of the subsurface. The basic
assumption of the seismic refraction method is velocity increases with depth. Seismic refraction is
Page 27
13
aiming for locating bedrock, i.e. depth of backfill and landfill, details of subsurface and the target
depth is around several tens of meters. The traveltime of the seismic wave depends on the acoustic
properties of the subsurface materials which is a product of density and velocity of the material.
Seismic wave propagation through rock mass
The propagation of seismic waves through intact rocks depends on material properties of
rock such as mineral content, grain size and shape, pores and micro-cracks. The waves follow both
Huygens’s and Fermat’s principle during its propagation through a medium. Like other energy
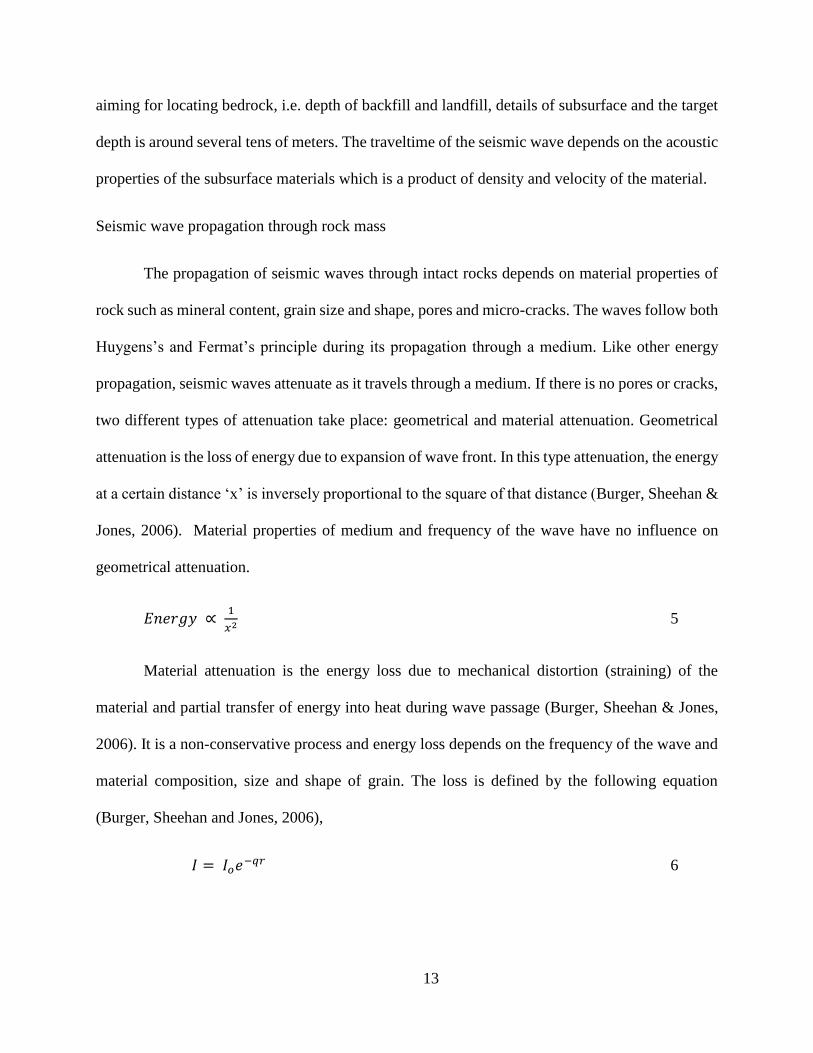
propagation, seismic waves attenuate as it travels through a medium. If there is no pores or cracks,
two different types of attenuation take place: geometrical and material attenuation. Geometrical
attenuation is the loss of energy due to expansion of wave front. In this type attenuation, the energy
at a certain distance ‘x’ is inversely proportional to the square of that distance (Burger, Sheehan &
Jones, 2006). Material properties of medium and frequency of the wave have no influence on
geometrical attenuation.
𝐸𝑛𝑒𝑟𝑔𝑦 ∝ 1
𝑥2 5
Material attenuation is the energy loss due to mechanical distortion (straining) of the
material and partial transfer of energy into heat during wave passage (Burger, Sheehan & Jones,
2006). It is a non-conservative process and energy loss depends on the frequency of the wave and
material composition, size and shape of grain. The loss is defined by the following equation
(Burger, Sheehan and Jones, 2006),
𝐼 = 𝐼𝑜𝑒−𝑞𝑟 6
Page 28
14
Here, I = Intensity at a distance r, Io = Intensity at the source, r = Distance traveled by the
energy and q = Absorption coefficient (dB/λ) which has a proportional relation with frequency.
Seismic waves with high frequency attenuate faster i.e. earth filters out higher frequency pulses as
wave travels through it. So, earth can be considered as a low-pass filter.
Another type of attenuation occurs at the interface of two layers having different
seismic impedance (product of density and velocity). At the interface, the partition of incident
wave energy and amplitude occurs among reflected and refracted P and S-waves.
Figure 10: Partitioning of wave energy among reflected and refracted P and S-waves (Burger,
Sheehan & Jones, 2006).
Here, Ai, Arfl and Arfr are the amplitude of the incident wave, reflected wave and refracted
wave respectively. V and ρ are the velocity and density respectively, and 1 and 2 denote the first
and second layer. Incident of P-wave and SV-wave produce the both reflected and refracted P-
wave and SV-wave whereas incident of SH-wave only produces reflected and refracted SH-wave.
The partitioned amount of energy can be computed by a set of equations (Zoeppritz, 1919).
Assume a plane P-wave with amplitude Ao incident on the boundary between two solid media. So,
there will be both reflection and refraction and both P and S-wave will be produced by the course
Page 29
15
of these two incidents. So, finally we will have four different waves: reflected P and S-wave, and
refracted P and S-wave.
Figure 11: Partitioning incident of P wave (Image by author).
The amplitude of four resulted waves can be computed by following equations (Zoeppritz,
1919).
𝐴1 cos 𝜃1 − 𝐵1 sin 𝜆1 + 𝐴2 cos 𝜃2 + 𝐵2 sin 𝜆2 = 𝐴0 cos 𝜃1 7
𝐴1 sin 𝜃1 + 𝐵1 cos 𝜆1 − 𝐴2 sin 𝜃2 + 𝐵2 cos 𝜆2 = −𝐴0 sin 𝜃1 8
𝐴1𝑍1 cos 2𝜆1 − 𝐵1𝑊1 sin 2𝜆1 − 𝐴2𝑍2 cos 2𝜆2 − 𝐵2𝑊2 sin 2𝜆2 =
− 𝐴0𝑍1 cos 2𝜆1 9
𝐵1𝑊1 cos 2𝜆1 + 𝐴1𝛾1𝑊1 sin 2𝜃1 − 𝐵2𝑊2 cos 2𝜆2 + 𝐴2𝛾2𝑊2 sin 2𝜃2 =
𝐴0𝛾1𝑊1 sin 2𝜃1 10
Page 30
16
Here, Ao, A1, A2, B1 and B2 are the amplitude of the incident wave, reflected P-wave,
refracted P-wave, reflected S-wave and refracted S-wave respectively. ϴ1 and ϴ2 are the angle of
reflection and refraction for P-wave and λ1 and λ2 are the angle of reflection and refraction of S-
wave. B, Z and γ are defined by the following equations,
𝛾𝑖 = 𝑉𝑆𝑖
𝑉𝑃𝑖 11
𝑍𝑖 = 𝑉𝑃𝑖 × 𝜌𝑖 12
𝑊𝑖 = 𝑉𝑆𝑖 × 𝜌𝑖 13
Where, i = 1 and 2
Solving the equations 7, 8, 9 and 10, the amplitude of the resulted waves can be easily
computed.
Nowadays, the seismic refraction method is gaining popularity among geophysicists and
geotechnical engineers because of it’s non-destructive, rapid and cost-effective nature. Users can
produce a 3D tomogram if the data volume is sufficient. This method gives an overall image of
the subsurface, whereas boring is expensive and gives only localized data. In addition, terrain
conditions may not be advantageous for drilling. Within the first 50-100m of the subsurface, both
vertical and horizontal velocity gradients vary rapidly and randomly due to the extremely variable
nature of the soil cover. Considering these site constraints, the seismic refraction method is
advantageous when compared to other exploration methods.
Page 31
17
Regional structural pattern
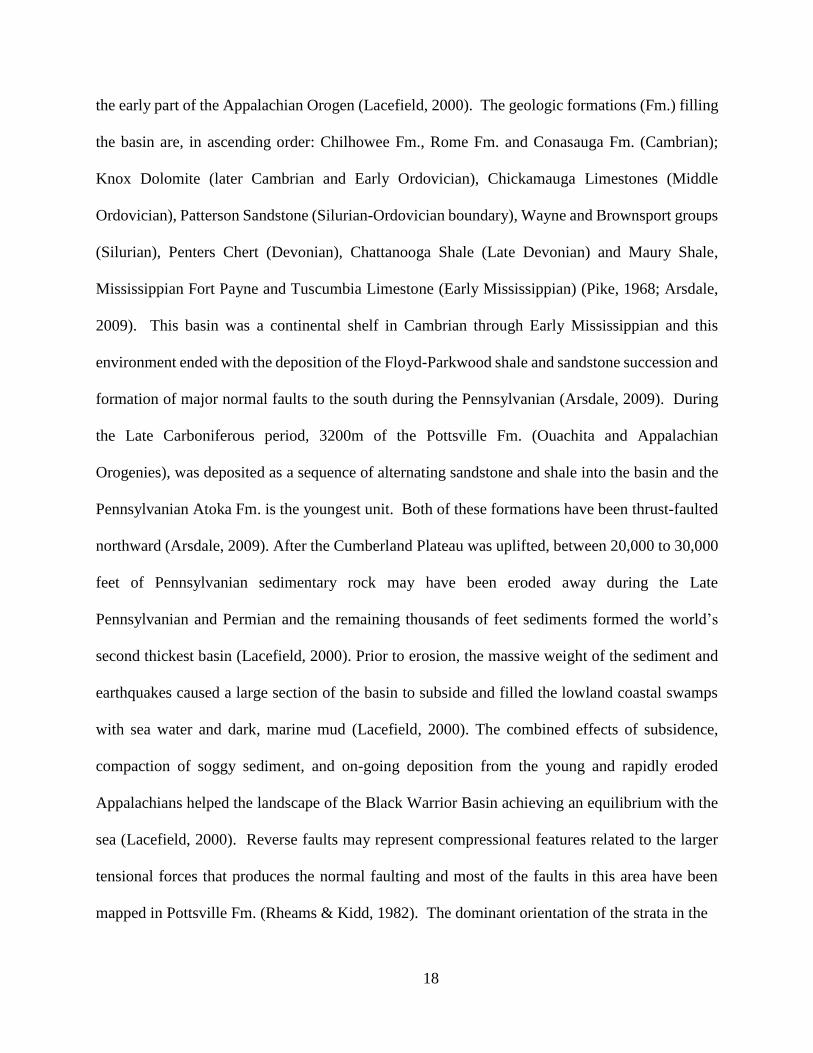
The Black Warrior Basin, a foreland basin of the Ouachita fold-thrust belt, is bounded to
the North by the Nashville Dome, Southeast by the Appalachian Mountains, Southwest by the
Ouachita thrust front and on the West by the Reelfoot Rift (Arsdale, 2009).
Figure 12: Outline of regional structural setting of Black Warrior basin (Thomas & Sloss, 1988).
This was formed tectonically and is the center of Pennsylvanian coal deposition in Alabama
and the oldest sedimentary rocks of Mississippi have been found in this basin and ranged from
Precambrian (granitic) to Pennsylvanian in age (Dockery III & Thompson, 2016; Lacefield, 2000).
The Black Warrior Basin was south of the North American shoreline for much of the late
Precambrian and Paleozoic time until it was filled by thick Pennsylvanian deltaic deposition during
Page 32
18
the early part of the Appalachian Orogen (Lacefield, 2000). The geologic formations (Fm.) filling
the basin are, in ascending order: Chilhowee Fm., Rome Fm. and Conasauga Fm. (Cambrian);
Knox Dolomite (later Cambrian and Early Ordovician), Chickamauga Limestones (Middle
Ordovician), Patterson Sandstone (Silurian-Ordovician boundary), Wayne and Brownsport groups
(Silurian), Penters Chert (Devonian), Chattanooga Shale (Late Devonian) and Maury Shale,
Mississippian Fort Payne and Tuscumbia Limestone (Early Mississippian) (Pike, 1968; Arsdale,
2009). This basin was a continental shelf in Cambrian through Early Mississippian and this
environment ended with the deposition of the Floyd-Parkwood shale and sandstone succession and
formation of major normal faults to the south during the Pennsylvanian (Arsdale, 2009). During
the Late Carboniferous period, 3200m of the Pottsville Fm. (Ouachita and Appalachian
Orogenies), was deposited as a sequence of alternating sandstone and shale into the basin and the
Pennsylvanian Atoka Fm. is the youngest unit. Both of these formations have been thrust-faulted
northward (Arsdale, 2009). After the Cumberland Plateau was uplifted, between 20,000 to 30,000
feet of Pennsylvanian sedimentary rock may have been eroded away during the Late
Pennsylvanian and Permian and the remaining thousands of feet sediments formed the world’s
second thickest basin (Lacefield, 2000). Prior to erosion, the massive weight of the sediment and
earthquakes caused a large section of the basin to subside and filled the lowland coastal swamps
with sea water and dark, marine mud (Lacefield, 2000). The combined effects of subsidence,
compaction of soggy sediment, and on-going deposition from the young and rapidly eroded
Appalachians helped the landscape of the Black Warrior Basin achieving an equilibrium with the
sea (Lacefield, 2000). Reverse faults may represent compressional features related to the larger
tensional forces that produces the normal faulting and most of the faults in this area have been
mapped in Pottsville Fm. (Rheams & Kidd, 1982). The dominant orientation of the strata in the
Page 33
19
Figure 13: The geologic map of Mississippi (Dockery III & Thompson, 2016).
Page 34
20
Figure 14: Structural features of Mississippi (Dockery III & Thompson, 2016).
Page 35
21
Figure 15: North-south cross section A-A′ from the Mississippi-Tennessee state line to Horn
Island in the Gulf of Mexico (Dockery III & Thompson, 2016).
Page 36
22
Black Warrior Basin is NW-SE with an average dip of 60°-70° (Pike & Warren, 1968).
However, these anomalies are not observed in the overlying post-Paleozoic deposition and these
fault patterns are related to the post-depositional basin deformation (Pike & Warren, 1968).
The exposed Ouachita and Appalachian fold and thrust belts border the Arkoma and the
Black Warrior Basin along the southern part of the North American craton (Hatcher Jr., Thomas
& Viele, 1989). The Black Warrior Basin beneath the coastal plain has a triangular shape, limited
on the southwest by the Ouachita orogenic belt and on the southeast by the Appalachian orogenic
belt (Mellen, 1947). The Central Mississippi Uplift is a fold-thrust belt related to the Appalachians
that has been displaced northward over rocks of Black Warrior Basin (Thomas, 1972, 1973,
1985a). The Black Warrior basin homocline has an average dip of less than 2° towards southwest.
This homocline has been displaced by a northwestward normal fault system by 4km. On the
southwest, this fault system intersects the front of the Appalachian fold-thrust belt at around 90°
and extends northwestward entirely across the Black Warrior basin (Thomas & Sloss, 1988). The
normal faulting is inferred to have been cause by a stress field with σ3 oriented NE-SW direction
(perpendicular to the normal fault strike), σ1 vertical and σ2 NW-SE. The extension direction is in
the principle curvature direction for Ouachita related flexure and the fault appear to be part of a
trend of Ouachita orogenic belt (Bradley & Kidd 1991; Cates et al. 2004). Both downdip gravity
glide and flexural extension could have contributed to the stress state. Farther, west, along the
Arkoma basin, this system of large-scale down-to-south normal fault extends beneath and
approximately parallel to the frontal thrust faults of the Ouachitas. Frontal ramps in Ouachita
thrust faults are positioned above these normal faults (Buchanan & Johnson, 1968). In case of
Appalachian fold system, the main folding event postdates Pottsville deposition and small amounts
of crystal-plastic grain deformation, including the cements, are widespread in this deposition (Wu
Page 37
23
& Groshong, 1991). Twin strain measurements in Mississippian limestone indicate the maximum
shortening direction is at a low angle to bedding and perpendicular to the fold axis indicating that
σ1 was oriented NW-SE (Cherry, 1990). The complete fold, fault and joint pattern could have
been caused by a triaxial stress field with σ1 oriented NW-SE horizontal (perpendicular to fold
trend), σ3 oriented NE-SW- horizontal (parallel to fold trend), and σ2 vertical (Groshong Jr. et al.,
2009).
Literature review
Most of the work on identifying rock mass anisotropy took place in the lab. Velocity
anisotropy due to the foliation, cleavage and the shistocity was identified on orthotropic slate
(Duellmann & Heitfeld, 1978; Tsidzi, 1997). Smooth transition in velocity nicely followed the
rotation of samples and velocity hysteresis on the unloading section was presumed as fabric
damage or micro-cracks formation due to loading.
Figure 16: Velocity anisotropy of slate due to cleavage (Duellmann & Heitfeld, 1978).
Page 38
24
In the above figure, α is the angle between the P-wave velocity and cleavage in slate.
Ultrasonic pulse velocity test showed similar results like seismic wave (Tsidzi, 1997). The
summary of this work is presented in the Table (2). For all kinds of foliated rocks, ultrasonic
velocity is the highest along the foliation and least normal to foliation. This is valid for saturated
and dry samples. Usually, anisotropy is small for fine-grained samples and large for coarse-
grained. However, the saturation increases the anisotropy in fine-grained samples and decreases
in the coarse-grained samples. Here, β is the angle between the wave propagation and foliation.
Table 3: Effect of foliation, cleavage, and schistosity on VP. Both dry and saturated state
(Tsidzi, 1997).
Rock Type β=0o β= 45o β= 90o β= 0o β= 45o β= 90o
Condition Dry Dry Dry Saturated Saturated Saturated
Gneiss (SW) 5102 4211 3956 5918 5237 5081
Phyllite (F) 6010 5130 5090 6050 5417 5307
Schist (SW) 6641 5802 5151 6706 5932 5378
Slate (F) 5913 5074 4893 5746 4722 4283
A crack tensor technique was developed which was consistent with the laboratory
experiment and in site tests on granite sites (Oda, Yamabe, & Kamemura, 1986). Laboratory
samples were prepared by plaster with deformable grease paper that acted as cracks. The squared
V/Vo ratio was normalized by intact sample velocity Vo. Samples with almost aligned cracks
showed velocity anisotropy whereas samples with randomly oriented cracks showed an isotropic
reduction of velocity Figure (17(i)). Similar results were observed on granite sites Figure (17(ii)).
Page 39
25
Their crack tensor showed remarkable agreement with the seismic survey and velocity
distributions followed major joint sets direction.
Figure 17: Velocity anisotropy with gypsum samples with deformable cracks and two jointed
granite sites in Japan (Oda et al., 1986).
An exclusive experiment was conducted to show the directional dependence of seismic
velocity under uni-axial pressure (Nur, 1971). The following figure was the summary of his
experiment. Velocity increase is greater along the stress direction rather than normal to it. Because
cracks perpendicular to the stress close due to applied pressure while open further along the stress
direction.
Page 40
26
This fairly represents in situ velocity anisotropy effects since horizontal σmax has a trend to
be parallel or sub-parallel to major jointing; so, velocity along the joints is highest.
Figure 18: sensitivity of the velocity anisotropy towards uniaxial loading (Nur, 1971).
(I: hydrostatic, II: measured parallel to the uniaxial, III: measured perpendicular to the
uniaxial)
Seismic refraction survey following a radial pattern (20o interval) was conducted at four
sites in chalk in Lincolnshire, England (Nunn et al., 1983). Strong anisotropy was recorded on
three sites (CFR, RGF and RGQ). Total velocity anisotropy (Vmax-Vmin)/Vmax = 0.38 which is
±20% around the mean velocity 2.25 km/s. The following equation shows relationship between
the compressional wave velocity through rock mass with crack (𝑉𝑝𝑜) and without crack (𝑉𝑝).
Page 41
27
For dry cracks:
𝑉𝑝2 = 𝑉𝑝𝑜
2 (1 −71
21𝜀−
8
3𝜀𝑐𝑜𝑠2𝜃 +
𝜀
21𝑐𝑜𝑠4𝜃) 14
Figure 19: Seismic observation scheme showing geophone spread and source point arrangement
e.g. solid line L7= Line 7 occupied by 12 geophones at 2m spacing and recorded from shot
positions S0, S6, S7 and S8. ‘Fan’ arrangement (dashed line) of geophones at S1 to S9 were
recorded from the source positions (Nunn et al., 1983).
Page 42
28
Figure 20: Azimuthal VP anisotropy at jointed limestone sites in Lincolnshire, England (Nunn et
al., 1983).
For saturated cracks:
𝑉𝑝2 = 𝑉𝑝𝑜
2 (1 − 8/21𝜀 + 8/21𝜀 𝑐𝑜𝑠4𝜃) 15
In the above equation, crack density 𝜀= Nr3/V is defined by the number of cracks ‘N’ in a
volume ‘V’ with radius ‘r’. ‘𝜃’ is the angle of incidence relative to normal of crack plane. It is
important to mention that the above equations did not account for the effect of stress on joint
closure or seismic visibility. To differentiate the velocity anisotropy between closely and wider
joints, seismic wave of wavelength 8-15m and ultra-sonic wave of wavelength 0.8-1.0m were used
on dolomite at Ingouri Hydroelectric Station in Caucasus (Lykoshin et al. 1971). In figure 21, solid
ellipse (ellipse a) represents the anisotropy of ultra-sonic velocity due to small scale joints. The
length of ultra-sonic velocity is close to the distance between these joint systems, so, these waves
Page 43
29
are influenced by the orientation of these joints. On the other hand, seismic velocity is more
influenced by the large-scale joints systems (ellipse b), as the inter-joint distance there was
comparable to seismic wave.
Figure 21: Change in velocity anisotropy for different frequencies of jointing (Lykoshin et al.
1971). (set I & II: closely spaced joints, set III & IV: wider joints).
Page 44
30
CHAPTER 3
METHODOLOGY
Initial test of refraction tomography: Location
Early study with this software has been done on the Coldwater River Levee, Tunica, MS.
That study was aimed to find out the geologic and structural structure of the levee and the
longitudinal and lateral variation within the structure.
Figure 22: Location of the segment of levee at Tunica, Mississippi (Rhodes, 2018).
Geology
The test area was located along the west branch of the levee. The dominant soil is Shakely
clay and Arakutla clay loam. In addition to this soil, transported material was used to build the
levee. These soils are poorly drained (USDA, 2013) and have natural water content of about 29-
Page 45
31
32% (in percent dry weight). The Coldwater River levee was built during the 1920s by the United
States Army Corps of Engineers (USACE). The levee has been modified several times over the
years, notably in the 1970s when they raised and widened the levee (USACE,1965). These
modifications are the results of not only the needs of the time but also failures that occurred on the
levee slope.
Study plan
The survey was conducted on both sides of levee: landside and riverside. The following
diagram has illustrated the survey profile of this study. Three orange lines are showing the
positions of seismic refraction survey profile and these lines are on the slope. There were an
additional two profiles on the riverside: at the bottom of the slope and at the junction. Also, there
was an additional profile on the landside which was at the bottom.
On each side, there were four profiles on the slope 3.81m apart except for the profile on
the junction on riverside. The first profile on both sides was located 3.81m from the crest. The
same geophysical instrument and software have been used in that study. Receivers were spread
out along the profile at two feet spacing, and to get a good signal-to-noise ratio three shots stacking
has been used. First, the raw data were imported to the Rayfract® directory. First arrivals were
picked by interactive mode. Bidirectional filter and bandpass filter (4-24Hz and 8-20Hz) were used
to reveal the signal from noisy traces. Later, a horizontally averaging initial (Wiechert-Herglotz
method) model was prepared to get an artefact free initial model and then the tomogram was
prepared by Wavepath Eikonal Traveltime (WET) method (Schuster, 1993).
Page 46
32
Results and Discussions
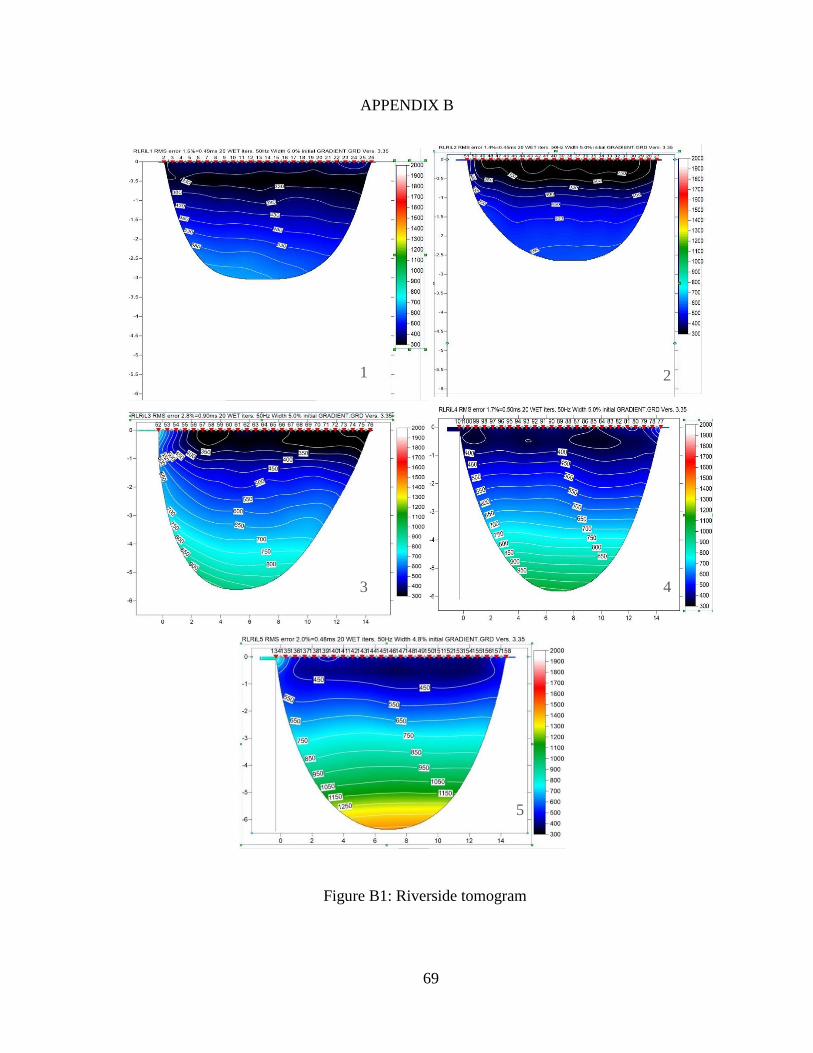
There were five lines on the riverside and four lines on the landside of the levee. Figure:
B1(1) was nearest the crest and the figure: B1(5) one was on the levee junction. First, one meter
first four tomograms in figure: B1 represented the very loose material. We have observed
vegetation on the riverside and due to vegetation, this low-velocity zone existed. Tomograms in
(figure: B1(1) and figure: B1(2)) didn’t reach the compact zone, (figure: B1(3) and figure: B1(4))
reached the compact zone and last tomogram (figure: B1(5)) reached the core of the levee. As we
moved to the junction, the seismic waves had more chance to hit the core.
Figure 23: Sample diagram from initial study.
On the landside, figure: B2(1) was nearest to the crest and the figure: B2(4) one was on the
bottom of the slope. All the tomograms showed a loose zone on the top couple of meters depth
which is due to vegetation. Seismic waves hit the compact zone on the last tomogram (figure:
Dep
th (
m)
Shot points
Profile length (m)
Vel
oci
ty (
ms-1
)
Very loose soil
Burrow
Compacted soil
Page 47
33
B2(4)). The saturated zone was deeper on the landside. In fact, on the landside this zone is below
6m from the surface, which is beyond the limit of our seismic profile.
Conclusions
• Both sides of the levee have the vegetation layer on the top, then a compact zone
and finally the core of it.
• Figure: B2(3) showed a loose pocket at 2m depth. A burrow was identified in the
field. Size and position of this loose zone matched with field observation.
• The saturated zone is deeper in the landside of the levee than that of in riverside.
• Besides the seismic refraction survey, GPR (ground penetrating radar) and ERT
(electrical resistivity tomography) were applied along with the same profile.
Combination of three different geophysical methods gave a better control on the
subsurface features.
This seismic refraction analytical method works good on soil, though it did not show any
anisotropy. But we have gathered experience on the software working on soil medium and apply
this on my study area to have better control on it.
Conceptual design of study
The idea is the implementation of refraction tomography software to understand the
subsurface without any drilling. To overcome the non-uniqueness characteristic of seismic survey,
at least a cut-slope face is necessary to evaluate our results. Cut-slope must be analogous to outcrop
containing the joint/joint sets which will be used to check the validity of our analysis and results.
A road side-cut or a quarry would be an ideal place for this kind of data acquisition. As these two
Page 48
34
kinds of places typically have large plane or less undulated surface to conduct refraction survey
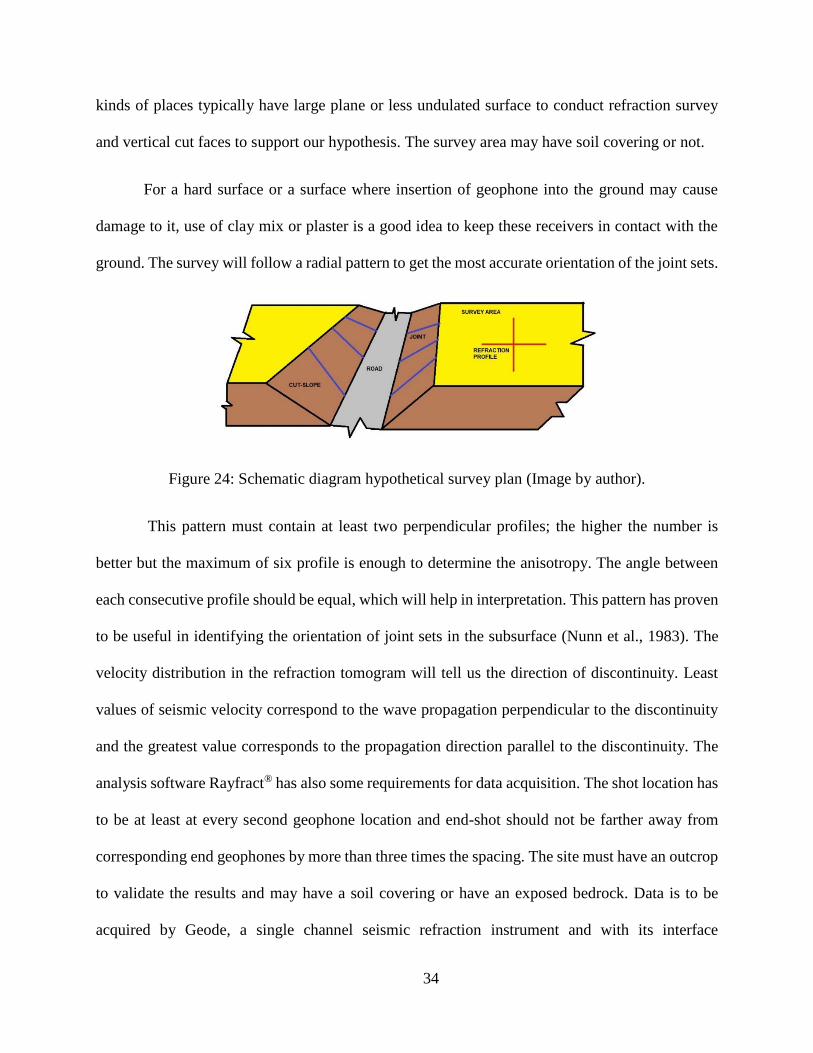
and vertical cut faces to support our hypothesis. The survey area may have soil covering or not.
For a hard surface or a surface where insertion of geophone into the ground may cause
damage to it, use of clay mix or plaster is a good idea to keep these receivers in contact with the
ground. The survey will follow a radial pattern to get the most accurate orientation of the joint sets.
Figure 24: Schematic diagram hypothetical survey plan (Image by author).
This pattern must contain at least two perpendicular profiles; the higher the number is
better but the maximum of six profile is enough to determine the anisotropy. The angle between
each consecutive profile should be equal, which will help in interpretation. This pattern has proven
to be useful in identifying the orientation of joint sets in the subsurface (Nunn et al., 1983). The
velocity distribution in the refraction tomogram will tell us the direction of discontinuity. Least
values of seismic velocity correspond to the wave propagation perpendicular to the discontinuity
and the greatest value corresponds to the propagation direction parallel to the discontinuity. The
analysis software Rayfract® has also some requirements for data acquisition. The shot location has
to be at least at every second geophone location and end-shot should not be farther away from
corresponding end geophones by more than three times the spacing. The site must have an outcrop
to validate the results and may have a soil covering or have an exposed bedrock. Data is to be
acquired by Geode, a single channel seismic refraction instrument and with its interface
Page 49
35
Geometrics Seismodule Controller. The output data is SEG-2 formatted file (Pullan, 1990).
Rayfract® uses first arrivals, picked either in an interactive or automatic way, to make a 1-D initial
model. The initial model is based on basically Delta-t-V method (Gebrande & Miller, 1985). The
user either can use this model or horizontally averaging Delta-t-V (Wiechert-Herglotz) model to
produce a 2D tomographic image by WET Wavepath Eikonal Traveltime Inversion (Schuster,
1993). At the same time, a synthetic forward model is run to compute the misfit between user-
defined and synthetic picks (Lecomte et al., 2000). After going through some trials and - errors, a
reliable output is obtained.
Site selection: Study area 1
The first study area is a roadside area by US-62, Hardy, AR and an abandoned dolomite
quarry by 119-1 Co Rd 165 Tishomingo, MS. In my observation, the rock mass in this area was
mainly calcite. We have observed solution features through the rock slope which has been marked
by red ellipses.
Site selection: Study area 2
The second study area was an abandoned dolomite quarry owned by Vulcan Materials
Company. The site is located by 119-1 Co Rd 165 Tishomingo, Mississippi. The lake by the site
is known as Providence Branch of Cripple Deer Creek. The total area is around 350 acres and our
survey location is about 460ft above sea level. The bedrock is mainly dolomite with overburden
backfill material.
Page 50
36
Figure 25: First study area. 1) Aerial view of the area, 2) Survey plan, 3 & 4) Field observation
red elliptical boundary. The red arrows are indicating two features along the cut-face.
1
2
3 4
N
24
1
24 1
2
Geophone 13
Page 51
37
Figure 26: Second study area. 1) Aerial view of the area, 2) Survey plan and 3 & 4) Field
observation.
Data collection
From the first area, data were collected in two orthogonal profiles which were the minimum
requirement of our study on October, 23rd, 2018 (figure: 25). The surface was quite hard, hammer
and nail have been used to penetrate geophones into the ground. In addition, clay mix has been
1 2
3 4
Page 52
38
used to ensure a better coupling of geophones with the ground. The profiles intersected in the
middle (13th geophone) and the bearing of them were 86o and 358o.
From the second area, the data was collected on February, 16th, 2019. Ground varied from
hard to soft from place to place and was saturated from recent rainfall. Data was collected in two
orthogonal lines in two pairs from this area (Figure: 26). The first pair intersected at 19th geophone
and second pair intersected at 13th (middle) geophone. There is a lake formed by an abandoned pit
beside the site. The bearing of the profiles of the first pair was 282o and 197o and for the second
pair, it was 323o and 235o.
Here is the summary of our refraction survey.
• 1:24 Geometrics seismograph
• 14 Hz vertical component geophone
• Sledgehammer with impact trigger switch
• Geometrics seismodule controller for data acquisition
• Shot spacing: 2 ft (area 1), 2 m (area 2)
• Stacking option: 3 shots
• File type: SEG-2 (.dat format)
Seismic refraction data analysis software: Rayfract®
Typically, the seismic refraction software has three components:
I. A tool to generate an initial model based on the first arrival picks,
II. An inversion method for adjusting the velocity tomogram until an acceptable
match between observed and calculated first arrival is achieved.
III. Finally, a forward modeling algorithm to calculate the source-receiver traveltime
based on current velocity model.
Page 53
39
In this study, Rayfract® has been used to analyze the raw data obtained from the field. This
software uses DeltatV method to create an initial model (Gebrande & Miller, 1985). This method
assumes subsurface has constant vertical velocity gradient model. This method determines layer
bottom velocity from CMP sorted traveltime curves by linear regression and the layer top velocity
by Newton-Raphson root finding method which is made fail-safe by the inclusion of bisection
method whenever Newton-Raphson does not work. To model the subsurface with a constant
velocity model and enable the DeltatV to handle sudden velocity change Modified Dix inversion
and Intercept Time inversion were incorporated with DeltatV (Winkelmann, 1998). Another means
of producing an initial model is ‘smooth inversion’ which is basically a horizontally averaged
DeltatV (Wiechert-Herglotz) model. The DeltatV initial model contains some artifacts which are
carried to the final tomogram during inversion. The ‘smooth inversion’, on the other hand, offers
an artefact free initial model. The software uses the WET (Wavepath eikonal traveltime) inversion
method to reduce the misfit between calculated and observed first arrival picks (Schuster &
Quintus-Bosz, 1993). This method computes wavepath by using the finite difference solution of
eikonal equation (Schuster, 1991). The forward modeling algorithm used to check the robustness
of the final tomogram is the first order eikonal solver (Lecomte et al. 2000). This can handle any
kind of geologic situation and topography of the surface. Finally, this software calls Surfer® to
display the models.
Noise analysis
Noise is an inherent part of seismic signals. The notable sources of noises are: trees, winds,
foot step, nearby electric line and vehicles movement. Signals received by distant geophones
mostly get affected it. Its presence plays an important role in identifying the first arrivals. To
Page 54
40
identify its nature, first the SEG-2 file has to be converted into ASCII file using the SEG-2 to
ASCII decoder, which comes with the Geode.
Figure 27: SEG-2 to ASCII Decoder.
Figure 28: The apparent straight line in the seismic trace was not straight at all.
After decoding the desired traces (distant traces mostly) into ASCII, MS-Excel was used
to plot the traces at trace scale and the noise part at noise scale. When the noise portion was isolated
and plotted separately, it was surprising the see that the apparent straight line in the seismic traces
-0.012
-0.01
-0.008
-0.006
-0.004
-0.002
0
0.002
0.004
0 20 40 60 80 100 120
Am
pli
tud
e
Time (miliseconds)
shot 101_24
-10
0
10
0 200 400 600
Geophone no.
Tim
e (m
s)
Page 55
41
was not straight but rather a mixture of many high frequencies wave superimposed on a low-
frequency sine wave. These hidden intricacies make first arrival pick difficult during the data
analysis
Page 56
42
CHAPTER 6
RESULTS
Velocity tomogram from the first study area
The unit along the X and Y-axis is meter and velocity has unit ms-1. On the top of each
tomogram the red dots denote the shot number. These units are valid for all the tomograms in this
study. The first line is based on horizontally averaged DeltatV model and within 20 WET
iterations, a reliable solution has been obtained. Wavepath width is 4.8% of central frequency
50Hz and RMS error is 1.2% (<2.0%).
Figure 29: Study area 1 (Road cut site): Line 1 tomogram
Backfill zone
Dep
th (
m)
Shot points
Profile length (m)
Vel
oci
ty (
ms-1
)
Highly
weathered in-situ
rocks
Page 57
43
The second line is based on DeltatV model and within 20 WET iterations, a reliable
solution has been obtained. Wavepath width is 3.4% of central frequency 50Hz and RMS error is
1.9% (<2.0%).
Figure 30: Study area 1 (Road cut site): Line 2 tomogram.
Black and blue zone (up to 600m/s) are representing the velocity through the backfill zone
which is very loose medium. Line 2 is showing the highly weathered zone of in-situ rocks as last
few geophones are closer to the cut-slope (≥1000m/s).
Velocity tomogram from the second study area
The first line is based on horizontally averaged DeltatV model and within 20 WET
iterations, a reliable solution has been obtained. Wavepath width is 1.8% of central frequency
50Hz and RMS error is 1.1% (<2.0%).
Backfill zone
Highly
weathered in-situ
rocks
Dep
th (
m)
Shot points
Profile length (m)
Vel
oci
ty (
ms-1
)
Page 58
44
Figure 31: Study area 2 (Dolomite quarry), Intersection 1: Line 1 tomogram.
The second line is also based on horizontally averaged DeltatV model and within 100 WET
iterations, a reliable solution has been obtained. Wavepath width is 1.8% of central frequency
50Hz and RMS error is 2.0% (=2.0%).
Location of joint
Loose backfill material Weathered bedrock
Fresh bedrock
Dep
th (
m)
Shot points
Profile length (m)
Vel
oci
ty (
ms-1
)
Page 59
45
Figure 32: Study area 2 (Dolomite quarry), Intersection 1: Line 2 tomogram.
The third line is based on horizontally averaged DeltatV model and within 20 WET
iterations, a reliable solution has been obtained. Wavepath width is 2.2% of central frequency
50Hz and RMS error is 2.2% (>2.0%).
Location of joint
Loose backfill material
Weathered bedrock
Fresh bedrock
Dep
th (
m)
Shot points
Profile length (m) V
eloci
ty (
ms-1
)
Page 60
46
Figure 33: Study area 2 (Dolomite quarry), Intersection 2: Line 3 tomogram.
Finally, the fourth line is based on horizontally averaged DeltatV model and within 20
WET iterations, a reliable solution has been obtained. Wavepath width is 2.3% of central frequency
50Hz and RMS error is 2.2% (>2.0%).
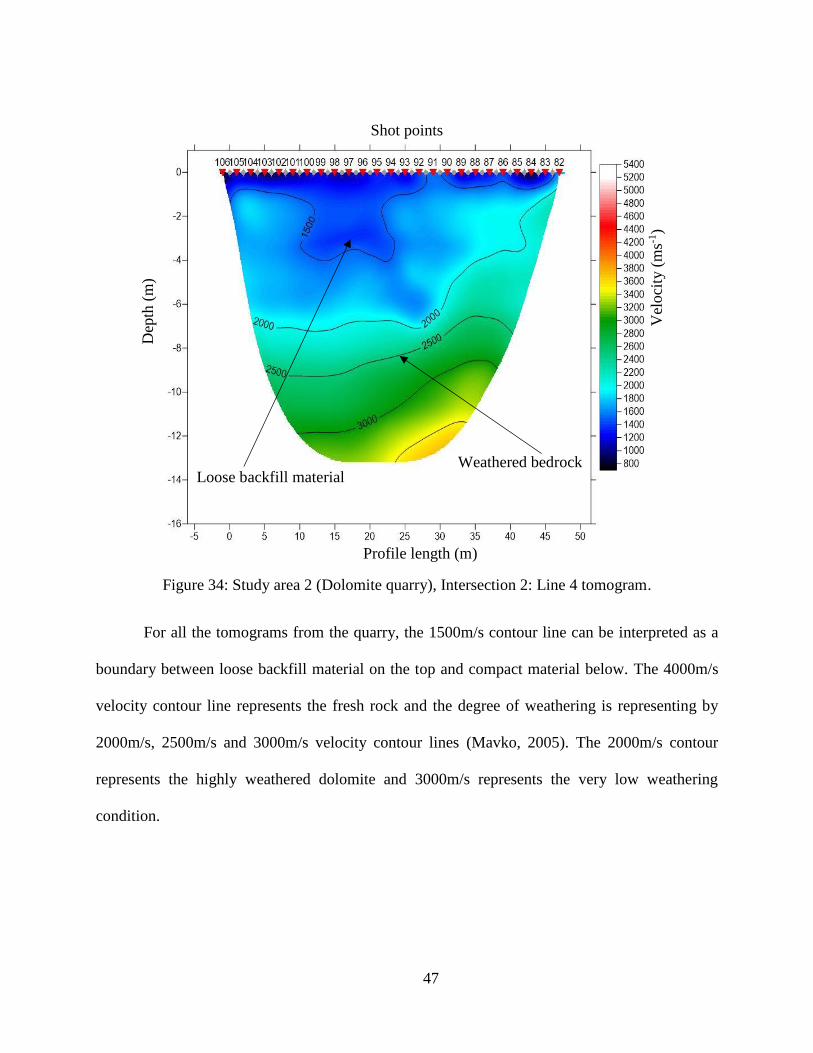
Location of joint
Loose backfill material
Weathered bedrock
Fresh bedrock
Dep
th (
m)
Shot points
Profile length (m)
Vel
oci
ty (
ms-1
)
Page 61
47
Figure 34: Study area 2 (Dolomite quarry), Intersection 2: Line 4 tomogram.
For all the tomograms from the quarry, the 1500m/s contour line can be interpreted as a
boundary between loose backfill material on the top and compact material below. The 4000m/s
velocity contour line represents the fresh rock and the degree of weathering is representing by
2000m/s, 2500m/s and 3000m/s velocity contour lines (Mavko, 2005). The 2000m/s contour
represents the highly weathered dolomite and 3000m/s represents the very low weathering
condition.
Loose backfill material Weathered bedrock
Dep
th (
m)
Shot points
Profile length (m)
Vel
oci
ty (
ms-1
)
Page 62
48
3D fence diagram (Velocity)
The acute angle between these lines is 88o. Both of the lines have a length of 14.63m and
depth around 2.25m. The lines have intersected at 13th geophones(middle).
Figure 35: Study area 1 (Road cut site), Velocity fence diagram.
The acute angle between these lines is 85o. Both of the lines have a length of 48m and depth
varied from 8-10m. The lines have intersected at 19th geophones.
Figure 36: Study area 2 (Dolomite quarry), Intersection 1: Velocity fence diagram.
The acute angle between these lines is 88o. Both of the lines have a length of 48m and depth
varied from 13-15m. The lines have intersected at 13th geophones.
Page 63
49
Figure 37: Study area 2 (Dolomite quarry), Intersection 2: Velocity fence diagram.
In the second area at first intersection, bedrock is shallower towards the south. Both lines
have backfilled zone on top overlying bedrock.
3D fence diagram (Rock mass quality, Q)
Very low Q value on the top and gradually increase at bottom.
Figure 38: Study area 1 (Road cut site): Fence diagram of Q value (Rock mass quality,
Q).
Page 64
50
In the second area, Q value is larger even from the largest value of the first area and it
gradually increases in the middle. As soon as, the wave reached the bedrock, it rose up quickly.
Figure 39: Study area 2 (Dolomite quarry), Intersection 1: Fence diagram of Q value (Rock mass
quality, Q).
But in the second intersection, it didn’t rise that much as it did in the first one. Largest Q
value here was found around 10 at the bottom.
Figure 40: Study area 2 (Dolomite quarry), Intersection 2: Fence diagram of Q value (Rock mass
quality, Q).
Page 65
51
CHAPTER 7
DISCUSSIONS AND CONCLUSIONS
Discussion
In the first area, none of the profiles reached the bedrock. From the velocity fence diagram
of the first area (Figure: 35), area is more compact along line 1 than line 2 and in the line of
intersection, the velocity anisotropy is around 300m/s. This much anisotropy is normal for very
loose material like soil covering on top. Here, the loose zone is located near the fill slope and
towards the north (Figure: 25) the ground is more compact. In-situ rock is shallower near the cut-
slope and deeper towards fill slope (Figure: 25). These features of the first area are displaying the
velocity anisotropy due to the varying compactness of the fill. This varying compaction is due to
the way this area has been filled e.g. dumping materials from north to south and pushing them
along the same direction.
In the second area, the depression on the bedrock (4000m/s contour line) is possibly
because of the location of profile over joints (Figure: 31, 32 and 33). The joint/fault location is
indicated by the depression on the contour lines (Zelt et al. 2013). Line 1 might cross over a joint
of the major joint set. The southern part of this area has been used to process the materials, so they
have prepared that part for their own convenience. That gave that part a shape like a basin. Over
the course of time, the whole area has been filled with rock fill material. On the fence diagram
(figure: 36), no visible mismatch in velocity has been identified on the first intersection and thus
Page 66
52
no velocity anisotropy exists there. Most probably this intersection ran obliquely over both
anisotropy planes or at least major anisotropic plane. The bedrock is deeper below the second
intersection. Line 4 barely touched the fresh rock. As the first intersection suggested a dipping
direction toward the south and second intersection supported this suggestion. The southern part of
the survey area has been used to grind and break the material, so, a basin-shaped topography is
observed. A visible mismatch in velocity (around 1000m/s) in the second intersection indicated an
existing velocity anisotropy below (figure: 37). The amount of anisotropy, which has been
observed in figure: 37 is common at the location of bedrock. Bedrock rose up about 4m in Line 3
relative to the Line 4. This is because Line 3 ran along with the major joint set and Line 4 ran
perpendicular to it. Also, Line 3 mostly ran over bedrock and whereas Line 4 barely touched
bedrock as it is deeper here.
The following figure: 41 shows the observed distribution of joints in the second area. The
major joint sets are drawn based on the observation from face 1 and the inferred joint sets are
drawn from face 2 observation. Both figure: 26(3) and figure: 26(4), are representing the face 1 in
the following figure which is accessible outcrop here. So, the existence of major joint sets can be
supported by figure: 26(3) and figure: 26(4). From the field observation, major joint sets are
oriented almost normal to face 1. As face 2 was inaccessible due to terrain condition, it has been
inferred that there is another joint set orienting almost normal to the face 2. In a sedimentary
sequence, the existence of two orthogonal joint sets is quite normal. Also, this area is a part of
Black Warrior foreland basin and two perpendicularly intersected fault systems: Ouachita fold
thrust-belt and Appalachian fold-thrust belt, are responsible for the creation of this structure. So,
two normal joints sets can be expected in this area and also, in sedimentary strata this kind of joint
systems is as usual.
Page 67
53
From the analysis of tomograms, two normal joint sets have been inferred to exist.
However, the predicted joint sets have been interpreted to be rotated by around 15° anti-clockwise
from the pattern observed in the field. The predicted pattern has been shown in figure: 42. The
white solid lines are representing the major joint sets and white dashed lines are representing the
inferred joint sets. From the structural point of view, this amount of deviation is unusual; however,
in a seismic refraction survey, this deviation is quite normal. As from the picking first arrival to
the tomogram interpretation, this method does not produce a single unique answer. First picks and
adjusting by several iterations depend on experience as well as interpretation. The software used
in this study to analyze seismic refraction data is based on some assumptions and sometimes the
user has to compromise with these assumptions. The method itself possesses a non-unique nature
which may puzzle the user in interpreting the results (Palmer, 2010). All of these uncertainties add
up in the final results and may cause the observed deviation.
Rock mass quality Q has been calculated using equation (2) (Barton et al., 1974). For the
first study area, the surface quality is below exceptionally poor-quality rocks (0.001) (Appendix)
which is indicating the very loose materials. The velocity contour lines representing 1000m/s and
above can be attributed to the highly weathered and loose top surface of the in-situ rock near the
road cut. Again, exceptionally poor-quality rocks were on the surface in the second study area as
both areas have been created in the same way. The quality of soil cover in both areas is similar;
very loose materials thus have very low Q value. As soon as the seismic wave reached the bedrock,
quality increased quickly (1 and above). A quarry is a more suitable place over road-cut for this
type of survey because a quarry allows the survey to be conducted on a larger area, which is one
criterion of this study. Preliminary reconnaissance can be done using Google Map. To enter into
the quarry; special permission, necessary attire like steel toe boots, helmet, goggles, etc. and a
Page 68
54
Figure 41: Observed joint system.
Figure 42: Predicted joint system (Both white solid and dashed lines).
Page 69
55
short training are needed. Arrangement of all of these may take some time, so this should be put
into consideration. For a better coupling of geophones with the hard ground, the use of clay-mix
or plaster is a good choice. Besides velocity measurements, Q value determination is an important
aspect of this study.
From the field observation (figure: 26), rock mass quality Q has been calculated and VP
has been derived from these values using equations (1) and (2). Based on field observation,
following values for determining the Q have been estimated:
Table 4: Rock mass quality, Q parameters
Parameters Estimated Value
RQD 90-10
Jn 4
Jr 1.5
Ja 2-4
Jw 1.0
SRF 2.5
Using the above values and equation (1), the range of values of rock mass quality, Q =
3.375 – 7.5 has been obtained. Then, using equation (2) the range of values of VP = 4.03 – 4.38
km/s has been calculated. The back-calculation attributes the 4000 m/s contour line as fresh
bedrock which is perfectly consistent with our tomograms. As every ten-fold change in Q values
changes the VP by 1 km/s and the estimated Q does not change that much. So, VP falls within a
short-range and similar range has been observed in the tomograms.
Page 70
56
Obtaining real data for Q parameters from the field directly is more appropriate than both
the estimated one and the one derived from an empirical equation. The equation used here is a
trend line from numerous data points but still, it gives Q value on the line rather the exact one.
Also, tomograms are subjective and vary with experience of the user. Thus, the derivation of Q
from P-wave velocity lacks its significance if it cannot be supported by its field measurement. To
solve this, all parameters except RQD can be obtained directly from the field. Samples can be
brought to the lab to run core and measure RQD. In case of absence of such facilities, the following
relations can be used to estimate RQD (Palmström, 1982).
𝑅𝑄𝐷 = 115 − 3.3 𝐽𝑣 16
Where, Jv represents the number of joints per cubic meter or the volumetric joint count and
RQD = 100 for Jv < 4.5.
Conclusions
The seismic refraction method has proven to be useful in identifying rock mass anisotropy
if two criteria are met: seismic waves must reach bedrock and there must be an outcrop near the
survey area to show the joint properties. This method is very effective if the area has a single
dominant joint set. The areas having two dominant joint sets require accessible outcrops or cut-
faces to obtain necessary rock mass data.
In addition to identifying rock mass anisotropy, this method is also useful to identify the
randomness in compaction in the subsurface (first study area).
P-wave velocity has been calculated in two ways: Using the seismic refraction method and
from the estimated Q value using equation (1). Also, the Q value has been calculated here in two
ways: From the P-wave velocity using equation (1) and from the field observation using equation
Page 71
57
(2). The estimation of Q value has produced a range of VP that is not far off the tomograms. Further
improvement of this work can be done by collecting the rock mass data from the outcrop, then
calculating the Q value and making a comparison between these two values coming from two
different sources.
Page 73
59
Ackermann, H. D., Pankratz, L. W., & Dansereau, D. (1986). Resolution of ambiguities of seismic
refraction traveltime curves. Geophysics, 51(2), 223-235.
Armstrong, T., McAteer, J., & Connolly, P. (2001). Removal of overburden velocity anomaly
effects for depth conversion. Geophysical Prospecting, 49(1), 79-99.
Arsdale, R. V. (2009) Adventures Through Deep Time: The Central Mississippi River Valley and
Its Earthquakes, Boulder, CO: The Geological Society of America, Inc.
Barton, Nicholas, Lien, R., & Lunde, J. (1974). Engineering classification of rock masses for the
design of tunnel support. Rock Mechanics, 6(4), 189-236.
Barton, Nick. (1991). Geotechnical design. World Tunneling, 410-416.
Barton, Nick. (1995). The influence of joint properties in modelling jointed rock masses. 8th ISRM
Congress. International Society for Rock Mechanics and Rock Engineering.
Barton, Nick. (2002). Some new Q-value correlations to assist in site characterization and tunnel
design. International Journal of Rock Mechanics and Mining Sciences, 39(2), 185-216.
Boggs Jr, S. (2014). Principles of sedimentology and stratigraphy, Upper Saddle River, NJ:
Pearson Education.
Bohara, P., Rhodes, R. A. G., Oyan, M. N. S., Moseley, P. & Aydin, A. (2017). Geophysical
Characterization of a Confederate Cemetery. AEG 60th Annual Meeting.
Page 74
60
Bradley, D. C., & Kidd, W. S. F. (1991). Flexural extension of the upper continental crust in
collisional foredeeps. Geological Society of America Bulletin, 103(11), 1416-1438.
Braile, L. (2010). https://web.ics.purdue.edu/~braile/edumod/waves/WaveDemo.htm#Contents_
Top.
Buchanan, R. S., & Johnson, F. K. (1968). Bonanza gas field: a model for Arkóma basin growth
faulting, Oklahoma City, OK: Oklahoma City Geological Society.
Burger, H. R., Sheehan, A. F. & Jones, C. H. (2006). Introduction to applied geophysics. New
York, NY: W. W. Norton & Company, Inc.
Cates, L. M., McIntyre, M. R., Hawkins, W. B., & Groshong Jr, R. H. (2004). Structure and oil
and gas production in the Black Warrior basin: Tuscaloosa, Alabama, University of Alabama
College of Continuing Studies. In 2004 International Coalbed Methane Symposium
Proceedings, Paper, 440, 34.
Cherry, B. A. (1990). Internal deformation and fold kinematics of part of the Sequatchie anticline,
southern Appalachian fold and thrust belt, Blount County, Alabama (Doctoral dissertation,
University of Alabama).
Dockery III, D. T., & Thompson, D. E. (2016). The Geology of Mississippi, Jackson, MS:
Mississippi Department of Environment Quality.
Page 75
61
Duellmann, H., & Heitfeld, K. H. (1978). Influence of grain fabric anisotropy on the elastic
properties of rocks. Proceedings 3rd IAEG Congress, Madrid, II (1), Imprime ADOSA,
Madrid, 150-162.
Eitzenberger, A. (2012). Wave Propagation in Rock and the Influence of Discontinuities (Doctoral
Thesis, Luleå University of Technology, Sweden).
Fossen, H. (2016). Structural geology, Cambridge, UK: Cambridge University Press.
Gebrande, H., & Miller, H. (1985). Refraktionsseismik. Angewandte Geowissenschaften II, 226-
260.
Groshong Jr, R. H., Pashin, J. C., & McIntyre, M. R. (2009). Structural controls on fractured coal
reservoirs in the southern Appalachian Black Warrior foreland basin. Journal of Structural
Geology, 31(9), 874-886.
Grujic, N. (1974). Ultrasonic testing of foundation rock. In Proc. 3rd Congr. Int. Soc. for Rock
Mechanics, 2(1), 404-409.
Hatcher Jr., R. D., Thomas, W. A., Viele, G. W. (1989). The Appalachian-Ouachita Orogen in the
United States, Boulder, CO: The Geological Society of America, Inc.
Iliev, I. G. (1966). An attempt to estimate the degree of weathering of intrusive rocks from their
physico-mechanical properties. In 1st ISRM Congress. International Society for Rock
Mechanics and Rock Engineering, 109-114.
Page 76
62
Lacefield, J. (2000). Lost World in Alabama Rocks, Tuscaloosa, AL: The Alabama Museum of
Natural History.
Lashkaripour, G. R., & Passaris, E. K. S. (1995). Correlations between index parameters and
mechanical properties of shales. In 8th ISRM Congress. International Society for Rock
Mechanics and Rock Engineering, 257-261.
Lecomte, I., Gjøystdal, H., Dahle, A. and Pedersen, O.C. (2000). Improving modelling and
inversion in refraction seismics with a first-order Eikonal solver. Geophysical Prospecting,
48(3), 437-454.
Leary, P. C., & Henyey, T. L. (1985). Anisotropy and fracture zones about a geothermal well from
P-wave velocity profiles. Geophysics, 50(1), 25-36.
Luo, Y. and Schuster, G.T. (1991). Wave-equation traveltime inversion. Geophysics, 56(5), 645-
653.
Lutgens, F. K., Tarbuck, E. J. & Tasa, D. (2006). Essentials of Geology, Upper Saddle River, NJ:
Pearson Education, Inc.
Lykoshin, A. G., Yaschenko, S. G., Mikhailov, A. D., Savitch, A. I., & Koptev, V. J. (1971).
Investigation of rock jointing by seismo-acoustic methods. Proc. Syrup. Soc. int. Mechanique
des Roches, Nancy, I-19.
Mavko, G. (2005). https://pangea.stanford.edu/courses/gp262/Notes/8.SeismicVelocity.pdf.
Page 77
63
Mellen, F. F. (1947). Black Warrior Basin, Alabama and Mississippi. Bulletin of The American
Association of Petroleum Geologists, 31(10), 1801-1816.
Nunn, K. R., Barker, R. D., & Bamford, D. (1983). In situ seismic and electrical measurements of
fracture anisotropy in the Lincolnshire Chalk. Quarterly Journal of Engineering Geology and
Hydrogeology, 16(3) 187-195.
Nur, A. (1971). Effects of stress on velocity anisotropy in rocks with cracks. Journal of
Geophysical Research, 76(8), 2022-2034.
Oda, M., Yamabe, T., & Kamemura, K. (1986). A crack tensor and its relation to wave velocity
anisotropy in jointed rock masses. International Journal of Rock Mechanics and Mining
Sciences & Geomechanics Abstracts, 23(6), 387-397.
Palmer, D. (2010). Non-uniqueness with refraction inversion–a syncline model study. Geophysical
Prospecting, 58(2), 203-218.
Palmström, A. (1982). The volumetric joint count-a useful and simple measure of the degree of
rock jointing. Proc. 4th Int. Cong. Int. Assoc. Eng. Geol, 5, 221-228.
Pike, S. J. & Warren, B. B. (1968). Black Warrior Basin, Northeast Mississippi and Northwest
Alabama. Natural Gases of North America, 9(2), 1693-1701.
Rheams, L. J. & Kidd, J. T. (1982). Depositional Setting of the Pottsville Formation in the Black
Warrior Basin, Tuscaloosa, AL: Alabama Geological Survey.
Page 78
64
Rhodes, R. A. G., Bohara, P., Oyan, M. N. S., Moseley, P. & Aydin, A. (2017). Geophysical
Characterization of a Short Segment of a River Levee. AEG 60th Annual Meeting.
Rhodes, R. A. G. (2018). Geophysical Characterization of a Levee Segment Along the Coldwater
River Levee (Unfinished Master’s thesis, The University of Mississippi).
Schuster, G.T. and Quintus-Bosz, A. (1993). Wavepath eikonal traveltime inversion: Theory.
Geophysics, 58(9), 1314-1323.
Stapor, F. W., & Cleaves, A. W. (1992). Mississippian (Chesterian) sequence stratigraphy in the
Black Warrior Basin: Pride Mountain Formation (lowstand wedge) and Hartselle Sandstone
(transgressive systems tract). Gulf Coast Association of Geological Societies, 42(1992), 683-
696.
Stearns, R. G., & Marcher, M. V. (1962). Late Cretaceous and subsequent structural development
of the northern Mississippi embayment area. Geological Society of America Bulletin, 73(11),
1387-1394.
Telford, W. M., Telford, W. M., Geldart, L. P. & Sheriff, R. E. (1990). Applied geophysics, New
York, NY: Cambridge university press.
Thomas, W. A. (1972). Regional Paleozoic stratigraphy in Mississippi between Ouachita and
Appalachian mountains. AAPG Bulletin, 56(1), 81-106.
Thomas, W. A., & Drahovzal, J. A. (1973). Regional Paleozoic stratigraphy of Alabama.
Tuscaloosa, AL: Alabama Geological Society.
Page 79
65
Thomas, W. A. (1985a). The Appalachian-Ouachita connection: Paleozoic orogenic belt at the
southern margin of North America. Annual Review of Earth and Planetary Sciences, 13(1),
175-199.
Thomas, W. A., & Sloss, L. L. (1988). Sedimentary Cover-North American Craton: U.S. Boulder,
CO: The Geological Society of America, Inc.
Tsidzi, K. E. N. (1997). Propagation characteristics of ultrasonic waves in foliated rocks. Bulletin
of the International Association of Engineering Geology, 56(1997), 103-114.
USACE. (1965). “Coldwater River Levee Construction”. FOIA Request from.
Winkelmann, R.A. (1996). Entwicklung und Anwendung eines Wellenfeldverfahrens zur
Auswertung von CMP-sortierten Refraktionseinsätzen. Akad. Verlag.
Wu, S., & Groshong Jr, R. H. (1991). Low-temperature deformation of sandstone, southern
Appalachian fold-thrust belt. Geological Society of America Bulletin, 103(7), 861-875.
Wyllie, D. C. (2014). Foundations on rock: engineering practice. New York, NY: E & FN Spon.
Zelt, C.A., Haines, S., Powers, M.H., Sheehan, J., Rohdewald, S., Link, C., Hayashi, K., Zhao, D.,
Zhou, H.W., Burton, B.L. and Petersen, U.K. (2013). Blind test of methods for obtaining 2-
D near-surface seismic velocity models from first-arrival traveltimes. Journal of
Environmental and Engineering Geophysics, 18(3), 183-194.
Zoeppritz, K. (1919). On the reflection and propagation of seismic waves. Gottinger Nachrichten,
1(5), 66-84.
Page 80
66
USDA Web Soil Survey. https://websoilsurvey.sc.egov.usda.gov /app/ WebSoilSurvey.aspx
“What is a seismic survey?” Park Seismic LLC.
Page 81
67
LIST OF APPENDICES
Page 82
68
APPENDIX A
Figure A1: The 1993 updated Q-support chart for selecting permanent B+S(fr) reinforcement and
support for tunnels and caverns in rock (Barton, 2002).
Page 83
69
APPENDIX B
Figure B1: Riverside tomogram
1 2
3 4
5
Page 84
70
Figure B2: Landside tomogram
1 2
3 4 4
Page 85
71
APPENDIX C
Creating a new profile
➢ Select File|New Profile.
➢ In the File name Section, write QOTL1 and click save.
➢ Now go to Header|Profile.
Figure C1: Edit profile display
➢ Set everything as it is on the above image. After setting everything up, click on OK to
proceed.
Seismic file import
➢ After creating a new directory following the above steps, a new directory will be created
in C:\RAY32
Page 86
72
➢ After the downloading the data file named under “QOTL1”, copy all the .dat file into
C:\RAY32\INPUT.
➢ In File|Import shots, Select SEG-2 as Import data type, then select select under Input
directory like below;
➢ A new window will pop-up, select the one of the files, preferably the first one then click
open.
➢ Change Default spread type from default 10:360 channels to 1:24 channels.
➢ Hit Import shots button to import shots, a window may pop-up and click yes and proceed.
➢ Leave the Layout start [station no.] at 0, only modify the Shot pos. [station no.].
Corresponding shot positions are given at table
Figure C2: Import shot display (Left) and Shot information display (Right)
➢ Leave the Import data settings and SEG-2 import settings under File menu as they are.
Page 87
73
Pick and review first breaks
➢ Select Trace|Shot gather, a window will pop-up, click OK. The Shot gather display will
appear and first picks can be picked interactively or automatically.
Figure C3: Shot gather display
Table C1: Survey information
OFL1
_2 OFL2
QOT
L1
QOT
L2
QOT
L3
QOT
L4
Spaci
ng = 2ft
Spaci
ng = 2ft
Spaci
ng = 2m
Spaci
ng = 2m
Spaci
ng = 2m
Spaci
ng = 2m
S
Shot
no
P
Positi
on
S
Shot
no
P
Positi
on
S
Shot
no
P
Positi
on
S
Shot
no
P
Positi
on
S
Shot
no
P
Positi
on
S
Shot
no
P
Positi
on
3
3
2
23
2
28
2
23.5
4
4
-
-0.5
3
32
-
-0.5
5
57
2
23.5
8
82
2
23.5
4
4
1
22
2
29
2
22.5
5
5
0
0.5
3
33
-
0.5
5
58
2
22.5
8
83
2
22.5
5
5
1
21
2
30
2
21.5
5
6
1
1.5
3
34
1
1.5
5
59
2
21.5
8
84
2
21.5
6
6
1
20
2
31
2
20.5
5
7
1
2.5
3
35
1
2.5
5
60
2
20.5
8
85
2
20.5
Page 88
74
7
7
1
19
2
32
1
19.5
5
8
1
3.5
3
36
1
3.5
5
61
2
19.5
8
86
2
19.5
8
8
1
18
2
33
1
18.5
5
9
1
4.5
3
37
1
4.5
5
62
2
18.5
8
87
2
18.5
9
9
1
17
2
34
1
17.5
5
10
1
5.5
3
38
1
5.5
5
63
2
17.5
8
88
2
17.5
1
10
1
16
2
35
1
16.5
5
11
1
6.5
3
39
1
6.5
5
64
2
16.5
8
89
2
16.5
1
11
1
15
2
36
1
15.5
5
12
1
7.5
3
40
1
7.5
5
65
2
15.5
8
90
2
15.5
1
12
1
14
2
37
1
14.5
5
13
1
8.5
3
41
1
8.5
5
66
2
14.5
8
91
2
14.5
1
13
1
13
2
38
1
13.5
1
14
1
9.5
3
42
1
9.5
5
67
2
13.5
8
92
2
13.5
1
14
1
12
2
39
1
12.5
1
15
1
10.5
3
43
1
10.5
5
68
2
12.5
8
93
2
12.5
1
15
1
11
2
40
1
11.5
1
16
1
11.5
3
44
1
11.5
5
69
1
11.5
8
94
2
11.5
1
16
1
10
2
41
1
10.5
1
17
1
12.5
3
45
1
12.5
5
70
2
10.5
8
95
2
10.5
1
17
1
49
2
42
1
9.5
1
18
1
13.5
3
46
1
13.5
5
71
9
9.5
8
96
2
9.5
1
19
8
8
4
43
1
8.5
1
19
1
14.5
3
47
1
14.5
5
72
8
8.5
8
97
2
8.5
1
20
7
7
4
44
1
7.5
1
20
1
15.5
3
48
1
15.5
5
73
7
7.5
8
98
2
7.5
2
21
6
6
4
45
1
6.5
1
21
1
16.5
3
49
1
16.5
5
74
7
6.5
8
99
2
6.5
2
22
5
5
4
46
5
5.5
1
22
1
17.5
3
50
1
17.5
5
75
7
5.5
1
100
2
5.5
2
23
4
4
4
47
4
4.5
1
23
1
18.5
3
51
1
18.5
5
76
7
4.5
1
101
2
4.5
2
24
.
3
4
48
4
3.5
1
24
1
19.5
3
52
1
19.5
5
77
3
7.5
1
102
3
3.5
Page 89
75
2
25
0
2
4
49
4
2.5
2
25
1
20.5
3
53
1
20.5
7
78
7
2.5
1
103
3
2.5
2
26
0
1
5
50
4
1.5
1
26
1
21.5
3
54
1
21.5
5
79
7
1.5
1
104
3
1.5
2
27
0
0
5
51
4
0.5
1
27
1
22.5
3
55
1
22.5
8
80
7
0.5
1
105
3
0.5
5
52
4
-0.5
2
28
1
23.5
3
56
1
23.5
8
81
-
-0.5
1
106
-
-0.5
Shot
inline offset
3
(-1.0
ft)
➢ Use F7/F8 to shift among shots, Ctlr+F1/F2 to zoom in/out the traces and Shift+F1/F2 to
zoom in/out along the station number, Shift+PgUp/PgDn to move over zoomed section
along the station number and F1/F2 to zoom in/out along time axis.
➢ In Processing| Bandpass filter, select Low corner frequency 8Hz and High corner
frequency 20Hz to remove the noises from the noisy traces. Most traces can be picked
easily without applying any filter.
➢ Subsurface does not vary much and picks between adjacent shots should not varies much.
Also, picks between adjacent shots should be consistent in nature.
➢ Trace|Offset gather display does not useful for us to reciprocity principle. As our shot
was not on the geophone location, so, this display will not help us to check the
consistency among first arrivals.
➢ Check the consistencies among shots in Refractor|Shot breaks display. This display a
kind of time-distance graph. Image below.
Page 90
76
Figure C4: Shot breaks display
WET tomography with Smooth Inversion
➢ Select Smooth invert|WET with 1D-gradient initial model. This will create a horizontally
averaged 1D initial model and call Surfer® to display the initial model. Then a window
will appear and ask for permission to run default WET tomography. Allow WET
tomography with default option by hitting Enter button. After 20 iterations the process
will stop and ray coverage and tomography will be displayed in Surfer®.
➢ The allowable RMS error is less than 2%. If this goes more than that go to Trace|Shot
gather and Refractor|Shot breaks to see the misfit between the forward model and user
picks. The red one denotes to user picks and blue one for synthetic model. Try to adjust
user picks accordingly. The synthetic model is based on the user picks, so, don’t follow
them blindly. As long as, the user picks are correct and consistent, the RMS error should
be around 2%.
➢ The process may go through some iterations, picking the first arrivals and producing
tomograms, then adjusting the first arrivals again and later produce another tomogram.
Page 91
77
➢ Increasing the number of iterations from 20 to 100 may decrease the error. But in my
case it didn’t help much. The number of iteration can be increased in the following
window which is located WET tomo|Interactive WET tomography. The default model
should be GRADIENT.GRD, if not then click the select button and follow this path
C:\RAY32\QOTL1\GRADTOMO. But it is a worthy try. Also, increasing the wavepath
width increase the robustness by removing the artifacts but offers lo-w resolution in
tomogram.
Figure C5: WET parameter display
Page 92
78
DeltatV
➢ I have used DeltatV only for second line in road cut, Hardy, AR. It is always better to
avoid this method because the initial model itself contains artifacts which are carried to
the tomogram. This can be found in DeltatV|Automatic DeltatV and WET inversion, after
clicking this an DeltatV initial model will be generated and a prompt window will appear
to ask permission for WET inversion. After clicking yes, WET inversion run with its
default parameters.
Appendix II - Surfer®
➢ After obtaining the desired tomograms in Surfer®, go to Object manager|Image -
[VELOITXX.GRD], here XX is the iteration number. In Property Manager, go to
General|Colors, select Rainbow2 and set Minimum=400 and Maximum=1500 for OFL1
and OFL2, set Minimum=800 and Maximum=5400 for QOTL1, QOTL2, QOTL3 and
QOTL4 and hit OK.
➢ Go to Object Manager|Contours-[VELOITXX.GRD], here XX is the iteration number. In
Property Manager, go to Levels|General, set Minimum contour= 500, Maximum
contour=1500, Contour interval= 50 and Major contour every= 1. for OFL1 and OFL2;
set Minimum contour= 500, Maximum contour= 5500, Contour interval= 500 and Major
contour every= 1. for QOTL1, QOTL2, QOTL3 and QOTL4.
➢ Go to Object Manager|Left Axis. In Property Manager, go to Scalling|Scalling, set Axis
minimum= -2.4, Axix maximum= 0.113976 and Major interval= 0.5 for OFL1 and OFL2
and set Axis minimum= -16, Axix maximum= 0.773635 and Major interval= 2 for
QOTL1, QOTL2, QOTL3 and QOTL4.
Page 93
79
➢ Now take screenshots to save your image. As our surfer is a Demo Inversion, we cannot
save our image.
Voxler®: Velocity fence diagram:
➢ Before beginning work in Voxler®, export the velocity file as ASCII file. Go to
Grid|Export grid file to ASCII.TXT. Click Select grid file and a new window will pop-up.
Select GRADTOMO or TOMO for smooth invert or DeltatV respectively. Select the
VELOITXX.GRD file, here, XX is the iteration number. Choose the file that has been
used to produce tomogram. Set Min. velocity and Max. velocity according to the velocity
range of the profile set in Surfer® in Object manager|Image, and then in Property
Manager, under General|Colors tab. Click on the Export to .TXT button to export the
velocity grid file as a ASCII file. The file will be saved in either GRADTOMO or
TOMO.
➢ Open the Voxler®, create a new project first from File|New|Project. On the Viewer
window a new project is now open.
➢ Go to File|Import, select one of the velocity files i.e. QOTL1 velocity file. A new window
called Data Import Options will appear. Set Start import at= 2 and click OK. This file is
now available in the Network Manager. Similarly, import the velocity file of QOTL2.
Select Network Manager|QOTL1, then select Property Manager|Worksheet|Edit
Worksheet. Select the column E and delete it and do the same for QOTL2.
➢ Move the cursor on one of files in Network Manager and click the right button. From
there select Computational|Transform. A new path is now created between the file and
Transform option. Do this for the other file also.
Page 94
80
Figure C6: File import display (Left) and Network manager (Right)
Figure C7: Property manager (for scatter plot: left and for data: right)
➢ In the Network Manager, select Transform of velocity file for QOTL2. Go to the Property
Manager|General. Set the Origin = Custom and set X = 38. Now go to the Property
Manager|Transform|Rotation. Set Angel(degree) = 270 and hit Enter.
Page 95
81
➢ Now in the Property Manager, right click on the Transform and select save data. An
Export window pop-up, set the File name= QOTL1 and Save as Type= XLSX Excel
2007 spreadsheet (*.xlsx) and hit Save button. Do this for other velocity file under
QOTL2 name.
➢ Open both QOTL1.xlsx and QOTL2.xlsx in excel. Copy all the data from the both file
into a new excel sheet and named it Combined intersection 1 velocity and save it as .xlsx
format. The column number in the new file will be same as parent files.
➢ Open a new project and import Combined intersection 1 velocity.xlsx like before. Right
click on it on Network Manager and add Transform like before. Right click on Transform
and select Graphics Output|ScatterPlot and right click on ScatterPlot in Network
Manager, select Graphics Output|Axes.
➢ In the Viewer window, a fence diagram will appear with XYZ axes.
➢ Select ScatterPlot in the Network Manager. In Property Manager|General, set Density=
100% (all points). In Property Manager|General|Rendering, set Symbol= Circle filled,
then go to the Colormap Editor from Colormap. Select Color Mapping: Rainbow2, set
Data Min: 600 and Data Max: 5500 for quarry data and Data Min: 300 and Data Max:
1500 for road cut data.
➢ In Property Manager|Legend, put ticks by Show legend. Write Velocity chart in the Title
under Legend tab. Make Number of labels= 8 in Labels under same tab.
➢ Right click on the Axes in Network Manager then come to the Property Manager again.
Write “Intersection 1: Line 1 (meter)”, “Intersection 1: Line 2 (meter)”, “Depth (m)” in
the Title bar of X, Y and Z axis respectively in Property Manager. Put tick by Flip text
Page 96
82
horz. for Y-axis and Flip text vert. for Z-axis. Set Cross Y axis at (Y value) = 24.67 and
hit Enter.
Q-value fence diagram
➢ Open Combined intersection 1 velocity.xlsx again. Add a column E for Q value. Use this
equation VP ≈ 3.5(Km/s) + log10 Q to find out Q and put these values in column E.
Save the file and exit.
➢ Now create a new project and import Combined intersection 1 velocity.xlsx file again.
➢ Select Combined intersection 1 velocity.xlsx in Network Manager. Select Column E in
Component-1 in Components and Label-1 in Labels under General tab in Property
Manager. Add Transform, ScatterPlot and Axes in Network Manager.
➢ In Property Manager, set Density: 100% (all points), Symbol: Circle filled and select
RainbowReverse in Colormap Editor. Set Data Min: 0.001918, Data Max: 48.82 and
select Color: 40% Black corresponding to the Data Min for the quarry data. And, set Data
Min: 0.0007484, Data Max: 0.006921 and select Color: 40% Black corresponding to the
Data Min for the road cut data.
➢ Save the images as .bmp file from File|Export, leave the options as they are and click
Save.
Page 97
83
VITA
Mohammad Najmush Sakib Oyan
Education
B.Sc. in Civil Engineering, (2014)
Bangladesh University of Engineering and Technology (BUET)
Major: Geotechnical Engineering
Professional Experience
Graduate Teaching Assistant, Department of Geology and Geological Engineering,
The University of Mississippi (2017-present)
➢ Lab Instructor: Rock Mechanics.
➢ Instructor: Engineering analysis, Engineering Geology, and Sedimentology and
Stratigraphy.
Assistant Engineer (Civil), Dhali Enterprise LTD. (2014-2016)
➢ Cost estimation, Construction management, Structural drawing.