k3000+firefly User and License Management Page 1 of 15 Kurzweil 3000+firefly User and License Management Revised September 21, 2017 Setting up K3000+firefly. Kurzweil 3000 Web License and K3000+firefly customers: Refer to the Web License Guide for instructions on installing software; then follow the steps below. K3000+firefly only customers: Follow the steps below. • Obtain the login information from your designated site administrator. • Go to https://www.kurzweil3000.com and log in. Working with User Accounts and License Allocation. After your organization purchases a number of Web Licenses, Cambium Learning Customer Service sets up the initial user (typically, this is a coordinator who could be a teacher, school administrator or IT specialist). He/she is given a username and password for login. We call this person the Top Level Coordinator (TLC). The TLC can then set up the Site Level Coordinators (SLC), providing them with their system- generated usernames, passwords, and allocated licenses. SLC users are typically teachers who set up their own sub-users, typically students. Once these accounts are set up, SLC users can log in, set up, manage and distribute licenses to sub- users under their accounts.
Transcript
k3000+firefly User and License Management Page 1 of 15
Kurzweil 3000+firefly
User and License Management Revised September 21, 2017
Setting up K3000+firefly. Kurzweil 3000 Web License and K3000+firefly customers: Refer to the Web License Guide for instructions on installing software; then follow the steps below.
K3000+firefly only customers: Follow the steps below. • Obtain the login information from your designated site administrator. • Go to https://www.kurzweil3000.com and log in.
Working with User Accounts and License Allocation. After your organization purchases a number of Web Licenses, Cambium Learning Customer Service sets up the initial user (typically, this is a coordinator who could be a teacher, school administrator or IT specialist). He/she is given a username and password for login. We call this person the Top Level Coordinator (TLC).
The TLC can then set up the Site Level Coordinators (SLC), providing them with their system-generated usernames, passwords, and allocated licenses. SLC users are typically teachers who set up their own sub-users, typically students.
Once these accounts are set up, SLC users can log in, set up, manage and distribute licenses to sub-users under their accounts.
k3000+firefly User and License Management Page 2 of 15
Accessing the User Management System. 1. Login to K3000+firefly. Along the top left area there are three tabs: Home, My Account, and Help.
Log Out is in the upper right corner of the K3000+firefly window.
2. After logging in, hover the cursor over the My Account tab and select Users from the drop-down
menu.
Note: Your K3000+firefly account is also accessible from Kurzweil 3000 Web License Editions for Windows and Macintosh: on Windows by choosing My Account from the File menu, and on Macintosh by choosing My Account from the Kurzweil 3000 menu.
k3000+firefly User and License Management Page 3 of 15
Registering Users. There are three ways to register sub-users under your account:
• You can use Kurzweil’s free user import and rostering service.
• You can register each user yourself using the Add Users feature.
• You can initiate self-registration and send a link to the users you want to self-register.
To Register Users through Import and Rostering Service. If you purchased a site or district license, we offer a free user import and rostering service. It is recommended that we create your user accounts through this import process, instead of manually creating user accounts (a process that is explained in this document). To take advantage of the free import and rostering service, please email [email protected].
To Register a User on the Add User Page. 1. Log in. Your Home page opens (or, if you were logged on previously and then logged out from a
different page, the Profile page for example, that page will open).
2. Hover the cursor over the My Account tab and select Users from the drop-down menu. Your Team page will open.
3. Click the Everyone icon and when it opens, click the Add User tab.
4. Add the user information:
• Last Name, First Name, Password, Email Address, School / Org, and External Id. The External ID must be unique within your subscription, but can be any identifier that you want – a Student ID Number, for example. Note: if you specify a password, the password must be at least 5 characters with no apostrophes. All other fields are required. If the user has a valid email address the login information is automatically emailed to the user. If the user does not have an email address, enter the TLC’s email address as a placeholder. You will then need to provide the user the login information.
k3000+firefly User and License Management Page 4 of 15
• The Student box is pre-checked. If you are adding a teacher, uncheck the Student box. Note that when the Student checkbox is deselected, in order to add a new teacher, the My Team checkbox is automatically selected adding the new teacher to the TLC or SLC's team.
• If you are adding a student, check the My Team box to add a student to your team at the same time the new student is being added.
Note: If you have more than one user to enter, use the drop-down list to select a number of fields to add, and click Add More. The number you select will add that many more lines of fields.
5. When you have finished adding users, click Save.
The user information then appears in the Student or Teacher list on the Everyone page, along with the system-generated username and password (if you didn’t already provide one).
Note that these usernames and passwords can also be used to login to the Kurzweil 3000 Web License Product and the free K3000+firefly iPad application that can be downloaded from the Apple store: https://itunes.apple.com/us/app/k3000/id535277727?mt=8.
To Add Users by Initiating Self-Registration. Links to the self-registration form enable teachers and students to add themselves to the K3000+firefly roster. Only the top-level coordinator can initiate self-registration.
1. Log in to K3000+firefly. Hover the cursor over the My Account tab and select Users from the drop-down menu. Your My Team page opens.
2. Click User Self-Registration. A window opens that displays a link for you to copy and send to teachers and a link for you to copy and send to students. Note: Because teachers and students have different privileges, it’s important to send the correct link.
k3000+firefly User and License Management Page 5 of 15
3. Click Copy next to the appropriate link (Teacher self-registration or Student self-registration).
4. Open your email application and address an email to the teachers or students you want to self-register.
5. In the message section of the email, paste the link you copied from the self-registration window.
6. Send.
The recipient will click the link in the email they’ve received and the User Self-Registration form will display.
After filling in the information and clicking the Add New button, a “Success” message will display that includes the username, password, and a link to the login form.
k3000+firefly User and License Management Page 6 of 15
k3000+firefly User and License Management Page 7 of 15
Viewing and Managing Licenses. 1. Hover the cursor over the My Account tab and choose Users from the drop-down menu. Open
any of the Everyone pages (Student, Teachers, or Add Users) or your Team page.
2. At the top of the page, you can find:
• Team Size: The number of users in your Team.
• Total Licenses: the total number of licenses for your site.
• Allocated Licenses: the number of licenses distributed among users.
• Remaining Licenses: the number of licenses remaining; that is the Total Licenses minus the Allocated Licenses.
• Show: Use the drop-down menu to set how many rows to display on each page. If there are more rows than you’ve selected, use the Next and Previous buttons at the bottom of the page to navigate forward and backwards. The number of rows you select (e.g., 10, 25, etc.) will be the default. The next time you log in, the number of rows you selected to Show will be displayed.
3. Use the column headers (e.g., Last Name) to sort alphabetically in ascending or descending order by selecting the down or up arrows at the top of each column (click the column heading to display the arrow). You can also use any of the search fields at the top of the list.
4. The Download button at the bottom of the page will display the appropriate list depending on the page (e.g., Team List, Student List, Teacher List, and Removed Users List).
k3000+firefly User and License Management Page 8 of 15
Managing Users. To Update User Information: First / Last Name, Username, Password, Email, School / Org, and Student Indicator Information.
1. Hover the cursor over the My Account tab and choose Users from the drop-down menu.
2. Click your Team icon on the Manage User Information screen.
3. Locate the user to be updated.
4. All the fields can be edited except the Password field (not visible—or field shown only as a
small blue bar if the TLC unchecked “show Passwords” in the Subscription Options page). Place your cursor in a field that needs updating and start typing. The line of fields is outlined in yellow and you’ll notice that the Save button is activated.
Note: To change the password, click the Reset Password link beneath the Password column heading. An email with a link for resetting the password is sent to the User. If the password column is not labeled and instead you see a column of blue bars between the username and email address, click the blue bar to send the Reset Password Email. (If you are unsure about the meaning, hover the cursor over the blue bar to display the tooltip).
5. Click Save when you have finished making changes. Note that these changes will appear on
the Everyone list and on any Team page the user information appears.
k3000+firefly User and License Management Page 9 of 15
To Download Lists. The Download button at the bottom of the page will display the appropriate list depending on the page (e.g., Team List, Student List, Teacher List, and Removed Users List). The following example steps you through the instructions for downloading the Team List. The other lists work the same way.
1. Hover the cursor over the My Account tab and choose Users from the drop-down menu.
2. Click your Team icon on the Manage User Information screen.
3. Click the Download Team List button at the bottom of the screen.
4. A dialog opens.
k3000+firefly User and License Management Page 10 of 15
• Select Open with Microsoft Excel, or use the drop-down menu to select another file type; or
• Select Save the File. The file is saved to a folder (usually your Download folder).
5. Click OK.
To Change Your Own Username or Password. You can change your own user information, including user name and password, on your Profile page.
1. Hover the cursor over the My Account tab and choose Profile from the drop-down menu.
2. Make the changes to your account in the text fields.
3. Click Update Account Information when you have finished.
To Remove a User from Your Team. Only a TLC can delete a user, but you can remove a user from your Team page. The user will still exist on the Everyone list.
1. Hover the cursor over the My Account tab and choose Users from the drop-down menu.
2. Click your Team or the Everyone icon.
3. Find the user that you want to remove from your Team and click the Remove button to the right of the user information if you are on your Team page or uncheck the checkbox to the right of the user information if you are on the Everyone page. Either of these actions will remove the user from your Team page.
k3000+firefly User and License Management Page 11 of 15
To Use Feature Locks to Disable Features. Feature locks are especially useful in Testing taking situations. k3000+firefly features can be locked from use (grayed out or not visible) for selected users. This is done in k3000+firefly on the My Team page by the TLC or Teacher by selecting Feature Lock checkboxes on the two Feature Lock Tabs: k3000+firefly Feature Locks and Miscellaneous Feature Locks.
Feature Locks tab
Miscellaneous Feature Locks tab
Features selected will lock the feature in Kurzweil 3000 Windows and Mac versions in addition to k3000+firefly; they will not lock features in the firefly iPad. The features that can be locked are Reading, Dictionary, Translation, Spell Check, Word Prediction, Brainstorm, Outline, Google Drive, Local Drive; and Bubble Note Edit and Bubble Note Audible Reading. When logged into Kurzweil 3000 these locks are shown in the Accounts column of the Lock Features dialog.
Note that if Dictionary and/or Translation are locked for an account, they will not be available on the Read the Web toolbar. See the Kurzweil 3000 online help topic “Using K3000 Read the Web as an Extension on Chrome or Firefox.”
To set feature locks:
1. Open the Feature Locks tab or Miscellaneous Feature Locks tab of your my Team page. 2. Select the locks by clicking the checkboxes in the columns beneath the feature locks headings,
and in the rows next to the users for which you want to set feature locks. (Clicking an empty box adds a checkmark. To deselect, click the checkmark.)
3. When you have finished, click the Save button. For Top Level Coordinators. There are some features that are available only to Top Level Coordinator (TLC) users.
To Change Subscription Options. A TLC user can specify Password and Display Options for all users, as well as administrative Settings.
1. Log in as TLC.
2. Hover the cursor over the My Account tab and choose Subscription Options from the drop-down menu.
k3000+firefly User and License Management Page 12 of 15
The Subscription Options page opens.
3. Under Password Options. If your subscription has been set up to allow password options to be
viewed, the following password options are available on the Subscription Options page:
a. Check or uncheck the Show passwords in user administration page for all coordinator/ teacher accounts. When the checkbox is selected, coordinator/teacher users and TLC users can view passwords.
b. Check or uncheck the Show passwords in user administration page for the Top Level Coordinator Account only. When the checkbox is selected, only TLC users can view passwords.
c. If both are selected, coordinator/teacher users and TLC users can view passwords.
Note: The default status is that neither option is selected and user passwords will not be visible to either coordinator/teacher or TLC users, although emails to reset a user's password can still be sent.
k3000+firefly User and License Management Page 13 of 15
4. Under Display Options:
a. Check or uncheck the Bookshare checkbox. If it is checked (default), the Bookshare button will be displayed on the Universal Library page. Your users will be able to search for books in the Bookshare library and open them in K3000+firefly to read. If the Bookshare option is not checked, Bookshare will not be available in K3000+firefly for your users.
b. Check or uncheck the Hide Shared Folders checkbox. The default is unchecked. When this option is checked by the TLC on the Subscription Options page, the TLC, SLC and Student users in the subscription will no longer see the shared collection folders (classic literature, help files, nonfiction bookbag, samples, templates). The folders will be hidden in the k3000+firefly web app, firefly iPad app, Kurzweil 3000 Windows and Mac Web License Editions.
Under Settings:
a. Check or uncheck whether to send emails when Teachers and/or Students are added, deleted, or restored.
b. Under Offline mode enter the credential duration hours for Kurzweil 3000 for Mac and Windows. The default is 96 hours and allows up to 432 hours of offline use.
c. Check or uncheck the Hide External Id Column for SLC Users. If it is checked, the External Id Column will be hidden when the SLC views the My Team and Everyone group lists. SLC Users will however still be able to see the External Id field on the Add Users page, and can still add users with an External ID.
5. Click the Update subscription options button to save your changes.
To Delete a User. Only a Top Level Coordinator (TLC) can delete a user. Later, if needed, the TLC can restore that user.
1. Log in as TLC.
2. Open the Everyone Page. In the right column you will notice a trash can icon next to each user in the list.
k3000+firefly User and License Management Page 14 of 15
3. Click the Delete button next to each user that you want to delete.
Note that although TLC users can delete users, they cannot delete active teachers from their own Team page.
k3000+firefly User and License Management Page 15 of 15
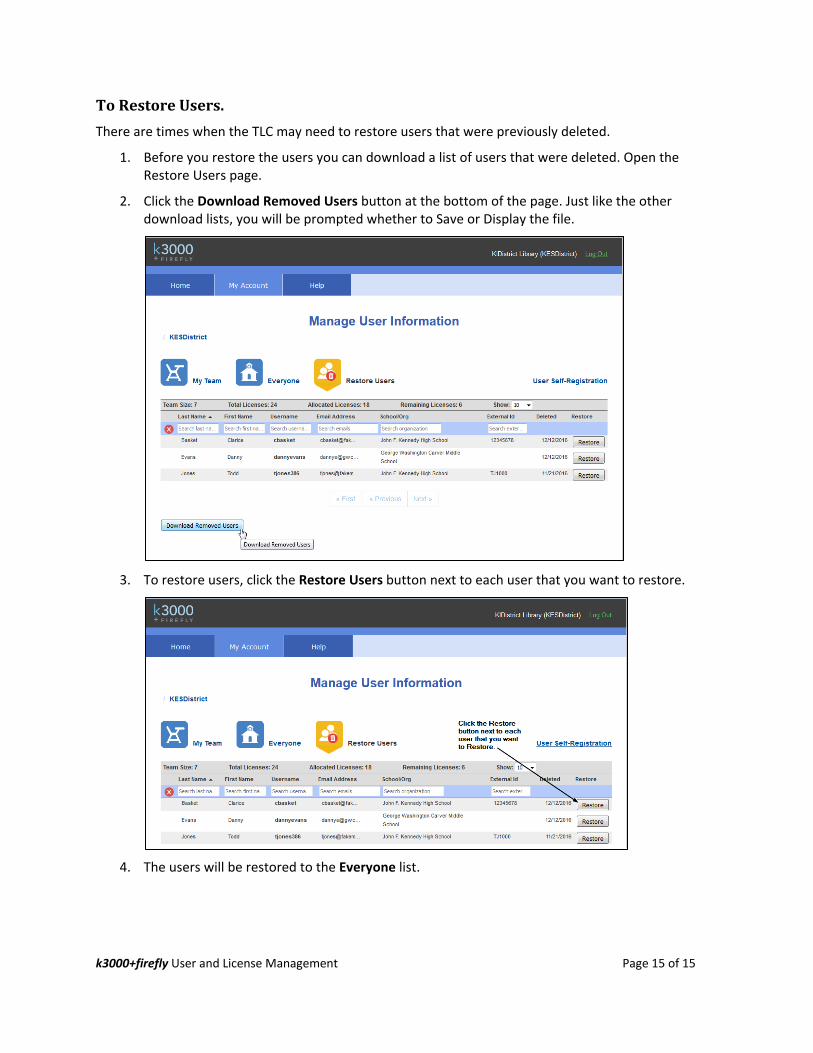
To Restore Users. There are times when the TLC may need to restore users that were previously deleted.
1. Before you restore the users you can download a list of users that were deleted. Open the Restore Users page.
2. Click the Download Removed Users button at the bottom of the page. Just like the other download lists, you will be prompted whether to Save or Display the file.
3. To restore users, click the Restore Users button next to each user that you want to restore.
4. The users will be restored to the Everyone list.