31
Identity and Access Management User Guide Issue 08 Date 2017-02-22
| Date post: | 19-Mar-2018 |
| Category: |
Documents |
| Upload: | doankhuong |
| View: | 220 times |
| Download: | 0 times |
Identity and Access Management
User Guide
Issue 08
Date 2017-02-22
Contents
1 How Do I Create User Groups and Assign Rights?................................................................1
2 Permission Description................................................................................................................ 7
3 How Do I Create Users?............................................................................................................... 9
4 How Do I Set Account Policies?............................................................................................... 11
5 How Do I Create an Identity Provider and Perform an SSO?............................................ 15
6 How Do I Set the Name and Permissions of a Federated User?.........................................19
A Change History........................................................................................................................... 27
B Glossary........................................................................................................................................ 29
Identity and Access ManagementUser Guide Contents
Issue 08 (2017-02-22) ii

1 How Do I Create User Groups and Assign
Rights?
When default user groups cannot meet user authorization requirements, you can create usergroups to assign rights to users.
PrerequisitesYou have Security Administrator permissions.
Procedure
Step 1 Log in to the Open Telekom Cloud management console.
Step 2 Choose Mgmt & Deployment > Identity and Access Management.
Step 3 In the navigation pane, choose User Group.
Step 4 On the user group page, click Create User Group.
Step 5 On the Create User Group page, set User Group and Description.
Step 6 Click OK.
Identity and Access ManagementUser Guide 1 How Do I Create User Groups and Assign Rights?
Issue 08 (2017-02-22) 1

Return to the user group list. The new user group is displayed in the user group list.
Step 7 Select the new user group and click Edit.
The Modify User Group page is displayed.
Step 8 In the User Group Rights area, click Edit in the Operation column corresponding to amanaged region or project.
Step 9 In the Available Rights Sets area of the Edit dialog box, select one or multiple permissionscorresponding to the selected service.
Detailed information about the selected permissions is displayed in the area on the right side.For details, see Permission Information.
Table 1 describes the default permissions.
Identity and Access ManagementUser Guide 1 How Do I Create User Groups and Assign Rights?
Issue 08 (2017-02-22) 2
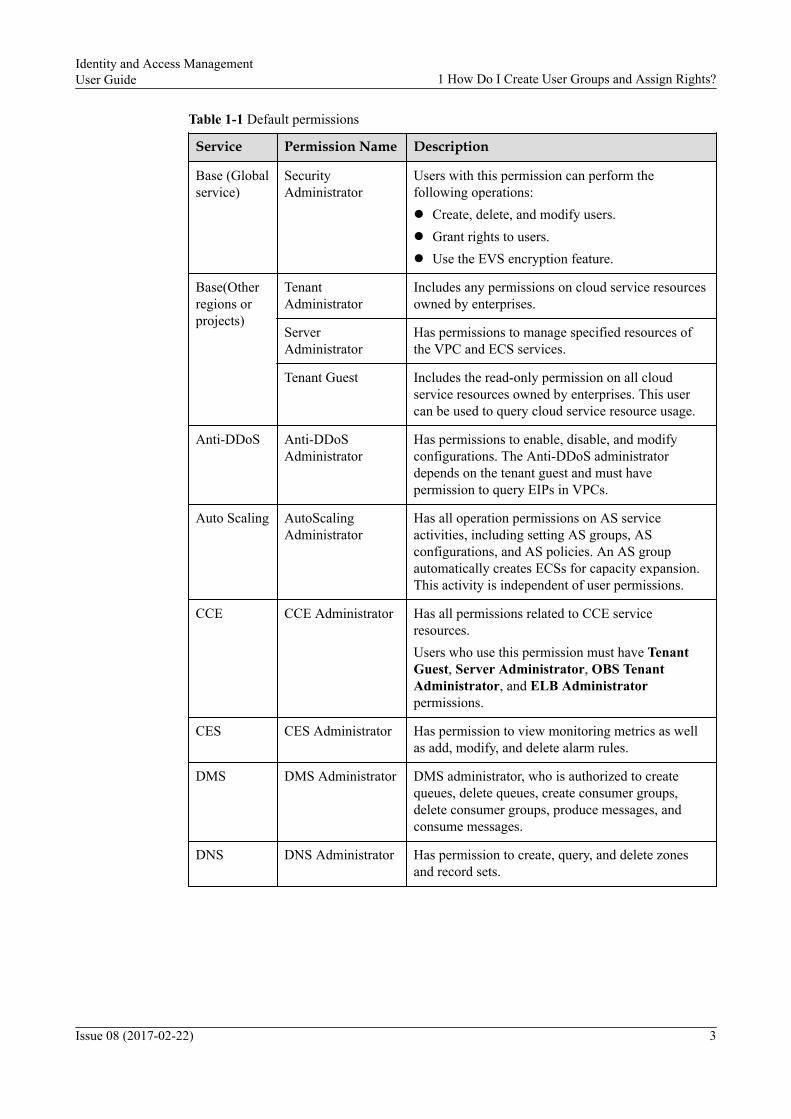
Table 1-1 Default permissions
Service Permission Name Description
Base (Globalservice)
SecurityAdministrator
Users with this permission can perform thefollowing operations:l Create, delete, and modify users.l Grant rights to users.l Use the EVS encryption feature.
Base(Otherregions orprojects)
TenantAdministrator
Includes any permissions on cloud service resourcesowned by enterprises.
ServerAdministrator
Has permissions to manage specified resources ofthe VPC and ECS services.
Tenant Guest Includes the read-only permission on all cloudservice resources owned by enterprises. This usercan be used to query cloud service resource usage.
Anti-DDoS Anti-DDoSAdministrator
Has permissions to enable, disable, and modifyconfigurations. The Anti-DDoS administratordepends on the tenant guest and must havepermission to query EIPs in VPCs.
Auto Scaling AutoScalingAdministrator
Has all operation permissions on AS serviceactivities, including setting AS groups, ASconfigurations, and AS policies. An AS groupautomatically creates ECSs for capacity expansion.This activity is independent of user permissions.
CCE CCE Administrator Has all permissions related to CCE serviceresources.Users who use this permission must have TenantGuest, Server Administrator, OBS TenantAdministrator, and ELB Administratorpermissions.
CES CES Administrator Has permission to view monitoring metrics as wellas add, modify, and delete alarm rules.
DMS DMS Administrator DMS administrator, who is authorized to createqueues, delete queues, create consumer groups,delete consumer groups, produce messages, andconsume messages.
DNS DNS Administrator Has permission to create, query, and delete zonesand record sets.
Identity and Access ManagementUser Guide 1 How Do I Create User Groups and Assign Rights?
Issue 08 (2017-02-22) 3
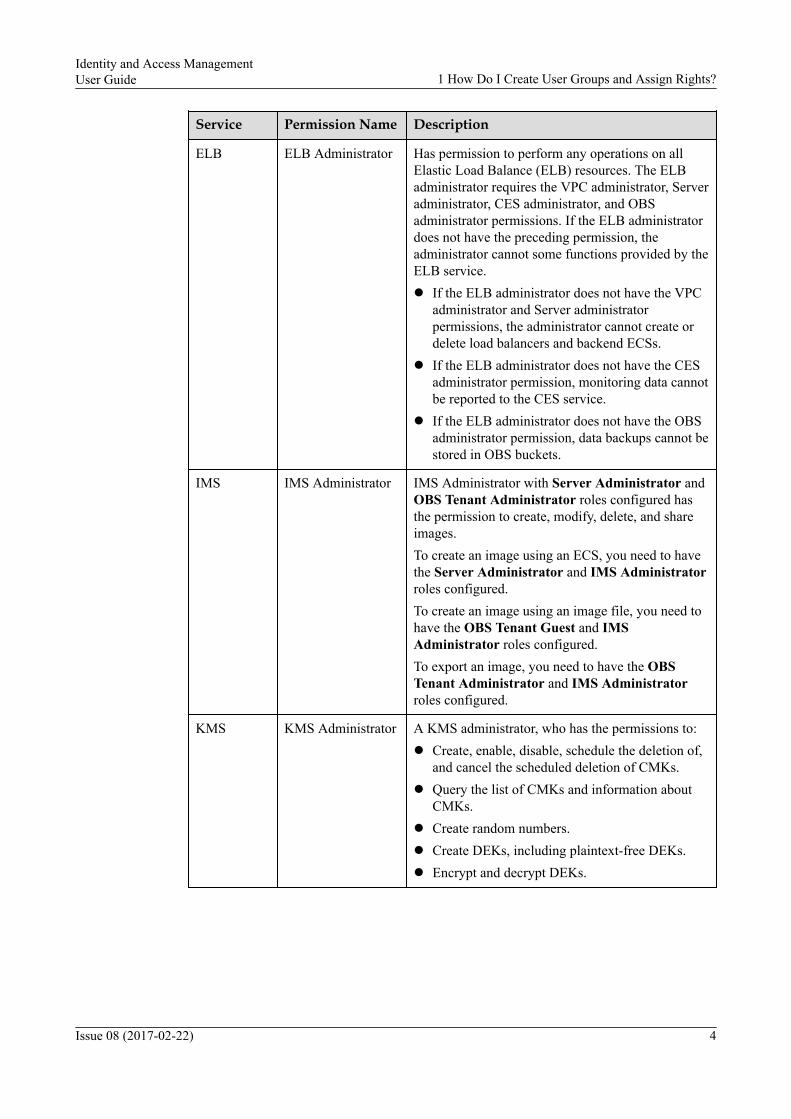
Service Permission Name Description
ELB ELB Administrator Has permission to perform any operations on allElastic Load Balance (ELB) resources. The ELBadministrator requires the VPC administrator, Serveradministrator, CES administrator, and OBSadministrator permissions. If the ELB administratordoes not have the preceding permission, theadministrator cannot some functions provided by theELB service.l If the ELB administrator does not have the VPC
administrator and Server administratorpermissions, the administrator cannot create ordelete load balancers and backend ECSs.
l If the ELB administrator does not have the CESadministrator permission, monitoring data cannotbe reported to the CES service.
l If the ELB administrator does not have the OBSadministrator permission, data backups cannot bestored in OBS buckets.
IMS IMS Administrator IMS Administrator with Server Administrator andOBS Tenant Administrator roles configured hasthe permission to create, modify, delete, and shareimages.To create an image using an ECS, you need to havethe Server Administrator and IMS Administratorroles configured.To create an image using an image file, you need tohave the OBS Tenant Guest and IMSAdministrator roles configured.To export an image, you need to have the OBSTenant Administrator and IMS Administratorroles configured.
KMS KMS Administrator A KMS administrator, who has the permissions to:l Create, enable, disable, schedule the deletion of,
and cancel the scheduled deletion of CMKs.l Query the list of CMKs and information about
CMKs.l Create random numbers.l Create DEKs, including plaintext-free DEKs.l Encrypt and decrypt DEKs.
Identity and Access ManagementUser Guide 1 How Do I Create User Groups and Assign Rights?
Issue 08 (2017-02-22) 4
Service Permission Name Description
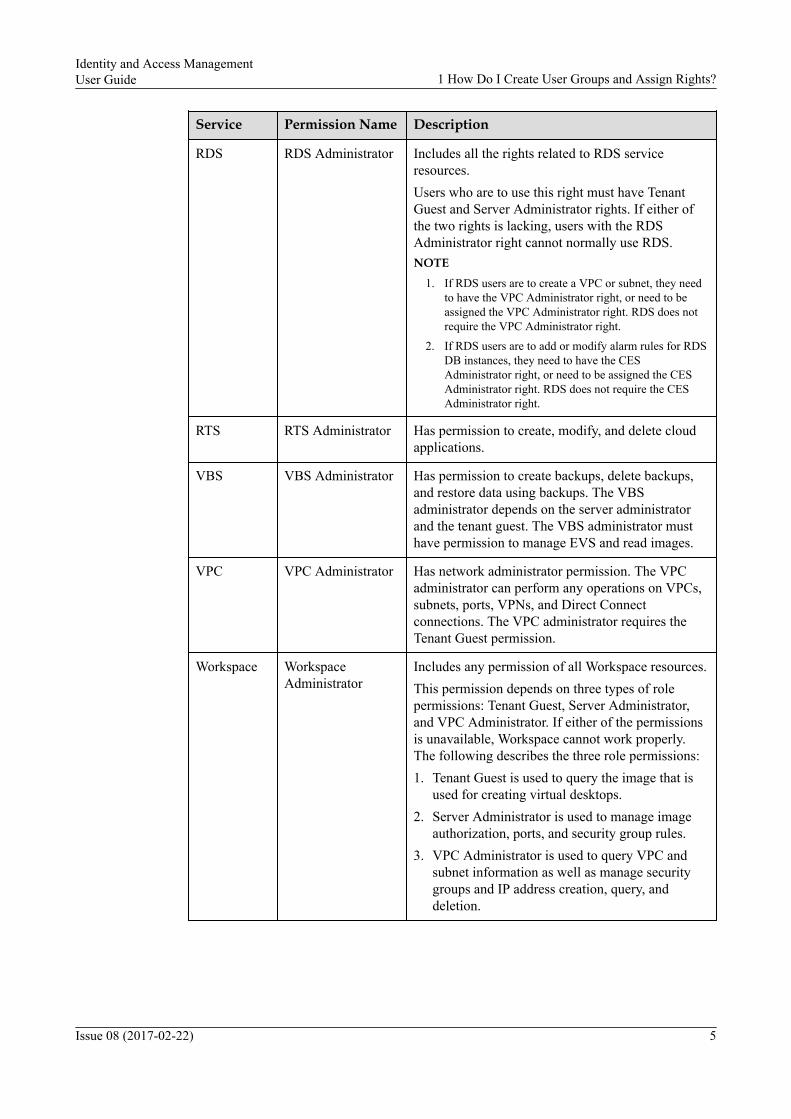
RDS RDS Administrator Includes all the rights related to RDS serviceresources.Users who are to use this right must have TenantGuest and Server Administrator rights. If either ofthe two rights is lacking, users with the RDSAdministrator right cannot normally use RDS.NOTE
1. If RDS users are to create a VPC or subnet, they needto have the VPC Administrator right, or need to beassigned the VPC Administrator right. RDS does notrequire the VPC Administrator right.
2. If RDS users are to add or modify alarm rules for RDSDB instances, they need to have the CESAdministrator right, or need to be assigned the CESAdministrator right. RDS does not require the CESAdministrator right.
RTS RTS Administrator Has permission to create, modify, and delete cloudapplications.
VBS VBS Administrator Has permission to create backups, delete backups,and restore data using backups. The VBSadministrator depends on the server administratorand the tenant guest. The VBS administrator musthave permission to manage EVS and read images.
VPC VPC Administrator Has network administrator permission. The VPCadministrator can perform any operations on VPCs,subnets, ports, VPNs, and Direct Connectconnections. The VPC administrator requires theTenant Guest permission.
Workspace WorkspaceAdministrator
Includes any permission of all Workspace resources.This permission depends on three types of rolepermissions: Tenant Guest, Server Administrator,and VPC Administrator. If either of the permissionsis unavailable, Workspace cannot work properly.The following describes the three role permissions:1. Tenant Guest is used to query the image that is
used for creating virtual desktops.2. Server Administrator is used to manage image
authorization, ports, and security group rules.3. VPC Administrator is used to query VPC and
subnet information as well as manage securitygroups and IP address creation, query, anddeletion.
Identity and Access ManagementUser Guide 1 How Do I Create User Groups and Assign Rights?
Issue 08 (2017-02-22) 5

Service Permission Name Description
EVS/ECS/VPC
ServerAdministrator
l For the EVS service, the Server Administratorhas permission to create, modify, and delete EVSdisks.
l For the ECS service, the Server Administratorhas permission to create, modify, and deleteECSs.
l For the VPC service, the Server administratorcan perform any operations on security groups,security group rules, ports, elastic IP addresses(EIPs), and bandwidth. The Server administratorrequires the Tenant Guest permission.
MRS MRS Administrator MRS administrator, who has the permission to viewMRS overview information, operation logs, clusterinformation, job information, HDFS file operationinformation, alarm list and MRS Manager portal.
Step 10 Click OK.
Step 11 Select or enter a user name included in the user group in the Group Members drop-downcombo box.
Step 12 Click OK.
Step 13 Optional: In the user group list, click to view user group details.
----End
Identity and Access ManagementUser Guide 1 How Do I Create User Groups and Assign Rights?
Issue 08 (2017-02-22) 6

2 Permission Description
Permissions specify operations that users are allowed to perform on related objects. You canadd operations on certain objects to the permissions of a user group and add a user to the usergroup so that the user inherits the permissions of the user group.
User permission management based on user groups is more organized.
Permission Information
After you select a permission in the Rights group box of the dialog box for editing user grouppermissions, the detailed information about this permission is displayed in the area on theright. The JSON-formatted permission file contains one or multiple statements. Eachstatement describes a group of permissions.
The following is a permission information example. Table 1 describes the parameters.
{ "Version" : "1.0", "Statement" : [ { "Effect" : "Allow", "Action" : [ "VPC:vpc:*", "VPC:router:*", "VPC:network:*", "VPC:subnet:*", "VPC:privateip:*", "VPC:port:*", "VPC:vpn:*" ] } ], "Depends" : [ { "catalog": "BASE", "display_name": "Tenant Guest" } ] }
Table 2-1 Parameter description
Parameter Meaning Value
Version Indicates a version. For example: 1.0
Identity and Access ManagementUser Guide 2 Permission Description
Issue 08 (2017-02-22) 7

Parameter Meaning Value
Statement(system-defined JSONstatement)
Effect Specifies whether anoperation included in anaction is allowed.
Options:l Allow: The operation is
allowed.l Deny: The operation is not
allowed.
Action Indicates an operation fora service included in apermission.
Service name:Operation nameFor example:VPC:subnet: indicates theoperation of managing allsubnets in a VPC.
Depends(dependentpermission)
catalog Service that a dependentpermission belongs to.
Service nameFor example:BASE
display_name
Name of a dependentpermission.
Permission nameFor example:Tenant Guest
Identity and Access ManagementUser Guide 2 Permission Description
Issue 08 (2017-02-22) 8

3 How Do I Create Users?
After creating users and adding them to a user group, you can grant operation rights to theusers in a centralized manner.
PrerequisitesYou have Security Administrator permissions.
Procedure
Step 1 Log in to the Open Telekom Cloud management console.
Step 2 Choose Mgmt & Deployment > Identity and Access Management.
Step 3 In the navigation pane, choose User.
Step 4 On the user page, click Create User.
Step 5 On the Create User page, set parameters, such as User Name and Password.
Step 6 Select or enter a user group name to be added in the User Groups drop-down combo box.
Identity and Access ManagementUser Guide 3 How Do I Create Users?
Issue 08 (2017-02-22) 9

Step 7 Click OK to return to the user list.
The new user is displayed in the user list.
By default, the new user is in the Enabled state. If you need to change the user status, clickEdit in the Operation column corresponding to the user.
Step 8 Optional: In the user list, click to view user details.
Step 9 Optional: In the user list, click Edit to modify user basic information.
NOTE
You are allowed to modify the following information: mobile number, email address, description,whether to disable a user account. In the User Groups area, you can add the user to a user group ordelete the user from a user group.
----End
Identity and Access ManagementUser Guide 3 How Do I Create Users?
Issue 08 (2017-02-22) 10
4 How Do I Set Account Policies?
The Identity and Access Management (IAM) allows you to set account policies. Accountpolicies include login authentication policies, password policies, and the access control list(ACL).
PrerequisitesYou have Security Administrator permissions.
ProcedureTable 4-1 describes the task for setting account policies.
Identity and Access ManagementUser Guide 4 How Do I Set Account Policies?
Issue 08 (2017-02-22) 11
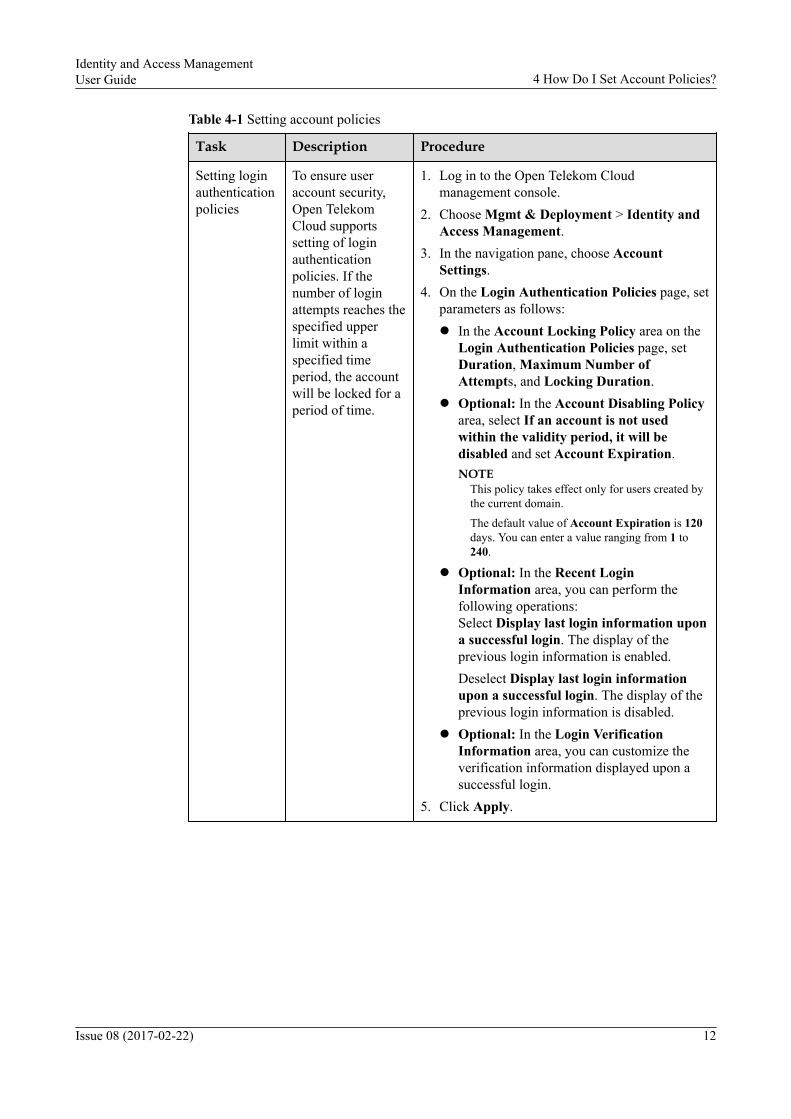
Table 4-1 Setting account policies
Task Description Procedure
Setting loginauthenticationpolicies
To ensure useraccount security,Open TelekomCloud supportssetting of loginauthenticationpolicies. If thenumber of loginattempts reaches thespecified upperlimit within aspecified timeperiod, the accountwill be locked for aperiod of time.
1. Log in to the Open Telekom Cloudmanagement console.
2. Choose Mgmt & Deployment > Identity andAccess Management.
3. In the navigation pane, choose AccountSettings.
4. On the Login Authentication Policies page, setparameters as follows:l In the Account Locking Policy area on the
Login Authentication Policies page, setDuration, Maximum Number ofAttempts, and Locking Duration.
l Optional: In the Account Disabling Policyarea, select If an account is not usedwithin the validity period, it will bedisabled and set Account Expiration.NOTE
This policy takes effect only for users created bythe current domain.
The default value of Account Expiration is 120days. You can enter a value ranging from 1 to240.
l Optional: In the Recent LoginInformation area, you can perform thefollowing operations:Select Display last login information upona successful login. The display of theprevious login information is enabled.Deselect Display last login informationupon a successful login. The display of theprevious login information is disabled.
l Optional: In the Login VerificationInformation area, you can customize theverification information displayed upon asuccessful login.
5. Click Apply.
Identity and Access ManagementUser Guide 4 How Do I Set Account Policies?
Issue 08 (2017-02-22) 12
Task Description Procedure
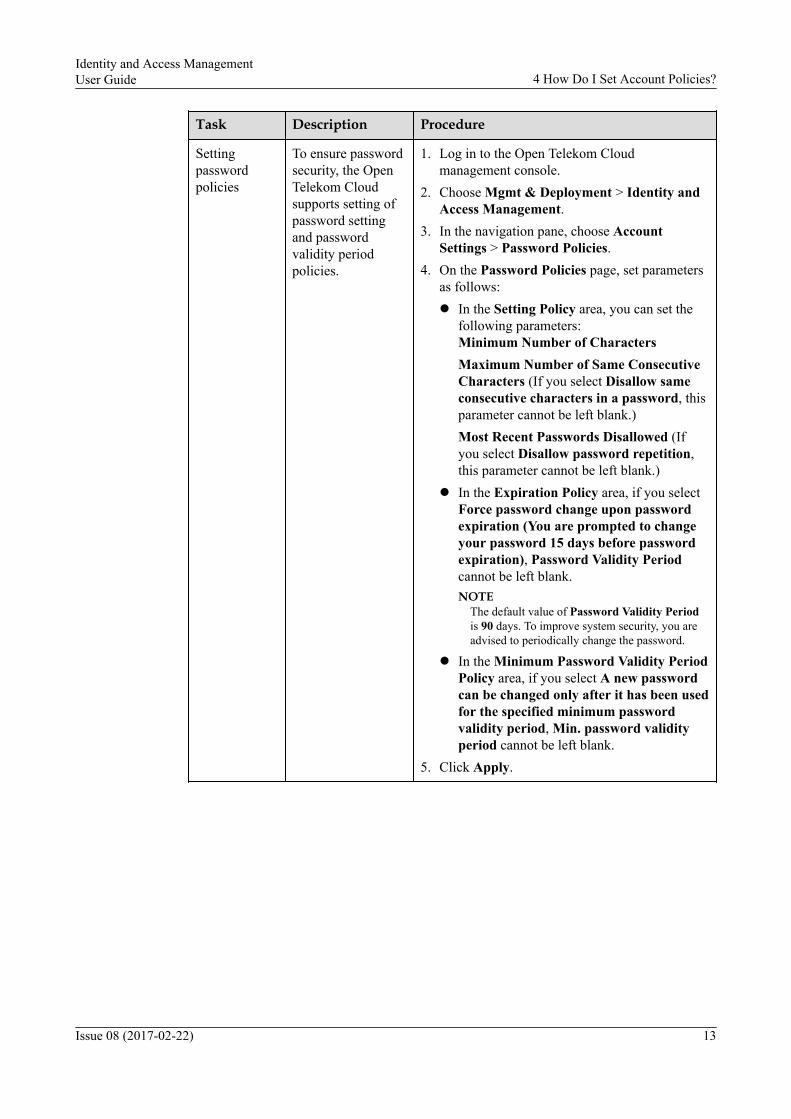
Settingpasswordpolicies
To ensure passwordsecurity, the OpenTelekom Cloudsupports setting ofpassword settingand passwordvalidity periodpolicies.
1. Log in to the Open Telekom Cloudmanagement console.
2. Choose Mgmt & Deployment > Identity andAccess Management.
3. In the navigation pane, choose AccountSettings > Password Policies.
4. On the Password Policies page, set parametersas follows:l In the Setting Policy area, you can set the
following parameters:Minimum Number of CharactersMaximum Number of Same ConsecutiveCharacters (If you select Disallow sameconsecutive characters in a password, thisparameter cannot be left blank.)Most Recent Passwords Disallowed (Ifyou select Disallow password repetition,this parameter cannot be left blank.)
l In the Expiration Policy area, if you selectForce password change upon passwordexpiration (You are prompted to changeyour password 15 days before passwordexpiration), Password Validity Periodcannot be left blank.NOTE
The default value of Password Validity Periodis 90 days. To improve system security, you areadvised to periodically change the password.
l In the Minimum Password Validity PeriodPolicy area, if you select A new passwordcan be changed only after it has been usedfor the specified minimum passwordvalidity period, Min. password validityperiod cannot be left blank.
5. Click Apply.
Identity and Access ManagementUser Guide 4 How Do I Set Account Policies?
Issue 08 (2017-02-22) 13
Task Description Procedure
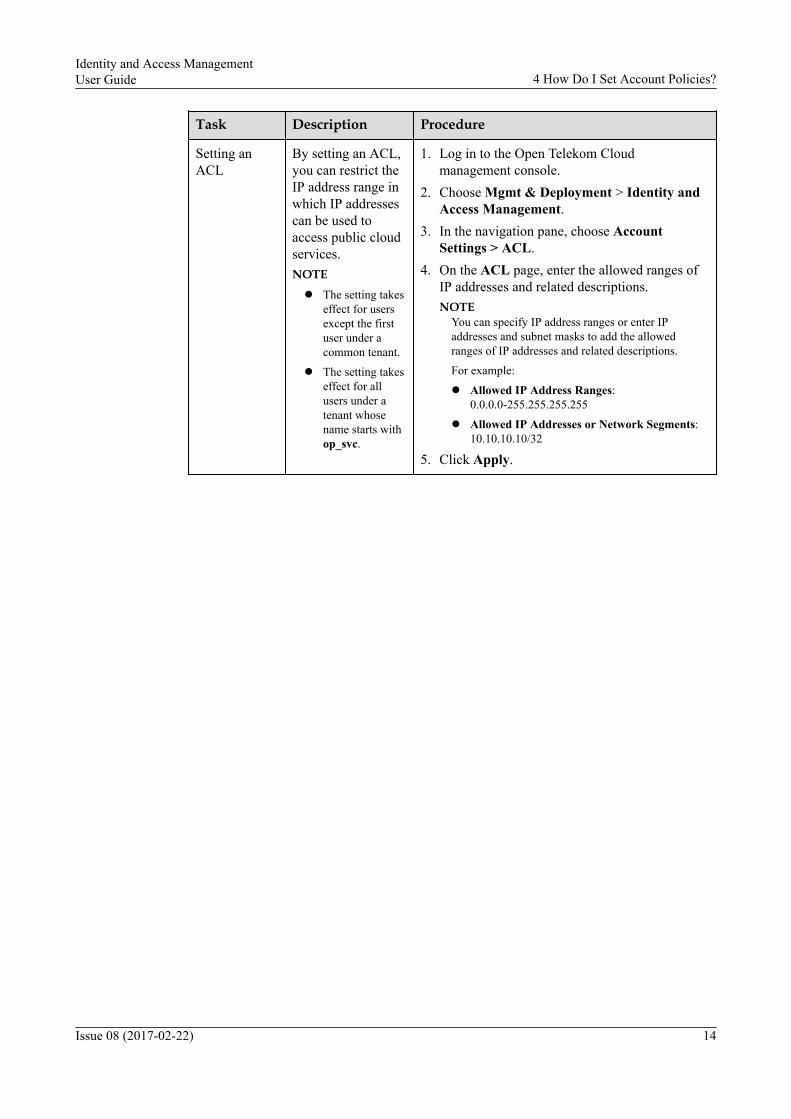
Setting anACL
By setting an ACL,you can restrict theIP address range inwhich IP addressescan be used toaccess public cloudservices.NOTE
l The setting takeseffect for usersexcept the firstuser under acommon tenant.
l The setting takeseffect for allusers under atenant whosename starts withop_svc.
1. Log in to the Open Telekom Cloudmanagement console.
2. Choose Mgmt & Deployment > Identity andAccess Management.
3. In the navigation pane, choose AccountSettings > ACL.
4. On the ACL page, enter the allowed ranges ofIP addresses and related descriptions.NOTE
You can specify IP address ranges or enter IPaddresses and subnet masks to add the allowedranges of IP addresses and related descriptions.
For example:
l Allowed IP Address Ranges:0.0.0.0-255.255.255.255
l Allowed IP Addresses or Network Segments:10.10.10.10/32
5. Click Apply.
Identity and Access ManagementUser Guide 4 How Do I Set Account Policies?
Issue 08 (2017-02-22) 14
5 How Do I Create an Identity Provider and
Perform an SSO?
Most enterprises or organizations have their own identity providers (IdPs), who provide asecure and reliable identity authentication service. For example, the IAM service acts as theIdP for the Open Telekom Cloud.
An enterprise administrator can use the IdP of its enterprise to complete employee identityauthentication and authorization as well as implement single sign-on (SSO) of its own websiteand Open Telekom Cloud system, instead of repeatedly creating employee information usingthe IAM service in the Open Telekom Cloud system.
Currently, the IAM service of the Open Telekom Cloud system supports entrustedauthentication and SSO using the standard SAML2.0 protocol. The enterprise administrator isable to create an IdP in the IAM service of the Open Telekom Cloud system to implementmutual credit between the IAM service of the Open Telekom Cloud system and theenterprise's IdP and implement the SSO between the enterprise portal and Open TelekomCloud system.
Prerequisitesl You have Security Administrator permissions.l The enterprise has the IdP service, and this IdP supports the SAML2.0 protocol.l You have a preliminary understanding of the SAML2.0 protocol and are familiar with
metadata files.l You have a basic knowledge of the following concepts for better understanding on how
to create and configure an identity provider:– IdP: indicates the identity provider of an enterprise.– Service provider (SP): indicates the Open Telekom Cloud system.– Metadata: indicates an SAML2.0-compliant interface file. The file contains
interface addresses and certificate information required by the SAML2.0 protocol.Two such files are available, one for IdP and the other for SP. The IdP and SP set upa trust relationship by exchanging their metadata files and configuring data in thefile of each other.
Identity and Access ManagementUser Guide
5 How Do I Create an Identity Provider and Perform anSSO?
Issue 08 (2017-02-22) 15

Procedure
Step 1 Configure the metadata file provided by the Open Telekom Cloud system on the IdP server ofthe enterprise.
1. Visit https://auth.otc.t-systems.com/authui/saml/metadata.xml.2. Right-click the browser and choose Save as, and set a file name, for example, otc-
metadata.xml.3. Configure the otc-metadata.xml file on the IdP server of the enterprise.
NOTE
The configuration operation depends on the IdP server brand and version of the enterprise.
Step 2 Obtain the metadata file of the enterprise IdP.
Generally, you can obtain the metadata file of an enterprise IdP using a URL address. Withregards to obtaining the file, consult the relevant department in the enterprise. After obtainingthis file, upload it to the Open Telekom Cloud system so that the Open Telekom Cloud systemcommunicates with the IdP server using the address and certificate in the metadata file.
Step 3 Create an IdP.
1. Log in to the Open Telekom Cloud management console.2. Choose Mgmt & Deployment > Identity and Access Management.3. In the navigation pane, choose Identity Provider.4. Click Create Identity Provider.5. Set Name, Protocol, and Status and fill in Description.6. Click OK.
If the following information is displayed, the IdP has been successfully created.
7. Complete the IdP information on the Set Identity Provider page using either of thefollowing methods:– Click the Set link in the message displayed in substep 6 to switch to the Set
Identity Provider page.– After the message displayed in substep 6 disappears, select an existing IdP from the
IdP list and click Edit to open the Set Identity Provider page.
8. In the Metadata File area of the Set Identity Provider page, click on the left ofUpload.
Identity and Access ManagementUser Guide
5 How Do I Create an Identity Provider and Perform anSSO?
Issue 08 (2017-02-22) 16

9. Select the metadata file obtained from Step2. and click Upload.10. After the file is uploaded, click OK at the bottom of the page to save the settings.
Step 4 Attempt to perform an SSO.
After the metadata file is uploaded, you can set permissions and find Login link on the SetIdentity Provider page.
You can attempt to open this login link using a browser to check whether the login pageprovided by the enterprise IdP server can be displayed. If the login page is displayed, enter auser name and password to check whether you can log in to the Open Telekom Cloud system.
Identity and Access ManagementUser Guide
5 How Do I Create an Identity Provider and Perform anSSO?
Issue 08 (2017-02-22) 17
l If the login is successful, configure this link on your enterprise website.l If the link redirection fails or differs from the expected result, check whether the
enterprise metadata file obtained in 2 and the enterprise IdP server are correctlyconfigured.
Step 5 (Recommended) Create an identity conversion rule and set the name and permissions of afederated user.
If the user name or permission information is not configured or both are not configured afterthe IdP is created, the Open Telekom Cloud system presets a default rule. The default username for this rule is FederationUser. This user is allowed to view only certain pages. Fordetails about how to create an identity conversion rule, see 6 How Do I Set the Name andPermissions of a Federated User?
----End
Identity and Access ManagementUser Guide
5 How Do I Create an Identity Provider and Perform anSSO?
Issue 08 (2017-02-22) 18

6 How Do I Set the Name and Permissions of
a Federated User?
The Open Telekom Cloud system implements user identity authentication and rightsconfiguration by creating identity conversion rules.
IdPs maintain user identity and permission information. After an SSO is complete, the IdPreturns an assertion structure to the SP. The assertion structure contains the user identity andpermission information that pass the authentication and presents the information as anattribute list. The following example shows the attributes in an assertion.
...<saml2:AttributeStatement> <saml2:Attribute FriendlyName="mail" Name="urn:oid:0.9.2342.19200300.100.1.3" NameFormat="urn:oasis:names:tc:SAML:2.0:attrname-format:uri"> <saml2:AttributeValue>[email protected]</saml2:AttributeValue> </saml2:Attribute> <saml2:Attribute FriendlyName="GROUPS" Name="urn:oid:1.3.6.1.4.1.5923.1.1.1.6" NameFormat="urn:oasis:names:tc:SAML:2.0:attrname-format:uri"> <saml2:AttributeValue>dev-adm;sec-adm</saml2:AttributeValue> </saml2:Attribute></saml2:AttributeStatement>...
If you are unfamiliar with the preceding assertion content, you are advised to learn basicinformation about SAML2.0 at https://en.wikipedia.org/wiki/SAML_2.0.
This section describes how to create an identity conversion rule. You can set certain rules toset up the mapping between the user and permission information returned by the enterpriseIdP server and those of the Open Telekom Cloud system. The user names and permissionnames returned by the enterprise IdP server and Open Telekom Cloud system may bedifferent. For example, set [email protected] of email in the attributes to the user name inthe Open Telekom Cloud system and allocate the user to the otc_admin user group based onidp_admin in Groups.
Prerequisitesl Complete the setting of the basic IdP information and verify the SSO by following the
instructions provided in How Do I Create an Identity Provider and Perform an SSO?
l You have Security Administrator permissions.
Identity and Access ManagementUser Guide
6 How Do I Set the Name and Permissions of a FederatedUser?
Issue 08 (2017-02-22) 19

l The enterprise has the IdP service, and this IdP supports the SAML2.0 protocol.l You have a preliminary understanding of the SAML2.0 protocol and are familiar with
metadata files.l You have learned the assertion structure displayed after successful SAML2.0
authentication.
Procedure
Step 1 Log in to the Open Telekom Cloud management console.
Step 2 Choose Mgmt & Deployment > Identity and Access Management.
Step 3 In the navigation pane, choose Identity Provider.
Step 4 Select an existing IdP from the IdP list and click Edit.
The Set Identity Provider page is displayed.
Step 5 In the Identity Conversion Rule area, perform the following operations:l View rules.
You can set multiple rules. After you create an IdP, the system generates a default rule.The default user name for this rule is FederationUser. In the Identity Conversion Rulearea, click View Rules to view the current rules. The example is as follows:
l Edit rules.In the Identity Conversion Rule area, click Edit Rule. This function provides flexiblesyntax for editing rules to meet federation authentication requirements. The followingshows a typical editing example.– Definition
Each rule is saved in a JSON-format file. The example is as follows:
Identity and Access ManagementUser Guide
6 How Do I Set the Name and Permissions of a FederatedUser?
Issue 08 (2017-02-22) 20
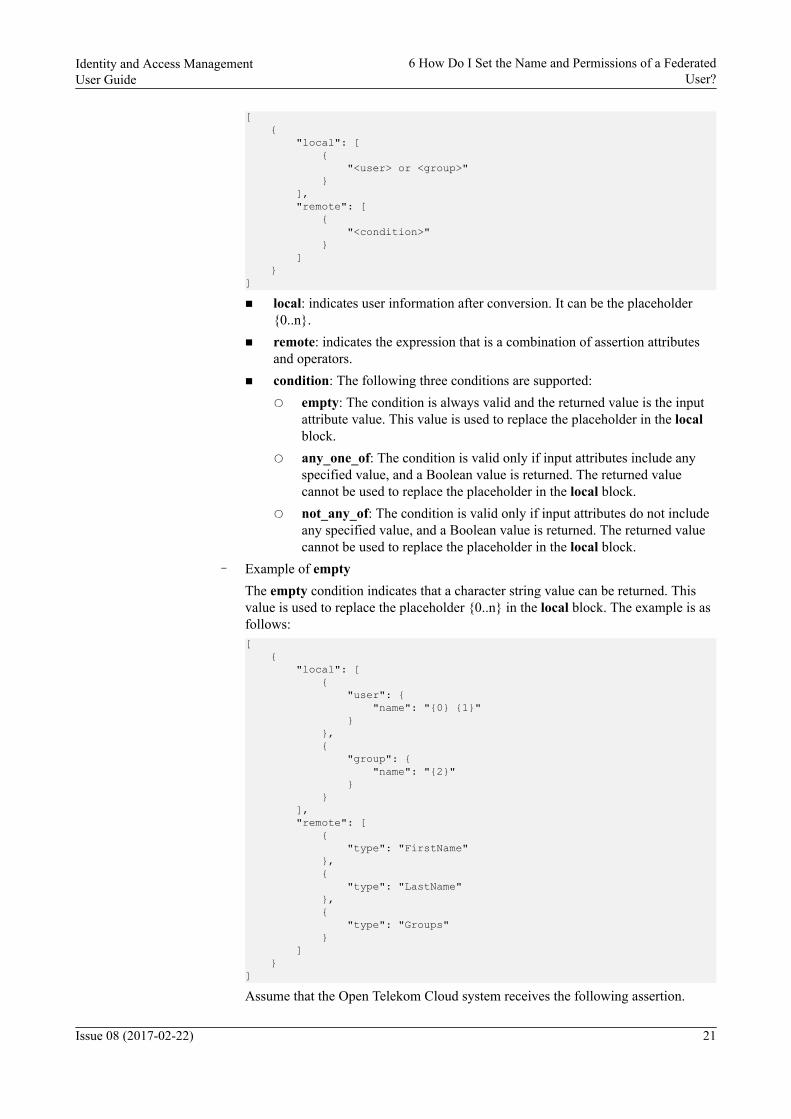
[ { "local": [ { "<user> or <group>" } ], "remote": [ { "<condition>" } ] }]n local: indicates user information after conversion. It can be the placeholder
{0..n}.n remote: indicates the expression that is a combination of assertion attributes
and operators.n condition: The following three conditions are supported:
○ empty: The condition is always valid and the returned value is the inputattribute value. This value is used to replace the placeholder in the localblock.
○ any_one_of: The condition is valid only if input attributes include anyspecified value, and a Boolean value is returned. The returned valuecannot be used to replace the placeholder in the local block.
○ not_any_of: The condition is valid only if input attributes do not includeany specified value, and a Boolean value is returned. The returned valuecannot be used to replace the placeholder in the local block.
– Example of emptyThe empty condition indicates that a character string value can be returned. Thisvalue is used to replace the placeholder {0..n} in the local block. The example is asfollows:[ { "local": [ { "user": { "name": "{0} {1}" } }, { "group": { "name": "{2}" } } ], "remote": [ { "type": "FirstName" }, { "type": "LastName" }, { "type": "Groups" } ] }]Assume that the Open Telekom Cloud system receives the following assertion.
Identity and Access ManagementUser Guide
6 How Do I Set the Name and Permissions of a FederatedUser?
Issue 08 (2017-02-22) 21

(For easy understanding, the following examples use a simplified assertionstructure.){FirstName: Jone}{LastName: Smith}{Groups: [admin, manager]}The following attributes are mapped into the Open Telekom Cloud system:n UserName: John Smithn Groups: admin;manager
– Example of Any one of and Not any ofDifferent from the Empty condition, the returned values of the Any one of and Notany of conditions are Boolean values. These values cannot be used to replace theplaceholder of in the local block. In the following example, only the placeholder{0} exists and is replaced by the returned value of Empty in the remote block, andthe value of group is permanently set to otc_admin.[ { "local": [ { "user": { "name": "{0}" } }, { "group": { "name": "otc_admin" } } ], "remote": [ { "type": "UserName" }, { "type": "Groups", "any_one_of": [ "idp_admin" ] } ] }]Assume that the Open Telekom Cloud system receives the following assertion.{UserName: Jone Smith}{Groups: [idp_user, idp_admin, idp_agency]}The following attributes are mapped into the Open Telekom Cloud system:n UserName: John Smithn Groups: otc_adminOppositely, assume that the Open Telekom Cloud system receives the followingassertion.{UserName: Jone Smith}{Groups: [idp_user, idp_agency]}None of the rules takes effect, and the current user is not allowed to log in to thesystem.
– Condition including a regular expressionYou can specify "regex": true in conditions to indicate that the system is calculatingthe result using a regular expression. This is an advanced function, which isprovided for you to have a simple understanding of it.
Identity and Access ManagementUser Guide
6 How Do I Set the Name and Permissions of a FederatedUser?
Issue 08 (2017-02-22) 22

[ { "local": [ { "user": { "name": "{0}" } }, { "group": { "name": "otc_admin" } } ], "remote": [ { "type": "UserName" }, { "type": "Groups", "any_one_of": [ ".*@mail.com$" ], "regex": true } ] }]
– Condition combination
Multiple conditions are combined using the logical AND.[ { "local": [ { "user": { "name": "{0}" } }, { "group": { "name": "otc_admin" } } ], "remote": [ { "type": "UserName" }, { "type": "Groups", "not_any_of": [ "idp_user" ] }, { "type": "Groups", "not_any_of": [ "idp_agent" ] } ] }]
The preceding mapping is similar to the following example:[ { "local": [
Identity and Access ManagementUser Guide
6 How Do I Set the Name and Permissions of a FederatedUser?
Issue 08 (2017-02-22) 23
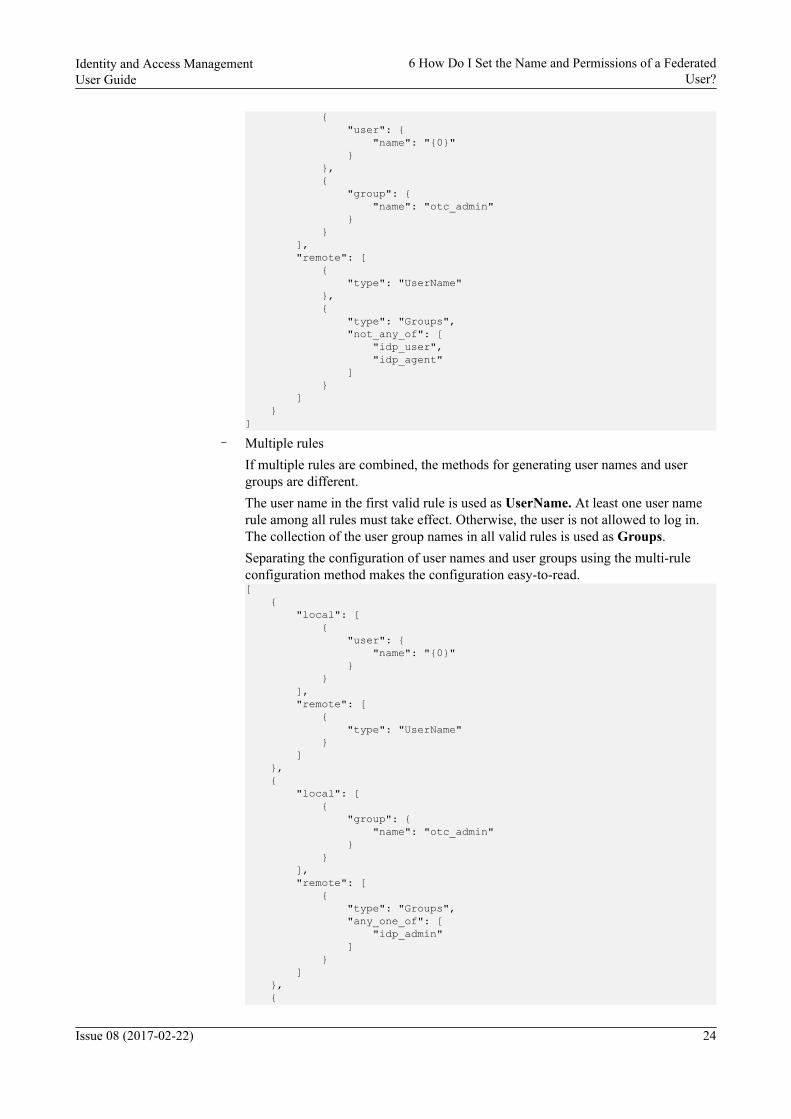
{ "user": { "name": "{0}" } }, { "group": { "name": "otc_admin" } } ], "remote": [ { "type": "UserName" }, { "type": "Groups", "not_any_of": [ "idp_user", "idp_agent" ] } ] }]
– Multiple rulesIf multiple rules are combined, the methods for generating user names and usergroups are different.The user name in the first valid rule is used as UserName. At least one user namerule among all rules must take effect. Otherwise, the user is not allowed to log in.The collection of the user group names in all valid rules is used as Groups.Separating the configuration of user names and user groups using the multi-ruleconfiguration method makes the configuration easy-to-read.[ { "local": [ { "user": { "name": "{0}" } } ], "remote": [ { "type": "UserName" } ] }, { "local": [ { "group": { "name": "otc_admin" } } ], "remote": [ { "type": "Groups", "any_one_of": [ "idp_admin" ] } ] }, {
Identity and Access ManagementUser Guide
6 How Do I Set the Name and Permissions of a FederatedUser?
Issue 08 (2017-02-22) 24

"local": [ { "group": { "name": "otc_agency" } } ], "remote": [ { "type": "orgPersonType", "any_one_of": [ "idp_agency" ] } ] }]Assume that the Open Telekom Cloud system receives the following assertion.{UserName: Jone Smith}{Groups: [idp_user, idp_admin, idp_agency]}The following attributes are mapped into the Open Telekom Cloud system:n UserName: John Smithn Groups: otc_admin;otc_agency
l Create rules.In the Identity Conversion Rule area, you can click Create Rule and create a rule to setuser permissions, define user names, and specify the scenarios where the rule takeseffect.
NOTE
Do not configure sensitive personal information in rules. For example, do not use a credit cardnumber as a user name.
The parameters are described as follows:– User name
Indicates the user name displayed in the Open Telekom Cloud system after thefederated user logs in. You can enter a simple expression in this input box, forexample, Federation_user_{email}. {email} is a placeholder, which is replaced by
Identity and Access ManagementUser Guide
6 How Do I Set the Name and Permissions of a FederatedUser?
Issue 08 (2017-02-22) 25

the value of the email attribute in the actual assertion. As indicated by the sampleassertion, the user name is [email protected].
NOTE
In Edit rules, placeholders, such as {0} and {1}, rather than {email} are used. After a rule iscreated, the system automatically converts the rule. Pay attention to the difference whenediting rules.
– User groupIndicates the user group to which the federation user belongs in the Open TelekomCloud system after a federated login. The user group of a user determines thepermissions of the user.
– Conditions for Validating This RuleYou can set certain conditions so that a rule takes effect only when it meets theconditions. If the user group otc_admin is specified in a rule and you need to grantthe otc_admin permission to only certain users who have a federation login, youcan specify conditions so that the rule takes effect only when these conditions aremet. If no rule takes effect, the user is not allowed to log in to the system. The usercan click the login link to display the corresponding error message.
----End
Identity and Access ManagementUser Guide
6 How Do I Set the Name and Permissions of a FederatedUser?
Issue 08 (2017-02-22) 26
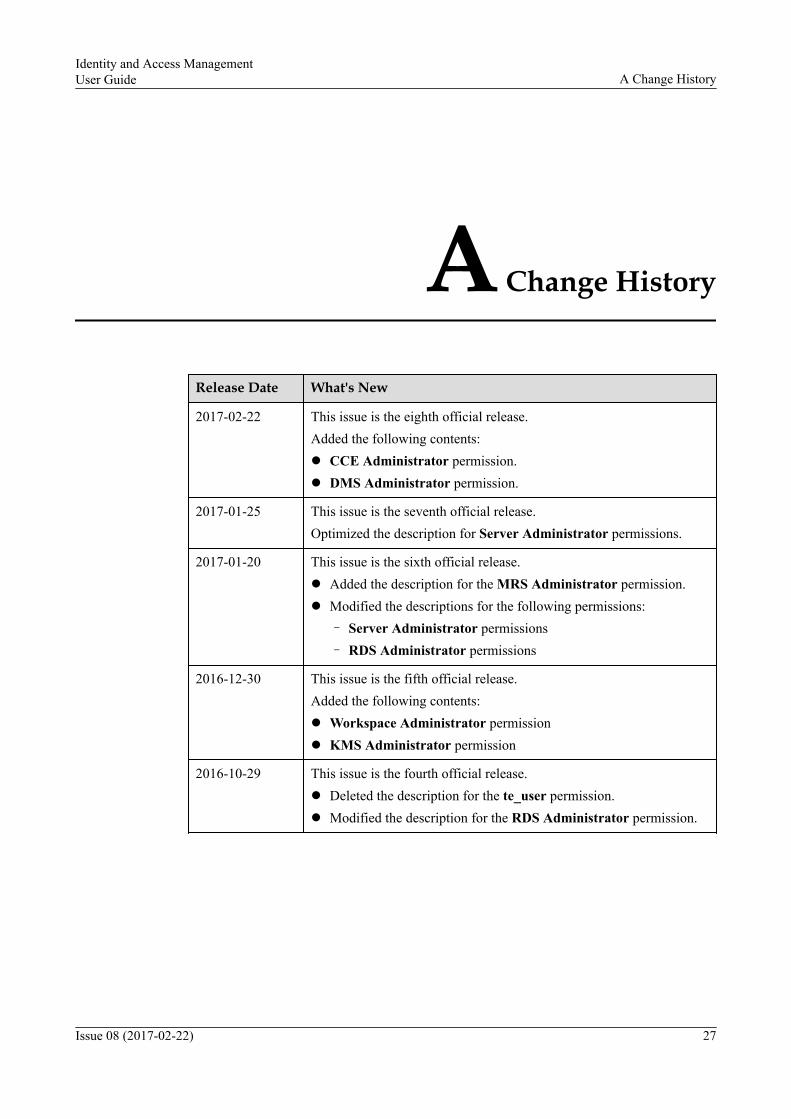
A Change History
Release Date What's New
2017-02-22 This issue is the eighth official release.Added the following contents:l CCE Administrator permission.l DMS Administrator permission.
2017-01-25 This issue is the seventh official release.Optimized the description for Server Administrator permissions.
2017-01-20 This issue is the sixth official release.l Added the description for the MRS Administrator permission.l Modified the descriptions for the following permissions:
– Server Administrator permissions– RDS Administrator permissions
2016-12-30 This issue is the fifth official release.Added the following contents:l Workspace Administrator permissionl KMS Administrator permission
2016-10-29 This issue is the fourth official release.l Deleted the description for the te_user permission.l Modified the description for the RDS Administrator permission.
Identity and Access ManagementUser Guide A Change History
Issue 08 (2017-02-22) 27
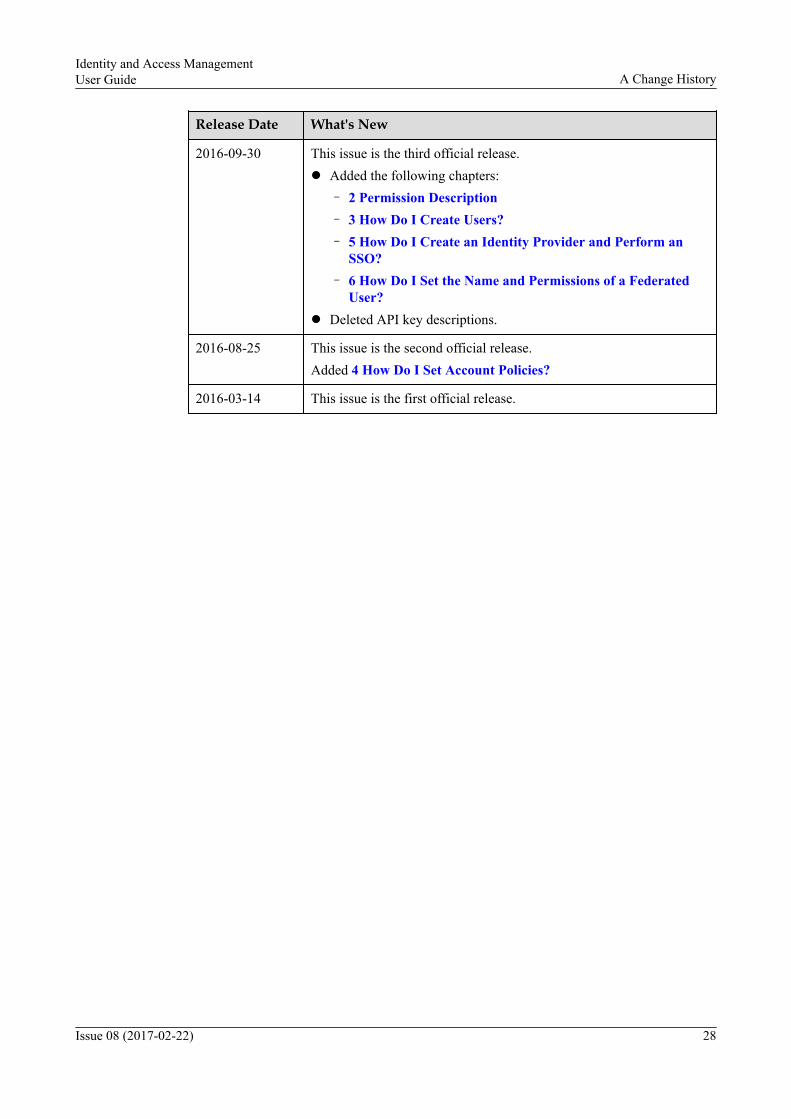
Release Date What's New
2016-09-30 This issue is the third official release.l Added the following chapters:
– 2 Permission Description– 3 How Do I Create Users?– 5 How Do I Create an Identity Provider and Perform an
SSO?– 6 How Do I Set the Name and Permissions of a Federated
User?l Deleted API key descriptions.
2016-08-25 This issue is the second official release.Added 4 How Do I Set Account Policies?
2016-03-14 This issue is the first official release.
Identity and Access ManagementUser Guide A Change History
Issue 08 (2017-02-22) 28
B Glossary
For details about the terms involved in this document, see Glossary.
Identity and Access ManagementUser Guide B Glossary
Issue 08 (2017-02-22) 29


