29
USER GUIDE

USER GUIDE

2
TABLE OF CONTENTS
WELCOME TO myCSA ...............................................................................................
LOGGING IN ............................................................................................................
FORGOT PASSWORD ..........................................................................................
FIRST TIME REGISTRATION .......................................................................................
ACCESS TYPE ...................................................................................................
GETTING STARTED .............................................................................................
SETTING PREFERENCES ...........................................................................................
CONTACT US ...........................................................................................................
DASHBOARD ...........................................................................................................
MANAGING YOUR DEVICES .......................................................................................
MY DEVICES .....................................................................................................
Assigning Devices .........................................................................................
Note 1 & 2 ....................................................................................................
Action Buttons .............................................................................................
Removing a Device ........................................................................................
Request Devices ...........................................................................................
METER READINGS ...................................................................................................
SUBMIT METER READS ......................................................................................
DOWNLOAD/UPLOAD METER READS ...................................................................
METER READ HISTORY .......................................................................................
PRODUCTS & SUPPLIES ...........................................................................................
CONTRACTED SUPPLIES .....................................................................................
OPEN/CLOSED SUPPLY ORDERS .........................................................................
PRODUCT CATALOG ...........................................................................................
ORDER INQUIRY ................................................................................................
4
5
5
5
5
6
6
7
8
9
9
9
9
9
10
10
11
11
11
12
13
13
16
17
17

3
SERVICE ................................................................................................................
REQUEST SERVICE ............................................................................................
OPEN SERVICE REQUESTS ..................................................................................
CLOSED SERVICE REQUESTS ...............................................................................
INVOICE INQUIRY AND PAYMENTS .............................................................................
INVOICE INQUIRY - CANON SOLUTIONS AMERICA INVOICES ....................................
MAKE PAYMENT ................................................................................................
INVOICE INQUIRY - CANON FINANCIAL SERVICES INVOICES .....................................
CONTRACT BILLING REPORTS ..............................................................................
ACCOUNT MANAGEMENT .........................................................................................
ACCOUNT DEVICES ............................................................................................
ACCOUNT SUPPORT ...........................................................................................
USER REGISTRATION ...............................................................................................
REGISTRATION OPTIONS ....................................................................................
SINGLE USER REGISTRATION ..............................................................................
MULTI USER REGISTRATION ................................................................................
USER MANAGEMENT .........................................................................................
Assigning a Business User ..............................................................................
Manage User Functions ..................................................................................
18
18
20
20
21
21
22
23
23
24
24
24
25
25
26
26
26
26
27

4
myCSA by Canon Solutions America, Inc. provides a simple and convenient solution to managing your devices. The secure account management portal is a self-service utility available 24 hours a day, 7 days a week that provides an efficient way to handle day-to-day functions.
Upon enrollment, you can take advantage of the many features of myCSA such as submitting meter reads, placing service requests, ordering contracted supplies, and retrieving account information. This flexibility and control provides tremendous value.
WELCOME TO myCSA SECURE ACCOUNT MANAGEMENT PORTAL

5
LOGGING INTo login to the myCSA Secure Account Management portal (myCSA), enter your username and password into the form found on the homepage. If you do not currently have a login then you will need to create a new user account. Click CREATE ACCOUNT to register.
FIRST TIME REGISTRATIONRegistering for a myCSA account is quick and easy. Simply click CREATE ACCOUNT on the login screen to get started. Make sure that you have a valid Serial/Equipment number for a device that you currently manage (You can add more devices after you register).
Forgot Password Forget your password? Not a problem. Simply click the ‘Forgot Password?’ link, fill out the form, and then click RESET PASSWORD.
Access TypemyCSA provides two types of user access: Quick Access (Business User) and Administrator Access (Business Admin).
• Quick Access gives users features such as device management, submitting meter reads, ordering supplies and placing service requests.
• Administrator Access gives users all basic functions as well as full access to myCSA allowing them to pay invoices, manage users and more.*
*Please note that this level of access requires additional approval.
6
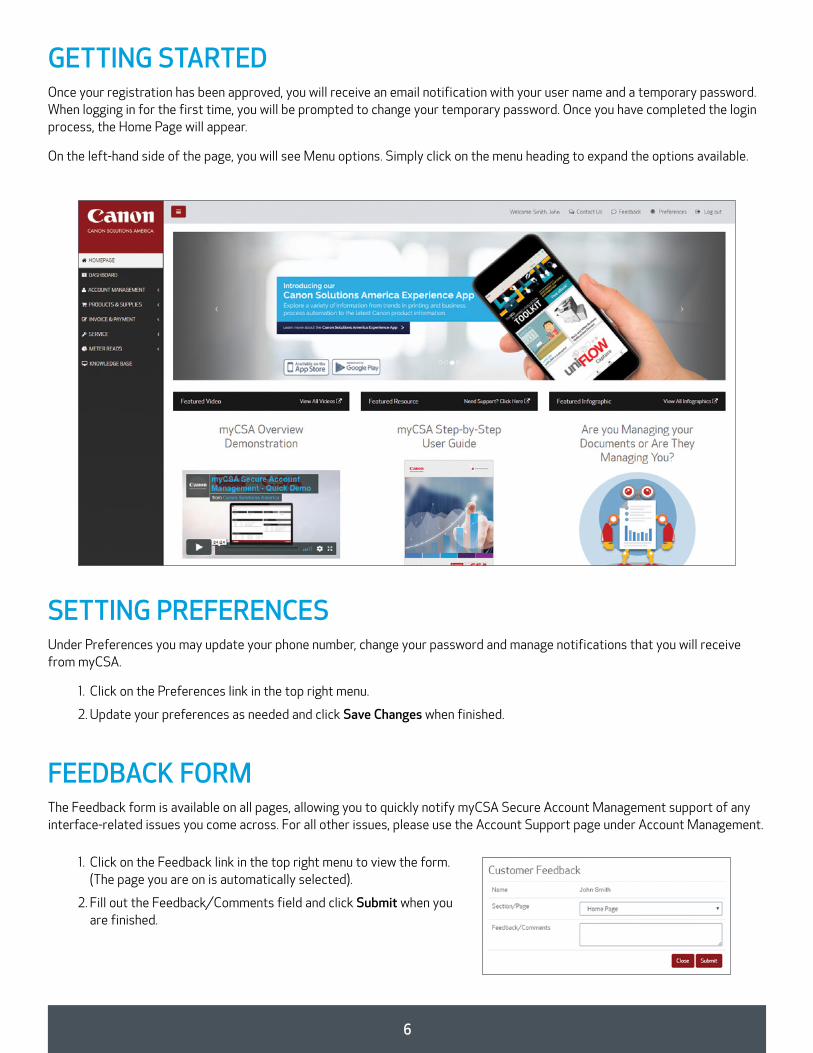
GETTING STARTEDOnce your registration has been approved, you will receive an email notification with your user name and a temporary password. When logging in for the first time, you will be prompted to change your temporary password. Once you have completed the login process, the Home Page will appear.
On the left-hand side of the page, you will see Menu options. Simply click on the menu heading to expand the options available.
SETTING PREFERENCES Under Preferences you may update your phone number, change your password and manage notifications that you will receive from myCSA.
1. Click on the Preferences link in the top right menu.
2. Update your preferences as needed and click Save Changes when finished.
FEEDBACK FORMThe Feedback form is available on all pages, allowing you to quickly notify myCSA Secure Account Management support of any interface-related issues you come across. For all other issues, please use the Account Support page under Account Management.
1. Click on the Feedback link in the top right menu to view the form.(The page you are on is automatically selected).
2. Fill out the Feedback/Comments field and click Submit when you are finished.

7
CONTACT USAt the top of every page you will find a link to the Contact Us form which you can use to submit any general inquiries that you may have. Contact requests can be submitted to either the myCSA Customer Support team or the Business Administrator that manages your account.
1. Click the Send To dropdown and choose the recipient of the contact request:
• Canon Solutions America Customer Support
• Contact An Administrator Within Your Company
2. Use the Serial Number field if your request involves a specific device.
3. Enter the topic of your request in the Subject field.
4. Enter your message in the Description field.
5. Once you’ve completed your message, click Submit to send the request. You will receive a confirmation notice that your request has been submitted. Requests to Customer Support are handled within one business day.

8
DASHBOARDThe myCSA Secure Account Management dashboard provides you with an overview of usage associated to the devices registered to you. Depending on your user role, it also allows you to quickly access overall customer account-related information such as the device fleet, invoicing, orders and service requests.
Usage InformationThe usage information described below is for assigned devices only.
• Average B&W Copies - Current average number of black & white copies based on previous two meter reads.
• Average Color Copies - Current average number of color copies based on previous two meter reads.
• Total Assigned Devices - Total number of devices registered to you.
• Average Uptime - Average up time for all machines assigned to you that are in working order (not down or serviced).
Customer Account Information
• My Devices - List of devices in your fleet that are assigned to you.
• Open Invoices - All open invoices that are available to view for your company’s account.
• Open Orders - All orders currently in process for your company’s account.
• Open Service Requests - All pending service requests not yet completed for your company’s account.

9
MANAGING YOUR DEVICESMy DevicesThe My Devices page lists all devices that are assigned to the user currently logged in. From this page, you may assign additional devices, remove devices, update notes, and perform most frequent actions (Order Supplies, Request Service, Enter Meter Reads).
Assigning Devices1. From the Account Management menu, select My Devices.
2. Click Assign Device.
All Account Devices not currently assigned to you will be displayed.
3. You may reduce the results using one of the search fields and click Search. It is recommended to perform a search by serial number.
4. Select the device(s) you would like to manage and click Submit. If the device is not displayed, you may have to request the device be added to the account. Refer to the Request Devices instructions.
You may also populate the Note 1 and Note 2 fields. These fields are managed by you and may include information such as location of equipment.
5. Once you click Submit, the My Devices page will be displayed.
Note 1 & 2The Note 1 & 2 fields are managed by you and may include information such as location of equipment. The information populated is specific to the device and will be visible to all account users.
1. Populate the fields. Information will be saved automatically when you tab out of the field.
Action ButtonsYou may perform actions for a device directly from My Devices.
1. Order Supplies
2. Request Service
3. Enter Meter Reads
4. Remove Device
10
Removing a DeviceIf you no longer wish to manage a device, you may remove the device from your assigned serial numbers. Once a device is removed from your assigned serial numbers, you will no longer receive notifications for meter readings or be able to place supply orders for the device.
Note: This will not cancel any active maintenance contract and the device will still be available under Account Devices.
1. Click under Actions for applicable device.
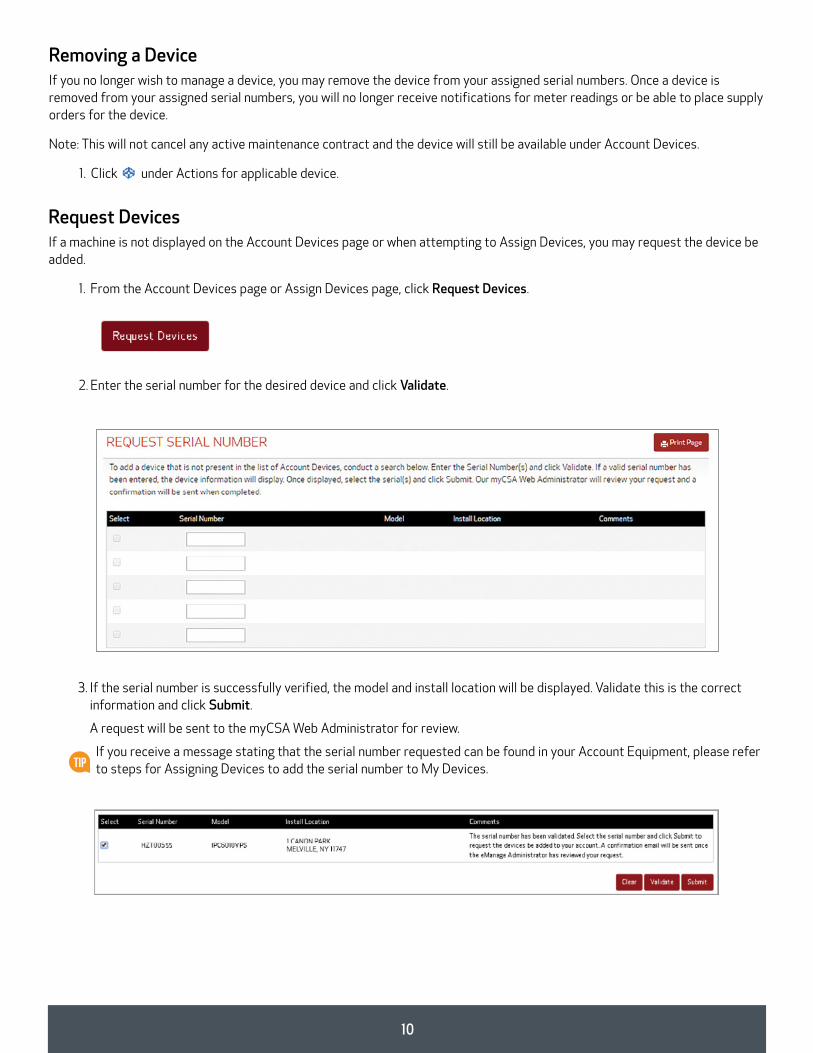
Request DevicesIf a machine is not displayed on the Account Devices page or when attempting to Assign Devices, you may request the device be added.
1. From the Account Devices page or Assign Devices page, click Request Devices.
2. Enter the serial number for the desired device and click Validate.
3. If the serial number is successfully verified, the model and install location will be displayed. Validate this is the correct information and click Submit.
A request will be sent to the myCSA Web Administrator for review.
If you receive a message stating that the serial number requested can be found in your Account Equipment, please refer to steps for Assigning Devices to add the serial number to My Devices.
11
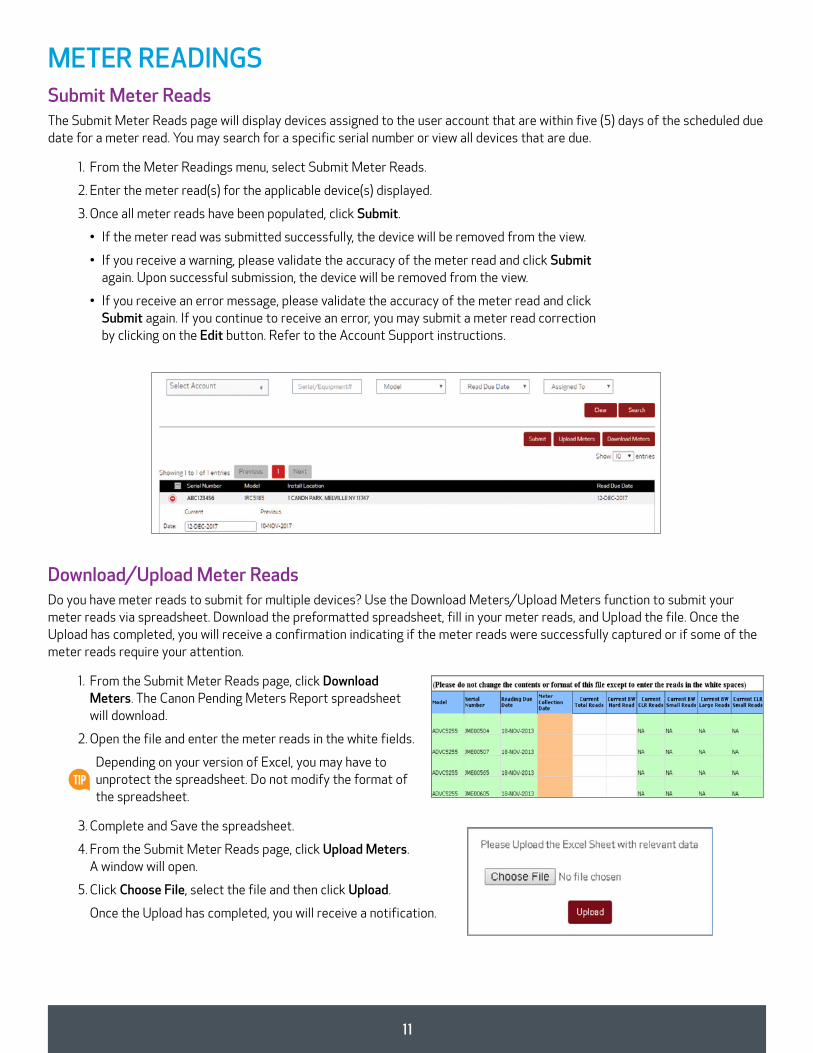
METER READINGS Submit Meter Reads The Submit Meter Reads page will display devices assigned to the user account that are within five (5) days of the scheduled due date for a meter read. You may search for a specific serial number or view all devices that are due.
1. From the Meter Readings menu, select Submit Meter Reads.
2. Enter the meter read(s) for the applicable device(s) displayed.
3. Once all meter reads have been populated, click Submit.
• If the meter read was submitted successfully, the device will be removed from the view.
• If you receive a warning, please validate the accuracy of the meter read and click Submit again. Upon successful submission, the device will be removed from the view.
• If you receive an error message, please validate the accuracy of the meter read and click Submit again. If you continue to receive an error, you may submit a meter read correction by clicking on the Edit button. Refer to the Account Support instructions.
Download/Upload Meter Reads Do you have meter reads to submit for multiple devices? Use the Download Meters/Upload Meters function to submit your meter reads via spreadsheet. Download the preformatted spreadsheet, fill in your meter reads, and Upload the file. Once the Upload has completed, you will receive a confirmation indicating if the meter reads were successfully captured or if some of the meter reads require your attention.
1. From the Submit Meter Reads page, click Download Meters. The Canon Pending Meters Report spreadsheet will download.
2. Open the file and enter the meter reads in the white fields.
Depending on your version of Excel, you may have to unprotect the spreadsheet. Do not modify the format of the spreadsheet.
3. Complete and Save the spreadsheet.
4. From the Submit Meter Reads page, click Upload Meters. A window will open.
5. Click Choose File, select the file and then click Upload.
Once the Upload has completed, you will receive a notification.

12
Meter Read HistoryOn the Meter Read History page, you may view meter read history for your assigned devices. Additionally, you may submit a meter read correction for the last usage invoice on a device.
1. From the Meter Readings menu, select Meter Read History.
2. To view the meter history for a specific device, click on the Serial Number. A new window will open displaying the meter read history since the start of the contract.
3. To download a device’s meter read history, click on a serial number to view the device’s meter read history and click Download. The meter read history will download to an Excel spreadsheet.
4. To correct the meter reads on the last usage invoice, click the plus sign . The usage invoice details from the last invoice will be displayed.
Note: You may also submit a meter read correction from the Account Support page.
5. Select the check box next to the Invoice Number.
6. Fill in the Read Date, Total Read/BW Read and any comments you would like to include regarding the correction. Click Submit.
7. Upon successful submission, a confirmation number will be displayed. Please use this number for future reference.
Download Full Meter Read HistoryDownload meter read history for all devices from the previous two years.
13
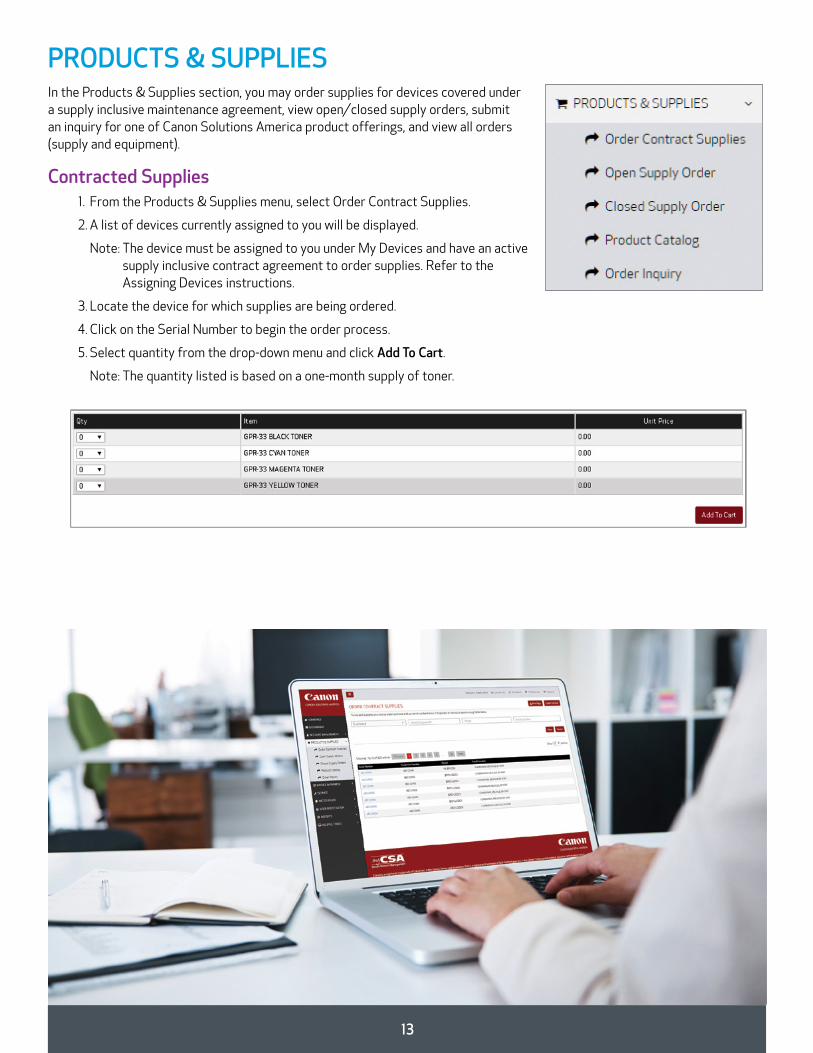
PRODUCTS & SUPPLIESIn the Products & Supplies section, you may order supplies for devices covered under a supply inclusive maintenance agreement, view open/closed supply orders, submit an inquiry for one of Canon Solutions America product offerings, and view all orders (supply and equipment).
Contracted Supplies 1. From the Products & Supplies menu, select Order Contract Supplies.
2. A list of devices currently assigned to you will be displayed.
Note: The device must be assigned to you under My Devices and have an active supply inclusive contract agreement to order supplies. Refer to the Assigning Devices instructions.
3. Locate the device for which supplies are being ordered.
4. Click on the Serial Number to begin the order process.
5. Select quantity from the drop-down menu and click Add To Cart.
Note: The quantity listed is based on a one-month supply of toner.
14
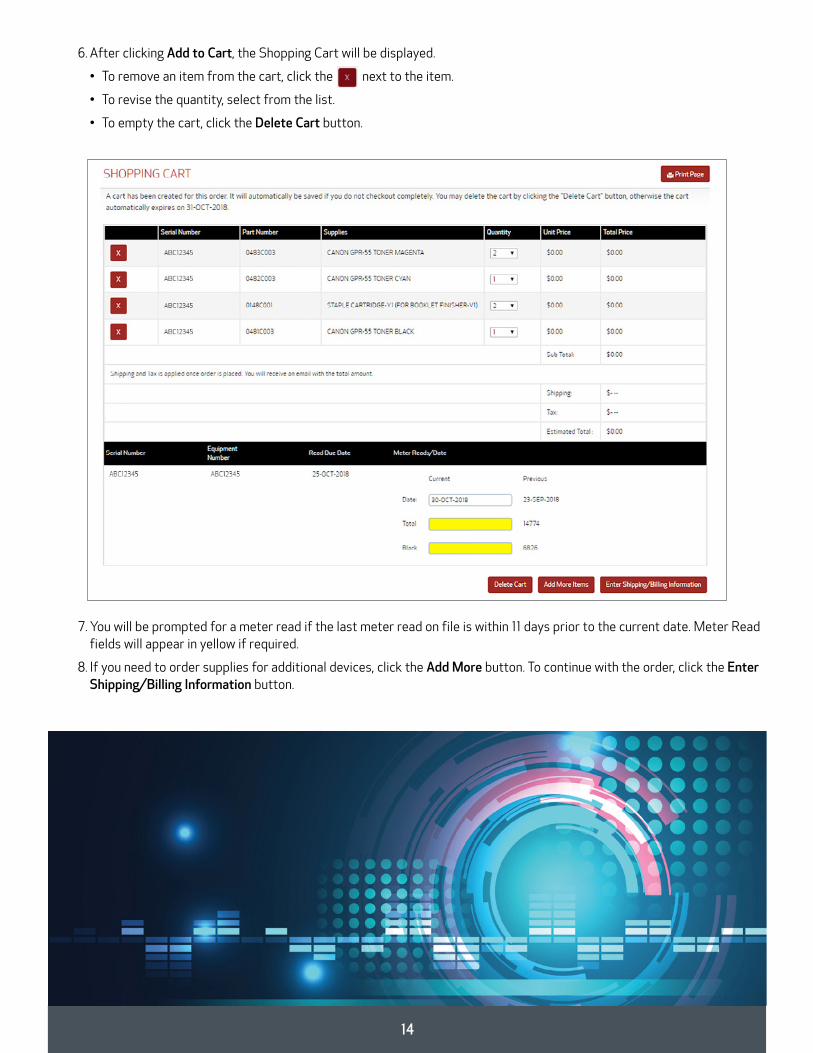
7. You will be prompted for a meter read if the last meter read on file is within 11 days prior to the current date. Meter Read fields will appear in yellow if required.
8. If you need to order supplies for additional devices, click the Add More button. To continue with the order, click the Enter Shipping/Billing Information button.
6. After clicking Add to Cart, the Shopping Cart will be displayed.
• To remove an item from the cart, click the next to the item.
• To revise the quantity, select from the list.
• To empty the cart, click the Delete Cart button.

15
9. Enter your Billing/Shipping information.
10. The install location of the first machine selected will be displayed in the Ship To field. Click the Change Ship To link to change the ship to location for the entire order.
Note: If the supplies need to be shipped to multiple addresses, please create separate orders.
11. The Shipping Method will default to standard ground shipping. If you require expedited shipping, contact Customer -Service at 800-613-2228.
12. In the Attn Label field enter First Name, Last Name and Phone Number to ensure prompt delivery of your supplies.
13. Click Checkout.
The Review and Place Order page will appear.
14. Review the order for accuracy.
• If you need to revise the order, click Edit Order.
• If you are ready to complete the order, click Place Order.
15. Upon successful submission of the order a confirmation message will appear and an email with the order number will be sent to you, which you should retain for your records.

16
Open/Closed Supply OrdersOnce your order has been accepted, the order details will be available on the Open Supply Requests page for orders that have not closed and Closed Supply Requests for orders that have closed. Tracking Information and Invoice information will be available once the order has shipped.
1. From the Product & Supplies menu, select Open Supply Requests or Closed Supply Requests.
2. Orders that have been created within the last 30 days under the user currently logged in will be displayed.
3. Using the search fields, you may search by Related Party Accounts, Request Number, Serial/Equipment Number, Model or for Orders Placed within 30 days - 18 months.
4. To view the Order Details, click the link under Order Information. If the order has been invoiced a link to the invoice will also be displayed.
5. Once the order has shipped, a link will be available for the tracking information. This will also be available on the Order Details page. The link will open the carrier’s website in a new window.

17
Product CatalogThe full catalog of Canon Solutions America offerings will be displayed. Select a model to request a quote or more product information.
1. From the Product & Supplies menu, click Product Catalog.
2. Select an option under Product Category and then under Product Family.
3. Click the checkbox for the product you would like more information on and then click Continue.
4. Look over your request on the Review Request page. You can also request more devices by clicking Add More Items.
5. When finished, click Request Information. A confirmation page will appear notifying you that your request is complete. You will be contacted in regards to your equipment request within one business day.
Order InquiryOnce your order has been accepted, it may be tracked on the Order Inquiry page.
1. From the Product & Supplies menu, select Order Inquiry.
2. Using the search fields, you may search by Related Party Accounts, Order/Contract Number, Serial/Equipment Number or Purchase Order. You may also narrow your search by Order Status.
3. The search results will be displayed.
4. You can collapse the details for all orders by clicking on the in the column heading or collapse for individual orders by clicking on the next to the order line.
• Tracking Information will be displayed if the order has shipped.
• To view detailed order information, click Order Details.

18
SERVICERequest Service Service calls may be placed for devices whether or not they are covered under an active maintenance agreement. If the machine is not covered under an active maintenance agreement, you will be notified of our current service rates.
1. From the Service menu, select Request Service.
A list of devices currently assigned to you will be displayed.
Note: If the device is not assigned to your user account, you can perform a search to locate the device.
It is recommended that you use only one search criteria (i.e. Serial Number, Install Location or Related Party Accounts).
2. Locate the device for which service is being requested.
3. Click on the Serial Number to begin the service request process.
The Service Request page will be displayed.
4. In the Device Information section, confirm if you would like to select a different Install Location. If Yes is selected, an additional field will open to select a different install location.
5. If the device is not covered under an active maintenance agreement, the Billing Information section will be displayed.

19
6. In the Contact Information section, the Contact Name, Contact Phone, and Business Hours will default but may be revised.
7. Complete the Room/Floor/Suite field.
8. In the Service Request Information section, select the Problem Summary and Problem Description, and include optional notes in Additional Instructions.
9. Click Continue. The Service Request Review Page will be displayed.
10. Click Change to revise the request or Submit to continue.
11. Upon successful submission of the service request, a confirmation email will be sent to you with the service -request number for your records.

20
Closed Service RequestsYou can view closed or cancelled service requests by visiting Service Request History under the Service menu. Information such as serial number, date closed, and problem summary will be displayed. If you need assistance with your service request, please call our Service Department at 1-800-355-1390.
1. From the Service menu, select Closed Service Requests.
Using the search fields, you may search for requests made within 30 days - 18 months by Request Number, Serial/Equipment Number, Requestor or Account Number.
Open Service RequestsYou can view open service requests by visiting Open Service Requests under the Service menu. Information such as serial number, creation date, and type of request will be displayed. If you need assistance with your service request, please call our Service Department at 1-800-355-1390.
1. From the Service menu, select Open Service Requests.
Using the search fields, you may search for requests made within 30 days - 18 months by Request Number, Serial/Equipment Number, Requestor or Account Number.
2. You may cancel a service request if it has not yet been assigned to a technician. Click the Cancel Request link. If the service request is beyond the point where it can be cancelled, a message will be displayed.

21
INVOICE INQUIRY AND PAYMENTSWith additional access, you may view and pay invoices billed directly from Canon Solutions America. You will continue to receive your invoice using your current delivery method, but may also view the invoices in myCSA. Additionally, you may also view Canon Financial Service invoices if invoiced through CFS. If you require access and the Invoice & Payment menu does not appear in your application, please contact us at 855-355-2365.
Invoice Inquiry - Canon Solutions America Invoices 1. From the Invoice & Payment menu, select Invoice Inquiry.
2. Complete the applicable search fields and click Search.
A list of invoices matching your search criteria will be displayed.
3. To download an invoice to a portable document format (pdf), click on the applicable Invoice Number.
4. To pay an invoice, select the Invoice and click on Pay Invoice.
Note: The Pay Invoice button will not appear until an invoice is selected.
Make Payment - Canon Solutions America InvoicesThe Make Payment page will display all open invoices by default. You may submit a credit card payment for open invoices on your account.
1. From the Invoice & Payment menu, click Make Payment. A list of open invoices will be displayed.
The Make Payment Page will open and the Payment Amount field will be prefilled with the remaining balance on the Invoice.
2. Select the invoice(s) to be paid and click Pay Invoice.
Note: The Pay Invoice button will not appear until an invoice is selected.
22
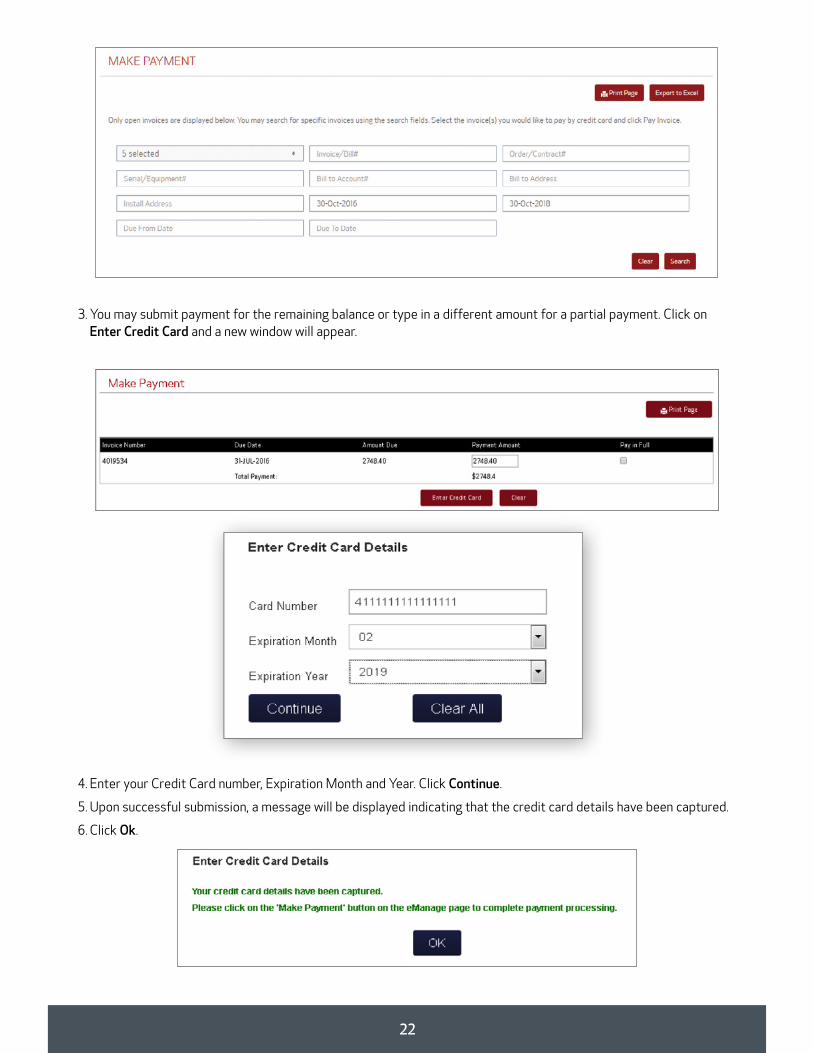
3. You may submit payment for the remaining balance or type in a different amount for a partial payment. Click on Enter Credit Card and a new window will appear.
4. Enter your Credit Card number, Expiration Month and Year. Click Continue.
5. Upon successful submission, a message will be displayed indicating that the credit card details have been captured.
6. Click Ok.

23
7. You will be returned to the Make Payment page. Click Submit Payment to submit the credit card payment.
8. Upon successful submission, a confirmation number will be displayed. Please use this number for future reference.
Contract Billing ReportsWith additional access, you may view Contract Billing Reports. The reports contain billing information billed directly to the customer by Canon Solutions America, Inc. The reports will not contain billing information from Canon Financial Services.
1. Click Download Last Month’s Billing to view billing information for the prior month.
2. Click Download All Contract Billing to view billing information for associated account number.
3. Create a custom report by entering in parameters for a date range, a specific contract or serial number, for example.
Invoice Inquiry - Canon Financial Services InvoicesWith additional access, you may also view Canon Financial Services invoices if invoiced through CFS. If you require access to the CFS invoices and it does not appear in your application, please contact us at 855-355-2365.
1. From the Invoice & Payment menu, select CFS Invoice.
2. Complete the applicable search fields and click Search. A list of invoices matching your search criteria will be displayed.
3. To download an invoice to a portable document format (pdf), click on the applicable Invoice Number. The Invoice Number will appear as a link if a pdf format is available.
Note: Invoice Payment is not available for Canon Financial Services Invoices at this time.

24
Account DevicesThe Account Devices page lists all devices that are associated with your account. This includes devices not covered under an active service contract with Canon Solutions America.
1. From the Account Management menu, click Account Devices.
All devices associated with the Account will be displayed.
2. Click the plus sign to display Note 1 & Note 2 information.
Account SupportYou may submit inquiries or report changes to your account on the Account Support page. This may include a correction to meter reads or change of address, for example.
1. From the Account Management menu, select Account Support.
2. Enter associated serial number.
3. Select the type of inquiry and complete the required fields.
4. Include any additional information in the Comment field.
5. Click Submit.
6. Upon successful submission, a confirmation number will be displayed. Please use this number for future reference.
ACCOUNT MANAGEMENT

25
Single User Registration1. Select a single user registration option from the menu: By Single Machine, By Model, By Location, By Notes or Copy User.
2. Use the checkboxes to make your selection(s) or click Select All to choose all.
3. Complete the Create New User section with user information and designated roles.
4. Select Yes or No to ‘Automatically assign all future installations’.
Note: If Yes is selected, any machine installed under the account will automatically be assigned to the user regardless of where the machine is located or department.
5. Click Create User. A confirmation will display once process is complete.
USER REGISTRATIONRegistration Options The User Registration section is available to the Business Administrator (BA) on the account. This section contains multiple options to register new users and to manage existing users.
• By Single Machine - To register a single user to a device(s).
• By Model - To register a single user with grouping by model number.
• By Location - To register a single user with grouping by install location.
• By Notes - To register a single user with grouping by Note 1 & Note 2.
• Copy User - To register a single user by copying the devices & roles of an existing user.
• Mass Registration - To register multiple users (up to 50) via a spreadsheet.

26
Multi-User Registration1. From the User Registration menu, select Mass Registration.
2. A list of users currently assigned to you as the Business Administrator will be displayed.
3. Download the registration form by clicking Download Template. Complete the form for up to 50 users and click Upload Registration. Once registration is submitted, the registered users will receive a confirmation email including a temporary password and user name.
Assign a Business UserTo manage a user, the user must be assigned to the Business Administrator. Multiple users can be assigned to a Business Administrator, but a user may only be assigned to one Business Administrator.
1. From the User Management page, click on the second Filter By field and select All Business Users.
User ManagementApproved Business Administrators may manage users associated with the account. This includes updating contact information, assigning devices, and providing access to the various menus in myCSA.
1. From the User Registration menu, select User Management.
If this option is not available, please contact myCSA Support at 855-355-2365.
2. A list of users currently assigned to you as the Business Administrator will be displayed.

27
2. Select the users you would like to manage and click Assign User.
Conversely, you can unassign a user by selecting the user and clicking Unassign User.
Note: You will not be able to assign or unassign a user that is assigned to another Business Administrator.
Once you have completed your updates, change the Filter By field back to Your Assigned Business Users or select User Management from the Account Management menu.
Manage User FunctionsTo manage a user, the user must be assigned to the Business Administrator. Multiple users can be assigned to a Business Administrator, but a user may only be assigned to one Business Administrator.
1. To manage the access of a specific user, click on the email address of the user in your list of assigned users.
2. The user details will be displayed.
3. User access in myCSA may also be maintained on this screen. Here is a description of each Role.
4. Make necessary updates and click Submit.
Entity Role Description
ACCOUNTView My Devices, Account Devices & Account Support - No Special Request
No Special Request option under Account Management
View My Devices, Account Devices & Account Support
Special Request option under Account Management
PRODUCTSSubmit & View Supply Orders, All Order Types
Ability to Submit Orders and view Open/Closed Orders for the account
INVOICE PAYMENT View & Pay CSA Invoices Ability to View and Pay invoices by CSA
View & Pay CSA Invoices, View CFS Invoices
Ability to View and Pay invoices by CSA and also View invoices by CFS
View CFS Invoices View Only CFS invoices
SERVICE Submit & View Service Requests Ability to Request Service and View Open/Closed Service Requests
View Service Requests Ability to View Open/Closed Service Requests
METER READS Submit & View Meter History Ability to Submit & View Meter Read History for devices
REPORT View CSA Billing Report Ability to Run Contract Billing Report. CSA Only Billing

28

Canon is a registered trademark of Canon Inc. in the United States and elsewhere. All other referenced product names and marks are trademarks of their respective owners and are hereby acknowledged. © 2017 Canon Solutions America, Inc. All rights reserved.
8/16-317


