12
User Guide for Nokia Image Viewer SU-2 9356381 Issue 3
User Guide for Nokia Image Viewer SU-2
9356381Issue 3
SU2_en3_1st_tab.fm Page 1 Wednesday, March 17, 2004 6:51 PM
DECLARATION OF CONFORMITYWe, NOKIA CORPORATION, declare under our sole responsibility that the product SU-2 is in conformity with the provisions of the following Council Directive: 1999/5/EC. A copy of the Declaration of Conformity can be found at http://www.nokia.com/phones/declaration_of_conformity/.
Copyright © 2003-2004 Nokia. All rights reserved.
Nokia and Nokia Connecting People are registered trademarks of Nokia Corporation. Other product and company names mentioned herein may be trademarks or tradenames of their respective owners.
Bluetooth is a registered trademark of Bluetooth SIG, Inc.
Nokia operates a policy of continuous development. Nokia reserves the right to make changes and improvements to any of the products described in this document without prior notice. Nokia reserves the right to revise this document or withdraw it at any time without prior notice.
Under no circumstances shall Nokia be responsible for any loss of data or income or any special, incidental, consequential or indirect damages howsoever caused.
The availability of particular products may vary by region. Please check with the Nokia dealer nearest to you.
9356381/Issue 3
SU2_en3_1st_tab.fm Page 2 Wednesday, March 17, 2004 6:51 PM
F O R Y O U R S A F E T Y
3
Engl
ish
FOR YOUR SAFETY
Read these simple guidelines. Breaking the rules may be dangerous or illegal. Further detailed information is given in this manual.
QUALIFIED SERVICEOnly qualified personnel may repair the Nokia Image Viewer.
CONNECTING TO OTHER DEVICESWhen connecting to any other device, read its user's guide for detailed safety instructions. Do not connect incompatible products.
INTERFERENCEAll wireless devices may get interference, which could affect performance.
WATER-RESISTANCEYour Nokia Image Viewer is not water-resistant. Keep it dry.
CHARGERS AND BATTERIESCheck the model number of any charger before use with this device. The Nokia Image Viewer is intended for use with the ACP-7, ACP-8 and ACP-12 chargers and with standard AAA batteries.
Warning! Use only batteries and chargers approved by the manufacturer for use with this particular enhancement. The use of any other types will invalidate any approval or warranty applying to the enhancement, and may be dangerous.
IMPORTANT:Only use chargers in dry conditions. Never connect the device to a power supply when the device or charger or their parts are damp or wet.
Never use any charger or battery which is damaged.
Do not short-circuit the batteries. Accidental short-circuiting can occur when a metallic object (coin, clip or pen) causes direct connection of the + and - terminals of the battery (metal strips on the battery) for example when you carry a spare battery in your pocket or purse. Short-circuiting the terminals may damage the battery or the connecting object.
Do not dispose of batteries in a fire!
Dispose of batteries according to local regulations (e.g. recycling). Do not dispose as household waste.
SU2_en3_1st_tab.fm Page 3 Wednesday, March 17, 2004 6:51 PM
I n t r o d u c t i o n
4
Introduction
The Nokia Image Viewer displays on a TV screen or compatible video projector pictures taken with the camera of a compatible phone that supports Bluetooth wireless technology.
Read this users guide carefully before using the Nokia Image Viewer.
■ Bluetooth wireless technologySince Bluetooth devices communicate using radio waves, your Bluetooth phone and the Nokia Image Viewer do not need to be in line of sight. The two devices need to be within up to 10 metres of each other.
In some countries, there may be restrictions on using Bluetooth devices. Check with your local authorities.
■ Compatibility• Image display devices: The Nokia Image Viewer is compatible with
PAL and NTSC standards. You can also connect the Nokia Image Viewer to a compatible video projector through an AV connector. SECAM TV sets require a special adapter which is not supplied in the sales package. The SECAM adapter can be bought in an electrical supply store.
• Phones: The Nokia Image Viewer is compatible with phones that support Bluetooth Specification 1.1, and the Object Push Profile (OPP) or Basic Imaging Profile (BIP). A Bluetooth profile is a set of commands that your phone uses for controlling the Nokia Image Viewer.
However, interoperability between the Nokia Image Viewer and other Bluetooth enabled products is not guaranteed and depends on compatibility.
SU2_en3_1st_tab.fm Page 4 Wednesday, March 17, 2004 6:51 PM

G e t t i n g s t a r t e d
5
Engl
ish
1. Getting started
The Nokia Image Viewer has the following parts (Figure 1):.
1. Power on/off/rotate button
2. Pause/continue/time change button
3. Power/Bluetooth status indicator light (blue)
4. Charger indicator light (green)
5. RCA connector and cable
6. Release buttons on both sides
7. NTSC/PAL switch
8. Charger connector
Figure 1
SU2_en3_1st_tab.fm Page 5 Wednesday, March 17, 2004 6:51 PM
G e t t i n g s t a r t e d
6
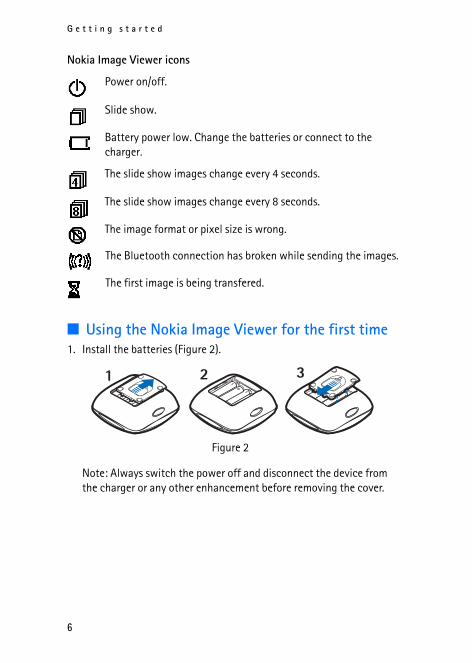
Nokia Image Viewer icons
Power on/off.
Slide show.
Battery power low. Change the batteries or connect to the charger.
The slide show images change every 4 seconds.
The slide show images change every 8 seconds.
The image format or pixel size is wrong.
The Bluetooth connection has broken while sending the images.
The first image is being transfered.
■ Using the Nokia Image Viewer for the first time1. Install the batteries (Figure 2).
Note: Always switch the power off and disconnect the device from the charger or any other enhancement before removing the cover.
Figure 2
SU2_en3_1st_tab.fm Page 6 Wednesday, March 17, 2004 6:51 PM
G e t t i n g s t a r t e d
7
Engl
ish
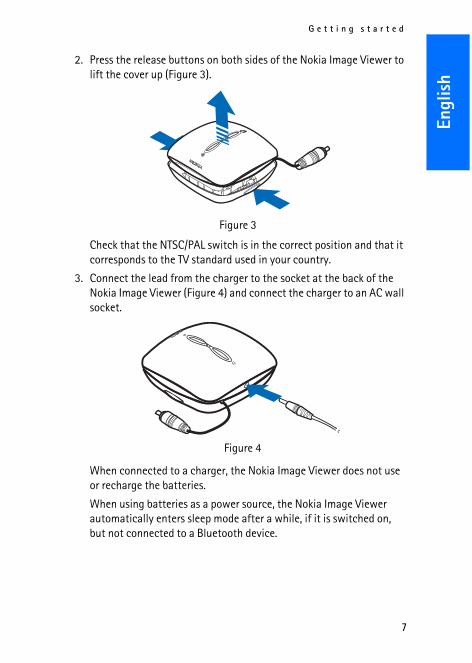
2. Press the release buttons on both sides of the Nokia Image Viewer to lift the cover up (Figure 3).
Check that the NTSC/PAL switch is in the correct position and that it corresponds to the TV standard used in your country.
3. Connect the lead from the charger to the socket at the back of the Nokia Image Viewer (Figure 4) and connect the charger to an AC wall socket.
When connected to a charger, the Nokia Image Viewer does not use or recharge the batteries.
When using batteries as a power source, the Nokia Image Viewer automatically enters sleep mode after a while, if it is switched on, but not connected to a Bluetooth device.
Figure 3
Figure 4
SU2_en3_1st_tab.fm Page 7 Wednesday, March 17, 2004 6:51 PM
G e t t i n g s t a r t e d
8
4. Connect the Nokia Image Viewer to the RCA connector on your TV.
If your TV does not have a RCA connector, you need a RCA/SCART adapter, which you can obtain from an electrical supply store. If you are using a wide screen TV set, the TV screen should be set to a 4/3 ratio.
5. Switch on the Nokia Image Viewer by pressing and holding the power on/off/rotate button for 3 seconds.
6. Switch on the TV and select the right AV channel. The Nokia logo appears on your TV screen.
7. Make sure that your compatible phone is switched on. Then, enter your phone’s Bluetooth menu and activate the Bluetooth connection.
8. Enter the submenu where you can set the phone to search for compatible Bluetooth devices, and start the search. The phone searches for all Bluetooth devices within up to 10 meters and shows them in a list.
9. Select SU-2 from the list.
10.Key in the four digit verification code ("pair") to your phone. The code is shown on your TV screen in the top right corner.
Once you have keyed in the verification code, your phone sends it to the Nokia Image Viewer. See Using the Nokia Image Viewer with several paired phones on page 10.
The blue indicator light shows that the Bluetooth connection is active. The Nokia Image Viewer appears in the phone menu where you can view the Bluetooth devices that are currently paired with your phone.
11.Transfer images from the phone to the Nokia Image Viewer.
12.When you want to stop using the Nokia Image Viewer, press and hold the power on/off/rotate button for 3 seconds.
SU2_en3_1st_tab.fm Page 8 Wednesday, March 17, 2004 6:51 PM
U s i n g t h e N o k i a I m a g e V i e w e r
9
Engl
ish
2. Using the Nokia Image Viewer
■ Nokia Image Viewer memory and picture formatsThe Nokia Image Viewer supports the most common variations of the JPEG format. The image size can be up to 640 x 480 pixels. The Nokia Image Viewer can show up to 65 pictures or a total of 3 MB of images. You can display one image at a time or a set of images as a slide show. Sending more than one image to the Nokia Image Viewer automatically starts a slide show. The default display time for each image in slide show mode is 8 seconds. Sending new image(s) replaces all images in the Nokia Image Viewer’s memory. Switching off the Nokia Image Viewer erases all images from its memory.
■ Transferring images to the Nokia Image ViewerWhen the Power/Bluetooth indicator light is on, you can transfer images to the Nokia Image Viewer.
• If the indicator light is not blinking, the Nokia Image Viewer is in discoverable mode:
The Nokia Image Viewer is visible to other Bluetooth devices that are using inquiry scan. The Nokia Image Viewer can also be connected to new compatible Bluetooth devices.
• If the indicator light is blinking, the Nokia Image Viewer is in transfer mode:
The Nokia Image Viewer is in transfer mode when it is receiving images over a Bluetooth connection. When the images have been received, the Nokia Image Viewer returns to discoverable mode. You can send multiple images during one transfer session. Note that only one transfer session can be active at a time.
If the connection between the phone and the Nokia Image Viewer fails during transfer, the connection failure icon appears on the TV screen. Resend the image.
SU2_en3_1st_tab.fm Page 9 Wednesday, March 17, 2004 6:51 PM
U s i n g t h e N o k i a I m a g e V i e w e r
10
■ Viewing images with the Nokia Image ViewerYou can view images one by one or in slide show mode. If you send more than one picture to the Nokia Image Viewer at a time, the pictures are automatically displayed as a slide show. To transfer multiple pictures at a time, you have to first select the pictures in your phone, and then send them using a Bluetooth connection. For instructions on how to select multiple pictures for transfer, see the user guide of your phone.
• To rotate an image 90 degrees clockwise, press the power on/off/rotate button briefly (less than 3 s.). Each keypress rotates the picture one step.
• To pause or continue a slide show, press the pause/continue/time change button briefly (less than 3 s.)
• To switch the length of the time display times between 8 and 4 s., press and hold the pause/continue/time change button for 3 seconds.
■ Using the Nokia Image Viewer with several paired phones
The Nokia Image Viewer can be paired with up to 10 phones, but it can be connected to only one phone at a time.
If the Nokia Image Viewer is switched on within up to 10 metres of several paired phones, it tries to connect to the phone that was first paired with the Nokia Image Viewer. If the Nokia Image Viewer cannot connect to the first paired phone (for example, it is switched off or its user rejects the connection), the Nokia Image Viewer tries to connect to the phone that was last used with the Nokia Image Viewer. If the Nokia Image Viewer cannot connect to either of the two phones, it can be discovered by other phones. This is shown by the blue indicator light.
If you want to use the Nokia Image Viewer with a paired phone that is not the first paired or the last used one, make the connection in your phone’s Bluetooth menu.
SU2_en3_1st_tab.fm Page 10 Wednesday, March 17, 2004 6:51 PM
C a r e a n d m a i n t e n a n c e
11
Engl
ish
Care and maintenanceTreat your Nokia Image Viewer with care. The suggestions below will help you to enjoy this product for many years.
• Keep all enhancements out of the reach of small children.
• Use the Nokia Image Viewer indoors only.
• Do not attempt to open the Nokia Image Viewer. Non-expert handling may damage it.
• Do not drop, knock or shake the Nokia Image Viewer. Rough handling can break internal circuit boards.
• Do not use harsh chemicals, cleaning solvents, or strong detergents to clean the Nokia Image Viewer.
If the Nokia Image Viewer is not working properly, take it to your nearest qualified service facility.
SU2_en3_1st_tab.fm Page 11 Wednesday, March 17, 2004 6:51 PM

12
SU2_en3_1st_tab.fm Page 12 Wednesday, March 17, 2004 6:51 PM


