38
User Guide DU-01057-001_v03 February 2004

User Guide
DU-01057-001_v03 February 2004

DA-01057-001_v03 i 02/18/04
Table of Contents
Chapter 1 About FX Composer ...........................................................................................1
1.1. System Requirements ............................................................................................ 3 1.2. References and Recommended Reading .................................................................. 3
Chapter 2 Using FX Composer ............................................................................................4
2.1. Panels .................................................................................................................. 4 2.2. Materials Panel ...................................................................................................... 7 2.3. Textures Panel ...................................................................................................... 8 2.4. Text Edit Panel ...................................................................................................... 8 2.5. Properties Panel .................................................................................................... 9 2.6. Scene Panel ........................................................................................................ 11 2.7. Scene Graph Panel............................................................................................... 14
Chapter 3 FX Composer Scene Commands.......................................................................15
3.1. Current Scene Commands .................................................................................... 15 3.2. Default Commands .............................................................................................. 18 3.3. Scene Command Examples................................................................................... 18
3.3.1. Blur Persistence of Vision .............................................................................. 18 3.3.2. TV Effect ..................................................................................................... 20
Chapter 4 Miscellaneous Hints and Tidbits… ...................................................................21
4.1. FX Composer Project Files .................................................................................... 21 4.2. Configuration Files ............................................................................................... 22 4.3. Mesh Sections ..................................................................................................... 23

DA-01057-001_v03 ii 03/01/04
Tutorial #1 Measuring and Managing Shader Performance with FX Composer ...............24
Sources of Performance Information ................................................................................ 24 Try It Yourself: The PerfTutor.fx Shader .......................................................................... 25
Looking at the Shader Perf Panel.................................................................................. 26 GPU Efficiency ............................................................................................................ 27 Shader Passes ............................................................................................................ 28 Tweaking the Code ..................................................................................................... 28 Frames per Second ..................................................................................................... 29
Moving Forward ............................................................................................................. 29 Tutorial #2 Optimizing a Bump Mapping Shader ...............................................................30
Shader Optimization ....................................................................................................... 30 FX Composer Shader Performance Tools....................................................................... 32
Optimizing Your Shader One Step at a Time .................................................................... 32 Index..................................................................................................................1
DA-01057-001_v03 iii 03/01/04
List of Figures
Figure 1-1. FX Composer Main Window ............................................................................. 2 Figure 2-1. Application Toolbar......................................................................................... 6 Figure 2-2. Interconnection of Panels................................................................................ 9 Figure 2-3. Color Selection Tear-off Panel........................................................................ 10 Figure 3-1. Applying a Material to a Scene....................................................................... 16 Figure 3-2. Blur Persistance of Vision .............................................................................. 19 Figure 3-3. Setviewpoint TV Effect .................................................................................. 20
List of Tables
Table 2-1. Window Panel Tool Icons ................................................................................ 5 Table 2-2. Description of Application Toolbar Icons ........................................................... 6 Table 3-1. Current Scene Commands ............................................................................. 17
List of Examples
Example 1. perftutor.fx .................................................................................................. 26
DA-01057-001_v03 1 03/01/04
Chapter 1. About FX Composer
FX Composer empowers developers to create high performance shaders in an integrated development environment with real-time preview and optimization features available only from NVIDIA. FX Composer was designed with the goal of making shader development and optimization easier for programmers while providing an intuitive user interface for artists customizing shaders in a particular scene
FX Composer supports all the standard features you would expect in an integrated development environment for high performance shaders:
Sophisticated text editing with Intellisense and syntax highlighting Work directly with HLSL .FX files, creating multiple techniques & passes. Use
the .FX files you create with FX Composer directly in your application Convenient, artist-friendly graphical editing of shader properties and some
attributes Supports Microsoft DirectX 9.0 standard HLSL semantics & annotations Provides a plug-in architecture supporting import of custom scene data so you
can view your shaders on your own models with lighting, animation, etc.
FX Composer also provides developers with visual debugging and advanced performance tuning features previously unavailable:
Visible preview of intermediate (generated) textures Capture of pre-calculated functions to texture look-up table Interactive compiler shows where the problems are – jump directly to problems
in your HLSL source code Simulated performance results for the entire family of NVIDIA GeForce FX
GPUs Empirical performance metrics such as GPU instruction count,
efficiency/utilization and frames per second (FPS)
Getting Started with FX Composer
DA-01057-001_v03 2 03/01/04
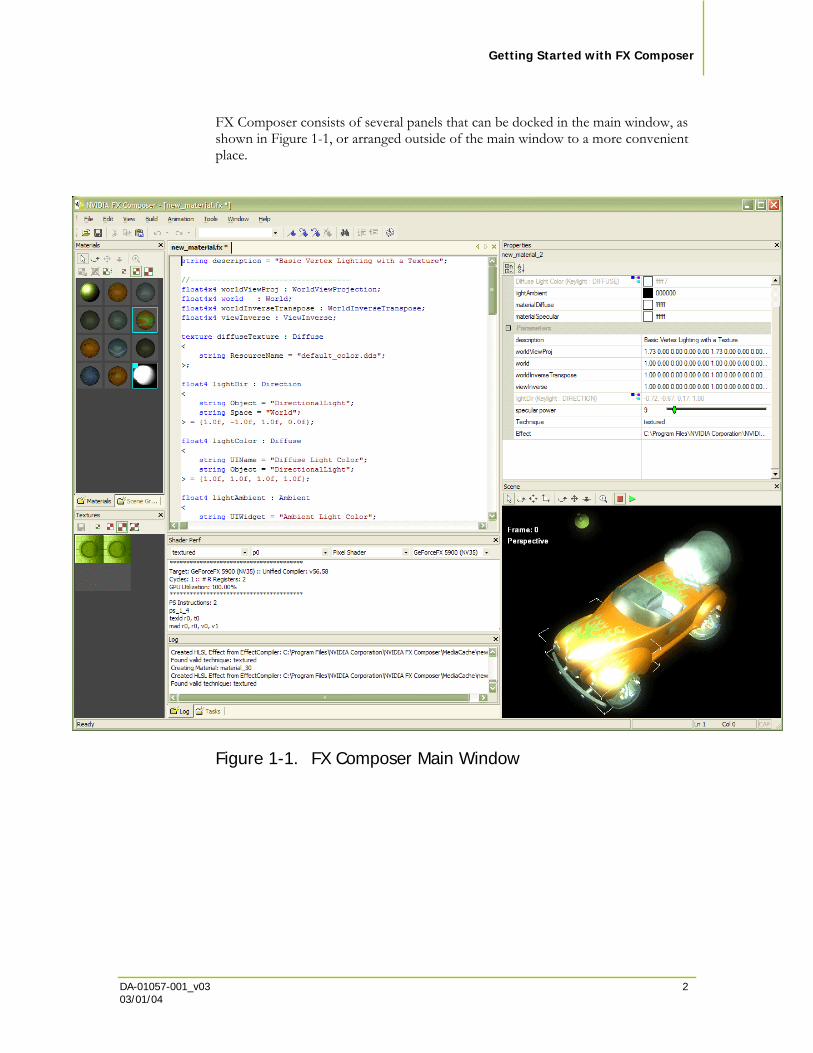
FX Composer consists of several panels that can be docked in the main window, as shown in Figure 1-1, or arranged outside of the main window to a more convenient place.
Figure 1-1. FX Composer Main Window

Getting Started with FX Composer
DA-01057-001_v03 3 03/01/04
1.1. System Requirements NVIDIA GeForce 3 or later
An NVIDIA GeForce FX or more recent GPU is recommended Microsoft DirectX 9.0 SDK Summer 2003 Update or later Windows 2000 or XP
1.2. References and Recommended Reading
Microsoft DirectX web site http://www.microsoft.com/windows/directx/default.aspx
NVIDIA Developer Relations web site http://www.developer.nvidia.com/page/home
GPU Gems: Programming Techniques, Tips, and Tricks for Real-Time Graphics http://developer.nvidia.com/object/gpu_gems_home.html
DA-01057-001_v03 4 03/01/04
Chapter 2. Using FX Composer
FX Composer allows the user to configure their development environment in several ways. The Text Editor panel is always displayed in the main window. Each optional element of the UI is displayed in a separate panel that can be moved, hidden, resized, docked to the main window, or free floating any where on the desktop. FX Composer supports systems with multiple displays, allowing free floating panels to be used on a second monitor and can be configured to display any combination of the following panels:
Log panel Error panel Properties panel Materials panel Textures panel Shader Perf panel Scene panel Scene Graph panel
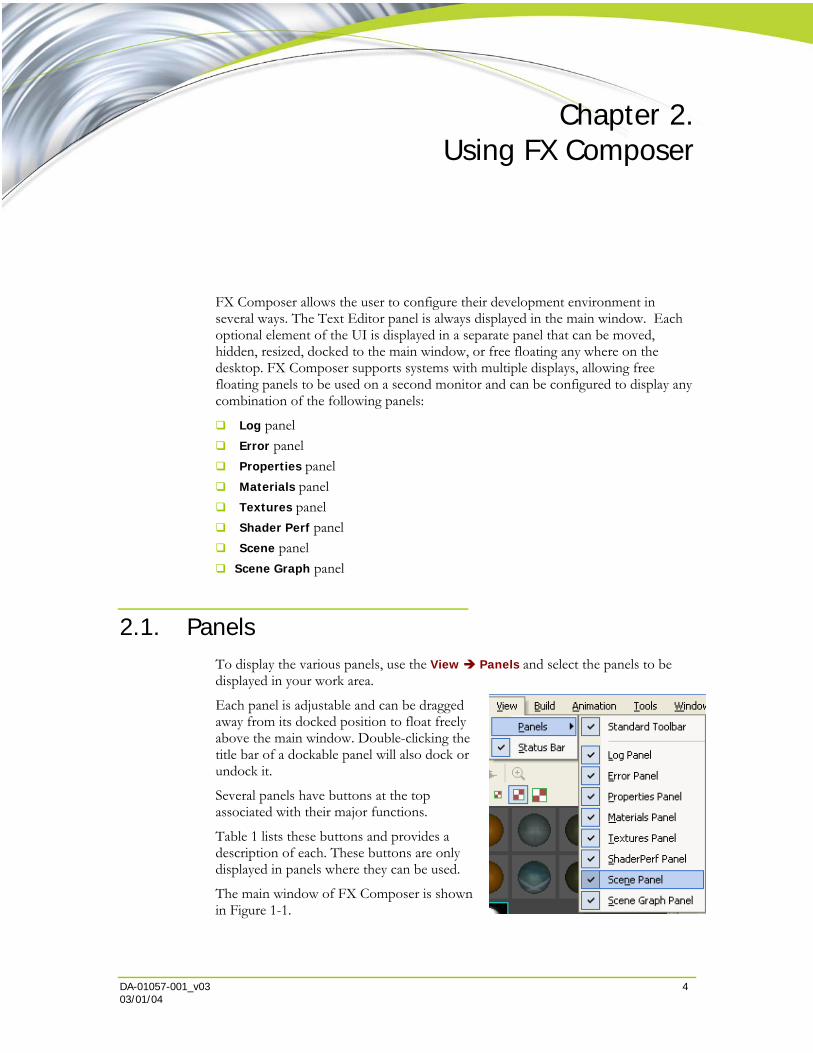
2.1. Panels To display the various panels, use the View Panels and select the panels to be displayed in your work area.
Each panel is adjustable and can be dragged away from its docked position to float freely above the main window. Double-clicking the title bar of a dockable panel will also dock or undock it.
Several panels have buttons at the top associated with their major functions.
Table 1 lists these buttons and provides a description of each. These buttons are only displayed in panels where they can be used.
The main window of FX Composer is shown in Figure 1-1.

Using FX Composer
DA-01057-001_v03 5 03/01/04
Table 2-1. Window Panel Tool Icons
Where applicable, a toolbar is located at the top of each window panel. The toolbar contains only those icons that are relevant to the panel operation.
Tool Icon Description
Select Object: Selects an object in the window.
Rotate Scene: Rotates a scene in the window.
Pan Scene: Pans over the scene in the window.
Dolly Scene: Resizes an object from the center.
Zoom Extents: Zooms in on an object/scene.
Apply Material: Applies the selected material to the currently mesh selection.
Delete Material: Removes this material and close the corresponding .fx file.
New Material: Creates new materials and corresponding .fx file.
Object size display Small: Changes object size to a small representation. Medium: Changes object size to a medium representation (selected). Large: Changes object size to a large representation.
Actual Size: Changes object representation to reflect its actual size.
Save: Saves current selection
Rotate Scene: Rotates all objects in the window in the direction you drag. (CTRL + L-mouse)
Pan Scene: Moves the camera up/down or left/right. (SHIFT + L-mouse)
Zoom Scene: Moves the camera closer or further away. (CTRL + SHIFT + L-mouse)
Categorize: Shows panel contents organized by category.
Alphabetize: Shows panel contents organized alphabetically.
Stop/Start Animation: Controls playback of scene animation. (CTRL+G=Start, CTRL+H=Stop)

Using FX Composer
DA-01057-001_v03 6 03/01/04
Table 2 lists the icons and their function and 2-1 shows the toolbar.
Figure 2-1. Application Toolbar
Table 2-2. Description of Application Toolbar Icons
Tool Icon Description
Open File: Opens the browser to find a file. (CTRL+O)
Save: Saves a file. (CTRL+S)
Cut: Deleted or cut code from the .fx file. (Shift+Delete)
Copy: Copies highlighted text. (CTRL+C)
Paste: Pastes the last copied text. (CTRL+V)
Undo: Undoes the last action. (ALT+Backspace)
Redo Redoes the last action. (CTRL+Y)
Bookmarks: Flags lines of code and skip quickly between them.
Toggle (apply/delete) Bookmark. (CTRL+F2)
Go to Next Bookmark. (F2)
Go to Previous Bookmark. (Shift+F2)
Clear ALL Bookmarks
Find: Finds specific words in a file. (CTRL+F)
Indent/Un-indent: Indents and un-indents lines of code.
Compile .fx: Compiles the code displayed in the Text Editor panel. Note that the compiler stops at each instance of an error in the code and does not continue until the error is corrected. Click the Compile key again to continue compiling. (CTRL+F7)

Using FX Composer
DA-01057-001_v03 7 03/01/04
2.2. Materials Panel The Materials panel is a collection of 3D viewports displaying a real-time preview of each material currently loaded, applied to a simple shape. This allows you to visualize a material and see it applied in 3D.
To open materials, use the File Load Material… and select the material to load. See Table 1-1 on page 5 for a description of the toolbar icons.
Use the Apply button to apply the selected material to an object in a scene. Select the desired material, select an object in the scene and click the Apply icon. You can also Right-click on a material to access a list of actions and select Apply To Selection.
Use the Rotate button to spin the materials around and see the different effects.
You can also Right-click within the panel to access Materials panel display options in a context menu. The menu allows you to apply a material to the current selection in the Scene panel, create new materials, open or close existing materials, select the geometric primitive to which the materials should be applied, and set the display dimensions and rendermode.
Note that the Materials panel renders all the previews it displays in real-time, and therefore incurs a performance cost. You can reduce the performance impact by closing the Materials panel.

Using FX Composer
DA-01057-001_v03 8 03/01/04
2.3. Textures Panel The Textures panel displays the current textures for the selected material as well as any procedurally-generated textures and render targets. The Texture panel also enables visualization of cubemaps and normal maps, since it's really just the same window as the materials panel, and it is displaying the textures in an FX file.
The icons in the toolbar are described in Table 1-1 on page 5. You can also Right-click anywhere in the Texture panel to access a context menu with options to set the display dimensions and save the currently selected texture.
2.4. Text Edit Panel The Text Edit panel contains the FX file code and is enabled with syntax highlighting (keywords in colors). It acts like the editor in Microsoft Visual Studio. All Material files opened are listed as tabs across the top of the panel to allow you to switch between files easily. Use the scrollbars and bookmarks to move through the file.
The Text Editor panel uses syntax highlighting to automatically color HLSL keywords and comments. It also provides convenient intellisense completion, allowing you to select from a list of supported keywords appropriate in the current context. For example, you can type fillmode= and select from a list of options that are displayed.
Using FX Composer
DA-01057-001_v03 9 03/01/04
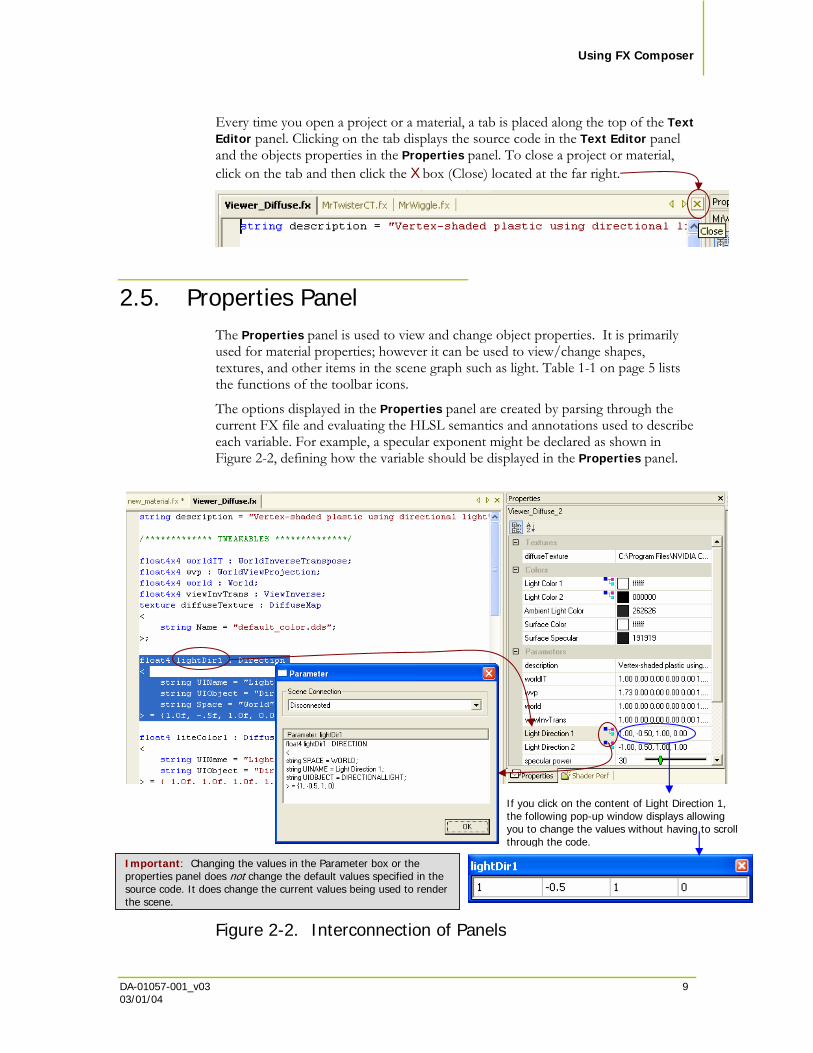
Every time you open a project or a material, a tab is placed along the top of the Text Editor panel. Clicking on the tab displays the source code in the Text Editor panel and the objects properties in the Properties panel. To close a project or material, click on the tab and then click the X box (Close) located at the far right.
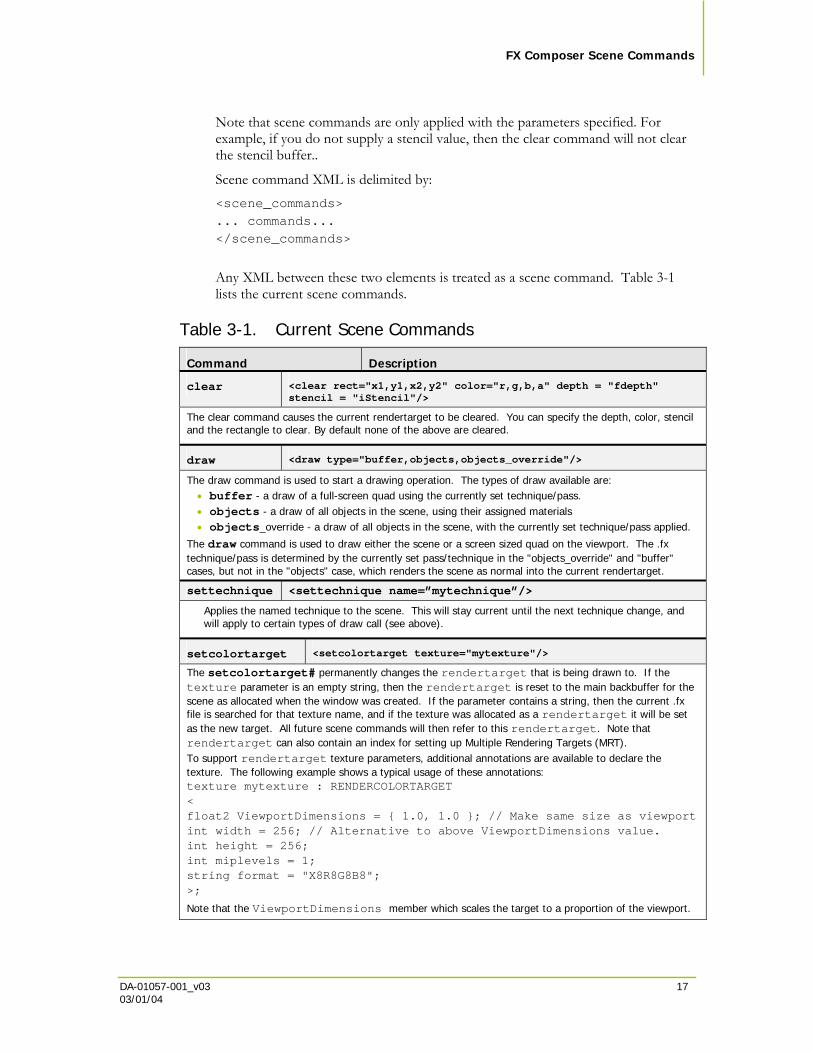
2.5. Properties Panel The Properties panel is used to view and change object properties. It is primarily used for material properties; however it can be used to view/change shapes, textures, and other items in the scene graph such as light. Table 1-1 on page 5 lists the functions of the toolbar icons.
The options displayed in the Properties panel are created by parsing through the current FX file and evaluating the HLSL semantics and annotations used to describe each variable. For example, a specular exponent might be declared as shown in Figure 2-2, defining how the variable should be displayed in the Properties panel.
Figure 2-2. Interconnection of Panels
Important: Changing the values in the Parameter box or the properties panel does not change the default values specified in the source code. It does change the current values being used to render the scene.
If you click on the content of Light Direction 1, the following pop-up window displays allowing you to change the values without having to scroll through the code.

Using FX Composer
DA-01057-001_v03 10 03/01/04
Vectors and matrices also get special treatment in the Properties panel. When defined with the proper semantics and annotations as shown in Figure 2-2, a matrix editor tear-off panel provides users with a convenient way to experiment with different values. Note that clicking on the scene graph icon next to Light Direction 1 causes FX Composer to display the assembly language calculations performed for this light in a pop-up window.
FX Composer supports special color selection tear-off panels for editing color information (Figure 2-3). Semantics and annotations can be used to tell FX Composer that a variable is used to store color information and provide a descriptive name for the Properties panel.
Figure 2-3. Color Selection Tear-off Panel
Click on the attribute to change the color. Click Other to display the Standard and Custom color palettes.

Using FX Composer
DA-01057-001_v03 11 03/01/04
2.6. Scene Panel The Scene panel displays the current scene and has the usual controls for manipulating scenes. FX Composer includes GeoPipe plug-ins that support importing scenes stored in .nvb and .x files, both of which can contain skinning information. Use the File Import Scene… command to load a scene.
Select an object in the scene and apply a different material to it to change its appearance. Note that the light source remains the same; only the material of the surface changes.
Select a material and click Apply. The material is applied to the selected object in the Scene panel.

Using FX Composer
DA-01057-001_v03 12 03/01/04
Use the tool icons in the Scene panel to manipulate objects and scenes.
Zoom Extents Dolly Scene Pan Scene Rotate Scene Scale Object Move Object Rotate Object Select Object
Use the animation controls in the toolbar to run the frames and see the animation associated with your scene. Note that the frame displayed is shown in the upper left corner of the window.
Rotated Scene
To move frame-by-frame, use Animation in the application toolbar or F10 fpr Next frame and F9 for Previous Frame.

Using FX Composer
DA-01057-001_v03 13 03/01/04
Dolly Scene Pan Scene
Move an Object Scale an Object
Note that turning on Tools Options Draw will always cause FPS to be displayed in the upper left.

Using FX Composer
DA-01057-001_v03 14 03/01/04
2.7. Scene Graph Panel The Scene Graph panel is used to browse through the current scene transform hierarchy and select objects. You can use it to select items that wouldn't easily be available in the UI, such as individual bone transforms, etc. It is also useful to see how a scene is built.
To use this window, you can, for example, select GeoPipe : Spot01 and then Right-Click to display the GeoPipe properties in the Properties panel (if not already displayed).

DA-01057-001_v03 15 03/01/04
Chapter 3. FX Composer Scene Commands
Scene commands are a way to extend the behavior of FX Composer to cover interactions between objects, and events that happen before/during/after the scene is rendered. A simple example might be clearing the background to a color before drawing the scene. A more complex example might render the screen to a render target texture, and then run an edge detection algorithm on it before displaying the final result.
3.1. Current Scene Commands Scene commands are a new feature, designed to enable control over the whole scene, and not just the current effect. With scene commands it’s possible to control selection of render targets, and apply full screen effects.
To create a scene command material, declare a regular .fx file and add the XML commands to the file, either in a comment field or in an #if 0 field (so that the parser doesn't complain when it sees them). Following is an example for the simple case of filling the backbuffer with a texture image before rendering the scene: /* <scene_commands> <clear color=".23,.23,.23" depth="1.0"/> <settechnique name="TextureClear"/> <draw type="buffer"/> <draw type="objects"/> </scene_commands> */ .... rest of .fx file....

FX Composer Scene Commands
DA-01057-001_v03 16 03/01/04
To enable a scene command material, right-click the material in the panel and select Apply to scene. The blue outline shows that it is the active scene command (you can only have one per scene). Another right-click menu lets you look at the commands in a dialog (Show scene command):
Figure 3-1 shows how the material looks in the Materials panel and on the scene:
Figure 3-1. Applying a Material to a Scene
Notice that the material has a blue square at the top left, indicating that it is a scene command material. The scene shows the toothadil model, being rendered following the scene commands above.
FX Composer Scene Commands
DA-01057-001_v03 17 03/01/04
Note that scene commands are only applied with the parameters specified. For example, if you do not supply a stencil value, then the clear command will not clear the stencil buffer..
Scene command XML is delimited by: <scene_commands> ... commands... </scene_commands>
Any XML between these two elements is treated as a scene command. Table 3-1 lists the current scene commands.
Table 3-1. Current Scene Commands
Command Description
clear <clear rect="x1,y1,x2,y2" color="r,g,b,a" depth = "fdepth" stencil = "iStencil"/>
The clear command causes the current rendertarget to be cleared. You can specify the depth, color, stencil and the rectangle to clear. By default none of the above are cleared.
draw <draw type="buffer,objects,objects_override"/>
The draw command is used to start a drawing operation. The types of draw available are: • buffer - a draw of a full-screen quad using the currently set technique/pass. • objects - a draw of all objects in the scene, using their assigned materials • objects_override - a draw of all objects in the scene, with the currently set technique/pass applied.
The draw command is used to draw either the scene or a screen sized quad on the viewport. The .fx technique/pass is determined by the currently set pass/technique in the "objects_override" and "buffer" cases, but not in the "objects" case, which renders the scene as normal into the current rendertarget.
settechnique <settechnique name=”mytechnique”/>
Applies the named technique to the scene. This will stay current until the next technique change, and will apply to certain types of draw call (see above).
setcolortarget <setcolortarget texture="mytexture"/>
The setcolortarget# permanently changes the rendertarget that is being drawn to. If the texture parameter is an empty string, then the rendertarget is reset to the main backbuffer for the scene as allocated when the window was created. If the parameter contains a string, then the current .fx file is searched for that texture name, and if the texture was allocated as a rendertarget it will be set as the new target. All future scene commands will then refer to this rendertarget. Note that rendertarget can also contain an index for setting up Multiple Rendering Targets (MRT). To support rendertarget texture parameters, additional annotations are available to declare the texture. The following example shows a typical usage of these annotations: texture mytexture : RENDERCOLORTARGET < float2 ViewportDimensions = { 1.0, 1.0 }; // Make same size as viewport int width = 256; // Alternative to above ViewportDimensions value. int height = 256; int miplevels = 1; string format = "X8R8G8B8"; >;
Note that the ViewportDimensions member which scales the target to a proportion of the viewport.

FX Composer Scene Commands
DA-01057-001_v03 18 03/01/04
Command Description
setdepthstenciltarget <setdepthstenciltarget texture="mytexture"/>
The setdepthstenciltarget permanently changes the depth buffer that is being drawn to. If the texture parameter is an empty string, then the depth is reset to the main z buffer for the scene as allocated when the window was created. If the parameter contains a string, then the current .fx file is searched for that texture name, and if the texture was allocated as a renderdepthstencil target it will be set as the new target. All future scene commands will then refer to this z buffer. To support z buffer texture parameters, additional annotations are available to declare the texture. The following example shows a typical usage of these annotations: texture mytexture : RENDERDEPTHSTENCILTARGET < float2 ViewportDimensions = { 1.0, 1.0 }; // Make same size as viewport int width = 256; // Alternative to above ViewportDimensions value. int height = 256; string format = "D24S8"; >; Note that the ViewportDimensions member which scales the target to a proportion of the viewport
3.2. Default Commands FX Composer actually uses a scene command .fx for the default rendering window. This can be found in data\defaultscene.fx, underneath the main FX Composer .exe. The effect simply clears the backbuffer to a dark grey, and the z buffer to 1, then draws all the objects in the scene. Because this .fx can be changed, it is possible to permanently change FX composer's rendering loop at startup. However, it should be changed with care!
3.3. Scene Command Examples
3.3.1. Blur Persistence of Vision <scene_commands> <setcolortarget texture="SceneMap"/> <setdepthstenciltarget texture="DepthMap"/> <clear color="0,0,0" depth="1.0"/> <draw type="objects"/> <setcolortarget texture="HBlurMap"/> <settechnique name="GlowH"/> <draw type="buffer"/> <setcolortarget texture="FinalBlurMap"/> <settechnique name="GlowV"/> <draw type="buffer"/> <setcolortarget texture="CompositeMap"/> <settechnique name="FinalComp"/>

FX Composer Scene Commands
DA-01057-001_v03 19 03/01/04
<draw type="buffer"/> <setcolortarget texture="BlendMap"/> <settechnique name="Plop"/> <draw type="buffer"/> <setcolortarget/> <settechnique name="Last"/> <draw type="buffer"/> </scene_commands>
See Figure 3-2 for the representation of blur persistence of vision.
Figure 3-2. Blur Persistance of Vision
FX Composer Scene Commands
DA-01057-001_v03 20 03/01/04
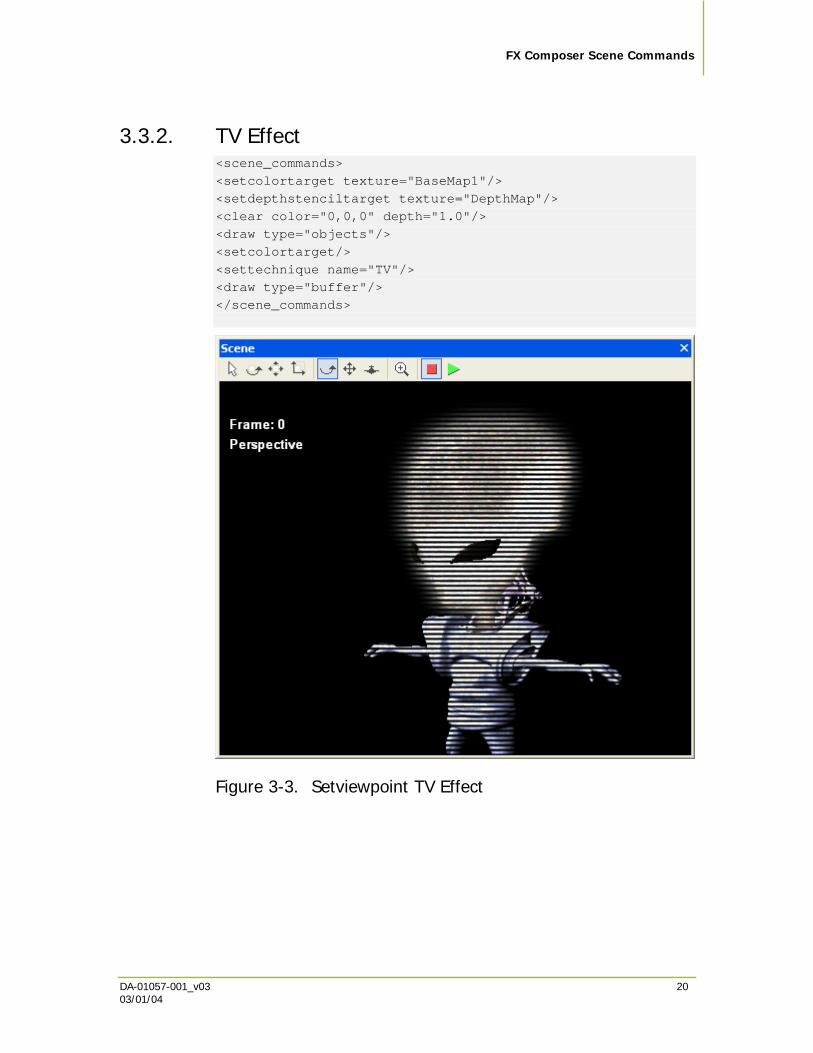
3.3.2. TV Effect <scene_commands> <setcolortarget texture="BaseMap1"/> <setdepthstenciltarget texture="DepthMap"/> <clear color="0,0,0" depth="1.0"/> <draw type="objects"/> <setcolortarget/> <settechnique name="TV"/> <draw type="buffer"/> </scene_commands>
Figure 3-3. Setviewpoint TV Effect
DA-01057-001_v03 21 03/01/04
Chapter 4. Miscellaneous Hints and Tidbits…
4.1. FX Composer Project Files The .fxcomposer project files are actually .zip archives that contain the following components:
An XML scene/material description (SceneGraph.xml) A binary component for mesh/animation data (Binary.bin) .fx files and textures.
The project file tries to be the best of both worlds: an easy to parse, human-readable XML file format, with a binary chunk for data that doesn't store well as text (the XML refers to this data via an offset).
As far as the XML content is concerned:
The first line or so contains the file version and the build version of FX Composer that created it
Then come the project-specific search paths Then the scene graph, with materials, hierarchy, parameter data, etc. Then a list of FX Composer objects/plugins required to successfully display this project.
Last in the file come the original paths of the media objects in the .fxcomposer compressed zip, so FX Composer knows where they were originally stored.
In the future, you will have the option to add the media to the project or not, as well as other project management options, but for now all the media is included in the package by default. This means that you can ship a finished scene to anyone by just sending the .fxcomposer project, and because it's compressed you get quite a saving over regular mesh files.
You can open and explore .fxcomposer projects simply by renaming to .zip.
Note: While we may add features to the file format, FX Composer will always load previous versions.

Miscellaneous Hints and Tidbits
DA-01057-001_v03 22 03/01/04
Full paths to all media and .fx files are always stored in the .fxcomposer project file. When you open a project, the current behavior is that FX Composer will look for your original drive copies, and if they aren't found, it will load the archived version into a 'MediaCache' directory underneath the main binary. Note that part of the search algorithm involves striping the file path and searching the FX Composer global and project-specific directories, set using the File Settings… dialog.
4.2. Configuration Files The FX Composer/data directory has a few useful configuration files that can be changed. All files are XML, and should be backed up before you tweak!
fxcomposer_config.xml Contains the list of standard materials offered when you click the 'new material' button. You can add your own standard materials along with text descriptions here, useful to give your artists a game-specific list of effects to use.
fxedit.xml Contains rules for syntax highlighting. You can change the keywords that get highlighted and the colors used to highlight them.
fxmapping.xml Lists the standard set of semantics and annotations supported by FX Composer. The <semantic name="foo"> field represents FX Composer's standard internal names for these values. Optional <mapping name="foo"> fields enable you to remap your semantic/annotation names to those used by FX Composer.
defaultscene.fx This is FX Composer's default scene command list. It is a very simple instruction list which simply clears the background to grey and draws all the elements in the scene. You can change the contents of this file and recompile it, just like other scene command materials; the advantage being that you will permanently change the default rendering method of FX Composer. Use with care!
plugins.inf Lists the plugins FX Composer should load, including ShaderPerf and geometry import plugins for .NVB and .x files. A future FX Composer SDK will allow developers to create their own plugins.

Miscellaneous Hints and Tidbits
DA-01057-001_v03 23 03/01/04
4.3. Mesh Sections Both .nvb and .x have mesh sections. But .x has the concept of polygon attributes which mean that within a mesh section you can have different material properties. .Eeach mesh section in a .nvb file has its own material.
It's up to the FX Composer importer as to how it gets this data in. Internally FX Composer has mesh sections, and per-polygon materials. But the UI currently only exposes the mesh sections in the scene window (you can also modify all materials in the Materials panel).
An FX Composer material refers to a .fx file, and a list of parameters for that .fx file. More than one material can refer to the same .fx file with different parameters for each material.
In the future, FX Composer will get better at manipulating these things.
DA-01057-001_v03 24 03/01/04
Tutorial #1 Measuring and Managing
Shader Performance with FX Composer
FX Composer does more than provide you with a way to view, edit, and test shaders on models and scenes. By using FX Composer’s performance tools and Shader Perf Panel display, you can assess and modify the efficiency and performance of your shaders—not just in general terms, but even for running on various different specific GPUs.
In this brief tutorial, we’ll look at a sample shader file and make some changes to see how they affect the performance of that shader. You will find the accompanying sample code in \MEDIA\fxcomposer\tutorials\perf_tutor.fxcomposer project.
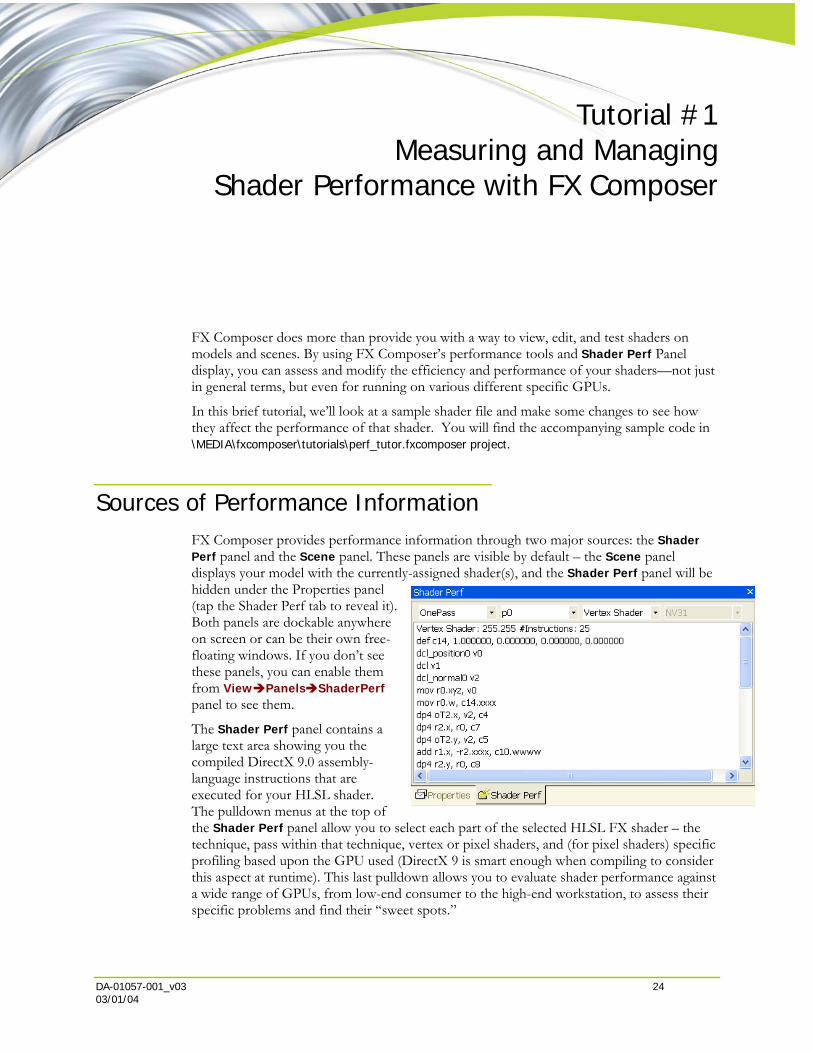
Sources of Performance Information FX Composer provides performance information through two major sources: the Shader Perf panel and the Scene panel. These panels are visible by default – the Scene panel displays your model with the currently-assigned shader(s), and the Shader Perf panel will be hidden under the Properties panel (tap the Shader Perf tab to reveal it). Both panels are dockable anywhere on screen or can be their own free-floating windows. If you don’t see these panels, you can enable them from View Panels ShaderPerf panel to see them.
The Shader Perf panel contains a large text area showing you the compiled DirectX 9.0 assembly-language instructions that are executed for your HLSL shader. The pulldown menus at the top of the Shader Perf panel allow you to select each part of the selected HLSL FX shader – the technique, pass within that technique, vertex or pixel shaders, and (for pixel shaders) specific profiling based upon the GPU used (DirectX 9 is smart enough when compiling to consider this aspect at runtime). This last pulldown allows you to evaluate shader performance against a wide range of GPUs, from low-end consumer to the high-end workstation, to assess their specific problems and find their “sweet spots.”

Measuring and Managing Shader Performance with FX Composer
DA-01057-001_v03 25 03/01/04
Performance analysis is presented in the main body of the Shader Perf panel, first with an instruction count before the shader begins, and then (for pixel shaders) with a report of its scheduling efficiency at the bottom of the listing.
The Scene panel can give you further assessment of the efficiency of your shader, by displaying a frames-per-second number for the render. This number will be visible for supported GPUs (that is, those with scheduling info available) when Tools Options Draw Always is turned on.
Try It Yourself: The PerfTutor.fx Shader
To try the Performance Tools yourself, use a shader called PerfTutor.fx. The PerfTutor.fx is a very generic shader using per-pixel lighting, two different kinds of lamps, and a variety of options (set by #define flags) that permit you to try different methods to get the same or nearly-the-same results and see the effects on final image and scene performance.
Use the following steps to create the scene in the example shown in Example 1:
1. Start FX Composer.
2. Make sure that the Scene panel is visible and the Shader Perf panel is available.
3. From the File menu, select File Load Project.
4. Open MEDIA/fxcomoser/tutorials/perftutor.fxcomposer.
5. Right-click on the Scene panel and select New Scene From Shape Teapot.
6. Select the teapot geometry in the Scene panel.
7. Select the Perf Tutor material in the Materials panel.
8. Right-click on the material and select Apply to Selection to assign the PerfTutor material to the teapot. Your display should look something like the shown in Example 1.
Measuring and Managing Shader Performance with FX Composer
DA-01057-001_v03 26 03/01/04
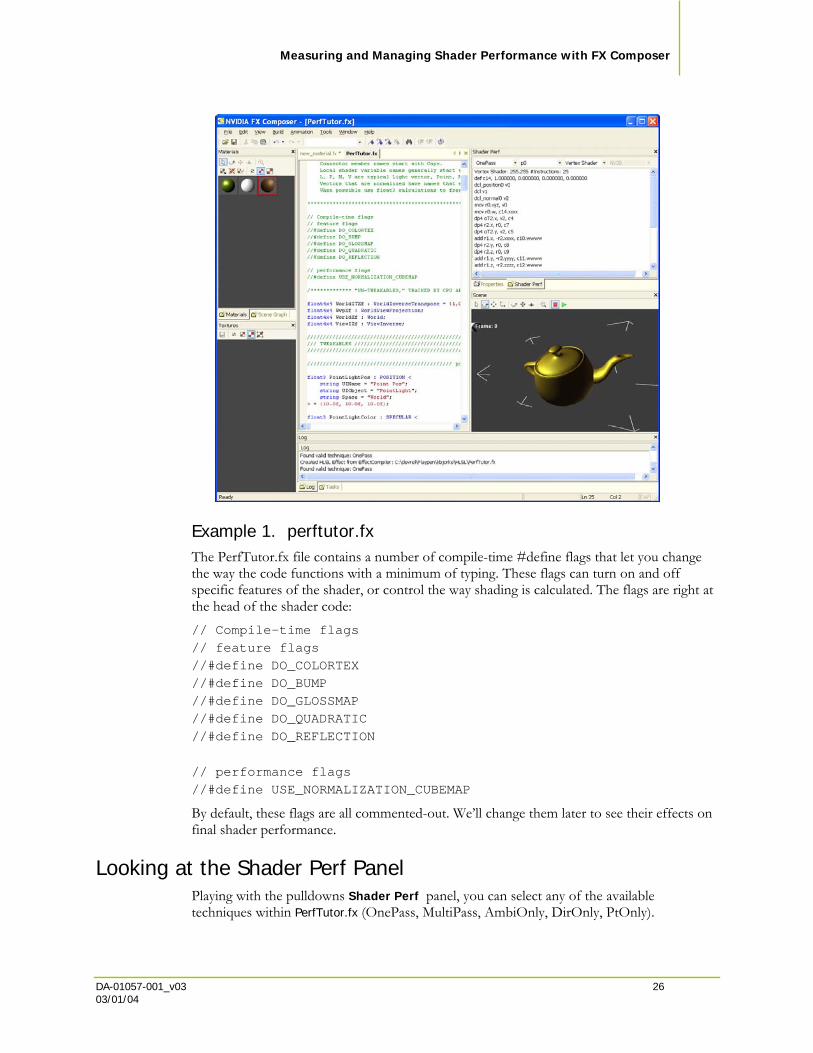
Example 1. perftutor.fx The PerfTutor.fx file contains a number of compile-time #define flags that let you change the way the code functions with a minimum of typing. These flags can turn on and off specific features of the shader, or control the way shading is calculated. The flags are right at the head of the shader code: // Compile-time flags // feature flags //#define DO_COLORTEX //#define DO_BUMP //#define DO_GLOSSMAP //#define DO_QUADRATIC //#define DO_REFLECTION // performance flags //#define USE_NORMALIZATION_CUBEMAP
By default, these flags are all commented-out. We’ll change them later to see their effects on final shader performance.
Looking at the Shader Perf Panel Playing with the pulldowns Shader Perf panel, you can select any of the available techniques within PerfTutor.fx (OnePass, MultiPass, AmbiOnly, DirOnly, PtOnly).

Measuring and Managing Shader Performance with FX Composer
DA-01057-001_v03 27 03/01/04
Select AmbiOnly, the pass p0 (the only pass in this particular technique), Pixel Shader, and NV30.
The display of the shader panel fills with NV30-specific information about this particular (a deliberately very short) pixel shader: Pixel Shader: 255.255 #Instructions: 7 def c2, 1.000000, 0.000000, 0.000000, 0.000000 mov r0.rgb, c1 mul r0.rgb, r0, c0 mov r0.a, c2.r mov oC0, r0 end Scheduling: This shader has a general efficiency rating of 100% Passes: 3 Effective Passes: 0.00 --- # of R register: 2 ---
GPU Efficiency Switching the hardware profile to NV36 changes the lines at the bottom slightly: Scheduling: This shader has a general efficiency rating of 33% There are opportunities to change a MOV instruction (executed on the SHD) to a MUL by 1 instruction for execution on CMB/FPB Passes: 3 Effective Passes: 0.00 --- # of R register: 2 ---
What does this mean? Will the shader run slower on the (usually) faster NV36 GPU?
Fortunately not – what it does mean is that this shader could be tweaked to run even faster on NV36 by adjusting the code to use the NV36’s greater floating point resources. For such a small pixel shader, the code would need careful tweaking. For a larger shader, the compiler is clever enough to adjust things on the fly for maximum performance. Efficiency numbers rate the shader against what the maximum possible throughput of the specific GPU might be (a shader perfectly-fitted to the NV36 could potentially run three times faster than this one).
Measuring and Managing Shader Performance with FX Composer
DA-01057-001_v03 28 03/01/04
Shader Passes Let’s switch to a more complex example. Select “OnePass” and the Pixel Shader. The compiled code for NV30 is now much longer – 48 instructions. At the bottom, we’ll see: Scheduling: This shader has a general efficiency rating of 100% Passes: 68 Effective Passes: 0.00 --- # of R register: 4 --- Switching profiles to the NV36: Scheduling: This shader has a general efficiency rating of 49% There are opportunities to change a MOV instruction (executed on the SHD) to a MUL by 1 instruction for execution on CMB/FPB Passes: 40 Effective Passes: 0.00 --- # of R register: 4 ---
While the efficiency rating of resource usage on the NV36 has dropped, look at the number of passes. On NV30, this shader would require 68 cycles through the shader core to execute – but on NV36, with its improved floating-point performance, only 40 passes are needed. This equates to an automatic improvement of around 30% (even at the same clock speed), over the older NV30 architecture.
Tweaking the Code In this example, we are going to set a compile-time flag and see the results on shader performance.
In the Editing Panel, un-comment the definition of //#define USE_NORMALIZATION_CUBEMAP by removing the leading // marks so the line appears as: #define USE_NORMALIZATION_CUBEMAP
You are able to see the color shift immediately from green to blue and black, showing that FX Composer recognizes these instructions.
Now press Ctrl-S or select File Save to save these changes and press the Build button to recompile the shader (or select Build Compile or press Ctrl-F7). The panel information is updated. You can see a new texture in the Textures panel (if displayed), showing a normalization cube map. When this option is enabled, the cube map is generated by PerfTutor.fx, using the DirectX 9.0 virtual machine (the specific functions are defined in the header file normalization.fxh). PerfTutor.fx is written to replace all calls to normalize() in the pixel shaders with texCUBE() calls when this texture is present.
What effect does this have on our shader performance numbers? We can check in the Shader Perf Panel.
The newly-compiled shader actually has more assembly-language instructions—59 instructions, versus the previous 48—but checking the efficiency and pass counts tell us that instruction counts can be deceptive.

Measuring and Managing Shader Performance with FX Composer
DA-01057-001_v03 29 03/01/04
For NV30, still at 100% efficient use of the GPU, the number of shader passes, the count of clock cycles needed to execute this shader, has declined from 68 to 60, a 13% improvement. So, even though the shader itself is longer, the execution of the shader on NV30 is faster.
The story for NV36 is even stronger. The GPU efficiency rises slightly, and the number of passes drops from 40 to 30—a 33% speed increase for this high-end GPU.
Frames per Second For GPUs that the performance analyzer recognizes an FPS counter can be displayed in the Render panel. To see the counter, turn on the Tools Options Draw Always option, and then either wiggle the model in the render window using the transform tools (e.g., Rotate Scene
) or press the green Run Animation button (you can use Ctrl-G/Ctrl-H to toggle animation on/off).
A few things to remember when using this frame counter:
The frame counter is showing you the speed of FX Composer in this window on this model. It is not showing you the frame rate of your model in your game engine. The frame counter is there as a means for you to evaluate relative performance between shader methods within FX Composer on your computer with your GPU—not as an absolute counter of efficiency and speed. Use the Shader Perf panel numbers to create those estimates and calibrate them against your game engine’s own characteristics.
The technique used in the Scene panel is the one specified in the Properties panel for this shader—not the technique specified in the Shader Perf panel.
While the Shader Perf panel can evaluate many different GPUs, the Scene panel shows you the value for just one—the GPU installed in your system.
When Draw Always is engaged, FX Composer is using the CPU to the maximum. When Draw Always is turned off, FX Composer only draws the scene when something changes. If you’re multitasking (running Microsoft’s Visual Studio or a game engine simultaneously with FX Composer) you may see resource fighting. Turn off Draw Always to get best performance from external applications.
Moving Forward Now you can experiment with setting other PerfTutor options, checking the characteristics of other GPUs, editing the code, and more importantly, applying these same lessons to your own .fx shaders. Have fun!

DA-01057-001_v03 30 03/01/04
Tutorial #2. Optimizing a Bump Mapping Shader
Building on what you learned in Tutorial #1, this tutorial provides some additional techniques you can use in performance tuning your shaders, using a simple tangent-space bump mapping example. You can find the accompanying sample code in the following location: \MEDIA\fxcomposer\perf_bumpplastic.fxcomposer project.
Shader Optimization Optimizing pixel shaders for modern graphics processors is a non-trivial task. In previous generations of hardware there was usually a one-to-one correspondence between pixel shader assembly code and the instructions that got executed by the hardware. One could often assume that each instruction would take a single clock cycle to execute. As GPUs have become more complex, and more like CPUs in many ways, the gap between the assembly language abstraction and the hardware has become larger. Modern GPUs include multiple pixel pipelines, each of which may include multiple math units and texture units. This means that the GPU can potentially execute multiple math and texture instructions in a single cycle. The ordering of instructions can affect the extent to which these execution units are used optionally.
Performance is also affected by register usage. The GPU processes groups of pixels in parallel, but only has a finite amount of register storage. Therefore using more registers means that fewer pixels can be processed at a time, and performance is reduced. NVIDIA GPUs support 16-bit “half” precision floating point numbers, which can help to improve performance by reducing register storage requirements. Data dependencies between instructions can also affect performance. In addition, these performance characteristics can vary widely between different GPUs. Using high level shading languages such as HLSL adds another layer of abstraction which can further obscure performance issues.
Fortunately, technology has come to the rescue. NVIDIA’s Unified Compiler, which is built into the graphics driver, takes high-level pixel and vertex shader assembly code and generates optimized micro-code for the target GPU. The Shader Perf panel in FX Composer simulates the Unified Compiler to allow you to analyze the performance of your shaders and report how they will execute on different GPUs.

Optimizing Tangent-space Bump Mapping Shader
DA-01057-001_v03 31 03/01/04
Despite the automated optimization in the Unified Compiler, there are still a few simple rules that you can follow to ensure that your shaders run as fast as possible on all hardware.
Optimize your algorithms Premature optimization is the root of all evil. Before attempting any of the lower-level optimizations described below, take a high-level look at the shader and see if there is some way you could rearrange the code so that it that requires less work.
Perform calculations only as often as necessary Some calculations can be moved from the pixel shader to the vertex shader, and the results passed to the pixel shader as texture coordinates. A common example is calculating a view vector. This varies linearly, so can be calculated per-vertex and interpolated. Texture coordinate interpolation is not always free, but this is almost always a performance win overall. In a similar way, sometimes calculations can be moved off the hardware completely. For example, multiplying a light color by a material color can be done on the CPU.
Replace complex math functions with texture look-ups Complex expressions such as lighting functions can be encoded into textures, and then accessed using a single texture lookup. This sacrifices some interactivity (the parameters can not be changed without rebuilding the texture), but is almost always faster on current hardware. The FX runtime includes a virtual machine that allows you to write functions in HLSL that can be used to generate textures very easily.
Use half precision where possible Half precision is almost always sufficient for representing colors and unit-length vectors, and requires half the register storage. Vectors representing distances in world coordinates will usually need to use full float precision. Remember that there are an infinite number of real numbers, but half precision floats can only represent 65536 of them!
Use lower pixel shader versions if possible GeForce FX series GPUs include support for the fixed-point type and instructions used in Direct3D Pixel Shader v1.4 and below. If your shader can be expressed in a lower version pixel shader, it may run faster than the equivalent operations in pixel shader v2.0 and FX Composer supports all of these shader profiles
Optimizing Tangent-space Bump Mapping Shader
DA-01057-001_v03 32 03/01/04
FX Composer Shader Performance Tools The Shader Perf panel in FX Composer makes it easy to see how much modifying your shader effects performance. It is based on an architectural simulator of the GeForce FX shader hardware, and can simulate hardware from the GeForce FX 5200 to the FX 5950. It displays four important statistics:
PS Instructions The number of Direct3D pixel shader instructions used
Cycles The number of clocks cycles the optimized shader will take to execute on the selected hardware. Note that this is often lower than the number of instructions, since multiple instructions can be executed per clock cycle.
# R registers This is how many full-precision “R” registers the optimized shader uses. This is affected by how many temporary variables your shader uses, and can have a big effect on performance. Note that two half-precision registers can fit in a single R register, so if you are using half-precision, double this number to get the actual number of registers used.
GPU utilization This is a measure of how well the shader utilizes the GPU’s math and texture functional units. Sometimes rearranging your code or switching to half precision will allow the optimizer to make better use of these units.
Optimizing Your Shader One Step at a Time
Once you have loaded the perf_bumpplastic.fxcomposer project, click on the BumpPlasticPerf.fx material to make it the active material and look in the Properties panel. Each step in optimizing the shader is implemented as a separate “technique”. You can switch between the techniques by selecting them from the Techniques pull-down menu in the properties panel. By clicking on the Shader Perf panel and selecting Pixel shader from the pull down menu, you can compare the performance of the different optimization steps.
The shader implements simple tangent space bump mapping with a color map, using the Blinn/Phong lighting model.
If you read through the BumpPlasticPerf.fx file you will see the section of HLSL code that corresponds to each technique. The vertex shader is the same for each technique; we only modify the pixel shader.
Step 1. The initial version of the shader BumpPlasticPS_0 uses math for the lighting calculation. It calls a function Phong to calculate the Blinn/Phong lighting model given the dot products between the normal vector, light vector and half angle vector. It uses float precision for everything.
Step 2. In this version of the shader, we remove the code to normalize the normal vector “N”. Since the normal is being read from a normal map, we can

Optimizing Tangent-space Bump Mapping Shader
DA-01057-001_v03 33 03/01/04
assume that it will be almost unit length, apart from de-normalization caused by linear texture filtering. If you switch between step 1 and step 2 you might be able to notice a slight change in the appearance of the specular highlights. Note that although this only reduces the number of instructions by one (the NRM instruction), it reduces the number of cycles by 2 because the NRM macro is expanded to several instructions (DP3, RSQ, MUL).
Step 3. In this step we replace the lighting math with a texture lookup. We use the same Phong to build a texture that encodes the lighting function. In the shader we can then replace the function call with a 2D texture lookup based on N.L and N.H.
Step 4. This is identical to step 2, but we have changed all the variables to half precision. This reduces the number of R registers required to 2.
Step 5. In the final step we convert the shader to pixel shader version 1.1. Obviously this will not be possible with all shaders, but for this example it illustrates the performance benefits..
The table below shows the relative performance of each optimization step. Frames per second numbers were measured on a NV35 with a full screen window.
Step FPS Instrs. Cycles #R regs Comment 0 75 23 14 4 Original shader
1 85 22 12 4 Remove normalize (N)
2 103 21 9 4 Replace math with texture lookup
3 143 21 5 2 Change floats to half precision
4 148 10 4 2 Convert to PS1.1
Working through all four optimization steps in this sample shader yields a 2x performance improvement (measured by FPS). The largest benefits come from replacing math with texture lookups and using half precision. By following these same simple rules and making use of the performance tools in FX Composer, you can ensure that your shaders will run as fast possible and provide the best end user experience on all hardware.

NVIDIA Corporation 2701 San Tomas Expressway
Santa Clara, CA 95050 www.nvidia.com
Notice
ALL NVIDIA DESIGN SPECIFICATIONS, REFERENCE BOARDS, FILES, DRAWINGS, DIAGNOSTICS, LISTS, AND OTHER DOCUMENTS (TOGETHER AND SEPARATELY, “MATERIALS”) ARE BEING PROVIDED “AS IS." NVIDIA MAKES NO WARRANTIES, EXPRESSED, IMPLIED, STATUTORY, OR OTHERWISE WITH RESPECT TO THE MATERIALS, AND EXPRESSLY DISCLAIMS ALL IMPLIED WARRANTIES OF NONINFRINGEMENT, MERCHANTABILITY, AND FITNESS FOR A PARTICULAR PURPOSE.
Information furnished is believed to be accurate and reliable. However, NVIDIA Corporation assumes no responsibility for the consequences of use of such information or for any infringement of patents or other rights of third parties that may result from its use. No license is granted by implication or otherwise under any patent or patent rights of NVIDIA Corporation. Specifications mentioned in this publication are subject to change without notice. This publication supersedes and replaces all information previously supplied. NVIDIA Corporation products are not authorized for use as critical components in life support devices or systems without express written approval of NVIDIA Corporation.
Trademarks
NVIDIA and the NVIDIA logo are registered trademarks of NVIDIA Corporation. Other company and product names may be trademarks of the respective companies with which they are associated.
Copyright
© 2004 NVIDIA Corporation. All rights reserved


