91
Oracle® Hospitality Labor Management User Guide Release 9.1 E82051-03 October 2019

Oracle® Hospitality Labor ManagementUser Guide
Release 9.1E82051-03October 2019
Oracle Hospitality Labor Management User Guide, Release 9.1
E82051-03
Copyright © 2000, 2019, Oracle and/or its affiliates. All rights reserved.
This software and related documentation are provided under a license agreement containing restrictions onuse and disclosure and are protected by intellectual property laws. Except as expressly permitted in yourlicense agreement or allowed by law, you may not use, copy, reproduce, translate, broadcast, modify,license, transmit, distribute, exhibit, perform, publish, or display any part, in any form, or by any means.Reverse engineering, disassembly, or decompilation of this software, unless required by law forinteroperability, is prohibited.
The information contained herein is subject to change without notice and is not warranted to be error-free. Ifyou find any errors, please report them to us in writing.
If this is software or related documentation that is delivered to the U.S. Government or anyone licensing it onbehalf of the U.S. Government, then the following notice is applicable:
U.S. GOVERNMENT END USERS: Oracle programs, including any operating system, integrated software,any programs installed on the hardware, and/or documentation, delivered to U.S. Government end users are"commercial computer software" pursuant to the applicable Federal Acquisition Regulation and agency-specific supplemental regulations. As such, use, duplication, disclosure, modification, and adaptation of theprograms, including any operating system, integrated software, any programs installed on the hardware,and/or documentation, shall be subject to license terms and license restrictions applicable to the programs.No other rights are granted to the U.S. Government.
This software or hardware is developed for general use in a variety of information management applications.It is not developed or intended for use in any inherently dangerous applications, including applications thatmay create a risk of personal injury. If you use this software or hardware in dangerous applications, then youshall be responsible to take all appropriate fail-safe, backup, redundancy, and other measures to ensure itssafe use. Oracle Corporation and its affiliates disclaim any liability for any damages caused by use of thissoftware or hardware in dangerous applications.
Oracle and Java are registered trademarks of Oracle and/or its affiliates. Other names may be trademarks oftheir respective owners.
Intel and Intel Xeon are trademarks or registered trademarks of Intel Corporation. All SPARC trademarks areused under license and are trademarks or registered trademarks of SPARC International, Inc. AMD, Opteron,the AMD logo, and the AMD Opteron logo are trademarks or registered trademarks of Advanced MicroDevices. UNIX is a registered trademark of The Open Group.
This software or hardware and documentation may provide access to or information about content, products,and services from third parties. Oracle Corporation and its affiliates are not responsible for and expresslydisclaim all warranties of any kind with respect to third-party content, products, and services unless otherwiseset forth in an applicable agreement between you and Oracle. Oracle Corporation and its affiliates will not beresponsible for any loss, costs, or damages incurred due to your access to or use of third-party content,products, or services, except as set forth in an applicable agreement between you and Oracle.

Contents
Preface
1 Using Labor Management
2 Labor Management Setup
Portlets and Permissions for Labor Management 2-1
Human Resources 2-2
Payroll Preprocessing 2-3
Scheduling - Schedule 2-5
Scheduling - Admin 2-6
Staffing - Profile 2-6
Staffing - Admin 2-7
Staffing - Requirements 2-7
Scheduling - Employee Self Service 2-7
Configuring Locations for Labor Management 2-8
Configuring Password Security 2-9
Configuring Social Security Number Security 2-9
Configuring Magnetic Card Security 2-10
Configuring Payroll Preprocessing Behavior and Overtime Labels 2-10
Choosing the Pay Rate Modifier 2-10
Configuring Reason Codes 2-11
3 Timekeeping
Configuring Timekeeping 3-1
Configuring Timekeeping Privileges By Employee 3-2
4 Labor Law Compliance
Configuring Compliance with Wage and Tip Laws 4-1
iii
Configuring Compliance with Child Labor Laws 4-1
5 Pay Periods
Configuring a Pay Period Cycle 5-1
Closing a Pay Period 5-1
Reopening a Pay Period 5-1
6 Preprocessing Payroll
Using Payroll Preprocessing 6-3
Time Cards 6-3
Viewing a Summary of Time Cards 6-3
Viewing a Summary of Time Cards for Shared Employees 6-3
Adding or Adjusting Time Cards 6-3
Adding or Adjusting Drill-Down Time Cards for Employee Shifts 6-4
7 Work Hours and Break Periods
Configuring Work Hour Restrictions 7-1
Assigning Work Hour Restrictions and Setting Store Hours 7-1
Configuring Store Work Hours 7-2
Assigning Store Work Hours to a Location 7-2
Configuring Break Rules 7-2
Assigning Break Rules to Locations 7-3
8 Overtime
Weighted Average Overtime 8-1
Weighted Average Overtime with Tip Credit 8-1
Configuring Work Requirements for Overtime Eligibility 8-2
Configuring Calculations and Rules for Overtime Pay 8-3
9 Premium Pay, Bonuses, and Deductions
Configuring a Premium Pay Rate 9-1
Assigning a Premium Pay Rate by Location and by Job 9-2
Assigning a Premium Pay Rate by Employee 9-3
Configuring a Payroll Bonus or Deduction 9-3
Configuring Pay Codes 9-4
iv

10
Tip Pools
Manual Tip Pools 10-1
Automatic Tip Pools 10-2
Configuring Manual Tip Pooling 10-2
Configuring Automatic Tip Pooling 10-2
Entering a Manual Tip Pool Amount 10-3
11
Jobs
Adding a Job Category 11-1
Adding a Labor Category 11-1
Creating a Job 11-2
Assigning a Job to a Location 11-3
12
Employee Management
Employee Home Locations and Away Locations 12-2
Human Resources Templates and Permissions 12-3
Assigning Human Resources Templates to Roles 12-3
Configuring Access to Employee Classes by Role 12-3
Employee Information Change Records 12-4
Configuring Employee Change Tracking 12-4
Importing Employee Information from a Microsoft Excel Spreadsheet 12-4
Including Salaried Employees in Labor Cost Calculations 12-5
Adding an Ethnicity 12-5
Adding Skill Levels 12-6
Adding a School District 12-6
Assigning a School District to a Location 12-6
Configuring a School Year and Vacation Days 12-7
Adding a Direct Deposit Bank 12-7
Assigning a Direct Deposit Bank to a Location 12-7
Employee Maintenance 12-7
Adding Employees 12-8
Point-of-Sale Account Configuration 12-10
13
Scheduling
Employee Work Hours and Availability 13-2
Schedule Approval Process 13-3
Creating Schedule Profiles 13-4
Configuring Schedule Profile Properties 13-4
v

Configuring Blackout Periods 13-7
Color-Coding Job Types and Employee Status 13-8
Configuring Staffing Placeholders 13-8
Configuring Schedule Edit Restrictions 13-9
Configuring Employee Work Hours and Availability 13-9
Creating Schedules 13-9
Editing Schedules 13-10
Submitting Schedules 13-10
Approving Schedules 13-11
Printing Schedules 13-11
Sending Schedules by Email 13-12
Creating Schedule Templates 13-12
Customizing Schedule Appearance 13-12
Configuring the Default View 13-13
14
Employee Self Service
Configuring Employee Self Service Permissions 14-1
Viewing Schedules 14-1
Printing Schedules 14-2
Sending Schedules by Email 14-2
Requesting Time Off 14-2
Requesting Time Off for Other Employees 14-3
Requesting Shift Changes 14-3
Approving Shift Change Requests 14-4
15
Staffing
Choosing a Staffing Method 15-1
Creating Staffing Profiles 15-5
Adding Jobs to a Staffing Profile 15-6
Defining General Forecast Requirements 15-6
Defining Forecast Productivity Requirements 15-8
Defining Shift Requirements 15-9
Defining Fixed Resource Requirements 15-9
Defining Recipe Requirements 15-10
Defining Advanced General Requirements 15-11
Assigning Skill Levels to Jobs 15-11
Assigning Stations to a Location 15-13
Assigning Staffing Profiles to Organization Levels 15-13
vi

Creating Stations 15-14
vii
Preface
This document provides information and instructions for using Oracle Hospitality LaborManagement web application, a human resources solution offering tools andfunctionality that support employee data management and payroll preprocessing.
Labor Management is built upon Oracle Hospitality Enterprise Back Office andleverages core functionality shared across all Enterprise Back Office products. TheOracle Hospitality Reporting and Analytics User Guide provides more information andinstructions.
Purpose
The navigation instructions throughout the documentation may not accurately depictthe menu layout for your Oracle Hospitality Enterprise Back Office deploymentbecause administrators can customize the name and organization of the groups andlinks in the sidebar menu. Use the navigation instructions provided as a guideline forlocating the links in your deployment, or contact an administrator for assistance.
Audience
This Oracle Hospitality Labor Management document is intended for:
• Administrators, who enter initial configurations and maintain data flow for reportingand forecasting.
• Human Resources, who enter and maintain employee records and maintainsystem-wide settings, such as compliance with labor laws and job definitions.
• Managers, who perform labor management operations such as entering employeeavailability and using the staffing and scheduling tasks.
• Point-of-Sale employees, who perform self-service tasks such as clocking in,requesting time off, and declaring tips.
Customer Support
To contact Oracle Customer Support, access My Oracle Support at the following URL:
https://support.oracle.com
When contacting Customer Support, please provide the following:
• Product version and program/module name
• Functional and technical description of the problem (include business impact)
• Detailed step-by-step instructions to re-create
• Exact error message received
• Screen shots of each step you take
Preface
viii

Documentation
Oracle Hospitality product documentation is available on the Oracle Help Center at https://docs.oracle.com/en/industries/food-beverage/.
Revision History
Date Description of Change
June 2018 Initial publication
September 2019 Updated Employee Home Locations and AwayLocations
October 2019 Added Configuring Magnetic Card Security
Preface
ix

1Using Labor Management
Labor Management enables you to manage labor costs for food and beverageoperations. Labor Management calculates projected labor costs when generatingschedules and updates those costs based on time card operations performed byemployees at Oracle Hospitality Point-of-Sale (POS) workstations. Labor Managementcontrols labor expenses through employee clock-in and clock-out restrictions enforcedat the workstations. Use Labor Management with Forecasting and Budget to generatemore accurate schedules. Labor Management integrates with Reporting and Analyticsto provide dashboard views of labor cost data and reporting capabilities on areas suchas employee job summaries and payroll summaries.
1-1
2Labor Management Setup
Follow these high-level steps to set up Labor Management. You can also use theseinstructions as a guideline for troubleshooting and maintenance.
1. Configure Reporting and Analytics:
a. Create and configure the organization and locations.
b. Enable Labor Management in each level.
c. Configure the Labor Management portlets and permissions.
2. Configure the Labor Management organization settings.
3. Configure the rules and calendars for locations in the organization.
4. Assign the rules and calendars for each location.
5. Configure payroll settings.
This section consists of the following topics:
• Portlets and Permissions for Labor Management
• Configuring Locations for Labor Management
• Configuring Password Security
• Configuring Social Security Number Security
• Configuring Magnetic Card Security
• Configuring Payroll Preprocessing Behavior and Overtime Labels
• Choosing the Pay Rate Modifier
• Configuring Reason Codes
Portlets and Permissions for Labor ManagementReporting and Analytics handles Labor Management roles and permissions throughthe Labor Management portlets. The Oracle Hospitality Reporting and Analytics UserGuide contains more information about roles and portlets in Reporting and Analytics.
• Human Resources
• Payroll Preprocessing
• Scheduling - Schedule
• Scheduling - Admin
• Staffing - Profile
• Staffing - Admin
• Staffing - Requirements
• Scheduling - Employee Self Service
2-1
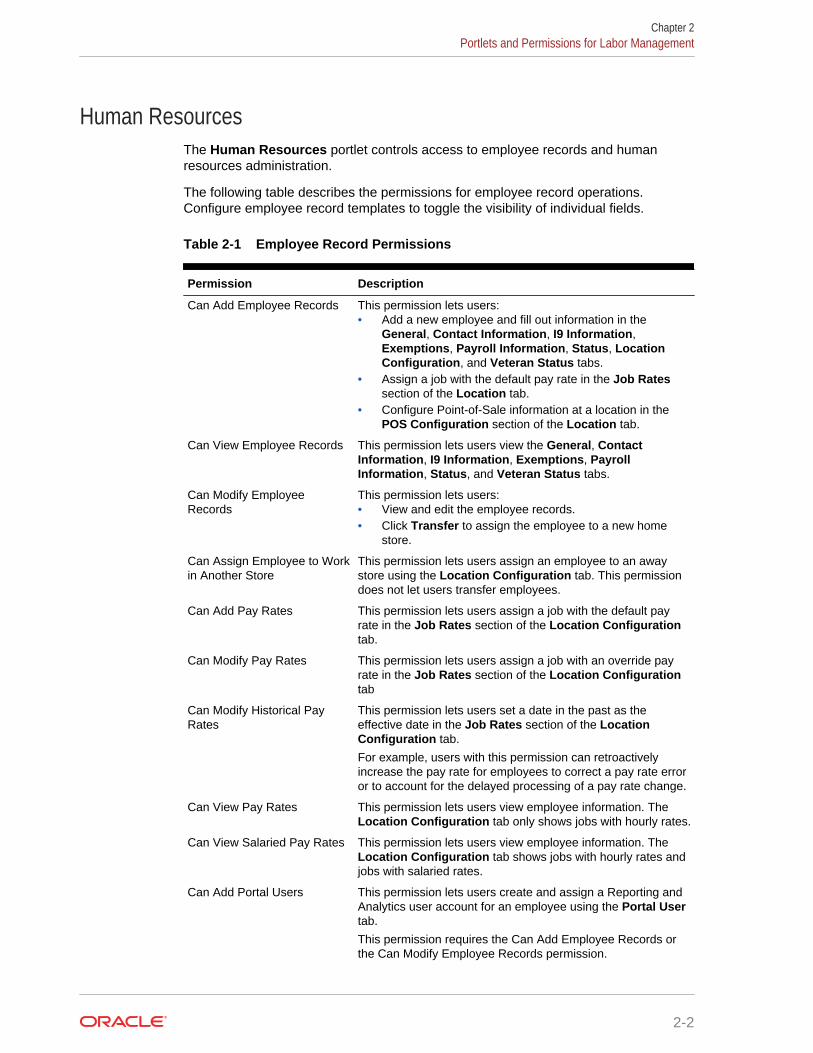
Human ResourcesThe Human Resources portlet controls access to employee records and humanresources administration.
The following table describes the permissions for employee record operations.Configure employee record templates to toggle the visibility of individual fields.
Table 2-1 Employee Record Permissions
Permission Description
Can Add Employee Records This permission lets users:• Add a new employee and fill out information in the
General, Contact Information, I9 Information,Exemptions, Payroll Information, Status, LocationConfiguration, and Veteran Status tabs.
• Assign a job with the default pay rate in the Job Ratessection of the Location tab.
• Configure Point-of-Sale information at a location in thePOS Configuration section of the Location tab.
Can View Employee Records This permission lets users view the General, ContactInformation, I9 Information, Exemptions, PayrollInformation, Status, and Veteran Status tabs.
Can Modify EmployeeRecords
This permission lets users:• View and edit the employee records.• Click Transfer to assign the employee to a new home
store.
Can Assign Employee to Workin Another Store
This permission lets users assign an employee to an awaystore using the Location Configuration tab. This permissiondoes not let users transfer employees.
Can Add Pay Rates This permission lets users assign a job with the default payrate in the Job Rates section of the Location Configurationtab.
Can Modify Pay Rates This permission lets users assign a job with an override payrate in the Job Rates section of the Location Configurationtab
Can Modify Historical PayRates
This permission lets users set a date in the past as theeffective date in the Job Rates section of the LocationConfiguration tab.
For example, users with this permission can retroactivelyincrease the pay rate for employees to correct a pay rate erroror to account for the delayed processing of a pay rate change.
Can View Pay Rates This permission lets users view employee information. TheLocation Configuration tab only shows jobs with hourly rates.
Can View Salaried Pay Rates This permission lets users view employee information. TheLocation Configuration tab shows jobs with hourly rates andjobs with salaried rates.
Can Add Portal Users This permission lets users create and assign a Reporting andAnalytics user account for an employee using the Portal Usertab.
This permission requires the Can Add Employee Records orthe Can Modify Employee Records permission.
Chapter 2Portlets and Permissions for Labor Management
2-2

Table 2-1 (Cont.) Employee Record Permissions
Permission Description
Can Rehire Employees This permission lets users click Rehire in the employeerecords menu to assign a terminated employee to a new job.
Allow Employee Promotion This permission lets users assign a job with a higher pay ratethan the current job.
The following table describes the permissions for organization-wide human resourcesadministration:
Table 2-2 Human Resources Administration Permissions
Permission Description
HR Administrator This permission gives access to the Admin menu. This letsusers view and make changes to organization-wide humanresources configurations, such as employee profile templates,job definitions, labor laws, and job categories. This permissiondoes not let users configure employee classes.
Can Use Employee Availability This permission gives access to the Employee Availabilityconfiguration. This lets users view and make changes toworking hour availability and unavailability preferences foremployees.
Can Administer RestrictedEmployee Classes
This permission gives access to the Access EmployeeClasses configuration from the Admin menu, and requires theHR Administrator permission.
This lets users control which Point-of-Sale employee classescan be assigned to employees by each Reporting andAnalytics role. For example, this permission lets administratorsprevent roles with minimal access from creating an employeebelonging to a Point-of-Sale administrator class.
Can Assign Premium PayRules to an Employee
This permission gives access to the Assign Premium PayRules to an Employee configuration. This lets users view,add, and change premium pay assignments to employees.
Disable Validation ofWOTC/I9/BG Code
This permission disables validation for Work Opportunity TaxCredit (WOTC), I-9, or BG codes when entered or changed byusers belonging to this role. This permission requires enablingSocial Security Validation for the United States in theorganization settings. Contact your system administrator if theoption is not available in your Reporting and Analyticsorganization.
Payroll PreprocessingThe Payment Preprocessing portlet controls access for viewing and editingemployee time cards.
The following table describes the permissions that pertain to viewing, editing, andapproving employee pay for a given work period:
Chapter 2Portlets and Permissions for Labor Management
2-3

Table 2-3 Time Card Permissions
Permission Description
Can View Employee TimeCard Records
This permission gives access to the Bulk Edit Time Cards,Time Cards, Time Card Summary, and the View Time CardSummary Shared Employee configurations. This lets usersview time cards by employee, by date, and by location.
Can Modify Time CardRecords for Home StoreEmployees
This permission lets users make changes to time cards loggedby employees assigned to their store.
Can Modify Time CardRecords for non-Home StoreEmployees
This permission lets users make changes to time cards loggedby employees assigned to other stores. This permission canbe used for cases such as when an employee fills in at adifferent location, or to let managers to cover time cardapprovals for another location.
Can Add Employee Time CardRecords
This permission lets users add time cards for employees.
Can Add Employee Other Pay This permission gives access to the Other Pay Assignmentby Location, Other Pay Assignment by Employee, andOther Pay Overheads Assignment configurations. This letsusers assign payroll bonuses, deductions, and any other one-time payroll effects to employees. This permission does notgive access to creating and configuring Other Pay types.
Can Delete Open PayrollPeriod Other Pay Records
This permission shows the Delete button in the Other Payconfiguration pages. This permission requires the Can AddEmployee Other Pay permission.
Allow non-HomestoreEmployees to be included inSearch Results
This permission lets users to search for and view time cardsfor employees assigned to other stores.
Restrict Negative HoursAdjustments
This permission stops users from reducing the number ofhours worked in a time card.
The following table describes the permissions for payment operations:
Table 2-4 Payroll Operations Permissions
Permission Description
Can Close Labor Periods This permission gives access to Close Labor Period and letsusers close a payroll period.
Can Reopen Closed LaborPeriods
This permission gives access to Reopen Closed LaborPeriod and lets users reopen a closed payroll period.
PP Administrator This permission gives access to the Admin menu and to theconfiguration pages for labor rules and restrictions, such aspay rules, overtime rules, break rules, and locationassignment. This permission does not let users configure tippool profiles.
Access to Tip PoolConfiguration
This permission gives access to the Tip Pool Profileconfiguration from the Admin Menu. This lets users configuretip pools and tipping periods for a location. This permissionrequires the PP Administrator permission.
Chapter 2Portlets and Permissions for Labor Management
2-4
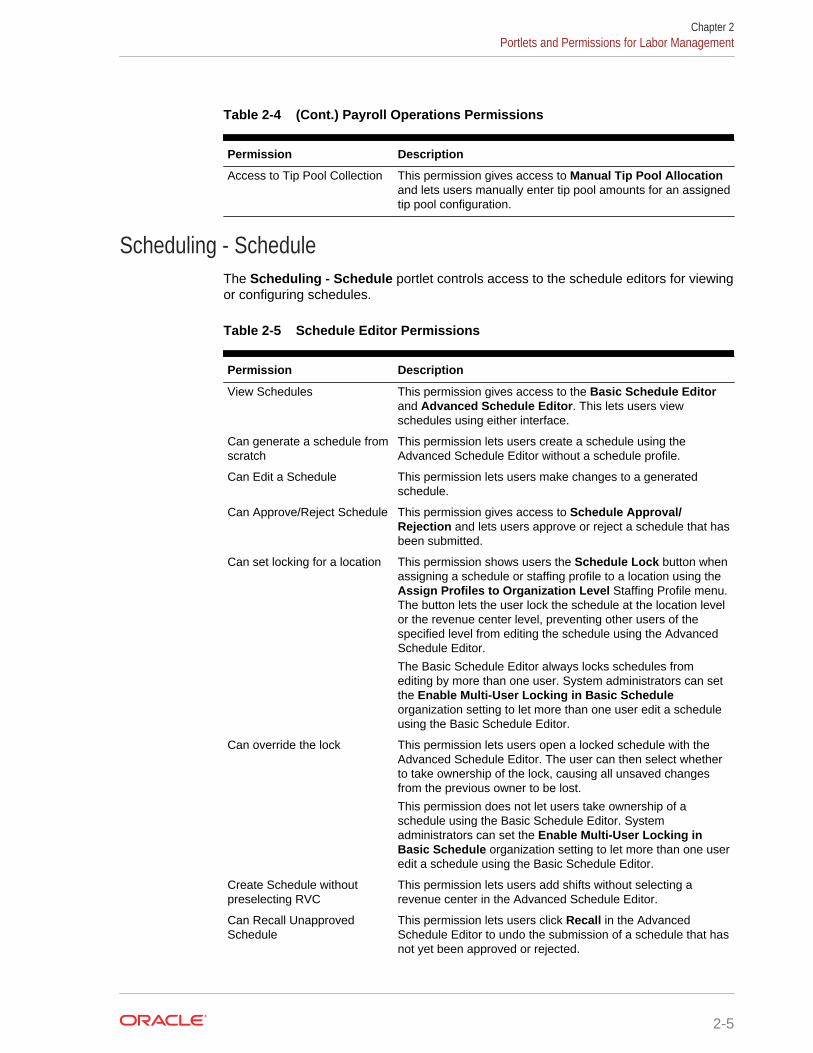
Table 2-4 (Cont.) Payroll Operations Permissions
Permission Description
Access to Tip Pool Collection This permission gives access to Manual Tip Pool Allocationand lets users manually enter tip pool amounts for an assignedtip pool configuration.
Scheduling - ScheduleThe Scheduling - Schedule portlet controls access to the schedule editors for viewingor configuring schedules.
Table 2-5 Schedule Editor Permissions
Permission Description
View Schedules This permission gives access to the Basic Schedule Editorand Advanced Schedule Editor. This lets users viewschedules using either interface.
Can generate a schedule fromscratch
This permission lets users create a schedule using theAdvanced Schedule Editor without a schedule profile.
Can Edit a Schedule This permission lets users make changes to a generatedschedule.
Can Approve/Reject Schedule This permission gives access to Schedule Approval/Rejection and lets users approve or reject a schedule that hasbeen submitted.
Can set locking for a location This permission shows users the Schedule Lock button whenassigning a schedule or staffing profile to a location using theAssign Profiles to Organization Level Staffing Profile menu.The button lets the user lock the schedule at the location levelor the revenue center level, preventing other users of thespecified level from editing the schedule using the AdvancedSchedule Editor.
The Basic Schedule Editor always locks schedules fromediting by more than one user. System administrators can setthe Enable Multi-User Locking in Basic Scheduleorganization setting to let more than one user edit a scheduleusing the Basic Schedule Editor.
Can override the lock This permission lets users open a locked schedule with theAdvanced Schedule Editor. The user can then select whetherto take ownership of the lock, causing all unsaved changesfrom the previous owner to be lost.
This permission does not let users take ownership of aschedule using the Basic Schedule Editor. Systemadministrators can set the Enable Multi-User Locking inBasic Schedule organization setting to let more than one useredit a schedule using the Basic Schedule Editor.
Create Schedule withoutpreselecting RVC
This permission lets users add shifts without selecting arevenue center in the Advanced Schedule Editor.
Can Recall UnapprovedSchedule
This permission lets users click Recall in the AdvancedSchedule Editor to undo the submission of a schedule that hasnot yet been approved or rejected.
Chapter 2Portlets and Permissions for Labor Management
2-5

Table 2-5 (Cont.) Schedule Editor Permissions
Permission Description
Can Edit Approved Schedule This permission lets users make changes to an approvedschedule, and then publish the updated schedule for approval.
Scheduling - AdminThe Scheduling - Admin portlet controls permissions for viewing and editing schedulecreation profiles.
Table 2-6 Schedule Profile Permissions
Permission Description
View Schedule Profiles This permission gives access to Schedule Profiles. This letsusers view schedule configuration profiles for the organization.
Add/Edit/Delete ScheduleProfiles
This permission lets users add or delete schedule profiles.
Access Role-based EditConfiguration
This permission gives access to Schedule Edit Restrictions.This lets users define how much a role can change the totalLabor Cost % of a schedule. For example, if a user belongingto a role with a limit of 50% makes changes to a schedule with20% Labor Cost, the user can add, delete, or modify shifts sothat the schedule results in a Labor Cost% of no less than 10%(-50%) and no more than 30% (+50%).
Staffing - ProfileThe Staffing - Profile portlet controls permissions for viewing and editing staffingrequirements profiles.
Table 2-7 Staffing Profile Permissions
Permission Description
View Staffing Profile This permission gives access to Staffing Profile Creation.This lets users view a list of staffing profiles, a list of jobprofiles assigned to each staffing profile, and the specificconfigurations for each job profile.
Add/Edit/Delete StaffingProfile
This permission lets users add, change, and delete staffingprofiles and job profiles associated with the staffing profile.
View Assignment To OrgLevel
This permission gives access to Assign Profiles toOrganization Level. This lets users view the staffing profilesand scheduling profiles that have been assigned toorganizations, levels, and locations.
Add/Edit/Delete AssignmentTo Org Level
This permission lets users assign staffing profiles andscheduling profiles to organizations, levels, and locations.
Chapter 2Portlets and Permissions for Labor Management
2-6

Staffing - AdminThe Staffing - Admin portlet controls permissions for viewing and editing skillrequirements and station assignments for locations.
Table 2-8 Staffing Profile Permissions
Permission Description
View Stations/Sections This permission gives access to Station/SectionsDefinitions. This lets users view the list of stations created forlocations in the organization.
Add/Edit/Delete Stations/Sections
This permission lets users create, change, or delete stationsfor the organization.
View Assign Station toOrganization Level
This permission gives access to Assign Station toOrganization Level. This lets users view the stations thathave been assigned to locations.
Add/Edit/Delete Assign Stationto Organization Level
This permission lets users assign multiple stations to a singlelocation, or assign a single station to multiple locations.
View the assignment of Skillsand Stations to StaffingRequirements
This permission gives access to Assign Skill Levels to StaffRequirements. This lets users view the skill levels andstations that have been assigned as required.
Add/Edit/Delete theassignment of Skills andStations to StaffingRequirements
This permission lets users assign skills and stations as staffingrequirements for specific jobs and specific days of the week.
Staffing - RequirementsThe Staffing - Requirements portlet lets users generate a staffing requirementsforecast on demand.
Scheduling - Employee Self ServiceThe Scheduling - Employee Self Service portlet controls the actions that can betaken by location employees regarding their shifts and schedules.
Table 2-9 Employee Self Service Permissions
Permission Description
Can Use ManagementRequest Approval
This permission gives access to Management RequestApproval. This lets users approve or reject schedule changesfor employees under their management.
Can View Employee Schedulewith In-time only
This permission gives access to Employee Schedule, whichlets users access their approved schedules and view the starttimes for every shift. Users with the Can View All Functionprivilege can also see the end times for every shift.
Can View All Function This permission lets users request shift changes, request timeoff, and use the shift pool through the Employee Schedule.
Chapter 2Portlets and Permissions for Labor Management
2-7
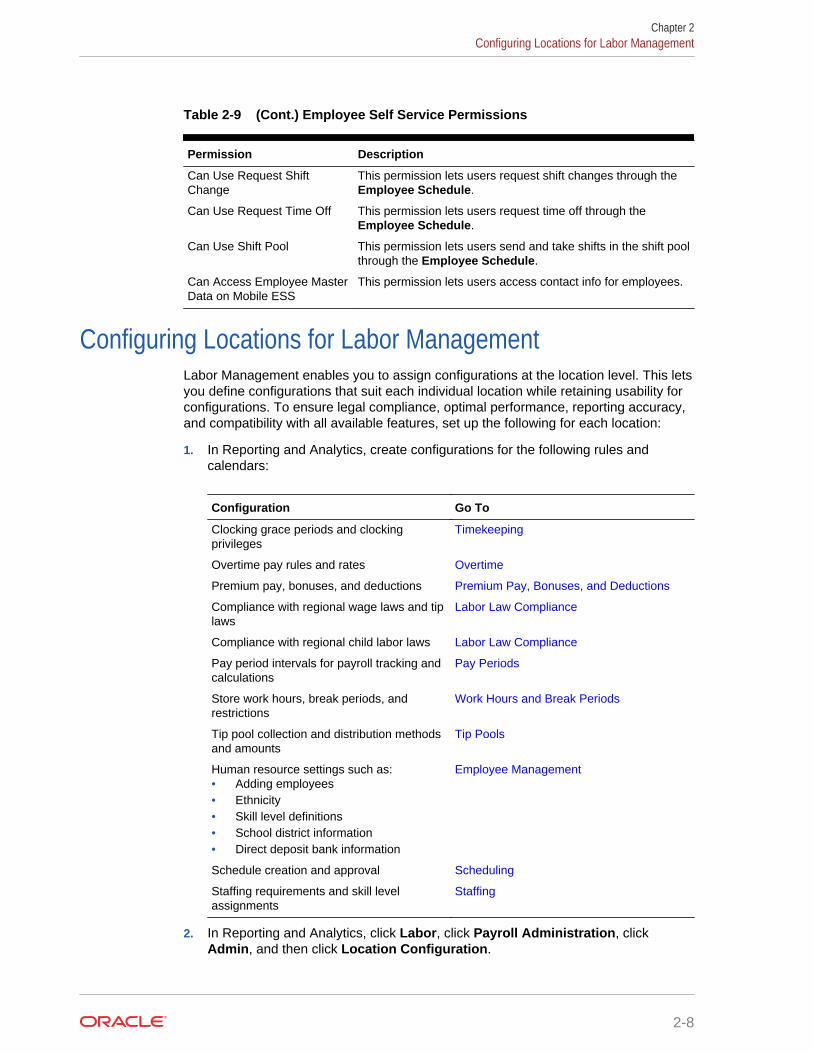
Table 2-9 (Cont.) Employee Self Service Permissions
Permission Description
Can Use Request ShiftChange
This permission lets users request shift changes through theEmployee Schedule.
Can Use Request Time Off This permission lets users request time off through theEmployee Schedule.
Can Use Shift Pool This permission lets users send and take shifts in the shift poolthrough the Employee Schedule.
Can Access Employee MasterData on Mobile ESS
This permission lets users access contact info for employees.
Configuring Locations for Labor ManagementLabor Management enables you to assign configurations at the location level. This letsyou define configurations that suit each individual location while retaining usability forconfigurations. To ensure legal compliance, optimal performance, reporting accuracy,and compatibility with all available features, set up the following for each location:
1. In Reporting and Analytics, create configurations for the following rules andcalendars:
Configuration Go To
Clocking grace periods and clockingprivileges
Timekeeping
Overtime pay rules and rates Overtime
Premium pay, bonuses, and deductions Premium Pay, Bonuses, and Deductions
Compliance with regional wage laws and tiplaws
Labor Law Compliance
Compliance with regional child labor laws Labor Law Compliance
Pay period intervals for payroll tracking andcalculations
Pay Periods
Store work hours, break periods, andrestrictions
Work Hours and Break Periods
Tip pool collection and distribution methodsand amounts
Tip Pools
Human resource settings such as:• Adding employees• Ethnicity• Skill level definitions• School district information• Direct deposit bank information
Employee Management
Schedule creation and approval Scheduling
Staffing requirements and skill levelassignments
Staffing
2. In Reporting and Analytics, click Labor, click Payroll Administration, clickAdmin, and then click Location Configuration.
Chapter 2Configuring Locations for Labor Management
2-8

a. In the Location Selection list, select the location.
b. To assign rules for time-keeping and labor calculations, select Labor PayRule, and then select a configured rule.
c. To assign a pay period, select Pay Period Calendar, and then select aconfigured pay period cycle.
d. To apply wage and tip compliance rules, select Wage and Tip Law, and thenselect a configured set of rules.
e. To apply child labor compliance rules, select Child Labor Law, and thenselect a configured set of rules.
f. To assign collection and distribution for implementing a tip pool, select TipPool, and then select a configured tip pool profile.
g. For each configuration, select a start date for enabling the rule at the location.You cannot select an earlier day than the start date configured in the rule.
You can set an end date for child labor laws.
h. Click Save to save changes for the selected locations.
3. To verify the Location Configuration settings for a location:
a. In Reporting and Analytics, click Labor, click Payroll Administration, clickAdmin, and then click Configuration Review.
b. Select a location, and then click Edit.
c. Verify that all settings are configured and active.
Configuring Password Security1. In Reporting and Analytics, click Labor, click Employee Administration, click
Admin, and then click Organization Configuration.
2. Enter a PC Application Password Exclusion Prefix to prohibit login names withthe entered prefix from logging into Labor Management.
3. Select whether you want to enforce unique Point-of-Sale passwords through LaborManagement. If you do not select this option, the Point-of-Sale for each locationenforces uniqueness using their respective settings.
4. Select to enable alphanumeric passwords for Labor Management logincredentials. If you do not select this option, employees must set a numericpassword.
5. Select whether you want to automatically generate a password when creatingusers.
Configuring Social Security Number Security1. In Reporting and Analytics, click Labor, click Employee Administration, click
Admin, and then click Organization Configuration.
2. Select the Social Security Number region from the SSN Validation drop-down.
3. Select whether you want to enforce Social Security Numbers Uniqueness Settingby organization or by levels such as locations.
Chapter 2Configuring Password Security
2-9
Configuring Magnetic Card Security
1. In Reporting and Analytics, click Labor, click Employee Administration, clickAdmin, and then click Organization Configuration.
2. To ensure magnetic card uniqueness across locations, select Enforce uniqueMagCard Number and then click Save.
If the system detects duplicate magnetic card IDs, the system lists the duplicaterecords. Manually update the IDs to make them unique.
Configuring Payroll Preprocessing Behavior and OvertimeLabels
1. In Reporting and Analytics, click Labor, click Payroll Administration, clickAdmin, and then click Organization Configuration.
2. Update the form, and then click Save.
a. If you do not want employees to declare tips while creating or editing their timecards, or if your organization does not require tipping, you can select HideIndirect Tips Prompt and Hide Cash Tips Prompt. Make sure to provide aseparate method for employees to declare their tips.
b. To allocate overtime hours as an away store instead of standard overtime pay,select Allocate Overtime to Away Store.
c. If you do not want Labor Management to perform database optimizationimmediately after an administrator makes changes, select Delay LaborAggregation After Adjustment.
d. Enter overtime, overtime pay, and overtime hours labels. Do not leave a blankfield.
e. Select Show terminated employees in Other Pay and then enter a numberof months. Labor Management includes the amount paid to terminatedemployees within the last entered number to months under Other Pay.
Choosing the Pay Rate ModifierLabor Management enables you to set up rules for modifying pay rates. Use thefollowing table to access more information on pay rate modifiers:
Chapter 2Configuring Magnetic Card Security
2-10
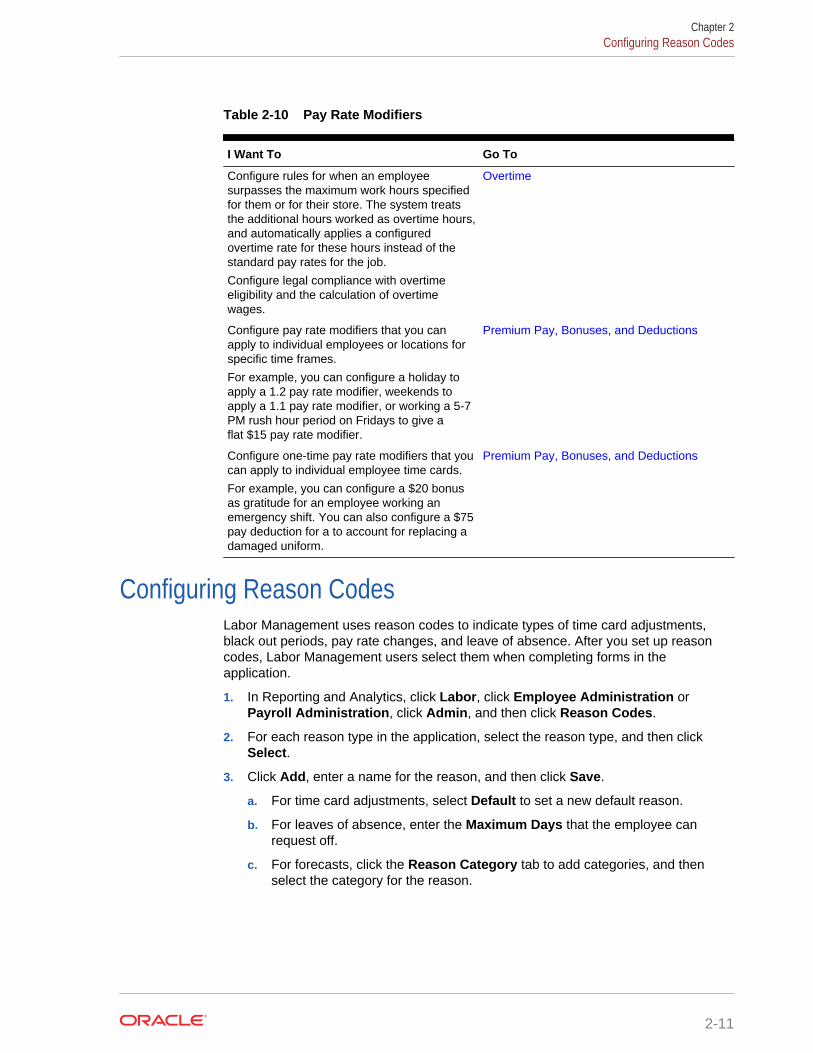
Table 2-10 Pay Rate Modifiers
I Want To Go To
Configure rules for when an employeesurpasses the maximum work hours specifiedfor them or for their store. The system treatsthe additional hours worked as overtime hours,and automatically applies a configuredovertime rate for these hours instead of thestandard pay rates for the job.
Configure legal compliance with overtimeeligibility and the calculation of overtimewages.
Overtime
Configure pay rate modifiers that you canapply to individual employees or locations forspecific time frames.
For example, you can configure a holiday toapply a 1.2 pay rate modifier, weekends toapply a 1.1 pay rate modifier, or working a 5-7PM rush hour period on Fridays to give aflat $15 pay rate modifier.
Premium Pay, Bonuses, and Deductions
Configure one-time pay rate modifiers that youcan apply to individual employee time cards.
For example, you can configure a $20 bonusas gratitude for an employee working anemergency shift. You can also configure a $75pay deduction for a to account for replacing adamaged uniform.
Premium Pay, Bonuses, and Deductions
Configuring Reason CodesLabor Management uses reason codes to indicate types of time card adjustments,black out periods, pay rate changes, and leave of absence. After you set up reasoncodes, Labor Management users select them when completing forms in theapplication.
1. In Reporting and Analytics, click Labor, click Employee Administration orPayroll Administration, click Admin, and then click Reason Codes.
2. For each reason type in the application, select the reason type, and then clickSelect.
3. Click Add, enter a name for the reason, and then click Save.
a. For time card adjustments, select Default to set a new default reason.
b. For leaves of absence, enter the Maximum Days that the employee canrequest off.
c. For forecasts, click the Reason Category tab to add categories, and thenselect the category for the reason.
Chapter 2Configuring Reason Codes
2-11
3Timekeeping
Labor Management integrates with Oracle Hospitality Point-of-Sale (POS)workstations to enforce timekeeping rules at the workstations.
• Configuring Timekeeping
• Configuring Timekeeping Privileges By Employee
Configuring Timekeeping1. In Reporting and Analytics, click Labor, click Payroll Administration, click
Admin, and then click Labor Pay Rules.
2. Click Add or select a set of rules to edit them.
3. To require time-keeping for salaried employees, select Require SalariedEmployees To Clock In.
4. To define a minimum amount of time that must elapse after clocking out before anemployee can clock in, select an hour and minute for Minimum Interval BetweenClock-Out and Clock-In.
For example, if you set the interval to 6 hours, an employee that clocks out at 2AM cannot clock in until after 8 AM without manager authorization.
5. To close all open timecards at a designated time for End of Day operations, selecta time from the Scheduled Time To Clockout All The Open Timecards drop-down list.
6. Use the Effective From date editor to select the first day in which the rulebecomes active. You can use the Effective To date editor to select a day in whichthe rule becomes inactive.
7. To restrict access to the Time Clock Application to scheduled employees, performthe following steps. This option requires that managers authorize employees toclock in when not scheduled to work.
a. Click the Time Clock Schedule tab, and then select Enable Time ClockSchedule.
b. To let employees select the job to which they are clocking in, select EnableScheduled Job Override.
c. If an employee does not have permissions to perform early or late clock-in andclock-outs, you can select options under Authorization Required For toenable managers to authorize the early or late clocking operations.
d. To set a time in minutes during which an employee can clock in and clock outearly or late without requiring manager authorization, enter values for therespective Grace Period fields.
8. Click Save.
3-1

Configuring Timekeeping Privileges By Employee1. In Reporting and Analytics, click Labor, click Payroll Administration, click
Admin, and then click Employee Privilege Administration.
2. Click Add, or select an existing set of privileges and then click Edit.
3. Enter a Name for the configuration. Establish a naming scheme that suits yourorganization, because the configuration is assigned at the employee details level.
For example, you can name the configuration Managers, but because you assignthe configuration at the employee level, the application does not prevent assigningthe configuration to non-manager employees.
4. Select a privilege level from 0 through 3, with 0 being the lowest, that theapplication checks against the clock-in privilege assigned to the job.
a. Authorize Clock Ins: Authorizing clock ins by other employees.
b. Perform Clock In: Clock in to the system.
5. Update selections for the form as described in the following table, and then clickSave:
Table 3-1 Employee Time Keeping Privilege Configurations
Option Description
Clock In/Out Outside Schedule Employees can clock in or clock out whenthey are not scheduled for work.
Override Clock In/Out Grace Employees can override the configuredgrace period for other employees.
Override Scheduled Jobs Employees can clock into an unscheduledjob without requiring authorization.
Authorize ID Assignment Employees can assign magnetic card IDnumbers to other employees.
Clock Out With Open Checks Employees can clock out while havingassigned open checks without requiringauthorization.
Clock Out With Open Tills Employees can clock out while havingassigned open tills without requiringauthorization.
Reprint Timecard Employees can reprint their time cards.
Authorize Clock Out with Open Checks Employees can provide authorization whenanother employee wants to clock out withassigned open checks.
Authorize Clock Out with Open Tills Employees can provide authorization whenanother employee wants to clock out withassigned open tills.
Authorize Clock In Out Outside Schedule Employees can provide authorization whenanother employee wants to clock in or clockout when they are not scheduled for work.
Limit Clock In to Workstations in RVC Restrict employees to clock in only atworkstations belonging to their assignedrevenue center.
Chapter 3Configuring Timekeeping Privileges By Employee
3-2

Table 3-1 (Cont.) Employee Time Keeping Privilege Configurations
Option Description
Limit Clock Out to Workstations in RVC Restrict employees to clock out only atworkstations belonging to their assignedrevenue center.
Chapter 3Configuring Timekeeping Privileges By Employee
3-3
4Labor Law Compliance
Labor Management enables you to define settings to comply with child labor laws andwage and tip laws. Compliance requirements can vary by location. Review compliancerequirements for your location before defining settings.
• Configuring Compliance with Wage and Tip Laws
• Configuring Compliance with Child Labor Laws
Configuring Compliance with Wage and Tip Laws1. In Reporting and Analytics, click Labor, click Employee Administration, click
Admin, and then click Wage and Tip Law.
2. Enter the Minimum Wage as required by law.
3. If federal or state law includes maximum tip credit restrictions, enter one or both ofthe Maximum Tip Credit Amount and Maximum Tip Credit Percentage.
A tip credit is the percentage or monetary amount set by federal or state law that isdeducted from the minimum wage of tip-applicable employees.
For example, state law sets a $6.15 minimum wage and allows up to a 50 percenttip credit if the employee receives enough tips to earn the minimum wage amountfor each hour. If the employee’s combined earnings (tip plus wage after tip creditadjustments) average out to being less than the minimum wage, the employermust make up the difference.
4. If federal or state law sets a separate minimum wage for tipped jobs:
a. Select Minimum Wages for tipped jobs.
b. Enter the minimum wage for jobs that qualify for tips. This value overrides thestandard minimum wage.
c. Enter the minimum wage for when an employee becomes eligible for overtimepay while working a job that qualifies for tips. The weighted average overtimeformula uses the value entered in this field instead of the minimum wageentered in Step 4b. Weighted Average Overtime with Tip Credit containsfurther information regarding the calculation of overtime pay with tip credit.
5. Select the starting date for law, and then click Save.
Configuring Compliance with Child Labor Laws1. In Reporting and Analytics, click Labor, click Employee Administration, click
Admin, and then click Child Labor Law.
2. Click Add, click the General tab, and then set the age and labor restrictions:
a. Enter the permissible age range for the law or restriction.
b. Enter the maximum number of consecutive days that employees in theentered age range can work.
4-1
c. Select whether employees in the entered age range are required to show anage certificate and a work permit by law.
d. Select the start date for the law or restriction. If applicable, select an end date.
3. Click the Overtime Rules tab and select the overtime rules that apply to the law orrestriction. This tab only shows overtime pay rules created for minor employees oremployees subject to work restrictions.
4. Click the Work Restrictions tab and specify additional restrictions for school daysand non-school days.
5. Click Save.
Chapter 4Configuring Compliance with Child Labor Laws
4-2
5Pay Periods
Pay periods define the start and end of pay cycles. You can assign pay periods at theorganization level or you can assign them at the location level. For example,regulations prohibit a group of locations from using the organization-level pay period.You can set up a separate pay period and assign it to each of those locations.
• Configuring a Pay Period Cycle
• Closing a Pay Period
• Reopening a Pay Period
Configuring a Pay Period Cycle1. In Reporting and Analytics, click Labor, click Payroll Administration, click
Admin, and then click Pay Period Calendars.
2. Click Add, or select pay period cycle and click Edit.
3. Select the Start Date and End Date for the pay period cycle.
4. Select the pay period interval from the Frequency drop-down:
• Weekly: Every 7-day interval beginning with the start date.
• Bi-weekly: Every 14-day interval beginning with the start date.
• Four Weeks: Every 24-day interval beginning with the start date.
• Monthly: Every start of the month.
• Semi-Monthly: Every start of the month and a day in the middle of the month.
• Single Pay Period: A single pay period extending from the start date to the enddate.
Closing a Pay Period1. In Reporting and Analytics, click Labor, click Payroll Administration, and then
click Close Labor Period.
2. Select a pay period, and then select one or more locations, then click ClosePeriod(s).
3. You can no longer create or adjust time cards for the closed period.
Reopening a Pay Period1. In Reporting and Analytics, click Labor, click Payroll Administration, and then
click Reopen Closed Labor Period.
2. Select a pay period, and then select one or more locations, then click ReopenPeriod(s).
5-1

3. You can now create or adjust time cards for the reopened period.
Chapter 5Reopening a Pay Period
5-2

6Preprocessing Payroll
Labor Management enforces the configured employee, location, and job constraints togenerate a time card for every employee shift. Authorized employees can then reviewand make adjustments to time cards. When the pay period ends, authorizedemployees can finalize the time cards by closing the pay period, and then perform thesteps needed to process the payroll.
The following image provides an overview of the data and constraint workflow:
6-1

• Using Payroll Preprocessing
• Time Cards
• Viewing a Summary of Time Cards
• Viewing a Summary of Time Cards for Shared Employees
• Adding or Adjusting Time Cards
• Adding or Adjusting Drill-Down Time Cards for Employee Shifts
Chapter 6
6-2
Using Payroll PreprocessingThese instructions provide guidelines for preprocessing the payroll at the end of a payperiod:
1. Review time cards for the pay period.
2. If needed, adjust time cards for the pay period.
3. Close the pay period. Employees can no longer create or adjust time cards for thepay period.
Authorized employees can reopen closed pay periods to create or adjust timecards.
Time CardsEmployee Time Cards consist of the following information:
• Shift information (clock-in date, time, and clock-out time)
• Clocking status
• Job and total wage due
• Direct and indirect tip amounts
• Premium pay hours and wage due
Viewing a Summary of Time CardsYou can use the Time Card Summary screen to view a consolidation of time cardinformation by location and by store, with the ability to drill down to:
• View a list of all open time cards at a selected location.
• View a list of all open time cards at a selected location and date.
• Adjust individual employee time cards.
Viewing a Summary of Time Cards for Shared EmployeesYou can use the Time Card Summary Shared Employee screen to view aconsolidation of time card information pertaining to employees shared by the homestore to which you belong, with the ability to drill down to:
• View a list of all open time cards for employees that worked more than onelocation.
• View a list of all open time cards by location and job for each employee.
• Adjust individual employee time cards.
Adding or Adjusting Time CardsYou cannot add or make adjustments to a time card if the pay period has been closed.
Chapter 6Using Payroll Preprocessing
6-3

1. In Reporting and Analytics, click Labor, click Payroll Administration, and thenclick Bulk Edit Time Cards.
2. Select a location, and then click Edit.
3. Select an employee.
a. To add a new time card for the employee, update the time card form and thenclick Add.
b. To adjust an existing time card for the employee, select the shift from the list oftime cards, update the time card form, and then click Save.
If you are sorting the list of time cards By Date, select the date, then select theemployee.
4. Click Calculate to update the labor cost totals. If you do not click calculate, thelabor totals do not reflect the updated time card information.
Adding or Adjusting Drill-Down Time Cards for EmployeeShifts
You cannot add or make adjustments to a time card if the pay period has been closed.
1. In Reporting and Analytics, click Labor, click Payroll Administration, and thenclick Time Cards.
2. Select an employee, and then click Edit.
3. Select the time card you want to adjust and then click Edit, or click Add TimeCard to create a time card for a new shift.
4. Update the form, and then click Save.
a. Select the clock-in date, clock-in time, and clock-out time.
b. Select the clock in and clock-out status.
c. Select the Reason that you are adjusting the time card.
d. Select the break period rules that applied to the shift.
e. Enter the amount of direct tips, indirect tips, and premium pay earned orworked by the employee during the shift.
Chapter 6Adding or Adjusting Drill-Down Time Cards for Employee Shifts
6-4
7Work Hours and Break Periods
Labor Management enables you to define work hours and break periods such as lunchbreaks and coffee breaks. After you set up work hours and break periods, you assignthem to locations.
• Configuring Work Hour Restrictions
• Assigning Work Hour Restrictions and Setting Store Hours
• Configuring Store Work Hours
• Assigning Store Work Hours to a Location
• Configuring Break Rules
• Assigning Break Rules to Locations
Configuring Work Hour Restrictions1. In Reporting and Analytics, click Labor, click Payroll Administration, click
Admin, and then click Work Rules.
2. Click Add, or select a work rule and then click Edit.
3. Update the minimum and maximum limits that an employee can work, and thenclick Save.
Assigning Work Hour Restrictions and Setting Store Hours1. In Reporting and Analytics, click Labor, click Payroll Administration, click
Admin, and then click Location Assignment.
2. Select the configured Work Rules from the drop-down to assign the work hourrestrictions.
3. To share employees with a location, select a location from the Labor Share Leveldrop-down.
4. Select the day of the week that a work week begins from the Labor Week StartDay drop-down.
5. To override the day of the week that scheduling begins, select a day from theSchedule Week Start Day drop-down.
6. To override the day of the week that forecasting begins, select the day from theForecast Week Start Day drop-down.
7. Select the time that the location begins a work day from the Start Business DayFixed Period drop-down list.
8. To override the store work hours configuration, select the configured Store WorkHours from the drop-down.
9. Select the hour at which each work day begins from the Start Labor Hour drop-down.
7-1

10. If the store is used as a beta test site, select Beta Store.
11. To override the clock-in grace period, select a number of minutes from the StartLabor Grace Minutes drop-down.
12. If the Enterprise Time Clock application is installed, you can verify the version inthe Currently Installed Time Clock Version field.
13. Click Save.
Related Topics
• Employee Home Locations and Away Locations
Configuring Store Work Hours1. In Reporting and Analytics, click Labor, click Employee Administration, click
Admin, and then click Store Work Hours.
2. Click Add, and enter a name for the store hours or the name of the specificlocation.
3. For each day of the week, use the drop-downs to set the start time and end time,and then click Save.
If you leave the drop-down for minutes as Closed, Labor Management considersthe day as closed for business.
4. You can now assign the store hours to locations.
Assigning Store Work Hours to a Location1. In Reporting and Analytics, click Labor, click Employee Administration, click
Admin, and then click Store Work Hours.
2. Select a set of work hours, and then click Edit.
3. Click the Assign to Locations tab, select Assign for each location to which thisset of work hours applies, and then click Save.
Configuring Break Rules1. In Reporting and Analytics, click Labor, click Payroll Administration, click
Admin, and then click Break Rules Administration.
2. Click Add, or select a break period and then click Edit.
3. In the Break Duration field, enter a duration in minutes.
4. Select Paid Break if employees continue to receive hourly or salary wages duringthe break period.
5. Select Minor if the break period can be used by minors.
6. Select Make Break Paid if Less Than Break Duration if employees can chooseto take a shorter break in exchange for a paid break.
7. Enter grace period intervals for clocking in and out of the break period.
8. Select Auto Schedule Breaks to enable the automatic scheduler to insert thebreak period.
Chapter 7Configuring Store Work Hours
7-2

9. Select Available for Manual Schedule to enable managers to insert the breakperiod when manually creating schedules.
10. Enter the minimum and maximum amount of minutes that an employee must workbefore they can take the break.
11. Select Duration before Break Repeatable Pattern to enforce the minimum andmaximum amount of minutes repeatedly throughout a work day to accommodateshort, repeated break periods.
12. Use the Effective From date editor to select the first day in which the break periodbecomes active. You can use the Effective To date editor to select a day in whichthe break period becomes inactive.
13. Click Save.
Related Topics
• Scheduling
Assigning Break Rules to Locations1. In Reporting and Analytics, click Labor, click Payroll Administration, click
Admin, and then click Break Rules Location Assignment.
2. In the Location Selection list, select one or more locations that you want toconfigure.
3. On the Rules tab:
a. Click Add Break Rule to add a row to the list of break periods. You can thenselect a break period and set the time frame in which the break period isenabled.
b. Click Add Minor Break Rule to add a row to the list of break periods specificto minor-aged employees. You can then select a break period and set the timeframe in which the break period is enabled.
c. Click Cancel to reset the list of break periods to the last saved configuration.
d. You can click Show Inactive to toggle showing inactive break periods.
4. On the Config tab:
a. To require employees to take a break during the scheduled time period, selectEnforce Scheduled Breaks.
b. To prompt employees at the Point-of-Sale to take a break, select Prompt forBreak.
c. Select the respective options for requiring management authorization for earlyor late clock-ins and clock-outs for paid or unpaid breaks.
5. Click Save.
Related Topics
• Scheduling
Chapter 7Assigning Break Rules to Locations
7-3
8Overtime
Use overtime rules to require employees to work a certain number of hours and acertain number of consecutive days within a week before they are eligible for overtimepay. For example, a store that operates Monday through Sunday requires employeesto work 40 hours per week and at least three consecutive days. In this case:
• An employee who works 15 hours across Monday and Tuesday and then 30 hoursacross Friday, Saturday, and Sunday is eligible for overtime.
• An employee who works 18 hours across Monday and Tuesday, 18 hours acrossThursday and Friday, and then 10 hours on Sunday is not eligible for overtimebecause the employee did not work three consecutive days.
• Weighted Average Overtime
• Weighted Average Overtime with Tip Credit
• Configuring Work Requirements for Overtime Eligibility
• Configuring Calculations and Rules for Overtime Pay
Weighted Average OvertimeWhen an employee works under more than pay rate, Labor Management supportscompliance with regulations requiring weighted average overtime calculations. Forexample, at a location configured with an overtime labor pay rule using 1.5 as thewage modifier, an employee might work the following two jobs and pay rates:
• Bartender, $10 per hour, 10 hours
• Kitchen, $12 per hour, 32 hours
Without factoring overtime pay, the employee would earn $100 (10 x 10) for thebartending shifts and $384 (12 x 32) for the kitchen shifts, for a total of $484. Becausethe employee worked two hours over the weekly threshold of 40 hours, LaborManagement uses the following formulas to calculate overtime pay to account for thetwo overtime hours:
• Total Pay / Total Hours = Weighted Average Rate
• [Weighted Average Rate x (Wage Multiplier — 1)] = Overtime Rate
Labor Management calculates 484 / 42 = $11.52 as the weighted average rate and[11.52 x (1.5 - 0.5)] = $5.76 as the overtime rate. Multiply the overtime rate by thenumber of overtime hours worked to determine the overtime pay: 5.76 x 2 = $11.52.
Weighted Average Overtime with Tip CreditLabor Management supports calculating weighted average overtime rates for tippedemployees who work under more than one pay rate. When the location uses tip creditsto deduct from the minimum wage, Labor Management uses the minimum wage tocalculate the total pay to establish the overtime rate, and then Labor Management
8-1

deducts the amount owed for tip credits. For example, at a location configured with anovertime labor pay rule using 1.5 as the wage modifier and in a state with a $5.15minimum wage, an employee might work the following two jobs and pay rates:
• Bartender, $11 per hour, 7 hours
• Server, $2.38 per hour, 35 hours
Without factoring overtime pay, the employee would earn $77 (11 x 7) for thebartending shifts and $83.30 (2.38 x 35) for the server shifts, for a total of $160.30.Because the employee worked two hours over the weekly threshold of 40 hours, LaborManagement uses the following formulas to calculate overtime pay to account for thetwo overtime hours:
• Total Pay / Total Hours = Weighted Average Rate
• [Weighted Average Rate x (Wage Multiplier - 1)] = Overtime Rate
Labor Management enforces the state minimum wage and calculates (5.15 x 35) + (7x 11) = $257.25 as the total pay, 257.25 / 42 = $6.12 as the weighted average rate,and [6.12 x (1.5 - 1)] = $3.06 as the overtime rate. Multiply the overtime rate by thenumber of overtime hours worked to determine the overtime pay: 3.06 x 2 = $6.12.
Deduct the tip credit amount from the total pay as shown in the following formula:
Total Pay + Overtime Pay - Tip Credit = Amount Owed
Configuring Work Requirements for Overtime Eligibility1. In Reporting and Analytics, click Labor, click Payroll Administration, click
Admin, and then click Labor Pay Overtime Rules.
2. Click Add or select a set of rules and click Edit.
3. In the Overtime Multiplier field, enter the amount by which to multiply the startinghourly wage to calculate the starting overtime wage.
4. Select an Overtime Level from the drop-down. Job definitions can be assigned toovertime levels.
5. To set daily thresholds for overtime eligibility:
a. In the Hours Before Overtime fields, enter the number of hours that anemployee must work before being eligible for overtime pay.
b. In the Hours Before Consecutive Overtime field, enter the number of hoursthat an employee must work consecutively before being eligible for overtimepay.
6. To set weekly thresholds for overtime eligibility:
a. In the Hours Before Overtime fields, enter the number of hours that anemployee must work before being eligible for overtime pay.
b. In the Hours Before Consecutive Overtime field, enter the number of hoursthat an employee must work consecutively before being eligible for overtimepay.
c. In the Consecutive Days To Start Overtime field, enter the number of daysthat an employee must work consecutively before being eligible for overtimepay.
Chapter 8Configuring Work Requirements for Overtime Eligibility
8-2
d. In the Days In A Week To Start Accumulated Days Overtime field, enter thenumber of days that an employee must work before being eligible for overtimepay.
7. If the overtime rules apply to minors, select Minor Rule.
8. Use the Effective From date editor to select the first day in which the rulebecomes active. You can use the Effective To date editor to select a day in whichthe rule becomes inactive.
Configuring Calculations and Rules for Overtime Pay1. In Reporting and Analytics, click Labor, click Payroll Administration, click
Admin, and then click Labor Pay Rules.
2. If you do not want daily overtime values to be included in weekly overtimecalculations, select Exclude Daily from Weekly Overtime.
3. Select Enable Weighted Average Overtime for compliance with regulationsrequiring weighted overtime calculations. This option enables weighted overtimecalculations for tipped and non-tipped employees.
4. If an overtime shift spanned multiple labor dates:
a. Select Allocate to Clock-In Labor Date to apply all overtime costs to the daythe employee clocked in.
b. Select Allocate to Actual Labor Date to apply overtime costs to each dayworked.
5. To calculate overtime on a daily basis, select End OT Accumulated At The Endof Labor Day.
6. To calculate overtime on a weekly basis, select End OT Accumulated At TheEnd of Labor Week.
7. Use the Effective From date editor to select the first day in which the rulebecomes active. You can use the Effective To date editor to select a day in whichthe rule becomes inactive.
8. Click the Overtime Rules tab, and then select the applicable overtime rules.
9. Click Save.
Chapter 8Configuring Calculations and Rules for Overtime Pay
8-3

9Premium Pay, Bonuses, and Deductions
Premium pay is additional pay for situations such as night shifts, holiday work, Sundaywork, and standby duty. Labor Management enables you to set up premium pay by:
• Amount: Flat amount or percentage increase to employee pay. For example, anemployee working on Christmas receives a flat increase of $50.
• Hours: Pay increase based on additional hours charged at a flat rate or a setwage. For example, employees working on Christmas receive normal wages asecond time for the hours worked, effectively doubling their wages.
• Split Shift: Compensation worth an extra hour of work or cases where anemployee works more than one shift in a day. For example, some states legallyrequire stores to compensate employees for an hour if two shifts are more thanone hour apart.
You can configure flat or percentage-based additions and deductions for adjustmentssuch as uniform fees and holiday bonuses. For example, you can configure a $50repair fee as a flat deduction for damaging uniforms or you can configure $20 bonusesfor winning employee of the month honors.
• Configuring a Premium Pay Rate
• Assigning a Premium Pay Rate by Location and by Job
• Assigning a Premium Pay Rate by Employee
• Configuring a Payroll Bonus or Deduction
• Configuring Pay Codes
Configuring a Premium Pay Rate1. In Reporting and Analytics, click Labor, click Payroll Administration, click
Admin, and then click Premium Pay Rules.
2. Click Add, or select a rule and click Edit.
3. To include the premium pay in all labor cost calculations and reports, selectInclude in Labor Cost.
If you do not select this option, premium pay only shows on payroll reports.
4. To assign the premium pay to minors, select Include Minor.
5. To include the premium pay in all average rate calculations, select Add ToAverage Rate.
6. Enter a Priority for the premium pay.
7. Select whether to enable the premium pay type based on Day of Week, a singleCalendar Day, or a Calendar Day Range.
You can then select details based on the effective date type.
9-1
8. Select the date on which the rule becomes effective from the Effective From dateeditor.
Use the Effective To date editor to select a day in which the rule becomesinactive.
9. Select the Minimum Duration Threshold and Maximum Duration Threshold forassigning the premium pay type.
10. To configure an amount-based rate:
a. Click the Type tab, and then select Amount.
b. Select the Start Time and the End Time for the premium pay rule to be active.
c. To make overtime rates eligible for the premium pay, select Rate Affected byOvertime.
d. To configure a flat amount, select Flat Amount, and then enter the amount.
e. To configure a percentage, select Percentage of, enter a percentage integer,and then select the base rate from which to calculate the percentage.
11. To configure an hours-based rate:
a. Click the Type tab, and then select Hours.
b. Select the Start Time and the End Time for the premium pay rule to be active.
c. In the Additional Hours field, enter the number of hours worth of premiumrate to add.
d. To include the premium pay in calculating overtime wages for labor costs andreports, select Include additional hours in overtime calculations.
e. Select the pay rate for additional hours. If you select Flat Amount, enter theamount per hour.
12. To configure a split-shift rate:
a. Click the Type tab, and then select Split Shift.
b. Enter the minimum and maximum hours between shifts for an employee to beeligible for compensation.
c. Select the Start Time and the End Time for the premium pay rule to be active.
d. In the Additional Hours field, enter the number of hours worth of premiumrate to add.
e. To include the premium pay in calculating overtime wages for labor costs andreports, select Include additional hours in overtime calculations.
f. Select the pay rate for additional hours. If you select Flat Amount, enter theamount per hour.
13. Click Save.
Assigning a Premium Pay Rate by Location and by Job1. In Reporting and Analytics, click Labor, click Payroll Administration, click
Admin, and then click Premium Pay Rule Location Assignment.
2. From the Location Selection tree, select one or more locations.
3. Select the job from the Job Code Name drop-down.
Chapter 9Assigning a Premium Pay Rate by Location and by Job
9-2

4. Select the premium pay type from the Premium Pay Rule drop-down.
5. Select the date on which the rule becomes active from the Effective From dateeditor.
Use the Effective To date editor to select a day in which the rule becomesinactive.
6. Click Save.
Assigning a Premium Pay Rate by Employee1. In Reporting and Analytics, click Labor, click Employee Administration, and then
click Assign Premium Pay Rules to an Employee.
2. Select an employee, and then click Edit.
To configure an employee who is terminated or on a leave of absence, selectInclude Terminated & LOA Employees.
3. To add a new premium pay rate for each location and job:
a. Click Add Premium Pay.
b. Select the Premium Pay Rule and the active Effective From and EffectiveTo date range, and then click Save.
4. To remove a premium pay rate:
a. Click the expand icon next to a location and job.
b. Click Delete for the premium pay rate, and then click Save.
Configuring a Payroll Bonus or Deduction1. In Reporting and Analytics, click Labor, click Payroll Administration, click
Admin, and then click Other Pay Administration.
2. Click Add, or select a bonus or deduction and then click Edit.
3. Select whether the bonus or deduction is a flat amount, a percentage amount, oran hourly charge from the Type drop-down.
If you select Percentage, select the total value from which the percentage amountis calculated.
4. Enter the default percentage or amount.
5. Enter a Reference or the bonus or deduction.
6. Enter the percentage of the bonus or deduction to be added to labor costcalculations.
7. Select the country for which the bonus or deduction is active.
8. Select whether to Add To Payroll, to Deduct From Payroll, to charge asOverhead, or to not act on the amount.
9. Select Prorate Labor Cost Across Payroll Period to divide the amount by thenumber of labor cost calculations in the payroll period.
10. Select Allow Rate Override to enable other factors, such as overtime andpremium pay, to override the amount.
Chapter 9Assigning a Premium Pay Rate by Employee
9-3
11. Select Recurring Debit/Credit if the amount counts as a recurring debit or creditcharge.
12. Select One Per Pay Period if the bonus or deduction recurs every pay period.
13. Use the Effective From date editor to select the first day in which the bonus ordeduction becomes active. You can use the Effective To date editor to select aday in which the bonus or deduction becomes inactive.
14. Click Save.
Configuring Pay Codes1. In Reporting and Analytics, click Labor, click Payroll Administration, click
Admin, click Other Pay Administration, and then click Pay Code Definitions.
2. Click Add, or select a pay code and then click Edit.
3. Enter a number, select whether to enable or disable the pay code, and then clickSave.
Chapter 9Configuring Pay Codes
9-4

10Tip Pools
Tip pools enable organizations to collect a percentage of tips from tipped employeesfor distribution to non-tipped employees. For example, you can set up a tip pool tocollect a portion of tips from servers and distribute the money to hosts. Follow federaland state regulations for tip pools because percentages for non-tipped employeesmight vary. Use tip periods to define time periods in a work day for tip pool calculation.For example, if a store regularly changes staff between day and evening shifts, youcan set a day and night tip period so the two periods have separate collection anddistribution pools.
• Manual Tip Pools
• Automatic Tip Pools
• Configuring Manual Tip Pooling
• Configuring Automatic Tip Pooling
• Entering a Manual Tip Pool Amount
Manual Tip PoolsSet up tip pools for manual collection so an authorized employee, such as a restaurantmanager, can enter the amount to collect for the day. The tip pool profile defines thepercentages for distributing tips. The system then determines an hourly wage for eachjob. For example, you have three jobs that receive tip pool distributions. You configuredistributions as follows:
• Bus Boys: 20 percent
• Hosts: 30 percent
• Bartenders: 50 percent
If you entered a tip pool amount of $75.00 for the day, the amount per job based onthe percentages would be:
• Bus Boys: $15.00
• Hosts: $22.50
• Bartenders: $37.50
The system calculates the hourly tip rate based on the total hours worked for the job:
• If bus boys worked 30 hours that day, the hourly rate of tips is $0.50.
• If hosts worked 25 hours, the hourly rate of tips is $0.90.
• If bartenders worked 10 hours, the hourly rate of tips is $3.75.
The system applies the hourly rates to each employee’s hours worked. A bartenderwho worked a 5-hour shift earns $18.75 in tips.
If one or more jobs do not have hours logged for the specific business day or tipperiod, the tip pool is distributed proportionally among the jobs that had hours logged.
10-1
For example, if the bar is closed for a day, the system maintains the proportions anddistributes the tip pool as 40 percent to bus boys and 60 percent to hosts.
Automatic Tip PoolsYou can configure tip pools for automatic collection so the system calculates theamount to collect for the day based on percentage of tip and type of sales total.
For example, you have three jobs that accept indirect tips. You configure the tip poolas follows:
• Bus Boys: 5 percent of Net Sales
• Hosts: 3 percent of Revenue Center Net Sales
• Bartenders: 8 percent of Beer, Wine, and Liquor Gross Sales
The system then calculates the distributed amount based on the respective salestotals.
Configuring Manual Tip Pooling1. In Reporting and Analytics, click Labor, click Payroll Administration, click
Admin, and then click Tip Pool Profile.
2. Click Add, or select a tip pool profile and then click Edit.
3. In the Distribution Method drop-down list, select whether to distribute from the tippool by cash or directly in a paycheck.
4. Select Post Indirect Tip To Timecard to post the amount distributed through thetip pool as an indirect tip to employee timecards.
5. To implement tip periods:
a. Select Enable Tip Period.
b. Under Tip Period Configuration, enable and set a duration in hours for up tofour tip periods. The durations must total 24 hours.
6. Select Manual Collection.
7. For each job that accepts indirect tips, enter the Percentage of the tip pool thateach job receives.
8. Use the Effective From date editor to select the first day in which the profilebecomes active. You can use the Effective To date editor to select a day in whichthe profile becomes inactive.
9. Click Save.
Configuring Automatic Tip Pooling1. In Reporting and Analytics, click Labor, click Payroll Administration, click
Admin, and then click Tip Pool Profile.
2. Click Add, or select a tip pool profile and then click Edit.
3. Enter a name and a description for the tip pool profile.
4. In the Distribution Method drop-down list, select whether to distribute from the tippool by cash or directly in a paycheck.
Chapter 10Automatic Tip Pools
10-2

5. Select Post Indirect Tip To Timecard to post the amount distributed through thetip pool as an indirect tip to employee timecards.
6. If the tip pool profile must account for work periods when tip pools are notcollected:
a. Select Enable Tip Period.
b. Under Tip Period Configuration, enable and set a duration in hours for up tofour tip periods. The durations must total 24 hours.
7. Select Automatic Collection.
8. For each job that accepts indirect tips:
a. In the Sales Method drop-down list, select the total sales value from which tocalculate the percentage.
b. Enter the Percentage of the total sales value that the job receives.
c. Select the revenue center, major item group, or order type to which theselected total sales value applies.
9. Use the Effective From date editor to select the first day in which the profilebecomes active. You can use the Effective To date editor to select a day in whichthe profile becomes inactive.
10. Click Save.
Entering a Manual Tip Pool AmountPerform these steps when using a tip pool profile configured for manual collection.
1. In Reporting and Analytics, click Labor, click Payroll Administration, and thenclick Manual Tip Pool Allocation.
2. Select the location, and then click Edit.
3. For each day and tip period you want to configure, enter the tip pool amount to bedistributed based on the tip pool profile, and then click Save.
Chapter 10Entering a Manual Tip Pool Amount
10-3
11Jobs
Labor Management enables you to define jobs for tracking labor activity for employeesby work category. When you define a job, you associate it with a job category, laborcategory, and a revenue center.
Job categories let you group jobs for reporting and scheduling. For example, you cancreate a job category named Kitchen Staff for dishwashers and cooks. Use laborcategories for reporting on hours worked for a specific job. For example, create a laborcategory for tipped employees and a labor category for non-tipped employees. Afteryou define the job, you set it as salaried or hourly and then define rate details.
• Adding a Job Category
• Adding a Labor Category
• Creating a Job
• Assigning a Job to a Location
Adding a Job Category1. In Reporting and Analytics, click Labor, click Employee Administration, click
Admin, and then click Job Category Master.
2. Click Add, enter a name, and then click Save. Depending on permissions, you canconfigure the following options:
a. Report: The job category can be used for reporting.
b. Active: The job category is active.
c. Enterprise Managed: The category is controlled by Enterprise Management.If this option is enabled, you cannot see or configure the job category whenconfiguring master items.
Labor Management automatically assigns a POS Reference number.
• Assigning Skill Levels to Jobs
• Adding a Labor Category
• Adding Skill Levels
• Creating Stations
Adding a Labor Category1. In Reporting and Analytics, click Labor, click Employee Administration, click
Admin, and then click Labor Category Master.
2. Click Add, enter a name, and then click Save. Depending on permissions, you canconfigure the following options:
a. Report: The labor category can be used for reporting.
11-1
b. Active: The labor category is active.
c. Enterprise Managed: The category is controlled by Enterprise Management.If this option is enabled, you cannot see or configure the labor category whenconfiguring master items.
Labor Management automatically assigns a POS Reference number.
• Assigning Skill Levels to Jobs
• Adding a Job Category
• Adding Skill Levels
• Creating Stations
Creating a Job1. In Reporting and Analytics, click Labor, click Employee Administration, click
Admin, and then click Job Definitions.
2. Click Add, click the General tab, and then update the form:
a. Select the Job Category and the Labor Category to which the job belongs.
b. Select an Overriding Employee Class to override employee normalprivileges when working this job.
For example, if the assistant manager for a restaurant is off on Mondayevenings and the restaurant appoints the head waiter to work as the assistantmanager on those nights, by default, the head waiter does not have thecorrect privileges even if they clock in as an assistant manager. If therestaurant sets the Overriding Employee Class to grant assistant managerprivileges for the assistant manager job, Labor Management overrides thehead waiter’s privileges with assistant manager privileges.
c. Select the Revenue Center for the job. Labor Management does not let youlink jobs to higher levels.
d. Select the Clock-In Privilege level that an employee must have to be able toclock in for this position.
You can assign the clock-in privilege level for an employee in OracleHospitality Reporting and Analytics Employee Configuration.
e. Enter a minimum age requirement for the job. Labor Management enforcesthe minimum age and prevents assigning the job to younger employees.
f. Declare direct tips on clock out and Declare indirect tips on clock out:Select to require employees to declare direct and indirect tips when clockingout.
g. Allow early or late clock out: Select to enable employees to clock out earlyor late. This option overrides the employee class setting.
h. Print tips declared on clock out: Select to print declared tips when anemployee clocks out.
i. Tipped Job: Select if tip credits apply for the job.
j. Enter the External Reference from the Point-of-Sale application.
k. Select an Employee Role.
Chapter 11Creating a Job
11-2
3. Click the Type tab to specify the wage type and if applicable the rates:
a. Select whether the job is paid Hourly or Salaried.
b. Select the first day that the job can be assigned.
c. Select the Overtime Levels that can be assigned to this job.
d. If the job is paid hourly, enter the regular and overtime pay rates andrestrictions.
Assigning a Job to a Location1. In Reporting and Analytics, click Labor, click Employee Administration, click
Admin, and then click Job Definitions.
2. Select a job, and then click Assign to Locations.
3. In the Location Selection menu, select every location to which you want to assignthe job.
4. Fill out the form to override any default wage configurations, and then click Save.
You can only enter one set of override values to all locations.
Chapter 11Assigning a Job to a Location
11-3
12Employee Management
Configuring Labor Management for Human Resources consists of the following high-level steps:
• Configuring organization settings, such as employee skill levels, working hours,and legal compliance.
You configure these settings after installing Labor Management. You update thesesettings as necessary to satisfy changing business requirements. In enterpriseorganizations, you assign the configurations to the locations.
• Configuring the employee information form to control viewing and editingpermissions for employee records.
You apply permissions to roles. You can also enable change tracking for auditing.
• Configuring and maintaining jobs, wages, pay rates, and employee jobassignments.
You set up job and labor categories to improve the accuracy and focus of wage-and job-related reports.
Organization Settings
You set up initial organization settings to set guidelines and restrictions on subsequentconfigurations. These settings include:
• Ethnicity
• Employee skill levels
• School districts
• School year calendars and vacation days
• Direct deposit banks
• Store work hours
• Reasons for change
You typically do not have to change these settings after you first define them.
Employee Information
You configure the employee information form using the Human Resources templatesto:
• Streamline the information available for viewing and editing.
• Add role-based permissions for viewing and editing the form.
• Employee create, edit, and assignment permissions by role.
• Configure the audit trail for changes to employee information.
12-1
Jobs, Wages, and Pay Rates
You configure settings for:
• The list of available jobs.
• Wages and pay rates.
• Job and labor categories for improved reporting data.
• Employee Home Locations and Away Locations
• Human Resources Templates and Permissions
• Assigning Human Resources Templates to Roles
• Configuring Access to Employee Classes by Role
• Employee Information Change Records
• Configuring Employee Change Tracking
• Importing Employee Information from a Microsoft Excel Spreadsheet
• Including Salaried Employees in Labor Cost Calculations
• Adding an Ethnicity
• Adding Skill Levels
• Adding a School District
• Assigning a School District to a Location
• Configuring a School Year and Vacation Days
• Adding a Direct Deposit Bank
• Assigning a Direct Deposit Bank to a Location
• Employee Maintenance
• Adding Employees
• Point-of-Sale Account Configuration
Employee Home Locations and Away LocationsWhen you add an employee to Labor Management, the user must assign theemployee to a location. The system handles the assignment as the home location forthe employee.
If an employee works at another location, you can assign them to the other location,known as an away store, through the Location Configuration tab. You must alsoassign the employee to a job at the away store. This ensures that the employee will bescheduled to work at one store at a time and prevents double booking.
Related Topics
• Assigning Work Hour Restrictions and Setting Store Hours
• Assigning Human Resources Templates to Roles
Chapter 12Employee Home Locations and Away Locations
12-2
Human Resources Templates and PermissionsYou can configure human resources templates to:
• Control viewing and editing permissions for entering and updating employeeinformation.
• Create pre-set values and guidelines for employees by location.
• Create and configure custom fields for additional information.
For example, you can configure a template for Store Managers, who typically do notneed to see or edit every available field.
You can further configure the template by hiding the necessary fields. While anadministrative Human Resources employee can view all the available fields, a StoreManager might only need to view and configure basic information. You can then hidefields such as Prefix and Suffix, hide region-specific options, and hide detailed addressinformation to only show basic contact information.
Assigning Human Resources Templates to Roles1. In Reporting and Analytics, click Labor, click Employee Administration, click
Admin, and then click Template Assignment.
2. For each role, select a template for the following columns:
The list of roles shown in this configuration screen depend on the Can BeAssigned in HR Form role permission.
a. Home Store Template: the template to use when creating an employee recordat an assigned location.
b. Away Store Template: the template to use when creating an employee recordwhile working as a visitor.
c. Home Store Edit Template: the template to use when editing an employeerecord at an assigned location.
d. Away Store Edit Template: the template to use when editing an employeerecord while working as a visitor.
Related Topics
• Employee Home Locations and Away Locations
Configuring Access to Employee Classes by Role1. In Reporting and Analytics, click Labor, click Employee Administration, click
Admin, and then click Access Employee Classes.
2. Select a role, and then click Configure.
3. Select the employee classes for which this role can add, edit, and assignemployees, and then click Save.
For example, if you grant a Shift Manager role privileges to all employee classesother than the General Manager and the Property Expert, the Shift Manager can:
• Create a new employee entry.
Chapter 12Human Resources Templates and Permissions
12-3
• View and edit the employee details of a bartender.
• Assign a new employee to the cashier class.
But the Shift Manager cannot view, edit, or assign employees to the GeneralManager or Property Expert class.
Employee Information Change RecordsYou can configure Employee Change Tracking rules to monitor changes made tospecific information in employee data. You can then generate the Employee ChangeTracking Report to view a log of changes containing details about the change, the dateand time of the change, and the user who made the change.
For example, if the organization tracks changes to First Name and Last Name, youcan run the Employee Change Tracking Report to see all cases of an employee namebeing changed. You can use this information to correct errors and to audit attempts atfraud.
Employee Change Tracking configurations can be in the following states:
• Active: The Tracking configuration has tracked at least one modification within aspecified activity time frame.
• Inactive: The Tracking configuration has tracked at least one modification but hasnot tracked a modification within a specified activity time frame.
• Deletable: The Tracking configuration has not tracked a modification and can bedeleted.
Configuring Employee Change Tracking1. In Reporting and Analytics, click Labor, click Employee Administration, click
Admin, and then click Employee Change Tracking.
2. For each data field you want to track:
a. Click Add, and then enter an identifier name.
b. Select the Table and then the corresponding Field Name, and then clickSave.
You can configure tracking for employee information detail fields, payroll wagefields, and for data from the Point-of-Sale application.
Importing Employee Information from a Microsoft ExcelSpreadsheet
If you are transferring employee information from a Point-of-Sale application, you canenter employee data into a provided Microsoft Excel spreadsheet, and then import thespreadsheet to perform a bulk entry of employee data. This method only enters basicaccount and personal data and does not function as an alternative for enteringemployee data through the employee administration interface.
1. In Reporting and Analytics, click Admin, and then click HR Employee Upload.
2. Right-click Enterprise Employee Worksheet, and save the file to your local drive.
Chapter 12Employee Information Change Records
12-4
3. Follow the instructions in the Microsoft Excel spreadsheet to populate a list ofemployee information, job and pay rate information, and Point-of-Sale applicationaccount information, and then save the file.
If you are using this method to update information for existing employees, click theOptions tab, and then change the Execution Mode value to 2.
4. Click Choose File, select the spreadsheet, and then click OK.
5. Click Import, and then wait for the confirmation screen to verify the importprocessed without errors.
6. In Reporting and Analytics, click Labor, click Employee Administration, and thenclick Employee.
7. Verify all imported employees, and update information for all employees asrequired by system configurations.
Including Salaried Employees in Labor Cost Calculations1. In Reporting and Analytics, click Labor, click Payroll Administration, click
Admin, and then click Labor Pay Rules.
2. Select Include Salaried Employees in Labor Costs to include wages paid tosalaried employees in Labor Cost reports.
3. Select Allocate Salaried Labor To Defined Salary Week to allocate anemployee’s salary equally for each salary week or the store.
4. Select Allocate Salaried Labor To Actual Clock in or Schedule Days toallocate an employee’s salary for each hour the employee is clocked in to work.The hourly amount adjusts as the employee clocks additional hours or as theemployee is scheduled for more hours.
5. Select Allocate Salaried Labor To Actual Clock in or Schedule Days toallocate an employee’s salary for each hour the employee is clocked in to work.The hourly amount adjusts as the employee clocks additional hours or as theemployee is scheduled for more hours.
6. Enter the Number of Hours in Salaried Labor Week to define the work hoursused by labor calculations when incorporating salaried labor.
7. Use the Effective From date editor to select the first day in which the rulebecomes active. You can use the Effective To date editor to select a day in whichthe rule becomes inactive.
8. Click Save.
Adding an Ethnicity1. In Reporting and Analytics, click Labor, click Employee Administration, click
Admin, and then click Ethnicity.
2. Click Add, enter the name, suffix, and sorting order for the ethnicity, and then clickSave.
Chapter 12Including Salaried Employees in Labor Cost Calculations
12-5

Adding Skill Levels1. In Reporting and Analytics, click Labor, click Employee Administration, click
Admin, and then click Skill Level.
2. Click Add, update the form, and then click Save.
a. Enter an integer between 1 and 10 for the Skill Level, where 10 is the leastproficient and 1 is an expert.
b. Enter an integer for Skill Level Value to quantify the skill level, with higherskill levels corresponding to higher skill level values.
For example, you can define three skill levels Expert, Intermediate, andNewbie. The values would be as follows:
Table 12-1 Example Skill Level Definitions
Name Skill Level Skill Level Value
Expert 1 100
Intermediate 2 75
Newbie 3 50
• Assigning Skill Levels to Jobs
• Adding a Job Category
• Adding a Labor Category
• Creating Stations
• Assigning Skill Levels to Jobs
Related Topics
• Scheduling
Adding a School District1. In Reporting and Analytics, click Labor, click Employee Administration, click
Admin, and then click School District.
2. Click Add, update the school district name and location, and then click Save.
3. You can now assign the school district to a location, and configure the school yearand vacation days for the district.
Assigning a School District to a Location1. In Reporting and Analytics, click Labor, click Employee Administration, click
Admin, and then click School District.
2. Select the school district you created, and then click Edit.
3. Click the Assign to Locations tab, select Assign for each location to which thisschool district applies, and then click Save.
Chapter 12Adding Skill Levels
12-6

4. You can now configure the school year and vacation days for the district.
Configuring a School Year and Vacation Days1. In Reporting and Analytics, click Labor, click Employee Administration, click
Admin, and then click School District.
2. Select a school district, click Edit, and then click the School District Calendarstab.
3. Click Add, configure the general parameters for the school year, and then clickSave.
a. Select the start and end dates for the school year.
b. Select the start and end times for a standard school day.
c. Select the days of the week in a standard school week.
4. Select the school year, click Edit, and then click the Vacation Days tab.
5. Add each vacation day or period, and then click Save.
a. Click Add, and then enter a name.
b. Select the start and end dates and times for the vacation day or period, andthen click Save.
Adding a Direct Deposit Bank1. In Reporting and Analytics, click Labor, click Employee Administration, click
Admin, and then click Payroll Bank.
2. Click Add, update the form, and then click Save.
a. Enter the address for the bank.
b. If applicable, enter a Building Society Roll Number.
c. Enter any information that Human Resources employees might need in theAlpha-Numeric Field.
3. You can now assign the bank to a location.
Assigning a Direct Deposit Bank to a Location1. In Reporting and Analytics, click Labor, click Employee Administration, click
Admin, and then click Payroll Bank.
2. Select a bank, and then click Edit.
3. Click the Assign to Locations tab, select Assign for each location to which thisbank applies, and then click Save.
Employee MaintenanceYou can create and maintain a database of employees containing the following sets ofinformation:
• Personal Information
Chapter 12Configuring a School Year and Vacation Days
12-7
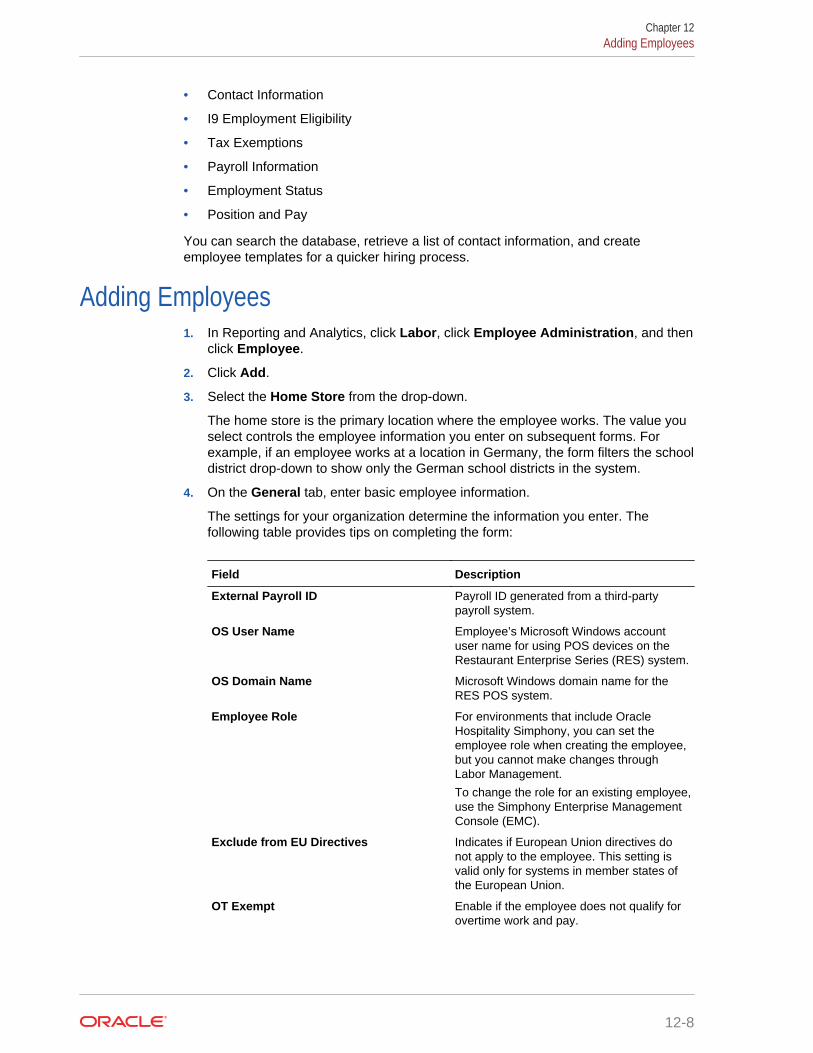
• Contact Information
• I9 Employment Eligibility
• Tax Exemptions
• Payroll Information
• Employment Status
• Position and Pay
You can search the database, retrieve a list of contact information, and createemployee templates for a quicker hiring process.
Adding Employees1. In Reporting and Analytics, click Labor, click Employee Administration, and then
click Employee.
2. Click Add.
3. Select the Home Store from the drop-down.
The home store is the primary location where the employee works. The value youselect controls the employee information you enter on subsequent forms. Forexample, if an employee works at a location in Germany, the form filters the schooldistrict drop-down to show only the German school districts in the system.
4. On the General tab, enter basic employee information.
The settings for your organization determine the information you enter. Thefollowing table provides tips on completing the form:
Field Description
External Payroll ID Payroll ID generated from a third-partypayroll system.
OS User Name Employee’s Microsoft Windows accountuser name for using POS devices on theRestaurant Enterprise Series (RES) system.
OS Domain Name Microsoft Windows domain name for theRES POS system.
Employee Role For environments that include OracleHospitality Simphony, you can set theemployee role when creating the employee,but you cannot make changes throughLabor Management.
To change the role for an existing employee,use the Simphony Enterprise ManagementConsole (EMC).
Exclude from EU Directives Indicates if European Union directives donot apply to the employee. This setting isvalid only for systems in member states ofthe European Union.
OT Exempt Enable if the employee does not qualify forovertime work and pay.
Chapter 12Adding Employees
12-8
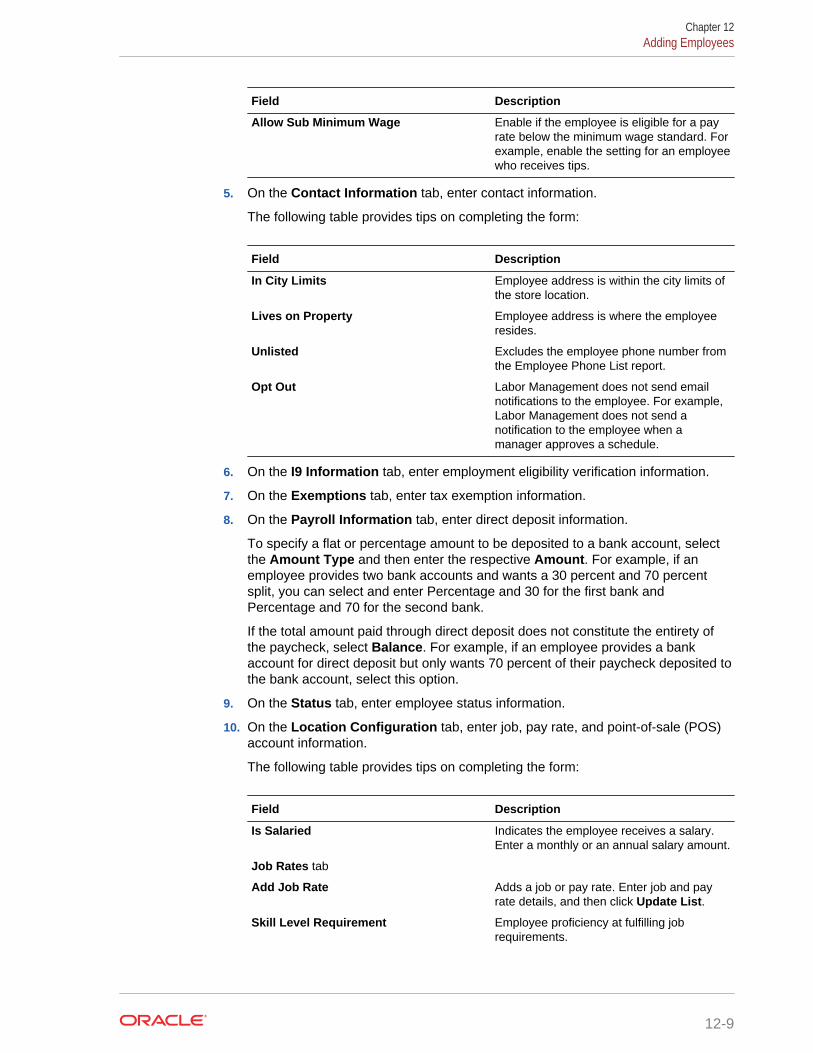
Field Description
Allow Sub Minimum Wage Enable if the employee is eligible for a payrate below the minimum wage standard. Forexample, enable the setting for an employeewho receives tips.
5. On the Contact Information tab, enter contact information.
The following table provides tips on completing the form:
Field Description
In City Limits Employee address is within the city limits ofthe store location.
Lives on Property Employee address is where the employeeresides.
Unlisted Excludes the employee phone number fromthe Employee Phone List report.
Opt Out Labor Management does not send emailnotifications to the employee. For example,Labor Management does not send anotification to the employee when amanager approves a schedule.
6. On the I9 Information tab, enter employment eligibility verification information.
7. On the Exemptions tab, enter tax exemption information.
8. On the Payroll Information tab, enter direct deposit information.
To specify a flat or percentage amount to be deposited to a bank account, selectthe Amount Type and then enter the respective Amount. For example, if anemployee provides two bank accounts and wants a 30 percent and 70 percentsplit, you can select and enter Percentage and 30 for the first bank andPercentage and 70 for the second bank.
If the total amount paid through direct deposit does not constitute the entirety ofthe paycheck, select Balance. For example, if an employee provides a bankaccount for direct deposit but only wants 70 percent of their paycheck deposited tothe bank account, select this option.
9. On the Status tab, enter employee status information.
10. On the Location Configuration tab, enter job, pay rate, and point-of-sale (POS)account information.
The following table provides tips on completing the form:
Field Description
Is Salaried Indicates the employee receives a salary.Enter a monthly or an annual salary amount.
Job Rates tab
Add Job Rate Adds a job or pay rate. Enter job and payrate details, and then click Update List.
Skill Level Requirement Employee proficiency at fulfilling jobrequirements.
Chapter 12Adding Employees
12-9

Field Description
Primary Job Indicates the selected job is the employee’sprimary job at the location.
Exclude from Staff Requirements Labor Management does not include theemployee when calculating staffingrequirements.
Exclude from Scheduler Employee and corresponding job do notappear in the editor when adjustingschedules.
Default Pay Rate Applies Labor Management uses the pay ratesconfigured for the job. Or, you can enter anOverride Pay Rate to enter a pay rate forthe employee.
11. On the Veteran Status tab, enter information for employees who served in themilitary.
12. On the Portal tab, enter account information so the employee can access and useOracle Hospitality Back Office.
13. Click Save.
Point-of-Sale Account Configuration1. Click the Location Configuration tab.
2. Select a location from the Filter by Location list, and then click the POSConfiguration tab.
3. Update information for the Point-of-Sale (POS) application account at the location,and then click Update List.
a. Enter and confirm the password for the POS Application and the PCApplication.
b. Select the Employee Class and Back Office Class for the employee. Thedrop-downs are populated by the POS applications.
c. Select the Employee Privilege to assign to the employee at the POSapplication. The drop-down list is populated by the Employee PrivilegeAdministration configurations.
d. Select whether the employee needs Cashier access, and specify the CashDrawer Id and the LDS ID (Liquor Dispensing) to which the employee needsaccess.
e. In the Password field, enter the POS login password for the employee.
If Oracle Hospitality RES 3700 is linked to Labor Management, you can clickGenerate Password to send an automatically-generated password to theemployee’s email address. This lets the employee set a new password.
f. Select User Account Disabled to disable the POS account.
g. Select In Training to designate the account as a training account.
h. To assign a magnetic card to the employee, swipe the card through anattached and configured magnetic card reader. The reader automaticallypopulates the Magnetic Card Number field with the number encoded on theback of the card.
Chapter 12Point-of-Sale Account Configuration
12-10

i. You can then specify an HTML page to associate with the employee’s login,and any additional alphabet and numeric information to be appended to theemployee’s POS account information.
Chapter 12Point-of-Sale Account Configuration
12-11

13Scheduling
Labor Management uses schedule profiles to control schedule appearance andsettings at a location. Labor Management can create schedules based on staffingrequirements generated from forecast and sales data or you can create schedules. Toset up Labor Management to create the schedules, configure the schedule profile forauto-scheduling. After Labor Management creates schedules, authorized employeescan edit the schedules.
Scheduling requirements can vary by organization. In most cases, setting upscheduling consists of the following high-level steps:
1. Verifying your environment has the following portlets and their privileges havebeen configured:
• Scheduling - Schedule
• Scheduling - Admin
• Staffing - Profile
The Oracle Hospitality Reporting and Analytics User Guide provides moreinformation on adding portlets.
2. Adding stations and skill levels (optional).
3. Configuring reason codes for blackout periods.
A blackout period is a time period during which employees cannot switch shifts orrequest time off. For example, you can configure a holiday weekend as a blackoutperiod. Employees receive an error when they try to switch shifts or request timeoff during a blackout period.
4. Configuring break rules and assigning them to locations.
5. Creating stations and assigning them to the organization level.
6. Creating schedule profiles.
7. Configuring schedule edit restrictions.
Schedule edit restrictions enable you to control schedule changes that result inlabor cost increases.
8. Assigning staffing profiles to the organization level.
• Employee Work Hours and Availability
• Schedule Approval Process
• Creating Schedule Profiles
• Configuring Schedule Edit Restrictions
• Configuring Employee Work Hours and Availability
• Creating Schedules
• Editing Schedules
• Submitting Schedules
13-1

• Approving Schedules
• Printing Schedules
• Sending Schedules by Email
• Creating Schedule Templates
• Customizing Schedule Appearance
• Configuring the Default View
• Staffing
Related Topics
• Assigning Staffing Profiles to Organization Levels
Related Topics
• Configuring Break Rules
• Assigning Break Rules to Locations
Related Topics
• Assigning Stations to a Location
• Adding Skill Levels
Employee Work Hours and AvailabilityLabor Management lets authorized employees set, incorporate, and override anemployee’s availability for schedules and for manual shift assignments. For example,you can configure the work hour rules and availability settings for a part-time employeewho has time commitments for classes.
The employee-specific work hour rules are configured so the employee must work atleast 20 hours in a week but is only required to work Monday, Wednesday, and Fridayper an agreement to accommodate classes on Tuesday and Thursday.
Table 13-1 Employee Work Hour Rules
Day of the Week Minimum Hours Maximum Hours
Week 20 40
Sunday 0 8
Monday 4 8
Tuesday 0 8
Wednesday 4 8
Thursday 0 8
Friday 4 8
Saturday 0 8
The employee availability settings are configured to specify unavailability on Tuesdayand Thursday to account for classes, preferred times on Monday, Wednesday, andFriday, and on-call status on weekends.
Chapter 13Employee Work Hours and Availability
13-2

Table 13-2 Employee Availability Settings
TimeSegment
All Day Event Start Day ofWeek
Start Time End Day ofWeek
End Time
Preferred No Monday 10:00 AM Monday 4:00 PM
Preferred No Wednesday 10:00 AM Wednesday 4:00 PM
Preferred No Friday 10:00 AM Friday 4:00 PM
Unavailable Yes Tuesday 12:00 AM Tuesday 11:45 PM
Unavailable Yes Thursday 12:00 AM Thursday 11:45 PM
On Call No Saturday 12:00 PM Saturday 9:00 PM
On Call No Sunday 12:00 PM Sunday 9:00 PM
Depending on the schedule profile, the forecast and automated schedule generatorcan take the preferred, unavailable, and on-call time segments as feedback forgenerating shifts and shift assignments. For example, during a week forecasted with abusy weekend, the system can schedule the employee to help with 3 hours onSaturday and on Sunday to account for the extra staffing needs.
Schedule Approval ProcessLabor Management includes a review and approval process for schedules. Eachschedule profile includes the ability to configure approval and automatic approvalsettings.
Blank
The schedule for a labor period begins without an approval status and can begenerated, edited, and saved by any authorized employee.
When an authorized employee clicks Submit in a schedule editor:
• If automatic approval is not enabled, the approval status changes to Pending.
• If automatic approval is enabled, the approval status changes to Approved orRejected.
Pending
A schedule in the Pending state cannot be changed.
Authorized employees can change the status to Approved or Rejected.
Rejected
The system does not implement a schedule in the Rejected state. Authorizedemployees can edit, save, and submit a rejected schedule.
Approved
A schedule in the Approved state cannot be changed, and the system implementsand enforces the shifts in an approved schedule. Authorized employees can then:
• Send the schedule by email.
Chapter 13Schedule Approval Process
13-3

• Make changes to the schedule, and then click Publish to submit the changedschedule for review. The system continues to enforce the approved schedule.
Creating Schedule Profiles1. In Reporting and Analytics, click Labor, click Schedule Admin, and then click
Schedule Profiles.
2. Click Add.
3. On the Scheduling Configuration tab, configure schedule properties.
4. On the Color Code Themes tab, assign colors to job and employee status.
Apply colors to job and employee status to differentiate between statuses whenworking with the schedule editor.
5. On the Blackout Period tab, configure blackout periods.
6. On the Schedule Place Holder tab, configure schedule placeholders.
After you create schedule profiles, you assign them to locations.
• Configuring Schedule Profile Properties
• Configuring Blackout Periods
• Color-Coding Job Types and Employee Status
• Configuring Staffing Placeholders
• Configuring Schedule Profile Properties
• Color-Coding Job Types and Employee Status
• Configuring Blackout Periods
• Configuring Staffing Placeholders
Configuring Schedule Profile Properties1. Click the Scheduling Configuration tab.
2. To use forecast and sales data from Oracle Hospitality Forecasting and Budgettogenerate staffing requirements for scheduling, select Enable Auto Scheduling.
3. To use shift pools, select Enable Shift Pool.
If an employee cannot work a scheduled shift, the employee can add the shift to apool so another employee can pick up the shift.
4. In the Max Number of Time off Requests a day field, enter the maximumnumber of requests per employee that the scheduler accommodates.
5. Configure the following schedule exceptions, or situations where the schedulerequires additional adjustments:
Chapter 13Creating Schedule Profiles
13-4
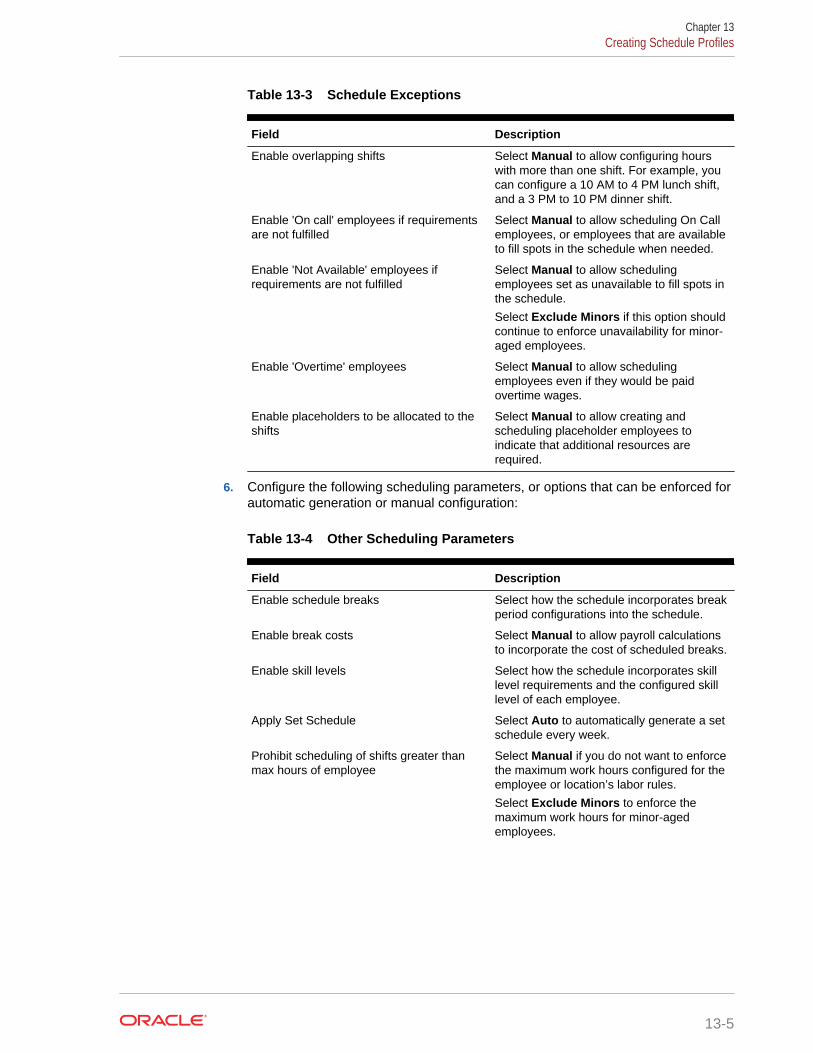
Table 13-3 Schedule Exceptions
Field Description
Enable overlapping shifts Select Manual to allow configuring hourswith more than one shift. For example, youcan configure a 10 AM to 4 PM lunch shift,and a 3 PM to 10 PM dinner shift.
Enable 'On call' employees if requirementsare not fulfilled
Select Manual to allow scheduling On Callemployees, or employees that are availableto fill spots in the schedule when needed.
Enable 'Not Available' employees ifrequirements are not fulfilled
Select Manual to allow schedulingemployees set as unavailable to fill spots inthe schedule.
Select Exclude Minors if this option shouldcontinue to enforce unavailability for minor-aged employees.
Enable 'Overtime' employees Select Manual to allow schedulingemployees even if they would be paidovertime wages.
Enable placeholders to be allocated to theshifts
Select Manual to allow creating andscheduling placeholder employees toindicate that additional resources arerequired.
6. Configure the following scheduling parameters, or options that can be enforced forautomatic generation or manual configuration:
Table 13-4 Other Scheduling Parameters
Field Description
Enable schedule breaks Select how the schedule incorporates breakperiod configurations into the schedule.
Enable break costs Select Manual to allow payroll calculationsto incorporate the cost of scheduled breaks.
Enable skill levels Select how the schedule incorporates skilllevel requirements and the configured skilllevel of each employee.
Apply Set Schedule Select Auto to automatically generate a setschedule every week.
Prohibit scheduling of shifts greater thanmax hours of employee
Select Manual if you do not want to enforcethe maximum work hours configured for theemployee or location’s labor rules.
Select Exclude Minors to enforce themaximum work hours for minor-agedemployees.
Chapter 13Creating Schedule Profiles
13-5

Table 13-4 (Cont.) Other Scheduling Parameters
Field Description
Prohibit scheduling of shifts less than minhours of employee
Select Manual if you do not want to enforcethe minimum work hours configured for theemployee or location’s labor rules.
Select Exclude Minors to enforce theminimum work hours for minor-agedemployees.
Select Suppress the warning messagesfor min weekly/monthly hours if you donot want Labor Management to show awarning when employees do not meet theminimum hour requirement.
Enforce Labor Scheduled Percent If your environment includes OracleHospitalityForecasting and Budget and youwant to enforce flexible hour percentages,select Manual, and then enter thepercentage you want to enforce. The systemcalculates the Forecast Sales values andenforces the value when you manuallycreate or configure a schedule.
7. If you enabled automatically generating schedules, configure the criteriaconsiderations:
Table 13-5 Scheduling Criteria Considerations
Field Description
Best cost Select whether to use the lowest possiblelabor cost among the available options. Forexample, if a site can choose betweenscheduling a cashier that makes $6.15 anhour and a cashier that makes $7.00 anhour, the automatic scheduler selects thecashier that makes $6.15 an hour if all otherconsiderations are equal.
Back to back shifts Select whether an employee can bescheduled for more than one consecutiveshifts.
Select Exclude Minors to exclude minor-aged employees from being scheduled forback-to-back shifts.
Employee maximum minimum hours Select whether to enforce maximum weeklyhours, maximum daily hours, and minimumdaily hours.
Select Exclude Minors if the threshold doesnot apply to minor-aged employees.
Set auto schedule length Select whether to use the same length inhours for every shift.
If you select Yes, enter the shift length in theAuto Schedule Length (Hours) field.
Chapter 13Creating Schedule Profiles
13-6
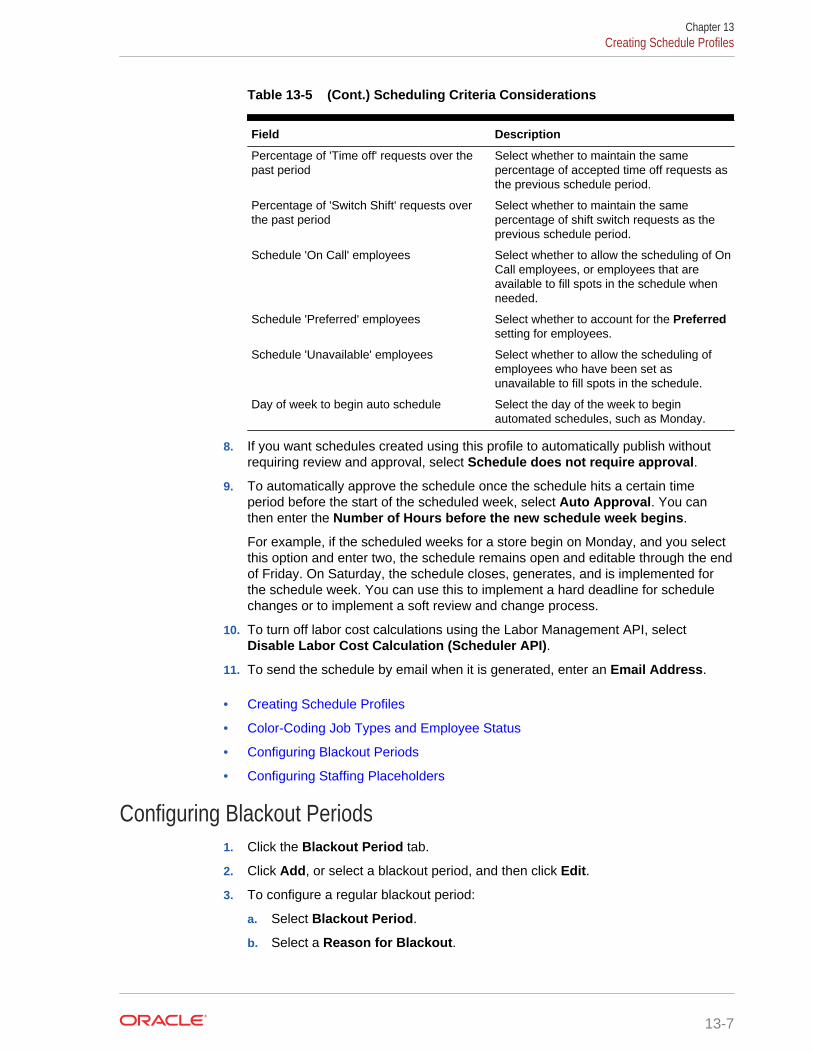
Table 13-5 (Cont.) Scheduling Criteria Considerations
Field Description
Percentage of 'Time off' requests over thepast period
Select whether to maintain the samepercentage of accepted time off requests asthe previous schedule period.
Percentage of 'Switch Shift' requests overthe past period
Select whether to maintain the samepercentage of shift switch requests as theprevious schedule period.
Schedule 'On Call' employees Select whether to allow the scheduling of OnCall employees, or employees that areavailable to fill spots in the schedule whenneeded.
Schedule 'Preferred' employees Select whether to account for the Preferredsetting for employees.
Schedule 'Unavailable' employees Select whether to allow the scheduling ofemployees who have been set asunavailable to fill spots in the schedule.
Day of week to begin auto schedule Select the day of the week to beginautomated schedules, such as Monday.
8. If you want schedules created using this profile to automatically publish withoutrequiring review and approval, select Schedule does not require approval.
9. To automatically approve the schedule once the schedule hits a certain timeperiod before the start of the scheduled week, select Auto Approval. You canthen enter the Number of Hours before the new schedule week begins.
For example, if the scheduled weeks for a store begin on Monday, and you selectthis option and enter two, the schedule remains open and editable through the endof Friday. On Saturday, the schedule closes, generates, and is implemented forthe schedule week. You can use this to implement a hard deadline for schedulechanges or to implement a soft review and change process.
10. To turn off labor cost calculations using the Labor Management API, selectDisable Labor Cost Calculation (Scheduler API).
11. To send the schedule by email when it is generated, enter an Email Address.
• Creating Schedule Profiles
• Color-Coding Job Types and Employee Status
• Configuring Blackout Periods
• Configuring Staffing Placeholders
Configuring Blackout Periods1. Click the Blackout Period tab.
2. Click Add, or select a blackout period, and then click Edit.
3. To configure a regular blackout period:
a. Select Blackout Period.
b. Select a Reason for Blackout.
Chapter 13Creating Schedule Profiles
13-7
Your administrator adds the blackout reason codes when setting up LaborManagement.
c. To set the blackout period only or a specific time range, enter start and endtimes for the blackout period. For example, if you enter 10 AM to 2 PM,employees can still request unavailability for the selected date range as longas they request times outside of the entered time range.
If you want the blackout period to encompass the whole day for the selecteddate range, select All Day Event.
d. Select start and end dates for the blackout period. You can then selectwhether the blackout period affects Selected Days of the Week within theselected date range, All Days within the selected date range, or only SelectedDays of Month within the selected date range.
e. Click Update List.
4. To configure a blackout period deadline before a new scheduled week:
a. Select Days before start of scheduled week.
b. Select a start and end date for the blackout deadline rule.
c. In the Days before start of scheduled week field, enter the number of daysafter which employees cannot request unavailability.
d. Click Update List.
• Creating Schedule Profiles
• Configuring Schedule Profile Properties
• Color-Coding Job Types and Employee Status
• Configuring Staffing Placeholders
Color-Coding Job Types and Employee StatusWhen you create the schedule profile, you can assign color codes to job types andemployee status.
1. Click the Color Code Themes tab.
2. For each job type, open the color picker, and then select the color.
3. Click the Legend tab.
4. For each employee status, open the color picker, and then select the color.
• Creating Schedule Profiles
• Configuring Schedule Profile Properties
• Configuring Blackout Periods
• Configuring Staffing Placeholders
Configuring Staffing PlaceholdersA placeholder is a visual indicator on a schedule that shows where you needemployees to satisfy staffing requirements.
1. Click the Schedule Place Holder tab.
Chapter 13Creating Schedule Profiles
13-8
2. Click Add, or select a placeholder and then click Edit.
3. Update or select resource detail information, and then click Update List:
a. Select the Job Category and Job that the placeholder indicates as required.
b. Enter the pay Rate for the job.
• Creating Schedule Profiles
• Configuring Schedule Profile Properties
• Color-Coding Job Types and Employee Status
• Configuring Blackout Periods
Configuring Schedule Edit Restrictions1. In Reporting and Analytics, click Labor, click Scheduling Admin, and then click
Schedule Edit Restrictions.
2. Specify restriction percentages for the roles that can edit schedules.
The percentage is a limit on the change in labor cost associated with schedulechanges. Labor Management does not let role members make schedule changesthat result in labor cost increases over the specified percentage.
3. Click Save.
Configuring Employee Work Hours and Availability1. In Reporting and Analytics, click Labor, click Employee Administration, and then
click Employee Availability.
2. Select the employee, and then click Edit.
3. In the Employee Work Rules section, enter the minimum and maximum hoursthat the employee can work per week and per day.
4. To add an availability setting:
a. In the Employee Availability section, click Add.
b. In the Time Segment drop-down, select whether to create an unavailabilityperiod, a period where the employee is available for on-call scheduling, and apreferred time period for scheduling.
c. Select the start and end day of the week for the segment. Labor Managementautomatically repeats the rule every week until you delete or modify the rule.
d. Select the start and end times for the segment, or select All Day Event todesignate the entirety of each day included in the segment.
e. Click Save.
You can now view employee availability intervals in the schedule editors. You canoverride availability intervals based on schedule configurations.
Creating Schedules1. In Reporting and Analytics, click Labor, click Schedule Editor, and then click
Basic Schedule Editor.
Chapter 13Configuring Schedule Edit Restrictions
13-9
2. Select the location, and then click Edit.
3. To zoom in on a day, double-click the day in the editor.
4. To copy a schedule from the previous week, click Copy Previous. This operationfails if a valid schedule was not submitted or generated for the previous week.
5. To copy a schedule from another week, click Copy Other Week. The operationfails if a valid schedule was not submitted or generated for the selected week.
6. To filter schedule data from the Filters pane, select a job category, job, oravailability status.
7. Click Shifts, and then select one of the following methods to add a shift:
• To add a fixed-length shift, drag a time block (for example, 7 hr) to theemployee row in the schedule editor.
• To add a custom-length shift, place the cursor in the employee row, and thendrag the cursor to define the start and end times.
• To move a shift to another employee, drag the shift to the new employee.
• To move all shifts from one employee to another employee, right-click thename of the current employee, select Assign To, and then select the newemployee.
8. To edit a shift:
• Drag the cursor to adjust the start time or end time.
• Right-click the shift, and then click Edit.
Editing Schedules1. In Reporting and Analytics, click Labor, click Schedule Editor, and then click
Basic Schedule Editor.
2. Select the location, and then click Edit.
3. To zoom in on a day, double-click the day in the editor.
4. To edit only the shift start and end times, drag the shift block start and end pointsto the new times.
5. To edit more shift details:
a. Right-click the shift block, and then click Edit.
b. Edit the shift details, and then click Save.
Submitting Schedules1. Click Calculate to update labor cost calculations. The schedule editor updates
total hours in real time, but does not calculate and update labor cost until you clickCalculate.
2. Click the Summary tab to view the labor costs for the week.
3. Click an employee name to view a summary of their assigned shifts.
4. Click the Schedule Notes tab and enter notes, considerations, or messages aboutthe schedule.
Chapter 13Editing Schedules
13-10
5. Click Save to check for schedule warnings and violations, and to save changes tothe schedule. You can save the schedule with warnings, but you must resolveviolations before you can save.
6. Click the Violation/Warning tab to review warnings and violations.
Warnings include scheduling employees outside of store work hours, andscheduling employees beyond their minimum or maximum work hours.
Violations include scheduling employees on Leave of Absence, or schedulingemployees with approved Time Off requests.
7. Click Submit to finalize a saved schedule and begin the schedule review andapproval process. Submitted schedules cannot be changed without requiringapproval.
If you made changes to an approved schedule, click Publish to submit thechanges for approval.
Approving Schedules1. In Reporting and Analytics, click Labor, click Schedule Editor, and then click
Schedule Approval/Rejection.
2. Enter the parameters for filtering the overview, and then click Display:
a. Select the Date that you want to view. The Schedule Approval/Rejectionpage shows the selected date and the following six days. The page does notuse labor weeks or financial weeks.
b. Select the approval Status that you want to view.
3. You can view a configured schedule by clicking Basic or Advanced in the ViewSchedule column, depending on the schedule editor(s) used in creating andconfiguring the schedule. The schedule editor opens for the selected location andlabor week.
4. To change the approval status of a schedule, select the new status from the drop-down list in the Status column, and then click Save.
Printing Schedules1. Click Print from the menu bar.
2. Select whether to order the schedule By Job or By Employee.
For example, if you select By Job, each row of the table corresponds to a job, andeach row includes a list of employees and shifts. If you select By Employee, eachrow of the table corresponds to an employee, and each row includes a list of jobsand shifts.
3. Select to Show End Times for each shift. If you do not select this option, theprinted schedules only include the start times for each shift.
4. Select a Job Code or Job Category from the drop-downs to filter the printedschedule.
5. Click View Printable Version for a printable version of the schedule.
Chapter 13Approving Schedules
13-11

Sending Schedules by EmailYou can use Labor Management to send approved schedules to employees throughemail.
1. In Reporting and Analytics, click Labor, click Schedule Editor, and then clickBasic Schedule Editor.
2. Select the location, and then click Edit.
3. Go to a week with an approved schedule.
4. Click Email.
5. Order the schedule By Job or By Employee.
For example, if you select By Job, each row of the table corresponds to a job, andeach row includes a list of employees and shifts. If you select By Employee, eachrow of the table corresponds to an employee, and each row includes a list of jobsand shifts.
6. Select to Show End Times for each shift. If you do not select this option, theprinted schedules include only the start times for each shift.
7. Select a Job Code or Job Category from the drop-downs to filter the printedschedule.
8. Click Email Schedule, and then enter the recipient email addresses.
Creating Schedule TemplatesLabor Management lets you create templates for setting up schedules.
1. In Reporting and Analytics, click Labor, click Schedule Editor, click AdvancedSchedule Editor, and then click Run Schedule Editor.
2. Select Save as weekly schedule, and then click Go.
Labor Management saves the schedule as a weekly schedule and imports theweekly schedule each week. You can select Copy from weekly schedule toimport shifts from the template to the schedule. The schedule editor does notimport shifts that are already assigned in the current template.
3. Select Save as set schedule, and then click Go.
Labor Management saves the schedule as a set template schedule. You canselect Copy from set schedule to import shifts from the template to the currentschedule. The schedule editor does not import shifts that are already assigned inthe current template.
4. Select Organize Template(s), and then click Go to open a dialog box for adding,editing, and deleting set templates.
Customizing Schedule Appearance1. Click Preferences.
2. In the Requirements Panel section:
Chapter 13Sending Schedules by Email
13-12
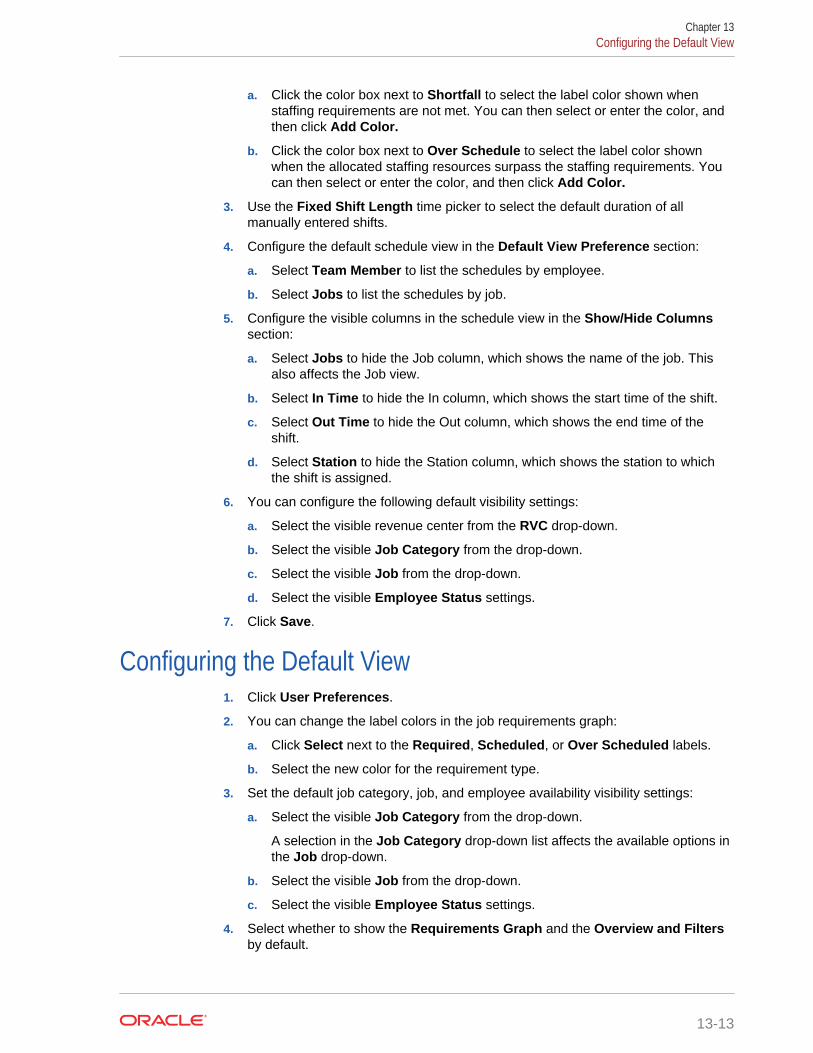
a. Click the color box next to Shortfall to select the label color shown whenstaffing requirements are not met. You can then select or enter the color, andthen click Add Color.
b. Click the color box next to Over Schedule to select the label color shownwhen the allocated staffing resources surpass the staffing requirements. Youcan then select or enter the color, and then click Add Color.
3. Use the Fixed Shift Length time picker to select the default duration of allmanually entered shifts.
4. Configure the default schedule view in the Default View Preference section:
a. Select Team Member to list the schedules by employee.
b. Select Jobs to list the schedules by job.
5. Configure the visible columns in the schedule view in the Show/Hide Columnssection:
a. Select Jobs to hide the Job column, which shows the name of the job. Thisalso affects the Job view.
b. Select In Time to hide the In column, which shows the start time of the shift.
c. Select Out Time to hide the Out column, which shows the end time of theshift.
d. Select Station to hide the Station column, which shows the station to whichthe shift is assigned.
6. You can configure the following default visibility settings:
a. Select the visible revenue center from the RVC drop-down.
b. Select the visible Job Category from the drop-down.
c. Select the visible Job from the drop-down.
d. Select the visible Employee Status settings.
7. Click Save.
Configuring the Default View1. Click User Preferences.
2. You can change the label colors in the job requirements graph:
a. Click Select next to the Required, Scheduled, or Over Scheduled labels.
b. Select the new color for the requirement type.
3. Set the default job category, job, and employee availability visibility settings:
a. Select the visible Job Category from the drop-down.
A selection in the Job Category drop-down list affects the available options inthe Job drop-down.
b. Select the visible Job from the drop-down.
c. Select the visible Employee Status settings.
4. Select whether to show the Requirements Graph and the Overview and Filtersby default.
Chapter 13Configuring the Default View
13-13

5. Click Save.
Chapter 13Configuring the Default View
13-14
14Employee Self Service
Employee Self Service enables you to work with scheduling functions through adesktop web browser or a mobile web browser. You log in to Reporting and Analyticsthrough the browser to access Employee Self Service functions.
• Configuring Employee Self Service Permissions
• Viewing Schedules
• Printing Schedules
• Sending Schedules by Email
• Requesting Time Off
• Requesting Time Off for Other Employees
• Requesting Shift Changes
• Approving Shift Change Requests
Configuring Employee Self Service Permissions1. Add or configure the MyScheduleESSPortlet for each user role.
2. To let users approve changes to the schedule, select Can Use ManagementRequest Approval.
3. Select Can View All Function to let users perform all scheduling functions,otherwise select the permissions you want to enable:
• Can Use Request Shift Change
• Can Use Request Time Off
• Can Use Shift Pool
4. To let users access the master data table for employee information when using amobile device, select Can Access Employee Master Data on Mobile ESS.
Viewing Schedules1. Log in to Reporting and Analytics.
2. Open the schedule list.
In a desktop web browser, click Employee Self Service in the side menu, andthen click Employee Schedule.
On a mobile device, tap Display Approved Schedules.
In a desktop browser, you can view a schedule for a specific week by selecting thedate from the date editor. On a mobile device, you can only view the schedule for thecurrent week.
14-1

Printing SchedulesYou can print schedules from a desktop web browser but not from a mobile device.
1. Log in to Reporting and Analytics.
2. Click Employee Self Service in the side menu, and then click EmployeeSchedule.
3. Click Print Current Schedule.
Sending Schedules by Email1. Log in to Reporting and Analytics.
2. To send a schedule by email from a desktop browser:
a. Click Employee Self Service in the side menu, and then click EmployeeSchedule.
b. Click Email Schedule.
c. Specify the email address.
To send the schedule to the recipient’s primary address, click Yes on theEmail Schedule to Primary Address prompt. To send the schedule to adifferent address, click No on the Email Schedule to Primary Addressprompt, type the address, and then click Send.
3. To send a schedule by email from a mobile device:
a. Tap Display Approved Schedules.
b. On the Approved Schedules page, tap Send via Email.
The system sends the schedule to the recipient’s primary email address.When using a mobile device, you cannot send the schedule to a differentemail address.
Requesting Time Off1. Log in to Reporting and Analytics.
2. To request time off from a desktop browser:
a. Click Employee Self Service in the side menu, and then click EmployeeSchedule.
b. Click Request Time Off.
c. Specify the date and time.
d. Select the reason for the request.
e. Click Save.
3. To request time off from a mobile device:
a. Initiate the request.
Tap Create/View Time Off Request or tap Create New Time Off Request ifthere are other requests pending.
Chapter 14Printing Schedules
14-2

b. Follow the prompts to specify the date and time, reason, and to confirm therequest.
c. On the summary page, tap Edit to change the request or tap Yes to submitthe request.
Requesting Time Off for Other EmployeesIf you have a manager role, you can request time off on behalf of employees.
1. Log in to Reporting and Analytics.
2. Click Employee Self Service in the side menu, and then click ManagementRequest Approval.
3. Select the location, and then select the employee.
4. Select the date, time, and reason for the request.
5. Click Save.
Requesting Shift ChangesLabor Management Employee Self Service enables you to request shift changes. Inmost cases, you can request changes from a desktop browser only. You can sendshifts to a pool and take shifts from a pool from a desktop browser and a mobiledevice.
1. Log in to Reporting and Analytics.
2. Click Employee Self Service in the side menu, and then click EmployeeSchedule.
3. Select the shift, and then click Request Change.
4. To request the change to the shift start time:
a. Select Change Start Time, and then select the date and time.
b. Type a note, and then click Save.
5. To assign the shift to another employee:
a. Select Send to another Employee, and then select the employee.
b. Type a note, and then click Save.
6. To accept or reject a shift sent to you from another employee, select AcceptRequest or Reject Request.
7. To withdraw the change request:
a. Select Withdraw Request.
b. Type a note, and then click Save.
8. To send the shift to a shift pool in a desktop browser:
a. Select Send to Shift Pool.
b. Type a note, and then click Save.
9. To send the shift to a shift pool on a mobile device:
a. Tap Assign Shift to Shift Pool.
Chapter 14Requesting Time Off for Other Employees
14-3

b. Select the shift, and then tap Next.
10. To take shifts from a shift pool in a desktop browser:
a. Click Shift Pool, and then select the shifts.
b. Click Apply.
11. To take shifts from a shift pool on a mobile device:
a. Tap Take Shift from Shift Pool, and then select the shift.
b. Tap Next.
Approving Shift Change RequestsIf you have a manager role, you can approve employee change requests, such asadding shifts to a shift pool or taking shifts from a shift pool. You can approve requestsin a desktop web browser only, not on a mobile device.
1. Log in to Reporting and Analytics.
2. Click Employee Self Service in the side menu, and then click ManagementRequest Approval.
3. To view all requests pending approval, select Pending from the Status drop-down.
4. To filter requests by type, select the type from the Request Type drop-down.
5. Select the change request, and then click Apply.
Chapter 14Approving Shift Change Requests
14-4

15Staffing
Labor Management can use forecast and sales data to generate staffing requirementsfor a labor period or you can manually generate them. Use the staffing requirementsas a guideline for creating schedules. Setting up Labor Management for staffingrequirements consists of the following high-level steps:
1. Creating a forecast profile.
2. Assigning the forecast profile to a location.
3. Creating a staffing profile.
4. Assigning the staffing profile to the location.
5. Generating the staffing requirements.
The Oracle Hospitality Forecasting and Budget User Guide provides more informationon forecast profiles.
You can set up the schedule profile to have Labor Management use the staffingrequirements as input to automatically generate schedules.
• Choosing a Staffing Method
• Creating Staffing Profiles
• Adding Jobs to a Staffing Profile
• Defining General Forecast Requirements
• Defining Forecast Productivity Requirements
• Defining Shift Requirements
• Defining Fixed Resource Requirements
• Defining Recipe Requirements
• Defining Advanced General Requirements
• Assigning Skill Levels to Jobs
• Assigning Stations to a Location
• Assigning Staffing Profiles to Organization Levels
• Creating Stations
• Scheduling
Choosing a Staffing MethodWhen you create a staffing profile, you add jobs to the profile, and then you select themethod Labor Management uses to calculate staffing requirements for each job. Usethe following table to access more information on staffing methods.
15-1

Table 15-1 Staffing Methods
I Want To Go To
Define requirements by setting generalthreshold values based on one or two forecastprofiles and forecast components, such assales and checks.
Example: Forecast threshold
Defining General Forecast Requirements
Define requirements by applying a productivityfactor to a forecast. A productivity factor is anumeric productivity level your organizationassigns to a specific job.
Example: Forecast productivity
Defining Forecast Productivity Requirements
Define staffing requirements for job functions,such as cashiers and servers. You set a netsales threshold and Labor Managementproposes the number of employees to staffbased on forecast values.
Example: Shift
Defining Shift Requirements
Define staffing requirements for job functions,such as cashiers and servers, for day parts foreach day of the week. You set a net salesthreshold and Labor Management proposesthe number of employees to staff based on thefixed resource requirements and forecastvalues.
Example: Fixed resources
Defining Fixed Resource Requirements
Define staffing requirements according to thelevel of effort required to prepare menu items.You create skills, create stations, and thenassign skill level requirements to the jobsassociated with the profiles.
Example: Recipe
Defining Recipe Requirements
Define staffing requirements by combiningstaffing methods:• Labor resource requirements by shifts.• Labor resource requirements by
forecasting components.• Labor resource requirements for non-
sales-driven activities, such as cleaningequipment and performing administrativetasks.
Example: Advanced General
Defining Advanced General Requirements
General Step
Define general forecast thresholds and assign staffing requirements based on thethresholds, as described in the following examples:
Chapter 15Choosing a Staffing Method
15-2
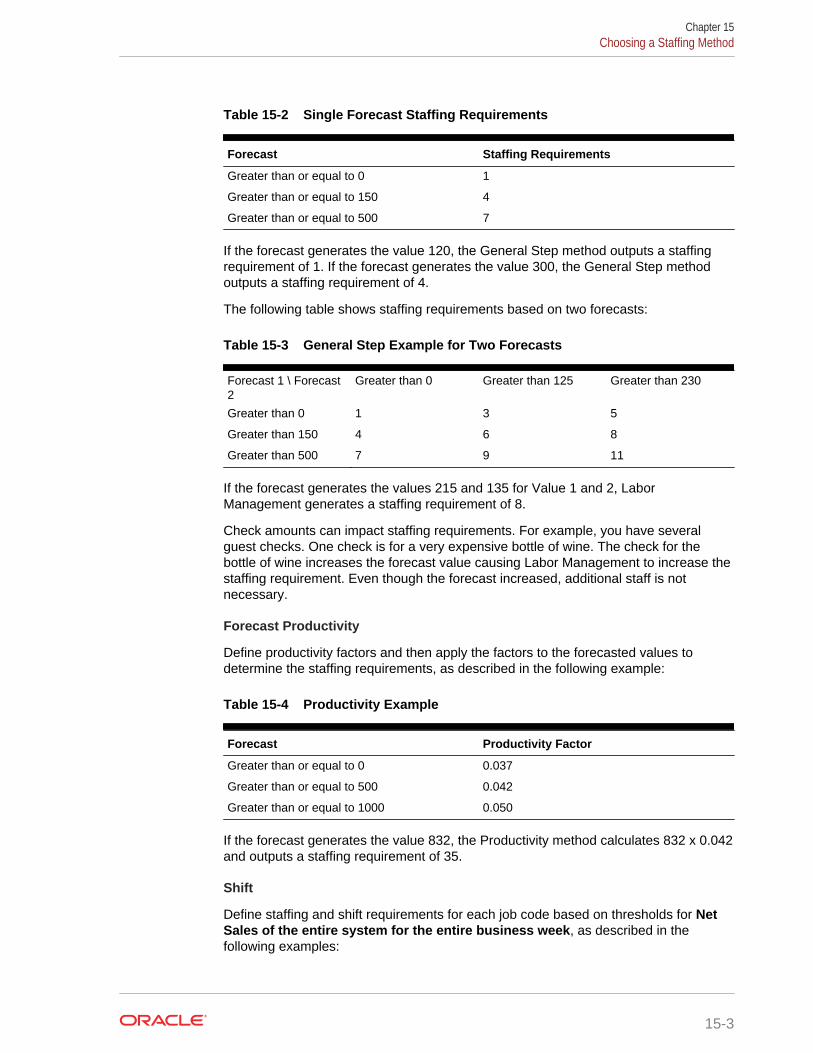
Table 15-2 Single Forecast Staffing Requirements
Forecast Staffing Requirements
Greater than or equal to 0 1
Greater than or equal to 150 4
Greater than or equal to 500 7
If the forecast generates the value 120, the General Step method outputs a staffingrequirement of 1. If the forecast generates the value 300, the General Step methodoutputs a staffing requirement of 4.
The following table shows staffing requirements based on two forecasts:
Table 15-3 General Step Example for Two Forecasts
Forecast 1 \ Forecast2
Greater than 0 Greater than 125 Greater than 230
Greater than 0 1 3 5
Greater than 150 4 6 8
Greater than 500 7 9 11
If the forecast generates the values 215 and 135 for Value 1 and 2, LaborManagement generates a staffing requirement of 8.
Check amounts can impact staffing requirements. For example, you have severalguest checks. One check is for a very expensive bottle of wine. The check for thebottle of wine increases the forecast value causing Labor Management to increase thestaffing requirement. Even though the forecast increased, additional staff is notnecessary.
Forecast Productivity
Define productivity factors and then apply the factors to the forecasted values todetermine the staffing requirements, as described in the following example:
Table 15-4 Productivity Example
Forecast Productivity Factor
Greater than or equal to 0 0.037
Greater than or equal to 500 0.042
Greater than or equal to 1000 0.050
If the forecast generates the value 832, the Productivity method calculates 832 x 0.042and outputs a staffing requirement of 35.
Shift
Define staffing and shift requirements for each job code based on thresholds for NetSales of the entire system for the entire business week, as described in thefollowing examples:
Chapter 15Choosing a Staffing Method
15-3
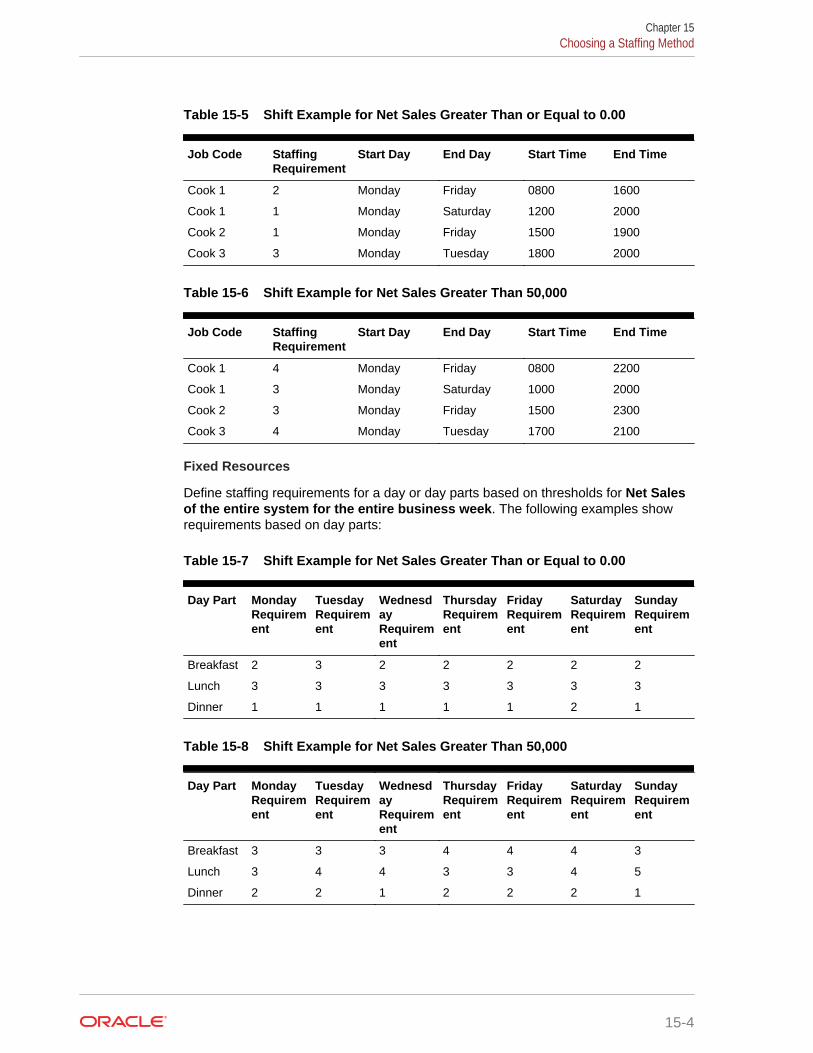
Table 15-5 Shift Example for Net Sales Greater Than or Equal to 0.00
Job Code StaffingRequirement
Start Day End Day Start Time End Time
Cook 1 2 Monday Friday 0800 1600
Cook 1 1 Monday Saturday 1200 2000
Cook 2 1 Monday Friday 1500 1900
Cook 3 3 Monday Tuesday 1800 2000
Table 15-6 Shift Example for Net Sales Greater Than 50,000
Job Code StaffingRequirement
Start Day End Day Start Time End Time
Cook 1 4 Monday Friday 0800 2200
Cook 1 3 Monday Saturday 1000 2000
Cook 2 3 Monday Friday 1500 2300
Cook 3 4 Monday Tuesday 1700 2100
Fixed Resources
Define staffing requirements for a day or day parts based on thresholds for Net Salesof the entire system for the entire business week. The following examples showrequirements based on day parts:
Table 15-7 Shift Example for Net Sales Greater Than or Equal to 0.00
Day Part MondayRequirement
TuesdayRequirement
WednesdayRequirement
ThursdayRequirement
FridayRequirement
SaturdayRequirement
SundayRequirement
Breakfast 2 3 2 2 2 2 2
Lunch 3 3 3 3 3 3 3
Dinner 1 1 1 1 1 2 1
Table 15-8 Shift Example for Net Sales Greater Than 50,000
Day Part MondayRequirement
TuesdayRequirement
WednesdayRequirement
ThursdayRequirement
FridayRequirement
SaturdayRequirement
SundayRequirement
Breakfast 3 3 3 4 4 4 3
Lunch 3 4 4 3 3 4 5
Dinner 2 2 1 2 2 2 1
Chapter 15Choosing a Staffing Method
15-4

Recipe
Define staffing requirements based on the effort required to prepare menu items. Forexample, you specify 90 seconds as the effort required to prepare a pizza, and theforecasted value of pizza sales for a shift is 250. The total effort required to makepizzas for the shift is 22,500 seconds (90 x 250) or 375 minutes. To determine staffingrequirements for 15-minute intervals for the forecast, the total effort in minutes isdivided by 15 (375/15) for a staffing requirement of 25.
Advanced General
Combines the shift method and the general step forecast threshold method. Theadvanced general method enables you to configure:
• Labor resource requirements by shifts.
• Labor resource requirements by forecasting components.
• Labor resource requirements for non-sales-driven activities, such as cleaningequipment and performing administrative tasks.
Related Topics
• Creating Staffing Profiles
• Adding Jobs to a Staffing Profile
• Assigning Skill Levels to Jobs
Related Topics
• Defining General Forecast Requirements
Related Topics
• Defining Forecast Productivity Requirements
Related Topics
• Defining Shift Requirements
Related Topics
• Defining Fixed Resource Requirements
Related Topics
• Defining Recipe Requirements
Related Topics
• Defining Advanced General Requirements
Creating Staffing Profiles1. In Reporting and Analytics, click Labor, click Staffing Profile, and then click
Staffing Profile Creation.
2. Click Add, and then type a profile name and description.
3. To consolidate all requirements within the staffing profile by the job code, selectAggregate Requirements by Job Code.
4. Click Save.
Chapter 15Creating Staffing Profiles
15-5

5. Add jobs to the staffing profile, and then define staffing requirements for the jobs.
• Adding Jobs to a Staffing Profile
• Assigning Skill Levels to Jobs
Related Topics
• Choosing a Staffing Method
Adding Jobs to a Staffing Profile1. In Reporting and Analytics, click Labor, click Staffing Profile, and then click
Staffing Profile Creation.
2. Select the profile from the table, and then click Add Job.
3. Select the Job Category or Job Code.
Selecting a category applies the calculation method to all the jobs associated withthe category. For example, a front-of-house (FOH) value applies to hosts,bartenders, waiters, and waitresses. Selecting a code applies the calculationmethod to a specific job such as a bartender. You can use skill requirements forjob categories to control baseline requirements for all jobs that belong to acategory.
You can exclude an employee from staffing requirement calculations for a jobwhen you define the job and pay settings for the employee.
4. Type a labor name and description, such as Bar and Runner.
5. Select the staffing method from the Method drop-down.
6. Select Active to enable the job.
7. To define requirements for the selected staffing method, click Next.
• Creating Staffing Profiles
• Assigning Skill Levels to Jobs
Related Topics
• Choosing a Staffing Method
• Defining General Forecast Requirements
• Defining Forecast Productivity Requirements
• Defining Shift Requirements
• Defining Fixed Resource Requirements
• Defining Recipe Requirements
• Defining Advanced General Requirements
Defining General Forecast Requirements1. Select the job duration:
To define requirements for day parts, such as breakfast and lunch, select DayPart, and then click Next.
Chapter 15Adding Jobs to a Staffing Profile
15-6

To define requirements for the entire day, select Day, and then click Next.
2. Define job settings for the day or day parts. If you selected Day in step 1, start withstep 2.c.
a. To define different settings for each day part, deselect Day Part. To apply thesame settings to each day part, select Day Part.
b. In the Duration drop-down, select the length of time for day parts as a wholeor for each day part.
c. Select a Lead/Lag value.
Lead: When determining the number of employees to fill a job, LaborManagement includes a time period leading up to the staffing requirement. Forexample, a location needs two servers between 11:15 a.m. and 11:30 a.m. Ifyou specify a lead duration of 15, Labor Management determines the locationneeds the two servers starting at 11:00 a.m.
Lag: When determining the number of employees to fill a job, LaborManagement includes a time period after the staffing requirement. Forexample, a location expects a dinner rush from 5:00 p.m. to 8 p.m. Since thereare not many dishes to wash at the beginning of the rush, the location needsonly one dishwasher from 4:00 p.m. to 6:00 p.m. Labor Management detects asharp increase in sales from 5:15 p.m. to 5:45 p.m., meaning there are moredirty dishes. Set a lag duration value to staff more dishwashers starting at 6:00p.m.
d. To assign the job settings to revenue centers, click Select, select the revenuecenters, and then click Assign.
3. Define driver settings for the day or parts:
a. Select the number of drivers:
One Staff Driver: Specify labor quantity threshold values for one forecastprofile.
Two Staff Driver: Specify labor quantity threshold values for two forecastprofiles.
b. Select the Forecast Profile and the Forecast Component.
c. To associate order types with the selected profile, click Order Type, select theorder types, and then click Assign.
d. To associate menu items with the selected profile, click Menu Item, select themenu items and groups, and then click Assign.
e. In the Requirement section, specify the labor quantities needed for thresholdvalues.
f. If necessary, repeat these substeps for the second driver.
4. Click Save.
Related Topics
• Choosing a Staffing Method
• Adding Jobs to a Staffing Profile
• Defining Forecast Productivity Requirements
• Defining Shift Requirements
Chapter 15Defining General Forecast Requirements
15-7
• Defining Fixed Resource Requirements
• Defining Recipe Requirements
• Defining Advanced General Requirements
Defining Forecast Productivity Requirements1. Select the job duration:
To define requirements for day parts, such as breakfast and lunch, select DayPart, and then click Next.
To define requirements for the entire day, select Day, and then click Next.
2. Define job settings for the day or day parts. If you selected Day in step 1, start withstep 2.c.
a. To define different settings for each day part, deselect Day Part. To apply thesame settings to each day part, select Day Part.
b. In the Duration drop-down, select the length of time for day parts as a wholeor for each day part.
c. Select a Lead/Lag value.
Lead: When determining the number of employees to fill a job, LaborManagement includes a time period leading up to the staffing requirement. Forexample, a location needs two servers between 11:15 a.m. and 11:30 a.m. Ifyou specify a lead duration of 15, Labor Management determines the locationneeds two servers starting at 11:00 a.m.
Lag: When determining the number of employees to fill a job, LaborManagement includes a time period after the staffing requirement. Forexample, a location expects a dinner rush from 5:00 p.m. to 8 p.m. Since thereare not many dishes to wash at the beginning of the rush, the location needsonly one dishwasher from 4:00 p.m. to 6:00 p.m. Labor Management detects asharp increase in sales from 5:15 p.m. to 5:45 p.m., meaning there are moredirty dishes. Set a lag duration value to staff more dishwashers starting at 6:00p.m.
d. To associate the job settings with revenue centers, click Select, select therevenue centers, and then click Assign.
3. Define driver settings for the day or for day parts:
a. Select the Forecast Profile.
b. To associate order types with the selected profile, click Order Type, select theorder types, and then click Assign.
c. To associate menu items with the selected profile, click Menu Item, select themenu items and groups, and then click Assign.
d. In the Requirement section, specify productivity factors for threshold values.
4. Click Save.
Related Topics
• Choosing a Staffing Method
• Adding Jobs to a Staffing Profile
• Defining General Forecast Requirements
Chapter 15Defining Forecast Productivity Requirements
15-8
• Defining Shift Requirements
• Defining Fixed Resource Requirements
• Defining Recipe Requirements
• Defining Advanced General Requirements
Defining Shift Requirements1. Select the Forecast Profile.
2. To associate the requirements with a revenue center, click Select, select therevenue centers, and then click Assign.
3. In the Net Sales field, specify the net sales threshold value.
4. Define the labor requirements for the shift:
a. In the Count field, specify the number of employees.
b. Select the days of the week.
c. Select the shift start and end times for the selected days.
d. To define labor requirements for another shift, click Add Row, and then repeatthese substeps.
5. To add a net sales threshold, click Add Matrix.
6. Click Save.
Related Topics
• Choosing a Staffing Method
• Adding Jobs to a Staffing Profile
• Defining General Forecast Requirements
• Defining Forecast Productivity Requirements
• Defining Fixed Resource Requirements
• Defining Recipe Requirements
• Defining Advanced General Requirements
Defining Fixed Resource Requirements1. Select the job duration:
To define requirements for day parts, such as breakfast and lunch, select DayPart, and then click Next.
To define requirements for the entire day, select Day, and then click Next.
2. Define job settings for the day or day parts.
a. Select the Forecast Profile.
b. To associate the job settings with revenue centers, click Select, select therevenue centers, and then click Assign.
c. In the Net Sales field, specify the net sales threshold value.
Chapter 15Defining Shift Requirements
15-9

d. Specify the number of employees needed for each day of the week or for eachday part for each day of the week.
3. To add a net sales threshold, click Add Matrix.
4. Click Save.
Related Topics
• Choosing a Staffing Method
• Adding Jobs to a Staffing Profile
• Defining General Forecast Requirements
• Defining Forecast Productivity Requirements
• Defining Shift Requirements
• Defining Recipe Requirements
• Defining Advanced General Requirements
Defining Recipe RequirementsBecause there is a dependency between skill level assignments, station assignments,and recipe staffing requirements, set up the assignments when you define the staffingrequirements.
1. Select the Forecast Profile.
2. To assign order types to the job, click Order Type, select the order types, andthen click Assign.
3. To assign revenue centers to the job, click Revenue Center, select the revenuecenters, and then click Assign.
4. To assign menu items to the job, click Menu Item, select the menu items andgroups, and then click Assign.
5. Select a Lead/Lag value.
Lead: When determining the number of employees to fill the job, LaborManagement includes a time period leading up to the staffing requirement. Forexample, a location needs two cooks for a dinner rush from 5:00 p.m. to 7:00 p.m.To prepare for the rush, you specify a lead duration of 15. Labor Managementdetermines the location needs the two cooks starting at 4:45 p.m.
Lag: When determining the number of employees to fill a job, Labor Managementincludes a time period after the staffing requirement. For example, a locationanticipates a lunch rush from 11:00 a.m. to 1:00 p.m. Labor Management. LaborManagement detects burger sales sharply increase starting at 12:15 p.m. Set a lagvalue to add another grill cook starting at 12:00 p.m.
6. In the Duration for Lead/Lag field, specify the lead or lag duration in 15-minuteintervals.
7. In the Default Efforts Required field, specify the amount of time it takes toprepare the item in seconds.
8. Click Save.
• Assigning Skill Levels to Jobs
Chapter 15Defining Recipe Requirements
15-10

• Assigning Stations to a Location
Related Topics
• Choosing a Staffing Method
• Adding Jobs to a Staffing Profile
• Defining General Forecast Requirements
• Defining Forecast Productivity Requirements
• Defining Shift Requirements
• Defining Fixed Resource Requirements
• Defining Advanced General Requirements
Defining Advanced General Requirements1. Select the number of drivers Labor Management uses when generating the
requirements.
2. On the Fixed Resource tab, define shift settings for the job:
a. Select the days, start time, and end time.
b. In the Labor QTY field, specify the number of employees needed to fill theshift.
c. To add a shift, click Add Row.
3. On the Additional Resources tab, define job settings according to thresholds forforecast values.
4. On each day part tab, define job settings according to thresholds for forecastvalues.
5. On each Day or day part tab, in the Requirement section:
6. Click Save.
Related Topics
• Choosing a Staffing Method
• Adding Jobs to a Staffing Profile
• Defining General Forecast Requirements
• Defining Forecast Productivity Requirements
• Defining Shift Requirements
• Defining Fixed Resource Requirements
• Defining Recipe Requirements
Assigning Skill Levels to JobsIf you defined staffing requirements for jobs according to the level of effort needed toprepare menu items, you can assign skill levels to the jobs. Before you assign skilllevels to jobs, verify you have completed the following tasks:
• Added job codes
Chapter 15Defining Advanced General Requirements
15-11

• Added job categories
• Added skill levels
• Created stations
1. In Reporting and Analytics, click Labor, click Staffing Admin, and then clickAssign Skill Levels to Staff Requirements.
2. To limit skill level assignments and requirements to one station, select EnforceUnique Station.
3. Click Add, or select a job category or job code requirement and then click Edit.
4. Select a Job Category or Job Code.
Job categories apply to all jobs that belong to the category. You can use skillrequirements for job categories to control baseline requirements for all jobs thatbelong to a category.
5. To activate the skill requirement, select Active.
6. Click Day Part, select the day parts for which the skill requirement applies, andthen click Assign.
7. Select the days of the week for which the skill requirement applies, and then clickNext.
8. In the Requirement field, enter an estimated number of employees required to fillthe job category or job code.
9. For each configured skill level, enter the number of employees to meet the skillrequirement. The total number of employees across the skill levels cannot behigher than the number entered in Requirement. Labor Managementautomatically calculates the number of employees that can be Any Level.
10. For each skill level with at least one employee, click Assign Skills to Station tospecify the station breakdown for the requirement.
a. Click Add.
b. Select a station, and then enter the employee Requirement.
c. Repeat the process until you assign all employees to stations, and then clickSave.
For example, if you need three employees with a level 3 skill requirement, youcan assign one to the Drink Bar station, one to the Grill station, and one to AnyStation. Assign all three required employees.
11. Click Save.
• Creating Staffing Profiles
• Adding Jobs to a Staffing Profile
Related Topics
• Choosing a Staffing Method
• Defining Recipe Requirements
• Assigning Stations to a Location
• Adding a Job Category
• Adding a Labor Category
Chapter 15Assigning Skill Levels to Jobs
15-12

• Adding Skill Levels
• Creating Stations
• Adding Skill Levels
Assigning Stations to a LocationIf you defined staffing requirements for jobs according to the level of effort needed toprepare menu items, assign stations to a location.
1. In Reporting and Analytics, click Labor, click Staffing Admin, and then clickStation/Sections Definitions.
2. To assign more than one station to one location (for example, after adding a newlocation):
a. Click the Multiple Stations to One Location tab.
b. Select the location from the Locations list.
c. In the Stations section, use the arrows to assign the stations.
d. Click Apply to continue making changes, or click Save.
3. To assign one station to more than one location (for example, after adding astation for use by all stores):
a. Click the Single Station to Multiple Locations tab.
b. Select the station from the Stations drop-down.
c. Select the Locations.
d. Click Apply to save and continue making changes, or click Save.
• Defining Recipe Requirements
• Assigning Skill Levels to Jobs
Related Topics
• Scheduling
Assigning Staffing Profiles to Organization LevelsLocations cannot use staffing profiles until you associate the profiles with organizationlevels.
1. In Reporting and Analytics, click Labor, click Staffing Profile, and then clickAssign Profiles to Organization Level.
2. To search for a level, type part of the location name, and then click Search.
3. In the row for the organization level, select the profile from the Staffing Profiledrop-down.
4. To view staffing profiles assigned to a location with a forecast profile different thanthe forecast profile assigned to the organization, click Mismatch of ForecastProfiles, and then update the profiles.
5. To save changes when working with multiple locations, click Apply, or click Saveto save all changes.
Chapter 15Assigning Stations to a Location
15-13

Related Topics
• Scheduling
Creating StationsA station is an area within a location. For example, the grill, the pantry, and the deepfryer are stations in the kitchen. After you create stations, you can assign them toshifts when editing schedules. In most cases, you use stations when basing staffingrequirements on the effort required to prepare menu items.
1. In Reporting and Analytics, click Labor, click Staffing Admin, and then clickStation/Sections Definitions.
2. Click Add, or select a station and then click Edit.
3. Update the Name and Description, and then click Save.
• Assigning Skill Levels to Jobs
• Adding a Job Category
• Adding a Labor Category
• Adding Skill Levels
Chapter 15Creating Stations
15-14


