34
REX GAME STUDIOS, LLC / MILITARY VISUALIZATIONS INC. Page 2 USER GUIDE LAST UPDATED NOVEMBER 30, 2016 ®

REX GAME STUDIOS, LLC / MILITARY VISUALIZATIONS INC. Page 2
USER GUIDELAST UPDATED NOVEMBER 30, 2016
®
REX GAME STUDIOS, LLC / MILITARY VISUALIZATIONS INC. Page 2
Table of ContentsIntroduction to the WX Advantage Radar .................................................................................................3
Features at a Glance ...........................................................................................................................................4
CHAPTER 1Software Installation Procedure ....................................................................................................................5
CHAPTER 2Gauge Installation: How to Install the Weather Radar Into an Aircraft .......................................10
CHAPTER 3How to Edit Gauge Properties ....................................................................................................................15
CHAPTER 4Gauge Removal: How to Remove the Weather Radar From an Aircraft .....................................19
CHAPTER 5WX Advantage Radar Functions .................................................................................................................22
CHAPTER 6How to Display the Weather Radar Within the Simulator ...............................................................24
CHAPTER 7Weather Radar Flight Operations Test Mode Operations ....................................................................................................................25 Weather Avoidance .........................................................................................................................26 Tilt Management During Flight Operations ..........................................................................27 Turbulence Detection .....................................................................................................................28 Gain Control .......................................................................................................................................28 Weather Radar Rescan Function ................................................................................................29 Weather Radar Version Info .........................................................................................................29 Identifying Dangerous Weather .................................................................................................30 Tight Gradient Radar Echoes .......................................................................................................30 U-Shaped, Hooked, or Fingered Radar Echoes ....................................................................30
CHAPTER 8Radar Principles Using Weather Radar to Avoid Bad Weather ........................................................................31 Thunderstorm Flying .......................................................................................................................32 Shadowed Areas ...............................................................................................................................32
CHAPTER 9Product Support ...............................................................................................................................................33
CHAPTER 10EULA .................................................................................................................................................................34

REX GAME STUDIOS, LLC / MILITARY VISUALIZATIONS INC. Page 3
The WX Advantage Radar System is a unique, advanced weather radar system that can be used with ANY 3rd-party commercial weather engines, freeware weather engines as well as the built-in weather for Microsoft’s Flight Simulator X, FSX:Steam Edition and Lockheed Martin Prepar3D. Each license of the WX Advantage Radar allows activation for all three flight simulators!
This advanced radar system includes unique cloud scan and precipitation sync features that will dynamically sync precipitation. Never experience precipitation falling outside indicated radar echoes.
The radar includes a new wet runway feature. Though there may be radar echoes nearby, the runways near precipitation will appear as if rain had just fallen. The system continuously measures four levels of precipitation: green for light precipitation, yellow for moderate, red for heavy, and magenta for severe precipitation and turbulence.
Because the system will continuously measure and sync precipitation, you will receive realistic and accurately placed radar echoes that precisely match depicted atmospheric conditions. Turbulence “intelligence” is built-in to isolate potential radar echoes that may contain moderate to severe turbulence.
The WX Advantage Radar System includes full TILT functions to analyze the complete scale of storm structures in real-time and accurately represents the effect of radar attenuation when larger more dense cells are in front of other cells – causing a rain shadow effect.
An intuitive, simple to use Aircraft Gauge Management Tool is also included! This tool allows the installation, editing, and removal of the 2D weather radar gauge for any default or 3rd-party aircraft within a few simple steps.
The Aircraft Gauge Management Tool includes FOUR different types of 2D gauges: Dark and Clean, Dark with Dirt, Light and Clean, Light with Dirt. You may select which version best represents the cockpit you are flying in as well as easily adjust the aspect ratio, size, and location of the radar gauge prior to opening the flight simulator.
The latest November 2016 update includes the activation of the MAP mode consisting of terrain masking and mapping, providing terrain returns and masking. Also included in this update is the improved beam geometry behavior in all modes, giving a more accurate behavior of precipitation cell detection as distance from the aircraft increases!
Introducing the WX Advantage Weather Radar System!
Introduction

REX GAME STUDIOS, LLC / MILITARY VISUALIZATIONS INC. Page 4
• The WX Advantage Radar System is a unique, advanced weather radar system that can be used with ANY 3rd-party weather engine, freeware weather engine, as well as the built-in weather of the flight simulator.
• Compatible with FSX, FSX:Steam and Prepar3D. Each license of the WX Advantage Radar allows activation for all three flight simulators!
• This advanced radar system includes unique cloudscan and precipitation sync features that will dynamically sync precipitation. Never experience precipitation falling outside indicated radar echoes.
• The radar includes a new wet runway feature. Though there may be radar echoes nearby, the runways near precipitation will appear as if rain had just fallen.
• High resolution 3D precipitation density map, which takes advantage of video hardware acceleration for greater performance and level of detail.
• High resolution precipitation cell data based on cloud density and other weather parameters at the location of each cloud.
• Precise control of ambient precipitation in the region of the aircraft.
• The system continuously measures four levels of precipitation: green for light precipitation, yellow for moderate, red for heavy, and magenta for severe precipitation and turbulence.
• Because the system will continuously measure and sync precipitation, you will receive realistic and accurately placed radar echoes that precisely match depicted atmospheric conditions.
• Turbulence “intelligence” is built-in to isolate potential radar echoes that may contain moderate to severe turbulence.
• The WX Advantage Radar System includes full TILT functions to analyze the complete scale of storm structures in real-time and accurately represents the effect of radar attenuation when larger more dense cells are in front of other cells – causing a rain shadow effect.
• An intuitive, simple to use Aircraft Gauge Management Tool is also included! This tool allows the installation, editing, and removal of the 2D weather radar gauge for any default or 3rd-party aircraft within a few simple steps.
• The Aircraft Gauge Management Tool includes FOUR different types of 2D gauges: Dark and Clean, Dark with Dirt, Light and Clean, Light with Dirt. You may select which version best represents the cockpit you are flying in as well as easily adjust the aspect ratio, size, and location of the radar gauge prior to opening the flight simulator.
• The WX Advantage Radar supports multiple screens and can be undocked and placed on a second window.
• Includes a full active transmitter/receiver range up to 160NM. (FSX and Prepar3D does not support ranges greater than 160NM)
• The WX Advantage Radar includes gain features to help differentiate between weather and ground clutter.
• The system includes test/diagnostics, WX (general weather), and WX/T (weather/turbulence) modes.
• NEW - ADDED MAP mode consisting of terrain masking and mapping, providing terrain returns and masking.
• NEW - Improved beam geometry behavior in all modes, giving a more accurate behavior of precipitation cell detection as distance from the aircraft increases!
Features at a Glance
Features at a Glance

REX GAME STUDIOS, LLC / MILITARY VISUALIZATIONS INC. Page 5
Software Installation ProcedureIn this section we are going to step you through the procedure to install the WX Advantage Radar System.
Step 1 Open the folder where the installer files are located. Double-click on the “wxinstaller.exe” file to start the installation process (Fig 1.1).
Step 2Click NEXT to continue the setup process (Fig 1.2).
IMPORTANT INFORMATIONYou must install the WX Advantage Radar System on the same computer that the flight simulator is installed on. You cannot install the software on a client machine within a network setup.!
Figure 1.1 – Installation Files
Figure 1.2 – Initial Setup Window
Chapter 1: Software Installation
REX GAME STUDIOS, LLC / MILITARY VISUALIZATIONS INC. Page 6
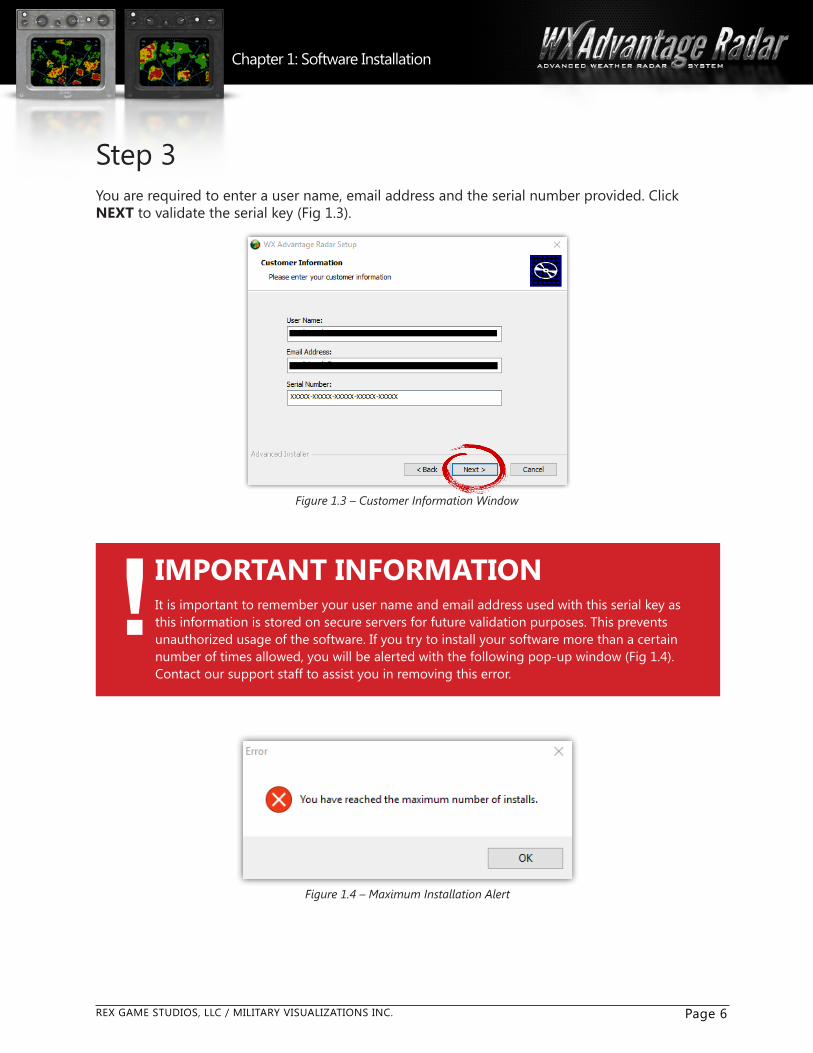
Step 3You are required to enter a user name, email address and the serial number provided. Click NEXT to validate the serial key (Fig 1.3).
IMPORTANT INFORMATIONIt is important to remember your user name and email address used with this serial key as this information is stored on secure servers for future validation purposes. This prevents unauthorized usage of the software. If you try to install your software more than a certain number of times allowed, you will be alerted with the following pop-up window (Fig 1.4). Contact our support staff to assist you in removing this error.
!Figure 1.3 – Customer Information Window
Figure 1.4 – Maximum Installation Alert
Chapter 1: Software Installation
REX GAME STUDIOS, LLC / MILITARY VISUALIZATIONS INC. Page 7
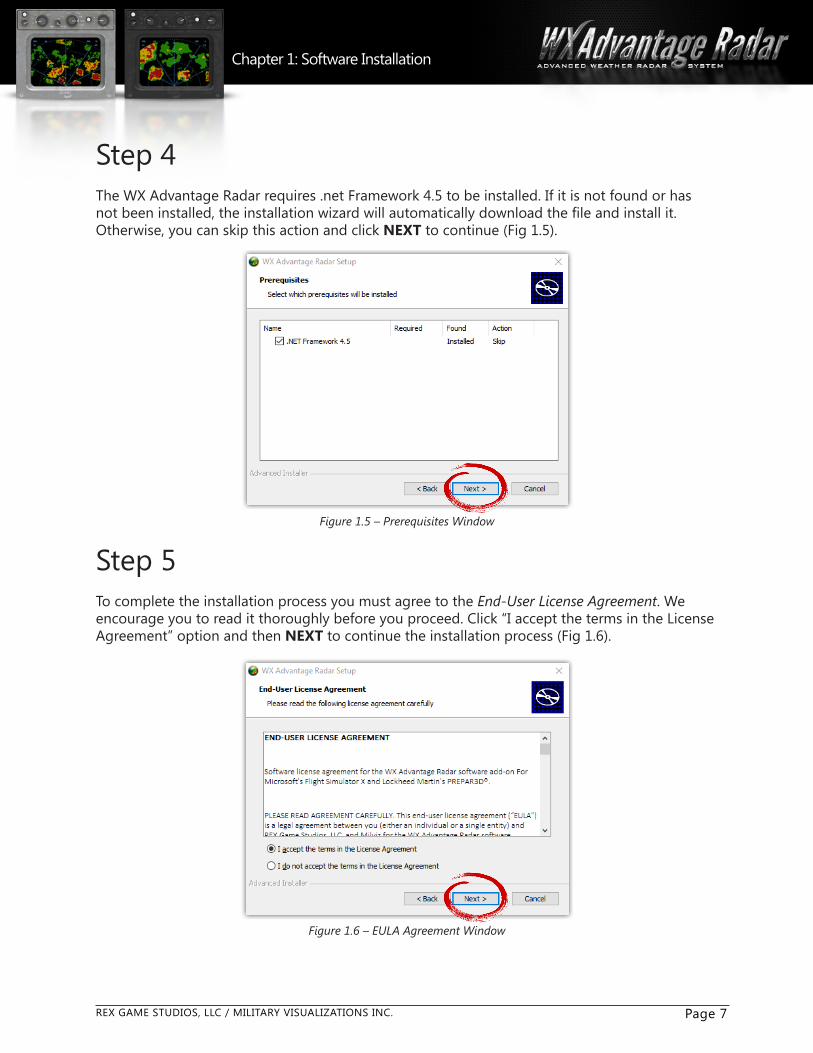
Step 4The WX Advantage Radar requires .net Framework 4.5 to be installed. If it is not found or has not been installed, the installation wizard will automatically download the file and install it. Otherwise, you can skip this action and click NEXT to continue (Fig 1.5).
Step 5To complete the installation process you must agree to the End-User License Agreement. We encourage you to read it thoroughly before you proceed. Click “I accept the terms in the License Agreement” option and then NEXT to continue the installation process (Fig 1.6).
Figure 1.5 – Prerequisites Window
Figure 1.6 – EULA Agreement Window
Chapter 1: Software Installation

REX GAME STUDIOS, LLC / MILITARY VISUALIZATIONS INC.
Step 6
You are prompted with the ideal location to install the software. You may modify this location by clicking BROWSE. Click NEXT to confirm your installation (Fig 1.7).
Step 7Click INSTALL to confirm and initiate the installation process (Fig 1.8).
Page 8
Figure 1.7 – Folder Selection Window
IMPORTANT INFORMATIONWe STRONGLY recommend you do NOT install the software into the Program Files or Program Files (x86) folder as this may cause issues with the operation of the radar.!
Figure 1.8 – Confirm Installation Window
Chapter 1: Software Installation
REX GAME STUDIOS, LLC / MILITARY VISUALIZATIONS INC. Page 9
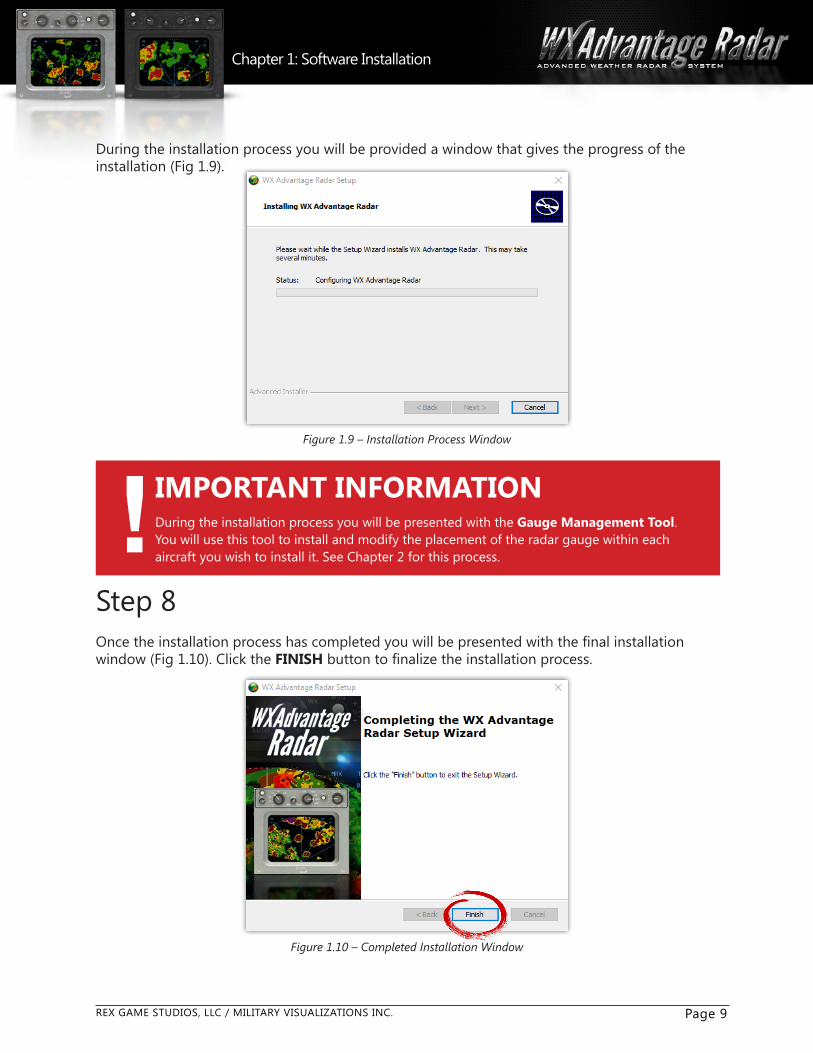
During the installation process you will be provided a window that gives the progress of the installation (Fig 1.9).
IMPORTANT INFORMATIONDuring the installation process you will be presented with the Gauge Management Tool. You will use this tool to install and modify the placement of the radar gauge within each aircraft you wish to install it. See Chapter 2 for this process.
!Figure 1.9 – Installation Process Window
Step 8
Once the installation process has completed you will be presented with the final installation window (Fig 1.10). Click the FINISH button to finalize the installation process.
Figure 1.10 – Completed Installation Window
Chapter 1: Software Installation

REX GAME STUDIOS, LLC / MILITARY VISUALIZATIONS INC.
How to Install the Weather Radar Into an AircraftIn this section we are going show you how to operate the Radar Gauge Management Tool. This tool allows you to install, edit, and remove the radar gauge within any default or 3rd-party aircraft.
Step 1
To install the radar within an aircraft, locate and double-click on the Gauge Management Tool icon on your desktop (Fig 2.1).
Page 10
Figure 2.1 -WX Radar Gauge Management Desktop Icon
IMPORTANT INFORMATIONDO NOT INSTALL THE GAUGE INTO AN AIRCRAFT WHILE THE SIMULATOR IS RUNNING!!
Step 2On the startup window click BEGIN to continue the installation process (Fig 2.2).
Figure 2.2 – Gauge Management Tool – Startup Window
Chapter 2: Gauge Installation

REX GAME STUDIOS, LLC / MILITARY VISUALIZATIONS INC. Page 11
Step 3Click on INSTALL and then NEXT (Fig 2.3).
Figure 2.3 – Gauge Management Tool – Work Window
Chapter 2: Gauge Installation
Step 4Select the flight simulator that you want to install the gauge into. Click NEXT to continue (Fig 2.4). (These buttons will change based upon which flight simulator(s) you have installed).
Figure 2.4 – Gauge Management Tool – Flight Simulator Window

REX GAME STUDIOS, LLC / MILITARY VISUALIZATIONS INC. Page 12
Step 5Select which aircraft you want the gauge to be installed into, then click NEXT (Fig 2.5). You only need to select ONE aircraft livery as the gauge will automatically install into all other aircraft within that specific aircraft type!
Figure 2.5 – Gauge Management Tool – Aircraft Selection Window
IMPORTANT INFORMATIONIf for some reason an aircraft is not displayed, select “Click here to browse for a folder containing that aircraft” to select the aircraft to modify.!
Chapter 2: Gauge Installation
REX GAME STUDIOS, LLC / MILITARY VISUALIZATIONS INC. Page 13
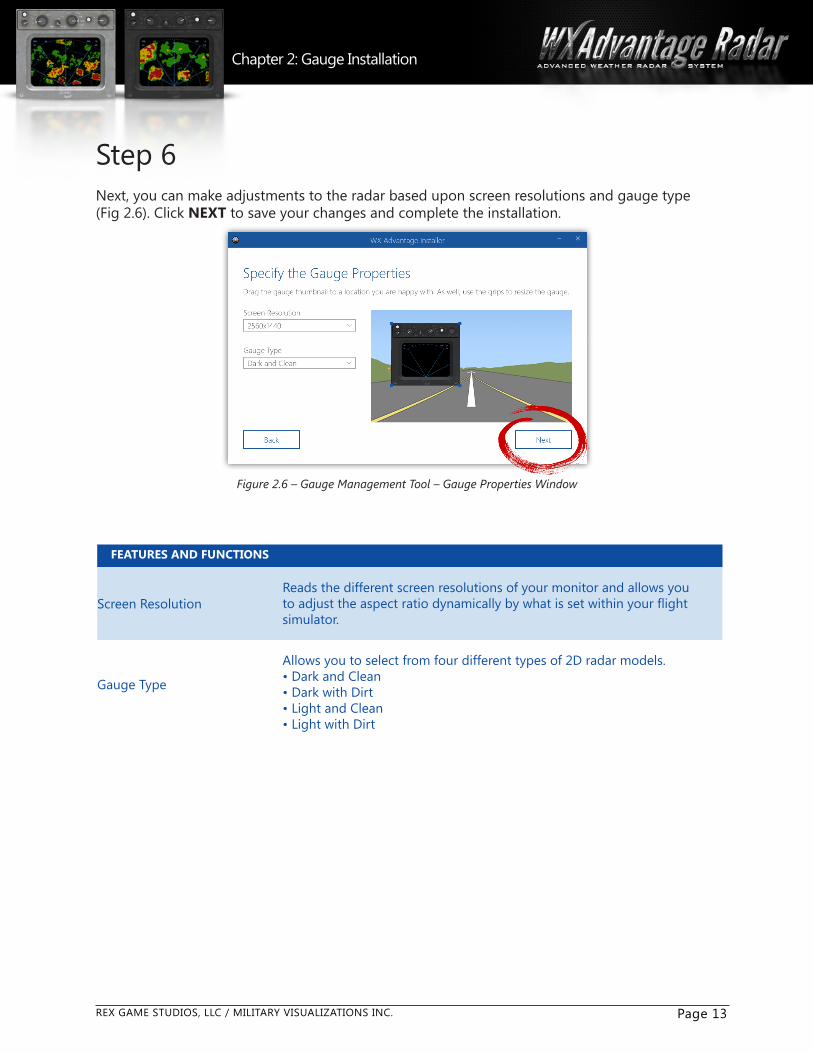
Step 6Next, you can make adjustments to the radar based upon screen resolutions and gauge type (Fig 2.6). Click NEXT to save your changes and complete the installation.
Figure 2.6 – Gauge Management Tool – Gauge Properties Window
FEATURES AND FUNCTIONS
Screen ResolutionReads the different screen resolutions of your monitor and allows you to adjust the aspect ratio dynamically by what is set within your flight simulator.
Gauge Type
Allows you to select from four different types of 2D radar models.• Dark and Clean• Dark with Dirt• Light and Clean• Light with Dirt
Chapter 2: Gauge Installation

REX GAME STUDIOS, LLC / MILITARY VISUALIZATIONS INC. Page 14
Step 7 (Optional)
You can move and adjust the size of the 2D model. Click on the radar model image to move it around and/or adjust the size. This is a pre-image of how the radar will appear within the simulator when activated (Fig 2.7). After you make your adjustments click NEXT to continue.
Figure 2.7 – Gauge Management Tool – Gauge Properties Window
IMPORTANT INFORMATIONThe gauge size and aspect ratio can be adjusted within the flight simulator at run time.!
Step 8After the installation process is completed you will be presented with the following screen indicating that the gauge code successfully installed (Fig 2.8).
Figure 2.8 – Gauge Management Tool – Successful Installation Window
Chapter 2: Gauge Installation

REX GAME STUDIOS, LLC / MILITARY VISUALIZATIONS INC. Page 15
Figure 3.1 -WX Radar Gauge Management Desktop Icon
How to Edit Gauge PropertiesIn this procedure you will use the Gauge Management Tool to modify/edit the radar properties.
Step 1To modify/edit the gauge properties, locate and double-click on the Gauge Management Tool icon on your desktop (Fig 3.1).
Chapter 3: Edit Gauge Properties
IMPORTANT INFORMATIONDO NOT EDIT THE GAUGE WHILE THE SIMULATOR IS RUNNING!!
Step 2On the startup window click BEGIN to continue (Fig 3.2).
Figure 3.2 – Gauge Management Tool – Startup Window

REX GAME STUDIOS, LLC / MILITARY VISUALIZATIONS INC. Page 16
Step 3Click on EDIT and then NEXT (Fig 3.3).
Figure 3.3 – Gauge Management Tool – Work Window
Step 4Select the flight simulator that you want to edit the gauge then click NEXT to continue (Fig 3.4). (These buttons will change based upon which flight simulator(s) you have installed).
Figure 3.4 – Gauge Management Tool – Flight Simulator Window
Chapter 3: Edit Gauge Properties
REX GAME STUDIOS, LLC / MILITARY VISUALIZATIONS INC. Page 17
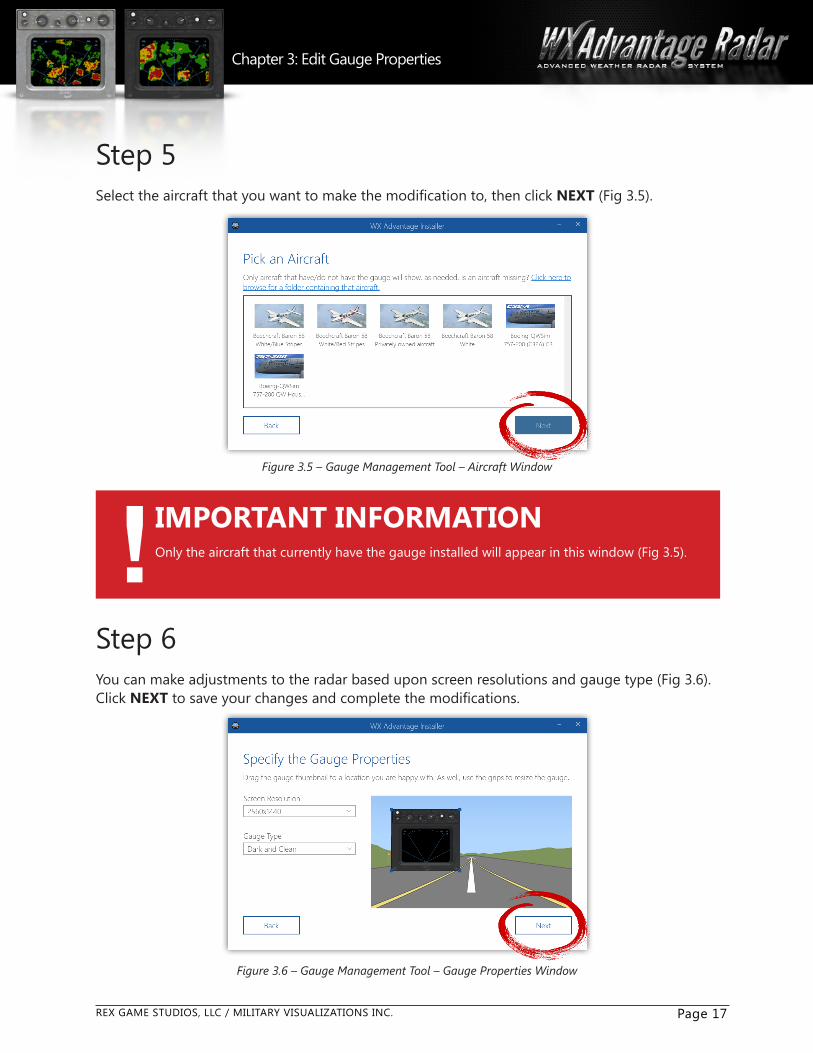
Step 5Select the aircraft that you want to make the modification to, then click NEXT (Fig 3.5).
Figure 3.5 – Gauge Management Tool – Aircraft Window
Chapter 3: Edit Gauge Properties
IMPORTANT INFORMATIONOnly the aircraft that currently have the gauge installed will appear in this window (Fig 3.5).!
Step 6You can make adjustments to the radar based upon screen resolutions and gauge type (Fig 3.6). Click NEXT to save your changes and complete the modifications.
Figure 3.6 – Gauge Management Tool – Gauge Properties Window

REX GAME STUDIOS, LLC / MILITARY VISUALIZATIONS INC. Page 18
Step 7After the modification process is completed you will be presented with the following screen indicating that the gauge code was successfully modified (Fig 3.7).
Figure 3.7 – Gauge Management Tool – Successful Modification Window
Chapter 3: Edit Gauge Properties
REX GAME STUDIOS, LLC / MILITARY VISUALIZATIONS INC. Page 19
Figure 4.1 -WX Radar Gauge Management Desktop Icon
How to Remove the Weather Radar from an AircraftIn this procedure you will use the Gauge Management Tool to remove the radar from an aircraft.
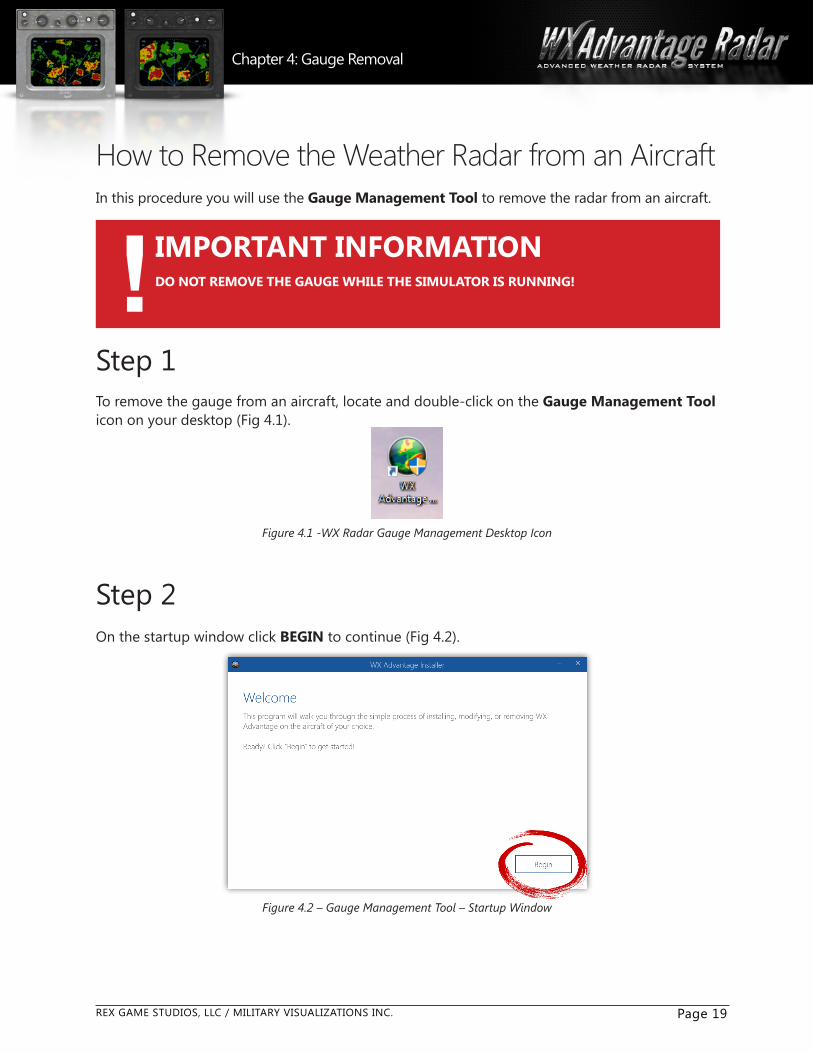
Step 1To remove the gauge from an aircraft, locate and double-click on the Gauge Management Tool icon on your desktop (Fig 4.1).
Chapter 4: Gauge Removal
IMPORTANT INFORMATIONDO NOT REMOVE THE GAUGE WHILE THE SIMULATOR IS RUNNING!!
Step 2On the startup window click BEGIN to continue (Fig 4.2).
Figure 4.2 – Gauge Management Tool – Startup Window
REX GAME STUDIOS, LLC / MILITARY VISUALIZATIONS INC. Page 20
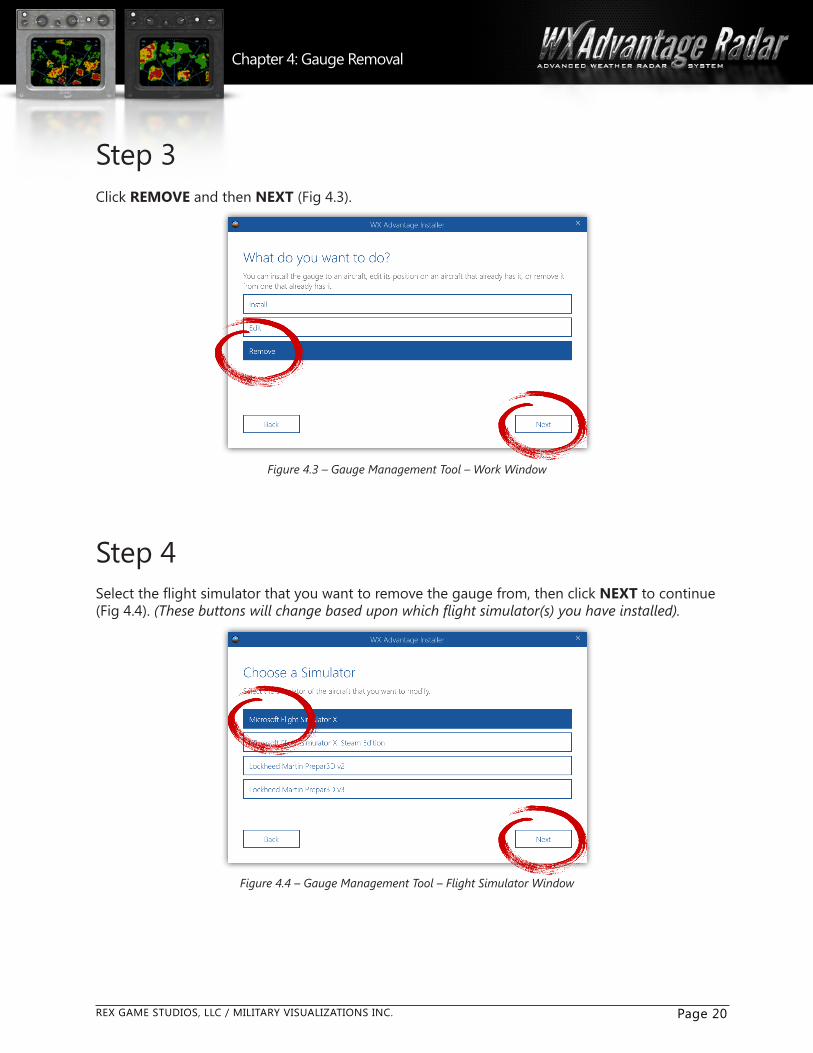
Step 3Click REMOVE and then NEXT (Fig 4.3).
Figure 4.3 – Gauge Management Tool – Work Window
Chapter 4: Gauge Removal
Step 4Select the flight simulator that you want to remove the gauge from, then click NEXT to continue (Fig 4.4). (These buttons will change based upon which flight simulator(s) you have installed).
Figure 4.4 – Gauge Management Tool – Flight Simulator Window

REX GAME STUDIOS, LLC / MILITARY VISUALIZATIONS INC. Page 21
Step 5Select the aircraft that you want to remove the gauge from, then click NEXT (Fig 4.5).
Figure 4.5 – Gauge Management Tool – Aircraft Window
Chapter 4: Gauge Removal
IMPORTANT INFORMATIONOnly the aircraft that currently have the gauge installed will appear in this window (Fig 4.5).!
Step 6After the removal process is completed you will be presented with the following screen indicating that the gauge code was successfully removed (Fig 4.6).
Figure 4.6 – Gauge Management Tool – Gauge Removal Success Window

REX GAME STUDIOS, LLC / MILITARY VISUALIZATIONS INC.
TCAS - Traffic Collision Avoidance System
RNG - Range Control
GAIN - Gain Control
MAIN Control
MSG - System Messaging
TILT - Tilt Control
BRT - Brightness
WX Advantage Radar FunctionsThe following diagram illustrates the different gauge knobs and functions (Fig. 5.1).
Page 22
Figure 5.1 – WX Advantage Radar
Chapter 5: WX Advantage Radar Functions
Precipitation Levels
Green - Light Precipitation
Yellow - Moderate Precipitation
RED - Heavy Precipitation
Magenta - Turbulence

REX GAME STUDIOS, LLC / MILITARY VISUALIZATIONS INC. Page 23
Chapter 5: Radar Gauge Functions
TCAS - Traffic Collision Avoidance System
RNG - Range Control
GAIN - Gain Control
MAIN Control
MSG - System Messaging
TILT - Tilt Control
BRT - Brightness
KNOB FUNCTION DESCRIPTION
TCAS [NOT OPERATIONAL] - Traffic collision avoidance system.
BRT Controls brightness of the indicator display (Clock-wise rotation for max brightness).
RNG Adjusts displayed distance of the radar map. Increasing the range causes the radar to show radar echoes further from the aircraft. Decreasing the range causes the radar to show radar echoes near the aircraft.
GAIN Adjusts the sensitivity of the receiver for the purpose of locating the most dense storm cells. This is used to regulate the intensity level of the radar echoes on the screen.
MAIN
Controls several aspects of the radar:• OFF – turns off the radar screen and receiver.• TEST – runs a series of test functions to determine if the radar receiver is working correctly.• WX – turns on the radar receiver to receive precipitation echoes.• WX/T – turns on the radar receiver to receive precipitation echoes and potential areas of turbulence.• MAP – turns on ground terrain detection as terrain masking and mapping now active
MSG [NOT OPERATIONAL] – Activates any status or system messages received from the radar receiver.
TILT Adjusts the angle of the radar beam relative to the horizon. Positive tilt forces the radar antenna upward, while negative tilt forces the radar antenna downward. Tilt allows examination of the heights and depths of radar echoes.

REX GAME STUDIOS, LLC / MILITARY VISUALIZATIONS INC. Page 24
Figure 6.1 – Activation of Radar menu system in FSX and FSX:Steam
How to Display the Radar - FSX/FSX:SteamTo open the radar while the simulator is running, choose:VIEWS -> INSTRUMENT PANEL -> WX ADVANTAGE (Fig 6.1).
Figure 6.2 – Activation of Radar menu system in Prepar3D
How to Display the Radar - PREPAR3DTo open the radar while the simulator is running, choose: VEHICLE -> INSTRUMENT PANEL -> WX ADVANTAGE (Fig 6.2).
Chapter 6: How to Display the Radar
REX GAME STUDIOS, LLC / MILITARY VISUALIZATIONS INC. Page 25
Chapter 7: Weather Radar Flight Operations
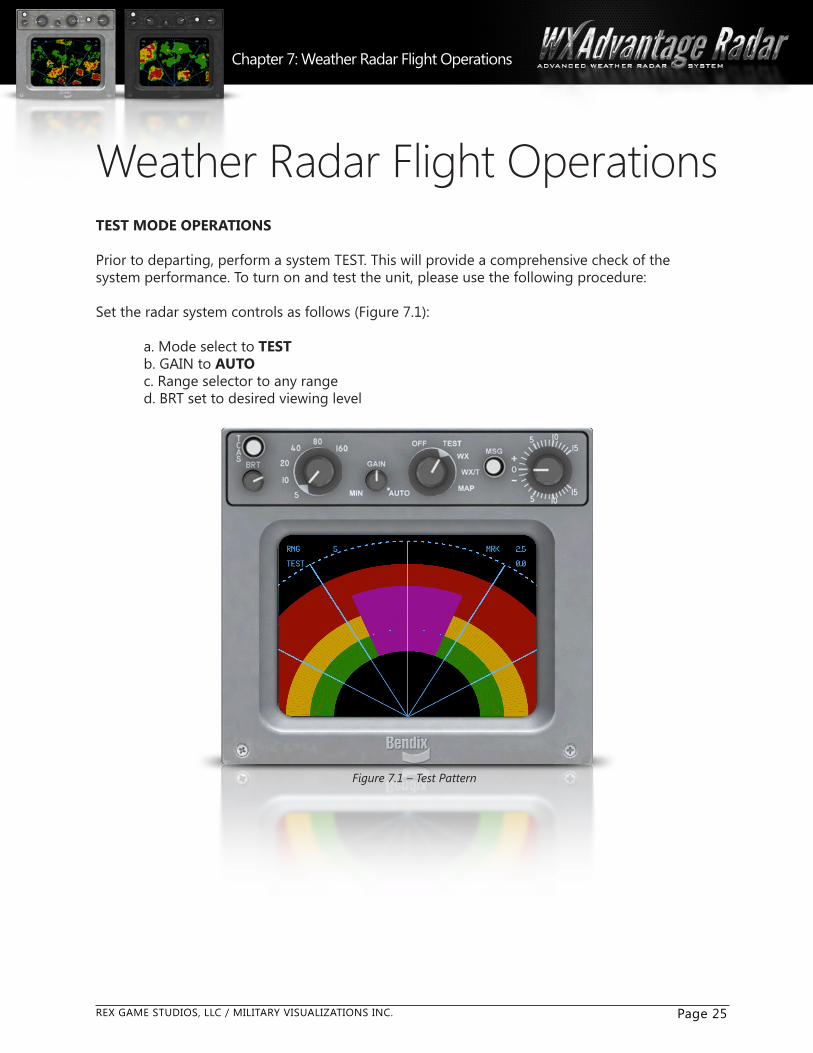
Weather Radar Flight OperationsTEST MODE OPERATIONS
Prior to departing, perform a system TEST. This will provide a comprehensive check of the system performance. To turn on and test the unit, please use the following procedure:
Set the radar system controls as follows (Figure 7.1): a. Mode select to TEST b. GAIN to AUTO c. Range selector to any range d. BRT set to desired viewing level
Figure 7.1 – Test Pattern
REX GAME STUDIOS, LLC / MILITARY VISUALIZATIONS INC. Page 26
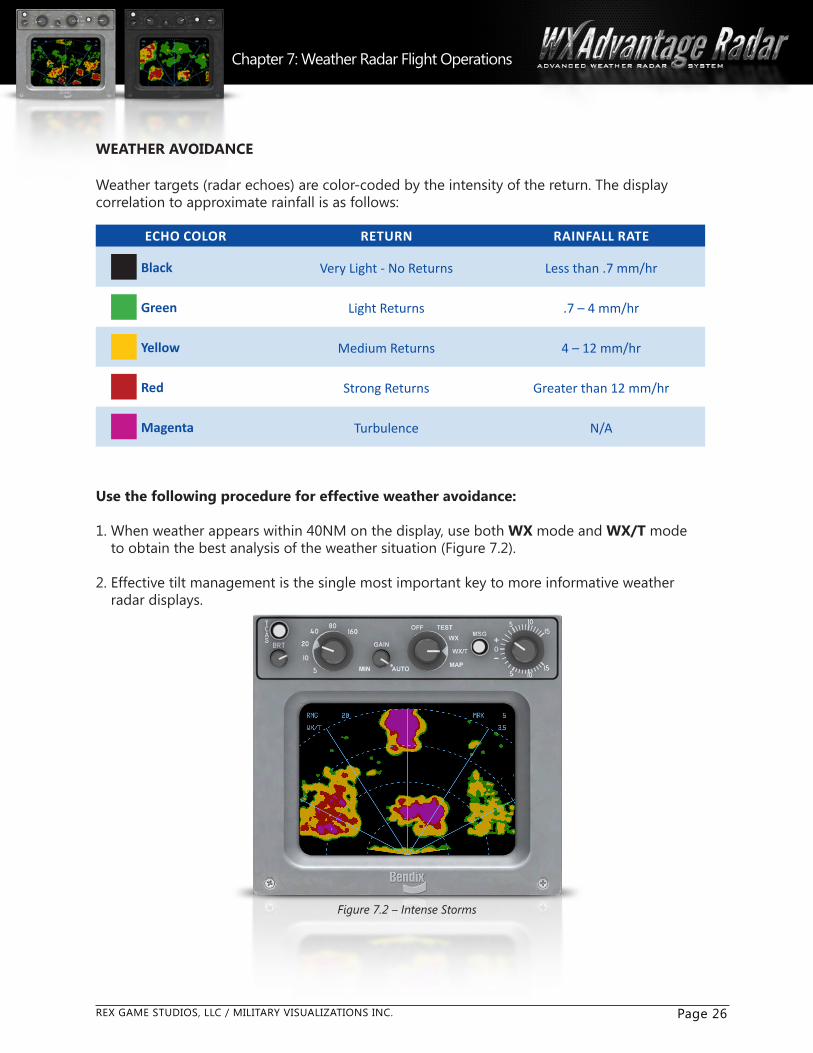
WEATHER AVOIDANCE
Weather targets (radar echoes) are color-coded by the intensity of the return. The display correlation to approximate rainfall is as follows:
Use the following procedure for effective weather avoidance:
1. When weather appears within 40NM on the display, use both WX mode and WX/T mode to obtain the best analysis of the weather situation (Figure 7.2).
2. Effective tilt management is the single most important key to more informative weather radar displays.
Figure 7.2 – Intense Storms
Chapter 7: Weather Radar Flight Operations
ECHO COLOR RETURN RAINFALL RATE
Black Very Light - No Returns Less than .7 mm/hr
Green Light Returns .7 – 4 mm/hr
Yellow Medium Returns 4 – 12 mm/hr
Red Strong Returns Greater than 12 mm/hr
Magenta Turbulence N/A

REX GAME STUDIOS, LLC / MILITARY VISUALIZATIONS INC. Page 27
Chapter 7: Weather Radar Flight Operations
TILT MANAGEMENT DURING FLIGHT OPERATIONS
Before takeoff:
1. Perform TEST mode procedure.
2. Set mode selector to WX/T.
3. Set range selector to range sufficient to display the area included in the planned flight path.
4. Adjust antenna TILT control down to -5 then slowly adjust the antenna TILT control in 1 or 2 degree increments until + 4 (Figure 7.3).
Climb-out:
1. Shortly after takeoff, slowly rotate antenna TILT selector to +15, then down to where returns appear, then back to +4 while searching for weather targets.
2. Maintain tilt settings of +4 as long as aircraft’s pitch attitude is approximately +15 degrees nose up or greater.
3. Repeat step 1 if course changes of 45 degrees or more are made during climb-out.
Cruise:
1. As soon as practical, after reaching cruise altitude, select the 40NM range and set the antenna TILT control to -10 then back +4.
2. While scanning and observing display for weather targets, adjust antenna TILT selector clockwise.
3. Repeat step 2 for each intermediate range through the longest range intended for use.
Approach:
1. Just before descent from cruise altitude, note TILT selector setting.
2. As descent begins, increase TILT selector setting in +1 degree increments for each 10,000 feet of planned descent.
Figure 7.3 – TILT Selector
IMPORTANT INFORMATIONAfter descending to approximately 15,000 feet and when flying over exceptional terrain such as mountains or cities, it may be necessary to adjust the TILT selector setting in +1 degree increments of tilt for 5,000 feet of planned descent.
!

REX GAME STUDIOS, LLC / MILITARY VISUALIZATIONS INC. Page 28
TURBULENCE DETECTION
Turbulence detection is a weather radar system option. Turbulence detection requires the presence of precipitation. Therefore, turbulence detection does not display clear air turbulence. Turbulence detection should be used only to isolate turbulence. Therefore, all areas display as red or magenta, whether turbulence or weather, should be avoided.
1. Select WX/T mode.
2. Select desired range.
3. Adjust antenna TILT selector to eliminate ground returns within 40NM if possible.
GAIN CONTROL
The GAIN control should always be returned to the AUTO position before evaluating weather in other areas or searching for distant targets.
Chapter 7: Weather Radar Flight Operations
IMPORTANT INFORMATIONTurbulence information is limited to the first 40 NM. Turbulence within this range will be displayed in magenta along with weather displayed in red, yellow, and green. !

REX GAME STUDIOS, LLC / MILITARY VISUALIZATIONS INC. Page 29
Chapter 7: Weather Radar Flight Operations
Figure 7.4 – Weather Radar Rescan Function
Figure 7.5 – Weather Radar Version Info
WEATHER RADAR: RESCAN
The rescan function immediately forces the WX Advantage Radar to re-populate its knowledge of the current weather situation. This can be useful if you have recently changed your weather and the changes are not being reflected within the radar display.
To use the rescan option while the simulator is running, choose:ADD-ONS -> WEATHER RADAR -> RESCAN (Fig 7.4).
WEATHER RADAR: VERSION INFO
To view the currently installed version of the WX Advantage Radar, choose:ADD-ONS -> WEATHER RADAR -> VERSION INFO (Fig 7.5).

REX GAME STUDIOS, LLC / MILITARY VISUALIZATIONS INC. Page 30
IDENTIFYING DANGEROUS WEATHER
The best way to identify storms that pose the best threat for dangerous weather is often indicated by the shapes of the radar echoes (Figure 7.6).
TIGHT GRADIENT RADAR ECHOES
Tight radar echo gradients often indicate areas of severe turbulence. These areas should be avoided at all times.
U-SHAPED, HOOKED, OR FINGERED RADAR ECHOES
These types of radar echoes can indicate various types of severe weather such as severe turbulence, hail, and possible tornadoes. These types of storms should be avoided at all times.
TIGHT RADAR GRADIENTS OFTEN INDICATES POTENTIAL TURBULENCE
U-SHAPED, HOOKED OR FINGERED STORMS CAN INDICATE SEVERE HAIL OR DANGEROUS WEATHER.
Chapter 7: Weather Radar Flight Operations
Figure 7.6 – Radar Echo Types

REX GAME STUDIOS, LLC / MILITARY VISUALIZATIONS INC. Page 31
USING WEATHER RADAR TO AVOID BAD WEATHER
Radar is fundamentally a distance measuring system using the principle of radio echoing. The term RADAR is an acronym from Radio Detection And Ranging. It is a method for locating targets by using radio waves.
The receiver transmitter unit generates microwave energy in the form of pulses. These pulses are then transferred to the antenna where they are focused into a beam by the antenna. The radar beam is much like a beam of a flashlight. The energy is focused and radiated by the antenna in such a way that it is most intense in the center of the beam with decreasing intensity near the edge.
The same antenna is used for both transmitting and receiving. When a pulse intercepts a target, the energy is reflected as an echo, or return signal, back to the antenna. From the antenna, the returned signal is transferred to the receiver and processing circuits located in the receiver transmitter unit. The echoes or returned signals are displayed on a scope called the Plan Position Indicator (PPI).
Radio waves travel at the speed of 300 million meters per second and thus yield nearly instantaneous information when echoing back. Radar ranging is a two-way process that requires 12.36 microseconds for the radio wave to travel out and back for each nautical mile of target range (Figure 8.1).
Airborne weather avoidance radar, as it names implies, is for avoiding severe weather-not for penetrating it. Whether to fly into an area of radar echoes depends on echo intensity, spacing between the echoes, and the capabilities of both pilot and aircraft. Remember that weather radar detects only precipitation; it does not detect minute cloud droplets.
Therefore, the radar display provides no assurance of avoiding instrument weather in clouds and fog. Your display may be clear between intense echoes; this clear area does not necessarily mean you can fly between the storms and maintain visual separation from them.
Chapter 8: Radar Principles
Figure 8.1 – Aviation Radar – Beam Relationship
REX GAME STUDIOS, LLC / MILITARY VISUALIZATIONS INC. Page 32
USING WEATHER RADAR TO AVOID BAD WEATHER (continued)
The geometry of the weather radar radiated beam precludes its use for reliable proximity warning or anti-collision protection. The beam is characterized as a cone shaped pencil beam. It is much like that of a flashlight or spotlight beam. It would be an event of chance, not of certainty, that such a beam would come upon another aircraft in flight.
Weather radar detects droplets of precipitation size. The strength of the radar returns (echo) depends on drop size, composition, and amount. Water particles return almost five times as much signal as ice particles of the same size. This means that rain is more easily detected than snow, although at times large, wet snowflakes may give a strong return.
Meteorologists have shown that drop size is almost directly proportional to rainfall rate. The greatest rainfall rate is in thunderstorms and therefore, the strongest echoes are from thunderstorms. Since the strongest echoes identify thunderstorms, they also mark the areas of the greatest hazards. Radar information can be valuable both from ground based radar for preflight planning and airborne radar for severe weather avoidance.
THUNDERSTORM FLYING
Thunderstorms build and dissipate rapidly. Therefore, you SHOULD NOT attempt to pre-plan a flight plan course between closely spaced echoes. The best use of ground radar information is to isolate general areas and coverages of echoes. You should avoid individual storms from in-flight observation’s either by visual sighting or by airborne radar.
Updrafts in thunderstorms support abundant water; and when carried above the freezing level, the water becomes super cooled. When temperature in the upward current cools to about -15C, much of the remaining water vapor sublimates as ice crystals; and above this level, the amount of super cooled water decreases.
Super cooled water freezes on impact with an aircraft. Clear icing can occur at any altitude above the freezing level; but at high levels, icing bay be rime or mixed rime and clear. The abundance of super cooled water makes clear icing very rapidly between 0C and -15C, and encounters can be frequent in a cluster of cells.
SHADOWED AREAS
Extremely heavy rainfall can reduce the ability of the radar waves to penetrate and present a full picture of the weather area. This condition is referred to as “radar attenuation”. It is a case where ground returns can be helpful in analyzing the weather situation. Tilt the antenna down and observe the ground returns around the radar echo. With very heavy intervening rain, the ground returns behind the echo will not be present but rather will appear as a shadow. This may indicate a larger area of precipitation than appears on the indicator.
Chapter 8: Radar Principles

REX GAME STUDIOS, LLC / MILITARY VISUALIZATIONS INC. Page 33
Need Support?MILVIZ and REX Game Studios offer top quality support. If you need assistance you may contact our support staff at:
http://www.realenvironmentxtreme.com/forums
We ask that you please search and read through similar help topics BEFORE you post a support question. Often you may find that a certain question has already been asked by someone else and the issue has been resolved.
IMPORTANT INFORMATIONTo receive customer support, we request that customers provide specific credentials in order to become verified users of our software. When inquiring for support please specify where the product was purchased as well as the order number of that purchase. This will ensure a timely response for your support ticket.
!
Chapter 9 : Product Support
REX GAME STUDIOS, LLC / MILITARY VISUALIZATIONS INC. Page 34
END-USER LICENSE AGREEMENT
Software license agreement for the WX Advantage Radar software add-on For Microsoft’s Flight Simulator X and Lockheed Martin’s PREPAR3D®.
PLEASE READ AGREEMENT CAREFULLY. This end-user license agreement (“EULA”) is a legal agreement between you (either an individual or a single entity) and REX Game Studios, LLC. and Military Visualizations Inc. for the WX Advantage Radar software product identified above, which includes computer software and includes associated media and “online” or electronic documentation (“SOFTWARE PRODUCT”). The SOFTWARE PRODUCT also includes any updates and supplements to the original SOFTWARE PRODUCT which may be provided to you by REX Game Studios LLC. and/or Military Visualizations Inc. By accessing or otherwise using the SOFTWARE PRODUCT, you agree to be bound by the terms of this EULA. If you do not agree to the terms of this EULA, do not use the SOFTWARE PRODUCT.
SOFTWARE PRODUCT LICENSEThe SOFTWARE PRODUCT is protected by copyright laws and international copyright treaties, as well as other intellectual property laws and treaties. The SOFTWARE PRODUCT is sold as a single user license and no ownership is transferred, only the right to use the license software. The SOFTWARE PRODUCT may not be re-distributed, sold for non-profit or profit or subscription fees, repackaged, delivered on CD or DVD media or any other form of electronic media by any other persons or party, website, organization or entity, other than the official e-commerce seller website(s) as contracted or authorized by REX Game Studios, LLC. and/or Military Visualizations Inc.
1. GRANT OF LICENSE. This EULA grants you the following rights:
a. You may install, access, and run a SINGLE copy of the SOFTWARE PRODUCT on a SINGLE personal computer for your personal, non-commercial, non-profit use. Any party or organization seeking to use the SOFTWARE PRODUCT under license for commercial use should contact Tim Fuchs at [email protected]
b. This SOFTWARE PRODUCT is for personal entertainment purposes only and may not be used for flight training purposes. This SOFTWARE PRODUCT is not part of an approved training program under the standards of any aviation regulatory agency or body worldwide, whether private or government.
c. Separation of Components. The SOFTWARE PRODUCT is licensed as a single product. Its original component parts created by REX Game Studios, LLC. and Military Visualizations Inc. may not be separated for use for other software or projects.
d. Trademarks. This EULA does not grant you any rights in connection with any trademarks or service marks of REX Game Studios, LLC. or Military Visualizations Inc.
e. Rental. You may not rent, lease, or lend the SOFTWARE PRODUCT. You may not charge admission or fees for any simulator, entertainment or training device which breaches this EULA by use of the SOFTWARE PRODUCT therein.
f. Support Services. This SOFTWARE PRODUCT is provided “as is”, however REX Game Studios, LLC. will provide provision of support services in relation to the operation, installation or remedy of issues arising to the use of the SOFTWARE at its official support website at http://www.realenvironmentxtreme.com/forums
g. Termination. Without prejudice to any other rights, REX Game Studios, LLC. and/or Military Visualizations Inc. may terminate this EULA if you fail to comply with the terms and conditions of this EULA. In such event, you must destroy all copies of the SOFTWARE PRODUCT and all of its component parts.
2. COPYRIGHT. All title and copyrights in and to the original created components of the SOFTWARE PRODUCT (including but not limited to any images, photographs, animations, video, audio, music, and text incorporated into the SOFTWARE PRODUCT), the accompanying online documentation materials, and any copies of the SOFTWARE PRODUCT are owned by REX Game Studios, LLC. and Military Visualizations Inc. All title and intellectual property rights in and to additional third-party libraries and content (which are used under the terms of those components’ distribution) which may be accessed through use of the SOFTWARE PRODUCT is the property of the respective content owner and may be protected by applicable copyright or other intellectual property laws and treaties. This EULA grants you no rights to use such content. This SOFTWARE PRODUCT contains documentation which is provided only in electronic form, and you may print multiple copies of such electronic documentation.
3. LEGAL JURISDICTION. This EULA is governed by the laws of the United States of America.
4. LIMITATION OF LIABILITY. TO THE MAXIMUM EXTENT PERMITTED BY APPLICABLE LAW, IN NO EVENT SHALL REX GAME STUDIOS, LLC. OR MILITARY VISUALIZATIONS INC. BE LIABLE FOR ANY SPECIAL, INCIDENTAL, INDIRECT, OR CONSEQUENTIAL DAMAGES WHATSOEVER (INCLUDING, WITHOUT LIMITATION, DAMAGES FOR LOSS OF BUSINESS PROFITS, BUSINESS INTERRUPTION, LOSS OF BUSINESS INFORMATION, OR ANY OTHER PECUNIARY LOSS) ARISING OUT OF THE USE OF OR INABILITY TO USE THE SOFTWARE PRODUCT OR THE PROVISION OF OR FAILURE TO PROVIDE SUPPORT SERVICES, EVEN IF REX GAME STUDIOS, LLC. OR MILITARY VISUALIZATIONS INC. HAVE BEEN ADVISED OF THE POSSIBILITY OF SUCH DAMAGES.
WX Advantage Radar is a brand of REX Game Studios, LLC. and Military Visualizations Inc. Microsoft Flight Simulator X is a copyrighted trademark of Microsoft Corporation. PREPAR3D® is a Registered trademark of Lockheed Martin Corporation.
Chapter 10: EULA


