44
User guide Version NeXT 7.x 1

User guide
Version NeXT 7.x
1

Core development :
Roberto J. Dohnert – lead system designer, kernel developer, conceptualistLayla Davidson – UI and GUI designerSimon Lincoln – kernel developerAndrew Johns – driver developerLindsay Johns – graphic designerMatthew Kornegay – applications and kernel developmentMatthew Harris – compatibility developer
Documentation :
Rich Dennis – documentation, release announcements, release QA
Social media :
Jeff Allain – social media announcements, release QA
2

Contents
1. Brief introduction and history 4 2. Downloading Black Lab 7 5
3. Burning the downloaded ISO to DVD or USB 6
4. Live session / Installation 9
5. Xfce - the Workspace Manager 15
6. Default application set 31
7. Updating the new system 33
8. Adding / removing software 34
9. FAQ 43
3

1. Brief history of Black Lab Linux
Black Lab is a modern Linux distribution fully compatible with Debian 8.x and Ubuntu 14.x developed by PC Opensystems LLC. It offers a stylized and highly functional Xfce desktop enhanced with a comprehensive selection of the most useful system tools, productivity software and media players. Commercial versions with paid support contracts and a free community version with the same desktop and codebase are both available.These features alone don't set Black Lab apart from the current Linux desktop standard. Debian and Ubuntu are known for their stability, ease-of-use and exceptionally comprehensive package base : Black Lab builds on these strengthswith an updated kernel, improved hardware recognition, expanded support for various media types, an expanded application base for the developer and enterprise, and an intuitive task-oriented user interface.
4

2. Downloading Black Lab Linux
The base distribution is offered in an x86_64 ISO format, to support modern andlegacy hardware. 64-bit Black Lab ISO files are designated with an x86_64 extension;32 bit ISO files end in x86. This is an important distinction, so make sure that you download the correct version for your hardware : a 64-bit ISO burned to disc will not work on a 32-bit system, and although a 32-bit ISO burned to disc can be run in live session and installed on 64-bit hardware, it may not be able to take full advantage of RAM above 4 GB (even a 32-bit PAE kernel is limited in the hardware resources it can address).
2.1 – Versions available
Black Lab's desktop is a fork of Xfce in development, called the Workspace Manager. The current release is available for purchase from PC/Opensystems LLC. Enterprise edition subscriptions are available with extended support contracts. Download the current version at http://blacklablinux.org.
2.2 – Verifying the ISO after download
An md5sum file accompanies a given download;the latest Black Lab ISO has its hash file, black-lab-linux-7-x86_64.iso.md5. Open a Terminal cd [path to →downloaded ISO] md5sum black-lab-linux-7-x86_64.iso. →
After opening the md5 file with a text editor, its hash should match the generated hash :
5

3. Burning the ISO to DVD / USB
An ISO file is an image / compressed archive which includes all the files and folders necessary to recreate a software filesystem. To be useable, it needs to be burned not copied to a DVD or USB drive. This distinction is important : simply writing an ISO file to a DVD will not result in a bootable disc suitable for a Live session or installation. A Linux distribution's ISO file size depends on its expressed goals during the Livesession / installation – some are optimized for older systems with CD drives and try to get keep the size of the ISO smaller;others, like PCOS Linux, include more software by default and require more modern hardware - a DVD drive and / or USB ports to properly run the Live session and install.
3.1 - Burning the ISO to DVD (software)
• in Windows (Windows Explorer in Win 7/8, Nero, Roxio, CDBurnerXP, ImgBurn)
• in MacOSX (Disk Utility, Burn (available at http://burn-osx.sourceforge.net/Pages/English/home.html)
• in Linux (KDE - K3B, GNOME - Brasero, Xfce - Xfburn)
3.2 - Burning the ISO to DVD (commandline)
Burning images with the command-line in Linux is also possible . This is the syntax :
cdrecord -v -dao dev=1,0,0 bll-5-x86_64.iso . Replace the numbers after dev= with the appropriate device number for your disc drive. To find that number, run : cdrecord -inq. All of these commands should be run as root.
3.5 – Burning the ISO to flash using dd
dd is a powerful distro-agnostic Linux tool used for block-level file copy from one device to another. The format used to copy a bootable ISO to a flash drive would be :
dd if=[path to downloaded Black Lab ISO here] of=[Linux mount point of flash drive]
6

3.4 - Burning the ISO to flash using Unetbootin
Unetbootin is a graphical tool which creates bootable flash media from an ISO file. It is available in the Ubuntu repositories, can be installed in Windows (XP, Vista, Seven or Eight) or OSX using installers available at http://sourceforge.net/projects/unetbootin/files/Unetbootin/603.
This is the dialog presented to the user after opening the utility (which needs to run with root privileges in Linux) on any one of its three supported platforms :
7
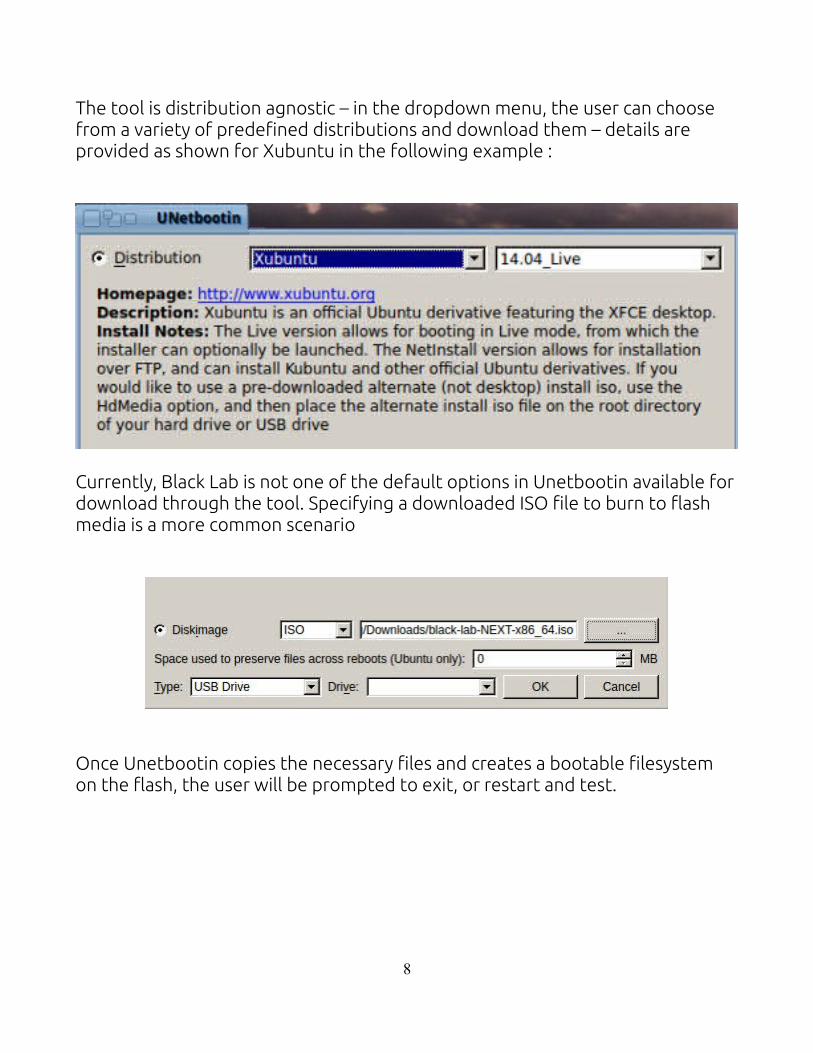
The tool is distribution agnostic – in the dropdown menu, the user can choose from a variety of predefined distributions and download them – details are provided as shown for Xubuntu in the following example :
Currently, Black Lab is not one of the default options in Unetbootin available fordownload through the tool. Specifying a downloaded ISO file to burn to flash media is a more common scenario
Once Unetbootin copies the necessary files and creates a bootable filesystem on the flash, the user will be prompted to exit, or restart and test.
8
4 - Live Session / Installation
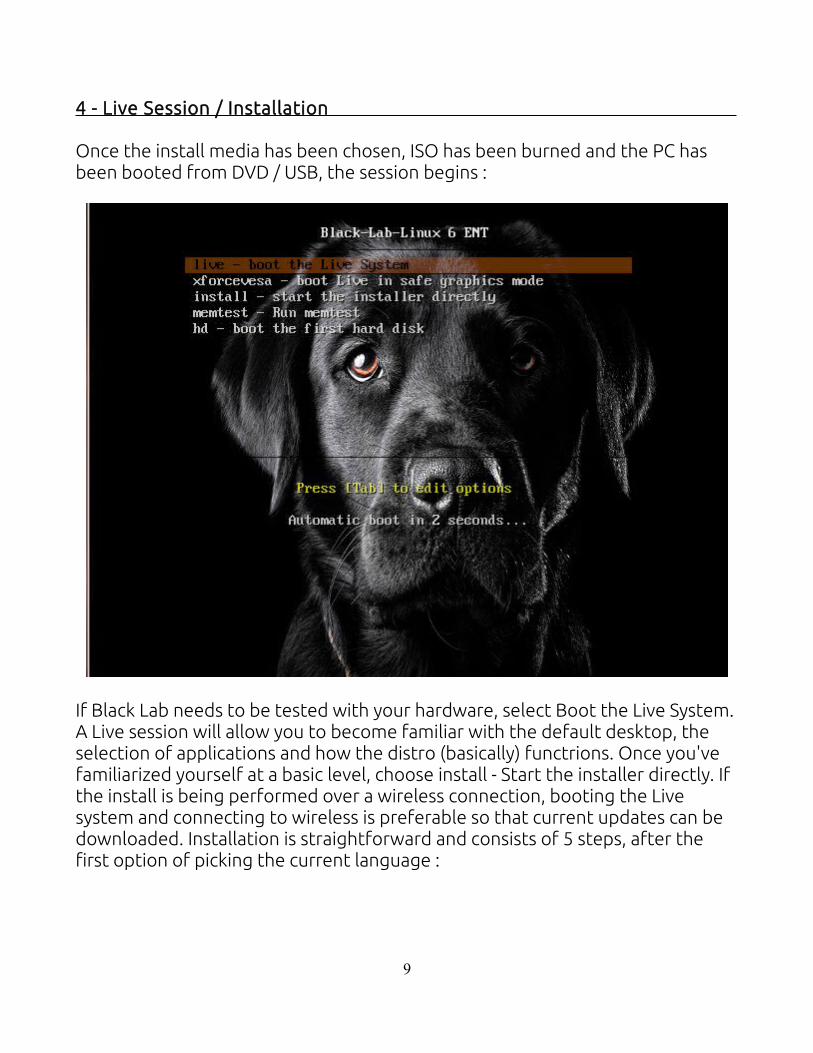
Once the install media has been chosen, ISO has been burned and the PC has been booted from DVD / USB, the session begins :
If Black Lab needs to be tested with your hardware, select Boot the Live System.A Live session will allow you to become familiar with the default desktop, the selection of applications and how the distro (basically) functrions. Once you've familiarized yourself at a basic level, choose install - Start the installer directly. If the install is being performed over a wireless connection, booting the Live system and connecting to wireless is preferable so that current updates can be downloaded. Installation is straightforward and consists of 5 steps, after the first option of picking the current language :
9

1). Preparing for installation (the PC should be plugged into a power source, should have 4.4 GB of available space, should be connected to the Internet).
It is optional, but recommended, to download updates while installing and to install third party software for ease-of-use post-installation.
10

2). Allocating drive space (most typical scenario is to install alongside another operating system).
For expert or IT installs, custom partitioning is also available.
11

3). Choosing current location (important for language detection) on a map.
Using the pointer the location can be moved. Typically, language and keyboard settings will toggle with location, which is a later step in the installation process.
12

4). Selecting or detecting keyboard type
If you're reading this guide, it's likely that you're accepting the default selection.But because it's Linux, Black Lab takes into account and supports any number of keyboard possibilities.
13

5). Entering username and login (your name, your computer's name, a username, a password, confirm the password, login automatically, require my password to login, encrypt my home folder).
After performing these 5 steps, the user or installer will be prompted to reboot.After reboot, you can begin using the installed system.
14

5 - Xfce - the Workspace Manager
After the Live session has ended, and the user has been prompted to restart, this is the a). Lightdm login screen and b). default desktop :
a).
Lightdm is the Black Lab login / display manager. It allows the user to choose a user and session – Xfce is the default, but like most Linux distributions, BL allowsthe user to install and then choose sessions from multiple desktop environments. And like most mainstream Linux distros, Black Lab will allow the user to swtich login / display managers (GNOME – GDM, KDE – KDM, LxQT - SDDM)
15

b).
It is a two-panel Xfce desktop, optimized for speed and productivity. PC/Opensystems LLC is currently forking this desktop into a proprietary version called the Workspace Manager, which will be available in future builds of Black Lab Linux. At this point in time, the default desktop is still based (almost) purely on Xfce, using its window manager, session manager, file manager, compositor and panels. As the Workspace Manager develops, other changes will be coming. As always, keep reading our guides and stay tuned for developments.
16

One of the first actions a user might want to undertake once their Black Lab system is installed is change the default desktop wallpaper. The distro ships witha variety of attractive options. Right clicking on the desktop Desktop Settings,→will bring up the Desktop dialog box.
If Black Lab is configured for multiple workspaces, the same wallpaper can be applied to all, or wallpapers can be selected for each individual virtual desktop. The default folder for Black Lab wallpapers is /usr/share/xfce4/backdrops, but this default selection can be changed, and the user can create a folder in ~/ (Home) or inside the Pictures folder in Home.
17

5.1 - the Applications menu
The Applications menu can be found in the leftmost corner of the top panel.
By default, the menu shows four Favorites in the right pane as shown, and application categories on the right. Right-clicking on an Application give the user the option to Add it to Favorites, Desktop, or Panel.
18

The user can browse for an application, or, at the top right of the menu, an inline search bar can be used to find an application without browsing, Typing chromium brings the following result :
The open source browser which is the code basis for Google Chrome. But the same principle applies - the Application menu's inline search feature is convenient and powerful. Typing Settings brings up the following options :
19

5.2 - Bookmarks and the Places Menu
The Places menu is the second item from the left on the bottom panel. By default it shows five items, the current user's Home folder, the Trashcan, the Desktop folder, the root Filesystem and Recent Documents. By Bookmarking individual folders - in this example the Documents, Pictures and Downloads by right-clicking on them and selecting Send to -> Side Pane, these folders from ~/ (Home) are added to this menu.
1).
2).
20

Folders on mounted removeable storage devices (external USB hard drivesand flash drives) can also be bookmarked this way. Generally any folder that the default user has read / write permissions to can be bookmarked in this fashion. System folders (/etc, /opt, /usr) cannot and should not be added to the bookmarks sidepane, only system-defined directories and user-defined bookmarks.Recent documents are also viewable in the Places menu :
This list can be cleared by selecting Clear. After doing which, this option will be greyed out in the Places menu.
21

5.3 - The Home folder and File Management
The Home folder in Black Lab corresponds to what would be called a User profile in Windows. Since Apple's OSX is based on FreeBSD, which has a UNIX filesystem, its file structure is similar to Linux and it also has a Home folder containing data and settings for the currently logged-in-user. Black Lab Linux uses the Thunar file manager, currently version 1.6.3. It is a lightweight but full-featured file browser, which supports viewing both local and remote folders.
The Home folder includes the subfolders shown above by default. During setup, the default user account has full read / write permissions to Home and does not need to run commands in ~/ as root. Folders can be added and deleted as necessary by the user.
22

Thunar, as stated, is lightweight but full-featured and offers a variety of options, with a menu structure that will seem familiar to users of Windows Explorer and OSX's Finder File, Edit, View, Go (and Help, giving informationabout Thunar itself) :
Because Thunar is tabbed, bookmarked or filesystem folders can be opened in a new tab, giving a clean horizontal layout or in a different window, for use with ALT+TAB. Opening a Terminal Here is a powerful and frequently accessed feature as well as the integrated Find in this folder.
23

Selecting all Files or Selecting by Pattern allows the user to simplify selecting multiple files. Configuring custom actions allows the (power) user the ability to tweak and modify Thunar's appearance and functionalityand is beyond the scope of this guide.
This menu toggles the default view of folders in the current window. Size and arrangement, and importantly for accessing current user configurationsettings, hiding and unhiding certain folders :
24

The Go menu provides shortcuts within the file manager window to access locations on the filesystem which may not be bookmarked.
Opening folders in tabbed view is, as said, a useful way to viewing content and moving / copying it between folders :
25

Remote folders set up as SMB shares are browseable :
26

5.4 - Adding links and shortcuts to the Desktop / Panel
Accessing folders and applications are the two most commonly performed tasks in any operating system. The most common way for a user (generally)to access an application is through a desktop shortcut. In Xfce desktop and the Workspace Manager, application Launchers can be created either on the Desktop or the Panel. Folder links can be sent to the Desktop.To send a Link to the desktop, right click on a folder in Home and select -> Send to Desktop. An orange arrow indicates that it's a link, not a folder.
The link on the Desktop is shown with an orange arrow to differentiate it from a folder.To add a Launcher to the Desktop, right click and select Create Launcher :
Typing its name populates the app Launcher's dialog. Type Chromium, and the rest of the values (Comment, Command, Icon, Options) are created .
27

5.5 - Adding Launchers / Items to the Panel
Launchers and other items can be added to either of the two panels. Right-click on one of them and select Panel -> add new items. Since there are two panels, the first is labeled 0 the second is labeled 1.
Once added, the launcher has a blank icon, and the application or location which the launcher, launches, has to be added :
Once the application is added, the icon and program fields populate :
28
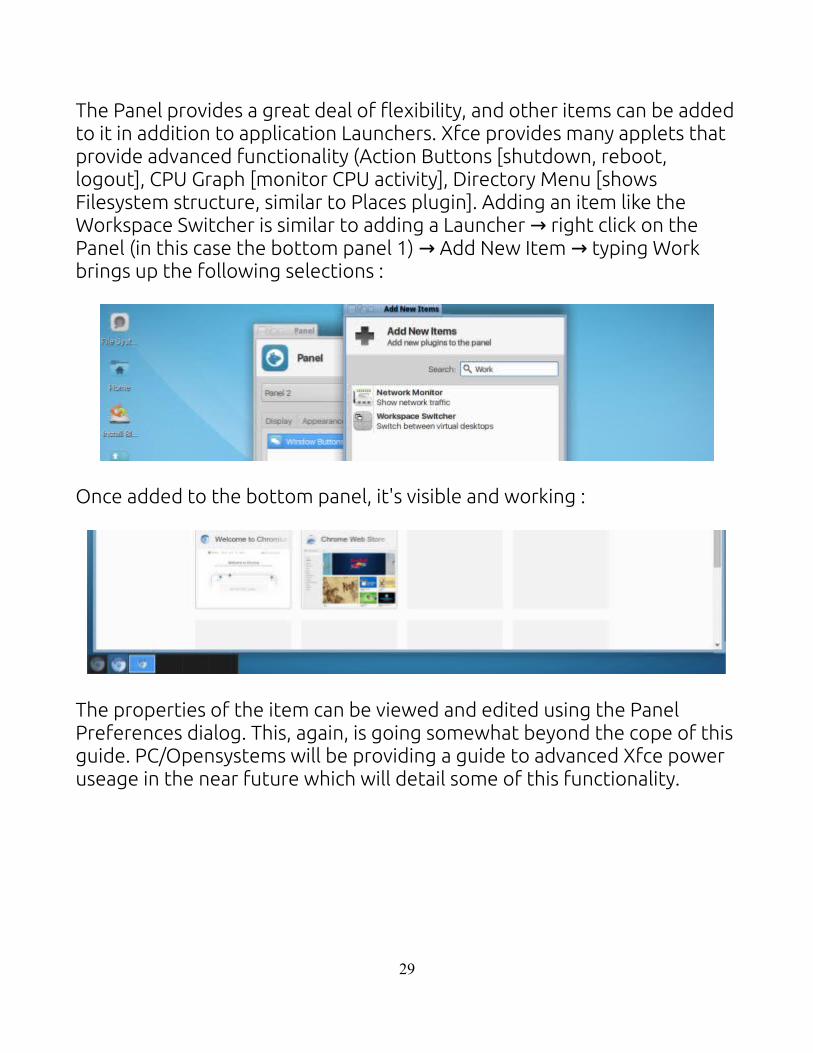
The Panel provides a great deal of flexibility, and other items can be addedto it in addition to application Launchers. Xfce provides many applets that provide advanced functionality (Action Buttons [shutdown, reboot, logout], CPU Graph [monitor CPU activity], Directory Menu [shows Filesystem structure, similar to Places plugin]. Adding an item like the Workspace Switcher is similar to adding a Launcher right click on the →Panel (in this case the bottom panel 1) Add New Item typing Work → →brings up the following selections :
Once added to the bottom panel, it's visible and working :
The properties of the item can be viewed and edited using the Panel Preferences dialog. This, again, is going somewhat beyond the cope of this guide. PC/Opensystems will be providing a guide to advanced Xfce power useage in the near future which will detail some of this functionality.
29

5.6 - the Settings Manager
PCOS includes a central utility to manage system-wide settings :
Divided into clearly defined categories, the Settings editor allows the user to change the default theme, font, icon set (Appearance), make changes the to the Desktop, Panel and Screensaver using the corresponding applets. And so on. The utility's functions are self-apparent and modular, which is one of Black Lab's (and Xfce's) strengths as a desktop environment.
30

6 - Default application set
Black Lab Linux includes the best available open-source programs to increase productivity.
Internet :
AVAHI SSH / VNC Server Browser - through a Citrix serverChromium - full featured web browser Create a new Fog App – useful for creating web-based applicationsDropbox – online storage service integrate with Thunar for local syncMozilla Thunderbird Pidgin Internet Messenger – integrated messaging clientSmuxi – Internet Relay Chat clientSteam – client for Steam gaming portalThunderbird - full-featured email client Transmission – integrated Bittorrent client
Office :
Libreoffice (5.0.3) - Writer, Calc, Base, Impress, Draw. Dictionary – client program to query different words and phrasesDocument Viewer – view multipage documentsebook-Reader – FBReader eBook readerOrage Calendar / Globaltime – integrated Xfce calendar and time apps
Graphics :
Document Viewer (Evince 3.4) - PDF viewerGIMP (2.8) - full featured image and graphics editorImageMagick – display and edit image filesInkscape – create and edit scalable vector image filesRistretto Image Viewer – integrated Xfce image viewing appShotwell (0.14.1) - photo organizerSimple Scan (3.4.4) - tool for scanning text and images
31

Multimedia :
Arista Transcoder - Audacious (3.6.2) - lightweight media playerAudacity – record and edit audio filesBrasero – create and copy CDs and DVDsCheese – take photos and videos with your webcamgMTP – a simple MTP client for MP3sParole Media Player – integrated Xfce media player appPulseAudio Volume Control – adjust the volume levelSimpleScreenRecorder – a feature-rich screen recorderSpotify – listen to music using SpotifyVLC Media Player (2.0.8) - multiformat media player
And last, but not least :
Games :
Aisleriot Solitaire – play many different Solitaire gamesMines – clear hidden mines from a minefieldSteam – application for managing and playing games from Steam librarySudoku – test your logic skills
32

7 - Updating the new system
Updating Black Lab from the terminal requires the utility aptitude, i.e. the command sudo apt-get update. After this is run in the terminal and sudo password entered, repositories are updated to reflect recent changes.
Running sudo apt-getupgrade all -y. will upgradethe installed package setto the most recentavailable package versionsand resolve any necessarydependencies.
33

8 - Adding / removing software
The App Grid is an intuitively categorizes Ubuntu software and streamlines its installation for the novice user :Opening App Grid from the menu, the user is greeted with a EULA :
Clicking Agree opens the main interface :
34

The Menu is separated into these categories :
Under each category,different results aredisplayed, as shownbelow :
VLC Media Player and Audacious are the first two results :
Similarly, Chromium and Thunderbird in Productivity :
35

The most common method is inline search, just like Black Lab's Apps Menu.The most common method is inline search, just like Black Lab's Apps Menu.Opening the Grid and searching for Calibre (QT-based eBook reader) Opening the Grid and searching for Calibre (QT-based eBook reader) immediately brings up the correct result :immediately brings up the correct result :
Clicking the result gives a full view of the software, creator, and reviews :Clicking the result gives a full view of the software, creator, and reviews :
Clicking Install, the user is prompted to enter administrative (sudo) Clicking Install, the user is prompted to enter administrative (sudo) credentials :credentials :
and the software installs to Apps Menu Office. Simple as that.→and the software installs to Apps Menu Office. Simple as that.→
36

8.1 – Installing software using Synaptic Package Manager8.1 – Installing software using Synaptic Package Manager
Black Lab Linux uses relies on the graphical frontend of the utility aptitude,Synaptic, to manage software sources and install software from a GUI. Typing synaptic in the menu brings up the desired result :
The left pane of the package manager shows available categories sorted by repository – main, multiverse and universe.
37

Synaptic's menus sort the actions that can be taken with packages installedand to be installed. The Edit menu allows upgrades to be marked and broken packages to be fixed – this can happen when Personal Package Archives are added and break packages. The Package menu offers the same functionality as highlighting and right-clicking on a package (Mark forinstallation, mark for removal, mark for complete removal, unmark). Software sources (such as a local server or CDROM) and repositories can be added and removed under the Settings menu.
Searching Xfce Desktop Environment shows packages available for Xfce (and Black Lab!) :
Screenshots are available for selected items :
38

8.1 - Installing software using the Terminal
Aptitude, the commandline utility used to update the newly installed BlackLab Linux system can (and is frequently) used to install software. Options and switches used in the Terminal offer a great deal of information. For example, even though it has already been installed, we'll search for Chromium using apt(itude)-cache search :
The output of the apt-cache search command lists all items in the repositories with the string chromium contained in their name or description, and eventually lists the browser itself, the subject of the initial search.
39

The user would type sudo apt-get install (-y) chromium (the -y switch bypasses prompts requiring user consent to install the software). If insteadwe want to verify what version of chromium-browser is available in the repositories, we would type sudo apt-cache policy chromium :
Conversely, installed software can be uninstalled using sudo apt-get autoremove :
The full scope of aptitude and its graphical frontend Synaptic are beyond the scope of this very cursory userguide;an entire guide could (and possibly may) be written about its use.
40

8.2 - adding software through PPA (Personal Package Archive)
Increasingly, popular software for Black Lab Linux is being offered outside the default software / application channels. Software available through this PPA format is added at the command line using sudo add-apt-repository<name of PPA here>
To install Y PPA Manager, a utility to manage Personal Package Archives, the PPA for the particular version of Black Lab is necessary :
41

Pressing Enter, the PPA is added to /etc/sources.list. Running sudo apt-get update && sudo apt-cache search y-ppa-manager displays that it is available :
Then sudo apt-get install installs Y PPA Manager and all of its dependencies :
and it is available in the Menu .
42

9 - FAQ
1). Isn't Black Lab Linux just Ubuntu with some extra software added?
- No. Black Lab includes many specialized optimizations and upgrades for out-of-the-box efficiency and cutting-edge performance. It generally uses ahigher-level kernel than the current version of Ubuntu and a more comprehensive application set.
2). Does Black Lab require antivirus software? Is it immune to malware?
- Because BL uses the Linux / UNIX modular security model, it is much moreresistant to viruses and malware than Windows. That being said, the possibility exists that it or any other Linux distro could be compromised at some point. It's incumbent on the user to have good basic Internet browsing and safety habits and use good common sense.
3). Why pay for Black Lab instead of getting another distro for free?
PC/Opensystems LLC releases the free community version of its desktop software for download six weeks after it has been released to enterprise and subscription customers. The paid version offers telephone and email support;it is also available on a variety of preinstalled media which can be ordered from PC/Opensystems LLC.
5). When I open Chromium, I keep getting prompted to enter a password.
- The default password for the GNOME keyring is desktop.
4). Do you (the Documentation guy) use Black Lab Linux?
- Yes I do. This entire document has been composed on a fully stock and barely modified BLNext system. It works great!
43

Copyright © 2015, the Black Lab Linux Documentation Team. Lead and primary author : Rich Dennis. Some rights reserved. Please feel free to distribute a copy of this manual to colleagues, friends, family, and anyone else who might be interested in state-of-the-art Linux software. Visit http://blacklablinux.org for current developments. Thanks to the rest of the Black Lab Linux team for their insight and constructive criticism.
44


