Draft Release 1.0 – January 2004 Modified – March 2007 by Teodoro Koliopoulos Panama Canal Authority Document Control Number _1.0 _ Confidentiality & Copyright This Manual contains CrimsonLogic proprietary material. While CrimsonLogic customers are given reasonable opportunity to view the Manual for the purpose of exemplifying CrimsonLogic's commitment to quality, any form of reproduction, transmission or use of this Manual or its contents is not permitted without prior written approval from CrimsonLogic. All rights are reserved. CrimsonLogic Pte Ltd 31 Science Park Road, The Crimson, Singapore 117611, Main: (65) 6887 7888, Fax: (65) 6778 5277, www.crimsonlogic.com CrimsonLogic USER MANUAL FOR Electronic Data Collection System (EDCS)
Transcript
Draft Release 1.0 – January 2004 Modified – March 2007 by Teodoro Koliopoulos
Panama Canal Authority
Document Control Number _1.0_
Confidentiality & Copyright
This Manual contains CrimsonLogic proprietary material. While CrimsonLogic customers are given reasonable opportunity to view the Manual for the purpose of exemplifying CrimsonLogic's commitment to quality, any form of reproduction, transmission or use of this Manual or its contents is not permitted without prior written approval from CrimsonLogic. All rights are reserved.
CrimsonLogic Pte Ltd 31 Science Park Road, The Crimson, Singapore 117611, Main: (65) 6887 7888, Fax: (65) 6778 5277, www.crimsonlogic.com
CrimsonLogic
USER MANUAL
FOR
Electronic Data Collection System (EDCS)
User Manual for EDCS User Admin March 2007
CrimsonLogic Contents & Release Notice: Page 1 of 220
CONTENTS
User Manual for EDCS User Admin March 2007
CrimsonLogic Contents & Release Notice: Page 2 of 220
1. INTRODUCTION
The EDCS application allows the Customers and Agents to submit forms when their vessels arrive at Panama waters as well as for ACP Representatives to process these submissions. The EDCS application is divided into different forms each of which serves its own purpose. This user manual is primarily designed for users that will be using the system directly. This includes the Customers, Agents and ACP Representatives such as the ETA Clerk, Booking Clerk and Watch Supervisor.
1.1 Features
The system provides the following forms (modules):
ETA
Ship Due (SHD)
Ship Due for Small Crafts (SSC)
Transit Booking Request (TBR)
Transit Booking Cancellation (TBC)
Request for Same Day Transit (SDT)
Daylight Transit Request (DLT)
Cargo Declaration (CAD)
Crew List (CRL)
Passenger List (PGL)
1.2 Target Users
EDCS Customers and Agents, ACP staff using the EDCS system, for example: the ETA Clerk, Booking Clerk and Watch Supervisor
Technical support staff for the EDCS
User Manual for EDCS User Admin March 2007
CrimsonLogic Contents & Release Notice: Page 3 of 220
1.3 System Requirements
1.3.1 Hardware Requirements
1.3.1.1 Client Side
Pentium II and above 64 MB RAM and above Color Monitor 28.8 kbps and above Modem 1 telephone line
1.3.1.2 Server Side
Pentium III and above 256 MB RAM or above
1.3.2 Software Requirements
1.3.2.1 Client Side
Windows 95 and above Internet browser
- Netscape Navigator 7.0 and above or - Microsoft Internet Explorer 6.0 and above
Internet access
1.3.2.2 Server Side
Oracle Database 8.1.6 Sun Solaris 7 and 8 Java tools (JDK/SDK) WebLogic Server 8.1 sp3 Apache Ant
1.3.3 Browser Settings
The system requires a browser that can support Javascript and be able to compare document in cache with the document in network every time. The recommended browser is Netscape Navigator 7.0 and above and Internet Explorer 5.0 and above.
2. In the Enable JavaScript for, Tick the Navigator. 3. Click OK to apply the settings
User Manual for EDCS User Admin March 2007
CrimsonLogic Contents & Release Notice: Page 4 of 220
1.3.3.3.2 Enable Cache and Network Comparison 1. Click Edit – Preference – Advanced - Cache from the
browser menu bar 2. Click ‘Document in cache is compared to document
on network’ to ‘Every time’
1.3.2.4 Internet Explorer
1.3.3.4.1 Enable Javascript 1. Javascript is automatically enabled in your browser
1.3.3.4.2 Enable Cache and Network Comparison
1. Click Tools - Internet Options - General tab 2. At the Temporary Internet files section, click Settings 3. Under the option ‘Check for newer versions of stored
pages, check on the ‘Every visit to the page’ option
4. Click OK to apply the settings
User Manual for EDCS User Admin March 2007
CrimsonLogic Contents & Release Notice: Page 5 of 220
1.4 General Information
* Marker indicates mandatory fields and must be keyed in. You will not be able to proceed with any mandatory fields are left empty.
Click once only and do not double-click as this will resend the request
If you receive error messages upon clicking the Submit button, such as mandatory
fields must be keyed in, you must rectify all errors identified before you can proceed
If your session has timed out messages due to inactivity, click the Logout button to
logout, and then re-login to use the application
The application is still processing your request when the browser icon on the top right hand corner is in motion. Please wait till the animation stops before proceeding
You can use the same login id to login ONCE
For security reasons, please do not use History List or Bookmark feature
1.5 Pre-Requisites
Registered user Ids must be available for log-on.
User Manual for EDCS User Admin March 2007
CrimsonLogic Contents & Release Notice: Page 6 of 220
2 GETTING STARTED
2.1 Application URL
EDCS application will reside in the ADCS portal. Please bookmark the URL for future access. Please refer to the System Administrator for the correct URL, the below is an example of the URL. http://edcs.pancanal.com
2.2 User ID and Password In order to access the system, you need to have a User ID granted access to EDCS via the assigned user role(s). Please refer to Appendix A – User Roles and Access Rights.
Fig 1.1 – EDCS Portal Website
User Manual for EDCS User Admin March 2007
CrimsonLogic Contents & Release Notice: Page 7 of 220
2.3 Login From the portal you have the option to login or to browse the introduction to other applications within the same portal.
To login, please key in your User ID and Password.
Fig 2.1 – Login
User Manual for EDCS User Admin March 2007
CrimsonLogic Contents & Release Notice: Page 8 of 220
User ID
Type in your User ID under ‘User ID’. Note that it is case sensitive.
Password
Type in your Password. Note that it is case sensitive.
Login Click on the Login button to logon to the application. If you enter the User ID or password incorrectly, or your User ID is still in an inactive state (such as deregistered, suspended or not commenced), the ‘Invalid User ID / Password’ login error message will be displayed. Do note that your password will automatically be frozen after 3 unsuccessful attempts to log in with an incorrect password.
Fig 2.2 – Launch Application
Launch Application
Choose ‘Electronic Data Collection System’ from the ‘Launch ->’ list box to launch the application
EDCS homepage screen
Fig 2.3 – EDCS Homepage
The maximum application launch session is default to 100 for each User ID. If you close the web browser without first logout from the portal, your number of chances to launch the application will be reduced on the next success login. ANA cron job shall free up any previous 12 hours launched application sessions daily.
User Manual for EDCS User Admin March 2007
CrimsonLogic Contents & Release Notice: Page 9 of 220
2.4 Change Password
Change Password
Fig 2.4 - Change Password 1. Click on My Account from the application’s top menu. My
Account page is showed. 2. Click on Change Password. The Change Password page is
showed. 3. Enter the Old Password. 4. Enter the New Password. 5. Enter the Confirm New Password. 6. Click on the Submit button to update the new password. 7. Click on the Reset button to clear the form input. If you enter the old password incorrectly or enter invalid new password, error message will be displayed. Do note that your password will automatically be frozen after 3 unsuccessful attempts to change password with an incorrect old password.
2.5 Change Security Question and Answer
Change Security Question and Answer
Fig 2.5 - Change Security Question and Answer 1. Click on My Account from the application’s top menu. My
Account page is showed. 2. Click on Change Security Question and Answer. The
Change Security Question and Answer page is showed. 3. Enter the New Question. 4. Enter the New Answer.
User Manual for EDCS User Admin March 2007
CrimsonLogic Contents & Release Notice: Page 10 of 220
5. Click on the Submit button to update the new security question and answer.
6. Click on the Reset button to clear the form input.
2.6 Logout
Logout from Portal
Fig 2.6 - Logout from Portal 1. Click on Logout from the application’s top menu. 2. A dialog box is showed to confirm the logout. Click on Ok to
confirm the logout, or Cancel to abort the logout. The user session is cleanup, upon logout.
2.7 Forgot Password
Forgot Password
Fig 2.7 - Forget Password 1. Click on forget password?
Retrieve Security Question by User ID
Fig 2.8 - Retrieve Security Question by User ID 2. Enter the User ID. 3. Click on the Submit button to display the security question. 4. Click on the Reset button to clear the form input.
User Manual for EDCS User Admin March 2007
CrimsonLogic Contents & Release Notice: Page 11 of 220
Security Question and Answer
Fig 2.9 - Security Question and Answer 5. Enter the Answer for the security question. 6. Click on the Submit button to post the answer. 7. Click on the Reset button to clear the form input.
User Manual for EDCS User Admin March 2007
CrimsonLogic Contents & Release Notice: Page 12 of 220
3 ETA
3.1 Create
Menu 1. Click on ETA – Create from the menu. Fill in Vessel Information, Visit Information and Special Conditions in ETA Header tab
Fig 3.1 – ETA Header Tab 2. Choose ‘Yes’ or ‘No’ for First Visit radio button. If ‘Yes’ is
selected, Vessel SIN will be disabled, and all vessel information fields need to be filled in manually. If First Visit is “No”, Vessel SIN and its selection button will be enabled, all the basic vessel information fields need to be disabled to prevent user from input. User will click the “Select” button to search and retrieve Vessel SIN and basic visit information.
3. Fill in necessary visit Information.
User Manual for EDCS User Admin March 2007
CrimsonLogic Contents & Release Notice: Page 13 of 220
4. Fill in necessary special condition. ETA Header Tab Details
First Visit to Panama
If the vessel visits Panama for the first time, select ‘Yes’. Else select ‘No’.
Vessel SIN Enter the Vessel SIN of the vessel manually, or clicking button, a popup window for Vessel SIN will be shown.
Fig 3.2 – Vessel SIN search window User can retrieve vessel basic information: Vessel SIN, Vessel Name, Flag, IMO No., by specifying Vessel SIN, Vessel Name as search criteria, clicking ‘Search’ button. Select the radio of the target record from the return result list. And then clicking ‘Ok’ button.
Vessel Name Enter Vessel Name of the vessel manually, or it will be populated after selecting Vessel SIN.
Flag Enter the Country code of registry for the vessel by clicking , or it will be populated after selecting Vessel SIN.
Call Letters Enter the call letters for the vessel. It can also be auto populated when the user select the Vessel SIN from the popup window.
Length Enter the length of the vessel in meters, or it will be populated after selecting Vessel SIN.
Ship Type Enter the Type of the vessel, or it will be populated after selecting Vessel SIN.
Beam Enter beam of the vessel manually, or it will be populated after selecting Vessel SIN.
IMO Number Enter the International Maritime Organization No. of the vessel manually, or it will be populated after selecting Vessel SIN.
Vessel Agent Default value of Agent Code is the account Id of the Agency. And
user also can select an agent code by clicking .
User Manual for EDCS User Admin March 2007
CrimsonLogic Contents & Release Notice: Page 14 of 220
Customer Code Default value of Customer Code is the account Id of the
Customer. And user also can select customer code by clicking . Arrival Port Choose Arrival Port of the vessel. TFW Draft FWD Enter the Forward Tropical Fresh water Draft measurement of the
vessel, which format is 99-99. TFW Draft AFT Enter the After Tropical Fresh water Draft measurement of the
vessel, which format is 99-99. TSW FWD Draft Enter the Forward Tropical Salt water Draft measurement of the
vessel, which format is 99-99. TSW AFT Draft Enter the After Tropical Salt water Draft measurement of the vessel,
which format is 99-99. Estimated Arrival Date
Enter the estimated arrival date and time in dd/mm/yyyy hhmm format, which should be later than current date.
ETA Time Zone Choose the time zone the estimated arrival date time based on from drop down list.
Vessel For Select the operation to be realized at ACP water, Transit or Local Movement.
Cape Mala Speed
Enter Cape Mala Speed of the vessel in Knots manually, or clicking
. No Of Movement
For display only. It will be showing how many ship movements it has in the Ship Movement Tab.
Dead Tow Visit Select to indicate whether the vessel is a Dead Tow. Dead Tow Visit Sequence
For display only. It will be showing the Dead Tow Visit Sequence number which is auto generated by the system.
DTU Additional Component Number
If user indicates “Dead Tow Visit” as “Yes”, this filed needs to be filled with valid data.
Fill in ship change information in Ship Change Info tab.
Fig 3.3 – Ship Change Information Tab 5. Provide ship change information if any. 6. Please take note that this tab will be disabled for “First Visit” as
“Yes”.
Change in Basic Select to indicate whether there is information as to the ship
User Manual for EDCS User Admin March 2007
CrimsonLogic Contents & Release Notice: Page 15 of 220
Vessel Information since Last Visit
information.
Any other Structural changes
Select to indicate whether there is structural change to the ship.
Structural Changes Remarks
Enter the remarks for ship structural changes.
New Flag Enter the new Country code of registry for the vessel by clicking , or it will be populated after selecting Vessel SIN.
New Vessel Name
Enter new Vessel Name of the vessel manually, or it will be populated after selecting Vessel SIN.
New Call Letters Enter the call letters for the vessel. It can also be auto populated when the user select the Vessel SIN from the popup window.
New Length Enter new length of the vessel in meters, or it will be populated after selecting Vessel SIN.
New Beam Enter new beam of the vessel manually, or it will be populated after selecting Vessel SIN.
Fill in ship movement information in Ship Movement Information Tab.
Fig 3.4 – Ship Movement Information Tab 7. Provide at least one valid ship movement information.
Movement Information Detail
Sequence No The internal movement sequence no will be assigned and displayed, once the ETA is approved by ACP.
Type Choose the movement type of this movement from the drop down list.
User Manual for EDCS User Admin March 2007
CrimsonLogic Contents & Release Notice: Page 16 of 220
Reason Enter the Movement Reason code. To select from a predefined list
of reason codes, click on the icon. Starting At The starting location will be assigned and displayed, once the ETA
is approved by ACP. Stopping At Enter the location code. To select from a predefined list of location
codes, click on the icon. Movement Status
The movement status of the movement will be displayed.
Ready Time Enter the Ready Time for the movement in dd/mm/yyyy HHmm format.
Ready Status Choose Ready Status of the movement from the drop down list. Transit Direction The Transit Direction will be assigned and displayed, once the ETA is
approved by ACP. Fill in ADS Preliminary Information and Stowage Plans in ADS Information tab
Fig 3.5 – ADS Information 8. If first visit is ‘Yes’, ADS Information is also required. Otherwise, it
would be disabled.
ADS Information Detail
User Manual for EDCS User Admin March 2007
CrimsonLogic Contents & Release Notice: Page 17 of 220
Suez Gross Enter certificate SUEZ Gross Tonnage of the vessel. Suez Net Enter SUEZ certificate Tonnage of the vessel. Vessel PRE-SIN Enter the preliminary identifier for the vessel assigned by ACP. ITC-69-Length Enter length as of ITC-69 certificate of the vessel in meters. ITC-69-Depth Enter depth as of ITC-69 certificate of the vessel in meters. ITC-69-Gross Tonnage
Enter ITC-69 gross tonnage of the vessel.
ITC-69-Net Tonnage
Enter net tonnage as of ITC-69 certificate of the vessel.
ITC-69 Beam Enter beam as of ITC-69 certificate of the vessel in meters. Year Build Enter the year when the vessel is built. Hull Number Enter the no assigned to the vessel’s hull when in construction. Passenger Capacity
Enter passenger total capacity of the vessel.
Summer Loaded Draft
Enter the vertical distance in meters and millimeters from the lowest point of the hull to the summer load line of the vessel.
Summer Loaded Deadweight
Enter the carrying capacity in metric tons of a vessel when loaded to its maximum summer load line.
Builder Enter the builder code. To select from a predefined list of builder
codes, click on the icon. Hull Type Enter the hull type code. To select from a predefined list of hull
type codes, click on the icon. Timber Summer Loaded Draft
Enter the vertical distance in meters and millimeters from the lowest point of the hull to the timber summer load line.
Summer Loaded Displacement
Enter the weight of the vessel and its contents in metric tons when loaded to its maximum authorized summer load line mark (Plimsoll mark).
No of Propellers Enter the number of propellers in the vessel. No of Engines Enter the number of vessel’s motors. Main Engine HP Type
Enter the code of engine horse power rate type. To select from a
predefined list of HP type codes, click on the icon. Propeller Type Enter the code of propeller type. To select from a predefined list of
propeller type code, click on the icon. Engine Type Enter the type of main propulsion engine(s). To select from a
predefined list of engine type code, click on the icon. Main Engine HP Enter the engine horse power of the vessel. DeadRise Enter the distance measured perpendicular to the molded base
line at the side of the vessel, from the molded base line to the line of bottom.
Tons per Centimeters Immersion
Enter the weight of salt water displaced by the ship when sinking one centimeter on a level plane.
Ship’s Email Enter the email address of the vessel. MMSI No. Enter the vessel identification based on the ITU table. Former Vessel Name
Enter the prior vessel name of the vessel.
Bilge Keel Enter the radius of the curvature of the bottom side corner of the
User Manual for EDCS User Admin March 2007
CrimsonLogic Contents & Release Notice: Page 18 of 220
Radius hull at the mid ship. INMARSAT C Number
Enter the International Maritime Satellite C no of the vessel.
Crew safe manning quantity
Enter the minimum quantity of crews – safe manning certificate.
Stowage Plan Click ‘Email’ hyperlink to send the plans of the ship that shows the location of each tank.
Fig 3.6 – Stowage Plans
Fill in Sister Ship Information in Sister Ship List tab
Fig 3.7 – Sister Ship List 9. If first visit is ‘Yes’, Sister Ship Information can be provided if there
is any. Otherwise, this tab would be disabled. Sister Ship Detail Sister SIN Enter the vessel SIN for the sister ship. To select from a predefined
list of vessel SIN, click on the icon. Sister Ship Name The sister ship name will be populated after sister SIN is selected.
User Manual for EDCS User Admin March 2007
CrimsonLogic Contents & Release Notice: Page 19 of 220
3.2 Save
Menu 1. Click on ETA – Create from the menu. Save a new created ETA
2. Enter all necessary information.
Fig 3.8 – Save button in creating page 3. Click on the Save button to activate save request.
The system will conduct syntax validation before trying to save the data into database
Fig 3.9 – Popup window for error message from syntax checking 4. If any syntax error detected upon mandatory fields for data
type or data size checking, a popup window would be shown to list all the errors.
The system will prompt warning message if any before trying to save the data into database
Fig 3.10 – Popup window for warning message from syntax checking
User Manual for EDCS User Admin March 2007
CrimsonLogic Contents & Release Notice: Page 20 of 220
5. If it is necessary to display warning message for some value entered or not entered by user, a popup window will be shown to list all warning message. By clicking on ‘Ok’ button, the save procedure will continue. By clicking on ‘Cancel’ button, the procedure will stop for user to revise data.
Upon successful validation again syntax rules, the data will be saved into database. A confirmation page will be shown to user.
Fig 3.11 – ETA save confirmation page 6. A confirmation page will be displayed once an ETA record is
saved successfully.
User Manual for EDCS User Admin March 2007
CrimsonLogic Contents & Release Notice: Page 21 of 220
3.3 Submit
Menu 1. Click on ETA – Create from the menu. Save a new created ETA
2. Enter all necessary information.
Fig 3.12 – Submit button in creating page 3. Click on the Submit button to activate submit request.
The system will conduct syntax validation before trying to submit the record
Fig 3.13 – Popup window for error message from syntax checking 4. If any syntax error detected upon mandatory fields for data
type or data size checking, a popup window would be shown to list all the errors.
5. By clicking the error message hyperlink, the mouse cursor will be navigated and focused to the field where the error occurs.
The system will prompt warning message if any before trying to submit the record.
User Manual for EDCS User Admin March 2007
CrimsonLogic Contents & Release Notice: Page 22 of 220
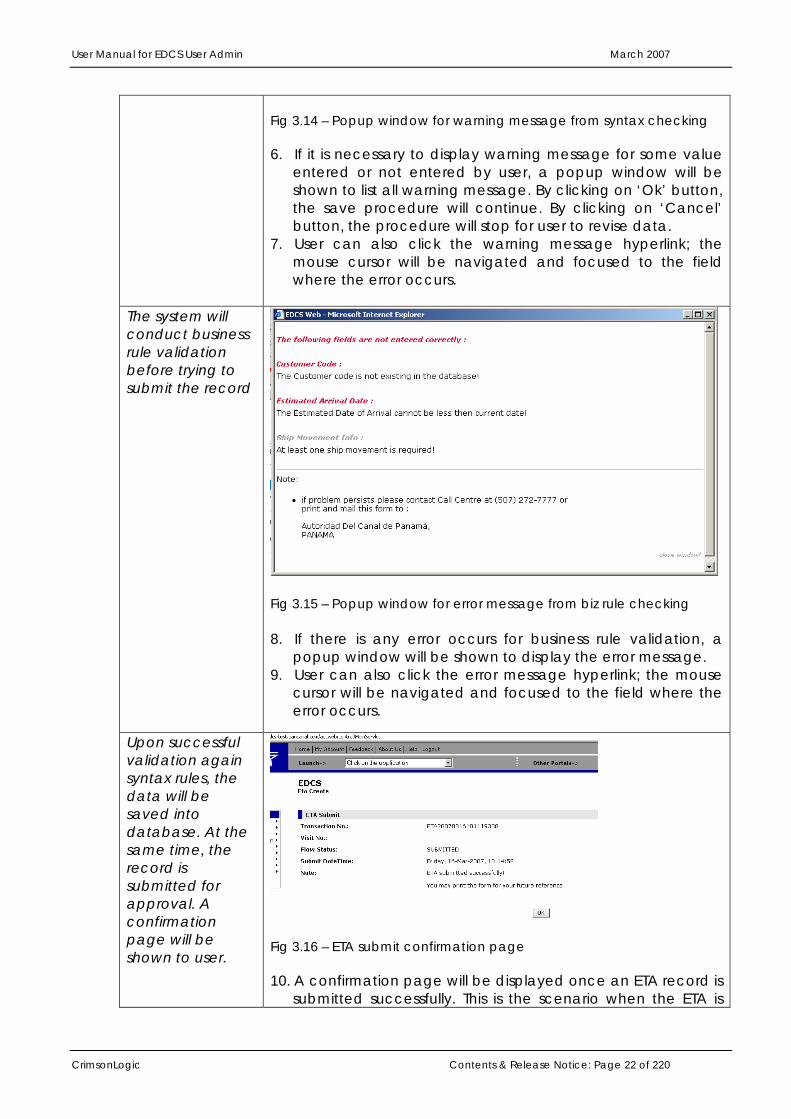
Fig 3.14 – Popup window for warning message from syntax checking 6. If it is necessary to display warning message for some value
entered or not entered by user, a popup window will be shown to list all warning message. By clicking on ‘Ok’ button, the save procedure will continue. By clicking on ‘Cancel’ button, the procedure will stop for user to revise data.
7. User can also click the warning message hyperlink; the mouse cursor will be navigated and focused to the field where the error occurs.
The system will conduct business rule validation before trying to submit the record
Fig 3.15 – Popup window for error message from biz rule checking 8. If there is any error occurs for business rule validation, a
popup window will be shown to display the error message. 9. User can also click the error message hyperlink; the mouse
cursor will be navigated and focused to the field where the error occurs.
Upon successful validation again syntax rules, the data will be saved into database. At the same time, the record is submitted for approval. A confirmation page will be shown to user.
Fig 3.16 – ETA submit confirmation page 10. A confirmation page will be displayed once an ETA record is
submitted successfully. This is the scenario when the ETA is
User Manual for EDCS User Admin March 2007
CrimsonLogic Contents & Release Notice: Page 23 of 220
created and submitted by Customer or Agent.
Fig 3.17 – ETA submit and approve confirmation page 11. If the ETA is created and submitted by ETA Clerk on the
behalf of Customer or Agent, upon successful validation again syntax as well as business rule, the ETA will be saved into database and submitted for approval. At the same time, the ETA will be approved automatically. A confirmation page of approval will be shown to the user.
User Manual for EDCS User Admin March 2007
CrimsonLogic Contents & Release Notice: Page 24 of 220
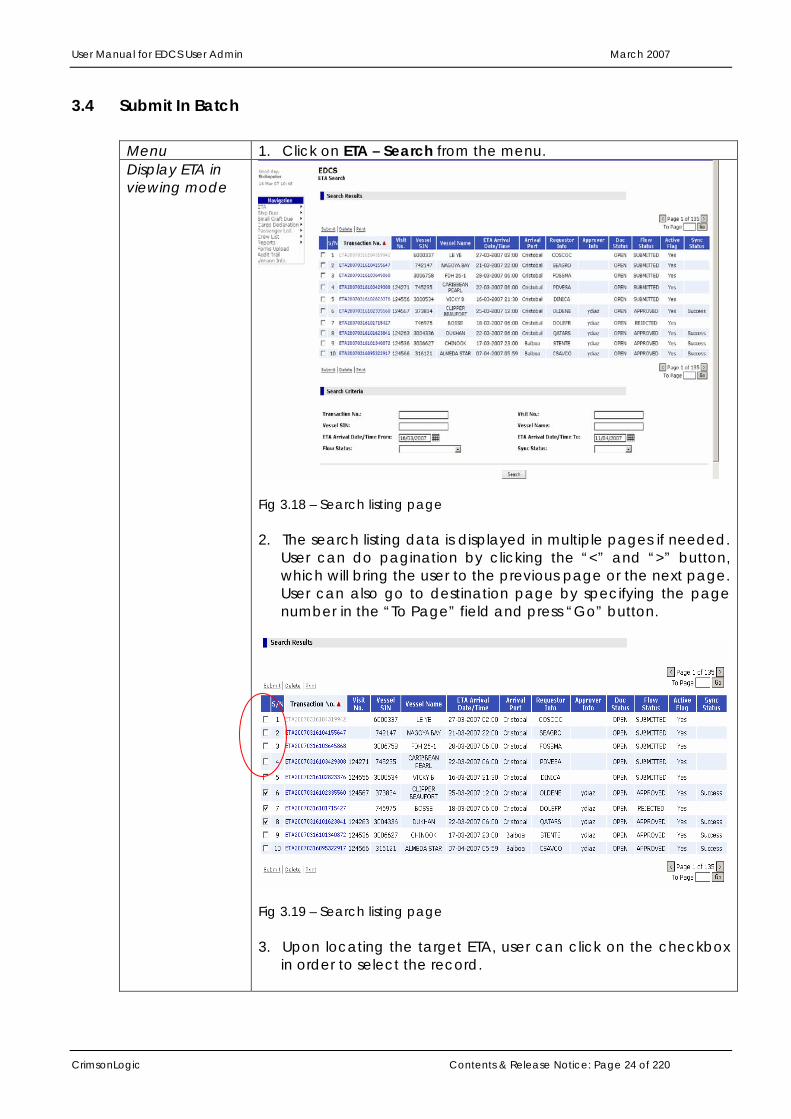
3.4 Submit In Batch
Menu 1. Click on ETA – Search from the menu. Display ETA in viewing mode
Fig 3.18 – Search listing page 2. The search listing data is displayed in multiple pages if needed.
User can do pagination by clicking the “<” and “>” button, which will bring the user to the previous page or the next page. User can also go to destination page by specifying the page number in the “To Page” field and press “Go” button.
Fig 3.19 – Search listing page 3. Upon locating the target ETA, user can click on the checkbox
in order to select the record.
User Manual for EDCS User Admin March 2007
CrimsonLogic Contents & Release Notice: Page 25 of 220
Fig 3.20 – Details of ETA in viewing mode 4. After that user can click the “submit” button as shown in
above figure.
ETA will be submitted in batch mode. Confirmation page will be displayed.
Fig 3.21 – ETA batch submit confirmation page 5. The ETA Batch Submit confirmation page will be shown. Inside
this confirmation every ETA selected by the user will be displayed with a submission status.
6. Please note that only ETA with “DRAFT” status can be submitted. If ETA with other status is selected, it will simply be ignored.
7. There will have business rules validation before the submission. If there are some errors for the business validation, the errors will be displayed in the confirmation page with the original ETA not submitted.
8. If the ETA is submitted by Agent or Customer, the status of the ETA will be change from “DRAFT” to “SUBMITTED”.
9. If the ETA is submitted by ETA Clerk, the ETA will be submitted and at the same time, get approved upon successful business rule validation. There will be synchronization with backend EVTMS system then this approval happens.
User Manual for EDCS User Admin March 2007
CrimsonLogic Contents & Release Notice: Page 26 of 220
3.5 Search
Menu 1. Click on ETA – Search from the menu. List all existing ETA
Fig 3.22 – List of existing ETA 2. All ETA belonging to the Agent or Customer as the login user
would be listed in a table. If the login user is ETA Clerk, all ETA will be listed.
Sorting and ordering of the list of ETA
3. By default, the data listing of ETA is ordered by Transaction No.
Fig 3.23 – Order by Visit No 4. User can alter the order sequence by clicking the listing table
User Manual for EDCS User Admin March 2007
CrimsonLogic Contents & Release Notice: Page 27 of 220
title as shown in the above figure.
Specify search criteria
5. By default, all ETA that the current user is authorised to view are listed.
6. User can search ETA by specifying search criteria as below.
Fig 3.24 – Search Criteria for ETA 7. By clicking on the ‘Search’ button, the user will be shown a
new listing of data based on the search criteria he provides.
User Manual for EDCS User Admin March 2007
CrimsonLogic Contents & Release Notice: Page 28 of 220
3.6 Edit
Menu 1. Click on ETA – Search from the menu. Display ETA in viewing mode
Fig 3.25 – Search listing page 2. The search listing data is displayed in multiple pages if needed.
User can do pagination by clicking the “<” and “>” button, which will bring the user to the previous page or the next page. User can also go to destination page by specifying the page number in the “To Page” field and press “Go” button.
3. Upon locating the target ETA, user can click on the hyperlink on the field of transaction no of the record.
User Manual for EDCS User Admin March 2007
CrimsonLogic Contents & Release Notice: Page 29 of 220
Fig 3.26 – Details of ETA in viewing mode 4. The details of ETA would be displayed in viewing mode.
Display ETA in editing mode
Fig 3.27 – Edit button in detail form 5. Click on ‘Edit’ button to change to editing mode.
Fig 3.28 – ETA form in editing mode
Save or Submit ETA after edition
User Manual for EDCS User Admin March 2007
CrimsonLogic Contents & Release Notice: Page 30 of 220
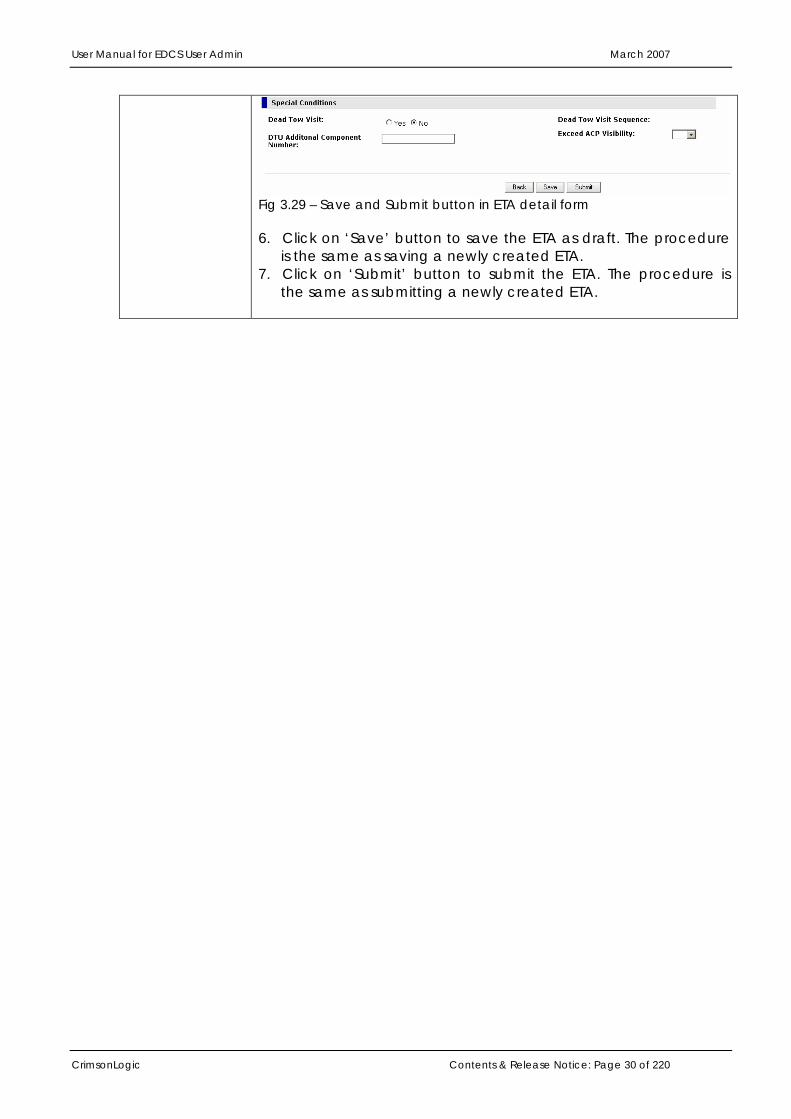
Fig 3.29 – Save and Submit button in ETA detail form 6. Click on ‘Save’ button to save the ETA as draft. The procedure
is the same as saving a newly created ETA. 7. Click on ‘Submit’ button to submit the ETA. The procedure is
the same as submitting a newly created ETA.
User Manual for EDCS User Admin March 2007
CrimsonLogic Contents & Release Notice: Page 31 of 220
3.7 Delete
Menu 1. Click on ETA – Search from the menu. Display ETA in viewing mode
Fig 3.30 – Search listing page 2. The search listing data is displayed in multiple pages if needed.
User can do pagination by clicking the “<” and “>” button, which will bring the user to the previous page or the next page. User can also go to destination page by specifying the page number in the “To Page” field and press “Go” button.
3. Upon locating the target ETA, user can click on the hyperlink on the field of transaction no of the record.
User Manual for EDCS User Admin March 2007
CrimsonLogic Contents & Release Notice: Page 32 of 220
Fig 3.31 – Details of ETA in viewing mode 4. The details of ETA would be displayed in viewing mode.
Click Delete button to delete the ETA
Fig 3.32 – Delete button in detail form 5. Click on ‘Delete’ button to delete the current record.
Display ETA delete confirmation page
Fig 3.33 – ETA delete confirmation page 6. Upon successful deletion of the ETA record, there will have a
deletion confirmation page displayed to user. 7. Please note that only “DRAFT” ETA can be deleted from the
system. In other word, the system has added in control such that the “Delete” button is only available to those ETA with “DRAFT” status.
User Manual for EDCS User Admin March 2007
CrimsonLogic Contents & Release Notice: Page 33 of 220
3.8 Delete In Batch
Menu 1. Click on ETA – Search from the menu. Display ETA in viewing mode
Fig 3.34 – Search listing page 2. The search listing data is displayed in multiple pages if needed.
User can do pagination by clicking the “<” and “>” button, which will bring the user to the previous page or the next page. User can also go to destination page by specifying the page number in the “To Page” field and press “Go” button.
Fig 3.35 – Search listing page 3. Upon locating the target ETA, user can click on the checkbox
User Manual for EDCS User Admin March 2007
CrimsonLogic Contents & Release Notice: Page 34 of 220
in order to select the record for deletion.
Fig 3.36 – Details of ETA in viewing mode 4. After that user can click the “Delete” hyperlink button as
shown in above figure.
ETA will be deleted in batch mode. Confirmation page will be displayed.
Fig 3.37 – ETA batch delete confirmation page 5. The ETA Batch Delete confirmation page will be shown. Inside
this confirmation every ETA selected by the user will be displayed with a deletion status.
6. Please note that only ETA with “DRAFT” status can be deleted. If ETA with other status is selected for deletion, it will simply be ignored.
7. User can only view and delete those ETA that belongs to his customer code or agent code.
3.9 Cancel
Menu 8. Click on ETA – Search from the menu.
User Manual for EDCS User Admin March 2007
CrimsonLogic Contents & Release Notice: Page 35 of 220
Display ETA in viewing mode
Fig 3.47 – Search listing page 9. The search listing data is displayed in multiple pages if needed.
User can do pagination by clicking the “<” and “>” button, which will bring the user to the previous page or the next page. User can also go to destination page by specifying the page number in the “To Page” field and press “Go” button.
10. Upon locating the target ETA, user can click on the hyperlink on the field of transaction no of the record.
User Manual for EDCS User Admin March 2007
CrimsonLogic Contents & Release Notice: Page 36 of 220
Fig 3.48 – Details of ETA in viewing mode 11. The details of ETA would be displayed in viewing mode.
Click Cancel button to cancel the ETA
Fig 3.49 – Delete button in detail form 12. Click on ‘Cancel’ button to cancel the current record.
Display ETA delete confirmation page
Fig 3.50 – ETA delete confirmation page 13. Upon successful cancellation of the ETA record, there will have
a cancellation confirmation page displayed to user. 14. Please note that only “APPROVED” ETA can be cancelled from
the system. In other word, the system has added in control such that the “Cancel” button is only available to those ETA with “APPROVED” status.
15. Upon successful cancellation submission, the ETA status will be change from “APPROVED” to “CANCELLATION PENDING”. ETA with such status can either be approved or rejected. If approved by ETA Clerk, the status will be changed to “CANCELLED”. If rejected, the status will be changed back to “APPROVED”.
User Manual for EDCS User Admin March 2007
CrimsonLogic Contents & Release Notice: Page 37 of 220
16. Please note that Agent and Customer can submit cancellation submission. If the cancellation submission is done by ETA Clerk on the behalf of Agent or Customer, the ETA will be cancelled automatically. Synchronization with backend regarding this ETA cancellation will also happen which is to update the backend EVTMS database.
User Manual for EDCS User Admin March 2007
CrimsonLogic Contents & Release Notice: Page 38 of 220
3.10 Duplicate
Menu 8. Click on ETA – Search from the menu. Display ETA in viewing mode
Fig 3.51 – Search listing page 9. The search listing data is displayed in multiple pages if needed.
User can do pagination by clicking the “<” and “>” button, which will bring the user to the previous page or the next page. User can also go to destination page by specifying the page number in the “To Page” field and press “Go” button.
10. Upon locating the target ETA, user can click on the hyperlink on the field of transaction no of the record.
User Manual for EDCS User Admin March 2007
CrimsonLogic Contents & Release Notice: Page 39 of 220
Fig 3.52 – Details of ETA in viewing mode 11. The details of ETA would be displayed in viewing mode.
Display ETA in editing mode
Fig 5.53 – Duplicate button in detail form 12. Click on ‘Duplicate’ button to change to editing mode.
User Manual for EDCS User Admin March 2007
CrimsonLogic Contents & Release Notice: Page 40 of 220
Fig 3.54 – ETA form in editing mode
Save or Submit ETA after duplication
Fig 3.55 – Save and Submit button in ETA detail form 13. Click on ‘Save’ button to save the ETA as draft. The procedure
is the same as saving a newly created ETA. 14. Click on ‘Submit’ button to submit the ETA. The procedure is
the same as submitting a newly created ETA.
User Manual for EDCS User Admin March 2007
CrimsonLogic Contents & Release Notice: Page 41 of 220
3.11 Print
Menu 1. Click on ETA – Search from the menu. Display ETA in viewing mode
Fig 3.56 – Search listing page 2. The search listing data is displayed in multiple pages if needed.
User can do pagination by clicking the “<” and “>” button, which will bring the user to the previous page or the next page. User can also go to destination page by specifying the page number in the “To Page” field and press “Go” button.
3. Upon locating the target ETA, user can click on the hyperlink on the field of transaction no of the record.
User Manual for EDCS User Admin March 2007
CrimsonLogic Contents & Release Notice: Page 42 of 220
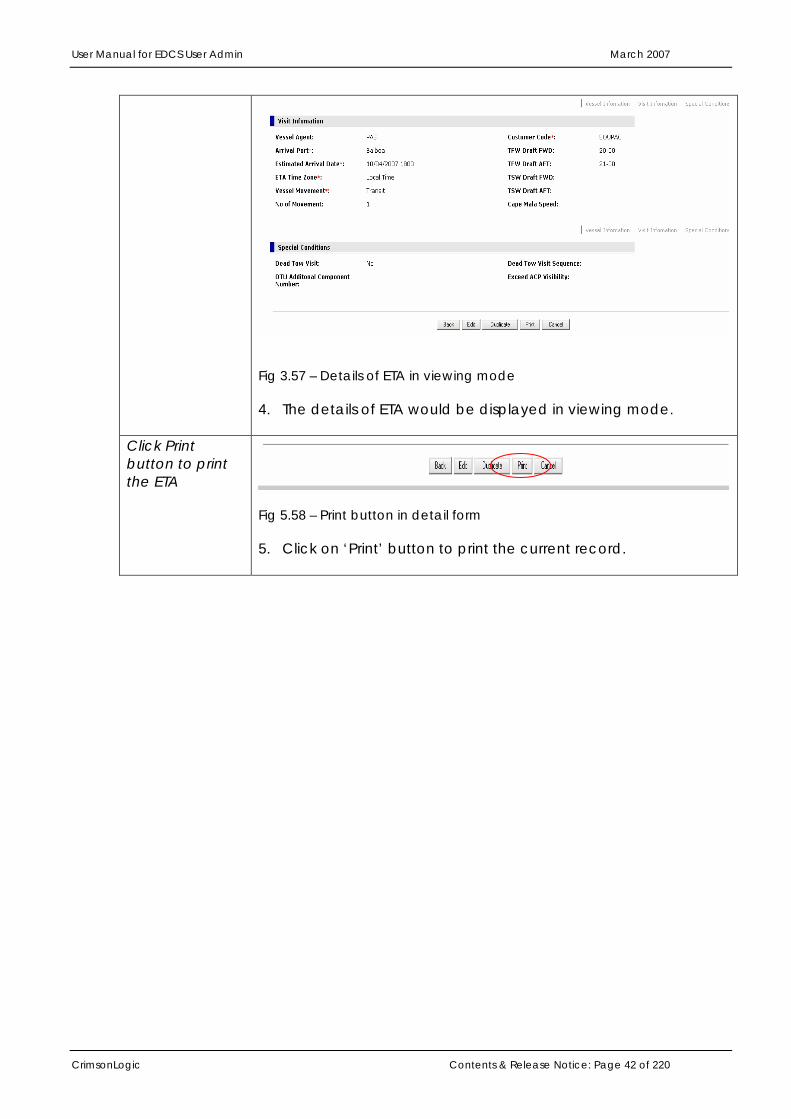
Fig 3.57 – Details of ETA in viewing mode 4. The details of ETA would be displayed in viewing mode.
Click Print button to print the ETA
Fig 5.58 – Print button in detail form 5. Click on ‘Print’ button to print the current record.
User Manual for EDCS User Admin March 2007
CrimsonLogic Contents & Release Notice: Page 43 of 220
Display ETA in printing mode
Fig 3.59 – ETA print page 6. Upon user click the “Print” button, there will have a popup
window which display the ETA in printing mode. Inside this popup window, all the data is formatted according to the layout required by the user.
7. User can then select from the menu to print the document. Please note that the paging is controlled by the browser as well as the printer at printing time.
User Manual for EDCS User Admin March 2007
CrimsonLogic Contents & Release Notice: Page 44 of 220
3.12 Print In Batch
Menu 1. Click on ETA – Search from the menu. Display ETA in viewing mode
Fig 3.60 – Search listing page 2. The search listing data is displayed in multiple pages if needed.
User can do pagination by clicking the “<” and “>” button, which will bring the user to the previous page or the next page. User can also go to destination page by specifying the page number in the “To Page” field and press “Go” button.
Fig 3.61 – Search listing page 3. Upon locating the target ETA, user can click on the checkbox
in order to select the record for printing.
User Manual for EDCS User Admin March 2007
CrimsonLogic Contents & Release Notice: Page 45 of 220
Fig 3.62 – Details of ETA in viewing mode 4. After that user can click the “Print” hyperlink button as shown in
above figure.
ETA will be printed in batch mode. Confirmation page will be displayed.
User Manual for EDCS User Admin March 2007
CrimsonLogic Contents & Release Notice: Page 46 of 220
Fig 3.63 – ETA batch print display page 5. Upon user click the “Print” hyperlink button, there will have a
popup window which display the ETA in printing mode. Inside this popup window, all the data is formatted according to the layout required by the user.
User Manual for EDCS User Admin March 2007
CrimsonLogic Contents & Release Notice: Page 47 of 220
6. User can then select from the menu to print the document. Please note that the paging is controlled by the browser as well as the printer at printing time.
User Manual for EDCS User Admin March 2007
CrimsonLogic Contents & Release Notice: Page 48 of 220
4 Ship Due (SHD)
4.1 Create
Menu 1. Click on SHD – Create from the menu. Fill in Vessel Information, Visit Information and Special Conditions in ETA Header tab
Fig 4.1 – ETA Header Tab 10. Choose ‘Yes’ or ‘No’ for First Visit radio button. If ‘Yes’ is
selected, Vessel SIN will be disabled, and all vessel information fields need to be filled in manually. If First Visit is “No”, Vessel SIN and its selection button will be enabled, all the basic vessel information fields need to be disabled to prevent user from input. User will click the “Select” button to search and retrieve Vessel SIN and basic visit information.
User Manual for EDCS User Admin March 2007
CrimsonLogic Contents & Release Notice: Page 49 of 220
11. Fill in necessary visit Information. 12. Fill in necessary special condition.
ETA Header Tab Details
First Visit to Panama
If the vessel visits Panama for the first time, select ‘Yes’. Else select ‘No’.
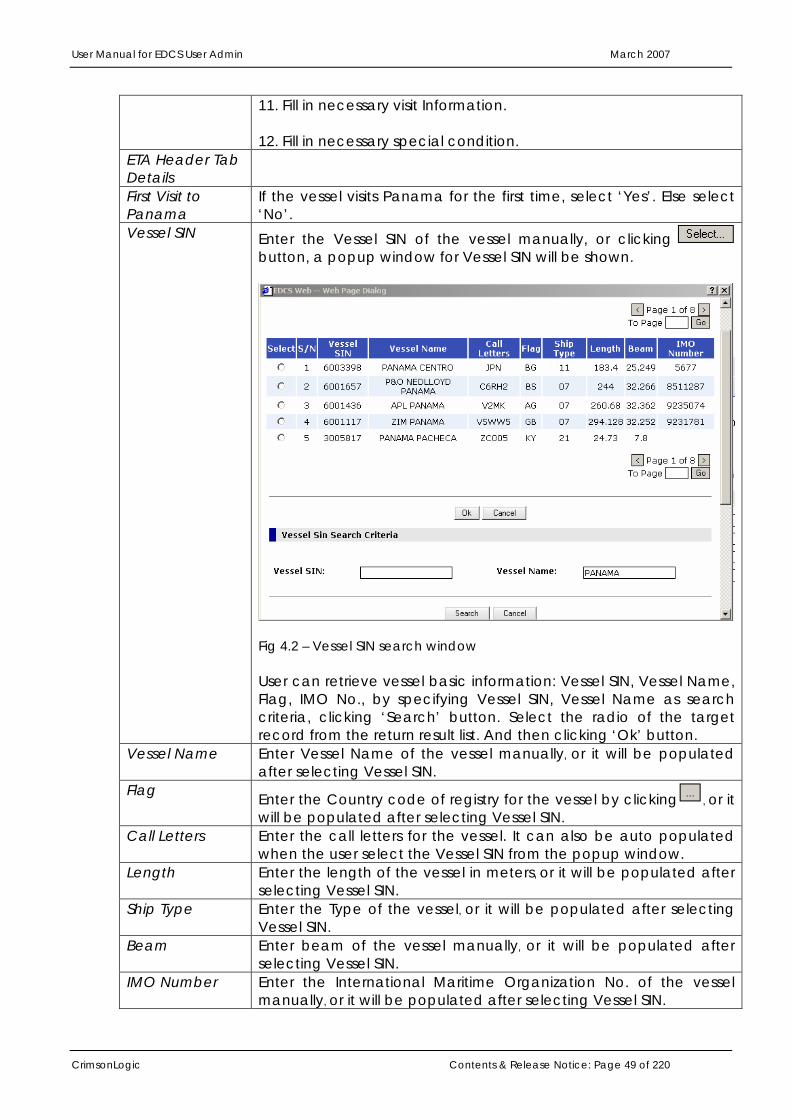
Vessel SIN Enter the Vessel SIN of the vessel manually, or clicking button, a popup window for Vessel SIN will be shown.
Fig 4.2 – Vessel SIN search window User can retrieve vessel basic information: Vessel SIN, Vessel Name, Flag, IMO No., by specifying Vessel SIN, Vessel Name as search criteria, clicking ‘Search’ button. Select the radio of the target record from the return result list. And then clicking ‘Ok’ button.
Vessel Name Enter Vessel Name of the vessel manually, or it will be populated after selecting Vessel SIN.
Flag Enter the Country code of registry for the vessel by clicking , or it will be populated after selecting Vessel SIN.
Call Letters Enter the call letters for the vessel. It can also be auto populated when the user select the Vessel SIN from the popup window.
Length Enter the length of the vessel in meters, or it will be populated after selecting Vessel SIN.
Ship Type Enter the Type of the vessel, or it will be populated after selecting Vessel SIN.
Beam Enter beam of the vessel manually, or it will be populated after selecting Vessel SIN.
IMO Number Enter the International Maritime Organization No. of the vessel manually, or it will be populated after selecting Vessel SIN.
User Manual for EDCS User Admin March 2007
CrimsonLogic Contents & Release Notice: Page 50 of 220
Vessel Agent Default value of Agent Code is the account Id of the Agency. And
user also can select an agent code by clicking . Customer Code Default value of Customer Code is the account Id of the
Customer. And user also can select customer code by clicking . Arrival Port Choose Arrival Port of the vessel. TFW Draft FWD Enter the Forward Tropical Fresh water Draft measurement of the
vessel, which format is 99-99. TFW Draft AFT Enter the After Tropical Fresh water Draft measurement of the
vessel, which format is 99-99. TSW FWD Draft Enter the Forward Tropical Salt water Draft measurement of the
vessel, which format is 99-99. TSW AFT Draft Enter the After Tropical Salt water Draft measurement of the vessel,
which format is 99-99. Estimated Arrival Date
Enter the estimated arrival date and time in dd/mm/yyyy hhmm format, which should be later than current date.
ETA Time Zone Choose the time zone the estimated arrival date time based on from drop down list.
Vessel For Select the operation to be realized at ACP water, Transit or Local Movement.
Cape Mala Speed
Enter Cape Mala Speed of the vessel in Knots manually, or clicking
. No Of Movement
For display only. It will be showing how many ship movements it has in the Ship Movement Tab.
Origin Route Select to indicate the region of origin of the route. Destination Route
Select to indicate the region of destination.
Exceed ACP Visibility
Select to indicate whether it is exceeding ACP visibility.
Equipped with AIS Class A
Select to indicate whether it is Equipped with AIS Class A.
Number of Deaths On Board
Enter the Number of Deaths On Board, if any.
Number of Dead Bodies
Enter the Number of Dead Bodies, if any.
Number of Disembarking Passenger
Enter the Number of Disembarking Passenger, if any.
Visit Remarks Enter the Visit Remarks if any. Dead Tow Visit Select to indicate whether the vessel is a Dead Tow. Dead Tow Visit Sequence
For display only. It will be showing the Dead Tow Visit Sequence number which is auto generated by the system.
DTU Additional Component Number
If user indicates “Dead Tow Visit” as “Yes”, this filed needs to be filled with valid data.
Port of Disembarking Passenger
Enter the Port of Disembarking Passenger if any.
User Manual for EDCS User Admin March 2007
CrimsonLogic Contents & Release Notice: Page 51 of 220
Fill in ship change information in Ship Change Info tab.
Fig 4.3 – Ship Change Information Tab 13. Provide ship change information if any. 14. Please take note that this tab will be disabled for “First Visit” as
“Yes”.
Change in Basic Vessel Information since Last Visit
Select to indicate whether there is information as to the ship information.
Any other Structural changes
Select to indicate whether there is structural change to the ship.
Structural Changes Remarks
Enter the remarks for ship structural changes.
New Flag Enter the new Country code of registry for the vessel by clicking , or it will be populated after selecting Vessel SIN.
New Vessel Name
Enter new Vessel Name of the vessel manually, or it will be populated after selecting Vessel SIN.
New Call Letters Enter the call letters for the vessel. It can also be auto populated when the user select the Vessel SIN from the popup window.
New Length Enter new length of the vessel in meters, or it will be populated after selecting Vessel SIN.
New Beam Enter new beam of the vessel manually, or it will be populated after selecting Vessel SIN.
User Manual for EDCS User Admin March 2007
CrimsonLogic Contents & Release Notice: Page 52 of 220
Fill in ship movement information in Ship Movement Information Tab.
Fig 4.4 – Ship Movement Information Tab 15. Provide at least one valid ship movement information.
Movement Information Detail
Sequence No The internal movement sequence no will be assigned and displayed, once the SHD is approved by ACP.
Type Choose the movement type of this movement from the drop down list.
Reason Enter the Movement Reason code. To select from a predefined list
of reason codes, click on the icon. Starting At The starting location will be assigned and displayed, once the SHD
is approved by ACP. Stopping At Enter the location code. To select from a predefined list of location
codes, click on the icon. Movement Status
The movement status of the movement will be displayed.
Ready Time Enter the Ready Time for the movement in dd/mm/yyyy HHmm format.
Ready Status Choose Ready Status of the movement from the drop down list. Transit Direction The Transit Direction will be assigned and displayed, once the SHD
is approved by ACP.
User Manual for EDCS User Admin March 2007
CrimsonLogic Contents & Release Notice: Page 53 of 220
Fill in Ship Security Information Tab
Fig 4.5 – Ship Security Information Tab 16. Provide necessary data for ship security information.
Fill in Ship Security Information Tab Details
Radio Pratique Requested
Select to indicate whether radio pratique is requested.
Security Officer First Name
Enter the first name of the security officer.
Security Officer Last Name
Enter the last name of the security officer.
Security Officer License Marine Code
Enter the security officer license marine code.
Security Officer Phone No
Enter the security officer telephone number.
User Manual for EDCS User Admin March 2007
CrimsonLogic Contents & Release Notice: Page 54 of 220
Security Officer Email Address:
Enter the security officer email address.
Security Officer Fax No.
Enter the security officer fax number.
International Ship Security Certificate
Select to indicate whether international ship security certificate is required.
Ship Security Certificate Date of Issue
Enter the ship security certificate date of issue. User can click the
button to select the date.
Ship Security Certificate Status
Select ship security certificate status from the drop down list.
Ship Security Certificate Number
Enter the ship security certificate number if any.
Ship Security Issuing Org. or Person
Enter the name of ship security issuing organization or person.
MARSEC Level of Security
Select the MARSEC level of security from the drop down list.
Security Level Remark
Enter the security level remarks if any.
Ship Security Certificate Date of Expiry
Enter the ship security certificate date of expiry. User can click the
button to select the date.
Ship Security Certificate Government
Enter the ship security certificate government. To select from a
predefined list of certificate government codes, click on the icon.
Deratting Certificate Date Enter the deratting certificate date. User can click the button
to select the date. Deratting Certificate Port
Enter the deratting certificate port. To select from a predefined list
of certificate port codes, click on the icon. Deratting Certificate Remark
Enter the deratting certificate remarks if any.
User Manual for EDCS User Admin March 2007
CrimsonLogic Contents & Release Notice: Page 55 of 220
Fill in the Port of Call Tab
Fig 4.6 – Port Of Call Tab 17. Provide necessary data for Port of Call information.
Port Of Call Tab Details
Next Port Enter the next port code. To select from a predefined list of port
codes, click on the icon. Declare All Last 10 Ports of Call
Define if you will go to declare the last 10 ports of call.
Reason for Not Being Able to Declare All Last 10 Ports of Call
If you response is NO in the option Declare All Last 10 Ports of Call, is mandatory to include the reasons that you are not be able to declared.
Sequence No Auto generated by the system as running number. Port Enter the port code. To select from a predefined list of port codes,
click on the icon. Depart Date Enter the departed date. User can click the button to select
the date. Ports MARSEC Level
Select Ports MARSEC Level from the drop down list.
Declaration of Select to indicate whether declaration of security is needed for this
User Manual for EDCS User Admin March 2007
CrimsonLogic Contents & Release Notice: Page 56 of 220
Security port. Infected Select to indicate whether this port is infected with some disease. Fill in Stowaway Header Tab
Fig 4.7 – Stowaway Header Tab 18. Provide necessary data for Stowaway header tab.
Stowaway Header Tab Detail
Sequence No Running number auto generated by the system to donate the number header of stowaway.
No Of Stowaway
Enter the number of stowaway, if any.
Country of Origin
Enter the country of origin for the stowaway. To select from a
predefined list of country codes, click on the icon. Port Of Origin Enter the port of origin for the stowaway. To select from a
predefined list of port codes, click on the icon.
User Manual for EDCS User Admin March 2007
CrimsonLogic Contents & Release Notice: Page 57 of 220
Fill in the Stowaway Detail Tab.
Fig 4.8 – Stowaway Detail Tab 19. Provide necessary information for the stowaway details which is
corresponding to the data in the stowaway header.
No Of Stowaway
Enter the number of stowaway, if any.
Country of Origin
Enter the country of origin for the stowaway. To select from a
predefined list of country codes, click on the icon. Port Of Origin Enter the port of origin for the stowaway. To select from a
predefined list of port codes, click on the icon. Sequence No Running number auto generated by the system to denote the
number of stowaway details for this particular stowaway header information.
User Manual for EDCS User Admin March 2007
CrimsonLogic Contents & Release Notice: Page 58 of 220
First name The first name of the particular stowaway. Last name The last name of the particular stowaway. Disembark at Panama
Select to indicate whether the stowaway will be disembark at Panama.
Fill in Animals Tab
Fig 4.9 – Animals Tab 20. Provide animals information of the vessel, if any.
Animals Tab Details
Sequence No Running number generated by the system to indicate the number of animal information.
Kind Of Animal Enter the kind of animals. To select from a predefined list of animal
codes, click on the icon. Class Of Animals Enter the class of animals. Port Of Origin Enter the port of origin of the animal. To select from a predefined
list of port codes, click on the icon. Country of Origin
Enter the country of origin of the animal. To select from a
predefined list of country codes, click on the icon. No Of Animals Enter the no of animals.
User Manual for EDCS User Admin March 2007
CrimsonLogic Contents & Release Notice: Page 59 of 220
Fill in Origin of Meat Cargo Stores Tab.
Fig 4.10 – Origin of Meat Cargo Stores Tab 21. Provide data for Meat and Cargo Store, if any.
Fill in Origin of Meat Cargo Stores Tab Detail
Sequence No For Meat
Running number auto generated by system.
Country of Origin For Meat
Enter the country of origin of the animal. To select from a
predefined list of country codes, click on the icon. Sequence No For Cargo
Running number auto generated by system.
Country of Origin For Cargo
Enter the country of origin of the animal. To select from a
predefined list of country codes, click on the icon.
User Manual for EDCS User Admin March 2007
CrimsonLogic Contents & Release Notice: Page 60 of 220
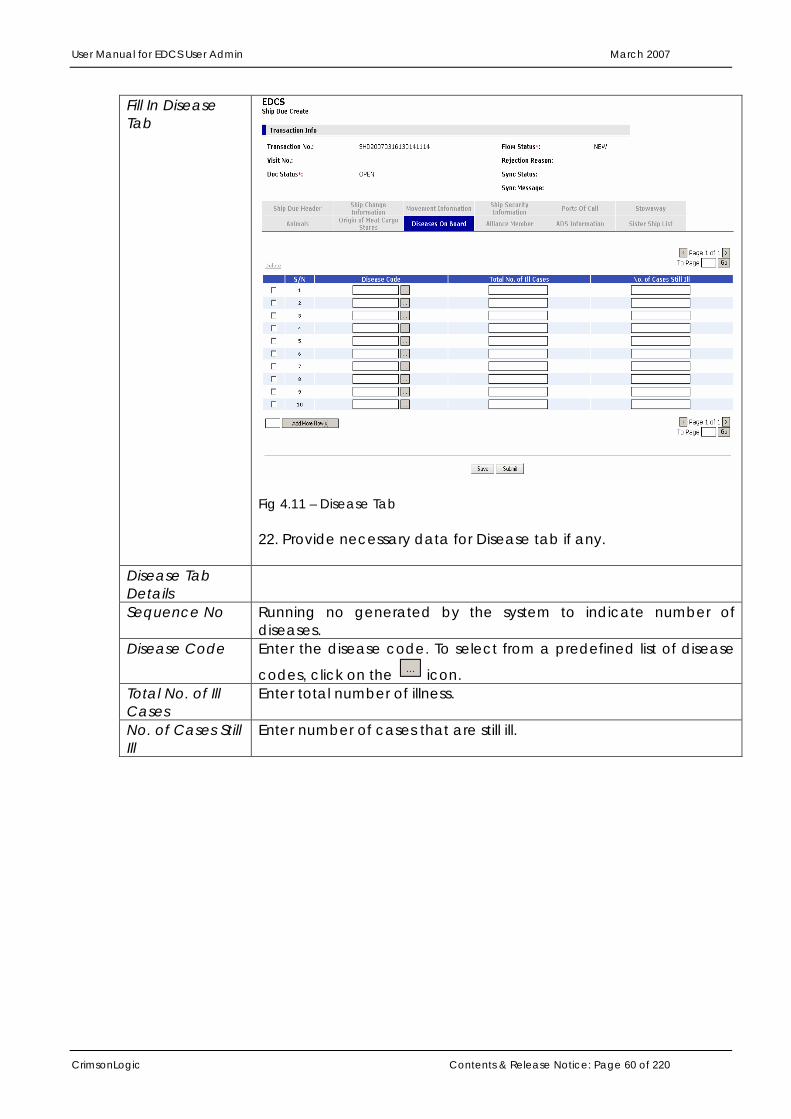
Fill In Disease Tab
Fig 4.11 – Disease Tab 22. Provide necessary data for Disease tab if any.
Disease Tab Details
Sequence No Running no generated by the system to indicate number of diseases.
Disease Code Enter the disease code. To select from a predefined list of disease
codes, click on the icon. Total No. of Ill Cases
Enter total number of illness.
No. of Cases Still Ill
Enter number of cases that are still ill.
User Manual for EDCS User Admin March 2007
CrimsonLogic Contents & Release Notice: Page 61 of 220
Fill in Alliance Member tab
Alliance Member tab Details
Sequence No Running no generated by the system to indicate number of diseases.
Member Customer Code
Enter the Member Customer Code. To select from a predefined list
of customer codes, click on the icon. Fill in ADS Preliminary Information and Stowage Plans in ADS Information tab
User Manual for EDCS User Admin March 2007
CrimsonLogic Contents & Release Notice: Page 62 of 220
Fig 4.11 – ADS Information 23. If first visit is ‘Yes’, ADS Information is also required. Otherwise, it
would be disabled.
ADS Information Detail
Suez Gross Enter certificate SUEZ Gross Tonnage of the vessel. Suez Net Enter SUEZ certificate Tonnage of the vessel. Vessel PRE-SIN Enter the preliminary identifier for the vessel assigned by ACP. ITC-69-Length Enter length as of ITC-69 certificate of the vessel in meters. ITC-69-Depth Enter depth as of ITC-69 certificate of the vessel in meters. ITC-69-Gross Tonnage
Enter ITC-69 gross tonnage of the vessel.
ITC-69-Net Tonnage
Enter net tonnage as of ITC-69 certificate of the vessel.
ITC-69 Beam Enter beam as of ITC-69 certificate of the vessel in meters. Year Build Enter the year when the vessel is built. Hull Number Enter the no assigned to the vessel’s hull when in construction. Passenger Capacity
Enter passenger total capacity of the vessel.
Summer Loaded Draft
Enter the vertical distance in meters and millimeters from the lowest point of the hull to the summer load line of the vessel.
Summer Loaded Deadweight
Enter the carrying capacity in metric tons of a vessel when loaded to its maximum summer load line.
Builder Enter the builder code. To select from a predefined list of builder
codes, click on the icon. Hull Type Enter the hull type code. To select from a predefined list of hull
type codes, click on the icon. Timber Summer Loaded Draft
Enter the vertical distance in meters and millimeters from the lowest point of the hull to the timber summer load line.
Summer Loaded
Enter the weight of the vessel and its contents in metric tons when loaded to its maximum authorized summer load line mark (Plimsoll
User Manual for EDCS User Admin March 2007
CrimsonLogic Contents & Release Notice: Page 63 of 220
Displacement mark). No of Propellers Enter the number of propellers in the vessel. No of Engines Enter the number of vessel’s motors. Main Engine HP Type
Enter the code of engine horse power rate type. To select from a
predefined list of HP type codes, click on the icon. Propeller Type Enter the code of propeller type. To select from a predefined list of
propeller type code, click on the icon. Engine Type Enter the type of main propulsion engine(s). To select from a
predefined list of engine type code, click on the icon. Main Engine HP Enter the engine horse power of the vessel. DeadRise Enter the distance measured perpendicular to the molded base
line at the side of the vessel, from the molded base line to the line of bottom.
Tons per Centimeters Immersion
Enter the weight of salt water displaced by the ship when sinking one centimeter on a level plane.
Ship’s Email Enter the email address of the vessel. MMSI No. Enter the vessel identification based on the ITU table. Former Vessel Name
Enter the prior vessel name of the vessel.
Bilge Keel Radius
Enter the radius of the curvature of the bottom side corner of the hull at the mid ship.
INMARSAT C Number
Enter the International Maritime Satellite C no of the vessel.
Crew safe manning quantity
Enter the minimum quantity of crews – safe manning certificate.
Stowage Plan Click ‘Email’ hyperlink to send the plans of the ship that shows the location of each tank.
Fig 4.12 – Stowage Plans
User Manual for EDCS User Admin March 2007
CrimsonLogic Contents & Release Notice: Page 64 of 220
Fill in Sister Ship Information in Sister Ship List tab
Fig 4.13 – Sister Ship List 24. If first visit is ‘Yes’, Sister Ship Information can be provided if there
is any. Otherwise, this tab would be disabled. Sister Ship Detail Sister SIN Enter the vessel SIN for the sister ship. To select from a predefined
list of vessel SIN, click on the icon. Sister Ship Name The sister ship name will be populated after sister SIN is selected.
User Manual for EDCS User Admin March 2007
CrimsonLogic Contents & Release Notice: Page 65 of 220
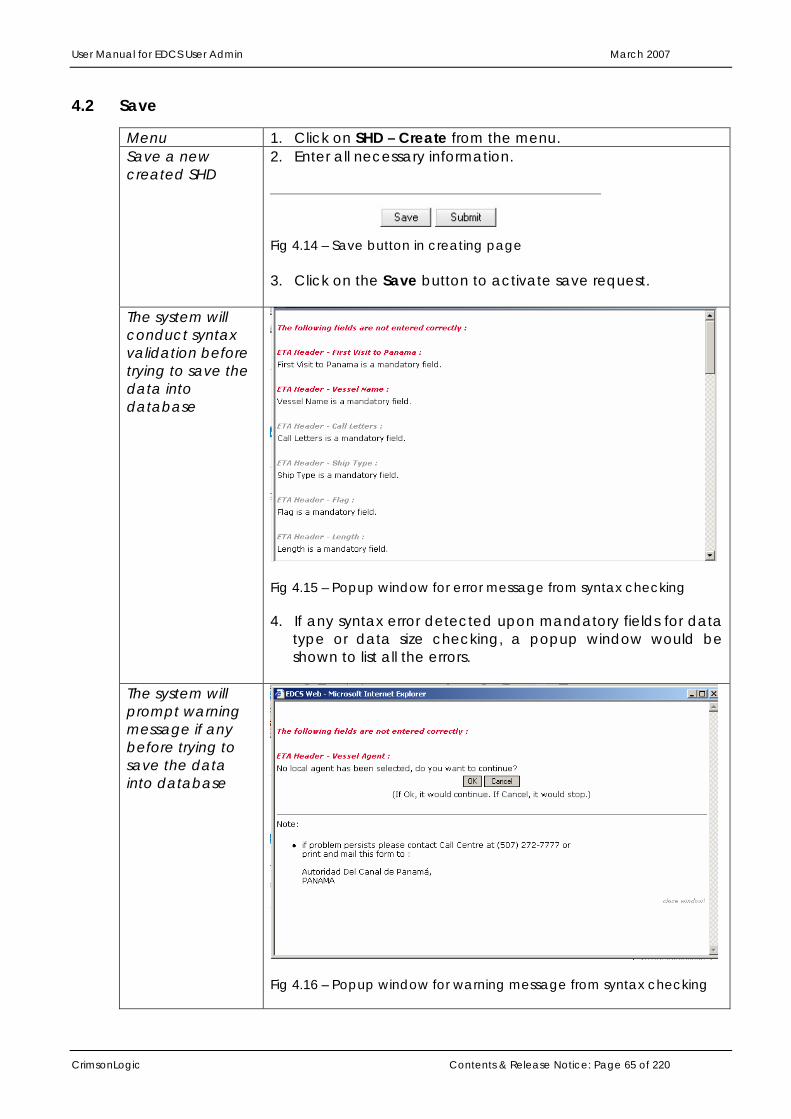
4.2 Save
Menu 1. Click on SHD – Create from the menu. Save a new created SHD
2. Enter all necessary information.
Fig 4.14 – Save button in creating page 3. Click on the Save button to activate save request.
The system will conduct syntax validation before trying to save the data into database
Fig 4.15 – Popup window for error message from syntax checking 4. If any syntax error detected upon mandatory fields for data
type or data size checking, a popup window would be shown to list all the errors.
The system will prompt warning message if any before trying to save the data into database
Fig 4.16 – Popup window for warning message from syntax checking
User Manual for EDCS User Admin March 2007
CrimsonLogic Contents & Release Notice: Page 66 of 220
5. If it is necessary to display warning message for some value entered or not entered by user, a popup window will be shown to list all warning message. By clicking on ‘Ok’ button, the save procedure will continue. By clicking on ‘Cancel’ button, the procedure will stop for user to revise data.
Upon successful validation again syntax rules, the data will be saved into database. A confirmation page will be shown to user.
Fig 4.17 – SHD save confirmation page 6. A confirmation page will be displayed once an SHD record
is saved successfully.
User Manual for EDCS User Admin March 2007
CrimsonLogic Contents & Release Notice: Page 67 of 220
4.3 Submit
Menu 1. Click on SHD – Create from the menu. Save a new created SHD
2. Enter all necessary information.
Fig 4.18 – Submit button in creating page 3. Click on the Submit button to activate submit request.
The system will conduct syntax validation before trying to submit the record
Fig 4.19 – Popup window for error message from syntax checking 4. If any syntax error detected upon mandatory fields for data
type or data size checking, a popup window would be shown to list all the errors.
5. By clicking the error message hyperlink, the mouse cursor will be navigated and focused to the field where the error occurs.
User Manual for EDCS User Admin March 2007
CrimsonLogic Contents & Release Notice: Page 68 of 220
The system will prompt warning message if any before trying to submit the record.
Fig 4.20 – Popup window for warning message from syntax checking 6. If it is necessary to display warning message for some value
entered or not entered by user, a popup window will be shown to list all warning message. By clicking on ‘Ok’ button, the save procedure will continue. By clicking on ‘Cancel’ button, the procedure will stop for user to revise data.
7. User can also click the warning message hyperlink; the mouse cursor will be navigated and focused to the field where the error occurs.
The system will conduct business rule validation before trying to submit the record
Fig 4.21 – Popup window for error message from biz rule checking 8. If there is any error occurs for business rule validation, a
popup window will be shown to display the error message. 9. User can also click the error message hyperlink; the mouse
cursor will be navigated and focused to the field where the error occurs.
User Manual for EDCS User Admin March 2007
CrimsonLogic Contents & Release Notice: Page 69 of 220
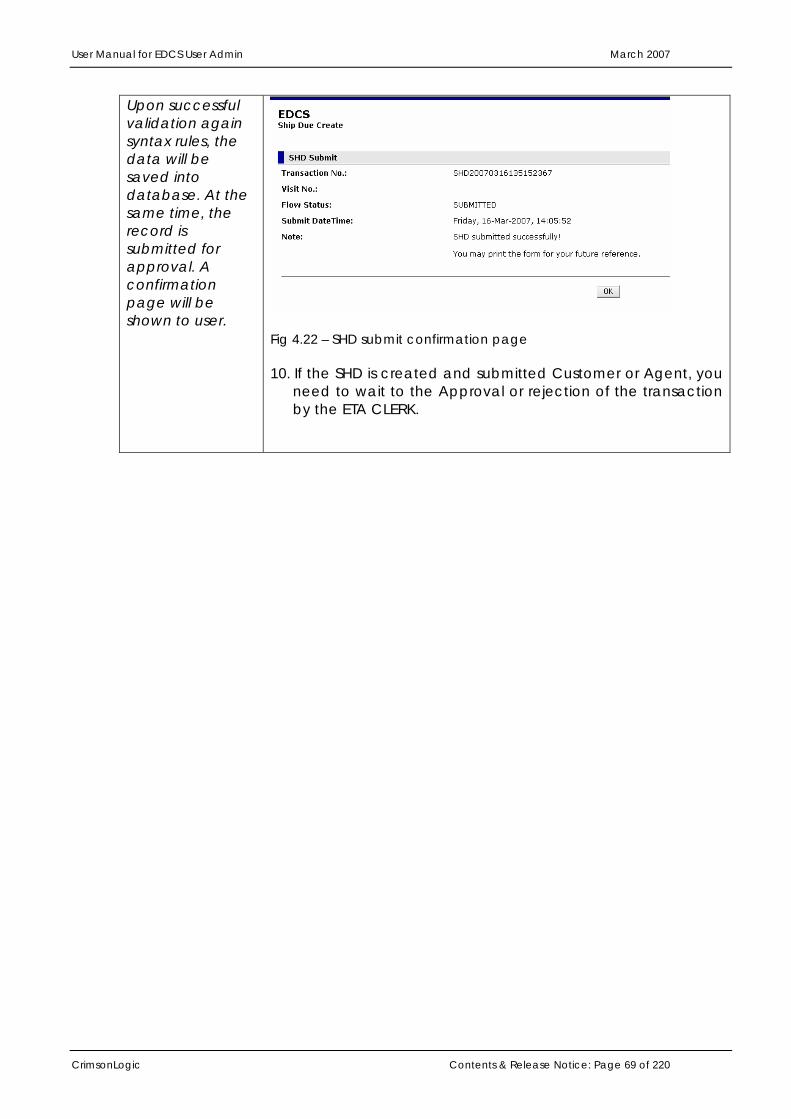
Upon successful validation again syntax rules, the data will be saved into database. At the same time, the record is submitted for approval. A confirmation page will be shown to user.
Fig 4.22 – SHD submit confirmation page 10. If the SHD is created and submitted Customer or Agent, you
need to wait to the Approval or rejection of the transaction by the ETA CLERK.
User Manual for EDCS User Admin March 2007
CrimsonLogic Contents & Release Notice: Page 70 of 220
4.4 Submit In Batch
Menu 1. Click on SHD – Search from the menu. Display SHD in viewing mode
Fig 4.24– Search listing page 2. The search listing data is displayed in multiple pages if needed.
User can do pagination by clicking the “<” and “>” button, which will bring the user to the previous page or the next page. User can also go to destination page by specifying the page number in the “To Page” field and press “Go” button.
Fig 4.25 – Search listing page 3. Upon locating the target SHD, user can click on the checkbox
in order to select the record.
User Manual for EDCS User Admin March 2007
CrimsonLogic Contents & Release Notice: Page 71 of 220
Fig 4.26 – Details of SHD in viewing mode 4. After that user can click the “submit” button as shown in
above figure.
SHD will be submitted in batch mode. Confirmation page will be displayed.
Fig 4.27 – SHD batch submit confirmation page 5. The SHD Batch Submit confirmation page will be shown. Inside
this confirmation every SHD selected by the user will be displayed with a submission status.
6. Please note that only SHD with “DRAFT” status can be submitted. If SHD with other status is selected, it will simply be ignored.
7. There will have business rules validation before the submission. If there are some errors for the business validation, the errors will be displayed in the confirmation page with the original SHD not submitted.
8. If the SHD is submitted by Agent or Customer, the status of the SHD will be change from “DRAFT” to “SUBMITTED”.
User Manual for EDCS User Admin March 2007
CrimsonLogic Contents & Release Notice: Page 72 of 220
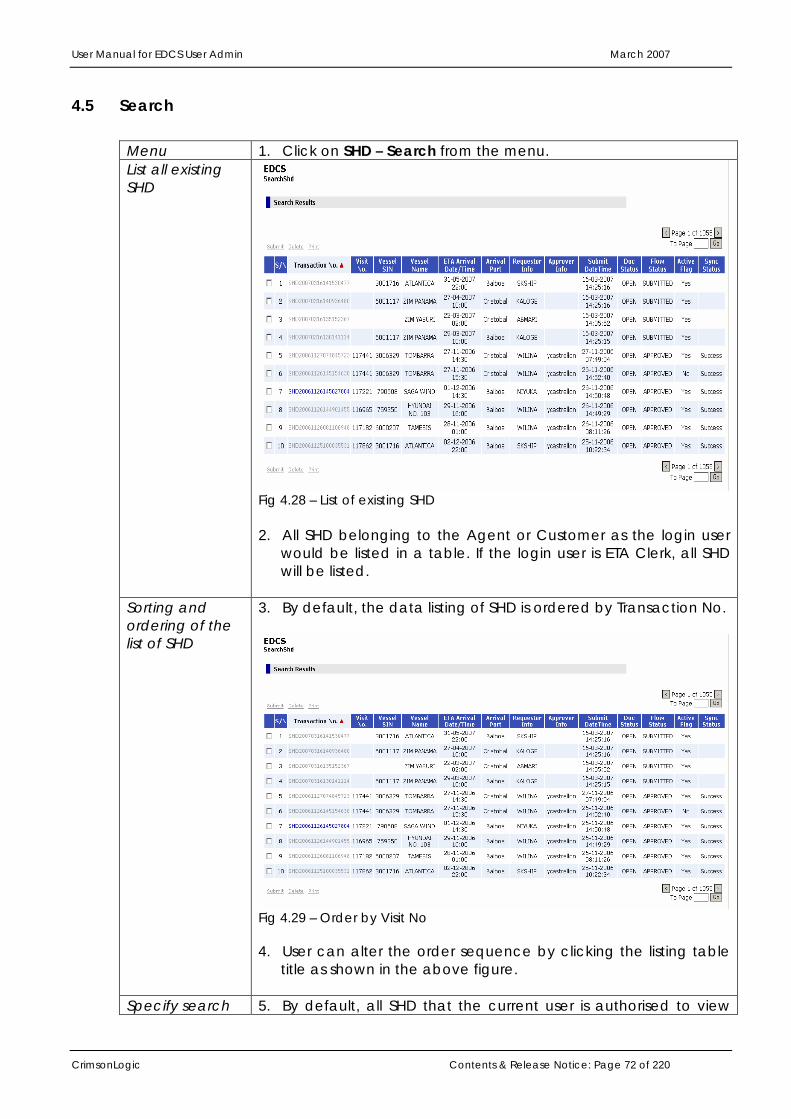
4.5 Search
Menu 1. Click on SHD – Search from the menu. List all existing SHD
Fig 4.28 – List of existing SHD 2. All SHD belonging to the Agent or Customer as the login user
would be listed in a table. If the login user is ETA Clerk, all SHD will be listed.
Sorting and ordering of the list of SHD
3. By default, the data listing of SHD is ordered by Transaction No.
Fig 4.29 – Order by Visit No 4. User can alter the order sequence by clicking the listing table
title as shown in the above figure.
Specify search 5. By default, all SHD that the current user is authorised to view
User Manual for EDCS User Admin March 2007
CrimsonLogic Contents & Release Notice: Page 73 of 220
criteria are listed. 6. User can search SHD by specifying search criteria as below.
Fig 4.30 – Search Criteria for SHD 7. By clicking on the ‘Search’ button, the user will be shown a
new listing of data based on the search criteria he provides.
User Manual for EDCS User Admin March 2007
CrimsonLogic Contents & Release Notice: Page 74 of 220
4.6 Edit
Menu 1. Click on SHD – Search from the menu. Display SHD in viewing mode
Fig 4.31 – Search listing page 2. The search listing data is displayed in multiple pages if needed.
User can do pagination by clicking the “<” and “>” button, which will bring the user to the previous page or the next page. User can also go to destination page by specifying the page number in the “To Page” field and press “Go” button.
3. Upon locating the target SHD, user can click on the hyperlink on the field of transaction no of the record.
User Manual for EDCS User Admin March 2007
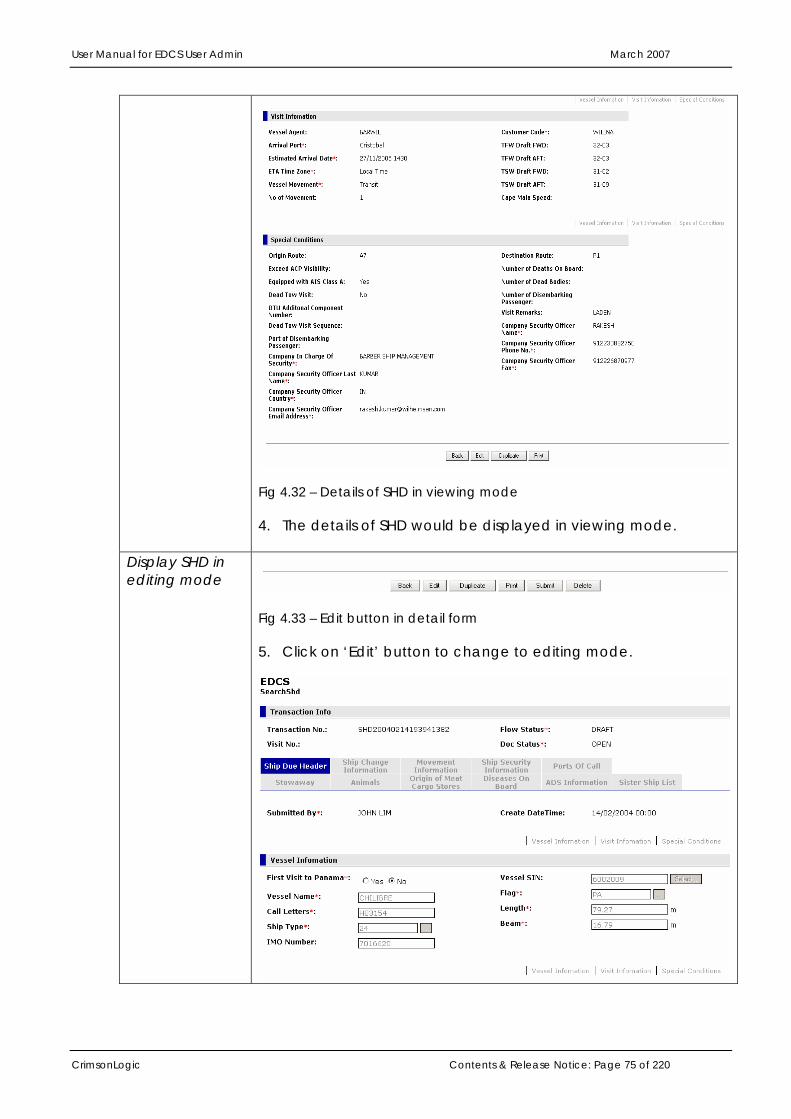
CrimsonLogic Contents & Release Notice: Page 75 of 220
Fig 4.32 – Details of SHD in viewing mode 4. The details of SHD would be displayed in viewing mode.
Display SHD in editing mode
Fig 4.33 – Edit button in detail form 5. Click on ‘Edit’ button to change to editing mode.
User Manual for EDCS User Admin March 2007
CrimsonLogic Contents & Release Notice: Page 76 of 220
Fig 4.34 – SHD form in editing mode
Save or Submit SHD after edition
Fig 4.35 – Save and Submit button in SHD detail form 6. Click on ‘Save’ button to save the SHD as draft. The procedure
is the same as saving a newly created SHD. 7. Click on ‘Submit’ button to submit the SHD. The procedure is
the same as submitting a newly created SHD.
User Manual for EDCS User Admin March 2007
CrimsonLogic Contents & Release Notice: Page 77 of 220
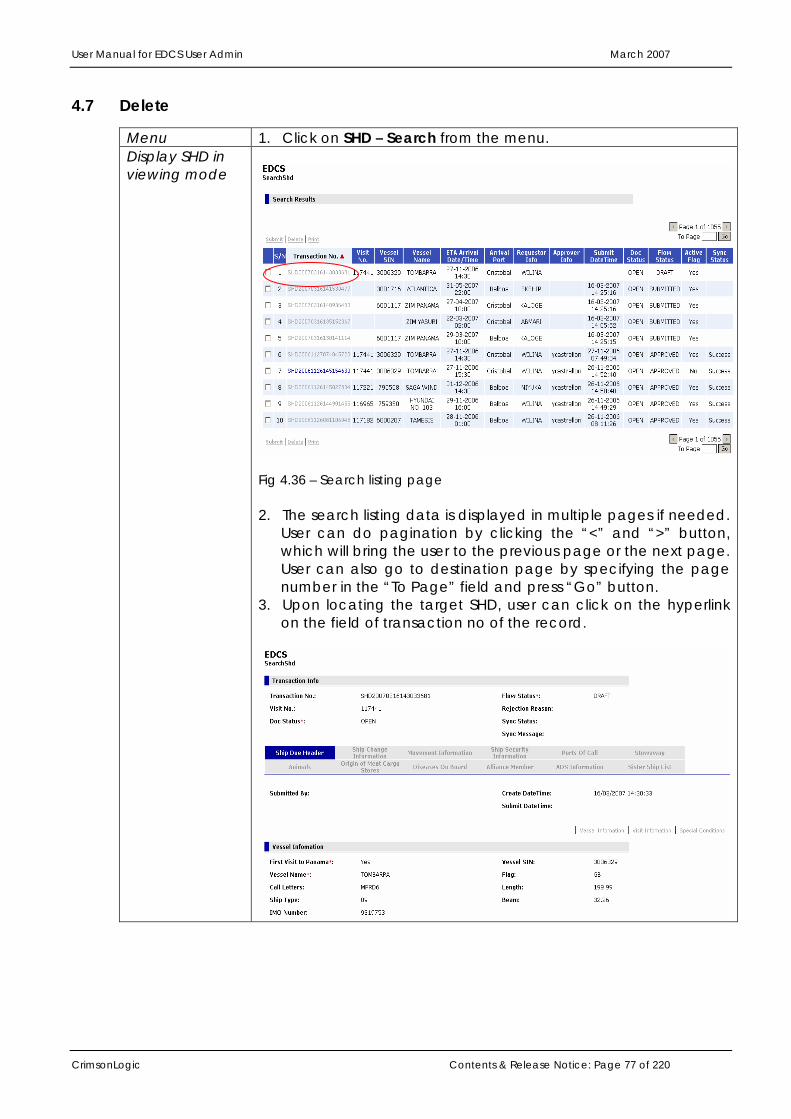
4.7 Delete
Menu 1. Click on SHD – Search from the menu. Display SHD in viewing mode
Fig 4.36 – Search listing page 2. The search listing data is displayed in multiple pages if needed.
User can do pagination by clicking the “<” and “>” button, which will bring the user to the previous page or the next page. User can also go to destination page by specifying the page number in the “To Page” field and press “Go” button.
3. Upon locating the target SHD, user can click on the hyperlink on the field of transaction no of the record.
User Manual for EDCS User Admin March 2007
CrimsonLogic Contents & Release Notice: Page 78 of 220
Fig 4.37 – Details of SHD in viewing mode 4. The details of SHD would be displayed in viewing mode.
Click Delete button to delete the SHD
Fig 4.38 – Delete button in detail form 5. Click on ‘Delete’ button to delete the current record.
Display SHD delete confirmation page
Fig 4.39 – SHD delete confirmation page 6. Upon successful deletion of the SHD record, there will have a
User Manual for EDCS User Admin March 2007
CrimsonLogic Contents & Release Notice: Page 79 of 220
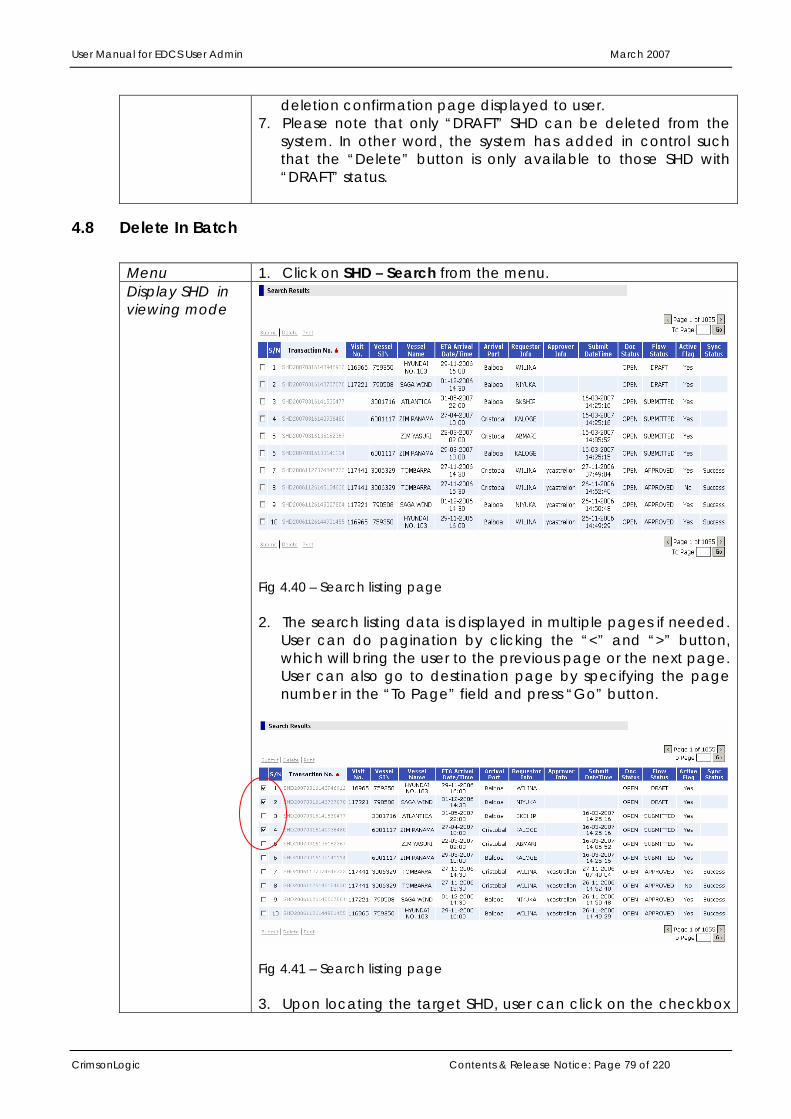
deletion confirmation page displayed to user. 7. Please note that only “DRAFT” SHD can be deleted from the
system. In other word, the system has added in control such that the “Delete” button is only available to those SHD with “DRAFT” status.
4.8 Delete In Batch
Menu 1. Click on SHD – Search from the menu. Display SHD in viewing mode
Fig 4.40 – Search listing page 2. The search listing data is displayed in multiple pages if needed.
User can do pagination by clicking the “<” and “>” button, which will bring the user to the previous page or the next page. User can also go to destination page by specifying the page number in the “To Page” field and press “Go” button.
Fig 4.41 – Search listing page 3. Upon locating the target SHD, user can click on the checkbox
User Manual for EDCS User Admin March 2007
CrimsonLogic Contents & Release Notice: Page 80 of 220
in order to select the record for deletion.
Fig 4.42 – Details of SHD in viewing mode 4. After that user can click the “Delete” hyperlink button as
shown in above figure.
SHD will be deleted in batch mode. Confirmation page will be displayed.
Fig 4.43 – SHD batch delete confirmation page 5. The SHD Batch Delete confirmation page will be shown. Inside
this confirmation every SHD selected by the user will be displayed with a deletion status.
6. Please note that only SHD with “DRAFT” status can be deleted. If SHD with other status is selected for deletion, it will simply be ignored.
7. User can only view and delete those SHD that belongs to his customer code or agent code.
User Manual for EDCS User Admin March 2007
CrimsonLogic Contents & Release Notice: Page 81 of 220
4.9 Cancel
Menu 1. Click on SHD – Search from the menu. Display SHD in viewing mode
Fig 4.53 – Search listing page 2. The search listing data is displayed in multiple pages if needed.
User can do pagination by clicking the “<” and “>” button, which will bring the user to the previous page or the next page. User can also go to destination page by specifying the page number in the “To Page” field and press “Go” button.
3. Upon locating the target SHD, user can click on the hyperlink on the field of transaction no of the record.
User Manual for EDCS User Admin March 2007
CrimsonLogic Contents & Release Notice: Page 82 of 220
Fig 4.54 – Details of SHD in viewing mode 4. The details of SHD would be displayed in viewing mode.
Click Cancel button to cancel the SHD
Fig 4.55 – Delete button in detail form 5. Click on ‘Cancel’ button to cancel the current record.
Display SHD delete confirmation page
Fig 4.56 – SHD delete confirmation page 6. Upon successful cancellation of the SHD record, there will have
a cancellation confirmation page displayed to user. 7. Please note that only “APPROVED” SHD can be cancelled
from the system. In other word, the system has added in control
User Manual for EDCS User Admin March 2007
CrimsonLogic Contents & Release Notice: Page 83 of 220
such that the “Cancel” button is only available to those SHD with “APPROVED” status.
8. Upon successful cancellation submission, the SHD status will be change from “APPROVED” to “CANCELLATION PENDING”. SHD with such status can either be approved or rejected. If approved by ETA Clerk, the status will be changed to “CANCELLED”. If rejected, the status will be changed back to “APPROVED”.
9. Please note that Agent and Customer can submit cancellation submission. If the cancellation submission is done by ETA Clerk on the behalf of Agent or Customer, the SHD will be cancelled automatically. Synchronization with backend regarding this SHD cancellation will also happen which is to update the backend EVTMS database.
User Manual for EDCS User Admin March 2007
CrimsonLogic Contents & Release Notice: Page 84 of 220
4.10 Duplicate
Menu 1. Click on SHD – Search from the menu. Display SHD in viewing mode
Fig 4.57 – Search listing page 2. The search listing data is displayed in multiple pages if needed.
User can do pagination by clicking the “<” and “>” button, which will bring the user to the previous page or the next page. User can also go to destination page by specifying the page number in the “To Page” field and press “Go” button.
3. Upon locating the target SHD, user can click on the hyperlink on the field of transaction no of the record.
User Manual for EDCS User Admin March 2007
CrimsonLogic Contents & Release Notice: Page 85 of 220
Fig 4.58 – Details of SHD in viewing mode 4. The details of SHD would be displayed in viewing mode.
Display SHD in editing mode
Fig 4.59 – Duplicate button in detail form 5. Click on ‘Duplicate’ button to change to editing mode.
User Manual for EDCS User Admin March 2007
CrimsonLogic Contents & Release Notice: Page 86 of 220
Fig 4.60 – SHD form in editing mode
Save or Submit SHD after duplication
Fig 4.61 – Save and Submit button in SHD detail form 6. Click on ‘Save’ button to save the SHD as draft. The procedure
is the same as saving a newly created SHD. 7. Click on ‘Submit’ button to submit the SHD. The procedure is
the same as submitting a newly created SHD.
User Manual for EDCS User Admin March 2007
CrimsonLogic Contents & Release Notice: Page 87 of 220
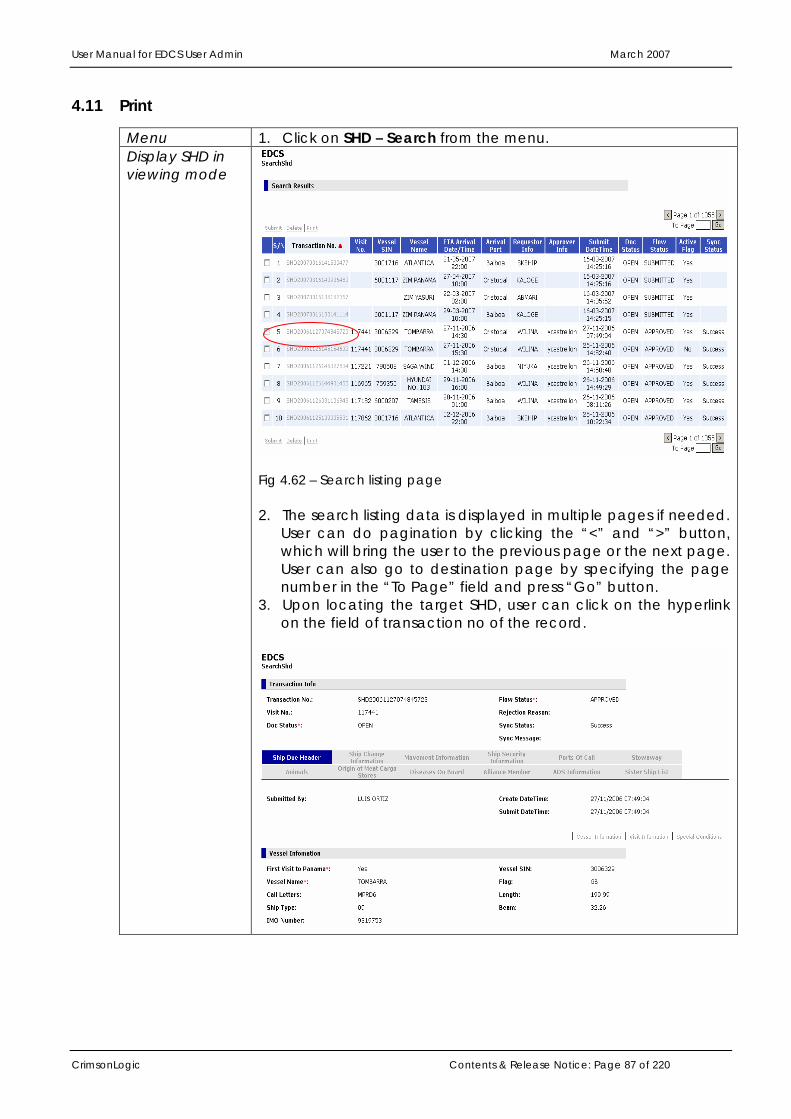
4.11 Print
Menu 1. Click on SHD – Search from the menu. Display SHD in viewing mode
Fig 4.62 – Search listing page 2. The search listing data is displayed in multiple pages if needed.
User can do pagination by clicking the “<” and “>” button, which will bring the user to the previous page or the next page. User can also go to destination page by specifying the page number in the “To Page” field and press “Go” button.
3. Upon locating the target SHD, user can click on the hyperlink on the field of transaction no of the record.
User Manual for EDCS User Admin March 2007
CrimsonLogic Contents & Release Notice: Page 88 of 220
Fig 4.63 – Details of SHD in viewing mode 4. The details of SHD would be displayed in viewing mode.
Click Print button to print the SHD
Fig 4.64 – Print button in detail form 5. Click on ‘Print’ button to print the current record.
Display SHD in printing mode
Fig 4.65 – SHD print page
User Manual for EDCS User Admin March 2007
CrimsonLogic Contents & Release Notice: Page 89 of 220
6. Upon user click the “Print” button, there will have a popup window which display the SHD in printing mode. Inside this popup window, all the data is formatted according to the layout required by the user.
7. User can then select from the menu to print the document. Please note that the paging is controlled by the browser as well as the printer at printing time.
User Manual for EDCS User Admin March 2007
CrimsonLogic Contents & Release Notice: Page 90 of 220
4.12 Print In Batch
Menu 1. Click on SHD – Search from the menu. Display SHD in viewing mode
Fig 4.66 – Search listing page 2. The search listing data is displayed in multiple pages if needed.
User can do pagination by clicking the “<” and “>” button, which will bring the user to the previous page or the next page. User can also go to destination page by specifying the page number in the “To Page” field and press “Go” button.
Fig 4.67 – Search listing page 3. Upon locating the target SHD, user can click on the checkbox
in order to select the record for printing.
User Manual for EDCS User Admin March 2007
CrimsonLogic Contents & Release Notice: Page 91 of 220
Fig 4.68 – Details of SHD in viewing mode 4. After that user can click the “Print” hyperlink button as shown in
above figure.
SHD will be printed in batch mode. Confirmation page will be displayed.
User Manual for EDCS User Admin March 2007
CrimsonLogic Contents & Release Notice: Page 92 of 220
Fig 4.69 – SHD batch print display page 5. Upon user click the “Print” hyperlink button, there will have a
popup window which display the SHD in printing mode. Inside this popup window, all the data is formatted according to the layout required by the user.
6. User can then select from the menu to print the document. Please note that the paging is controlled by the browser as well as the printer at printing time.
User Manual for EDCS User Admin March 2007
CrimsonLogic Contents & Release Notice: Page 93 of 220
5 Ship Due for Small Crafts (SSC)
5.1 Create
Menu 1. Click on Small Craft Due – Create from the menu. Fill in Vessel and Visit Information in Small Craft Information tab
Fig 5.1 – Small Craft Information tab 25. Choose ‘Yes’ or ‘No’ in First Visit field. If ‘Yes’ is selected, vessel
SIN will be disabled, and all vessel information need to be filled in manually. If it is not first visit, vessel information can be searched and retrieved by clicking ‘Select…’ button.
26. Fill in necessary visit Information
Small Craft Information – Header Tab
First Visit If the small craft is the first time to visit Panama, select ‘Yes’. Else select ‘No’.
Email Address Enter user’s email address for further notification. Flag Enter the Country code of registry for the small craft by clicking
, or it will be populated after selecting Vessel SIN. Length Overall Enter the maximum length of the small craft in meters, or it will be
populated after selecting Vessel SIN. Speed Enter the maximum speed of the small craft in knots, or it will be
populated after selecting Vessel SIN.
User Manual for EDCS User Admin March 2007
CrimsonLogic Contents & Release Notice: Page 94 of 220
Type of Small Craft
Choose the Type of the small craft from drop down list, or it will be populated after selecting Vessel SIN.
TFW Draft FWD Enter the Forward Tropical Fresh water Draft measurement of the small craft, which format is 99-99.
TFW Draft AFT Enter the After Tropical Fresh water Draft measurement of the small craft, which format is 99-99.
TSW FWD Draft Enter the Forward Tropical Salt water Draft measurement of the small craft, which format is 99-99.
TSW AFT Draft Enter the After Tropical Salt water Draft measurement of the small craft, which format is 99-99.
Ship Type The default value is 21, or user can select other Ship Type by
clicking . Vessel SIN Enter the Vessel SIN of the small craft manually, or clicking
button, a Vessel SIN search window will be popped up.
Fig 5.2 – Vessel SIN search window User can retrieve vessel basic information: Vessel SIN, Vessel Name, Flag, IMO No., Length, Breadth, Speed, Small Craft Type, and Email, by specifying Vessel SIN, Vessel Name as search criteria, clicking ‘Search’ button. Select the radio of the target record from the return result list. And then clicking ‘Ok’ button.
Vessel Name Enter Vessel Name of the small craft manually, or it will be populated after selecting Vessel SIN.
IMO Number Enter the International Maritime Organization No. of the small craft manually, or it will be populated after selecting Vessel SIN.
Extreme Breadth Enter maximum beam of the small craft manually, or it will be
User Manual for EDCS User Admin March 2007
CrimsonLogic Contents & Release Notice: Page 95 of 220
populated after selecting Vessel SIN. Hull Color Enter hull color of the small craft by clicking . Remark on Small Craft Type
Enter remark on Small Craft Type if necessary.
Center Chamber or Sidewall
If the small craft will transit in the center of the chamber, select ‘Center Chamber’. If it will transit alongside of the chamber, select ‘Sidewall’.
Docking If the small craft will go to dock, select the docking port. Nested If the small craft will transit nested with other small craft, select
‘Yes’. Else select ‘No’. Sanitary Facility If sanitary facility is available and working in small craft, select
‘Yes’. Else select ‘No’. Estimated Arrival Date
Enter the estimated arrival date and time in dd/mm/yyyy hhmm format.
ETA based on Choose the time zone the estimated arrival date time based on from drop down list.
Passengers on Board
If there is at least one passenger on the small craft, select ‘Yes’. Else select ‘No’.
Arrival Port Choose Arrival Port of the small craft from drop down list. Ladden or Ballast
Select Ladden, or Ballast for the small craft accordingly.
Lockage alongside ACP tug
If the small craft will transit alongside an ACP tug, select ‘Yes’. Else select ‘No’.
Deckhands required
If the small craft will require an ACP deckhand for transit, select ‘Yes’. Else ‘select ‘No’.
Able to Anchor If the small craft is available to anchor, select ‘Yes’. Else select ‘No’. Cape Mala Speed
Enter Cape Mala Speed of the small craft in Knots manually, or
clicking . Agent Code Default value of Agent Code is the account Id of the Agency. And
user also can select an agent code by clicking . Vessel for Select the operation to be realized at ACP water, Transit or Local
Movement. Rejection Reason
The rejection reason assigned by ACP will be displayed if the Small Craft Due is rejected by ACP.
User Manual for EDCS User Admin March 2007
CrimsonLogic Contents & Release Notice: Page 96 of 220
Fill in Crew Information in Crew List tab
Fig 5.3 – Crew List Tab 27. Provide at least one crew information.
Last Name Enter Last Name of crew. Second Last Name
Enter Second Last Name of crew.
First Name Enter First Name of crew. Middle Name Enter Middle Name of crew. Capacity Enter Capacity code of the crew. To select from a predefined list
of capacity codes, click on the icon. Birthplace Enter Birthplace code of the crew. To select from a predefined list
of birthplace codes, click on the icon. Nationality Enter Nationality code of the crew. To select from a predefined list
of nationality codes, click on the icon. ID Enter the identification number of the crew. Add More Row(s)
To add more rows for more crew members, enter a numeric number and click on the Add More Row(s) button.
Click on the S/N hyperlink next to a crew
The details of the crew will be shown as follows:
Fill in Crew Detail Information
28. More detail information can also be entered when entering some fields in the listing table, and then clicking the Sequence No hyperlink.
User Manual for EDCS User Admin March 2007
CrimsonLogic Contents & Release Notice: Page 97 of 220
Fig 5.4 – Crew Detail
Crew Information
Last Name Enter Last Name of crew. Second Last Name
Enter Second Last Name of crew.
First Name Enter First Name of crew. Middle Name Enter Middle Name of crew. Capacity Enter Capacity code of the crew. To select from a predefined list
of capacity codes, click on the icon. Birthplace Enter Birthplace code of the crew. To select from a predefined list
of birthplace codes, click on the icon. Birthday Enter the Birthday of the crew in dd/mm/yyyy format or click on
the icon to select a date from the popup calendar. Note that the birthday must be earlier that the current date.
Nationality Enter Nationality code of the crew. To select from a predefined list
of nationality codes, click on the icon. ID Enter the identification number of the crew. ID Type Enter the identification type by selecting from the drop-down list. Port of Embarking
Enter the Port of Embarking code. To select from a predefined list
of port codes, click on the icon. Date of Embarking
Enter the Date of Embarking in dd/mm/yyyy format or click on the
icon to select from the popup calendar.
Port of Disembarking
Enter the Port of Disembarking code. To select from a predefined
list of port codes, click on the icon. Date of Disembarking
Enter the Date of Disembarking in dd/mm/yyyy format or click on
the icon to select from the popup calendar. Crew Disposition Enter the Crew Disposition by selecting from the drop-down list. Exclusion Reason
Enter the exclusion reason.
Local Activity
Port of Enter the Port of local Embarking code. To select from a
User Manual for EDCS User Admin March 2007
CrimsonLogic Contents & Release Notice: Page 98 of 220
Embarking predefined list of port codes, click on the icon. Date of Embarking
Enter the Date of local Embarking in dd/mm/yyyy format or click
on the icon to select from the popup calendar.
Port of Disembarking
Enter the Port of local Disembarking code. To select from a
predefined list of port codes, click on the icon. Date of Disembarking
Enter the Date of local Disembarking in dd/mm/yyyy format or
click on the icon to select from the popup calendar.
Add More Row(s)
To add more rows for more local activity, enter a numeric number and click on the Add More Row(s) button.
Click on the Next button
This will show the details page of the next crew member entered in the table in Figure 11.4.
Click on the Previous button
This will show the details page of the previous crew member entered in the table in Figure 11.4.
Click on the Back button
This will show the details page of the crew listing table Figure 5.3.
Fill in Passenger Information in Passenger List tab
Fig 5.5 – Passenger List Tab 29. If Passenger on board in first tab is Yes, at least one Passenger
information is required. 30. More detail information can also be entered when entering
some fields in the listing table, and then clicking the Sequence No hyperlink.
Passenger Information Tab Details
Last Name Enter Last Name of passenger. Second Last Name
Enter Second Last Name of passenger.
First Name Enter First Name of passenger.
User Manual for EDCS User Admin March 2007
CrimsonLogic Contents & Release Notice: Page 99 of 220
Middle Name Enter Middle Name of passenger. Birthplace Enter Birthplace code of the passenger. To select from a
predefined list of birthplace codes, click on the icon. Birthday Enter the Birthday of the passenger in dd/mm/yyyy format or click
on the icon to select a date from the popup calendar. Note that the birthday must be earlier that the current date.
Nationality Enter Nationality code of the passenger. To select from a
predefined list of nationality codes, click on the icon. ID Enter the identification number of the passenger. Add More Row(s)
To add more rows for more passenger members, enter a numeric number and click on the Add More Row(s) button.
Click on the S/N hyperlink next to a crew
The details of the passenger will be shown as follows:
Passenger Detail Information
Fig 5.6 – Passenger Detail
Passenger Information
Last Name Enter Last Name of passenger. Second Last Name
Enter Second Last Name of passenger.
First Name Enter First Name of passenger. Middle Name Enter Middle Name of passenger. Birthplace Enter Birthplace code of the passenger. To select from a
predefined list of birthplace codes, click on the icon.
User Manual for EDCS User Admin March 2007
CrimsonLogic Contents & Release Notice: Page 100 of 220
Birthday Enter the Birthday of the passenger in dd/mm/yyyy format or click
on the icon to select a date from the popup calendar. Note that the birthday must be earlier that the current date.
Nationality Enter Nationality code of the passenger. To select from a
predefined list of nationality codes, click on the icon. ID Enter the identification number of the passenger. Port of Embarking
Enter the Port of Embarking code. To select from a predefined list
of port codes, click on the icon. Date of Embarking
Enter the Date of Embarking in dd/mm/yyyy format or click on the
icon to select from the popup calendar.
Port of Disembarking
Enter the Port of Disembarking code. To select from a predefined
list of port codes, click on the icon. Date of Disembarking
Enter the Date of Disembarking in dd/mm/yyyy format or click on
the icon to select from the popup calendar. Local Activity
Port of Embarking
Enter the Port of local Embarking code. To select from a
predefined list of port codes, click on the icon. Date of Embarking
Enter the Date of local Embarking in dd/mm/yyyy format or click
on the icon to select from the popup calendar.
Port of Disembarking
Enter the Port of local Disembarking code. To select from a
predefined list of port codes, click on the icon. Date of Disembarking
Enter the Date of local Disembarking in dd/mm/yyyy format or
click on the icon to select from the popup calendar.
Add More Row(s)
To add more rows for more local activity, enter a numeric number and click on the Add More Row(s) button.
Click on the Next button
This will show the details page of the next passenger member entered in the table in Figure 12.4.
Click on the Previous button
This will show the details page of the previous passenger member entered in the table in Figure 11.4.
Click on the Back button
This will show the details page of the passenger listing table in Figure 5.5.
User Manual for EDCS User Admin March 2007
CrimsonLogic Contents & Release Notice: Page 101 of 220
Fill in Movement Information in Movement List tab
Fig 5.7 – Movement List 31. Provide at least one movement information.
Movement Information
SequenceNo The internal movement sequence no will be assigned and displayed, once the Small Craft Due is approved by ACP.
Type Choose the movement type of this movement from the drop down list.
Reason Enter the Movement Reason code. To select from a predefined list
of reason codes, click on the icon. Starting At The starting location will be assigned and displayed, once the
Small Craft Due is approved by ACP. Stopping At Enter the location code. To select from a predefined list of location
codes, click on the icon. Movement Status
The movement status of the movement will be displayed.
Ready Time Enter the Ready Time for the movement in dd/mm/yyyy HHmm format.
Ready Status Choose Ready Status of the movement from the drop down list. Transit Direction The Transit Direction will be assigned and displayed, once the Small
Craft Due is approved by ACP.
User Manual for EDCS User Admin March 2007
CrimsonLogic Contents & Release Notice: Page 102 of 220
Fill in ADS Preliminary Information and Stowage Plans in ADS Information tab
Fig 5.8 – ADS Information 32. If first visit is ‘Yes’, ADS Information is also required. Otherwise, it
would be disabled.
ADS Information Detail
Suez Gross Enter certificate SUEZ Gross Tonnage of the small craft. Suez Net Enter SUEZ certificate Tonnage of the small craft. Call Letters Enter the radio call letters of the small craft. Vessel PRE-SIN Enter the preliminary identifier for the small craft assigned by ACP. ITC-69-Length Enter length as of ITC-69 certificate of the small craft in meters. ITC-69-Depth Enter depth as of ITC-69 certificate of the small craft in meters. ITC-69-Gross Tonnage
Enter ITC-69 gross tonnage of the small craft.
ITC-69-Net Tonnage
Enter net tonnage as of ITC-69 certificate of the small craft.
ITC-69 Beam Enter beam as of ITC-69 certificate of the small craft in meters. Year Build Enter the year when the small craft is built. Hull Number Enter the no assigned to the small craft’s hull when in construction. Passenger Capacity
Enter passenger total capacity of the small craft.
Summer Enter the vertical distance in meters and millimeters from the lowest
User Manual for EDCS User Admin March 2007
CrimsonLogic Contents & Release Notice: Page 103 of 220
Loaded Draft point of the hull to the summer load line of the small craft. Summer Loaded Deadweight
Enter the carrying capacity in metric tons of a vessel when loaded to its maximum summer load line.
Builder Enter the builder code. To select from a predefined list of builder
codes, click on the icon. Hull Type Enter the hull type code. To select from a predefined list of hull
type codes, click on the icon. Timber Summer Loaded Draft
Enter the vertical distance in meters and millimeters from the lowest point of the hull to the timber summer load line.
Summer Loaded Displacement
Enter the weight of the vessel and its contents in metric tons when loaded to its maximum authorized summer load line mark (Plimsoll mark).
No of Propellers Enter the number of propellers in the small craft. No of Engines Enter the number of small craft’s motors. Main Engine HP Type
Enter the code of engine horse power rate type. To select from a
predefined list of HP type codes, click on the icon. Propeller Type Enter the code of propeller type. To select from a predefined list of
propeller type code, click on the icon. Engine Type Enter the type of main propulsion engine(s). To select from a
predefined list of engine type code, click on the icon. Main Engine HP Enter the engine horse power of the small craft. DeadRise Enter the distance measured perpendicular to the molded base
line at the side of the vessel, from the molded base line to the line of bottom.
Tons per Centimeters Immersion
Enter the weight of salt water displaced by the ship when sinking one centimeter on a level plane.
Ship’s Email Enter the email address of the small craft. MMSI No. Enter the vessel identification based on the ITU table. Former Vessel Name
Enter the prior vessel name of the small craft.
Bilge Keel Radius
Enter the radius of the curvature of the bottom side corner of the hull at the mid ship.
INMARSAT C Number
Enter the International Maritime Satellite C no of the small craft.
Crew safe manning quantity
Enter the minimum quantity of crews – safe manning certificate.
Stowage Plan Click ‘Email’ hyperlink to send the plans of the ship that shows the location of each tank.
Fig 5.9 – Stowage Plans
User Manual for EDCS User Admin March 2007
CrimsonLogic Contents & Release Notice: Page 104 of 220
Fill in Sister Ship Information in Sister Ship List tab
Fig 5.10 – Sister Ship List 33. If first visit is ‘Yes’, Sister Ship Information can be provided if there
is any. Otherwise, this tab would be disabled. Sister Ship Detail Sister SIN Enter the vessel SIN for the sister ship. To select from a predefined
list of vessel SIN, click on the icon. Sister Ship Name The sister ship name will be populated after sister SIN is selected.
User Manual for EDCS User Admin March 2007
CrimsonLogic Contents & Release Notice: Page 105 of 220
5.2 Save
Menu 7. Click on Small Craft Due – Create from the menu. Save a new created Small Craft Due
8. Enter all necessary information.
Fig 5.11 – Save button in creating page 9. Click on the Save button to active save request.
Syntax checking before save successfully
Fig 5.12 – Popped up error message returned from syntax checking 10. If any error detected on mandatory, data type or data size
checking, a window would be popped up to list all syntax errors.
Warning before save successfully
Fig 5.13 – Popped up warning message 11. If some value is suspected being entered wrongly, a window
would be popped up to list all warning message. If click on ‘Ok’ button, the save procedure will continue. If click on ‘Cancel’ button, the procedure will stop for user checking and
User Manual for EDCS User Admin March 2007
CrimsonLogic Contents & Release Notice: Page 106 of 220
revising.
Display confirmation page
Fig 5.14 – Save confirmation page 12. A confirmation page will be displayed once a Small Craft Due
is saved successfully.
User Manual for EDCS User Admin March 2007
CrimsonLogic Contents & Release Notice: Page 107 of 220
5.3 Submit
Menu 1. Click on Small Craft Due – Create from the menu. Submit a new created Small Craft Due
2. Enter all necessary information.
Fig 5.15 – Submit button in creating page 3. Click on the Submit button to active submit request.
Syntax checking before submit successfully
Fig 5.16 – Popped up error message returned from syntax checking 4. If any error detected in mandatory, data type or data size
checking, a window would be popped up to list all syntax errors.
Warning checking before submit successfully
Fig 5.17 – Popped up warning message 5. If some value is suspected being entered wrongly, a window
would be popped up to list all warning messages. If click on ‘Ok’ button, the submit procedure will continue. If click on ‘Cancel’ button, the procedure will stop for user checking and
User Manual for EDCS User Admin March 2007
CrimsonLogic Contents & Release Notice: Page 108 of 220
revising.
Business Rule checking before submit successfully
Fig 5.18 – Popped up business rule error message 6. Click on the error title, the tab that contains the error field
would be activated.
Display confirmation page
Fig 5.19 – Submit confirmation page 7. A confirmation page will be displayed once a Small Craft Due
is submitted successfully.
Submit in batch 8. Multiple Small Craft Dues also can be submitted in batch. And the detail is similar to deleting Small Craft Due in batch (please refer to 5.6 Delete multiple Small Craft Due in batch).
User Manual for EDCS User Admin March 2007
CrimsonLogic Contents & Release Notice: Page 109 of 220
5.4 Search
Menu 8. Click on Small Craft Due – Search from the menu. List all created Small Craft Due
Fig 5.20 – List of created Small Craft Due 9. All Small Craft Due that are created by the same agency
would be listed in a table.
Search Result Transaction No The Transaction No of the created Small Craft Due will be
displayed. Visit No The Visit No of the Small craft Due will be assigned and displayed,
once approved by ACP. Vessel SIN The Vessel SIN o of the Small Craft will be displayed. Vessel Name The Vessel Name of the Small Craft will be displayed. Estimated Arrival Date
The Estimated Arrival Date of the Small Craft Due will be displayed in dd/mm/yyyy hh:mm format.
Arrival Port The Arrival Port of the Small Craft Due will be displayed. Request Date The Date time of submitting the Small Craft Due will be displayed. Status The Flow Status of the Small Craft Due will be displayed.
Possible Flow Status reflected here includes: DRAFT – The Small Craft Due is a draft. SUBMITTED – The Small Craft Due is submitted by agent or ETA Clerk, and has been received by ACP. APPROVED PENDING – The Small Craft Due has been approved by ACP, but not received by end user. APPROVED – The Small Craft Due has been approved by ACP, and also received by end user. REJECTED PENDING – The Small Craft Due has been rejected by ACP, but not received by end user. REJECTED – The Small Craft Due has been rejected by ACP, and also received by end user. SUBMITTED CANCELLATION – The cancel request on Small Craft Due has been submitted by agent or ETA Clerk, and received by ACP. CANCELLED PENDING - The Small Craft Due has been cancelled,
User Manual for EDCS User Admin March 2007
CrimsonLogic Contents & Release Notice: Page 110 of 220
but not received by end user. CANCELLED – The Small Craft Due has been cancelled.
Order the list of Small Craft Due
10. The Small Craft Due is ordered based on Transaction No. by default.
Fig 5.21 – Order by ETA Date 11. User can specify the order sequence by clicking the target
field.
Specify search criteria
Fig 5.22 – Search Criteria for Small Craft Due 12. User can search for Small Craft Due by specifying any fields in
Search Criteria section. 13. Click on ‘Search’ button, the result Small Craft Due would be
listed in the table.
Search Criteria Transaction No Enter the Transaction No of the Small Craft Due to search. Visit No Enter the visit No of the Small Craft Due to search. Vessel SIN Enter the Vessel SIN of the Small Craft to search. Vessel Name Enter the Vessel Name of the Small Craft to search. Estimated Arrival Date From
Enter the Estimated Arrival Start Date in dd/mm/yyyy format to search.
Estimated Arrival Date To
Enter the Estimated Arrival End Date in dd/mm/yyyy format to search.
Flow Status Enter the Flow Status of the Small Craft Due to search. Click on the Search button
If a match is found, the results will be displayed in the same screen, else No Record Found will be shown.
User Manual for EDCS User Admin March 2007
CrimsonLogic Contents & Release Notice: Page 111 of 220
5.5 Edit
Menu 10. Click on Small Craft Due – Search from the menu. Enter the detail form of a draft Small Craft Due in view mode
Fig 5.23 – Search the target record 11. Locate the target draft Small Craft Due. 12. Click on the transaction no hyperlink of the record.
Fig 5.24 – Detail form of Small Craft Due 13. The detail of Small Craft Due would be displayed in view
mode.
Enter the detail form of Small Craft Due in edit mode
Fig 5.25 – Edit button in detail form 14. Click on ‘Edit’ button to enter edit mode.
User Manual for EDCS User Admin March 2007
CrimsonLogic Contents & Release Notice: Page 112 of 220
Fig 5.26 – Small Craft Due detail form in edit mode
Save or Submit Small Craft Due after edit
Fig 5.25 – Save and Submit button in detail form 15. Click on ‘Save’ button to save the Small Craft Due as draft
again. The procedure is the same as saving a new created Small Craft Due.
16. Click on ‘Submit’ button to submit the Small Craft Due. The procedure is the same as submitting a new created Small Craft Due.
User Manual for EDCS User Admin March 2007
CrimsonLogic Contents & Release Notice: Page 113 of 220
5.6 Delete
Menu 1. Click on Small Craft Due – Search from the menu. Delete single Small Craft Due
Fig 5.27 – Search the target record 2. Locate the target draft Small Craft Due. 3. Click on the transaction no hyperlink of the record.
Fig 5.28 – Detail form of Small Craft Due 4. The detail of Small Craft Due would be displayed in view
mode.
Fig 5.29 – Delete button in detail form 5. Click on ‘Delete’ button, a confirmation page would be
displayed if deletion is successful.
User Manual for EDCS User Admin March 2007
CrimsonLogic Contents & Release Notice: Page 114 of 220
Fig 5.30 – Confirmation page of deleting single Small Craft Due
Delete multiple Small Craft Due in batch
6. Select at least one draft Small Craft Due in the listing table.
Fig 5.31 – Check multiple Small Craft Due records 7. Click on ‘Delete’ hyperlink and a confirmation page would be
displayed.
Fig 5.32 – Confirmation page of deleting Small Craft Due in batch
User Manual for EDCS User Admin March 2007
CrimsonLogic Contents & Release Notice: Page 115 of 220
5.7 Cancel
Menu 1. Click on Small Craft Due – Search from the menu. List Approved Small Craft Due
2. List Approved Small Craft Due in listing table by specifying flow status as ‘Approved’.
Fig 5.33 – List of approved Small Craft Due 3. Click on the transaction no hyperlink of the record.
Fig 5.34 – Detail form of approved Small Craft Due
Click ‘Cancel’ button to request for canceling a Small Craft Due
4. Click on the ‘Cancel’ button on the bottom after checking the whole document.
Fig 5.35 – ‘Cancel’ button in approved Small Craft Due 5. A confirmation page will be displayed.
User Manual for EDCS User Admin March 2007
CrimsonLogic Contents & Release Notice: Page 116 of 220
Fig 5.36 – Confirmation page of rejection
User Manual for EDCS User Admin March 2007
CrimsonLogic Contents & Release Notice: Page 117 of 220
5.8 Duplicate
Menu 1. Click on Small Craft Due – Search from the menu. Enter the detail form of a Small Craft Due in view mode
Fig 5.37 – Search the target record 2. Locate the target Small Craft Due. 3. Click on the transaction no hyperlink of the record.
Fig 5.38 – Detail form of Small Craft Due 4. The detail of Small Craft Due would be displayed in view
mode.
Duplicate the Small Craft Due
Fig 5.39 – Duplicate button in detail form 5. Click on ‘Duplicate’ button to create a new Small Craft Due.
User Manual for EDCS User Admin March 2007
CrimsonLogic Contents & Release Notice: Page 118 of 220
Fig 5.40 – new created Small Craft
Save or Submit Small Craft Due after edit
Fig 5.41 – Save and Submit button in detail form 6. Click on ‘Save’ button to save the Small Craft Due as draft. The
procedure is the same as saving a new created Small Craft Due.
7. Click on ‘Submit’ button to submit the Small Craft Due. The procedure is the same as submitting a new created Small Craft Due.
User Manual for EDCS User Admin March 2007
CrimsonLogic Contents & Release Notice: Page 119 of 220
5.9 Print
Menu 1. Click on Small Craft Due – Search from the menu. Print single Small Craft Due
Fig 5.42 – Search the target record 2. Locate the target Small Craft Due. 3. Click on the transaction no hyperlink of the record.
Fig 5.43 – Detail form of Small Craft Due 4. The detail of Small Craft Due would be displayed in view
mode.
Fig 5.44 – Print button in detail form 5. Click on ‘Print’ button, an official form is generated and
popped up.
User Manual for EDCS User Admin March 2007
CrimsonLogic Contents & Release Notice: Page 120 of 220
Fig 5.45 – official form for Small Craft Due
Print multiple Small Craft Due in batch
6. Select at least one Small Craft Due in the listing table.
Fig 5.46 – Check multiple Small Craft Due records 7. Click on ‘Print’ hyperlink and a set of Small Craft Due official
forms is generated and displayed in a popped up window.
User Manual for EDCS User Admin March 2007
CrimsonLogic Contents & Release Notice: Page 121 of 220
Fig 5.47 – A set of Small Craft Due official forms
User Manual for EDCS User Admin March 2007
CrimsonLogic Contents & Release Notice: Page 122 of 220
6 Transit Booking Request (TBR)
6.1 Create
Menu Click on Booking Request – Create from the menu. Visit Selection Screen
Figure 6.1 – Visit Selection Screen
Search Results Visit No. The Visit No. that the user has will be displayed. Vessel SIN The Vessel SIN for the Visit No. will be displayed. Vessel Name The Vessel Name for the Visit No. will be displayed. ETA Date Time The Estimated Time of Arrival in dd/mm/yyyy hh:mm format will
be displayed. Movement No The Movement Sequence No retrieved from ETA will be
displayed. Transit Direction The Transit Direction of the movement will be displayed. Begin Location The Begin Location of the movement will be displayed. Stop Location The Stop Location of the movement will be displayed. Search Criteria Visit No. Enter the Visit No. to search, which type is Numeric (7). Vessel Name Enter the Vessel Name to search, which type is Alphanumeric
(50). Vessel SIN Enter the Vessel SIN to search, which type is Numeric (7). Movement No Enter the Movement Sequence No to search, which type is
Numeric (7). Click on the Search button
If a match is found, the results will be displayed in the same screen, else No Record Found will be shown
Click on the hyperlink of a Visit No.
The Transit Booking Details will be shown as follows to allow you to enter details of the Transit Booking Request.
Booking Information – Header Tab
User Manual for EDCS User Admin March 2007
CrimsonLogic Contents & Release Notice: Page 123 of 220
Figure 6.2 – Booking Information (Header Tab)
Header Tab details
Visit No. The Visit No. of this transit booking will be displayed. Customer Code The Customer Code retrieved from ETA will be displayed. Tropical Fresh Water Draft_AFT
The TFW_Draft_AFT retrieved from ETA will be displayed.
Vessel Agent The Agent Code retrieved from ETA will be displayed. Agent Representative
The default value would be the login user name. And user also can change to other agent.
Request Date The Date time of submitting the booking request will be displayed.
ACP Approving Official
The ACP official who processes this booking request will be displayed.
Booking Id The Booking Id will be generated and displayed when the booking request has been approved.
Movement Seq No.
The Movement Sequence no retrieved from ETA will be displayed.
ETA The Estimated Time of Arrival in dd/mm/yyyy hh:mm format will be displayed.
Initial Transit ‘Yes’ or ‘No’ will be displayed in this field. Agent Remark Agent can fill in remark on this booking request if necessary. Booking Date Agent needs to provide the Booking Date for this request. Rejection Reason The Rejection Reason, if provided by ACP official, will be
displayed.
User Manual for EDCS User Admin March 2007
CrimsonLogic Contents & Release Notice: Page 124 of 220
Vessel SIN The Vessel SIN retrieved from ETA will be displayed. Vessel Name The Vessel Name retrieved from ETA will be displayed. IMO No. The IMO No. retrieved from ETA will be displayed. Vessel Type The Vessel Type retrieved from ETA will be displayed. Beam The Beam retrieved from ETA will be displayed. Flag The Flag retrieved from ETA will be displayed. Click on the Booking Details Tab to display the following screen.
Enter more details of the booking request. Booking Details Tab
Figure 6.3 – Booking Details tab
Booking Details Tab Details
Dead Tow If the booking request is for a component in a dead tow, select ‘Yes’. Else select ‘No’.
Tug SIN If Dead Tow is ‘Yes’ and Vessel Type is not Tug, provide Tug SIN
by clicking on the icon. Tug Name Tug Name will be populated if Tug SIN is selected. Transit Direction The Transit Direction retrieved from ETA will be displayed. Click on the Structural Changes Tab to display the following
screen. Enter more details of the booking request. Structural Changes Tab
Figure 6.4 – Structural Changes tab
Structural Changes Tab Details
Unusual Configuration
If there is any change in configuration that may affect the vessel’s restrictions, select ‘Yes’.
Configuration Description
If Unusual Configuration is ‘Yes’, provide more detail description on the change.
User Manual for EDCS User Admin March 2007
CrimsonLogic Contents & Release Notice: Page 125 of 220
Click on the Booking Fee Tab to display the following screen. The information of Booking Fee provided by ACP will be displayed.
Booking Fee Tag
Figure 6.5 – Booking Fee tab
Booking Fee Tab Details
Regular Booking Fee
The Booking Fee assigned by ACP will be displayed once the booking request is approved.
Required Arrival Time
The Required Arrival Time assigned by ACP will be displayed once the booking request is approved.
Booking Period The Booking Period assigned by ACP will be displayed once the booking request is approved.
PCUMS Net Tons The PCUMS Net Tons assigned by ACP will be displayed once the booking request is approved.
y-Job Message The y-Job Message assigned by ACP will be displayed once the booking request is approved.
Restriction The Restriction assigned by ACP will be displayed once the booking request is approved.
High Mast Lighting Restriction
The High Mast Lighting Restriction assigned by ACP will be displayed once the booking request is approved.
Booking Condition
The Booking Condition assigned by ACP will be displayed once the booking request is approved.
User Manual for EDCS User Admin March 2007
CrimsonLogic Contents & Release Notice: Page 126 of 220
6.2 Save
Menu 1. Click on Booking Request – Create from the menu. Save a new created Transit Booking Request
2. Enter all necessary booking information in first four tabs.
Fig 6.6 – Save button on the bottom of the creating page 3. Click on the Save button to active save request.
Syntax checking before save successfully
Fig 6.7 – Popped up error message returned from syntax checking 4. If any error detected on mandatory, data type or data size
checking, a window would be popped up to list all syntax errors.
Warning before save successfully
Fig 6.8 – Popped up warning message 5. If some value is suspected being entered wrongly, a window
would be popped up to list all warning message. If click on ‘Ok’ button, the save procedure will continue. If click on ‘Cancel’ button, the procedure will stop for user checking and revising.
User Manual for EDCS User Admin March 2007
CrimsonLogic Contents & Release Notice: Page 127 of 220
Display confirmation page
Fig 6.9 – Save confirmation page 6. A confirmation page will be displayed once a Booking Request
is saved successfully.
User Manual for EDCS User Admin March 2007
CrimsonLogic Contents & Release Notice: Page 128 of 220
6.3 Sign And Submit
Menu 1. Click on Booking Request – Create from the menu. Submit a new created Booking Request
2. Enter all necessary Booking information.
Fig 6.10 – Submit button in creating page 3. Click on the Submit button to active submit request.
Syntax checking before submit successfully
Fig 6.11 – Popped up error message returned from syntax checking 4. If any error detected in mandatory, data type or data size
checking, a window would be popped up to list all syntax errors.
Warning checking before submit successfully
Fig 6.12 – Popped up warning message 5. If some value is suspected being entered wrongly, a window
would be popped up to list all warning messages. If click on ‘Ok’ button, the submit procedure will continue. If click on ‘Cancel’ button, the procedure will stop for user checking and revising.
User Manual for EDCS User Admin March 2007
CrimsonLogic Contents & Release Notice: Page 129 of 220
Business Rule checking before submit successfully
Fig 6.13 – Popped up business rule error message 6. Click on the error name, the tab that contains the error field
would be activated.
Digital signing on Booking information
7. If it is the first time for the browser to sign a document, a security warning will be popped up.
Fig 6.14 – Security warning message 8. Click on ‘Yes’ button and a dialog is popped up for entering
personal password.
Fig 6.15 – Dialog for entering password 9. Enter password, and click ‘Ok’ button.
User Manual for EDCS User Admin March 2007
CrimsonLogic Contents & Release Notice: Page 130 of 220
Display confirmation page
Fig 6.14 – Submit confirmation page 10. A confirmation page will be displayed once a Booking Request
is submitted successfully.
User Manual for EDCS User Admin March 2007
CrimsonLogic Contents & Release Notice: Page 131 of 220
6.4 Search
Menu Click on Booking Request – Search from the menu. Search Listing Screen
The list of Transit Booking Requst transactions will be listed as shown:
Figure 6.15 – Search Listing Screen
Search Results Transaction No. The Transaction No. of the created Booking Request will be
displayed.
Visit No. The Visit No. of the Booking Request will be displayed.
Booking Id The Booking Id assigned by ACP will be displayed once the Booking Request has been approved.
Vessel SIN The Vessel SIN for the Booking Request will be displayed.
Vessel Name The Vessel Name for the Booking Request will be displayed.
Dir. The Transit Direction for the Booking Request will be displayed.
Agent The Agent code for the Booking Request will be displayed. ETA The Estimated Time of Arrival in dd/mm/yyyy hh:mm format will
be displayed. Request Date The Date Time of submitting the Booking Request will be
displayed. Flow Status The Flow Status of the Booking Request will be displayed.
Possible Flow Status reflected here includes: DRAFT – The Booking Request is a draft, but not signed.
User Manual for EDCS User Admin March 2007
CrimsonLogic Contents & Release Notice: Page 132 of 220
DRAFT AND SIGNED – The Booking Request is a draft, and has been signed. SUBMIT PENDING – The Booking Request is submitted by agent, but not received by ACP yet. SUBMITTED – The Booking Request is submitted by agent, and has been received by ACP. APPROVED PENDING SIGNING – The Booking Request has been approved, but not signed by ACP. APPROVED PENDING – The Booking Request has been approved and signed by ACP, but not received by agent. APPROVED – The Booking Request has been approved and signed by ACP, and also received by agent. REJECTED PENDING SIGNING – The Booking Request has been rejected, but not signed by ACP. REJECTED PENDING – The Booking Request has been rejected and signed by ACP, but not received by agent. REJECTED – The Booking Request has been rejected and signed by ACP, and also received by agent. CANCELLED – The Booking Request has been cancelled.
Search Criteria Transaction No. Enter the Transaction No. to search. Visit No. Enter the Visit No. to search. Vessel SIN Enter the Vessel SIN to search. Booking Id Enter the Booking Id to search. Booking Date Enter the Booking Date to search. Flow Status Enter the Flow Status to search. Click on the Search button
If a match is found, the results will be displayed in the same screen, else No Record Found will be shown.
User Manual for EDCS User Admin March 2007
CrimsonLogic Contents & Release Notice: Page 133 of 220
6.5 Edit Menu 1. Click on Booking Request – Search from the menu. Enter the detail form of a draft Booking Request in view mode
Fig 6.16 – Search the target draft Booking Request 2. Locate the target draft Booking Request. 3. Click on the transaction no hyperlink of the record.
Fig 6.17 – Detail form of Booking Request 4. The detail of Transit Booking Request would be displayed in
view mode.
Edit Booking Request before submission
Fig 6.18 – Edit button in detail form 5. Click on ‘Edit’ button to enter edit mode.
User Manual for EDCS User Admin March 2007
CrimsonLogic Contents & Release Notice: Page 134 of 220
Fig 6.19 – Booking Request detail form in edit mode
Save or Submit Booking Request after edit
Fig 6.20 – Save and Submit button in detail form 6. Click on ‘Save’ button to save the Booking Request as draft
again. The procedure is the same as saving a new created Booking Request.
7. Click on ‘Sign And Submit’ button to sign and submit the Booking Request. The procedure is the same as submitting a new created Booking Request.
User Manual for EDCS User Admin March 2007
CrimsonLogic Contents & Release Notice: Page 135 of 220
6.6 Sign
Menu 1. Click on Booking Request – Search from the menu. Enter the detail form of a draft Booking Request in view mode
Fig 6.21 – Search the target draft Booking Request 2. Locate the target draft Booking Request, which flow status can
be Draft, or Draft And Signed. 3. Click on the transaction no hyperlink of the record.
Fig 6.22 – Detail form of Booking Request 4. The detail of Transit Booking Request would be displayed in
view mode.
Sign Booking Request, but not submit at the time
Fig 6.23 – Sign button in detail form
User Manual for EDCS User Admin March 2007
CrimsonLogic Contents & Release Notice: Page 136 of 220
5. Click on ‘Sign’ button to invoke digital signing. If it is the first time for the browser to sign, a security warning dialog will be popped up
Fig 6.24 – Security warning message 6. Click on ‘Yes’ button and a dialog is popped up for entering
personal password.
Fig 6.25 – Dialog for entering password 7. Enter password, and click ‘Ok’ button.
Display signing confirmation page
Fig 6.26 – Sign confirmation page 8. A confirmation page will be displayed once a Booking Request
is signed successfully.
User Manual for EDCS User Admin March 2007
CrimsonLogic Contents & Release Notice: Page 137 of 220
6.7 Delete
Menu 1. Click on Booking Request – Search from the menu. Delete single Booking Request
Fig 6.27 – Search the target record 2. Locate the target draft Booking Request, which status can be
Draft, or Draft And Signed. 3. Click on the transaction no hyperlink of the record.
Fig 6.28 – Detail form of Booking Request 4. The detail of Booking Request would be displayed in view
mode.
Fig 6.29 – Delete button in detail form 5. Click on ‘Delete’ button, a confirmation page would be
User Manual for EDCS User Admin March 2007
CrimsonLogic Contents & Release Notice: Page 138 of 220
displayed if deletion is successful.
Fig 6.30 – Confirmation page of deleting single Booking Request
Delete multiple Booking Requests in batch
6. Select at least one draft Booking Request in the listing table, which status can be Draft, or Draft And Signed.
Fig 6.31 – Check multiple Booking Request records 7. Click on ‘Delete’ hyperlink and a confirmation page would be
displayed.
Fig 6.32 – Confirmation page of deleting Booking Request in batch
User Manual for EDCS User Admin March 2007
CrimsonLogic Contents & Release Notice: Page 139 of 220
6.8 Submit in Batch
Menu 1. Click on Booking Request – Search from the menu. Select Draft And Signed Booking Request
Fig 6.33 – Search the target record 2. Select at least one draft Booking Request in the listing table,
which status can be Draft, or Draft And Signed.
Submit the selected Booking Requests in batch
3. Click on ‘Submit’ hyperlink and a confirmation page would be displayed.
Fig 6.34 – Submit hyperlink on the listing table
A confirmation page will be displayed
4. A confirmation page will displayed.
Fig 6.35 – Confirmation page of submitting Booking Request in batch
User Manual for EDCS User Admin March 2007
CrimsonLogic Contents & Release Notice: Page 140 of 220
6.9 Print
Menu 1. Click on Booking – Search from the menu. Print single Booking Request
Fig 6.36 – Search the target record 2. Locate the target Booking Request. 3. Click on the transaction no hyperlink of the record.
Fig 6.37 – Detail form of Booking Request 4. The detail of Booking Request would be displayed in view
mode.
5. Click on button, an official form is generated and popped up.
User Manual for EDCS User Admin March 2007
CrimsonLogic Contents & Release Notice: Page 141 of 220
Fig 6.38– official form for Booking Request
Print multiple Small Craft Due in batch
6. Select at least one Booking in the listing table.
Fig 6.39 – Check multiple Booking Request 7. Click on ‘Print’ hyperlink and a set of Booking Request official
forms is generated and displayed in a popped up window.
User Manual for EDCS User Admin March 2007
CrimsonLogic Contents & Release Notice: Page 142 of 220
Fig 6.40 – A set of Booking Request official forms
User Manual for EDCS User Admin March 2007
CrimsonLogic Contents & Release Notice: Page 143 of 220
7 Transit Booking Cancellation (TBC)
7.1 Create
Menu Click on Booked Transits – Transit Booking Cancel - Create from the menu.
Search Results Transaction No The Transaction No for the approved Transit Booking will be
displayed. Visit No. The Visit No. for the approved Transit Booking will be displayed. Booking Id The Booking Id for the approved Transit Booking will be
displayed. Booking Date The Booking Date for the approved Transit Booking will be
displayed. Vessel SIN The Vessel SIN for the approved Transit Booking will be displayed. Vessel Name The Vessel Name for the approved Transit Booking will be
displayed. Transit Direction The Transit Direction for the approved Transit Booking will be
displayed. Search Criteria Visit No. Enter the Visit No. to search, which type is Numeric (7). Vessel SIN Enter the Vessel SIN to search, which type is Numeric (7). Transaction No Enter the Transaction No of Transit Booking to search. Booking Date Enter the Booking Date of Transit Booking to search. Click on the Search button
If a match is found, the results will be displayed in the same screen, else No Record Found will be shown
Click on the hyperlink of a Transaction No.
The Transit Booking Cancellation Details will be shown as follows to allow you to enter details of the Transit Booking Cancellation.
User Manual for EDCS User Admin March 2007
CrimsonLogic Contents & Release Notice: Page 144 of 220
Transit Booking Cancellation Information
Figure 7.2 – Booking Cancellation Information
Details
Transaction No. A new Transaction No. of this transit booking cancellation will be generated and displayed.
Flow Status The Flow Status of the Transit Booking Cancellation will be assigned and displayed.
SIN The Vessel SIN of this Transit Booking Cancellation will be displayed.
Vessel Name The Vessel Name of this Transit Booking Cancellation will be displayed.
Visit No The Visit No of this Transit Booking Cancellation will be displayed. Booking Cancellation Date
The Date time of submitting the Transit Booking Cancellation will be displayed.
Vessel Agent The Agent Code of this Transit Booking Cancellation will be displayed.
Transit Direction The Transit Direction of this Transit Booking Cancellation will be displayed.
Booking Id The Booking Id of this Transit Booking Cancellation will be displayed.
Booking Date The Booking Date of this Transit Booking Cancellation will be displayed.
User Manual for EDCS User Admin March 2007
CrimsonLogic Contents & Release Notice: Page 145 of 220
7.2 Sign And Submit
Menu 1. Click on Booked Transits – Transit Booking Cancel - Create from the menu.
Submit a new created Transit Booking Cancellation
2. Choose one approved Transit Booking (Please refer to 7.1 Create)
Fig 7.3 – Sign And Submit button in creating page 3. Click on the Sign And Submit button to active submit request.
Syntax checking before submit successfully
Fig 7.4 – Popped up error message returned from syntax checking 4. If any error detected in mandatory, data type or data size
checking, a window would be popped up to list all syntax errors.
Digital signing on Booking Cancellation information
5. If it is the first time for the browser to sign a document, a security warning will be popped up.
Fig 7.5 – Security warning message 6. Click on ‘Yes’ button and a dialog is popped up for entering
personal password.
User Manual for EDCS User Admin March 2007
CrimsonLogic Contents & Release Notice: Page 146 of 220
Fig 7.6 – Dialog for entering password 7. Enter password, and click ‘Ok’ button.
Display confirmation page
Fig 7.7 – Submit confirmation page 8. A confirmation page will be displayed once a Transit Booking
Cancellation is submitted successfully.
User Manual for EDCS User Admin March 2007
CrimsonLogic Contents & Release Notice: Page 147 of 220
7.3 View Menu Click on Booked Transits – Transit Booking Cancel - View from
the menu. Search Listing Screen
The list of Transit Booking Cancellation transactions will be listed as shown:
Figure 7.8 – Search Listing Screen
Search Results Transaction No. The Transaction No. of the created Transit Booking Cancellation
will be displayed.
Visit No. The Visit No. of the Transit Booking Cancellation will be displayed.
Booking Id The Booking Id of the Transit Booking Cancellation will be displayed.
Booking Date The Booking Date of the Transit Booking Cancellation will be displayed.
Vessel SIN The Vessel SIN for the Transit Booking Cancellation will be displayed.
Vessel Name The Vessel Name for the Transit Booking Cancellation will be displayed.
Transit Direction The Transit Direction for the Transit Booking Cancellation will be displayed.
Booking Cancellation Date
The Booking Cancellation Date of submitting the booking cancellation will be displayed in dd/mm/yyyy hh:mm format.
Flow Status The Flow Status of the Transit Booking Cancellation will be displayed. Possible Flow Status reflected here includes: PENDING – The Transit Booking Cancellation is submitted by agent, but not received by ACP yet. SUBMITTED – The Transit Booking Cancellation is submitted by agent, and has been received by ACP.
User Manual for EDCS User Admin March 2007
CrimsonLogic Contents & Release Notice: Page 148 of 220
APPROVED PENDING SIGNING – The Transit Booking Cancellation has been approved, but not signed by ACP. APPROVED PENDING – The Transit Booking Cancellation has been approved and signed by ACP, but not received by agent. APPROVED – The Transit Booking Cancellation has been approved and signed by ACP, and also received by agent. REJECTED PENDING SIGNING – The Transit Booking Cancellation has been rejected, but not signed by ACP. REJECTED PENDING – The Transit Booking Cancellation has been rejected and signed by ACP, but not received by agent. REJECTED – The Transit Booking Cancellation has been rejected and signed by ACP, and also received by agent.
Submitter Name The Submitter Name for the Transit Booking Cancellation will be displayed.
Search Criteria Transaction No. Enter the Transaction No. to search. Visit No. Enter the Visit No. to search. Vessel SIN Enter the Vessel SIN to search. Booking Id Enter the Booking Id to search. Booking Date Enter the Booking Date to search. Flow Status Enter the Flow Status to search. Click on the Search button
If a match is found, the results will be displayed in the same screen, else No Record Found will be shown.
Click on the Transaction No hyperlink of Transit Booking Cancellation, view the detail information.
Detail form of Transit Booking Cancellation
Figure 7.9 – Detail form of Transit Booking Cancellation
Detail Transaction No. The Transaction No. of this transit booking cancellation will be
displayed. Booking Cancellation Date
The Date time of submitting the Transit Booking Cancellation will be displayed.
Submitted Name The Submitted Name of this transit booking cancellation will be
User Manual for EDCS User Admin March 2007
CrimsonLogic Contents & Release Notice: Page 149 of 220
generated and displayed. Rejection Reason The Rejection Reason of the Transit Booking Cancellation will be
assigned and displayed, once the Cancellation is rejected by ACP.
Flow Status The Flow Status of the Transit Booking Cancellation will be displayed.
Booking Cancellation Fee
The Booking Cancellation Fee of the Transit Booking Cancellation will be assigned and displayed, once the Cancellation is approved by ACP.
Booking Cancel Hours
The Booking Cancel Hours of the Transit Booking Cancellation will be assigned and displayed, once the Cancellation is approved by ACP.
Booking Cancel Days
The Booking Cancel Days of the Transit Booking Cancellation will be assigned and displayed, once the Cancellation is approved by ACP.
SIN The Vessel SIN of this Transit Booking Cancellation will be displayed.
Vessel Name The Vessel Name of this Transit Booking Cancellation will be displayed.
Visit No The Visit No of this Transit Booking Cancellation will be displayed. Vessel Agent Code
The Agent Code of this Transit Booking Cancellation will be displayed.
Booking Id The Booking Id of this Transit Booking Cancellation will be displayed.
Transit Direction The Transit Direction of this Transit Booking Cancellation will be displayed.
Booking Date The Booking Date of this Transit Booking Cancellation will be displayed.
ACP Approving Official
The ACP official who approves/rejects this Transit Booking Cancellation will be displayed.
User Manual for EDCS User Admin March 2007
CrimsonLogic Contents & Release Notice: Page 150 of 220
7.4 Print
Menu 1. Click on Booked Transits – Transit Booking Cancel - View from the menu.
Print single Transit Booking Cancellation
Fig 7.9 – Search the target record 2. Locate the target Transit Booking Cancellation record. 3. Click on the transaction no hyperlink of the record.
Fig 7.10 – Detail form of Transit Booking Cancellation 4. The detail of Transit Booking Cancellation would be displayed
in view mode. 5. Click on ‘Print’ button, an official form is generated and
popped up.
User Manual for EDCS User Admin March 2007
CrimsonLogic Contents & Release Notice: Page 151 of 220
Fig 7.11– official form for Transit Booking Cancellation
Print multiple Transit Booking Cancellation in batch
6. Select at least one Transit Booking Cancellation in the listing table.
Fig 7.12 – Check multiple Transit Booking Cancellation records 7. Click on ‘Print’ hyperlink and a set of Transit Booking
Cancellation official forms is generated and displayed in a popped up window.
User Manual for EDCS User Admin March 2007
CrimsonLogic Contents & Release Notice: Page 152 of 220
Fig 7.13 – A set of Transit Booking Cancellation official forms
User Manual for EDCS User Admin March 2007
CrimsonLogic Contents & Release Notice: Page 153 of 220
8 Request for Same Day Transit (SDT)
8.1 Create
Menu Click on Booked Transits – Same Day Transit – Create from the menu.
Transit Selection Screen
Figure 8.1 – Transit Selection Screen
Search Results Transaction No. The Transaction No. for the transit will be displayed. Visit No. The Visit No. for the transit will be displayed. Booking ID The booking ID for the transit will be displayed. Vessel SIN The Vessel SIN for the Visit No. will be displayed. Vessel Name The Vessel Name for the Visit No. will be displayed. Booking Date The booking date of the transit will be displayed in dd/mm/yyyy
format. Transit Direction The direction of the transit, either Northbound or Southbound will
be displayed. Search Criteria Visit No. Enter the Visit No. to search. Vessel SIN Enter the Vessel SIN to search. Booking ID Enter the Booking ID to search. Vessel Name Enter the Vessel Name to search. Click on the Search button
If a match is found, the results will be displayed in the same screen, else No Record Found will be shown
Click on the hyperlink of a Transaction No.
The Same Day Transit Details will be shown as follows to allow the user to enter the Agent Name.
User Manual for EDCS User Admin March 2007
CrimsonLogic Contents & Release Notice: Page 154 of 220
Same Day Transit Details
Figure 8.2 – Same Day Transit Details
Transaction Information
Transaction No. The Transaction No. for this newly created Same Day Transit. Flow Status The Flow Status of this Same Day Transit. It will be shown as NEW
for creation of Same Day Transits. Vessel Information
Vessel SIN The Vessel SIN will be displayed. Vessel Name The Vessel Name will be displayed. Visit Information
Visit No. The Visit No. will be displayed. Booking Id The Booking Id will be displayed. Booking Date The Booking Date in dd/mm/yyyy format will be displayed. Agent Code The Agent Code will be displayed. Request Option Same Day Transit will be displayed as the Request Option. Transit Direction The Transit Direction will be displayed. Either Northbound or
Southbound. Booking Retention Date
The Booking Retention Date in dd/mm/yyyy hhmm format will be displayed. This is the current date time of creating this Same Day Transit.
Agent Name Enter the Agent Name for this Same Day Transit Request. Click on the Submit button
The following confirmation dialog will be displayed.
Figure 8.3 – Confirmation Dialog The user then clicks on the OK button. This will display the following security dialog:
User Manual for EDCS User Admin March 2007
CrimsonLogic Contents & Release Notice: Page 155 of 220
Figure 8.4 – Security Dialog Click on Yes button to proceed and the following dialog will be shown to prompt for the token password:
Figure 8.5 – Token Password Dialog If an invalid password is entered, the following dialog will be shown:
Figure 8.6 – Wrong Password Dialog Ensure that your digital token is inserted into your computer correctly. After that, enter the password and click on the Ok button to digitally sign the submission. When this is successfully completed, the following submission confirmation page will be displayed:
User Manual for EDCS User Admin March 2007
CrimsonLogic Contents & Release Notice: Page 156 of 220
Figure 8.7 – Submit Confirmation Page Click on the OK button to return to the table listing as shown in Figure 8.1
Click on the Back button
This will bring the user back to the table listing of the transit bookings as shown in Figure 8.1
User Manual for EDCS User Admin March 2007
CrimsonLogic Contents & Release Notice: Page 157 of 220
8.2 Search
Menu Click on Booked Transits – Same Day Transit – Search from the menu.
Search Listing Screen
The list of Same Day Transit transactions will be listed as shown:
Figure 8.8 – Search Listing Screen
Search Results Transaction No. The Transaction No. of the Same Day Transit will be displayed. Visit No. The Visit No. of the Same Day Transit will be displayed. Booking ID The Booking ID of the Same Day Transit will be displayed. Vessel SIN The Vessel SIN of the Same Day Transit will be displayed. Vessel Name The Vessel Name of the Same Day Transit will be displayed. Booking Date The Booking Date of the Transit Booking will be displayed in
dd/mm/yyyy format. Transit Direction The Transit Direction will be displayed. Either Northbound or
Southbound. Flow Status The Flow Status of the Same Day Transit will be displayed.
Possible Flow Status reflected here includes: SUBMITTED – The Same Day Transit is submitted but pending approval by ACP Representative. APPROVED – The Same Day Transit is approved. REJECTED – The Same Day Transit is rejected. CANCELLED – The Same Day Transit is cancelled due to cancellation of the Transit Booking itself.
Agent Name The Agent Name for this Same Day Transit will be displayed. ACP Approving Official
The Name of the ACP Official processing this Same Day Transit will be displayed.
Search Criteria Transaction No. Enter the Transaction No. to search. Visit No. Enter the Visit No. to search. Vessel SIN Enter the Vessel SIN to search. Booking ID Enter the Booking ID to search. Click on the Search button
If a match is found, the results will be displayed in the same screen, else No Record Found will be shown.
User Manual for EDCS User Admin March 2007
CrimsonLogic Contents & Release Notice: Page 158 of 220
Click on the hyperlink of an Agent Name
This is to verify the digital signature of the Agent Name and popup the following window showing the verification result:
Figure 8.9 – Verification Result Window If the verification is not successful, the Result will show the verification error instead.
Click on the hyperlink of an ACP Approving Official
This is to verify the digital signature of the ACP Approving Official and popup a window showing the verification result, which is similar to the one shown in Figure 8.9. If the verification is not successful, the Result will show verification error instead.
Select record(s) and click on the Print hyperlink
Select the records to be printed and click on the Print hyperlink. The following window will be shown with the formatted Same Day Transit form(s) details:
Figure 8.10 – Print Window To print the formatted Same Day Transit form to the printer,
User Manual for EDCS User Admin March 2007
CrimsonLogic Contents & Release Notice: Page 159 of 220
select from the menu, File – Print… and click on the Print button. Click on the hyperlink of a Transaction No.
The Same Day Transit Details will be shown as in Figure 8.11. All the fields are the same as mentioned in Section 8.1 above.
Same Day Transit Details
Figure 8.11 – Same Day Transit Details
Click on the Print button
The following window will be shown with the formatted Same Day Transit form details:
Figure 8.12 – Print Window To print the formatted Same Day Transit form to the printer, select from the menu, File – Print… and click on the Print button.
Click on the Back button
This will bring the user back to the Same Day Transit Listing as shown in Figure 8.8.
User Manual for EDCS User Admin March 2007
CrimsonLogic Contents & Release Notice: Page 160 of 220
9 Daylight Transit (DLT)
9.1 Create
Menu Click on Booked Transits – Daylight Transit - Create from the menu.
Visit Selection Screen
Figure 9.1 – Visit Selection Screen
Search Results Transaction No The Transaction No of approved Transit Booking will be
displayed. Visit No. The Visit No. that the user has will be displayed. Booking Id The Booking Id of approved Transit Booking will be displayed. Vessel SIN The Vessel SIN of approved Transit Booking will be displayed. Vessel Name The Vessel Name of approved Transit Booking will be displayed. Booking Date The Booking Date of approved Transit Booking will be displayed
in dd/mm/yyyy hh:mm format. Transit Direction The Transit Direction of the movement will be displayed. Search Criteria Transaction No Enter the Transaction No of the approved Transit Booking to
search. Booking Id Enter the Booking Id of the approved Transit Booking to search. Visit No. Enter the Visit No. to search, which type is Numeric (7). Vessel Name Enter the Vessel Name to search, which type is Alphanumeric
(50). Vessel SIN Enter the Vessel SIN to search, which type is Numeric (7). Booking Date Enter the Booking Date to search, which type is Numeric (7). Click on the Search button
If a match is found, the results will be displayed in the same screen, else No Record Found will be shown
Click on the hyperlink of a Transaction No.
The Daylight Transit Details will be shown as follows to allow you to enter details of the Transit Booking Request.
User Manual for EDCS User Admin March 2007
CrimsonLogic Contents & Release Notice: Page 161 of 220
Daylight Transit Form
Figure 9.2 – Daylight Transit Detail
Details
Transaction No The Transaction No of this Daylight Transit will be generated and displayed.
Flow Status The Flow Status of this Daylight Transit will be generated and displayed.
Vessel SIN The Vessel SIN retrieved from ETA will be displayed. Vessel Name The Vessel Name retrieved from ETA will be displayed. Visit No. The Visit No. of this transit booking will be displayed. Booking Id The Booking Id of this Daylight Transit will be displayed. Booking Date The Booking Date of this Daylight Transit will be displayed. Agent Representative
The default value would be the login user name. And user also can change to other agent.
ACP Approving Official
The ACP official who processes this Daylight Transit will be displayed.
Rejection Reason The Rejection Reason, if provided by ACP official, will be displayed.
Daylight Transit Request Date
The Date time of submitting the Daylight Transit request will be displayed.
Daylight Transit Cancellation Date
The Date time of submitting the Daylight Transit Cancellation will be displayed.
Request Option The Request Option, which indicates the job is Daylight Transit, or Daylight Transit Cancellation, will be displayed.
Agent Code The Agent Code retrieved from ETA will be displayed. Transit Direction The Transit Direction of this Daylight Transit will be displayed. Daylight Transit Cancellation Fee
The Daylight Transit Cancellation Fee would be assigned and displayed, once the Daylight Transit Cancellation has been approved by ACP.
User Manual for EDCS User Admin March 2007
CrimsonLogic Contents & Release Notice: Page 162 of 220
9.2 Sign And Submit
Menu 1. Click on Booked Transits – Daylight Transit - Create from the menu.
Submit a new created Daylight Transit
2. Enter all necessary Daylight Transit information (Refer to 9.1 Create).
Fig 9.3 – Sign And Submit button in creating page 3. Click on the Sign And Submit button to active submit request.
Syntax checking before submit successfully
Fig 9.4 – Popped up error message returned from syntax checking 4. If any error detected in mandatory, data type or data size
checking, a window would be popped up to list all syntax errors.
Business Rule checking before submit successfully
Fig 9.5 – Popped up business rule error message 5. Click on the error name, the tab that contains the error field
would be activated.
Digital signing on Daylight Transit information
6. If it is the first time for the browser to sign a document, a security warning will be popped up.
User Manual for EDCS User Admin March 2007
CrimsonLogic Contents & Release Notice: Page 163 of 220
Fig 9.6 – Security warning message 7. Click on ‘Yes’ button and a dialog is popped up for entering
personal password.
Fig 9.7 – Dialog for entering password 8. Enter password, and click ‘Ok’ button.
Display confirmation page
Fig 9.8 – Submit confirmation page 9. A confirmation page will be displayed once a Daylight Transit is
submitted successfully.
User Manual for EDCS User Admin March 2007
CrimsonLogic Contents & Release Notice: Page 164 of 220
9.3 Search
Menu Click on Booked Transits – Daylight Transit – Search from the menu.
Search Listing Screen
The list of Daylight Transit transactions will be listed as shown:
Figure 9.9 – Search Listing Screen
Search Results Transaction No. The Transaction No. of the created Daylight Transit or Daylight
Transit Cancellation will be displayed.
Visit No. The Visit No. of the Daylight Transit or Daylight Transit Cancellation will be displayed.
Booking Id The Booking Id of the Daylight Transit or Daylight Transit Cancellation will be.
Vessel SIN The Vessel SIN for the Daylight Transit or Daylight Transit Cancellation will be displayed.
Vessel Name The Vessel Name for Daylight Transit or Daylight Transit Cancellation will be displayed.
Request Option The Request Option, which indicate it is Daylight Transit, or Daylight Transit Cancellation, will be displayed.
Agent Representative
The Agent Representative for the Daylight Transit or Daylight Transit Cancellation will be displayed.
ACP Official The ACP official who approves or rejects this Daylight Transit or Daylight Transit Cancellation will be displayed.
Flow Status The Flow Status of the Daylight Transit will be displayed. Possible Flow Status reflected here includes: SUBMIT PENDING – The Daylight Transit is submitted by agent, but not received by ACP yet. SUBMITTED – The Daylight Transit or Daylight Transit Cancellation is submitted by agent, and has been received by ACP. APPROVED PENDING SIGNING – The Daylight Transit or Daylight Transit Cancellation has been approved, but not signed by ACP.
User Manual for EDCS User Admin March 2007
CrimsonLogic Contents & Release Notice: Page 165 of 220
APPROVED PENDING – The Daylight Transit or Daylight Transit Cancellation has been approved and signed by ACP, but not received by agent. APPROVED – The Daylight Transit or Daylight Transit Cancellation has been approved and signed by ACP, and also received by agent. REJECTED PENDING SIGNING – The Daylight Transit or Daylight Transit Cancellation has been rejected, but not signed by ACP. REJECTED PENDING – The Daylight Transit or Daylight Transit Cancellation has been rejected and signed by ACP, but not received by agent. REJECTED – The Daylight Transit or Daylight Transit Cancellation has been rejected and signed by ACP, and also received by agent. CANCELLED PENDING - The Daylight Transit Cancellation is submitted by agent, but not received by ACP yet. CANCELLED – The Booking Request has been cancelled.
Search Criteria Transaction No. Enter the Transaction No. to search. Visit No. Enter the Visit No. to search. Vessel SIN Enter the Vessel SIN to search. Booking Id Enter the Booking Id to search. Booking Date Enter the Booking Date to search. Flow Status Enter the Flow Status to search. Click on the Search button
If a match is found, the results will be displayed in the same screen, else No Record Found will be shown.
User Manual for EDCS User Admin March 2007
CrimsonLogic Contents & Release Notice: Page 166 of 220
9.4 Cancel
Menu 1. Click on Booked Transits – Daylight Transit – Search from the menu.
Enter the detail form of an approved Daylight Transit in view mode
Fig 9.10 – Search the target approved Daylight Transit 2. Locate the target approved Daylight Transit. 3. Click on the transaction no hyperlink of the record.
Fig 9.11 – Detail form of Daylight Transit 4. The detail of Daylight Transit would be displayed in view mode.
User Manual for EDCS User Admin March 2007
CrimsonLogic Contents & Release Notice: Page 167 of 220
Business Rule validation
Fig 9.12 – Error message for business rule validation 5. If any error message for business rule validation detected, a
window will be popped up to list the messages.
Cancel approved Daylight Transit
6. Click on ‘Cancel’ button to invoke digital signing and canceling. If it is the first time for the browser to sign, a security warning dialog will be popped up
Fig 9.13 – Security warning message 7. Click on ‘Yes’ button and a dialog is popped up for entering
personal password.
Fig 9.14 – Dialog for entering password 8. Enter password, and click ‘Ok’ button.
User Manual for EDCS User Admin March 2007
CrimsonLogic Contents & Release Notice: Page 168 of 220
Display signing confirmation page
Fig 9.15– Cancel confirmation page 9. A confirmation page will be displayed once a Daylight Transit
Cancellation is signed and submitted successfully.
User Manual for EDCS User Admin March 2007
CrimsonLogic Contents & Release Notice: Page 169 of 220
9.5 Print
Menu 1. Click on Booked Transits – Daylight Transit – Search from the menu.
Print single Daylight Transit or Daylight Transit Cancellation
Fig 9.16 – Search the target record 2. Locate the target Daylight Transit or Daylight Transit
Cancellation. 3. Click on the transaction no hyperlink of the record.
Fig 9.17 – Detail form of Daylight Transit 4. The detail of Daylight Transit or Daylight Transit Cancellation
would be displayed in view mode. 5. Click on ‘Print’ button, an official form is generated and
popped up.
User Manual for EDCS User Admin March 2007
CrimsonLogic Contents & Release Notice: Page 170 of 220
Fig 9.18– official form for Daylight Transit
Fig 9.19– official form for Daylight Transit Cancellation
Print multiple Daylight Transit or Daylight Transit Cancellation in batch
6. Select at least one record in the Daylight Transit or Daylight Transit Cancellation listing table.
User Manual for EDCS User Admin March 2007
CrimsonLogic Contents & Release Notice: Page 171 of 220
Fig 9.20 – Check multiple Daylight Transit or Daylight Transit Cancellation records 7. Click on ‘Print’ hyperlink and a set of Daylight Transit or
Daylight Transit Cancellation official forms is generated and displayed in a popped up window.
Fig 9.21 – A set of Daylight Transit or Daylight Transit Cancellation official forms
User Manual for EDCS User Admin March 2007
CrimsonLogic Contents & Release Notice: Page 172 of 220
10 Cargo Declaration (CAD)
10.1 Create
Menu Click on Cargo Declaration – Create from the menu. Visit/Movement Selection Screen
Figure 10.1 – Visit & Movement Selection Screen
Search Results ETA Transaction No.
The transaction no of the Estimated time of arrival
Visit No. The Visit No. provided by ACP Internal Movement Sequence
The Internal movement sequence number provided by ACP for each movement within the canal
Vessel Name The Vessel Name IMO number International Maritime Organization Number IMO No The IMO No. of the vessel if any will be displayed. ETA The Estimated Time of Arrival in dd/mm/yyyy hh :mm format will
be displayed. Customer Code The Customer Code associated with the visit will be displayed. Vessel Agent Code
The Agent Name associated with the visit will be displayed.
Search Criteria Visit No. Enter the Visit No. to search. Internal Movement Sequence
Enter Internal Movement Sequence
Vessel SIN Enter the Vessel SIN to search. Estimated Time Of Arrival Enter the ETA in dd/mm/yyyy format or click on the icon to
select from the popup calendar.
Click on the Search button
If a match is found, the results will be displayed in the same screen, else No Record Found will be shown
User Manual for EDCS User Admin March 2007
CrimsonLogic Contents & Release Notice: Page 173 of 220
Fig 10.2 - No Records in search result
Click on the hyperlink of a Visit No)
Since the Cargo Declaration is tied to visit (see circled) and the Internal Movements (see square), select the correct combination
Fig 10.3 - Selection of Visit & Movement
Cargo Declaration Details – Header Tab – Vessel Visit Information
The header – vessel & Visit Information will have pre filled values retrieved from the Visit/movement selected. None of the fields in this section are editable.
User Manual for EDCS User Admin March 2007
CrimsonLogic Contents & Release Notice: Page 174 of 220
Fig 10.4 – Header Tab – Vessel and Visit Information
Visit No Visit number Internal Movement Sequence
Internal movement sequence assigned by ACP
Sequence No Movement Sequence generated by ETA module for each movement
Vessel Sin SIN (Ship Identification Number) -Official and unique number assigned to the vessel
Vessel's Name Official Actual Name of the Vessel IMO Number International Maritime Organization Number Estimated Time of Arrival
Estimated Time of arrival to the Panama canal
Vessel Agent Account Code provide for Vessel Agent Customer Code Account Code provide for Customer If need to reselect the visit or movement for which the cargo is
declared, click on button in the vessel and Visit information section. This will open up a popup window displaying the available visits and movement’s .Select the new visit radio button and click Ok. This will close the popup window and populate the new visit/movement information in the vessel visit information of the header screen. You may choose to use the search options to filter the records
User Manual for EDCS User Admin March 2007
CrimsonLogic Contents & Release Notice: Page 175 of 220
Fig 10.5 – Popup Window for Reselect of visit
Cargo Declaration Details – Header Tab – Complimentary Vessel Information
Fig 10.6 - Header Tab – Complimentary Vessel Information
Service Code Any particular code for the Service the vessel provides Service Name The defined, regular pattern of calls made by a carrier in the
pick-up and discharge of cargo Voyage No. Reference number assigned by the carrier or his agent to the
vessel Voyage Type Type of voyage for this transit (use the drop down list) Other Voyage Type
If “Others” selected in the Voyage Type, specify here.
Alliance Strategic agreement among shipping lines Carrier Any person or entity who, in a contract of carriage, undertakes
to perform or to procure the performance of carriage Major Cargo Type
To select from a predefined list of cargo type codes, click on the
icon. Carriying General or
Select Yes - if the vessel has general or Containeried carg, else No
User Manual for EDCS User Admin March 2007
CrimsonLogic Contents & Release Notice: Page 176 of 220
Containerized Cargo Empty Tank ? If Vessel is an empty tank choose Yes ,else No Cargo Declaration Details – Header Tab – Cargo Information
Fig 10.7 - – Header Tab – Cargo Information
Major deck Cargo Type
To select from a predefined list of cargo type codes, click on the
icon. Deck Cargo Remarks
Remarks on the deck cargo.
Explosives or Dangerous Cargo in Bulk On Board
Select Yes - if Explosives or Dangerous Cargo in Bulk On Board else No
Dangerous Cargo in Packs on Board
Select Yes - if Dangerous Cargo in Packs on Board On Board else No
Cargo /Container Details
Click On General Cargo orContainer Details Tab to enter cargo Details
Fig 10.8 – To switch to Cargo Details Tab
User Manual for EDCS User Admin March 2007
CrimsonLogic Contents & Release Notice: Page 177 of 220
Fig 10.9 – General Cargo List Screen
Fig 10.10 – Containerized Cargo List Screen The details of cargo carried by the vessel can be entered in this page. Each individual item details can be entered by click of the S/N. (Note: To activate the individual details of a particular item at least one field for that item should be entered)
Fig 10.11 –General Cargo Details Link
User Manual for EDCS User Admin March 2007
CrimsonLogic Contents & Release Notice: Page 178 of 220
On Click of the link the following page appears for more details of that particular item .The entries from the previous screen are retained
Fig 10.12 – General Cargo Item Details Screen If you have already entered more than one item in the List screen use the Next button to go the next item details screen or previous button to go the previous item details screen . If there are no previous or next items then on click of the Next or Previous button the current item itself is show . Use the Back button to return to the List Screen
Fig 10.13 –Navigation to next /previous item or the list page The same features for Containerized Cargo Details, but with other fields must be entered.
Fig 10.14 – Containerized Cargo Details Link
User Manual for EDCS User Admin March 2007
CrimsonLogic Contents & Release Notice: Page 179 of 220
Fig 10.15 – Containerized Cargo Item Details Screen If there are more than 5 items to be entered return to the Cargo /Container List Screen and enter the number of additional items and click on the Add More Items button . Additional blank rows will be created in the next List Page.
Fig 10.16 –Add more Items to the list To navigate across cargo /container list pages use the following page navigators provided on top and bottom of the list.
Fig 10.16 –Page navigator
Container ID Enter the numeric Container Identifier Container Size Select the value from the list Container Size Type
Select the value from the list
Container Type Select the value from the list Container Weight(MT)
Enter container weight in Metric Tones
Container Location
Enter the Container Location .Should be of exactly format xx-xx-xx where x is a numeric value
Container Deck Location
Select the value from the list
Cargo Port Of Origin Code To select from a predefined list of port codes, click on the
icon .On Select of the code the Cargo Port Of Origin Description, Cargo Country Of Origin are auto populated
Cargo Port Of Origin Description
This field cannot be edited ,use the icon in the Cargo Port Of Origin field to fill in these values
Cargo Country Of Origin This field cannot be edited ,use the icon in the Cargo Port
Of Origin field to fill in these values Harmonized Code
To select from a predefined list of Harmonized codes, click on
the icon. Harmonized Description This field cannot be edited ,use the icon in the Harmonized
Code field to fill in these values
User Manual for EDCS User Admin March 2007
CrimsonLogic Contents & Release Notice: Page 180 of 220
Cargo Quantity in( MT)
Enter Cargo Quantity in Metric Tones
Cargo Volume in (CM)
Enter Cargo volume in Cubic meters
Discharge Cargo Quantity (MT)
Discharge Cargo Quantity in Metric Tones to port of destination
Cargo Port Of Destination Code
To select from a predefined list of port codes, click on the icon .On Select of the code the Cargo Port Of Destination Description, Cargo Country Of Destination are auto populated
Cargo Port Of Destination Description
This field cannot be edited ,use the icon in the Cargo Port Of Destination field to fill in these values
Cargo Country Of Destination This field cannot be edited ,use the icon in the Cargo Port
Of Destination field to fill in these values Empty Container Tab
Click On Empty Container Tab to Enter the empty container Information. Note there are no hyperlinks for S/N of individual items in the list .
Fig 10.15 Empty Container List Screen
Deck Location Select the value from the list Type Select the value from the list Size Select the value from the list Size Type Select the value from the list Qty Of Empty Containers
Enter the quantity of empty container only numeric integers
Empty Container Weight(MT)
Empty Container Weight in Metric Tons
Dangerous Cargo Tab
Click On Dangerous Cargo Tab to Enter the dangerous Cargo Information.
User Manual for EDCS User Admin March 2007
CrimsonLogic Contents & Release Notice: Page 181 of 220
Fig 10.16 Dangerous Cargo List Screen Each individual item details can be entered by click of the S/N. (Note: To activate the individual details of a particular item at least one field for that item should be entered)
Fig 10.17 Dangerous Cargo Details Link On Click of the link the following page appears for more details of that particular item .The entries from the previous screen are retained
User Manual for EDCS User Admin March 2007
CrimsonLogic Contents & Release Notice: Page 182 of 220
Fig 10.18 Dangerous Cargo Individual Item Details As explained in the Cargo/Containers Details section you can navigate across different items and can add more items from the Dangerous Cargo List Screen
Location/Stowage
Enter Location on Board of dangerous goods .Should be of format xx-xx-xx where x is numeric integer
UN Code Enter Un code for Dangerous goods. To select from a predefined
list of UN codes, click on the icon. Proper shipping Name
Proper shipping name of dangerous goods .This field cannot be
edited ,use the icon in the UN Code field to fill in this values IMO DCG International Maritime Organization (IMO) Division Compatibility
Group. This field cannot be edited ,use the icon in the UN Code field to fill in this values
IMO Class Enter International Maritime Organization (IMO) Class. . To
select from a predefined list of IMO class, click on the icon. IMO Division Enter International Maritime Organization (IMO) Division. To
select from a predefined list of IMO Division, click on the icon.
BC Code Enter Bulk Cargoes Code Flash Point Enter Flash point of dangerous material .This can be a positive or
negative integer Kept In? Dangerous Cargo Kept In Bulk or Packs .Select from the list Cargo Qty (MT) Enter Cargo Quantity in Metric Tones of each Dangerous
Material Port Of Origin Port of Origin Code of the Dangerous Material . To select from a
predefined list of Port Code, click on the icon. Port Of Origin Description
Port of Origin Description of the Dangerous Material. This is non
editable field when clicked on Port Code icon this field is populated.
Country Of Country of Origin of the Dangerous Material. This is non editable
User Manual for EDCS User Admin March 2007
CrimsonLogic Contents & Release Notice: Page 183 of 220
Origin field when clicked on Port Code icon this field is populated. Port Of Destination
Port of Destination Code of the Dangerous Material. To select
from a predefined list of Port Code, click on the icon. Port Of Destination Description
Port of Destination Description of the Dangerous Material. This is
non editable field when clicked on Port Code icon this field is populated.
Country Of Destination
Country of Destination of the Dangerous Material. This is non
editable field when clicked on Port Code icon this field is populated.
Last Cargo Tab Click On Last Cargo Tab to Enter the last cargo Information. Note there are no hyperlinks for S/N of individual items in the list.
Fig 10.19 Last Cargo List Screen
Last Cargo Dangerous Location
Enter Last Cargo Dangerous Location . Should be of format xx-xx-xx where x is numeric integer
UN Code Enter last cargo UN Code for Dangerous Materials. To select
from a predefined list of UN Code, click on the icon. Proper Shipping Name
Proper Shipping Name of the Dangerous Materials. This is non
editable field when clicked on UN Code icon this field is populated.
IMO DCG International Maritime Organization (IMO) Division Compatibility
Group. This field cannot be edited ,use the icon in the UN Code field to fill in this values
IMO Class Enter IMO Class. To select from a predefined list of IMO Class,
click on the icon. IMO Division Enter IMO Division. To select from a predefined list of IMO Class,
User Manual for EDCS User Admin March 2007
CrimsonLogic Contents & Release Notice: Page 184 of 220
click on the icon. When using the icon only those IMO Divisions linked to the IMO Class selected will be displayed.
BC Code Enter the Bulk Cargoes Code Flash Point Enter Flash Point of Last Cargo .Can be a positive or Negative
Integer Inerted ? Select the value from the list Gas Free ? Select the value from the list Safe For Entry and Rework ?
Select the value from the list
Remarks Enter Last Cargo Remark Click on the Save button (on any tab)
This will validate the cargo declaration (all tabs) for the mandatory fields and the syntax of the entered values and save the cargo declaration as a draft. If there are errors encountered, a popup window with the appropriate error messages will be shown. The following is an example:
Fig 10.20 Error Popup Window If no errors are encountered during saving, the following confirmation page will be shown together with the transaction number, visit no. , internal movement sequence number and date/time of saving:
User Manual for EDCS User Admin March 2007
CrimsonLogic Contents & Release Notice: Page 185 of 220
Figure 10.21 – Save Confirmation Page Click on the OK button to return to the Visit selection page as shown in Figure 10.1
Click on the Submit button
This will validate the Cargo Declaration form and submit to ACP. If there are errors encountered, a popup window with the appropriate error messages will be shown. The following is an example:
Figure 10.22 – Cargo Declaration Validation Errors If no errors are encountered during saving, the following confirmation page will be shown together with the transaction number, visit no. , internal movement sequence number and date/time of saving
Figure 10.23 – Submit Confirmation Page Click on the OK button to return to the Visit selection page as shown in Figure 10.1
User Manual for EDCS User Admin March 2007
CrimsonLogic Contents & Release Notice: Page 186 of 220
10.2 Search
Menu Click on Cargo Declaration– Search from the menu.
Fig 10.24 - Cargo Declaration Search from Menu
Search Listing Screen
Figure 10.25 – Search Listing Screen
Search Results Transaction No. The Transaction No. of the Cargo Declaration will be displayed.
Visit No. The Visit No. of the Cargo Declaration will be displayed.
Internal Movement Sequence
The Internal Movement Sequence will be displayed.
Vessel SIN The Vessel SIN for the Visit No. will be displayed.
Vessel Name The Vessel Name will be displayed.
Estimated Time of Arrival
The Estimated Time of Arrival in dd/mm/yyyy hhmm format will be displayed.
Flow Status The Flow Status of the Cargo Declaration will be displayed. Possible Flow Status reflected here includes: DRAFT – The Cargo Declaration is a draft.
User Manual for EDCS User Admin March 2007
CrimsonLogic Contents & Release Notice: Page 187 of 220
PENDING – The Cargo Declaration is submitted to ACP but not yet approved. APPROVED – The Cargo Declaration is approved. REJECTED – The Cargo Declaration is rejected. CANCELLED – The Cargo Declaration is cancelled due to cancellation of the visit or movement itself.
Search Criteria Transaction No. Enter the Transaction No. to search. Visit No. Enter the Visit No. to search. Vessel SIN Enter the Vessel SIN to search. Internal Movement Sequence
Enter the Internal Movement Sequence to search.
Click on the Search button
If a match is found, the results will be displayed in the same screen, else No Record Found will be shown.
Fig 10.26 – Search with no results
Fig 10.27 – Search with results
User Manual for EDCS User Admin March 2007
CrimsonLogic Contents & Release Notice: Page 188 of 220
Delete Hyperlink Select the records to delete and click on the Delete hyperlink.
Fig 10.28 – Delete Cargo Declaration The following delete confirmation dialog box will be shown:
Fig 10.29 – Delete Confirmation Dialog Note that only drafts can be deleted. The following confirmation screen will be displayed when user click on the OK button. Validation errors if any will be shown.
Fig 10.29 – Delete Result Page
Select record(s) and click on the Submit hyperlink
Select the records to be submitted and click on the Submit hyperlink.
User Manual for EDCS User Admin March 2007
CrimsonLogic Contents & Release Notice: Page 189 of 220
Fig 10.30 – Select Records to Submit The following confirmation dialog box will be shown:
Fig 10.30 – Submit Confirmation Dialog Note that only drafts can be submitted. The following confirmation screen will be displayed when user click on the OK button. Validation errors if any will be shown.
Fig 10.31 – Submit Confirmation Screen Click on the OK button to return to the search listing as shown in Fig 10.25
Click on the hyperlink of a Transaction No. in Result (Cargo Declaration in View Mode)
The Cargo Declaration List Details will be shown as follows. Note that the Cargo Declaration is not editable at this moment. All the fields are the same as mentioned in Section 10.1 above. The fields are non editable
User Manual for EDCS User Admin March 2007
CrimsonLogic Contents & Release Notice: Page 190 of 220
Fig 10.32 – Cargo Declaration in View Mode Shown above is the header screen. The rest of the screens can be viewed clicking the respective tabs
Click on the Delete button
The following confirmation dialog box will be shown:
Fig 10.33– Delete Confirmation Dialog Note that the Delete button will only appear if the transaction is a draft. The following confirmation screen will be displayed when user click on the OK button.
Fig 10.34 – Delete Confirmation Screen
User Manual for EDCS User Admin March 2007
CrimsonLogic Contents & Release Notice: Page 191 of 220
Click on the OK button to return to the search listing as shown in Figure 10.25
Click on the Edit button
When the user clicks on Edit button in view mode the fields become non editable as in Fig 10.32 to Fig 10.35
Fig 10.35 – Cargo declaration editable Note when a draft cargo declaration is edited the Transaction number is not changed ,whereas when a approved ,pending or rejected declaration is edited a new Transaction number is created
Click on the Duplicate button
When the user clicks on Duplicate button in view mode all the fields except the vessel and visit information is duplicated
Fig 10.36 – Cargo Declaration Duplicated (Except Vessel & Visit Information ) Use the select button as explained previously in Fig 10.4 to reselect the visit information The user can delete , save or submit information as explained in previous sections or can use back button to go back to the cargo declaration listing page
User Manual for EDCS User Admin March 2007
CrimsonLogic Contents & Release Notice: Page 192 of 220
11 Crew List (CRL)
11.1 Create
Menu Click on Crew List – Create from the menu. Visit Selection Screen
Figure 11.1 – Visit Selection Screen
Search Results Visit No. The Visit No. that the user has will be displayed. Vessel SIN The Vessel SIN for the Visit No. will be displayed. Vessel Name The Vessel Name for the Visit No. will be displayed. Arrival Port The Arrival Port for that Visit No. will be displayed. Flag The Flag of the vessel for that Visit No. will be displayed. IMO No The IMO No. of the vessel if any will be displayed. ETA The Estimated Time of Arrival in dd/mm/yyyy hhmm format will
be displayed. Customer Code The Customer Code associated with the visit will be displayed. Agent Name The Agent Name associated with the visit will be displayed. Search Criteria Visit No. Enter the Visit No. to search. Vessel Name Enter the Vessel Name to search. Vessel SIN Enter the Vessel SIN to search. Click on the Search button
If a match is found, the results will be displayed in the same screen, else No Record Found will be shown
Click on the hyperlink of a Visit No.
The Crew List Details will be shown as follows to allow you to enter details of the Crew List.
User Manual for EDCS User Admin March 2007
CrimsonLogic Contents & Release Notice: Page 193 of 220
Crew List Details – Header Tab
Figure 11.2 – Crew List Details (Header Tab)
Header Tab details
Visit No. The Visit No. will be displayed. Vessel SIN The Vessel SIN will be displayed. IMO No The IMO No. will be displayed. Flag The Flag will be displayed. ETA The ETA will be displayed in dd/mm/yyyy hhmm format. Vessel Name The Vessel Name will be displayed. Arrival Port The Arrival Port will be displayed. Rejection Reason The Rejection Reason will be displayed. To reselect the visit, click on the Reselect visit… button
The following window will appear to allow the user to re-select the visit to create the Crew List for:
Figure 11.3 – Reselection of Visit The fields here are similar to what have been described above. Click on the OK button after selecting a visit. This will return the screen to the Crew List Details as in Figure 11.2
User Manual for EDCS User Admin March 2007
CrimsonLogic Contents & Release Notice: Page 194 of 220
Click on the Crew Information Tab to display the following
screen. Enter details of the crew information. Crew List Details – Crew Information Tab
Figure 11.4 – Crew List Details (Crew Information Tab)
Crew Information Tab Details
Last Name Enter Last Name of crew. First Name Enter First Name of crew. Capacity Enter Capacity code of the crew. To select from a predefined
list of capacity codes, click on the icon. Birthplace Enter Birthplace code of the crew. To select from a predefined
list of birthplace codes, click on the icon. Birthday Enter the Birthday of the crew in dd/mm/yyyy format or click on
the icon to select a date from the popup calendar. Note that the birthday must be earlier that the current date.
Nationality Enter Nationality code of the crew. To select from a predefined
list of nationality codes, click on the icon. ID Type Enter the identification type by selecting from the drop-down list. ID Enter the identification number of the crew. Add More Row(s) To add more rows for more crew members, enter a numeric
number and click on the Add More Row(s) button. Click on the S/N hyperlink next to a crew
The details of the crew will be shown as follows:
User Manual for EDCS User Admin March 2007
CrimsonLogic Contents & Release Notice: Page 195 of 220
Crew Details Page
Figure 11.5 – Crew Details Page
Crew Information
Last Name Enter Last Name of crew. Second Last Name
Enter Second Last Name of crew.
First Name Enter First Name of crew. Middle Name Enter Middle Name of crew. Capacity Enter Capacity code of the crew. To select from a predefined
list of capacity codes, click on the icon. Birthplace Enter Birthplace code of the crew. To select from a predefined
list of birthplace codes, click on the icon. Birthday Enter the Birthday of the crew in dd/mm/yyyy format or click on
the icon to select a date from the popup calendar. Note that the birthday must be earlier that the current date.
Nationality Enter Nationality code of the crew. To select from a predefined
list of nationality codes, click on the icon. ID Enter the identification number of the crew. ID Type Enter the identification type by selecting from the drop-down list. Port of Embarking
Enter the Port of Embarking code. To select from a predefined
list of port codes, click on the icon. Date of Enter the Date of Embarking in dd/mm/yyyy format or click on
User Manual for EDCS User Admin March 2007
CrimsonLogic Contents & Release Notice: Page 196 of 220
Embarking the icon to select from the popup calendar.
Port of Disembarking
Enter the Port of Disembarking code. To select from a
predefined list of port codes, click on the icon. Date of Disembarking
Enter the Date of Disembarking in dd/mm/yyyy format or click
on the icon to select from the popup calendar. Crew Disposition Enter the Crew Disposition by selecting from the drop-down list. Exclusion Reason Enter the exclusion reason. Local Activity
Port of Embarking
Enter the Port of local Embarking code. To select from a
predefined list of port codes, click on the icon. Date of Embarking
Enter the Date of local Embarking in dd/mm/yyyy format or click
on the icon to select from the popup calendar.
Port of Disembarking
Enter the Port of local Disembarking code. To select from a
predefined list of port codes, click on the icon. Date of Disembarking
Enter the Date of local Disembarking in dd/mm/yyyy format or
click on the icon to select from the popup calendar.
Add More Row(s) To add more rows for more local activity, enter a numeric number and click on the Add More Row(s) button.
Click on the Next button
This will show the details page of the next crew member entered in the table in Figure 11.4.
Click on the Previous button
This will show the details page of the previous crew member entered in the table in Figure 11.4.
Click on the Back button
This will bring the user back to the table listing of the crew members as shown here once again:
Figure 11.6 – Crew List Details (Crew Information Tab)
Click on the Save button
This will validate the form and save the Crew List as a draft. If there are errors encountered, a popup window with the appropriate error messages will be shown. The following is an
User Manual for EDCS User Admin March 2007
CrimsonLogic Contents & Release Notice: Page 197 of 220
example:
Figure 11.7 – Crew List Validation Errors If no errors are encountered during saving, the following confirmation page will be shown together with the transaction number, visit no. and date/time of saving:
Figure 11.8 – Save Confirmation Page Click on the OK button to return to the Visit selection page as shown in Figure 11.1
Click on the Submit button
This will validate the Crew List form and submit to ACP. If there are errors encountered, a popup window with the appropriate error messages will be shown. The following is an example:
User Manual for EDCS User Admin March 2007
CrimsonLogic Contents & Release Notice: Page 198 of 220
Figure 11.9 – Crew List Validation Errors If no errors are encountered during submit, the following confirmation page will be shown together with the transaction number, visit no. and date/time of submission:
Figure 11.10 – Submit Confirmation Page Click on the OK button to return to the Visit selection page as shown in Figure 11.1
User Manual for EDCS User Admin March 2007
CrimsonLogic Contents & Release Notice: Page 199 of 220
11.2 Search
Menu Click on Crew List – Search from the menu. Search Listing Screen
The list of Crew List transactions will be listed as shown:
Figure 11.11 – Search Listing Screen
Search Results Transaction No. The Transaction No. of the Crew List will be displayed.
Visit No. The Visit No. of the Crew List will be displayed.
Vessel SIN The Vessel SIN for the Visit No. will be displayed.
Vessel Name The Vessel Name for the Visit No. will be displayed.
Arrival Port The Arrival Port for that Visit No. will be displayed.
ETA The Estimated Time of Arrival in dd/mm/yyyy hhmm format will
be displayed. Flow Status The Flow Status of the Crew List will be displayed.
Possible Flow Status reflected here includes: DRAFT – The Crew List is a draft. SUMITTED – The Crew List is submitted to ACP but not yet approved. APPROVED – The Crew List is approved. REJECTED – The Crew List is rejected. CANCELLED – The Crew List is cancelled due to cancellation of the visit itself.
Search Criteria Transaction No. Enter the Transaction No. to search. Visit No. Enter the Visit No. to search. Vessel SIN Enter the Vessel SIN to search. Vessel Name Enter the Vessel Name to search. Click on the Search button
If a match is found, the results will be displayed in the same screen, else No Record Found will be shown.
Select record(s) and click on the Delete hyperlink
Select the records to delete and click on the Delete hyperlink. The following delete confirmation dialog box will be shown:
User Manual for EDCS User Admin March 2007
CrimsonLogic Contents & Release Notice: Page 200 of 220
Figure 11.12 – Delete Confirmation Dialog Note that only drafts can be deleted. The following confirmation screen will be displayed when user click on the OK button. Validation errors if any will be shown.
Figure 11.13 – Delete Confirmation Screen Click on the OK button to return to the search listing as shown in Figure 11.11
Select record(s) and click on the Submit hyperlink
Select the records to be submitted and click on the Submit hyperlink. The following confirmation dialog box will be shown:
Figure 11.14 – Submit Confirmation Dialog Note that only drafts can be submitted. The following confirmation screen will be displayed when user click on the OK button. Validation errors if any will be shown.
User Manual for EDCS User Admin March 2007
CrimsonLogic Contents & Release Notice: Page 201 of 220
Figure 11.15 – Submit Confirmation Screen Click on the OK button to return to the search listing as shown in Figure 11.11
Click on the hyperlink of a Transaction No.
The Crew List Details will be shown as follows. Note that the Crew List is not editable at this moment. All the fields are the same as mentioned in Section 11.1 above.
Crew List Details – Header Tab
Figure 11.16 – Crew List Details (Header Tab)
Crew List Details – Crew Information Tab
Figure 11.17 – Crew List Details (Crew Information Tab)
Click on the Delete button
The following confirmation dialog box will be shown:
User Manual for EDCS User Admin March 2007
CrimsonLogic Contents & Release Notice: Page 202 of 220
Figure 11.18 – Delete Confirmation Dialog Note that the Delete button will only appear if the transaction is a draft. The following confirmation screen will be displayed when user click on the OK button.
Figure 11.19 – Delete Confirmation Screen Click on the OK button to return to the search listing as shown in Figure 11.11
Click on the Edit button
The Crew Information tab becomes editable for the user to change the crew information as shown here:
Figure 11.20 – Crew List Details (Crew Information Tab) The user edits the information in the crew list details and then either save it as a draft by clicking the Save button or click on the Submit button to submit the Crew List to ACP. The validation and confirmation screens and dialogs displayed
User Manual for EDCS User Admin March 2007
CrimsonLogic Contents & Release Notice: Page 203 of 220
will be similar to those described in Section 11.1. To return to the Crew List Search Listing page, click on the Back button.
Click on the Duplicate button
The Crew Information tab becomes editable for the user to change the crew information as shown here:
Figure 11.21 – Crew List Details (Crew Information Tab) In addition, the Reselect Visit… button in the Header tab will be enabled for the user to select a visit for this duplicated crew list. The following is a sample screen:
Figure 11.22 – Crew List Details (Header Tab) The user can click on the Reselect Visit… button to select a visit for this Crew List. The same procedure applies as described in Section 11.1. The user then edits the crew list details in the Crew Information tab if necessary and then either save it as a draft by clicking the Save button or click on the Submit button to submit the Crew List to ACP. The validation and confirmation screens and dialogs displayed will be similar to those described in Section 11.1.
User Manual for EDCS User Admin March 2007
CrimsonLogic Contents & Release Notice: Page 204 of 220
To return to the Crew List Search Listing page, click on the Back button.
Click on the Submit button
The following confirmation dialog box will be shown:
Figure 11.23 – Submit Confirmation Dialog Note that the Submit button will only appear if the transaction is a draft. Click on the OK button. This will validate the Crew List form and submit to ACP. If there are errors encountered, a popup window with the appropriate error messages will be shown. The following is an example:
Figure 11.24 – Crew List Validation Errors If no errors are encountered during submit, the following confirmation page will be shown together with the transaction number, visit no. and date/time of submission:
User Manual for EDCS User Admin March 2007
CrimsonLogic Contents & Release Notice: Page 205 of 220
Figure 11.25 – Submit Confirmation Page Click on the OK button to return to the Crew List Search Listing page as shown in Figure 11.11
Click on the Back button
This will bring the user back to the Crew List Search Listing as shown in Figure 11.11
User Manual for EDCS User Admin March 2007
CrimsonLogic Contents & Release Notice: Page 206 of 220
12 Passenger List (PGL)
12.1 Create
Menu Click on Passenger List – Create from the menu. Visit Selection Screen
Figure 12.1 – Visit Selection Screen
Search Results Visit No. The Visit No. that the user has will be displayed. Vessel SIN The Vessel SIN for the Visit No. will be displayed. Vessel Name The Vessel Name for the Visit No. will be displayed. Arrival Port The Arrival Port for that Visit No. will be displayed. Flag The Flag of the vessel for that Visit No. will be displayed. IMO No The IMO No. of the vessel if any will be displayed. ETA The Estimated Time of Arrival in dd/mm/yyyy hhmm format will
be displayed. Customer Code The Customer Code associated with the visit will be displayed. Agent Name The Agent Name associated with the visit will be displayed. Search Criteria Visit No. Enter the Visit No. to search. Vessel Name Enter the Vessel Name to search. Vessel SIN Enter the Vessel SIN to search. Click on the Search button
If a match is found, the results will be displayed in the same screen, else No Record Found will be shown
Click on the hyperlink of a Visit No.
The Passenger List Details will be shown as follows to allow you to enter details of the Passenger List.
User Manual for EDCS User Admin March 2007
CrimsonLogic Contents & Release Notice: Page 207 of 220
Passenger List Details – Header Tab
Figure 12.2 – Passenger List Details (Header Tab)
Header Tab details
Visit No. The Visit No. will be displayed. Vessel SIN The Vessel SIN will be displayed. IMO No The IMO No. will be displayed. Rejection Reason The Rejection Reason will be displayed. ETA The ETA will be displayed in dd/mm/yyyy hhmm format. Vessel Name The Vessel Name will be displayed. Arrival Port The Arrival Port will be displayed. To reselect the visit, click on the Reselect visit… button
The following window will appear to allow the user to re-select the visit to create the Passenger List for:
Figure 12.3 – Reselection of Visit The fields here are similar to what have been described above. Click on the OK button after selecting a visit. This will return the screen to the Passenger List Details as in Figure 12.2
User Manual for EDCS User Admin March 2007
CrimsonLogic Contents & Release Notice: Page 208 of 220
Click on the Passenger Information Tab to display the following
screen. Enter details of the passenger information. Passenger List Details – Passenger Information Tab
Figure 12.4 – Passenger List Details (Passenger Information Tab)
Passenger Information Tab Details
Last Name Enter Last Name of passenger. Second Last Name
Enter Second Last Name of passenger.
First Name Enter First Name of passenger. Middle Name Enter Middle Name of passenger. Birthplace Enter Birthplace code of the passenger. To select from a
predefined list of birthplace codes, click on the icon. Birthday Enter the Birthday of the passenger in dd/mm/yyyy format or
click on the icon to select a date from the popup calendar. Note that the birthday must be earlier that the current date.
Nationality Enter Nationality code of the passenger. To select from a
predefined list of nationality codes, click on the icon. ID Enter the identification number of the passenger. Add More Row(s) To add more rows for more passenger members, enter a
numeric number and click on the Add More Row(s) button. Click on the S/N hyperlink next to a crew
The details of the passenger will be shown as follows:
User Manual for EDCS User Admin March 2007
CrimsonLogic Contents & Release Notice: Page 209 of 220
Passenger Details Page
Figure 12.5 – Passenger Details Page
Passenger Information
Last Name Enter Last Name of passenger. Second Last Name
Enter Second Last Name of passenger.
First Name Enter First Name of passenger. Middle Name Enter Middle Name of passenger. Birthplace Enter Birthplace code of the passenger. To select from a
predefined list of birthplace codes, click on the icon. Birthday Enter the Birthday of the passenger in dd/mm/yyyy format or
click on the icon to select a date from the popup calendar. Note that the birthday must be earlier that the current date.
Nationality Enter Nationality code of the passenger. To select from a
predefined list of nationality codes, click on the icon. ID Enter the identification number of the passenger. Port of Embarking
Enter the Port of Embarking code. To select from a predefined
list of port codes, click on the icon. Date of Embarking
Enter the Date of Embarking in dd/mm/yyyy format or click on
the icon to select from the popup calendar.
Port of Disembarking
Enter the Port of Disembarking code. To select from a
predefined list of port codes, click on the icon. Date of Enter the Date of Disembarking in dd/mm/yyyy format or click
User Manual for EDCS User Admin March 2007
CrimsonLogic Contents & Release Notice: Page 210 of 220
Disembarking on the icon to select from the popup calendar.
Local Activity
Port of Embarking
Enter the Port of local Embarking code. To select from a
predefined list of port codes, click on the icon. Date of Embarking
Enter the Date of local Embarking in dd/mm/yyyy format or click
on the icon to select from the popup calendar.
Port of Disembarking
Enter the Port of local Disembarking code. To select from a
predefined list of port codes, click on the icon. Date of Disembarking
Enter the Date of local Disembarking in dd/mm/yyyy format or
click on the icon to select from the popup calendar.
Add More Row(s) To add more rows for more local activity, enter a numeric number and click on the Add More Row(s) button.
Click on the Next button
This will show the details page of the next passenger member entered in the table in Figure 12.4.
Click on the Previous button
This will show the details page of the previous passenger member entered in the table in Figure 11.4.
Click on the Back button
This will bring the user back to the table listing of the passenger members as shown here once again:
Figure 12.6 – Passenger List Details (Passenger Information Tab)
Click on the Save button
This will validate the form and save the Passenger List as a draft. If there are errors encountered, a popup window with the appropriate error messages will be shown. The following is an example:
User Manual for EDCS User Admin March 2007
CrimsonLogic Contents & Release Notice: Page 211 of 220
Figure 12.7 – Passenger List Validation Errors If no errors are encountered during saving, the following confirmation page will be shown together with the transaction number, visit no. and date/time of saving:
Figure 12.8 – Save Confirmation Page Click on the OK button to return to the Visit selection page as shown in Figure 11.1
Click on the Submit button
This will validate the Passenger List form and submit to ACP. If there are errors encountered, a popup window with the appropriate error messages will be shown. The following is an example:
User Manual for EDCS User Admin March 2007
CrimsonLogic Contents & Release Notice: Page 212 of 220
Figure 12.9 – Passenger List Validation Errors If no errors are encountered during submit, the following confirmation page will be shown together with the transaction number, visit no. and date/time of submission:
Figure 12.10 – Submit Confirmation Page Click on the OK button to return to the Visit selection page as shown in Figure 12.1
User Manual for EDCS User Admin March 2007
CrimsonLogic Contents & Release Notice: Page 213 of 220
12.2 Search
Menu Click on Passenger List – Search from the menu. Search Listing Screen
The list of Passenger List transactions will be listed as shown:
Figure 12.11 – Search Listing Screen
Search Results Transaction No. The Transaction No. of the Passenger List will be displayed.
Visit No. The Visit No. of the Passenger List will be displayed.
Vessel SIN The Vessel SIN for the Visit No. will be displayed.
Vessel Name The Vessel Name for the Visit No. will be displayed.
Arrival Port The Arrival Port for that Visit No. will be displayed.
ETA The Estimated Time of Arrival in dd/mm/yyyy hhmm format will
be displayed. Flow Status The Flow Status of the Passenger List will be displayed.
Possible Flow Status reflected here includes: DRAFT – The Passenger List is a draft. SUBMITTED – The Passenger List is submitted to ACP but not yet approved. APPROVED – The Passenger List is approved. REJECTED – The Passenger List is rejected. CANCELLED – The Passenger List is cancelled due to cancellation of the visit itself.
Search Criteria Transaction No. Enter the Transaction No. to search. Visit No. Enter the Visit No. to search. Vessel SIN Enter the Vessel SIN to search. Vessel Name Enter the Vessel Name to search. Click on the Search button
If a match is found, the results will be displayed in the same screen, else No Record Found will be shown.
Select record(s) Select the records to delete and click on the Delete hyperlink.
User Manual for EDCS User Admin March 2007
CrimsonLogic Contents & Release Notice: Page 214 of 220
and click on the Delete hyperlink
The following delete confirmation dialog box will be shown:
Figure 12.12 – Delete Confirmation Dialog Note that only drafts can be deleted. The following confirmation screen will be displayed when user click on the OK button. Validation errors if any will be shown.
Figure 12.13 – Delete Confirmation Screen Click on the OK button to return to the search listing as shown in Figure 12.11
Select record(s) and click on the Submit hyperlink
Select the records to be submitted and click on the Submit hyperlink. The following confirmation dialog box will be shown:
Figure 12.14 – Submit Confirmation Dialog Note that only drafts can be submitted. The following confirmation screen will be displayed when user click on the OK button. Validation errors if any will be shown.
User Manual for EDCS User Admin March 2007
CrimsonLogic Contents & Release Notice: Page 215 of 220
Figure 12.15 – Submit Confirmation Screen Click on the OK button to return to the search listing as shown in Figure 11.11
Click on the hyperlink of a Transaction No.
The Passenger List Details will be shown as follows. Note that the Passenger List is not editable at this moment. All the fields are the same as mentioned in Section 12.1 above.
Passenger List Details – Header Tab
Figure 12.16 – Passenger List Details (Header Tab)
Passenger List Details – Passenger Information Tab
Figure 12.17 – Passenger List Details (Passenger Information Tab)
Click on the Delete button
The following confirmation dialog box will be shown:
User Manual for EDCS User Admin March 2007
CrimsonLogic Contents & Release Notice: Page 216 of 220
Figure 12.18 – Delete Confirmation Dialog Note that the Delete button will only appear if the transaction is a draft. The following confirmation screen will be displayed when user click on the OK button.
Figure 12.19 – Delete Confirmation Screen Click on the OK button to return to the search listing as shown in Figure 12.11
Click on the Edit button
The Passenger Information tab becomes editable for the user to change the passenger information as shown here:
Figure 12.20 – Passenger List Details (Passenger Information Tab) The user edits the information in the passenger list details and then either save it as a draft by clicking the Save button or click on the Submit button to submit the Passenger List to ACP. The validation and confirmation screens and dialogs displayed will be similar to those described in Section 12.1.
User Manual for EDCS User Admin March 2007
CrimsonLogic Contents & Release Notice: Page 217 of 220
To return to the Passenger List Search Listing page, click on the Back button.
Click on the Duplicate button
The Passenger Information tab becomes editable for the user to change the passenger information as shown here:
Figure 12.21 – Passenger List Details (Passenger Information Tab) In addition, the Reselect Visit… button in the Header tab will be enabled for the user to select a visit for this duplicated crew list. The following is a sample screen:
Figure 12.22 – Passenger List Details (Header Tab) The user can click on the Reselect Visit… button to select a visit for this Passenger List. The same procedure applies as described in Section 12.1. The user then edits the passenger list details in the Passenger Information tab if necessary and then either save it as a draft by clicking the Save button or click on the Submit button to submit the Passenger List to ACP. The validation and confirmation screens and dialogs displayed
User Manual for EDCS User Admin March 2007
CrimsonLogic Contents & Release Notice: Page 218 of 220
will be similar to those described in Section 12.1. To return to the Passenger List Search Listing page, click on the Back button.
Click on the Submit button
The following confirmation dialog box will be shown:
Figure 12.23 – Submit Confirmation Dialog Note that the Submit button will only appear if the transaction is a draft. Click on the OK button. This will validate the Passenger List form and submit to ACP. If there are errors encountered, a popup window with the appropriate error messages will be shown. The following is an example:
Figure 12.24 – Passenger List Validation Errors If no errors are encountered during submit, the following confirmation page will be shown together with the transaction number, visit no. and date/time of submission:
User Manual for EDCS User Admin March 2007
CrimsonLogic Contents & Release Notice: Page 219 of 220
Figure 12.25 – Submit Confirmation Page Click on the OK button to return to the Passenger List Search Listing page as shown in Figure 12.11
Click on the Back button
This will bring the user back to the Passenger List Search Listing as shown in Figure 12.11