67
P/N: 2900-300567 Rev 1 www.KramerAV.com USER MANUAL MODEL: SL-280 Master / Room Controller Kramer Control Brain

P/N: 2900-300567 Rev 1 www.KramerAV.com
USER MANUAL MODEL:
SL-280 Master / Room Controller Kramer Control Brain

SL-280 – Introduction i
Contents Introduction 1
Getting Started 1 Overview 2 Typical Applications 3 Controlling your SL-280 3
Defining the SL-280 Master / Room Controller Kramer Control Brain 4 Installing in a Rack 6 Connecting SL-280 7
Connecting the Relay Ports 8 Remote Operation via the Web Pages 9
Loading and Saving Configurations 10 Viewing Connected Clients Information 11 Modifying Device Settings 11 Defining IP Settings 13 Configuring the Serial Ports 14 Configuring I/O Ports 15 Changing the State of a Relay Port 19 Teaching IR Commands 20 Activating Device Security 21 Using the Log 23 About Us Page 24
Resetting and Upgrading Firmware 25 Resetting to Factory Default Settings 25 Upgrading the Firmware 25
Technical Specifications 26 Default Communication Parameters 27 Default Security Parameters 27
Protocol 3000 28 Understanding Protocol 3000 29 Kramer Protocol 3000 Syntax 30 Protocol 3000 Commands 31
License Information 61

Kramer Electronics Ltd.
SL-280 – Introduction 1
Introduction Welcome to Kramer Electronics! Since 1981, Kramer Electronics has been providing a world of unique, creative, and affordable solutions to the vast range of problems that confront the video, audio, presentation, and broadcasting professional on a daily basis. In recent years, we have redesigned and upgraded most of our line, making the best even better!
Our 1,000-plus different models now appear in 14 groups that are clearly defined by function: GROUP 1: Distribution Amplifiers; GROUP 2: Switchers and Routers; GROUP 3: Control Systems; GROUP 4: Format & Standards Converters; GROUP 5: Range Extenders & Repeaters; GROUP 6: Specialty AV Products; GROUP 7: Scalers; GROUP 8: Cables and Connectors; GROUP 9: Room Connectivity; GROUP 10: Mounting and Rack Adapters; GROUP 11: Sierra Video; GROUP 12: Digital Signage; GROUP 13: Audio; GROUP 14: Collaboration; and GROUP 15: KM & KVM Switches.
Getting Started
We recommend that you:
• Unpack the equipment carefully and save the original box and packaging materials for possible future shipment.
• Review the contents of this user manual.
Go to www.kramerav.com/downloads/SL-280 to check for up-to-date user manuals, application programs, and to check if firmware upgrades are available (where appropriate).
Achieving the Best Performance • Use only good quality connection cables (we recommend Kramer high-performance
cables) to avoid interference, deterioration in signal quality due to poor matching, and elevated noise levels (often associated with low quality cables).
• Do not secure the cables in tight bundles or roll the slack into tight coils.
• Avoid interference from neighbouring electrical appliances that may adversely influence signal quality.
• Position your Kramer SL-280 away from moisture, excessive sunlight and dust.
This equipment is to be used only inside a building. It may only be connected to other equipment that is installed inside a building.

Kramer Electronics Ltd.
SL-280 – Introduction 2
Safety Instructions
Caution: There are no operator serviceable parts inside the unit.
Warning: Use only the power cord that is supplied with the unit.
Warning: Do not open the unit. High voltages can cause electrical shock! Servicing by qualified personnel only.
Warning: Disconnect the power and unplug the unit from the wall before installing.
Recycling Kramer Products
The Waste Electrical and Electronic Equipment (WEEE) Directive 2002/96/EC aims to reduce the amount of WEEE sent for disposal to landfill or incineration by requiring it to be collected and recycled. To comply with the WEEE Directive, Kramer Electronics has made arrangements with the European Advanced Recycling Network (EARN) and will cover any costs of treatment, recycling and recovery of waste Kramer Electronics branded equipment on arrival at the EARN facility. For details of Kramer’s recycling arrangements in your particular country go to our recycling pages at www.kramerav.com/support/recycling.
Overview
SL-280 is a master room (space) controller that can operate over Ethernet with control interfaces that include: eight bidirectional RS-232, eight IR, eight GPI/O, and eight relays. It controls devices such as scalers, video displays, audio amplifiers, Blu-ray players, sensors, screens, shades, door locks, lights, and more. Multiple Kramer Ethernet control gateways can be used to add remote I/O ports.
Main Features • Kramer Control Space Controller – Controls any AV device/display with its corresponding
logic.
• High Performance Architecture – Enables a scalable and flexible programming platform.
• 8 RS-232 Bidirectional Control Ports – For controlling devices via bi-directional serial control protocols.
• 8 IR Emitter & 1 IR Learning Control Port – Control devices via IR control protocols and learn commands from IR remotes.
• 8 GPI/O Control Ports – Control devices via general purpose I/O ports, program configured as digital input, digital output or analog input interface for controlling sensors, door locks, and lighting control devices.
• 8 Relay Control Ports – Control devices via low voltage relay contact closure, such as opening and closing drapes, shades, blinds, and projection screen scrolling.
• Network Support – 10/100/1000Mbps Ethernet.
• LED Indicators – I/O port state, link and system status.
• Software Management Support – Kramer Control, API, K-Upload.

Kramer Electronics Ltd.
SL-280 – Introduction 3
Typical Applications
SL-280 is ideal for the following typical applications:
• Small to large spaces
• Retail stores
• Class rooms and lecture halls
• Auditoriums
• Government meeting rooms
• Court rooms
• Command and control applications
Controlling your SL-280
Control your SL-280 directly via one of the following:
• Ethernet using built-in, user-friendly web pages (see Remote Operation via the Web Pages on page 9).
• Kramer Control Builder
• Kramer Control Client App

Kramer Electronics Ltd.
SL-280 – Defining the SL-280 Master / Room Controller Kramer Control Brain 4
Defining the SL-280 Master / Room Controller Kramer Control Brain
This section defines SL-280.
Figure 1: SL-280 Master / Room Controller Kramer Control Brain Front Panel
# Feature Function
POWER LED Lights green when powered on.
SERVICE Micro USB Connector
Connect to a PC to send P3K commands and perform a firmware upgrade.
IR Receiver and LED Detects IR signals for IR learning. Lights blue when waiting to receive a signal.
LINK LED Lights blue to indicate Ethernet activity: • On – good connection • Flashing – no connection • Off – before first connection
CONTROL LED Lights to indicate control states of the control application (brain): • Flashing – sending data • Green – ready and working • White – no devices are assigned • Blue – synchronizing • Yellow – one or more controlled devices are disconnected • Red – an error occurred • Purple – Brain booting up
SERIAL LEDs (1–8) White Tx LEDs and blue Rx LEDs flash to indicate activity on each channel.
IR LEDs (1–8) Light blue to indicate IR activity on each channel (the associated LED lights when the relevant IR port transmits data).
I/O LEDs (1–8) Light blue to indicate I/O activity on each channel (the associated LED lights on Digital Out HIGH, and when Digital In is triggered).
RELAY LEDs (1–8) Light blue to indicate relay activity on each channel (the associated LED lights when the relay is closed).

Kramer Electronics Ltd.
SL-280 – Defining the SL-280 Master / Room Controller Kramer Control Brain 5
Figure 2: SL-280 Master / Room Controller Kramer Control Brain Rear Panel
# Feature Function
SERIAL Ports (1–8) Terminal Block
Connect to up to 8 serial controlled devices, for Ethernet-to-RS232 bidirectional tunneling.
IR Ports (1–8) Terminal Block
Connect to up to 8 IR emitters or blasters.
I/O Ports (1–8) Terminal Block
Connect to up to 8 sensors or devices to be controlled, for example, a motion sensor. Port may be configured as a digital input, digital output, or analog input (see Configuring I/O Ports on page 15).
RELAY Ports (1–8) Terminal Block
Connect to up to 8 devices to be controlled by relay for example, a motorized projection screen. Six of the ports are NO and ports 1 and 5 can be connected as NO or NC (see Connecting the Relay Ports on page 8).
USB Connector For future use.
ID Button For self-identification over the network. Press the button to send (broadcast) the Beacon P3K command. Reply includes: IP address, UDP port number, TCP port number, MAC address, and Model Name.
RESET Button Press while performing a factory default reset (see Resetting to Factory
Default Settings on page 25.
LAN RJ-45 Connector Connect to a local area network. Indications:
LINK LED lights amber – 1000/100/10MB connection. DATA LED flashes green – Ethernet data link activity.
Power Socket with Fuse and Power Switch
Connect to the power cord and to the mains electricity. Switch for turning the unit ON or OFF.

Kramer Electronics Ltd.
SL-280 – Installing in a Rack 6
Installing in a Rack This section provides instructions for rack mounting SL-280. Before installing in a rack, verify that the environment is within the recommended range:
• Operation temperature – 0° to 40°C (32 to 104°F).
• Storage temperature – -40° to +70°C (-40 to +158°F).
• Humidity – 10% to 90%, RHL non-condensing.
When installing on a 19" rack, avoid hazards by taking care that:
• It is located within recommended environmental conditions. Operating ambient temperature of a closed or multi-unit rack assembly may exceed ambient room temperature.
• Once rack mounted, there is enough air still flow around SL-280.
• SL-280 is placed upright in the correct horizontal position.
• You do not overload the circuit(s). When connecting SL-280 to the supply circuit, overloading the circuits may have a detrimental effect on overcurrent protection and supply wiring. Refer to the appropriate nameplate ratings for information. For example, for fuse replacement, see the value printed on the product label.
• SL-280 is earthed (grounded) and connected only to an electricity socket with grounding. Pay particular attention when electricity is supplied indirectly (for example, when the power cord is not plugged directly into the wall socket but to an extension cable or power strip). Use only the supplied power cord.
To rack-mount SL-280:
1. Attach both rack ears to SL-280: Remove the screws from each side of SL-280 (3 on each side), and replace them through the rack ears.
2. Place the rack ears of SL-280 against the rack rails and insert the appropriate screws (not provided) through each of the four holes in the rack ears.
Some models, may feature built-in rack ears:
• Detachable rack ears can be removed for desktop use.
• Always mount SL-280 in the rack before connecting any cables or power.

Kramer Electronics Ltd.
SL-280 – Connecting SL-280 7
Connecting SL-280
Always switch off the power to each device before connecting it to your SL-280. After connecting your SL-280, connect its power and then switch on the power to each device.
Figure 3: Connecting SL-280
To connect SL-280 as illustrated in the example in Figure 3, do the following:
1. Connect up to eight bidirectional RS-232 devices to the Serial terminal block ports .
2. Connect up to eight IR emitters or blasters to the IR terminal block ports .
3. Connect up to eight GPIO (General Purpose I/O) devices to the I/O terminal block ports . No more than 30V can be connected.
4. Connect to a LAN through the LAN RJ-45 connector .
5. Connect the power cord to the power socket and to the mains electricity.

Kramer Electronics Ltd.
SL-280 – Connecting SL-280 8
Connecting the Relay Ports
The normal state of the relay ports is as follows:
• Ports 2–4, 6–8 – NO (Normally Open)
• Ports 1 and 5 – can be connected as NO or NC (Normally Closed)
Figure 4: Relay Ports
To connect a ports as NO:
• Connect the device to the C (Common) and NO terminals of the relevant port.
To connect ports 1 and 5 as NC:
• Connect the device to the C and NC terminals of the relevant port.

Kramer Electronics Ltd.
SL-280 – Remote Operation via the Web Pages 9
Remote Operation via the Web Pages
SL-280 embedded webpages enable you to define device settings, configure communication parameters, configure port settings, define security parameters, and view activity logs.
The specific parameter values shown in screenshots of this manual are merely representative.
To access the web pages:
1. Enter the IP address of the device (see Default Communication Parameters on page 27) in the address bar of your browser. The Loading page appears followed shortly by the General Info page.
Figure 5: Embedded Web Pages – General Info Page
The General Info page displays the following:
• Model name
• Firmware version
• Serial number
• Web pages version
2. Click the tabs on the left side of the screen to access the relevant web page.

Kramer Electronics Ltd.
SL-280 – Remote Operation via the Web Pages 10
Loading and Saving Configurations
You can save a configuration for easy recall in the future.
At the bottom left hand side of all web pages there is a Load and a Save button. These enable you to save the current configuration and load any pre-saved configurations.
To load a configuration:
1. Click Load. An Explorer window opens.
2. Select the required file and click Open. The device is configured according to the saved preset.
To save the current configuration:
1. Configure the device as required.
2. Click Save. The Save File window opens.
3. Browse to the required location to which to save the file.
4. Enter the required name for the saved preset.
5. Click OK. The current configuration is saved.
When using Chrome, the file is automatically saved in the Downloads folder.

Kramer Electronics Ltd.
SL-280 – Remote Operation via the Web Pages 11
Viewing Connected Clients Information
SL-280 web pages enable you to view information for client devices that are connected to SL-280 via Ethernet.
To view connected clients information:
1. Click Connected Clients on the left side of the web page (Figure 5). The Connected Clients page appears.
Figure 6: Connected Clients Page
2. View the following connected clients information:
• IP – IP address
• To – The RS-232 port to which it is connected
• Through – Method of connection
• S/R – Whether or not Send Replies is enabled for the port (see Configuring the Serial Ports on page 14).
Modifying Device Settings
SL-280 web pages enable you to modify the following device settings:
• Device Name
• Time and Date Settings

Kramer Electronics Ltd.
SL-280 – Remote Operation via the Web Pages 12
Changing the Device Name
SL-280 device name is used by DNS when addressing the device and is necessary for accessing the device for the first time using a Web browser.
To change the name of your device:
1. Click Device Settings on the left side of the web page (Figure 5). The Device Settings page appears.
Figure 7: Device Settings Page
2. In the General info area, enter a new name in the Device name field. The device name cannot include any spaces, can be up to 14 characters and can include letters, numbers, hyphens and underscores only.
3. Click Save Changes.
Setting the Date and Time
SL-280 web pages enable you to manually set the date and time for your SL-280 device or to use a time server to automatically set the date and time. Date and time settings are used by the device for logging purposes (see Using the Log on page 23), and for time driven events as defined through Kramer Control Builder.
To set the date and time for your device:
1. Click Device Settings on the left side of the web page (Figure 5). The Device Settings page appears (Figure 7).
2. In the Time and Date area, if Use time server (NTP) is set to ON, click OFF and click in the relevant fields to define the date, time and time zone.
–OR–
3. Click the ON button, enter the time server address in the Time server address field, and click Set.
Kramer Electronics Ltd.
SL-280 – Remote Operation via the Web Pages 13
4. Click Save Changes.
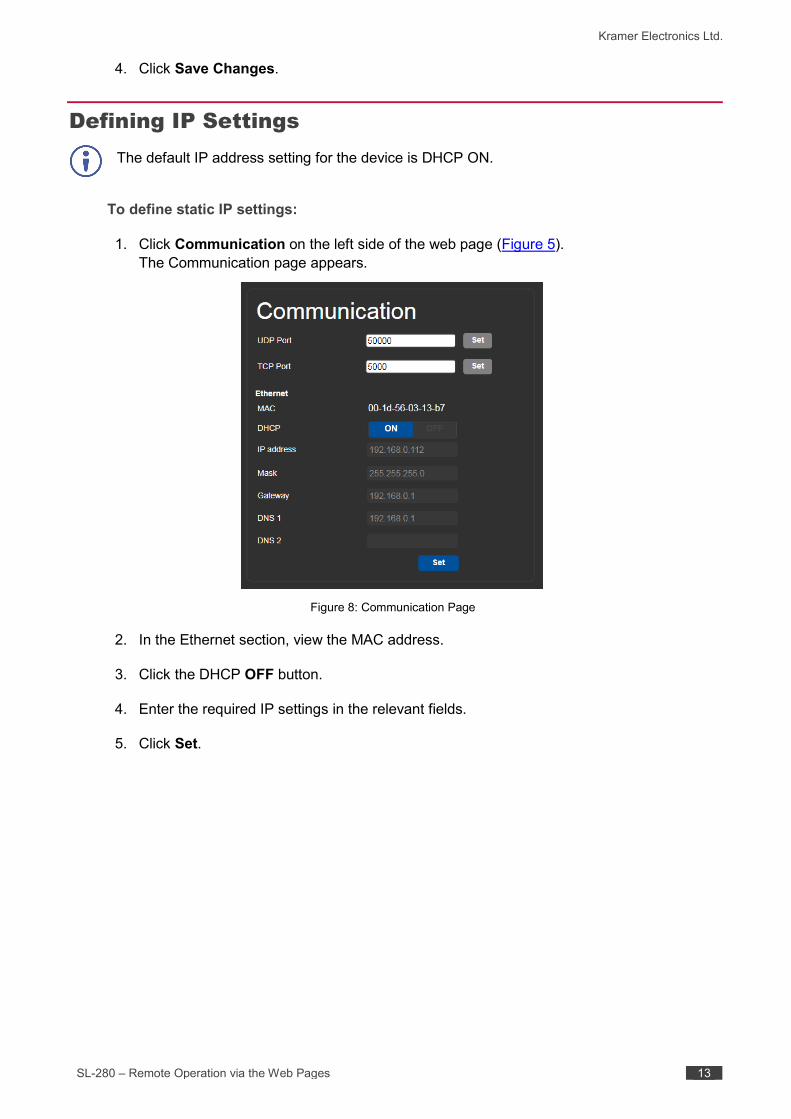
Defining IP Settings
The default IP address setting for the device is DHCP ON.
To define static IP settings:
1. Click Communication on the left side of the web page (Figure 5). The Communication page appears.
Figure 8: Communication Page
2. In the Ethernet section, view the MAC address.
3. Click the DHCP OFF button.
4. Enter the required IP settings in the relevant fields.
5. Click Set.
Kramer Electronics Ltd.
SL-280 – Remote Operation via the Web Pages 14
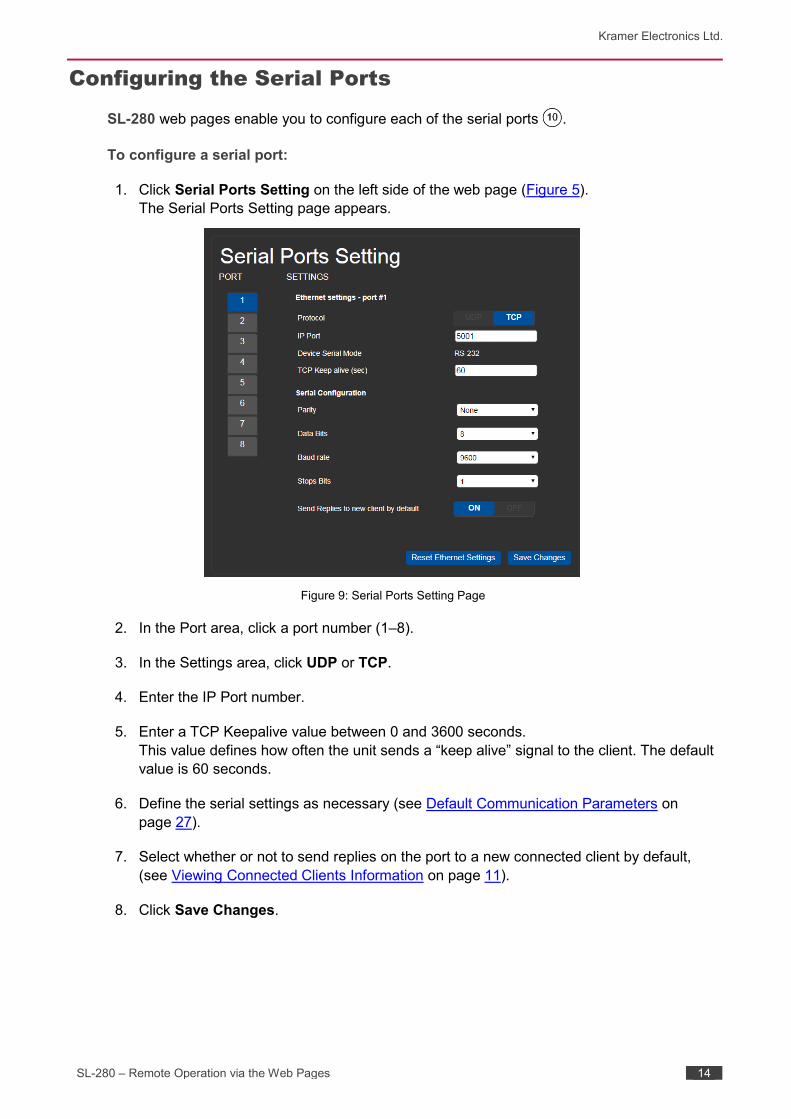
Configuring the Serial Ports
SL-280 web pages enable you to configure each of the serial ports .
To configure a serial port:
1. Click Serial Ports Setting on the left side of the web page (Figure 5). The Serial Ports Setting page appears.
Figure 9: Serial Ports Setting Page
2. In the Port area, click a port number (1–8).
3. In the Settings area, click UDP or TCP.
4. Enter the IP Port number.
5. Enter a TCP Keepalive value between 0 and 3600 seconds. This value defines how often the unit sends a “keep alive” signal to the client. The default value is 60 seconds.
6. Define the serial settings as necessary (see Default Communication Parameters on page 27).
7. Select whether or not to send replies on the port to a new connected client by default, (see Viewing Connected Clients Information on page 11).
8. Click Save Changes.
Kramer Electronics Ltd.
SL-280 – Remote Operation via the Web Pages 15
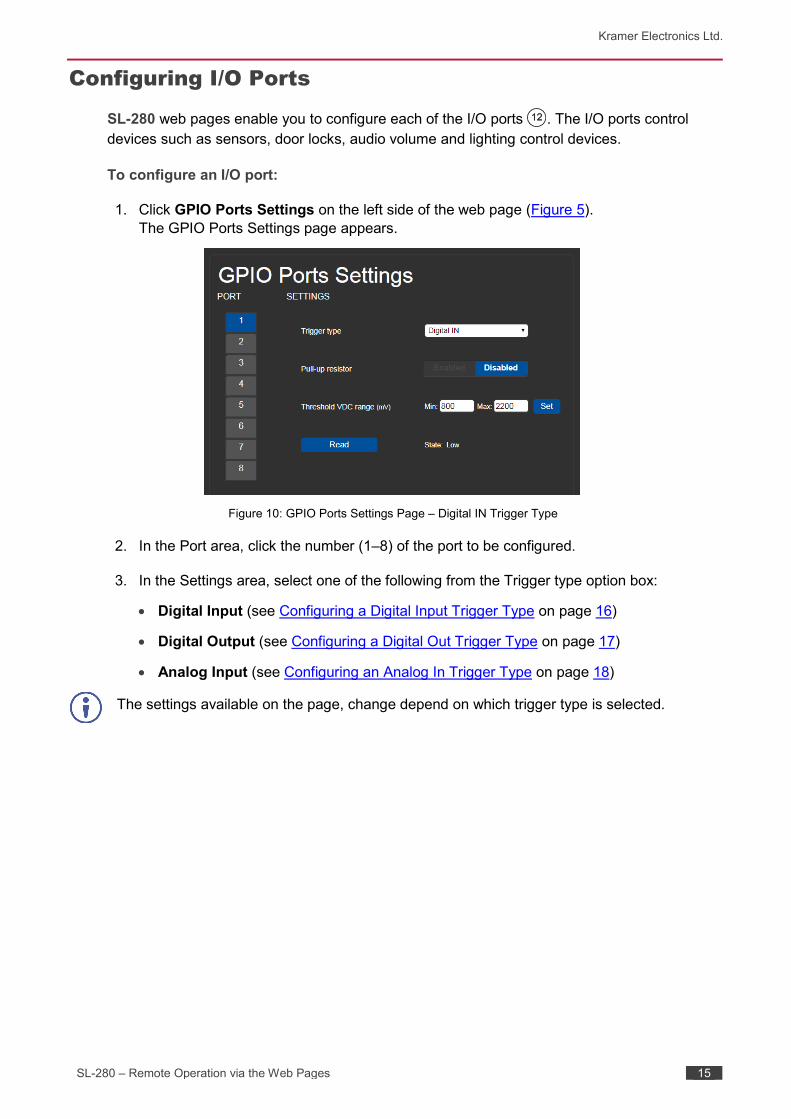
Configuring I/O Ports
SL-280 web pages enable you to configure each of the I/O ports . The I/O ports control devices such as sensors, door locks, audio volume and lighting control devices.
To configure an I/O port:
1. Click GPIO Ports Settings on the left side of the web page (Figure 5). The GPIO Ports Settings page appears.
Figure 10: GPIO Ports Settings Page – Digital IN Trigger Type
2. In the Port area, click the number (1–8) of the port to be configured.
3. In the Settings area, select one of the following from the Trigger type option box:
• Digital Input (see Configuring a Digital Input Trigger Type on page 16)
• Digital Output (see Configuring a Digital Out Trigger Type on page 17)
• Analog Input (see Configuring an Analog In Trigger Type on page 18)
The settings available on the page, change depend on which trigger type is selected.

Kramer Electronics Ltd.
SL-280 – Remote Operation via the Web Pages 16
Configuring a Digital Input Trigger Type
Digital Input trigger mode reads the digital input of an external sensor device that is connected to the GPIO port, and detects High (upon passing Max threshold from Low state) or Low (upon passing Min threshold from High state) port states according to the user defined voltage threshold levels.
To configure a digital input trigger type:
1. On the GPIO Ports Settings page, select Digital IN from the Trigger type option box (Figure 10). The Digital IN options appear (Figure 10).
2. Select one of the following for the Pull-up resistor setting:
• Enabled Detection of an open circuit as High, or a short to ground as Low. This is suitable for example, for a pushbutton switch (connecting one terminal of the switch to ground, and the other to the input) or for an alarm closing a circuit that activates a series of actions. When the pull-up resistor is enabled, the port state is high and to be triggered it must be pulled low by the externally connected sensor.
• Disabled Suitable, for example, for a high temperature alarm that exceeds the maximum voltage threshold. When the pull-up resistor is disabled, the port state is low and to be triggered it must be pulled high by the externally connected sensor.
3. Define the Min and Max for the Threshold VDC range (threshold voltage at which the port changes state) and click Set.

Kramer Electronics Ltd.
SL-280 – Remote Operation via the Web Pages 17
Configuring a Digital Out Trigger Type
To configure a digital output trigger type:
1. On the GPIO Ports Settings page, select Digital OUT from the Trigger type option box (Figure 10). A Warning message appears.
Figure 11: Digital Out Selection Warning
2. Click OK. The Digital OUT options appear.
Figure 12: GPIO Ports Settings Page – Digital OUT Trigger Type
3. Select one of the following for the Pull-up resistor setting:
• Pullup resistor enabled: The port can be used for controlling devices that accept a TTL signal such as for powering LEDs. The voltage output is TTL positive logic: open: ~ 3.5V; closed: ~ 0.3V. When the pull-up resistor is enabled, the port state is high. For the state to be low, you must click Low for the Current Status.
• Pullup resistor disabled: The port is used for controlling external devices such as room or light switches. The external source device determines the voltage output; the maximum voltage is 30V DC and the maximum current is 100mA. When the pull-up resistor is disabled, the port state is low and to set it high, you must click High for the Current Status.
Make sure that the current in this configuration does not exceed 100mA.

Kramer Electronics Ltd.
SL-280 – Remote Operation via the Web Pages 18
Configuring an Analog In Trigger Type
When you select the Analog IN trigger type, the port is triggered by an external analog device, such as a volume control device. The trigger is activated once when the detected voltage is within the 0 to 30V DC voltage range.
When the Analog IN trigger type is selected, the Pullup resistor and Threshold settings are disabled.
To configure an analog input trigger type:
1. On the GPIO Ports Settings page, select Analog IN from the Trigger type option box (Figure 10). The Analog IN options appear.
Figure 13: GPIO Port Settings Page Analog IN
2. Enter or use the arrows to scroll to a value (1–100) for the Maximum reported steps. This value is the number of steps that the analog input signal is divided into. To calculate the voltage of each step, use the following formula: Voltage of one step = 30V / number of steps

Kramer Electronics Ltd.
SL-280 – Remote Operation via the Web Pages 19
Changing the State of a Relay Port
SL-280 web pages enable you to change the state of each of the relay ports . The SL-280 relay ports have the following characteristics:
• Default state of relays 2–4 and 6–8 is NO (normally open)
• Default state of relays 1 and 5 can be NO or NC (normally closed), depending on how they are connected to the device (see Connecting the Relay Ports on page 8)
• Rated at 30V DC and 1A
• A non-latching relay function – the contact is left in its default state when unpowered or in power up state. This means that if a relay is in its non-default state and power is lost, the relay returns to its default state. To return it to its pre-power loss state, the setting must be changed using either the web pages or a Protocol 3000 command.
To change the state of a relay, (for example, relay 2):
1. Click Relay Ports Settings on the left side of the web page (Figure 5). The Relay Ports Settings page appears.
Figure 14: Relay Ports Settings Page
2. In the Port section, click the number (1–8) of the relay port to be changed. The current status of the selected relay appears.
3. Click Close/Open. The relay changes to the selected state.
When relays 1 and 5 are connected as NC (see Connecting the Relay Ports on page 8), the Current status buttons are reversed. Clicking Open closes the relay and clicking Close opens the relay.

Kramer Electronics Ltd.
SL-280 – Remote Operation via the Web Pages 20
Teaching IR Commands
SL-280 web pages enable you to teach SL-280 IR commands. These can be saved for later use. The IR learning commands are in Pronto format.
While learning is in progress, the relevant IR LED on the front panel lights and SL-280 is not available for normal operation.
At the start and end of learning a message is sent to all attached clients.
To teach a command to SL-280:
1. Click IR Command Learner on the left side of the web page (Figure 5). The IR Command Learner page appears.
Figure 15: IR Command Learner Page
2. Enter a name for the command in the first field.
3. Enter a value in the Learning timeout field. This value defines how long the system waits to receive a command before exiting learning mode.
4. Click Start Learning.
5. Position the IR remote control approximately 5cm to 7cm (2in to 2.7in) from the SL-280 front panel.
6. Send a command with the remote control. The command string received during the process appears in the Command received box.

Kramer Electronics Ltd.
SL-280 – Remote Operation via the Web Pages 21
7. Click Copy. The command string is copied to the clip board.
8. Paste the command string into a control application.
Depending on the application, the format of the command string may have to be modified.
9. (Optional) Select the port on which to test the learned command and press the Test play button. The command runs on the selected port.
10. Click Save to save the new command.
11. To delete the current command, click Clear.
12. To retrieve a previously saved command, click Load.
Activating Device Security
SL-280 web pages enable you to turn logon security (authentication) on or off. When security is on, access to the Web pages is granted only on submission of a valid user name and password. For default logon credentials see Default Security Parameters on page 27.
To activate Web page security:
1. Click Security on the left side of the web page (Figure 5). The Security page appears.
Figure 16: Security Page
2. Click ON. A confirmation message appears.
Figure 17: Security Confirmation Message

Kramer Electronics Ltd.
SL-280 – Remote Operation via the Web Pages 22
3. Click OK. The Authentication Required window appears.
Figure 18: Authentication Required Window
4. Enter the default username and password (see Default Security Parameters on page 27).
5. Click OK. The web pages reload and the General Info page (Figure 5) appears.
6. Click Security on the left side of the web page. The Security page appears with the Change Password settings.
Figure 19: Security Activated Page
7. If required, change the password and click Change.

Kramer Electronics Ltd.
SL-280 – Remote Operation via the Web Pages 23
Using the Log
This feature is for future use and is not yet available.
SL-280 web pages enable you to view the current log entries, search log entries with filters and configure the types of events the log records. The log file is updated once per minute.
To use the log:
1. Click Logs on the left side of the web page (Figure 5). The Logs page appears.
Figure 20: Logs Page
2. Select any of the options in the Log Filter list to define which types of events are displayed.
3. Select any of the options in the Log Config list to define which types of events are recorded.
The display may not update automatically. Click Refresh to update the display.

Kramer Electronics Ltd.
SL-280 – Remote Operation via the Web Pages 24
About Us Page
Click About on the left side of the web page (Figure 5).to display the web page version and Kramer company information.
Figure 21: About Us Page

Kramer Electronics Ltd.
SL-280 – Resetting and Upgrading Firmware 25
Resetting and Upgrading Firmware
Resetting to Factory Default Settings
To reset the device to its factory default settings:
1. Press and hold the RESET button on the rear panel for 6 seconds.
2. Release the RESET button. Wait for the reset process to complete. The device is reset to the factory default settings.
Upgrading the Firmware
For instructions on upgrading the firmware see the “Kramer K-Upload User Manual”.

Kramer Electronics Ltd.
SL-280 – Technical Specifications 26
Technical Specifications Inputs 1 IR Built-in sensor (for learning) Outputs 8 IR On 2-pin terminal block connectors
8 Relays Ports 8 RS-232 Serial On 3-pin terminal blocks
8 GPI/O On 2-pin terminal blocks 1 Ethernet On an RJ-45 connector 1 P3K Serial Port On a micro-USB connector
Processing Processor Speed 1GHz Memory 512MB RAM, 4GB Flash
Electrical Power Consumption 100–240V AC, 200mA Environmental Conditions
Operating Temperature 0° to +40°C (32° to 104°F) Storage Temperature -40° to +70°C (-40° to 158°F) Humidity 10% to 90%, RHL non-condensing
Regulatory Compliance
Safety CE
Enclosure Size 19” 1U Type Aluminum
General Net Dimensions (W, D, H) 43.64cm x 18.3 cm x 4.36cm (19" x 7.2" x 1.7")
Shipping Dimensions (W, D, H) 55cm x27.6cm x 10.7cm (21.7" x 10.9" x 4.2")
Net Weight 1.65kg (3.6lbs) approx. Shipping Weight 2.6kg (5.7lbs) approx.
Accessories Included Power cord, rack ears Optional For optimum range and
performance use the recommended USB, Ethernet, serial and IR Kramer cables available at www.kramerav.com/product/ SL-280
Specifications are subject to change without notice at www.kramerav.com

Kramer Electronics Ltd.
SL-280 – Technical Specifications 27
Default Communication Parameters RS-232 over Micro USB Baud Rate: 115200 Data Bits: 8 Stop Bits: 1 Parity: None Command Format: ASCII Example (Set configuration for I/O port number 1 to digital input with the pull-up enabled): #GPIO-CFG 1,1,0,1<CR> Ethernet DHCP is enabled by factory default, the following are the default addresses if no DHCP server is found. IP Address: 192.168.1.39 Subnet Mask: 255.255.0.0 Default Gateway: 192.168.0.1 TCP Port #: 5000 Concurrent TCP Connections: 500 Full Factory Reset Front panel buttons Press and hold the RESET button on the rear panel for 6 seconds.
See Resetting to Factory Default Settings on page 25.
Default Security Parameters • Default User Name: Admin
• Default Password: adminpw

Kramer Electronics Ltd.
SL-280 – Protocol 3000 28
Protocol 3000 The SL-280 Master / Room Controller Kramer Control Brain can be operated using the Kramer Protocol 3000 serial commands.
The command framing varies according to how you interface with a device. For example, a basic video input switching command that routes a layer 1 video signal to HDMI out 1 from HDMI input 2 (ROUTE 1,1,2), is entered as follows:
• Terminal communication software, such as Hercules:
The above image is for illustration purposes only.
The framing of the command varies according to the terminal communication software.
You can enter commands directly using terminal communication software (e.g., Hercules) by connecting a PC to the serial or Ethernet port on SL-280. To enter CR press the Enter key (LF is also sent but is ignored by the command parser).
Commands sent from various non-Kramer controllers (e.g., Crestron) may require special coding for some characters (such as, /X##). For more information, refer to your controller’s documentation.
For more information about:
• Using Protocol 3000 commands, see Understanding Protocol 3000 on page 29
• General syntax used for Protocol 3000 commands, see Kramer Protocol 3000 Syntax on page 30
• Protocol 3000 commands available for SL-280, see Protocol 3000 Commands on page 31

Kramer Electronics Ltd.
SL-280 – Protocol 3000 29
Understanding Protocol 3000
Protocol 3000 commands are structured according to the following:
• Command – A sequence of ASCII letters (A–Z, a-z and -). A command and its parameters must be separated by at least one space.
• Parameters – A sequence of alphanumeric ASCII characters (0–9, A–Z, a–z and some special characters for specific commands). Parameters are separated by commas.
• Message string – Every command entered as part of a message string begins with a message starting character and ends with a message closing character.
A string can contain more than one command. Commands are separated by a pipe (|) character. The maximum string length is 64 characters.
• Message starting character: # – For host command/query
~ – For device response
• Query sign –? follows some commands to define a query request
• Message closing character: CR – Carriage return for host messages (ASCII 13)
CR LF – Carriage return for device messages (ASCII 13) and line-feed (ASCII 10)
• Command chain separator character – Multiple commands can be chained in the same string. Each command is delimited by a pipe character (|). When chaining commands, enter the message starting character and the message closing character only at the beginning and end of the string.
Spaces between parameters or command terms are ignored. Commands in the string do not execute until the closing character is entered. A separate response is sent for every command in the chain.

Kramer Electronics Ltd.
SL-280 – Protocol 3000 30
Kramer Protocol 3000 Syntax
The Kramer Protocol 3000 syntax uses the following delimiters:
• CR = Carriage return (ASCII 13 = 0x0D)
• LF = Line feed (ASCII 10 = 0x0A)
• SP = Space (ASCII 32 = 0x20)
Some commands have short name syntax in addition to long name syntax to enable faster typing. The response is always in long syntax.
The Protocol 3000 syntax is in the following format:
• Host Message Format: Start Address
(optional) Body Delimiter
# Device_id@ Message CR
• Simple Command – Command string with only one command without addressing: Start Body Delimiter # Command SP
Parameter_1,Parameter_2,… CR
• Command String – Formal syntax with command concatenation and addressing: Start Address Body Delimiter # Device_id@ Command_1
Parameter1_1,Parameter1_2,…| Command_2 Parameter2_1,Parameter2_2,…| Command_3 Parameter3_1,Parameter3_2,…|…
CR
• Device Message Format: Start Address
(optional) Body Delimiter
~ Device_id@ Message CR LF
• Device Long Response – Echoing command: Start Address
(optional) Body Delimiter
~ Device_id@ Command SP [Param1 ,Param2 …] result
CR LF

Kramer Electronics Ltd.
SL-280 – Protocol 3000 31
Protocol 3000 Commands
This section includes the following commands:
• System Commands (page 31)
• Communication Commands (page 38)
• I/O Gateway Commands (page 45)
• File System Commands (page 54)
• Authentication Commands (page 58)
System Commands Command Description # Protocol handshaking BUILD-DATE Get device build date FACTORY Reset to factory default configuration HELP Get command list LOG-TAIL Get the last lines of message logs MODEL Get device model NAME Set/get machine (DNS) name NAME-RST Reset machine (DNS) name to factory default PROT-VER Get device protocol version RESET Reset device SN Get device serial number TIME Get/set device time and date TIME-LOC Get/set local time offset from UTC/GMT VERSION Get device firmware version
BUILD-DATE Functions Permission Transparency Set: - - - Get: BUILD-DATE? End User Public Description Syntax Set: - - Get: Get device build date #BUILD-DATE?CR
Response ~nn@BUILD-DATESPdateSPtimeCR LF
Parameters date – Format: YYYY/MM/DD where YYYY = Year, MM = Month, DD = Day time – Format: hh:mm:ss where hh = hours, mm = minutes, ss = seconds Response Triggers Notes Example #BUILD-DATE?<CR>

Kramer Electronics Ltd.
SL-280 – Protocol 3000 32
FACTORY Functions Permission Transparency Set: FACTORY End User Public Get: - - - Description Syntax
Set: Reset device to factory default configuration #FACTORYCR
Get: - - Response ~nn@FACTORYSPOKCR LF
Parameters Response Triggers Notes This command deletes all user data from the device. The deletion can take some time. Power cycle the device after performing the reset to apply the changes. Example #FACTORY<CR>
HELP Functions Permission Transparency Set: - - - Get: HELP End User Public Description Syntax Set: - -
Get: Get command list or help for specific command
1. #HELPCR 2. #HELPSPcommand_nameCR
Response 1. Multi-line: ~nn@Device available protocol 3000 commands:CRLF command,SPcommand...CR LF 2. Multi-line: ~nn@HELPSPcommand:CR LFdescriptionCR LFUSAGE:usageCR LF Parameters command_name – name of a specific command Response Triggers Notes Example 1. Get a list of all SL-280 commands: #HELP<CR> 2. Get help for the ETH-PORT command: #HELP ETH-PORT<CR>

Kramer Electronics Ltd.
SL-280 – Protocol 3000 33
LOG-TAIL Function Permission Transparency Set: – – – Get: LOG-TAIL? End User Public Description Syntax Set: – –
Get: Get the last lines of message logs #LOG-TAIL?␠line_num␍␊
Response Multi-line: ~nn@LOG-TAIL?␍␊
Line #1 content ␍␊
Line #2 content ␍␊ Etc... Parameters line_num: the number of lines to display 1–n (n = the number of lines in the entire log). If this parameter is omitted, it returns the last 20 lines of the log by default. Response Triggers Notes Used for advanced troubleshooting. Helps find error root causes and gets details not displayed in the error code number. Example Get the last 20 lines of message logs: #LOG-TAIL?<CR> Get the last 50 lines of message logs: #LOG-TAIL? 50<CR>

Kramer Electronics Ltd.
SL-280 – Protocol 3000 34
MODEL Functions Permission Transparency Set: - - - Get: MODEL? End User Public Description Syntax Set: - - Get: Get device model #MODEL?CR
Response ~nn@MODELSPmodel_nameCR LF
Parameters model_name – String of up to 19 printable ASCII chars Response Triggers Notes Example #MODEL?<CR>
NAME Functions Permission Transparency Set: NAME Administrator Public Get: NAME? End User Public Description Syntax Set: Set machine (DNS) name #NAMESPmachine_nameCR
Get: Get machine (DNS) name #NAME?CR
Response ~nn@NAME?SPmachine_nameCR LF Parameters machine_name–String of up to 14 alpha-numeric characters (can include hyphens but not at the beginning or end) Response Triggers Notes The machine name is not the same as the model name. The machine name is used to identify a specific machine or a network in use (with DNS feature on). Example Set the DNS name of the device to “room-442”: #NAME room-442<CR>

Kramer Electronics Ltd.
SL-280 – Protocol 3000 35
NAME-RST Functions Permission Transparency Set: NAME-RST Administrator Public Get: - - - Description Syntax
Set: Reset machine (DNS) name to factory default #NAME-RSTCR
Get: - - Response ~nn@NAME-RSTSPOKCR LF
Parameters Response Triggers Notes Factory default of machine (DNS) name is “SL-280-XXXXXXX”, where XXXXXXX = the last 7 digits of the serial number. Example Reset the DNS name of the device to the factory default: #NAME-RST<CR>
PROT-VER Functions Permission Transparency Set: - - - Get: PROT-VER? End User Public Description Syntax Set: - -
Get: Get device protocol version #PROT-VER?CR
Response ~nn@PROT-VERSP3000:versionCR LF
Parameters version–XX.XX where X is a digit Response Triggers Notes Example #PROT-VER?<CR>

Kramer Electronics Ltd.
SL-280 – Protocol 3000 36
RESET Functions Permission Transparency Set: RESET Administrator Public Get: - - - Description Syntax Set: Reset device #RESETCR
Get: - - Response ~nn@RESETSPOKCR LF
Parameters Response Triggers Notes Example #RESET<CR>
SN Functions Permission Transparency Set: - - - Get: SN? End User Public Description Syntax
Set: - -
Get: Get device serial number #SN?CR
Response ~nn@SNSPserial_numberCR LF
Parameters serial_number–14 digits, factory assigned Response Triggers Notes This device has a 14 digit serial number. Example #SN?<CR>

Kramer Electronics Ltd.
SL-280 – Protocol 3000 37
TIME Functions Permission Transparency Set: TIME Administrator Public Get: TIME? End User Public Description Syntax
Set: Set device time and date #TIME␠day_of_week,date,time␍
Get: Get device time and date #TIME?␍
Response
~nn@TIME␠day_of_week,date,time␍␊ Parameters day_of_week – options: SUN,MON,TUE,WED,THU,FRI,SAT date – format: DD-MM-YYYY time – format: hh:mm:ss Response Triggers Notes The year must be 4 digits The device does not validate the day of week from the date Time format – 24 hours Date format – Day, Month, Year Example Set device time to Monday, August 8, 2017 at 3:00pm: #TIME MON,29-08-2017,15:00:00<CR>
TIME-LOC Functions Permission Transparency Set: TIME-LOC End User Public Get: TIME-LOC? End User Public Description Syntax
Set: Set local time offset from UTC/GMT #TIME-LOC␠UTC_off,DayLight␍
Get: Get local time offset from UTC/GMT #TIME-LOC?␍
Response
~nn@TIME-LOC␠UTC_off,DayLight␍␊ Parameters UTC_off – offset of device local time from UTC/GMT (without daylight time correction): -12 (subtract 12 hours from UTC/GMT) – 14 (add 14 hours to UTC/GMT) DayLight – use 0, see notes. Response Triggers Notes This command is relevant only if the time server is configured. Device time calculates by adding UTC_off to UTC time (that it got from the time server) + 1 hour if daylight savings time is in effect. The DayLight parameter is no longer in use, because daylight savings time information is received from the time server. This parameter is maintained only for backward compatibility. The TIME command sets the device time without considering these settings. Example Set device local time to US EST (Eastern Standard Time = -5 UTC/GMT): #TIME-LOC -5,0<CR>

Kramer Electronics Ltd.
SL-280 – Protocol 3000 38
VERSION Functions Permission Transparency Set: - - - Get: VERSION? End User Public Description Syntax Set: - -
Get: Get firmware version number #VERSION?CR
Response ~nn@VERSIONSPfirmware_versionCR LF
Parameters firmware_version – XX.XX.XXXX where the digit groups are: major.minor.build version Response Triggers Notes Example #VERSION?<CR>
Communication Commands Command Description
BEACON-INFO Get beacon information, including IP address, UDP control port, TCP control port, MAC address, model, name
ETH-PORT Set/get Ethernet port protocol NET-CONFIG Set a network configuration NET-DHCP Set/get DHCP mode NET-DNS Get DNS name server NET-GATE Set/get gateway IP NET-IP Set/get IP address NET-MAC Get MAC address NET-MASK Set/get subnet mask TIME-SRV Get/set time server UART Get/set com port configuration

Kramer Electronics Ltd.
SL-280 – Protocol 3000 39
BEACON-INFO Functions Permission Transparency Set: – – – Get: BEACON-INFO? End User Public Description Syntax Set: – –
Get:
Get beacon information, including IP address, UDP control port, TCP control port, MAC address, model, name
#BEACON-INFO?␠port_id␍
Response
~nn@BEACON-INFO␠port_id,ip_string,udp_port,tcp_port,mac_address,model,
name␍␊ Parameters port_id – ID of the Ethernet port, 0 (wired Ethernet connection). 1 and higher (for future use). ip_string – dot-separated representation of the IP address udp_port – UDP control port tcp_port – TCP control port mac_address – dash-separated MAC address model – device model name – device name Response Triggers After execution, notification is sent containing beacon information. Notes There is no Set command. The port_id parameter is not necessary and can be omitted. Example Get beacon information for port 0: #BEACON-INFO? 0<CR>

Kramer Electronics Ltd.
SL-280 – Protocol 3000 40
ETH-PORT Functions Permission Transparency Set: ETH-PORT Administrator Public Get: ETH-PORT? End User Public Description Syntax
Set: Set Ethernet port protocol #ETH-PORTSPportType,ETHPortCR
Get: Get Ethernet port protocol #ETH-PORT?SPportTypeCR
Response ~nn@ETH-PORTSPportType,ETHPortCR LF
Parameters portType – string of 3 letters indicating the port type: TCP, UDP ETHPort – TCP / UDP port number: 0–65535 Response Triggers Notes If the port number you enter is already in use, an error is returned The port number must be within the following range: 0–(2^16-1) Example Set the Ethernet port protocol for TCP to port 12457: #ETH-PORT TCP,12457<CR>
NET-CONFIG Functions Permission Transparency Set: NET-CONFIG End User Public Get: NET-CONFIG? End User Public Description Syntax
Set: Set a network configuration. #NET-CONFIG ␠id,ip,net_mask,gateway␍␊
Get: Get a network configuration. #NET-CONFIG?␠id␍␊
Response
Get: ~nn@NET-CONFIG ␠␠id,ip,net_mask,gateway ␍␊ Parameters id – Ethernet connection ID number: 0 ip – network IP address, in the following format: xxx.xxx.xxx.xxx net_mask – network mask, in the following format: xxx.xxx.xxx.xxx gateway – network gateway, in the following format: xxx.xxx.xxx.xxx Response Triggers Notes Example Set the device network parameters to IP address 192.168.113.10, net mask 255.255.0.0, and gateway 192.168.0.1: #NET-CONFIG 0,192.168.113.10,255.255.0.0,192.168.0.1<CR>

Kramer Electronics Ltd.
SL-280 – Protocol 3000 41
NET-DHCP Functions Permission Transparency Set: NET-DHCP Administrator Public Get: NET-DHCP? End User Public Description Syntax Set: Set DHCP mode #NET-DHCPSPmodeCR
Get: Get DHCP mode #NET-DHCP?CR
Response ~nn@NET-DHCPSPmodeCR LF
Parameters mode – 0 (do not use DHCP. Use the IP address set by the factory or the NET-IP command), 1 (try to use DHCP. If unavailable, use the IP address set by the factory or the NET-IP command) Response Triggers Notes To connect with an assigned IP by DHCP, specify the device DNS name (if available) using the NAME command. You can also get an assigned IP by direct connection to RS-232 protocol port if available. Example Enable DHCP mode, if available: #NET-DHCP 1<CR>
NET-DNS Functions Permission Transparency Set: - - - Get: NET-DNS? End User Public Description Syntax Set: - -
Get: Get DNS name server #NET-DNS?␠dns_id␍ Response
~nn@NET-DNS␠dns_id,ip␍␊ Parameters dns_id – ID of the DNS name server to retrieve: 0 (DNS server 1), 1 (DNS server 2) ip – IP address of the DNS server Response Triggers After execution, response is sent to the com port that sent the Get command Notes There is no “Set” command. Use the NET-CONFIG command to setup the network, including DNS name servers. If dns_id is out of the defined DNS range, Error Code #3 (ERR_PARAMETER_OUT_OF_RANGE) is returned. If no dns_id is defined, Error Code #3 is returned for any dns_id. Example Get the IP address of DNS name server 1: #NET-DNS? 0<CR>

Kramer Electronics Ltd.
SL-280 – Protocol 3000 42
NET-GATE Functions Permission Transparency Set: NET-GATE Administrator Public Get: NET-GATE? End User Public Description Syntax Set: Set gateway IP #NET-GATESPip_addressCR
Get: Get gateway IP #NET-GATE?CR
Response ~nn@NET-GATESPip_addressCR LF
Parameters ip_address – gateway IP address, in the following format: xxx.xxx.xxx.xxx Response Triggers Notes A network gateway connects the device via another network, possibly over the Internet. Be aware of security issues. Consult your network administrator for correct settings. Example Set the gateway IP address to 192.168.0.1: #NET-GATE 192.168.000.001<CR>
NET-IP Functions Permission Transparency Set: NET-IP Administrator Public Get: NET-IP? End User Public Description Syntax Set: Set IP address #NET-IPSPip_addressCR
Get: Get IP address #NET-IP?CR
Response ~nn@NET-IPSPip_addressCR LF
Parameters ip_address – IP address, in the following format: xxx.xxx.xxx.xxx Response Triggers Notes Consult your network administrator for correct settings. Example Set the IP address to 192.168.1.39: #NET-IP 192.168.001.039<CR>

Kramer Electronics Ltd.
SL-280 – Protocol 3000 43
NET-MAC Functions Permission Transparency Set: - - - Get: NET-MAC? End User Public Description Syntax Set: - - Get: Get MAC address #NET-MAC?CR
Response ~nn@NET-MACSPmac_addressCR LF
Parameters mac_address – unique MAC address. Format: xx-xx-xx-xx-xx-xx where x is hex digit Response Triggers Notes Example #NET-MAC?<CR>
NET-MASK Functions Permission Transparency Set: NET-MASK Administrator Public Get: NET-MASK? End User Public Description Syntax Set: Set subnet mask #NET-MASKSPnet_maskCR
Get: Get subnet mask #NET-MASK?CR
Response ~nn@NET-MASKSPnet_maskCR LF
Parameters net_mask – Subnet mask address. Format: xxx.xxx.xxx.xxx Response Triggers The subnet mask limits the Ethernet connection within the local network. Consult your network administrator for correct settings. Notes Example Set the subnet mask to 255.255.0.0: #NET-MASK 255.255.000.000<CR>

Kramer Electronics Ltd.
SL-280 – Protocol 3000 44
TIME-SRV Functions Permission Transparency Set: TIME-SRV Administrator Public Get: TIME-SRV? End User Public Description Syntax
Set: Set time server #TIME-SRV␠mode,time_server,time_server_sync_hour␍
Get: Get time server #TIME-SRV?␍ Response
~nn@TIME-SRV␠mode,time_server,time_server_sync_hour,server_status␍␊ Parameters mode – 0 (OFF), 1 (ON) time_server – time server IP address or hostname. IP must be, in the following format: xxx.xxx.xxx.xxx time_server_sync_hour – not in use: 0 server_status – ON/OFF Response Triggers Notes This command sets up the NTP server. Example Set time server with IP address of 128.138.140.44 to ON: #TIME-SRV 1, 128.138.140.44,0<CR>

Kramer Electronics Ltd.
SL-280 – Protocol 3000 45
UART Functions Permission Transparency Set: UART Administrator Public Get: UART? End User Public Description Syntax
Set: Set SERIAL port configuration
#UART␠
COM_Num,baud_rate,data_bits,parity,stop_bits␍
Get: Get SERIAL port configuration #UART?␠COM_Num␍
Response
Set: ~nn@UART␠COM_Num,baud_rate,data_bits,parity,stop_bits␍␊
Get: ~nn@UART?␠COM_Num,baud_rate,data_bits,parity,stop_bits␍␊ Parameters COM_Num – The number of the relevant SERIAL port:1–8 baud_rate – 300–115200 (default: 9600) data_bits – 5–8 parity – 0 (no parity), 1 (Odd), 2 (Even), 3 (Mark), or 4 (Space) stop_bits – 1, 1.5, 2 Response Triggers Notes Stop_bits = 1.5 only when data_bits = 5. Example Set SERIAL port number 1 configuration to baud rate 9600, data bits 8, parity ‘None’, stop bits 1: #UART 1,9600,8,0,1<CR>
I/O Gateway Commands Command Description COM-ROUTE Get tunneling port routing COM-ROUTE-ADD Add communication route tunnel connection COM-ROUTE-REMOVE Remove communication route tunnel connection ETH-TUNNEL Get opened tunnel parameters GPIO-CFG Set/get HW GPIO configuration GPIO-STATE Set/get HW GPIO state GPIO-STEP Set/get HW GPIO step GPIO-THR Set/get HW GPIO threshold voltage GPIO-VOLT Get HW GPIO voltage level IR-LEARN Send IR learning command IR-SND Send IR command to port IR-STOP Send IR stop command to port RELAY-STATE Set/get relay state

Kramer Electronics Ltd.
SL-280 – Protocol 3000 46
COM-ROUTE Functions Permission Transparency Set: Get: COM-ROUTE? End User Internal Description Syntax Set:
Get: Get tunneling port routing #COM-ROUTE?␠COM_Num␍
Response
~nn@COM-ROUTE␠COM_Num,portType,ETHPort,ETH_rep_en,TCP_keep_alive_timing␍␊ Parameters COM_Num – SERIAL port number: 1–8, * (get all route tunnels) portType – 1 (UDP), 2 (TCP) ETHPort – TCP/UDP port number: default = 5001–5008 ETH_rep_en – 1 (COM port sends replies to new clients) 0 (COM port does not send replies to new clients) TCP_keep_alive_timing – every x seconds the device sends an empty string to TCP client ("/0"): 0–3600 seconds Response Triggers Notes This command gets tunneling port routing. Every SERIAL port can send or receive data from the ETH port. Example Get tunneling port routing through SERIAL port number 1: #COM-ROUTE? 1<CR>
Kramer Electronics Ltd.
SL-280 – Protocol 3000 47
COM-ROUTE-ADD Functions Permission Transparency Set: COM-ROUTE-ADD Administrator Internal Get: - - - Description Syntax
Set: Add a communication route tunnel connection
#COM-ROUTE-ADD␠ ComNum,PortType,EthPort,EthRepEn,Timeout␍
Get: - - Response
~nn@COM-ROUTE-ADD␠ComNum,PortType,EthPort,EthRepEn,TCP_keep_alive_timing ␍␊ Parameters COM_Num – SERIAL port number: 1–8 portType – 1 (UDP), 2 (TCP) ETHPort – TCP/UDP port number: default = 5001–5008 ETH_rep_en – 1 (COM port sends replies to new clients) 0 (COM port does not send replies to new clients) TCP_keep_alive_timing – every x seconds the device sends an empty string to TCP client ("/0"): 0–3600 seconds Response Triggers Notes Example Add a communication route tunnel connection through SERIAL port number 1and TCP port number 5025, COM port sends replies to new clients and the device sends a keep alive signal every 10 minutes (600 seconds): #COM-ROUTE-ADD 1,TCP,5025,1,600<CR>
COM-ROUTE-REMOVE Functions Permission Transparency Set: COM-ROUTE-REMOVE Administrator Internal Get: - - - Description Syntax
Set: Remove a communication route tunnel connection
#COM-ROUTE-REMOVE␠ComNum␍
Get: - - Response
~nn@COM-ROUTE-REMOVE␠Com_Num␍␊ Parameters Com_Num – SERIAL port number: 1–8 Response Triggers Notes Example Remove communication route tunnel connection from SERIAL port number 3: #COM-ROUTE-REMOVE 3<CR>
Kramer Electronics Ltd.
SL-280 – Protocol 3000 48
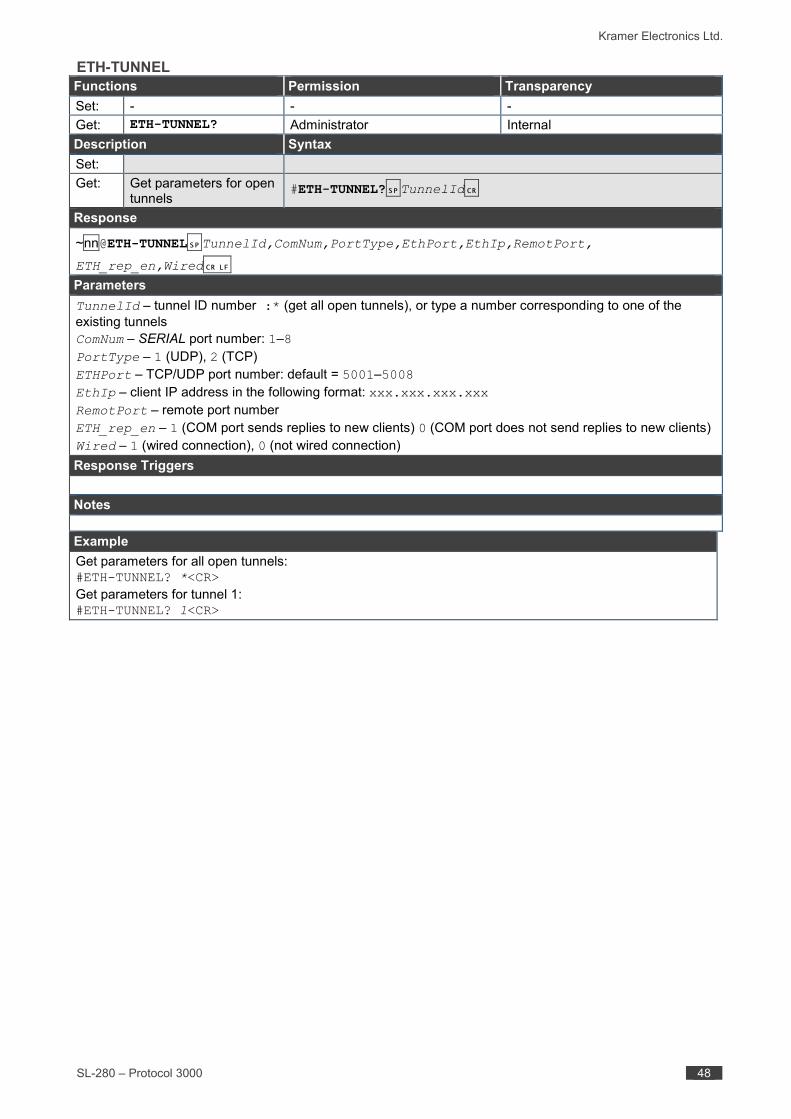
ETH-TUNNEL Functions Permission Transparency Set: - - - Get: ETH-TUNNEL? Administrator Internal Description Syntax Set: Get: Get parameters for open
tunnels #ETH-TUNNEL?␠TunnelId␍
Response
~nn@ETH-TUNNEL␠TunnelId,ComNum,PortType,EthPort,EthIp,RemotPort,
ETH_rep_en,Wired␍␊ Parameters TunnelId – tunnel ID number :* (get all open tunnels), or type a number corresponding to one of the existing tunnels ComNum – SERIAL port number: 1–8 PortType – 1 (UDP), 2 (TCP) ETHPort – TCP/UDP port number: default = 5001–5008 EthIp – client IP address in the following format: xxx.xxx.xxx.xxx RemotPort – remote port number ETH_rep_en – 1 (COM port sends replies to new clients) 0 (COM port does not send replies to new clients) Wired – 1 (wired connection), 0 (not wired connection) Response Triggers Notes Example Get parameters for all open tunnels: #ETH-TUNNEL? *<CR> Get parameters for tunnel 1: #ETH-TUNNEL? 1<CR>

Kramer Electronics Ltd.
SL-280 – Protocol 3000 49
GPIO-CFG Functions Permission Transparency Set: GPIO-CFG End User Public Get: GPIO-CFG? End User Public Description Syntax
Set: Set I/O port configuration
#GPIO-CFG␠HwGpioNumber,HwGpioType,HwGpioDir,Pullup␍
Get: Get I/O port configuration
#GPIO-CFG?␠HwGpioNumber␍
Response
~nn@GPIO-CFG␠HwGpioNum,HwGpioType,HwGpioDir␍␊ Parameters HwGpioNum – I/O port number: 1–8 HwGpioType – I/O port type: 0 (analog), 1 (digital) HwGpioDir – I/O port direction: 0 (input), 1 (output) Pullup – 0 (disable), 1 (enable) Response Triggers Notes Example Set configuration for I/O port number 1 to digital input with the pull-up enabled: #GPIO-CFG 1,1,0,1<CR>
GPIO-STATE Functions Permission Transparency Set: GPIO-STATE End User Public Get: GPIO-STATE? End User Public Description Syntax
Set: Set I/O port state #GPIO-STATE␠HwGpioNumber,HwGpioState␍
Get: Get I/O port state #GPIO-STATE␠HwGpioNumber␍ Response
~nn@GPIO-STATE␠HwGpioNum,HwGpioState␍␊ Parameters HwGpioNum – I/O port number (1–8) HwGpioState – I/O port state – See note below Response Triggers Notes GPIO-STATE? can only be sent in digital mode and the answer is 0=Low, 1=High. In analog mode an error message is sent. GPIO-STATE can only be sent in digital out mode and the parameter is 0=Low, 1=High. In all other modes an error message is sent. The device uses this command to notify the user of whenever there is a change regarding the state. Example Set state for digital I/O port number 1 to high: #GPIO-STATE 1,1<CR>
Kramer Electronics Ltd.
SL-280 – Protocol 3000 50
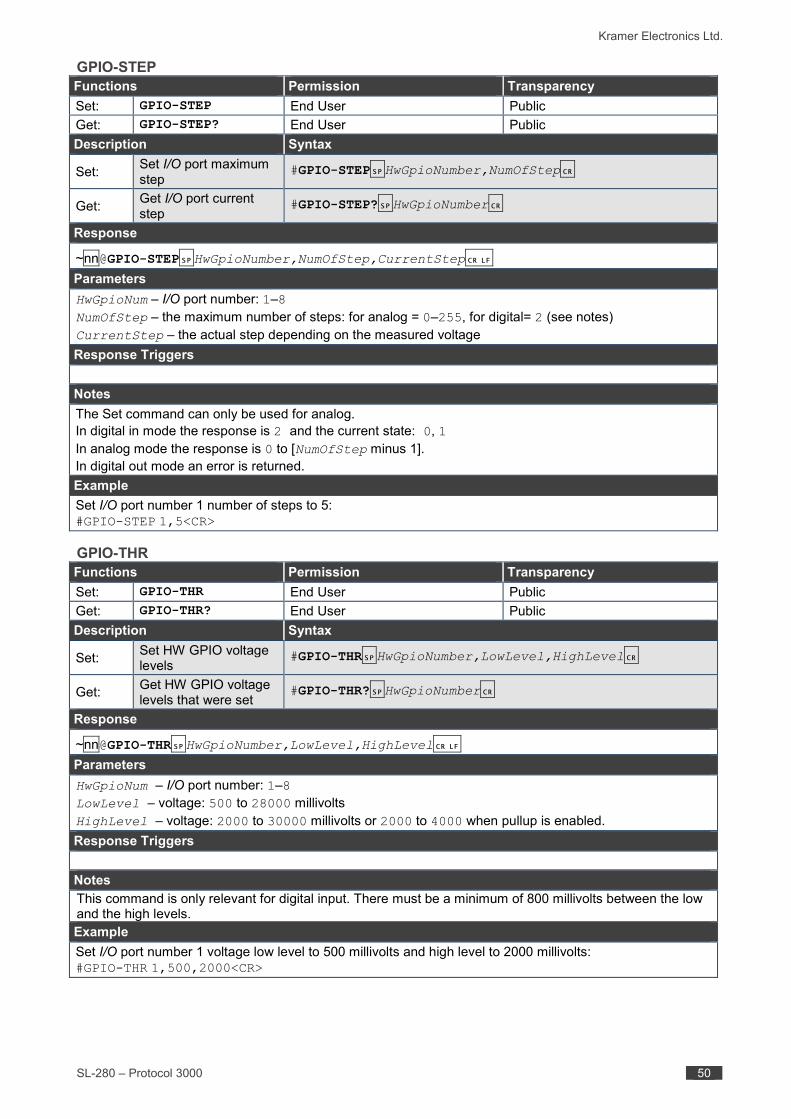
GPIO-STEP Functions Permission Transparency Set: GPIO-STEP End User Public Get: GPIO-STEP? End User Public Description Syntax
Set: Set I/O port maximum step
#GPIO-STEP␠HwGpioNumber,NumOfStep␍
Get: Get I/O port current step
#GPIO-STEP?␠HwGpioNumber␍
Response
~nn@GPIO-STEP␠HwGpioNumber,NumOfStep,CurrentStep␍␊ Parameters HwGpioNum – I/O port number: 1–8 NumOfStep – the maximum number of steps: for analog = 0–255, for digital= 2 (see notes) CurrentStep – the actual step depending on the measured voltage Response Triggers Notes The Set command can only be used for analog. In digital in mode the response is 2 and the current state: 0, 1 In analog mode the response is 0 to [NumOfStep minus 1]. In digital out mode an error is returned. Example Set I/O port number 1 number of steps to 5: #GPIO-STEP 1,5<CR>
GPIO-THR Functions Permission Transparency Set: GPIO-THR End User Public Get: GPIO-THR? End User Public Description Syntax
Set: Set HW GPIO voltage levels
#GPIO-THR␠HwGpioNumber,LowLevel,HighLevel␍
Get: Get HW GPIO voltage levels that were set
#GPIO-THR?␠HwGpioNumber␍
Response
~nn@GPIO-THR␠HwGpioNumber,LowLevel,HighLevel␍␊ Parameters HwGpioNum – I/O port number: 1–8 LowLevel – voltage: 500 to 28000 millivolts HighLevel – voltage: 2000 to 30000 millivolts or 2000 to 4000 when pullup is enabled. Response Triggers Notes This command is only relevant for digital input. There must be a minimum of 800 millivolts between the low and the high levels. Example Set I/O port number 1 voltage low level to 500 millivolts and high level to 2000 millivolts: #GPIO-THR 1,500,2000<CR>

Kramer Electronics Ltd.
SL-280 – Protocol 3000 51
GPIO-VOLT Functions Permission Transparency Set: - - - Get: GPIO-VOLT? End User Public Description Syntax Set:
Get: Get active voltage levels of HW GPIO
#GPIO-VOLT?␠HwGpioNumber␍
Response
~nn@GPIO-VOLT␠HwGpioNumber,Voltage␍␊ Parameters HwGpioNum – hardware GPIO number: 1–8 Voltage – voltage 0 to 30000 millivolts Response Triggers Notes This command is not available in digital out mode Example Get HW GPIO #1 active voltage level: #GPIO-VOLT? 1<CR>
IR-LEARN Functions Permission Transparency Set: IR-LEARN End User Public Get: - - - Description Syntax
Set: Send IR learning command
#IR-LEARN␠CommandName,Timeout␍
Get: - - Response
~nn@IR-LEARN␠CommandName,IR_Status␍␊ Parameters CommandName – String: IR command name limited to 15 chars (white space or commas not allowed). Timeout – Timeout in seconds: 1–60 IR_Status – 0 (Sent), 1 (Stop), 2 (Done), 3 (Busy), 4 (Wrong Parameter), 5 (Nothing to Stop), 6 (Start), 7 (Timeout), 8 (Error) Response Triggers Notes Example Send IR learning command PowerToggle, with a 30 second timeout: #IR-LEARN PowerToggle,30<CR>
Kramer Electronics Ltd.
SL-280 – Protocol 3000 52
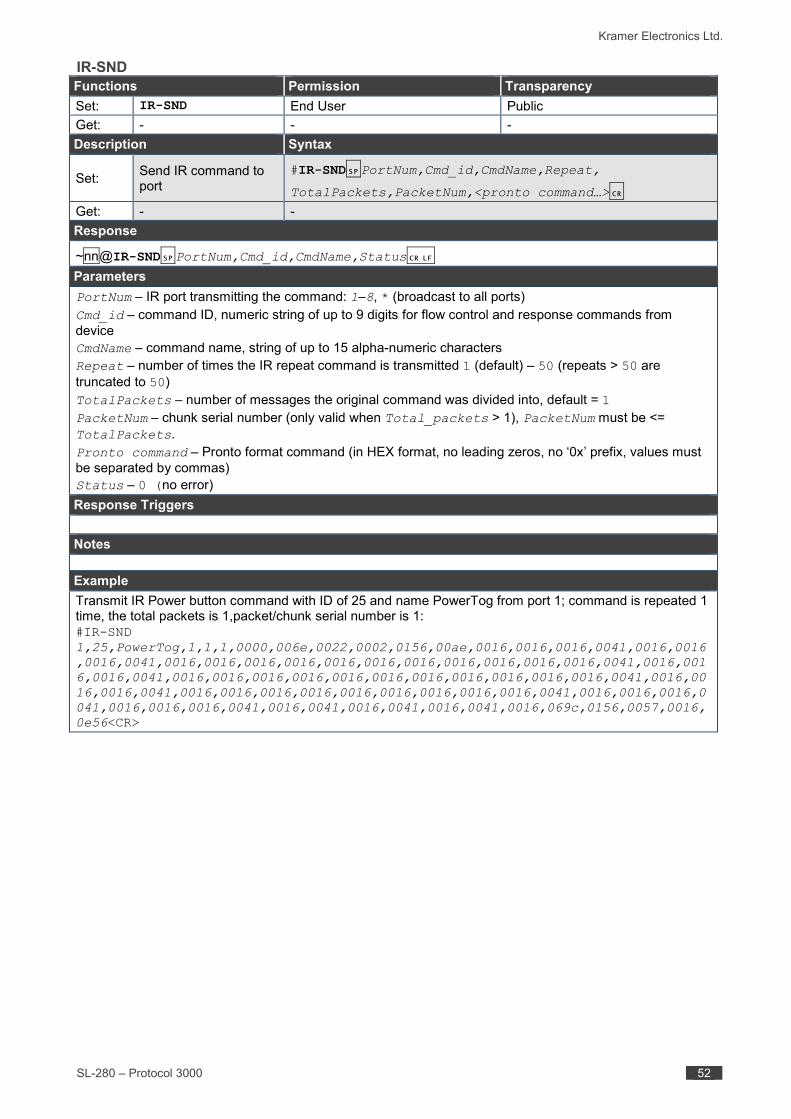
IR-SND Functions Permission Transparency Set: IR-SND End User Public Get: - - - Description Syntax
Set: Send IR command to port
#IR-SND␠PortNum,Cmd_id,CmdName,Repeat,
TotalPackets,PacketNum,<pronto command…>␍ Get: - - Response
~nn@IR-SND␠PortNum,Cmd_id,CmdName,Status␍␊ Parameters PortNum – IR port transmitting the command: 1–8, * (broadcast to all ports) Cmd_id – command ID, numeric string of up to 9 digits for flow control and response commands from device CmdName – command name, string of up to 15 alpha-numeric characters Repeat – number of times the IR repeat command is transmitted 1 (default) – 50 (repeats > 50 are truncated to 50) TotalPackets – number of messages the original command was divided into, default = 1 PacketNum – chunk serial number (only valid when Total_packets > 1), PacketNum must be <= TotalPackets. Pronto command – Pronto format command (in HEX format, no leading zeros, no ‘0x’ prefix, values must be separated by commas) Status – 0 (no error) Response Triggers Notes Example Transmit IR Power button command with ID of 25 and name PowerTog from port 1; command is repeated 1 time, the total packets is 1,packet/chunk serial number is 1: #IR-SND 1,25,PowerTog,1,1,1,0000,006e,0022,0002,0156,00ae,0016,0016,0016,0041,0016,0016,0016,0041,0016,0016,0016,0016,0016,0016,0016,0016,0016,0016,0016,0041,0016,0016,0016,0041,0016,0016,0016,0016,0016,0016,0016,0016,0016,0016,0016,0041,0016,0016,0016,0041,0016,0016,0016,0016,0016,0016,0016,0016,0016,0041,0016,0016,0016,0041,0016,0016,0016,0041,0016,0041,0016,0041,0016,0041,0016,069c,0156,0057,0016,0e56<CR>

Kramer Electronics Ltd.
SL-280 – Protocol 3000 53
IR-STOP Functions Permission Transparency Set: IR-STOP End User Public Get: - - - Description Syntax
Set: Send IR stop command to port #IR-STOP␠PortNum,Cmd_id,CmdName␍
Get: - - Response
~nn@IR-STOP␠PortNum,Cmd_id,CmdName,Status␍␊ Parameters PortNum – IR port transmitting the command: 1–8, * (broadcast to all ports) Cmd_id – command ID, numeric string of up to 9 digits for flow control and response commands from device CmdName – command name, string of up to 15 alpha-numeric characters Status – 0 (no error) Response Triggers Notes Example Send IR stop command for IR port number 1, for PowerTog command with ID of 25: #IR-STOP 1,25,PowerTog<CR>
RELAY-STATE Functions Permission Transparency Set: RELAY-STATE End User Public Get: RELAY-STATE? End User Public Description Syntax
Set: Set relay state #RELAY-STATE␠RelayNumber,RelayState␍
Get: Get relay state #RELAY-STATE?␠RelayNumber␍ Response
~nn@RELAY-STATE␠RelayNum,RelayState␍␊ Parameters RelayNumber – Relay port number: 1–8 RelayState – relay state: 0 (open), 1 (closed), see note Response Triggers Notes When relays 1 and 5 are connected as NC (Normally Closed) (see Connecting the Relay Ports on page 8), the RelayState parameter is reversed: 0 (closed), 1 (open). Example Set Relay port number 2 state to closed: #RELAY-STATE 2,1<CR>

Kramer Electronics Ltd.
SL-280 – Protocol 3000 54
File System Commands Command Description DEL Delete file DIR List files in device FORMAT Format file system FS-FREE Get file system free space GET Get file
DEL Functions Permission Transparency Set: DEL Administrator Public Get: - - - Description Syntax
Set: Delete file #DEL␠file_name␍ Get: Response
~nn@DEL␠file_name␍␊ Parameters file_name – name of file to delete Response Triggers Notes File names are case-sensitive. Example Delete Setup file: #DEL Setup<CR>
Kramer Electronics Ltd.
SL-280 – Protocol 3000 55
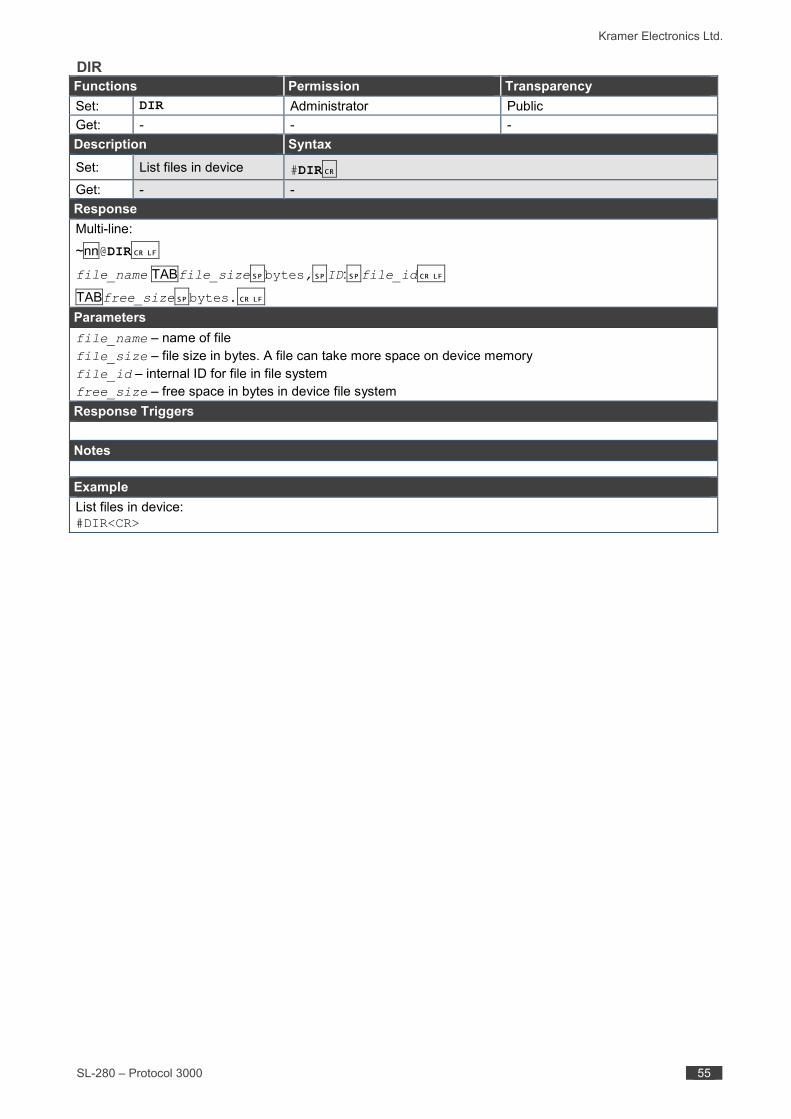
DIR Functions Permission Transparency Set: DIR Administrator Public Get: - - - Description Syntax
Set: List files in device #DIR␍ Get: - - Response Multi-line: ~nn@DIR␍␊
file_name TABfile_size␠bytes,␠ID:␠file_id␍␊ TABfree_size␠bytes.␍␊ Parameters file_name – name of file file_size – file size in bytes. A file can take more space on device memory file_id – internal ID for file in file system free_size – free space in bytes in device file system Response Triggers Notes Example List files in device: #DIR<CR>

Kramer Electronics Ltd.
SL-280 – Protocol 3000 56
FORMAT Functions Permission Transparency Set: FORMAT Administrator Public Get: - - - Description Syntax
Set: Format file system #FORMAT␍ Get: - - Response
~nn@FORMAT␠OK␍␊ Parameters Response Triggers Notes Response could take several seconds until formatting completes. Example Format file system: #FORMAT<CR>
FS-FREE? Functions Permission Transparency Set: - - - Get: FS-FREE? Administrator Public Description Syntax Set: - -
Get: Get file system free space #FS-FREE?␍
Response
~nn@FS_FREE␠free_size␍␊ Parameters free_size – free size in device file system in bytes Response Triggers Notes Example Get file system free space: #FS-FREE?<CR>

Kramer Electronics Ltd.
SL-280 – Protocol 3000 57
GET Functions Permission Transparency Set: - - - Get: GET Administrator Public Description Syntax Set: - -
Get: Get file #GET␠file_name␍ Response Multi-line: ~nn@GET␠file_name,file_size␠READY␍␊contents ~nn@GET␠file_name␠OK␍␊ Parameters file_name – name of file to get contents contents – byte stream of file contents file_size – size of file (device sends it in response to give user a chance to get ready) Response Triggers Notes Example Get file: #GET file_name<CR>

Kramer Electronics Ltd.
SL-280 – Protocol 3000 58
Authentication Commands Command Description LOGIN Set/get protocol permission LOGOUT Cancel current permission level PASS Set/get password for login level SECUR Set/get current security state
LOGIN Functions Permission Transparency Set: LOGIN Not Secure Public Get: LOGIN? Not Secure Public Description Syntax
Set: Set protocol permission #LOGINSPlogin_level,passwordCR
Get: Get current protocol permission level #LOGIN?CR
Response Set: ~nn@LOGINSPlogin_level,passwordSPOKCR LF or ~nn@LOGINSPERRSP004CR LF (if bad password entered) Get: ~nn@LOGINSPlogin_levelCR LF Parameters login_level – level of permissions required: User, Admin password – predefined password (by PASS command). Default password is an empty string. Response Triggers Notes When the permission system is enabled, LOGIN enables running commands with the User or Administrator permission level. When set, login must be performed upon each connection. The permission system works only if security is enabled with the SECUR command. It is not mandatory to enable the permission system in order to use the device. Example Set the protocol permission level to Admin (when the password defined in the PASS command is 33333): #LOGIN Admin,33333<CR>

Kramer Electronics Ltd.
SL-280 – Protocol 3000 59
LOGOUT Functions Permission Transparency Set: LOGOUT Not Secure Public Get: - - - Description Syntax
Set: Cancel current permission level #LOGOUTCR
Get: - - Response ~nn@LOGOUTSPOKCR LF
Parameters Response Triggers Notes Logs out from User or Administrator permission levels Example #LOGOUT<CR>
PASS Functions Permission Transparency Set: PASS Administrator Public Get: PASS? Administrator Public Description Syntax
Set: Set password for login level #PASSSPlogin_level,passwordCR
Get: Get password for login level #PASS?SPlogin_levelCR
Response ~nn@PASSSPlogin_level,passwordCR LF
Parameters login_level – level of login to set: User, Admin password – password for the login_level. Up to 15 printable ASCII chars. Response Triggers Notes The default password is an empty string Example Set the password for the Admin protocol permission level to 33333: #PASS Admin,33333<CR>

Kramer Electronics Ltd.
SL-280 – Protocol 3000 60
SECUR Functions Permission Transparency Set: SECUR Administrator Public Get: SECUR? Not Secure Public Description Syntax Set: Start/stop security #SECURSPsecurity_modeCR
Get: Get current security state #SECUR?CR
Response ~nn@SECURSPsecurity_modeCR LF
Parameters security_mode – 1 (On / enable security), 0 (Off / disable security) Response Triggers Notes The permission system works only if security is enabled with the SECUR command. Example Enable the permission system: #SECUR 0<CR>

Kramer Electronics Ltd.
SL-280 – License Information 61
License Information OpenSSL License Copyright (c) 1998-2017 The OpenSSL Project. All rights reserved. Redistribution and use in source and binary forms, with or without modification, are permitted provided that the following conditions are met:
1. Redistributions of source code must retain the above copyright notice, this list of conditions and the following disclaimer. 2. Redistributions in binary form must reproduce the above copyright notice, this list of conditions and the following disclaimer in the
documentation and/or other materials provided with the distribution. 3. All advertising materials mentioning features or use of this software must display the following acknowledgment: "This product
includes software developed by the OpenSSL Project for use in the OpenSSL Toolkit. (http://www.openssl.org/)". 4. The names "OpenSSL Toolkit" and "OpenSSL Project" must not be used to endorse or promote products derived from this software
without prior written permission. For written permission, please contact [email protected]. 5. Products derived from this software may not be called "OpenSSL" nor may "OpenSSL" appear in their names without prior written
permission of the OpenSSL Project. 6. Redistributions of any form whatsoever must retain the following acknowledgment: "This product includes software developed by the
OpenSSL Project for use in the OpenSSL Toolkit (http://www.openssl.org/)". THIS SOFTWARE IS PROVIDED BY THE OpenSSL PROJECT ``AS IS'' AND ANY EXPRESSED OR IMPLIED WARRANTIES, INCLUDING, BUT NOT LIMITED TO, THE IMPLIED WARRANTIES OF MERCHANTABILITY AND FITNESS FOR A PARTICULAR PURPOSE ARE DISCLAIMED. IN NO EVENT SHALL THE OpenSSL PROJECT OR ITS CONTRIBUTORS BE LIABLE FOR ANY DIRECT, INDIRECT, INCIDENTAL, SPECIAL, EXEMPLARY, OR CONSEQUENTIAL DAMAGES (INCLUDING, BUT NOT LIMITED TO, PROCUREMENT OF SUBSTITUTE GOODS OR SERVICES; LOSS OF USE, DATA, OR PROFITS; OR BUSINESS INTERRUPTION) HOWEVER CAUSED AND ON ANY THEORY OF LIABILITY, WHETHER IN CONTRACT, STRICT LIABILITY, OR TORT (INCLUDING NEGLIGENCE OR OTHERWISE) ARISING IN ANY WAY OUT OF THE USE OF THIS SOFTWARE, EVEN IF ADVISED OF THE POSSIBILITY OF SUCH DAMAGE.
• This product includes cryptographic software written by Eric Young ([email protected]). • This product includes software written by Tim Hudson ([email protected]).
Original SSLeay License Copyright (C) 1995-1998 Eric Young ([email protected]) all rights reserved. This package is an SSL implementation written by Eric Young ([email protected]). The implementation was written so as to conform with Netscapes SSL. This library is free for commercial and non-commercial use as long as the following conditions are adhered to. The following conditions apply to all code found in this distribution, be it the RC4, RSA, lhash, DES, etc., code; not just the SSL code. The SSL documentation included with this distribution is covered by the same copyright terms except that the holder is Tim Hudson ([email protected]). Copyright remains Eric Young's, and as such any Copyright notices in the code are not to be removed. If this package is used in a product, Eric Young should be given attribution as the author of the parts of the library used. This can be in the form of a textual message at program startup or in documentation (online or textual) provided with the package. Redistribution and use in source and binary forms, with or without modification, are permitted provided that the following conditions are met:
1. Redistributions of source code must retain the copyright notice, this list of conditions and the following disclaimer. 2. Redistributions in binary form must reproduce the above copyright notice, this list of conditions and the following disclaimer in the
documentation and/or other materials provided with the distribution. 3. All advertising materials mentioning features or use of this software must display the following acknowledgement: "This product
includes cryptographic software written by Eric Young ([email protected])". The word 'cryptographic' can be left out if the routines from the library being used are not cryptographic related.
4. If you include any Windows specific code (or a derivative thereof) from the apps directory (application code) you must include an acknowledgement: "This product includes software written by Tim Hudson ([email protected])".
THIS SOFTWARE IS PROVIDED BY ERIC YOUNG ``AS IS'' AND ANY EXPRESS OR IMPLIED WARRANTIES, INCLUDING, BUT NOT LIMITED TO, THE IMPLIED WARRANTIES OF MERCHANTABILITY AND FITNESS FOR A PARTICULAR PURPOSE ARE DISCLAIMED. IN NO EVENT SHALL THE AUTHOR OR CONTRIBUTORS BE LIABLE FOR ANY DIRECT, INDIRECT, INCIDENTAL, SPECIAL, EXEMPLARY, OR CONSEQUENTIAL DAMAGES (INCLUDING, BUT NOT LIMITED TO, PROCUREMENT OF SUBSTITUTE GOODS OR SERVICES; LOSS OF USE, DATA, OR PROFITS; OR BUSINESS INTERRUPTION) HOWEVER CAUSED AND ON ANY THEORY OF LIABILITY, WHETHER IN CONTRACT, STRICT LIABILITY, OR TORT (INCLUDING NEGLIGENCE OR OTHERWISE) ARISING IN ANY WAY OUT OF THE USE OF THIS SOFTWARE, EVEN IF ADVISED OF THE POSSIBILITY OF SUCH DAMAGE. The license and distribution terms for any publically available version or derivative of this code cannot be changed. i.e. this code cannot simply be copied and put under another distribution license [including the GNU Public License.]

Kramer Electronics Ltd.
SL-280 – License Information 62
GNU General Public License Version 2, June 1991 Copyright (C) 1989, 1991 Free Software Foundation, Inc. 51 Franklin Street, Fifth Floor, Boston, MA 02110-1301, USA Everyone is permitted to copy and distribute verbatim copies of this license document, but changing it is not allowed.
PREAMBLE The licenses for most software are designed to take away your freedom to share and change it. By contrast, the GNU General Public License is intended to guarantee your freedom to share and change free software--to make sure the software is free for all its users. This General Public License applies to most of the Free Software Foundation's software and to any other program whose authors commit to using it. (Some other Free Software Foundation software is covered by the GNU Lesser General Public License instead.) You can apply it to your programs, too. When we speak of free software, we are referring to freedom, not price. Our General Public Licenses are designed to make sure that you have the freedom to distribute copies of free software (and charge for this service if you wish), that you receive source code or can get it if you want it, that you can change the software or use pieces of it in new free programs; and that you know you can do these things. To protect your rights, we need to make restrictions that forbid anyone to deny you these rights or to ask you to surrender the rights. These restrictions translate to certain responsibilities for you if you distribute copies of the software, or if you modify it. For example, if you distribute copies of such a program, whether gratis or for a fee, you must give the recipients all the rights that you have. You must make sure that they, too, receive or can get the source code. And you must show them these terms so they know their rights. We protect your rights with two steps: (1) copyright the software, and (2) offer you this license which gives you legal permission to copy, distribute and/or modify the software. Also, for each author's protection and ours, we want to make certain that everyone understands that there is no warranty for this free software. If the software is modified by someone else and passed on, we want its recipients to know that what they have is not the original, so that any problems introduced by others will not reflect on the original authors' reputations. Finally, any free program is threatened constantly by software patents. We wish to avoid the danger that redistributors of a free program will individually obtain patent licenses, in effect making the program proprietary. To prevent this, we have made it clear that any patent must be licensed for everyone's free use or not licensed at all. The precise terms and conditions for copying, distribution and modification follow.
TERMS AND CONDITIONS FOR COPYING, DISTRIBUTION AND MODIFICATION 0. This License applies to any program or other work which contains a notice placed by the copyright holder saying it may be distributed under the terms of this General Public License. The "Program", below, refers to any such program or work, and a "work based on the Program" means either the Program or any derivative work under copyright law: that is to say, a work containing the Program or a portion of it, either verbatim or with modifications and/or translated into another language. (Hereinafter, translation is included without limitation in the term "modification".) Each licensee is addressed as "you". Activities other than copying, distribution and modification are not covered by this License; they are outside its scope. The act of running the Program is not restricted, and the output from the Program is covered only if its contents constitute a work based on the Program (independent of having been made by running the Program). Whether that is true depends on what the Program does. 1. You may copy and distribute verbatim copies of the Program's source code as you receive it, in any medium, provided that you conspicuously and appropriately publish on each copy an appropriate copyright notice and disclaimer of warranty; keep intact all the notices that refer to this License and to the absence of any warranty; and give any other recipients of the Program a copy of this License along with the Program. You may charge a fee for the physical act of transferring a copy, and you may at your option offer warranty protection in exchange for a fee. 2. You may modify your copy or copies of the Program or any portion of it, thus forming a work based on the Program, and copy and distribute such modifications or work under the terms of Section 1 above, provided that you also meet all of these conditions: a) You must cause the modified files to carry prominent notices stating that you changed the files and the date of any change. b) You must cause any work that you distribute or publish, that in whole or in part contains or is derived from the Program or any part thereof, to be licensed as a whole at no charge to all third parties under the terms of this License. c) If the modified program normally reads commands interactively when run, you must cause it, when started running for such interactive use in the most ordinary way, to print or display an announcement including an appropriate copyright notice and a notice that there is no warranty (or else, saying that you provide a warranty) and that users may redistribute the program under these conditions, and telling the user how to view a copy of this License. (Exception: if the Program itself is interactive but does not normally print such an announcement, your work based on the Program is not required to print an announcement.) These requirements apply to the modified work as a whole. If identifiable sections of that work are not derived from the Program, and can be reasonably considered independent and separate works in themselves, then this License, and its terms, do not apply to those sections when you distribute them as separate works. But when you distribute the same sections as part of a whole which is a work based on the Program, the distribution of the whole must be on the terms of this License, whose permissions for other licensees extend to the entire whole, and thus to each and every part regardless of who wrote it. Thus, it is not the intent of this section to claim rights or contest your rights to work written entirely by you; rather, the intent is to exercise the right to control the distribution of derivative or collective works based on the Program. In addition, mere aggregation of another work not based on the Program with the Program (or with a work based on the Program) on a volume of a storage or distribution medium does not bring the other work under the scope of this License. 3. You may copy and distribute the Program (or a work based on it, under Section 2) in object code or executable form under the terms of Sections 1 and 2 above provided that you also do one of the following: a) Accompany it with the complete corresponding machine-readable source code, which must be distributed under the terms of Sections 1 and 2 above on a medium customarily used for software interchange; or,

Kramer Electronics Ltd.
SL-280 – License Information 63
b) Accompany it with a written offer, valid for at least three years, to give any third party, for a charge no more than your cost of physically performing source distribution, a complete machine-readable copy of the corresponding source code, to be distributed under the terms of Sections 1 and 2 above on a medium customarily used for software interchange; or, c) Accompany it with the information you received as to the offer to distribute corresponding source code. (This alternative is allowed only for noncommercial distribution and only if you received the program in object code or executable form with such an offer, in accord with Subsection b above.) The source code for a work means the preferred form of the work for making modifications to it. For an executable work, complete source code means all the source code for all modules it contains, plus any associated interface definition files, plus the scripts used to control compilation and installation of the executable. However, as a special exception, the source code distributed need not include anything that is normally distributed (in either source or binary form) with the major components (compiler, kernel, and so on) of the operating system on which the executable runs, unless that component itself accompanies the executable. If distribution of executable or object code is made by offering access to copy from a designated place, then offering equivalent access to copy the source code from the same place counts as distribution of the source code, even though third parties are not compelled to copy the source along with the object code. 4. You may not copy, modify, sublicense, or distribute the Program except as expressly provided under this License. Any attempt otherwise to copy, modify, sublicense or distribute the Program is void, and will automatically terminate your rights under this License. However, parties who have received copies, or rights, from you under this License will not have their licenses terminated so long as such parties remain in full compliance. 5. You are not required to accept this License, since you have not signed it. However, nothing else grants you permission to modify or distribute the Program or its derivative works. These actions are prohibited by law if you do not accept this License. Therefore, by modifying or distributing the Program (or any work based on the Program), you indicate your acceptance of this License to do so, and all its terms and conditions for copying, distributing or modifying the Program or works based on it. 6. Each time you redistribute the Program (or any work based on the Program), the recipient automatically receives a license from the original licensor to copy, distribute or modify the Program subject to these terms and conditions. You may not impose any further restrictions on the recipients' exercise of the rights granted herein. You are not responsible for enforcing compliance by third parties to this License. 7. If, as a consequence of a court judgment or allegation of patent infringement or for any other reason (not limited to patent issues), conditions are imposed on you (whether by court order, agreement or otherwise) that contradict the conditions of this License, they do not excuse you from the conditions of this License. If you cannot distribute so as to satisfy simultaneously your obligations under this License and any other pertinent obligations, then as a consequence you may not distribute the Program at all. For example, if a patent license would not permit royalty-free redistribution of the Program by all those who receive copies directly or indirectly through you, then the only way you could satisfy both it and this License would be to refrain entirely from distribution of the Program. If any portion of this section is held invalid or unenforceable under any particular circumstance, the balance of the section is intended to apply and the section as a whole is intended to apply in other circumstances. It is not the purpose of this section to induce you to infringe any patents or other property right claims or to contest validity of any such claims; this section has the sole purpose of protecting the integrity of the free software distribution system, which is implemented by public license practices. Many people have made generous contributions to the wide range of software distributed through that system in reliance on consistent application of that system; it is up to the author/donor to decide if he or she is willing to distribute software through any other system and a licensee cannot impose that choice. This section is intended to make thoroughly clear what is believed to be a consequence of the rest of this License. 8. If the distribution and/or use of the Program are restricted in certain countries either by patents or by copyrighted interfaces, the original copyright holder who places the Program under this License may add an explicit geographical distribution limitation excluding those countries, so that distribution is permitted only in or among countries not thus excluded. In such case, this License incorporates the limitation as if written in the body of this License. 9. The Free Software Foundation may publish revised and/or new versions of the General Public License from time to time. Such new versions will be similar in spirit to the present version, but may differ in detail to address new problems or concerns. Each version is given a distinguishing version number. If the Program specifies a version number of this License which applies to it and "any later version", you have the option of following the terms and conditions either of that version or of any later version published by the Free Software Foundation. If the Program does not specify a version number of this License, you may choose any version ever published by the Free Software Foundation. 10. If you wish to incorporate parts of the Program into other free programs whose distribution conditions are different, write to the author to ask for permission. For software which is copyrighted by the Free Software Foundation, write to the Free Software Foundation; we sometimes make exceptions for this. Our decision will be guided by the two goals of preserving the free status of all derivatives of our free software and of promoting the sharing and reuse of software generally.
NO WARRANTY 11. BECAUSE THE PROGRAM IS LICENSED FREE OF CHARGE, THERE IS NO WARRANTY FOR THE PROGRAM, TO THE EXTENT PERMITTED BY APPLICABLE LAW. EXCEPT WHEN OTHERWISE STATED IN WRITING THE COPYRIGHT HOLDERS AND/OR OTHER PARTIES PROVIDE THE PROGRAM "AS IS" WITHOUT WARRANTY OF ANY KIND, EITHER EXPRESSED OR IMPLIED, INCLUDING, BUT NOT LIMITED TO, THE IMPLIED WARRANTIES OF MERCHANTABILITY AND FITNESS FOR A PARTICULAR PURPOSE. THE ENTIRE RISK AS TO THE QUALITY AND PERFORMANCE OF THE PROGRAM IS WITH YOU. SHOULD THE PROGRAM PROVE DEFECTIVE, YOU ASSUME THE COST OF ALL NECESSARY SERVICING, REPAIR OR CORRECTION. 12. IN NO EVENT UNLESS REQUIRED BY APPLICABLE LAW OR AGREED TO IN WRITING WILL ANY COPYRIGHT HOLDER, OR ANY OTHER PARTY WHO MAY MODIFY AND/OR REDISTRIBUTE THE PROGRAM AS PERMITTED ABOVE, BE LIABLE TO YOU FOR DAMAGES, INCLUDING ANY GENERAL, SPECIAL, INCIDENTAL OR CONSEQUENTIAL DAMAGES ARISING OUT OF THE USE OR INABILITY TO USE THE PROGRAM (INCLUDING BUT NOT LIMITED TO LOSS OF DATA OR DATA BEING RENDERED INACCURATE OR LOSSES SUSTAINED BY YOU OR THIRD PARTIES OR A FAILURE OF THE PROGRAM TO OPERATE WITH ANY OTHER PROGRAMS), EVEN IF SUCH HOLDER OR OTHER PARTY HAS BEEN ADVISED OF THE POSSIBILITY OF SUCH DAMAGES.

The warranty obligations of Kramer Electronics Inc. (“Kramer Electronics”) for this product are limited to the terms set forth below: What is Covered This limited warranty covers defects in materials and workmanship in this product. What is Not Covered This limited warranty does not cover any damage, deterioration or malfunction resulting from any alteration, modification, improper or unreasonable use or maintenance, misuse, abuse, accident, neglect, exposure to excess moisture, fire, improper packing and shipping (such claims must be presented to the carrier), lightning, power surges, or other acts of nature. This limited warranty does not cover any damage, deterioration or malfunction resulting from the installation or removal of this product from any installation, any unauthorized tampering with this product, any repairs attempted by anyone unauthorized by Kramer Electronics to make such repairs, or any other cause which does not relate directly to a defect in materials and/or workmanship of this product. This limited warranty does not cover cartons, equipment enclosures, cables or accessories used in conjunction with this product. Without limiting any other exclusion herein, Kramer Electronics does not warrant that the product covered hereby, including, without limitation, the technology and/or integrated circuit(s) included in the product, will not become obsolete or that such items are or will remain compatible with any other product or technology with which the product may be used. How Long this Coverage Lasts The standard limited warranty for Kramer products is seven (7) years from the date of original purchase, with the following exceptions: 1. All Kramer VIA hardware products are covered by a standard three (3) year warranty for the VIA hardware and a standard three (3) year
warranty for firmware and software updates. 2. All Kramer fiber optic cables and adapters, active cables, cable retractors, all Kramer speakers and Kramer touch panels are covered by a
standard one (1) year warranty. 3. All Kramer Cobra products, all Kramer Calibre products, all Kramer Minicom digital signage products, all HighSecLabs products, all
streaming, and all wireless products are covered by a standard three (3) year warranty. 4. All Sierra Video MultiViewers are covered by a standard five (5) year warranty. 5. Sierra switchers & control panels are covered by a standard seven (7) year warranty (excluding power supplies and fans that are covered for
three (3) years). 6. K-Touch software is covered by a standard one (1) year warranty for software updates. 7. All Kramer passive cables are covered by a ten (10) year warranty.
Who is Covered Only the original purchaser of this product is covered under this limited warranty. This limited warranty is not transferable to subsequent purchasers or owners of this product. What Kramer Electronics Will Do Kramer Electronics will, at its sole option, provide one of the following three remedies to whatever extent it shall deem necessary to satisfy a proper claim under this limited warranty: 1. Elect to repair or facilitate the repair of any defective parts within a reasonable period of time, free of any charge for the necessary parts and
labor to complete the repair and restore this product to its proper operating condition. Kramer Electronics will also pay the shipping costs necessary to return this product once the repair is complete.
2. Replace this product with a direct replacement or with a similar product deemed by Kramer Electronics to perform substantially the same function as the original product.
3. Issue a refund of the original purchase price less depreciation to be determined based on the age of the product at the time remedy is sought under this limited warranty.
What Kramer Electronics Will Not Do Under This Limited Warranty If this product is returned to Kramer Electronics or the authorized dealer from which it was purchased or any other party authorized to repair Kramer Electronics products, this product must be insured during shipment, with the insurance and shipping charges prepaid by you. If this product is returned uninsured, you assume all risks of loss or damage during shipment. Kramer Electronics will not be responsible for any costs related to the removal or re-installation of this product from or into any installation. Kramer Electronics will not be responsible for any costs related to any setting up this product, any adjustment of user controls or any programming required for a specific installation of this product. How to Obtain a Remedy Under This Limited Warranty To obtain a remedy under this limited warranty, you must contact either the authorized Kramer Electronics reseller from whom you purchased this product or the Kramer Electronics office nearest you. For a list of authorized Kramer Electronics resellers and/or Kramer Electronics authorized service providers, visit our web site at www.kramerav.com or contact the Kramer Electronics office nearest you. In order to pursue any remedy under this limited warranty, you must possess an original, dated receipt as proof of purchase from an authorized Kramer Electronics reseller. If this product is returned under this limited warranty, a return authorization number, obtained from Kramer Electronics, will be required (RMA number). You may also be directed to an authorized reseller or a person authorized by Kramer Electronics to repair the product. If it is decided that this product should be returned directly to Kramer Electronics, this product should be properly packed, preferably in the original carton, for shipping. Cartons not bearing a return authorization number will be refused. Limitation of Liability THE MAXIMUM LIABILITY OF KRAMER ELECTRONICS UNDER THIS LIMITED WARRANTY SHALL NOT EXCEED THE ACTUAL PURCHASE PRICE PAID FOR THE PRODUCT. TO THE MAXIMUM EXTENT PERMITTED BY LAW, KRAMER ELECTRONICS IS NOT RESPONSIBLE FOR DIRECT, SPECIAL, INCIDENTAL OR CONSEQUENTIAL DAMAGES RESULTING FROM ANY BREACH OF WARRANTY OR CONDITION, OR UNDER ANY OTHER LEGAL THEORY. Some countries, districts or states do not allow the exclusion or limitation of relief, special, incidental, consequential or indirect damages, or the limitation of liability to specified amounts, so the above limitations or exclusions may not apply to you. Exclusive Remedy TO THE MAXIMUM EXTENT PERMITTED BY LAW, THIS LIMITED WARRANTY AND THE REMEDIES SET FORTH ABOVE ARE EXCLUSIVE AND IN LIEU OF ALL OTHER WARRANTIES, REMEDIES AND CONDITIONS, WHETHER ORAL OR WRITTEN, EXPRESS OR IMPLIED. TO THE MAXIMUM EXTENT PERMITTED BY LAW, KRAMER ELECTRONICS SPECIFICALLY DISCLAIMS ANY AND ALL IMPLIED WARRANTIES, INCLUDING, WITHOUT LIMITATION, WARRANTIES OF MERCHANTABILITY AND FITNESS FOR A PARTICULAR PURPOSE. IF KRAMER ELECTRONICS CANNOT LAWFULLY DISCLAIM OR EXCLUDE IMPLIED WARRANTIES UNDER APPLICABLE LAW, THEN ALL IMPLIED WARRANTIES COVERING THIS PRODUCT, INCLUDING WARRANTIES OF MERCHANTABILITY AND FITNESS FOR A PARTICULAR PURPOSE, SHALL APPLY TO THIS PRODUCT AS PROVIDED UNDER APPICABLE LAW. IF ANY PRODUCT TO WHICH THIS LIMITED WARRANTY APPLIES IS A “CONSUMER PRODUCT” UNDER THE MAGNUSON-MOSS WARRANTY ACT (15 U.S.C.A. §2301, ET SEQ.) OR OTHER APPICABLE LAW, THE FOREGOING DISCLAIMER OF IMPLIED WARRANTIES SHALL NOT APPLY TO YOU, AND ALL IMPLIED WARRANTIES ON THIS PRODUCT, INCLUDING WARRANTIES OF MERCHANTABILITY AND FITNESS FOR THE PARTICULAR PURPOSE, SHALL APPLY AS PROVIDED UNDER APPLICABLE LAW. Other Conditions This limited warranty gives you specific legal rights, and you may have other rights which vary from country to country or state to state. This limited warranty is void if (i) the label bearing the serial number of this product has been removed or defaced, (ii) the product is not distributed by Kramer Electronics or (iii) this product is not purchased from an authorized Kramer Electronics reseller. If you are unsure whether a reseller is an authorized Kramer Electronics reseller, visit our web site at www.kramerav.com or contact a Kramer Electronics office from the list at the end of this document. Your rights under this limited warranty are not diminished if you do not complete and return the product registration form or complete and submit the online product registration form. Kramer Electronics thanks you for purchasing a Kramer Electronics product. We hope it will give you years of satisfaction.

SAFETY WARNING
Disconnect the unit from the power supply before opening and servicing
For the latest information on our products and a list of Kramer distributors, visit our Web site where updates to this user manual may be found.
We welcome your questions, comments, and feedback.
www.KramerAV.com [email protected]
P/N: 2900-300567 Rev: 1


![Attribute Reference - Cisco · Management Port Number On Primary CTM [c5mngportnum] Specify the CTM Gateway/TL1 port number. The port number must be specified in order to initiate](https://static.documents.pub/doc/80x56/5ed991c11b54311e7967ce90/attribute-reference-cisco-management-port-number-on-primary-ctm-c5mngportnum.jpg)


