17
User manual
| Date post: | 20-Aug-2018 |
| Category: |
Documents |
| Upload: | duongthuan |
| View: | 219 times |
| Download: | 0 times |
4ZERO Elite V1.0 EN 01/17
User manual
UK • 2Return to contents 4ZERO Elite V1.0 EN 01/17
USER MANUAL UK • IntroductionUtilising the very latest Global Positioning Satellite (GPS) technology, Snooper have created the 4ZERO Elite, which has been designed to help you drive safely within the confines of today’s speed limits, by alerting you quickly, and easily to the presence of police speed traps, often located at accident black spots, electronically indicating potentially dangerous and hazardous situations.
The geographical coordinates of all ‘fixed’ speed monitoring systems and many officially designated accident ‘hotspots’ have been stored on a database that is constantly monitored and updated by our data collection team, ensuring that you are alerted to every potentially hazardous stretch of road or danger spot. The 4ZERO Elite connects quickly and easily to your PC or Mac so that you can download the database in a matter of minutes (internet connection required). Please note that a certain level of system hardware and software are required on your PC or Mac; see the section Software CD later in this manual*. Once the database has been downloaded your 4ZERO Elite compares your position using its built-in GPS antenna, with the position of every known ‘fixed’ speed monitoring system and accident ‘hotspot’ alerting you both audibly and visually via a speaker and LED text display ensuring your highest concentration at all times. *Apple MAC compatible software can be downloaded from www.snooperneo.co.uk
The 4ZERO Elite also comes with a built-in radar and laser detector. A combination of a detection lens at the front of the unit ensures all round protection. It has been designed to detect Radar and Laser speed monitoring systems often used in danger spots where ‘fixed’ systems cannot be easily utilised.
Drive Safely with Snooper!
4ZERO Elite has been designed and manufactured to help enhance road safety and is in no way a licence to speed nor has it been designed as a substitute for concentration. Driving within the speed limit, whilst carefully observing current road conditions is essential.
Contents Page
Components Included 3
Features 4
Registering your 4Zero 5
Downloading
Installing the 4Zero 6
Power connection 7
Operating Instructions 8
1. Using the 4Zero for the first time
2. Standby Screen
3. Adjusting the Volume 9
4. MUTE Button
5. CITY Mode - Radar Alert Management
6. DIM Button
7. Alert Patterns
8. Auto Mute
How Laser works 10
Page
Features and Settings 11
1. Laser
2. X Band Radar
3. K Band Radar
4. Ka Band Radar
5. Risk Zones
6. GPS Speed Trap Alerts
7. Voice
8. Speed Limit 12
9. MPH/KMH
Troubleshooting
Specification 14
Snooper Accessories & Price List 15
Service under Warranty
UK • 3Return to contents 4ZERO Elite V1.0 EN 01/17
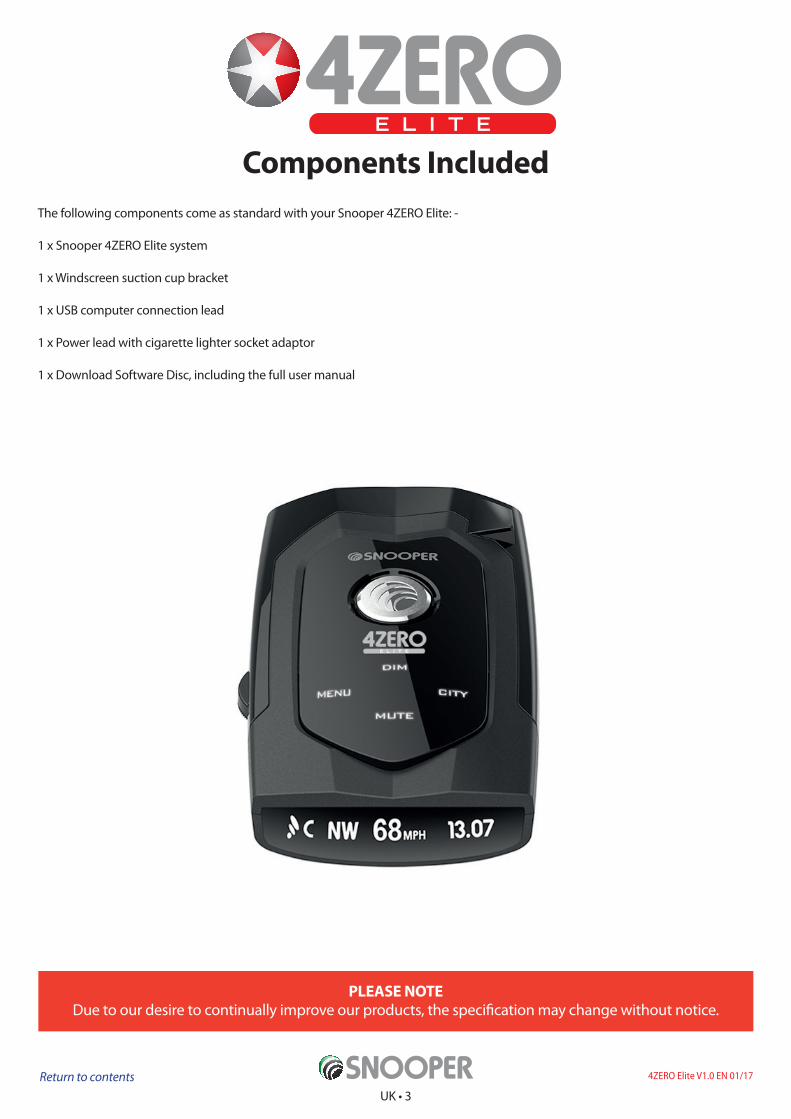
Components IncludedThe following components come as standard with your Snooper 4ZERO Elite: -
1 x Snooper 4ZERO Elite system
1 x Windscreen suction cup bracket
1 x USB computer connection lead
1 x Power lead with cigarette lighter socket adaptor
1 x Download Software Disc, including the full user manual
PLEASE NOTEDue to our desire to continually improve our products, the specification may change without notice.
UK • 4Return to contents 4ZERO Elite V1.0 EN 01/17
Features
1
2
3
4
7
9
10
8
65
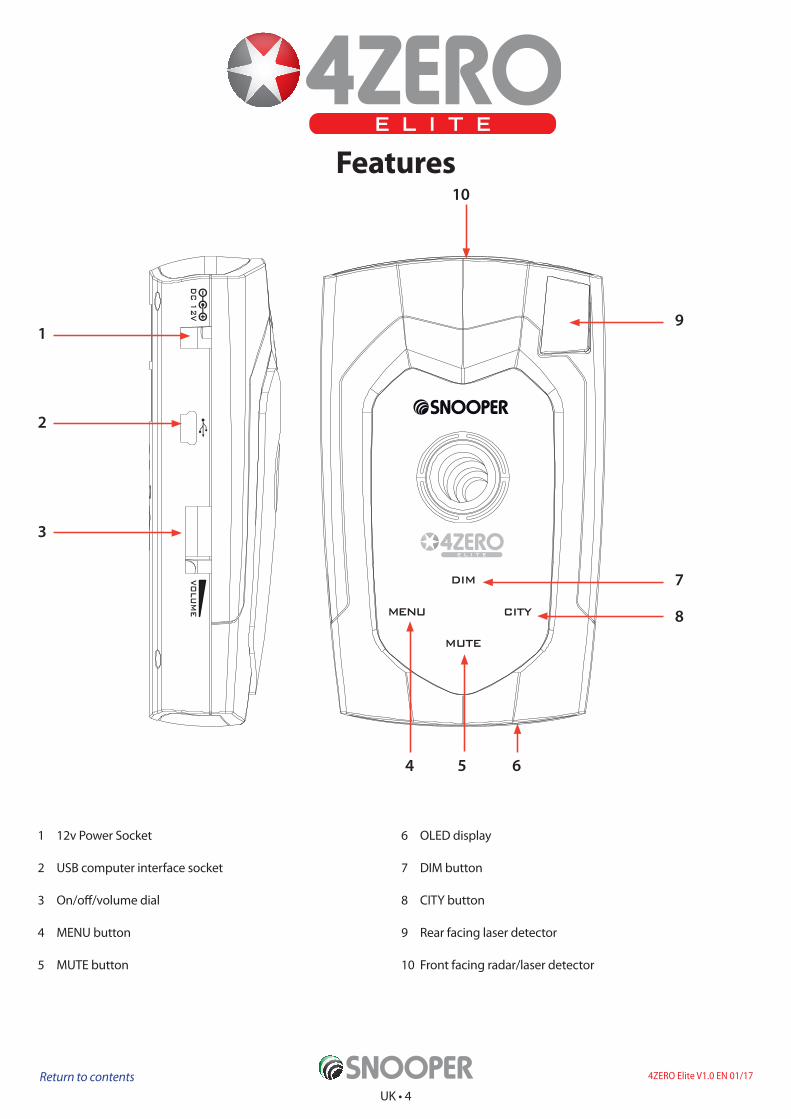
1 12v Power Socket
2 USB computer interface socket
3 On/off/volume dial
4 MENU button
5 MUTE button
6 OLED display
7 DIM button
8 CITY button
9 Rear facing laser detector
10 Front facing radar/laser detector
4ZERO Elite V1.0 EN 01/17Return to contents5
Registering 4ZERO EliteIMPORTANT! PLEASE READ BEFORE USING 4ZERO Elite
You must first register your 4ZERO Elite before you can perform a download of the AURA™ database to your 4ZERO Elite.
Register OnlineGo to the official Snooper website www.snooperneo.co.uk and register your unit online. Your unit should normally be activated within 30 minutes of registration. Please note that you will need to enter the serial number of your 4Zero Elite during the registration process.
Monthly - Only £2.99 inc vat
Quarterly - Only £7.99 inc vat
Annually - Only £29.99 inc vat
Minimum subscription period 12 months.
Note: This is only applicable to the original registrant of the unit and is non transferable. Automated payments can be made using most credit or debit cards.
User tip. Please note that you will not be able to download the Snooper speed trap database to your 4ZERO Elite until you have successfully registered it.
DownloadingPerforming a download is straight forward.
Windows PC software installation
1. Power on your PC and ensure it is connected to the internet.
2. Insert the CD Rom supplied with your 4ZERO Elite.
3. The CD Rom supplied should ‘AutoRun’ and display a number of different options.
4. Follow the on-screen instructions describing how to install the Snooper speed trap updater software.
5. Once the Snooper speed trap updater software has been installed successfully you will see a Snooper shortcut icon displayed on your PC’s desktop called ‘Speed Trap Updater’.
6. Double click on the Snooper ‘Speed Trap Updater’
User tip. You must register your 4ZERO Elite at www.snooperneo.co.uk before you can perform a download.
User tip. If you have any problems installing the Snooper speed trap updater software or downloading the speed trap database to your 4ZERO Elite, please refer to the Troubleshooting section of this user manual.
Apple Mac software installation.
Software can be downloaded from www.snooperneo.co.uk/4zeroelite.cfm
1. Download the MAC updater - choose the updater which matches your MAC OS
2. Drag the app ‘4ZeroEliteUpdate’ on to your desktop or add to your Mac’s Application folder ready to use
3. Follow any on screen instruction
4. Click on the 4ZeroEliteUpdated to launch the software and follow the on screen instructions
UK • 6Return to contents 4ZERO Elite V1.0 EN 01/17
Installing the 4ZERO EliteFor optimal results mount the 4ZERO Elite onto the vehicles windscreen or alternatively mount it on to the dashboard.
When installing your 4ZERO Elite please consider the following:
●● The unit, with its built in GPS antenna has a clear view of the sky*
●● It is located in a position where you can easily view the OLED display without having to take your eyes too far from the road ahead and that you can reach the controls safely.
●● When the power cable is attached it must not impede the safe operation of the vehicle or its controls.
●● The positioning of the device must not impair the driver’s vision.
●● Does not jeopardise the drivers or passengers safety
●● You will be able to remove the device when the vehicle is left unattended and to perform downloads.
Please Note: Some vehicles may come with a ‘Solar Reflective’, ‘Metal Oxide’ or ‘Athermic’ windscreen which will affect the performance of the built in radar laser detector. If your car has this type of screen try and locate a section of the screen that is clear. This can sometimes be found near the rearview mirror or at the centre of the screen just above the dashboard. Unfortunately if your car windscreen does not have a clear area it will not be possible to use the 4ZERO Elite. If you are unsure what type of windscreen is fitted to your vehicle then please contact your local vehicle dealer or manufacturer for further information.
Once you have found a suitable location for your 4ZERO Elite secure it in place by using the suction cup windscreen bracket or hook and loop fastener, remembering to clean the area where the bracket is going to be positioned thoroughly before hand to ensure good contact. More detailed installation instructions follow.
PLEASE NOTE: Be careful to choose a location that does not block the drivers view or where it might endanger the driver or passengers should your vehicle suddenly come to a stop or be involved in an accident.
Installing your 4ZERO Elite using the Windscreen Suction Cup bracket
You can mount your 4ZERO Elite to the inside of your vehicles windscreen using the suction cup windscreen bracket provided. Simply select a position within the windscreen so that the top of the unit has a clear view of the sky, remembering that you need to connect the power cable as well as ensuring that you can read the display and reach the controls safely.
●● Install the suction cups onto the bracket by fitting them into the holes (if required).
●● Clean the area where you wish to position the bracket thoroughly with a good quality glass cleaner
●● Adjust the bracket to the rake of the windscreen by carefully bending it so that when the 4ZERO Elite is mounted onto the windscreen it is perpendicular to the road ahead. The display must be facing the driver and the controls should be within reach of the driver.
Installing your 4ZERO Elite using the Hook and Loop Fastener
The 4ZERO Elite can be installed anywhere on the dashboard as long as the built in GPS antenna has a clear view of the sky and you can easily see the display and operate the controls safely. You will also need to be sure that you can connect the power cable. Your 4ZERO Elite can be installed easily with the hook and loop fastener provided if you have a sufficiently flat area on your dashboard.
●● Use an alcohol wipe or similar cleaner to thoroughly clean the bottom of your 4ZERO Elite and the area of the dashboard where you intend to mount your unit.
●● Apply the ‘hook’ portion of the fastener to the dashboard and the ‘loop’ portion to the underside of your 4ZERO Elite.
DO NOT leave the unit in view when the car is stationary during hot conditions. Exposing the 4ZERO to extremely high temperatures can temporarily impair performance. Keep the 4ZERO out of sight when not in use to help avoid theft.
UK • 7Return to contents 4ZERO Elite V1.0 EN 01/17
Power Connection
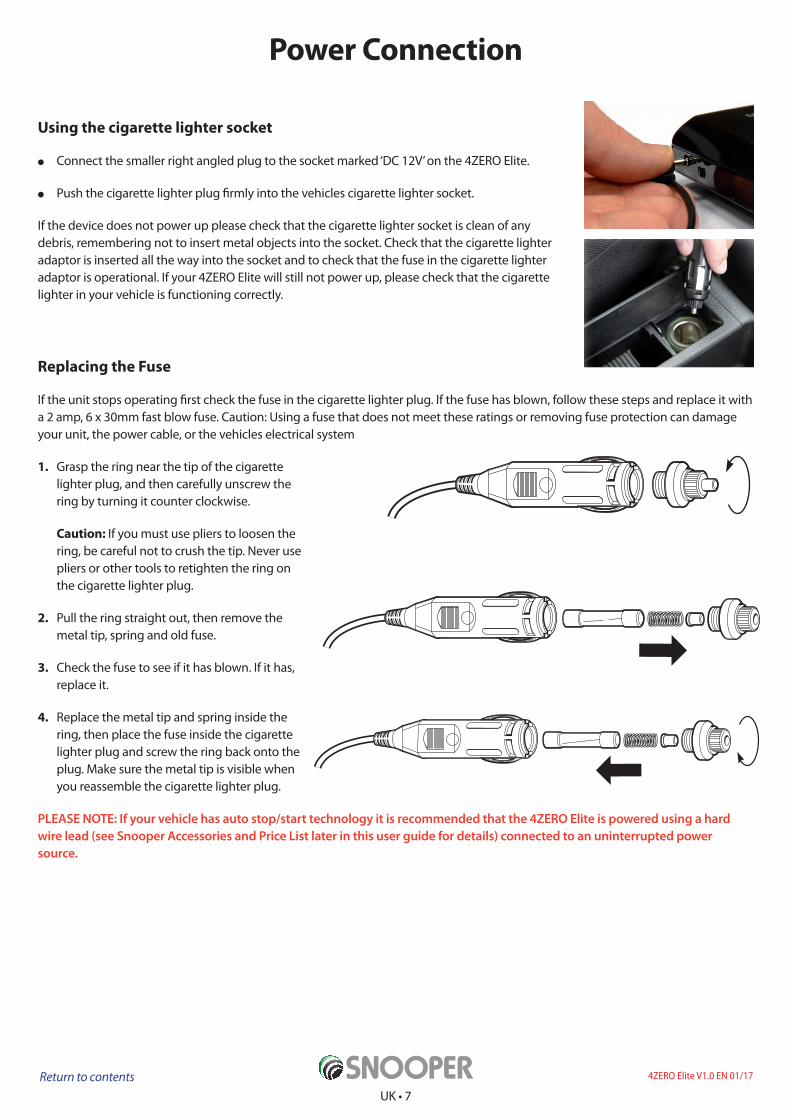
Using the cigarette lighter socket
●● Connect the smaller right angled plug to the socket marked ‘DC 12V’ on the 4ZERO Elite.
●● Push the cigarette lighter plug firmly into the vehicles cigarette lighter socket.
If the device does not power up please check that the cigarette lighter socket is clean of any debris, remembering not to insert metal objects into the socket. Check that the cigarette lighter adaptor is inserted all the way into the socket and to check that the fuse in the cigarette lighter adaptor is operational. If your 4ZERO Elite will still not power up, please check that the cigarette lighter in your vehicle is functioning correctly.
Replacing the Fuse
If the unit stops operating first check the fuse in the cigarette lighter plug. If the fuse has blown, follow these steps and replace it with a 2 amp, 6 x 30mm fast blow fuse. Caution: Using a fuse that does not meet these ratings or removing fuse protection can damage your unit, the power cable, or the vehicles electrical system
1. Grasp the ring near the tip of the cigarette lighter plug, and then carefully unscrew the ring by turning it counter clockwise.
Caution: If you must use pliers to loosen the ring, be careful not to crush the tip. Never use pliers or other tools to retighten the ring on the cigarette lighter plug.
2. Pull the ring straight out, then remove the metal tip, spring and old fuse.
3. Check the fuse to see if it has blown. If it has, replace it.
4. Replace the metal tip and spring inside the ring, then place the fuse inside the cigarette lighter plug and screw the ring back onto the plug. Make sure the metal tip is visible when you reassemble the cigarette lighter plug.
PLEASE NOTE: If your vehicle has auto stop/start technology it is recommended that the 4ZERO Elite is powered using a hard wire lead (see Snooper Accessories and Price List later in this user guide for details) connected to an uninterrupted power source.
UK • 8Return to contents 4ZERO Elite V1.0 EN 01/17
Operating Instructions1. Using the 4ZERO Elite for the first time
After you have updated and installed your 4ZERO Elite it is time to perform the first ‘Cold’ start up. First make sure your vehicle is parked in as open a space as possible, clear of tall trees and buildings so that the built in GPS antenna has as clear a view of the sky above. Next turn the unit on by turning the rotary on/off/volume dial on the left handside of the unit away from you in to the On position. After going through an initial start-up sequence the display will revert to the standby screen and begin to search for satellite connection. Once your 4ZERO Elite has successfully established a GPS connection it will display your current speed, indicate the GPS signal strength and is ready for use.
As the GPS engine and antenna have never been used before, the first ‘Cold’ start could take up to 10 minutes to establish a satellite connection. Once initialised, subsequent start ups will take less time and eventually should take only a few seconds.
PLEASE NOTE: If the unit is not used for some time the initial GPS start up may take longer than when the unit is used regularly.
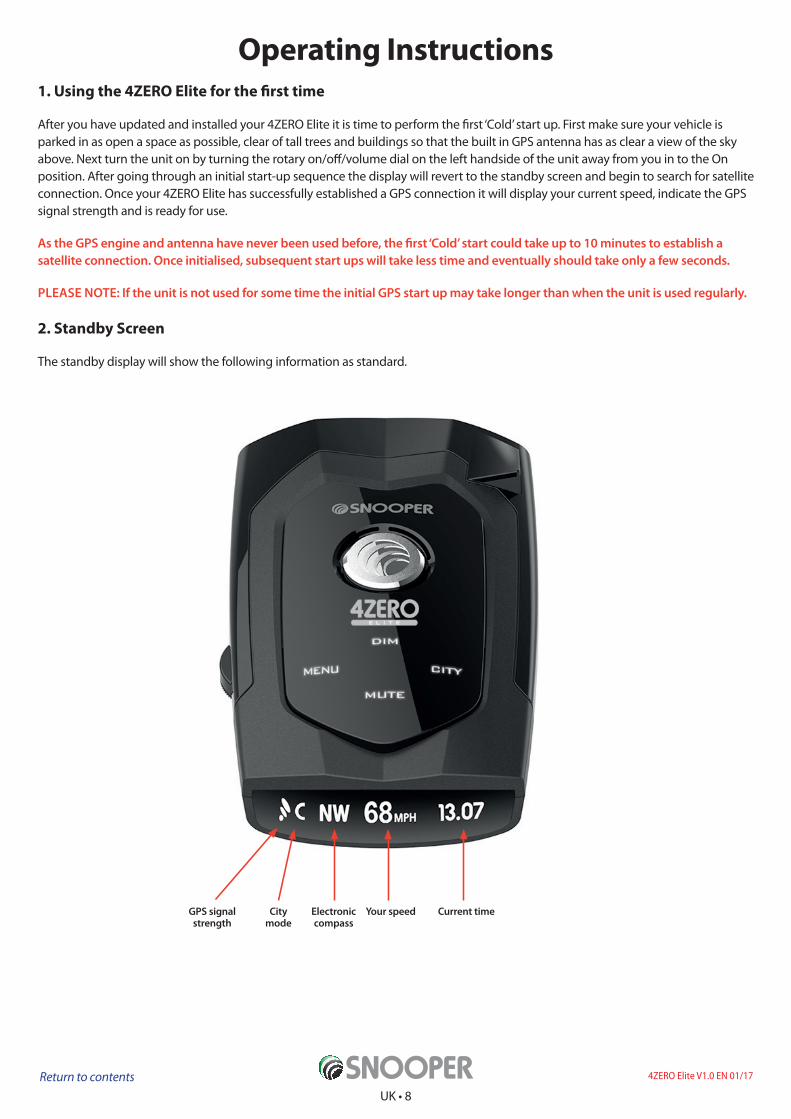
2. Standby Screen
The standby display will show the following information as standard.
GPS signal strength
City mode
Electronic compass
Current timeYour speed
UK • 9Return to contents 4ZERO Elite V1.0 EN 01/17
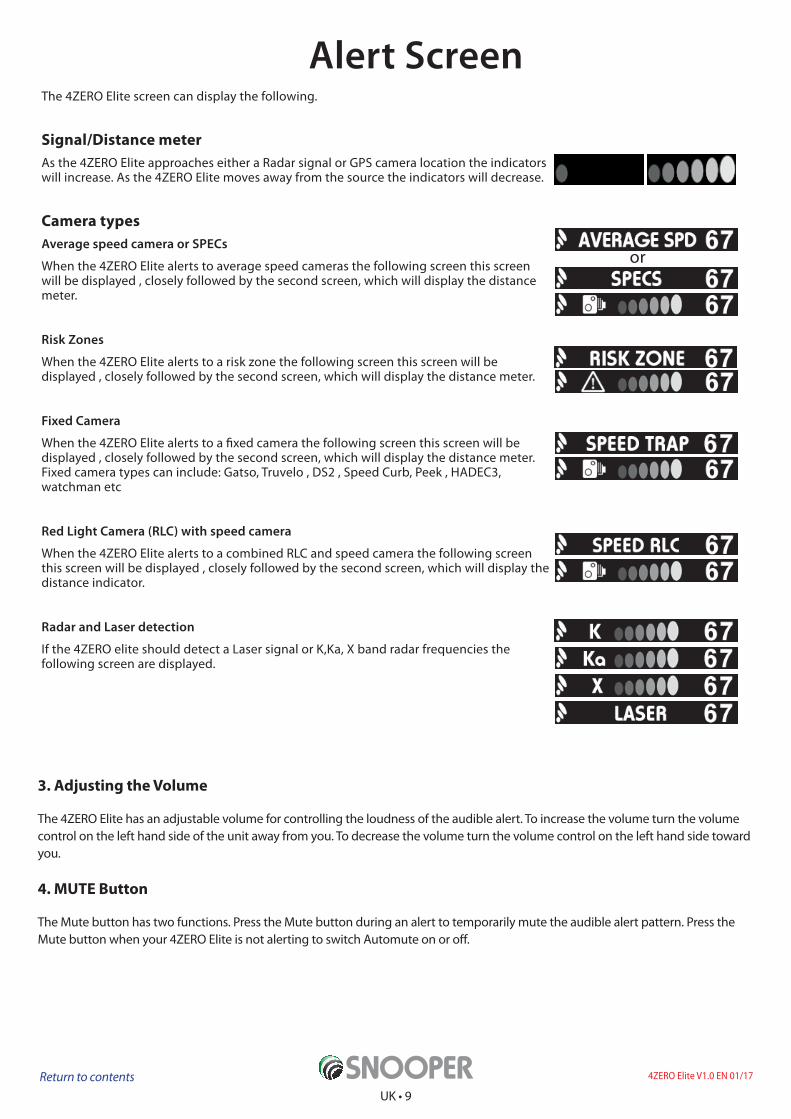
The 4ZERO Elite screen can display the following.
Signal/Distance meter As the 4ZERO Elite approaches either a Radar signal or GPS camera location the indicators will increase. As the 4ZERO Elite moves away from the source the indicators will decrease.
Camera typesAverage speed camera or SPECs
When the 4ZERO Elite alerts to average speed cameras the following screen this screen will be displayed , closely followed by the second screen, which will display the distance meter.
Risk Zones
When the 4ZERO Elite alerts to a risk zone the following screen this screen will be displayed , closely followed by the second screen, which will display the distance meter.
Fixed Camera
When the 4ZERO Elite alerts to a fixed camera the following screen this screen will be displayed , closely followed by the second screen, which will display the distance meter.Fixed camera types can include: Gatso, Truvelo , DS2 , Speed Curb, Peek , HADEC3, watchman etc
Red Light Camera (RLC) with speed camera
When the 4ZERO Elite alerts to a combined RLC and speed camera the following screen this screen will be displayed , closely followed by the second screen, which will display the distance indicator.
Radar and Laser detection
If the 4ZERO elite should detect a Laser signal or K,Ka, X band radar frequencies the following screen are displayed.
or
Alert Screen
3. Adjusting the Volume
The 4ZERO Elite has an adjustable volume for controlling the loudness of the audible alert. To increase the volume turn the volume control on the left hand side of the unit away from you. To decrease the volume turn the volume control on the left hand side toward you.
4. MUTE Button
The Mute button has two functions. Press the Mute button during an alert to temporarily mute the audible alert pattern. Press the Mute button when your 4ZERO Elite is not alerting to switch Automute on or off.
UK • 10Return to contents 4ZERO Elite V1.0 EN 01/17
5. CITY mode - radar alert management.
Press the CITY button to switch between CITY, CITY MAX and MOTORWAY modes.
CITY ModeWhen CITY Mode is selected there will be no audible X Band alerts unless the signal strength exceeds level 2. There will be no audible K or Ka band alerts unless the signal strength exceeds level 1.
Laser alerts remain unaffected when selecting this mode.
CITY PLUS ModeWhen CITY PLUS is selected you will not receive audible X, K or Ka band alerts unless the signal strength reaches maximum.
MOTORWAY ModeIf MOTORWAY mode is selected you will receive audible X, K and Ka radar alerts as normal based on the volume level you have selected.
6. DIM button.
Use the DIM button to adjust the brightness of the OLED display. Press the DIM button to switch quickly between Bright, Dim or Dark settings.
7. Alert Patterns
Alerts to fixed speed traps using GPS. As you approach a fixed speed trap stored in the device’s internal memory, the unit will beep 3 times and emit a voice alert. At the same time the display will visually confirm the alert. If at any time you would like to cancel the audible alert, press the MUTE button on top of the device.
Alerts to radar and laser frequencies. When approaching a radar frequency, 4ZERO Elite will confirm the frequency type, X, K or Ka and will indicate the signal strength. The signal strength will increase as you approach the source of the radar and decrease as you drive away from it. 4ZERO will emit and audible beep pattern and voice alert, based on the CITY Mode selected.
When approaching a Laser alert, 4ZERO Elite will produce an ‘instant on’ alert by indicating on the display that you are approaching a laser source with a full audio alert.
If at any time you want to cancel the audible alert, press the MUTE button on top of the device.
8. Automute - radar alerts only.Press the MUTE button to turn Automute on or off.
When 4ZERO Elite alerts you to a radar frequency, rather than continually beeping through the alert, it simply beeps at your selected volume for five seconds and then automatically mutes volume until you are out of range of the source. This allows you to receive a brief audible alert instead of a continuous one.
If you would like to change the alert to a visual alert only press the MUTE button to temporarily turn off the sound.
UK • 11Return to contents 4ZERO Elite V1.0 EN 01/17
How Laser works LASER stands for Light Amplification by Stimulated Emission of Radiation The laser speed gun uses a method that relies on the reflection time of light. You have probably experienced the reflection time of sound waves in the form of an echo. For example, if you shout down a well or across a canyon, the sound takes a noticeable amount of time to reach the bottom of the well and travel back to your ear. Sound travels at approximately 1,000 feet (300 meters) per second, so a deep well or a wide canyon creates a very apparent round-trip time for the sound.
A laser speed gun measures the round-trip time for light to reach a car and reflect back. Light from a laser speed gun moves a lot faster than sound --about 984,000,000 feet per second (300,000,000 meters) or roughly 1 foot (30 cm) per nanosecond. A laser speed gun shoots a very short burst of infrared laser light and then waits for it to reflect off the vehicle. The gun counts the number of nanoseconds it takes for the round trip, and by dividing by 2 it can calculate the distance to the car. If the gun takes 1,000 samples per second, it can compare the change in distance between samples and calculate the speed of the car. By taking several hundred samples over the course of a third of a second or so, the accuracy can be very high.
The advantage of a laser speed gun is that the size of the “cone” of light that the gun emits is very small, even at a range like 1,000 feet (300 meters). The cone at this distance might be 3 feet (1 meter) in diameter. This allows the gun to target a specific vehicle. A laser speed gun is also very accurate. The officer has to aim the laser speed gun at a specific target therefore the officer will only target your vehicle if the officer deems that you are speeding.
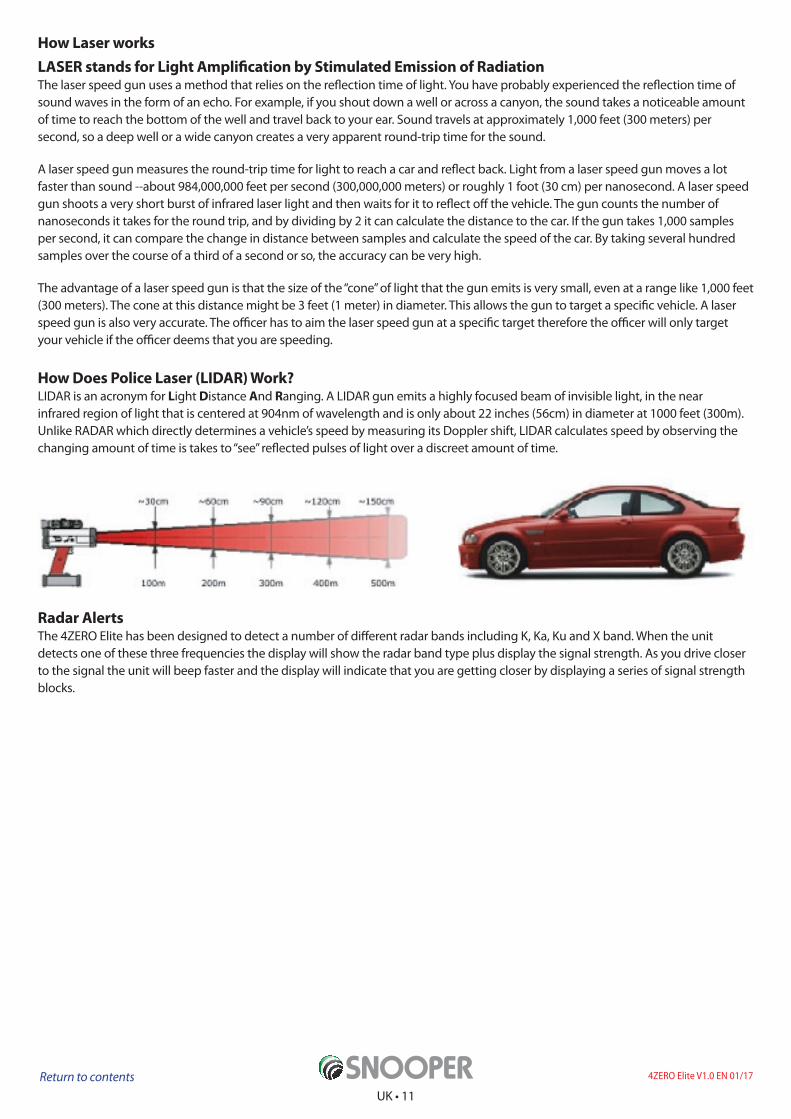
How Does Police Laser (LIDAR) Work? LIDAR is an acronym for Light Distance And Ranging. A LIDAR gun emits a highly focused beam of invisible light, in the near infrared region of light that is centered at 904nm of wavelength and is only about 22 inches (56cm) in diameter at 1000 feet (300m). Unlike RADAR which directly determines a vehicle’s speed by measuring its Doppler shift, LIDAR calculates speed by observing the changing amount of time is takes to “see” reflected pulses of light over a discreet amount of time.
Radar AlertsThe 4ZERO Elite has been designed to detect a number of different radar bands including K, Ka, Ku and X band. When the unit detects one of these three frequencies the display will show the radar band type plus display the signal strength. As you drive closer to the signal the unit will beep faster and the display will indicate that you are getting closer by displaying a series of signal strength blocks.
UK • 12Return to contents 4ZERO Elite V1.0 EN 01/17
Features and Settings Access the Menu by pressing the MENU button on top of the unit. Next use the DIM button to move up (+) through the menu and the MUTE button to move down (-) through the menu. When you have found the feature you are looking for press the CITY button to select it. Finally press the MENU button to save any changes and exit the menu.
Please Note: If you would like to exit the Menu at any time simply press the MENU button. If you do not press any buttons for a period of five seconds the unit will automatically exit the Menu and return to the Standby display.
The following menu options are available on your unit. Press SELECT once your desired option is displayed.
1. Laser
This setting allows you to turn Laser OFF or ON.
To adjust the Laser setting enter the Menu and scroll up or down using the DIM or Mute buttons until you see ‘Laser’. Use the CITY button to select Laser On or Off and press the Menu button to save and exit.
2. X Band Radar.
You can choose to turn alerts for X band radar ‘On’ or ‘Off’. Please note the recommended setting for the UK is ‘Off’
To turn X band radar ‘On’ or ‘Off’ enter the menu and scroll up or down using the DIM (+) or MUTE (-) buttons until you see ‘X Band’. Use the CITY button to switch between ‘On’ or ‘Off’ and press the MENU button to save your selection and exit.
3. K Band Radar.
You can choose to turn alerts for K band radar ‘On’ or ‘Off’. Please note the recommended setting for the UK is ‘On’
To turn K band radar ‘On’ or ‘Off’ enter the menu and scroll up or down using the DIM (+) or MUTE (-) buttons until you see ‘K Band’. Use the CITY button to switch between ‘On’ or ‘Off’ and press the MENU button to save your selection and exit.
4. Ka Band Radar.
You can choose to turn alerts for Ka band radar ‘On’ or ‘Off’. Please note the recommended setting for the UK is ‘Off’
To turn Ka band radar ‘On’ or ‘Off’ enter the menu and scroll up or down using the DIM (+) or MUTE (-) buttons until you see ‘Ka Band’. Use the CITY button to switch between ‘On’ or ‘Off’ and press the MENU button to save your selection and exit.
5. Risk Zones
You can choose to turn alerts for Risk Zones ‘On’ or ‘Off’. Please note that Risk Zones are set to ‘On’ as the factory default setting.
To turn Risk Zones ‘On’ or ‘Off’ enter the menu and scroll up or down using the DIM (+) or MUTE (-) buttons until you see ‘Risk Zones’. Use the CITY button to switch between ‘On’ or ‘Off’ and press the MENU button to save your selection and exit.
6. GPS speed trap alerts
You can choose to turn off alerts for GPS speed traps and use your 4ZERO Elite as a radar/laser detector only. Please note GPS speed trap alerts are set to ‘On’ as the factory default setting.
To turn GPS Speed Traps ‘On’ or ‘Off’ enter the menu and scroll up or down using the DIM (+) or MUTE (-) buttons until you see ‘GPS Speed Trap’. Use the CITY button to switch between ‘On’ or ‘Off’ and press the MENU button to save your selection and exit.
7. Voice
To turn the Voice alert on or off enter the menu and scroll up or down using the DIM (+) or MUTE (-) buttons until you see Voice. Use the CITY button to switch the Voice On or Off and press the MENU button to save your selection and exit.
8. Speed Limit
This safety feature has been designed to let you programme your 4ZERO Elite to alert you when you reach any speed you choose. For example you could set your unit to alert you when your speed reaches 30mph sand you will then receive an alarm if you ever accidentally stray above this speed limit.

UK • 13Return to contents 4ZERO Elite V1.0 EN 01/17
To turn on and set the Speed limit alert, enter the menu and scroll up or down using the DIM (+) or MUTE (-) buttons until you see ‘Speed Limit’ and press CITY button to select. Use the DIM (+) or MUTE (-) buttons to select the speed limit you require and press the MENU button to save your selection and exit.
9. MPH/KMH
To switch between MPH and KMH enter the menu and scroll up or down using the DIM (+) or MUTE (-) buttons until you see ‘MPH/KMH’. Use the CITY button to switch between MPH or KMH and press the MENU button to save your selection and exit.
10. Direction
Logic 1 - When this mode is selected your unit will alert you via BOTH audible alert and visual alerts of cameras on both sides of the road – ie in your direction of travel – the only exception to this is that if you encounter a series of SPECs cameras the device will only ever detect systems on your side of the carriageway.
Logic 2 (Factory Default Setting) - When this mode is selected your unit will alert you with an audible and visual alert of cameras on your side of the carriageway only. The unit will not indicate the presence of cameras or monitoring vehicles on the opposite side of the carriageway as you approach them.
11. Smart Mute On/Off
You will receive a visual alert only if you are travelling below the posted speed limit and are approaching a ‘fixed’ location such as a Gatso camera. If you are travelling above the posted speed limit you will receive both an audible and a visual alert as normal .EG If the camera speed limit is set to 30mph and the vehicle is travelling at 28 mile per hour then only a VISUAL alert is shown BUT if the vehicle is travelling at 31 mph the driver will receive BOTH a visual AND audible alert.
Auto range – On/Off This will change the distance from which the device starts to alert to a speed camera location dependent on the speed the vehicle is travelling. If the vehicle is travelling at a high speed the distance will be greater than when travelling at a slower speed.
Detection - Fixed Cameras Detection
High Risk Zones
Speed limit Pre-Alert Speed Limit Pre-Alert
20 or 30mph 200m 20 or 30mph 300m
40mph 250m 40 or 50mph 500m
50mph 300m 60 or 70mph 700m
60mph 400m
70mph 500m
12. Touch Tone OF/OFF
On When the buttons are pressed the unit will emit an audible beep Off No audible beep will be heard when the buttons are pressed.
13. Clock
The time is set by the satellite, the time is Coordinated Universal Time (UTC) which is ) GMT. The time cn be adjusted from -9 to +9
14. Language
Seletable display languages are English, Hebrew, Italian, Spanish, Dutch and German
15. Version
Displays the Firmware and Speed camera database versions
UK • 14Return to contents 4ZERO Elite V1.0 EN 01/17
Troubleshooting 4ZERO Elite Downloads
If you are having difficulty performing a download to your 4ZERO Elite you should consult the following checklist first before contacting technical support. If you are still unable to perform a download after following this checklist then please contact our Technical Helpline on 0333 121 2252 and select Option 3. There is also additional help available on the www.snooperneo.co.uk website.
This guide is in two sections; the first section is a list of things to check before performing a download and the second section consists of possible reasons and solutions to error messages encountered while trying to perform a download.
SECTION ONE
1. Have you registered your 4ZERO Elite?
You will not be able to download the database unless the 4ZERO Elite is registered. Please register online at www.snooperneo.co.uk.
2. Is the USB computer cable supplied with the 4ZERO Elite connected correctly?
Please check that the USB lead is plugged into the USB socket on the 4ZERO Elite and is fully plugged in as far as possible. Check the computer USB connection is secure.
3. What operating system are you using on your computer?
The Snooper download software will only work on the following Windows operating systems: Windows Vista , Windows 7, Windows 8, Windows 8.1 and Windows 10. THE SOFTWARE WILL NOT WORK ON WINDOWS 95/98, 98SE, Millennium and Windows 2000. Supported Apple Mac software: MAC OS Yosemite, El Capitan and Sierra.
To determine which operating system you have on your computer:
a) Right click on the ‘My Computer’ icon on your desktop and select ‘Properties’ from the drop down menu.
b) When the ‘System Properties’ dialogue box opens the ‘General’ tab is selected by default. Under the heading ‘System’ the operating system is displayed.
c) If you do not have a ‘My Computer’ icon on your desktop (common in Windows XP) click on ‘Start’ and two columns will appear. In the right hand column you will see the option of ‘My Computer’. Right click on this option as instructed in (a) above.
4. Have you installed the Snooper download software onto your computer?
If you have not installed the software you will not be able to perform a download to your 4ZERO. Once the software is installed there will be a new icon on your desktop: ‘4ZERO Elite Updater’. Please check to see if you have the latest version of this software by visiting www.snooperneo.co.uk and clicking on the link ‘Download software’.
5. Have you connected the computer to the internet?
The computer needs to be connected to the internet before you can begin to download the database to your 4ZERO Elite. Please make sure that your internet connection is established and that you have signed in to your broadband account (if required).
UK • 15Return to contents 4ZERO Elite V1.0 EN 01/17
Other Problems
The unit cannot be switched on
Check that the cigarette lighter adaptor is well inserted into the cigarette lighter socket and that the cigarette lighter socket is functioning properly. Check that the lighter socket is clean and free from debris. Also check that the fuse of the cigarette lighter adaptor is intact.
If you are using the hardwire connection check that you have secured a good earth and that you have taken the 12v feed from a 12v supply that is live on ignition. Also check that the in-line fuse is intact.
The unit cannot acquire satellite connection
Check that the 4ZERO’s built in GPS antenna has a clear view of the sky above.
If this is the first time you have powered up your 4ZERO Elite please remember that the first ‘cold’ start can take up to 10 minutes to acquire sufficient satellite connection. The unit requires time to calibrate and you will find that with subsequent use that the time for acquiring satellites will reduce. Eventually the unit should take only a few seconds to acquire satellite connection.
Disconnect and reconnect the power to the unit and start the power up procedure again.
Check that the windscreen has not been specially treated to reflect UV rays (Metal Oxide, Athermic, solar reflective). Please check with the local vehicle dealer or manufacturer to ascertain what type of windscreen is fitted to your vehicle. If you do have this type of windscreen place the 4ZERO Elite where there is a clear section of glass usually situated near the rearview mirror or near the centre of the windscreen just above the dashboard. If you do not have clear section on the windscreen then unfortunately the 4ZERO Elite will not work in that vehicle.
The satellite signal temporarily or permanently drops out
This may happen temporarily in areas where there are a significant number of tall buildings or trees or whilst driving through a tunnel. The signal should only be lost for a few seconds and then quickly reacquired.
Check that the device has not moved and that the built in GPS antenna still has a good clear view of the sky above.
Very occasionally you may experience bad satellite coverage that may lead you to loosing a signal. This should last no longer than a few minutes.
If you have a specially treated windscreen some manufacturers leave a small section of the windscreen untreated. If the unit is not positioned properly in this untreated area then the unit may loose satellite signal frequently. Reposition the unit within this untreated area.
The device does not appear to respond to Police speed monitoring systems
Have you performed a download recently? If not, perform a fresh download to ensure that you have all the latest coordinates stored on your device.
Check that the unit is positioned in such a way that the lens has a clear view of the road ahead and is unobstructed by any metallic objects (such as windscreen wipers). The laser lens at the rear of the unit, this must also be unobstructed.
UK • 16Return to contents 4ZERO Elite V1.0 EN 01/17
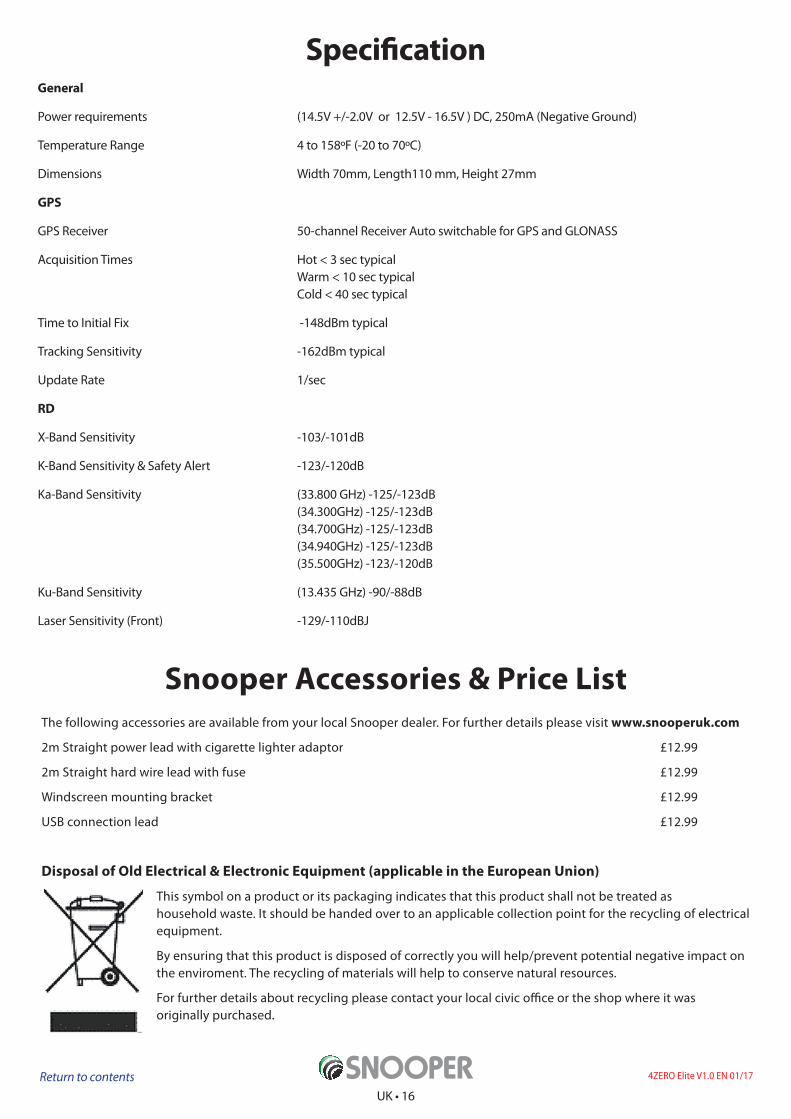
Specification General
Power requirements (14.5V +/-2.0V or 12.5V - 16.5V ) DC, 250mA (Negative Ground)
Temperature Range 4 to 158ºF (-20 to 70ºC)
Dimensions Width 70mm, Length110 mm, Height 27mm
GPS
GPS Receiver 50-channel Receiver Auto switchable for GPS and GLONASS
Acquisition Times Hot < 3 sec typical Warm < 10 sec typical Cold < 40 sec typical
Time to Initial Fix -148dBm typical
Tracking Sensitivity -162dBm typical
Update Rate 1/sec
RD
X-Band Sensitivity -103/-101dB
K-Band Sensitivity & Safety Alert -123/-120dB
Ka-Band Sensitivity (33.800 GHz) -125/-123dB (34.300GHz) -125/-123dB (34.700GHz) -125/-123dB (34.940GHz) -125/-123dB (35.500GHz) -123/-120dB
Ku-Band Sensitivity (13.435 GHz) -90/-88dB
Laser Sensitivity (Front) -129/-110dBJ
Snooper Accessories & Price ListThe following accessories are available from your local Snooper dealer. For further details please visit www.snooperuk.com
2m Straight power lead with cigarette lighter adaptor £12.99
2m Straight hard wire lead with fuse £12.99
Windscreen mounting bracket £12.99
USB connection lead £12.99
Disposal of Old Electrical & Electronic Equipment (applicable in the European Union)
This symbol on a product or its packaging indicates that this product shall not be treated as household waste. It should be handed over to an applicable collection point for the recycling of electrical equipment.
By ensuring that this product is disposed of correctly you will help/prevent potential negative impact on the enviroment. The recycling of materials will help to conserve natural resources.
For further details about recycling please contact your local civic office or the shop where it was originally purchased.
UK • 17Return to contents 4ZERO Elite V1.0 EN 01/17
Service under WarrantyYour 4ZERO Elite comes with a standard one year manufacturer’s warranty.
If, for some reason, your unit requires service under warranty return your 4ZERO, via speial delivery (insured) and in suitable packaging to:
The Returns DepartmentPerformance Products LimitedCleaver HouseSarus CourtManor ParkCheshire WA7 1UL
Enclose the following information:
(a) Your name, address and a full description of the problem.(b) A telephone number where you can be reached during business hours.(c) Your units’ serial number.(d) A copy of the proof of purchase.
For further detail please visit: http://www.snooperneo.co.uk/Returns.cfm
PLEASE NOTE: We cannot process any warranty claims unless proof of puchase is provided. Please retain your receipt as a precaution. Full terms and conditions of warranty are available on request.Limited Warranty
This Snooper product is warranted against all defects in materials and workmanship for a period of one (1) year from the date of original purchase, when purchased from an authorized Snooper dealer.
ALL PURCHASES OF SNOOPER PRODUCTS FROM NON-AUTHORIZED SNOOPER DEALERS ARE SUBJECT TO FURTHER WARRANTY RESTRICTIONS AS DESCRIBED OVERLEAF.
The conditions of this Limited Warranty and the extent of responsibilty of Performance Products Ltd (PPL) under this Limited Warranty are as follows:
1. This Limited Warranty will become void if service is performed by anyone other than an approved Snooper Warranty Service Centre that results in damage to the product.
2. This Limited Warranty does not apply to any product which has been subject to misuse, neglect or accident, or which has had the serial number altered, defaced or removed, or which has been connected, installed, adjusted or repaired, other than in accordance with the instructions provided by Snooper.
3. Should you have any difficulties with the performance of this product during the warranty period, please call snooper or visit our website http://www.snooperneo.co.uk You must also contact Snooper Customer Services at the address listed above for any service help you may need with Snooper products.
4. PROOF OF DATE OF PURCHASE FROM AN AUTHORIZED SNOOPER DEALER WILL BE REQUIRED FOR ANY WARRANTY SERVICE OF THIS PRODUCT.
5. SNOOPER PRODUCTS PURCHASED FROM A SOURCE OTHER THAN AN AUTHORIZED SNOOPER DEALER, INCLUDING ANY AND ALL PURCHASES VIA THE INTERNET FROM A NON INTERNET AUTHORIZED SNOOPER DEALER, SHALL NOT BE COVERED BY ANY SNOOPER LIMITED WARRANTY TO THE EXTENT ALLOWED BY APPLICABLE LAW.
6. THIS LIMITED WARRANTY GIVES YOU SPECIFIC LEGAL RIGHTS, AND YOU MAY ALSO HAVE OTHER RIGHTS WHICH VARY FROM EU COUNTRY TO EU COUNTRY.
7. ALL IMPLIED WARRANTIES, EXCEPT TO THE EXTENT PROHIBITED BY APPLICABLE LAW, SHALL HAVE NO GREATER DURATION THAN THE WARRANTY PERIOD SET FORTH ABOVE. UNDER NO CIRCUMSTANCES SHALL SNOOPER BE LIABLE FOR ANY LOSS OR DAMAGE, DIRECT OR CONSEQUENTIAL, ARISING OUT OF THE USE OR INABILITY TO USE THE PRODUCT. BECAUSE SOME EU COUNTRIES DO NOT ALLOW LIMITATIONS ON HOW LONG AN IMPLIED WARRANTY LASTS OR EXCLUSIONS OR LIMITATIONS OF INCIDENTAL OR CONSEQUENTIAL DAMAGES, THE ABOVE LIMITATIONS OR EXCLUSIONS MAY NOT APPLY TO YOU.
8. Product must be shipped in its original carton or equivalent carton, fully insured, with shipping charges prepaid. Snooper will not assume any responsibility for any loss or damage incurred in shipping.
9. The sole responsibility of Snooper under this Limited Warranty shall be limited to the repair of the product or the replacement of the product only (whichever is deemed appropriate and at the sole discreation of Snooper)
10. This Limited Warranty does not cover car static or other electrical interferences, labour costs or any other associated or incidental costs incurred for the removal or resinstallation of the unit for repair.


