28
USER MANUAL Dishwasher WSF6606

USER MANUALDishwasher
WSF6606

2
Important safety instructions 3 Recycling 3 Safety information 3 Recommendations 4 Items not suitable for dishwashing 4Description of your appliance 5 Technical specifications 5 Conformity with the standards and Test data 5 Quick Start Guide 7Installing the machine 8 Positioning the machine 8 Water connections 8 Water inlet hose 8 Water outlet hose 8 Electrical connection 8 Fitting the machine undercounter 9Preparing the machine for use 11 Prior to using the machine 11 Detergent usage 11 Filling the detergent compartment 11 Combined detergent 12 Filling with rinse aid and making the setting 12Loading your dishwasher 13 Alternative basket loads 17 Standard loading and Test data 18Program descriptions 19 Program items 19Switching on the machine and selecting a program 20 Switching on the machine 20 Program follow-up 20 Changing a program 20 Changing a program with resetting 21 Switching the machine off 21Maintenance and Cleaning 22 Filters 22 Spray arms 23 Hose filter 23Failure codes and what to do in case of failure 24Practical and useful information 25 Notes 26 Warranty 27
ENVIRONMENTAL TIPS ENvIRoNMENTAL TIPS iNfoRMATioN oN diSpoSAL foR USERS • Mostofthepackagingmaterialsarerecyclable.
Pleasedisposeofthosematerialsthroughyourlocalrecyclingdepotorbyplacingtheminappropriatecollectioncontainers.
• Ifyouwishtodiscardthisproduct,pleasecontactyourlocalauthoritiesandaskforthecorrectmethodofdisposal.
Congratulationsandthankyouforchoosingourproduct.Wearesureyouwillfindyournewapplianceapleasuretouseandagreatassettoyourcooking.Beforeyouusetheappliance,werecommendyoureadthroughthewholeusermanualwhichprovidesadescriptionoftheproductanditsfunctions.
Toavoidtherisksthatarealwayspresentwhenyouuseanappliance,itisimportantthattheapplianceisinstalledcorrectlyandthatyoureadthesafetyinstructionscarefullytoavoidmisuseandhazards.Werecommendthatyoukeepthisinstructionbookletforfuturereferenceandpassitontoanyfutureowners.ThisappliancecomplieswiththerequirementsofAustralianStandardAS/NZ60335.2.6.GasappliancesalsocomplywiththerequirementsofAS4551.
coNdiTioNS of USE Thisapplianceisintendedtobeusedinhouseholdandsimilarapplicationssuchas:
• Staffkitchenareasinshops,officesandotherworkingenvironments
• Farmhouses
• Byclientsinhotels,motelsandotherresidentialtypeenvironments
• Bedandbreakfasttypeenvironments.
Record model and serial number here:
Model:
Serial number:
TIPS & INFORMATION TIPS AND INFoRMATIoNiMpoRTANT –cHEcK foR ANy dAMAgE oR MARKS.Ifyoufindthedishwasherisdamagedormarked,youmustreportitwithin7daysifyouwishtoclaimfordamage/marksunderthemanufacturerswarranty.Thisdoesnotaffectyourstatutoryrights.
coNTENTScoNgRATULATioNS
CoNTENTS

3 SAFETY
iMpoRTANT SAfETy iNSTRUcTioNS
Thesewarningshavebeenprovidedintheinterestofsafety.YouMUSTreadthemcarefullybeforeinstallingorusingtheappliance.Thesymbolsyouwillseeinthisbooklethavethesemeanings:
WARNINGWARNINGThis symbol indicates information concerning your personal safety
TIPS & INFORMATION TIPS AND INFoRMATIoNThis symbol indicates tips and information about use of the appliance
ENVIRONMENTAL TIPS ENvIRoNMENTAL TIPSThis symbol indicates tips and information about economical and ecological use of the appliance
REcycLiNg• Certaincomponentsandthepackagingof
yourmachinehavebeenproducedfromrecyclablematerials.
• Plasticpartsaremarkedwithinternationalabbreviations:(>PE<,>PS<,>POM<,>PP<,....)
• Cardboardpartshavebeenproducedfromrecycledpaperandtheyshouldbedisposedofintowastepapercollectioncontainersforrecycling.
• Suchmaterialsarenotsuitableforbeingdisposedofintogarbagebins.Theyshouldbedeliveredtorecyclingcentresinstead.
• Contactrelevantcentresinordertoobtaininformationonmethodsandpointsofdisposal.
SAfETy iNfoRMATioNWhen you take delivery of your machine• Checkforanydamagetoyourmachineortoits
packaging.Neverstartamachinedamagedinanyway,makesuretocontactanauthorisedtechnician.
• Unwrapthepackagingmaterialsasindicatedanddisposeoftheminaccordancewiththerules.
The points to pay attention during machine installation• Chooseasuitable,safeandlevelplacetoinstall
yourmachine.
• Carryouttheinstallationandconnectionofyourmachinebyfollowingtheinstructions.
• Thismachineshouldbeinstalledandrepairedbyanauthorisedtechnicianonly.
• Onlyoriginalsparepartsshouldbeusedwiththemachine.
• Beforeinstalling,besurethatthemachineisunplugged.
• Checkwhethertheindoorelectricalfusesystemisconnectedaccordingtotheregulations.
• Payspecialattentionandbesurethatthemachinedoesnotstandontheelectricitysupplycable.
• Neveruseanextensioncordoramultiplesocketformakingaconnection.Theplugshouldbeeasilyaccessibleafterthemachinehasbeeninstalled.
• Afterinstallingthemachinetoasuitableplace,runitunloadedforthefirsttime.
iN dAiLy USE • Donotgetup,sitorplacealoadontheopendoorof
thedishwasher,itmayfallover.
• Neverputintothedetergentandrinseaiddispensersofyourmachineanythingotherthanthosedetergentsandrinseaidswhichareproducedspecificallyfordishwashers.Ourcompanywillnotberesponsibleforanydamagethatmightoccurinyourmachineotherwise.
WARNINGWARNINGThe water in the machine’s washing section is not drinking water, do not drink it.
• Duetodangerofexplosion,donotputintothemachine’swashingsectionanychemicalagentssuchassolvents.
• Checkwhetherplasticitemsareheat-resistantbeforewashingtheminthemachine.
• Donotputintoyourmachinethoseitemswhicharenotsuitablefordishwashing.Also,donotoverloadbasket.
• Themachinedoorshouldnotbeopenedwhilethemachineisinoperation,toavoidtheriskofhotwatersprayingout.Asafetydeviceensuresthatthemachinestopsifthedoorisopened.
WARNINGWARNINGdo not leave your dishwasher’s door open, this may lead to accidents and injury.
WARNINGWARNINGplace knives and other sharp ended objects in the cutlery basket in the point down position.
• Thisapplianceisnotintendedforusebypersons(includingchildren)withreducedphysical,sensoryormentalcapabilities,orlackofexperienceandknowledge,unlesstheyhavebeengivensupervisionorinstructionconcerninguseoftheappliancebyapersonresponsiblefortheirsafety.

4
SAfETy iNfoRMATioN ANd REcoMMENdATioNS
SAFETY
foR yoUR cHiLdREN’S SAfETy• Afterremovingthemachine’spackaging,makesure
thatthepackagingmaterialisoutofreachofchildren.
• Donotallowchildrentoplaywithorstartthemachine.
• Keepyourchildrenawayfromdetergentsandrinseaids.
• Keepchildrenawayfromthemachinewhileitisopenbecausetheremaystillberesiduesofcleaningsubstancesinsidethemachine.
• Besurethatyouroldmachinedoesnotposeanythreattochildren.Removethedishwasherdoorlockandpowersupplycord.
iN cASE of MALfUNcTioNiNg• Anymalfunctioninthemachineshouldberepaired
byqualifiedpersons.Anyrepairworkperformedbyanyoneotherthantheauthorisedservicepersonnelwillcauseyourmachinetobeleftoutsidethescopeofwarranty.
• Priortoanyrepairworkonthemachine,besuretounplugthedishwasherfromthepowersupply.Donotpullbythecablewhenunplugging.Makesuretoturnoffthewatertap.
REcoMMENdATioNS• Forenergyandwatersaving,removecoarseresidues
onyourdishesbeforeplacingthedishesintothemachine.Startyourmachineafterhavingfullyloadedit.
• Usethepre-washprogramonlywhenevernecessary.
• Placeitemssuchasbowls,glassesandpotsintothemachinesotheywillfacedown.
items not suitable for dishwashing:• Cigaretteashes,candleleftovers,polish,paint,
chemicalsubstances,iron-alloymaterials;
• Forks,spoonsandkniveswithwoodenorbone,ivoryornacre-coatedhandles;glueditems,itemssoiledwithabrasive,acidicorbasechemicals;
• Plasticitemsthatarenotheat-resistant,copperortincoatedcontainers;
• Aluminiumandsilverobjects(theymaydiscolour,becomedull);
• Certaindelicateglasstypes,porcelainswithornamentalprintedpatterns(mayfadeevenafterthefirstwash);certaincrystalitems(maylosetheirtransparencyovertime),laminatedcutlerythatisnotheat-resistant,leadcrystalglasses,cuttingboards,itemsmanufacturedwithsyntheticfibre;
• Absorbentitemssuchasspongesorkitchenragsarenotsuitablefordishwashing.
WARNINGWARNING Some dishwasher detergents are strongly alkaline. They can be extremely dangerous if swallowed. Avoid contact with the skin and eyes and keep children away from the dishwasher when the door is open. check that the detergent compartment is empty after completion of wash cycle.
5 DESCRIPTIoN
12
13
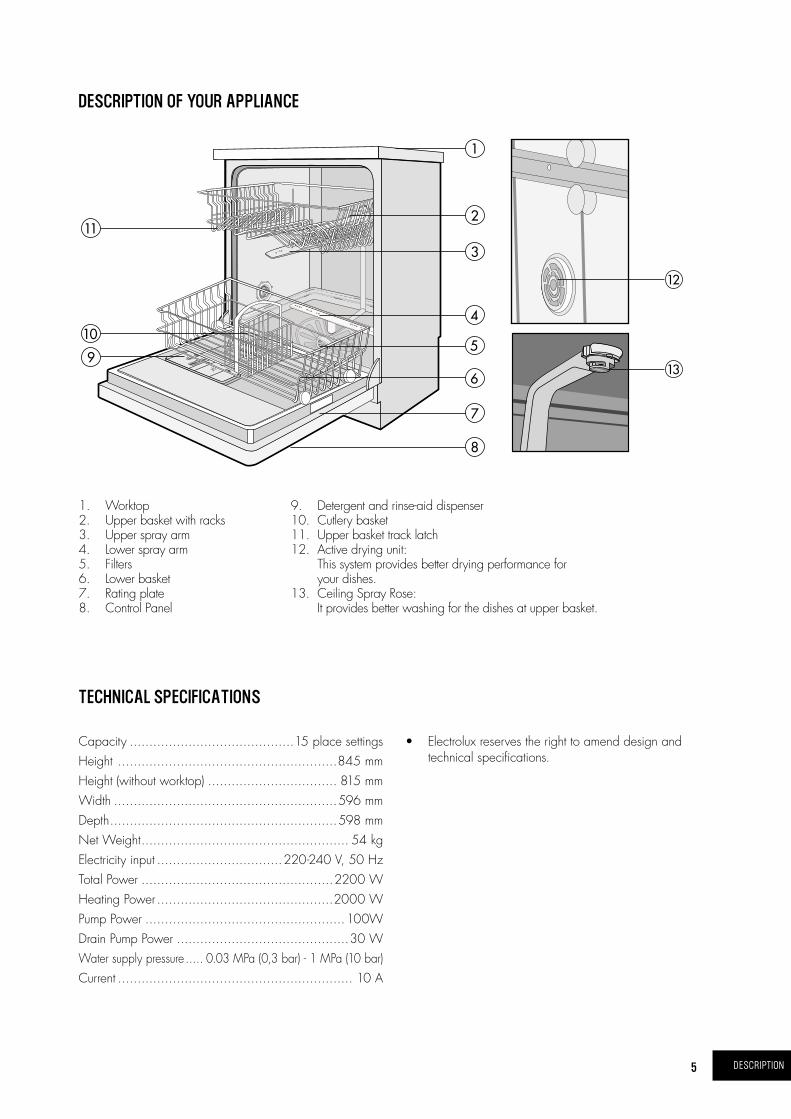
dEScRipTioN of yoUR AppLiANcE
TEcHNicAL SpEcificATioNS
Capacity..........................................15placesettingsHeight........................................................845mmHeight(withoutworktop)................................. 815mmWidth.........................................................596mmDepth..........................................................598mmNetWeight..................................................... 54kgElectricityinput................................220-240V,50HzTotalPower.................................................2200WHeatingPower.............................................2000WPumpPower...................................................100WDrainPumpPower............................................30WWatersupplypressure..... 0.03MPa(0,3bar)-1MPa(10bar)Current............................................................ 10A
• Electroluxreservestherighttoamenddesignandtechnicalspecifications.
2
3
5
4
6
7
8
9
10
11
1
1. Worktop2. Upperbasketwithracks3. Uppersprayarm4. Lowersprayarm5. Filters6. Lowerbasket7. Ratingplate8. ControlPanel
9. Detergentandrinse-aiddispenser10. Cutlerybasket11. Upperbaskettracklatch12. Activedryingunit:
Thissystemprovidesbetterdryingperformanceforyourdishes.
13. CeilingSprayRose:Itprovidesbetterwashingforthedishesatupperbasket.

6
4 5 6 71 2 3
1. poWER BUTToNWhenpressedonON/OFFbutton,themachineisenergizedandthepowerlightilluminates.
2. HygiENE BUTToNByusingthisoption,washingtemperatureandperiodsduringrespectivecyclesmaybechanged,whichensuresmorehygienicwashing.
3. TABLET dETERgENT BUTToNUsethisoptionwhenusingcombineddetergentthatcontainsrinseaidandextrafunctions.
4. dooR HANdLEUsedoorhandletoopen-closethedoorofthemachine.
5. pRogRAM SELEcTioN BUTToNWiththeprogramselectorbutton,youcanselectasuitableprogramforyourdishes.
6. UppER BASKET BUTToNByusingthe‘UpperBasketWash‘feature,youcanwashthedishesonlyonupperbasket,reducingthedurationofyourselectedprograms,anddecreasingyourpowerandwaterconsumption.
7. START/pAUSE BUTToNTheStart/Pausebuttonwillstarttheselectedprogram.InthePauseconditionwhilewashledison,Start/Pauseledwillblink.8. RiNSE Aid poWER iNdicAToRWhentherinseaidlightilluminates,filltherinseaidchamber.Thepowerlightindicatespowerisavailabletotheappliance.
Note: If you have used an extra option on the last washing program, this feature will remain active also on the next washing program. to deselct an option on the newly selected washing program, press the selected option button again, and check that the indicator lamp on the button goes off.
9. pRogRESS iNdicAToR LigHTSProgramstatuscanbemonitoredviatheprogressindicatorlightsoncontrolpanel.• Wash• Dry• End
10. TiME iNdicAToR diSpLAyTimeIndicatordisplaystheprogramtimesandremainingtimefortheprograminoperation.Inaddition,youcanadjustprogramdelaytimebypressingthebuttonsontheindicatorbeforeprogramstarts.Ifyouwanttochangedelaytime,youcansetthetimebypressingStart/Pausebuttonandusingbuttonsontheindicator.PressStart/Pausebuttonagaininordertoactivate.
cHiLd LocK opERATioNInordertoactivatechildlock,press“+”and“–”buttonssimultaneouslyfor3seconds.Atthistime,“CL”appearsfor2secondsonremainingtimeindicator.Toinactivechildlock,press“+”and“–”buttonsagainsimultaneouslyfor3seconds.“CL”willblinkonce.
8910
DESCRIPTIoN
dEScRipTioN of yoUR AppLiANcE
DESCRIPTIoN

7
1
1
1
1
2
2
2
3
3
3
4
DESCRIPTIoN
QUicK START gUidE
QUICKSTART
SWiTcHiNg oN THE MAcHiNE
pRogRAM foLLoW-Up
cHANgiNg A pRogRAM
cANcELLiNg A pRogRAM
Youcanfollowtheprogramflowusingtheprogramfollow-uplampslocatedonthecontrolpanel.
Ifyouwouldliketochangeprogramswhileawashingprogramiscontinuing.
Ifyouwanttocancelcurrentprogramforanyreason.
PresstheON/OFFbutton
Additonalfunctions StarttheprogrampressingtheSTART/PAUSEbuttonOncetheON/OFFbuttonispressed,theSTART/PAUSEsymbolilluminates.
DuringthewashingcycletheWASHlightison
PressthePAUSE/STARTbutton
HoldthePAUSE/STARTbuttonfor3seconds
TheENDlightstartsflashingandwaterinsidethemachinewilldrainfor30seconds.TheprogramiscancelledwhentheENDlightstopsflashing
Afterthedishwasherstops,selectthedesiredprogramonthePROGRAMselectbutton
PressthePAUSE/STARTbuttontocommencenewprogram
OncetheprogramiscompletedtheENDlightcomeson.Donotopenthedishwasheruntilthislightcomeson.
TheSTART/PAUSEbuttonturnsoffoncetheprogramstartsandtheWASHlightison
OncecompletedtheDRYlightwillilluminateandthemachinewillrunsilentlywhilstdrying.
2
SelecttheprogramviathePROGRAMselectorbutton

8INSTALLATIoN
iNSTALLiNg THE MAcHiNE
poSiTioNiNg THE MAcHiNEWhenconsideringthelocationforthedishwasher,ensurethatthereisadequatespacetoenableloadingandunloadingofthedishes.
• Donotputyourmachineinanylocationwheretheambienttemperaturecanfallbelow5°C.
• Beforepositioning,takethemachineoutofitspackagingbyfollowingthewarningslocatedonthepackage.
• Positionthemachineclosetoawatertapanddrain.Youneedtositeyourmachine,takingintoconsiderationthatitsconnectionswillnotbealteredoncetheyaremade.
• Donotgripthemachinebyitsdoororpanelinordertomoveit.
• Takecaretoleaveacertainclearancefromallsidesofthemachinesothatyoucancomfortablymoveitbackandforthduringcleaning.
• Makesurethatthewaterinletandoutlethosesdonotgetsqueezedwhilepositioningthemachine.Also,makesurethatthemachinedoesnotstandontheelectricalcable.Adjustthemachine’sadjustablefeetsothatitcanstandlevelandbalanced.Properpositioningofthemachineensuresproblem-freeopeningandclosingofitsdoor.
• Ifthedoorofyourmachinedoesnotcloseproperly,checkifthemachineisstableontheflooritstandson;ifnot,adjusttheadjustablefeetandensureitsstableposition.
WATER coNNEcTioNBesurethattheindoorplumbingissuitableforinstallingadishwasher.Also,werecommendthatyoufitafilterattheentranceofyourplaceorapartmentsoastoavoidanydamagetoyourmachinebecauseofanycontamination(sand,clay,rustetc)thatmightbeoccasionallycarriedinthroughthemain’swatersupplyortheindoorplumbing,andtoforestallsuchcomplaintsasyellowingandformationofdepositsafterwashing.
WATER iNLET HoSEDonotusethewaterinlethoseofyouroldmachine,youmustusethenewwaterinlethosesuppliedwithyourmachineinstead.Beforeconnectingthewaterinlethosetothewatertap,ensurecleanwaterisflowingfromthetapbeforemakingtheconnection.Connectthewaterinlethosedirectlytothewaterinlettap.Thepressuresuppliedbythetap
shouldbeataminimumof0.03MPaandatamaximumof1MPa.Ifthewaterpressureisabove1MPa,apressure-reliefvalveshouldbefittedinbetween.
Aftertheconnectionsaremade,thetapshouldbeturnedonfullyandcheckedforwatertightness.Forthesafetyofyourmachine,makesuretoalwaysturnoffthewaterinlettapaftereachwashprogramisfinished.
WARNINGWARNING Note: Aquastop inlet hose has components using 240V. Do not cut Aquastop inlet hose. Do not let it get folded or twisted.
WATER dRAiN HoSEIfyouconnectthewaterdrainhosetoatrapspigotunderthesink,removetheplasticmembrane.Ifyoudonotremovetheentiremembrane,remainingfoodcancauseblockageinthedrainhosespigot.Ensureahoseclampisusedtosecurethehosetothespigot.
Thewaterdrainhosecanbeconnectedeitherdirectlytothewaterdrainholeortothesinkoutletspigot.Usingahosehook(ifavailable),thewatercanbedraineddirectlyintothesinkbypositioningthehosehookovertheedgeofthesink.
Thisconnectionshouldbeataminimumof50cmandatamaximumof110cmabovethebaseofthedishwasher.
WARNiNg: Maximum drain hose length is 4m. Longer hose length will prevent correct drainingand result in poor wash performance.
Removeentireinternalmembrane

9 INSTALLATIoN
iNSTALLiNg THE MAcHiNE
WARNINGWARNINGELEcTRicAL coNNEcTioN
Theearthedplugofyourmachineshouldbeconnectedtoanearthedoutletsuppliedbysuitablevoltageandcurrent.Ifthereisnoearthinginstallation,haveacompetentelectriciancarryoutanearthinginstallation.Incaseofusagewithoutearthinginstalled,ourcompanywillnotberesponsibleforanylossofusagethatmightoccur.
Theindoorfusecurrentvalueshouldbe10-16A.
Yourmachineisdesignedfor220-240V.Themachineshouldnotbepluggedinduringinstallation.
• Alwaysusethemoldedplugsuppliedwithyourmachine.• Runninginlowvoltagewillcauseadeclinein
washingquality.• Themachine’selectricalcableshouldbereplacedbyan
authorisedserviceoranauthorisedelectricianonly.Failuretodosomayleadtoaccidents.
• Forsafetypurposes,alwaysmakesuretodisconnecttheplugwhenawashprogramisfinished.
• Inordernottocauseanelectricshock,donotunplugwhenyourhandsarewet.
• Whendisconnectingyourmachinefromthemainssupply,alwayspullfromtheplug.Neverpullthecorditself.
fiTTiNg THE MAcHiNE UNdERcoUNTER Ifyouwishtofityourmachineundercounter,checkwhetheryouhavesufficientspaceunderyourcountertopandwhetherthewiring-plumbingissuitabletodoso.
1. Ifyoudecidethatthespaceunderthecountertopissuitableforfittingyourmachine,removetheworktopasshownintheillustration.
2. Toremovetheworktop,removethescrewsthatholdtheworktopwhicharelocatedattherearofthemachine;thenpushthefrontpanel1cmfromthefronttowardstherearandliftit.
598596
845
570
465
97
815
85
1
2

10INSTALLATIoN
iNSTALLiNg THE MAcHiNE
3. Adjustthemachinefeetaccordingtotheslopeofthefloor.
4. Fityourmachinebypushingitundercounterwithoutlettingthehosesgetcrushedorbent.
WARNINGWARNINGAfter removal of worktop, ensure the opening for the dishwasher is according to the following dimensions.
4
3
min.600
mm820mm
570mm

11 PREPARATIoN
pREpARiNg THE MAcHiNE foR USE
pRioR To USiNg THE MAcHiNE foR THE fiRST TiME• Checkwhethertheelectricityandwatersupply
specificationsmatchthevaluesindicatedbytheinstallationinstructionsforthemachine.
• Removeallpackagingmaterialsinsidethemachine.
• Filltherinseaidcompartment.
dETERgENT USAgEUseadetergentspecificallydesignedforuseindomesticdishwashers.Youcanfindpowder,gel,andtabletdetergentsinthemarketthathavebeendesignedforhouseholddishwashers.Detergentshouldbeputintothecompartmentpriortostartingthemachine.Keepyourdetergentsincool,dryplacesoutofreachofyourchildren.Donotfilldetergentintothedetergentcompartmentmorethanrequired;otherwiseitmayetchyourglassesaswellasleavingundissolveddetergentinthedishwasher.Shouldyouneedmoreinformationconcerningthedetergentyouwilluse,contactdetergentmanufacturersdirectly.
fiLLiNg THE dETERgENT coMpARTMENT1.Pushthelatchtoopenthedetergentcontainerasshowninimage1.
2.Detergentcompartmenthaslevellinesinside.Itispossibletomeasuretherightdetergentamountusingtheselines.Detergentcompartment(A)cantake40gmofdetergent.Openthedishwasherdetergentandpourintothelargercompartment25gmifyourdishesareheavilysoiledor15gmiftheyarelesssoiled.
Ifyourdisheshavebeenkeptdirtyforaverylongtime,iftherearedriedfoodwastesonthem,andifyouhavefullyloadedthedishwasher,pour5gmdetergentintothepre-washcompartment(B)andstartyourmachine.
Youmayhavetoaddmoredetergentintoyourmachine,dependingonthedegreeofsoilandonthewaterhardnesslevelinyourarea.
coMBiNEd dETERgENTDetergentmanufacturersalsoproducecombineddetergentscalled“2in1”,“3in1”or“5in1”etc.
“2in1”detergentscontaindetergentorrinseaid.Whenusing“2in1”detergentmakesuretocheckthespecificationsofthetablet.
Othertabletdetergentscontaindetergent+rinseaid+variousextrafunctions/additives.
Generally,combineddetergentsproduceacceptableresultsundercertainusageconditionsonly.Suchdetergentscontainrinseaidinpresetamounts.
Pointstoconsiderwhenusingthesetypeofproducts:
• Alwaysmakesuretocheckthespecificationsofthedetergentyouwilluseorwhetherornotitisacombineddetergent.
• Checkifthedetergentusedisappropriateforthehardnessofmainswater.
• Observetheinstructionsonpackagingwhenusingsuchproducts.
• Ifdetergentsareintheformoftablets,neverputthemintotheinteriorsectionorthecutlerybasketofthedishwasher.Alwaysputthetabletsintothedetergentcompartmentinthedetergentdispenser.
• Tabletsproducegoodresultsforcertaintypesofusageonly.Ifyouareusingthistypeofdetergent,youneedtocontactthemanufacturerandfindoutaboutthesuitableconditionsofuse.
• Whentheconditionsofuseofsuchproductsandthemachinesettingsareappropriate,theyensuresavingsinrinseaidconsumption.
• Contactthedetergentmanufacturersifyouarenotobtaininggoodwashresults(ifyourdisheshavelimescaleandstaywet)afterhavingused2in1or3in1detergents.Thescopeofwarrantyforyourmachinedoesnotcoveranycomplaintscausedbytheuseofthesetypesofdetergents.
Recommendedusage:Ifyouwanttoobtainbetterresultswhileusingcombineddetergents,addrinseaidintoyourmachineandadjustthewatersoftenersettingandtherinseaidsettingtothelowestposition.
Solubility of the tablet detergents produced by different companies can vary depending on the temperature and time. Therefore, it is not recommended to use these detergents in short programs. it is more suitable to use powder detergents in short programs.
WARNINGWARNINGShould any problem occur which you have not encountered before, with the use of these type of detergents, contact the detergent manufacturers directly.
1DETERG
ENT
2AB

12PREPARATIoN
pREpARiNg THE MAcHiNE foR USE
WHEN yoU STop USiNg coMBiNEd dETERgENTS• Filltherinseaidcompartments.
• Selectasuitablerinseaidsetting.
fiLLiNg WiTH RiNSE Aid ANd MAKiNg THE SETTiNgRinseaidisusedtoimprovethedryingofthewashloadandreducethedepositofcloudydropsandstreaksonglassesanddishware.Forthisreason,careshouldbetakenthatthereisadequateamountofrinseaidintherinseaidcompartmentandonlyrinseaidproducedforuseindishwashersshouldbeused.
Iftherinseaidlamponthecontrolpanelilluminates,filltherinseaidcompartmentwithrinseaid.
1.Toputinrinseaid,removetherinseaidcompartmentcapbyturningit.
2.Filltherinseaidcompartmentwithrinseaiduntiltherinseaidlevelindicatorbecomesdark;refitthecapbylocatingthelockingpinsandcloseitbyturningintheoppositedirection.Bycheckingtherinseaidlevelindicatoronthedetergentdispenser,youcanunderstandwhetherornotyourmachineneedsrinseaid.Adarkindicatormeansthatthereisrinseaidinthecompartment,whilealightindicatorshowsthatyouneedtofillthecompartmentwithrinseaid.
3.Therinseaidleveladjustercanbesettoapositionbetween1and6.Factorysettingforrinseaidisposition3.Youneedtoincreasethesettingoftheadjusterifwaterstainsformonyourdishesafterawash,whereasyouneedtodecreasethesettingifabluestainisleftwhenwipedbyhand.(3)
TIPS & INFORMATION TIPS AND INFoRMATIoN oNLy USE RiNSE Aid SUiTABLE foR AUToMATic diSHWASHERS. As rinse aid residues left as a result of overflowing will create extremely high amounts of foam and reduce the washing performance, remove the excess amount of rinse aid by wiping it with a rag. Remove all excess rinse aid if spilt while filling,
1
2
1 2 3 4 5 6
3
13 LoADING
LoAdiNg yoUR diSHWASHER
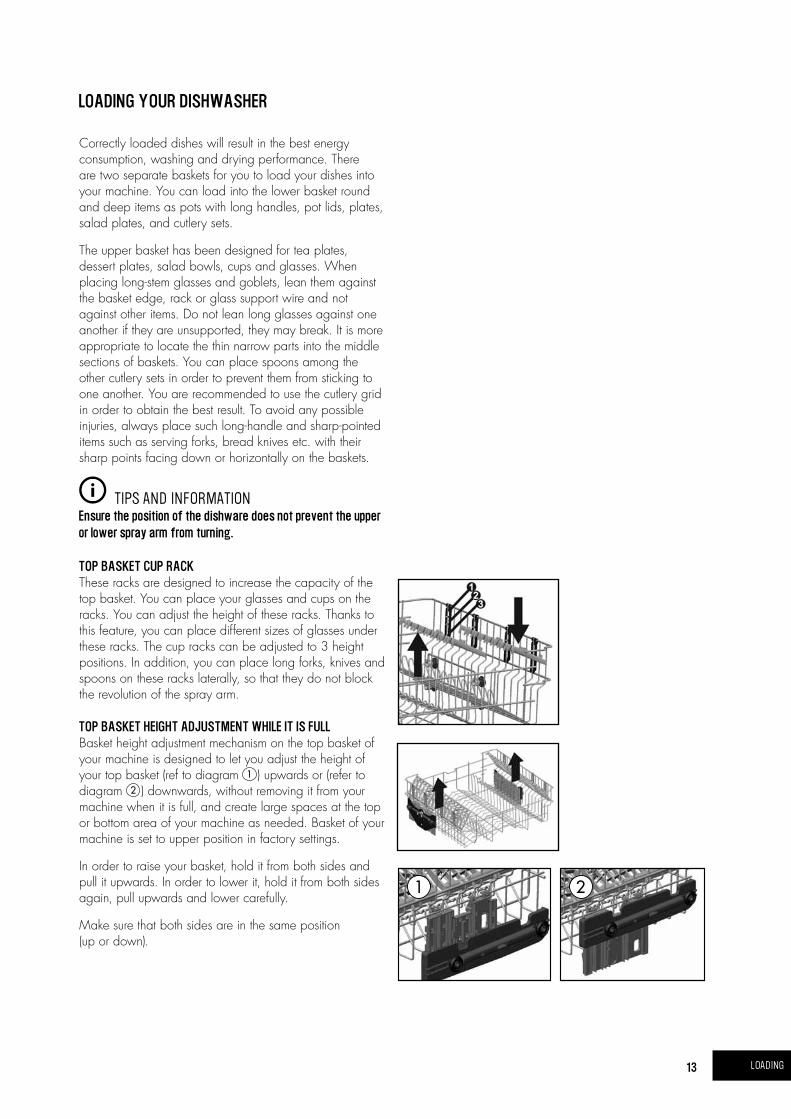
Correctlyloadeddisheswillresultinthebestenergyconsumption,washinganddryingperformance.Therearetwoseparatebasketsforyoutoloadyourdishesintoyourmachine.Youcanloadintothelowerbasketroundanddeepitemsaspotswithlonghandles,potlids,plates,saladplates,andcutlerysets.
Theupperbaskethasbeendesignedforteaplates,dessertplates,saladbowls,cupsandglasses.Whenplacinglong-stemglassesandgoblets,leanthemagainstthebasketedge,rackorglasssupportwireandnotagainstotheritems.Donotleanlongglassesagainstoneanotheriftheyareunsupported,theymaybreak.Itismoreappropriatetolocatethethinnarrowpartsintothemiddlesectionsofbaskets.Youcanplacespoonsamongtheothercutlerysetsinordertopreventthemfromstickingtooneanother.Youarerecommendedtousethecutlerygridinordertoobtainthebestresult.Toavoidanypossibleinjuries,alwaysplacesuchlong-handleandsharp-pointeditemssuchasservingforks,breadknivesetc.withtheirsharppointsfacingdownorhorizontallyonthebaskets.
TIPS & INFORMATION TIPS AND INFoRMATIoN Ensure the position of the dishware does not prevent the upper or lower spray arm from turning.
Top BASKET cUp RAcK Theseracksaredesignedtoincreasethecapacityofthetopbasket.Youcanplaceyourglassesandcupsontheracks.Youcanadjusttheheightoftheseracks.Thankstothisfeature,youcanplacedifferentsizesofglassesundertheseracks.Thecuprackscanbeadjustedto3heightpositions.Inaddition,youcanplacelongforks,knivesandspoonsontheserackslaterally,sothattheydonotblocktherevolutionofthesprayarm.
Top BASKET HEigHT AdjUSTMENT WHiLE iT iS fULLBasketheightadjustmentmechanismonthetopbasketofyourmachineisdesignedtoletyouadjusttheheightofyourtopbasket(reftodiagram 1 )upwardsor(refertodiagram 2 )downwards,withoutremovingitfromyourmachinewhenitisfull,andcreatelargespacesatthetoporbottomareaofyourmachineasneeded.Basketofyourmachineissettoupperpositioninfactorysettings.
Inordertoraiseyourbasket,holditfrombothsidesandpullitupwards.Inordertolowerit,holditfrombothsidesagain,pullupwardsandlowercarefully.
Makesurethatbothsidesareinthesameposition(upordown).
1 2

14
SpooN RAcKItallowsyourlong-stemmedglassestobewashedsafelyaswellasprovidingaconvenientalternativelocationtowashspoonsandforks.Donotleanyourlong-stemmedgobletsandglassesagainsteachotherbutspoonrack,thusduringthewashingitisensuredyourglassesandgobletsstayinplaceandasafewashingbypreventingcontacteachother.
Thereare4differentpositionsforyourspoonrack.Accordingtothetypeoflongstemmedglasses,youcansetyourspoonracktothepositionsnumber1and2.
Useitforyourspoonsandforkswhileitwasinposition1.
Ifyoudonotwanttousethespoonrackpositions3or4areavailable.
LoAdiNg yoUR diSHWASHER
LoADING
a b
Ifyoudonotwanttousespoonrack,youcanbringittothepositions3or4,sothatyoucanformlarger-volumeareasintheupperbasketb.
1
3
2
4

15
LoWER BASKET foLdiNg RAcKSFoldingracksconsistingoffourpartsthatarelocatedonthelowerbasketofyourmachinearedesignedinordertoletyouplacebigitemseasiersuchaspots,pans,etc.Ifrequested,eachpartcanbefoldedseparately,orallofthemcanbefoldedandlargerspacescanbeobtained.Youcanusefoldingracksbyraisingthemupwards,orbyfolding.
LoAdiNg yoUR diSHWASHER
ModULAR cUTLERy BASKETDependingupontheamountofsoiledcutlery,thebasketcanbeseparatedintotwoparts.Holdthebasketfrombothsidesandmoveeachsideinoppositedirections.Tocombinethebasketsreversetheprocedure.
Thecutlerybaskethandlesareadjustable,position(a)or(b).Whenseparated,thebasketscanbeusedintheupperorlowerdishwasherbasketasrequired.
LoADING
1 2
a
b

16
LoAdiNg yoUR diSHWASHER
LoADING
ALTERNATE cUTLERy BASKETAnalternatecutlerybaskethasbeenprovidedforconvenience.Thecutlerybaskethandleisadjustable-position(a)or(b).Thebasketcanbeusedintheupperorlowerdishwasherbasketasrequired.
a
b
ALTERNATivE cUTLERy BASKET poSiTioNSByplacingyourmodularcutlerybasketindifferentplacesoftheupperorlowerbasket,youcancreatesuitablelocationsforyourotherdishes.
Belowyoucanseeseveralrecommendedoptions.

17
LoAdiNg yoUR diSHWASHER
ALTERNATivE BASKET LoAdS Lower Basket
LoADING
ALTERNATivE ModULAR BASKET poSiTioN

18
LoAdiNg yoUR diSHWASHER
LoADING
TIPS & INFORMATION TIPS AND INFoRMATIoNExamples of incorrect loading
Top Basket
iNfoRMATioN foR TEST LABoRAToRiESForallthenecessaryinformationforperformancetesting,sendanemailto
InyourmailpleaseprovidethemodelnumberandPNCnumber(9digits)thatisontheratingplateontheappliancedoor.

19 PRoGRAMS
pRogRAM dEScRipTioNS
pRogRAM iTEMS
**Onlypowderdetergentshouldbeusedincycleofprewashprogramme.
WARNINGWARNING Short programs do not include a drying step. The values declared above are the values obtained under laboratory conditions according to relevant standards. These values can change depending on conditions of product’s use and environment (network tension, water pressure, water input temperature and environment temperature).
NAME of pRogRAM RiNSE fAST 30 Eco TiME SAvE HEAvy iNTENSivE
WASHiNg TEMpERATURE
- 40ºC 50ºC 65ºC 60ºC 65ºC
TypE of food SoiLS
Prewashtorinseandloosenfoodresidue
Freshcoffee,milk,tea,coldmeat,vegetables
Freshcoffee,milk,tea,coldmeat,vegetables
Bakedonsoup,sauce,pastry,egg,rice,potatoandmeatscookedinoven,friedfood
Freshcoffee,milk,tea,coldmeat,vegetables
Disheswithdensedriedonsoilsorforhygienicwashing
LEvEL of food SoiLS
Small Small Medium Medium Medium High
AMoUNT of dETERgENT A: 25gm/ 15gm
B: 5gm
A:15A:25B:5
A:25B:5
A:25B:5
A:40B:5
NA Pre-wash 40ºCWash Pre-wash 65ºC
Wash Pre-wash Pre-wash
Finish ColdRinse 50ºCWash
IntermediateRinse
60ºCWash
55ºCWash
HotRinse ColdRinse HotRinse ColdRinse 65ºCWash
End HotRinse End HotRinse ColdRinse
Dry Dry IntermediateRinse
End End HotRinse
Dry
pRogRAM TiME (mins)
15 30 122 50 90 177
poWER coNSUMpTioN (kW hour)
0.02 0.84 0.95 1.21 1.34 1.73
WATER coNSUMpTioN (Litres)
4.2 10.9 13.5 10.7 14.4 24.6

20
SWiTcHiNg oN THE MAcHiNE ANd SELEcTiNg A pRogRAM
SWITCHING oN
StarttheprogrambypressingtheSTART/PAUSEkey
cHANgiNg A pRogRAMIfyouwouldliketochangeprogramswhileawashingprogramiscontinuing.
SWiTcHiNg oN THE MAcHiNE
pRogRAM foLLoW-UpYoucanfollowtheprogramflowusingtheprogramfollow-uplampslocatedonthecontrolpanel.
PresstheON/OFFbutton
SelecttheprogramsuitingyourdishesviathePROGRAMselectorbutton
1
2 4Youcanchooseanadditonalfunction 3
1
3
DuringthewashingcycletheWASHlightison
OncetheprogramiscompletedtheENDlightcomesonDonotopenthedishwasheruntilthislightcomeson
2 OncecompletedtheDRYlightwillilluminateandthemachinewillrunsilentlywhilstdrying
1
23
PressthePAUSE/STARTbutton
Aftertheprogramstops,selectthedesiredprogramonthePROGRAMselectbutton PressthePAUSE/STARTbutton
tocommencenewprogram

21 SWITCHING oN
HoldSTART/PAUSEbuttonpressedforapprox.3sec.untilENDlightblinks
cHANgiNg A pRogRAM WiTH RESETTiNgIfyouwouldliketocancelaprogramwhileawashingprogramisresumed.
TIPS & INFORMATION TIPS AND INFoRMATIoN
Note: If the machine door is opened during washing or the power is cut off, the machine resumes the program when the door is shut or the power comes back.
Note: For better drying results when the program has finished, keep the door ajar for some minutes before you remove the dishes.
2AfterENDlightstartsblinking,thewaterinsideisdischargedforapprox.30sec.OnceENDlightcomeson,itmeansthat
thecyclehasbeencancelled
SWiTcHiNg THE MAcHiNE off
WhentheENDlightcomeson,switchyourmachineoffbyusingthePOWEROn/Offbutton1 Pulltheplugoutoftheoutlet.Turnoffthewatertap2
1

22MAINTENANCE
MAiNTENANcE ANd cLEANiNg
Cleaningthemachineinregularintervalsprolongsthemachine’sservicelife.
Oilandlimemayaccumulateinthemachine’swashingsection.Incaseofsuchaccumulation:
Fillthedetergentcompartmentwithdetergentwithoutloadinganydishesintothemachine,selectaprogramthatrunsathightemperature,andstartthemachine.Alternatively,usedescalingmaterialavailableinthemarket.(Dishwashercleanersproducedbydetergentmanufacturers.)
cLEANiNg THE SEALS iN THE MAcHiNE dooRTocleananyaccumulatedresiduesinthedoorseals,wipethesealsregularlybyusingadampenedcloth.
cLEANiNg THE MAcHiNECleanthefiltersandsprayarmsatleastonceaweek.Unplugyourmachineandturnoffitstapbeforestartingthecleaning.Donotuseabrasivematerialswhencleaningyourmachine.Wipewithafinecleaningmaterialandadampenedcloth.
fiLTERSCheckifanyfoodwasteshaveremainedonthecoarseandfinefilters.Ifanyfoodwastesareleft,removethefiltersandcleanthemthoroughlyunderthewatertap.
a. MicroFilterb. CoarseFilterc. Metal/PlasticFilter
1 Toremoveandcleanthefiltercombination,turnitcounterclockwiseandtakeitoutbyliftingupwards.
2 Pullandremovethemetal/plasticfilter.
3 Thenpullthecoarsefilteroutofthemicrofilter.Rinseitwithwaterunderthetap.Refitthemetal/plasticfilter.Insertthecoarsefilterintothemicrofilterinawaythatthemarkswillcorrespondtooneanother.
4 Attachmicrofilterintothemetal/plasticfilterandturntothedirectionofarrowanditislockedwhenthearrowonmicrofiltercanbeseenfromacross.
5 Neveruseyourdishwasherwithoutanyfilter.
6 Incorrectfittingofthefilterwillreducethewashingeffectiveness.
7 Cleanfiltersareveryimportantintermsoftheproperrunningofthemachine.
1
2
c
3
b
a
4

23 MAINTENANCE
MAiNTENANcE ANd cLEANiNg
SpRAy ARMSCheckwhetherornottheholesfortheupperandlowersprayarmsareclogged.Ifthereisanyclogging,removethesprayarmsandcleanthemunderwater.
Youcanremovethelowersprayarmbypullingitupwards,whiletheuppersprayarmnutcanberemovedbyturningthenuttotheleft.Besurethatthenutisperfectlytightenedwhenrefittingtheuppersprayarm.
HoSE fiLTERTheinlethosefilterreducescontamination(sand,clay,rustetc.)thatmightbeoccasionallycarriedinthroughthemain’swatersupplyortheindoorplumbing,andavoidsdamagetodishwashercomponents.Checkthefilterandthehosefromtimetotimeandcleanthemifnecessary.Tocleanthefilter,firstturnoffyourtapandthenremovethehose.Afterremovingthefilterfromthehose,cleanitunderthetap.Insertthecleanedfilterbackintoitsplaceinsidethehose.Refitthehoseandcheckthattherearenoleaks.

24FAILURE CoDES
fAiLURE codES ANd WHAT To do iN cASE of fAiLURE
pRAcTicAL ANd USEfUL iNfoRMATioN
1 Wheneveryouwillnotbeoperatingyourmachine:
• Unplugthemachineandthenturnthewateroff.
• Leavethedoorslightlyajarinordertopreventtheformationofunpleasantodours.
• Keepthemachineinteriorclean.
2 Eliminatingwaterdroplets:
• Washthedisheswiththeintensiveprogram.
• Increasetherinseaidsetting.
• Ifplasticitemsarewashed,waterdropsontheseitemswillbeunavoidable.Programswithhighertemperaturesandincreasedrinseaidsettingsmayreducethewaterdrops.Checkthattheplasticitemsaresuitablefordishwasheruse.
3 Correctlyloadeddisheswillgivethebestenergyconsumption,washinganddryingperformance.
4 Cleanallroughwastebeforeyouplacedirtydishesinthemachine.
5 Operatethemachineafteritiscompletelyfull.
6 Usepre-washingprogramonlywhennecessary.
7 Observeprograminformationandaverageconsumptionvaluestablewhenselectingaprogram.
8 Sincethemachinewillreachhightemperatures,itshouldnotbeinstalledneararefrigerator.
9 Iftheapplianceislocatedinaplacewheretheriskoffreezingexists,youmustcompletelydrainthewaterthathasremainedinthemachine.Turnoffthewatertap,disconnectthewaterinlethosefromthetapandallowtheinteriorwatertodrain.
ERRoR codE ERRoR dEScRipTioN coNTRoL
F5 Inadequatewatersupply •Makesurethewatertapisopenandthatmainwatersupplyison.
•Closethewatertap,separatethewaterinlethosefromthetapandcleanthefilterattheconnectionendofthehose.
•Restartyourmachine,contacttheservicecentreiftheerrorresumes.
F3 Errorofcontinuouswaterinput •Closethetap.•Contacttheservicecentre.
F2 Thewastewaterinthemachinecannotbedischarged
•Waterdrainhoseisclogged.•Spigotonsinktapisblocked.•Thefiltersofyourmachinemightbeclogged.•Poweroffyourmachineandactivatetheprogramcancellationcommand.
•Checkthedrainspigot’smembranehasbeenremovedorblocked.
•Iftheerrorcontinues,contacttheservicecentre.
F8 Heatererror •Contacttheservicecentre.
F1 Alarmisactiveagainstwateroverflow •Poweroffyourmachineandclosethetap.•Contacttheservicecentre.
FE Faultyelectroniccard •Contacttheservicecentre.
F7 Overheatingerror(temperatureinthemachineistoohigh)
•Contacttheservicecentre.
F9 FlowControlValvepositionerror •Contacttheservicecentre.
F6 Faultyheatersensor •Contacttheservicecentre.
25 INFoRMATIoN
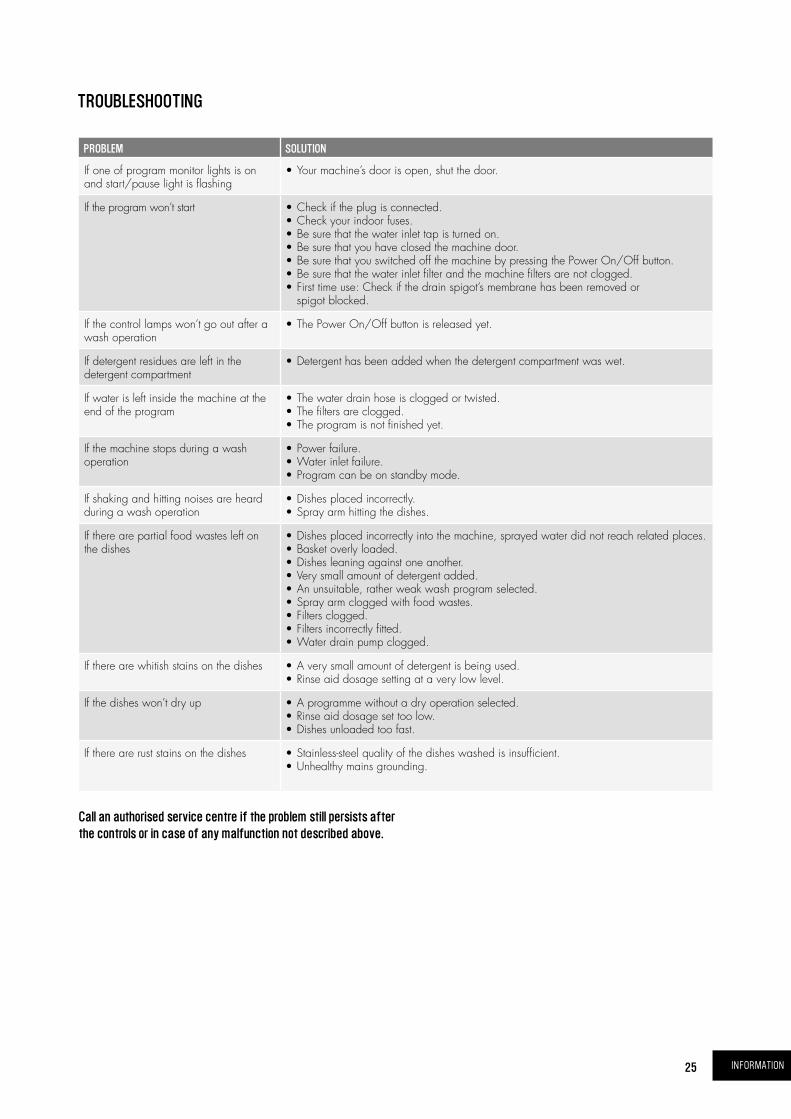
TRoUBLESHooTiNg
call an authorised service centre if the problem still persists after the controls or in case of any malfunction not described above.
pRoBLEM SoLUTioN
Ifoneofprogrammonitorlightsisonandstart/pauselightisflashing
•Yourmachine’sdoorisopen,shutthedoor.
Iftheprogramwon’tstart •Checkiftheplugisconnected.•Checkyourindoorfuses.•Besurethatthewaterinlettapisturnedon.•Besurethatyouhaveclosedthemachinedoor.•BesurethatyouswitchedoffthemachinebypressingthePowerOn/Offbutton.•Besurethatthewaterinletfilterandthemachinefiltersarenotclogged.•Firsttimeuse:Checkifthedrainspigot’smembranehasbeenremovedorspigotblocked.
Ifthecontrollampswon’tgooutafterawashoperation
•ThePowerOn/Offbuttonisreleasedyet.
Ifdetergentresiduesareleftinthedetergentcompartment
•Detergenthasbeenaddedwhenthedetergentcompartmentwaswet.
Ifwaterisleftinsidethemachineattheendoftheprogram
•Thewaterdrainhoseiscloggedortwisted.•Thefiltersareclogged.•Theprogramisnotfinishedyet.
Ifthemachinestopsduringawashoperation
•Powerfailure.•Waterinletfailure.•Programcanbeonstandbymode.
Ifshakingandhittingnoisesareheardduringawashoperation
•Dishesplacedincorrectly.•Sprayarmhittingthedishes.
Iftherearepartialfoodwastesleftonthedishes
•Dishesplacedincorrectlyintothemachine,sprayedwaterdidnotreachrelatedplaces.•Basketoverlyloaded.•Dishesleaningagainstoneanother.•Verysmallamountofdetergentadded.•Anunsuitable,ratherweakwashprogramselected.•Sprayarmcloggedwithfoodwastes.•Filtersclogged.•Filtersincorrectlyfitted.•Waterdrainpumpclogged.
Iftherearewhitishstainsonthedishes •Averysmallamountofdetergentisbeingused.•Rinseaiddosagesettingataverylowlevel.
Ifthedisheswon’tdryup •Aprogrammewithoutadryoperationselected.•Rinseaiddosagesettoolow.•Dishesunloadedtoofast.
Ifthereareruststainsonthedishes •Stainless-steelqualityofthedisheswashedisinsufficient.•Unhealthymainsgrounding.

26
NoTES
NoTES

27 WARRANTY
This document sets out the terms and conditions of the product warranties for Electrolux Appliances. It is an important document. Please keep it with your proof of purchase documents in a safe place for future reference should you require service for your Appliance.
1. In this warranty:
(a) ‘acceptable quality’ as referred to in clause 10 of this warranty has the same meaning referred to in the ACL;
(b) ‘ACL’ means Schedule 2 of the Competition and Consumer Act 2010;
(c) ‘Appliance’ means any Electrolux product purchased by you and accompanied by this document;
(d) ‘ASC’ means Electrolux authorised service centres;
(e) ‘Electrolux’ means Electrolux Home Products Pty Ltd of 163 O’Riordan Street, Mascot NSW 2020, ABN 51 004 762 341 in respect of Appliances purchased in Australia and Electrolux (NZ) Limited (collectively ‘Electrolux’) of 3-5 Niall Burgess Road, Mount Wellington, in respect of Appliances purchased in New Zealand;
(f) ‘major failure’ as referred to in clause 10 of this warranty has the same meaning referred to in the ACL and includes a situation when an Appliance cannot be repaired or it is uneconomic for Electrolux, at its discretion, to repair an Appliance during the Warranty Period;
(g) ‘Warranty Period’ means the Appliance is warranted against manufacturing defects in Australia for 24 months and in New Zealand for 24 months, following the date of original purchase of the Appliance;
(h) ‘you’ means the purchaser of the Appliance not having purchased the Appliance for re-sale, and ‘your’ has a corresponding meaning.
2. This warranty only applies to Appliances purchased and used in Australia or New Zealand and used in normal domestic applications and is in addition to (and does not exclude, restrict, or modify in any way) any non-excludable statutory warranties in Australia or New Zealand.
3. During the Warranty Period Electrolux or its ASC will, at no extra charge if your Appliance is readily accessible for service, without special equipment and subject to these terms and conditions, repair or replace any parts which it considers to be defective. Electrolux or its ASC may use remanufactured parts to repair your Appliance. You agree that any replaced Appliances or parts become the property of Electrolux. This warranty does not apply to light globes, batteries, filters or similar perishable parts.
4. Parts and Appliances not supplied by Electrolux are not covered by this warranty.
5. To the extent permitted by law, you will bear the cost of transportation, travel and delivery of the Appliance to and from Electrolux or its ASC. If you reside outside of the service area, you will bear the cost of:
(a) travel of an authorised representative;
(b) transportation and delivery of the Appliance to and from Electrolux or its ASC.
In all instances, unless the Appliance is transported by Electrolux or an Electrolux authorised representative, the Appliance is transported at the owner’s cost and risk while in transit to and from Electrolux or its ASC.
6. Proof of purchase is required before you can make a claim under this warranty.
7. You may not make a claim under this warranty unless the defect claimed is due to faulty or defective parts or workmanship. Electrolux is not liable in the following situations (which are not exhaustive):
(a) the Appliance is damaged by:
(i) accident
(ii) misuse or abuse, including failure to properly maintain or service
(iii) normal wear and tear
(iv) power surges, electrical storm damage or incorrect power supply
(v) incomplete or improper installation
(vi) incorrect, improper or inappropriate operation
(vii) insect or vermin infestation
(viii) failure to comply with any additional instructions supplied with the Appliance;
(b) the Appliance is modified without authority from Electrolux in writing;
(c) the Appliance’s serial number or warranty seal has been removed or defaced;
(d) the Appliance was serviced or repaired by anyone other than Electrolux, an authorised repairer or ASC.
8. This warranty, the contract to which it relates and the relationship between you and Electrolux are governed by the law applicable where the Appliance was purchased. Where the Appliance was purchased in New Zealand for commercial purposes the Consumer Guarantee Act does not apply.
9. To the extent permitted by law and subject to your non-excludable statutory rights and warranties, Electrolux excludes all warranties and liabilities (other than as contained in this document) including liability for any loss or damage whether direct or indirect arising from your purchase, use or non use of the Appliance.
10. For Appliances and services provided by Electrolux in Australia, the Appliances come with a guarantee by Electrolux that cannot be excluded under the ACL. You are entitled to a replacement or refund for a major failure and for compensation for any other reasonably foreseeable loss or damage. You are also entitled to have the Appliance repaired or replaced if the Appliance fails to be of acceptable quality and the failure does not amount to a major failure. The benefits to you given by this warranty are in addition to your other rights and remedies under a law in relation to the Appliances or services to which the warranty relates.
11. At all times during the Warranty Period, Electrolux shall, at its discretion, determine whether repair, replacement or refund will apply if an Appliance has a valid warranty claim applicable to it.
12. For Appliances and services provided by Electrolux in New Zealand, the Appliances come with a guarantee by Electrolux pursuant to the provisions of the Consumer Guarantees Act, the Sale of Goods Act and the Fair Trading Act.
13. To enquire about claiming under this warranty, please follow these steps:
(a) carefully check the operating instructions, user manual and the terms of this warranty;
(b) have the model and serial number of the Appliance available;
(c) have the proof of purchase (e.g. an invoice) available;
(d) telephone the numbers shown below.
14. You accept that if you make a warranty claim, Electrolux and its ASC may exchange information in relation to you to enable Electrolux to meet its obligations under this warranty.
WarrantyFOR SALES IN AUSTRALIA AND NEW ZEALAND
APPLIANCE: DISHWASHER
Important NoticeBefore calling for service, please ensure that the steps listed in clause 13 above have been followed.
FOR SERVICE or to find the address of your nearest
state service centre in Australia PlEASE CAll 13 13 49
For the cost of a local call (Australia only)
SERVICE AUSTRAlIA
ELECTROLUX HOME PRODUCTSwww.electrolux.com.au
FOR SPARE PARTS or to find the address of your nearest state spare parts centre in Australia
PlEASE CAll 13 13 50 For the cost of a local call (Australia only)
FOR SERVICE or to find the address of your nearest
authorised service centre in New Zealand FREE CAll 0800 10 66 10
(New Zealand only)
SERVICE NEW ZEAlAND
ELECTROLUX (NZ) Limitedwww.electrolux.co.nz
FOR SPARE PARTS or to find the address of your nearest
state spare parts centre in New Zealand FREE CAll 0800 10 66 20
(New Zealand only)
GDW_Warr_Aug13

AUSTRALIAphone: 1300363640fax: 1800350067email: [email protected]: www.westinghouse.com.au
NEW ZEALANDphone: 095732384fax: 0800363600email: [email protected]: www.westinghouse.co.nz
for more information on all Westinghouse appliances, or for dimension and installation information, call into your retailer, phone or email our customer care team or visit our website:
Top SERvicE TopServiceencompassestheaftersalesserviceprovidedbyTheElectroluxGrouptoconsumersincludingdelivery,homeserviceandspareparts.
Westinghouse. We are part of the Electrolux family. Share more of our thinking at www.electrolux.com
P/No: 5208 2280 Issue: B©2013ElectroluxHomeProductsPtyLtdABN51004762341WMAN_WSF6606_Oct13


