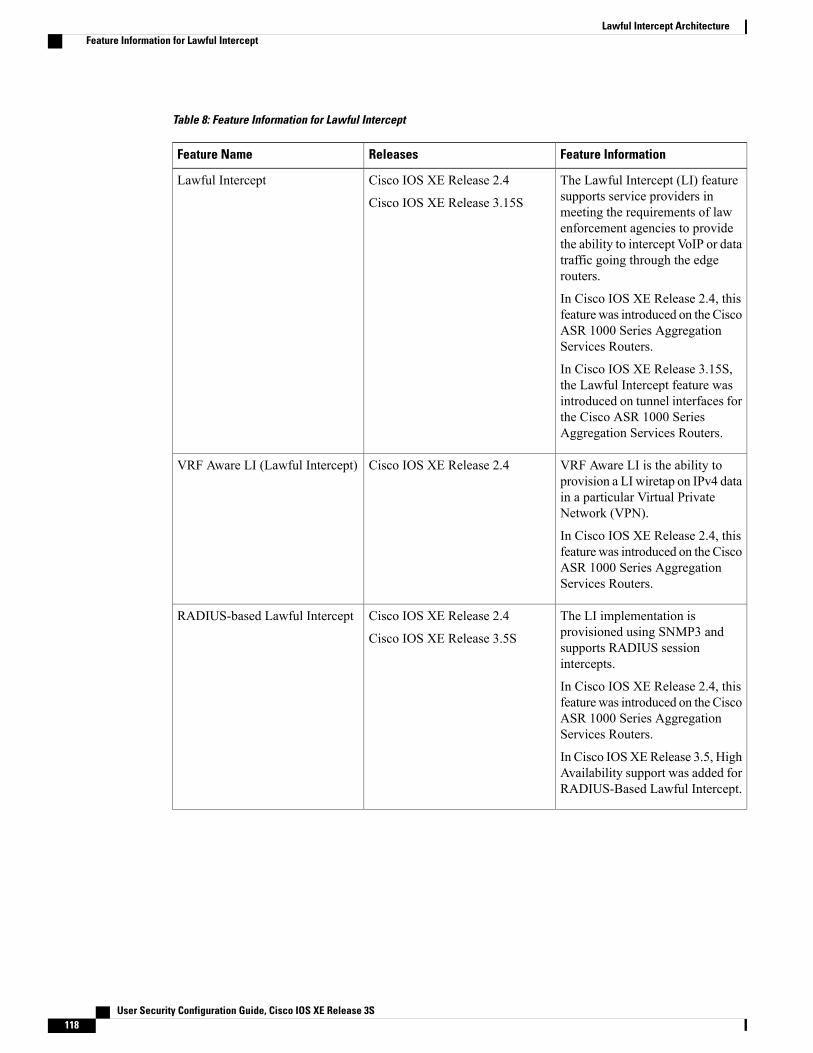
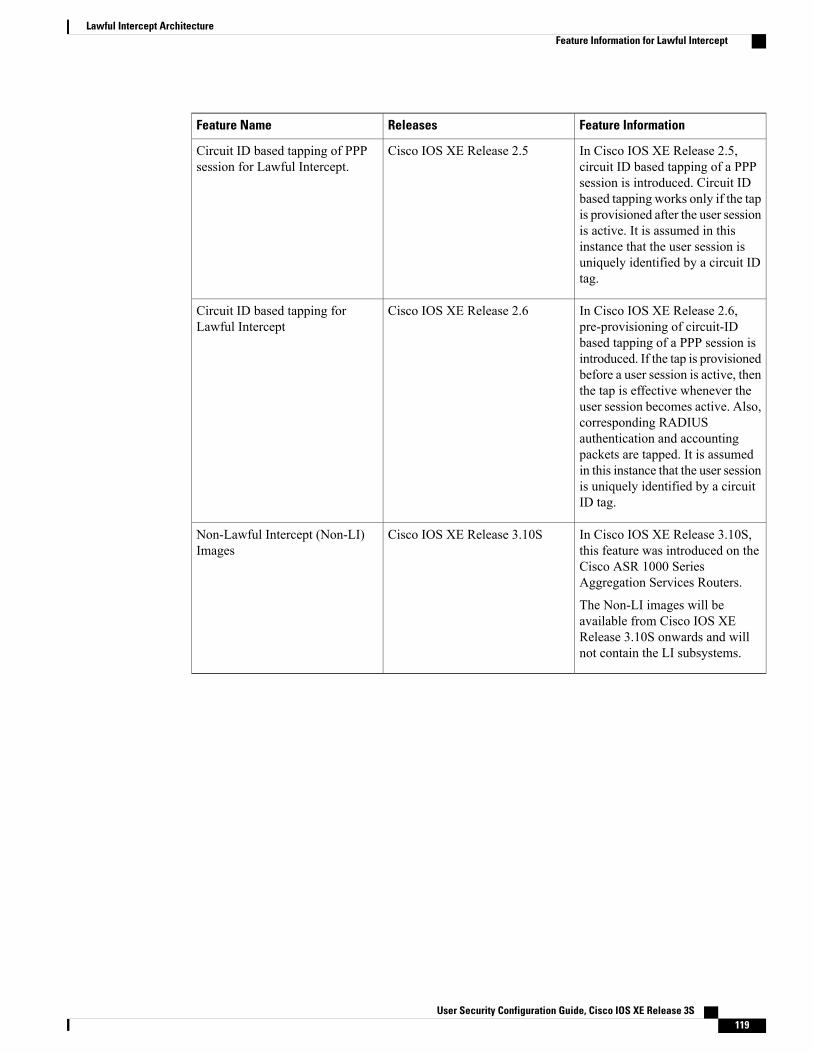
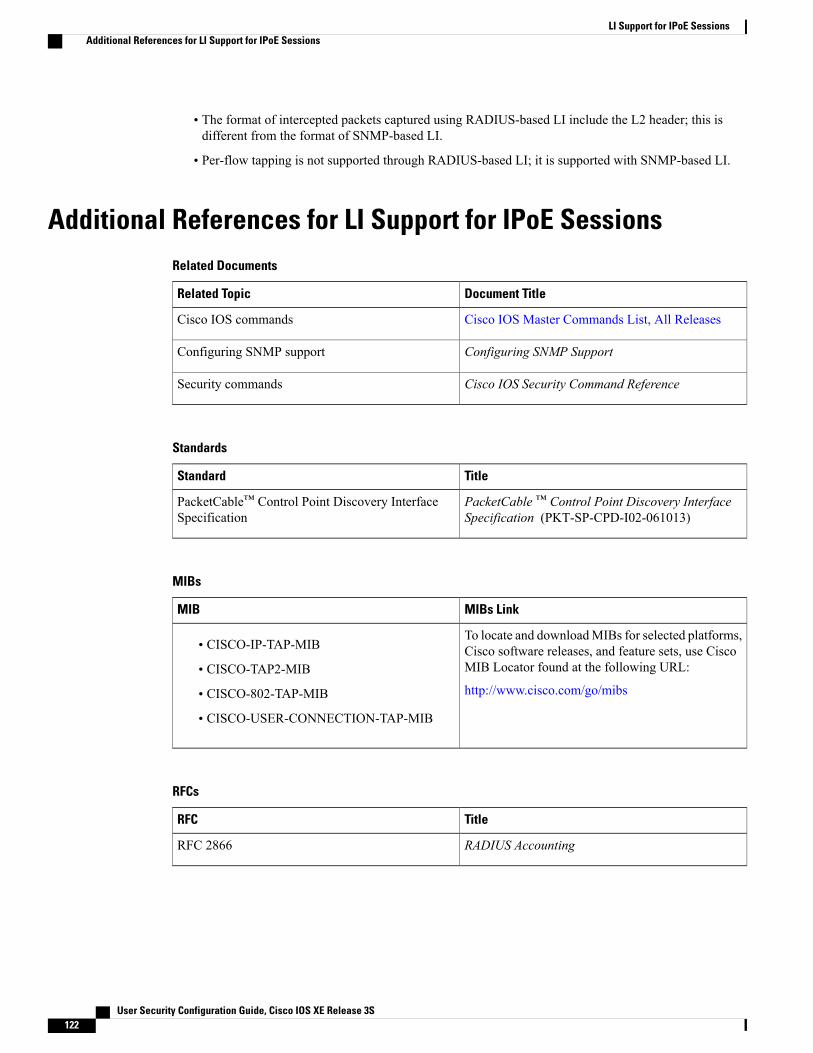
Additional References for LI Support for IPoE Sessions 122
Feature Information for LI Support for IPoE Sessions 123
C H A P T E R 8 Image Verification 125
Finding Feature Information 125
Restrictions for Image Verification 125
Information About Image Verification 126
Benefits of Image Verification 126
How Image Verification Works 126
How to Use Image Verification 126
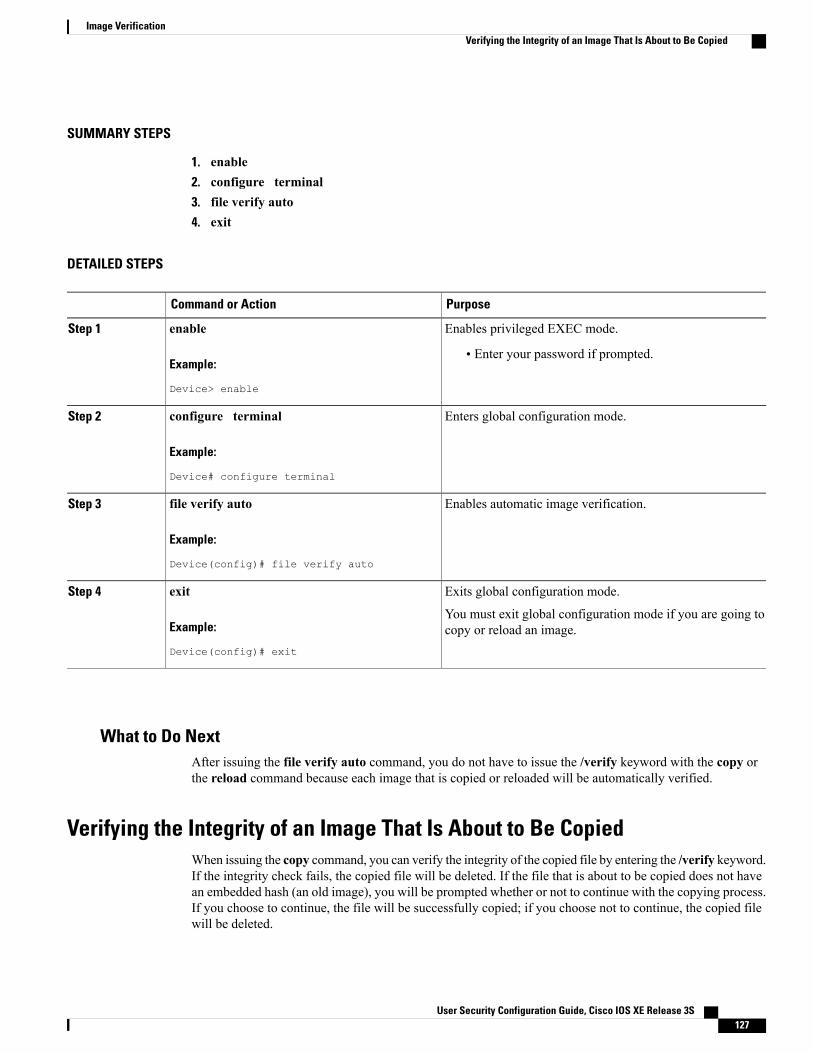
Globally Verifying the Integrity of an Image 126
What to Do Next 127
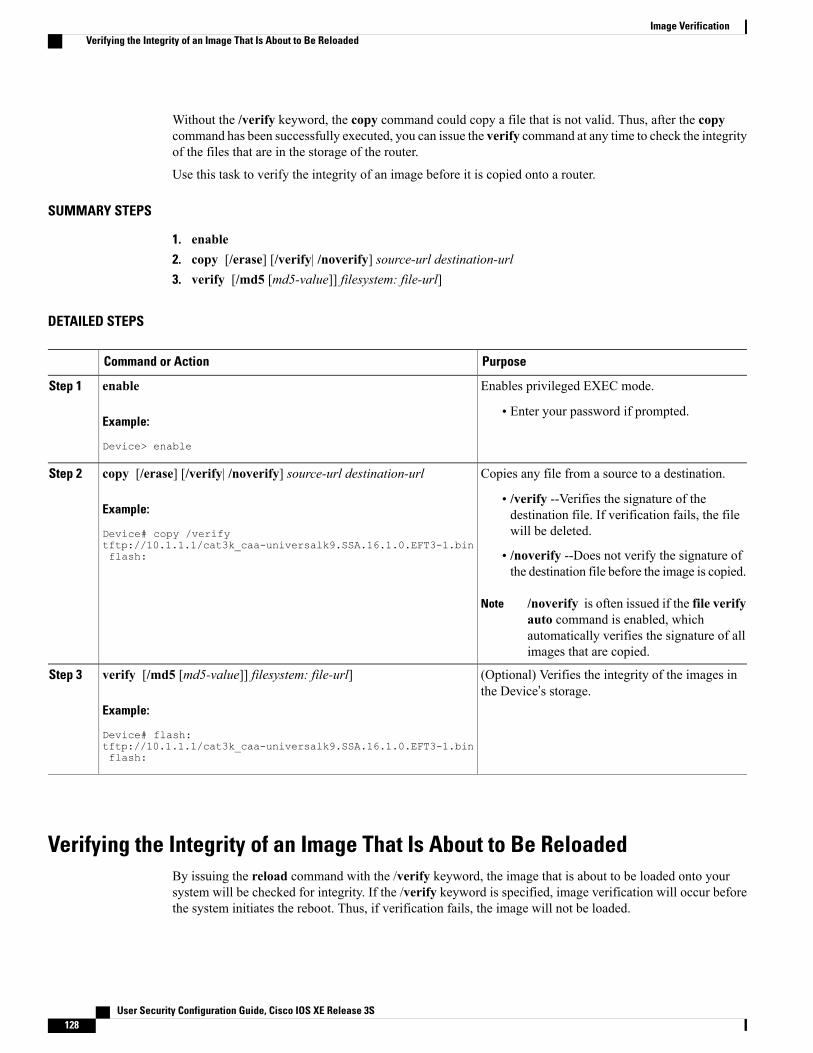
Verifying the Integrity of an Image That Is About to Be Copied 127
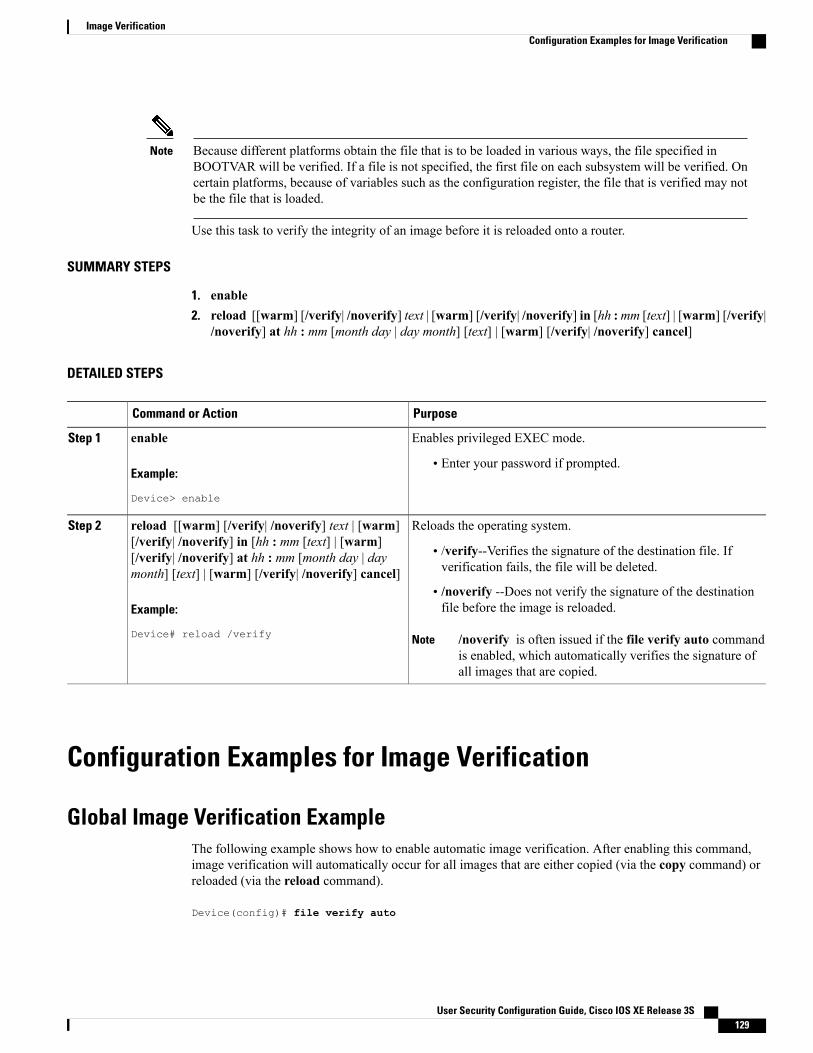
Verifying the Integrity of an Image That Is About to Be Reloaded 128
Configuration Examples for Image Verification 129
Global Image Verification Example 129
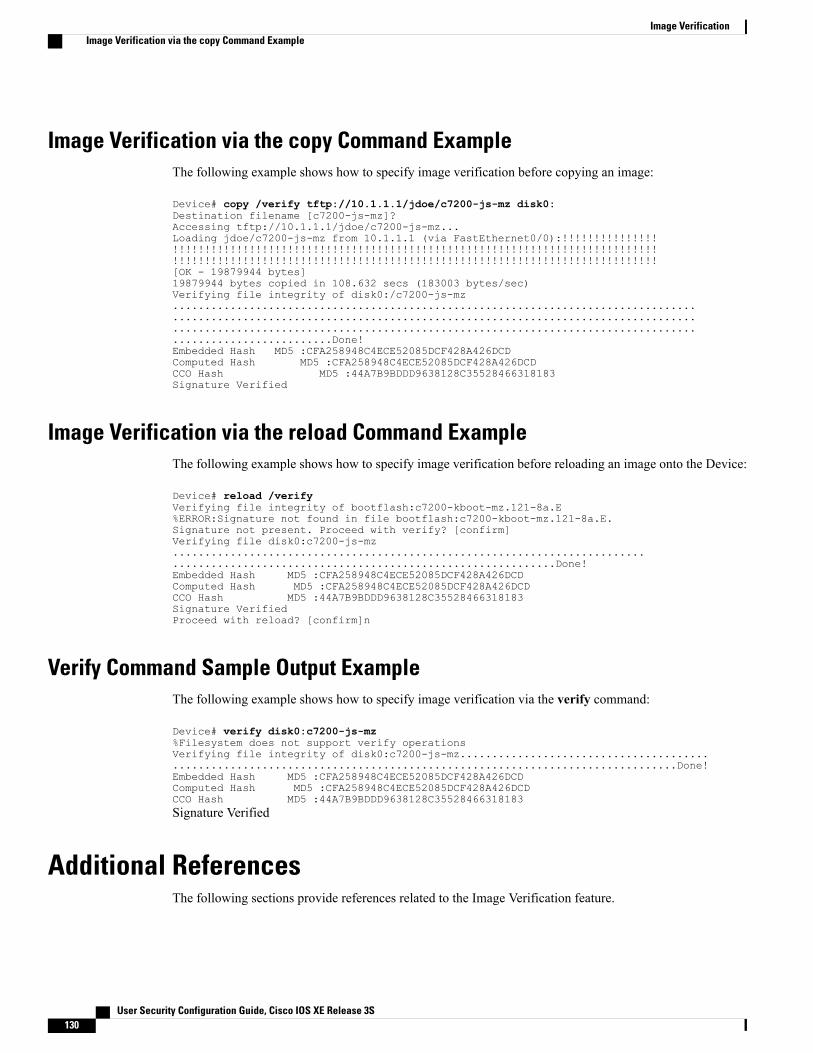
Image Verification via the copy Command Example 130
User Security Configuration Guide, Cisco IOS XE Release 3Sviii
Contents
Image Verification via the reload Command Example 130
Verify Command Sample Output Example 130
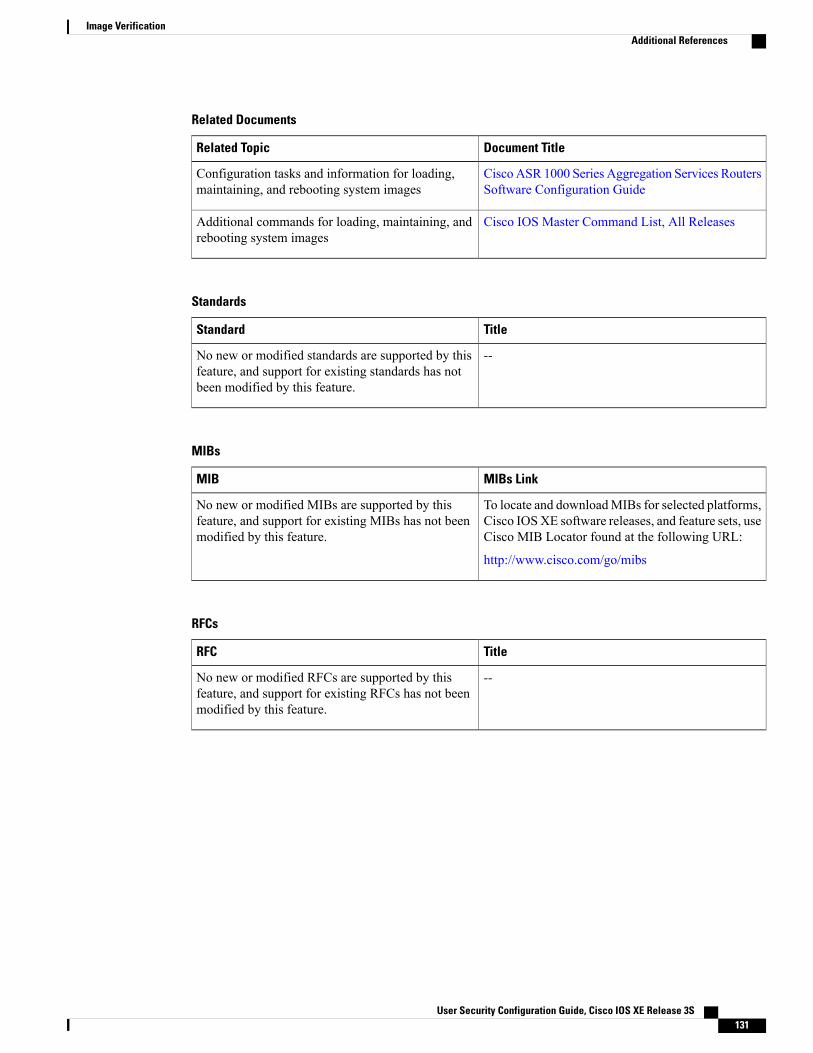
Additional References 130
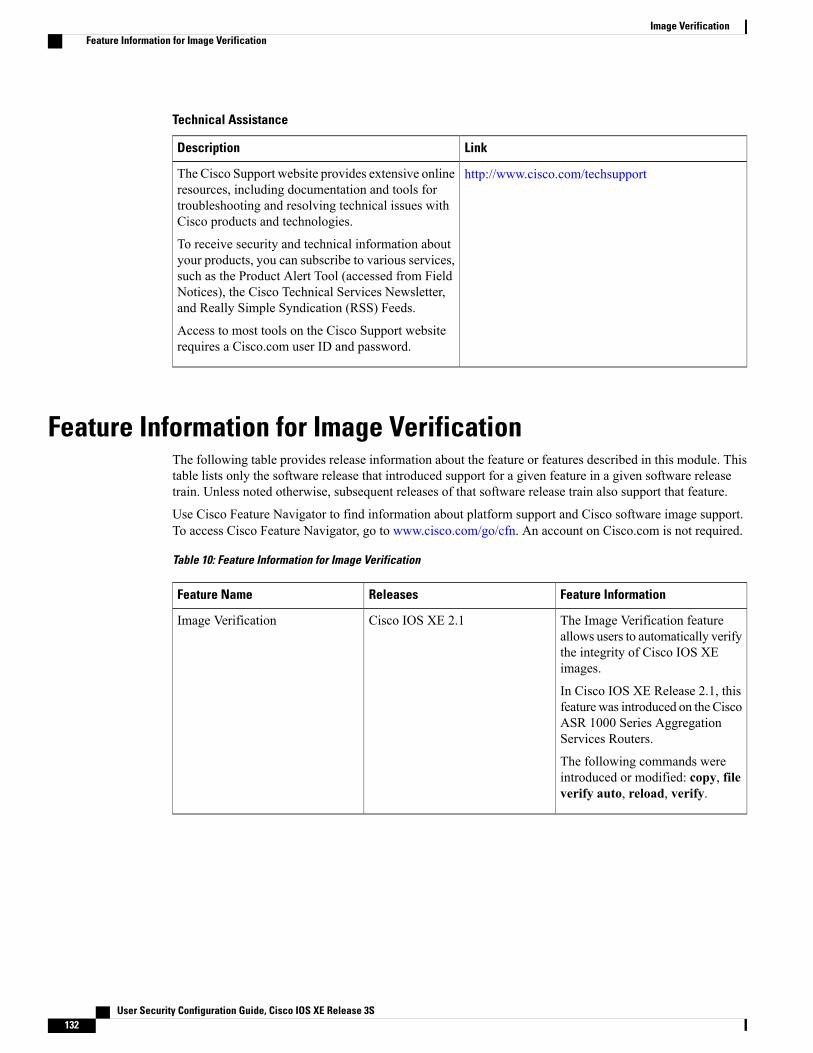
Feature Information for Image Verification 132
User Security Configuration Guide, Cisco IOS XE Release 3S ix
Contents
User Security Configuration Guide, Cisco IOS XE Release 3Sx
Contents
C H A P T E R 1Cisco IOS Login Enhancements-Login Block
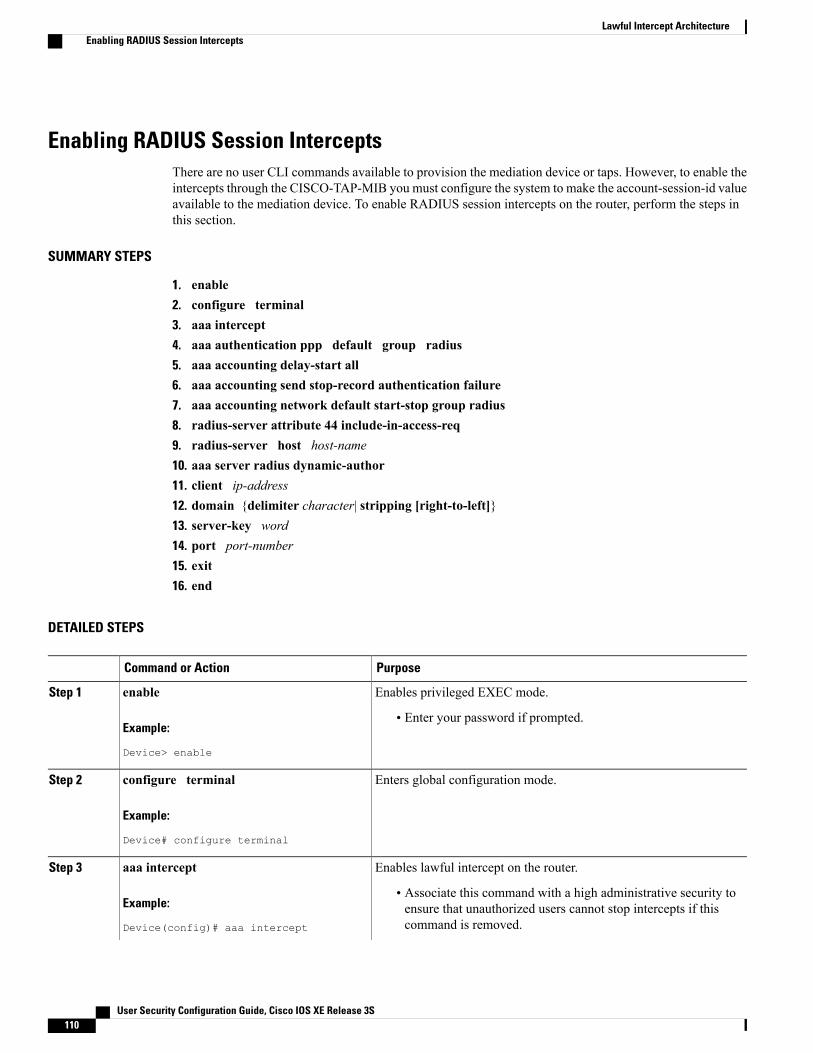
The Cisco IOS Login Enhancements (Login Block) feature allows users to enhance the security of a routerby configuring options to automatically block further login attempts when a possible denial-of-service (DoS)attack is detected.
The login block and login delay options introduced by this feature can be configured for Telnet or SSHvirtual connections. By enabling this feature, you can slow down “dictionary attacks” by enforcing a “quietperiod” if multiple failed connection attempts are detected, thereby protecting the routing device from a typeof denial-of-service attack.
• Finding Feature Information, page 1
• Information About Cisco IOS Login Enhancements, page 2
• How to Configure Cisco IOS Login Enhancements, page 3
• Configuration Examples for Login Parameters, page 6
• Additional References, page 6
• Feature Information for Cisco IOS Login Enhancements-Login Block, page 8
Finding Feature InformationYour software release may not support all the features documented in this module. For the latest caveats andfeature information, see Bug Search Tool and the release notes for your platform and software release. Tofind information about the features documented in this module, and to see a list of the releases in which eachfeature is supported, see the feature information table.
Use Cisco Feature Navigator to find information about platform support and Cisco software image support.To access Cisco Feature Navigator, go to www.cisco.com/go/cfn. An account on Cisco.com is not required.
User Security Configuration Guide, Cisco IOS XE Release 3S 1
Protecting Against Denial of Service and Dictionary Login AttacksConnecting to a routing device for the purposes of administering (managing) the device, at either the User orExecutive level, is most frequently performed using Telnet or SSH (secure shell) from a remote console (suchas a PC). SSH provides a more secure connection option because communication traffic between the user’sdevice and the managed device are encrypted. The Login Block capability, when enabled, applies to bothTelnet connections and SSH connections.
The automated activation and logging of the Login Block and Quiet Period capabilities introduced by thisfeature are designed to further enhance the security of your devices by specifically addressing two well knownmethods that individuals use to attempt to disrupt or compromise networked devices.
If the connection address of a device is discovered and is reachable, a malicious user may attempt to interferewith the normal operations of the device by flooding it with connection requests. This type of attack is referredto as an attempted Denial-of-Service, because it is possible that the device may become too busy trying toprocess the repeated login connection attempts to properly handle normal routing services or will not be ableto provide the normal login service to legitimate system administrators.
The primary intention of a dictionary attack, unlike a typical DoS attack, is to actually gain administrativeaccess to the device. A dictionary attack is an automated process to attempt to login by attempting thousands,or even millions, of username/password combinations. (This type of attack is called a “dictionary attack”because it typically uses, as a start, every word found in a typical dictionary as a possible password.) As scriptsor programs are used to attempt this access, the profile for such attempts is typically the same as for DoSattempts; multiple login attempts in a short period of time.
By enabling a detection profile, the routing device can be configured to react to repeated failed login attemptsby refusing further connection request (login blocking). This block can be configured for a period of time,called a “quiet period”. Legitimate connection attempts can still be permitted during a quiet period by configuringan access-list (ACL) with the addresses that you know to be associated with system administrators.
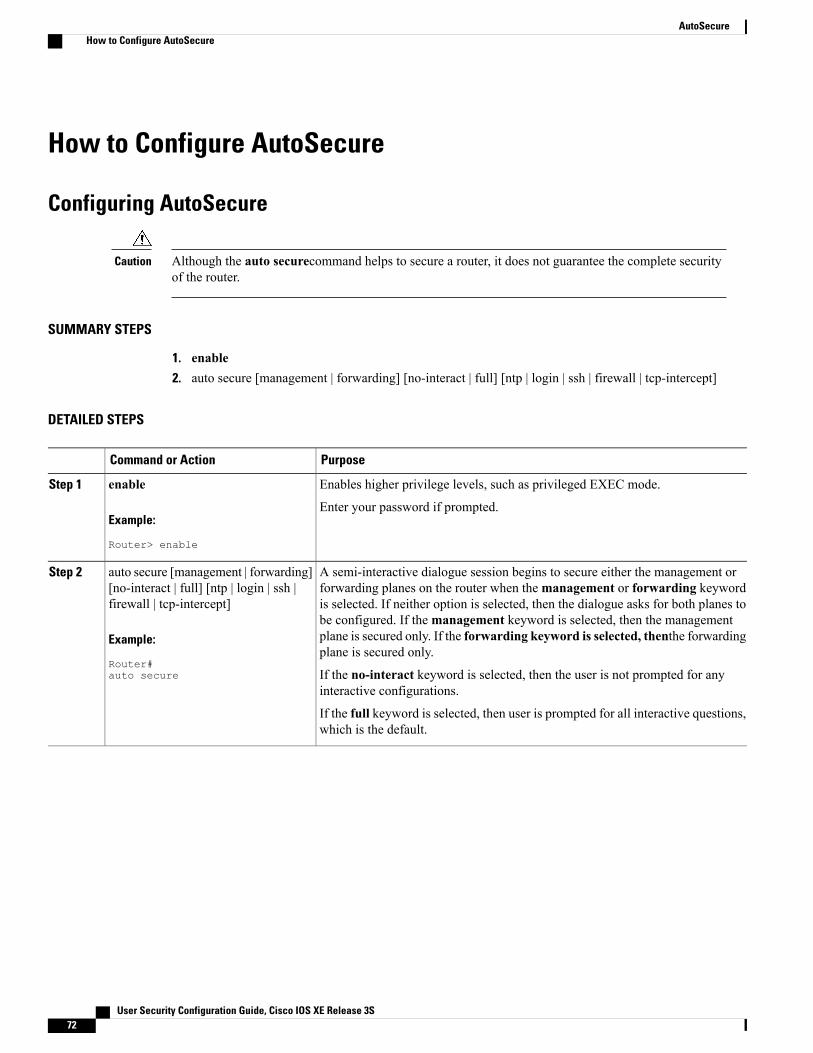
Login Enhancements Functionality Overview
Delays Between Successive Login AttemptsA Cisco device can accept virtual connections as fast as they can be processed. Introducing a delay betweenlogin attempts helps to protect the Cisco device against malicious login connections such as dictionary attacksand DoS attacks. Delays can be enabled in one of the following ways:
• Via the auto secure command. If you enable the AutoSecure feature, the default login delay time of onesecond is automatically enforced.
• Via the login block-for command. Youmust enter this command before issuing the login delay command.If you enter only the login block-for command, the default login delay time of one second is automaticallyenforced.
• Via the new global configuration mode command, login delay, which allows you to specify a the logindelay time to be enforced, in seconds.
User Security Configuration Guide, Cisco IOS XE Release 3S2
Cisco IOS Login Enhancements-Login BlockInformation About Cisco IOS Login Enhancements
Login Shutdown If DoS Attacks Are SuspectedIf the configured number of connection attempts fail within a specified time period, the Cisco device will notaccept any additional connections for a “quiet period.” (Hosts that are permitted by a predefined access-controllist [ACL] are excluded from the quiet period.)
The number of failed connection attempts that trigger the quiet period can be specified via the new globalconfiguration mode command login block-for. The predefined ACL that is excluded from the quiet periodcan be specified via the new global configuration mode command login quiet-mode access-class.
This functionality is disabled by default, and it is not enabled if autosecure if enabled.
How to Configure Cisco IOS Login Enhancements
Configuring Login ParametersUse this task to configure your Cisco device for login parameters that help detect suspected DoS attacks andslow down dictionary attacks.
All login parameters are disabled by default. You must issue the login block-for command, which enablesdefault login functionality, before using any other login commands. After the login block-for command isenabled, the following defaults are enforced:
• A default login delay of one second
• All login attempts made via Telnet or SSH are denied during the quiet period; that is, no ACLs areexempt from the login period until the login quiet-mode access-class command is issued.
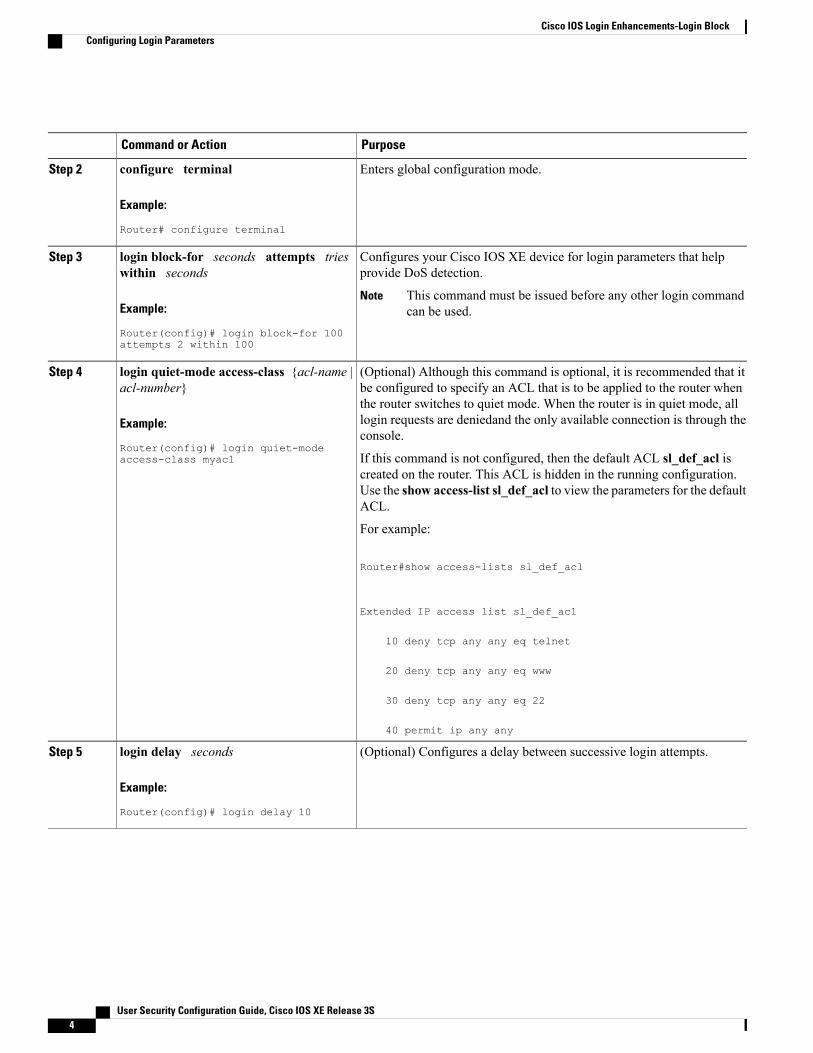
login requests are deniedand the only available connection is through theconsole.
If this command is not configured, then the default ACL sl_def_acl iscreated on the router. This ACL is hidden in the running configuration.Use the show access-list sl_def_acl to view the parameters for the defaultACL.
For example:
Router#show access-lists sl_def_acl
Extended IP access list sl_def_acl
10 deny tcp any any eq telnet
20 deny tcp any any eq www
30 deny tcp any any eq 22
40 permit ip any any
(Optional) Configures a delay between successive login attempts.login delay seconds
Example:
Router(config)# login delay 10
Step 5
User Security Configuration Guide, Cisco IOS XE Release 3S4
What to Do NextAfter you have configured login parameters on your router, you may wish to verify the settings. To completethis task, see the following section “Verifying Login Parameters, on page 5.”
Verifying Login ParametersUse this task to verify the applied login configuration and present login status on your router.
• failures --Displays information related only to failed loginattempts.
Examples
The following sample output from the show login command verifies that no login parameters have beenspecified:
Router# show loginNo login delay has been applied.No Quiet-Mode access list has been configured.All successful login is logged and generate SNMP traps.All failed login is logged and generate SNMP trapsRouter NOT enabled to watch for login AttacksThe following sample output from the show login command verifies that the login block-forcommand isissued. In this example, the command is configured to block login hosts for 100 seconds if 16 or more loginrequests fail within 100 seconds; five login requests have already failed.
Router# show loginA default login delay of 1 seconds is applied.No Quiet-Mode access list has been configured.All successful login is logged and generate SNMP traps.All failed login is logged and generate SNMP traps.
User Security Configuration Guide, Cisco IOS XE Release 3S 5
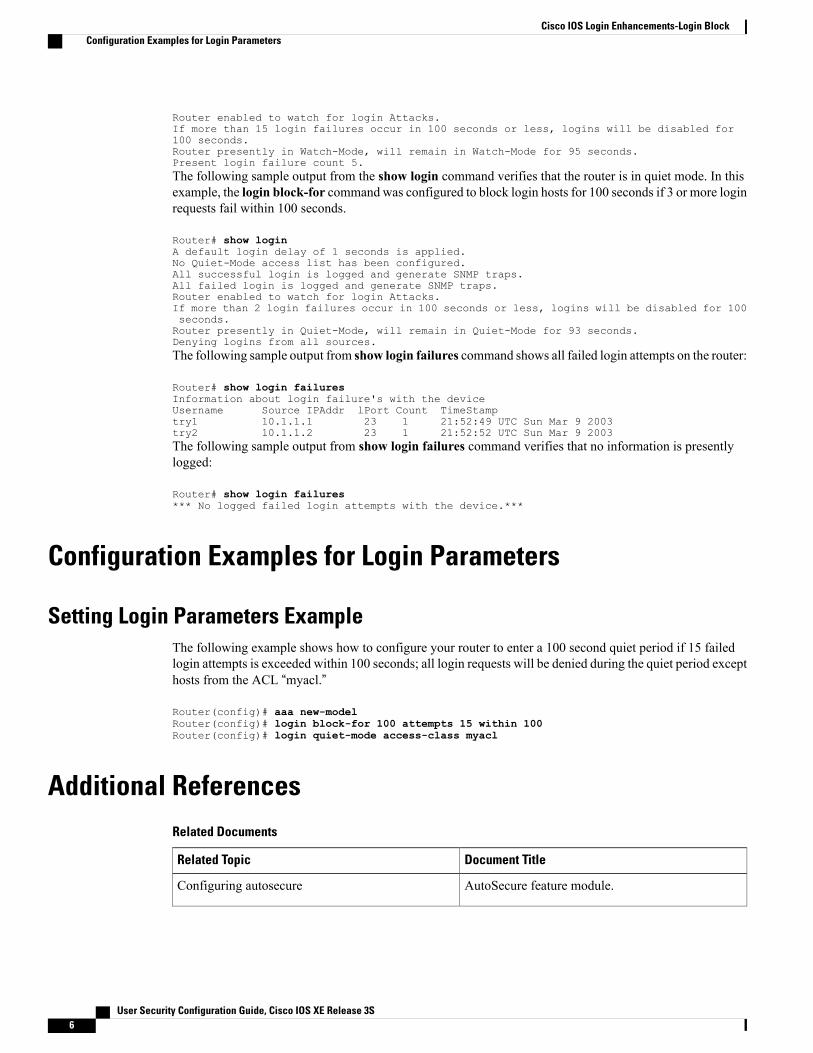
Router enabled to watch for login Attacks.If more than 15 login failures occur in 100 seconds or less, logins will be disabled for100 seconds.Router presently in Watch-Mode, will remain in Watch-Mode for 95 seconds.Present login failure count 5.The following sample output from the show login command verifies that the router is in quiet mode. In thisexample, the login block-for command was configured to block login hosts for 100 seconds if 3 or more loginrequests fail within 100 seconds.
Router# show loginA default login delay of 1 seconds is applied.No Quiet-Mode access list has been configured.All successful login is logged and generate SNMP traps.All failed login is logged and generate SNMP traps.Router enabled to watch for login Attacks.If more than 2 login failures occur in 100 seconds or less, logins will be disabled for 100seconds.Router presently in Quiet-Mode, will remain in Quiet-Mode for 93 seconds.Denying logins from all sources.The following sample output from show login failures command shows all failed login attempts on the router:
Router# show login failuresInformation about login failure's with the deviceUsername Source IPAddr lPort Count TimeStamptry1 10.1.1.1 23 1 21:52:49 UTC Sun Mar 9 2003try2 10.1.1.2 23 1 21:52:52 UTC Sun Mar 9 2003The following sample output from show login failures command verifies that no information is presentlylogged:
Router# show login failures*** No logged failed login attempts with the device.***
Configuration Examples for Login Parameters
Setting Login Parameters ExampleThe following example shows how to configure your router to enter a 100 second quiet period if 15 failedlogin attempts is exceeded within 100 seconds; all login requests will be denied during the quiet period excepthosts from the ACL “myacl.”
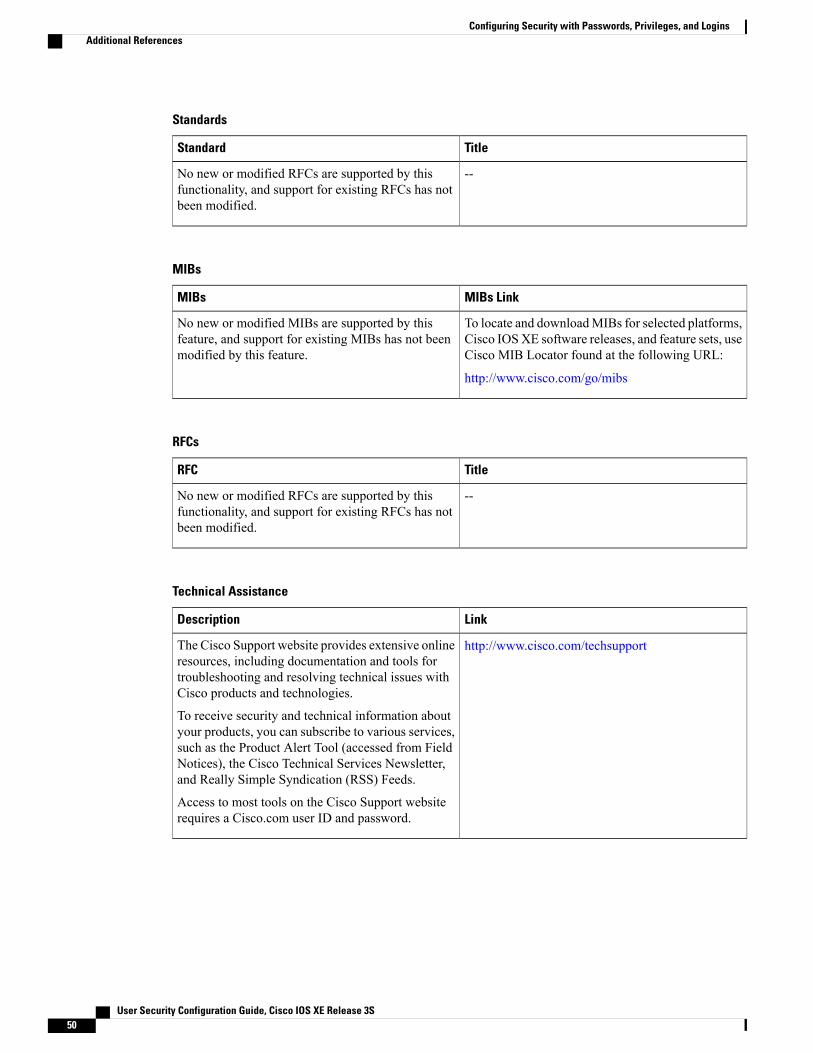
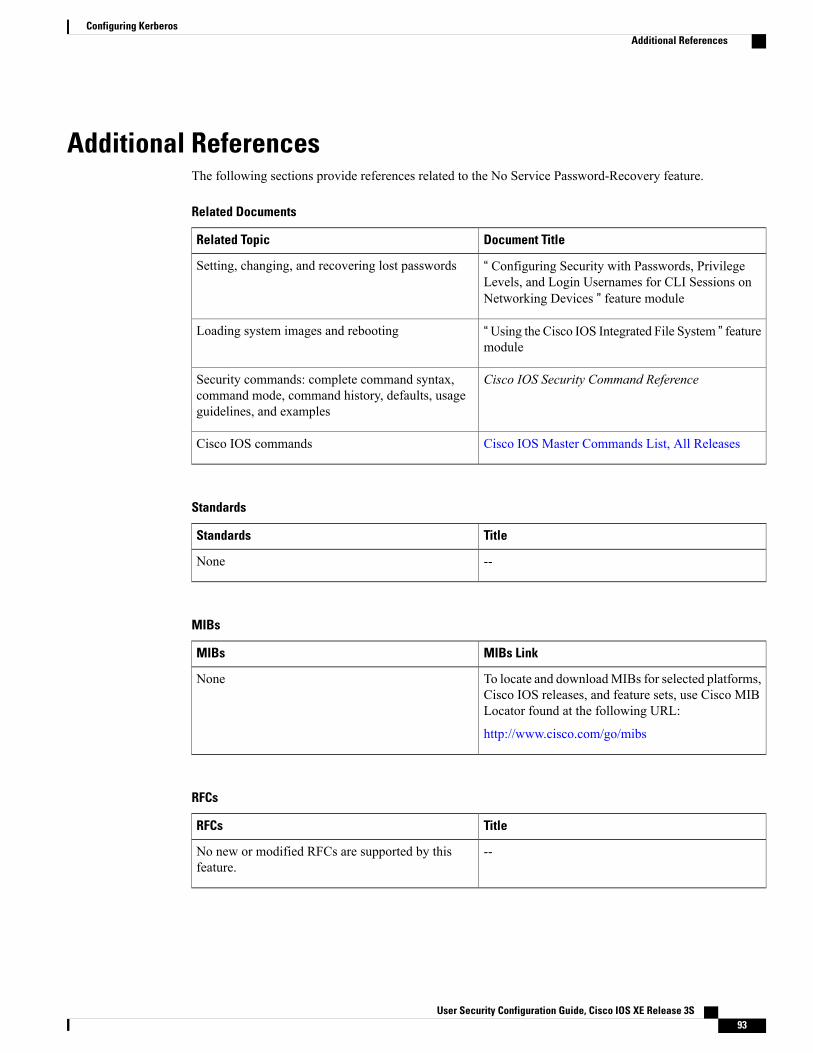
http://www.cisco.com/cisco/web/support/index.htmlThe Cisco Support website provides extensive onlineresources, including documentation and tools fortroubleshooting and resolving technical issues withCisco products and technologies.
To receive security and technical information aboutyour products, you can subscribe to various services,such as the Product Alert Tool (accessed from FieldNotices), the Cisco Technical Services Newsletter,and Really Simple Syndication (RSS) Feeds.
Access to most tools on the Cisco Support websiterequires a Cisco.com user ID and password.
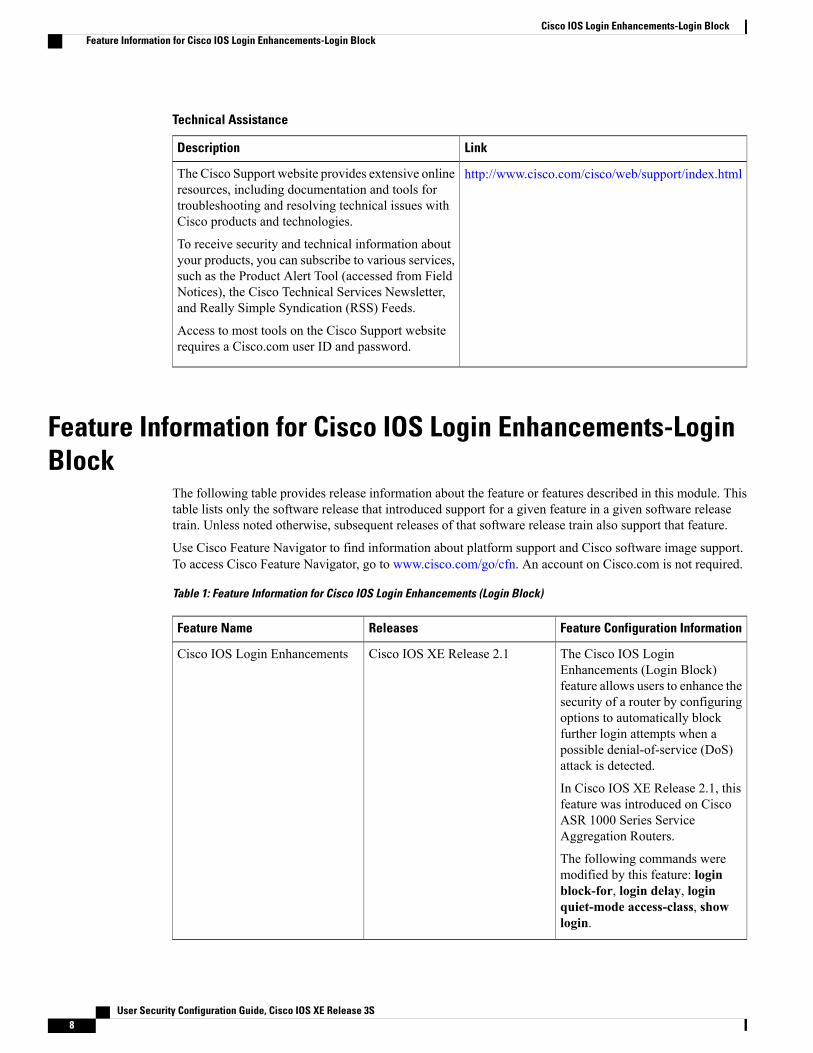
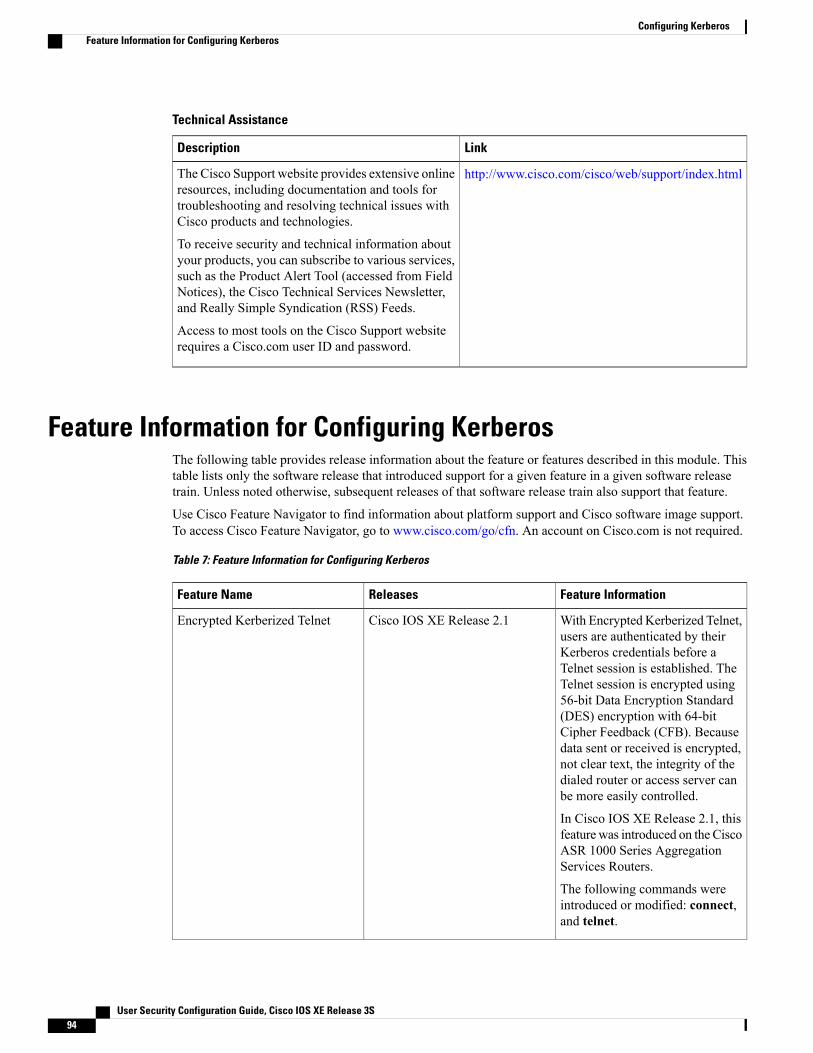
Feature Information for Cisco IOS Login Enhancements-LoginBlock
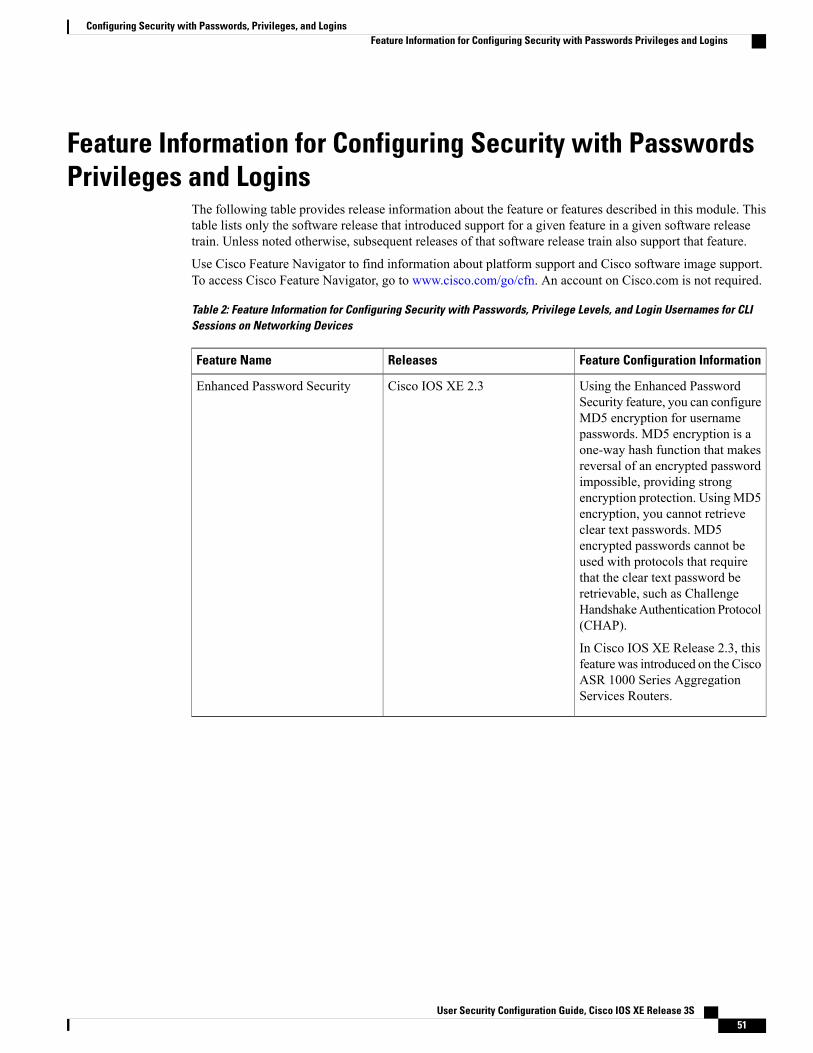
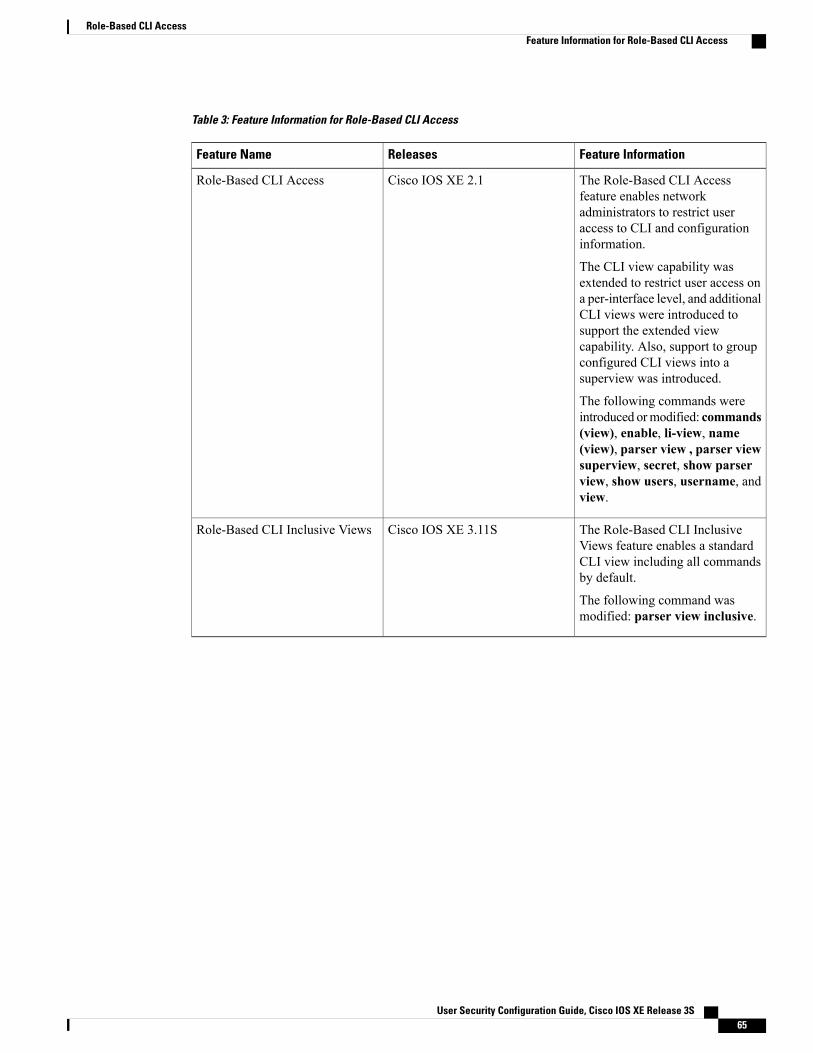
The following table provides release information about the feature or features described in this module. Thistable lists only the software release that introduced support for a given feature in a given software releasetrain. Unless noted otherwise, subsequent releases of that software release train also support that feature.
Use Cisco Feature Navigator to find information about platform support and Cisco software image support.To access Cisco Feature Navigator, go to www.cisco.com/go/cfn. An account on Cisco.com is not required.
Table 1: Feature Information for Cisco IOS Login Enhancements (Login Block)
Feature Configuration InformationReleasesFeature Name
The Cisco IOS LoginEnhancements (Login Block)feature allows users to enhance thesecurity of a router by configuringoptions to automatically blockfurther login attempts when apossible denial-of-service (DoS)attack is detected.
In Cisco IOS XE Release 2.1, thisfeature was introduced on CiscoASR 1000 Series ServiceAggregation Routers.
The following commands weremodified by this feature: loginblock-for, login delay, loginquiet-mode access-class, showlogin.
User Security Configuration Guide, Cisco IOS XE Release 3S 9
Cisco IOS Login Enhancements-Login BlockFeature Information for Cisco IOS Login Enhancements-Login Block
User Security Configuration Guide, Cisco IOS XE Release 3S10
Cisco IOS Login Enhancements-Login BlockFeature Information for Cisco IOS Login Enhancements-Login Block
C H A P T E R 2Configuring Security with Passwords, Privileges,and Logins
Cisco IOS based networking devices provide several features that can be used to implement basic securityfor CLI sessions using only the operating system running on the device. These features include the following:
• Different levels of authorization for CLI sessions to control access to commands that can modify thestatus of the networking device versus commands that are used to monitor the device
• Assigning passwords to CLI sessions
• Requiring users log in to a networking device with a username
• Changing the privilege levels of commands to create new authorization levels for CLI sessions
This module is a guide to implementing a baseline level of security for your networking devices. It focuseson the least complex options available for implementing a baseline level of security. If you have networkingdevices installed in your network with no security options configured, or you are about to install a networkingdevice and you need help understanding the how to implement a baseline of security, this document willhelp you.
• Finding Feature Information, page 12
• Restrictions for Configuring Security with Passwords, Privileges, and Logins, page 12
• Information About Configuring Security with Passwords, Privileges, and Logins, page 12
• How To Configure Security with Passwords Privileges and Logins, page 24
• Configuration Examples for Configuring Security with Passwords Privileges and Logins, page 46
• Where to Go Next, page 49
• Additional References, page 49
• Feature Information for Configuring Security with Passwords Privileges and Logins, page 51
User Security Configuration Guide, Cisco IOS XE Release 3S 11
Finding Feature InformationYour software release may not support all the features documented in this module. For the latest caveats andfeature information, see Bug Search Tool and the release notes for your platform and software release. Tofind information about the features documented in this module, and to see a list of the releases in which eachfeature is supported, see the feature information table.
Use Cisco Feature Navigator to find information about platform support and Cisco software image support.To access Cisco Feature Navigator, go to www.cisco.com/go/cfn. An account on Cisco.com is not required.
Restrictions for Configuring Security with Passwords,Privileges, and Logins
Your networking device must not be configured to use any local or remote authentication, authorization, andaccounting (AAA) security features. This document describes only the non-AAA security features that canbe configured locally on the networking device.
For information how to configure AAA security features that can be run locally on a networking device, orfor information on how to configure remote AAA security using TACACS+ or RADIUS servers, see theSecuring User Services Configuration Guide Library.
Information About Configuring Security with Passwords,Privileges, and Logins
Benefits of Creating a Security SchemeThe foundation of a good security scheme in the network is the protection of the user interfaces of thenetworking devices from unauthorized access. Protecting access to the user interfaces on your networkingdevices prevents unauthorized users from making configuration changes that can disrupt the stability of yournetwork or compromise your network security.
The Cisco IOS XE features described in this document can be combined in many different ways to create aunique security scheme for each of your networking devices. Here are some possible examples that you canconfigure:
• You can enable non administrative users to run a subset of the administrative commands available onthe networking device by lowering the entitlement level for the commands to the non administrativeprivilege level. This can be useful for the following scenarios:
• ISPs that want their first-line technical support staff to perform tasks such as enabling new interfacesfor new customers or resetting the connection for a customer whose connection has stopped passingtraffic. See the Example: Configuring a Device to AllowUsers to Shutdown and Enable Interfaces,on page 48 section for an example of how to do this.
• When you want your first-line technical support staff to have the ability to clear console portsessions that were disconnected improperly from a terminal server. See the Example: Configuring
User Security Configuration Guide, Cisco IOS XE Release 3S12
Configuring Security with Passwords, Privileges, and LoginsFinding Feature Information
a Device to Allow Users to Clear Remote Sessions, on page 46 section for an example of how todo this.
• When you want your first-line technical support staff to have the ability to view, but not change,the configuration of a networking device to facilitate troubleshooting a networking problem. Seethe Example: Configuring a Device to Allow Users to View the Running Configuration, on page47 section for an example of how to do this.
Cisco IOS XE CLI ModesTo aid in the configuration of Cisco devices, the Cisco IOSXE command-line interface is divided into differentcommand modes. Each command mode has its own set of commands available for the configuration,maintenance, and monitoring of router and network operations. The commands available to you at any giventime depend on the mode you are in. Entering a question mark(?) at the system prompt (device prompt) allowsyou to obtain a list of commands available for each command mode.
The use of specific commands allows you to navigate from one command mode to another. The standardorder in which a user would access the modes is as follows: user EXECmode; privileged EXECmode; globalconfiguration mode; specific configuration modes; configuration submodes; and configuration subsubmodes.
The default configuration of a Cisco IOSXE software based networking device only allows you to configurepasswords to protect access to user EXECmode (for local, and remote CLI sessions) and privileged EXECmode. This document describes how you can provide additional levels of security by protecting access toother modes, and commands, using a combination of usernames, passwords and the privilege command.
Note
Most EXEC mode commands are one-time commands, such as show or more commands, which show thecurrent configuration status, and clear commands, which clear counters or interfaces. EXECmode commandsare not saved across reboots of the router.
From privileged EXECmode, you can enter global configuration mode . In this mode, you can enter commandsthat configure general system characteristics. You also can use global configuration mode to enter specificconfiguration modes. Configuration modes, including global configuration mode, allow you to make changesto the running configuration. If you later save the configuration, these commands are stored across routerreboots.
From global configuration mode you can enter a variety of protocol-specific or feature-specific configurationmodes. The CLI hierarchy requires that you enter these specific configuration modes only through globalconfiguration mode. For example, interface configuration mode , is a commonly used configuration mode.
From configuration modes, you can enter configuration submodes. Configuration submodes are used for theconfiguration of specific features within the scope of a given configuration mode. As an example, this chapterdescribes the subinterface configuration mode , a submode of the interface configuration mode.
ROM monitor mode is a separate mode used when the router cannot boot properly. If your system (router,switch, or access server) does not find a valid system image to load when it is booting, the system will enterROMmonitor mode. ROMmonitor (ROMMON)mode can also be accessed by interrupting the boot sequenceduring startup. ROMMON is not covered in this document because it does not have any security featuresavailable in it.
User Security Configuration Guide, Cisco IOS XE Release 3S 13
Configuring Security with Passwords, Privileges, and LoginsCisco IOS XE CLI Modes
User EXEC ModeWhen you start a session on a router, you generally begin in user EXEC mode , which is one of two accesslevels of the EXEC mode. For security purposes, only a limited subset of EXEC commands are available inuser EXEC mode. This level of access is reserved for tasks that do not change the configuration of the router,such as determining the router status.
If your device is configured to require users to log-in the log-in process will require a username and a password.You may try three times to enter a password before the connection attempt is refused.
User EXEC mode is set by default to privilege level 1. Privileged EXEC mode is set by default to privilegelevel 15. For more information see the Privileged EXEC Mode, on page 15. When you are logged into anetworking device in user EXEC mode your session is running at privilege level 1. By default the EXECcommands at privilege level 1 are a subset of those available at privilege level 15. When you are logged intoa networking device in privileged EXEC mode your session is running at privilege level 15. You can movecommands to any privilege level between 1 and 15 using the privilege command. See the Cisco IOS XEPrivilege Levels, on page 23 for more information on privilege levels and the privilege command.
In general, the user EXEC commands allow you to connect to remote devices, change terminal line settingson a temporary basis, perform basic tests, and list system information.
To list the available user EXEC commands, use the following command:
PurposeCommand
Lists the user EXEC mode commandsDevice(config)# ?
The user EXEC mode prompt consists of the host name of the device followed by an angle bracket (>), asshown in the following example:
Device>The default host name is generally Router, unless it has been changed during initial configuration using thesetup EXEC command. You also change the host name using the hostname global configurationcommand.
Examples in Cisco IOS XE documentation assume the use of the default name of “Device.” Differentdevices (for example, access servers) may use a different default name. If the device (router, access server,or switch) has been named with the hostname command, that name will appear as the prompt instead ofthe default name.
Note
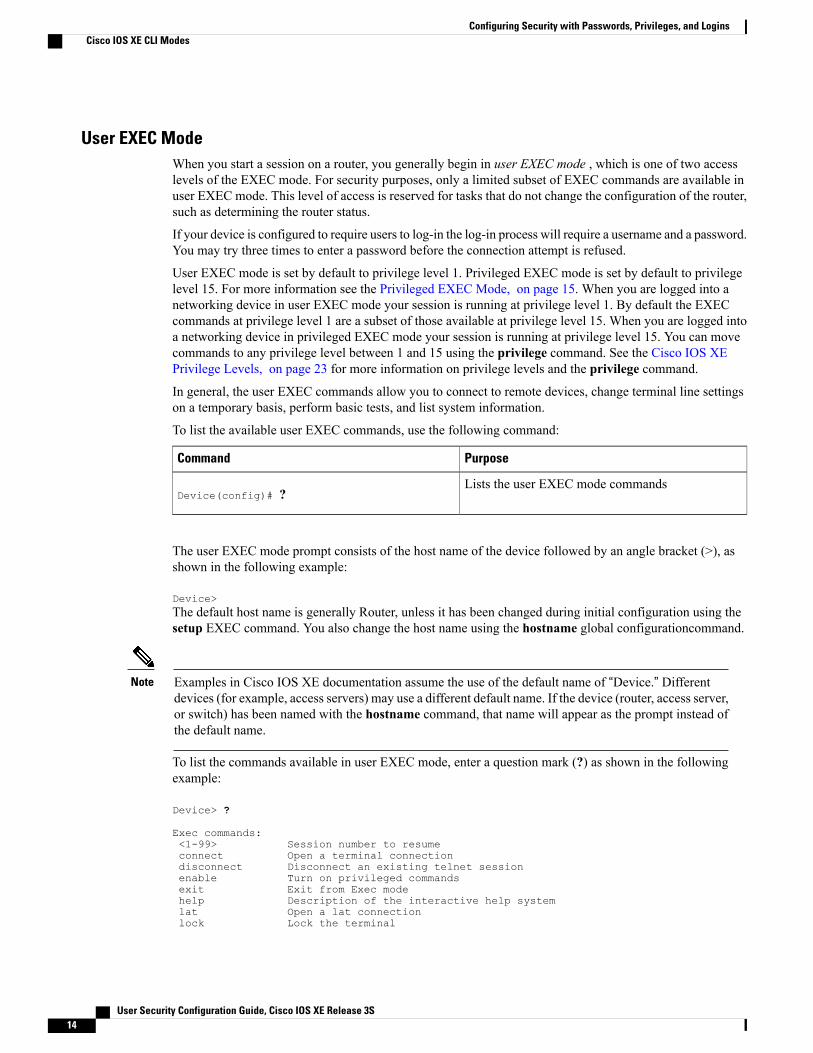
To list the commands available in user EXEC mode, enter a question mark (?) as shown in the followingexample:
Device> ?
Exec commands:<1-99> Session number to resumeconnect Open a terminal connectiondisconnect Disconnect an existing telnet sessionenable Turn on privileged commandsexit Exit from Exec modehelp Description of the interactive help systemlat Open a lat connectionlock Lock the terminal
User Security Configuration Guide, Cisco IOS XE Release 3S14
Configuring Security with Passwords, Privileges, and LoginsCisco IOS XE CLI Modes
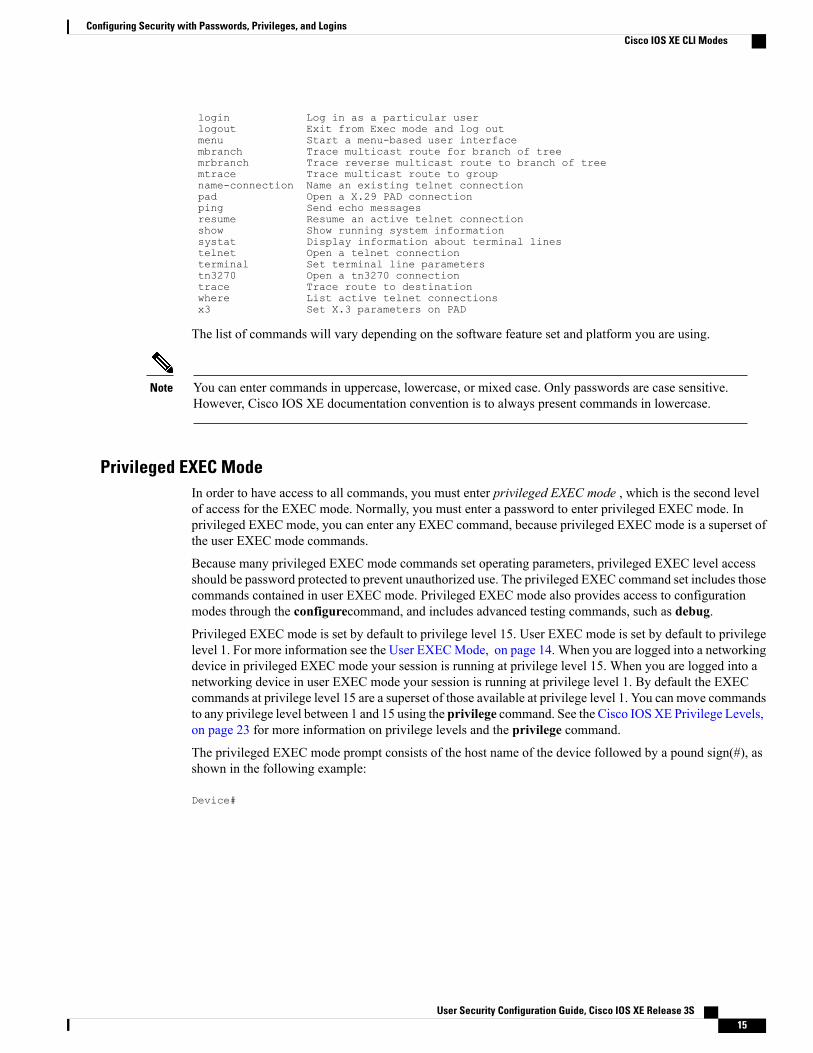
login Log in as a particular userlogout Exit from Exec mode and log outmenu Start a menu-based user interfacembranch Trace multicast route for branch of treemrbranch Trace reverse multicast route to branch of treemtrace Trace multicast route to groupname-connection Name an existing telnet connectionpad Open a X.29 PAD connectionping Send echo messagesresume Resume an active telnet connectionshow Show running system informationsystat Display information about terminal linestelnet Open a telnet connectionterminal Set terminal line parameterstn3270 Open a tn3270 connectiontrace Trace route to destinationwhere List active telnet connectionsx3 Set X.3 parameters on PAD
The list of commands will vary depending on the software feature set and platform you are using.
You can enter commands in uppercase, lowercase, or mixed case. Only passwords are case sensitive.However, Cisco IOS XE documentation convention is to always present commands in lowercase.
Note
Privileged EXEC ModeIn order to have access to all commands, you must enter privileged EXEC mode , which is the second levelof access for the EXEC mode. Normally, you must enter a password to enter privileged EXEC mode. Inprivileged EXEC mode, you can enter any EXEC command, because privileged EXEC mode is a superset ofthe user EXEC mode commands.
Because many privileged EXEC mode commands set operating parameters, privileged EXEC level accessshould be password protected to prevent unauthorized use. The privileged EXEC command set includes thosecommands contained in user EXEC mode. Privileged EXEC mode also provides access to configurationmodes through the configurecommand, and includes advanced testing commands, such as debug.
Privileged EXEC mode is set by default to privilege level 15. User EXEC mode is set by default to privilegelevel 1. For more information see the User EXECMode, on page 14. When you are logged into a networkingdevice in privileged EXEC mode your session is running at privilege level 15. When you are logged into anetworking device in user EXEC mode your session is running at privilege level 1. By default the EXECcommands at privilege level 15 are a superset of those available at privilege level 1. You can move commandsto any privilege level between 1 and 15 using the privilege command. See the Cisco IOSXE Privilege Levels,on page 23 for more information on privilege levels and the privilege command.
The privileged EXEC mode prompt consists of the host name of the device followed by a pound sign(#), asshown in the following example:
Device#
User Security Configuration Guide, Cisco IOS XE Release 3S 15
Configuring Security with Passwords, Privileges, and LoginsCisco IOS XE CLI Modes
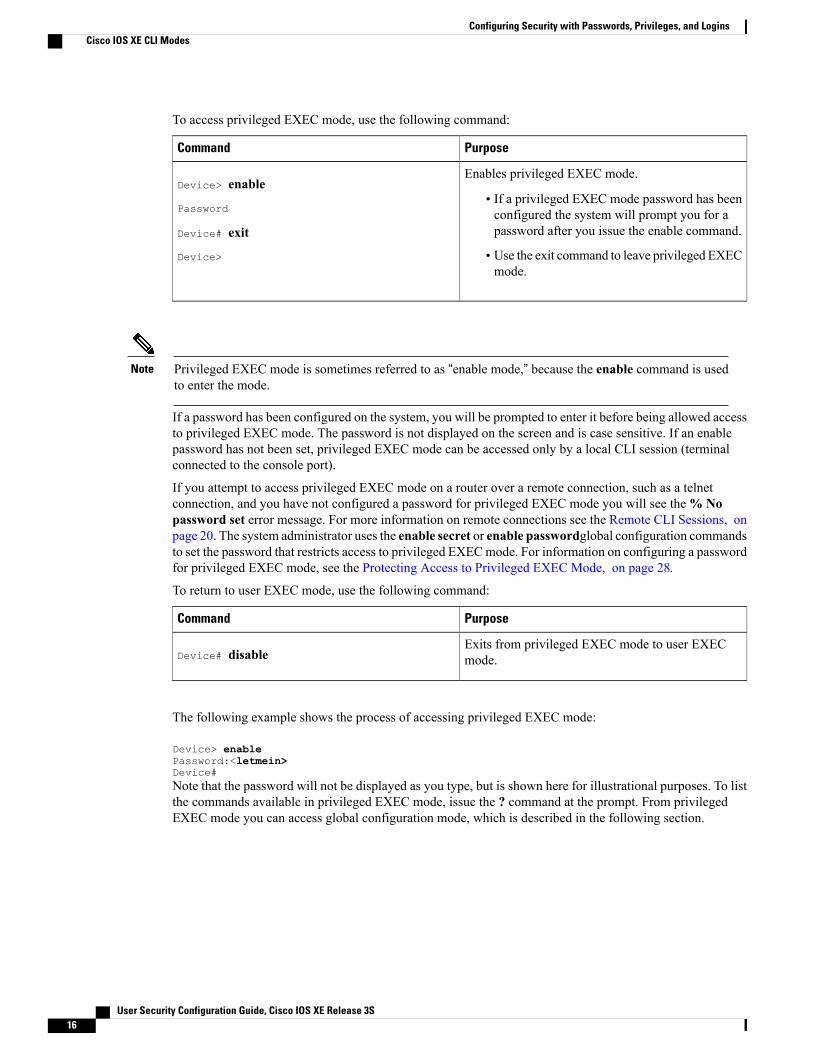
To access privileged EXEC mode, use the following command:
PurposeCommand
Enables privileged EXEC mode.
• If a privileged EXEC mode password has beenconfigured the system will prompt you for apassword after you issue the enable command.
• Use the exit command to leave privileged EXECmode.
Device> enable
Password
Device# exit
Device>
Privileged EXEC mode is sometimes referred to as “enable mode,” because the enable command is usedto enter the mode.
Note
If a password has been configured on the system, you will be prompted to enter it before being allowed accessto privileged EXEC mode. The password is not displayed on the screen and is case sensitive. If an enablepassword has not been set, privileged EXEC mode can be accessed only by a local CLI session (terminalconnected to the console port).
If you attempt to access privileged EXEC mode on a router over a remote connection, such as a telnetconnection, and you have not configured a password for privileged EXEC mode you will see the%Nopassword set error message. For more information on remote connections see the Remote CLI Sessions, onpage 20. The system administrator uses the enable secret or enable passwordglobal configuration commandsto set the password that restricts access to privileged EXECmode. For information on configuring a passwordfor privileged EXEC mode, see the Protecting Access to Privileged EXEC Mode, on page 28.
To return to user EXEC mode, use the following command:
PurposeCommand
Exits from privileged EXEC mode to user EXECmode.Device# disable
The following example shows the process of accessing privileged EXEC mode:
Device> enablePassword:<letmein>Device#Note that the password will not be displayed as you type, but is shown here for illustrational purposes. To listthe commands available in privileged EXEC mode, issue the ? command at the prompt. From privilegedEXEC mode you can access global configuration mode, which is described in the following section.
User Security Configuration Guide, Cisco IOS XE Release 3S16
Configuring Security with Passwords, Privileges, and LoginsCisco IOS XE CLI Modes
Because the privileged EXEC command set contains all of the commands available in user EXEC mode,some commands can be entered in either mode. In Cisco IOS XE documentation, commands that can beentered in either user EXEC mode or privileged EXEC mode are referred to as EXEC mode commands.If user or privileged is not specified in the documentation, assume that you can enter the referencedcommands in either mode.
Note
Global Configuration ModeThe term “global” is used to indicate characteristics or features that affect the system as a whole. Globalconfiguration mode is used to configure your system globally, or to enter specific configuration modes toconfigure specific elements such as interfaces or protocols. Use the configure terminalprivileged EXECcommand to enter global configuration mode.
To access global configuration mode, use the following command in privileged EXEC mode:
PurposeCommand
From privileged EXEC mode, enters globalconfiguration mode.Device#
configure terminal
The following example shows the process of entering global configuration mode from privileged EXECmode:
Device# configure terminalEnter configuration commands, one per line. End with CNTL/Z.Device(config)#Note that the system prompt changes to indicate that you are now in global configuration mode. The promptfor global configuration mode consists of the host-name of the device followed by (config) and the poundsign ( # ). To list the commands available in privileged EXEC mode, issue the ? command at the prompt.
Commands entered in global configuration mode update the running configuration file as soon as they areentered. In other words, changes to the configuration take effect each time you press the Enter or Return keyat the end of a valid command. However, these changes are not saved into the startup configuration file untilyou issue the copy running-config startup-config EXEC mode command. This behavior is explained inmore detail later in this document.
As shown in the example above, the system dialogue prompts you to end your configuration session (exitconfiguration mode) by pressing the Control (Ctrl) and “z” keys simultaneously; when you press these keys,^Z is printed to the screen. You can actually end your configuration session by entering the Ctrl-Z keycombination, using the end command, using the Ctrl-C key combination. The end command is the recommendedway to indicate to the system that you are done with the current configuration session.
If you use Ctrl-Z at the end of a command line in which a valid command has been typed, that commandwill be added to the running configuration file. In other words, using Ctrl-Z is equivalent to hitting theEnter (Carriage Return) key before exiting. For this reason, it is safer to end your configuration sessionusing the end command. Alternatively, you can use the Ctrl-C key combination to end your configurationsession without sending a Carriage Return signal.
Caution
User Security Configuration Guide, Cisco IOS XE Release 3S 17
Configuring Security with Passwords, Privileges, and LoginsCisco IOS XE CLI Modes
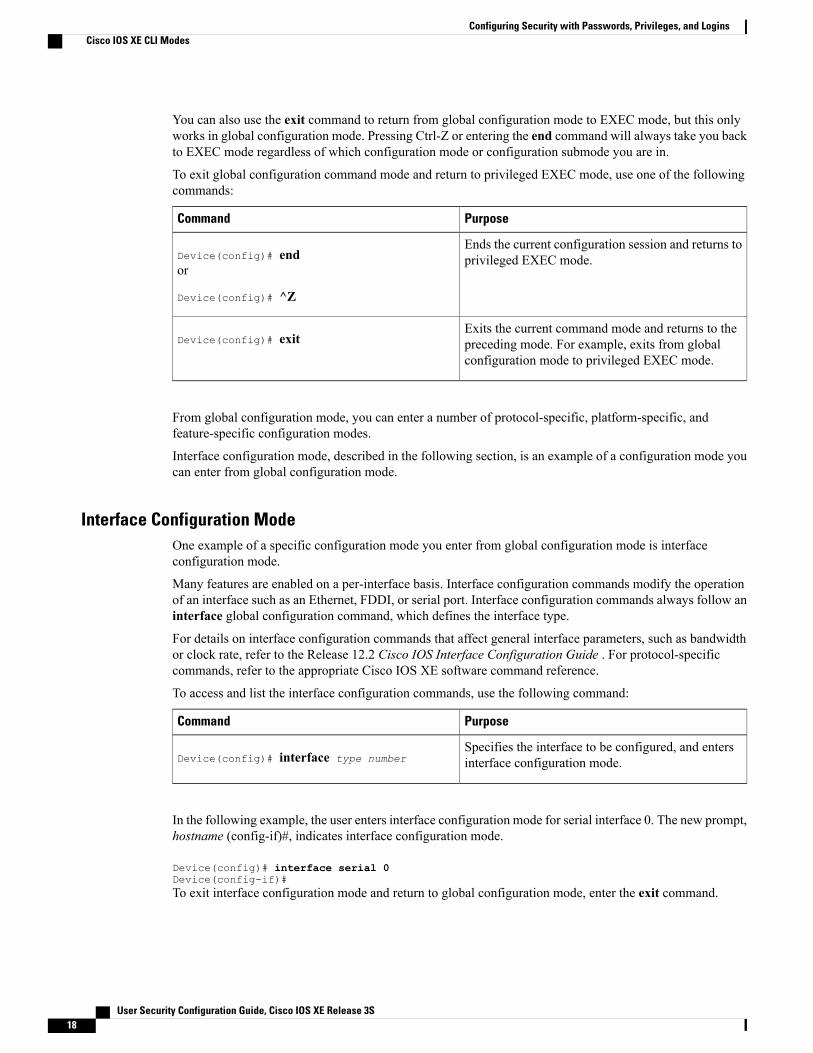
You can also use the exit command to return from global configuration mode to EXEC mode, but this onlyworks in global configuration mode. Pressing Ctrl-Z or entering the end command will always take you backto EXEC mode regardless of which configuration mode or configuration submode you are in.
To exit global configuration command mode and return to privileged EXEC mode, use one of the followingcommands:
PurposeCommand
Ends the current configuration session and returns toprivileged EXEC mode.Device(config)# end
or
Device(config)# ^Z
Exits the current command mode and returns to thepreceding mode. For example, exits from globalconfiguration mode to privileged EXEC mode.
Device(config)# exit
From global configuration mode, you can enter a number of protocol-specific, platform-specific, andfeature-specific configuration modes.
Interface configuration mode, described in the following section, is an example of a configuration mode youcan enter from global configuration mode.
Interface Configuration ModeOne example of a specific configuration mode you enter from global configuration mode is interfaceconfiguration mode.
Many features are enabled on a per-interface basis. Interface configuration commands modify the operationof an interface such as an Ethernet, FDDI, or serial port. Interface configuration commands always follow aninterface global configuration command, which defines the interface type.
For details on interface configuration commands that affect general interface parameters, such as bandwidthor clock rate, refer to the Release 12.2 Cisco IOS Interface Configuration Guide . For protocol-specificcommands, refer to the appropriate Cisco IOS XE software command reference.
To access and list the interface configuration commands, use the following command:
PurposeCommand
Specifies the interface to be configured, and entersinterface configuration mode.Device(config)# interface type number
In the following example, the user enters interface configuration mode for serial interface 0. The new prompt,hostname (config-if)#, indicates interface configuration mode.
Device(config)# interface serial 0Device(config-if)#To exit interface configuration mode and return to global configuration mode, enter the exit command.
User Security Configuration Guide, Cisco IOS XE Release 3S18
Configuring Security with Passwords, Privileges, and LoginsCisco IOS XE CLI Modes
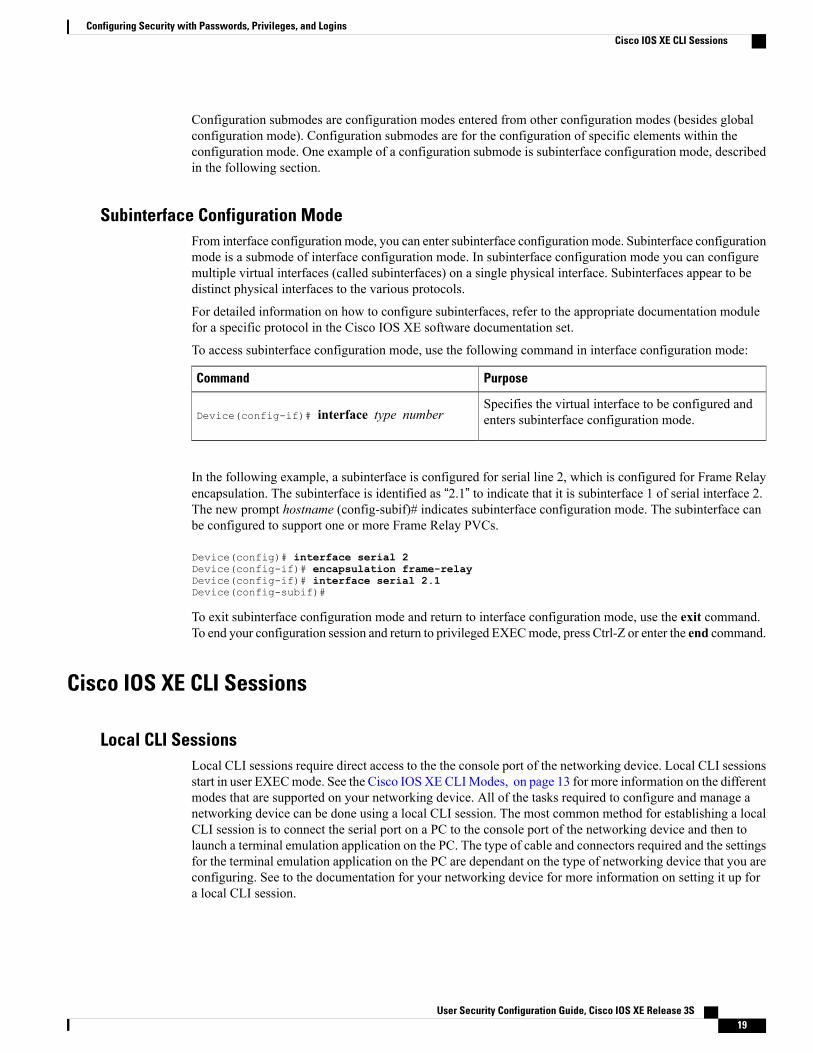
Configuration submodes are configuration modes entered from other configuration modes (besides globalconfiguration mode). Configuration submodes are for the configuration of specific elements within theconfiguration mode. One example of a configuration submode is subinterface configuration mode, describedin the following section.
Subinterface Configuration ModeFrom interface configuration mode, you can enter subinterface configuration mode. Subinterface configurationmode is a submode of interface configuration mode. In subinterface configuration mode you can configuremultiple virtual interfaces (called subinterfaces) on a single physical interface. Subinterfaces appear to bedistinct physical interfaces to the various protocols.
For detailed information on how to configure subinterfaces, refer to the appropriate documentation modulefor a specific protocol in the Cisco IOS XE software documentation set.
To access subinterface configuration mode, use the following command in interface configuration mode:
PurposeCommand
Specifies the virtual interface to be configured andenters subinterface configuration mode.Device(config-if)# interface type number
In the following example, a subinterface is configured for serial line 2, which is configured for Frame Relayencapsulation. The subinterface is identified as “2.1” to indicate that it is subinterface 1 of serial interface 2.The new prompt hostname (config-subif)# indicates subinterface configuration mode. The subinterface canbe configured to support one or more Frame Relay PVCs.
Device(config)# interface serial 2Device(config-if)# encapsulation frame-relayDevice(config-if)# interface serial 2.1Device(config-subif)#
To exit subinterface configuration mode and return to interface configuration mode, use the exit command.To end your configuration session and return to privileged EXECmode, press Ctrl-Z or enter the end command.
Cisco IOS XE CLI Sessions
Local CLI SessionsLocal CLI sessions require direct access to the the console port of the networking device. Local CLI sessionsstart in user EXECmode. See the Cisco IOSXECLIModes, on page 13 for more information on the differentmodes that are supported on your networking device. All of the tasks required to configure and manage anetworking device can be done using a local CLI session. The most common method for establishing a localCLI session is to connect the serial port on a PC to the console port of the networking device and then tolaunch a terminal emulation application on the PC. The type of cable and connectors required and the settingsfor the terminal emulation application on the PC are dependant on the type of networking device that you areconfiguring. See to the documentation for your networking device for more information on setting it up fora local CLI session.
User Security Configuration Guide, Cisco IOS XE Release 3S 19
Configuring Security with Passwords, Privileges, and LoginsCisco IOS XE CLI Sessions
Remote CLI SessionsRemote CLI sessions are created between a host such as a PC and a networking device such as a router overa network using a remote terminal access application such as Telnet and Secure Shell (SSH). Local CLIsessions start in user EXEC mode. See the Cisco IOS XE CLI Modes, on page 13 for more information onthe different modes that are supported on your networking device. Most of the tasks required to configure andmanage a networking device can be done using a remote CLI session. The exceptions are tasks that interactdirectly with the console port (such as recovering from a corrupted operating system (OS) by uploading anew OS image over the console port) and interacting with the networking device when it is in ROMMonitorMode.
This document explains how to configure security for remote Telnet sessions. Telnet is the most commonmethod for accessing a remote CLI session on a networking device.
SSH is a more secure alternative to Telnet. SSH provides encryption for the session traffic between yourlocal management device such as a PC and the networking device that you are managing. Encrypting thesession traffic with SSH prevents hackers that might intercept the traffic from being able to decode it. SeeSecure Shell Version 2 Support feature module for more information on using SSH.
Note
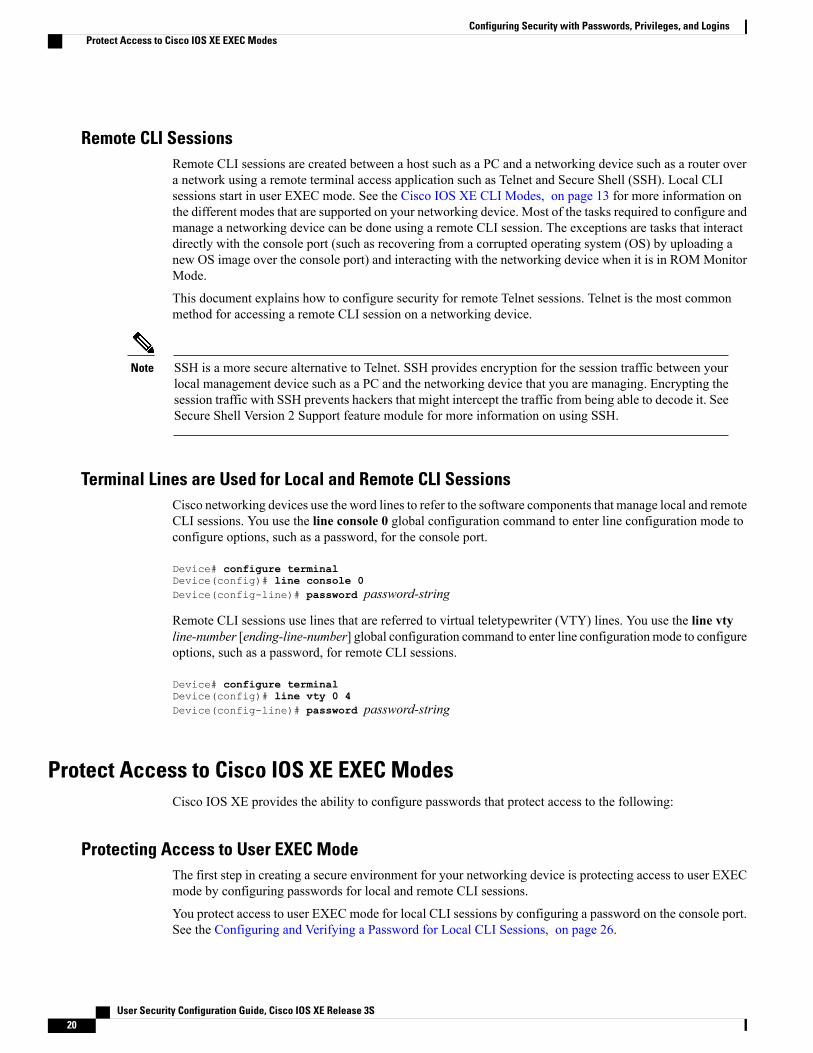
Terminal Lines are Used for Local and Remote CLI SessionsCisco networking devices use the word lines to refer to the software components that manage local and remoteCLI sessions. You use the line console 0 global configuration command to enter line configuration mode toconfigure options, such as a password, for the console port.
Device# configure terminalDevice(config)# line console 0Device(config-line)# password password-string
Remote CLI sessions use lines that are referred to virtual teletypewriter (VTY) lines. You use the line vtyline-number [ending-line-number] global configuration command to enter line configurationmode to configureoptions, such as a password, for remote CLI sessions.
Device# configure terminalDevice(config)# line vty 0 4Device(config-line)# password password-string
Protect Access to Cisco IOS XE EXEC ModesCisco IOS XE provides the ability to configure passwords that protect access to the following:
Protecting Access to User EXEC ModeThe first step in creating a secure environment for your networking device is protecting access to user EXECmode by configuring passwords for local and remote CLI sessions.
You protect access to user EXEC mode for local CLI sessions by configuring a password on the console port.See the Configuring and Verifying a Password for Local CLI Sessions, on page 26.
User Security Configuration Guide, Cisco IOS XE Release 3S20
Configuring Security with Passwords, Privileges, and LoginsProtect Access to Cisco IOS XE EXEC Modes
You protect access to user EXEC mode for remote CLI sessions by configuring a password on the virtualterminal lines (VTYs). See the Configuring and Verifying a Password for Remote CLI Sessions, on page 24for instructions on how to configure passwords for remote CLI sessions.
Protecting Access to Privileged EXEC modeThe second step in creating a secure environment for your networking device is protecting access to privilegedEXEC mode with a password. The method for protecting access to privileged EXEC mode is the same forlocal and remote CLI sessions.
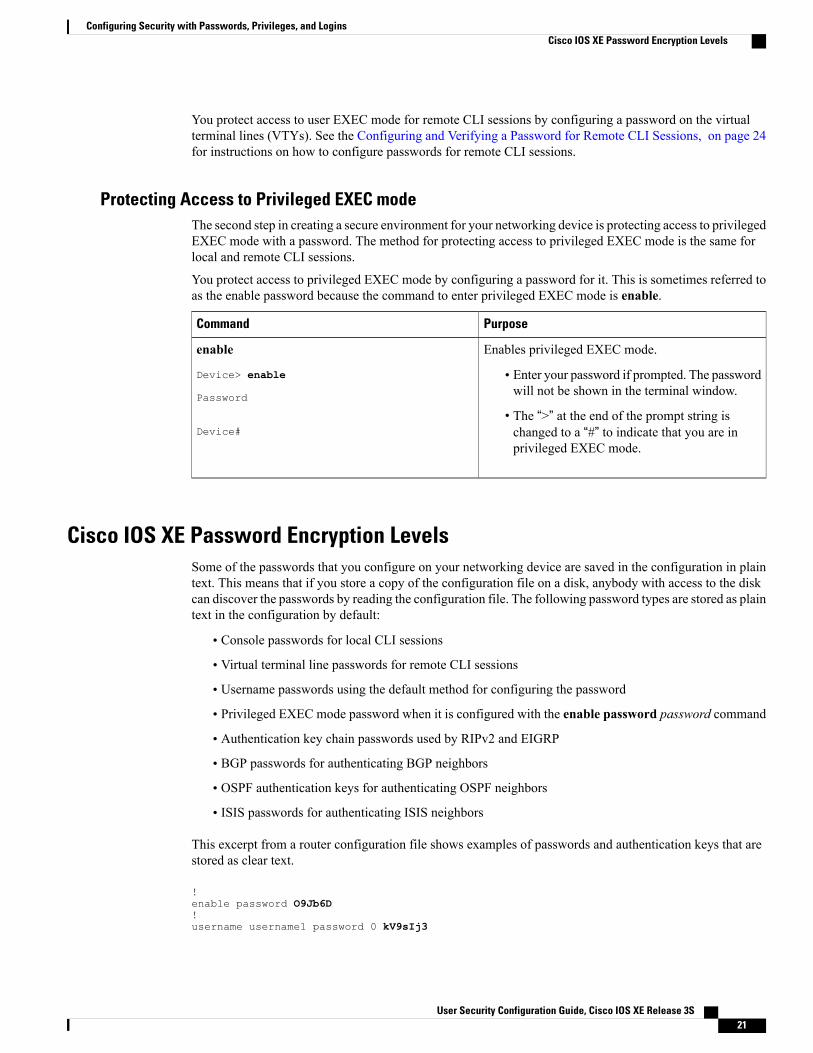
You protect access to privileged EXEC mode by configuring a password for it. This is sometimes referred toas the enable password because the command to enter privileged EXEC mode is enable.
PurposeCommand
Enables privileged EXEC mode.
• Enter your password if prompted. The passwordwill not be shown in the terminal window.
• The “>” at the end of the prompt string ischanged to a “#” to indicate that you are inprivileged EXEC mode.
enable
Device> enable
Password
Device#
Cisco IOS XE Password Encryption LevelsSome of the passwords that you configure on your networking device are saved in the configuration in plaintext. This means that if you store a copy of the configuration file on a disk, anybody with access to the diskcan discover the passwords by reading the configuration file. The following password types are stored as plaintext in the configuration by default:
• Console passwords for local CLI sessions
• Virtual terminal line passwords for remote CLI sessions
• Username passwords using the default method for configuring the password
• Privileged EXEC mode password when it is configured with the enable password password command
• Authentication key chain passwords used by RIPv2 and EIGRP
• BGP passwords for authenticating BGP neighbors
• OSPF authentication keys for authenticating OSPF neighbors
• ISIS passwords for authenticating ISIS neighbors
This excerpt from a router configuration file shows examples of passwords and authentication keys that arestored as clear text.
User Security Configuration Guide, Cisco IOS XE Release 3S 21
Configuring Security with Passwords, Privileges, and LoginsCisco IOS XE Password Encryption Levels
!key chain treeskey 1key-string willow
!interface Ethernet1/0.1ip address 172.16.6.1 255.255.255.0ip router isisip rip authentication key-chain treesip authentication key-chain eigrp 1 treesip ospf authentication-key j7876no snmp trap link-statusisis password u7865k!line vty 0 4password V9jA5M!You can encrypt these clear text passwords in the configuration file by using the service password-encryptioncommand. This should be considered only a minimal level of security because the encryption algorithm usedby the service password-encryption command to encrypt passwords creates text strings that be decryptedusing tools that are publicly available. You should still protect access to any electronic or paper copies of yourconfiguration files after you use the service password-encryption command.
The service password-encryption command does not encrypt the passwords when they are sent to the remotedevice. Anybody with a network traffic analyzer who has access to you network can capture these passwordsfrom the packets as they are transmitted between the devices. See the Configuring Password Encryption forClear Text Passwords, on page 30 for more information on encrypting clear text passwords in configurationfiles.
Many of the Cisco IOSXE features that use clear text passwords can also be configured to use the more secureMD5 algorithm. The MD5 algorithm creates a text string in the configuration file that is much more difficultto decrypt. The MD5 algorithm does not send the password to the remote device. This prevents people usinga traffic analyzer to capture traffic on your network from being able to discover your passwords.
You can determine the type of password encryption that has been used by the number that is stored with thepassword string in the configuration file of the networking device. The number 5 in the configuration excerptbelow indicates that the enable secret password has been encrypted using the MD5 algorithm.
enable secret 5 $1$fGCS$rkYbR6.Z8xo4qCl3vghWQ0
The number 7 in the excerpt below indicates that the enable password has been encrypted using the less securealgorithm used by the service password-encryption command.
!
enable password 7 00081204
Cisco IOS XE CLI Session UsernamesAfter you have protected access to user EXEC mode and privileged EXEC mode by configuring passwordsfor them you can further increase the level of security on your networking device by configuring usernamesto limit access to CLI sessions to your networking device to specific users.
Usernames that are intended to be used for managing a networking device can be modified with additionaloptions such as:
See the Cisco IOS Security Command Reference .(http://www.cisco.com/en/US/docs/ios/security/command/reference/sec_book.html) for more information onhow to configure the username command.
User Security Configuration Guide, Cisco IOS XE Release 3S22
Configuring Security with Passwords, Privileges, and LoginsCisco IOS XE CLI Session Usernames
Cisco IOS XE Privilege LevelsThe default configuration for Cisco IOS XE based networking devices uses privilege level 1 for user EXECmode and privilege level 15 for privileged EXEC. The commands that can be run in user EXEC mode atprivilege level 1 are a subset of the commands that can be run in privileged EXEC mode at privilege 15.
The privilege command is used to move commands from one privilege level to another. For example, someISPs allow their first level technical support staff to enable and disable interfaces to activate new customerconnections or to restart a connection that has stopped transmitting traffic. See the Example: Configuring aDevice to Allow Users to Shutdown and Enable Interfaces, on page 48 for an example of how to configurethis option.
The privilege command can also be used to assign a privilege level to a username so that when a user logs inwith the username, the session will run at the privilege level specified by the privilege command. For exampleif you want your technical support staff to view the configuration on a networking device to help themtroubleshoot network problems without being able to modify the configuration, you can create a username,configure it with privilege level 15, and configure it to run the show running-config command automatically.When a user logs in with the username the running configuration will be displayed automatically. The user’ssession will be logged out automatically after the user has viewed the last line of the configuration. See theExample: Configuring a Device to Allow Users to View the Running Configuration, on page 47 for anexample of how to configure this option.
These command privileges can also be implemented when using AAA with TACACS+ and RADIUS. Forexample, TACACS+ provides two ways to control the authorization of router commands on a per-user orper-group basis. The first way is to assign privilege levels to commands and have the router verify with theTACACS+ server whether or not the user is authorized at the specified privilege level. The second way is toexplicitly specify in the TACACS+ server, on a per-user or per-group basis, the commands that are allowed.For more information about implementing AAA with TACACS+ and RADIUS, see the technical note Howto Assign Privilege Levels with TACACS+ and RADIUS .
Cisco IOS XE Password ConfigurationCisco IOS XE software does not prompt you to repeat any passwords that you configure to verify that youhave entered the passwords exactly as you intended. New passwords, and changes to existing passwords, gointo effect immediately after you press the Enter key at the end of a password configuration command string.If you make a mistake when you enter a new password and have saved the configuration on the networkingdevice to its startup configuration file and exited privileged EXEC mode before you realize that you made amistake, you may find that you are no longer able to manage the device.
The following are common situations that can happen:
• You make a mistake configuring a password for local CLI sessions on the console port.
• If you have properly configured access to your networking device for remote CLI sessions, youcan Telnet to it and reconfigure the password on the console port.
• You make a mistake configuring a password for remote Telnet or SSH sessions.
• If you have properly configured access to your networking device for local CLI sessions, you canconnect a terminal to it and reconfigure the password for the remote CLI sessions.
User Security Configuration Guide, Cisco IOS XE Release 3S 23
Configuring Security with Passwords, Privileges, and LoginsCisco IOS XE Privilege Levels
• You make a mistake configuring a password for privileged EXEC mode (enable password or enablesecret password).
• You will have to perform a lost password recovery procedure.
• You make a mistake configuring your username password, and the networking device requires that youlog into it with your username.
• If you do not have access to another account name, you will have to perform a lost passwordrecovery procedure.
To protect yourself from having to perform a lost password recovery procedure open two CLI sessions to thenetworking device and keep one of them in privilege EXEC mode while you reset the passwords using theother session. You can use the same device (PC or terminal) to run the two CLI sessions or two differentdevices. You can use a local CLI session and a remote CLI session or two remote CLI sessions for thisprocedure. The CLI session that you use to configure the password can also be used to verify that the passwordwas changed properly. The other CLI session that you keep in privileged EXEC mode can be used to changethe password again if you made a mistake the first time you configured it.
You should not save password changes that you have made in the running configuration to the startupconfiguration until you have verified that your password was changed successfully. If you discover that youmade a mistake configuring a password, and you were not able to correct the problem using the second CLIsession technique described above, you can power cycle the networking device so that it returns to the previouspasswords that are stored in the startup configuration.
How To Configure Security with Passwords Privileges andLogins
Protecting Access to User Exec Mode
Configuring and Verifying a Password for Remote CLI SessionsThis task will assign a password for remote CLI sessions. After you have completed this task the networkingdevice will prompt you for a password the next time that you start a remote CLI session with it.
Cisco IOSXE based networking devices require that you have a password configured for remote CLI sessions.If you attempt to start a remote CLI session with a device that doesn’t have a password configured for remoteCLI sessions you will see a message that a password is required and has not been set. The remote CLI sessionwill be terminated by the remote host.
Before You Begin
If you have not previously configured a password for remote CLI sessions, you must perform this task overa local CLI session using a terminal or a PC running a terminal emulation application, attached to the consoleport.
Your terminal, or terminal emulation application, must be configured with the settings that are used by theconsole port on the networking device. The console ports on most Cisco networking devices require the
User Security Configuration Guide, Cisco IOS XE Release 3S24
Configuring Security with Passwords, Privileges, and LoginsHow To Configure Security with Passwords Privileges and Logins
following settings: 9600 baud, 8 data bits, 1 stop bit, no parity, and flow control is set to "none." See thedocumentation for your networking device if these settings do not work for your terminal.
To perform the verification step (Step 6) for this task, your networking device must have an interface that isin an operational state. The interface must have a valid IP address.
If you have not previously configured a password for remote CLI sessions, you must perform this taskover a local CLI session using a terminal attached to the console port.
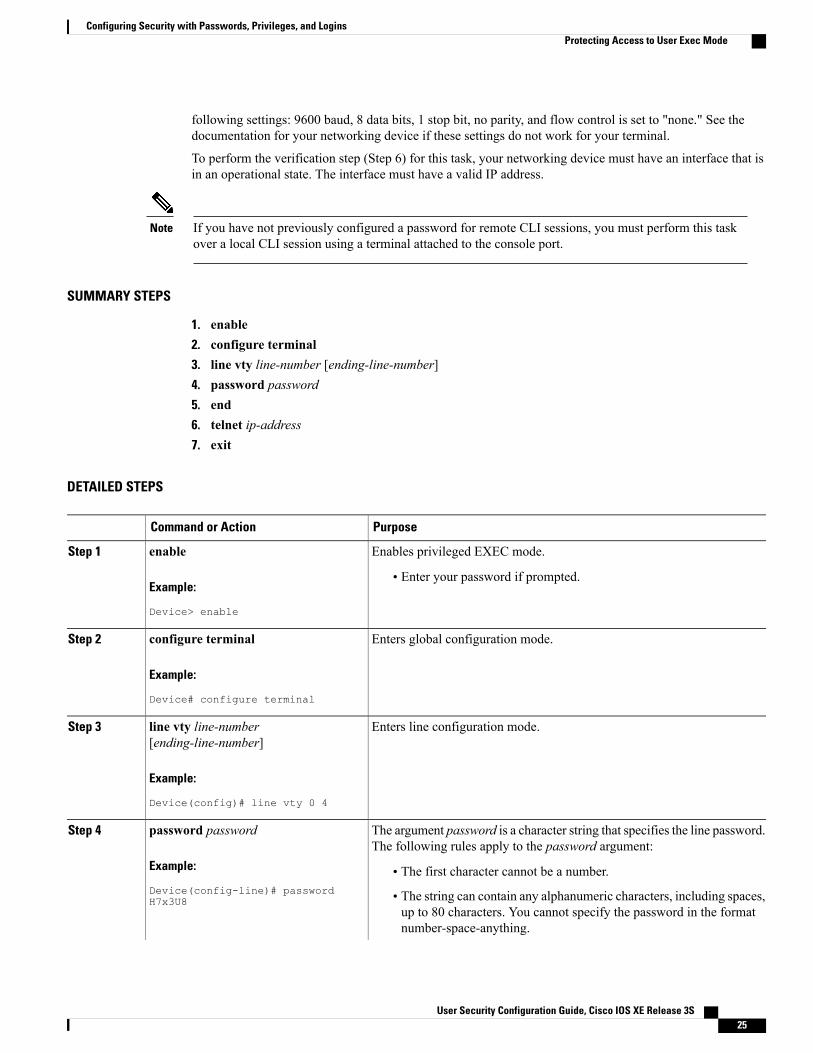
Enters global configuration mode.configure terminal
Example:
Device# configure terminal
Step 2
Enters line configuration mode.line vty line-number[ending-line-number]
Step 3
Example:
Device(config)# line vty 0 4
The argument password is a character string that specifies the line password.The following rules apply to the password argument:
password password
Example:
Device(config-line)# passwordH7x3U8
Step 4
• The first character cannot be a number.
• The string can contain any alphanumeric characters, including spaces,up to 80 characters. You cannot specify the password in the formatnumber-space-anything.
User Security Configuration Guide, Cisco IOS XE Release 3S 25
Configuring Security with Passwords, Privileges, and LoginsProtecting Access to User Exec Mode
PurposeCommand or Action
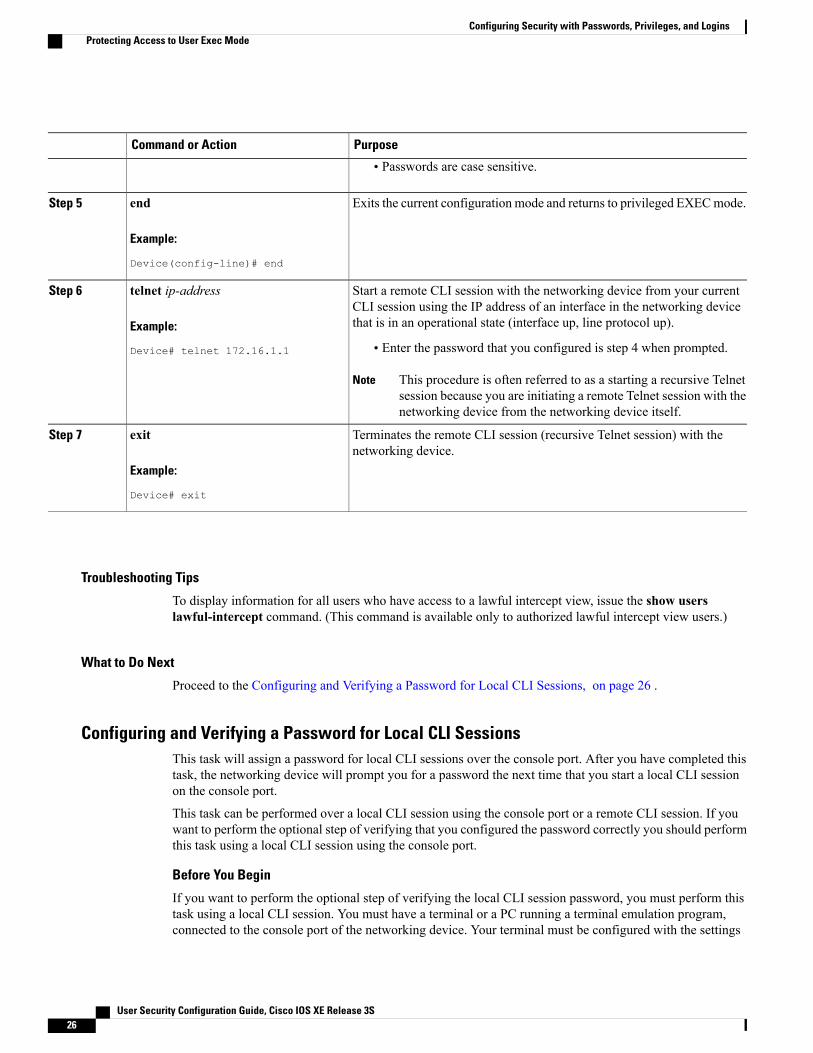
• Passwords are case sensitive.
Exits the current configuration mode and returns to privileged EXECmode.end
Example:
Device(config-line)# end
Step 5
Start a remote CLI session with the networking device from your currentCLI session using the IP address of an interface in the networking devicethat is in an operational state (interface up, line protocol up).
telnet ip-address
Example:
Device# telnet 172.16.1.1
Step 6
• Enter the password that you configured is step 4 when prompted.
This procedure is often referred to as a starting a recursive Telnetsession because you are initiating a remote Telnet session with thenetworking device from the networking device itself.
Note
Terminates the remote CLI session (recursive Telnet session) with thenetworking device.
exit
Example:
Device# exit
Step 7
Troubleshooting Tips
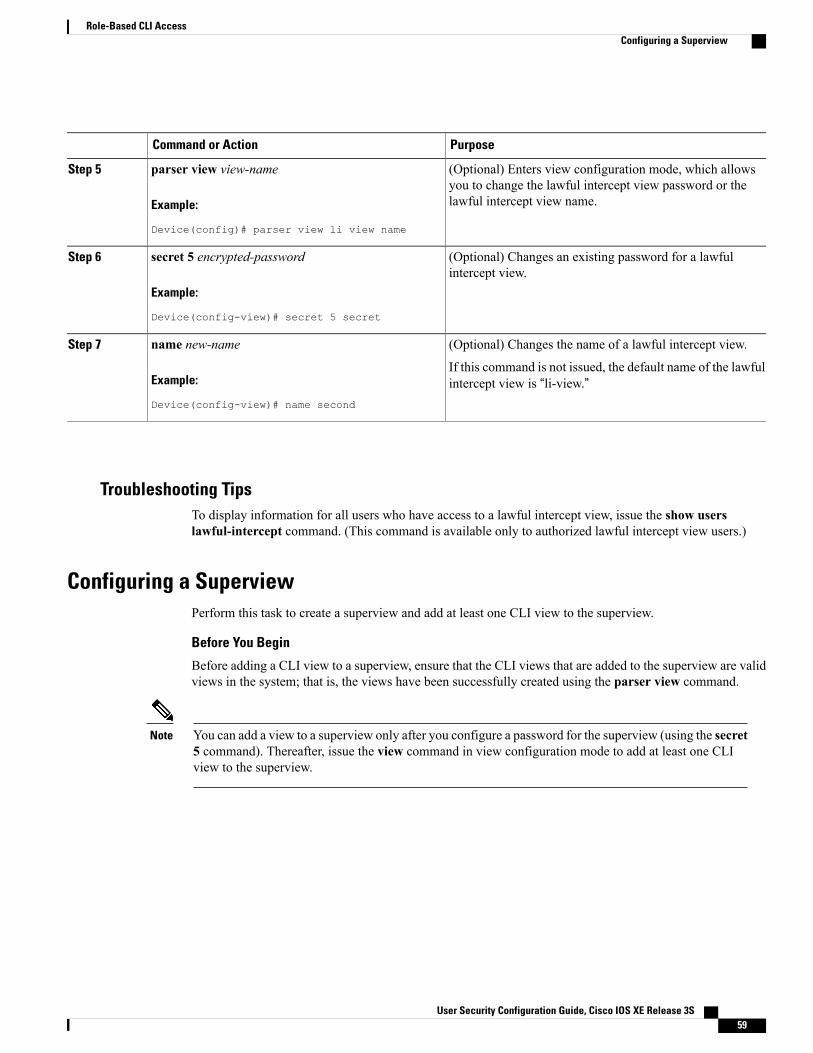
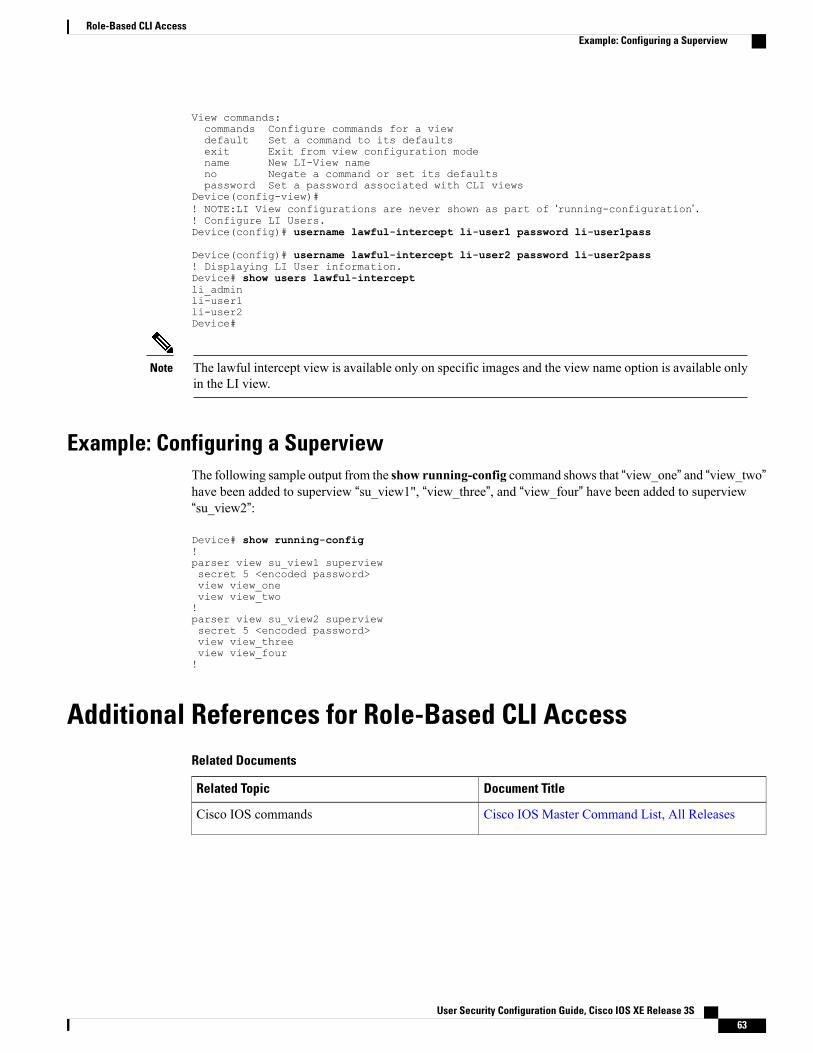
To display information for all users who have access to a lawful intercept view, issue the show userslawful-intercept command. (This command is available only to authorized lawful intercept view users.)
What to Do Next
Proceed to the Configuring and Verifying a Password for Local CLI Sessions, on page 26 .
Configuring and Verifying a Password for Local CLI SessionsThis task will assign a password for local CLI sessions over the console port. After you have completed thistask, the networking device will prompt you for a password the next time that you start a local CLI sessionon the console port.
This task can be performed over a local CLI session using the console port or a remote CLI session. If youwant to perform the optional step of verifying that you configured the password correctly you should performthis task using a local CLI session using the console port.
Before You Begin
If you want to perform the optional step of verifying the local CLI session password, you must perform thistask using a local CLI session. You must have a terminal or a PC running a terminal emulation program,connected to the console port of the networking device. Your terminal must be configured with the settings
User Security Configuration Guide, Cisco IOS XE Release 3S26
Configuring Security with Passwords, Privileges, and LoginsProtecting Access to User Exec Mode
that are used by the console port on the networking device. The console ports on most Cisco networkingdevices require the following settings: 9600 baud, 8 data bits, 1 stop bit, no parity, and flow control is set to"none." See the documentation for your networking device if these settings do not work for your terminal.
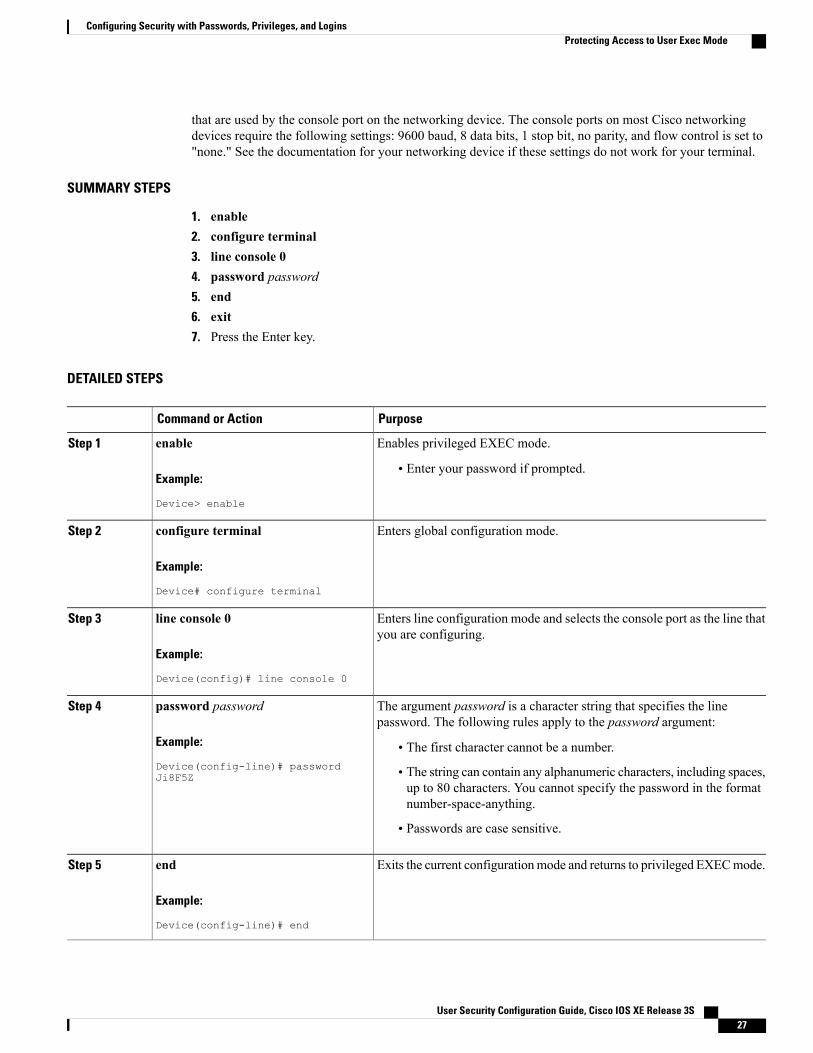
SUMMARY STEPS
1. enable2. configure terminal3. line console 04. password password5. end6. exit7. Press the Enter key.
DETAILED STEPS
PurposeCommand or Action
Enables privileged EXEC mode.enableStep 1
Example:
Device> enable
• Enter your password if prompted.
Enters global configuration mode.configure terminal
Example:
Device# configure terminal
Step 2
Enters line configuration mode and selects the console port as the line thatyou are configuring.
line console 0
Example:
Device(config)# line console 0
Step 3
The argument password is a character string that specifies the linepassword. The following rules apply to the password argument:
password password
Example:
Device(config-line)# passwordJi8F5Z
Step 4
• The first character cannot be a number.
• The string can contain any alphanumeric characters, including spaces,up to 80 characters. You cannot specify the password in the formatnumber-space-anything.
• Passwords are case sensitive.
Exits the current configurationmode and returns to privileged EXECmode.end
Example:
Device(config-line)# end
Step 5
User Security Configuration Guide, Cisco IOS XE Release 3S 27
Configuring Security with Passwords, Privileges, and LoginsProtecting Access to User Exec Mode
PurposeCommand or Action
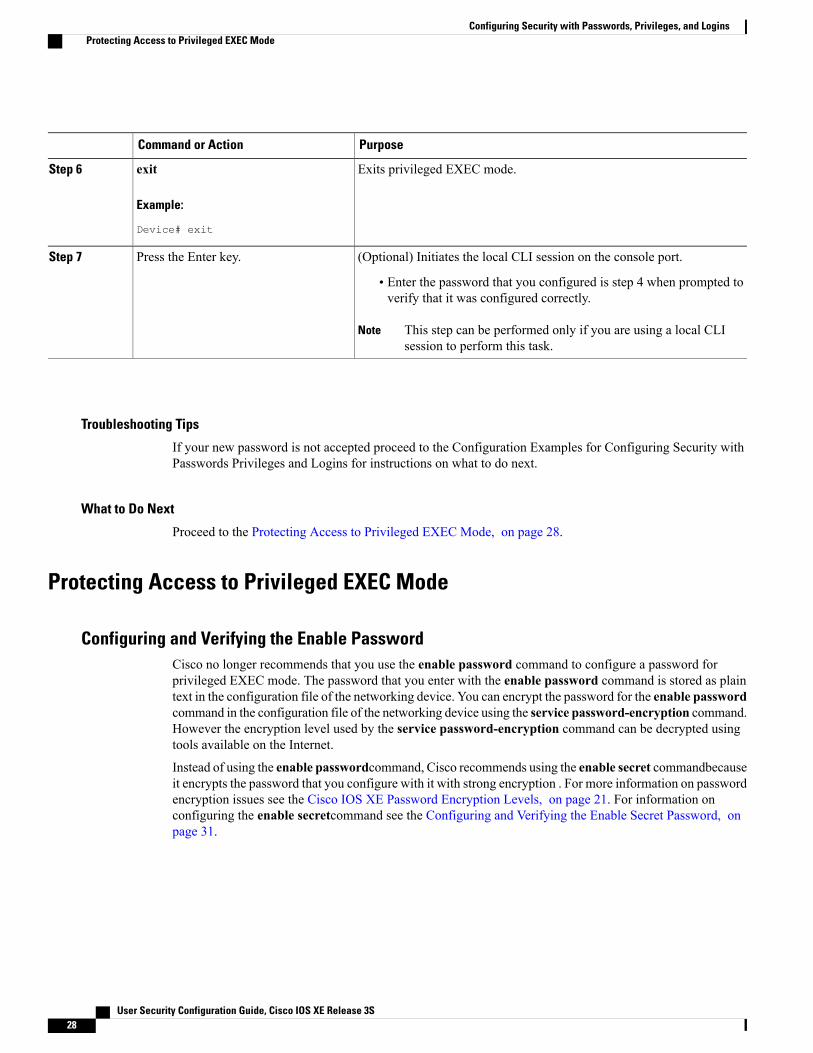
Exits privileged EXEC mode.exit
Example:
Device# exit
Step 6
(Optional) Initiates the local CLI session on the console port.Press the Enter key.Step 7
• Enter the password that you configured is step 4 when prompted toverify that it was configured correctly.
This step can be performed only if you are using a local CLIsession to perform this task.
Note
Troubleshooting Tips
If your new password is not accepted proceed to the Configuration Examples for Configuring Security withPasswords Privileges and Logins for instructions on what to do next.
What to Do Next
Proceed to the Protecting Access to Privileged EXEC Mode, on page 28.
Protecting Access to Privileged EXEC Mode
Configuring and Verifying the Enable PasswordCisco no longer recommends that you use the enable password command to configure a password forprivileged EXEC mode. The password that you enter with the enable password command is stored as plaintext in the configuration file of the networking device. You can encrypt the password for the enable passwordcommand in the configuration file of the networking device using the service password-encryption command.However the encryption level used by the service password-encryption command can be decrypted usingtools available on the Internet.
Instead of using the enable passwordcommand, Cisco recommends using the enable secret commandbecauseit encrypts the password that you configure with it with strong encryption . For more information on passwordencryption issues see the Cisco IOS XE Password Encryption Levels, on page 21. For information onconfiguring the enable secretcommand see the Configuring and Verifying the Enable Secret Password, onpage 31.
User Security Configuration Guide, Cisco IOS XE Release 3S28
Configuring Security with Passwords, Privileges, and LoginsProtecting Access to Privileged EXEC Mode
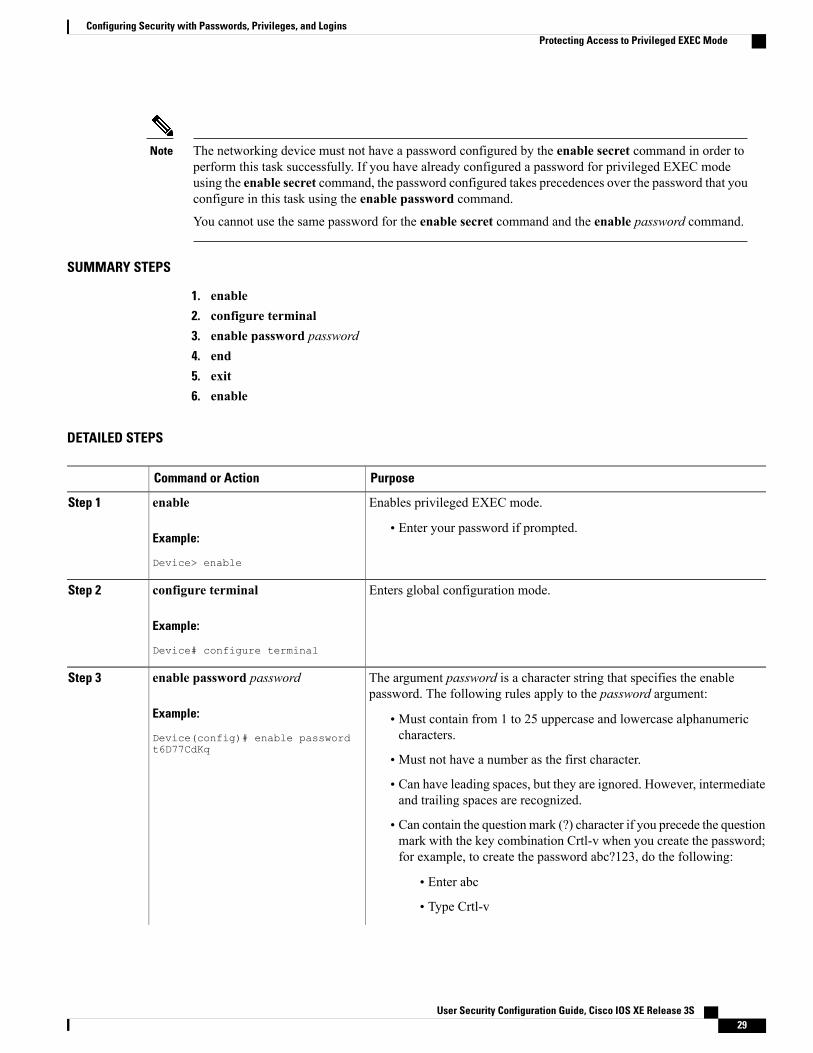
The networking device must not have a password configured by the enable secret command in order toperform this task successfully. If you have already configured a password for privileged EXEC modeusing the enable secret command, the password configured takes precedences over the password that youconfigure in this task using the enable password command.
You cannot use the same password for the enable secret command and the enable password command.
Enters global configuration mode.configure terminal
Example:
Device# configure terminal
Step 2
The argument password is a character string that specifies the enablepassword. The following rules apply to the password argument:
enable password password
Example:
Device(config)# enable passwordt6D77CdKq
Step 3
• Must contain from 1 to 25 uppercase and lowercase alphanumericcharacters.
• Must not have a number as the first character.
• Can have leading spaces, but they are ignored. However, intermediateand trailing spaces are recognized.
• Can contain the question mark (?) character if you precede the questionmark with the key combination Crtl-v when you create the password;for example, to create the password abc?123, do the following:
• Enter abc
• Type Crtl-v
User Security Configuration Guide, Cisco IOS XE Release 3S 29
Configuring Security with Passwords, Privileges, and LoginsProtecting Access to Privileged EXEC Mode
PurposeCommand or Action
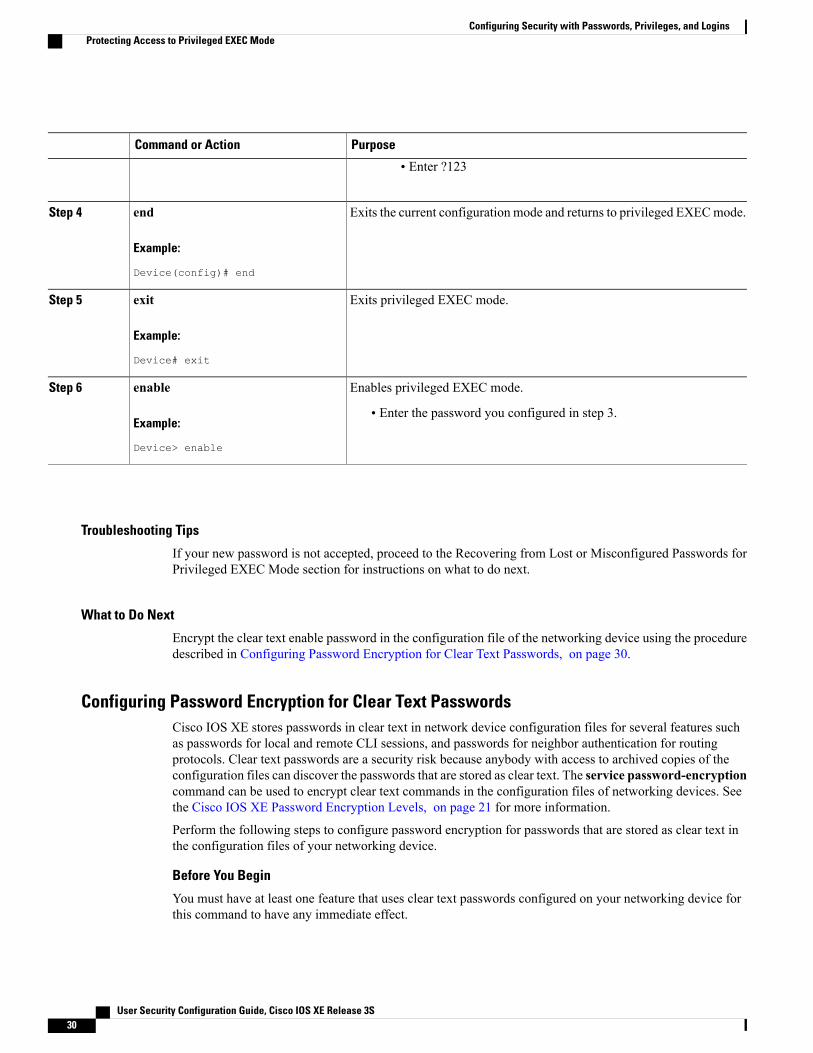
• Enter ?123
Exits the current configuration mode and returns to privileged EXECmode.end
Example:
Device(config)# end
Step 4
Exits privileged EXEC mode.exit
Example:
Device# exit
Step 5
Enables privileged EXEC mode.enableStep 6
Example:
Device> enable
• Enter the password you configured in step 3.
Troubleshooting Tips
If your new password is not accepted, proceed to the Recovering from Lost or Misconfigured Passwords forPrivileged EXEC Mode section for instructions on what to do next.
What to Do Next
Encrypt the clear text enable password in the configuration file of the networking device using the proceduredescribed in Configuring Password Encryption for Clear Text Passwords, on page 30.
Configuring Password Encryption for Clear Text PasswordsCisco IOS XE stores passwords in clear text in network device configuration files for several features suchas passwords for local and remote CLI sessions, and passwords for neighbor authentication for routingprotocols. Clear text passwords are a security risk because anybody with access to archived copies of theconfiguration files can discover the passwords that are stored as clear text. The service password-encryptioncommand can be used to encrypt clear text commands in the configuration files of networking devices. Seethe Cisco IOS XE Password Encryption Levels, on page 21 for more information.
Perform the following steps to configure password encryption for passwords that are stored as clear text inthe configuration files of your networking device.
Before You Begin
You must have at least one feature that uses clear text passwords configured on your networking device forthis command to have any immediate effect.
User Security Configuration Guide, Cisco IOS XE Release 3S30
Configuring Security with Passwords, Privileges, and LoginsProtecting Access to Privileged EXEC Mode
SUMMARY STEPS
1. enable2. configure terminal3. service password-encryption4. end
DETAILED STEPS
PurposeCommand or Action
Enables privileged EXEC mode.enableStep 1
Example:
Device> enable
• Enter your password if prompted.
Enters global configuration mode.configure terminal
Example:
Device# configure terminal
Step 2
Enables Password encryption for all passwords clear text passwords,including username passwords, authentication key passwords, the
service password-encryption
Example:
Device(config)# servicepassword-encryption
Step 3
privileged command password, console and virtual terminal lineaccess passwords, and Border Gateway Protocol neighbor passwords.
Exits the current configurationmode and returns to privileged EXECmode.
end
Example:
Device(config)# end
Step 4
Configuring and Verifying the Enable Secret PasswordCisco recommends that you use the enable secret command, instead of the enable password command toconfigure a password for privileged EXEC mode. The password created by the enable secret command isencrypted with the more secure MD5 algorithm.
You cannot use the same password for the enable secret command and the enable password command.Note
User Security Configuration Guide, Cisco IOS XE Release 3S 31
Configuring Security with Passwords, Privileges, and LoginsProtecting Access to Privileged EXEC Mode
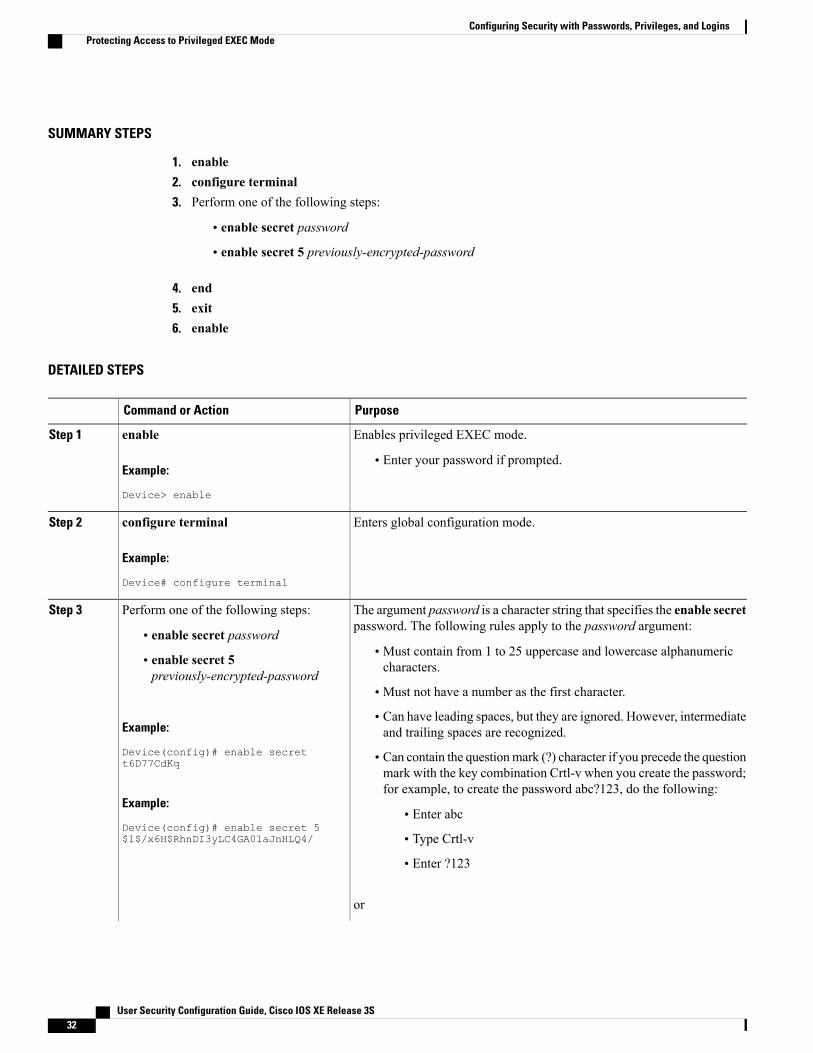
SUMMARY STEPS
1. enable2. configure terminal3. Perform one of the following steps:
• enable secret password
• enable secret 5 previously-encrypted-password
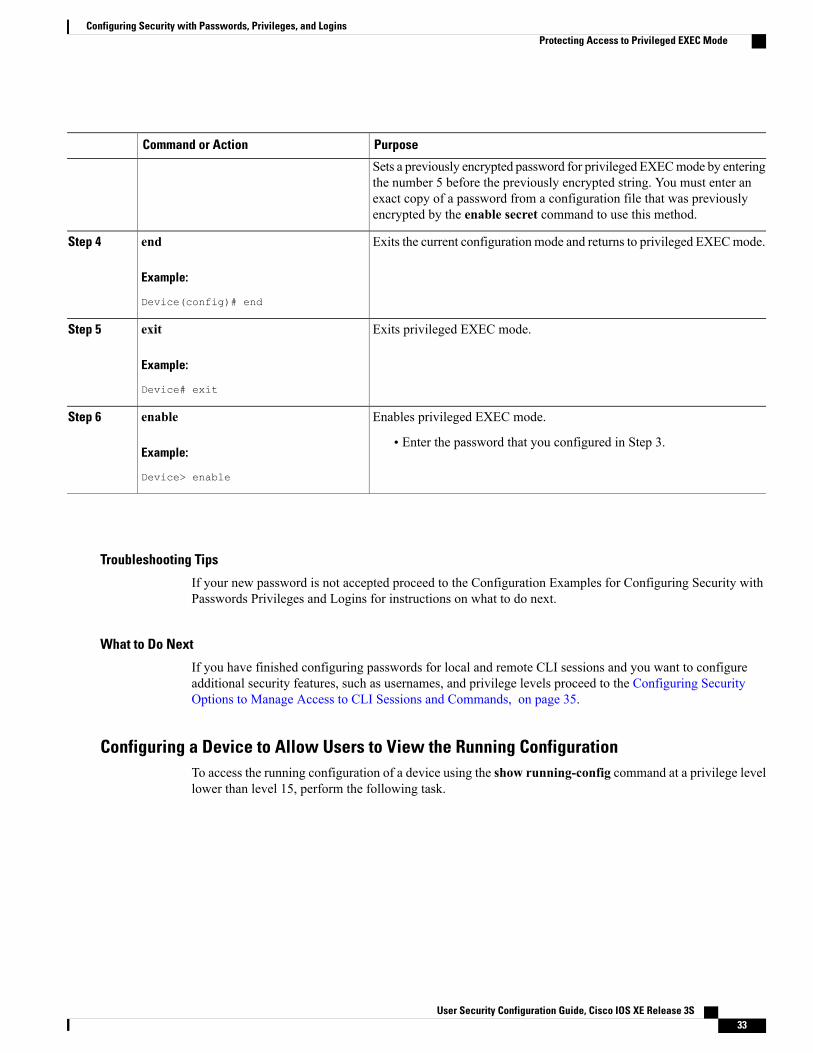
4. end5. exit6. enable
DETAILED STEPS
PurposeCommand or Action
Enables privileged EXEC mode.enableStep 1
Example:
Device> enable
• Enter your password if prompted.
Enters global configuration mode.configure terminal
Example:
Device# configure terminal
Step 2
The argument password is a character string that specifies the enable secretpassword. The following rules apply to the password argument:
Perform one of the following steps:Step 3
• enable secret password• Must contain from 1 to 25 uppercase and lowercase alphanumericcharacters.• enable secret 5
previously-encrypted-password• Must not have a number as the first character.
Example:
Device(config)# enable secrett6D77CdKq
• Can have leading spaces, but they are ignored. However, intermediateand trailing spaces are recognized.
• Can contain the questionmark (?) character if you precede the questionmark with the key combination Crtl-v when you create the password;for example, to create the password abc?123, do the following:
User Security Configuration Guide, Cisco IOS XE Release 3S32
Configuring Security with Passwords, Privileges, and LoginsProtecting Access to Privileged EXEC Mode
PurposeCommand or Action
Sets a previously encrypted password for privileged EXECmode by enteringthe number 5 before the previously encrypted string. You must enter anexact copy of a password from a configuration file that was previouslyencrypted by the enable secret command to use this method.
Exits the current configuration mode and returns to privileged EXECmode.end
Example:
Device(config)# end
Step 4
Exits privileged EXEC mode.exit
Example:
Device# exit
Step 5
Enables privileged EXEC mode.enableStep 6
Example:
Device> enable
• Enter the password that you configured in Step 3.
Troubleshooting Tips
If your new password is not accepted proceed to the Configuration Examples for Configuring Security withPasswords Privileges and Logins for instructions on what to do next.
What to Do Next
If you have finished configuring passwords for local and remote CLI sessions and you want to configureadditional security features, such as usernames, and privilege levels proceed to the Configuring SecurityOptions to Manage Access to CLI Sessions and Commands, on page 35.
Configuring a Device to Allow Users to View the Running ConfigurationTo access the running configuration of a device using the show running-config command at a privilege levellower than level 15, perform the following task.
User Security Configuration Guide, Cisco IOS XE Release 3S 33
Configuring Security with Passwords, Privileges, and LoginsProtecting Access to Privileged EXEC Mode
SUMMARY STEPS
1. enable2. configure terminal3. privilege exec all level level command-string4. file privilege level5. privilege configure all level level command-string6. end7. show privilege8. show running-config
DETAILED STEPS
PurposeCommand or Action
Enables privileged EXEC mode.enableStep 1
Example:
Device> enable
• Enter your password if prompted.
Enters global configuration mode.configure terminal
Example:
Device# configure terminal
Step 2
Changes the privilege level of the specified command fromone privilege level to another.
privilege exec all level level command-string
Example:
Device(config)# privilege exec all level 5show running-config
Step 3
Allows a user of the privilege level to execute commands thatinvolve the file system on a device.
file privilege level
Example:
Device(config)# file privilege 5
Step 4
Allows a user of a privilege level to see specific configurationcommands. For example, allows the user of privilege level 5
privilege configure all level level command-string
Example:
Device(config)# privilege configure all level5 logging
Step 5
to see the logging configuration commands in the runningconfiguration.
Exits global configuration mode and returns to privilegedEXEC mode.
end
Example:
Device(config)# end
Step 6
User Security Configuration Guide, Cisco IOS XE Release 3S34
Configuring Security with Passwords, Privileges, and LoginsProtecting Access to Privileged EXEC Mode
PurposeCommand or Action
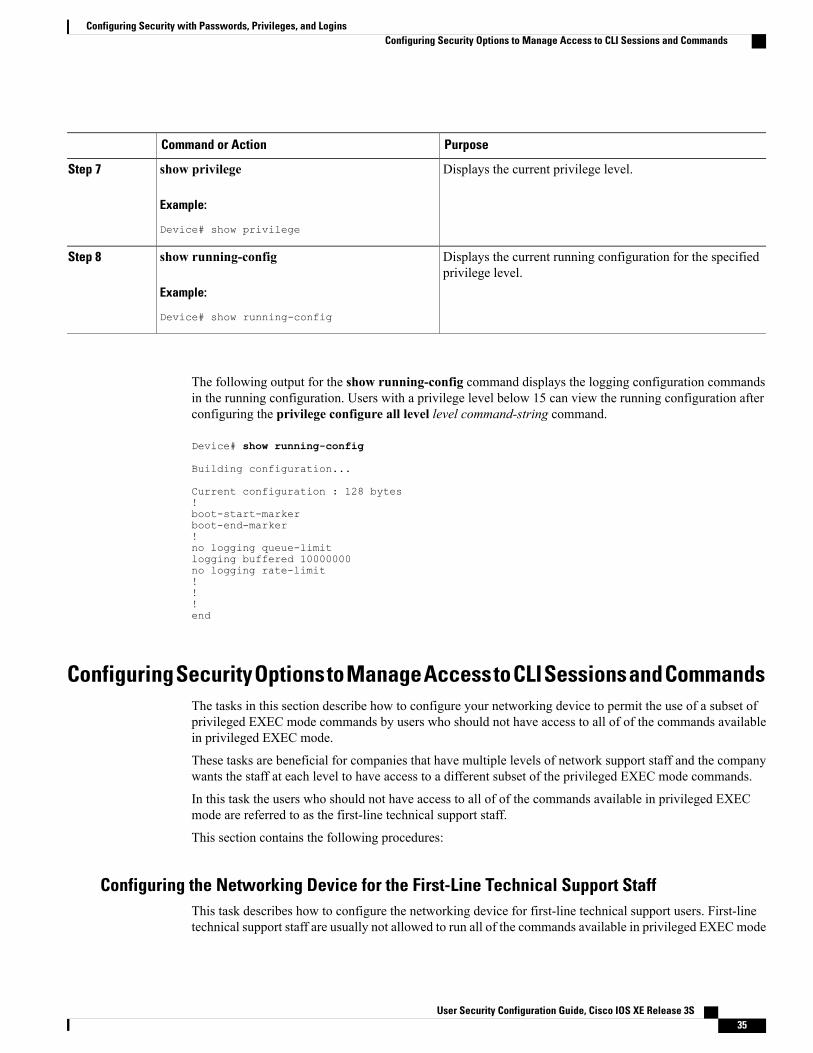
Displays the current privilege level.show privilege
Example:
Device# show privilege
Step 7
Displays the current running configuration for the specifiedprivilege level.
show running-config
Example:
Device# show running-config
Step 8
The following output for the show running-config command displays the logging configuration commandsin the running configuration. Users with a privilege level below 15 can view the running configuration afterconfiguring the privilege configure all level level command-string command.
Configuring Security Options to Manage Access to CLI Sessions and CommandsThe tasks in this section describe how to configure your networking device to permit the use of a subset ofprivileged EXEC mode commands by users who should not have access to all of of the commands availablein privileged EXEC mode.
These tasks are beneficial for companies that have multiple levels of network support staff and the companywants the staff at each level to have access to a different subset of the privileged EXEC mode commands.
In this task the users who should not have access to all of of the commands available in privileged EXECmode are referred to as the first-line technical support staff.
This section contains the following procedures:
Configuring the Networking Device for the First-Line Technical Support StaffThis task describes how to configure the networking device for first-line technical support users. First-linetechnical support staff are usually not allowed to run all of the commands available in privileged EXECmode
User Security Configuration Guide, Cisco IOS XE Release 3S 35
Configuring Security with Passwords, Privileges, and LoginsConfiguring Security Options to Manage Access to CLI Sessions and Commands
(privilege level 15) on a networking device. They are prevented from running commands that they are notauthorized for by not being granted access to the password assigned to privileged EXEC mode or to otherroles that have been configured on the networking device.
The privilege command is used to move commands from one privilege level to another in order to create theadditional levels of administration of a networking device that is required by companies that have differentlevels of network support staff with different skill levels.
The default configuration of a Cisco IOS XE device permits two types of users to access the CLI. The firsttype of user is a person who is only allowed to access user EXEC mode. The second type of user is a personwho is allowed access to privileged EXEC mode. A user who is only allowed to access user EXEC mode isnot allowed to view or change the configuration of the networking device, or to make any changes to theoperational status of the networking device. On the other hand, a user who is allowed access to privilegedEXEC mode can make any change to a networking device that is allowed by the CLI.
In this task the two commands that normally run at privilege level 15 are reset to privilege level 7 using theprivilege command in order that first-line technical support users will be allowed to run the two commands.The two commands for which the privilege levels will be reset are the clear counters command and reloadcommand.
• The clear counters command is used to reset the counter fields on interfaces for statistics such as packetsreceived, packets transmitted, and errors. When a first-line technical support user is troubleshooting aninterface related connectivity issue between networking devices, or with remote users connecting to thenetwork, it is useful to reset the interface statistics to zero and them monitor the interfaces for a periodof time to see if the values in the interface statistics counters change.
• The reload command is used initiate a reboot sequence for the networking device. One common use ofthe reload command by first-line technical support staff is to cause the networking device to rebootduring a maintenance window so that it loads a new operating system that was previously copied ontothe networking device’s file system by a user with a higher level of authority.
Any user that is permitted to know the enable secret password that is assigned to the first-line technicalsupport user role privilege level can access the networking device as a first-line technical support user. Youcan add an additional level of security by configuring a username on the networking device and requiring thatthe users know the username and the password. Configuring a username as an additional level of security isdescribed in the Configuring a Device to Require a Username for the First-Line Technical Support Staff, onpage 41.
User Security Configuration Guide, Cisco IOS XE Release 3S36
Configuring Security with Passwords, Privileges, and LoginsConfiguring Security Options to Manage Access to CLI Sessions and Commands
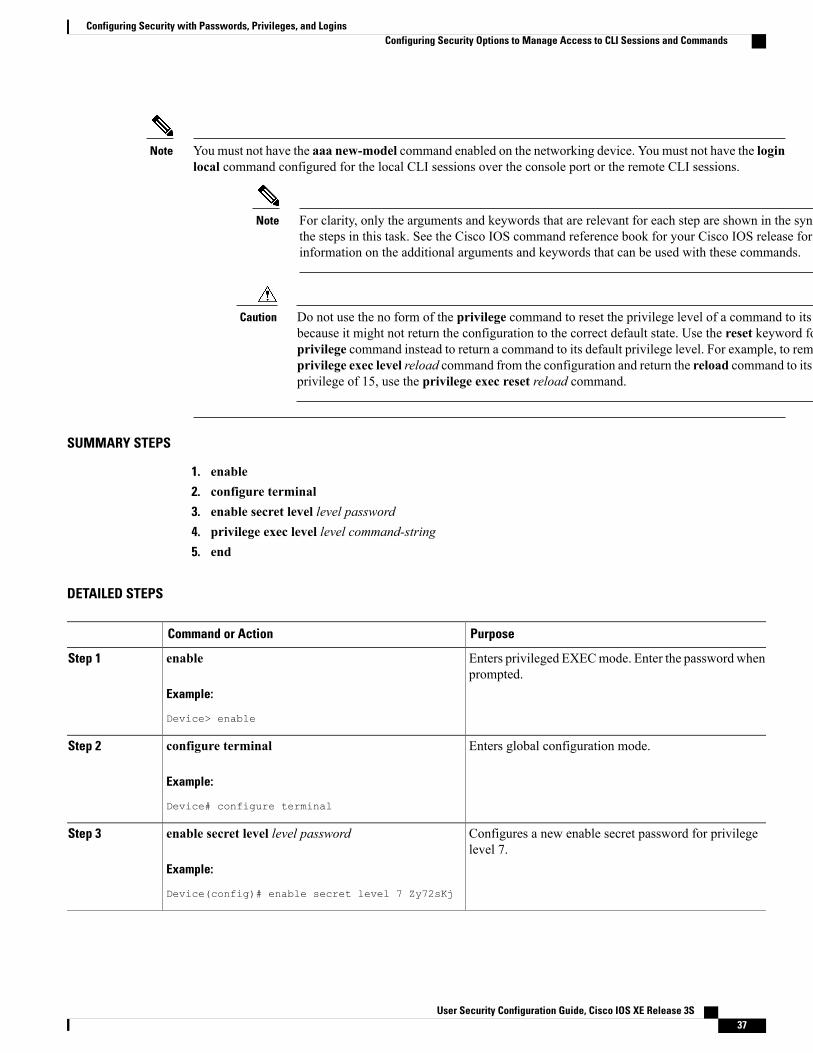
You must not have the aaa new-model command enabled on the networking device. You must not have the loginlocal command configured for the local CLI sessions over the console port or the remote CLI sessions.
Note
For clarity, only the arguments and keywords that are relevant for each step are shown in the syntax forthe steps in this task. See the Cisco IOS command reference book for your Cisco IOS release for furtherinformation on the additional arguments and keywords that can be used with these commands.
Note
Do not use the no form of the privilege command to reset the privilege level of a command to its defaultbecause it might not return the configuration to the correct default state. Use the reset keyword for theprivilege command instead to return a command to its default privilege level. For example, to remove theprivilege exec level reload command from the configuration and return the reload command to its defaultprivilege of 15, use the privilege exec reset reload command.
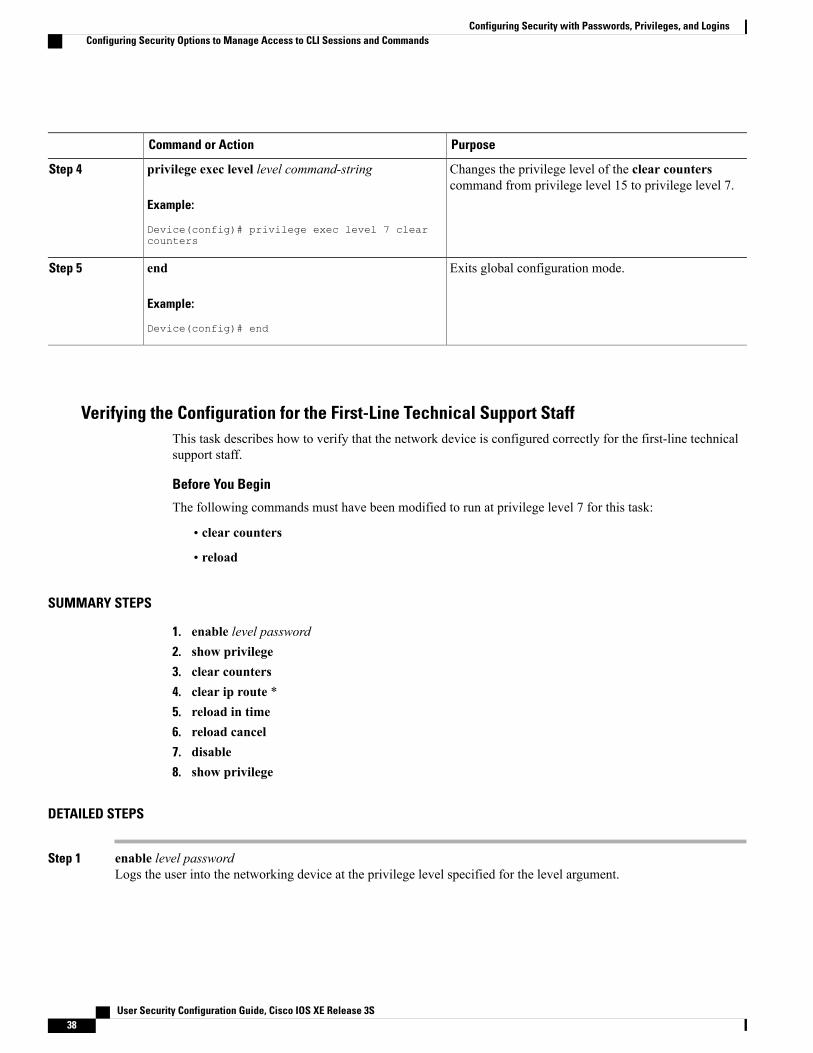
Verifying the Configuration for the First-Line Technical Support StaffThis task describes how to verify that the network device is configured correctly for the first-line technicalsupport staff.
Before You Begin
The following commands must have been modified to run at privilege level 7 for this task:
• clear counters
• reload
SUMMARY STEPS
1. enable level password2. show privilege3. clear counters4. clear ip route *5. reload in time6. reload cancel7. disable8. show privilege
DETAILED STEPS
Step 1 enable level passwordLogs the user into the networking device at the privilege level specified for the level argument.
User Security Configuration Guide, Cisco IOS XE Release 3S38
Configuring Security with Passwords, Privileges, and LoginsConfiguring Security Options to Manage Access to CLI Sessions and Commands
Example:
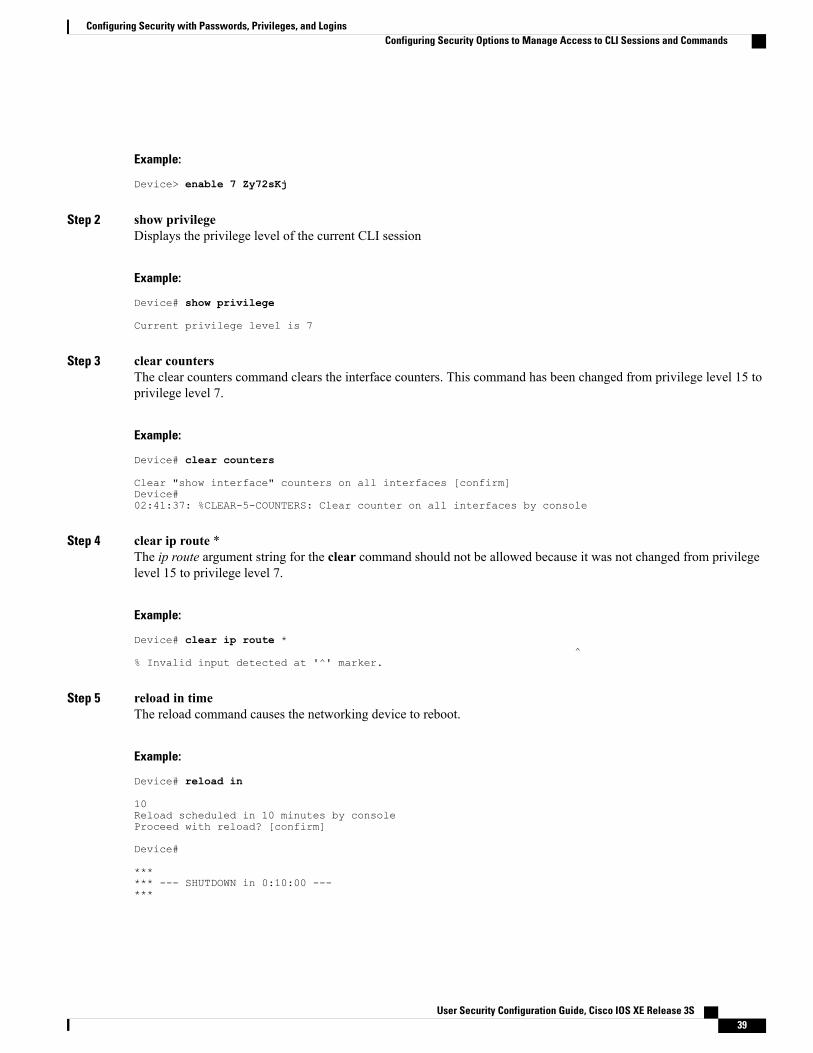
Device> enable 7 Zy72sKj
Step 2 show privilegeDisplays the privilege level of the current CLI session
Example:
Device# show privilege
Current privilege level is 7
Step 3 clear countersThe clear counters command clears the interface counters. This command has been changed from privilege level 15 toprivilege level 7.
Example:
Device# clear counters
Clear "show interface" counters on all interfaces [confirm]Device#02:41:37: %CLEAR-5-COUNTERS: Clear counter on all interfaces by console
Step 4 clear ip route *The ip route argument string for the clear command should not be allowed because it was not changed from privilegelevel 15 to privilege level 7.
Example:
Device# clear ip route *^
% Invalid input detected at '^' marker.
Step 5 reload in timeThe reload command causes the networking device to reboot.
Example:
Device# reload in
10Reload scheduled in 10 minutes by consoleProceed with reload? [confirm]
Device#
****** --- SHUTDOWN in 0:10:00 ---***
User Security Configuration Guide, Cisco IOS XE Release 3S 39
Configuring Security with Passwords, Privileges, and LoginsConfiguring Security Options to Manage Access to CLI Sessions and Commands
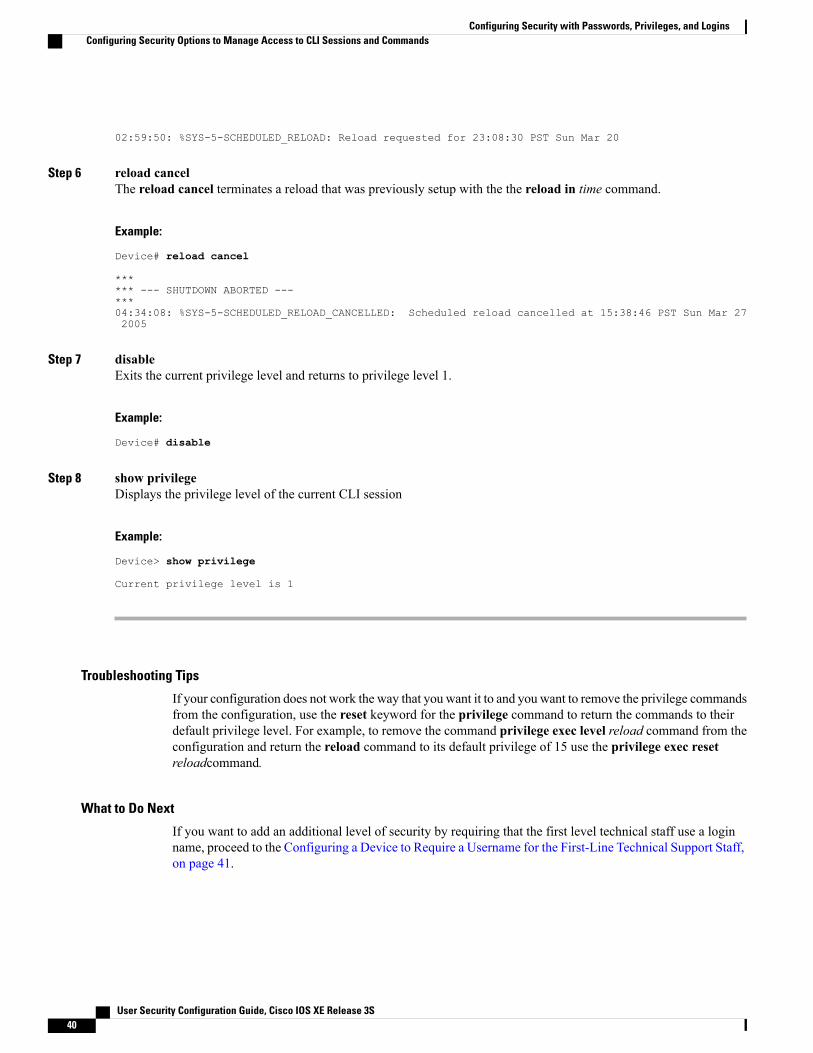
02:59:50: %SYS-5-SCHEDULED_RELOAD: Reload requested for 23:08:30 PST Sun Mar 20
Step 6 reload cancelThe reload cancel terminates a reload that was previously setup with the the reload in time command.
Example:
Device# reload cancel
****** --- SHUTDOWN ABORTED ---***04:34:08: %SYS-5-SCHEDULED_RELOAD_CANCELLED: Scheduled reload cancelled at 15:38:46 PST Sun Mar 272005
Step 7 disableExits the current privilege level and returns to privilege level 1.
Example:
Device# disable
Step 8 show privilegeDisplays the privilege level of the current CLI session
Example:
Device> show privilege
Current privilege level is 1
Troubleshooting Tips
If your configuration does not work the way that you want it to and you want to remove the privilege commandsfrom the configuration, use the reset keyword for the privilege command to return the commands to theirdefault privilege level. For example, to remove the command privilege exec level reload command from theconfiguration and return the reload command to its default privilege of 15 use the privilege exec resetreloadcommand.
What to Do Next
If you want to add an additional level of security by requiring that the first level technical staff use a loginname, proceed to the Configuring a Device to Require a Username for the First-Line Technical Support Staff,on page 41.
User Security Configuration Guide, Cisco IOS XE Release 3S40
Configuring Security with Passwords, Privileges, and LoginsConfiguring Security Options to Manage Access to CLI Sessions and Commands
Configuring a Device to Require a Username for the First-Line Technical Support StaffThis task configures the networking device to require that the first-line technical support staff login to thenetworking device with a login name of admin. The admin username configured in this task is assigned theprivilege level of 7 which will allow users who log in with this name to run the commands that were reassignedto privilege level 7 in the previous task. When a user successfully logs in with the admin username, the CLIsession will automatically enter privilege level 7.
Before Cisco IOS XE Release 2.3, two types of passwords were associated with usernames: Type 0, whichis a clear text password visible to any user who has access to privileged mode on the router, and type 7, whichhas a password encrypted by the service password encryption command.
In Cisco IOS XE Release 2.3 and later releases, the new secret keyword for the username command allowsyou to configure Message Digest 5 (MD5) encryption for username passwords.
Before You Begin
The following commands must have been modified to run at privilege level 7 for this task:
• clear counters
• reload
See the Configuring the Networking Device for the First-Line Technical Support Staff, on page 35 forinstructions on how to change the privilege level for a command.
MD5 encryption for the username command is not supported in versions of Cisco IOS software prior to CiscoIOS XE Release 2.3.
You must not have the aaa-new model command enabled on the networking device. You must not have thelogin local command configured for the local CLI sessions over the console port or the remote CLI sessions.
Note
For clarity, only the arguments and keywords that are relevant for each step are shown in the syntax forthe steps in this task. Refer to the Cisco IOS command reference book for your Cisco IOS XE release forfurther information on the additional arguments and keywords that can be used with these commands.
Note
User Security Configuration Guide, Cisco IOS XE Release 3S 41
Configuring Security with Passwords, Privileges, and LoginsConfiguring Security Options to Manage Access to CLI Sessions and Commands
SUMMARY STEPS
1. enable2. configure terminal3. username username privilege level secret password4. end5. disable6. login username7. show privilege8. clear counters9. clear ip route *10. reload in time11. reload cancel12. disable13. show privilege
DETAILED STEPS
PurposeCommand or Action
Enters privileged EXECmode. Enter the password whenprompted.
enable
Example:
Device> enable
Step 1
Enters global configuration mode.configure terminal
Example:
Device# configure terminal
Step 2
Creates a username and applies MD5 encryption to thepassword text string.
User Security Configuration Guide, Cisco IOS XE Release 3S42
Configuring Security with Passwords, Privileges, and LoginsConfiguring Security Options to Manage Access to CLI Sessions and Commands
PurposeCommand or Action
Exits the current privilege level and returns to userEXEC mode.
disable
Example:
Device# disable
Step 5
Logs in the user. Enter the username and password youconfigured in step 3 when prompted.
login username
Example:
Device> login admin
Step 6
The show privilege command displays the privilegelevel of the CLI session.
show privilege
Example:
Device# show privilege
Step 7
Current privilege level is 7
The clear counters command clears the interfacecounters. This command has been changed fromprivilege level 15 to privilege level 7.
clear counters
Example:
Device# clear counters
Step 8
Clear "show interface" counters on all interfaces[confirm]Device#02:41:37: %CLEAR-5-COUNTERS: Clear counter on allinterfaces by console
The ip route argument string for the clear command isnot allowed because it was not changed from privilegelevel 15 to privilege level 7.
clear ip route *
Example:
Device# clear ip route *
Step 9
^% Invalid input detected at '^' marker.
The reload command causes the networking device toreboot.
reload in time
Example:
Device# reload in
Step 10
10Reload scheduled in 10 minutes by consoleProceed with reload? [confirm]Device#****** --- SHUTDOWN in 0:10:00 ---***02:59:50: %SYS-5-SCHEDULED_RELOAD: Reloadrequested for 23:08:30 PST Sun Mar 20
User Security Configuration Guide, Cisco IOS XE Release 3S 43
Configuring Security with Passwords, Privileges, and LoginsConfiguring Security Options to Manage Access to CLI Sessions and Commands
PurposeCommand or Action
The reload cancel command terminates a reload thatwas previously setup with the the reload in timecommand.
Exits the current privilege level and returns to userEXEC mode.
disable
Example:
Device# disable
Step 12
Displays the privilege level of the current CLI sessionshow privilege
Example:
Device> show privilege
Step 13
Current privilege level is 1
Recovering from a Lost or Misconfigured Password for Local SessionsThere are three methods that can be used to recover from a lost or misconfigured password for local CLIsessions over console port. The method that you will use depends on the current configuration of yournetworking device.
Networking Device Is Configured to Allow Remote CLI SessionsThe fastest method to recover from a lost, or misconfigured password for local CLI sessions is to establish aremote CLI session with the networking device and repeat the Configuring and Verifying a Password forLocal CLI Sessions, on page 26. Your networking device must be configured to allow remote CLI sessionsand you must know the remote CLI session password to perform this procedure.
Networking Device Is Not Configured to Allow Remote CLI Sessions• If you cannot establish a remote session to your networking device, and you have not saved themisconfigured local CLI session password to the startup configuration, you can restart the networkingdevice.When the networking device starts up again it will read the startup configuration file. The previouslocal CLI session password is restored.
User Security Configuration Guide, Cisco IOS XE Release 3S44
Configuring Security with Passwords, Privileges, and LoginsRecovering from a Lost or Misconfigured Password for Local Sessions
Restarting a networking device will cause it to stop forwarding traffic. This will also cause an interruptionin any services that are running on the networking device, such as a DHCP server service, to stop. Youshould only restart a networking device during a period of time that has been allocated for networkmaintenance.
Caution
Recovering from a Lost or Misconfigured Password for Remote SessionsThere are three methods that can be used to recover from a lost, or misconfigured remote CLI session password.The method that you will use depends on the current configuration of your networking device.
Networking Device Is Configured to Allow Local CLI SessionsThe fastest method to recover from a lost, or misconfigured password for remote CLI sessions is to establisha local CLI session with the networking device and repeat the Configuring and Verifying a Password forRemote CLI Sessions, on page 24. Your networking device must be configured to allow local CLI sessionsand you must know the local CLI session password to perform this procedure.
Networking Device Is Not Configured to Allow Local CLI Sessions• If you cannot establish a local CLI session to your networking device, and you have not saved themisconfigured remote CLI session password to the startup configuration, you can restart the networkingdevice.When the networking device starts up again it will read the startup configuration file. The previousremote CLI session password is restored.
Restarting a networking device will cause it to stop forwarding traffic. This will also cause an interruptionin any services that are running on the networking device, such as a DHCP server service, to stop. Youshould only restart a networking device during a period of time that has been allocated for networkmaintenance.
Caution
Recovering from Lost or Misconfigured Passwords for Privileged EXEC ModeThere are two methods that can be used to recover from a lost, or misconfigured Privileged EXEC Modepassword. The method that you will use depends on the current configuration of your networking device.
A Misconfigured Privileged EXEC Mode Password Has Not Been Saved• If you have not saved the misconfigured privileged EXEC mode password to the startup configuration,you can restart the networking device.When the networking device starts up again it will read the startupconfiguration file. The previous privileged EXEC mode password is restored.
User Security Configuration Guide, Cisco IOS XE Release 3S 45
Configuring Security with Passwords, Privileges, and LoginsRecovering from a Lost or Misconfigured Password for Remote Sessions
Restarting a networking device will cause it to stop forwarding traffic. This will also cause an interruptionin any services that are running on the networking device, such as a DHCP server service, to stop. Youshould only restart a networking device during a period of time that has been allocated for networkmaintenance.
Caution
Configuration Examples for Configuring Security withPasswords Privileges and Logins
Example: Configuring a Device to Allow Users to Clear Remote SessionsThe following example shows how to configure a networking device to allow a non administrative user toclear remote CLI session virtual terminal (VTY) lines.
The first section is an excerpt of the running configuration for this example. The following sections show youhow this example is used.
The following section is an excerpt of the running-configuration:
!privilege exec level 7 clear line!no aaa new-model!!username admin privilege 7 secret 5 $1$tmIw$1aM7sadKhWMpkVTzxNw1J.!privilege exec level 7 clear line!! the privilege exec level 7 clear command below is entered automatically! when you enter the privilege exec level 7 clear line command above, do! not enter it again!privilege exec level 7 clear!The following section using the login command shows the user logging in to the networking device with theusername of admin:
R1> loginUsername: adminPassword:The following section using the show privilege command shows that the current privilege level is 7:
R1# show privilege
Current privilege level is 7R1#The following section using the show user command shows that two users (admin and root) are currentlylogged in to the networking device:
R1# show user
Line User Host(s) Idle Location* 0 con 0 admin idle 00:00:00
User Security Configuration Guide, Cisco IOS XE Release 3S46
Configuring Security with Passwords, Privileges, and LoginsConfiguration Examples for Configuring Security with Passwords Privileges and Logins
The following section using the clear line 2 command terminates the remote CLI session in use by the usernameroot:
R1# clear line 2
[confirm][OK]The following section using the show user command shows that admin is the only user currently logged into the networking device:
R1# show userLine User Host(s) Idle Location
* 0 con 0 admin idle 00:00:00Interface User Mode Idle Peer Address
Example: Configuring a Device to Allow Users to View the RunningConfiguration
For Users With Privilege Level 15
The following example shows how to configure the networking device to allow a non administrative users(no access to privileged EXECmode) to view the running configuration automatically. This example requiresthat the username is configured for privilege level 15 because many of the commands in the configurationfile can be viewed only by users who have access to privilege level 15.
The solution is to temporarily allow the user access to privilege level 15 while running the show running-configcommand and then terminating the CLI session when the end of the configuration file has been viewed. Inthis example the networking device will automatically terminate the CLI session when the end of theconfiguration file has been viewed. No further configuration steps are required.
You must include the noescape keyword for the username command to prevent the user from enteringan escape character that will terminate viewing the configuration file and leave the session running atprivilege level 15.
For Users With Privilege Level Lower Than Level 15
The following example shows how to configure a networking device to allow a user with privilege level lowerthan level 15 to view the running configuration.
Device> enableDevice# configure terminalDevice(config)# privilege exec all level 5 show running-configDevice(config)# file privilege 5Device(config)# privilege configure all level 5 loggingDevice(config)# endDevice# show privilege
User Security Configuration Guide, Cisco IOS XE Release 3S 47
Configuring Security with Passwords, Privileges, and LoginsExample: Configuring a Device to Allow Users to View the Running Configuration
Example: Configuring a Device to Allow Users to Shutdown and EnableInterfaces
The following example shows how to configure a networking device to allow non administrative users toshutdown and enable interfaces.
The first section is an an excerpt of the running configuration for this example. The following sections showyou how this example is used.
The following section is an excerpt of the running-configuration:
!no aaa new-model!username admin privilege 7 secret 5 $1$tmIw$1aM7sadKhWMpkVTzxNw1J.!privilege interface all level 7 shutdownprivilege interface all level 7 no shutdownprivilege configure level 7 interfaceprivilege exec level 7 configure terminal!! the privilege exec level 7 configure command below is entered automatically! when you enter the privilege exec level 7 configure terminal command above, do! not enter it again!privilege exec level 7 configure!The following section using the login command shows the user logging in to the networking device with theusername of admin:
R1> loginUsername: adminPassword:The following section using the show privilege command shows that the current privilege level is 7:
R1# show privilegeCurrent privilege level is 7The following section using the show user command shows that admin is the only user currently logged into the networking device:
R1# show userLine User Host(s) Idle Location
User Security Configuration Guide, Cisco IOS XE Release 3S48
Configuring Security with Passwords, Privileges, and LoginsExample: Configuring a Device to Allow Users to Shutdown and Enable Interfaces
* 0 con 0 admin idle 00:00:00Interface User Mode Idle Peer Address
The following section shows that the admin user is permitted to shutdown and enable an interface:
R1# configure terminalEnter configuration commands, one per line. End with CNTL/Z.R1(config)# interface ethernet 1/0R1(config-if)# shutdownR1(config-if)# no shutdownR1(config-if)# exitR1#
Where to Go NextOnce you have established a baseline of security for your networking devices you can consider more advancedoptions such as:
• Role-Based CLI Access--The role-based CLI access feature offers a more comprehensive set of optionsthan the privilege command (described in this document) for network managers who want to allowdifferent levels of technical support staff to have different levels of access to CLI commands.
• AAASecurity--Many Cisco networking devices offer an advanced level of security using authentication,authorization and accounting (AAA) features. All of the tasks described in this document, and other -more advanced security features - can be implemented usingAAAon the networking device in conjunctionwith a remote TACACS+ or RADIUS server. For information how to configure AAA security featuresthat can be run locally on a networking device, or for information on how to configure remote AAAsecurity using TACACS+ or RADIUS servers, see the Cisco IOS XE Security ConfigurationGuide:Securing User Services , Release 2.
Additional ReferencesThe following sections provide references related to Configuring Security with Passwords and, LoginUsernamesfor CLI Sessions on Networking Devices.
Related Documents
Document TitleRelated Topic
“Role-Based CLI Access” in the Cisco IOS XESecurity ConfigurationGuide: SecuringUser Services, Release 2
Managing user access to CLI commands andconfiguration information
--No new or modified RFCs are supported by thisfunctionality, and support for existing RFCs has notbeen modified.
MIBs
MIBs LinkMIBs
To locate and downloadMIBs for selected platforms,Cisco IOSXE software releases, and feature sets, useCisco MIB Locator found at the following URL:
http://www.cisco.com/go/mibs
No new or modified MIBs are supported by thisfeature, and support for existing MIBs has not beenmodified by this feature.
RFCs
TitleRFC
--No new or modified RFCs are supported by thisfunctionality, and support for existing RFCs has notbeen modified.
Technical Assistance
LinkDescription
http://www.cisco.com/techsupportThe Cisco Support website provides extensive onlineresources, including documentation and tools fortroubleshooting and resolving technical issues withCisco products and technologies.
To receive security and technical information aboutyour products, you can subscribe to various services,such as the Product Alert Tool (accessed from FieldNotices), the Cisco Technical Services Newsletter,and Really Simple Syndication (RSS) Feeds.
Access to most tools on the Cisco Support websiterequires a Cisco.com user ID and password.
User Security Configuration Guide, Cisco IOS XE Release 3S50
Configuring Security with Passwords, Privileges, and LoginsAdditional References
Feature Information for Configuring Security with PasswordsPrivileges and Logins
The following table provides release information about the feature or features described in this module. Thistable lists only the software release that introduced support for a given feature in a given software releasetrain. Unless noted otherwise, subsequent releases of that software release train also support that feature.
Use Cisco Feature Navigator to find information about platform support and Cisco software image support.To access Cisco Feature Navigator, go to www.cisco.com/go/cfn. An account on Cisco.com is not required.
Table 2: Feature Information for Configuring Security with Passwords, Privilege Levels, and Login Usernames for CLISessions on Networking Devices
Feature Configuration InformationReleasesFeature Name
Using the Enhanced PasswordSecurity feature, you can configureMD5 encryption for usernamepasswords. MD5 encryption is aone-way hash function that makesreversal of an encrypted passwordimpossible, providing strongencryption protection. UsingMD5encryption, you cannot retrieveclear text passwords. MD5encrypted passwords cannot beused with protocols that requirethat the clear text password beretrievable, such as ChallengeHandshakeAuthentication Protocol(CHAP).
In Cisco IOS XE Release 2.3, thisfeature was introduced on the CiscoASR 1000 Series AggregationServices Routers.
Cisco IOS XE 2.3Enhanced Password Security
User Security Configuration Guide, Cisco IOS XE Release 3S 51
Configuring Security with Passwords, Privileges, and LoginsFeature Information for Configuring Security with Passwords Privileges and Logins
User Security Configuration Guide, Cisco IOS XE Release 3S52
Configuring Security with Passwords, Privileges, and LoginsFeature Information for Configuring Security with Passwords Privileges and Logins
C H A P T E R 3Role-Based CLI Access
The Role-Based CLI Access feature allows the network administrator to define views, which are a set ofoperational commands and configuration capabilities that provide selective or partial access to Cisco IOSEXEC and configuration (config) mode commands. Views restrict user access to Cisco IOS command-lineinterface (CLI) and configuration information; that is, a view can define what commands are accepted andwhat configuration information is visible. Thus, network administrators can exercise better control overaccess to Cisco networking devices.
• Finding Feature Information, page 53
• Prerequisites for Role-Based CLI Access, page 53
• Restrictions for Role-Based CLI Access, page 54
• Information About Role-Based CLI Access, page 54
• How to Use Role-Based CLI Access, page 55
• Configuration Examples for Role-Based CLI Access, page 61
• Additional References for Role-Based CLI Access, page 63
• Feature Information for Role-Based CLI Access, page 64
Finding Feature InformationYour software release may not support all the features documented in this module. For the latest caveats andfeature information, see Bug Search Tool and the release notes for your platform and software release. Tofind information about the features documented in this module, and to see a list of the releases in which eachfeature is supported, see the feature information table.
Use Cisco Feature Navigator to find information about platform support and Cisco software image support.To access Cisco Feature Navigator, go to www.cisco.com/go/cfn. An account on Cisco.com is not required.
Prerequisites for Role-Based CLI AccessYour image must support CLI views.
User Security Configuration Guide, Cisco IOS XE Release 3S 53
Restrictions for Role-Based CLI AccessLawful Intercept Images Limitation
CLI views are a part of all platforms and Cisco IOS images because they are a part of the Cisco IOS parser.However, the lawful intercept view is available only in images that contain the lawful intercept subsystem.
Maximum Number of Allowed Views
Themaximumnumber of CLI views and superviews, including one lawful intercept view, that can be configuredis 15. (This does not include the root view.)
Parse View Profiles
When you configure Parse View profiles, the 'no' or 'default' commands in combination with any configurationcommands are not saved to the startup-configuration file. The configuration is accepted and is persistent untilthe device is reloaded. Examples of commands which are not saved to the startup-configuration:
• command configure include all no
• command interface include all no
• command configure include all default
Information About Role-Based CLI Access
Benefits of Using CLI ViewsAlthough users can control CLI access via both privilege levels and enable mode passwords, these functionsdo not provide network administrators with the necessary level of detail needed when working with CiscoIOS devices. CLI views provide a more detailed access control capability for network administrators, thereby,improving the overall security and accountability of Cisco IOS software.
As of Cisco IOS Release 12.3(11)T, network administrators can also specify an interface or a group of interfacesto a view; thereby, allowing access on the basis of specified interfaces.
Root ViewWhen a system is in root view, it has all of the access privileges as a user who has level 15 privileges. If theadministrator wishes to configure any view to the system (such as a CLI view, a superview, or a lawful interceptview), the system must be in root view.
The difference between a user who has level 15 privileges and a root view user is that a root view user canconfigure a new view and add or remove commands from the view. Also, when you are in a CLI view, youhave access only to the commands that have been added to that view by the root view user.
User Security Configuration Guide, Cisco IOS XE Release 3S54
Role-Based CLI AccessRestrictions for Role-Based CLI Access
Lawful Intercept ViewLike a CLI view, a lawful intercept view restricts access to specified commands and configuration information.Specifically, a lawful intercept view allows a user to secure access to lawful intercept commands that are heldwithin the TAP-MIB, which is a special set of simple network management protocol (SNMP) commands thatstore information about calls and users.
Commands available in lawful intercept view belong to one of the these categories:
• Lawful intercept commands that should not be made available to any other view or privilege level
• CLI views that are useful for lawful intercept users but do not have to be excluded from other views orprivilege levels
SuperviewA superview consists of one or more CLI views, which allow users to define what commands are acceptedand what configuration information is visible. Superviews allow a network administrator to easily assign allusers within configured CLI views to a superview instead of having to assign multiple CLI views to a groupof users.
Superviews contain these characteristics:
• A CLI view can be shared among multiple superviews.
• Commands cannot be configured for a superview; that is, you must add commands to the CLI view andadd that CLI view to the superview.
• Users who are logged into a superview can access all of the commands that are configured for any ofthe CLI views that are part of the superview.
• Each superview has a password that is used to switch between superviews or from a CLI view to asuperview.
• If a superview is deleted, its associated CLI views are not deleted.
View Authentication via a New AAA AttributeView authentication is performed by an external authentication, authorization, and accounting (AAA) servervia the new attribute cli-view-name.
AAA authentication associates only one view name to a particular user; that is, only one view name can beconfigured for a user in an authentication server.
How to Use Role-Based CLI Access
Configuring a CLI ViewPerform this task to create a CLI view and add commands or interfaces to the view, as appropriate.
User Security Configuration Guide, Cisco IOS XE Release 3S 55
Role-Based CLI AccessLawful Intercept View
Before You Begin
Before you create a view, you must perform the following tasks:
• Enable AAA using the aaa new-model command.
• Ensure that your system is in root view-not privilege level 15.
• Enter your privilege level 15 password (for example, root password)if prompted.
Enters global configuration mode.configure terminal
Example:
Device# configure terminal
Step 2
Creates a view including all commands by default. If the inclusive keywordoption is not selected, it creates a view excluding all commands by default.You are in the view configuration mode.
parser view view-name [inclusive]
Example:
Device(config)# parser view first
Step 3
inclusiveDevice(config-view)#
Associates a CLI view or superview with a password.secret [0 | 5] encrypted-passwordStep 4
Example:
Device(config-view)# secret 5 secret
Youmust issue this command before you can configure additionalattributes for the view.
Note
With CSCts50236, the password can be removed or overwritten.Use the no secret command to remove the configured password.
Note
Adds commands or interfaces to a view and specifies the mode in whichthe specified command exists.
User Security Configuration Guide, Cisco IOS XE Release 3S56
Role-Based CLI AccessConfiguring a CLI View
PurposeCommand or Action
While configuring parser view profiles, the following no ordefault commands are not saved to the startup configuration.These commands are in use until the device is reloaded. Once thedevice is reloaded, reapply these commands to get the requiredresults.
Note
• commands configure include all no
• commands interface include all no
• commands configure include all default
Example:
Device(config-view)# commands execinclude show version
Exits view configuration mode and returns to privileged EXEC mode.end
Example:
Device(config-view)# end
Step 6
Prompts you for a password to access a configured CLI view, and you canswitch from one view to another view.
enable [privilege-level | view view-name]
Example:
Device# enable view first
Step 7
Enter the password to access the CLI view.
(Optional) Displays information for all views that are configured on thedevice.
show parser view all
Example:
Device# show parser view all
Step 8
Although this command is available for both root and lawfulintercept users, the all keyword is available only to root users.However, the all keyword can be configured by a user in rootview to be available for users in lawful intercept view and CLIview.
Note
Troubleshooting TipsYou must associate a password with a view. If you do not associate a password, and you attempt to addcommands to the view using the commands command, a system message such as the following is displayed:
%Password not set for view <viewname>.
Configuring a Lawful Intercept ViewPerform this task to initialize and configure a view for lawful-intercept-specific commands and configurationinformation.
User Security Configuration Guide, Cisco IOS XE Release 3S 57
Role-Based CLI AccessConfiguring a Lawful Intercept View
Before You Begin
Before you initialize a lawful intercept view, ensure that the privilege level is set to 15 using the privilegecommand.
Only an administrator or a user who has level 15 privileges can initialize a lawful intercept view.Note
User Security Configuration Guide, Cisco IOS XE Release 3S58
Role-Based CLI AccessConfiguring a Lawful Intercept View
PurposeCommand or Action
(Optional) Enters view configuration mode, which allowsyou to change the lawful intercept view password or thelawful intercept view name.
parser view view-name
Example:
Device(config)# parser view li view name
Step 5
(Optional) Changes an existing password for a lawfulintercept view.
secret 5 encrypted-password
Example:
Device(config-view)# secret 5 secret
Step 6
(Optional) Changes the name of a lawful intercept view.name new-nameStep 7
Example:
Device(config-view)# name second
If this command is not issued, the default name of the lawfulintercept view is “li-view.”
Troubleshooting TipsTo display information for all users who have access to a lawful intercept view, issue the show userslawful-intercept command. (This command is available only to authorized lawful intercept view users.)
Configuring a SuperviewPerform this task to create a superview and add at least one CLI view to the superview.
Before You Begin
Before adding a CLI view to a superview, ensure that the CLI views that are added to the superview are validviews in the system; that is, the views have been successfully created using the parser view command.
You can add a view to a superview only after you configure a password for the superview (using the secret5 command). Thereafter, issue the view command in view configuration mode to add at least one CLIview to the superview.
Note
User Security Configuration Guide, Cisco IOS XE Release 3S 59
Role-Based CLI AccessConfiguring a Superview
SUMMARY STEPS
1. enable view2. configure terminal3. parser view superview-name superview4. secret 5 encrypted-password5. view view-name6. end7. show parser view all
DETAILED STEPS
PurposeCommand or Action
Enables root view.enable viewStep 1
Example:
Device> enable view
• Enter your privilege level 15 password (for example, rootpassword) if prompted.
Enters global configuration mode.configure terminal
Example:
Device# configure terminal
Step 2
Creates a superview and enters view configuration mode.parser view superview-name superview
Example:
Device(config)# parser view su_view1superview
Step 3
Associates a CLI view or superview with a password.secret 5 encrypted-passwordStep 4
Example:
Device(config-view)# secret 5 secret
You must issue this command before you can configureadditional attributes for the view.
Note
Adds a normal CLI view to a superview.view view-nameStep 5
Example:
Device(config-view)# view view_three
Issue this command for each CLI view that is to be added to a givensuperview.
Exits view configurationmode and returns to privileged EXECmode.end
Example:
Device(config-view)# endDevice#
Step 6
User Security Configuration Guide, Cisco IOS XE Release 3S60
Role-Based CLI AccessConfiguring a Superview
PurposeCommand or Action
(Optional) Displays information for all views that are configured onthe device.
show parser view all
Example:
Device# show parser view
Step 7
Although this command is available for both root and lawfulintercept users, the all keyword is available only to rootusers. However, the all keyword can be configured by a userin root view to be available for users in lawful intercept viewand CLI view.
Note
Monitoring Views and View UsersTo display debug messages for all views-root, CLI, lawful intercept, and superview-use the debug parserview command in privileged EXEC mode.
Configuration Examples for Role-Based CLI Access
Example: Configuring a CLI ViewThe following example shows how to configure two CLI views, “first” and “second". Thereafter, you canverify the CLI view in the running configuration.
Device(config)# parser view first inclusiveDevice(config-view)# secret 5 firstpassDevice(config-view)# command exec exclude show versionDevice(config-view)# command exec exclude configure terminalDevice(config-view)# command exec exclude all show ipDevice(config-view)# exitDevice(config)# parser view secondDevice(config-view)# secret 5 secondpassDevice(config-view)# command exec include-exclusive show ip interfaceDevice(config-view)# command exec include logoutDevice(config-view)# exit!!Device(config-view)# do show running-config | beg view
parser view first inclusivesecret 5 $1$MCmh$QuZaU8PIMPlff9sFCZvgW/commands exec exclude configure terminalcommands exec exclude configurecommands exec exclude all show ipcommands exec exclude show versioncommands exec exclude show!parser view secondsecret 5 $1$iP2M$R16BXKecMEiQesxLyqygW.commands exec include-exclusive show ip interfacecommands exec include show ipcommands exec include showcommands exec include logout!
User Security Configuration Guide, Cisco IOS XE Release 3S 61
Role-Based CLI AccessMonitoring Views and View Users
Example: Verifying a CLI ViewAfter you have configured the CLI views “first” and “second", you can issue the enable viewcommand toverify which commands are available in each view. The following example shows which commands areavailable inside the CLI view “first” after the user has logged into this view. (Because the show ip commandis configured with the all option, a complete set of suboptions is shown, except the show ip interface command,which is using the include-exclusive keyword in the second view.)
Device# enable view firstPassword:Device# ?Exec commands:configure Enter configuration modeenable Turn on privileged commandsexit Exit from the EXECshow Show running system information
Device# show ?ip IP informationparser Display parser informationversion System hardware and software status
Device# show ip ?
access-lists List IP access listsaccounting The active IP accounting databasealiases IP alias tablearp IP ARP tableas-path-access-list List AS path access listsbgp BGP informationcache IP fast-switching route cachecasa display casa informationcef Cisco Express Forwardingcommunity-list List community-listdfp DFP informationdhcp Show items in the DHCP databasedrp Director response protocoldvmrp DVMRP informationeigrp IP-EIGRP show commandsextcommunity-list List extended-community listflow NetFlow switchinghelper-address helper-address tablehttp HTTP informationigmp IGMP informationirdp ICMP Device Discovery Protocol
.
.
.
Example: Configuring a Lawful Intercept ViewThe following example shows how to configure a lawful intercept view, add users to the view, and verify theusers that were added:
!Initialize the LI-View.Device(config)# li-view lipass user li_admin password li_adminpassDevice(config)# end! Enter the LI-View; that is, check to see what commands are available within the view.Device# enable view li-viewPassword:Device# configure terminalEnter configuration commands, one per line. End with CNTL/Z.Device(config)# parser view li-view
Device(config-view)# ?
User Security Configuration Guide, Cisco IOS XE Release 3S62
Role-Based CLI AccessExample: Verifying a CLI View
View commands:commands Configure commands for a viewdefault Set a command to its defaultsexit Exit from view configuration modename New LI-View nameno Negate a command or set its defaultspassword Set a password associated with CLI views
Device(config-view)#! NOTE:LI View configurations are never shown as part of ‘running-configuration’.! Configure LI Users.Device(config)# username lawful-intercept li-user1 password li-user1pass
Device(config)# username lawful-intercept li-user2 password li-user2pass! Displaying LI User information.Device# show users lawful-interceptli_adminli-user1li-user2Device#
The lawful intercept view is available only on specific images and the view name option is available onlyin the LI view.
Note
Example: Configuring a SuperviewThe following sample output from the show running-config command shows that “view_one” and “view_two”have been added to superview “su_view1", “view_three”, and “view_four” have been added to superview“su_view2”:
"Configuring Security with Passwords, Privileges andLogins" module.
Privilege levels
Technical Assistance
LinkDescription
http://www.cisco.com/cisco/web/support/index.htmlThe Cisco Support and Documentation websiteprovides online resources to download documentation,software, and tools. Use these resources to install andconfigure the software and to troubleshoot and resolvetechnical issues with Cisco products and technologies.Access to most tools on the Cisco Support andDocumentation website requires a Cisco.com user IDand password.
Feature Information for Role-Based CLI AccessThe following table provides release information about the feature or features described in this module. Thistable lists only the software release that introduced support for a given feature in a given software releasetrain. Unless noted otherwise, subsequent releases of that software release train also support that feature.
Use Cisco Feature Navigator to find information about platform support and Cisco software image support.To access Cisco Feature Navigator, go to www.cisco.com/go/cfn. An account on Cisco.com is not required.
User Security Configuration Guide, Cisco IOS XE Release 3S64
Role-Based CLI AccessFeature Information for Role-Based CLI Access
Table 3: Feature Information for Role-Based CLI Access
Feature InformationReleasesFeature Name
The Role-Based CLI Accessfeature enables networkadministrators to restrict useraccess to CLI and configurationinformation.
The CLI view capability wasextended to restrict user access ona per-interface level, and additionalCLI views were introduced tosupport the extended viewcapability. Also, support to groupconfigured CLI views into asuperview was introduced.
The following commands wereintroduced ormodified: commands(view), enable, li-view, name(view), parser view , parser viewsuperview, secret, show parserview, show users, username, andview.
Cisco IOS XE 2.1Role-Based CLI Access
The Role-Based CLI InclusiveViews feature enables a standardCLI view including all commandsby default.
The following command wasmodified: parser view inclusive.
Cisco IOS XE 3.11SRole-Based CLI Inclusive Views
User Security Configuration Guide, Cisco IOS XE Release 3S 65
Role-Based CLI AccessFeature Information for Role-Based CLI Access
User Security Configuration Guide, Cisco IOS XE Release 3S66
Role-Based CLI AccessFeature Information for Role-Based CLI Access
C H A P T E R 4AutoSecure
The AutoSecure feature secures a router by using a single CLI command to disable common IP services thatcan be exploited for network attacks, enable IP services and features that can aid in the defense of a networkwhen under attack, and simplify and harden the security configuration of the router.
AutoSecure enhances secure access to the router by configuring a required minimum password length toeliminate common passwords that can be common on many networks, such as “lab” and “company name.”Syslog messages are generated after the number of unsuccessful attempts exceeds the configured threshold.
AutoSecure also allows a router to revert (roll) back to its pre-AutoSecure configuration state if the AutoSecureconfiguration fails.
When AutoSecure is enabled, a detailed audit trail of system logging messages capture any changes ortampering of the AutoSecure configuration that may have been applied to the running configuration.
• Finding Feature Information, page 67
• Restrictions for AutoSecure, page 68
• Information About AutoSecure, page 68
• How to Configure AutoSecure, page 72
• Configuration Example for AutoSecure, page 74
• Additional References, page 76
• Feature Information for AutoSecure, page 77
Finding Feature InformationYour software release may not support all the features documented in this module. For the latest caveats andfeature information, see Bug Search Tool and the release notes for your platform and software release. Tofind information about the features documented in this module, and to see a list of the releases in which eachfeature is supported, see the feature information table.
Use Cisco Feature Navigator to find information about platform support and Cisco software image support.To access Cisco Feature Navigator, go to www.cisco.com/go/cfn. An account on Cisco.com is not required.
User Security Configuration Guide, Cisco IOS XE Release 3S 67
Restrictions for AutoSecureThe AutoSecure configuration can be configured at run time or setup time. If any related configuration ismodified after AutoSecure has been enabled, the AutoSecure configuration may not be fully effective.
Information About AutoSecure
Securing the Management PlaneThe management plane is secured by turning off certain global and interface services that can be potentiallyexploited for security attacks and turning on global services that help mitigate the threat of attacks. Secureaccess and secure logging are also configured for the router.
If your device is managed by a network management (NM) application, securing the management planecould turn off some services like the HTTP server and disrupt the NM application support.
Caution
The following subsections define how AutoSecure helps to secure the management plane:
Disabling Global ServicesAfter enabling this feature (through the auto secure command), the following global services are disabled onthe router without prompting the user:
• Finger--Collects information about the system (reconnaissance) before an attack. If enabled, theinformation can leave your device vulnerable to attacks.
• PAD--Enables all packet assembler and disassembler (PAD) commands and connections between PADdevices and access servers. If enabled, it can leave your device vulnerable to attacks.
• Small Servers--Causes TCP andUser Datagram Protocol (UDP) diagnostic port attacks: a sender transmitsa volume of fake requests for UDP diagnostic services on the router, consuming all CPU resources.
• Bootp Server--Bootp is an insecure protocol that can be exploited for an attack.
• HTTP Server--Without secure-http or authentication embedded in the HTTP server with an associatedACL, the HTTP server is insecure and can be exploited for an attack. (If you must enable the HTTPserver, you are prompted for the proper authentication or access list.)
If you are using Cisco Configuration Professional (CCP), you must manually enable the HTTP serverthrough the ip http server command.
Note
• Identification Service--An insecure protocol, defined in RFC 1413, that allows one to query a TCP portfor identification. An attacker can access private information about the user from the ID server.
User Security Configuration Guide, Cisco IOS XE Release 3S68
AutoSecureRestrictions for AutoSecure
• CDP--If a large number of Cisco Discovery Protocol (CDP) packets are sent to the router, the availablememory of the router can be consumed, causing the router to crash.
NM applications that use CDP to discover network topology are not able to perform discovery.Caution
• NTP--Without authentication or access-control, Network Time Protocol (NTP) is insecure and can beused by an attacker to send NTP packets to crash or overload the router. (If you want to turn on NTP,you must configure NTP authentication using Message Digest 5 (MD5) and the ntp access-groupcommand. If NTP is enabled globally, disable it on all interfaces on which it is not needed.)
• Source Routing--Provided only for debugging purposes, so source routing should be disabled in all othercases. Otherwise, packets may slip away from some of the access control mechanisms that they shouldhave gone through.
Disabling Per Interface ServicesAfter enabling this feature, the following per interface services are disabled on the router without promptingthe user:
• ICMP redirects--Disabled on all interfaces. Does not add a useful functionality to a correctly configuredto network, but it could be used by attackers to exploit security holes.
• ICMP unreachables--Disabled on all interfaces. Internet Control Management Protocol (ICMP)unreachables are a known cause for some ICMP-based denial of service (DoS) attacks.
• ICMPmask reply messages--Disabled on all interfaces. ICMPmask reply messages can give an attackerthe subnet mask for a particular subnetwork in the internetwork.
• Proxy-Arp--Disabled on all interfaces. Proxy-Arp requests are a known cause for DoS attacks becausethe available bandwidth and resources of the router can be consumed in an attempt to respond to therepeated requests that are sent by an attacker.
• Directed Broadcast--Disabled on all interfaces. Potential cause of SMURF attacks for DoS.
• Maintenance Operations Protocol (MOP) service--Disabled on all interfaces.
Enabling Global ServicesAfter AutoSecure is enabled, the following global services are enabled on the router without prompting theuser:
• The service password-encryption command--Prevents passwords from being visible in the configuration.
• The service tcp-keepalives-in and service tcp-keepalives-out commands--Ensures that abnormallyterminated TCP sessions are removed.
User Security Configuration Guide, Cisco IOS XE Release 3S 69
AutoSecureSecuring the Management Plane
Securing Access to the Router
If your device is managed by an NM application, securing access to the router could turn off vital servicesand may disrupt the NM application support.
Caution
After enabling this feature, the following options in which to secure access to the router are available to theuser:
• If a text banner does not exist, users are prompted to add a banner. This feature provides the followingsample banner:
Authorized access onlyThis system is the property of ABC EnterpriseDisconnect IMMEDIATELY if you are not an authorized user!Contact [email protected] +99 876 543210 for help.
• The login and password (preferably a secret password, if supported) are configured on the console, AUX,vty, and tty lines. The transport input and transport outputcommandsare also configured on all ofthese lines. (Telnet and secure shell (SSH) are the only valid transport methods.) The exec-timeoutcommand is configured on the console and AUX as 10.
• When the image on the device is a crypto image, AutoSecure enables SSH and secure copy (SCP) foraccess and file transfer to and from the router. The timeout seconds and authentication-retries integeroptions for the ip ssh command are configured to a minimum number. (Telnet and FTP are not affectedby this operation and remain operational.)
• If the AutoSecure user specifies that their device does not use Simple Network Management Protocol(SNMP), one of the following functions occur:
• In interactive mode, the user is asked whether to disable SNMP regardless of the values of thecommunity strings, which act like passwords to regulate access to the agent on the router.
• In non-interact mode, SNMP is disabled if the community string is “public” or “private.”
After AutoSecure has been enabled, tools that use SNMP to monitor or configure a device is unable tocommunicate with the device through SNMP.
Note
• If authentication, authorization, and accounting (AAA) is not configured, configure local AAA.AutoSecure prompts users to configure a local username and password on the router.
Security LoggingThe following logging options are available after AutoSecure is enabled. These options identify securityincidents and provide ways to respond to them.
• Sequence numbers and time stamps for all debug and log messages. This option is useful when auditinglogging messages.
User Security Configuration Guide, Cisco IOS XE Release 3S70
AutoSecureSecuring the Management Plane
• Logging messages can be generated for login-related events; for example, the message “Blocking Periodwhen Login Attack Detected” is displayed when a login attack is detected and the router enters “quietmode.” (Quiet mode means that the router does not allow any login attempts through Telnet, HTTP, orSSH.)
For more information on login system messages, see the Cisco IOS Release 12.3(4)T feature module CiscoIOS Login Enhancements .
• The logging console criticalcommand, which sends system logging (syslog) messages to all availableTTY lines and limits messages based on severity.
• The logging buffered command, which copies loggingmessages to an internal buffer and limits messageslogged to the buffer based on severity.
• The logging trap debugging command, which allows all commandswith a severity higher than debuggingto be sent to the logging server.
Securing the Forwarding PlaneTo minimize the risk of attacks on the router forward plane, AutoSecure provides the following functions:
• Cisco Express Forwarding (CEF)--AutoSecure enables CEF or distributed CEF (dCEF) on the routerwhenever possible. Because there is no need to build cache entries when traffic starts arriving for newdestinations, CEF behaves more predictably than other modes when presented with large volumes oftraffic addressed to many destinations. Thus, routers configured for CEF perform better under SYNattacks than routers using the traditional cache.
CEF consumes more memory than a traditional cache.Note
• If the TCP intercept feature is available, it can be configured on the router for connection timeout.
• If strict Unicast Reverse Path Forwarding (uRPF) is available, it can be configured on the router to helpmitigate problems that are caused by the introduction of forged (spoofed) IP source addresses. uRPFdiscards IP packets that lack a verifiable IP source address.
• If the router is being used as a firewall, it can be configured for context-based access control (CBAC)on public interfaces that are facing the Internet.
At the beginning of the AutoSecure dialogue, you are prompted for a list of public interfaces.Note
User Security Configuration Guide, Cisco IOS XE Release 3S 71
AutoSecureSecuring the Forwarding Plane
How to Configure AutoSecure
Configuring AutoSecure
Although the auto securecommand helps to secure a router, it does not guarantee the complete securityof the router.
is selected. If neither option is selected, then the dialogue asks for both planes to
Example:
Router#auto secure
be configured. If themanagement keyword is selected, then the managementplane is secured only. If the forwarding keyword is selected, thenthe forwardingplane is secured only.
If the no-interact keyword is selected, then the user is not prompted for anyinteractive configurations.
If the full keyword is selected, then user is prompted for all interactive questions,which is the default.
User Security Configuration Guide, Cisco IOS XE Release 3S72
AutoSecureHow to Configure AutoSecure
Configuring Enhanced Security Access to the Router
• threshold-rate --Number of allowable unsuccessful loginattempts.
• log --Syslog authentication failures if the rate exceedsthe threshold.
Exits configuration mode and enters privileged EXEC mode.exit threshold-rate log
Example:
Router(config)# exit
Step 5
User Security Configuration Guide, Cisco IOS XE Release 3S 73
AutoSecureConfiguring Enhanced Security Access to the Router
PurposeCommand or Action
(Optional) Displays all configuration commands that havebeen added as part of the AutoSecure configuration.
show auto secure config
Example:
Router# show auto secure config
Step 6
Configuration Example for AutoSecureThe following example is a sample AutoSecure dialogue. After you enable the auto secure command, thefeature automatically prompts you with a similar dialogue unless you enable the no-interact keyword. (Forinformation on which services are disabled and which features are enabled, see the sections, “Securing theManagement Plane, on page 68” and “Securing the Forwarding Plane, on page 71” earlier in this document.)
Router# auto secure--- AutoSecure Configuration ---
*** AutoSecure configuration enhances the security of the router but it will not make routerabsolutely secure from all security attacks ***All the configuration done as part of AutoSecure will be shown here. For more details ofwhy and how this configuration is useful, and any possible side effects, please refer toCisco documentation of AutoSecure.At any prompt you may enter '?' for help.Use ctrl-c to abort this session at any prompt.Gathering information about the router for AutoSecureIs this router connected to internet? [no]:yEnter the number of interfaces facing internet [1]:Interface IP-Address OK? Method StatusProtocolFastEthernet0/1/0 10.1.1.1 YES NVRAM up downFastEthernet1/0/0 10.2.2.2 YES NVRAM up downFastEthernet1/1/0 10.0.0.1 YES NVRAM up upLoopback0 unassigned YES NVRAM up upFastEthernet0/0/0 10.0.0.2 YES NVRAM up downEnter the interface name that is facing internet:FastEthernet0/0/0Securing Management plane services..Disabling service fingerDisabling service padDisabling udp & tcp small serversEnabling service password encryptionEnabling service tcp-keepalives-inEnabling service tcp-keepalives-outDisabling the cdp protocolDisabling the bootp serverDisabling the http serverDisabling the finger serviceDisabling source routingDisabling gratuitous arpEnable secret is either not configured or is same as enable passwordEnter the new enable secret:abc123Configuring aaa local authenticationConfiguring console, Aux and vty lines forlocal authentication, exec-timeout, transportConfigure SSH server? [yes]:Enter the domain-name:example.comConfiguring interface specific AutoSecure servicesDisabling the following ip services on all interfaces:no ip redirectsno ip proxy-arpno ip unreachables
User Security Configuration Guide, Cisco IOS XE Release 3S74
AutoSecureConfiguration Example for AutoSecure
no ip directed-broadcastno ip mask-replyDisabling mop on Ethernet interfacesSecuring Forwarding plane services..Enabling CEF (it might have more memory requirements on some low endplatforms)Enabling unicast rpf on all interfaces connected to internetConfigure CBAC Firewall feature? [yes/no]:yesThis is the configuration generated:no service fingerno service padno service udp-small-serversno service tcp-small-serversservice password-encryptionservice tcp-keepalives-inservice tcp-keepalives-outno cdp runno ip bootp serverno ip http serverno ip fingerno ip source-routeno ip gratuitous-arpsno ip identdsecurity authentication failure rate 10 logenable secret 5 $1$CZ6G$GkGOnHdNJCO3CjNHHyTUA.aaa new-modelaaa authentication login local_auth localline console 0login authentication local_authexec-timeout 5 0transport output telnetline aux 0login authentication local_authexec-timeout 10 0transport output telnetline vty 0 4login authentication local_authtransport input telnetip domain-name example.comcrypto key generate rsa general-keys modulus 1024ip ssh time-out 60ip ssh authentication-retries 2line vty 0 4transport input ssh telnetservice timestamps debug datetime localtime show-timezone msecservice timestamps log datetime localtime show-timezone mseclogging facility local2logging trap debuggingservice sequence-numberslogging console criticallogging bufferedinterface FastEthernet0/1/0no ip redirectsno ip proxy-arpno ip unreachablesno ip directed-broadcastno ip mask-replyno mop enabledinterface FastEthernet1/0/0no ip redirectsno ip proxy-arpno ip unreachablesno ip directed-broadcastno ip mask-replyno mop enabledinterface FastEthernet1/1/0no ip redirectsno ip proxy-arpno ip unreachablesno ip directed-broadcastno ip mask-replyno mop enabledinterface FastEthernet0/0/0
User Security Configuration Guide, Cisco IOS XE Release 3S 75
AutoSecureConfiguration Example for AutoSecure
no ip redirectsno ip proxy-arpno ip unreachablesno ip directed-broadcastno ip mask-replyno mop enabledip cefinterface FastEthernet0/0/0ip verify unicast reverse-pathip inspect audit-trailip inspect dns-timeout 7ip inspect tcp idle-time 14400ip inspect udp idle-time 1800ip inspect name autosec_inspect cuseeme timeout 3600ip inspect name autosec_inspect ftp timeout 3600ip inspect name autosec_inspect http timeout 3600ip inspect name autosec_inspect rcmd timeout 3600ip inspect name autosec_inspect realaudio timeout 3600ip inspect name autosec_inspect smtp timeout 3600ip inspect name autosec_inspect tftp timeout 30ip inspect name autosec_inspect udp timeout 15ip inspect name autosec_inspect tcp timeout 3600access-list 100 deny ip any anyinterface FastEthernet0/0/0ip inspect autosec_inspect outip access-group 100 in!endApply this configuration to running-config? [yes]:yesApplying the config generated to running-configThe name for the keys will be:ios210.example.com% The key modulus size is 1024 bits% Generating 1024 bit RSA keys ...[OK]Router#
Additional ReferencesRelated Documents
Document TitleRelated Topic
Cisco IOS Master Commands List, All ReleasesCisco IOS commands
To locate and downloadMIBs for selected platforms,Cisco software releases, and feature sets, use CiscoMIB Locator found at the following URL:
http://www.cisco.com/go/mibs
• CISCO-802-TAP-MIB
• CISCO-IP-TAP-MIB
• CISCO-MOBILITY-TAP-MIB
• CISCO-TAP2-MIB
• CISCO-USER-CONNECTION-TAP-MIB
RFCs
TitleRFC
Remote Authentication Dial In User Service(RADIUS)
RFC-2865
Dynamic Authorization Extensions to RemoteAuthentication Dial In User Service (RADIUS)
RFC-3576
Cisco Architecture for Lawful Intercept in IPNetworks
RFC-3924
Technical Assistance
LinkDescription
http://www.cisco.com/cisco/web/support/index.htmlThe Cisco Support and Documentation websiteprovides online resources to download documentation,software, and tools. Use these resources to install andconfigure the software and to troubleshoot and resolvetechnical issues with Cisco products and technologies.Access to most tools on the Cisco Support andDocumentation website requires a Cisco.com user IDand password.
Feature Information for AutoSecureThe following table provides release information about the feature or features described in this module. Thistable lists only the software release that introduced support for a given feature in a given software releasetrain. Unless noted otherwise, subsequent releases of that software release train also support that feature.
User Security Configuration Guide, Cisco IOS XE Release 3S 77
Use Cisco Feature Navigator to find information about platform support and Cisco software image support.To access Cisco Feature Navigator, go to www.cisco.com/go/cfn. An account on Cisco.com is not required.
Table 4: Feature Information for AutoSecure
Feature InformationReleasesFeature Name
This feature was introduced on theCisco ASR 1000 SeriesAggregation Services Routers.
By using a single command-lineinterface (CLI), the AutoSecurefeature allows a user to perform thefollowing functions:
• Disable common IP servicesthat can be exploited fornetwork attacks
• Enable IP services andfeatures that can aid in thedefense of a network whenunder attack
This feature also simplifies thesecurity configuration of a routerand hardens the routerconfiguration.
The following commands wereintroduced or modified: autosecure and show auto secureconfig
Cisco IOS XE Release 2.3AutoSecure Manageability
User Security Configuration Guide, Cisco IOS XE Release 3S78
• Feature Information for Configuring Kerberos, page 94
Finding Feature InformationYour software release may not support all the features documented in this module. For the latest caveats andfeature information, see Bug Search Tool and the release notes for your platform and software release. Tofind information about the features documented in this module, and to see a list of the releases in which eachfeature is supported, see the feature information table.
Use Cisco Feature Navigator to find information about platform support and Cisco software image support.To access Cisco Feature Navigator, go to www.cisco.com/go/cfn. An account on Cisco.com is not required.
Information About KerberosKerberos is a secret-key network authentication protocol, developed at theMassachusetts Institute of Technology(MIT), that uses the Data Encryption Standard (DES) cryptographic algorithm for encryption and authentication.Kerberos was designed to authenticate requests for network resources. Kerberos, like other secret-key systems,is based on the concept of a trusted third party that performs secure verification of users and services. In theKerberos protocol, this trusted third party is called the key distribution center (KDC).
The primary use of Kerberos is to verify that users and the network services they use are really who and whatthey claim to be. To accomplish this, a trusted Kerberos server issues tickets to users. These tickets, whichhave a limited lifespan, are stored in a user’s credential cache and can be used in place of the standardusername-and-password authentication mechanism.
User Security Configuration Guide, Cisco IOS XE Release 3S 79
The Kerberos credential scheme embodies a concept called “single logon.” This process requires authenticatinga user once, and then allows secure authentication (without encrypting another password) wherever that user’scredential is accepted.
Cisco IOS XE software includes Kerberos 5 support, which allows organizations already deploying Kerberos5 to use the same Kerberos authentication database on their routers that they are already using on their othernetwork hosts (such as UNIX servers and PCs).
The following network services are supported by the Kerberos authentication capabilities in Cisco IOS XEsoftware:
• Telnet
• rlogin
• rsh
• rcp
Cisco Systems’ implementation of Kerberos client support is based on code developed by CyberSafe,which was derived from the MIT code. As a result, the Cisco Kerberos implementation has successfullyundergone full compatibility testing with the CyberSafe Challenger commercial Kerberos server andMIT’sserver code, which is freely distributed.
Note
The table below lists common Kerberos-related terms and their definitions.
Table 5: Kerberos Terminology
DefinitionTerm
A process by which a user or service identifies itselfto another service. For example, a client canauthenticate to a router or a router can authenticateto another router.
authentication
A means by which the router determines whatprivileges you have in a network or on the router andwhat actions you can perform.
authorization
A general term that refers to authentication tickets,such as ticket granting tickets (TGTs) and servicecredentials. Kerberos credentials verify the identityof a user or service. If a network service decides totrust the Kerberos server that issued a ticket, it canbe used in place of retyping in a username andpassword. Credentials have a default lifespan of eighthours.
credential
User Security Configuration Guide, Cisco IOS XE Release 3S80
Configuring KerberosInformation About Kerberos
DefinitionTerm
An authorization level label for Kerberos principals.Most Kerberos principals are of the formuser@REALM (for example,[email protected]).AKerberos principalwitha Kerberos instance has the formuser/instance@REALM (for example,smith/[email protected]). The Kerberosinstance can be used to specify the authorization levelfor the user if authentication is successful. It is up tothe server of each network service to implement andenforce the authorization mappings of Kerberosinstances. Note that the Kerberos realm name mustbe in uppercase characters.
instance
Applications and services that have been modified tosupport the Kerberos credential infrastructure.
Kerberized
A domain consisting of users, hosts, and networkservices that are registered to a Kerberos server. TheKerberos server is trusted to verify the identity of auser or network service to another user or networkservice. Kerberos realmsmust always be in uppercasecharacters.
Kerberos realm
A daemon running on a network host. Users andnetwork services register their identity with theKerberos server. Network services query the Kerberosserver to authenticate to other network services.
Kerberos server
A Kerberos server and database program running ona network host.
key distribution center (KDC)
Also known as a Kerberos identity, this is who youare or what a service is according to the Kerberosserver.
principal
A credential for a network service.When issued fromthe KDC, this credential is encrypted with thepassword shared by the network service and the KDC,and with the user’s TGT.
service credential
A password that a network service shares with theKDC. The network service authenticates an encryptedservice credential by using the SRVTAB (also knownas a KEYTAB) to decrypt it.
SRVTAB
User Security Configuration Guide, Cisco IOS XE Release 3S 81
Configuring KerberosInformation About Kerberos
DefinitionTerm
A credential that the key distribution center (KDC)issues to authenticated users. When users receive aTGT, they can authenticate to network services withinthe Kerberos realm represented by the KDC.
ticket granting ticket (TGT)
Kerberos Client Support OperationThis section describes how the Kerberos security system works with a Cisco router functioning as the securityserver. Although (for convenience or technical reasons) you can customize Kerberos in a number of ways,remote users attempting to access network services must pass through three layers of security before they canaccess network services.
Authenticating to the Boundary RouterThis section describes the first layer of security that remote users must pass through when they attempt toaccess a network. The first step in the Kerberos authentication process is for users to authenticate themselvesto the boundary router. The following process describes how users authenticate to a boundary router:
1 The remote user opens a PPP connection to the corporate site router.
2 The router prompts the user for a username and password.
3 The router requests a TGT from the KDC for this particular user.
4 The KDC sends an encrypted TGT to the router that includes (among other things) the user’s identity.
5 The router attempts to decrypt the TGT using the password the user entered. If the decryption is successful,the remote user is authenticated to the router.
A remote user who successfully initiates a PPP session and authenticates to the boundary router is inside thefirewall but still must authenticate to the KDC directly before being allowed to access network services. Thisis because the TGT issued by the KDC is stored on the router and is not useful for additional authenticationunless the user physically logs on to the router.
Obtaining a TGT from a KDCThis section describes how remote users who are authenticated to the boundary router authenticate themselvesto a KDC.
When a remote user authenticates to a boundary router, that user technically becomes part of the network;that is, the network is extended to include the remote user and the user’s machine or network. To gain accessto network services, however, the remote user must obtain a TGT from the KDC. The following processdescribes how remote users authenticate to the KDC:
1 The remote user, at a workstation on a remote site, launches the KINIT program (part of the client softwareprovided with the Kerberos protocol).
2 The KINIT program finds the user’s identity and requests a TGT from the KDC.
User Security Configuration Guide, Cisco IOS XE Release 3S82
Configuring KerberosKerberos Client Support Operation
3 The KDC creates a TGT, which contains the identity of the user, the identity of the KDC, and the expirationtime of the TGT.
4 Using the user’s password as a key, the KDC encrypts the TGT and sends the TGT to the workstation.
5 When the KINIT program receives the encrypted TGT, it prompts the user for a password (this is thepassword that is defined for the user in the KDC).
6 If the KINIT program can decrypt the TGT with the password the user enters, the user is authenticated tothe KDC, and the KINIT program stores the TGT in the user’s credential cache.
At this point, the user has a TGT and can communicate securely with the KDC.In turn, the TGT allows theuser to authenticate to other network services.
Authenticating to Network ServicesThe following process describes how a remote user with a TGT authenticates to network services within agiven Kerberos realm. Assume the user is on a remote workstation (Host A) and wants to log in to Host B.
1 The user on Host A initiates a Kerberized application (such as Telnet) to Host B.
2 The Kerberized application builds a service credential request and sends it to the KDC. The servicecredential request includes (among other things) the user’s identity and the identity of the desired networkservice. The TGT is used to encrypt the service credential request.
3 The KDC tries to decrypt the service credential request with the TGT it issued to the user on Host A. Ifthe KDC can decrypt the packet, it is assured that the authenticated user on Host A sent the request.
4 The KDC notes the network service identity in the service credential request.
5 The KDC builds a service credential for the appropriate network service on Host B on behalf of the useron Host A. The service credential contains the client’s identity and the desired network service’s identity.
6 The KDC then encrypts the service credential twice. It first encrypts the credential with the SRVTAB thatit shares with the network service identified in the credential. It then encrypts the resulting packet withthe TGT of the user (who, in this case, is on Host A).
7 The KDC sends the twice-encrypted credential to Host A.
8 Host A attempts to decrypt the service credential with the user’s TGT. If Host A can decrypt the servicecredential, it is assured the credential came from the real KDC.
9 Host A sends the service credential to the desired network service. Note that the credential is still encryptedwith the SRVTAB shared by the KDC and the network service.
10 The network service attempts to decrypt the service credential using its SRVTAB.
11 If the network service can decrypt the credential, it is assured the credential was in fact issued from theKDC. Note that the network service trusts anything it can decrypt from the KDC, even if it receives itindirectly from a user. This is because the user first authenticated with the KDC.
At this point, the user is authenticated to the network service on Host B. This process is repeated each time auser wants to access a network service in the Kerberos realm.
User Security Configuration Guide, Cisco IOS XE Release 3S 83
Configuring KerberosKerberos Client Support Operation
How to Configure KerberosFor hosts and the KDC in your Kerberos realm to communicate and mutually authenticate, you must identifythem to each other. To do this, you add entries for the hosts to the Kerberos database on the KDC and addSRVTAB files generated by the KDC to all hosts in the Kerberos realm. You also make entries for users inthe KDC database.
This section describes how to set up a Kerberos-authenticated server-client system and contains the followingtopics:
This section assumes that you have installed the Kerberos administrative programs on a UNIX host, knownas the KDC, initialized the database, and selected a Kerberos realm name and password. For instructions aboutcompleting these tasks, refer to documentation that came with your Kerberos software.
Write down the host name or IP address of the KDC, the port number you want the KDC to monitor forqueries, and the name of the Kerberos realm it will serve. You need this information to configure therouter.
Note
Configuring the KDC Using Kerberos CommandsAfter you set up a host to function as the KDC in your Kerberos realm, you must make entries to the KDCdatabase for all principals in the realm. Principals can be network services on Cisco routers and hosts or theycan be users.
To use Kerberos commands to add services to the KDC database (and to modify existing database information),complete the tasks in the following sections:
All Kerberos command examples are based on Kerberos 5 Beta 5 of the original MIT implementation.Later versions use a slightly different interface.
Note
Adding Users to the KDC DatabaseTo add users to the KDC and create privileged instances of those users, use the su command to become rooton the host running the KDC and use the kdb5_edit program to use the following commands in privilegedEXEC mode:
User Security Configuration Guide, Cisco IOS XE Release 3S84
Configuring KerberosHow to Configure Kerberos
DETAILED STEPS
PurposeCommand or Action
Use the ank (add new key) command to add a user to the KDC. Thiscommand prompts for a password, which the user must enter toauthenticate to the router.
Router# ankusername@REALMStep 1
Use the ank command to add a privileged instance of a user.Router# ankusername/instance@REALMStep 2
What to Do Next
For example, to add user loki of Kerberos realm CISCO.COM, enter the following Kerberos command:
The Kerberos realm name must be in uppercase characters.Note
You might want to create privileged instances to allow network administrators to connect to the router at theenable level, for example, so that they need not enter a clear text password (and compromise security) to enterenable mode.
To add an instance of loki with additional privileges (in this case, enable, although it could be anything) enterthe following Kerberos command:
ank loki/[email protected] each of these examples, you are prompted to enter a password, which you must give to user loki to use atlogin.
The Enabling Kerberos Instance Mapping, on page 91 describes how to map Kerberos instances to variousCisco IOS XE privilege levels.
Creating SRVTABs on the KDCAll routers that you want to authenticate to use the Kerberos protocol must have an SRVTAB. This sectionand the Extracting SRVTABs, on page 86 describe how to create and extract SRVTABs for a router calledrouter1 . The Copying SRVTAB Files, on page 88 describes how to copy SRVTAB files to the router.
To make SRVTAB entries on the KDC, use the following command in privileged EXEC mode:
PurposeCommand
Use the ark (add random key) command to add anetwork service supported by a host or router to theKDC.
Router# ark SERVICE/HOSTNAME@REALM
User Security Configuration Guide, Cisco IOS XE Release 3S 85
Configuring KerberosConfiguring the KDC Using Kerberos Commands
For example, to add a Kerberized authentication service for a Cisco router called router1 to the Kerberosrealm CISCO.COM, enter the following Kerberos command:
ark host/[email protected] entries for all network services on all Kerberized hosts that use this KDC for authentication.
Extracting SRVTABsSRVTABs contain (among other things) the passwords or randomly generated keys for the service principalsyou entered into the KDC database. Service principal keys must be shared with the host running that service.To do this, you must save the SRVTAB entries to a file, then copy the file to the router and all hosts in theKerberos realm. Saving SRVTAB entries to a file is called extracting SRVTABs. To extract SRVTABs, usethe following command in privileged EXEC mode:
PurposeCommand
Use the kdb5_edit command xst to write an SRVTABentry to a file.Router# xst
router-name host
For example, to write the host/[email protected] SRVTAB to a file, enter the followingKerberos command:
xst [email protected] hostUse the quit command to exit the kdb5_edit program.
Configuring the Router to Use the Kerberos Protocol
Defining a Kerberos RealmFor a router to authenticate a user defined in the Kerberos database, it must know the host name or IP addressof the host running the KDC, the name of the Kerberos realm and, optionally, be able to map the host nameor Domain Name System (DNS) domain to the Kerberos realm.
To configure the router to authenticate to a specified KDC in a specified Kerberos realm, use the followingcommands in global configuration mode. Note that DNS domain names must begin with a leading dot (.):
Because the machine running the KDC and all Kerberized hosts must interact within a 5-minute windowor authentication fails, all Kerberized machines, and especially the KDC, should be running the NetworkTime Protocol (NTP).
Note
The kerberos local-realm, kerberos realm, and kerberos server commands are equivalent to the UNIXkrb.conf file. The table below identifies mappings from the Cisco IOS XE configuration commands to aKerberos 5 configuration file (krb5.conf).
Table 6: Kerberos 5 Configuration File and Commands
kerberos serverDOMAIN.COM 172.65.44.2(172.65.44.2is the example IP address for DOMAIN.PIL.COM)
[realms]
kdc = DOMAIN.PIL.COM:750
admin_server = DOMAIN.PIL.COM
default_domain = DOMAIN.COM
For an example of defining a Kerberos realm, see the Defining a Kerberos Realm Examples module.
User Security Configuration Guide, Cisco IOS XE Release 3S 87
Configuring KerberosConfiguring the Router to Use the Kerberos Protocol
Copying SRVTAB FilesTo make it possible for remote users to authenticate to the router using Kerberos credentials, the router mustshare a secret key with the KDC. To do this, you must give the router a copy of the SRVTAB you extractedon the KDC.
The most secure method to copy SRVTAB files to the hosts in your Kerberos realm is to copy them ontophysical media and go to each host in turn and manually copy the files onto the system. To copy SRVTABfiles to the router, which does not have a physical media drive, you must transfer them via the network usingTFTP.
To remotely copy SRVTAB files to the router from the KDC, use the following command in globalconfiguration mode:
PurposeCommand
Retrieves an SRVTAB file from the KDC.Router(config)# kerberos srvtab remote{hostname| ip-address} {filename}
When you copy the SRVTAB file from the router to the KDC, the kerberos srvtab remote command parsesthe information in this file and stores it in the router’s running configuration in the kerberos srvtab entryformat.To ensure that the SRVTAB is available (does not need to be acquired from the KDC) when you reboot therouter, use the write memory configuration command to write your running configuration (which containsthe parsed SRVTAB file) to NVRAM.
For an example of copying SRVTAB files, see the SRVTAB File Copying Example, on page 92.
Specifying Kerberos AuthenticationYou have now configured Kerberos on your router. This makes it possible for the router to authenticate usingKerberos. The next step is to tell it to do so. Because Kerberos authentication is facilitated through AAA, youneed to enter the aaa authentication command, specifying Kerberos as the authentication method. For moreinformation, refer to the chapter “Configuring Authentication”.
Enabling Credentials ForwardingWith Kerberos configured thus far, a user authenticated to a Kerberized router has a TGT and can use it toauthenticate to a host on the network. However, if the user tries to list credentials after authenticating to ahost, the output will show no Kerberos credentials present.
You can optionally configure the router to forward users’ TGTs with them as they authenticate from the routerto Kerberized remote hosts on the network when using Kerberized Telnet, rcp, rsh, and rlogin (with theappropriate flags).
User Security Configuration Guide, Cisco IOS XE Release 3S88
Configuring KerberosConfiguring the Router to Use the Kerberos Protocol
To force all clients to forward users’ credentials as they connect to other hosts in the Kerberos realm, use thefollowing command in global configuration mode:
PurposeCommand
Forces all clients to forward user credentials uponsuccessful Kerberos authentication.Router(config)# kerberos credentials forward
With credentials forwarding enabled, users’ TGTs are automatically forwarded to the next host they authenticateto. In this way, users can connect to multiple hosts in the Kerberos realm without running the KINIT programeach time to get a new TGT.
Opening a Telnet Session to the RouterTo use Kerberos to authenticate users opening a Telnet session to the router from within the network, use thefollowing command in global configuration mode:
PurposeCommand
Sets login authentication to use the Kerberos 5 Telnetauthentication protocol when using Telnet to connectto the router.
Although Telnet sessions to the router are authenticated, users must still enter a clear text password if theywant to enter enable mode. The kerberos instance map command, discussed in a later section, allows themto authenticate to the router at a predefined privilege level.
Establishing an Encrypted Kerberized Telnet SessionAnother way for users to open a secure Telnet session is to use Encrypted Kerberized Telnet. With EncryptedKerberized Telnet, users are authenticated by their Kerberos credentials before a Telnet session is established.The Telnet session is encrypted using 56-bit Data Encryption Standard (DES) encryption with 64-bit CipherFeedback (CFB). Because data sent or received is encrypted, not clear text, the integrity of the dialed routeror access server can be more easily controlled.
This feature is available only if you have the 56-bit encryption image. 56-bit DES encryption is subjectto U.S. Government export control regulations.
Note
User Security Configuration Guide, Cisco IOS XE Release 3S 89
Configuring KerberosConfiguring the Router to Use the Kerberos Protocol
To establish an encrypted Kerberized Telnet session from a router to a remote host, use either of the followingcommands in EXEC command mode:
PurposeCommand
Establishes an encrypted Telnet session.Router(config)# connect host[port] /encrypt kerberos
When a user opens a Telnet session from a Cisco router to a remote host, the router and remote host negotiateto authenticate the user using Kerberos credentials. If this authentication is successful, the router and remotehost then negotiate whether or not to use encryption. If this negotiation is successful, both inbound andoutbound traffic is encrypted using 56-bit DES encryption with 64-bit CFB.
When a user dials in from a remote host to a Cisco router configured for Kerberos authentication, the hostand router will attempt to negotiate whether or not to use encryption for the Telnet session. If this negotiationis successful, the router will encrypt all outbound data during the Telnet session.
If encryption is not successfully negotiated, the session will be terminated and the user will receive a messagestating that the encrypted Telnet session was not successfully established.
For information about enabling bidirectional encryption from a remote host, refer to the documentation specificto the remote host device.
For an example of using encrypted Kerberized Telnet to open a secure Telnet session, see the Encrypted TelnetSession Example, on page 92.
Enabling Mandatory Kerberos AuthenticationAs an added layer of security, you can optionally configure the router so that, after remote users authenticateto it, these users can authenticate to other services on the network only with Kerberized Telnet, rlogin, rsh,and rcp. If you do not makeKerberos authenticationmandatory andKerberos authentication fails, the applicationattempts to authenticate users using the default method of authentication for that network service; for example,Telnet and rlogin prompt for a password, and rsh attempts to authenticate using the local rhost file.
To make Kerberos authentication mandatory, use the following command in global configuration mode:
PurposeCommand
Sets Telnet, rlogin, rsh, and rcp to fail if they cannotnegotiate the Kerberos protocol with the remoteserver.
Router(config)# kerberos clients mandatory
User Security Configuration Guide, Cisco IOS XE Release 3S90
Configuring KerberosConfiguring the Router to Use the Kerberos Protocol
Enabling Kerberos Instance MappingAs mentioned in the Creating SRVTABs on the KDC, on page 85, you can create administrative instancesof users in the KDC database. The kerberos instance map command allows you to map those instances toCisco IOS XE privilege levels so that users can open secure Telnet sessions to the router at a predefinedprivilege level, obviating the need to enter a clear text password to enter enable mode.
To map a Kerberos instance to a Cisco IOS XE privilege level, use the following command in globalconfiguration mode:
PurposeCommand
Maps a Kerberos instance to a Cisco IOSXE privilegelevel.Router(config)# kerberos instance map
instanceprivilege-level
If there is a Kerberos instance for user loki in the KDC database (for example, loki/admin ), user loki can nowopen a Telnet session to the router as loki/admin and authenticate automatically at privilege level 15, assuminginstance “admin” is mapped to privilege level 15. (See the Opening a Telnet Session to the Router, on page89.)
Cisco IOS XE commands can be set to various privilege levels using the privilege levelcommand.
After you map a Kerberos instance to a Cisco IOS XE privilege level, you must configure the router to checkfor Kerberos instances each time a user logs in. To run authorization to determine if a user is allowed to runan EXEC shell based on a mapped Kerberos instance, use the aaa authorization command with thekrb5-instance keyword. For more information, refer to the chapter “Configuring Authorization.”
Monitoring and Maintaining KerberosTo display or remove a current user’s credentials, use the following commands in EXEC mode:
SUMMARY STEPS
1. Router# show kerberos creds2. Router# clear kerberos creds
DETAILED STEPS
PurposeCommand or Action
Lists the credentials in a current user’s credentials cache.Router# show kerberos credsStep 1
Destroys all credentials in a current user’s credentials cache,including those forwarded.
Router# clear kerberos credsStep 2
User Security Configuration Guide, Cisco IOS XE Release 3S 91
Configuring KerberosConfiguring the Router to Use the Kerberos Protocol
Kerberos Configuration Examples
Kerberos Realm Definition ExamplesTo define CISCO.COM as the default Kerberos realm, use the following command:
kerberos local-realm CISCO.COMTo tell the router that the CISCO.COMKDC is running on host 10.2.3.4 at port number 170, use the followingKerberos command:
kerberos server CISCO.COM 10.2.3.4 170To map the DNS domain cisco.com to the Kerberos realm CISCO.COM, use the following command:
kerberos realm.cisco.com CISCO.COM
SRVTAB File Copying ExampleTo copy over the SRVTAB file on a host named host123.cisco.com for a router named router1.cisco.com,the command would look like this:
kerberos srvtab remote host123.cisco.com router1.cisco.com-new-srvtabValid Starting Expires Service Principal13-May-1996 14:59:44 13-May-1996 23:00:45 krbtgt/[email protected]# show privilegeCurrent privilege level is 15chet-2500# qConnection closed by foreign host.chet-ss20% telnet chet-2500Trying 172.16.0.0 ...Connected to chet-2500.cisco.com.Escape character is '^]'.User Access VerificationUsername: chet/restrictedPassword:chet-2500# show kerberos credsDefault Principal: chet/[email protected] Starting Expires Service Principal13-May-1996 15:00:32 13-May-1996 23:01:33 krbtgt/[email protected]# show privilegeCurrent privilege level is 3chet-2500# qConnection closed by foreign host.chet-ss20%
Encrypted Telnet Session ExampleThe following example shows how to establish an encrypted Telnet session from a router to a remote hostnamed “host1”:Router> telnet host1 /encrypt kerberos
User Security Configuration Guide, Cisco IOS XE Release 3S92
http://www.cisco.com/cisco/web/support/index.htmlThe Cisco Support website provides extensive onlineresources, including documentation and tools fortroubleshooting and resolving technical issues withCisco products and technologies.
To receive security and technical information aboutyour products, you can subscribe to various services,such as the Product Alert Tool (accessed from FieldNotices), the Cisco Technical Services Newsletter,and Really Simple Syndication (RSS) Feeds.
Access to most tools on the Cisco Support websiterequires a Cisco.com user ID and password.
Feature Information for Configuring KerberosThe following table provides release information about the feature or features described in this module. Thistable lists only the software release that introduced support for a given feature in a given software releasetrain. Unless noted otherwise, subsequent releases of that software release train also support that feature.
Use Cisco Feature Navigator to find information about platform support and Cisco software image support.To access Cisco Feature Navigator, go to www.cisco.com/go/cfn. An account on Cisco.com is not required.
Table 7: Feature Information for Configuring Kerberos
Feature InformationReleasesFeature Name
With Encrypted Kerberized Telnet,users are authenticated by theirKerberos credentials before aTelnet session is established. TheTelnet session is encrypted using56-bit Data Encryption Standard(DES) encryption with 64-bitCipher Feedback (CFB). Becausedata sent or received is encrypted,not clear text, the integrity of thedialed router or access server canbe more easily controlled.
In Cisco IOS XE Release 2.1, thisfeature was introduced on the CiscoASR 1000 Series AggregationServices Routers.
The following commands wereintroduced or modified: connect,and telnet.
Kerberos 5 support allowsorganizations already deployingKerberos 5 to use the sameKerberos authentication databaseon their routers that they arealready using on their othernetwork hosts (such as UNIXservers and PCs).
In Cisco IOS XE Release 2.1, thisfeature was introduced on the CiscoASR 1000 Series AggregationServices Routers.
Cisco IOS XE Release 2.1Kerberos V Client Support
User Security Configuration Guide, Cisco IOS XE Release 3S 95
Configuring KerberosFeature Information for Configuring Kerberos
User Security Configuration Guide, Cisco IOS XE Release 3S96
Configuring KerberosFeature Information for Configuring Kerberos
C H A P T E R 6Lawful Intercept Architecture
The Lawful Intercept (LI) feature supports service providers in meeting the requirements of law enforcementagencies (LEA) to provide electronic surveillance as authorized by a judicial or administrative order. Thesurveillance is performed using wiretaps to intercept Voice-over-Internet protocol (VoIP) or data trafficgoing through the edge routers. The LEA delivers a request for a wiretap to the target's service provider,who is responsible for intercepting data communication to and from the individual using IP sessions.
This document explains LI architecture, including Cisco Service Independent Intercept architecture andPacketCable Lawful Intercept architecture. It also describes the components of the LI feature and providesinstructions on how to configure the LI feature in your system.
Before Cisco IOS XE Release 2.5, PPP sessions were tapped based on the accounting session. Circuit-IDbased tapping was introduced in Cisco IOS XE Release 2.5.
In Cisco IOS XERelease 2.6, a user session is tapped based on the unique PPP over Ethernet (PPPoE) circuitID tag. This circuit ID tag serves as a unique parameter for the PPPoE user session on the device. The tappeduser session is provisioned through SNMP, and user session data packets and RADIUS authentication datapackets are tapped.
• Finding Feature Information, page 97
• Prerequisites for Lawful Intercept, page 98
• Restrictions for Lawful Intercept, page 98
• Information About Lawful Intercept, page 99
• How to Configure Lawful Intercept, page 105
• Configuration Examples for Lawful Intercept, page 115
• Additional References, page 116
• Feature Information for Lawful Intercept, page 117
Finding Feature InformationYour software release may not support all the features documented in this module. For the latest caveats andfeature information, see Bug Search Tool and the release notes for your platform and software release. Tofind information about the features documented in this module, and to see a list of the releases in which eachfeature is supported, see the feature information table.
User Security Configuration Guide, Cisco IOS XE Release 3S 97
Use Cisco Feature Navigator to find information about platform support and Cisco software image support.To access Cisco Feature Navigator, go to www.cisco.com/go/cfn. An account on Cisco.com is not required.
Prerequisites for Lawful InterceptAccess to the Cisco LI MIB view should be restricted to the mediation device and to system administratorswho need to be aware of lawful intercepts on the router. To access the MIB, users must have level-15 accessrights on the router.
Communication with Mediation Device
For the router to communicate with the mediation device to execute a lawful intercept, the followingconfiguration requirements must be met:
• The domain name for both the router and the mediation device must be registered in the Domain NameSystem (DNS).
In DNS, the router IP address is typically the address of the FastEthernet0/0/0 interface on the router.
• The mediation device must have an access function (AF) and an access function provisioning interface(AFPI).
• You must add the mediation device to the Simple Network Management Protocol (SNMP) user groupthat has access to the CISCO-TAP2-MIB view. Specify the username of the mediation device as theuser to add to the group.
When you add the mediation device as a CISCO-TAP2-MIB user, you can include the mediation device’sauthorization password if you want. The password must be at least eight characters in length.
Restrictions for Lawful InterceptGeneral Restrictions
There is no command-line interface (CLI) available to configure LI on the router. All error messages are sentto the mediation device as SNMP notifications. All intercepts are provisioned using SNMPv3 only.
Lawful Intercept does not support SUP HA. LI configuration needs to be reapplied after SUP switchover. AnSNMP trap will be generated for this event.
Lawful Intercept MIBs
Only the mediation device and users who need to know about lawful intercepts are allowed to access the LIMIBs.
Due to its sensitive nature, the Cisco LIMIBs are only available in software images that support the LI feature.These MIBs are not accessible through the Network Management Software MIBs Support page ( http://www.cisco.com/public/sw-center/netmgmt/cmtk/mibs.shtml ).
User Security Configuration Guide, Cisco IOS XE Release 3S98
Lawful Intercept ArchitecturePrerequisites for Lawful Intercept
SNMP notifications for LI must be sent to User Datagram Protocol (UDP) port 161 on the mediation device,not port 162 (which is the SNMP default). For more information, see the Enabling SNMP Notifications forLawful Intercept, on page 107.
Information About Lawful Intercept
Introduction to Lawful InterceptLI is the process by which law enforcement agencies (LEAs) conduct electronic surveillance as authorizedby judicial or administrative order. Increasingly, legislation is being adopted and regulations are being enforcedthat require service providers (SPs) and Internet service providers (ISPs) to implement their networks toexplicitly support authorized electronic surveillance. The types of SPs or ISPs that are subject to LI mandatesvary greatly from country to country. LI compliance in the United States is specified by the Commission onAccreditation for Law Enforcement Agencies (CALEA).
Cisco supports two architectures for LI: PacketCable and Service Independent Intercept. The LI componentsby themselves do not ensure customer compliance with applicable regulations but rather provide tools thatcan be used by SPs and ISPs to construct an LI-compliant network.
Cisco Service Independent Intercept ArchitectureThe Cisco Service Independent Intercept Architecture Version 3.0 document describes implementation of LIfor VoIP networks using the Cisco BTS 10200 Softswitch call agent, version 5.0, in a non-PacketCablenetwork. Packet Cable Event Message specification version 1.5-I01 is used to deliver the call identifyinginformation along with version 2.0 of the Cisco Tap MIB for call content.
The Cisco Service Independent Intercept Architecture Version 2.0 document describes implementation of LIfor VoIP networks using the Cisco BTS 10200 Softswitch call agent, versions 4.4 and 4.5, in a non-PacketCablenetwork. Although not a PacketCable network, PacketCable Event Messages Specification version I08 is stillused to deliver call identifying information, along with version 1.0 or version 2.0 of the Cisco Tap MIB forcall content. The Cisco Service Independent Intercept Architecture Version 2.0 document adds additionalfunctionality for doing data intercepts by both IP address and session ID, which are both supported in version2.0 of the Cisco Tap MIB (CISCO-TAP2-MIB).
The Cisco Service Independent Intercept Architecture Version 1.0 document describes implementation of LIfor VoIP networks that are using the Cisco BTS 10200 Softswitch call agent, versions 3.5 and 4.1, in anon-PacketCable network. Although not a PacketCable network, PacketCable Event Message Specificationversion I03 is still used to deliver call identifying information, along with version 1.0 of the Cisco Tap MIB(CISCO-TAP-MIB) for call content. Simple data intercepts by IP address are also discussed.
PacketCable Lawful Intercept ArchitectureThe PacketCable Lawful Intercept Architecture for BTS Version 5.0 document describes the implementationof LI for VoIP using Cisco BTS 10200 Softswitch call agent, version 5.0, in a PacketCable network thatconforms to PacketCable Event Messages Specification version 1.5-I01.
User Security Configuration Guide, Cisco IOS XE Release 3S 99
Lawful Intercept ArchitectureInformation About Lawful Intercept
The PacketCable Lawful Intercept Architecture for BTS Versions 4.4 and 4.5 document describes theimplementation of LI for VoIP using Cisco BTS 10200 Softswitch call agent, versions 4.4 and 4.5, in aPacketCable network that conforms to PacketCable Event Messages Specification version I08.
The PacketCable Lawful Intercept Architecture for BTS Versions 3.5 and 4.1 document describes theimplementation of LI for voice over IP (VoIP) using Cisco Broadband Telephony Softswitch (BTS) 10200Softswitch call agent, versions 3.5 and 4.1, in a PacketCable network that conforms to PacketCable EventMessage Specification version I03.
The PacketCable Control Point Discovery Interface Specification document defines an IP-based protocolthat can be used to discover a control point for a given IP address. The control point is the place where Qualityof Service (QoS) operations, LI content tapping operations, or other operations may be performed.
CISCO ASR 1000 Series RoutersThe Cisco ASR 1000 Series Aggregation Services Routers support two types of LI: regular and broadband(per-subscriber). Broadband wiretaps are executed on access subinterfaces and tunnel interfaces. Regularwiretaps are executed on access subinterfaces, tunnel interfaces, and physical interfaces. Wiretaps are notrequired, and are not executed, on internal interfaces. The router determines which type of wiretap to executebased on the interface that the target’s traffic is using.LI on the Cisco ASR 1000 series routers can intercept traffic based on a combination of one or more of thefollowing fields:
• Destination IP address and mask (IPv4 or IPv6 address)
• Destination port or destination port range
• Source IP address and mask (IPv4 or IPv6 address)
• Source port or source port range
• Protocol ID
• Type of Service (TOS)
• Virtual routing and forwarding (VRF) name, which is translated to a vrf-tableid value within the router.
• Subscriber (user) connection ID
The LI implementation on the Cisco ASR 1000 series routers is provisioned using SNMP3 and supports thefollowing functionality:
• RADIUS session intercepts, which can occur in one of the following ways:
• Interception through Access-Accept packets allows interception to start at the beginning of asession.
• Interception through CoA-Request packets enables the router to start or stop interception duringa session.
• Interception of communication content. The router duplicates each intercepted packet and then placesthe copy of the packet within a UDP-header encapsulated packet (with a configured CCCid). The routersends the encapsulated packet to the LI mediation device. Even if multiple lawful intercepts are configuredon the same data flow, only one copy of the packet is sent to the mediation device. If necessary, themediation device can duplicate the packet for each LEA.
User Security Configuration Guide, Cisco IOS XE Release 3S100
Lawful Intercept ArchitectureCISCO ASR 1000 Series Routers
• Interception of IPv4, IPv4 multicast, IPv6, and IPv6 multicast flows.
VRF Aware LIVRF Aware LI is the ability to provision a LI wiretap on IPv4 data in a particular Virtual Private Network(VPN). This feature allows a LEA to lawfully intercept targeted data within that VPN. Only IPv4 data withinthat VPN is subject to the VRF-based LI tap.
VRF Aware LI is available for the following types of traffic:
• ip2ip
• ip2tag (IP to MPLS)
• tag2ip (MPLS to IP)
To provision a VPN-based IPv4 tap, the LI administrative function (running on the mediation device) usesthe CISCO-IP-TAP-MIB to identify the name of the VRF table that the targeted VPN uses. The VRF nameis used to select the VPN interfaces on which to enable LI in order to execute the tap.
The router determines which traffic to intercept and which mediation device to send the intercepted packetsbased on the VRF name (along with the source and destination address, source and destination port, andprotocol).
When using the Cisco-IP-TAP-MIB, if the VRF name is not specified in the stream entry, the global IProuting table is used by default.
Note
Lawful Intercept MIBsDue to its sensitive nature, the Cisco LIMIBs are only available in software images that support the LI feature.These MIBs are not accessible through the Network Management Software MIBs Support page ( http://www.cisco.com/public/sw-center/netmgmt/cmtk/mibs.shtml ).
Restricting Access to the Lawful Intercept MIBsOnly the mediation device and users who need to know about lawful intercepts should be allowed to accessthe LI MIBs. To restrict access to these MIBs, you must:
1 Create a view that includes the Cisco LI MIBs.
2 Create an SNMP user group that has read-and-write access to the view. Only users assigned to this usergroup can access information in the MIBs.
3 Add users to the Cisco LI user groups to define who can access the MIBs and any information related tolawful intercepts. Be sure to add the mediation device as a user in this group; otherwise, the router cannotperform lawful intercepts.
For more information, see the Creating a Restricted SNMP View of Lawful Intercept MIBs module.
User Security Configuration Guide, Cisco IOS XE Release 3S 101
Access to the Cisco LIMIB view should be restricted to the mediation device and to system administratorswho need to be aware of lawful intercepts on the router. To access the MIB, users must have level-15access rights on the router.
Note
RADIUS-Based Lawful InterceptA RADIUS-based lawful intercept solution enables intercept requests to be sent (through Access-Acceptpackets or Change of Authorizationt (CoA)-Request packets) to the network access server (NAS) or to theLayer 2 Tunnel Protocol access concentrator (LAC) from the RADIUS server. All traffic data going to orfrom a PPP or L2TP session is passed to a mediation device. Another advantage of RADIUS-based lawfulintercept is the synchronicity of the solution—the tap is set with Access-Accept packets so that all target trafficis intercepted.
Intercept requests are initiated by the mediation device via SNMPv3 messages, and all traffic data going toor from a given IP address is passed to a mediation device. Interception based on IP addresses prevents asession from being tapped until an IP address has been assigned to the session.
The RADIUS-based lawful intercept feature provides High Availability (HA) support for LI for the followingmodes:
• Access-Accept based LI for the new session
• CoA based LI for existing session
The RADIUS-based LI HA supports only the RADIUS based provisioning. The SNMP-based provisioningis not supported.
Intercept Operation
How Intercept Requests Work Within Access-Accept Packets
When an intercept target begins to establish a connection, an Access-Request packet is sent to the RADIUSserver. The RADIUS server responds with an Access-Accept packet containing the four RADIUS attributes.
The NAS or the LAC receives the LI-Action attribute with the value 1, allowing the NAS or LAC to duplicatethe traffic data at the start of the new session and forward the duplicated data to the mediation device that wasspecified through the attributes, MD-IP-Address and MD-Port-Number.
If the NAS or LAC cannot start intercepting traffic data for a new session, the session does not getestablished.
Note
If accounting is enabled (through the aaa accounting network command and the aaa accounting sendstop-record authentication failure command), an Accounting-Stop packet must be sent with theAcct-Termination-Cause attribute (49) set to 15, which means that service is not available.
User Security Configuration Guide, Cisco IOS XE Release 3S102
How Intercept Requests Work Within CoA-Request Packets
After a session has been established for the intercept target, CoA-Request packets can be used for the followingtasks:
• Starting the interception of an existing session. The LI-Action attribute is set to 1.
• Stopping the interception of an existing session. The LI-Action attribute is set to 0.
• Issuing a dummy intercept request. The LI-Action attribute is set to 2. The NAS or LAC should notperform any session interception; instead, it searches the session on the basis of the Acct-Session-IDattribute value that was specified in the CoA-Request packets. If a session is found, the NAS or LACsends a CoA acknowledgment (ACK) response to the RADIUS server. If a session is not found, theNAS or LAC issues a “session not found” error message.
In each case, the RADIUS server must send CoA-Request packets with the identified attributes and theAcct-Session-ID attribute. Each of these attributes must be in the packet.
The Acct-Session-ID attribute identifies the session that will be intercepted. The Acct-Session-ID attributecan be obtained from either the Access-Request packet or the Accounting-Stop packet.
When a session is being tapped and the session terminates, the tap stops. The session does not start when thesubscriber logs back in unless the Access-Accept indicates a start tap or a CoA-Request is sent to start thesession.
The frequency of CoA-Request packets should not exceed a rate of one request every 10 minutes.Note
Service Independent Intercept (SII)Cisco developed the Service Independent Intercept (SII) architecture in response to requirements that supportlawful intercept for service provider customers. The SII architecture offers well-defined, open interfacesbetween the Cisco equipment acting as the content Intercept Access Point (IAP) and the mediation device.The modular nature of the SII architecture allows the service provider to choose the most appropriate mediationdevice to meet specific network requirements and regional, standards-based requirements for the interface tothe law enforcement collection function.
The mediation device uses SNMPv3 to instruct the call connect (CC) IAP to replicate the CC and send thecontent to the mediation device. The CC IAP can be either an edge router or a trunking gateway for voice,and either an edge router or an access server for data.
To increase the security and to mitigate any SNMPv3 vulnerability, the following tasks are required:
Restricting Access to Trusted Hosts (without Encryption)SNMPv3 provides support for both security models and security levels. A security model is an authenticationstrategy that is set up for a user and the group in which the user resides. A security level is the permitted levelof security within a security model. A combination of a security model and a security level will determine thesecurity mechanism employed when handling an SNMP packet.
Additionally, the SNMP Support for the Named Access Lists feature adds support for standard named accesscontrol lists (ACLs) to several SNMP commands.
User Security Configuration Guide, Cisco IOS XE Release 3S 103
To configure a new SNMP group or a table that maps SNMP users to SNMP views, use the snmp-servergroup command in global configuration mode.
access-list my-list permit ip host 10.10.10.1snmp-server group my-group v3 auth access my-listIn this example, the access list namedmy-list allows SNMP traffic only from 10.10.10.1. This access list isthen applied to the SNMP group calledmy-group.
Encrypting Lawful Intercept Traffic and Restricting Access to Trusted HostsEncryption of intercepted traffic between the router (the content Intercept Access Point (IAP)) and theMediationDevice (MD) is highly recommended.
The following configuration is required:
• Configuring encryption in the router and either an encryption client in the MD or a router associatedwith the MD to decrypt the traffic.
• Restricting access to trusted hosts.
• Configuring the VPN client.
Configuring encryption in the Router
First configure Authentication, Authorization and Accounting (AAA) parameters. The following exampleshows how to configure the parameters:
aaa authentication login userauthen localusername <username> password 0 <password>The following example uses the internal database; however, external authentication servers can also be specifiedto perform the authentication.
After configuring the AAA parameters, configure the Internet Security Association and Key ManagementProtocol (ISAKMP) policy and the crypto map. The following example uses pre-shared keys, Diffie-Hellman(DH) group 2 and AES 256 as the encryption protocol for phase 1 (Internet Key Exchange (IKE)). The cryptomap is called dynamic-map and the VPN group is called LI-group. Access-list 108 defines the traffic that isallowed to the router (in this case the ip pool is 10.1.1.1 through 10.1.1.254).
crypto map clientmap client configuration address respondcrypto map clientmap 10 ipsec-isakmp dynamic dynmap!!interface GigabitEthernet0/3ip address <IP address of LI-enabled router> 255.255.255.0crypto map clientmap!!ip local pool ippool 10.1.1.1 10.1.1.254!!access-list 108 permit ip 10.1.1.0 0.0.0.255 host 10.0.24.4 <IP address of LI-enabledrouter>
Restricting Access to Trusted Hosts (with Encryption)
The following example shows how to create an ACL that allows only the IP pool (10.1.1.0/24) for VPN clients,and assign that ACL to the SNMPv3 group.
access-list my-list permit ip 10.1.1.0 0.0.0.255snmp-server group my-group v3 auth access my-list
Configuring the VPN Client
See theInstalling the VPN Clientdocument to download and configure the Cisco VPN Client for Solaris. See theCisco VPN Client installation instructionsdocument to download and configure the Cisco VPN Client for other operating systems.
How to Configure Lawful InterceptAlthough there are no direct user commands to provision lawful intercept on the router, you do need to performsome configuration tasks, such as providing access to LI MIBs, setting up SNMP notifications, and enablingthe LI RADIUS session feature. This section describes how to perform the required tasks.
Creating a Restricted SNMP View of Lawful Intercept MIBsTo create and assign users to an SNMP view that includes the Cisco lawful intercept MIBs, perform the stepsin this section.
Before You Begin
• You must issue the commands in global configuration mode with level-15 access rights.
• SNMPv3 must be configured on the device.
User Security Configuration Guide, Cisco IOS XE Release 3S 105
Lawful Intercept ArchitectureHow to Configure Lawful Intercept
Enters global configuration mode.configure terminal
Example:
Device# configure terminal
Step 2
Enables lawful intercept on the device.aaa interceptStep 3
Example:
Device(config)# aaa intercept
• Associate this command with a high administrativesecurity to ensure that unauthorized users cannot stopintercepts if this command is removed.
The aaa intercept command is required to set upthe wiretap using an IP session.
Note
Creates an SNMPview that includes the CISCO-TAP2-MIB(where exampleViewis the name of the view to create forthe MIB).
snmp-server view view-name MIB-name included
Example:
Device(config)# snmp-server view exampleViewciscoTap2MIB included
Step 4
• This MIB is required for both regular and broadbandlawful intercept.
Adds the CISCO-IP-TAP-MIB to the SNMP view.snmp-server view view-name MIB-name included
Example:
Device(config)# snmp-server view exampleViewciscoIpTapMIB included
Step 5
User Security Configuration Guide, Cisco IOS XE Release 3S106
Lawful Intercept ArchitectureCreating a Restricted SNMP View of Lawful Intercept MIBs
PurposeCommand or Action
Adds the CISCO-802-TAP-MIB to the SNMP view.snmp-server view view-name MIB-name included
Example:
Device(config)# snmp-server view exampleViewcisco802TapMIB included
Step 6
Creates an SNMP user group that has access to the LI MIBview and defines the group’s access rights to the view.
snmp-server group group-name v3 noauth readview-name write view-name
Example:
Device(config)# snmp-server group exampleGroupv3 noauth read exampleView write exampleView
Step 7
Adds users to the specified user group.snmp-server user user-name group-name v3 authmd5 auth-password
Step 8
Example:
Device(config)# snmp-server user exampleUserexampleGroup v3 auth md5 examplePassword
Exits the current configuration mode and returns toprivileged EXEC mode.
end
Example:
Device(config)# end
Step 9
Where to Go NextThe mediation device can now access the lawful intercept MIBs and issue SNMP set and get requests toconfigure and run lawful intercepts on the router. To configure the router to send SNMP notification to themediation device, see the Enabling SNMP Notifications for Lawful Intercept.
Enabling SNMP Notifications for Lawful InterceptSNMP automatically generates notifications for lawful intercept events. To configure the router to send lawfulintercept notifications to the mediation device, perform the steps in this section.
Before You Begin
• You must issue the commands in global configuration mode with level-15 access rights.
• SNMPv3 must be configured on the router.
User Security Configuration Guide, Cisco IOS XE Release 3S 107
Lawful Intercept ArchitectureEnabling SNMP Notifications for Lawful Intercept
• These notifications indicate authentication failures, linkstatus (up or down), and router restarts.
authentication linkup linkdown coldstartwarmstart
Exits the current configuration mode and returns to privilegedEXEC mode.
end
Example:
Device(config)# end
Step 5
User Security Configuration Guide, Cisco IOS XE Release 3S108
Lawful Intercept ArchitectureEnabling SNMP Notifications for Lawful Intercept
Disabling SNMP NotificationsTo disable SNMP notifications on the router, perform the steps in this section.
To disable lawful intercept notifications, use SNMPv3 to set the CISCO-TAP2-MIB objectcTap2MediationNotificationEnable to false(2). To reenable lawful intercept notifications through SNMPv3,reset the object to true(1).
Note
SUMMARY STEPS
1. enable2. configure terminal3. no snmp-server enable traps4. end
DETAILED STEPS
PurposeCommand or Action
Enables privileged EXEC mode.enableStep 1
Example:
Device> enable
• Enter your password if prompted.
Enters global configuration mode.configure terminal
Example:
Device# configure terminal
Step 2
Disables all SNMP notification types that are available onyour system.
no snmp-server enable traps
Example:
Device(config)# no snmp-server enable traps
Step 3
Exits the current configuration mode and returns toprivileged EXEC mode.
end
Example:
Device(config)# end
Step 4
User Security Configuration Guide, Cisco IOS XE Release 3S 109
Enabling RADIUS Session InterceptsThere are no user CLI commands available to provision the mediation device or taps. However, to enable theintercepts through the CISCO-TAP-MIB you must configure the system to make the account-session-id valueavailable to the mediation device. To enable RADIUS session intercepts on the router, perform the steps inthis section.
Specifies the authentication method to use on the serial interfaces thatare running Point-to-Point protocol (PPP).
aaa authentication ppp default groupradius
Step 4
Example:
Device(config)# aaa authentication pppdefault group radius
This command is required because tap information residesonly on the RADIUS server. You can authenticate with locallyconfigured information, but you cannot specify a tap withlocally configured information.
Note
Delays the generation of accounting start records until the user IPaddress is established. Specifying the all keyword ensures that the delayapplies to all VRF and non-VRF users.
aaa accounting delay-start all
Example:
Device(config)# aaa accountingdelay-start all
Step 5
This command is required so that the mediation device cansee the IP address assigned to the target.
Note
(Optional) Generates accounting stop records for users who fail toauthenticate while logging into or during session negotiation.
If a lawful intercept action of 1 does not start the tap, the stoprecord contains Acct-Termination-Cause, attribute 49, set to15 (Service Unavailable).
Note
(Optional) Enables accounting for all network-related service requests.aaa accounting network default start-stopgroup radius
Step 7
This command is required only to determine the reason whya tap did not start.
Note
Example:
Device(config)# aaa accounting networkdefault start-stop group radius
(Optional) Sends RADIUS attribute 44 (Accounting Session ID) inaccess request packets before user authentication (including requestsfor preauthentication).
Enter this command to obtain attribute 44 from theAccess-Request packet. Otherwise you will have to wait forthe accounting packets to be received before you can determinethe value of attribute 44.
Note
(Optional) Specifies the RADIUS server host.radius-server host host-name
Example:
Device(config)# radius-server host host1
Step 9
Configures a device as an Authentication, Authorization, andAccounting (AAA) server to facilitate interaction with an external
aaa server radius dynamic-author
Example:
Device(config)# aaa server radiusdynamic-author
Step 10
policy server and enters dynamic authorization local server configurationmode.
This is an optional command if taps are always started with asession starts. The command is required if CoA-Requests areused to start and stop taps in existing sessions.
Note
User Security Configuration Guide, Cisco IOS XE Release 3S 111
Configuring Circuit ID Based TappingTo configure circuit ID based tapping of user session data packets and RADIUS authentication data packetson the router, perform the steps in this section.
SUMMARY STEPS
1. enable2. configure terminal3. subscriber access pppoe unique-key circuit-id4. end5. show pppoe session all6. show idmgr session key circuit-id circuit-id
DETAILED STEPS
PurposeCommand or Action
Enables privileged EXEC mode.enableStep 1
Example:
Device> enable
• Enter your password if prompted.
Enters global configuration mode.configure terminal
Example:
Device# configure terminal
Step 2
Specifies a unique circuit ID tag for a PPPoE usersession to be tapped on the router.
User Security Configuration Guide, Cisco IOS XE Release 3S114
Lawful Intercept ArchitectureConfiguring Circuit ID Based Tapping
PurposeCommand or Action
Example:
The session hdl AA000007 in the record is valid
Example:
No service record found
Configuration Examples for Lawful Intercept
Example: Enabling Mediation Device Access Lawful Intercept MIBsThe following example shows how to enable the mediation device to access the lawful intercept MIBs. Itcreates an SNMP view (tapV) that includes four LI MIBs (CISCO-TAP2-MIB, CISCO-IP-TAP-MIB,CISCO-802-TAP-MIB, and CISCO-USER-CONNECTION-TAP-MIB). It also creates a user group that hasread, write, and notify access to MIBs in the tapV view.
Example: Enabling RADIUS Session Lawful InterceptThe following example shows the configuration of a RADIUS-Based Lawful Intercept solution on a routeracting as a network access server (NAS) device employing an Ethernet PPP connection over Ethernet (PPPoE)link:
aaa new-model!aaa intercept!aaa group server radius SGserver 10.0.56.17 auth-port 1645 acct-port 1646!aaa authentication login LOGIN group SGaaa authentication ppp default group SGaaa authorization network default group SGaaa accounting send stop-record authentication failureaaa accounting network default start-stop group SG!aaa server radius dynamic-authorclient 10.0.56.17 server-key cisco
User Security Configuration Guide, Cisco IOS XE Release 3S 115
Lawful Intercept ArchitectureConfiguration Examples for Lawful Intercept
!vpdn enable!bba-group pppoe PPPoE-TERMINATEvirtual-template 1!interface Loopback0ip address 10.1.1.2 255.255.255.0!interface GigabitEthernet4/1/0description To RADIUS serverip address 10.0.56.20 255.255.255.0duplex auto!interface GigabitEthernet4/1/2description To networkip address 10.1.1.1 255.255.255.0duplex auto!interface GigabitEthernet5/0/0description To subscriberno ip address!interface GigabitEthernet5/0/0.10encapsulation dot1q 10protocol pppoe group PPPoE-TERMINATE!interface Virtual-Template1ip unnumbered Loopback0ppp authentication chap!radius-server attribute 44 include-in-access-reqradius-server attribute nas-port format dradius-server host 10.0.56.17 auth-port 1645 acct-port 1646radius-server key cisco
Additional ReferencesRelated Documents
Document TitleRelated Topic
Cisco IOS Master Commands List, All ReleasesCisco IOS commands
To locate and downloadMIBs for selected platforms,Cisco software releases, and feature sets, use CiscoMIB Locator found at the following URL:
http://www.cisco.com/go/mibs
• CISCO-TAP2-MIB
• CISCO-IP-TAP-MIB
• CISCO-802-TAP-MIB
• CISCO-USER-CONNECTION-TAP-MIB
RFCs
TitleRFC
Remote Authentication Dial In User Service(RADIUS)
RFC-2865
Dynamic Authorization Extensions to RemoteAuthentication Dial In User Service (RADIUS)
RFC-3576
Cisco Architecture for Lawful Intercept in IPNetworks
RFC-3924
Technical Assistance
LinkDescription
http://www.cisco.com/cisco/web/support/index.htmlThe Cisco Support and Documentation websiteprovides online resources to download documentation,software, and tools. Use these resources to install andconfigure the software and to troubleshoot and resolvetechnical issues with Cisco products and technologies.Access to most tools on the Cisco Support andDocumentation website requires a Cisco.com user IDand password.
Feature Information for Lawful InterceptThe following table provides release information about the feature or features described in this module. Thistable lists only the software release that introduced support for a given feature in a given software releasetrain. Unless noted otherwise, subsequent releases of that software release train also support that feature.
Use Cisco Feature Navigator to find information about platform support and Cisco software image support.To access Cisco Feature Navigator, go to www.cisco.com/go/cfn. An account on Cisco.com is not required.
User Security Configuration Guide, Cisco IOS XE Release 3S 117
Lawful Intercept ArchitectureFeature Information for Lawful Intercept
The Lawful Intercept (LI) featuresupports service providers inmeeting the requirements of lawenforcement agencies to providethe ability to intercept VoIP or datatraffic going through the edgerouters.
In Cisco IOS XE Release 2.4, thisfeature was introduced on the CiscoASR 1000 Series AggregationServices Routers.
In Cisco IOS XE Release 3.15S,the Lawful Intercept feature wasintroduced on tunnel interfaces forthe Cisco ASR 1000 SeriesAggregation Services Routers.
Cisco IOS XE Release 2.4
Cisco IOS XE Release 3.15S
Lawful Intercept
VRF Aware LI is the ability toprovision a LI wiretap on IPv4 datain a particular Virtual PrivateNetwork (VPN).
In Cisco IOS XE Release 2.4, thisfeature was introduced on the CiscoASR 1000 Series AggregationServices Routers.
Cisco IOS XE Release 2.4VRF Aware LI (Lawful Intercept)
The LI implementation isprovisioned using SNMP3 andsupports RADIUS sessionintercepts.
In Cisco IOS XE Release 2.4, thisfeature was introduced on the CiscoASR 1000 Series AggregationServices Routers.
In Cisco IOSXERelease 3.5, HighAvailability support was added forRADIUS-Based Lawful Intercept.
Cisco IOS XE Release 2.4
Cisco IOS XE Release 3.5S
RADIUS-based Lawful Intercept
User Security Configuration Guide, Cisco IOS XE Release 3S118
Lawful Intercept ArchitectureFeature Information for Lawful Intercept
Feature InformationReleasesFeature Name
In Cisco IOS XE Release 2.5,circuit ID based tapping of a PPPsession is introduced. Circuit IDbased tapping works only if the tapis provisioned after the user sessionis active. It is assumed in thisinstance that the user session isuniquely identified by a circuit IDtag.
Cisco IOS XE Release 2.5Circuit ID based tapping of PPPsession for Lawful Intercept.
In Cisco IOS XE Release 2.6,pre-provisioning of circuit-IDbased tapping of a PPP session isintroduced. If the tap is provisionedbefore a user session is active, thenthe tap is effective whenever theuser session becomes active. Also,corresponding RADIUSauthentication and accountingpackets are tapped. It is assumedin this instance that the user sessionis uniquely identified by a circuitID tag.
Cisco IOS XE Release 2.6Circuit ID based tapping forLawful Intercept
In Cisco IOS XE Release 3.10S,this feature was introduced on theCisco ASR 1000 SeriesAggregation Services Routers.
The Non-LI images will beavailable from Cisco IOS XERelease 3.10S onwards and willnot contain the LI subsystems.
User Security Configuration Guide, Cisco IOS XE Release 3S 119
Lawful Intercept ArchitectureFeature Information for Lawful Intercept
User Security Configuration Guide, Cisco IOS XE Release 3S120
Lawful Intercept ArchitectureFeature Information for Lawful Intercept
C H A P T E R 7LI Support for IPoE Sessions
The LI Support for IPoE Sessions feature extends support for provisioning lawful intercept (LI) to IP overEthernet (IPoE) sessions in accordance with RFC 2866. This document describes RADIUS-based LI forIPoE. See the “Lawful Intercept Architecture” module for information on LI architecture and componentsand for configuration tasks and examples.
• Finding Feature Information, page 121
• Restrictions for LI Support for IPoE Sessions, page 121
• Additional References for LI Support for IPoE Sessions, page 122
• Feature Information for LI Support for IPoE Sessions, page 123
Finding Feature InformationYour software release may not support all the features documented in this module. For the latest caveats andfeature information, see Bug Search Tool and the release notes for your platform and software release. Tofind information about the features documented in this module, and to see a list of the releases in which eachfeature is supported, see the feature information table.
Use Cisco Feature Navigator to find information about platform support and Cisco software image support.To access Cisco Feature Navigator, go to www.cisco.com/go/cfn. An account on Cisco.com is not required.
Restrictions for LI Support for IPoE SessionsThe following restrictions apply to RADIUS-based LI for IPoE sessions:
• You cannot use Access-Accept packets to start TAP for a RADIUS proxy session when the LI parametersare encrypted.
• The aaa intercept command must be configured to accept attribute value pairs (AVPs) associated withRADIUS-based LI. The frequency of change of authentication (CoA) requests to start, stop, or no-action,should not exceed a rate of 1 per 10 minutes.
• Intercepted traffic from different users is sent to the samemediation device (MD). Youmust use a uniquestream ID (made up of the first four digits of the eight-digit intercept ID) for each MD.
User Security Configuration Guide, Cisco IOS XE Release 3S 121
http://www.cisco.com/supportThe Cisco Support website provides extensive onlineresources, including documentation and tools fortroubleshooting and resolving technical issues withCisco products and technologies.
To receive security and technical information aboutyour products, you can subscribe to various services,such as the Product Alert Tool (accessed from FieldNotices), the Cisco Technical Services Newsletter,and Really Simple Syndication (RSS) Feeds.
Access to most tools on the Cisco Support websiterequires a Cisco.com user ID and password.
Feature Information for LI Support for IPoE SessionsThe following table provides release information about the feature or features described in this module. Thistable lists only the software release that introduced support for a given feature in a given software releasetrain. Unless noted otherwise, subsequent releases of that software release train also support that feature.
Use Cisco Feature Navigator to find information about platform support and Cisco software image support.To access Cisco Feature Navigator, go to www.cisco.com/go/cfn. An account on Cisco.com is not required.
Table 9: Feature Information for LI Support for IPoE Sessions
Feature InformationReleasesFeature Name
Extends support for provisioningLI to IPoE sessions in accordancewith RFC 2866.
Cisco IOS XE Release 3.10SLI Support for IPoE Sessions
User Security Configuration Guide, Cisco IOS XE Release 3S 123
LI Support for IPoE SessionsFeature Information for LI Support for IPoE Sessions
User Security Configuration Guide, Cisco IOS XE Release 3S124
LI Support for IPoE SessionsFeature Information for LI Support for IPoE Sessions
C H A P T E R 8Image Verification
The Image Verification feature allows users to automatically verify the integrity of Cisco IOS XE imagesand provisioning files. Thus, users can be sure that an image or provisioning file is protected from accidentalcorruption, which can occur at any time during transit, starting from the moment the files are generated byCisco until they reach the user.
• Finding Feature Information, page 125
• Restrictions for Image Verification, page 125
• Information About Image Verification, page 126
• How to Use Image Verification, page 126
• Configuration Examples for Image Verification, page 129
• Additional References, page 130
• Feature Information for Image Verification, page 132
Finding Feature InformationYour software release may not support all the features documented in this module. For the latest caveats andfeature information, see Bug Search Tool and the release notes for your platform and software release. Tofind information about the features documented in this module, and to see a list of the releases in which eachfeature is supported, see the feature information table.
Use Cisco Feature Navigator to find information about platform support and Cisco software image support.To access Cisco Feature Navigator, go to www.cisco.com/go/cfn. An account on Cisco.com is not required.
Restrictions for Image VerificationImage Verification is applied to and attempted on any file; however, if the file is not an image file orprovisioning file, image verification will not occur and you will see the following error,“SIGNATURE-4-NOT_PRESENT.”
User Security Configuration Guide, Cisco IOS XE Release 3S 125
The Image Verification feature can only be used to check the integrity of a Cisco IOS XE software imageor provisioning file that is stored on a Cisco IOS XE device. It cannot be used to check the integrity of animage on a remote file system or an image running in memory.
Note
Information About Image Verification
Throughout this document, any references to Cisco IOS XE images, also applies to provisioning files.Note
Benefits of Image VerificationThe efficiency of Cisco IOS XE routers is improved because the routers can now automatically detect whenthe integrity of an image or provisioning file is accidentally corrupted as a result of transmission errors ordisk corruption.
How Image Verification WorksBecause a production image undergoes a sequence of transfers before it is copied into the memory of a router,the integrity of the image is at risk of accidental corruption every time a transfer occurs. When downloadingan image from Cisco.com, a user can run a message-digest5 (MD5) hash on the downloaded image and verifythat the MD5 digest posted on Cisco.com is the same as the MD5 digest that is computed on the user’s server.However, many users choose not to run an MD5 digest because it is 128-bits long and the verification ismanual. Image verification allows the user to automatically validate the integrity of all downloaded images,thereby, significantly reducing user interaction.
How to Use Image Verification
Globally Verifying the Integrity of an ImageThe file verify auto command enables image verification globally; that is, all images that are to be copied(via the copy command) or reloaded (via the reload command) are automatically verified. Although both thecopy and reload commands have a /verify keyword that enables image verification, you must issue thekeyword each time you want to copy or reload an image. The file verify auto command enables imageverification by default, so you no longer have to specify image verification multiple times.
If you have enabled image verification by default but prefer to disable verification for a specific image copyor reload, the /noverify keyword, along with either the copy or the reload command, will override the fileverify auto command.
Use this task to enable automatic image verification.
User Security Configuration Guide, Cisco IOS XE Release 3S126
Image VerificationInformation About Image Verification
Enters global configuration mode.configure terminal
Example:
Device# configure terminal
Step 2
Enables automatic image verification.file verify auto
Example:
Device(config)# file verify auto
Step 3
Exits global configuration mode.exitStep 4
Example:
Device(config)# exit
You must exit global configuration mode if you are going tocopy or reload an image.
What to Do NextAfter issuing the file verify auto command, you do not have to issue the /verify keyword with the copy orthe reload command because each image that is copied or reloaded will be automatically verified.
Verifying the Integrity of an Image That Is About to Be CopiedWhen issuing the copy command, you can verify the integrity of the copied file by entering the /verify keyword.If the integrity check fails, the copied file will be deleted. If the file that is about to be copied does not havean embedded hash (an old image), you will be prompted whether or not to continue with the copying process.If you choose to continue, the file will be successfully copied; if you choose not to continue, the copied filewill be deleted.
User Security Configuration Guide, Cisco IOS XE Release 3S 127
Image VerificationVerifying the Integrity of an Image That Is About to Be Copied
Without the /verify keyword, the copy command could copy a file that is not valid. Thus, after the copycommand has been successfully executed, you can issue the verify command at any time to check the integrityof the files that are in the storage of the router.
Use this task to verify the integrity of an image before it is copied onto a router.
Verifying the Integrity of an Image That Is About to Be ReloadedBy issuing the reload command with the /verify keyword, the image that is about to be loaded onto yoursystem will be checked for integrity. If the /verify keyword is specified, image verification will occur beforethe system initiates the reboot. Thus, if verification fails, the image will not be loaded.
User Security Configuration Guide, Cisco IOS XE Release 3S128
Image VerificationVerifying the Integrity of an Image That Is About to Be Reloaded
Because different platforms obtain the file that is to be loaded in various ways, the file specified inBOOTVAR will be verified. If a file is not specified, the first file on each subsystem will be verified. Oncertain platforms, because of variables such as the configuration register, the file that is verified may notbe the file that is loaded.
Note
Use this task to verify the integrity of an image before it is reloaded onto a router.
SUMMARY STEPS
1. enable2. reload [[warm] [/verify| /noverify] text | [warm] [/verify| /noverify] in [hh :mm [text] | [warm] [/verify|
/noverify] at hh : mm [month day | day month] [text] | [warm] [/verify| /noverify] cancel]
DETAILED STEPS
PurposeCommand or Action
Enables privileged EXEC mode.enableStep 1
Example:
Device> enable
• Enter your password if prompted.
Reloads the operating system.reload [[warm] [/verify| /noverify] text | [warm][/verify| /noverify] in [hh : mm [text] | [warm]
Step 2
• /verify--Verifies the signature of the destination file. Ifverification fails, the file will be deleted.
[/verify| /noverify] at hh : mm [month day | daymonth] [text] | [warm] [/verify| /noverify] cancel]
Example:
Device# reload /verify
• /noverify --Does not verify the signature of the destinationfile before the image is reloaded.
/noverify is often issued if the file verify auto commandis enabled, which automatically verifies the signature ofall images that are copied.
Note
Configuration Examples for Image Verification
Global Image Verification ExampleThe following example shows how to enable automatic image verification. After enabling this command,image verification will automatically occur for all images that are either copied (via the copy command) orreloaded (via the reload command).
Device(config)# file verify auto
User Security Configuration Guide, Cisco IOS XE Release 3S 129
Image VerificationConfiguration Examples for Image Verification
Image Verification via the copy Command ExampleThe following example shows how to specify image verification before copying an image:
Image Verification via the reload Command ExampleThe following example shows how to specify image verification before reloading an image onto the Device:
Device# reload /verifyVerifying file integrity of bootflash:c7200-kboot-mz.121-8a.E%ERROR:Signature not found in file bootflash:c7200-kboot-mz.121-8a.E.Signature not present. Proceed with verify? [confirm]Verifying file disk0:c7200-js-mz......................................................................................................................................Done!Embedded Hash MD5 :CFA258948C4ECE52085DCF428A426DCDComputed Hash MD5 :CFA258948C4ECE52085DCF428A426DCDCCO Hash MD5 :44A7B9BDDD9638128C35528466318183Signature VerifiedProceed with reload? [confirm]n
Verify Command Sample Output ExampleThe following example shows how to specify image verification via the verify command:
Device# verify disk0:c7200-js-mz%Filesystem does not support verify operationsVerifying file integrity of disk0:c7200-js-mz......................................................................................................................Done!Embedded Hash MD5 :CFA258948C4ECE52085DCF428A426DCDComputed Hash MD5 :CFA258948C4ECE52085DCF428A426DCDCCO Hash MD5 :44A7B9BDDD9638128C35528466318183Signature Verified
Additional ReferencesThe following sections provide references related to the Image Verification feature.
User Security Configuration Guide, Cisco IOS XE Release 3S130
Image VerificationImage Verification via the copy Command Example
Related Documents
Document TitleRelated Topic
CiscoASR 1000 Series Aggregation Services RoutersSoftware Configuration Guide
Configuration tasks and information for loading,maintaining, and rebooting system images
Cisco IOS Master Command List, All ReleasesAdditional commands for loading, maintaining, andrebooting system images
Standards
TitleStandard
--No new or modified standards are supported by thisfeature, and support for existing standards has notbeen modified by this feature.
MIBs
MIBs LinkMIB
To locate and downloadMIBs for selected platforms,Cisco IOSXE software releases, and feature sets, useCisco MIB Locator found at the following URL:
http://www.cisco.com/go/mibs
No new or modified MIBs are supported by thisfeature, and support for existing MIBs has not beenmodified by this feature.
RFCs
TitleRFC
--No new or modified RFCs are supported by thisfeature, and support for existing RFCs has not beenmodified by this feature.
User Security Configuration Guide, Cisco IOS XE Release 3S 131
http://www.cisco.com/techsupportThe Cisco Support website provides extensive onlineresources, including documentation and tools fortroubleshooting and resolving technical issues withCisco products and technologies.
To receive security and technical information aboutyour products, you can subscribe to various services,such as the Product Alert Tool (accessed from FieldNotices), the Cisco Technical Services Newsletter,and Really Simple Syndication (RSS) Feeds.
Access to most tools on the Cisco Support websiterequires a Cisco.com user ID and password.
Feature Information for Image VerificationThe following table provides release information about the feature or features described in this module. Thistable lists only the software release that introduced support for a given feature in a given software releasetrain. Unless noted otherwise, subsequent releases of that software release train also support that feature.
Use Cisco Feature Navigator to find information about platform support and Cisco software image support.To access Cisco Feature Navigator, go to www.cisco.com/go/cfn. An account on Cisco.com is not required.
Table 10: Feature Information for Image Verification
Feature InformationReleasesFeature Name
The Image Verification featureallows users to automatically verifythe integrity of Cisco IOS XEimages.
In Cisco IOS XE Release 2.1, thisfeature was introduced on the CiscoASR 1000 Series AggregationServices Routers.
The following commands wereintroduced or modified: copy, fileverify auto, reload, verify.
Cisco IOS XE 2.1Image Verification
User Security Configuration Guide, Cisco IOS XE Release 3S132
Image VerificationFeature Information for Image Verification