19
User’s Guide for TD Community Manager (TDCM) Student Aid Internet Gateway

User’s Guide for
TD Community
Manager (TDCM)
Student Aid Internet Gateway
TDCM User Guide
March 2012 ii
DOCUMENT CONTROL
DOCUMENT INFORMATION Title: TDCM User Guide
Revision: v1.0
Issue Date: 3/05/2012
DOCUMENT HISTORY
Version Number
Date Summary of Change
1.0 3/05/2012 Updated for TDCM 3.2 release
TDCM User Guide
March 2012 iii
Table of Contents
1 TRANSACTION DELIVERY COMMUNITY MANAGER (TDCM) ............................ 1
1.1 PREFACE ............................................................................................................ 1
1.2 ITEMS TO CONSIDER ............................................................................................ 2
1.3 STARTING THE TDCM ......................................................................................... 3
Figure 1: The Login Screen .................................................................................................................. 3 1.3.1 The Welcome Screen .............................................................................................................. 4 Figure 2: The Welcome Screen ............................................................................................................ 4
1.4 TABS .................................................................................................................. 5
1.4.1 The Messages Tab .................................................................................................................. 5 Figure 3: The Messages Tab ............................................................................................................... 6
1.4.1.1 Tips ................................................................................................................................. 6 Figure 4: The Expand Button ............................................................................................................... 7
1.4.1.2 Additional Tips ................................................................................................................ 8 Figure 5: Advanced Search .................................................................................................................. 9
1.4.1.3 Restoring Files Received Within the Last Ten Days .................................................... 10 1.4.2 The Archive Tab .................................................................................................................... 10
1.4.2.1 Restoring Files Received Within the Last 11 to 180 Days ........................................... 10 Figure 6: The Restore Files Screen ................................................................................................... 11 1.4.3 The Participants Tab ............................................................................................................. 12 Figure 7: The Participants Screen to Change Password ................................................................... 13
1.4.3.1 Password Changes ....................................................................................................... 14 1.5 FREQUENTLY ASKED QUESTIONS ....................................................................... 15
1.6 TECHNICAL SUPPORT ........................................................................................ 16
TDCM User Guide
March 2012 1
1 Transaction Delivery Community Manager (TDCM)
1.1 Preface
The TDCommunity Manager (TDCM) Web site, saigportal.ed.gov, gives you the ability to view Student Aid Internet Gateway (SAIG) network traffic, restore previously received files, and to change your SAIG Password (also called the Group Password or TG Password) or FTPPASSWD. In addition, the TDCM displays files that failed the “mailboxing” process and will give the cause of the error.
The TDCM is best viewed with Internet Explorer 5.0 or higher, in 24-bit True Color,
and at 1024 × 768 screen resolution.

TDCM User Guide
March 2012 2
1.2 Items to Consider
All time references in the TDCM are listed in Eastern Standard Time (EST) and Eastern Daylight Time (EDT) as appropriate.
Your User ID for the TDCM is your TG Number and your password is the
network password you transmitted with EDconnect or the TDClient. If you have never accessed the TDCM before and have not transmitted a network password change with EDconnect, your initial password is set as follows: “ccyynnnn” where “ccyy” is your birth year and “nnnn” represents the last four digits of your social security number. You will be required to change your password the first time you access your mailbox.
TDCM User Guide
March 2012 3
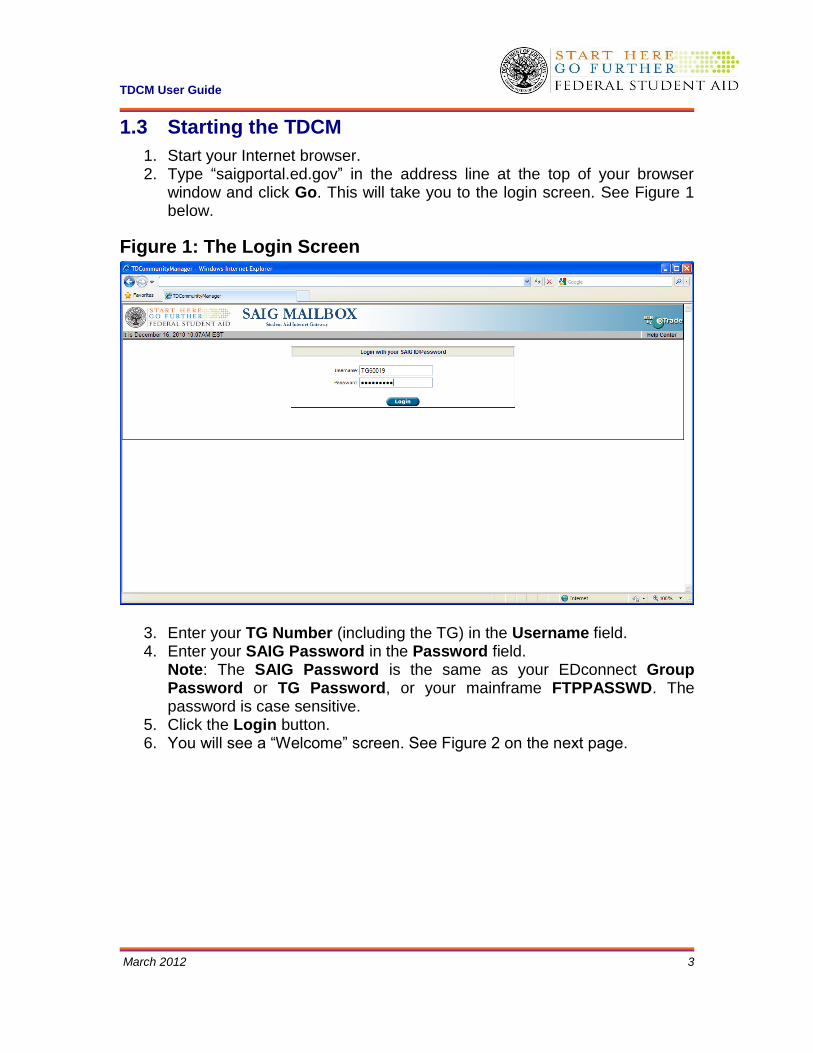
1.3 Starting the TDCM
1. Start your Internet browser. 2. Type “saigportal.ed.gov” in the address line at the top of your browser
window and click Go. This will take you to the login screen. See Figure 1 below.
Figure 1: The Login Screen
3. Enter your TG Number (including the TG) in the Username field. 4. Enter your SAIG Password in the Password field.
Note: The SAIG Password is the same as your EDconnect Group Password or TG Password, or your mainframe FTPPASSWD. The password is case sensitive.
5. Click the Login button. 6. You will see a “Welcome” screen. See Figure 2 on the next page.
TDCM User Guide
March 2012 4
1.3.1 The Welcome Screen
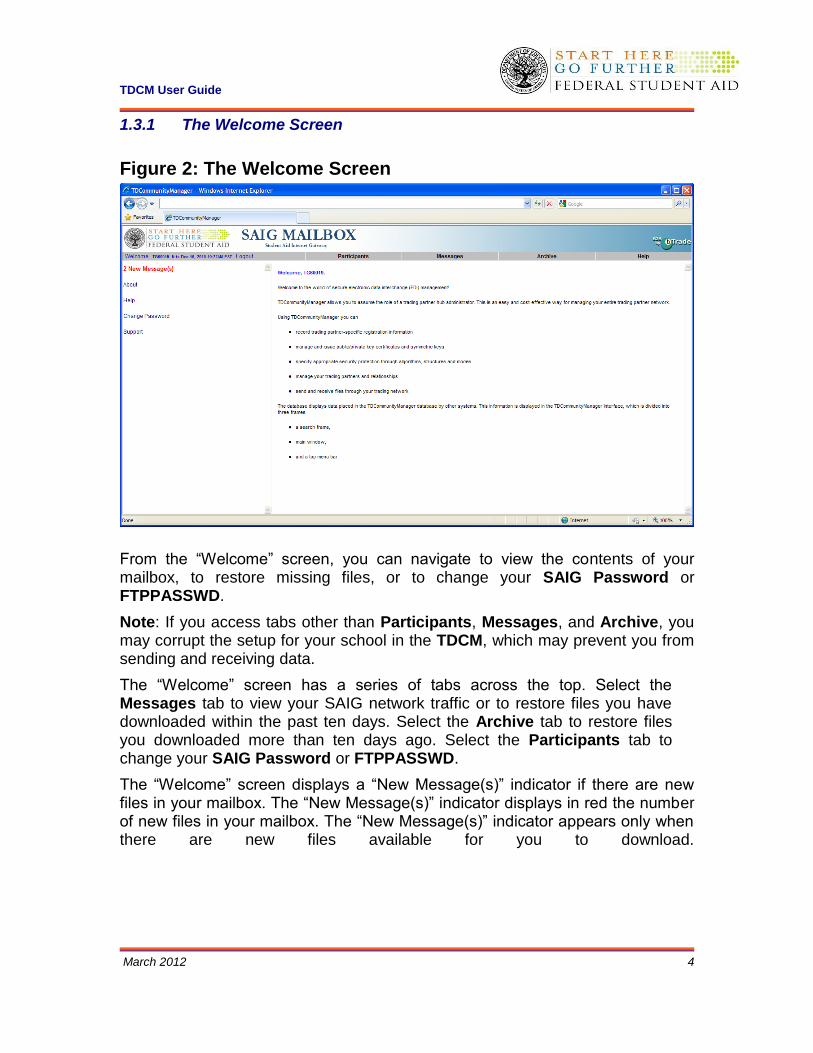
Figure 2: The Welcome Screen
From the “Welcome” screen, you can navigate to view the contents of your mailbox, to restore missing files, or to change your SAIG Password or FTPPASSWD.
Note: If you access tabs other than Participants, Messages, and Archive, you may corrupt the setup for your school in the TDCM, which may prevent you from sending and receiving data.
The “Welcome” screen has a series of tabs across the top. Select the Messages tab to view your SAIG network traffic or to restore files you have downloaded within the past ten days. Select the Archive tab to restore files you downloaded more than ten days ago. Select the Participants tab to change your SAIG Password or FTPPASSWD.
The “Welcome” screen displays a “New Message(s)” indicator if there are new files in your mailbox. The “New Message(s)” indicator displays in red the number of new files in your mailbox. The “New Message(s)” indicator appears only when there are new files available for you to download.

TDCM User Guide
March 2012 5
1.4 Tabs
1.4.1 The Messages Tab
You can view your mailbox by clicking the “New Message(s)” indicator, which displays in red the number of new files in your mailbox. Clicking on the “New Message(s)” indicator takes you directly to the Messages tab. You can also click on the Messages tab at the top of the screen.
From this tab you can view files that have been sent, received, and are ready to
be received. All Send files are listed with a lowercase “s” to the left of the
Sender ID and are color-coded blue. Receive files are listed with a lowercase
“r” to the left of the Sender ID. Receive files are color-coded red when they are
ready for you to receive and blue once you receive them, or after they have
been re-queued.
The Messages tab has the following display options:
“Show All” “Show Sent” “Show Received” “To Mailbox” “From Mailbox” “Message Class” “Only New Messages”
The “Status” field displays the current status of a file.
“AVAILABLE” status in sender’s mailbox indicates the file has been successfully sent and in receiver’s mailbox indicates the file is ready to be downloaded.
“RECEIVED” indicates the file has already been downloaded. “REJECTED” indicates the file has been flagged for deletion.
“REJECTED” files are not available through EDconnect’s Mailbox Query or Received File View.
“IC-FAIL” means that the file was sent to the mailbox, but failed during the “mailboxing” process. The rejected file will only display in the sender’s mailbox. The Error Detail tab will be activated and will give an explanation of the reject.
All files displayed on the Messages tab are files that you have sent or received within approximately ten days of the “Date/Time Picked Up” field. If there are more than 500 files that meet the search criteria, the Messages tab will list the first 500 files. The “<<Previous” and “Next>>” options allow you to view the previous or next 500 files, if applicable.
1. Log into the TDCM using the steps previously listed. 2. Click the Messages tab.
TDCM User Guide
March 2012 6
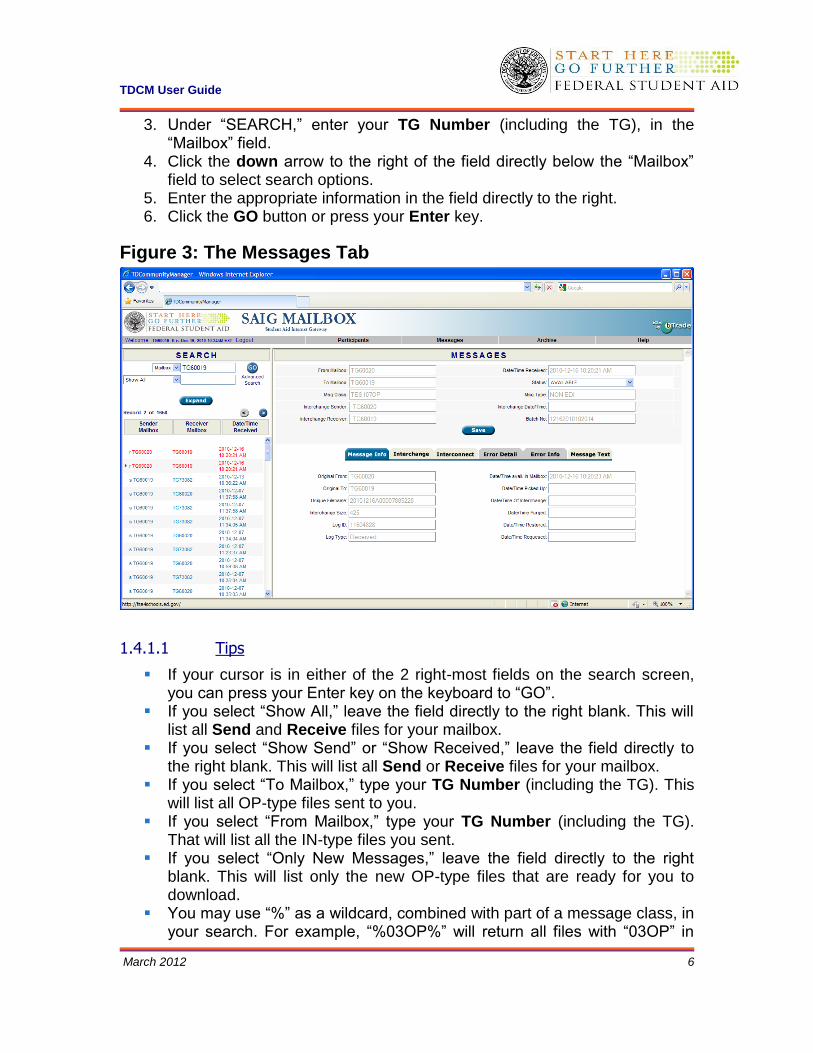
3. Under “SEARCH,” enter your TG Number (including the TG), in the “Mailbox” field.
4. Click the down arrow to the right of the field directly below the “Mailbox” field to select search options.
5. Enter the appropriate information in the field directly to the right. 6. Click the GO button or press your Enter key.
Figure 3: The Messages Tab
1.4.1.1 Tips
If your cursor is in either of the 2 right-most fields on the search screen, you can press your Enter key on the keyboard to “GO”.
If you select “Show All,” leave the field directly to the right blank. This will list all Send and Receive files for your mailbox.
If you select “Show Send” or “Show Received,” leave the field directly to the right blank. This will list all Send or Receive files for your mailbox.
If you select “To Mailbox,” type your TG Number (including the TG). This will list all OP-type files sent to you.
If you select “From Mailbox,” type your TG Number (including the TG). That will list all the IN-type files you sent.
If you select “Only New Messages,” leave the field directly to the right blank. This will list only the new OP-type files that are ready for you to download.
You may use “%” as a wildcard, combined with part of a message class, in your search. For example, “%03OP%” will return all files with “03OP” in

TDCM User Guide
March 2012 7
the message class. You may also search with “*” as a wildcard as long as it is at the end of a field value. For example, “SARA*” will return all files with “SARA” in the message class.
The TDCM will list all files that meet your search criteria. The “Date Received” column reflects the date a file was initially placed in your mailbox.
To view information about a specific file, click on the file name in the list of files returned by your search. File details will display on the right side of the screen.
“Unique Filename” displays the item number. “Batch No” displays the full batch number. “Msg Class” displays the message class. “Status” displays whether or not you have downloaded the file. “Date/Time Picked Up” displays the date and time you
downloaded the file.
Figure 4: The Expand Button
The Expand button allows you to view additional search details:
“Sender Mailbox” “Receiver Mailbox” “Date/Time Received” “Status” “Batch Number” “Msg Class”
TDCM User Guide
March 2012 8
You can also perform more in-depth searches on the Message tab. The “Advanced Search” option allows you to search on the fields below. You must enter your TG Number in the “Mailbox” field to perform an “Advanced Search.”
– “Mailbox” – “Message Class” – “To Mailbox” – “From Mailbox” – “Transaction Type” “All” (both sent and received) “Sent” “Received”
– “Only New Messages” – “Batch # Range” (enter batch number in both fields) – “Date Applies To” “Date/Time Received by Portal” (shows when the file was sent to
your mailbox) “Date/Time avail. In Mailbox” (shows when the file was placed in
your mailbox) “Date/Time Picked Up” (the date you downloaded the file from your
mailbox) “Restored by Portal” (if applicable, shows the date the file was
restored to your mailbox)
1.4.1.2 Additional Tips
You can search on one or more of the fields listed. Enter the values you would like to use as search criteria and click the “GO” button. This will display all files that meet the criteria you selected on the left side of the screen.
The “Start Date/Time” and “End Date/Time” fields display Eastern Standard Time (E.S.T.).
When searching by a specific batch number, enter the same batch number in both of the fields for “Batch # Range.”
The Message Text tab will also display the batch number. It will be listed immediately following “BAT=”. For files in IC-FAIL status, an additional window will appear with a REQUE option. Please do not select this option.
TDCM User Guide
March 2012 9
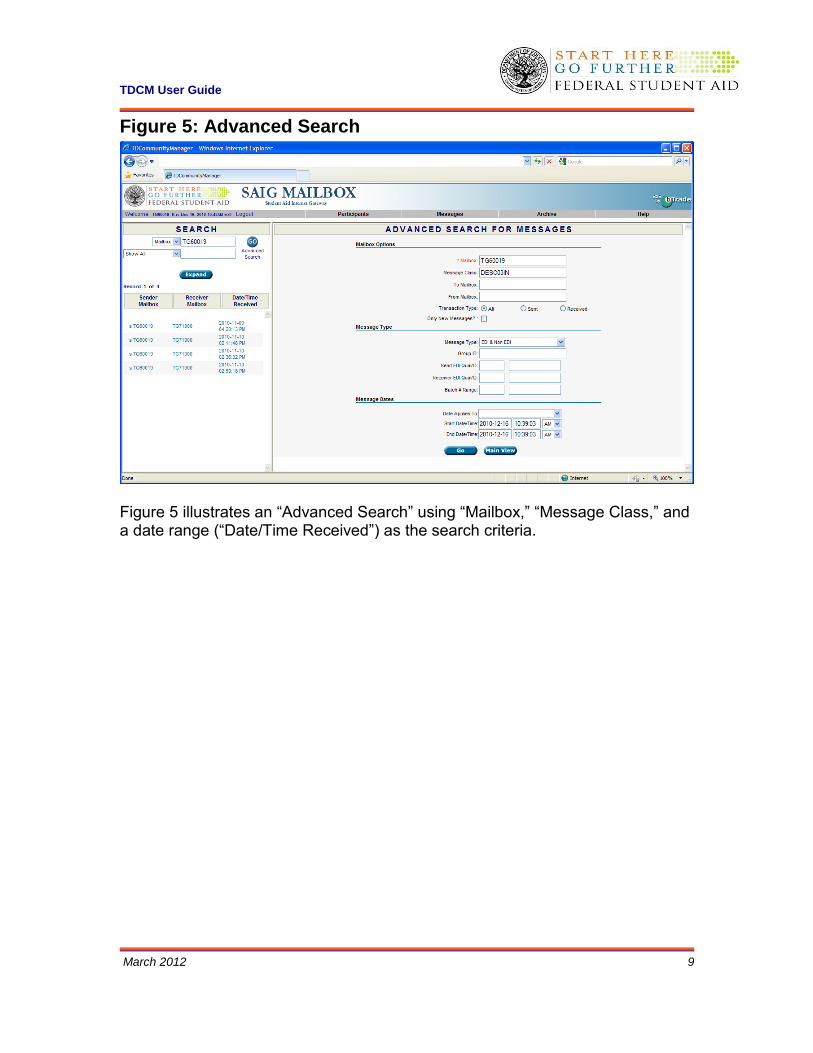
Figure 5: Advanced Search
Figure 5 illustrates an “Advanced Search” using “Mailbox,” “Message Class,” and a date range (“Date/Time Received”) as the search criteria.
TDCM User Guide
March 2012 10
1.4.1.3 Restoring Files Received Within the Last Ten Days
The TDCM also gives you the ability to restore files to your mailbox.
You still have the option of calling CPS/SAIG Technical Support (800/330-5947) to have files restored.
To restore files that you have received within the last ten days:
1. Log into the TDCM. 2. Click the Messages tab. 3. Search and display the Receive file you would like to restore. 4. On the right side of the screen, click the drop-down menu for the “Status”
field and change the status from “RECEIVED” to “AVAILABLE”. 5. Click Save. 6. The file will remain color-coded blue on the left side of the screen, but you
will be able to download the file immediately. 1.4.2 The Archive Tab
The TDCM automatically moves files to the Archive tab view when they have been in your mailbox more than ten days, based on the date listed in the “Date/Time Picked Up” field. This process runs once a day at 4 a.m. E.S.T. Files remain in the Archive for a total of 180 days, including the ten
days the files appeared on the Messages tab.
The Archive tab has the same search capabilities as the Messages tab, along with a “Mailbox Pending” option. “Mailbox Pending” will display all files at the “pend” (pending) status.
Note: Only check the box directly to the left of the file you would like to restore. You still have the option of calling CPS/SAIG Technical Support (800/330-5947) to have files restored.
1.4.2.1 Restoring Files Received Within the Last 11 to 180 Days
To restore a file that you received within the last 11 to 180 days, follow the procedure below. See Figure 6 on the next page.
1. Log into the TDCM. 2. Click the Archive tab. 3. Search and display the Receive file you would like to restore. 4. Check the box directly to the left of the file(s) and click the Restore button.
Note: The file will be marked “pend” in red to the left of the file(s) you requested to have restored. The file(s) will not be immediately available. The file(s) will be available for you to download within one hour. This process runs at the top of every hour from 7 a.m.–11 p.m. (E.S.T.).
5. Note the number in the “Unique Filename” field. 6. For EDconnect users:

TDCM User Guide
March 2012 11
– After one hour has passed, perform a transmission with nothing in the Transmission Queue.
– Go to the Received File View. – Check the box under Move to TQ for the file that has the same Item
Number as the unique file name from the “Unique Filename” field. – Make another transmission to receive the file.
7. For mainframe/midrange users: – After one hour has passed, add RECEIVE_SERVER_FILE=unique file
name to your Transfer command statement. Note: This is the unique file name from the “Unique Filename” field, noted above.
Figure 6: The Restore Files Screen
Figure 6 above shows the fields in which you would restore a file that you received within the last 11 to 180 days.
TDCM User Guide
March 2012 12
1.4.3 The Participants Tab
The TDCM allows you to update your SAIG Password or FTPPASSWD. Once you have updated your password, you will need to update the password in EDconnect, or in your mainframe scripts or JCL. Although the TDCM allows passwords to be of any length, you must still follow existing password rules; as follows:
Password must begin with an alpha character. Password must be a minimum length of eight characters. Password must contain at least one upper case and one lower case alpha
character, plus one numeric character. Password cannot be changed back to “PASSWORD”. (Only CPS/SAIG
Technical Support can reset a password to “PASSWORD”.) Password cannot be the same as any of the previous four passwords and
current password. Password cannot match the User Name or TG number (ignore case). Password will be locked out after three failures. (Password will be
unlocked after 30 minutes or you may call CPS/SAIG Technical Support to have the password reset.)
Passwords expire every 90 days, but you may change your password more frequently.
You must update the password on all batch jobs used to communicate with the SAIG.
Can contain special characters: SAIG passwords can contain special keyboard characters, such as @, #,
and $, but because some computer platforms use certain special characters as command characters, we recommend avoiding % (percent), ^ (caret), & (ampersand), \ (backslash), / (forward slash), < (less than), > (greater than), and | ("pipe" symbol).
If you have any difficulty establishing your first password, contact CPS/SAIG Technical Support at 800/330-5947 and request to have your SAIG mailbox password reset.
TDCM User Guide
March 2012 13
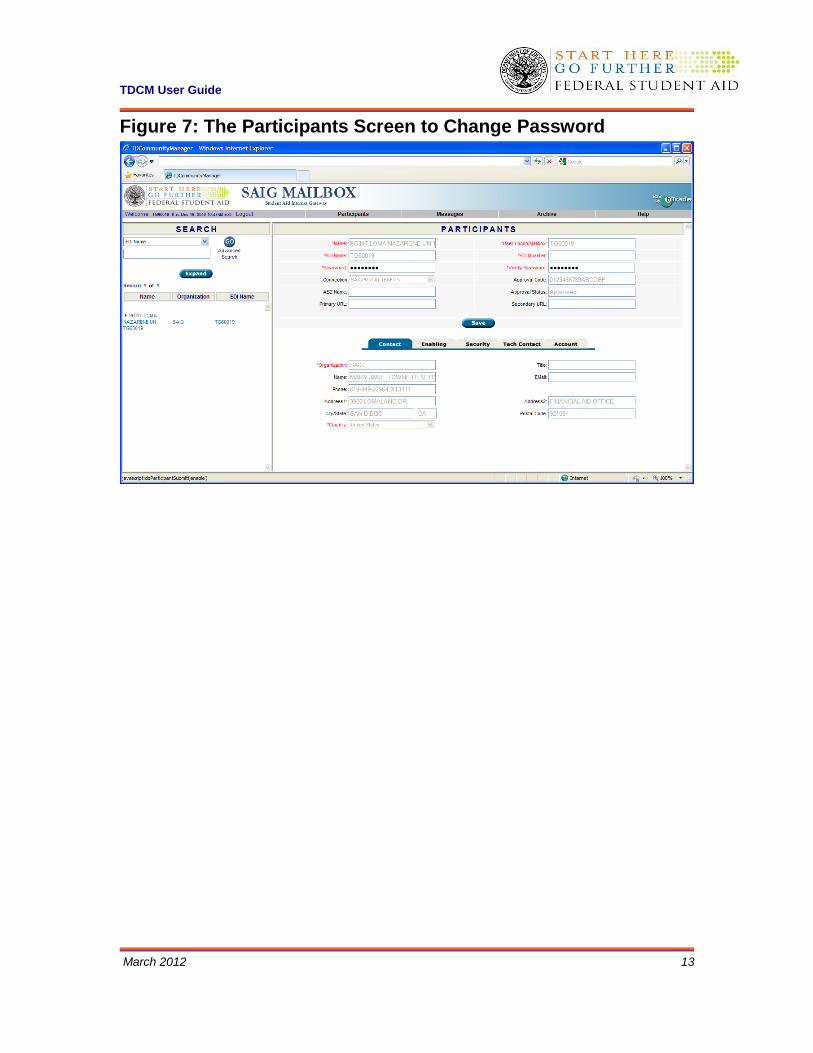
Figure 7: The Participants Screen to Change Password

TDCM User Guide
March 2012 14
1.4.3.1 Password Changes
To change your password (see Figure 7, previous page):
1. Log into the TDCM. 2. Click the Participants tab. 3. Click on the name of your school on the left side of the screen. The right
side of the screen will populate with the setup information for your school. 4. Type your new password into the “Password” field. The password must
contain at least eight valid characters and is case sensitive. 5. Type your new password again into the “Verify Password” field. 6. Click Save. 7. For EDconnect users:
– Open the Security View. Right-click on the Security Group for which you are changing the password.
– Select Properties from the pop-up menu. – Click the Network tab. – Type the password you entered in the TDCM in the “New” field. – Type the password again in the “Verify” field. – Select the Local Only option. – Click OK.
8. For mainframe users: – Update all scripts or JCL to reflect the new password.
Note: When you are on the Participants tab, you should only make changes to the “Password” and “Verify” fields. If you update any other fields on the Participants tab, you run a risk of corrupting the setup for your school in the TDCM. This could prevent your school from sending and receiving files.

TDCM User Guide
March 2012 15
1.5 Frequently Asked Questions
I changed my password in the TDCM and now I get “Failed transmission” when I try to transmit using EDconnect. How do I fix this?
When you changed your password in the TDCM, either your password did not contain the required eight characters or you did not save the password update. You can call CPS/SAIG Technical Support (800/330-5947) to have your password reset, or you can update your password again in the TDCM and in EDconnect. Passwords must be at least eight characters in length, contain alphanumeric characters, and begin with an alpha character.
To update your password using the TDCM:
1. Log into the TDCM. 2. Click on the Participants tab. 3. Click on the name of your school on the left side of the screen. The right
side of the screen will populate with the setup information for your school. 4. Type your new password into the “Password” field. The password must
contain eight valid characters. 5. Type your new password again into the “Verify” field. 6. Click Save. 7. Log into EDconnect. 8. Open the Security View. 9. Right-click on the Security Group for which you are changing the
password. 10. Select Properties from the pop-up menu. 11. Click the Network tab. 12. Type the password you entered in the TDCM in the “New” field. 13. Type the password again in the “Verify” field. 14. Select the Local Only option. 15. Click OK.
If you are still unable to complete a successful transmission, please contact CPS/SAIG Technical Support at 800/330-5947 or by e-mail at [email protected].
I see a “REJECTED” option in the “Status” field on the Messages tab. When should I use it?
The “REJECTED” option allows you to initiate the deletion of a file. You should only use this option if instructed to do so by CPS/SAIG Technical Support.

TDCM User Guide
March 2012 16
1.6 Technical Support
Contacting FSA Technical Support
For FSA technical support, you may post a message (including your TG Number and a contact telephone number) with your question to the FSATECH listserve. For information about subscribing to FSATECH, go to www.ed.gov/offices/OSFAP/sfatech/listserv.html
Department staff or contractors for the system about which you have a question will work on a response.
Note: You must subscribe to FSATECH in order to send and receive messages from the listserve.
Contacting CPS/SAIG Technical Support
If you need technical support, contact CPS/SAIG Technical Support at 800/330-5947. Representatives are available to assist you between 7 a.m. and 7 p.m. (CT), Monday through Friday, excluding holidays. You may also send your inquiries by e-mail to [email protected].


