Notices: The information in this document is subject to change without notice. NO WARRANTY OFANY KIND IS MADE WITH REGARD TO THIS MATERIAL, INCLUDING, BUT NOT LIMITED TO,THE IMPLIED WARRANTIES OF MERCHANTABILITY AND FITNESS FOR A PARTICULAR PURPOSE. No liability is assumed for errors contained herein or for incidental or consequential damages in connection with the furnishing, performance, or use of this material. This document contains proprietary information that is protected by copyright. All rights are reserved. No part of this document may be photocopied, reproduced, or translated into another language without priorwritten consent.
Trademark Acknowledgments: Windows is a registered trademark of Microsoft Corporation. All other trademarks are the property of their respective owners.
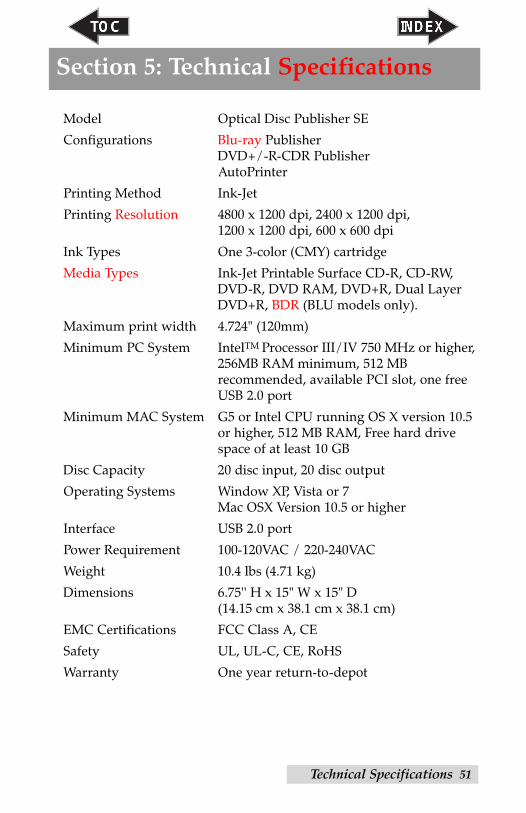
Printing HistoryEdition 1.5, #110209, Copyright 2009, All rights reserved.
FCC Compliance Statement: This device complies with part 15 of the FCC rules. Operation is subject to the following two conditions: (1) this device may not cause harmful interference, and (2) this device must accept any interference received, including interference that may cause undesired operation.
For Users in the United States: This product is intended to be supplied by a UL listed Direct Plug-In Power Supply marked "Class 2"or a UL listed ITE Power Supply marked "LPS" with output rated12VDC, 4.5A or higher. This equipment has been tested and found to comply with the limits for a Class A digital device, pursuant to Part 15 of the FCC Rules. In a domestic environment this productmay cause radio interference, in which case the user may be required to take adequate measures. Thisequipment generates, uses, and can radiate radio frequency energy and, if not installed and used inaccordance with the instructions, may cause harmful interference to radio communications. However,there is no guarantee that interference will not occur in a particular installation. If this equipment doescause harmful interference to radio or television reception, which can be determined by turning the equipment off and on, the user is encouraged to try to correct the interference by one or more of thefollowing measures:• Re-orient or relocate the receiving antenna.• Increase the separation between the equipment and receiver.• Connect the equipment into an outlet on a circuit different from that to which the receiver is
connected.• Consult the dealer or an experienced radio/TV technician for help.Use of shielded cables is required to comply with the Class A limits of Part 15 of the FCC Rules. Youare cautioned that any changes or modifications not expressly approved in this manual could voidyour authority to operate and/or obtain warranty service for this equipment.
For Users in Canada: This digital apparatus does not exceed the Class A limits for radio noise fordigital apparatus set out on the Radio Interference Regulations of the Canadian Department ofCommunications. Le present appareil numerique n'emet pas de bruits radioelectriques depassant leslimites applicables aux appareils numeriques de la class A prescrites dans le Reglement sur le brouillage radioelectrique edicte par le ministere des Communications du Canada.
CAUTION!TO PREVENT FIRE OR SHOCK HAZARD, DO NOT EXPOSE THE UNIT TO RAIN ORMOISTURE. TO REDUCE THE RISK OF ELECTRIC SHOCK, DO NOT REMOVE EXTERIORPANELS. NO USER-SERVICEABLE PARTS INSIDE. REFER SERVICING TO QUALIFIED SERVICE PERSONNEL. OPERATE THE UNIT WITH ONLY THE PROPER ELECTRICAL SPECIFICATIONS AS LABELED ON THE PRINTER AND AC ADAPTER.
CAUTION!THIS PRODUCT CONTAINS A LASER DIODE OF A HIGHER CLASS THAN 1. TO ENSURECONTINUED SAFETY, DO NOT REMOVE ANY COVERS OR ATTEMPT TO GAIN ACCESS TOTHE INSIDE OF THIS PRODUCT. REFER ALL SERVICING TO QUALIFIED PERSONNEL. THEFOLLOWING LABEL APPEARS INSIDE YOUR UNIT:CLASS 1 LASER PRODUCT LASER KLASSE 1
CAUTION!USE OF CONTROLS OR ADJUSTMENTS OR PERFORMANCE OF PROCEDURES OTHERTHAN THOSE SPECIFIED HEREIN MAY RESULT IN HAZARDOUS RADIATION.
510963.qxd 11/2/2009 12:18 PM Page ii
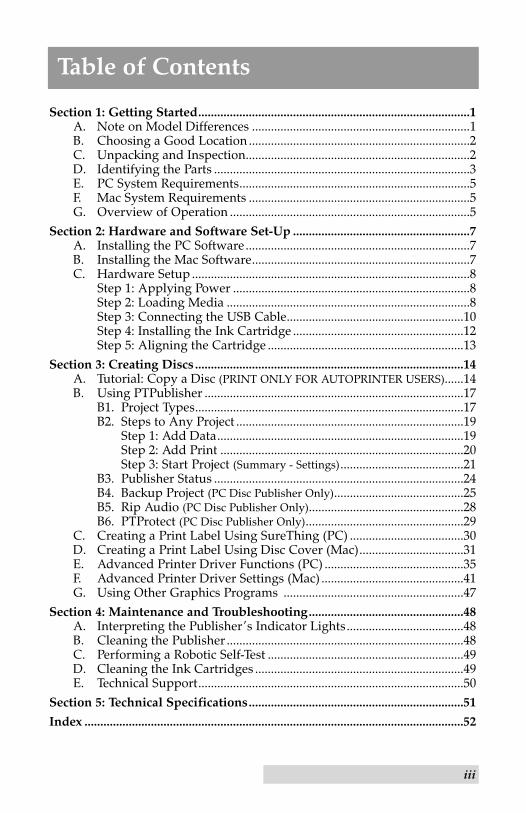
Table of Contents
Section 1: Getting Started......................................................................................1A. Note on Model Differences .....................................................................1B. Choosing a Good Location ......................................................................2C. Unpacking and Inspection.......................................................................2D. Identifying the Parts .................................................................................3E. PC System Requirements.........................................................................5F. Mac System Requirements ......................................................................5G. Overview of Operation ............................................................................5
Section 2: Hardware and Software Set-Up ........................................................7A. Installing the PC Software.......................................................................7B. Installing the Mac Software.....................................................................7C. Hardware Setup ........................................................................................8
Step 1: Applying Power ...........................................................................8Step 2: Loading Media .............................................................................8Step 3: Connecting the USB Cable........................................................10Step 4: Installing the Ink Cartridge ......................................................12Step 5: Aligning the Cartridge ..............................................................13
Section 3: Creating Discs .....................................................................................14A. Tutorial: Copy a Disc (PRINT ONLY FOR AUTOPRINTER USERS)......14B. Using PTPublisher ..................................................................................17
B1. Project Types.....................................................................................17B2. Steps to Any Project ........................................................................19
C. Creating a Print Label Using SureThing (PC) ....................................30D. Creating a Print Label Using Disc Cover (Mac).................................31E. Advanced Printer Driver Functions (PC) ............................................35F. Advanced Printer Driver Settings (Mac) .............................................41G. Using Other Graphics Programs .........................................................47
Section 4: Maintenance and Troubleshooting.................................................48A. Interpreting the Publisher’s Indicator Lights.....................................48B. Cleaning the Publisher ...........................................................................48C. Performing a Robotic Self-Test ..............................................................49D. Cleaning the Ink Cartridges ..................................................................49E. Technical Support....................................................................................50
Index ........................................................................................................................52
iii
510963.qxd 11/2/2009 12:18 PM Page iii
There are interactive features that will allow you to jump to different locations within the document. Each listing inthe Table of Contents is interactive. Place the cursor oneither the words or the page number. A small hand with apointing finger icon appears. Click on the line with theicon and the document will jump to that page. If you wantto return to the Table of Contents, move the icon to the topof the page and click on the arrow marked TOC.Navigating through the Index is similar. Place the icon onone of the listings or page numbers, click on it, and it willmove to that page. The text relating to the Index listing will appear in red. Returning to the Index can be done byclicking on the arrow marked Index.
Interactive Feature in this PDF Document
Interactive.qxd 9/6/2005 3:30 PM Page 1
Getting Started 1
Section 1: Getting Started
THANK YOU…
...for purchasing the Bravo® Disc Publisher SE. Bravo is the perfect all-in-one solution for producing professional lookingCD-R and DVD-R discs. A wide variety of disc formats aresupported, including audio CDs, Video Cds, data discs andmore. Operation is simple and completely automatic once a job has been started.
To begin using your Disc Publisher, please read this manualcarefully. This Operator's Manual is a complete step-by-stepguide to quickly and easily create discs with your new DiscPublisher.
A separate Help file is provided with your Publisher thatexplains the operation of the Software. On a PC this is accessible via the software's help menu and the ? icon. On aMac this accessible in the Disc Publisher folder in the applications directory.
NOTE ON TERMS AND CONVENTIONS:
From this point forward, the following terms and conventionswill apply:
The Bravo Disc Publisher SE will be abbreviated simply as thePublisher.
Optical discs, which can include many different types of discsincluding CD-Rs, CD-RWs, DVD+/-Rs and more are allreferred to as CDs or discs. Please note that in order to copyand record DVDs, you will need to have purchased the DVDversion of the Publisher.
A. NOTE ON MODEL DIFFERENCES
The Bravo SE comes in three different models which are:
• Bravo SE AutoPrinter (No Drives) Print Only - See Section3A, C and D.
• Bravo SE Disc Publisher (DVD Drive) Burns and PrintsCD, DVDs and DVD-DL.
• Bravo SE Blu (BDR Drive)Burns and Prints CD, DVD,DVD-DL, BDR and BDR-DL.
510963.qxd 11/2/2009 12:18 PM Page 1
2 Getting Started
These instructions are written to apply to all models. For exam-ple there are no special instructions for burning Blu-ray discs ifyou have a Blu-ray model. The software simply recognizes thatyou have Blu-ray capable drives and adds the BDR media typeto the list of available media to burn.
B. CHOOSING A GOOD LOCATION• Place the Publisher in a location with adequate air
circulation to prevent internal heat build up. You will need at least 15.25" (38.73 cm) of over-head space to fullyopen the cover.
• Do not place the Publisher near heat sources such as radiators or air ducts, or in a place subject to direct sunlight, excessive dust, mechanical vibration or shock.
C. UNPACKING AND INSPECTION
While unpacking your Publisher, inspect the carton to ensurethat no damage has occurred during shipping. Make sure thatall supplied accessories are included with your unit.
The following items should be included:• Disc Publisher• Power Cord and Converter• One Three-Color (CMY) Ink Cartridge• Installation Disc• USB 2.0 Interface
Save the carton andpacking materials.They will come inhandy later if youever need to transport thePublisher and/orany of its parts andaccessories.
510963.qxd 11/2/2009 12:18 PM Page 2
Getting Started 3
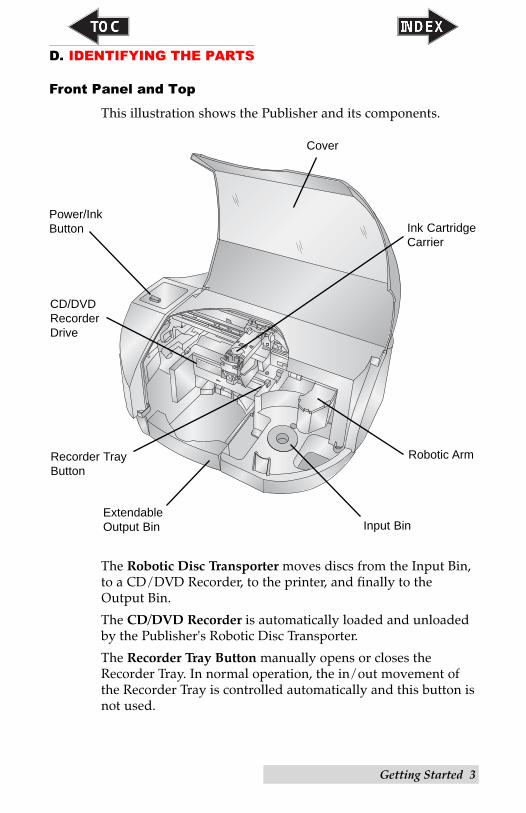
D. IDENTIFYING THE PARTS
Front Panel and Top
This illustration shows the Publisher and its components.
The Robotic Disc Transporter moves discs from the Input Bin,to a CD/DVD Recorder, to the printer, and finally to theOutput Bin.
The CD/DVD Recorder is automatically loaded and unloadedby the Publisher's Robotic Disc Transporter.
The Recorder Tray Button manually opens or closes theRecorder Tray. In normal operation, the in/out movement ofthe Recorder Tray is controlled automatically and this button isnot used.
ExtendableOutput Bin
Recorder TrayButton
Input Bin
Cover
Robotic Arm
Power/InkButton
CD/DVDRecorderDrive
Ink CartridgeCarrier
510963.qxd 11/2/2009 12:18 PM Page 3
4 Getting Started
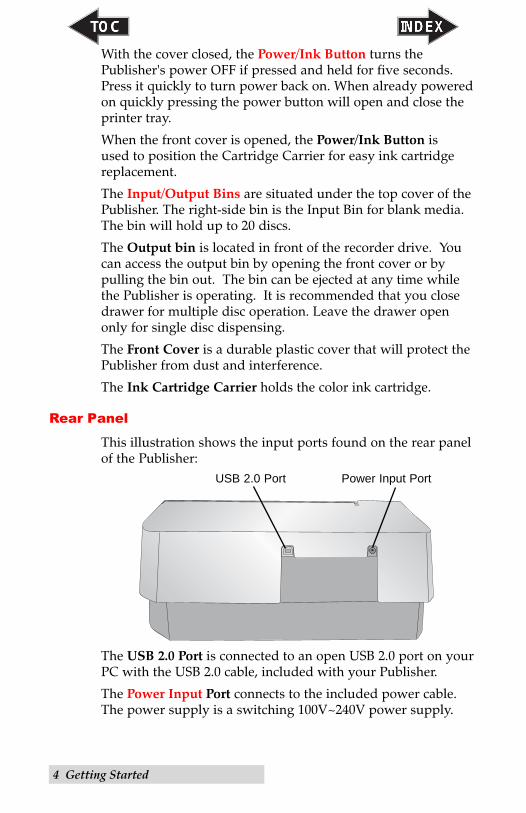
With the cover closed, the Power/Ink Button turns thePublisher's power OFF if pressed and held for five seconds.Press it quickly to turn power back on. When already poweredon quickly pressing the power button will open and close theprinter tray.
When the front cover is opened, the Power/Ink Button is used to position the Cartridge Carrier for easy ink cartridgereplacement.
The Input/Output Bins are situated under the top cover of thePublisher. The right-side bin is the Input Bin for blank media.The bin will hold up to 20 discs.
The Output bin is located in front of the recorder drive. Youcan access the output bin by opening the front cover or bypulling the bin out. The bin can be ejected at any time whilethe Publisher is operating. It is recommended that you closedrawer for multiple disc operation. Leave the drawer openonly for single disc dispensing.
The Front Cover is a durable plastic cover that will protect thePublisher from dust and interference.
The Ink Cartridge Carrier holds the color ink cartridge.
Rear Panel
This illustration shows the input ports found on the rear panelof the Publisher:
The USB 2.0 Port is connected to an open USB 2.0 port on yourPC with the USB 2.0 cable, included with your Publisher.
The Power Input Port connects to the included power cable.The power supply is a switching 100V~240V power supply.
Power Input PortUSB 2.0 Port
510963.qxd 11/2/2009 12:18 PM Page 4
Getting Started 5
E. PC SYSTEM REQUIREMENTSBefore getting started, it is important for you to verify thatyour PC meets the minimum system requirements.• Celeron processor or better running Windows XP, Vista or 7.• 512 MB or greater RAM• Free hard drive space of at least 10 GB.• Available USB 2.0 Port. (This looks the same as a USB 1.0
port. Make sure you have a USB 2.0 port for optimal performance)
If your PC does not have these minimum system requirements,system performance may not be acceptable.
F. MAC SYSTEM REQUIREMENTS
Before getting started, it is important for you to verify thatyour computer meets the recommended system requirements.
• G5 or Intel CPU running OS X version 10.5 or higher• 512 MB RAM• Free hard drive space of at least 10 GB• Available USB 2.0 Port• Do not connect the Publisher to any USB hubs or the USB
port on your keyboard. It should be connected directly toan onboard USB 2.0 port.
If your computer does not have at least these minimum systemrequirements, system performance may not be acceptable.
G. OVERVIEW OF OPERATION
Your new Publisher is an automated, precision device intendedfor continuous-duty publishing of discs. The following is adescription of the complete process of duplicating and printinga CD/DVD job on your Publisher:
1. Up to 20 blank discs may be loaded at one time into theInput Bin.
2. The Publisher's integrated Robotic Disc Transporter willfirst check your recorder drive for a disc by attemptingto"pick" from the recorder. Then, the Robotic DiscTransporter will pick a disc from the Input Bin.
510963.qxd 11/2/2009 12:18 PM Page 5
6 Getting Started
3. The Recorder Tray opens automatically and the RoboticDisc Transporter places a disc into the recorder. After thedisc is placed in the recorder, the Robotic Disc Transporterchecks the input stack to "see" if two discs were picked.
4. The Recorder Tray then automatically shuts. If a disc doesnot record properly (meaning that all or part of that disc isnot recordable), the Robotic Disc Transporter picks it out ofthe CD Tray and sends it to the Output Bin.
5. The Recorder is now writing to the disc. If you were tofully record a CD with data, audio, video or music (650MB), recording time is about 3 ½ minutes each. A full DVDrecords in about 7-15 minutes depending on the speed ofthe media to which you are recording. Most jobs don't fillthe entire disc, so recording time is usually less than this.After recording, the Recorder Tray opens automatically.The Robotic Disc Transporter will lift the disc out of theRecorder Tray. The Recorder Tray will close, and thePrinter Tray will open. The Robotic Disc Transporter willlower the disc into the Printer Tray, and the Printer Traywill then automatically close.
6. If publishing more than one disc, the Robotic DiscTransporter will load the Recorder Drive with a blank discfrom the Input Bin to start recording the next round.
7. Once recording has started on the next round, printing willstart with the recorded disc from the previous round. Thissimultaneous printing and recording greatly increases thethroughput of your Publisher.
8. Print time varies according to which print mode has beenselected (Section 3-A). In most cases, print time takes nomore than 2 minutes. After printing the first disc, thePublisher's Printer Disc Tray opens automatically. TheRobotic Disc Transporter moves the finished disc to theOutput Bin.
9. The Robotic Disc Transporter will now load the secondrecorded disc into the Printer Tray for printing.
10. The process starts over and repeats until all blank discs aregone or the number you have specified via software arecopied and printed.
510963.qxd 11/2/2009 12:18 PM Page 6
Hardware and Software Setup 7
Section 2: Hardware and SoftwareSetup
Setup
This section will describe the step-by-step process of setting upyour Publisher. This includes information on how to load thesupplies (ink and disc media) necessary to start producingdiscs.
A. INSTALLING THE PC SOFTWARE
The Installer Disc has a menu that will guide you through the process of setting up your Publisher. Please refer to the following for more information on each step:
1. Place the Optical Disc Publisher Installer CD in yourCDRom Drive. The Installer application should automati-cally launch in a few moments. If it does, proceed to Step 2.If it does not automatically launch, follow these steps:
• Double-click the My Computer Icon, then double-clickthe icon of the appropriate CD drive containing theSoftware Installer disc.
• Double-click Setup.exe2. Follow the on screen instructions. They will guide you
step-by-step through the installation process.
B. INSTALLING THE MAC SOFTWARE
The Installer Disc will guide you through the process of settingup your Publisher. Please refer to the following for more information on each step: Install the software as follows:
a. Insert the Installation CD-ROM in your system's CD-ROMdrive.
b. Double-click the CD-ROM icon.
c. Double-click on the Disc Publisher SE Installer.pkg fileicon. Follow the on-screen instructions.
510963.qxd 11/2/2009 12:18 PM Page 7
8 Hardware and Software Setup
C. HARDWARE SETUP
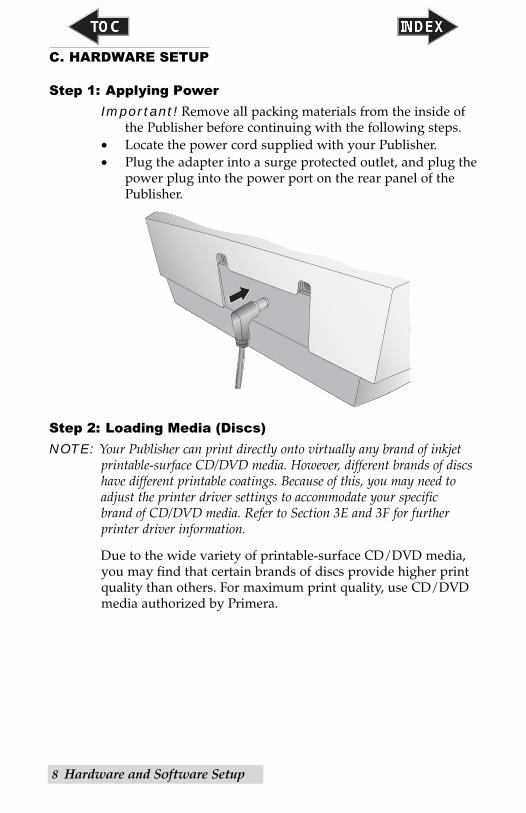
Step 1: Applying PowerImportant! Remove all packing materials from the inside of
the Publisher before continuing with the following steps.• Locate the power cord supplied with your Publisher.• Plug the adapter into a surge protected outlet, and plug the
power plug into the power port on the rear panel of thePublisher.
Step 2: Loading Media (Discs)NOTE: Your Publisher can print directly onto virtually any brand of inkjet
printable-surface CD/DVD media. However, different brands of discshave different printable coatings. Because of this, you may need toadjust the printer driver settings to accommodate your specific brand of CD/DVD media. Refer to Section 3E and 3F for furtherprinter driver information.
Due to the wide variety of printable-surface CD/DVD media,you may find that certain brands of discs provide higher printquality than others. For maximum print quality, use CD/DVDmedia authorized by Primera.
510963.qxd 11/2/2009 12:18 PM Page 8
Hardware and Software Setup 9
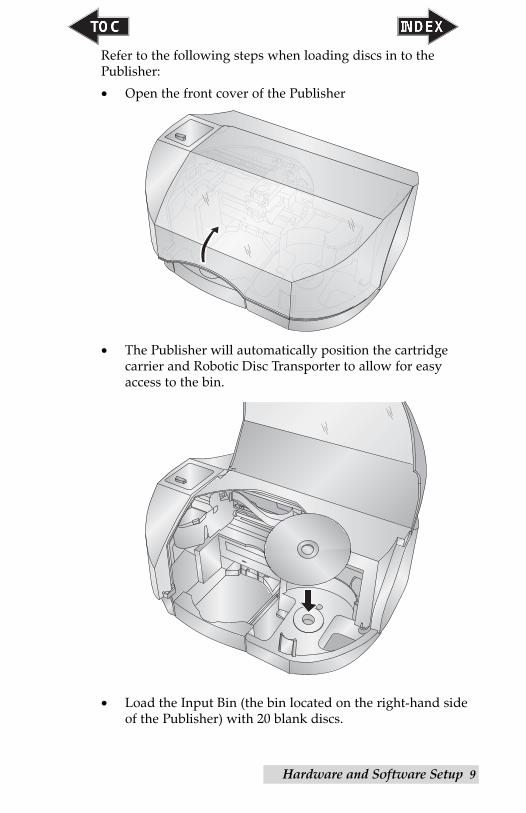
Refer to the following steps when loading discs in to thePublisher:
• Open the front cover of the Publisher
• The Publisher will automatically position the cartridge carrier and Robotic Disc Transporter to allow for easyaccess to the bin.
• Load the Input Bin (the bin located on the right-hand sideof the Publisher) with 20 blank discs.
510963.qxd 11/2/2009 12:18 PM Page 9
10 Hardware and Software Setup
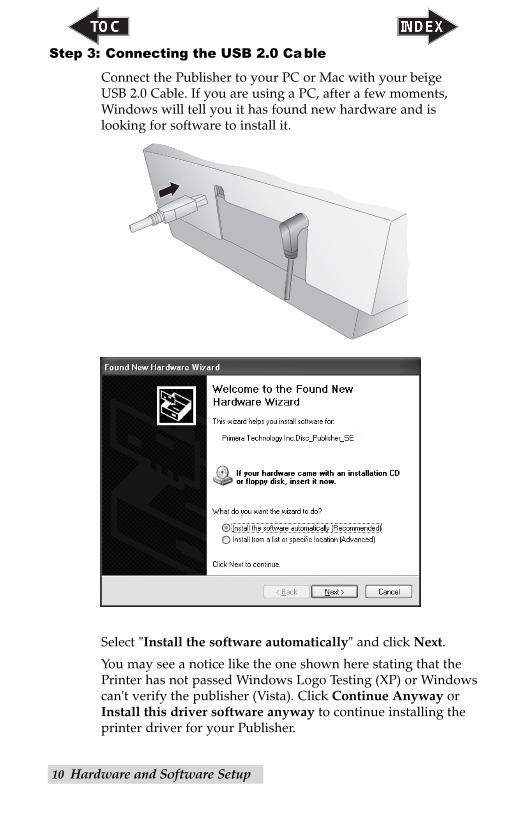
Step 3: Connecting the USB 2.0 Cable
Connect the Publisher to your PC or Mac with your beige USB 2.0 Cable. If you are using a PC, after a few moments,Windows will tell you it has found new hardware and is looking for software to install it.
Select "Install the software automatically" and click Next.
You may see a notice like the one shown here stating that thePrinter has not passed Windows Logo Testing (XP) or Windowscan't verify the publisher (Vista). Click Continue Anyway orInstall this driver software anyway to continue installing theprinter driver for your Publisher.
510963.qxd 11/2/2009 12:18 PM Page 10
Hardware and Software Setup 11
If you are using a Mac:
Connect the Publisher to your PC with your beige USB 2.0Cable.
The printer driver will automatically install. To verify the driver installed or reinstall go to the Mac System Preferences(Apple - System Preferences). Click the Print and Fax Icon.
Windows XP Message Windows Vista/7 Message
510963.qxd 11/2/2009 12:18 PM Page 11
12 Hardware and Software Setup
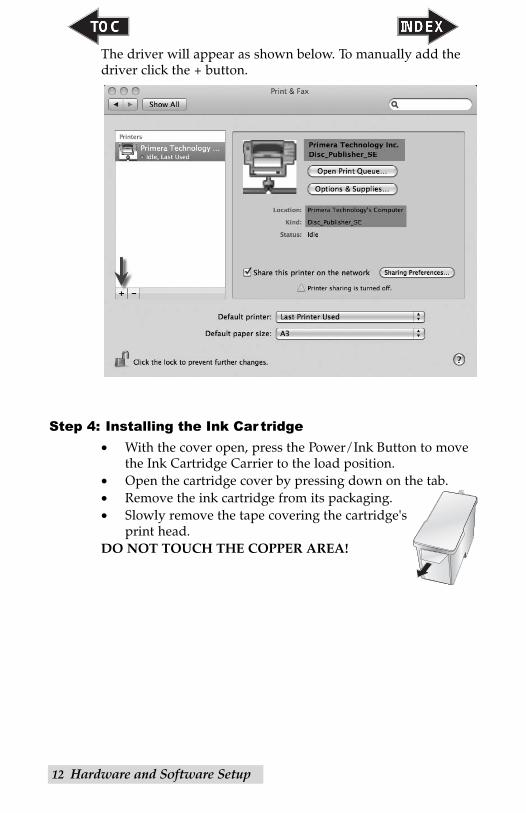
The driver will appear as shown below. To manually add thedriver click the + button.
Step 4: Installing the Ink Car tridge• With the cover open, press the Power/Ink Button to move
the Ink Cartridge Carrier to the load position.• Open the cartridge cover by pressing down on the tab.• Remove the ink cartridge from its packaging.• Slowly remove the tape covering the cartridge's
print head. DO NOT TOUCH THE COPPER AREA!
510963.qxd 11/2/2009 12:18 PM Page 12
Hardware and Software Setup 13
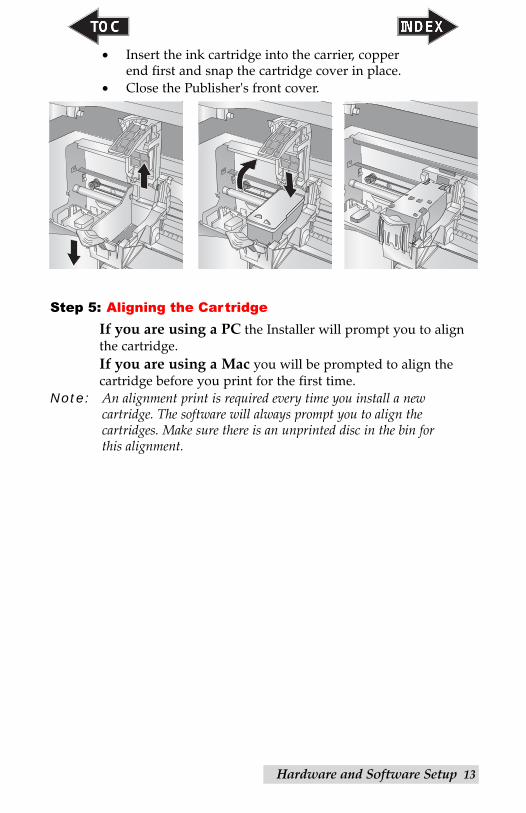
• Insert the ink cartridge into the carrier, copper end first and snap the cartridge cover in place.
• Close the Publisher's front cover.
Step 5: Aligning the CartridgeIf you are using a PC the Installer will prompt you to alignthe cartridge. If you are using a Mac you will be prompted to align thecartridge before you print for the first time.
Note: An alignment print is required every time you install a new cartridge. The software will always prompt you to align the cartridges. Make sure there is an unprinted disc in the bin for this alignment.
510963.qxd 11/2/2009 12:18 PM Page 13
14 Creating Discs
Section 3: Creating Discs
There are two main components to creating discs, printing andburning. For PC, SureThing CD Labler is used to design theimage to print on the disc. For Mac, Disc Cover is used todesign the image to print on disc. For Mac and PC,PTPublisher controls the recording and allows you to select theimage to be printed to your discs.
A. TUTORIAL: COPY A DISC (PRINT ONLY FORAUTOPRINTER USERS)Note: PTPublisher functions virtually the same on both Mac and PC.
Every effort was made to make them look and function the same.However, due the unique benefits and limitations of both operatingsystems there are subtle differences. Where important, those differences will be highlighted. In general, these instructions willapply to both the Mac and PC editions.
Note for AutoPrinter Users: Start at step 4 after choosing Print Onlyfrom the project starter window.
There are three basic steps to any project. 1. Add Data 2. Adda Print File. 3. Set the number of copies and adjust options(Summary). The instructions below explain how to do themost common project - A Copy Project.
A Copy Project can be used to copy any CD, DVD, DVD-DL or Blu-ray master. This job type reads the master disc from theDisc Publisher drive to the hard drive of your computer. The master is stored in the Global Image format (*.gi) in a temporary location on your computer. PTPublisher uses thistemporary file to make all subsequent copies that are requested. The master disc is read only once to create the initial temporary file.
Recommended for: All CD, DVD or Blu-ray content or disctypes (Audio CD, Data CD, Software Install Disc, Video CD,DVD Video, Blu-ray Video: CDR, DVD-R, DVD+R, DVD-ROM,DVD+DL, DVD-DL, BDR, BDR-DL, etc.). This is best used forsingle runs where you will not need to make additional copiesof the master disc a later time.
This project requires a master disc. If you do not have oneuse another project type. (See Section 3B)
510963.qxd 11/2/2009 12:18 PM Page 14
Creating Discs 15
1. Select Copy Project from the Starter Window or the NewProject Panel on the left side of the screen. Step one of theCopy Disc wizard will be displayed.
2. You will be prompted to place the disc you would like to copy into the drive inside the Disc Publisher. Thetray door will open automatically. Place the disc in thedrive and click OK.
3. The Publisher will close the drive and read the contents of thedisc. It will display disc type (CD/DVD) and show the size ofthe disc in Megabytes. Verify this information is correct andclick the next arrow to continue.
AutoPrinter users Start here after choosing PrintOnly from the project starter window.
4. Select the print label file by clicking the select a label button. When you have selected print label file, click thenext arrow. There are several ways to select a print file. See the explainations below for more information.
For any job type you choose you will be prompted to selecta label file to print. You may select an existing label, createa label or choose to print nothing. Simply click the nextarrow to print nothing on the disc. Otherwise follow thesteps below.
4A. Select a Label
1. Click the browse button to open a browse window tochoose your print file.
2. Double Click on the file to add it to your project. Youmay add any BMP, JPG, TIFF, SureThing (PC) or DiscCover (Mac) file. SureThing or Disc Cover files areautomatically formated correctly. All other file typesshould be 4.72" x 4.72" square. For best print quality theimage resolution should be atleast 300 dpi.
510963.qxd 11/2/2009 12:18 PM Page 15
16 Creating Discs
4B. Create a Label
1. Click the Create a Label button to open the SureThingCD Labler or Disc Cover program. These programs willallow you create a label.
2. Follow the instructions in Section 3 D or E to create alabel using Sure Thing or Disc Cover.
3. Once you have designed the label, save it and close theprogram. A message will appear asking if you wouldlike to use the label file you just created in your currentproject. Click Yes to use it in your project. Once youchoose your label a preview will be displayed.
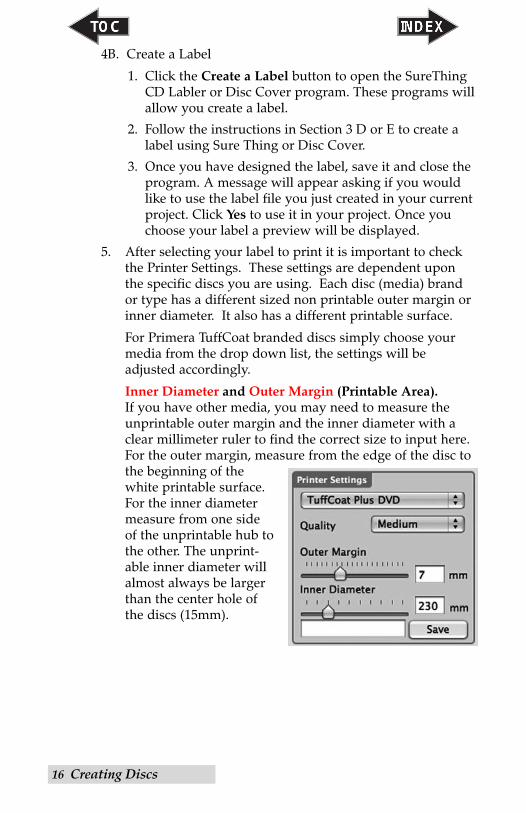
5. After selecting your label to print it is important to checkthe Printer Settings. These settings are dependent uponthe specific discs you are using. Each disc (media) brandor type has a different sized non printable outer margin orinner diameter. It also has a different printable surface.
For Primera TuffCoat branded discs simply choose yourmedia from the drop down list, the settings will be adjusted accordingly.
Inner Diameter and Outer Margin (Printable Area).If you have other media, you may need to measure theunprintable outer margin and the inner diameter with aclear millimeter ruler to find the correct size to input here.For the outer margin, measure from the edge of the disc tothe beginning of thewhite printable surface.For the inner diametermeasure from one sideof the unprintable hub tothe other. The unprint-able inner diameter willalmost always be largerthan the center hole ofthe discs (15mm).
510963.qxd 11/2/2009 12:18 PM Page 16
Creating Discs 17
Print Quality. All Primera media is automatically defaulted to the best print quality. Other media may alsoaccept the best quality setting. However, with some mediayou may have to print at a lower print quality to eliminatesmudging and bleeding. Some lower quality media cannot hold all of the ink that is printed at the highest qualitysettings.
Click the next arrow.
6. The third and final step of any project is the summaryscreen. On this screen you can review the data and printselected for the project , set the number of copies, adjustburn options and name the job. Click the Options buttonto access burn speed and other options. If you do notadjust the project options, optimal settings will automati-cally be selected for you.
Click the "Go" button to start the job.
B. USING PTPUBLISHER
PTPublisher allows you to record and print CDs, DVDs, andBDRs (Blu-ray) using a variety of project types describedbelow. When the software is opened these projects will beavailable from the main starter menu. At any point you canaccess these project by clicking the project in the New Projectsarea on the left.
B.1 Project TypesNote: “Print Only” Project is the only project available for AutoPrinters.
Copy ProjectA Copy Project can be used to copy any CD, DVD, DVD-DL orBlu-ray master. This job type reads the master disc from theDisc Publisher drive to the hard drive of your computer. The master is stored in the Global Image format (*.gi) in a temporary location on your computer. PTPublisher uses this temporary file to make all subsequent copies that arerequested. The master disc is read only once to create the initial temporary file.
510963.qxd 11/2/2009 12:18 PM Page 17
18 Creating Discs
Recommended for: All CD, DVD or Blu-ray content or disctypes (Audio CD, Data CD, Software Install Disc, Video CD,DVD Video, Blu-ray Video: CDR, DVD-R, DVD+R, DVD-ROM,DVD+DL, DVD-DL, BDR, BDR-DL, etc.). This is best used forsingle runs where you will not need to make additional copiesof the master disc a later time.
The project requires a master disc. If you do not have oneuse another project type.
Data ProjectA data disc project allows you to create a data disc on a CD,DVD or BDR using files on your hard drive. You can replicatethe file structure on your hard drive or you can create yourown customized file structure.
Recommended for: Use the data disc job to create softwareinstallation discs, or data discs containing image files, presenta-tion files, PDFs, documents, MP3s or any other file type. Datadiscs can generally ONLY be read by computers.
Audio ProjectThis project allows you to create an audio CD using WAV, MP3,AIFF or WMA files. Note: this procedure is not for copyingalready created and mastered original audio CDs. If you havealready created a master audio CD in another application orthis application and you would like to make additional copies,please use the Copy project.
Recommended for: Creating Audio CDs
Video ProjectThis project involves extracting the Audio_TS and Video_TSfolders from the master DVD or directing your DVD authoringsoftware to output into Audio_TS and Video_TS folders insteadof burning a master disc. For Blu-ray Video, this methodinvolves extracting the Blu-ray folders from the master DVD or directing your Blu-ray authoring software to output intoBlu-ray folders instead of burning a master disc. Note: ThePTPublisher software was not meant for authoring DVDs orBlu-ray. You must use another software to burn a master DVDfirst. Make sure that disc plays and the menus work on all sys-tems. You may also copy a master DVD using Copy Project orImage Project. However, the video project is the recommendedmethod.
510963.qxd 11/2/2009 12:18 PM Page 18
Creating Discs 19
Recommend for: This method is especially useful if you arehaving compatibility problems with the formatting created bythe DVD/Blu-ray authoring software or with the media type ofthe master disc. This method removes some potentially compli-cating variables from the DVD/Blu-ray Video creation process.This method eliminates the need for a master disc. Error orincompatibilities can be introduced into your master by thedrive burning the master, the disc the master is burned on orthe software burning the master. Instead masters can be storedon a large hard drive. This allows you to burn additionalcopies at any time with out locating the master. If a backupstrategy is employed, hard drive storage is more reliable overthe long term since it is not susceptible to scratching like amaster disc.
Image ProjectThe Image Project allows you to copy any CD, DVD, or BDRmaster. You can use an existing image or create an image andthen use it in the project. The master disc is read from thespecified drive to the hard drive of your computer. The masteris stored in the Global Image format (*.gi) in a user specifiedlocation on your computer. PTPublisher uses this file to makeall subsequent copies that are requested. The master disc isread only once to create the initial file.
Recommended for: All CD, DVD or Blu-ray content or disctypes (Audio CD, Data CD, Software Install Disc, Video CD,DVD Video, Blu-ray Video: CDR, DVD-R, DVD+R, DVD-ROM,DVD+DL, DVD-DL, BDR, BDR-DL, etc.). This is best used forjobs that are repeated on a regular basis where you will need to make additional copies of the master disc at a later time.This project type stores the master on your hard drive. Thissaves the time it takes to read in the master and reduces thepossibility of defects being introduced into the master disc.
B.2 Steps to any Project.Step 1: Add Data
Depending on your job type this step will be different. Youmay choose your master, choose data on your hard drive,choose tracks to your audio CD, choose your disc image orDVD or BDR video folders.
510963.qxd 11/2/2009 12:18 PM Page 19
20 Creating Discs
On most job types a volume label can also be created at thisstep. This is the label that will appear when this disc is inserted into a computer drive.
When you have selected the data you would like to burn clickthe next button.
Step 2: Add Print
If you want something printed on your disc, this is where youchoose an existing label or create it. Follow these steps.
To Select an exiting label:
1. Click the browse button to open a browse window or dragand drop files to the print file box or click the drop downarrow to choose previously used labels.
2. Choose any supported file types of JPG, BMP, TIFF,SureThing (PC) Disc Cover (Mac). Files should be4.72"(120mm) square. For best print quality the image resolution should be at least 300 dpi. Non-conforming fileswill be stretched or increased in size to fill the full size ofthe disc.
3. Once the print file is selected a preview will be displayed.
4. At this point you may choose to move on to the next stepby clicking the next arrow. However, there are print qualityand print area settings that you may want to adjust.
5. Several preset media types that correspond with the mediaavailable at our webstore can be selected the Media dropdown box. When you select a media type from this box thePrint Quality, Outer Margin and Inner Diameter are auto-matically adjusted to fit that media.
6. To manually set these settings simply edit them. The mediatype will automatically change to Custom. You can saveyour adjusted settings by typing the name of the profile andclicking Save. This name and the associated settings willnow be available to choose in the media drop down box.
Below is a description of each of the available settings.
• Quality. There are several choices here that correspond tothe speed of the print and the saturation of the image.Higher quality = slower print speed and more vibrant andcrisp prints.
510963.qxd 11/2/2009 12:18 PM Page 20
Creating Discs 21
• Outer Margin. Disc from other manufacturers vary widelyregarding how far the printable surface extends to the edgeof the disc. Measure the distance from the edge of the discto the start of the white printable area. This will be between0 and 2 mm in increments of .1mm.
• Inner Diameter. Discs from other manufactures vary widelyregarding how for the printable surface extends to theinside of the disc. Measure the distance from one side of theinner unprintable center hub to the other. This will bebetween 15 mm and 50 mm displayed in increments of.1mm.
To Create a new label:
1. Click the Create Label button.
2. The label design application SureThing (PC) or Disc Cover(Mac) will open.
Design your label using the included backgrounds and clipart. You may also add your own image. Add text andany other design features.
3. Save your label by going to the File menu - Save as.
4. Close SureThing or Disc Cover.
5. You will be asked if you would like to use the label you justcreated in your current project. Click Yes.
6. You may now choose to adjust print settings as describedabove.
Step 3: Start Project (Summary - Settings)
In this step you can verify data and print information and setthe number of copies. Optionally you may choose to edit burnsettings. However, the default settings are optimized to giveyou the best quality burn. Simply click “Go” to start the job.
A summary of all the options on this step is listed below.
Project Summary
This areas displays information about the data you have chosen, a thumbnail and file name of the print file you havechosen and picture and description of the Disc Publisher Robot you have chosen. If any of this information is incorrect,use the back arrow at the bottom of the screen to go back toappropriate window to correct it.
510963.qxd 11/2/2009 12:18 PM Page 21
22 Creating Discs
• Change Robot. This is only available with multiple robotsconnected. Click it to change the robot to which this projectwill be sent.
• Drives. With an Xi2 connected you can choose to burn toboth drives or the top or bottom drive only.
• Protect Video with PTProtect (PC Only). This is only available in the DVD Video and ISO image Project withpurchase of PTProtect USB dongle. See the PTProtect section for more information.
• Save Project. On a Mac, at the top of the summary windowyou can type the name of your job and then click save tosave it anywhere on your computer. For PC, you can save aproject at any time by opening the file menu and choosingSave Project.
A project file is a small file that holds the locations of filesto be burned, the location of the print file to be printed, andany specific project settings such as burn speed and num-ber of copies. Note: A saved project file does not includethe data to be burned or the print file to be printed. If thesefiles are moved or deleted, the project file will need to beedited to reflect these changes.
• Schedule Project. Click this button to schedule this job torun daily weekly or monthy at a specific time. For moreinformation on this topic see Section 3B.5.
Project Options
For any job type you can click on the Options button for additional options for that job. Below is a description of allProject Options. Not all options are available for all ProjectTypes. If the options are not available for the chosen projecttype, they will be hidden. If you would like these settings to bethe default for all projects of this type click "Save as Defaults".
• Recording Speed. Set the recording speed with this option.The fastest recording speed is determined by the lowestmaximum speed of the blank media or the drive. For example: The "fastest" speed in a 20x max drive with 16xmax media would burn at 16x. In many cases a slowerspeed should be selected to achieve the least number ofrejected discs.
510963.qxd 11/2/2009 12:18 PM Page 22
Creating Discs 23
• Recording Type.
Track-at-Once. This is the default. For track at once, the laseris turned off after each track, which produces a two-secondgap. The track-at-once feature, enables songs and data to bewritten at different intervals. The lead-in sectors that arewritten at the beginning of each session contain the locationwhere additional data can be placed on the disc.
Disc-at-Once. If this option is checked, the lead-in, all thetracks and lead-out are written in same action. The laser iskept on for the entire session.
• Closed-Finalized/Open. A closed disc means no additionaldata can be added. If the disc is left open additional datacan be added in another session.
• File System. The file system is the method by which thefiles and folder are arranged on the burned disc. Joliet isbest for most CD burning applications. UDF 1.02 is best forDVD burning. UDF 2.6 is used for Blu-ray. The recordingengine can also add a bridge which effectively adds anoth-er file system to the disc. UDF1.02 with a Joliet bridge is thedefault.
Most of the differences between file system types relate tofile name length and character restrictions and folder leveldepth. ISO is the most restrictive and oldest and UDF is theleast restrictive newest file type. The complete list of speci-fications for each is several hundred pages. Macs and PCscan read both types.
If you would like to make your burned disc compatiblewith very old operating systems or other less popular oper-ating systems use the ISO system.
• Test Record. If this option is checked the recorder tests adisc for record ability before burning. The drive laser is setto read power and the entire surface is scanned for errors.This takes the same amount of time as recording. (DVD+Rmedia can not be tested) This options can not be used incombination with normal recording or verify.
• Verify. If this option is checked, it compares the copy withthe master bit for bit. If it finds a discrepancy it rejects thedisc. Verify is an extremely high quality standard. If thedisc is audio or video, the discs may still be playable and
510963.qxd 11/2/2009 12:18 PM Page 23
24 Creating Discs
the errors may not be detectable by human eyes or ears.This operation may be useful to verify software installationdiscs where it is extremely important to have accuratecopies of all installation files. Checking this option willdouble the time it takes to record each disc.
• Set Time and Date to Mastering Time. If this option ischecked, all files on the disc will automatically be set to thecurrent time and date.
B.3 Publisher StatusThe status window is automatically displayed when a jobstarts. You may also access it at any time by clicking the MoreStatus link under the picture and description of the robot connected. Publisher Status is only available if the Publisher is connected.
• If no errors are present, the green check button will be displayed with a Ready indication to the left.
• If errors are present a red exclamation button will be dis-played with the error explained to the right. At times theentire error will not be visible. Click More Status to viewthe complete error.
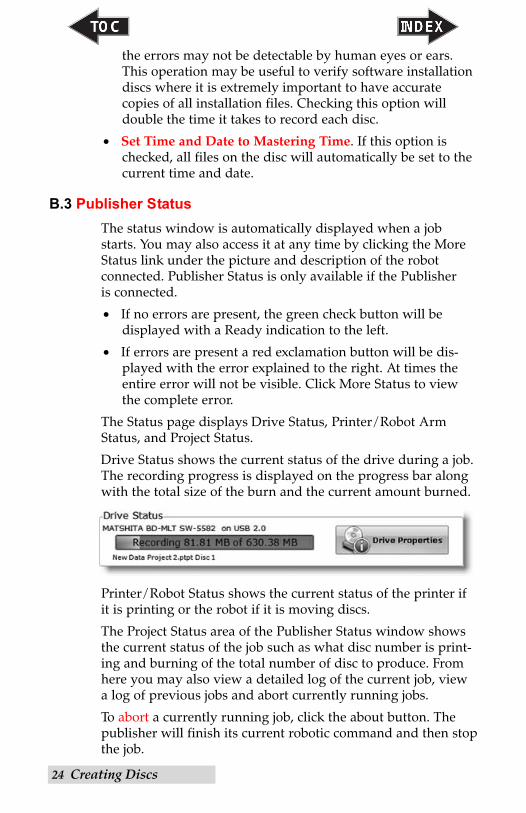
The Status page displays Drive Status, Printer/Robot ArmStatus, and Project Status.
Drive Status shows the current status of the drive during a job.The recording progress is displayed on the progress bar alongwith the total size of the burn and the current amount burned.
Printer/Robot Status shows the current status of the printer ifit is printing or the robot if it is moving discs.
The Project Status area of the Publisher Status window showsthe current status of the job such as what disc number is print-ing and burning of the total number of disc to produce. Fromhere you may also view a detailed log of the current job, viewa log of previous jobs and abort currently running jobs.
To abort a currently running job, click the about button. Thepublisher will finish its current robotic command and then stopthe job.
510963.qxd 11/2/2009 12:18 PM Page 24
Creating Discs 25
Queue Project. To queue another project to run after the current one is finished simply setup the project as you normally would. When you get to the third step of theproject setup wizard, if a project is currently running aQueue button will appear instead of a Go button. Clickit to queue the job.
B.4 Backup Project. (PC Disc Publishers Only)To create a new backup project you must setup a data projectand then schedule it. Follow these steps:
1. Choose Data Project from the project starter window.
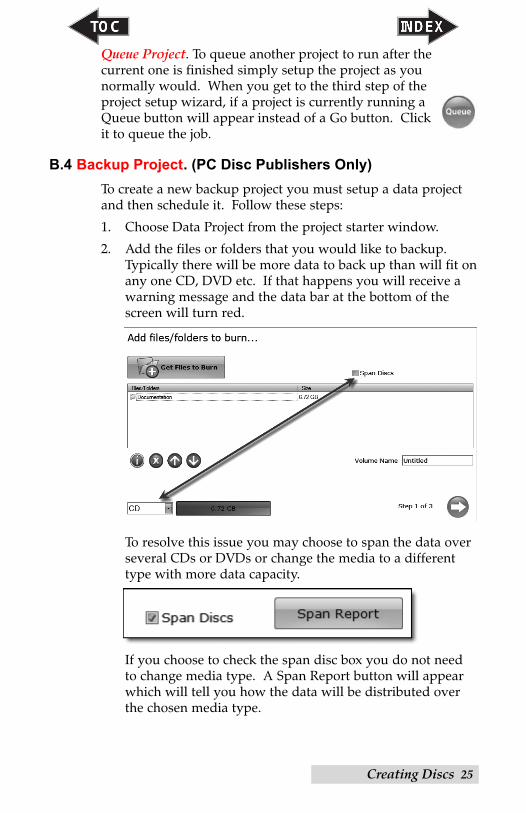
2. Add the files or folders that you would like to backup.Typically there will be more data to back up than will fit onany one CD, DVD etc. If that happens you will receive awarning message and the data bar at the bottom of thescreen will turn red.
To resolve this issue you may choose to span the data overseveral CDs or DVDs or change the media to a differenttype with more data capacity.
If you choose to check the span disc box you do not needto change media type. A Span Report button will appearwhich will tell you how the data will be distributed overthe chosen media type.
510963.qxd 11/2/2009 12:18 PM Page 25
26 Creating Discs
Regardless of the media type selected for back up projectsit is recommended that span discs be checked to accommo-date future backups of the same files/folders which maybe larger.
Important Note: It is not possible to span a single large file over multiple discs.
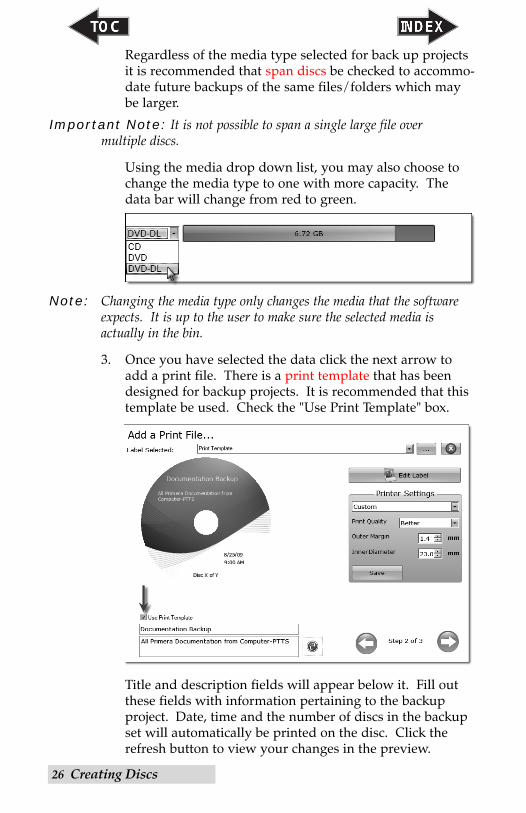
Using the media drop down list, you may also choose tochange the media type to one with more capacity. Thedata bar will change from red to green.
Note: Changing the media type only changes the media that the softwareexpects. It is up to the user to make sure the selected media is actually in the bin.
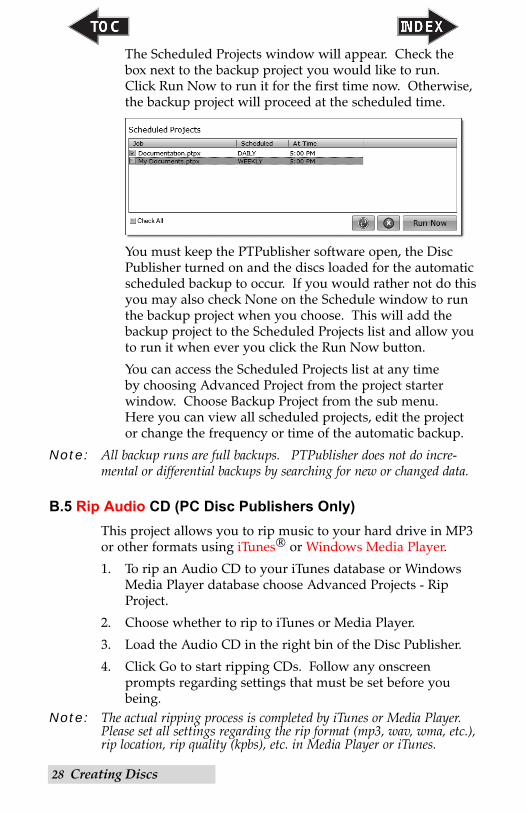
3. Once you have selected the data click the next arrow toadd a print file. There is a print template that has beendesigned for backup projects. It is recommended that thistemplate be used. Check the "Use Print Template" box.
Title and description fields will appear below it. Fill outthese fields with information pertaining to the backup project. Date, time and the number of discs in the backupset will automatically be printed on the disc. Click therefresh button to view your changes in the preview.
510963.qxd 11/2/2009 12:19 PM Page 26
Creating Discs 27
4. Click the next button to display a summary of the project.Click Schedule Project to convert this data project into abackup project. You will be prompted to save your project.Do not move projects once you have saved them. Alwayschoose only one copy even if your project will be spannedacross multiple discs.
Once the project has been saved the Schedule window willappear. Set the frequency of the backup and the time ofday. Click Schedule.
510963.qxd 11/2/2009 12:19 PM Page 27
28 Creating Discs
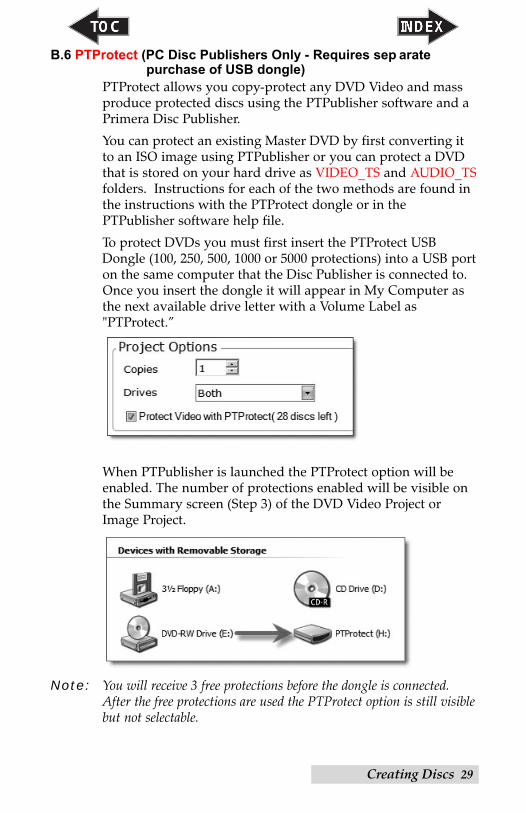
The Scheduled Projects window will appear. Check thebox next to the backup project you would like to run.Click Run Now to run it for the first time now. Otherwise,the backup project will proceed at the scheduled time.
You must keep the PTPublisher software open, the DiscPublisher turned on and the discs loaded for the automaticscheduled backup to occur. If you would rather not do thisyou may also check None on the Schedule window to runthe backup project when you choose. This will add thebackup project to the Scheduled Projects list and allow youto run it when ever you click the Run Now button.
You can access the Scheduled Projects list at any time by choosing Advanced Project from the project starter window. Choose Backup Project from the sub menu. Here you can view all scheduled projects, edit the projector change the frequency or time of the automatic backup.
Note: All backup runs are full backups. PTPublisher does not do incre-mental or differential backups by searching for new or changed data.
B.5 Rip Audio CD (PC Disc Publishers Only)This project allows you to rip music to your hard drive in MP3or other formats using iTunes® or Windows Media Player.
1. To rip an Audio CD to your iTunes database or WindowsMedia Player database choose Advanced Projects - RipProject.
2. Choose whether to rip to iTunes or Media Player.
3. Load the Audio CD in the right bin of the Disc Publisher.
4. Click Go to start ripping CDs. Follow any onscreenprompts regarding settings that must be set before youbeing.
Note: The actual ripping process is completed by iTunes or Media Player.Please set all settings regarding the rip format (mp3, wav, wma, etc.),rip location, rip quality (kpbs), etc. in Media Player or iTunes.
510963.qxd 11/2/2009 12:19 PM Page 28
Creating Discs 29
B.6 PTProtect (PC Disc Publishers Only - Requires sep arate purchase of USB dongle)
PTProtect allows you copy-protect any DVD Video and massproduce protected discs using the PTPublisher software and aPrimera Disc Publisher.
You can protect an existing Master DVD by first converting itto an ISO image using PTPublisher or you can protect a DVDthat is stored on your hard drive as VIDEO_TS and AUDIO_TSfolders. Instructions for each of the two methods are found inthe instructions with the PTProtect dongle or in thePTPublisher software help file.
To protect DVDs you must first insert the PTProtect USBDongle (100, 250, 500, 1000 or 5000 protections) into a USB porton the same computer that the Disc Publisher is connected to.Once you insert the dongle it will appear in My Computer asthe next available drive letter with a Volume Label as"PTProtect.”
When PTPublisher is launched the PTProtect option will beenabled. The number of protections enabled will be visible onthe Summary screen (Step 3) of the DVD Video Project orImage Project.
Note: You will receive 3 free protections before the dongle is connected.After the free protections are used the PTProtect option is still visiblebut not selectable.
510963.qxd 11/2/2009 12:19 PM Page 29
30 Creating Discs
C. CREATING A PRINT LABEL USING SURETHING (PC)
The SureThing Disc Labeler software included with yourPublisher is a great tool for creating professional looking discs.You can use SureThing's Smart Designs to quickly label a disc,or easily import your own design in many popular file formats.The Help section included with the software will provide complete instructions on all the features in this package. (Go tothe Help Menu - Choose Contents) The following is a tutorialon creating a basic disc design:
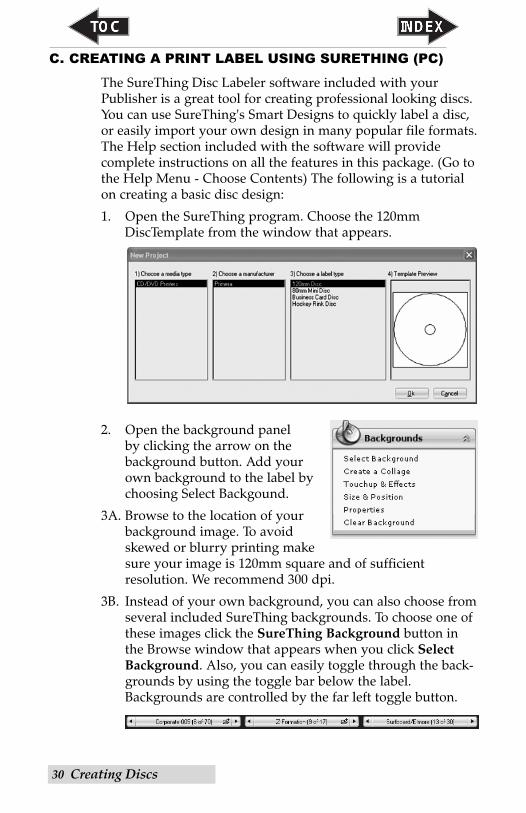
1. Open the SureThing program. Choose the 120mmDiscTemplate from the window that appears.
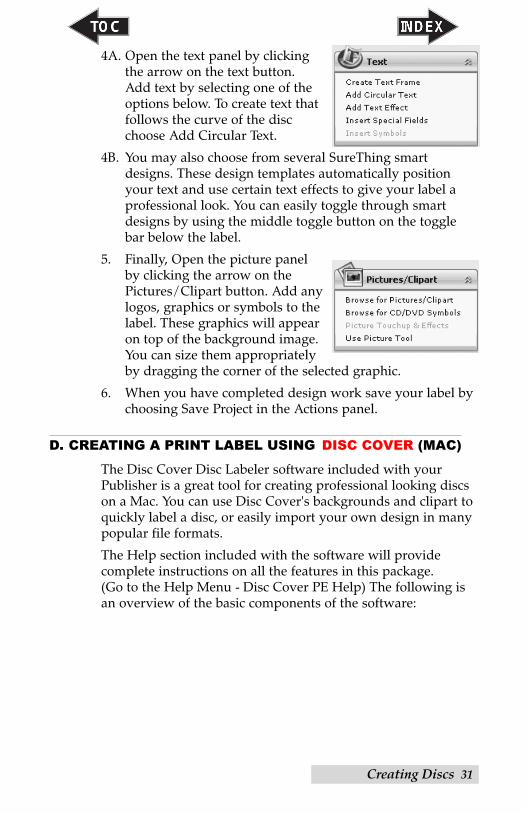
2. Open the background panel by clicking the arrow on thebackground button. Add yourown background to the label bychoosing Select Backgound.
3A. Browse to the location of yourbackground image. To avoidskewed or blurry printing makesure your image is 120mm square and of sufficient resolution. We recommend 300 dpi.
3B. Instead of your own background, you can also choose fromseveral included SureThing backgrounds. To choose one ofthese images click the SureThing Background button inthe Browse window that appears when you click SelectBackground. Also, you can easily toggle through the back-grounds by using the toggle bar below the label.Backgrounds are controlled by the far left toggle button.
510963.qxd 11/2/2009 12:19 PM Page 30
Creating Discs 31
4A. Open the text panel by clickingthe arrow on the text button.Add text by selecting one of theoptions below. To create text thatfollows the curve of the discchoose Add Circular Text.
4B. You may also choose from several SureThing smartdesigns. These design templates automatically positionyour text and use certain text effects to give your label aprofessional look. You can easily toggle through smartdesigns by using the middle toggle button on the togglebar below the label.
5. Finally, Open the picture panelby clicking the arrow on thePictures/Clipart button. Add anylogos, graphics or symbols to thelabel. These graphics will appearon top of the background image.You can size them appropriatelyby dragging the corner of the selected graphic.
6. When you have completed design work save your label bychoosing Save Project in the Actions panel.
D. CREATING A PRINT LABEL USING DISC COVER (MAC)
The Disc Cover Disc Labeler software included with yourPublisher is a great tool for creating professional looking discson a Mac. You can use Disc Cover's backgrounds and clipart toquickly label a disc, or easily import your own design in manypopular file formats.
The Help section included with the software will provide complete instructions on all the features in this package. (Go to the Help Menu - Disc Cover PE Help) The following isan overview of the basic components of the software:
510963.qxd 11/2/2009 12:19 PM Page 31
32 Creating Discs
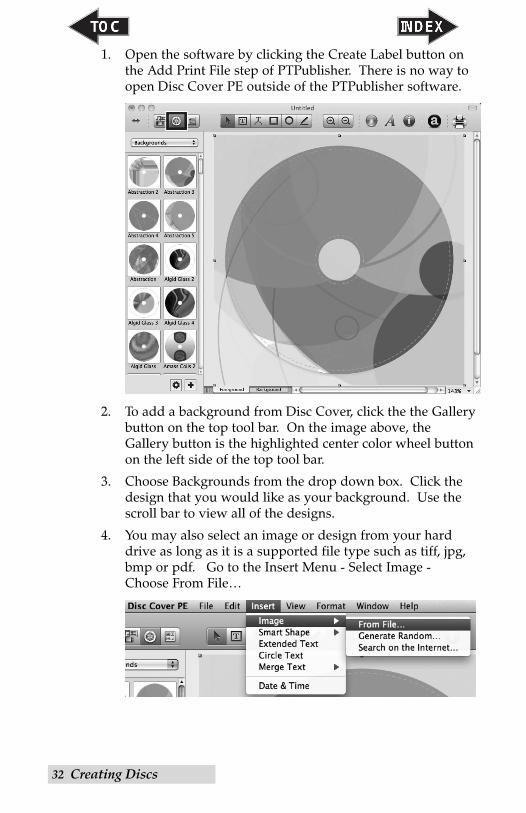
1. Open the software by clicking the Create Label button onthe Add Print File step of PTPublisher. There is no way toopen Disc Cover PE outside of the PTPublisher software.
2. To add a background from Disc Cover, click the the Gallerybutton on the top tool bar. On the image above, theGallery button is the highlighted center color wheel buttonon the left side of the top tool bar.
3. Choose Backgrounds from the drop down box. Click thedesign that you would like as your background. Use thescroll bar to view all of the designs.
4. You may also select an image or design from your harddrive as long as it is a supported file type such as tiff, jpg,bmp or pdf. Go to the Insert Menu - Select Image -Choose From File…
510963.qxd 11/2/2009 12:19 PM Page 32
Creating Discs 33
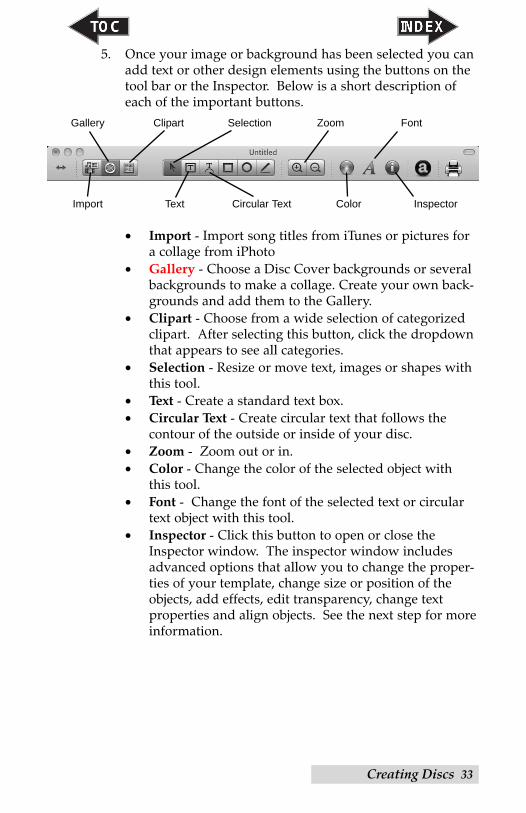
5. Once your image or background has been selected you canadd text or other design elements using the buttons on thetool bar or the Inspector. Below is a short description ofeach of the important buttons.
• Import - Import song titles from iTunes or pictures fora collage from iPhoto
• Gallery - Choose a Disc Cover backgrounds or severalbackgrounds to make a collage. Create your own back-grounds and add them to the Gallery.
• Clipart - Choose from a wide selection of categorizedclipart. After selecting this button, click the dropdownthat appears to see all categories.
• Selection - Resize or move text, images or shapes withthis tool.
• Text - Create a standard text box.• Circular Text - Create circular text that follows the
contour of the outside or inside of your disc. • Zoom - Zoom out or in.• Color - Change the color of the selected object with
this tool.• Font - Change the font of the selected text or circular
text object with this tool. • Inspector - Click this button to open or close the
Inspector window. The inspector window includesadvanced options that allow you to change the proper-ties of your template, change size or position of theobjects, add effects, edit transparency, change textproperties and align objects. See the next step for moreinformation.
Selection
Inspector
ClipartGallery Zoom Font
Import Text Circular Text Color
510963.qxd 11/2/2009 12:19 PM Page 33
34 Creating Discs
6. Once you have several objects on screen you may choose touse the Inspector tool to edit advanced object properties.Select the objects you would like to edit and then click onone of the six buttons on the top of the inspector. Four areshown below. See the description of each understand whatoptions are available on each.
• Design Element - Switch to a new template, edit thecurrent template, create your own.
• Geometry - Precisely move, resize or rotate selectedobjects.
• Fill and Shadow - Add shadow, change thickness orcolor of geometric objects.
• Image - Add transparency or a gradient to images, cli-part or backgrounds.
• Text - Change line spacing, character spacing, fonts,size, or justifications of any selected text object.
• Alignment - Align or distribute multiple text objects.7. Many other options such as changing the order of objects,
(send to front, send to back) and exporting in other file for-mats are available from the Disc Cover menus.
8. Finally, save the design by going to the file menu - save as.Quit Disc Cover by choosing Quit from the Disc Cover PEmenu. PTPublisher will ask you if you would like to usethe design you just saved in your project. Choose Yes.
510963.qxd 11/2/2009 12:19 PM Page 34
Creating Discs 35
E. ADVANCED PRINTER DRIVER FUNCTIONS (PC)
Once the Publisher software has been successfully installed,you will want to take a moment to familiarize yourself with theprinter driver settings for your Publisher. These settings affectthe print quality of your discs. The default settings of thePublisher printer driver will fit most printing needs. Pleaserefer to the following steps to change or verify your printerdriver options:
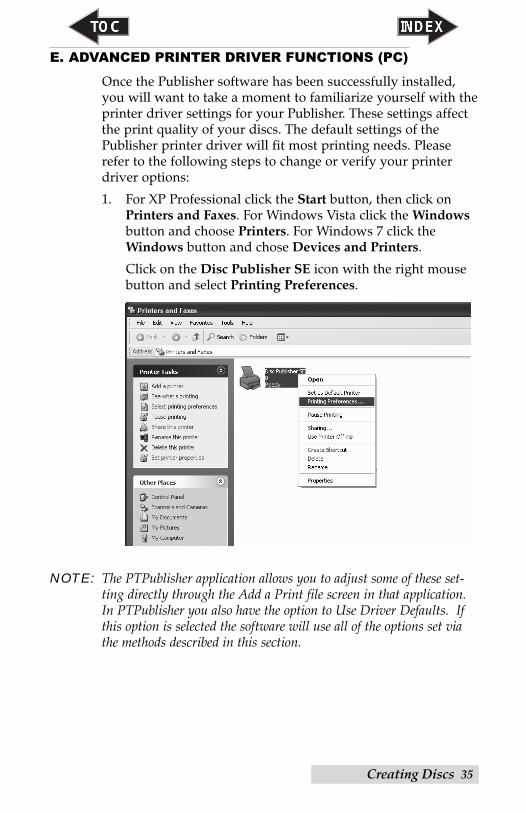
1. For XP Professional click the Start button, then click onPrinters and Faxes. For Windows Vista click the Windowsbutton and choose Printers. For Windows 7 click theWindows button and chose Devices and Printers.
Click on the Disc Publisher SE icon with the right mousebutton and select Printing Preferences.
NOTE: The PTPublisher application allows you to adjust some of these set-ting directly through the Add a Print file screen in that application.In PTPublisher you also have the option to Use Driver Defaults. Ifthis option is selected the software will use all of the options set viathe methods described in this section.
510963.qxd 11/2/2009 12:19 PM Page 35
36 Creating Discs
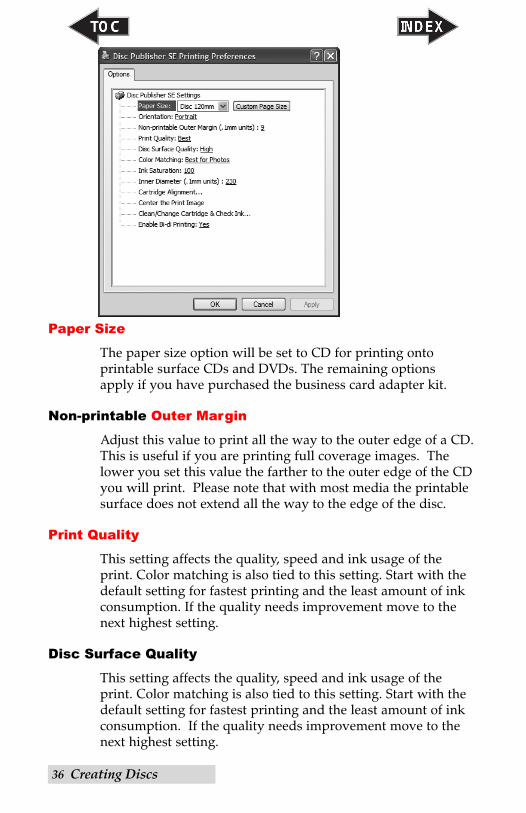
Paper Size
The paper size option will be set to CD for printing onto printable surface CDs and DVDs. The remaining options apply if you have purchased the business card adapter kit.
Non-printable Outer Margin
Adjust this value to print all the way to the outer edge of a CD.This is useful if you are printing full coverage images. Thelower you set this value the farther to the outer edge of the CDyou will print. Please note that with most media the printablesurface does not extend all the way to the edge of the disc.
Print Quality
This setting affects the quality, speed and ink usage of theprint. Color matching is also tied to this setting. Start with thedefault setting for fastest printing and the least amount of inkconsumption. If the quality needs improvement move to thenext highest setting.
Disc Surface Quality
This setting affects the quality, speed and ink usage of theprint. Color matching is also tied to this setting. Start with thedefault setting for fastest printing and the least amount of inkconsumption. If the quality needs improvement move to thenext highest setting.
510963.qxd 11/2/2009 12:19 PM Page 36
Creating Discs 37
Color Matching
Best for Graphics mode is best used for graphical imageswhere accurate color reproduction is not as essential. Imagesprinted in this mode will look more vibrant because more inkis being used to produce them. However, printing images ofpeople may produce skin tones that have a reddish tint.
Best for Photos mode is best used for photographic imageswhere accurate color reproduction is very essential. Imagesprinted in this mode will look lighter than those printed inPhoto mode. Skin tones especially will look more natural inthis mode.
NOTE: Exact color matching of the printed discs to the screen may never be possible since there are factors that affect this out of the driverscontrol. The surface of the disc reacts with the ink in the cartridge toproduce the color. For this reason, when printing the same image todifferent types of discs with different surfaces the printed output canlook entirely different.
Ink Saturation
This option controls the ink saturation of the printed image.When printing onto the printer manufacturer's TuffCoat CDmedia, this option can be left at its default setting of 100%.When printing onto other brands of printable CD media, youmay need to adjust this control in order to optimize the ink saturation for the printable surface of your specific CD media.If discs do not seem to be drying completely it may be necessary to reduce this value.
Inner Diameter
This value changes the size of the non-printed center. Largernumbers cause the non-printed center to be larger and smallernumbers make the non-printed center smaller. This number isincremented by 0.1mm so a change of 10 for inner diameterchanges the diameter by 1mm.
The Cartridge Alignment prints a test print and then automatically scans the print to configure your printer for bidirectional printing and to align the color cartridge. It isimportant to perform this calibration every time you change a cartridge. If you forget to perform this calibration you will be prompted to do so before your first print from the new cartridge.
Center The Print ImageNOTE: Your printer comes from the factory pre-calibrated to printthe image in the center of the CD. You can use this adjustment if youneed to fine-tune this location.
If you ever wish to verify your factory-calibrated Vertical and Horizontal calibration settings, you can run a simple calibration procedure to assure that your images will be centered when printed on a CD. To do this, refer to the following steps:
1. Verify that a disc and a color ink cartridge are installed in the Publisher. It is important to use the same disc younormally use for your publishing because different brandsof discs may vary slightly in size. Also, verify that thePublisher is powered ON and that it is connected to yourcomputer.
2. Click on the Center the Print Image and then theProperties button. The printer will begin printing the calibration test print.
3. When the print is complete, rotate disc 180ºand put the disc back in the input bin andrepeat step 2 using the same disc.
510963.qxd 11/2/2009 12:19 PM Page 38
Creating Discs 39
4. When the second run of the print is complete, you shouldhave a test print that looks similar to the following:
5. Along the Vertical axis of the printed disc, find the numberwhose lines touch. For example, in the above illustration,Enter the number 2 into the Vertical box of the Calibrationwindow and 0 for the Horizontal axis.
6. Select the OK button. Your images should now be centeredwhen printed on a disc.
After your selections have been made, close out of theprinter setup window. You are now ready to go to an application program and print. All printer driver selectionswill stay the same until you change them.
-5 -4 -3 -2 -1 0 1 2 3 4 5
5 4 3 2 1 0 -1 -2 -3 4 -5
Horizontal CalibrationFind and enter the numberwhose lines tough(must be the SAME number)
Vertical CalibrationFind and enter the numberwhose lines tough(must be the SAME number)NOTE:
After printing this imageonce, rotate this CDso the ARROWS pointto the BACK of the printerand print again. -5
-4 -3 -2 -1 0 1 2 3 4 5
5 4 3 2 1 0 -1 -2 -3 -4 -5
BACK BACK
510963.qxd 11/2/2009 12:20 PM Page 39
40 Creating Discs
Clean/Change Cartridge & Check Ink Levels
Select this button to display the current ink levels as well asoptions for cleaning and changing cartridge.
Change Cartridge
Select the Change Cartridge button to install a new ink cartridge or to switch back and forth between previously usedcartridges.
Clean/Purge
Select Clean/Purge button to send a simple test pattern to theprinter. Be sure to have a disc in the Publisher's input bin andthe front cover closed. The test pattern purges ink through noz-zles of your ink cartridge to clear any blockages.
Details
Select the Details button for information on the drivers,firmware, alignment and number of discs printed with yourPublisher. Click Reset Factory Default to set all print centeringand cartridge alignment settings back to factory defaults.
Enable Bi-di Printing
Set this option to Yes for faster printing that requires cartridgealignment. Set it to no for slower printing that does notrequire cartridge alignment.
510963.qxd 11/2/2009 12:20 PM Page 40
Creating Discs 41
F. ADVANCED PRINTER DRIVER SETTINGS (MAC)
Access the advanced printer driver setting from any printingprogram on the Mac. Go to file - print. Select Publisher Settingsfrom the copies and pages drop down menu. Click Save asDefaults when you are finished.
Note: The most common settings can be accessed directly from the printstep of PTPublisher. If you adjust settings there you do not need toadjust them here. These settings do not typically need to be changed.They are for advanced users only.
The following is a description of the printer driver settings:
Print QualityThere are three options for image quality. Keep in mind thatNormal provides the fastest print at lower quality while Bestdelivers the best quality at a slower print speed.
Disc Surface QualityThis setting also affects the Quality of the printed image by altering the color matching profile. Start with the defaultsetting for fastest printing and the least ink consumption. If the quality needs improvement, move to the next highest setting.
510963.qxd 11/2/2009 12:20 PM Page 41
42 Creating Discs
Color MatchingGraphic mode is best used for graphical images where accurate color reproduction is not as essential. Images printedin this mode will look more vibrant because more ink is beingused to produce them. However, printing images of peoplemay produce skin tones that have a reddish tint. Photo mode is best used for photographic images where accurate color reproduction is very essential. Images printed inthis mode will look lighter than those printed in Photo mode.Skin tones especially will look more natural in this mode.
NOTE: Exact color matching of the printed discs to the screen may never be possible since there are factors that affect this out of the driverscontrol. The surface of the disc reacts with the ink in the cartridge toproduce the color. For this reason, when printing the same image todifferent brands of discs with different printable surfaces the printedoutput can look entirely different .
IntensityThe Intensity setting will control the amount of ink saturationon the disc. When printing onto the Primera ToughCoat discs,96% is usually sufficient. When printing on to other brands ofmedia, or if you would like to print darker colors, you maywish to increase the Intensity setting.
Inner DiameterThe inner diameter refers to the size of the non-printed centeron your disc. The size of the center hub can vary from one typeof media to the next. This allows you to set the inner diameterin millimeters allowing you to print all the way to the centerhub regardless of the type of disc you are using. For the discsthat Primera sells, use the following guide for Inner Diameter:
− 23 mm for Primera's Tuff-Coat CDR− 24.9 mm for the Hockey Rink Disc, Business Card
Disc and 80mm CD
510963.qxd 11/2/2009 12:20 PM Page 42
Creating Discs 43
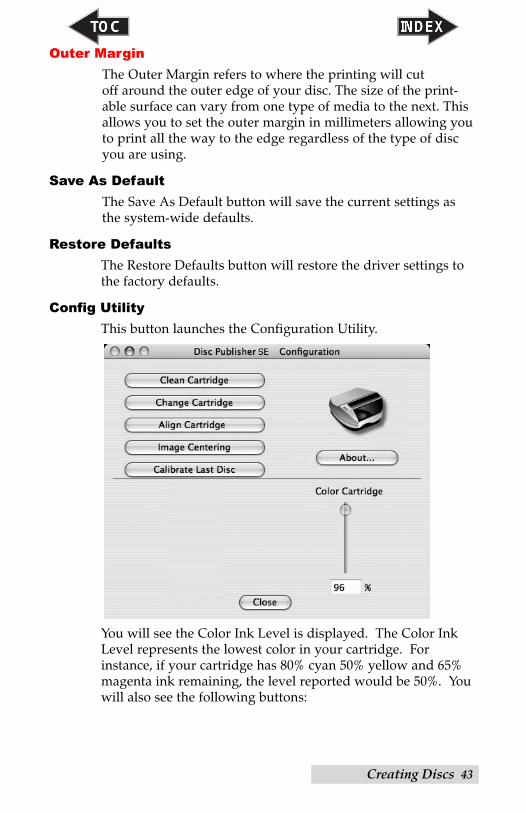
Outer MarginThe Outer Margin refers to where the printing will cut off around the outer edge of your disc. The size of the print-able surface can vary from one type of media to the next. Thisallows you to set the outer margin in millimeters allowing youto print all the way to the edge regardless of the type of discyou are using.
Save As DefaultThe Save As Default button will save the current settings asthe system-wide defaults.
Restore DefaultsThe Restore Defaults button will restore the driver settings tothe factory defaults.
Config UtilityThis button launches the Configuration Utility.
You will see the Color Ink Level is displayed. The Color InkLevel represents the lowest color in your cartridge. Forinstance, if your cartridge has 80% cyan 50% yellow and 65%magenta ink remaining, the level reported would be 50%. Youwill also see the following buttons:
510963.qxd 11/2/2009 12:20 PM Page 43
44 Creating Discs
Clean Cartridge
A cartridge that sits idle in the Publisher for a period of timemay start to experience some drying of ink in the tiny nozzlesthat make up the print head. Clicking the Clean Cartridgebutton will cause the Publisher to pick a disc and place in intothe printer tray. The Publisher will then print a simple patternthat will flush ink through the nozzles. The test pattern willalso show you if any nozzles are clogged. In the pattern youwill see some diagonal lines which should be continuous;breaks in those lines indicate a clogged nozzle. Please notethat it may require more than one cleaning to fully clear allnozzles. If the nozzles are not fully clear after a few cleaningprints, it may be necessary to remove the cartridge and actually clean the print head by gently blotting the nozzleswith a moist cloth or paper towel and replace it in thePublisher. See Section 4-D.
Change Cartridge
If you need to change the cartridge, it is a good idea to use theChange Cartridge button in the Configuration Utility. Thisensures the most accurate tracking of ink levels. To change acartridge, click the Change Cartridge button. The cartridgeholder will move to the center of the Publisher to make it easi-er to install the cartridge. Lift the top cover and install the cartridge as described in Section 2 of this manual. You will be prompted to let the system know whether or not you areinstalling a new or used color cartridge. Once installed, clickthe OK button and the system will update your cartridge levels.
Alignment Calibration Print
The Cartridge Alignment prints a test print and then automatically scans the print to configure your printer for bidirectional printing. It is important to perform this calibration every time you change a cartridge. If you forget toperform this calibration you will be prompted to do so beforeyour first print from the new cartridge.
510963.qxd 11/2/2009 12:20 PM Page 44
Creating Discs 45
Image Alignment
The Image Alignment button will allow you to nudge theimage up, down, left, or right on your disc. To center theimage, click the Image Alignment button. You will be prompted with a choice to print a test print or simply entervalues to nudge the image alignment on the disc.
If you do not know the direction and distance to move theimage in order to center it on your disc, you can opt to printthe centering test print. Make sure the Publisher has discs andan ink cartridge installed, and it is connected and ready toreceive a print job, and then click the Yes button. ThePublisher will pick a disc and print a scale of numbers on it.You will be prompted to open the Publisher's frontcover, rotate the printed disc 180 degrees, reload itinto the input, and close the cover. Click OKwhen ready and the Publisher will pick the discand print another scale of numbers. The discshould look like this:
-5 -4 -3 -2 -1 0 1 2 3 4 5
5 4 3 2 1 0 -1 -2 -3 4 -5
Horizontal CalibrationFind and enter the numberwhose lines tough(must be the SAME number)
Vertical CalibrationFind and enter the numberwhose lines tough(must be the SAME number)NOTE:
After printing this imageonce, rotate this CDso the ARROWS pointto the BACK of the printerand print again. -5
-4 -3 -2 -1 0 1 2 3 4 5
5 4 3 2 1 0 -1 -2 -3 -4 -5
BACK BACK
510963.qxd 11/2/2009 12:21 PM Page 45
46 Creating Discs
Once the print has finished, you will see the following dialog box:
Look at the finished alignment disc and pick the numbers thatcome closest to lining up with one another. For instance, onthe disc shown in this manual, the vertical alignment is 2 andthe horizontal alignment is 0. Enter this in the alignment dia-log box.
If you choose not to print the test print, you will simply see thealignment dialog box and can enter values to move the image.The unit of measure is roughly 0.1mm. Making the HorizontalCalibration number smaller or more negative will move theimage slightly to the left. Making the Horizontal Calibration alarger value, or more positive will move the image to the right.If the Vertical Calibration number is made smaller, or morenegative the image will move slightly up. If the VerticalCalibration is set to a larger value, or more positive value, theimage will move down on the disc.
Calibrate Last Disc
Use this calibration if you frequently receive false messagesthat two discs were picked. When you press this button youwill be prompted to place one disc in the input bin. ThePublisher will then touch each disc with the robotic arm to setthe correct measurement for the last disc in the bin.
510963.qxd 11/2/2009 12:21 PM Page 46
Creating Discs 47
G. USING OTHER GRAPHICS PROGRAMS
While SureThing will handle most labeling needs, other graphics programs can be used if you prefer.
When printing and burning through the PTPublisher softwareyour Publisher will support the following additional stardardlabel image file formats: BMP, TIF, JPG, GIF, PNG and PRN.These formats can be exported from most any original graphicsformat such as Adobe Photoshop or Illustrator.
When creating images in other graphics programs we recommend creating a 4.72 x 4.72 square image that has a 300 dpi resolution.
510963.qxd 11/2/2009 12:21 PM Page 47
48 Maintenance and Troubleshooting
Section 4: Maintenace and Troubleshooting
A. INTERPRETING THE PUBLISHER’S INDICATOR LIGHTS
The Power/Ink button can tell you what is happening insidethe Publisher. Please refer to the following:
Power/Ink Button Publisher
Fast Flashing The Publisher is initializing.You will see this pattern when the Publisher is first turned on. Wait until the lights stop blinking before opening software or starting jobs.
Slow Flashing The cover is open and the ink cartridge carrier is in change position. Insert a new cartridge and close the cover. (The slow flashing light can also indicate an out of media condition, a robotic error or a picking problem. However, these conditions are always paired with a error message on screen.)
B. CLEANING THE PUBLISHER
NOTE: Do NOT attempt to oil or grease the Publisher's Robotic Arm shaftor other components. You will likely cause more harm than good!Any moving parts are designed to operate for the life of the machinewith no additional lubrication required.
Use a clean, lint-free rag with a small amount of ammonia window cleaner to clean the Publisher's outside case and trays. This type of cleaner is very effective on inks that mayaccumulate on the printer tray. Stronger cleaning solutions areNOT recommended because they may damage the paint andplastic materials from which the parts are manufactured.Always disconnect your Publisher's power cords before cleaning. Resume operation only after the surfaces are completely dry.
510963.qxd 11/2/2009 12:21 PM Page 48
Maintenance and Troubleshooting 49
C. PERFORMING A ROBOTIC SELF-TEST
To ensure that everything is working properly, a Self-Test feature is built in to your Publisher. In this mode, the RoboticDisc Transporter will go through the motions of picking andplacing a disc to ensure proper working order. This test may beperformed without connecting the Publisher to the PC.
Perform the test by doing the following steps:
• Load some discs into the Input Bin.• Open the cover.• Press and hold the power button for five seconds. The test
will start.• To stop the test, close the cover and press the power
button.
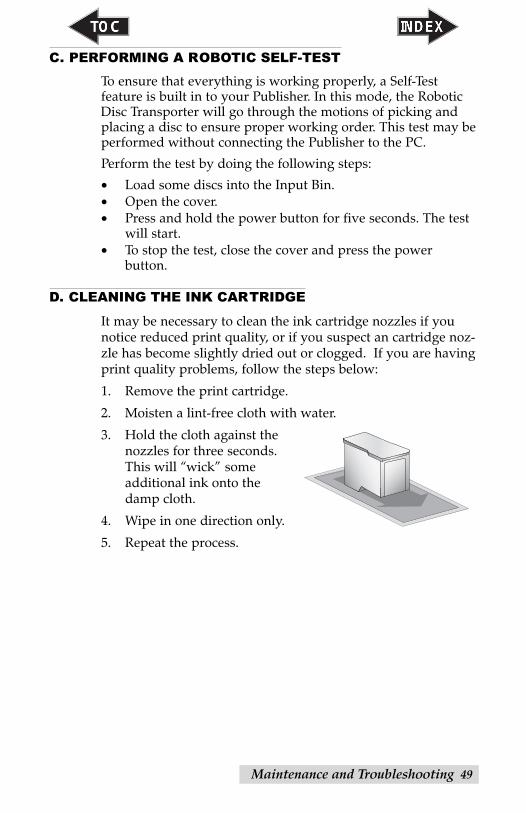
D. CLEANING THE INK CARTRIDGE
It may be necessary to clean the ink cartridge nozzles if younotice reduced print quality, or if you suspect an cartridge noz-zle has become slightly dried out or clogged. If you are havingprint quality problems, follow the steps below:
1. Remove the print cartridge.
2. Moisten a lint-free cloth with water.
3. Hold the cloth against thenozzles for three seconds.This will “wick” some additional ink onto thedamp cloth.
4. Wipe in one direction only.
5. Repeat the process.
510963.qxd 11/2/2009 12:21 PM Page 49
50 Maintenance and Troubleshooting
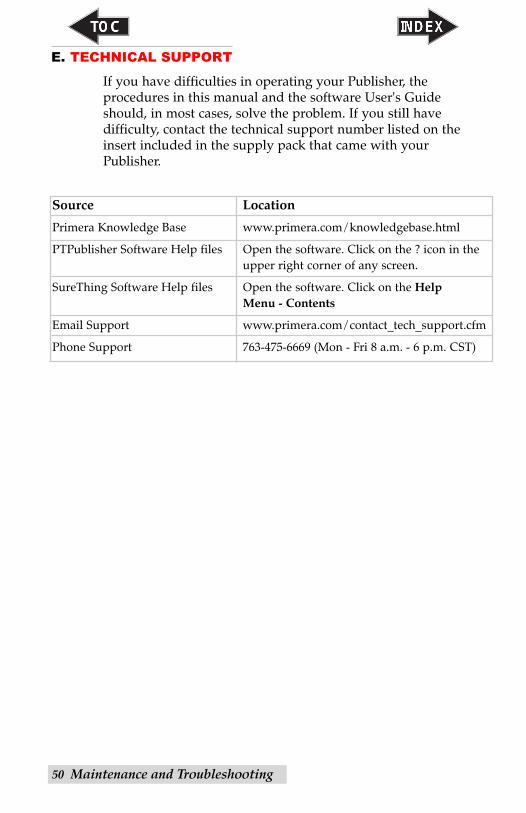
E. TECHNICAL SUPPORT
If you have difficulties in operating your Publisher, the procedures in this manual and the software User's Guideshould, in most cases, solve the problem. If you still have difficulty, contact the technical support number listed on theinsert included in the supply pack that came with yourPublisher.
Source Location
Primera Knowledge Base www.primera.com/knowledgebase.html
PTPublisher Software Help files Open the software. Click on the ? icon in theupper right corner of any screen.
SureThing Software Help files Open the software. Click on the Help Menu - Contents
Email Support www.primera.com/contact_tech_support.cfm
Print Template.................................................................................26PTProtect....................................................................................22, 29Publisher Status .............................................................................24Queue Project..................................................................................25Recording Speed ............................................................................22Recording Type...............................................................................23Resolution........................................................................................51Rip Audio ........................................................................................28Robot Options ................................................................................22Save Project .....................................................................................22Schedule Project.............................................................................22Set Time and Date to Mastering Time.......................................24Span Discs .......................................................................................26Specifications..................................................................................51System Requirements .....................................................................5Technical Support ..........................................................................50Test Record ......................................................................................23Verify ................................................................................................23Video Project...................................................................................18VIDEO_TS.................................................................................18, 29Windows Media Player.................................................................28