17
00000000rev00 USER'S MANUAL EN COMBINATION OVEN WITH STEAM GENERATOR M/X VERSION Technical service

00000000rev00
USER'S MANUAL
EN
COMBINATION OVENWITH STEAM GENERATOR
M/X VERSION
Technical service

16 • DETTAGLI OPERATIVI
PAGE1 • GENERAL REMINDERS 32 • POINTS TO REMEMBER 43 • DESCRIPTION OF KEYS 54 • STARTING COOKING 65 • OVEN OPERATION 76 • COOKING WITH THE CORE PROBE ( VERSION X ONLY) 87 • HINTS ON USING THE CORE PROBE (VERSION X ONLY) 98 • OPERATION OF THE HOLDING CABINET (MG A.... ONLY) 109 • PRACTICAL ADVICE 1110 • DAILY CLEANING 1211 • ROUTINE MAINTENANCE 1312 • DESCALING THE BOILER 1313 • MAJOR SERVICING 1414 • WHAT TO DO IF... 15
(1) All versions of model M. 227 . have two independent ovens.
2
The reproduction or copying of any part of this manual by any meanswhatsoever is strictly forbidden unless authorized previously in writing bythe manufacturer.
donadini & c. advertising © - 016.38.122 - 16.02.2000
ME 106
ME 110
ME 210
ME 211
ME S20
ME C20
ME S24
ME C24
ME S40
ME C40
ME 227(1)
MG 106
MG A06
MG 110
MG A10
MG 210/211
MG A21/A22
MG S20
MG C20
MG S24
MG C24
MG S40
MG C40
MG 227(1)
M Standard electromechanical devices with manual controls and humidifier.
X Standard electromechanical devices with manual controls, humidifier and core probe.
The manufacturer accepts no liability for any inaccuracies in this manualattributable to printing or copying errors. We reserve the right to modifyour products as we deem fit, without impairing their basic features.
CONTENTS
ELECTRIC MODELS GAS MODELS
VERSION
00000000rev00

3
Repairs may become necessary overt ime; these and a l l major serv ic ingoperat ions must be ent rustedexclusively to a Lainox technician or aLainox authorized service agent.
1.1 • Carefully read the directions given in thismanual; they contain important informationon safety during installation, operation andmaintenance.Keep the manual in a safe place forfuture consultation!
1.2 • This appliance must be put only to the usefor which it is specifically intended, i.e.cooking foods. Any other type of use isimproper and therefore dangerous.
1.3 • Only t ra ined k i tchen s ta ff should beallowed to use the appliance.
1.4 • The oven must not be lef t unattendedduring operation.
1.5 • There are sur faces of the oven thatbecome hot during operation. Take care!
1.6 • Ask the installer for information on correctoperation and use of the water softener;incorrect or incomplete regeneration of theresins will result in inadequately treatedwater, which could damage the oven.
1.7 • Should it become necessary to call out aserv ice technic ian, a l l essent ia lidentification details of the appliance areshown on the data plate.
1.8 • In the event of technical assistance beingrequired, the trouble must be describedin as much detail as possible , so that aservice technician wil l be able straightaway to understand the nature of theproblem.
1.9 • The room in which the oven is to operatemust be well ventilated!
1.10 • In the event o f breakdown or fau l tyoperat ion, swi tch of f the ovenimmediately!
1 • GENERAL REMINDERS
2000TYP. VE 106 "X"NR xxxxxxxxxx
50 Hz3N AC 400 V
8 kW kPa150 - 500
IPX 5 - 98
IPX 5
AC 230 V
A1
IT
LX TYP. VG 110 "P" TYP.
2000 NR xxxxxxxxxx
1.00 kW
kPa
50 - 500
B21
P mbar20; 28-30/37
8; 20
0085
00000000rev00
4
2.1 • Before any food is cooked in a new oven,the interior must be thoroughly cleaned(see the “Daily Cleaning” heading).
2.2 • At the end of the working day, clean theoven thoroughly inside and out; this willensure smooth operation of the applianceand prolong its useful life.
2.3 • Do not use high pressure water jetswhen cleaning the oven!
2.4 • For daily cleaning, use non-corrosiveproducts (alkali based) suitable for thepurpose. Abrasive materials and productsshould not be used as they will damage thesurfaces.
2.5 • Always switch off the appliance when workis finished, and shut off all energy supplies(electricity, water, and gas if connected).
2.6 • Avoid any operat ion that might causecooking salt to be deposited on the steelsurfaces of the oven; if salt is accidentallysp i l led, r inse off immediate ly andthoroughly.
2.7 • After s team cooking, open the doorcarefully to avoid being hit by the rush ofresidual steam escaping from the oven.Failure to observe this warning may bedangerous for the operator.
2.8 • To ensure safe operation of the oven donot obstruct the vents or any otheropening in the casing!
Fai lure to observe bas ic safetyguidelines may jeopardize the smoothoperation of the oven and expose theoperator to serious danger!The manufacturer accepts no liability ifthe or ig inal funct ion of the oven isaltered or there is tampering or failureto observe the instructions given in themanuals.
2 • POINTS TO REMEMBER
2.9 • To ensure long term efficiency andreliability of the oven, major servicingshould be carried out at least once ayear. With this in mind, customers arerecommended to s ign a serv iceagreement.
00000000rev00

3.1 • IMMEDIATE RESPONSE FUNCTIONS
Humidification key. Pressing key 38 sprays water into theoven, increasing the humidity level. Theflow of water lasts as long as the key ispressed. It is useful for foods that requireadded humidity when cooking.
Open oven vent valve. Turning valve 39 opens or closes the vent.This function is useful for products thatrelease a lot of moisture when cooking. It isrecommended not to use this funct ionwhen steam cooking.
Oven light key. Pressing key 29 switches on the oven light,permi t t ing the operator to check theprogress of the cooking.
5
3 • DESCRIPTION OF KEYS
FOREWORD This page descr ibes the immediateresponse keys (which, at any moment,
activate the additional services available,provided that the oven is working).
Vent closed
Vent open
00000000rev00
6
OPERATIONS
4.1 • SELECTTurn knob 41 to select the cooking mode:convection 42, steam 43, combination 44.
4.2 • SETSet the cooking temperature with knob 18.
4.3 • SETTING - STARTSet the cooking time with knob 21. At this point the oven begins cooking.
Or you can set the cook ing temperatureregulated by the core probe in the product: - press key 46, to activate the function;- press keys 23 , to set the requi redtemperature, which wi l l appear on thedisplay.At this point the oven begins cooking.
4.4 • END OF COOKINGIf infinite time [ ∞ ] has been selected,switch off the oven manually using key 41for setting the cooking mode.If a cooking time or core probe temperaturehas been entered, a beep will be generatedwhen the time expires or the temperaturehas been reached, to indicate that cookinghas terminated and the oven has switcheditself off. To interrupt the signal, simplyopen the oven door.Remove the food from the oven, followingthe directions given under paragraph 2.7 ofthe “Points to remember” heading.
GAS MODELS ONLY (MG 106, MG A06, MG 110, MG A10, MG 210/211, MG A21/A22 AND MG 227)When key 40 lights up, this means that theburners are inhibited. Press the key toreset ignition.
4 • STARTING COOKING
00000000rev00

7
OPERATIONS
5.1 • MAIN SWITCH AND KNOBALLOWING SELECTION OFCOOKING MODE AND COOLINGWITH OVEN DOOR OPENTo switch on the oven turn the knob 41onto the required cooking mode:
42 convection
43 steam
44 combination
The indicator light above knob 41 comes onto show that the oven is powered up.
To cool the oven quickly, open the doorand turn the knob onto the symbol 45. Thisactivates the fan, which rapidly lowers thetemperature in the oven. This function canbe used when the next product to be cookedrequires a much lower oven temperature.
5.2 • TEMPERATURE SETTING KNOBUse knob 18 to set the preheat temperaturewith the oven empty, or the required cookingtemperature.When the set temperature is reached in theoven, the indicator light located near theknob will go out. The temperature in theoven is shown on the thermometer abovethe cooking mode selector.The light indicates the operation of thethermostat control:if the indicator is alight, the heating elementsor burners are OFF;if the indicator is not alight, the heatingelements or burners are OFF.
5.3 • COOKING TIME SETTING KNOBUse knob 21 to set the required cookingtime. When cooking is not controlled by time,position the knob on infinite [ ∞ ].The oven will not come into operation untilthis final setting has been made.If a set cooking time has been selected theoven will switch itself off when the timeelapses and emit a beep; this can beinterrupted either by opening the door or byswitching off the oven. Whereas, if infinitetime has been selected [ ∞ ], the oven mustbe switched off manually, by returning theknob to the zero position.When the indicator is alight, the oven is inoperation.
GAS MODELS ONLY (MG 106, MG A06, MG 110, MG A10, MG 210/211, MG A21/A22 AND MG 227)When key 40 lights up, this means that theburners are inhibited. Press the key to resetignition.
5 • OVEN OPERATION
00000000rev00

8
OPERATIONS
WarningWhen cooking with this accessory, thetimer function can not be used!
Plug the probe connector into the panelsocket (36). Insert the probe into the food(see also illustrations in the next heading).
1 • Select the cooking mode, as described inprevious headings;
2 • Set the required oven temperature;3 • Press key 46 to activate the function;4 • Set the core temperature using the keys
23; the selected temperature will remain inthe display for a few seconds. Once thistime has elapsed, the same display willshow the actual core temperature.
5 • As soon as the temperature at the core ofthe product reaches the selected value theoven will switch itself off and emit a beep,which can be interrupted either by openingthe door or by switching off at the controls.
Displaying the set time during cookingIf the set core temperature needs to bechecked dur ing cook ing, proceed asfollows:
6 • Press momentarily any one of the keys 23;7 • The set temperature value will appear in
the display for approximately 3 seconds,after which the actual temperature at thecore of the product returns automatically.
Changing the set value during cookingIf the value set at the start of cookingneeds to be changed ( increased ordecreased), proceed as follows:
8 • Press and hold key [ + ] 23 for at least 2seconds i f the va lue needs to beincreased, or key [ - ] 23 if it needs to bedecreased;
9 • Release the key as soon as the requiredtemperature appears on the display;
10 • After a few seconds, the display will revertautomat ica l ly to the actua l coretemperature.
When using the core probe, make certain itis properly connected to the panel.When the core probe is not being used,replace the probe in its case and makesure the safety cap is fitted correctly.
6 • COOKING WITH THE CORE PROBE (version X only)
00000000rev00

9
7 • HINTS ON USING THE CORE PROBE (version X only)
In cooking with this device, the position ofthe core probe is extremely important. Theprobe must be posit ioned from the topdownwards at the centre of gravity of thefood to cook and be fu l ly inserted. Inpieces whose thickness is less than twicethe probe, it is inserted horizontally to thetabletop so that the tip of the probe isanyhow in the middle of the food (seefigure). It is also recommended that the probe beinserted with the food positioned at thecentre of the oven.
Cooking with the core probe is ideal for:• large i tems that requi re cook ing in a
part icular way at the core (roast-beef,salmon, etc.);
• cooking vacuum-packed products (usingthe needle probe, optional).
Optional: On request and without anyspec i f ic adapta t ion, i t i s poss ib le toconnect the needle probe to the frontpane l to con t ro l t he tempera tu re o fvacuum-packed foods.
Advantages• Improves control over the cooking process,
eliminating the risk of loss and waste;• Permits accurate cooking irrespective of
the quality or mass of the product;• Saves time because cooking control is
automatic;• Guarantees hygiene; wi th prec is ion
monitoring of the core temperature, there isno need for food to be handled, poked orprodded.
NO YES
NO YES
00000000rev00
10
OPERATIONS
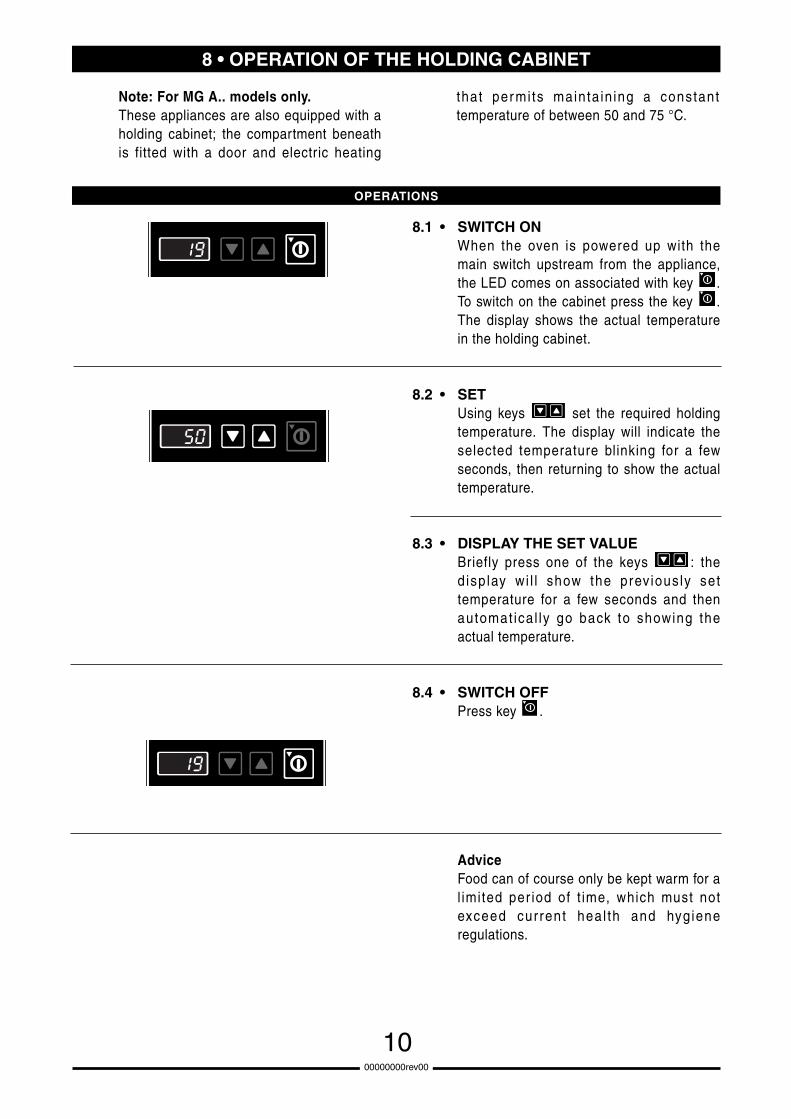
Note: For MG A.. models only. These appliances are also equipped with aholding cabinet; the compartment beneathis fitted with a door and electric heating
that per mi ts mainta in ing a constanttemperature of between 50 and 75 °C.
8 • OPERATION OF THE HOLDING CABINET
00000000rev00
8.1 • SWITCH ONWhen the oven is powered up with themain switch upstream from the appliance,the LED comes on associated with key .To switch on the cabinet press the key .The display shows the actual temperaturein the holding cabinet.
8.2 • SETUsing keys set the required holdingtemperature. The display will indicate theselected temperature blinking for a fewseconds, then returning to show the actualtemperature.
8.3 • DISPLAY THE SET VALUEBriefly press one of the keys : thedisp lay wi l l show the prev ious ly settemperature for a few seconds and thenautomat ica l ly go back to showing theactual temperature.
8.4 • SWITCH OFFPress key .
AdviceFood can of course only be kept warm for al imited per iod of t ime, which must notexceed current heal th and hygieneregulations.

11
9 • PRACTICAL ADVICE
9.1 • PREHEATING THE OVENThe oven preheating phase is extremelyimpor tant and usefu l for successfu lcooking.As a general rule, always preheat the ovenwhen empty, set t ing the temperatureapprox. 20% higher than that to be utilizedsubsequently in cooking. In the case of steam cooking, preheat theempty oven using convection mode as thiswill allow temperatures of over 100°C to beselected.
9.2 • COOKING LOADSThe depth of the pan must be suitable forthe height of the food.For uniform cooking i t is preferable todistribute the load over several shallowpans rather than loading just one extremelydeep pan. Keep to the weights spec i f ied in thefollowing table:
9.3 • FROZEN/DEEP-FROZEN PRODUCTSThe oven must be preheated and loadedrespecting the quality and nature of thesefoods. For example, frozen spinach mustnot be hit with temperatures that are toohigh as, due to its nature, it could dry outon the outside and impair the result.
9.4 • TYPES OF CONTAINERFor optimum results, it is vital to use theright pan for the different kinds of food:aluminium or aluminium plate pans forconfectionery and baked foods, perforatedpans for steam cooking, mesh pans forpre-fried potatoes.
9.5 • CLEARANCE BETWEENCONTAINERSWhen loading the oven with the food tocook, it is recommended to pay specialat tent ion there is suff ic ient c learancebetween containers. This makes it possiblefor the heat and air to distribute evenly fora more uniform result, which would not bepossible if the food in one pan were incontact with the pan above.
9.6 • LESS SEASONING By using this type of oven it is possible tovirtually eliminate the use of seasoning, oil,butter, fat and flavouring. Minimizing theuse of such ingredients in cooking, thenatural flavours of the food are highlightedand the nutritional content remains intact,br ing ing the benef i ts o f a more d ie t -conscious type of cuisine.
160 kg8 kg4 kg
20 x GN 2/140 x GN 1/1
Maximum ovenload
24 kg
40 kg
80 kg
2 x 64 kg
Loadper pan
4 kg
4 kg
4 kg
8 kg
No. pans
6 x GN 1/1
10 x GN 1/1
20 x GN 1/1
2 x 8 x GN 2/1
Model
ME 106.MG 106. / MG A06.
ME 110.MG 110. / MG A10.
80 kg8 kg10 x GN 2/1ME 210.
MG 210. / MG A21.
ME 211.MG 211. / MG A22.
ME 227.MG 227.
Note: When loading the oven you should clearly consider not only the weight of the product, but also its size, firmness and thickness.
80 kg4 kg20 x GN 1/1ME S20. / ME C20.MG S20. / MG C20.
ME S24. / ME C24.MG S24. / MG C24.
ME S40. / ME C40.MG S40. / MG C40.
96 kg8 kg4 kg
12 x GN 2/124 x GN 1/1
00000000rev00
12
10.1 • THOROUGH CLEANING ...... is a prerequisite for faultless cookingand better yields:
• the food’s own flavour remains unchanged;• dur ing operat ion, there are no fumes
caused by previous remains of food thatburn;
• energy savings;• less maintenance work and a longer
service life;• in addition, the simplicity of the procedure
means that a thorough c lean can becarried out in just a few minutes:- 5 minutes approximately to spray clean- 10 minutes steam cycle- rinsing- drying
10.2 • WARNINGNever use direct or high-pressure jets ofwater to clean the outside of the oven. Never use corrosive and/or abrasivesubstances on steel surfaces, and avoidscouring or scrubbing with steel wool orwire brush, as irreparable damage couldoccur. Similarly, aggressive detergents ofnon-alkaline formulation containing highpercentages of sodium and ammonia cansoon damage the seals, jeopardizing ovenefficiency and operation.The outside of the oven is washed with asponge and warm water with an ordinarydetergent suited to the purpose.
10.3 • CLEANING THE OVEN .... . . a t the end of work, proceed asfollows:
1 • with the mode se lector pos i t ioned oncooling with the door open (45), allow theoven to cool down to approximately 60 °C. If the oven is cold, preheat thechamber wi th s team up to 60 °C;
2 • remove any cooking spills, using a spatulathat will not scratch the steel surface;
3 • spray the inside with a proprietary ovencleaner. Use a non-corrosive alkaline product;
4 • close the door and allow the chemical toact for the t ime ind icated by themanufacturer (generally between 5 and 10minutes);
5 • switch on the oven, in steam mode, for 4 to10 minutes. Swi tch off the appl iancecompletely and open the oven door slowly;
6 • rinse the oven thoroughly with plenty ofclean water and wipe the door seals with asponge. The use of a hand-held shower(optional) is recommended;
7 • switch on again, and select a convectioncycle of about 5 minutes duration;
8 • stop and shut off all utilities (electricity,water and gas, if connected). Leave the door s l ight ly a jar when theappliance is not in use.
10 • DAILY CLEANING
00000000rev00
13
11 • ROUTINE MAINTENANCE
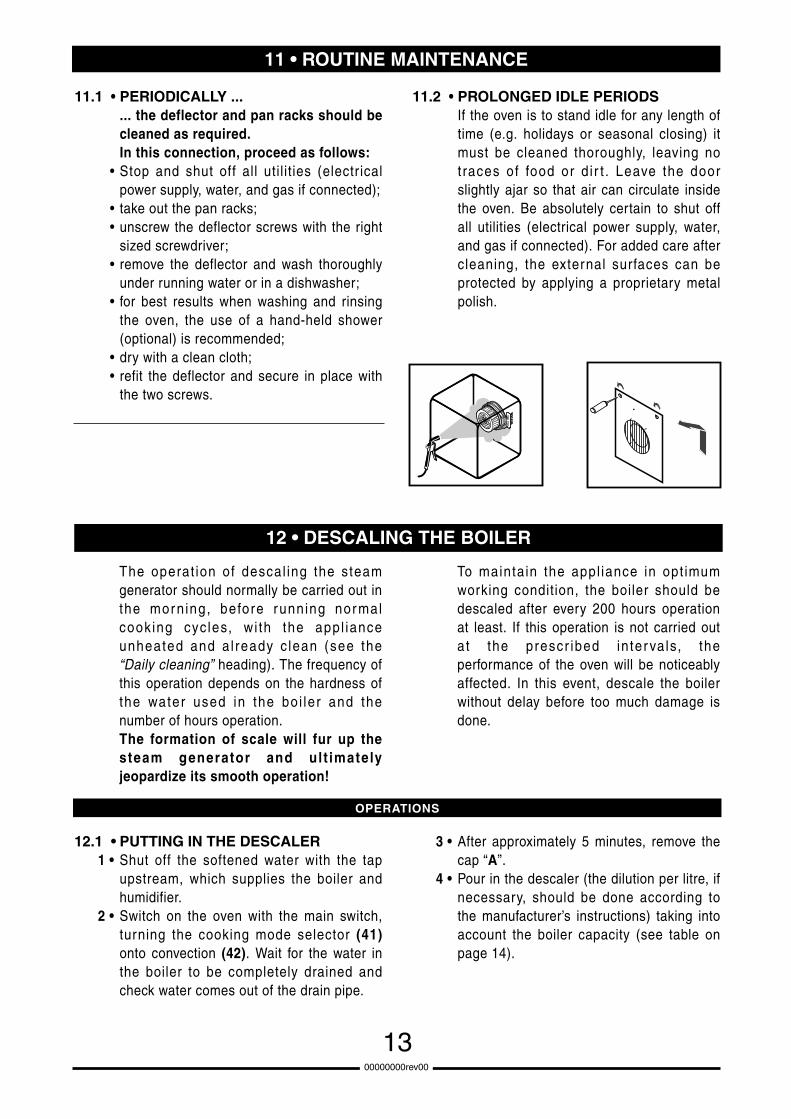
11.1 • PERIODICALLY ...... the deflector and pan racks should becleaned as required. In this connection, proceed as follows:
• Stop and shut off all util it ies (electr icalpower supply, water, and gas if connected);
• take out the pan racks; • unscrew the deflector screws with the right
sized screwdriver;• remove the deflector and wash thoroughly
under running water or in a dishwasher;• for best results when washing and rinsing
the oven, the use of a hand-held shower(optional) is recommended;
• dry with a clean cloth;• refit the deflector and secure in place with
the two screws.
11.2 • PROLONGED IDLE PERIODSIf the oven is to stand idle for any length oftime (e.g. holidays or seasonal closing) itmust be cleaned thoroughly, leaving notraces of food or d i r t . Leave the doorslightly ajar so that air can circulate insidethe oven. Be absolutely certain to shut offall utilities (electrical power supply, water,and gas if connected). For added care aftercleaning, the external surfaces can beprotected by applying a proprietary metalpolish.
12 • DESCALING THE BOILER
The operat ion of descal ing the steamgenerator should normally be carried out inthe mor n ing, before running nor malcook ing cyc les, wi th the appl ianceunheated and a l ready c lean (see the“Daily cleaning” heading). The frequency ofthis operation depends on the hardness ofthe water used in the bo i ler and thenumber of hours operation.The formation of scale will fur up thesteam generator and ul t imatelyjeopardize its smooth operation!
To maintain the appl iance in opt imumworking condition, the boiler should bedescaled after every 200 hours operationat least. If this operation is not carried outat the prescr ibed in ter va ls, theperformance of the oven will be noticeablyaffected. In this event, descale the boilerwithout delay before too much damage isdone.
00000000rev00
OPERATIONS
12.1 • PUTTING IN THE DESCALER1 • Shut off the softened water with the tap
upstream, which supplies the boiler andhumidifier.
2 • Switch on the oven with the main switch,turning the cooking mode selector (41)onto convection (42). Wait for the water inthe boiler to be completely drained andcheck water comes out of the drain pipe.
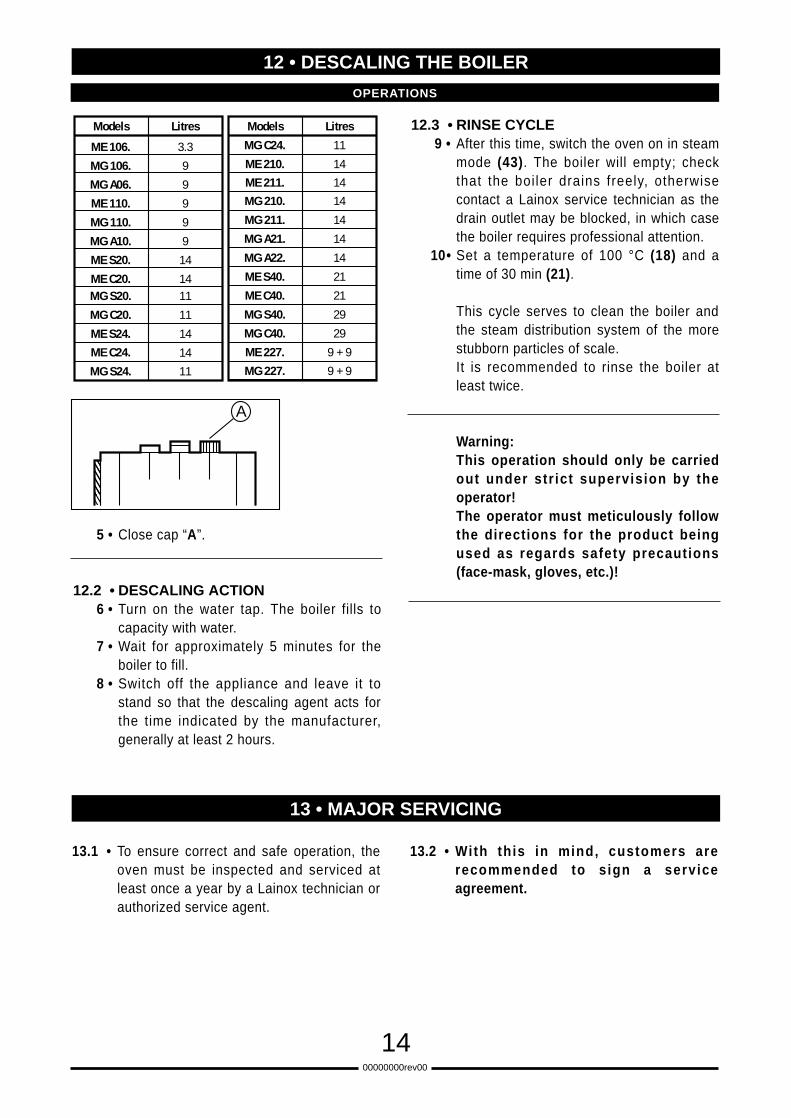
3 • After approximately 5 minutes, remove thecap “A”.
4 • Pour in the descaler (the dilution per litre, ifnecessary, should be done according tothe manufacturer’s instructions) taking intoaccount the boiler capacity (see table onpage 14).
14
OPERATIONS
13.1 • To ensure correct and safe operation, theoven must be inspected and serviced atleast once a year by a Lainox technician orauthorized service agent.
13.2 • Wi th th is in mind, customers arerecommended to s ign a serv iceagreement.
00000000rev00
12 • DESCALING THE BOILER
13 • MAJOR SERVICING
5 • Close cap “A”.
12.2 • DESCALING ACTION6 • Turn on the water tap. The boiler fills to
capacity with water.7 • Wait for approximately 5 minutes for the
boiler to fill.8 • Switch off the appliance and leave it to
stand so that the descaling agent acts forthe time indicated by the manufacturer,generally at least 2 hours.
12.3 • RINSE CYCLE9 • After this time, switch the oven on in steam
mode (43). The boiler will empty; checkthat the boi ler drains freely, otherwisecontact a Lainox service technician as thedrain outlet may be blocked, in which casethe boiler requires professional attention.
10• Set a temperature of 100 °C (18) and atime of 30 min (21).
This cycle serves to clean the boiler andthe steam distribution system of the morestubborn particles of scale. It is recommended to rinse the boiler atleast twice.
Warning:This operation should only be carriedout under s t r ic t superv is ion by theoperator!The operator must meticulously followthe directions for the product beingused as regards safety precaut ions(face-mask, gloves, etc.)!
Models
ME 106.
MG 106.
MG A06.
ME 110.
MG 110.
MG A10.
ME S20.
ME C20.
Litres
3.3
9
9
9
9
9
14
14
Models Litres
11
11
11
14
14
14
21
21MG S20.
MG C20.
14ME S24.
ME C24.
11
14
MG S24.
MG C24.
ME 210.
MG A21.
MG A22.
ME S40.
ME C40.
29
29
MG S40.
MG C40.
9 + 9
9 + 9
ME 227.
MG 227.
MG 211.
MG 210.ME 211.
14
1414
���
A
15
This heading gives a summary of the faultsthat can be remedied by the user, or ofsituations that do not jeopardize safety.
14.1 • ... the power indicator does not light upwhen the cooking mode selector is turned.Check that the isolating switch betweenthe appliance and the electr ical powersupply has been turned on, and in the caseof gas models, that the gas shutoff valve isopen.
14.2 • ... no steam is generated in the ovenwhen steam cooking mode has beenselected. Check that the water shutoffvalve is open, and in the case of gasmodels, that the gas shutoff valve is open.
14.3 • ... the convection system does not work,the oven does not heat upafter selecting and switching on. Checkthat the door is properly shut.
WARNING FOR GAS MODELS(MG 106, MG A06, MG 110, MG A10, MG 210/211, MG A21/A22 AND MG 227)Gas appl iances are f i t ted with ignit iondevices incorporat ing a manual resetfunction. If the burner fails to light, thetemperature in the oven will not rise, andthe key (40) lights up. Press the key. Thissimple remedy will reset the ignition. If thefault persists, contact a Lainox technicianor authorized service agent.
WARNING FOR GAS MODELS(MG 20, MG 24 and MG 40)Gas appl iances are f i t ted with ignit iondevices incorporating an automatic resetfunction. If the burner fails to light, thetemperature in the oven will not rise; it istherefore necessary to open the door, keepit open for 60 sec., then close it again. Thissimple remedy will reset the ignition. If thefault persists, contact a Lainox technicianor authorized service agent.
14.4 • CORE PROBE FAULT INDICATIONIf, when using the core probe, the [ err ]message appears on the display (25) ,check that the connector is p luggedproper ly in to the panel socket . I f themessage cont inues to be d isp layed,contact a Lainox technician or authorizedservice agent.The oven can still be used without the coreprobe.
I f , after careful ly carrying out thesechecks, the appl iance st i l l does notfunct ion proper ly, ca l l a La inoxtechnician or authorized service agent.
Note: When contacting Lainox servicetechnicians, try to explain the fault in asmuch detail as possible, referring all thein fo rmat ion ind ica ted on theidentification data plate (see page 3).
14 • WHAT TO DO IF...
00000000rev00

16
NOTES
00000000rev00
150200
250
300
35050
100
˚C
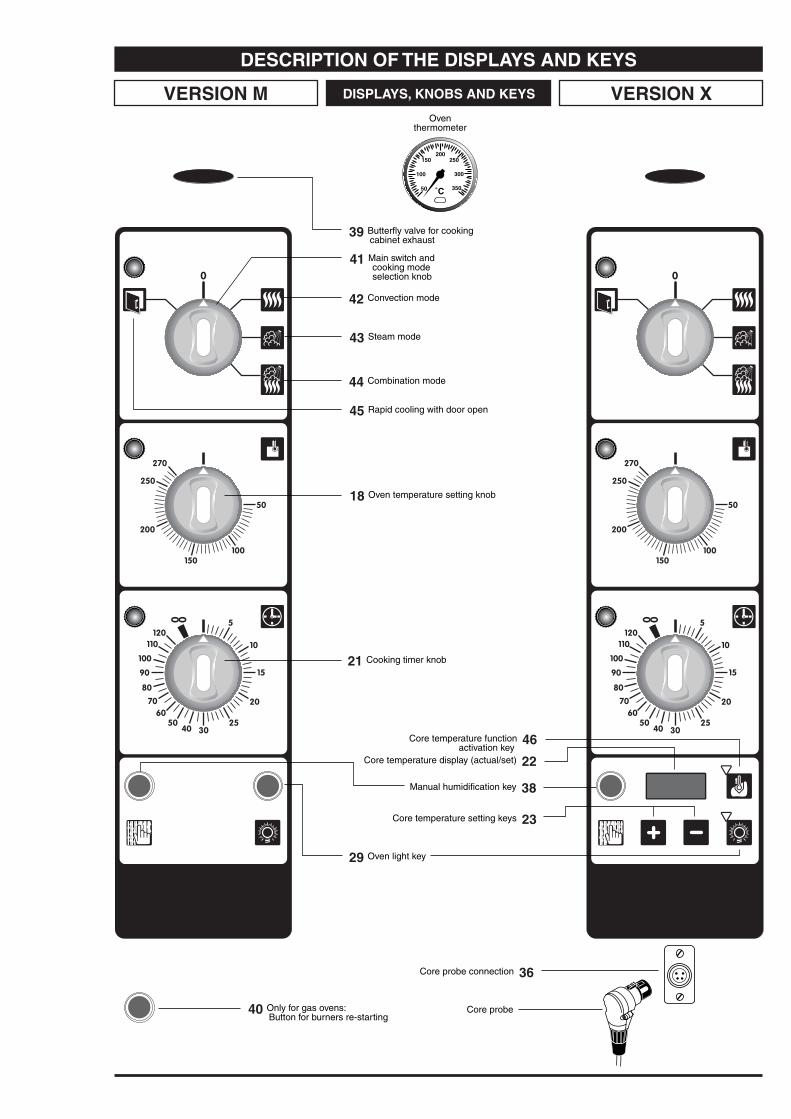
DESCRIPTION OF THE DISPLAYS AND KEYS
VERSION M VERSION XDISPLAYS, KNOBS AND KEYS
39 Butterfly valve for cooking cabinet exhaust
41 Main switch andcooking modeselection knob
Oventhermometer
Core temperature function 46activation key
Core temperature setting keys 23
Core temperature display (actual/set) 22
18 Oven temperature setting knob
21 Cooking timer knob
42 Convection mode
43 Steam mode
44 Combination mode
45 Rapid cooling with door open
29 Oven light key
Manual humidification key 38
Core probe connection 36
Core probe40 Only for gas ovens: Button for burners re-starting


