49
1 Using Avaya Aura ® Messaging

1
Using Avaya Aura® Messaging
2
Contents
Using Avaya Aura®
Messaging ................................................................................................. 1
Chapter 1: Getting Started ...................................................................................................... 5 Messaging overview ........................................................................................................................................................................5 Prerequisites ....................................................................................................................................................................................5 Accessing your mailbox from any phone ......................................................................................................................................5 Accessing the mailbox from your desk phone or soft phone .....................................................................................................6 Initializing your mailbox ..................................................................................................................................................................6 Logging in to User Preferences ......................................................................................................................................................7
Chapter 2: Messaging from your e-mail client ...................................................................... 8 Email client (Outlook) configuration ..............................................................................................................................................8 Configuring Outlook 2013/2016 for Avaya message store ...................................................................................................................9 Configuring Outlook 2010 for Avaya message store ......................................................................................................................... 12 Configuring Outlook 2007 for Avaya message store ......................................................................................................................... 14 Configuring Outlook 2003 for Avaya message store ......................................................................................................................... 15 Purging deleted messages ............................................................................................................................................................... 16 Voice messages ............................................................................................................................................................................. 18 MWI and message status ................................................................................................................................................................. 18 Private messages ............................................................................................................................................................................ 18 Moved messages ............................................................................................................................................................................. 18 Auto Delete Notification and Message Retention ........................................................................................................................ 19
Chapter 3: Fax ....................................................................................................................... 20 Outbound fax ................................................................................................................................................................................. 21 Messaging fax client pre-installation checklist .................................................................................................................................. 21 Installing Messaging fax client .......................................................................................................................................................... 23 Fax printer service configuration ...................................................................................................................................................... 24 Sending a fax ................................................................................................................................................................................... 25 Changing your password in the network fax printer service .............................................................................................................. 26 Troubleshooting the fax issues .................................................................................................................................................... 27 Unable to download a fax client installer .......................................................................................................................................... 27 Unable to add a fax printer service ................................................................................................................................................... 27 Windows fails to connect to a fax printer service .............................................................................................................................. 27 Unable to send a fax ........................................................................................................................................................................ 28 A Messaging fax receiver is unable to receive faxes......................................................................................................................... 28
Chapter 4: Customizing Messaging ..................................................................................... 29 About User Preferences ................................................................................................................................................................ 29 General preferences ...................................................................................................................................................................... 29 Account Information ......................................................................................................................................................................... 30 Location and Language .................................................................................................................................................................... 30 Mobile Phone or Pager .................................................................................................................................................................... 31 Message Blocking Options ............................................................................................................................................................... 31 Defining an email address for inbound fax ........................................................................................................................................ 32 Configuring TSID for outbound fax ................................................................................................................................................... 32 Play On Phone ................................................................................................................................................................................. 32 Attendant ......................................................................................................................................................................................... 33 Reach Me preferences .................................................................................................................................................................. 33 Caller Categories ............................................................................................................................................................................. 33 Call Handling ................................................................................................................................................................................... 34
3
Defining your Reach Me numbers .................................................................................................................................................... 35 Defining a Reach Me schedule......................................................................................................................................................... 35 Reach Me default settings when re-enabled using the TUI ............................................................................................................... 36 Testing your Reach Me configuration ............................................................................................................................................... 36 Notify Me preferences ................................................................................................................................................................... 36 Configuring email notification ........................................................................................................................................................... 38 Configuring fax email notifications .................................................................................................................................................... 39 My Phone preferences .................................................................................................................................................................. 39 Message playback order options ...................................................................................................................................................... 40 Changing message playback speed ................................................................................................................................................. 40 Enabling Rapid Prompts................................................................................................................................................................... 41 Setting date and time announcement ............................................................................................................................................... 41 Setting addressing preferences ........................................................................................................................................................ 42 Personal lists ................................................................................................................................................................................. 42 Creating a personal list .................................................................................................................................................................... 42 Editing a personal list ....................................................................................................................................................................... 43 Deleting a personal list ..................................................................................................................................................................... 44 Enhanced lists ............................................................................................................................................................................... 44 Greetings ........................................................................................................................................................................................ 45 Configuring standard greetings......................................................................................................................................................... 46 Configuring optional greetings .......................................................................................................................................................... 47 Defining business hours ................................................................................................................................................................... 48 Changing your password .............................................................................................................................................................. 48 From a phone .................................................................................................................................................................................. 48 From User Preferences .................................................................................................................................................................... 49

4
5
Chapter 1: Getting Started Messaging overview
With Avaya Aura® Messaging, you can manage your calls, voice messages, and fax messages on any device including tablets, smart phones, deskphones, and computers. Messaging offers an intuitive interface and a rich set of features for users to enhance productivity. Messaging provides the required flexibility, resilience, and scale in to fit into demanding environments.
Prerequisites Get the following Messaging information from the administrator:
• The Messaging access number (2-0000 or 517-432-0000)
• The mailbox number and a temporary password
• The URL to gain access to the Avaya Aura® Messaging User Preferences webpage (http://www.telecom.msu.edu/vm)
Accessing your mailbox from any phone About this task You can go to your mailbox from anywhere by dialing one of the Messaging access numbers.
Procedure 1. Perform one of the following actions:
• From any external phone, dial the Messaging access number (external) and press the pound key (#).
• On a phone belonging to another Messaging user within your organization, dial the Messaging access number. Then, press star (*).
2. Enter your mailbox number, and press the pound key (#).
The system announces your name and prompts you to enter your password.
3. Enter your password, and press the pound key (#).
6
Getting Started
Accessing the mailbox from your desk phone or soft phone
Before you begin Ensure that you have your Messaging access number. If not, contact your administrator.
Procedure 1. From your office deskphone or softphone, do one of the following:
• Press the Voice mail or Message button. • Dial the Messaging access number (internal).
The system announces your name and prompts you for your password.
2. Enter your Messaging password and then press the pound key (#). Initializing your mailbox
Before you begin Know what your voicemail extension and 1st time password is.
About this task Initialize your mailbox using TUI to receive voice mail. During your mailbox initialization, you will:
• Change your temporary password. • Record your name: Messaging uses your recorded name to identify you to other Messaging
users. The system also uses your recorded name in the system-generated greeting that TUI plays when callers reach your mailbox. If your organization uses the Messaging automatic attendant, TUI plays your recorded name before the attendant transfers callers to your extension. If you do not record your name, TUI plays the Text-to-Speech (TTS) version of your name.
• Record your personal greeting: Messaging plays greeting to callers when your phone is busy or you do not answer a call. If you do not record a greeting, Messaging uses your recorded name. If you do not record a greeting, TUI plays the TTS version of the system-generated greeting.
If you initialized your mailbox earlier, but cannot log in, get a temporary password from MSU Telecom Systems by calling 517-353-5515 (3-5515).
7
Initializing your mailbox Procedure
1. Call the voicemail system at 517-432-0000 or 2-0000.
2. Enter your temporary password that the administrator assigns you while creating your mailbox, and press the pound key (#).
3. Follow the prompts to change your password.
4. Follow the prompts to record your name. 5. (Optional) Follow the prompts to record your personal greeting.
If the administrator configured Messaging to prevent sending messages to uninitialized mailboxes, you can perform this step later.
Next steps To record your name or a personal greeting or both, in absence of the TUI prompts, see the TUI Quick reference for the required commands. Getting Started
Logging in to User Preferences About this task You can configure options for various Messaging features through the User Preferences webpage. You MUST have initialized your voicemail box before you can perform this function and have a Unified Messaging mailbox.
Procedure 1. To open the User Preferences webpage, perform the following:
• Open a web browser, in the address bar type the following:
http://www.telecom.msu.edu/vm and press enter.
The system displays the Messaging User Preferences login page.
2. In the Mailbox number field, type your mailbox number.
3. In the Messaging password field, type your password.
4. Click Log In.
The system displays the User Preferences General webpage.
Next steps Customize your General preferences. For more information, see General preferences
8
Chapter 2: Messaging from your e-mail client
Email client (Outlook) configuration
Messaging supports the following message stores: • The Avaya message store • The Exchange server
To gain access to the voice messages, you must configure Microsoft Outlook based on the message store that you use.
• To configure Microsoft Outlook for Avaya message store, set up an IMAP email account in your Outlook to use voice messages. The procedures to configure Microsoft Outlook for Avaya message store depend on the Outlook version. Users of Outlook 2016 (Office365 or Standalone) can follow the directions for Outlook 2013. - Configuring Outlook 2013/2016 for Avaya message store - Configuring Outlook 2010 for Avaya message store - Configuring Outlook 2007 for Avaya message store - Configuring Outlook 2003 for Avaya message store

9
Email client (Outlook) configuration
Configuring Outlook 2013/2016 for Avaya message store
About this task To configure Microsoft Office Outlook 2013/2016, perform the following steps:
Procedure 1. Start Outlook.
2. On the File menu, click Info and then click Add Account.
You must create a default Outlook profile and load the default profile in Microsoft Office Outlook 2013/2016 otherwise, Outlook window closes automatically.
The system displays the Auto Account Setup dialog box.
3. Select the Manual setup of additional server types option, and then click Next.
The system displays the Choose Service dialog box.
4. Select the POP or IMAP option, and then click Next. The system displays the POP and IMAP Account Settings dialog box.
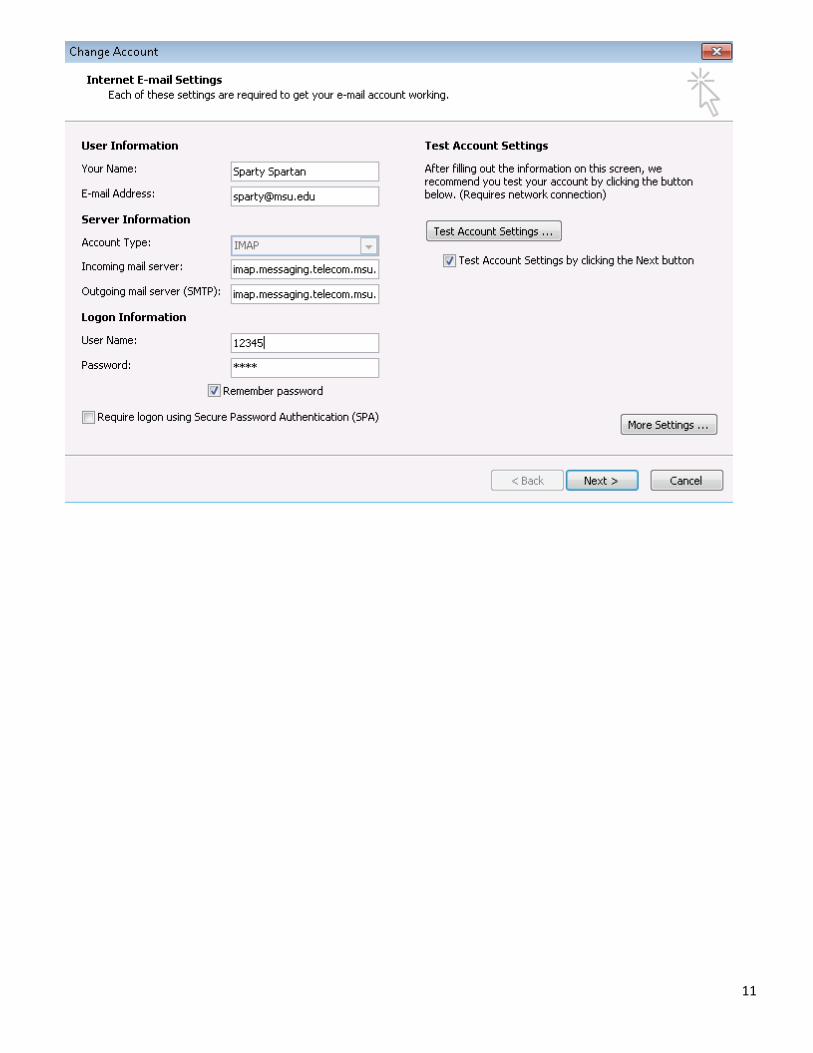
5. In the Your Name box, type your name, for example Michael J. Smith.
6. In the E-mail Address box, type your email address for MSU, for example [email protected].
7. In the Server Information section, select IMAP for Account Types.
8. In the Incoming mail server box, type the Messaging server address. This would be: imap.messaging.telecom.msu.edu
9. In the Outgoing mail server (SMTP) box, type the name of your Messaging server address. This would be imap.messaging.telecom.msu.edu.
10. In the User Name box, type your mailbox number. For example, 12345.
10
Messaging from your e-mail client
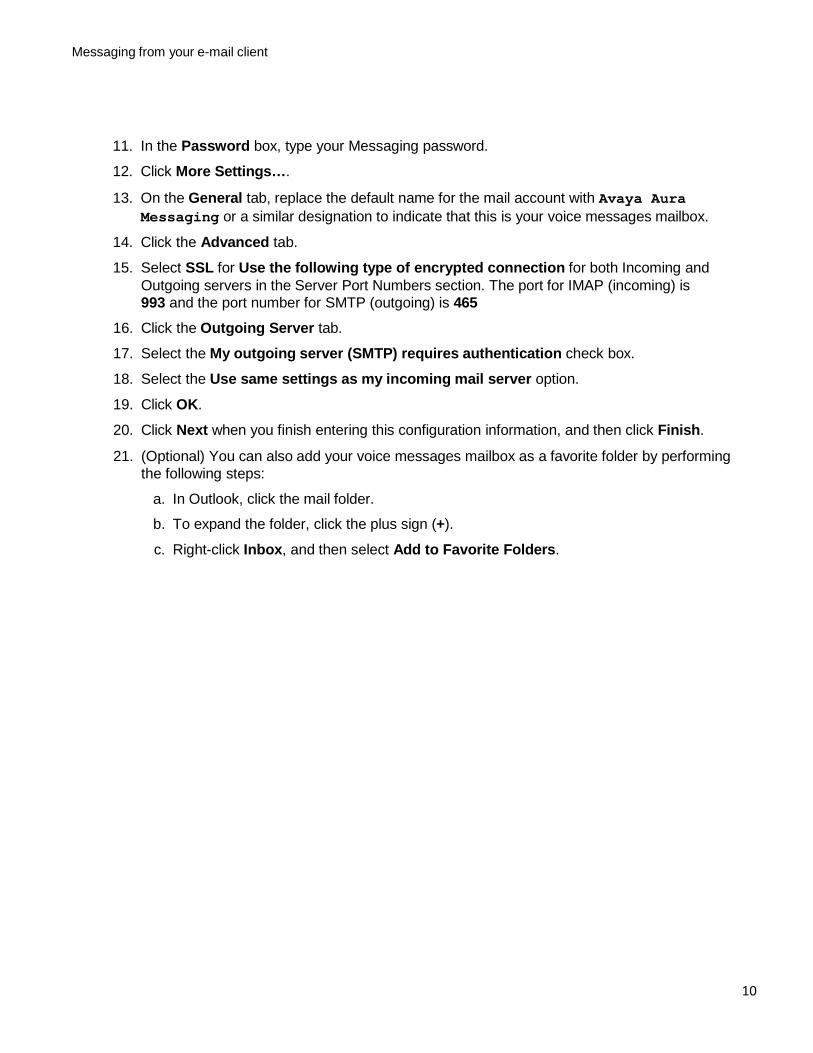
11. In the Password box, type your Messaging password.
12. Click More Settings….
13. On the General tab, replace the default name for the mail account with Avaya Aura Messaging or a similar designation to indicate that this is your voice messages mailbox.
14. Click the Advanced tab.
15. Select SSL for Use the following type of encrypted connection for both Incoming and Outgoing servers in the Server Port Numbers section. The port for IMAP (incoming) is 993 and the port number for SMTP (outgoing) is 465
16. Click the Outgoing Server tab.
17. Select the My outgoing server (SMTP) requires authentication check box.
18. Select the Use same settings as my incoming mail server option.
19. Click OK.
20. Click Next when you finish entering this configuration information, and then click Finish.
21. (Optional) You can also add your voice messages mailbox as a favorite folder by performing the following steps:
a. In Outlook, click the mail folder.
b. To expand the folder, click the plus sign (+).
c. Right-click Inbox, and then select Add to Favorite Folders.
11
12
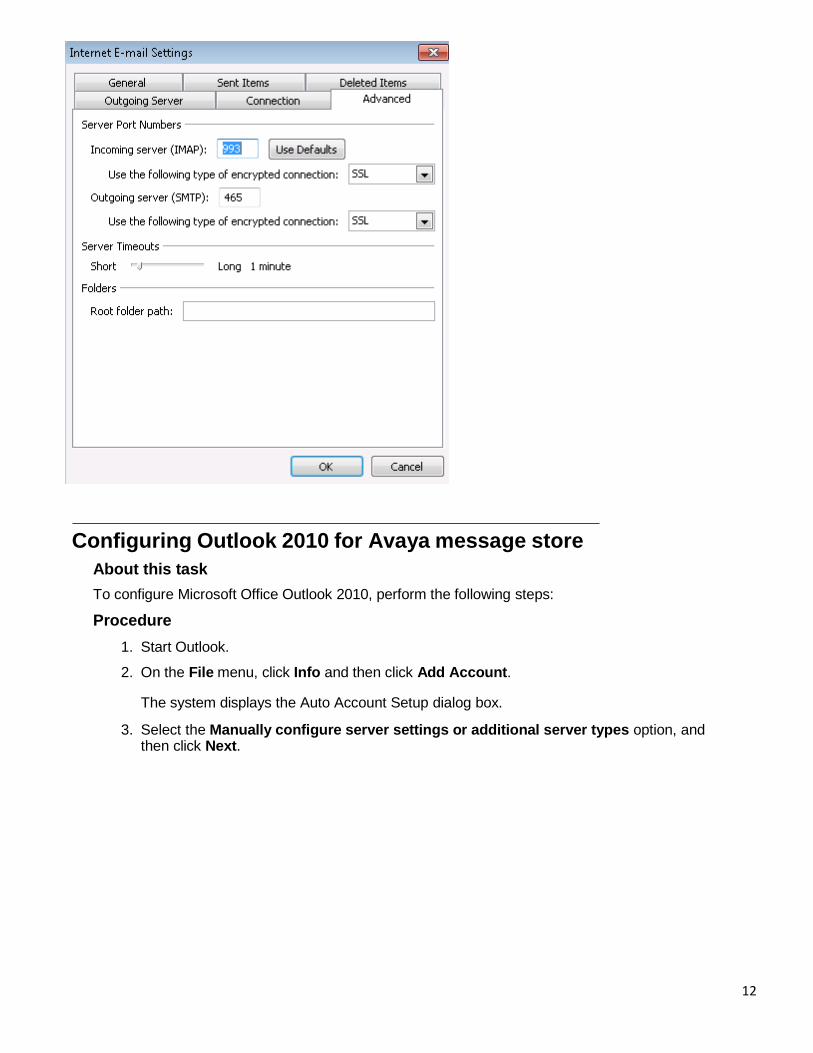
Configuring Outlook 2010 for Avaya message store
About this task To configure Microsoft Office Outlook 2010, perform the following steps:
Procedure 1. Start Outlook.
2. On the File menu, click Info and then click Add Account.
The system displays the Auto Account Setup dialog box.
3. Select the Manually configure server settings or additional server types option, and then click Next.
13
Email client (Outlook) configuration
The system displays the Choose Service dialog box.
4. Select the Internet E-Mail check box, and then click Next.
The system displays the Internet E-mail Settings dialog box.
5. In the Your Name box, type your name, for example Michael J. Smith.
6. In the E-mail Address box, type the email address that you use for your Avaya message store.
7. In the Server Information section, select IMAP for Account Types.
8. In the Incoming mail server box, type the Messaging server address. This would be: imap.messaging.telecom.msu.edu.
9. In the Outgoing mail server (SMTP) box, type the name of your Messaging server address. This would be imap.messaging.telecom.msu.edu.
Note: • The Outgoing mail server (SMTP) is to be used by Messaging only. Do not send
emails using this account. To send emails, use your designated email account. Tip: You must use the Outlook 2010 upgraded with latest SP2 for Office 2010 (32-bit), to view the functions under Custom Actions in the context-sensitive menu.
10. In the User Name box, type your assigned mailbox number. For example, 12345 11. In the Password box, type your Messaging password.
12. Click More Settings….
13. On the General tab, replace the default name for the mail account with Avaya Aura Messaging or a similar designation to indicate that this is your voice messages mailbox.
14. Click the Advanced tab.
15. Select SSL for Use the following type of encrypted connection for both Incoming and Outgoing servers in the Server Port Numbers section. Use port 993 for IMAP (Incoming) and port 465 for SMTP (Outgoing)
16. Click the Outgoing Server tab.
17. Select the My outgoing server (SMTP) requires authentication check box.
18. Select the Use same settings as my incoming mail server option.
19. Click OK.
20. Click Next when you finish entering this configuration information, and then click Finish.
14
Messaging from y ,;our e-mail client
21. (Optional) You can also add your voice messages mailbox as a favorite folder by performing the following steps:
a. In Outlook, click the mail folder.
b. To expand the folder, click the plus sign (+).
c. Right-click Inbox, and then select Add to Favorite Folders. Configuring Outlook 2007 for Avaya message store
Procedure 1. Start Outlook.
2. On the Tools menu, click Account Settings....
3. On the E-mail tab, click New.
The system displays the Choose E-mail Service dialog box.
4. Select the Microsoft Exchange, POP3, IMAP, or HTTP option, and then click Next.
The system displays the Auto Account Setup dialog box.
5. Select the Manually configure server settings or additional server types check box, and then click Next.
The System displays the Choose E-mail Service dialog box. 6. Select the Internet E-mail option, and then click Next.
The System displays the Internet E-mail Settings dialog box.
7. In the Your Name box, type your name, for example Michael J. Smith.
8. In the E-mail Address box, type the email address that you use for your Avaya message store.
9. In the Server Information section, select IMAP for Account Types.
10. In the Incoming mail server box, type the Messaging server. This would be: imap.messaging.telecom.msu.edu.
11. In the Outgoing mail server (SMTP) box, type the name of your Messaging server address. This would be imap.messaging.telecom.msu.edu.
15
Email client (Outlook) configuration
Note: • The Outgoing mail server (SMTP) is to be used by Messaging only. Do not send e-
mails using this account. To send e-mails, use your designated email account.
12. In the User Name box, type your assigned mailbox number. For example, 12345 13. In the Password box, type your Messaging password.
14. Click More Settings….
15. On the General tab, replace the default name for the mail account with Avaya Aura Messaging or a similar designation to indicate that this is your voice messages mailbox.
16. Select SSL for Use the following type of encrypted connection for both Incoming and Outgoing servers in the Server Port Numbers section. The IMAP (Incoming) port number is 993 and the SMTP (Outgoing) port number is 465.
17. Click the Outgoing Server tab.
18. Select the My outgoing server (SMTP) requires authentication check box.
19. Select the Use same settings as my incoming mail server option.
20. Click OK.
21. Click Next when you finish entering this configuration information, and then click Finish.
22. (Optional) You can also add your voice messages mailbox as a favorite folder by performing the following steps:
a. In Outlook, click the mail folder. b. To expand the folder, click the plus sign (+). c. Right-click Inbox, and then select Add to Favorite Folders.
Configuring Outlook 2003 for Avaya message store
About this task To configure Microsoft Office Outlook 2003 and earlier versions of Outlook, perform the following steps:
Procedure 1. Start Outlook.
16
Messaging from your e-mail client
2. On the Tools menu, click E-mail Accounts....
The system displays the E-mail Accounts dialog box.
3. Select the Add a new e-mail account check box under E-mail, and then click Next.
The system displays the Server Type dialog box.
4. Select IMAP as the type of account that you are creating, and then click Next.
The system displays the Internet E-mail Settings (IMAP) dialog box.
5. In the Your Name box, type your name, for example Michael J. Smith.
6. In the E-mail Address box, type and email address that you use.
7. In the User Name box, type your mailbox number. For example, 12345 8. In the Password box, type your Messaging mailbox password.
9. In the Incoming mail server box, type the Messaging server. This would be: imap.messaging.telecom.msu.edu.
10. In the Outgoing mail server (SMTP) box, type the name of your Messaging server address. This would be imap.messaging.telecom.msu.edu.
Note:
The Outgoing mail server (SMTP) is to be used by Messaging only. Do not send emails using this account. To send emails, use your designated email account. To reply to voice messages or to forward them, use the Messaging toolbar.
11. Click More Settings….
12. On the General tab, replace the default name for the mail account with Avaya Aura Messaging or a similar designation to indicate that this is your voice messages mailbox and click OK
13. Click Next when you finish entering this configuration information, and then click Finish.
14. (Optional) You can also add your voice messages mailbox as a favorite folder by performing the following steps:
a. In Outlook, click the mail folder. b. To expand the folder, click the plus sign (+). c. Right-click Inbox, and then select Add to Favorite Folders.
Purging deleted messages
By default, Outlook does not automatically purge deleted messages. You might notice that when you mark an item on an IMAP server for deletion, it is displayed in strike-through text. This can lead

17
Email client (Outlook) configuration users to unexpectedly run out of space in their mailboxes. The manual steps for purging differ slightly depending on the Outlook versions.
Before you begin Ensure that you are working online and connected to the IMAP server.
About this task You can either manually purge messages marked for deletion, or configure Outlook to delete any marked items when you switch between folders.
Procedure 1. For Outlook 2010 and 2013/2016, perform the following steps to purge deleted items:
a. Open the folder from which you want to purge deleted items.
b. On the main menu, click Folder. c. Click Purge and select Purge Marked Items in Folder name.
2. To configure Outlook 2010 or 2013/2016 to delete any marked items when you switch between folders, perform the following steps:
a. On the main menu, select Folder > Purge > Purge Options.
b. For Outlook 2010, click Deleted Items tab and select Purge items when switching folders while online.
c. For Outlook 2013/2016, click Advanced tab and select Purge items when switching folders while online.
d. Click Ok.
3. For Outlook 2007, perform the following steps to purge deleted items:
a. Open the folder from which you want to purge deleted items.
b. On the main menu, click Edit. c. Click Purge and select Purge Marked Items in Folder name.
4. To configure Outlook 2007 to delete any marked items when you switch between folders, perform the following steps:
a. On the main menu, select Edit > Purge > Purge Options.
b. Click General tab and select Purge items when switching folders while online.
c. Click Ok.
5. For Outlook 2003, perform the following steps to purge deleted items:
a. On the main menu, click Edit. b. Click Purge Deleted Messages.
18
Messaging from your e-mail client
Voice messages MWI and message status
Voice messages appear as unread until they are accessed over the phone or are marked as read in your email client. The message waiting indicator (MWI) light on your desk phone remains switched on as long as one or more voice messages in your Messaging Inbox are marked as Unread. The MWI light is turned off when all voice messages in your Inbox are marked as Read.
MWI behavior with the Aria TUI • If you skip a message by pressing # before ten seconds of message playback has elapsed, the
message remains marked as Unread and the MWI lamp remains switched on. • If you skip a message by pressing # after ten seconds of message playback has elapsed, the
message is marked as Read. • If you save a message, it is marked as Read even if the message played back for less than
ten seconds.
MWI behavior with Outlook If Outlook is in cached mode when you delete a message, the MWI light switches off only after the next synchronization between Outlook and Exchange. The MWI light is switched off when there is any change in Outlook that influences the MWI, such as read or unread status change, deletion of a message, or moving a message to another folder.
Private messages
If you need to protect your outgoing message from being forwarded by the recipient, mark it as Private. When Avaya Message Store is the storage destination for Messaging:
• Recipients of a Private voice message can only access it from a phone.
• Private voice messages cannot be forwarded.
When Exchange is the storage destination, Private messages are flagged as private but otherwise not protected.
Moved messages
Voice messages can be moved from your inbox to other folders like any other email. Once a message is moved, it is no longer available over the phone.
19
Auto Delete Notification and Message Retention
Auto Delete Notification and Message Retention Using the Auto Delete Notification feature, you can set the TUI to play a warning if any messages are near the automatic deletion date. You can use your TUI to review the soon-to-be-deleted messages and restore the messages that you want to keep. The administrator configures the Messaging threshold for the message retention capacity. The administrator must set appropriate permissions for you to use the Message Retention feature.
Note: The TUI plays auto delete notification only when one or more messages are pending for deletion.
20
Chapter 3: Fax
Using the fax feature of Messaging, you can perform the following:
• Receive faxes to a specified email address.
• Send faxes from any appropriately configured and supported version of Windows
desktop. Messaging administrators control which groups of users can send and receive faxes.
Computer requirements The Messaging fax client runs on any of the following operating system and Windows system type:
• Operating system:
- Windows 7
- Windows 8
- Windows 8.1
- Windows 10
• Windows system type:
- 32 bit - 64 bit
Inbound fax The Messaging system receives inbound fax messages and forwards them to a specified email address. You can receive fax messages to any the following email addresses depending on your Messaging mailbox configuration:
• The email address specified in the internal corporate directory.
• The email address specified in the User Preferences webpage.
The maximum transmission length of an inbound fax is 90 minutes. After 90 minutes, Messaging stops the transmission and sends a report to the sending fax server. The report includes the number of pages transmitted successfully.
You cannot gain access to inbound faxes from the TUIs because Messaging does not store any faxes in the message store. Message Waiting Indicator of the TUIs does not light up on receipt of a new fax.
Cache for fax The Messaging system only caches inbound faxes if you have a specified email address in User Preferences. The system does not cache outbound faxes or inbound faxes sent to a fax server. The default retention period for a cached fax is 72 hours. Messaging administrators can modify the retention period.
21
No. Task Description Notes
1 Configure the Internet Printing Protocol (IPP) feature
• See Turning on the IPP feature on W indows 7 on page 23
By default, your computer has this printing capability. However, some companies disable this capability for security reasons.
2 Configure the HyperText Transfer Protocol (HTTP) printing
• See Turning on the HTTP printing on Windows 7 on page 23
By default, your computer has this printing capability. However, some
Outbound fax Using Messaging, you can compose a document in a Windows-based program and fax it to any destination fax number. The Messaging fax client on your desktop sends your document to the fax printer service on the Avaya storage server. The fax printer service sends the document to the application role, which sends it to the destination fax number. You can change fax-related defaults in User Preferences. Outbound fax has the following features:
• You can customize Transmitting Subscriber Identification (TSID) for outbound fax jobs. The TSID is a string that identifies a specific fax machine as the sender of a fax transmission. By default, the Messaging system assigns each user a TSID in the format mailbox@external access number. You can change the default value of TSID through the General section of the User Preferences webpage.
• You can configure email notifications for outbound fax. You can configure Messaging to send a status notification by email for each fax that you send. You can enable the notification through the Notify Me section of the User Preferences webpage.
• You can monitor the status of your outbound fax jobs. An outbound fax job is similar to a print job. You can view and cancel your outbound fax jobs using the remote fax printer configured on your Windows desktop. You can also delete failed fax jobs and remove them from the queue.
Outbound fax has the following requirements: • Messaging requirements. Your Messaging administrator must enable the fax support and
dialing privileges for your mailbox so that you can use the fax features. • Computer requirements. Your computer must support the Internet Printing Protocol (IPP)
feature and HTTP printing. Messaging fax client pre-installation checklist
Get the administrator permission for the following Messaging fax client pre-installation tasks:
22
No. Task Description Notes
companies disable this capability for security reasons.
3 Download a fax client installer
• See Downloading a fax client installer on page 24
IPP feature configuration Turn on the IPP feature of your computer to enable secure remote printing. After enabling the IPP feature, you can send messages to the Messaging fax client to print and generate fax messages.
By default, the IPP feature is enabled for the computers running on Windows XP. If not, contact your system administrator.
Turning on the IPP feature on Windows 7 Before you begin Get the administrator permission for enabling the IPP feature on computers running on Windows 7.
Procedure 1. Click Start > Control Panel > Get programs > Turn Windows features on or off.
Windows displays the Windows Features window.
2. Expand Print and Document Services.
3. Select Internet Printing Client. 4. Click Ok.
HTTP printing configuration Turn on the HTTP printing of your computer to send fax messages from your computer to the network fax printer service on the Messaging storage server.
Turning on the HTTP printing on Windows 7
Before you begin Get the administrator permission to enable the HTTP printing on your computer.
Procedure 1. Click Start > Run.
23
2. In the Open field, type regedit, and click OK.
3. Click HKEY_LOCAL_MACHINE > SOFTWARE > Policies > Microsoft. 4. Click Windows NT > Printers.
5. Double-click DisableHTTPPrinting, and set the value to 0.
6. Click OK.
Downloading a fax client installer About this task Download the fax client installer from the Messaging storage server on your computer for a specific language that you have set in the User Preferences webpage.
Important: You must save the fax client installer on a local drive of your computer. You cannot install a fax client from a shared location or a network drive.
Before you begin Get the administrator permission for downloading the fax client installer.
Procedure 1. In Internet Explorer, type:
http://www.telecom.msu.edu/sso
2. Press Enter. 3. Once logged in on the left hand column click on APP Downloads
4. Look for Avaya Aura Messaging Fax Client and click on Download
The system displays a dialog box with the message: Do you want to run or save FaxClient-en-US.msi from messaging.telecom.msu.edu?
5. Click Save.
The system saves the fax client installer on your computer. Installing Messaging fax client
About this task The Messaging fax client is a printer driver that prints your messages and generates fax messages.
Before you begin Complete the fax client pre-installation procedures.
Procedure 1. Run the fax client installer for your language.
24
2. Select I accept the terms in the License Agreement. 3. Click Install, and follow the instructions in the installation wizard.
4. Click Finish.
Messaging installs the fax client and adds Avaya Aura® Messaging Fax printer driver to the list of Printers and Faxes.
5. Restart the computer.
Next steps Configure the fax printer service to Windows.
Fax printer service configuration
The fax printer service is the remote fax printer on the Messaging storage server, where you send fax messages. Add the fax printer service as a network printer on the Windows desktop to send faxes to a destination number based on your dial-out privilege.
Adding the fax printer service as a network printer on Windows Before you begin Install the Messaging fax client on your computer.
Procedure 1. Click Start > Devices and Printers > Add Printer.
Windows displays the Add Printer window.
2. Select Add a network, wireless or Bluetooth printer > The printer that I want isn’t listed. 3. Select Select a shared printer by name. 4. In the search text box, type:
http://imap.messaging.telecom.msu.edu:8631/printers/fax. 5. Click Next.
Windows displays the Configure Internet Port window.
6. In the User Name field, type your mailbox number.
7. In the Password field, type your mailbox password.
8. Click Ok, and the following instructions of the Add Printer wizard.
9. Click Finish.
The system adds the following remote network printer to the Windows environment:
• Fax on http://imap.messaging.telecom.msu.edu:8631
Adding the fax printer service as a network printer on Windows 8 or later
25
Before you begin Install the Messaging fax client on your computer.
Procedure 1. Navigate to Control Panel. 2. Click Devices and Printers > Add Printer
Windows displays the Add Printer window.
3. Select Add a network, wireless or Bluetooth printer > The printer I want isn’t listed.
4. Select Select a shared printer by name
5. In the search text box, type http://messaging.telecom.msu.edu:8631/printers/fax.
6. Click Next.
Windows displays the Configure Internet Port window.
7. In the User Name field, type your mailbox number.
8. In the Password field, type your mailbox password.
9. Click OK, and follow the instructions of the Add Printer wizard.
10. Click Finish.
The system adds the following remote network printer to the Windows environment:
• fax on http://messaging.telecom.msu.edu:8631
Sending a fax About this task Using Messaging, you can send faxes to local, national, or international numbers depending on your dial-out privileges. You can use any Windows-based program, such as Microsoft Word, to draft your fax content. The fax client sends the drafted content without any cover page. Before you begin
• Install the outbound fax client on your computer. • Add the remote network printer to your environment. • Request your administrator to configure the dial-out privileges for you to send a fax to a
destination number. • When sending fax to a Messaging mailbox, ensure that the Messaging mailbox of the fax
receiver has fax privileges.
Procedure 1. Create a document in Windows with the content that you want to send as a fax message. 2. Click File > Print. 3. From the list of printers, select Avaya Aura® Messaging Fax.
26
4. Click Print.
The system displays Avaya Aura® Messaging Fax Client.
5. In the Printer URL field, select http://messaging.telecom.msu.edu:8631/printers/fax
6. In the Destination Fax field, type the fax number of the recipient.
For all destinations type +1 (area code)xxx-xxxx. For example +15175551212
7. To preview your fax, select Display fax content. 8. Click OK.
If you enabled outbound fax notifications, the system sends you an email notification with the status of each outbound fax job.
Managing outbound fax jobs About this task You can manage an outbound fax job as you manage the regular print jobs. You can cancel an in- progress fax job or delete a failed fax job.
Procedure 1. Click Start > Devices and Printers
2. Double-click fax on http://messaging.telecom.msu.edu:8631
3. Perform one of the following:
• To cancel a fax job that is in-progress, right-click the fax job and click Cancel. • To delete a failed fax job, right-click the fax job and click Delete.
Changing your password in the network fax printer service
About this task If you change your Messaging password, you must update the password in the network fax printer service on the Messaging server. Otherwise, you cannot send faxes.
Procedure 1. Click Start. 2. Click fax on http://messaging.telecom.msu.edu:8631
3. Click Print server properties > Ports.
27
4. Select the port http://messaging.telecom.msu.edu:8631/printers/fax
5. Click Configure Port.
Windows displays the Configure Internet Port window.
6. In the Password field, type your new mailbox password.
7. Click OK twice. Troubleshooting the fax issues
Unable to download a fax client installer
Condition Unable to download a fax client installer.
Solution Recheck that you are using the correct URL to download the fax client installer.
Unable to add a fax printer service
Condition When adding a fax printer service as a network printer on a Windows desktop, after typing the username and password, Messaging displays the following error message: They do not have access to the printer, please try a different username or password.
Solution Contact your system administrator.
Windows fails to connect to a fax printer service
Condition Windows fails to connect to the added fax printer service.
28
Solution Recheck that you enabled the IPP feature on your computer.
Unable to send a fax
Condition Messaging displays the error message: Print file failed. rc = 1260.
Solution Recheck that you enabled the HTTP printing feature on your computer.
A Messaging fax receiver is unable to receive faxes
Condition A Messaging fax receiver is unable to receive faxes that you are sending.
Cause The Messaging mailbox of the fax receiver does not have the fax privilege.
Solution Ask the Messaging fax receiver to contact the administrator.
29
Chapter 4: Customizing Messaging
About User Preferences User Preferences is a web-based tool to customize settings for Messaging.
Note:
Some of these features may not be available in your organization. For details, contact your administrator.
You can access the Aura Messaging User Preferences tool by going to http://www.telecom.msu.edu/vm, logging in and clicking on Preferences.
General preferences The following User Preference features are found on the General Web page:
• Messaging Access Number
• Account Information • Location and Language • Mobile Phone or Pager • Message Blocking Options • Fax
• Play on Phone • Attendant
Note:
Some of these features might not be available in your organization. For details, contact your administrator.
Messaging access number Messaging access numbers (internal and external) are used to access Messaging. Use the internal number to dial from inside the office. The external number is the one that you dial from outside the office. The internal and external Messaging access numbers are available on the User Preferences > General page.
30
If you see more than one Messaging access number (internal or external), use the number that is assigned to a language that you know.
When you call the messaging access number from your mobile phone, Messaging recognizes your mobile number. The Messaging system directly prompts you to enter your mailbox password, skipping the need for you to enter your mailbox number. To ensure that the Messaging system recognizes your mobile number, you must enter your mobile number in the correct format on the User Preferences General page. To obtain the correct format of your mobile number, call your desk phone and make note of the number as displayed on the caller ID.
Account Information
Account information displays the following fields:
• Mailbox: Displays your assigned voice messaging mailbox number.
• Extension: Displays your assigned phone extension.
• Auto logon: Displays the auto logon option for each extension. With the auto logon option, you can log in to your mailbox using the extension on which you have enabled the auto logon option without having to enter your mailbox number and password. Your administrator must enable appropriate permissions for you to use the auto logon feature.
• Additional Extensions: Displays any additional phone extensions associated with your mailbox. If the Additional extensions field is not displayed, no additional extensions are configured for your mailbox.
Location and Language
Select your preferred time zone and language in the Location and Language section.
Time zone Selecting a time zone affects the date and time announcement that the phone plays when you listen to a voice message using the telephone user interface. Changes to the time zone also impact the Reach Me Schedule on the Reach Me screen.
Language You can select your preferred language that you want to use in the voice messaging system. If this field is unavailable, the default language is available. This setting affects the following:
• The language of the voice prompts you hear when accessing your Messaging mailbox through the telephone user interface.
• The language used for your User Preferences webpages. You can configure a specific call answer language as the default call answer language with two additional call answer languages. You must have appropriate permissions to define multiple call answer languages.
31
Important: You must not configure multiple languages when using One-Step Audix Recording feature, but configure a single default call answer language.
Mobile Phone or Pager
You can use Mobile Phone or Pager for features such as:
• Notify Me (if enabled).
• Reach Me forwarding number.
• Other mobile phone when using Play on Phone, Voice Reply, Voice Forward, and Call Sender in your email client.
For Mobile Phone or Pager: Select the Use this mobile phone or pager for "Notify Me" and other features check box, and specify an alternate mobile phone or pager number to enable the integrated login.
Note:
Avaya Aura® Messaging supports only email based (SMTP) pager notifications. Message Blocking Options
With the Incoming Messages Blocking option, you can choose if you want Messaging to allow or prevent your callers from leaving voice messages. The options available are:
• Never: Active by default. Incoming callers can record voice messages. • Always: Incoming callers cannot record voice messages. • Only when extended absence greeting is active: Incoming callers cannot record voice
messages if you have recorded and enabled an extended absence greeting. On the basis of your selection, you can decide from the following options on how Messaging processes the call:
• Disconnected: Messaging plays your greeting and disconnects the call. • Transferred to a custom attendant (operator) : Messaging plays your greeting and transfers
the call to a custom attendant. Your administrator must enable the appropriate permissions for you to use the income message blocking feature.
32
Defining an email address for inbound fax
About this task By default, you receive inbound fax messages at your email address specified in the internal directory of your organization. However, you can define an email address of your choice for receiving inbound fax messages from the General section of the User Preferences Web pages.
Procedure 1. In the Fax section, select the Forward incoming fax messages to: check box.
2. In the adjacent text box, type an email address.
3. Click Save. Configuring TSID for outbound fax
Before you begin Consult your system administrator before you change the TSID assigned to outbound faxes. About this task You can configure the transmitting subscriber identification (TSID) for outbound faxes with which fax recipients identify the origin of an incoming fax. You can configure the TSID through the General section of the User Preferences Web pages.
Procedure 1. In the Fax section, type a TSID of your choice in the Transmitting subscriber ID for
outgoing fax messages: field.
This field accepts a TSID of maximum length up to 128 characters. In case the field is left blank, the field defaults to <Extension>@<External Messaging Access Number>.
2. Click Save. Play On Phone
When you click Play on Phone, Voice Reply, Voice Forward, or Call Sender on the Messaging toolbar, the system displays a pop-up window where you need to specify which phone is to be used for the requested action. The Play on Phone settings on the User Preferences General page provide options to manage this pop-up as follows:
• Always use this phone: Use this option to specify a phone number that you want to use for Play on Phone, Voice Reply, Voice Forward, or Call Sender. This phone number will automatically be used every time it is needed, and you will not be prompted with a pop-up for this purpose.
33
• Ask me every time which phone to use: Use this option to restore the default setting where the system displays a pop-up that prompts you to select a phone each time you use Play on Phone, Voice Reply, Voice Forward, or Call Sender.
Attendant
Attendant settings define where calls are forwarded when a caller presses 0 while listening to your voice message greeting.
The options available for Attendant are:
• Default attendant (operator) : Calls are routed to the system attendant (operator).
• Personal attendant/assistant: Calls are routed to another phone number. You must enter the phone number, which can be internal (typically a phone extension) or external (any phone number formatting is acceptable). If you do not see this field, your system administrator has disabled this feature.
Reach Me preferences Reach Me settings are located on the Reach Me Web page in your User Preferences. If you do not have a Reach Me Web page, the Reach Me features have been disabled at the system administration level.
The Reach Me feature provides callers with an opportunity to reach you on an alternate phone when you do not answer or when your primary extension is busy. The Reach Me feature manages how your incoming calls are forwarded based on the following:
• Caller priority - A priority status over other callers is given to the callers that you define as priority callers.
• Call screening - You can screen the call before deciding to answer by asking the callers to record their name.
• Forwarding numbers - For any incoming call, you can forward calls to up to three Reach Me numbers.
• Schedule - You can forward calls during certain hours and on certain days defined by you. Caller Categories
You can let the Reach Me feature handle all calls in an identical fashion, or define different call handling actions for priority callers, internal callers, and external callers. You can configure a list of priority callers through the User Preferences Web pages.
34
To define caller categories: 1. Navigate to the User Preferences > Reach Me page.
2. Under the Caller Categories section
• Select Treat all callers the same if you want to set the same call handling action for all callers.
• Select Distinguish between internal callers and other callers to setup different call handling actions for internal callers and other callers.
3. Click Save. Call Handling
Call Handling settings are where:
• Reach Me is enabled, allowing you to forward your incoming calls.
Configuring incoming call handling when treating all callers the same About this task Call handling options depend on how you choose to categorize your callers. You can choose to treat all callers the same in the manner:
Procedure 1. To configure Reach Me, select from the following options:
• To enable Reach me, select Forward calls to the Reach Me numbers below.
• To disable Reach Me, select Go to voice messaging.
2. When Reach Me is enabled, you can use call screening. To enable call screening, select the Before forwarding, ask callers to record their name so I can screen the call check box.
3. Click Save.
Configuring incoming call handling with other callers About this task Options for Call Handling differ depending on how you chose to categorize your users. If you chose to distinguish between internal callers and other callers, the system presents you with options to define call handling for internal callers and other callers separately.
Procedure 1. To configure Reach Me for internal callers, select from the following options:
• To enable Reach Me, select Forward calls to the Reach Me numbers below . • To disable Reach me, select Go to voice messaging.
35
2. To configure Reach Me for other callers, select from the following options: • To enable Reach Me, select Forward calls to the Reach Me numbers below . • To disable Reach me, select Go to voice messaging.
3. If you want to activate call screening, select the Before forwarding, ask callers to record their name so I can screen the call check box.
4. Click Save.
Call screening Call Screening is an optional Reach Me feature, which you can enable from the Call Handling section of the Reach Me Web page in your User Preferences. When you enable call screening:
• Messaging prompts callers to record their names before forwarding the call to you.
• Messaging plays the recorded name when you receive the forwarded call on the basis of which you can accept or reject the call.
If you reject the call, Messaging informs the caller that you are unavailable and routes the call to your Messaging mailbox.
Defining your Reach Me numbers
Before you begin These settings are applicable only when Reach Me is enabled.
About this task With Reach Me enabled, incoming calls can be forwarded to up to three numbers. The Messaging system tries to reach you at all your Reach Me numbers, by dialing them one at a time, before forwarding a call to your Messaging mailbox. To define Reach Me numbers:
Procedure 1. From the drop-down boxes, select the forwarding numbers.
2. For each Reach Me Number, specify a ring threshold. For most phones, 3 rings is a good choice.
Defining a Reach Me schedule
Before you begin These settings are applicable only when Reach Me is enabled.
36
About this task When you enable Reach Me, you can set up a Reach Me schedule to forward calls during a certain time period and for specific days of the week. By default, calls are forwarded between 9:00 AM and 5:00 PM, Monday through Friday. To set up a Reach Me schedule:
Procedure 1. Select Forward calls only between.
2. Select a start and stop time.
3. Select the days that you would like the schedule to be in effect.
The system does not forward calls outside the schedule. If your extension rings and you do not answer, the call is routed to your mailbox.
Reach Me default settings when re-enabled using the TUI
You can enable or disable Reach Me from the Aria or Audix TUI or by using the User Preferences Web pages. If you use the TUI to re-enable Reach Me, the system:
• Enables call forwarding to previously defined Reach Me numbers.
• Enables the 'Treat all callers the same' option.
• Disables call screening.
• Enables Reach Me scheduling. Testing your Reach Me configuration
After you configure your Reach Me settings, call your extension from a separate phone to experience exactly what your callers experience. This is important for testing defined ring thresholds and forwarding settings.
You have successfully configured your Reach Me settings if your test call is forwarded to all specified phone numbers, one by one and then finally, to your Messaging mailbox.
Notify Me preferences
Notify Me settings are located on the Notify Me Web page in your User Preferences.
The Notify Me feature sends you a notification when you receive a new voice message. You receive the notification by:
• Text message to your mobile phone.
37
• Phone call to your mobile phone.
• Page notification to your pager.
• Email notification to your email address.
You can also configure the Notify Me settings to send an email notification to your email address after each successful outbound fax.
Notify Me settings offer the following rule-based configuration options, which are designed around your availability:
• Disable when Extended Absence Greeting is active.
Note:
• If you do not have a Notify Me Web page, notification features have been disabled at the system administration level. Similarly, if one of the described notification options is not available, it has been disabled by the administrator.
• Avaya Aura® Messaging supports only email based (SMTP) pager notifications. Configuring phone notifications
Before you begin To enable text message or page notifications you must define a mobile phone or pager number. To set up your mobile phone or pager number, specify the phone number in the Mobile Phone or Pager section in General preferences. Avaya Aura® Messaging supports only email based (SMTP) pager notifications.
About this task To configure phone notifications, perform the following steps on the Notify Me Web page of your User Preferences:
Procedure 1. On the Notify Me Web page of User Preferences, under Phone Notifications select Notify
me when a new voice message arrives.
2. Select one of the following notification options:
a. To receive notifications through a phone call, select With a phone call to:
The system displays the phone number you specified in the Other mobile phone or pager field on the General Web page.
b. To receive notifications as text message or pager notifications, select With a text message or page to:
The system displays the phone number you specified in the Other mobile phone or pager field on the General Web page.
38
If you choose this option, you must select your service provider from the Mobile provider drop-down list. Contact your system administrator if the system does not display your mobile provider in the drop-down list.
c. Select Only for important messages if you want to receive notifications for voice messages that the caller specifies as important in the respective TUI.
The Aria TUI provides two additional delivery options wherein the caller can mark the voice messages as private and for future delivery.
Note:
In future delivery, you can set a future date on which you want the system to deliver your voice message. In case you specify a delivery date without year and the specified date is less than the current date, the system does not prompt any error but delivers the voice message on the specified date next year.
3. Click Save. Configuring email notification
You can receive an email notification of a new voice message to a specified email account. For email notifications, the Messaging toolbar is not available. You might have to wait about 10 minutes for your changes to take effect.
Procedure 1. On the Notify Me Web page of User Preferences, under Voice Email Notifications, select
the Email me a notification for each voice message check box.
2. Select Custom subject to customize the subject line of your email notifications. You can enter up to 80 alphanumeric characters.
You can turn off custom subject lines later by selecting Default subject. The default format for the subject line is: Voice message from <name or telephone number>.
3. In the To email addresses text box, enter the email address to which email notifications need to be sent.
You can enter up to five email addresses. Use a semicolon to separate addresses.
4. Select the Include the recording check box if you want to include the recording of the voice message. For Private messages, the voice message recording may not be included even if this check box is selected, depending on the system configuration.
5. Select Only for important messages if you want to receive notifications for voice messages that the caller specifies as important in the TUI.
39
Configuring fax email notifications
Before you begin The administrator must enable the appropriate permissions for you to be able to use fax-related features.
About this task You can configure the system to send an email status notification for each outbound fax through the Notify Me section of the User Preferences Web pages.
Procedure 1. In the Fax Email Notifications section, select the Email me a notification for each fax
message sent check box.
2. In the To email address field, type an email address to which you want the notifications to be sent.
3. Click Save. My Phone preferences
User preferences on the My Phone Web page allows you to customize your preferences when using the telephone user interface.
The following user preference features are found on the My Phone Web page:
• Auto play
• Message Playback Order
• Message Playback Speed
• Prompt Level
• Date and Time Announcement
• Voice Recognition for Addressing Preferences
Note:
If one of the described phone preference features is not available on the My Phone Web page, it has been disabled by the administrator.
40
Auto play The My Phone webpage only displays the auto play option if you use the CallPilot TUI. If you select this option:
• The TUI automatically begins playback of messages upon log in. You do not have to press any keys to initiate listening to messages.
• You define the message playback order on the My Phone webpage. Message playback order options
You can set the order of the messages in which the TUI plays the messages to you. By default, the TUI plays the messages starting with the newest message first. You can set the following playback order options independently for unread, read, and saved messages:
• Play newest first to hear messages starting with the newest message first.
• Play oldest first to hear messages starting with the oldest message first.
• Play important messages before others to hear urgent messages first.
• Arrange by sender to hear messages that Messaging sorts by sender name.
Note:
- The My Phone page displays Arrange by sender option only if your administrator activates the option for you.
- When you select Arrange by sender option, Messaging sorts in the normal sequence unless your mailbox has multiple messages from the same sender.
- If the envelope information for the message does not include the name of the sender, Messaging uses the telephone number of the sender.
Some of the message playback options might not be available for your TUI. Changing message playback speed
About this task When reviewing messages using the phone, by default, they are initially played at normal speed, or 100%. Telephone keypad options are available to speed up or slow down the message during review. By setting the Message Playback Speed, you can choose a slower or faster default speed at which all messages are initially played. After setting a slower or faster default playback speed, the telephone keypad options are still available to further speed up or slow down an individual message during review.
41
Procedure 1. To hear messages at a slower than normal speed, choose one of the following (in order of
slowest to fastest):
• 70%
• 85%
• 90%
2. To hear messages at a faster than normal speed, choose one of the following (in order of slowest to fastest):
• 125%
• 170%
3. To return to normal speed, select 100%. Enabling Rapid Prompts
About this task Rapid prompts are a set of short, condensed phone prompts that replace the standard phone prompts. Because they are much shorter, rapid prompts help you save time. For example, for the standard prompt 'Message sent. Only your introduction will be heard before the original message', the corresponding rapid prompt is 'Sent'. Use rapid prompts only if you are familiar with the standard prompts and do not need to hear instructions in detail each time you use Messaging. If you cannot see the Use Rapid Prompts check box on the My Phone page in User Preferences, your administrator has not setup rapid prompts on the Messaging system or you have not selected a language that supports rapid prompts on the General page in User Preferences. Rapid prompts are currently only available in US English for the Aria TUI . To enable rapid prompts on your phone:
Procedure 1. Enable the Use Rapid Prompts check box on the My Phone page in User Preferences.
Setting date and time announcement
Procedure 1. Select Announce date and time for each message to hear the date and time that a message was received before reviewing it from the telephone user interface.
42
Setting addressing preferences
About this task Messaging provides the following options to select recipients for a message:
1. Voice recognition: You can use Voice recognition to select recipients or distribution lists by speaking their full name (as listed in the internal directory or as defined by you for your personal lists).
2. Telephone keypad: You can use the telephone keypad to select recipients or distribution list by using the keypad to spell their name or enter their mailbox number.
Procedure 1. To set your addressing preferences, select one of the following options:
• Select Using voice or keypad to use both voice recognition and the telephone keypad to select voice message recipients.
• Select Using keypad only to use only the telephone keypad to select voice message recipients.
Note:
Some of these features may not be available in your organization. For details, contact your administrator.
Personal lists
When you want to send a voice message to many voice messaging recipients, you can create one or more personal distribution lists in the Personal Lists page of your User Preferences Web page.
Creating a personal list
Procedure 1. In the User Preferences Web page, click Personal Lists.
2. In the Personal Lists Web page, click Add New List. 3. In the List name text box, specify a name for your personal list. You can use this name
when addressing an outgoing message.
4. From the List number drop-down list, select a list number. The list number ranges from 11 to 99.
5. In the New member (mail box) text box, enter the mailbox number of the member that you want to add to your personal list, and then click Add.
The system displays the First Name, Last Name, and Mailbox of the newly added member.

43
6. Continue adding members until you have all the names you would like to include in your personal list. The maximum number of members that you can add in a personal list is 100.
7. Click Save.
The maximum number of personal lists that you can create is 89. Editing a personal list
Procedure 1. From the Personal list: drop-down list, select the personal list that you want to edit.
2. Click Edit. 3. You can perform the following actions:
• Edit the list name • Change the list number • Delete existing members • Add new members
Editing the list name Procedure
1. In the List name: text box, type the new name of the list.
2. Click Save.
Changing the list number Procedure
1. From the List number: drop-down list, select an available new list number for your personal list.
2. Click Save.
Deleting existing members Procedure
1. In the Members: list, identify the member you want to delete, and then click Delete.
2. Continue deleting members until you have deleted all the members you would like to remove from your personal list.
3. Click Save.
Adding new members Procedure
1. In the New member (mailbox): text box, enter the mailbox number of the member you would like to add to your existing personal list.
44
2. Continue adding members until you have added all the members you would like to have in your personal list.
3. Click Save. Deleting a personal list
Procedure 1. From the Personal list drop-down list, select the personal list that you want to delete.
2. Click Delete.
3. Click OK to confirm. Enhanced lists
Using the Enhanced List page, you can add or delete members of enhanced lists defined by the system administrator.
Note:
You can only see the Enhanced List User Preferences Web page if the system administrator added you to the administrator list for at least one enhanced list.
Editing an enhanced list
Procedure 1. In the User Preferences Web page, click Enhanced Lists.
2. From the Enhanced list: drop-down list, select the enhanced list that you want to edit.
3. Click Edit. 4. You can perform the following actions:
• Delete existing members
• Add new members
Deleting existing members Procedure
1. In the Members: list, identify the member you want to delete, and then click Delete.
2. Continue deleting members until you have deleted all the members you would like to remove from your enhanced list.
3. Click Save.
45
Adding new members
Procedure 1. In the New member: text box, enter the mailbox number or email address of the member
you would like to add to your existing enhanced list.
2. Continue adding members until you have added all the members you would like to have in your enhanced list.
3. Click Save. Greetings
Greetings include prerecorded names and messages that the TUIs play to the callers when a call reaches your voice mail. If you do not want the TUIs to play the default Messaging system greetings, you can customize the following:
• Names: You can record your name to replace the system-generated version of your name.
• Standard Greetings: You can record the following standard greetings for the phone to play to the callers:
- Personal Greeting: To reply to callers when you cannot answer a call. For example, when you are away or when your line is busy.
- Extended Absence Greeting (EAG): To inform callers of the reason for not responding to the calls immediately. For example, when you are away from the office .
• Optional Greetings: You can record optional greetings that the phone plays based on a set of optional rules. For example, you can set up an optional greeting to play during office hours to all internal callers who get no answer on your phone.
Important:
You can set either the Standard Greetings or the Optional Greetings for the TUI to play.
You can record only voice messages. Messaging does not support recording music as greetings.
46
Recording your name
Procedure 1. Log in to User Preferences and navigate to the Greetings page.
2. Click the Record icon in the Recorded Name row.
3. Use the controls in the Recording: Recorded Name section to record, play, and save your name.
Configuring standard greetings
You can configure settings for your standard greetings from the Greetings tab on the User Preferences Web pages. Your administrator must enable appropriate permissions for you to use standard greetings-related features.
Procedure 1. To record your Personal greeting, click the appropriate Record icon on the personal greeting
row.
• Red Record icon: Click to record greeting from your computer. A separate section Recording: Personal opens on the User Preferences Greetings webpage, to record, play, rerecord, pause, stop, and save the recorded greeting.
• Green Record icon: Click to record greeting from phone. A separate window opens, directing you to your phone number associated with the Messaging application.
Once you save a recorded greeting, you can click the Play icon to play the greeting.
• Arrow Play icon: Click to play a recorded greeting on your computer.
• Phone Play icon: Click to play a recorded greeting on your phone. Directs you to the phone number associated with the Messaging application.
2. To activate your Personal greeting, select the Active check box on the personal greeting row.
3. To activate your Extended Absence greeting, select the Active check box on the extended absence greeting row.
• Red Record icon: Click to record greeting from your computer. A separate section Recording: Extended Absence appears on the User Preferences Greetings web page, allowing you to record, play, rerecord, pause, stop, and save the recorded greeting.
• Green Record icon: Click to record greeting from phone. A separate window opens, directing you to your phone number associated with the Messaging application.
Once you save a recorded greeting, you can click the Play icon to play the greeting.
• Arrow Play icon: Click to play a recorded greeting on your computer.
47
• Phone Play icon: Click to play a recorded greeting on your phone. Directs you to the phone number associated with the Messaging application.
4. If you want a greeting to expire within a certain time limit, select the Enable Expiry check box, and set the Expiration Date/Time for that greeting.
5. <Optional> If you want Messaging to play your current status before playing the standard greeting, select the Play status prompt before greeting check box.
6. Click Save. Configuring optional greetings
You can configure your optional greetings from the Greetings tab on the User Preferences Web pages. You can also configure greeting rules, based on which Messaging plays optional greetings to your callers. The rules are designed on the basis of your availability. Your administrator must enable appropriate permissions for you to use optional greetings-related features.
Procedure 1. To record Optional Greetings, click the appropriate Record icon on each optional greeting
row.
• Red Record icon: Click to record greeting from your computer. A separate section Recording: Optional Greeting number opens on the User Preferences Greetings webpage, to record, play, rerecord, pause, stop, and save the recorded greeting.
• Green Record icon: Click to record greeting from phone. A separate window opens, directing you to your phone number associated with the Messaging application.
Once you save a recorded greeting, you can click the Play icon to play the greeting.
• Arrow Play icon: Click to play a recorded greeting on your computer.
• Phone Play icon: Click to play a recorded greeting on your phone. Directs you to the phone number associated with the Messaging application.
2. Activate an optional greeting of your choice by selecting the Active check box for that greeting.
3. Enter a description for the selected greeting in the Description field.
4. Select a call type from the All / Internal / External drop-down list box.
• To set the optional greeting to play for all calls, select All. • To set the optional greeting to play for internal calls only, select Internal. Messaging
classifies only the systemwide set of users or the mailboxes on the system as internal callers. In that case, the TUI plays the recorded internal greeting to the internal callers.
• To set the optional greeting to play for external calls only, select External. Messaging classifies a caller as an external caller, if the caller does not have a mailbox on the system. In that case, the TUI plays the recorded external greeting to the external callers.
48
Customizing Messaging
5. Select a phone status from the All / Busy / No Answer drop-down list box.
• To set the optional greeting to play for all calls, select All. • To set the optional greeting to play only when your phone is busy, select Busy.
• To set the optional greeting to play only when a caller gets no answer on your phone, select No Answer.
6. Select a time zone from the All / Office Hours / Non Office Hours drop-down list box. The office hours are defined in the Business Hours section.
• To set the optional greeting to play at all times, select All. • To set the optional greeting to play only during office hours, select Office Hours.
• To set the optional greeting to play only during non office hours, select Non Office Hours.
7. Click Save. Defining business hours
Before you begin These settings are applicable only when greetings are enabled.
About this task You can customize your business hours and set up the time period on each day, for specific days of the week. By default, business hours are between 8:00 AM and 6:00 PM, Monday through Friday.
Procedure 1. On the Greetings tab, set the start and end times for the Business Hours Between fields.
2. Define the days of your work week, by individually selecting the check box adjacent to each day of the week.
Changing your password From a phone
Login to the Avaya Aura TUI by dialing the external access number (517-432-0000 or 2-0000). Then perform the following steps
1. Enter your mailbox by entering your mailbox number and password (if you are dialing from your desk phone, you may not need to dial your mailbox number)
2. From the main menu, press 4 for User Preferences. 3. Press 2 for Administrative Options 4. Press 1 for Password Options
49
5. Follow the prompts to change your password. From User Preferences
About this task To change the password using User Preferences, perform the following steps:
Procedure 1. On the User Preferences Web page, click Password.
2. Enter a new password, and confirm it.
3. Click Change.


