57
Using IP Office Web Collaboration Agent Release 10.0 September 2016

Using IP Office Web Collaboration Agent
Release 10.0September 2016
© 2015-2016, Avaya, Inc.All Rights Reserved.
NoticeWhile reasonable efforts have been made to ensure that theinformation in this document is complete and accurate at the time ofprinting, Avaya assumes no liability for any errors. Avaya reservesthe right to make changes and corrections to the information in thisdocument without the obligation to notify any person or organizationof such changes.
Documentation disclaimer“Documentation” means information published by Avaya in varyingmediums which may include product information, operatinginstructions and performance specifications that Avaya may generallymake available to users of its products and Hosted Services.Documentation does not include marketing materials. Avaya shall notbe responsible for any modifications, additions, or deletions to theoriginal published version of documentation unless suchmodifications, additions, or deletions were performed by Avaya. EndUser agrees to indemnify and hold harmless Avaya, Avaya's agents,servants and employees against all claims, lawsuits, demands andjudgments arising out of, or in connection with, subsequentmodifications, additions or deletions to this documentation, to theextent made by End User.
Link disclaimerAvaya is not responsible for the contents or reliability of any linkedwebsites referenced within this site or documentation provided byAvaya. Avaya is not responsible for the accuracy of any information,statement or content provided on these sites and does notnecessarily endorse the products, services, or information describedor offered within them. Avaya does not guarantee that these links willwork all the time and has no control over the availability of the linkedpages.
WarrantyAvaya provides a limited warranty on Avaya hardware and software.Refer to your sales agreement to establish the terms of the limitedwarranty. In addition, Avaya’s standard warranty language, as well asinformation regarding support for this product while under warranty isavailable to Avaya customers and other parties through the AvayaSupport website: https://support.avaya.com/helpcenter/getGenericDetails?detailId=C20091120112456651010 under the link“Warranty & Product Lifecycle” or such successor site as designatedby Avaya. Please note that if You acquired the product(s) from anauthorized Avaya Channel Partner outside of the United States andCanada, the warranty is provided to You by said Avaya ChannelPartner and not by Avaya.
“Hosted Service” means a hosted service subscription that Youacquire from either Avaya or an authorized Avaya Channel Partner(as applicable) and which is described further in Hosted SAS or otherservice description documentation regarding the applicable hostedservice. If You purchase a Hosted Service subscription, the foregoinglimited warranty may not apply but You may be entitled to supportservices in connection with the Hosted Service as described furtherin your service description documents for the applicable HostedService. Contact Avaya or Avaya Channel Partner (as applicable) formore information.
Hosted ServiceTHE FOLLOWING APPLIES IF YOU PURCHASE A HOSTEDSERVICE SUBSCRIPTION FROM AVAYA OR AN AVAYACHANNEL PARTNER (AS APPLICABLE), THE TERMS OF USEFOR HOSTED SERVICES ARE AVAILABLE ON THE AVAYAWEBSITE, HTTPS://SUPPORT.AVAYA.COM/LICENSEINFOUNDER THE LINK “Avaya Terms of Use for Hosted Services” ORSUCH SUCCESSOR SITE AS DESIGNATED BY AVAYA, AND AREAPPLICABLE TO ANYONE WHO ACCESSES OR USES THEHOSTED SERVICE. BY ACCESSING OR USING THE HOSTEDSERVICE, OR AUTHORIZING OTHERS TO DO SO, YOU, ONBEHALF OF YOURSELF AND THE ENTITY FOR WHOM YOU AREDOING SO (HEREINAFTER REFERRED TO INTERCHANGEABLYAS “YOU” AND “END USER”), AGREE TO THE TERMS OF USE. IFYOU ARE ACCEPTING THE TERMS OF USE ON BEHALF ACOMPANY OR OTHER LEGAL ENTITY, YOU REPRESENT THATYOU HAVE THE AUTHORITY TO BIND SUCH ENTITY TO THESE
TERMS OF USE. IF YOU DO NOT HAVE SUCH AUTHORITY, ORIF YOU DO NOT WISH TO ACCEPT THESE TERMS OF USE, YOUMUST NOT ACCESS OR USE THE HOSTED SERVICE ORAUTHORIZE ANYONE TO ACCESS OR USE THE HOSTEDSERVICE. YOUR USE OF THE HOSTED SERVICE SHALL BELIMITED BY THE NUMBER AND TYPE OF LICENSESPURCHASED UNDER YOUR CONTRACT FOR THE HOSTEDSERVICE, PROVIDED, HOWEVER, THAT FOR CERTAIN HOSTEDSERVICES IF APPLICABLE, YOU MAY HAVE THE OPPORTUNITYTO USE FLEX LICENSES, WHICH WILL BE INVOICEDACCORDING TO ACTUAL USAGE ABOVE THE CONTRACTLICENSE LEVEL. CONTACT AVAYA OR AVAYA’S CHANNELPARTNER FOR MORE INFORMATION ABOUT THE LICENSESFOR THE APPLICABLE HOSTED SERVICE, THE AVAILABILITYOF ANY FLEX LICENSES (IF APPLICABLE), PRICING ANDBILLING INFORMATION, AND OTHER IMPORTANTINFORMATION REGARDING THE HOSTED SERVICE.
LicensesTHE SOFTWARE LICENSE TERMS AVAILABLE ON THE AVAYAWEBSITE, HTTPS://SUPPORT.AVAYA.COM/LICENSEINFO,UNDER THE LINK “AVAYA SOFTWARE LICENSE TERMS (AvayaProducts)” OR SUCH SUCCESSOR SITE AS DESIGNATED BYAVAYA, ARE APPLICABLE TO ANYONE WHO DOWNLOADS,USES AND/OR INSTALLS AVAYA SOFTWARE, PURCHASEDFROM AVAYA INC., ANY AVAYA AFFILIATE, OR AN AVAYACHANNEL PARTNER (AS APPLICABLE) UNDER A COMMERCIALAGREEMENT WITH AVAYA OR AN AVAYA CHANNEL PARTNER.UNLESS OTHERWISE AGREED TO BY AVAYA IN WRITING,AVAYA DOES NOT EXTEND THIS LICENSE IF THE SOFTWAREWAS OBTAINED FROM ANYONE OTHER THAN AVAYA, ANAVAYA AFFILIATE OR AN AVAYA CHANNEL PARTNER; AVAYARESERVES THE RIGHT TO TAKE LEGAL ACTION AGAINST YOUAND ANYONE ELSE USING OR SELLING THE SOFTWAREWITHOUT A LICENSE. BY INSTALLING, DOWNLOADING ORUSING THE SOFTWARE, OR AUTHORIZING OTHERS TO DO SO,YOU, ON BEHALF OF YOURSELF AND THE ENTITY FOR WHOMYOU ARE INSTALLING, DOWNLOADING OR USING THESOFTWARE (HEREINAFTER REFERRED TOINTERCHANGEABLY AS “YOU” AND “END USER”), AGREE TOTHESE TERMS AND CONDITIONS AND CREATE A BINDINGCONTRACT BETWEEN YOU AND AVAYA INC. OR THEAPPLICABLE AVAYA AFFILIATE (“AVAYA”).
Avaya grants You a license within the scope of the license typesdescribed below, with the exception of Heritage Nortel Software, forwhich the scope of the license is detailed below. Where the orderdocumentation does not expressly identify a license type, theapplicable license will be a Designated System License. Theapplicable number of licenses and units of capacity for which thelicense is granted will be one (1), unless a different number oflicenses or units of capacity is specified in the documentation or othermaterials available to You. “Software” means computer programs inobject code, provided by Avaya or an Avaya Channel Partner,whether as stand-alone products, pre-installed on hardware products,and any upgrades, updates, patches, bug fixes, or modified versionsthereto. “Designated Processor” means a single stand-alonecomputing device. “Server” means a Designated Processor thathosts a software application to be accessed by multiple users.“Instance” means a single copy of the Software executing at aparticular time: (i) on one physical machine; or (ii) on one deployedsoftware virtual machine (“VM”) or similar deployment.
License type(s)Designated System(s) License (DS). End User may install and useeach copy or an Instance of the Software only on a number ofDesignated Processors up to the number indicated in the order.Avaya may require the Designated Processor(s) to be identified inthe order by type, serial number, feature key, Instance, location orother specific designation, or to be provided by End User to Avayathrough electronic means established by Avaya specifically for thispurpose.
Concurrent User License (CU). End User may install and use theSoftware on multiple Designated Processors or one or more Servers,so long as only the licensed number of Units are accessing and usingthe Software at any given time. A “Unit” means the unit on whichAvaya, at its sole discretion, bases the pricing of its licenses and canbe, without limitation, an agent, port or user, an e-mail or voice mail

account in the name of a person or corporate function (e.g.,webmaster or helpdesk), or a directory entry in the administrativedatabase utilized by the Software that permits one user to interfacewith the Software. Units may be linked to a specific, identified Serveror an Instance of the Software.
Database License (DL). End User may install and use each copy oran Instance of the Software on one Server or on multiple Serversprovided that each of the Servers on which the Software is installedcommunicates with no more than one Instance of the samedatabase.
CPU License (CP). End User may install and use each copy orInstance of the Software on a number of Servers up to the numberindicated in the order provided that the performance capacity of theServer(s) does not exceed the performance capacity specified for theSoftware. End User may not re-install or operate the Software onServer(s) with a larger performance capacity without Avaya’s priorconsent and payment of an upgrade fee.
Named User License (NU). You may: (i) install and use each copy orInstance of the Software on a single Designated Processor or Serverper authorized Named User (defined below); or (ii) install and useeach copy or Instance of the Software on a Server so long as onlyauthorized Named Users access and use the Software. “NamedUser”, means a user or device that has been expressly authorized byAvaya to access and use the Software. At Avaya’s sole discretion, a“Named User” may be, without limitation, designated by name,corporate function (e.g., webmaster or helpdesk), an e-mail or voicemail account in the name of a person or corporate function, or adirectory entry in the administrative database utilized by the Softwarethat permits one user to interface with the Software.
Shrinkwrap License (SR). You may install and use the Software inaccordance with the terms and conditions of the applicable licenseagreements, such as “shrinkwrap” or “clickthrough” licenseaccompanying or applicable to the Software (“Shrinkwrap License”).
Heritage Nortel Software“Heritage Nortel Software” means the software that was acquired byAvaya as part of its purchase of the Nortel Enterprise SolutionsBusiness in December 2009. The Heritage Nortel Software is thesoftware contained within the list of Heritage Nortel Products locatedat https://support.avaya.com/LicenseInfo under the link “HeritageNortel Products” or such successor site as designated by Avaya. ForHeritage Nortel Software, Avaya grants Customer a license to useHeritage Nortel Software provided hereunder solely to the extent ofthe authorized activation or authorized usage level, solely for thepurpose specified in the Documentation, and solely as embedded in,for execution on, or for communication with Avaya equipment.Charges for Heritage Nortel Software may be based on extent ofactivation or use authorized as specified in an order or invoice.
CopyrightExcept where expressly stated otherwise, no use should be made ofmaterials on this site, the Documentation, Software, Hosted Service,or hardware provided by Avaya. All content on this site, thedocumentation, Hosted Service, and the product provided by Avayaincluding the selection, arrangement and design of the content isowned either by Avaya or its licensors and is protected by copyrightand other intellectual property laws including the sui generis rightsrelating to the protection of databases. You may not modify, copy,reproduce, republish, upload, post, transmit or distribute in any wayany content, in whole or in part, including any code and softwareunless expressly authorized by Avaya. Unauthorized reproduction,transmission, dissemination, storage, and or use without the expresswritten consent of Avaya can be a criminal, as well as a civil offenseunder the applicable law.
VirtualizationThe following applies if the product is deployed on a virtual machine.Each product has its own ordering code and license types. Note thateach Instance of a product must be separately licensed and ordered.For example, if the end user customer or Avaya Channel Partnerwould like to install two Instances of the same type of products, thentwo products of that type must be ordered.
Third Party Components“Third Party Components” mean certain software programs orportions thereof included in the Software or Hosted Service may
contain software (including open source software) distributed underthird party agreements (“Third Party Components”), which containterms regarding the rights to use certain portions of the Software(“Third Party Terms”). As required, information regarding distributedLinux OS source code (for those products that have distributed LinuxOS source code) and identifying the copyright holders of the ThirdParty Components and the Third Party Terms that apply is availablein the products, Documentation or on Avaya’s website at: https://support.avaya.com/Copyright or such successor site as designatedby Avaya. The open source software license terms provided as ThirdParty Terms are consistent with the license rights granted in theseSoftware License Terms, and may contain additional rights benefitingYou, such as modification and distribution of the open sourcesoftware. The Third Party Terms shall take precedence over theseSoftware License Terms, solely with respect to the applicable ThirdParty Components to the extent that these Software License Termsimpose greater restrictions on You than the applicable Third PartyTerms.
The following applies if the H.264 (AVC) codec is distributed with theproduct. THIS PRODUCT IS LICENSED UNDER THE AVC PATENTPORTFOLIO LICENSE FOR THE PERSONAL USE OF ACONSUMER OR OTHER USES IN WHICH IT DOES NOT RECEIVEREMUNERATION TO (i) ENCODE VIDEO IN COMPLIANCE WITHTHE AVC STANDARD (“AVC VIDEO”) AND/OR (ii) DECODE AVCVIDEO THAT WAS ENCODED BY A CONSUMER ENGAGED IN APERSONAL ACTIVITY AND/OR WAS OBTAINED FROM A VIDEOPROVIDER LICENSED TO PROVIDE AVC VIDEO. NO LICENSE ISGRANTED OR SHALL BE IMPLIED FOR ANY OTHER USE.ADDITIONAL INFORMATION MAY BE OBTAINED FROM MPEGLA, L.L.C. SEE HTTP://WWW.MPEGLA.COM.
Service ProviderTHE FOLLOWING APPLIES TO AVAYA CHANNEL PARTNER’SHOSTING OF AVAYA PRODUCTS OR SERVICES. THE PRODUCTOR HOSTED SERVICE MAY USE THIRD PARTY COMPONENTSSUBJECT TO THIRD PARTY TERMS AND REQUIRE A SERVICEPROVIDER TO BE INDEPENDENTLY LICENSED DIRECTLYFROM THE THIRD PARTY SUPPLIER. AN AVAYA CHANNELPARTNER’S HOSTING OF AVAYA PRODUCTS MUST BEAUTHORIZED IN WRITING BY AVAYA AND IF THOSE HOSTEDPRODUCTS USE OR EMBED CERTAIN THIRD PARTYSOFTWARE, INCLUDING BUT NOT LIMITED TO MICROSOFTSOFTWARE OR CODECS, THE AVAYA CHANNEL PARTNER ISREQUIRED TO INDEPENDENTLY OBTAIN ANY APPLICABLELICENSE AGREEMENTS, AT THE AVAYA CHANNEL PARTNER’SEXPENSE, DIRECTLY FROM THE APPLICABLE THIRD PARTYSUPPLIER.
WITH RESPECT TO CODECS, IF THE AVAYA CHANNELPARTNER IS HOSTING ANY PRODUCTS THAT USE OR EMBEDTHE G.729 CODEC, H.264 CODEC, OR H.265 CODEC, THEAVAYA CHANNEL PARTNER ACKNOWLEDGES AND AGREESTHE AVAYA CHANNEL PARTNER IS RESPONSIBLE FOR ANYAND ALL RELATED FEES AND/OR ROYALTIES. THE G.729CODEC IS LICENSED BY SIPRO LAB TELECOM INC. SEE WWW.SIPRO.COM/CONTACT.HTML. THE H.264 (AVC) CODEC ISLICENSED UNDER THE AVC PATENT PORTFOLIO LICENSE FORTHE PERSONAL USE OF A CONSUMER OR OTHER USES INWHICH IT DOES NOT RECEIVE REMUNERATION TO: (I)ENCODE VIDEO IN COMPLIANCE WITH THE AVC STANDARD(“AVC VIDEO”) AND/OR (II) DECODE AVC VIDEO THAT WASENCODED BY A CONSUMER ENGAGED IN A PERSONALACTIVITY AND/OR WAS OBTAINED FROM A VIDEO PROVIDERLICENSED TO PROVIDE AVC VIDEO. NO LICENSE IS GRANTEDOR SHALL BE IMPLIED FOR ANY OTHER USE. ADDITIONALINFORMATION FOR H.264 (AVC) AND H.265 (HEVC) CODECSMAY BE OBTAINED FROM MPEG LA, L.L.C. SEE HTTP://WWW.MPEGLA.COM.
Compliance with LawsCustomer acknowledges and agrees that it is responsible forcomplying with any applicable laws and regulations, including, but notlimited to laws and regulations related to call recording, data privacy,intellectual property, trade secret, fraud, and music performancerights, in the country or territory where the Avaya product is used.
Preventing Toll Fraud“Toll Fraud” is the unauthorized use of your telecommunicationssystem by an unauthorized party (for example, a person who is not acorporate employee, agent, subcontractor, or is not working on yourcompany's behalf). Be aware that there can be a risk of Toll Fraudassociated with your system and that, if Toll Fraud occurs, it canresult in substantial additional charges for your telecommunicationsservices.
Avaya Toll Fraud interventionIf You suspect that You are being victimized by Toll Fraud and Youneed technical assistance or support, call Technical Service CenterToll Fraud Intervention Hotline at +1-800-643-2353 for the UnitedStates and Canada. For additional support telephone numbers, seethe Avaya Support website: https://support.avaya.com or suchsuccessor site as designated by Avaya.
Security VulnerabilitiesInformation about Avaya’s security support policies can be found inthe Security Policies and Support section of https://support.avaya.com/security.
Suspected Avaya product security vulnerabilities are handled per theAvaya Product Security Support Flow (https://support.avaya.com/css/P8/documents/100161515).
Downloading DocumentationFor the most current versions of Documentation, see the AvayaSupport website: https://support.avaya.com, or such successor siteas designated by Avaya.
Contact Avaya SupportSee the Avaya Support website: https://support.avaya.com forproduct or Hosted Service notices and articles, or to report a problemwith your Avaya product or Hosted Service. For a list of supporttelephone numbers and contact addresses, go to the Avaya Supportwebsite: https://support.avaya.com (or such successor site asdesignated by Avaya), scroll to the bottom of the page, and selectContact Avaya Support.
TrademarksThe trademarks, logos and service marks (“Marks”) displayed in thissite, the Documentation, Hosted Service(s), and product(s) providedby Avaya are the registered or unregistered Marks of Avaya, itsaffiliates, or other third parties. Users are not permitted to use suchMarks without prior written consent from Avaya or such third partywhich may own the Mark. Nothing contained in this site, theDocumentation, Hosted Service(s) and product(s) should beconstrued as granting, by implication, estoppel, or otherwise, anylicense or right in and to the Marks without the express writtenpermission of Avaya or the applicable third party.
Avaya is a registered trademark of Avaya Inc.
All non-Avaya trademarks are the property of their respective owners.Linux® is the registered trademark of Linus Torvalds in the U.S. andother countries.
Contents
Chapter 1: Introduction............................................................................................................ 8Purpose.................................................................................................................................. 8Intended audience................................................................................................................... 8Related Resources.................................................................................................................. 8
Documentation.................................................................................................................. 8Support.................................................................................................................................. 9Warranty................................................................................................................................. 9
Chapter 2: Overview............................................................................................................... 10Collaboration Agent............................................................................................................... 10Collaboration Agent user types............................................................................................... 11Main window components field descriptions............................................................................ 11
Audio in Collaboration Agent............................................................................................ 13Conference check list............................................................................................................ 14Viewing the Collaboration Agent version................................................................................. 15Accessing online help............................................................................................................ 15
Chapter 3: Logging in to and out of collaboration agent.................................................... 16Plug-in requirements.............................................................................................................. 16
Supported web browsers and operating systems............................................................... 16Logging into collaboration agent............................................................................................. 17
Logging in to Collaboration Agent as the conference owner................................................ 17Logging in to Collaboration Agent as a guest........................................................................... 17Logging out of Collaboration Agent......................................................................................... 18
Chapter 4: Accessing IP Office Web Collaboration............................................................. 19Accessing Web Collaboration................................................................................................. 19
Accessing Web Collaboration through One X user portal.................................................... 19Accessing Web Collaboration through Avaya Office Plug-in................................................ 20Accessing Web Collaboration through Avaya Communicator for Windows........................... 20Accessing Web Collaboration through Avaya Communicator for iOS................................... 21
Chapter 5: Managing your participation............................................................................... 22Raising and lowering your hand.............................................................................................. 22Muting and enabling your audio.............................................................................................. 22Capturing the attendance snapshot......................................................................................... 23Searching for participants....................................................................................................... 23Disconnecting from conferences............................................................................................. 24
Chapter 6: Managing a conference....................................................................................... 25Adding participants to conferences......................................................................................... 25Muting and enabling the audio of participants.......................................................................... 25Promoting participants to the presenter role............................................................................. 26Promoting a participant to moderator...................................................................................... 26
September 2016 Using IP Office Web Collaboration Agent 5Comments on this document? [email protected]
Resuming the moderator role................................................................................................. 26Disconnecting participants..................................................................................................... 27Lowering raised hands of participants..................................................................................... 27Locking and unlocking conferences........................................................................................ 28
Chapter 7: Sharing information............................................................................................. 29Web collaboration.................................................................................................................. 29
Web Collaboration components........................................................................................ 29Managing your library............................................................................................................ 30
Library............................................................................................................................ 30Supported document formats........................................................................................... 30Uploading documents to the library................................................................................... 31Viewing documents in the library...................................................................................... 31Renaming documents in the library................................................................................... 32Deleting documents in the library...................................................................................... 32Sorting documents in the library........................................................................................ 32
Installing the web collaboration plug-in.................................................................................... 33Document sharing................................................................................................................. 34
Sharing documents from the library................................................................................... 34Browsing shared content independently............................................................................ 34Ending document sharing................................................................................................. 35Shared document buttons................................................................................................ 35
Virtual whiteboard sharing...................................................................................................... 36Sharing virtual whiteboards.............................................................................................. 36Adding virtual whiteboards............................................................................................... 36Deleting virtual whiteboards............................................................................................. 36Ending whiteboard sharing............................................................................................... 37Virtual whiteboard buttons................................................................................................ 37
Sharing applications and the desktop...................................................................................... 37Sharing applications and the desktop................................................................................ 37Ending application and desktop sharing............................................................................ 38Shared applications and desktop buttons.......................................................................... 38Granting remote control of the shared desktop................................................................... 38Requesting remote control of the shared content............................................................... 39
Annotating content................................................................................................................ 39Annotations in shared content.......................................................................................... 39Shared content annotation tools....................................................................................... 40
Changing the type of content sharing...................................................................................... 41Chapter 8: Sending messages in conferences.................................................................... 42
Opening the Messages window.............................................................................................. 42Sending messages................................................................................................................ 42
Chapter 9: Managing meeting minutes................................................................................. 43Adding meeting minutes......................................................................................................... 43Editing meeting minutes......................................................................................................... 43
Contents
September 2016 Using IP Office Web Collaboration Agent 6Comments on this document? [email protected]
Deleting meeting minutes....................................................................................................... 44Meeting minutes buttons........................................................................................................ 44
Chapter 10: Managing meeting reports................................................................................ 45Viewing meeting reports......................................................................................................... 45Sorting meeting reports.......................................................................................................... 45Deleting meeting reports........................................................................................................ 46Renaming meeting reports..................................................................................................... 46Sending meeting reports........................................................................................................ 47Sending Collaboration Agent plug-in logs................................................................................ 48
Chapter 11: Installing Certificate........................................................................................... 49Installing certificates.............................................................................................................. 49
Installing a trusted root certificate in Chrome..................................................................... 49Installing a trusted root certificate in Firefox....................................................................... 49Installing a trusted root certificate in Internet Explorer......................................................... 50Installing a trusted root certificate in an Apple system......................................................... 50Browser support for certificates........................................................................................ 50
Chapter 12: Troubleshooting................................................................................................. 52Client error............................................................................................................................ 52
Outlook Plug-in link to web collaboration fails.................................................................... 52Avaya Communicator for Windows fails............................................................................. 52
Document sharing error......................................................................................................... 52Unable to upload a file to the library.................................................................................. 52
Unable to share desktop in Safari and Chrome browser........................................................... 53SIP registration failed............................................................................................................. 53
Contents
September 2016 Using IP Office Web Collaboration Agent 7Comments on this document? [email protected]
Chapter 1: Introduction
PurposeThis document describes how to use product features and capabilities.
Intended audienceThis document is intended for people who want to learn how to use product features andcapabilities.
Related Resources
DocumentationDownload the following related documents at http://support.avaya.com.
Related linksUsing on page 8
UsingDocumentNumber
Title Use this document to: Audience
Using IP Office WebCollaboration Agent.
Manage and participate inconferences usingCollaboration Agent
Customers
Related linksDocumentation on page 8
September 2016 Using IP Office Web Collaboration Agent 8Comments on this document? [email protected]
SupportGo to the Avaya Support website at http://support.avaya.com for the most up-to-datedocumentation, product notices, and knowledge articles. You can also search for release notes,downloads, and resolutions to issues. Use the online service request system to create a servicerequest. Chat with live agents to get answers to questions, or request an agent to connect you to asupport team if an issue requires additional expertise.
WarrantyDetailed terms and conditions are contained in the sales agreement or other applicabledocumentation and establish the terms of the limited warranty. In addition, the Avaya standardwarranty description and details for support under warranty are available at Avaya Support underMore Resources for Maintenance and Warranty Information, see https://support.avaya.com/.
Support
September 2016 Using IP Office Web Collaboration Agent 9Comments on this document? [email protected]
Chapter 2: Overview
Collaboration AgentCollaboration Agent is an application that provides web collaboration and conferencing tools. Userswith IP Office accounts and invited guests can use the tools to manage conferences and participateand collaborate in conferences. Conference participants can join conferences by logging in toCollaboration Agent and dialing in to the audio bridge assigned to the conference.
Participants can use the Collaboration Agent tools to boost productivity and track action items evenafter the conference ends. Conference moderators can:
• Record and edit meeting minutes.
• Create and distribute meeting reports based on the meeting minutes.
Collaboration Agent featuresIn Collaboration Agent, the participants and moderators can perform multiple tasks such as:
• View a list of other participants.• Virtually raise a hand and seek permission to speak.• Send messages.• Annotate shared content.• Record or edit minutes.• Set the entry and exit tones.• Dial out to other users and the users to the conference.• Disconnect participants.• Promote participants to the moderator role.• Invite more participants to join an active conference.
During the conference, participants can view the following information in Collaboration Agent:
• The participants who joined only on the audio bridge• The participants active on web collaboration• The participant currently speaking• The current presenter
September 2016 Using IP Office Web Collaboration Agent 10Comments on this document? [email protected]
Collaboration Agent user typesWithin the Collaboration Agent environment, there are two types of users. These types are:
• Member
• Guest
During a conference, the user type is constant. It does not change.
Members require a password and an account on IP Office. Members have access to a large numberof privileges within the Collaboration Agent environment.
Guests do not require a password and do not have an account on IP Office. If a guest wishes tobecome a member, an administrator must create a conferencing profile for them in IP OfficeManager. Guests have fewer privileges than members. For example, guests can log in to aconference, raise their hands, send messages, enter minutes, associate their audio line, and bepromoted to a presenter. However, they cannot be promoted to a moderator. Guests can also mutethemselves if their Collaboration Agent log-in is associated with their phone in the participant list.
A guest must know the collaboration code to join the Collaboration Agent. Participants, includingguests, who receive the Microsoft Outlook meeting invitation can also join the conference throughCollaboration Agent by clicking the conference link in the invitation, which automatically opensCollaboration Agent.
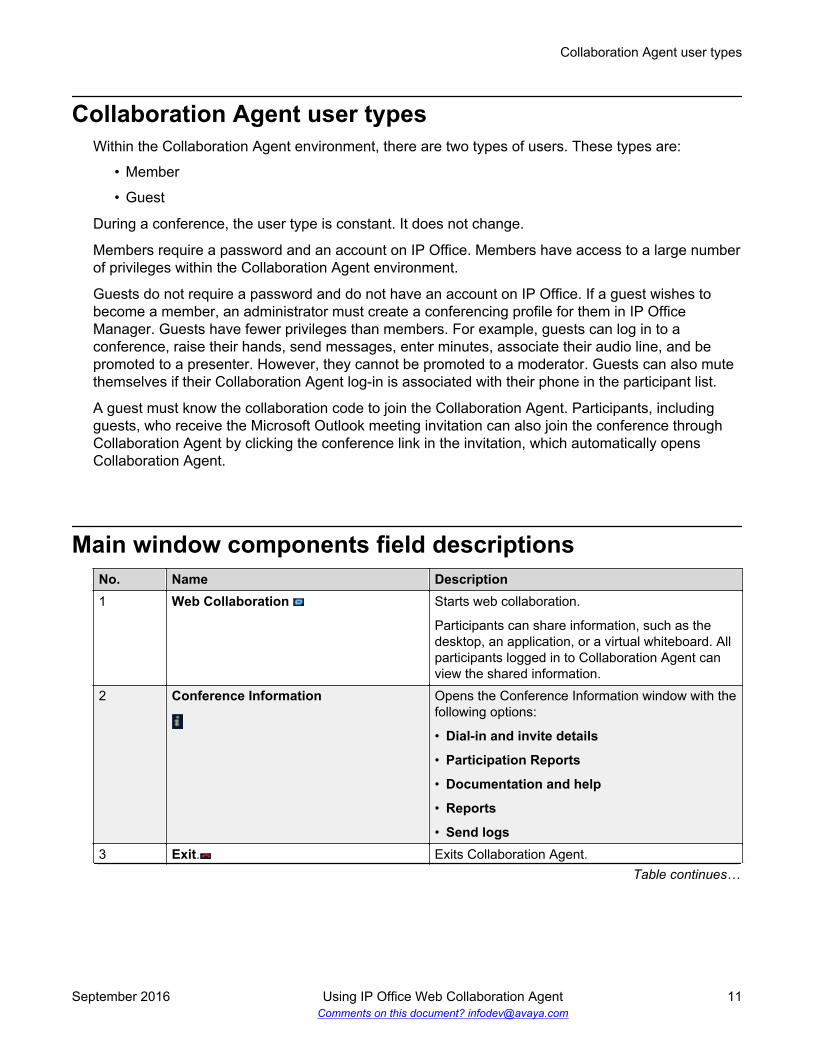
Main window components field descriptionsNo. Name Description1 Web Collaboration Starts web collaboration.
Participants can share information, such as thedesktop, an application, or a virtual whiteboard. Allparticipants logged in to Collaboration Agent canview the shared information.
2 Conference Information Opens the Conference Information window with thefollowing options:
• Dial-in and invite details
• Participation Reports
• Documentation and help
• Reports
• Send logs3 Exit. Exits Collaboration Agent.
Table continues…
Collaboration Agent user types
September 2016 Using IP Office Web Collaboration Agent 11Comments on this document? [email protected]
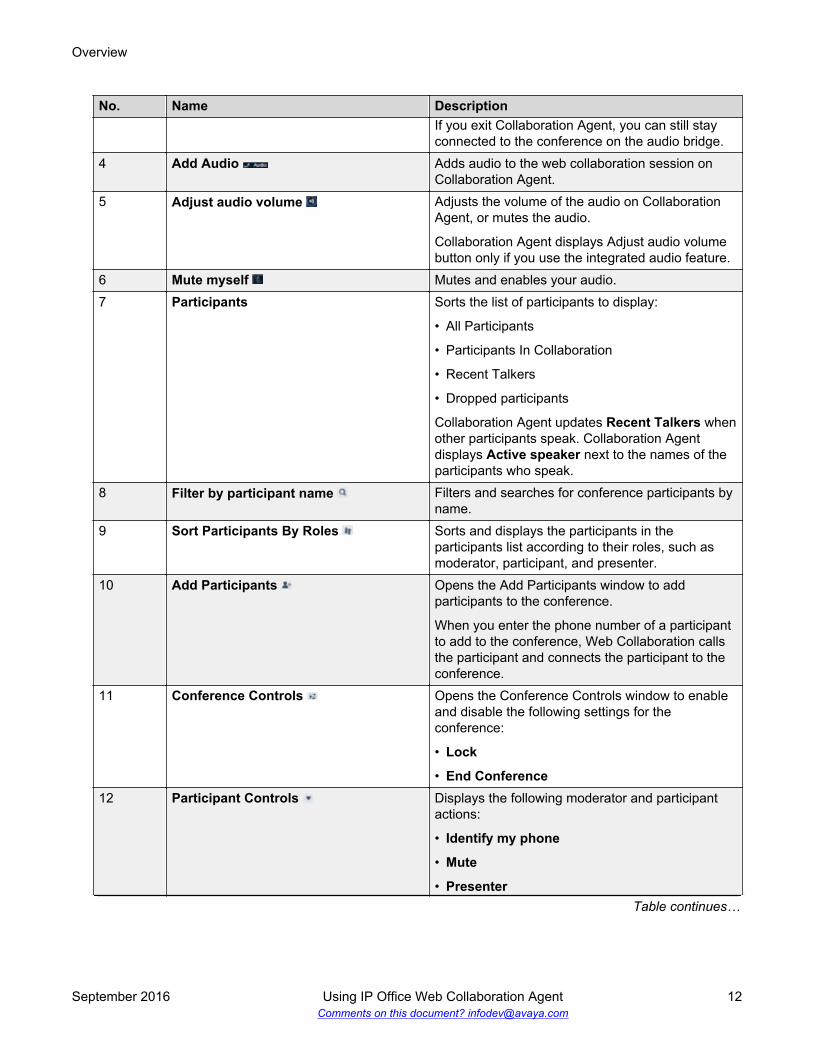
No. Name DescriptionIf you exit Collaboration Agent, you can still stayconnected to the conference on the audio bridge.
4 Add Audio Adds audio to the web collaboration session onCollaboration Agent.
5 Adjust audio volume Adjusts the volume of the audio on CollaborationAgent, or mutes the audio.
Collaboration Agent displays Adjust audio volumebutton only if you use the integrated audio feature.
6 Mute myself Mutes and enables your audio.7 Participants Sorts the list of participants to display:
• All Participants
• Participants In Collaboration
• Recent Talkers
• Dropped participants
Collaboration Agent updates Recent Talkers whenother participants speak. Collaboration Agentdisplays Active speaker next to the names of theparticipants who speak.
8 Filter by participant name Filters and searches for conference participants byname.
9 Sort Participants By Roles Sorts and displays the participants in theparticipants list according to their roles, such asmoderator, participant, and presenter.
10 Add Participants Opens the Add Participants window to addparticipants to the conference.
When you enter the phone number of a participantto add to the conference, Web Collaboration callsthe participant and connects the participant to theconference.
11 Conference Controls Opens the Conference Controls window to enableand disable the following settings for theconference:
• Lock
• End Conference12 Participant Controls Displays the following moderator and participant
actions:
• Identify my phone
• Mute
• PresenterTable continues…
Overview
September 2016 Using IP Office Web Collaboration Agent 12Comments on this document? [email protected]
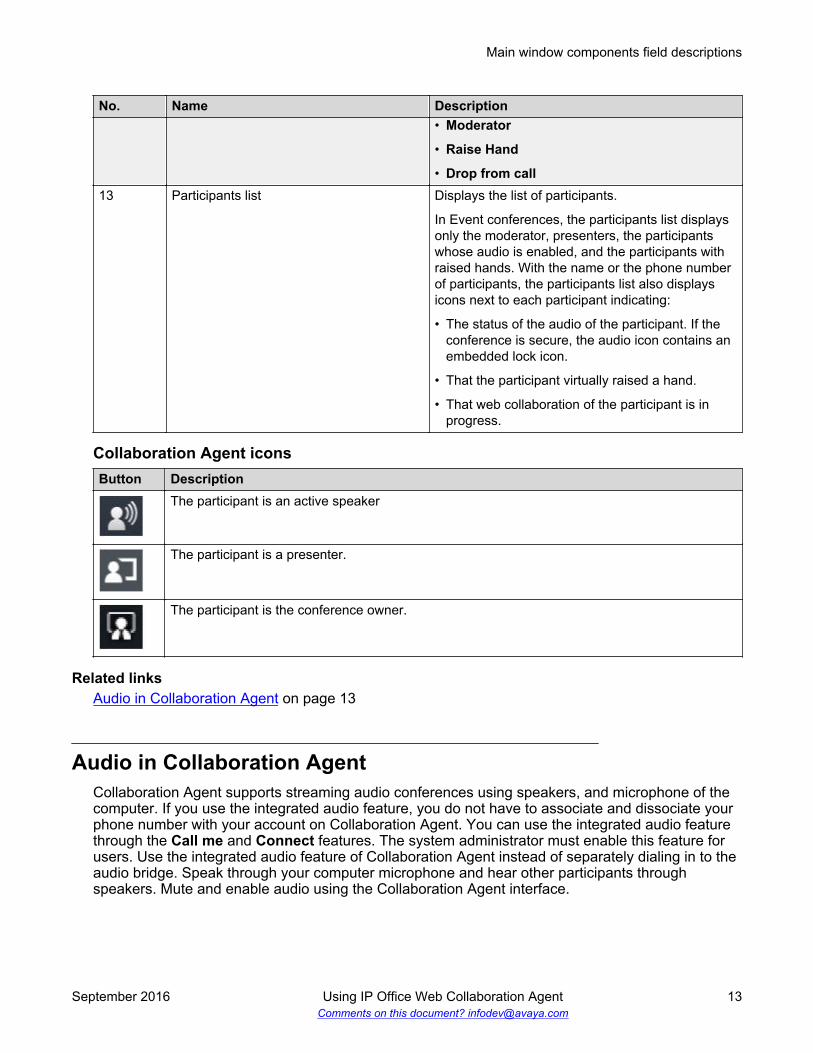
No. Name Description• Moderator
• Raise Hand
• Drop from call13 Participants list Displays the list of participants.
In Event conferences, the participants list displaysonly the moderator, presenters, the participantswhose audio is enabled, and the participants withraised hands. With the name or the phone numberof participants, the participants list also displaysicons next to each participant indicating:
• The status of the audio of the participant. If theconference is secure, the audio icon contains anembedded lock icon.
• That the participant virtually raised a hand.
• That web collaboration of the participant is inprogress.
Collaboration Agent iconsButton Description
The participant is an active speaker
The participant is a presenter.
The participant is the conference owner.
Related linksAudio in Collaboration Agent on page 13
Audio in Collaboration AgentCollaboration Agent supports streaming audio conferences using speakers, and microphone of thecomputer. If you use the integrated audio feature, you do not have to associate and dissociate yourphone number with your account on Collaboration Agent. You can use the integrated audio featurethrough the Call me and Connect features. The system administrator must enable this feature forusers. Use the integrated audio feature of Collaboration Agent instead of separately dialing in to theaudio bridge. Speak through your computer microphone and hear other participants throughspeakers. Mute and enable audio using the Collaboration Agent interface.
Main window components field descriptions
September 2016 Using IP Office Web Collaboration Agent 13Comments on this document? [email protected]
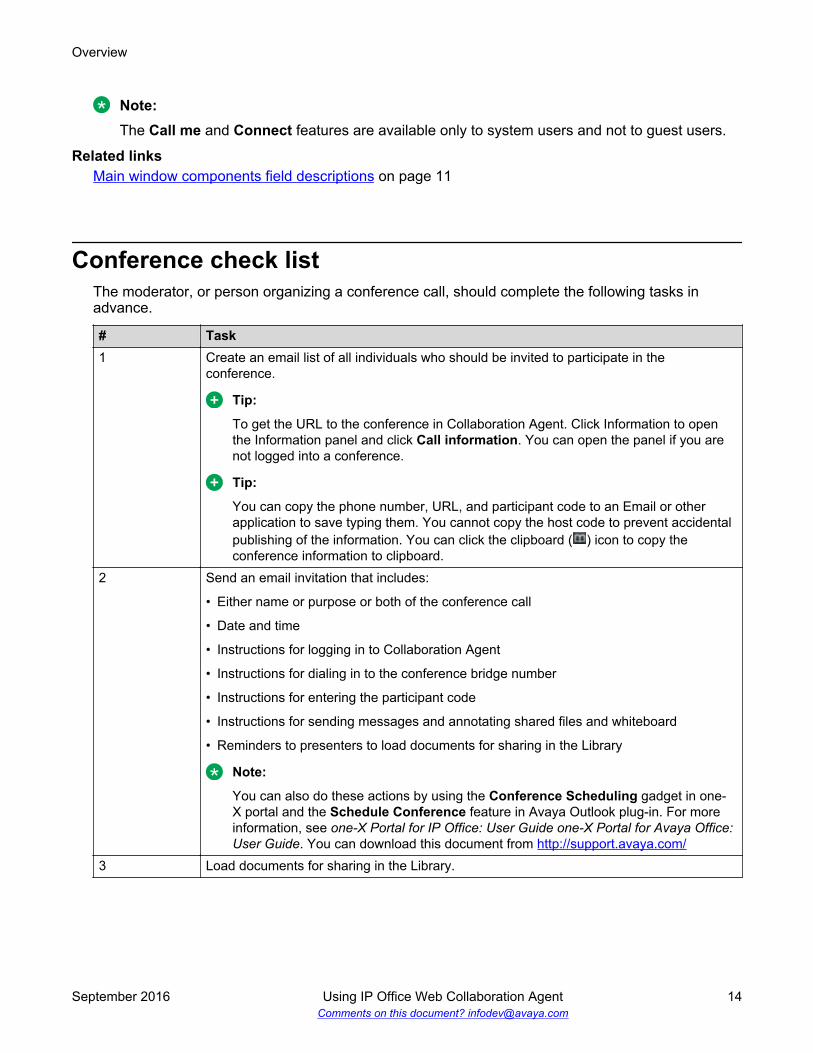
Note:The Call me and Connect features are available only to system users and not to guest users.
Related linksMain window components field descriptions on page 11
Conference check listThe moderator, or person organizing a conference call, should complete the following tasks inadvance.
# Task1 Create an email list of all individuals who should be invited to participate in the
conference.
Tip:
To get the URL to the conference in Collaboration Agent. Click Information to openthe Information panel and click Call information. You can open the panel if you arenot logged into a conference.
Tip:
You can copy the phone number, URL, and participant code to an Email or otherapplication to save typing them. You cannot copy the host code to prevent accidentalpublishing of the information. You can click the clipboard ( ) icon to copy theconference information to clipboard.
2 Send an email invitation that includes:
• Either name or purpose or both of the conference call
• Date and time
• Instructions for logging in to Collaboration Agent
• Instructions for dialing in to the conference bridge number
• Instructions for entering the participant code
• Instructions for sending messages and annotating shared files and whiteboard
• Reminders to presenters to load documents for sharing in the Library
Note:
You can also do these actions by using the Conference Scheduling gadget in one-X portal and the Schedule Conference feature in Avaya Outlook plug-in. For moreinformation, see one-X Portal for IP Office: User Guide one-X Portal for Avaya Office:User Guide. You can download this document from http://support.avaya.com/
3 Load documents for sharing in the Library.
Overview
September 2016 Using IP Office Web Collaboration Agent 14Comments on this document? [email protected]
Viewing the Collaboration Agent versionYou can view the current version of Collaboration Agent at any time.
About this taskThe purpose of this task is to view the version information of the Collaboration Agent application thatyou are currently using.
Procedure1. Log in to Collaboration Agent and access a conference.
You can access your own conference or enter the code(s) required to access anotherconference.
2. On the Web Collaboration pane, right click the mouse button to display an information menu.
The version information is displayed at the top of the information menu.
Accessing online helpIf you have difficulties accomplishing any task in Collaboration Agent, you can access helpfulinstructions at any time.
About this taskThe purpose of this task is to view helpful information related to the Collaboration Agent application.
Procedure1. Log in to Collaboration Agent and access a conference.
You can access your own conference or enter the code(s) required to access anotherconference.
2. In the Collaboration Agent window, click Information.
3. On the Information Panel, click Documentation and Help.
Collaboration Agent opens a new dialog which contains a comprehensive guide to thecommon tasks and important concepts within Collaboration Agent.
Viewing the Collaboration Agent version
September 2016 Using IP Office Web Collaboration Agent 15Comments on this document? [email protected]
Chapter 3: Logging in to and out ofcollaboration agent
Plug-in requirements• Adobe Flash version 11.2.0 or later• Audio conferencing plug-in• Web collaboration plug-in
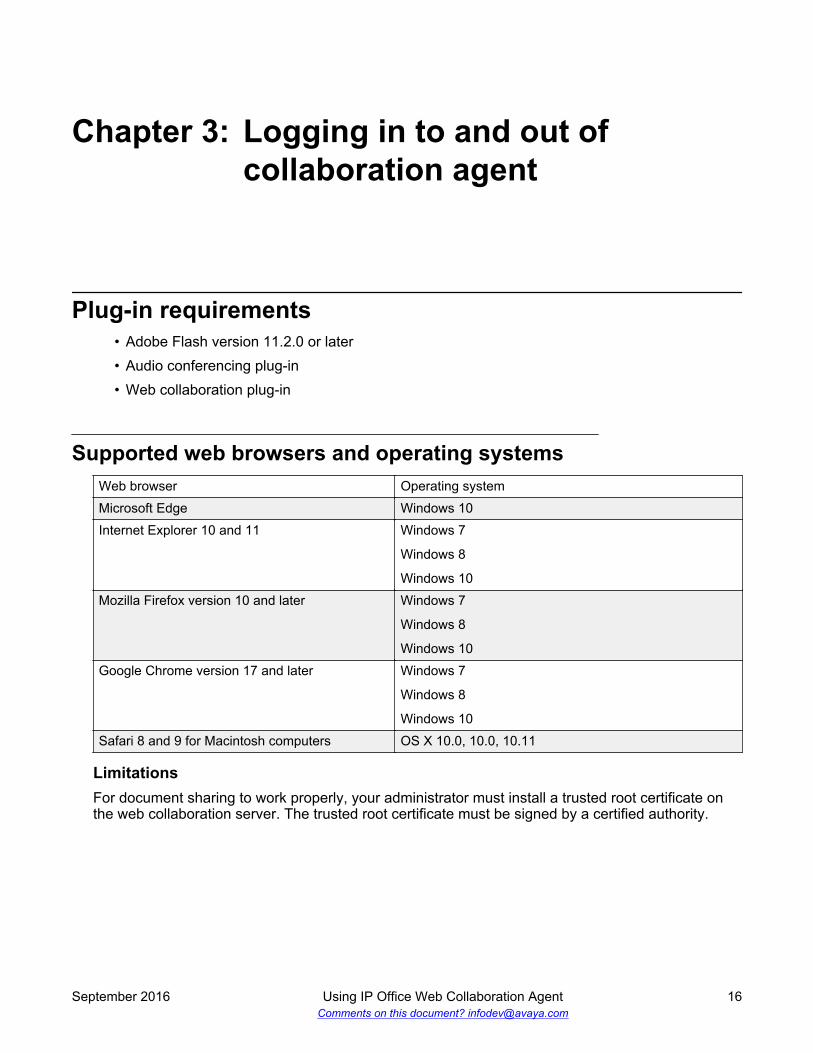
Supported web browsers and operating systemsWeb browser Operating systemMicrosoft Edge Windows 10Internet Explorer 10 and 11 Windows 7
Windows 8
Windows 10Mozilla Firefox version 10 and later Windows 7
Windows 8
Windows 10Google Chrome version 17 and later Windows 7
Windows 8
Windows 10Safari 8 and 9 for Macintosh computers OS X 10.0, 10.0, 10.11
LimitationsFor document sharing to work properly, your administrator must install a trusted root certificate onthe web collaboration server. The trusted root certificate must be signed by a certified authority.
September 2016 Using IP Office Web Collaboration Agent 16Comments on this document? [email protected]
Logging into collaboration agentYou can log in to Collaboration Agent as a conference owner or as a guest.
Note:
Before you log in, you must install the Avaya Web Collaboration Agent application on yourbrowser.
Logging in to Collaboration Agent as the conference ownerBefore you beginGet the collaboration agent address from your system administrator.
Procedure1. Using your web browser, go to the Collaboration Agent address provided by your system
administrator.
2. In the IP Office Web Collaboration window, select Login as conference owner.
3. In the Username box, type your user name.
Note:
4. In the Password box, type your password.
Note:
The password must be the same as the telephony password defined in IP OfficeManager .
5. To retain your login settings, check Remember me.
6. Click Login.
The system opens the IP Office Web Collaboration application.
7. In the IP Office Web Collaboration application screen, perform one of the following:
• To join the conference as a member, in the Join Conference tab, type the conferencenumber.
• To start the conference as a conference owner, in the My Conference tab, click Start MyConference.
Logging in to Collaboration Agent as a guestAbout this taskYou can log in to multiple conferences using different web browsers.
Logging into collaboration agent
September 2016 Using IP Office Web Collaboration Agent 17Comments on this document? [email protected]
If you use Microsoft Surface Pro, you can improve your Collaboration Agent experience by reducingthe Windows Explorer default zoom setting to 125% or less.
Procedure1. In your web browser, go to the Collaboration Agent URL.
For example, https://IP address or server name:9443/meeting2. In Collaboration Agent, enter your name and the collaboration code.
• The name must be from 2 to 31 characters long. Collaboration Agent displays the name inthe participants list.
• If the Collaboration Agent address contains the collaboration code, Collaboration Agentautomatically populates the code.
3. (Optional) Click Download the Sharing and Collaboration Plugin to install the plug-in forsharing content.
4. Click Login.
• If the conference requires passcodes for security, Collaboration Agent displays the Thisconference requires a PIN window.
• If the Collaboration Agent address contains a PIN, Collaboration Agent automaticallypopulates the PIN and does not display the This conference requires a PIN window.
5. (Optional) Enter the passcode, and click Login.
Logging out of Collaboration AgentProcedure
1. Click Exit in the upper-right corner.
Collaboration Agent displays a confirmation.
2. Click Yes.
• Collaboration Agent ends the conference.
• Depending on whether you logged in as a guest or a member, Collaboration Agentdisplays the Join a conference as a guest or the Member login window. To log in toanother Collaboration Agent conference, keep this window open.
3. Click Logout.
Logging in to and out of collaboration agent
September 2016 Using IP Office Web Collaboration Agent 18Comments on this document? [email protected]
Chapter 4: Accessing IP Office WebCollaboration
Accessing Web CollaborationYou can access Web Collaboration as a conference owner or a participant from one of the followingAvaya endpoints:
• Avaya one-X® Portal for IP Office• Avaya IP Office Outlook Plug-in• Avaya Communicator for Windows• Avaya Communicator for iOS
The integration of web collaboration with Avaya communication end points ensure ease ofcommunication. By clicking the web collaboration icon you can directly start a collaboration sessionwithout the need to enter the user name and password again.
Accessing Web Collaboration through One X user portalBefore you beginYour administrator must enable Web Collaboration for you.
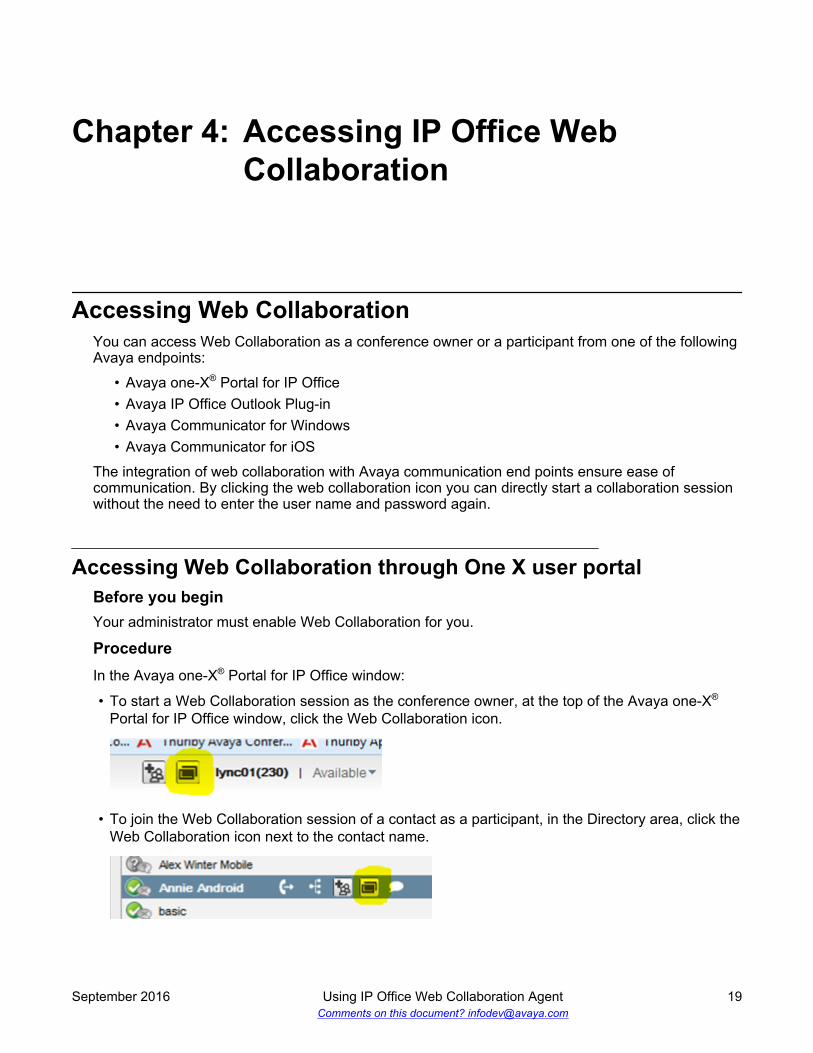
ProcedureIn the Avaya one-X® Portal for IP Office window:
• To start a Web Collaboration session as the conference owner, at the top of the Avaya one-X®
Portal for IP Office window, click the Web Collaboration icon.
• To join the Web Collaboration session of a contact as a participant, in the Directory area, click theWeb Collaboration icon next to the contact name.
September 2016 Using IP Office Web Collaboration Agent 19Comments on this document? [email protected]
The Web Collaboration session starts in a separate window.
Accessing Web Collaboration through Avaya Office Plug-inBefore you beginYour administrator must enable Web Collaboration for you.
About this taskUse this task to start your Web Collaboration session as the conference owner. You can also joinWeb Collaboration session of other users as a participant.
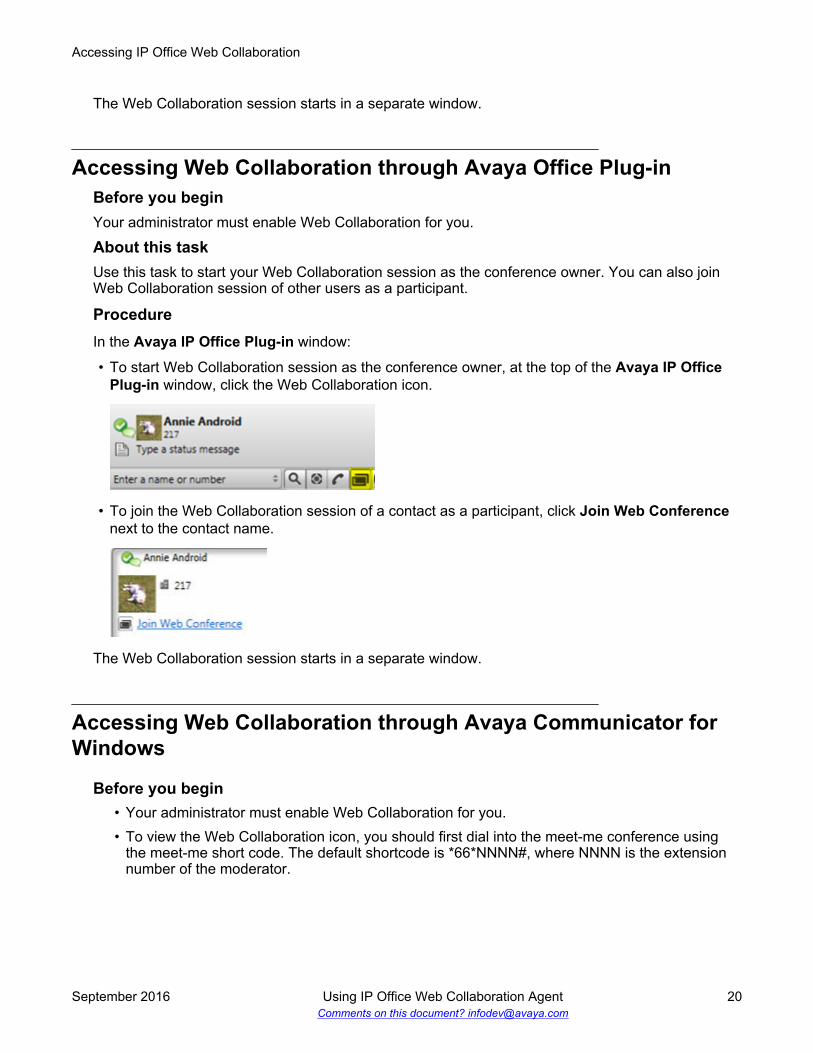
ProcedureIn the Avaya IP Office Plug-in window:
• To start Web Collaboration session as the conference owner, at the top of the Avaya IP OfficePlug-in window, click the Web Collaboration icon.
• To join the Web Collaboration session of a contact as a participant, click Join Web Conferencenext to the contact name.
The Web Collaboration session starts in a separate window.
Accessing Web Collaboration through Avaya Communicator forWindows
Before you begin• Your administrator must enable Web Collaboration for you.• To view the Web Collaboration icon, you should first dial into the meet-me conference using
the meet-me short code. The default shortcode is *66*NNNN#, where NNNN is the extensionnumber of the moderator.
Accessing IP Office Web Collaboration
September 2016 Using IP Office Web Collaboration Agent 20Comments on this document? [email protected]
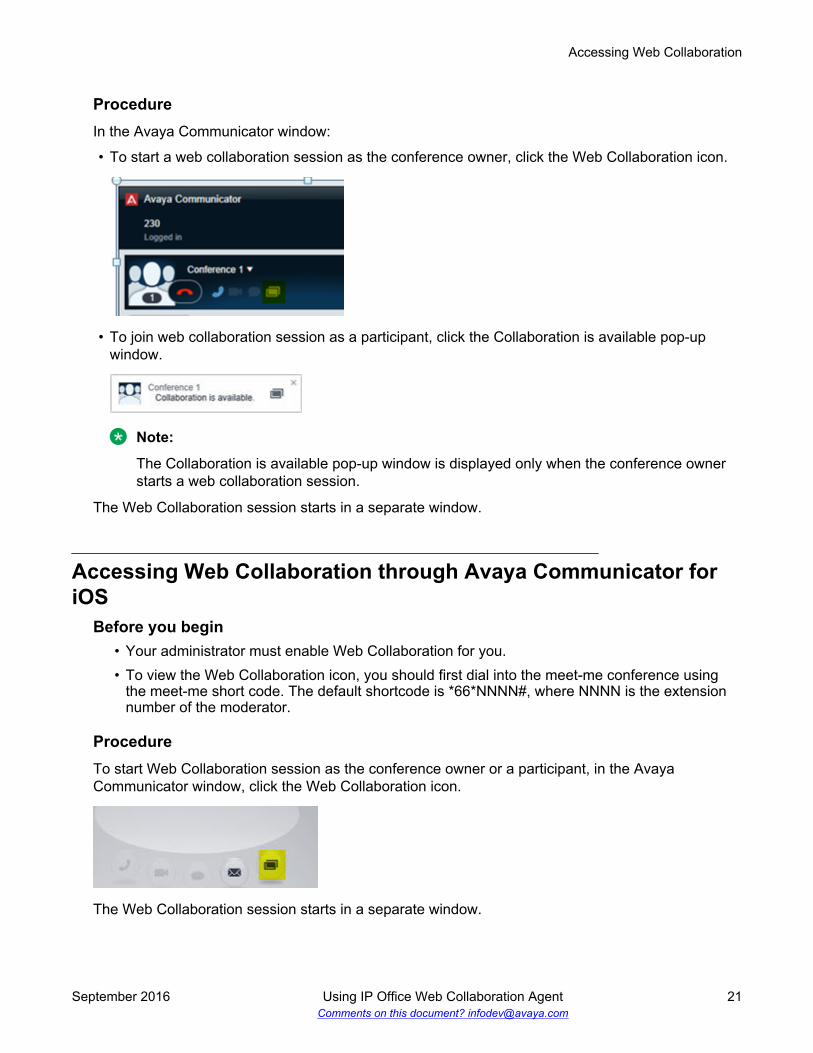
ProcedureIn the Avaya Communicator window:
• To start a web collaboration session as the conference owner, click the Web Collaboration icon.
• To join web collaboration session as a participant, click the Collaboration is available pop-upwindow.
Note:
The Collaboration is available pop-up window is displayed only when the conference ownerstarts a web collaboration session.
The Web Collaboration session starts in a separate window.
Accessing Web Collaboration through Avaya Communicator foriOS
Before you begin• Your administrator must enable Web Collaboration for you.• To view the Web Collaboration icon, you should first dial into the meet-me conference using
the meet-me short code. The default shortcode is *66*NNNN#, where NNNN is the extensionnumber of the moderator.
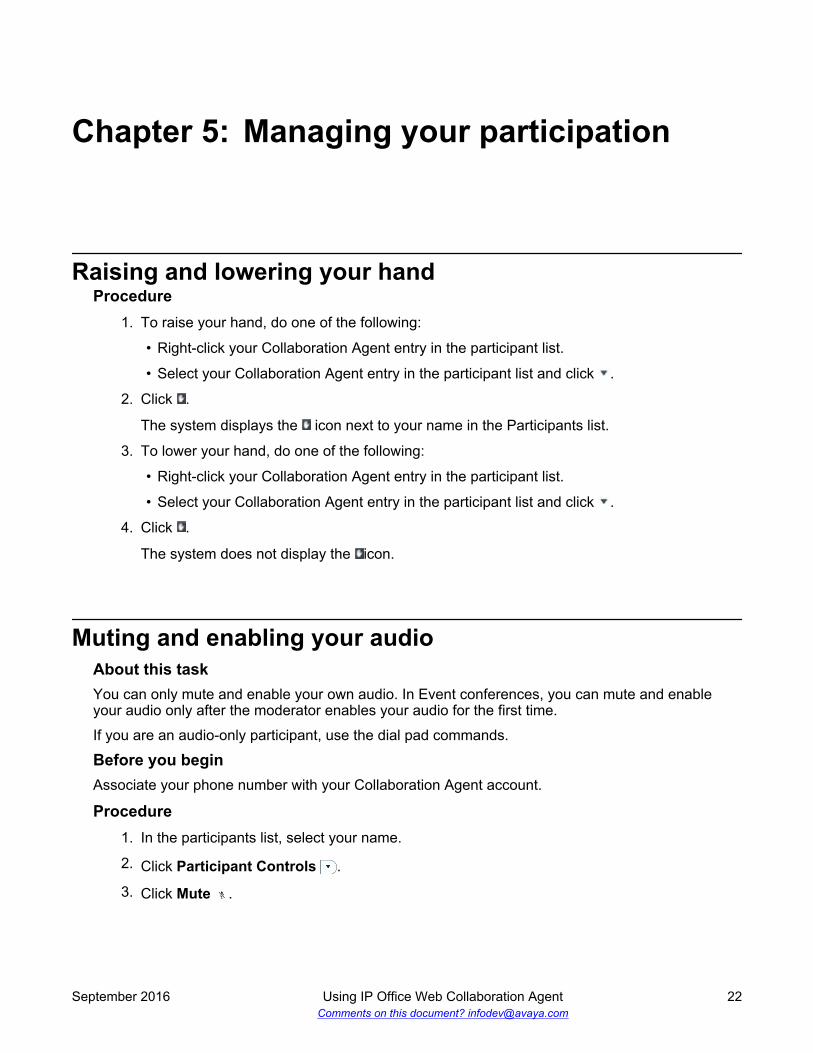
ProcedureTo start Web Collaboration session as the conference owner or a participant, in the AvayaCommunicator window, click the Web Collaboration icon.
The Web Collaboration session starts in a separate window.
Accessing Web Collaboration
September 2016 Using IP Office Web Collaboration Agent 21Comments on this document? [email protected]
Chapter 5: Managing your participation
Raising and lowering your handProcedure
1. To raise your hand, do one of the following:
• Right-click your Collaboration Agent entry in the participant list.
• Select your Collaboration Agent entry in the participant list and click .
2. Click .
The system displays the icon next to your name in the Participants list.
3. To lower your hand, do one of the following:
• Right-click your Collaboration Agent entry in the participant list.
• Select your Collaboration Agent entry in the participant list and click .
4. Click .
The system does not display the icon.
Muting and enabling your audioAbout this taskYou can only mute and enable your own audio. In Event conferences, you can mute and enableyour audio only after the moderator enables your audio for the first time.
If you are an audio-only participant, use the dial pad commands.
Before you beginAssociate your phone number with your Collaboration Agent account.
Procedure1. In the participants list, select your name.
2. Click Participant Controls .
3. Click Mute .
September 2016 Using IP Office Web Collaboration Agent 22Comments on this document? [email protected]
You can also:
• Right-click your name in the participants list, and click Mute .• Click Mute myself in the upper-right corner.
4. Click Mute again to enable your audio.
Capturing the attendance snapshotAbout this taskUse this procedure to capture the list of participants in the conference. Collaboration Agent displaysthe list in a dialog box. The attendance list contains names of the participants and the entry and exittimes. You can:
• Print the attendance list.• Copy the text on a clipboard.• Copy and paste the attendance list in Microsoft Excel, which preserves the format.
Tip:The attendance snapshot captures only a specific moment in the conference. Use the recordingfeature to get a true representation of the attendance for the full duration of the conference.
Before you beginEnable pop-ups in your web browser.
Procedure1. Click Conference Information .
2. Click Participation Reports.
Searching for participantsAbout this taskThe participants list displays only a limited number of participants. The search feature searches theentire list.
Procedure1. Click Filter By Participant Name .
Collaboration Agent expands the button to type the name of a participant.
2. Enter the name of the participant.
For example, if you want to find the moderator, enter moderator.
Capturing the attendance snapshot
September 2016 Using IP Office Web Collaboration Agent 23Comments on this document? [email protected]
3. To cancel the search and view all participants in the Collaboration Agent list, click X in FilterBy Participant Name .
Disconnecting from conferencesProcedure
1. In the participants list, select your name.
2. Click Participant Controls .
3. Click Drop from Call .
You can also right-click your name in the participants list, and click Drop from Call .
ResultIP Office disconnects all phones associated with your Collaboration Agent login. To stay connectedon Collaboration Agent, disconnect only your phone.
Managing your participation
September 2016 Using IP Office Web Collaboration Agent 24Comments on this document? [email protected]
Chapter 6: Managing a conference
Adding participants to conferencesAbout this taskDial out to the phones of users from Collaboration Agent and connect the users to the audio bridge.
When you dial out from Collaboration Agent, you can call a phone by entering the PSTN number.You also do not need to enter the conference access code to join conferences.
Procedure1. Click Add Participants .
Collaboration Agent displays the Add Participants window.
2. Enter the phone number of the participant.
3. Click Add to Call .
Muting and enabling the audio of participantsAbout this taskMute and enable the audio of all participants or specific participants.
Muted participants can enable their own audio. In Event conferences, all participants are muted andcannot enable their audio. After the moderator enables the audio of the participants in Eventconferences for the first time, the participants can mute and enable their audio.
Only moderators can perform this task.
Procedure1. In the participants list, select the name of the participant.
2. Click Participant Controls .
3. Click Mute .
You can also right-click the name of the participant in the participants list, and click Mute .
4. Click Mute again to enable the audio of the participant.
September 2016 Using IP Office Web Collaboration Agent 25Comments on this document? [email protected]
Promoting participants to the presenter roleAbout this taskPromote participants to the presenter role, so that the promoted participants can share documents,applications, or a virtual whiteboard. By default, only the moderator can present content to theparticipants in a conference.
Procedure1. In the participants list, select the name of the participant.
2. Click Participant Controls .
3. Click Presenter .
You can also right-click the name of the participant in the participants list, and clickPresenter .
Promoting a participant to moderatorAbout this taskUsing this procedure, you can promote another participant to moderator during a conference.
Important:This promotion takes place immediately after you click OK in the confirmation dialog box.
Note:A guest cannot be promoted to a moderator.
Procedure1. Right-click the Collaboration Agent entry of the participant in the participant list.
2. Click Moderator.
3. In the confirmation dialog box, click Yes to promote the participant to moderator.
The participant is promoted to a moderator.
Resuming the moderator roleAbout this taskUsing this procedure, you can resume the moderator role during a conference.
Managing a conference
September 2016 Using IP Office Web Collaboration Agent 26Comments on this document? [email protected]
Procedure1. Right-click your Collaboration Agent entry in the participant list.
2. Click and select Assume Moderator.
You resume the moderator role.
Disconnecting participantsProcedure
1. In the participants list, select the name of the participant.
2. Click Participant Controls .
3. Click Drop from Call .
You can also right-click the name of the participant in the participants list, and click Dropfrom Call .
ResultIP Office disconnects all phones associated with the selected participant from the conference. If thephone and the Collaboration Agent account are associated, IP Office disconnects both the phoneand Collaboration Agent.
Lowering raised hands of participantsAbout this taskOnly moderators can perform this task.
Procedure1. In the participants list, select the name of the participant.
2. Click Participant Controls .
3. Click Raise Hand .
You can also right-click the name of the participant in the participants list, and click RaiseHand .
Disconnecting participants
September 2016 Using IP Office Web Collaboration Agent 27Comments on this document? [email protected]
Locking and unlocking conferencesAbout this taskYou can lock the conference to prevent more participants from joining the audio conference or theCollaboration Agent conference. If some participants join the audio conference, but do not log in tothe Collaboration Agent conference, these participants cannot join the web conference later in thelocked conference.
Only moderators can lock and unlock conferences.
Procedure1. Click Conference Controls .
2. Click Lock .
You can also press *7 on the phone dial pad.
Collaboration Agent locks the conference to prevent more participants from joining theconference.
3. Click Lock again to unlock the conference.
Managing a conference
September 2016 Using IP Office Web Collaboration Agent 28Comments on this document? [email protected]
Chapter 7: Sharing information
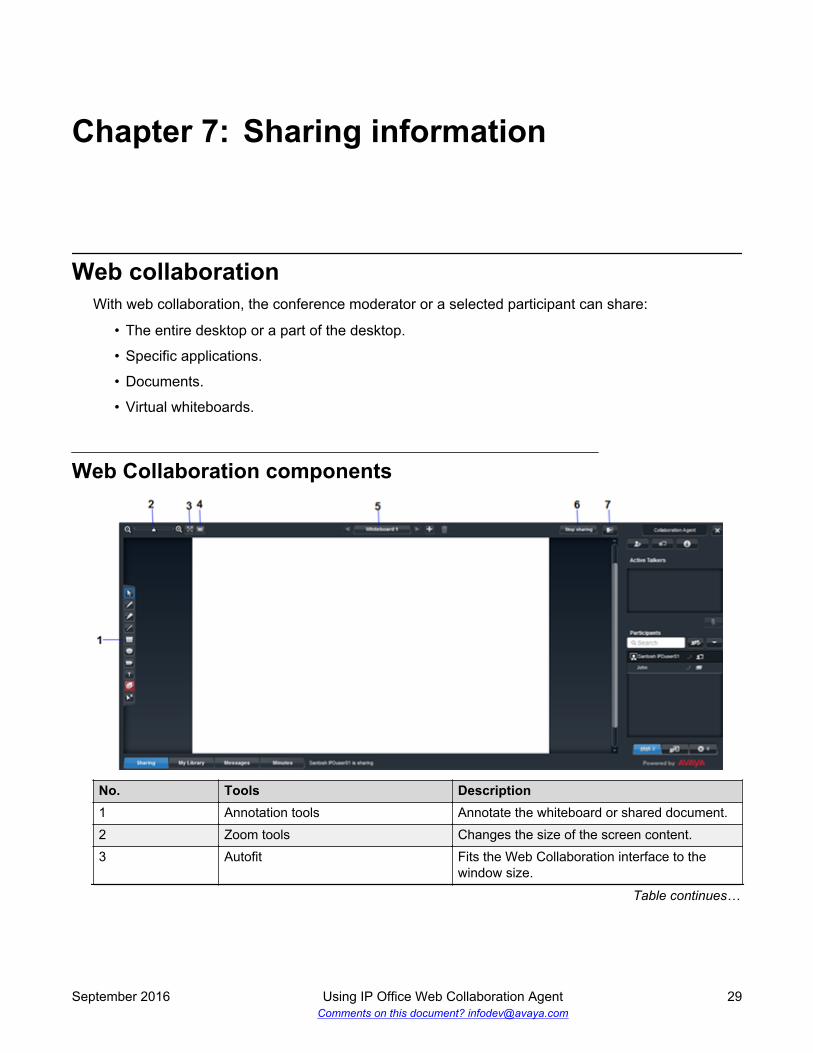
Web collaborationWith web collaboration, the conference moderator or a selected participant can share:
• The entire desktop or a part of the desktop.
• Specific applications.
• Documents.
• Virtual whiteboards.
Web Collaboration components
No. Tools Description1 Annotation tools Annotate the whiteboard or shared document.2 Zoom tools Changes the size of the screen content.3 Autofit Fits the Web Collaboration interface to the
window size.
Table continues…
September 2016 Using IP Office Web Collaboration Agent 29Comments on this document? [email protected]
No. Tools Description4 Screenshot Sends a shot of the current screen to all
participants as a JPG file that participants candownload.
5 Navigation tools Navigate the shared content. The buttonschange according to the content being shared.
6 Stop Sharing Stop sharing current content.7 Hide or show roster Hides or shows the conference roster.
Managing your library
LibraryIP Office provides a library for users with accounts to upload documents, presentations, and imagesto share in web collaboration sessions. Participants can collaborate by viewing these documentsand making notes on shared whiteboards. In the library, you can:
• Upload documents.
• View documents.
• Rename documents.
• Sort documents according to your preference.
• Delete the uploaded documents.
Sharing content from the library has the following advantages. Presenters can share content fromthe library:
• From anywhere by logging in to Collaboration Agent and gaining access to the library.
• For more responsive and higher resolution sessions.
• To enable participants to browse the shared content independently in a separate pop-upwindow.
Supported document formatsTab Document type ExtensionPlain text • .txtDocuments Adobe Acrobat • .pdf
Table continues…
Sharing information
September 2016 Using IP Office Web Collaboration Agent 30Comments on this document? [email protected]
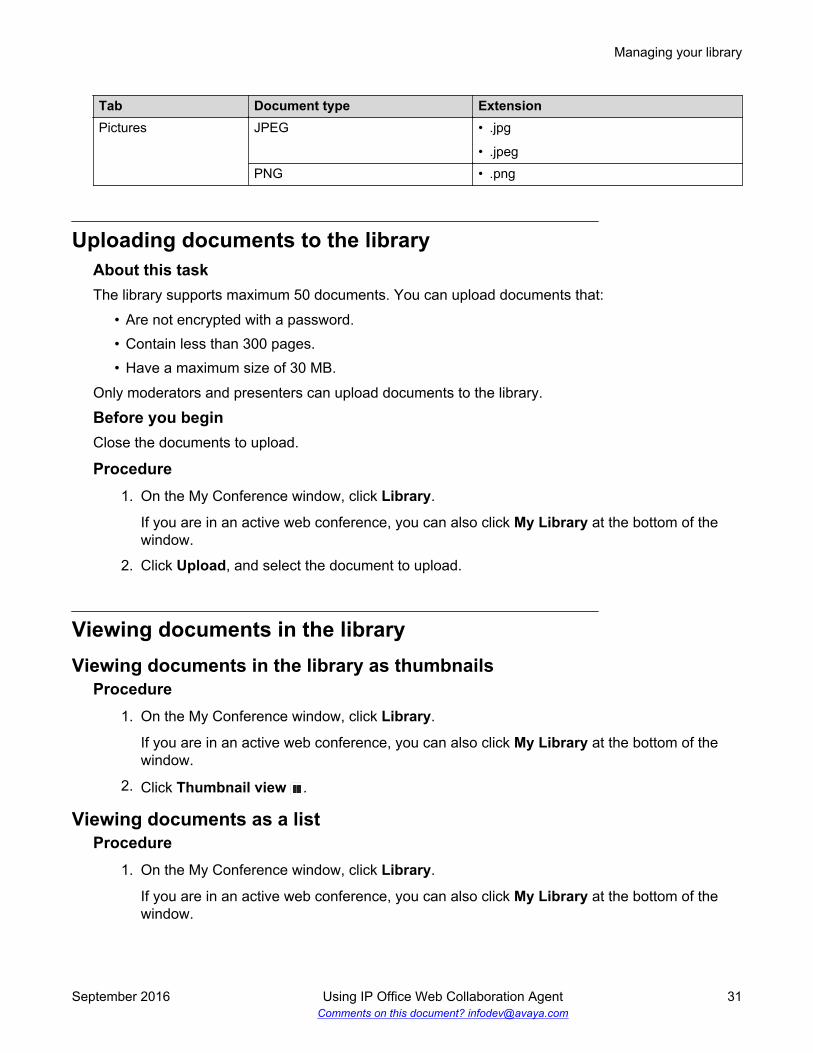
Tab Document type ExtensionPictures JPEG • .jpg
• .jpegPNG • .png
Uploading documents to the libraryAbout this taskThe library supports maximum 50 documents. You can upload documents that:
• Are not encrypted with a password.• Contain less than 300 pages.• Have a maximum size of 30 MB.
Only moderators and presenters can upload documents to the library.
Before you beginClose the documents to upload.
Procedure1. On the My Conference window, click Library.
If you are in an active web conference, you can also click My Library at the bottom of thewindow.
2. Click Upload, and select the document to upload.
Viewing documents in the libraryViewing documents in the library as thumbnails
Procedure1. On the My Conference window, click Library.
If you are in an active web conference, you can also click My Library at the bottom of thewindow.
2. Click Thumbnail view .
Viewing documents as a listProcedure
1. On the My Conference window, click Library.
If you are in an active web conference, you can also click My Library at the bottom of thewindow.
Managing your library
September 2016 Using IP Office Web Collaboration Agent 31Comments on this document? [email protected]
2. Click List view .
Renaming documents in the libraryBefore you beginLog in to Collaboration Agent.
Procedure1. On the My Conference window, click Library.
If you are in an active web conference, you can also click My Library at the bottom of thewindow.
2. Select a document.
3. Click Rename.
4. Type the new name in the dialog box.
5. Click Save.
Deleting documents in the libraryBefore you beginLog in to Collaboration Agent.
Procedure1. On the My Conference window, click Library.
If you are in an active web conference, you can also click My Library at the bottom of thewindow.
2. Select a document.
3. Click Delete.
Collaboration Agent asks for a confirmation.
4. Click OK.
Sorting documents in the libraryProcedure
1. On the My Conference window, click Library.
If you are in an active web conference, you can also click My Library at the bottom of thewindow.
Sharing information
September 2016 Using IP Office Web Collaboration Agent 32Comments on this document? [email protected]
2. Click one of the following options:
• Presentations
• Documents
• Pictures
Collaboration Agent displays the type of documents that you select.
3. Click your choice again to reverse the filter.
Installing the web collaboration plug-inAbout this taskCollaboration Agent requires a Java applet to share content. The web browser might blockCollaboration Agent from starting the Java applet to share content because of modifications to webbrowsers by developers to resolve security vulnerabilities. Install the web collaboration plug-in sothat Collaboration Agent does not require the Java applet to share content.
If you disable the plug-in, Collaboration Agent prompts you to download the plug-in again when youshare content the next time. If you install the plug-in again, the operating system of your computermight display the following message:This program might not have installed correctly.The web collaboration plug-in supports only 32–bit web browsers. You must restart the web browserafter you install the plug-in.
Procedure1. On the Join a conference as a guest or Member login page, click Download the Sharing
and Collaboration Plugin.
Collaboration Agent displays Download the Sharing and Collaboration Plugin only if theweb collaboration plug-in is not installed or if the plug-in is disabled.
Collaboration Agent displays a prompt to save the file.
2. Save the plug-in installation file.
The operating system firewall might display a warning when you download the plug-in. Clickthe appropriate option for the firewall to allow access to the plug-in.
3. Run the installation file, and follow the instructions in the IP Office Web Collaborationwizard.
Next stepsRestart the web browser.
Installing the web collaboration plug-in
September 2016 Using IP Office Web Collaboration Agent 33Comments on this document? [email protected]
Document sharing
Sharing documents from the libraryAbout this taskIf you disconnect from the conference without ending the document sharing, the sharing on theconference continues.
Before you beginWeb collaboration must be active on Collaboration Agent.
Upload the documents to the library.
Procedure1. Click Collaboration .
2. Click Sharing.
3. Click Document from library.
4. On the My Library window, select one of the following document types:
• Presentations
• Documents
• Pictures
5. Select a document.
6. Click Share.
Browsing shared content independentlyAbout this taskBrowse a shared document independently of the moderator or presenter.
Before you beginThe moderator or the presenter must be sharing content in the web collaboration session.
Procedure
Click Browse shared content in private pop-up window .
Sharing information
September 2016 Using IP Office Web Collaboration Agent 34Comments on this document? [email protected]
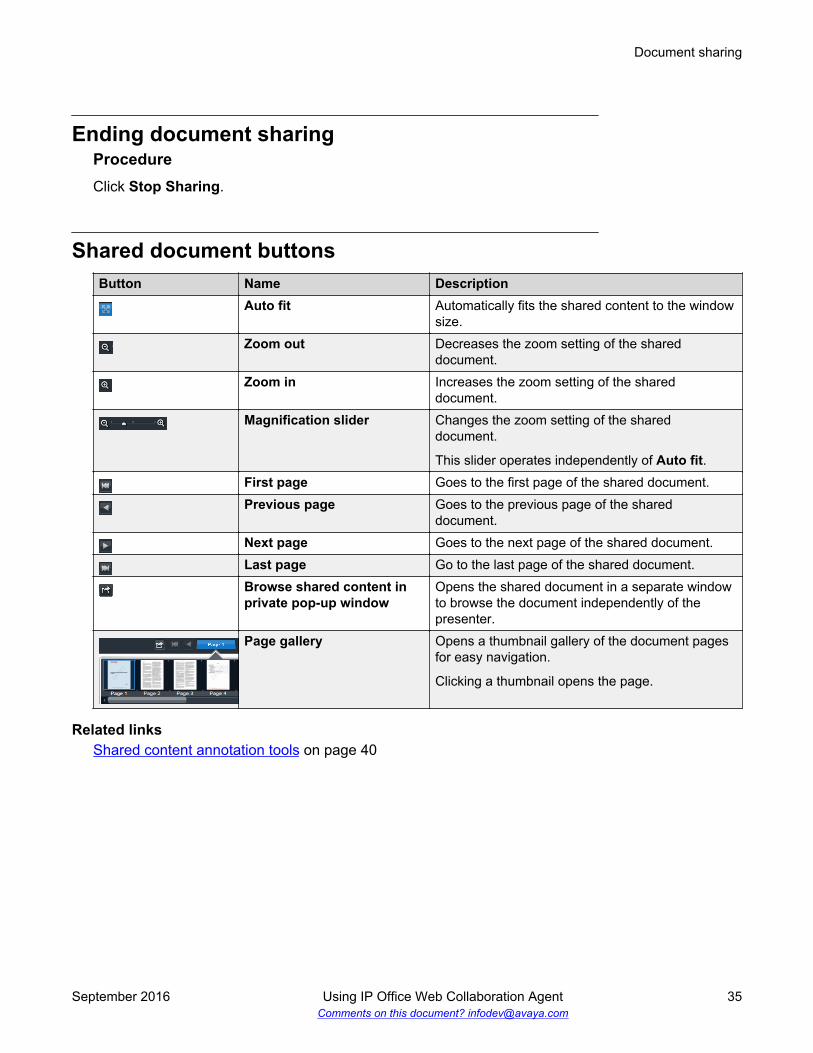
Ending document sharingProcedureClick Stop Sharing.
Shared document buttonsButton Name Description
Auto fit Automatically fits the shared content to the windowsize.
Zoom out Decreases the zoom setting of the shareddocument.
Zoom in Increases the zoom setting of the shareddocument.
Magnification slider Changes the zoom setting of the shareddocument.
This slider operates independently of Auto fit.First page Goes to the first page of the shared document.Previous page Goes to the previous page of the shared
document.Next page Goes to the next page of the shared document.Last page Go to the last page of the shared document.Browse shared content inprivate pop-up window
Opens the shared document in a separate windowto browse the document independently of thepresenter.
Page gallery Opens a thumbnail gallery of the document pagesfor easy navigation.
Clicking a thumbnail opens the page.
Related linksShared content annotation tools on page 40
Document sharing
September 2016 Using IP Office Web Collaboration Agent 35Comments on this document? [email protected]
Virtual whiteboard sharing
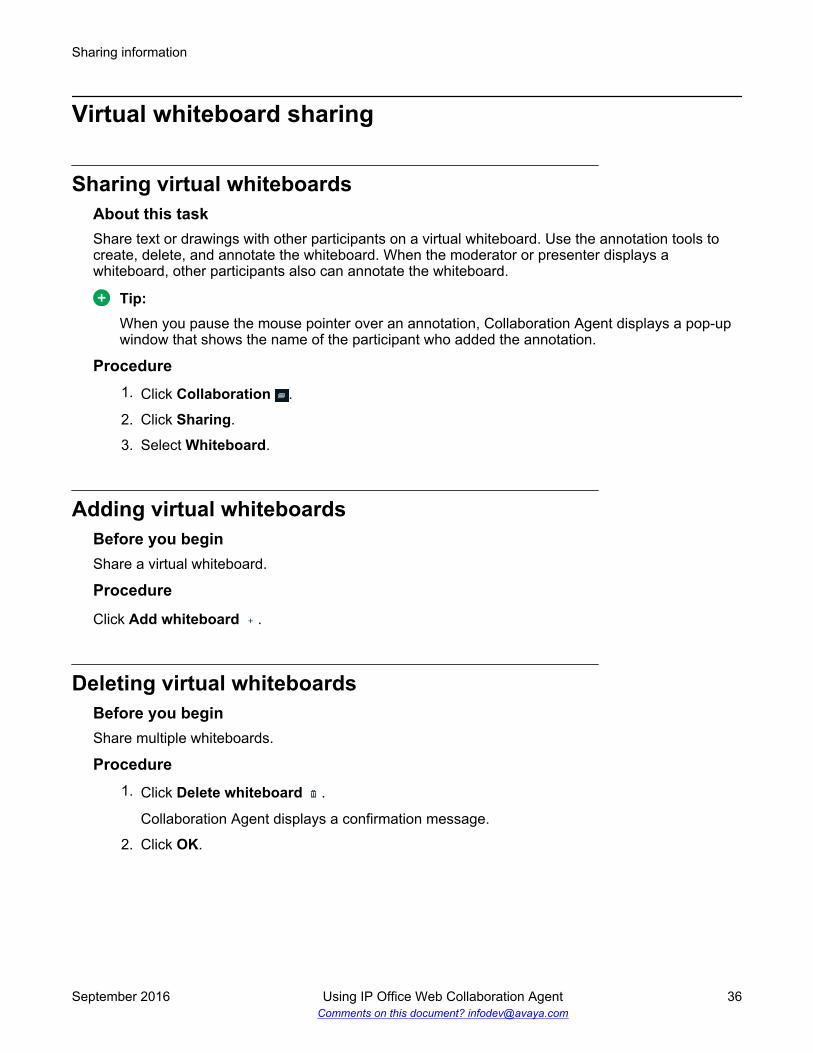
Sharing virtual whiteboardsAbout this taskShare text or drawings with other participants on a virtual whiteboard. Use the annotation tools tocreate, delete, and annotate the whiteboard. When the moderator or presenter displays awhiteboard, other participants also can annotate the whiteboard.
Tip:When you pause the mouse pointer over an annotation, Collaboration Agent displays a pop-upwindow that shows the name of the participant who added the annotation.
Procedure1. Click Collaboration .
2. Click Sharing.
3. Select Whiteboard.
Adding virtual whiteboardsBefore you beginShare a virtual whiteboard.
Procedure
Click Add whiteboard .
Deleting virtual whiteboardsBefore you beginShare multiple whiteboards.
Procedure1. Click Delete whiteboard .
Collaboration Agent displays a confirmation message.
2. Click OK.
Sharing information
September 2016 Using IP Office Web Collaboration Agent 36Comments on this document? [email protected]
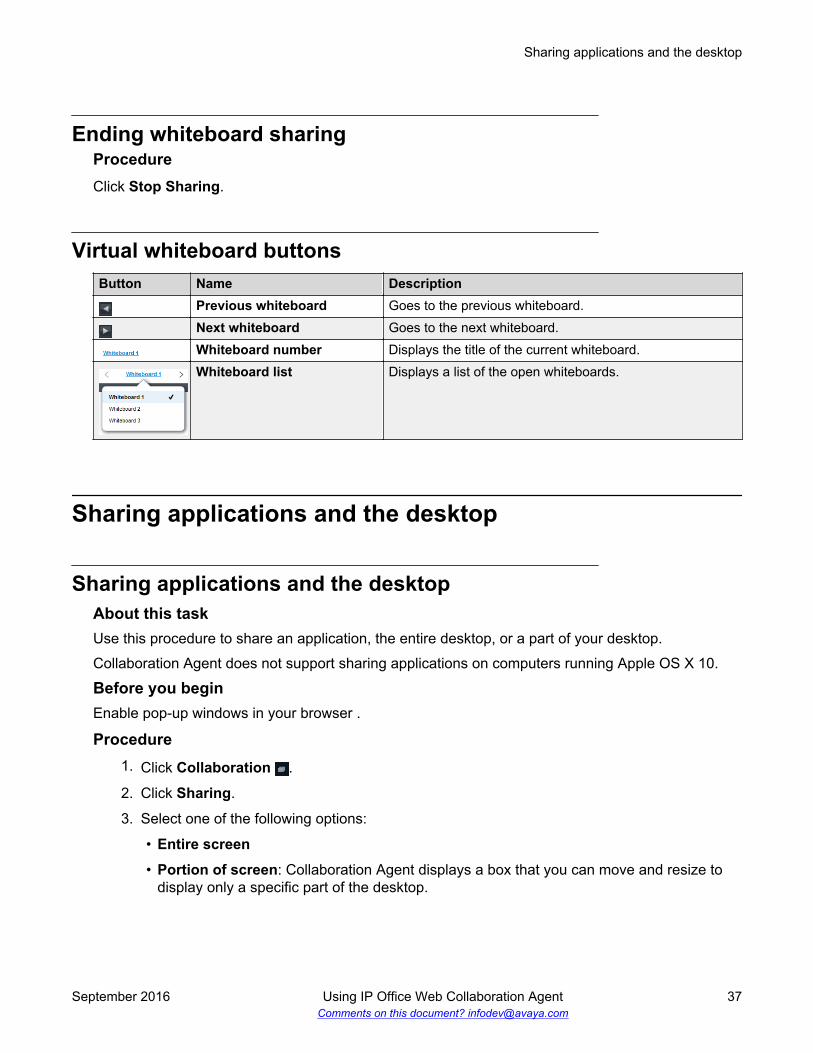
Ending whiteboard sharingProcedureClick Stop Sharing.
Virtual whiteboard buttonsButton Name Description
Previous whiteboard Goes to the previous whiteboard.Next whiteboard Goes to the next whiteboard.Whiteboard number Displays the title of the current whiteboard.Whiteboard list Displays a list of the open whiteboards.
Sharing applications and the desktop
Sharing applications and the desktopAbout this taskUse this procedure to share an application, the entire desktop, or a part of your desktop.
Collaboration Agent does not support sharing applications on computers running Apple OS X 10.
Before you beginEnable pop-up windows in your browser .
Procedure1. Click Collaboration .
2. Click Sharing.
3. Select one of the following options:
• Entire screen
• Portion of screen: Collaboration Agent displays a box that you can move and resize todisplay only a specific part of the desktop.
Sharing applications and the desktop
September 2016 Using IP Office Web Collaboration Agent 37Comments on this document? [email protected]
• Application window: Collaboration Agent displays the Choose application window toselect the application to share.
If you installed the Collaboration Agent plug-in, do not minimize the application window thatyou are sharing. Collaboration Agent stops the application sharing if you minimize thewindow.
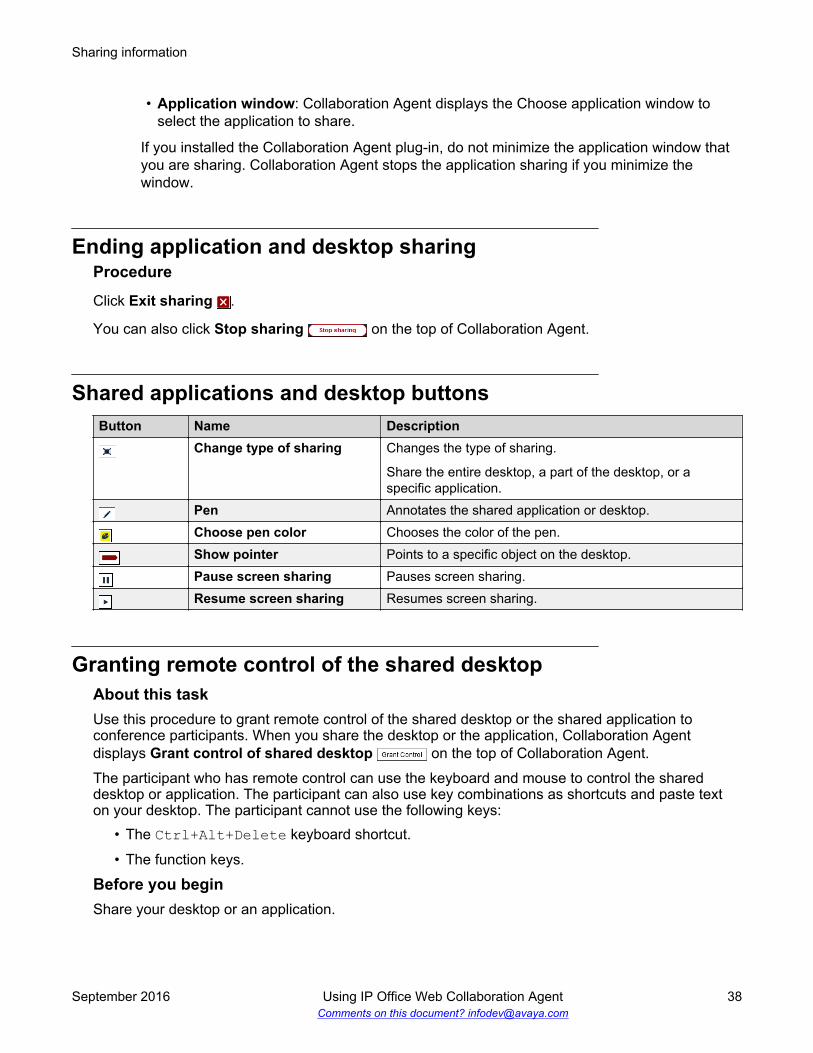
Ending application and desktop sharingProcedure
Click Exit sharing .
You can also click Stop sharing on the top of Collaboration Agent.
Shared applications and desktop buttonsButton Name Description
Change type of sharing Changes the type of sharing.
Share the entire desktop, a part of the desktop, or aspecific application.
Pen Annotates the shared application or desktop.Choose pen color Chooses the color of the pen.Show pointer Points to a specific object on the desktop.Pause screen sharing Pauses screen sharing.Resume screen sharing Resumes screen sharing.
Granting remote control of the shared desktopAbout this taskUse this procedure to grant remote control of the shared desktop or the shared application toconference participants. When you share the desktop or the application, Collaboration Agentdisplays Grant control of shared desktop on the top of Collaboration Agent.
The participant who has remote control can use the keyboard and mouse to control the shareddesktop or application. The participant can also use key combinations as shortcuts and paste texton your desktop. The participant cannot use the following keys:
• The Ctrl+Alt+Delete keyboard shortcut.
• The function keys.
Before you beginShare your desktop or an application.
Sharing information
September 2016 Using IP Office Web Collaboration Agent 38Comments on this document? [email protected]
Procedure1. Click Grant control of shared desktop .
Collaboration Agent displays the Grant control to window.
2. Select a participant, and click Ok.
Requesting remote control of the shared contentAbout this taskUse this procedure to request presenters to gain control of the shared content. When the presenteris sharing content, Collaboration Agent displays Request control on the top ofCollaboration Agent
Your remote control of the shared content ends if the presenter stops sharing the content.Collaboration Agent does not display a warning before stopping your remote control. Presenters canalso stop your remote control of the shared desktop or application.
Before you beginA presenter must be sharing content.
Procedure
Click Request control .
Annotating content
Annotations in shared contentWeb collaboration provides various dynamic tools for annotating shared content, applications, anddrawings on virtual whiteboards. The availability of the dynamic tools depends on the type of contentshared: applications, documents, or whiteboards. You can add text, lines, and stamps to the sharedcontent.
Moderators and presenters can annotate all shared content, while participants can annotate onlyvirtual whiteboards.
Annotating content
September 2016 Using IP Office Web Collaboration Agent 39Comments on this document? [email protected]
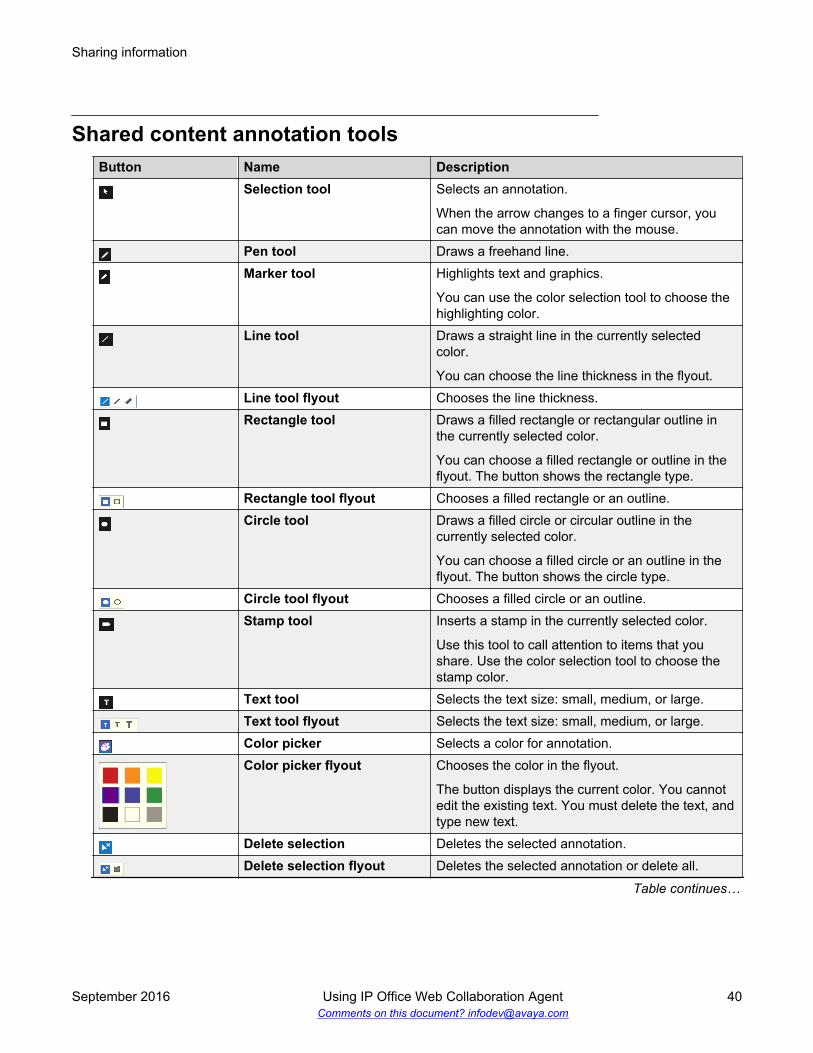
Shared content annotation toolsButton Name Description
Selection tool Selects an annotation.
When the arrow changes to a finger cursor, youcan move the annotation with the mouse.
Pen tool Draws a freehand line.Marker tool Highlights text and graphics.
You can use the color selection tool to choose thehighlighting color.
Line tool Draws a straight line in the currently selectedcolor.
You can choose the line thickness in the flyout.Line tool flyout Chooses the line thickness.Rectangle tool Draws a filled rectangle or rectangular outline in
the currently selected color.
You can choose a filled rectangle or outline in theflyout. The button shows the rectangle type.
Rectangle tool flyout Chooses a filled rectangle or an outline.Circle tool Draws a filled circle or circular outline in the
currently selected color.
You can choose a filled circle or an outline in theflyout. The button shows the circle type.
Circle tool flyout Chooses a filled circle or an outline.Stamp tool Inserts a stamp in the currently selected color.
Use this tool to call attention to items that youshare. Use the color selection tool to choose thestamp color.
Text tool Selects the text size: small, medium, or large.Text tool flyout Selects the text size: small, medium, or large.Color picker Selects a color for annotation.Color picker flyout Chooses the color in the flyout.
The button displays the current color. You cannotedit the existing text. You must delete the text, andtype new text.
Delete selection Deletes the selected annotation.Delete selection flyout Deletes the selected annotation or delete all.
Table continues…
Sharing information
September 2016 Using IP Office Web Collaboration Agent 40Comments on this document? [email protected]
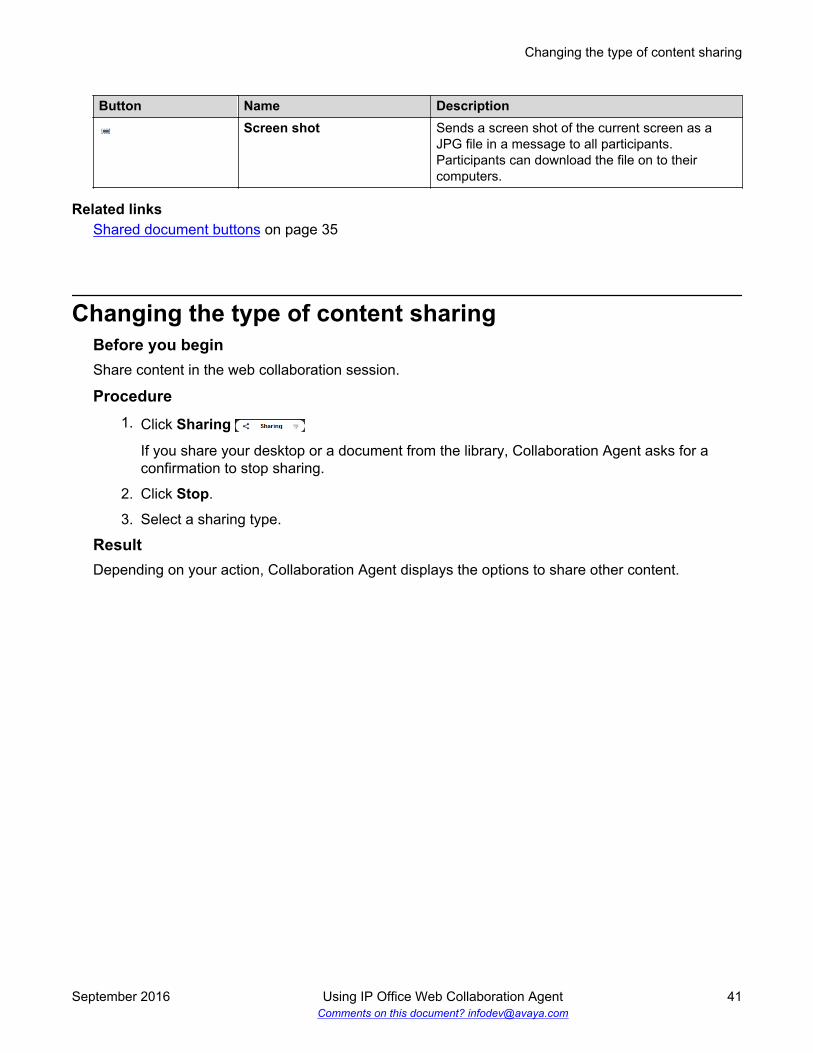
Button Name DescriptionScreen shot Sends a screen shot of the current screen as a
JPG file in a message to all participants.Participants can download the file on to theircomputers.
Related linksShared document buttons on page 35
Changing the type of content sharingBefore you beginShare content in the web collaboration session.
Procedure1. Click Sharing
If you share your desktop or a document from the library, Collaboration Agent asks for aconfirmation to stop sharing.
2. Click Stop.
3. Select a sharing type.
ResultDepending on your action, Collaboration Agent displays the options to share other content.
Changing the type of content sharing
September 2016 Using IP Office Web Collaboration Agent 41Comments on this document? [email protected]
Chapter 8: Sending messages inconferences
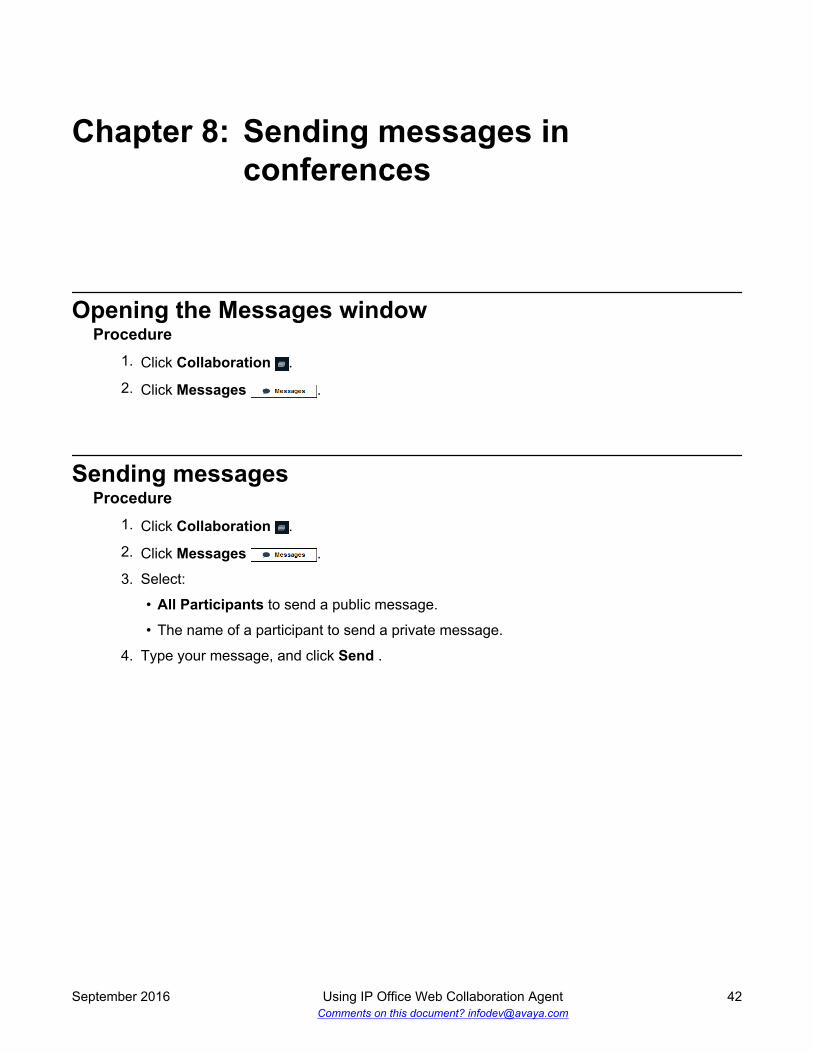
Opening the Messages windowProcedure
1. Click Collaboration .
2. Click Messages .
Sending messagesProcedure
1. Click Collaboration .
2. Click Messages .
3. Select:
• All Participants to send a public message.
• The name of a participant to send a private message.
4. Type your message, and click Send .
September 2016 Using IP Office Web Collaboration Agent 42Comments on this document? [email protected]
Chapter 9: Managing meeting minutes
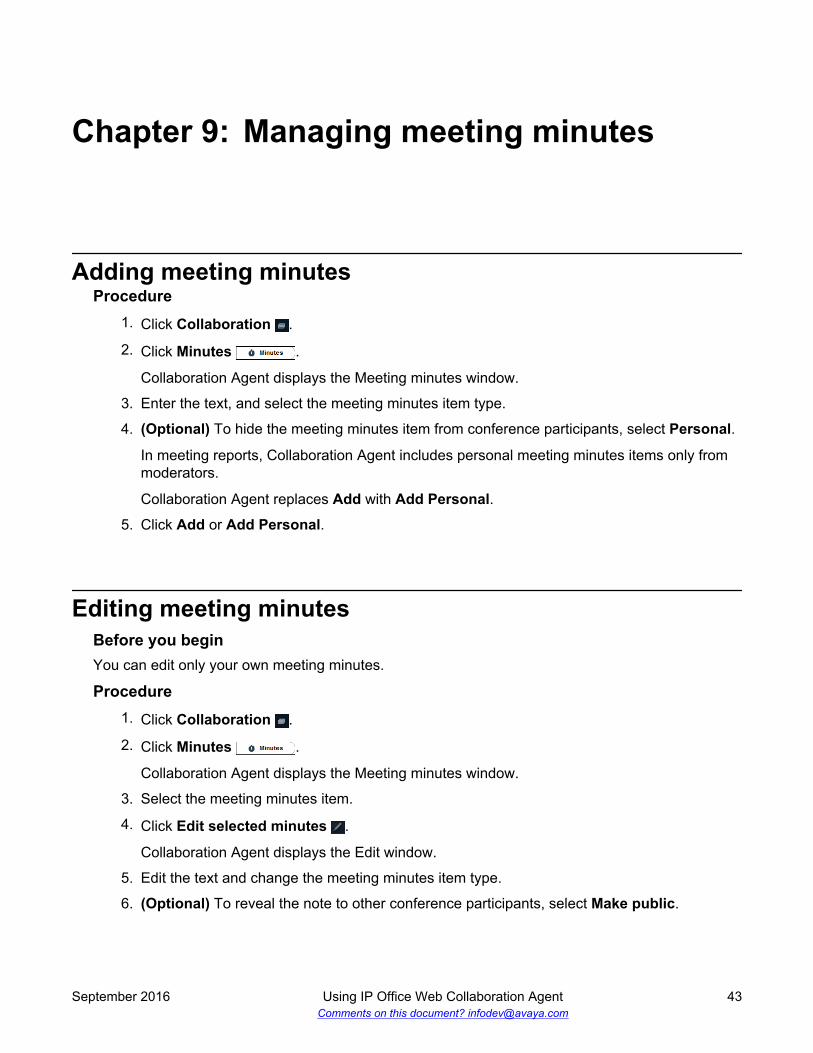
Adding meeting minutesProcedure
1. Click Collaboration .
2. Click Minutes .
Collaboration Agent displays the Meeting minutes window.
3. Enter the text, and select the meeting minutes item type.
4. (Optional) To hide the meeting minutes item from conference participants, select Personal.
In meeting reports, Collaboration Agent includes personal meeting minutes items only frommoderators.
Collaboration Agent replaces Add with Add Personal.
5. Click Add or Add Personal.
Editing meeting minutesBefore you beginYou can edit only your own meeting minutes.
Procedure1. Click Collaboration .
2. Click Minutes .
Collaboration Agent displays the Meeting minutes window.
3. Select the meeting minutes item.
4. Click Edit selected minutes .
Collaboration Agent displays the Edit window.
5. Edit the text and change the meeting minutes item type.
6. (Optional) To reveal the note to other conference participants, select Make public.
September 2016 Using IP Office Web Collaboration Agent 43Comments on this document? [email protected]
7. Click Save.
Deleting meeting minutesBefore you beginYou can delete only your own meeting minutes.
Procedure1. Click Collaboration .
2. Click Minutes .
Collaboration Agent displays the Meeting minutes window.
3. Select the meeting minutes item.
4. Click Delete selected minutes .
Collaboration Agent displays a confirmation.
5. Click Ok.
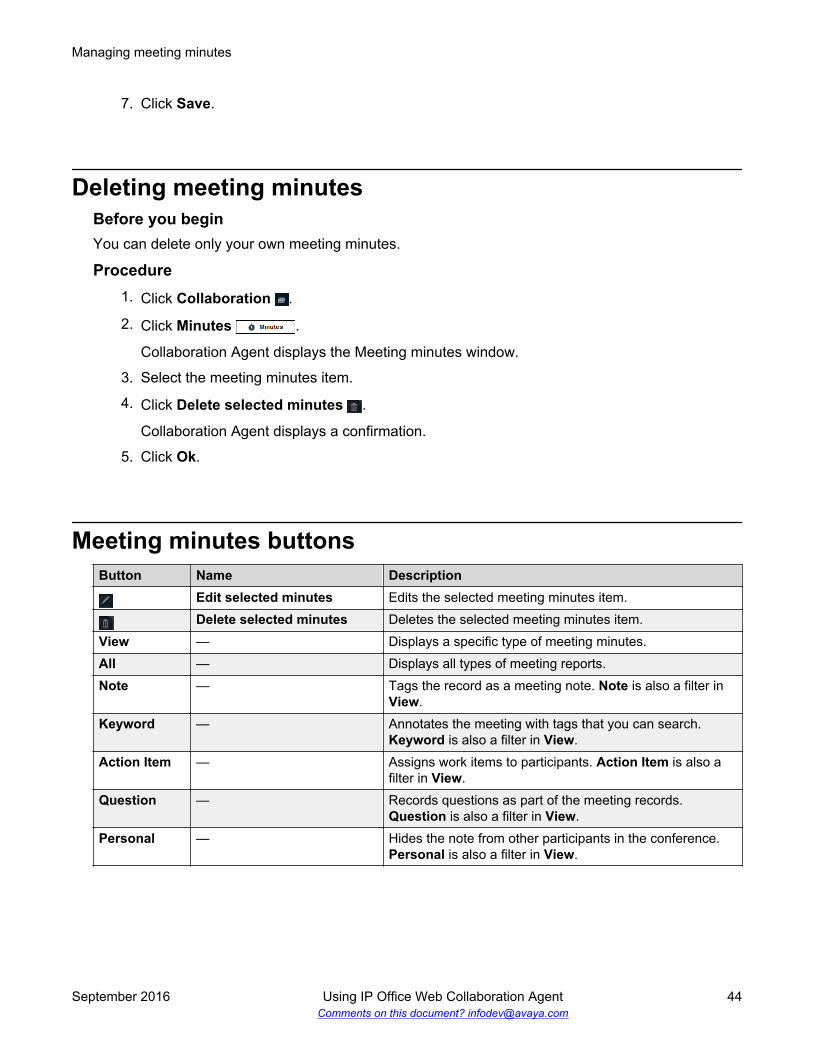
Meeting minutes buttonsButton Name Description
Edit selected minutes Edits the selected meeting minutes item.Delete selected minutes Deletes the selected meeting minutes item.
View — Displays a specific type of meeting minutes.All — Displays all types of meeting reports.Note — Tags the record as a meeting note. Note is also a filter in
View.Keyword — Annotates the meeting with tags that you can search.
Keyword is also a filter in View.Action Item — Assigns work items to participants. Action Item is also a
filter in View.Question — Records questions as part of the meeting records.
Question is also a filter in View.Personal — Hides the note from other participants in the conference.
Personal is also a filter in View.
Managing meeting minutes
September 2016 Using IP Office Web Collaboration Agent 44Comments on this document? [email protected]
Chapter 10: Managing meeting reports
Viewing meeting reportsAbout this taskOnly conference owners can gain access to meeting reports.
Before you beginLog in to Collaboration Agent.
Procedure1. On the My Conference window, click Reports.
In an active conference, you can view the meeting reports from Reports in ConferenceInformation .
Collaboration Agent displays the Meeting Reports window.
2. Select a meeting report.
3. Click Open.
Sorting meeting reportsAbout this taskSort the meeting reports by date and time, name, and duration of conferences in ascending anddescending order.
Only conference owners can gain access to meeting reports.
Before you beginLog in to Collaboration Agent.
Procedure1. On the My Conference window, click Reports.
In an active conference, you can view the meeting reports from Reports in ConferenceInformation .
Collaboration Agent displays the Meeting Reports window.
September 2016 Using IP Office Web Collaboration Agent 45Comments on this document? [email protected]

2. Select a meeting report.
3. Click one of the following columns:
• Date and Time• Name• Duration
Collaboration Agent sorts the meeting reports by the column that you select.
4. Click the column again to revert the sorting order.
Deleting meeting reportsAbout this taskOnly conference owners can gain access to meeting reports.
Before you beginLog in to Collaboration Agent.
Procedure1. On the My Conference window, click Reports.
In an active conference, you can view the meeting reports from Reports in ConferenceInformation .
Collaboration Agent displays the Meeting Reports window.
2. Select a meeting report.
3. Click Delete.
Collaboration Agent displays a confirmation.
4. Click Ok.
Renaming meeting reportsAbout this taskOnly conference owners can gain access to meeting reports.
Before you beginLog in to Collaboration Agent.
Procedure1. On the My Conference window, click Reports.
Managing meeting reports
September 2016 Using IP Office Web Collaboration Agent 46Comments on this document? [email protected]
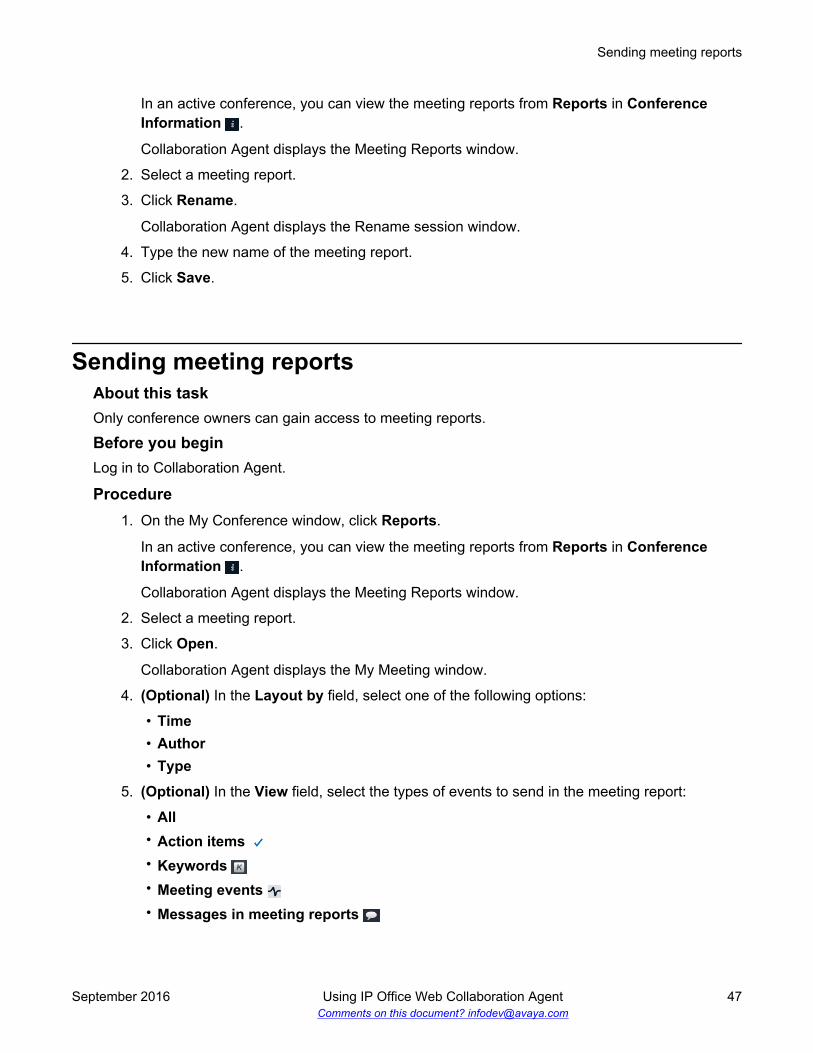
In an active conference, you can view the meeting reports from Reports in ConferenceInformation .
Collaboration Agent displays the Meeting Reports window.
2. Select a meeting report.
3. Click Rename.
Collaboration Agent displays the Rename session window.
4. Type the new name of the meeting report.
5. Click Save.
Sending meeting reportsAbout this taskOnly conference owners can gain access to meeting reports.
Before you beginLog in to Collaboration Agent.
Procedure1. On the My Conference window, click Reports.
In an active conference, you can view the meeting reports from Reports in ConferenceInformation .
Collaboration Agent displays the Meeting Reports window.
2. Select a meeting report.
3. Click Open.
Collaboration Agent displays the My Meeting window.
4. (Optional) In the Layout by field, select one of the following options:
• Time• Author• Type
5. (Optional) In the View field, select the types of events to send in the meeting report:
• All• Action items • Keywords • Meeting events • Messages in meeting reports
Sending meeting reports
September 2016 Using IP Office Web Collaboration Agent 47Comments on this document? [email protected]

• Note
• Questions
You can select multiple options.
6. Click Export.
Collaboration Agent displays the Report preview window.
7. Do one of the following:
• To copy the report to the clipboard as text, click Copy.
• To print the report, click Print.
• To save the report as an HTML file, click Save.
Sending Collaboration Agent plug-in logsProcedure
1. Click Conference Information.
Collaboration Agent displays the Conference Information window.
2. Click Send logs.
Collaboration Agent opens an email in Microsoft Outlook. The email contains theCollaboration Agent plug-in logs, which includes all conference events, and a list ofquestions.
3. Type your responses to the questions, and send the email.
Related linksInstalling the web collaboration plug-in on page 33
Managing meeting reports
September 2016 Using IP Office Web Collaboration Agent 48Comments on this document? [email protected]
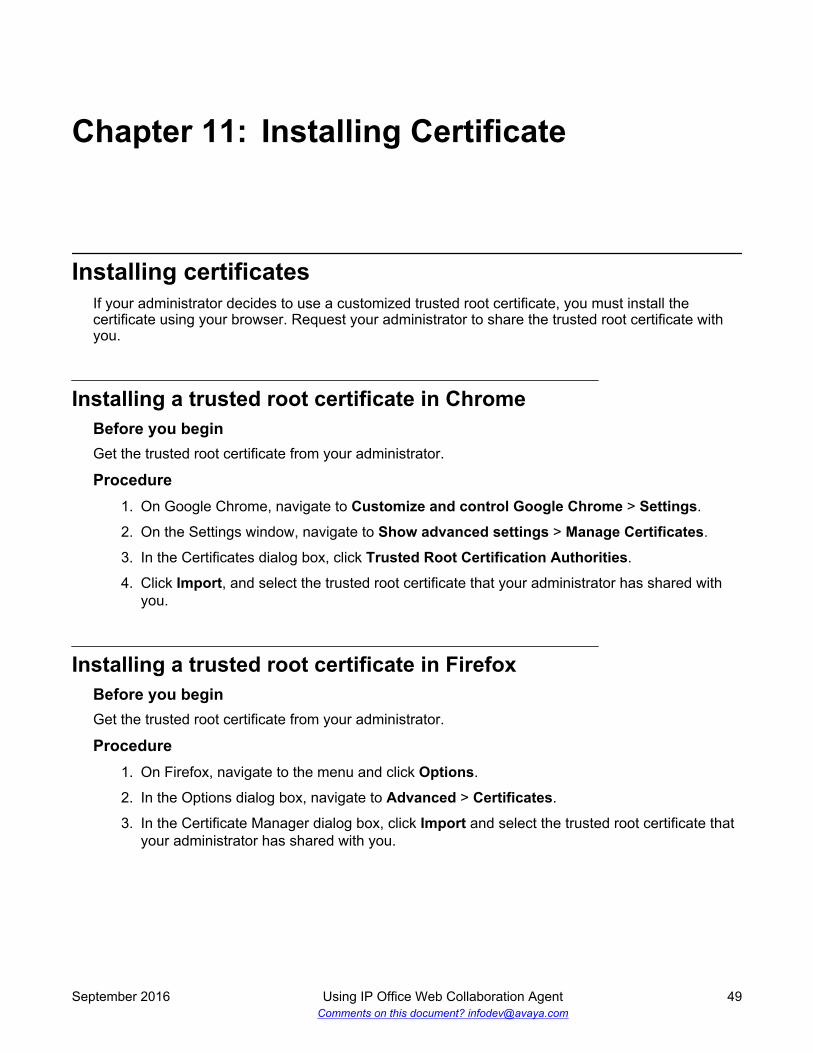
Chapter 11: Installing Certificate
Installing certificatesIf your administrator decides to use a customized trusted root certificate, you must install thecertificate using your browser. Request your administrator to share the trusted root certificate withyou.
Installing a trusted root certificate in ChromeBefore you beginGet the trusted root certificate from your administrator.
Procedure1. On Google Chrome, navigate to Customize and control Google Chrome > Settings.
2. On the Settings window, navigate to Show advanced settings > Manage Certificates.
3. In the Certificates dialog box, click Trusted Root Certification Authorities.
4. Click Import, and select the trusted root certificate that your administrator has shared withyou.
Installing a trusted root certificate in FirefoxBefore you beginGet the trusted root certificate from your administrator.
Procedure1. On Firefox, navigate to the menu and click Options.
2. In the Options dialog box, navigate to Advanced > Certificates.
3. In the Certificate Manager dialog box, click Import and select the trusted root certificate thatyour administrator has shared with you.
September 2016 Using IP Office Web Collaboration Agent 49Comments on this document? [email protected]
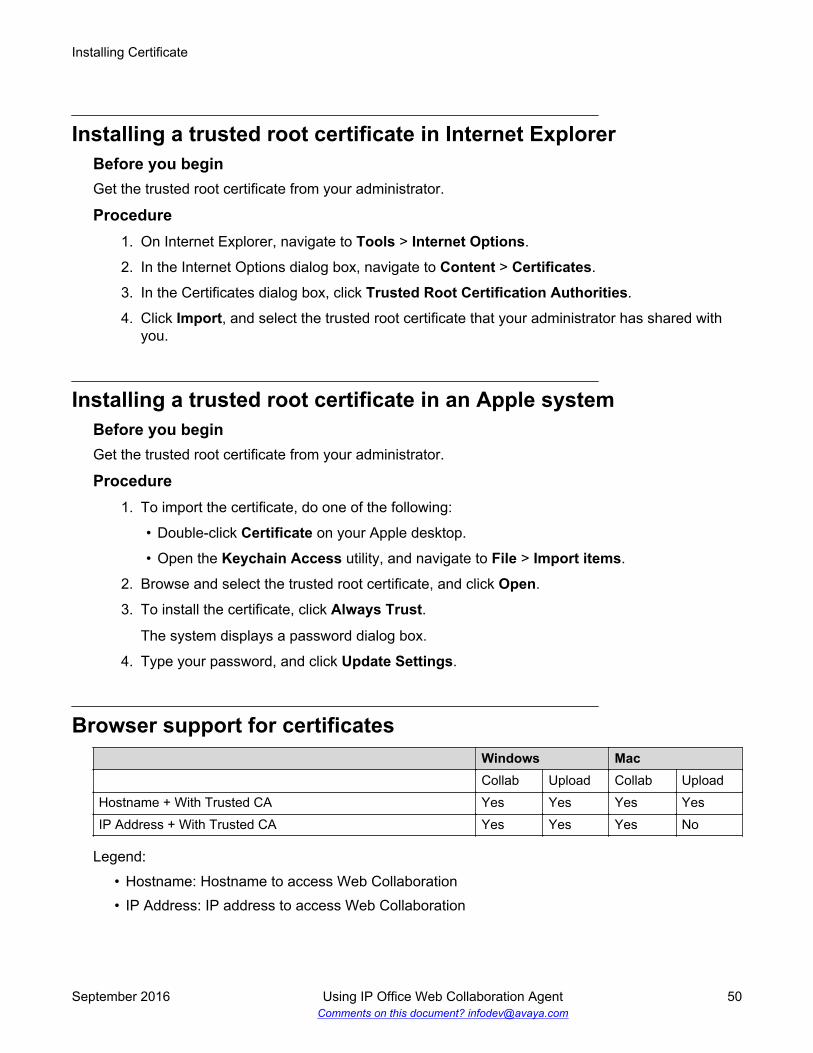
Installing a trusted root certificate in Internet ExplorerBefore you beginGet the trusted root certificate from your administrator.
Procedure1. On Internet Explorer, navigate to Tools > Internet Options.
2. In the Internet Options dialog box, navigate to Content > Certificates.
3. In the Certificates dialog box, click Trusted Root Certification Authorities.
4. Click Import, and select the trusted root certificate that your administrator has shared withyou.
Installing a trusted root certificate in an Apple systemBefore you beginGet the trusted root certificate from your administrator.
Procedure1. To import the certificate, do one of the following:
• Double-click Certificate on your Apple desktop.
• Open the Keychain Access utility, and navigate to File > Import items.
2. Browse and select the trusted root certificate, and click Open.
3. To install the certificate, click Always Trust.
The system displays a password dialog box.
4. Type your password, and click Update Settings.
Browser support for certificatesWindows MacCollab Upload Collab Upload
Hostname + With Trusted CA Yes Yes Yes YesIP Address + With Trusted CA Yes Yes Yes No
Legend:
• Hostname: Hostname to access Web Collaboration• IP Address: IP address to access Web Collaboration
Installing Certificate
September 2016 Using IP Office Web Collaboration Agent 50Comments on this document? [email protected]
• With Trusted CA: Certificate from a trusted signing authority, or added as Trusted RootCertificate
• Collab: Using Collaboration• Upload: Using document sharing services
Installing certificates
September 2016 Using IP Office Web Collaboration Agent 51Comments on this document? [email protected]
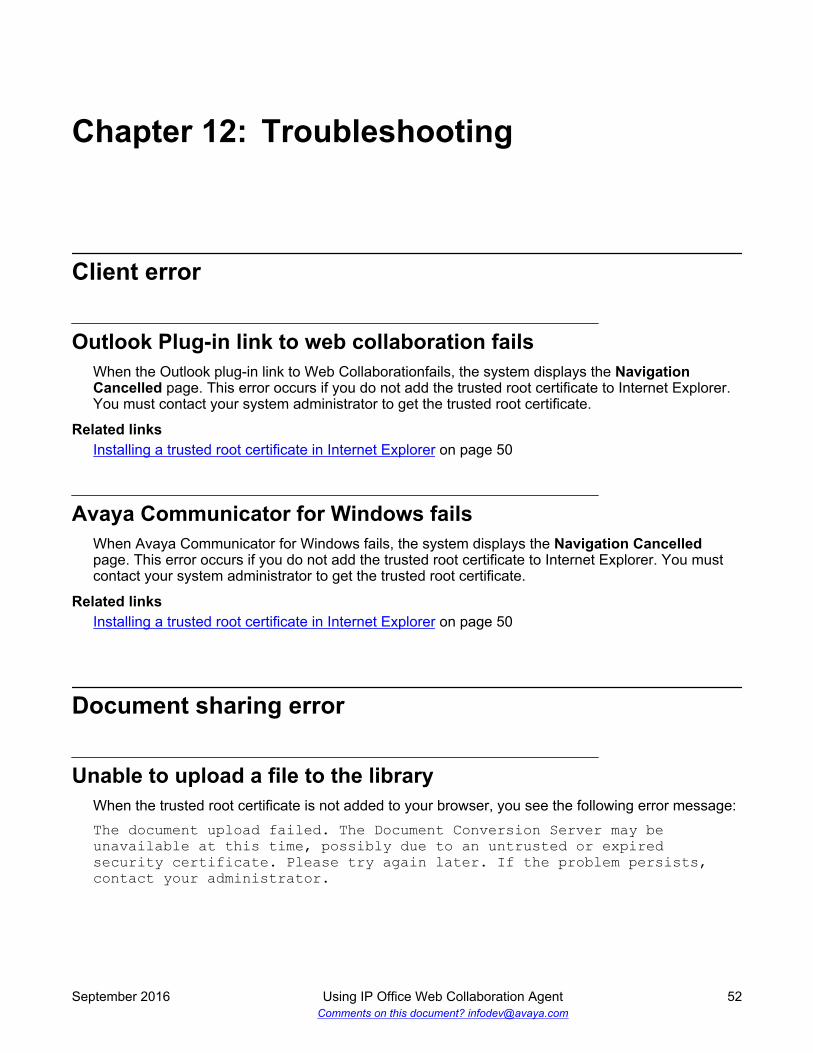
Chapter 12: Troubleshooting
Client error
Outlook Plug-in link to web collaboration failsWhen the Outlook plug-in link to Web Collaborationfails, the system displays the NavigationCancelled page. This error occurs if you do not add the trusted root certificate to Internet Explorer.You must contact your system administrator to get the trusted root certificate.
Related linksInstalling a trusted root certificate in Internet Explorer on page 50
Avaya Communicator for Windows failsWhen Avaya Communicator for Windows fails, the system displays the Navigation Cancelledpage. This error occurs if you do not add the trusted root certificate to Internet Explorer. You mustcontact your system administrator to get the trusted root certificate.
Related linksInstalling a trusted root certificate in Internet Explorer on page 50
Document sharing error
Unable to upload a file to the libraryWhen the trusted root certificate is not added to your browser, you see the following error message:The document upload failed. The Document Conversion Server may beunavailable at this time, possibly due to an untrusted or expiredsecurity certificate. Please try again later. If the problem persists,contact your administrator.
September 2016 Using IP Office Web Collaboration Agent 52Comments on this document? [email protected]

Contact your system administrator for the trusted root certificate. Your system administrator willshare the certificate with you.
Related linksInstalling a trusted root certificate in Chrome on page 49Installing a trusted root certificate in Firefox on page 49Installing a trusted root certificate in Internet Explorer on page 50Installing a trusted root certificate in an Apple system on page 50
Unable to share desktop in Safari and Chrome browserWhile sharing the desktop in Safari, the system might display a desktop sharing error. Ensure thatyou enable the IP Office Conferencing Plugin in Safari.
While sharing an application or the desktop in Chrome, the system might provide an option to installthe IP Office Conferencing Collaboration Plugin. If the plug-in is already installed, ensure that youenable the plug-in in Chrome.
SIP registration failedCauseSIP registration not enabled.
SolutionFor a user to access WebRTC, the administrator must select the SIP Registrar Enable check boxin IP Office Manager. The check box is located at System > LAN1 > VoIP.
If the administrator does not enable this check box then users with any extension type will not beable to access WebRTC. Also, for WebRTC to work on Server Edition machines, the Server Editionlicense needs to be added.
Unable to share desktop in Safari and Chrome browser
September 2016 Using IP Office Web Collaboration Agent 53Comments on this document? [email protected]
Index
Aaccess ..................................................................................19adding
meeting minutes ........................................................... 43participants ................................................................... 25whiteboards .................................................................. 36
annotating shared content ................................................... 40annotation ............................................................................ 29annotations
overview ....................................................................... 39tools for shared content ................................................ 40
applicationsending sharing .............................................................. 38sharing ..........................................................................37
attendance snapshot capturing ............................................23audio
collaboration agent ....................................................... 13disabling ....................................................................... 22enabling ........................................................................ 22muting ...........................................................................22
audio of participantsenabling ........................................................................ 25muting ...........................................................................25
avaya communicator ............................................................52
Bbrowsing shared content independently .............................. 34buttons
meeting minutes navigation ..........................................44shared applications .......................................................38shared desktop ............................................................. 38shared documents ........................................................ 35whiteboards .................................................................. 37
Ccapturing the attendance snapshot ......................................23certificate ....................................................................... 49, 50certificates ......................................................................49, 50changing sharing type ..........................................................41check list .............................................................................. 14conference check list ........................................................... 14conference lock
disabling during conferences ........................................28enabling during conferences ........................................ 28
conference owner ................................................................ 17conferences
disconnecting from ....................................................... 24ending ...........................................................................18locking .......................................................................... 28logging out .................................................................... 18
unlocking ...................................................................... 28
Ddeleting
documents .................................................................... 32library documents ......................................................... 32meeting minutes ........................................................... 44meeting reports .............................................................46reports .......................................................................... 46whiteboards .................................................................. 36
desktopending sharing .............................................................. 38sharing ..........................................................................37sharing a part ................................................................37
desktop sharing ................................................................... 53disabling
audio .............................................................................22disabling during conferences
conference lock ............................................................ 28disconnecting from conferences .......................................... 24disconnecting participants ................................................... 27documents
deleting ......................................................................... 32ending sharing .............................................................. 35renaming .......................................................................32sharing ..........................................................................34sharing from the library .................................................34sorting ...........................................................................32supported formats in library .......................................... 30uploading to library ....................................................... 31viewing as list ............................................................... 31viewing as thumbnails .................................................. 31
document sharingerror .............................................................................. 52
Eediting meeting minutes .......................................................43enabling
audio .............................................................................22audio of participants ..................................................... 25
enabling during conferencesconference lock ............................................................ 28
endingconferences .................................................................. 18sharing ..........................................................................35sharing applications ......................................................38sharing desktop ............................................................ 38sharing documents ....................................................... 35sharing whiteboards ..................................................... 37
error ..................................................................................... 53document sharing ......................................................... 52
September 2016 Using IP Office Web Collaboration Agent 54Comments on this document? [email protected]
Ffails ...................................................................................... 52features overview .................................................................10
Ggranting remote control of desktop ...................................... 38guest .................................................................................... 11guests logging in ..................................................................17
Hhelp ...................................................................................... 15
Iinstall ..............................................................................49, 50installation ......................................................................49, 50installing
web collaboration plug-in ..............................................33iPad ......................................................................................21
Llibrary
deleting documents ...................................................... 32list view ......................................................................... 31overview ....................................................................... 30renaming documents .................................................... 32sharing documents ....................................................... 34sorting documents ........................................................ 32supported document formats ........................................30thumbnail view ..............................................................31uploading documents ................................................... 31
list view of library ................................................................. 31locking conferences ............................................................. 28logging in
guest .............................................................................17logging out of conferences ...................................................18log in .................................................................................... 17log into
collaboration agent ....................................................... 17lowering ............................................................................... 22lowering hand ...................................................................... 22lowering raised hands of participants .................................. 27
Mmain window ........................................................................ 11meeting minutes
adding ...........................................................................43buttons ..........................................................................44deleting ......................................................................... 44editing ........................................................................... 43navigating ..................................................................... 44
meeting reportsdeleting ......................................................................... 46renaming .......................................................................46sending ......................................................................... 47sorting ...........................................................................45viewing ..........................................................................45
member ................................................................................11messages
opening .........................................................................42sending ......................................................................... 42
moderator ............................................................................ 26moderator role ..................................................................... 26moderators
lowering raised hands of participants ........................... 27muting
audio .............................................................................22audio of participants ..................................................... 25
Nnavigating
meeting minutes ........................................................... 44shared applications .......................................................38shared desktop ............................................................. 38shared documents ........................................................ 35whiteboards .................................................................. 37
navigation ............................................................................ 29navigation tools
meeting minutes ........................................................... 44shared applications .......................................................38shared desktop ............................................................. 38shared documents ........................................................ 35whiteboards .................................................................. 37
Oone x portal .......................................................................... 19opening
messages ..................................................................... 42outlook ................................................................................. 20owner ................................................................................... 17
Pparticipants
adding ...........................................................................25disconnecting ................................................................27lowering raised hands ...................................................27promoting to presenter ................................................. 26searching for .................................................................23
plug-insrequired ........................................................................ 16sending logs ................................................................. 48web collaboration ..........................................................33
presenterspromoting participants .................................................. 26
Index
September 2016 Using IP Office Web Collaboration Agent 55Comments on this document? [email protected]
promote ................................................................................26promoting
participants to presenter ............................................... 26
Rraise ..................................................................................... 22raising .................................................................................. 22raising hand ......................................................................... 22related documentation ........................................................... 8remote control of desktop
granting .........................................................................38requesting .....................................................................39
renamingdocuments .................................................................... 32library documents ......................................................... 32meeting reports .............................................................46reports .......................................................................... 46
reportsdeleting ......................................................................... 46renaming .......................................................................46sending ......................................................................... 47sorting ...........................................................................45viewing ..........................................................................45
requesting remote control of desktop .................................. 39required plug-ins .................................................................. 16resume .................................................................................26roster ....................................................................................29
Sscreenshot ........................................................................... 29searching participants ..........................................................23sending
meeting reports .............................................................47messages ..................................................................... 42plug-in logs ................................................................... 48reports .......................................................................... 47
shared applicationsbuttons ..........................................................................38navigating ..................................................................... 38navigation tools .............................................................38
shared contentannotations overview ....................................................39annotation tools ............................................................ 40browsing independently ................................................34
shared desktopbuttons ..........................................................................38granting remote control .................................................38navigating ..................................................................... 38navigation tools .............................................................38requesting remote control .............................................39
shared documentsbuttons ..........................................................................35navigating ..................................................................... 35navigation tools .............................................................35
sharing
applications ...................................................................37changing the type ......................................................... 41desktop ......................................................................... 37documents .................................................................... 34ending ...........................................................................35part of the desktop ........................................................37whiteboards .................................................................. 36
SIP registrationfailed ............................................................................. 53
sortingdocuments .................................................................... 32library documents ......................................................... 32meeting reports .............................................................45reports .......................................................................... 45
support ...................................................................................9supported
operating systems ........................................................ 16web browsers ............................................................... 16
supporting browser .............................................................. 50
Tthumbnail view of library ...................................................... 31
Uunlocking conferences ......................................................... 28uploading documents to library ............................................31user types ............................................................................ 11using ...................................................................................... 8
Vversion ................................................................................. 15viewing
documents as list ..........................................................31documents as thumbnails .............................................31meeting reports .............................................................45reports .......................................................................... 45
Wweb collaboration ...........................................................19–21
installing plug-in ............................................................33overview ....................................................................... 29
web collaboration link .......................................................... 52web collaboration plug-in
installing ........................................................................33whiteboards
adding ...........................................................................36buttons ..........................................................................37deleting ......................................................................... 36ending sharing .............................................................. 37navigating ..................................................................... 37navigation tools .............................................................37sharing ..........................................................................36
Index
September 2016 Using IP Office Web Collaboration Agent 56Comments on this document? [email protected]
windows ............................................................................... 20
Zzoom .................................................................................... 29
Index
September 2016 Using IP Office Web Collaboration Agent 57Comments on this document? [email protected]


