89
Using One Citrix Web Interface Site with Multiple XenApp Farms Carl Webster CTP, CCIA, CCEE, CCEA
| Date post: | 13-Dec-2015 |
| Category: |
Documents |
| Upload: | anonymous-s6sqioip8 |
| View: | 3 times |
| Download: | 0 times |

Using One Citrix Web Interface Site with Multiple XenApp Farms
Carl Webster CTP, CCIA, CCEE, CCEA

Usinf One Citrix Web Interface Site with Multiple XenApp Farms © Copyright 2011 Carl Webster, All Rights Reserved Page 1
Published by Carl Webster
Tullahoma, TN 37388
First published 2011 by Carl Webster Copyright ©Carl Webster 2011
All Rights Reserved

Usinf One Citrix Web Interface Site with Multiple XenApp Farms © Copyright 2011 Carl Webster, All Rights Reserved Page 2
Contact Info: [email protected] Article web site: http://CarlWebster.com

Usinf One Citrix Web Interface Site with Multiple XenApp Farms © Copyright 2011 Carl Webster, All Rights Reserved Page 3
Contents Introduction .............................................................................................................................................. 4
How Does Web Interface Work ................................................................................................................ 7
Creating a Combined Web Interface Site................................................................................................ 13
Testing the Combined Web Interface Site .............................................................................................. 33
Configuring Citrix Secure Gateway and Web Interface .......................................................................... 44
Final Tests ............................................................................................................................................... 57
Appendix A Finding the Most Preferred Data Collector ......................................................................... 61
For XenApp 5 for Windows Server 2003 ............................................................................................. 61
For XenApp 5 for Windows Server 2008 ............................................................................................. 62
For XenApp 6.0 .................................................................................................................................... 64
For XenApp 6.5 .................................................................................................................................... 67
Appendix B Finding the XML Port for XenApp 5 for Windows Server 2003 ........................................... 69
Appendix C Finding the XML Port for XenApp 5 for Windows Server 2008 ........................................... 72
Appendix D Finding the XML Port for XenApp 6.0 .................................................................................. 75
Appendix E Finding the XML Port for XenApp 6.5 .................................................................................. 82

Usinf One Citrix Web Interface Site with Multiple XenApp Farms © Copyright 2011 Carl Webster, All Rights Reserved Page 4
Introduction I frequent Experts Exchange (http://www.experts-exchange.com/) and because of my status there, I often receive questions. Some of the questions have a common theme. Such as:
• “How do I show published applications to my users when I have multiple XenApp farms?” • “How can I use Web Interface to migrate users to a new XenApp farm while using both farms?” • “If I have the same application published in multiple farms, how can I control which farm the
application is run from?”
In this article, you will learn how to configure Web Interface 5.4 and Citrix Secure Gateway 3.3 for multiple XenApp farms.
There are several potential reasons for using multiple XenApp farms:
• XenApp 6.0 and XenApp 6.5 require new farms • Distinct farms for 32-bit applications and 64-bit applications • Organizational security requirements • Business mergers and acquisitions • Multiple internal environments
XenApp 6.x cannot be integrated into the farm of an earlier version of XenApp or Presentation Server. Similarly, XenApp 6.5 cannot be mixed with a XenApp 6.0 farm. Attempting to join a XenApp 6.x server into an earlier farm will damage the data store.
Deploying a 32-bit application on a 64-bit server will install the application, by default, in the C:\Program Files (x86)\ folder tree. Deploying a 32-bit application on a 32-bit server will install the application, by default, in the C:\Program Files\ directory. This means that the default application location used when publishing the application is different for 32-bit and 64-bit versions of Windows Server when installing a 32-bit application.
An enterprise may have applications that are required to be separated from other applications for security or business requirements. Installing the applications to XenApp servers that are in different farms can allow for segregated farm administration and more granular user access.
When one business merges with or acquires another business, it is possible that both businesses may have pre-existing XenApp farms. Business requirements, during the transition phase, may necessitate the need to keep the XenApp farms separate temporarily or permanently.
A highly structured environment with strict change management controls may require different farms for different environments. For example, an organization may have Development, Test, QA, Training and Production environments. An application may be installed into the Development farm until network and systems administration procedures are documented. Once documented, the settings for the application can be moved into the Test farm. The Test farm can then be used for user acceptance

Usinf One Citrix Web Interface Site with Multiple XenApp Farms © Copyright 2011 Carl Webster, All Rights Reserved Page 5
testing. Once user testing has been completed, the settings for the application can be moved into the next farm. And so on, until the application is put into the production farm.
For this article, the following Virtual Machines (VMs) will be used:
• Domain Controller: TrainingDC o The VM will be assigned two virtual CPUs (vCPUs), 2GB of RAM and 24GB of Hard Drive
space o Windows Server 2008 R2 SP1 o Domain Controller for the WebstersLab.com Active Directory domain o Remote Desktop Services License server and Citrix Licensing server o Static IP Address 192.168.1.100
• SQL Server: TrainingSQL o The VM will be assigned two vCPUs, 2GB of RAM and 24GB of Hard Drive space o Hosts the SQL Server data stores for all four XenApp farms o Microsoft SQL Server 2008 R2 SP1 on Windows Server 2008 R2 SP1 o Static IP Address 192.168.1.101
• XenApp 5 #1: XA520031 o The VM will be assigned two vCPUs, 4GB of RAM and 32GB of Hard Drive space o XenApp 5 for Server 2003 Hotfix Rollup Pack 7 on Windows Server 2003 SP2 32-bit o Static IP Address 192.168.1.102 o Default XML port of 80 o Farm name XA52003
• XenApp 5 #3: XA520081 o The VM will be assigned two vCPUs, 4GB of RAM and 32GB of Hard Drive space o XenApp 5 for Server 2008 Hotfix Rollup Pack 1 on Windows Server 2008 SP2 32-bit o Static IP Address 192.168.1.104 o Default XML port of 80 o Farm name XA52008
• Web Interface and Citrix Secure Gateway: CitrixWI o The VM will be assigned two vCPUs, 2GB of RAM and 24GB of Hard Drive space o Windows Server 2003 SP2 32-bit o Web Interface 5.4 with Hotfix WI540MSI002 and Citrix Secure Gateway 3.3 o Not a member of the WebstersLab.com domain o Static IP Address 192.168.1.105
• XenApp 6.0: XENAPP60 o The VM will be assigned two vCPUs, 4GB of RAM and 40GB of Hard Drive space o XenApp 6.0 Hotfix Rollup Pack 1 on Windows Server 2008 R2 SP1 o Static IP Address 192.168.1.106 o XML port 8060 o Farm name XA60Farm
• XenApp 6.5: XENAPP65
Usinf One Citrix Web Interface Site with Multiple XenApp Farms © Copyright 2011 Carl Webster, All Rights Reserved Page 6
o The VM will be assigned two vCPUs, 4GB of RAM and 40GB of Hard Drive space o XenApp 6.5 on Windows Server 2008 R2 SP1 o Static IP Address 192.168.1.107 o XML port 8065 o Farm name XA65Farm
In addition to the Administrator account, five accounts were created in the WebstersLab.com domain:
• User03, who has access to only the XA52003 farm • User08, who has access to only the XA52008 farm • User60, who has access to only the XA60Farm farm • User65, who has access to only the XA65Farm farm • UserAll, who has access to all four farms
Each farm has two resources published.
• XA52003 o Notepad o Word 2010
• XA52008 o Paint o Word 2010
• XA60Farm o Calculator o Word 2010
• XA65Farm o WordPad o Word 2010

Usinf One Citrix Web Interface Site with Multiple XenApp Farms © Copyright 2011 Carl Webster, All Rights Reserved Page 7
How Does Web Interface Work In a Microsoft Windows environment, Web Interface works with Internet Information Services (IIS) to provide users with access to published resources. Users will use a standards based Internet browser or the Citrix Receiver to access their resources.
A Web Interface (WI) server will have one or more XenApp Web sites or XenApp Services sites configured. Each site will be configured for one or more XenApp farms. Each XenApp farm will have one or more XML Brokers listed to handle user authentication and resource enumeration. Once a user has been authenticated and selects a published resource, the Zone Data Collector (DC) is contacted. The DC determine s if the user has an existing session on the server hosting the published resource and if a session exists, that session is reused (called Session Sharing). If the user does not have an existing session, a session is created and the published resource is started.
The XML Broker will also request a session ticket from the Secure Ticket Authority (STA). The STA is responsible for issuing session tickets in response to the request to connect to the published resources. These session tickets form the basis of authentication and authorization for access to the published resources.
A Web Interface server is normally placed in a DMZ; however, it may be placed inside the corporate network. Web Interface requires no XenApp components to be installed. A Web Interface server is not typically a member of a XenApp farm, nor is it typically a member of an Active Directory domain. However, in the smallest of networks, it is possible and common for Web Interface to be deployed on a XenApp farm member and/or on a member of an Active Directory domain.
First, let’s stop, take a step back and review some basics.
What is a XenApp farm? A XenApp farm is a group of XenApp servers that can be managed as a unit, enabling the administrator to configure features and settings for the entire XenApp farm rather than being required to configure each server individually. All the servers in a farm share a single data store. What is a data store? The data store provides a repository of persistent information about the farm that each server can reference, including the following:
• Farm configuration information, • Published resource configurations, • Server configurations, • XenApp administrator accounts, • Printers, • Printer drivers, • Policies, • Load Evaluators, and • Folders.
What is a Zone? A Zone is a logical grouping of XenApp servers that share a common zone data collector. Zones allow the efficient collection of dynamic farm information. Each zone in a farm has exactly one data collector. All of the member

Usinf One Citrix Web Interface Site with Multiple XenApp Farms © Copyright 2011 Carl Webster, All Rights Reserved Page 8
servers in a particular zone communicate their dynamic information to the data collector for their zone. What is a zone data collector? A zone data collector is a server that stores and manages dynamic information about the XenApp servers in a zone, including:
• Published resource usage, • Server load, • User sessions, • Online servers, • Connected sessions, • Disconnected sessions, and • Load balancing information.
The data collector shares this information with all other data collectors in the XenApp farm. All XenApp servers in the farm use the Independent Management Architecture (IMA) service and protocol in server-to-server communication. IMA also is used by the Access Management Console or the Delivery Services Console or AppCenter (depending on the version of XenApp used) to allow XenApp farm administrators to manage and configure various XenApp farm and server settings. What is an XML Broker? The Citrix XML Broker functions as an intermediary between the XenApp servers in the XenApp farm and the Web Interface. When a user authenticates to the Web Interface, the XML Broker:
• Receives the user’s credentials from the Web Interface and queries the XenApp farm for a list of published resources that the user has permission to access. The XML Broker retrieves this application set from the IMA system and returns it to the Web Interface.
• Upon receiving the user’s request to launch a resource, the DC locates the servers in the farm that host this application and identifies which of these is the optimal server to service this connection based on several factors. The DC returns the address of this server to the Web Interface.
The XML Broker is a function of the Citrix XML Service. By default, the XML Service is installed on every server during the XenApp installation process. Multiple XenApp servers can have their XML Service specified in Web Interface to allow those servers to function as a XML Broker. The XML Service on the other farm servers still runs but is not used for servicing end-user connections. The Secure Ticket Authority is also installed on every XenApp server. For most small to medium sized XenApp farms, one XenApp server is dedicated to be the Zone Data Collector, XML Broker and STA server. In some large XenApp farms, it may be necessary to dedicate a XenApp server for each of the three roles. Dedicating a XenApp server for each role is easy to do. You would have three XenApp servers with no end-user applications installed. In the Zone settings for the farm, you would configure one of the servers as the Most Preferred data collector and the other two as Preferred data collectors. The server to be dedicated as the

Usinf One Citrix Web Interface Site with Multiple XenApp Farms © Copyright 2011 Carl Webster, All Rights Reserved Page 9
XML Broker would only be used when an XML Broker needs to be entered. The server to be dedicated as the STA server would only be used when an STA server needs to be entered.
Figure 1 illustrates the interaction between Web Interface and other servers in a XenApp farm.
Figure 1
Figure 2 shows some of the steps involved in the Web Interface process.
Figure 2
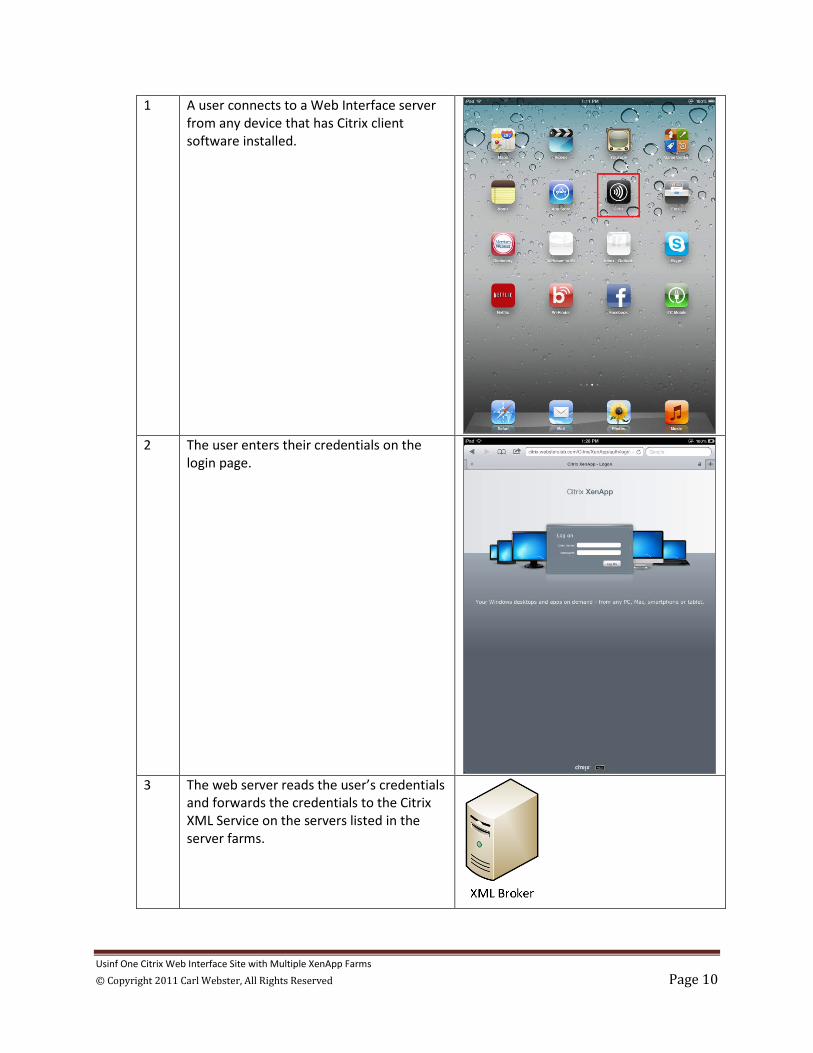
Step Action Graphic
Usinf One Citrix Web Interface Site with Multiple XenApp Farms © Copyright 2011 Carl Webster, All Rights Reserved Page 10
1 A user connects to a Web Interface server from any device that has Citrix client software installed.
2 The user enters their credentials on the
login page.
3 The web server reads the user’s credentials
and forwards the credentials to the Citrix XML Service on the servers listed in the server farms.

Usinf One Citrix Web Interface Site with Multiple XenApp Farms © Copyright 2011 Carl Webster, All Rights Reserved Page 11
4 If the user’s credentials are not valid, return to Step 2. If the user’s credentials are valid, the Citrix XML Service retrieves a list of resources from the XenApp servers the user has permission to access. This list of resources is called the user’s resource set. The Citrix XML Services returns the resource list back to the Web Interface server.
5 The Web Interface server builds a custom HTML web page consisting of the resources the user has permissions to run.
6 The user clicks one of the published
resource icons.
7 The Citrix XML Service locates a server in
the required farm that has an existing session for the user and the settings for the resource being launched match the settings for the resources running in the existing session. If those conditions match, the Citrix XML Service requests a session ticket and returns the server’s IP address and session ticket to the Web Interface server. If those conditions are not met, the Citrix XML Service requests a session ticket from

Usinf One Citrix Web Interface Site with Multiple XenApp Farms © Copyright 2011 Carl Webster, All Rights Reserved Page 12
the least-busy server and returns the server’s IP address and session ticket to the Web Interface server.
8 Web Interface creates a custom launch.ica file and sends the file to the user’s Citrix client.
9 The Citrix client software receives the file
and initiates a session with the server specified in the file.
10 The published resource runs on the XenApp
server and is displayed on the end-user device.
Usinf One Citrix Web Interface Site with Multiple XenApp Farms © Copyright 2011 Carl Webster, All Rights Reserved Page 13
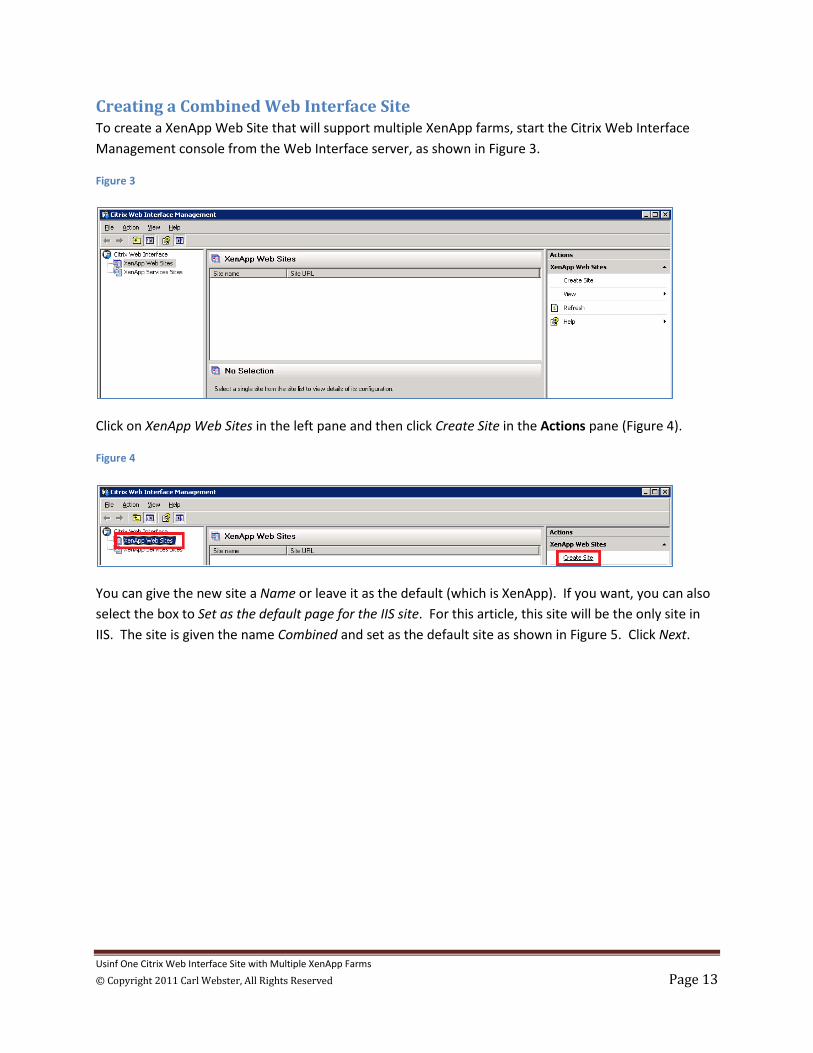
Creating a Combined Web Interface Site To create a XenApp Web Site that will support multiple XenApp farms, start the Citrix Web Interface Management console from the Web Interface server, as shown in Figure 3.
Figure 3
Click on XenApp Web Sites in the left pane and then click Create Site in the Actions pane (Figure 4).
Figure 4
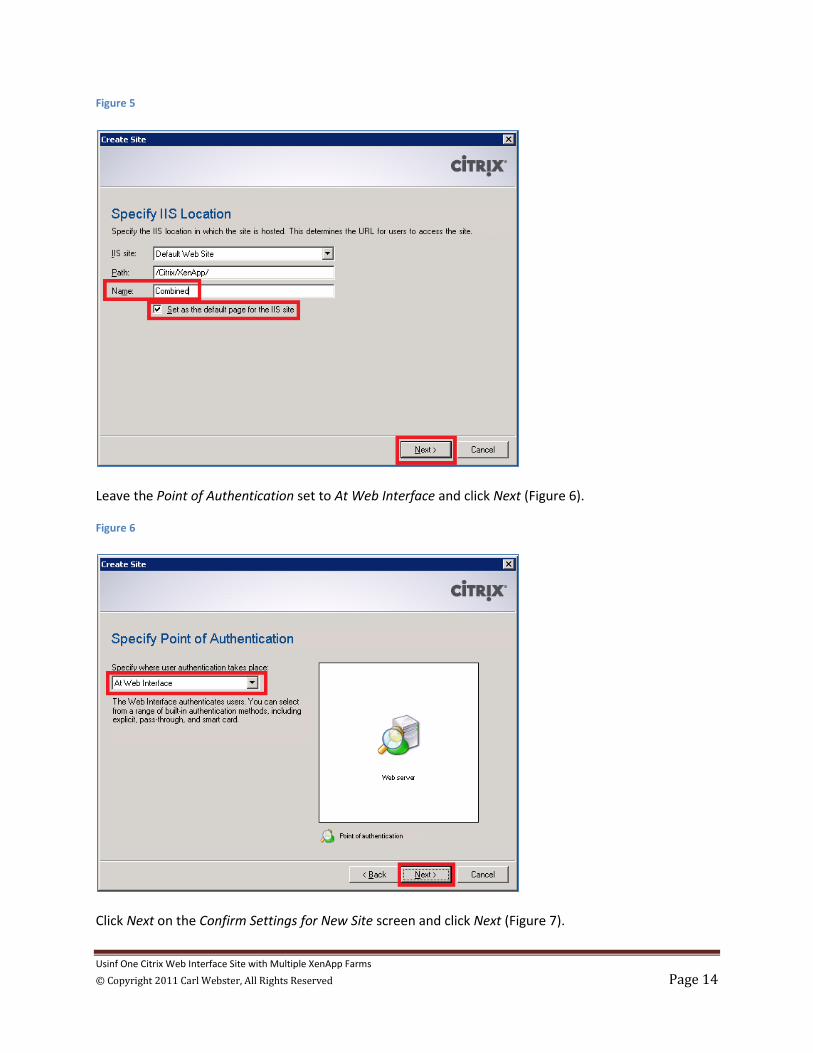
You can give the new site a Name or leave it as the default (which is XenApp). If you want, you can also select the box to Set as the default page for the IIS site. For this article, this site will be the only site in IIS. The site is given the name Combined and set as the default site as shown in Figure 5. Click Next.
Usinf One Citrix Web Interface Site with Multiple XenApp Farms © Copyright 2011 Carl Webster, All Rights Reserved Page 14
Figure 5
Leave the Point of Authentication set to At Web Interface and click Next (Figure 6).
Figure 6
Click Next on the Confirm Settings for New Site screen and click Next (Figure 7).

Usinf One Citrix Web Interface Site with Multiple XenApp Farms © Copyright 2011 Carl Webster, All Rights Reserved Page 15
Figure 7
After a few moments, the new site is created. Uncheck the Configure this site now option and click Finish (Figure 8).
Figure 8
Select the new site in the top middle pane and click Server Farms in the Actions pane (Figure 9).
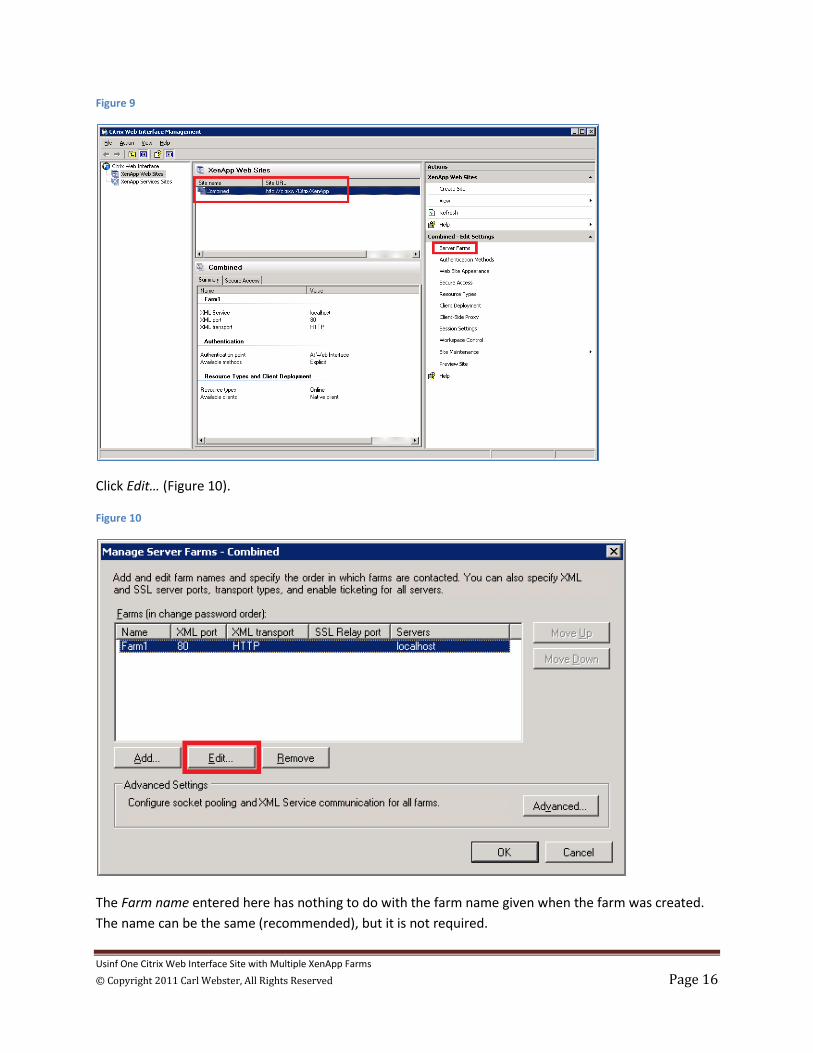
Usinf One Citrix Web Interface Site with Multiple XenApp Farms © Copyright 2011 Carl Webster, All Rights Reserved Page 16
Figure 9
Click Edit… (Figure 10).
Figure 10
The Farm name entered here has nothing to do with the farm name given when the farm was created. The name can be the same (recommended), but it is not required.

Usinf One Citrix Web Interface Site with Multiple XenApp Farms © Copyright 2011 Carl Webster, All Rights Reserved Page 17
Fellow CTP Thomas Koetzing makes this recommendation for the farm name:
“For me best practice is to give ‘speaking’ farm names in Web Interface (WI). Farm names in WI are totally unrelated to the real farm name. So for example I would use something like XA6_production, XA6_acceptance, XA6_development, XD_APAC etc. The reason for that is that the farm name is logged in the server eventlog and makes it more readable. In the eventlog you would get something like ‘XA6_production failed to contact XML Broker…’ instead of ‘Farm1 failed…’ or ‘XA60 failed’. It helps troubleshooting.”
Enter a Farm name and click Add (Figure 11). I am entering information for the XenApp 5 on Windows Server 2003 farm.
Figure 11
Enter the fully qualified domain name (FQDN) of a XenApp server in the XenApp farm into the Server name field and click OK (Figure 12).
Note: You can use the NetBIOS name of the XenApp server but using the FQDN could help speed up name resolution. Please see http://support.microsoft.com/kb/172218 for an explanation of Microsoft TCP/IP Host Name Resolution Order.
Note: In XenApp 5.x and XenApp 6.0, all XenApp servers can be Secure Ticket Authority servers, XML Brokers and even a data collector. In XenApp 6.5, this is not the case. If you have designated a XenApp server to be the Most Preferred Data Collector, you should list that server here. The server you list here

Usinf One Citrix Web Interface Site with Multiple XenApp Farms © Copyright 2011 Carl Webster, All Rights Reserved Page 18
should also be used for Citrix Secure Gateway. Because the server listed here will be used to receive the user’s credentials from the Web Interface, Citrix refers to this server as an XML Broker.
Note: How do you find the Most Preferred Data Collector for a XenApp farm? Please see Appendix A Finding the Most Preferred Data Collector for explanations for all four versions of XenApp used for this article.
Figure 12
Select the server named localhost and click Remove (Figure 13).
Figure 13
Since the XA52003 farm uses the default XML port of 80, click OK (Figure 14). If the XenApp farm is configured to use a different XML port, make sure the correct port number is entered. It is recommended to have at least two servers in this list. This allows for some basic redundancy: if one server becomes unavailable, the other server(s) would be used.
Note: To learn how to find the XML port please see Appendix B Finding the XML Port for XenApp 5 for Windows Server 2003.

Usinf One Citrix Web Interface Site with Multiple XenApp Farms © Copyright 2011 Carl Webster, All Rights Reserved Page 19
Figure 14
To add the next XenApp farm, click Add… (Figure 15).
Figure 15

Usinf One Citrix Web Interface Site with Multiple XenApp Farms © Copyright 2011 Carl Webster, All Rights Reserved Page 20
Enter the next Farm name and click Add (Figure 16). I am entering information for the XenApp 5 on Windows Server 2008 farm.
Figure 16
Enter the Server name of an XML Broker in the XenApp farm and click OK (Figure 17).
Figure 17
Since the XA52008 farm uses the default XML port of 80, click OK (Figure 18). If the XenApp farm is configured to use a different XML port, make sure the correct port number is entered. It is recommended to have at least two servers in this list. This allows for some basic redundancy: if one server becomes unavailable, the other server(s) would be used.
Note: To learn how to find the XML port please see Appendix C Finding the XML Port for XenApp 5 for Windows Server 2008.

Usinf One Citrix Web Interface Site with Multiple XenApp Farms © Copyright 2011 Carl Webster, All Rights Reserved Page 21
Figure 18
To add the next XenApp farm, click Add… (Figure 19).
Figure 19

Usinf One Citrix Web Interface Site with Multiple XenApp Farms © Copyright 2011 Carl Webster, All Rights Reserved Page 22
Enter the next Farm name and click Add (Figure 20). I am now entering information for the XenApp 6.0 farm.
Figure 20
Enter the Server name of an XML Broker in the XenApp farm and click OK (Figure 21).
Figure 21
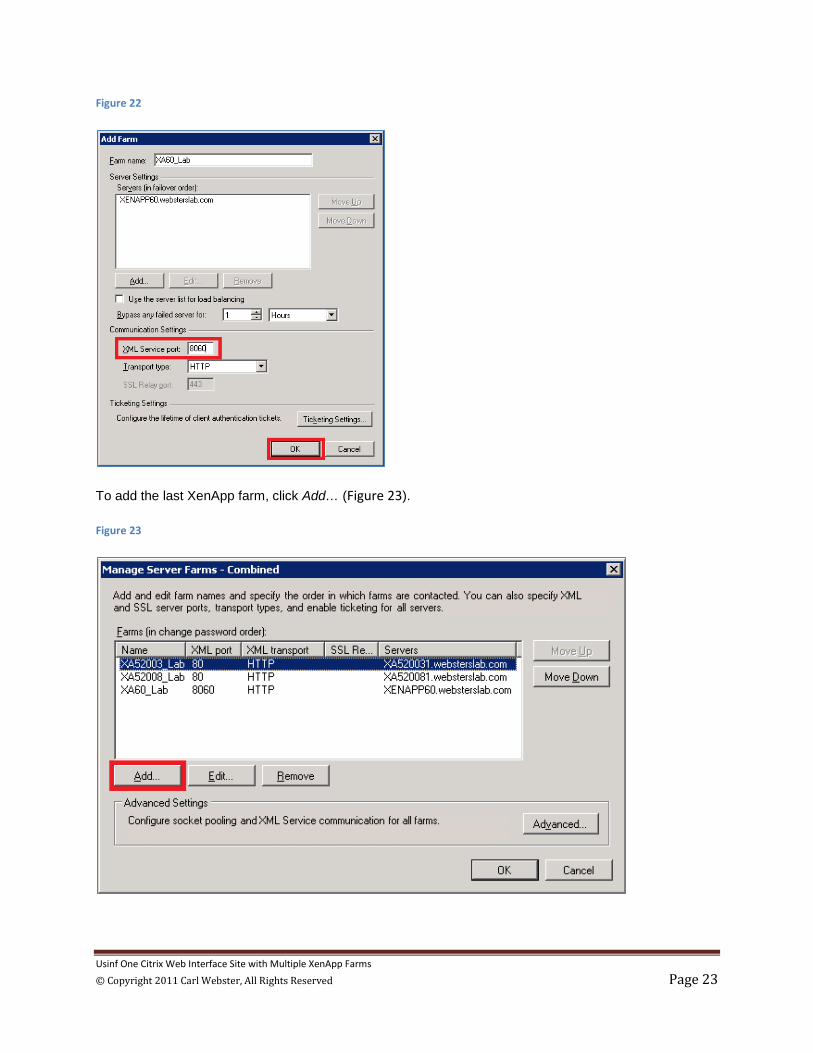
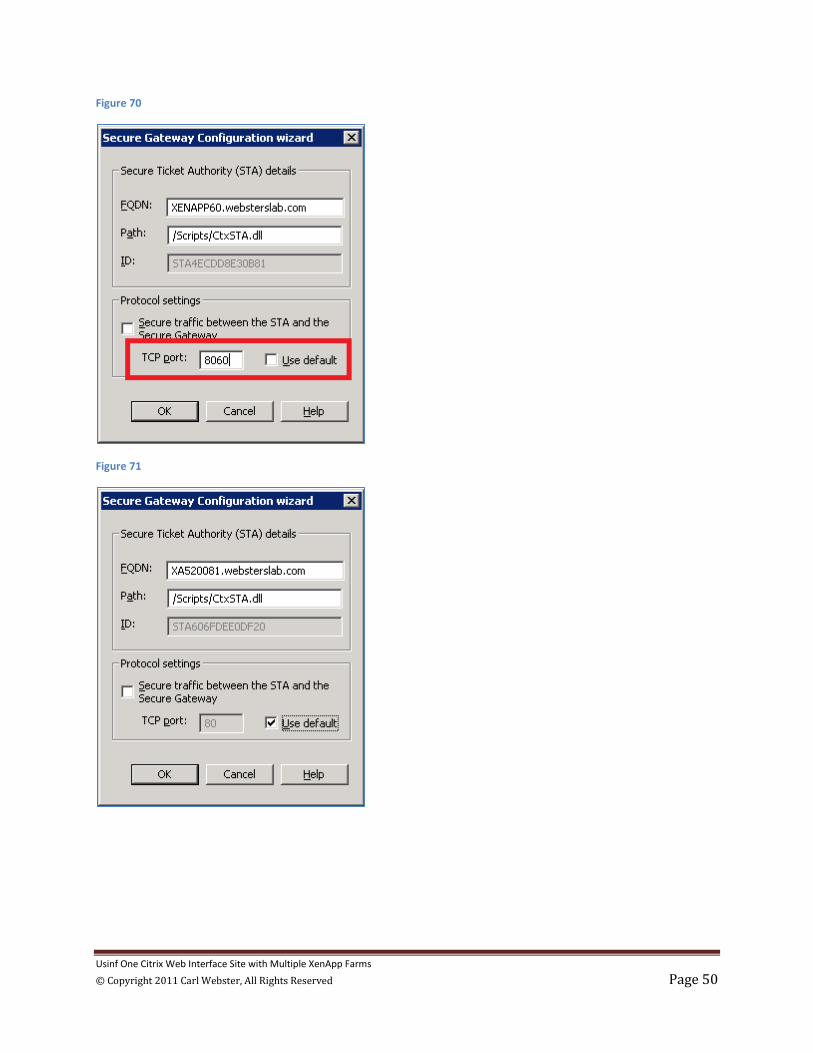
Since the XA60Farm farm does not use the default XML port of 80, enter the proper XML port of 8060 and click OK (Figure 22). It is recommended to have at least two servers in this list. This allows for some basic redundancy: if one server becomes unavailable, the other server(s) would be used.
Note: To learn how to find the XML port, please see Appendix D Finding the XML Port for XenApp 6.0.
Usinf One Citrix Web Interface Site with Multiple XenApp Farms © Copyright 2011 Carl Webster, All Rights Reserved Page 23
Figure 22
To add the last XenApp farm, click Add… (Figure 23).
Figure 23

Usinf One Citrix Web Interface Site with Multiple XenApp Farms © Copyright 2011 Carl Webster, All Rights Reserved Page 24
Enter the next Farm name and click Add (Figure 24). I am now entering information for the XenApp 6.5 farm.
Figure 24
Enter the Server name of an XML Broker in the XenApp farm and click OK (Figure 25).
Note: XenApp 6.5 has two modes for a server:
• Controller and session-host mode • Session-host mode
Only enter XenApp 6.5 servers that have Controller and Session-host modes enabled. If you enter a XenApp 6.5 server that is Session-host mode only, your site will not enumerate applications.
Figure 25
Since the XA65Farm farm does not use the default XML port of 80, enter the proper XML port of 8065 and click OK (Figure 26). It is recommended to have at least two servers in this list. This allows for some basic redundancy: if one server becomes unavailable, the other server(s) would be used.

Usinf One Citrix Web Interface Site with Multiple XenApp Farms © Copyright 2011 Carl Webster, All Rights Reserved Page 25
Note: To learn how to find the XML port please see Appendix E Finding the XML Port for XenApp 6.5.
Figure 26
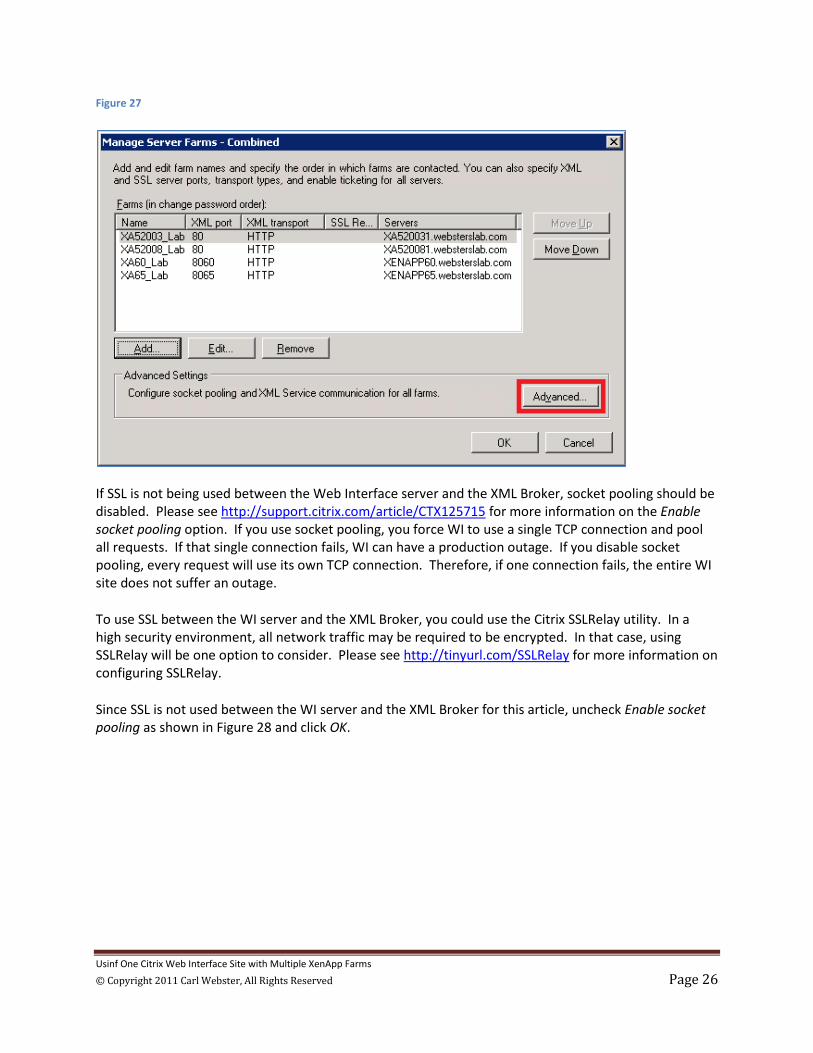
Now that all the XenApp farms have been entered, click Advanced (Figure 27).
Usinf One Citrix Web Interface Site with Multiple XenApp Farms © Copyright 2011 Carl Webster, All Rights Reserved Page 26
Figure 27
If SSL is not being used between the Web Interface server and the XML Broker, socket pooling should be disabled. Please see http://support.citrix.com/article/CTX125715 for more information on the Enable socket pooling option. If you use socket pooling, you force WI to use a single TCP connection and pool all requests. If that single connection fails, WI can have a production outage. If you disable socket pooling, every request will use its own TCP connection. Therefore, if one connection fails, the entire WI site does not suffer an outage.
To use SSL between the WI server and the XML Broker, you could use the Citrix SSLRelay utility. In a high security environment, all network traffic may be required to be encrypted. In that case, using SSLRelay will be one option to consider. Please see http://tinyurl.com/SSLRelay for more information on configuring SSLRelay.
Since SSL is not used between the WI server and the XML Broker for this article, uncheck Enable socket pooling as shown in Figure 28 and click OK.

Usinf One Citrix Web Interface Site with Multiple XenApp Farms © Copyright 2011 Carl Webster, All Rights Reserved Page 27
Figure 28
The site needs to be configured before users can access it. Select the site in the middle pane and click Authentication Methods in the Actions pane (Figure 29).
Figure 29

Usinf One Citrix Web Interface Site with Multiple XenApp Farms © Copyright 2011 Carl Webster, All Rights Reserved Page 28
The Citrix online documentation for Web Interface 5.4 explains the authentication methods available. Please see http://support.citrix.com/proddocs/topic/web-interface-impington/wi-authenticate-wrapper-gransden.html.
For this article, select only Explicit and click Properties… (Figure 30).
Figure 30
When users go to the Web Interface site, they will need to enter a user name, a password and a domain name. You may not want your users having to know or remember the domain name. You can pre-populate the Active Directory domain name to keep users from having to know this information. For this article, I am entering my domain name, which is websterslab.
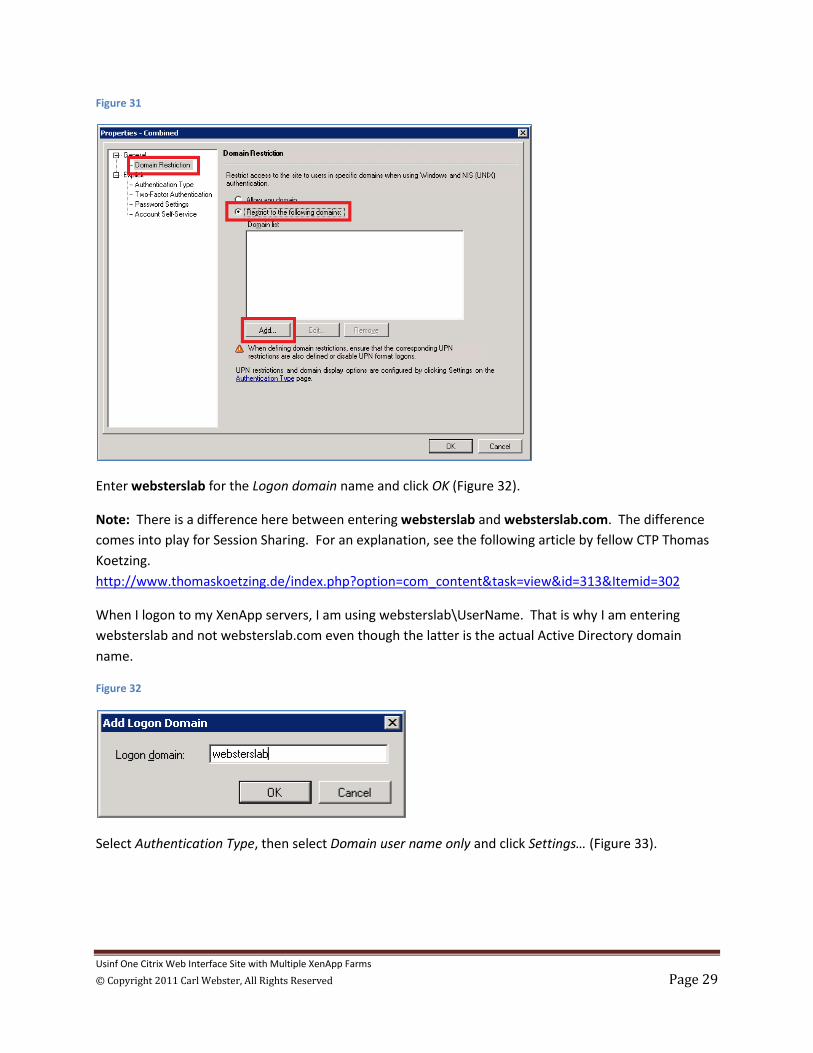
Select Domain Restriction, then select Restrict domains to the following and click the Add button (Figure 31).
Usinf One Citrix Web Interface Site with Multiple XenApp Farms © Copyright 2011 Carl Webster, All Rights Reserved Page 29
Figure 31
Enter websterslab for the Logon domain name and click OK (Figure 32).
Note: There is a difference here between entering websterslab and websterslab.com. The difference comes into play for Session Sharing. For an explanation, see the following article by fellow CTP Thomas Koetzing. http://www.thomaskoetzing.de/index.php?option=com_content&task=view&id=313&Itemid=302
When I logon to my XenApp servers, I am using websterslab\UserName. That is why I am entering websterslab and not websterslab.com even though the latter is the actual Active Directory domain name.
Figure 32
Select Authentication Type, then select Domain user name only and click Settings… (Figure 33).

Usinf One Citrix Web Interface Site with Multiple XenApp Farms © Copyright 2011 Carl Webster, All Rights Reserved Page 30
Figure 33
Select Hide Domain box, select Pre-populated from the drop-down box and click Add… (Figure 34).
Figure 34
Select websterslab and click OK (Figure 35).

Usinf One Citrix Web Interface Site with Multiple XenApp Farms © Copyright 2011 Carl Webster, All Rights Reserved Page 31
Figure 35
Click OK (Figure 36).
Figure 36
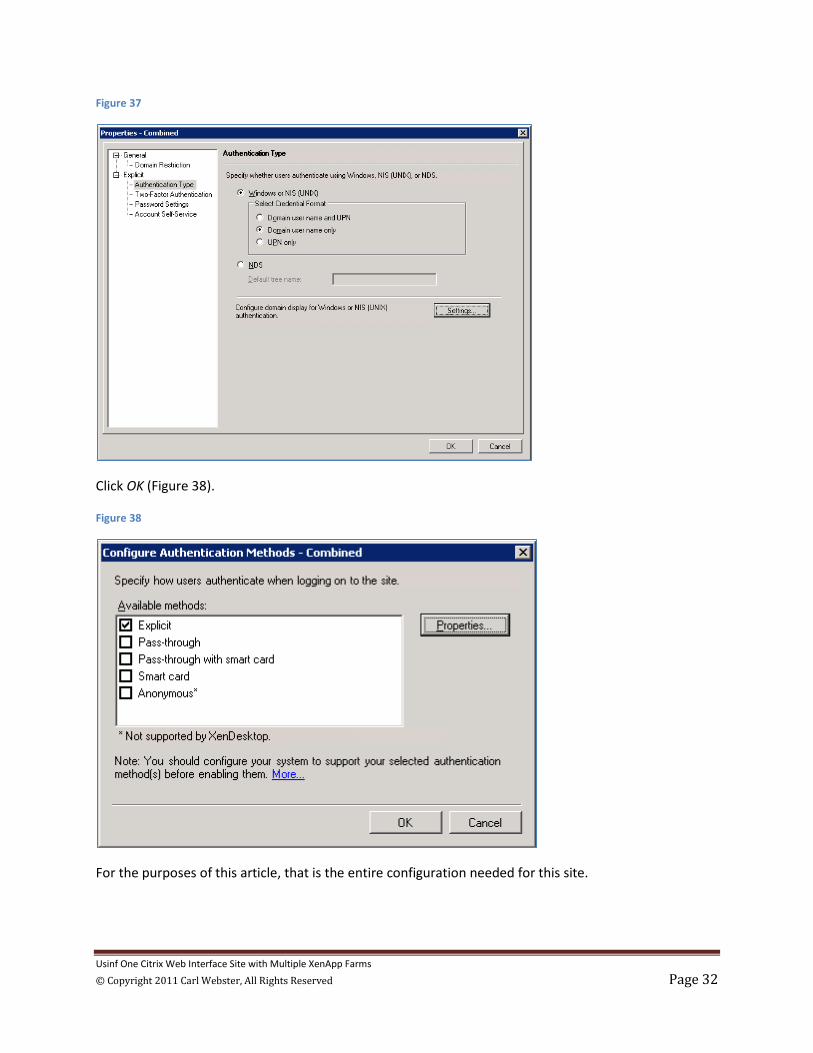
Click OK (Figure 37).
Usinf One Citrix Web Interface Site with Multiple XenApp Farms © Copyright 2011 Carl Webster, All Rights Reserved Page 32
Figure 37
Click OK (Figure 38).
Figure 38
For the purposes of this article, that is the entire configuration needed for this site.
Usinf One Citrix Web Interface Site with Multiple XenApp Farms © Copyright 2011 Carl Webster, All Rights Reserved Page 33
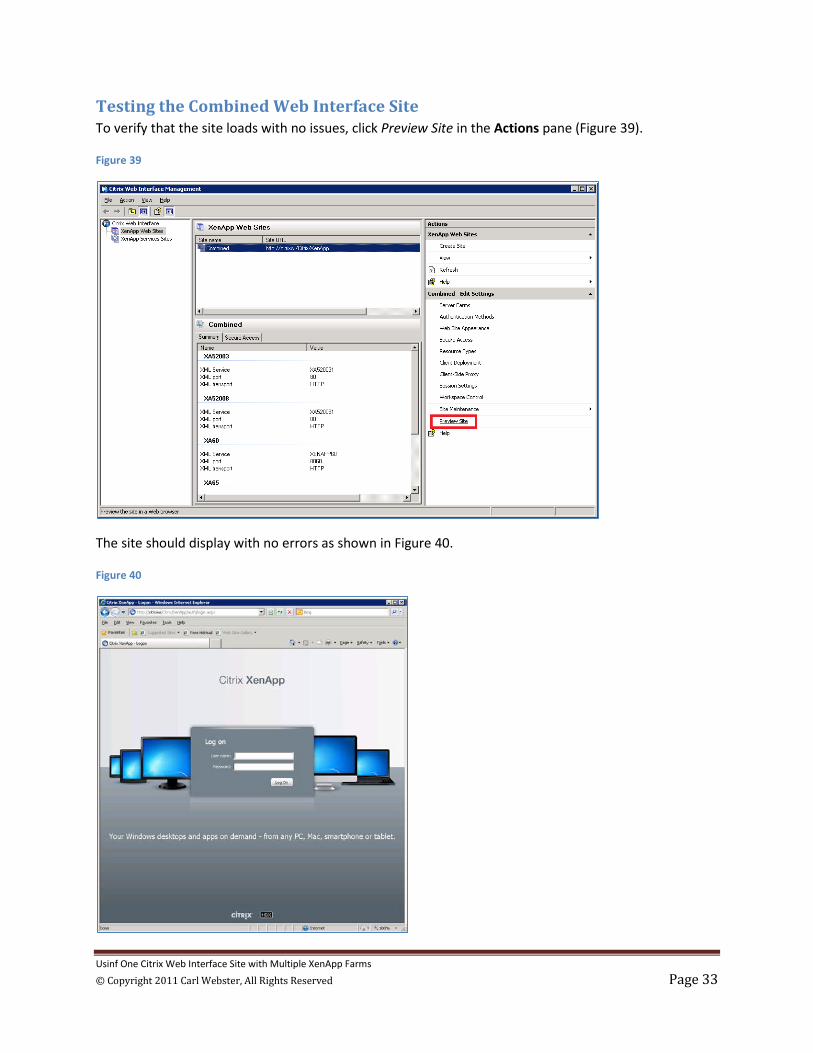
Testing the Combined Web Interface Site To verify that the site loads with no issues, click Preview Site in the Actions pane (Figure 39).
Figure 39
The site should display with no errors as shown in Figure 40.
Figure 40

Usinf One Citrix Web Interface Site with Multiple XenApp Farms © Copyright 2011 Carl Webster, All Rights Reserved Page 34
To verify that each user can access only the XenApp farm they are configured to access, login as each user. First up is User03 that can access the XA52003 farm which has Notepad and Word 2010 published, as shown in Figure 41.
Figure 41
Both Notepad and Word 2010 run successfully, as shown in Figure 42.
Figure 42
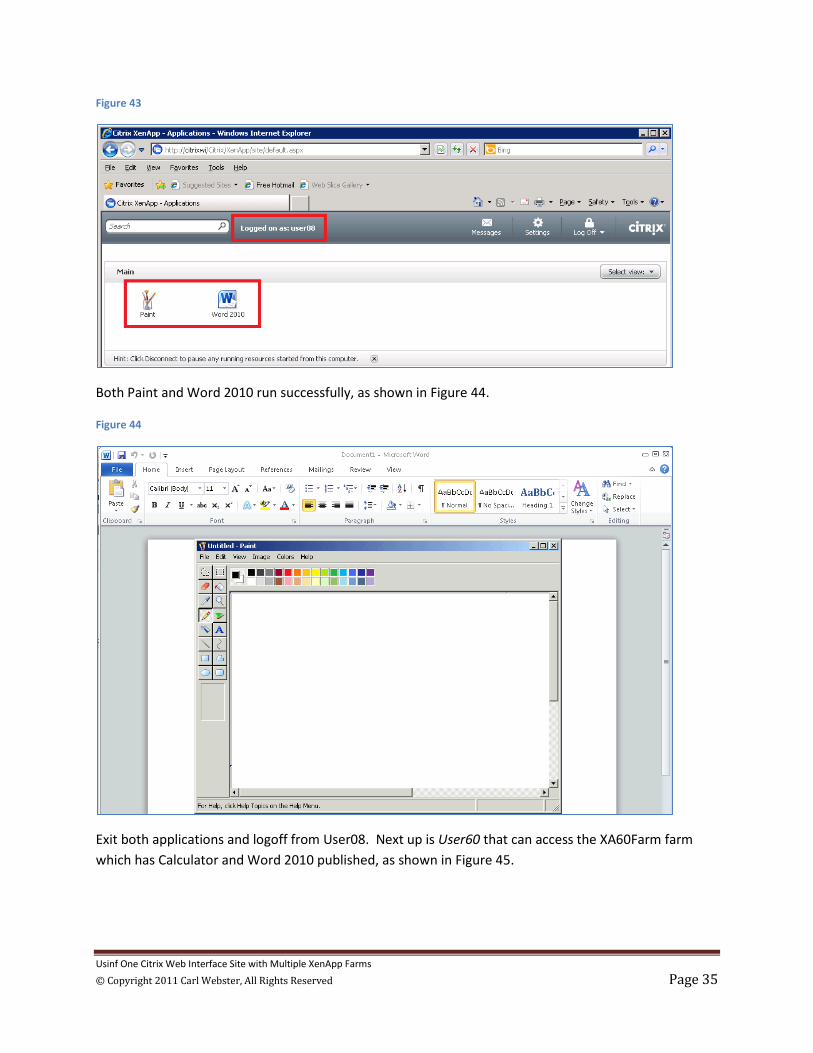
Exit both applications and logoff from User03. Next up is User08 that can access the XA52008 farm which has Paint and Word 2010 published, as shown in Figure 43.
Usinf One Citrix Web Interface Site with Multiple XenApp Farms © Copyright 2011 Carl Webster, All Rights Reserved Page 35
Figure 43
Both Paint and Word 2010 run successfully, as shown in Figure 44.
Figure 44
Exit both applications and logoff from User08. Next up is User60 that can access the XA60Farm farm which has Calculator and Word 2010 published, as shown in Figure 45.

Usinf One Citrix Web Interface Site with Multiple XenApp Farms © Copyright 2011 Carl Webster, All Rights Reserved Page 36
Figure 45
Both Paint and Word 2010 run successfully, as shown in Figure 46.
Figure 46
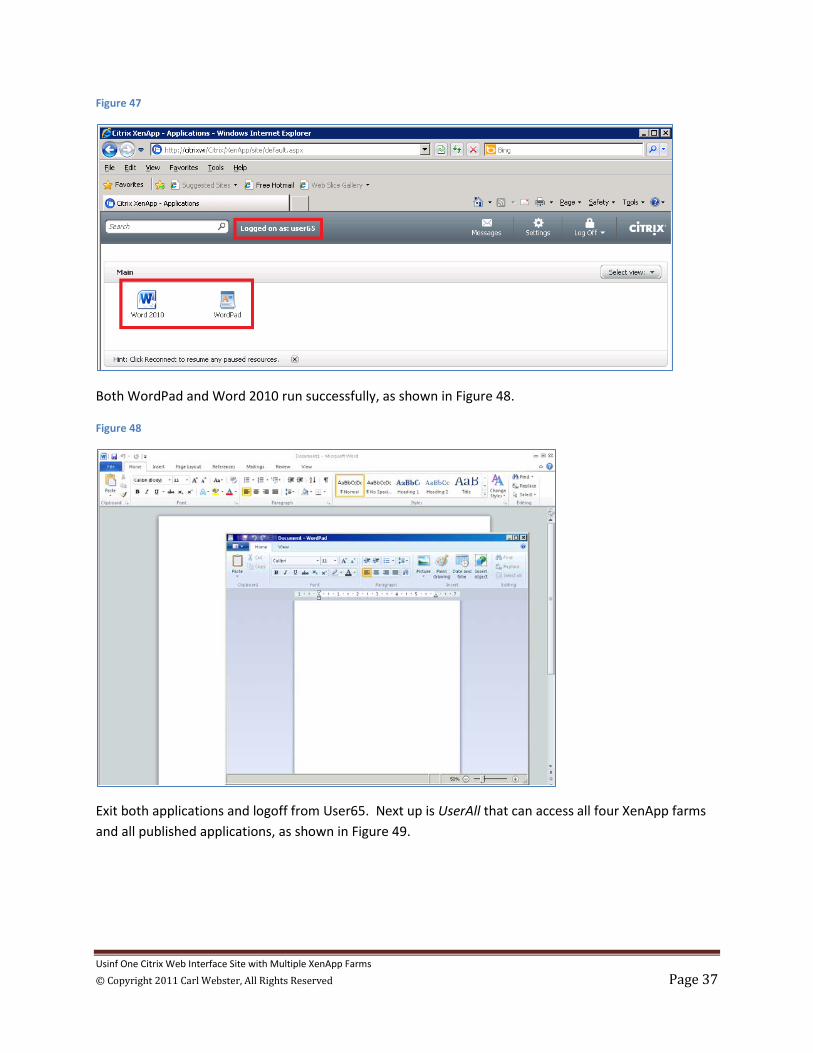
Exit both applications and logoff from User60. Next up is User65 that can access the XA65Farm farm which has WordPad and Word 2010 published, as shown in Figure 47.
Usinf One Citrix Web Interface Site with Multiple XenApp Farms © Copyright 2011 Carl Webster, All Rights Reserved Page 37
Figure 47
Both WordPad and Word 2010 run successfully, as shown in Figure 48.
Figure 48
Exit both applications and logoff from User65. Next up is UserAll that can access all four XenApp farms and all published applications, as shown in Figure 49.

Usinf One Citrix Web Interface Site with Multiple XenApp Farms © Copyright 2011 Carl Webster, All Rights Reserved Page 38
Figure 49
All eight published applications run successfully, as shown in Figure 50.
Figure 50
Exit all applications, logoff UserAll and exit your Internet browser.

Usinf One Citrix Web Interface Site with Multiple XenApp Farms © Copyright 2011 Carl Webster, All Rights Reserved Page 39
As you can see, getting multiple XenApp farms to work through one Web Interface site is not difficult. As long as you enter the correct XML port when entering the farm information and at least two XML Brokers ( recommended), you should have no issues.
In the examples used for this article, there are four copies of Word 2010 with the same application name of Word 2010. What if the user only needs to be shown one copy of Word 2010? Starting with Web Interface 5.3, Citrix added a parameter to the C:\Inetpub\wwwroot\Citrix\XenApp\conf\webinterface.conf file called SuppressDuplicateResources. By default, this is set to Off.
In order to enable this suppression, on the Web Interface server, exit the Citrix Web Interface Management console. Open C:\Inetpub\wwwroot\Citrix\XenApp\conf\webinterface.conf using WordPad (do not use Notepad) and search for SuppressDuplicateResources as shown in Figure 51.
Note: webinterface.conf is a UTF-8 encoded file. Editing this file with Notepad could cause you to experience errors when the Web Interface website is opened.
Figure 51
Cancel the search dialog. Remove the # from the beginning of the line and change the value to On as shown in Figure 52.

Usinf One Citrix Web Interface Site with Multiple XenApp Farms © Copyright 2011 Carl Webster, All Rights Reserved Page 40
Figure 52
Save the file and exit WordPad. Launch your Internet browser, open the Web Interface site and logon as UserAll. As shown in Figure 53, only one copy of the Word 2010 published application is displayed.
Figure 53
That is good, but from which XenApp farm and server will this Word 2010 be launched from? Can you guess before I show you the answer?
I created a Word file named for each server in the Documents folder for UserAll on each of the four XenApp servers. Logging in as UserAll, launching Word 2010 and then going to File, Open reveals the answer, as shown in Figure 54.

Usinf One Citrix Web Interface Site with Multiple XenApp Farms © Copyright 2011 Carl Webster, All Rights Reserved Page 41
Figure 54
Word 2010 launched from the XA520031 server. Why? Because it is the first server in the Manage Server Farms server list as shown in Figure 55.
Figure 55
What happens if I move XENAPP65 to the top of the list of servers as shown in Figure 56?
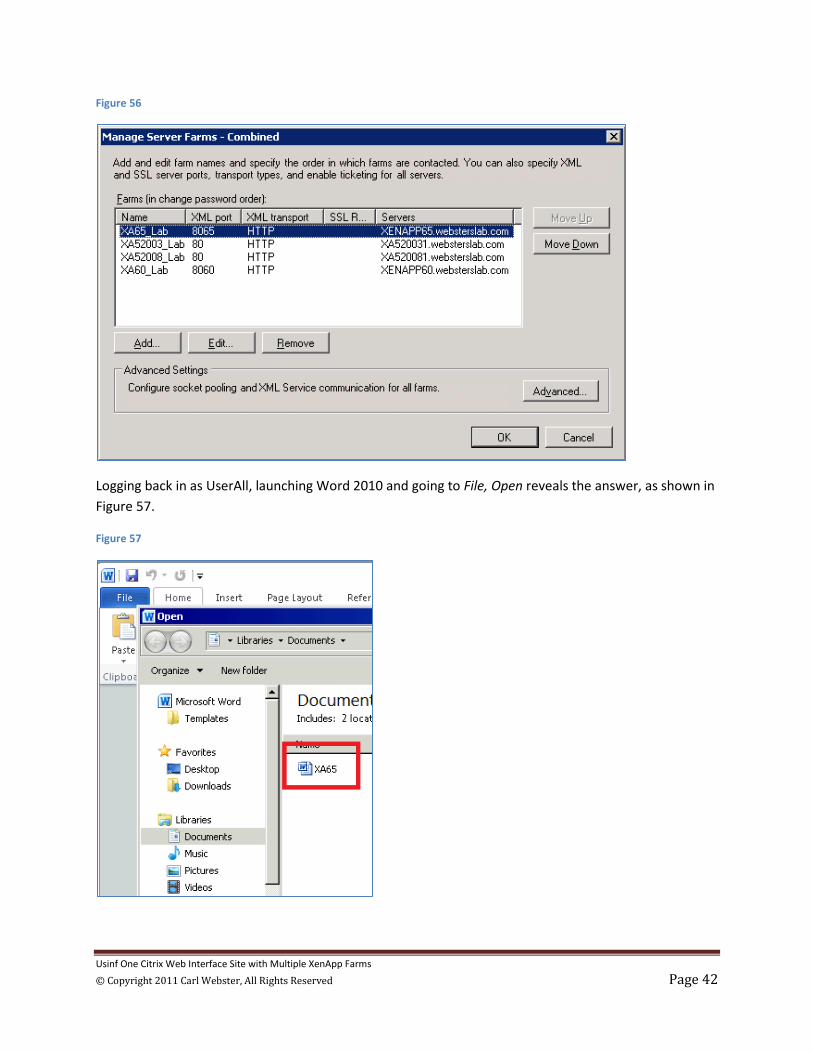
Usinf One Citrix Web Interface Site with Multiple XenApp Farms © Copyright 2011 Carl Webster, All Rights Reserved Page 42
Figure 56
Logging back in as UserAll, launching Word 2010 and going to File, Open reveals the answer, as shown in Figure 57.
Figure 57

Usinf One Citrix Web Interface Site with Multiple XenApp Farms © Copyright 2011 Carl Webster, All Rights Reserved Page 43
If you have multiple farms containing the same application name and you want to restrict your users to running only one version of the application, you should move the desired server to the top of the server list.
This also illustrates that even though I made a manual change to the webinterface.conf file and then made a change to the Web Interface site configuration, my manual change is still there. I also went back and ordered the servers in the farm list as shown in Figure 58.
Figure 58
What if you are using Citrix Secure Gateway (CSG)? How does CSG handle multiple XenApp farms?

Usinf One Citrix Web Interface Site with Multiple XenApp Farms © Copyright 2011 Carl Webster, All Rights Reserved Page 44
Configuring Citrix Secure Gateway and Web Interface Citrix Secure Gateway needs to be reconfigured to make the necessary changes to handle multiple XenApp farms.
Click Start, All Programs, Citrix, Management Consoles and Secure Gateway Management Console (Figure 59).
Figure 59
Click Secure Gateway Configuration (Figure 60).
Figure 60
Click OK (Figure 61).
Usinf One Citrix Web Interface Site with Multiple XenApp Farms © Copyright 2011 Carl Webster, All Rights Reserved Page 45
Figure 61
Select Advanced and click Next (Figure 62).
Figure 62
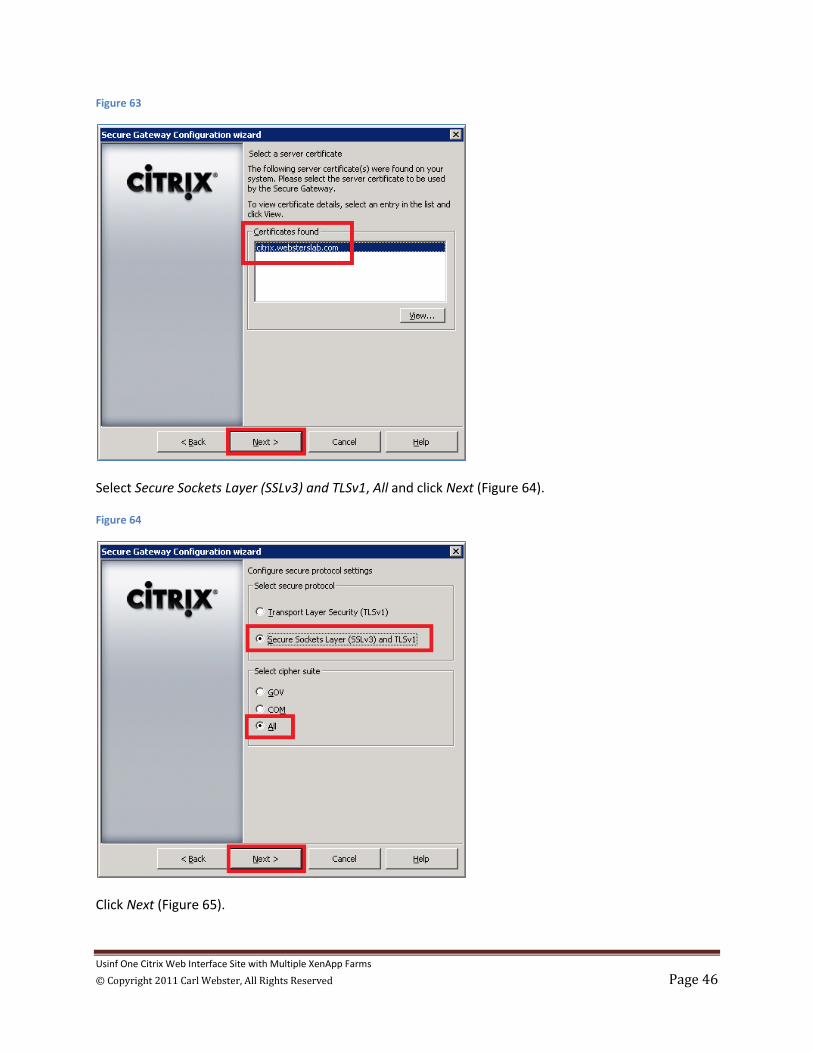
Select the correct SSL certificate and click Next (Figure 63).
Usinf One Citrix Web Interface Site with Multiple XenApp Farms © Copyright 2011 Carl Webster, All Rights Reserved Page 46
Figure 63
Select Secure Sockets Layer (SSLv3) and TLSv1, All and click Next (Figure 64).
Figure 64
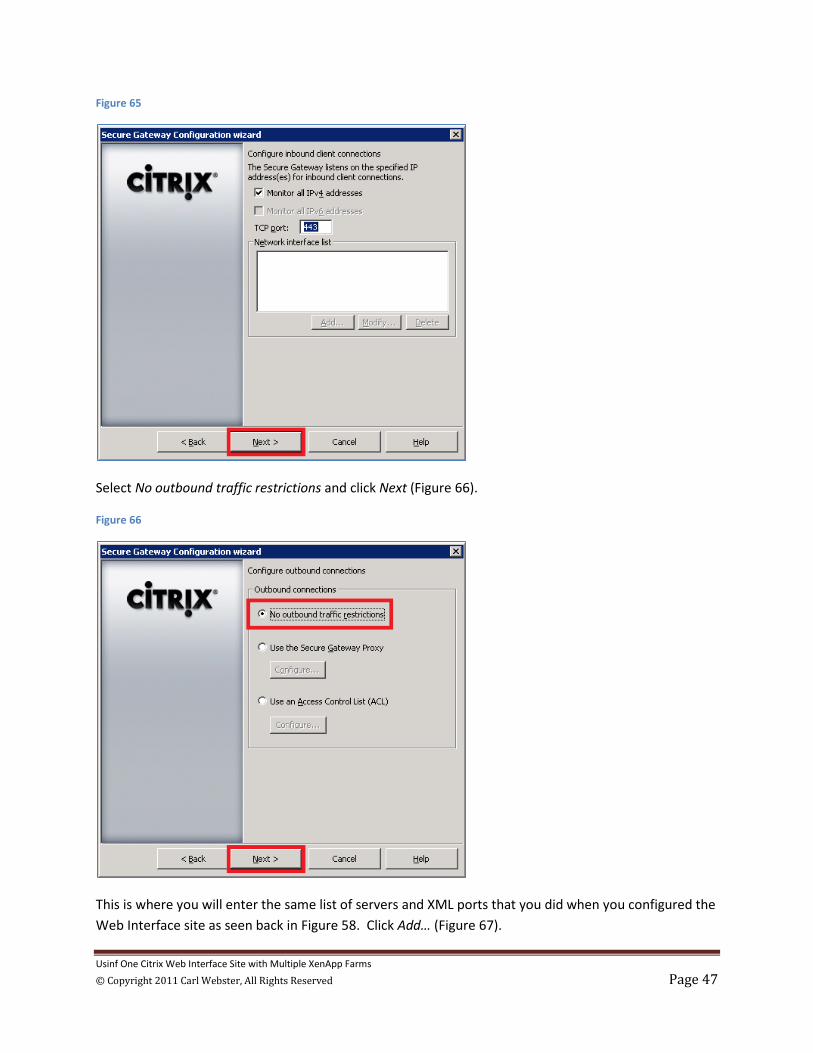
Click Next (Figure 65).
Usinf One Citrix Web Interface Site with Multiple XenApp Farms © Copyright 2011 Carl Webster, All Rights Reserved Page 47
Figure 65
Select No outbound traffic restrictions and click Next (Figure 66).
Figure 66
This is where you will enter the same list of servers and XML ports that you did when you configured the Web Interface site as seen back in Figure 58. Click Add… (Figure 67).

Usinf One Citrix Web Interface Site with Multiple XenApp Farms © Copyright 2011 Carl Webster, All Rights Reserved Page 48
Figure 67
Enter the name of a XenApp farm XML Broker and if the farm is not using the default XML port of 80, uncheck Use default and enter the correct XML port.
Note: To learn how to find the XML port, please see:
• Appendix B Finding the XML Port for XenApp 5 for Windows Server 2003. • Appendix C Finding the XML Port for XenApp 5 for Windows Server 2008. • Appendix D Finding the XML Port for XenApp 6.0. • Appendix E Finding the XML Port for XenApp 6.5.
If you do not enter the correct XML port, you will see the following error as shown in Figure 68. If you receive this error, click the Back button and correct the XML port.

Usinf One Citrix Web Interface Site with Multiple XenApp Farms © Copyright 2011 Carl Webster, All Rights Reserved Page 49
Figure 68
See Figure 69 through Figure 73 for the entries related to my four XenApp farms. I am entering the Secure Ticket Authority (STA) servers in the order they appear in the Web Interface site farm settings servers list.
Figure 69
Usinf One Citrix Web Interface Site with Multiple XenApp Farms © Copyright 2011 Carl Webster, All Rights Reserved Page 50
Figure 70
Figure 71

Usinf One Citrix Web Interface Site with Multiple XenApp Farms © Copyright 2011 Carl Webster, All Rights Reserved Page 51
Figure 72
Figure 73
Once CSG is configured, on the Web Interface server, start the Citrix Web Interface Management console and click Secure Access in the Actions pane (Figure 74).
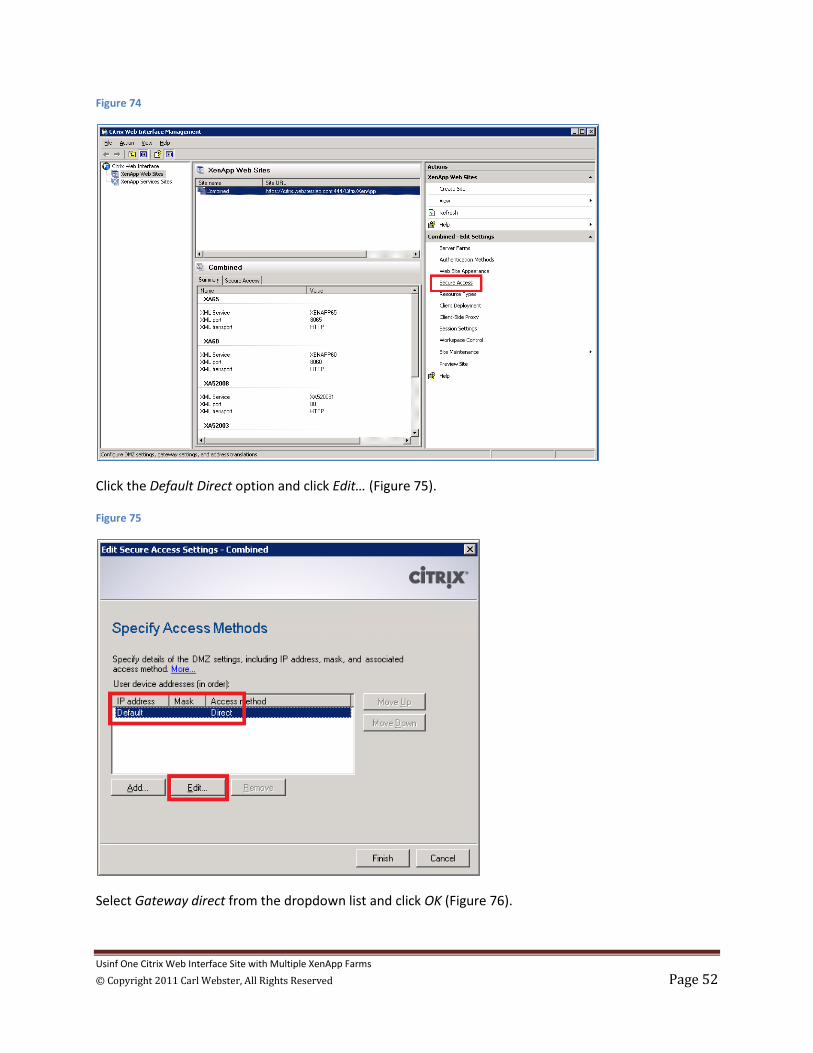
Usinf One Citrix Web Interface Site with Multiple XenApp Farms © Copyright 2011 Carl Webster, All Rights Reserved Page 52
Figure 74
Click the Default Direct option and click Edit… (Figure 75).
Figure 75
Select Gateway direct from the dropdown list and click OK (Figure 76).

Usinf One Citrix Web Interface Site with Multiple XenApp Farms © Copyright 2011 Carl Webster, All Rights Reserved Page 53
Figure 76
Click Next (Figure 77).
Figure 77
Enter the appropriate external name to reach the Web Interface site, select Enable session reliability, do not select Request tickets from two STAs, where available and click Next (Figure 78). When the option to Request tickets from two STAs, where available was enabled, I always received a Protocol Driver Error when attempting to launch any published application. The only thing I could do to resolve that error message was to not select requesting tickets from two STAs.

Usinf One Citrix Web Interface Site with Multiple XenApp Farms © Copyright 2011 Carl Webster, All Rights Reserved Page 54
Figure 78
Click Add (Figure 79).
Figure 79
Enter the FQDN of your first STA server plus /scripts/ctxsta.dll and click OK (Figure 80).
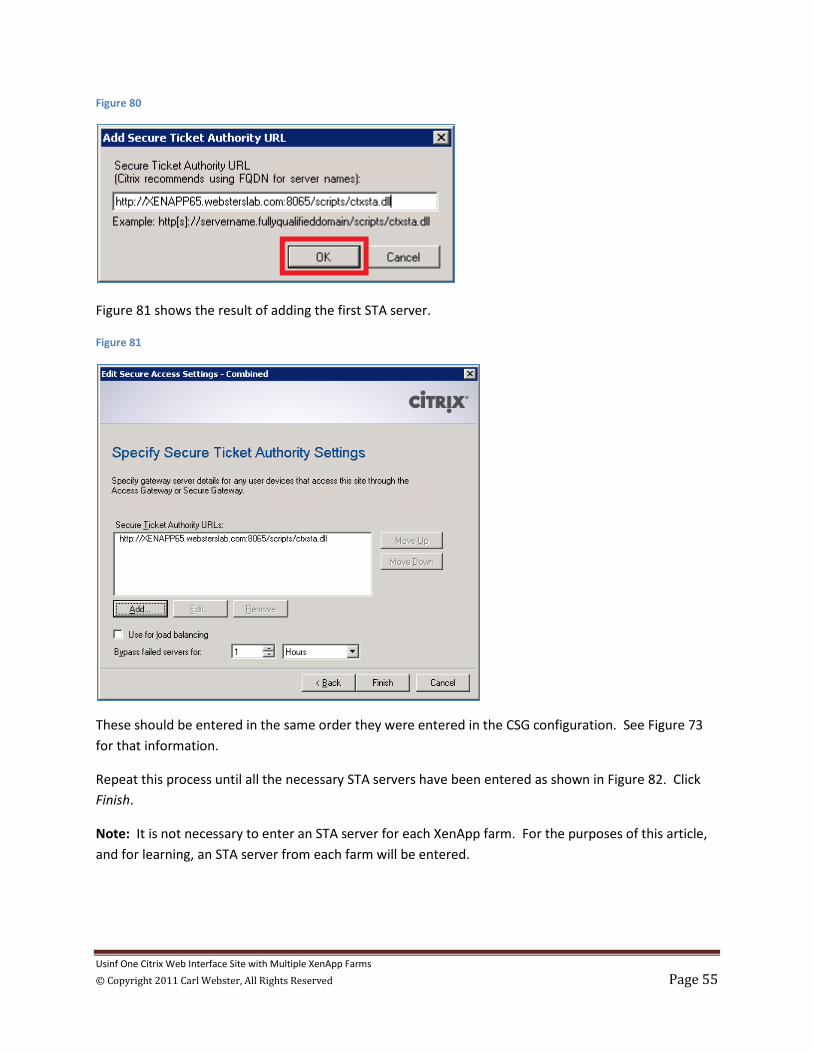
Usinf One Citrix Web Interface Site with Multiple XenApp Farms © Copyright 2011 Carl Webster, All Rights Reserved Page 55
Figure 80
Figure 81 shows the result of adding the first STA server.
Figure 81
These should be entered in the same order they were entered in the CSG configuration. See Figure 73 for that information.
Repeat this process until all the necessary STA servers have been entered as shown in Figure 82. Click Finish.
Note: It is not necessary to enter an STA server for each XenApp farm. For the purposes of this article, and for learning, an STA server from each farm will be entered.

Usinf One Citrix Web Interface Site with Multiple XenApp Farms © Copyright 2011 Carl Webster, All Rights Reserved Page 56
Figure 82

Usinf One Citrix Web Interface Site with Multiple XenApp Farms © Copyright 2011 Carl Webster, All Rights Reserved Page 57
Final Tests Open your Internet browser and go to the FQDN you specified in Figure 78 to reach the site. For me, this is https://citrix.websterslab.com as shown in Figure 83.
Figure 83
Login in as UserAll, launch the applications and verify that all applications still work. Word 2010 is still run from the XenApp 6.5 server as shown in Figure 84.
Figure 84
Usinf One Citrix Web Interface Site with Multiple XenApp Farms © Copyright 2011 Carl Webster, All Rights Reserved Page 58
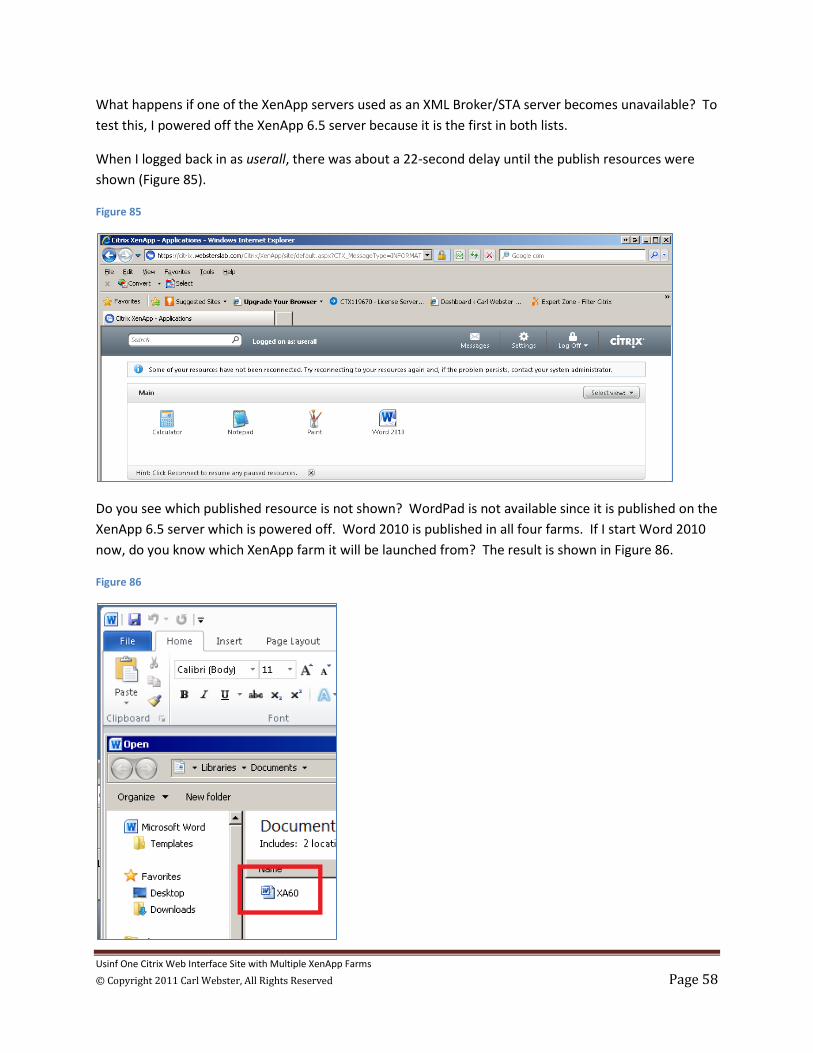
What happens if one of the XenApp servers used as an XML Broker/STA server becomes unavailable? To test this, I powered off the XenApp 6.5 server because it is the first in both lists.
When I logged back in as userall, there was about a 22-second delay until the publish resources were shown (Figure 85).
Figure 85
Do you see which published resource is not shown? WordPad is not available since it is published on the XenApp 6.5 server which is powered off. Word 2010 is published in all four farms. If I start Word 2010 now, do you know which XenApp farm it will be launched from? The result is shown in Figure 86.
Figure 86

Usinf One Citrix Web Interface Site with Multiple XenApp Farms © Copyright 2011 Carl Webster, All Rights Reserved Page 59
Why is Word 2010 running from the XenApp 6.0 farm? Because the XenApp 6.0 farm is second in the list of XenApp farms for this Web Interface site as shown in Figure 58.
Imagine you are the accidental Citrix administrator trying to figure out why WordPad is not showing for userall, why Word 2010 is running from the XenApp 6.0 farm, why your user took so long to log on and to log off. Where would start to look for your answer?
Go to the Web Interface server and open the Application event log as shown in Figure 87.
Figure 87
If you look at the first error reported, you would see the following error recorded:
Site path: c:\inetpub\wwwroot\Citrix\XenApp. An error occurred while attempting to connect to the server XENAPP65.websterslab.com on port 8065. Verify that the Citrix XML Service is running and is using the correct port. If the XML Service is configured to share ports with Microsoft Internet Information Services (IIS), verify that IIS is running. This message was reported from the XML Service at address . The specified Citrix XML Service could not be contacted and has been temporarily removed from the list of active services. [Unique Log ID: e7a98902] The next error is:
Site path: c:\inetpub\wwwroot\Citrix\XenApp. All the Citrix XML Services configured for farm XA65_Lab failed to respond to this XML Service transaction. [Unique Log ID: cb3c03d4]
Web Interface tried 10 times before it gave up and stopped recording the error.
This shows the XenApp 6.5 server listed to be used as the XML Broker for the XenApp 6.5 farm did not respond. This is one of the reasons you should use at least two XML Brokers.

Usinf One Citrix Web Interface Site with Multiple XenApp Farms © Copyright 2011 Carl Webster, All Rights Reserved Page 60
When userall went to log off Web Interface, there was also about a 22 second delay as four more attempts to contact the XenApp 6.5 XML Broker were made (the last two errors shown in Figure 87).
Even after adding Citrix Secure Gateway, getting multiple XenApp farms to work through one Web Interface site is fairly easy. As long as you enter the correct XML port when entering the farm information and when adding the STA in the CSG configuration, you should have no issues.
I would like to thank my friends and fellow CTPs Thomas Koetzing and Pierre Marmignon for taking their time to review this article and for making numerous technical corrections and suggestions.
As always, my friend, and Exchange MVP, Michael B. Smith forced me to make numerous corrections and additions and used up all the red pixels on his computer doing so.
Jo Harder used her fair share of red pixels also on this article.
Thanks to all four of them for helping me turn this article into another one of my novels. Without them, I would have been finished two months ago!

Usinf One Citrix Web Interface Site with Multiple XenApp Farms © Copyright 2011 Carl Webster, All Rights Reserved Page 61
Appendix A Finding the Most Preferred Data Collector
For XenApp 5 for Windows Server 2003 Click Start, All Programs, Citrix, Management Consoles and select XenApp Advanced Configuration (Figure 88).
Figure 88
Right-click the XenApp farm and select Properties (Figure 89).
Figure 89
Click Zones and expand the zone by clicking the “+” sign to the left of the zone name (Figure 90).

Usinf One Citrix Web Interface Site with Multiple XenApp Farms © Copyright 2011 Carl Webster, All Rights Reserved Page 62
Figure 90
The server with the blue checkmark is the Most Preferred server as shown in Figure 91.
Figure 91
For XenApp 5 for Windows Server 2008 Click Start, All Programs, Citrix, Administration Tools and select XenApp Advanced Configuration (Figure 92).

Usinf One Citrix Web Interface Site with Multiple XenApp Farms © Copyright 2011 Carl Webster, All Rights Reserved Page 63
Figure 92
Right-click the XenApp farm and select Properties (Figure 93).
Figure 93
Click Zones and expand the zone by clicking the “+” sign to the left of the zone name (Figure 94).

Usinf One Citrix Web Interface Site with Multiple XenApp Farms © Copyright 2011 Carl Webster, All Rights Reserved Page 64
Figure 94
The server with the blue checkmark is the Most Preferred server as shown in Figure 95.
Figure 95
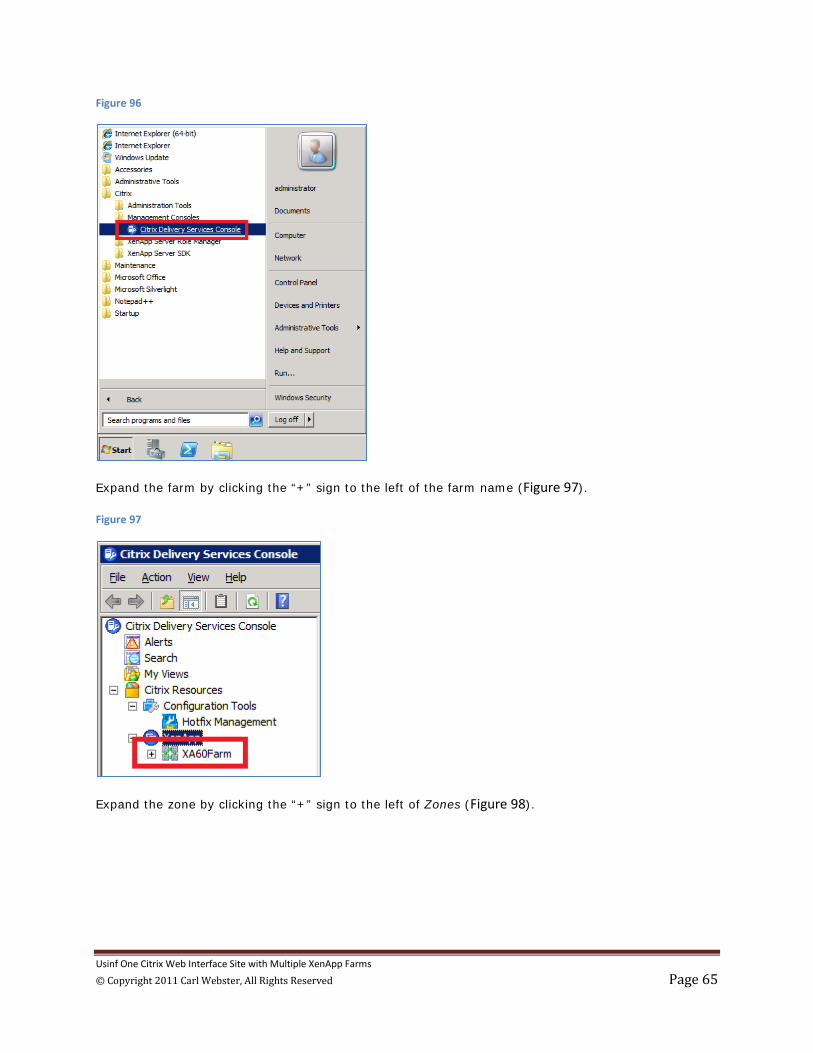
For XenApp 6.0 Click Start, All Programs, Citrix, Management Consoles and select Citrix Delivery Services Console (Figure 96).
Usinf One Citrix Web Interface Site with Multiple XenApp Farms © Copyright 2011 Carl Webster, All Rights Reserved Page 65
Figure 96
Expand the farm by clicking the “+” sign to the left of the farm name (Figure 97).
Figure 97
Expand the zone by clicking the “+” sign to the left of Zones (Figure 98).

Usinf One Citrix Web Interface Site with Multiple XenApp Farms © Copyright 2011 Carl Webster, All Rights Reserved Page 66
Figure 98
Click on the zone name server and the Most Preferred server is shown in the Election Preference column Figure 99.
Figure 99
Usinf One Citrix Web Interface Site with Multiple XenApp Farms © Copyright 2011 Carl Webster, All Rights Reserved Page 67
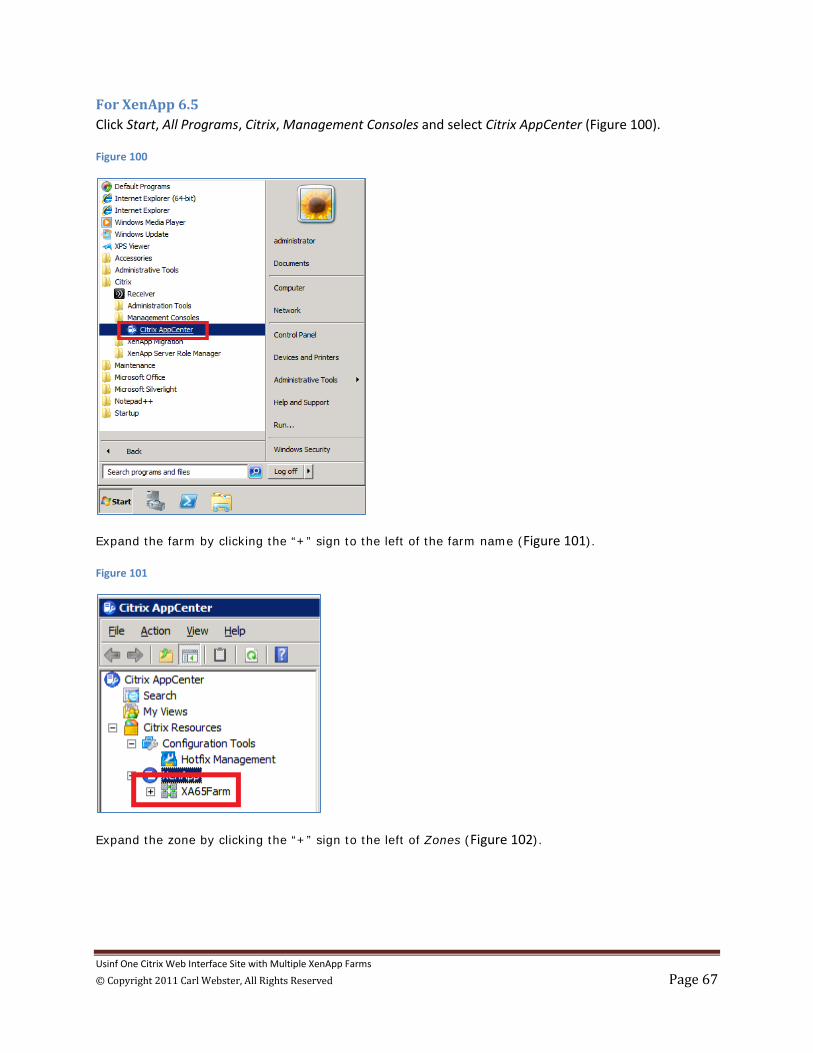
For XenApp 6.5 Click Start, All Programs, Citrix, Management Consoles and select Citrix AppCenter (Figure 100).
Figure 100
Expand the farm by clicking the “+” sign to the left of the farm name (Figure 101).
Figure 101
Expand the zone by clicking the “+” sign to the left of Zones (Figure 102).

Usinf One Citrix Web Interface Site with Multiple XenApp Farms © Copyright 2011 Carl Webster, All Rights Reserved Page 68
Figure 102
Click on the zone name server and the Most Preferred server is shown in the Election Preference column Figure 103.
Figure 103

Usinf One Citrix Web Interface Site with Multiple XenApp Farms © Copyright 2011 Carl Webster, All Rights Reserved Page 69
Appendix B Finding the XML Port for XenApp 5 for Windows Server 2003 Click Start, All Programs, Citrix, Management Consoles and select Delivery Services Console (Figure 104).
Figure 104
Expand the farm by clicking the “+” sign to the left of the farm name (Figure 105).
Figure 105
Expand the servers by clicking the “+” sign to the left of the Servers node ().

Usinf One Citrix Web Interface Site with Multiple XenApp Farms © Copyright 2011 Carl Webster, All Rights Reserved Page 70
Figure 106
Select the server being used as the XML Broker (Figure 107).
Figure 107
Right-click the server, click Modify server properties and click Modify all properties (Figure 108).

Usinf One Citrix Web Interface Site with Multiple XenApp Farms © Copyright 2011 Carl Webster, All Rights Reserved Page 71
Figure 108
Click XML Service and the current XML port is shown (Figure 109).
Figure 109

Usinf One Citrix Web Interface Site with Multiple XenApp Farms © Copyright 2011 Carl Webster, All Rights Reserved Page 72
Appendix C Finding the XML Port for XenApp 5 for Windows Server 2008 Click Start, All Programs, Citrix, Management Consoles and select Delivery Services Console (Figure 110).
Figure 110
Expand the farm by clicking the “+” sign to the left of the farm name (Figure 111).
Figure 111
Expand the servers by clicking the “+” sign to the left of the Servers node (Figure 112).

Usinf One Citrix Web Interface Site with Multiple XenApp Farms © Copyright 2011 Carl Webster, All Rights Reserved Page 73
Figure 112
Select the server being used as the XML Broker (Figure 113).
Figure 113
Right-click the server, click Modify server properties and click Modify all properties (Figure 114).

Usinf One Citrix Web Interface Site with Multiple XenApp Farms © Copyright 2011 Carl Webster, All Rights Reserved Page 74
Figure 114
Click XML Service and the current XML port is shown (Figure 115).
Figure 115

Usinf One Citrix Web Interface Site with Multiple XenApp Farms © Copyright 2011 Carl Webster, All Rights Reserved Page 75
Appendix D Finding the XML Port for XenApp 6.0 Click Start, All Programs, Citrix, Management Consoles and select Citrix Delivery Services Console (Figure 116).
Figure 116
Expand the farm by clicking the “+” sign to the left of the farm name (Figure 117).
Figure 117
XenApp 6.0 does not have individual server properties. Those properties are now contained within Citrix Policies.
Click on the Policies node and then the Computer tab (Figure 118).

Usinf One Citrix Web Interface Site with Multiple XenApp Farms © Copyright 2011 Carl Webster, All Rights Reserved Page 76
Figure 118
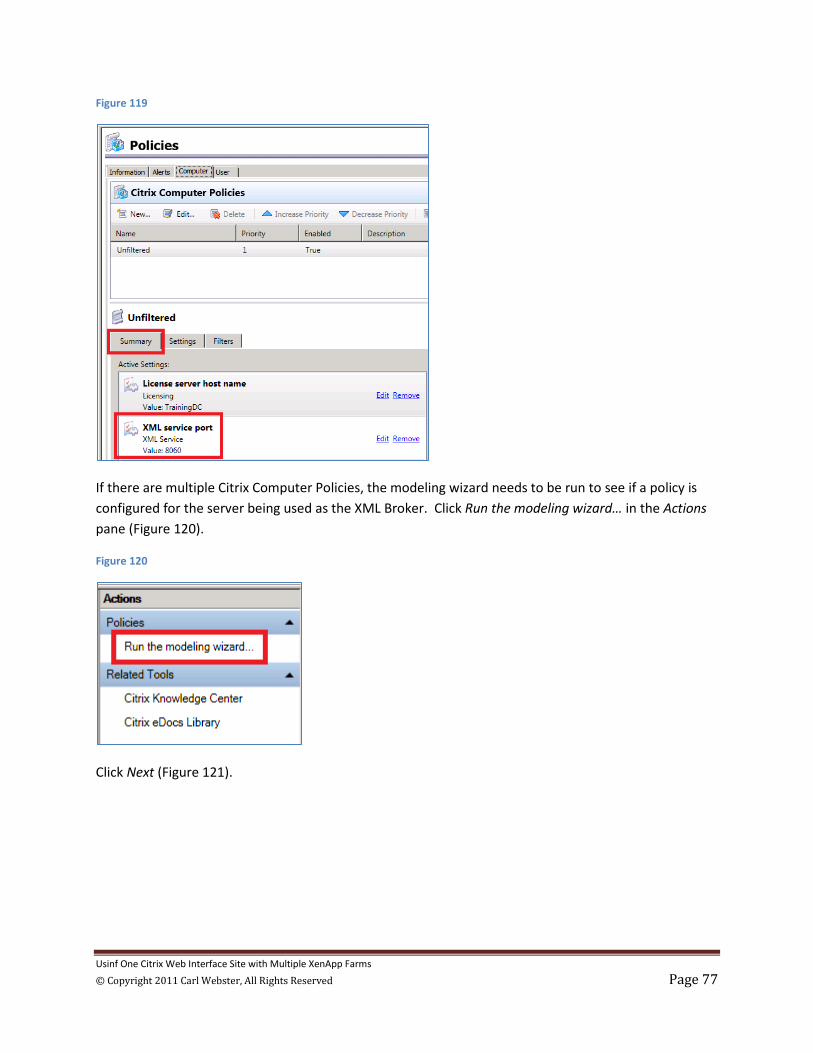
If there is only one Citrix Computer Policy named Unfiltered, finding the XML port will be easy. Click the Summary tab (Figure 119). If the XML port is not using the default of 80, the policy setting will be shown. If the XML service port policy setting is not shown in the Summary tab, then the default port of 80 is being used.
Usinf One Citrix Web Interface Site with Multiple XenApp Farms © Copyright 2011 Carl Webster, All Rights Reserved Page 77
Figure 119
If there are multiple Citrix Computer Policies, the modeling wizard needs to be run to see if a policy is configured for the server being used as the XML Broker. Click Run the modeling wizard… in the Actions pane (Figure 120).
Figure 120
Click Next (Figure 121).

Usinf One Citrix Web Interface Site with Multiple XenApp Farms © Copyright 2011 Carl Webster, All Rights Reserved Page 78
Figure 121
Click Next (Figure 122).
Figure 122
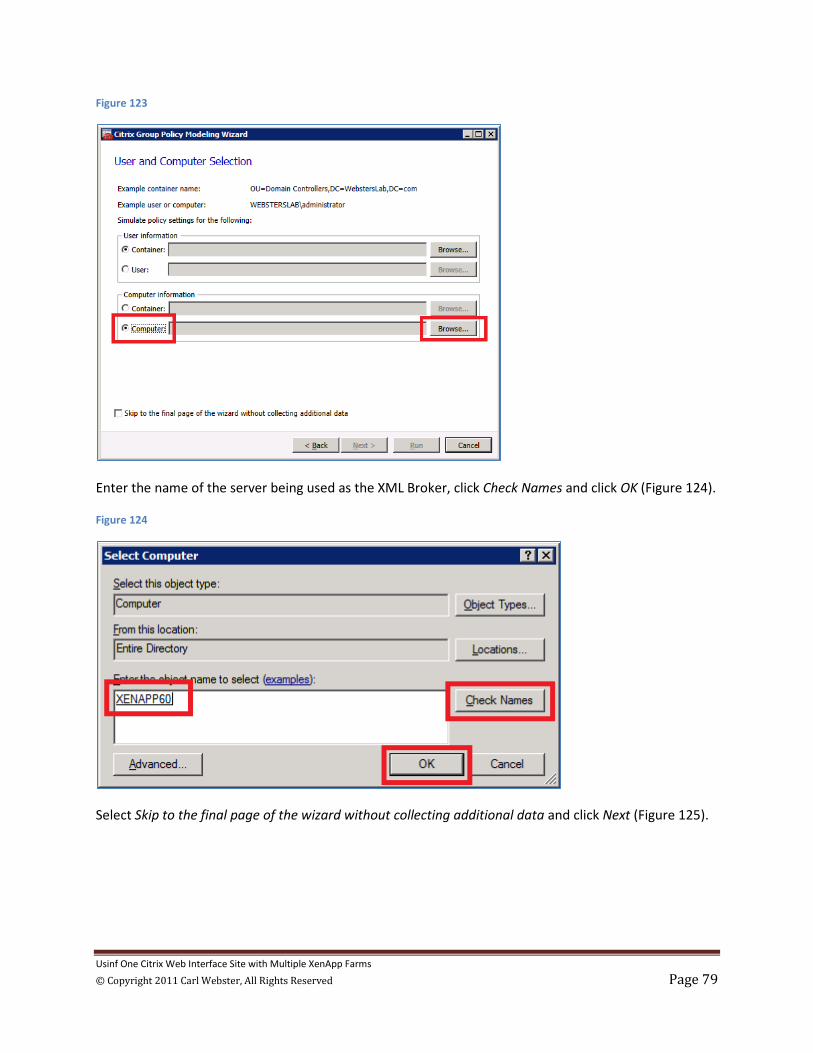
Select Computer and click Browse… (Figure 123).
Usinf One Citrix Web Interface Site with Multiple XenApp Farms © Copyright 2011 Carl Webster, All Rights Reserved Page 79
Figure 123
Enter the name of the server being used as the XML Broker, click Check Names and click OK (Figure 124).
Figure 124
Select Skip to the final page of the wizard without collecting additional data and click Next (Figure 125).

Usinf One Citrix Web Interface Site with Multiple XenApp Farms © Copyright 2011 Carl Webster, All Rights Reserved Page 80
Figure 125
Click Run (Figure 126)
Figure 126
Click Close (Figure 127).

Usinf One Citrix Web Interface Site with Multiple XenApp Farms © Copyright 2011 Carl Webster, All Rights Reserved Page 81
Figure 127
The modeling results are displayed as shown in Figure 128. The Citrix Computer Policy that affects the XML service port should be displayed. If it is not displayed, then the default port of 80 is being used.
Figure 128

Usinf One Citrix Web Interface Site with Multiple XenApp Farms © Copyright 2011 Carl Webster, All Rights Reserved Page 82
Appendix E Finding the XML Port for XenApp 6.5 Click Start, All Programs, Citrix, Management Consoles and select Citrix AppCenter (Figure 129).
Figure 129
Expand the farm by clicking the “+” sign to the left of the farm name (Figure 130).
Figure 130
XenApp 6.5 does not have individual server properties. Those properties are now contained within Citrix Policies.
Click on the Policies node and then the Computer tab Figure 131).

Usinf One Citrix Web Interface Site with Multiple XenApp Farms © Copyright 2011 Carl Webster, All Rights Reserved Page 83
Figure 131
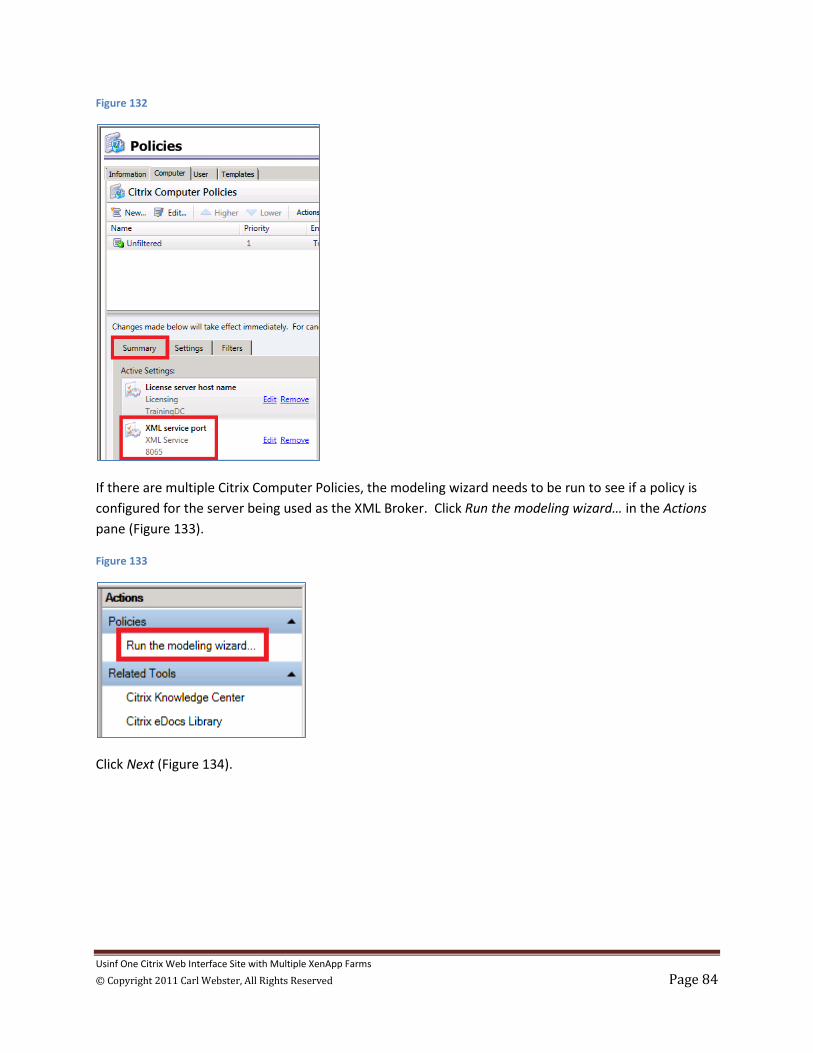
If there is only one Citrix Computer Policy named Unfiltered, finding the XML port will be easy. Click the Summary tab (Figure 132). If the XML port is not using the default of 80, the policy setting will be shown. If the XML service port policy setting is not shown in the Summary tab, then the default port of 80 is being used.
Usinf One Citrix Web Interface Site with Multiple XenApp Farms © Copyright 2011 Carl Webster, All Rights Reserved Page 84
Figure 132
If there are multiple Citrix Computer Policies, the modeling wizard needs to be run to see if a policy is configured for the server being used as the XML Broker. Click Run the modeling wizard… in the Actions pane (Figure 133).
Figure 133
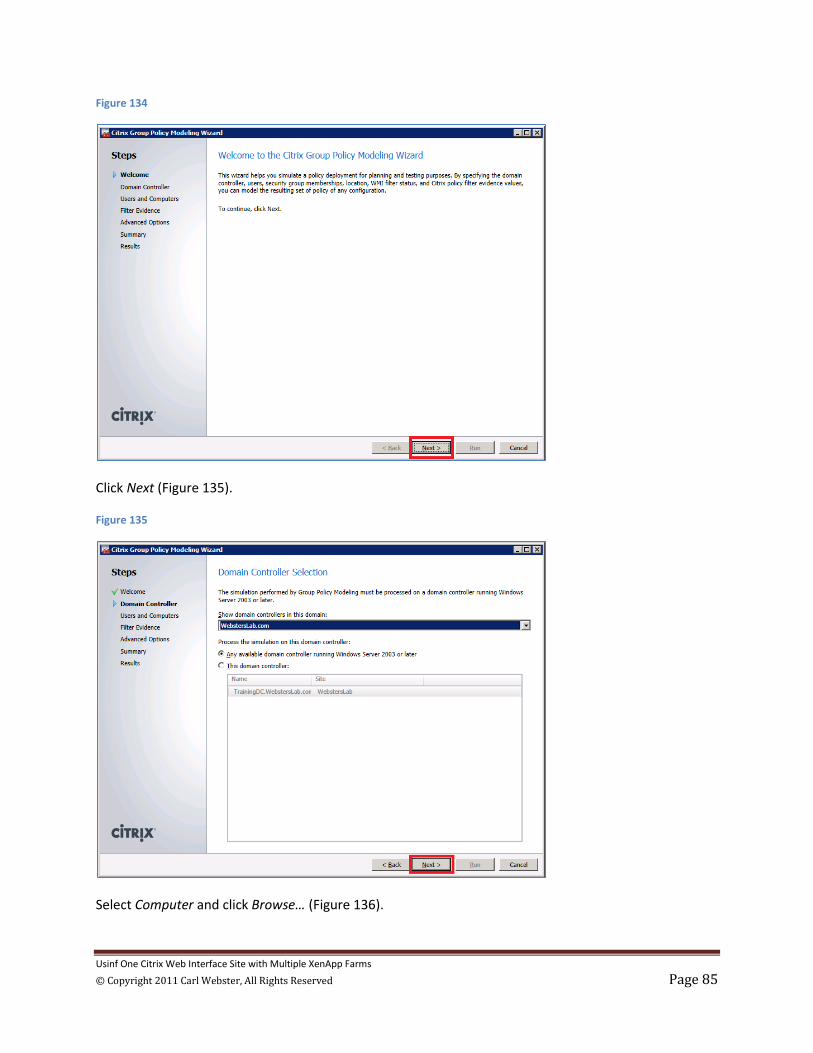
Click Next (Figure 134).
Usinf One Citrix Web Interface Site with Multiple XenApp Farms © Copyright 2011 Carl Webster, All Rights Reserved Page 85
Figure 134
Click Next (Figure 135).
Figure 135
Select Computer and click Browse… (Figure 136).

Usinf One Citrix Web Interface Site with Multiple XenApp Farms © Copyright 2011 Carl Webster, All Rights Reserved Page 86
Figure 136
Enter the name of the server being used as the XML Broker, click Check Names and click OK (Figure 137).
Figure 137
Select Skip to the final page of the wizard without collecting additional data and click Next (Figure 138).

Usinf One Citrix Web Interface Site with Multiple XenApp Farms © Copyright 2011 Carl Webster, All Rights Reserved Page 87
Figure 138
Click Run (Figure 139)
Figure 139
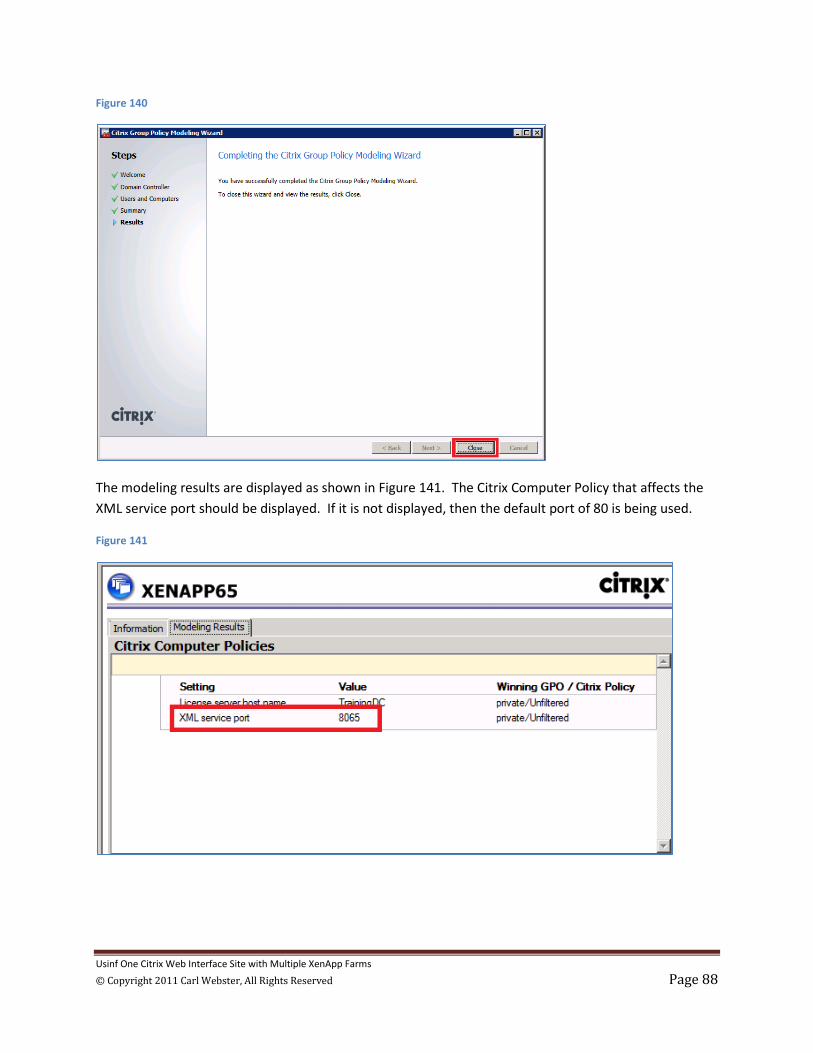
Click Close (Figure 140).
Usinf One Citrix Web Interface Site with Multiple XenApp Farms © Copyright 2011 Carl Webster, All Rights Reserved Page 88
Figure 140
The modeling results are displayed as shown in Figure 141. The Citrix Computer Policy that affects the XML service port should be displayed. If it is not displayed, then the default port of 80 is being used.
Figure 141


