57
Using Oracle® SQL Developer Web Release 19.4.1 F26685-01 March 2020
Using Oracle® SQL Developer Web
Release 19.4.1F26685-01March 2020
Using Oracle® SQL Developer Web, Release 19.4.1
F26685-01
Copyright © 2018, 2020, Oracle and/or its affiliates.
Primary Authors: Celin Cherian, Mike Fitch
Contributing Authors: Chuck Murray
Contributors: Jeff Smith, Syme Kutz, Victor Martinez, Renato Uriel Gutierrez Salas, Antonio Hernandez, SofiaIsadora Padilla Munoz, Miguel Sanchez Villafan, Tulika Das, Eric Paapanen
This software and related documentation are provided under a license agreement containing restrictions onuse and disclosure and are protected by intellectual property laws. Except as expressly permitted in yourlicense agreement or allowed by law, you may not use, copy, reproduce, translate, broadcast, modify,license, transmit, distribute, exhibit, perform, publish, or display any part, in any form, or by any means.Reverse engineering, disassembly, or decompilation of this software, unless required by law forinteroperability, is prohibited.
The information contained herein is subject to change without notice and is not warranted to be error-free. Ifyou find any errors, please report them to us in writing.
If this is software or related documentation that is delivered to the U.S. Government or anyone licensing it onbehalf of the U.S. Government, then the following notice is applicable:
U.S. GOVERNMENT END USERS: Oracle programs (including any operating system, integrated software,any programs embedded, installed or activated on delivered hardware, and modifications of such programs)and Oracle computer documentation or other Oracle data delivered to or accessed by U.S. Government endusers are "commercial computer software" or “commercial computer software documentation” pursuant to theapplicable Federal Acquisition Regulation and agency-specific supplemental regulations. As such, the use,reproduction, duplication, release, display, disclosure, modification, preparation of derivative works, and/oradaptation of i) Oracle programs (including any operating system, integrated software, any programsembedded, installed or activated on delivered hardware, and modifications of such programs), ii) Oraclecomputer documentation and/or iii) other Oracle data, is subject to the rights and limitations specified in thelicense contained in the applicable contract. The terms governing the U.S. Government’s use of Oracle cloudservices are defined by the applicable contract for such services. No other rights are granted to the U.S.Government.
This software or hardware is developed for general use in a variety of information management applications.It is not developed or intended for use in any inherently dangerous applications, including applications thatmay create a risk of personal injury. If you use this software or hardware in dangerous applications, then youshall be responsible to take all appropriate fail-safe, backup, redundancy, and other measures to ensure itssafe use. Oracle Corporation and its affiliates disclaim any liability for any damages caused by use of thissoftware or hardware in dangerous applications.
Oracle and Java are registered trademarks of Oracle and/or its affiliates. Other names may be trademarks oftheir respective owners.
Intel and Intel Inside are trademarks or registered trademarks of Intel Corporation. All SPARC trademarks areused under license and are trademarks or registered trademarks of SPARC International, Inc. AMD, Epyc,and the AMD logo are trademarks or registered trademarks of Advanced Micro Devices. UNIX is a registeredtrademark of The Open Group.
This software or hardware and documentation may provide access to or information about content, products,and services from third parties. Oracle Corporation and its affiliates are not responsible for and expresslydisclaim all warranties of any kind with respect to third-party content, products, and services unless otherwiseset forth in an applicable agreement between you and Oracle. Oracle Corporation and its affiliates will not beresponsible for any loss, costs, or damages incurred due to your access to or use of third-party content,products, or services, except as set forth in an applicable agreement between you and Oracle.
Contents
Preface
Audience v
Documentation Accessibility v
Product Accessibility v
Related Documents v
Conventions vi
Third-Party License Information vi
1 About Oracle SQL Developer Web
1.1 About the SQL Developer Web User Interface 1-1
1.2 Accessing Oracle SQL Developer Web 1-3
1.2.1 Enabling User Access to SQL Developer Web 1-3
2 The Dashboard
3 The Home Page
4 The Activity Pages
4.1 The Activity Overview Page 4-1
4.2 The Automatic Indexing Page 4-1
4.3 The Performance Hub Page 4-3
4.4 The Alerts Page 4-5
4.5 The Sessions Page 4-5
4.6 The Storage Page 4-6
5 The Worksheet Page
5.1 Navigating Objects and Worksheets 5-1
5.2 Executing SQL Statements in the Worksheet Editor 5-2
iii
5.2.1 Shortcut Keys in the Worksheet 5-4
5.3 Viewing the Worksheet Output 5-4
5.4 Loading Data from a Local File to an Existing Table 5-6
5.5 Loading Data from a Local File to a New Table 5-7
6 The Data Modeler Page
6.1 Navigating Diagrams and Objects 6-1
6.2 About the Data Modeling Editor 6-2
7 Creating and Editing Database Objects
7.1 The Table Properties Dialog 7-2
7.2 The Index Properties Dialog 7-12
7.3 The Sequence Properties Dialog 7-13
7.4 The View Properties Dialog 7-14
7.5 The Synonym Properties Dialog 7-15
7.6 Implied Foreign Keys 7-16
7.7 The Materialized View Log Properties Dialog 7-17
iv
Preface
This document provides information about Oracle SQL Developer Web, a browser-based interface for Oracle SQL Developer.
AudienceThis online help is intended for those using Oracle SQL Developer Web in OracleAutonomous Database, specifically in Oracle Autonomous Data Warehouse andOracle Autonomous Transaction Processing.
Documentation AccessibilityFor information about Oracle's commitment to accessibility, visit the OracleAccessibility Program website at http://www.oracle.com/pls/topic/lookup?ctx=acc&id=docacc.
Access to Oracle Support
Oracle customers that have purchased support have access to electronic supportthrough My Oracle Support. For information, visit http://www.oracle.com/pls/topic/lookup?ctx=acc&id=info or visit http://www.oracle.com/pls/topic/lookup?ctx=acc&id=trsif you are hearing impaired.
Product AccessibilityOracle SQL Developer Web provides features to support accessibility. See SQLDeveloper Web Accessibility Guide.
Related DocumentsFor the desktop version of Oracle SQL Developer, see Oracle SQL Developer User'sGuide.
To download release notes, installation documentation, white papers, or othercollateral for SQL Developer, go to the Oracle Technology Network (OTN) at
http://www.oracle.com/technetwork/
For the PL/SQL page on OTN, see http://www.oracle.com/technetwork/database/features/plsql/
v
ConventionsThe following text conventions are used in this document:
Convention Meaning
boldface Boldface type indicates graphical user interface elements associatedwith an action, or terms defined in text or the glossary.
italic Italic type indicates book titles, emphasis, or placeholder variables forwhich you supply particular values.
monospace Monospace type indicates commands within a paragraph, URLs, codein examples, text that appears on the screen, or text that you enter.
Third-Party License InformationOracle SQL Developer contains third-party code. Oracle is required to provide thefollowing notices. Note, however, that the Oracle program license that accompaniedthis product determines your right to use the Oracle program, including the third-partysoftware, and the terms contained in the following notices do not change those rights.
Rappid 2.1
RAPPID GENERAL LICENSE STATEMENT AND LIMITED WARRANTY Copyright ©2009 - 2018 client IO s.r.o.
Definitions
"Rappid" shall mean a programmer's toolkit for building interactive diagrammingapplications as originally created by client IO.
"Software" shall mean Rappid, as originally created by client IO.
"Licensee" is you, only if you agree to be bound by the terms and conditions set forthin this Agreement.
"Source code" means the JavaScript files and other related files in the Softwarepackage. This license statement and limited warranty constitutes a legal agreement("License Agreement") between You (either as an individual or a single entity) andclient IO for the software product ("Software") identified above, including any software,media, and accompanying on-line or printed documentation.
By installing, copying, or otherwise using the Software, you are agreeing to be boundby the terms of this Agreement. If you do not agree to the terms of this Agreement, youare not authorized to use this Software. BY INSTALLING, COPYING, OROTHERWISE USING THE SOFTWARE, YOU AGREE TO BE BOUND BY ALL OFTHE TERMS AND CONDITIONS OF THE LICENSE AGREEMENT.
Upon your acceptance of the terms and conditions of the License Agreement, client IOgrants to you the right to use the Software in the manner provided below.
This license is perpetual, no additional payment is required to maintain it, with theexception of you breaking any part of this license, in which case you lose all rightsunder the license. You may transfer the rights granted to you under this agreement inand to the Software and documentation on a permanent basis provided you retain no
Preface
vi
copies, the recipient agrees to the terms of the License Agreement and the totalnumber of developers licensed to use the software does not exceed the number oflicensed developers at the time of license purchase. client IO must be informed inwriting of the transfer. Except as provided in the License Agreement, you may nottransfer, rent, lease, lend, copy, modify, translate, sublicense, time-share orelectronically transmit or receive the Software, media or documentation. Whentransferring licenses, the whole of the licensed product must be transferred. In additionto the other terms contained herein, We grant to You a revocable, non-exclusive, non-transferable and non-sublicensable license to install and use the Software (the "TrialLicense") strictly for Your internal evaluation and review purposes and not forproduction purposes.
This Trial License applies only if You have registered with Us for a Trial License of theSoftware and shall be effective for thirty (30) consecutive days following the date ofregistration ("the Trial Period"). You may only register for a Trial License once in anyeighteen month period. You agree not to use a Trial License for any purpose otherthan determining whether to purchase a license to the Software. You are explicitly notpermitted to distribute the Software to any user outside the Organization on whosebehalf you have undertaken this license.
Your rights to use the Trial License will immediately terminate upon the earlier of (i) theexpiration of the Trial Period, or (ii) such time that You purchase a license to theSoftware. We reserve the right to terminate Your Trial License at any time in Ourabsolute and sole discretion. YOU ACKNOWLEDGE THAT TRIAL SOFTWAREMIGHT PLACE WATERMARKS ON OUTPUT, CONTAIN LIMITED FUNCTIONALITY,FUNCTION FOR A LIMITED PERIOD OF TIME, OR LIMIT THE FUNCTIONALITY ORTIME OF FUNCTIONING OF ANY OUTPUT. ACCESS TO AND/OR USE OF ANYFILES OR OUTPUT CREATED WITH SUCH SOFTWARE IS ENTIRELY AT YOUROWN RISK. WE ARE LICENSING THE SOFTWARE ON AN "AS IS" BASIS AT YOUROWN RISK AND WE DISCLAIM ANY WARRANTY OR LIABILITY TO YOU OF ANYKIND. DEVELOPER LICENSE TERMS
To develop products using the Software, you require a number of developmentlicenses equal to the number of engineers developing the application area thatspecifically uses the Software. This is the maximum number of such developers overany 1 month sliding window. A development license is not required in order to build anapplication that uses the software. A developer License may be installed on anynumber of computers at any time.
client IO grants to you non exclusive license to install and use the Software for the solepurposes of designing, developing and testing application programs which you create.In addition to the right to install the complete software on the specified number ofcomputers, the Source code may also be placed on storage devices for the purposesof version control, automated building and archiving. The entire downloaded Softwarepackage may also be archived for backup purposes. Additional Redistribution Termsfor Software client IO hereby grants to you the worldwide, non exclusive, perpetualright under all intellectual property rights in and to the Software to incorporate theSoftware in whole or in part in your offerings and to redistribute the Software asincorporated to your customers and distributors and resellers. Rappid must be part ofa larger system. You may not expose the Rappid API for developer use in yourproduct.
Updates Free updates are provided for all versions of the Software for the period oftwelve (12) months from the time of the license purchase. Updates are performed bydownloading the updated Software package through a link provided in the purchaseprocess or sent to an email address provided in the purchase process. Marketingclient IO is permitted to reference you as a user of the Software in customer lists on
Preface
vii
any of the web sites owned by client IO, in presentations to clients and at trade events.Limited Warranty client IO warrants that as provided the Software does not containany malicious code inserted to affect the functioning of the Software or any computerthat the Software runs on. Any developer using Rappid must have a broadunderstanding of security issue relating to web application and must take allreasonable steps at a system level to mitigate those risks. client IO warrants that theSoftware does not infringe any patent, copyright or design secret of any third party.client IO is not aware of any facts upon which such a claim for infringement could bebased. TO THE MAXIMUM EXTENT PERMITTED BY APPLICABLE LAW, CLIENT IOAND ITS SUPPLIERS DISCLAIM ALL OTHER WARRANTIES AND CONDITIONS,EITHER EXPRESSED OR IMPLIED, INCLUDING, BUT NOT LIMITED TO, IMPLIEDWARRANTIES OF MERCHANTABILITY, FITNESS FOR A PARTICULAR PURPOSE,TITLE, AND NON-INFRINGEMENT, WITH REGARD TO THE SOFTWARE, AND THEPROVISION OF OR FAILURE TO PROVIDE SUPPORT SERVICES. THIS LIMITEDWARRANTY GIVES YOU SPECIFIC LEGAL RIGHTS. YOU MAY HAVE OTHERS,WHICH VARY FROM STATE/JURISDICTION TO STATE/JURISDICTION.LIMITATION OF LIABILITY TO THE MAXIMUM EXTENT PERMITTED BYAPPLICABLE LAW, IN NO EVENT SHALL CLIENT IO OR ITS SUPPLIERS BELIABLE FOR ANY SPECIAL, INCIDENTAL, INDIRECT, OR CONSEQUENTIALDAMAGES WHATSOEVER (INCLUDING, WITHOUT LIMITATION, DAMAGES FORLOSS OF BUSINESS PROFITS, BUSINESS INTERRUPTION, LOSS OF BUSINESSINFORMATION, OR ANY OTHER PECUNIARY LOSS) ARISING OUT OF THE USEOF OR INABILITY TO USE THE SOFTWARE PRODUCT OR THE PROVISION OFOR FAILURE TO PROVIDE SUPPORT SERVICES, EVEN IF CLIENT IO HAS BEENADVISED OF THE POSSIBILITY OF SUCH DAMAGES. BECAUSE SOME STATESAND JURISDICTIONS DO NOT ALLOW THE EXCLUSION OR LIMITATION OFLIABILITY, THE ABOVE LIMITATION MAY NOT APPLY TO YOU.
General Provisions This License Agreement may only be modified in writing signed byyou and client IO. If any provision of this License Agreement is found void orunenforceable, the remainder will remain valid and enforceable according to its terms.If any remedy provided is determined to have failed for its essential purpose, alllimitations of liability and exclusions of damages set forth in the Limited Warranty shallremain in effect. Governing Law and Jurisdiction This Agreement shall be subject toand governed by the Law of The Netherlands. Any dispute arising out of or inconnection with this Agreement shall be exclusively dealt with by the courts of TheNetherlands. This License Agreement gives you specific legal rights; you may haveothers which vary from state to state and from country to country. client IO reserves allrights not specifically granted in this License Agreement.
CodeMirror 5.47.0
CodeMirror is an open-source project shared under an MIT license. MIT LicenseCopyright (C) 2017 by Marijn Haverbeke <[email protected]> and others
Permission is hereby granted, free of charge, to any person obtaining a copy of thissoftware and associated documentation files (the "Software"), to deal in the Softwarewithout restriction, including without limitation the rights to use, copy, modify, merge,publish, distribute, sublicense, and/or sell copies of the Software, and to permitpersons to whom the Software is furnished to do so, subject to the followingconditions:
The above copyright notice and this permission notice shall be included in all copies orsubstantial portions of the Software.
THE SOFTWARE IS PROVIDED "AS IS", WITHOUT WARRANTY OF ANY KIND,EXPRESS OR IMPLIED, INCLUDING BUT NOT LIMITED TO THE WARRANTIES OF
Preface
viii
MERCHANTABILITY, FITNESS FOR A PARTICULAR PURPOSE ANDNONINFRINGEMENT. IN NO EVENT SHALL THE AUTHORS OR COPYRIGHTHOLDERS BE LIABLE FOR ANY CLAIM, DAMAGES OR OTHER LIABILITY,WHETHER IN AN ACTION OF CONTRACT, TORT OR OTHERWISE, ARISINGFROM, OUT OF OR IN CONNECTION WITH THE SOFTWARE OR THE USE OROTHER DEALINGS IN THE SOFTWARE.
Dexie.js 2.0.4
Dexie.js is licensed under the Apache License 2.0.
Apache License Version 2.0, January 2004
http://www.apache.org/licenses/
TERMS AND CONDITIONS FOR USE, REPRODUCTION, AND DISTRIBUTION
1. Definitions. "License" shall mean the terms and conditions for use, reproduction,and distribution as defined by Sections 1 through 9 of this document.
"Licensor" shall mean the copyright owner or entity authorized by the copyright ownerthat is granting the License.
"Legal Entity" shall mean the union of the acting entity and all other entities thatcontrol, are controlled by, or are under common control with that entity. For thepurposes of this definition, "control" means (i) the power, direct or indirect, to cause thedirection or management of such entity, whether by contract or otherwise, or (ii)ownership of fifty percent (50%) or more of the outstanding shares, or (iii) beneficialownership of such entity.
"You" (or "Your") shall mean an individual or Legal Entity exercising permissionsgranted by this License.
"Source" form shall mean the preferred form for making modifications, including butnot limited to software source code, documentation source, and configuration files.
"Object" form shall mean any form resulting from mechanical transformation ortranslation of a Source form, including but not limited to compiled object code,generated documentation, and conversions to other media types.
"Work" shall mean the work of authorship, whether in Source or Object form, madeavailable under the License, as indicated by a copyright notice that is included in orattached to the work (an example is provided in the Appendix below).
"Derivative Works" shall mean any work, whether in Source or Object form, that isbased on (or derived from) the Work and for which the editorial revisions, annotations,elaborations, or other modifications represent, as a whole, an original work ofauthorship. For the purposes of this License, Derivative Works shall not include worksthat remain separable from, or merely link (or bind by name) to the interfaces of, theWork and Derivative Works thereof.
"Contribution" shall mean any work of authorship, including the original version of theWork and any modifications or additions to that Work or Derivative Works thereof, thatis intentionally submitted to Licensor for inclusion in the Work by the copyright owneror by an individual or Legal Entity authorized to submit on behalf of the copyrightowner. For the purposes of this definition, "submitted" means any form of electronic,verbal, or written communication sent to the Licensor or its representatives, includingbut not limited to communication on electronic mailing lists, source code controlsystems, and issue tracking systems that are managed by, or on behalf of, the
Preface
ix
Licensor for the purpose of discussing and improving the Work, but excludingcommunication that is conspicuously marked or otherwise designated in writing by thecopyright owner as "Not a Contribution."
"Contributor" shall mean Licensor and any individual or Legal Entity on behalf of whoma Contribution has been received by Licensor and subsequently incorporated withinthe Work.
2. Grant of Copyright License. Subject to the terms and conditions of this License,each Contributor hereby grants to You a perpetual, worldwide, non-exclusive, no-charge, royalty-free, irrevocable copyright license to reproduce, prepare DerivativeWorks of, publicly display, publicly perform, sublicense, and distribute the Work andsuch Derivative Works in Source or Object form.
3. Grant of Patent License. Subject to the terms and conditions of this License, eachContributor hereby grants to You a perpetual, worldwide, non-exclusive, no-charge,royalty-free, irrevocable (except as stated in this section) patent license to make, havemade, use, offer to sell, sell, import, and otherwise transfer the Work, where suchlicense applies only to those patent claims licensable by such Contributor that arenecessarily infringed by their Contribution(s) alone or by combination of theirContribution(s) with the Work to which such Contribution(s) was submitted. If Youinstitute patent litigation against any entity (including a cross-claim or counterclaim in alawsuit) alleging that the Work or a Contribution incorporated within the Workconstitutes direct or contributory patent infringement, then any patent licenses grantedto You under this License for that Work shall terminate as of the date such litigation isfiled.
4. Redistribution. You may reproduce and distribute copies of the Work or DerivativeWorks thereof in any medium, with or without modifications, and in Source or Objectform, provided that You meet the following conditions:
(a) You must give any other recipients of the Work or Derivative Works a copy of thisLicense; and
(b) You must cause any modified files to carry prominent notices stating that Youchanged the files; and
(c) You must retain, in the Source form of any Derivative Works that You distribute, allcopyright, patent, trademark, and attribution notices from the Source form of the Work,excluding those notices that do not pertain to any part of the Derivative Works; and
(d) If the Work includes a "NOTICE" text file as part of its distribution, then anyDerivative Works that You distribute must include a readable copy of the attributionnotices contained within such NOTICE file, excluding those notices that do not pertainto any part of the Derivative Works, in at least one of the following places: within aNOTICE text file distributed as part of the Derivative Works; within the Source form ordocumentation, if provided along with the Derivative Works; or, within a displaygenerated by the Derivative Works, if and wherever such third-party notices normallyappear. The contents of the NOTICE file are for informational purposes only and donot modify the License. You may add Your own attribution notices within DerivativeWorks that You distribute, alongside or as an addendum to the NOTICE text from theWork, provided that such additional attribution notices cannot be construed asmodifying the License.
You may add Your own copyright statement to Your modifications and may provideadditional or different license terms and conditions for use, reproduction, or distributionof Your modifications, or for any such Derivative Works as a whole, provided Your use,
Preface
x
reproduction, and distribution of the Work otherwise complies with the conditionsstated in this License.
5. Submission of Contributions. Unless You explicitly state otherwise, any Contributionintentionally submitted for inclusion in the Work\ by You to the Licensor shall be underthe terms and conditions of this License, without any additional terms or conditions.Notwithstanding the above, nothing herein shall supersede or modify the terms of anyseparate license agreement you may have executed with Licensor regarding suchContributions.
6. Trademarks. This License does not grant permission to use the trade names,trademarks, service marks, or product names of the Licensor, except as required forreasonable and customary use in describing the origin of the Work and reproducingthe content of the NOTICE file.
7. Disclaimer of Warranty. Unless required by applicable law or agreed to in writing,Licensor provides the Work (and each Contributor provides its Contributions) on an"AS IS" BASIS, WITHOUT WARRANTIES OR CONDITIONS OF ANY KIND, eitherexpress or implied, including, without limitation, any warranties or conditions of TITLE,NON-INFRINGEMENT, MERCHANTABILITY, or FITNESS FOR A PARTICULARPURPOSE. You are solely responsible for determining the appropriateness of using orredistributing the Work and assume any risks associated with Your exercise ofpermissions under this License.
8. Limitation of Liability. In no event and under no legal theory, whether in tort(including negligence), contract, or otherwise, unless required by applicable law (suchas deliberate and grossly negligent acts) or agreed to in writing, shall any Contributorbe liable to You for damages, including any direct, indirect, special, incidental, orconsequential damages of any character arising as a result of this License or out ofthe use or inability to use the Work (including but not limited to damages for loss ofgoodwill, work stoppage, computer failure or malfunction, or any and all othercommercial damages or losses), even if such Contributor has been advised of thepossibility of such damages.
9. Accepting Warranty or Additional Liability. While redistributing the Work orDerivative Works thereof, You may choose to offer, and charge a fee for, acceptanceof support, warranty, indemnity, or other liability obligations and/or rights consistentwith this License. However, in accepting such obligations, You may act only on Yourown behalf and on Your sole responsibility, not on behalf of any other Contributor, andonly if You agree to indemnify, defend, and hold each Contributor harmless for anyliability incurred by, or claims asserted against, such Contributor by reason of youraccepting any such warranty or additional liability.
END OF TERMS AND CONDITIONS
Hopscotch 0.3.1
Apache License Version 2.0, January 2004
http://www.apache.org/licenses/
TERMS AND CONDITIONS FOR USE, REPRODUCTION, AND DISTRIBUTION
1. Definitions. "License" shall mean the terms and conditions for use, reproduction,and distribution as defined by Sections 1 through 9 of this document.
"Licensor" shall mean the copyright owner or entity authorized by the copyright ownerthat is granting the License.
Preface
xi
"Legal Entity" shall mean the union of the acting entity and all other entities thatcontrol, are controlled by, or are under common control with that entity. For thepurposes of this definition, "control" means (i) the power, direct or indirect, to cause thedirection or management of such entity, whether by contract or otherwise, or (ii)ownership of fifty percent (50%) or more of the outstanding shares, or (iii) beneficialownership of such entity.
"You" (or "Your") shall mean an individual or Legal Entity exercising permissionsgranted by this License.
"Source" form shall mean the preferred form for making modifications, including butnot limited to software source code, documentation source, and configuration files.
"Object" form shall mean any form resulting from mechanical transformation ortranslation of a Source form, including but not limited to compiled object code,generated documentation, and conversions to other media types.
"Work" shall mean the work of authorship, whether in Source or Object form, madeavailable under the License, as indicated by a copyright notice that is included in orattached to the work (an example is provided in the Appendix below).
"Derivative Works" shall mean any work, whether in Source or Object form, that isbased on (or derived from) the Work and for which the editorial revisions, annotations,elaborations, or other modifications represent, as a whole, an original work ofauthorship. For the purposes of this License, Derivative Works shall not include worksthat remain separable from, or merely link (or bind by name) to the interfaces of, theWork and Derivative Works thereof.
"Contribution" shall mean any work of authorship, including the original version of theWork and any modifications or additions to that Work or Derivative Works thereof, thatis intentionally submitted to Licensor for inclusion in the Work by the copyright owneror by an individual or Legal Entity authorized to submit on behalf of the copyrightowner. For the purposes of this definition, "submitted" means any form of electronic,verbal, or written communication sent to the Licensor or its representatives, includingbut not limited to communication on electronic mailing lists, source code controlsystems, and issue tracking systems that are managed by, or on behalf of, theLicensor for the purpose of discussing and improving the Work, but excludingcommunication that is conspicuously marked or otherwise designated in writing by thecopyright owner as "Not a Contribution."
"Contributor" shall mean Licensor and any individual or Legal Entity on behalf of whoma Contribution has been received by Licensor and subsequently incorporated withinthe Work.
2. Grant of Copyright License. Subject to the terms and conditions of this License,each Contributor hereby grants to You a perpetual, worldwide, non-exclusive, no-charge, royalty-free, irrevocable copyright license to reproduce, prepare DerivativeWorks of, publicly display, publicly perform, sublicense, and distribute the Work andsuch Derivative Works in Source or Object form.
3. Grant of Patent License. Subject to the terms and conditions of this License, eachContributor hereby grants to You a perpetual, worldwide, non-exclusive, no-charge,royalty-free, irrevocable (except as stated in this section) patent license to make, havemade, use, offer to sell, sell, import, and otherwise transfer the Work, where suchlicense applies only to those patent claims licensable by such Contributor that arenecessarily infringed by their Contribution(s) alone or by combination of theirContribution(s) with the Work to which such Contribution(s) was submitted. If Youinstitute patent litigation against any entity (including a cross-claim or counterclaim in a
Preface
xii
lawsuit) alleging that the Work or a Contribution incorporated within the Workconstitutes direct or contributory patent infringement, then any patent licenses grantedto You under this License for that Work shall terminate as of the date such litigation isfiled.
4. Redistribution. You may reproduce and distribute copies of the Work or DerivativeWorks thereof in any medium, with or without modifications, and in Source or Objectform, provided that You meet the following conditions:
(a) You must give any other recipients of the Work or Derivative Works a copy of thisLicense; and
(b) You must cause any modified files to carry prominent notices stating that Youchanged the files; and
(c) You must retain, in the Source form of any Derivative Works that You distribute, allcopyright, patent, trademark, and attribution notices from the Source form of the Work,excluding those notices that do not pertain to any part of the Derivative Works; and
(d) If the Work includes a "NOTICE" text file as part of its distribution, then anyDerivative Works that You distribute must include a readable copy of the attributionnotices contained within such NOTICE file, excluding those notices that do not pertainto any part of the Derivative Works, in at least one of the following places: within aNOTICE text file distributed as part of the Derivative Works; within the Source form ordocumentation, if provided along with the Derivative Works; or, within a displaygenerated by the Derivative Works, if and wherever such third-party notices normallyappear. The contents of the NOTICE file are for informational purposes only and donot modify the License. You may add Your own attribution notices within DerivativeWorks that You distribute, alongside or as an addendum to the NOTICE text from theWork, provided that such additional attribution notices cannot be construed asmodifying the License.
You may add Your own copyright statement to Your modifications and may provideadditional or different license terms and conditions for use, reproduction, or distributionof Your modifications, or for any such Derivative Works as a whole, provided Your use,reproduction, and distribution of the Work otherwise complies with the conditionsstated in this License.
5. Submission of Contributions. Unless You explicitly state otherwise, any Contributionintentionally submitted for inclusion in the Work\ by You to the Licensor shall be underthe terms and conditions of this License, without any additional terms or conditions.Notwithstanding the above, nothing herein shall supersede or modify the terms of anyseparate license agreement you may have executed with Licensor regarding suchContributions.
6. Trademarks. This License does not grant permission to use the trade names,trademarks, service marks, or product names of the Licensor, except as required forreasonable and customary use in describing the origin of the Work and reproducingthe content of the NOTICE file.
7. Disclaimer of Warranty. Unless required by applicable law or agreed to in writing,Licensor provides the Work (and each Contributor provides its Contributions) on an"AS IS" BASIS, WITHOUT WARRANTIES OR CONDITIONS OF ANY KIND, eitherexpress or implied, including, without limitation, any warranties or conditions of TITLE,NON-INFRINGEMENT, MERCHANTABILITY, or FITNESS FOR A PARTICULARPURPOSE. You are solely responsible for determining the appropriateness of using orredistributing the Work and assume any risks associated with Your exercise ofpermissions under this License.
Preface
xiii
8. Limitation of Liability. In no event and under no legal theory, whether in tort(including negligence), contract, or otherwise, unless required by applicable law (suchas deliberate and grossly negligent acts) or agreed to in writing, shall any Contributorbe liable to You for damages, including any direct, indirect, special, incidental, orconsequential damages of any character arising as a result of this License or out ofthe use or inability to use the Work (including but not limited to damages for loss ofgoodwill, work stoppage, computer failure or malfunction, or any and all othercommercial damages or losses), even if such Contributor has been advised of thepossibility of such damages.
9. Accepting Warranty or Additional Liability. While redistributing the Work orDerivative Works thereof, You may choose to offer, and charge a fee for, acceptanceof support, warranty, indemnity, or other liability obligations and/or rights consistentwith this License. However, in accepting such obligations, You may act only on Yourown behalf and on Your sole responsibility, not on behalf of any other Contributor, andonly if You agree to indemnify, defend, and hold each Contributor harmless for anyliability incurred by, or claims asserted against, such Contributor by reason of youraccepting any such warranty or additional liability.
END OF TERMS AND CONDITIONS
Preface
xiv
1About Oracle SQL Developer Web
Oracle SQL Developer Web is a browser-based application that uses ORDS (OracleREST Data Services) to provide many of the database development andadministration features of desktop-based Oracle SQL Developer.
Note:
Some features of Oracle SQL Developer Web are not currently available orare only available if you sign in as a user with database administration rights.For such features, a "restricted availability" statement appears at the start ofthe feature description; for example:
Available only if you signed in as a database user with administratorrights.
The main features include running SQL statements and scripts in the worksheet,exporting data, creating Data Modeler diagrams for existing schemas, and enablingdatabase administrators to monitor the database.
For a complete integrated development environment, see Oracle SQL Developer.
1.1 About the SQL Developer Web User InterfaceThe SQL Developer Web user interface has three components:
• The Header at the top
• The page body, whose content varies depending on which page you are viewing
• The Status Bar at the bottom
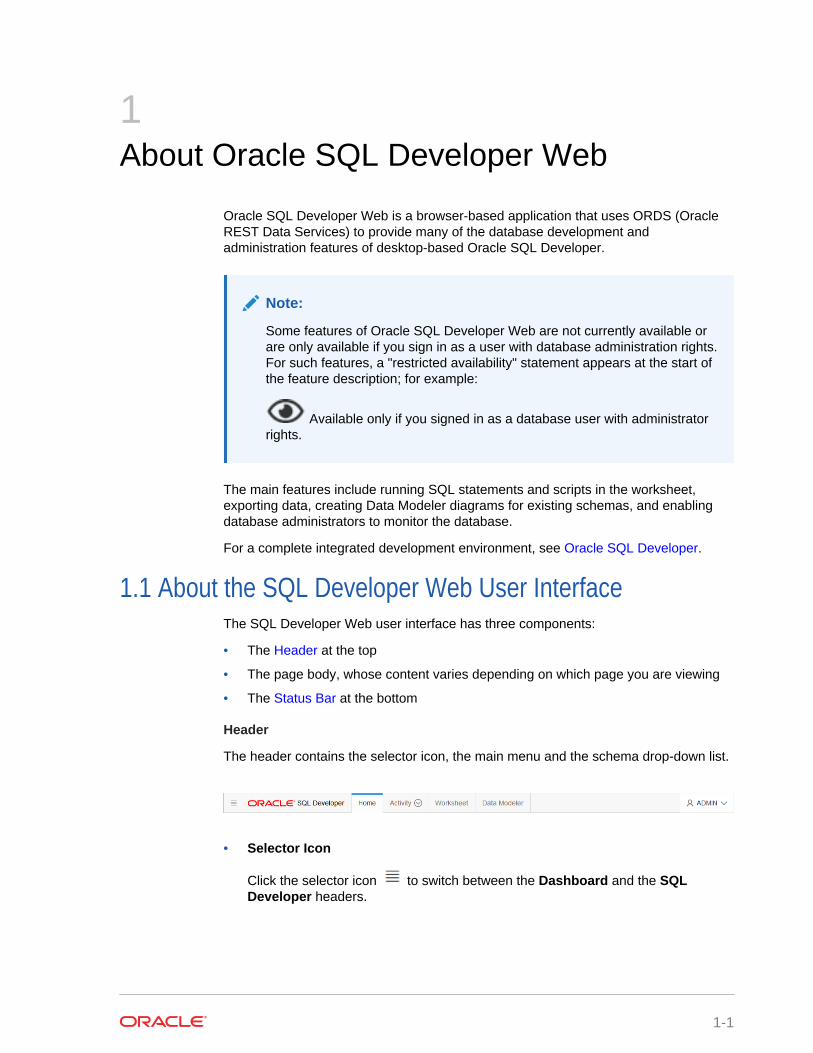
Header
The header contains the selector icon, the main menu and the schema drop-down list.
• Selector Icon
Click the selector icon to switch between the Dashboard and the SQLDeveloper headers.
1-1
• Main Menu
The main menu lists the pages available. The Dashboard is a single page and sohas no main menu. The SQL Developer header's main menu has the followingtabs:
– Home: Displays widgets that provide a general overview of the activity andstatus in SQL Developer Web. See The Home Page.
– Activity: Provides several pages to view the performance and othercharacteristics of your database. See The Activity Pages.
– Worksheet: Enables you to enter and execute SQL and PL/SQL commands.See The Worksheet Page.
– Data Modeler: Enables you to create diagrams from existing databaseschemas, generate DDL statements, and create reports. See The DataModeler Page.
• Schema Drop-Down List
The schema drop-down list shows the database user you are signed in as, andprovides the following items when you open it:
– Preferences: Opens a dialog that lets you set your preferred time zone.
– Log: Opens a dialog that shows the list of HTTP calls made during your SQLDeveloper Web session.
– Help: Opens online help for the page you are viewing in a new browser tab.
– About: Opens a dialog providing version information for the database andother components as well as copyright and licensing information.
– Sign Out: Signs you out of your database session.
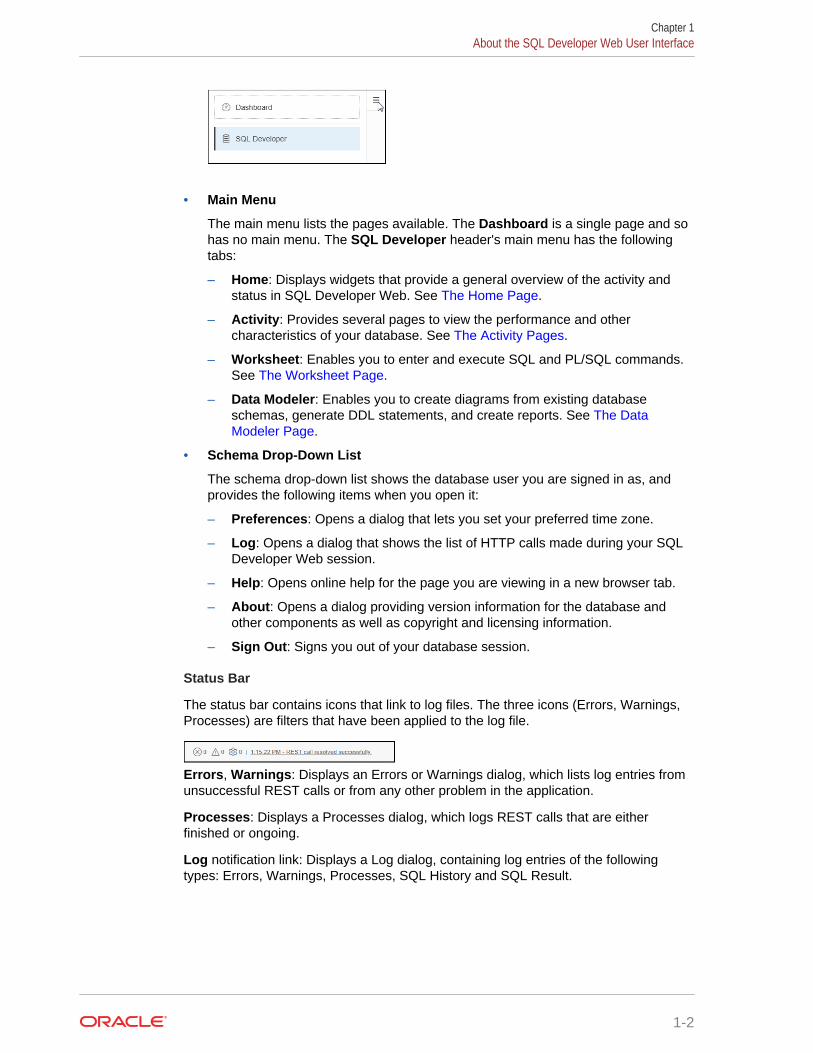
Status Bar
The status bar contains icons that link to log files. The three icons (Errors, Warnings,Processes) are filters that have been applied to the log file.
Errors, Warnings: Displays an Errors or Warnings dialog, which lists log entries fromunsuccessful REST calls or from any other problem in the application.
Processes: Displays a Processes dialog, which logs REST calls that are eitherfinished or ongoing.
Log notification link: Displays a Log dialog, containing log entries of the followingtypes: Errors, Warnings, Processes, SQL History and SQL Result.
Chapter 1About the SQL Developer Web User Interface
1-2
1.2 Accessing Oracle SQL Developer WebOracle SQL Developer Web runs in Oracle REST Data Services and access to it isprovided through schema-based authentication. To use Oracle SQL Developer Web,you must sign in as a database user whose schema has been enabled for SQLDeveloper Web.
In Oracle Autonomous Database databases, the ADMIN user is pre-enabled for SQLDeveloper Web. To enable another database user's schema, see Enabling UserAccess to SQL Developer Web.
In the SQL Developer Web login page, enter the user name and the password of thedatabase user for the enabled schema. Then, click Sign In. The Worksheet page isdisplayed.
1.2.1 Enabling User Access to SQL Developer WebTo enable a database user to sign into SQL Developer Web, run the following code asthe ADMIN user:
BEGIN ords_admin.enable_schema( p_enabled => TRUE, p_schema => 'schema-name', p_url_mapping_type => 'BASE_PATH', p_url_mapping_pattern => 'schema-alias', p_auto_rest_auth => NULL ); commit;END;
where:
• schema-name is the database schema name in all-uppercase.
• schema-alias is an alias for the schema name that will appear in the URL the userwill use to access SQL Developer Web. Oracle recommends that you do not usethe schema name itself as a security measure to keep the schema name frombeing exposed.
After enabling user access, do the following:
1. The default URL for logging in as an administrator user to the SQL Developer Webpre-login page ends with ..ords/admin/sign-in or ..ords/admin/_sdw.Change the URL to ..ords/sql-developer:
http://<domain name>/ords/sql-developer
2. Enter the Username (schema-alias) and click Next. You see the URL changeto /ords/<schema alias>.
3. In the SQL Developer Web login page, enter the password and click Sign in.
When you log out, you return to the pre-login page (/ords/sql-developer) and areprompted for the user name (schema-alias) again.
Chapter 1Accessing Oracle SQL Developer Web
1-3
2The Dashboard
Available only if you signed in as a database user with administrator rights.
The Dashboard displays general status information about the database and providesquick links to commonly used pages.
• Database Status: Displays the overall status of the database.
• Alerts: Displays the number of Error alerts in the alert log. You can click this itemto open the Alerts page.
• Database Storage: Displays how much storage is being used by the database.You can click this item to open the Storage page.
• Sessions: Displays the status of open sessions in the database. You can click thetitle to open the Sessions page.
• Physical IO Panel: Displays the rates of physical reads and writes of databasedata.
• Waits: Displays how many wait events are occurring in the database by wait eventclass.
• Quick Links: Provides buttons to open the Worksheet, Data Modeler, andPerformance Hub pages. It also provides a button to open the Oracle ApplicationExpress sign-in page for the current database.
2-1
3The Home Page
The Home page contains widgets that provide a general overview of the activity andstatus in SQL Developer Web.
• My Worksheets: Displays the worksheets that have been created or modified.You can click the name of the worksheet to open it in the Worksheet page.
• My Diagrams: Displays the Data Modeler diagrams that have been created ormodified. You can click the name of the diagram to open it in the Data Modelerpage.
• Recently Modified Objects: Displays a timeline of the created, modified, anddropped objects in the database. You can zoom in and out using the + and –icons. You can also move horizontally by dragging the cursor to the right or left.
• Invalid Objects: Displays the invalid objects in the database.
• Table Stats Freshness: Displays the time period since the tables were lastanalyzed.
You can right-click the header in Invalid Objects, Table Stats Freshness, MyWorksheets, or My Diagrams to manage or sort columns:
• Columns: Enables you to select columns to show or hide.
• Sort: Displays a dialog box for selecting columns to sort by. For each column, youcan specify ascending or descending order, and you can specify that null valuesbe displayed first.
Right-click the body of the display table to count rows or to view records:
• Count Rows: Displays the number of rows in the table.
• Single Record View: Enables you to view data for a table or view, one record at atime.
3-1

4The Activity Pages
Available only if you signed in to an Oracle Autonomous Database ondedicated Exadata infrastructure as a user with administrator rights.
The Activity menu on the SQL Developer Web header provides access to severalpages to view the performance and other characteristics of your database.
• The Activity Overview Page
• The Automatic Indexing Page
• The Performance Hub Page
• The Alerts Page
• The Sessions Page
• The Storage Page
4.1 The Activity Overview Page
Available only if you signed in to a dedicated Oracle Autonomous TransactionProcessing database as a user with administrator rights.
The Activity Overview page displays general information about the database.
• Used Online Database Storage: Displays how much storage is being used by thedatabase. You can click the title to open the Storage page.
• Users: Displays how many user accounts are in the open, locked and expiringstatuses. You can hover over one of the statuses to see a list of the user accountswith that status.
• Sessions: Displays the status of open sessions in the database. You can click thetitle to open the Sessions page.
• Waits: Displays how many wait events are occurring in the database for variousreasons. You can click the title to open the Performance Hub page.
4.2 The Automatic Indexing Page
Available only if you signed in to an Oracle Autonomous TransactionProcessing on dedicated Exadata infrasturcture release 19c database or later as auser with administrator rights.
The automatic indexing feature automates the index management tasks in an Oracledatabase. Automatic indexing automatically creates, rebuilds, and drops indexes in adatabase thus improving database performance.
The Automatic Indexing page consists of the following parts:
4-1
• Auto Index Settings: Use this page to configure settings for automatic indexing in adatabase.
• Activity Report: Use this page to configure settings related to generating reportsfor automatic indexing operations in a database.
Auto Index Settings
In the Activity Report page, click the (Open Settings) icon on the top right toconfigure settings for auto indexing. The Auto Indexing Settings page is displayed.
The configuration settings in the Auto Index Settings page are:
Indexing Mode
You can use the indexing mode configuration setting to enable or disable automaticindexing in a database. You can select one of the following values from the drop-downlist:
• IMPLEMENT: New auto indexes are created as visible indexes and any existinginvisible auto indexes are also set to visible indexes. In this mode, auto indexesare available to be used in SQL statements.
• REPORT ONLY: New auto indexes are created as invisible indexes and are notavailable to be used in SQL statements.
• OFF: The automatic indexing feature is disabled, that is, no new auto indexes arecreated and the existing auto indexes are disabled.
Retention Periods
• Automatic Indexes: Enter the number of days for which unused auto indexes areretained in the database, after which they are deleted. The default value is 373days.
• Manual Indexes: Enter the number of days for which unused manually createdindexes are retained in the database, after which they are deleted. When it is setto Default, the manually created indexes are not deleted by the automatic indexingprocess.
• Reports: Enter the number of days for which automatic indexing logs are retainedin the database before they are deleted. As the automatic indexing report isgenerated based on these logs, the automatic indexing report cannot begenerated for a period beyond this specified value. The default value is 31 days.
Schema Restrictions
You can specify schemas to include or exclude from using auto indexes. To specifythe schemas to include, select Include and then in the Schema name text box, enterthe schemas by selecting from the drop-down list. You can select multiple schemas.To remove a schema, click the x icon next to a schema name.
The automatic indexing process manages two schema lists, the inclusion list and theexclusion list. The inclusion list contains the schemas that can use auto indexes. Theexclusion list contains the schemas that cannot use auto indexes. Initially, both theselists are empty and all the schemas in the database can use auto indexes whenautomatic indexing is enabled for a database.
To apply the configuration settings, click Apply. To return to the Activity Report pagewithout applying the changes, click Cancel.
Chapter 4The Automatic Indexing Page
4-2
Activity Report
The report configuration settings in the Activity Report page are:
• Report Interval Time: Select the interval time of the report. You can select avalue from the drop-down list or you can set a custom interval time.
• Report Type: Select the format of the report. The available options are HTML,TXT, JSON, XML.
• Include Sections: Select the sections to include in the report. By default, if you donot select any section to include, all sections will be included. The sections in thereport are SUMMARY, INDEX_DETAILS, VERIFICATION_DETAILS, andERRORS.
• Report Level: Select the level of automatic indexing information to include in thereport. The values are BASIC, TYPICAL, and ALL.
• Exclude Sections: Select the sections to exclude from the report.
Click Preview to view a preview of the report based on the settings selected.
To download the report, click Download and the report is downloaded based on theformat selected in the Report Type field.
4.3 The Performance Hub Page
Available only if you signed in to a dedicated Oracle Autonomous TransactionProcessing database as a user with administrator rights.
The Performance Hub page shows performance data for a time period you specify. Itconsists of these parts:
• Time Range Area. Use the controls in time range area at the top of the page tospecify the time period for which you want to view performance data.
• ASH Analytics Tab. Use this tab to explore ASH (Active Session History)information across a variety of different dimensions for the specified time period.
• SQL Monitoring Tab. Use this tab to view the top 100 SQL statement executionsby different dimensions for the specified time period, and to view details of SQLstatement executions you select.
Time Range Area
Use these controls in the time range area to specify the time period for which you wantto view performance data:
• Timeframe Dropdown. Use this dropdown list, located in the top right of the timerange area, to set the timeframe displayed in the timeline. You can choose Lasthour, Last 8 hours, Last 24 hours, Last Week, or you can choose Custom anddefine your own timeframe.
• Timeline. The timeline displays a graph spanning the timeframe selected in thetimeframe dropdown, showing Waits, User I/O and CPU usage during the period.At its end is the time slider.
• Time Slider. The time slider is a box you can drag back and forth along thecurrent timeline. Use it to pick the specific time period within the timeframe for
Chapter 4The Performance Hub Page
4-3
which you want to view performance data. You can also drag the side handles onthe time slider to make it wider or narrower to encompass a longer or shorter timeperiod.
ASH Analytics Tab
The ASH Analytics tab consists of the Average Active Sessions chart and twosecondary tables below it.
• Average Active Sessions Chart. This chart shows performance information forthe time period defined by the time slider. You can choose to chart differentdimensions of information, such as Wait Class, Wait Event, or Service, byselecting the dimension from the dropdown list to the right of the chart title.
You can download an AWR (Automatic Workload Repository) report for the currenttime period by right-clicking in the Average Active Sessions chart area andchoosing Generate AWR Report.
For more information about ASH and AWR, see Active Session History (ASH) and Automatic Workload Repository (AWR) in Oracle Database Concepts.
• Secondary Tables. The two tables below the Average Active Sessions chartshow the information dimension chosen in the chart filtered by another dimensionyou choose. For example, if the Average Active Sessions chart is showing WaitClass, you could show SQL ID and User Session dimension information by WaitClass, one in each of the two secondary tables.
In the secondary tables, the SQL ID and User Session dimensions provide links toSQL Details and Session Details pages, respectively, for the dimension data listedin the table.
SQL Monitoring Tab
The SQL Monitoring tab shows a table of the top 100 monitored SQL statements thatwere executing or that completed during the selected time period.
The table displays information about monitored SQL statement executions. If there is agreen spinning icon in the Status column, then the monitored statement did notcomplete during the selected time period. A red cross indicates that the SQL did notcomplete either due to an error or due to the session getting terminated. If there is acheck mark in the Status column, then the statement completed its execution duringthe selected time period.
SQL statements are monitored only if they have consumed at least 5 seconds of CPUor I/O time.
You can view information such as the status of a statement, its duration, its type (SQL,PL/SQL, or DBOP), its SQL ID, its SQL plan hash, the user who issued it, whether itexecuted as a serial or parallel statement, the time the database spent performingCPU activity, I/O, or other activity for the statement, the read and write requests andbytes associated with the statement, and the start and end time for the statement.
Click a SQL ID to display the SQL Details page with more information about that SQLstatement.
Chapter 4The Performance Hub Page
4-4
4.4 The Alerts Page
Available only if you signed in to a dedicated Oracle Autonomous TransactionProcessing database as a user with administrator rights.
The Alerts page is a chronological log of messages and errors and is commonly usedto learn whether the background processes have encountered errors. You can reviewthe alert log periodically to verify that your database system is operating normally.
The alert log includes the following:
• Nondefault initialization parameters used at startup
• Administrative operations, such as STARTUP, SHUTDOWN, ARCHIVE LOG,RECOVER, and CREATE/ALTER/ DROP DATABASE/TABLESPACE
• Messages and errors relating to the functions of certain background processes,such as LGWR
• Internal errors (ORA-600), block corruption errors (ORA-1578), and deadlockerrors (ORA-60)
You can search for a specific value in the log by selecting the display column in thefirst drop-down list, selecting the condition in the second drop-down list, entering thesearch value in the box, and clicking the search icon.
In the display table, if you right-click the header row, you see:
Columns: Enables you to select columns to show or hide.
Sort: Displays a dialog box for selecting columns to sort by. For each column, you canspecify ascending or descending order, and you can specify that null values bedisplayed first.
If you right-click any other part of the display table, you see:
Count Rows: Displays the number of rows in the table.
Single Record View: Enables you to view data for a table or view, one record at atime.
4.5 The Sessions Page
Available only if you signed in to a dedicated Oracle Autonomous TransactionProcessing database as a user with administrator rights.
The Sessions page shows information about all currently open sessions in thedatabase. The data is automatically refreshed at intervals ranging from 10 seconds to2 minutes. You can also refresh the data by clicking the Refresh icon at the top right ofthe screen.
The table shows summarized data about each open session. Select a session in thetable to see more detailed data in the Session Details table below, such as the lastSQL statement, explain plan, waits, contention, and so on. You can use the Column,Operator and Value fields to search for the required sessions.
In the display table, if you right-click the header row, you see:
Chapter 4The Alerts Page
4-5
Columns: Enables you to select columns to show or hide.
Sort: Displays a dialog box for selecting columns to sort by. For each column, you canspecify ascending or descending order, and you can specify that null values bedisplayed first.
If you right-click any other part of the display table, you see:
Count Rows: Displays the number of rows in the table.
Single Record View: Enables you to view data for a table or view, one record at atime.
4.6 The Storage Page
Available only if you signed in to a dedicated Oracle Autonomous TransactionProcessing database as a user with administrator rights.
The Storage page shows the storage used based on the current allocation oftablespaces along with additional drill-down capabilities to view segments. You canrefine the list of segments shown by using the filter feature. Click View Datafiles toview the datafiles in each tablespace.
You can view tablespace and segment space usage.
A tablespace is a database storage unit that groups related logical structures together.A tablespace is comprised of datafiles. A segment is a set of extents allocated from atablespace for a specific database object such as a table or index.
To view space usage information
1. From the Database drop-down menu, click Storage.
The Storage page displays. If the Oracle database is version 12c or later, theStorage page shows the used and allocated storage space for tablespaces in anypluggable database. If the Oracle database is version 11g, the Storage pageshows the used and allocated space for the entire database.
2. You can click a tablespace to view its storage information. An interactive reportappears, showing the segments that exist within the tablespace. Most segmentsare user objects, and they include tables, LOBs, and indexes.
3. On the Segments page, you can refine the list of segments shown by using thefilter feature.
For example, you can search for all the segments for a specific owner (schema) byselecting OWNER from the first drop-down list, entering the owner (schema) namein the box, and clicking the search icon.
Chapter 4The Storage Page
4-6
5The Worksheet Page
The Worksheet page provides a code editor that is used to enter and execute SQLand PL/SQL statements.
You can use SQL and PL/SQL statements in the worksheet to create a table, insertdata, create and edit a trigger, select data from a table, and save that data to a file.Some other features are syntax highlighting and error detection.
Database administrators can also access the worksheet from the Quick Links pane inDashboard.
The Worksheet page consists of the left pane for navigating worksheets and objects,the editor for executing SQL statements, and the output pane for viewing the results.These panes are described in the following sections:
• Navigating Objects and Worksheets
• Executing SQL Statements in the Worksheet Editor
– Shortcut Keys in the Worksheet
• Viewing the Worksheet Output
• Loading Data from a Local File to an Existing Table
• Loading Data from a Local File to a New Table
5.1 Navigating Objects and WorksheetsThe Navigator tab in the left pane displays the saved objects for the selected schema.The drop-down menus enable you to select the schema for which you want to see theobjects, and filter the results by object type.
The Worksheets tab displays the worksheets that are saved in the browser. Theworksheets displayed are dependent on the browser used (Internet Explorer, MozillaFirefox, or Google Chrome) for the SQL Developer Web session at the time of savingthe worksheet, and they will not be accessible from any other browser. You can openor delete an existing worksheet by using the context (right-click) menu.
You can also search the contents of a saved worksheet or search for objects in theNavigator tab by name. The search functionality is not case-sensitive, retrieves allmatching entries and does not require the use of wildcard characters.
Using the context (right-click) menu for objects in the Navigator tab, you can createand edit objects, add indexes and synonyms, and upload data from local files intoexisting tables.
To refresh the objects or worksheets list, click the icon. To create a new object,
click the icon.
For context-related help, click the icon.
5-1
You can drag objects from the Navigator and drop them into the worksheet editor inthe right pane:
• If you drag and drop a table or view, you are prompted to select one of thefollowing SQL statements: Insert, Update, Select, or Delete. For example, if youchoose Select, a Select statement is constructed with all columns in the table orview. You can then edit the statement, for example, modifying the column list oradding a WHERE clause.
If you choose Object Name, the name of the object prefixed by the schema nameis added to the worksheet.
• If you drag and drop a function or procedure, you can choose to insert the name orthe PL/SQL code of the function or procedure in the worksheet. If you select thePL/SQL code, you can enter the parameters before inserting the code into theworksheet.
5.2 Executing SQL Statements in the Worksheet EditorThe worksheet editor in the right pane enables you to enter the SQL statements thatyou intend to execute. You can use SQL and PL/SQL statements to specify actionssuch as creating a table, inserting data, selecting data or deleting data from a table.For multiple statements, each non-PL/SQL statement must be terminated with either asemicolon or (on a new line) a slash (/), and each PL/SQL statement must beterminated with a slash (/) on a new line. SQL keywords are automatically highlighted.
For a list of the SQL*Plus statements that are supported by the SQL Worksheet, see Supported SQL*Plus Statements.
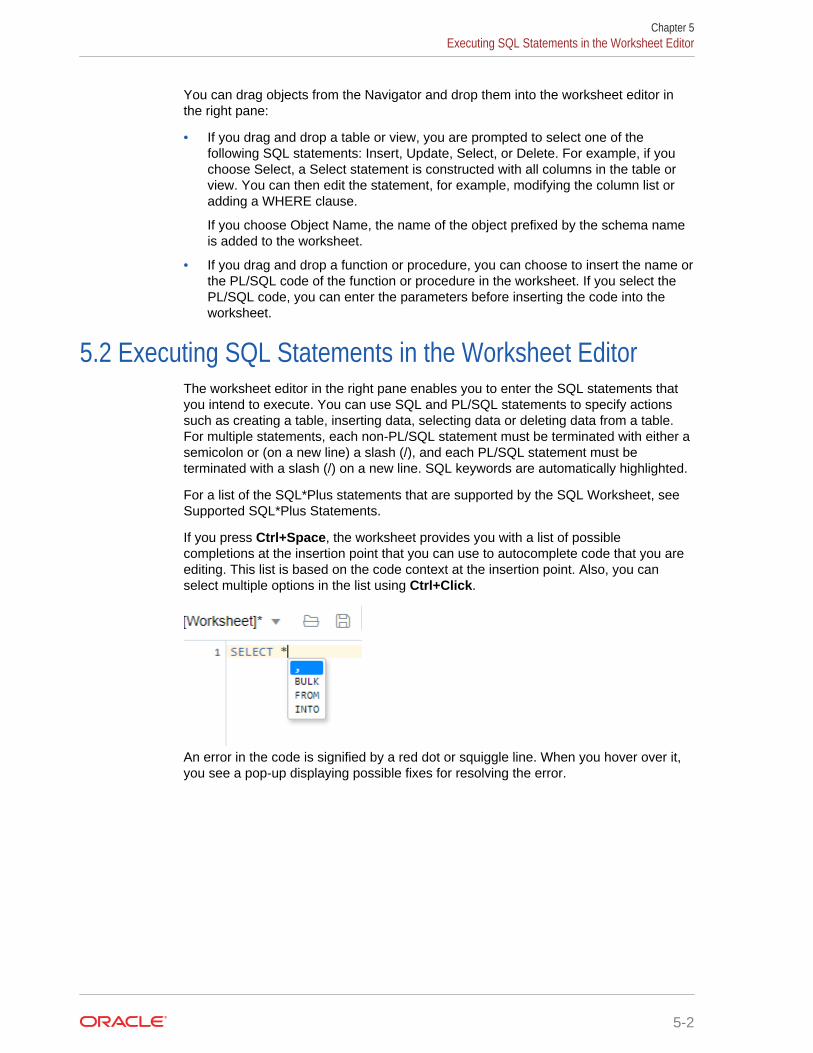
If you press Ctrl+Space, the worksheet provides you with a list of possiblecompletions at the insertion point that you can use to autocomplete code that you areediting. This list is based on the code context at the insertion point. Also, you canselect multiple options in the list using Ctrl+Click.
An error in the code is signified by a red dot or squiggle line. When you hover over it,you see a pop-up displaying possible fixes for resolving the error.
Chapter 5Executing SQL Statements in the Worksheet Editor
5-2
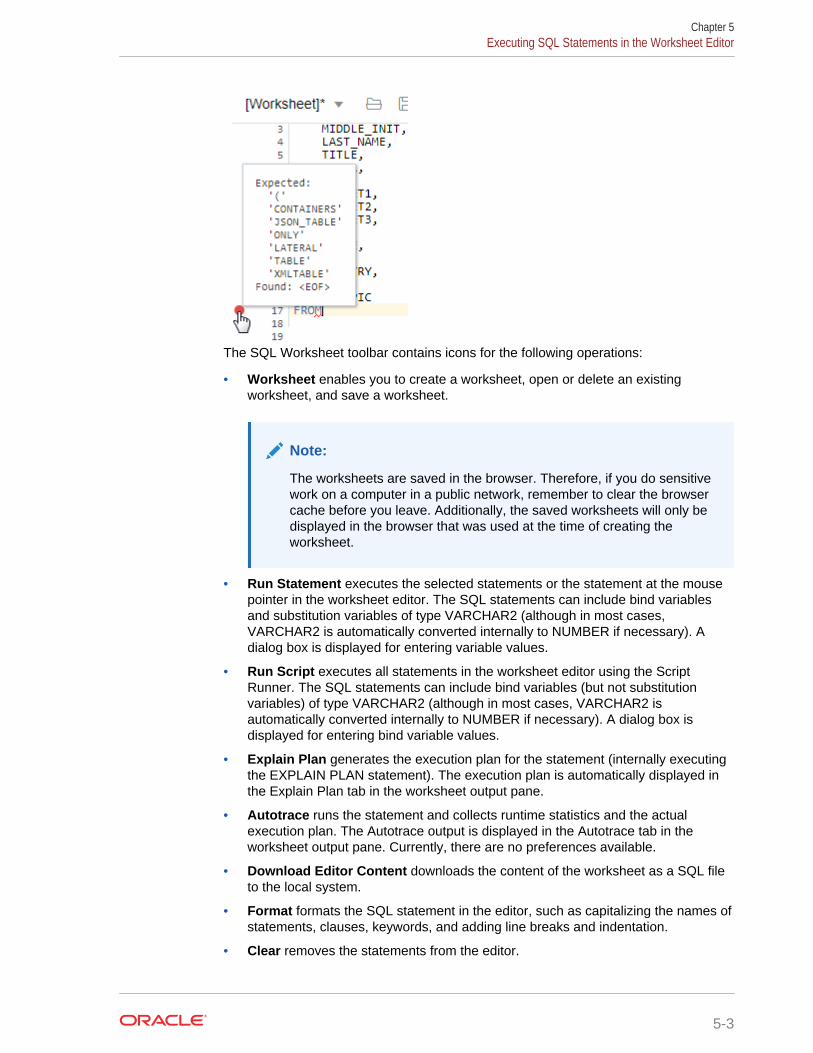
The SQL Worksheet toolbar contains icons for the following operations:
• Worksheet enables you to create a worksheet, open or delete an existingworksheet, and save a worksheet.
Note:
The worksheets are saved in the browser. Therefore, if you do sensitivework on a computer in a public network, remember to clear the browsercache before you leave. Additionally, the saved worksheets will only bedisplayed in the browser that was used at the time of creating theworksheet.
• Run Statement executes the selected statements or the statement at the mousepointer in the worksheet editor. The SQL statements can include bind variablesand substitution variables of type VARCHAR2 (although in most cases,VARCHAR2 is automatically converted internally to NUMBER if necessary). Adialog box is displayed for entering variable values.
• Run Script executes all statements in the worksheet editor using the ScriptRunner. The SQL statements can include bind variables (but not substitutionvariables) of type VARCHAR2 (although in most cases, VARCHAR2 isautomatically converted internally to NUMBER if necessary). A dialog box isdisplayed for entering bind variable values.
• Explain Plan generates the execution plan for the statement (internally executingthe EXPLAIN PLAN statement). The execution plan is automatically displayed inthe Explain Plan tab in the worksheet output pane.
• Autotrace runs the statement and collects runtime statistics and the actualexecution plan. The Autotrace output is displayed in the Autotrace tab in theworksheet output pane. Currently, there are no preferences available.
• Download Editor Content downloads the content of the worksheet as a SQL fileto the local system.
• Format formats the SQL statement in the editor, such as capitalizing the names ofstatements, clauses, keywords, and adding line breaks and indentation.
• Clear removes the statements from the editor.
Chapter 5Executing SQL Statements in the Worksheet Editor
5-3
• Tour provides a guided tour of the worksheet highlighting salient features andproviding information that is useful if you are new to the interface.
• Help provides context-related help and provides a link to the help documentation.
For a list of shortcuts used in the worksheet, see Shortcut Keys in the Worksheet.
Related Topics
• Execution Plan in Oracle SQL Developer User's Guide
• Autotrace Pane in Oracle SQL Developer User's Guide
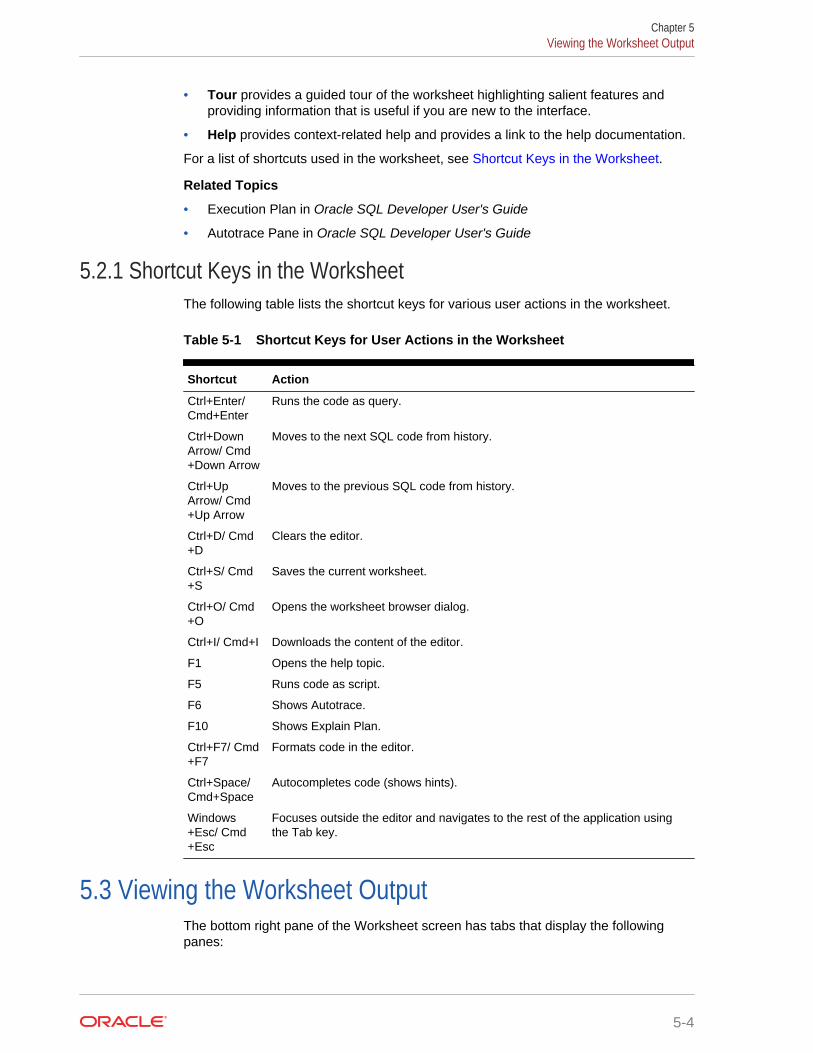
5.2.1 Shortcut Keys in the WorksheetThe following table lists the shortcut keys for various user actions in the worksheet.
Table 5-1 Shortcut Keys for User Actions in the Worksheet
Shortcut Action
Ctrl+Enter/Cmd+Enter
Runs the code as query.
Ctrl+DownArrow/ Cmd+Down Arrow
Moves to the next SQL code from history.
Ctrl+UpArrow/ Cmd+Up Arrow
Moves to the previous SQL code from history.
Ctrl+D/ Cmd+D
Clears the editor.
Ctrl+S/ Cmd+S
Saves the current worksheet.
Ctrl+O/ Cmd+O
Opens the worksheet browser dialog.
Ctrl+I/ Cmd+I Downloads the content of the editor.
F1 Opens the help topic.
F5 Runs code as script.
F6 Shows Autotrace.
F10 Shows Explain Plan.
Ctrl+F7/ Cmd+F7
Formats code in the editor.
Ctrl+Space/Cmd+Space
Autocompletes code (shows hints).
Windows+Esc/ Cmd+Esc
Focuses outside the editor and navigates to the rest of the application usingthe Tab key.
5.3 Viewing the Worksheet OutputThe bottom right pane of the Worksheet screen has tabs that display the followingpanes:
Chapter 5Viewing the Worksheet Output
5-4
• Query Result: Displays the results of the most recent Run Statement operation ina display table.
• Script Output: Displays the text output from your statements executed as a scriptusing SQL Developer Web's script engine.
• DBMS Output: Displays the output of DBMS_OUTPUT package statements.
• Explain Plan: Displays the plan for your query using the Explain Plan command.
• Autotrace: Displays the session statistics and execution plan from v$sql_planwhen executing a SQL statement using the Autotrace feature. Displays the outputif you clicked the Autotrace icon.
• SQL History: Displays the SQL statements and scripts that you have executed.To re-enter a previously executed query in the worksheet, double-click the query inthe history list. You can search for specific statements by clicking the Search icon.The Search functionality is case-sensitive, retrieves all entries that contain thesearch text, and does not require wildcard characters.
The icons in this pane are:
• Clear output: Clears the output.
• Show info: Displays the SQL statement for which the output is displayed.
• Open in new tab: Opens the query result or explain plan in a new window.
• Download: This is applicable only for Query Result. Enables you to download thequery result to your local computer in CSV, JSON, XML, or TEXT (.tsv) format.
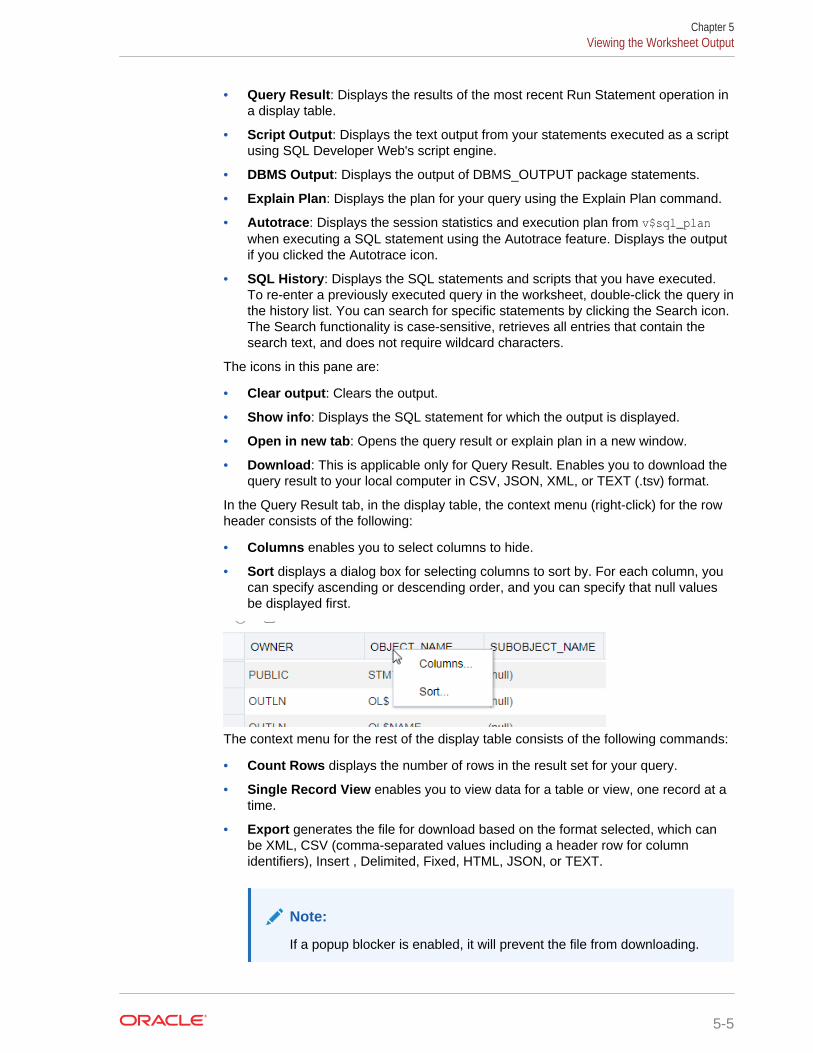
In the Query Result tab, in the display table, the context menu (right-click) for the rowheader consists of the following:
• Columns enables you to select columns to hide.
• Sort displays a dialog box for selecting columns to sort by. For each column, youcan specify ascending or descending order, and you can specify that null valuesbe displayed first.
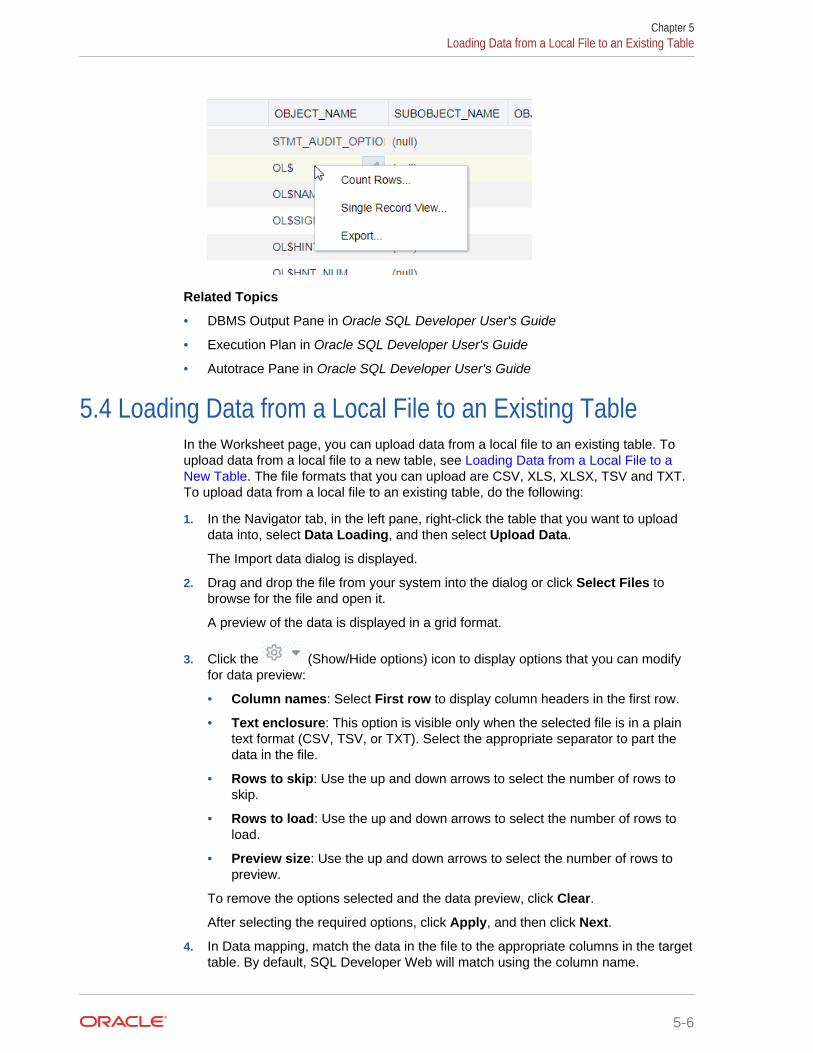
The context menu for the rest of the display table consists of the following commands:
• Count Rows displays the number of rows in the result set for your query.
• Single Record View enables you to view data for a table or view, one record at atime.
• Export generates the file for download based on the format selected, which canbe XML, CSV (comma-separated values including a header row for columnidentifiers), Insert , Delimited, Fixed, HTML, JSON, or TEXT.
Note:
If a popup blocker is enabled, it will prevent the file from downloading.
Chapter 5Viewing the Worksheet Output
5-5
Related Topics
• DBMS Output Pane in Oracle SQL Developer User's Guide
• Execution Plan in Oracle SQL Developer User's Guide
• Autotrace Pane in Oracle SQL Developer User's Guide
5.4 Loading Data from a Local File to an Existing TableIn the Worksheet page, you can upload data from a local file to an existing table. Toupload data from a local file to a new table, see Loading Data from a Local File to aNew Table. The file formats that you can upload are CSV, XLS, XLSX, TSV and TXT.To upload data from a local file to an existing table, do the following:
1. In the Navigator tab, in the left pane, right-click the table that you want to uploaddata into, select Data Loading, and then select Upload Data.
The Import data dialog is displayed.
2. Drag and drop the file from your system into the dialog or click Select Files tobrowse for the file and open it.
A preview of the data is displayed in a grid format.
3. Click the (Show/Hide options) icon to display options that you can modifyfor data preview:
• Column names: Select First row to display column headers in the first row.
• Text enclosure: This option is visible only when the selected file is in a plaintext format (CSV, TSV, or TXT). Select the appropriate separator to part thedata in the file.
• Rows to skip: Use the up and down arrows to select the number of rows toskip.
• Rows to load: Use the up and down arrows to select the number of rows toload.
• Preview size: Use the up and down arrows to select the number of rows topreview.
To remove the options selected and the data preview, click Clear.
After selecting the required options, click Apply, and then click Next.
4. In Data mapping, match the data in the file to the appropriate columns in the targettable. By default, SQL Developer Web will match using the column name.
Chapter 5Loading Data from a Local File to an Existing Table
5-6
To modify, click the Show/Hide options icon. In Match columns by:
• Select Name to match columns based on the name of the column in the targettable.
• Select Position if you want to match columns based on the position of thecolumn in the target table.
• Select None to remove the current selections and to select the target columnfor each source column from the drop-down list.
Note:
SQL Developer Web will attempt to retrieve the correct format mask ofdate-based columns based on the data in the file, but it will still enableyou to change the suggested format by entering the required formatdirectly in the target column.
If there are any issues to be resolved, you see a notification such as
on the top right that provides details about the issue tobe fixed.
Click Next.
5. A summary of the previous screens is displayed. Click Finish.
The data will start uploading to the target table. After it is completed, an entry isadded to the Log with the status of the operation. To view the Log, click thetimestamp notification at the bottom of the page. If the operation is successful, aData Import Completed notification is displayed.
6. For a detailed summary of the upload process, right-click the table in the Navigatortab, select Data Loading, and then select History. A summary of the data loadedis displayed in the Data Loading History dialog.
If any data failed to load, you can view the number of rows in the Failed Rowscolumn. Click the column and a dialog is displayed showing the failed rows.
In the Data Loading History dialog, you can also search for files loaded by schemaname, table name, or file name. To remove the loaded files, click the Delete icon.
5.5 Loading Data from a Local File to a New TableIn the Worksheet page, you can load data from a local file into a new table. The fileformats that you can upload are CSV, XLS, XLSX, TSV and TXT. To upload data froma local file to a new table, do the following:
1. You can start in one of the following ways:
• In the Navigator tab, in the left pane, click , select Data Loading, and thenselect Upload Data into New Table.
• In the Navigator tab, drag and drop the local file into the left pane. When youdrag a file into the pane, the following message is displayed Drop the filehere to start.
Chapter 5Loading Data from a Local File to a New Table
5-7
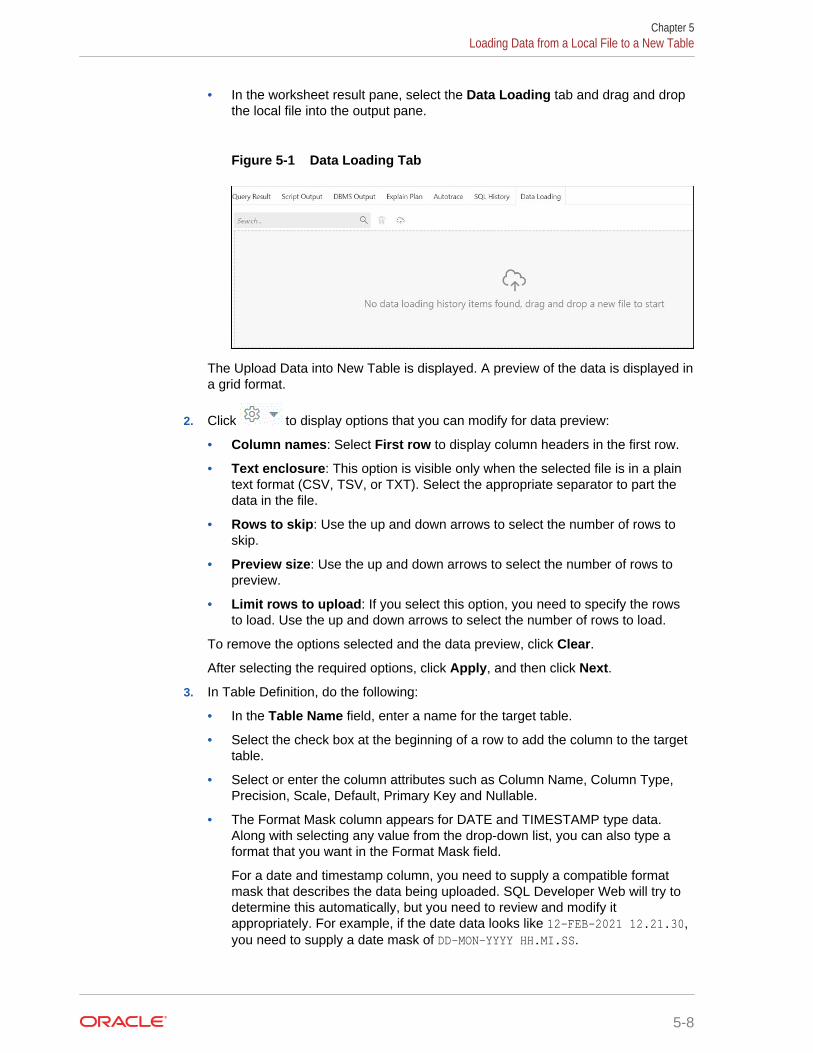
• In the worksheet result pane, select the Data Loading tab and drag and dropthe local file into the output pane.
Figure 5-1 Data Loading Tab
The Upload Data into New Table is displayed. A preview of the data is displayed ina grid format.
2. Click to display options that you can modify for data preview:
• Column names: Select First row to display column headers in the first row.
• Text enclosure: This option is visible only when the selected file is in a plaintext format (CSV, TSV, or TXT). Select the appropriate separator to part thedata in the file.
• Rows to skip: Use the up and down arrows to select the number of rows toskip.
• Preview size: Use the up and down arrows to select the number of rows topreview.
• Limit rows to upload: If you select this option, you need to specify the rowsto load. Use the up and down arrows to select the number of rows to load.
To remove the options selected and the data preview, click Clear.
After selecting the required options, click Apply, and then click Next.
3. In Table Definition, do the following:
• In the Table Name field, enter a name for the target table.
• Select the check box at the beginning of a row to add the column to the targettable.
• Select or enter the column attributes such as Column Name, Column Type,Precision, Scale, Default, Primary Key and Nullable.
• The Format Mask column appears for DATE and TIMESTAMP type data.Along with selecting any value from the drop-down list, you can also type aformat that you want in the Format Mask field.
For a date and timestamp column, you need to supply a compatible formatmask that describes the data being uploaded. SQL Developer Web will try todetermine this automatically, but you need to review and modify itappropriately. For example, if the date data looks like 12-FEB-2021 12.21.30,you need to supply a date mask of DD-MON-YYYY HH.MI.SS.
Chapter 5Loading Data from a Local File to a New Table
5-8

Figure 5-2 Table Definition Step in Upload Data into New Table
Click Next.
4. Review the generated DDL code based on the selections made in the previousscreens. The mapping of the source to target columns are also displayed.
Click Finish. After the data is successfully uploaded, the new table is displayed inthe Navigator pane.
5. For a detailed report of the total and failed rows uploaded, do one of the following:
• Right-click the table in the Navigator tab, select Data Loading, and then selectHistory. This displays the report for a specific table.
• In the Navigator pane, select , select Data Loading, and then selectHistory. This displays the report for all tables in the schema that is currentlyselected in the object Navigator.
• In the worksheet result pane, select the Data Loading tab. This displays thereport for all visible tables by the current user (including tables from otherschemas).
A summary of the data loaded is displayed in the History dialog. If any data failedto load, you can view the number of rows in the Failed Rows column. Click thefailed rows number and a dialog is displayed showing the failed rows. In theHistory dialog, you can also search for files loaded by schema name, table name,or file name. To remove the loaded files, click the Delete icon.
Chapter 5Loading Data from a Local File to a New Table
5-9
6The Data Modeler Page
The Data Modeler page provides an integrated version of Oracle SQL Developer DataModeler with basic reporting features. You can create diagrams from existingschemas, retrieve data dictionary information, generate DDL statements, and exportdiagrams.
Note:
You can create and edit objects for your schema in the Data Modelerinterface.
• Navigating Diagrams and Objects
• About the Data Modeling Editor
Related Topics
• Oracle SQL Developer Data Modeler User's Guide
6.1 Navigating Diagrams and ObjectsThe Diagrams tab lists the Data Modeler diagrams that have been saved. When youright-click a diagram, you have options to open, save, delete, and view properties.When you click a diagram in the list, a thumbnail preview is shown with an option toopen the diagram.
• To create a new diagram, in the Diagrams tab, click the icon next to the Searchfield.
• To open an existing diagram, in the Diagrams tab, select or right-click the diagram,and then click Open.
Note:
Diagrams are stored in the database, in the SQL Developer Web userschema. When you use Data Modeler for the first time, a OSDDMW_DIAGRAMStable is created in your schema, to store the diagrams.
Oracle SQL Developer Data Modeler can import from or export to theOSDDMW_DIAGRAMS table if a connection is provided. For moreinformation, see Sharing Diagrams with SQL Developer Data Modeler.
The Navigator tab lists the objects that are available for each schema. You can selectthe schema and object type from the drop-down lists. For a particular schema, if a
6-1
tables object is selected, the left pane displays all the tables that belong to theparticular schema. You can expand a table to view its columns. You can drag and dropan object into a selected diagram in the right pane. You can also add objects to thediagram by clicking the Add Objects to Diagram icon in the editor pane.
You can also search the contents of a saved diagram or search for objects in theNavigator tab by name. The search functionality is not case-sensitive, retrieves allmatching entries and does not require the use of wildcard characters.
The context menu for a table or view consists of:
Add Object to Diagram: Adds the selected object to the selected diagram.
Add Object with dependencies to Diagram: Adds parent and child tables related tothe object to the selected diagram.
Add Object as Star Schema to Diagram: Adds the selected object to the diagramand searches the data dictionary for foreign keys and implied foreign keys related tothe object. The related tables or views are added to the diagram and the star schemalayout is applied. See Implied Foreign Keys
New, Edit, Use as Template: Creates a new object (such as table or view) for aspecific schema, edits an existing object, or creates a new object by using an existingone for the initial content. See The Table Properties Dialog and The View PropertiesDialog.
Add/Edit Sequence: To create or edit a sequence for a selected schema. See TheSequence Properties Dialog.
Add Index: To create an index for a table. See The Index Properties Dialog.
6.2 About the Data Modeling EditorYou can create and work with relational diagrams in the editor pane.
When an object is selected, you can inspect the properties of the object in the rightpane. The only properties that you can edit are background and border color. Forexample, when a table is selected, the properties displayed are Columns, PrimaryKey, Unique Constraints, Indexes, Foreign Keys, Comments, and Colors. You can editthe background and border color by selecting from the color palette in the Pick a Colordialog box. Click the Reset icon next to the Background and Border Color fields toreturn to the default colors.
When creating diagrams, you can do the following:
• Move objects around by dragging the mouse.
• Adjust or move objects with the relationships intact.
• Add elbows to relationship lines to avoid intersecting with lines from other objects.Right-click the relationship line and drag to create the elbow. Click the X icon torestore to the original shape.
• Resize objects by dragging the handles that are positioned around the box.
• Right-click an object for options to preview DDL statements, update, delete, edit,or define implied foreign keys.
The Data Modeler toolbar icons are:
Chapter 6About the Data Modeling Editor
6-2
• Save Diagram: Saves the currently selected diagram. Diagrams are stored in atable that are created in the schema of the user.
• Print Diagram: Prints the selected diagram.
• Save to SVG: Saves the currently selected diagram to an image file in SVGformat.
• Add Objects to Diagram: A dialog is displayed where you can select one or moreobjects from a specific schema into the selected diagram. Type * or a fewcharacters in the search field to list the objects from the selected schema.
• Add Note: Adds notes to the selected diagram. Select the note to see theassociated properties in the right pane, such as Text and Colors.
– To enter text, expand the TEXT box and type information.
– To select the background, border, or text color for the note, click the box andselect the required color. To revert to the default color, click the Reset icon.
• Delete: Deletes the selected object or objects from the diagram. To select multipleobjects, press the CTRL key and select the objects.
• Zoom In: Displays more detail, and potentially fewer objects, in the currentlyselected diagram.
• Zoom Out: Displays less detail, and potentially more objects, in the currentlyselected diagram.
• Fit Screen: Makes all relevant objects fit in the window for the currently selecteddiagram, adjusting the sizes of shapes and text labels as needed.
• Actual Size: Adjusts the shapes and text labels in the currently selected diagramto the default sizes.
• Layout: Auto Layout: Rearranges the objects in the diagram to a layout that maybe more meaningful and attractive. If you do not like the rearrangement, you canrestore the previous layout by clicking Undo.
• Layout: Star Layout: Rearranges the objects in the diagram to a star schemalayout, where the fact table is in the center and the associated dimension tablessurround the fact table.
• DDL Preview: Shows the DDL statements that would be generated to create theobject. You can preview the DDL for selected objects by dragging the cursor overthe objects that you want to preview and clicking DDL Preview. You have theoption to save or send the DDL statements to the worksheet. To specify options onhow to generate the DDL, click Options.
• DDL Preview for Current Schema: Shows the DDL statements that would begenerated for the current schema. You can send the DDL statements to theworksheet. To specify DDL options for the schema, click Options.
• Diagram Report: Generates a report for tables and views in the selected diagram.
• Schema Report: Generates a report for tables and views in the selected schema.
• Help: Displays the help for the Data Modeling editor.
Chapter 6About the Data Modeling Editor
6-3
7Creating and Editing Database Objects
You can create and edit objects for some object types by using the context menu inthe Navigator tab. If you do not have any existing objects for the object type (such astables), you can create objects by using the New Object icon, after first selecting theobject type from the drop-down list. For all objects, the context menu includes QuickDDL, which saves the DDL statements for creating the object to a worksheet or to atext file. The various object types and the corresponding options are:
• Tables: Tables are used to hold data. Each table has multiple columns thatdescribe the attributes of the database entity associated with the table, and eachcolumn has an associated data type.
You can create new tables, edit existing tables, and add indexes by using theoptions available in the context menu. Or you can select Use as Template, whichdisplays the dialog box with information for the selected object filled in. You shouldthen change the object name and any other aspects of the definition, as needed,to create a new object of that type. For a description of the fields, see The TableProperties Dialog.
• Views: Views are virtual tables that select data from one or more underlyingtables. For information about creating and editing a view, see The View PropertiesDialog.
• Indexes: An index contains an entry for each value that appears in the indexedcolumn of the table and provides direct, fast access to rows. For information aboutcreating and editing an index for a table, see The Index Properties Dialog.
• Packages, Functions, Procedures: A package contains subprograms, which areprogramming objects that can be stored and executed in the database server, andcalled from other programming objects or applications. A package can containfunctions or procedures, or both. Select Run from the context menu to insert thecode for a selected function, procedure, or package into the worksheet.
• Triggers: Triggers are stored PL/SQL blocks associated with a table, a schema,the database, or anonymous PL/SQL blocks or calls to a procedure implementedin PL/SQL or Java.
• Types: A data type associates a fixed set of properties with the values that can beused in a column of a table or in an argument of a function or procedure.
• Sequences: Sequences are used to generate unique integers. You can usesequences to automatically generate primary key values. For information aboutcreating and editing a sequence, see The Sequence Properties Dialog.
• Materialized View: A materialized view is a database object that contains theresults of a query. The FROM clause of the query can name tables, views, andother materialized views. For information about creating and editing a materializedview, see Materialized View.
• Materialized Views Logs: A materialized view log is a table associated with themaster table of a materialized view. When DML changes are made to master tabledata, Oracle Database stores rows describing those changes in the materializedview log and then uses the materialized view log to refresh materialized views
7-1
based on the master table. For information about creating and editing amaterialized view log, see The Materialized View Log Properties Dialog.
• Synonyms, Public Synonyms: Synonyms provide alternative names for tables,views, sequences, procedures, stored functions, packages, materialized views,Java class database objects, user-defined object types, or other synonyms. Forinformation about creating a synonym, see The Synonym Properties Dialog.
• Database Links: A database link is a database object in one database thatenables you to access objects on another database. After you have created adatabase link, you can use it to refer to tables and views in the other database.
7.1 The Table Properties DialogThe Table Properties Dialog is displayed when you create a table, edit an existingtable, or create a table using an existing one as a template. To create or edit a table,do one of the following:
• In Worksheet, in the Navigator pane, select Tables in the object field, click ,and select Create Object.
• In Worksheet, right-click a table object in the Navigator tab to add or edit.
• The table options are also available when you right-click a table object in the DataModeler Navigator tab.
The table properties are grouped in several panes.
If you are editing an existing table, you can visit the panes in any order. If you clickCreate before you are finished creating the table, right-click the table name, selectEdit, and continue creating the table.
Note:
Editing a partitioned table is not recommended. To identify whether a table ispartitioned or not, right-click the table name and select Edit. If the table ispartitioned, a warning message will be displayed.
Schema: Database schema in which to create the table. By default, a new table iscreated in the existing schema or the schema that you are logged into.
Name: Name for the table.
The different panes in the dialog are described in the following sections:
• Columns pane
• Primary Key pane
• Unique Keys pane
• Indexes pane
• Foreign Keys pane
• Table Constraints pane
• Comments pane
Chapter 7The Table Properties Dialog
7-2
• Storage pane
• External Table Properties pane
• Materialized View
• DDL pane
• Output pane
Columns pane
Specifies properties for each column in the table.
General tab
Lists the columns currently in the table. To add a column, click the Add Column (+)icon, from the table below, select the column whose properties you want to add, andenter the details for each column. To delete a column, select the row and click theRemove Column (-) icon; to move a column up or down in the table definition, select itand use the up-arrrow and down-arrow buttons.
• Name: Name for the column.
• Datatype: Data type for the column.
• Default: If no value is specified, the default value inserted into the column when arow is inserted.
• Default on NULL: Applicable for Oracle Database 12c and later releases. If thisoption is selected, when a row is inserted into the table and the value specified forthe column is NULL, the default value is inserted into the column.
• Expression: Expression for computing the value in the column.
• Comments: Optional descriptive comments about the column. Use this field toprovide descriptions for the attributes.
In the table:
• PK: If this option is selected, the column becomes the primary key.
• Identity Column: If this option is selected, the column becomes an identitycolumn. This is applicable only for Oracle Database 12c and later releases. Formore details, see the Identity Column tab.
Constraints tab
Displays the Not Null and Check Constraints for a column. A check constraint requiresvalues in a column to comply with a specified condition.
• Not Null Constraint: Name: Name for the Not Null constraint.
• Not Null Constraint: Not Null: If this option is selected, the column must containdata. You cannot specify no value or an explicit null value for this column whenyou insert a row. If this option is not checked, the column can contain either dataor no data. A primary key column cannot be null.
• Check Constraint: Name: Name for the check constraint definition.
• Check Constraint: Constraint: Condition that must be met for a column to fulfillthe check constraint. You can use any valid CHECK clause (without the CHECKkeyword). For example, to indicate that the value in a numeric column namedRATING must be from 1 to 10, you can specify: rating >=1 and rating <= 10.
Chapter 7The Table Properties Dialog
7-3
• Enabled: If this option is selected, the constraint is checked when data is enteredor updated in the column.
• Deferrable: If this option is selected, you can defer checking the validity of theconstraint until the end of a transaction.
• Initially Immediate: If this option is selected, the constraint is checked wheneveryou add, update, or delete data from the column.
• Validate: If this option is selected, the existing data is checked to see if it conformsto the constraint.
Identity Column tab
Applicable for Oracle Database 12c and later releases. The Identity Column tab liststhe properties of the identity column. This tab becomes available only after the IdentityColumn checkbox is selected for the column in the General tab. An identity column isan autoincrement column that can be used to identify a table row. Only one identitycolumn can be specified for a table.
• Generate: Always means that values cannot be explicitly included for the identitycolumn in INSERT OR UPDATE statements, By Default means values for theidentity column are generated automatically if no values are specified explicitly, ByDefault on Null means values are generated for the column only when a NULLvalue is supplied.
• Start with: Starting value of the sequence.
• Increment: Interval between successive numbers in a sequence.
• Min value: Lowest possible value for the sequence. The default is 1 for anascending sequence and -(10^26) for a descending sequence.
• Max value: Highest possible value for the sequence. The default is 10^27 for anascending sequence and -1 for a descending sequence.
• Cache and Cache size: Cache causes sequence values to be preallocated incache, which can improve application performance; Cache size indicates thenumber of sequence values preallocated in cache. No Cache causes sequencevalues not to be preallocated in cache.
• Cycle: Indicates whether the sequence "wraps around" to reuse numbers afterreaching its maximum value (for an ascending sequence) or its minimum value (fora descending sequence). If cycling of values is not enabled, the sequence cannotgenerate more values after reaching its maximum or minimum value.
• Order: Indicates whether sequence numbers are generated in the order in whichthey are requested. If No Order is specified, sequence numbers are notguaranteed to be in the order in which they were requested.
Primary Key pane
Specifies the primary key for the table. The primary key is the column, or set ofcolumns, that uniquely identifies each row in the table. If the Primary Key checkbox isselected for a column in the General tab, the corresponding fields are automaticallypopulated in the Primary Key pane. You can make changes to the properties asrequired.
An index is automatically created on the primary key.
• Name: Name of the constraint to be associated with the primary key definition.
Chapter 7The Table Properties Dialog
7-4
• Enabled: If this option is checked, the primary key constraint is enforced: that is,the data in the primary key column (or set of columns) must be unique and notnull.
• Index: Name of the index to which the primary key refers.
• Tablespace: Name of the tablespace associated with the index.
• Available Columns: Lists the columns that are available to be added to theprimary key definition. You can select multiple attributes, if required, for theprimary key.
• Selected Columns: Lists the columns that are included in the primary keydefinition.
To add a column to the primary key definition, select it in Available Columns and clickthe Add (>) icon; to remove a column from the primary key definition, select it inSelected Columns and click the Remove (<) icon. To move all columns from availableto selected (or the reverse), use the Add All (>>) or Remove All (<<) icon. To move acolumn up or down in the primary key definition, select it in Selected Columns and usethe arrow buttons.
Unique Keys pane
Specifies one or more unique constraints for the table. A unique constraint specifies acolumn, or set of columns, whose data values must be unique: each data value mustnot be null, and it must not be the same as any other value in the column.
To add a unique constraint, click the Add button; to delete a unique constraint, select itand click the Remove button.
• Name: Name of the unique constraint.
• Enabled: If this option is selected, the unique constraint is enforced.
• Rely: If this option is selected, the constraint in NOVALIDATE mode is taken intoaccount during query rewrite.
• Deferrable: If this option is selected, in subsequent transactions, constraintchecking can be deferred until the end of the transaction using the SETCONSTRAINT(S) statement.
• Initially Immediate: If this option is selected, the constraint is checked at the endof each subsequent SQL statement.
• Validate: If the option is selected, the existing data is checked to see if it conformsto the constraint.
• Index: Name of the index to which the unique key refers.
• Tablespace: Name of the tablespace associated with the index.
• Available Columns: Lists the columns that are available to be added to theunique constraint definition.
• Selected Columns: Lists the columns that are included in the unique constraintdefinition.
To add a column to the unique constraint definition, select it in Available Columns andclick the Add (>) icon; to remove a column from the unique constraint definition, selectit in Selected Columns and click the Remove (<) icon. To move all columns fromavailable to selected (or the reverse), use the Add All (>>) or Remove All (<<) icon. Tomove a column up or down in the unique constraint definition, select it in SelectedColumns and use the arrow buttons.
Chapter 7The Table Properties Dialog
7-5
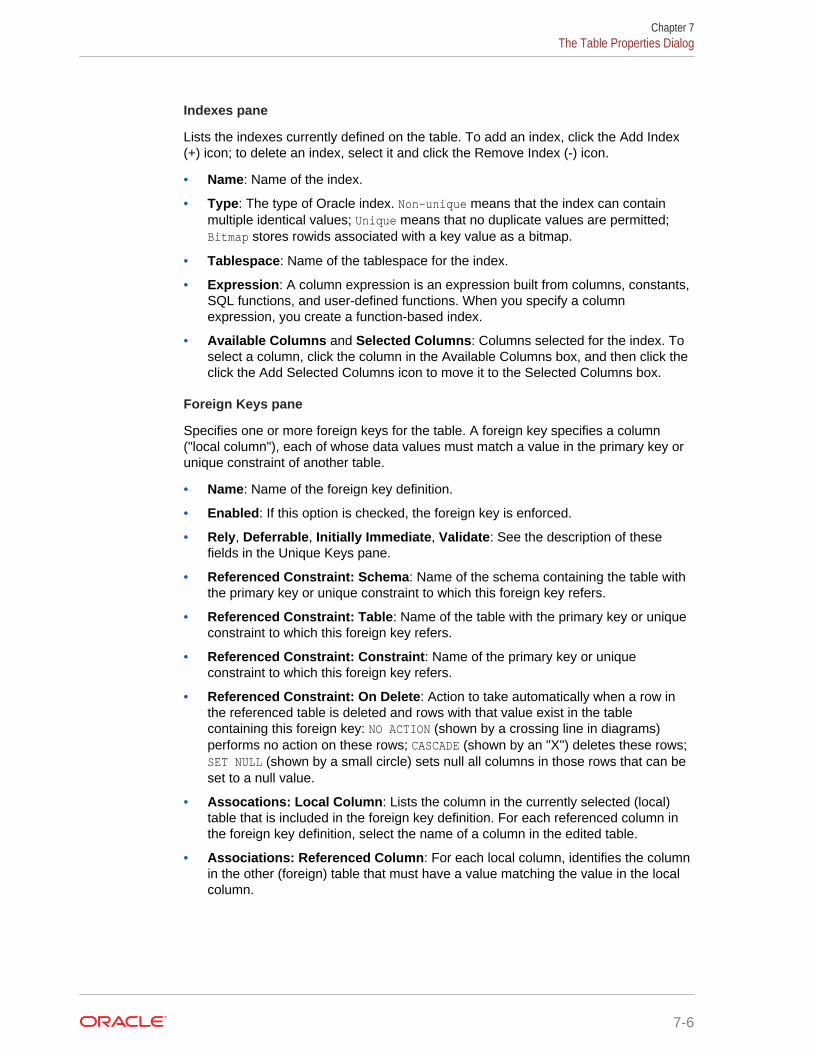
Indexes pane
Lists the indexes currently defined on the table. To add an index, click the Add Index(+) icon; to delete an index, select it and click the Remove Index (-) icon.
• Name: Name of the index.
• Type: The type of Oracle index. Non-unique means that the index can containmultiple identical values; Unique means that no duplicate values are permitted;Bitmap stores rowids associated with a key value as a bitmap.
• Tablespace: Name of the tablespace for the index.
• Expression: A column expression is an expression built from columns, constants,SQL functions, and user-defined functions. When you specify a columnexpression, you create a function-based index.
• Available Columns and Selected Columns: Columns selected for the index. Toselect a column, click the column in the Available Columns box, and then click theclick the Add Selected Columns icon to move it to the Selected Columns box.
Foreign Keys pane
Specifies one or more foreign keys for the table. A foreign key specifies a column("local column"), each of whose data values must match a value in the primary key orunique constraint of another table.
• Name: Name of the foreign key definition.
• Enabled: If this option is checked, the foreign key is enforced.
• Rely, Deferrable, Initially Immediate, Validate: See the description of thesefields in the Unique Keys pane.
• Referenced Constraint: Schema: Name of the schema containing the table withthe primary key or unique constraint to which this foreign key refers.
• Referenced Constraint: Table: Name of the table with the primary key or uniqueconstraint to which this foreign key refers.
• Referenced Constraint: Constraint: Name of the primary key or uniqueconstraint to which this foreign key refers.
• Referenced Constraint: On Delete: Action to take automatically when a row inthe referenced table is deleted and rows with that value exist in the tablecontaining this foreign key: NO ACTION (shown by a crossing line in diagrams)performs no action on these rows; CASCADE (shown by an "X") deletes these rows;SET NULL (shown by a small circle) sets null all columns in those rows that can beset to a null value.
• Assocations: Local Column: Lists the column in the currently selected (local)table that is included in the foreign key definition. For each referenced column inthe foreign key definition, select the name of a column in the edited table.
• Associations: Referenced Column: For each local column, identifies the columnin the other (foreign) table that must have a value matching the value in the localcolumn.
Chapter 7The Table Properties Dialog
7-6
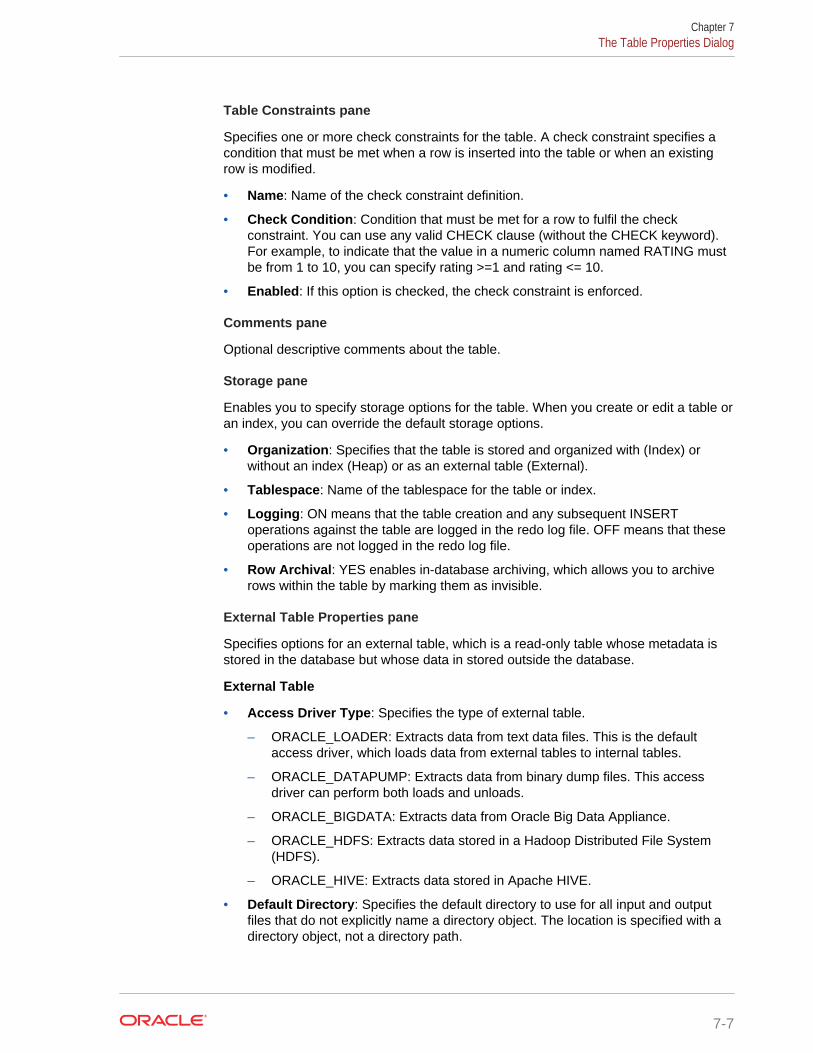
Table Constraints pane
Specifies one or more check constraints for the table. A check constraint specifies acondition that must be met when a row is inserted into the table or when an existingrow is modified.
• Name: Name of the check constraint definition.
• Check Condition: Condition that must be met for a row to fulfil the checkconstraint. You can use any valid CHECK clause (without the CHECK keyword).For example, to indicate that the value in a numeric column named RATING mustbe from 1 to 10, you can specify rating >=1 and rating <= 10.
• Enabled: If this option is checked, the check constraint is enforced.
Comments pane
Optional descriptive comments about the table.
Storage pane
Enables you to specify storage options for the table. When you create or edit a table oran index, you can override the default storage options.
• Organization: Specifies that the table is stored and organized with (Index) orwithout an index (Heap) or as an external table (External).
• Tablespace: Name of the tablespace for the table or index.
• Logging: ON means that the table creation and any subsequent INSERToperations against the table are logged in the redo log file. OFF means that theseoperations are not logged in the redo log file.
• Row Archival: YES enables in-database archiving, which allows you to archiverows within the table by marking them as invisible.
External Table Properties pane
Specifies options for an external table, which is a read-only table whose metadata isstored in the database but whose data in stored outside the database.
External Table
• Access Driver Type: Specifies the type of external table.
– ORACLE_LOADER: Extracts data from text data files. This is the defaultaccess driver, which loads data from external tables to internal tables.
– ORACLE_DATAPUMP: Extracts data from binary dump files. This accessdriver can perform both loads and unloads.
– ORACLE_BIGDATA: Extracts data from Oracle Big Data Appliance.
– ORACLE_HDFS: Extracts data stored in a Hadoop Distributed File System(HDFS).
– ORACLE_HIVE: Extracts data stored in Apache HIVE.
• Default Directory: Specifies the default directory to use for all input and outputfiles that do not explicitly name a directory object. The location is specified with adirectory object, not a directory path.
Chapter 7The Table Properties Dialog
7-7
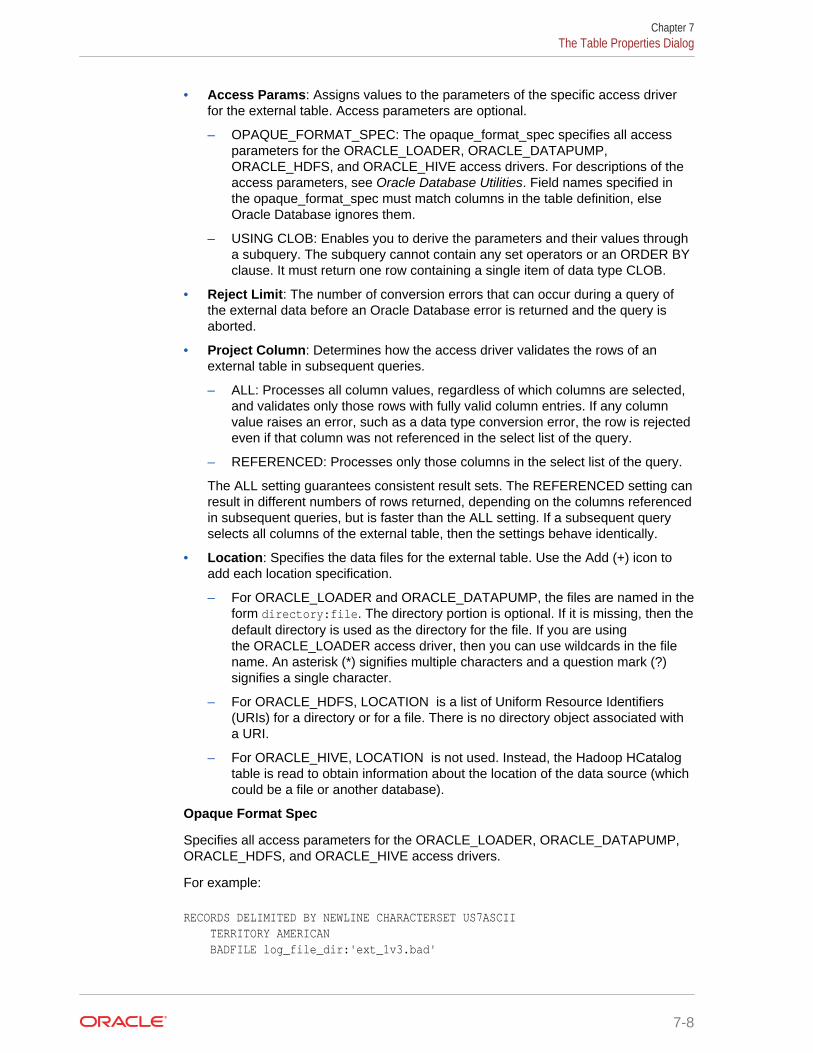
• Access Params: Assigns values to the parameters of the specific access driverfor the external table. Access parameters are optional.
– OPAQUE_FORMAT_SPEC: The opaque_format_spec specifies all accessparameters for the ORACLE_LOADER, ORACLE_DATAPUMP,ORACLE_HDFS, and ORACLE_HIVE access drivers. For descriptions of theaccess parameters, see Oracle Database Utilities. Field names specified inthe opaque_format_spec must match columns in the table definition, elseOracle Database ignores them.
– USING CLOB: Enables you to derive the parameters and their values througha subquery. The subquery cannot contain any set operators or an ORDER BYclause. It must return one row containing a single item of data type CLOB.
• Reject Limit: The number of conversion errors that can occur during a query ofthe external data before an Oracle Database error is returned and the query isaborted.
• Project Column: Determines how the access driver validates the rows of anexternal table in subsequent queries.
– ALL: Processes all column values, regardless of which columns are selected,and validates only those rows with fully valid column entries. If any columnvalue raises an error, such as a data type conversion error, the row is rejectedeven if that column was not referenced in the select list of the query.
– REFERENCED: Processes only those columns in the select list of the query.
The ALL setting guarantees consistent result sets. The REFERENCED setting canresult in different numbers of rows returned, depending on the columns referencedin subsequent queries, but is faster than the ALL setting. If a subsequent queryselects all columns of the external table, then the settings behave identically.
• Location: Specifies the data files for the external table. Use the Add (+) icon toadd each location specification.
– For ORACLE_LOADER and ORACLE_DATAPUMP, the files are named in theform directory:file. The directory portion is optional. If it is missing, then thedefault directory is used as the directory for the file. If you are usingthe ORACLE_LOADER access driver, then you can use wildcards in the filename. An asterisk (*) signifies multiple characters and a question mark (?)signifies a single character.
– For ORACLE_HDFS, LOCATION is a list of Uniform Resource Identifiers(URIs) for a directory or for a file. There is no directory object associated witha URI.
– For ORACLE_HIVE, LOCATION is not used. Instead, the Hadoop HCatalogtable is read to obtain information about the location of the data source (whichcould be a file or another database).
Opaque Format Spec
Specifies all access parameters for the ORACLE_LOADER, ORACLE_DATAPUMP,ORACLE_HDFS, and ORACLE_HIVE access drivers.
For example:
RECORDS DELIMITED BY NEWLINE CHARACTERSET US7ASCII TERRITORY AMERICAN BADFILE log_file_dir:'ext_1v3.bad'
Chapter 7The Table Properties Dialog
7-8
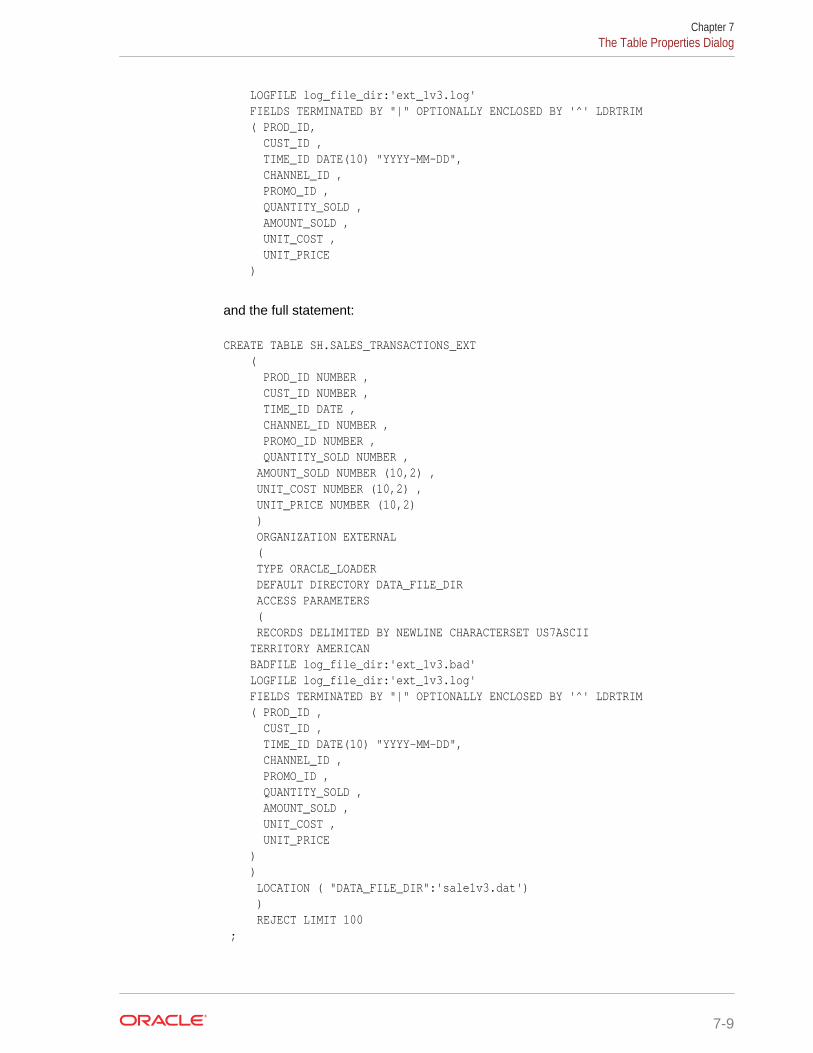
LOGFILE log_file_dir:'ext_1v3.log' FIELDS TERMINATED BY "|" OPTIONALLY ENCLOSED BY '^' LDRTRIM ( PROD_ID, CUST_ID , TIME_ID DATE(10) "YYYY-MM-DD", CHANNEL_ID , PROMO_ID , QUANTITY_SOLD , AMOUNT_SOLD , UNIT_COST , UNIT_PRICE )
and the full statement:
CREATE TABLE SH.SALES_TRANSACTIONS_EXT ( PROD_ID NUMBER , CUST_ID NUMBER , TIME_ID DATE , CHANNEL_ID NUMBER , PROMO_ID NUMBER , QUANTITY_SOLD NUMBER , AMOUNT_SOLD NUMBER (10,2) , UNIT_COST NUMBER (10,2) , UNIT_PRICE NUMBER (10,2) ) ORGANIZATION EXTERNAL ( TYPE ORACLE_LOADER DEFAULT DIRECTORY DATA_FILE_DIR ACCESS PARAMETERS ( RECORDS DELIMITED BY NEWLINE CHARACTERSET US7ASCII TERRITORY AMERICAN BADFILE log_file_dir:'ext_1v3.bad' LOGFILE log_file_dir:'ext_1v3.log' FIELDS TERMINATED BY "|" OPTIONALLY ENCLOSED BY '^' LDRTRIM ( PROD_ID , CUST_ID , TIME_ID DATE(10) "YYYY-MM-DD", CHANNEL_ID , PROMO_ID , QUANTITY_SOLD , AMOUNT_SOLD , UNIT_COST , UNIT_PRICE ) ) LOCATION ( "DATA_FILE_DIR":'sale1v3.dat') ) REJECT LIMIT 100 ;
Chapter 7The Table Properties Dialog
7-9
CLOB Subquery
Type or copy and paste the query.
Note:
For more information about the external table fields, see Oracle DatabaseUtilities and Oracle Database SQL Language Reference
Materialized View
Query: Contains the SQL code for the query part of the view definition. Type or copyand paste the query.
General
• On Pre-built Table: If Yes, an existing table is registered as a preinitializedmaterialized view. This option is particularly useful for registering largematerialized views in a data warehousing environment. The table must have thesame name and be in the same schema as the resulting materialized view, andthe table should reflect the materialization of a subquery.
• Reduced Precision: Yes authorizes the loss of precision that will result if theprecision of the table or materialized view columns do not exactly match theprecision returned by the subquery. If No , the precision of the table ormaterialized view columns must exactly match the precision returned by thesubquery, or the create operation will fail.
• For Update: Select Yes to allow a subquery, primary key, object, or rowidmaterialized view to be updated. When used in conjunction with AdvancedReplication, these updates will be propagated to the master.
• Real Time MV: Select Yes to create a real-time materialized view or a regularview. A real-time materialized view provides fresh data to user queries even whenthe materialized view is not in sync with its base tables due to data changes.Instead of modifying the materialized view, the optimizer writes a query thatcombines the existing rows in the materialized view with changes recorded in logfiles (either materialized view logs or the direct loader logs). This is called on-querycomputation.
• Query Rewrite: If Enable, the materialized view is enabled for query rewrite,which transforms a user request written in terms of master tables into asemantically equivalent request that includes one or more materialized views.
• Build: Specifies when to populate the materialized view. Immediate indicates thatthe materialized view is to be populated immediately. Deferred indicates that thematerialized view is to be populated by the next refresh operation. If you specifyDeferred, the first (deferred) refresh must always be a complete refresh; until then,the materialized view has a staleness value of unusable, so it cannot be used forquery rewrite.
• Use Index: If Yes, a default index is created and used to speed up incremental(fast) refresh of the materialized view. If No, this default index is not created. (Forexample, you might choose to suppress the index creation now and to create suchan index explicitly later.)
Chapter 7The Table Properties Dialog
7-10
• Index Tablespace: Specifies the tablespace in which the materialized view is tobe created. If a tablespace is not selected, the materialized view is created in thedefault tablespace of the schema containing the materialized view.
• Cache: If Yes, the blocks retrieved for this table are placed at the most recentlyused end of the least recently used (LRU) list in the buffer cache when a full tablescan is performed. This setting is useful for small lookup tables. If No, the blocksare placed at the least recently used end of the LRU list.
Refresh Clause
• Refresh: Select Yes to enable refresh operations.
• Refresh Type: The method of refresh operation to be performed:
– Complete Refresh: Executes the defining query of the materialized view, evenif a fast refresh is possible.
– Fast Refresh: Uses the incremental refresh method, which performs therefresh according to the changes that have occurred to the master tables. Thechanges for conventional DML changes are stored in the materialized view logassociated with the master table. The changes for direct-path INSERToperations are stored in the direct loader log.
– Force Refresh: Performs a fast refresh if one is possible; otherwise, performsa complete refresh.
• Action: The type of refresh operation to be performed:
– On Demand: Performs a refresh when one of the DBMS_MVIEW refreshprocedures are called.
– On Commit: Performs a fast refresh whenever the database commits atransaction that operates on a master table of the materialized view. This mayincrease the time taken to complete the commit, because the databaseperforms the refresh operation as part of the commit process.
– Specify: Performs refresh operations according to what you specify in the Starton and Next fields.
• Start Date: Starting date and time for the first automatic refresh operation. Mustbe in the future.
• Next Date: Time for the next automatic refresh operation. The interval betweenthe Start on and Next times establishes the interval for subsequent automaticrefresh operations. If you do not specify a value, the refresh operation isperformed only once at the time specified for Start on.
• With: Refresh type, which determines the type of materialized view:
– Primary Key: Creates a primary key materialized view, which allowsmaterialized view master tables to be reorganized without affecting theeligibility of the materialized view for fast refresh.
– Row ID: Creates a rowid materialized view, which is useful if the materializedview does not include all primary key columns of the master tables.
• Default Storage: If Yes, DEFAULT specifies that Oracle Database will chooseautomatically which rollback segment to use. If you specify DEFAULT, you cannotspecify the rollback_segment. DEFAULT is most useful when modifying, ratherthan creating, a materialized view.
• Storage Type: MASTER specifies the remote rollback segment to be used at theremote master site for the individual materialized view. LOCAL specifies the
Chapter 7The Table Properties Dialog
7-11
remote rollback segment to be used for the local refresh group that contains thematerialized view. This is the default.
• Rollback Segment: Enter the name of the rollback segment.
• Using Constraint: If this option is checked, more rewrite alternatives can be usedduring the refresh operation, resulting in more efficient refresh execution. Thebehavior of this option is affected by whether you select Enforced or Trusted.
– Enforced: Causes only enforced constraints to be used during the refreshoperation.
– Trusted: Enables the use of dimension and constraint information that hasbeen declared trustworthy by the database administrator but that has not beenvalidated by the database. If the dimension and constraint information is valid,performance may improve. However, if this information is invalid, then therefresh procedure may corrupt the materialized view even though it returns asuccess status.
DDL pane
You can review and save the SQL statements that SQL Developer Web will use tocreate or edit the object. If you want to make any changes, go back to the relevantpanes and make the changes there.
For a new table, click CREATE to view the generated DDL statements. When you edittable properties, click UPDATE to view the generated ALTER statements. For a newtable, the UPDATE tab will not be available.
When you are finished, click Apply.
Output pane
Displays the results of the DDL commands. If there are any errors, go to theappropriate pane, fix the errors, and run the commands again. You can save to a textfile or clear the output.
Related Topics
• Oracle Database SQL Language Reference
7.2 The Index Properties DialogThe Index Properties dialog box is displayed when you create or edit an index. Youcan create and edit in three ways:
• In Worksheet, in the Navigator pane, select Indexes in the object field, click ,and select Create Object.
• In Worksheet, right-click a table in the Navigator tab, and select Add Index. Toedit, right-click an index in the Navigator tab and select Edit.
• Right-click a table object in the Data Modeler Navigator tab, and select Add Index.
• Create and edit an index in the Table Properties Dialog (See The Table PropertiesDialog).
Definition pane
• Schema: Database schema that owns the table associated with the index.
Chapter 7The Index Properties Dialog
7-12
• Table: Name of the table associated with the index.
• Schema: Database in which to create the index.
• Tablespace: Tablespace for the index.
• Name: Name of the index.
• Type: The type of Oracle index. Non-unique means that the index can containmultiple identical values; Unique means that no duplicate values are permitted;Bitmap stores rowids associated with a key value as a bitmap.
• Expression: A column name or column expression. A column expression is anexpression built from columns, constants, SQL functions, and user-definedfunctions. When you specify a column expression, you create a function-basedindex.
• Available Columns: Columns available in the table.
• Selected Columns: Columns selected for the index. Click the Add SelectedColumns icon to move columns from the Available Columns list.
• Order: ASC for an ascending index (index values sorted in ascending order);DESC for a descending index (index values sorted in descending order).
DDL pane
You can review and save the SQL statements that SQL Developer Web will use tocreate or edit the index. If you want to make any changes, go back to the Definitionpane and make the changes there. For a new index, click CREATE to view thegenerated DDL statements. When you edit index properties, click UPDATE to view thegenerated ALTER statements. For a new index, the UPDATE tab will not be available.When you are finished, click Apply.
Output pane
Displays the results of the DDL commands. If there are any errors, go to the Definitionpane, fix the errors, and run the commands again. You can save to a text file or clearthe output.
7.3 The Sequence Properties DialogTo open the Sequence Properties Dialog, do one of the following:
• In Worksheet, in the Navigator pane, select Sequences in the object field, click
, and select Create Object.
• In Worksheet, right-click a sequence object in the Navigator tab and select AddSequence or Edit Sequence.
• These options are also available when you right-click a table object in the DataModeler Navigator tab.
A sequence is an object from which multiple users may generate unique integers. Youcan use sequences to automatically generate primary key values.
Properties pane
• Schema: Database schema in which to create the sequence.
• Name: Name of the sequence.
Chapter 7The Sequence Properties Dialog
7-13
• Start with: Starting value of the sequence.
• Increment: Interval between successive numbers in a sequence.
• Min value: Lowest possible value for the sequence. The default is 1 for anascending sequence and -(10^26) for a descending sequence.
• Max value: Highest possible value for the sequence. The default is 10^27 for anascending sequence and -1 for a descending sequence.
• Cache and Cache size: Cache causes sequence values to be preallocated incache, which can improve application performance; Cache size indicates thenumber of sequence values preallocated in cache. No Cache causes sequencevalues not to be preallocated in cache.
• Cycle: Indicates whether the sequence "wraps around" to reuse numbers afterreaching its maximum value (for an ascending sequence) or its minimum value (fora descending sequence). If cycling of values is not enabled, the sequence cannotgenerate more values after reaching its maximum or minimum value.
• Order: Indicates whether sequence numbers are generated in the order in whichthey are requested. If No Order is specified, sequence numbers are notguaranteed to be in the order in which they were requested.
DDL pane
You can review and save the SQL statements that SQL Developer Web will use tocreate or edit the sequence. If you want to make any changes, go back to theProperties pane and make the changes there. For a new sequence, click CREATE toview the generated DDL statements. When you edit a sequence, click UPDATE toview the generated ALTER statements. For a new sequence, the UPDATE tab will notbe available. When you are finished, click Apply.
Output pane
Displays the results of the DDL commands. If there are any errors, go to the Propertiespane, fix the errors, and run the commands again. You have save to a text file or clearthe output.
7.4 The View Properties DialogThe View Properties Dialog is displayed when you create or edit a view. To create oredit a view, do one of the following:
• In Worksheet, in the Navigator pane, select Views in the object field, click ,and select Create Object.
• Right-click a view in the Navigator tab, and select New or Edit.
Schema: Database schema in which to create the view.
Name: Name of the view.
The different panes in the dialog are described in the following sections:
SQL Query pane
Enter or copy and paste the SQL query for the view, using the SELECT and FROMkeywords along with the syntax needed to retrieve the desired information. Asemicolon is not required after the query.
Chapter 7The View Properties Dialog
7-14
Columns pane
Click the Refresh Columns icon to automatically populate the columns in this pane.You can edit the columns by selecting the required row and making changes in theHeader Alias and Comments fields.
Storage pane
• Force on Create: Select Yes to create the view regardless of whether the basetables of the view or the referenced object types exist or the owner of the schemacontaining the view has privileges on them. These conditions must be true beforeany SELECT, INSERT, UPDATE, or DELETE statements can be issued againstthe view. If the view definition contains any constraints, CREATE VIEW ... FORCEfails if the base table does not exist or the referenced object type does not exist.CREATE VIEW ... FORCE also fails if the view definition names a constraint thatdoes not exist.
• Query Restriction: Read Only prevents the view from being used to add, delete,or change data in the underlying table. Check Option prohibits any changes to theunderlying table that would produce rows that are not included in this view.
Use the Primary Key, Unique Keys, Foreign Keys, and Comments panes to add or editproperties as required.
DDL pane
Based on the inputs provided, the DDL statements are generated. You can review andsave the SQL statements. If you want to make any changes, go back to the relevantpane and make the changes there. For a new view, click CREATE to view thegenerated DDL statements. When you edit a view, click UPDATE to view thegenerated ALTER statements. For a new view, the UPDATE tab will not be available.When you are finished, click Apply.
Output pane
Displays the results of the DDL commands. If there are any errors, go to the respectivepane, fix the errors, and run the commands again. You can save to a text file or clearthe output.
7.5 The Synonym Properties DialogThe Synonym Properties Dialog is displayed when you create a synonym.
There are two ways of creating a synonym:
• In Worksheet, in the Navigator pane, right-click the object for which you want tocreate the synonym, and select Add Synonym. In this case, the only fields thatyou can edit in the Properties pane are Public and Synonym Name. The values ofthe remaining fields are predetermined by the object selected.
• In Worksheet, in the Navigator pane, select the object type as Synonyms or
Public Synonyms from the drop-down list. Click , and select Create Object.All the fields in the Properties dialog are available for edit.
The different panes in the dialog are described in the following sections:
Properties pane
Chapter 7The Synonym Properties Dialog
7-15

• Public: If this option is checked, the synonym is accessible to all users. However,each user must have appropriate privileges on the underlying object to use thesynonym. If this option is not checked, the synonym is a private synonym, and isaccessible only within its schema.
• Synonym Schema: Database schema in which to create the synonym.
• Synonym Name: Name of the synonym. A private synonym must be unique withinits schema; a public synonym must be unique within the database.
• Object Type: Specify the type of object to which this synonym refers.
• Object Schema: Schema containing the object or name to which this synonymrefers.
• DB Filter: After selecting the Object Type and Object Schema, the list of objects ofthe selected type may be very long. To filter the object names, enter the searchentry and click the Refresh icon. The Object Name field is auto-filled withappropriate object names in the drop-down list.
• Object Name: Select the name of the object to which this synonym refers.
• DB Link: Enter a complete or partial database link to create a synonym for aschema object on a remote database where the object is located. If you specifyDB Link and omit schema, then the synonym refers to an object in the schemaspecified by the database link. Oracle recommends that you specify the schemacontaining the object in the remote database. If you omit DB Link, then OracleDatabase assumes the object is located on the local database.
DDL pane
Based on the inputs provided, the DDL statements are generated. You can review andsave the SQL statements. If you want to make any changes, go back to the relevantpane and make the changes there. For a new view, click CREATE to view thegenerated DDL statements. When you edit a view, click UPDATE to view thegenerated ALTER statements. For a new view, the UPDATE tab will not be available.When you are finished, click Apply.
Output pane
Displays the results of the DDL commands. If there are any errors, go to the respectivepane, fix the errors, and run the commands again. You can save to a text file or clearthe output.
7.6 Implied Foreign KeysImplied foreign keys are dependencies that exist between tables but are not defined inthe database. In a data warehouse environment, it is a common practice not to createforeign keys. However, it becomes necessary to show these dependencies forpresentation or reporting purposes.
In SQL Developer Web, you can display implied foreign keys for objects in a starschema by defining them or by discovering them in the data dictionary. It is possible tohave more than one source for implied foreign keys.
Define Implied Foreign Keys
You can defined implied foreign keys in two ways:
• Using the Implied Foreign Keys dialog
Chapter 7Implied Foreign Keys
7-16
You can define implied foreign keys using the Implied Foreign Keys dialog.
1. Right-click an object (table or view) in a diagram and select Implied ForeignKeys. The Implied Foreign Keys dialog is displayed.
2. In the Implied Foreign Keys dialog, click the + icon to add an entry in the grid.
3. Select the entry in the grid to enable and enter values in the following fields:
– Referenced Object: Object in the diagram that has a dependency to thesource object.
– Local Column: Name of the column in the source object.
– Referenced Column: Name of the column in the targeted object.
– Discovery Sources: Automatically prefilled, displays whether the impliedforeign keys have been defined or were discovered in the data dictionary.
4. Click OK. The implied foreign key dependency is displayed with a dotted lineon the diagram.
• By dragging the arrow to the referenced object in the diagram
You can also define an implied foreign key in the following way:
1. Select the source object on the diagram.
2. Click and drag the small blue curved arrow to the referenced object. Thedependency will be displayed with a dotted line on the diagram.
3. Right-click the source object and enter the column names in the ImpliedForeign Keys dialog.
Discover Implied Foreign Keys in the Data Dictionary
SQL Developer Web can automatically create a star schema by searching for severaltypes of definitions in the data dictionary.
In the Navigator tab, right-click an object (table or view) and select Add Object asStar Schema to Diagram. The object must be a fact table. The data dictionary is thensearched for joins and dependencies related to the object, such as:
• Foreign keys defined for the selected table to other tables. If implied foreign keysare later discovered for the same columns, they will not be displayed on thediagram.
• Joins used in the definitions of bitmap join indexes, materialized views withaggregates, and attribute clustering.
• Dependencies based on dimension definitions and column name matching in facttable.
• Fact and dimension definitions for Analytic views and OLAP cube and dimensions.
7.7 The Materialized View Log Properties DialogThe Materialized View Log Properties dialog is displayed when you create or edit amaterialized view log, which is a table associated with the master table of amaterialized view.
Chapter 7The Materialized View Log Properties Dialog
7-17

To create a materialized view log, in the Navigator pane, select Materialized View
Logs in the object field, click , and select Create Object. To edit, right-click amaterialized view log object in the Navigator pane and select Edit.
Schema: Database schema in which to create the materialized view log.
Table: Name of the master table of the materialized view to be associated with thismaterialized view log.
Properties tab
• Row ID Logged: Yes indicates that the rowid of all rows changed should berecorded in the materialized view log; No indicates that the rowid of all rowschanged should not be recorded in the materialized view log.
• PK Logged: Yes indicates that the primary key of all rows changed should berecorded in the materialized view log; No indicates that the primary key of all rowschanged should not be recorded in the materialized view log.
• New values: Yes saves both old and new values for update DML operations in thematerialized view log; No disables the recording of new values in the materializedview log. If this log is for a table on which you have a single-table materializedaggregate view, and if you want the materialized view to be eligible for fast refresh,you must specify Yes.
• Object ID Logged: For a log on an object table only: Yes indicates that thesystem-generated or user-defined object identifier of every modified row should berecorded in the materialized view log. No indicates that the system-generated oruser-defined object identifier of every modified row should not be recorded in thematerialized view log.
• Cache: For data that will be accessed frequently, CACHE specifies that the blocksretrieved for this log are placed at the most recently used end of the least recentlyused list in the buffer cache when a full table scan is performed. This attribute isuseful for small lookup tables. NOCACHE specifies that the blocks are placed atthe least recently used end of the LRU list.
• Parallel: If YES, parallel operations will be supported for the materialized view log.
• Sequence Logged: Yes indicates that a sequence value providing additionalordering information should be recorded in the materialized view log. No indicatesthat a sequence value providing additional ordering information should not berecorded in the materialized view log. Sequence numbers (that is, Yes for thisoption) are necessary to support fast refresh after some update scenarios.
• Commit SCN: If this option is enabled, the database is instructed to use commitSCN data rather than timestamps.
• Available Columns and Selected Columns: Additional columns, which are non-primary-key columns referenced by subquery materialized views, to be recorded inthe materialized view log. To select one or more filter columns, use the arrowbuttons to move columns from Available to Selected.
Storage tab
• Tablespace: Tablespace in which the materialized view log is to be created
• Logging: YES or NO, to establish the logging characteristics for the materializedview log.
Chapter 7The Materialized View Log Properties Dialog
7-18
• Buffer Mode: Select KEEP to put blocks from the segment into the KEEP bufferpool. Select RECYCLE to put blocks from the segment into the RECYCLE pool.Select DEFAULT to indicate the default buffer pool.
• Percent Free: Specify a whole number representing the percentage of space ineach data block of the database object reserved for future updates to rows of theobject. The value of PCTFREE must be a value from 0 to 99.
• Percent Used: Specify a whole number representing the minimum percentage ofused space that Oracle maintains for each data block of the database object.PCTUSED is specified as a positive integer from 0 to 99 and defaults to 40.
• Initrans: Specify the initial number of concurrent transaction entries allocatedwithin each data block allocated to the database object. This value can range from1 to 255 and defaults to 1.
• Freelists: In tablespaces with manual segment-space management, for objectsother than tablespaces and rollback segments, specify the number of free lists foreach of the free list groups for the table, partition, cluster, or index. The default andminimum value for this parameter is 1, meaning that each free list group containsone free list.
• Freelist Groups: In tablespaces with manual segment-space management,specify the number of groups of free lists for the database object you are creating.
• Initial Extent: Specify the size of the first extent of the object.
• Next Extent: Specify in bytes the size of the next extent to be allocated to theobject.
• Percent Increase: In locally managed tablespaces, Oracle Database uses thevalue of PCTINCREASE during segment creation to determine the initial segmentsize and ignores this parameter during subsequent space allocation.
• Min Extent: In locally managed tablespaces, Oracle Database uses the value ofMINEXTENTS in conjunction with PCTINCREASE, INITIAL and NEXT todetermine the initial segment size.
• Max Extent: This storage parameter is valid only for objects in dictionary-managed tablespaces. Specify the total number of extents, including the first, thatOracle can allocate for the object.
• Unlimited: Select this option if you want extents to be allocated automatically asneeded. Oracle recommends this setting as a way to minimize fragmentation.
Purge tab
• Type: In IMMEDIATE SYNCHRONOUS, the materialized view log is purgedimmediately after refresh. This is the default. In IMMEDIATE ASYNCHRONOUS,the materialized view log is purged in a separate Oracle Scheduler job after therefresh operation.
• Deferred, Start With, Next, Repeat Interval: Sets up a scheduled purge that isindependent of the materialized view refresh and is initiated during CREATE orALTER MATERIALIZED VIEW LOG statement.
Refresh tab
• Type: Synchronous Refresh creates a staging log that can be used forsynchronous refresh. Specify the name of the staging log to be created. Thestaging log will be created in the schema in which the master table resides. FastRefresh creates a materialized view log that can be used for fast refresh. The
Chapter 7The Materialized View Log Properties Dialog
7-19
materialized view log will be created in the same schema in which the master tableresides. This is the default.
DDL pane
Based on the inputs provided, the DDL statements are generated. You can review andsave the SQL statements. If you want to make any changes, go back to the relevantpane and make the changes there. For a new materialized view log, click CREATE toview the generated DDL statements. When you edit a materialized view log, clickUPDATE to view the generated ALTER statements. For a new materialized view log,the UPDATE tab will not be available. When you are finished, click Apply.
Output pane
Displays the results of the DDL commands. If there are any errors, go to the respectivepane, fix the errors, and run the commands again. You can save to a text file or clearthe output.
Chapter 7The Materialized View Log Properties Dialog
7-20


