17
Using SalesBuilder Marketing & Loyalty with your FireFly POS System

Using SalesBuilder
Marketing & Loyalty
with your
FireFly POS System

Guide Contents:Guide Contents:IntroductionFoundation: A Few Choices
Using Loyalty Cards?Auto or Manual Enrollment?Earning Rewards: Salesbuilder, FireFly or Both?
Set Up Your ProgramSet up Salesbuilder
Salesbuilder BasicsSetting Up OffersSetting up your campaignCreating your Email MessagesImporting customers
Set up FireFly POSSetting Up LoyaltyPrinting OptionsSetting Up OffersYour Network
Set up online orderingUsing Your Loyalty Program
Identify & Enroll CustomersFrom the Tender ScreenFrom the Lookup ScreenCustomer Self-Enroll
Posting TransactionsRedeeming Offers
Scanning the OfferThrough Customer Look upRedeeming FireFly Points
Online OrdersManual PostingModifying Customer RecordsSending a BroadcastCustomer Surveys
More Assistance

IntroductionThe Salesbuilder marketing & loyalty solution is a powerful way to keep in touch with your customers and reward them for visiting your restaurant(s). When combined with the FireFly POS system in the store, it's a easy, automated way to gather and consolidate data on all your customers. A powerful, multi-store customer database makes it easy to target your marketing message. FireFly will update Salesbuilder every time your customer orders - from any store location - so Salesbuilder will have a complete picture of your customer history - from your best customers to those who need a reminder to return. Salesbuilder’s automated e-mail marketing campaigns ensure that your customers are never forgotten, while powerful on-the-fly campaigns let you trigger a sales boost whenever you want!
For an overview of how Salesbuilder and FireFly work together, please see this training video:
http://updatephoenix.us/firefly/Phoenix_Videos/SB_FF_Overview.swf
Foundation: A Few ChoicesBefore you get started, you need to make a few decisions about how you want to set up the program.
Using Loyalty Cards?You can issue physical loyalty cards to your customers if you wish, but it is not required. If you use bar coded or magnetic stripe cards, you can scan these at the POS to identify the customer. If you don't use a card, you can simply look up the customer using their phone number, name, email or any number you wish to assign to as their loyalty ID.
Advantages of using cards Disadvantages of using cards
● Cards with your logo may serve as a billboard in your customers' wallet or keychain, always reminding them about your restaurant.
● Swiping a card is a quick and easy way to look up the customer.
● Customers may think that carrying a card is a hassle
● Cards cost money● You will need new scanners at each register,
if you use barcoded cards. Magnetic stripe cards are also an option.
Auto or Manual Enrollment?

In FireFly, you will have the option to "auto enroll" all customers in the loyalty program, or to manually enroll. If you auto enroll, every time you select a customer you will be prompted for an email in order to join the loyalty program (e-mail is required for SalesBuilder). Every time you save a customer with an e-mail, the customer data will be sent to SalesBuilder and a welcome message will be sent based on your configuration. The customer will automatically be assigned a loyalty ID (their phone #) if you do not specify one.
If you choose to manually enroll, FireFly will still search for a SalesBuilder match every time you select a customer. But if a match is not found, you can choose to enroll the customer by editing the record, selecting "Earn Points", and entering a loyalty card # (or, the system will default this to the phone #). You will also need to enter an email address.
Auto enroll is a great way to build your database more quickly and thoroughly. However, if you prefer to reward only your top customers, you may want to keep your program more exclusive.
Earning Rewards: Salesbuilder, FireFly or Both?Most loyalty programs include a points and rewards component. With Salesbuilder & FireFly, you have two different points programs to choose from:
Salesbuilder Points FireFly Points
● Points earned per $ spent, with multiplier option for day of week
● Points earned per $ spent, with bonus options for specific items, times, days of week, online orders, first order, etc.
● Customer is notified of available rewards when they receive an emailed coupon
● Customer is notified of total points by printing on the receipt (will not be emailed automatically)
● Reward “coupons” are redeemed for rewards of your choice
● Rewards are redeemed at time of order for $ off the ticket.
● Points can accumulate from multiple locations integrated with SalesBuilder & online orders
● Points can accumulate from multiple locations using FireFly & online orders
So which should you choose? If you are using Salesbuilder, it is likely you will want to use the points accumulated by the Salesbuilder program to automatically generate e-mail rewards for your customers and skip the FireFly points. You may wish to limit the program to this. Or, you could use Salesbuilder to issue “surprises” to your customers while letting the FireFly points accumulate for them to use as $ off their order. It’s up to you!

Set Up Your ProgramReady to get started? Your GRS Implementation Consultant will assist you with setting up your SalesBuilder program. But here is an overview of the options you will be reviewing.
Set up Salesbuilder
Salesbuilder BasicsYou’ll need to decide a few basics, like what will you call your program? How much does a customer need to spend to get what level of reward? Will you want to designate any days as “double” point days?
Salesbuilder works off a standard “Campaign”. For each campaign element, you’ll need to decide on what reward you wish to offer. For example, some of the campaign elements will include:
● Welcome - sent when somone joins the program● Birthday - sent 10 days before customers’ birthday● Anniversary - sent 10 days before customers’ anniversary● Half Birthday - sent 6 months after the customers’ birthday● Website activation - sent when someone activates their account profile page● Customer Satisfaction Survey - sent periodically asking for feedback● Refer a Friend - Sent when a member refers a new customer● Lost - Sent when a member has not visited in 60 days● Reward - Sent when a member has accumulated a number of points.
One thing to know - your rewards program will have its very own URL! Your implementation consultant will let you know what this URL is and this will be used throughout the program.
Setting Up OffersThe first step to setting up your loyalty campaign is to set up the offers in Salesbuilder. Navigate to Campaigns / Offers and you’ll see a list of offers in your account.

Click on “Add New Offer” to set up a new offer. You’ll just need to give the Offer ID (remember, this needs to match the PLU# in your POS system), the offer name, and description.
Setting up your campaignOnce you’ve got all your offers in the system, you can decide which offer will be linked to each “Campaign Message”. Just navigate to Campaigns and select the Campaign name that is listed there. You should see a screen like this:
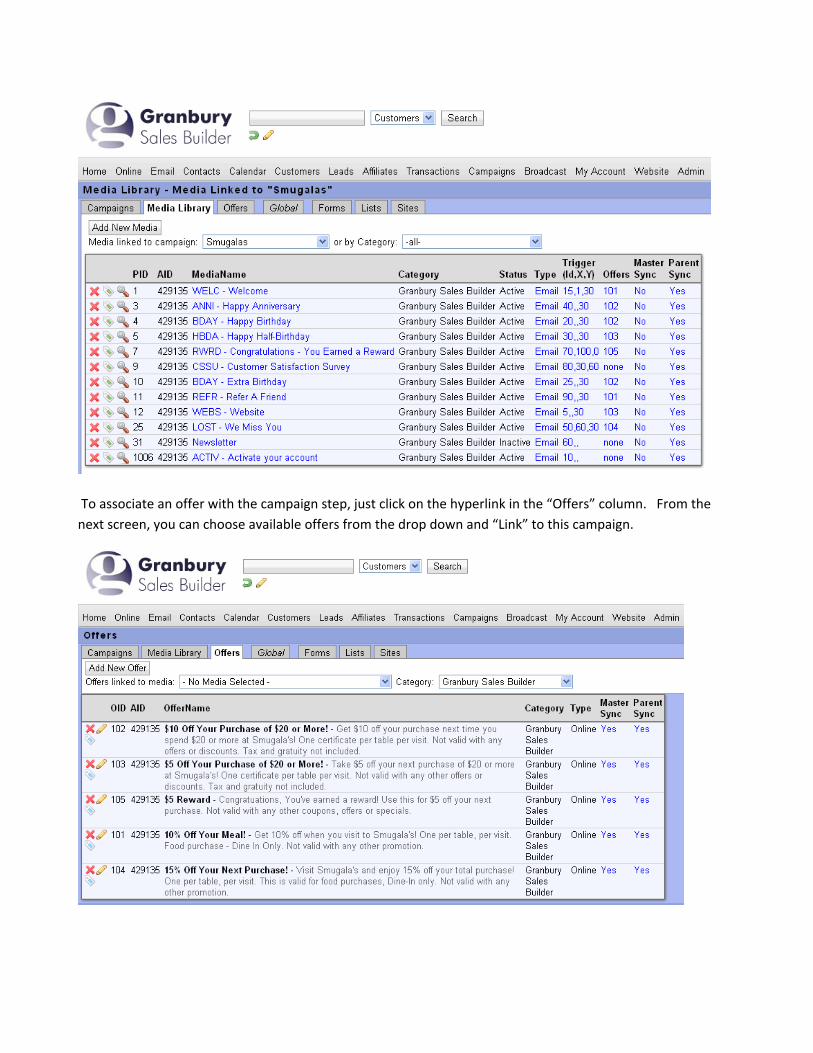
To associate an offer with the campaign step, just click on the hyperlink in the “Offers” column. From the next screen, you can choose available offers from the drop down and “Link” to this campaign.
Creating your Email MessagesSalesbuilder comes with some pre-formatted messages that will be sent with each campaign step. You can modify the wording of these message or add your own graphics and html formatting. From the Media Library Screen (pictured above), just click on the name of the Campaign element to edit it. You can also click on the link that says “email” to send yourself a test email.
Note: If you will be creating html messages with images, you’ll need to load your images onto the salesbuilder server first. Navigate to Broadcast / Files, and select Upload a File. Once these are saved, you can access them to insert into HTML emails.
Importing customersIf you’ve got an email list already, you may want to import it into Salesbuilder so you can communicate with these customers. It is best to import these names as “leads” since they are not already enrolled in your loyalty program. To do this, go to Leads / Import. If you wish to automatically assign these leads to a campaign upon import, you can do so here, or you can wait until they are already imported.
Set up FireFly POS
Setting Up LoyaltyThe FireFly system must be configured at each store. First, navigate to Configuration / Customer / Customer Loyalty. This is where you can turn on the program and choose your point formula, if you are going to be using FireFly points. Here you will also activate the “External” loyalty program, entering in the Salesbuilder company and location ID. Press the “Test Conn” buton to confirm that the account information is valid. This test must be successful for the POS to try to connect.
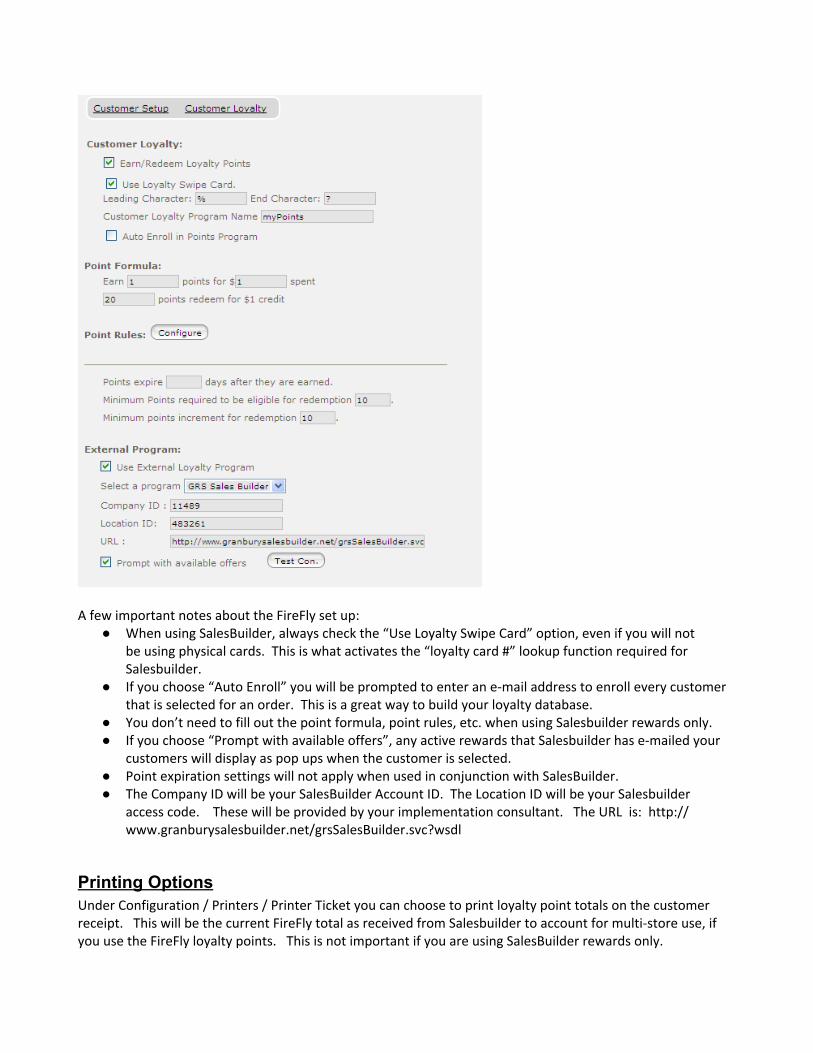
A few important notes about the FireFly set up:
● When using SalesBuilder, always check the “Use Loyalty Swipe Card” option, even if you will not be using physical cards. This is what activates the “loyalty card #” lookup function required for Salesbuilder.
● If you choose “Auto Enroll” you will be prompted to enter an e-mail address to enroll every customer that is selected for an order. This is a great way to build your loyalty database.
● You don’t need to fill out the point formula, point rules, etc. when using Salesbuilder rewards only.● If you choose “Prompt with available offers”, any active rewards that Salesbuilder has e-mailed your
customers will display as pop ups when the customer is selected.● Point expiration settings will not apply when used in conjunction with SalesBuilder.● The Company ID will be your SalesBuilder Account ID. The Location ID will be your Salesbuilder
access code. These will be provided by your implementation consultant. The URL is: http://www.granburysalesbuilder.net/grsSalesBuilder.svc?wsdl
Printing OptionsUnder Configuration / Printers / Printer Ticket you can choose to print loyalty point totals on the customer receipt. This will be the current FireFly total as received from Salesbuilder to account for multi-store use, if you use the FireFly loyalty points. This is not important if you are using SalesBuilder rewards only.

Setting Up OffersThe offers that you choose to use for Salesbuilder rewards need to match up to coupons in your FireFly system. For example, if you give a reward of $5 off your order, you will need a corresponding coupon in FireFly. You can use existing coupons or set up specific Salesbuilder offers. In either case, salesbuilder “Offer ID” must match the FireFly offer PLU #. You can change this in Salesbuilder OR in FireFly, but keep in mind that certain FireFly offers may also match to your online ordering coupons using the same PLU #.
Your NetworkDepending on your network settings and firewall configuration, you may need to allow traffic between your store and the Salesbuilder web server (URL specified above). Please contact your network technician to configure this properly and securely.
Set up online orderingIf your online order provider integrates with Salesbuilder, you can set up the website to allow customer enrollment and lookup, and to redeem Salesbuilder offers. Again, any offers should match to both FireFly and Salesbuilder.
The online transaction will be sent to the POS system with the customer’s Salesbuilder ID identified, as well as any SalesBuilder offers redeemed on the transaction. The POS system will be responsible for finalizing the transaction.
For GRS online ordering (LetsGet), you need to set up the following in the Administrative portal:
Navigate to “Accounts” and about halfway down in the “Marketing” section, select Marketer = SalesBuilder. Enter the Salesbuilder account ID in the “Loyalty program company ID” field. Enter your Loyalty program name and upload an image to represent your Loyalty program, if desired.

Next, navigate to “Location & Menus” and choose Edit. About halfway down, the Marketing section should contain the Salesbuilder Access Code in the “Marketer / Loyalty program Store Code” field.
If your online order provider does not integrate directly to Salesbuilder, no problem. FireFly will record transactions from any client who is already enrolled in Salesbuilder according to the POS system.

Using Your Loyalty Program
Identify & Enroll CustomersWhen setting up your loyalty program, your goal is to get as many customers as possible to enroll! With the FireFly system, we’ve got several ways to make this easy:
From the Tender ScreenWhen you’re ready to tender an order, just press the “Loyalty Card” button and you’ll get a pop-up window to search for a Salesbuilder customer.
From here, you can swipe the customer’s loyalty card or type in any of the fields to search for a customer that may already be enrolled in the loyalty program, even from another store location. Press ‘Search’. If you find a matching result, select that customer. If that customer is not already in your FireFly database, it will be added.
If you don’t find a matching result, you can enroll a customer from here. Type in the card number (if applicable), name,e-mail and phone. Press the “Enroll” button and you’ll get a confirmation that the customer was successfully enrolled. Now you can finish your transaction.
Tip: View our training video on how to enroll customers: http://updatephoenix.us/firefly/Phoenix_Videos/SB_FF_Enroll.swf
From the Lookup ScreenWhen you are looking up a delivery customer, it’s easy to enroll them in the loyalty program.
If you have the program set to “Auto Enroll”, you’ll be prompted to enter an e-mail address for every customer as you select or save them, so they can be enrolled in the program.
If you don’t use Auto Enroll, or want to enter a loyalty card #, just choose “Edit Customer” then

choose “More” from the bottom of the screen. You’ll be on the “Customer Details” screen. In the bottom right corner, check the “Earn points for purchase” box and fill in the loyalty card # (optional). You’ll be prompted for an e-mail address upon save, if you don’t already have one.
Customer Self-EnrollYou can encourage customers to enroll in your loyalty program directly from your website. Within SalesBuilder, there is sample code you can use to embed a form on your website. (Navigate to Website / Sign up forms). Or, you can direct them to sign up using a direct link. Your link will vary based on the URL that is registered for your program. You can find out the URL for your program by navigating within Salesbuilder to Customers / Sign Up Page.
Posting Transactions The POS system will automatically update SalesBuilder with the transaction amount, date, time, offers redeemed, and FireFly point balance. This occurs when the order is closed. For dine in or to go orders, it will occur immediately, but for delivery or table orders, it will not occur until the driver / server processes a close shift. This is because of the potential modifications that may occur to the order.
You can view posted transactions in SalesBuilder by navigating to Transactions / View Transactions.
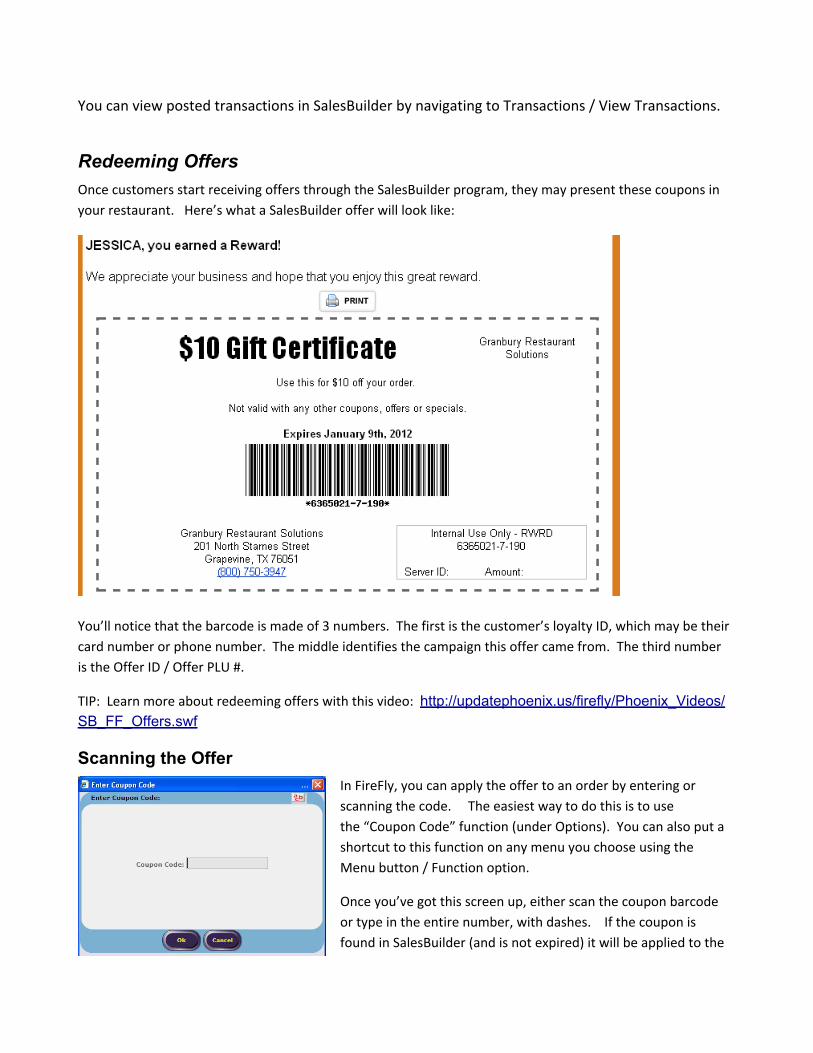
Redeeming OffersOnce customers start receiving offers through the SalesBuilder program, they may present these coupons in your restaurant. Here’s what a SalesBuilder offer will look like:
You’ll notice that the barcode is made of 3 numbers. The first is the customer’s loyalty ID, which may be their card number or phone number. The middle identifies the campaign this offer came from. The third number is the Offer ID / Offer PLU #.
TIP: Learn more about redeeming offers with this video: http://updatephoenix.us/firefly/Phoenix_Videos/SB_FF_Offers.swf
Scanning the OfferIn FireFly, you can apply the offer to an order by entering or scanning the code. The easiest way to do this is to use the “Coupon Code” function (under Options). You can also put a shortcut to this function on any menu you choose using the Menu button / Function option.
Once you’ve got this screen up, either scan the coupon barcode or type in the entire number, with dashes. If the coupon is found in SalesBuilder (and is not expired) it will be applied to the
order. The appropriate customer will also be associated with this order, so they will get points for their purchase. If the coupon is not found, already used, expired, or does not match a FireFly offer, you will get an error. Also, keep in mind that FireFly offer restrictions apply, so if this offer is limited to certain items or a minimum purchase amount, you may not be able to apply it (these restrictions are defined in FireFly).
Through Customer Look upIf you set your FireFly Customer Loyalty configuration to “Prompt for available offers” you will be notified of any offers the customer has available as soon as you look up the customer. Just select “Auto Apply” to apply the offer to this order, or “Skip All” to bypass the offers.
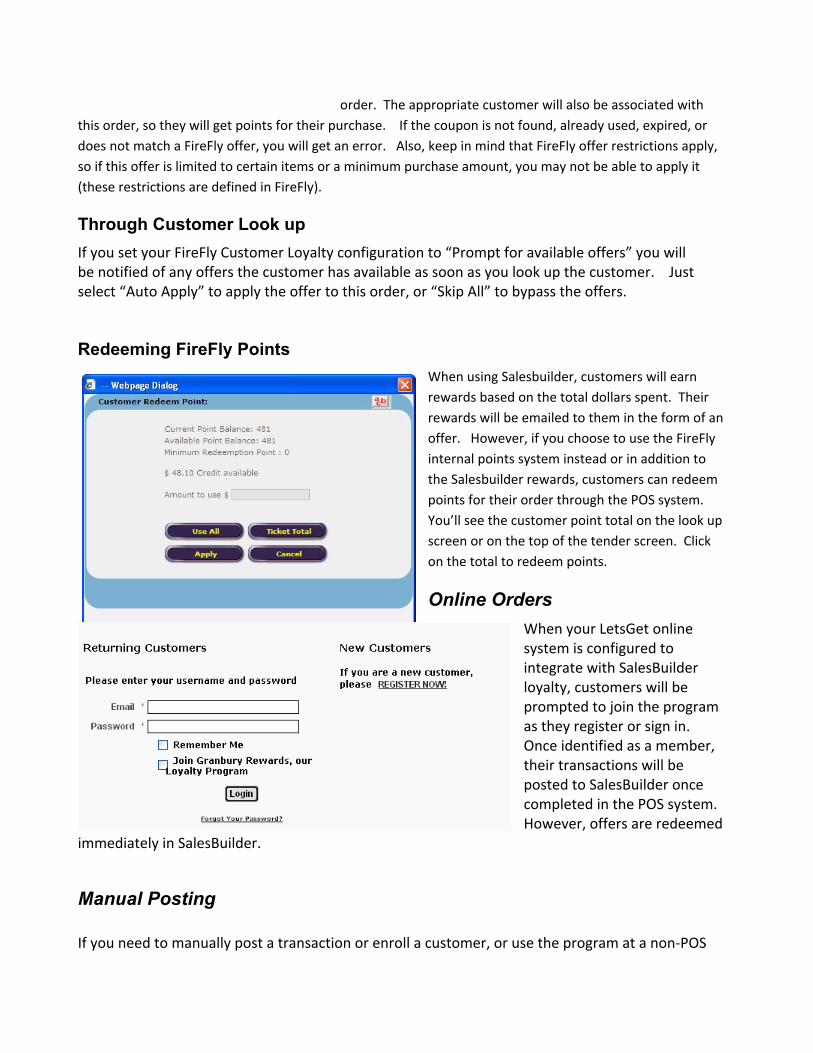
Redeeming FireFly PointsWhen using Salesbuilder, customers will earn rewards based on the total dollars spent. Their rewards will be emailed to them in the form of an offer. However, if you choose to use the FireFly internal points system instead or in addition to the Salesbuilder rewards, customers can redeem points for their order through the POS system. You’ll see the customer point total on the look up screen or on the top of the tender screen. Click on the total to redeem points.
Online OrdersWhen your LetsGet online system is configured to integrate with SalesBuilder loyalty, customers will be prompted to join the program as they register or sign in. Once identified as a member, their transactions will be posted to SalesBuilder once completed in the POS system. However, offers are redeemed
immediately in SalesBuilder.
Manual Posting If you need to manually post a transaction or enroll a customer, or use the program at a non-POS

integrated location, SalesBuilder gives you a web form to do so without having to log into the main SalesBuilder interface. Check with your implementation specialist for the proper URL, or from within SalesBuilder, go to Transactions / Post Transaction and you will see the URL at the top of the form.
Modifying Customer Records If you need to change a customer record, such as to issue a new card # or change their email, you will need to do so both within the SalesBuilder program (from the Post Transaction Form or Edit Customer) and within the FireFly POS system.
Sending a BroadcastOnce you’ve set up SalesBuilder it’s going to operate on auto-pilot for you, sending out emails on your behalf to customers on an ongoing basis. If you would like to supplement this with additional marketing, it’s easy to send out additional emails, text messages, etc. to your customers.
From the SalesBuilder main menu, Select Broadcast, e-mail broadcast. Select the set of customers you wish to email.
On the next screen, you’ll be able to type your message or create your HTML. If you’d like to attach an offer to your email, you’ll need to insert the Customization
Tag “Landing Page” which will be a link to the page of offers. Then, select the offers from the list below.
Customer SurveysIf you are using the Customer Survey feature of SalesBuilder, you can access the survey results through Transactions / View Surveys.

More AssistanceNeed more help? Visit our customer support web portal at www.granburyrs.com/support/ to submit a support request, or call 800-750-3947.


