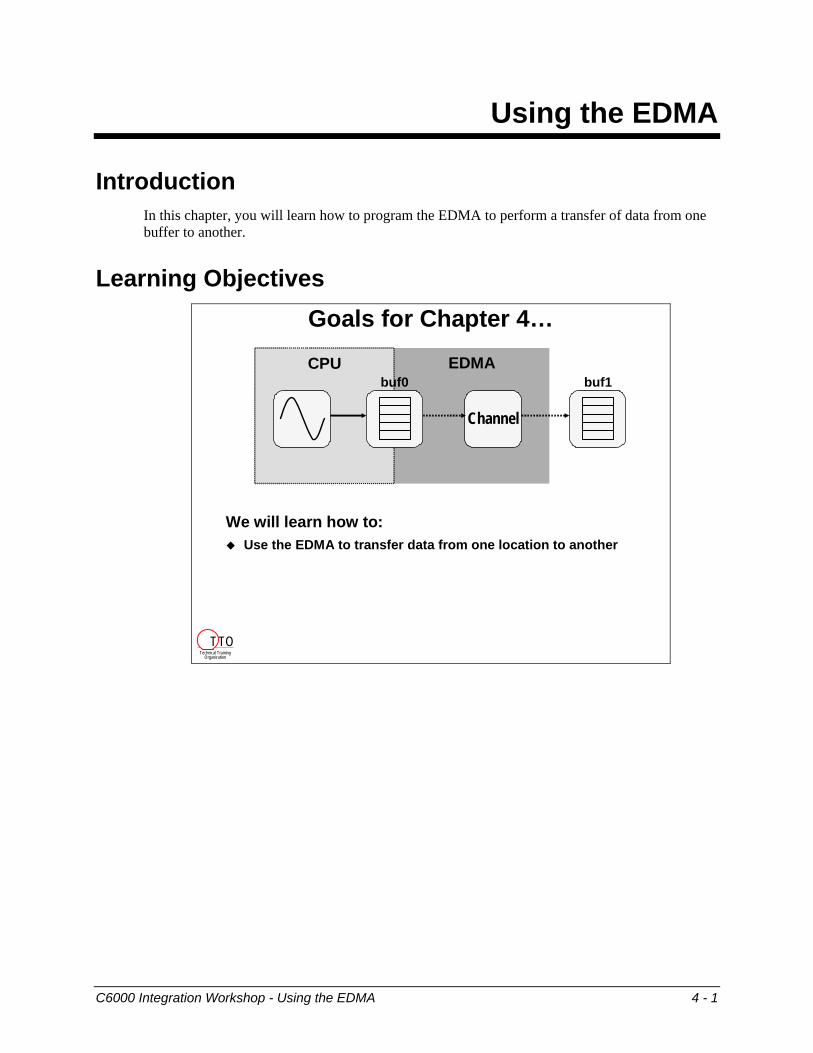
Using the EDMA Introduction In this chapter, you will learn how to program the EDMA to perform a transfer of data from one buffer to another. Learning Objectives EDMA Goals for Chapter 4… CPU buf0 Channel buf1 We will learn how to: Use the EDMA to transfer data from one location to another Technical Training Organization T TO C6000 Integration Workshop - Using the EDMA 4 - 1
Transcript
Using the EDMA
Introduction In this chapter, you will learn how to program the EDMA to perform a transfer of data from one buffer to another.
Learning Objectives
EDMA
Goals for Chapter 4…
CPUbuf0
Channel
buf1
We will learn how to:Use the EDMA to transfer data from one location to another
Technical TrainingOrganization
T TO
C6000 Integration Workshop - Using the EDMA 4 - 1
Chip Support Library (CSL)
Chapter Topics Using the EDMA........................................................................................................................................ 4-1
Chip Support Library (CSL) ................................................................................................................... 4-3 Enhanced Direct Memory Access (EDMA)............................................................................................. 4-4
Introduction ........................................................................................................................................ 4-4 Overview ............................................................................................................................................ 4-5 Definitions .......................................................................................................................................... 4-5 Example.............................................................................................................................................. 4-6 Programming the EDMA (the traditional way) .................................................................................. 4-7
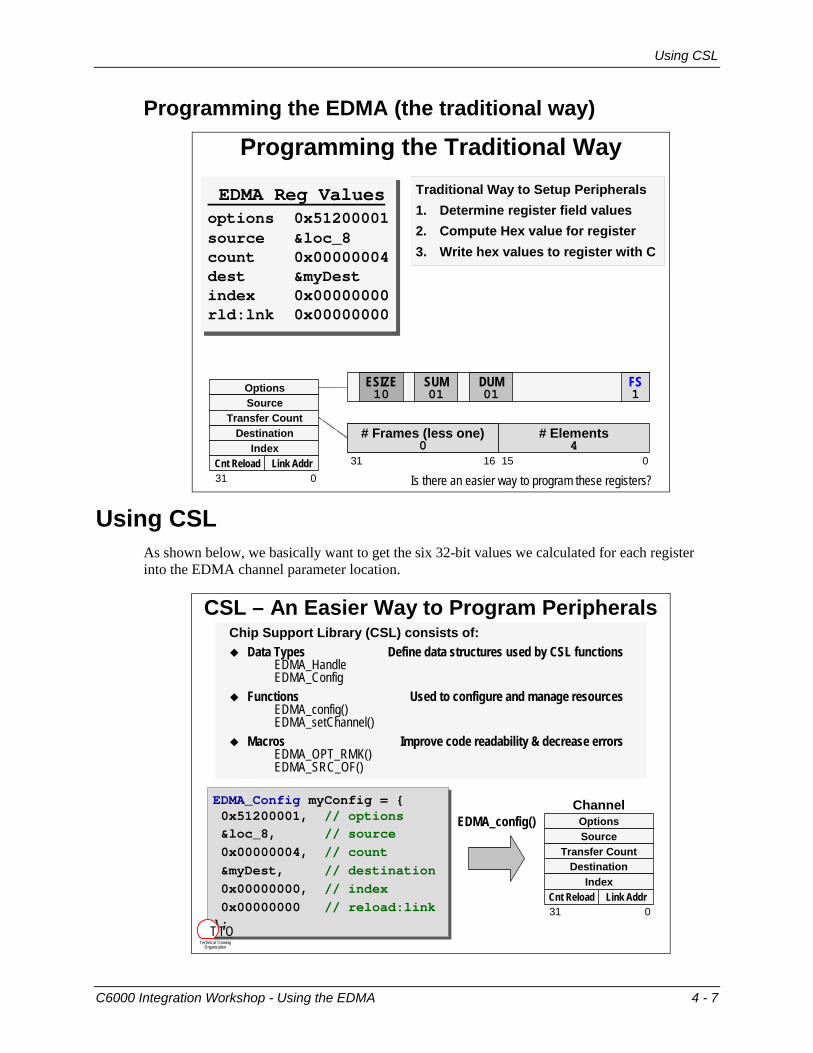
Using CSL............................................................................................................................................... 4-7 Looking more closely at the Config structure?................................................................................... 4-8
DMA (vs. EDMA).............................................................................................................................4-20 EDMA: Channel Controller vs. Transfer Controller ........................................................................4-22 QDMA...............................................................................................................................................4-23 DAT (CSL module) ...........................................................................................................................4-24 EDMA: Alternate Option Fields.......................................................................................................4-26
4 - 2 C6000 Integration Workshop - Using the EDMA
Chip Support Library (CSL)
Chip Support Library (CSL) Chip Support Library
C-callable library that supports programming of on-chip peripheralsSupports peripherals in three ways:
1. Resource Management (functions)Verify if periph is available“Check-out” a peripheral
2. Simplifies Configuration Data structuresConfig functions
3. Macros improve code readability
You still have to know what you want the peripherals to do, CSL just simplifies the code and maintenance
Viterbi Co-ProcessorVCPeXpansion BusXBUS
Utopia Port (ATM)UTOPIAOn-chip TimersTIMERTurbo Co-ProcessorTCPPower Down ModesPWRPhase Lock LoopPLLPCI InterfacePCIBuffered Serial PortMcBSPAudio Serial PortMcASPHardware InterruptsIRQI2C Bus InterfaceI2CHost Port InterfaceHPIGeneral Purpose Bit I/OGPIO
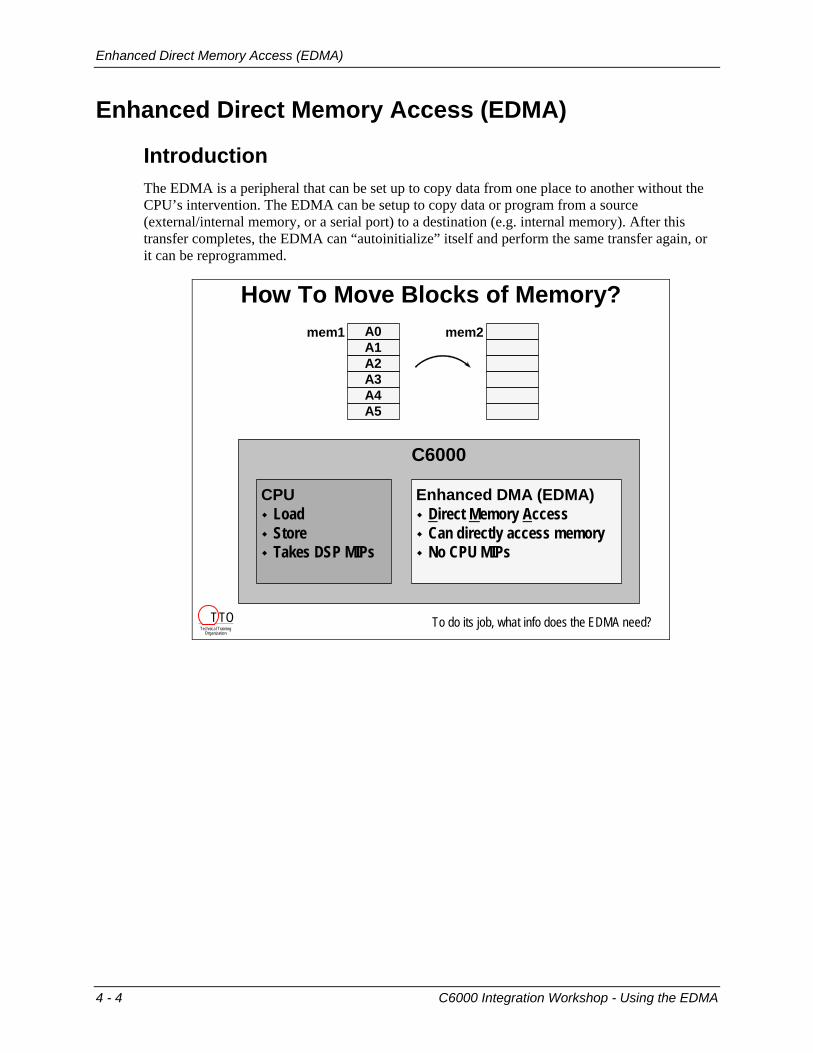
Introduction The EDMA is a peripheral that can be set up to copy data from one place to another without the CPU’s intervention. The EDMA can be setup to copy data or program from a source (external/internal memory, or a serial port) to a destination (e.g. internal memory). After this transfer completes, the EDMA can “autoinitialize” itself and perform the same transfer again, or it can be reprogrammed.
How To Move Blocks of Memory?mem2mem1 A0
A1A2A3A4A5
C6000
CPULoadStoreTakes DSP MIPs
Enhanced DMA (EDMA)Direct Memory AccessCan directly access memoryNo CPU MIPs
To do its job, what info does the EDMA need?Technical Training
Organization
T TO
4 - 4 C6000 Integration Workshop - Using the EDMA
Enhanced Direct Memory Access (EDMA)
Overview
EDMA Overview
Source
DestinationTransfer Count
Options
IndexLink AddrCount Reload
31 16 15 0
EDMA requires transfer parametersMost obvious: Src, Dest, Count
Each channel has also has options for: Data sizeChannel PriorityAutoinit (linking)Inc/dec src & dest addresses
Channel 63 (15)
Channel 1Channel 2
...
Channel 0EDMA
C64x has 64 channelsC67x has 16 channels
EDMA Channel
How much does the EDMA move?Technical TrainingOrganization
T TO
Definitions
EDMA - How much to move
Element
ESIZE
00: 32-bits01: 16-bits10: 8-bits11: rsvd
ESIZE
Elem 1Elem 2
Elem N
Frame
..
# Elements (N)015
Frame 1Frame 2
Frame M
Block
..
1631
# Frames (M-1)
OptionsSource
DestinationIndex
Link AddrCnt Reload31 0
Transfer Count
C6000 Integration Workshop - Using the EDMA 4 - 5
Enhanced Direct Memory Access (EDMA)
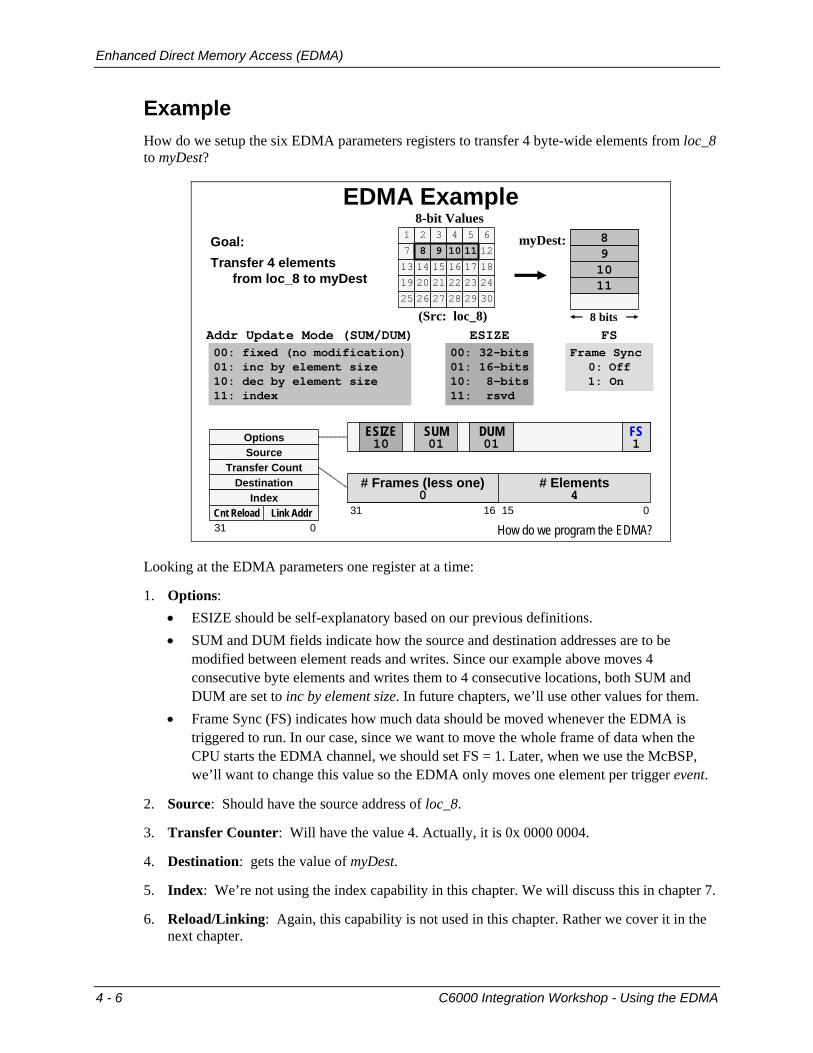
Example How do we setup the six EDMA parameters registers to transfer 4 byte-wide elements from loc_8 to myDest?
EDMA ExamplemyDest:
8 bits
891011
(Src: loc_8)
8-bit Values1 2 3 4 5 6
7 12
13 14 15 16 17 18
19 20 21 22 23 24
25 26 27 28 29 30
8 9 10 118 9 10 11891011
ESIZE00: 32-bits01: 16-bits10: 8-bits11: rsvd
OptionsSource
DestinationIndex
Link AddrCnt Reload31 0
Transfer Count
ESIZE10
Goal:Transfer 4 elements
from loc_8 to myDest
# Elements4
0151631
# Frames (less one)0
FS
FSFrame Sync
0: Off1: On
00: fixed (no modification)01: inc by element size10: dec by element size11: index
Addr Update Mode (SUM/DUM)
SUM DUM
How do we program the EDMA?
SUM01
DUM01
FS1
Looking at the EDMA parameters one register at a time:
1. Options: • ESIZE should be self-explanatory based on our previous definitions. • SUM and DUM fields indicate how the source and destination addresses are to be
modified between element reads and writes. Since our example above moves 4 consecutive byte elements and writes them to 4 consecutive locations, both SUM and DUM are set to inc by element size. In future chapters, we’ll use other values for them.
• Frame Sync (FS) indicates how much data should be moved whenever the EDMA is triggered to run. In our case, since we want to move the whole frame of data when the CPU starts the EDMA channel, we should set FS = 1. Later, when we use the McBSP, we’ll want to change this value so the EDMA only moves one element per trigger event.
2. Source: Should have the source address of loc_8.
3. Transfer Counter: Will have the value 4. Actually, it is 0x 0000 0004.
4. Destination: gets the value of myDest.
5. Index: We’re not using the index capability in this chapter. We will discuss this in chapter 7.
6. Reload/Linking: Again, this capability is not used in this chapter. Rather we cover it in the next chapter.
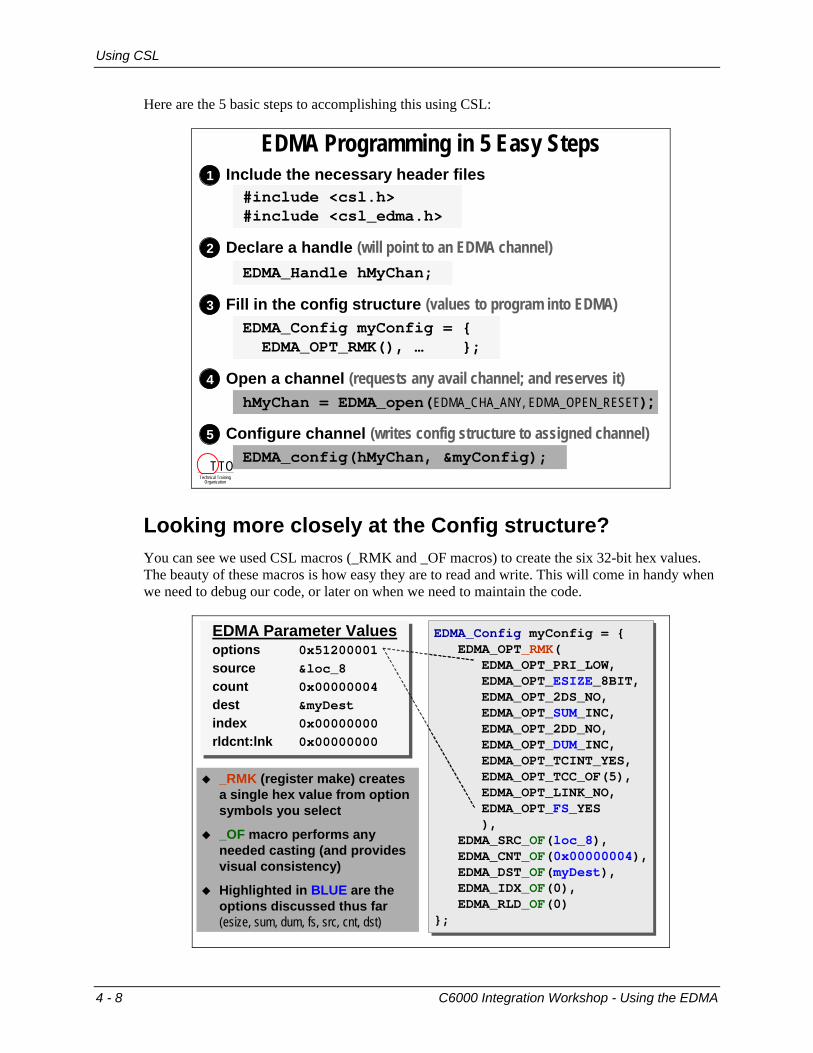
Here are the 5 basic steps to accomplishing this using CSL:
EDMA Programming in 5 Easy Steps
2 Declare a handle (will point to an EDMA channel)EDMA_Handle hMyChan;
3 Fill in the config structure (values to program into EDMA)EDMA_Config myConfig = {EDMA_OPT_RMK(), … };
1 Include the necessary header files#include <csl.h>#include <csl_edma.h>
4 Open a channel (requests any avail channel; and reserves it)hMyChan = EDMA_open(EDMA_CHA_ANY, EDMA_OPEN_RESET);
5 Configure channel (writes config structure to assigned channel)EDMA_config(hMyChan, &myConfig);
Technical TrainingOrganization
T TO
Looking more closely at the Config structure? You can see we used CSL macros (_RMK and _OF macros) to create the six 32-bit hex values. The beauty of these macros is how easy they are to read and write. This will come in handy when we need to debug our code, or later on when we need to maintain the code.
_RMK (register make) creates a single hex value from option symbols you select
_OF macro performs any needed casting (and provides visual consistency)
Highlighted in BLUE are the options discussed thus far(esize, sum, dum, fs, src, cnt, dst)
4 - 8 C6000 Integration Workshop - Using the EDMA
EDMA Events – Triggering the EDMA
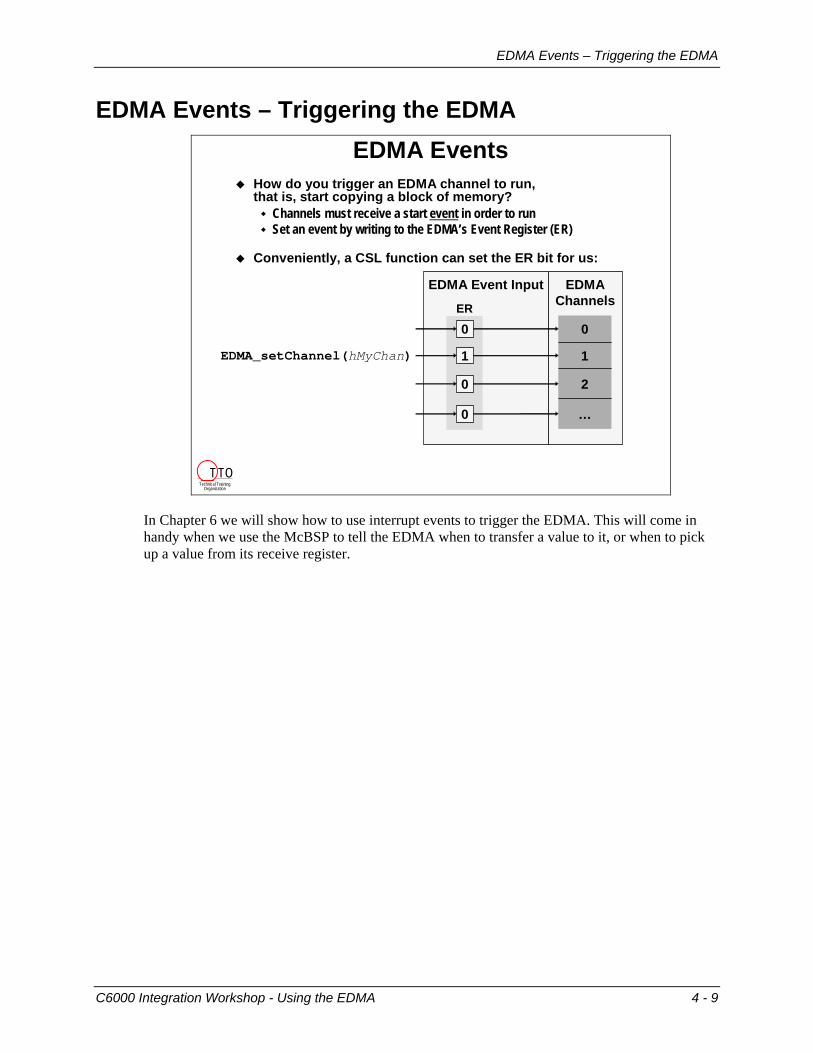
EDMA Events – Triggering the EDMA EDMA Events
EDMAChannels
…
2
1
0
EDMA_setChannel(hMyChan)
EDMA Event Input
0
1
0
0
ER
How do you trigger an EDMA channel to run,that is, start copying a block of memory?
Channels must receive a start event in order to runSet an event by writing to the EDMA’s Event Register (ER)
Conveniently, a CSL function can set the ER bit for us:
Technical TrainingOrganization
T TO
In Chapter 6 we will show how to use interrupt events to trigger the EDMA. This will come in handy when we use the McBSP to tell the EDMA when to transfer a value to it, or when to pick up a value from its receive register.
C6000 Integration Workshop - Using the EDMA 4 - 9
Exercise
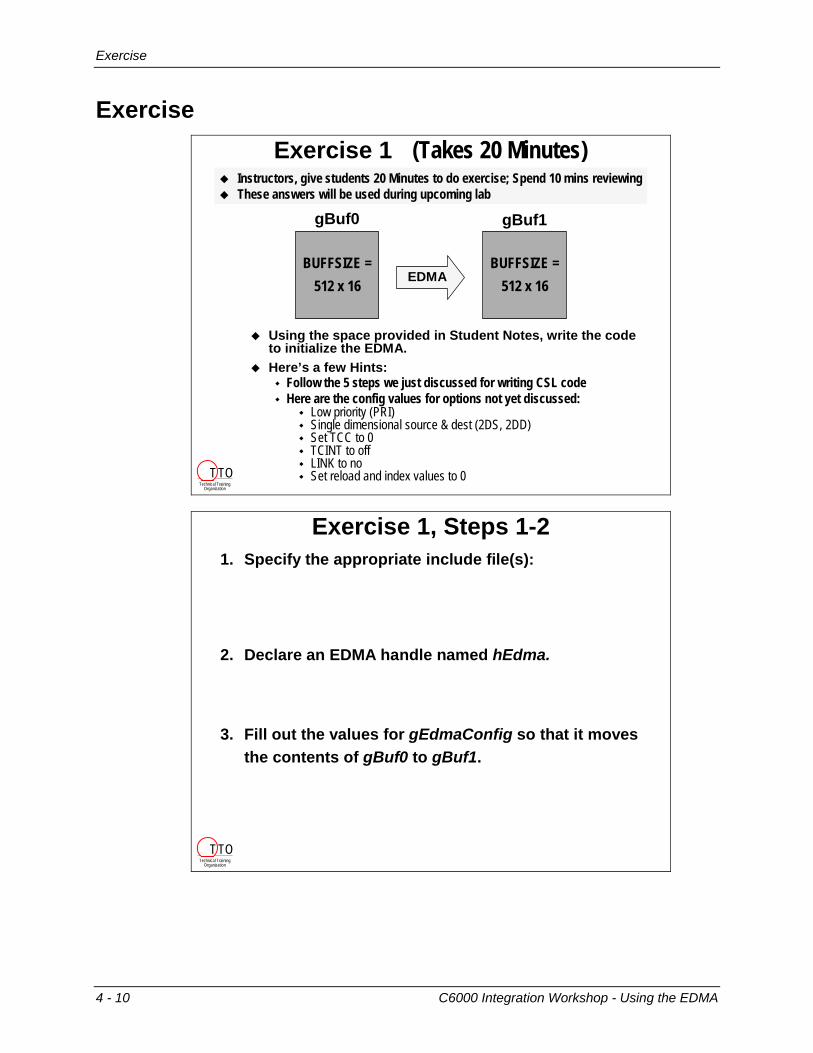
Exercise Exercise 1 (Takes 20 Minutes)
Using the space provided in Student Notes, write the code to initialize the EDMA.Here’s a few Hints:
Follow the 5 steps we just discussed for writing CSL codeHere are the config values for options not yet discussed:
Low priority (PRI)Single dimensional source & dest (2DS, 2DD)Set TCC to 0TCINT to offLINK to noSet reload and index values to 0
BUFFSIZE =512 x 16
gBuf0
EDMA
gBuf1
BUFFSIZE =512 x 16
Instructors, give students 20 Minutes to do exercise; Spend 10 mins reviewingThese answers will be used during upcoming lab
Technical TrainingOrganization
T TO
Exercise 1, Steps 1-21. Specify the appropriate include file(s):
2. Declare an EDMA handle named hEdma.
3. Fill out the values for gEdmaConfig so that it moves the contents of gBuf0 to gBuf1.
Technical TrainingOrganization
T TO
4 - 10 C6000 Integration Workshop - Using the EDMA
EDMA_OPT_RMK(EDMA_OPT_PRI_ , // Priority?EDMA_OPT_ESIZE_ , // Element size?EDMA_OPT_2DS_ , // Is it a 2 dimensional src?EDMA_OPT_SUM_ , // Src update mode?EDMA_OPT_2DD_ , // Is it a 2 dimensional dst?EDMA_OPT_DUM_ , // Dest update mode?EDMA_OPT_TCINT_ , // Cause EDMA interrupt?EDMA_OPT_TCC_OF( ), // Transfer complete code?EDMA_OPT_LINK_ , // Enable linking (autoinit)?EDMA_OPT_FS_ , // Use frame sync?
Exercise 1, Steps 4-64. Request any available EDMA channel from CSL to
perform the transfer:
5. Configure the EDMA channel you opened:
6. How would you trigger this channel to run?
Technical TrainingOrganization
T TO
C6000 Integration Workshop - Using the EDMA 4 - 11
Exercise
*** this page is VERY blank ***
4 - 12 C6000 Integration Workshop - Using the EDMA
Lab 4 – Overview
Lab 4 – Overview
EDMA
Lab 4 – Programming the EDMA
CPUgBuf0
EDMA
gBuf1
Goals:1. CPU generates 32 sine values into gBuf02. EDMA transfers 32 elements from gBuf0 to gBuf1
Technical TrainingOrganization
T TO
Goals of the lab:
• To use CSL to set up the EDMA for copying buf0 to buf1. This will be done programmatically as discussed in the material.
C6000 Integration Workshop - Using the EDMA 4 - 13
Lab 4
Lab 4
Understanding Coding/Naming Conventions 1. Reset the DSK, start CCS and open audioapp.pjt.
2. Open main.c
You can open a file by double-clicking on it in the Project View window. You may have to expand the source files folder to find it.
3. Review coding conventions. • Take a look at the prototypes and global variables. You’ll notice that each uses titleCase,
meaning that the first word is lower case and the concatenated second word has the first character capitalized. Titlecase is suggested for user-defined functions as well as global variables. Example: gBuf.
• Constants are entirely capitalized (no underscores) – notice the constant BUFFSIZE. • CSL Functions: the CSL API uses a specific naming convention. The generic form of a
CSL function looks like: MOD_function( ). For example, when using the EDMA module, its open function appears as:
EDMA_open( )
EDMA is capitalized because it is the module name. The function (such as “config”, “intEnable”, or “open”) is in titleCase and separated by an underscore.
• CSL Data Types: take the generic form MOD_DataType. That is, along with the module name, the type is separated by an underscore. Also, notice that titleCase is used here, too, with one exception; the first letter after the underscore is Capitalized.
• To distinguish global variables from locals, we will use a small “g” prefix. Globals do not use underscores. (The small “g” is not required, but it’s a common practice.)
• Handles (or pointers to our resources) will normally begin with a lower case prefix of “h”. (Not required, but again, it’s a common practice.)
These conventions match TI’s software development guidelines, and are similar to Microsoft’s naming conventions. For the most part, understanding and using these conventions will help clarify everyone’s code. Hopefully they’ll quickly become second nature.
Add a Second Buffer to the System 4. In main.c, add a second buffer for use as the EDMA destination
Per the system diagram, we need to create another buffer to be used as the destination of our EDMA transfer. We currently have just one buffer (gBuf) that was used to hold the sine values that we graphed in lab2.
Change the name of the current buffer to gBuf0 (search and replace all occurrences).
Declare a second global buffer, the same size as gBuf0, and name it gBuf1. gBuf0 will be the source of our EDMA transfer and gBuf1 will be the destination.
4 - 14 C6000 Integration Workshop - Using the EDMA
Lab 4
Initialize the EDMA via CSL Our goal is to set up an EDMA channel to copy one buffer to another. The following steps will get the EDMA to transfer just once. Later in the lab, we’ll add the autoinitialization capability.
We will be using the Chip Support Library (CSL) to perform setup and initialization (most of the code you’ll need comes from the paper exercise). Refer to the 5-step CSL procedure for programming the EDMA from the discussion – and the paper exercise you did just before the lab. We’re going to follow the first 5 steps of the procedure and save the autoinit step until later.
If you need additional help, you can refer to the CSL Reference Manual (SPRU401) under Help → Users Manuals in CCS.
We are going to put all of the code that initializes the EDMA into a separate file to keep it all nice and organized. We have provided a simple file to start with called edma.c.
5. Add edma.c to your project
The file, edma.c, is located in c:\iw6000\labs\audioapp\.
6. Open edma.c and inspect it
There's not much exciting here right now, but we'll add a lot of code to this file by the day's end.
We're going to add code to this file to initialize and configure the EDMA to do a transfer. We will basically be following the 5 step procedure that we outlined earlier. Please refer back to this procedure to help you keep track of what you are doing.
7. Add the two header files necessary for CSL and the EDMA APIs (Step 1 of 5)
In edma.c, our code will reference the functions and data-structures from these libraries (<csl.h> and <csl_edma.h>). Make sure you add them in the correct order. These should be the first #include statements in main.c
8. Declare the EDMA Handle in edma.c (Step 2 of 5)
Add a global EDMA handle, named hEdma, to the global variables area of your program in edma.c. We will use this handle to point to and initialize the channel registers.
9. Copy the Starter EDMA Config Structure
Rather than typing the whole structure from scratch, we have provided a structure for you that is almost completely filled in (see comments at the top of the file).
Copy the structure from the commented area to the global variables area of edma.c just beneath the declaration for the EDMA handle. Change the name of the structure from variableName to gEdmaConfig.
Notice: The TYPE definition EDMA_Config uses an uppercase C for “C”onfig. This is the naming standard for CSL’s typedefs, i.e. MOD_Config, where MOD is the module name EDMA. (As opposed to the “config” function that uses a small “c”.)
C6000 Integration Workshop - Using the EDMA 4 - 15
Lab 4
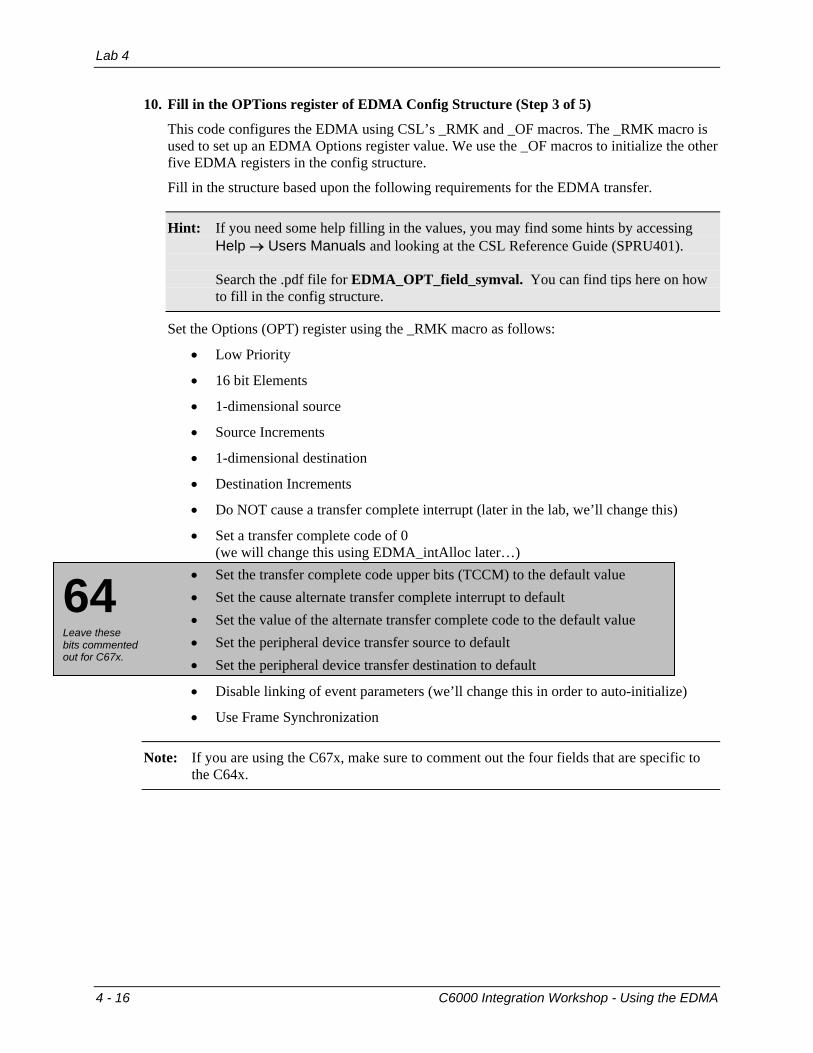
10. Fill in the OPTions register of EDMA Config Structure (Step 3 of 5)
This code configures the EDMA using CSL’s _RMK and _OF macros. The _RMK macro is used to set up an EDMA Options register value. We use the _OF macros to initialize the other five EDMA registers in the config structure.
Fill in the structure based upon the following requirements for the EDMA transfer.
Hint: If you need some help filling in the values, you may find some hints by accessing Help → Users Manuals and looking at the CSL Reference Guide (SPRU401). Search the .pdf file for EDMA_OPT_field_symval. You can find tips here on how to fill in the config structure.
Set the Options (OPT) register using the _RMK macro as follows:
• Low Priority
• 16 bit Elements
• 1-dimensional source
• Source Increments
• 1-dimensional destination
• Destination Increments
• Do NOT cause a transfer complete interrupt (later in the lab, we’ll change this)
• Set a transfer complete code of 0 (we will change this using EDMA_intAlloc later…)
64 Leave these bits commented out for C67x.
• Set the transfer complete code upper bits (TCCM) to the default value • Set the cause alternate transfer complete interrupt to default • Set the value of the alternate transfer complete code to the default value • Set the peripheral device transfer source to default • Set the peripheral device transfer destination to default
• Disable linking of event parameters (we’ll change this in order to auto-initialize)
• Use Frame Synchronization
Note: If you are using the C67x, make sure to comment out the four fields that are specific to the C64x.
4 - 16 C6000 Integration Workshop - Using the EDMA
Lab 4
11. Now, set the other registers as follows:
• Source is gBuf0.
• Set Count to the buffer’s size. Use the defined constant at the top of the file.
• Destination is gBuf1.
• No Index needed, set to 0. Not used unless the DUM and SUM use IDX (index).
• Set Reload (and Link) to 0, for now. We’ll change this dynamically in the code.
12. Add external references for gBuf0 and gBuf1
Since gBuf0 and gBuf1 are declared in main.c, we need to add external references to them so that the code generation tools know how to go find them. The easiest way to do this is to copy the code that creates the two buffers from main.c to edma.c and add the C keyword extern in front of them.
Initializing the EDMA 13. Add code to the initEdma function in edma.c
In edma.c, find the function called initEdma( ).
Notice that this function is already prototyped for you.
14. Inside initEdma( ), open the EDMA channel (Step 4 of 5 Easy Steps)
Inside this function, add a call to the CSL function that opens an EDMA channel. Use the handle that we created earlier. Pick any channel (hint) and reset the channel when it’s opened.
15. Configure the EDMA channel (Step 5 of 5 Easy Steps)
Next, use a CSL function to configure the channel with the Config structure you created earlier.
You have now completed the initEdma() function.
Modifying main( ) 16. Add initEdma() call to main( ) in main.c
Now that the function is created, we need to call it. Add a call to initEdma( ) in the main() function just below the call to SINE_init(…).
17. Include edma.h in main.c
Since we are calling a function that is located in another file, we need to reference it in the calling file, main.c. We have provided a header file to do this for you, edma.h. Feel free to open edma.h and check out what it has in it.
C6000 Integration Workshop - Using the EDMA 4 - 17
Lab 4
18. Tell the EDMA Channel to Transfer the Buffer
Call EDMA_setChannel( ) after SINE_blockFill( ) in main.c (and before the while loop) to initiate an EDMA transfer for the hEdma channel. This function was discussed toward the end of the chapter (as part of the EDMA ISR topic).
We are using this function in place of a synchronization (i.e. trigger) event. The next lab uses the McBSP to trigger the EDMA transfers. Which is a lot more fun.
19. Add CSL header files to main.c
Since we are using a CSL function for the EDMA in main.c (EDMA_setChannel()), we need to add the two necessary header files to main.c. Add #include statements for <csl.h> and <csl_edma.h> to main.c. Make sure to add these files in this order and put them above the other header files in main.c.
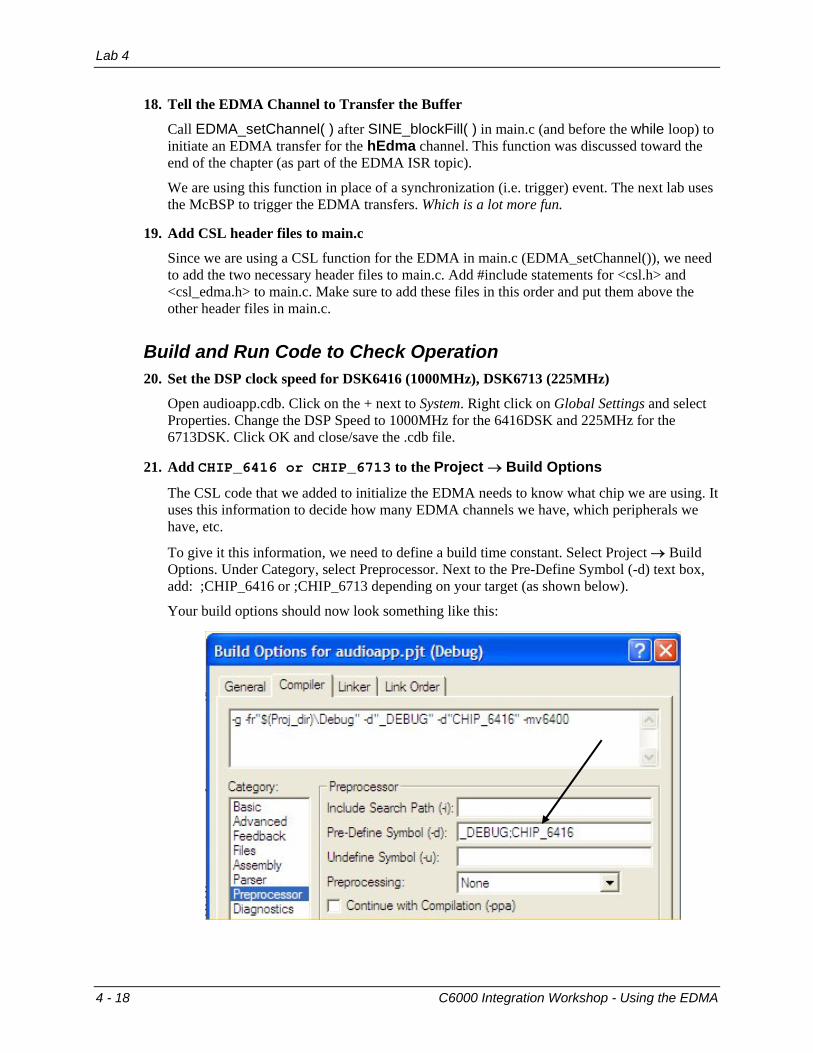
Build and Run Code to Check Operation 20. Set the DSP clock speed for DSK6416 (1000MHz), DSK6713 (225MHz)
Open audioapp.cdb. Click on the + next to System. Right click on Global Settings and select Properties. Change the DSP Speed to 1000MHz for the 6416DSK and 225MHz for the 6713DSK. Click OK and close/save the .cdb file.
21. Add CHIP_6416 or CHIP_6713 to the Project → Build Options
The CSL code that we added to initialize the EDMA needs to know what chip we are using. It uses this information to decide how many EDMA channels we have, which peripherals we have, etc.
To give it this information, we need to define a build time constant. Select Project → Build Options. Under Category, select Preprocessor. Next to the Pre-Define Symbol (-d) text box, add: ;CHIP_6416 or ;CHIP_6713 depending on your target (as shown below).
Your build options should now look something like this:
4 - 18 C6000 Integration Workshop - Using the EDMA
Lab 4
22. Build/load your code and fix any errors.
23. Run your code
Looking at main( ), you’ll notice that all we are doing is: • Initializing the EDMA channel • Filling the source buffer (gBuf0); then • Telling the EDMA to transfer that buffer to the destination (gBuf1)
Afterwards, the code drops into the while loop and does nothing.
Our main intent is to see if the EDMA config structure is set up properly and that the EDMA actually does one transfer. Once this is working, the next step is to cause the EDMA transfer repeatedly. We’ll do this by adding a hardware interrupt to our system and configuring our channel for autoinitialization in the next chapter.
24. Halt the processor and graph gBuf0 and gBuf1. After halting the CPU, graph (as you did in lab 2) the source buffer (gBuf0) and the
destination buffer (gBuf1) to make sure they match. If not, debug your code and re-verify. Here's a reminder for how to do the graphs:
View → Graph → Time/Frequency
Modify the following values:
• Graph Title gBuf0 • Start Address gBuf0 • Acquisition Buffer Size 32 • Display Data Size 32 • DSP Data Type 16-bit signed integer • Sampling Rate 8000
Click OK when finished.
To do the graph for gBuf1, follow the same steps except change the graph title and start address to gBuf1.
Once the graphs match, you have successfully programmed the EDMA to transfer data from one buffer to another.
25. Copy project to preserve your solution.
Using Windows Explorer, copy the contents of:
c:\iw6000\labs\audioapp\*.* TO c:\iw6000\labs\lab4
You’re Done
C6000 Integration Workshop - Using the EDMA 4 - 19
Lab 4
Optional Topics
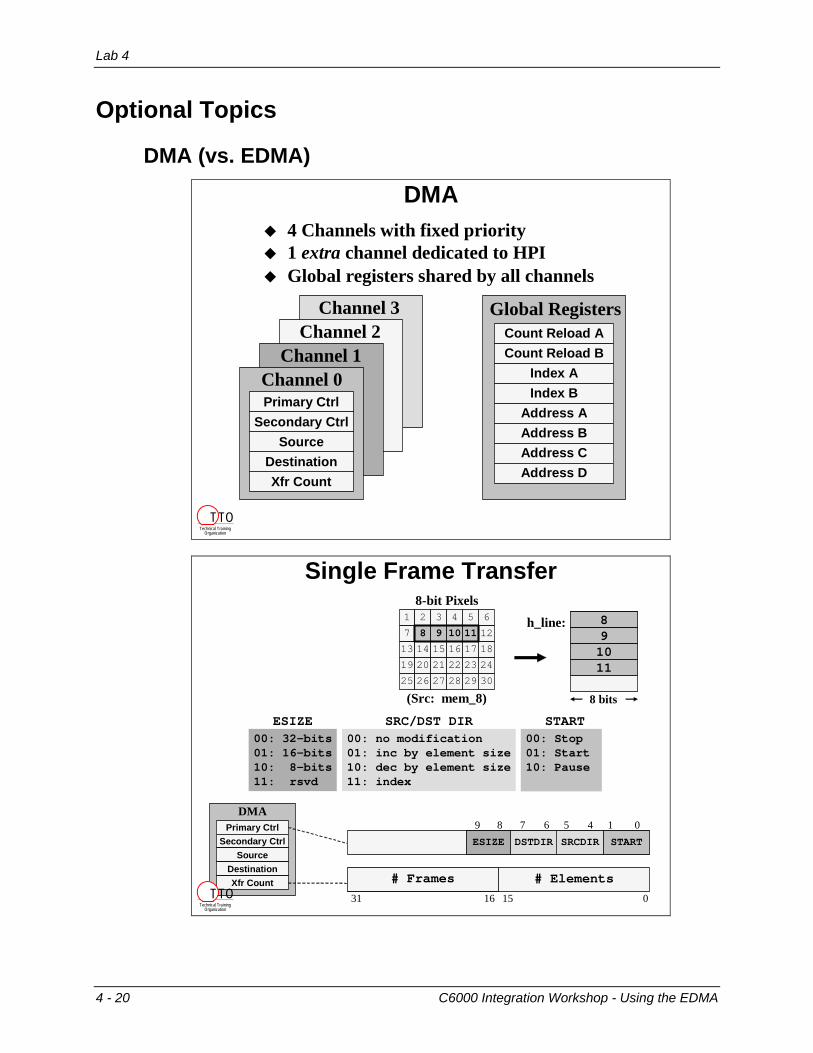
DMA (vs. EDMA)
DMA
Channel 3Channel 2
Channel 1
Primary CtrlSecondary Ctrl
SourceDestinationXfr Count
DMAChannel 0
4 Channels with fixed priority1 extra channel dedicated to HPI
Count Reload ACount Reload B
Index AIndex B
Address AAddress BAddress CAddress D
Global Registers
Global registers shared by all channels
Technical TrainingOrganization
T TO
Primary CtrlSecondary Ctrl
SourceDestinationXfr Count
DMA
# Elements1631 015
h_line:
8 bits
891011
(Src: mem_8)
8-bit Pixels1 2 3 4 5 6
7 12
13 14 15 16 17 18
19 20 21 22 23 24
25 26 27 28 29 30
8 9 10 118 9 10 11891011
ESIZEESIZE
9 8
ESIZE00: 32-bits01: 16-bits10: 8-bits11: rsvd
00: Stop01: Start10: Pause
START
01START
00: no modification01: inc by element size10: dec by element size11: index
SRC/DST DIR
SRCDIRDSTDIR
7 6 5 4
Single Frame Transfer
# Frames
Technical TrainingOrganization
T TO
4 - 20 C6000 Integration Workshop - Using the EDMA
Lab 4
DMA / EDMA Comparison
4 prog levels2 prog levels4 fixed levelsPriority
elementframe2D (block)
elementframeSync
64 channels+ 1 for HPI+ Q-DMA
16 channels+ 1 for HPI+ Q-DMA
4 channels+ 1 for HPIChannels
C64x EDMAC67x EDMADMAFeatures:
Technical TrainingOrganization
T TO
C6000 Integration Workshop - Using the EDMA 4 - 21
Lab 4
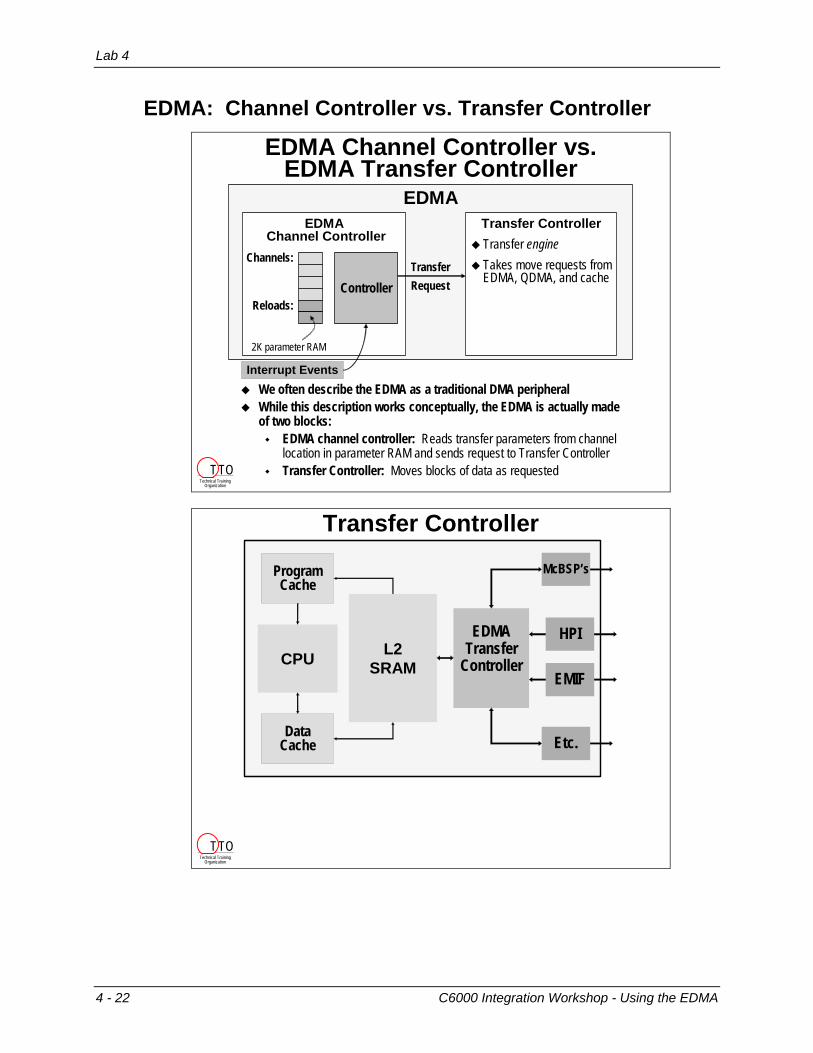
EDMA: Channel Controller vs. Transfer Controller
EDMA Channel Controller vs. EDMA Transfer Controller
EDMAEDMA
Channel ControllerTransfer ControllerTransfer engineTakes move requests from EDMA, QDMA, and cache
Channels:
Reloads:
2K parameter RAM
ControllerTransferRequest
We often describe the EDMA as a traditional DMA peripheralWhile this description works conceptually, the EDMA is actually made of two blocks:
EDMA channel controller: Reads transfer parameters from channel location in parameter RAM and sends request to Transfer ControllerTransfer Controller: Moves blocks of data as requested
Interrupt Events
Technical TrainingOrganization
T TO
Transfer Controller
L2SRAMCPU
ProgramCache
DataCache
EMIF
EDMATransfer
Controller
HPI
McBSP’s
Etc.
Technical TrainingOrganization
T TO
4 - 22 C6000 Integration Workshop - Using the EDMA
Lab 4
QDMA
QDMAEDMA
Channel ControllerTransfer ControllerTransfer engineTakes move requests from EDMA, QDMA, and cache
Channels:
Reloads:
2K parameter RAM
ControllerTransferRequest
Interrupt Events
QDMA OptionsSourceCount
Destination
QDMASends a single block transfer requestStarts (i.e. sends transfer request) when last register is written to; it doesn't work with (interrupt) eventsNo auto-init, therefore it does not have Reload:Linking register (this feature is discussed in the next chapter)Transfer request goes directly to the Transfer Controller
Index
Technical TrainingOrganization
T TO
C6000 Integration Workshop - Using the EDMA 4 - 23
Lab 4
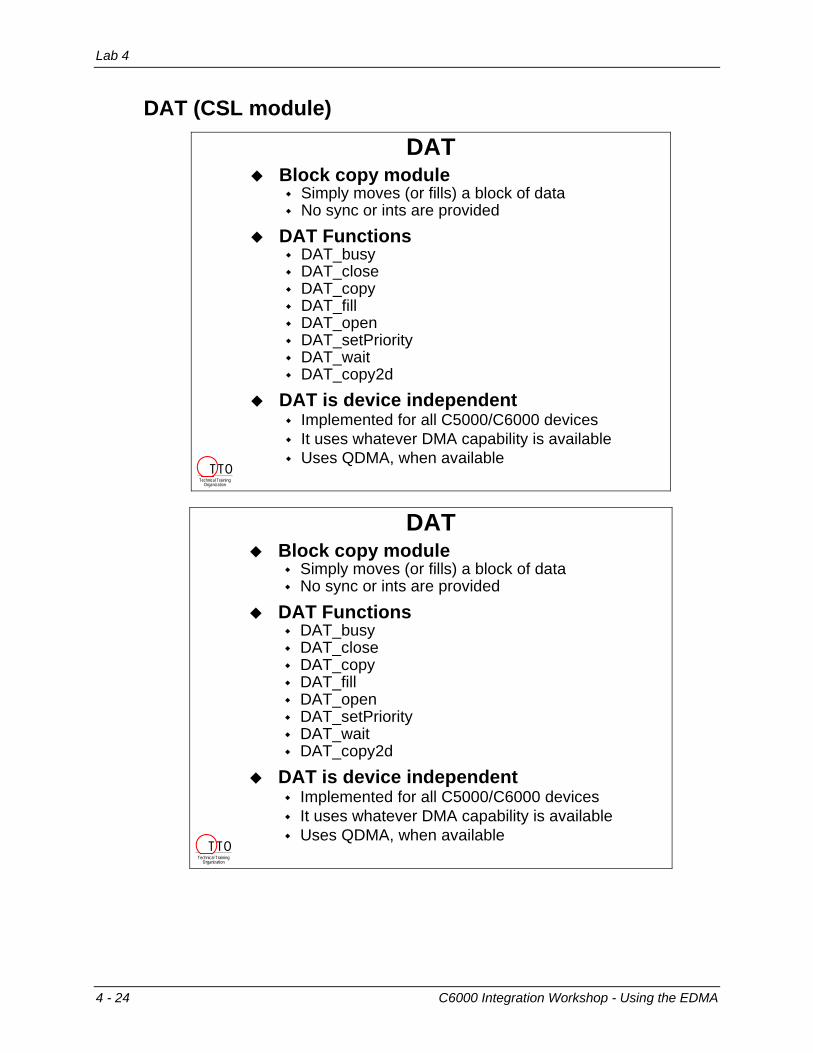
DAT (CSL module)
DATBlock copy module
Simply moves (or fills) a block of dataNo sync or ints are provided
DAT FunctionsDAT_busyDAT_closeDAT_copyDAT_fillDAT_openDAT_setPriorityDAT_waitDAT_copy2d
DAT is device independentImplemented for all C5000/C6000 devicesIt uses whatever DMA capability is availableUses QDMA, when available
Technical TrainingOrganization
TTO
DATBlock copy module
Simply moves (or fills) a block of dataNo sync or ints are provided
DAT FunctionsDAT_busyDAT_closeDAT_copyDAT_fillDAT_openDAT_setPriorityDAT_waitDAT_copy2d
DAT is device independentImplemented for all C5000/C6000 devicesIt uses whatever DMA capability is availableUses QDMA, when available
Technical TrainingOrganization
T TO
4 - 24 C6000 Integration Workshop - Using the EDMA
FillValue = 0x00C0FFEE; /* Set the fill value */XfrId = DAT_fill(BuffA, BUFFSZ, &FillValue); /* Perform the fill operation */DAT_wait(XfrId); /* Wait for completion */
XfrId = DAT_copy(BuffA, BuffB, BUFFSZ); /* copy A -> B */…if (DAT_busy(XfrId) == 0) then /* Check if copy completed, yet */
printf("Not done yet");…DAT_close();
}
Technical TrainingOrganization
TTO
C6000 Integration Workshop - Using the EDMA 4 - 25
EDMA_OPT_RMK(EDMA_OPT_PRI_LOW, // Priority?EDMA_OPT_ESIZE_16BIT, // Element size?EDMA_OPT_2DS_NO, // Is it a 2 dimensional src?EDMA_OPT_SUM_INC, // Src update mode?EDMA_OPT_2DD_NO, // Is it a 2 dimensional dst?EDMA_OPT_DUM_INC, // Dest update mode?EDMA_OPT_TCINT_NO, // Cause EDMA interrupt?EDMA_OPT_TCC_OF( 0 ), // Transfer complete code?EDMA_OPT_LINK_NO, // Enable linking (autoinit)?EDMA_OPT_FS_YES // Use frame sync?