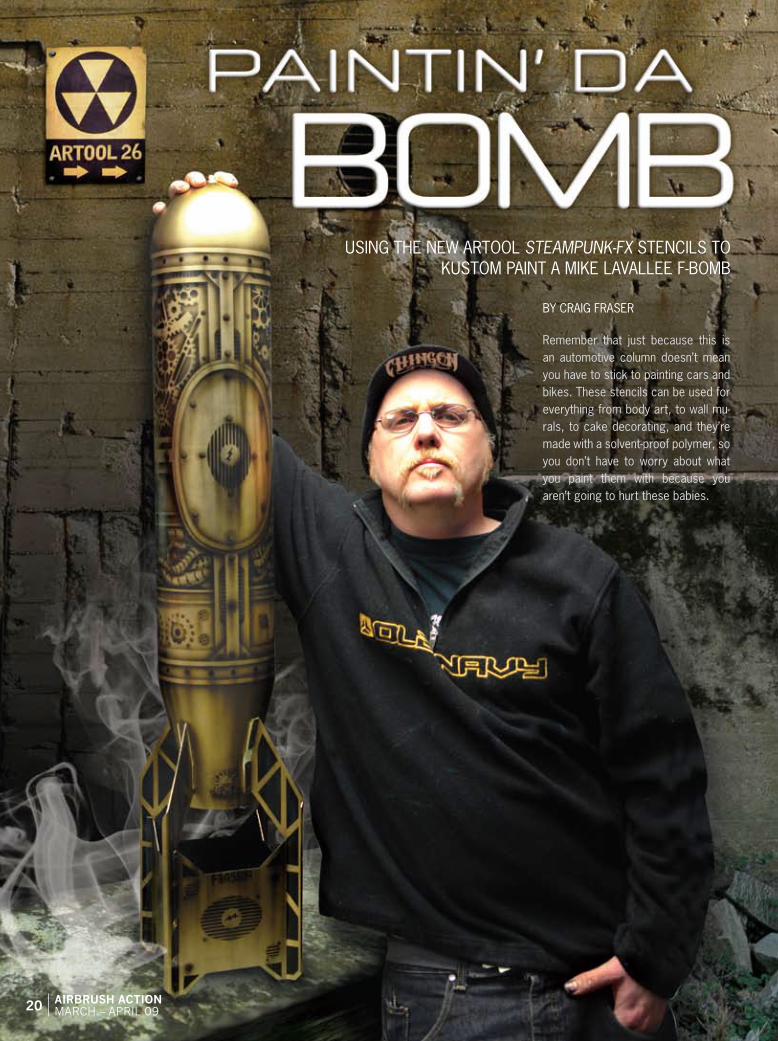
BY CRAIG FRASER Remember that just because this is an automotive column doesn’t mean you have to stick to painting cars and bikes. These stencils can be used for everything from body art, to wall mu- rals, to cake decorating, and they’re made with a solvent-proof polymer, so you don’t have to worry about what you paint them with because you aren’t going to hurt these babies. USING THE NEW ARTOOL STEAMPUNK-FX STENCILS TO KUSTOM PAINT A MIKE LAVALLEE F-BOMB AIRBRUSH ACTION MARCH – APRIL 09 20
Transcript
By Craig Fraser
remember that just because this is an automotive column doesn’t mean you have to stick to painting cars and bikes. These stencils can be used for everything from body art, to wall mu-rals, to cake decorating, and they’re made with a solvent-proof polymer, so you don’t have to worry about what you paint them with because you aren’t going to hurt these babies.
Using The new arTool Steampunk-FX sTenCils To kUsTom painT a mike lavallee F-BomB
AIRBRUSH ACTIONMARCH – APRIL 0920
when the new Steampunk FX stencils hit the market around Christmas, i re-ceived many requests to write an article showing a few of their uses. i also had one of mike lavallee’s fiberglass F-Bombs sitting in my shop waiting for a paintjob and subsequent article.
For those of you unfamiliar with the term, steampunk can be described as neo-victorian retro-futuristic technology. if you’ve seen the movie 20,000 Leagues under the Sea, all of the sets and mechanical areas of Captain nemo’s submarine were representative of steampunk. X-Box’s Bioshock is definitely steampunk, and if you want a quick crash course in it, check out www.doctorsteel.com steampunk is more than just a passing fad, it’s a legitimate and lasting addition to the kustom kulture. it’s an art form, a
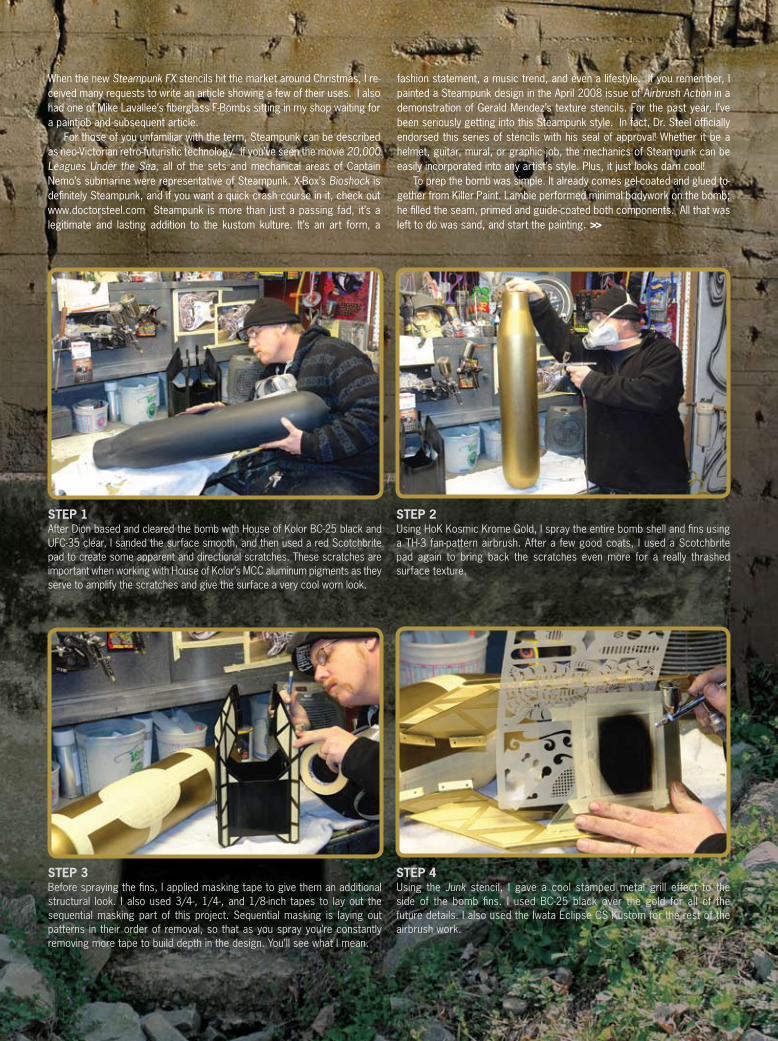
STEP 1after Dion based and cleared the bomb with house of kolor BC-25 black and UFC-35 clear, i sanded the surface smooth, and then used a red scotchbrite pad to create some apparent and directional scratches. These scratches are important when working with house of kolor’s mCC aluminum pigments as they serve to amplify the scratches and give the surface a very cool worn look.
STEP 2Using hok kosmic krome gold, i spray the entire bomb shell and fins using a Th-3 fan-pattern airbrush. after a few good coats, i used a scotchbrite pad again to bring back the scratches even more for a really thrashed surface texture.
STEP 3Before spraying the fins, i applied masking tape to give them an additional structural look. i also used 3/4-, 1/4-, and 1/8-inch tapes to lay out the sequential masking part of this project. sequential masking is laying out patterns in their order of removal, so that as you spray you’re constantly removing more tape to build depth in the design. you’ll see what i mean.
fashion statement, a music trend, and even a lifestyle. if you remember, i painted a steampunk design in the april 2008 issue of airbrush action in a demonstration of gerald mendez’s texture stencils. For the past year, i’ve been seriously getting into this steampunk style. in fact, Dr. steel officially endorsed this series of stencils with his seal of approval! whether it be a helmet, guitar, mural, or graphic job, the mechanics of steampunk can be easily incorporated into any artist’s style. plus, it just looks darn cool!
To prep the bomb was simple. it already comes gel-coated and glued to-gether from killer paint. lambie performed minimal bodywork on the bomb; he filled the seam, primed and guide-coated both components. all that was left to do was sand, and start the painting. >>
STEP 4Using the Junk stencil, i gave a cool stamped metal grill effect to the side of the bomb fins. i used BC-25 black over the gold for all of the future details. i also used the iwata eclipse Cs kustom for the rest of the airbrush work.
AIRBRUSH ACTIONMARCH – APRIL 0922
STEP 6klockworks is my absolute favorite stencil in the Steampunk-FX series be-cause it’s a complete stand-alone stencil. Freehand work is hardly neces-sary, and it still looks amazing after you spray it out. i added just a bit more black to the underside of each edge to give the whole piece a bit more depth and shadow.
STEP 7with the gears finished, i removed a layer of the border tape and airbrushed some recessed tube grills along the edges with the Junk stencil.
STEP 9no self-respecting steampunk bomb would come without a few switches, so i grabbed—what else?— the Switch stencil. Switch includes enough knobs, throws, and contacts to make hundreds of varied switches. The trick to any of these stencils is not to over airbrush. For example, too much black may compromise all your depth, detail, and, of course, gold.
STEP 8it was becoming a pain airbrushing the bomb on the table, so as soon as the gear sections were finished, i assembled the bomb and proceeded to airbrush more goodies from the Junk stencil. The random tubes and pip-ing are a killer addition to any bio-mechanical or steampunk piece.
STEP 10with some stippling, streaks, and drop shadows, the switch looks killer. notice how the preliminary masking acts as the borders to all of the mini stencil murals that make up this entire project.
STEP 5From this angle, notice the structural look that the masking gave the fins. after spraying the stencil, all that’s required for a worn, aged look is a few streaks. i also added a bit of stippling by flicking the trigger on the eclipse. This gives the surface a gritty texture that really compliments the vintage grill work.
STEP 16last, i wanted to bring out mike lavallee’s logo on the side. a big thanks goes to mike for providing the F-Bomb. also, if you’re interested in painting your own bomb—these things are seriously cool to play with—they’re avail-able from Coast airbrush, 714-635-5557.
AIRBRUSH ACTIONMARCH – APRIL 0924
as you can see in the final pics, this sucker came out killer! (i know, you thought i was gonna say ‘it’s the bomb!’). steampunk is an amazingly diverse and popular current trend that you should seriously consider incorporating into your graphics and murals. Just to let you know, this bomb was modified into a desk lamp with a blown-glass plasma bulb attached to the underside of the fin area.
These stencils are perfect for creating the steampunk look without get-ting bogged down with cutting, or even weeding computer-cut masks. with
STEP 11Using the Gauge stencil, i added a few random gauges throughout the design. like the Switch stencil, Gauge is modular, and can be assembled in a number of different ways for hundreds of gauge combinations. For a little background effect, i cut out one of the positive elements from the Gear Drive stencil.
STEP 13last, but not least, i used the mechanix stencil. (actually, i used this earlier for some screw-heads; but what the heck). Using the worm-gear pattern, i made a long worm-gear rod that spans the entire length of the back. many of the repeat-ing stencils in this series just required overlapping to be as long as required.
STEP 15To change up from rivets and screws in the borders, i opted for small holes to give the top and bottom bands on the bomb a very nice erector-set feel. although i used each stencil in the Steampunk-FX line for this demonstration, i have only scratched the surface on what you can do with them.
STEP 12here’s another gauge creation from the Gauge stencil. at this point, i’m going around all of the mini muralettes and doing any last minute touch-ups before unmasking the remaining border tape.
STEP 14as i unmasked the border tape, i filled the gaps with rivets from the circle templates from the mechanix stencil. The cool thing about mechanix is that there are also allen-heads, torques, and philips-head stencils to give your mechanical creations that authentic raw-assembly look.
sequential masking and a little freehanding, you can create a design in just a few hours that will look like you’ve spent days on it. in fact, this bomb, from start to finish, took only about five hours, not including the final clear. you should always seize the opportunity to save substantial time without affect-ing quality. i hope you’ll enjoy using these new stencils as much as i enjoyed creating them.
paint to live, live to paint, and sometimes on bombs!! – Fraser