A-1 Cisco 4700 Series Application Control Engine Appliance Application Acceleration and Optimization Configuration OL-23545-02 APPENDIX A Using the Optional Cisco AVS 3180A Management Station for Reporting The optional Cisco AVS 3180A Management Station runs the Management Console that includes database, management, and reporting features, including AppScope reporting, for the ACE optimization functionality. Note The reporting functions are not available in the Cisco 4700 Series Application Control Engine (ACE) appliance. You must run the Management Console on the optional Cisco AVS 3180A Management Station in order to see the Report items in the Management Console. Note In addition, the Cisco AVS 3180A Management Station allows you to configure and manage multiple AVS 3120 devices, monitor AVS performance with the AppScope Performance Monitor, and generate a variety of reports. See the Cisco Application Velocity System User Guide for details. This appendix contains the following major sections: • Accessing the Management Console • Using Auto Node Registration for the ACE • Viewing Bandwidth Savings Reports • Viewing Throughput Reports • Viewing AppScope Reports
Transcript
Cisco 4700 Series Application Control Engine Appliance Application AcceleraOL-23545-02
A P P E N D I X A
Using the Optional Cisco AVS 3180A Management Station for Reporting
The optional Cisco AVS 3180A Management Station runs the Management Console that includes database, management, and reporting features, including AppScope reporting, for the ACE optimization functionality.
Note The reporting functions are not available in the Cisco 4700 Series Application Control Engine (ACE) appliance. You must run the Management Console on the optional Cisco AVS 3180A Management Station in order to see the Report items in the Management Console.
Note In addition, the Cisco AVS 3180A Management Station allows you to configure and manage multiple AVS 3120 devices, monitor AVS performance with the AppScope Performance Monitor, and generate a variety of reports. See the Cisco Application Velocity System User Guide for details.
This appendix contains the following major sections:
• Accessing the Management Console
• Using Auto Node Registration for the ACE
• Viewing Bandwidth Savings Reports
• Viewing Throughput Reports
• Viewing AppScope Reports
A-1tion and Optimization Configuration
Appendix A Using the Optional Cisco AVS 3180A Management Station for ReportingAccessing the Management Console
• Viewing Saved AppScope Reports
• Viewing Scheduled Reports
• Managing Locations
• Defining Transaction Types
• Defining Business Transactions
• Maintaining the Database
Accessing the Management ConsoleBefore you can access the Management Console, specify the IP address and port number of the Cisco AVS 3180A Management Station. Start your web browser and enter a URL in the following format:
http://consoleIPAddress:consolePort/fgconsole/
For example, enter the following format:
http://192.168.10.2:9000/fgconsole/
For details on accessing the Management Console by using the secure HTTP (HTTPS) protocol, see the “Securing the Management Console” section.
Note To access the Management Console, you must use Microsoft Internet Explorer version 6.0 or higher.
A dialog will request your username and password. The default values are:
• username: admin
• password: admin
For details on changing the username and password, see the “Changing the Username or Password” section.
After you enter the correct username and password, the web browser displays the Management Console main page (Figure A-1).
A-2Cisco 4700 Series Application Control Engine Appliance Application Acceleration and Optimization Configuration
OL-23545-02
Appendix A Using the Optional Cisco AVS 3180A Management Station for ReportingAccessing the Management Console
Figure A-1 Management Console Main Page
Changing the Username or Password To change the Management Console username or password, open the following file in a text editor:
The username appears before the equal sign (=) and the password appears after the equal sign (=). For example, to change the username to Cisco and the password to accelerate, this line should read as follows:
Cisco=accelerate
If you change the username, you must change the following file:
The username is set by the line that contains admin=.
The username appears before the equal sign (=). For example, to change the username to Cisco, change it as follows:
Cisco=
Do not change the text after the equal sign (=) in this file.
The username that you enter must match the username in the users.properties file.
A-3Cisco 4700 Series Application Control Engine Appliance Application Acceleration and Optimization ConfigurationOL-23545-02
Appendix A Using the Optional Cisco AVS 3180A Management Station for ReportingAccessing the Management Console
Securing the Management ConsoleBy default, the Management Console communicates with the browser using standard HTTP on port 9000. You can configure the Management Console to support secure HTTPS (HTTPS). To make the Management Console more secure, follow these steps:
Step 1 Obtain a PEM-encoded X.509 digital certificate.
Step 2 Shutdown all AVS related services and processes by using the following CLI command:
velocity> set console stop
Step 3 Add the java keytool utility to your path by using the following commands:
Step 4 Import the X.509 digital certificate to the Java key store using the keytool utility.
There are two recommended methods that you can follow to import the X.509 digital certificate:
• Import the certificate to the Java key store using a certificate generated using the OpenSSL utility and signed by a Certificate Authority (CA) that is trusted by the default cacerts key store.
• Import the certificate to the Java key store using a certificate generated using the OpenSSL utility and signed by a CA this is not trusted by the default cacerts key store. In this case the CA's public certificate must be imported in the console.keystore key store.
For example, to create a certificate entry in the console.keystore key store, with the data from the X.509 Certificate file server.x509, and assign the alias consolecertificate, use the following commands:
• Between lines 24 and 50, comment out these lines by adding both <!-- and --> characters
• Delete lines 58 and 99, which will uncomment out a section of this file
• Replace the word “keystorepassword” with the password you chose in the previous step.
• Replace the word “mySecurityDomain” with an appropriate domain name. (You may choose any name you want.) Note that there are multiple occurrences of the “mySecurityDomain” word in the file.
This file has been included below along with line numbers.
1 <?xml version="1.0" encoding="UTF-8"?>2 <!-- Set catalina.home to the location of the Tomcat-4.x dist.3 The default value is that of the JBoss/Catalina bundle where the4 jakarta-tomcat-4.0.3-LE-jdk14 is included as jboss_dist/catalina5 -->6 <!DOCTYPE server [7 <!ENTITY catalina.home "../catalina">8 ]>910 <!-- The service configuration for the embedded Tomcat4 web container11 -->12 <server>1314 <classpath codebase="file:&catalina.home;/common/lib/" archives="*"/>15 <classpath codebase="file:&catalina.home;/server/lib/" archives="*"/>16 <classpath codebase="file:&catalina.home;/bin/" archives="*"/>17 <classpath codebase="file:&catalina.home;/lib/" archives="*"/>18 <classpath codebase="." archives="tomcat4-service.jar"/>19202122
A-5Cisco 4700 Series Application Control Engine Appliance Application Acceleration and Optimization ConfigurationOL-23545-02
Appendix A Using the Optional Cisco AVS 3180A Management Station for ReportingAccessing the Management Console
23 <!-- NON SSL SETUP BEGIN: Comment the following for SSL SETUP --> 24 <mbean code="org.jboss.web.catalina.EmbeddedCatalinaServiceSX"25 name="jboss.web:service=EmbeddedCatalinaSX">26 <attribute name="CatalinaHome">&catalina.home;</attribute>272829 <attribute name="Config">30 <Server>31 <Service name = "JBoss-Tomcat">32 <Engine name="MainEngine" defaultHost="localhost">33 <Logger className = "org.jboss.web.catalina.Log4jLogger"34 verbosityLevel = "trace" category = "org.jboss.web.localhost.Engine"/>35 <Host name="localhost">36 <Valve className = "org.apache.catalina.valves.AccessLogValve"37 prefix = "localhost_access" suffix = ".log"38 pattern = "common" directory = "../server/default/log" />39 <DefaultContext cookies = "true" crossContext = "true" override = "true" />40 </Host>41 </Engine>424344 <Connector className = "org.apache.catalina.connector.http.HttpConnector"45 port = "9000" minProcessors = "3" maxProcessors = "10" enableLookups = "true"46 acceptCount = "10" debug = "0" connectionTimeout = "60000"/>47 </Service>48 </Server>49 </attribute>50 </mbean>51 <!-- NON SSL SETUP END --> 525354 <!-- SSL SETUP BEGIN: Comment the following for Non SSL SETUP 55 replace mySecurityDomain, keystorepassword in the following text.56 --> 5758 <!---5960 <mbean code="org.jboss.security.plugins.JaasSecurityDomain"
A-6Cisco 4700 Series Application Control Engine Appliance Application Acceleration and Optimization Configuration
OL-23545-02
Appendix A Using the Optional Cisco AVS 3180A Management Station for ReportingAccessing the Management Console
A-7Cisco 4700 Series Application Control Engine Appliance Application Acceleration and Optimization ConfigurationOL-23545-02
Appendix A Using the Optional Cisco AVS 3180A Management Station for ReportingUsing Auto Node Registration for the ACE
100101 <!-- SSL SETUP END --> 102103104 105106 </server>107
Step 8 Restart the AVS related services and processes by using the following CLI command:
velocity> set console start
After this procedure, you must access the Management Console by using the HTTPS protocol. For example:
https://consoleIPAddress:consolePort/fgconsole/
Using Auto Node Registration for the ACEThe auto node registration feature of the Management Console allows each individual ACE appliance node to be registered automatically when the management console is running. You do not register an ACE node with the Management Console; the Management Console is preloaded with one default cluster called DefaultACECluster. All registered ACE nodes appear under the default cluster. The Management Console supports the editing of an ACE node name in the DefaultACECluster.
Auto registration operates with the syslog-ng server on the Management Console. You configure each ACE appliance to upload the application acceleration and optimization statistical log information to the Cisco AVS 3180A Management Station as described in Chapter 5, Configuring Global Optimization Settings.
Note If you plan to use an optional Management Console with multiple ACE nodes, we strongly recommend that you synchronize the system clock of each ACE node with a Network Time Protocol (NTP) server (see the Cisco 4700 Series Application Control Engine Appliance Administration Guide). The AppScope
A-8Cisco 4700 Series Application Control Engine Appliance Application Acceleration and Optimization Configuration
OL-23545-02
Appendix A Using the Optional Cisco AVS 3180A Management Station for ReportingUsing Auto Node Registration for the ACE
performance monitoring relies on very accurate time measurement, in the millisecond range. If you install multiple ACE appliances, different parts of a single transaction can be handled by different nodes, and it is important that the clocks be synchronized.
This section includes the following topics:
• Editing the ACE Cluster Name
• Viewing ACE Cluster Information
• Managing Individual ACE Nodes
• Viewing Bandwidth Savings Reports
Editing the ACE Cluster NameTo edit the ACE appliance cluster name, click DefaultACECluster in the left pane of the console, then click Edit Cluster Name. The Edit Cluster Name page appears (Figure A-2).
Enter the new ACE cluster name and click Apply to change the name, or click Cancel to leave the name unchanged.
Figure A-2 Edit Cluster Name Page
A-9Cisco 4700 Series Application Control Engine Appliance Application Acceleration and Optimization ConfigurationOL-23545-02
Appendix A Using the Optional Cisco AVS 3180A Management Station for ReportingUsing Auto Node Registration for the ACE
Viewing ACE Cluster InformationTo view disk and console space usage information about the nodes in the ACE default cluster, click the Cluster Information command. The Cluster Information page appears (Figure A-3). The information block shows disk utilization and Syslog-ng status information.
Figure A-3 Cluster Information Page
Managing Individual ACE NodesTo manage an individual ACE node in the default ACE cluster, click the default ACE cluster in the left pane to open it, then click on an individual ACE node in that cluster. The Edit Properties and Unregister Node menu items appear below the ACE node name (Figure A-4).
A-10Cisco 4700 Series Application Control Engine Appliance Application Acceleration and Optimization Configuration
OL-23545-02
Appendix A Using the Optional Cisco AVS 3180A Management Station for ReportingUsing Auto Node Registration for the ACE
Figure A-4 ACE Edit Properties Page
The following sections describe the menu items that are available for managing an ACE node:
• Editing ACE Node Properties
• Unregistering an ACE Node
Editing ACE Node Properties
To edit the node properties of an ACE, click the Edit Properties command. The Edit Properties page appears (see Figure A-4) where you view and change various properties. You can modify the Node Name or Alias and Enable Statlog Processing fields. The other two fields are read-only and cannot be changed for an ACE node.
Fill in the fields on the form as described below, then click Apply to modify the node properties.
A-11Cisco 4700 Series Application Control Engine Appliance Application Acceleration and Optimization ConfigurationOL-23545-02
Appendix A Using the Optional Cisco AVS 3180A Management Station for ReportingUsing Auto Node Registration for the ACE
The Register Node Name page includes the following form fields for the ACE:
• Name or Alias—Enter the node DNS name or alias.
• Virtual Context Name—The unique identifier assigned to the ACE virtual context associated with the node. This is a read-only field. For details on contexts, see the Cisco 4700 Series Application Control Engine Appliance Administration Guide.
• OPTM Id—The serial number of the ACE appliance. This is a read-only field.
• Enable Statlog Processing—Specifies whether to allow the Cisco AVS 3180A Management Station to receive and process statistical log information from the ACE. Valid selections are yes and no. To configure the ACE to upload the application acceleration and optimization statistical log information to the optional Cisco AVS 3180A Management Station, see Chapter 5, Configuring Global Optimization Settings.
Note Statistical log information from the active ACE nodes is carried by the syslog-ng daemon to the Management Console and written to the log.txt file under the /avs-log/console/log/syslog/ directory.
Unregistering an ACE NodeTo remove an ACE node from the default ACE cluster, click the Unregister Node command. The Unregister Node page appears (Figure A-5). Confirm that you want to remove the node.
• Click Yes to remove the node
• Click No to leave it unchanged
A-12Cisco 4700 Series Application Control Engine Appliance Application Acceleration and Optimization Configuration
OL-23545-02
Appendix A Using the Optional Cisco AVS 3180A Management Station for ReportingViewing Bandwidth Savings Reports
Figure A-5 Unregister Node Page
Viewing Bandwidth Savings ReportsYou can use the Bandwidth Savings Reports page (Figure A-6) to generate color-coded graphical reports based on a configurable reporting period for the ACE optimization functionality. In addition, this feature provides both summary and detailed reports that re organized by the content type to enable you to easily quantify the actual bandwidth reduction and the resulting return on investment (ROI).
A-13Cisco 4700 Series Application Control Engine Appliance Application Acceleration and Optimization ConfigurationOL-23545-02
Appendix A Using the Optional Cisco AVS 3180A Management Station for ReportingViewing Bandwidth Savings Reports
Figure A-6 Bandwidth Savings Reports Page
The Bandwidth Savings Reports page contains controls that allows you to set the report time period and domain filter. The time period can be set either as recent activity in the last minutes/hours/days or as a date range.
Enter a specific domain (such as “www.yahoo.com” or “usatoday”) to report bandwidth savings just for that domain. By default, the Domain Search String is set to “All Domains,” which generates a report for all domains.
Additionally, you can choose your output format as either HTML or PDF.
An example Bandwidth Savings Report is shown in Figure A-7. In the figure, all domains are selected; graphs compare bandwidth for uncondensed and condensed traffic and show the bandwidth usage for the various content types.
A-14Cisco 4700 Series Application Control Engine Appliance Application Acceleration and Optimization Configuration
OL-23545-02
Appendix A Using the Optional Cisco AVS 3180A Management Station for ReportingViewing Throughput Reports
Figure A-7 Bandwidth Savings Report
Viewing Throughput ReportsYou can use the Throughput Reports page (Figure A-8) to generate graphical reports based on a configurable reporting period and reporting interval. The reports show the ACE throughput performance for the ACE optimization functionality as measured in both transactions per second and kilobytes per second.
A-15Cisco 4700 Series Application Control Engine Appliance Application Acceleration and Optimization ConfigurationOL-23545-02
Appendix A Using the Optional Cisco AVS 3180A Management Station for ReportingViewing Throughput Reports
Figure A-8 Throughput Reports Page
The Throughput Reports page contains controls that allow you to set the report time period and report sampling interval.
The time period can be set either as a recent activity in the last minutes/hours/days or as a date range.
The report (sampling) interval can be set to a number of minutes or hours. This interval specifies the smaller periodic interval during which the average throughput is calculated. For example, if you specify a one-day report range, and a report interval of two hours, data for each two-hour block during the day is averaged together, and 12 (24 divided by 2) data points are graphed along the X axis.
Additionally, you can choose your output format as either HTML or PDF.
An example Throughput Report is shown in Figure A-9. The report displays the throughput in two different graphs as transactions per second and megabytes per second.
A-16Cisco 4700 Series Application Control Engine Appliance Application Acceleration and Optimization Configuration
OL-23545-02
Appendix A Using the Optional Cisco AVS 3180A Management Station for ReportingViewing AppScope Reports
Figure A-9 Throughput Report
Viewing AppScope ReportsYou can use the AppScope Reports page (Figure A-10) to generate reports for the ACE optimization functionality that measures the true end-to-end application performance seen by real end users. AppScope also accurately determines both the server delay and network delay components at the transaction level. AppScope’s Statistical Traffic Sampling technology enables an enterprise to statistically sample user requests, making AppScope highly scalable for high-traffic applications.
A-17Cisco 4700 Series Application Control Engine Appliance Application Acceleration and Optimization ConfigurationOL-23545-02
Appendix A Using the Optional Cisco AVS 3180A Management Station for ReportingViewing AppScope Reports
You can measure true application performance by grouping transactions into sets of business transactions that define a series of individual web page transactions performed by a user in a typical application task such as filing an online expense report. Aggregate statistics and charts show performance trends for the whole business transaction in addition to individual transactions. For more details on business transactions, see the “Defining Business Transactions” section.
Note If you plan to use an optional Management Console with multiple ACE nodes, we strongly recommend that you synchronize the system clock of each ACE node with an NTP server (see the Cisco 4700 Series Application Control Engine Appliance Administration Guide). The AppScope performance monitoring relies on very accurate time measurement, in the millisecond range. If you install multiple ACE appliances, different parts of a single transaction can be handled by different nodes, and it is important that the clocks be synchronized.
Performance Monitoring DetailsYou can use the AppScope performance monitoring feature to measure the total page download times from the point of view of the client. AppScope measures both accelerated (condensed) and pass-through (uncondensed) transactions, so that you can compare these transactions and determine the benefit of ACE optimization. When measuring pass-through transactions, AppScope operates in proxy mode.
AppScope’s ability to measure a sample of all transactions enables it to easily scale in high-traffic situations. When you use AppScope in a load-balanced configuration, the ACE some portion of the traffic to AppScope. In this scenario, configure AppScope to measure 100 percent of all transactions that it sees.
When measuring a transaction, AppScope begins by measuring the time when the server first receives the main request for a page and stops by measuring the time when the client acknowledges that it has received the remaining bytes of data for the page, including all embedded objects.
To accurately measure the true page download time from the client’s perspective, AppScope inserts a small amount of JavaScript code into the page that is delivered to the client. This code calculates the page download time on the client and reports
A-18Cisco 4700 Series Application Control Engine Appliance Application Acceleration and Optimization Configuration
OL-23545-02
Appendix A Using the Optional Cisco AVS 3180A Management Station for ReportingViewing AppScope Reports
it back to the server via a query parameter in a GET request. The server inserts the performance data into a log file, which is then loaded into the Management Console database. Performance reports are generated from this database.
You can configure measurement sampling in two ways:
• Individual request sampling—Each transaction request is treated individually and randomly selected for a measurement group: accelerated measurement, pass-through measurement, or no measurement.
• Session-based sampling—Once a transaction request has been randomly selected for a measurement group, all subsequent requests from that client are handled the same, for a configurable period of time, up to one day.
The following topics describe how to view AppScope reports:
• Generating Basic Reports
• Generating Drilldown Reports
• Using Charts
• Filtering AppScope Data
Generating Basic ReportsThis section describes how to generate basic AppScope Performance reports.
Tip If the original content uses VBScript as its scripting language, you must set the DefaultClientScript VBScript directive. To configure the ACE to recognize the Visual Basic scripting language used on condensed content pages, either JavaScript or Visual Basic, use the clientscript-default command in parameter map optimize configuration mode (see Chapter 3, Configuring an Optimization HTTP Parameter Map).
Click on the AppScope Reports item in the left menu to display the main AppScope reports page (Figure A-10).
AppScope Reports may not be visible under the Reports folder until you register at least one cluster that contains an ACE node.
A-19Cisco 4700 Series Application Control Engine Appliance Application Acceleration and Optimization ConfigurationOL-23545-02
Appendix A Using the Optional Cisco AVS 3180A Management Station for ReportingViewing AppScope Reports
Figure A-10 AppScope Main Page
A-20Cisco 4700 Series Application Control Engine Appliance Application Acceleration and Optimization Configuration
OL-23545-02
Appendix A Using the Optional Cisco AVS 3180A Management Station for ReportingViewing AppScope Reports
The option buttons at the top of the AppScope Main page provide access to the following functions:
• Query—Allows you to submit a query to generate a basic report. The query page is the default page when you start AppScope.
• Report—Allows you to display the last report generated. This button is inactive until you submit a query to generate a report.
• Console—Allows you to return to the Management Console home page.
Tip If the options buttons at the top of the AppScope Main page are not fully visible, you need to change due to the Microsoft Windows display DPI setting. To change this setting, right-click on the desktop and choose Properties to open the Display control panel. Click the Settings tab, then the Advanced button. Check the DPI setting. The normal setting is 96 DPI. If a larger setting is used, this setting will cause an adverse effect on the screen layout in the AppScope Performance Reports main page.
If you are not in the AppScope main page, click Query to proceed to that page.
Defining the Query
The query page contains controls that allow you to set the query parameters for generating a report:
• Report on Performance—From the drop-down list, choose one of the following selections:
– Passthrough—Show a report on just pass-through (unoptimized) requests.
– Accelerated—Show a report on accelerated (optimized) requests.
– Comparison—Compare the two types of requests.
• Organize Output By—Choose URL to organize the report output by URLs or choose Business Transaction to organize the output by business transaction as follows:
– When organized by a URL, each row of the report contains the data for one request URL. Matching URLs that differ only in their query parameters (after the ‘?’) are treated as the same URL; they are not listed on separate lines, but are combined on one line. Specify the
A-21Cisco 4700 Series Application Control Engine Appliance Application Acceleration and Optimization ConfigurationOL-23545-02
Appendix A Using the Optional Cisco AVS 3180A Management Station for ReportingViewing AppScope Reports
request-grouping-string command in parameter map optimization mode to specify that all variations based on query parameters are to be treated as separate URLs for reporting purposes (see Chapter 3, Configuring an Optimization HTTP Parameter Map). Each variation appears on a separate line in the report.
– When organized by a Business Transaction, each row of the report contains aggregated data for all URLs in one business transaction. For more information on defining business transactions, see the “Defining Business Transactions” section.
– When organized by Application Class, each row of the report contains the aggregated results for the ACE.
• Enable Drilldown By—Choose Source IP Address Blocks to enable navigating through the report by IP address blocks of the requesting clients, or choose Defined Source Locations to enable navigating through named locations that have been defined by the Manage Locations command (under the Reports folder in the lefthand navigation menu).
• Start Date and Time—Choose the type of start date that you want to use: a relative time in the past, or a specific date. Enter the number of time units in the past or a specific date and time. For details on how to choose a date, see the “Date Selection” section.
• Duration—Enter the duration of the reporting period and choose the units of time (Minutes, Hours, Days, Weeks, or Months) from the drop-down list. By choosing longer periods of time, you generate charts that show performance trends over a period of time.
• Application Class—Choose All Application Classes to aggregate results for the ACE, or choose a single application class from this drop-down list to show the results only from one class. The following information is available for the ACE: context name, context ID, policy map name, class map name, and policy ID. This drop-down list is disabled when Organize Output By is set to Business Transaction.
• Transaction Type—Choose All Transaction Types to aggregate results from all Transaction Types, or choose a single Transaction Type from this drop-down list to show results only from that type.
• Performance Node—Choose All Performance Nodes to aggregate results from all nodes (if you have more than one installed), or choose a single node from this drop-down list to show results only from that node.
A-22Cisco 4700 Series Application Control Engine Appliance Application Acceleration and Optimization Configuration
OL-23545-02
Appendix A Using the Optional Cisco AVS 3180A Management Station for ReportingViewing AppScope Reports
• Domain—Choose All Domains to aggregate results from all domains, or choose a single domain from this drop-down list to show results only from one domain.
• Source IP Address—Click the All IP Addresses option button to aggregate results from all source IP addresses, or click Range and enter a beginning and ending IP address to show results only from that range of source IP addresses.
Date Selection
In the Start Date and Time controls, you choose a starting time for the report. Choose a relative time in the past (relative to when the report is run) or a specific date. The available choices are shown in Table A-1.
If you choose one of the first five relative times, the date input field changes to allow you to specify the value for “N.” For example, if you choose “N minutes ago,” the date input field allows you to enter a number of minutes.
Table A-1 Date Selection Choices
Date Selection Type Description of Date Input Field
N minutes ago Allows you to enter the number of minutes ago to start the reporting period.
N hours ago Allows you to enter the number of hours ago to start the reporting period.
N days ago Allows you to enter the number of days ago to start the reporting period. A value of 0 means today, 1 means yesterday, and so on. You can also set the time on that day at which to start, using a 24-hour time format. For example, “1 day ago at 14:00” means yesterday at 2:00 pm.
N weeks ago Allows you to enter the number of weeks ago to start the reporting period. A value of 0 means this week, 1 means last week, and so on. You can also set the day of the week and the time on that day at which to start. For example, “1 week ago on Tuesday at 18:00” means Tuesday of last week at 6:00 pm.
A-23Cisco 4700 Series Application Control Engine Appliance Application Acceleration and Optimization ConfigurationOL-23545-02
Appendix A Using the Optional Cisco AVS 3180A Management Station for ReportingViewing AppScope Reports
Generating the Report
Click Submit to submit the query to the database and show the report.
Click Reset to reset all Query form fields to their default values.
Figure A-11 shows an example of a report that results from a query showing pass-through requests and by URLs.
N months ago Allows you to enter the number of months ago to start the reporting period. A value of 0 means this month, 1 means last month, and so on. You can also set the day of the month and the time on that day at which to start. For example, “2 months ago on 31 at 00:00” means the 31st day of the month before last at midnight. If the actual month has fewer than the specified number of days, the extra days are carried into the next month. In this example, if the month has only 29 days, then the report would start on the second day of the following month.
Specific date Allows you to enter the start date and time for the reporting period. You must enter the dates in the format MM/DD/YYYY, and enter the time in HH:MM, using the 24-hour clock. Click the calendar icon to pick the date from a pop-up calendar.
Table A-1 Date Selection Choices (continued)
Date Selection Type Description of Date Input Field
A-24Cisco 4700 Series Application Control Engine Appliance Application Acceleration and Optimization Configuration
OL-23545-02
Appendix A Using the Optional Cisco AVS 3180A Management Station for ReportingViewing AppScope Reports
Figure A-11 Pass-Through Requests by URL Report
The requested URLs are shown in the left column in alphabetical order. Next to each URL, the columns to the right show the following performance data for the ACE optimization functionality:
• Avg Total Time—The time from when the browser user initiates the request until the page and all of its components have been downloaded and the browser has completed rendering the page on the screen. This time period ends when the browser initiates the onload event. This selection measures the end user’s experience of the total page download time.
• Avg Server Time—Time taken by the origin server to generate the page. This selection measures the time taken by the back-end systems (web server, application server, database server, and so on) to generate the contents of the page.
A-25Cisco 4700 Series Application Control Engine Appliance Application Acceleration and Optimization ConfigurationOL-23545-02
Appendix A Using the Optional Cisco AVS 3180A Management Station for ReportingViewing AppScope Reports
• Avg Time To First Byte (TTFB)—The time from when the web browser user initiates the request until the browser processes the first byte of the HTML content of the page. This time period ends when the browser processes the first byte of the response, not necessarily when the first byte of the response arrives at the user’s network card. A measure of the network latency is TTFB – (Server time).
• Avg Time to Last Byte (TTLB)—The time from when the browser user initiates the request until the last byte of the HTML content of the page is processed by the browser. At this time, the browser has not completed downloading all embedded objects (such as images) and has not completed rendering the page. A measure of the time taken to download the HTML content of the page is TTLB – TTFB.
• Avg Page Size—The average HTML page size, in bytes, for page responses.
• Number of Hits—The number of hits on this URL that were measured.
Note Similar data is shown for a report on accelerated page requests.
Click any column to sort all the report rows by the data in that column. You can toggle the sort order between ascending and descending by clicking again on the same column. The red arrow indicates the sort column and sort order (up for ascending and down for descending).
Save any report by clicking the small disk icon at the top of the report page. You can save a report so that you can regenerate it at a later time. For more details about saved reports, see the “Viewing Saved AppScope Reports”section.
To chart the data for any row and see data trends, click on the chart icon shown at the left end of each row. For more details, see the “Using Charts” section.
You can request each report or chart in Adobe Acrobat (PDF) format. Click the Adobe Acrobat icon that appears on the report or chart page.
Figure A-12 shows another example of a report where Organize Output By is set to Business Transaction. In this report, each row represents a business transaction rather than a URL. A row shows the average aggregated performance data for the business transaction.
A-26Cisco 4700 Series Application Control Engine Appliance Application Acceleration and Optimization Configuration
OL-23545-02
Appendix A Using the Optional Cisco AVS 3180A Management Station for ReportingViewing AppScope Reports
Figure A-12 Business Transaction Report
You can also generate a report that compares the accelerated and pass-through performance data, as shown in Figure A-13.
A-27Cisco 4700 Series Application Control Engine Appliance Application Acceleration and Optimization ConfigurationOL-23545-02
Appendix A Using the Optional Cisco AVS 3180A Management Station for ReportingViewing AppScope Reports
Figure A-13 Comparison Report
The URLs are shown in the left column in alphabetical order. Next to each URL, the columns to the right show the following performance data:
• Average time (in seconds) for pass-through page responses
• Average time (in seconds) for accelerated page responses
• Average HTML page size (in bytes) for pass-through page responses
• Average HTML page size (in bytes) for accelerated page responses
• Number of hits measured on pass-through page responses
• Number of hits measured on accelerated page responses
A-28Cisco 4700 Series Application Control Engine Appliance Application Acceleration and Optimization Configuration
OL-23545-02
Appendix A Using the Optional Cisco AVS 3180A Management Station for ReportingViewing AppScope Reports
Note When viewing comparison reports, some URLs may not have measurements in both the accelerated and pass-through columns because both types of measurements were not taken for them. Drilldown reports are available only for URLs that have both types of measurements.
Generating Drilldown ReportsAfter generating a basic report, you generate a drilldown report from it.
On the basic report, click on a URL or business transaction in the left column to generate a drilldown report on that item. Depending on what you selected on the Query page, you can drill down by choosing Source IP Address Blocks or Defined Source Locations.
For navigating through business transactions, click on a business transaction name. This action shows a new report (Figure A-14) that lists the individual transaction types in the business transaction. Clicking on one of those types allows you to drill down into the individual URL and finally into the source IP block or defined location.
A-29Cisco 4700 Series Application Control Engine Appliance Application Acceleration and Optimization ConfigurationOL-23545-02
Appendix A Using the Optional Cisco AVS 3180A Management Station for ReportingViewing AppScope Reports
Figure A-14 Drilldown Report into Business Transaction
Drilling Down by Source IP Address Blocks
If you choose Source IP Address Blocks for the Enable Drilldown By item on the Query page, then you can drill down multiple levels on a particular URL or business transaction. Each drilldown level includes data from a narrower block of client IP addresses for the selected URL. For business transactions, the intermediate levels of individual transactions and URL reports are shown before the IP blocks.
From a basic report organized by URL, clicking on a URL drills down one level, showing a report similar to that in Figure A-15, where IP address blocks are shown on each row. Clicking an IP address block up to three more times to drill down further will narrow the scope of the report to smaller blocks of IP addresses.
A-30Cisco 4700 Series Application Control Engine Appliance Application Acceleration and Optimization Configuration
OL-23545-02
Appendix A Using the Optional Cisco AVS 3180A Management Station for ReportingViewing AppScope Reports
Figure A-15 Drilldown Report by IP Address Block
Drilling Down by Defined Source Locations
If you choose Defined Source Locations for the Enable Drilldown By item on the Query page, then you can drill down one level to a list of defined locations for a particular URL or business transaction. A defined location is simply a name that has been previously defined to correspond to a range of source IP addresses. Use the Manage Locations command under the Reports folder in the menu to define a location; for details, see the “Managing Locations” section.
From a basic report organized by URL, clicking on a URL drills down one level, showing a report similar to that in Figure A-16, where defined locations are shown on each row. The performance data is from the range of source IP addresses that corresponds to the location name. No further drilldown applies to this kind of report.
A-31Cisco 4700 Series Application Control Engine Appliance Application Acceleration and Optimization ConfigurationOL-23545-02
Appendix A Using the Optional Cisco AVS 3180A Management Station for ReportingViewing AppScope Reports
Figure A-16 Drilldown Report by Defined Location
Using ChartsCharts are available for each row of data at every report level to allow you to view performance trends over time. Each report row includes a chart icon at the left edge of the row.
Click the chart icon to generate a chart of the row data. An example of a chart for a row of data in a business transaction report is shown in Figure A-17. The colored stacked bars in the top chart show the various response time measurements for each reporting period. The colored bars are stacked on top of each other, with the light blue at the back, then the dark blue, light green, and dark green in the front. The red bars in the chart at the bottom show the number of hits that were measured.
Note If you are running an upgraded version of the Performance Suite software on your own hardware, the Management Console requires the X libraries in order to run graphical reports. Without the libraries installed, the following error will occur if you attempt to run a graphical report: “An error occurred while processing the
A-32Cisco 4700 Series Application Control Engine Appliance Application Acceleration and Optimization Configuration
OL-23545-02
Appendix A Using the Optional Cisco AVS 3180A Management Station for ReportingViewing AppScope Reports
request (/cust/fineground/console/j2sdk1.4.0_03/jre/lib/i386/libawt.so: libXp.so.6: cannot open shared object file: No such file or directory.” This issue does not apply to the ACE.
Figure A-17 Chart of Transaction Data
An example chart of a comparison report is shown in Figure A-18. This chart shows two colored bars for each reporting period: one for accelerated responses (green) and one for pass-through responses (blue).
A-33Cisco 4700 Series Application Control Engine Appliance Application Acceleration and Optimization ConfigurationOL-23545-02
Appendix A Using the Optional Cisco AVS 3180A Management Station for ReportingViewing AppScope Reports
Figure A-18 Chart of Comparison Data
A-34Cisco 4700 Series Application Control Engine Appliance Application Acceleration and Optimization Configuration
OL-23545-02
Appendix A Using the Optional Cisco AVS 3180A Management Station for ReportingViewing Saved AppScope Reports
Filtering AppScope DataAll AppScope reports are filtered to remove outlier transactions. Outlier transactions lie outside the normal range of results because they take longer than 120 seconds to complete and are filtered out because they skew the averages. Typically, these anomalous transactions result from network outages, backend application issues, database issues, and so on.
You may want to adjust the filter threshold to a higher or lower number than the default 120 seconds. If the application that you are measuring is slow, and you want to include these transactions in AppScope reports, set the threshold to several minutes. If too many anomalies are still skewing the averages reduce the outlier threshold to a lower number such as 60 seconds or less.
To change the outlier threshold value, edit the following file:
Change the value 120.0 to the number of seconds to set as the outlier threshold.
This text occurs multiple times in the properties file. Make sure that you change all occurrences to the new value.
Viewing Saved AppScope ReportsThis section contains the following topics related to AppScope reports:
• Saving Reports
• Accessing Saved Reports
A-35Cisco 4700 Series Application Control Engine Appliance Application Acceleration and Optimization ConfigurationOL-23545-02
Appendix A Using the Optional Cisco AVS 3180A Management Station for ReportingViewing Saved AppScope Reports
Saving ReportsTo save an AppScope report to regenerate it at a later time, click Save at the top of the report page. Saving a report is useful if the report is based on a relative starting date such as the last day, last month, or one week ago. Whenever you regenerate this type of report, the report data is recalculated based on the specified time period relative to the time that the report is regenerated.
When you save a report on which you have executed drilldown, sorting, or charting options, those effects are saved also. When the report is regenerated again, the report (or chart) will look exactly like it did when you saved it.
You can save reports only from HTML report pages, not PDF pages. In addition, you cannot save reports when viewing a previously saved report from the Saved Reports page or when executing a previously saved report from an external link, such as an e-mail.
When you click Save, a dialog box prompts you to name the report. Enter a name and click OK, or click Cancel to cancel the save. If you enter a name that is already used for a saved report, the warning shown in Figure A-19 appears. You can then perform one of the following actions:
• Click Yes to overwrite the existing report with the new report.
• Click No to cancel the operation and return to the report page; in that case, click Save again to choose a different name.
When you successfully save a report, the report page is redisplayed with a confirmation message at the top: “Report “Your report name” has been saved.”
A-36Cisco 4700 Series Application Control Engine Appliance Application Acceleration and Optimization Configuration
OL-23545-02
Appendix A Using the Optional Cisco AVS 3180A Management Station for ReportingViewing Saved AppScope Reports
Figure A-19 Duplicate Saved Report Warning
Accessing Saved ReportsTo access previously saved reports, click Saved Reports under the Reports folder in the left pane of the Management Console main page. All saved reports are listed in a table as shown in Figure A-20.
Figure A-20 Saved Reports List
A-37Cisco 4700 Series Application Control Engine Appliance Application Acceleration and Optimization ConfigurationOL-23545-02
Appendix A Using the Optional Cisco AVS 3180A Management Station for ReportingViewing Saved AppScope Reports
Each report is listed on one row, followed by links that invoke various operations available for the report. The following topics describe the operations that you can perform on each report:
• Viewing Reports
• Editing Reports
• Copying Reports
• Scheduling Reports
• Renaming Reports
• Deleting Reports
Only an authenticated (logged-in) Management Console user can save and manage reports by using the functions described in this section. However, any user with access to the server and port that is running the Management Console can view reports if the user has a URL to view the saved report. Unauthenticated users can view reports that are sent to them as links in an e-mail or saved as browser bookmarks.
Viewing Reports
To view a saved report in HTML or PDF format, click either HTML or PDF. The report regenerates when you click the link, so if it uses a relative starting date, the report data is recalculated, relative to the moment that you clicked the link.
Editing Reports
To edit the query for a saved report, clicking Edit. The report query page appears, with the selection criteria set to the original criteria used for the report. You can perform three things from the report query page:
• View the criteria on the report query page. For example, you might want to review the criteria if the report is not producing the expected data.
• Click Report in the top frame to regenerate the saved report, including the drilldown level, sorting, and charting that is defined in the report. You can then change the drilldown level, sorting, or charting, and save the modified report by clicking Save.
A-38Cisco 4700 Series Application Control Engine Appliance Application Acceleration and Optimization Configuration
OL-23545-02
Appendix A Using the Optional Cisco AVS 3180A Management Station for ReportingViewing Saved AppScope Reports
• Click Submit at the bottom of the query page to regenerate the report at the top level, without using any drilldown, sorting, or charting settings that may have been saved in the original report definition. After the report appears, you can drill down, resort, or chart the data. If desired, you can save the modified report by clicking Save.
If you modify and then save an existing report, the name field of the Save dialog is initialized with the existing name of the report. Click OK to save the report under that name and overwrite the existing report, or change the name to a new name and then click OK to create a new saved report. If you choose to overwrite the existing report with the same name, no additional warnings appear.
Copying Reports
To copy a report, click Copy. Similar to saving a report, a Save dialog box appears where enter a name for the copy of the report. Click OK to save the copy, or click Cancel to cancel the operation. You are warned if you enter a report name that already exists.
Note Another way of making a copy of a report is to edit it, view the report, click Save, and specify a new name for the copy.
Scheduling Reports
You can define a periodic schedule at which a saved report is automatically generated and then e-mailed to a distribution list. To schedule a report for regeneration at a future time, click Sched.
Note If the e-mail configuration for scheduled reports is not set up when you click this link, you must use the Scheduled Reports command to visit the Scheduled Reports page and click Email Configuration to set it up (see the “Configuring E-mail for Scheduling” section).
If there are one or more schedules already defined for the report, they are listed in the Report Schedule page, as shown in Figure A-21.
A-39Cisco 4700 Series Application Control Engine Appliance Application Acceleration and Optimization ConfigurationOL-23545-02
Appendix A Using the Optional Cisco AVS 3180A Management Station for ReportingViewing Saved AppScope Reports
Figure A-21 Report Schedule Page
The saved report name is shown above the table. Each row in the table lists one schedule for the report. The schedule interval is shown, followed by the e-mail distribution list, and the links that allow you to edit or delete the schedule. Click Add Schedule below the table to add a new schedule for the report.
For more information on adding, editing, and deleting scheduling reports, see the “Viewing Scheduled Reports” section.
Renaming Reports
To rename a report, click Rename. Similar to saving a report, a Save dialog appears where you enter a new name for the report. Click OK to change the name, or click Cancel to cancel the name change. You are warned if you enter a report name that already exists.
Deleting Reports
To delete a saved report, click Delete. You are prompted with a dialog to confirm that you want to delete the report. Click OK to delete the report, or click Cancel to cancel the deletion.
A-40Cisco 4700 Series Application Control Engine Appliance Application Acceleration and Optimization Configuration
OL-23545-02
Appendix A Using the Optional Cisco AVS 3180A Management Station for ReportingViewing Scheduled Reports
Viewing Scheduled ReportsYou can use the AppScope scheduled reports to define a periodic schedule at which a saved report is automatically generated and then e-mailed to a distribution list.
Use the Scheduled Reports command (under the Reports folder in the left pane) to view a list of all saved reports, as shown in Figure A-22. You must save a report before you can schedule a report.
Figure A-22 All Scheduled Reports Page
Each row in the table lists one saved report with its schedules (if no schedule is shown, then the report is not scheduled). The report name is shown, followed by the schedule interval, and the e-mail distribution list. The Email Configuration link above the table allows you to change the e-mail setup.
To add another schedule to a report, edit the schedule, or delete the schedule for a report, click on the report name to display the schedules for that report, as shown in Figure A-23.
A-41Cisco 4700 Series Application Control Engine Appliance Application Acceleration and Optimization ConfigurationOL-23545-02
Appendix A Using the Optional Cisco AVS 3180A Management Station for ReportingViewing Scheduled Reports
Figure A-23 Report Schedules Page
Each row shows one schedule for this report. Click Edit or Delete next to a report schedule to edit or delete the schedule. Click Add Schedule below the table to add a schedule for the report.
• Adding a Schedule
• Editing a Schedule
• Deleting a Schedule
• Configuring E-mail for Scheduling
Adding a ScheduleTo add a schedule for a report, click Add Schedule below the schedule table. The schedule configuration page appears.
As a default, the report frequency is set to weekly, which means that the schedule is for a weekly report. You can change the report frequency to one of the other choices for a repeating schedule: daily, monthly, or yearly.
A-42Cisco 4700 Series Application Control Engine Appliance Application Acceleration and Optimization Configuration
OL-23545-02
Appendix A Using the Optional Cisco AVS 3180A Management Station for ReportingViewing Scheduled Reports
The schedule configuration function operates differently in each case and is described in the following sections:
• Daily Schedule
• Weekly Schedule
• Monthly Schedule
• Yearly Schedule
Each version of the configurator allows you to choose the report type. This selection is common to all versions and is described in this section. The report types are as follows:
• Link to HTML—Inserts a link to an HTML report into an e-mail. When a user clicks the link, an interactive report is generated in which the user can click to drilldown, sort, or show charts. However, if the report includes a lot of data, a significant delay may occur before the report appears. Also, the data for the report will usually not be available indefinitely; depending on the archiving and maintenance policy for the database, older data is archived or purged and may not be available if the user opens the e-mail and clicks the link only after some time. In addition, HTML reports are less suitable for printing than PDF reports.
• Link to PDF—Inserts a link to a PDF report into an e-mail. When the user clicks the link, the report is generated. It is not an interactive report, so no drilldown, sorting, or charting is possible. If the report includes a lot of data, a significant delay may occur before the report appears. In addition, the data for the report will usually not be available indefinitely; depending on the archiving and maintenance policy for the database, older data is archived or purged and may not be available if the user opens the e-mail and clicks the link only after some time. A PDF report is more suitable for printing than an HTML report, but it is not interactive.
• PDF Attachment—Attaches a PDF report to the e-mail. The report is generated when the scheduled task executes, so there is no waiting for the report to be generated when the e-mail attachment is opened. The report is self-contained and requires no server access (other than access to the e-mail server to initially retrieve the e-mail, similar to other e-mail that the user receives). This option is more suitable for traveling users, disconnected laptops, and similar situations. A PDF report is more suitable for printing than an HTML report, but it is not interactive.
A-43Cisco 4700 Series Application Control Engine Appliance Application Acceleration and Optimization ConfigurationOL-23545-02
Appendix A Using the Optional Cisco AVS 3180A Management Station for ReportingViewing Scheduled Reports
Daily Schedule
You can use the Daily schedule option to generate a daily report. The Daily Schedule Configuration page is shown in Figure A-24.
Figure A-24 Daily Schedule Configuration Page
The Daily Schedule Configuration page contains controls that allow you to define the schedule for generating a daily report:
• Time—Set the time to the hours and minutes using the 24-hour clock. This is the time each day that you want to generate the report.
• Report Type—Choose the report type, as described in the “Adding a Schedule” section.
• Email Report To—Enter one or more e-mail addresses, separated by commas.
Click OK to save the schedule, or click Cancel to cancel the operation.
A-44Cisco 4700 Series Application Control Engine Appliance Application Acceleration and Optimization Configuration
OL-23545-02
Appendix A Using the Optional Cisco AVS 3180A Management Station for ReportingViewing Scheduled Reports
Weekly Schedule
You can use the Weekly schedule option to generate a weekly report on one or more days each week. The Weekly Schedule Configuration page is shown in Figure A-25.
Figure A-25 Weekly Schedule Configuration Page
The Weekly Schedule Configuration page contains controls that define the schedule for generating a weekly report:
• Repeat Every Week On—Check the days of the week on which you want the report to be generated.
• Time—Set the time to the hours and minutes, using the 24-hour clock.
• Report Type—Choose the report type, as described in the “Adding a Schedule” section.
• Email Report To—Enter one or more e-mail addresses, separated by commas.
Click OK to save the schedule, or click Cancel to cancel the operation.
A-45Cisco 4700 Series Application Control Engine Appliance Application Acceleration and Optimization ConfigurationOL-23545-02
Appendix A Using the Optional Cisco AVS 3180A Management Station for ReportingViewing Scheduled Reports
Monthly Schedule
You can use the Monthly schedule option to generate a report on one day each month. The Monthly Schedule Configuration page is shown in Figure A-26.
Figure A-26 Monthly Schedule Configuration Page
The Monthly Schedule Configuration page contains controls that define the schedule for generating a monthly report:
• Day ... of every month—Enter the number of the day each month on which you want the report to be generated.
• The ... of every month—Choose the week in the month and the day of the week on which you want the report to be generated, such as on the first Monday of every month.
• Time—Set the time to the hours and minutes using the 24-hour clock.
• Report Type—Choose the report type, as described in the “Adding a Schedule” section.
• Email Report To—Enter one or more e-mail addresses, separated by commas.
A-46Cisco 4700 Series Application Control Engine Appliance Application Acceleration and Optimization Configuration
OL-23545-02
Appendix A Using the Optional Cisco AVS 3180A Management Station for ReportingViewing Scheduled Reports
Click OK to save the schedule, or click Cancel to cancel the operation.
Yearly Schedule
You can use the Yearly schedule option to generate the report on one day each year. The Yearly Schedule Configuration page is shown in Figure A-27.
Figure A-27 Yearly Schedule Configuration Page
A-47Cisco 4700 Series Application Control Engine Appliance Application Acceleration and Optimization ConfigurationOL-23545-02
Appendix A Using the Optional Cisco AVS 3180A Management Station for ReportingViewing Scheduled Reports
The Yearly Schedule Configuration page contains controls that define the schedule for generating a yearly report:
• Every—Choose the month and the date on which you want the report to be generated.
• The ... of ... —Choose the week in the month, the day of the week, and the month in which you want the report to be generated, such as on the first Monday of January.
• Time—Set the time to the hours and minutes, using the 24-hour clock.
• Report Type—Choose the report type, as described in the “Adding a Schedule” section.
• Email Report To—Enter one or more e-mail addresses, separated by commas.
Click OK to save the schedule, or click Cancel to cancel the operation.
Editing a ScheduleTo edit the schedule for a saved report, click Edit next to the schedule. The schedule configurator page appears, showing the original schedule settings.
Change the schedule settings and click OK to save the modified schedule, or click Cancel to keep the original settings.
For details on using the schedule configuration function for each type of schedule, see the “Adding a Schedule” section.
Deleting a ScheduleTo delete a schedule for a report, click Delete next to the schedule. You will not receive a confirmation before the schedule is deleted.
Configuring E-mail for SchedulingYou must set up the e-mail configuration for scheduled reports before you can schedule any reports. To configure the e-mail settings, click Email Configuration at the top of the Scheduled Reports page. This action displays the Email Configuration page, shown in Figure A-28.
A-48Cisco 4700 Series Application Control Engine Appliance Application Acceleration and Optimization Configuration
OL-23545-02
Appendix A Using the Optional Cisco AVS 3180A Management Station for ReportingViewing Scheduled Reports
Figure A-28 Email Configuration Page
The Email Configuration page defines the e-mail account settings that you can use for distributing scheduled reports by e-mail. It includes the following fields:
• Outgoing mail (SMTP) Server—Enter the name of the outgoing e-mail server to be used by the AppScope server for scheduled reports.
• Server port number—Enter the mail server port number.
A-49Cisco 4700 Series Application Control Engine Appliance Application Acceleration and Optimization ConfigurationOL-23545-02
Appendix A Using the Optional Cisco AVS 3180A Management Station for ReportingManaging Locations
• Server requires authentication—Check this box if the mail server requires an account name and password for access. Also, you can enter the account name and password in the following fields.
• Send Test Message upon Submit—Check this box to send a test message using the information entered on this form when the form is submitted.
• Logon using: Account—Enter the username for the e-mail account to be used by the AppScope server for scheduled reports. Leave this field blank if you have not checked the Server requires authentication box.
• Password—Enter the password for the e-mail account. Leave this field blank if you have not checked the Server requires authentication box.
• From name—Enter the name to be shown in the From field on the e-mail.
• From address—Enter the e-mail address to be shown in the Return address field on the e-mail.
• Subject template—Enter the e-mail subject to be shown in the Subject field on the e-mail. Use the expression %%reportname%%, which is replaced with the actual report name, or %%reportlink%%, which is replaced with a hypertext link to the report.
• Email Report Link URL Prefix—Enter the URL prefix (including the port number) for report links used in the e-mail. This field is initialized automatically to the local URL of the Management Console, but you can override it if needed. To check that this field is set correctly, be sure to send yourself a test scheduled report and click the report link to make sure that it works.
• Body template—Enter the body of the e-mail. You can use the expressions %%reportname%% or %%reportlink%% here.
Click OK to save the e-mail settings, or click Cancel to cancel the operation.
Managing LocationsYou can use the Manage Locations command to define and manage locations. A location is a named range of source IP addresses. Locations can be used in AppScope reports to easily group results from particular IP address blocks.
A-50Cisco 4700 Series Application Control Engine Appliance Application Acceleration and Optimization Configuration
OL-23545-02
Appendix A Using the Optional Cisco AVS 3180A Management Station for ReportingManaging Locations
Click this command to display the Manager Locations page that shows a list of defined locations, where you can delete existing locations and define new ones, as shown in Figure A-29.
Figure A-29 Manage Locations Page
To delete a location, click the Delete checkbox to the left of a location (or click the top checkbox to delete all locations), and click Delete Checked Locations.
To add a new location, click Add Location. This action displays the Add Location page where you specify the location name and the beginning and ending IP addresses of the corresponding range, as shown in Figure A-30. Click Save to save the new location.
A-51Cisco 4700 Series Application Control Engine Appliance Application Acceleration and Optimization ConfigurationOL-23545-02
Appendix A Using the Optional Cisco AVS 3180A Management Station for ReportingManaging Locations
Figure A-30 Add Location Page
To edit or delete a location, click on the name of the location in the list (as shown in Figure A-29). The Edit Location page shown in Figure A-31 appears.
To edit the location, perform any of the following selections:
• Type over the name to change the name.
• Type over an existing range to change it.
• Enter a new range to add a range to the location.
• Click the Delete Range checkbox to delete a range from the location.
Click Save to save your changes, or click Delete to delete the entire location including all of the ranges that it defines.
A-52Cisco 4700 Series Application Control Engine Appliance Application Acceleration and Optimization Configuration
OL-23545-02
Appendix A Using the Optional Cisco AVS 3180A Management Station for ReportingDefining Transaction Types
Figure A-31 Edit Location Page
Defining Transaction TypesA transaction type is represented by a Boolean expression that contains criteria that determine whether a given transaction matches this type or not. Use transaction types in AppScope reports by limiting the report to a single transaction type with the Transaction Type drop-down list on the AppScope Reports Query page.
Use the Transaction Types command (under the Reports folder in the left pane) to view a list of all defined transaction types on the Transaction Types page, as shown in Figure A-32.
Figure A-32 Transaction Types Page
A-54Cisco 4700 Series Application Control Engine Appliance Application Acceleration and Optimization Configuration
OL-23545-02
Appendix A Using the Optional Cisco AVS 3180A Management Station for ReportingDefining Transaction Types
Each row in the table lists one saved transaction type; the transaction type name is shown, followed by its sequence number and definition. Sequence numbers are explained in the “Adding a Transaction Type” section. To change a sequence number, enter a new number in the sequence column and click Update Sequence.
To add a transaction type, click Create Transaction Type above the table. Click Edit or Delete next to a transaction type to edit or delete the transaction type.
The following topics describes the operations you can perform on a transaction type:
• Adding a Transaction Type
• Editing a Transaction Type
• Deleting a Transaction Type
Adding a Transaction TypeTo add a transaction type, click Create Transaction Type above the table. The Create/Edit Transaction Type page appears, as shown in Figure A-33.
A-55Cisco 4700 Series Application Control Engine Appliance Application Acceleration and Optimization ConfigurationOL-23545-02
Appendix A Using the Optional Cisco AVS 3180A Management Station for ReportingDefining Transaction Types
Figure A-33 Create/Edit Transaction Type Page
To add a transaction type, follow these steps:
1. Enter a name for the transaction type in the Name field.
2. In the Definition area, click New to create a new expression for the transaction type (for details, see the “Adding a New Expression” section on page 58). If there are existing expressions, the new expression is added after the row in which you click New. The new expression is joined to the existing
A-56Cisco 4700 Series Application Control Engine Appliance Application Acceleration and Optimization Configuration
OL-23545-02
Appendix A Using the Optional Cisco AVS 3180A Management Station for ReportingDefining Transaction Types
expression with an And connector. Change this expression (or any connector between the two expressions) to an Or connector by choosing Or in the drop-down list.
3. If you have multiple expression lines, you can add parentheses to group lines, click the checkboxes for the first and last lines that you want to enclose in parentheses, then click Go in the Add Parentheses section.
4. To delete parentheses, click Delete on the row of either the opening or closing parenthesis. The matching parenthesis is automatically deleted.
5. To delete an expression, click Delete on the row that contains the expression. A confirmation dialog boxes prompts you to confirm the deletion. If you delete an expression that is the only item enclosed in a set of parentheses, then the set of parentheses is also deleted.
6. To save the transaction type, click Save, or to cancel its creation or editing, click Cancel.
The Substitute Client Timing section is explained in the “Substitute Client Timing” section.
Substitute Client Timing
In some web applications, the returned page is not rendered by the browser but is used by some other client side component such as a Java applet or ActiveX control. For such a request, the server time can be measured, but the client-side timings cannot be measured. Typically, AppScope does not report on requests where no client-side timings are received, because the assumption is that the request was not completed or encountered an error.
Click the Use Substitute Client Timing checkbox to enable AppScope to measure at least the server timing for such requests. AppScope uses 0 for all client-side times, so the reported Server Time, TTFB, TTLB, and Total Time will all be the same as the Server Time. To use more realistic values for the client-side times, enter the time in milliseconds for the average network latency (one way) and client rendering time. If left blank, these fields default to 0.
When a transaction is measured, it may match more than one defined transaction type. If you enable substitute client timing for the transaction types, you must specify which substitute timing statistics to use because the statistics may be
A-57Cisco 4700 Series Application Control Engine Appliance Application Acceleration and Optimization ConfigurationOL-23545-02
Appendix A Using the Optional Cisco AVS 3180A Management Station for ReportingDefining Transaction Types
different for different transaction types. The sequence numbers on the Transaction Types page (see Figure A-32) determine the transaction type that is used for timing purposes. The first matching transaction type (the one with the lowest sequence number) is used for substitute timings.
As each transaction type is created, it is given an incremented sequence number. You can view and change these numbers in the Sequence column on the Transaction Types page (see Figure A-32).
Adding a New Expression
When you click New to create a new expression, or click Edit to edit an existing expression, the Create/Edit Expression page appears, as shown in Figure A-34.
Figure A-34 Create/Edit Expression Page
This page contains the following controls:
• Not—Check this box to reverse the result of the test (for example, to test that a URL does not match a particular pattern).
• Attribute—Select the transaction attribute to test. Attributes are discussed in Table A-2.
A-58Cisco 4700 Series Application Control Engine Appliance Application Acceleration and Optimization Configuration
OL-23545-02
Appendix A Using the Optional Cisco AVS 3180A Management Station for ReportingDefining Transaction Types
• Operation—Specify a regular expression that the attribute is tested against. If the attribute value matches this regular expression, the expression evaluates as true; otherwise, it evaluates as false.
• OK/Cancel buttons—Add the expression to the transaction type by clicking OK, or clicking Cancel to cancel the transaction type.
If you choose ParamSummary in the Attribute list, the form changes to add a Param Name field, as shown in Figure A-35.
Figure A-35 Create/Edit Expression Page with ParamSummary
For the ParamSummary attribute, set these other fields:
• Param Name—Set the parameter name.
• Operation—Click Matches if you want to do a regular expression match, and enter a regular expression that the attribute is to match. Click Exists to do an existence check. If the named parameter exists, this expression evaluates to true; otherwise, it evaluates to false.
When you finish defining or editing the transaction expression, click OK to save it and return to the create/edit transaction type page, or click Cancel to cancel creating or editing the expression.
A-59Cisco 4700 Series Application Control Engine Appliance Application Acceleration and Optimization ConfigurationOL-23545-02
Appendix A Using the Optional Cisco AVS 3180A Management Station for ReportingDefining Transaction Types
The ParamSummary and QueryString attributes contain similar data, but each has its advantages and disadvantages:
• The QueryString contains only the first 255 characters of the query string, so depending on the length of the query string, it may not contain all of the parameters.
• The ParamSummary contains all of the parameter names (it contains all of those names that appear within the first 40 KB of the posted data), but it includes only the first 100 characters of each parameter value.
Table A-2 Transaction Type Attributes
Attribute Description
Domain Server name; for example, www.example.com.
URL URL, not including the query string, if any.
QueryString First 255 characters of the query string.
ParamSummary Summary of all the query parameters in the request, including the full text of each parameter name and the first 100 bytes of each parameter value. You can configure the number of maximum number of bytes that are logged for each parameter value by using the parameter-summary command in parameter map optimize configuration mode (see Chapter 3, Configuring an Optimization HTTP Parameter Map).
The parameter can be very large in the case of a browser POST, so the scan for parameters is limited to the first 40 KB of posted data by default. To change the maximum number of kilobytes of POST data, use the post-content-buffer-limit command in parameter map optimize configuration mode (see Chapter 3, Configuring an Optimization HTTP Parameter Map).
ApplicationClass Not applicable for the ACE.
RequestGroupingString String that allows the request grouping string of a request to be used to determine its transaction type. The request grouping string is defined by the request-grouping-string command in parameter map optimization mode (see Chapter 3, Configuring an Optimization HTTP Parameter Map).
A-60Cisco 4700 Series Application Control Engine Appliance Application Acceleration and Optimization Configuration
OL-23545-02
Appendix A Using the Optional Cisco AVS 3180A Management Station for ReportingDefining Transaction Types
• For a GET query, the QueryString and ParamSummary contain the same data (except for possible truncation due to the character length limits mentioned above).
• For a POST query, the QueryString does not contain any of the POST data; the ParamSummary contains the POST parameter names and the first 100 characters of each parameter value.
Editing a Transaction TypeTo edit a transaction, click Edit on the same row as the expression. The Create/Edit Transaction Type page appears, as shown in Figure A-33. The process for editing a transaction type is exactly the same as described in the “Adding a Transaction Type” section.
Deleting a Transaction TypeTo delete a transaction type, click Delete on the same row as the expression. A confirmation dialog box prompts you to confirm the deletion.
You cannot delete a transaction type that is used in a business transaction unless it is removed from the business transaction or the business transaction is deleted.
Managing Transaction Type MappingAt the time that each transaction is recorded in the database, AppScope determines its transaction type(s) and stores them in the database. This process is known as the mapping between transactions and defined transaction types. When a query is executed using the transaction type filter, the stored transaction type mappings are used to determine which results to display. For information on using transaction types in queries, see the Transaction Type drop-down list in the “Defining the Query”section.
Because you can update the transaction type definitions at any time, some of the mappings in the database may become stale. You can use the following methods to resolve stale mappings in the database:
A-61Cisco 4700 Series Application Control Engine Appliance Application Acceleration and Optimization ConfigurationOL-23545-02
Appendix A Using the Optional Cisco AVS 3180A Management Station for ReportingDefining Transaction Types
• If you only care about categorizing new data, you do not need to take any further action. New transactions are automatically categorized using the new transaction type definitions.
• If you want to recategorize existing data using the new transaction type definitions, then you must use the Transaction Type Mapping Status page to instruct AppScope to update the mappings.
To reach the Transaction Type Mapping Status page, use the Transaction Types command (under the Reports folder in the left pane). Click Transaction Type Mapping Status in the upper left of the page to display the page shown in Figure A-36.
A-62Cisco 4700 Series Application Control Engine Appliance Application Acceleration and Optimization Configuration
OL-23545-02
Appendix A Using the Optional Cisco AVS 3180A Management Station for ReportingDefining Transaction Types
Figure A-36 Transaction Type Mapping Status Page
In Figure A-36, the current transaction type version number is 61. A total of 34490 transactions exist in the database. None of the transaction type mappings are current because their transaction type version is 41 or 0.
Update the mappings for some or all of the transactions by specifying a transaction date and clicking Update. In the example, if you update all of the transaction mappings, you will see the Transaction Type Mapping Status Updated page shown in Figure A-37. Notice that because the transaction type mappings are current, the Update option is not available.
A-63Cisco 4700 Series Application Control Engine Appliance Application Acceleration and Optimization ConfigurationOL-23545-02
Appendix A Using the Optional Cisco AVS 3180A Management Station for ReportingDefining Business Transactions
Figure A-37 Transaction Type Mapping Status Updated Page
Defining Business TransactionsYou can use business transactions to group transactions into sets. For example, if a user visits five web pages to file an online expense report, you can group this set of five transactions into a single business transaction.
Run AppScope reports on business transactions by setting the Organize Output By drop-down list to Business Transaction on the AppScope Reports Query page.
A business transaction does not track the flow of a given user through a web application. Instead, individual transaction data is collected and aggregated into statistics based on the frequency that each transaction occurs in the typical sequence. Business transaction data is aggregated, not gathered on a per-user tracking basis.
A-64Cisco 4700 Series Application Control Engine Appliance Application Acceleration and Optimization Configuration
OL-23545-02
Appendix A Using the Optional Cisco AVS 3180A Management Station for ReportingDefining Business Transactions
To define a business transaction, follow these steps:
1. Define two or more transaction types that describe individual transactions included in the business transaction. For details on defining transaction types, see the “Defining Transaction Types” section.
2. Define the business transaction by specifying the set of transaction types that it includes, and the proportion of each transaction within the aggregated data. For details, see the remainder of this section.
Use the Business Transactions command (under the Reports folder in the left pane) to view a list of all defined business transactions, as shown in Figure A-38.
Figure A-38 Business Transactions Page
Each row in the table lists one saved business transaction; the name is shown, followed by its component transaction types. Click on a transaction type name to jump to the Transaction Type page where it is defined.
A-65Cisco 4700 Series Application Control Engine Appliance Application Acceleration and Optimization ConfigurationOL-23545-02
Appendix A Using the Optional Cisco AVS 3180A Management Station for ReportingDefining Business Transactions
To add a business transaction, click Create Business Transaction Type above the table. Click Edit or Delete next to a business transaction to edit or delete the business transaction.
The following topics describe how to manage a business transaction:
• Adding a Business Transaction
• Editing a Business Transaction
• Deleting a Business Transaction
Adding a Business TransactionTo add a business transaction, click Create Business Transaction Type above the table. The Create/Edit Business Transaction page appears, as shown in Figure A-39.
Figure A-39 Create/Edit Business Transaction Page
A-66Cisco 4700 Series Application Control Engine Appliance Application Acceleration and Optimization Configuration
OL-23545-02
Appendix A Using the Optional Cisco AVS 3180A Management Station for ReportingDefining Business Transactions
To add a business transaction, follow these steps:
1. In the Available Transaction Types area, choose the transaction types that you want to include in the business transaction. Click to choose a single entry in the list, press Shift-click to choose a range of entries, or press Ctrl-click to choose a variety of different entries. You can also click the Select All or Select None buttons.
When you choose the desired transaction types, click Add Selected Types to Business Transaction.
2. In the Business Transaction Definition area, enter a name for the business transaction in the Name field. This name must be unique among both business transactions and transaction types.
3. In the Component Transaction Frequency area, choose the appropriate option button for how the frequency of a transaction is to be computed:
– Choose Use actual frequency to compute the frequency based on the actual data of how many times a transaction occurs within a business transaction.
– Choose Use specified frequency to compute the frequency from the numbers that you enter. Enter the frequencies in the Component Transaction Types area. Choose this option when a transaction is used in some other context outside the given business transaction or when the frequency of a transaction is known or is expected to fluctuate over time. If the frequency fluctuates, this selection allows you to perform o equivalent comparisons over time.
4. In the Component Transaction Types area, enter frequency information and reorder the transactions.
a. If you choose to use the specified frequencies, enter the number of times that each individual transaction occurs in the business transaction. If you choose to use actual frequencies, these fields are ignored.
b. Click Counter for the transaction that you want to use as the counter transaction. When this transaction occurs, then an instance of the business transaction is considered to have occurred.
c. Use the Select checkboxes to choose a transaction that you want to move up or down in the list, the click Move Up or Move Down. The sequence of transactions has no effect on the statistics and the ability to change the
A-67Cisco 4700 Series Application Control Engine Appliance Application Acceleration and Optimization ConfigurationOL-23545-02
Appendix A Using the Optional Cisco AVS 3180A Management Station for ReportingMaintaining the Database
sequence is provided simply to improve readability and maintenance. You can also choose one or more transactions and click Remove to remove them from this business transaction.
5. When you are done creating or editing the business transaction, click Save to save the business transaction. If there is an error, you return to this page, with an error message at the top explaining the nature of the problem.
Editing a Business TransactionTo edit a business transaction, click Edit on the same row as the business transaction in the list. The Create/Edit Transaction Type page appears, as shown in Figure A-39. The process for editing a business transaction is the same as described in the “Adding a Business Transaction” section.
Deleting a Business TransactionTo delete a business transaction, click Delete on the same row as the business transaction in the list. A confirmation dialog box prompts you to confirm the deletion.
Maintaining the DatabaseThe Cisco AVS 3180A Management Station allows you to automatically summarize, back up, and delete old data from the Management Console database. The following topics describe how to maintain the database:
• Database Archiving Overview
• Configuring Archiving
• Initiating Manual Database Archiving
• Managing Optimal Database Performance
A-68Cisco 4700 Series Application Control Engine Appliance Application Acceleration and Optimization Configuration
OL-23545-02
Appendix A Using the Optional Cisco AVS 3180A Management Station for ReportingMaintaining the Database
Database Archiving OverviewOver time the Management Console database can grow very large and it is possible to run out of disk space to store new data. Also, the accumulation of more data results in longer query and update times and decreases the performance of the database. Routine database archiving addresses these concerns. You should perform these four tasks:
• Summarizing—Older data is aggregated and summarized so that concise trend information is maintained for future analysis without having to keep all of the individual records. Transaction data is summarized in the transaction_aggregates table, and performance monitoring data (if AppScope is used) is summarized in the summarized_performance_monitorings table.
• Backup—Older data that is summarized is backed up to external files outside the database. This enables retrieval of the data if needed for some reason by restoring from the backup files.
Note Data archiving is not a backup of the entire database, but only of the older summarized data. We recommend that you perform a periodic file backup of the entire database, logs, cache files, and so on as part of a typical system recovery plan.
• Pruning—After summarizing and backing up, the unneeded older data is deleted from the database.
• Clean-Up—Transaction logs are cleaned up and disk space is recovered by using the SQL vacuum command. This command also performs query optimization analysis that PostgresSQL uses to improve the performance of the database.
The following section describes how to configure database archiving.
Configuring ArchivingTo configure database archiving, use the Database Archiving command under the Reports folder in the menu at the left side of the main Management Console, as shown in Figure A-40.
A-69Cisco 4700 Series Application Control Engine Appliance Application Acceleration and Optimization ConfigurationOL-23545-02
Appendix A Using the Optional Cisco AVS 3180A Management Station for ReportingMaintaining the Database
Figure A-40 Database Archiving Configuration Page
The names and values of the database archiving parameters that appear on this page are listed in Table A-3. Enter the new values to change any of these parameters to address your needs, then click Save.
Note For details about initiating the manual database archiving feature by using the RunNow button, see the “Initiating Manual Database Archiving” section.
A-70Cisco 4700 Series Application Control Engine Appliance Application Acceleration and Optimization Configuration
OL-23545-02
Appendix A Using the Optional Cisco AVS 3180A Management Station for ReportingMaintaining the Database
Table A-3 Archiving Parameters
Field Description
Maintenance Hour Integer value in the range 0 to 23 that specifies the hour of the day (using the 24-hour clock) during which the archiving is to be performed. The default is 1, which means that archiving is performed at 1 AM every day. Choose an hour when the database load is at its lowest.
Current Transaction Archive Age (Days)
Integer value that specifies the age in days of current data in the transaction_aggregates table to be considered as old for archiving purposes. The default is set to 30 days.
Current Performance Monitoring Archive Age (Days)
Integer value that specifies the age in days of data in the performance_monitorings table to be considered as old for archiving purposes. The default is set to 30 days.
Summarized Transaction Archive Age (Months)
Integer value that specifies the age in months of summarized data in the transaction_aggregates table to be considered as old for archiving purposes. The default is set to 6 months.
Summarized Performance Monitoring Archive Age (Months)
Integer value that specifies the age in months of data in the summarized_performance_monitorings table to be considered as old for archiving purposes. The default is set to 6 months.
Enable Backups Controls whether or not the backup step is performed. Backup of old data to external files is performed only when you choose Yes. The default is No.
Backup Directory Name of the directory (on the database server) where backup files are to be placed. You must specify the full absolute name of the directory and you must ensure that the directory exists and that the Postgres process has the correct permissions to write to it. By default, this parameter is set to the empty string during database installation.
Keep Detailed Transaction Records
Controls whether or not detailed transaction records are stored in the transactions table for debugging purposes. The default is No.
Detailed Transaction Records Retention Period (Days)
Integer value that specifies the number of days that detailed transaction records should be retained in the database, if Keep Detailed Transaction Records is set to Yes. The default is set to 1 day. A short retention period is recommended because this table can grow at a fast rate.
A-71Cisco 4700 Series Application Control Engine Appliance Application Acceleration and Optimization ConfigurationOL-23545-02
Appendix A Using the Optional Cisco AVS 3180A Management Station for ReportingMaintaining the Database
Initiating Manual Database ArchivingDaily database archiving is automatic; you schedule the maintenance hour by entering the fields in the Database Archiving Configuration page of the Management Console when you want database archiving to be performed.The Management Console includes a RunNow option button at the bottom of the Database Archiving Configuration page (see Figure A-40) that enables you to run a database archive at your convenience. The database archival is initiated immediately when you click RunNow.
The Management Console also supports manual database archiving to allow the database administrator with an easier maintenance process for the Management Console database.
The manual database archival process is a two-step process. It shares the same GUI used by the daily database archival process to set the parameters.
Upon starting the manual database archiving process, the Cisco AVS 3180A Management Station:
• Updates the archival parameters to the Management Console database.
• Starts the database archival process. Effectively, the Cisco AVS 3180A Management Station ignores the specified Maintenance Hour parameter and immediately starts the database archival process.
Managing Optimal Database PerformanceDeployment of an ACE requires that you perform some amount of maintenance on the database to ensure optimal use and efficiency. As data volumes increase because of transactions, the response time for various database operations will increase at a proportional rate. In order to manage performance to an acceptable level, you need to manage the number of data elements or rows in the database.
The performance_monitorings table size is the most critical component when various reports are generated using the Management Console. Managing the size of this table is the key to obtaining optimal performance for report generation and other related activities.
The growth of this table is governed by the number of page views that the node is handling and the number of page views that are measured, as configured by the sampling percentages defined in the standard production configuration file, fgn.conf. By default, this file includes two AppScope directives,
A-72Cisco 4700 Series Application Control Engine Appliance Application Acceleration and Optimization Configuration
OL-23545-02
Appendix A Using the Optional Cisco AVS 3180A Management Station for ReportingMaintaining the Database
AppScopeOptimizeRatePercent and AppScopePassThruRatePercent, which control the sampling rates for client performance monitoring. We recommend that you keep the performance_monitorings table under 8 million rows in size to maintain reasonable database performance.
An ACE node can handle one million page views per day (a day is defined as a 10-hour window of operation). Assuming network peak load and usage, this would yield a result in the performance_monitorings table of about one million rows of new data. The database can process only eight days worth of data, which means that you must archive the oldest data (about one million rows), which would bring the total amount of data back under the threshold.
Another example is handling 500,000 page views per day. In this scenario, it is possible to store approximately 16 days worth of data in the database using a single node. However, if you have a dual node configuration, then the total number of days is reduced by half, to only eight days (assuming that each node is handling 500,000 page views per day).
Another important aspect of database maintenance is the archiving of older data. Currently, the archiving process takes approximately two hours to complete. By default, this activity is scheduled to run automatically every night starting at 1:00 AM. Given the daily growth of the database with one million page views, the archive process deletes approximately one million rows nightly.
We recommend that no other processing is performed on the database system during the archiving maintenance window. For example, do not run scheduled report generation during this time. If additional activity is permitted during the archiving window, the archiving process will require more time to complete.
To control the number of rows that are archived automatically, you must change the archive policy on the Management Console. If you need to archive one million data rows, which represents a single day’s data, you must alter the Current Performance Monitoring Archive Age archive parameter to archive only seven days worth of data (seven out of eight days). By default, this parameter is set to 30 days.
A-73Cisco 4700 Series Application Control Engine Appliance Application Acceleration and Optimization ConfigurationOL-23545-02
Appendix A Using the Optional Cisco AVS 3180A Management Station for ReportingMaintaining the Database
A-74Cisco 4700 Series Application Control Engine Appliance Application Acceleration and Optimization Configuration


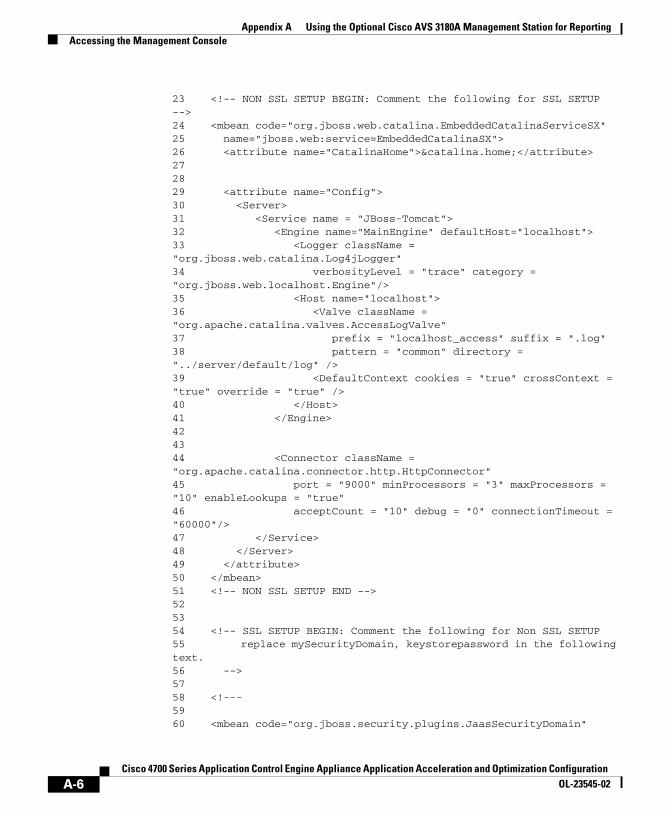


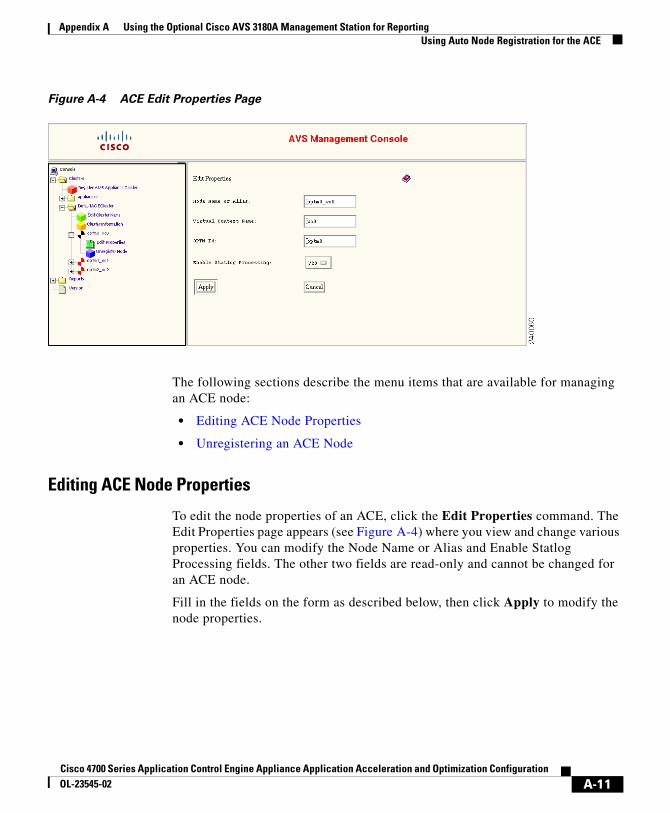

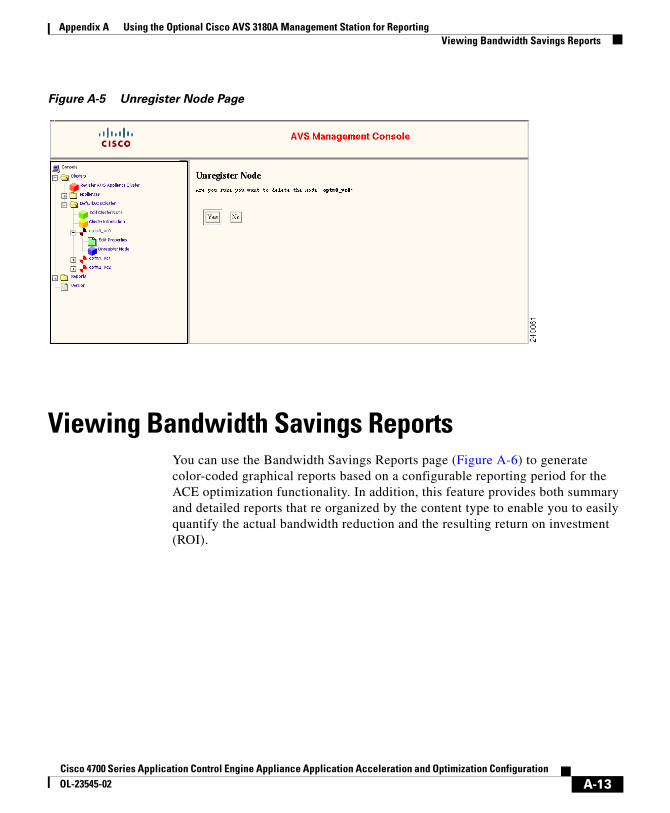


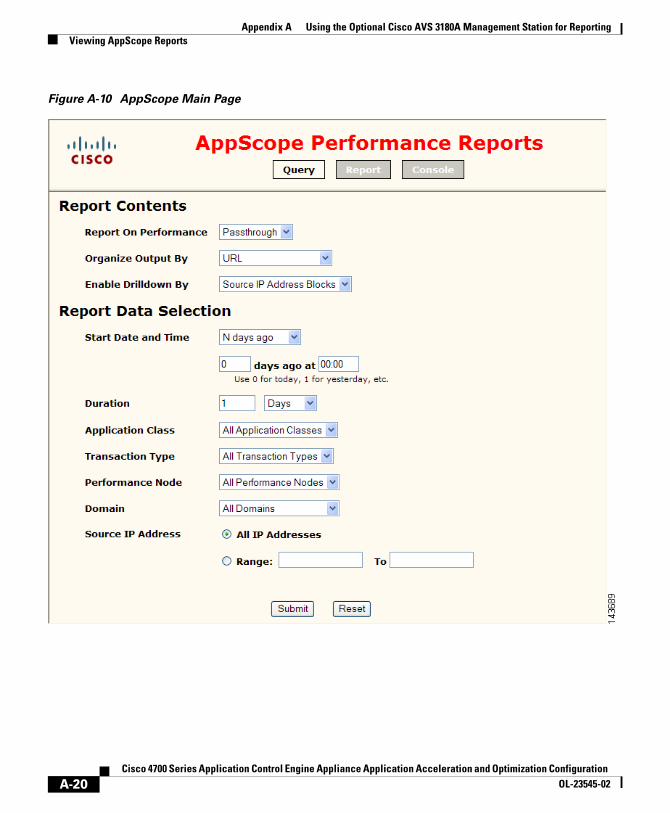


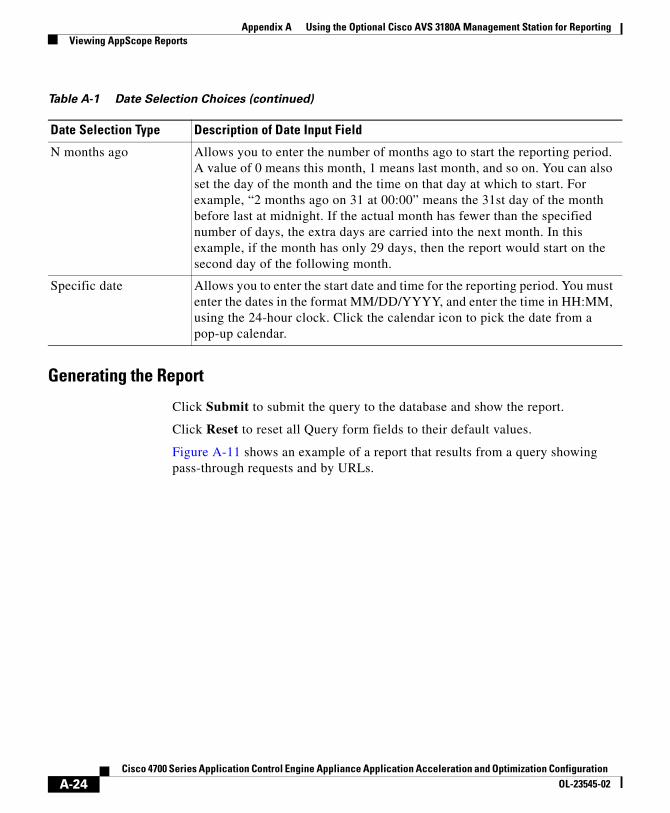


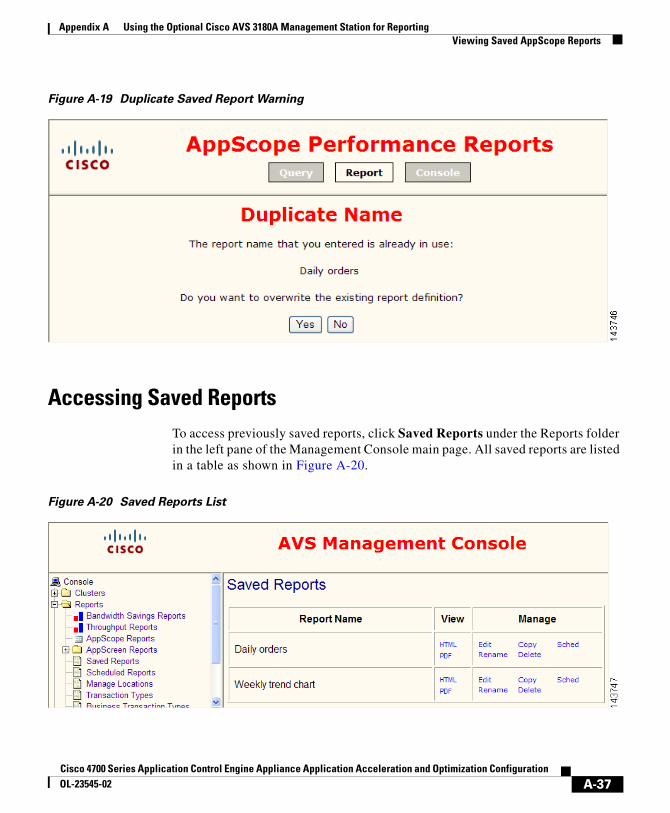


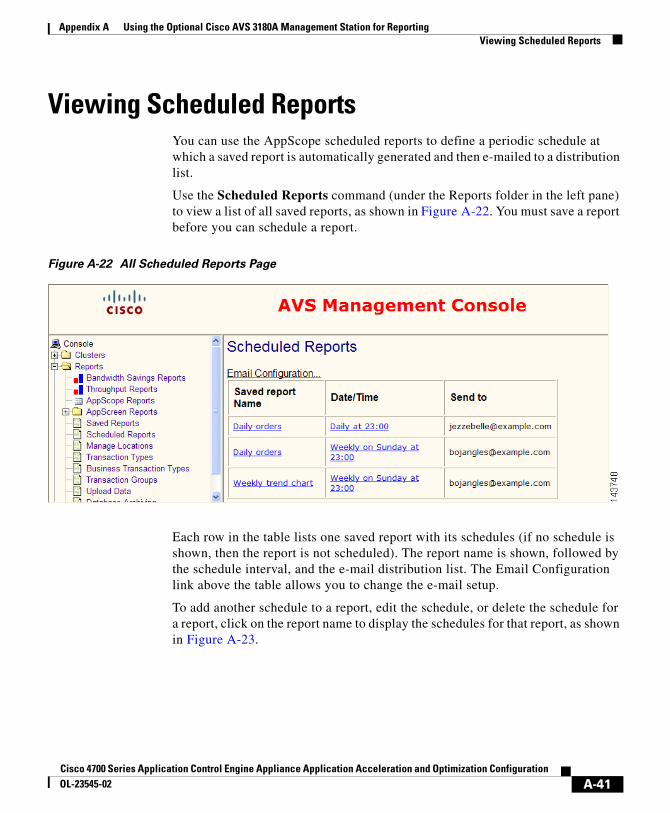


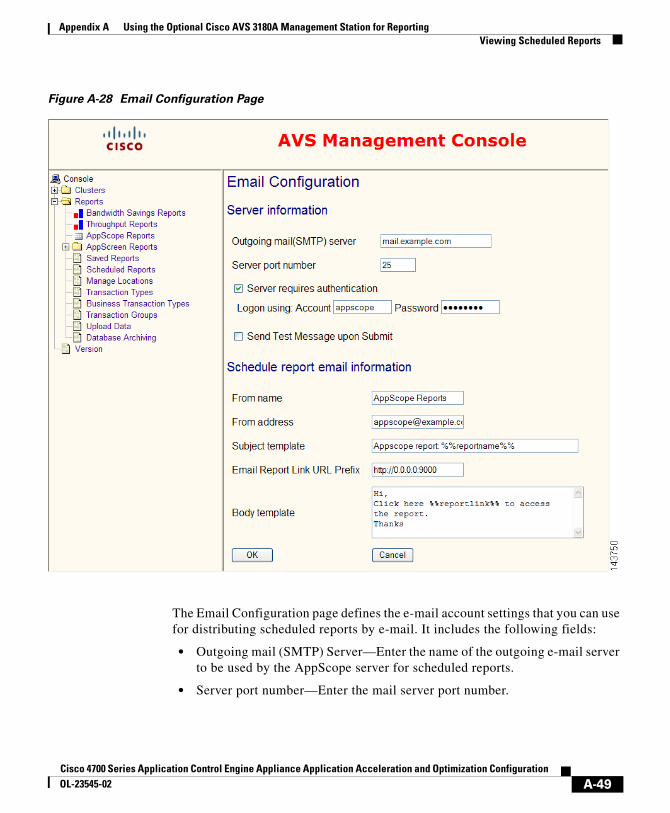


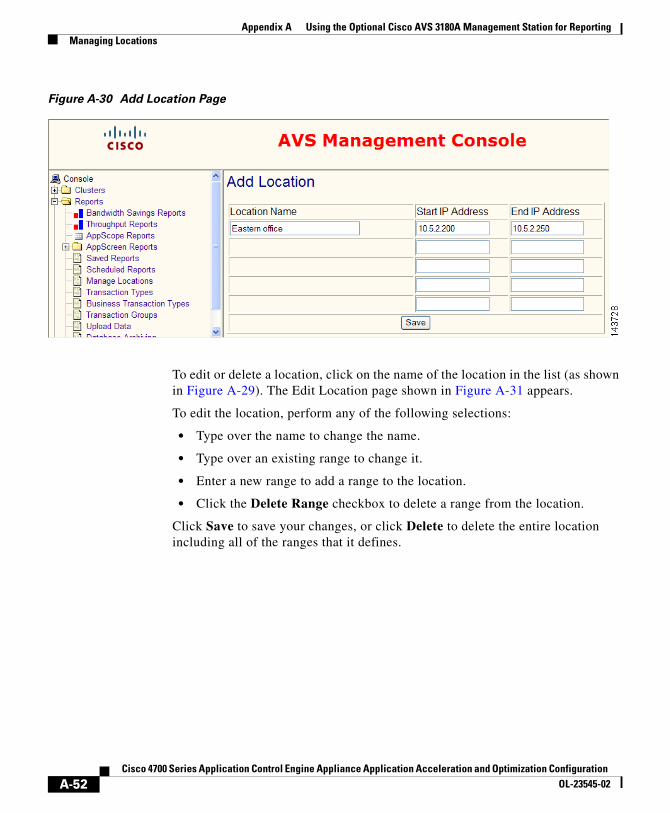


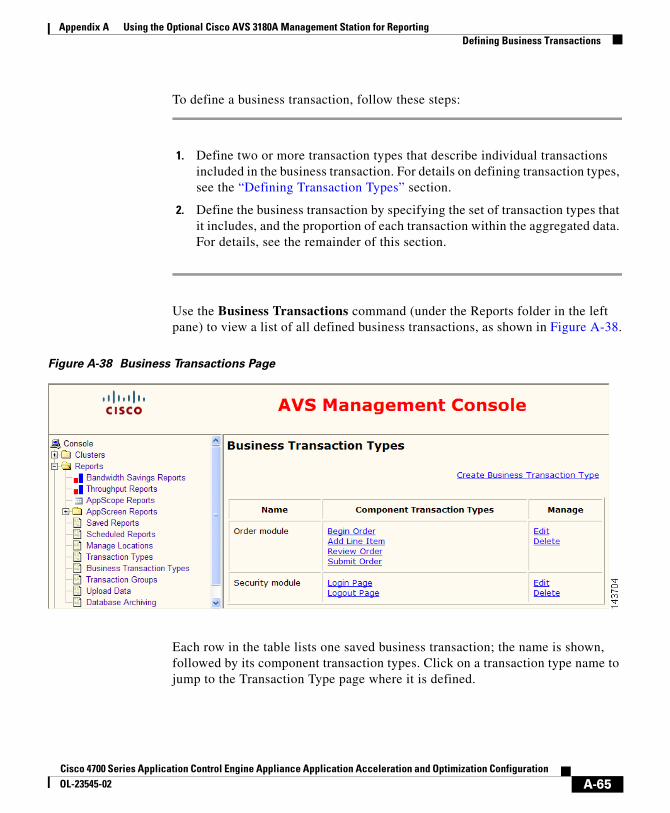
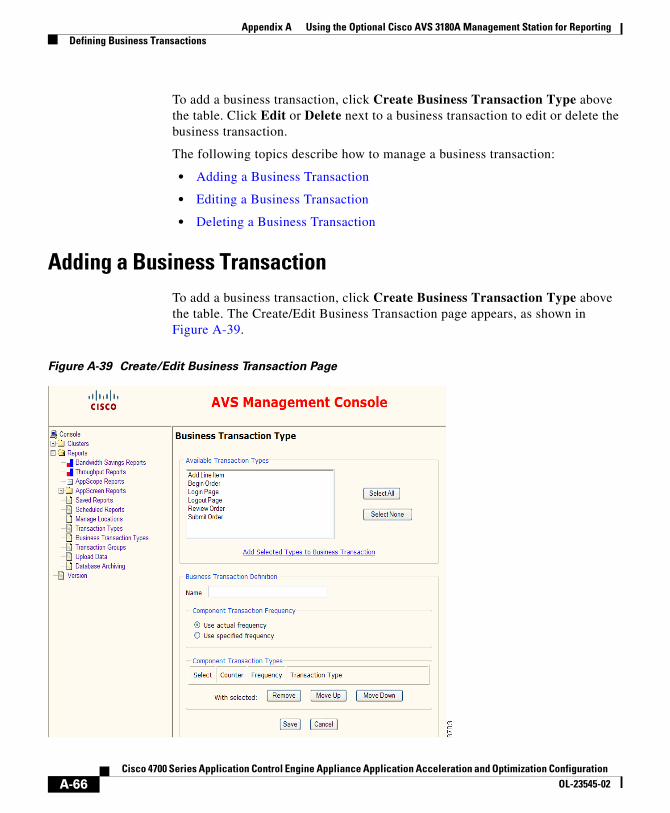


![JA Knowledge Manager Manual-4.0.3 EDITED …...mYe"#$%&’("nopqr" s9tkuv]wxy" 567189":;](https://static.documents.pub/doc/80x56/5f1004517e708231d447077e/ja-knowledge-manager-manual-403-edited-myeanopqr.jpg)

