Using the Yealink T4-series, T2-series and T19P SIP phones on the Cloud PBX Table of Contents List of Yealink phones that are tightly integrated ............................................................................................................... 2 Auto provisioning ................................................................................................................................................................ 2 Typical phone lay-out.......................................................................................................................................................... 3 Browse to the portal for call set-up and phone programming ........................................................................................... 3 Program the soft keys on the phone with PBX functions ................................................................................................... 4 Program the keys on the EXP40 LCD Expansion Module .................................................................................................... 5 The PBX soft key.................................................................................................................................................................. 6 User button LED mode ........................................................................................................................................................ 6 Answering a Call .................................................................................................................................................................. 7 Making an External Call....................................................................................................................................................... 7 Make an Internal Call .......................................................................................................................................................... 7 Redial a Number ................................................................................................................................................................. 8 Transfer a Call (unannounced) ............................................................................................................................................ 8 Transfer a Call (announced) ................................................................................................................................................ 8 Hold versus Park.................................................................................................................................................................. 8 Hold and Resume ................................................................................................................................................................ 8 Park ..................................................................................................................................................................................... 8 Picking up a Parked Call ...................................................................................................................................................... 8 Voice Mail ........................................................................................................................................................................... 9 Conference .......................................................................................................................................................................... 9 Listen, Whisper and Intrude.............................................................................................................................................. 10 Hot Desk ............................................................................................................................................................................ 10 Call Record ........................................................................................................................................................................ 11 Record a memo or a Dictaphone message ....................................................................................................................... 11 Volume Adjustment .......................................................................................................................................................... 11 Ring Tones ......................................................................................................................................................................... 11
Transcript
Using the Yealink T4-series, T2-series and T19P SIP phones on the Cloud PBX
Table of Contents
List of Yealink phones that are tightly integrated ............................................................................................................... 2
Auto provisioning ................................................................................................................................................................ 2
Browse to the portal for call set-up and phone programming ........................................................................................... 3
Program the soft keys on the phone with PBX functions ................................................................................................... 4
Program the keys on the EXP40 LCD Expansion Module .................................................................................................... 5
The PBX soft key .................................................................................................................................................................. 6
User button LED mode ........................................................................................................................................................ 6
Answering a Call .................................................................................................................................................................. 7
Making an External Call ....................................................................................................................................................... 7
Make an Internal Call .......................................................................................................................................................... 7
Redial a Number ................................................................................................................................................................. 8
Transfer a Call (unannounced) ............................................................................................................................................ 8
Transfer a Call (announced) ................................................................................................................................................ 8
Hold versus Park.................................................................................................................................................................. 8
Hold and Resume ................................................................................................................................................................ 8
Park ..................................................................................................................................................................................... 8
Picking up a Parked Call ...................................................................................................................................................... 8
Voice Mail ........................................................................................................................................................................... 9
Listen, Whisper and Intrude.............................................................................................................................................. 10
Hot Desk ............................................................................................................................................................................ 10
Call Record ........................................................................................................................................................................ 11
Record a memo or a Dictaphone message ....................................................................................................................... 11
Ring Tones ......................................................................................................................................................................... 11
List of Yealink phones that are tightly integrated
Yealink T19P / T19P-E2,
T20P, T21P /
T21P-E2, T22P,
T23P / T23G,
T26P
T27P / T27G (including EXP20 Module),
T28P (including EXP20 Module),
T29G (including EXP20 Module),
T40P, T42G, T41P,
T48G (including EXP40 Module),
T46G (including EXP40 Module).
The PBX menus can be accesses by pressing the PBX soft key.
The Menu soft key accesses local phone parameters, such as the IP address. Access also by
pressing “ok”.
Auto provisioning
The user credentials should be auto-provisioned by a provisioning server.
Typical phone lay-out
1. LCD Screen 2. Power Indicator 3. Feature Keys 4. Headset and Mute Keys 5. Message, Hold, Redial, Transfer (Note soft keys sometimes duplicate these functions) 6. Speakerphone Key 7. Volume Key – Adjusts volume of the handset, headset, speaker, and ringer 8. Keypad
9. Navigation Keys – Scroll through the displayed information, “OK” confirms an action, “X” cancels
10. Soft keys – these keys change function depending on if the phone is idle or in a call
Browse to the portal for call set-up and phone programming
Go to your user portal on the cloud PBX, by browsing to your cloud server, normally at an address in
the format mycompany.serverpbx.com, and entering your user name and password.
Dial a number by entering it in the Dial/Chat box or by selecting an entry in a phone book.
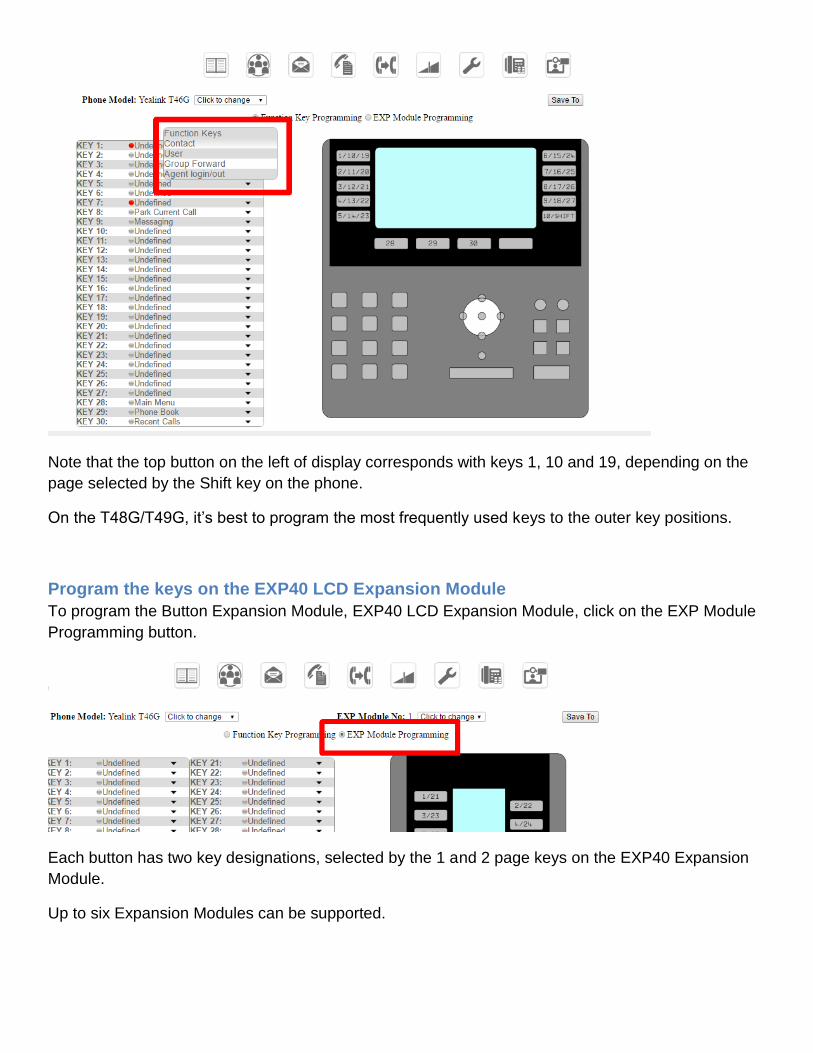
Program the soft keys on the phone with PBX functions
In the browser portal, click on the Function Keys icon and your Yealink model should be displayed.
Each key can be configured using the drop-down menu. The last key on the bottom right is used to
scroll to next page when multiple pages are configured.
Note that the top button on the left of display corresponds with keys 1, 10 and 19, depending on the
page selected by the Shift key on the phone.
On the T48G/T49G, it’s best to program the most frequently used keys to the outer key positions.
Program the keys on the EXP40 LCD Expansion Module
To program the Button Expansion Module, EXP40 LCD Expansion Module, click on the EXP Module
Programming button.
Each button has two key designations, selected by the 1 and 2 page keys on the EXP40 Expansion
Module.
Up to six Expansion Modules can be supported.
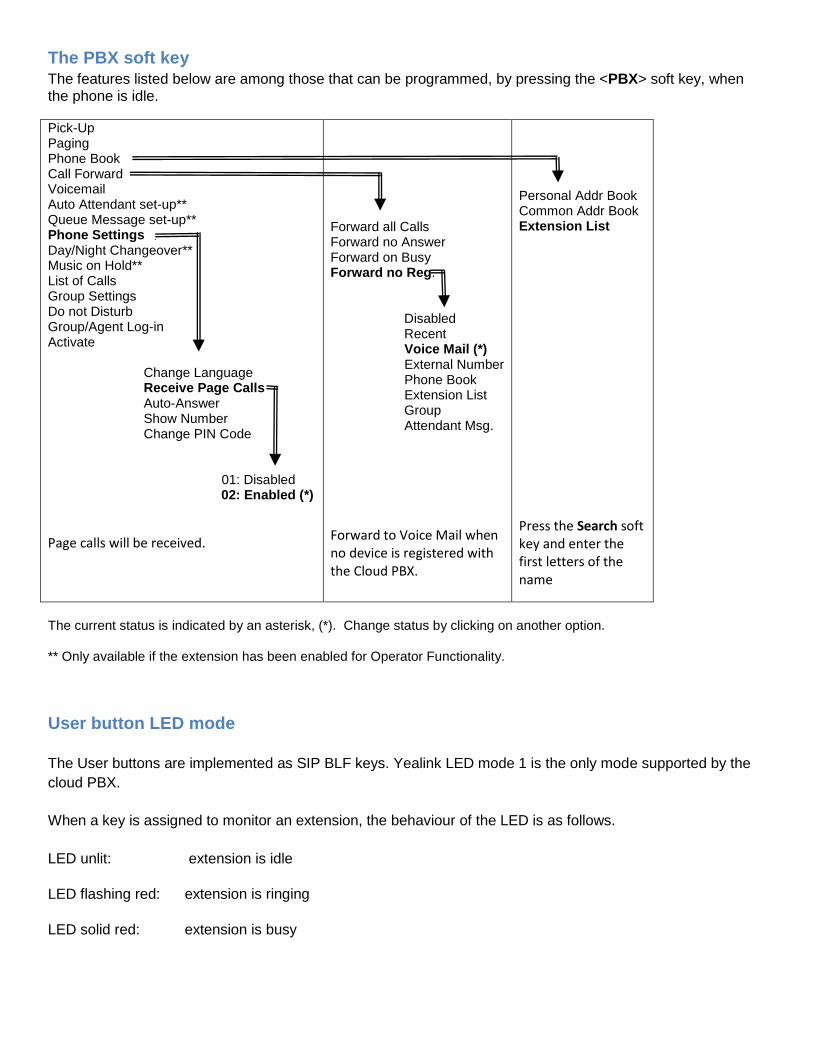
The PBX soft key
The features listed below are among those that can be programmed, by pressing the <PBX> soft key, when the phone is idle.
Pick-Up Paging Phone Book Call Forward Voicemail Auto Attendant set-up** Queue Message set-up** Phone Settings Day/Night Changeover** Music on Hold** List of Calls Group Settings Do not Disturb Group/Agent Log-in Activate Change Language Receive Page Calls Auto-Answer Show Number Change PIN Code
01: Disabled 02: Enabled (*)
Page calls will be received.
Forward all Calls Forward no Answer Forward on Busy Forward no Reg. Disabled Recent Voice Mail (*) External Number Phone Book Extension List Group Attendant Msg.
Forward to Voice Mail when no device is registered with the Cloud PBX.
Personal Addr Book Common Addr Book Extension List
Press the Search soft key and enter the first letters of the name
The current status is indicated by an asterisk, (*). Change status by clicking on another option.
** Only available if the extension has been enabled for Operator Functionality.
User button LED mode
The User buttons are implemented as SIP BLF keys. Yealink LED mode 1 is the only mode supported by the
cloud PBX.
When a key is assigned to monitor an extension, the behaviour of the LED is as follows.
LED unlit: extension is idle
LED flashing red: extension is ringing
LED solid red: extension is busy
Quick Reference Guide for Yealink T4- and T2- series and T19 phones on the Cloud PBX server
7
Answering a Call Incoming calls to the system phone are indicated in several ways -
• The phone rings • The Red LED lamp on the upper right corner flashes • The incoming call is shown on the display
• The call can be answered either by…
1. Pressing the <Answer> soft key (speaker or headset mode) 2. Press the “Speaker” button (6) (speaker or headset mode) 3. Lifting the handset.
Note: You can ignore an incoming call by pressing the Reject soft key.
Making an External Call Handset
Lift the handset, you will hear dial tone
Dial 9 + the telephone number
Press the “SEND” soft key button
Speakerphone
Dial 9 + the telephone number
Press “SEND” soft key (alternatively after dialing pick up the handset to go to handset mode)
Using the headset:
With the headset connected, press the headset key or headset symbol to activate the headset mode.
Enter the number, and then press the Send soft key.
Note: During a call, you can alternate between the headset, hands-free speakerphone and handset
modes by pressing the Headset key, Speakerphone key or by picking up the handset. Headset
mode requires a connected headset.
Make an Internal Call Handset
Lift the handset, you will hear dial tone
Dial the extension number
Press the “SEND” soft key button
Speakerphone
Dial the extension number
Press “SEND” soft key (alternatively after dialing pick up the handset to go to handset mode)
USER Soft keys (show the user status and direct dials user)
Press the User Soft key
This can be done before picking up the handset (Speaker mode)
Or after the handset is picked up
Quick Reference Guide for Yealink T4- and T2- series and T19 phones on the Cloud PBX server
8
Redial a Number
Press the “REDIAL” button
A menu will display showing a list of previous calls
To call back the last number at the top of the list just press “REDIAL” button again
To call other than the last called number, navigate to the desired number using up/down keys o Press “REDIAL” button OR press “SEND” soft key.
Transfer a Call (unannounced) While in conversation
Press the “Transfer” soft key (you will hear dial tone)
Dial the extension number to transfer to, then press the “Transfer” soft key again
Hang up handset
Transfer a Call (announced) While in conversation
Press the “Transfer” soft key (you will hear dial tone)
Dial the extension number to transfer to, then press the “OK” button
When the user answers, announce the call you are transferring
Press the “Transfer” soft key or simply hang up to transfer o If the user does not want to accept the call
If the user hangs up first, press the “Resume” soft key To disconnect the user who does not want the call press “End Call” soft key, then press
the “Resume” soft key to reconnect the caller
Hold versus Park “Hold” puts the caller “on-hold” at your phone and the caller can only be picked-up from your phone.
“Park” puts the caller on a ‘System Hold’ (Parked) so that the caller can be picked-up from any phone.
Hold and Resume While in conversation…
Press the “Hold” soft key
Caller now hears music-on-hold and your display shows the call status as “Hold”
To reconnect to the caller press the “Resume” soft key
Park While in conversation…
Press the “Park” soft key
Caller now hears music-on-hold and your “Park” soft key will be lit. o Note the “Park” key may already be lit if there are already 1 or more callers parked.
Picking up a Parked Call Press the “Park” soft key
The display will show all Parked calls, if there is more than 1 call parked use the navigation keys (up/down arrows) to highlight the call you want to pick-up.
Press the “Pickup” soft key to retrieve the parked call
Quick Reference Guide for Yealink T4- and T2- series and T19 phones on the Cloud PBX server
9
Voice Mail To retrieve voice mails or setup voice mail box
Using display and navigation
Press the “Message” soft key
Navigate to Voice Mail (or Setup Voice Mail) and press “Select” soft key
Voice mail messages will be listed
Navigate to desired message (newest is at top) and press “Select” soft key
Using just audio prompts
Press the “Message” button (5) and the phone will connect just using audio prompts to listen to messages
To access your mailbox from another phone dial #99<ext> where <ext> is your extension or mailbox number
At the prompt, press “#” and the system will prompt you to input your PIN.
PIN is available from the system administrator.
Call Forward
To enable call forward, press the PBX key and scroll down to the Call Forward option.
Conference While in conversation with party 1
Press the “Conference” soft key, you will hear dial tone
Dial the number of the 3rd
party to conference in and press “OK”
After the 3rd
party answers press “Conference” o If the 3
rd party does not answer, or maybe you reach voice mail and do not want to
conference Press the “Cancel” soft key to disconnect the 3
rd party
Press the “Resume” soft key to reconnect the caller
Quick Reference Guide for Yealink T4- and T2- series and T19 phones on the Cloud PBX server
10
Listen, Whisper and Intrude
Assign keys to the Listen and Intrude functions, by selecting from the Function Keys drop-down menu,
under the Function Keys tab, at the User Portal.
Listen/Whisper:
Pressing Listen when the phone is idle displays a list of the active calls that can be listened to. To listen,
select the call from the list.
Whisper uses the Listen button. Pressing it toggles between listen and whisper and the led color
changes. Green is for Listen mode, red for whisper.
Dialing 7 will toggle between the listen and whisper modes.
Dialing 9 will go from Listen or Whisper mode into Intrude mode.
Intrude:
Pressing Intrude when the phone is idle displays a list of the active calls that can be intruded on. To intrude, select the call from the list.
Dialing 9 will go from Listen or Whisper mode into Intrude mode.
Hot Desk
Assign a key to the Hot Desk function, by selecting from the Function Keys drop-down menu, under the Function Keys tab, at the User Portal.
Pressing the key will display a Warning question “Clear all account config?”. Confirm by pressing OK. The user’s credentials are cleared and the phone is deregistered from the PBX. User name and Password must be entered again to register. Pressing the Hot Desk key once again presents the option to clear the credentials and deregister the phone.
Quick Reference Guide for Yealink T4- and T2- series and T19 phones on the Cloud PBX server
11
Call Record Assign keys to the Listen and Intrude functions, by selecting from the Function Keys drop-down menu, under the Function Keys tab, at the User Portal.
Press the Record key, during a call, to start the recording. The associated led flashes. Press the Record key again to finish recording; the led is extinguished. The recorded call is sent to the programmed email address.
Record a memo or a Dictaphone message
Dial #98 followed by the destination extension number (your own for a personal memo). Record a message of up to three minutes and hang up.
Volume Adjustment Press during a call to adjust the receiver volume of the handset/speakerphone/
headset.
Press when the phone is idle to adjust the ringer volume.
Ring Tones 1. Press the Menu soft key when the phone is idle, and then select Settings->Basic Settings->Ring