39
SAP ECC 6.0 EhP3 August 2008 English Printing: Forms (153) SAP AG Dietmar-Hopp-Allee 16 69190 Walldorf Germany Building Block Configuration Guide
| Date post: | 27-Jan-2016 |
| Category: |
Documents |
| Upload: | ksureshkumar |
| View: | 262 times |
| Download: | 1 times |

SAP ECC 6.0 EhP3
August 2008
English
Printing: Forms (153)
SAP AGDietmar-Hopp-Allee 1669190 WalldorfGermany
Building Block Configuration Guide

SAP Best Practices Printing: Forms (153): Configuration Guide
Copyright
© Copyright 2008 SAP AG. All rights reserved.
No part of this publication may be reproduced or transmitted in any form or for any purpose without the ex-press permission of SAP AG. The information contained herein may be changed without prior notice.
Some software products marketed by SAP AG and its distributors contain proprietary software components of other software vendors.
Microsoft, Windows, Excel, Outlook, and PowerPoint are registered trademarks of Microsoft Corporation.
IBM, DB2, DB2 Universal Database, OS/2, Parallel Sysplex, MVS/ESA, AIX, S/390, AS/400, OS/390, OS/400, iSeries, pSeries, xSeries, zSeries, System i, System i5, System p, System p5, System x, System z, System z9, z/OS, AFP, Intelligent Miner, WebSphere, Netfinity, Tivoli, Informix, i5/OS, POWER, POWER5, POWER5+, OpenPower and PowerPC are trademarks or registered trademarks of IBM Corporation.
Adobe, the Adobe logo, Acrobat, PostScript, and Reader are either trademarks or registered trademarks of Adobe Systems Incorporated in the United States and/or other countries.
Oracle is a registered trademark of Oracle Corporation.
UNIX, X/Open, OSF/1, and Motif are registered trademarks of the Open Group.
Citrix, ICA, Program Neighborhood, MetaFrame, WinFrame, VideoFrame, and MultiWin are trademarks or registered trademarks of Citrix Systems, Inc.
HTML, XML, XHTML and W3C are trademarks or registered trademarks of W3C®, World Wide Web Consor-tium, Massachusetts Institute of Technology.
Java is a registered trademark of Sun Microsystems, Inc.
JavaScript is a registered trademark of Sun Microsystems, Inc., used under license for technology invented and implemented by Netscape.
SAP, R/3, xApps, xApp, SAP NetWeaver, Duet, PartnerEdge, ByDesign, SAP Business ByDesign, and other SAP products and services mentioned herein as well as their respective logos are trademarks or re-gistered trademarks of SAP AG in Germany and in several other countries all over the world. All other product and service names mentioned are the trademarks of their respective companies. Data contained in this document serves informational purposes only. National product specifications may vary.
These materials are subject to change without notice. These materials are provided by SAP AG and its affili-ated companies ("SAP Group") for informational purposes only, without representation or warranty of any kind, and SAP Group shall not be liable for errors or omissions with respect to the materials. The only war-ranties for SAP Group products and services are those that are set forth in the express warranty statements accompanying such products and services, if any. Nothing herein should be construed as constituting an ad-ditional warranty.
© SAP AG Page 2 of 31

SAP Best Practices Printing: Forms (153): Configuration Guide
Icons
Icon Meaning
Caution
Example
Note
Recommendation
Syntax
External Process
Business Process Alternative/Decision Choice
Typographic Conventions
Type Style Description
Example text Words or characters that appear on the screen. These include field names, screen titles, pushbuttons as well as menu names, paths and options.
Cross-references to other documentation.
Example text Emphasized words or phrases in body text, titles of graphics and tables.
EXAMPLE TEXT Names of elements in the system. These include report names, pro-gram names, transaction codes, table names, and individual key words of a programming language, when surrounded by body text, for exam-ple, SELECT and INCLUDE.
Example text Screen output. This includes file and directory names and their paths, messages, source code, names of variables and parameters as well as names of installation, upgrade and database tools.
EXAMPLE TEXT Keys on the keyboard, for example, function keys (such as F2) or the ENTER key.
Example text Exact user entry. These are words or characters that you enter in the system exactly as they appear in the documentation.
<Example text> Variable user entry. Pointed brackets indicate that you replace these words and characters with appropriate entries.
© SAP AG Page 3 of 31

SAP Best Practices Printing: Forms (153): Configuration Guide
Contents1 Purpose................................................................................................................................... 6
2 Preparation.............................................................................................................................. 6
2.1 Prerequisites..................................................................................................................6
3 Configuration........................................................................................................................... 6
3.1 Styles............................................................................................................................. 6
3.1.1 Copying Styles for SMARTFORMS into Customer Namespace................................6
3.1.2 Copying Text Modules into Customer Namespace...................................................7
3.2 Function Group and Function Module...........................................................................8
3.2.1 Creating Function Group Y_FSP...............................................................................8
3.2.2 Copying Function Module into Customer Namespace..............................................9
3.3 Copying SAP Script Forms from Client 000.................................................................10
3.4 Copying Smart Forms into Customer Namespace......................................................12
3.4.1 Copying Smart Forms into Customer Namespace..................................................12
3.4.2 Activating Smart Forms...........................................................................................14
3.5 Copying Print Programs into Customer Namespace...................................................14
3.5.1 Copying Print Programs into Customer Namespace...............................................14
3.6 Text Modules...............................................................................................................15
3.6.1 Use of Text Modules for Sender, Letter Header and Footer Texts..........................15
3.6.2 Assigning Text Modules to Sales Organization.......................................................16
3.6.3 Assigning Text Modules to Purchasing Organization..............................................16
3.7 Assigning Standard Texts for Invoice Verification Forms.............................................17
3.8 Assigning MM and SD Forms......................................................................................18
3.8.1 Assigning SD Forms................................................................................................18
3.8.2 Assigning MM Forms...............................................................................................19
3.8.3 Assigning Forms (Layout Sets) for Print Reports....................................................22
3.9 Assigning FI Forms and Text Modules........................................................................22
3.9.1 Creating Sap script Standard Texts (Copy from Client 000)....................................22
3.9.2 Dunning Form..........................................................................................................23
3.9.3 Defining Form Names for Correspondence Print.....................................................26
3.9.4 Defining Form Check Deposit..................................................................................27
3.9.5 Setting up Paying Company Codes for Payment Transactions – Forms.................27
3.9.6 Setting up Payment Methods per Company Code for Payment Transact – Forms. 28
3.9.7 Defining Sender Details for Correspondence Form.................................................29
© SAP AG Page 4 of 31

SAP Best Practices Printing: Forms (153): Configuration Guide
Printing: Forms
1 PurposeThis configuration guide provides the information you need to set up the configuration of this building block manually.
If you do not want to configure manually and prefer an automated installation process using eCATT and other tools, activate building block 153 in the Installation Assistant.
2 Preparation
2.1 PrerequisitesBefore you start installing this building block, you must install prerequisite building blocks. For more information, see the building block prerequisite matrix (Prerequisites_Matrix_[xx]_EN_CN.xls; the placeholder [xx] depends on the SAP Best Practices version you use, for example, BL refers to the SAP Best Practices Baseline Package: Prerequi-sites_Matrix_BL_EN_CN.xls). This document can be found on the SAP Best Practices documen-tation DVD in the folder ..\BBLibrary\General\.
3 Configuration
3.1 Styles
3.1.1 Copying Styles for SMARTFORMS into Customer Namespace
UseProcess this activity to make sure that the used Styles are copied into your Customer Names-pace.
Procedure1. Access the activity using one of the following navigation options:
Transaction code SMARTFORMS
IMG menu Tools Form Printout Smartforms
2. On the SAP Smart Forms: Initial Screen choose Style and then choose Copy (Ctrl + F5).
3. In Source Object, enter the name of the Style you want to copy.
4. In Target Object, enter the new name in your customer namespace.
Source Object Target Object
/SMBA0/AA_BL_SF YBAA_BL_SF
© SAP AG Page 5 of 31

SAP Best Practices Printing: Forms (153): Configuration Guide
Source Object Target Object
/SMBA0/AA_SFSTYLE YBAA_SFSTYLE
/SMB12/CN_SFSTYLE YFSP_SFSTYLE
5. Save the new Style.
3.1.2 Copying Text Modules into Customer Namespace
UseProcess this activity to make sure that the used text modules are copied into your customer namespace.
ProcedureCarry out the following steps:
1. Access the activity using one of the following navigation options:
IMG Menu Tools Form Printout Smartforms
Transaction Code SMARTFORMS
2. On the SAP Smart Forms: Initial Screen choose Text Module and then choose Copy (Ctrl + F5).
3. In Source Object, enter the name of the text module you want to copy.
4. In Target Object, enter the new name in your customer namespace.
Source Object Target Object
/SMB12/CN_ADR1 YBCN_ADR1
/SMB12/CN_FOOTER YBCN_FOOTER
/SMB12/CN_FOOTER1 YBCN_FOOTER1
/SMB12/CN_FOOTER2 YBCN_FOOTER2
/SMB12/CN_FOOTER3 YBCN_FOOTER3
/SMB12/CN_FOOTER4 YBCN_FOOTER4
/SMB12/CN_HEAD1 YBCN_HEAD1
/SMB12/CN_GRUSS YBCN_GRUSS
/SMB12/CN_ADR_SENDER YBCN_ADR_SENDER
/SMB12/CN_BILL_TO YBCN_BILL_TO
/SMB12/CN_PAGE_INFORMATION YBCN_PAGE_INFORMATION
/SMB12/CN_SENDER YBCN_SENDER
/SMBA0/AA_QMCON_BEGIN1 YBAA_QMCON_BEGIN1
/SMBA0/AA_QMCON_BEGIN2 YBAA_QMCON_BEGIN2
/SMBA0/AA_QMCON_END YBAA_QMCON_END
© SAP AG Page 6 of 31

SAP Best Practices Printing: Forms (153): Configuration Guide
Source Object Target Object
/SMB12/CN_COMPANY_NAME YFSP_ADR1
/SMB12/CN_PAGE_INFO YFSP_PAGE_INFORMATION
/SMB12/CN_SD_ADDR YFSP_SD_ADDR
/SMB12/CN_SD_ADDR_VALUE YFSP_SD_ADDR_VALUE
/SMB12/CN_SD_COND YFSP_SD_COND
/SMB12/CN_SD_COND_VALUE YFSP_SD_COND_VALUE
/SMB12/CN_SD_SOLDTO YFSP_SD_SOLDTO
/SMB12/CN_SD_SOLDTO_VALUE YFSP_SD_SOLDTO_VALUE
/SMB12/CN_SD_WEIGHT YFSP_SD_WEIGHT
/SMB12/CN_SD_WEIGHT_VALUE YFSP_SD_WEIGHT_VALUE
/SMB12/CN_FOOTER_ADDRESS_INFO YFSP_TM_FOOTER_ADDRESS_INFO
/SMB12/CN_FOOTER_ADDRESS_L YFSP_TM_FOOTER_ADDRESS_L
/SMB12/CN_FOOTER_ADDRESS_R YFSP_TM_FOOTER_ADDRESS_R
/SMB12/CN_FOOTER_INFO YFSP_TM_FOOTER_INFO
/SMB12/CN_POCON_INFO YFSP_TM_POCON_INFO
/SMB12/CN_SIGNATURE_L YFSP_TM_SIGNATURE_L
/SMB12/CN_SIGNATURE_R YFSP_TM_SIGNATURE_R
/SMB12/CN_VENDOR_INFO YFSP_TM_VENDOR_INFO
/SMB12/CN_VENDOR_INFO2 YFSP_TM_VENDOR_INFO2
/SMB12/CN_VENDOR_INFO_RET YFSP_TM_VENDOR_INFO_RET
/SMB12/CN_VENDOR_INFO_RET2 YFSP_TM_VENDOR_INFO_RET2
5. Save the new Text Module.
3.2 Function Group and Function Module
3.2.1 Creating Function Group Y_FSP
UseThe purpose of this activity is to create function group Y_FSP.
Procedure
1. Access the activity using one of the following navigation options:
SAP ECC menu Tools ABAP Workbench Development Function Builder
Transaction code SE37
2. Choose Goto – Function Groups – Create Group from SAP menu.
© SAP AG Page 7 of 31

SAP Best Practices Printing: Forms (153): Configuration Guide
3. On the Create Function Group Screen, Enter the function group and short text.
Field name Description User action and values Comment
Function group Y_FSP
Short text Common function module for baseline China
4. Choose Save.
5. If the dialog box ’Create Object Directory Entry’ appears, you can assign package Z001.
6. Choose Save.
7. Choose Continue.
ResultThe function group Y_FSP is created
3.2.2 Copying Function Module into Customer Namespace
UseProcess this activity to make sure that the function modules are copied into your Customer Namespace.
Procedure
1. Access the activity using one of the following navigation options:
SAP ECC menu Tools ABAP Workbench Development Function Builder
Transaction code SE37
2. On the Function Builder: Initial Screen, Choose Copy….
3. On the Copy Function Group Screen, Enter the following data.
Field name Description User action and values Comment
fr. Function module
/SMB12/FSP_GET_ADDR_TEL_FAX
To Function module
Y_FSP_GET_ADDR_TEL_FAX
Function group
Y_FSP
4. Choose Copy.
5. On the Function Builder: Initial Screen, Enter the function module.
Field name Description User action and values Comment
Function Module Y_FSP_GET_ADDR_TEL_FAX
6. Choose Activate. If a dialog box appears, choose line Y_FSP_GET_ADDR_TEL_FAX and choose Continue.
© SAP AG Page 8 of 31

SAP Best Practices Printing: Forms (153): Configuration Guide
7. Repeat steps 2 to 6 for the following function modules:
fr. Function module To Function modu Function group
/SMB12/FSP_GET_CONTACT_PERSON Y_FSP_GET_CONTACT_PERSON Y_FSP
/SMB12/FSP_GET_MATERIAL_TYPE Y_FSP_GET_MATERIAL_TYPE Y_FSP
/SMB12/FSP_GET_USER_TEL_FAX Y_FSP_GET_USER_TEL_FAX Y_FSP
ResultThe function modules are copied from name space /SMB12/.
3.3 Copying SAP Script Forms from Client 000
UseThe purpose of this activity is to copy the following SAP script forms from client 000 into the cus-tomer namespace YB_* in your installation client:
/SMB12/CN_LVSTAE /SMB12/LVSTALIST LVSTOSOLO LVSKOMMIL1 LVSKOMMIL2 F_M40S_CHEQUE F140_ACC_STAT_01 F140_CASH_DOC_01 F_DUZI_01 F110_EDI_01 F140_IND_TEXT_01 F140_INT_DOCU_01 F140_PAY_CONF_01 F130_LIST_02 F130_RESULT_02 /SMB12/INVENT SD_PICK_SINGLE F130_CONFIRM_01 F130_ERROR_02 F110_D_AVIS SD-CAS-MAIL SD_EXPORT_FECO SD_EXPORT_EUDC /SMB12/QM_INS_RE FIAA_F001 QM_COMPLAIN /SMB12/CN_ACC_ST
Note that if you have already installed this building block in another client in your sys-tem, the forms will already be included in a transport request. This means that the forms are locked for change in the current implementation client and an error occurs. In this case, you must remove the objects from the transport request in the other client (transaction SE09) before you can carry out this step.
© SAP AG Page 9 of 31

SAP Best Practices Printing: Forms (153): Configuration Guide
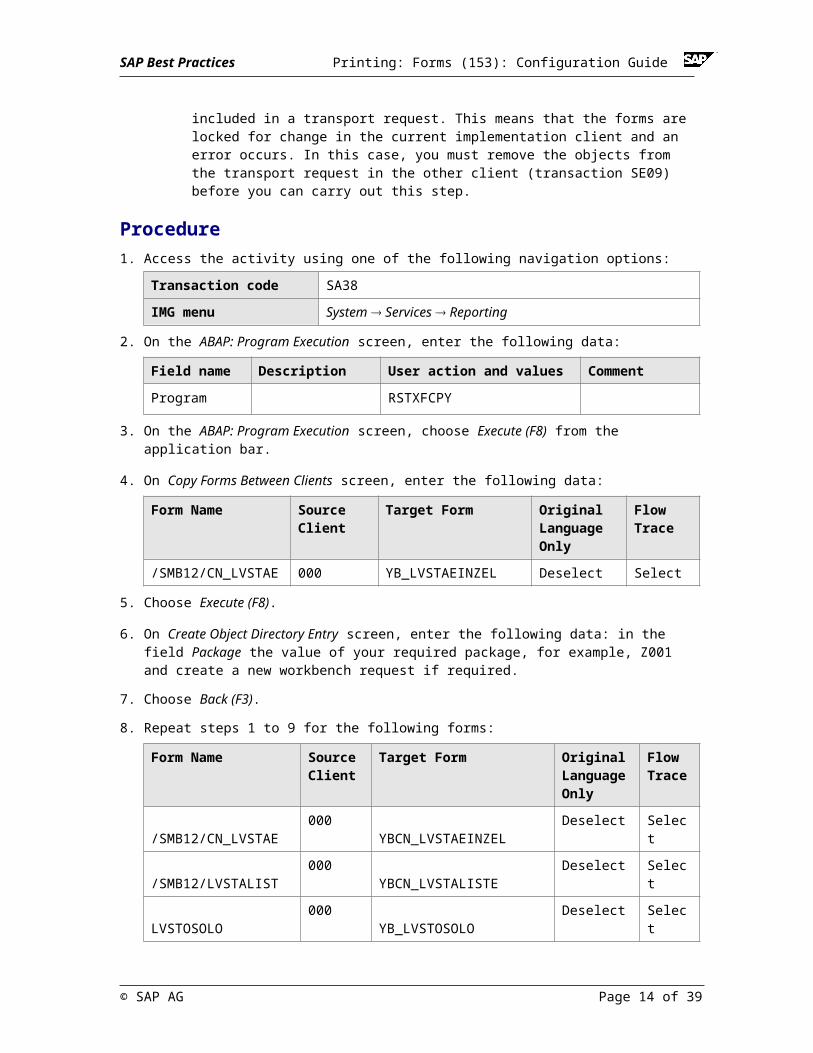
Procedure1. Access the activity using one of the following navigation options:
Transaction code SA38
IMG menu System Services Reporting
2. On the ABAP: Program Execution screen, enter the following data:
Field name Description User action and values Comment
Program RSTXFCPY
3. On the ABAP: Program Execution screen, choose Execute (F8) from the application bar.
4. On Copy Forms Between Clients screen, enter the following data:
Form Name Source Client
Target Form Original Language Only
Flow Trace
/SMB12/CN_LVSTAE 000 YB_LVSTAEINZEL Deselect Select
5. Choose Execute (F8).
6. On Create Object Directory Entry screen, enter the following data: in the field Package the value of your required package, for example, Z001 and create a new workbench request if re-quired.
7. Choose Back (F3).
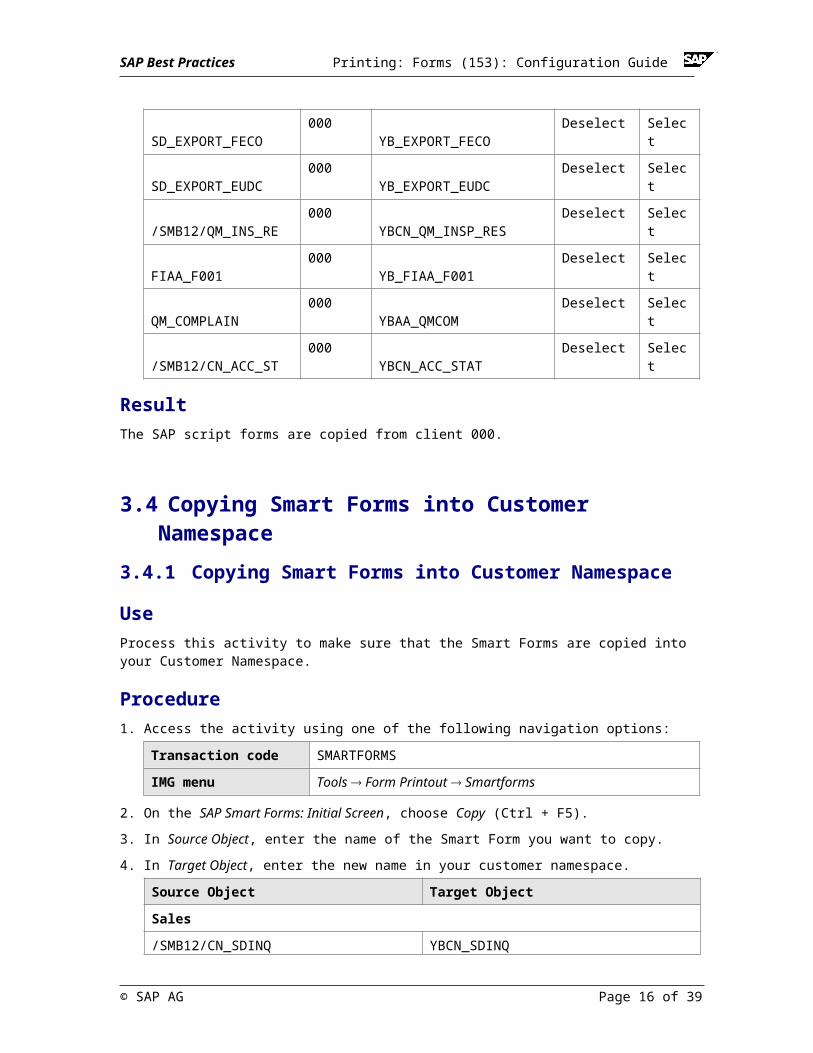
8. Repeat steps 1 to 9 for the following forms:
Form Name Source Client
Target Form Original Language Only
Flow Trace
/SMB12/CN_LVSTAE 000 YBCN_LVSTAEINZEL Deselect Select
/SMB12/LVSTALIST 000 YBCN_LVSTALISTE Deselect Select
LVSTOSOLO 000 YB_LVSTOSOLO Deselect Select
LVSKOMMIL1 000 YB_LVSKOMMIL1 Deselect Select
LVSKOMMIL2 000 YB_LVSKOMMIL2 Deselect Select
F_M40S_CHEQUE 000 YB_F_M40S_CHEQUE Deselect Select
F140_ACC_STAT_01 000 YB_F140_ACC_STAT Deselect Select
F140_CASH_DOC_01 000 YB_F140_CASH_DOC Deselect Select
F_DUZI_01 000 YB_F_DUZI_01 Deselect Select
F110_EDI_01 000 YB_F110_EDI_01 Deselect Select
F140_IND_TEXT_01 000 YB_F140_IND_TEXT Deselect Select
F140_INT_DOCU_01 000 YB_F140_INT_DOCU Deselect Select
F140_PAY_CONF_01 000 YB_F140_PAY_CONF Deselect Select
F130_LIST_02 000 YB_F130_LIST_02 Deselect Select
© SAP AG Page 10 of 31

SAP Best Practices Printing: Forms (153): Configuration Guide
F130_RESULT_02 000 YB_F130_RESULT02 Deselect Select
/SMB12/INVENT 000 YBCN_INVENT Deselect Select
SD_PICK_SINGLE 000 YB_SD_PICK_SINGL Deselect Select
F130_CONFIRM_01 000 YB_F130_CONFIRM Deselect Select
F130_ERROR_02 000 YB_F130_ERROR_02 Deselect Select
F110_D_AVIS 000 YB_F110_D_AVIS Deselect Select
SD-CAS-MAIL 000 YB_SD-CAS-MAIL Deselect Select
SD_EXPORT_FECO 000 YB_EXPORT_FECO Deselect Select
SD_EXPORT_EUDC 000 YB_EXPORT_EUDC Deselect Select
/SMB12/QM_INS_RE 000 YBCN_QM_INSP_RES Deselect Select
FIAA_F001 000 YB_FIAA_F001 Deselect Select
QM_COMPLAIN 000 YBAA_QMCOM Deselect Select
/SMB12/CN_ACC_ST 000 YBCN_ACC_STAT Deselect Select
ResultThe SAP script forms are copied from client 000.
3.4 Copying Smart Forms into Customer Namespace
3.4.1 Copying Smart Forms into Customer Namespace
UseProcess this activity to make sure that the Smart Forms are copied into your Customer Names-pace.
Procedure1. Access the activity using one of the following navigation options:
Transaction code SMARTFORMS
IMG menu Tools Form Printout Smartforms
2. On the SAP Smart Forms: Initial Screen, choose Copy (Ctrl + F5).
3. In Source Object, enter the name of the Smart Form you want to copy.
4. In Target Object, enter the new name in your customer namespace.
Source Object Target Object
Sales
/SMB12/CN_SDINQ YBCN_SDINQ
/SMB12/CN_SDQUO YBCN_SDQUO
/SMB12/CN_SDORC YBCN_SDORC
© SAP AG Page 11 of 31

SAP Best Practices Printing: Forms (153): Configuration Guide
/SMB12/CN_SDCSH YBCN_SDCSH
/SMB12/CN_SDCON YBCN_SDCON
/SMB12/CN_SDSDA YBCN_SDSDA
Shipping
/SMB12/CN_SDDLN YBCN_SDDLN
/SMB12/CN_SDBLD YBCN_SDBLD
/SMB12/CN_SDPIL YBCN_SDPIL
Billing
/SMB12/CN_SDINV YBCN_SDINV
Purchasing RFQ
/SMB12/CN_MMRFQ YBCN_MMRFQ
Purchase Order
/SMB12/CN_MMPO YBCN_MMPO
Purch.Outl.Agr.
/SMB12/CN_MMCON YBCN_MMCON
Purch.SchAgrRelease
/SMB12/CN_MMDLS YBCN_MMDLS
Inventory Management
/SMB12/CN_MMGR1 YBCN_MMGR1
/SMB12/CN_MMGR2 YBCN_MMGR2
/SMB12/CN_MMGR3 YBCN_MMGR3
/SMB12/CN_MMGI1 YBCN_MMGI1
/SMB12/CN_MMGI2 YBCN_MMGI2
/SMB12/CN_MMGI3 YBCN_MMGI3
FI
/SMB12/CN_FIMA YBCN_FIMAPP/SMB12/CN_PROD_ORD YBAA_PROD_ORDService Entry/SMB12/CN_MMSER YBCN_MMSER
5. Save the new Smart Forms as Active version.
3.4.2 Activating Smart Forms
Use
© SAP AG Page 12 of 31
SAP Best Practices Printing: Forms (153): Configuration Guide
Process this activity to make sure that the Smart Forms are active.
Procedure1. Access the activity using one of the following navigation options:
Transaction code SMARTFORMS
IMG menu Tools Form Printout Smartforms
2. On the SAP Smart Forms: Initial Screen, enter your new Smart Form (see list above).
3. Choose Change.
4. Check if SAP Smart Forms has the Active status (this information is mentioned at the right of form’s name). If not, choose the activate button (match).
5. During Smart Form activation, you will be asked to enter a Workbench Request.
6. Go back to continue the configuration.
ResultThe Smart Forms are activated.
3.5 Copying Print Programs into Customer Namespace
3.5.1 Copying Print Programs into Customer Namespace
UseProcess this activity to make sure that the Smart Form print programs are copied into your Cus-tomer Namespace.
Procedure1. Access the activity using one of the following navigation options:
Transaction code SE38
2. On the ABAP Editor: Initial Screen enter the source program.
3. Choose Copy (Ctrl + F5).
4. In the target program, enter the name of the new program.
Source Program Target Program
/SMBA0/AA_FM06P YBAA_FM06P
/SMBA0/AA_M07DR YBAA_M07DR
/SMBA0/AA_RVADOR01 YBAA_RVADOR01
/SMBA0/AA_RLE_DELNOTE YBAA_RLE_DELNOTE
/SMBA0/AA_RLB_INVOICE YBAA_RLB_INVOICE
/SMBA0/AA_FM06P YBAA_FM06P
© SAP AG Page 13 of 31
SAP Best Practices Printing: Forms (153): Configuration Guide
Source Program Target Program
/SMBA0/AA_M07DR YBAA_M07DR
/SMBA0/AA_SFCOPCT_SFORM YBAA_SFCOPCT_SFORM
/SMBA0/AA_MMSER YBAA_MMSER
/SMBA0/AA_LVSTAE YBAA_LVSTAE
/SMBA0/AA_RQQMRB01 YBAA_RQQMRB01
/SMB12/FSP_RFKORD10 YFSP_RFKORD10
/SMB12/FSP_RVADEK01 YFSP_RVADEK01
/SMB12/FSP_RFKORI00 YFSP_RFKORI00
/SMB12/FSP_RFKORI02 YFSP_RFKORI02
/SMB12/FSP_RFKORI15 YFSP_RFKORI15
/SMB12/FSP_RFKORI80 YFSP_RFKORI80
/SMB12/FSP_RFKORI90 YFSP_RFKORI90
/SMB12/FSP_RFKORI91 YFSP_RFKORI91
/SMB12/FSP_RFKORI92 YFSP_RFKORI92
/SMB12/FSP_RFKORI93 YFSP_RFKORI93
/SMB12/FSP_MV50BFZ1 YFSP_MV50BFZ1
/SMB12/FSP_SADRDATA YFSP_SADRDATA
/SMB12/FSP_VBBDDATA YFSP_VBBDDATA
/SMB12/FSP_VBFADATA YFSP_VBFADATA
/SMB12/FSP_VBLPDATA YFSP_VBLPDATA
/SMB12/FSP_VBPADATA YFSP_VBPADATA
/SMB12/FSP_VBUKDATA YFSP_VBUKDATA
/SMB12/FSP_VBUPDATA YFSP_VBUPDATA
3.6 Text Modules
3.6.1 Use of Text Modules for Sender, Letter Header and Footer Texts
The Smart Forms text modules for the sender address (field ‘Address text’) and the address in the letter header of the receivers address (field ‘letter header’) can be maintained per sales orga-nization (see 3.6.2), purchasing organization (see 3.6.3) and company code (for dunning notice and interest calculation, see 3.9.2.4).
© SAP AG Page 14 of 31

SAP Best Practices Printing: Forms (153): Configuration Guide
Four text areas are provided for the output of the footer texts. (No. 1 - 4). Therefore it is neces-sary to maintain only the prefix for the Smart Forms text modules. Within the form processing the final text module name is concatenated in the following manner:
Prefix + <1-4> + _ + organizational unit
Example: /SMB12/CN_FOOTER1_1000
If no Smart Forms text module is found, the final text module name is concatenated without the organizational unit (sales organization, purchasing organization, company code).
Prefix + <1-4>
Example: / SMB12/CN _FOOTER2
If no Smart Forms text module is found, the corresponding footer area will be empty.
3.6.2 Assigning Text Modules to Sales Organization
UseProcess this activity to assign the text modules to your Sales Organization.
Procedure1. Access the activity using one of the following navigation options:
Transaction code V/85
IMG menu Sales and Distribution Basic Functions Output Control Output Determination Process Output and Forms Assign Form Texts Assign form texts per sales organization
2. Make the following entries:
Sales Org.
Address Text
Letter header Footer text li. Greeting text
Text SDS sender
1000 YBCN_ADR1 YBCN_HEAD1 YBCN_FOOTER
1100 YBCN_ADR1 YBCN_HEAD1 YBCN_FOOTER
3. Save your settings.
3.6.3 Assigning Text Modules to Purchasing Organization
UseProcess this activity to assign the text modules to your Purchasing Organization.
Procedure
© SAP AG Page 15 of 31
SAP Best Practices Printing: Forms (153): Configuration Guide
1. Access the activity using one of the following navigation options:
Transaction code V_024E_T (SM30)
IMG menu Materials Management Purchasing Messages Texts for messages Define Texts for Purchasing Organization
2. Select the Purchasing Organization and choose Details (Ctrl + Shift + F2).
3. Make the following entries:
Text Sndr Line Letter heading Text: footer Text: Close
YBCN_ADR1 YBCN_HEAD1 YBCN_FOOTER
4. Save your settings.
3.7 Assigning Standard Texts for Invoice Verification Forms
UseProcess this activity to assign the text modules for invoice verification to your company code.
Procedure 1. Access the activity using one of the following navigation options:
Transaction code OMRU
IMG menu Materials Management Logistics Invoice Verification Mes-sage Determination Define Sender Details for Forms
2. On the Change View ‘Sender Texts for Invoice Verification Forms’: Overview screen, choose New Entries.
3. On the New Entries: Details of Added Entries screen enter the values shown below.
Field name Description User action and values Note
Company Code For example: 1000
Text ID ADRS
Header Text ADRS_HEADER
Footer Text ADRS_FOOTER
Signature Text ADRS_SIGNATURE
Sender ADRS_SENDER
4. Save your settings.
5. Choose Back (F3).
© SAP AG Page 16 of 31

SAP Best Practices Printing: Forms (153): Configuration Guide
3.8 Assigning MM and SD Forms
3.8.1 Assigning SD Forms
UseProcess these activities to configure the SD Smart Forms.
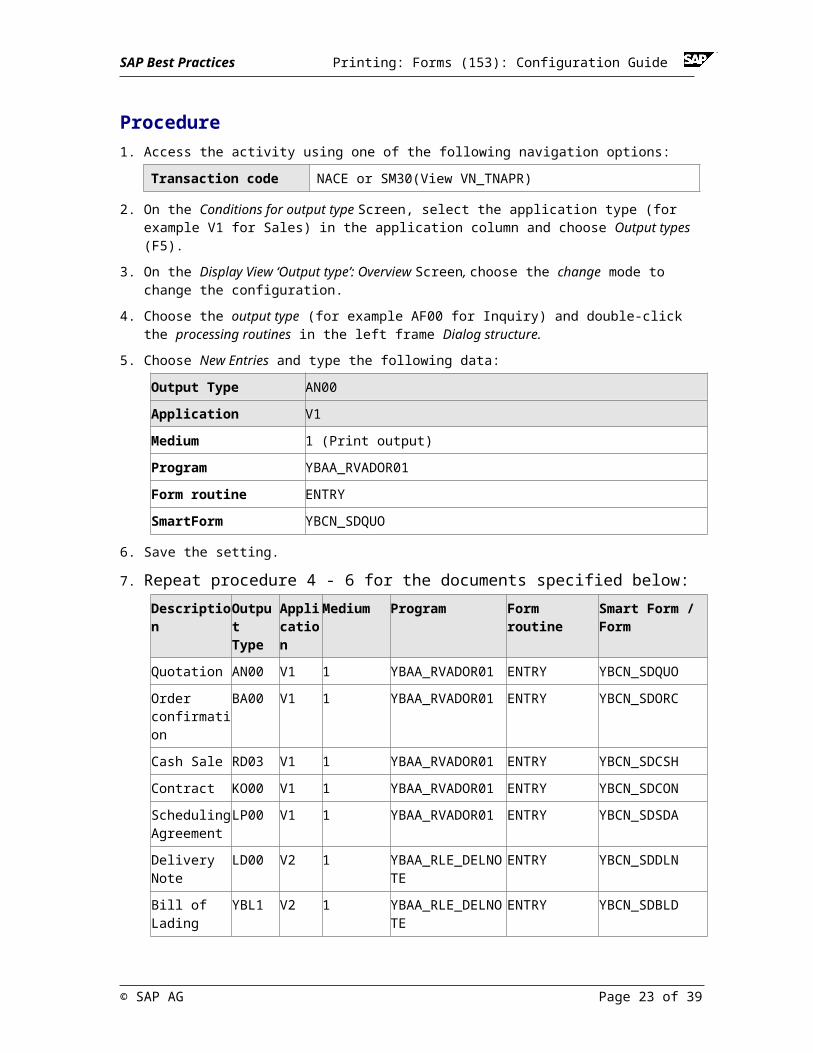
Procedure1. Access the activity using one of the following navigation options:
Transaction code NACE or SM30(View VN_TNAPR)
2. On the Conditions for output type Screen, select the application type (for example V1 for Sales) in the application column and choose Output types (F5).
3. On the Display View ‘Output type’: Overview Screen, choose the change mode to change the configuration.
4. Choose the output type (for example AF00 for Inquiry) and double-click the processing rou-tines in the left frame Dialog structure.
5. Choose New Entries and type the following data:
Output Type AN00
Application V1
Medium 1 (Print output)
Program YBAA_RVADOR01
Form routine ENTRY
SmartForm YBCN_SDQUO
6. Save the setting.
7. Repeat procedure 4 - 6 for the documents specified below:
Description Output Type
Appli-cation
Medium Program Form routine Smart Form / Form
Quotation AN00 V1 1 YBAA_RVADOR01 ENTRY YBCN_SDQUO
Order confir-mation
BA00 V1 1 YBAA_RVADOR01 ENTRY YBCN_SDORC
Cash Sale RD03 V1 1 YBAA_RVADOR01 ENTRY YBCN_SDCSH
Contract KO00 V1 1 YBAA_RVADOR01 ENTRY YBCN_SDCON
Scheduling Agreement
LP00 V1 1 YBAA_RVADOR01 ENTRY YBCN_SDSDA
Delivery NoteLD00 V2 1 YBAA_RLE_DEL-NOTE
ENTRY YBCN_SDDLN
Bill of Lading YBL1 V2 1 YBAA_RLE_DEL-NOTE
ENTRY YBCN_SDBLD
Sales InvoiceRD00 V3 1 YBAA_RLB_IN- ENTRY YBCN_SDINV
© SAP AG Page 17 of 31

SAP Best Practices Printing: Forms (153): Configuration Guide
VOICE
Quotation AN00 V1 2 YBAA_RVADOR01 ENTRY YBCN_SDQUO
Order confir-mation
BA00 V1 2 YBAA_RVADOR01 ENTRY YBCN_SDORC
Cash Sale RD03 V1 2 YBAA_RVADOR01 ENTRY YBCN_SDCSH
Contract KO00 V1 2 YBAA_RVADOR01 ENTRY YBCN_SDCON
Scheduling Agreement
LP00 V1 2 YBAA_RVADOR01 ENTRY YBCN_SDSDA
Delivery NoteLD00 V2 2 YBAA_RLE_DEL-NOTE
ENTRY YBCN_SDDLN
Bill of Lading YBL1 V2 2 YBAA_RLE_DEL-NOTE
ENTRY YBCN_SDBLD
Sales InvoiceRD00 V3 2 YBAA_RLB_IN-VOICE
ENTRY YBCN_SDINV
Direct MailingMAAK K1 1 RVCASM01 ENTRY YB_SD-CAS-MAIL (Form)
Export Decla-ration
FEEX V3 1 RVADAUS1 ENTRY_FEEX YB_EXPORT_EUDC
Cert. of Ori-gin EU
FECO V3 1 RVADAUS1 ENTRY_FECO YB_EXPORT_FECO
Pick List SD EK00 V4 1 YFSP_RVADEK01 ENTRY YBCN_SDPIL
ResultAfter processing these steps the SD Smart Forms configuration is set up in your system.
3.8.2 Assigning MM Forms
UseProcess these activities to configure the MM Smart Form.
Procedure1. Access the activity using one of the following navigation options:
Transaction code NACE
2. On the Conditions for output type Screen, select the application type (for example EA for Purchasing RFQ) in the application column and choose Output types (F5)
3. On the Display View ‘Output type’: Overview Screen, choose the change mode to change the configuration.
4. Choose the output type (for example NEU for RFQ) and double-click the processing routines in the left frame Dialog structure
5. Choose New Entries and type the following data:
© SAP AG Page 18 of 31

SAP Best Practices Printing: Forms (153): Configuration Guide
Output Type NEU
Application EA
Medium 1 (Print output)
Program YBAA_SAPFM06P
Form routine ENTRY_NEU
SmartForm YBCN_MMRFQ
6. Save the setting.
7. Repeat procedure 4 - 6 for the documents specified below:
Description Out-put Type
Appli-ca-tion
Medium
Program Form routine Smart Form / Form
RFQ NEU EA 1 YBAA_FM06P ENTRY_NEU YBCN_MM-RFQ
RFQ-Urging/Reminder
MAHN
EA 1 YBAA_FM06P ENTRY_MAHN
YBCN_MM-RFQ
RFQ-Quo rejection
ABSA EA 1 YBAA_FM06P ENTRY_ABSA YBCN_MM-RFQ
PO NEU EF 1 YBAA_FM06P ENTRY_NEU YBCN_MMPO
PO-Urging/Reminder
MAHN
EF 1 YBAA_FM06P ENTRY_MAHN
YBCN_MMPO
PO-Ack. Ex-pediter
AUFB EF 1 YBAA_FM06P ENTRY_AUFB YBCN_MMPO
Contract (Scheduling Agreement)
NEU EV 1 YBAA_FM06P ENTRY_NEU YBCN_MM-CON
Contract(SA)-Ack. Expe-diter
AUFB EV 1 YBAA_FM06P ENTRY_AUFB YBCN_MM-CON
Delivery Schedule
LPET EL 1 YBAA_FM06P ENTRY_LPET YBCN_MMDLS
DLS-Fore-cast
LPH2 EL 1 YBAA_FM06P ENTRY_LPHE_CD
YBCN_MMDLS
DLS-JIT LPJ2 EL 1 YBAA_FM06P ENTRY_LPJE_CD
YBCN_MMDLS
DLS-Urging/Reminder
LPMA EL 1 YBAA_FM06P ENTRY_LPMA
YBCN_MMDLS
Goods Re-ceipt Slip1
WE01 ME 1 YBAA_M07DR ENTRY_WE01
YBCN_MMGR1
Goods Re-ceipt Slip 2
WE02 ME 1 YBAA_M07DR ENTRY_WE02
YBCN_MMGR2
© SAP AG Page 19 of 31

SAP Best Practices Printing: Forms (153): Configuration Guide
Goods Re-ceipt Slip 3
WE03 ME 1 YBAA_M07DR ENTRY_WE03
YBCN_MMGR3
Goods Issue Slip1
WA01 ME 1 YBAA_M07DR ENTRY_WA01
YBCN_MMGI1
Goods Issue Slip 2
WA02 ME 1 YBAA_M07DR ENTRY_WA02
YBCN_MMGI2
Goods Issue Slip3
WA03 ME 1 YBAA_M07DR ENTRY_WA03
YBCN_MMGI3
Service En-try Sheet
NEU ES 1 YBAA_MMSER
ENTRY_NEW YBCN_MMSER
RFQ NEU EA 2 YBAA_FM06P ENTRY_NEU YBCN_MM-RFQ
RFQ-Urging/Reminder
MAHN
EA 2 YBAA_FM06P ENTRY_MAHN
YBCN_MM-RFQ
RFQ-Quo rejection
ABSA EA 2 YBAA_FM06P ENTRY_ABSA YBCN_MM-RFQ
PO NEU EF 2 YBAA_FM06P ENTRY_NEU YBCN_MMPO
PO-Urging/Reminder
MAHN
EF 2 YBAA_FM06P ENTRY_MAHN
YBCN_MMPO
PO-Ack. Ex-pediter
AUFB EF 2 YBAA_FM06P ENTRY_AUFB YBCN_MMPO
Contract (Scheduling Agreement)
NEU EV 2 YBAA_FM06P ENTRY_NEU YBCN_MM-CON
Contract(SA)-Ack. Expe-diter
AUFB EV 2 YBAA_FM06P ENTRY_AUFB YBCN_MM-CON
Delivery Schedule
LPET EL 2 YBAA_FM06P ENTRY_LPET YBCN_MMDLS
DLS-Fore-cast
LPH2 EL 2 YBAA_FM06P ENTRY_LPHE_CD
YBCN_MMDLS
DLS-JIT LPJ2 EL 2 YBAA_FM06P ENTRY_LPJE_CD
YBCN_MMDLS
DLS-Urging/Reminder
LPMA EL 2 YBAA_FM06P ENTRY_LPMA
YBCN_MMDLS
Goods Re-ceipt Slip1
WE01 ME 2 YBAA_M07DR ENTRY_WE01
YBCN_MMGR1
Goods Re-ceipt Slip 2
WE02 ME 2 YBAA_M07DR ENTRY_WE02
YBCN_MMGR2
Goods Re-ceipt Slip 3
WE03 ME 2 YBAA_M07DR ENTRY_WE03
YBCN_MMGR3
Goods Issue Slip1
WA01 ME 2 YBAA_M07DR ENTRY_WA01
YBCN_MMGI1
© SAP AG Page 20 of 31

SAP Best Practices Printing: Forms (153): Configuration Guide
Goods Issue Slip 2
WA02 ME 2 YBAA_M07DR ENTRY_WA02
YBCN_MMGI2
Goods Issue Slip3
WA03 ME 2 YBAA_M07DR ENTRY_WA03
YBCN_MMGI3
Service En-try Sheet
NEU ES 2 YBAA_MMSER
ENTRY_NEW YBCN_MMSER
3.8.3 Assigning Forms (Layout Sets) for Print Reports
UseProcess these activities to configure the MM SAP Script Forms.
Procedure1. Access the activity using one of the following navigation options:
Transaction Code OMBU
IMG Menu Materials Management Inventory Management and Physical Inventory Print Control Assign Forms (Layout Sets) for Print Reports
2. On the ‘Change View: Layout Set Versions: Overview’ screen, select the line with the follow-ing entry:
Report Report Title Version P Act
RM07IDRU Print Physical Inventory Document 4 X
3. Choose Details.
4. On the Change View: Layout Set Versions: Details screen, make the following entry:
Form
YB_INVENT
5. Save your setting.
3.9 Assigning FI Forms and Text Modules
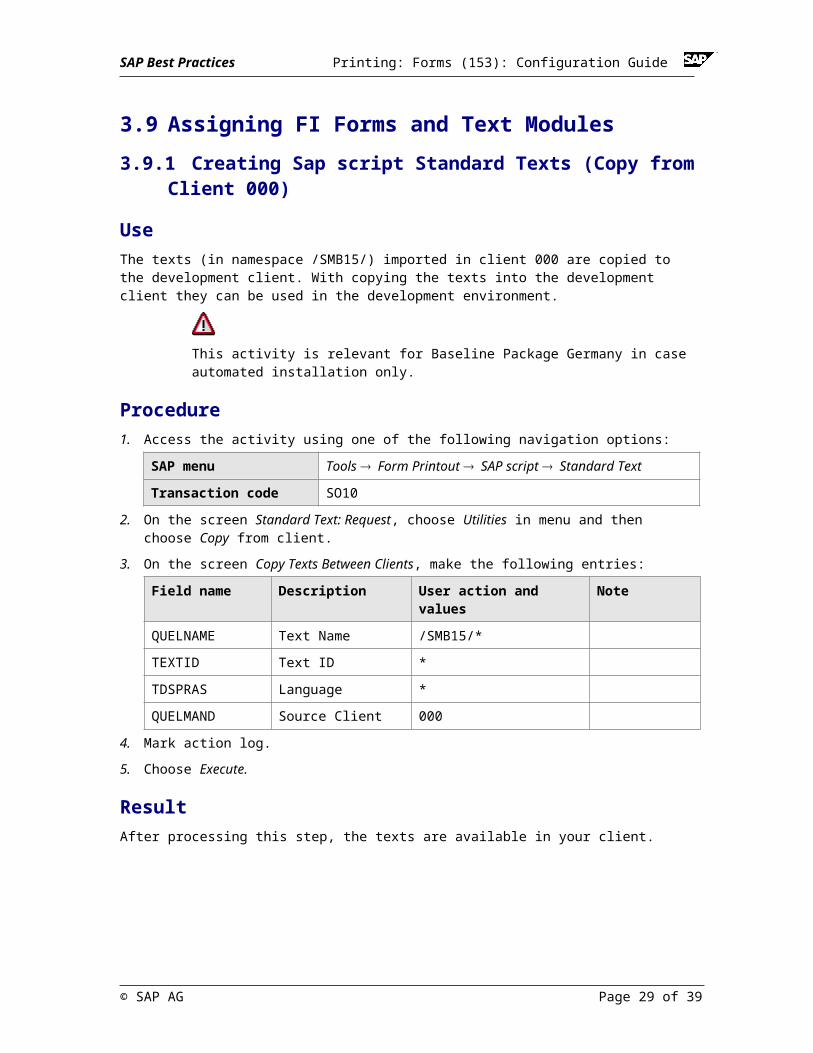
3.9.1 Creating Sap script Standard Texts (Copy from Client 000)
UseThe texts (in namespace /SMB15/) imported in client 000 are copied to the development client. With copying the texts into the development client they can be used in the development environ-ment.
© SAP AG Page 21 of 31

SAP Best Practices Printing: Forms (153): Configuration Guide
This activity is relevant for Baseline Package Germany in case automated installation only.
Procedure1. Access the activity using one of the following navigation options:
SAP menu Tools Form Printout SAP script Standard Text
Transaction code SO10
2. On the screen Standard Text: Request, choose Utilities in menu and then choose Copy from client.
3. On the screen Copy Texts Between Clients, make the following entries:
Field name Description User action and values Note
QUELNAME Text Name /SMB15/*
TEXTID Text ID *
TDSPRAS Language *
QUELMAND Source Client 000
4. Mark action log.
5. Choose Execute.
ResultAfter processing this step, the texts are available in your client.
3.9.2 Dunning Form
3.9.2.1 Assigning Forms for Interest Indicators
Use
In this step, you can specify which form is to be used for the letter on interest on arrears or ac-count balance interest for each interest indicator. The forms defined here are used if no other form is specified when calculating interest.
Procedure1. Access the activity using one of the following navigation options:
Transaction code V_T056D (SM30)
IMG menu Financial Accounting (new) Accounts Receivable and Ac-counts Payable Business Transactions Interest Calcula-tion Print Assign Forms for Interest Indicators
2. On the Change View: Forms for Interest Calculation: Overview screen, choose New Entries.
Int.ind. CoCd Form Type Form Name
© SAP AG Page 22 of 31
SAP Best Practices Printing: Forms (153): Configuration Guide
01 <company code> SAPSCRIPT YB_F_DUZI_01
3. Save your settings.
3.9.2.2 Form selection f. legal dunning proceed
Use
In this step, you can specify reference data for the dunning procedure.
Procedure1. Access the activity using one of the following navigation options:
Transaction code FBMP
IMG menu Financial Accounting (New) Accounts Receivable and Ac-counts Payable Business Transactions Business Transac-tions Dunning Dunning Procedure Define Dunning Pro-cedures
2. On the Maintain Dunning Procedure: List screen, choose procedure 0001.
3. On the Maintain Dunning Procedure: Overview screen, make the following entries
Field name Description User action and values Note
Ref. Dunning Proce-dure for texts
0001
4. Select back.
5. On the Maintain Dunning Procedure: List screen, choose procedure YB30.
6. On the Maintain Dunning Procedure: Overview screen, make the following entries
Field name Description User action and values Note
Ref. Dunning Proce-dure for texts
YB30
7. Save your entries.
3.9.2.3 Defining Dunning Procedure - Form Selection f. Dun-ning Notices
Use
In this step, you can specify the form selection for the dunning procedure.
Procedure1. Access the activity using one of the following navigation options:
Transaction code FBMP
© SAP AG Page 23 of 31

SAP Best Practices Printing: Forms (153): Configuration Guide
IMG Menu Financial Accounting (New) Accounts Receivable and Ac-counts Payable Business Transactions Business Transac-tions Dunning Dunning Procedure Define Dunning Pro-cedures
2. On the Maintain Dunning Procedure: List screen, choose procedure 0001.
3. On the Maintain Dunning Procedure: Overview screen, choose dunning texts.
4. n the dialog box, choose company code 1000.
5. Choose Continue.
6. On the Maintain Dunning Procedure: Dunning texts screen, make the following entries
Normal dunning procedure Form
1 YBCN_FIMA
2 YBCN_FIMA
3 YBCN_FIMA
4 YBCN_FIMA
7. Select back.
8. Select back.
9. On the Maintain Dunning Procedure: List screen, choose procedure YB30.
10. On the Maintain Dunning Procedure: Overview screen, choose dunning texts.
11. In the dialog box, choose company code 1000.
12. Choose Continue.
13. On the Maintain Dunning Procedure: Dunning texts screen, make the following entries
Normal dunning procedure Form
1 YBCN_FIMA
14. Save your entries.
3.9.2.4 Defining Sender Details for Dunning Forms
UseProcess this activity to assign the text modules used for dunning notices / interest calculations to your company code.
Procedure1. Access the activity using one of the following navigation options:
Transaction code V_T047I (SM30)
IMG menu Financial Accounting Accounts Receivable and accounts payable Business Transactions Dunning Printout De-fine Sender Details for Dunning Forms
2. On the Determine Work Area: Entry screen enter the company code and choose Enter.
© SAP AG Page 24 of 31

SAP Best Practices Printing: Forms (153): Configuration Guide
3. Make the following entries:
SF Header Text SF Footer SF Sender SF Greeting Text
YBCN_HEAD1 YBCN_FOOTER YBCN_ADR1 YBCN_GRUSS
4. Save your settings.
3.9.3 Defining Form Names for Correspondence Print
Use
In this activity, you define the names of the forms, which are to be used for printing the correspon-dence in FI (SAP Script Forms).
Procedure1. Access the activity using one of the following navigation options:
Transaction code V_001F_B (SM30)
IMG menu Financial Accounting Financial Accounting Global Settings Correspondence SAPscript-Based Forms Define Form Names for Correspondence Print
2. On the Change View: Forms for Correspondence screen choose New Entries:
CoCd Program Fo.ID Form
no entry required RFKORD00 YB_F140_PAY_CONF
no entry required RFKORD10 YBCN_ACC_STAT
no entry required RFKORD30 YB_F140_INT_DOCU
no entry required RFKORD40 YB_F140_IND_TEXT
no entry required RFKORD80 YB_F140_CASH_DOC
no entry required SAPF130D YB_F130_CONFIRM
no entry required SAPF130D ER YB_F130_ERROR_02
no entry required SAPF130D LI YB_F130_LIST_02
no entry required SAPF130D RE YB_F130_RESULT02
no entry required SAPF130K YB_F130_CONFIRM
no entry required SAPF130K ER YB_F130_ERROR_02
no entry required SAPF130K LI YB_F130_LIST_02
no entry required SAPF130K RE YB_F130_RESULT02
no entry required SAPF130D YB_F130_CONFIRM
no entry required SAPF130D ER YB_F130_ERROR_02
no entry required SAPF130D LI YB_F130_LIST_02
no entry required SAPF130D RE YB_F130_RESULT02
no entry required SAPF130K YB_F130_CONFIRM
© SAP AG Page 25 of 31

SAP Best Practices Printing: Forms (153): Configuration Guide
no entry required SAPF130K ER YB_F130_ERROR_02
no entry required SAPF130K LI YB_F130_LIST_02
no entry required SAPF130K RE YB_F130_RESULT02
3. Save your settings.
3.9.4 Defining Form Check Deposit
Use
In this step you specify a form for the check deposit list.
Procedure1. Access the activity using one of the following navigation options:
Transaction code OT54
IMG menu Financial Accounting (New) Bank Accounting Business Transactions Check Deposit Define Forms
2. On the Change View ‘Manual Check Deposit Firms’: Overview screen, make the following en-tries
Field name Description User action and values Note
SAP script Form YB_F_M40S_CHEQUE
3. Save your entries.
3.9.5 Setting up Paying Company Codes for Payment Trans-actions – Forms
Use
In this activity, you make the Forms and sender details for advice notes and EDI accompanying sheets. If you wish to print payment advice notes or an EDI accompanying sheet, specify the form name. Specify also the SAP script text modules that contain details about the sender that are to be printed on the payment advice note. You can go directly from this transaction to the transac-tion for editing forms and text modules.
Procedure1. Access the activity using one of the following navigation options:
Transaction code SPRO
IMG menu Financial Accounting (New) Accounts Receivable and Ac-counts Payable Business Transactions Outgoing Payments Automatic Outgoing Payments Payment Method/Bank Se-lection for Payment Program Set Up Paying Company Codes for Payment Transactions
© SAP AG Page 26 of 31

SAP Best Practices Printing: Forms (153): Configuration Guide
2. On the Change View ‘Paying Company Codes’: Overview screen, select Company Code 1000.
3. On the Change View ‘Paying Company Codes’: Details screen, choose Sender Details and make the following entries
Field name Description User action and values Note
Text ID ADRS
Letter header ADRS_HEADER
Footer ADRS_FOOTER
Signature text ADRS_SIGNATURE
Sender ADRS_SENDER
4. Save your entries.
3.9.6 Setting up Payment Methods per Company Code for Payment Transact – Forms
Use
In this activity, you make the Forms and sender details for advice notes and EDI accompanying sheets. If you wish to print payment advice notes or an EDI accompanying sheet, specify the form name. Specify also the SAP script text modules that contain details about the sender that are to be printed on the payment advice note. You can go directly from this transaction to the transac-tion for editing forms and text modules.
Procedure1. Access the activity using one of the following navigation options:
Transaction code SPRO
IMG menu Financial Accounting (New) Accounts Receivable and Ac-counts Payable Business Transactions Outgoing Payments Automatic Outgoing Payments Payment Method/Bank Se-lection for Payment Program Set Up Payment Methods per Company Code for Payment Transactions
2. On the Change View ‘Maintenance of Company Code Data for a Payment Method’: Overview screen, select Company Code 1000 and Payment Method C.
3. On the Change View ‘Maintenance of Company Code Data for a Payment Method’: C screen, select Form Data and make the following entries
Field name Description User action and values Note
Form the Payment Medium
4. Choose Back.
5. On the Change View ‘Maintenance of Company Code Data for a Payment Method’: Overview screen, select Company Code 1000 and Payment Method I.
© SAP AG Page 27 of 31

SAP Best Practices Printing: Forms (153): Configuration Guide
6. On the Change View ‘Maintenance of Company Code Data for a Payment Method’: I screen, select Form Data and make the following entries
Field name Description User action and values Note
Next form F110_IN_CHECK
7. Choose Back.
8. On the Change View ‘Maintenance of Company Code Data for a Payment Method’: Overview screen, select Company Code 1000 and Payment Method U.
9. On the Change View ‘Maintenance of Company Code Data for a Payment Method’: U screen, select Form Data and make the following entries
Field name Description User action and values Note
Next form
10. Choose Back.
11. Save your entries.
3.9.7 Defining Sender Details for Correspondence Form
Use
In this activity, you define which texts are to be used in the letter window and the signature line for each company code. This applies to the following:
letter header
letter footer
sender address
Procedure1. Access the activity using one of the following navigation options:
Transaction code SPRO
IMG menu Financial Accounting (New) General Ledger Accounting (New) Business Transactions Correspondence: Internal Document Make and Check Settings for Correspondence Define Sender Details for Correspondence Form
2. On the Change View ‘Sender Details For Correspondence’’: Overview screen, choose New Entries.
3. On the New Entries: Details of Added Entries screen make the following entries
Field name Description User action and values Note
Company Code 1000
Program Name RFKORD00
Text-ID ADRS
© SAP AG Page 28 of 31
SAP Best Practices Printing: Forms (153): Configuration Guide
Field name Description User action and values Note
Standard Texts
Header Text
ADRS_HEADER
Standard Texts
Footer text
ADRS_FOOTER
Standard Texts
Signature text
ADRS_SIGNATURE
Sender ADRS_SENDER
4. Choose Next Entries.
5. On the New Entries: Details of Added Entries screen make the following entries
Field name Description User action and values Note
Company Code 1000
Program Name RFKORD10
Text-ID ADRS
Standard Texts
Header Text
ADRS_HEADER
Standard Texts
Footer text
ADRS_FOOTER
Standard Texts
Signature text
ADRS_SIGNATURE
Sender ADRS_SENDER
6. Choose Next Entries.
7. On the New Entries: Details of Added Entries screen make the following entries
Field name Description User action and values Note
Company Code 1000
Program Name RFKORD40
Text-ID ADRS
Standard Texts
Header Text
ADRS_HEADER
Standard Texts
Footer text
ADRS_FOOTER
Standard Texts
Signature text
ADRS_SIGNATURE
Sender ADRS_SENDER
© SAP AG Page 29 of 31

SAP Best Practices Printing: Forms (153): Configuration Guide
8. Choose Next Entries.
9. On the New Entries: Details of Added Entries screen make the following entries
Field name Description User action and values Note
Company Code 1000
Program Name RFKORD80
Text-ID ADRS
Standard Texts
Header Text
ADRS_HEADER
Standard Texts
Footer text
ADRS_FOOTER
Standard Texts
Signature text
ADRS_SIGNATURE
Sender ADRS_SENDER
10. Choose Next Entries.
11. On the New Entries: Details of Added Entries screen make the following entries
Field name Description User action and values Note
Company Code 1000
Program Name SAPF130D
Text-ID ADRS
Standard Texts
Header Text
ADRS_HEADER
Standard Texts
Footer text
ADRS_FOOTER
Standard Texts
Signature text
ADRS_SIGNATURE
Sender ADRS_SENDER
12. Choose Next Entries.
13. On the New Entries: Details of Added Entries screen make the following entries
Field name Description User action and values Note
Company Code 1000
Program Name SAPF130K
Text-ID ADRS
Standard Texts
Header Text
ADRS_HEADER
© SAP AG Page 30 of 31

SAP Best Practices Printing: Forms (153): Configuration Guide
Standard Texts
Footer text
ADRS_FOOTER
Standard Texts
Signature text
ADRS_SIGNATURE
Sender ADRS_SENDER
14. Save your entries.
© SAP AG Page 31 of 31


