17238029/B-10024-9 INTRODUCTION Thank you for selecting the Tsurumi UZ Submersible Sewage & Wastewater Pumps. This equipment should not be used for applications other than those listed in this manual. Failure to observe this precaution may lead to a malfunction or an accident. In the event of a malfunction or an accident, the manufacturer will not assume any liability. After reading this Operation Manual, keep it in a location that is easily accessible, so that it can be referred to whenever information is needed while operating the equipment. CONTENTS 1. BE SURE TO READ FOR SAFETY ................................ 1 2. PART NAMES.................................................................. 4 3. PRIOR TO OPERATION ............................................... 4 4. INSTALLATION ............................................................. 5 5. ELECTRICAL WIRING .................................................... 8 6. OPERATION.................................................................... 11 7. MAINTENANCE AND INSPECTION ............................... 14 8. DISASSEMBLY AND REASSEMBLY PROCEDURE ...... 16 9. TROUBLESHOOTING .................................................. 17 TSURUMI MANUFACTURING CO., LTD. Submersible Sewage & Wastewater Pumps OPERATION MANUAL with Vortex Impeller UZ Series
Transcript
17238029/B-10024-9
INTRODUCTIONThank you for selecting the Tsurumi UZ Submersible Sewage & Wastewater Pumps.This equipment should not be used for applications other than those listed in this manual. Failure to observe this precaution may lead to a malfunction or an accident. In the event of a malfunction or an accident, the manufacturer will not assume any liability. After reading this Operation Manual, keep it in a location that is easily accessible, so that it can be referred to whenever information is needed while operating the equipment.
CONTENTS1. BE SURE TO READ FOR SAFETY ................................ 12. PART NAMES.................................................................. 43. PRIOR TO OPERATION ............................................... 44. INSTALLATION ............................................................. 55. ELECTRICAL WIRING .................................................... 86. OPERATION .................................................................... 117. MAINTENANCE AND INSPECTION ............................... 148. DISASSEMBLY AND REASSEMBLY PROCEDURE ...... 169. TROUBLESHOOTING .................................................. 17
TSURUMI MANUFACTURING CO., LTD.
Submersible Sewage & Wastewater Pumps
OPERATION MANUALwith Vortex Impeller
UZ Series
-1-
:The mark indicates an action that must be taken, or instructs how to perform a task. The symbol inside the mark describes the precaution in more detail ("provide ground work", in the case of the example on the left).
:The mark indicates a WARNING or CAUTION item. The symbol inside the mark describes the precaution in more detail ("electrical shock", in the case of the example on the left).
●
: Operating the equipment improperly by failing to observe this precaution may possibly cause injury to humans and other physical damage.
: Operating the equipment improperly by failing to observe this precaution may possibly lead to death or injury to humans.
: Gives information that does not fall in the WARNING or CAUTION categories.●
:The mark indicates a prohibited action. The symbol inside the mark, or a notation in the vicinity of the mark describes the precaution in more detail ("disassembly prohibited", in the case of the example on the left).
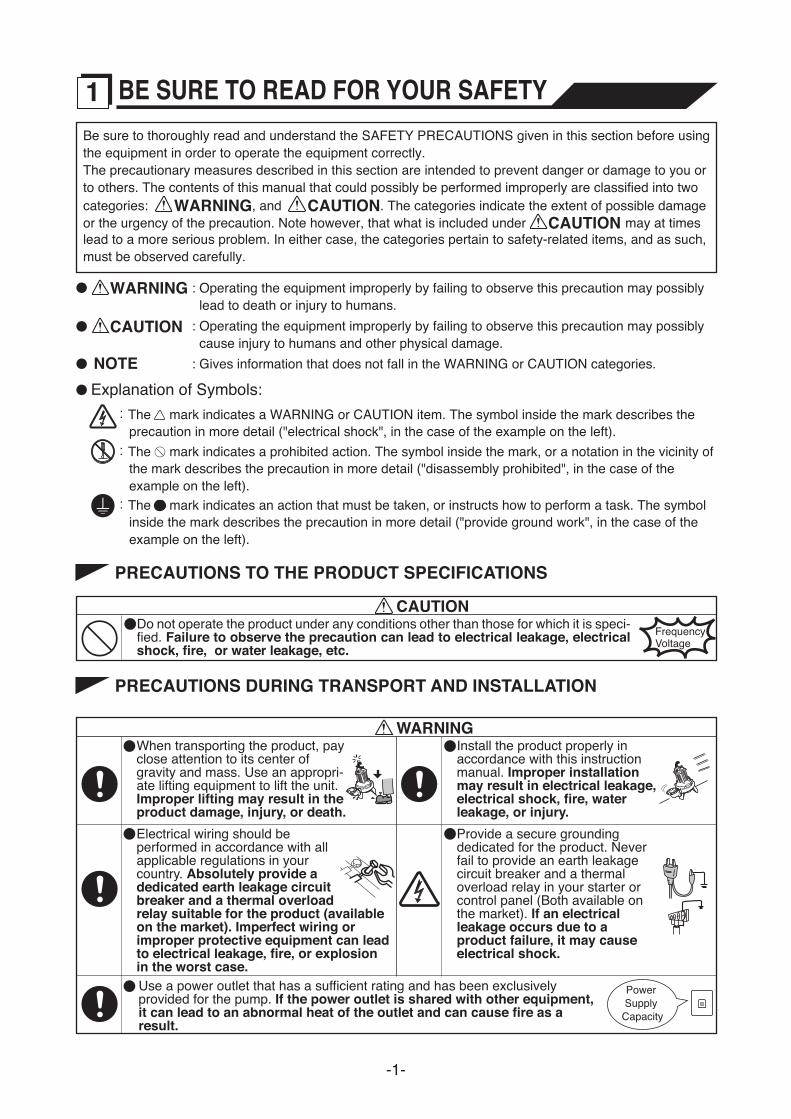
Be sure to thoroughly read and understand the SAFETY PRECAUTIONS given in this section before using the equipment in order to operate the equipment correctly.The precautionary measures described in this section are intended to prevent danger or damage to you or to others. The contents of this manual that could possibly be performed improperly are classified into two categories: WARNING, and CAUTION. The categories indicate the extent of possible damage or the urgency of the precaution. Note however, that what is included under CAUTION may at times lead to a more serious problem. In either case, the categories pertain to safety-related items, and as such, must be observed carefully.
WARNING
CAUTION
NOTEExplanation of Symbols:
1 BE SURE TO READ FOR YOUR SAFETY
PRECAUTIONS TO THE PRODUCT SPECIFICATIONS
PRECAUTIONS DURING TRANSPORT AND INSTALLATION
Do not operate the product under any conditions other than those for which it is speci-fied. Failure to observe the precaution can lead to electrical leakage, electrical shock, fire, or water leakage, etc.
CAUTIONFrequencyVoltage
WARNINGWhen transporting the product, pay close attention to its center of gravity and mass. Use an appropri-ate lifting equipment to lift the unit. Improper lifting may result in the product damage, injury, or death.Electrical wiring should be performed in accordance with all applicable regulations in your country. Absolutely provide a dedicated earth leakage circuit breaker and a thermal overload relay suitable for the product (available on the market). Imperfect wiring or improper protective equipment can lead to electrical leakage, fire, or explosion in the worst case.
Install the product properly in accordance with this instruction manual. Improper installation may result in electrical leakage, electrical shock, fire, water leakage, or injury.Provide a secure grounding dedicated for the product. Never fail to provide an earth leakage circuit breaker and a thermal overload relay in your starter or control panel (Both available on the market). If an electrical leakage occurs due to a product failure, it may cause electrical shock.
Power Supply Capacity
Use a power outlet that has a sufficient rating and has been exclusively provided for the pump. If the power outlet is shared with other equipment, it can lead to an abnormal heat of the outlet and can cause fire as a result.
-2-
PRECAUTIONS DURING TEST OPERATION AND OPERATION
CAUTION
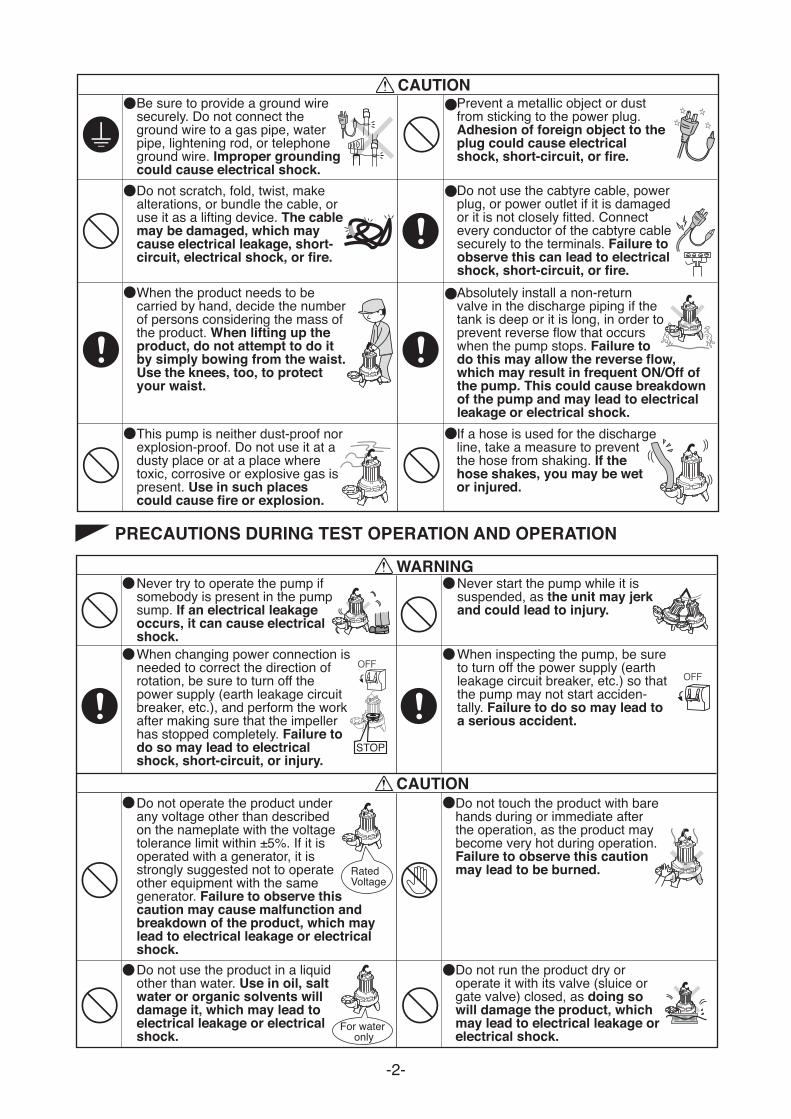
Do not scratch, fold, twist, make alterations, or bundle the cable, or use it as a lifting device. The cable may be damaged, which may cause electrical leakage, short-circuit, electrical shock, or fire.
When the product needs to be carried by hand, decide the number of persons considering the mass of the product. When lifting up the product, do not attempt to do it by simply bowing from the waist. Use the knees, too, to protect your waist.
Be sure to provide a ground wire securely. Do not connect the ground wire to a gas pipe, water pipe, lightening rod, or telephone ground wire. Improper grounding could cause electrical shock.
This pump is neither dust-proof nor explosion-proof. Do not use it at a dusty place or at a place where toxic, corrosive or explosive gas is present. Use in such places could cause fire or explosion.
If a hose is used for the discharge line, take a measure to prevent the hose from shaking. If the hose shakes, you may be wet or injured.
Absolutely install a non-return valve in the discharge piping if the tank is deep or it is long, in order to prevent reverse flow that occurs when the pump stops. Failure to do this may allow the reverse flow, which may result in frequent ON/Off of the pump. This could cause breakdown of the pump and may lead to electrical leakage or electrical shock.
Do not use the cabtyre cable, power plug, or power outlet if it is damaged or it is not closely fitted. Connect every conductor of the cabtyre cable securely to the terminals. Failure to observe this can lead to electrical shock, short-circuit, or fire.
Prevent a metallic object or dust from sticking to the power plug. Adhesion of foreign object to the plug could cause electrical shock, short-circuit, or fire.
CAUTION
WARNING Never try to operate the pump if somebody is present in the pump sump. If an electrical leakage occurs, it can cause electrical shock. When changing power connection is needed to correct the direction of rotation, be sure to turn off the power supply (earth leakage circuit breaker, etc.), and perform the work after making sure that the impeller has stopped completely. Failure to do so may lead to electrical shock, short-circuit, or injury.
Never start the pump while it is suspended, as the unit may jerk and could lead to injury.
When inspecting the pump, be sure to turn off the power supply (earth leakage circuit breaker, etc.) so that the pump may not start acciden-tally. Failure to do so may lead to a serious accident.
Do not operate the product under any voltage other than described on the nameplate with the voltage tolerance limit within ±5%. If it is operated with a generator, it is strongly suggested not to operate other equipment with the same generator. Failure to observe this caution may cause malfunction and breakdown of the product, which may lead to electrical leakage or electrical shock.
Do not touch the product with bare hands during or immediate after the operation, as the product may become very hot during operation. Failure to observe this caution may lead to be burned.
Do not use the product in a liquid other than water. Use in oil, salt water or organic solvents will damage it, which may lead to electrical leakage or electrical shock.
Do not run the product dry or operate it with its valve (sluice or gate valve) closed, as doing so will damage the product, which may lead to electrical leakage or electrical shock.
For water only
Rated Voltage
OFF OFF
STOP
-3-
PRECAUTIONS DURING MAINTENANCE AND INSPECTION
CAUTION
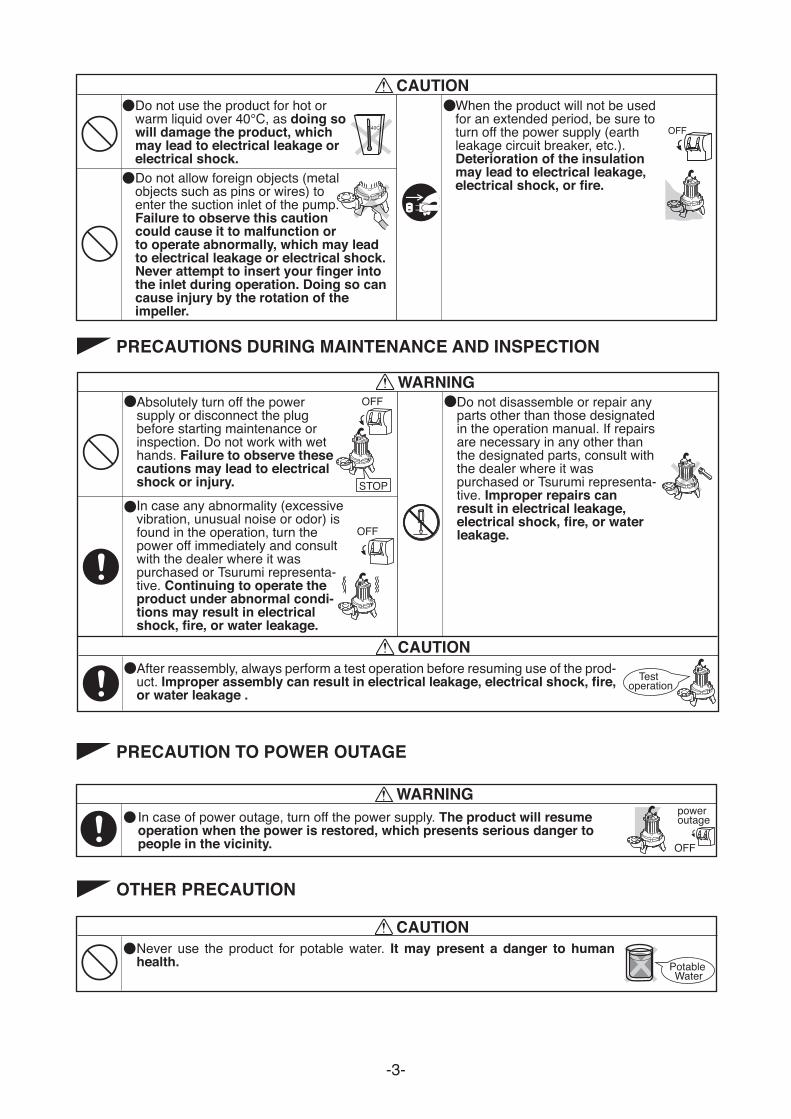
WARNINGAbsolutely turn off the power supply or disconnect the plug before starting maintenance or inspection. Do not work with wet hands. Failure to observe these cautions may lead to electrical shock or injury.
After reassembly, always perform a test operation before resuming use of the prod-uct. Improper assembly can result in electrical leakage, electrical shock, fire, or water leakage .
In case any abnormality (excessive vibration, unusual noise or odor) is found in the operation, turn the power off immediately and consult with the dealer where it was purchased or Tsurumi representa-tive. Continuing to operate the product under abnormal condi-tions may result in electrical shock, fire, or water leakage.
Do not disassemble or repair any parts other than those designated in the operation manual. If repairs are necessary in any other than the designated parts, consult with the dealer where it was purchased or Tsurumi representa-tive. Improper repairs can result in electrical leakage, electrical shock, fire, or water leakage.
Test operation
STOP
OFF
OFF
PRECAUTION TO POWER OUTAGE
In case of power outage, turn off the power supply. The product will resume operation when the power is restored, which presents serious danger to people in the vicinity.
WARNINGpower outage
OFF
OTHER PRECAUTION
CAUTIONNever use the product for potable water. It may present a danger to human health. Potable
Water
CAUTION
Do not allow foreign objects (metal objects such as pins or wires) to enter the suction inlet of the pump. Failure to observe this caution could cause it to malfunction or to operate abnormally, which may lead to electrical leakage or electrical shock.Never attempt to insert your finger into the inlet during operation. Doing so can cause injury by the rotation of the impeller.
Do not use the product for hot or warm liquid over 40℃, as doing so will damage the product, which may lead to electrical leakage or electrical shock.
When the product will not be used for an extended period, be sure to turn off the power supply (earth leakage circuit breaker, etc.). Deterioration of the insulation may lead to electrical leakage, electrical shock, or fire.
OFF
-4-
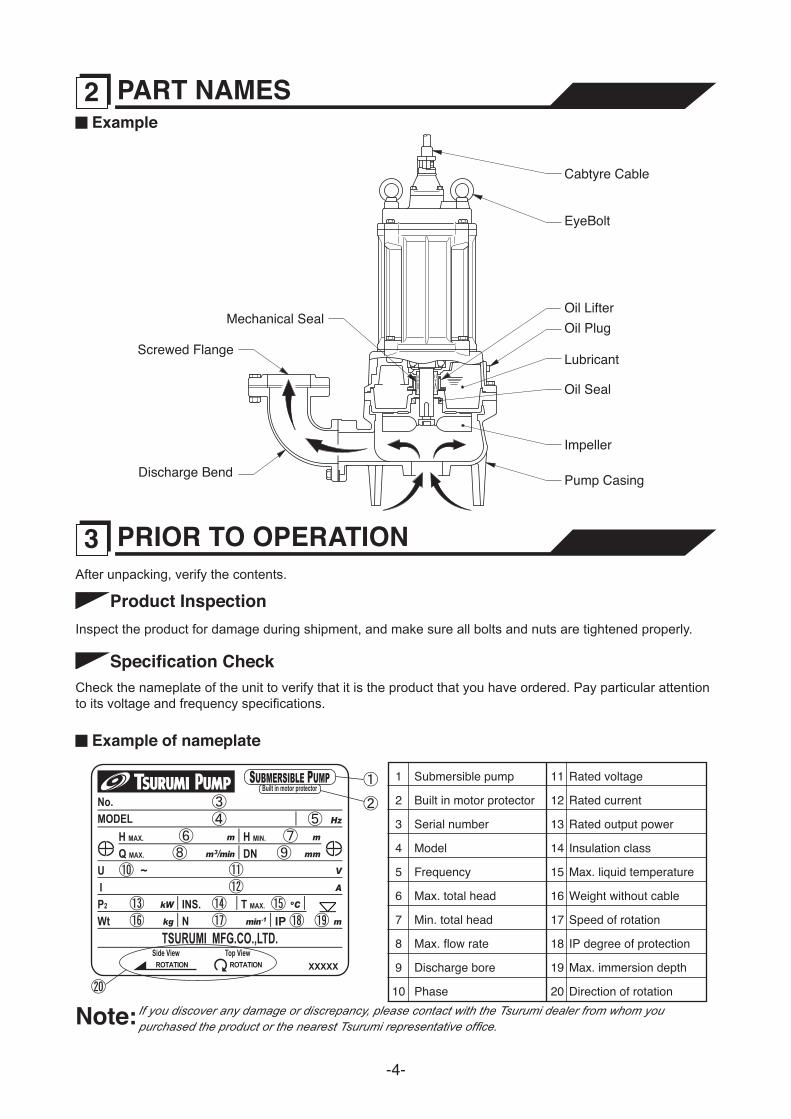
2 PART NAMES
After unpacking, verify the contents.
Product InspectionInspect the product for damage during shipment, and make sure all bolts and nuts are tightened properly.
Specification CheckCheck the nameplate of the unit to verify that it is the product that you have ordered. Pay particular attention to its voltage and frequency specifications.
Example
Discharge Bend
Screwed Flange
Mechanical SealOil LifterOil Plug
Lubricant
Pump Casing
Oil Seal
Impeller
EyeBolt
Cabtyre Cable
3 PRIOR TO OPERATION
If you discover any damage or discrepancy, please contact with the Tsurumi dealer from whom you purchased the product or the nearest Tsurumi representative off ce.Note:
Example of nameplate
1
2
3
4
5
6
7
8
9
10
11Submersible pump
Built in motor protector
Serial number
Model
Frequency
Max. total head
Min. total head
Max. flow rate
Discharge bore
Phase
Rated voltage
12
13
14
15
16
17
18
19
20
Rated current
Rated output power
Insulation class
Max. liquid temperature
Weight without cable
Speed of rotation
IP degree of protection
Max. immersion depth
Direction of rotation
-5-
Accessory CheckVerify that all accessory items are included in the package.
If you discover any damage or discrepancy in the product, please contact the dealer where this equipment was purchased or the Tsurumi sales off ce in your area.
Note:
Bend Type • Discharge Bend (with bolts and packings) ..................................1 set • Screwed Flange (with bolts and packings) ..................................1 set • Operation Manual .........................................................................1
Guide-Rail Type • Guide Support (with bolts) .............................................................1 set • Duck-Foot Bend (with bolts) ..........................................................1 set • Guide Hook (with bolts) .................................................................1 set • Chain for lifting up/down the pump (with shackle) .........................1 set • Guide Connector (with bolts) .........................................................1 set • Screwed Flange *1 ........................................................................1 set • Operation Manual ..........................................................................1 *1 : Some of the models are not provided.Foundation Bolts are not provided.
Product Specifications Do not operate this product under any conditions other than those that
have been specified. Failure to observe this precaution can lead to electrical shock, electrical leakage, fire, water leakage or other problems.
CAUTION Major Standard Specifications
Fluid Property Waste water, sewage, and liquid carrying waste and solid matters ; 0 ~ 40℃
PumpImpeller Vortex typeShaft Seal Double Mechanical Seal Bearing Shielded Ball BearingSpecifications Dry type Submersible Induction Motor, 4-PoleInsulation Class E, and F
Protection System (built-in)
Circle thermal protector (7.5kW max.)Miniature protector (11kW,and some models with 5.5kW and 7.5kW)Turbine oil VG32 (non-additive)Lubricant
Discharge ConnectionSpecial screwed flange (only for Bend Type of 1.5kW withdischarge φ50mm)JIS 10K flange
Motor
• Do not use the pump for pumping liquids other than water, such as oil, salt water, or organic solvents.
• Use with a power supply voltage tolerance within ± 5% of the rated voltage. • The water temperature for operating the pump should be between 0 ~ 40℃. Failure to observe the precautions given above could cause the pump to
malfunction, which may lead to current leakage or electrical shock.
CAUTION
Critical Use Pressure Do not operate the pump in an area that is exposed to a water pressure that
exceeds the values given below.CAUTION
To use the pump for a special solution, contact the dealer where it was purchased, or the Tsurumi sales of-f ce in your area.
Note:
Models with output of 7.5kW or under 0.3MPa(3kgf/cm2) − discharge pressure during useModels with output of 11kW 0.4MPa(4kgf/cm2) − discharge pressure during use
Applicable Pump Critical Use Pressure
4 INSTALLATION
-6-
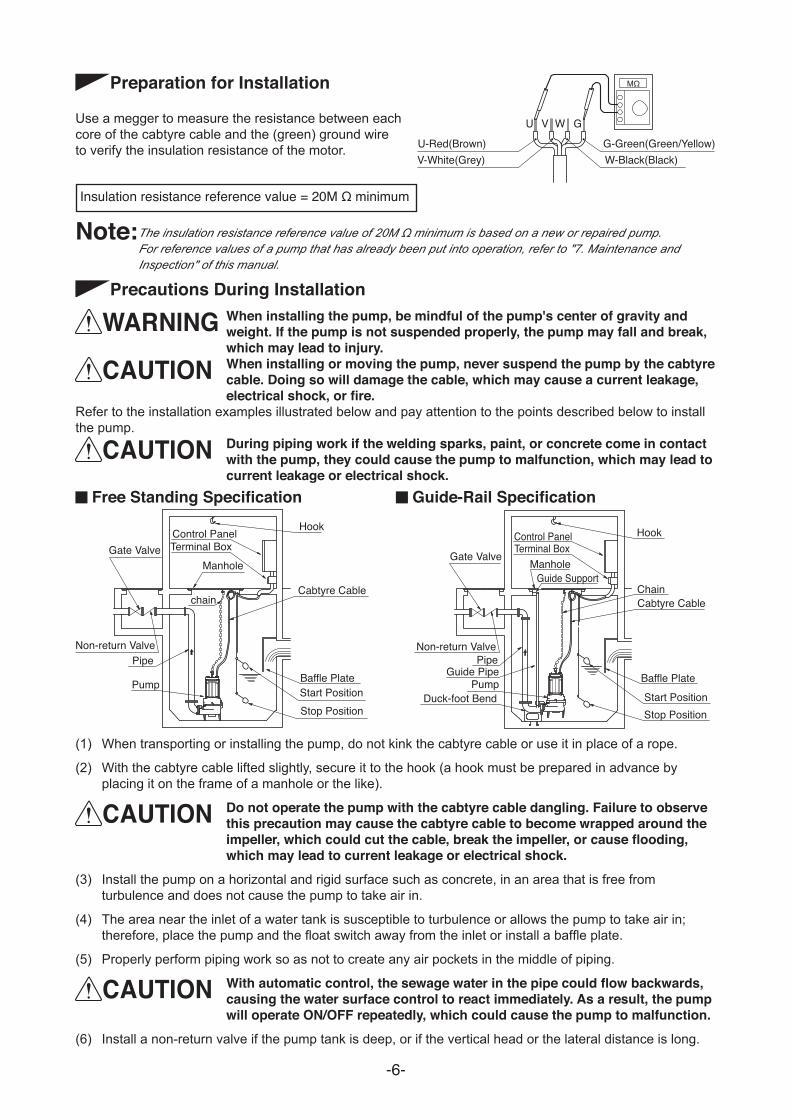
Preparation for Installation
The insulation resistance reference value of 20M Ω minimum is based on a new or repaired pump. For reference values of a pump that has already been put into operation, refer to "7. Maintenance and Inspection" of this manual.
Note:
Use a megger to measure the resistance between each core of the cabtyre cable and the (green) ground wire to verify the insulation resistance of the motor. U-Red(Brown)
Insulation resistance reference value = 20M Ω minimum
Precautions During Installation When installing the pump, be mindful of the pump's center of gravity and
weight. If the pump is not suspended properly, the pump may fall and break, which may lead to injury.
When installing or moving the pump, never suspend the pump by the cabtyre cable. Doing so will damage the cable, which may cause a current leakage, electrical shock, or fire.
Refer to the installation examples illustrated below and pay attention to the points described below to install the pump. During piping work if the welding sparks, paint, or concrete come in contact
with the pump, they could cause the pump to malfunction, which may lead to current leakage or electrical shock.
(1) When transporting or installing the pump, do not kink the cabtyre cable or use it in place of a rope.
(2) With the cabtyre cable lifted slightly, secure it to the hook (a hook must be prepared in advance by placing it on the frame of a manhole or the like).
Do not operate the pump with the cabtyre cable dangling. Failure to observe this precaution may cause the cabtyre cable to become wrapped around the impeller, which could cut the cable, break the impeller, or cause flooding, which may lead to current leakage or electrical shock.
(3) Install the pump on a horizontal and rigid surface such as concrete, in an area that is free from turbulence and does not cause the pump to take air in.
(4) The area near the inlet of a water tank is susceptible to turbulence or allows the pump to take air in; therefore, place the pump and the float switch away from the inlet or install a baffle plate.
(5) Properly perform piping work so as not to create any air pockets in the middle of piping.
With automatic control, the sewage water in the pipe could flow backwards, causing the water surface control to react immediately. As a result, the pump will operate ON/OFF repeatedly, which could cause the pump to malfunction.
(6) Install a non-return valve if the pump tank is deep, or if the vertical head or the lateral distance is long.
CAUTION
CAUTION
Hook Control Panel Terminal Box
Manhole Guide Support
Cabtyre Cable
Start Position
Chain
Non-return Valve
Gate Valve
Pipe Guide Pipe
Pump Duck-foot Bend
Stop Position
Baffle Plate
Gate Valve
Hook Control Panel Terminal Box
Manhole
Cabtyre Cable
Baffle Plate Start Position Stop Position
Pump
Pipe Non-return Valve
chain
-7-
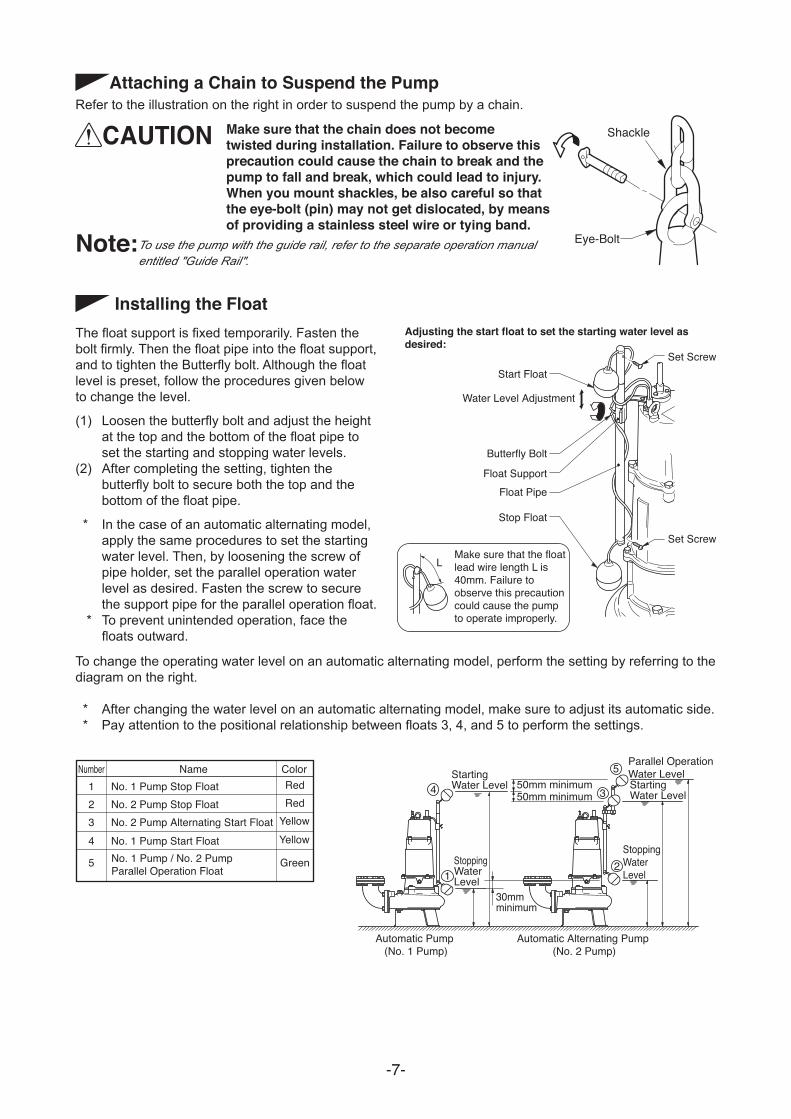
Attaching a Chain to Suspend the Pump
Make sure that the chain does not become twisted during installation. Failure to observe this precaution could cause the chain to break and the pump to fall and break, which could lead to injury.
When you mount shackles, be also careful so that the eye-bolt (pin) may not get dislocated, by means of providing a stainless steel wire or tying band.
CAUTION
To use the pump with the guide rail, refer to the separate operation manual entitled "Guide Rail".
Note:
Refer to the illustration on the right in order to suspend the pump by a chain.
Shackle
Eye-Bolt
Installing the Float
To change the operating water level on an automatic alternating model, perform the setting by referring to the diagram on the right.
* After changing the water level on an automatic alternating model, make sure to adjust its automatic side. * Pay attention to the positional relationship between floats 3, 4, and 5 to perform the settings.
LMake sure that the float lead wire length L is 40mm. Failure to observe this precaution could cause the pump to operate improperly.
Adjusting the start float to set the starting water level as desired:
Start Float
Stop Float
Float PipeFloat Support
Butterfly Bolt
Water Level Adjustment
Set Screw
Set Screw
1
4
5
3
2
Automatic Pump (No. 1 Pump)
Automatic Alternating Pump (No. 2 Pump)
Starting Water Level Starting
Water Level
Stopping Water Level
Stopping Water Level
Parallel Operation Water Level
50mm minimum50mm minimum
30mm minimum
The float support is fixed temporarily. Fasten the bolt firmly. Then the float pipe into the float support, and to tighten the Butterfly bolt. Although the float level is preset, follow the procedures given below to change the level.
(1) Loosen the butterfly bolt and adjust the height at the top and the bottom of the float pipe to set the starting and stopping water levels.
(2) After completing the setting, tighten the butterfly bolt to secure both the top and the bottom of the float pipe.
* In the case of an automatic alternating model, apply the same procedures to set the starting water level. Then, by loosening the screw of pipe holder, set the parallel operation water level as desired. Fasten the screw to secure the support pipe for the parallel operation float.
* To prevent unintended operation, face the floats outward.
-8-
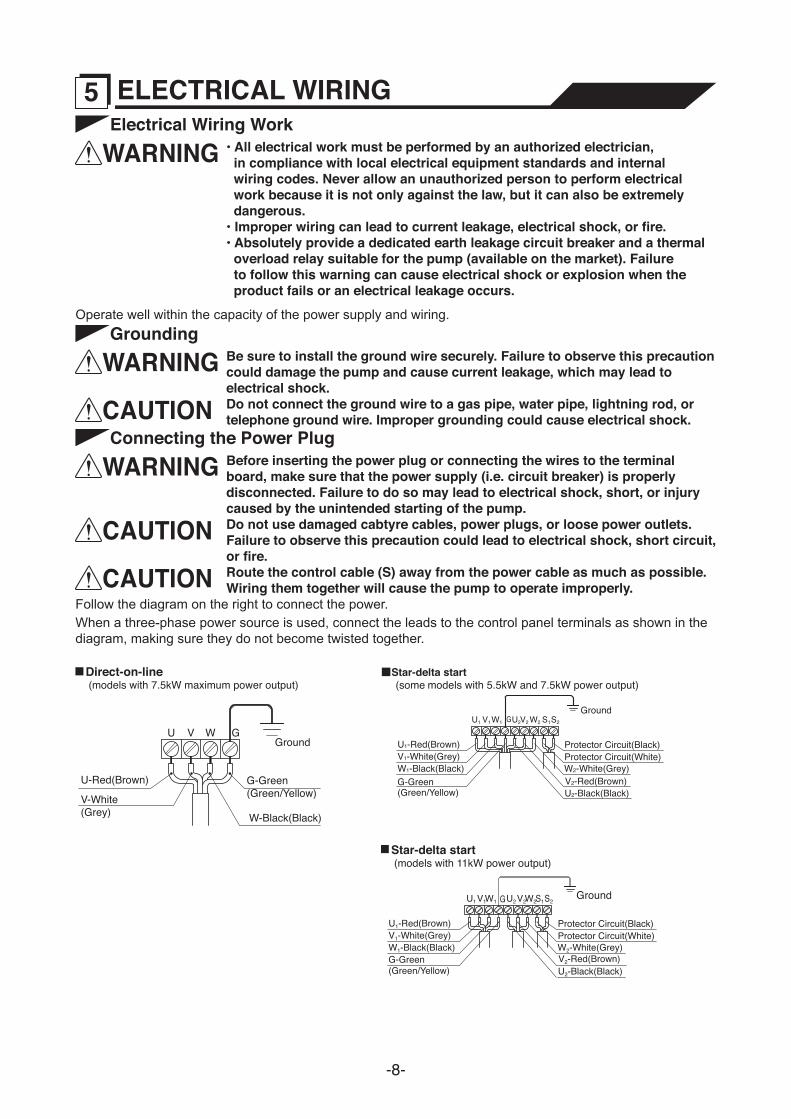
Electrical Wiring Work • All electrical work must be performed by an authorized electrician,
in compliance with local electrical equipment standards and internal wiring codes. Never allow an unauthorized person to perform electrical work because it is not only against the law, but it can also be extremely dangerous.
• Improper wiring can lead to current leakage, electrical shock, or fire. • Absolutely provide a dedicated earth leakage circuit breaker and a thermal
overload relay suitable for the pump (available on the market). Failure to follow this warning can cause electrical shock or explosion when the product fails or an electrical leakage occurs.
Operate well within the capacity of the power supply and wiring.
WARNING
Grounding Be sure to install the ground wire securely. Failure to observe this precaution
could damage the pump and cause current leakage, which may lead to electrical shock.
Do not connect the ground wire to a gas pipe, water pipe, lightning rod, or telephone ground wire. Improper grounding could cause electrical shock.
WARNING
CAUTIONConnecting the Power Plug
Before inserting the power plug or connecting the wires to the terminal board, make sure that the power supply (i.e. circuit breaker) is properly disconnected. Failure to do so may lead to electrical shock, short, or injury caused by the unintended starting of the pump.
Do not use damaged cabtyre cables, power plugs, or loose power outlets. Failure to observe this precaution could lead to electrical shock, short circuit, or fire.
Route the control cable (S) away from the power cable as much as possible. Wiring them together will cause the pump to operate improperly.Follow the diagram on the right to connect the power.
WARNING
CAUTION
CAUTIONWhen a three-phase power source is used, connect the leads to the control panel terminals as shown in the diagram, making sure they do not become twisted together.
Motor Protector The pump is equipped with an internal motor protector.1. Circle Thermal Protector: If a current overload or overheating occurs under the symptoms given below, the motor will stop
automatically to protect the motor regardless of the water level at the time of operation. In this type of motor protector, the motor will automatically restart after cooling down. If the motor is
stopped by protector tripping, turn off the power supply first, and disconnect the cables from the power terminals. After this, make sure to eliminate the cause of the problem, such as the following:
• Extreme fluctuation of power supply voltage • Pump operated under overload condition • Pump operated at open phase or binding condition
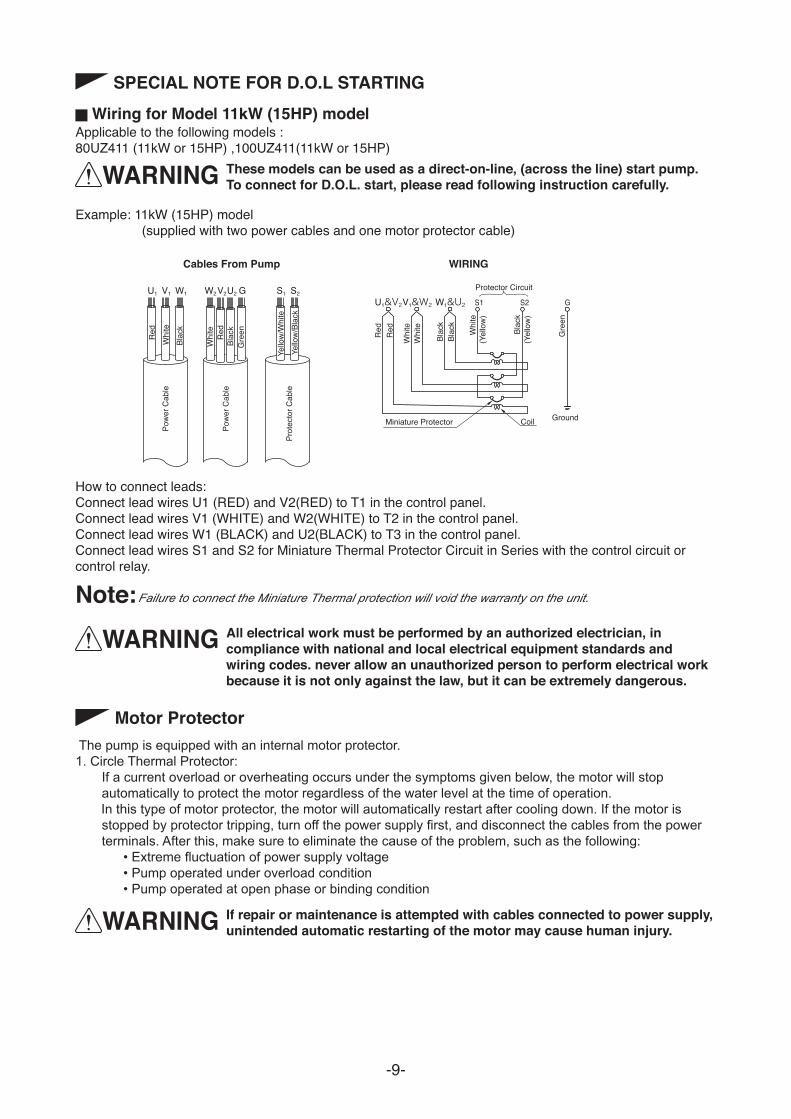
How to connect leads:Connect lead wires U1 (RED) and V2(RED) to T1 in the control panel.Connect lead wires V1 (WHITE) and W2(WHITE) to T2 in the control panel.Connect lead wires W1 (BLACK) and U2(BLACK) to T3 in the control panel.Connect lead wires S1 and S2 for Miniature Thermal Protector Circuit in Series with the control circuit or control relay.
Failure to connect the Miniature Thermal protection will void the warranty on the unit.Note: All electrical work must be performed by an authorized electrician, in
compliance with national and local electrical equipment standards and wiring codes. never allow an unauthorized person to perform electrical work because it is not only against the law, but it can be extremely dangerous.
WARNING
Miniature Protector Coil
U1&V2 U1 U2 G V1 V2 W1 W2
V1&W2 S2 S1 G
Protector Circuit
Red
Red
Po
wer
Cab
le
Red
Whi
te
Whi
te
Whi
te
W1&U2
Blac
k
Blac
k
Blac
k
Whi
te
(Yel
low
)
(Yel
low
) Bl
ack
Gre
en
Ground
WIRINGCables From Pump
S1 S2
Yello
w/W
hite
Pr
otec
tor C
able
Ye
llow
/Bla
ck
Red
Po
wer
Cab
le
Whi
te
Gre
en
Blac
k
If repair or maintenance is attempted with cables connected to power supply, unintended automatic restarting of the motor may cause human injury.WARNING
SPECIAL NOTE FOR D.O.L STARTING
These models can be used as a direct-on-line, (across the line) start pump. To connect for D.O.L. start, please read following instruction carefully.WARNING
Wiring for Model 11kW (15HP) modelApplicable to the following models :80UZ411 (11kW or 15HP) ,100UZ411(11kW or 15HP)
Example: 11kW (15HP) model (supplied with two power cables and one motor protector cable)
-10-
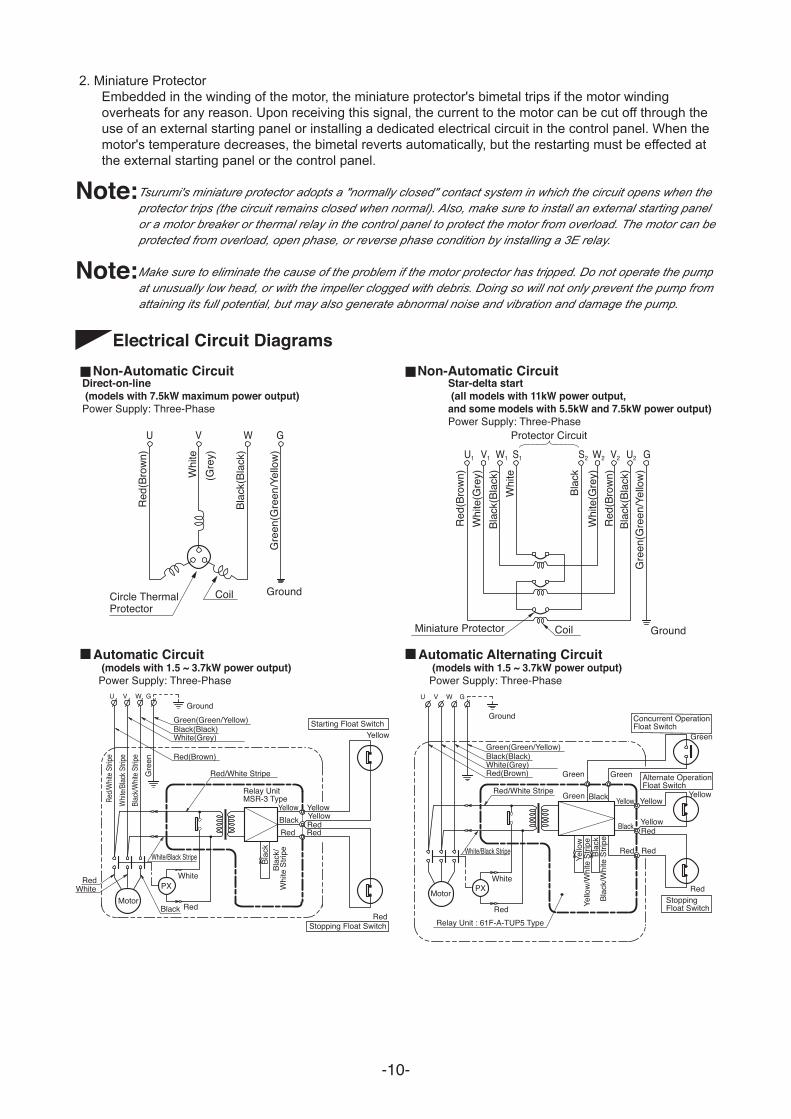
Electrical Circuit Diagrams
Circle Thermal Protector
Coil
U V W G
Miniature Protector Coil
U1 V1 W1 S2 U2V2W2S1 G
Protector Circuit
Direct-on-line (models with 7.5kW maximum power output)Power Supply: Three-Phase
Star-delta start (all models with 11kW power output, and some models with 5.5kW and 7.5kW power output)Power Supply: Three-Phase
Red
(Bro
wn)
Red
(Bro
wn)
Whi
te(G
rey)W
hite
(Gre
y)
Whi
te(G
rey)
Blac
k(Bl
ack)
Blac
k(Bl
ack)
Blac
k(Bl
ack)
Red
(Bro
wn)
Whi
te
Blac
k
Gre
en(G
reen
/Yel
low
)
Gre
en(G
reen
/Yel
low
)
Non-Automatic Circuit Non-Automatic Circuit
Ground
Ground
Automatic Circuit Automatic Alternating Circuit (models with 1.5 ~ 3.7kW power output)Power Supply: Three-Phase
(models with 1.5 ~ 3.7kW power output)Power Supply: Three-Phase
Green(Green/Yellow)
Red(Brown)White(Grey)Black(Black)
Red/W
hite S
tripe
Whit
e/Blac
k Strip
eBl
ack/W
hite S
tripe
Gre
en
U V W G U V W G
PX
Relay UnitMSR-3 Type
Starting Float Switch
Stopping Float Switch
Motor
Red
Yellow
Red/White Stripe
White/Black Stripe
Black
RedWhite W
hite
Stri
pe
Red
Blac
k
White
Blac
k/
YellowYellow
RedRedBlack Red
Yellow
PX
Relay Unit : 61F-A-TUP5 Type
Red/White Stripe
White/Black Stripe
Blac
k/W
hite
Stri
pe
Red
Blac
k
White
Motor
Yello
w
Concurrent Operation Float Switch
Alternate Operation Float Switch
Stopping Float Switch
Red
Yello
w/W
hite
Stri
pe
Green
YellowYellowYellow
YellowRed
Red
Black
Red
GreenGreen
Green Black
GroundGround
Green(Green/Yellow)
Red(Brown)
White(Grey)Black(Black)
2. Miniature Protector Embedded in the winding of the motor, the miniature protector's bimetal trips if the motor winding
overheats for any reason. Upon receiving this signal, the current to the motor can be cut off through the use of an external starting panel or installing a dedicated electrical circuit in the control panel. When the motor's temperature decreases, the bimetal reverts automatically, but the restarting must be effected at the external starting panel or the control panel.
Tsurumi's miniature protector adopts a "normally closed" contact system in which the circuit opens when the protector trips (the circuit remains closed when normal). Also, make sure to install an external starting panel or a motor breaker or thermal relay in the control panel to protect the motor from overload. The motor can be protected from overload, open phase, or reverse phase condition by installing a 3E relay.
Make sure to eliminate the cause of the problem if the motor protector has tripped. Do not operate the pump at unusually low head, or with the impeller clogged with debris. Doing so will not only prevent the pump from attaining its full potential, but may also generate abnormal noise and vibration and damage the pump.
Note:
Note:
-11-
Prior to Operation(1) Once again, check the nameplate of the pump to verify that its voltage and frequency are correct.
Improper voltage and frequency of the power supply will prevent the pump from attaining its full potential, and may also damage the pump.
Verify the specs on the pump's nameplate.
(2) Check the wiring, power supply voltage, the capacity of the ground leakage circuit breaker, and the insulation resistance of the motor.
Insulation resistance reference value = 20MΩ minimum
The insulation resistance reference value of 20MΩ minimum is based on a new or repaired pump. For refer-ence values of a pump that has already been put into operation, refer to "Maintenance and Inspection".
(3) Adjust the setting of the thermal relay (i.e. 3E relay) to the pump's rated current.
Verify the rated current on the pump's nameplate.
CAUTIONNote:
Note:
Note:
Trial Operation Never start the pump while it is suspended, as the pump may jerk and cause
a serious accident involving injury.(1) Operate the pump for a short time (1 to 2 seconds) and verify the direction of the rotation of the impeller.
Observe the pump unit from above, and if its recoil is in the counterclockwise direction, the direction of its rotation is correct.
Make sure to check the pump's direction of rotation with the pump exposed to the atmosphere. Operating the pump in reverse while it is submerged in water will damage the pump, which may lead to current leakage and electrical shock.
(2) To reverse the rotation, the following countermeasures must be taken.
WARNING
CAUTION
Before changing the connections for reverse rotation, make sure that the power supply (i.e. circuit breaker) is properly disconnected and that the impeller has stopped completely. Failure to observe this may lead to electrical shock, short, or injury.
COUNTERMEASURE Direct-on-line starting Interchange any two of the three wires designated U, V, and W,
respectively.
WARNING
Example:
U V W G
Interchanging phases V and W
Ground
6-1 NON-AUTOMATIC OPERATION
COUNTERMEASURE Star Delta startingInterchange any two of the three phases
designated R, S, and T, respectively.
This method cannot be used if the starting panel is equipped with a reverse-phase detector such as a 3E relay. If this is the case, contact the manufacturer of the starting panel, the dealer where the pump was purchased, or the Tsurumi sales off ce in your area.
Note:R S T
(Example) Interchanging phases S and T
6 OPERATION
-12-
COUNTERMEASURE If the power supply voltage deviates from the variation value, the cause of the deviation may be the capacity of
the power supply or the extension cable that is used. Refer to section "5. Electrical Wiring" to operate the pump in the correct manner.
COUNTERMEASURE Because an overload condition may be present at the pump motor if the
operating current exceeds the rated current, follow the instructions in section "4. Installation" to operate the pump in the correct manner.
(3) Connect the pump to the pipe and submerge it in water.
(4) Operate the pump for a short time (3 to 10 minutes) and perform the following checks:
Using an AC ammeter (clamp), measure the operating current at the phases U, V, and W that are connected to the terminal board.
Using an AC voltmeter (tester), measure the voltage at the terminal board. Power supply voltage tolerance = within ± 5% of the rated voltage
In case the pump exhibits an abnormal condition (such as a considerable amount of vibration, noise, or smell), disconnect the power supply immediately and contact the dealer where you purchased the equipment, or Tsurumi's sales office in your area. If the pump continues to be used in the abnormal state, it may cause current leakage, electrical shock, or fire.
(5) Proceed with the normal operation if no abnormal conditions are found during the trial operation.
CAUTION
Operation The pump unit may be extremely hot during operation. To prevent burns, do
not touch the pump unit with bare hands during or after the operation.Pay attention to the water level during the pump operation. The pump will become damaged if it is allowed to operate dry.Due to an overload operation or a pump malfunction, if the motor protector trips to stop the pump, make sure to eliminate the cause of the problem before restarting.A frequent ON/OFF will shorten the lifetime of the pump.To operate a submersible pump (including automatic operation), set the water level so that the pump will operate at approximately the following rate: less than 5-6 times per hour on models with output of 3.7kW or less, and 3-4 times per hour on models with output of 5.5kW or more.
A large amount of amperage f ows when a submersible pump is started, causing the temperature of its wind-ings to rise rapidly. Beware that a frequent stop-and-go operation of the pump will accelerate the deteriora-tion of the insulation of the motor windings and thus affect the use life of the motor.
WARNING
Note:
Operating Water Level Do not operate the pump at the lowest water level longer than 30 minutes,
as it could damage the pump, causing current leakage and electrical shock. For details on the lowest water level, refer to the dimension drawing, which is provided separately.
CAUTION
U V W GGround
VU V GW
Ground
-13-
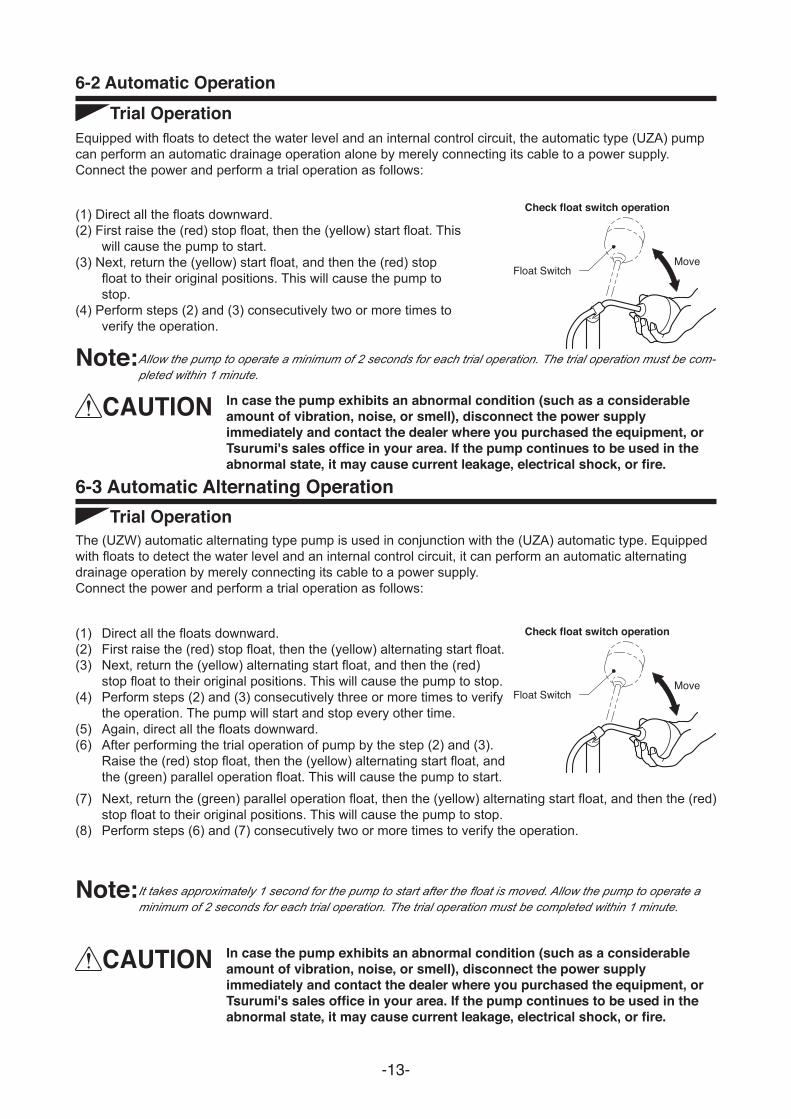
6-2 Automatic OperationTrial Operation
Equipped with floats to detect the water level and an internal control circuit, the automatic type (UZA) pump can perform an automatic drainage operation alone by merely connecting its cable to a power supply.Connect the power and perform a trial operation as follows:
Allow the pump to operate a minimum of 2 seconds for each trial operation. The trial operation must be com-pleted within 1 minute.
Note: In case the pump exhibits an abnormal condition (such as a considerable
amount of vibration, noise, or smell), disconnect the power supply immediately and contact the dealer where you purchased the equipment, or Tsurumi's sales office in your area. If the pump continues to be used in the abnormal state, it may cause current leakage, electrical shock, or fire.
The (UZW) automatic alternating type pump is used in conjunction with the (UZA) automatic type. Equipped with floats to detect the water level and an internal control circuit, it can perform an automatic alternating drainage operation by merely connecting its cable to a power supply.Connect the power and perform a trial operation as follows:
(1) Direct all the floats downward.(2) First raise the (red) stop float, then the (yellow) start float. This
will cause the pump to start.(3) Next, return the (yellow) start float, and then the (red) stop
float to their original positions. This will cause the pump to stop.
(4) Perform steps (2) and (3) consecutively two or more times to verify the operation.
It takes approximately 1 second for the pump to start after the f oat is moved. Allow the pump to operate a minimum of 2 seconds for each trial operation. The trial operation must be completed within 1 minute.
Note:
In case the pump exhibits an abnormal condition (such as a considerable amount of vibration, noise, or smell), disconnect the power supply immediately and contact the dealer where you purchased the equipment, or Tsurumi's sales office in your area. If the pump continues to be used in the abnormal state, it may cause current leakage, electrical shock, or fire.
CAUTION
Check float switch operation
MoveFloat Switch
Check float switch operation
MoveFloat Switch
(7) Next, return the (green) parallel operation float, then the (yellow) alternating start float, and then the (red) stop float to their original positions. This will cause the pump to stop.
(8) Perform steps (6) and (7) consecutively two or more times to verify the operation.
(1) Direct all the floats downward.(2) First raise the (red) stop float, then the (yellow) alternating start float.(3) Next, return the (yellow) alternating start float, and then the (red)
stop float to their original positions. This will cause the pump to stop.(4) Perform steps (2) and (3) consecutively three or more times to verify
the operation. The pump will start and stop every other time.(5) Again, direct all the floats downward.(6) After performing the trial operation of pump by the step (2) and (3).
Raise the (red) stop float, then the (yellow) alternating start float, and the (green) parallel operation float. This will cause the pump to start.
-14-
Regular maintenance and inspection are indispensable to maintaining the pump's performance. If the pump behaves differently from its normal operating condition, refer to section "9. Troubleshooting" and take appropriate measures at an early stage. We also recommend that you have a spare pump on hand for an emergency.
Prior to Inspection Make sure that the power supply (i.e. circuit breaker) is disconnected and
disconnect the cabtyre cable from the power outlet or remove it from the terminal board. Failure to do so may cause electrical shock or unintended starting of the pump, which may lead to serious accidents.
(1) Washing the Pump Remove any debris attached to the pump's outer surface, and wash the pump with tap water. Pay
particular attention to the impeller area, and completely remove any debris from the impeller.(2) Inspecting the Pump Exterior Verify that there is no damage, and that the bolts and nuts have not loosened.
If the pump must be disassembled for repair due to damage or loose bolts or nuts, contact the dealer where it was purchased, or the Tsurumi sales off ce in your area.
WARNING
Note:
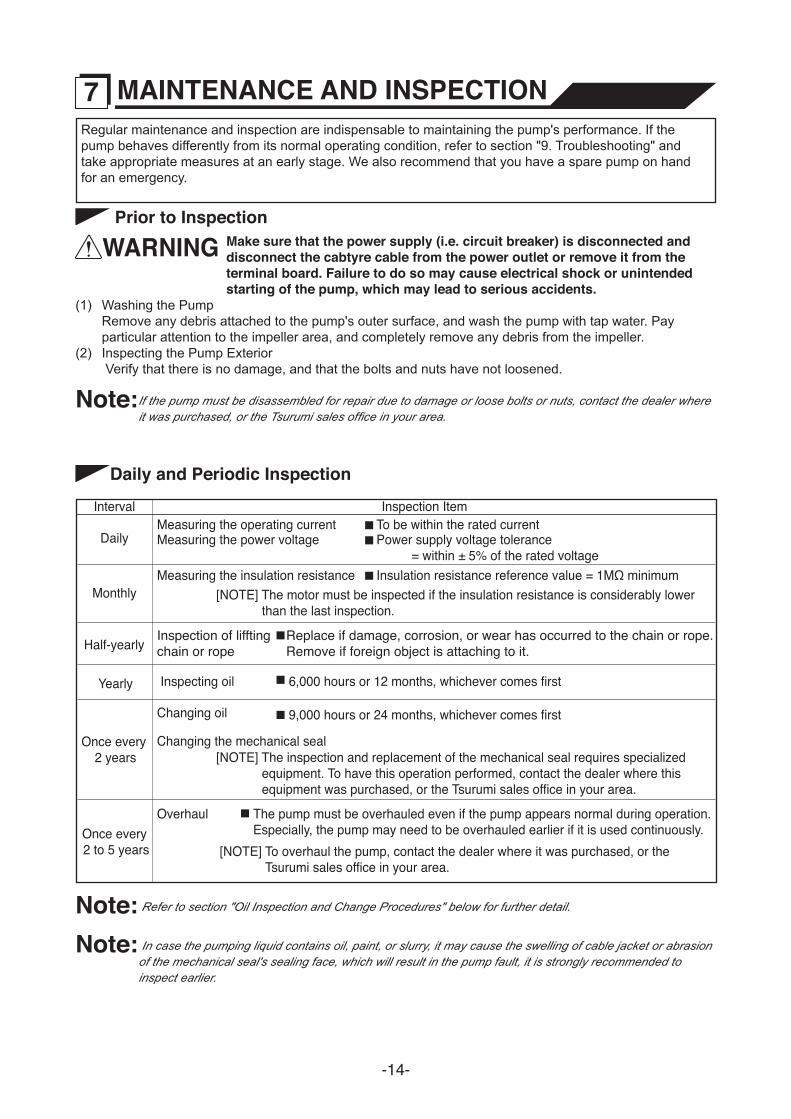
Daily and Periodic Inspection
Refer to section "Oil Inspection and Change Procedures" below for further detail.Note:
Interval
Monthly
Daily
Half-yearly
Inspection Item
Yearly
Once every 2 years
Once every 2 to 5 years
Measuring the operating current
Measuring the insulation resistance[NOTE] The motor must be inspected if the insulation resistance is considerably lower than the last inspection.
Inspecting oil
[NOTE] The inspection and replacement of the mechanical seal requires specialized equipment. To have this operation performed, contact the dealer where this equipment was purchased, or the Tsurumi sales office in your area.
Overhaul
[NOTE] To overhaul the pump, contact the dealer where it was purchased, or the Tsurumi sales office in your area.
9,000 hours or 24 months, whichever comes first
Changing the mechanical seal
Power supply voltage tolerance = within ± 5% of the rated voltage
Measuring the power voltage To be within the rated current
Insulation resistance reference value = 1MΩ minimum
The pump must be overhauled even if the pump appears normal during operation. Especially, the pump may need to be overhauled earlier if it is used continuously.
Inspection of liffting chain or rope
Replace if damage, corrosion, or wear has occurred to the chain or rope. Remove if foreign object is attaching to it.
Changing oil
6,000 hours or 12 months, whichever comes first
7 MAINTENANCE AND INSPECTION
In case the pumping liquid contains oil, paint, or slurry, it may cause the swelling of cable jacket or abrasion of the mechanical seal's sealing face, which will result in the pump fault, it is strongly recommended to inspect earlier.
Note:
-15-
StorageIf the pump will not be operated for a long period of time, pull the pump up, wash the pump, allow it to dry, and store it indoors.
For reinstallation, be sure to perform a trial operation before putting the pump into operation.
If the pump remains immersed in water, operate it on a regular basis (i.e. once a week).Note:
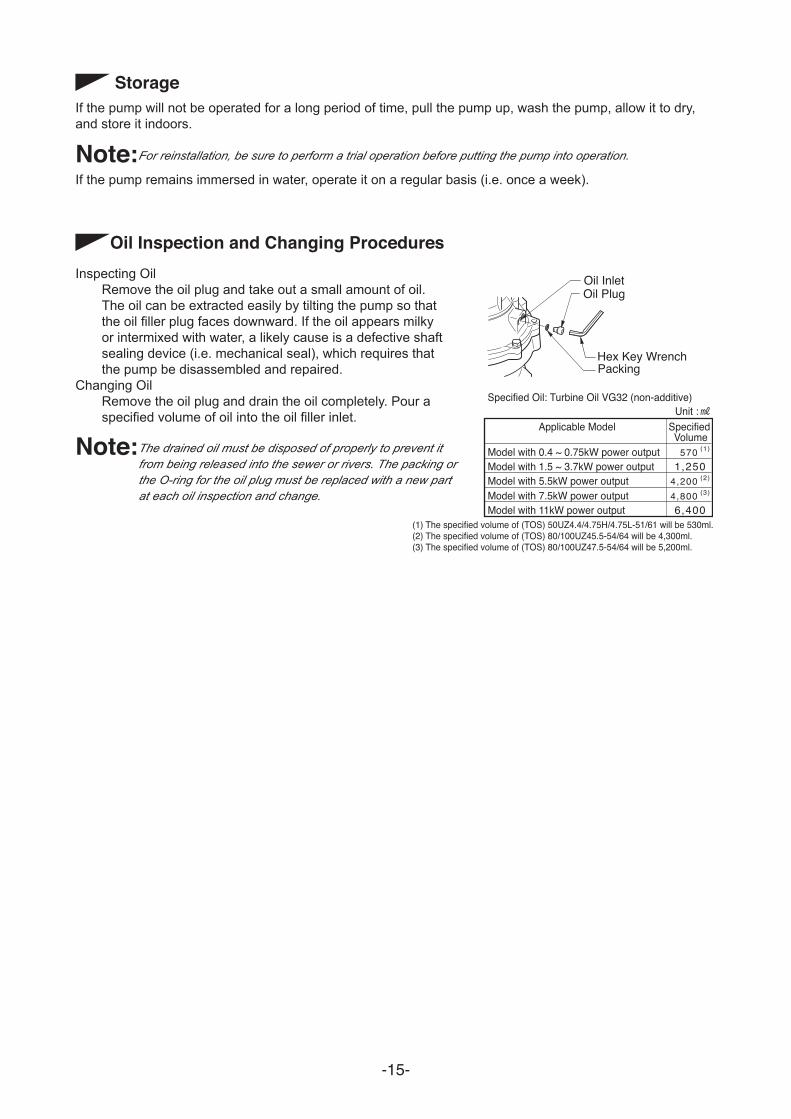
Oil Inspection and Changing ProceduresInspecting Oil Remove the oil plug and take out a small amount of oil.
The oil can be extracted easily by tilting the pump so that the oil filler plug faces downward. If the oil appears milky or intermixed with water, a likely cause is a defective shaft sealing device (i.e. mechanical seal), which requires that the pump be disassembled and repaired.
Changing Oil Remove the oil plug and drain the oil completely. Pour a
specified volume of oil into the oil filler inlet.
The drained oil must be disposed of properly to prevent it from being released into the sewer or rivers. The packing or the O-ring for the oil plug must be replaced with a new part at each oil inspection and change.
Note:
Oil Inlet
Packing
Oil Plug
Hex Key Wrench
Specified Oil: Turbine Oil VG32 (non-additive)
Model with 1.5 ~ 3.7kW power outputModel with 0.4 ~ 0.75kW power output
1,250570
Applicable Model Specified Volume
Unit :
Model with 5.5kW power output 4,200
Model with 11kW power outputModel with 7.5kW power output
6,4004,800
(1)
(2)
(3)
(1) The specified volume of (TOS) 50UZ4.4/4.75H/4.75L-51/61 will be 530ml.(2) The specified volume of (TOS) 80/100UZ45.5-54/64 will be 4,300ml.(3) The specified volume of (TOS) 80/100UZ47.5-54/64 will be 5,200ml.
-16-
Spring Washer
Screwed Flange
Packing
Packing
Packing
Discharge Bend
Spring Washer
Spring Washer
Hex. Bolt*
Hex. NutHex. Bolt
Hex. Bolt
Oil Seal
Impeller
Hex. Socket Bolt
Impeller Fixing Washer
Oil Plug
Pump Casing
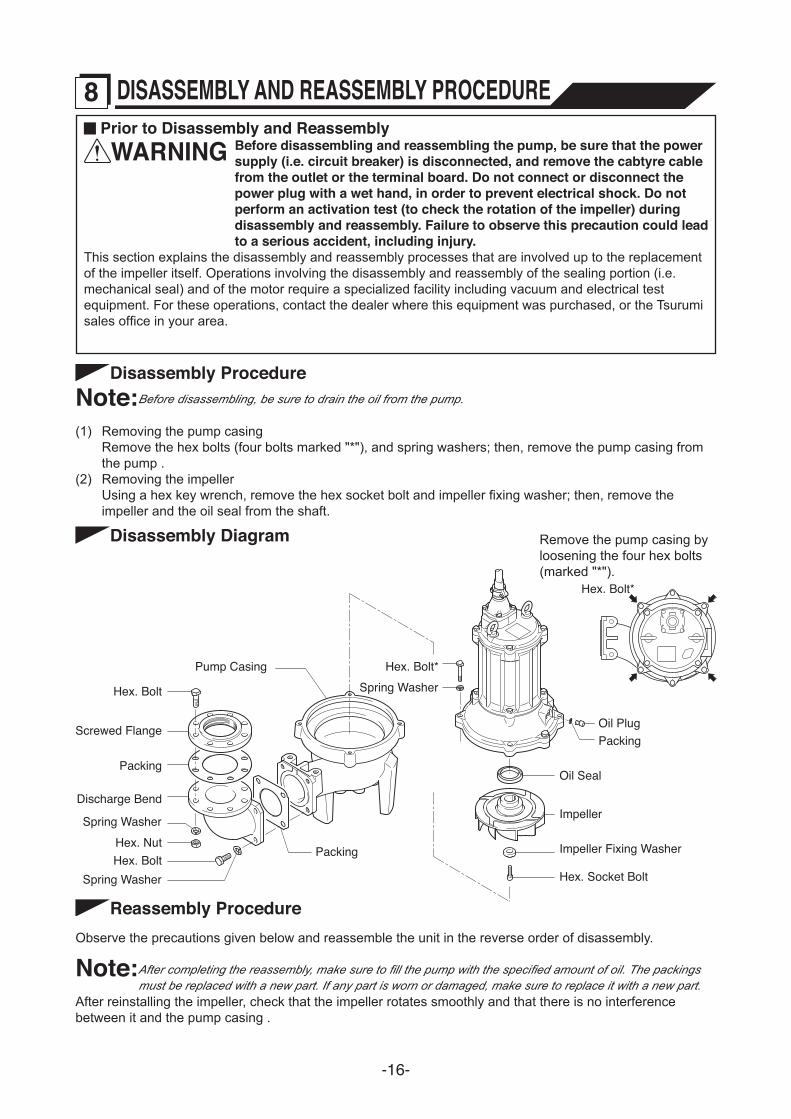
Disassembly Procedure
Disassembly Diagram
Reassembly ProcedureObserve the precautions given below and reassemble the unit in the reverse order of disassembly.
After completing the reassembly, make sure to f ll the pump with the specif ed amount of oil. The packings must be replaced with a new part. If any part is worn or damaged, make sure to replace it with a new part.
After reinstalling the impeller, check that the impeller rotates smoothly and that there is no interference between it and the pump casing .
Note:
(1) Removing the pump casing Remove the hex bolts (four bolts marked "*"), and spring washers; then, remove the pump casing from
the pump .(2) Removing the impeller Using a hex key wrench, remove the hex socket bolt and impeller fixing washer; then, remove the
impeller and the oil seal from the shaft.
Prior to Disassembly and Reassembly Before disassembling and reassembling the pump, be sure that the power
supply (i.e. circuit breaker) is disconnected, and remove the cabtyre cable from the outlet or the terminal board. Do not connect or disconnect the power plug with a wet hand, in order to prevent electrical shock. Do not perform an activation test (to check the rotation of the impeller) during disassembly and reassembly. Failure to observe this precaution could lead to a serious accident, including injury.
This section explains the disassembly and reassembly processes that are involved up to the replacement of the impeller itself. Operations involving the disassembly and reassembly of the sealing portion (i.e. mechanical seal) and of the motor require a specialized facility including vacuum and electrical test equipment. For these operations, contact the dealer where this equipment was purchased, or the Tsurumi sales office in your area.
WARNING
Before disassembling, be sure to drain the oil from the pump.Note:
Remove the pump casing by loosening the four hex bolts (marked "*").
8 DISASSEMBLY AND REASSEMBLY PROCEDURE
Hex. Bolt*
-17-
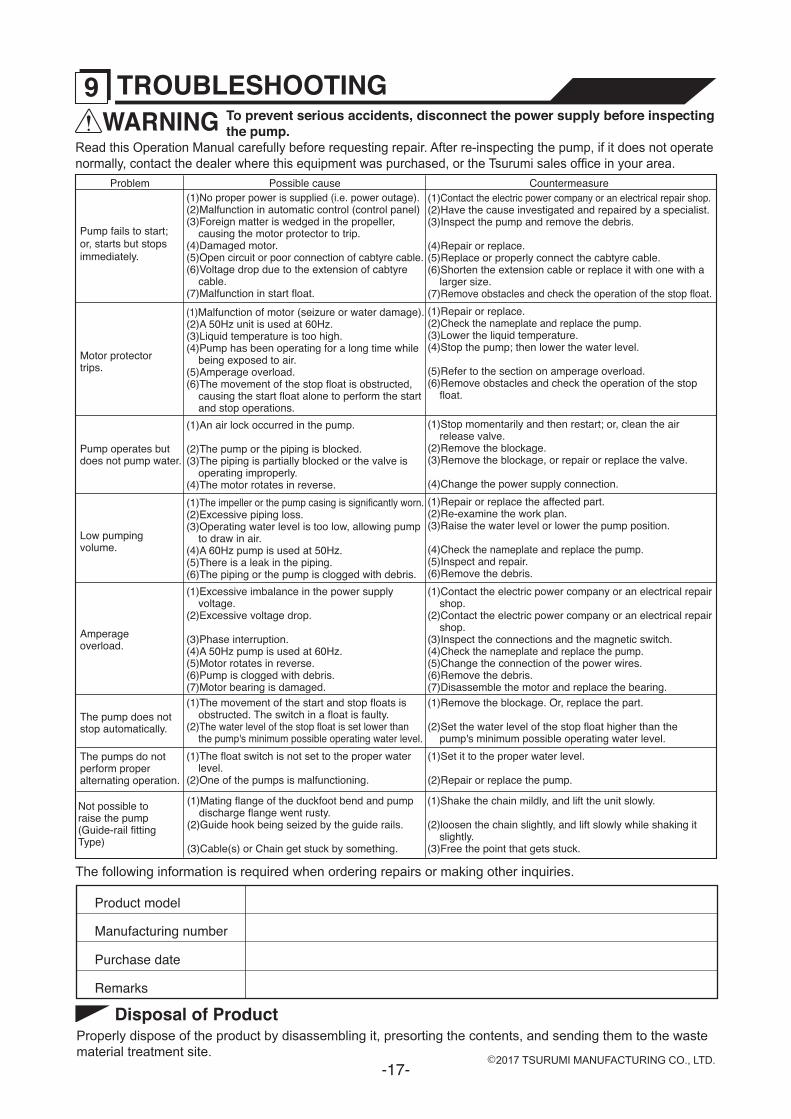
To prevent serious accidents, disconnect the power supply before inspecting the pump.
Read this Operation Manual carefully before requesting repair. After re-inspecting the pump, if it does not operate normally, contact the dealer where this equipment was purchased, or the Tsurumi sales office in your area.
WARNING
The following information is required when ordering repairs or making other inquiries.
Disposal of ProductProperly dispose of the product by disassembling it, presorting the contents, and sending them to the waste material treatment site.
(1)Contact the electric power company or an electrical repair shop.(2)Have the cause investigated and repaired by a specialist.(3)Inspect the pump and remove the debris.
(4)Repair or replace.(5)Replace or properly connect the cabtyre cable.(6)Shorten the extension cable or replace it with one with a
larger size.(7)Remove obstacles and check the operation of the stop float.
(1)No proper power is supplied (i.e. power outage).(2)Malfunction in automatic control (control panel)(3)Foreign matter is wedged in the propeller,
causing the motor protector to trip.(4)Damaged motor.(5)Open circuit or poor connection of cabtyre cable.(6)Voltage drop due to the extension of cabtyre
cable.(7)Malfunction in start float.
(1)Repair or replace.(2)Check the nameplate and replace the pump.(3)Lower the liquid temperature.(4)Stop the pump; then lower the water level.
(5)Refer to the section on amperage overload.(6)Remove obstacles and check the operation of the stop
float.
(1)Malfunction of motor (seizure or water damage). (2)A 50Hz unit is used at 60Hz. (3)Liquid temperature is too high. (4)Pump has been operating for a long time while
being exposed to air. (5)Amperage overload. (6)The movement of the stop float is obstructed,
causing the start float alone to perform the start and stop operations.
(1)Stop momentarily and then restart; or, clean the air release valve.
(2)Remove the blockage.(3)Remove the blockage, or repair or replace the valve.
(4)Change the power supply connection.
(1)An air lock occurred in the pump. (2)The pump or the piping is blocked. (3)The piping is partially blocked or the valve is
operating improperly. (4)The motor rotates in reverse.
Pump fails to start; or, starts but stops immediately.
(1)Repair or replace the affected part.(2)Re-examine the work plan.(3)Raise the water level or lower the pump position.
(4)Check the nameplate and replace the pump.(5)Inspect and repair.(6)Remove the debris.
(1)The impeller or the pump casing is significantly worn. (2)Excessive piping loss. (3)Operating water level is too low, allowing pump
to draw in air. (4)A 60Hz pump is used at 50Hz. (5)There is a leak in the piping. (6)The piping or the pump is clogged with debris.
Low pumping volume.
(1)Contact the electric power company or an electrical repair shop.
(2)Contact the electric power company or an electrical repair shop.
(3)Inspect the connections and the magnetic switch.(4)Check the nameplate and replace the pump.(5)Change the connection of the power wires.(6)Remove the debris.(7)Disassemble the motor and replace the bearing.
(1)Excessive imbalance in the power supply voltage.
(2)Excessive voltage drop.
(3)Phase interruption.(4)A 50Hz pump is used at 60Hz.(5)Motor rotates in reverse.(6)Pump is clogged with debris.(7)Motor bearing is damaged.
Amperage overload.
Motor protector trips.
Pump operates but does not pump water.
(1)Set it to the proper water level.
(2)Repair or replace the pump.
(1)The float switch is not set to the proper water level.
(2)One of the pumps is malfunctioning.
(1)Remove the blockage. Or, replace the part.
(2)Set the water level of the stop float higher than the pump's minimum possible operating water level.
(1)The movement of the start and stop floats is obstructed. The switch in a float is faulty.
(2)The water level of the stop float is set lower than the pump's minimum possible operating water level.
The pump does not stop automatically.
The pumps do not perform proper alternating operation.
Problem Possible cause Countermeasure
(1)Shake the chain mildly, and lift the unit slowly.
(2)loosen the chain slightly, and lift slowly while shaking it slightly.
(3)Free the point that gets stuck.
(1)Mating flange of the duckfoot bend and pump discharge flange went rusty.
(2)Guide hook being seized by the guide rails.
(3)Cable(s) or Chain get stuck by something.
Not possible to raise the pump (Guide-rail fitting Type)