Page 1
Design Visualization: From Concept to Reality Trent Cito – RNL
Code AB4345
LearningObjectivesAt the end of this class, you will be able to:
Leverage Models you are already creating
Implement an efficient visualization workflow using Autodesk® 3ds Max®
Create Hi-quality, Hi-end Renderings (be your own outsource company)
Page 2
Design Visualization: From Concept to Reality
2
LeverageModelsyouareAlreadyCreating
UseAutodesk®3dsMax®tobridgethegapbetweendifferentdesignsoftware’s
Autodesk®Revit®
AutoCAD®
Google™SketchUpPro
Rhinoceros®
SoitisnotnecessarilywhatdesignsoftwareyouusejustthatyouprepitforeaseofuseonceyougetitintoMax.
Page 3
Design Visualization: From Concept to Reality
3
Iwillusethisprojectasourexampleandwewillessentiallybecreatingthisimage.
WeusedRhino4.0forthesitemodelandGoogleSketchUp8forthebuilding.BothbasedontheAutoCADbasefile.
WhereintheworldamI?
Knowwhatunitsyourprojectisin–imperial/metricandthenkeepitconsistent
(Inthisexampleweusedarch.inchesforourmodelsaswellasMax.)
ModelPrep
BaseyourmodeletiquetteonexistingofficeCADstandards
Applysamelayeringpracticesfor3Dasyouwouldin2D
Page 4
Design Visualization: From Concept to Reality
4
InourRhinositemodelIhaveaddeda3d‐prefixtomylayers.Simplydothisforanyobjectyouhavemodeled.DothisforthebuildingfilethatwascreatedinSketchUpaswell.
Page 5
Design Visualization: From Concept to Reality
5
SavetheRhinositemodelin.dwgformatmakingsuretowritesurfacesasSolids.IamusingMax2011soIneedtosavethesketchupfileasaversion7fileandwewillbringthenativesketchupfilerightintomax.
MaxSettings
RenderSetupDialogue–CommonTab–AssignrenderertoMentalRayRenderer
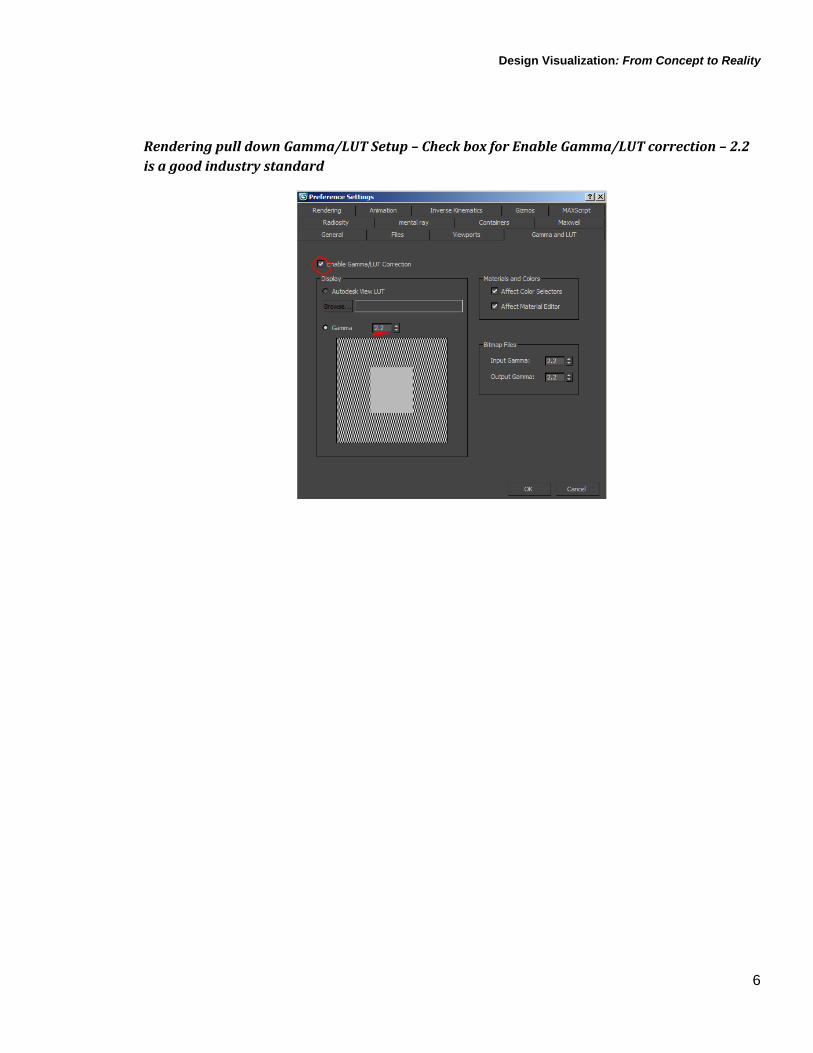
Page 6
Design Visualization: From Concept to Reality
6
RenderingpulldownGamma/LUTSetup–CheckboxforEnableGamma/LUTcorrection–2.2isagoodindustrystandard
Page 7
Design Visualization: From Concept to Reality
7
Renderingpulldown–Environment
Page 8
Design Visualization: From Concept to Reality
8
ImportSiteModel
Choose.dwgasthefiletype‐browsetothex‐site.dwg(exportedRhinofile)‐clickok
Page 9
Design Visualization: From Concept to Reality
9
Ontheimportoptions,makesuretheMaximumSurfaceDeviationfor3Dsolidshasalownumber.01(forsmootharc’sandcircles)
AlsobringinobjectsasEntity,BlocksasNodeHierarchy–afterfileisloadedsaveasx‐site.max
Page 10
Design Visualization: From Concept to Reality
10
HowlayerscomeintoplayinAutodesk®3dsMax®
SelectManageLayers…
SelectfirstlayerandthenSelectHighlightedObjectsandLayers
OpenupMaterialEditor….
Page 11
Design Visualization: From Concept to Reality
11
Namematerial then….
AssignmaterialtoSelection ..selectStandard…. Browseto
MentalRaythenArch&DesignMaterial
Page 12
Design Visualization: From Concept to Reality
12
InWindowsexplorerbrowsetothemapyouwanttouseforthematerialanddraganddropitintotheDiffuseColorslot,thenShowStandardMapinViewport(rightclicknexttoviewportnameandselectSmooth+Highlights)
GotoModifyTab browsedownandselectUVWMapandthenselectBoxasthemappingtype,use1’6”forthelength,widthandheight.(remember,selectingthegizmoonlyeffectsthematerialplacementandnottheobject)
WiththeobjectstillselectedrightclickobjectandselecttheObjectPropertiesandassign#1totheObjectID:….Dotheabovefortheremaininglayersyouwanttoapplymaterialsto.
AssignDaylightandtestyourmaterials.
GotoCreateTab–selectsystems–Daylight
Page 13
Design Visualization: From Concept to Reality
13
PlacedaylightanduseModifyTab–ChangetoMrSunandMrSky–Setuptochangetime,dateandlocation.
RenderSetupDialogue
GotoRenderElementsTab–selectAdd–browsedowntoObjectID–selectOK–thenselectElementsActivebox
Usesmallimagesize1000x714orsmaller
IndirectIlluminationTab–selectEnableFinalGathersettoDraftandEnableGI
HitRender–saveoften
ImportBuildingModel
Createnewfile
Import–Sketchupfile‐ ChecktheCamerasandDaylightSystem…ExtractTexturestoaCommonfolderonyournetworkNOTLOCALHARDDRIVE
SelectDaylightandgotoModifyTab–converttoMrSunandMrSky–Setuptochangetime,dateandlocation
SelectSunandCamerasputthereownlayerandSAVESELECTEDASS‐Scene_day.max
SaveFileasX‐Bldg.max
Page 14
Design Visualization: From Concept to Reality
14
ImplementanEfficientVisualizationWorkflowusingAutodesk®3dsMax®
Compartmentalizeyourproject
Filemanagement
Page 15
Design Visualization: From Concept to Reality
15
OpenSceneFile(s‐scene_day.max)
GotoReference..
XrefScene
SelecttheSite(x‐site.max)–uncheckLights,CamerasandHelpers–dothesameforthebuilding(x‐bldg.max)
IfyouneedtomovexreffilecreateDummyobjectandbinditwithinthexrefscenedialogue.
AdjustDaylightifneeded
Type‘C’andselectcameratogoto.
OpenupRenderSetupDialogue–MakeimagesizelargerforHi‐resimage–RenderOutputSavefile(choosefilenameandlocation)–RenderElementsselectObjectID–ChangeIndirectIllumination‐FinalGatherfromDrafttoLoworMedium.
Save
Render
Page 16
Design Visualization: From Concept to Reality
16
AmbientOcclusionPass
OpenupMaterialEditor–inemptyslot–selectStandard–changetoMentalRay,Arch+Designmaterial–UnderDiffuseColorSlotselectAmbient/ReflectiveOcclusionmaterial–selectok
NameMaterialAO
BringtheReflectionandGlossinessto0
OntheDiffuseColorslotselecttheAmbient/ReflectiveOcclusionMaterial
ChangetheSamplesto56(onlychangeinincrementsof8)
Maxdistancewillvarydependingonscenesize.Setitto5000’
InRenderSetupDialogue
GotoProcessingTab
CheckEnableMaterialOverrideanddragAOmaterialoverasanInstance
Save
RenderoutHi‐Resolution(sameresolutionasaboveimage)
Page 17
Design Visualization: From Concept to Reality
17
CreateHi‐quality,Hi‐endRenderings(beyourownoutsourcecompany)
InPhotoshoporothercompositingsoftware
Openupallthreefiles–Imagefile–ObjectIDfile–AmbientOcclusionfile
Combineallimagesintoonefile–namelayersastowhattheyare–putObjectIDbelowall
MaketheAmbientOcclusion(AO)layeramultiplyLayerandgiveitatransparency
Adjustlevelsandattachittoyourbaselayer
AdjustlevelsfortheAOlayer
IsolatetheIDlayer–gotoSelectpulldownandColorRange–selectacolor
Createlayerandfillwithadesiredcolor–makethislayermultiplylayer
UseIDlayerformasking
AddEntourage/landscape/people/background/sky/effects(Iwilloftenuse3dobjectsinsteadofaddingthepostproductionobjects)
AbouttheSpeaker Trent is a practicing Landscape Architect at RNL, a multi-disciplinary international design firm with offices in Denver, Los Angeles, Phoenix and Abu Dhabi. He has applied his techniques to design projects for over 13 years and is the Director of RNL’s design visualization group. He has been published in Landscape Architect and Specifier News and Architect Magazine, and has won numerous awards utilizing his computer visualization techniques. Establishing a flexible design process based on familiar software practices is critical for today’s design professional.
[email protected]