18
I2 I3 I1 Q3/Q4 + B3/B4 Q1/Q2+B1/B2 Q5/Q6+B5/B6 Q7 Q8 536630 Vacuum Gripper Robot 24V
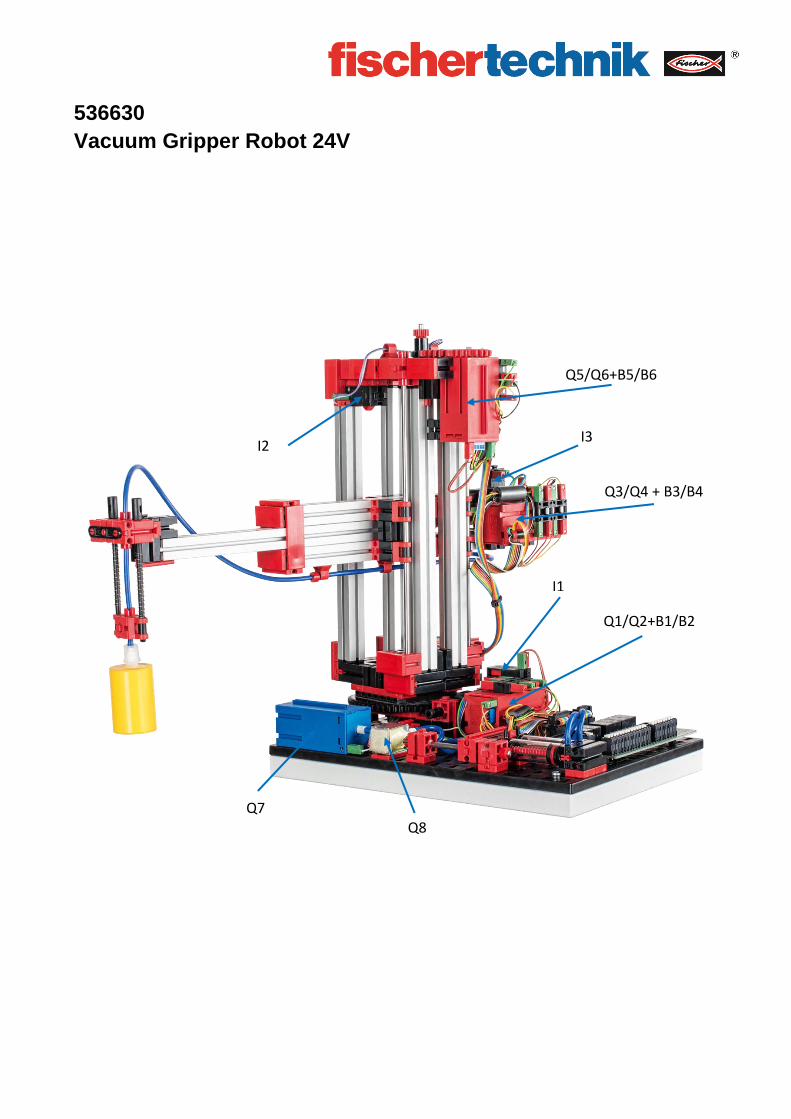
I2 I3
I1
Q3/Q4 + B3/B4
Q1/Q2+B1/B2
Q5/Q6+B5/B6
Q7 Q8
536630
Vacuum Gripper Robot 24V
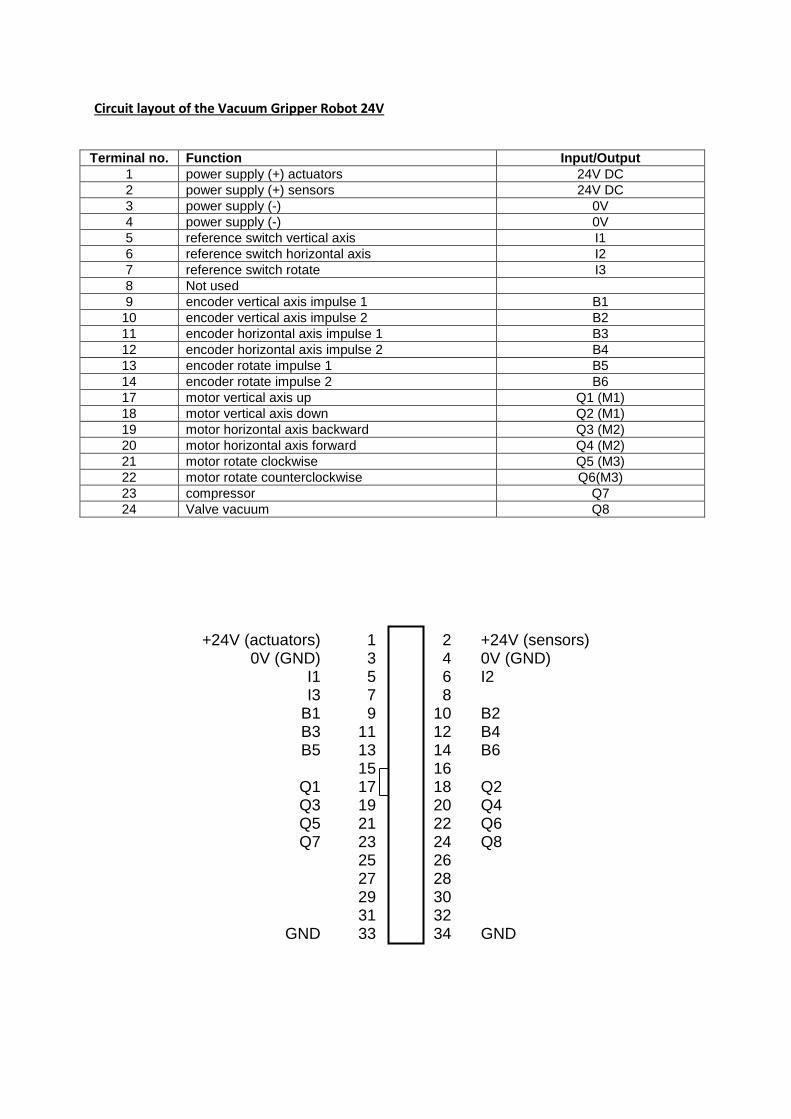
Circuit layout of the Vacuum Gripper Robot 24V
Terminal no. Function Input/Output
1 power supply (+) actuators 24V DC
2 power supply (+) sensors 24V DC
3 power supply (-) 0V
4 power supply (-) 0V
5 reference switch vertical axis I1
6 reference switch horizontal axis I2
7 reference switch rotate I3
8 Not used
9 encoder vertical axis impulse 1 B1
10 encoder vertical axis impulse 2 B2
11 encoder horizontal axis impulse 1 B3
12 encoder horizontal axis impulse 2 B4
13 encoder rotate impulse 1 B5
14 encoder rotate impulse 2 B6
17 motor vertical axis up Q1 (M1)
18 motor vertical axis down Q2 (M1)
19 motor horizontal axis backward Q3 (M2)
20 motor horizontal axis forward Q4 (M2)
21 motor rotate clockwise Q5 (M3)
22 motor rotate counterclockwise Q6(M3)
23 compressor Q7
24 Valve vacuum Q8
+24V (actuators) 1 2 +24V (sensors) 0V (GND) 3 4 0V (GND) I1 5 6 I2 I3 7 8 B1 9 10 B2 B3 11 12 B4 B5 13 14 B6 15 16 Q1 17 18 Q2 Q3 19 20 Q4 Q5 21 22 Q6 Q7 23 24 Q8 25 26 27 28 29 30 31 32 GND 33 34 GND
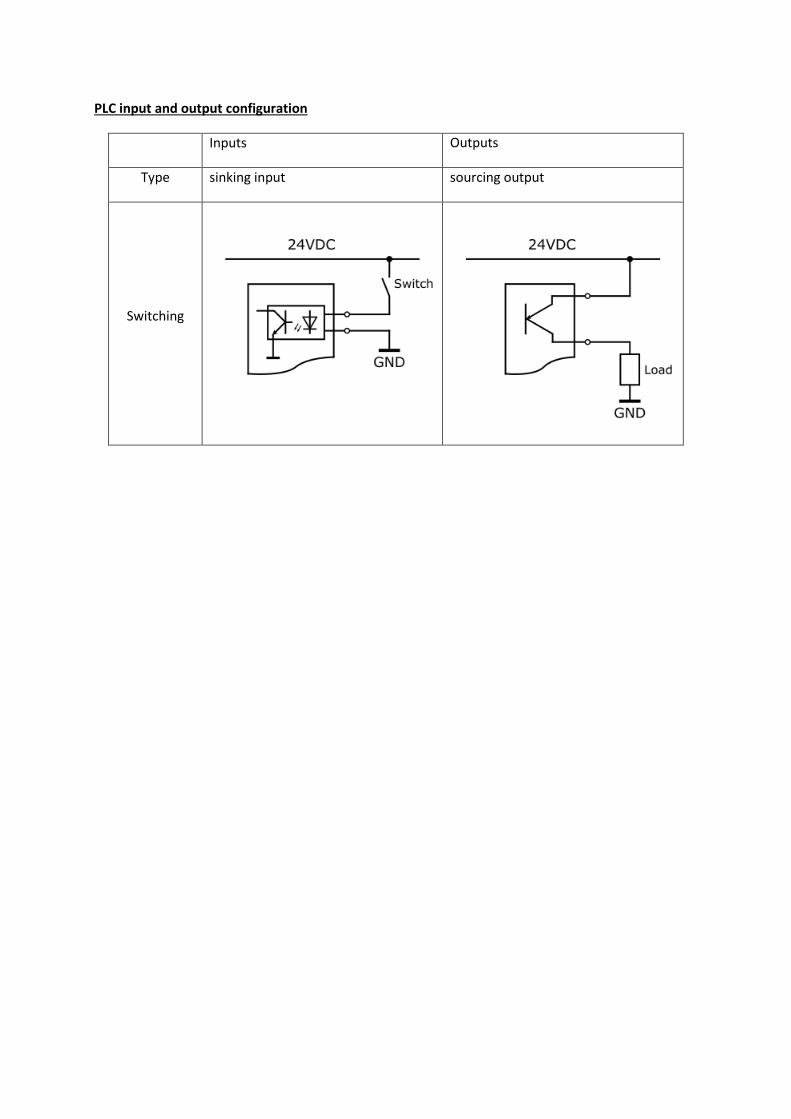
PLC input and output configuration
Inputs Outputs
Type sinking input sourcing output
Switching

Technical data
Encoder motor:
The vacuum gripper robot is powered by three encoder motors. This is
possible through permanent magnet DC motors, which enable the
incremental measurement of angles with the help of Hall Effect sensors.
The encoder motors have a rated voltage of 24 V and a maximum output
of 2.03 W at 214 rpm. The current input at maximum power is 320 mA.
The integrated gearbox gear ratio is 25:1. This means that the encoder
produces three pulses per motor shaft rotation or 75 pulses per rotation
of the gearbox output shaft. Since two phase shifted pulses are indexed,
the encoder is able to distinguish the direction in which the motor is
rotating.
The connection is made via a four core cable with a red wire for the 24 V
output and a green wire for the ground connection. The black and yellow
wires transmit the pulse (push-pull output, 1 kHz max., 10 mA max.).
Mini-switch:
For the sorting line with detection, the mini-switch is used as a pulse
counter. Combined with a pulse wheel, the push-button switches are used
as incremental rotary encoders to determine the position of the conveyor
belt. The mini-switch used for this purpose includes a changeover switch
and can be used both as a normally closed contact and as a normally open
contact. When the switch is actuated, equipotential bonding occurs
between contact 1 and contact 3, while the connection between contact 1
and contact 2 is separated. Figure 1 shows the schematic circuit diagram
of the mini-switch.
Fig. 1: Mini-switch circuit diagram
pushed not pushed
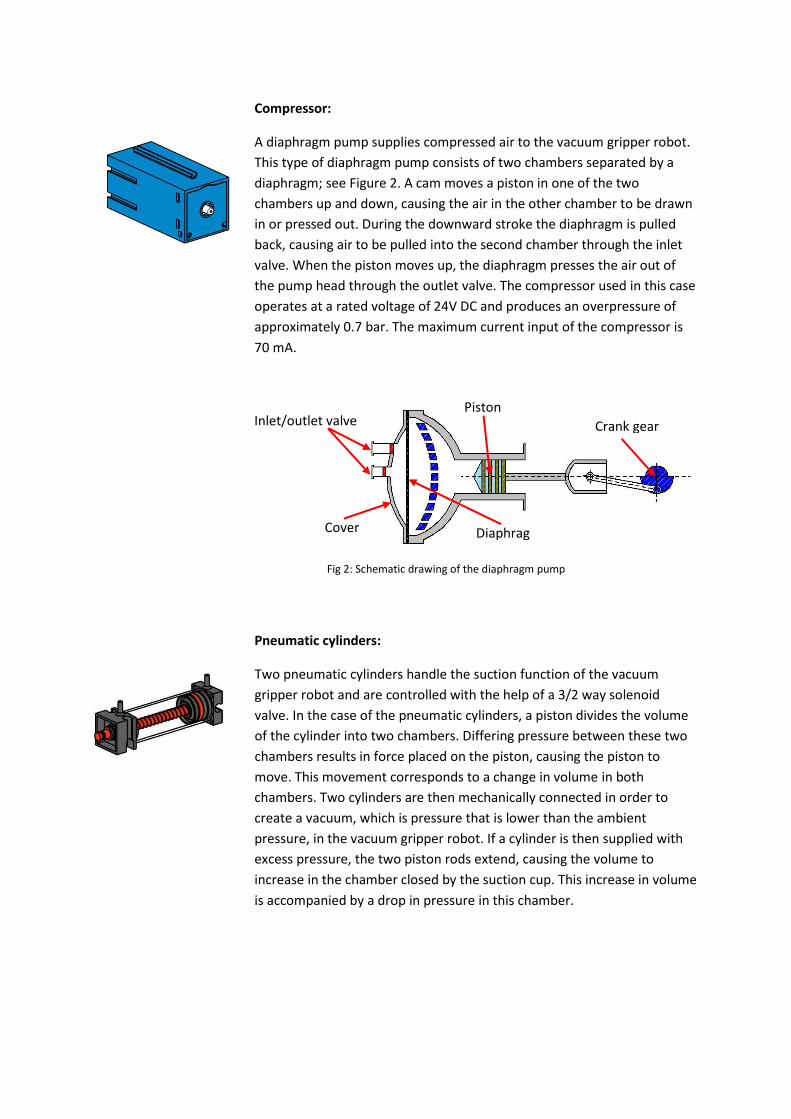
Compressor:
A diaphragm pump supplies compressed air to the vacuum gripper robot.
This type of diaphragm pump consists of two chambers separated by a
diaphragm; see Figure 2. A cam moves a piston in one of the two
chambers up and down, causing the air in the other chamber to be drawn
in or pressed out. During the downward stroke the diaphragm is pulled
back, causing air to be pulled into the second chamber through the inlet
valve. When the piston moves up, the diaphragm presses the air out of
the pump head through the outlet valve. The compressor used in this case
operates at a rated voltage of 24V DC and produces an overpressure of
approximately 0.7 bar. The maximum current input of the compressor is
70 mA.
Pneumatic cylinders:
Two pneumatic cylinders handle the suction function of the vacuum
gripper robot and are controlled with the help of a 3/2 way solenoid
valve. In the case of the pneumatic cylinders, a piston divides the volume
of the cylinder into two chambers. Differing pressure between these two
chambers results in force placed on the piston, causing the piston to
move. This movement corresponds to a change in volume in both
chambers. Two cylinders are then mechanically connected in order to
create a vacuum, which is pressure that is lower than the ambient
pressure, in the vacuum gripper robot. If a cylinder is then supplied with
excess pressure, the two piston rods extend, causing the volume to
increase in the chamber closed by the suction cup. This increase in volume
is accompanied by a drop in pressure in this chamber.
Inlet/outlet valve
Cover Diaphrag
m
Piston
Crank gear
Fig 2: Schematic drawing of the diaphragm pump
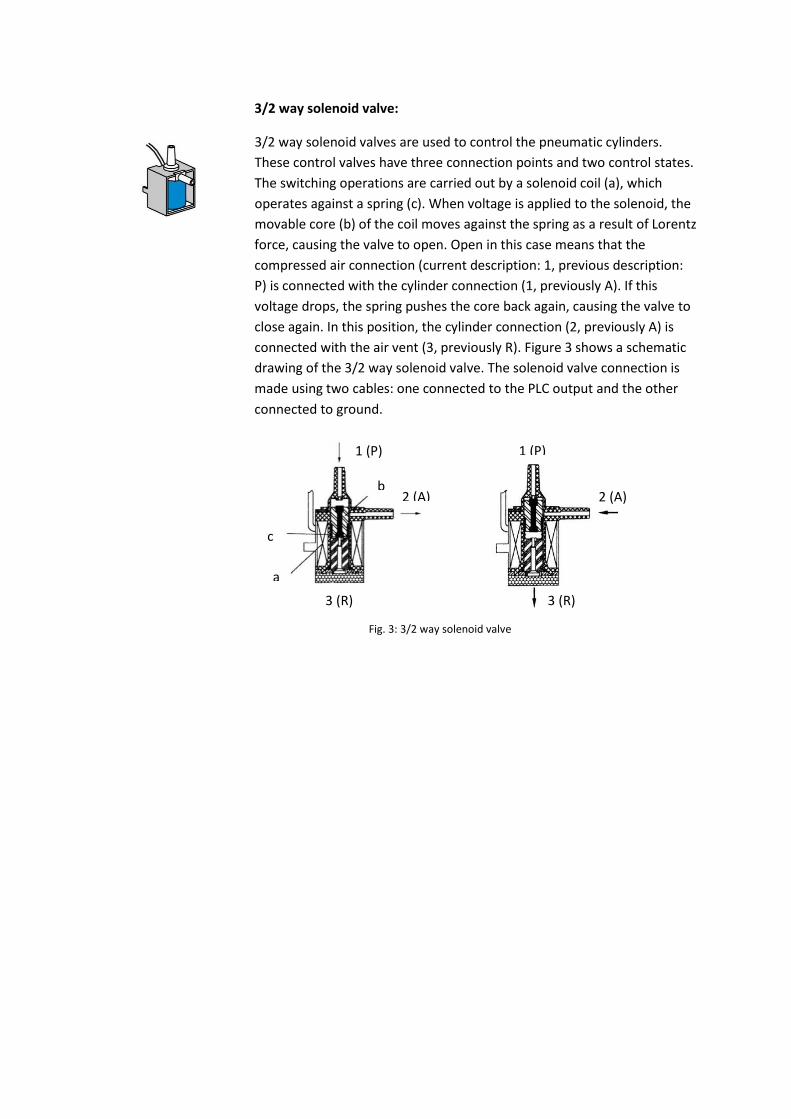
3/2 way solenoid valve:
3/2 way solenoid valves are used to control the pneumatic cylinders.
These control valves have three connection points and two control states.
The switching operations are carried out by a solenoid coil (a), which
operates against a spring (c). When voltage is applied to the solenoid, the
movable core (b) of the coil moves against the spring as a result of Lorentz
force, causing the valve to open. Open in this case means that the
compressed air connection (current description: 1, previous description:
P) is connected with the cylinder connection (1, previously A). If this
voltage drops, the spring pushes the core back again, causing the valve to
close again. In this position, the cylinder connection (2, previously A) is
connected with the air vent (3, previously R). Figure 3 shows a schematic
drawing of the 3/2 way solenoid valve. The solenoid valve connection is
made using two cables: one connected to the PLC output and the other
connected to ground.
1 (P)
2 (A) 2 (A)
3 (R) 3 (R)
1 (P)
c
a
b
Fig. 3: 3/2 way solenoid valve
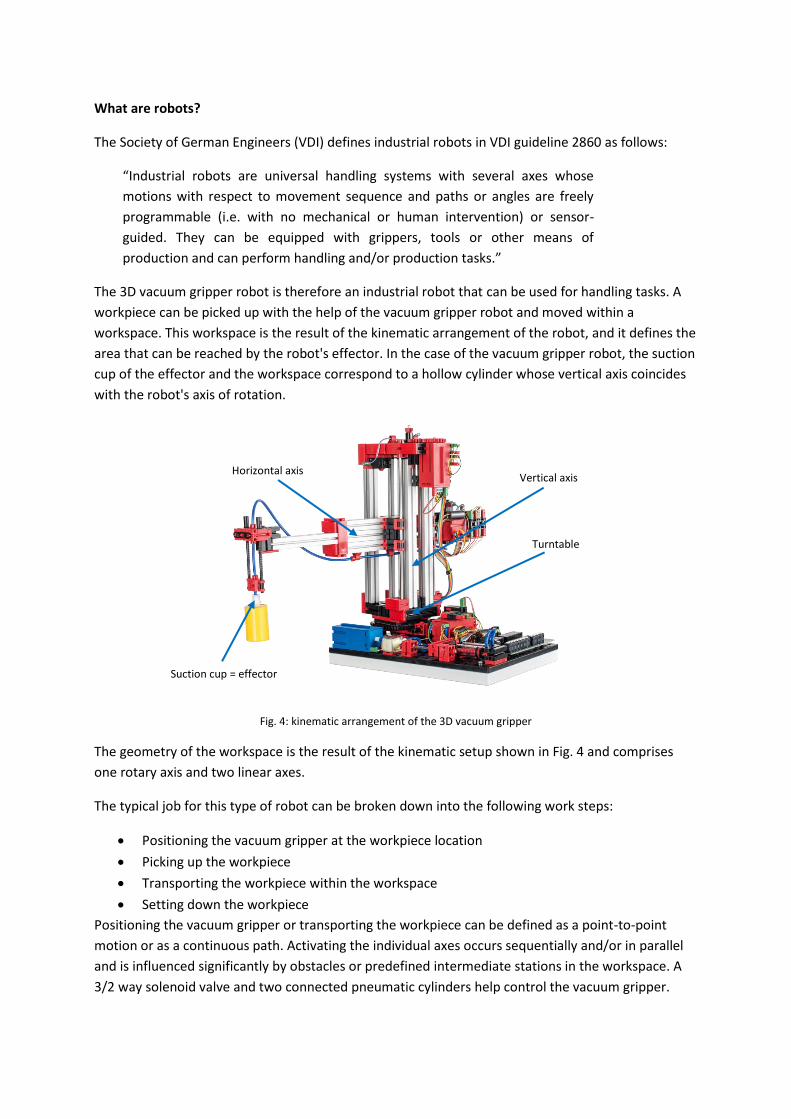
What are robots?
The Society of German Engineers (VDI) defines industrial robots in VDI guideline 2860 as follows:
“Industrial robots are universal handling systems with several axes whose
motions with respect to movement sequence and paths or angles are freely
programmable (i.e. with no mechanical or human intervention) or sensor-
guided. They can be equipped with grippers, tools or other means of
production and can perform handling and/or production tasks.”
The 3D vacuum gripper robot is therefore an industrial robot that can be used for handling tasks. A
workpiece can be picked up with the help of the vacuum gripper robot and moved within a
workspace. This workspace is the result of the kinematic arrangement of the robot, and it defines the
area that can be reached by the robot's effector. In the case of the vacuum gripper robot, the suction
cup of the effector and the workspace correspond to a hollow cylinder whose vertical axis coincides
with the robot's axis of rotation.
The geometry of the workspace is the result of the kinematic setup shown in Fig. 4 and comprises
one rotary axis and two linear axes.
The typical job for this type of robot can be broken down into the following work steps:
Positioning the vacuum gripper at the workpiece location
Picking up the workpiece
Transporting the workpiece within the workspace
Setting down the workpiece
Positioning the vacuum gripper or transporting the workpiece can be defined as a point-to-point
motion or as a continuous path. Activating the individual axes occurs sequentially and/or in parallel
and is influenced significantly by obstacles or predefined intermediate stations in the workspace. A
3/2 way solenoid valve and two connected pneumatic cylinders help control the vacuum gripper.
Suction cup = effector
Fig. 4: kinematic arrangement of the 3D vacuum gripper
robot
Vertical axis Horizontal axis
Turntable
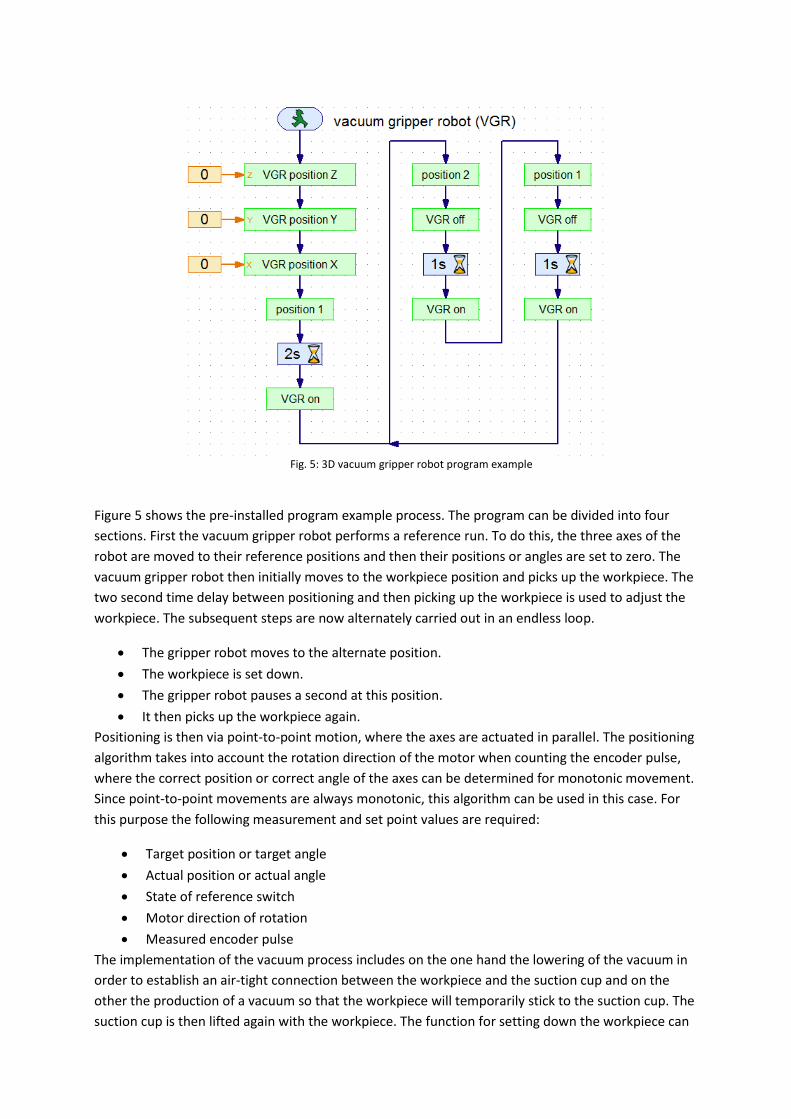
Figure 5 shows the pre-installed program example process. The program can be divided into four
sections. First the vacuum gripper robot performs a reference run. To do this, the three axes of the
robot are moved to their reference positions and then their positions or angles are set to zero. The
vacuum gripper robot then initially moves to the workpiece position and picks up the workpiece. The
two second time delay between positioning and then picking up the workpiece is used to adjust the
workpiece. The subsequent steps are now alternately carried out in an endless loop.
The gripper robot moves to the alternate position.
The workpiece is set down.
The gripper robot pauses a second at this position.
It then picks up the workpiece again.
Positioning is then via point-to-point motion, where the axes are actuated in parallel. The positioning
algorithm takes into account the rotation direction of the motor when counting the encoder pulse,
where the correct position or correct angle of the axes can be determined for monotonic movement.
Since point-to-point movements are always monotonic, this algorithm can be used in this case. For
this purpose the following measurement and set point values are required:
Target position or target angle
Actual position or actual angle
State of reference switch
Motor direction of rotation
Measured encoder pulse
The implementation of the vacuum process includes on the one hand the lowering of the vacuum in
order to establish an air-tight connection between the workpiece and the suction cup and on the
other the production of a vacuum so that the workpiece will temporarily stick to the suction cup. The
suction cup is then lifted again with the workpiece. The function for setting down the workpiece can
Fig. 5: 3D vacuum gripper robot program example

also be divided into three sections. First the suction cup is lowered, then the air is removed from the
cylinder, eliminating the vacuum, and finally the suction cup is raised again.

Industrial robots – definition and characteristics
Name five key words that describe an industrial robot according to VDI guideline 2860.
What tasks can the vacuum gripper robot be used for?
What is considered a robot workspace and how is this space defined?
What is the shape of the vacuum gripper robot workspace?
What is the kinematic arrangement of the vacuum gripper robot?
Industrial robots – definition and characteristics ANSWER
Name five key words that describe an industrial robot according to VDI guideline 2860.
Universal handling systems with several axes
Freely programmable with respect to movement sequence and paths or angles
Possibly sensor-guided
Can be equipped with grippers, tools or other means of production
Can perform handling and/or production tasks
What tasks can the vacuum gripper robot be used for?
The vacuum gripper robot can be used for handling tasks.
What is considered a robot workspace and how is this space defined?
The workspace of an industrial robot is the area that can be reached by the
robot's effector. The workspace is defined by the kinematic arrangement of the robot,
which is determined by the type and arrangement of the movable axes.
What is the shape of the vacuum gripper robot workspace?
The workspace of the vacuum gripper robot can be described as a hollow cylinder.
What is the kinematic arrangement of the vacuum gripper robot?
The kinematic arrangement of the vacuum gripper robot consists of a turntable and two
linear axes.
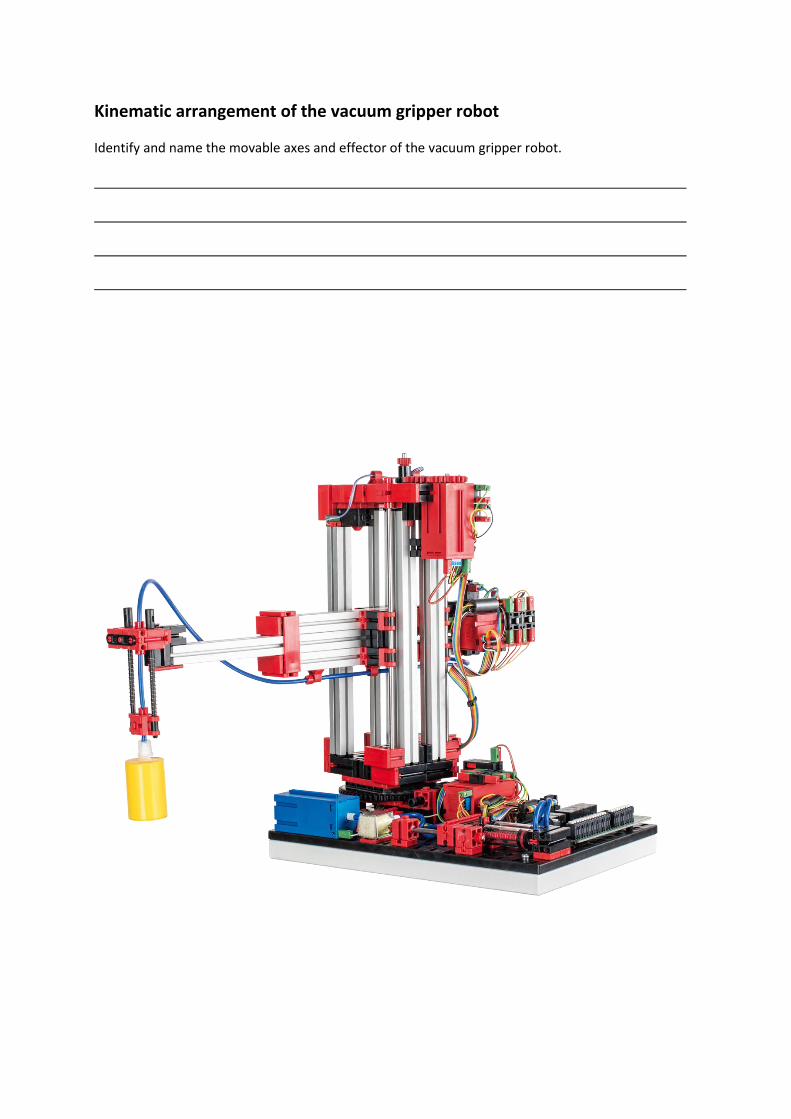
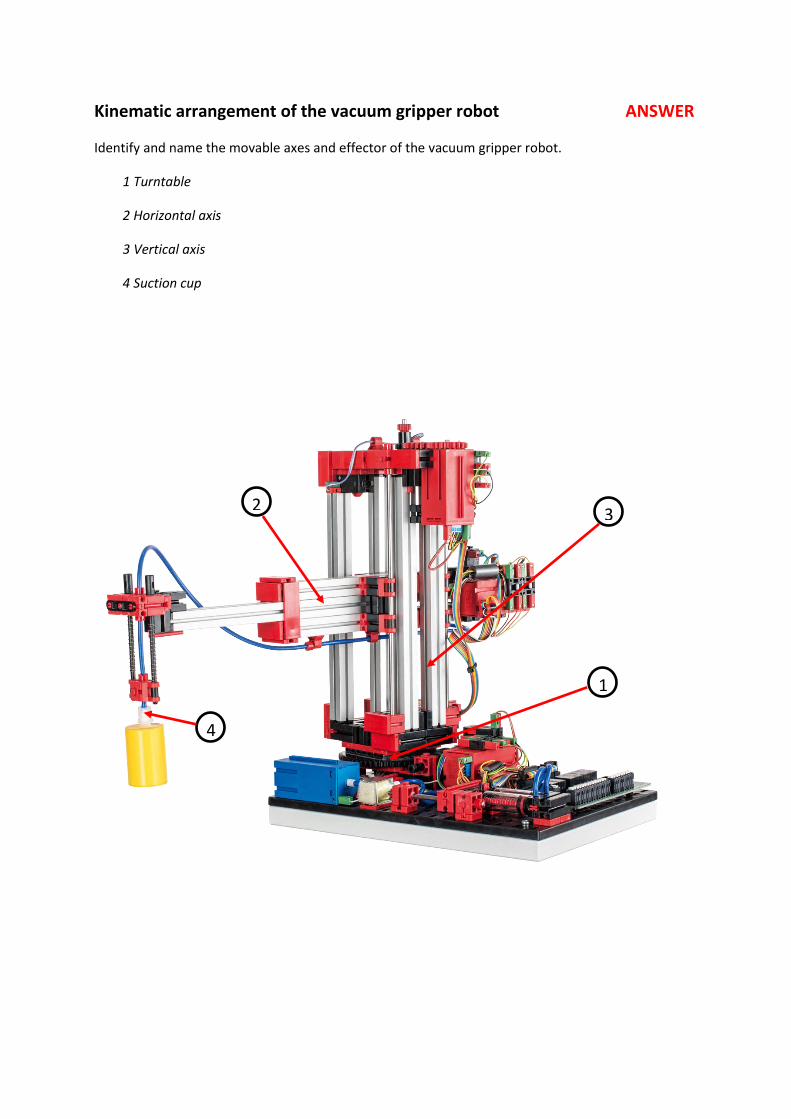
Kinematic arrangement of the vacuum gripper robot
Identify and name the movable axes and effector of the vacuum gripper robot.
Kinematic arrangement of the vacuum gripper robot ANSWER
Identify and name the movable axes and effector of the vacuum gripper robot.
1 Turntable
2 Horizontal axis
3 Vertical axis
4 Suction cup
1
4
2 3

Handling tasks
Name the four typical jobs of the vacuum gripper robot.
For which two job types can positioning jobs be defined?
What controls the individual axes of the robot? What significantly influences actuation?
Why are reference runs necessary? Which measuring method requires reference runs?
Handling tasks ANSWER
Name the four typical jobs of the vacuum gripper robot.
Positioning the vacuum gripper at the workpiece location
Picking up the workpiece
Transporting the workpiece within the workspace
Setting down the workpiece
For which two job types can positioning jobs be defined?
Point-to-point motions
Continuous path
What controls the individual axes of the robot? What significantly influences actuation?
The axes of the vacuum gripper robot can be actuated sequentially and/or in parallel.
Actuation is significantly affected by obstacles in the workspace and by predefined
intermediate stations.
Why are reference runs necessary? Which measuring method requires reference runs?
Reference runs help to define the absolute position or absolute angle.
They are used for incremental measuring.
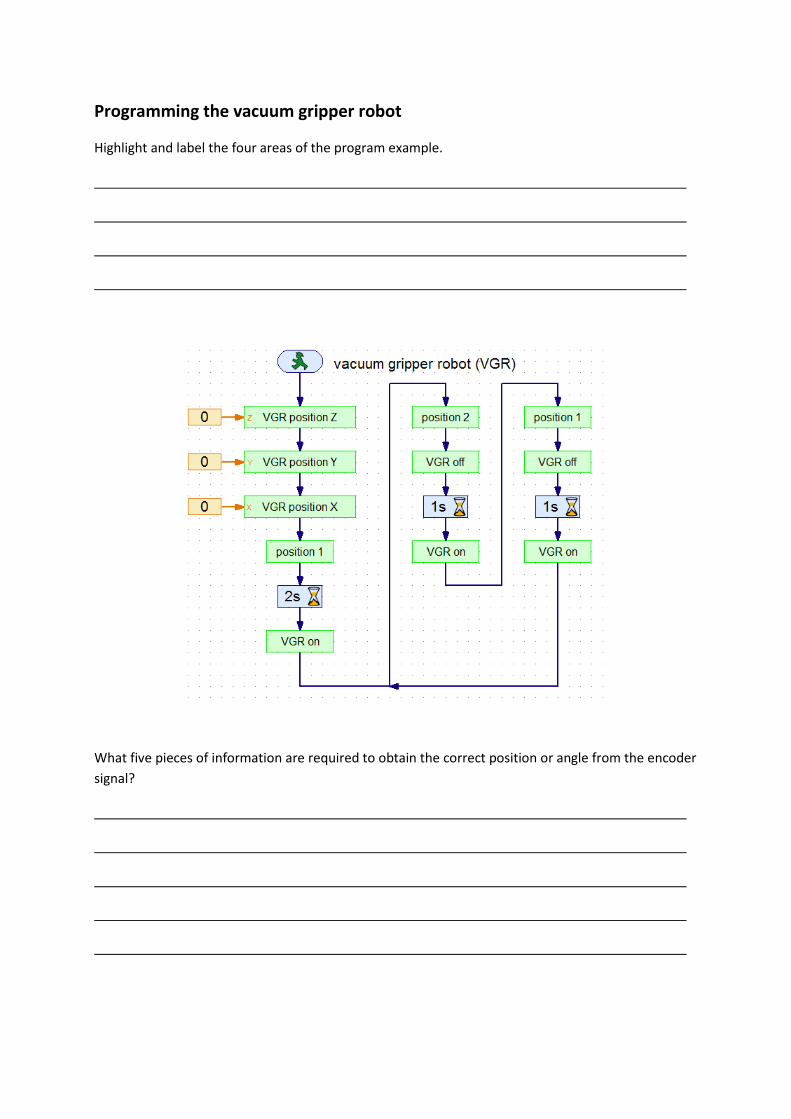
Programming the vacuum gripper robot
Highlight and label the four areas of the program example.
What five pieces of information are required to obtain the correct position or angle from the encoder
signal?

Programming the vacuum gripper robot ANSWER
Highlight and label the four areas of the program example.
1 Reference run
2 Initial positioning and pickup of workpiece
3 Workpiece transport, deposit and pick up again – variant 2
4 Workpiece transport, deposit and pick up again – variant 1
What five pieces of information are required to obtain the correct position or angle from the encoder
signal?
Target position or target angle
Actual position or actual angle
State of reference switch
Motor direction of rotation
Measured encoder pulse
1
2
3 4

Maintenance and troubleshooting
The vacuum gripper robot is generally maintenance free. It may be necessary to re-grease the worm
or worm screw nut. Keep in mind that it is possible to avoid a friction-type connection by applying a
thin layer of grease at specific locations.
Problem: One of the three motors/axes is no longer moving.
Solution: Visually inspect the robot. Specifically check the cabling of the failed motor. If
necessary, use a multimeter to check if there is a broken cable.
Problem: One of the three motors/axes moves beyond the specified position and no longer
stops on its own.
Solution: Verify that the three encoder cable wires are correctly connected to the TXT
controller. The “Interface Test” window may be helpful.
Problem: One of the three motors/axes no longer moves to the positions correctly and
pauses briefly in front of the desired position.
Solution: Verify that the robot chucks and chuck nuts are secured tightly. If not, it is possible
that there could be slippage between the friction lock parts.
Problem: The suction cup loses the workpiece during transport.
Solution: Visually inspect the hose system. Make sure that the two connected pneumatic
cylinders can extend freely and, if necessary, moisten the suction cup. Make sure that
the workpieces are not dirty in order to ensure an air-tight connection between the
suction cup and workpiece.


