93
Vendor Reference Guide August 2017 – Version 1.04 Updated – October 18, 2017 – Page 27 Vendor Portal

Vendor Reference Guide
August 2017 – Version 1.04
Updated – October 18, 2017 – Page 27
Vendor Portal

Vendor Portal 10.5.2.188Vendor Portal 10.5.3.188 – August 2017
Vendor Reference Guide Contents
1. Introduction to the Vendor Portal
2. Getting Started – Basics
3. Costs and Cost Book Module
3.1 Understanding Costs and Cost Zones
3.2 Workflow for Submitting Costs
3.3 Download Cost Book
3.4 Enter Cost Changes
3.5 Import Cost Spreadsheet
3.6 Check Status
4. Item Adjustment Module
4.1 Understanding Item Adjustments
4.2 Workflow for Submitting Item Adjustments
4.3 Download Item Adjustment List
4.4 Enter Item Adjustments
4.5 Import Item Adjustments Spreadsheet
4.6 Check Status
5. Vendor Cost Entry Module
6. Vendor Item Adjustments Module
7. Reference Material
1

Vendor Portal 10.5.2.188Vendor Portal 10.5.3.188 – August 2017
1. Introduction to the Vendor Portal
2

Vendor Portal 10.5.2.188Vendor Portal 10.5.3.188 – August 2017 3
The Vendor Portal is …
Web interface into Power HQ (the centralized DeCA item catalog and data repository) that
enables you to communicate and collaborate with DeCA electronically
A view into item, cost, and adjustment data for all products you provide DeCA – by contract
if you have multiple contracts with DeCA
A protected means for providing costs and adjustments to DeCA electronically – access to
data is controlled so you can only see your data and another vendor cannot
A replacement for the DeCA Web Pricing System
An easy and accurate way to enter future cost changes and promotional adjustments –
using the data already in Power HQ
A means to continually increase data integrity and visibility in real-time
What is the Vendor Portal?
1

Vendor Portal 10.5.2.188Vendor Portal 10.5.3.188 – August 2017
Benefits of the Vendor Portal
Less Paperwork & Delay
• Everything in electronic
format
• Submit costs/adjustments
electronically and
immediately
• No more waiting on the mail
Accuracy & Efficiency
• Eliminate errors in entering
data provided on paper or
in spreadsheets
• Validation of key data
elements at the time of
data submission
Visibility
• You see your data only –
and other vendors cannot
see your data
• Current view into your
items, costs (historical,
current, and future) and
deals/adjustments
• Transparency between
you and DeCA – you see
what DeCA sees
Cost Savings & Profitability
• Reduced costs to provide
data – leverage existing
data versus starting from
scratch
• Real-time input and delivery
to ensure correct cost and
deals are in place on the
effective date
• Supports multiple costs and
adjustment submissions
4

Vendor Portal 10.5.2.188Vendor Portal 10.5.3.188 – August 2017
What’s Here and What’s Coming?
Vendor Portal Phase II
Submit new items – replaces
DeCA Form 40-15 (New Item
Presentation and File Maintenance)
Resale Ordering Agreement (ROA)
Contracting Management
Maintain items
GDSN synchronization
Bill Back Manager
Vendor Portal Phase I
View Cost Book
View Item Adjustments Lists
Enter and submit cost changes
Enter and submit adjustments (deals and
promotional offers)
View status of submitted costs and
adjustments
5
2018

Vendor Portal 10.5.2.188Vendor Portal 10.5.3.188 – August 2017
Impact on Vendors
Vendor Portal replaces DeCA’s current Web Pricing tool – all Web Pricing vendors must use the
Vendor Portal to submit cost changes and item adjustments for existing items.
EDI vendors can use the Vendor Portal, but can continue to submit costs and item adjustments via
EDI.
For EDI vendors, DeCA will accept Regular Costs through the 879 EDI transaction set and
Promotional EDI 889 for all Adjustments (no changes).
For Web Pricing vendors, you will no longer submit a “net cost” (i.e., your regular cost for a non-
promoted item minus any allowance/adjustments for promotional items). You will submit your regular
cost for an item and then submit adjustments to that cost for deals/promotions separately.
New items will not be submitted in the Vendor Portal until Phase II. New items will continue to be
submitted on DeCA Form 40-15 (New Item Presentation and File Maintenance) with initial regular cost
and entered by DeCA into Power HQ. Once the new item is added to Power HQ, you will submit cost
changes and adjustments via the Vendor Portal.
Vendor Portal will replace the use of DeCA Form 40-16 (DeCA Promotional Presentation Form). Item
adjustments/deals are to be submitted through the Vendor Portal or EDI 889 with the exception of
seasonal, One Time Buy (OTB), Shippers, and Pallets. These will continue to be submitted on a 40-
16 accompanied with a 40-15. The adjustments for these items will be entered into Power HQ by
DeCA.
You will see the same record that DeCA sees – a single version of the truth.
6

Vendor Portal 10.5.2.188Vendor Portal 10.5.3.188 – August 2017
Overview of How the Vendor Portal Works
Submit cost changes and item
adjustments (deals) via the Vendor
Portal (your view into Power HQ)
The changes go into the Staging
Tables, which are a holding area until
the entry is accepted or rejected (based
on defined business rules or DeCA
actions)
You can review, correct, and resubmit
rejected changes if necessary
Accepted changes move to the
Operational Tables where they
become effective on the specified Start
Date
Vendors
Vendor Portal
Staging Tables
Operational Tables
Power HQ
DeCA
Review and accept or
reject changes not
automatically
accepted/rejected by
defined business rules
(e.g., item adjustments
for negotiated
promotions)
7

Vendor Portal 10.5.2.188Vendor Portal 10.5.3.188 – August 2017
2. Getting Started – Basics
8

Vendor Portal 10.5.2.188Vendor Portal 10.5.3.188 – August 2017
How to …
1. Enter your assigned Login Name.
Your login is tied to roles and
permissions that determine what
you can see and do in the Vendor
Portal.
2. Enter your Password.
3. Click the Login button.
If you are unable to log into the Vendor
Portal, contact the Vendor Portal Help Desk
(available 24x7) at
1-800-531-2222 and enter PIN 7780
Logging into Vendor Portal
If you do not have a Login
Name, contact the Vendor Portal
Help Desk if your company has
been on-boarded
9
Login to the Vendor Portal via Internet Explorer (IE-11) by going to www.commissaries.comand select Our Agency > About DeCA > Business with DeCA > Vendors/EBS

Vendor Portal 10.5.2.188Vendor Portal 10.5.2.188Vendor Portal 10.5.3.188 – August 2017
How to Change Your Password
To change your login
password…
1. Click on your username.
2. Click on the User Security
popup.
In the User Security window…
3. Enter your current
password.
4. Enter and confirm your new
password (see Password
Requirements).
5. Leave the Password Never
Expire box checked or use
the calendar to select a
Password Expiration Date.
6. Click the Save button.
7. Click OK on the
confirmation message,
10

Vendor Portal 10.5.2.188Vendor Portal 10.5.3.188 – August 2017
How to …
1. In the Vendor Selection area, the Select Vendor
radio button is set as the default selection.
2. The Select Vendor section lists your existing
contracts. Select the desired contract by
double-clicking on the row.
3. By using the UPC EAN radio button, you can
also enter a UPC (Universal Product Code),
EAN (European Article Number), or PLU
(Product Look Up) number and click the
button. A pop-up window will
display the Vendor Numbers for the item.
Vendor Selection
11
Many DeCA vendors have multiple contracts or agreements with DeCA. In the Vendor Portal …
• The Vendor Number is 6 digits in the format of xxxx-xx. The first 4 digits are your traditional Vendor Number. The
2 digits after the dash establishes a one-to-one relationship with the contract PIIN.
• The Vendor Name is followed by a dash and a 7-digit alpha-numeric that is your contract PIIN.
The Vendor Selection screen enables you to select the vendor number/contract you want to view. After you are in the
Vendor Portal, you can toggle between your various contracts.

Vendor Portal 10.5.2.188Vendor Portal 10.5.3.188 – August 2017
Modules in Vendor Portal
12
Cost Book • Detailed information, including current costs, on the items
you provide to DeCA
• Template for providing cost changes via electronic import
Item Adjustment • Template for providing item adjustments (deals and
promotional pricing) via electronic import
Vendor Cost Entry • Input cost changes directly into the Vendor Portal
• Review status (accepted, rejected, etc.) of previously
submitted cost changes
Vendor Item
Adjustments
• Input item adjustments directly into the Vendor Portal
• Review status (accepted, rejected, etc.) of previously
submitted item adjustments
Electronic Imports • Import cost changes and/or item adjustments from Excel
spreadsheets into the Vendor Portal
View Generated Report • Means to export and save contents of your Cost Book and
Item Adjustment list into Excel
• View and save reports you create
Vendor Maintenance • Basic vendor information – view only
Vendor Store Table • Identifies the Cost Zones and Stores within those Cost
Zones that you are authorized to serve
The modules you can see and use are defined by your assigned role in Vendor Portal (see next page).
Vendor Portal 10.5.2.188Vendor Portal 10.5.3.188 – August 2017
Vendor Roles and Permissions
13
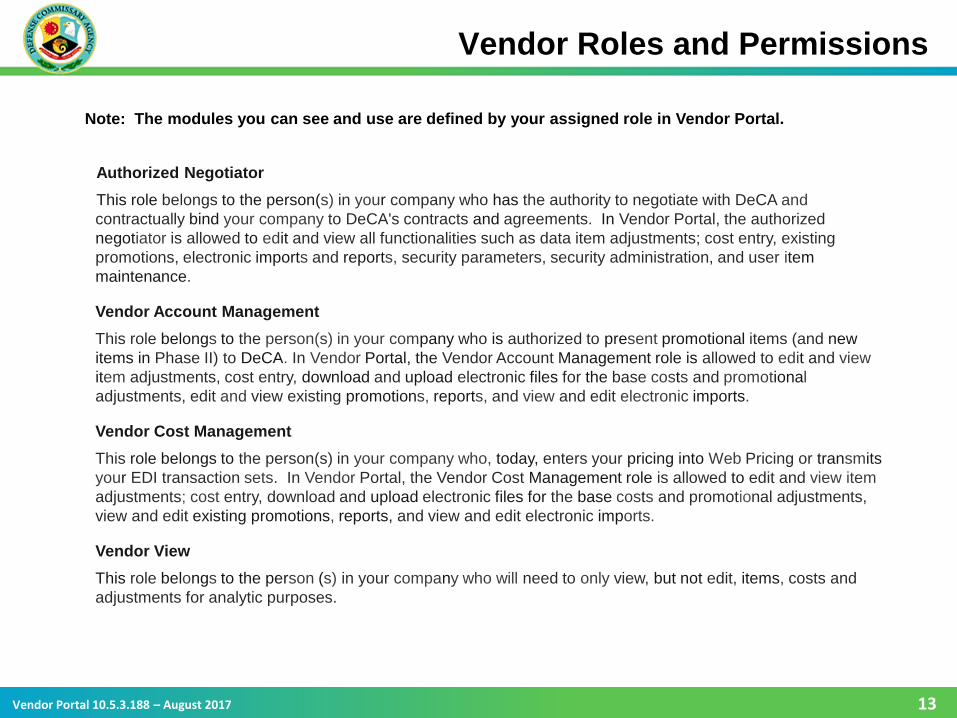
Note: The modules you can see and use are defined by your assigned role in Vendor Portal.
Authorized Negotiator
This role belongs to the person(s) in your company who has the authority to negotiate with DeCA and
contractually bind your company to DeCA's contracts and agreements. In Vendor Portal, the authorized
negotiator is allowed to edit and view all functionalities such as data item adjustments; cost entry, existing
promotions, electronic imports and reports, security parameters, security administration, and user item
maintenance.
Vendor Account Management
This role belongs to the person(s) in your company who is authorized to present promotional items (and new
items in Phase II) to DeCA. In Vendor Portal, the Vendor Account Management role is allowed to edit and view
item adjustments, cost entry, download and upload electronic files for the base costs and promotional
adjustments, edit and view existing promotions, reports, and view and edit electronic imports.
Vendor Cost Management
This role belongs to the person(s) in your company who, today, enters your pricing into Web Pricing or transmits
your EDI transaction sets. In Vendor Portal, the Vendor Cost Management role is allowed to edit and view item
adjustments; cost entry, download and upload electronic files for the base costs and promotional adjustments,
view and edit existing promotions, reports, and view and edit electronic imports.
Vendor View
This role belongs to the person (s) in your company who will need to only view, but not edit, items, costs and
adjustments for analytic purposes.

Vendor Portal 10.5.2.188Vendor Portal 10.5.3.188 – August 2017
Navigation Basics
14

Vendor Portal 10.5.2.188Vendor Portal 10.5.3.188 – August 2017
Stage Status Indicators
Stage Status
OPEN
PENDING ACCEPT
APPLIED
PENDING REJECT
REJECTED
15
Open – The Adjustment is open in the Staging Table waiting for action from DeCA.
Pending Accept – The Adjustment has been accepted but has not yet been applied to the operational tables.
Applied – The Cost Change or Adjustment has been accepted and applied to the operational tables.
Pending Reject – The Adjustment has been rejected; however you have the opportunity to resubmit the
Adjustment based on the rejection code and reason.
Rejected – The Cost Change or Adjustment has been rejected.
Vendor Portal uses the following color coding to indicate the status of submitted changes in the Staging Tables.

Vendor Portal 10.5.2.188Vendor Portal 10.5.3.188 – August 2017
Filter to Find the Data You Want
Vendor Portal
gives you access
to detailed
information on all
the items you
provide to DeCA.
In most modules,
you can use filters
to narrow down to
just the specific
data you need.
How to …
1. Select filter option from the dropdown (e.g., UPC EAN to find information on a specific item). The filter options will vary based on the module you are in. To see all items, just click Apply and go to step 7.
2. Select a filter logic from the dropdown. The most commonly used logic for each filter is displayed as the default and can ty pically be used (see next page).
3. Enter the filter value or use the Find icon. The Find icon allows you to enter a specified value or initiate a wildca rd search.
4. Click Add.
5. Verify the filter displays in the summary bar. If it does not, click Add again. To delete a filter, click on the X. To delete all filters, click Clear. In some modules, a default filter (e.g., Include any one of” Recent Submissions”) may be displayed. Click Clear to delete the filter.
6. Click Apply.
7. Results based on the filters specified display in the summary grid. You can click on any column heading to sort the results (either ascending or descending).
8. In the Vendor Cost Entry and Vendor Item Adjustments modules, click to select a row and display additional data.
16

Vendor Portal 10.5.2.188Vendor Portal 10.5.3.188 – August 2017
Include “Any
one of”
Includes items with the specified value.
For example: To view items with for specific UPCs, EANs or
PLUs
Criteria = UPC EAN
Values = 4011, 279000-00037, 70821-00056
Exclude
“Any one of”
Excludes items with the specified value from retrieval.
For example: To view all items, except those with specific
UPCs, EANs, or PLUs
Criteria = UPC EAN
Values = 4011, 279000-00037, 70821-00056
Less Than Retrieves items with a value less than the target value.
For example: To retrieve items that have a (cost/adjustment)
start date earlier than (less than) a certain date
Criteria = Start Date
Values = 12/31/2017
Less Than
Or Equal To
Retrieves items that, for the criteria, have a value that is equal to
or less than the specified value.
For example: To view all items with UPCs equal to or less than
27900-00037
Criteria = UPC EAN
Values = 27900-00037
Greater Than Retrieves items that, for the criteria, have a value that is greater
than the specified value.
For example: To view item UPC EANs greater than 70821-
00056
Criteria = UPC EAN
Values = 10821-00056
Greater Than
Or Equal To
Retrieves items that, for the criteria, have a value that is equal to
or greater than the specified value.
For example: To view all items with a (cost/adjustment) end
date including or later than 12/31/2017
Criteria = End Date
Values = 12/31/2015
Inside Range Retrieves items that, for the criteria, are within a specified
range.
For example: To view items that have an adjustment start
date within the range 9/30/2016 and 9/30/2017
Criteria = Start Date
From = 09/30/16
To = 09/30/17
Outside
Range
Retrieves items that, for the criteria, have a value outside a
specified range.
For example: To view items that have a start date
outside of the range of 12/15/2016 to 1/31/2017
Criteria = Start Date
From = 12/15/2016
To = 1/31/2017
Like (uses
the %
wildcard)
Retrieves items that, for the criteria, have a value that
matches or is similar to the value entered in the Like field.
For example: To view all items that have a UPC EAN that is
similar to (begins with or ends with) 10821:
Criteria = UPC EAN
Like = 10821%
Not Like Exclude items that, for the criteria, have the specified value.
For example: To view all items that are not similar to (do not
begin or end with) 10821
Criteria = UPC EAN
Not Like = 10821%
Not Exist Used as a second filter to show any missing items with empty
specified criteria fields.
For example: First filter by a particular UPC or Brand Code.
Add a 2nd filter:
Criteria = Start Date
Not Exist
17
Description/Examples of Logic Statements

Vendor Portal 10.5.2.188Vendor Portal 10.5.3.188 – August 2017
How to …
1. Select the first filter using the dropdown. Filter options will vary by
module.
2. Select the filter logic.
3. Enter or select the value.
4. Click Add (click a second time if there is a Find icon).
5. Select the next filter(s) from the dropdown and click Add (click a second
time if there is a Find icon).
6. When all filters are entered and displayed in the filter bar, click Apply.
Using Multiple Filters
18
You can use
multiple filters to
narrow down or
find the data you
need.

Vendor Portal 10.5.2.188Vendor Portal 10.5.3.188 – August 2017
How to …
1. If you do not know the exact value to enter for a filter, click on the Find icon in the filter bar. A new window opens.
2. Click the drop down arrow in the Filter By box and select the filter (e.g., Brand Description).
3. Click the down arrow in the search logic field and select the logic statement (e.g., Like).
4. Use the wildcard (%) to search for the value. You can use the wildcard on both sides of value (e.g., %almo% will display all options that have “almo” as part of the Brand Description). You can also just use the wildcard on one side of the value (e.g., almo% will display options that begin with “almo”).
5. Click the Add button. The requested filter will appear in the search summary bar.
6. Click the Apply button.
7. The search data will appear in the grid. Select the item you want.
8. Then, click Apply at the bottom of the screen.
(continued on next page)
Filtering Using the Find Icon and Wildcards
You can use the Find icon and wildcards (%)
to find the correct values to use in filtering.
19

Vendor Portal 10.5.2.188Vendor Portal 10.5.3.188 – August 2017
Filtering Using Find Icon and Wildcards (cont.)
How to (cont.)…
9. The system returns to the primary screen with the search value inserted.
10. Click Add.
11. Validate filter(s) displayed in summary bar.
12. Click Apply.
13. Results display in the grid.
20

Vendor Portal 10.5.2.188Vendor Portal 10.5.3.188 – August 2017
Export and View Reports
In most modules, you can create, export and view reports that display the results of your filtering. The steps for this are shown
below. You can select from three file formats for exporting reports:
1. PDF – displays reports as shown on screen
2. CSV (Comma delimited) – opens report in an Excel spreadsheet, with formatting (the most commonly used)
3. CSV (Comma delimited, Unformatted values) – opens the report in an Excel spreadsheet without formatting
21

Vendor Portal 10.5.2.188Vendor Portal 10.5.3.188 – August 2017
3. Costs & Cost Book Module
22

Vendor Portal 10.5.2.188Vendor Portal 10.5.3.188 – August 2017
3.1 Understanding Costs and Cost Zones
23

Vendor Portal 10.5.2.188Vendor Portal 10.5.3.188 – August 2017
1. Regular Cost is the cost of an Item without any Adjustments. Regular base cost changes go directly into the
operational tables after passing through Vendor Portal business rules to filter out error conditions and incorrect data.
Vendors will see their regular base cost changes marked as Accepted if they pass all Business Rules and Filters or
Rejected if they do not pass.
2. Web Pricing vendors will no longer submit a “net cost” (i.e., regular cost for a non-promoted item minus any
allowance/adjustments for promotional items). You will submit your regular base cost for items. You will then
submitted adjustments to the base cost for deals/promotions separately.
3. Regular Costs are submitted via:
• EDI 879 and Vendor Portal
• Bi-weekly – submitted by the 10th or 25th of the month to apply to the 1st or 16th of the next month,
respectively.
• Weekly as identified in the contract. Submitted five days prior to start date (e.g., submit by Tuesday to start
on Saturday).
• Form 40-15 – submitted when a new item is added. The cost for the item will be added by DeCA File
Maintenance the date the item is added to the Master Catalog, not the date the item is allocated (allowing
Sales to see any vendor cost changes prior to item availability in the distribution center).
4. Power HQ will populate an end date for a Regular Cost only when a new Regular Cost is submitted.
5. Item cost will revert back to the Regular Cost at the end of a promotion or cost adjustment period.
6. Power HQ will not accept a Regular Cost submission/change for a date with an active adjustment.
7. “Last-in” submission applies only if the cut-off date has not passed.
Understanding Costs in Vendor Portal
24

Vendor Portal 10.5.2.188Vendor Portal 10.5.2.188Vendor Portal 10.5.3.188 – August 2017
Your contracts and agreements with DeCA define the Cost Zones and Stores you serve. These are defined in the
Vendor Store Table module on a vendor and contract basis. The Stores associated with any defined Cost Zone
will vary between vendors.
You need to provide a cost for Cost Zone 99 (EDI Price Zone DoDAAC HQCAAA on the EDI 879), which is the
“base” cost of the item for all Cost Zones and Stores you serve. If you have a Cost Zone(s) that requires a base
cost that is different than Cost Zone 99, a separate cost entry must be entered for that Cost Zone(s).
What is the importance of Cost Zone 99? Cost Zone 99 will always be the cost that the system will revert back to in
the case of a cost record having an end date without a future cost to change to. Any item that is in the system
without a cost assigned to Cost Zone 99 will risk system error that will result in adverse impact on invoices and
retails in our stores.
For example, you want to submit the following cost changes for an item:
Cost Zone Region Case Cost
99 All Cost Zones $99.00
22 Alaska $110.00
23 Hawaii $110.00
First, you enter the Case Cost of $99.00 for Cost Zone 99. Then enter the Case Cost of $110.00 for Cost Zones 22
and 23. That’s all you have to enter since the cost entered for Cost Zone 99 will apply to the other Cost Zones you
serve.
Important Note: Each time a new cost for Cost Zone 99 is submitted (via EDI 879 or the Vendor Portal), the
new Base Cost 99 will override all other Cost Zones. This will require a new cost entry for each Cost Zone
that continues to be different from the Base Cost 99.
25
How Cost Zones Work in Vendor Portal

Vendor Portal 10.5.2.188Vendor Portal 10.5.2.188Vendor Portal 10.5.3.188 – August 2017 26
How to …
1. Open the Vendor Store Table module.
To view all Cost Zones and Stores, click Apply.
To filter results…
2. Click the drop down arrow in the Filter By box and select the filter.
3. Click the down arrow in the search logic field and select the logic statement.
4. Enter or use the Find icon to select the filter value.
5. Click the Add button. The requested filter will appear in the search summary bar.
6. Click the Apply button.
7. Click on any column heading to sort the data.
The Vendor Store Table identifies the Cost Zones and the Stores within those
Cost Zones that you are authorized to serve based on your contract/agreement
with DeCA.
The Vendor Store Table
You can filter the Vendor Store Table by Store ID, DoDAAC, Store Name,
Distributor Code, or Cost Zone.

Vendor Portal 10.5.2.188Vendor Portal 10.5.2.188Vendor Portal 10.5.3.188 – August 2017
Cost
Zone Region/Division
Pricing
DoDAAC
11 Europe HQCAAB
21 Northwest CONUS HQCP07
22 Alaska (see note) HQCP15
23 Hawaii (see note) HQCP16
24 Pacific HQCAAC
31 California HQCP08
32 Southwest CONUS (not
California)
HQCP09
41 Midwest CONUS (Upper) HQCP06
42 Midwest CONUS (Lower) HQCP05
51 Central CONUS HACP04
61 Southern CONUS HQCP03
71 Northeast CONUS (Upper) HQCP02
72 Northeast CONUS (Lower) HQCP01
99 Base Cost Zone HQCAAA
Cost Zones, Regions, and Pricing DoDAACs
Note: Alaska and Hawaii stores could be included in Cost Zone 21, 22, or 23 depending on how stores and cost zones are defined in your contract.
27

Vendor Portal 10.5.2.188Vendor Portal 10.5.3.188 – August 2017
3.2 Workflow for Submitting Costs
28

Vendor Portal 10.5.2.188Vendor Portal 10.5.3.188 – August 2017
Cost Changes via Electronic Import Workflow
29
Steps for using the Cost Book to submit cost changes via the Electronic Import module…
• Open Cost Book
• Select, Add, and
Apply filters to
select the items
you want to
submit costs for
• Click
• Select CSV
comma delimited
as the file type
• Click OK on the
report generated
message
Step 1
Export Spreadsheet
• Open View
Generated Report
• Select your report
from the list
• Click
• An Excel
spreadsheet opens
• Enter cost data
• Save to your PC as
an .xls file
Enter cost data• Case Cost• Start Date• End Date
(if applicable)
Step 2
Enter Costs
• Open Electronic Imports
• Click
• For TransTypeID, enter “0”
• Click
• Click
• Locate the .xls file on your
PC and double click on it
• Click to import the
file
• When the Import Data
appears, click
• Click OK on the two
confirmation messages
• Results tab shows the
number of rows, inserts,
errors, warnings, and
excludes
Step 3
Import Spreadsheet
• Open Vendor
Cost Entry
• Click Apply to
see recent cost
submissions
• Grid will show
submitted
changes as
Applied or
Rejected
Step 4
Check Status
29

Vendor Portal 10.5.2.188Vendor Portal 10.5.3.188 – August 2017
3.3 Download Cost Book
30

Vendor Portal 10.5.2.188Vendor Portal 10.5.3.188 – August 2017
The Cost Book
The Cost Book serves two primary functions:
1. Allows you to view current cost and other information on all the items you provide to DeCA under a specific contract or
agreement (i.e., unique vendor number) – you see what DeCA sees.
2. Allows you to create and download a spreadsheet to enter and submit cost changes electronically.
How to get your Cost Book…
1. Open Cost Book module. The Cost Book displayed is based on your Vendor Number and Name.
2. To see all items in your Cost Book, click Apply.
3. The total number of pages and records for the designated contract/ agreement are displayed.
4. You can sort by any column to change the ways the results are displayed.
31

Vendor Portal 10.5.2.188Vendor Portal 10.5.2.188Vendor Portal 10.5.3.188 – August 2017
Filtering the Cost Book
To limit the items to review, you can filter the Cost Book by UPC, Brand Code, Start Date, and/or Cost Zone.
How to …
1. Select filter (e.g., Brand Code).
2. Select logic statement. Typically you can use the default logic statement displayed.
3. Enter the value (e.g., York) or use the Find icon if shown to select the value.
4. Click Add. If a specific value is required (indicated by the Find icon), click Add again.
5. Click Apply.
6. The total number of pages and records satisfying the filter criteria are displayed.
Note that the UPC EAN appears multiple times in the grid. The UPC EAN is listed for each Cost Zone served per your contract/agreement.
32

Vendor Portal 10.5.2.188Vendor Portal 10.5.3.188 – August 2017
Data Provided in the Cost Book
The Cost Book provides the
following data fields for each item
• Vendor Number
• Contract Number
• UPC EAN
• Case GTIN
• Item Description
• Brand Code
• Case Pack
• Unit UOI (Unit Unit of Issue)
• Future Case Cost
• Start Date
• End Date (if applicable)
• Cost Zone
• Region
• Store ID
• Current Case Cost
• Current Unit Cost
• RSL Code
• Vendor Item (not currently used –
reserved for produce)
Blank fields - where you
enter future cost changes
You can sort on any column
to rearrange the data
33

Vendor Portal 10.5.2.188Vendor Portal 10.5.3.188 – August 2017
Export the Cost Book
34
You can export the Cost Book (with all items or for items based on filtering) for your internal use or to use as a
template for submitting cost changes via Electronic Import.
Export entire
Cost Book
or filter to
get the info
you want and
click Export
• Open the View Generated
Report module
• Select the report from list
by double-clicking on it
• Click the View icon
• On the popup message,
click “Open” or “Save” and
save the file as an Excel
spreadsheet
Click OK
• Select file format (select CSV (Comma
delimited) to export to Excel
• Select Generate Report

Vendor Portal 10.5.2.188Vendor Portal 10.5.3.188 – August 2017
Downloaded Cost Book
The generated report opens in the Excel spreadsheet format (based on all items or the defined filters), displaying
details on the items you provide to DeCA under a specific contract or agreement. As shown, you can use the
spreadsheet to enter and submit cost changes. as described in the next section of this guide.
Save the file as an Excel workbook in the document library on your PC.
Enter cost changes by UPC and Cost Zone
Template for
entering cost
changes by
item and Cost
Zone
35
NOTE: You can use own spreadsheet instead of the exported Cost Book spreadsheet if it meets the
Spreadsheet Requirements described in the next section.

Vendor Portal 10.5.2.188Vendor Portal 10.5.3.188 – August 2017
3.4 Enter Cost Changes
36

Vendor Portal 10.5.2.188Vendor Portal 10.5.3.188 – August 2017 37
Spreadsheet Requirements
Required Column Headers and Mandatory Information to Upload Cost Changes
Whether using the exported Cost Book spreadsheet or your own spreadsheet, the column headings for the mandatory
fields must labeled exactly as follows (all upper case) for the electronic import to be successful. The columns can be
in any order within the spreadsheet.
UPC_EAN
FUTURE_CASE_COST
START_DATE
COST_ZONE
Output reports from vendors’ systems can be used to import into Vendor Portal contingent on
the following:
• The column headers and mandatory fields are included (exactly as above, cases sensitive)
• Ensure no formulas are present in the columns.
• Vendor Portal will only import the above information into the operational table.
• The upload must be in Excel Workbook format.
• The uploaded file cannot exceed 2 megabytes (Mb) of information.
• If the workbook has multiple tabs, the system will only import the first tab.
Formulas
Formulas cannot be used in any of the mandatory columns on the spreadsheet for the import to be successful. If you use
formulas to calculate a field, do it in a separate column (or spreadsheet) and copy the column and paste it as Values (1,2,3) under the mandatory column heading.

Vendor Portal 10.5.2.188Vendor Portal 10.5.3.188 – August 2017
Enter Costs into a Spreadsheet
After your Cost Book report opens in the Excel spreadsheet, you can enter your cost changes.
Do not change the column headers of the UPC_EAN, FUTURE_CASE_COST, START_DATE, and
COST_ZONE columns if you plan to use the spreadsheet for Electronic Imports.
Enter Cost Changes by Cost Zone
• Future Case Cost• Start Date• End Date
(if applicable)
Key points about entering cost changes and preparing a spreadsheet for Electronic Import
You must enter the FUTURE CASE COST and START DATE by Cost Zone. A Future Case Cost amount can be
calculated by multiplying the future Unit Cost by the Case Pack (column G in the above example).
Enter the END DATE only if applicable.
Delete any rows that do not contain cost changes.
The following fields must be included in any cost submission: UPC, FUTURE CASE COST, START DATE, and
COST ZONE
38

Vendor Portal 10.5.2.188Vendor Portal 10.5.3.188 – August 2017
Enter Costs into Spreadsheet (cont.)
Following is an excerpt of a completed spreadsheet.
• The bold text indicates the mandatory fields.
• The red text indicates what you must enter.
How to …
1. For each UPC that you want to submit a cost change for, enter the Future Case Cost and Start Date for applicable Cost Zones for your contract/agreement.
Note that the UPC EAN appears multiple times in the Cost Book. The UPC EAN is listed for each Cost Zone served per your contract/ agreement.
2. If you format the spreadsheet, make sure the mandatory column headers and format are not changed.
3. Save the file as an Excel workbook in the document library on your PC.
39

Vendor Portal 10.5.2.188Vendor Portal 10.5.3.188 – August 2017
3.5 Import Cost Spreadsheet
40

Vendor Portal 10.5.2.188Vendor Portal 10.5.3.188 – August 2017
Electronic Import of Costs
How to …
1. Return to the Modules panel and select Electronic Imports.
2. Click on the button.
3. A secondary window opens.
Enter 0 (zero) for the Transaction Type ID (TransType ID:).
4. Click Load from Excel.
5. Click Select Excel File…
The Document Library on your PC will open. Find and double-click on the Excel file you saved. (The system will not accept a CSV file.)
6. The selected file name appears on the screen.
(continued on next page)
41

Vendor Portal 10.5.2.188Vendor Portal 10.5.3.188 – August 2017
Electronic Import of Costs (cont.)
How to (cont.) …
7. Click the Load button.
8. The Load status will display as a green bar.
9. The imported data displays in the lower section.
10. Click Save at the bottom of the screen.
11. A confirmation screens advises that “After Import you will not be able to edit input data. Continue?” Click OK.
12. A second confirmation screen advises the import was “Inserted successfully.” Click OK.
42
(continued on next page)

Vendor Portal 10.5.2.188Vendor Portal 10.5.3.188 – August 2017
Electronic Import of Costs (cont.)
43
How to (cont.)…
13. The Results tab will display and show:
• Number of rows – total number of rows submitted
• Number of inserts – number of rows successfully inserted
• Number of errors – number of rows that were not processed or imported due to errors
• Number of warnings – number of rows that were processed but received warnings based on business rules
• Number of excludes – number of rows that were excluded from the import due to no cost change data in those rows (this could be a large number if you do not filter the Cost Book and/or delete rows without cost changes)
In this example, all rows were processed without warnings or errors.
14. Optionally, click the Import tab to view the downloaded data.
15. Click the to close the Electronic Imports window.

Vendor Portal 10.5.2.188Vendor Portal 10.5.3.188 – August 2017
Warnings alert you to conditions that are generally outside the scope of defined business rules, but the record will be
imported.
Following is an example that shows warnings based on violations for the minimum number of days to submit a change
and the maximum percentage of change allowed.
Electronic Import of Costs - Warnings
44

Vendor Portal 10.5.2.188Vendor Portal 10.5.3.188 – August 2017
Electronic Import of Costs - Errors
An Error condition indicates that the record was not successfully imported. An Error typically occurs when a mandatory
data value is not provided. As illustrated below, only 12 of the 15 submitted items were inserted. The 3 items without a
Start Date ‘errored out’ and did not import.
To correct and resubmit the items, you can:
• Import a corrected spreadsheet via the Electronic Imports module
or
• Use the Vendor Cost Entry module to submit a correction
45

Vendor Portal 10.5.2.188Vendor Portal 10.5.3.188 – August 2017
3.6 Check Status
46

Vendor Portal 10.5.2.188Vendor Portal 10.5.3.188 – August 2017
Verify Status of Imported Cost Changes
How to …
1. In the Module Panel,
select Vendor Cost
Entry.
2. Click Apply to see all
your recent cost
submissions or use
filtering to find specific
cost submissions.
3. The grid will show the
cost changes submitted
(sorted by date with the
most recent displayed
first). It also shows if
the cost change was
Applied (shown with a
grey background) or
Rejected (shown in red
text) based on business
rules.
4. Click on any row to get
the additional
information sidebar.
If you want to verify the status of imported cost changes…
47

Vendor Portal 10.5.2.188Vendor Portal 10.5.3.188 – August 2017
4. Item Adjustment Module
48

Vendor Portal 10.5.2.188Vendor Portal 10.5.3.188 – August 2017
4.1 Understanding Item Adjustments
49

Vendor Portal 10.5.2.188Vendor Portal 10.5.3.188 – August 2017
Item Adjustments – Key Principles
Key Principles
Adjustments typically reduce the regular cost.
Item adjustments are applied as a case adjustment $ amount. The system calculates the unit adjustment based on
the number of units in the case.
A regular cost change (EDI 879) will be rejected during an adjustment period on an item.
“Last-in” submission applies only if the record is open and the cut-off date has not passed.
Types of Adjustments/Promotions
Non-Negotiated Adjustments do NOT require DeCA approval and are independent of a promotional event.
Adjustment Code 1 – Off Invoice includes Every Day Low Price (EDLP) and Temporary Price Reduction (TPR).
Negotiated Adjustments require DeCA approval, are associated with a promotional event, and must be
submitted 120 days prior to the Voluntary Price Reduction (VPR) date. (Negotiations occur outside of the system.)
Adjustment Code 2 –Off Invoice Allowance includes Power Buys
and National Promotions.
Adjustment Code 10 - Managers Specials Scan Downs - the adjustment is taken off the retail price as a scan down.
Adjustments and Cost Zones
• Cost Zone 99 - applies adjustment to all Cost Zones (worldwide) and should be used for Non-Negotiated Promotions only (Adjustment Code 1).
• Cost Zone 999 – applies adjustment to the 48 states in the continental US (not Alaska and Hawaii) and should be used for Negotiated Promotions (Adjustment Codes 2 and 10). Alaska and Hawaii Cost Zones can be added if applicable.
Cost Zone 999 can only be used with adjustments (not costs).
50

Vendor Portal 10.5.2.188Vendor Portal 10.5.3.188 – August 2017
Negotiated and Non-Negotiated Item Adjustments
Non-Negotiated Promotions/Adjustments (Adjustment Code 1)
Non-negotiated promotional adjustments do not require action from DeCA personnel. They are processed through
defined business parameters and returned with a status of ‘APPLIED’ or ‘REJECTED’.
Negotiated Promotions/Adjustments (Adjustment Codes 2 and 10)
Negotiated Adjustments are submitted and initially returned as ‘OPEN’ in the Staging Table. DeCA personnel then
approve or reject the adjustment, resulting in a final Stage Status ‘APPLIED’ or ‘REJECTED’. (NOTE: Actual
negotiations occur outside of the system.)
51

Vendor Portal 10.5.2.188Vendor Portal 10.5.3.188 – August 2017
Stacking Adjustments/Promotions
An item (single UPC) can have a single adjustment or up to three simultaneous adjustments
(aka “promotional stacking”)
1. Adjustments that can be stacked:
• Adjustment Code 1 – EDI Off Invoice (Non-negotiated TPRs or EDLPs Off Invoice)
• Adjustment Code 2 – PowerBuy Off Invoice Allowance
• Adjustment Code 10 – Managers Special - Scandown
2. All adjustments will be reflected in the Retail Price calculation in Power HQ as “Adjustments”
(Retail Price = Regular Cost + Markup – Adjustments).
3. Adjustment Code 10 will be reflected in the Retail Price calculation, but will not be reflected in
the Net Cost of an item. Adjustment Code 10 is a scan based adjustment and will be collected
as an AVCM/VCM.
4. Promotions with the same Adjustment Code will not stack. The last one received will apply.
52

Vendor Portal 10.5.2.188Vendor Portal 10.5.3.188 – August 2017
Example of Adjustment/Promotions Stacking
Example: For the selected item and Cost Zone 71, there are three item adjustments for the month of May (a Manager’s Special,
a Powerbuy Off Invoice, and an EDI Off Invoice).
• From 5/1 – 5/15, Adjustments and apply, for a total Case Adjustment Amount of $16.94 ($4.10 + $12.84).
• From 5/16 - 5/22, only Adjustment applies, for a Case Adjustment Amount of $12.84.
• From 5/23 - 5/27, Adjustments and apply, for a total Case Adjustment Amount of $15.34 ($12.84 + $2.50).
• From 5/28 – 5/31, only Adjustment applies, for a Case Adjustment Amount of $12.84.
53
Event numbers are provided on the DeCA Promotional Calendar, which can be accessed from the
commissaries.com web page.

Vendor Portal 10.5.2.188Vendor Portal 10.5.3.188 – August 2017
4.2 Workflow for Submitting Item Adjustments
54

Vendor Portal 10.5.2.188Vendor Portal 10.5.3.188 – August 2017
Electronic Import Workflow
55
• Open Item
Adjustment
module
• Select, Add, and
Apply filters to
select the items
you want to
submit
adjustments for
• Click
• Select CSV
comma delimited
as the file type
• Click OK on the
report generated
message
Step 1
Export Spreadsheet
• Open View
Generated Report
module
• Select your report
from the list
• Click
• An Excel
spreadsheet opens
• Enter item
adjustment data
• Save to your PC as
an .xls file
Step 2
Enter Adjustments
• Open Electronic Imports
module
• Click
• For TransTypeID, enter “4”
• Click
• Click
• Locate the .xls file on your
PC and double click on it
• Click to import the file
• When the Import Data
appears, click
• Click OK on the two
confirmation messages
• Results tab shows number of
rows, inserts, errors,
warnings, and excludes
Step 3
Import Spreadsheet
• Open
Vendor Item
Adjustments
module
• Click Apply to
see recent
submissions
• Grid will show
status of
submitted item
adjustments
Step 4
Check Status
Enter Item
Adjustment
Data

Vendor Portal 10.5.2.188Vendor Portal 10.5.3.188 – August 2017
4.3 Download Item Adjustment List
56

Vendor Portal 10.5.2.188Vendor Portal 10.5.3.188 – August 2017
The Item Adjustment List
The Item Adjustment list contains all the items you provide to DeCA under a specific contract or agreement (i.e., unique
vendor number). You can use it to create and download a spreadsheet to enter and submit item adjustments electronically.
How to get your Item Adjustment list…
1. Open the Item Adjustment module. The items displayed are based on your Vendor Number and Name.
2. To see all items in your Item Adjustment list, click Apply.
3. You can sort on any column by clicking in thecolumn heading to change the way the results are displayed.
57

Vendor Portal 10.5.2.188Vendor Portal 10.5.3.188 – August 2017 58
Filtering the Item Adjustment List
1. You can filter the data in the Item Adjustment list by the options shown. The example shows filtering by Brand Code “Cadbury”.
2. The item UPC EAN appears multiple times. It is listed for each Cost Zone served per your contract/agreement.
3. Note the inclusion of Cost Zone 999 (CONUS Allowance zone). This Cost Zone allows you to submit an item adjustment that is for
the Continental U.S. (excludes Alaska and Hawaii). This Cost Zone should be used for all negotiated promotions.
4. The total number of pages and records are noted at the bottom of the screen.

Vendor Portal 10.5.2.188Vendor Portal 10.5.3.188 – August 2017
Data in the Item Adjustment List
The Item Adjustment List provides the following data fields for each item.
59
• Vendor Number
• Contract Number
• UPC EAN
• Case GTIN
• Item Description
• Brand Code
• Event (Event Number)
• Adjustment Code
• Case Adjustment Amount
• Cost Zone
• Region
• Store ID
• Start Date
• End Date
• Vendor Comment
• Unit Cost
• Current Case Cost
• Case Pack
• Unit UOM (Unit of Measure)
• Unit UOI (Unit of Issue)
• Minimum Quantity
• RSL Code
Where you enter
item adjustment data

Vendor Portal 10.5.2.188Vendor Portal 10.5.3.188 – August 2017
Export the Item Adjustment List
Export the entire
Item Adjustment
list or filter to get
the info you
want and click
the Export
button
• Open the View Generated
Report module
• Select the report from list
by double clicking on it
• Click the View icon
• On the popup message,
click “Open” or “Save” and
save the file as an Excel
spreadsheet
60
You can export the Item Adjustment list (with all items or for select items based on filtering) to use as a template for submitting item
adjustments via Electronic Import.
• Select CSV (Comma delimited) as the file
format to export to Excel
• Click Generate Report
• Click OK

Vendor Portal 10.5.2.188Vendor Portal 10.5.3.188 – August 2017
Downloaded Item Adjustment Spreadsheet
The generated report opens in Excel spreadsheet format (based on all items or the defined filters), displaying the items
you provide to DeCA under a specific contract or agreement. As shown, you can use the spreadsheet to enter and
submit item adjustments as described in the next section of this guide.
Save the file as an Excel workbook in the document library on your PC.
NOTE: Not all columns and rows shown in example.
61
NOTE: You can use own spreadsheet instead of the exported Item Adjustment spreadsheet if it meets the
Spreadsheet Requirements described in the next section.

Vendor Portal 10.5.2.188Vendor Portal 10.5.3.188 – August 2017
4.4 Enter Item Adjustments
62

Vendor Portal 10.5.2.188Vendor Portal 10.5.3.188 – August 2017 63
Spreadsheet Requirements
Required Column Headers and Mandatory Information to Upload Adjustments (Promotions)
Whether using the exported Item Adjustment spreadsheet or your own spreadsheet, the column headings for the
mandatory fields must labeled exactly as follows (all upper case) for the electronic import to be successful. The
columns can be in any order within the spreadsheet. Other fields can be included.
UPC_EAN
ADJ_CODE
CASE_ADJ_AMOUNT
COST_ZONE
START_DATE
END_DATE
EVENT An Event ID is required when entering a NEGOTIATED promotion (Adjustment Code
2, Power Buys or Adjustment Code 10, Manager Specials/Hot Deals Scandowns)
VENDOR_COMMENT Although not required, these can be used to communicate with the Category Management
Team as part of the evaluation of your offer.
Output reports from vendors’ systems can be used to import into Vendor Portal contingent on the following:
• The column headers and mandatory fields are included (exactly as above, cases sensitive)
• Ensure no formulas are present in the columns.
• Vendor Portal will only import the above information into the operational table.
• The upload must be in Excel Workbook format.
• The uploaded file cannot exceed 2 megabytes (Mb) of information.
• If the workbook has multiple tabs, the system will only import the first tab.
Mandatory for all Adjustments

Vendor Portal 10.5.2.188Vendor Portal 10.5.3.188 – August 2017
Mandatory Fields for Item Adjustments
NOTE: Not all columns and rows shown in example.
The following mandatory fields must be entered for an item adjustment.
1. Event ID Number – If the adjustment is tied to a promotional event (Negotiated Adjustments and Manager Specials),
enter the Event ID number. If not, leave this field blank. Refer to the DeCA promotional calendar on commissaries.com
for Event ID numbers.
2. Adjustment Code – Enter the appropriate Adjustment Code.
“1” for Non-Negotiated adjustments (e.g., EDLP and TPR). An Event ID is not required.
“2” for Negotiated adjustments/promotions (e.g., Power Buy, National Promotion). An Event ID number is
required.
“10” for Managers Special Scan Downs, a negotiated promotion. An Event ID number is required.
3. Case Adjustment Amount – Enter the adjustment amount on a per case basis (NOT a unit basis).
A Case Adjustment Amount can be calculated by multiplying the unit adjustment amount by the Case Pack quantity
(column R in example).
4. Start Date – Enter the date that the adjustment begins.
5. End Date – Enter the date that the adjustment ends.
6. Vendor Comments – Enter any applicable comments. This is not a mandatory field.
64

Vendor Portal 10.5.2.188Vendor Portal 10.5.3.188 – August 2017
Example: Non-Negotiated Promotion
This example shows how the mandatory fields for Item Adjustments are entered
into the downloaded Item Adjustment List for a non-negotiated promotion. The
vendor supplies items to all Cost Zones and is providing a TPR for its Cadbury
items. Using the spreadsheet created from exporting the Item Adjustment list …
1. Enter the item adjustment for Cost Zone 99 (Base Zone), which will apply to
all Cost Zones unless you enter an override. The example shows:
• Event is blank for a non-negotiated promotion
• Adjustment Code “1”
• Case Adjustment Amount of $2.20 (remember, the adjustment amount
is on the case cost)
• Start Date and End Date – these MUST be entered
• Vendor Comment is optional
2. No entry needed for the Cost Zones where the adjustment amount is the
same as the Base Zone, but they can be entered.
3. Override adjustments are provided for Cost Zones 11, 22, 23, and 34.
Do not change the column headings. You can delete unused columns and/or rows.
65
A Reminder on Cost Zones and Overrides
1. The Vendor Store Table module identifies the Cost
Zones (regions) and the Stores within those Cost
Zones that you serve under a specific contract or
agreement. You can also use the Find icon to view
your Cost Zones and Stores.
2. For non-negotiated promotions, use Cost Zone 99
(the base cost zone) to apply the item adjustment to
all Cost Zones and Stores (including EU and PAC)
unless you specify otherwise.
3. For negotiated promotions, use Cost Zone 999 to
apply the item adjustment to all Cost Zones and
Stores in the 48 continental states unless specified
otherwise. Alaska and Hawaii can be added
separately if applicable.

Vendor Portal 10.5.2.188Vendor Portal 10.5.3.188 – August 2017
Example: Negotiated Promotion
66
This examples shows how the mandatory fields for Item Adjustments are entered into the downloaded Item Adjustment List for a
negotiated promotion (Adjustment Codes 2 and 10). The example is for a Negotiated Promotion (Event 20170025); thus an
Event ID is required. Refer to the DeCA promotional calendar on commissaries.com for Event ID numbers.
Example where the item adjustment
applies to Cost Zone 999 (all Cost Zones
and Stores in the continental US) and
Alaska and Hawaii
Example where the item adjustment
applies to Cost Zone 999 only (all Cost
Zones and Stores in the continental US)

Vendor Portal 10.5.2.188Vendor Portal 10.5.3.188 – August 2017
4.5 Import Item Adjustments Spreadsheet
67

Vendor Portal 10.5.2.188Vendor Portal 10.5.3.188 – August 2017
Electronic Import of Item Adjustments
How To…
1. Open the Electronic Imports
module
2. Click
3. For TransTypeID, enter “4” for
Adjustments
4. Click Load from Excel
5. Click Select Excel File…
6. Locate the .xls file on your
computer and double click on it
(the system will not accept a CSV
file, only an .xls file)
7. Click Load to import the file
(continued on next page)
68
Non-Negotiated Adjustments are
submitted using the same process
as Negotiated Adjustments, but are
processed through system
generated business parameters
and are either Applied or Rejected
based on business rules.

Vendor Portal 10.5.2.188Vendor Portal 10.5.3.188 – August 2017
How To (cont.)…
8. The Import Data appears
9. Click Save
10. Click OK to confirm you
cannot edit input data after
the import and you want to
continue
11. Click OK on the inserted
successfully message
The system will display the
Results.
(see next page)
69
Electronic Import of Item Adjustments (cont.)

Vendor Portal 10.5.2.188Vendor Portal 10.5.3.188 – August 2017
Electronic Import Results
Click on the ‘Import’ tab to view the downloaded data.
70
The Results tab shows:
• Number of rows – total number of rows submitted
• Number of inserts – number of rows successfully inserted
• Number of errors – number of rows that were not processed due to errors
• Number of warnings- number of rows that were processed but received warnings based on business rules
• Number of excludes – number of rows that were excluded from the import due to no Item adjustment data in those rows. This could be a large number if you do not filter the Item Adjustment List and/or delete rows without item adjustment data.
In this example, all rows were processed without warnings or errors.
Click the to close the Electronic Imports window.

Vendor Portal 10.5.2.188Vendor Portal 10.5.3.188 – August 2017
Electronic Import – Warning Example
Example of Electronic Import with Warning
Six Non-Negotiated Adjustments were submitted using the following spreadsheet.
The ‘Results’ tab shows there was one
“warning” and identifies the problem.
You can check the status using theVendor Item Adjustments module.
71
The Start Date
violation

Vendor Portal 10.5.2.188Vendor Portal 10.5.3.188 – August 2017
4.6 Check Status
72

Vendor Portal 10.5.2.188Vendor Portal 10.5.3.188 – August 2017
Check Status of Imported Item Adjustments
How to …
1. In the Module Panel,
select Vendor Item
Adjustments.
2. Click Apply to see all
your recent
submissions or use
filtering to find specific
submissions.
3. The grid will show the
item adjustments
submitted (sorted by
date with the most
recent displayed first).
It also shows the status
of the submission in the
Staging Table.
4. Click on any row to get
the additional
information sidebar.
If you want to verify the status of imported item adjustments…
73

Vendor Portal 10.5.2.188Vendor Portal 10.5.3.188 – August 2017
5. Vendor Cost Entry Module
74

Vendor Portal 10.5.2.188Vendor Portal 10.5.3.188 – August 2017
Vendor Cost Entry Module
With the Vendor Cost Entry module you can:
1. Enter and submit cost changes directly in the Vendor Portal (vs. importing a spreadsheet). You can also use it to
correct errors that caused a cost change to be rejected.
2. Check the status of previously submitted cost changes. You can see if they have been accepted and applied to the
Operational Tables (shown in a grey background) or rejected (shown in red text).
Applied Cost
Rejected Cost
75

Vendor Portal 10.5.2.188Vendor Portal 10.5.3.188 – August 2017
Steps for Submitting Costs Manually
How To…
1. Open Vendor Cost Entry module.
2. Click in the top blank row.
3. Enter the UPC, EAN, or PLU
number and tab or click off the
entry. The system will populate the
basic item data.
4. Enter the cost change under Future
Case Cost. Remember, this is the
cost of the case (not the unit cost)
with no adjustments,
5. Enter the Cost Zone that the change
applies to (see insert).
6. Enter the Start Date (the date the
cost change is to become
effective).
7. Enter the End Date (if appropriate).
Typically this can be left blank.
8. Click the “+” sign to submit the entry
and open a new row. You can
continue to add additional cost
changes.
To submit cost changes for a limited number of items, you can use the Vendor Cost Entry module.
76
A Reminder on Cost Zones and Overrides
1. The Vendor Store Table module identifies the Cost Zones (regions) and the
Stores within those Cost Zones that you serve under a specific contract or
agreement. You can also use the Find icon to view your Cost Zones and
Stores.
2. Cost Zone 99 (the base cost zone) will apply the cost change to all Cost Zones
and Stores unless you specify otherwise.
3. For any Cost Zone where the item cost is not the same as for Cost Zone 99, you
must make an entry for that Cost Zone (steps 3-8). TIP: If you need to enter
multiple Cost Zones for an item, use CRTL + C to copy a UPC and CRTL + V to
paste it into the new row(s) so you don’t have to type it multiple times.

Vendor Portal 10.5.2.188Vendor Portal 10.5.3.188 – August 2017
What Happens to Submitted Costs?
77
When you submit a cost change (by clicking the + sign), several things happen.
1. Power HQ will immediately accept or reject the submission based on DeCA’s business rules.
2. The entry will drop down in the grid and show as either as Applied (grey background) or Rejected (red text) based on
business rules and filters.
3. The most recently submitted cost changes will appear at the top of the grid.
4. To get more details on an entry and its status (including a Reason Code and Reason if the submission is rejected), click
on the row to get the detail sidebar.
5. The system captures and displays the date the record was changed and who changed it for accountability.

Vendor Portal 10.5.2.188Vendor Portal 10.5.3.188 – August 2017
Correct a Submitted Cost
If you make an error in entering a cost change and want to change a submission that has been applied or rejected, you will
need to make a “new” cost change entry.
NOTE: The Start Date for the new entry CANNOT be before the Start Date of the prior entry.
In this example, the cost submission was rejected due to the Start Date ( T ), Note that the entered Start Date is the same as
the Record Status Date. The error resulted from not changing the “default” Start Date (which is the current date) to a valid Start
Date as defined by DeCA business rules.
To correct the error, enter a new cost entry with a valid Start Date (shown in ). This will override the initial submission.
The submission is then accepted and applied (shown in ).
78

Vendor Portal 10.5.2.188Vendor Portal 10.5.3.188 – August 2017
Review Status of Submitted Costs
You can also use the Vendor Cost Entry module to view the status of cost submissions.
Based on what you want to review, select from the following filter options.
• View all recent submissions by clicking Apply
• View submissions for a specific item by filtering by UPC EAN
• View by Start Date (when the cost change is to be effective)
• View by Brand Code
• View rejected submissions by Reason Code
• View by Stage Status (Applied and/or Rejected)
Click on any row to populate the Item Information fields on the right.
79

Vendor Portal 10.5.2.188Vendor Portal 10.5.3.188 – August 2017
6. Vendor Item Adjustments Module
80
Vendor Portal 10.5.2.188Vendor Portal 10.5.3.188 – August 2017
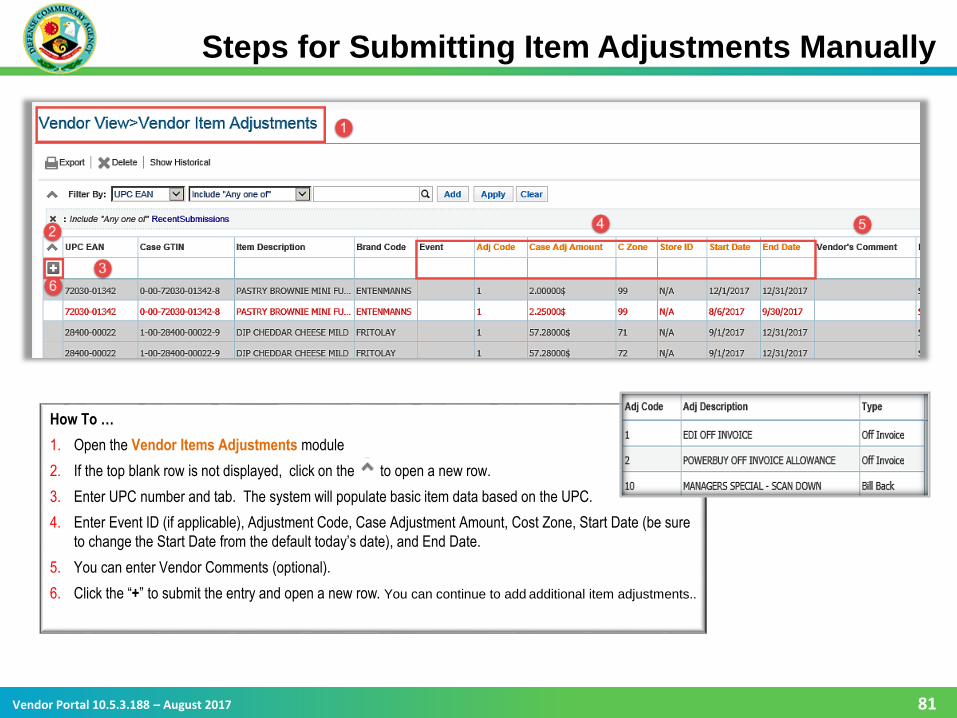
Steps for Submitting Item Adjustments Manually
81
How To …
1. Open the Vendor Items Adjustments module
2. If the top blank row is not displayed, click on the to open a new row.
3. Enter UPC number and tab. The system will populate basic item data based on the UPC.
4. Enter Event ID (if applicable), Adjustment Code, Case Adjustment Amount, Cost Zone, Start Date (be sure
to change the Start Date from the default today’s date), and End Date.
5. You can enter Vendor Comments (optional).
6. Click the “+” to submit the entry and open a new row. You can continue to add additional item adjustments..

Vendor Portal 10.5.2.188Vendor Portal 10.5.3.188 – August 2017
How To (cont.) …
7. The entry will drop to the grid below and its status in the Staging Table will be reflected.
8. Click on the row to see the detailed information grid.
9. The system captures and displays the date the record was changed and who changed it.
82
Steps for Submitting Item Adjustments Manually (cont.)
Note: This is a negotiated promotion in an
OPEN status pending DeCA review.

Vendor Portal 10.5.2.188Vendor Portal 10.5.3.188 – August 2017
Review Status of Submitted Adjustments
You can also use the Vendor Item Adjustments module to view the status of adjustments submitted via Electronic Imports
and manually.
83
Based on what you want to review, select from the following filter options.
• View all recent submissions by clicking Apply
• View submissions for a specific item by filtering by UPC EAN
• View by Brand Code
• View by Start Date (when the item adjustment is to be effective)
• View by End Date (when the item adjustment ends)
• View by Stage Status
• View rejected submissions by Reason
• View rejected submissions by Reason Code
Click on any row to populate the Item Information fields on the right.

Vendor Portal 10.5.2.188Vendor Portal 10.5.3.188 – August 2017
Stage Status of Item Adjustments
84
Non-Negotiated Adjustments
Non-Negotiated Adjustments are automatically Applied or Rejected based on DeCA business rules.
They will show as ‘APPLIED’ (grey highlight) or as ‘REJECTED’ (red text) in the Staging Table.
The “Remove” Option is not available.
Negotiated Adjustments
Negotiated Adjustments will show in an OPEN status initially. They may show in a PENDING ACCEPT or PENDING
REJECT status until DeCA applies them to the Operational Tables.
If an adjustment is in an OPEN, PENDING ACCEPT, or PENDING REJECT status, you can request DeCA remove the
submission. DeCA will make the decision to remove or not.

Vendor Portal 10.5.2.188Vendor Portal 10.5.3.188 – August 2017
Correct and Resubmit Rejected Submissions
You can check the status of the Item Adjustments submitted manually or via Electronic Imports using the Vendor Item Adjustments
module. In the following example five submissions were accepted and Applied, one submission was Rejected.
1. Click on the row that was Rejected.
2. The sidebar displays the Reason Code and Reason the submission was rejected.
3. Note the incorrect start date.
4. To correct and resubmit, click in the top row and enter the correct information for the item adjustment and click + to submit.
The Start Date was entered incorrectly as 8/1/2017. To
correct, click in the top row and enter the information
for the item adjustment with a Start Date of 9/1/2017.
85

Vendor Portal 10.5.2.188Vendor Portal 10.5.3.188 – August 2017
7. Reference Material
86

Vendor Portal 10.5.2.188Vendor Portal 10.5.3.188 – August 2017
Vendor Portal Help Desk
Vendor Portal Help Desk Support
Available everyday, all day (7x24x365)
Vendor Portal Help Desk support includes providing:
– Guidance in the correct usage of the Vendor Portal
– Login assistance and password reset support
– Answering and/or escalating workflow questions to the appropriate DeCA personnel
– Receiving and resolving technical support issues
For Vendor Portal Help Desk support, call 1-800-531-2222 and enter PIN 7780
87

Vendor Portal 10.5.2.188Vendor Portal 10.5.3.188 – August 2017
WBTs and Reference Guide
Web Based Training (WBT) and the Vendor Reference Guide are on
www.commissaries.com under
Our Agency > About DeCA > Business with DeCA > Vendors/EBS
As updates and enhancements are made to Vendor Portal, the
documentation will be updated and provided on www.commissaries.com
88

Vendor Portal 10.5.2.188Vendor Portal 10.5.3.188 – August 2017
Vendor Maintenance Module
89
This is a “view only”
module that provides
basic information on
your company. If
changes are needed,
contact DeCA.

Vendor Portal 10.5.2.188Vendor Portal 10.5.3.188 – August 2017 90
EDI 879 Error Codes
* Internal Warning for DeCA
Error Code 824 Message Description
0600F Effective date past cutoff Effective Date is in the Past or Submission Date Past Cut –Off (10th or the 25th of the month)
0601F Effective date must be the 1st or 16th of the month Cost Effective Date is not the 1st or the 16th of the month
0603F Cannot change cost for an item on promotion The item is included on a promotional event and the cost change effective date is within the promotional event VPR Dates
0604F Cost Change identical to current cost Cost Change is equal to or < one cent. Unit Basis must be “CA” or “EA”
0606F Unit UPC not found in DeCA catalog UPC is not on the “Vendor’s Contract”
0607F Case pack required for case level pricing Unit or Basis for Measurement Code is “CA” so Case Pack is Required
0608F Missing or Invalid Case UPC; Case UPC is mandatory Unit or Basis for Measurement Code is “CA” so Case UPC is Required
0609F Item not Authorized for Vendors Contract UPC/EAN attached to the cost change is not Authorized
0611F No CAGE Code provided in N1 segment Missing CAGE Code
0612F 879 X12 has no item level pricing information EMPTY FILE- No item data contained in file
0613F Invalid CAGE Code for this Case UPC The case UPC is not authorized for this CAGE Code
0614F CAGE Code not on file CAGE Code Invalid
0615F Case Pack differs from DeCA Catalog Unit Basis is “CA” provided Case Pack does not match DeCA’s Catalog
0616F Duplicate UPC/CAGE Code/DODAAC/Start Date Duplicates within one transaction set or working set (multiple transaction sets within 1 hours of each other)
0617F Invalid or Missing Price Zone DoDAAC Pricing DoDAAC is invalid or missing
0618F Item Not Authorized for Price Zone DODAAC Pricing DoDAAC is not authorized for your CAGE Code
0621F System Error Contact DeCA Support Requires DeCA support to discuss and resolve the error
0626F Unit Basis in G40*07 must be CA (case) or EA (each) “CA” or “EA” must be used for Unit Basis
0627F* Missing PIIN for Web Pricing Vendor System Error contact DeCA Support
0621W* Cost Change Warning – Date An EDI 879 Transaction Set has already been received for the same item and same cost effective date
0622W* Cost Change Warning - Cost Increase or Decrease An EDI Transaction Set has been received more than three times in a 60-day period
0624W* Cost Change Warning - Cost Zones Cost change transaction set was not received for all cost zones identified for the item

Vendor Portal 10.5.2.188Vendor Portal 10.5.3.188 – August 2017 91
EDI 889 Error Codes
* Denotes internal warning for DeCA
Error Code 824 Message Description
0500F Promotion Status Code (G42*01) is invalid or missing
Promotional Status must be “O1” (O2 and O3 will be used sometime in the future, DeCA will announce when these options are available)
0501F Adjustment Start/End Date is Invalid or Missing Date format must be CCYYMMDD where CC represents the first two digits of the calendar year Event and its Start and/End Date do not match DeCA’s Event Calendar
0502F Duplicate UPC/CAGE Code/DoDAAC/Start Date This is within one transaction set or working set (multiple transactions sets within 1 Hour of each other)
0503F Effective date must be the 1st or 16th of the month The cost effective start date is not 1st or 16th of the month
0504F Missed cutoff date for Promotions Negotiated- The Cost Adjustment is less than or equal to 120 days prior to promotional start date for the event number submitted. Non Negotiated- Submission Date is Past Cutoff (10th or the 25th of the month)
0507F Case pack required for case level pricing Unit Basis for Measurement Code is CA so Case Pack is Required
0508F Missing or Invalid Case UPC; Case UPC is mandatory -Unit Basis is missing -Case UPC is Invalid or Missing
0509F Cost Adjustment of zero not allowed -Cost Adjustment is Zero Amount not allow -Unit Basis must be “EA” or “CA”
0510F Item Not Authorized for Price Zone DODAAC Cost Adjustment transaction set was for cost zones not identified for the item/contract
0512F Unknown or missing DeCA CAGE Code -Cost adjustment transaction set does not include the CAGE Code or -CAGE Code is Invalid
0513F 889 X12 has no item level pricing information EMPTY FILE- No item data contained in file
0514F DeCA Event ID is invalid or blank DeCA Event ID is invalid or missing
0517F Case value differs from DeCA Catalog Unit Basis is “CA” provided Case pack does not match DeCA’s Catalog
0518F Cost Adjustment identical to current adjustment UPC/CAGE/DODAAC/START DATE Are Identical
0522F Invalid or Missing Price Zone DoDAAC Pricing DoDAAC is invalid or missing
0523F CAGE Code Not Authorized for Price Zone DoDAAC Pricing DoCAAC is not authorized for your CAGE Code
0528F System Error contact DeCA support Requires DeCA Support to discuss and resolve the Error
0525W* Cost Adjustment Warning – Cost The Item Cost Adjustment is equal to or < .01 Cent
0526W* Multiple Offers Item has previously been submitted for this Event

Vendor Portal 10.5.2.188Vendor Portal 10.5.3.188 – August 2017 92
Reason Code Reason Description
MaxChg Maximum % Change The percent of change caused by this transaction exceeds the allowable
MinDays Minimum Days The minimum number of days for a change is violated by this transaction
Lead Time Lead Time The lead time is too short for this promotion period
Target Mar Target Margin Insufficient incremental lift
Patron Sav Patron Savings Not enough patron savings for the category
Poor Perf Poor Performance Insufficient lift during required time period for required items
Low ACV Low ACV ACV too low to warrant a promotion
Seasonal Seasonal Wrong timing or theme
Back2Back Back 2 Back Item is in a previous promotion package
Comp Item Competitor Item Competitor’s item is selected
No EDLP No EDLP No space within this period for Every Day Low Price (EDLP)
DayOfWeek Day of Week Promotion period not available
Portal Reason Codes


