181
Veritas™ Cluster Server Agent for Oracle Installation and Configuration Guide Solaris 5.2
| Date post: | 03-May-2018 |
| Category: |
Documents |
| Upload: | trinhkhanh |
| View: | 238 times |
| Download: | 0 times |

Veritas™Cluster Server Agentfor Oracle Installation andConfiguration Guide
Solaris
5.2

Veritas Cluster Server Agent for Oracle Installation andConfiguration Guide
The software described in this book is furnished under a license agreement andmay be usedonly in accordance with the terms of the agreement.
Agent version: 5.2
Document version: 5.2.0
Legal NoticeCopyright © 2008 Symantec Corporation. All rights reserved.
Symantec, the Symantec Logo, Veritas and Veritas Storage Foundation are trademarks orregistered trademarks of Symantec Corporation or its affiliates in the U.S. and othercountries. Other names may be trademarks of their respective owners.
The product described in this document is distributed under licenses restricting its use,copying, distribution, and decompilation/reverse engineering. No part of this documentmay be reproduced in any form by any means without prior written authorization ofSymantec Corporation and its licensors, if any.
THEDOCUMENTATIONISPROVIDED"ASIS"ANDALLEXPRESSORIMPLIEDCONDITIONS,REPRESENTATIONS ANDWARRANTIES, INCLUDING ANY IMPLIEDWARRANTY OFMERCHANTABILITY, FITNESS FOR A PARTICULAR PURPOSE OR NON-INFRINGEMENT,ARE DISCLAIMED, EXCEPT TO THE EXTENT THAT SUCH DISCLAIMERS ARE HELD TOBELEGALLYINVALID.SYMANTECCORPORATIONSHALLNOTBELIABLEFORINCIDENTALOR CONSEQUENTIAL DAMAGES IN CONNECTIONWITH THE FURNISHING,PERFORMANCE, OR USE OF THIS DOCUMENTATION. THE INFORMATION CONTAINEDIN THIS DOCUMENTATION IS SUBJECT TO CHANGEWITHOUT NOTICE.
The Licensed Software andDocumentation are deemed to be commercial computer softwareas defined in FAR12.212 and subject to restricted rights as defined in FARSection 52.227-19"Commercial Computer Software - Restricted Rights" and DFARS 227.7202, "Rights inCommercial Computer Software or Commercial Computer Software Documentation", asapplicable, and any successor regulations. Any use, modification, reproduction release,performance, display or disclosure of the Licensed Software andDocumentation by theU.S.Government shall be solely in accordance with the terms of this Agreement.

Symantec Corporation20330 Stevens Creek Blvd.Cupertino, CA 95014
http://www.symantec.com

Technical SupportSymantec Technical Support maintains support centers globally. TechnicalSupport’s primary role is to respond to specific queries about product featuresand functionality. TheTechnical Support group also creates content for our onlineKnowledge Base. The Technical Support group works collaboratively with theother functional areas within Symantec to answer your questions in a timelyfashion. For example, theTechnical Support groupworkswithProductEngineeringand Symantec Security Response to provide alerting services and virus definitionupdates.
Symantec’s maintenance offerings include the following:
■ A range of support options that give you the flexibility to select the rightamount of service for any size organization
■ Telephone and Web-based support that provides rapid response andup-to-the-minute information
■ Upgrade assurance that delivers automatic software upgrade protection
■ Global support that is available 24 hours a day, 7 days a week
■ Advanced features, including Account Management Services
For information about Symantec’sMaintenance Programs, you can visit ourWebsite at the following URL:
www.symantec.com/techsupp/
Contacting Technical SupportCustomerswith a currentmaintenance agreementmay access Technical Supportinformation at the following URL:
www.symantec.com/business/support/assistance_care.jsp
Before contacting Technical Support, make sure you have satisfied the systemrequirements that are listed in your product documentation. Also, you should beat the computer onwhich theproblemoccurred, in case it is necessary to replicatethe problem.
When you contact Technical Support, please have the following informationavailable:
■ Product release level
■ Hardware information
■ Available memory, disk space, and NIC information
■ Operating system

■ Version and patch level
■ Network topology
■ Router, gateway, and IP address information
■ Problem description:
■ Error messages and log files
■ Troubleshooting that was performed before contacting Symantec
■ Recent software configuration changes and network changes
Licensing and registrationIf yourSymantecproduct requires registrationor a licensekey, access our technicalsupport Web page at the following URL:
www.symantec.com/techsupp/
Customer serviceCustomer service information is available at the following URL:
www.symantec.com/techsupp/
Customer Service is available to assist with the following types of issues:
■ Questions regarding product licensing or serialization
■ Product registration updates, such as address or name changes
■ General product information (features, language availability, local dealers)
■ Latest information about product updates and upgrades
■ Information about upgrade assurance and maintenance contracts
■ Information about the Symantec Buying Programs
■ Advice about Symantec's technical support options
■ Nontechnical presales questions
■ Issues that are related to CD-ROMs or manuals
Documentation feedbackYour feedback on product documentation is important to us. Send suggestionsfor improvements and reports on errors or omissions [email protected]. Include the title and document version (locatedon the second page), and chapter and section titles of the text on which you arereporting.

Maintenance agreement resourcesIf you want to contact Symantec regarding an existing maintenance agreement,please contact the maintenance agreement administration team for your regionas follows:
[email protected] and Japan
[email protected], Middle-East, and Africa
[email protected] America and Latin America
Additional enterprise servicesSymantec offers a comprehensive set of services that allow you tomaximize yourinvestment in Symantec products and to develop your knowledge, expertise, andglobal insight, which enable you to manage your business risks proactively.
Enterprise services that are available include the following:
These solutions provide early warning of cyber attacks, comprehensive threatanalysis, and countermeasures to prevent attacks before they occur.
SymantecEarlyWarningSolutions
These services remove the burdenofmanaging andmonitoring security devicesand events, ensuring rapid response to real threats.
Managed Security Services
Symantec Consulting Services provide on-site technical expertise fromSymantec and its trustedpartners. SymantecConsultingServices offer a varietyof prepackaged and customizable options that include assessment, design,implementation,monitoring, andmanagement capabilities. Each is focused onestablishing andmaintaining the integrity and availability of your IT resources.
Consulting Services
Educational Services provide a full array of technical training, securityeducation, security certification, and awareness communication programs.
Educational Services
To access more information about Enterprise services, please visit our Web siteat the following URL:
www.symantec.com
Select your country or language from the site index.

Technical Support . . . . . . . . . . . . . . . . . . . . . . . . . . . . . . . . . . . . . . . . . . . . . . . . . . . . . . . . . . . . . . . . . . . . . . . . . . . . . . . . . . . . . . . . . . . . . . . 4
Chapter 1 Introducing the Veritas Cluster Server agent forOracle . . . . . . . . . . . . . . . . . . . . . . . . . . . . . . . . . . . . . . . . . . . . . . . . . . . . . . . . . . . . . . . . . . . . . . . . . . . . . . . 11
About the Veritas Cluster Server agent for Oracle ... . . . . . . . . . . . . . . . . . . . . . . . . . . . 11About the agent for Oracle ASM ..... . . . . . . . . . . . . . . . . . . . . . . . . . . . . . . . . . . . . . . . . . . . 12
What’s new in this release ... . . . . . . . . . . . . . . . . . . . . . . . . . . . . . . . . . . . . . . . . . . . . . . . . . . . . . . . . . . 12Supported software .... . . . . . . . . . . . . . . . . . . . . . . . . . . . . . . . . . . . . . . . . . . . . . . . . . . . . . . . . . . . . . . . . . . 13How the agent makes Oracle highly available ... . . . . . . . . . . . . . . . . . . . . . . . . . . . . . . . . . 13
Oracle instances running in Solaris zones ... . . . . . . . . . . . . . . . . . . . . . . . . . . . . . . . . 14How the agent makes Oracle ASM instance highly available ... . . . . . . . . 14
About Veritas Cluster Server agent for Oracle agent functions .... . . . . . . . . . 15Oracle agent functions .... . . . . . . . . . . . . . . . . . . . . . . . . . . . . . . . . . . . . . . . . . . . . . . . . . . . . . . . . 15Netlsnr agent functions .... . . . . . . . . . . . . . . . . . . . . . . . . . . . . . . . . . . . . . . . . . . . . . . . . . . . . . . . 23ASMInst agent functions .... . . . . . . . . . . . . . . . . . . . . . . . . . . . . . . . . . . . . . . . . . . . . . . . . . . . . . 24ASMDG agent functions .... . . . . . . . . . . . . . . . . . . . . . . . . . . . . . . . . . . . . . . . . . . . . . . . . . . . . . . 25
Typical Oracle configuration in a VCS cluster ... . . . . . . . . . . . . . . . . . . . . . . . . . . . . . . . . . 26About setting up Oracle in a VCS cluster ... . . . . . . . . . . . . . . . . . . . . . . . . . . . . . . . . . . . . . . . . 27
Chapter 2 Installing and configuring Oracle . . . . . . . . . . . . . . . . . . . . . . . . . . . . . . . . . . . . 29
About installing Oracle in a VCS environment .... . . . . . . . . . . . . . . . . . . . . . . . . . . . . . . . 29Before you install Oracle ... . . . . . . . . . . . . . . . . . . . . . . . . . . . . . . . . . . . . . . . . . . . . . . . . . . . . . . . . . . . . 30About VCS requirements for installing Oracle ... . . . . . . . . . . . . . . . . . . . . . . . . . . . . . . . . 30
Kernel parameter configuration .... . . . . . . . . . . . . . . . . . . . . . . . . . . . . . . . . . . . . . . . . . . . . 30Location of the $ORACLE_HOME .... . . . . . . . . . . . . . . . . . . . . . . . . . . . . . . . . . . . . . . . . . . 31Multiple Oracle instances (SIDs) ... . . . . . . . . . . . . . . . . . . . . . . . . . . . . . . . . . . . . . . . . . . . . 32Location of database tablespaces ... . . . . . . . . . . . . . . . . . . . . . . . . . . . . . . . . . . . . . . . . . . . . 32Location of core files ... . . . . . . . . . . . . . . . . . . . . . . . . . . . . . . . . . . . . . . . . . . . . . . . . . . . . . . . . . . . . 32Transparent listener failover ... . . . . . . . . . . . . . . . . . . . . . . . . . . . . . . . . . . . . . . . . . . . . . . . . . 33Listener authentication in VCS environment .... . . . . . . . . . . . . . . . . . . . . . . . . . . . 33Long pathname limitation for $ORACLE_HOME .... . . . . . . . . . . . . . . . . . . . . . . 33Defining NLS information .... . . . . . . . . . . . . . . . . . . . . . . . . . . . . . . . . . . . . . . . . . . . . . . . . . . . . 34Hot backup of Oracle database in VCS environment .... . . . . . . . . . . . . . . . . . . 34Storage devices for Oracle ASM configurations in VCS .... . . . . . . . . . . . . . . 35
About Oracle installation tasks for VCS .... . . . . . . . . . . . . . . . . . . . . . . . . . . . . . . . . . . . . . . . . 36
Contents

Installation tasks for $ORACLE_HOME on shared disks ... . . . . . . . . . . . . . . 36Installation tasks for $ORACLE_HOME on local disks ... . . . . . . . . . . . . . . . . 37Installation tasks for Oracle using ASM ..... . . . . . . . . . . . . . . . . . . . . . . . . . . . . . . . . . 38
Installing Oracle binaries ... . . . . . . . . . . . . . . . . . . . . . . . . . . . . . . . . . . . . . . . . . . . . . . . . . . . . . . . . . . . . 39Disabling the clustering daemon for Oracle 10g or later ... . . . . . . . . . . . . . 42
Configuring the Oracle ASM ..... . . . . . . . . . . . . . . . . . . . . . . . . . . . . . . . . . . . . . . . . . . . . . . . . . . . . . . 43Enabling the clustering daemon for ASM-managed database .... . . . . . . 44
Configuring the Oracle database ... . . . . . . . . . . . . . . . . . . . . . . . . . . . . . . . . . . . . . . . . . . . . . . . . . . 45Copying the $ORACLE_BASE/admin/SID directory .... . . . . . . . . . . . . . . . . . . . . . . . . . 47Copying the ASM initialization parameter file ... . . . . . . . . . . . . . . . . . . . . . . . . . . . . . . . . 47Verifying access to the database ... . . . . . . . . . . . . . . . . . . . . . . . . . . . . . . . . . . . . . . . . . . . . . . . . . . 47
Starting the database when your $ORACLE_HOME is on shareddisks ... . . . . . . . . . . . . . . . . . . . . . . . . . . . . . . . . . . . . . . . . . . . . . . . . . . . . . . . . . . . . . . . . . . . . . . . . . . . 48
Starting the database when your $ORACLE_HOME is on localdisks ... . . . . . . . . . . . . . . . . . . . . . . . . . . . . . . . . . . . . . . . . . . . . . . . . . . . . . . . . . . . . . . . . . . . . . . . . . . . 48
Starting the ASM-managed database .... . . . . . . . . . . . . . . . . . . . . . . . . . . . . . . . . . . . . . 48
Chapter 3 Installing and removing the agent for Oracle . . . . . . . . . . . . . . . 51
Before you install or upgrade the agent for Oracle ... . . . . . . . . . . . . . . . . . . . . . . . . . . . 51Installing the agent software .... . . . . . . . . . . . . . . . . . . . . . . . . . . . . . . . . . . . . . . . . . . . . . . . . . . . . . . 52Upgrading the agent ... . . . . . . . . . . . . . . . . . . . . . . . . . . . . . . . . . . . . . . . . . . . . . . . . . . . . . . . . . . . . . . . . . . 55
Upgrading VCS agent 3.5 for Oracle (Solaris SPARC) ... . . . . . . . . . . . . . . . . . . 55UpgradingVCSagent forOracle fromversions4.0 or later (Solaris
SPARC) ... . . . . . . . . . . . . . . . . . . . . . . . . . . . . . . . . . . . . . . . . . . . . . . . . . . . . . . . . . . . . . . . . . . . . . . . 56Upgrading VCS agent 4.1 or 5.0 for Oracle (Solaris x64) ... . . . . . . . . . . . . . . 57
Disabling the Veritas Cluster Server agent for Oracle ... . . . . . . . . . . . . . . . . . . . . . . . 57Removing the Veritas Cluster Server agent for Oracle ... . . . . . . . . . . . . . . . . . . . . . . 58
Chapter 4 Configuring VCS service groups for Oracle . . . . . . . . . . . . . . . . . . . . 61
About configuring a service group for Oracle ... . . . . . . . . . . . . . . . . . . . . . . . . . . . . . . . . . 61Configuring Oracle instances in VCS .... . . . . . . . . . . . . . . . . . . . . . . . . . . . . . . . . . . . . . . . . . . . . 62
Configuring single Oracle instance in VCS .... . . . . . . . . . . . . . . . . . . . . . . . . . . . . . . 62Configuring multiple Oracle instances (single listener) in
VCS .... . . . . . . . . . . . . . . . . . . . . . . . . . . . . . . . . . . . . . . . . . . . . . . . . . . . . . . . . . . . . . . . . . . . . . . . . . . . 64Configuring multiple Oracle instances (multiple listeners) in
VCS .... . . . . . . . . . . . . . . . . . . . . . . . . . . . . . . . . . . . . . . . . . . . . . . . . . . . . . . . . . . . . . . . . . . . . . . . . . . . 65Configuring Oracle instance with shared server support in
VCS .... . . . . . . . . . . . . . . . . . . . . . . . . . . . . . . . . . . . . . . . . . . . . . . . . . . . . . . . . . . . . . . . . . . . . . . . . . . . 67Before you configure the service group .... . . . . . . . . . . . . . . . . . . . . . . . . . . . . . . . . . . . . . . . . 69
Importing the type definition files ... . . . . . . . . . . . . . . . . . . . . . . . . . . . . . . . . . . . . . . . . . . 70Configuring the service group .... . . . . . . . . . . . . . . . . . . . . . . . . . . . . . . . . . . . . . . . . . . . . . . . . . . . . 71
Contents8

Configuring the service group using the agent configurationwizard .... . . . . . . . . . . . . . . . . . . . . . . . . . . . . . . . . . . . . . . . . . . . . . . . . . . . . . . . . . . . . . . . . . . . . . . . . 72
Configuring the service group using Cluster Manager (Javaconsole) ... . . . . . . . . . . . . . . . . . . . . . . . . . . . . . . . . . . . . . . . . . . . . . . . . . . . . . . . . . . . . . . . . . . . . . . . 83
Configuring the service group using the command-line ... . . . . . . . . . . . . . . 85Setting up detail monitoring .... . . . . . . . . . . . . . . . . . . . . . . . . . . . . . . . . . . . . . . . . . . . . . . . . . . . . . . 88
Setting up detail monitoring for Oracle ... . . . . . . . . . . . . . . . . . . . . . . . . . . . . . . . . . . . 89Setting up detail monitoring for Netlsnr ... . . . . . . . . . . . . . . . . . . . . . . . . . . . . . . . . . . 91
Chapter 5 Administering VCS service groups for Oracle . . . . . . . . . . . . . . . 93
About administering VCS service groups .... . . . . . . . . . . . . . . . . . . . . . . . . . . . . . . . . . . . . . . 93Bringing the service group online .... . . . . . . . . . . . . . . . . . . . . . . . . . . . . . . . . . . . . . . . . . . . . . . . . 93Taking the service group offline ... . . . . . . . . . . . . . . . . . . . . . . . . . . . . . . . . . . . . . . . . . . . . . . . . . . . 94Switching the service group .... . . . . . . . . . . . . . . . . . . . . . . . . . . . . . . . . . . . . . . . . . . . . . . . . . . . . . . . 94Modifying the service group configuration .... . . . . . . . . . . . . . . . . . . . . . . . . . . . . . . . . . . . 95
Chapter 6 Troubleshooting Veritas Cluster Server agent forOracle . . . . . . . . . . . . . . . . . . . . . . . . . . . . . . . . . . . . . . . . . . . . . . . . . . . . . . . . . . . . . . . . . . . . . . . . . . . . . . . 97
About troubleshooting Veritas Cluster Server agent for Oracle ... . . . . . . . . . . 97Error messages common to the Oracle and Netlsnr agents ... . . . . . . . . . . . . . . . . 98Error messages specific to the Oracle agent ... . . . . . . . . . . . . . . . . . . . . . . . . . . . . . . . . . . 100Error messages specific to the Netlsnr agent ... . . . . . . . . . . . . . . . . . . . . . . . . . . . . . . . . 103Error messages specific to the ASMInst agent ... . . . . . . . . . . . . . . . . . . . . . . . . . . . . . . . 103Error messages specific to the ASMDG agent ... . . . . . . . . . . . . . . . . . . . . . . . . . . . . . . . . 104Issues specific to Oracle ... . . . . . . . . . . . . . . . . . . . . . . . . . . . . . . . . . . . . . . . . . . . . . . . . . . . . . . . . . . . . 105
Appendix A Resource type definitions . . . . . . . . . . . . . . . . . . . . . . . . . . . . . . . . . . . . . . . . . . . . . . . . 107
About the resource type and attribute definitions ... . . . . . . . . . . . . . . . . . . . . . . . . . . 107Oracle resource type .... . . . . . . . . . . . . . . . . . . . . . . . . . . . . . . . . . . . . . . . . . . . . . . . . . . . . . . . . . . . . . . . 107
Oracle attribute definitions ... . . . . . . . . . . . . . . . . . . . . . . . . . . . . . . . . . . . . . . . . . . . . . . . . . 108Netlsnr resource type .... . . . . . . . . . . . . . . . . . . . . . . . . . . . . . . . . . . . . . . . . . . . . . . . . . . . . . . . . . . . . . . 115
Netlsnr attribute definitions ... . . . . . . . . . . . . . . . . . . . . . . . . . . . . . . . . . . . . . . . . . . . . . . . . 115ASMInst resource type .... . . . . . . . . . . . . . . . . . . . . . . . . . . . . . . . . . . . . . . . . . . . . . . . . . . . . . . . . . . . . 119
ASMInst attribute definitions ... . . . . . . . . . . . . . . . . . . . . . . . . . . . . . . . . . . . . . . . . . . . . . . 119ASMDG resource type .... . . . . . . . . . . . . . . . . . . . . . . . . . . . . . . . . . . . . . . . . . . . . . . . . . . . . . . . . . . . . . 121
ASMDG attribute definitions ... . . . . . . . . . . . . . . . . . . . . . . . . . . . . . . . . . . . . . . . . . . . . . . . 122
Appendix B Sample configurations . . . . . . . . . . . . . . . . . . . . . . . . . . . . . . . . . . . . . . . . . . . . . . . . . . . . . 125
About the sample configurations for Oracle enterprise agent ... . . . . . . . . . . . 125Sample single Oracle instance configuration .... . . . . . . . . . . . . . . . . . . . . . . . . . . . . . . . 126
Sample configuration file for single Oracle instance .... . . . . . . . . . . . . . . . 127
9Contents

Single Oracle instance configured in Solaris zones ... . . . . . . . . . . . . . . . . . . . 129Sample multiple Oracle instances (single listener) configuration .... . . . . . 133
Sample configuration file for multiple Oracle instances (singlelistener) ... . . . . . . . . . . . . . . . . . . . . . . . . . . . . . . . . . . . . . . . . . . . . . . . . . . . . . . . . . . . . . . . . . . . . . 135
Multiple Oracle instances (single listener) configured in Solariszones ... . . . . . . . . . . . . . . . . . . . . . . . . . . . . . . . . . . . . . . . . . . . . . . . . . . . . . . . . . . . . . . . . . . . . . . . . 140
Sample multiple instance (multiple listeners) configuration .... . . . . . . . . . . . 146Sample configuration file ... . . . . . . . . . . . . . . . . . . . . . . . . . . . . . . . . . . . . . . . . . . . . . . . . . . . . 146
Sample Oracle configuration with shared server support ... . . . . . . . . . . . . . . . . 151Sample configuration file for Oracle instance configured with
shared server support ... . . . . . . . . . . . . . . . . . . . . . . . . . . . . . . . . . . . . . . . . . . . . . . . . . . 152Oracle instancewith shared server support configured in Solaris
zones ... . . . . . . . . . . . . . . . . . . . . . . . . . . . . . . . . . . . . . . . . . . . . . . . . . . . . . . . . . . . . . . . . . . . . . . . . 155Sample Oracle ASM configurations .... . . . . . . . . . . . . . . . . . . . . . . . . . . . . . . . . . . . . . . . . . . . . 159
Sample configuration for ASM disks as raw disks ... . . . . . . . . . . . . . . . . . . . . 159Sample configuration for ASM disks as VxVM volumes .... . . . . . . . . . . . 163Sample configuration for ASM disks as CVM volumes .... . . . . . . . . . . . . . 167
Appendix C Best practices . . . . . . . . . . . . . . . . . . . . . . . . . . . . . . . . . . . . . . . . . . . . . . . . . . . . . . . . . . . . . . . . . . . . . 173
Best practices for multiple Oracle instance configurations .... . . . . . . . . . . . . . 173
Appendix D Using the SPFILE in a VCS cluster for Oracle . . . . . . . . . . . . . . 175
About the Oracle initialization parameter files ... . . . . . . . . . . . . . . . . . . . . . . . . . . . . . . 175Starting an Oracle instance .... . . . . . . . . . . . . . . . . . . . . . . . . . . . . . . . . . . . . . . . . . . . . . . . . . . . . . . 175Using the SPFILE in a VCS cluster ... . . . . . . . . . . . . . . . . . . . . . . . . . . . . . . . . . . . . . . . . . . . . . . 176
Specifying the SPFILE location in the PFILE .... . . . . . . . . . . . . . . . . . . . . . . . . . . 176Creating the SPFILE from a PFILE .... . . . . . . . . . . . . . . . . . . . . . . . . . . . . . . . . . . . . . . . . 177
Index . . . . . . . . . . . . . . . . . . . . . . . . . . . . . . . . . . . . . . . . . . . . . . . . . . . . . . . . . . . . . . . . . . . . . . . . . . . . . . . . . . . . . . . . . . . . . . . . . . . . . . . . . . . . . . . . . . . 179
Contents10

Introducing the VeritasCluster Server agent forOracle
This chapter includes the following topics:
■ About the Veritas Cluster Server agent for Oracle
■ What’s new in this release
■ Supported software
■ How the agent makes Oracle highly available
■ About Veritas Cluster Server agent for Oracle agent functions
■ Typical Oracle configuration in a VCS cluster
■ About setting up Oracle in a VCS cluster
About the Veritas Cluster Server agent for OracleThe Veritas Cluster Server agent for Oracle provides high availability for Oracle.
Veritas high availability agents do the following:
■ Monitor specific resources within an enterprise application.
■ Determine the status of these resources.
■ Start or stop the resources according to external events.
1Chapter

The agents include resource type declarations and agent executables. The agentfor Oracle monitors the Oracle and listener processes, brings them online, andtakes them offline.
The agent package for Oracle contains the following agents that work togetherto make Oracle highly available:
■ The Oracle agent monitors the Oracle database processes.
■ The Netlsnr agent monitors the listener process.
Note:TheVeritas Cluster Server agent forOracle on Solaris x64 operating systemdoesnot support local zones. The agent does notmonitorOracle instances runningin non-global zones.
About the agent for Oracle ASMTheVeritas Cluster Server agent suite for Oracle provides high availability agentsfor the Oracle 10g R2 or later databases that use Automatic StorageManagement(ASM). The agents for Oracle ASMmonitor the Oracle ASM instance and ASMdisk groups.
The agent package for Oracle also contains the following agents for Oracle ASM:
■ The ASMInst agent monitors the Oracle ASM instance.
■ The ASMDG agent monitors the Oracle ASM disk groups.
Note: The agents for Oracle ASM do not support local zones.
What’s new in this releaseTheVeritasCluster Server agent forOracle includes the followingnewor enhancedfeatures:
■ For Solaris SPARC:The agent supports Oracle 11g.
■ The agent detects intentional offline.TheOracle agent has a new IntentionalOffline attributewith the default valueas 1. If you enable Health checkmonitoring option, the agent detects gracefulshutdown for Oracle 10g and later.See “Oracle attribute definitions” on page 108.
■ The agent supports CUSTOM as one of the start up options when you use Hotbackup feature of Oracle.
Introducing the Veritas Cluster Server agent for OracleWhat’s new in this release
12

See “Hot backup of Oracle database in VCS environment” on page 34.
■ The agent supports a new action entry point pfile.vfd.See “Action entry point” on page 21.
■ The agent also supports csh and tcsh shell when Health check monitoring isenabled.
Supported softwareThe Veritas Cluster Server agent for Oracle 5.2 supports the following softwareversions in a Veritas Cluster Server (VCS) environment:
On Solaris SPARC:
Oracle9i, Oracle 10g R1, Oracle 10g R2, and Oracle 11g R1 (including64-bit versions)
On Solaris x64:
Oracle 10g R1 and Oracle 10g R2 (including 64-bit versions)
Note: Veritas Cluster Server agent for Oracle supports the specifiedOracle versions on Solaris if Oracle supports that version on Solaris.Refer to the Veritas Cluster Server Release Notes for more details.
Oracle
VCS 5.0 MP3 on SolarisVCS
For Solaris SPARC:
Solaris 8, 9,and 10 (32-bit and 64-bit)
For Solaris x64:
Solaris 10 (64-bit)
Note: For each platform, Symantec recommends applying the latestSolaris operating systempatches available fromSun. Visit Sun’sWebsite to download the latest patches.
Solaris
How the agent makes Oracle highly availableThe Veritas Cluster Server agent for Oracle continuously monitors the Oracledatabase and listener processes to verify they function properly.
See “About Veritas Cluster Server agent for Oracle agent functions” on page 15.
The agent provides the following levels of application monitoring:
■ Primary or Basic monitoring
13Introducing the Veritas Cluster Server agent for OracleSupported software
This mode has Process check and Health check monitoring options. With thedefault Process check option, the agent verifies that the Oracle and listenerprocesses are present in theprocess table. Process check cannot detectwhetherprocesses are in a hung or stopped states.TheOracle agent provides functionality to detectwhether theOracle resourcewas intentionally takenoffline. The agent detects graceful shutdown forOracle10g and later.When an administrator brings downOracle gracefully, the agentdoes not trigger a resource fault even though Oracle is down. The value of thetype-level attribute IntentionalOffline attribute and the value of theMonitorOption attribute must be set to 1 to enable Oracle agent's intentionaloffline functionality.
■ Secondary or Detail monitoringIn this mode, the agent runs a perl script that executes commands against thedatabase and listener to verify their status.
The agent detects application failure if themonitoring routine reports an improperfunction of the Oracle or listener processes.When this application failure occurs,the Oracle service group fails over to another node in the cluster. Thus the agentensures high availability for the Oracle services and the database.
Oracle instances running in Solaris zonesSolaris 10 provides a means of virtualizing operating system services, allowingone or more processes to run in isolation from other activity on the system. Sucha "sandbox" is called a "non-global zone." Each zone can provide a rich andcustomized set of services. The processes that run in a “global zone” have thesame set of privileges that are available on a Solaris system today.
VCS provides high availability to applications running in non-global zones byextending the failover capability to zones. VCS is installed in a global zone, andall the VCS agents and the engine components run in the global zone. Forapplications running within non-global zones, agents run script entry pointsinside the zones. If a zone configured under VCS control faults, VCS fails over theentire service group containing the zone.
See Veritas Cluster Server User’s Guide.
TheVeritas Cluster Server agent for Oracle is zone-aware and canmonitor Oracleinstances running in non-global zones.
How the agent makes Oracle ASM instance highly availableOracle 10g and later provides ASM feature to store and manage the Oracle datathat includes data files, control files, and log files. These Oracle data files that arestored in ASM disk groups are called ASM files.
Introducing the Veritas Cluster Server agent for OracleHow the agent makes Oracle highly available
14

For ASM-managed databases, you must start an ASM instance before you startthe database instance. The ASM instance mounts ASM disk groups and makesASM files available to database instances.
ASMrequiresCluster SynchronizationServices to enable synchronizationbetweenan ASM instance and a database instance.
See Oracle documentation.
The Veritas Cluster Server agent for Oracle has the following agents to keep theOracle ASM instance and ASM disk groups highly available:
■ ASMInst agentSee “ASMInst agent functions” on page 24.
■ ASMDG agentSee “ASMDG agent functions” on page 25.
The Veritas high availability agent for Oracle continuously monitors the ASMinstance and ASM disk groups to verify they function properly.
About Veritas Cluster Server agent for Oracle agentfunctions
The functions an agent performs are called entry points. Review the functionsfor the following agents that are part of the Veritas Cluster Server agent suite forOracle:
■ Oracle agent functionsSee “Oracle agent functions” on page 15.
■ Netlsnr agent functionsSee “Netlsnr agent functions” on page 23.
■ ASMInst agent functionsSee “ASMInst agent functions” on page 24.
■ ASMDG agent functionsSee “ASMDG agent functions” on page 25.
Oracle agent functionsThe Oracle agent monitors the database processes.
Table 1-1 lists the Oracle agent operations.
15Introducing the Veritas Cluster Server agent for OracleAbout Veritas Cluster Server agent for Oracle agent functions

Table 1-1 Oracle agent operations
DescriptionAgent operation
Starts the Oracle database by using the following svrmgrl orsqlplus command:
startup force pfile=$PFile
The default Startup option is STARTUP_FORCE. You can alsoconfigure the agent to start the database using different Startupoptions for Oracle.
See “Startup and shutdown options” on page 17.
Online
Stops the Oracle database with the specified options by using thefollowing svrmgrl or sqlplus command:
shutdown immediate
The default Shutdown option is IMMEDIATE. You can alsoconfigure the agent to stop the database using different Shutdownoptions for Oracle.
See “Startup and shutdown options” on page 17.
Offline
Verifies the status of the Oracle processes. The Oracle agentprovides two levels of monitoring: basic and detail.
See “Monitor options for Oracle agent” on page 18.
Monitor
Forcibly stops theOracle database byusing the followingsvrmgrlor sqlplus command:
shutdown abort
If the process does not respond to the shutdown command, thenthe agent does the following:
■ Scans the process table for the processes that are associatedwith the configured instance
■ Kills the processes that are associated with the configuredinstance
Clean
Provides the static and dynamic information about the state ofthe database.
See “Info entry point” on page 20.
Info
Performs the predefined actions on a resource.
See “Action entry point” on page 21.
Action
Introducing the Veritas Cluster Server agent for OracleAbout Veritas Cluster Server agent for Oracle agent functions
16

Startup and shutdown optionsYou can specify Startup and Shutdown options for the Oracle instances that areconfigured.
Table 1-2 lists the startup options that the agent supports.
Table 1-2 Startup options
DescriptionOption
Runs the command startup force
pfile='location_of_pfile’ if the pfile is configured.
If the pfile is not configured, the agent runs startup force. Itpicks up the default parameter files from their default locations.
STARTUP_FORCE
(Default)
Runs the command startup pfile='location_of_pfile’
if the pfile is configured.
If the pfile is not configured, the agent picks up the defaultparameter files from their default locations and runs startup.
STARTUP
Starts the database in the RESTRICTED mode.RESTRICTED
Performs a database recovery on instance startup.RECOVERDB
Uses a predefined SQL script (start_custom_$SID.sql) andruns custom startup options. The script must be in the/opt/VRTSagents/ha/bin/Oracle directory and must have accessto the Oracle Owner OS user. If the file is not present, the agentlogs an error message.
With a custom script, the agent takes the following action:
sqlplus /nolog <<!connect / as sysdba;@start_custom_$SID.sqlexit;!
CUSTOM
Uses the srvctl utility to start an instance of the database.
ForRACclusters, youmustmanually set the default startupoptionas SRVCTLSTART.
SRVCTLSTART
Table 1-3 lists the shutdown options that the agent supports.
17Introducing the Veritas Cluster Server agent for OracleAbout Veritas Cluster Server agent for Oracle agent functions

Table 1-3 Shutdown options
DescriptionOption
Shuts down the Oracle instance by running shutdownimmediate.
IMMEDIATE
(Default)
Runs the shutdown transactional command. This option isvalid only for the database versions that support this option.
TRANSACTIONAL
Uses a predefined SQL script (shut_custom_$SID.sql) andruns custom shutdown options. The script must be in the/opt/VRTSagents/ha/bin/Oracle directory and must have accessto the Oracle Owner OS user. If the file is not present, the agentshuts the agent down with the default option.
CUSTOM
Uses the srvctl utility to stop an instance of the database.
For RAC clusters, you must manually set the default option asSRVCTLSTOP.
SRVCTLSTOP
Monitor options for Oracle agentThe Oracle agent provides two levels of monitoring: basic and detail. By default,the agent does a basic monitoring.
The basic monitoring mode has the following options:
■ Process check
■ Health check
The MonitorOption attribute of the Oracle resource determines whether the theagent must perform basic monitoring in Process check or Health check mode.
Table 1-4 describes the basic monitoring options.
Table 1-4 Basic monitoring options
DescriptionOption
Process check
The agent scans the process table for the ora_dbw, ora_smon,ora_pmon, and ora_lgwr processes to verify that Oracle is running.
0
(Default)
Introducing the Veritas Cluster Server agent for OracleAbout Veritas Cluster Server agent for Oracle agent functions
18

Table 1-4 Basic monitoring options (continued)
DescriptionOption
Health check (supported on Oracle 10g and later)
The agent uses theHealthCheckAPIs fromOracle tomonitor theSGAand retrieve the information about the instance.
If youwant to use the Oracle agent's intentional offline functionality,you must enable Health check monitoring.
See “How the agent makes Oracle highly available” on page 13.
1
Review the following considerations if you want to configure basic monitoring:
■ Within a failover service group, when the administrator onlines an Oracleresource on anode and if theOracle instance is online on any other nodewithina cluster, the instance would come up. However, the database does not getmounted. In such circumstances, this failure is detected only by health checkmonitoring option of basicmonitoring or detailmonitoring. Detailmonitoringupdates the database table after detecting a failure whereas health checkmonitoring does not.If health check monitoring option of basic monitoring or detail monitoring isnot configured, then such a conflict would go undetected.
In the detail monitoring mode, the agent performs a transaction on a test tablein the database to ensure that Oracle functions properly. The DetailMonitorattribute of the Oracle resource determines whether the the agent must performdetail monitoring.
See “HowtheagenthandlesOracle error codesduringdetailmonitoring”onpage19.
See “Setting up detail monitoring” on page 88.
How the agent handles Oracle error codes during detailmonitoringThe Veritas Cluster Server agent for Oracle handles Oracle errors during detailmonitoring. The agent classifies Oracle errors according to their severity andassociates predefined actions with each error code.
The agent includes a reference file oraerror.dat, which lists Oracle errors and theaction to be taken when the error is encountered.
The file stores information in the following format:
Oracle_error_string:action_to_be_taken
For example:
19Introducing the Veritas Cluster Server agent for OracleAbout Veritas Cluster Server agent for Oracle agent functions

01035:WARN
01034:FAILOVER
Table 1-5 lists the predefined actions that the agent takes when an Oracle erroris encountered.
Table 1-5 Predefined agent actions for Oracle errors
DescriptionAction
Ignores the error.
When the Veritas agent for Oracle encounters an error, the agentmatches the error code in the oraerror.dat file. If the error does nothave a matching error code in the file, then the agent ignores theerror.
IGNORE
Marks the resource state as UNKNOWN and sends a notification ifthe Notifier resource is configured. See the Veritas Cluster ServerUser's Guide for more information about VCS notification.
This action is typically associatedwith configuration errors orprograminterface errors.
UNKNOWN
Marks the resource state as ONLINE and sends a notification if theNotifier resource is configured.
This action is typically associated with errors due to exceeded quotalimits, session limits/restricted sessions so on.
WARN
Marks the resource state as OFFLINE. This faults the service groupby default, which fails over to the next available system.
If the file oraerror.dat is not available, the agent assumes this defaultbehavior for every Oracle error encountered.
FAILOVER
(Default)
Freezes the service group temporarily and marks the resource stateasOFFLINE. The agent also sends anotification if theNotifier resourceis configured.
This action is typically associated with the errors that are notsystem-specific. For example, if a database does not open from a nodedue to corrupt Oracle files, failing it over to another node does nothelp.
NOFAILOVER
Info entry pointThe Veritas Cluster Server agent for Oracle supports the Info entry point, whichprovides static and dynamic information about the state of the database.
To invoke the Info entry point, type the following command:
Introducing the Veritas Cluster Server agent for OracleAbout Veritas Cluster Server agent for Oracle agent functions
20

# hares -value resource ResourceInfo [system]\
[-clus cluster | -localclus]
The entry point retrieves the following static information:
■ InstanceName■ InstanceNo■ Version
■ StartupTime■ HostName■ DatabaseName
■ InstanceRole■ Thread■ Parallel
The entry point retrieves the following dynamic information:
■ OpenMode■ Logins■ InstanceStatus
■ DatabaseStatus■ ShutdownPending■ LogMode
■ Buffer Hits Percent■ Shared Pool Percent free
You can add additional attributes by adding sql statements to the file/opt/VRTSagents/ha/bin/Oracle/resinfo.sql. For example:
select 'static:HostName:'||host_name from v$instance;
select 'dynamic:ShutdownPending:'||shutdown_pending from
v$instance;
The format of the selected record must be as follows:
attribute_type:userkey_name:userkey_value
The variable attribute_type can take the value static and/or dynamic.
Action entry pointTheVeritas Cluster Server agent forOracle supports theAction entry point, whichenables you to perform predefined actions on a resource.
To perform an action on a resource, type the following command:
# hares -action res token [-actionargs arg1 ...] \
[-sys system] [-clus cluster]
You can also add custom actions for the agent.
For further information, refer to the Veritas Cluster Server Agent Developer’sGuide.
See Table 1-7 on page 22.
21Introducing the Veritas Cluster Server agent for OracleAbout Veritas Cluster Server agent for Oracle agent functions

Table 1-6 describes the agent’s predefined actions.
Table 1-6 Predefined agent actions
DescriptionAction
Retrieves the name of the configured instance. You canuse this option for the Oracle and the Netlsnr resources.
VRTS_GetInstanceName
Retrieves the list of processes that the agent monitors.You can use this option for the Oracle and the Netlsnrresources.
VRTS_GetRunningServices
Changes the database session to enable the RESTRICTEDmode.
DBRestrict
Changes the database session to disable theRESTRICTEDmode.
DBUndoRestrict
Suspends a database.DBSuspend
Resumes a suspended database.DBResume
Backs up a tablespace;actionargs contains nameof thetablespace to be backed up.
DBTbspBackup
Table 1-7 lists the virtual fire drill actions of the Veritas Cluster Server agent forOracle lets you run infrastructure checks and fix specific errors.
Table 1-7 Predefined virtual fire drill actions
DescriptionVirtual fire drill action
Verifies that the Oracle Owner exists on the node.getid
(Oracle agent)
Verifies the following:
■ ORACLE_HOME is mounted on the node andcorresponding entry is in the fstab.
If theORACLE_HOME is notmounted, the action entrypoint checks if anyother resourcehas alreadymountedORACLE_HOME.
■ Pfile is provided and it exists on the node.
■ Password file from$ORACLE_HOME/dbs/orapw[SID]is present.
home.vfd
(Oracle agent)
Introducing the Veritas Cluster Server agent for OracleAbout Veritas Cluster Server agent for Oracle agent functions
22

Table 1-7 Predefined virtual fire drill actions (continued)
DescriptionVirtual fire drill action
Verifies the uid and gid of the Oracle Owner attribute.Checks if uid and gid of Owner attribute is the same onthe node where the Oracle resource is currently ONLINE.
owner.vfd
(Oracle agent)
Checks for the presence of pfile or spfile on the local disk.If both pfile and spfile are not present, the agent functionexits. If the Oracle resource is online in the cluster, theagent function logs a message that the spfile must be onthe shared storage because the Oracle resource is online.
pfile.vfd
(Oracle agent)
Checks if listener.ora file is present. If listener.ora file, itchecks if ORACLE_HOME is mounted and displaysappropriate messages.
tnsadmin.vfd
(Netlsnr agent)
Netlsnr agent functionsThe listener is a server process that listens to incoming client connection requestsandmanages traffic to the database. TheNetlsnr agent brings the listener servicesonline, monitors their status, and takes them offline.
Table 1-8 lists the Netlsnr agent operations.
Table 1-8 Netlsnr agent operations
DescriptionAgent operation
Starts the listener process by using the following command:
lsnrctl start $LISTENER
Online
Stops the listener process by using the following command:
lsnrctl stop $LISTENER
If the listener is configured with a password, the agent uses thepassword to stop the listener.
Offline
23Introducing the Veritas Cluster Server agent for OracleAbout Veritas Cluster Server agent for Oracle agent functions

Table 1-8 Netlsnr agent operations (continued)
DescriptionAgent operation
Verifies the status of the listener process.
The Netlsnr agent provides two levels of monitoring, basic anddetail:
■ In the basicmonitoringmode, the agent scans theprocess tablefor the tnslsnr process to verify that the listener process isrunning.
■ In the detail monitoring mode, the agent uses the lsnrctlstatus $LISTENER command to verify the status of theListener process. (Default)
Monitor
Scans the process table for tnslsnr $Listener and kills it.Clean
Performs the predefined actions on a resource.
See “Action entry point” on page 21.
Action
ASMInst agent functionsThe ASMInst agent monitors the processes of ASM instance.
Table 1-9 lists the ASMInst agent operations.
Table 1-9 ASMInst agent operations
DescriptionAgent operation
Starts the Oracle ASM instance by using the following SQLcommand:
startup nomount
The Online operation starts the ASM instance without mountingany disk groups.
Online
Stops the Oracle ASM instance by using the following SQLcommand:
shutdown immediate
Offline
Introducing the Veritas Cluster Server agent for OracleAbout Veritas Cluster Server agent for Oracle agent functions
24

Table 1-9 ASMInst agent operations (continued)
DescriptionAgent operation
Verifies the status of the ASM instance.
The ASMInst agent monitors the ASM instance using the Healthcheck monitoring method. If the Health check monitoring fails,the agent does Process check monitoring.
The agent also checks if the ocssd.bin process is running. Theagent returns offline for the following conditions:
■ The process is not running.
■ The process is restarted.
Note:Make sure that theOCSSDprocess is running. TheASMInstagent onlymonitors the OCSSD process. The agent does not startor stop the process.
Monitor
Forcibly stops the Oracle ASM instance by using the followingSQL command:
shutdown abort
If the process does not respond to the shutdown command, theagent kills the process using theSIGTERMorSIGKILL commands.
Clean
ASMDG agent functionsThe ASMDG agent mounts the ASM disk groups that the Oracle databases use,monitors the status, unmounts the ASM disk groups.
You must have specified the disk group names in the DiskGroup attribute of theASMDG agent.
Table 1-10 lists the ASMDG agent operations.
Table 1-10 ASMInst agent operations
DescriptionAgent operation
Mounts the specified Oracle ASMdisk groups to an ASM instanceby using the following SQL command:
alter diskgroup dg_name1, dg_name2 mount
Online
25Introducing the Veritas Cluster Server agent for OracleAbout Veritas Cluster Server agent for Oracle agent functions

Table 1-10 ASMInst agent operations (continued)
DescriptionAgent operation
Unmounts the specified Oracle ASM disk groups from an ASMinstance by using the following SQL command:
alter diskgroup dg_name1, dg_name2 dismount
Note: The followingOraclemessage appears in the VCS logwhenanASM instancewith noASMdisk groupsmounted is shut down:
ORA-15100: invalid or missing diskgroup name
Offline
Verifies the status of the specified ASM disk groups.
The disk groups can be in one of the following states:
■ mounted
■ dismounted
■ unknown
■ broken
■ connected
If multiple ASM disk groups are configured for a resource, thentheASMDGagent returns the resource state considering the statusof all the specified ASM disk groups.
Monitor
Forcibly unmounts the Oracle ASM disk groups by using thefollowing SQL command:
alter diskgroup dg_name1, dg_name2 dismount force
Clean
Typical Oracle configuration in a VCS clusterA typical Oracle configuration in a VCS cluster has the following characteristics:
■ VCS is configured in a two-node cluster.
■ The Oracle data is installed on shared storage.
■ The Oracle binaries are installed locally on both nodes or on shared disks.
If you use Oracle ASM feature, then the characteristics are as follows:
■ The Oracle binaries are installed locally on both the nodes.
■ The database files are installed on the ASM disk groups.
Review the typical cluster setup illustration for ASM-managed database.See Figure 1-2 on page 27.
■ The Veritas Cluster Server agent for Oracle is installed on both nodes.
Introducing the Veritas Cluster Server agent for OracleTypical Oracle configuration in a VCS cluster
26

For ASM, ASMInst and ASMDG agents are installed on both nodes.
Figure 1-1 depicts a configuration where Oracle binaries and data are installedcompletely on shared disks.
Figure 1-1 Oracle binaries and data on shared disks
Node1 Node2VCS private network
Shared disks/diskgroups
Oracle binariesand data files
Public network
Figure 1-2 depicts a configuration where Oracle binaries are installed locally oneach node and Oracle data is installed on shared disks.
Figure 1-2 Oracle binaries on local disk and Oracle data on shared disk
Node1 Node2VCS private network
Shared disks/diskgroups/ASM diskgroups
Oracle binaries
Public network
Oracledata files
Oracle binaries
About setting up Oracle in a VCS clusterTasks involved in setting up Oracle in a VCS environment include:
■ Setting up a VCS clusterRefer to Veritas Cluster Server Installation Guide for more information oninstalling and configuring VCS.
■ Installing and configuring Oracle
27Introducing the Veritas Cluster Server agent for OracleAbout setting up Oracle in a VCS cluster

See “About installing Oracle in a VCS environment” on page 29.
■ Installing the Veritas Cluster Server agent for OracleSee “Before you install or upgrade the agent for Oracle” on page 51.
■ Configuring VCS service groups for OracleSee “About configuring a service group for Oracle” on page 61.
Introducing the Veritas Cluster Server agent for OracleAbout setting up Oracle in a VCS cluster
28

Installing and configuringOracle
This chapter includes the following topics:
■ About installing Oracle in a VCS environment
■ Before you install Oracle
■ About VCS requirements for installing Oracle
■ About Oracle installation tasks for VCS
■ Installing Oracle binaries
■ Configuring the Oracle ASM
■ Configuring the Oracle database
■ Copying the $ORACLE_BASE/admin/SID directory
■ Copying the ASM initialization parameter file
■ Verifying access to the database
About installing Oracle in a VCS environmentThe strategy for installing Oracle into a VCS cluster is aimed at ensuring thatinstallations on all nodes in the cluster are uniform.
See the Oracle documentation on Solaris.
You can install Oracle in the following ways in a VCS environment:
2Chapter

Oracle binaries and Oracle data are installed onshared disks.
$ORACLE_HOME on the shared disk
Oracle binaries are installed locally on each nodeand Oracle data is installed on shared disks.
$ORACLE_HOME on the local disk
Note: To use ASM for Oracle database storage, youmust install $ORACLE_HOMEon the local disks of all nodes in the cluster.
See “About Oracle installation tasks for VCS” on page 36.
Note thatOracle data includes the datafiles, control files, redo log files, and archivelog files.
When installing Oracle, ensure that the login_id, id_name, group_id, andgroup_name for the Oracle owner is the same on all the nodes. The user oracleand the group dba must be local and not Network Information Service (NIS andNIS+) users.
Before you install OracleMake sure you meet the following prerequisites:
■ Verify that VCS is installed on all nodes in the cluster.
■ Verify that all nodes in the cluster have adequate resources to run Oracle andVCS.
■ Verify that the network supports the TCP/IP protocol.
■ Make sure that you meet the VCS requirements to install Oracle.See “About VCS requirements for installing Oracle” on page 30.
About VCS requirements for installing OracleReview the requirements before you install Oracle in aVCS cluster andmake surethat you meet the requirements.
Kernel parameter configurationMake sure you meet the following configuration requirements for each node onwhich you want to install Oracle:
■ Disk partitions
■ Shared memory
Installing and configuring OracleBefore you install Oracle
30

■ Swap size
■ Semaphores
■ File handles
See Oracle documentation for the corresponding operating system.
Location of the $ORACLE_HOMEYou can place the Oracle home directory ($ORACLE_HOME), which contains theOracle binaries and configuration files, locally on each server’s disk. Alternatively,you canplace theOraclehomedirectory on the shared storage. The correct locationfor Oracle binaries depends on your environment. The following points discussthe advantages of each approach.
If you want to use Oracle ASM, then you must place the Oracle home directoryonly on the local disks of each node. You can install Oracle ASM on the sameOracle home as Oracle Database, or you can install Oracle ASM on a differentOracle home directory.
See Oracle documentation.
$ORACLE_HOME directory on shared disksYou can install the Oracle Database Server ($ORACLE_HOME) on shared disks.Each node in the clustermust have the samemount point directory for the sharedfile system. Placing the Oracle binaries on shared storage simplifies setting up agiven node in a cluster to run an instance. Each database service group isself-contained. An instance can bemoved to a new node in the cluster that sharesthe storage.
For example, in a cluster with four nodes, you can have three database instancesor service groups, each at a different Oracle version. If the Oracle binaries areplaced on shared storage, three copies of Oracle, that is, one per version arerequired on shared storage. By contrast, placing the Oracle binaries on localstorage, would require as many as 12 copies of the binaries (three versions onfour nodes).
The disadvantage of this approach is that a rolling upgrade of Oracle binaries onshared storage is not possible.
$ORACLE_HOME directory on the local diskYou can install the Oracle Database Server ($ORACLE_HOME) on the local disk.The advantage is that you can upgrade the Oracle database binaries on an offlinenode while the database server runs on another node. The database server can
31Installing and configuring OracleAbout VCS requirements for installing Oracle

later be switched to the upgraded node (provided the database is compatible),permitting a minimum amount of downtime.
The disadvantage of this approach is thatwith a large number of nodes, it becomesdifficult to maintain the various Oracle installations.
Multiple Oracle instances (SIDs)You can have multiple Oracle instances that are defined in a single clusterconfiguration. In such cases, theparameter file for each instancemust be accessibleon all the nodes in the service group’s SystemList attribute.
Note: If you installed multiple versions of Oracle on the same system, make surethat the SIDs are unique.
Location of database tablespacesIf the tablespaces are created using regular (UFS or VxFS) files, the file systemscontaining these filesmust be located on shared disks. Create the same file systemmount points on each node.
If you use raw devices on shared disks for Oracle tablespaces, do one of thefollowing:
■ Change the ownership to Oracle dba user and the permissions.
■ Change the access mode to 660 on the raw devices storing the Oracle data.
For example, if you use Veritas Volume Manager, type:
# vxedit -g diskgroup_name set group=dba \
user=oracle mode=660 volume_name
Note: The user oracle and the group dbamust be local and not NetworkInformation Service (NIS and NIS+) users
Location of core filesThe VCS agent framework sets the current directory to/opt/VRTSagents/ha/bin/Oracle before it runs the Oracle agent scripts or theprograms that execute the Oracle binaries. Oracle binaries, which run as the useroracle, do not have permission to write to /opt/VRTSagents/ha/bin/Oracle. So,any "core" files that the Oracle binaries generate are lost. The processes that
Installing and configuring OracleAbout VCS requirements for installing Oracle
32

terminate abnormallyproduce core files. Symantec recommendsusing thecoreadm(1M) command to specify the name and the location of such core files.
Transparent listener failoverYou can enable Oracle Server clients to reconnect after a node switch withoutreconfiguring. For such reconnections you must include at least one IP resourcein the service group for theOracle resource. Thehostnamemapping the IP addressof this resource must be used for the Host field in the file$TNS_ADMIN/listener.ora.
If you use theTCP/IP protocol forOracle client/server communication, verify thatthe file /etc/services contains the service name of the Oracle Net Service. Youmust verify this file on eachnode that is defined in the service group’s SystemListattribute.
Listener authentication in VCS environmentTheNetlsnr agent supportsOS authentication aswell as password authenticationfor the listener process. If you useOracle 10g or later, Symantec recommends youto configureOS authentication. If youwant to configure a listener password,makesure that you configure the password correctly. A misconfigured password cancause the listener to fault.
See “Encrypting passwords ” on page 87.
Refer to the Oracle documentation for details on configuring the listenerauthentication.
Long pathname limitation for $ORACLE_HOMEThe Solaris process table limits process pathnames to 79 characters.
The full pathname of processes in $ORACLE_HOME can possibly have 80characters ormore. In this case, you can create a soft link to the $ORACLE_HOMEdirectory. You can then use the soft link in place of the long filename in theHomeattribute in the main.cf file.
Replacing the long pathnames in the attributesYou must create the soft link on each of the nodes in the cluster.
33Installing and configuring OracleAbout VCS requirements for installing Oracle

To replace the long pathnames
1 Create a soft link to the long pathname. For example:
# ln -s /opt/apps/oracle/home/directory/is/longer/than\
/eighty/characters/oracle /opt/link_to_longpath
2 In the file /etc/VRTSvcs/conf/config/main.cf, modify the Home and Pfileattributes for both the Oracle resource type and the Netlsnr resource type.
See “About the sample configurations forOracle enterprise agent”onpage125.
For example:
Home = "/opt/link_to_longpath"
Pfile = "/opt/link_to_longpath/dbs/initVRT.ora"
Defining NLS informationYou can define NLS information by defining the appropriate parameters in theOracle parameter file or by defining the appropriate environment variables in theEnvFile.
See “About the resource type and attribute definitions” on page 107.
Defining the parameters in theOracle parameters file affects NLS settings for theOracle server. Defining the environment variables affects the NLS input andoutput of client utilities.
Hot backup of Oracle database in VCS environmentThe hot backup of Oracle database is enabled by default in VCS environment.
A node can fail while running a hot backup of an Oracle database. During suchfailures, the failover to another node can succeed only if the Oracle resourceattribute AutoEndBkup is set to a non-zero value. So, the AutoEndBkup attributevalue is set to 1 by default.
Otherwise, the agent cannot open the database in the backupmode on the failovernode, and VCS cannot online the Oracle resource group.
The following errors are displayed to indicate this condition:
$ ORA-1110 "data file %s: ’%s’"
or
$ ORA-1113 "file %s needs media recovery"
Installing and configuring OracleAbout VCS requirements for installing Oracle
34

Before VCS can bring the Oracle resource group online on the failover node, youmust take the datafiles in the database out of the backup mode. Then, you mustshut down the database so that the agent can reopen the database.
Refer to the Oracle documentation for instructions on how to change the state ofthe database files.
However, if you want to use the hot backup feature in a VCS environment, youmust meet the following requirements:
■ The AutoEndBkup attribute value must be set to 1.See “About the resource type and attribute definitions” on page 107.
■ The Startup option of Oracle agent must be STARTUP, STARTUP_FORCE, orCUSTOM.See “Startup and shutdown options” on page 17.
■ If you set the AutoEndBkup attribute value to 0, then you must set theDetailMonitor attribute value to 1.See “Setting up detail monitoring” on page 88.
Storage devices for Oracle ASM configurations in VCSYou can choose one of the following storage devices for Oracle ASM:
■ ASM disks as raw disksIf you use raw disks, then make sure that the disks have the persistentpermissions that are specified for ASM $ORACLE_HOME.
■ ASM disks as Veritas Volume Manager volumesIf you use VxVM volumes, then make sure that the disks have persistentpermissions across reboots. The permissionsmust be the same as that of ASM$ORACLE_HOME.See Veritas Volume Manager documentation.
■ ASM disks as Veritas Cluster Volume Manager volumesIf you use CVM volumes, then make sure that the disks have persistentpermissions across reboots. The permissionsmust be the same as that of ASM$ORACLE_HOME.See Veritas Volume Manager documentation.
If youwant to configuremirroring forASMdisks that useVxVMorCVMvolumes,then you must configure VxVMmirroring and not configure ASMmirroring.
See “Sample Oracle ASM configurations” on page 159.
35Installing and configuring OracleAbout VCS requirements for installing Oracle

About Oracle installation tasks for VCSTasks to complete Oracle installation in a VCS cluster depend on whether youwant the $ORACLE_HOME on shared disk or local disk.
See “Installation tasks for $ORACLE_HOME on shared disks” on page 36.
See “Installation tasks for $ORACLE_HOME on local disks” on page 37.
ForASM, youmust install $ORACLE_HOMEon local disks and configure theOracleASM.
See “Installation tasks for Oracle using ASM” on page 38.
Figure 2-1 illustrates the flow of the installation when the $ORACLE_HOME is onshared disk and on local disk.
Figure 2-1 Comparison of the installation flow
Install Oracle binaries onshared disks
Create the database on shareddisks
Mount the Oracle binariesdirectory
Verify if you can start thedatabase
Install Oracle binaries locallyon the first system
Create the database on shareddisks
Install Oracle binaries on localdisks
Copy the $ORACLE_BASE/admin/SID directory to thelocal disks
Verify if you can start thedatabase
$ORACLE_HOME on shared disks $ORACLE_HOME on local disks
Repeat steps on each clusternode
Installation tasks for $ORACLE_HOME on shared disksThemethodology is to install theOracle binaries and to create theOracle databaseon shared disks during the first installation. Mount the Oracle binaries directoryand verify that the database can be started from all nodes.
Installing and configuring OracleAbout Oracle installation tasks for VCS
36

Table 2-1 lists the tasks to install Oracle such that $ORACLE_HOME is on shareddisks.
Table 2-1 Installation tasks for $ORACLE_HOME on shared disks
ReferenceTask
See “Installing Oracle binaries” on page 39.
See “Disabling the clustering daemon forOracle 10g or later” on page 42.
From any node in the cluster, install Oraclebinaries on shared disks.
Disable the Oracle clustering daemon forOracle 10g and later.
See “Configuring the Oracle database”on page 45.
From the node where you installed Oracle,create the database on shared disks.
See “Verifying access to the database”on page 47.
From each node that would be a part of theOracle cluster, verify access to the databaseon shared disks.
Installation tasks for $ORACLE_HOME on local disksThe methodology is to install the Oracle binaries on the local disk and to createthe Oracle database on shared disks during the first installation. Then, install theOracle binaries on local disks of other nodes. This methodology ensures that allOracle installations are identical and access the database from the same locationon the shared disk.
Table 2-2 lists the tasks to install Oracle such that $ORACLE_HOME is on localdisks.
Table 2-2 Installation tasks for $ORACLE_HOME on local disks
ReferenceTask
See “Installing Oracle binaries” on page 39.On the first node in the cluster, install Oraclebinaries on the local disk.
See “Configuring the Oracle database”on page 45.
From the first node where you installedOracle, create the database on shared disks.
■ See“InstallingOraclebinaries”onpage39.
■ See “Copying the$ORACLE_BASE/admin/SID directory”on page 47.
■ See “Verifying access to the database”on page 47.
On each node in the cluster, perform thefollowing tasks:
■ Install Oracle binaries on the local disk.
■ Copy the $ORACLE_BASE/admin/SIDdirectory to the local disk.
■ Verify if you can start the database.
37Installing and configuring OracleAbout Oracle installation tasks for VCS

Installation tasks for Oracle using ASMFigure 2-2 illustrates the flow of the installation when you want to use ASM forthe Oracle database.
Figure 2-2 Installation flow for Oracle ASM
Install Oracle binaries locally on the first system
Create the database on shared disks
Install Oracle binaries on local disks
Copy the $ORACLE_BASE/admin/SID directory tothe local disks
Verify if you can start the database
Oracle installation for ASM
Configure the Oracle ASM
Copy the ASM initialization parameter file to thelocal disks
Repeat steps on eachcluster node
The methodology is to perform the following:
■ Install the Oracle binaries on the local disk, configure the ASM, and to createthe Oracle database on ASM disk groups during the first installation.
■ Then, install the Oracle binaries on local disks of other nodes.
This methodology ensures that all Oracle installations are identical and accessthe database from the same location.
Table 2-3 lists the tasks to install Oracle such that $ORACLE_HOME is on localdisks.
Table 2-3 Installation tasks for $ORACLE_HOME on local disks
ReferenceTask
See “Installing Oracle binaries” on page 39.
See “Enabling the clustering daemon forASM-managed database” on page 44.
On the first node in the cluster, install Oraclebinaries on the local disk.
Enable the Oracle clustering daemon forOracle 10g and later.
Installing and configuring OracleAbout Oracle installation tasks for VCS
38

Table 2-3 Installation tasks for $ORACLE_HOME on local disks (continued)
ReferenceTask
See “Configuring theOracleASM”onpage43.From the first node where you installedOracle, configure the Oracle ASM.
See “Configuring the Oracle database”on page 45.
From the first node where you installedOracle, create the database on ASM diskgroups.
Refer the following topics:
■ See“InstallingOraclebinaries”onpage39.
■ See “Copying the$ORACLE_BASE/admin/SID directory”on page 47.
■ See “Copying the ASM initializationparameter file” on page 47.
■ See “Verifying access to the database”on page 47.
On each node in the cluster, perform thefollowing tasks:
■ Install Oracle binaries on the local disk.
■ Copy the $ORACLE_BASE/admin/SIDdirectory to the local disk.
■ Copy the ASM initialization parameterfile to the local disk.
■ Verify if you can start the database.
Installing Oracle binariesInstall a version ofOracle that theVeritas Cluster Server agent forOracle supports.
Note: If you want to use Oracle ASM feature, do not disable the ClusterSynchronization Services.
To install Oracle9i for VCS
1 Insert the Oracle CD.
2 Set the DISPLAY variable, mount the CD drive, and run the Oracle installeras Oracle User.
# /mnt/cdrom/runInstaller
3 Read the Welcome screen and click Next.
4 If youperform theOracle installation for the first time, the Inventory Locationdialog box is displayed. Specify the location of your base directory and clickOK.
■ If you plan the $ORACLE_HOME to be on local disks in your installation,specify a location on the local disk.
39Installing and configuring OracleInstalling Oracle binaries

■ If you plan the $ORACLE_HOME to be on shared disks in your installation,specify a location on the shared disk.
5 On the UNIX Group Name dialog box, enter the name of a UNIX group thathas permissions to update the Oracle software and click Next.
6 The Oracle installer displays a message asking you to run the script/tmp/orainstRoot.sh. Run the script and click Continue to return to theOracle installer.
7 On the File Locations dialog box, enter or select a name and a path for theOracle Home and click Next.
8 On the Available Products dialog box, select the Oracle9i Database optionand click Next.
9 On the Installation Types dialog box, select your installation type and clickNext.
10 On the Database Configuration dialog box, select the SoftwareOnly optionand click Next.
11 On the Summary dialog box, review your selections. Click Back to makechanges. Otherwise click Install.
12 Click Next after the installation is complete.
13 On the End of Installation dialog box, click Exit.
14 Proceed to configure the database on shared disks.
See “Configuring the Oracle database” on page 45.
To install Oracle 10g for VCS
1 Insert the Oracle CD.
2 Set the DISPLAY variable, mount the CD drive, and run the Oracle installeras Oracle User.
# /mnt/cdrom/runInstaller
3 Read the Welcome screen and click Next.
4 If youperform theOracle installation for the first time, the Inventory Locationdialog box is displayed. Specify the location of your base directory and clickOK. Do one of the following:
■ If you plan the $ORACLE_HOME to be on local disks in your installation,specify a location on the local disk.
■ If you plan the $ORACLE_HOME to be on shared disks in your installation,specify a location on the shared disk.
Installing and configuring OracleInstalling Oracle binaries
40

5 The Oracle installer displays a message asking you to run the script/tmp/orainstRoot.sh. Run the script and clickContinue to return to theOracleinstaller.
6 In the File Locations dialog box, enter or select a name and a path for theOracle Home and click Next.
7 In the Installation Types dialog box, select your installation type and clickNext.
8 In the Select Database Configuration dialog box, select the Donot create astarter database option and click Next.
9 In the Summary dialog box, review your selections. Click Back to makechanges. Otherwise click Install.
10 Click Next after the installation is complete.
11 In the End of Installation dialog box, click Exit.
12 Disable the Oracle clustering daemon.
See “Disabling the clustering daemon for Oracle 10g or later” on page 42.
If you want to use ASM, skip this step and proceed to configuring the OracleASM.
See “Configuring the Oracle ASM” on page 43.
13 Proceed to configure the database on shared disks.
See “Configuring the Oracle database” on page 45.
To install Oracle 11g for VCS
1 Insert the Oracle CD.
2 Set the DISPLAY variable, mount the CD drive, and run the Oracle installeras Oracle User.
# /mnt/cdrom/runInstaller
3 In theSelect InstallationMethoddialogbox, choose theAdvancedInstallationmethod and click Next.
4 If you perform theOracle installation for the first time, the Specify Inventorydirectory and credentials dialog box is displayed. Specify the location of yourinventory directory and click Next. Do one of the following:
■ If you plan the $ORACLE_HOME to be on local disks in your installation,specify a location on the local disk.
■ If you plan the $ORACLE_HOME to be on shared disks in your installation,specify a location on the shared disk.
41Installing and configuring OracleInstalling Oracle binaries

5 Follow the wizard instructions and select other options
6 In the Create Database dialog box, choose Install database Software only.
7 In the Summary dialog box, review your selections. Click Back to makechanges. Otherwise click Install.
8 During the installation, the Oracle installer displays a message asking youto run some configuration scripts. Run the scripts and click OK to return tothe Oracle installer.
9 Click Next after the installation is complete.
10 In the End of Installation dialog box, click Exit.
11 Disable the Oracle clustering daemon.
See “Disabling the clustering daemon for Oracle 10g or later” on page 42.
If you want to use ASM, skip this step and proceed to configuring the OracleASM.
See “Configuring the Oracle ASM” on page 43.
12 Proceed to configure the database on shared disks.
See “Configuring the Oracle database” on page 45.
Disabling the clustering daemon for Oracle 10g or laterIf you installed Oracle binaries for Oracle versions 10g or later on shared disks,you must disable the Oracle clustering daemon.
Warning: If youwant to useASM feature, then donot disable theOracle clusteringdaemon.
Oracle versions 10g and later provide a clustering daemon called Oracle ClusterSynchronization ServiceDaemon (CSSD). If theOracle binary files are on a sharedstorage, the init command to start the daemon may result in an error. Becausea VCS cluster for Oracle does not require this daemon, Symantec recommendsyou to disable the daemon.
To disable the daemon on Solaris 9 and below
◆ Remove the following line from the /etc/inittab file on the node from whereyou ran the Oracle installation wizard:
h1:23:respawn:/etc/init.d/init.cssd run >/dev/null 2>&1 >
</dev/null
Installing and configuring OracleInstalling Oracle binaries
42

To disable the daemon on Solaris 10
◆ On the node from where you ran the Oracle installation wizard:
■ Find out the Fault Management Resource Identifier (FMRI) for the cssddaemon. Type the following from the command prompt:
# svcs | grep cssd
The FMRI for the cssd daemon is displayed.
■ Modify the Service Configuration Repository such that the SVC does notcontrol the daemon. Type the following from the command prompt:
# svccfg delete -f <FMRI>
FMRI is the cssd FMRI you obtained.
Configuring the Oracle ASMIf you want to use ASM feature of Oracle 10g or later, then configure the OracleASMusing the Database Configuration Assistant. You need to configure the ASMonly once, from the node on which you installed Oracle first.
Review the procedure to configure ASM for Oracle database.
To configure ASM for the Oracle 10g or Oracle 11g database
1 Set the DISPLAY variable and start the Oracle Database ConfigurationAssistant as Oracle User.
# dbca
2 Read the Welcome screen, click Next.
3 In the Operations dialog box, select the ConfigureAutomatic StorageManagement option and click Next.
4 In theDatabaseTemplates dialog box, select a template to create the databaseand click Next.
5 In the Database Identification dialog box, enter or select a unique name andSID for the global database and click Next.
6 Follow the wizard instructions and select other options.
7 In the Storage Options dialog box, select theAutomatic StorageOption andclick Next.
43Installing and configuring OracleConfiguring the Oracle ASM

8 Review the warning message and click OK. Make sure that the Oracleclustering daemon is running.
See “Enabling the clustering daemon forASM-manageddatabase” onpage 44.
9 In the Create ASM Instance dialog box, specify the ASM SYS user passwordand click Next.
10 Click OK in the message box that appears.
11 In the ASMDisk Groups dialog box, choose to create a new disk group or adddisks to an existing disk group.
12 In the Change Disk Discovery Path dialog box, enter the path name.
Depending on the disk device you want to use for ASM, enter the diskdiscovery path.
See “Storage devices for Oracle ASM configurations in VCS” on page 35.
13 In the Create Disk Group dialog box, do the following:
■ Choose one of the Redundancy options.
■ In the Select Member Disks area, choose the ShowCandidates option.
■ Select the disks against theDiskPath from the list to create the ASMdiskgroup.
■ Click OK.
14 Follow the wizard instructions and complete configuring the Oracle ASM.
Enabling the clustering daemon for ASM-managed databaseIf your database is ASM-managed, then you must make sure that the Oracleclustering daemon is enabled in eachnode of the cluster. If theCSSD is not enabled,perform the following procedure.
To enable the clustering daemon for ASM-managed database
1 Log in as superuser.
2 Run the following command to configure and start the clustering daemon.
# $ORACLE_HOME/bin/localconfig add
3 Make sure the node has only one Oracle CSSD process running.
Installing and configuring OracleConfiguring the Oracle ASM
44

Configuring the Oracle databaseConfigure an Oracle database on shared disks using the Database ConfigurationAssistant. You need to configure the database only once, from the node on whichyou installed Oracle first.
If you configuredASM forOracle database storage, configure theOracle databaseon ASM disk groups.
To configure the Oracle9i database
1 Set the DISPLAY variable and start the Oracle Database ConfigurationAssistant as Oracle User.
# dbca
2 Read the Welcome screen, click Next.
3 On the Operations dialog box, select the Create a database option and clickNext.
4 On theDatabaseTemplates dialog box, select a template to create the databaseand click Next.
5 On the Database Identification dialog box, enter or select a unique name andSID for the global database and click Next.
6 On theDatabase ConnectionOptions dialog box, select theDedicatedServerMode or the Shared ServerMode and click Next.
7 On the InitializationParameters dialogbox, specify the locations of the archivelogs and the initialization parameter files:
■ If you want to enable archive logs for the database, click theArchive taband select the Archive LogMode check box. In the Archive LogDestination(s) list, enter a path on the shared disk to ensure that theArchive Log is created on the shared disk.
■ Click the File Locations tab.
■ If installingOracle locally on all systems,make sure that the initializationparameter file and the trace file directories are on the local disk.
■ Modify other parameters, if desired.
■ Click Next.
8 On theDatabase Storage dialog box, specify the locations of the Control, Data,and Redo log files:
■ In the left pane, expand the Storage folder by clicking the + next to it.
45Installing and configuring OracleConfiguring the Oracle database

■ Click Controlfile and click the General tab in the right pane.
■ In theFileDirectory field, enter a path on the shared disk for each controlfile.
■ Expand the Datafiles folder by clicking the + next to it.
■ Select the datafile in the left pane and click the General tab in the rightpane. In theName field, enter a path on the shared disk for each datafile.
■ Expand the Redo LogGroups folder by clicking the + next to it.
■ Select the Redo Log file in the left pane. In the FileDirectory field in theright pane, enter the path of a directory on the shared disk for each RedoLog file. Specify file sizes for the Redo Log files, if desired.
■ Click Next.
9 On the Creation Options dialog box, select the CreateDatabase check boxand click Finish.
10 On the Summary dialog box, review your selections and click OK.
To configure the Oracle 10g or Oracle 11g database
1 Set the DISPLAY variable and start the Oracle Database ConfigurationAssistant as Oracle User.
# dbca
2 Read the Welcome screen, click Next.
3 In the Operations dialog box, select the Create a database option and clickNext.
4 In theDatabaseTemplates dialog box, select a template to create the databaseand click Next.
5 In the Database Identification dialog box, enter or select a unique name andSID for the global database and click Next.
6 Follow the wizard instructions and select other options.
7 In the Storage Options dialog box, select the File System or RawDevicesoption and click Next.
If you configured ASM, select Automatic StorageOption (ASM) and clickNext.
8 If you configured ASM, in the ASM Disk Groups dialog box, select the ASMdisk group for the Oracle database storage and click Next.
Installing and configuring OracleConfiguring the Oracle database
46

9 In the Database File Locations dialog box, specify a location on the shareddisk for the database files to be created and click Next.
If youconfiguredASM, chooseUseOracle-ManagedFiles, specify thedatabasearea, and click Next.
10 In the Recovery Configuration dialog box, specify the FlashRecoveryAreaon the shared disk and click Next.
If you configuredASM, specify the appropriateFlashRecoveryArea locationand click Next.
11 If you use Oracle 11g, in the Security Settings dialog box, choose therecommended security setting. Choose the Keep the enhanced 11g defaultsecurity settings option and click Next.
12 Follow the wizard instructions and complete creating the database.
Copying the $ORACLE_BASE/admin/SID directoryFollow the instruction on each node in the cluster, only if the $ORACLE_HOMEis on local disks.
To copy the $ORACLE_BASE/admin/SID directory
◆ Copy the directory $ORACLE_BASE/admin/SID from the shared disk to thelocal disk.
The variable SID represents the database instance.
Refer to Oracle’s documentation on OFA Structure for more information.
Copying the ASM initialization parameter fileIf your Oracle is ASM-managed, then perform the procedure on each node in thecluster.
To copy the ASM initialization parameter file
◆ Copy the initSID.ora file from the $ORACLE_HOME/dbs directory on thenodewhere you first installed Oracle ASM to the local node.
where SID is the ASM instance identifier.
Verifying access to the databaseYou can verify access to the database by running an SQL query.
47Installing and configuring OracleCopying the $ORACLE_BASE/admin/SID directory

Dependingon the locationof your$ORACLE_HOME,performoneof theproceduresto start the database.
See “Starting the database when your $ORACLE_HOME is on shared disks”on page 48.
See “Starting thedatabasewhenyour$ORACLE_HOMEison localdisks”onpage48.
For ASM, the $ORACLE_HOME is on local disks and the database is configuredon ASM disk groups.
See “Starting the ASM-managed database” on page 48.
Upon completion, the Oracle database is started from the node in the cluster thatyou last performed this procedure.
Starting the database when your $ORACLE_HOME is on shared disksVerify that you can access the shared database from each node. Perform the stepsfrom each node that would be a part of the Oracle cluster.
To start the database when $ORACLE_HOME is on shared disks
1 If the Oracle binaries are mounted on any other node, unmount it.
2 If the data files on shared disk are mounted on any node, unmount it.
3 Mount the Oracle binaries and data files.
4 Start the database.
Starting the database when your $ORACLE_HOME is on local disksVerify that you can access the database individually on each node that would bea part of the Oracle cluster.
To start the database when $ORACLE_HOME is on local disks
1 Make sure you have installed Oracle binaries on the node.
2 If the data files on shared disk are mounted on any node, unmount it.
3 Mount the data files.
4 Start the database.
Starting the ASM-managed databaseVerify that you can access the database individually on each node that would bea part of the Oracle cluster.
Installing and configuring OracleVerifying access to the database
48

To start the ASM-managed database
1 Make sure you have installed Oracle binaries on the node.
2 If you use VxVM disks as ASM disks, do the following:
■ If the ASM disk groups are mounted on any node, do the following:
■ Unmount the ASM disk groups from the ASM instance.
■ Stop the ASM instance.
■ Stop the VxVM volumes.
■ Deport the VxVM disk groups.
■ Import the VxVM disk groups on this node and start the volumes.
■ Start the ASM instance.
■ Mount the ASM disk groups.
3 If you use CVM volumes for ASM, do the following:
■ Unmount the ASM disk group from the ASM instance on the node wherethe disk group is mounted.
■ Mount the ASM disk groups on the other node.
4 If you use raw disks as ASM disks, do the following:
■ If the ASM disk groups are mounted on any node, unmount it.
■ If the ASM instance is not running on this node, then start the ASMinstance.
■ Mount the ASM disk groups.
5 Start the database.
49Installing and configuring OracleVerifying access to the database

Installing and configuring OracleVerifying access to the database
50

Installing and removing theagent for Oracle
This chapter includes the following topics:
■ Before you install or upgrade the agent for Oracle
■ Installing the agent software
■ Upgrading the agent
■ Disabling the Veritas Cluster Server agent for Oracle
■ Removing the Veritas Cluster Server agent for Oracle
Before you install or upgrade the agent for OracleMeet the following prerequisites to install or upgrade the Veritas Cluster Serveragent for Oracle:
■ Make sure that VCS is installed in the cluster.Symantec recommends installing the VCS graphical user interface. Refer tothe Veritas Cluster Server Installation Guide.
■ Verify that the Oracle Server for Solaris and the add-on Listener are installedand configured.See Oracle documentation.See “About installing Oracle in a VCS environment” on page 29.
3Chapter

Installing the agent softwareYou can install the Veritas Cluster Server agent for Oracle from the product disc.Youmust install the Oracle enterprise agent on all nodes that will host the Oracleservice group.
To install the agent on a Solaris SPARC node
1 Log in as superuser.
2 Create a temporary directory for installation:
# mkdir /tmp/install
3 Insert the disc into a drive connected to your node:
■ If you are running Solaris volume-management software, the softwareautomatically mounts the disc as /cdrom/cdrom0. Type the followingcommand to go to the location:
# cd /cdrom/cdrom0
■ If you are not running Solaris volume-management software, you mustmount the disc manually. For example:
# mount -F hsfs -o ro /dev/dsk/c0t6d0s2 /cdrom
Where, in this example, /dev/dsk/c0t6d0s2 is the default for the CDdrive.After the disc ismounted, go to the locationwhere the package filesare present:
# cd /cdrom
4 Copy the compressed package files from the software disc to the temporarydirectory:
# cp -r oracle_agent/pkgs/* /tmp/install
5 If your system does not have the gunzip utility, copy it from the disc:
# cp /cdrom_path/gnu/gunzip /tmp/install
6 Go to the temporary directory and unzip the compressed package file:
# cd /tmp/install
# gunzip VRTS*.gz
Installing and removing the agent for OracleInstalling the agent software
52

7 Extract the compressed files from the tar files:
# tar -xvf VRTSvcsor.tar
# tar -xvf VRTScsocw.tar
8 Install the package:
# pkgadd -d . VRTSvcsor
# pkgadd -d . VRTScsocw
These packages include the following:
■ VRTSvcsor—the agent binaries for Oracle, Netlsnr, ASMInst, andASMDGagents
■ VRTScsocw—the agent configuration wizard
To install the Japanese language pack on a Solaris SPARC node
1 After installing the agent, insert the "Language" disc into a drive connectedto the system.
2 Insert the disc into a drive connected to your system:
■ If you are running Solaris volume-management software, the softwareautomatically mounts the disc as /cdrom/cdrom0. Type the followingcommand to go to the location:
# cd /cdrom/cdrom0
■ If you are not running Solaris volume-management software, you mustmount the disc manually. For example:
# mount -F hsfs -o ro /dev/dsk/c0t6d0s2 /cdrom
Where, in this example, /dev/dsk/c0t6d0s2 is the default for the CDdrive.After the disc is mounted, go to the location where the package files arepresent:
# cd /cdrom
3 Copy the compressed package files from the software disc to the temporarydirectory:
# cp -r ja/oracle_agent/pkgs/* /tmp/install
53Installing and removing the agent for OracleInstalling the agent software

4 Go to the temporary directory and unzip the compressed package file:
# cd /tmp/install
# gunzip VRTSjacso.tar.gz
5 Extract the compressed file from the tar file:
# tar -xvf VRTSjacso.tar
6 Install the Japanese package:
# pkgadd -d . VRTSjacso
To install the agent on a Solaris x64 node
1 Log in as superuser.
2 Create a temporary directory for installation:
# mkdir /tmp/install
3 Insert the disc into a drive connected to your node:
■ If you are running Solaris volume-management software, the softwareautomatically mounts the disc as /cdrom/cdrom0. Type the followingcommand to go to the location:
# cd /cdrom/cdrom0
■ If you are not running Solaris volume-management software, you mustmount the disc manually. For example:
# mount -F hsfs -o ro /dev/dsk/c0t6d0s2 /cdrom
Where, in this example, /dev/dsk/c0t6d0s2 is the default for the CDdrive.After the disc is mounted, go to the location where the package files arepresent:
# cd /cdrom
4 Install the package:
# pkgadd -d . VRTSvcsor
# pkgadd -d . VRTScsocw
These packages include the following:
Installing and removing the agent for OracleInstalling the agent software
54

■ VRTSvcsor—the agent binaries for Oracle, Netlsnr, ASMInst, andASMDGagents
■ VRTScsocw—the agent configuration wizard
Upgrading the agentBefore you upgrade the agent, make sure you meet the prerequisites to upgradethe Veritas Cluster Server agent for Oracle.
See “Before you install or upgrade the agent for Oracle” on page 51.
On Solaris SPARC: You can upgrade Veritas Cluster Server agent for Oracle fromversions 3.5, 4.0, 4.1, 5.0, and 5.1 in a VCS cluster.
On Solaris x64: You can upgrade Veritas Cluster Server agent for Oracle fromversions 4.1 and 5.0 in a VCS cluster.
See “Supported software” on page 13.
Upgrading VCS agent 3.5 for Oracle (Solaris SPARC)The Veritas Cluster Server agent for Oracle has resource type changes betweenversions 3.5 and5.2. So, youneed to replace resources of typeSqlnetwith resourcesof type Netlsnr.
To upgrade VCS agent 3.5 for Oracle to version 5.2
1 Save the VCS configuration and stop the VCS engine.
# haconf -dump -makero
# hastop -all -force
2 On all nodes on which the Oracle agent was installed, do the following:
■ Remove the Oracle agent.
# pkgrm VRTSvcsor
■ Delete the file /etc/VRTSvcs/conf/config/OracleTypes.cf.
■ Install the VCS enterprise agent 5.2 for Oracle.See “Installing the agent software” on page 52.
3 Copy the file OracleTypes.cf from the directory/etc/VRTSagents/ha/conf/Oracle to the /etc/VRTSvcs/conf/config directory.
55Installing and removing the agent for OracleUpgrading the agent

4 For Oracle 10g or later, if you use ASM for database storage, then copy thefile OracleASMTypes.cf from the directory/etc/VRTSagents/ha/conf/OracleASMto /etc/VRTSvcs/conf/configdirectory.
5 From a node in the cluster, edit your configuration file/etc/VRTSvcs/conf/config/main.cf.
Replace all resources of type Sqlnet with resources of type Netlsnr.
See “About the resource type and attribute definitions” on page 107.
6 Verify the configuration.
# hacf -verify config
7 Start VCS on local node first.
8 Start VCS on other nodes.
Upgrading VCS agent for Oracle from versions 4.0 or later (SolarisSPARC)
Perform the following steps on each node of the VCS cluster. You can use thisprocedure to upgrade the agent from versions 4.0, 4.1, 5.0. or 5.1.
To upgrade VCS agent for Oracle to 5.2
1 Stop VCS locally.
# hastop -local -force
2 Remove the earlier version of the VCS agent for Oracle.
# pkgrm VRTSvcsor
# pkgrm VRTScsocw
3 If you installed ASM agents with VCS agent for Oracle version 5.1, removethe ASM agents.
# pkgrm VRTSorasm
4 If you installed Japanese language package, issue the following command.
# pkgrm VRTSjacso
5 Install the VCS agent 5.2 for Oracle.
See “Installing the agent software” on page 52.
Installing and removing the agent for OracleUpgrading the agent
56

6 Copy the file OracleTypes.cf from the directory/etc/VRTSagents/ha/conf/Oracle to the /etc/VRTSvcs/conf/config directory.
7 For Oracle 10g or later, if you use ASM for database storage, then copy thefile OracleASMTypes.cf from the directory/etc/VRTSagents/ha/conf/OracleASMto /etc/VRTSvcs/conf/configdirectory.
8 Restart the VCS engine.
# hastart
Upgrading VCS agent 4.1 or 5.0 for Oracle (Solaris x64)Perform the following steps in each node of the VCS cluster.
To upgrade VCS agent for Oracle to version 5.2
1 Stop VCS locally.
# hastop -local -force
2 Remove the earlier version of the VCS enterprise agent for Oracle.
# pkgrm VRTSvcsor
# pkgrm VRTScsocw
3 Install the VCS enterprise agent 5.2 for Oracle.
See “Installing the agent software” on page 52.
4 Copy the file OracleTypes.cf from the directory/etc/VRTSagents/ha/conf/Oracle to the /etc/VRTSvcs/conf/config directory.
5 For Oracle 10g or later, if you use ASM for database storage, then copy thefile OracleASMTypes.cf from the directory/etc/VRTSagents/ha/conf/OracleASMto /etc/VRTSvcs/conf/configdirectory.
6 Restart the VCS engine.
# hastart
Disabling the Veritas Cluster Server agent for OracleTodisable theVeritas Cluster Server agent forOracle, youmust change theOracleservice group to an OFFLINE state. You can stop the application completely orswitch the agent to another system.
57Installing and removing the agent for OracleDisabling the Veritas Cluster Server agent for Oracle

To disable the agent
1 To remove a system from the service group’s SystemList, check if the servicegroup is online:
# hagrp -state service_group -sys system_name
2 If the service group is online, take it offline. Use one of the followingcommands:
■ To take the service group offline on one node and online it on anothernode, you can use the -switch option:
# hagrp -switch service_group -to system_name
■ To take the service group offline without bringing it online on any othernode in the cluster, enter:
# hagrp -offline service_group -sys system_name
3 Stop the agent on the node:
# haagent -stop Oracle -sys system_name
4 When you get themessage "Please look for messages in the log file,"check the file /var/VRTSvcs/log/engine_A.log for a message confirming theagent has stopped.
You can also use the ps command to confirm the agent is stopped.
5 You can now remove the service group, the resource type, or both from theVCS configuration after disabling the agent on all nodes.
See the Veritas Cluster Server User’s Guide for more information.
Removing the Veritas Cluster Server agent for OracleRemoving the agent involves removing the agent configuration wizard and theagent files from each system. Perform the procedure to remove the agents oneach node in the cluster.
Installing and removing the agent for OracleRemoving the Veritas Cluster Server agent for Oracle
58

To remove the agent on a node
1 Remove the agent configuration wizard.
# pkgrm VRTScsocw
2 Remove the agent. Answer prompts accordingly.
# pkgrm VRTSvcsor
To remove the Japanese language pack on a Solaris SPARC node
◆ Remove the Japanese language package.
# pkgrm VRTSjacso
59Installing and removing the agent for OracleRemoving the Veritas Cluster Server agent for Oracle

Installing and removing the agent for OracleRemoving the Veritas Cluster Server agent for Oracle
60

Configuring VCS servicegroups for Oracle
This chapter includes the following topics:
■ About configuring a service group for Oracle
■ Configuring Oracle instances in VCS
■ Before you configure the service group
■ Configuring the service group
■ Setting up detail monitoring
About configuring a service group for OracleConfiguring the Oracle service group involves creating the Oracle service group,its resources, and defining attribute values for the configured resources. Youmusthave administrator privileges to create and configure a service group.
You can configure VCS enterprise agent for Oracle using one of the following:
■ The agent configuration wizard
■ The Cluster Manager (Java console)
■ The command-line
See “Configuring the service group” on page 71.
Note: If you use Oracle ASM feature, you must also configure ASMInst resourcesand ASMDG resources to keep the ASM instance highly available. You must usethe command-line to configure these resources.
4Chapter

Configuring Oracle instances in VCSYou can set upOracle in differentways in aVCS environment. ConfiguringOraclefor VCS involves configuring theOracle files listener.ora and tnsnames.ora as perVCS requirements.
For Solaris 10 on SPARC, if you are configuring a service group for an Oracleinstance running in anon-global zone, youmustmake sure that the zone is createdon all the systems that will be part of the service group.
Note:TheVeritas Cluster Server agent forOracle on Solaris x64 operating systemdoes not support local zones.
Table 4-1 lists the different Oracle configurations you can set up in a VCSenvironment for high availability.
Table 4-1 Oracle configurations in VCS
ReferenceConfiguration type
See “Configuring single Oracle instance inVCS” on page 62.
Single Oracle instance configuration
See “Configuring multiple Oracle instances(single listener) in VCS” on page 64.
Multiple Oracle instances (single listener)configuration
See “Configuring multiple Oracle instances(multiple listeners) in VCS” on page 65.
MultipleOracle instances (multiple listeners)configuration
See “ConfiguringOracle instancewith sharedserver support in VCS” on page 67.
Configuration with shared server support
See “Best practices for multiple Oracle instance configurations” on page 173.
Configuring single Oracle instance in VCSReview the resourcedependencygraphand sample configurationof service groupsinvolving a single Oracle instance.
See “Sample single Oracle instance configuration” on page 126.
Configuring VCS service groups for OracleConfiguring Oracle instances in VCS
62

To configure an Oracle instance in VCS
1 Review the Oracle andNetlsnr resource types and their attribute definitions.
See “About the resource type and attribute definitions” on page 107.
2 Configure theOracle file tnsnames.ora as perVCS requirements. The changesrequired in the file depends on your Oracle configuration.
For clients to connect to the failover instance, in the file tnsnames.ora locatedat $TNS_ADMIN, change thehost name for all TCPprotocol address databasesto the virtual IP address for the service group.
The following example assumes that the host name for the database is set tooraprod, which represents the virtual IP address for the service group.
prod =
(DESCRIPTION =
(ADDRESS_LIST =
(ADDRESS = (PROTOCOL = TCP)(HOST = oraprod)(PORT = 1521))
)
(CONNECT_DATA =
(SERVICE_NAME = prod)
)
)
3 Configure the Oracle file listener.ora as per VCS requirements. The changesrequired in the file depends on your Oracle configuration.
In the file listener.ora located at $TNS_ADMIN, edit the "Host=" line in theADDRESS_LIST section and add the name of the high availability address forthe service group, in this case, oraprod.
LISTENER_PROD =
(DESCRIPTION_LIST =
(DESCRIPTION =
(ADDRESS_LIST =
(ADDRESS = (PROTOCOL = TCP)(HOST = oraprod)(PORT = 1521))
)
)
4 Create theOracle service groupsusing the agent configurationwizard, ClusterManager (Java Console), or the command-line.
See “Configuring the service group” on page 71.
5 Bring the Oracle service group online.
See “Bringing the service group online” on page 93.
63Configuring VCS service groups for OracleConfiguring Oracle instances in VCS

Configuring multiple Oracle instances (single listener) in VCSReview the resource dependency graph and sample configuration of a servicegroup involving multiple Oracle instances.
See “SamplemultipleOracle instances (single listener) configuration”onpage 133.
To configure multiple Oracle instances (single listener)
1 Review the Oracle andNetlsnr resource types and their attribute definitions.
See “About the resource type and attribute definitions” on page 107.
2 Configure theOracle file tnsnames.ora as perVCS requirements. The changesrequired in the file depends on your Oracle configuration.
For clients to connect to the failover instance, in the file tnsnames.ora locatedat $TNS_ADMIN, change thehost name for all TCPprotocol address databasesto the virtual IP address for the service group.
The following example assumes that the host name for the database is set tooraprod, which represents the virtual IP address for the service group.
prod =
(DESCRIPTION =
(ADDRESS_LIST =
(ADDRESS = (PROTOCOL = TCP)(HOST = oraprod)(PORT = 1521))
)
(CONNECT_DATA =
(SERVICE_NAME = prod)
)
)
mktg =
(DESCRIPTION =
(ADDRESS_LIST =
(ADDRESS = (PROTOCOL = TCP)(HOST = oramktg)(PORT = 1522))
)
(CONNECT_DATA =
(SERVICE_NAME = mktg)
)
)
Configuring VCS service groups for OracleConfiguring Oracle instances in VCS
64

3 Configure the Oracle file listener.ora as per VCS requirements. The changesrequired in the file depends on your Oracle configuration.
In the file listener.ora located at $TNS_ADMIN, edit the "Host=" line in theADDRESS_LIST section and add the name of the high availability address forthe service group, in this case, oraprod.
LISTENER_ORACLE =
(DESCRIPTION_LIST =
(DESCRIPTION =
(ADDRESS_LIST =
(ADDRESS = (PROTOCOL = TCP)(HOST = oraprod)(PORT = 1521))
(ADDRESS = (PROTOCOL = TCP)(HOST = oramktg)(PORT = 1522))
)
4 Create the Oracle and Listener service groups using Cluster Manager (JavaConsole.) You can also use the command-line to create the service group.
See “Configuring the service group” on page 71.
5 Bring the Oracle service group online.
See “Bringing the service group online” on page 93.
Configuring multiple Oracle instances (multiple listeners) in VCSReview the resource dependency graph and sample configuration of a servicegroup involving multiple Oracle instance.
See “Sample multiple instance (multiple listeners) configuration” on page 146.
65Configuring VCS service groups for OracleConfiguring Oracle instances in VCS

To configure multiple Oracle instances (multiple listeners)
1 Review the Oracle andNetlsnr resource types and their attribute definitions.
See “About the resource type and attribute definitions” on page 107.
2 Configure theOracle file tnsnames.ora as perVCS requirements. The changesrequired in the file depends on your Oracle configuration.
For clients to connect to the failover instance, in the file tnsnames.ora locatedat $TNS_ADMIN, change thehost name for all TCPprotocol address databasesto the virtual IP address for the service group.
prod =
(DESCRIPTION =
(ADDRESS_LIST =
(ADDRESS = (PROTOCOL = TCP)(HOST = oraprod)(PORT = 1521))
)
(CONNECT_DATA =
(SERVICE_NAME = prod)
)
)
mktg =
(DESCRIPTION =
(ADDRESS_LIST =
(ADDRESS = (PROTOCOL = TCP)(HOST = oramktg)(PORT = 1522))
)
(CONNECT_DATA =
(SERVICE_NAME = mktg)
)
)
Configuring VCS service groups for OracleConfiguring Oracle instances in VCS
66

3 Configure the Oracle file listener.ora as per VCS requirements. The changesrequired in the file depends on your Oracle configuration.
In the file listener.ora, create independent configurations for each listener.
LISTENER_PROD =
(DESCRIPTION_LIST =
(DESCRIPTION =
(ADDRESS_LIST =
(ADDRESS = (PROTOCOL = TCP)(HOST = oraprod)(PORT = 1521))
)
)
LISTENER_MKTG =
(DESCRIPTION_LIST =
(DESCRIPTION =
(ADDRESS_LIST =
(ADDRESS = (PROTOCOL = TCP)(HOST = oramktg)(PORT = 1522))
)
)
4 Create theOracle service groupsusing the agent configurationwizard, ClusterManager (Java Console,) or the command-line.
See “Configuring the service group” on page 71.
5 Bring the Oracle service group online.
See “Bringing the service group online” on page 93.
Configuring Oracle instance with shared server support in VCSReview the resource dependency graph and sample configuration.
See “Sample Oracle configuration with shared server support” on page 151.
67Configuring VCS service groups for OracleConfiguring Oracle instances in VCS
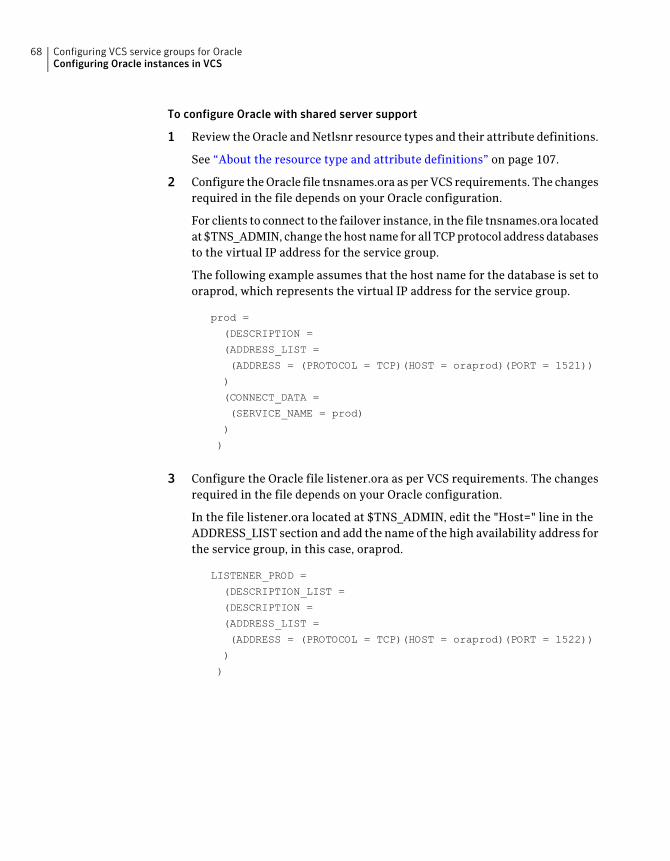
To configure Oracle with shared server support
1 Review the Oracle andNetlsnr resource types and their attribute definitions.
See “About the resource type and attribute definitions” on page 107.
2 Configure theOracle file tnsnames.ora as perVCS requirements. The changesrequired in the file depends on your Oracle configuration.
For clients to connect to the failover instance, in the file tnsnames.ora locatedat $TNS_ADMIN, change thehost name for all TCPprotocol address databasesto the virtual IP address for the service group.
The following example assumes that the host name for the database is set tooraprod, which represents the virtual IP address for the service group.
prod =
(DESCRIPTION =
(ADDRESS_LIST =
(ADDRESS = (PROTOCOL = TCP)(HOST = oraprod)(PORT = 1521))
)
(CONNECT_DATA =
(SERVICE_NAME = prod)
)
)
3 Configure the Oracle file listener.ora as per VCS requirements. The changesrequired in the file depends on your Oracle configuration.
In the file listener.ora located at $TNS_ADMIN, edit the "Host=" line in theADDRESS_LIST section and add the name of the high availability address forthe service group, in this case, oraprod.
LISTENER_PROD =
(DESCRIPTION_LIST =
(DESCRIPTION =
(ADDRESS_LIST =
(ADDRESS = (PROTOCOL = TCP)(HOST = oraprod)(PORT = 1522))
)
)
Configuring VCS service groups for OracleConfiguring Oracle instances in VCS
68

4 In the initialization parameter file, for the dispatchers parameter, set thehost name for all TCP protocol address dispatchers to the virtual IP addressfor the service group.
In the following example, the host name for the dispatcher is set to oraprod.
dispatchers =
"(ADDRESS = (PROTOCOL = TCP)(HOST = oraprod))
(MUL=ON)(TICK=15)(POOL=true)"
5 In the initialization parameter file, set the LOCAL_LISTENER attribute to alistener alias, so that the Oracle PMON process registers information withthe listener.
local_listener=listener_alias
This listener alias gets appended by the default domain set in the filesqlnet.ora.
6 In the file tnsnames.ora, create an entry for the listener alias to resolve theaddress information. In the address parameter, set the host name to thevirtual IP address for the service group,without theCONNECT_DATAportionof the connect descriptor.
In the following example, the listener listener_alias uses TCP/IP port 1521and the virtual IP address for the service group is oraprod.
listener_alias=
(address = (PROTOCOL = TCP)(HOST = oraprod)
(PORT= 1521))
7 Create theOracle service groupsusing the agent configurationwizard, ClusterManager (Java Console,) or the command-line.
See “Configuring the service group” on page 71.
8 Bring the Oracle service group online.
See “Bringing the service group online” on page 93.
Before you configure the service groupBefore you configure the Oracle service group, you must:
■ Verify that VCS is installed and configured on all nodes in the cluster whereyou will configure the service group.Refer to the Veritas Cluster Server Installation Guide for more information.
69Configuring VCS service groups for OracleBefore you configure the service group

■ Verify that Oracle is installed and configured identically on all nodes in thecluster.See “About installing Oracle in a VCS environment” on page 29.
■ Verify that the Veritas Cluster Server agent for Oracle is installed on all nodesin the cluster.If the Oracle database is ASM-managed, verify that the ASM agent binariesare also installed.See “Before you install or upgrade the agent for Oracle” on page 51.
■ Verify that the type definition for Veritas Cluster Server agent for Oracle isimported into the VCS engine.See “Importing the type definition files” on page 70.
■ If you have installed Oracle 10g, make sure that the Oracle services are notstarted on reboot by the init script.
■ If the Oracle database is ASM-managed, make sure that the Oracle clusteringdaemon is enabled. Else, the OCSSD daemon must be disabled.
Importing the type definition filesBefore configuring the Veritas Cluster Server agent for Oracle, you must importthe OracleTypes.cf file to the VCS engine.
If youwant to configure theASMagents, youmust import theOracleASMTypes.cffile. Import the OracleASMTypes.cf file using the command-line.
To import using the Cluster Manager
1 Start Cluster Manager and log on to the cluster.
2 From the Cluster Explorer’s Filemenu, choose Import Types.
3 In the Import Types dialog box, select the/etc/VRTSagents/ha/conf/Oracle/OracleTypes.cf file.
4 Click Import.
5 Save the configuration.
To import using the command line
1 Log in to sysa as superuser.
2 Ensure that all changes to the existing configuration have been saved andthat further changes are prevented while you modify main.cf:
# haconf -dump -makero
Configuring VCS service groups for OracleBefore you configure the service group
70

3 To ensure that VCS is not runningwhile you editmain.cf, stop theVCS engineon all nodes and leave the resources available:
# hastop -all -force
4 Make a backup copy of the main.cf file:
# cd /etc/VRTSvcs/conf/config
# cp main.cf main.cf.orig
5 Copy the Oracle types configuration file into place:
# cp /etc/VRTSagents/ha/conf/Oracle/OracleTypes.cf \
/etc/VRTSvcs/conf/config/OracleTypes.cf
If you want to configure the ASM agents, do the following:
# cp /etc/VRTSagents/ha/conf/OracleASM/OracleASMTypes.cf \
/etc/VRTSvcs/conf/config/OracleASMTypes.cf
6 Edit the main.cf file to include the OracleTypes.cf file:
include "OracleTypes.cf"
If you want to configure the ASM agents, you must also include theOracleASMTypes.cf file:
include "OracleASMTypes.cf"
Configuring the service groupYou can configure Oracle in a VCS environment in one of the ways that VCSsupports.
See “Configuring Oracle instances in VCS” on page 62.
You can configure VCS agent for Oracle using one of the following:
See “Configuring the service group using theagent configuration wizard” on page 72.
Note: You can use the wizard to configure theservice group forOracle inVCS environment.Usethe Cluster Manager or the command-line for SFHA environments.
The agent configuration wizard
71Configuring VCS service groups for OracleConfiguring the service group

See “Configuring the service group using ClusterManager (Java console)” on page 83.
The Cluster Manager (Java console)
See “Configuring the service group using thecommand-line” on page 85.
The command-line
Review the following to configure the service group:
■ Sample configuration files and resource dependency graphs of the Oracleservice group.See “About the sample configurations forOracle enterprise agent” onpage 125.
■ Resource type and the attribute definitions of the Oracle and Netlsnr agents.For ASM, resource type and the attribute definitions of the ASMInst andASMDG agents.See “About the resource type and attribute definitions” on page 107.
Configuring the service group using the agent configuration wizardVCS provides an agent configuration wizard that guides you through the processof configuring the agent in a VCS environment. The wizard creates and modifiesOracle service groups. You can also modify an existing service group.
See “Modifying the service group configuration” on page 95.
Make sure that you meet the following requirements:
■ The Oracle instances and listeners to be configured must be running. Alllisteners to be configured must listen to the same virtual IP address.
Note: For the default listener, the configuration wizard requires the listenerparameter file, listener.ora, to reside in $ORACLE_HOME/network/admin. Nosuch condition applies for non-default listeners.
■ For Solaris SPARC:
■ The Oracle instances and listeners to be configured, whether in global orin non-global zones, must be running.
■ If you are configuring a service group for an Oracle instance running in anon-global zone, make sure that the zone is created on all the systems thatwill be part of the service group.
■ The Oracle files (control, data, redo-log, and archive files) must be on shareddisks.
Configuring VCS service groups for OracleConfiguring the service group
72

■ The IP addresses and host names specified in the files listener.ora andtnsnames.ora must be the same.
■ If detail monitoring is to be used for a database instance, the table used fordetail monitoring must be set up, with user and password assigned.See “Setting up detail monitoring” on page 88.
To configure the service group using the agent configuration wizard
1 Set theDISPLAY variable, start the VCSOracle configurationwizard as root.
# hawizard oracle
2 Read the information on the Welcome screen and click Next.
3 In the Wizard Options dialog box, select the Create Oracle Service Groupoption and click Next.
4 In the ServiceGroupConfiguration dialog box, specify information about theservice group.
Specify the following information:
Enter a name for the Oracle service group.Service GroupName
Select the systems on which to configure theservice group and click the right-arrow icon tomove the systems to the service group’s systemlist.
Available Cluster Systems
73Configuring VCS service groups for OracleConfiguring the service group

■ To remove a system from the service group’ssystem list, select the system in the SystemsinPriorityOrder box and click the left arrowicon.
■ To change a system’s priority in the servicegroup’s system list, select the system in theSystems in PriorityOrder box and click thebuttons with the up and down arrow icons.
The system at the top of the list has thehighest priority while the system at thebottom of the list has the lowest priority.
Systems in PriorityOrder
5 Click Next.
6 In the Instance Selection dialog box, select the Oracle instances to beconfigured along with their listeners. Click DiscoverOracle Configuration,if required.
On Solaris SPARC:
On Solaris x64:
Configuring VCS service groups for OracleConfiguring the service group
74

Depending on the Solaris architecture, do the following:
■ Solaris SPARC:The wizard displays the instances, along with the name of the non-globalzone where the instance is running. However, the zone name is notdisplayed for an instance running in a global zone.Select the instances and click Next.If you select multiple instances, make sure that they are running in thesame zone.
■ Solaris x64:The wizard displays the instances that are running.Select the instances and click Next.
75Configuring VCS service groups for OracleConfiguring the service group
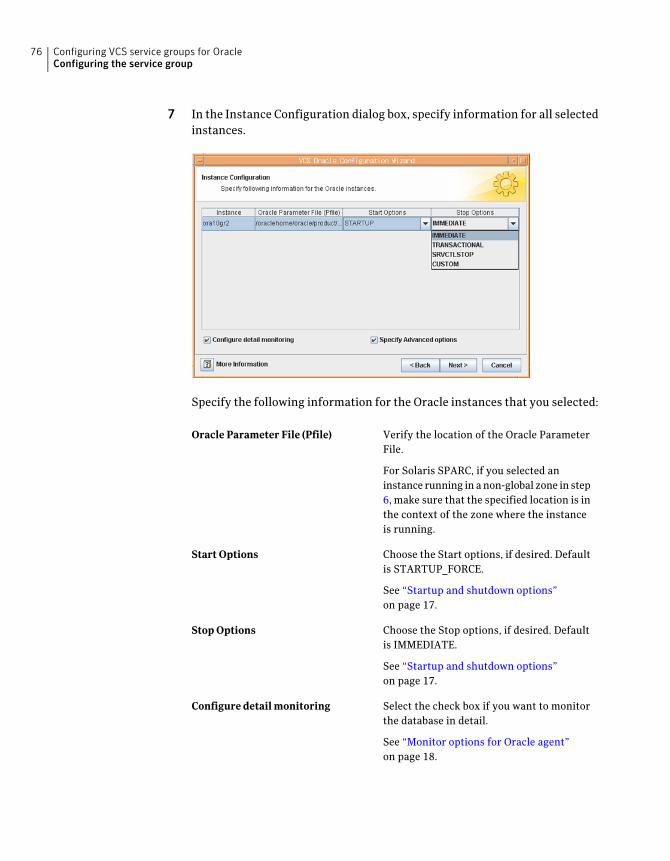
7 In the Instance Configuration dialog box, specify information for all selectedinstances.
Specify the following information for the Oracle instances that you selected:
Verify the location of the Oracle ParameterFile.
Oracle Parameter File (Pfile)
For Solaris SPARC, if you selected aninstance running in anon-global zone in step6, make sure that the specified location is inthe context of the zone where the instanceis running.
Choose the Start options, if desired. Defaultis STARTUP_FORCE.
Start Options
See “Startup and shutdown options”on page 17.
Choose the Stop options, if desired. Defaultis IMMEDIATE.
StopOptions
See “Startup and shutdown options”on page 17.
Select the check box if you want to monitorthe database in detail.
Configure detailmonitoring
See “Monitor options for Oracle agent”on page 18.
Configuring VCS service groups for OracleConfiguring the service group
76

Select the check box to enter advancedconfiguration information for the databaseinstances.
SpecifyAdvancedOptions
8 Click Next.
9 If you chose to monitor the database in detail, the Detail Monitoring dialogbox is displayed.
Specify the following information for the database instances that you wantthe agent to monitor in detail and click Next:
Select the check box corresponding to the database to bemonitored in detail.
Select
Enter a valid user name for the database.User
Enter a valid password for the database user.
Donot encrypt passwordswhenentering themthrough theAgentConfiguration Wizard; the wizard takes care of encryptingpasswords.
Password
Enter the name of a table that will be queried to validate thestatus of the database.
Table
77Configuring VCS service groups for OracleConfiguring the service group

10 If you chose to specify advanced options, the Oracle Advanced Configurationdialog box is displayed.
Specify the following information for the Oracle instances and click Next:
Enter the location of the Oracle Envfile.
For Solaris SPARC, if you selected an instance running in anon-global zone in step 6, make sure that the specifiedlocation is in the context of the zone where the instance isrunning.
Oracle EnvFile
Enter the encoding.Oracle Encoding
Select the check box, if desired.
See “Hot backup of Oracle database in VCS environment”on page 34.
AutoEndBkup
Configuring VCS service groups for OracleConfiguring the service group
78

11 In the Monitor option Configuration dialog box, specify the monitor optionfor the Oracle instances, and click Next.
The default monitor option is Process check.
See “Monitor options for Oracle agent” on page 18.
12 In the Database Configuration dialog box, verify the mount points requiredby each database, specify the Mount and Fsck options, and click Next.
79Configuring VCS service groups for OracleConfiguring the service group

13 In the Listener Configuration dialog box, configure the listeners for thedatabases.
On Solaris SPARC:
On Solaris x64:
Specify the following information for the listeners:
Verify the virtual IP address.Address
Verify the Netmask.Netmask
For each system, select a device.Device
Configuring VCS service groups for OracleConfiguring the service group
80

Select the check box to enable detailmonitoring.Enable detailmonitoring
Select the check box to enter advancedconfiguration information for the listeners.
SpecifyAdvancedOptions
14 Click Next.
15 If you chose to specify advanced options for the listeners, the ListenerAdvanced Configuration dialog box is displayed.
Specify the following information for each listener and click Next:
Enter the path of the listener Envfile.
For Solaris SPARC, if you selected a listener running in anon-global zone in step 6, make sure that the specifiedlocation is in the context of the zone where the listener isrunning.
Netlsnr EnvFile
Enter the encoding.Netlsnr Encoding
Enter a valid password for the listener.
Do not encrypt passwords when entering them throughthe agent configuration wizard; the wizard takes care ofencrypting passwords.
Listener Password
16 In the Service Group Summary dialog, review your configuration.
On Solaris SPARC:
81Configuring VCS service groups for OracleConfiguring the service group

On Solaris x64:
Click on a resource to view its attributes and their configured values in theAttributes box.
■ Change names of resources, if desired; the wizard assigns unique namesto resources based on their respective name rules.To edit a resource name, select the resource name and click on it, pressEnter after editing each attribute.
■ Review your configuration and click Finish.
The wizard starts running commands to create the Oracle service group.Various messages indicate the status of these commands.
Configuring VCS service groups for OracleConfiguring the service group
82
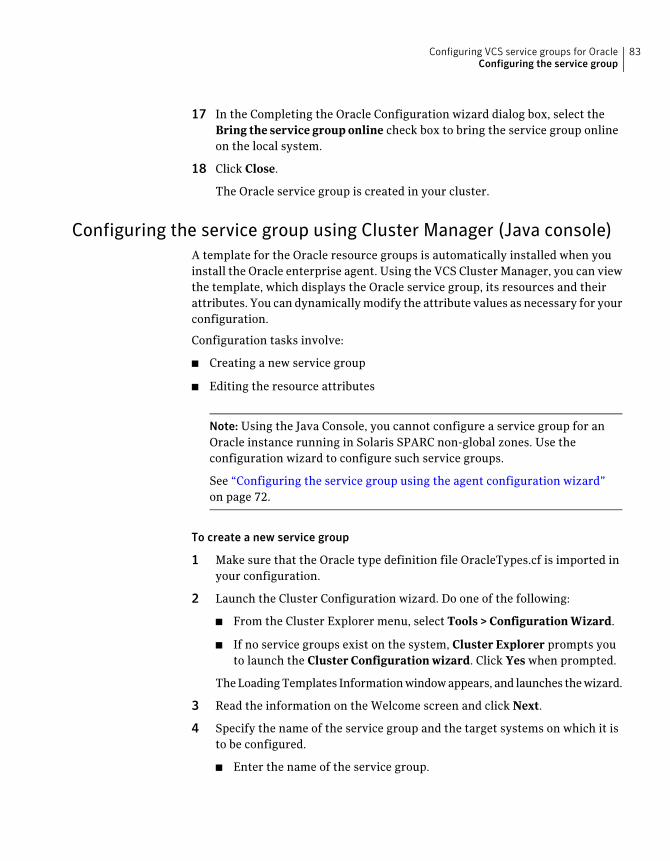
17 In the Completing the Oracle Configuration wizard dialog box, select theBring the service group online check box to bring the service group onlineon the local system.
18 Click Close.
The Oracle service group is created in your cluster.
Configuring the service group using Cluster Manager (Java console)A template for the Oracle resource groups is automatically installed when youinstall the Oracle enterprise agent. Using the VCS Cluster Manager, you can viewthe template, which displays the Oracle service group, its resources and theirattributes. You can dynamicallymodify the attribute values as necessary for yourconfiguration.
Configuration tasks involve:
■ Creating a new service group
■ Editing the resource attributes
Note: Using the Java Console, you cannot configure a service group for anOracle instance running in Solaris SPARC non-global zones. Use theconfiguration wizard to configure such service groups.
See “Configuring the service group using the agent configuration wizard”on page 72.
To create a new service group
1 Make sure that the Oracle type definition file OracleTypes.cf is imported inyour configuration.
2 Launch the Cluster Configuration wizard. Do one of the following:
■ From the Cluster Explorer menu, select Tools > ConfigurationWizard.
■ If no service groups exist on the system, Cluster Explorer prompts youto launch the Cluster Configurationwizard. Click Yes when prompted.
TheLoadingTemplates Informationwindowappears, and launches thewizard.
3 Read the information on the Welcome screen and click Next.
4 Specify the name of the service group and the target systems on which it isto be configured.
■ Enter the name of the service group.
83Configuring VCS service groups for OracleConfiguring the service group

■ On the Available Systems box, select the systems on which to configurethe service group.
■ Click the right arrow to move the selected systems to the Systems forService Group box. To remove a system from the box, select the systemand click the left arrow.
■ Indicate the order in which the systems will fail over (priority). Systempriority is numbered sequentially, with 1 denoting the system that startsfirst following a failover.
■ Click Next.
5 In theWould you like to use a template to configure the service group? dialogbox, click Next.
6 In the Select a template to configure the service group dialog box, select theOracleGroup template on which to base the service group.
If applicable, a window opens notifying you that names of some resourceswithin the new service group are already in use. This window also includesa list of alternative names. You can select an alternative name, ormodify thename. Click Next after resolving the name clashes.
7 Click Next to create the service group based on the selected template.
A window opens indicating that commands are being sent to add the group,its resources, and the attributes and dependencies specified in the template.
A progress indicator displays the percentage of the commands fired.
The actual commands are displayed at the top of the indicator.
8 Click Next when prompted that the service group has been successfullycreated.
A window opens listing the service group’s resources and their associatedattributes.
9 Click Finish to accept the default values and complete the configuration.
You canmodify the default values of the resources according to your specificconfiguration requirements, as instructed in the following section.
To edit the resource attributes
1 Select the resource from the list on the left pane.
The resource’s attributes appear in the right pane.
2 Select the attribute to be modified.
See “About the resource type and attribute definitions” on page 107.
3 Click the edit icon in the Edit column.
Configuring VCS service groups for OracleConfiguring the service group
84
4 In the Edit Attribute dialog box, enter the attribute values. To modify thescope of the attribute, click the option buttons for Global or Local.
5 Click OK.
6 Repeat the procedure for each resource and its attributes and click Finish.Edit the attributes for all the resources according to your configuration.
7 Follow the wizard instructions to complete the configuration.
8 Click Finish to quit the wizard.
Configuring the service group using the command-lineThe Veritas Cluster Server agent for Oracle comes with a sample configurationfile that can be used as reference to directly modify your present configurationfile. When you use this method, you must stop and restart VCS to implement theconfiguration.
The Veritas Cluster Server agent for Oracle also includes sample configurationfiles for ASM configurations in a VCS environment.
See “About the sample configurations for Oracle enterprise agent” on page 125.
To configure the service group using the sample configuration file
1 Log in to sysa as superuser.
2 Ensure that all changes to the existing configuration have been saved andthat further changes are prevented while you modify main.cf:
# haconf -dump -makero
3 To ensure that VCS is not running while you edit main.cf, issue the followingcommand to stop the VCS engine on all systems and leave the resourcesavailable:
# hastop -all -force
4 Make a backup copy of the main.cf file:
# cd /etc/VRTSvcs/conf/config
# cp main.cf main.cf.orig
5 Edit the main.cf file.
You can use the file /etc/VRTSagents/ha/conf/Oracle/sample_main.cf forreference.
85Configuring VCS service groups for OracleConfiguring the service group

For ASM, you can refer to the examples shown in the file/etc/VRTSagents/ha/conf/OracleASM/sample_main.cf.asm.
Do the following:
■ Create the Oracle and Netlsnr resources.For ASM instances and disk groups, create the ASMInst and ASMDGresources.
■ Edit the default attributes tomatch the parameters in your configuration.See “About the resource type and attribute definitions” on page 107.
■ Assign dependencies to the newly created resources.See “About the sample configurations for Oracle enterprise agent”on page 125.See the Veritas Cluster Server User’s Guide for more information onassigning dependencies.
6 Save and close the file.
7 Verify the syntax of the file /etc/VRTSvcs/conf/config/main.cf:
# cd /etc/VRTSvcs/conf/config/
# hacf -verify .
8 Start the VCS engine:
# hastart
9 Verify that all Oracle service group resources are brought online:
# hagrp -state
10 Take the service group offline and verify that all resources are stopped:
# hagrp -offline service_group -sys system_name
# hagrp -state
11 Bring the service grouponline again andverify that all resources are available:
# hagrp -online service_group -sys system_name
# hagrp -state
12 Start the VCS engine on sysb:
# hastart
Configuring VCS service groups for OracleConfiguring the service group
86
13 Switch the Oracle service group to sysb:
# hagrp -switch service_group -to sysb
14 Verify that all Oracle service group resources are brought online on sysb:
# hagrp -state
15 On all the nodes, look at the following log files for any errors or status:
/var/VRTSvcs/log/engine_A.log
/var/VRTSvcs/log/Oracle_A.log
/var/VRTSvcs/log/Netlsnr_A.log
/var/VRTSvcs/log/ASMInst_A.log/
var/VRTSvcs/log/ASMDG_A.log
Encrypting passwordsVCSprovides a utility to encrypt database user passwords and listener passwords.You must encrypt the Pword attribute in the Oracle agent and the LsnrPwdattribute in the Netlsnr agent before you configure these attributes.
See “Listener authentication in VCS environment” on page 33.
The vcsencrypt utility also allows you to encrypt the agent passwords using asecurity key.
See Veritas Cluster Server User’s Guide for more information.
Note: You need not encrypt passwords when using the configuration wizard ortheVCSClusterManager (JavaConsole) to configure attributes. Theuserpasswordsthat are used for detail monitoring of the Oracle database are encrypted. Thelistener password that is considered for querying the status of the listener andstopping the listener is also encrypted.
Oracle provides the option of storing the listener password in the listener.ora file,in both clear text and encrypted formats. Irrespective of the format in which thepassword is stored inOracle, youmust encrypt the password using the vcsencryptutility before you configure the LsnrPwd attribute.
If you encrypted the listener password using the Oracle lsnrctl utility, make surethat you pass the encrypted password to the vcsencrypt utility.
For example, if the password after you encrypt using the Oracle lsnrctl utility isas follows:
87Configuring VCS service groups for OracleConfiguring the service group

PASSWORDS_LISTENER = 652C5971EE3A8DF9
You must pass the Oracle-encrypted password to the vcsencrypt utility. Forexample:
# vcsencrypt -agent 652C5971EE3A8DF9
The vcsencrypt utility displays the encrypted password. For example:ciiIhiEkfIhiLijIdkHkhIfkDikKgkIil
To encrypt passwords
1 From the path $VCS_HOME/bin/, run the vcsencrypt utility.
■ Type the following command:
# vcsencrypt -agent
■ Enter the password and confirm it by entering it again. Press Enter.
# Enter New Password:
# Enter Again:
2 Review as the utility encrypts the password and displays the encryptedpassword.
3 Enter this encrypted password as the value for the attribute.
4 Copy the encrypted password for future reference.
Setting up detail monitoringThe Veritas Cluster Server agent for Oracle provides two levels of applicationmonitoring: primary (basic monitoring) and secondary (detail monitoring).
■ In the basic monitoring mode, the agent monitors the Oracle processes toverify that they are continuously active.
Note:The agent forOracle ASMdoes only basicmonitoring forASM instances.
■ In the detail monitoring mode, the agent executes the script defined in theattribute MonScript of the Oracle and Netlsnr resources. If the scriptsuccessfully executes, the agent considers the resource available. You cancustomize the default script according to your configuration.
See “Monitor options for Oracle agent” on page 18.
Configuring VCS service groups for OracleSetting up detail monitoring
88

You can use the agent’s detail monitoring capability to monitor the status of adatabase and listener and increase the confidence in their availability. Beforesetting up detail monitoring, you must have the agent running satisfactorily atthe basic level of monitoring.
Note: Disable detail monitoring before undertaking any database maintenancethat involves disabling database access to external users.
Setting up detail monitoring for OracleDetail monitoring for an Oracle resource verifies whether a database is ready fortransactions by performing an update transaction against a table within thedatabase. The update action is taken by the two scripts, SqlTest.pl andSimpleTest.pl, provided with the Veritas Cluster Server agent for Oracle. Thescripts are available under the directory /opt/VRTSagents/ha/bin/Oracle/. Bothscripts update the timestamp to monitor the database.
The SqlTest.pl script checks whether the database is open before updating thetimestamp. If the database is found to be in restricted mode, quiesced mode, orsuspendedmode, themonitor returns success. In sucha case, only basicmonitoringoccurs. The SimpleTest.pl script does not perform database checks but onlyissues update statements against the table.
Before enabling detail monitoring for Oracle, you must create a test table (with atimestamp) in the Oracle database. The detail monitor script, MonScript, mustexist and have execute permission for root. You can use a custommonitor script,or the scripts provided with the agent. In the monitor script, the return code 100indicates failure. Return codes from 101 to 110 indicate success.
The example to set up detail monitoring, based on the use of the supplied script,shows how to create and test a table for use by detail monitoring, and how toenable detail monitoring.
To set up detail monitoring for Oracle
1 Make the VCS configuration writable:
haconf -makerw
2 Freeze the service group to avoid automated actions by VCS caused by anincomplete reconfiguration:
hagrp -freeze service_group
89Configuring VCS service groups for OracleSetting up detail monitoring

3 Log on as an Oracle user.
su - <Owner>
4 Set the environment variables for ORACLE_HOME and ORACLE_SID.
export ORACLE_HOME=<Home>
export ORACLE_SID=<Sid>
5 Start the svrmgrl or sqlplus utility to set up a database table:
$ORACLE_HOME/bin/svrmgrl
or
$ORACLE_HOME/bin/sqlplus /nolog
6 As the database administrator, issue the following statements at the svrmgrlor sqlplus prompt to create the test table:
connect / as sysdba
create user <User>
identified by <Pword>
default tablespace USERS
temporary tablespace TEMP
quota 100K on USERS;
grant create session to <User>;
create table <User>.<Table> ( tstamp date );
insert into <User>.<Table> (tstamp) values (SYSDATE);
Configuring VCS service groups for OracleSetting up detail monitoring
90

7 To test the database table for use, do the following:
disconnect
connect <User>/<Pword>
update <User>.<Table> set ( tstamp ) = SYSDATE;
select TO_CHAR(tstamp, ’MON DD, YYYY HH:MI:SS AM’)
from <User>.<Table>;
exit
8 Enable the detail monitoring for the Oracle resource using the following VCScommands:
hares -modify OracleResource User User
hares -modify OracleResource Pword Pword
hares -modify OracleResource Table Table
hares -modify OracleResource MonScript "./bin/Oracle/SqlTest.pl"
hares -modify OracleResource DetailMonitor 1
haconf -dump -makero
hagrp -unfreeze service_group
You can also use Cluster Manager (Java Console) to set these attributes.
Enabling and disabling detail monitoring for OracleReview the instructions to enable or disable detail monitoring.
To enable detail monitoring
◆ Set the DetailMonitor attribute to 1.
hares -modify OracleResource DetailMonitor 1
To disable detail monitoring
◆ Set the DetailMonitor attribute to 0.
hares -modify OracleResource DetailMonitor 0
Setting up detail monitoring for NetlsnrFor Netlsnr agent, the detail monitoring is enabled by default to monitor thelistener process.
91Configuring VCS service groups for OracleSetting up detail monitoring

You can disable detail monitoring by setting the value of the attribute MonScriptto an empty string.
You can enable detail monitoring for Netlsnr by specifying a value for theMonScript attribute. The example to set up detail monitoring uses the suppliedmonitor script for Netlsnr, /opt/VRTSagents/ha/bin/Netlsnr/LsnrTest.pl. Thedetail monitoring script for the Netlsnr resource uses the Listener commandlsnrctl status $Listener to test the Listener process.
To disable detail monitoring for Netlsnr
◆ Disable detail monitoring by setting the MonScript attribute to an emptystring:
haconf -makerw
hagrp -freeze service_group
hares -modify SqlResource MonScript ""
haconf -dump -makero
hagrp -unfreeze
To set up detail monitoring for Netlsnr
1 Make the VCS configuration writable:
haconf -makerw
2 Freeze the service group to avoid automated actions by VCS caused by anincomplete reconfiguration:
hagrp -freeze service_group
3 Enable detail monitoring by entering the following commands:
hares -modify LsnrResource MonScript "./bin/Netlsnr/LsnrTest.pl"
haconf -dump -makero
hagrp -unfreeze service_group
Configuring VCS service groups for OracleSetting up detail monitoring
92

Administering VCS servicegroups for Oracle
This chapter includes the following topics:
■ About administering VCS service groups
■ Bringing the service group online
■ Taking the service group offline
■ Switching the service group
■ Modifying the service group configuration
About administering VCS service groupsYou can administer service groups in Cluster Server using the Cluster Manageror command-line. Review the procedures to administer the service groups usingthe Cluster Manager.
See Veritas Cluster Server User’s Guide.
Bringing the service group onlinePerform the following steps to bring the service group online.
To bring a service group online
1 In the Cluster Explorer configuration tree, select the newly created servicegroup.
2 Right-click the service group name, and select Enable Resources to enableall resources in the service group.
5Chapter

3 Right-click the service groupname, and select the systems onwhich to enablethe service group (Right-click>Enable>system_name orRight-click>Enable>All).
4 Save your configuration (File>Close Configuration).
5 Right-click the service group and select to online the service group on thesystem (Right-click>Online>system_name).
Taking the service group offlinePerform the following steps to take the service group offline.
To take a service group offline
1 In the Service Groups tab of the Cluster Explorer configuration tree,right-click the service group.
or
Select the cluster in theCluster Explorer configuration tree, select theServiceGroups tab, and right-click the service group icon in the view panel.
2 Choose Offline, and choose the appropriate system from the pop-up menu(Right-click>Offline>system_name).
Switching the service groupThe process of switching a service group involves taking it offline on its currentsystem and bringing it online on another system.
To switch a service group
1 In the Service Groups tab of the Cluster Explorer configuration tree,right-click the service group.
or
Select the cluster in theCluster Explorer configuration tree, select theServiceGroups tab, and right-click the service group icon in the view panel.
2 Choose SwitchTo, and choose the appropriate system from the pop-upmenu(Right-click>Switch To>system_name).
Administering VCS service groups for OracleTaking the service group offline
94

Modifying the service group configurationYou can dynamically configure the Veritas Cluster Server agent for Oracle inseveral ways. You can use the following to configure the Veritas Cluster Serveragent for Oracle:
■ Configuration wizard
■ Command-line interface
■ Cluster Manager Java Console
■ Veritas Cluster Server Management Console
Refer to the Veritas Cluster Server User’s Guide for more information.
To modify an Oracle service group using the cluster configuration wizard
1 Start the Oracle Configuration wizard.
# hawizard oracle
2 Read the information on the Welcome screen and click Next.
3 On the Wizard Options dialog box, select theModify service group option,select the service group to be modified, and click Next.
4 Follow the wizard instructions and make modifications as per yourconfiguration.
See “Configuring the service group using the agent configuration wizard”on page 72.
95Administering VCS service groups for OracleModifying the service group configuration

Administering VCS service groups for OracleModifying the service group configuration
96

Troubleshooting VeritasCluster Server agent forOracle
This chapter includes the following topics:
■ About troubleshooting Veritas Cluster Server agent for Oracle
■ Error messages common to the Oracle and Netlsnr agents
■ Error messages specific to the Oracle agent
■ Error messages specific to the Netlsnr agent
■ Error messages specific to the ASMInst agent
■ Error messages specific to the ASMDG agent
■ Issues specific to Oracle
About troubleshooting Veritas Cluster Server agentfor Oracle
Review the information on the error logs that you must access:
■ To check the Oracle installation error log, you must access:
$ORACLE_BASE/oraInventory/logs/installActionsdate_time.log
This file contains the errors that occurred during installation. It clarifies thenature of the error and at exactly which point it occurred during the
6Chapter

installation. If there are any installation problems, you must send this file toTech Support for debugging the issue.
■ To check the Veritas log file, you must access:
/var/VRTSvcs/log/engine_A.log
/var/VRTSvcs/log/Oracle_A.log
/var/VRTSvcs/log/Netlsnr_A.log
/var/VRTSvcs/log/ASMInst_A.log
/var/VRTSvcs/log/ASMDG_A.log
These files contain all the actions that the VCS engine and other agents forOracle perform.
Review the description of the error messages for the following agents and thepossible solutions:
■ Oracle agent
■ Netlsnr agent
■ ASMInst agent
■ ASMDG agent
Error messages common to the Oracle and Netlsnragents
Table 6-1 lists the Veritas Cluster Server agent for Oracle error messages withthe description and a recommended solution, if available.
Table 6-1 Veritas Cluster Server agent for Oracle error messages
Description and solutionMessage
The Home attribute in the Oracle or Netlsnr typehas not been set.
Solution: Set the Home attribute value to thecorrect full path name of the Oracle home.
No ORACLE_HOME specified
The string that is specified for theHomeattributein the Oracle or Netlsnr type is incorrect.
Solution: Set the Home attribute value to thecorrect full path name of the Oracle home.
Oracle home directory %s does notexist
Troubleshooting Veritas Cluster Server agent for OracleError messages common to the Oracle and Netlsnr agents
98

Table 6-1 Veritas Cluster Server agent for Oracle error messages (continued)
Description and solutionMessage
The file that the EnvFile attribute specifies forsourcing the environmentvariables isnotpresent,not readable, or is not a text file.
Solution: Set the EnvFile attribute value to thecorrect full pathname. Ensure that the file formatis valid.
File %s is not a valid text file
Internal error.
Solution: Contact Technical Support for furtherassistance.
VCSAgExec returned failure whentrying to execute in-depth test
Internal error.
Solution: Contact Technical Support for furtherassistance.
Unable to open pipe from%s
Warningmessage to indicate that the PID for theOracle process that is specified is different thanthe one registered by the previousmonitor cycle.
Process %s restarted
MonScript failed to execute correctly.
Solution: Debug MonScript to assess the exactcause of failure.
Monitor procedure %s returned %s
Internal error while executing MonScript.
Solution: Contact Technical Support for furtherassistance.
Monitor procedure %s did not exit,return value is %s
The Owner attribute in the Oracle type has notbeen set.
Solution: Set the Owner attribute value to thecorrect owner of the database binaries.
No owner for Oracle executables wasspecified
The Operating System user that the Ownerattribute specifies is invalid.
Solution: Set the Owner attribute value to thecorrect owner of the database binaries.
Invalidowner%s forOracle executableswas specified
The file that the MonScript attribute specifies isnot accessible or not found.
Solution: Make sure that the file name indicatesa valid and accessible file.
Access to Monscript %s denied. DetailMonitoringwill not be enabled!! Pleasespecify a valid file.
99Troubleshooting Veritas Cluster Server agent for OracleError messages common to the Oracle and Netlsnr agents

Table 6-1 Veritas Cluster Server agent for Oracle error messages (continued)
Description and solutionMessage
The agent cannot decrypt the password youspecified.
Solution: Use vcsencrypt utility to create a newencrypted password and supply the password.
Encountered errors while decryptingpassword!
Error messages specific to the Oracle agentTable 6-2 lists the errormessages for theVCS agent forOraclewith the descriptionand a recommended solution, if available.
Table 6-2 Oracle agent error messages
Description and solutionMessage
The Sid attribute in the Oracle type has not beenset.
Solution: Set the Sid attribute value to the correctdatabase instance.
No SID specified
The client utilities svrmgrl or sqlplus are notfound in the $ORACLE_HOME/bin directory.
Solution: Verify that the Oracle home has beencorrectly specified and that these executables arepresent.
sqlplus/svrmgrl not found in %s/bin
The client utility srvctl is not found in the$ORACLE_HOME/bin directory.
Solution: Verify that the Oracle home has beencorrectly specified and that this executable ispresent.
srvctl not found in %s/bin
Warning message to indicate that the followingcommands were not successful in closing theOracle instance in the clean or offline entry point:
■ Shutdown immediate
■ Shutdown abort
Oracle %s failed to stop
Troubleshooting Veritas Cluster Server agent for OracleError messages specific to the Oracle agent
100

Table 6-2 Oracle agent error messages (continued)
Description and solutionMessage
Warning message to indicate that the databaseinstance was not running even before the cleanor offline entry points were executed.
Solution: No action required.
Oracle database %s not running
Warning message to indicate that the Oracleprocesses would be signaled with SIGTERM.
Solution: No action required.
Oracle (%s) kill TERM%s
Warning message to indicate that the Oracleprocesses would be signaled with SIGKILL.
Solution: No action required.
Oracle (%s) kill KILL %s
Warning message to indicate that database is inQUIESCING or QUIESCED mode.
Database in QUIESCING/QUIESCEDmode
Warning message to indicate that database is inRESTRICTED mode.
Database in RESTRICTED mode
Warning message to indicate that database is inSUSPENDED state.
Database in SUSPENDED state
Refer to Oracle’s alert log for more information.
When a monitor times out as many times as thevalue specified, the corresponding resource isbrought down by calling the clean entry point.The resource is then marked FAULTED, or it isrestarted, dependingon theRestartLimit attributevalue.
Solution: Set the FaultOnMonitorTimeoutsattribute value to 0 so that the monitor failuresare not considered indicative of a resource fault.
Another possible reason could be that automaticarchiving was not enabled while setting up thedatabase.
Solution: Archive the database manually. Ifautomatic archival is enabled, set theLOG_ARCHIVE_START parameter value in thefile init.ora to TRUE.
Resource %s - monitor procedure didnot completewithin the expected time.
101Troubleshooting Veritas Cluster Server agent for OracleError messages specific to the Oracle agent

Table 6-2 Oracle agent error messages (continued)
Description and solutionMessage
The agent could not find the custom script at thespecified location to start the database.
Solution: Make sure the custom file exists at thespecified location and has valid permissions.
Custom script /opt/VRTSagents/ha/bin/Oracle/start_custom_%s.sqldoes not exist. Will not be able to startthe database.
The agent could not find the custom script at thespecified location to stop the database.
Solution:Make sure the custom file exists and thespecified location and has valid permissions.
Custom script /opt/VRTSagents/ha/bin/Oracle/shut_custom_%s.sqldoes not exist. Using default shutdownoption.
The file oraerror.dat is not present or has recordsin an unsupported format.
Solution: Make sure the file exists and has datain the supported format.
oraerror.dat did not have records thatcould be parsed
TheMonitorOption value is less than 0 or greaterthan 1.
Solution: Set the MonitorOption attribute valueto 0 or 1.
Incorrect Monitor Option
The health check monitoring option is selectedwhen Oracle version is not Oracle 10g or later.
Solution: Set the MonitorOption value to 0 toselect the process check monitoring option.
MonitorOption value not applicable forthis Oracle Version
Internal error.
Solution: Contact Technical Support for furtherassistance.
VCSAgExec returned failure whentrying to execute health checkmonitortest
Internal error.
Solution: Contact Technical Support for furtherassistance.
VCSAgExec returned failure whiletrying to find Oracle version
Detail Monitoring has been enabled but thenecessary attributes for detail monitoring havenot been set correctly.
Solution: Set the values of the required attributesfor detail monitoring correctly or setDetailMonitor attribute value to 0 to disable detailmonitoring.
One or more of the attributesUser:Pword:Table:MonScript are notset correctly. Detailmonitoringwill notbe enabled!! Unset the DetailMonitorattribute if you want to disableDetailMonitoring.
Troubleshooting Veritas Cluster Server agent for OracleError messages specific to the Oracle agent
102

Error messages specific to the Netlsnr agentTable 6-3 lists the Netlsnr agent error messages with the description and arecommended solution, if available.
Table 6-3 Netlsnr agent error messages
Description and solutionMessage
The agent could not process the /proc entries inthe particular monitor cycle.
Solution: No action required.
Cannot open process directory.
Warning message to indicate that the Listenerprocess was not running even before the clean oroffline entry points were executed.
Solution: No action required.
Listener process %s not running
Warning message to indicate that the Listenerprocess would be signaled with SIGTERM.
Solution: No action required.
Listener %s kill TERM%s
Warning message to indicate that the Listenerprocess would be signaled with SIGKILL.
Solution: No action required.
Listener %s kill KILL %s
The client utility lsnrctl is not found in the$ORACLE_HOME/bin directory.
Solution: Verify that the Oracle home has beencorrectly specified and that this executable ispresent.
lsnrctl not found in %s/bin
The tnslsnr process does not respond.
Solution: Verify the underlyingnetwork protocol.
lsnrctl operation timed out
Error messages specific to the ASMInst agentTable 6-4 lists the ASMInst agent error messages with the description and arecommended solution, if available.
103Troubleshooting Veritas Cluster Server agent for OracleError messages specific to the Netlsnr agent

Table 6-4 ASMInst agent error messages
Description and solutionMessage
The Home attribute of the ASMInst agent hasmultiple tokens.
Solution: Correct the value of theHome attribute.
Attribute Home cannot have multipletokens.
The Oracle CSSD process is not running.
Solution: Enable the CSSD process.
See “Enabling the clustering daemon forASM-managed database” on page 44.
Cluster Synchronization Serviceprocess is not running.
The Oracle CSSD process has died.
Solution: Enable the CSSD process.
See “Enabling the clustering daemon forASM-managed database” on page 44.
Cluster Synchronization Service diedor is restarted.
Error messages specific to the ASMDG agentTable 6-5 lists the ASMInst agent error messages with the description and arecommended solution, if available.
Table 6-5 ASMDG agent error messages
Description and solutionMessage
TheDiskGroups attribute value forASMDGagentis not specified.
Solution: Specify the value of the Diskgroupattribute.
No ASM Diskgroup name specified, oris null.
The ASM initialization parameter file does nothave the correct value forASM instance to searchthe ASM disk groups.
Solution: Specify the correct value for theasm_diskstring parameter in the ASMinitialization parameter file.
Agent unable to identify state of theASMDG resource. The asm_diskstringparameter is not set correctly in theASM initialization parameter file.
TheASMDGagent cannot identify the state of theresource.
Solution: Contact Technical Support for furtherassistance.
Agent unable to identify state of theresource.
Troubleshooting Veritas Cluster Server agent for OracleError messages specific to the ASMDG agent
104

Issues specific to OracleTable 6-6 lists an Oracle issue and the solution.
Table 6-6 Oracle common issue
Description and solutionMessage
Solution: The recommendation from Oracle is toset the values of the database initializationparameters db_cache_size and java_pool_size tooptimal values.
On Solaris x64:
The Oracle database instanceterminates at regular short intervals.
Thismessageappears forASM-manageddatabaseif you try to offline the Oracle service groupwithin 2-3 minutes after you brought the servicegroup online.
Refer to Oracle bug 5045309 for moreinformation.
ORA-15097: Cannot SHUTDOWNASMinstance with connected RDBMSinstance.
105Troubleshooting Veritas Cluster Server agent for OracleIssues specific to Oracle

Troubleshooting Veritas Cluster Server agent for OracleIssues specific to Oracle
106

Resource type definitions
This appendix includes the following topics:
■ About the resource type and attribute definitions
■ Oracle resource type
■ Netlsnr resource type
■ ASMInst resource type
■ ASMDG resource type
About the resource type and attribute definitionsThe resource type represents the VCS configuration definition of the agent andspecifies how the agent is defined in the configuration file main.cf. The AttributeDefinitions explain the attributes associated with the agent. The Requiredattributes explain the attributes thatmust be configured for the agent to functionproperly.
Note:TheVeritas Cluster Server agent forOracle on Solaris x64 operating systemdoesnot support local zones. The agent does notmonitorOracle instances runningin non-global zones.
Oracle resource typeThe Oracle agent of the Veritas Cluster Server agent for Oracle is represented bythe Oracle resource type in VCS.
type Oracle (
AAppendix

static str AgentDirectory = "/opt/VRTSagents/ha/bin/Oracle"
static str ContainerType = Zone
static keylist SupportedActions = { VRTS_GetInstanceName,
VRTS_GetRunningServices, DBRestrict, DBUndoRestrict,
DBResume, DBSuspend, DBTbspBackup,
"home.vfd", "owner.vfd", "getid", "pfile.vfd" }
static str ArgList[] = { Sid, Owner, Home, Pfile, StartUpOpt,
ShutDownOpt, EnvFile, AutoEndBkup, DetailMonitor,
User, Pword, Table, MonScript, AgentDebug, Encoding,
MonitorOption }
str Sid
str Owner
str Home
str Pfile
str StartUpOpt = STARTUP_FORCE
str ShutDownOpt = IMMEDIATE
str EnvFile
boolean AutoEndBkup = 1
int DetailMonitor = 0
str MonScript = "./bin/Oracle/SqlTest.pl"
str User
str Pword
str Table
boolean AgentDebug = 0
str Encoding
int MonitorOption = 0
static int IntentionalOffline = 1
str ContainerName
)
Oracle attribute definitionsReview the description of the Oracle agent attributes. The agent attributes areclassified as required, optional, and internal.
Table A-1 lists the required attributes. You must assign values to the requiredattributes.
Resource type definitionsOracle resource type
108

Table A-1 Required attributes for Oracle agent
DefinitionType and dimensionRequired attributes
The variable $ORACLE_SID thatrepresents theOracle instance. TheSid is considered case-sensitive bythe Oracle agent and by the Oracledatabase server.
string-scalarSid
The Oracle user, as the definedowner of executables and databasefiles in /etc/passwd.
string-scalarOwner
The $ORACLE_HOME path toOracle binaries and configurationfiles. For example, you couldspecify the path as /opt/ora_home.
Note: Do not append a slash (/) atthe end of the path.
string-scalarHome
Table A-2 lists the optional attributes for Oracle agent. You can configure theoptional attributes if necessary.
Table A-2 Optional attributes for Oracle agent
DefinitionType and DimensionOptional Attributes
Startup options for the Oracleinstance. This attribute can takethe following values:
■ STARTUP
■ STARTUP_FORCE
■ RESTRICTED
■ RECOVERDB
■ SRVCTLSTART
■ CUSTOM
Default is STARTUP_FORCE.
See “Startup and shutdownoptions” on page 17.
string-scalarStartUpOpt
109Resource type definitionsOracle resource type

Table A-2 Optional attributes for Oracle agent (continued)
DefinitionType and DimensionOptional Attributes
Shut down options for the Oracleinstance. This attribute can takethe following values:
■ IMMEDIATE
■ TRANSACTIONAL
■ SRVCTLSTOP
■ CUSTOM
Default is IMMEDIATE.
See “Startup and shutdownoptions” on page 17.
string-scalarShutDownOpt
The full path name of the file thatis sourced by the entry pointscripts. This file contains theenvironment variables set by theuser for the Oracle database serverenvironment such asLD_LIBRARY_PATH,NLS_DATE_FORMAT, and so on.
The syntax for the contents of thefile depends on the login shell ofOwner. File must be readable byOwner. The file must not containany prompts for user input.
string-scalarEnvFile
The name of the initializationparameter file with the completepath of the startup profile.
You can also use the serverparameter file. Create a one-linetext initialization parameter filethat contains only the SPFILEparameter. See the Oracledocumentation for moreinformation.
See “Using the SPFILE in a VCScluster” on page 176.
string-scalarPfile
Resource type definitionsOracle resource type
110

Table A-2 Optional attributes for Oracle agent (continued)
DefinitionType and DimensionOptional Attributes
Setting theAutoEndBkup attributeto a non-zero value takes thedatafiles in the database out of thebackup mode, during Online.
Default = 1
See “Hot backup ofOracle databasein VCS environment” on page 34.
integer-scalarAutoEndBkup
Monitor options for the Oracleinstance. This attribute can takevalues 0 or 1.
■ 0 - Process check monitoring(recommended)
■ 1 - Health check monitoring
You must the set the value of thisattribute as 1 to use the intentionaloffline functionality of the agent.
Default = 0
See “Monitor options for Oracleagent” on page 18.
integer-scalarMonitorOption
Setting this flag to a non-zeroenables detail monitoring forOracle. The value indicates thenumber of monitor cycles afterwhich theagentwillmonitorOraclein detail. For example, the value 5indicates that the agent willmonitor Oracle in detail every fivemonitor intervals.
Note: If you set the AutoEndBkupattribute value to 0, then youmustset the DetailMonitor attributevalue to 1.
Default = 0
integer-scalarDetailMonitor
111Resource type definitionsOracle resource type

Table A-2 Optional attributes for Oracle agent (continued)
DefinitionType and DimensionOptional Attributes
Pathname to the script provided fordetail monitoring. The default(basicmonitoring) is tomonitor thedatabase PIDs only.
Note:Detailmonitoring is disabledif the value of the attributeMonScript is invalid or is set to anempty string.
The pathname to the supplieddetail monitor script is/opt/VRTSagents/ha/bin/Oracle/SqlTest.pl.
MonScript also accepts apathnamerelative to /opt/VRTSagents/ha. Arelativepathnameshould startwith"./", as in the path./bin/Oracle/SqlTest.pl.
string-scalarMonScript
Internal database user. Connects tothe database for detailmonitoring.
string-scalarUser
Encrypted password for internaldatabase-user authentication.
Encrypt passwords only whenentering them using thecommand-line. Passwordsmust beencrypted using the VCS Encryptutility.
See “Encrypting passwords ”on page 87.
string-scalarPword
Table for update by User/Pword.string-scalarTable
Resource type definitionsOracle resource type
112

Table A-2 Optional attributes for Oracle agent (continued)
DefinitionType and DimensionOptional Attributes
Specifies operating systemencoding that corresponds toOracle encoding for the displayedOracle output.
For example, if Oracle output is in"JAPANESE_JAPAN.JA16EUC,"then"eucJP" is the Solaris value forEncoding. Refer to the Oracle andSolaris documentation forrespective encoding values.
Default is "".
string-scalarEncoding
Defines how VCS reacts whenOracle is intentionally stoppedoutside of VCS control.
If you stop Oracle out of VCScontrol, the agent behavior is asfollows:
■ 0—the Oracle agent registers afault and initiates the failoverof the service group.
■ 1—the Oracle agent takes theOracle resource offline whenHealth check monitoring isenabled.
If Health check monitoring isnot enabled, the agent registersa fault and initiates the failoverof the service group.
Note: If you want to use theintentional offline functionality ofthe agent, you must set the valueof the MonitorOption attribute as1 to enable Health checkmonitoring.
Default = 1
See Veritas Cluster Server User’sGuide.
static-intIntentionalOffline
113Resource type definitionsOracle resource type
Table A-2 Optional attributes for Oracle agent (continued)
DefinitionType and DimensionOptional Attributes
Additional debug messages arelogged when this flag is set.
Default = 0
boolean-scalarAgentDebug
Solaris SPARC: Specifies the nameof the zone where the Oracleinstance to be monitored isrunning. You must define thisattribute if you want the agent tomonitor the Oracle instances thatrun in non-global zones.
Solaris x64: For future use. Do notconfigure the attribute.
string-scalarContainerName
Table A-3 lists the internal attribute for Oracle agent. This attribute is for internaluse only. Symantec recommends not to modify the value of this attribute.
Table A-3 Internal attributes for Oracle agent
DefinitionType and DimensionOptional Attributes
Specifies the location of binaries,scripts, and other files related tothe Oracle agent.
Default is/opt/VRTSagents/ha/bin/Oracle.
static-stringAgentDirectory
Do not change. For internal useonly.
Solaris SPARC: Indicates that theOracle agent monitors the Oracleinstances that run in Solaris 10zones if you set the value of theContainerName attribute to a zonename.
Solaris x64: For future use.
string-scalarContainerType
Resource type definitionsOracle resource type
114

Netlsnr resource typeThe Netlsnr agent of the Veritas Cluster Server agent for Oracle is representedby the Netlsnr resource type in VCS.
type Netlsnr (
static str AgentDirectory = "/opt/VRTSagents/ha/bin/Netlsnr"
static str ContainerType = Zone
static keylist SupportedActions = { VRTS_GetInstanceName,
VRTS_GetRunningServices, "tnsadmin.vfd" }
static str ArgList[] = { Owner, Home, TnsAdmin, Listener,
EnvFile, MonScript, LsnrPwd, AgentDebug, Encoding }
str Owner
str Home
str TnsAdmin
str Listener
str EnvFile
str MonScript = "./bin/Netlsnr/LsnrTest.pl"
str LsnrPwd
boolean AgentDebug = 0
str Encoding
static int IntentionalOffline = 0
str ContainerName
)
Netlsnr attribute definitionsReview the description of the Netlsnr agent attributes. The agent attributes areclassified as required, optional, and internal.
Table A-4 lists the required attributes for Netlsnr agent. You must assign valuesto the required attributes.
Table A-4 Required attributes for Netlsnr agent
DefinitionType and dimensionRequired attributes
Oracle user, as the defined ownerof executables and database files in/etc/passwd.
string-scalarOwner
115Resource type definitionsNetlsnr resource type

Table A-4 Required attributes for Netlsnr agent (continued)
DefinitionType and dimensionRequired attributes
The $ORACLE_HOME path toOracle binaries and configurationfiles. For example, you couldspecify the path as /opt/ora_home.
Do not append a slash (/) at the endof the path.
string-scalarHome
Table A-5 lists the optional attributes for Netlsnr agent. You can configure theoptional attributes if necessary.
Table A-5 Optional attributes for Netlsnr agent
DefinitionType and dimensionOptional attributes
The$TNS_ADMINpath todirectoryinwhich the Listener configurationfile resides (listener.ora).
Default is /var/opt/oracle.
string-scalarTnsAdmin
Name of Listener. The name forListener is consideredcase-insensitive by the Netlsnragent and the Oracle databaseserver.
Default is LISTENER.
string-scalarListener
The VCS encrypted password usedto stop and monitor the listener.This password is set in the Listenerconfiguration file.
Encrypt passwords only whenentering them using thecommand-line. Passwordsmust beencrypted using the VCS Encryptutility.
See “Listener authentication inVCSenvironment” on page 33.
See “Encrypting passwords ”on page 87.
string-scalarLsnrPwd
Resource type definitionsNetlsnr resource type
116

Table A-5 Optional attributes for Netlsnr agent (continued)
DefinitionType and dimensionOptional attributes
Specifies the full path name of thefile that is sourced by the entrypoint scripts. This file contains theenvironment variables set by theuser for the Oracle listenerenvironment such asLD_LIBRARY_PATH and so on.
The syntax for the contents of thefile depends on the login shell ofOwner. This file must readable byOwner. The file must not containany prompts for user input.
string-scalarEnvFile
Pathname to the script provided fordetail monitoring. By default, thedetail monitoring is enabled tomonitor the listerner process.
Note: If the value of the attributeMonScript is set to an empty string,the agent disables detailmonitoring.
The pathname to the supplieddetail monitoring script is/opt/VRTSagents/ha/bin/Netlsnr/LsnrTest.pl.
MonScript also accepts apathnamerelative to /opt/VRTSagents/ha. Arelativepathnameshould startwith"./", as in the path./bin/Netlsnr/LsnrTest.pl.
string-scalarMonScript
117Resource type definitionsNetlsnr resource type

Table A-5 Optional attributes for Netlsnr agent (continued)
DefinitionType and dimensionOptional attributes
Specifies operating systemencoding that corresponds toOracle encoding for the displayedOracle output. For example, ifOracle output is in"JAPANESE_JAPAN.JA16EUC,"then"eucJP" is the Solaris value forEncoding. Refer to the Oracle andSolaris documentation forrespective encoding values.
Default is "".
string-scalarEncoding
For future use.
Do not change the value of thisattribute.
Default = 0
static-intIntentionalOffline
Additional debug messages arelogged when this flag is set.
Default = 0
booleanAgentDebug
Solaris SPARC: Specifies the nameof the zone where the listenerprocess to bemonitored is running.You must define this attribute ifyou want the agent to monitor thelistener process that runs innon-global zones.
Solaris x64: For future use. Do notconfigure the attribute.
string-scalarContainerName
TableA-6 lists the internal attribute forNetlsnr agent. This attribute is for internaluse only. Symantec recommends not to modify the value of this attribute.
Resource type definitionsNetlsnr resource type
118

Table A-6 Internal attributes for Netlsnr agent
DefinitionType and DimensionOptional Attributes
Specifies the location of binaries,scripts, and other files related tothe Netlsnr agent.
Default is/opt/VRTSagents/ha/bin/Netlsnr.
static-stringAgentDirectory
Do not change. For internal useonly.
Solaris SPARC: Indicates that theNetlsnr agentmonitors the listenerprocess that runs in Solaris 10zones if you set the value of theContainerName attribute to a zonename.
Solaris x64: For future use. Do notconfigure the attribute.
static-stringContainerType
ASMInst resource typeThe ASMInst agent of the Veritas Cluster Server agent for Oracle is representedby the ASMInst resource type in VCS.
type ASMInst (
static str AgentDirectory = "/opt/VRTSagents/ha/bin/ASMInst"
static str ArgList[] = { Sid, Owner, Home, Pfile,
EnvFile, Encoding }
str Sid
str Owner
str Home
str Pfile
str EnvFile
str Encoding
)
ASMInst attribute definitionsReview the description of the ASMInst agent attributes. The agent attributes areclassified as required, optional, and internal.
119Resource type definitionsASMInst resource type

Table A-7 lists the required attributes. You must assign values to the requiredattributes.
Table A-7 Required attributes for ASMInst agent
DefinitionType and dimensionRequired attributes
The variable $ORACLE_SID thatrepresents the ASM instance. TheSid is considered case-sensitive bythe ASMInst agent.
string-scalarSid
The Oracle user, as the definedowner of $ORACLE_HOME of ASMinstance and in /etc/passwd.
string-scalarOwner
The $ORACLE_HOME path toOracle ASM binaries andconfiguration files. For example,you could specify the path as/opt/ora_home.
Note: Do not append a slash (/) atthe end of the path.
string-scalarHome
Table A-8 lists the optional attributes for ASMInst agent. You can configure theoptional attributes if necessary.
Table A-8 Optional attributes for ASMInst agent
DefinitionType and DimensionOptional Attributes
The full path name of the file thatis sourced by the entry pointscripts. This file contains theenvironment variables set by theuser for the Oracle database serverenvironment such asLD_LIBRARY_PATH,NLS_DATE_FORMAT, and so on.
The syntax for the contents of thefile depends on the login shell ofOwner. File must be readable byOwner. The file must not containany prompts for user input.
string-scalarEnvFile
Resource type definitionsASMInst resource type
120

Table A-8 Optional attributes for ASMInst agent (continued)
DefinitionType and DimensionOptional Attributes
The name of the initializationparameter file of ASM instancewith the complete path of thestartup profile.
You can also use the serverparameter file. Create a one-linetext initialization parameter filethat contains only the SPFILEparameter. See the Oracledocumentation for moreinformation.
See “Using the SPFILE in a VCScluster” on page 176.
string-scalarPfile
Specifies operating systemencoding that corresponds toOracle encoding for the displayedOracle output. Default is "".
string-scalarEncoding
Table A-9 lists the internal attribute for ASMInst agent. This attribute is forinternal use only. Symantec recommends not tomodify the value of this attribute.
Table A-9 Internal attributes for ASMInst agent
DefinitionType and DimensionOptional Attributes
Specifies the location of binaries,scripts, and other files related tothe ASMInst agent.
Default is/opt/VRTSagents/ha/bin/ASMInst.
static-stringAgentDirectory
ASMDG resource typeThe ASMDG agent of the Veritas Cluster Server agent for Oracle is representedby the ASMDG resource type in VCS.
type ASMDG (
static str AgentDirectory = "/opt/VRTSagents/ha/bin/ASMDG"
static str ArgList[] = { Sid, Owner, Home, DiskGroups,
EnvFile, Encoding }
121Resource type definitionsASMDG resource type
str Sid
str Owner
str Home
keylist DiskGroups
str EnvFile
str Encoding
)
ASMDG attribute definitionsReview the description of the ASMDG agent attributes. The agent attributes areclassified as required, optional, and internal.
Table A-10 lists the required attributes. You must assign values to the requiredattributes.
Table A-10 Required attributes for ASMDG agent
DefinitionType and dimensionRequired attributes
The ASM disk groups, where youstore the Oracle database files.
keylistDiskGroups
The variable $ORACLE_SID thatrepresents the ASM instance. TheSid is considered case-sensitive bythe ASMInst agent.
string-scalarSid
The Oracle user, as the definedowner of $ORACLE_HOME of ASMinstance and in /etc/passwd.
string-scalarOwner
The $ORACLE_HOME path toOracle ASM binaries andconfiguration files. For example,you could specify the path as/opt/ora_home.
Note: Do not append a slash (/) atthe end of the path.
string-scalarHome
Table A-11 lists the optional attributes for ASMDG agent. You can configure theoptional attributes if necessary.
Resource type definitionsASMDG resource type
122

Table A-11 Optional attributes for ASMDG agent
DefinitionType and DimensionOptional Attributes
The full path name of the file thatis sourced by the entry pointscripts. This file contains theenvironment variables set by theuser for the Oracle database serverenvironment such asLD_LIBRARY_PATH,NLS_DATE_FORMAT, and so on.
The syntax for the contents of thefile depends on the login shell ofOwner. File must be readable byOwner. The file must not containany prompts for user input.
string-scalarEnvFile
Specifies operating systemencoding that corresponds toOracle encoding for the displayedOracle output. Default is "".
string-scalarEncoding
Table A-12 lists the internal attribute for ASMDG agent. This attribute is forinternal use only. Symantec recommends not tomodify the value of this attribute.
Table A-12 Internal attributes for ASMDG agent
DefinitionType and DimensionOptional Attributes
Specifies the location of binaries,scripts, and other files related tothe ASMDG agent.
Default is/opt/VRTSagents/ha/bin/ASMDG.
static-stringAgentDirectory
123Resource type definitionsASMDG resource type

Resource type definitionsASMDG resource type
124
Sample configurations
This appendix includes the following topics:
■ About the sample configurations for Oracle enterprise agent
■ Sample single Oracle instance configuration
■ Sample multiple Oracle instances (single listener) configuration
■ Sample multiple instance (multiple listeners) configuration
■ Sample Oracle configuration with shared server support
■ Sample Oracle ASM configurations
About the sample configurations forOracle enterpriseagent
The sample configuration include descriptions for typical service groups that areconfigured to monitor the state of Oracle in a VCS cluster.
See “Configuring Oracle instances in VCS” on page 62.
The sample dependency graphs depict the resource types, resources, and resourcedependencies within the service group. The sample configuration file (main.cf) isalso included for your reference.
Review these dependencies carefully before configuring the agent. For moreinformation about VCS resource types, see the Veritas Cluster Server BundledAgents Reference Guide.
BAppendix

Sample single Oracle instance configurationFigure B-1 describes a typical service group configured to monitor the state of anOracle instance in a VCS cluster.
See “Single Oracle instance configured in Solaris zones” on page 129.
Figure B-1 Dependency graph for single Oracle instance
IP_oraprod
NIC_oraprod
Mount
NIC
IP
DG_oraprod
Vol_oraprod_vol2
Vol_oraprod_vol1
Mount_oraprod_u01
Mount_oraprod_u02
ORA_oraprod
LSNR_oraprod_lsnr
Mount
Volume
DiskGroup
Oracle
Netlsnr
Volume
The shared disk groups and volumes in the cluster are configured as resources oftype DiskGroup and Volume respectively. The volumes are mounted using theMount agent. The virtual IP address for the service group is configured using theIP and NIC resource types. The Oracle server can be started after each of theseresources is brought online.
If your configuration does not use Veritas Volume Manager, use theDiskReservation resource type to configure shared storage instead of theDiskGroup and Volume resource types.
Sample configurationsSample single Oracle instance configuration
126

Sample configuration file for single Oracle instanceReview the sample configurationwith a resource of typeOracle that is configuredas follows in main.cf file:
include "types.cf"
include "OracleTypes.cf"
cluster vcs (
)
system vcssun48 (
)
system vcssun49 (
)
group ORA_PROD_Group (
SystemList = { vcssun48 = 0, vcssun49 = 1 }
AutoStartList = { vcssun48 }
)
DiskGroup DG_oraprod (
DiskGroup = ora_prod_dg
StartVolumes = 0
StopVolumes = 0
)
IP IP_oraprod (
Device = hme0
Device = bge0
Address = "10.212.102.13"
)
Mount Mount_oraprod_u01 (
MountPoint = "/prod/u01"
BlockDevice = "/dev/vx/dsk/ora_prod_dg/u01-vol"
FSType = vxfs
FsckOpt = "-n"
)
127Sample configurationsSample single Oracle instance configuration

Mount Mount_oraprod_u02 (
MountPoint = "/prod/u02"
BlockDevice = "/dev/vx/dsk/ora_prod_dg/u02-vol"
FSType = vxfs
FsckOpt = "-n"
)
NIC NIC_oraprod (
Device = hme0
Device = bge0
)
Netlsnr LSNR_oraprod_lsnr (
Owner = oraprod
Home = "/orahome/Oracle"
TnsAdmin = "/orahome/Oracle/network/admin"
Listener = LISTENER_PROD
MonScript = "./bin/Netlsnr/LsnrTest.pl"
LsnrPwd = cqfOdoOolOo
)
Oracle ORA_oraprod (
Sid = PROD
Owner = oraprod
Home = "/orahome/Oracle"
EnvFile = "/tmp/env.sh"
DetailMonitor = 1
MonScript = "./bin/Oracle/SqlTest.pl"
User = thor
Pword = hvlTptWvj
Table = thor
MonitorOption = 0
)
Volume Vol_oraprod_vol1 (
Volume = u01-vol
DiskGroup = ora_prod_dg
)
Volume Vol_oraprod_vol2 (
Sample configurationsSample single Oracle instance configuration
128

Volume = u02-vol
DiskGroup = ora_prod_dg
)
IP_oraprod requires NIC_oraprod
LSNR_oraprod_lsnr requires IP_oraprod
LSNR_oraprod_lsnr requires ORA_oraprod
Mount_oraprod_u01 requires Vol_oraprod_vol1
Mount_oraprod_u02 requires Vol_oraprod_vol2
ORA_oraprod requires Mount_oraprod_u01
ORA_oraprod requires Mount_oraprod_u02
Vol_oraprod_vol1 requires DG_oraprod
Vol_oraprod_vol2 requires DG_oraprod
Single Oracle instance configured in Solaris zonesThe following examples describe a typical service group that is configured tomonitor the state of an Oracle instance configured in a Solaris zone:
■ Zone root on local diskSee “Zone root on local disk for single Oracle instance” on page 129.See “Sample configuration for zone root on local disk for singleOracle instance”on page 130.
■ Zone root on shared diskSee “Zone root on shared disk for single Oracle instance” on page 131.See “Sample configuration for zone root on shared disk for single Oracleinstance” on page 132.
Zone root on local disk for single Oracle instanceFigure B-2 describes a typical service group in a Solaris zone that is on local disk.If the root file system of a zone is on the local disk of each node, the file systemis mounted when the system is booted. Hence, the service group does not need tohave separate DiskGroup and Volume resources for the zone.
129Sample configurationsSample single Oracle instance configuration

Figure B-2 Single Oracle instance in zone on local disk
NIC_oraprod
Mount
DG_oraprod
Vol_oraprod_vol1
Mount_oraprod_u01
ORA_oraprod
LSNR_oraprod_lsnr
Volume
Netlsnr
Oracle
Zone
DiskGroup
NIC
ORA_zone
The shared disk groups and volumes in the cluster are configured as resources oftype DiskGroup and Volume respectively. The volumes are mounted using theMount agent. The Solaris zone is monitored through a zone resource, which isdependent on theMount andNIC resources. TheOracle server can be started aftereach of these resources is brought online.
If your configuration does not use Veritas Volume Manager, use theDiskReservation resource type to configure shared storage instead of theDiskGroup and Volume resource types.
Sample configuration for zone root on local disk for singleOracle instanceA resource of type Zone may be configured as follows in the main.cf:
Zone ORA_zone (
ZoneName = z-ora
)
Sample configurationsSample single Oracle instance configuration
130

Along with this resource addition, the service group configuration would alsochange to have the NIC and Mount resources to depend on the Zone resource.Refer to the resource dependency diagrams tomodify the resource dependenciesto reflect your zone configuration.
See “Zone root on local disk for single Oracle instance” on page 129.
You must also do the following for the resources that run in the zones for whichyou want the appropriate agents to monitor:
■ Verify that the value of the ContainerType attribute is set to Zone.
■ Set the value of the ContainerName attribute to the name of the non-globalzone.
See the Veritas Cluster Server User’s Guide for more information.
Zone root on shared disk for single Oracle instanceFigure B-3 describes a typical service group in a Solaris zone that is on shareddisk. If the root file system of a zone is on a shared disk, the file system should bemounted by VCS. Hence, separate DiskGroup and Volume resources are requiredfor the zone.
131Sample configurationsSample single Oracle instance configuration

Figure B-3 Single Oracle instance in zone on shared disk
NIC_oraprod
Mount
DG_zone
Vol_zone
Vol_oraprod_vol1
Mount_oraprod_u01
Mount_zone
ORA_oraprod
LSNR_oraprod_lsnr
Mount
VolumeVolume
DiskGroup
Netlsnr
Oracle
Zone
DiskGroup
NIC
ORA_zone
DG_oraprod
8
The shared disk groups and volumes in the cluster are configured as resources oftype DiskGroup and Volume respectively. The volumes are mounted using theMount agent. The Solaris zone is monitored through a zone resource, which isdependent on theMount andNIC resources. TheOracle server can be started aftereach of these resources is brought online.
If your configuration does not use Veritas Volume Manager, use theDiskReservation resource type to configure shared storage instead of theDiskGroup and Volume resource types.
Sample configuration for zone root on shared disk for singleOracle instanceA resource of type Zone may be configured as follows in the main.cf:
Sample configurationsSample single Oracle instance configuration
132

Zone ORA_zone (
ZoneName = z-ora
)
Along with this resource addition, the service group configuration would alsochange to have the NIC and Mount resources to depend on the Zone resource.Refer to the resource dependency diagrams tomodify the resource dependenciesto reflect your zone configuration.
See “Zone root on shared disk for single Oracle instance” on page 131.
You must also do the following for the resources that run in the zones for whichyou want the appropriate agents to monitor:
■ Verify that the value of the ContainerType attribute is set to Zone.
■ Set the value of the ContainerName attribute to the name of the non-globalzone.
See the Veritas Cluster Server User’s Guide for more information.
Sample multiple Oracle instances (single listener)configuration
Figure B-4 describes a typical VCS configuration tomonitor two Oracle instancessharing a listener. This configuration has a service group for eachOracle instance.The Listener too is configured in a separate service group.
See “Multiple Oracle instances (single listener) configured in Solaris zones”on page 140.
133Sample configurationsSample multiple Oracle instances (single listener) configuration

Figure B-4 Two Oracle instances sharing a listener
ORA_MKTG_Group
Online LocalFirm
ORA_PROD_Group
LISTENER SERVICE GROUP
TheOracle service groups aremade dependent on the Listener service groupusingan Online Local Firm dependency.
Figure B-5 shows the dependency graph for one of theOracle instances in theVCSconfiguration. In the Oracle service group, the shared disk groups and volumesin the cluster are configured as resources of type DiskGroup and Volumerespectively. The volumes are mounted using the Mount agent.
Figure B-5 Dependency graph for one of the Oracle instances
Mount
Ora_DG_Bin
Vol_oramktg_vol2Vol_oramktg_vol1
Mount_oramktg_u01 Mount_oramktg_u02
Oracle
ORA_oramktg
Mount
Volume
DiskGroup
Volume
Sample configurationsSample multiple Oracle instances (single listener) configuration
134

Figure B-6 shows the dependency graph for the listener that the two Oracleinstances share in theVCS configuration. In the Listener service group, the virtualIP address is configured using the IP and NIC resource types. The Listener can bestarted after the IP and NIC resources are brought online.
Figure B-6 Dependency graph for the single listener
IP
DG_orabin
Vol_orabin
NIC_Public1
IP_oraprod
Mount_orabin
Netlsnr
LSNR_oracle
Mount
NIC DiskGroup
Volume
TheOracle server can be started after the Listener service group and the resourcesin the Oracle service group are brought online.
If your configuration does not use Veritas Volume Manager, use theDiskReservation resource type to configure shared storage instead of theDiskGroup and Volume resource types.
Note: In this case, make sure you have modified all proper system files, such as/etc/system, /etc/passwd, /etc/group, and /etc/shadow to support multipledatabases. Pay particular attention to system requirements like physicalmemoryand shared memory segment availability. Also ensure a single system is capableof sustaining amultiple instance load in the event of a server failure and extendedoperation on the backup server.
Sample configuration file formultiple Oracle instances (single listener)Review the sample configuration file for multiple Oracle instances.
135Sample configurationsSample multiple Oracle instances (single listener) configuration

include "types.cf"
include "OracleTypes.cf"
cluster vcs (
)
system vcssun48 (
)
system vcssun49 (
)
group ORA_MKTG_Group (
SystemList = { vcssun48 = 0, vcssun49 = 1 }
AutoStartList = { vcssun48 }
)
DiskGroup DG_oramktg (
DiskGroup = ora_mktg_dg
StartVolumes = 0
StopVolumes = 0
)
Mount Mount_oramktg_u01 (
MountPoint = "/mktg/u01"
BlockDevice = "/dev/vx/dsk/ora_mktg_dg/u01-vol"
FSType = vxfs
FsckOpt = "-n"
)
Mount Mount_oramktg_u02 (
MountPoint = "/mktg/u02"
BlockDevice = "/dev/vx/dsk/ora_mktg_dg/u02-vol"
FSType = vxfs
FsckOpt = "-n"
)
Oracle ORA_oramktg (
Sid = MKTG
Owner = oramktg
Sample configurationsSample multiple Oracle instances (single listener) configuration
136

Home = "/orahome/Oracle"
EnvFile = "/tmp/env.sh"
DetailMonitor = 1
MonScript = "./bin/Oracle/SqlTest.pl"
User = thor
Pword = hvlTptWvj
Table = thor
MonitorOption = 0
)
Volume Vol_oramktg_vol1 (
Volume = u01-vol
DiskGroup = ora_mktg_dg
)
Volume Vol_oramktg_vol2 (
Volume = u02-vol
DiskGroup = ora_mktg_dg
)
requires group Common_Service online firm
Mount_oramktg_u01 requires Vol_oramktg_vol1
Mount_oramktg_u02 requires Vol_oramktg_vol2
ORA_oramktg requires Mount_oramktg_u01
ORA_oramktg requires Mount_oramktg_u02
Vol_oramktg_vol1 requires DG_oramktg
Vol_oramktg_vol2 requires DG_oramktg
group ORA_PROD_Group (
SystemList = { vcssun48 = 0, vcssun49 = 1 }
AutoStartList = { vcssun48 }
)
DiskGroup DG_oraprod (
DiskGroup = ora_prod_dg
StartVolumes = 0
StopVolumes = 0
)
Mount Mount_oraprod_u01 (
MountPoint = "/prod/u01"
137Sample configurationsSample multiple Oracle instances (single listener) configuration

BlockDevice = "/dev/vx/dsk/ora_prod_dg/u01-vol"
FSType = vxfs
FsckOpt = "-n"
)
Mount Mount_oraprod_u02 (
MountPoint = "/prod/u02"
BlockDevice = "/dev/vx/dsk/ora_prod_dg/u02-vol"
FSType = vxfs
FsckOpt = "-n"
)
Oracle ORA_oraprod (
Sid = PROD
Owner = oraprod
Home = "/orahome/Oracle"
EnvFile = "/tmp/env.sh"
DetailMonitor = 1
MonScript = "./bin/Oracle/SqlTest.pl"
User = thor
Pword = hvlTptWvj
Table = thor
MonitorOption = 0
)
Volume Vol_oraprod_vol1 (
Volume = u01-vol
DiskGroup = ora_prod_dg
)
Volume Vol_oraprod_vol2 (
Volume = u02-vol
DiskGroup = ora_prod_dg
)
requires group Common_Service online firm
Mount_oraprod_u01 requires Vol_oraprod_vol1
Mount_oraprod_u02 requires Vol_oraprod_vol2
ORA_oraprod requires Mount_oraprod_u01
ORA_oraprod requires Mount_oraprod_u02
Vol_oraprod_vol1 requires DG_oraprod
Vol_oraprod_vol2 requires DG_oraprod
Sample configurationsSample multiple Oracle instances (single listener) configuration
138

group Common_Service (
SystemList = { vcssun48 = 0, vcssun49 = 1 }
AutoStartList = { vcssun48 }
)
DiskGroup DG_orabin (
DiskGroup = ora_bin_dg
StartVolumes = 0
StopVolumes = 0
)
IP IP_oraprod (
Device = hme0
Device = bge0
Address = "10.212.102.13"
)
Mount Mount_orabin (
MountPoint = "/orahome/Oracle"
BlockDevice = "/dev/vx/dsk/ora_bin_dg/u01-vol"
FSType = vxfs
FsckOpt = "-n"
)
NIC NIC_Public1 (
Device = hme0
Device = bge0
)
Netlsnr LSNR_oracle (
Owner = oracle
Home = "/orahome/Oracle"
TnsAdmin = "/orahome/Oracle/network/admin"
Listener = LISTENER_ORACLE
MonScript = "./bin/Netlsnr/LsnrTest.pl"
139Sample configurationsSample multiple Oracle instances (single listener) configuration

)
Volume Vol_orabin (
Volume = u01-vol
DiskGroup = ora_bin_dg
)
IP_oraprod requires NIC_Public1
LSNR_oracle requires IP_oraprod
LSNR_oracle requires Mount_orabin
Mount_orabin requires Vol_orabin
Vol_orabin requires DG_orabin
Multiple Oracle instances (single listener) configured in Solaris zonesThe following examples describe a typical service group configured to monitorthe state of multiple Oracle instances configured in a Solaris zone:
■ Zone root on local diskSee “Zone root on local disk for multiple Oracle instances” on page 141.See “Sample configuration for zone root on local disk for multiple Oracleinstances” on page 143.
■ Zone root on shared diskSee “Zone root on shared disk for multiple Oracle instances” on page 143.See “Sample configuration for zone root on shared disk for multiple Oracleinstances” on page 145.
Sample configurationsSample multiple Oracle instances (single listener) configuration
140
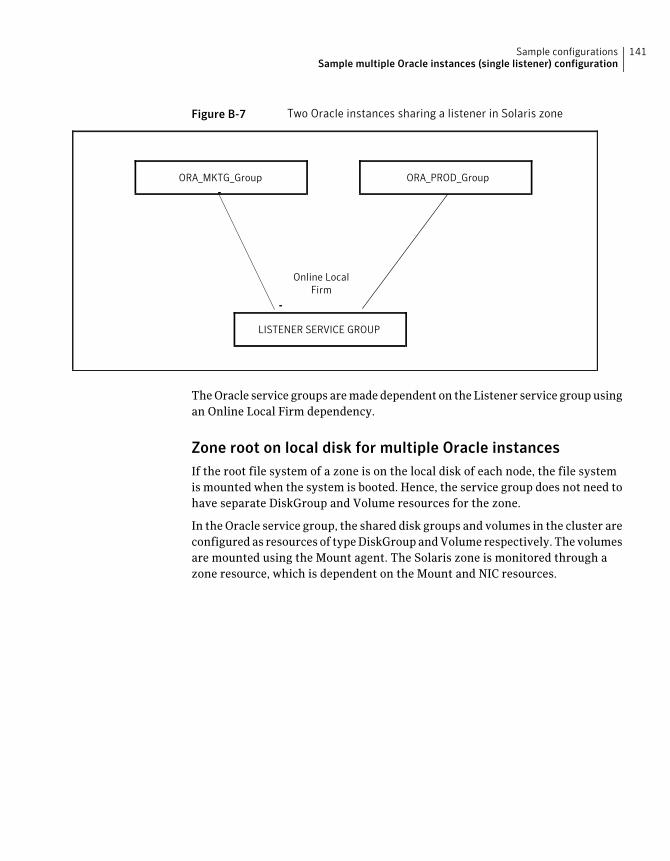
Figure B-7 Two Oracle instances sharing a listener in Solaris zone
ORA_MKTG_Group
Online LocalFirm
ORA_PROD_Group
LISTENER SERVICE GROUP
TheOracle service groups aremade dependent on the Listener service groupusingan Online Local Firm dependency.
Zone root on local disk for multiple Oracle instancesIf the root file system of a zone is on the local disk of each node, the file systemis mounted when the system is booted. Hence, the service group does not need tohave separate DiskGroup and Volume resources for the zone.
In the Oracle service group, the shared disk groups and volumes in the cluster areconfigured as resources of typeDiskGroupandVolume respectively. Thevolumesare mounted using the Mount agent. The Solaris zone is monitored through azone resource, which is dependent on the Mount and NIC resources.
141Sample configurationsSample multiple Oracle instances (single listener) configuration

Figure B-8 Dependency for an Oracle instance in a zone on local disk
Mount
DG_oraprod
Vol_oraprod_vol1
Mount_oraprod_u01
ORA_oraprod
Volume
Oracle
Zone
DiskGroup
NIC
ORA_zone
NIC_oraprod
In the Listener service group, the Listener resource is dependent on the zoneresource. The Listener can be started after the zone resource is brought online.
Figure B-9 Dependency for the single listener in a zone on local disk
Mount
DG_oraprod
Vol_oraprod_vol1
Mount_oraprod_u01
LSNR_oracle
Volume
Netlsnr
Zone
DiskGroup
NIC
ORA_zone
NIC_oraprod
Sample configurationsSample multiple Oracle instances (single listener) configuration
142

TheOracle server can be started after the Listener service group and the resourcesin the Oracle service group are brought online.
If your configuration does not use Veritas Volume Manager, use theDiskReservation resource type to configure shared storage instead of theDiskGroup and Volume resource types.
Note: In this case, make sure you have modified all proper system files, such as/etc/system, /etc/passwd, /etc/group, and /etc/shadow to support multipledatabases. Pay particular attention to system requirements like physicalmemoryand shared memory segment availability. Also ensure a single system is capableof sustaining amultiple instance load in the event of a server failure and extendedoperation on the backup server.
Sample configuration for zone root on local disk for multipleOracle instancesA resource of type Zone may be configured as follows in the main.cf:
Zone ORA_zone (
ZoneName = z-ora
)
Along with this resource addition, the service group configuration would alsochange to have the NIC and Mount resources to depend on the Zone resource.Refer to the resource dependency diagrams tomodify the resource dependenciesto reflect your zone configuration.
See “Zone root on local disk for multiple Oracle instances” on page 141.
You must also do the following for the resources that run in the zones for whichyou want the appropriate agents to monitor:
■ Verify that the value of the ContainerType attribute is set to Zone.
■ Set the value of the ContainerName attribute to the name of the non-globalzone.
See the Veritas Cluster Server User’s Guide for more information.
Zone root on shared disk for multiple Oracle instancesIf the root file system of a zone is on a shared disk, the file system should bemounted by VCS. Hence, separate DiskGroup and Volume resources are requiredfor the zone.
143Sample configurationsSample multiple Oracle instances (single listener) configuration

In the Oracle service group, the shared disk groups and volumes in the cluster areconfigured as resources of typeDiskGroupandVolume respectively. Thevolumesare mounted using the Mount agent. The Solaris zone is monitored through azone resource, which is dependent on the Mount and NIC resources.
Figure B-10 Dependency for an Oracle instance in a zone on shared disk
Mount
DG_oraprod
Vol_oraprod_vol1
Mount_oraprod_u01
ORA_oraprod
Volume
Oracle
Zone
DiskGroup
NICMount
DG_zone
Vol_zone
Mount_zone
Volume
DiskGroup
ORA_zone
NIC_oraprod
In the Listener service group, the Listener resource is dependent on the zoneresource. The Listener can be started after the zone resource is brought online.
Sample configurationsSample multiple Oracle instances (single listener) configuration
144

Figure B-11 Dependency for the single listener in a zone on shared disk
Mount
DG_oraprod
Vol_oraprod_vol1
Mount_oraprod_u01
LSNR_oracle
Volume
Netlsnr
Zone
DiskGroup
NICMount
Volume
DiskGroup
DG_zone
Vol_zone
Mount_zone
ORA_zone
NIC_oraprod
TheOracle server can be started after the Listener service group and the resourcesin the Oracle service group are brought online.
If your configuration does not use Veritas Volume Manager, use theDiskReservation resource type to configure shared storage instead of theDiskGroup and Volume resource types.
Note: In this case, make sure you have modified all proper system files, such as/etc/system, /etc/passwd, /etc/group, and /etc/shadow to support multipledatabases. Pay particular attention to system requirements like physicalmemoryand shared memory segment availability. Also ensure a single system is capableof sustaining amultiple instance load in the event of a server failure and extendedoperation on the backup server.
Sample configuration for zone root on shareddisk formultipleOracle instancesA resource of type Zone may be configured as follows in the main.cf:
Zone ORA_zone (
ZoneName = z-ora
)
145Sample configurationsSample multiple Oracle instances (single listener) configuration

Along with this resource addition, the service group configuration would alsochange to have the NIC and Mount resources to depend on the Zone resource.Refer to the resource dependency diagrams tomodify the resource dependenciesto reflect your zone configuration.
See “Zone root on shared disk for multiple Oracle instances” on page 143.
You must also do the following for the resources that run in the zones for whichyou want the appropriate agents to monitor:
■ Verify that the value of the ContainerType attribute is set to Zone.
■ Set the value of the ContainerName attribute to the name of the non-globalzone.
See the Veritas Cluster Server User’s Guide for more information.
Sample multiple instance (multiple listeners)configuration
This configurationhas several single-instance configurations. EachOracle instanceis configured in a separate service group. The resource dependencies are similarto the single Oracle instance configuration.
See “Sample single Oracle instance configuration” on page 126.
Sample configuration fileReview the sample configuration file for the multiple Oracle instances that havemultiple listeners.
include "types.cf"
include "OracleTypes.cf"
cluster vcs (
)
system vcssun48 (
system vcssun48 (
)
system vcssun49 (
system vcssun49 (
Sample configurationsSample multiple instance (multiple listeners) configuration
146

)
group ORA_MKTG_Group (
SystemList = { vcssun48 = 0, vcssun49 = 1 }
AutoStartList = { vcssun48 }
SystemList = { vcssun48 = 0, vcssun49 = 1 }
AutoStartList = { vcssun48 }
)
DiskGroup DG_oramktg (
DiskGroup = ora_mktg_dg
StartVolumes = 0
StopVolumes = 0
)
IP IP_oramktg (
Device = hme0
Device = bge0
Address = "10.212.102.14"
)
Mount Mount_oramktg_u01 (
MountPoint = "/mktg/u01"
BlockDevice = "/dev/vx/dsk/ora_mktg_dg/u01-vol"
FSType = vxfs
FsckOpt = "-n"
)
Mount Mount_oramktg_u02 (
MountPoint = "/mktg/u02"
BlockDevice = "/dev/vx/dsk/ora_mktg_dg/u02-vol"
FSType = vxfs
FsckOpt = "-n"
)
Netlsnr LSNR_oramktg_lsnr (
Owner = oramktg
147Sample configurationsSample multiple instance (multiple listeners) configuration

Home = "/mktg/u01/oracle/product/8.1.5"
TnsAdmin = "/mktg/u01/oracle/network/admin"
Home = "/orahome/Oracle"
TnsAdmin = "/orahome/Oracle/network/admin"
Listener = LISTENER_MKTG
MonScript = "./bin/Netlsnr/LsnrTest.pl"
LsnrPwd = cqfOdoOolOo
)
Oracle ORA_oramktg (
Sid = MKTG
Owner = oramktg
Home = "/orahome/Oracle"
Home = "/mktg/u01/oracle/product/8.1.5"
Pfile = "/mktg/u01/oracle/admin/pfile/initMKTG.ora"
EnvFile = "/tmp/env.sh"
DetailMonitor = 1
MonScript = "./bin/Oracle/SqlTest.pl"
User = thor
Pword = hvlTptWvj
Table = thor
MonitorOption = 0
)
Proxy NICProxy_oramktg (
TargetResName = NIC_Public1
)
Volume Vol_oramktg_vol1 (
Volume = u01-vol
DiskGroup = ora_mktg_dg
)
Volume Vol_oramktg_vol2 (
Volume = u02-vol
DiskGroup = ora_mktg_dg
)
IP_oramktg requires NICProxy_oramktg
LSNR_oramktg_lsnr requires IP_oramktg
LSNR_oramktg_lsnr requires ORA_oramktg
Sample configurationsSample multiple instance (multiple listeners) configuration
148

Mount_oramktg_u01 requires Vol_oramktg_vol1
Mount_oramktg_u02 requires Vol_oramktg_vol2
ORA_oramktg requires Mount_oramktg_u01
ORA_oramktg requires Mount_oramktg_u02
Vol_oramktg_vol1 requires DG_oramktg
Vol_oramktg_vol2 requires DG_oramktg
group ORA_PROD_Group (
SystemList = { vcssun48 = 0, vcssun49 = 1 }
AutoStartList = { vcssun48 }
SystemList = { vcssun48 = 0, vcssun49 = 1 }
AutoStartList = { vcssun48 }
)
DiskGroup DG_oraprod (
DiskGroup = ora_prod_dg
StartVolumes = 0
StopVolumes = 0
)
IP IP_oraprod (
Device = hme0
Device = bge0
Address = "10.212.102.13"
)
Mount Mount_oraprod_u01 (
MountPoint = "/prod/u01"
BlockDevice = "/dev/vx/dsk/ora_prod_dg/u01-vol"
FSType = vxfs
FsckOpt = "-n"
)
Mount Mount_oraprod_u02 (
MountPoint = "/prod/u02"
BlockDevice = "/dev/vx/dsk/ora_prod_dg/u02-vol"
FSType = vxfs
FsckOpt = "-n"
)
149Sample configurationsSample multiple instance (multiple listeners) configuration

Netlsnr LSNR_oraprod_lsnr (
Owner = oraprod
Home = "/orahome/Oracle"
TnsAdmin = "/orahome/Oracle/network/admin"
Listener = LISTENER_PROD
MonScript = "./bin/Netlsnr/LsnrTest.pl"
LsnrPwd = cqfOdoOolOo
)
Oracle ORA_oraprod (
Sid = PROD
Owner = oraprod
Home = "/orahome/Oracle"
EnvFile = "/tmp/env.sh"
DetailMonitor = 1
MonScript = "./bin/Oracle/SqlTest.pl"
User = thor
Pword = hvlTptWvj
Table = thor
MonitorOption = 0
)
Proxy NICProxy_oraprod (
TargetResName = NIC_Public1
)
Volume Vol_oraprod_vol1 (
Volume = u01-vol
DiskGroup = ora_prod_dg
)
Volume Vol_oraprod_vol2 (
Volume = u02-vol
DiskGroup = ora_prod_dg
)
IP_oraprod requires NICProxy_oraprod
LSNR_oraprod_lsnr requires IP_oraprod
LSNR_oraprod_lsnr requires ORA_oraprod
Mount_oraprod_u01 requires Vol_oraprod_vol1
Mount_oraprod_u02 requires Vol_oraprod_vol2
Sample configurationsSample multiple instance (multiple listeners) configuration
150

ORA_oraprod requires Mount_oraprod_u01
ORA_oraprod requires Mount_oraprod_u02
Vol_oraprod_vol1 requires DG_oraprod
Vol_oraprod_vol2 requires DG_oraprod
group Parallel_Service (
SystemList = { vcssun48 = 0, vcssun49 = 1 }
SystemList = { vcssun48 = 0, vcssun49 = 1 }
Parallel = 1
AutoStartList = { vcssun48 }
AutoStartList = { vcssun48 }
)
NIC NIC_Public1 (
Device = hme0
Device = bge0
)
Sample Oracle configuration with shared serversupport
Figure B-12 describes a typical service group configured to monitor Oracle withshared server support.
You can also configure Oracle instances with shared server support in Solariszones.
See “Oracle instance with shared server support configured in Solaris zones”on page 155.
151Sample configurationsSample Oracle configuration with shared server support

Figure B-12 Dependency for Oracle configured with shared server support
IP_oraprod
NIC_oraprod
NIC
DG_oraprod
Vol_oraprod_vol2
Vol_oraprod_vol1
Mount_oraprod_u01
Mount_oraprod_u02
ORA_oraprod
LSNR_oraprod_lsnr
Mount
VolumeVolume
DiskGroup
Netlsnr
Mount
Oracle
IP
The shared disk groups and volumes in the cluster are configured as resources oftype DiskGroup and Volume respectively. The volumes are mounted using theMount agent. The virtual IP address for the service group is configured using theIP and NIC resource types. The Oracle server can be started after each of theseresources is brought online.
If your configuration does not use Veritas Volume Manager, use theDiskReservation resource type to configure shared storage instead of theDiskGroup and Volume resource types.
Sample configuration file for Oracle instance configured with sharedserver support
Review the configuration file for anOracle instance that is configuredwith sharedserver support.
include "types.cf"
include "OracleTypes.cf"
Sample configurationsSample Oracle configuration with shared server support
152

cluster vcs (
)
system vcssun48 (
system vcssun48 (
)
system vcssun49 (
system vcssun49 (
)
group ORA_PROD_Group (
SystemList = { vcssun48 = 0, vcssun49 = 1 }
AutoStartList = { vcssun48 }
SystemList = { vcssun48 = 0, vcssun49 = 1 }
AutoStartList = { vcssun48 }
)
DiskGroup DG_oraprod (
DiskGroup = ora_prod_dg
StartVolumes = 0
StopVolumes = 0
)
IP IP_oraprod (
Device = hme0
Device = bge0
Address = "10.212.102.13"
)
Mount Mount_oraprod_u01 (
MountPoint = "/prod/u01"
BlockDevice = "/dev/vx/dsk/ora_prod_dg/u01-vol"
FSType = vxfs
FsckOpt = "-n"
)
153Sample configurationsSample Oracle configuration with shared server support

Mount Mount_oraprod_u02 (
MountPoint = "/prod/u02"
BlockDevice = "/dev/vx/dsk/ora_prod_dg/u02-vol"
FSType = vxfs
FsckOpt = "-n"
)
NIC NIC_ORAPROD (
Device = hme0
Device = bge0
)
Netlsnr LSNR_oraprod_lsnr (
Owner = oraprod
Home = "/orahome/Oracle"
TnsAdmin = "/orahome/Oracle/network/admin"
Listener = LISTENER_PROD
MonScript = "./bin/Netlsnr/LsnrTest.pl"
LsnrPwd = cqfOdoOolOo
)
Oracle ORA_oraprod (
Sid = PROD
Owner = oraprod
Home = "/orahome/Oracle"
EnvFile = "/tmp/env.sh"
DetailMonitor = 1
MonScript = "./bin/Oracle/SqlTest.pl"
User = thor
Pword = hvlTptWvj
Table = thor
MonitorOption = 0
)
Volume Vol_oraprod_vol1 (
Volume = u01-vol
DiskGroup = ora_prod_dg
)
Volume Vol_oraprod_vol2 (
Sample configurationsSample Oracle configuration with shared server support
154

Volume = u02-vol
DiskGroup = ora_prod_dg
)
IP_oraprod requires NIC_ORAPROD
LSNR_oraprod_lsnr requires IP_oraprod
Mount_oraprod_u01 requires Vol_oraprod_vol1
Mount_oraprod_u02 requires Vol_oraprod_vol2
ORA_oraprod requires IP_oraprod
ORA_oraprod requires Mount_oraprod_u01
ORA_oraprod requires Mount_oraprod_u02
Vol_oraprod_vol1 requires DG_oraprod
Vol_oraprod_vol2 requires DG_oraprod
Oracle instancewith shared server support configured in Solaris zonesThe following examples describe a typical service group configured to monitorOracle with shared server support configured in a Solaris zone:
■ Zone root on local diskSee “Zone root on local disk for Oracle instance with shared server support”on page 155.See “Sample configuration for Oracle with shared server support configuredin a Zone root on local disk” on page 156.
■ Zone root on shared diskSee “Zone root on shared disk for Oracle instance with shared server support”on page 157.See “Sample configuration for Oracle with shared server support configuredin a Zone root on shared disk” on page 158.
Zone root on local disk for Oracle instance with shared serversupportIf the root file system of a zone is on the local disk of each node, the file systemis mounted when the system is booted. Hence, the service group does not need tohave separate DiskGroup and Volume resources for the zone.
155Sample configurationsSample Oracle configuration with shared server support

Figure B-13 Oracle instance with shared server support in zone on local disk
NIC_oraprod
NIC
DG_oraprod
Vol_oraprod_vol1
Mount_oraprod_u01
ORA_zone
LSNR_oraprod_lsnr
Volume
DiskGroup
Netlsnr
Mount
Oracle
Zone
The shared disk groups and volumes in the cluster are configured as resources oftype DiskGroup and Volume respectively. The volumes are mounted using theMount agent. The Solaris zone is monitored through a zone resource, which isdependent on theMount andNIC resources. TheOracle server can be started aftereach of these resources is brought online.
If your configuration does not use Veritas Volume Manager, use theDiskReservation resource type to configure shared storage instead of theDiskGroup and Volume resource types.
Sample configuration for Oracle with shared server supportconfigured in a Zone root on local diskA resource of type Zone may be configured as follows in the main.cf:
Zone ORA_zone (
ZoneName = z-ora
)
Sample configurationsSample Oracle configuration with shared server support
156

Along with this resource addition, the service group configuration would alsochange to have the NIC and Mount resources to depend on the Zone resource.Refer to the resource dependency diagrams tomodify the resource dependenciesto reflect your zone configuration.
See “Zone root on local disk for Oracle instance with shared server support”on page 155.
You must also do the following for the resources that run in the zones for whichyou want the appropriate agents to monitor:
■ Verify that the value of the ContainerType attribute is set to Zone.
■ Set the value of the ContainerName attribute to the name of the non-globalzone.
See the Veritas Cluster Server User’s Guide for more information.
Zone root on shareddisk forOracle instancewith shared serversupportIf the root file system of a zone is on a shared disk, the file system should bemounted by VCS. Hence, separate DiskGroup and Volume resources are requiredfor the zone.
157Sample configurationsSample Oracle configuration with shared server support
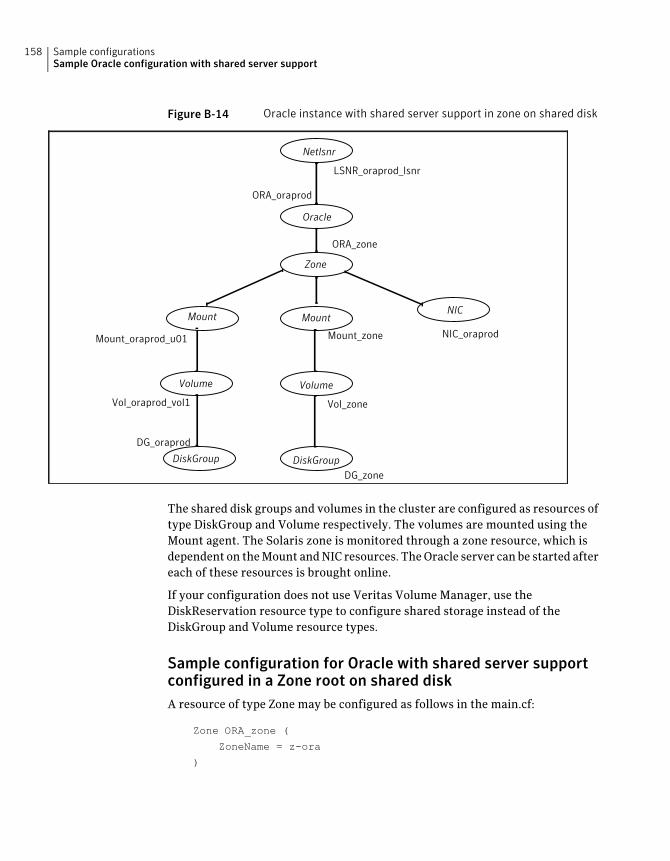
Figure B-14 Oracle instance with shared server support in zone on shared disk
NIC_oraprod
NIC
DG_oraprod
Vol_oraprod_vol1
Mount_oraprod_u01
ORA_oraprod
LSNR_oraprod_lsnr
Volume
DiskGroup
Netlsnr
Mount
Oracle
Zone
Volume
DiskGroup
Mount
DG_zone
Vol_zone
Mount_zone
ORA_zone
The shared disk groups and volumes in the cluster are configured as resources oftype DiskGroup and Volume respectively. The volumes are mounted using theMount agent. The Solaris zone is monitored through a zone resource, which isdependent on theMount andNIC resources. TheOracle server can be started aftereach of these resources is brought online.
If your configuration does not use Veritas Volume Manager, use theDiskReservation resource type to configure shared storage instead of theDiskGroup and Volume resource types.
Sample configuration for Oracle with shared server supportconfigured in a Zone root on shared diskA resource of type Zone may be configured as follows in the main.cf:
Zone ORA_zone (
ZoneName = z-ora
)
Sample configurationsSample Oracle configuration with shared server support
158

Along with this resource addition, the service group configuration would alsochange to have the NIC and Mount resources to depend on the Zone resource.Refer to the resource dependency diagrams tomodify the resource dependenciesto reflect your zone configuration.
See “Zone root on shared disk for Oracle instance with shared server support”on page 157.
You must also do the following for the resources that run in the zones for whichyou want the appropriate agents to monitor:
■ Verify that the value of the ContainerType attribute is set to Zone.
■ Set the value of the ContainerName attribute to the name of the non-globalzone.
See the Veritas Cluster Server User’s Guide for more information.
Sample Oracle ASM configurationsReview the dependency graphs for the service group configured to monitor thestate of an Oracle instance that is ASM-managed in a VCS cluster. You can havethe following Oracle ASM configurations in a VCS environment:
■ ASM disks as raw disks
■ ASM disks as Veritas Volume Manager volumes
■ ASM disks as Veritas Cluster Volume Manager volumes
Sample configuration for ASM disks as raw disksIf you use raw devices as ASM disks, you can configure your service group in thefollowing way:
■ Oracle and ASMDG resources as parent failover service groups, and ASMInstresource as parallel service group
■ TheservicegroupsaremadedependentusinganOnlineLocal Firmdependency.
Figure B-15 describes a typical service group with ASMInst resource as a parallelservice group.
159Sample configurationsSample Oracle ASM configurations

Figure B-15 Dependency graphwith ASMInst resource as a parallel service group
oraasm_grp
ASMInst
ASM_asminst
listener
Netlsnr
Oracle
ASMDG
Ora_oraprod
ASM_asmdg
Parallel service group
Failover service group
IP
NIC
IP_oraprod
NIC_oraprod
asminstgrpOnline Local Firm
The Oracle ASM instance and ASM disk groups in the cluster are configured asresources of type ASMInst and ASMDG respectively. The ASMInst agent isconfigured as parallel service group, asminstgrp.
The virtual IP address for the service group is configured using the IP and NICresource types. TheOracle andASMDGresources are configured as failover servicegroup, oraasm_grp. TheOracle server can be started after each of these resourcesis brought online.
The oraasm_grp ismadedependent on the asminstgrpusing anOnline Local Firmdependency.
Figure B-16 describes a typical service group with multiple Oracle instancessharing an ASMInst resource that is configured as a parallel service group.
Sample configurationsSample Oracle ASM configurations
160

Figure B-16 Dependency graph for Oracle ASM with multiple Oracle instanceson a node
Failover service group Failover service group
Parallel service group
Onlinelocal firm
Oracle1
ASMDG1 ASMDG2
Oracle2
ASMInst
If you have multiple Oracle instances, a failover service group is configured foreach Oracle instance. The Oracle service groups share a single ASM instance thatis configured as a parallel service group. The Oracle service groups are madedependent on theASMInst service group using anOnline Local Firmdependency.However, each database must use exclusive ASM disk groups, so that the VeritasCluster Server agent for Oracle can fail over the disk group.
Sample configuration file for ASM-managed Oracle instanceReview the sample configuration for an Oracle instance that is ASM-managed.The sample file has the ASMInst resource as part of a parallel service group.
include "types.cf"
include "OracleTypes.cf"
include "OracleASMTypes.cf"
cluster vcs (
)
system symnode01 (
)
161Sample configurationsSample Oracle ASM configurations

system symnode02 (
)
group asminstgrp (
SystemList = { symnode01 = 0, symnode02 = 1 }
Parallel = 1
)
ASMInst ASM_asminst (
Sid = "+ASM"
Owner = "oraprod"
Home = "/orahome/Oracle"
)
group oraasm_grp (
SystemList = { symnode01 = 0, symnode02 = 1 }
AutoStartList = { symnode01 }
)
ASMDG ASM-asmdg (
Sid = "+ASM"
Owner = "oracle"
Home = "/orahome/Oracle"
DiskGroups = { asmhighdg }
)
IP IP_oraprod (
Device = hme0
Address = "10.212.102.13"
NetMask = "255.255.240.0"
)
NIC NIC_oraprod (
Device = hme0
)
Netlsnr LSNR_oraprod_lsnr (
Owner = "oraprod"
Home = "/orahome/Oracle"
TnsAdmin = "/orahome/Oracle/network/admin"
Listener = LISTENER_PROD
Sample configurationsSample Oracle ASM configurations
162

MonScript = "./bin/Netlsnr/LsnrTest.pl"
)
Oracle ORA_oraprod (
Sid = PROD
Owner = "oraprod"
Home = "/orahome/Oracle"
EnvFile = "/tmp/env.sh"
DetailMonitor = 1
MonScript = "./bin/Oracle/SqlTest.pl"
User = thor
Pword = hvlTptWvj
Table = thor
MonitorOption = 0
)
requires group asminstgrp online local firm
IP_oraprod requires NIC_oraprod
LSNR_oraprod_lsnr requires IP_oraprod
LSNR_oraprod_lsnr requires ORA_oraprod
ORA_oraprod requires ASM_asmdg
Sample configuration for ASM disks as VxVM volumesFigure B-17 describes a typical service group with VxVM disks chosen for OracleASM.
163Sample configurationsSample Oracle ASM configurations
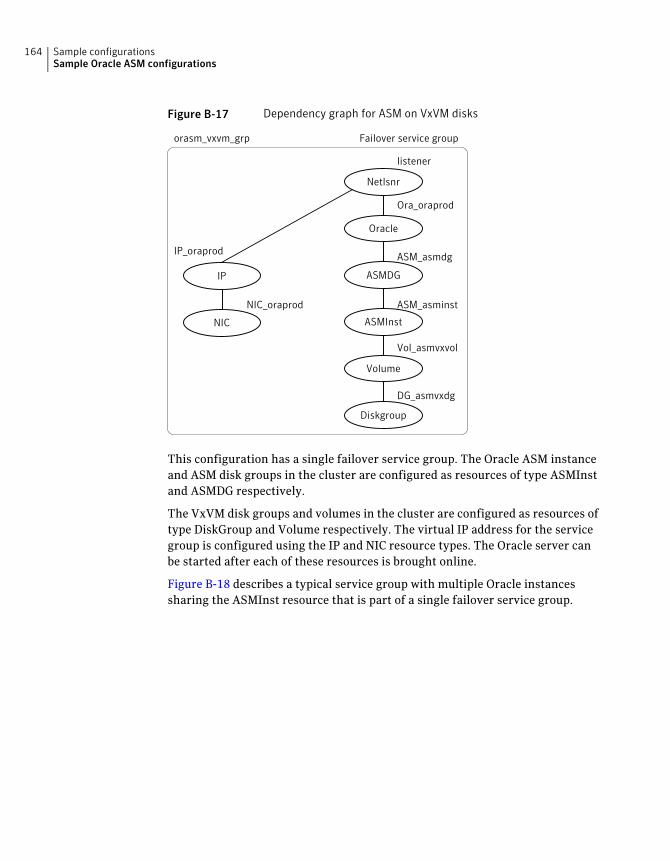
Figure B-17 Dependency graph for ASM on VxVM disks
Netlsnr
Oracle
ASMDG
ASMInst
Volume
Diskgroup
IP
NIC
listener
Ora_oraprod
ASM_asmdg
ASM_asminst
Vol_asmvxvol
DG_asmvxdg
IP_oraprod
NIC_oraprod
orasm_vxvm_grp Failover service group
This configuration has a single failover service group. The Oracle ASM instanceand ASM disk groups in the cluster are configured as resources of type ASMInstand ASMDG respectively.
The VxVM disk groups and volumes in the cluster are configured as resources oftype DiskGroup and Volume respectively. The virtual IP address for the servicegroup is configured using the IP and NIC resource types. The Oracle server canbe started after each of these resources is brought online.
Figure B-18 describes a typical service group with multiple Oracle instancessharing the ASMInst resource that is part of a single failover service group.
Sample configurationsSample Oracle ASM configurations
164

Figure B-18 Dependency graph for Oracle ASM with multiple Oracle instanceson a node
Volume1
DiskGroup1
Volume2
DiskGroup2
ASMInst
Oracle1
ASMDG1
Oracle2
ASMDG2
Failover service group
Sample configuration file for ASM disks as VxVM disksReview the sample configuration for an Oracle instance that is ASM-managed.
include "types.cf"
include "OracleTypes.cf"
include "OracleASMTypes.cf"
cluster vcs (
)
system symnode01 (
)
system symnode02 (
)
group orasm_vxvm_grp (
SystemList = { symnode01 = 0, symnode02 = 1 }
AutoStartList = { symnode01 }
)
165Sample configurationsSample Oracle ASM configurations

ASMDG ASM-asmdg (
Sid = "+ASM"
Owner = oracle
Home = "/orahome/Oracle"
DiskGroups = { asmhighdg }
)
ASMInst ASM_asminst (
Sid = "+ASM"
Owner = oraprod
Home = "/orahome/Oracle"
)
DiskGroup DG_asmvxdg (
DiskGroup = asmvxdg
)
IP IP_oraprod (
Device = hme0
Address = "10.212.102.13"
NetMask = "255.255.240.0"
)
NIC NIC_oraprod (
Device = hme0
)
Netlsnr LSNR_oraprod_lsnr (
Owner = oraprod
Home = "/orahome/Oracle"
TnsAdmin = "/orahome/Oracle/network/admin"
Listener = LISTENER_PROD
MonScript = "./bin/Netlsnr/LsnrTest.pl"
LsnrPwd = cqfOdoOolOo
AgentDebug = 1
)
Oracle ORA_oraprod (
Sid = PROD
Sample configurationsSample Oracle ASM configurations
166

Owner = oraprod
Home = "/orahome/Oracle"
EnvFile = "/tmp/env.sh"
DetailMonitor = 1
MonScript = "./bin/Oracle/SqlTest.pl"
User = thor
Pword = hvlTptWvj
Table = thor
MonitorOption = 0
AgentDebug = 1
)
Volume Vol_asmvxvol (
Volume = asmvxvol
DiskGroup = asmvxdg
)
ASM_asminst requires VOL_asmvxvol
ASM_asmdg requires ASM_asminst
IP_oraprod requires NIC_oraprod
LSNR_oraprod_lsnr requires IP_oraprod
LSNR_oraprod_lsnr requires ORA_oraprod
ORA_oraprod requires ASM_asmdg
VOL_asmvxvol requires DG_asmvxdg
Sample configuration for ASM disks as CVM volumesFigure B-19 describes a typical service groupwith CVMvolumes chosen forOracleASM.
167Sample configurationsSample Oracle ASM configurations
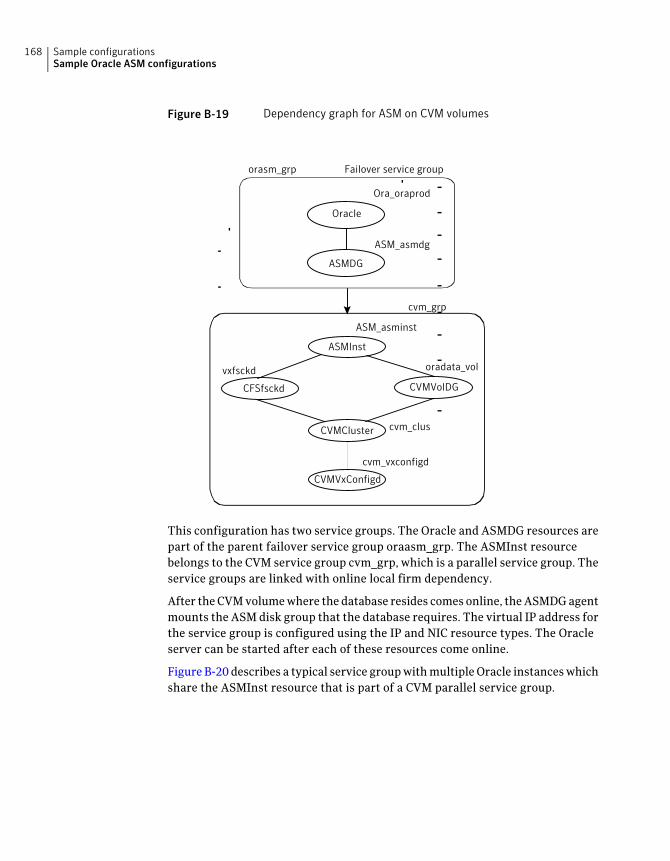
Figure B-19 Dependency graph for ASM on CVM volumes
orasm_grp
Oracle
ASMDG
Ora_oraprod
ASM_asmdg
Failover service group
ASM_asminst
ASMInst
oradata_vol
CVMVolDG
vxfsckd
CFSfsckd
cvm_clusCVMCluster
cvm_vxconfigd
CVMVxConfigd
cvm_grp
This configuration has two service groups. The Oracle and ASMDG resources arepart of the parent failover service group oraasm_grp. The ASMInst resourcebelongs to the CVM service group cvm_grp, which is a parallel service group. Theservice groups are linked with online local firm dependency.
After theCVMvolumewhere the database resides comes online, theASMDGagentmounts the ASMdisk group that the database requires. The virtual IP address forthe service group is configured using the IP and NIC resource types. The Oracleserver can be started after each of these resources come online.
Figure B-20 describes a typical service groupwithmultipleOracle instanceswhichshare the ASMInst resource that is part of a CVM parallel service group.
Sample configurationsSample Oracle ASM configurations
168

Figure B-20 Dependency graph for Oracle ASM with multiple Oracle instanceson a node
Oradb1_grp
Oracle
ASMDG
Ora1
asmdata_dg1
asm_inst
ASMInst
oradata_vol1CVMVolDG
vxfsckd
CFSfsckd
cvm_clus
CVMCluster
cvm_vxconfigd
CVMVxConfigd
cvm_grp
Oradb2_grp
Oracle
ASMDG
Ora2
asmdata_dg2
oradata_vol2
CVMVolDG
If you have multiple Oracle instances, a failover service group is configured foreach Oracle instance. The Oracle service groups share a single ASM instance thatis configured as part of the CVMparallel service group. TheOracle service groupsare made dependent on the CVM service group using an Online Local Firmdependency.However, eachdatabasemust use exclusiveASMdisk groups, so thatthe Veritas Cluster Server agent for Oracle can fail over the disk group.
Sample configuration file for ASM that uses CVM volumesReview the sample configuration for an Oracle instance that uses CVM volumesfor ASM.
include "types.cf"
include "CFSTypes.cf"
include "CVMTypes.cf"
include "OracleTypes.cf"
include "OracleASMTypes.cf"
169Sample configurationsSample Oracle ASM configurations

cluster vcsclus_asm (
UserNames = { admin = abcdef }
Administrator = { admin }
HacliUserLevel = COMMANDROOT
)
system symnode01 (
)
system symnode02 (
)
group cvm (
SystemList = { symnode01 = 0, symnode02 = 1 }
AutoFailOver = 0
Parallel = 1
AutoStartList = { symnode01, symnode02 }
)
CFSfsckd vxfsckd (
)
CVMCluster cvm_clus (
CVMClustName = vcsclus_asm
CVMNodeId = { symnode01 = 0, symnode02 = 1 }
CVMTransport = gab
CVMTimeout = 200
)
CVMVolDg oradata_vol (
CVMDiskGroup = ora_dg
CVMVolume = { oradatavol }
CVMActivation = sw
)
CVMVxconfigd cvm_vxconfigd (
Critical = 0
CVMVxconfigdArgs = { syslog }
)
ASMInst ASM_asminst (
Sid = "+ASM"
Sample configurationsSample Oracle ASM configurations
170

Owner = oracle
Home = "/orahome/Oracle"
)
ASM_asminst requires vxfsckd
ASM_asminst requires oradata_vol
oradata_vol requires cvm_clus
vxfsckd requires cvm_clus
cvm_clus requires cvm_vxconfigd
group oraasm_grp (
SystemList = { symnode01 = 0, symnode02 = 1 }
AutoFailOver = 1
AutoStartList = { symnode01, symnode02 }
)
ASMDG ASM_asmdg (
Sid = "+ASM"
Owner = oracle
Home = "/orahome/Oracle"
DiskGroups = { ASM_DG }
)
Oracle Ora_oraprod (
Owner = oracle
Sid = vrts
Home = "/orahome/Oracle"
)
requires group cvm_grp online local firm
Ora_oraprod requires ASM_asmdg
171Sample configurationsSample Oracle ASM configurations

Sample configurationsSample Oracle ASM configurations
172

Best practices
This appendix includes the following topics:
■ Best practices for multiple Oracle instance configurations
Best practices for multiple Oracle instanceconfigurations
Review some of the best practices for using multiple Oracle instances in a VCSenvironment:
■ For each SID to be configured, create UNIX accounts with DBA privileges.
■ Make sure that eachOracle instancehas a separate disk groupand is configuredas a separate service group.
■ Define the systemparameters such that the allocationof semaphore and sharedmemory is appropriate on all systems.
■ Use a dedicated set of binaries for each Oracle instance, even if each instanceuses the same Oracle version.
■ If your configuration uses the same Oracle version for all instances, install aversion on the root disk or preferably on a secondary disk. Locate the pfiles inthe default location and define several listener processes to ensure cleanfailover.
■ If your configuration has different versions of Oracle, create a separate$ORACLE_HOME for each Oracle version.
■ Follow the Optimal Flexible Architecture (OFA) standard (/uxx/<SID>). Incluster configurations, you could adapt the standard to make it moreapplication-specific. For example, /app/uxx/<SID>.
■ Listeners accompanying different versions of Oracle may not bebackward-compatible. So, if you want to create a single listener.ora file, you
CAppendix

must verify that the listener supports the other versions ofOracle in the cluster.You must also create a separate Envfile for each version of Oracle.
■ Make sure that each listener listens to a different virtual address. Also, assigndifferent names to listeners andmake sure that they do not listen to the sameport.
■ The pfiles must be coordinated between systems. For the same instance of adatabase, ensure that the pfiles referenced are identical across the nodes.
Best practicesBest practices for multiple Oracle instance configurations
174
Using the SPFILE in a VCScluster for Oracle
This appendix includes the following topics:
■ About the Oracle initialization parameter files
■ Starting an Oracle instance
■ Using the SPFILE in a VCS cluster
About the Oracle initialization parameter filesOracle versions earlier to Oracle9i used an initialization file initSID.ora, a textfile, to start database instances. Changes thatwere applied to instance parametersduring a database session were not saved to the file. You had to manually applythem to the initialization file.
Oracle9i introduced the SPFILE, which is a binary file stored on the databaseserver. With this feature, changes to the instance parameters can be set to bepersistent across all startup and shutdown procedures.
Starting an Oracle instanceFor versions above Oracle9i, you can start an Oracle instance in the followingways:
■ Using the default SPFILE spfileSID.ora
■ Using the default init.ora file initSID.ora
■ By specifying an initialization file init.ora
■ By specifying an SPFILE in the initialization file init.ora
DAppendix

When you run the startup command without a PFILE clause, Oracle reads theinitialization parameters from the SPFILE. On Solaris platforms, the defaultlocation for the SPFILE or PFILE is $ORACLE_HOME/dbs.
Oracle locates the initialization parameter file by examining file names in thefollowing order:
■ SPFILESID.ora
■ SPFILE.ora
■ initSID.ora
Using the SPFILE in a VCS clusterWhen using the Veritas Cluster Server agent for Oracle, you can start a databaseinstance by specifying a PFILE. If you do not specify the PFILE, the databaseinstance starts up using the default SPFILE.
The agent attribute Pfile must specify the location of the PFILE. If yourconfiguration uses the SPFILE, the contents of the PFILEmust specify the locationof the SPFILE, which must be created from the PFILE.
Note: If you want the SPFILE’s session parameter changes be persistent acrossan instance failover, thenSymantec recommends you to save theSPFILEon sharedstorage.
Specifying the SPFILE location in the PFILETo specify the location of the SPFILE in a PFILE, create a PFILE and specify thefollowing entry in the PFILE:
SPFILE = spfile_location
The variable spfile_location represents the complete path of the SPFILE. Forexample:
SPFILE = /database/startup/spfileora1.ora
In this case, to start the database use the following command:
startup pfile=location_of_pfile
Using the SPFILE in a VCS cluster for OracleUsing the SPFILE in a VCS cluster
176

Creating the SPFILE from a PFILEThe SPFILE must be created from the PFILE. You must have the sysdba or thesysoper system privileges to create an SPFILE.
You can run the following command to create the SPFILE:
CREATE SPFILE [= spfile_name] FROM PFILE [= pfile_name ];
If you do not specify the complete path for the SPFILE, this command creates anSPFILE at the default location ($ORACLE_HOME/dbs on Solaris).
177Using the SPFILE in a VCS cluster for OracleUsing the SPFILE in a VCS cluster

Using the SPFILE in a VCS cluster for OracleUsing the SPFILE in a VCS cluster
178

Symbols$ORACLE_HOME
limitation for 33location 31on local disk 31on shared disk 31
Aagent operations
Netlsnr agent 23Oracle agent 15
ASMDG agentattribute definitions 122resource type 121
ASMDG agent attributesAgentDirectory 122DiskGroups 122Encoding 122EnvFile 122Home 122Owner 122Sid 122
ASMInst agentattribute definitions 119resource type 119
ASMInst agent attributesAgentDirectory 119Encoding 119EnvFile 119Home 119Owner 119Pfile 119Sid 119
attribute definitionsASMDG agent 122ASMInst 119Netlsnr agent 115Oracle agent 108
attributesediting 84modifying 84
Bbasic monitoring 18
health check 18process 18
Ccluster manager 83configuration
modifying 95typical setup 26
configuration files 125configuration wizard 72core files
location of 32cssd daemon 42
disablingon Solaris 10 43on Solaris 9 and below 42
Ddatabase tablespaces 32detail monitoring 18
about 88disabling for Netlsnr 92disabling for Oracle 91enabling for Netlsnr 92enabling for Oracle 91setting up 88
Eediting attributes 84encrypting passwords 87enterprise agent
about 11configuring using cluster manager 83configuring using command-line 85configuring using wizard 72disabling 57error messages 98installing 52
Index

enterprise agent (continued)modifying configuration 95removing 58troubleshooting 97typical setup 26upgrading 55
error messages 98
Ffailover 13
Hhealth check APIs 18health check monitoring 18hot backup 34
Mmessage log 98monitoring
basic 18detail 18
monitoring options 13
NNetlsnr agent
attribute definitions 115operations 23resource type 115
Netlsnr agent attributesAgentDebug 115AgentDirectory 115ContainerName 115ContainerType 115Encoding 115EnvFile 115Home 115IntentionalOffline 115Listener 115LsnrPwd 115MonScript 115Owner 115TnsAdmin 115
NLS informationdefining 34
Ooperations
Netlsnr agent 23Oracle agent 15
Oracledatabase tablespaces 32error handling 19installing 29multiple instances 32shutdown options 17startup options 17supported configurations 62
Oracle agentattribute definitions 108operations 15resource type 107
Oracle agent attributesAgentDebug 108AgentDirectory 108AutoEndBkup 108ContainerName 108ContainerType 108DetailMonitor 108Encoding 108EnvFile 108Home 108IntentionalOffline 108MonitorOption 108MonScript 108Owner 108Pfile 108Pword 108ShutDownOpt 108Sid 108StartUpOpt 108Table 108User 108
Oracle configurationmultiple instances (multiple listeners) 65multiple instances (single listener) 133single instance 126
Oracle databasehot backup 34
Ppasswords
encrypting 87process monitoring 18
Index180

Rremoving agent 93resource attributes
editing 84resource type
ASMDG 121ASMInst 119Netlsnr 115Oracle 107
Ssample configuration files 125sample Oracle configuration 26service group
bringing online 93switching 94taking offline 94
shutdown options 17Solaris 10 zones 14SPFILE
creating 177location of 176using in VCS 175
startup options 17switching service group 94
Ttroubleshooting 97
Vvadencrypt utility 87vcsencrypt utility 87virtual fire drill 22
Wwizard 72
Zzones
with Solaris 10 14
181Index


