150
Veritas Cluster Server Implementation Guide for Microsoft SQL Server 2008 and 2008 R2 Windows Server 2008 (x64), Windows Server 2008 R2 (x64) 6.0 October 2011
Veritas Cluster ServerImplementation Guide forMicrosoft SQL Server 2008and 2008 R2
Windows Server 2008 (x64), WindowsServer 2008 R2 (x64)
6.0
October 2011
Veritas Cluster Server Database Agent for SQLThe software described in this book is furnished under a license agreement and may be usedonly in accordance with the terms of the agreement.
6.0
6.0.0.0
Legal NoticeCopyright © 2011 Symantec Corporation. All rights reserved.
Symantec, the Symantec logo, Veritas, Veritas Storage Foundation, CommandCentral,NetBackup, Enterprise Vault, and LiveUpdate are trademarks or registered trademarks ofSymantec corporation or its affiliates in the U.S. and other countries. Other names may betrademarks of their respective owners.
This Symantec product may contain third party software for which Symantec is requiredto provide attribution to the third party (“Third Party Programs”). Some of the Third PartyPrograms are available under open source or free software licenses. The License Agreementaccompanying the Software does not alter any rights or obligations you may have underthose open source or free software licenses. See the Third-party Legal Notices documentfor this product, which is available online or included in the base release media.
The product described in this document is distributed under licenses restricting its use,copying, distribution, and decompilation/reverse engineering. No part of this documentmay be reproduced in any form by any means without prior written authorization ofSymantec Corporation and its licensors, if any.
THE DOCUMENTATION IS PROVIDED "AS IS" AND ALL EXPRESS OR IMPLIED CONDITIONS,REPRESENTATIONS AND WARRANTIES, INCLUDING ANY IMPLIED WARRANTY OFMERCHANTABILITY, FITNESS FOR A PARTICULAR PURPOSE OR NON-INFRINGEMENT,ARE DISCLAIMED, EXCEPT TO THE EXTENT THAT SUCH DISCLAIMERS ARE HELD TOBE LEGALLY INVALID. SYMANTEC CORPORATION SHALL NOT BE LIABLE FOR INCIDENTALOR CONSEQUENTIAL DAMAGES IN CONNECTION WITH THE FURNISHING,PERFORMANCE, OR USE OF THIS DOCUMENTATION. THE INFORMATION CONTAINEDIN THIS DOCUMENTATION IS SUBJECT TO CHANGE WITHOUT NOTICE.
The Licensed Software and Documentation are deemed to be commercial computer softwareas defined in FAR 12.212 and subject to restricted rights as defined in FAR Section 52.227-19"Commercial Computer Software - Restricted Rights" and DFARS 227.7202, "Rights inCommercial Computer Software or Commercial Computer Software Documentation", asapplicable, and any successor regulations. Any use, modification, reproduction release,performance, display or disclosure of the Licensed Software and Documentation by the U.S.Government shall be solely in accordance with the terms of this Agreement.

Symantec Corporation350 Ellis StreetMountain View, CA 94043
http://www.symantec.com
Technical SupportSymantec Technical Support maintains support centers globally. TechnicalSupport’s primary role is to respond to specific queries about product featuresand functionality. The Technical Support group also creates content for our onlineKnowledge Base. The Technical Support group works collaboratively with theother functional areas within Symantec to answer your questions in a timelyfashion. For example, the Technical Support group works with Product Engineeringand Symantec Security Response to provide alerting services and virus definitionupdates.
Symantec’s support offerings include the following:
■ A range of support options that give you the flexibility to select the rightamount of service for any size organization
■ Telephone and/or Web-based support that provides rapid response andup-to-the-minute information
■ Upgrade assurance that delivers software upgrades
■ Global support purchased on a regional business hours or 24 hours a day, 7days a week basis
■ Premium service offerings that include Account Management Services
For information about Symantec’s support offerings, you can visit our Web siteat the following URL:
www.symantec.com/business/support/index.jsp
All support services will be delivered in accordance with your support agreementand the then-current enterprise technical support policy.
Contacting Technical SupportCustomers with a current support agreement may access Technical Supportinformation at the following URL:
www.symantec.com/business/support/contact_techsupp_static.jsp
Before contacting Technical Support, make sure you have satisfied the systemrequirements that are listed in your product documentation. Also, you should beat the computer on which the problem occurred, in case it is necessary to replicatethe problem.
When you contact Technical Support, please have the following informationavailable:
■ Product release level

■ Hardware information
■ Available memory, disk space, and NIC information
■ Operating system
■ Version and patch level
■ Network topology
■ Router, gateway, and IP address information
■ Problem description:
■ Error messages and log files
■ Troubleshooting that was performed before contacting Symantec
■ Recent software configuration changes and network changes
Licensing and registrationIf your Symantec product requires registration or a license key, access our technicalsupport Web page at the following URL:
www.symantec.com/business/support/
Customer serviceCustomer service information is available at the following URL:
www.symantec.com/business/support/
Customer Service is available to assist with non-technical questions, such as thefollowing types of issues:
■ Questions regarding product licensing or serialization
■ Product registration updates, such as address or name changes
■ General product information (features, language availability, local dealers)
■ Latest information about product updates and upgrades
■ Information about upgrade assurance and support contracts
■ Information about the Symantec Buying Programs
■ Advice about Symantec's technical support options
■ Nontechnical presales questions
■ Issues that are related to CD-ROMs or manuals
Support agreement resourcesIf you want to contact Symantec regarding an existing support agreement, pleasecontact the support agreement administration team for your region as follows:
[email protected] and Japan
[email protected], Middle-East, and Africa
[email protected] America and Latin America
DocumentationYour feedback on product documentation is important to us. Send suggestionsfor improvements and reports on errors or omissions. Include the title anddocument version (located on the second page), and chapter and section titles ofthe text on which you are reporting. Send feedback to:
About Symantec ConnectSymantec Connect is the peer-to-peer technical community site for Symantec’senterprise customers. Participants can connect and share information with otherproduct users, including creating forum posts, articles, videos, downloads, blogsand suggesting ideas, as well as interact with Symantec product teams andTechnical Support. Content is rated by the community, and members receivereward points for their contributions.
http://www.symantec.com/connect/storage-management

Technical Support . . . . . . . . . . . . . . . . . . . . . . . . . . . . . . . . . . . . . . . . . . . . . . . . . . . . . . . . . . . . . . . . . . . . . . . . . . . . . . . . . . . . . . . . . . . . . . . 4
Chapter 1 Introducing the VCS agents for SQL Server andNetApp . . . . . . . . . . . . . . . . . . . . . . . . . . . . . . . . . . . . . . . . . . . . . . . . . . . . . . . . . . . . . . . . . . . . . . . . . . . . . 13
About the VCS agents for SQL and NetApp .... . . . . . . . . . . . . . . . . . . . . . . . . . . . . . . . . . . . . 13About the VCS hardware replication agent for NetApp .... . . . . . . . . . . . . . . . . . . . . 14
About the NetApp Filer agent ... . . . . . . . . . . . . . . . . . . . . . . . . . . . . . . . . . . . . . . . . . . . . . . . . 15About the NetApp SnapDrive agent ... . . . . . . . . . . . . . . . . . . . . . . . . . . . . . . . . . . . . . . . . 16About the NetApp SnapMirror agent ... . . . . . . . . . . . . . . . . . . . . . . . . . . . . . . . . . . . . . . 17
About the VCS database agent for Microsoft SQL Server 2008 and2008 R2 .... . . . . . . . . . . . . . . . . . . . . . . . . . . . . . . . . . . . . . . . . . . . . . . . . . . . . . . . . . . . . . . . . . . . . . . . . . . . . 21About the agent for SQL Server 2008 Database Engine .... . . . . . . . . . . . . . . 22About the agent for SQL Server 2008 FILESTREAM ..... . . . . . . . . . . . . . . . . . 26About the agent for SQL Server 2008 Agent and Analysis
services ... . . . . . . . . . . . . . . . . . . . . . . . . . . . . . . . . . . . . . . . . . . . . . . . . . . . . . . . . . . . . . . . . . . . . . . . 27About the agent for SQL Server 2008 MSDTC service ... . . . . . . . . . . . . . . . . . 28
SQL Server 2008 sample dependency graph .... . . . . . . . . . . . . . . . . . . . . . . . . . . . . . . . . . . 29MSDTC sample dependency graph .... . . . . . . . . . . . . . . . . . . . . . . . . . . . . . . . . . . . . . . . . . . . . . . 30Database monitoring options .... . . . . . . . . . . . . . . . . . . . . . . . . . . . . . . . . . . . . . . . . . . . . . . . . . . . . . 31How the agents make SQL Server highly available ... . . . . . . . . . . . . . . . . . . . . . . . . . . . 33
Local cluster configuration after a failover ... . . . . . . . . . . . . . . . . . . . . . . . . . . . . . . . 33Disaster recovery configuration after a failover ... . . . . . . . . . . . . . . . . . . . . . . . . 33
Running SQL Server in an Active-Active clustered environment .... . . . . . . . 33Typical SQL Server 2008 configuration in a VCS cluster ... . . . . . . . . . . . . . . . . . . . 34Typical disaster recovery configuration of a VCS cluster ... . . . . . . . . . . . . . . . . . . 35
Chapter 2 Installing and configuring VCS . . . . . . . . . . . . . . . . . . . . . . . . . . . . . . . . . . . . . . . . . 37
About installing Veritas Cluster Server ... . . . . . . . . . . . . . . . . . . . . . . . . . . . . . . . . . . . . . . . . . 37Configuring the cluster using the Cluster Configuration Wizard .... . . . . . . . 37
Configuring notification .... . . . . . . . . . . . . . . . . . . . . . . . . . . . . . . . . . . . . . . . . . . . . . . . . . . . . . . 47Configuring Wide-Area Connector process for global
clusters ... . . . . . . . . . . . . . . . . . . . . . . . . . . . . . . . . . . . . . . . . . . . . . . . . . . . . . . . . . . . . . . . . . . . . . . . 49
Contents

Chapter 3 Installing SQL Server 2008 or 2008 R2 in a VCSenvironment . . . . . . . . . . . . . . . . . . . . . . . . . . . . . . . . . . . . . . . . . . . . . . . . . . . . . . . . . . . . . . . . . . . 53
About installing SQL Server in a VCS environment .... . . . . . . . . . . . . . . . . . . . . . . . . . 53About installing multiple SQL instances ... . . . . . . . . . . . . . . . . . . . . . . . . . . . . . . . . . . . . . . . . 54Prerequisites for installing SQL Server ... . . . . . . . . . . . . . . . . . . . . . . . . . . . . . . . . . . . . . . . . . . 55
Privileges required for installing SQL Server ... . . . . . . . . . . . . . . . . . . . . . . . . . . . . 56Configuring Microsoft iSCSI initiator ... . . . . . . . . . . . . . . . . . . . . . . . . . . . . . . . . . . . . . . 56
Managing storage using NetApp filer ... . . . . . . . . . . . . . . . . . . . . . . . . . . . . . . . . . . . . . . . . . . . . 57Connecting virtual disks to the cluster node .... . . . . . . . . . . . . . . . . . . . . . . . . . . . . 58Disconnecting virtual disks from the cluster nodes ... . . . . . . . . . . . . . . . . . . . . 59
Managing storage using Windows Logical Disk Manager ... . . . . . . . . . . . . . . . . . . 60Reserving disks (if you use Windows LDM) .... . . . . . . . . . . . . . . . . . . . . . . . . . . . . . . 61Creating volumes (if you use Windows LDM) .... . . . . . . . . . . . . . . . . . . . . . . . . . . . 61Mounting volumes (if you use Windows LDM) .... . . . . . . . . . . . . . . . . . . . . . . . . . 62Unassigning a drive letter ... . . . . . . . . . . . . . . . . . . . . . . . . . . . . . . . . . . . . . . . . . . . . . . . . . . . . . 62Releasing disks (if you use Windows LDM) .... . . . . . . . . . . . . . . . . . . . . . . . . . . . . . . 63
Installing SQL Server 2008 or 2008 R2 on the first cluster node .... . . . . . . . . 63Installing SQL Server 2008 or 2008 R2 on the additional cluster
nodes ... . . . . . . . . . . . . . . . . . . . . . . . . . . . . . . . . . . . . . . . . . . . . . . . . . . . . . . . . . . . . . . . . . . . . . . . . . . . . . . . . 65Assigning ports for multiple SQL Server instances ... . . . . . . . . . . . . . . . . . . . . . . . . . . 66Enabling IPv6 support for the SQL Server Analysis Service ... . . . . . . . . . . . . . . . 67
Chapter 4 Configuring the SQL Server service group . . . . . . . . . . . . . . . . . . . . . 69
About configuring the SQL service group .... . . . . . . . . . . . . . . . . . . . . . . . . . . . . . . . . . . . . . . 69Before configuring the SQL service group .... . . . . . . . . . . . . . . . . . . . . . . . . . . . . . . . . . . . . . 70Configuring a SQL Server service group .... . . . . . . . . . . . . . . . . . . . . . . . . . . . . . . . . . . . . . . . 72
Assigning privileges to the existing SQL Server databases andlogs ... . . . . . . . . . . . . . . . . . . . . . . . . . . . . . . . . . . . . . . . . . . . . . . . . . . . . . . . . . . . . . . . . . . . . . . . . . . . . 79
Running SnapManager for SQL .... . . . . . . . . . . . . . . . . . . . . . . . . . . . . . . . . . . . . . . . . . . . . . . . . . . . 80Making SQL Server user-defined databases highly available with
VCS .... . . . . . . . . . . . . . . . . . . . . . . . . . . . . . . . . . . . . . . . . . . . . . . . . . . . . . . . . . . . . . . . . . . . . . . . . . . . . . . . . . 81Create volumes or LUNs for SQL user-defined databases ... . . . . . . . . . . . . 81Creating SQL Server databases ... . . . . . . . . . . . . . . . . . . . . . . . . . . . . . . . . . . . . . . . . . . . . . . 81Adding storage agent resources to the SQL service group .... . . . . . . . . . . 82
Verifying the service group configuration .... . . . . . . . . . . . . . . . . . . . . . . . . . . . . . . . . . . . . . 83Bringing the service group online .... . . . . . . . . . . . . . . . . . . . . . . . . . . . . . . . . . . . . . . . . . . 83Taking the service group offline ... . . . . . . . . . . . . . . . . . . . . . . . . . . . . . . . . . . . . . . . . . . . . . 83Switching the service group .... . . . . . . . . . . . . . . . . . . . . . . . . . . . . . . . . . . . . . . . . . . . . . . . . . 84
Administering a SQL Server service group .... . . . . . . . . . . . . . . . . . . . . . . . . . . . . . . . . . . . . 85Modifying a SQL service group configuration .... . . . . . . . . . . . . . . . . . . . . . . . . . . 85Deleting a SQL service group .... . . . . . . . . . . . . . . . . . . . . . . . . . . . . . . . . . . . . . . . . . . . . . . . . 86
Contents8
Chapter 5 Configuring an MSDTC service group . . . . . . . . . . . . . . . . . . . . . . . . . . . . . 87
About configuring the MSDTC service group .... . . . . . . . . . . . . . . . . . . . . . . . . . . . . . . . . . 87Reviewing the configuration .... . . . . . . . . . . . . . . . . . . . . . . . . . . . . . . . . . . . . . . . . . . . . . . . . . . . . . . 88Before configuring the MSDTC service group .... . . . . . . . . . . . . . . . . . . . . . . . . . . . . . . . . 90Creating an MSDTC service group .... . . . . . . . . . . . . . . . . . . . . . . . . . . . . . . . . . . . . . . . . . . . . . . . 91About configuring an MSDTC client ... . . . . . . . . . . . . . . . . . . . . . . . . . . . . . . . . . . . . . . . . . . . . . . 95Configuring an MSDTC client on Windows Server 2008 .... . . . . . . . . . . . . . . . . . . . 95About using the virtual MMC viewer .... . . . . . . . . . . . . . . . . . . . . . . . . . . . . . . . . . . . . . . . . . . . . 96Viewing DTC transaction information .... . . . . . . . . . . . . . . . . . . . . . . . . . . . . . . . . . . . . . . . . . . 96Verifying the installation .... . . . . . . . . . . . . . . . . . . . . . . . . . . . . . . . . . . . . . . . . . . . . . . . . . . . . . . . . . . 98
Chapter 6 Making a standalone SQL server highlyavailable . . . . . . . . . . . . . . . . . . . . . . . . . . . . . . . . . . . . . . . . . . . . . . . . . . . . . . . . . . . . . . . . . . . . . . . . . . 99
About making a standalone SQL server highly available ... . . . . . . . . . . . . . . . . . . . 99Reviewing the configuration .... . . . . . . . . . . . . . . . . . . . . . . . . . . . . . . . . . . . . . . . . . . . . . . . . . . . . . 100
Sample configuration .... . . . . . . . . . . . . . . . . . . . . . . . . . . . . . . . . . . . . . . . . . . . . . . . . . . . . . . . . 101Installing and configuring VCS on the standalone SQL server ... . . . . . . . . . . 102Verifying that SQL Server databases and logs are moved to shared
storage .... . . . . . . . . . . . . . . . . . . . . . . . . . . . . . . . . . . . . . . . . . . . . . . . . . . . . . . . . . . . . . . . . . . . . . . . . . . . 102Installing and configuring SQL Server on additional nodes ... . . . . . . . . . . . . . . 103Assigning ports for multiple SQL Server instances ... . . . . . . . . . . . . . . . . . . . . . . . . . 104Configuring the VCS SQL Server service group .... . . . . . . . . . . . . . . . . . . . . . . . . . . . . . 104Creating a SQL Server user-defined database .... . . . . . . . . . . . . . . . . . . . . . . . . . . . . . . . 104Verifying the installation and configuration .... . . . . . . . . . . . . . . . . . . . . . . . . . . . . . . . . 105
Chapter 7 Active-active configuration . . . . . . . . . . . . . . . . . . . . . . . . . . . . . . . . . . . . . . . . . . . . . 107
About active-active configuration .... . . . . . . . . . . . . . . . . . . . . . . . . . . . . . . . . . . . . . . . . . . . . . . 107Reviewing the configuration .... . . . . . . . . . . . . . . . . . . . . . . . . . . . . . . . . . . . . . . . . . . . . . . . . . . . . . 107
Sample configuration .... . . . . . . . . . . . . . . . . . . . . . . . . . . . . . . . . . . . . . . . . . . . . . . . . . . . . . . . . 108Installing VCS and configuring the cluster ... . . . . . . . . . . . . . . . . . . . . . . . . . . . . . . . . . . . 110Configuring volumes or virtual disks for SQL Server ... . . . . . . . . . . . . . . . . . . . . . . 110Installing and configuring the first instance of SQL Server ... . . . . . . . . . . . . . . 111Configuring the VCS service group for the first SQL Server
instance .... . . . . . . . . . . . . . . . . . . . . . . . . . . . . . . . . . . . . . . . . . . . . . . . . . . . . . . . . . . . . . . . . . . . . . . . . . . 111Creating a SQL Server user-defined database .... . . . . . . . . . . . . . . . . . . . . . . . . . . . . . . . 112Repeating SQL Server installation for additional instances ... . . . . . . . . . . . . . 112Verifying the configuration .... . . . . . . . . . . . . . . . . . . . . . . . . . . . . . . . . . . . . . . . . . . . . . . . . . . . . . . 113
9Contents
Chapter 8 Configuring a disaster recovery setup . . . . . . . . . . . . . . . . . . . . . . . . . . 115
About disaster recovery configuration .... . . . . . . . . . . . . . . . . . . . . . . . . . . . . . . . . . . . . . . . . 115What is a disaster recovery solution? .... . . . . . . . . . . . . . . . . . . . . . . . . . . . . . . . . . . . . . . . . . 115
Why implement a disaster recovery solution? .... . . . . . . . . . . . . . . . . . . . . . . . . 116Understanding replication .... . . . . . . . . . . . . . . . . . . . . . . . . . . . . . . . . . . . . . . . . . . . . . . . . . 116
What needs to be protected in a SQL Server environment? ... . . . . . . . . . . . . . . 117Typical disaster recovery configuration .... . . . . . . . . . . . . . . . . . . . . . . . . . . . . . . . . . . . . . . 117Disaster recovery: New SQL Server installation .... . . . . . . . . . . . . . . . . . . . . . . . . . . . . 118
Reviewing the configuration .... . . . . . . . . . . . . . . . . . . . . . . . . . . . . . . . . . . . . . . . . . . . . . . . 119Installing VCS and configuring the cluster ... . . . . . . . . . . . . . . . . . . . . . . . . . . . . . 119Configuring volumes or LUNs on the shared storage .... . . . . . . . . . . . . . . . 119Installing and configuring SQL Server at the primary site ... . . . . . . . . . 120Configuring the VCS SQL service group .... . . . . . . . . . . . . . . . . . . . . . . . . . . . . . . . . 120
Creating a parallel environment on the secondary site ... . . . . . . . . . . . . . . . . . . . 120Configuring DR components ... . . . . . . . . . . . . . . . . . . . . . . . . . . . . . . . . . . . . . . . . . . . . . . . . . . . . . . 121Configuring replication using NetApp SnapMirror ... . . . . . . . . . . . . . . . . . . . . . . . . . 122Configuring SnapMirror resources at the primary site ... . . . . . . . . . . . . . . . . . . . . 122Configuring the Global Cluster Option for wide-area failover ... . . . . . . . . . . . 123
Prerequisites ... . . . . . . . . . . . . . . . . . . . . . . . . . . . . . . . . . . . . . . . . . . . . . . . . . . . . . . . . . . . . . . . . . . . . 123Linking clusters: Adding a remote cluster to a local cluster ... . . . . . . . 124Converting a local service group to a global service group .... . . . . . . . . 125Bringing a global service group online .... . . . . . . . . . . . . . . . . . . . . . . . . . . . . . . . . . . 127Administering global service groups .... . . . . . . . . . . . . . . . . . . . . . . . . . . . . . . . . . . . . 128Deleting a remote cluster ... . . . . . . . . . . . . . . . . . . . . . . . . . . . . . . . . . . . . . . . . . . . . . . . . . . . . 129
Chapter 9 Troubleshooting VCS agents for NetApp andMicrosoft SQL Server . . . . . . . . . . . . . . . . . . . . . . . . . . . . . . . . . . . . . . . . . . . . . . . . . . 133
About troubleshooting VCS agents for NetApp and Microsoft SQLServer ... . . . . . . . . . . . . . . . . . . . . . . . . . . . . . . . . . . . . . . . . . . . . . . . . . . . . . . . . . . . . . . . . . . . . . . . . . . . . . 133
VCS logging .... . . . . . . . . . . . . . . . . . . . . . . . . . . . . . . . . . . . . . . . . . . . . . . . . . . . . . . . . . . . . . . . . . . . . . . . . . . . 134VCS Cluster Configuration Wizard (VCW) logs ... . . . . . . . . . . . . . . . . . . . . . . . . . . . . . . 135VCWsilent logs ... . . . . . . . . . . . . . . . . . . . . . . . . . . . . . . . . . . . . . . . . . . . . . . . . . . . . . . . . . . . . . . . . . . . . . . . 135NetApp agents error messages ... . . . . . . . . . . . . . . . . . . . . . . . . . . . . . . . . . . . . . . . . . . . . . . . . . . . 136SQL Server agent error messages and descriptions .... . . . . . . . . . . . . . . . . . . . . . . . 137
Agent for MSDTC error messages ... . . . . . . . . . . . . . . . . . . . . . . . . . . . . . . . . . . . . . . . . . 137Agent for SQL Server 2008 .... . . . . . . . . . . . . . . . . . . . . . . . . . . . . . . . . . . . . . . . . . . . . . . . . . 139Agent for SQL Server 2008 FILESTREAM ..... . . . . . . . . . . . . . . . . . . . . . . . . . . . . . 143Agent for SQL Server 2008 Analysis Service ... . . . . . . . . . . . . . . . . . . . . . . . . . . . 143
Contents10

Appendix A Using the virtual MMC viewer . . . . . . . . . . . . . . . . . . . . . . . . . . . . . . . . . . . . . . . . . 145
About using the virtual MMC viewer .... . . . . . . . . . . . . . . . . . . . . . . . . . . . . . . . . . . . . . . . . . . 145Viewing DTC transaction information .... . . . . . . . . . . . . . . . . . . . . . . . . . . . . . . . . . . . . . . . . 145
Index . . . . . . . . . . . . . . . . . . . . . . . . . . . . . . . . . . . . . . . . . . . . . . . . . . . . . . . . . . . . . . . . . . . . . . . . . . . . . . . . . . . . . . . . . . . . . . . . . . . . . . . . . . . . . . . . . . . 149
11Contents

Contents12
Introducing the VCS agentsfor SQL Server and NetApp
This chapter includes the following topics:
■ About the VCS agents for SQL and NetApp
■ About the VCS hardware replication agent for NetApp
■ About the VCS database agent for Microsoft SQL Server 2008 and 2008 R2
■ SQL Server 2008 sample dependency graph
■ MSDTC sample dependency graph
■ Database monitoring options
■ How the agents make SQL Server highly available
■ Running SQL Server in an Active-Active clustered environment
■ Typical SQL Server 2008 configuration in a VCS cluster
■ Typical disaster recovery configuration of a VCS cluster
About the VCS agents for SQL and NetAppThe VCS database agent for Microsoft SQL Server provides high availability toSQL Server. The VCS hardware replication agent for NetApp SnapMirror enablesconfiguring NetApp filers over an iSCSI or Fibre Channel (FC) connection in a VCScluster environment. Both the agents work together to provide high availabilityand disaster recovery to SQL Server in environments that use NetApp filers forshared storage. The agents also support disaster recovery configurations set upusing the VCS Global Cluster Option and NetApp SnapMirror for data replication.
1Chapter
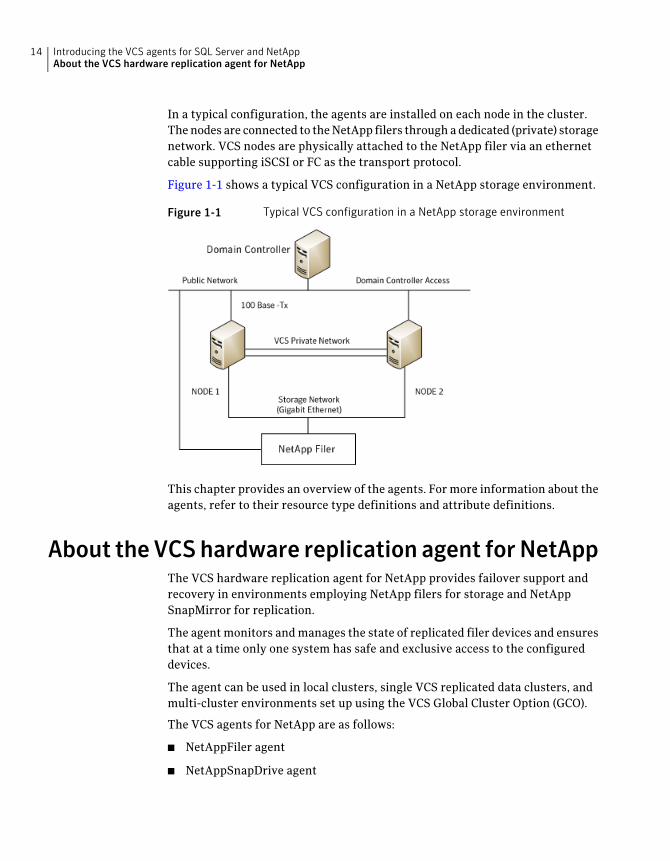
In a typical configuration, the agents are installed on each node in the cluster.The nodes are connected to the NetApp filers through a dedicated (private) storagenetwork. VCS nodes are physically attached to the NetApp filer via an ethernetcable supporting iSCSI or FC as the transport protocol.
Figure 1-1 shows a typical VCS configuration in a NetApp storage environment.
Figure 1-1 Typical VCS configuration in a NetApp storage environment
This chapter provides an overview of the agents. For more information about theagents, refer to their resource type definitions and attribute definitions.
About theVCShardware replication agent forNetAppThe VCS hardware replication agent for NetApp provides failover support andrecovery in environments employing NetApp filers for storage and NetAppSnapMirror for replication.
The agent monitors and manages the state of replicated filer devices and ensuresthat at a time only one system has safe and exclusive access to the configureddevices.
The agent can be used in local clusters, single VCS replicated data clusters, andmulti-cluster environments set up using the VCS Global Cluster Option (GCO).
The VCS agents for NetApp are as follows:
■ NetAppFiler agent
■ NetAppSnapDrive agent
Introducing the VCS agents for SQL Server and NetAppAbout the VCS hardware replication agent for NetApp
14
■ NetAppSnapMirror agent
About the NetApp Filer agentThe NetApp Filer agent monitors the state of the filer device. The agent isrepresented by the NetAppFiler resource type in VCS. NetAppFiler resources arepersistent, meaning that they are not brought online or taken offline.
NetApp Filer agent functionThe NetApp Filer agent function is as follows:
Performs the following tasks:
■ Verifies the state of the filer attached to the host by sending anICMP ping command to the filer. If the filer does not respond, theagent reports the state of the filer as faulted.
■ Opens a filer connection and checks if ONTAPI version is supportedby the filer. If the connection fails or the ONTAPI version is notsupported, the agent reports the state as offline.
Monitor
NetAppFiler agent resource type definitionThe NetApp Filer agent is configured as a resource of type NetAppFiler.
type NetAppFiler (
static int MonitorInterval = 30
static i18nstr ArgList[] = { FilerName, StorageIP }
static str Operations = None
str FilerName
str StorageIP
)
NetAppFiler agent attribute definitionsTable 1-1 describes the NetApp Filer agent attributes.
Table 1-1 NetApp Filer agent attributes
DescriptionAttribute
DNS-resolvable name or IP address of the locally attached filer.
Type and dimension: string-scalar
FilerName
15Introducing the VCS agents for SQL Server and NetAppAbout the VCS hardware replication agent for NetApp
Table 1-1 NetApp Filer agent attributes (continued)
DescriptionAttribute
The private storage IP address of the filer.
Type and dimension: string-scalar
StorageIP
About the NetApp SnapDrive agentThe NetApp SnapDrive agent monitors, connects, and disconnects filer volumes.You can configure the agent to use the iSCSI or the FC protocol.
NetApp SnapDrive agent functionsThe NetApp SnapDrive agent functions are as follows:
Connects a virtual disk (LUN) using an iSCSI or an FC initiator. Theagent presents the LUN as a locally-attached drive to the host. Theagent also removes LUN-host mappings made before the onlineoperation.
Online
Disconnects the virtual disk (LUN) from the host.Offline
Verifies that the specified virtual disk (LUN) is connected to the host.Monitor
Verifies that there is connectivitiy to the filer. It also checks that theVCS Helper service is running with the same privileges as theSnapDrive service.
Open
Attempts to forcibly disconnect a virtual disk (LUN).Clean
NetAppSnapDrive agent resource type definitionNetApp SnapDrive agent is configured as a resource of type NetAppSnapDrive.
type NetAppSnapDrive (
static int MonitorInterval = 30
static int NumThreads = 1
static i18nstr ArgList[] = { FilerResName,
"FilerResName:FilerName", "FilerResName:StorageIP",
VolumeName, ShareName, LUN, MountPath, Initiator,
InitiatorMonitorInterval }
str FilerResName
str VolumeName
str ShareName
str LUN
Introducing the VCS agents for SQL Server and NetAppAbout the VCS hardware replication agent for NetApp
16
str MountPath
str Initiator[]
int InitiatorMonitorInterval = 30
)
NetAppSnapDrive agent attribute definitionsTable 1-2 describes the NetApp SnapDrive agent attributes.
Table 1-2 NetApp SnapDrive agent attributes
DescriptionAttribute
Name of the VCS NetAppFiler-type resource in the service group.
Type and dimension: string-scalar
FilerResName
Name of the volume containing the virtual disk. Define the volumename in the same case as on the filer.
Type and dimension: string-scalar
VolumeName
Name of the CIFS share containing the virtual disk. This attributeis ignored if NetApp SnapDrive version 6.0 is used.
Type and dimension: string-scalar
ShareName
Name of the LUN (virtual disk) on the filer that is presented to thehost for mounting. Define the LUN name in the same case as onthe filer.
Type and dimension: string-scalar
LUN
Drive letter to be assigned to the virtual disk.
Type and dimension: string-scalar
MountPath
Name of iSCSI or FC initiator the host uses to connect virtual disks.You can retrieve this value from the Disk Management console.
Type and dimension: string-vector
Initiator
About the NetApp SnapMirror agentThe NetApp SnapMirror agent monitors the replication state of filer devices.When a failover occurs, the agent reverses the direction of replication. The agentsupports the replication modes supported by NetApp. The agent supportsasynchronous, semi-synchronous, and synchronous modes of replication. Youcan set the mode of replication using the SyncMode agent attribute.
17Introducing the VCS agents for SQL Server and NetAppAbout the VCS hardware replication agent for NetApp
NetApp SnapMirror agent functionsThe NetApp SnapMirror agent functions are as follows:
If the state of the local filer device is SOURCE, the agent creates a lockfile to indicate that the resource can come online. This effectivelymakes the devices writable for the application.
If the state of the local filer is SNAPMIRRORED, the agent attemptsto reverse the direction of replication by changing the state of thelocal filer to SOURCE and that of the original source toSNAPMIRRORED.
If the original source filer is down, the agent performs a mirrorbreakoff to enable local write access, if the filer is not already brokenoff.
If the original source returns to life, you must resynchronize the datamanually. The online function touches a lock file if read-write accessis enabled successfully.
Online
Removes the lock file. The agent does not perform any filer operationsbecause an offline entry point does not necessarily indicate anintention to give up the devices.
Offline
Verifies that the lock file exists. If the lock file exists, the monitorfunction reports the status of the resource as online. If the lock filedoes not exist, the monitor function reports the status of the resourceas offline.
Monitor
Removes the lock file thereby preventing potential concurrencyviolation if the group fails over to another node.
Note: The agent does not remove the lock file if the agent is startedafter an hastop -force command.
Open
Removes the lock file. No filer operations are performed as taking theresource offline does not indicate a pending role swap.
Clean
Action functionUse the Action function to perform predefined actions on a resource. To performan action on a resource, type the following command:
hares -action <SnapMirror_resname> <token> [-actionargs <arg1> ...]
[-sys <system>] [-clus <cluster> ]
Table 1-3 lists the action supported by the NetAppSnapMirror agent.
Introducing the VCS agents for SQL Server and NetAppAbout the VCS hardware replication agent for NetApp
18
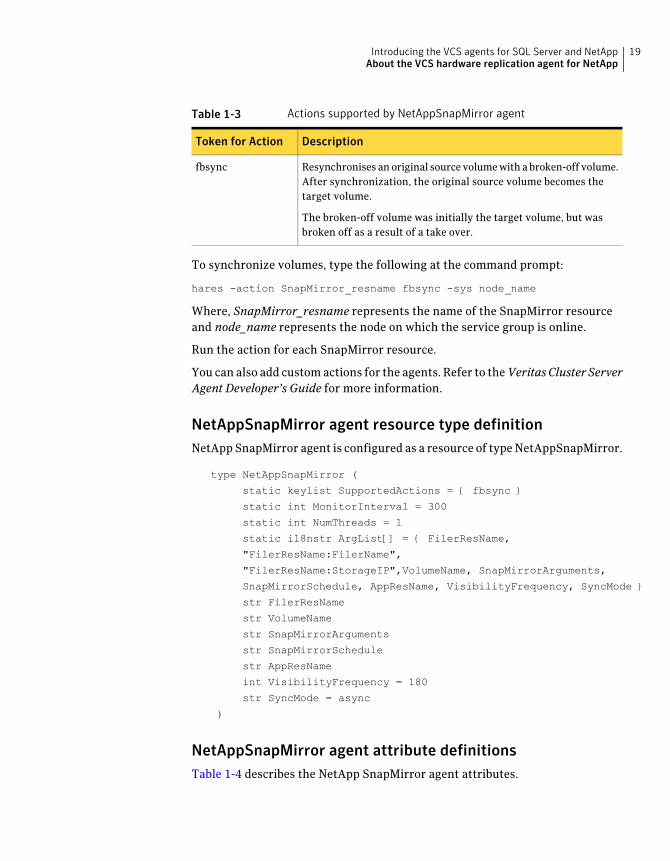
Table 1-3 Actions supported by NetAppSnapMirror agent
DescriptionToken for Action
Resynchronises an original source volume with a broken-off volume.After synchronization, the original source volume becomes thetarget volume.
The broken-off volume was initially the target volume, but wasbroken off as a result of a take over.
fbsync
To synchronize volumes, type the following at the command prompt:
hares -action SnapMirror_resname fbsync -sys node_name
Where, SnapMirror_resname represents the name of the SnapMirror resourceand node_name represents the node on which the service group is online.
Run the action for each SnapMirror resource.
You can also add custom actions for the agents. Refer to theVeritasCluster ServerAgent Developer’s Guide for more information.
NetAppSnapMirror agent resource type definitionNetApp SnapMirror agent is configured as a resource of type NetAppSnapMirror.
type NetAppSnapMirror (
static keylist SupportedActions = { fbsync }
static int MonitorInterval = 300
static int NumThreads = 1
static i18nstr ArgList[] = { FilerResName,
"FilerResName:FilerName",
"FilerResName:StorageIP",VolumeName, SnapMirrorArguments,
SnapMirrorSchedule, AppResName, VisibilityFrequency, SyncMode }
str FilerResName
str VolumeName
str SnapMirrorArguments
str SnapMirrorSchedule
str AppResName
int VisibilityFrequency = 180
str SyncMode = async
)
NetAppSnapMirror agent attribute definitionsTable 1-4 describes the NetApp SnapMirror agent attributes.
19Introducing the VCS agents for SQL Server and NetAppAbout the VCS hardware replication agent for NetApp
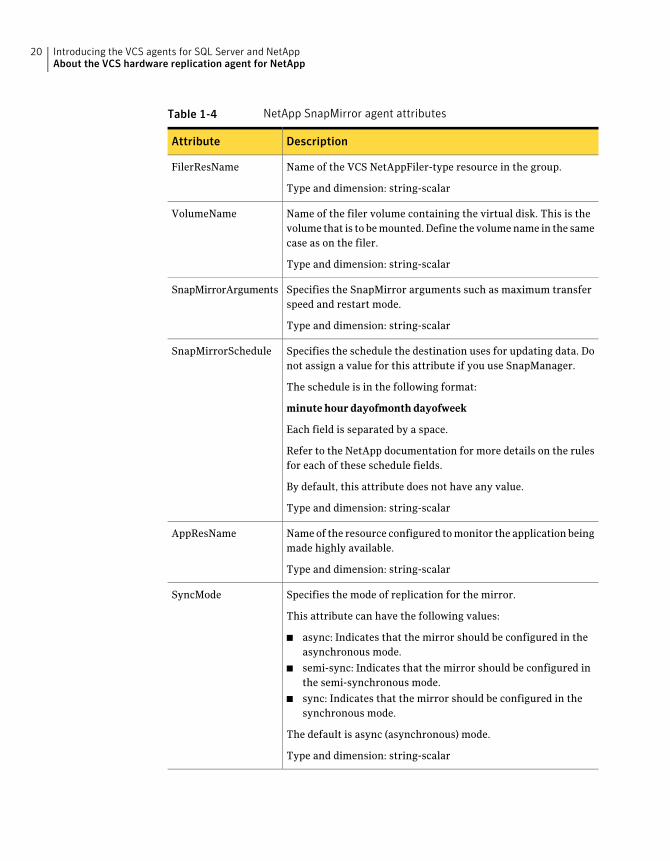
Table 1-4 NetApp SnapMirror agent attributes
DescriptionAttribute
Name of the VCS NetAppFiler-type resource in the group.
Type and dimension: string-scalar
FilerResName
Name of the filer volume containing the virtual disk. This is thevolume that is to be mounted. Define the volume name in the samecase as on the filer.
Type and dimension: string-scalar
VolumeName
Specifies the SnapMirror arguments such as maximum transferspeed and restart mode.
Type and dimension: string-scalar
SnapMirrorArguments
Specifies the schedule the destination uses for updating data. Donot assign a value for this attribute if you use SnapManager.
The schedule is in the following format:
minute hour dayofmonth dayofweek
Each field is separated by a space.
Refer to the NetApp documentation for more details on the rulesfor each of these schedule fields.
By default, this attribute does not have any value.
Type and dimension: string-scalar
SnapMirrorSchedule
Name of the resource configured to monitor the application beingmade highly available.
Type and dimension: string-scalar
AppResName
Specifies the mode of replication for the mirror.
This attribute can have the following values:
■ async: Indicates that the mirror should be configured in theasynchronous mode.
■ semi-sync: Indicates that the mirror should be configured inthe semi-synchronous mode.
■ sync: Indicates that the mirror should be configured in thesynchronous mode.
The default is async (asynchronous) mode.
Type and dimension: string-scalar
SyncMode
Introducing the VCS agents for SQL Server and NetAppAbout the VCS hardware replication agent for NetApp
20
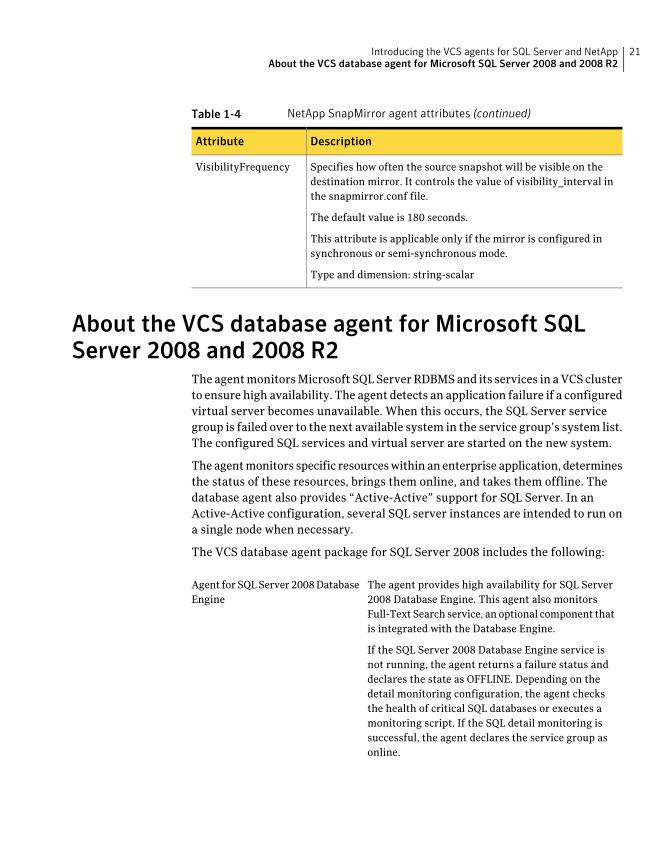
Table 1-4 NetApp SnapMirror agent attributes (continued)
DescriptionAttribute
Specifies how often the source snapshot will be visible on thedestination mirror. It controls the value of visibility_interval inthe snapmirror.conf file.
The default value is 180 seconds.
This attribute is applicable only if the mirror is configured insynchronous or semi-synchronous mode.
Type and dimension: string-scalar
VisibilityFrequency
About the VCS database agent for Microsoft SQLServer 2008 and 2008 R2
The agent monitors Microsoft SQL Server RDBMS and its services in a VCS clusterto ensure high availability. The agent detects an application failure if a configuredvirtual server becomes unavailable. When this occurs, the SQL Server servicegroup is failed over to the next available system in the service group’s system list.The configured SQL services and virtual server are started on the new system.
The agent monitors specific resources within an enterprise application, determinesthe status of these resources, brings them online, and takes them offline. Thedatabase agent also provides “Active-Active” support for SQL Server. In anActive-Active configuration, several SQL server instances are intended to run ona single node when necessary.
The VCS database agent package for SQL Server 2008 includes the following:
The agent provides high availability for SQL Server2008 Database Engine. This agent also monitorsFull-Text Search service, an optional component thatis integrated with the Database Engine.
If the SQL Server 2008 Database Engine service isnot running, the agent returns a failure status anddeclares the state as OFFLINE. Depending on thedetail monitoring configuration, the agent checksthe health of critical SQL databases or executes amonitoring script. If the SQL detail monitoring issuccessful, the agent declares the service group asonline.
Agent for SQL Server 2008 DatabaseEngine
21Introducing the VCS agents for SQL Server and NetAppAbout the VCS database agent for Microsoft SQL Server 2008 and 2008 R2
The agent provides high availability for SQL Server2008 FILESTREAM feature. The agent monitors theWindows FILESTREAM configuration settings forthe SQL Server instance.
Agent for SQL Server 2008FILESTREAM
VCS employs the GenericService agent to providehigh availability for the SQL Server 2008 Agentservice and the Analysis service. The GenericServiceagent monitors the SQL Server 2008 Agent andAnalysis services. If the services are not running, theagent declares the services as OFFLINE.
GenericService agent for SQL Server2008 Agent service and Analysisservice
The VCS database agent for MSDTC provides highavailability for the Microsoft Distributed TransactionCoordinator (MSDTC) service used in distributedtransactions.
The MSDTC agent monitors the MSDTC service todetect failure. The agent detects an MSDTC failureif the MSDTC service is not running.
Agent for MSDTC
About the agent for SQL Server 2008 Database EngineThis SQL Server 2008 agent monitors the SQL Server Database Engine service.As Full-text search is an integrated optional component for SQL Server DatabaseEngine, when installed and configured, the agent also monitors the full-text searchservice. The agent brings the SQL Server 2008 service online, monitors the status,and takes it offline.
Specific agent functions include the following:
Brings the SQL Server service online.Online
Takes the SQL Server service offline.Offline
Queries the Service Control Manager (SCM) for the status of SQLServer services. Also, if detail monitoring is configured, the agentperforms a database health check depending on the configuration.
See “Database monitoring options” on page 31.
Monitor
Forcibly stops the SQL Server service.Clean
Resource type definition for SQL Server 2008Database EngineagentThe agent for SQL Server 2008 is configured as a resource of type SQLServer2008.
Introducing the VCS agents for SQL Server and NetAppAbout the VCS database agent for Microsoft SQL Server 2008 and 2008 R2
22
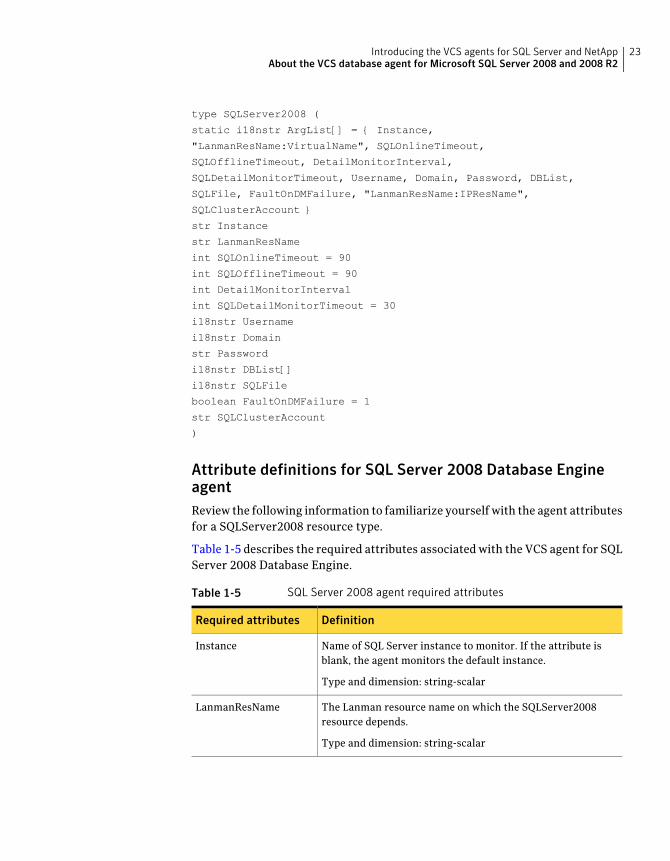
type SQLServer2008 (
static i18nstr ArgList[] = { Instance,
"LanmanResName:VirtualName", SQLOnlineTimeout,
SQLOfflineTimeout, DetailMonitorInterval,
SQLDetailMonitorTimeout, Username, Domain, Password, DBList,
SQLFile, FaultOnDMFailure, "LanmanResName:IPResName",
SQLClusterAccount }
str Instance
str LanmanResName
int SQLOnlineTimeout = 90
int SQLOfflineTimeout = 90
int DetailMonitorInterval
int SQLDetailMonitorTimeout = 30
i18nstr Username
i18nstr Domain
str Password
i18nstr DBList[]
i18nstr SQLFile
boolean FaultOnDMFailure = 1
str SQLClusterAccount
)
Attribute definitions for SQL Server 2008 Database EngineagentReview the following information to familiarize yourself with the agent attributesfor a SQLServer2008 resource type.
Table 1-5 describes the required attributes associated with the VCS agent for SQLServer 2008 Database Engine.
Table 1-5 SQL Server 2008 agent required attributes
DefinitionRequired attributes
Name of SQL Server instance to monitor. If the attribute isblank, the agent monitors the default instance.
Type and dimension: string-scalar
Instance
The Lanman resource name on which the SQLServer2008resource depends.
Type and dimension: string-scalar
LanmanResName
23Introducing the VCS agents for SQL Server and NetAppAbout the VCS database agent for Microsoft SQL Server 2008 and 2008 R2
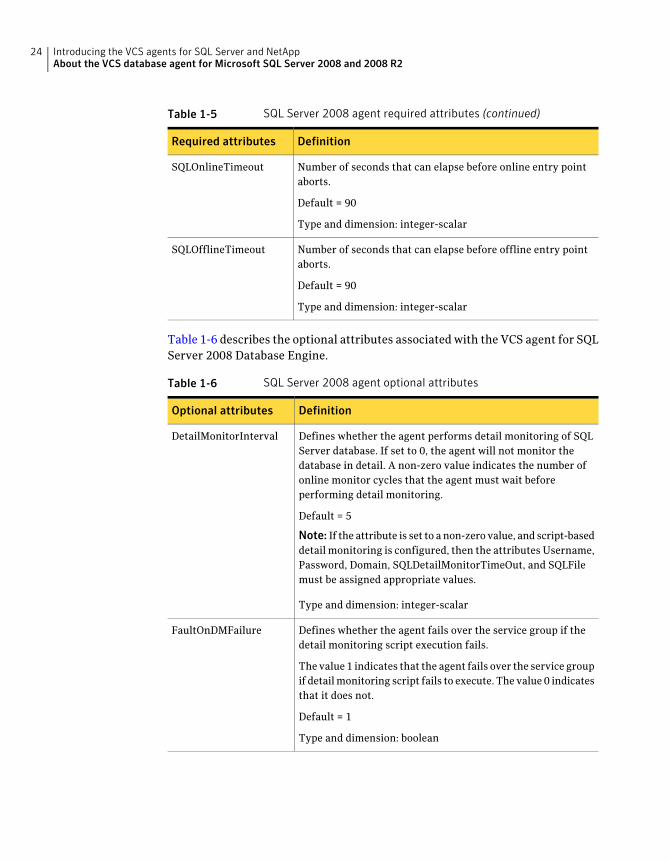
Table 1-5 SQL Server 2008 agent required attributes (continued)
DefinitionRequired attributes
Number of seconds that can elapse before online entry pointaborts.
Default = 90
Type and dimension: integer-scalar
SQLOnlineTimeout
Number of seconds that can elapse before offline entry pointaborts.
Default = 90
Type and dimension: integer-scalar
SQLOfflineTimeout
Table 1-6 describes the optional attributes associated with the VCS agent for SQLServer 2008 Database Engine.
Table 1-6 SQL Server 2008 agent optional attributes
DefinitionOptional attributes
Defines whether the agent performs detail monitoring of SQLServer database. If set to 0, the agent will not monitor thedatabase in detail. A non-zero value indicates the number ofonline monitor cycles that the agent must wait beforeperforming detail monitoring.
Default = 5
Note: If the attribute is set to a non-zero value, and script-baseddetail monitoring is configured, then the attributes Username,Password, Domain, SQLDetailMonitorTimeOut, and SQLFilemust be assigned appropriate values.
Type and dimension: integer-scalar
DetailMonitorInterval
Defines whether the agent fails over the service group if thedetail monitoring script execution fails.
The value 1 indicates that the agent fails over the service groupif detail monitoring script fails to execute. The value 0 indicatesthat it does not.
Default = 1
Type and dimension: boolean
FaultOnDMFailure
Introducing the VCS agents for SQL Server and NetAppAbout the VCS database agent for Microsoft SQL Server 2008 and 2008 R2
24
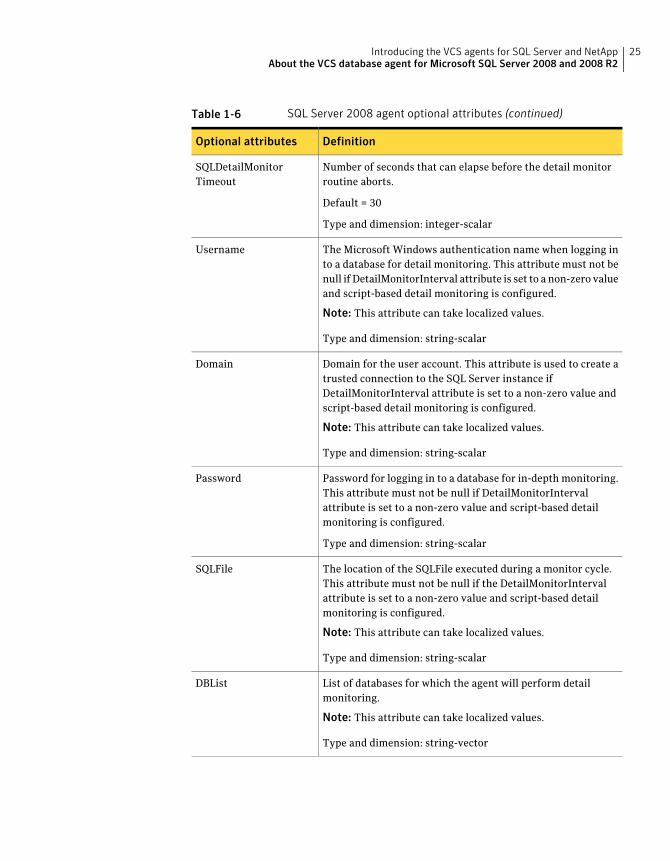
Table 1-6 SQL Server 2008 agent optional attributes (continued)
DefinitionOptional attributes
Number of seconds that can elapse before the detail monitorroutine aborts.
Default = 30
Type and dimension: integer-scalar
SQLDetailMonitorTimeout
The Microsoft Windows authentication name when logging into a database for detail monitoring. This attribute must not benull if DetailMonitorInterval attribute is set to a non-zero valueand script-based detail monitoring is configured.
Note: This attribute can take localized values.
Type and dimension: string-scalar
Username
Domain for the user account. This attribute is used to create atrusted connection to the SQL Server instance ifDetailMonitorInterval attribute is set to a non-zero value andscript-based detail monitoring is configured.
Note: This attribute can take localized values.
Type and dimension: string-scalar
Domain
Password for logging in to a database for in-depth monitoring.This attribute must not be null if DetailMonitorIntervalattribute is set to a non-zero value and script-based detailmonitoring is configured.
Type and dimension: string-scalar
Password
The location of the SQLFile executed during a monitor cycle.This attribute must not be null if the DetailMonitorIntervalattribute is set to a non-zero value and script-based detailmonitoring is configured.
Note: This attribute can take localized values.
Type and dimension: string-scalar
SQLFile
List of databases for which the agent will perform detailmonitoring.
Note: This attribute can take localized values.
Type and dimension: string-vector
DBList
25Introducing the VCS agents for SQL Server and NetAppAbout the VCS database agent for Microsoft SQL Server 2008 and 2008 R2
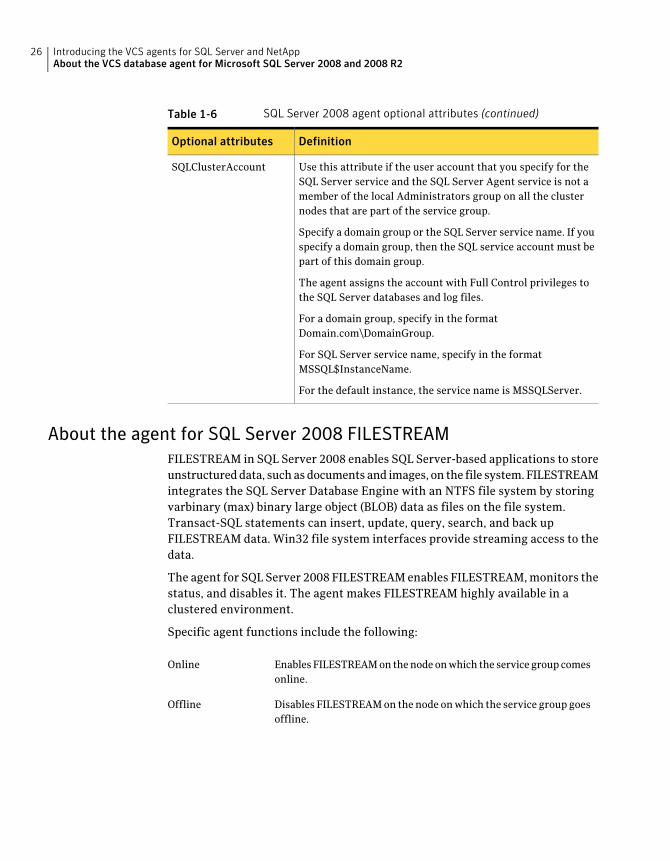
Table 1-6 SQL Server 2008 agent optional attributes (continued)
DefinitionOptional attributes
Use this attribute if the user account that you specify for theSQL Server service and the SQL Server Agent service is not amember of the local Administrators group on all the clusternodes that are part of the service group.
Specify a domain group or the SQL Server service name. If youspecify a domain group, then the SQL service account must bepart of this domain group.
The agent assigns the account with Full Control privileges tothe SQL Server databases and log files.
For a domain group, specify in the formatDomain.com\DomainGroup.
For SQL Server service name, specify in the formatMSSQL$InstanceName.
For the default instance, the service name is MSSQLServer.
SQLClusterAccount
About the agent for SQL Server 2008 FILESTREAMFILESTREAM in SQL Server 2008 enables SQL Server-based applications to storeunstructured data, such as documents and images, on the file system. FILESTREAMintegrates the SQL Server Database Engine with an NTFS file system by storingvarbinary (max) binary large object (BLOB) data as files on the file system.Transact-SQL statements can insert, update, query, search, and back upFILESTREAM data. Win32 file system interfaces provide streaming access to thedata.
The agent for SQL Server 2008 FILESTREAM enables FILESTREAM, monitors thestatus, and disables it. The agent makes FILESTREAM highly available in aclustered environment.
Specific agent functions include the following:
Enables FILESTREAM on the node on which the service group comesonline.
Online
Disables FILESTREAM on the node on which the service group goesoffline.
Offline
Introducing the VCS agents for SQL Server and NetAppAbout the VCS database agent for Microsoft SQL Server 2008 and 2008 R2
26
Monitors FILESTREAM status on the node on which the servicegroup is online. If the agent is unable to query the status ofFILESTREAM or if FILESTREAM is disabled on the node, theFILESTREAM resource in the service group faults.
Monitor
Resource type definition the SQL Server 2008 FILESTREAMagentThe agent for SQL Server 2008 FILESTREAM is configured as a resource of typeSQLFilestream.
type SQLFilestream (
static i18nstr ArgList[] = { InstanceName }
str InstanceName
)
Attribute definitions the SQL Server 2008 FILESTREAM agentReview the following information to familiarize yourself with the agent attributesfor a SQLFilestream resource type.
Table 1-7 describes the required attributes associated with the VCS agent for SQLServer 2008 FILESTREAM.
Table 1-7 SQL Server 2008 Filestream agent required attributes
DefinitionRequired attributes
The name of the SQLServer2008 resource to which theFILESTREAM is bound. If this attribute is blank, the agentmonitors the default SQL server instance (MSSQLSERVER).
Type and dimension: string-scalar
InstanceName
About the agent for SQL Server 2008 Agent and Analysis servicesVCS uses the GenericService agent to make the SQL Server 2008 Agent serviceand Analysis service highly available. The GenericService agent brings theseservices online, monitors their status, and takes them offline.
Specific agent functions include the following:
Brings the configured SQL Server services online.Online
Takes the configured SQL Server services offline.Offline
27Introducing the VCS agents for SQL Server and NetAppAbout the VCS database agent for Microsoft SQL Server 2008 and 2008 R2

Queries the Service Control Manager (SCM) for the status of configuredSQL Server services.
Monitor
Forcibly stops the configured SQL Server services.Clean
Refer to Veritas Cluster Server Bundled Agents Reference Guide for moreinformation about the GenericService agent.
About the agent for SQL Server 2008 MSDTC serviceThe MSDTC agent brings the MSDTC service online, monitors its status, and takesit offline. The agent provides high availability for the MSDTC service in a clusteredenvironment.
Specific agent functions include the following:
Brings the configured MSDTC service online.Online
Takes the configured MSDTC service offline.Offline
Monitors the configured MSDTC service.Monitor
Forcibly stops the configured MSDTC service.Clean
Note: The MSDTC agent comprises two parts; MSDTC client and MSDTC server.The MSDTC client and the MSDTC server must not be configured on the samecluster node.
Resource type definition for SQL Server 2008 MSDTC agentThe MSDTC agent is configured as a resource of type MSDTC.
type MSDTC (
static i18nstr ArgList[] = {"LanmanResName:VirtualName",
"MountResName:MountPath", LogPath }
str LanmanResName
str MountResName
i18nstr LogPath
)
Attribute definitions for SQL Server 2008 MSDTC agentReview the following information to familiarize yourself with the agent attributesfor an MSDTC resource type.
Introducing the VCS agents for SQL Server and NetAppAbout the VCS database agent for Microsoft SQL Server 2008 and 2008 R2
28
Table 1-8 describes the required attributes associated with the VCS agent forMSDTC.
Table 1-8 MSDTC agent required attributes
DefinitionRequired Attributes
Name of the Lanman resource on which the MSDTC resourcedepends.
Type and dimension: string-scalar
LanmanResName
The mount resource name on which the MSDTC resourcedepends.
Type and dimension: string-scalar
MountResName
The path for MSDTC logs. This attribute can take localized values.
Type and dimension: string-scalar
LogPath
SQL Server 2008 sample dependency graphA sample configuration graphically depicts the resources and their dependencieswithin the service group. The following example illustrates a typical service groupconfigured to make SQL Server 2008 or SQL Server 2008 R2 highly available in aVCS cluster.
The shared disk group is configured using the NetApp Filer (NetAppFiler) resource.The virtual name for the SQL Server is created using the Lanman resource. Theservice group IP address for the SQL Server is configured using the IP and NICresources. The NetApp SnapDrive mount point is created using theNetAppSnapDrive resource. SQL Server 2008 registry is replicated using theRegRep and RegRepNetAppSnapDrive resources. The FileStream resource monitorsthe Windows FILESTREAM configuration settings for the SQL Server instance.The SQL Server 2008 resource comes online after each of these resources arebrought online. The SQL Server 2008 Analysis service (MSOlap) and SQL Server2008 Agent service (SQLServerAgent) are configured as GenericService resources.
Figure 1-2 shows the dependencies in the SQL Server 2008 service group. Thesame dependencies apply to a SQL Server 2008 R2 service group.
29Introducing the VCS agents for SQL Server and NetAppSQL Server 2008 sample dependency graph
Figure 1-2 SQL Server 2008 service group dependency graph
MSDTC sample dependency graphA sample configuration graphically depicts the resources and their dependencieswithin the service group. The following example describes a typical MSDTC servicegroup configured to monitor the state of the MSDTC services in a VCS cluster.
In the sample configuration shown in the dependency graph below, the shareddisk group is configured using the Volume Manager Diskgroup (VMDg) resource.The virtual name for the MSDTC Server is created using the Lanman resource.The service group IP address for the MSDTC Server is configured using the IP andNIC resources. The MountV mount point is created using the MountV resource.MSDTC registry is replicated using the RegRep and RegRepMountV resources.
Introducing the VCS agents for SQL Server and NetAppMSDTC sample dependency graph
30
The MSDTC resource comes online after each of these resources are broughtonline.
Figure 1-3 shows the dependencies in the MSDTC service group.
Figure 1-3 MSDTC service group dependency graph
Database monitoring optionsThe VCS database agent for Microsoft SQL Server provides two levels of applicationmonitoring: basic and detail. Basic monitoring queries the SCM to verify whetherthe SQL Server services are continuously active. Detail monitoring updates atemporary table in the SQL Server database to verify the availability of the databaseinstance.
Table 1-9 describes the methods of configuring detail monitoring for SQLdatabases.
31Introducing the VCS agents for SQL Server and NetAppDatabase monitoring options
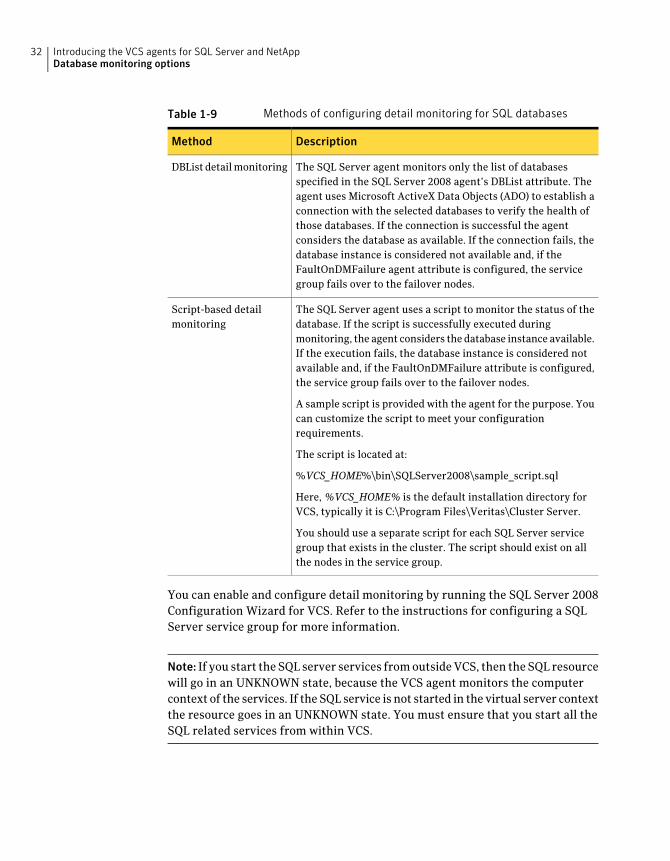
Table 1-9 Methods of configuring detail monitoring for SQL databases
DescriptionMethod
The SQL Server agent monitors only the list of databasesspecified in the SQL Server 2008 agent’s DBList attribute. Theagent uses Microsoft ActiveX Data Objects (ADO) to establish aconnection with the selected databases to verify the health ofthose databases. If the connection is successful the agentconsiders the database as available. If the connection fails, thedatabase instance is considered not available and, if theFaultOnDMFailure agent attribute is configured, the servicegroup fails over to the failover nodes.
DBList detail monitoring
The SQL Server agent uses a script to monitor the status of thedatabase. If the script is successfully executed duringmonitoring, the agent considers the database instance available.If the execution fails, the database instance is considered notavailable and, if the FaultOnDMFailure attribute is configured,the service group fails over to the failover nodes.
A sample script is provided with the agent for the purpose. Youcan customize the script to meet your configurationrequirements.
The script is located at:
%VCS_HOME%\bin\SQLServer2008\sample_script.sql
Here, %VCS_HOME% is the default installation directory forVCS, typically it is C:\Program Files\Veritas\Cluster Server.
You should use a separate script for each SQL Server servicegroup that exists in the cluster. The script should exist on allthe nodes in the service group.
Script-based detailmonitoring
You can enable and configure detail monitoring by running the SQL Server 2008Configuration Wizard for VCS. Refer to the instructions for configuring a SQLServer service group for more information.
Note: If you start the SQL server services from outside VCS, then the SQL resourcewill go in an UNKNOWN state, because the VCS agent monitors the computercontext of the services. If the SQL service is not started in the virtual server contextthe resource goes in an UNKNOWN state. You must ensure that you start all theSQL related services from within VCS.
Introducing the VCS agents for SQL Server and NetAppDatabase monitoring options
32
How the agents make SQL Server highly availableThe VCS database agent for Microsoft SQL Server detects an application failureif a configured virtual server becomes unavailable. The NetApp agents ensureconsistent data access to the node on which SQL Server instances are running.
This section describes how the agents migrate SQL Server to another node in localclusters and in global disaster recovery configurations.
Local cluster configuration after a failoverWhen the VCS database agent for Microsoft SQL Server detects an applicationfailure, the SQL Server service group is failed over to the next available systemin the service group’s system list. The configured SQL services and virtual serverare started on the new system. The NetApp agents connect the virtual disks (LUNs)that contain the SQL Server data to the new node; thus ensuring continuousavailability to SQL data.
Disaster recovery configuration after a failoverIn a disaster recovery configuration, VCS first attempts to fail over the applicationto a node in the local cluster. If all nodes in the local cluster are unavailable, or ifa disaster strikes the site, VCS attempts to fail over the application to the remotesite.
This involves the following steps:
■ Connecting the virtual disks (LUNs) to the target hosts (using theNetAppSnapDrive agent).
■ Performing a mirror break, which enables write access to the target (using theNetAppSnapMirror agent).
■ Reversing the direction of replication by demoting the original source to atarget, and begin replicating from the new source (using the NetAppSnapMirroragent).
■ Starting the SQL services on the remote node (using the VCS database agentfor SQL Server).
Running SQL Server in an Active-Active clusteredenvironment
In an Active-Active SQL Server configuration, several instances are intended torun on a single node when necessary. A SQL Server instance is a completely
33Introducing the VCS agents for SQL Server and NetAppHow the agents make SQL Server highly available
independent SQL Server installation, with its own services, master database,storage, and memory resources. Each instance is defined uniquely by a separateSQL Server virtual server and service group.
SQL Server allows multiple independent instances of SQL Server to run on a singlemachine. Using this feature, the VCS database agent for Microsoft SQL Serversupports SQL Server in an Active-Active environment by allowing a node to runup as many instances as supported by SQL. A SQL Server instance can fail overto any of the other cluster nodes that you specify when you configure the SQLServer service group.
You can choose an Active-Active SQL Server configuration where several instancesare intended to run on a single node. However, remember that you must configurefailover nodes such that a single node can never host more instances than whatis supported by SQL Server.
Refer to the Microsoft documentation for more information on multiple instancesupport.
Typical SQL Server 2008 configuration in a VCScluster
A typical SQL Server 2008 or SQL Server 2008 R2 configuration in a VCS clusterinvolves two cluster nodes accessing a shared storage. The SQL Server binariesare installed on the cluster nodes. The shared storage is used to store SQL Serverdata files and the MSDTC log files. The cluster nodes access the shared storage.The shared storage can be managed using NetApp suite of products.
The cluster nodes are configured to host the SQL Server 2008 resource, the SQLServer 2008 FILESTREAM resource, the SQL Server 2008 Analysis and Agentservice resources. The MSDTC resource can be configured on the same clusternodes. You need not configure an MSDTC client if the MSDTC resource isconfigured on the same nodes that have SQL Server 2008 resource configured.However, if the MSDTC resource is configured on other nodes, you must configurean MSDTC client to point to the virtual server name of the MSDTC resource.
Figure 1-4 depicts a two node cluster hosting a SQL Server 2008 service groupwith the different services configured. MSDTC resource is also configured on thesame nodes.
Introducing the VCS agents for SQL Server and NetAppTypical SQL Server 2008 configuration in a VCS cluster
34
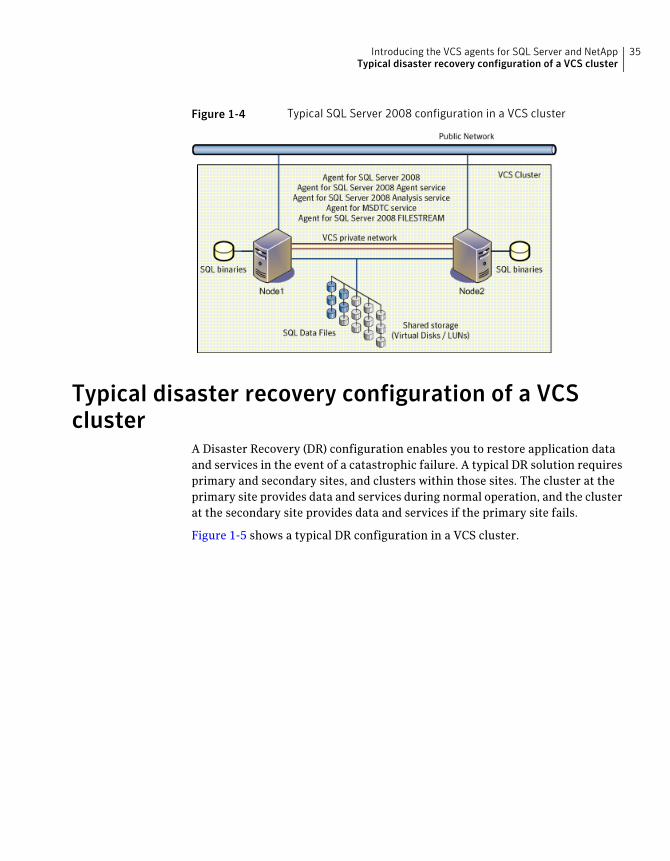
Figure 1-4 Typical SQL Server 2008 configuration in a VCS cluster
Typical disaster recovery configuration of a VCScluster
A Disaster Recovery (DR) configuration enables you to restore application dataand services in the event of a catastrophic failure. A typical DR solution requiresprimary and secondary sites, and clusters within those sites. The cluster at theprimary site provides data and services during normal operation, and the clusterat the secondary site provides data and services if the primary site fails.
Figure 1-5 shows a typical DR configuration in a VCS cluster.
35Introducing the VCS agents for SQL Server and NetAppTypical disaster recovery configuration of a VCS cluster
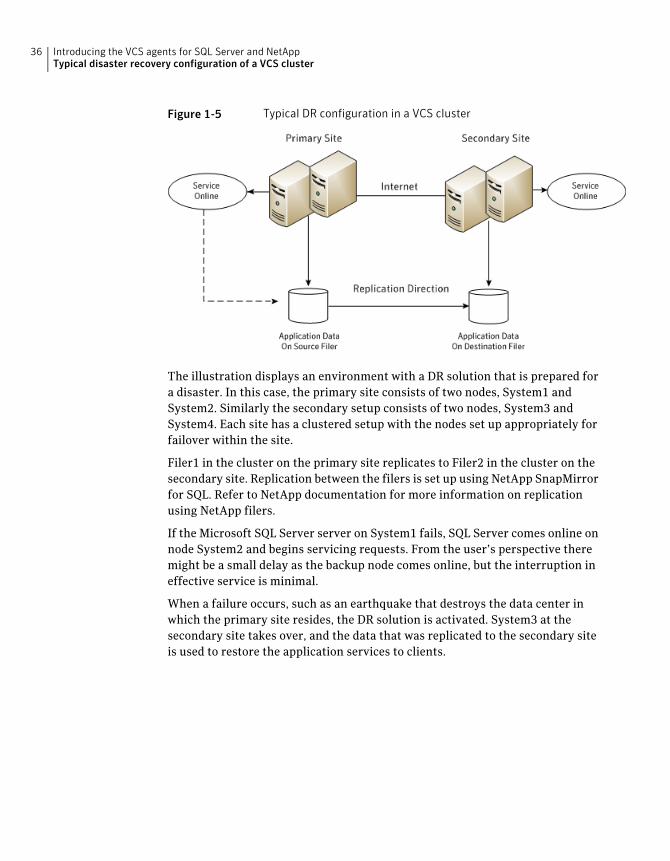
Figure 1-5 Typical DR configuration in a VCS cluster
The illustration displays an environment with a DR solution that is prepared fora disaster. In this case, the primary site consists of two nodes, System1 andSystem2. Similarly the secondary setup consists of two nodes, System3 andSystem4. Each site has a clustered setup with the nodes set up appropriately forfailover within the site.
Filer1 in the cluster on the primary site replicates to Filer2 in the cluster on thesecondary site. Replication between the filers is set up using NetApp SnapMirrorfor SQL. Refer to NetApp documentation for more information on replicationusing NetApp filers.
If the Microsoft SQL Server server on System1 fails, SQL Server comes online onnode System2 and begins servicing requests. From the user’s perspective theremight be a small delay as the backup node comes online, but the interruption ineffective service is minimal.
When a failure occurs, such as an earthquake that destroys the data center inwhich the primary site resides, the DR solution is activated. System3 at thesecondary site takes over, and the data that was replicated to the secondary siteis used to restore the application services to clients.
Introducing the VCS agents for SQL Server and NetAppTypical disaster recovery configuration of a VCS cluster
36
Installing and configuringVCS
This chapter includes the following topics:
■ About installing Veritas Cluster Server
■ Configuring the cluster using the Cluster Configuration Wizard
About installing Veritas Cluster ServerInstall Veritas Cluster Server (VCS) on all the systems where you want to configurethe application. During installation, the product installer installs the VCS agentsrequired for making the applications highly available.
You must install the VCS agents before configuring the application with VCS.
Refer to the Veritas Cluster Server for Windows Installation and Upgrade Guidefor instructions.
Configuring the cluster using the ClusterConfiguration Wizard
After installing the software, set up the components required to run Veritas ClusterServer. The VCS Cluster Configuration Wizard (VCW) sets up the clusterinfrastructure, including LLT and GAB, the user account for the VCS Helper service,and provides an option for configuring the VCS Authentication Service in thecluster. The wizard also configures the ClusterService group, which containsresources for notification and global clusters (GCO). You can also use VCW tomodify or delete cluster configurations.
2Chapter
Note: After configuring the cluster you must not change the names of the nodesthat are part of the cluster. If you wish to change a node name, run this wizard toremove the node from the cluster, rename the system, and then run this wizardagain to add that system to the cluster.
Note the following prerequisites before you proceed:
■ Verify that the public network adapters on each node use static IP addresses(DHCP is not supported) and name resolution is configured for each node.
■ Symantec recommends that you use three network adapters (two NICsexclusively for the VCS private network and one for the public network) persystem. You can implement the second private link as a low-priority link overa public interface. Route each private NIC through a separate hub or switchto avoid single points of failure. Symantec recommends that you disable TCP/IPfrom private NICs to lower system overhead.
■ The logged on user must have local Administrator privileges on the systemwhere you run the wizard. The user account must be a domain user account.
■ The logged on user must have administrative access to all systems selectedfor cluster operations. Add the domain user account to the local Administratorgroup of each system.
■ If you plan to create a new user account for the VCS Helper service, the loggedon user must have Domain Administrator privileges or must belong to theDomain Account Operators group.
■ When configuring a user account for the VCS Helper service, make sure thatthe user account is a domain user. The VCS High Availability Engine (HAD),which runs in the context of the local system built-in account, uses the VCSHelper Service user context to access the network. This account does notrequire Domain Administrator privileges.
■ Make sure the VCS Helper Service domain user account has "Add workstationsto domain" privilege enabled in the Active Directory.
■ In case of a NetApp storage environment, the user account for the VCS Helperservice must have administrative privileges on the NetApp filer.
■ If you plan to set up a disaster recovery (DR) environment, you must configurethe wide-area connector process for global clusters.
■ If you are setting up a Replicated Data Cluster configuration, add only thesystems in the primary zone (zone 0) to the cluster, at this time.
Installing and configuring VCSConfiguring the cluster using the Cluster Configuration Wizard
38
To configure a VCS cluster using the wizard
1 Click Start > All Programs > Symantec > Veritas Cluster Server >ConfigurationTools>ClusterConfigurationWizard to start the VCS ClusterConfiguration Wizard.
2 Read the information on the Welcome panel and click Next.
3 On the Configuration Options panel, click ClusterOperations and click Next.
4 On the Domain Selection panel, select or type the name of the domain inwhich the cluster resides and select the discovery options.
To discover information about all systems and users in the domain, do thefollowing:
■ Clear Specify systems and users manually.
■ Click Next.Proceed to step 8.
To specify systems and user names manually (recommended for largedomains), do the following:
■ Select Specify systems and users manually.Additionally, you may instruct the wizard to retrieve a list of systems andusers in the domain by selecting appropriate check boxes.
■ Click Next.If you chose to retrieve the list of systems, proceed to step 6. Otherwise,proceed to the next step.
5 On the System Selection panel, type the name of each system to be added,click Add, and then click Next.
Do not specify systems that are part of another cluster.
Proceed to step 8.
6 On the System Selection panel, specify the systems for the cluster and thenclick Next.
Do not select systems that are part of another cluster.
Enter the name of the system and click Add to add the system to the SelectedSystems list, or click to select the system in the Domain Systems list and thenclick the > (right-arrow) button.
7 The System Report panel displays the validation status, whether Acceptedor Rejected, of all the systems you specified earlier. Review the status andthen click Next.
39Installing and configuring VCSConfiguring the cluster using the Cluster Configuration Wizard
Select the system to see the validation details. If you wish to include a rejectedsystem, rectify the error based on the reason for rejection and then run thewizard again.
A system can be rejected for any of the following reasons:
■ System is not pingable.
■ WMI access is disabled on the system.
■ Wizard is unable to retrieve the system architecture or operating system.
■ VCS is either not installed on the system or the version of VCS is differentfrom what is installed on the system on which you are running the wizard.
8 On the Cluster Configuration Options panel, click Create New Cluster andthen click Next.
Installing and configuring VCSConfiguring the cluster using the Cluster Configuration Wizard
40
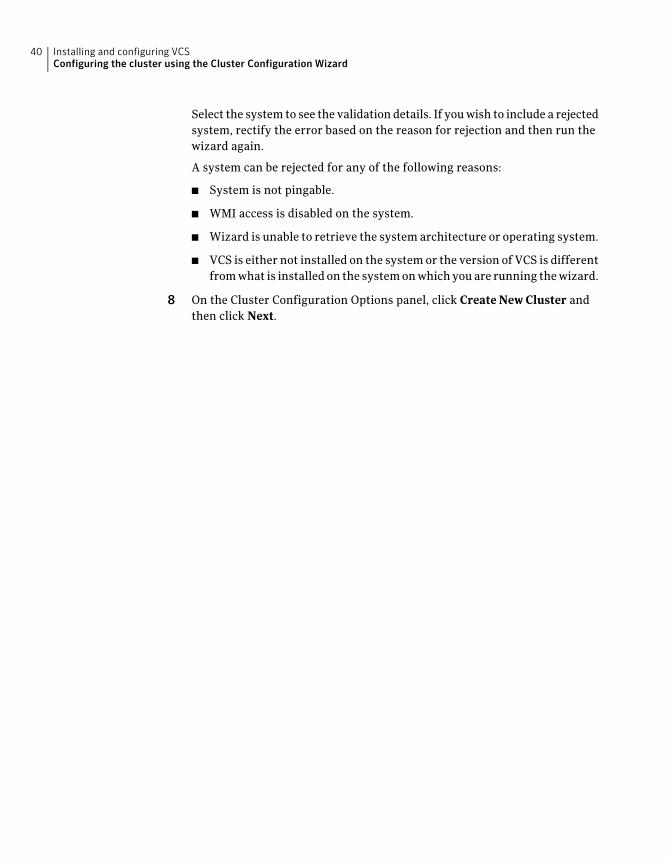
9 On the Cluster Details panel, specify the details for the cluster and then clickNext.
Specify the cluster details as follows:
Type a name for the new cluster. Symantec recommends amaximum length of 32 characters for the cluster name.
Cluster Name
Select a cluster ID from the suggested cluster IDs in thedrop-down list, or type a unique ID for the cluster. The clusterID can be any number from 0 to 65535.
Cluster ID
Caution: If you chose to specify systems and users manually instep 4 or if you share a private network between more than onedomain, make sure that the cluster ID is unique.
From the drop-down list, select the operating system.Operating System
The Available Systems box then displays all the systems that arerunning the specified operating system.
All the systems in the cluster must have the same operatingsystem and architecture. You cannot configure a Windows Server2008 and a Windows Server 2008 R2 system in the same cluster.
41Installing and configuring VCSConfiguring the cluster using the Cluster Configuration Wizard

Select the systems that you wish to configure in the cluster.
Check the Select all systems check box to select all the systemssimultaneously.
The wizard discovers the NICs on the selected systems. Forsingle-node clusters with the required number of NICs, the wizardprompts you to configure a private link heartbeat. In the dialogbox, click Yes to configure a private link heartbeat.
Available Systems
10 The wizard validates the selected systems for cluster membership. After thesystems are validated, click Next.
If a system is not validated, review the message associated with the failureand restart the wizard after rectifying the problem.
If you chose to configure a private link heartbeat in step 9, proceed to thenext step. Otherwise, proceed to step 12.
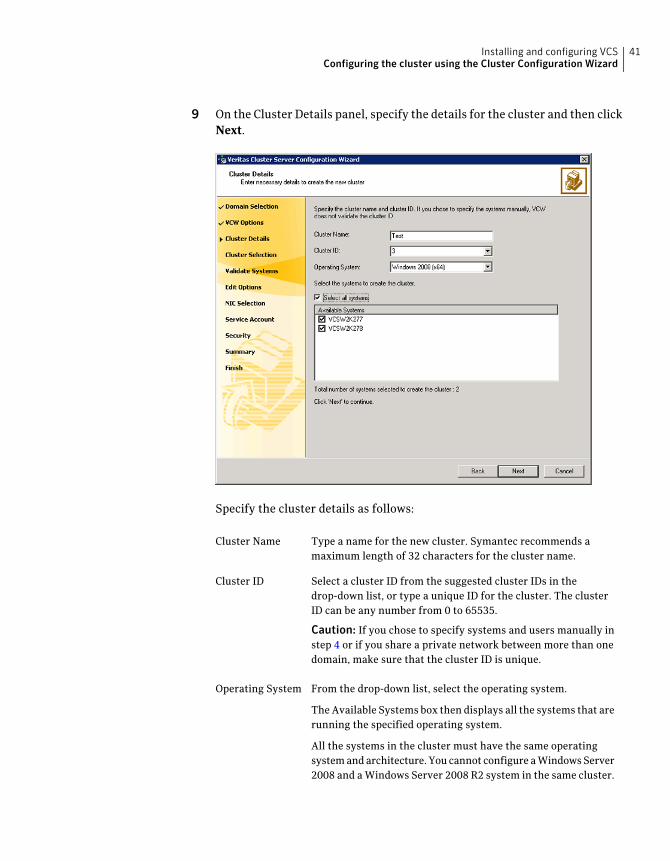
11 On the Private Network Configuration panel, configure the VCS privatenetwork and then click Next. You can configure the VCS private networkeither over the ethernet or over the User Datagram Protocol (UDP) layer usingIPv4 or IPv6 network.
Do one of the following:
■ To configure the VCS private network over ethernet, complete thefollowing steps:
Installing and configuring VCSConfiguring the cluster using the Cluster Configuration Wizard
42
■ Select Configure LLT over Ethernet.
■ Select the check boxes next to the two NICs to be assigned to the privatenetwork. You can assign a maximum of eight network links.Symantec recommends reserving two NICs exclusively for the privatenetwork. However, you could lower the priority of one of the NICs and usethe low-priority NIC for both public and as well as private communication.
■ If there are only two NICs on a selected system, Symantec recommendsthat you lower the priority of at least one NIC that will be used for privateas well as public network communication.To lower the priority of a NIC, right-click the NIC and select LowPriorityfrom the pop-up menu.
■ If your configuration contains teamed NICs, the wizard groups them as"NIC Group #N" where "N" is a number assigned to the teamed NIC. Ateamed NIC is a logical NIC, formed by grouping several physical NICstogether. All NICs in a team have an identical MAC address. Symantecrecommends that you do not select teamed NICs for the private network.The wizard configures the LLT service (over ethernet) on the selectednetwork adapters.
43Installing and configuring VCSConfiguring the cluster using the Cluster Configuration Wizard
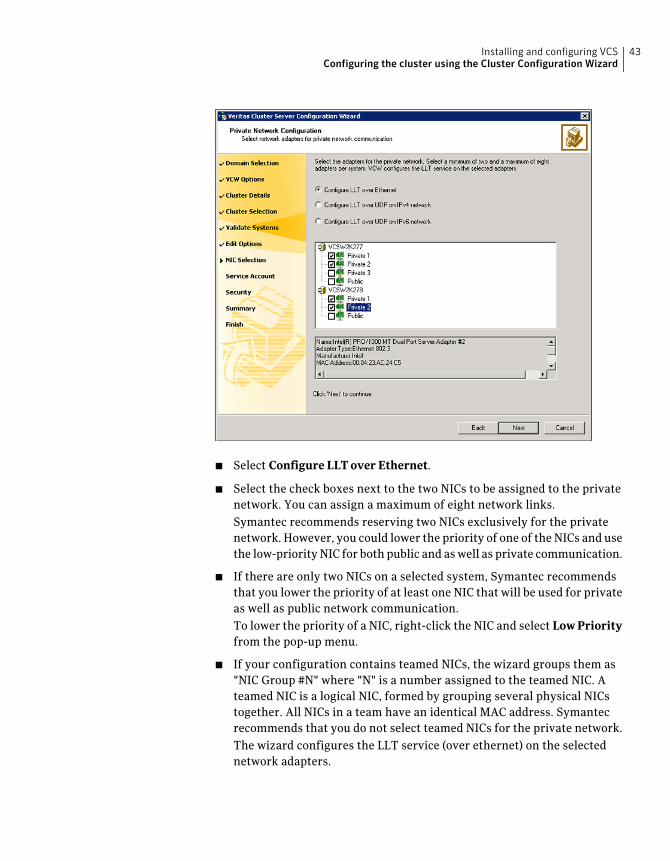
■ To configure the VCS private network over the User Datagram Protocol(UDP) layer, complete the following steps:
■ Select Configure LLT over UDP on IPv4 network or Configure LLT overUDP on IPv6 network depending on the IP protocol that you wish to use.The IPv6 option is disabled if the network does not support IPv6.
■ Select the check boxes next to the NICs to be assigned to the privatenetwork. You can assign a maximum of eight network links. Symantecrecommends reserving two NICs exclusively for the VCS private network.
■ For each selected NIC, verify the displayed IP address. If a selected NIChas multiple IP addresses assigned, double-click the field and choose thedesired IP address from the drop-down list. In case of IPv4, each IP addresscan be in a different subnet.The IP address is used for the VCS private communication over thespecified UDP port.
■ Specify a unique UDP port for each of the link. Click EditPorts if you wishto edit the UDP ports for the links. You can use ports in the range 49152to 65535. The default ports numbers are 50000 and 50001 respectively.Click OK.
Installing and configuring VCSConfiguring the cluster using the Cluster Configuration Wizard
44
For each selected NIC, double-click the respective field in the Link columnand choose a link from the drop-down list. Specify a different link (Link1or Link2) for each NIC. Each link is associated with a UDP port that youspecified earlier.The wizard configures the LLT service (over UDP) on the selected networkadapters. The specified UDP ports are used for the private networkcommunication.
12 On the VCS Helper Service User Account panel, specify the name of a domainuser for the VCS Helper Service.
The VCS High Availability Engine (HAD), which runs in the context of thelocal system built-in account, uses the VCS Helper Service user context toaccess the network. This account does not require Domain Administratorprivileges.
Specify the domain user details as follows:
■ To specify an existing user, do one of the following:
■ Click Existing user and select a user name from the drop-down list.
■ If you chose not to retrieve the list of users in step 4, type the username in the Specify User field and then click Next.
■ To specify a new user, click New user and type a valid user name in theCreate New User field and then click Next.Do not append the domain name to the user name; do not type the username as Domain\user or user@domain.
■ In the Password dialog box, type the password for the specified user andclick OK, and then click Next.
13 On the Configure Security Service Option panel, specify security options forthe cluster communications and then click Next.
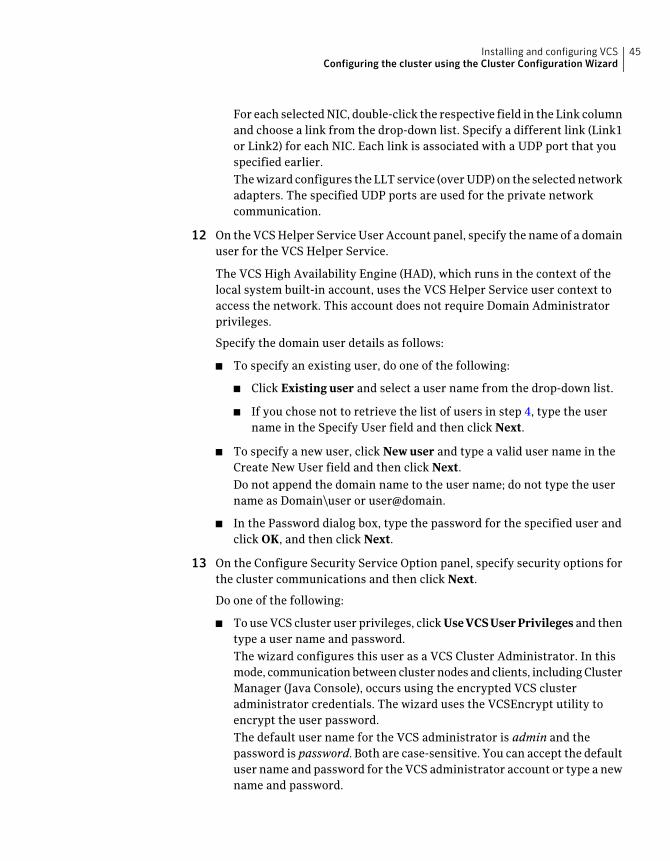
Do one of the following:
■ To use VCS cluster user privileges, click UseVCSUserPrivileges and thentype a user name and password.The wizard configures this user as a VCS Cluster Administrator. In thismode, communication between cluster nodes and clients, including ClusterManager (Java Console), occurs using the encrypted VCS clusteradministrator credentials. The wizard uses the VCSEncrypt utility toencrypt the user password.The default user name for the VCS administrator is admin and thepassword is password. Both are case-sensitive. You can accept the defaultuser name and password for the VCS administrator account or type a newname and password.
45Installing and configuring VCSConfiguring the cluster using the Cluster Configuration Wizard
Symantec recommends that you specify a new user name and password.
■ To use the single sign-on feature, click Use Single Sign-on.In this mode, the VCS Authentication Service is used to securecommunication between cluster nodes and clients by using digitalcertificates for authentication and SSL to encrypt communication overthe public network. VCS uses SSL encryption and platform-basedauthentication. The VCS high availability engine (HAD) and VeritasCommand Server run in secure mode.The wizard configures all the cluster nodes as root brokers (RB) andauthentication brokers (AB). Authentication brokers serve as intermediateregistration and certification authorities. Authentication brokers havecertificates signed by the root. These brokers can authenticate clientssuch as users and services. The wizard creates a copy of the certificateson all the cluster nodes.
14 Review the summary information on the Summary panel, and click Configure.
The wizard configures the VCS private network. If the selected systems haveLLT or GAB configuration files, the wizard displays an informational dialogbox before overwriting the files. In the dialog box, click OK to overwrite thefiles. Otherwise, click Cancel, exit the wizard, move the existing files to adifferent location, and rerun the wizard.
The wizard starts running commands to configure VCS services. If anoperation fails, click View configuration log file to see the log.
15 On the Completing Cluster Configuration panel, click Next to configure theClusterService group; this group is required to set up components fornotification and for global clusters.
To configure the ClusterService group later, click Finish.
At this stage, the wizard has collected the information required to set up thecluster configuration. After the wizard completes its operations, with orwithout the ClusterService group components, the cluster is ready to hostapplication service groups. The wizard also starts the VCS engine (HAD) andthe Veritas Command Server at this stage.
16 On the Cluster Service Components panel, select the components to beconfigured in the ClusterService group and then click Next.
Do the following:
■ Check the NotifierOption check box to configure notification of importantevents to designated recipients.See “Configuring notification” on page 47.
Installing and configuring VCSConfiguring the cluster using the Cluster Configuration Wizard
46
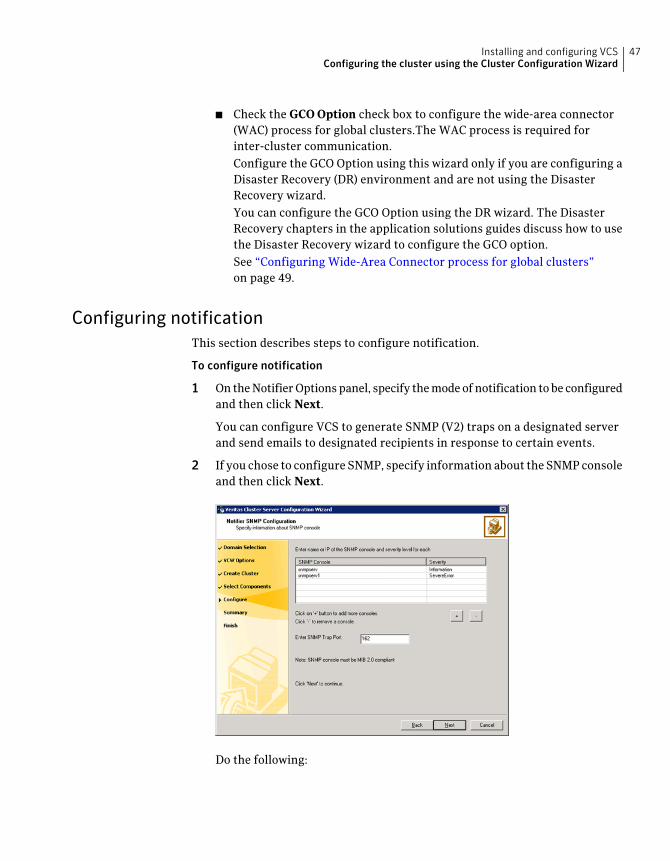
■ Check the GCO Option check box to configure the wide-area connector(WAC) process for global clusters.The WAC process is required forinter-cluster communication.Configure the GCO Option using this wizard only if you are configuring aDisaster Recovery (DR) environment and are not using the DisasterRecovery wizard.You can configure the GCO Option using the DR wizard. The DisasterRecovery chapters in the application solutions guides discuss how to usethe Disaster Recovery wizard to configure the GCO option.See “Configuring Wide-Area Connector process for global clusters”on page 49.
Configuring notificationThis section describes steps to configure notification.
To configure notification
1 On the Notifier Options panel, specify the mode of notification to be configuredand then click Next.
You can configure VCS to generate SNMP (V2) traps on a designated serverand send emails to designated recipients in response to certain events.
2 If you chose to configure SNMP, specify information about the SNMP consoleand then click Next.
Do the following:
47Installing and configuring VCSConfiguring the cluster using the Cluster Configuration Wizard
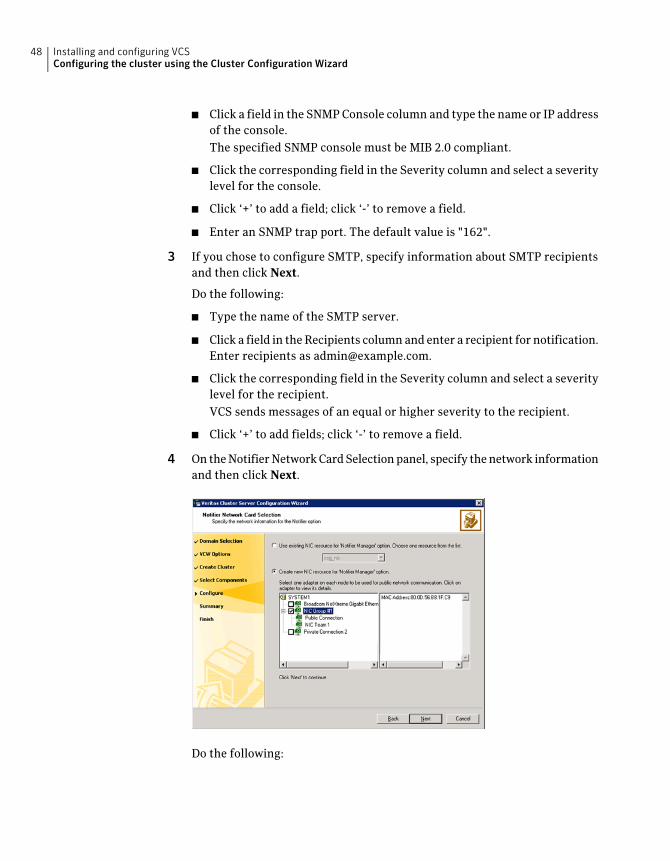
■ Click a field in the SNMP Console column and type the name or IP addressof the console.The specified SNMP console must be MIB 2.0 compliant.
■ Click the corresponding field in the Severity column and select a severitylevel for the console.
■ Click ‘+’ to add a field; click ‘-’ to remove a field.
■ Enter an SNMP trap port. The default value is "162".
3 If you chose to configure SMTP, specify information about SMTP recipientsand then click Next.
Do the following:
■ Type the name of the SMTP server.
■ Click a field in the Recipients column and enter a recipient for notification.Enter recipients as [email protected].
■ Click the corresponding field in the Severity column and select a severitylevel for the recipient.VCS sends messages of an equal or higher severity to the recipient.
■ Click ‘+’ to add fields; click ‘-’ to remove a field.
4 On the Notifier Network Card Selection panel, specify the network informationand then click Next.
Do the following:
Installing and configuring VCSConfiguring the cluster using the Cluster Configuration Wizard
48
■ If the cluster has a ClusterService group configured, you can use the NICresource configured in that service group or configure a new NIC resourcefor notification.
■ If you choose to configure a new NIC resource, select a network adapterfor each node in the cluster.The wizard lists the public network adapters along with the adapters thatwere assigned a low priority.
5 Review the summary information and choose whether you want to bring thenotification resources online when VCS starts and click Configure.
6 Click Finish to exit the wizard.
Configuring Wide-Area Connector process for global clustersConfigure the Wide-Area Connector process only if you are configuring a disasterrecovery environment. The GCO option configures the wide-area connector (WAC)process for global clusters. The WAC process is required for inter-clustercommunication. Configure the GCO Option using this wizard only if you areconfiguring a Disaster Recovery (DR) environment and are not using the DisasterRecovery wizard.
You can configure the GCO Option using the DR wizard. The Disaster Recoverychapters in the application solutions guides discuss how to use the DisasterRecovery wizard to configure the GCO option.
To configure the wide-area connector process for global clusters
1 On the GCO Network Selection panel, specify the network information andthen click Next.
49Installing and configuring VCSConfiguring the cluster using the Cluster Configuration Wizard
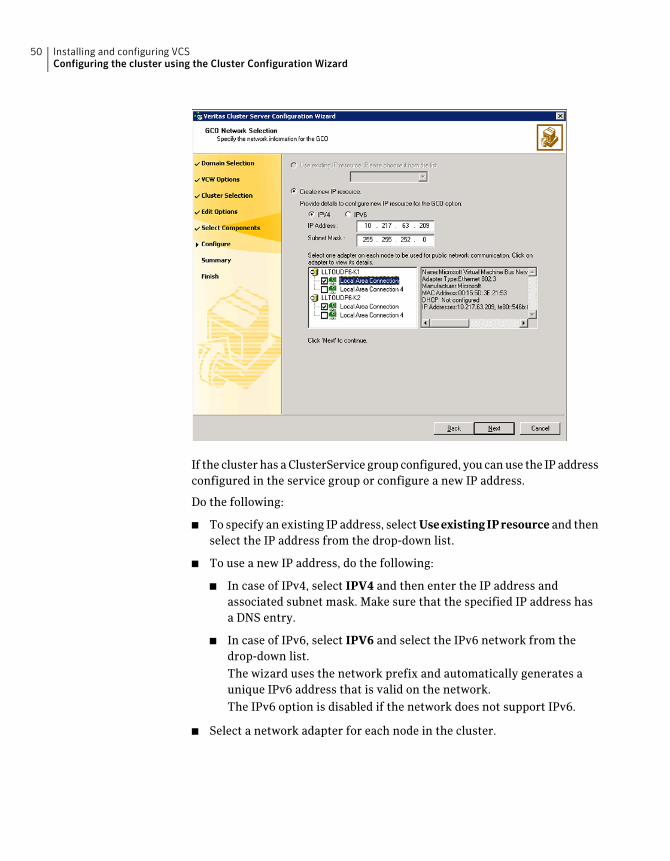
If the cluster has a ClusterService group configured, you can use the IP addressconfigured in the service group or configure a new IP address.
Do the following:
■ To specify an existing IP address, select UseexistingIPresource and thenselect the IP address from the drop-down list.
■ To use a new IP address, do the following:
■ In case of IPv4, select IPV4 and then enter the IP address andassociated subnet mask. Make sure that the specified IP address hasa DNS entry.
■ In case of IPv6, select IPV6 and select the IPv6 network from thedrop-down list.The wizard uses the network prefix and automatically generates aunique IPv6 address that is valid on the network.The IPv6 option is disabled if the network does not support IPv6.
■ Select a network adapter for each node in the cluster.
Installing and configuring VCSConfiguring the cluster using the Cluster Configuration Wizard
50

The wizard lists the public network adapters along with the adapters thatwere assigned a low priority.
2 Review the summary information and choose whether you want to bring theWAC resources online when VCS starts and then click Configure.
3 Click Finish to exit the wizard.
51Installing and configuring VCSConfiguring the cluster using the Cluster Configuration Wizard

Installing and configuring VCSConfiguring the cluster using the Cluster Configuration Wizard
52
Installing SQL Server 2008or 2008 R2 in a VCSenvironment
This chapter includes the following topics:
■ About installing SQL Server in a VCS environment
■ About installing multiple SQL instances
■ Prerequisites for installing SQL Server
■ Managing storage using NetApp filer
■ Managing storage using Windows Logical Disk Manager
■ Installing SQL Server 2008 or 2008 R2 on the first cluster node
■ Installing SQL Server 2008 or 2008 R2 on the additional cluster nodes
■ Assigning ports for multiple SQL Server instances
■ Enabling IPv6 support for the SQL Server Analysis Service
About installing SQL Server in a VCS environmentThis chapter provides information for installing and configuring SQL Server ina VCS environment. This environment uses an active-passive configuration withone to one failover capabilities.
This is applicable for both SQL Server 2008 and SQL Server 2008 R2.
Installing and configuring SQL Server involves the following tasks:
3Chapter
■ Installing SQL Server on the first cluster node.You must install the SQL instance on the local disk and install the SQL databasefiles and analysis service files on the shared storage.The shared storage mustbe accessible from all the nodes where you wish to install and configure SQLServer.
■ Installing SQL Server on additional cluster nodes.You must install the SQL instances, database files, and analysis service fileson the local disk. You need not install the database files and the analysis servicefiles on shared storage.The advantage of this method is that while you are installing SQL Server onthe first cluster node, you can run parallel installations on the remainingcluster nodes.
■ Configuring the SQL Server service group using the SQL Server ConfigurationWizard and bringing it online on the first node.You must run the wizard from the first cluster node where you installed theSQL Server database and analysis service files on shared storage. This isrequired as the wizard configures the resources for the SQL Server databaseand registry information installed on the shared storage and propagates thisinformation to the remaining nodes that are part of the SQL service group.When the service group fails over to any additional cluster node, thisinformation moves to that node and the SQL instance is brought online onthat node.
To configure MSDTC service groups.
See “About configuring the MSDTC service group” on page 87.
If you already have an existing SQL Server deployment, you can make it highlyavailable using VCS.
See “About making a standalone SQL server highly available” on page 99.
If you are planning to deploy an active-active configuration with multiple SQLinstances.
See “About active-active configuration” on page 107.
About installing multiple SQL instancesIf you are installing multiple instances of SQL Server on the same system, as inan active-active cluster configuration, the following additional requirementsapply.
Installing SQL Server 2008 or 2008 R2 in a VCS environmentAbout installing multiple SQL instances
54
■ Symantec recommends that you must follow all steps for installing and settingup high availability for the first instance before you begin installing the nextinstance.
■ Assign a unique name and a unique instance ID to each SQL instance. Wheninstalling SQL Server on additional nodes for the same instance, ensure thatyou specify the same instance name and ID.
■ Assign a unique port number for each instance.
■ The order of the instance installation does not matter. You must ensure thatthe instances are installed with the same name and ID.
Prerequisites for installing SQL ServerEnsure the following before you install SQL Server:
■ Verify that VCS is installed on all the systems where you want to install andconfigure SQL Server.Refer to theVCS forWindows Install andUpgradeGuide for more information.
■ Verify that you have configured a VCS cluster using VCS Cluster ConfigurationWizard (VCW).See “Configuring the cluster using the Cluster Configuration Wizard”on page 37.
■ If using iSCSI, verify that the Microsoft iSCSI Initiator is configured to establisha persistent connection between the NetApp filer and the cluster nodes. Seethe Microsoft documentation for instructions.
■ Ensure that you have created volumes on an external, basic disk, or LUNs(virtual disks) on a NetApp filer. Mount or connect them to the first clusternode where you will install SQL.Ensure that the shared disks or filer LUNs are accessible from all the clusternodes where you will install SQL Server.
Symantec recommends that you create volumes for the following:
■ SQL Server data
■ Registry replication
■ User defined database
■ User defined database logs
■ FILESTREAM enabled database objects
See “Managing storage using NetApp filer” on page 57.See “Managing storage using Windows Logical Disk Manager” on page 60.
55Installing SQL Server 2008 or 2008 R2 in a VCS environmentPrerequisites for installing SQL Server
■ If your cluster has an Exchange service group configured, make sure to installSQL Server on a node that is not in the SystemList attribute for the Exchangeservice group.
Privileges required for installing SQL ServerThe following privileges are required for installing SQL Server:
■ The logged-on user must be a domain user with local Administrator privileges.
■ The logged-on user must be a member of the local Administrators group onall nodes where you will install Microsoft SQL Server.
■ The logged-on user or the VCS Helper Service user account must have writepermissions for the Active Directory objects corresponding to these nodes.
■ The logged-on user or the VCS Helper Service user account must have writepermissions on the DNS server to perform DNS updates.
Configuring Microsoft iSCSI initiatorThe Microsoft iSCSI initiator enables communication between Windows systemsand NetApp Filers. The initiator uses the iSCSI protocol to present the filer volumeas a local block device to the system.
To configure Microsoft iSCSI initiator on a Windows Server 2008 system
1 Start the Microsoft iSCSI initiator.
2 On the Discovery tab, click Add Portal.
3 On the Add Target Portal dialog box, specify the DNS name for the NetAppfiler and then click OK.
4 On the Targets tab, click Log On.
5 On the Log On to Target dialog box, clear the Automatically restore thisconnection when the system reboots check box and then click OK.
6 On the Targets tab, verify that the newly added portal is listed under theSelect a target box and the status shows "connected". Click OK.
To configure Microsoft iSCSI initiator on a Windows Server 2008 R2 system
1 Start the Microsoft iSCSI initiator.
2 On the Discovery tab, click Discover Portal.
3 On the Discover Target Portal dialog box, specify the DNS name for the NetAppfiler and then click OK.
4 On the Target tab, click Connect.
Installing SQL Server 2008 or 2008 R2 in a VCS environmentPrerequisites for installing SQL Server
56
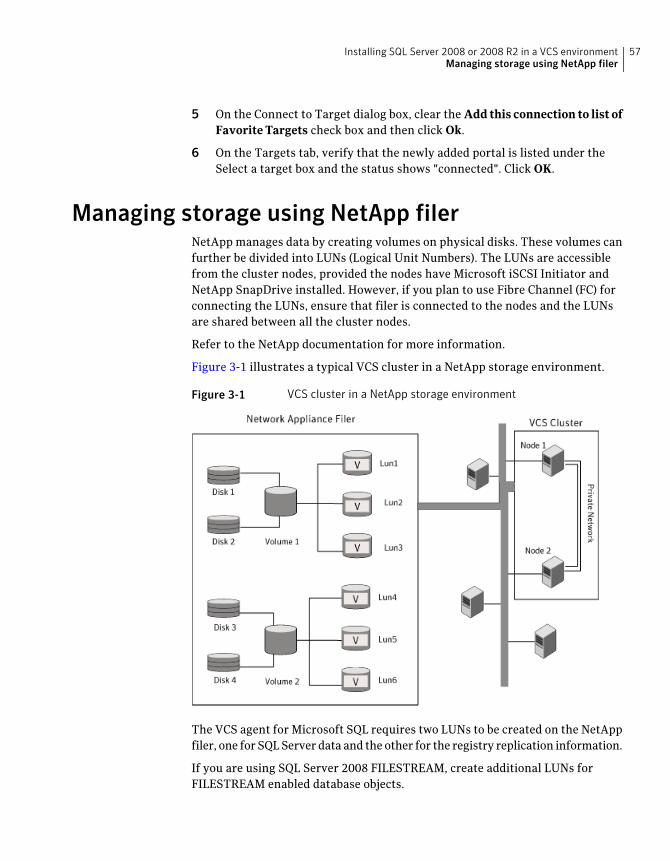
5 On the Connect to Target dialog box, clear the Add this connection to list ofFavorite Targets check box and then click Ok.
6 On the Targets tab, verify that the newly added portal is listed under theSelect a target box and the status shows "connected". Click OK.
Managing storage using NetApp filerNetApp manages data by creating volumes on physical disks. These volumes canfurther be divided into LUNs (Logical Unit Numbers). The LUNs are accessiblefrom the cluster nodes, provided the nodes have Microsoft iSCSI Initiator andNetApp SnapDrive installed. However, if you plan to use Fibre Channel (FC) forconnecting the LUNs, ensure that filer is connected to the nodes and the LUNsare shared between all the cluster nodes.
Refer to the NetApp documentation for more information.
Figure 3-1 illustrates a typical VCS cluster in a NetApp storage environment.
Figure 3-1 VCS cluster in a NetApp storage environment
The VCS agent for Microsoft SQL requires two LUNs to be created on the NetAppfiler, one for SQL Server data and the other for the registry replication information.
If you are using SQL Server 2008 FILESTREAM, create additional LUNs forFILESTREAM enabled database objects.
57Installing SQL Server 2008 or 2008 R2 in a VCS environmentManaging storage using NetApp filer
If you plan to configure an MSDTC service group, create additional volumes forMSDTC log and MSDTC registry replication. These LUNs must be accessible fromall cluster nodes.
Symantec recommends that you create separate LUNs (virtual disks) for thefollowing:
■ INST1_DATA_FILESContains the SQL Server system data files (including the master, model, msdb,and tempdb databases).
■ INST1_REGREP_VOLContains the list of registry keys that must be replicated among cluster systemsfor the SQL Service. Create a 100 MB (minimum recommended size) volumefor this purpose.
■ INST1_FS_VOLContains FILESTREAM enabled database objects for the SQL database.
■ INST1_DB1_VOLContains the user database files.
■ INST1_DB1_LOGContains the user database log files.
■ INST1_DB1_FS_VOLContains FILESTREAM enabled database objects for the user database
These LUNs must be accessible from all cluster nodes.
Perform the following tasks to create LUNs on the NetApp filer and to make themaccessible from cluster nodes:
■ Add the filer storage system to the SnapDrive Storage System Managementsnap-in on the cluster nodes.
■ Create volumes on the NetApp filer.
■ Share the volumes.
■ Create LUNs or virtual disks on the shared volumes.Refer to NetApp documentation for instructions on performing these tasks.
Connecting virtual disks to the cluster nodeOnce the virtual disks are created on the NetApp filer, they must be connected (ifnot connected already) to the cluster nodes using NetApp SnapDrive.
Installing SQL Server 2008 or 2008 R2 in a VCS environmentManaging storage using NetApp filer
58
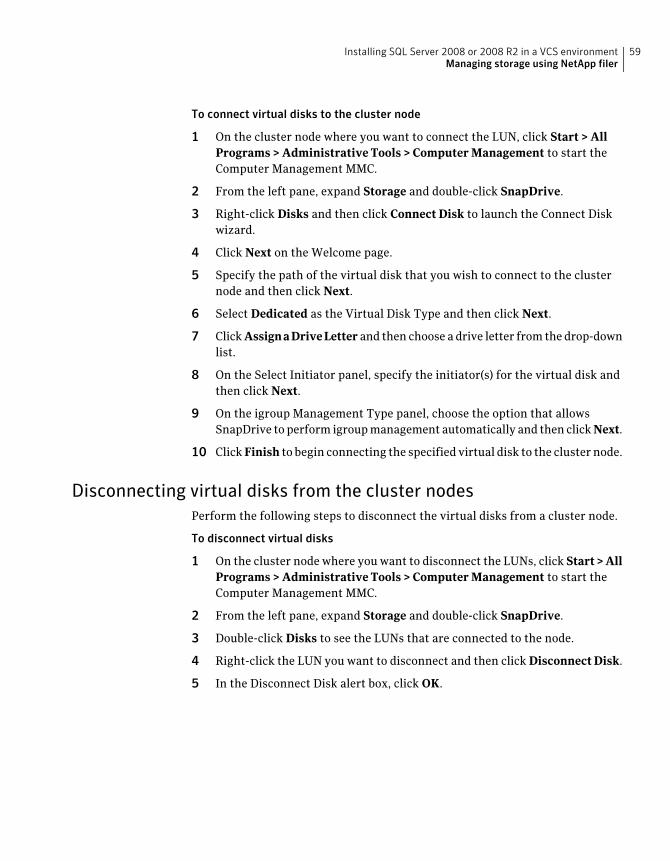
To connect virtual disks to the cluster node
1 On the cluster node where you want to connect the LUN, click Start > AllPrograms > Administrative Tools > Computer Management to start theComputer Management MMC.
2 From the left pane, expand Storage and double-click SnapDrive.
3 Right-click Disks and then click Connect Disk to launch the Connect Diskwizard.
4 Click Next on the Welcome page.
5 Specify the path of the virtual disk that you wish to connect to the clusternode and then click Next.
6 Select Dedicated as the Virtual Disk Type and then click Next.
7 Click AssignaDriveLetter and then choose a drive letter from the drop-downlist.
8 On the Select Initiator panel, specify the initiator(s) for the virtual disk andthen click Next.
9 On the igroup Management Type panel, choose the option that allowsSnapDrive to perform igroup management automatically and then click Next.
10 Click Finish to begin connecting the specified virtual disk to the cluster node.
Disconnecting virtual disks from the cluster nodesPerform the following steps to disconnect the virtual disks from a cluster node.
To disconnect virtual disks
1 On the cluster node where you want to disconnect the LUNs, click Start>AllPrograms > Administrative Tools > Computer Management to start theComputer Management MMC.
2 From the left pane, expand Storage and double-click SnapDrive.
3 Double-click Disks to see the LUNs that are connected to the node.
4 Right-click the LUN you want to disconnect and then click DisconnectDisk.
5 In the Disconnect Disk alert box, click OK.
59Installing SQL Server 2008 or 2008 R2 in a VCS environmentManaging storage using NetApp filer
Managing storage using Windows Logical DiskManager
If your configuration uses shared disks and volumes that are managed usingWindows Logical Disk Manager (LDM), use the VCS DiskReservation (DiskRes)and Mount (Mount) agents. Before configuring shared storage, review the resourcetypes and attribute definitions of the Disk Reservation and Mount agents describedin the Veritas Cluster Server Bundled Agents Reference Guide.
Note the following restrictions before you proceed to manage the storage usingLDM:
■ Disk Reservation and Mount agents are supported on VCS for Windows only.These agents are not supported in an SFW storage environment.
■ For using LDM, your storage devices must be configured to use SCSI-2 diskreservations. SCSI-3 is not supported.
■ LDM support is not applicable for Disaster Recovery configurations. Currentlyonly HA configurations are supported.
The VCS SQL Server agent requires that you create two volumes on the shareddisk, one for SQL Server data and the other for the registry replication information.
If you are using SQL Server 2008 FILESTREAM, create additional volumes forFILESTREAM enabled database objects.
If you will plan to configure an MSDTC service group, create additional volumesfor MSDTC log and MSDTC registry replication.
Symantec recommends that you create separate volumes for the following:
■ INST1_DATA_FILESContains the SQL Server system data files (including the master, model, msdb,and tempdb databases).
■ INST1_REGREP_VOLContains the list of registry keys that must be replicated among cluster systemsfor the SQL Service. Create a 100 MB (minimum recommended size) volumefor this purpose.
■ INST1_FS_VOLContains FILESTREAM enabled database objects for the SQL database.
■ INST1_DB1_VOLContains the user database files.
■ INST1_DB1_LOGContains the user database log files.
Installing SQL Server 2008 or 2008 R2 in a VCS environmentManaging storage using Windows Logical Disk Manager
60

■ INST1_DB1_FS_VOLContains FILESTREAM enabled database objects for the user database.
These volumes must be on the shared storage and should be accessible from allcluster nodes.
Perform the following tasks to create volumes and make them accessible fromthe cluster nodes:
■ Reserve disks.See “Reserving disks (if you use Windows LDM)” on page 61.
■ Create volumes.See “Creating volumes (if you use Windows LDM)” on page 61.
■ Mount volumes.See “Mounting volumes (if you use Windows LDM)” on page 62.
Reserving disks (if you use Windows LDM)Complete the following steps to reserve the disks on the node on which you aregoing to perform the application installation.
To reserve the disks
1 To display all the disks, type the following on the command line:
C:\>havol -scsitest /l
Make a note of the disk numbers (Disk# column in the table). You will needit in the next step.
2 To reserve a disk, type the following on the command line:
C:\>havol -scsitest /RES:<disk #>
For example, to reserve disk #4, type:
C:\>havol -scsitest /RES:4
Make a note of the disk number and the corresponding signature. You willrequire these details to identify and reserve the disks during installation andwhile configuring the service group, on additional nodes in the cluster.
Creating volumes (if you use Windows LDM)Perform the following steps to create volumes.
61Installing SQL Server 2008 or 2008 R2 in a VCS environmentManaging storage using Windows Logical Disk Manager
To create volumes
1 Use the Windows Disk Management tool to verify that the disks are visibleon the cluster nodes, and then create volumes on the reserved disks.
2 After creating the required volumes on a node, release the reserved disks onthat node.
See “Releasing disks (if you use Windows LDM)” on page 63.
3 Rescan the disks on all the remaining nodes in the cluster.
Refer to Microsoft Windows documentation for more information about theDisk Management tool.
Mounting volumes (if you use Windows LDM)Perform the following steps to mount volumes on a cluster node.
To mount a volume
1 Use the Windows Disk Management tool to mount the volumes that youcreated earlier.
2 After mounting the volumes on a cluster node, run the CHKDSK commandand verify that there are no errors on the mounted volumes.
3 Make a note of the drive letters that you assign to the mounted volumes.
Use the same drive letters while mounting these volumes on the remainingcluster nodes.
Refer to Microsoft Windows documentation for more information about theCHKDSK command and the Disk Management tool.
Unassigning a drive letterWhile installing an application on multiple nodes, you must first unassign driveletters and release the disks from one node, and then reserve the disks, mountthe volumes using the same drive letters and then install the application on thefailover node.
Note: You must run Disk Management on all systems each time you add a shareddisk. This ensures each disk has a valid signature written to it, and that the devicepaths and symbolic links are updated.
Complete these steps to unassign the drive letters from a node.
Installing SQL Server 2008 or 2008 R2 in a VCS environmentManaging storage using Windows Logical Disk Manager
62
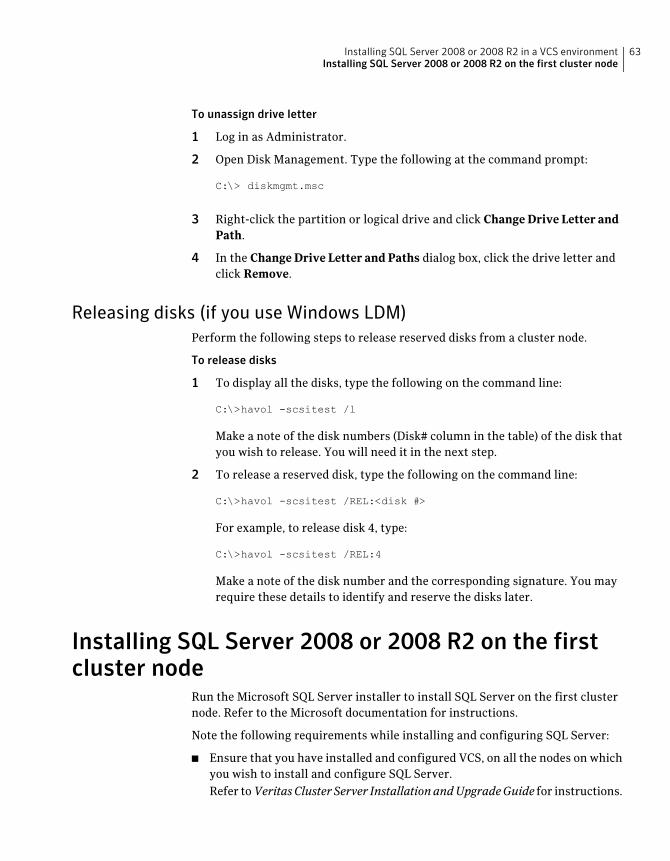
To unassign drive letter
1 Log in as Administrator.
2 Open Disk Management. Type the following at the command prompt:
C:\> diskmgmt.msc
3 Right-click the partition or logical drive and click Change Drive Letter andPath.
4 In the Change Drive Letter and Paths dialog box, click the drive letter andclick Remove.
Releasing disks (if you use Windows LDM)Perform the following steps to release reserved disks from a cluster node.
To release disks
1 To display all the disks, type the following on the command line:
C:\>havol -scsitest /l
Make a note of the disk numbers (Disk# column in the table) of the disk thatyou wish to release. You will need it in the next step.
2 To release a reserved disk, type the following on the command line:
C:\>havol -scsitest /REL:<disk #>
For example, to release disk 4, type:
C:\>havol -scsitest /REL:4
Make a note of the disk number and the corresponding signature. You mayrequire these details to identify and reserve the disks later.
Installing SQL Server 2008 or 2008 R2 on the firstcluster node
Run the Microsoft SQL Server installer to install SQL Server on the first clusternode. Refer to the Microsoft documentation for instructions.
Note the following requirements while installing and configuring SQL Server:
■ Ensure that you have installed and configured VCS, on all the nodes on whichyou wish to install and configure SQL Server.Refer toVeritasCluster Server InstallationandUpgradeGuide for instructions.
63Installing SQL Server 2008 or 2008 R2 in a VCS environmentInstalling SQL Server 2008 or 2008 R2 on the first cluster node
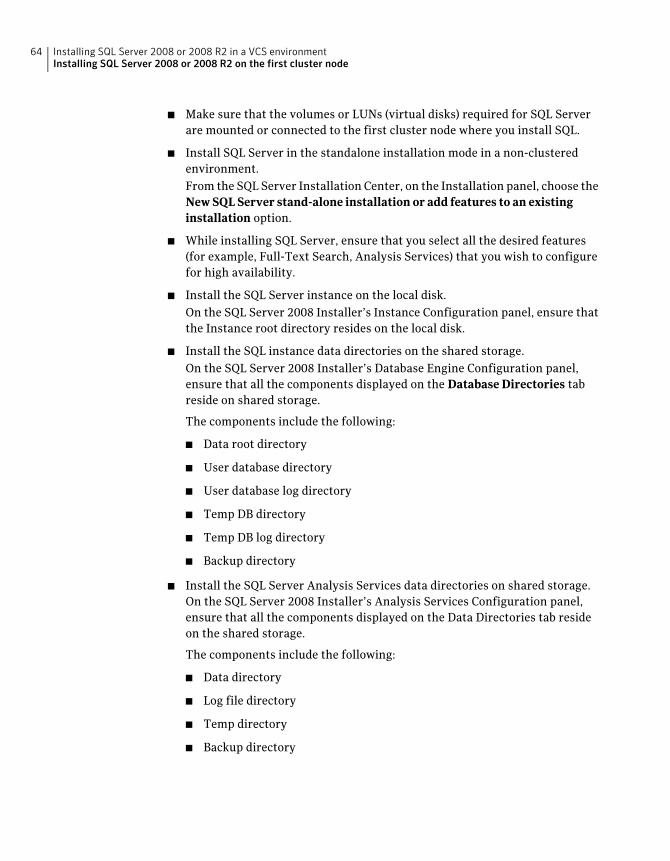
■ Make sure that the volumes or LUNs (virtual disks) required for SQL Serverare mounted or connected to the first cluster node where you install SQL.
■ Install SQL Server in the standalone installation mode in a non-clusteredenvironment.From the SQL Server Installation Center, on the Installation panel, choose theNew SQL Server stand-alone installation or add features to an existinginstallation option.
■ While installing SQL Server, ensure that you select all the desired features(for example, Full-Text Search, Analysis Services) that you wish to configurefor high availability.
■ Install the SQL Server instance on the local disk.On the SQL Server 2008 Installer’s Instance Configuration panel, ensure thatthe Instance root directory resides on the local disk.
■ Install the SQL instance data directories on the shared storage.On the SQL Server 2008 Installer’s Database Engine Configuration panel,ensure that all the components displayed on the Database Directories tabreside on shared storage.
The components include the following:
■ Data root directory
■ User database directory
■ User database log directory
■ Temp DB directory
■ Temp DB log directory
■ Backup directory
■ Install the SQL Server Analysis Services data directories on shared storage.On the SQL Server 2008 Installer’s Analysis Services Configuration panel,ensure that all the components displayed on the Data Directories tab resideon the shared storage.
The components include the following:
■ Data directory
■ Log file directory
■ Temp directory
■ Backup directory
Installing SQL Server 2008 or 2008 R2 in a VCS environmentInstalling SQL Server 2008 or 2008 R2 on the first cluster node
64
■ Make a note of the SQL instance name and instance ID. You must use the sameinstance name and instance ID when you install the SQL Server instance onadditional failover nodes.
■ If you are installing multiple instances of SQL in the cluster, each instancemust have a unique instance name and instance ID. Use the same instancename and instance ID when you install the SQL instances on the additionalnodes.
■ While specifying a user name for the SQL Server services account, specify adomain user account.
■ If the domain user account specified for the SQL Server services is not part ofthe local Administrators group on all the SQL Server nodes, then you mustconfigure the VCS SQL agent's SQLClusterAccount attribute while configuringthe SQL Server service group later.
■ Apart from the SQL Browser service, make sure that the other SQL Serverservices are not set to start at the end of the SQL installation. While installingSQL Server on the first node, set the startup type of all the SQL Server servicesto manual. However, set the startup type of the SQL Server Browser serviceto automatic. You must do this only for the instance which you have installed.You can change the services startup type either during the installation or usingthe SQL Server Configuration Manager after the installation. Refer to theMicrosoft documentation for instructions.
Installing SQL Server 2008 or 2008 R2 on theadditional cluster nodes
Run the Microsoft SQL Server installer to install SQL Server on the second or anyadditional cluster node. Refer to the Microsoft documentation for instructions.
Note the following prerequisites before installing SQL Server on the second orany additional failover nodes:
■ Ensure that you have installed and configured VCS, on all the nodes on whichyou wish to install and configure SQL Server. Refer to theVeritasCluster ServerInstallation and Upgrade Guide for instructions.
■ Install SQL Server in the standalone installation mode in a non-clusteredenvironment.From the SQL Server Installation Center, on the Installation panel, choose theNew SQL Server stand-alone installation or add features to an existinginstallation option.
65Installing SQL Server 2008 or 2008 R2 in a VCS environmentInstalling SQL Server 2008 or 2008 R2 on the additional cluster nodes

■ While installing SQL Server on additional cluster nodes, install the SQLinstance, the data directories, and Analysis Services data directories on a localdisk. You do not have to install these files on the shared storage.If you choose to install the SQL database files to a shared storage, ensure thatthe shared storage location are not the same as that used while installing SQLon the first cluster node.Ensure that you do not overwrite the database directories created by the SQLinstallation on the first cluster node.
■ While installing SQL Server, ensure that you select all the desired features(for example, Full-Text Search, Analysis Services) that you wish to configurefor high availability.
■ While installing the SQL instances on additional nodes, ensure that you specifythe same instance names and instance IDs that you used while installing theinstances on the first cluster node.
■ If you are installing multiple instances of SQL in the cluster, each instancemust have a unique instance name and instance ID. Use the same instancename and instance ID when you install the SQL instances on the additionalnodes.
■ While specifying a user name for the SQL Server services account, specify adomain user account.
■ If the domain user account specified for the SQL Server services is not a partof the local Administrators group on all the SQL Server nodes, then you mustconfigure the SQLClusterAccount attribute while configuring the SQL Serverservice group later.
Assigning ports for multiple SQL Server instancesIf you are running multiple SQL Server instances, you must assign a differentport to each named instance. You can assign static or dynamic ports.
Refer to the Microsoft Knowledge Base for the instructions on assigning ports.At the time of this release, this information is in the following article:
Microsoft Knowledge Base Article - 823938: How to configure an instance of SQLServer to listen on a specific TCP port or a dynamic port
See Technote: http://support.microsoft.com/kb/823938/en-us.
If you wish to change the port after configuring the SQL service group, you mustperform the steps in the following order:
■ Bring the SQL service group online or partially online (upto the registryreplication resource) on a cluster node.
Installing SQL Server 2008 or 2008 R2 in a VCS environmentAssigning ports for multiple SQL Server instances
66
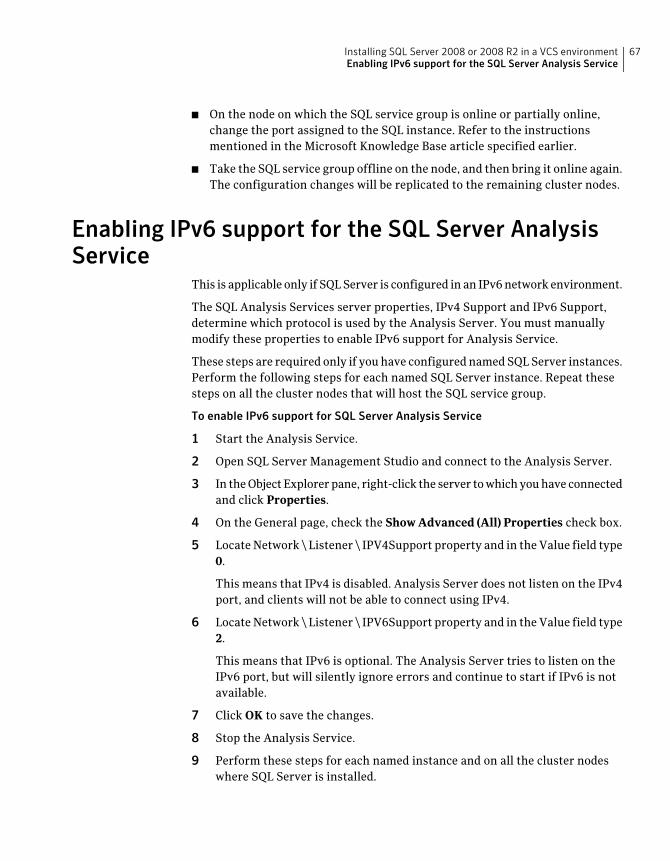
■ On the node on which the SQL service group is online or partially online,change the port assigned to the SQL instance. Refer to the instructionsmentioned in the Microsoft Knowledge Base article specified earlier.
■ Take the SQL service group offline on the node, and then bring it online again.The configuration changes will be replicated to the remaining cluster nodes.
Enabling IPv6 support for the SQL Server AnalysisService
This is applicable only if SQL Server is configured in an IPv6 network environment.
The SQL Analysis Services server properties, IPv4 Support and IPv6 Support,determine which protocol is used by the Analysis Server. You must manuallymodify these properties to enable IPv6 support for Analysis Service.
These steps are required only if you have configured named SQL Server instances.Perform the following steps for each named SQL Server instance. Repeat thesesteps on all the cluster nodes that will host the SQL service group.
To enable IPv6 support for SQL Server Analysis Service
1 Start the Analysis Service.
2 Open SQL Server Management Studio and connect to the Analysis Server.
3 In the Object Explorer pane, right-click the server to which you have connectedand click Properties.
4 On the General page, check the Show Advanced (All) Properties check box.
5 Locate Network \ Listener \ IPV4Support property and in the Value field type0.
This means that IPv4 is disabled. Analysis Server does not listen on the IPv4port, and clients will not be able to connect using IPv4.
6 Locate Network \ Listener \ IPV6Support property and in the Value field type2.
This means that IPv6 is optional. The Analysis Server tries to listen on theIPv6 port, but will silently ignore errors and continue to start if IPv6 is notavailable.
7 Click OK to save the changes.
8 Stop the Analysis Service.
9 Perform these steps for each named instance and on all the cluster nodeswhere SQL Server is installed.
67Installing SQL Server 2008 or 2008 R2 in a VCS environmentEnabling IPv6 support for the SQL Server Analysis Service

Installing SQL Server 2008 or 2008 R2 in a VCS environmentEnabling IPv6 support for the SQL Server Analysis Service
68

Configuring the SQL Serverservice group
This chapter includes the following topics:
■ About configuring the SQL service group
■ Before configuring the SQL service group
■ Configuring a SQL Server service group
■ Running SnapManager for SQL
■ Making SQL Server user-defined databases highly available with VCS
■ Verifying the service group configuration
■ Administering a SQL Server service group
About configuring the SQL service groupConfiguring the SQL Server service group involves creating resources for theNetApp and SQL agents. VCS provides several ways of configuring a service group,which include the service group configuration wizard, Cluster Manager (JavaConsole), and the command line. This chapter provides instructions on configuringa SQL service group using the SQL Server Configuration Wizard.
A SQL service group is used to bring a SQL Server instance online on another nodeif the active node fails. If you have set up multiple cluster nodes, you specify thepriority of the failover node while configuring the service group. The SQL ServerConfiguration Wizard enables you to create a SQL Server service group and definethe attributes for its resources on all the nodes within the cluster simultaneously.
4Chapter
You use the VCS SQL Server 2008 Configuration Wizard to configure a servicegroup for SQL 2008 or 2008 R2. You can configure a service group for only oneSQL Server version in a single wizard workflow. To configure another SQL Serverversion, you must run the wizard again.
Before configuring the SQL service groupEnsure the following before configuring the SQL service group:
■ Verify that VCS, along with the VCS database agent for SQL Server, is installedon all the cluster nodes.
■ Verify that you have configured a VCS cluster using VCS Cluster ConfigurationWizard (VCW).
■ Verify that SQL Server is identically installed on all the cluster nodes that willparticipate in the service group.
■ Verify that you have VCS Administrator privileges. This user classification isrequired to create and configure a service group.
■ The logged-on user account must be a local Administrator on the node whereyou run the wizard. If you wish to configure detail monitoring for a SQLinstance, the logged-on user must have the permission to log on to that SQLinstance.
■ You must be an Administrator for the NetApp filer containing the LUNs createdto store SQL Server components.
■ Run the SQL Server 2008 Configuration Wizard from the first cluster nodewhere you installed SQL Server. Do not run the wizard from the additionalnodes.This is required as the wizard configures the resources for the SQL Serverdatabase and registry information installed on the shared storage andpropagates this information to the remaining nodes that are part of the SQLservice group.
■ Verify that the Veritas High Availability Engine (HAD) is running on the systemfrom where you run the wizard.
■ Verify that the volumes or LUNs (virtual disks) created to store the followingdata components are mounted or connected to the node where you run thewizard and dismounted or disconnected from other nodes in the cluster:
■ SQL Server system data files
■ Registry replication information.
■ User database files
Configuring the SQL Server service groupBefore configuring the SQL service group
70
■ User database log files
■ FILESTREAM database objects
For creating a service group, this must be the first cluster node where youinstalled SQL Server.
■ If you wish to configure high availability for FILESTREAM, ensure thatFILESTREAM is configured and enabled for the SQL instance on the first clusternode where you installed SQL, and disabled on all the remaining nodes.Refer to the Microsoft SQL Server documentation for more information.
■ In case of IPv4, assign a unique virtual IPv4 address to the SQL Server instance.You specify this IP address when configuring the service group.In case of IPv6, the configuration wizard automatically generates an IPv6address based on the network selected. The IPv6 address is valid and uniqueon the network.
■ In an IPv6 environment, the Lanman agent relies on the DNS records to validatethe virtual server name on the network. If the virtual servers configured inthe cluster use IPv6 addresses, you must specify the DNS server IP, either inthe network adapter settings or in the Lanman agent’s AdditionalDNSServersattribute.
■ If you wish to use a script for detail monitoring, either save the script file inshared storage or ensure that the same file exists in the same location on allthe cluster nodes.A sample script is supplied in C:\Program Files\Veritas\clusterserver\bin\SQLServer2008\sample_script.sql. The same script can be used tomonitor SQL Server 2008 and SQL Server 2008 R2.If the script is successfully executed during monitoring, the agent considersthe database instance available. If the execution fails, the database instanceis considered not available and the service group faults and fails over to thefailover nodes. You can customize the script to meet your configurationrequirements.
Note: You should use a separate script for each SQL Server service group thatexists in the cluster. The script should exist on all the nodes in the servicegroup.
■ Make sure that the following services are stopped on the first cluster nodewhere you are running the wizard:
■ SQL Server
■ SQL Server Agent
71Configuring the SQL Server service groupBefore configuring the SQL service group
■ SQL Server Analysis Services
Stop these services for the SQL instances that you wish to configure in theservice group.
■ Review the resource types and the attribute definitions of the agents.
■ If you have configured Windows Firewall, add the following to the FirewallExceptions list:
■ Port 14150 or the VCS Command Server service,%vcs_home%\bin\CmdServer.exe.
Here, %vcs_home% is the installation directory for VCS, typicallyC:\Program Files\Veritas\Cluster Server.
■ Port 14141
For a detailed list of services and ports used by VCS, refer to theVeritasClusterServer for Windows Installation and Upgrade Guide.
Configuring a SQL Server service groupThis section describes how to configure a SQL service group.
To modify an existing service group.
See “Modifying a SQL service group configuration” on page 85.
The VCS SQL Server 2008 Configuration Wizard is used to configure a servicegroup for both SQL Server 2008 and SQL Server 2008 R2. You can configure aservice group for only one SQL Server version at a time. To configure a servicegroup for another SQL Server version, you must run the wizard again.
To create a SQL Server service group on the cluster
1 Ensure that you have stopped the SQL Server service for the instance andare running the wizard from the first cluster node.
2 Start the SQL Server 2008 Agent Configuration Wizard from the SolutionsConfiguration Center or click Start > All Programs > Symantec > VeritasCluster Server > Configuration Tools > SQL Server 2008 ConfigurationWizard.
3 Review the prerequisites on the Welcome panel and then click Next.
4 On the Options panel, select Create service group and then click Next.
5 On the Service Group Configuration panel, specify the service group nameand system list.
Complete the following:
Configuring the SQL Server service groupConfiguring a SQL Server service group
72
■ In the Service Group Name field, specify a name for the SQL Server servicegroup, for example, INST1_SG. If there are multiple instances, ensure thatthe name is unique within the cluster.
■ In the Available Cluster Systems box, select the systems on which toconfigure the service group and click the right-arrow to move the systemsto the Systems in Priority Order list.
■ To change the priority of a system in the Systems in Priority Order list,select the system and click the up and down arrow icons. Arrange thesystems in priority order as failover targets for the group. The server thatneeds to come online first must be at the top of the list.For an active/active configuration, ensure that the active and failoversystems are set differently for each instance. For example, if the systempriority for the first instance is SYSTEM1, then SYSTEM2, the systempriority for the second instance should be SYSTEM2, then SYSTEM1.
■ Click Next.
6 On the SQL Server Instance Selection panel, select the SQL Server instanceand any other services that were installed and that needs to be configuredfor high availability in your environment. Complete the following steps andthen click Next.
■ From the SQLServerversion drop-down list, select the SQL Server versionfor which you wish to configure the service group.You can configure a service group for only one SQL Server version in asingle wizard workflow. To configure another SQL Server version, youmust run the wizard again.The wizard displays instances of the selected SQL Server version thatsatisfy the following criteria:
■ Instances installed identically on all the systems
■ Instances not configured in other SQL service groups
■ Select the SQL Server instance(s) that you wish to configure in the servicegroup.
■ If required, select the other services that you wish to make highly available.These options are available for selection only if the corresponding servicesare installed.Note that you can choose only one instance of the Analysis service perservice group. If you have selected an instance of Analysis service, youmust uncheck it before you can select another instance of the Analysisservice.Note that services that are already configured and online in the clusterappear in bold and are not available for selection. You have to offline the
73Configuring the SQL Server service groupConfiguring a SQL Server service group
service group and run the wizard in the modify mode to edit the serviceresources.
■ Select SQLFILESTREAM if you wish to configure high availability forFILESTREAM enabled database objects. The wizard configures a resourceonly if FILESTREAM is enabled for the instance on the current node.Note that FILESTREAM option will not appear for selection if it is notenabled on the node.
■ Clear the Configure NetApp SnapMirror Resource(s) check box. Thisoption is applicable only in case of a disaster recovery configuration. TheSnapMirror resource is used to monitor replication between filers at theprimary and the secondary site, in a disaster recovery configuration. Ifyou are setting up a disaster recovery environment, check this check boxto configure the SnapMirror resource at the primary site. Note that youmust configure the SnapMirror resource only after you have configuredreplication between the NetApp filers.
7 Click Yes on the dialog box that prompts you whether you wish to allow thewizard to reconfigure the database paths for the selected instances using thecurrent cluster node as a reference.
8 On the User Databases List panel, view the summary of the databases for theselected instance and then click Next.
In case of multiple instances, select the required instance from the SQLInstance dropdown list. The panel displays the databases and the respectivefiles for which the wizard configures resources. Click a database name to viewits database files.
Databases that appear with a red cross indicate that the wizard does notconfigure the storage agent resources for those items. These databases eitherdo not reside on shared storage or the wizard is unable to locate them. If youwish to configure resources for these databases, ensure that the database arelocated on shared storage and then run the wizard again.
9 On the SQL Server Cluster Account Configuration panel, specify the SQLcluster account details and then click Next.
The SQL Cluster account must be configured if the SQL Server service andthe SQL Server Agent service accounts do not have local administratorprivileges on all the SQL Server nodes in the service group.
Complete the following steps for each SQL Server instance that you wish toconfigure in the service group:
■ Select a SQL instance from the Instance Name box.
■ Check the Configure SQL Server Cluster Account check box.
Configuring the SQL Server service groupConfiguring a SQL Server service group
74
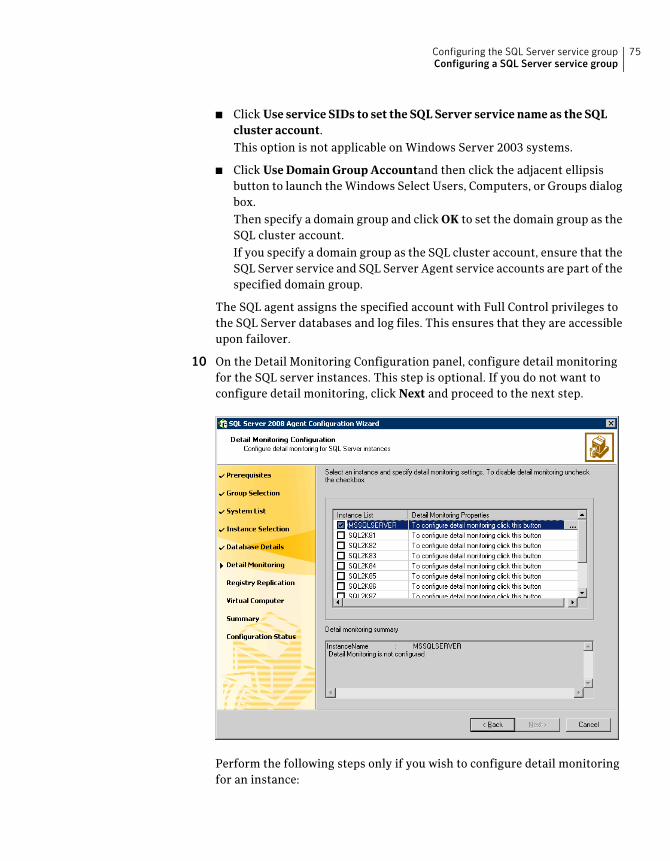
■ Click Use service SIDs to set the SQL Server service name as the SQLcluster account.This option is not applicable on Windows Server 2003 systems.
■ Click Use Domain Group Accountand then click the adjacent ellipsisbutton to launch the Windows Select Users, Computers, or Groups dialogbox.Then specify a domain group and click OK to set the domain group as theSQL cluster account.If you specify a domain group as the SQL cluster account, ensure that theSQL Server service and SQL Server Agent service accounts are part of thespecified domain group.
The SQL agent assigns the specified account with Full Control privileges tothe SQL Server databases and log files. This ensures that they are accessibleupon failover.
10 On the Detail Monitoring Configuration panel, configure detail monitoringfor the SQL server instances. This step is optional. If you do not want toconfigure detail monitoring, click Next and proceed to the next step.
Perform the following steps only if you wish to configure detail monitoringfor an instance:
75Configuring the SQL Server service groupConfiguring a SQL Server service group
■ Check the check box for a SQL instance, and then click the button fromthe Detail Monitoring Properties column to specify the detail monitoringsettings.Clear the check box to disable detail monitoring for the instance.
■ On the Detail Monitor configuration dialog box, specify the monitoringinterval in the Detail monitoring interval field.This sets the value for the DetailMonitoringInterval attribute of the SQLagent. It indicates the number of online monitor cycles that the agentmust wait before performing detail monitoring. The default value is 5.Symantec recommends that you set the monitoring interval between 1and 12.
■ Select DBList Detail Monitoring and then choose the databases from thelist of databases available for the instance. The selected databases populatethe DBList attribute of the SQL agent. In this mode of detail monitoringthe agent monitors the health of the databases by connecting to thosedatabases. The agent monitors only the databases specified in the DBListattribute.
■ Select SQLFile Detail Monitoring if you wish to use a script to monitorSQL databases. In this mode of detail monitoring, the agent executes thescript that you specify for detail monitoring.
■ Specify the fully qualified user name and the password for connecting tothe SQL Server database. Make sure that the user has SQL Server logonpermissions.
■ Select Global or PerSystem depending on whether the monitoring scriptlocation is the same for all the nodes or is unique for each cluster node,and then specify the path of the script appropriately.
■ Check Fail over service group if detail monitoring fails check box, if notalready checked. This allows the SQL agent to fail over the service groupto another node if the detail monitoring fails.
■ Click Apply.
■ Repeat these steps for each SQL instance that you wish to configure detailmonitoring for, and then click Next.
11 On the Registry Replication Path panel, specify the mount path to the registryreplication volume (INST1_REGREP_VOL) and click Next.
Symantec recommends that RegRep resources and SQL data be in separatevolumes.
12 On the Virtual Server Configuration panel, configure the virtual server asfollows:
Configuring the SQL Server service groupConfiguring a SQL Server service group
76

■ Select IPv4 to configure an IPv4 address for the virtual server.
■ In the Virtual IP Address field, type a unique virtual IPv4 address thatis currently not being used on your network, but is in the same subnetas the current node.
■ In the Subnet Mask field, type the subnet to which the virtual IPv4address belongs.
■ Select IPv6 to configure an IPv6 address for the virtual server. The IPv6option is disabled if the network does not support IPv6.
■ Select the network from the drop-down list. The wizard uses thenetwork prefix and automatically generates an IPv6 address that isvalid and unique on the network.
■ Enter the virtual name for the server, for example INST1-VS. Ensure thatthe virtual server name you enter is unique in the cluster.
■ For each system in the cluster, select the public network adapter name.The Adapter Display Name field displays the TCP/IP enabled adapters ona system, including the private network adapters, if they are TCP/IPenabled. Make sure that you select the adapters to be assigned to the publicnetwork, and not those assigned to the private network.
77Configuring the SQL Server service groupConfiguring a SQL Server service group
■ If you require a computer object to be created in the Active Directory,click Advanced Settings, check the Active Directory Update requiredcheck box, specify the desired Organizational Unit (OU) in the domainand then click OK.This sets the Lanman resource attributes ADUpdateRequired andADCriticalForOnline to true. It allows the Lanman agent to update theActive Directory with the virtual server name.You can type the OU details in the formatCN=Computers,DC=domainname,DC=com. To search for an OU, clickon the ellipsis button and specify the search criteria in the Windows FindOrganization Unit dialog box.By default, the Lanman resource adds the virtual server to the defaultcontainer “Computers.” The user account for VCS Helper service musthave adequate privileges on the specified container to create and updatecomputer accounts.
■ Click Next.
13 On the Initiator Selection panel, select the initiator for the virtual disk fromthe list of available initiators displayed for each cluster node, and then clickNext.
If you are configuring MPIO over FC, you must select at least 2 FC initiatorsfor each cluster node. Note that the node from which you run this wizardalready has an initiator selected by default. This is the initiator that wasspecified when you connected the LUNs to this cluster node.
14 On the Service Group Summary panel, review the service group configurationand then click Next. The Resources box lists the configured resources. Thewizard assigns unique names to resources based on their respective namerules. Click a resource to view its attributes and their configured values inthe Attributes box. Optionally, if desired, change the names of the resources.
To edit a resource name, click the resource name or press the F2 key. PressEnter after editing each resource name.
To cancel editing a resource name, press Esc.
Configuring the SQL Server service groupConfiguring a SQL Server service group
78
15 Click Yes when prompted to confirm creating the service group. Messagesindicate the status of the commands.
16 Select the Bring the servicegrouponline check box, if you want to bring theservice group online.
You may want to review the service group configuration in the ClusterManager (Java Console) before bringing the service group online. You can usethe Cluster Manager to bring the service group online later.
You must bring the SQL service group online on the node from where youran the configuration wizard. This is the first cluster node where you installedSQL Server. This allows the wizard to configure the resources required forSQL Server services.
The wizard marks all the resources in the service group as CRITICAL. Ifdesired, use Cluster Manager (Java Console) or the command line to changethe state.
If you have created a new SQL Server database, you must modify the SQLServer service group to add the required storage agent resources to the servicegroup. Run the service group configuration wizard to modify the servicegroup.
Click Finish to exit the wizard or click Next to configure another SQL servicegroup or an MSDTC service group.
The wizard marks all the resources in the service group as CRITICAL. Ifdesired, use Cluster Manager (Java Console) or the command line to changethe state.
You can also configure an MSDTC service group.
See “About configuring the MSDTC service group” on page 87.
Assigning privileges to the existing SQL Server databases and logs
Note:The following steps are required only if you have configured the SQL clusteraccount while creating the SQL Server service group earlier.
While installing SQL Server, if the user account specified for the SQL Serverservices is not a member of the local administrators group, then the SQL servicesand databases may not be accessible after a service group failover. For such acase, you configure the SQL cluster account while creating the SQL Server servicegroup.
The SQL cluster account gets full control privileges to all the new databases andlog files that are created after the service group is configured.
79Configuring the SQL Server service groupConfiguring a SQL Server service group
However, if databases were created before the service group is configured, youhave to manually assign the SQL cluster account with full control privileges tothe existing databases and log files associated with the instances in the servicegroup.
To assign privileges to the existing SQL databases and logs
1 On the node where the SQL Server service group is online, navigate to thefollowing directory from Windows explorer:
<Datarootdirectory>\<SQLinstancename>\MSSQL\
The directory contains various directories including DATA, FTData, JOBS,Log, repldata.
Here, <Datarootdirectory> is the path that you specified while installing SQLServer.
2 Assign the SQL Cluster account with full control privileges to the followingdirectories:
■ DATA
■ Log
3 Navigate inside the DATA folder and then assign the SQL cluster accountwith full control privileges to the following files in that directory:
■ tempdb.mdf
■ templog.ldf
4 Repeat these steps for all the instances that are configured in the SQL Serverservice group.
This ensures the existing SQL databases are accessible after a service groupfailover.
Running SnapManager for SQLAfter configuring the service group, you may want to run the SnapManagerConfiguration Wizard on the node on which the service group is online, to schedulebackups of SQL Server database.
You must adhere to the following requirements while running SnapManager forSQL:
■ Make sure the SQL service group is online.
■ Do not move the SQL Server database components.
Configuring the SQL Server service groupRunning SnapManager for SQL
80
If you are scheduling backups in a VCS cluster, schedule them on the node onwhich the service group is online. If the SQL service group fails over to anothernode, you must set up the backup schedule again on the new node.
See the NetApp documentation for more information about running SnapManagerfor SQL.
Making SQL Server user-defined databases highlyavailable with VCS
You can use VCS to manage user-defined SQL Server databases. Create the requiredSQL databases using the SQL Server Management Studio and then make themhighly available with VCS.
Perform the following tasks to configure user-defined databases with VCS:
■ Create volumes or LUNs for a user-defined SQL Server database and itstransaction log.
■ Create a SQL Server user-defined database and point the database files andtransaction log to the paths of the new volumes or LUNs.
■ Modify the SQL service group using the SQL Server 2008 Configuration Wizardto add the NetAppFiler and NetAppSnapDrive resources for the user databases.
Create volumes or LUNs for SQL user-defined databasesYou must create volumes or LUNs for a user-defined SQL Server database and itstransaction log.
In the sample deployment these volumes are named as follows:
■ INST1_DB1_VOLContains a user-defined database file
■ INST1_DB1_LOGContains a user-defined database log file
■ INST1_DB1_FS_VOLContains FILESTREAM enabled database objects for the user database
Creating SQL Server databasesUse the SQL Server Management Studio to create a SQL Server user-defineddatabase for the required SQL instance. While creating the database, ensure thatyou point the database files and transaction log to the paths of the new volumesor LUNs created earlier.
81Configuring the SQL Server service groupMaking SQL Server user-defined databases highly available with VCS

Refer to the SQL Server documentation for instructions on how to create databases.
Adding storage agent resources to the SQL service groupAfter creating the database, run the SQL Server 2008 Configuration Wizard andmodify the SQL Server service group. This allows the wizard to add the NetAppFilerand NetAppSnapDrive (Mount and DiskRes in case of Windows LDM) storageresources for the user databases, to the SQL Server service group.
You must run the SQL Server 2008 Configuration Wizard in the modify mode onlyif you create user-defined databases after creating the SQL Server service group.
Note: You must run the wizard in the modify mode even if you have added orchanged volumes in your existing configuration.
Before running the configuration wizard to add the storage agent resources, dothe following:
■ Make sure the SQL service group is online.
■ Make sure the volumes for the user database, transaction logs and FILESTREAMare mounted on the node.
Note: Mount or NetAppSnapDrive resources are required only if the database iscreated on a new volume.
To add storage agent resources to the SQL service group
1 Start the SQL Server 2008 Configuration Wizard. Click Start >AllPrograms> Symantec > Veritas Cluster Server > Configuration Tools > SQL Server2008 Configuration Wizard.
2 Review the Prerequisites page and click Next.
3 On the Wizard Options panel, click Edit service group, select the servicegroup and then click Next.
4 Click Yes on the VCS Notice informing you that the service is not completelyoffline. No adverse consequences are implied.
5 In the Service Group Configuration page, click Next.
6 In the SQL Server Instance Selection page, make sure the correct instance ofSQL Server is selected and click Next.
7 In the User Databases List page, make sure the databases are shown withcorrect paths and click Next.
Configuring the SQL Server service groupMaking SQL Server user-defined databases highly available with VCS
82
8 If a database is not configured correctly, a VCS warning appears indicatingpotential problems. Click OK to continue.
9 In the Detail Monitoring and succeeding pages, review the information andclick Next to continue.
10 Click Yes to continue when a VCS Notice indicates the configuration will bemodified.
11 Click Finish to exit the wizard.
The wizard marks all the resources in the service group as CRITICAL. Ifdesired, use Cluster Manager (Java Console) or the command line to changethe state.
Verifying the service group configurationFailover simulation is an important part of configuration testing. This sectionprovides steps to verify the SQL Server service group configuration by bringingthe service group online, taking the service group offline, and switching the servicegroup to another cluster node.
Bringing the service group onlinePerform the following steps to bring the service group online from the VCS Javaor Web Console.
To bring a service group online from the Java Console
1 In the Cluster Explorer configuration tree, select the SQL service group to betaken online.
2 Right-click the service group name, and select EnableResources. This enablesall resources in the service group.
3 Right-click the service group name, and select the system on which to enablethe service group. (Right-click > Enable> system_nameor Right-click >Enable> All)
4 Save your configuration (File > Close Configuration).
5 Right-click the service group and select to online the service group on thesystem. (Right-click > Online > system_name)
Taking the service group offlinePerform the following steps to take the service group offline from the VCS Javaor Web Console.
83Configuring the SQL Server service groupVerifying the service group configuration
To take a service group offline from the Java Console
1 On the Service Groups tab of the Cluster Explorer configuration tree,right-click the service group.
or
Select the cluster in the Cluster Explorer configuration tree, select the ServiceGroups tab, and right-click the service group icon in the view panel.
2 Choose Offline, and choose the appropriate system from the pop-up menu.(Right-click > Offline > system_name)
Switching the service groupTo verify the configuration of a cluster, either move the online groups, or shutdown an active cluster node, as follows:
■ Use Veritas Cluster Manager (Java Console) to switch all the service groupsfrom one node to another.
■ Simulate a local cluster failover by shutting down an active cluster node.
To switch service groups
1 In the Veritas Cluster Manager (Java Console), click the cluster in theconfiguration tree, click the Service Groups tab, and right-click the servicegroup icon in the view panel. Then do the following:
■ Click Switch To, and click the appropriate node from the menu.
■ In the dialog box, click Yes. The service group you selected is taken offlineon the original node and brought online on the node you selected.If there is more than one service group, you must repeat this step untilall the service groups are switched.
2 Verify that the service group is online on the node you selected to switch toin the earlier step.
3 To move all the resources back to the original node, repeat step 1 for each ofthe service groups.
To shut down an active cluster node
1 Gracefully shut down or restart the cluster node where the service group isonline.
2 In the Veritas Cluster Manager (Java Console) on another node, connect tothe cluster.
Configuring the SQL Server service groupVerifying the service group configuration
84
3 Verify that the service group has failed over successfully, and is online onthe next node in the system list.
4 If you need to move all the service groups back to the original node, do thefollowing:
■ Restart the node you shut down in step 1.
■ Click Switch To, and click the appropriate node from the menu.
■ In the dialog box, click Yes.The service group you selected is taken offline and brought online on thenode that you selected.
Administering a SQL Server service groupYou can dynamically modify the SQL service group configuration in several ways,including the SQL Server Configuration Wizard, Cluster Manager (Java Console),Cluster Manager (Web Console), and the command line. The following stepsdescribe how to modify the service group using the SQL Server ConfigurationWizard.
Modifying a SQL service group configurationNote the following prerequisites before modifying the SQL service group:
■ If the SQL Server service group is online, you must run the wizard from a nodeon which the service group is online. You can then use the wizard to addresources to and remove them from the configuration. You cannot changeresource attributes.
■ To change the resource attributes, you must take the service group offline.However, the NetAppFiler and NetAppSnapDrive resources for the servicegroup should be online on the node where you run the wizard and offline onall other nodes.
■ If you are running the wizard to remove a node from the service group’s systemlist, do not run the wizard on the node being removed.
■ If you are running the wizard to add or remove NetAppSnapDrive resourcesfor user defined databases, make sure the service group is online.
To modify a SQL Server service group
1 Start the SQL Server 2008 Configuration Wizard. Click Start >AllPrograms> Symantec > Veritas Cluster Server > Configuration Tools > SQL Server2008 Configuration Wizard.
2 Review the prerequisites and click Next.
85Configuring the SQL Server service groupAdministering a SQL Server service group
3 In the Service Group Selection panel, select the service group to modify andclick Next.
4 In the Service Group Configuration panel, add or remove systems from theservice group’s SystemList and click Next.
5 In the SQL Server Instance Selection panel, select the SQL Server instanceto be made highly available and click Next.
6 In the User Databases List panel, verify the master and user defined databasesconfigured for the SQL instance. The wizard will create NetAppSnapDriveresource for each database. Click Next.
7 Follow the wizard instructions and make desired modifications to the servicegroup configuration.
Deleting a SQL service groupThe following steps describe how to delete a SQL Server service group using theconfiguration wizard.
To delete a SQL Server service group
1 Start the SQL Server 2008 Configuration Wizard. Click Start >AllPrograms> Symantec > Veritas Cluster Server > Configuration Tools > SQL Server2008 Configuration Wizard.
2 Review the prerequisites and click Next.
3 In the Service Group Selection dialog box, select the service group to deleteand click Next.
4 In the Service Group Summary dialog box, click Next.
5 A message appears informing you that the wizard will run commands todelete the service group. Click Yes to delete the service group.
6 Click Finish.
Configuring the SQL Server service groupAdministering a SQL Server service group
86
Configuring an MSDTCservice group
This chapter includes the following topics:
■ About configuring the MSDTC service group
■ Reviewing the configuration
■ Before configuring the MSDTC service group
■ Creating an MSDTC service group
■ About configuring an MSDTC client
■ Configuring an MSDTC client on Windows Server 2008
■ About using the virtual MMC viewer
■ Viewing DTC transaction information
■ Verifying the installation
About configuring the MSDTC service groupMicrosoft Distributed Transaction Coordinator (MSDTC) service enables you toperform distributed transactions. A distributed transaction updates data on morethan one computer in a network. The MSDTC service ensures that a transactionis successfully committed on each computer. A failure to commit on a singlesystem aborts the transaction on all systems in the network. If a transaction spansacross more than one computer in the network, you must ensure that the MSDTCservice is running on all the computers. Also, all the computers must be able tocommunicate with each other.
Configuring the MSDTC service group involves the following tasks:
5Chapter
■ Creating an MSDTC Server service group using the SQL Configuration Wizard
■ Configuring the MSDTC client manually
Note: You have to use the SQL Server Configuration Wizard to configure theMSDTC Server service group. You cannot use the SQL Server 2008 ConfigurationWizard to perform this task.
VCS provides several ways to configure a service group, including the servicegroup configuration wizard, Cluster Manager (Java Console), and the commandline. This chapter provides instructions on how to use the configuration wizardto configure the MSDTC service group.
Reviewing the configurationMSDTC servers can co-exist with SQL servers on the same cluster nodes. If theMSDTC Server and the SQL Server are running on the same node, the MSDTCclient is configured in the default configuration. If the MSDTC Server is notconfigured on the same node as the SQL Server, then the MSDTC client must beconfigured on that node. In general, you must configure the MSDTC client on allnodes except the node on which the MSDTC Server is configured to fail over. TheMSDTC client and the MSDTC Server must not run on the same cluster node.
For example, a SQL Server configuration in a VCS cluster might span four nodesand two sets of shared storage.
The following configurations are possible:
■ MSDTC Server and SQL Server are configured on different nodes in the samecluster
■ MSDTC Server and SQL Server are configured on the same nodes in a cluster
■ MSDTC Server and SQL Server are configured on nodes in different clusters
Figure 5-1 illustrates a configuration where MSDTC Server and SQL Server areconfigured on different nodes in a cluster.
Configuring an MSDTC service groupReviewing the configuration
88
Figure 5-1 MSDTC Server and SQL Server configured on different nodes
Figure 5-2 illustrates a configuration where MSDTC Server and SQL Server areconfigured on the same node in a cluster.
Figure 5-2 MSDTC Server configured on the same node as SQL Server
Figure 5-3 illustrates a configuration where MSDTC Server and SQL Server areconfigured on nodes belonging to different clusters.
89Configuring an MSDTC service groupReviewing the configuration
Figure 5-3 MSDTC Server and SQL Server configured on nodes in differentclusters
Before configuring the MSDTC service groupNote the following prerequisites before you configure the MSDTC service group:
■ You must be a Cluster Administrator. This user classification is required tocreate and configure a service group.
■ You must be a local Administrator on the node where you run the wizard.
■ Verify that the VCS agent for SQL Server is installed on all cluster nodes.
■ Verify that the VCS cluster is configured using the VCS Cluster ConfigurationWizard (VCW).
■ Verify that the MSDTC service is installed on all nodes that will participate inthe MSDTC Server service group.
■ Verify that the Distributed Transaction Coordinator (MSDTC) service is stopped.
■ Verify that you have created the volumes or LUNs (virtual disks) for storingMSDTC log and MSDTC registry replication information, on a shared disk.See “Managing storage using NetApp filer” on page 57.See “Managing storage using Windows Logical Disk Manager” on page 60.
■ Verify that the volumes or LUNs created for the MSDTC logs and registryreplication information are mounted or connected to the node where you runthe wizard and dismounted or disconnected from all other nodes.
Configuring an MSDTC service groupBefore configuring the MSDTC service group
90
■ If you have configured a firewall, add the following to the firewall exceptionslist:
■ Port 14150 or the VCS Command Server service,%vcs_home%\bin\CmdServer.exe.
Here, %vcs_home% is the installation directory for VCS, typicallyC:\Program Files\Veritas\Cluster Server.
■ Port 14141
For a detailed list of services and ports used by VCS, refer to theVeritasClusterServer Installation and Upgrade Guide.
■ Keep the following information ready with you; the wizard prompts you forthese details:
■ A unique virtual name for the MSDTC Server. This is the name that is usedby MSDTC clients to connect to the MSDTC Server. The DTC service runsunder this virtual name.
■ A unique virtual IP address for the for the MSDTC Server.The virtual IP address is required only if you wish to configure an IPv4address. In case of IPv6, the wizard prompts you to select the IPv6 networkand automatically generates an IPv6 address that is valid and unique onthe network. The wizard uses the prefix that is advertised by the router onthe IPv6 network.
Creating an MSDTC service groupMSDTC is a global resource and is accessed by more than one SQL Server servicegroup. Symantec recommends configuring one MSDTC service group in per cluster.VCS provides a SQL Server Configuration Wizard that guides you through theprocess of configuring an MSDTC service group. You can also use this wizard tomodify an MSDTC service group configuration.
Note: Symantec recommends that you create only one MSDTC Server servicegroup in a cluster.
This section describes the steps required to create an MSDTC Server service groupusing the SQL Configuration Wizard.
You have to use the SQL Server Configuration Wizard to configure the MSDTCServer service group. You cannot use the SQL Server 2008 Configuration Wizardto perform this task.
91Configuring an MSDTC service groupCreating an MSDTC service group
To create an MSDTC service group
1 Start the SQL Server Configuration Wizard. Click Start > All Programs >Symantec > Veritas Cluster Server > Configuration Tools > SQL ServerConfiguration Wizard.
2 In the Select Configuration Option panel, click MSDTCServer-ServiceGroupConfiguration, click Create, and then click Next.
3 Review and verify that you have met the prerequisites for configuring anMSDTC Server service group and then click Next.
4 On the Service Group Configuration panel, specify the service group nameand select the systems for the service group as follows:
■ Type a name for MSDTC service group.
■ In the Available Cluster Systems box, select the systems on which toconfigure the service group and click the right-arrow to move the systemsto the Systems in Priority Order box. The systems listed in the Systemsin Priority Order box represent the SystemList attribute of the servicegroup. While selecting systems, make sure to select the systems that arenot in the SystemList attribute for an Exchange service group configuredin the cluster.To remove a system from the service group’s system list, select the Systemsin Priority Order list and click the left arrow.To change a system’s priority in the service group’s system list, select thesystem from the Systems in Priority Order and click the up and downarrows. The system at the top of the list has the highest priority while thesystem at the bottom of the list has the lowest priority.
■ Click Next. If the cluster configuration is in read-only mode, the wizardprompts you before changing it to read-write mode. The wizard startsvalidating your configuration. Various messages indicate the validationstatus.
5 On the Virtual Server Configuration panel, specify the information relatedto the virtual server as follows:
■ Type a virtual name for the MSDTC Server. This is the name that is usedby MSDTC clients to connect to the MSDTC Server. The DTC service runsunder this virtual name. Ensure that the virtual server name is unique inthe cluster.
■ Select IPv4 to configure an IPv4 address for the virtual server.
■ In the Virtual IP Address field, type a unique virtual IPv4 address forthe MSDTC server.
Configuring an MSDTC service groupCreating an MSDTC service group
92
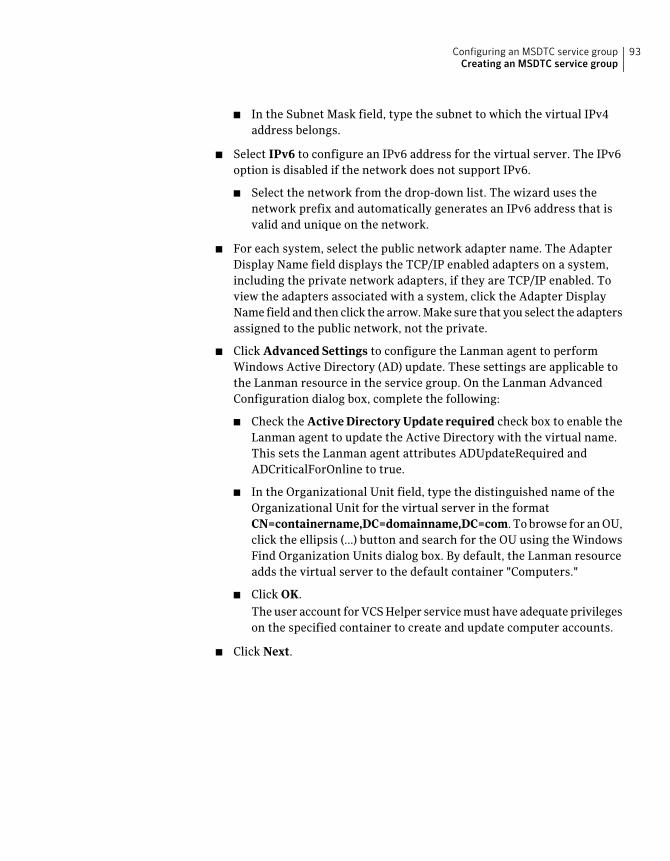
■ In the Subnet Mask field, type the subnet to which the virtual IPv4address belongs.
■ Select IPv6 to configure an IPv6 address for the virtual server. The IPv6option is disabled if the network does not support IPv6.
■ Select the network from the drop-down list. The wizard uses thenetwork prefix and automatically generates an IPv6 address that isvalid and unique on the network.
■ For each system, select the public network adapter name. The AdapterDisplay Name field displays the TCP/IP enabled adapters on a system,including the private network adapters, if they are TCP/IP enabled. Toview the adapters associated with a system, click the Adapter DisplayName field and then click the arrow. Make sure that you select the adaptersassigned to the public network, not the private.
■ Click Advanced Settings to configure the Lanman agent to performWindows Active Directory (AD) update. These settings are applicable tothe Lanman resource in the service group. On the Lanman AdvancedConfiguration dialog box, complete the following:
■ Check the Active Directory Update required check box to enable theLanman agent to update the Active Directory with the virtual name.This sets the Lanman agent attributes ADUpdateRequired andADCriticalForOnline to true.
■ In the Organizational Unit field, type the distinguished name of theOrganizational Unit for the virtual server in the formatCN=containername,DC=domainname,DC=com. To browse for an OU,click the ellipsis (...) button and search for the OU using the WindowsFind Organization Units dialog box. By default, the Lanman resourceadds the virtual server to the default container "Computers."
■ Click OK.The user account for VCS Helper service must have adequate privilegeson the specified container to create and update computer accounts.
■ Click Next.
93Configuring an MSDTC service groupCreating an MSDTC service group
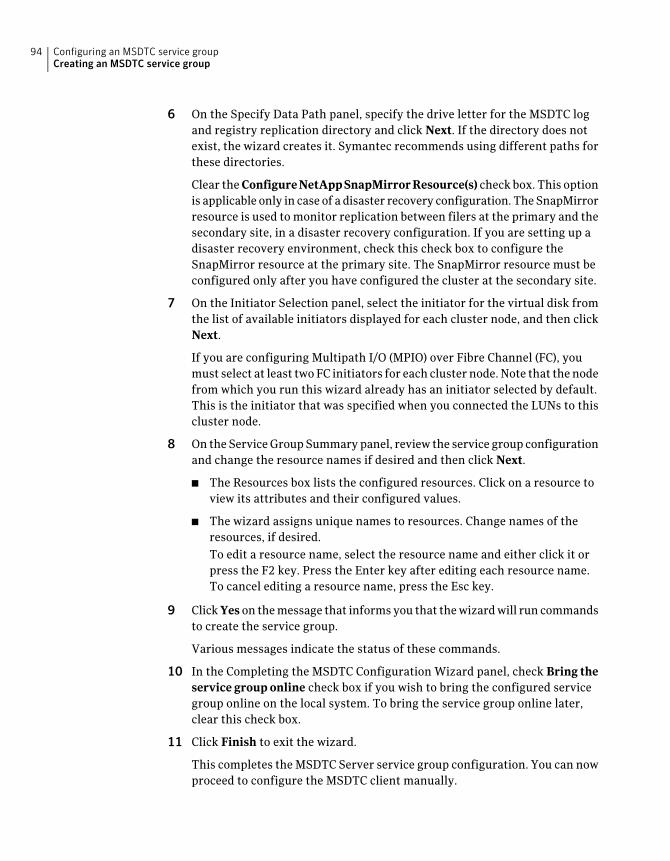
6 On the Specify Data Path panel, specify the drive letter for the MSDTC logand registry replication directory and click Next. If the directory does notexist, the wizard creates it. Symantec recommends using different paths forthese directories.
Clear the ConfigureNetAppSnapMirrorResource(s) check box. This optionis applicable only in case of a disaster recovery configuration. The SnapMirrorresource is used to monitor replication between filers at the primary and thesecondary site, in a disaster recovery configuration. If you are setting up adisaster recovery environment, check this check box to configure theSnapMirror resource at the primary site. The SnapMirror resource must beconfigured only after you have configured the cluster at the secondary site.
7 On the Initiator Selection panel, select the initiator for the virtual disk fromthe list of available initiators displayed for each cluster node, and then clickNext.
If you are configuring Multipath I/O (MPIO) over Fibre Channel (FC), youmust select at least two FC initiators for each cluster node. Note that the nodefrom which you run this wizard already has an initiator selected by default.This is the initiator that was specified when you connected the LUNs to thiscluster node.
8 On the Service Group Summary panel, review the service group configurationand change the resource names if desired and then click Next.
■ The Resources box lists the configured resources. Click on a resource toview its attributes and their configured values.
■ The wizard assigns unique names to resources. Change names of theresources, if desired.To edit a resource name, select the resource name and either click it orpress the F2 key. Press the Enter key after editing each resource name.To cancel editing a resource name, press the Esc key.
9 Click Yes on the message that informs you that the wizard will run commandsto create the service group.
Various messages indicate the status of these commands.
10 In the Completing the MSDTC Configuration Wizard panel, check Bring theservice group online check box if you wish to bring the configured servicegroup online on the local system. To bring the service group online later,clear this check box.
11 Click Finish to exit the wizard.
This completes the MSDTC Server service group configuration. You can nowproceed to configure the MSDTC client manually.
Configuring an MSDTC service groupCreating an MSDTC service group
94
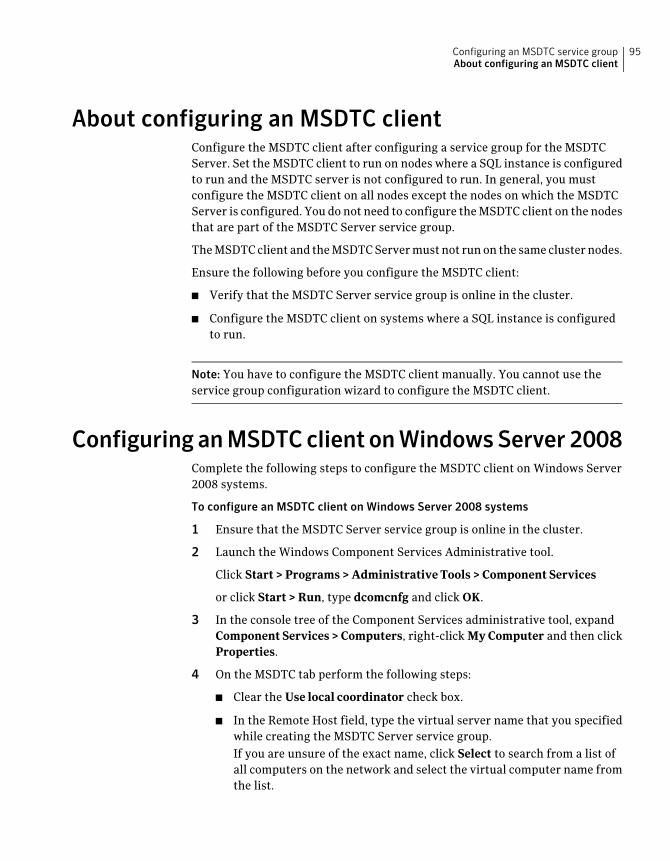
About configuring an MSDTC clientConfigure the MSDTC client after configuring a service group for the MSDTCServer. Set the MSDTC client to run on nodes where a SQL instance is configuredto run and the MSDTC server is not configured to run. In general, you mustconfigure the MSDTC client on all nodes except the nodes on which the MSDTCServer is configured. You do not need to configure the MSDTC client on the nodesthat are part of the MSDTC Server service group.
The MSDTC client and the MSDTC Server must not run on the same cluster nodes.
Ensure the following before you configure the MSDTC client:
■ Verify that the MSDTC Server service group is online in the cluster.
■ Configure the MSDTC client on systems where a SQL instance is configuredto run.
Note: You have to configure the MSDTC client manually. You cannot use theservice group configuration wizard to configure the MSDTC client.
Configuring anMSDTCclient onWindowsServer 2008Complete the following steps to configure the MSDTC client on Windows Server2008 systems.
To configure an MSDTC client on Windows Server 2008 systems
1 Ensure that the MSDTC Server service group is online in the cluster.
2 Launch the Windows Component Services Administrative tool.
Click Start > Programs > Administrative Tools > Component Services
or click Start > Run, type dcomcnfg and click OK.
3 In the console tree of the Component Services administrative tool, expandComponent Services > Computers, right-click My Computer and then clickProperties.
4 On the MSDTC tab perform the following steps:
■ Clear the Use local coordinator check box.
■ In the Remote Host field, type the virtual server name that you specifiedwhile creating the MSDTC Server service group.If you are unsure of the exact name, click Select to search from a list ofall computers on the network and select the virtual computer name fromthe list.
95Configuring an MSDTC service groupAbout configuring an MSDTC client
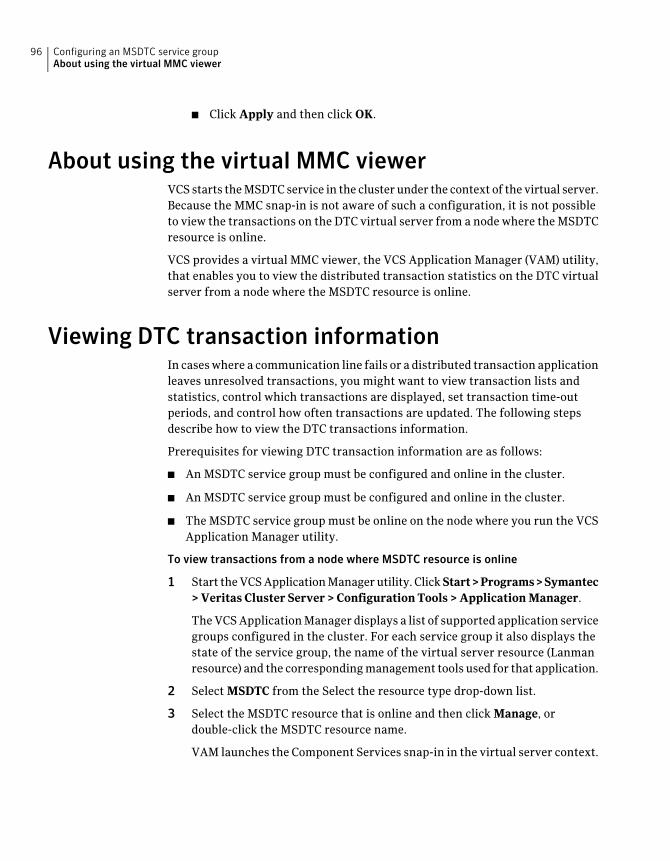
■ Click Apply and then click OK.
About using the virtual MMC viewerVCS starts the MSDTC service in the cluster under the context of the virtual server.Because the MMC snap-in is not aware of such a configuration, it is not possibleto view the transactions on the DTC virtual server from a node where the MSDTCresource is online.
VCS provides a virtual MMC viewer, the VCS Application Manager (VAM) utility,that enables you to view the distributed transaction statistics on the DTC virtualserver from a node where the MSDTC resource is online.
Viewing DTC transaction informationIn cases where a communication line fails or a distributed transaction applicationleaves unresolved transactions, you might want to view transaction lists andstatistics, control which transactions are displayed, set transaction time-outperiods, and control how often transactions are updated. The following stepsdescribe how to view the DTC transactions information.
Prerequisites for viewing DTC transaction information are as follows:
■ An MSDTC service group must be configured and online in the cluster.
■ An MSDTC service group must be configured and online in the cluster.
■ The MSDTC service group must be online on the node where you run the VCSApplication Manager utility.
To view transactions from a node where MSDTC resource is online
1 Start the VCS Application Manager utility. Click Start>Programs>Symantec> Veritas Cluster Server > Configuration Tools > Application Manager.
The VCS Application Manager displays a list of supported application servicegroups configured in the cluster. For each service group it also displays thestate of the service group, the name of the virtual server resource (Lanmanresource) and the corresponding management tools used for that application.
2 Select MSDTC from the Select the resource type drop-down list.
3 Select the MSDTC resource that is online and then click Manage, ordouble-click the MSDTC resource name.
VAM launches the Component Services snap-in in the virtual server context.
Configuring an MSDTC service groupAbout using the virtual MMC viewer
96
4 In the console tree of the Component Services administrative tool, expandComponent Services > Computers > My Computer > Distributed TransactionCoordinator > Local DTC.
5 Click Transaction List to view all transactions, their status, and theiridentifiers. Right-click a transaction and click View > Properties to list theparent transaction and its children.
6 Click Transaction Statistics to view statistical information about thetransactions in which a server participated.
You can use transaction statistics to get an overview of DTC performance.
Refer to the Microsoft documentation for further information.
The following steps describe how to view DTC transactions from nodes that arenot part of the MSDTC Server service group.
To view transactions from any node in the domain
1 Launch the Windows Component Services Administrative tool. Click Start >Programs > Administrative Tools > Component Services.
2 In the console tree of the Component Services administrative tool, double-clickComponent Services, right-click Computers, click New >Computer.
3 In the Add Computer dialog box, specify the virtual server name that youspecified while creating the MSDTC Server service group. If you are unsureof the exact name, click Browse to search from a list of all computers on thenetwork and select the virtual computer name from the list.
4 Click OK. The virtual computer entry is added to the Computers container.
5 Expand the newly added virtual computer entry and double-clickDistributedTransaction Coordinator.
6 Click Transaction List to view all transactions, their status, and theiridentifiers. Right-click a transaction and click View > Properties to list theparent transaction and its children.
7 Click Transaction Statistics to view statistical information about thetransactions in which a server participated.
You can use transaction statistics to get an overview of DTC performance.
Refer to the Microsoft documentation for further information.
97Configuring an MSDTC service groupViewing DTC transaction information
Verifying the installationVerify your installation by switching online nodes or by shutting down thecomputer that is currently online. Either process will test that the service groupcan be smoothly transferred between nodes.
Shutting down a node creates an actual failure, stressing your system, but moretruly testing its high availability than by switching nodes. If you do shut downthe online computer in your cluster, remember to bring it back up after you haveconfirmed that the service group successfully failed over to another node.
You must complete the procedure to verify the service group configuration.
Configuring an MSDTC service groupVerifying the installation
98

Making a standalone SQLserver highly available
This chapter includes the following topics:
■ About making a standalone SQL server highly available
■ Reviewing the configuration
■ Installing and configuring VCS on the standalone SQL server
■ Verifying that SQL Server databases and logs are moved to shared storage
■ Installing and configuring SQL Server on additional nodes
■ Assigning ports for multiple SQL Server instances
■ Configuring the VCS SQL Server service group
■ Creating a SQL Server user-defined database
■ Verifying the installation and configuration
About making a standalone SQL server highlyavailable
This chapter describes the procedure to convert a standalone SQL Server into aclustered SQL Server in a new Veritas Cluster Server environment. Thisenvironment involves an active-passive configuration with one to one failovercapabilities.
If you are planning a new SQL Server deployment:
See “About installing SQL Server in a VCS environment” on page 53.
6Chapter
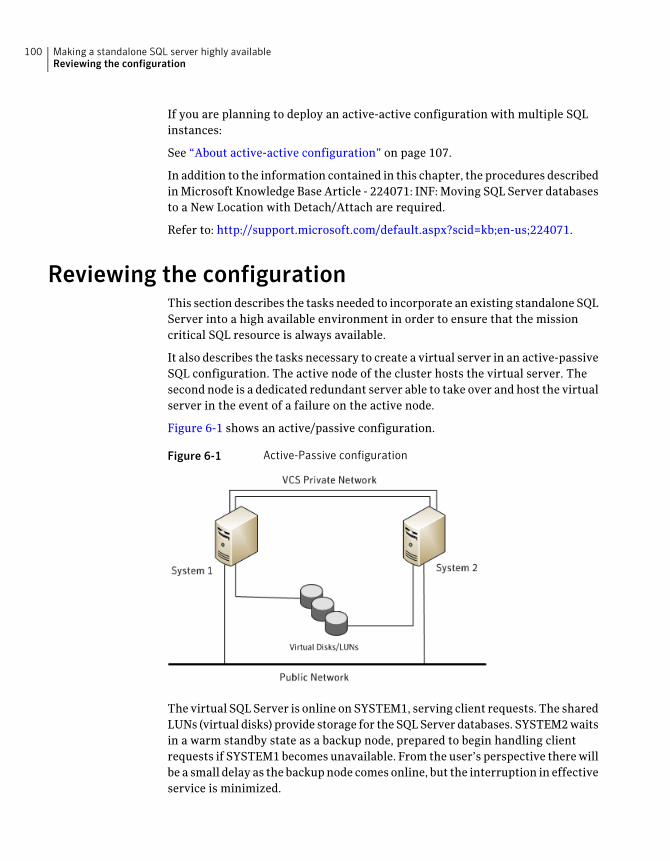
If you are planning to deploy an active-active configuration with multiple SQLinstances:
See “About active-active configuration” on page 107.
In addition to the information contained in this chapter, the procedures describedin Microsoft Knowledge Base Article - 224071: INF: Moving SQL Server databasesto a New Location with Detach/Attach are required.
Refer to: http://support.microsoft.com/default.aspx?scid=kb;en-us;224071.
Reviewing the configurationThis section describes the tasks needed to incorporate an existing standalone SQLServer into a high available environment in order to ensure that the missioncritical SQL resource is always available.
It also describes the tasks necessary to create a virtual server in an active-passiveSQL configuration. The active node of the cluster hosts the virtual server. Thesecond node is a dedicated redundant server able to take over and host the virtualserver in the event of a failure on the active node.
Figure 6-1 shows an active/passive configuration.
Figure 6-1 Active-Passive configuration
The virtual SQL Server is online on SYSTEM1, serving client requests. The sharedLUNs (virtual disks) provide storage for the SQL Server databases. SYSTEM2 waitsin a warm standby state as a backup node, prepared to begin handling clientrequests if SYSTEM1 becomes unavailable. From the user’s perspective there willbe a small delay as the backup node comes online, but the interruption in effectiveservice is minimized.
Making a standalone SQL server highly availableReviewing the configuration
100
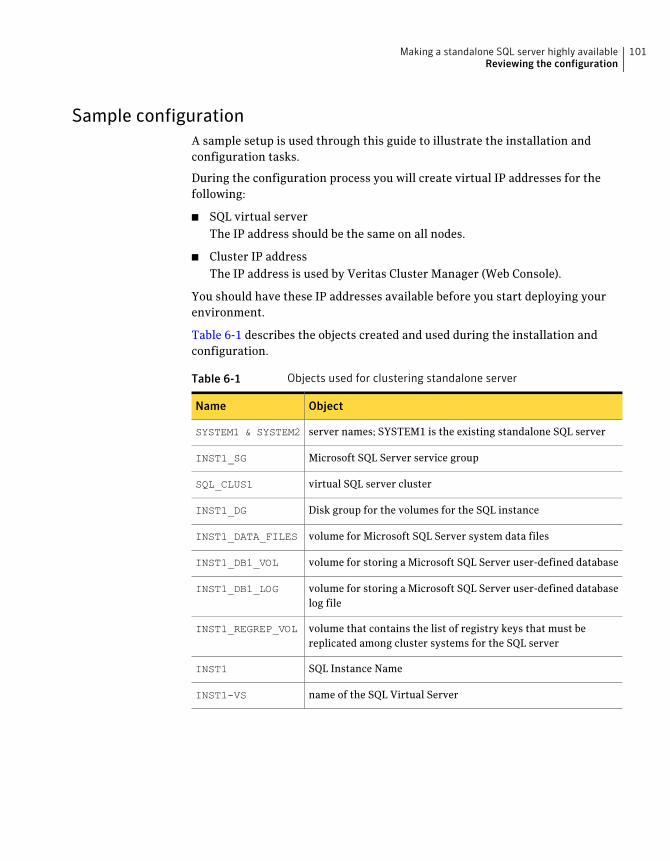
Sample configurationA sample setup is used through this guide to illustrate the installation andconfiguration tasks.
During the configuration process you will create virtual IP addresses for thefollowing:
■ SQL virtual serverThe IP address should be the same on all nodes.
■ Cluster IP addressThe IP address is used by Veritas Cluster Manager (Web Console).
You should have these IP addresses available before you start deploying yourenvironment.
Table 6-1 describes the objects created and used during the installation andconfiguration.
Table 6-1 Objects used for clustering standalone server
ObjectName
server names; SYSTEM1 is the existing standalone SQL serverSYSTEM1 & SYSTEM2
Microsoft SQL Server service groupINST1_SG
virtual SQL server clusterSQL_CLUS1
Disk group for the volumes for the SQL instanceINST1_DG
volume for Microsoft SQL Server system data filesINST1_DATA_FILES
volume for storing a Microsoft SQL Server user-defined databaseINST1_DB1_VOL
volume for storing a Microsoft SQL Server user-defined databaselog file
INST1_DB1_LOG
volume that contains the list of registry keys that must bereplicated among cluster systems for the SQL server
INST1_REGREP_VOL
SQL Instance NameINST1
name of the SQL Virtual ServerINST1-VS
101Making a standalone SQL server highly availableReviewing the configuration
Installing and configuring VCS on the standalone SQLserver
Perform the following tasks to convert the existing standalone SQL into a clusteredserver.
■ Create a backup of the data on the existing standalone SQL server.
■ Use the SQL Configuration Manager and set the startup type of all the SQLservices for the SQL instance to manual.
■ Install VCS on the standalone SQL server.Refer to the Veritas Cluster Server Installation and Upgrade Guide for moreinformation.
■ Configure the cluster using the VCS Cluster Configuration Wizard (VCW).See “Configuring the cluster using the Cluster Configuration Wizard”on page 37.
■ Create volumes or LUNs (virtual disks) necessary to manage the SQL Serverstorage.See “Managing storage using NetApp filer” on page 57.See “Managing storage using Windows Logical Disk Manager” on page 60.
Verifying that SQL Server databases and logs aremoved to shared storage
Verify the location of all SQL Server databases and logs for the existing standaloneserver. If they are located on local storage, move them from the local drive to theappropriate volumes or LUNs on shared storage to ensure proper failoveroperations in the cluster.
To move the database and logs to shared storage
1 Stop the SQL Server service.
2 Verify that you have backed up your existing data.
3 Ensure that the volumes or LUNs are imported or connected to the nodewhere the original database files are located on the local drives.
See “Managing storage using NetApp filer” on page 57.
See “Managing storage using Windows Logical Disk Manager” on page 60.
Making a standalone SQL server highly availableInstalling and configuring VCS on the standalone SQL server
102
4 Modify the SQL Server data file and user database locations.
Refer to the Microsoft SQL Server documentation for instructions.
5 Restart SQL Server.
Installing and configuring SQL Server on additionalnodes
Perform the following tasks to install Microsoft SQL Server on additional nodes.
■ Ensure that the shared volumes or LUNs are imported or connected to thenode where the original database files are located on the local drives..
■ Ensure that the SQL Server configuration is identical on all nodes in the cluster.To have identical configuration, ensure that the instance name (if applicable),destination folder for Program Files and Data Files and the AuthenticationMode are same on all the nodes.
■ Move the SQL Server databases and logs to the shared storage.Verify the location of all SQL Server databases and logs for the existingstandalone server. If they are located on local storage, move them from thelocal drive to the appropriate volumes or LUNs on shared storage to ensureproper failover operations in the cluster.Complete the following tasks to move the databases.
To move the database and logs to shared storage
■ Stop the SQL Server services for the SQL instance, on the first node whereyou installed SQL Server.
■ Modify the SQL Server data file and user database locations.Refer to the Microsoft SQL Server documentation for instructions.
■ Use the same instance name and instance ID when you install this instanceof SQL Server on failover nodes. If you are installing multiple instances ofSQL in the cluster, each instance must have a unique instance name andinstance ID.
■ Install SQL Server in the stand-alone installation mode in a non-clusteredenvironment.From the SQL Server Installation Center, on the Installation panel, choose theNew SQL Server stand-alone installation or add features to an existinginstallation option.
■ While installing SQL, ensure that you select all the desired features (forexample, Full-Text Search, Analysis Services) that you wish to configure forhigh availability.
103Making a standalone SQL server highly availableInstalling and configuring SQL Server on additional nodes
■ While installing SQL on additional cluster nodes, install the SQL instance, thedatabase files and analysis services files to a local disk. You do not need toinstall these files to the shared storage.
■ While specifying a user name for the SQL Server services account, specify adomain user account.
Assigning ports for multiple SQL Server instancesIf you are running multiple SQL Server instances, you must assign a differentport to each named instance. You can assign static or dynamic ports.
See “Assigning ports for multiple SQL Server instances” on page 66.
Configuring the VCS SQL Server service groupThe SQL Server 2008 Configuration Wizard enables you to create a SQL Server2008 or 2008 R2 service group and define the attributes for its resources on allthe nodes within the cluster simultaneously.
Run the configuration wizard from the node where the shared drives containingthe SQL database files are mounted.
You must complete the procedure to configure the SQL Server service group.
See “Configuring a SQL Server service group” on page 72.
Creating a SQL Server user-defined databasePerform the following steps to create and manage a SQL Server user-defineddatabase.
See “Making SQL Server user-defined databases highly available with VCS”on page 81.
■ Create volumes for a user-defined SQL Server database and its transaction log.
■ Create a SQL Server user-defined database and point the database files andtransaction log to the paths of the new volumes.
■ Use the SQL Server 2008 Configuration Wizard to add the storage resources(DiskRes and Mount or NetAppFiler and NetAppSnapDrive) for the userdatabases, to the existing SQL Server service group.
Making a standalone SQL server highly availableAssigning ports for multiple SQL Server instances
104
Verifying the installation and configurationVerify your installation by switching online nodes or by shutting down the nodethat is currently online. Either process will test that the service group can besmoothly transferred between nodes.
Shutting down a node creates an actual failure, stressing your system, but moretruly testing its high availability than by switching nodes. If you do shut downthe online computer in your cluster, remember to bring it back up after you haveconfirmed that the service group successfully failed over to another node.
See “Verifying the service group configuration” on page 83.
105Making a standalone SQL server highly availableVerifying the installation and configuration

Making a standalone SQL server highly availableVerifying the installation and configuration
106
Active-active configuration
This chapter includes the following topics:
■ About active-active configuration
■ Reviewing the configuration
■ Installing VCS and configuring the cluster
■ Configuring volumes or virtual disks for SQL Server
■ Installing and configuring the first instance of SQL Server
■ Configuring the VCS service group for the first SQL Server instance
■ Creating a SQL Server user-defined database
■ Repeating SQL Server installation for additional instances
■ Verifying the configuration
About active-active configurationThis chapter describes how to install and configure VCS for SQL Server thatincludes active-active clustering.
Reviewing the configurationA SQL Server instance is a completely independent SQL Server installation, withits own services, master database, storage, and memory resources. Each instanceis defined uniquely by a separate SQL Server virtual server and service group.
SQL Server supports up to 16 independent instances of SQL Server to run on asingle machine. A SQL Server instance can fail over to any of the other nodesconfigured nodes on its system list.
7Chapter
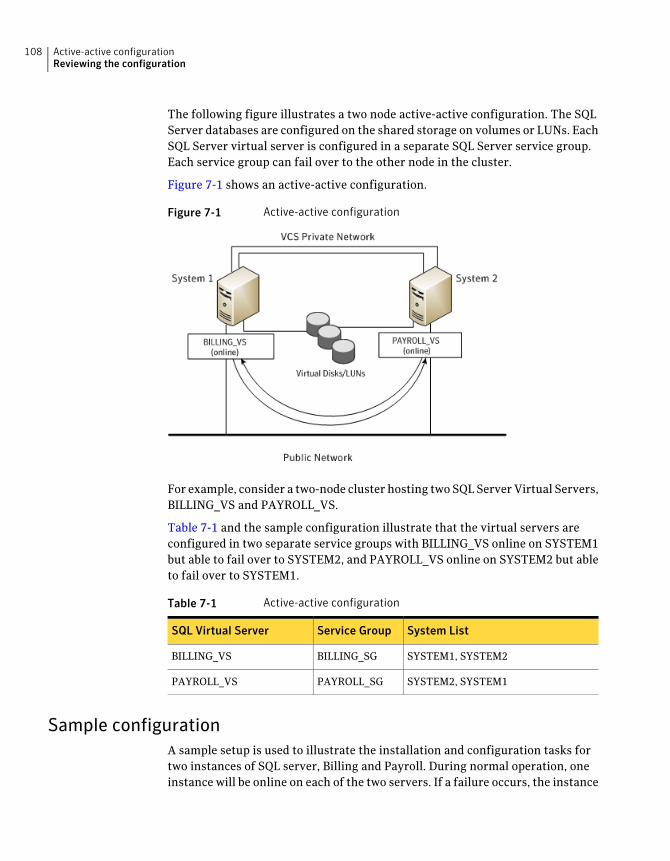
The following figure illustrates a two node active-active configuration. The SQLServer databases are configured on the shared storage on volumes or LUNs. EachSQL Server virtual server is configured in a separate SQL Server service group.Each service group can fail over to the other node in the cluster.
Figure 7-1 shows an active-active configuration.
Figure 7-1 Active-active configuration
For example, consider a two-node cluster hosting two SQL Server Virtual Servers,BILLING_VS and PAYROLL_VS.
Table 7-1 and the sample configuration illustrate that the virtual servers areconfigured in two separate service groups with BILLING_VS online on SYSTEM1but able to fail over to SYSTEM2, and PAYROLL_VS online on SYSTEM2 but ableto fail over to SYSTEM1.
Table 7-1 Active-active configuration
System ListService GroupSQL Virtual Server
SYSTEM1, SYSTEM2BILLING_SGBILLING_VS
SYSTEM2, SYSTEM1PAYROLL_SGPAYROLL_VS
Sample configurationA sample setup is used to illustrate the installation and configuration tasks fortwo instances of SQL server, Billing and Payroll. During normal operation, oneinstance will be online on each of the two servers. If a failure occurs, the instance
Active-active configurationReviewing the configuration
108
on the failing node will be brought online on the other server, resulting in twoinstances running on one server.
During the configuration process, create virtual IP addresses for the following:
■ Billing virtual server (virtual IP address is the same on all nodes)
■ Payroll virtual server (virtual IP address is the same on all node)
■ Cluster IP address (used by Web Console)
You should have these IP addresses available before you begin to deploy yourenvironment.
The IP addresses are required only in case of IPv4. In an IPv6 network environment,the configuration wizards automatically generate a unique and valid IPv6 addressbased on the network prefix advertised by the routers.
Table 7-2 describes the objects created and used during the installation andconfiguration.
Table 7-2 Active-active configuration objects
DescriptionName
server namesSYSTEM1 & SYSTEM2
virtual SQL server clusterSQL_CLUS1
volume for the SQL Server system data files for thebilling instance
volume for the SQL Server system data files for thepayroll instance
BILLING_VS_SYS_FILES
PAYROLL_VS_SYS_FILES
volume for a SQL Server user-defined database forthe billing instance
volume for a SQL Server user-defined database forthe payroll instance
BILLING_DATA
PAYROLL_DATA
volume for a SQL Server user-defined database logfile fort he billing instance
volume for a SQL Server user-defined database logfile for the payroll instance
BILLING_LOG
PAYROLL_LOG
volume for the list of registry keys replicated amongthe nodes for the billing instance
volume for the list of registry keys replicated amongthe nodes for the payroll instance
BILLING_REGREP
PAYROLL_REGREP
109Active-active configurationReviewing the configuration
Table 7-2 Active-active configuration objects (continued)
DescriptionName
instance name for the billing instance
instance name for the payroll instance
BILLING_INSTPAYROLL_INST
virtual SQL server name for the billing instance
virtual SQL server name for the payroll instance
BILLING_VSPAYROLL_VS
SQL Server service group for the billing instance
SQL Server service group for the payroll instance
BILLING_SGPAYROLL_SG
Installing VCS and configuring the clusterComplete the following procedures to install VCS and then establish the cluster:
■ Install VCS. Refer to theVeritas Cluster Server InstallationandUpgradeGuidefor more information.
■ Configure the VCS cluster using the VCS Cluster Configuration Wizard (VCW).See “Configuring the cluster using the Cluster Configuration Wizard”on page 37.
Configuring volumes or virtual disks for SQL ServerFor each instance of SQL Server, create volumes or LUNs (virtual disks) on theshared storage.
Referring to the sample configuration described earlier, for the Billing instance,create the following:
■ BILLING_DG, a cluster disk group for the volumes related to the Billing instance
■ BILLING_VS_SYS_FILES, the volume for the SQL Server system data files
■ BILLING-REGREP, the volume for the list of registry keys replicated amongcluster nodes for the Billing instance
■ BILLING_VS_FS_VOL, volume or LUNs for FILESTREAM enabled objects
For the Payroll instance, create the following:
■ PAYROLL_DG, a cluster disk group for the volumes related to the Payrollinstance
■ PAYROLL_VS_SYS_FILES, the volume for the SQL Server system data files
Active-active configurationInstalling VCS and configuring the cluster
110
■ PAYROLL_REGREP, the volume for the list of registry keys replicated amongcluster nodes for the Payroll instance
■ PAYROLL_VS_FS_VOL, volume or LUNs for FILESTREAM enabled objects
See “Managing storage using NetApp filer” on page 57.
See “Managing storage using Windows Logical Disk Manager” on page 60.
Installing and configuring the first instance of SQLServer
Note the following changes to be performed while you install and configure SQLServer.
■ Do not accept the default instance name. Specify an instance name for eachSQL Server installation.
■ Install SQL Server in the standalone installation mode in a non-clusteredenvironment.From the SQL Server Installation Center, on the Installation panel, choose theNew SQL Server stand-alone installation or add features to an existinginstallation option.
■ While installing SQL, ensure that you select all the desired features (forexample, Full-Text Search, Analysis Services) that you wish to configure withSFW HA.
■ Each SQL Server instance must be assigned a different port. The default portis 1433; ports for subsequent instances are generally assigned in descendingorder (1432, 1431, 1430, etc.).
Complete the tasks to install and configure the first SQL Server instance on allnodes of the cluster.
See “Installing SQL Server 2008 or 2008 R2 on the first cluster node” on page 63.
See “Installing SQL Server 2008 or 2008 R2 on the additional cluster nodes”on page 65.
See “Assigning ports for multiple SQL Server instances” on page 66.
Configuring the VCS service group for the first SQLServer instance
Consider the following points as you configure the SQL Server service group forthe first instance:
111Active-active configurationInstalling and configuring the first instance of SQL Server
■ Assign a unique name to the SQL Server service group, for exampleBILLING_SG.
■ Pay close attention to the priority order of the systems. For example, if thesystem priority for the first instance is SYSTEM1 then SYSTEM2; reverse thepriority order for the second instance, so that SYSTEM2 has a higher priority.
See “Configuring a SQL Server service group” on page 72.
Creating a SQL Server user-defined databaseCreate a user-defined database and then configure it with VCS.
The procedure includes the following tasks:
■ Create volumes or LUNs for a user-defined SQL Server database and itstransaction log and for FILESTREAM enabled database objects if configured.
■ Create a new SQL Server user-defined database and point the database filesand transaction log to the paths of the new volumes or LUNs.
■ Add new VCS storage agent resources (Mount and DiskRes in case of WindowsLDM, or NetAppSnapDrive and NetAppFiler) to the existing SQL Server servicegroup..
See “Making SQL Server user-defined databases highly available with VCS”on page 81.
Repeating SQL Server installation for additionalinstances
To install and configure one or more additional SQL Server instances, follow thesame procedures as when installing the first instance.
Note the following changes to be performed when you proceed to install additionalinstances.
■ Do not accept the default instance name. Specify a unique instance name foreach SQL Server installation.
■ Each SQL Server instance must be assigned a different port. The default portis 1433; ports for subsequent instances are generally assigned in descendingorder (1432, 1431, 1430, etc.).
■ Set a unique internal name for each instance, for example PAYROLL_VS.
See “Installing and configuring the first instance of SQL Server” on page 111.
Active-active configurationCreating a SQL Server user-defined database
112
Consider the following points as you configure the SQL Server service groups forthe additional instances:
■ Assign a unique name to the SQL Server service group, for examplePAYROLL_SG.
■ Note the priority order of the systems. For example, if the system priority forthe first instance is SYSTEM1 then SYSTEM2; reverse the priority order forthe second instance, so that SYSTEM2 has a higher priority.
■ Create any SQL Server user-defined databases required for your environment.
See “About configuring the SQL service group” on page 69.
See “Making SQL Server user-defined databases highly available with VCS”on page 81.
Verifying the configurationSee “Verifying the service group configuration” on page 83.
113Active-active configurationVerifying the configuration

Active-active configurationVerifying the configuration
114

Configuring a disasterrecovery setup
This chapter includes the following topics:
■ About disaster recovery configuration
■ What is a disaster recovery solution?
■ What needs to be protected in a SQL Server environment?
■ Typical disaster recovery configuration
■ Disaster recovery: New SQL Server installation
■ Creating a parallel environment on the secondary site
■ Configuring DR components
■ Configuring replication using NetApp SnapMirror
■ Configuring SnapMirror resources at the primary site
■ Configuring the Global Cluster Option for wide-area failover
About disaster recovery configurationThis chapter describes how to set up a disaster recovery configuration for SQLServer using the VCS agents for NetApp SnapMirror and Microsoft SQL Server.
What is a disaster recovery solution?A disaster recovery (DR) solution is a series of procedures you can use to safelyand efficiently restore application data and services in the event of a catastrophic
8Chapter
failure. A typical DR solution requires clusters on primary and secondary siteswith replication between those sites. The cluster on the primary site provides dataand services during normal operation; the cluster on the secondary site providesdata and services if the cluster on the primary site fails.
Symantec recommends that you configure the secondary site only after you haveestablished a local cluster with the GCO Option at the primary site.
Why implement a disaster recovery solution?A DR solution is vital for businesses that rely on the availability of data.
A well-designed DR solution prepares a business for unexpected disasters andprovides the following benefits in a DR situation:
■ Minimizes economic loss due to the unavailability or loss of data.
■ Provides a plan for the safe and orderly recovery of data in the event of adisaster.
■ Ensures safe and efficient recovery of data and services.
■ Minimizes any decision making during DR.
■ Reduces the reliance on key individuals.
Strategically planning a DR solution provides businesses with affordable ways tomeet their service level agreements, comply with government regulations, andminimize their business risks.
Note:A DR solution requires a well-defined backup strategy. Refer to your backupproduct documentation for information on configuring backup.
Understanding replicationThe term replication refers to the use of a tool or service to automate the processof maintaining a consistent copy of data from a designated source (primary site)on one or more remote locations (secondary sites).
In the event that the primary site data center is destroyed, the application datais readily available at the remote site, and the application can be restarted at theremote site. Refer to the NetApp documentation for more information onreplication in a NetApp storage environment.
Configuring a disaster recovery setupWhat is a disaster recovery solution?
116
What needs to be protected in a SQL Serverenvironment?
The following components of a SQL server environment must be protected in theevent of a disaster:
■ User DatabasesThe most critical component in any SQL Server implementation is the userdata that is stored in user-defined databases.
■ LoginsLogins allow clients to connect to SQL Server and execute queries on user data.Logins are stored in the master database and each of the user-defined databases.
■ JobsJobs are a set of scheduled tasks that maintain SQL Server databases. The jobconfiguration is stored in the msdb system database.
■ AlertsAlerts are actions that are taken when a specific event occurs. They are usedto respond to and correct errors that occur in SQL Server. The alertconfiguration is stored in the msdb system database.
■ OperatorsOperators are contacts that address problems occurring in SQL Server. Theyare notified in the event of errors. The operator configuration is stored in themsdb system database.
■ Extended Stored ProceduresExtended stored procedures are external routines that are called from withinSQL Server. They are typically stored in DLL files on the file system.
■ Other Server ExtensionsSQL Server is a very flexible database engine and it is possible to extend itsfunctionality in several ways. These extensions are also important to theoperation of the SQL Server.
Typical disaster recovery configurationA Disaster Recovery (DR) configuration enables you to restore application dataand services in the event of a catastrophic failure. A typical DR solution requiresprimary and secondary sites, and clusters within those sites. The clusters at theprimary and secondary sites are a part of the global cluster. The cluster at theprimary site provides data and services during normal operation, and the clusterat the secondary site provides data and services if the primary site fails. VCS
117Configuring a disaster recovery setupWhat needs to be protected in a SQL Server environment?
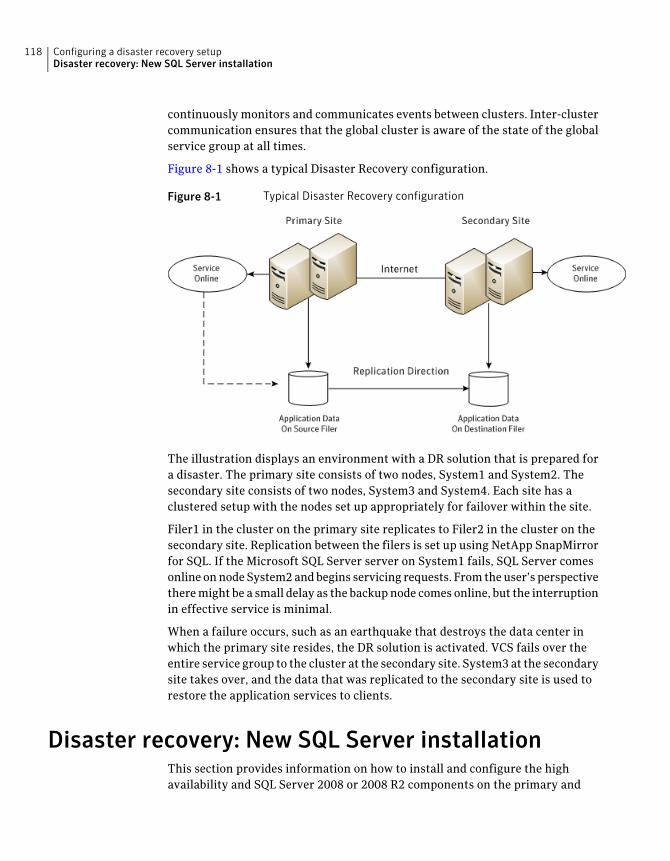
continuously monitors and communicates events between clusters. Inter-clustercommunication ensures that the global cluster is aware of the state of the globalservice group at all times.
Figure 8-1 shows a typical Disaster Recovery configuration.
Figure 8-1 Typical Disaster Recovery configuration
The illustration displays an environment with a DR solution that is prepared fora disaster. The primary site consists of two nodes, System1 and System2. Thesecondary site consists of two nodes, System3 and System4. Each site has aclustered setup with the nodes set up appropriately for failover within the site.
Filer1 in the cluster on the primary site replicates to Filer2 in the cluster on thesecondary site. Replication between the filers is set up using NetApp SnapMirrorfor SQL. If the Microsoft SQL Server server on System1 fails, SQL Server comesonline on node System2 and begins servicing requests. From the user’s perspectivethere might be a small delay as the backup node comes online, but the interruptionin effective service is minimal.
When a failure occurs, such as an earthquake that destroys the data center inwhich the primary site resides, the DR solution is activated. VCS fails over theentire service group to the cluster at the secondary site. System3 at the secondarysite takes over, and the data that was replicated to the secondary site is used torestore the application services to clients.
Disaster recovery: New SQL Server installationThis section provides information on how to install and configure the highavailability and SQL Server 2008 or 2008 R2 components on the primary and
Configuring a disaster recovery setupDisaster recovery: New SQL Server installation
118

secondary sites, with the intent of creating a parallel setup for the SQL servicegroup on both sites. The configuration process is the same for both sites.
Perform the following tasks to set up a disaster recovery environment for SQLServer 2008 or 2008 R2.
Reviewing the configurationDuring the configuration process you will require virtual IP addresses for thefollowing:
■ SQL virtual server: the IP address should be the same on all nodes at theprimary and secondary sites
■ Cluster IP address for the primary site: used for VCS Cluster ManagementConsole (Single Cluster Mode), also known as Web Console.
■ Cluster IP address for the secondary site: used for VCS Cluster ManagementConsole (Single Cluster Mode), also known as Web Console.
You should have these IP addresses available before you start deploying yourenvironment.
This is applicable only in case of IPv4. In case of an IPv6 environment, theconfiguration wizards automatically generate valid and unique IPv6 addressesbased on the IPv6 network prefix advertised by the routers on the network.
Installing VCS and configuring the clusterPerform the following tasks:
■ Install VCS.While installing, ensure that you select the Global Cluster Option to enablewide-area failover.Refer to the Veritas Cluster Server Installation and Upgrade Guide forinstructions.
■ Configure cluster components including the Wide-Area Connector (WAC)resource for global clusters, using the VCS Cluster Configuration Wizard (VCW).See “Configuring the cluster using the Cluster Configuration Wizard”on page 37.
Configuring volumes or LUNs on the shared storagePerform the following tasks:
■ Create volumes or LUNs (virtual disks) required for SQL Server.
119Configuring a disaster recovery setupDisaster recovery: New SQL Server installation

■ Ensure that the volumes or LUNs are connected to the first cluster node.See “Managing storage using Windows Logical Disk Manager” on page 60.See “Managing storage using NetApp filer” on page 57.
Installing and configuring SQL Server at the primary sitePerform the following tasks:
■ Create volumes or LUNs (virtual disks) and ensure that they are mounted orconnected to the first cluster node
■ Install and configure SQL Server
■ Configure SQL services
■ Stop the SQL services
■ Install SQL Server on the additional nodeSee “Installing SQL Server 2008 or 2008 R2 on the additional cluster nodes”on page 65.
Configuring the VCS SQL service groupPerform the following tasks:
■ Create a SQL Server service group using the VCS SQL Server 2008 ConfigurationWizard
■ If required, create volumes or LUNs for a user-defined database and transactionlog
■ If required, create a user-defined database in SQL Server
■ If required, add VCS storage agent resources for a user-defined database inVCS
■ Verify the service group configuration
Creating a parallel environment on the secondary siteAfter setting up a high availability environment on the primary site, use thefollowing guidelines to complete the same tasks on the secondary site.
Before you begin creating the SQL Server 2008 service group for the cluster atthe secondary site, make sure that the SQL Server service group at the primarysite is offline.
See “Reviewing the configuration” on page 119.Review the configuration
Configuring a disaster recovery setupCreating a parallel environment on the secondary site
120
See “Configuring the cluster using the Cluster ConfigurationWizard” on page 37.
Configure the cluster
See “Managing storage using Windows Logical DiskManager” on page 60.
See “Managing storage using NetApp filer” on page 57.
When you create volumes or LUNs (virtual disks) for thesecondary site, make sure the following is exactly the sameas the cluster on the primary site:
■ Volume sizes
■ Volume names
■ Drive letters
Create volumes or LUNs
See “Installing SQL Server 2008 or 2008 R2 on the firstcluster node” on page 63.
Select the same options at the secondary site as you did atthe primary site.
Install and configure SQLServer 2008 or 2008 R2 on thefirst cluster node
See “Installing SQL Server 2008 or 2008 R2 on theadditional cluster nodes” on page 65.
Ensure that the instance name is same on the primary siteand secondary site.
Install and configure SQLServer 2008 or 2008 R2 on theadditional cluster nodes
See “About configuring the SQL service group” on page 69.
Ensure that the service group name and virtual computername is same on both the primary site and secondary site.
Configure a SQL service group
Configuring DR componentsAfter configuring the high availability and SQL components on the primary andsecondary sites, complete the disaster recovery solution by configuring the disasterrecovery components for both sites.
Table 8-1 shows the process for configuring the DR components.
Table 8-1 Process for creating the DR components
ProcedureTask
See “Configuring replication using NetApp SnapMirror” on page 122.Set up volumereplication usingNetAppSnapMirror
121Configuring a disaster recovery setupConfiguring DR components
Table 8-1 Process for creating the DR components (continued)
ProcedureTask
See “Configuring SnapMirror resources at the primary site”on page 122.
ConfigureSnapMirrorresources in theSQL service groupat the primary site
See “Configuring the Global Cluster Option for wide-area failover”on page 123.
Configure GCOoption forwide-area failover
Configuring replication using NetApp SnapMirrorYou can replicate SQL Server data by establishing a SnapMirror relationshipbetween the filers at the primary and secondary sites. Before configuringreplication, make sure the service group is offline at the secondary site.
SnapMirror replicates snapshots taken on a filer and applies them to a remotefiler over a wide area network; these snapshots can be used by the target host toprovide rapid failover in case of a disaster.
If required, you can transfer the initial base snapshot image from the primary tosecondary via tape, and then set up incremental SnapMirror updates to thedestination filer. After you set up a SnapMirror relationship, ensure that the stateof the volumes (that are to be replicated) at the primary site shows asSnapMirrored.
Refer to NetApp documentation for more information.
Configuring SnapMirror resources at the primary siteConfigure NetAppSnapMirror resources at the primary site to monitor datareplication from the primary to the secondary site. Creating a resource at theprimary site will enable the filer to replicate from the primary to the secondarysite.
You may want to repeat this procedure and create a NetAppSnapMirror resourceat the secondary site.
This is required in cases such as the following:
■ the service group is online at the secondary site (either it is failed over orswitched to the secondary site) and the filer should replicate from secondaryto primary site
Configuring a disaster recovery setupConfiguring replication using NetApp SnapMirror
122
■ if you want to fail over or switch the service group from the secondary to theprimary site
Use the SQL Server 2008 Configuration Wizard to add the SnapMirror resource.Verify that the volumes or LUNs created to store the registry replicationinformation and the SQL Server database are connected to the node on which yourun the wizard, and disconnected from other nodes in the cluster.
See “Configuring a SQL Server service group” on page 72.
Configuring the Global Cluster Option for wide-areafailover
The Global Cluster option is required to manage global clustering for wide-areadisaster recovery.
Creating a global cluster environment involves the following:
■ Connecting standalone clusters by adding a remote cluster to a local cluster.
■ Converting the local service group that is common to all the clusters to a globalservice group.
You need to create a wide-area connector resource for global clusters.
You can use the VCS Java Console to perform global cluster operations; this guideonly provides procedures for the Java Console. Refer to theVeritas Cluster ServerAdministrator’s Guide for more information on GCO operations available fromthe Java Console and the command line.
PrerequisitesCreating a global cluster environment requires the following:
■ Wide-area Connector process is configured and the ClusterService group isonline at both sites.See “Configuring Wide-Area Connector process for global clusters” on page 49.
■ All service groups properly configured and able to come online.
■ The service group serving as the global group has the same unique name acrossall applicable clusters.
■ The clusters use the same version of VCS.
■ The clusters use the same operating system.
■ The clusters are standalone and do not already belong to a global clusterenvironment.
123Configuring a disaster recovery setupConfiguring the Global Cluster Option for wide-area failover

■ The names of the clusters at the primary and secondary sites and the virtualIP addresses associated with them are registered in the DNS with reverselookup.
Linking clusters: Adding a remote cluster to a local clusterThe VCS Java Console provides a wizard to create global clusters by linkingstandalone clusters or bringing a standalone cluster into an existing globalenvironment.
You can run the wizard from the following locations:
■ If you are creating a global cluster environment for the first time with twostandalone clusters, run the wizard from either the cluster on the primary siteor the cluster on the secondary site.
■ If you are adding a standalone cluster to an existing global cluster environment,run the wizard from a cluster already in the global cluster environment.
The following information is required for the Remote Cluster Configuration Wizardin Cluster Explorer:
■ The active host name or IP address of each cluster in the global configurationand of the cluster being added to the configuration.
■ The user name and password of the administrator for each cluster in theconfiguration.
■ The user name and password of the administrator for the cluster being addedto the configuration.Symantec does not support adding a cluster that is already part of a globalcluster environment. To merge the clusters of one global cluster environment(for example, cluster A and cluster B) with the clusters of another globalenvironment (for example, cluster C and cluster D), separate cluster C andcluster D into standalone clusters and add them one by one to the environmentcontaining cluster A and cluster B.
To add a remote cluster in Cluster Explorer
1 From Cluster Explorer, click Add/Delete Remote Cluster on the Edit menu.
or
From the Cluster Explorer configuration tree, right-click the cluster name,and click Add/Delete Remote Cluster.
2 Review the required information for the Remote Cluster Configuration Wizardand click Next.
3 In the Wizard Options panel, click Add Cluster, then click Next.
Configuring a disaster recovery setupConfiguring the Global Cluster Option for wide-area failover
124
4 In the New Cluster Details panel, enter the details of the new cluster.
If the cluster is not running in secure mode, do the following:
■ Enter the host name of a cluster system, an IP address of a cluster system,or the IP address of the cluster that will join the global environment.
■ If necessary, change the default port number.
■ Enter the user name.
■ Enter the password.
■ Click Next.
If the cluster is running in secure mode, do the following:
■ Enter the host name of a cluster system, an IP address of a cluster system,or the IP address of the cluster that will join the global environment.
■ Verify the port number.
■ Choose to connect to the remote cluster with the credentials used for thecurrent cluster connection, or enter new credentials, including the username, password, and the domain.
■ If you connected to the remote cluster earlier through the wizard, you canuse the credentials from the previous connection.
■ Click Next.
5 Click Finish. After running the wizard, the configurations on all the relevantclusters are in read-write mode; the wizard does not close the configurations.
6 Verify that the heartbeat connection between clusters is alive. From thecommand window enter hahb -display. The state attribute in the outputshould show alive.
If the state is unknown, then offline and online the ClusterService group.
Converting a local service group to a global service groupAfter linking the clusters, use the Global Group Configuration wizard to converta local service group that is common to the global clusters to a global group. Thiswizard also enables you to convert global groups into local groups.
125Configuring a disaster recovery setupConfiguring the Global Cluster Option for wide-area failover
To convert a local service group to a global group
1 From Cluster Explorer, click Configure Global Groups on the Edit menu.
or
From the Cluster Explorer configuration tree, right-click the cluster, and clickConfigure Global Groups.
or
From the Cluster Explorer configuration tree, right-click the service group,click Configure As Global, and proceed to step 3b.
2 Review the information required for the Global Group Configuration wizardand click Next.
3 Enter the details of the service group to modify as follows:
■ Click the name of the service group that will be converted from a localgroup to a global group, or vice versa.
■ From the Available Clusters box, click the clusters on which the group cancome online. Click the right arrow to move the cluster name to the Clustersfor Service Group box; for global to local cluster conversion, click the leftarrow to move the cluster name back to the Available Clusters box. Apriority number (starting with 0) indicates the cluster on which the groupwill attempt to come online. If necessary, double-click the entry in thePriority column and enter the new value.
■ Select the policy for cluster failover as follows:
Prevents a group from automatically failing over to anothercluster.
Manual
Enables a group to automatically fail over to another clusterif it is unable to fail over within the cluster, or if the entirecluster fails.
Auto
Enables a group to automatically fail over to another clusterif it is unable to fail over within the cluster.
Connected
■ Click Next.
4 Enter or review the connection details for each cluster. Click the Configureicon to review the remote cluster information for each cluster:
Configuring a disaster recovery setupConfiguring the Global Cluster Option for wide-area failover
126
■ Enter the IP address of the remote cluster, the IP address ofa cluster system, or the host name of a cluster system.
■ Verify the port number.
■ Enter the user name.
■ Enter the password.
■ Click OK.
■ Repeat these steps for each cluster in the global environment.
Cluster not insecure mode
■ Enter the IP address of the remote cluster, the IP address ofa cluster system, or the host name of a cluster system.
■ Verify the port number.
■ Choose to connect to the remote cluster with the credentialsused for the current cluster connection, or enter newcredentials, including the user name, password, and domain.
■ If you connected to the remote cluster earlier through thewizard, you can use the credentials from the previousconnection.
■ Click OK.
■ Repeat these steps for each cluster in the global environment.
Cluster in securemode
5 Click Next, then click Finish.
At this point, you must bring the global service group online from ClusterExplorer.
Bringing a global service group onlineAfter converting the local service group that is common to the global clusters toa global group, use the Cluster Explorer to bring the global service group online.
To bring a remote global service group online from Cluster Explorer
1 In the Service Groups tab of the configuration tree, right-click the servicegroup.
or
Click a cluster in the configuration tree, click the Service Groups tab, andright-click the service group icon in the view panel.
2 Click Online, and click Remote online.
3 In the Online global group dialog box, do the following:
■ Click the remote cluster to bring the group online.
■ Click the specific system, or click Any System, to bring the group online.
127Configuring a disaster recovery setupConfiguring the Global Cluster Option for wide-area failover
■ Click OK.
Administering global service groupsAdministering global groups requires the following conditions:
■ A group that will serve as the global group must have the same name acrossall applicable clusters.
■ You must know the user name and password for the administrator to eachcluster in the configuration.
Use the VCS Java Console or Web Console to bring a global group online, take aglobal group offline, or switch a global group on a remote cluster. The sectionbelow provides additional procedures for administering global groups from theJava Console. Refer to the Veritas Cluster Server Administrator’s Guide for moreinformation on global cluster operations from the Java Console and Web Console.
Note: For remote cluster operations, the user must have the same name andprivilege as the user logged on to the local cluster.
Taking a remote global service group offlineUse Cluster Explorer to take a remote global service group offline.
To take a remote global service group offline from Cluster Explorer
1 In the Service Groups tab of the configuration tree, right-click the servicegroup.
or
Click a cluster in the configuration tree, click the Service Groups tab, andright-click the service group icon in the view panel.
2 Click Offline, and click Remote offline.
3 In the Offline global group dialog box do the following:
■ Click the remote cluster to take the group offline.
■ Click the specific system, or click All Systems, to take the group offline.
■ Click OK.
Switching a remote service groupUse Cluster Explorer to switch a remote service group.
Configuring a disaster recovery setupConfiguring the Global Cluster Option for wide-area failover
128
To switch a remote service group from Cluster Explorer
1 In the Service Groups tab of the configuration tree, right-click the servicegroup.
or
Click a cluster in the configuration tree, click the Service Groups tab, andright-click the service group icon in the view panel.
2 Click Switch To, and click Remote switch.
3 In the Switch global group dialog box do the following:
■ Click the cluster to switch the group.
■ Click the specific system, or click Any System, to take the group offline.
■ Click OK.
Deleting a remote clusterIf necessary, use the Remote Cluster Configuration wizard to delete a remotecluster.
Note: You cannot delete a remote cluster if the cluster is part of a cluster list forglobal service groups or global heartbeats, or if the cluster is in the RUNNING,BUILD, INQUIRY, EXITING, or TRANSITIONING states.
Deleting a remote cluster involves the following tasks:
■ Taking the wide area cluster (wac) resource in the ClusterService group offlineon the cluster that will be removed from the global environment. For example,to delete cluster C2 from a global environment containing C1 and C2, log onto C2 and take the wac resource offline.
■ Removing the name of the specified cluster (C2) from the cluster lists of theother global groups using the Global Group Configuration wizard. Note thatthe Remote Cluster Configuration wizard in Cluster Explorer automaticallyupdates the cluster lists for heartbeats. Log on to the local cluster (C1) tocomplete this task before using the Global Group Configuration wizard.
■ Deleting the cluster (C2) from the local cluster (C1) through the Remote ClusterConfiguration wizard.
Use Cluster Explorer to take the wide area cluster resource offline, remove acluster from the cluster list for a global group, and delete a remote cluster fromthe local cluster.
129Configuring a disaster recovery setupConfiguring the Global Cluster Option for wide-area failover
To take the wide area cluster (wac) resource offline
1 From Cluster Monitor, log on to the cluster that will be deleted from the globalcluster environment.
2 In the Service Groups tab of the Cluster Explorer configuration tree, right-clickthe wac resource under the Application type in the ClusterService group.
or
Click a service group in the configuration tree, click the Resources tab, andright-click the wac resource in the view panel.
3 Click Offline, and click the appropriate system from the menu.
To remove a cluster from a cluster list for a global group
1 From Cluster Explorer, click Configure Global Groups on the Edit menu.
2 Click Next.
3 Enter the details of the service group to modify, as follows:
■ Click the name of the service group.
■ For global to local cluster conversion, click the left arrow to move thecluster name from the cluster list back to the Available Clusters box.
■ Click Next.
4 Enter or review the connection details for each cluster. Click the Configureicon to review the remote cluster information for each cluster:
If the cluster is not running in secure mode, do the following:
■ Enter the IP address of the remote cluster, the IP address of a clustersystem, or the host name of a cluster system.
■ Verify the port number.
■ Enter the user name.
■ Enter the password.
■ Click OK.
If the cluster is running in secure mode, do the following:
■ Enter the IP address of the remote cluster, the IP address of a clustersystem, or the host name of a cluster system.
■ Verify the port number.
■ Choose to connect to the remote cluster using the connected cluster’scredentials, or enter new credentials, including the user name, password,and domain.
Configuring a disaster recovery setupConfiguring the Global Cluster Option for wide-area failover
130
■ Click OK.
5 Click Next.
6 Click Finish.
To delete a remote cluster from the local cluster
1 From Cluster Explorer, click Add/Delete Remote Cluster on the Edit menu.
or
From the Cluster Explorer configuration tree, right-click the cluster name,and click Add/Delete Remote Clusters.
2 Review the required information for the Remote Cluster Configuration wizardand click Next.
3 On the Wizard Options panel, click Delete Cluster, then click Next.
4 In the Delete Cluster panel, click the name of the remote cluster to delete,then click Next.
5 Review the connection details for each cluster. Click the Configure icon toreview the remote cluster information for each cluster:
If the cluster is not running in secure mode do the following:
■ Enter the IP address of the remote cluster, the IP address of a clustersystem, or the host name of a cluster system.
■ Verify the port number.
■ Enter the user name.
■ Enter the password.
■ Click OK.
If the cluster is running in secure mode do the following:
■ Enter the IP address of the remote cluster, the IP address of a clustersystem, or the host name of a cluster system.
■ Verify the port number.
■ Choose to connect to the remote cluster with the credentials used for thecurrent cluster connection, or enter new credentials, including the username, password, and the domain.If you connected to the remote cluster earlier through the wizard, you canuse the credentials from the previous connection.
■ Click OK.
6 Click Finish.
131Configuring a disaster recovery setupConfiguring the Global Cluster Option for wide-area failover

Configuring a disaster recovery setupConfiguring the Global Cluster Option for wide-area failover
132
Troubleshooting VCSagents for NetApp andMicrosoft SQL Server
This chapter includes the following topics:
■ About troubleshooting VCS agents for NetApp and Microsoft SQL Server
■ VCS logging
■ VCS Cluster Configuration Wizard (VCW) logs
■ VCWsilent logs
■ NetApp agents error messages
■ SQL Server agent error messages and descriptions
About troubleshooting VCS agents for NetApp andMicrosoft SQL Server
This chapter describes how to troubleshoot common problems in the VCS agentsfor NetApp and Microsoft SQL Server. The chapter lists the error messages, anddescribes the problem associated with the agent. Recommended solution isincluded, where applicable.
9Chapter
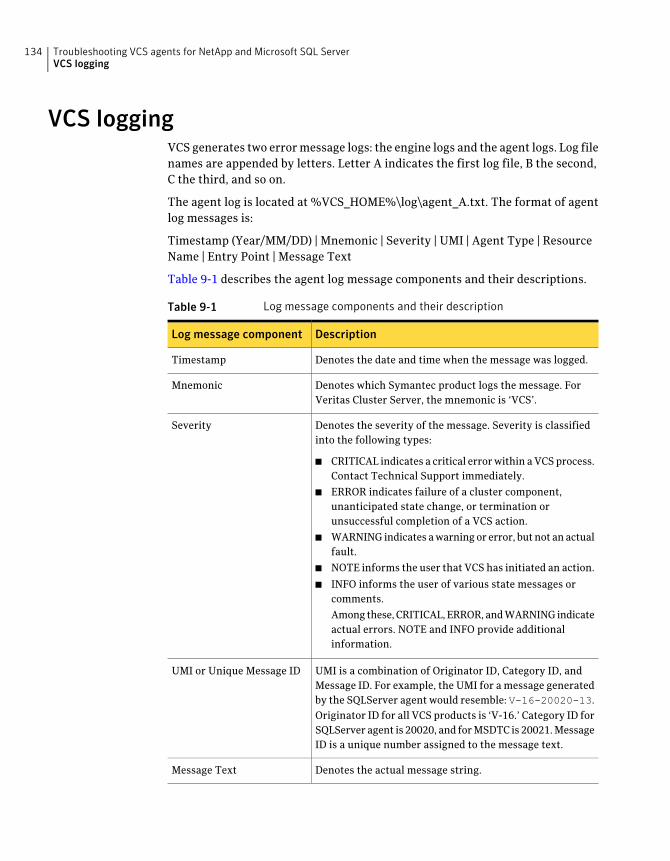
VCS loggingVCS generates two error message logs: the engine logs and the agent logs. Log filenames are appended by letters. Letter A indicates the first log file, B the second,C the third, and so on.
The agent log is located at %VCS_HOME%\log\agent_A.txt. The format of agentlog messages is:
Timestamp (Year/MM/DD) | Mnemonic | Severity | UMI | Agent Type | ResourceName | Entry Point | Message Text
Table 9-1 describes the agent log message components and their descriptions.
Table 9-1 Log message components and their description
DescriptionLog message component
Denotes the date and time when the message was logged.Timestamp
Denotes which Symantec product logs the message. ForVeritas Cluster Server, the mnemonic is ‘VCS’.
Mnemonic
Denotes the severity of the message. Severity is classifiedinto the following types:
■ CRITICAL indicates a critical error within a VCS process.Contact Technical Support immediately.
■ ERROR indicates failure of a cluster component,unanticipated state change, or termination orunsuccessful completion of a VCS action.
■ WARNING indicates a warning or error, but not an actualfault.
■ NOTE informs the user that VCS has initiated an action.
■ INFO informs the user of various state messages orcomments.
Among these, CRITICAL, ERROR, and WARNING indicateactual errors. NOTE and INFO provide additionalinformation.
Severity
UMI is a combination of Originator ID, Category ID, andMessage ID. For example, the UMI for a message generatedby the SQLServer agent would resemble: V-16-20020-13.Originator ID for all VCS products is ‘V-16.’ Category ID forSQLServer agent is 20020, and for MSDTC is 20021. MessageID is a unique number assigned to the message text.
UMI or Unique Message ID
Denotes the actual message string.Message Text
Troubleshooting VCS agents for NetApp and Microsoft SQL ServerVCS logging
134
You can view these message logs using Notepad or any text editor. All messagesare logged to the engine and the agent logs. Messages of type CRITICAL and ERRORare written to the Windows event log.
A typical agent log resembles:
2010/01/12 11:22:47 VCS NOTICE V-16-20020-10
SQLServer2005:SQL-Group-SQLServer2005:monitor:SQL Server
Instance name is not specified. Agent will operate on default
instance.
VCS Cluster Configuration Wizard (VCW) logsThe VCS Cluster Configuration Wizard (VCW) log is located at%allusersprofile%\Application Data\Veritas\Cluster Server\vcw.log.
Here, %allusersprofile% is the file system directory containing application datafor all users. A typical path is C:\Documents and Settings\All Users\.
The format of the wizard log is of the format ThreadID | Message Text.
ThreadID is the ID of the thread initiated by the wizard and Message Text is theactual message generated by the wizard.
A typical wizard log resembles the following:
00000576-00000264: ExecMethod return 00000000.
00000576-00000110: CRegistry::Query for VCS License failed.
Error=0x00000000
00000576-00000264: ExecMethod return 00000000.
00000576-00000264: ExecMethod return 00000001.
00000576-00000127: QueryDWORDValue returned 0x00000001
00000576-00000132: CRegistry::Query for VxSS Root information
failed. Error=0x00000001
VCWsilent logsThe VCWsilent log is located at <currentdirectory>\vcwsilent.log.
Here, <currentdirectory> is the directory from where the VCWsilent.exe is run.
A typical VCWsilent log resembles the following:
00005540-00000064: 5540: STARTING - Discovering NICs on the
selected machines...
00009956-00000064: 9956: STARTING - Generating private network
related files...
135Troubleshooting VCS agents for NetApp and Microsoft SQL ServerVCS Cluster Configuration Wizard (VCW) logs
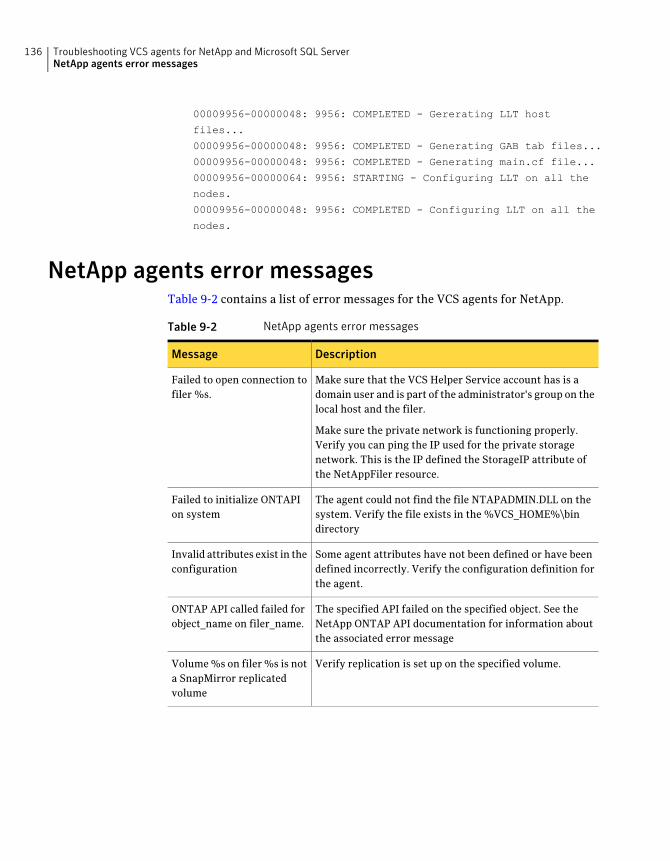
00009956-00000048: 9956: COMPLETED - Gererating LLT host
files...
00009956-00000048: 9956: COMPLETED - Generating GAB tab files...
00009956-00000048: 9956: COMPLETED - Generating main.cf file...
00009956-00000064: 9956: STARTING - Configuring LLT on all the
nodes.
00009956-00000048: 9956: COMPLETED - Configuring LLT on all the
nodes.
NetApp agents error messagesTable 9-2 contains a list of error messages for the VCS agents for NetApp.
Table 9-2 NetApp agents error messages
DescriptionMessage
Make sure that the VCS Helper Service account has is adomain user and is part of the administrator's group on thelocal host and the filer.
Make sure the private network is functioning properly.Verify you can ping the IP used for the private storagenetwork. This is the IP defined the StorageIP attribute ofthe NetAppFiler resource.
Failed to open connection tofiler %s.
The agent could not find the file NTAPADMIN.DLL on thesystem. Verify the file exists in the %VCS_HOME%\bindirectory
Failed to initialize ONTAPIon system
Some agent attributes have not been defined or have beendefined incorrectly. Verify the configuration definition forthe agent.
Invalid attributes exist in theconfiguration
The specified API failed on the specified object. See theNetApp ONTAP API documentation for information aboutthe associated error message
ONTAP API called failed forobject_name on filer_name.
Verify replication is set up on the specified volume.Volume %s on filer %s is nota SnapMirror replicatedvolume
Troubleshooting VCS agents for NetApp and Microsoft SQL ServerNetApp agents error messages
136
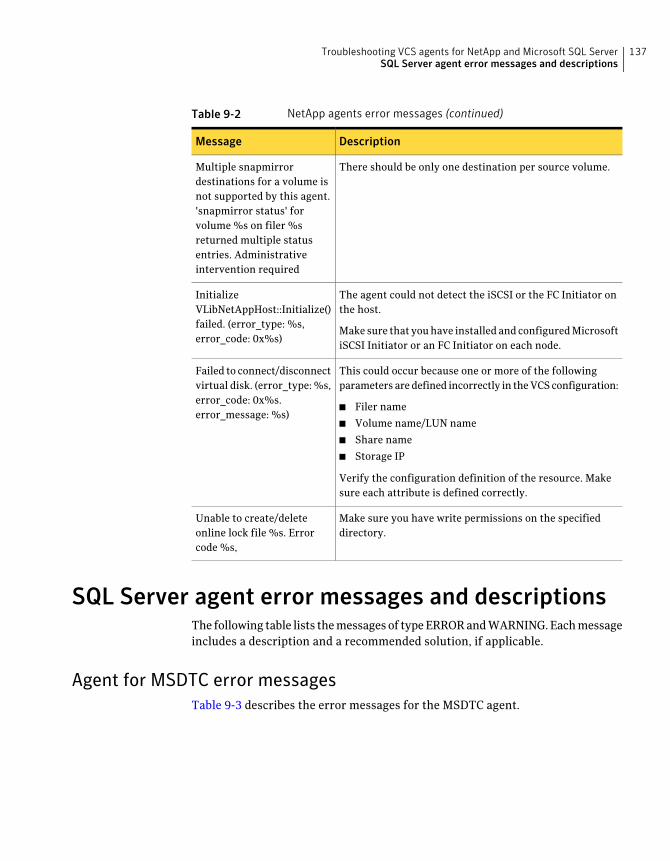
Table 9-2 NetApp agents error messages (continued)
DescriptionMessage
There should be only one destination per source volume.Multiple snapmirrordestinations for a volume isnot supported by this agent.'snapmirror status' forvolume %s on filer %sreturned multiple statusentries. Administrativeintervention required
The agent could not detect the iSCSI or the FC Initiator onthe host.
Make sure that you have installed and configured MicrosoftiSCSI Initiator or an FC Initiator on each node.
InitializeVLibNetAppHost::Initialize()failed. (error_type: %s,error_code: 0x%s)
This could occur because one or more of the followingparameters are defined incorrectly in the VCS configuration:
■ Filer name
■ Volume name/LUN name
■ Share name
■ Storage IP
Verify the configuration definition of the resource. Makesure each attribute is defined correctly.
Failed to connect/disconnectvirtual disk. (error_type: %s,error_code: 0x%s.error_message: %s)
Make sure you have write permissions on the specifieddirectory.
Unable to create/deleteonline lock file %s. Errorcode %s,
SQL Server agent error messages and descriptionsThe following table lists the messages of type ERROR and WARNING. Each messageincludes a description and a recommended solution, if applicable.
Agent for MSDTC error messagesTable 9-3 describes the error messages for the MSDTC agent.
137Troubleshooting VCS agents for NetApp and Microsoft SQL ServerSQL Server agent error messages and descriptions
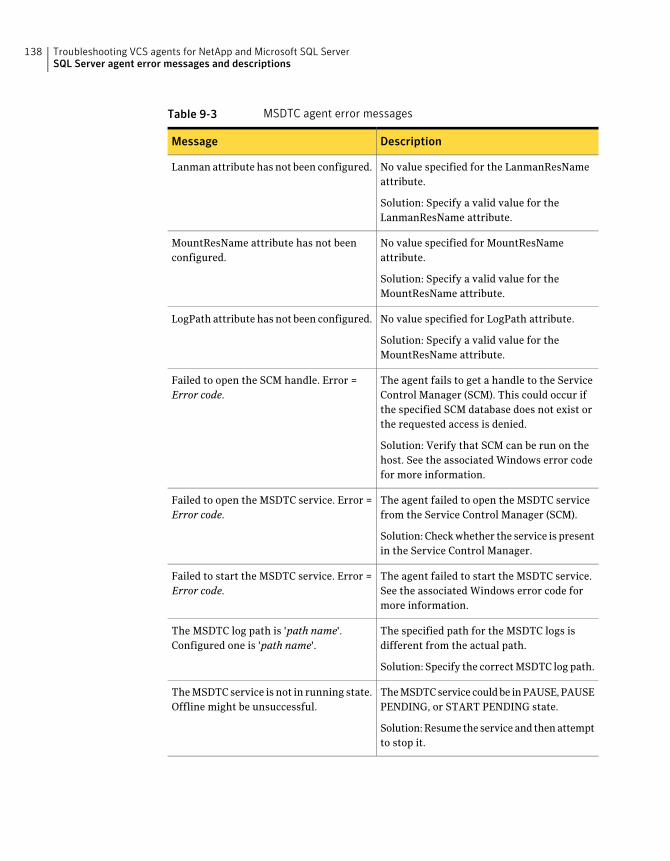
Table 9-3 MSDTC agent error messages
DescriptionMessage
No value specified for the LanmanResNameattribute.
Solution: Specify a valid value for theLanmanResName attribute.
Lanman attribute has not been configured.
No value specified for MountResNameattribute.
Solution: Specify a valid value for theMountResName attribute.
MountResName attribute has not beenconfigured.
No value specified for LogPath attribute.
Solution: Specify a valid value for theMountResName attribute.
LogPath attribute has not been configured.
The agent fails to get a handle to the ServiceControl Manager (SCM). This could occur ifthe specified SCM database does not exist orthe requested access is denied.
Solution: Verify that SCM can be run on thehost. See the associated Windows error codefor more information.
Failed to open the SCM handle. Error =Error code.
The agent failed to open the MSDTC servicefrom the Service Control Manager (SCM).
Solution: Check whether the service is presentin the Service Control Manager.
Failed to open the MSDTC service. Error =Error code.
The agent failed to start the MSDTC service.See the associated Windows error code formore information.
Failed to start the MSDTC service. Error =Error code.
The specified path for the MSDTC logs isdifferent from the actual path.
Solution: Specify the correct MSDTC log path.
The MSDTC log path is 'path name'.Configured one is 'path name'.
The MSDTC service could be in PAUSE, PAUSEPENDING, or START PENDING state.
Solution: Resume the service and then attemptto stop it.
The MSDTC service is not in running state.Offline might be unsuccessful.
Troubleshooting VCS agents for NetApp and Microsoft SQL ServerSQL Server agent error messages and descriptions
138
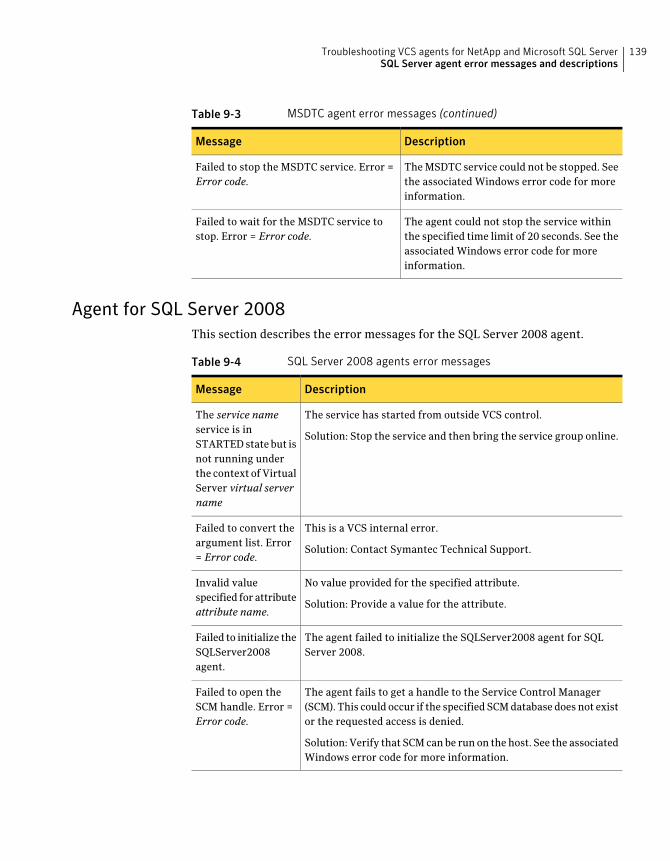
Table 9-3 MSDTC agent error messages (continued)
DescriptionMessage
The MSDTC service could not be stopped. Seethe associated Windows error code for moreinformation.
Failed to stop the MSDTC service. Error =Error code.
The agent could not stop the service withinthe specified time limit of 20 seconds. See theassociated Windows error code for moreinformation.
Failed to wait for the MSDTC service tostop. Error = Error code.
Agent for SQL Server 2008This section describes the error messages for the SQL Server 2008 agent.
Table 9-4 SQL Server 2008 agents error messages
DescriptionMessage
The service has started from outside VCS control.
Solution: Stop the service and then bring the service group online.
The service nameservice is inSTARTED state but isnot running underthe context of VirtualServer virtual servername
This is a VCS internal error.
Solution: Contact Symantec Technical Support.
Failed to convert theargument list. Error= Error code.
No value provided for the specified attribute.
Solution: Provide a value for the attribute.
Invalid valuespecified for attributeattribute name.
The agent failed to initialize the SQLServer2008 agent for SQLServer 2008.
Failed to initialize theSQLServer2008agent.
The agent fails to get a handle to the Service Control Manager(SCM). This could occur if the specified SCM database does not existor the requested access is denied.
Solution: Verify that SCM can be run on the host. See the associatedWindows error code for more information.
Failed to open theSCM handle. Error =Error code.
139Troubleshooting VCS agents for NetApp and Microsoft SQL ServerSQL Server agent error messages and descriptions
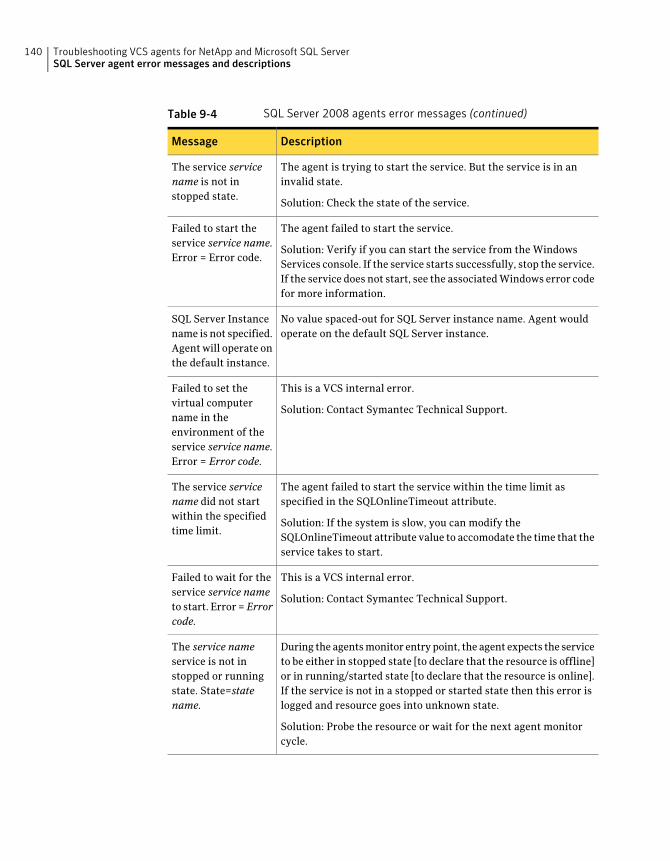
Table 9-4 SQL Server 2008 agents error messages (continued)
DescriptionMessage
The agent is trying to start the service. But the service is in aninvalid state.
Solution: Check the state of the service.
The service servicename is not instopped state.
The agent failed to start the service.
Solution: Verify if you can start the service from the WindowsServices console. If the service starts successfully, stop the service.If the service does not start, see the associated Windows error codefor more information.
Failed to start theservice service name.Error = Error code.
No value spaced-out for SQL Server instance name. Agent wouldoperate on the default SQL Server instance.
SQL Server Instancename is not specified.Agent will operate onthe default instance.
This is a VCS internal error.
Solution: Contact Symantec Technical Support.
Failed to set thevirtual computername in theenvironment of theservice service name.Error = Error code.
The agent failed to start the service within the time limit asspecified in the SQLOnlineTimeout attribute.
Solution: If the system is slow, you can modify theSQLOnlineTimeout attribute value to accomodate the time that theservice takes to start.
The service servicename did not startwithin the specifiedtime limit.
This is a VCS internal error.
Solution: Contact Symantec Technical Support.
Failed to wait for theservice service nameto start. Error =Errorcode.
During the agents monitor entry point, the agent expects the serviceto be either in stopped state [to declare that the resource is offline]or in running/started state [to declare that the resource is online].If the service is not in a stopped or started state then this error islogged and resource goes into unknown state.
Solution: Probe the resource or wait for the next agent monitorcycle.
The service nameservice is not instopped or runningstate. State=statename.
Troubleshooting VCS agents for NetApp and Microsoft SQL ServerSQL Server agent error messages and descriptions
140
Table 9-4 SQL Server 2008 agents error messages (continued)
DescriptionMessage
Incorrect encrypted password specified for detail monitoring.
Solution: Provide a password that is encrypted using the‘VCSencrypt’ utility.
Failed to get thepassword attribute.Error = Error code.
This is a VCS internal error.
Solution: Contact Symantec Technical Support.
Failed to convert thepassword attribute.Error = Error code.
The agent failed to open the service from the Service ControlManager.
Solution: Check whether the service is present in the Service ControlManager.
Failed to open theservice service name.Error = Error code.
The agent failed to query the state of the service.
Solution: Check whether the service is present in the Service ControlManager.
Failed to query thestatus of the serviceservice name. Error =Error code.
The SQL Server service could be in PAUSE, PAUSE PENDING, orSTART PENDING state.
Solution: Resume the service and then attempt to stop it.
The service servicename is not inrunning state.Attempt to stop itmight beunsuccessful.
The agent failed to stop the service. See the associated Windowserror code for more information.
The service servicename did not stop.Error = Error code.
The agent failed to stop the service within the time limit as specifiedin the SQLOfflineTimeout attribute.
Solution: If the system is slow, you can modify theSQLOfflineTimeout attribute value to accomodate the time thatthe service takes to stop.
The service servicename did not stopwithin the specifiedtimeout. Error =Error code.
The SQL script for detail monitoring failed. See the associatedWindows error code for more information.
Sql script has failedwith error error code.
This is a VCS internal error.
Solution: Contact Symantec Technical Support.
Error occurred whilegetting the processexit code. Error =Error code.
141Troubleshooting VCS agents for NetApp and Microsoft SQL ServerSQL Server agent error messages and descriptions
Table 9-4 SQL Server 2008 agents error messages (continued)
DescriptionMessage
This is a VCS internal error.
Solution: Contact Symantec Technical Support.
WaitForSingleObjectfailed with error errorcode.
The password attribute used for detail monitoring is not configured.The passwordattribute has not beenconfigured.
The agent failed to execute the script for detail monitoring. See theassociated Windows error code for more information.
Failed to start the Sqlscript. (User = username, Domain =domain name) Error= Error code.
This is a VCS internal error.
Solution: Contact Symantec Technical Support.
Unable to convert thebuffer to UNICODE.Error = Error code
The SQL script failed to monitor the SQL Server instance. See thescript output for more information.
Sql script failed.Script output : output
This is a VCS internal error.
Solution: Contact Symantec Technical Support.
Failed to get thetemporary file path.Error : Error code
This is a VCS internal error.
Solution: Contact Symantec Technical Support.
Failed to create thetemporary file. Error= Error code.
This is a VCS internal error.
Solution: Contact Symantec Technical Support.
Failed read thetemporary file. Error= Error code.
This is a VCS internal error.
Solution: Contact Symantec Technical Support.
Failed to remove thevirtual nameenvironment for theservice service name.
The Lanman resource name is incorrect.
Solution: Verify that the Lanman resource name is valid.
Invalid arglist. TheArgList shouldcontainLanmanResName:IPResName
Troubleshooting VCS agents for NetApp and Microsoft SQL ServerSQL Server agent error messages and descriptions
142

Agent for SQL Server 2008 FILESTREAMThis section describes the error messages for the SQL Server 2008 FILESTREAMagent.
Table 9-5 SQL Server 2008 FILESTREAM agent error messages
DescriptionMessage
If FILESTREAM is not enabled on the node and the VCS Filestreamresource is created manually, the resource fails to discoverFILESTREAM settings on the node.
Solution: Enable FILESTREAM for that SQL instance and then probethe VCS Filestream resource.
Check Filestream isenabled inMSSQL-ConfigurationManager if not enablefilestream withappropriate enablelevel [206]
When the VCS Filestream resource is taken offline, the respectiveFILESTREAM fileshares on the node are also deleted. If the agentis unable to delete the fileshares the VCS Filestream resource goesin to an unknown state.
Solution: Delete the FILESTREAM fileshares from the commandline manually, and then probe the resource.
SQLFilestreamResource will be inUNKNOWN [Actual:Offline] State :Filestream Fileshareexists even filestreamis disabled [406]
The FILESTREAM access level is set to 0 (local access) but theFILESTREAM fileshares exists. This causes the VCS Filestreamresource to go in to an unknown state.
Solution: Delete the FILESTREAM fileshares from the commandline manually, probe the resource, take the resource offline andthen bring it online.
SQLFilestreamResource is inUNKNOWN[Actual:online]: Filestream Fileshareexists even filestreamis enabled for localaccess only [407
Either the FILESTREAM fileshares do not exist or the agent failedto create them. The VCS Filestream resource goes offline. Solution:From the SQL Configuration Manager, enable FILESTREAM forthat instance, and then probe the resource.
Filestream will be inoffline [Actual:Online]: Filestream Filesharedoesn't exists evenfilestream is Enabled[409]
Agent for SQL Server 2008 Analysis ServiceThis section describes the error messages for the GenericService agent used tomake SQL Server 2008 Analysis Service highly available.
143Troubleshooting VCS agents for NetApp and Microsoft SQL ServerSQL Server agent error messages and descriptions
Table 9-6 GenericService agent error messages
DescriptionMessage
This error may occur if the Analysis Service takes a longtime to start. The configured GenericService resourcemay go into an unknown state.
Solution: The GenericService agent attributesDelayAfterOffline and DelayAfterOnline determine thenumber of seconds the agent waits for the service to startor stop. Modify these attribute values depending on thetime the configured service takes to start or stop oncethe resource is taken online or offline in the environment.
VCS ERROR V-16-10051-6012GenericService:MSOlap-resourcename Online:Failed to wait forthe service service name tostart. Error = 258.
Troubleshooting VCS agents for NetApp and Microsoft SQL ServerSQL Server agent error messages and descriptions
144
Using the virtual MMCviewer
This appendix includes the following topics:
■ About using the virtual MMC viewer
■ Viewing DTC transaction information
About using the virtual MMC viewerVCS starts the MSDTC service in the cluster under the context of the virtual server.Because the MMC snap-in is not aware of such a configuration, it is not possibleto view the transactions on the DTC virtual server from a node where the MSDTCresource is online. VCS provides a virtual MMC viewer, the VCS ApplicationManager (VAM) utility, that enables you to view the distributed transactionstatistics on the DTC virtual server from a node where the MSDTC resource isonline.
Viewing DTC transaction informationIn cases where a communication line fails or a distributed transaction applicationleaves unresolved transactions, you might want to view transaction lists andstatistics, control which transactions are displayed, set transaction time-outperiods, and control how often transactions are updated. The following stepsdescribe how to view the DTC transactions information.
Prerequisites for viewing DTC transaction information are as follows:
■ An MSDTC service group must be configured and online in the cluster.
AAppendix
■ MSDTC client must be configured on the nodes on which you wish to view thetransactions.
■ The MSDTC service group must be online on the node where you run the VCSApplication Manager utility.
To view transactions from a node where MSDTC resource is online
1 Start the VCS Application Manager utility.
Click Start>Programs>Symantec>VeritasClusterServer>ConfigurationTools > Application Manager.
The VCS Application Manager displays a list of supported application servicegroups configured in the cluster. For each service group it also displays thestate of the service group, the name of the virtual server resource (Lanmanresource) and the corresponding management tools used for that application.
2 Select MSDTC from the Select the resource type drop-down list.
3 Select the MSDTC resource that is online and then click Manage, ordouble-click the MSDTC resource name.
VAM launches the Component Services snap-in in the virtual server context.
4 In the console tree of the Component Services administrative tool, expandComponentServices>Computers>MyComputer>DistributedTransactionCoordinator > Local DTC.
5 Click Transaction List to view all transactions, their status, and theiridentifiers. Right-click a transaction and click View > Properties to list theparent transaction and its children.
6 Click Transaction Statistics to view statistical information about thetransactions in which a server participated.
You can use transaction statistics to get an overview of DTC performance.Refer to the Microsoft documentation for further information.
The following steps describe how to view DTC transactions from nodes that arenot part of the MSDTC Server service group.
To view transactions from any node in the domain
1 Launch the Windows Component Services Administrative tool.
Click Start > Programs > Administrative Tools > Component Services.
2 In the console tree of the Component Services administrative tool, double-clickComponent Services, right-click Computers, click New > Computer.
Using the virtual MMC viewerViewing DTC transaction information
146

3 In the Add Computer dialog box, specify the virtual server name that youspecified while creating the MSDTC Server service group. If you are unsureof the exact name, click Browse to search from a list of all computers on thenetwork and select the virtual computer name from the list.
4 Click OK. The virtual computer entry is added to the Computers container.
5 Expand the newly added virtual computer entry and double-click DistributedTransaction Coordinator.
6 Click Transaction List to view all transactions, their status, and theiridentifiers. Right-click a transaction and click View > Properties to list theparent transaction and its children.
7 Click Transaction Statistics to view statistical information about thetransactions in which a server participated.
You can use transaction statistics to get an overview of DTC performance.Refer to the Microsoft documentation for further information.
147Using the virtual MMC viewerViewing DTC transaction information

Using the virtual MMC viewerViewing DTC transaction information
148
Aabout
agent for SQL Server 2008 FILESTREAM 26agent for SQL Server 2008 MSDTC service 28GenericService agent for SQL Server 2008 Agent
and Analysis services 27installing multiple SQL instances 54using virtual MMC viewer 96VCS database agent 21
Active-Activeconfiguring VCS SQL Server service group 111
Active/Activeconfiguration diagram 108configuration overview 107creating a user-defined database 112
application failuredetecting 33
Assignport; multiple SQL Server instances 104
asynchronous replication 20Attribute definitions
SQL Server 2008 FILESTREAM agent 27attribute definitions
SQL Server 2008 MSDTC agent 28attributes
for NetApp Filer agent 15for NetApp SnapDrive agent 17for NetApp SnapMirror agent 19
Cclusters
setting up 37configurations
Disaster Recovery 35, 117configure
LLT over Ethernet using VCW 42LLT over UDP using VCW 44
convertingstandalone SQL conversion to HA 100
Createuser-defined database 81
Ddatabase agent
error messages 134Disaster recovery
create; parallel environment 120secondary site; create parallel environment 120SQL Server installation 118
disaster recovery (DR)illustrated 35, 118protection in a SQL Server environment 117rationale 116typical configuration 117
Disaster Recovery configuration 35, 117
Eerror tags 134
GGlobal Cluster Option (GCO)
prerequisites 123
IInstall
SQL Server; additional nodes 65SQL Server; first cluster node 63
Install and configurefirst instance of SQL Server 111SQL Server, additional nodes 103
installingverifying the installation 98
IPv6 support 67
LLLT over Ethernet
configuring using VCW 42LLT over UDP
configuring using VCW 44logging
VCW logs 135VCWsilent logs 135
Index
LogsVCS 134VCW 135VCWsilent 135
Mmessage logs 134message tags 134MSDTC
configuring the client (VCS) 95creating an MSDTC service group 91HA configuration overview 88service group configuration (VCS) 88
MSDTC client configurationWindows 2008 95
MSOLAP: IPv6 67multiple SQL Server instances
assigning the port 66
NNetApp Filer agent
attributes 15type definition 15
NetApp SnapDrive agentattributes 17type definition 16
NetApp SnapMirror agentattributes 19type definition 19
Pport assignment for multiple instances 66
Rreplication
defined 116replication modes 20Resource type
SQL Server 2008 MSDTC agent 28resource type
NetApp Filer agent 15NetApp SnapDrive agent 16NetApp SnapMirror agent 19
Resource type definitionSQL Server 2008 FILESTREAM agent 27
SSample
dependency graph 29–30sample configurations
active-active 108standalone SQL Server conversion (HA) 101
Security Servicesconfiguring 37, 45
semi-synchronous replication 20service groups
administering global groups 128SQL cluster
Disaster Recovery setup 35, 117SQL cluster configuration
Disaster Recovery 35, 117SQL Server database agent
detail monitoring options 31standalone SQL Server
convert; clustered server 102overview of HA configuration 100sample HA configuration 101
synchronous replication 20
Ttype definition
NetApp Filer agent 15NetApp SnapDrive agent 16NetApp SnapMirror agent 19
VVCS
configuring the SQL Server service group(Active-Active) 111
VCS Clustersample; SQL Server Configuration 34
VCS Configuration wizard 37VCS logs 135VCS utilities
Veritas Application Manager 145Veritas Application Manager utility 145view
DTC transaction information 96viewing distributed transactions 145virtual DTC viewer 145
Wwizards
VCS Configuration 37
Index150


