94
Veritas™ Operations Manager Release Notes 3.0
Veritas™ Operations ManagerRelease Notes
3.0

Veritas™ Operations Manager Release NotesThe software described in this book is furnished under a license agreement andmay be usedonly in accordance with the terms of the agreement.
Product version: 3.0
Documentation version: 3.0.1
Legal NoticeCopyright © 2010 Symantec Corporation. All rights reserved.
Symantec, the Symantec logo, Veritas, and Veritas Storage Foundation are trademarks orregistered trademarks of Symantec Corporation or its affiliates in the U.S. and othercountries. Other names may be trademarks of their respective owners.
This Symantec product may contain third party software for which Symantec is requiredto provide attribution to the third party (“Third Party Programs”). Some of the Third PartyPrograms are available under open source or free software licenses. The LicenseAgreementaccompanying the Software does not alter any rights or obligations you may have underthose open source or free software licenses. Please see theThird Party LegalNoticeAppendixto this Documentation or TPIP ReadMe File accompanying this Symantec product for moreinformation on the Third Party Programs.
The product described in this document is distributed under licenses restricting its use,copying, distribution, and decompilation/reverse engineering. No part of this documentmay be reproduced in any form by any means without prior written authorization ofSymantec Corporation and its licensors, if any.
THEDOCUMENTATIONISPROVIDED"ASIS"ANDALLEXPRESSORIMPLIEDCONDITIONS,REPRESENTATIONS AND WARRANTIES, INCLUDING ANY IMPLIED WARRANTY OFMERCHANTABILITY, FITNESS FOR A PARTICULAR PURPOSE OR NON-INFRINGEMENT,ARE DISCLAIMED, EXCEPT TO THE EXTENT THAT SUCH DISCLAIMERS ARE HELD TOBELEGALLYINVALID.SYMANTECCORPORATIONSHALLNOTBELIABLEFORINCIDENTALOR CONSEQUENTIAL DAMAGES IN CONNECTION WITH THE FURNISHING,PERFORMANCE, OR USE OF THIS DOCUMENTATION. THE INFORMATION CONTAINEDIN THIS DOCUMENTATION IS SUBJECT TO CHANGE WITHOUT NOTICE.
The Licensed Software andDocumentation are deemed to be commercial computer softwareas defined in FAR12.212 and subject to restricted rights as defined in FARSection 52.227-19"Commercial Computer Software - Restricted Rights" and DFARS 227.7202, "Rights inCommercial Computer Software or Commercial Computer Software Documentation", asapplicable, and any successor regulations. Any use, modification, reproduction release,performance, display or disclosure of the Licensed Software andDocumentation by theU.S.Government shall be solely in accordance with the terms of this Agreement.

Symantec Corporation350 Ellis StreetMountain View, CA 94043
http://www.symantec.com

Technical SupportSymantec Technical Support maintains support centers globally. TechnicalSupport’s primary role is to respond to specific queries about product featuresand functionality. TheTechnical Support group also creates content for our onlineKnowledge Base. The Technical Support group works collaboratively with theother functional areas within Symantec to answer your questions in a timelyfashion. For example, theTechnical Support groupworkswithProductEngineeringand Symantec Security Response to provide alerting services and virus definitionupdates.
Symantec’s support offerings include the following:
■ A range of support options that give you the flexibility to select the rightamount of service for any size organization
■ Telephone and/or Web-based support that provides rapid response andup-to-the-minute information
■ Upgrade assurance that delivers software upgrades
■ Global support purchased on a regional business hours or 24 hours a day, 7days a week basis
■ Premium service offerings that include Account Management Services
For information about Symantec’s support offerings, you can visit our Web siteat the following URL:
www.symantec.com/business/support/
All support services will be delivered in accordance with your support agreementand the then-current enterprise technical support policy.
Contacting Technical SupportCustomers with a current support agreement may access Technical Supportinformation at the following URL:
www.symantec.com/business/support/
Before contacting Technical Support, make sure you have satisfied the systemrequirements that are listed in your product documentation. Also, you should beat the computer onwhich theproblemoccurred, in case it is necessary to replicatethe problem.
When you contact Technical Support, please have the following informationavailable:
■ Product release level
■ Hardware information
■ Available memory, disk space, and NIC information
■ Operating system
■ Version and patch level
■ Network topology
■ Router, gateway, and IP address information
■ Problem description:
■ Error messages and log files
■ Troubleshooting that was performed before contacting Symantec
■ Recent software configuration changes and network changes
Licensing and registrationIf yourSymantecproduct requires registrationor a licensekey, access our technicalsupport Web page at the following URL:
www.symantec.com/business/support/
Customer serviceCustomer service information is available at the following URL:
www.symantec.com/business/support/
Customer Service is available to assist with non-technical questions, such as thefollowing types of issues:
■ Questions regarding product licensing or serialization
■ Product registration updates, such as address or name changes
■ General product information (features, language availability, local dealers)
■ Latest information about product updates and upgrades
■ Information about upgrade assurance and support contracts
■ Information about the Symantec Buying Programs
■ Advice about Symantec's technical support options
■ Nontechnical presales questions
■ Issues that are related to CD-ROMs or manuals
Support agreement resourcesIf youwant to contact Symantec regarding an existing support agreement, pleasecontact the support agreement administration team for your region as follows:
[email protected] and Japan
[email protected], Middle-East, and Africa
[email protected] America and Latin America

Technical Support . . . . . . . . . . . . . . . . . . . . . . . . . . . . . . . . . . . . . . . . . . . . . . . . . . . . . . . . . . . . . . . . . . . . . . . . . . . . . . . . . . . . . . . . . . . . . . . 4
Chapter 1 Overview of this release . . . . . . . . . . . . . . . . . . . . . . . . . . . . . . . . . . . . . . . . . . . . . . . . . . . . . 13
About Veritas Operations Manager ... . . . . . . . . . . . . . . . . . . . . . . . . . . . . . . . . . . . . . . . . . . . . . . 13Management Server ... . . . . . . . . . . . . . . . . . . . . . . . . . . . . . . . . . . . . . . . . . . . . . . . . . . . . . . . . . . . . 13Managed host ... . . . . . . . . . . . . . . . . . . . . . . . . . . . . . . . . . . . . . . . . . . . . . . . . . . . . . . . . . . . . . . . . . . . . . 14Standalone (unmanaged) host ... . . . . . . . . . . . . . . . . . . . . . . . . . . . . . . . . . . . . . . . . . . . . . . . 14
Veritas Operations Manager installation options .... . . . . . . . . . . . . . . . . . . . . . . . . . . . 15What’s new in Veritas Operations Manager 3.0 ... . . . . . . . . . . . . . . . . . . . . . . . . . . . . . . . 15
Object faults and risks monitoring .... . . . . . . . . . . . . . . . . . . . . . . . . . . . . . . . . . . . . . . . . . 15Enhanced alert notification feature ... . . . . . . . . . . . . . . . . . . . . . . . . . . . . . . . . . . . . . . . 16Enhanced database discovery .... . . . . . . . . . . . . . . . . . . . . . . . . . . . . . . . . . . . . . . . . . . . . . . . 16Enhanced Storage Foundation discovery .... . . . . . . . . . . . . . . . . . . . . . . . . . . . . . . . . 16Enhanced policy checks ... . . . . . . . . . . . . . . . . . . . . . . . . . . . . . . . . . . . . . . . . . . . . . . . . . . . . . . . . 16Enhancements in reports ... . . . . . . . . . . . . . . . . . . . . . . . . . . . . . . . . . . . . . . . . . . . . . . . . . . . . . . 16Enhancements in License Deployment Report ... . . . . . . . . . . . . . . . . . . . . . . . . . . 16Advanced management of roles ... . . . . . . . . . . . . . . . . . . . . . . . . . . . . . . . . . . . . . . . . . . . . . 17Business Entities ... . . . . . . . . . . . . . . . . . . . . . . . . . . . . . . . . . . . . . . . . . . . . . . . . . . . . . . . . . . . . . . . . . 17New Storage Provisioning Add-on (UNIX Only) ... . . . . . . . . . . . . . . . . . . . . . . . . . 17Performance charts ... . . . . . . . . . . . . . . . . . . . . . . . . . . . . . . . . . . . . . . . . . . . . . . . . . . . . . . . . . . . . . 17Performance improvements ... . . . . . . . . . . . . . . . . . . . . . . . . . . . . . . . . . . . . . . . . . . . . . . . . . . 17Veritas Cluster Server administration features ... . . . . . . . . . . . . . . . . . . . . . . . . 17Discovery of third-party Volume Managers and clusters ... . . . . . . . . . . . . 18Download patches from Veritas Operations Services Web
site ... . . . . . . . . . . . . . . . . . . . . . . . . . . . . . . . . . . . . . . . . . . . . . . . . . . . . . . . . . . . . . . . . . . . . . . . . . . . . . 18Enhanced user interface and navigation .... . . . . . . . . . . . . . . . . . . . . . . . . . . . . . . . . . 18Enhanced Dashboard .... . . . . . . . . . . . . . . . . . . . . . . . . . . . . . . . . . . . . . . . . . . . . . . . . . . . . . . . . . . 19
Chapter 2 System requirements . . . . . . . . . . . . . . . . . . . . . . . . . . . . . . . . . . . . . . . . . . . . . . . . . . . . . . . . . 21
Operating system requirements ... . . . . . . . . . . . . . . . . . . . . . . . . . . . . . . . . . . . . . . . . . . . . . . . . . . . 21Third-party required libraries ... . . . . . . . . . . . . . . . . . . . . . . . . . . . . . . . . . . . . . . . . . . . . . . . . . . . . . 23
32-bit SNIA Common HBA API on Windows hosts ... . . . . . . . . . . . . . . . . . . . . . 23System resource requirements ... . . . . . . . . . . . . . . . . . . . . . . . . . . . . . . . . . . . . . . . . . . . . . . . . . . . . 24Supported hardware .... . . . . . . . . . . . . . . . . . . . . . . . . . . . . . . . . . . . . . . . . . . . . . . . . . . . . . . . . . . . . . . . . . 24Web browser requirements ... . . . . . . . . . . . . . . . . . . . . . . . . . . . . . . . . . . . . . . . . . . . . . . . . . . . . . . . . . 25
Contents
Network and firewall requirements ... . . . . . . . . . . . . . . . . . . . . . . . . . . . . . . . . . . . . . . . . . . . . . . 25
Chapter 3 Software limitations . . . . . . . . . . . . . . . . . . . . . . . . . . . . . . . . . . . . . . . . . . . . . . . . . . . . . . . . . . . 27
No coexistence of managed host and CommandCentral StorageManagement Server ... . . . . . . . . . . . . . . . . . . . . . . . . . . . . . . . . . . . . . . . . . . . . . . . . . . . . . . . . . . . . 27
Live statistics for initiators are not supported on HP-UX(2001078) ... . . . . . . . . . . . . . . . . . . . . . . . . . . . . . . . . . . . . . . . . . . . . . . . . . . . . . . . . . . . . . . . . . . . . . . . . . . 27
Performance charts are not supported in certain cases for multipleobjects that belong to different hosts (2023666) ... . . . . . . . . . . . . . . . . . . . . . . . . 28
Chapter 4 Known issues . . . . . . . . . . . . . . . . . . . . . . . . . . . . . . . . . . . . . . . . . . . . . . . . . . . . . . . . . . . . . . . . . . . . . . . 29
Installation and upgrade issues ... . . . . . . . . . . . . . . . . . . . . . . . . . . . . . . . . . . . . . . . . . . . . . . . . . . . . 29Service groups setup for Veritas OperationsManager HA-DR on
remote clusters remain frozen after upgrade from 2.x to 3.0(2005676) ... . . . . . . . . . . . . . . . . . . . . . . . . . . . . . . . . . . . . . . . . . . . . . . . . . . . . . . . . . . . . . . . . . . . . 29
Administer linkdoesnotworkafterWindows-basedManagementServer upgrade (1997072) ... . . . . . . . . . . . . . . . . . . . . . . . . . . . . . . . . . . . . . . . . . . . . . . . 30
The VRTSsfmh package does not get listed under theLicenses/Packages tab after you upgrade to VeritasOperations Manager 3.0 (1922803) ... . . . . . . . . . . . . . . . . . . . . . . . . . . . . . . . . . . . 30
Solaris-based managed hosts appear as not installed afterupgrade to Veritas Operations Manager 3.0 (2020546) ... . . . . . . . . . 31
Console logon page displays unixpwd domain for both thephysical and the virtual host after upgrade (1982315) ... . . . . . . . . . . 31
Web console does not launch after upgrade of UNIX-basedManagement Server to Veritas Operations Manager 3.0(2023180) ... . . . . . . . . . . . . . . . . . . . . . . . . . . . . . . . . . . . . . . . . . . . . . . . . . . . . . . . . . . . . . . . . . . . . 32
Management Server issues ... . . . . . . . . . . . . . . . . . . . . . . . . . . . . . . . . . . . . . . . . . . . . . . . . . . . . . . . . . . 32Inconsistent behavior when you configure the LDAP domain if
the LDAP server does not respond or server name is invalid(2024598) ... . . . . . . . . . . . . . . . . . . . . . . . . . . . . . . . . . . . . . . . . . . . . . . . . . . . . . . . . . . . . . . . . . . . . 32
Managed host issues ... . . . . . . . . . . . . . . . . . . . . . . . . . . . . . . . . . . . . . . . . . . . . . . . . . . . . . . . . . . . . . . . . . . 33Expiry date for the demo licenses is not displayed for managed
host running on non-English locale (2010501) ... . . . . . . . . . . . . . . . . . . . . 33Console display issues ... . . . . . . . . . . . . . . . . . . . . . . . . . . . . . . . . . . . . . . . . . . . . . . . . . . . . . . . . . . . . . . . . 33
Tables do not get refreshed properly in Internet Explorer ... . . . . . . . . . . . 33Updated information is not displayed immediately in the console
after resource-level operations are performed .... . . . . . . . . . . . . . . . . . . . 34Status of all SF Manager 2.x hosts is shown as healthy on an
upgraded Veritas Operations Manager 3.0 setup(2009372) ... . . . . . . . . . . . . . . . . . . . . . . . . . . . . . . . . . . . . . . . . . . . . . . . . . . . . . . . . . . . . . . . . . . . . 34
Contents8
Console does not display a service group with a name thatcontains more than 100 characters approximately(1982548) ... . . . . . . . . . . . . . . . . . . . . . . . . . . . . . . . . . . . . . . . . . . . . . . . . . . . . . . . . . . . . . . . . . . . . 35
Console does not display the second service group created withthe same name as an existing one (1934795) ... . . . . . . . . . . . . . . . . . . . . . . 35
All the associated hosts are not displayed on the service groupand resource details page and resource dependency view(1939786) ... . . . . . . . . . . . . . . . . . . . . . . . . . . . . . . . . . . . . . . . . . . . . . . . . . . . . . . . . . . . . . . . . . . . . 35
Duplicate entries displayed for a cluster after it is renamed(1929454) ... . . . . . . . . . . . . . . . . . . . . . . . . . . . . . . . . . . . . . . . . . . . . . . . . . . . . . . . . . . . . . . . . . . . . 35
Console displays the EMC PowerPath controller as disabled(1735257) ... . . . . . . . . . . . . . . . . . . . . . . . . . . . . . . . . . . . . . . . . . . . . . . . . . . . . . . . . . . . . . . . . . . . . 35
Initiator statistics are not supported on the hosts that haveStorage Foundation releases earlier than 5.0 MP3 .... . . . . . . . . . . . . . . 36
Objects in business entity details may get listed more than once(2020928) ... . . . . . . . . . . . . . . . . . . . . . . . . . . . . . . . . . . . . . . . . . . . . . . . . . . . . . . . . . . . . . . . . . . . . 36
Columns may be truncated when you view emailed reports inOutlook 2003 (1937908) ... . . . . . . . . . . . . . . . . . . . . . . . . . . . . . . . . . . . . . . . . . . . . . . . . . 36
Reports archived in the earlier versions are not available afteryou upgrade to Veritas Operations Manager 3.0(1997050) ... . . . . . . . . . . . . . . . . . . . . . . . . . . . . . . . . . . . . . . . . . . . . . . . . . . . . . . . . . . . . . . . . . . . . 36
Exchange service group is not listed in the Exchange Serverstable (1976615) ... . . . . . . . . . . . . . . . . . . . . . . . . . . . . . . . . . . . . . . . . . . . . . . . . . . . . . . . . . . . . . 37
Veritas Operations Manager Add-on for Veritas Cluster ServerAdministration issues ... . . . . . . . . . . . . . . . . . . . . . . . . . . . . . . . . . . . . . . . . . . . . . . . . . . . . . . . . . . 37The text 'active' appears next to two nodes (1639342) ... . . . . . . . . . . . . . . . . 37
Other issues ... . . . . . . . . . . . . . . . . . . . . . . . . . . . . . . . . . . . . . . . . . . . . . . . . . . . . . . . . . . . . . . . . . . . . . . . . . . . . . 37Package check on Management Server shows errors after
installation .... . . . . . . . . . . . . . . . . . . . . . . . . . . . . . . . . . . . . . . . . . . . . . . . . . . . . . . . . . . . . . . . . . 37Log on to the Veritas Operations Manager console may fail on
Firefox (1939352) ... . . . . . . . . . . . . . . . . . . . . . . . . . . . . . . . . . . . . . . . . . . . . . . . . . . . . . . . . . . 38Session timed out error while adding a managed host to
Management Server ... . . . . . . . . . . . . . . . . . . . . . . . . . . . . . . . . . . . . . . . . . . . . . . . . . . . . . . 39Logon to console fails on InternetExplorer ifManagementServer
host name has the underscore (_) character ... . . . . . . . . . . . . . . . . . . . . . . . 39Add host operation fails after Storage Foundation is uninstalled
from Management Server or managed host (1755861) ... . . . . . . . . . . 39Trailing zeroes after the decimal point in product versions are
truncated when CSV data is viewed in Excel ... . . . . . . . . . . . . . . . . . . . . . . . 40Log on using LDAP/AD fails on Management Server that is
upgraded from 2.x to 3.0 (1993211) ... . . . . . . . . . . . . . . . . . . . . . . . . . . . . . . . . . . . 40Authentication broker crashes while LDAP authentication
(2017319) ... . . . . . . . . . . . . . . . . . . . . . . . . . . . . . . . . . . . . . . . . . . . . . . . . . . . . . . . . . . . . . . . . . . . . 40
9Contents

Storage Foundation Manager 2.x add-ons are unavailable afterupgrade to Veritas Operations Manager 3.0 ... . . . . . . . . . . . . . . . . . . . . . . . . 41
No content displayed for some Help pages ... . . . . . . . . . . . . . . . . . . . . . . . . . . . . . . . 41Creation of a storage template is not supported for Windows
hosts (2024296) ... . . . . . . . . . . . . . . . . . . . . . . . . . . . . . . . . . . . . . . . . . . . . . . . . . . . . . . . . . . . . 41Erroneous cluster informationdisplayed if two clusters have the
same name and ID .... . . . . . . . . . . . . . . . . . . . . . . . . . . . . . . . . . . . . . . . . . . . . . . . . . . . . . . . . 42
Appendix A Documentation addenda and errata . . . . . . . . . . . . . . . . . . . . . . . . . . . . . . . 43
Addenda for Veritas Operations Manager Online Help .... . . . . . . . . . . . . . . . . . . . . 43About tasks ... . . . . . . . . . . . . . . . . . . . . . . . . . . . . . . . . . . . . . . . . . . . . . . . . . . . . . . . . . . . . . . . . . . . . . . . . 43About messages posted on Activity Board .... . . . . . . . . . . . . . . . . . . . . . . . . . . . . . . . 43Set Tier panel ... . . . . . . . . . . . . . . . . . . . . . . . . . . . . . . . . . . . . . . . . . . . . . . . . . . . . . . . . . . . . . . . . . . . . . 44Set displayable name for enclosure panel ... . . . . . . . . . . . . . . . . . . . . . . . . . . . . . . . . 44Set displayable name for array port panel ... . . . . . . . . . . . . . . . . . . . . . . . . . . . . . . . . 44Select database instances options .... . . . . . . . . . . . . . . . . . . . . . . . . . . . . . . . . . . . . . . . . . . 45Provide credentials options .... . . . . . . . . . . . . . . . . . . . . . . . . . . . . . . . . . . . . . . . . . . . . . . . . . . 45Database Instance Credentials Summary options .... . . . . . . . . . . . . . . . . . . . . . 45Removing ignored violations from the ignore list ... . . . . . . . . . . . . . . . . . . . . . . 46Marking policy violations to exclude from the subsequent
scans .... . . . . . . . . . . . . . . . . . . . . . . . . . . . . . . . . . . . . . . . . . . . . . . . . . . . . . . . . . . . . . . . . . . . . . . . . . 46Modifying policy templates ... . . . . . . . . . . . . . . . . . . . . . . . . . . . . . . . . . . . . . . . . . . . . . . . . . . . 47Activating suppressed faults ... . . . . . . . . . . . . . . . . . . . . . . . . . . . . . . . . . . . . . . . . . . . . . . . . . 47Performing database discovery for secure databases ... . . . . . . . . . . . . . . . . . 48Viewing scan tunables associated with a policy scan .... . . . . . . . . . . . . . . . . . 49Viewing the overview of a rule ... . . . . . . . . . . . . . . . . . . . . . . . . . . . . . . . . . . . . . . . . . . . . . . . 50Suppress the Faults options .... . . . . . . . . . . . . . . . . . . . . . . . . . . . . . . . . . . . . . . . . . . . . . . . . . 50Installing Veritas Operations Manager Add-ons .... . . . . . . . . . . . . . . . . . . . . . . . 51
Errata for Veritas Operations Manager Online Help .... . . . . . . . . . . . . . . . . . . . . . . . . 51Monitoring alerts and setting alert rules ... . . . . . . . . . . . . . . . . . . . . . . . . . . . . . . . . . 51Viewing alert log details ... . . . . . . . . . . . . . . . . . . . . . . . . . . . . . . . . . . . . . . . . . . . . . . . . . . . . . . . 52Viewing tasks ... . . . . . . . . . . . . . . . . . . . . . . . . . . . . . . . . . . . . . . . . . . . . . . . . . . . . . . . . . . . . . . . . . . . . . 52Viewing the activity board .... . . . . . . . . . . . . . . . . . . . . . . . . . . . . . . . . . . . . . . . . . . . . . . . . . . . 52Setting signature tunables ... . . . . . . . . . . . . . . . . . . . . . . . . . . . . . . . . . . . . . . . . . . . . . . . . . . . . 53Removing signatures from a policy template ... . . . . . . . . . . . . . . . . . . . . . . . . . . . . 54Adding signatures to a policy template ... . . . . . . . . . . . . . . . . . . . . . . . . . . . . . . . . . . . . 54Viewing signature extended information details ... . . . . . . . . . . . . . . . . . . . . . . . 55Setting tier to a storage enclosure ... . . . . . . . . . . . . . . . . . . . . . . . . . . . . . . . . . . . . . . . . . . 55Setting display name to a storage enclosure ... . . . . . . . . . . . . . . . . . . . . . . . . . . . . . 56Deploy Add-on .... . . . . . . . . . . . . . . . . . . . . . . . . . . . . . . . . . . . . . . . . . . . . . . . . . . . . . . . . . . . . . . . . . . . 57About uploading Veritas Operations Manager Add-ons to the
Repository .... . . . . . . . . . . . . . . . . . . . . . . . . . . . . . . . . . . . . . . . . . . . . . . . . . . . . . . . . . . . . . . . . . . 58
Contents10

Uploading a Veritas Operations Manager Add-on toRepository .... . . . . . . . . . . . . . . . . . . . . . . . . . . . . . . . . . . . . . . . . . . . . . . . . . . . . . . . . . . . . . . . . . . 58
Uninstalling Add-ons from managed hosts ... . . . . . . . . . . . . . . . . . . . . . . . . . . . . . . 59Deploying a package or patch on managed hosts on which the
installation is not initiated .... . . . . . . . . . . . . . . . . . . . . . . . . . . . . . . . . . . . . . . . . . . . . . 59Deploy Package and patches options .... . . . . . . . . . . . . . . . . . . . . . . . . . . . . . . . . . . . . . . 59Viewing Packages and Patches in the Repository .... . . . . . . . . . . . . . . . . . . . . . . 60Viewing the list ofmanagedhosts onwhich the package or patch
is installed .... . . . . . . . . . . . . . . . . . . . . . . . . . . . . . . . . . . . . . . . . . . . . . . . . . . . . . . . . . . . . . . . . . . 61Viewing scan details of a policy check .... . . . . . . . . . . . . . . . . . . . . . . . . . . . . . . . . . . . . 62Viewing faults and risks ... . . . . . . . . . . . . . . . . . . . . . . . . . . . . . . . . . . . . . . . . . . . . . . . . . . . . . . . 62Analyzing faults and risks ... . . . . . . . . . . . . . . . . . . . . . . . . . . . . . . . . . . . . . . . . . . . . . . . . . . . . 63Deleting a policy template ... . . . . . . . . . . . . . . . . . . . . . . . . . . . . . . . . . . . . . . . . . . . . . . . . . . . . 64Suppressing faults ... . . . . . . . . . . . . . . . . . . . . . . . . . . . . . . . . . . . . . . . . . . . . . . . . . . . . . . . . . . . . . . . 65LDAP/AD Settings - discover attributes and configuration
information panel options .... . . . . . . . . . . . . . . . . . . . . . . . . . . . . . . . . . . . . . . . . . . . . . 65About Veritas Operations Manager Add-ons .... . . . . . . . . . . . . . . . . . . . . . . . . . . . . 66About deploying Veritas Operations Manager Add-ons .... . . . . . . . . . . . . . . 67Running a manual policy template scan .... . . . . . . . . . . . . . . . . . . . . . . . . . . . . . . . . . 67Creating policy templates ... . . . . . . . . . . . . . . . . . . . . . . . . . . . . . . . . . . . . . . . . . . . . . . . . . . . . . 68Policy Template Details options .... . . . . . . . . . . . . . . . . . . . . . . . . . . . . . . . . . . . . . . . . . . . . 68Setting rules that trigger actions based on alert conditions .... . . . . . . . . 69Creating alert rules ... . . . . . . . . . . . . . . . . . . . . . . . . . . . . . . . . . . . . . . . . . . . . . . . . . . . . . . . . . . . . . . 69Enabling alert rules ... . . . . . . . . . . . . . . . . . . . . . . . . . . . . . . . . . . . . . . . . . . . . . . . . . . . . . . . . . . . . . 71Disabling alert rules ... . . . . . . . . . . . . . . . . . . . . . . . . . . . . . . . . . . . . . . . . . . . . . . . . . . . . . . . . . . . . 71Editing alert rules ... . . . . . . . . . . . . . . . . . . . . . . . . . . . . . . . . . . . . . . . . . . . . . . . . . . . . . . . . . . . . . . . 72Enable Rule options .... . . . . . . . . . . . . . . . . . . . . . . . . . . . . . . . . . . . . . . . . . . . . . . . . . . . . . . . . . . . . 72Disable Rule options .... . . . . . . . . . . . . . . . . . . . . . . . . . . . . . . . . . . . . . . . . . . . . . . . . . . . . . . . . . . . 72Removing an add-on from repository .... . . . . . . . . . . . . . . . . . . . . . . . . . . . . . . . . . . . . . 72Remove Add-on from the Repository options .... . . . . . . . . . . . . . . . . . . . . . . . . . . 73Canceling the deployment request ... . . . . . . . . . . . . . . . . . . . . . . . . . . . . . . . . . . . . . . . . . . 73Cancel Deployment ... . . . . . . . . . . . . . . . . . . . . . . . . . . . . . . . . . . . . . . . . . . . . . . . . . . . . . . . . . . . . . 73Downloading the deployment log .... . . . . . . . . . . . . . . . . . . . . . . . . . . . . . . . . . . . . . . . . . . 73Download deployment log .... . . . . . . . . . . . . . . . . . . . . . . . . . . . . . . . . . . . . . . . . . . . . . . . . . . . . 73Viewing policy template details ... . . . . . . . . . . . . . . . . . . . . . . . . . . . . . . . . . . . . . . . . . . . . . 73Enabling Add-ons on specific managed host ... . . . . . . . . . . . . . . . . . . . . . . . . . . . . . 74Disable Add-ons .... . . . . . . . . . . . . . . . . . . . . . . . . . . . . . . . . . . . . . . . . . . . . . . . . . . . . . . . . . . . . . . . . . 74Enable Add-ons .... . . . . . . . . . . . . . . . . . . . . . . . . . . . . . . . . . . . . . . . . . . . . . . . . . . . . . . . . . . . . . . . . . . 74
Addenda for Storage Provisioning Add-on Online Help .... . . . . . . . . . . . . . . . . . . . 74Viewing Impact Analysis Report ... . . . . . . . . . . . . . . . . . . . . . . . . . . . . . . . . . . . . . . . . . . . . 74
Errata for Storage Provisioning Add-on Online Help .... . . . . . . . . . . . . . . . . . . . . . . . 76Moving volumes from thick to thin LUNs .... . . . . . . . . . . . . . . . . . . . . . . . . . . . . . . . 76
11Contents
Moving volumes on an enclosure to one or more otherenclosures ... . . . . . . . . . . . . . . . . . . . . . . . . . . . . . . . . . . . . . . . . . . . . . . . . . . . . . . . . . . . . . . . . . . . 77
Move Volumes options .... . . . . . . . . . . . . . . . . . . . . . . . . . . . . . . . . . . . . . . . . . . . . . . . . . . . . . . . . 78Move Volumes, Change Volume Layout options .... . . . . . . . . . . . . . . . . . . . . . . . 79Move Volumes - Select host and enclosure options .... . . . . . . . . . . . . . . . . . . . 80Move Volumes Summary .... . . . . . . . . . . . . . . . . . . . . . . . . . . . . . . . . . . . . . . . . . . . . . . . . . . . . . 82Importing storage templates ... . . . . . . . . . . . . . . . . . . . . . . . . . . . . . . . . . . . . . . . . . . . . . . . . . 82Exporting storage templates ... . . . . . . . . . . . . . . . . . . . . . . . . . . . . . . . . . . . . . . . . . . . . . . . . . 83Unlocking storage template ... . . . . . . . . . . . . . . . . . . . . . . . . . . . . . . . . . . . . . . . . . . . . . . . . . . 84Locking storage template ... . . . . . . . . . . . . . . . . . . . . . . . . . . . . . . . . . . . . . . . . . . . . . . . . . . . . . . 84Deleting storage templates ... . . . . . . . . . . . . . . . . . . . . . . . . . . . . . . . . . . . . . . . . . . . . . . . . . . . 84Provision Storage – Select host and disk group options .... . . . . . . . . . . . . . 85Updating or viewing a storage template ... . . . . . . . . . . . . . . . . . . . . . . . . . . . . . . . . . . 85Creating a storage template using volumes .... . . . . . . . . . . . . . . . . . . . . . . . . . . . . . 86Create/Update/ViewStorageTemplate - File systemparameters
options .... . . . . . . . . . . . . . . . . . . . . . . . . . . . . . . . . . . . . . . . . . . . . . . . . . . . . . . . . . . . . . . . . . . . . . . . 87Create/Update/View Storage Template - Volume parameters
options .... . . . . . . . . . . . . . . . . . . . . . . . . . . . . . . . . . . . . . . . . . . . . . . . . . . . . . . . . . . . . . . . . . . . . . . 88Create Storage Template - Select host, disk group, VxFS or
volumes options .... . . . . . . . . . . . . . . . . . . . . . . . . . . . . . . . . . . . . . . . . . . . . . . . . . . . . . . . . . . . 89Create/Update/View Storage Template – File system advanced
options .... . . . . . . . . . . . . . . . . . . . . . . . . . . . . . . . . . . . . . . . . . . . . . . . . . . . . . . . . . . . . . . . . . . . . . . . 89Create Storage Template – Volume Advanced option .... . . . . . . . . . . . . . . . . 91Creating a new storage template design .... . . . . . . . . . . . . . . . . . . . . . . . . . . . . . . . . . . 92
Appendix B Getting help . . . . . . . . . . . . . . . . . . . . . . . . . . . . . . . . . . . . . . . . . . . . . . . . . . . . . . . . . . . . . . . . . . . . . . . . . . 93
Veritas Operations Manager on the Web .... . . . . . . . . . . . . . . . . . . . . . . . . . . . . . . . . . . . . . . . 93Getting help .... . . . . . . . . . . . . . . . . . . . . . . . . . . . . . . . . . . . . . . . . . . . . . . . . . . . . . . . . . . . . . . . . . . . . . . . . . . . . 93Using the product documentation .... . . . . . . . . . . . . . . . . . . . . . . . . . . . . . . . . . . . . . . . . . . . . . . . 94Commenting on product documentation .... . . . . . . . . . . . . . . . . . . . . . . . . . . . . . . . . . . . . . . . 94
Contents12
Overview of this release
This chapter includes the following topics:
■ About Veritas Operations Manager
■ Veritas Operations Manager installation options
■ What’s new in Veritas Operations Manager 3.0
About Veritas Operations ManagerVeritas Operations Manager by Symantec gives you a single, centralizedmanagement console for the Veritas Storage Foundation and High Availabilityproducts. You can use it to monitor, visualize, and manage storage and clusterresources, and generate reports about them. Veritas Operations Manager letsadministrators centrally manage diverse datacenter environments.
A typical Veritas Operations Manager deployment consists of the following:
■ Management ServerSee “Management Server” on page 13.
■ Managed hostsSee “Managed host” on page 14.
■ Standalone hostsSee “Standalone (unmanaged) host” on page 14.
For more information on managing security roles and users accounts, see theVeritas Operations Manager Administrator's Guide.
Management ServerIn a centrallymanaged deployment, youmust configure one host asManagementServer. Management Server receives information about all the resources in its
1Chapter

domain. When you log on to Management Server, you can gain access to theresources on different hosts within the centrally-managed deployment.
When you install Management Server, the Web Server component is installedautomatically.
Managed hostA managed host runs at least one Storage Foundation and High Availabilityproduct, and belongs to a centralmanagement domain controlled byManagementServer.
Managed hosts include the following:
■ Hosts with Storage Foundation 4.x, or later, on all supported platforms
■ Hosts with Storage Foundation 3.5 on HP-UX
■ Hosts with Storage Foundation and High Availability 4.x, or later, on allsupported platforms
Typically, a managed host is a production server (database File Server) on whichyou install and runStorageFoundation andHighAvailability product components.A typical site can have thousands of hosts using some or all of the StorageFoundation and High Availability products. In Veritas Operations Manager,Management Server is also configured as a managed host. You can manageManagement Server itself as part of a central management domain.
In a centrally managed deployment, managed hosts relay information aboutstorage network resources and applications toManagement Server.ManagementServer coalesces the data it receives from the managed hosts within its database.Using this coalesced data, the Veritas Operations Manager Console can presentcentralized views and reports.
You can use the Web Server on Management Server to access the managed hostsin the centrallymanaged deployment. You log on to theManagement Server URLandWeb Server port 14161 (for example, https://myhost.example.com:14161).
Standalone (unmanaged) hostA standalone (unmanaged) host is a Storage Foundation host that has beenconfigured so it does not belong to a central management domain.
To manage individual Storage Foundation hosts, you can install and use theJava-based Veritas Enterprise Administrator. This console lets youmanage hostsusing the Storage Foundation products installed on them.
Overview of this releaseAbout Veritas Operations Manager
14
If you want a standalone host to participate in the central management domain,youmust update it by installing theVeritasOperationsManagerhostmanagementpackage.
Note: You can convert any standalone host to a managed host. However, becauseManagement Server is also a managed host, you cannot configure it to be astandalone host.
Veritas Operations Manager installation optionsYou can install Veritas Operations Manager in the following ways:
■ If you choose to implement centralized management, then a typical fullinstallation of Veritas Operations Manager consists of the following: a singleManagementServer,multiplemanagedhosts, andanynumberofWebConsoles.
■ If you prefer to implement the traditional single host management, then youhave two options: install a "thick" client, the Java-based Veritas EnterpriseAdministrator, or a light-weight Web Server that relies on a standard Webbrowser client; however, only the Java Console supports single hostmanagement of both 5.x and 4.x hosts.
With each installation option, you can establish user credentials such thatauthorized users can access the product to perform sensitive management tasksand other users can perform only a more basic set of functions.
What’s new in Veritas Operations Manager 3.0This release ofVeritasOperationsManager (earlier knownas Storage FoundationManager) includes the following new features and enhancements.
Object faults and risks monitoringVeritas Operations Manager provides you enhanced functionality to closelymonitor the faulty status and possible risks to the managed objects in yourdatacenter. This functionality also lets you analyze each fault to understand theirimplications and causes. You can view and analyze the faults on your objects atthe level of each object and at the level of every business entity. A consolidatedfault report is provided to you at the business entity level.
For enhancedmonitoring of faults and risks, you can automate the error handlingmechanism by creating certain rules that trigger specific actions in response tovarious alert conditions.
15Overview of this releaseVeritas Operations Manager installation options

Enhanced alert notification featureThis release of Veritas Operations Manager provides you advanced alertnotification functionalities. The enhanced feature helps youunderstand the faultsand risks pertaining to the objects in your datacenter. The advanced alertnotification feature also includes email notifications on Simple NetworkManagement Protocol (SNMP) traps. VeritasOperationsManager sends you thesenotifications in the formof separate emails, and also as a single email that containsthe summary of all the alerts that are triggered on each day.
Enhanced database discoveryVeritas Operations Manager provides secure Oracle, Microsoft SQL Server, andSybase discovery. It also discovers the database files.
Enhanced Storage Foundation discoveryVeritas Operations Manager provides you with information on the tunables forVeritas File System, Veritas Volume Manager, enclosures, and DMP. It alsodiscovers EMC PowerPath paths.
Enhanced policy checksIn Veritas Operations Manager, the policy check feature can now be accessedusing anew top-levelmenu.Newcheckshavebeenadded to this feature.Additionalchecks are available as pluggable add-ons and can be downloaded and installed.The checks can be scheduled to run daily, weekly, or monthly.
Enhancements in reportsYou can now use the Veritas Operations Manager reports with a revampedinterface. You can use the new report categorization to access the reports. Youcannowgenerate reports for thin LUNs, SSDLUNs, cluster activity, and inventory.You can also schedule the reports to run at a specified time with a specifiedfrequency.
Enhancements in License Deployment ReportLicense Deployment Report that was an add-on in the previous release is nowbundledwithVeritasOperationsManager. You canuseLicenseDeploymentReportfrom the Veritas Operations Manager top-level menu. You can now use LicenseDeploymentReport to track keyless licenses, discover virtualmachines, and createor modify license deployment policies.
Overview of this releaseWhat’s new in Veritas Operations Manager 3.0
16
Advanced management of rolesYou can now use Veritas Operations Manager to assign appropriate predefinedroles to users. You can use the enhanced security management module to assigntheDomainAdmin,Admin,DomainOperator,Operator, orGuest roles to users.To log on to Veritas Operations Manager, a user requires at least the Guestprivilege. Also, Veritas Operations Manager provides enhanced authenticationfeature based onLightweightDirectoryAccess Protocol (LDAP) orActiveDirectoryon the primary authentication broker.
Business EntitiesVeritas Operations Manager lets you create Business Entities that are basically aset of applications that you can define the scope for a specific operation. BusinessEntities are the advanced formofApplicationGroups.Unlike in the earlier releases,you need not select any inherited object when you create a business entity.However, you can specify clusters as the base objects.
New Storage Provisioning Add-on (UNIX Only)You can now install the new Storage Provisioning Add-on. You can use templatedesigner of Storage Provisioning Add-on to perform template-based storageprovisioning. Dynamic Storage Tiering (DST) support is available for thesetemplates. You can also use Storage Provisioning Add-on to perform volumemigration with layout change and thick to thin migration.
Performance chartsYou can now use interactive charts to view performance of hosts, disks, volumes,initiators, and file systems on multiple performance parameters. You can alsoselect multiple objects to compare their performances on a single parameter byusing these charts.
Performance improvementsYou cannowobserve better page load times and improved discovery performance.A new scalable heartbeat mechanism has also been added.
Veritas Cluster Server administration featuresTheVeritasOperationsManagerAdd-on forVeritasCluster ServerAdministrationlets you manage high availability application clusters based on Veritas ClusterServer. The add-on,which is installed and enabled bydefault onVeritasOperations
17Overview of this releaseWhat’s new in Veritas Operations Manager 3.0

Manager, enables centralized administration, management, and analysis of allclusters in the enterprise from a single console. This feature includes enhancedviews and information on Veritas Cluster Server objects, cluster logs, servicegroup and resource dependency, and GCO setups. Advanced local and remoteoperations for cluster, service groups, and resources ensure the high availabilityof the objects in your datacenter. The newly added cluster categories such asFailover, Oracle RAC, CFS, CVM, andSybase CE ensure the compatibility ofVeritasOperations Manager with various storage products.
Discovery of third-party Volume Managers and clustersVeritas Operations Manager can now discover the third-party Volume Managersand clusters. The followingVolumeManagers and clusters can nowbe discovered:
■ Linux LVM
■ AIX LVM
■ HP-UX LVM
■ ZFS
■ MSCS
Download patches from Veritas Operations Services Web siteYou can now use Veritas Operations Manager to connect to Veritas OperationsServices (VOS) Web site. In this Web site, you can review the information onvarious patches for Storage Foundation and Storage Foundation for highavailability that Symantec releases periodically. Also, you can download thesepatches and deploy them in your datacenter.
Enhanced user interface and navigationYou can now use Veritas Operations Manager with the following user interfaceand navigation enhancements:
■ User interface components that conform to the highlander guidelines.
■ Summary view that displays the inventory of Application, Servers, Storage,and HA-DR objects.
■ Object views that are arranged hierarchically so that you can navigate to theimportant and high-level views easily. You can navigate to the views thatdisplay base storage objects (for example disks, disk groups, volumes, etc.)from the Hosts view only.
Overview of this releaseWhat’s new in Veritas Operations Manager 3.0
18

■ Left pane of the object views that provides the search and the filter options.
■ Auto refresh facility to all the VCS object views.
Enhanced DashboardYou can now use the enhancedHome page of Veritas OperationsManager to viewthe following information:
■ Visual overview of faults and alerts.
■ Table that lists faults and alerts with top priority.
■ Activity board where you can post and view activities.
■ Quick Links area that lists links to important support Web sites, recentlyvisited storage objects, and frequently visited storage objects.
19Overview of this releaseWhat’s new in Veritas Operations Manager 3.0

Overview of this releaseWhat’s new in Veritas Operations Manager 3.0
20
System requirements
This chapter includes the following topics:
■ Operating system requirements
■ Third-party required libraries
■ System resource requirements
■ Supported hardware
■ Web browser requirements
■ Network and firewall requirements
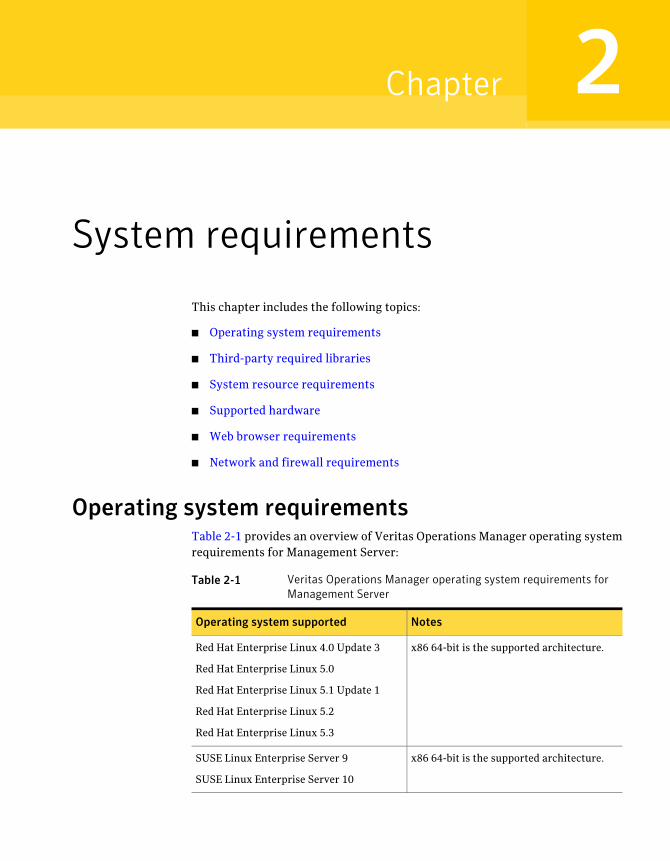
Operating system requirementsTable 2-1 provides an overview of Veritas Operations Manager operating systemrequirements for Management Server:
Table 2-1 Veritas Operations Manager operating system requirements forManagement Server
NotesOperating system supported
x86 64-bit is the supported architecture.Red Hat Enterprise Linux 4.0 Update 3
Red Hat Enterprise Linux 5.0
Red Hat Enterprise Linux 5.1 Update 1
Red Hat Enterprise Linux 5.2
Red Hat Enterprise Linux 5.3
x86 64-bit is the supported architecture.SUSE Linux Enterprise Server 9
SUSE Linux Enterprise Server 10
2Chapter
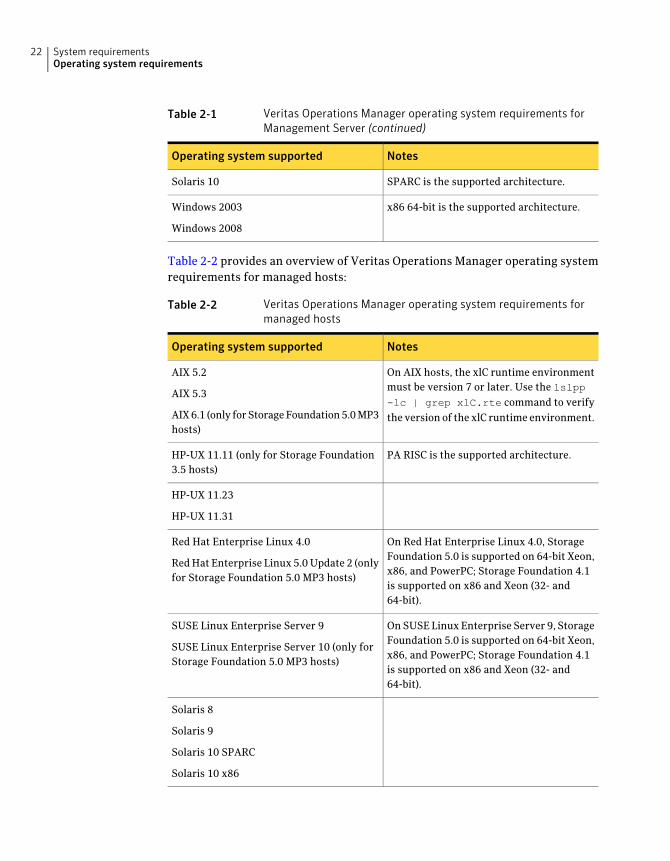
Table 2-1 Veritas Operations Manager operating system requirements forManagement Server (continued)
NotesOperating system supported
SPARC is the supported architecture.Solaris 10
x86 64-bit is the supported architecture.Windows 2003
Windows 2008
Table 2-2 provides an overview of Veritas Operations Manager operating systemrequirements for managed hosts:
Table 2-2 Veritas Operations Manager operating system requirements formanaged hosts
NotesOperating system supported
On AIX hosts, the xlC runtime environmentmust be version 7 or later. Use the lslpp-lc | grep xlC.rte command to verifythe version of the xlC runtime environment.
AIX 5.2
AIX 5.3
AIX6.1 (only forStorageFoundation5.0MP3hosts)
PA RISC is the supported architecture.HP-UX 11.11 (only for Storage Foundation3.5 hosts)
HP-UX 11.23
HP-UX 11.31
On Red Hat Enterprise Linux 4.0, StorageFoundation 5.0 is supported on 64-bit Xeon,x86, and PowerPC; Storage Foundation 4.1is supported on x86 and Xeon (32- and64-bit).
Red Hat Enterprise Linux 4.0
RedHat Enterprise Linux 5.0Update 2 (onlyfor Storage Foundation 5.0 MP3 hosts)
On SUSE Linux Enterprise Server 9, StorageFoundation 5.0 is supported on 64-bit Xeon,x86, and PowerPC; Storage Foundation 4.1is supported on x86 and Xeon (32- and64-bit).
SUSE Linux Enterprise Server 9
SUSE Linux Enterprise Server 10 (only forStorage Foundation 5.0 MP3 hosts)
Solaris 8
Solaris 9
Solaris 10 SPARC
Solaris 10 x86
System requirementsOperating system requirements
22

Table 2-2 Veritas Operations Manager operating system requirements formanaged hosts (continued)
NotesOperating system supported
Windows 2000 Server is supported on x86andx64.Windows2003Server andWindows2008 Server is supported on x86, x64, andIA64.
Windows 2000 Server
Windows Server 2003
Windows Server 2008
For the most complete, up-to-date platform support documentation for StorageFoundation (UNIX) and Storage Foundation HA for Windows, visit the SymantecTechnical Support Web site :
www.symantec.com/techsupp/
Third-party required librariesThis section lists third-party libraries required to runVeritasOperationsManager:
■ 32-bit SNIA Common HBA API on Windows hosts
32-bit SNIA Common HBA API on Windows hostsFor proper discovery of Fibre Channel attached devices—including discovery ofHBAand its target ports—VeritasOperationsManager requires installation of the32-bit SNIA Common HBA API on all Windows managed hosts running HBAcontrollers.
The Common HBA API would be typically available as part of your HBA vendor’sdriver kit, or you can download it from your HBA vendor’s site.
Follow these steps to determine if the SNIA Common HBA API is already presenton your Windows host.
To verify that the 32-bit SNIA Common HBA API is installed on a Windows host
1 Open the registry editor on the managed host using the regedit command.
2 Check the following location to get the SNIA library information:
HKEY_LOCAL_MACHINE\SOFTWARE\SNIA\HBA\hba_model
On64-bit platforms,VeritasOperationsManager requires 32-bit libraries installedas a pre-requisite. For more information, see your HBA vendor documentation.
23System requirementsThird-party required libraries

System resource requirementsThe amounts ofmemory anddisk space thatVeritasOperationsManager requiresare in addition to the resources already consumed by other software on the host.
Table 2-3 provides the memory specifications and the disk space specificationsfor Veritas Operations Manager components.
Table 2-3 System resources on Veritas Operations Manager hosts
Disk space requiredMemoryrequired
CPU requiredComponent
Database only: 19GB (for 750hostsincluding DB backup)
Database only: 6GB (for 100 hosts)
Requires additional swap space ofat least 8GB to 16GB.
2GB (Less than50 managedhosts)
4GB (Over 50managed hosts)
Dual processor(Less than 50managed hosts)
Quad processor(Over 50managed hosts)
ManagementServer
■ On UNIX hosts: 50MB in/var/opt for discovery statefiles; 50MB in /opt
■ On Windows hosts: 30MB inInstall_path\Veritas\VRTSsfmh;50MB in%COMMONAPPDATAFOLDER%\Symantec
See StorageFoundationdocumentation
See StorageFoundationdocumentation
Managed host
Read the following Symantec Technical Support TechNotes for the latestinformation on updates, patches, and software issues regarding this release:
http://seer.entsupport.symantec.com/docs/346742.htm
Supported hardwareThe followingTechNotes contain theHardwareCompatibility List (HCL) forVeritasOperations Manager 3.0 and Storage Foundation products on UNIX:
■ Storage Foundation 5.0 for UNIX: http://support.veritas.com/docs/283161
■ Storage Foundation 5.1 for UNIX:http://seer.entsupport.symantec.com/docs/330441.htm
The followingTechNotes contain theHardwareCompatibility List (HCL) forVeritasOperations Manager 3.0 and Storage Foundation products on Windows:
System requirementsSystem resource requirements
24

■ Storage Foundation 5.0 for Windows:http://seer.entsupport.symantec.com/docs/286541.htm
■ Storage Foundation 5.1 for Windows:http://seer.entsupport.symantec.com/docs/302144.htm
Web browser requirementsTheVeritasOperationsManager console is a graphical user interface that displaysreports and other information for users of the Storage Foundation productsthrough a standard Web browser.
The Web browsers that the Veritas Operations Manager console supports are:
■ Internet Explorer 6.0 (or later)
■ Firefox 3.0 (or later)
Additional considerations for supported Web browsers:
■ Your browser must support JavaScript 1.2.
■ If you use pop-up blockers (includingYahooToolbar orGoogle Toolbar), eitherdisable them or configure them to accept pop-ups from the Web server towhich you connect.
■ For Internet Explorer 6.0 onWindows 2003 (Server and Advanced Server), setthe default intranet zone security level to MEDIUM or lower.
■ For Internet Explorer, when popup-blocker is turned on, make sure that thefilter level is set to Medium or lower.
■ You must install Adobe Flash plug-in version 10 or above.
Use the following criteria to identify the kind of system you need to run the Webconsole:
■ The Web console host must be able to access Veritas Operations Manager.
■ Veritas Operations Manager must support the Web browser.
Network and firewall requirementsIf you are managing hosts within multiple domains, you will need to update theresolve.conf file on the Management Server host. This file resides by default inthe /etc directory.
For example:
search my.domain1.example.com my.domain2.example.com
25System requirementsWeb browser requirements
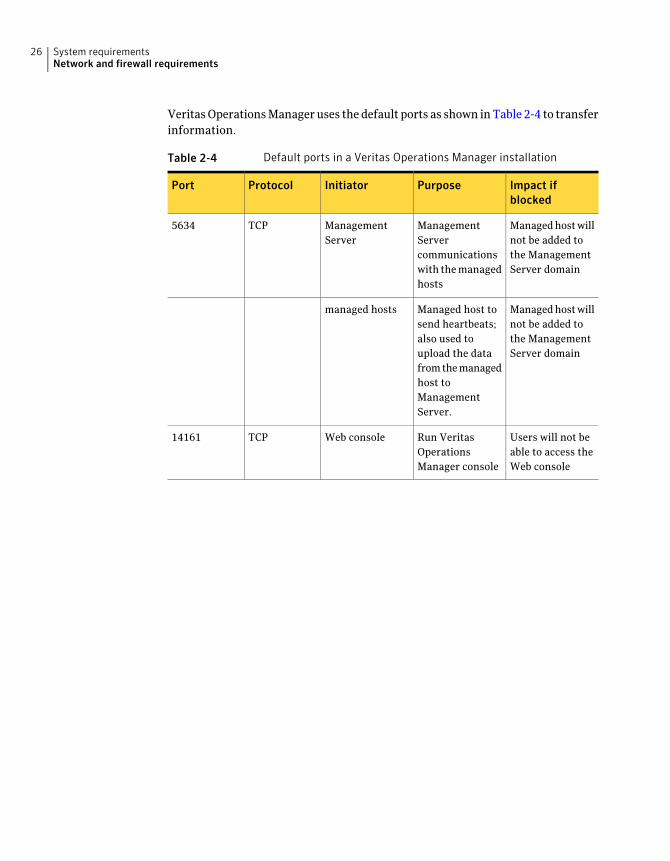
VeritasOperationsManageruses thedefault ports as shown inTable 2-4 to transferinformation.
Table 2-4 Default ports in a Veritas Operations Manager installation
Impact ifblocked
PurposeInitiatorProtocolPort
Managedhostwillnot be added tothe ManagementServer domain
ManagementServercommunicationswith themanagedhosts
ManagementServer
TCP5634
Managedhostwillnot be added tothe ManagementServer domain
Managed host tosend heartbeats;also used toupload the datafromthemanagedhost toManagementServer.
managed hosts
Users will not beable to access theWeb console
Run VeritasOperationsManager console
Web consoleTCP14161
System requirementsNetwork and firewall requirements
26
Software limitations
This chapter includes the following topics:
■ No coexistence of managed host and CommandCentral Storage ManagementServer
■ Live statistics for initiators are not supported on HP-UX (2001078)
■ Performance charts are not supported in certain cases for multiple objectsthat belong to different hosts (2023666)
No coexistence of managed host andCommandCentral Storage Management Server
Do not install Veritas Operations Manager managed host on a host that hasCommandCentral Storage Management Server installed on it. Even if theinstallation succeeds, the operation to add the host to the Management Serverdomain fails.
Live statistics for initiators are not supported onHP-UX (2001078)
You cannot view live statistics for initiators in the performance charts on theHP-UX hosts that have Veritas Volume Manager 5.0 or earlier releases.
There is no workaround for this issue.
3Chapter
Performance charts arenot supported in certain casesfor multiple objects that belong to different hosts(2023666)
Performance charts are not supported formultiple disks, volumes, or file systemsthat belong to different hosts that are not shared as part of a CVM/CFSconfiguration. However, you can view performance charts for multiple disks,volumes, or file systems fromdifferent hosts that are shared as part of a CVM/CFSconfiguration.
Performance charts are also not supported for multiple initiators that belong todifferent hosts. However, you can viewperformance charts formultiple initiatorsfrom the same host.
Software limitationsPerformance charts are not supported in certain cases for multiple objects that belong to different hosts (2023666)
28
Known issues
This chapter includes the following topics:
■ Installation and upgrade issues
■ Management Server issues
■ Managed host issues
■ Console display issues
■ VeritasOperationsManagerAdd-on forVeritas Cluster ServerAdministrationissues
■ Other issues
Installation and upgrade issuesThe following issues relate toVeritasOperationsManager installationandupgrade.
Service groups setup for Veritas Operations Manager HA-DR on remoteclusters remain frozen after upgrade from 2.x to 3.0 (2005676)
In aVeritas OperationsManager high availabilitywith disaster recovery (HA-DR)setup, after you upgrade Management Server on all the cluster hosts in the localand the remote clusters from Storage Foundation Manager 2.x to VeritasOperationsManager 3.0, some service groups on the remote cluster remain in thefrozen state.
WorkaroundUnfreeze the SFM_Services and the SFM_Xprtld service groups on the remotecluster.
4Chapter

To unfreeze the SFM_Services and the SFM_Xprtld service groups on the remotecluster
1 In the ServiceGroups view for the remote cluster, select the check boxes forthe SFM_Services and the SFM_Xprtld service groups.
2 Do one of the following:
■ Click More above the service groups list and select Unfreeze.
■ Right-click on any of the selected rows to display the shortcutmenu. Fromthe shortcut menu, select Unfreeze.
3 In the Unfreeze Service Group panel, click OK to confirm the action.
4 In the Result panel, verify that the operation was successful. Click OK.
Administer link does not work after Windows-based ManagementServer upgrade (1997072)
After youupgrade aWindows-basedManagementServer fromStorageFoundationManager 2.x to Veritas Operations Manager 3.0, the Administer link arrow foradministering the managed hosts appears as green. However, when you click thelink, you get an error message.
WorkaroundAfter upgrade, you need to first remove the files for the Storage FoundationAdministration for UNIX Add-on and the Storage Foundation Administration forWindowsAdd-on that you had deployed for version 2.x. Delete the following files:
■ \Program Files\Veritas\VRTSsfmcs\esmweb\webgui\sm\config\winadm
■ \Program Files\Veritas\VRTSsfmcs\esmweb\webgui\sm\config\unixadm
Next, deploy and enable the Storage FoundationAdministration forUNIXAdd-onand the Storage Foundation Administration for Windows Add-on for version 3.0.
You can now administer the managed hosts.
The VRTSsfmh package does not get listed under the Licenses/Packagestab after you upgrade to Veritas Operations Manager 3.0 (1922803)
After you upgrade a Solaris-based managed host to Veritas Operations Manager3.0, the VRTSsfmh package does not get listed under the Licenses/Packages tabin the host details view.
Known issuesInstallation and upgrade issues
30
WorkaroundYou need to refresh the host details.
To refresh the host details
1 In the Veritas Operations Manager console, select Manage > Hosts.
2 In theHosts view, select the check boxes for thehosts that youwant to refreshand click Refresh Host(s).
Solaris-based managed hosts appear as not installed after upgrade toVeritas Operations Manager 3.0 (2020546)
When you upgrade the Solaris-based managed hosts from Storage FoundationManager 2.x toVeritasOperationsManager 3.0, the hostsmay continue to appearin theNotInstalledHosts table of the deployment view. TheMHVersion columnhowever, correctly reflects the upgraded version of the managed host.
WorkaroundYou need to refresh the host details.
To refresh the host details
1 In the Veritas Operations Manager console, select Manage > Hosts.
2 In theHosts view, select the check boxes for thehosts that youwant to refreshand click Refresh Host(s).
Console logon page displays unixpwd domain for both the physicaland the virtual host after upgrade (1982315)
After you upgrade a Storage Foundation Manager 2.1 high availability setup toVeritas Operations Manager 3.0, the Domain list in the console logon page mayinclude the unixpwd domain for the physical host name, as well as the virtualhost name.
WorkaroundYou need to refresh the Authentication Broker.
To refresh the Authentication Broker
1 In the console, select Settings > Authentication Brokers.
2 Do one of the following:
■ Click Refresh Broker.
31Known issuesInstallation and upgrade issues
■ Right-click on the row for the broker to display the shortcut menu, andselect Refresh Broker.
Verify that the entry for the physical host unixpwd domain has been removedfrom the Domains table. If the domain entry is still present, select the check boxfor it and click Disable Domains.
Web console does not launch after upgrade of UNIX-based ManagementServer to Veritas Operations Manager 3.0 (2023180)
After you upgrade a UNIX-based Management Server from Storage FoundationManager 2.x to Veritas Operations Manager 3.0, the Web console fails to launch.
WorkaroundFirst, you need to stop the java process running for the previous version of theproduct. Run the following command to check whether the process is running:
ps -ef | grep java /opt/VRTSsfmcs/esmweb/VRTSjre/bin/java
If the process is running, you need to stop it. Run the following command to stopthe process:
kill -9 process_id
Finally, you need to start theWeb server for Veritas OperationsManager 3.0. Runthe following command to start the Web server:
/opt/VRTSsfmcs/cweb/sfmw start
You can now launch the console and log on to Veritas Operations Manager 3.0.
Management Server issuesThe following issues relate to Veritas Operations Manager Management Server.
Inconsistent behavior when you configure the LDAP domain if the LDAPserver does not respond or server name is invalid (2024598)
If the LDAP server name is invalid or if it does not respond within five minuteswhen you configure the LDAP domain, the configuration fails with inconsistentresults. Either the 'Invalid CA certificate' error message is displayed or theconfiguration is proceeded to the second stage with an empty search base.
Known issuesManagement Server issues
32

WorkaroundIn both the cases, you must not proceed with configuring the LDAP domain. Youmust fix the LDAP server name to point to correct server.
Managed host issuesThe following issues relate to host management.
Expiry date for the demo licenses is not displayed for managed hostrunning on non-English locale (2010501)
In the Veritas OperationsManager console, the information on licenses for demoproducts installed on a managed host is displayed. However, the expiry date forthe demo licenses is not displayed for managed host running on non-Englishlocale.
There is no workaround for this issue.
Console display issuesThe following issues relate to the Veritas Operations Manager console display.
Tables do not get refreshed properly in Internet ExplorerInVeritasOperationsManager, the updated parts of tables are refreshed by usingpartial page refresh. Partial page refresh is a mechanism by using which parts ofan HTML page can be refreshed automatically without a full page refresh. InInternet Explorer, you may notice that parts of a table do not get refreshedautomatically to show updated information.
WorkaroundYou need to change the Temporary Internet Files setting in Internet Explorer toalways check for the newer version of a stored Web page.
To change the Temporary Internet Files setting
1 In Internet Explorer, select Tools > Internet Options.
2 In the General tab, under Browsing history, click Settings.
3 In theTemporaryInternetFilesdialog box, underTemporaryInternetFiles,select the Every time I visit the webpage option and click OK.
4 In the Internet Options dialog box, click OK.
33Known issuesManaged host issues

Updated information is not displayed immediately in the console afterresource-level operations are performed
After you perform resource-level operations like enable and disable that do notaffect service groups, the updated informationmay not be displayed immediatelyin the Veritas Operations Manager console.
WorkaroundTo view the updated information, refresh the host, or hosts, that are associatedwith the resource.
To refresh the host
1 In the resource view of the console, click on the required host from the HostAssociations table.
2 In thehost details view, selectActions>RefreshHost(s) fromthe task toolbar.
Status of all SF Manager 2.x hosts is shown as healthy on an upgradedVeritas Operations Manager 3.0 setup (2009372)
When you view the status of hosts on an upgraded Veritas Operations Manager3.0 console that has SF Manager 2.xmanaged hosts, the status of all the hosts isshown as healthy even though some of the hosts have reported faults.
WorkaroundYou need to upgrade the 2.xmanaged hosts to Veritas Operations Manager 3.0and then clean up the 2.x faults.
To clean up the 2.x faults
1 Create a file a.sql that has the following contents:
call HABDBSYNC.SP_ccsf_db_cleanup_21_faults();
2 Execute the following:
export LD_LIBRARY_PATH=/opt/VRTSsfmcs/asa11/lib32:$LD_LIBRARY_PATH
/opt/VRTSsfmh/bin/xdbadm -f ./a.sql -c /var/opt/VRTSsfmcs/conf -o
/etc/vx/VRTSsfmcs/.odbc.ini -d SFMdb3 -v
Known issuesConsole display issues
34

Console does not display a service group with a name that containsmore than 100 characters approximately (1982548)
The service group list pagedoesnot showany service group thathas approximatelymore than 100 characters in its name. The actual length limit of the service groupdepends on a combination of the length of the service group name and the parentcluster name.
There is no workaround for this issue.
Console does not display the second service group created with thesame name as an existing one (1934795)
In Veritas Cluster Server, you can create two service groups with the same name,using different cases. But, the service group that was created last is not displayedon the Veritas Operations Manager console.
There is no workaround for this issue. The Veritas Operations Manager databaseis case-insensitive.
All the associated hosts are not displayed on the service group andresource details page and resource dependency view (1939786)
The associated hosts that are marked “exited” or “unknown” are not displayedon theHostAssociations list in the service group and resource details page. Also,these hosts do not appear on the resource dependency view. Ideally, all the hoststhat are associated to the selected resource must be displayed, irrespective of thestate of the hosts.
There is no workaround for this issue.
Duplicate entries displayed for a cluster after it is renamed (1929454)When you rename a cluster that has multiple nodes, the All Clusters page in theVeritas Operations Manager console may display two entries for the cluster, onewith the new name and another with the old name.
There is no workaround for this issue. The entry with the old name is removedafter a few minutes.
Console displays the EMC PowerPath controller as disabled (1735257)After you add a host that has disks under the EMC PowerPath (EMCPP) control,the Inititator tab for the host shows the EMCPP controller as disabled.
There is no workaround for this issue.
35Known issuesConsole display issues
Initiator statistics are not supported on the hosts that have StorageFoundation releases earlier than 5.0 MP3
You cannot view the Read/Write Queue and Read/Write Error statistics in theperformance graphs for initiators on the hosts that have Storage Foundationreleases earlier than 5.0 MP3.
There is no workaround for this issue.
Objects in business entity details may get listed more than once(2020928)
You may view multiple entries for objects in the business entity details in thefollowing two scenarios:
■ A cluster or a service group that is a base object as well as an object that isinherited fromanother base object,mayget listedmultiple times in thebusinessentity details.
■ An initiator that is connected to multiple enclosures may get listed multipletimes in the business entity details.
There is no workaround for this issue.
Columns may be truncated when you view emailed reports in Outlook2003 (1937908)
When you view a report in Microsoft Outlook 2003 that was sent by email, someof the columns may be truncated.
There is no workaround for this issue. The reports can be viewed correctly inMicrosoft Outlook 2007.
Reports archived in the earlier versions are not available after youupgrade to Veritas Operations Manager 3.0 (1997050)
After you upgrade to Veritas Operations Manager 3.0, the reports that werearchived in the earlier versions are not available.
There is no workaround for this issue. The reports that were archived in versionsearlier than Veritas Operations Manager 3.0 are no longer supported.
Known issuesConsole display issues
36

Exchange service group is not listed in the Exchange Servers table(1976615)
After you add a host that has an Exchange server installed in the high availabilityenvironment to the Management Server, the Exchange service group is notdiscovered. This issue does not get resolved even after you perform a refresh hostoperation.
WorkaroundYou need to refresh the database family.
To refresh the database family
◆ Execute the following command:
/opt/VRTSsfmh/bin/mh_ctl.pl --family DB --refresh
Veritas Operations Manager Add-on for VeritasCluster Server Administration issues
The following issues relate to the Veritas OperationsManager Add-on for VeritasCluster Server Administration.
The text 'active' appears next to two nodes (1639342)AfteryouconfigureVeritasOperationsManager forhigh-availability configuration,the text active erroneously appears next to the host name of both the active node,and the passive node, in the host list.
There is no workaround for this issue.
Other issuesThis section lists additional issues that cannot be categorized in the rest of theVeritas Operations Manager known issues sections.
Package check on Management Server shows errors after installationAfter you install and configure Management Server on a Linux or a Solaris host,if you runapackage checkon theVRTSsfmcspackage, someerrorsmaybe reported.These errors are reported because the/opt/VRTSsfmcs/esmweb/tomcat/cert/.keystore file gets modified during runtime.
37Known issuesVeritas Operations Manager Add-on for Veritas Cluster Server Administration issues

There is no workaround for this issue. This issue does not affect any systemfunctionality.
Log on to the Veritas Operations Manager console may fail on Firefox(1939352)
When you try to log on to the Veritas Operations Manager console on Firefox ,you may get the following error:
Secure Connection Failed
An error occurred during a connection to <system>
Peer reports it experienced an internal error.
(Error code: ssl_error_internal_error_alert)
WorkaroundPerform any one of the following modifications on the configuration settings forFirefox:
■ Disable TLS
■ Enable SSL 2 encryption protocols
To disable TLS in Firefox
1 In Firefox, select Tools > Options.
2 In the Options dialog box, click Advanced.
3 In theAdvancedpanel, under theEncryption tab, clear theUseTLS1.0 checkbox.
To enable SSL 2 encryption protocols in Firefox
1 In Firefox, in the address bar, type about:config and press Enter.
2 On this page, use Filter to search for the security.enable_ssl2 setting.
3 Select the security.enable_ssl2 setting and do one of the following to setthe value to true:
■ Double-click the security.enable_ssl2 setting.
■ Right-click the security.enable_ssl2 setting and then click Toggle.
4 Restart Firefox.
Known issuesOther issues
38

Session timed out error while adding a managed host to ManagementServer
In the managed hosts view, if your session has timed out, you can still add thedetails of hosts that are to be added as managed hosts. However, when you clickSubmit after you add the details of hosts, the operation fails and you may see anerror message that indicates that the session has timed out.
There is noworkaround for this issue. Youhave to log on to theVeritasOperationsManager console again to add the managed hosts.
Log on to console fails on Internet Explorer if Management Server hostname has the underscore (_) character
When you install or upgrade Management Server to 3.0 on a Windows 2003 host,and attempt to log on to the console using Internet Explorer, the log on may fail.The failure occurs if the console is launched using the Management Server hostname, and the host name contains the underscore (_) character.
There is no workaround for this issue. Internet Explorer does not allow theunderscore (_) character in the host name. Do not install Management Server onsuch a host.
Add host operation fails after Storage Foundation is uninstalled fromManagement Server or managed host (1755861)
If you uninstall Storage Foundation from Management Server and then attemptto add a managed host to its domain, the operation may fail. Similarly, if youuninstall Storage Foundation from a managed host and then attempt to add it toaManagementServer domain, the operationmay fail. The following errormessageis displayed:
Could not contact host, Xprtld may be down or host is not part of
domain
WorkaroundWhen Storage Foundation is uninstalled from an Veritas Operations Managerhost, the xprtld and the vxdclid processes may be stopped. These processes arerequired for the Veritas Operations Manager host to function properly.
You need to restart the xprtld and the vxdclid processes.
39Known issuesOther issues
To restart the xprtld process
◆ Run the following command to restart the xprtld process:
# /opt/VRTSsfmh/adm/xprtldctrl start
To restart the vxdclid process
◆ Run the following command to restart the vxdclid process:
# /opt/VRTSsfmh/etc/vxdcli.sh start
Trailing zeroes after the decimal point in product versions are truncatedwhen CSV data is viewed in Excel
In the Veritas Operations Manager console, you can export table data to a CSVfile. If the table contains product versions such as the operating system versionfor a managed host, trailing zeroes after the decimal point in the version may betruncated when the CSV file is viewed in Excel. For example, a product versionsuch as 5.10 may appear as 5.1.
Log on using LDAP/AD fails on Management Server that is upgradedfrom 2.x to 3.0 (1993211)
If you upgrade Management Server from version 2.x to version 3.0, you may notbe able to log on using the LDAP/AD domain that you configured on the 2.xManagement Server.
WorkaroundRemove all the LDAP/AD domains that were configured for 2.x. Reconfigure thedomains on the 3.0 Management Server.
Authentication broker crashes while LDAP authentication (2017319)On a host in which LDAP is configured with PAM and TLS is enabled, theauthentication broker may crash while performing LDAP authentication.
WorkaroundPerform the following changes.
■ Disable start_tls.
■ Remove PAM from authsequence.
Known issuesOther issues
40
To disable the start_tls parameter
◆ In the /etc/ldap.conf file, after ssl start_tls add the following line:
ssl no
To remove PAM from authsequence
◆ In the EAT_DATA_DIR/root/.VRTSat/profile/VRTSatlocal.conf file, deletepam from the following entry:
"DefaultAuthSequence"="pam unixpwd nis nisplus"
Storage Foundation Manager 2.x add-ons are unavailable after upgradeto Veritas Operations Manager 3.0
After you upgrade to Veritas Operations Manager 3.0, the add-ons that youdownloaded and installed on Storage Foundation Manager 2.x still appear in theadd-ons list. The state of the 2.x add-ons appears as not installed and not enabled.
WorkaroundRemove the 2.x add-ons if they are no longer required.
No content displayed for some Help pagesWhen you click Help on some of the pages of the console, or on wizard panels, nohelp content is displayed.
There is no workaround for this issue. For information on the topic, refer to thelatest Veritas OperationsManager documentation on the Symantec Support site.
http://go.symantec.com/vom
Creation of a storage template is not supported for Windows hosts(2024296)
When you try to create a storage template by selecting a volume on a Windowshost, it results in an exception.
There is no workaround for this issue. Storage templates are not supported onthe Windows hosts.
41Known issuesOther issues
Erroneous cluster information displayed if two clusters have the samename and ID
When you addmanaged hosts toManagement Server from two clusters that havethe same name and ID, the information displayed for each cluster in the clusterview may be erroneous.
There is no workaround for this issue. Clusters that have the same name and IDare not supported in Veritas Operations Manager.
Known issuesOther issues
42
Documentation addendaand errata
This appendix includes the following topics:
■ Addenda for Veritas Operations Manager Online Help
■ Errata for Veritas Operations Manager Online Help
■ Addenda for Storage Provisioning Add-on Online Help
■ Errata for Storage Provisioning Add-on Online Help
Addenda for Veritas OperationsManager OnlineHelpThis section contains the additional information that is not included in theOnlineHelp for Veritas Operations Manager.
About tasksAtask represents anyoperation that canbeperformedbyusingVeritasOperationsManager. You can view the list of all tasks and the details about each of them inthe Tasks view. The list of all tasks lets you keep a track of all the operations thatare either in progress or that have completed for the various datacenter objects.
About messages posted on Activity BoardYou can post messages in the Activity Board panel on the Veritas OperationsManager Home view. These messages let you inform other users about anyadministrative or other important activities that are scheduled or that may havebeen performed.
AAppendix
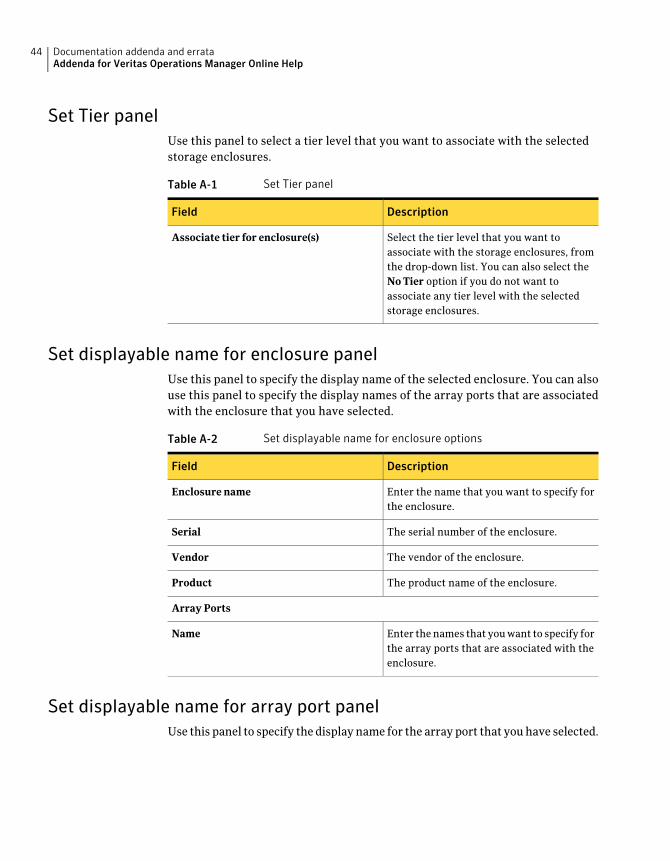
Set Tier panelUse this panel to select a tier level that you want to associate with the selectedstorage enclosures.
Table A-1 Set Tier panel
DescriptionField
Select the tier level that you want toassociate with the storage enclosures, fromthe drop-down list. You can also select theNo Tier option if you do not want toassociate any tier level with the selectedstorage enclosures.
Associate tier for enclosure(s)
Set displayable name for enclosure panelUse this panel to specify the display name of the selected enclosure. You can alsouse this panel to specify the display names of the array ports that are associatedwith the enclosure that you have selected.
Table A-2 Set displayable name for enclosure options
DescriptionField
Enter the name that you want to specify forthe enclosure.
Enclosure name
The serial number of the enclosure.Serial
The vendor of the enclosure.Vendor
The product name of the enclosure.Product
Array Ports
Enter thenames that youwant to specify forthe array ports that are associated with theenclosure.
Name
Set displayable name for array port panelUse this panel to specify the displayname for the array port that youhave selected.
Documentation addenda and errataAddenda for Veritas Operations Manager Online Help
44

Table A-3 Set displayable name for array port panel
DescriptionField
Enter the name that you want to specify forthe array port.
Arrayport name
Select database instances optionsUse thiswizardpanel to specify the securedatabases that youwant to authenticate.
Select the check boxes to choose the databases that you want to authenticate.
Note: You can choose multiple databases if the credentials for the databases arethe same.
See “Performing database discovery for secure databases ” on page 48.
Provide credentials optionsUse this wizard panel to specify the credentials to authenticate the database.
Table A-4 Provide credentials panel options
DescriptionField
Choose this option to authenticate thedatabase using the domain or SQL servercredentials.
Enter the user name and the password forthe SQL server or the domain.
Domain/SQL Authentication
Choose this option to authenticate thedatabase using the credentials for theoperating system.
Enter the user name and password for thespecific host.
Operating System Authentication
See “Performing database discovery for secure databases ” on page 48.
Database Instance Credentials Summary optionsUse this wizard panel to verify the authentication and the credential details.
See “Performing database discovery for secure databases ” on page 48.
45Documentation addenda and errataAddenda for Veritas Operations Manager Online Help

Removing ignored violations from the ignore listIn Veritas Operations Manager, you can remove the ignored violations from theignore list. After you remove the violations from the ignore list, they are listed inthe scan details again.
See “Marking policy violations to exclude from the subsequent scans” on page 46.
To remove the ignored violations from the ignore list
1 In theVeritasOperationsManager console, selectPolicies>PolicyTemplates.
2 Click on the desired policy template to view the policy template details.
3 On the Ignored Violations tab, select the check boxes for the violations thatyou want to remove from the ignore list and do one of the following:
■ Click Remove from Ignore List.
■ Right-click one of the selected violations, and then click Remove fromIgnore List.
4 In the Remove fromIgnoreList panel, confirm whether you want to removethe selected violations and click OK.
5 In the Result panel, verify that the operation was successful and click OK.
Marking policy violations to exclude from the subsequent scansAfter the policy template scan, you can view the list of all policy violations. Youcan mark one or more policy violations if you want to exclude them from thesubsequent scans. It is referred to as ignoring the violation. Once youhavemarkedthese policy violations, they are not included in next scan cycles.
To mark a policy violation to exclude from the subsequent scans
1 In theVeritasOperationsManager console, selectPolicies>PolicyTemplates.
2 Click the policy template for which you want to exclude its associated policyviolations in the subsequent scans.
3 Under Scans, you can view all the scan reports associated with the policytemplate that you have selected. Click the desired scan report.
4 In Violations table, select the violation that you want to exclude from thesubsequent scans.
5 At the top of the Violations table, click Ignore Violation.
6 In the Ignore Violations panel, click OK.
7 In the Results panel, click OK to confirm.
Documentation addenda and errataAddenda for Veritas Operations Manager Online Help
46
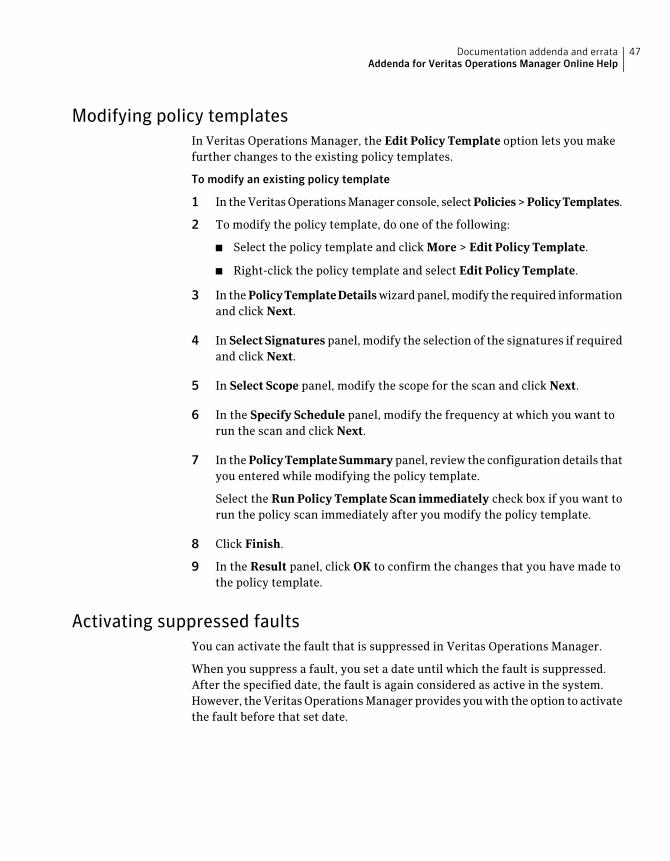
Modifying policy templatesIn Veritas Operations Manager, the Edit Policy Template option lets you makefurther changes to the existing policy templates.
To modify an existing policy template
1 In theVeritasOperationsManager console, selectPolicies>PolicyTemplates.
2 To modify the policy template, do one of the following:
■ Select the policy template and click More > Edit Policy Template.
■ Right-click the policy template and select Edit Policy Template.
3 In thePolicyTemplateDetailswizardpanel,modify the required informationand click Next.
4 In SelectSignatures panel, modify the selection of the signatures if requiredand click Next.
5 In Select Scope panel, modify the scope for the scan and click Next.
6 In the Specify Schedule panel, modify the frequency at which you want torun the scan and click Next.
7 In thePolicyTemplateSummarypanel, review the configuration details thatyou entered while modifying the policy template.
Select the Run Policy Template Scan immediately check box if you want torun the policy scan immediately after you modify the policy template.
8 Click Finish.
9 In the Result panel, click OK to confirm the changes that you have made tothe policy template.
Activating suppressed faultsYou can activate the fault that is suppressed in Veritas Operations Manager.
When you suppress a fault, you set a date until which the fault is suppressed.After the specified date, the fault is again considered as active in the system.However, theVeritasOperationsManager provides youwith the option to activatethe fault before that set date.
47Documentation addenda and errataAddenda for Veritas Operations Manager Online Help
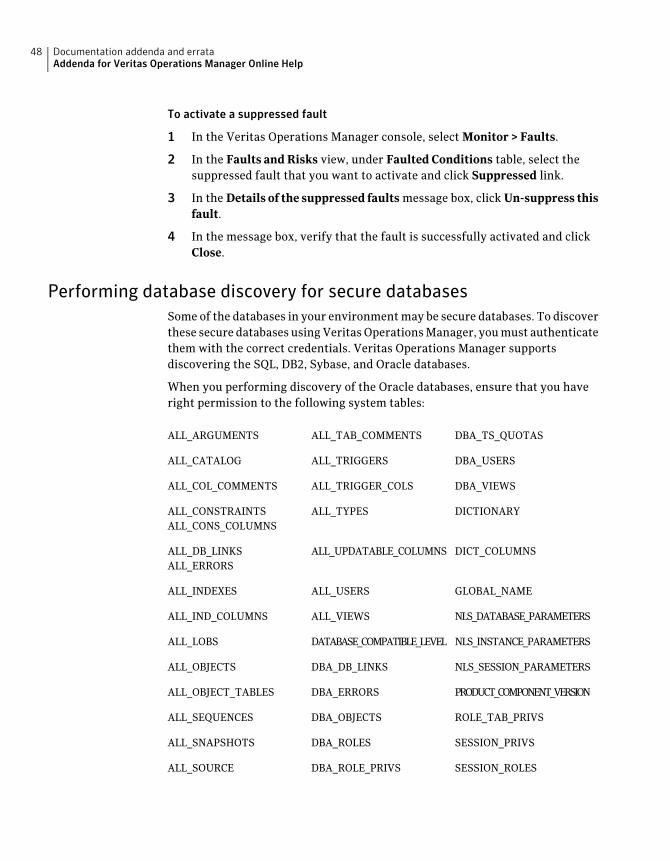
To activate a suppressed fault
1 In the Veritas Operations Manager console, select Monitor > Faults.
2 In the Faults and Risks view, under Faulted Conditions table, select thesuppressed fault that you want to activate and click Suppressed link.
3 In the Details of the suppressed faults message box, click Un-suppress thisfault.
4 In the message box, verify that the fault is successfully activated and clickClose.
Performing database discovery for secure databasesSome of the databases in your environmentmay be secure databases. To discoverthese secure databases usingVeritasOperationsManager, youmust authenticatethem with the correct credentials. Veritas Operations Manager supportsdiscovering the SQL, DB2, Sybase, and Oracle databases.
When you performing discovery of the Oracle databases, ensure that you haveright permission to the following system tables:
DBA_TS_QUOTASALL_TAB_COMMENTSALL_ARGUMENTS
DBA_USERSALL_TRIGGERSALL_CATALOG
DBA_VIEWSALL_TRIGGER_COLSALL_COL_COMMENTS
DICTIONARYALL_TYPESALL_CONSTRAINTSALL_CONS_COLUMNS
DICT_COLUMNSALL_UPDATABLE_COLUMNSALL_DB_LINKSALL_ERRORS
GLOBAL_NAMEALL_USERSALL_INDEXES
NLS_DATABASE_PARAMETERSALL_VIEWSALL_IND_COLUMNS
NLS_INSTANCE_PARAMETERSDATABASE_COMPATIBLE_LEVELALL_LOBS
NLS_SESSION_PARAMETERSDBA_DB_LINKSALL_OBJECTS
PRODUCT_COMPONENT_VERSIONDBA_ERRORSALL_OBJECT_TABLES
ROLE_TAB_PRIVSDBA_OBJECTSALL_SEQUENCES
SESSION_PRIVSDBA_ROLESALL_SNAPSHOTS
SESSION_ROLESDBA_ROLE_PRIVSALL_SOURCE
Documentation addenda and errataAddenda for Veritas Operations Manager Online Help
48

SYSTEM_PRIVILEGE_MAPDBA_SOURCEALL_SYNONYMS
TABLE_PRIVILEGESDBA_TABLESPACESALL_TABLES
TABLE_PRIVILEGE_MAPDBA_TAB_PRIVSALL_TAB_COLUMNS
DBA_TRIGGERSALL_TAB_COL_STATISTICS
To perform database discovery for a secure database
1 Select Manage > Databases.
2 Click the Click Here link above the database list.
3 In the Select database instances panel, select the secure database that youwant to authenticate, and click Next.
See “Select database instances options” on page 45.
4 In the Provide Credentials panel, enter the required information, and clickNext.
See “Provide credentials options” on page 45.
5 In the Database Instance Credentials Summary panel, review theauthentication information. Click Next.
See “Database Instance Credentials Summary options” on page 45.
6 In the Result panel, verify that the databases have been authenticatedsuccessfully.
Viewing scan tunables associated with a policy scanInVeritasOperationsManager, you can view the scan tunables that are associatedwith a policy scan under the Scans tab in the policy template details.
To view the scan tunables
1 In theVeritasOperationsManager console, selectPolicies>PolicyTemplates.
2 Click on the desired policy template to view the policy template details.
3 On the Scans tab, do one of the following:
■ Select the check box for the policy scan for which you want to view theassociated tunables and then click More > Show Scan Tunables Used.
■ Right-click the policy scan for which you want to view the associatedtunables, and then click Show Scan Tunables Used.
49Documentation addenda and errataAddenda for Veritas Operations Manager Online Help

Viewing the overview of a ruleThe Rule page displays the properties of the selected rule. The information onthis page includes:
■ Overview: It includes name of the rule, its description, its current state, nameof the owner, and the date when the rule was last modified.
■ Alert Conditions: It includes the alert conditions that are configured for thisrule.
■ Actions: It displays the actions the system performs when a rule is executed.The information includes E-mail notification details, SNMP configuration,command file details, and the information about custom script.
You can create rules for faults aswell as alerts from their respective user interfacepanels. All such rules are also displayed on this page.
To view the overview for a rule
1 In the Veritas Operations Manager console, select Monitor > Rules.
2 Click the rule that you want to overview.
Suppress the Faults optionsUse this panel to suppress the detected faults. Once a fault is suppressed, it is nolonger considered as active for a specified duration. You can suppress one ormorefaults simultaneously.
Table A-5 Suppress Faults
DescriptionField
You can specify the date untilwhich the faultremains suppressed.After this date, the faultis again considered as active in VeritasOperationsManager. If you donot select anydate, the application considers the systemdate.
Date
Select the time of the selected date untilwhich the fault is suppressed. If you do notselect any specific time, the applicationconsiders the system time.
Time
Provide the reason to suppress this fault.Reason
Documentation addenda and errataAddenda for Veritas Operations Manager Online Help
50

Installing Veritas Operations Manager Add-onsYou must install the Add-ons before you can use them. The installation needs tobe done for the Add-ons that are included with Veritas Operations Manager, andfor the Add-ons that you have downloaded and then uploaded to the Repository.
To install Add-ons
1 In the Veritas Operations Manager console, select Settings > DeploymentManagement.
2 In the Deployment view, click the Add-ons tab.
3 In the Add-ons Repository view, select the add-on that you want to installand click Install.
4 In the Deploy Add-on panel, click Deploy.
5 In the Result panel, verify that the operation was successful and click OK.
Errata for Veritas Operations Manager Online HelpThis section contains the errata for the Online Help for Veritas OperationsManager.
Monitoring alerts and setting alert rulesIn this help topic, the following changes were performed:
■ The title is changed to: Viewing alerts
■ TheAlert LogDetails content is removed from the procedure and the followingcontent is added:You can view the detailed information about an alert by clicking on the iconin the Details column. The Alert Log Details panel displays the detailedinformation about an alert.
■ The FilteringAlerts procedure is removed and the following content about theoptions on the left-side panel is added:
You can use the options on the left-side panel to do the following:
■ Search for alerts based on message, classification, and source host.
■ Filter the tasks based on their severity.
The procedure now reads as follows:
To view all alerts
◆ In the Veritas Operations Manager console, select Monitor > Alerts.
51Documentation addenda and errataErrata for Veritas Operations Manager Online Help
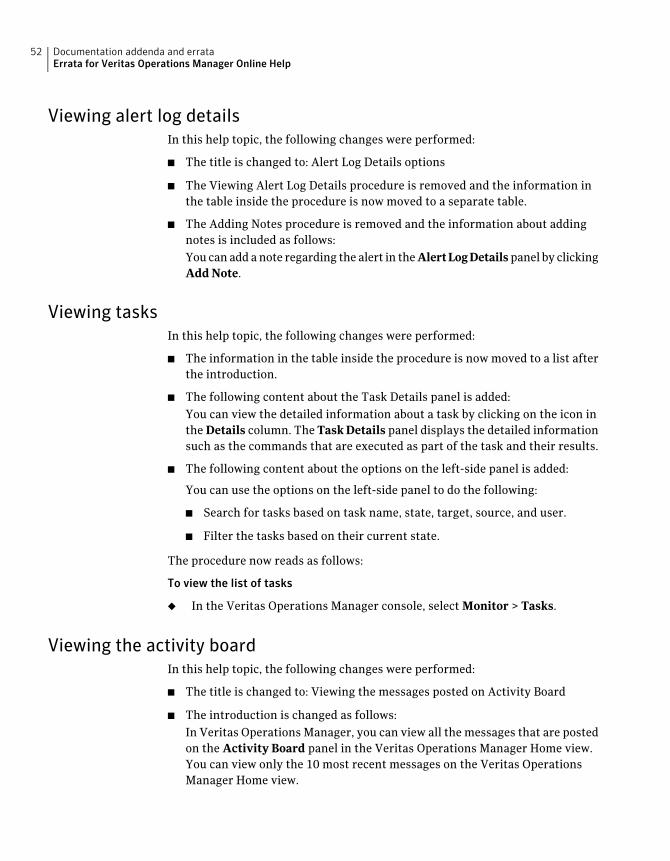
Viewing alert log detailsIn this help topic, the following changes were performed:
■ The title is changed to: Alert Log Details options
■ The Viewing Alert Log Details procedure is removed and the information inthe table inside the procedure is now moved to a separate table.
■ The Adding Notes procedure is removed and the information about addingnotes is included as follows:You can add anote regarding the alert in theAlertLogDetailspanel by clickingAdd Note.
Viewing tasksIn this help topic, the following changes were performed:
■ The information in the table inside the procedure is now moved to a list afterthe introduction.
■ The following content about the Task Details panel is added:You can view the detailed information about a task by clicking on the icon inthe Details column. The TaskDetails panel displays the detailed informationsuch as the commands that are executed as part of the task and their results.
■ The following content about the options on the left-side panel is added:
You can use the options on the left-side panel to do the following:
■ Search for tasks based on task name, state, target, source, and user.
■ Filter the tasks based on their current state.
The procedure now reads as follows:
To view the list of tasks
◆ In the Veritas Operations Manager console, select Monitor > Tasks.
Viewing the activity boardIn this help topic, the following changes were performed:
■ The title is changed to: Viewing the messages posted on Activity Board
■ The introduction is changed as follows:In Veritas Operations Manager, you can view all the messages that are postedon the Activity Board panel in the Veritas Operations Manager Home view.You can view only the 10 most recent messages on the Veritas OperationsManager Home view.
Documentation addenda and errataErrata for Veritas Operations Manager Online Help
52

■ The following details about the Activity Board view are added:
In the Activity Board view, you can view the following information in a table:
■ The date and time at which the message was sent.
■ The sender of the message.
■ The message that was sent.
■ The number of activities or messages.
■ The following content about the Search option on the left-side panel is added:You can use the Search option on the left-side panel to search for messagesbased on the sender and the message.
The procedure now reads as follows:
To view all the messages posted on Activity Board
◆ In the Veritas Operations Manager console, do one of the following:
■ Select Monitor > Activities.
■ In the Activity Board panel on the Home view, click Show all.
Setting signature tunablesIn this help topic, the introduction now reads as follows:
In Veritas Operations Manager, you can set the tunables for a signature that youselected while creating a policy check template under the Signatures tab in thepolicy template details. However, some of the signatures may not have anyassociated tunables. You can refer to the Tunable Settings column of theSignatures table to determine whether a signature has any associated tunables.
The procedure now reads as follows:
To set signature tunables
1 In theVeritasOperationsManager console, selectPolicies>PolicyTemplates.
2 Click on the desired policy template to view the policy template details.
3 On the Signatures tab, do one of the following:
■ Select the check box for the signature for which you want to set thetunables and click Set Tunables.
■ Right-click the signature for which youwant to set the tunables, and thenclick Set Tunables.
53Documentation addenda and errataErrata for Veritas Operations Manager Online Help

4 In the Set Signature Tunables panel, enter the new tunable values and clickOK.
5 In the Result panel, verify that the operation was successful and click OK.
Set Signature Tunables optionsUse this wizard panel to enter the new tunable values for the signature youselected. The tunable options that are displayed on this panel vary depending onthe signature you have selected.
Removing signatures from a policy templateIn this help topic, the following changes were performed:
■ The title is changed to: Removing a signature from a policy template
■ The introduction now reads as follows:In Veritas Operations Manager, you can remove a signature from a policytemplate under the Signatures tab in the policy template details. After youremove a signature from a policy template, it is not included in the futurepolicy scans based on that policy template.
The procedure now reads as follows:
To remove a signature from a policy template
1 In theVeritasOperationsManager console, selectPolicies>PolicyTemplates.
2 Click on the desired policy template to view the policy template details.
3 On the Signatures tab, do one of the following:
■ Select the check box for the signature that you want to remove from thepolicy template and click Remove Signature.
■ Right-click the signature that youwant to remove fromthepolicy template,and then click Remove Signature.
4 In theRemoveSignaturefromPolicyTemplatepanel, confirm that youwantto remove the selected signature and click Yes.
5 In the Result panel, verify that the operation was successful and click OK.
Adding signatures to a policy templateIn this help topic, the following introduction is added:
In Veritas Operations Manager, you can add signatures to a policy template inthe Installed Signatures view.
Documentation addenda and errataErrata for Veritas Operations Manager Online Help
54
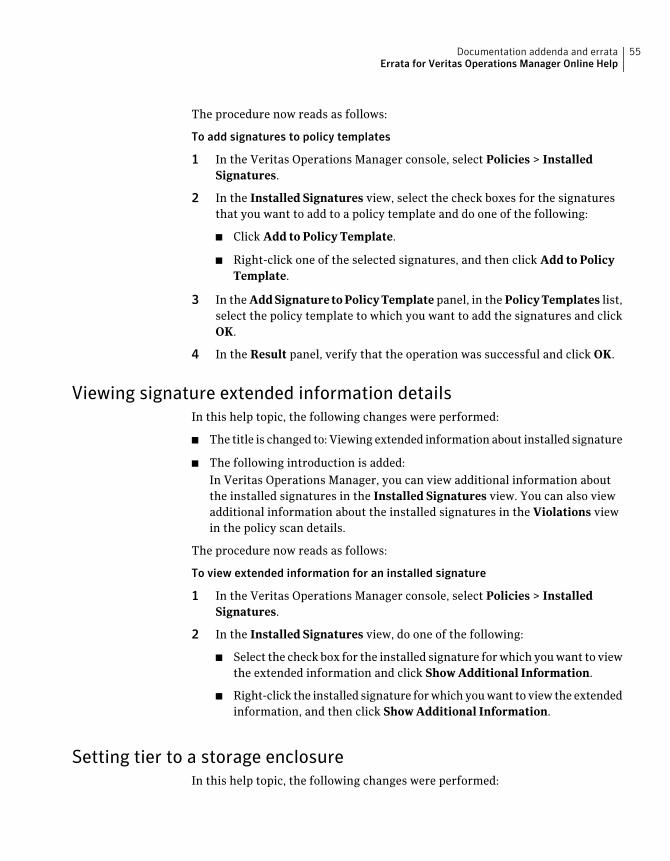
The procedure now reads as follows:
To add signatures to policy templates
1 In the Veritas Operations Manager console, select Policies > InstalledSignatures.
2 In the Installed Signatures view, select the check boxes for the signaturesthat you want to add to a policy template and do one of the following:
■ Click Add to Policy Template.
■ Right-click one of the selected signatures, and then click Add to PolicyTemplate.
3 In the AddSignature toPolicyTemplate panel, in the PolicyTemplates list,select the policy template to which you want to add the signatures and clickOK.
4 In the Result panel, verify that the operation was successful and click OK.
Viewing signature extended information detailsIn this help topic, the following changes were performed:
■ The title is changed to: Viewing extended information about installed signature
■ The following introduction is added:In Veritas Operations Manager, you can view additional information aboutthe installed signatures in the Installed Signatures view. You can also viewadditional information about the installed signatures in the Violations viewin the policy scan details.
The procedure now reads as follows:
To view extended information for an installed signature
1 In the Veritas Operations Manager console, select Policies > InstalledSignatures.
2 In the Installed Signatures view, do one of the following:
■ Select the check box for the installed signature forwhich youwant to viewthe extended information and click Show Additional Information.
■ Right-click the installed signature forwhichyouwant to view the extendedinformation, and then click Show Additional Information.
Setting tier to a storage enclosureIn this help topic, the following changes were performed:
55Documentation addenda and errataErrata for Veritas Operations Manager Online Help

■ The title is changed to: Setting tier level for storage enclosures
■ The following introduction is added:In Veritas Operations Manager, you can specify a tier level for storageenclosures. Associating storage enclosures with a tier level helps you in dataclassification. For example, you can move all the databases to the storageenclosures that are in the same tier.
The procedure is changed as follows:
To set tier level for storage enclosures
1 In the Veritas Operations Manager console, select Manage > Enclosures.
2 In theEnclosures view, select the check boxes for the storage enclosures thatyou want to associate with a tier level and do one of the following:
■ Click Set Tier.
■ Right-click one of the selected enclosures, and then click Set Tier.
3 In the Set Tier panel, select the tier level that you want to associate with theselected enclosures and click OK.
See “Set Tier panel” on page 44.
4 In the Result panel, verify that the operation was successful and click OK.
Setting display name to a storage enclosureIn this help topic, the following changes were performed:
■ The title is changed to: Setting display name for a storage enclosure
■ The introduction now reads as follows:InVeritas OperationsManager, you can specify the display name for a storageenclosure. You can also specify the display names for the array ports that areassociated with the storage enclosure.You can specify the display name for an array port in the ArrayPorts view ofthe detailed view of an enclosure.
■ The following note is added:
Note: You can revert to the default name of the storage enclosure or arrayport.
The procedure now reads as follows:
Documentation addenda and errataErrata for Veritas Operations Manager Online Help
56
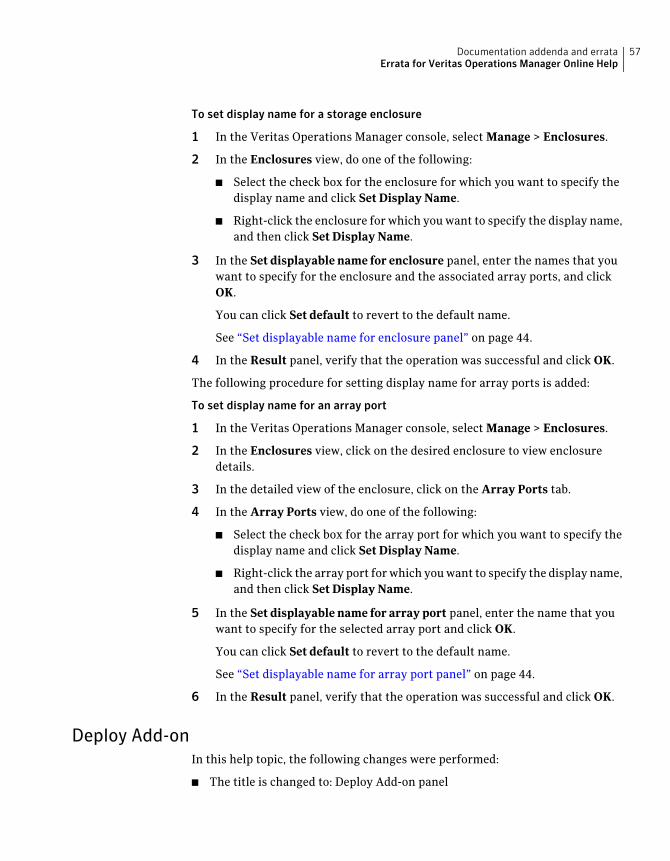
To set display name for a storage enclosure
1 In the Veritas Operations Manager console, select Manage > Enclosures.
2 In the Enclosures view, do one of the following:
■ Select the check box for the enclosure for which you want to specify thedisplay name and click Set Display Name.
■ Right-click the enclosure for which youwant to specify the display name,and then click Set Display Name.
3 In the Set displayable name for enclosure panel, enter the names that youwant to specify for the enclosure and the associated array ports, and clickOK.
You can click Set default to revert to the default name.
See “Set displayable name for enclosure panel” on page 44.
4 In the Result panel, verify that the operation was successful and click OK.
The following procedure for setting display name for array ports is added:
To set display name for an array port
1 In the Veritas Operations Manager console, select Manage > Enclosures.
2 In the Enclosures view, click on the desired enclosure to view enclosuredetails.
3 In the detailed view of the enclosure, click on the Array Ports tab.
4 In the Array Ports view, do one of the following:
■ Select the check box for the array port for which you want to specify thedisplay name and click Set Display Name.
■ Right-click the array port forwhich youwant to specify the display name,and then click Set Display Name.
5 In the Set displayable name for array port panel, enter the name that youwant to specify for the selected array port and click OK.
You can click Set default to revert to the default name.
See “Set displayable name for array port panel” on page 44.
6 In the Result panel, verify that the operation was successful and click OK.
Deploy Add-onIn this help topic, the following changes were performed:
■ The title is changed to: Deploy Add-on panel
57Documentation addenda and errataErrata for Veritas Operations Manager Online Help
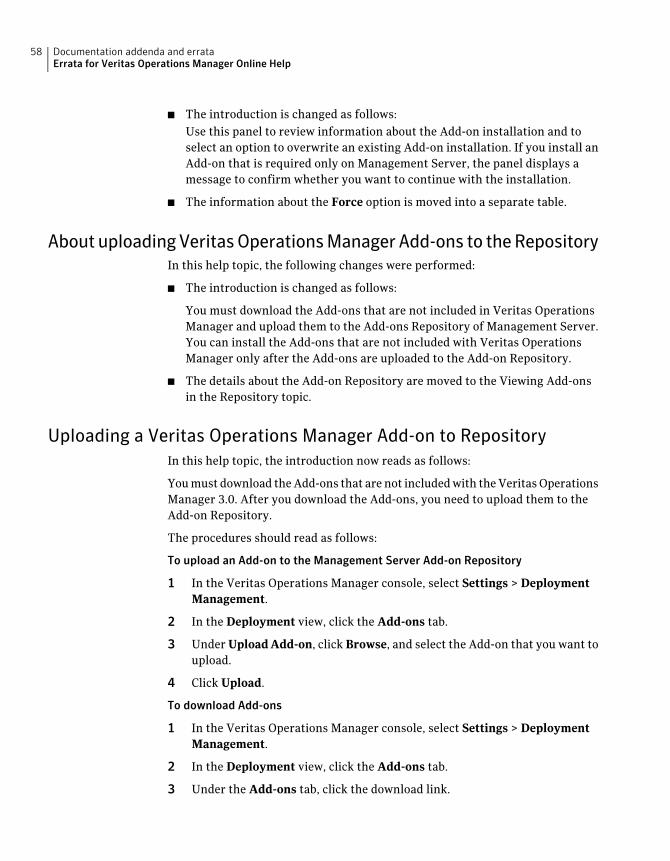
■ The introduction is changed as follows:Use this panel to review information about the Add-on installation and toselect an option to overwrite an existing Add-on installation. If you install anAdd-on that is required only on Management Server, the panel displays amessage to confirm whether you want to continue with the installation.
■ The information about the Force option is moved into a separate table.
About uploading Veritas Operations Manager Add-ons to the RepositoryIn this help topic, the following changes were performed:
■ The introduction is changed as follows:
You must download the Add-ons that are not included in Veritas OperationsManager and upload them to the Add-ons Repository of Management Server.You can install the Add-ons that are not included with Veritas OperationsManager only after the Add-ons are uploaded to the Add-on Repository.
■ The details about the Add-on Repository are moved to the Viewing Add-onsin the Repository topic.
Uploading a Veritas Operations Manager Add-on to RepositoryIn this help topic, the introduction now reads as follows:
Youmust download theAdd-ons that are not includedwith theVeritasOperationsManager 3.0. After you download the Add-ons, you need to upload them to theAdd-on Repository.
The procedures should read as follows:
To upload an Add-on to the Management Server Add-on Repository
1 In the Veritas Operations Manager console, select Settings > DeploymentManagement.
2 In the Deployment view, click the Add-ons tab.
3 Under UploadAdd-on, click Browse, and select the Add-on that you want toupload.
4 Click Upload.
To download Add-ons
1 In the Veritas Operations Manager console, select Settings > DeploymentManagement.
2 In the Deployment view, click the Add-ons tab.
3 Under the Add-ons tab, click the download link.
Documentation addenda and errataErrata for Veritas Operations Manager Online Help
58

Uninstalling Add-ons from managed hostsThe title, description, and procedure has been changed in this help topic. Thistopic should read as follows:
Uninstalling Add-onsYou canuninstall anAdd-on fromManagement Server in theAdd-onsRepositoryview. After you uninstall an Add-on, you cannot enable or disable it.
To uninstall Add-ons
1 In the Veritas Operations Manager console, select Settings > DeploymentManagement.
2 In the Deployment view, click the Add-ons tab.
3 In theAdd-onsRepository view, select theAdd-on that youwant to uninstalland click Uninstall.
4 In the Uninstall panel, click OK.
5 In the Result panel, verify that the operation was successful, and click OK.
Deploying a package or patch on managed hosts on which theinstallation is not initiated
In this help topic, the procedure should read as follows:
To deploy package or patch on specific hosts
1 In the Veritas Operations Manager console, select Settings > DeploymentManagement.
2 In the Deployment view, click on the Package/Patch tab.
3 In thePackage/PatchRepository table, click the link under theNotInstalledOn column for the corresponding package or patch.
4 In the Not Installed Hosts table, select the check box for the managed hoston which you want to deploy the package or patch and click Install.
Deploy Package and patches optionsIn this help topic, the description is changed and a table is added that describesthe Deploy Package and patches options. The modified help topic should read asfollows:
59Documentation addenda and errataErrata for Veritas Operations Manager Online Help

Deploy Package and patches optionsUse this panel to select the hosts or platforms on which you want to install thepackage or patch.
Table A-6 Deploy Package/Patches options
DescriptionField
Select this option to list all the hosts that areavailable for installation. The hosts that areadded to the Management Server are alsolisted. You can select the hosts onwhich youwant to install the package or patch.
Select Hosts
Select this option to list all the platformsthat are available for installation. Thepackage or patch is also installed on anynewhosts of the platforms that are listed here.You can select the platforms on which youwant to install the package or patch.
Select Platforms
Viewing Packages and Patches in the RepositoryIn this help topic, the description and procedure ismodified. The new topic shouldread as follows:
Viewing Packages and Patches in the RepositoryIn theDeployment view, under thePackage/Patch tab, you can upload a packageor patch to the repository, install a package or patch, and remove a package orpatch from the repository.
A package or patch must be uploaded to the repository before installation. Thepackage or patch must be in the Storage Foundation Archive (SFA) format for itto be installed. The packages or patches that are uploaded toManagement Serverare displayed in the Package/Patch Repository table.
You can view the following details in the Package/Patch Repository table.
■ The name of the package or patch.
■ The version of the package or patch.
■ A description of the package or patch.
■ The platforms on which the package or patch can be deployed.
■ The type of the object: Package or Patch.
Documentation addenda and errataErrata for Veritas Operations Manager Online Help
60
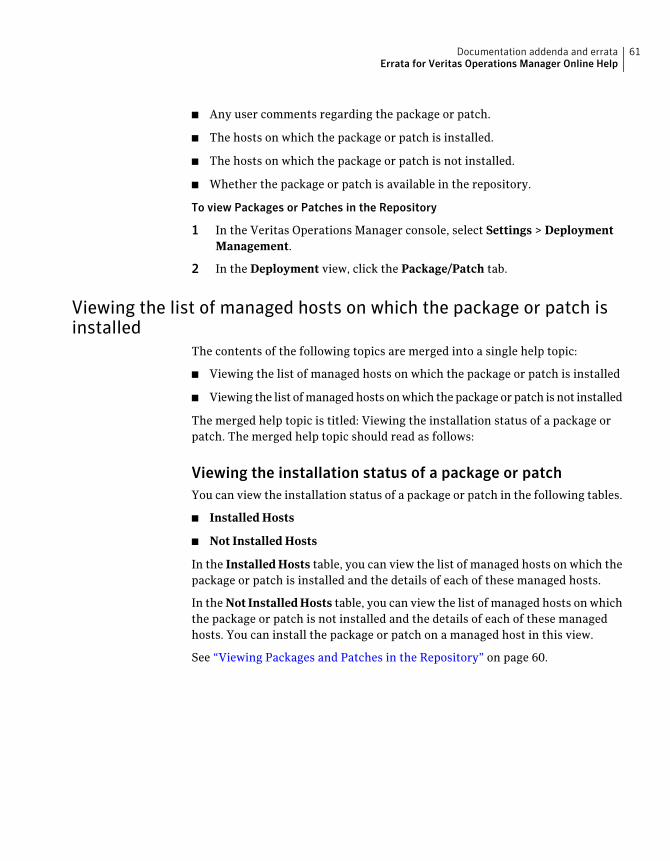
■ Any user comments regarding the package or patch.
■ The hosts on which the package or patch is installed.
■ The hosts on which the package or patch is not installed.
■ Whether the package or patch is available in the repository.
To view Packages or Patches in the Repository
1 In the Veritas Operations Manager console, select Settings > DeploymentManagement.
2 In the Deployment view, click the Package/Patch tab.
Viewing the list of managed hosts on which the package or patch isinstalled
The contents of the following topics are merged into a single help topic:
■ Viewing the list of managed hosts on which the package or patch is installed
■ Viewing the list ofmanagedhosts onwhich thepackage or patch is not installed
The merged help topic is titled: Viewing the installation status of a package orpatch. The merged help topic should read as follows:
Viewing the installation status of a package or patchYou can view the installation status of a package or patch in the following tables.
■ Installed Hosts
■ Not Installed Hosts
In the InstalledHosts table, you can view the list of managed hosts on which thepackage or patch is installed and the details of each of these managed hosts.
In the Not InstalledHosts table, you can view the list of managed hosts on whichthe package or patch is not installed and the details of each of these managedhosts. You can install the package or patch on a managed host in this view.
See “Viewing Packages and Patches in the Repository” on page 60.
61Documentation addenda and errataErrata for Veritas Operations Manager Online Help

To view the installation status of a package or patch
1 In the Veritas Operations Manager console, select Settings > DeploymentManagement.
2 In the Deployment view, click on the Package/Patch tab.
3 In the Package/Patch Repository table, click the link under either theInstalled Status column or the Not Installed On column for the package orpatch.
Viewing scan details of a policy checkIn this help topic, the description is changed. the modified description shouldread as follows:
You can view the following details of the scans that can be performed for a policycheck in this view:
■ Date and time when the scan was run
■ Number of signatures with violations
■ Number of hosts with violations
■ Total number of violations
Viewing faults and risksThe modified introduction is as follows:
On Faults and Risks page, you can view the system identified fault conditionsalong with their corresponding faulty entities and the fault sources. If required,you can suppress one or more faults for a specific period using the SuppressFaults option. You can also create rules for a selected fault. The rule determinesthe action that Veritas Operations Manager performs when it receives the alertthat is related to a faulty entity. Click the Analyze icon to view the Faultdependencyviewpanel that displays the hierarchy of a particular fault. Youmusthave administrative privileges to create rules and suppress faults.
Using the provided search filter, you can search existing faults based on variouscriteria. For example, suppress status of the fault, type of the fault, type of thefaulty entity and the storage type. Since it is dynamic search, the displayed faultlist changes automatically as you type the term in the Search text box or youselect the check box for the faulty entities. For instance,whenyou selectExchangecheck box in Faulted Entity Type, the application displays a list of only thosefaulty entities whereMicrosoft Exchange Server is installed. Similarly, when youselectShowonlybasefaults check box inFaulttype, VeritasOperationsManagerdisplays a list of only the base faults.
Documentation addenda and errataErrata for Veritas Operations Manager Online Help
62
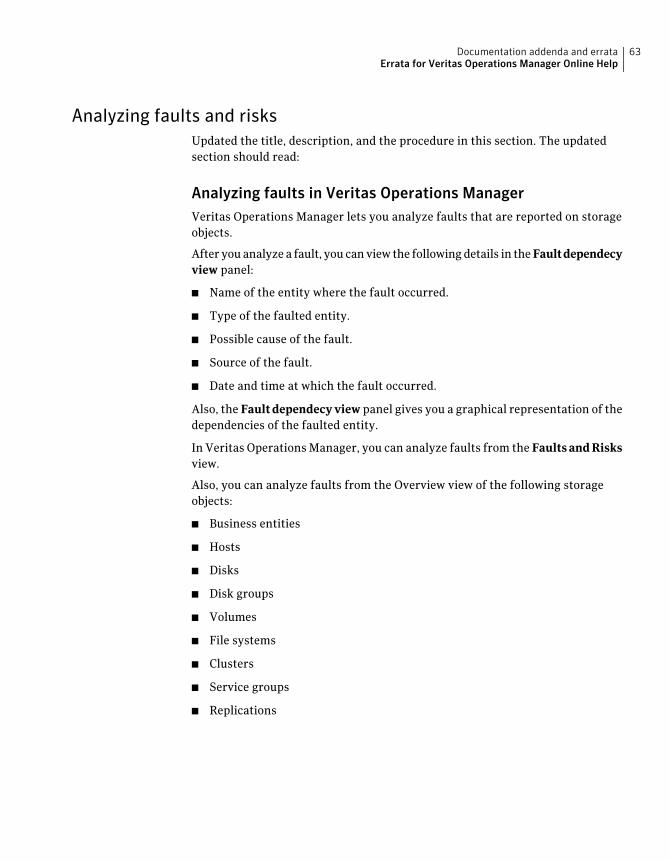
Analyzing faults and risksUpdated the title, description, and the procedure in this section. The updatedsection should read:
Analyzing faults in Veritas Operations ManagerVeritas Operations Manager lets you analyze faults that are reported on storageobjects.
After you analyze a fault, you canview the followingdetails in theFaultdependecyview panel:
■ Name of the entity where the fault occurred.
■ Type of the faulted entity.
■ Possible cause of the fault.
■ Source of the fault.
■ Date and time at which the fault occurred.
Also, the Faultdependecyview panel gives you a graphical representation of thedependencies of the faulted entity.
In Veritas OperationsManager, you can analyze faults from the FaultsandRisksview.
Also, you can analyze faults from the Overview view of the following storageobjects:
■ Business entities
■ Hosts
■ Disks
■ Disk groups
■ Volumes
■ File systems
■ Clusters
■ Service groups
■ Replications
63Documentation addenda and errataErrata for Veritas Operations Manager Online Help
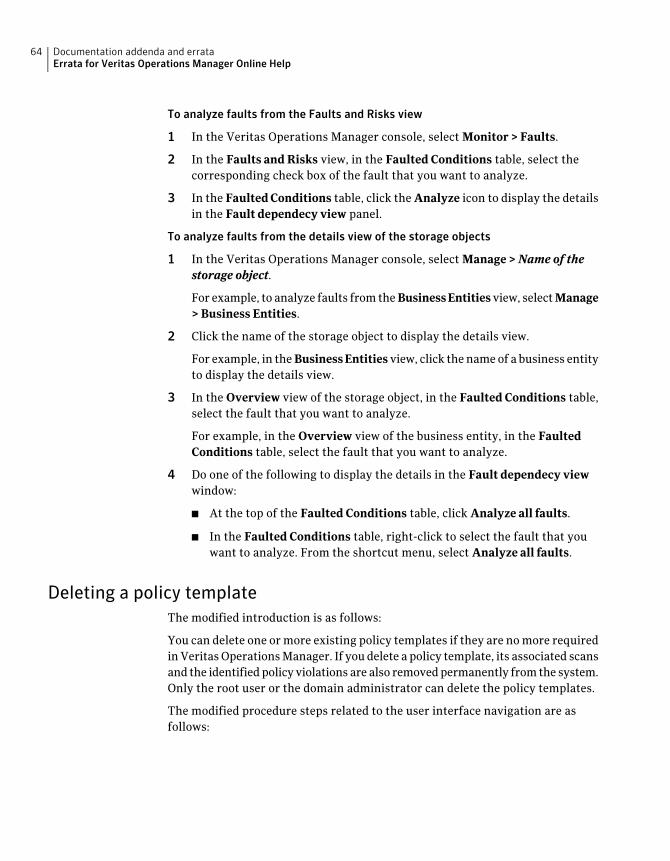
To analyze faults from the Faults and Risks view
1 In the Veritas Operations Manager console, select Monitor > Faults.
2 In the Faults and Risks view, in the Faulted Conditions table, select thecorresponding check box of the fault that you want to analyze.
3 In the FaultedConditions table, click the Analyze icon to display the detailsin the Fault dependecy view panel.
To analyze faults from the details view of the storage objects
1 In the Veritas Operations Manager console, select Manage > Name of thestorage object.
For example, to analyze faults from theBusinessEntities view, selectManage> Business Entities.
2 Click the name of the storage object to display the details view.
For example, in theBusinessEntities view, click the nameof a business entityto display the details view.
3 In the Overview view of the storage object, in the Faulted Conditions table,select the fault that you want to analyze.
For example, in the Overview view of the business entity, in the FaultedConditions table, select the fault that you want to analyze.
4 Do one of the following to display the details in the Fault dependecy viewwindow:
■ At the top of the Faulted Conditions table, click Analyze all faults.
■ In the Faulted Conditions table, right-click to select the fault that youwant to analyze. From the shortcut menu, select Analyze all faults.
Deleting a policy templateThe modified introduction is as follows:
You can delete one ormore existing policy templates if they are nomore requiredinVeritasOperationsManager. If you delete a policy template, its associated scansand the identifiedpolicy violations are also removedpermanently fromthe system.Only the root user or the domain administrator can delete the policy templates.
The modified procedure steps related to the user interface navigation are asfollows:
Documentation addenda and errataErrata for Veritas Operations Manager Online Help
64
To delete a policy template
1 In theVeritasOperationsManager console, selectPolicies>PolicyTemplates.
2 Select the policy template that youwant to delete anddo one of the following:
■ Click More > Delete Policy Template.
■ Right-click thepolicy template and from the submenu, selectDeletePolicyTemplate.
3 Click Yes to confirm.
Suppressing faultsThe modified introduction is as follows:
Using the Suppress faults option, you can suppress one or more faults in VeritasOperations Manager. You can specify a period to keep the selected fault in thesuppressed state. After the specified date, the fault is again considered as active.In the Faults and Risks view under Faulted Conditions table, you can view thedetails of faulted entities with their corresponding fault sources. You must haveadministrator rights to suppress the faults.
The modified procedure steps related to the user interface navigation are asfollows:
To suppress a fault
1 In the Veritas Operations Manager console, select Monitor > Faults.
2 In theFaultsandRisks view, underFaultedConditions table, select the faultthat you want to suppress, and then do one of the following:
■ Click Suppress Faults.
■ Right-click thedesired fault and fromthe submenu, selectSuppressFaults.
3 On the Suppress Faults wizard panel, enter the required information andclick OK.
See “Suppress the Faults options” on page 50.
LDAP/AD Settings - discover attributes and configuration informationpanel options
In the LDAP/AD Settings - discover attributes and configuration informationpanel options table, added the following note in the description for theUserNamefield:
65Documentation addenda and errataErrata for Veritas Operations Manager Online Help

Note: You must ensure that the user name that you enter does not contain anyspecial characters. For example, you must not enter the special character '(' inthis field.
In the LDAP/AD Settings - discover attributes and configuration informationpanel options table, added the GroupName field and its description. This shouldread:
Name of the user group that the system useto detect the LDAP server-related settings.
Veritas Operations Manager displays thisfield if the user does not belong to any usergroups.
Note: Youmust ensure that the groupnamethat you enter does not contain any specialcharacters. For example, youmust not enterthe special character '(' in this field.
The system determines the search basebased on the groupnamealongwith the username that you have specified.
Group Name
About Veritas Operations Manager Add-onsIn this section, the following text is modified:
Add-ons are installed onVeritasOperationsManager 3.0Management Server andare deployed from there on the managed hosts.
The updated text should read:
Add-ons are installed on Veritas Operations Manager Management Server.
Added the following Add-on in the list of currently available Veritas OperationsManager Add-ons:
Veritas Operations Manager Storage Provisioning Add-on
The following URL to the Web site where the latest Veritas Operations ManagerAdd-ons are available for downloading is updated:
http://www.symantec.com/sfm_addons
The updated URL is:
http://www.symantec.com/business/products/components.jsp?pcid=pcat_storage&pvid=operations_manager_1
Documentation addenda and errataErrata for Veritas Operations Manager Online Help
66
About deploying Veritas Operations Manager Add-onsAdded the following text that describes Veritas Operations Manager StorageProvisioning Add-on:
To enable the template-based storage provisioning fromManagement Server, youmust download and deploy Veritas Operations Manager Storage ProvisioningAdd-on on Management Server.
Removed theVeritasOperationsManagerAdd-ons deployment table that explainswhere you can deploy the currently available Add-ons. The following descriptionreplaces the content of the Veritas Operations Manager Add-ons deploymenttable:
The following Veritas Operations Manager Add-ons are deployed along withManagement Server installation:
■ Veritas Operations Manager Dynamic Multipathing Add-on
■ VeritasOperationsManagerAdd-on forVeritas Cluster ServerAdministration
You must download the following Veritas Operations Manager Add-ons from theVeritasOperationsManagerWeb site, upload to theAdd-onRepository, anddeployon Management Server:
■ Veritas Operations Manager Storage Provisioning Add-on
■ Storage Foundation Administration for Windows Add-on
■ Storage Foundation Administration for Unix Add-on
After youdeployStorageProvisioningAdd-on, StorageFoundationAdministrationfor Windows Add-on, and Storage Foundation Administration for Unix Add-onon Management Server, you must restart the Web server.
Depending on the platform of Management Server, use the following commandto restart the Web server:
■ Solaris and Red Hat Linux: /opt/VRTSsfmcs/cweb/sfmw restart
■ Windows: On the Servicescontrol panel, restart the Veritas StorageManagerService.)
Running a manual policy template scanIn this help topic, the procedure has been modified. The modified procedure is asfollows:
Running a manual policy template scanIn Veritas Operations Manager, you can run a policy template scan manually.
67Documentation addenda and errataErrata for Veritas Operations Manager Online Help

To run a manual policy template scan
1 Select Policies > Policy Templates.
2 Select the check box corresponding to the policy template that you want torun manually.
3 Click Scan Now.
4 In the Run Policy Template Scan Now page, click Yes to run the scan.
5 In the Results page, verify that the policy template scan has started. ClickOK.
Creating policy templatesIn this help topic, the introductory description has been added. The descriptionis as follows:
Veritas Operations Manager lets you create policy templates to check theperformance, availability, utilization of the storage objects in your datacenter.The policy templates also generates information based on the conformance of thestorage objects with the best practices. Using the policy templates, you can scanthe storage objects for 42 types of checks.
Youcancreatepolicy templates only for thedomainswhereyouhaveadministratorprivileges.
Policy Template Details optionsIn this help topic, the description for the scan scope has been modified. The newdescription is as follows:
Table A-7 Policy Template Details panel options
DescriptionField
Specify the policy template name.Name
Add a brief description of the policytemplate.
Description
Documentation addenda and errataErrata for Veritas Operations Manager Online Help
68

Table A-7 Policy Template Details panel options (continued)
DescriptionField
Select one of the following to define the scanscope:
■ Scan specific hosts to choose the hoststo be scanned
■ Scan hosts associated with a BusinessEntity to scan the hosts that areassociated with a business entity
■ Scan all hosts to scan all the hosts
Scan Scope
Specify the email address to whichnotifications must be sent in case of policyviolations. This field is optional.
Setting rules that trigger actions based on alert conditionsThis help topic has been renamed to "Viewing the rules that trigger actions basedon alert conditions".
The procedure in this topic has been updated as follows:
To view the rules that trigger actions based on alert conditions
◆ Click Monitor > Rules.
Creating alert rulesIn this help topic, the following changes were done:
■ Updated the introduction
■ Added procedures on creating rules from the Rules view and the Faults andRisks view
The updated topics is as follows:
Creating alert rulesInVeritasOperationsManager you can create the rules that trigger various actionsbased on alert conditions. Aside from creating rules from the rules option, youcan also create rules for selected faults and alerts.
This section explains creating rules in Veritas Operations Manager.
69Documentation addenda and errataErrata for Veritas Operations Manager Online Help
To create a rule from the Rules view
1 In the Veritas Operations Manager console, click Monitor > Rules..
2 In the Rules view, at the top of the Rules table, click the Create Rule tab.
3 In the Create Rule dialog box, select from the following options to create arule, and click Next :
You can create a rule by selecting the alert condition that triggers an action.
You can create a rule by selecting the alert severity level.
You can also create a rule by selecting from a list of alert topics.
4 In the dialog box to select the source of the alert trigger, select if you wantto trigger the rule for alerts originating fromanyhost in thedomainor specifichosts. Click Next.
5 In the wizard panel to specify the notification medium, select the requiredoption. Click Next.
6 In thewizard panel to specify the descriptions for the rule, enter the requiredinformation. Click Finish
7
8 In the Result panel, verify that the rule has been successfully created.
To create a rule from the Faults and Risks view
1 In the Veritas Operations Manager console, click Monitor > Faults.
2 From the Faulted Conditions table, select the fault for which you want tocreate the rule.
3 Click Create Rule.
4 In theCreateRulepanel, enter the alert that triggers actions for the rule thatyou create. Click Next.
5 In the wizard panel to specify the alert source, select the required option.Click Next.
6 In the wizard panel to specify the notification medium, select the requiredoption. Click Next.
7 In thewizard panel to specify the descriptions for the rule, enter the requiredinformation. Click Finish
For_AG
8 In the Result panel, verify that the rule has been successfully created.
Documentation addenda and errataErrata for Veritas Operations Manager Online Help
70

To create a rule from the Alerts view
1 In the Veritas Operations Manager console, click Monitor > Alerts.
2 From the Alerts table, select the alert for which you want to create a rule.
3 Click Create Rule.
4 In theCreateRulepanel, enter the alert that triggers actions for the rule thatyou create. Click Next.
5 In the wizard panel to specify the alert source, select the required option.Click Next.
6 In the wizard panel to specify the notification medium, select the requiredoption. Click Next.
7 In thewizard panel to specify the descriptions for the rule, enter the requiredinformation. Click Finish
8 In the Result panel, verify that the rule has been successfully created.
Enabling alert rulesIn this help topic, the procedure has been modified to include the Enable Rulewizard panel option.
The modified procedure is as follows:
To enable a rule
1 In the Veritas Operations Manager console, select Monitor > Rules.
2 From the list of existing rules, check the rule that you want to disable and doone of the following:
■ At the top of the Rules table, click the More drop-down list and selectEnable Rule.
■ Click on the name of the rule to go to the Overview page. In the Overviewpage, click Enable Rule.
3 In the Enable Rule panel, click Yes.
4 In the Result panel, verify that the rule has been successfully enabled. ClickOK.
Disabling alert rulesIn this help topic, the procedure has been modified to include the Disable Rulewizard panel options.
71Documentation addenda and errataErrata for Veritas Operations Manager Online Help
The modified procedure is as follows:
To disable a rule
1 In the Veritas Operations Manager console, select Monitor > Rules.
2 From the list of existing rules, check the rule that you want to disable and doone of the following:
■ At the top of theRules table, clickMoredrop-down list and selectDisableRule.
■ Click on the name of the rule to go to the Overview page. In the Overviewpage, click Disable Rule.
3 In the Disable Rule panel, click Yes.
4 In the Result panel, verify that the rule has been disabled successfully. ClickOk.
Editing alert rulesThe title of this help topic has been changed to "Modifying alert rules".
Enable Rule optionsThis help topic has been removed. The information of this topic is included in the"Enabling alert rules" topic.
Disable Rule optionsThis help topic has been removed. The information of this topic is included in the"Disabling alert rules" topic.
Removing an add-on from repositoryIn this help topic, the following changes were done:
■ Changed the title of the topic
■ Updated the steps
The modified topic is as follows:
Removing a Veritas Operations Manager Add-on fromRepositoryYoucan removeVeritasOperationsManagerAdd-ons fromtheAdd-onsRepositoryofManagement Server. However, you cannot removeAdd-onswhich are included
Documentation addenda and errataErrata for Veritas Operations Manager Online Help
72

with Veritas Operations Manager 3.0. You also cannot remove add-on which isinstalled on one or more hosts.
You can only remove one add-on at a time. If you want to remove more than oneadd-on, you must repeat steps 3 and 4.
To remove Add-ons from the management server
1 Select Settings > Deployment Management.
2 In the Deployment view, click the Add-ons tab.
3 In the Add-ons Repository, select the add-on that you want to remove.
4 Click Remove Add-on From Repository.
5 Click OK.
Remove Add-on from the Repository optionsThis help topic has been removed.
Canceling the deployment requestThis help topic has been updated to include the information on the CancelDeployment wizard panel options.
Cancel DeploymentThis help topic has been removed. The information in this topic is available inthe "Canceling the deployment request" help topic.
Downloading the deployment logThis help topic has been updated to include the information on the DownloadDeployment Log wizard panel options.
Download deployment logThis help topic has been removed. The information in this topic is available inthe "Downloading the deployment log" help topic.
Viewing policy template detailsIn this help topic, the introductory description was added as follows:
73Documentation addenda and errataErrata for Veritas Operations Manager Online Help
The policy templates in Veritas Operations Manager let you scan the storageobjects for the performance, availability, utilization, and conformance to bestpractices.
Enabling Add-ons on specific managed hostIn this section, the modified introduction should read:
VeritasOperationsManagerAdd-ons are auto-enabled bydefault, whenyou installthem on managed hosts. However, you have the option to enable add-on for aspecific host, even if the add-on is already installed on the host using Force option.
Disable Add-onsIn this section, the modified introduction should read:
You can use the Disable add-ons wizard panel to disable one or more add-ons onspecific managed hosts. If the add-on is already disabled on the managed hosts,you can again disable it using the Force option.When you select the Force option,the application overwrites all the configuration details related to previouslydisabled add-on for the host.
Enable Add-onsIn this section, the modified introduction should read:
You canuse theEnableadd-onswizardpanel to enable add-onon specificmanagedhosts. If the add-on is already enabled on themanaged hosts, you can again enableit using the Force option. When you select the Force option, the applicationoverwrites all the configuration details related to previously enabled add-on forthe host.
Addenda for StorageProvisioningAdd-onOnlineHelpThis section contains the additional information that is not included in theOnlineHelp for Storage Provisioning Add-on.
Viewing Impact Analysis ReportIn Veritas Operations Manager Storage Provisioning Add-on, you can generateImpactAnalysisReport while you migrate volumes from one enclosure to otherenclosure and from thick to thin LUNs. This report lets you view the objects thatare associated with the volumes being migrated. You can analyze the potential
Documentation addenda and errataAddenda for Storage Provisioning Add-on Online Help
74

outcome of the volume migration by viewing this report and change the optionsyou have selected before executing the volume migration.
You can view the following information in Impact Analysis Report.
■ The host to which the migrated volumes belong.
■ The source enclosure of the migrated volumes.
■ The details about the migrated volumes.
■ The details about the disks that may be affected after the volume migration.
■ The details about the business entities that may be affected after the volumemigration.
■ The details about the databases that may be affected after the volumemigration.
■ The details about the hosts that may be affected after the volume migration.
■ The details about the file systems that may be affected after the volumemigration.
See “Moving volumes on an enclosure to one ormore other enclosures” onpage 77.
See “Moving volumes from thick to thin LUNs” on page 76.
To view Impact Analysis Report
1 In the Veritas Operations Manager console, click Add-ons.
2 In the Add-ons view, under Storage Provisioning, click Move Volumes.
3 In the Move Volumes panel, select one of the options, enter the details, andclick Next.
See “Move Volumes options” on page 78.
4 In the Move Volumes - Select host and enclosure options panel, select thehost and the enclosure, and click Next.
See “Move Volumes - Select host and enclosure options” on page 80.
5 In theMoveVolumes-Selectvolumeandchangevolumelayoutpanel, selectthe check boxes for the volumes that you want to move and click Next.
See “Move Volumes - Select volumes and change volume layout options”on page 79.
6 In the Move Volumes - Summary panel, click Impact Analysis Report.
75Documentation addenda and errataAddenda for Storage Provisioning Add-on Online Help

Errata for Storage Provisioning Add-on Online HelpThis section contains the errata for the Online Help for Storage ProvisioningAdd-on.
Moving volumes from thick to thin LUNsIn this help topic, the description and procedure are changed. The modified topicshould read as follows:
Moving volumes from thick to thin LUNsIn Veritas Operations Manager Storage Provisioning Add-on, you can migrate avolume from thick to thin LUNs.
See “Viewing Impact Analysis Report” on page 74.
To move volumes from thick to thin LUNs
1 In the Veritas Operations Manager console, click Add-ons.
2 In the Add-ons view, under Storage Provisioning, click Move Volumes.
3 In the Move Volumes panel, select Move volumes from thick to thin LUNs,enter the details, and click Next.
See “Move Volumes options” on page 78.
4 In the Move Volumes - Select host and enclosure options panel, select thehost and the enclosure fromwhich youwant tomove the volumes from thickto thin LUNs, and click Next.
See “Move Volumes - Select host and enclosure options” on page 80.
5 In theMoveVolumes-Selectvolumeandchangevolumelayoutpanel, selectthe check boxes for the volumes that you want to move and click Next.
See “Move Volumes - Select volumes and change volume layout options”on page 79.
For information on changing volume layout, refer to: To change the volumelayout
6 In theMoveVolumes-Summarypanel, review the information. You canalsogenerate the Impact Analysis Report.
7 After reviewing the information, click Execute.
Documentation addenda and errataErrata for Storage Provisioning Add-on Online Help
76
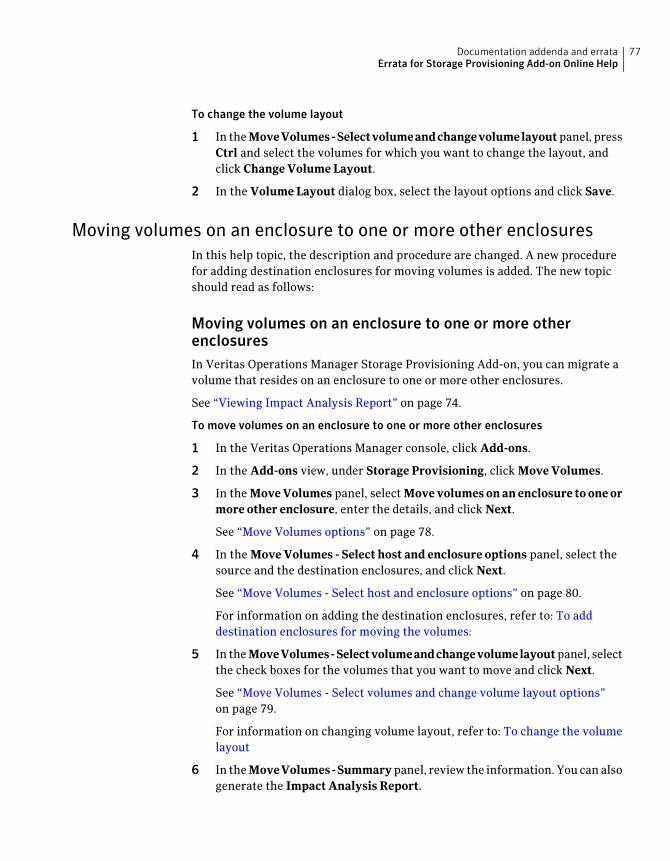
To change the volume layout
1 In theMoveVolumes-Selectvolumeandchangevolumelayoutpanel, pressCtrl and select the volumes for which you want to change the layout, andclick Change Volume Layout.
2 In the Volume Layout dialog box, select the layout options and click Save.
Moving volumes on an enclosure to one or more other enclosuresIn this help topic, the description and procedure are changed. A new procedurefor adding destination enclosures for moving volumes is added. The new topicshould read as follows:
Moving volumes on an enclosure to one or more otherenclosuresIn Veritas Operations Manager Storage Provisioning Add-on, you can migrate avolume that resides on an enclosure to one or more other enclosures.
See “Viewing Impact Analysis Report” on page 74.
To move volumes on an enclosure to one or more other enclosures
1 In the Veritas Operations Manager console, click Add-ons.
2 In the Add-ons view, under Storage Provisioning, click Move Volumes.
3 In the MoveVolumes panel, select Movevolumesonanenclosure to oneormore other enclosure, enter the details, and click Next.
See “Move Volumes options” on page 78.
4 In the Move Volumes - Select host and enclosure options panel, select thesource and the destination enclosures, and click Next.
See “Move Volumes - Select host and enclosure options” on page 80.
For information on adding the destination enclosures, refer to: To adddestination enclosures for moving the volumes:
5 In theMoveVolumes-Selectvolumeandchangevolumelayoutpanel, selectthe check boxes for the volumes that you want to move and click Next.
See “Move Volumes - Select volumes and change volume layout options”on page 79.
For information on changing volume layout, refer to: To change the volumelayout
6 In theMoveVolumes-Summarypanel, review the information. You canalsogenerate the Impact Analysis Report.
77Documentation addenda and errataErrata for Storage Provisioning Add-on Online Help
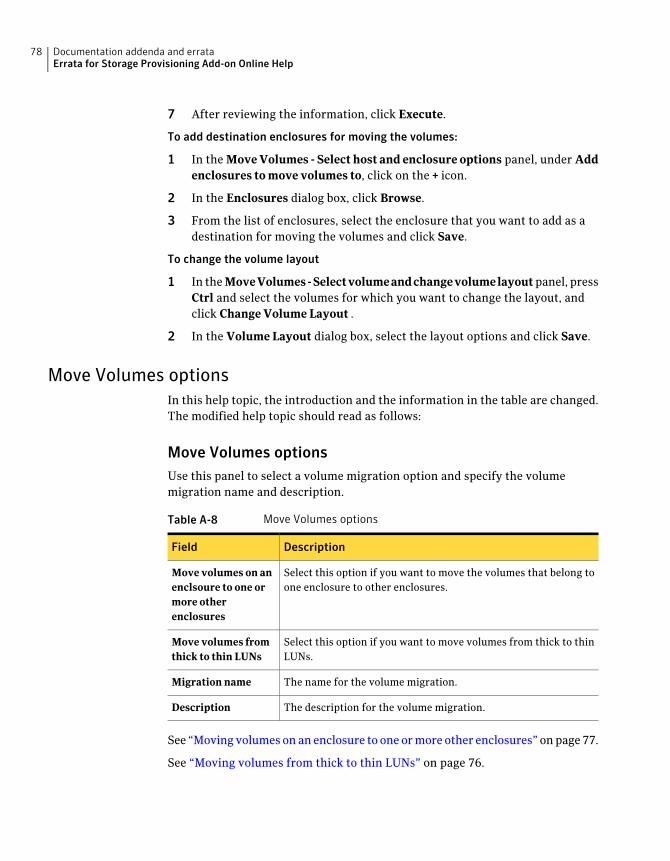
7 After reviewing the information, click Execute.
To add destination enclosures for moving the volumes:
1 In the Move Volumes - Select host and enclosure options panel, under Addenclosures to move volumes to, click on the + icon.
2 In the Enclosures dialog box, click Browse.
3 From the list of enclosures, select the enclosure that you want to add as adestination for moving the volumes and click Save.
To change the volume layout
1 In theMoveVolumes-Selectvolumeandchangevolumelayoutpanel, pressCtrl and select the volumes for which you want to change the layout, andclick Change Volume Layout .
2 In the Volume Layout dialog box, select the layout options and click Save.
Move Volumes optionsIn this help topic, the introduction and the information in the table are changed.The modified help topic should read as follows:
Move Volumes optionsUse this panel to select a volume migration option and specify the volumemigration name and description.
Table A-8 Move Volumes options
DescriptionField
Select this option if you want to move the volumes that belong toone enclosure to other enclosures.
Move volumes on anenclsoure to one ormore otherenclosures
Select this option if you want to move volumes from thick to thinLUNs.
Move volumes fromthick to thin LUNs
The name for the volume migration.Migration name
The description for the volume migration.Description
See “Moving volumes on an enclosure to one ormore other enclosures” onpage 77.
See “Moving volumes from thick to thin LUNs” on page 76.
Documentation addenda and errataErrata for Storage Provisioning Add-on Online Help
78

Move Volumes, Change Volume Layout optionsIn this help topic, the following changes were performed:
■ The title is changed to: Move Volumes - Select volumes and change volumelayout options
■ The description is changed.
■ The Change volume layout options are moved to a separate table.
The modified topic should read as follows:
Move Volumes - Select volumes and change volume layoutoptionsUse this panel to select the volumes that you want to move to other enclosuresor from thick to thin LUNs. You can also select multiple volumes to change theirvolume layout in this panel.
Table A-9 Move Volume options
DescriptionField
The host on which the volumes reside.On host
The name of the volume .Volume
The enclosure to which the migratedvolumes belong.
Source Enclosure
The file system that is associated with thevolume.
File System
Thevolume set towhich the volumebelongs.Volume Set
The current layout of the volume.Current Layout
The new layout of the volume.New Layout
Select this check box if you want to move avolume. All volumes in the enclosure areselected by default.
Move
Click this option to change the layout of thevolumes that you have selected.
Change Volume Layout
79Documentation addenda and errataErrata for Storage Provisioning Add-on Online Help
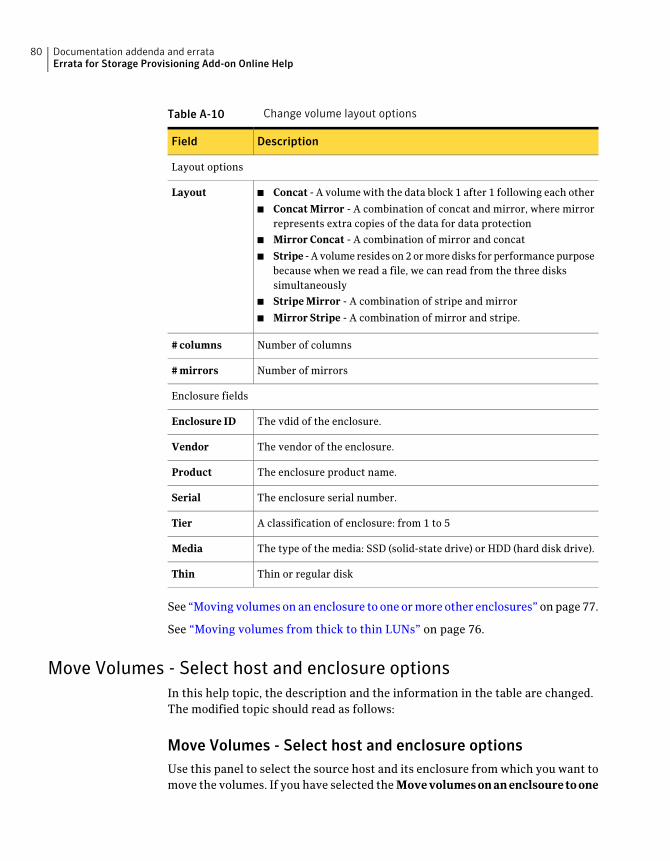
Table A-10 Change volume layout options
DescriptionField
Layout options
■ Concat - A volumewith the data block 1 after 1 following each other
■ Concat Mirror - A combination of concat and mirror, where mirrorrepresents extra copies of the data for data protection
■ Mirror Concat - A combination of mirror and concat
■ Stripe - A volume resides on2ormore disks for performancepurposebecause when we read a file, we can read from the three diskssimultaneously
■ Stripe Mirror - A combination of stripe and mirror
■ Mirror Stripe - A combination of mirror and stripe.
Layout
Number of columns# columns
Number of mirrors# mirrors
Enclosure fields
The vdid of the enclosure.Enclosure ID
The vendor of the enclosure.Vendor
The enclosure product name.Product
The enclosure serial number.Serial
A classification of enclosure: from 1 to 5Tier
The type of the media: SSD (solid-state drive) or HDD (hard disk drive).Media
Thin or regular diskThin
See “Moving volumes on an enclosure to one ormore other enclosures” onpage 77.
See “Moving volumes from thick to thin LUNs” on page 76.
Move Volumes - Select host and enclosure optionsIn this help topic, the description and the information in the table are changed.The modified topic should read as follows:
Move Volumes - Select host and enclosure optionsUse this panel to select the source host and its enclosure from which you want tomove the volumes. If you have selected theMovevolumesonanenclsouretoone
Documentation addenda and errataErrata for Storage Provisioning Add-on Online Help
80
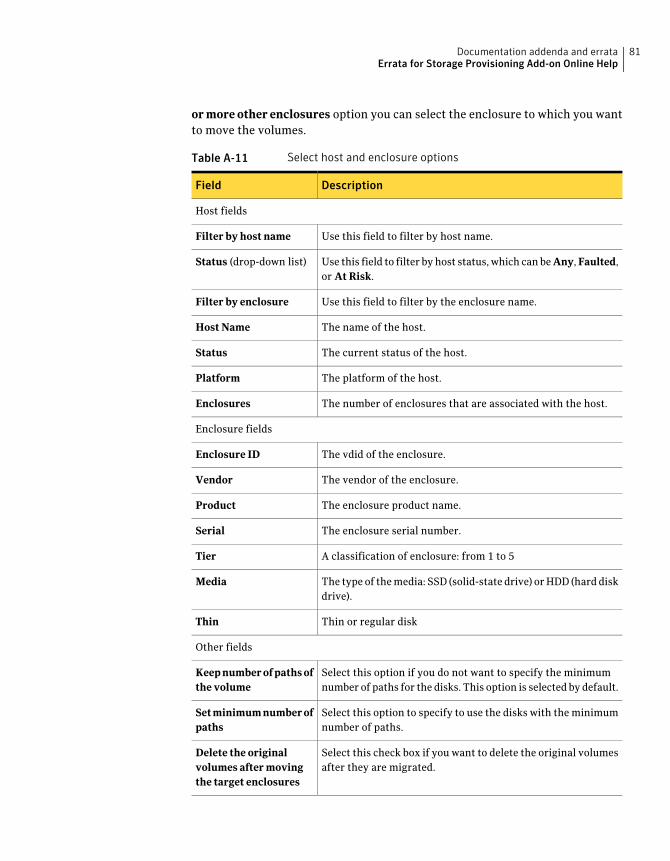
or more other enclosures option you can select the enclosure to which you wantto move the volumes.
Table A-11 Select host and enclosure options
DescriptionField
Host fields
Use this field to filter by host name.Filter by host name
Use this field to filter by host status, which can beAny,Faulted,or At Risk.
Status (drop-down list)
Use this field to filter by the enclosure name.Filter by enclosure
The name of the host.Host Name
The current status of the host.Status
The platform of the host.Platform
The number of enclosures that are associated with the host.Enclosures
Enclosure fields
The vdid of the enclosure.Enclosure ID
The vendor of the enclosure.Vendor
The enclosure product name.Product
The enclosure serial number.Serial
A classification of enclosure: from 1 to 5Tier
The type of themedia: SSD (solid-state drive) orHDD (hard diskdrive).
Media
Thin or regular diskThin
Other fields
Select this option if you do not want to specify the minimumnumber of paths for the disks. This option is selected by default.
Keepnumberofpathsofthe volume
Select this option to specify to use the disks with the minimumnumber of paths.
Setminimumnumberofpaths
Select this check box if you want to delete the original volumesafter they are migrated.
Delete the originalvolumes after movingthe target enclosures
81Documentation addenda and errataErrata for Storage Provisioning Add-on Online Help
See “Moving volumes on an enclosure to one ormore other enclosures” onpage 77.
See “Moving volumes from thick to thin LUNs” on page 76.
Move Volumes SummaryIn this help topic, the following changes were performed:
■ The title is changed to: Move Volumes - Summary panel
■ The description is changed. The description should read as follows:Use this panel to review the information before you execute the volumemigration. You can view the details of the enclosure to which the volumesbelong, the excluded volumes and their disk groups, and the volume layoutchanges.View Impact Analysis Report for details about the objects that are related tothe volumes being migrated.
Importing storage templatesThe modified procedure steps related to the user interface navigation are asfollows:
To import a storage template
1 In the Veritas Operations Manager console, click Add-ons.
2 Under Storage Provisioning, click Manage Storage Templates.
3 In Storage Template view, do one of the following:
■ Click More > Import Templates
■ Right-click on a row of the table listing the storage templates and selectImport Templates.
4 In ImportTemplates wizard panel, click Browse to navigate to the templatethat you want to import.
5 Select the appropriate options to import the template.
See “Import Template options” on page 82.
6 Click Import to import the template into the Veritas Operations Managerrepository.
Import Template optionsThe modified reference topic is as follows:
Documentation addenda and errataErrata for Storage Provisioning Add-on Online Help
82
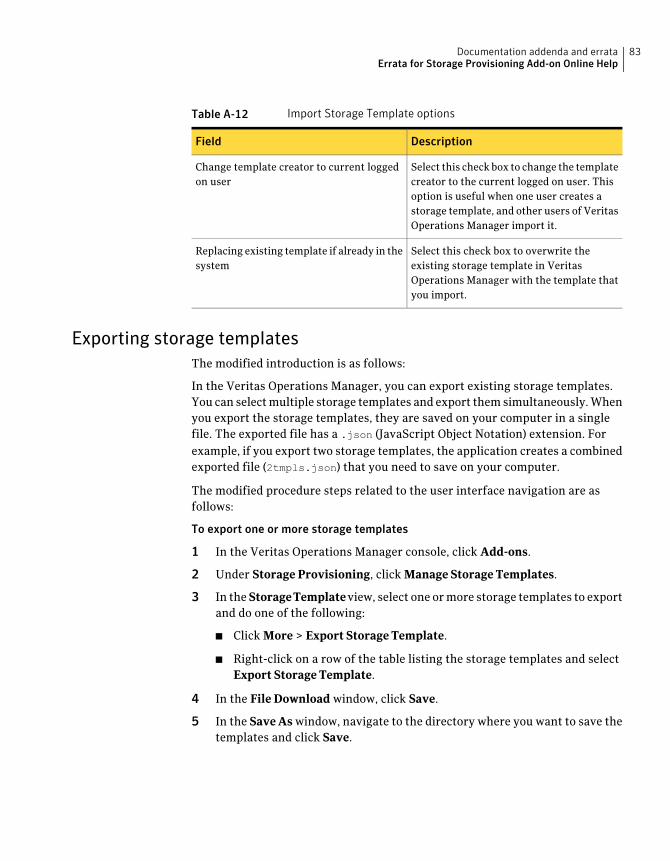
Table A-12 Import Storage Template options
DescriptionField
Select this check box to change the templatecreator to the current logged on user. Thisoption is useful when one user creates astorage template, and other users of VeritasOperations Manager import it.
Change template creator to current loggedon user
Select this check box to overwrite theexisting storage template in VeritasOperations Manager with the template thatyou import.
Replacing existing template if already in thesystem
Exporting storage templatesThe modified introduction is as follows:
In the Veritas Operations Manager, you can export existing storage templates.You can selectmultiple storage templates and export themsimultaneously.Whenyou export the storage templates, they are saved on your computer in a singlefile. The exported file has a .json (JavaScript Object Notation) extension. Forexample, if you export two storage templates, the application creates a combinedexported file (2tmpls.json) that you need to save on your computer.
The modified procedure steps related to the user interface navigation are asfollows:
To export one or more storage templates
1 In the Veritas Operations Manager console, click Add-ons.
2 Under Storage Provisioning, click Manage Storage Templates.
3 In the StorageTemplateview, select one ormore storage templates to exportand do one of the following:
■ Click More > Export Storage Template.
■ Right-click on a row of the table listing the storage templates and selectExport Storage Template.
4 In the File Download window, click Save.
5 In the SaveAs window, navigate to the directory where you want to save thetemplates and click Save.
83Documentation addenda and errataErrata for Storage Provisioning Add-on Online Help

Unlocking storage templateThe modified procedure steps related to the user interface navigation are asfollows:
To unlock one or more storage templates
1 In the Veritas Operations Manager console, click Add-ons.
2 Under Storage Provisioning, click Manage Storage Templates.
3 In the Storage Template view, select the storage template to unlock and doone of the following:
■ Click More > Unlock Storage Template.
■ Right-click the storage template and select Unlock Storage Template.
Locking storage templateThe modified procedure steps related to the user interface navigation are asfollows:
To lock one or more storage templates
1 In the Veritas Operations Manager console, click Add-ons
2 Under Storage Provisioning, click Manage Storage Templates.
3 In the StorageTemplateview, select the storage template to lock and do oneof the following:
■ Click More > Lock Storage Template.
■ Right-click the storage template and select Lock Storage Template.
4 In the Lock Storage Template panel, click Yes to lock the storage template.You can lock only those storage templates that you have created.
Deleting storage templatesThe modified procedure steps related to the user interface navigation are asfollows:
To delete one or more storage templates
1 In the Veritas Operations Manager console, click Add-ons.
2 Under Storage Provisioning, click Manage Storage Templates.
3 In the Storage Template view, select the storage template to delete and doone of the following:
Documentation addenda and errataErrata for Storage Provisioning Add-on Online Help
84

■ Click More > Delete Storage Template.
■ Right-click the storage template and select Delete Storage Template.
4 In the Delete Storage Template panel, click Yes to confirm the operation.You can delete only those storage templates that editable and created by you.
Provision Storage – Select host and disk group optionsIn this section, the modified introduction should read:
Use this wizard panel to select a host and a disk group that the storage isprovisioned on. When you select a host, the associated disk groups are displayed.Select the required disk group from the list.
You can use the following filters to locate the host:
■ Filtered by host name to dynamically search the host names in the system.
■ Status to further refine your search by providing the status of host - Any,Faulted, Healthy, or At Risk.
You can use the following filters to locate the disk group:
■ Filtered by disk group name to search the disk group name in the system.
Updating or viewing a storage templateThe title, description, and the procedure aremodified in this help topic. This topicshould read as follows:
Updating a storage templateThis section explains how to update or view a storage template.
You must have domain administrator privileges to update the storage template.If you do not have the required permissions, you can only view the storagetemplate.
To update a storage template
1 In the Veritas Operations Manager console, click Add-ons.
2 Under Storage Provisioning, click Manage Storage Templates.
3 In Storage Template view, do one of the following:
■ Select the storage template that youwant toupdate and clickUpdate/ViewStorage Template.
■ Right-click the storage template and from the submenu selectUpdate/View Storage Template.
85Documentation addenda and errataErrata for Storage Provisioning Add-on Online Help
4 In Update Storage Template wizard panel, modify the storagetemplate-related information in the Summary tab. The name of storagetemplate is mandatory and it must be unique. Expand the storage templatein the left navigation to view its associated volume and file system.
5 Select the file system from the left navigation tree. You can view or updatethe file system-related information in the following tabs:
■ Summary tab
■ Parameters tab
■ Advanced tab: This tab is displayed only if you selected the Create FileSystem check box in the Parameters tab.
■ DST Policy tab: This tab is displayed only if you have added two or morevolume objects under the file system.
6 Select the volume from the left navigation tree. You can view or update thevolume-related information in the following tabs:
■ Summary tab
■ Parameters tab
■ Advanced tab:
7 To create a copy of the storage template, click Save As. In the ApplicationStorageTemplateSummarywindow that is displayed, enter a newname anddescription for the storage template and click Save.
8 To save the updated storage template information, click Save.
9 In the Result panel, verify that the storage template was successfully savedand click OK.
Creating a storage template using volumesIn this help topic, the procedure has changed as follows:
To create a storage template using volumes
1 In the Veritas Operations Manager console, click Add-ons.
2 Under Storage Provisioning, click Manage Storage Templates.
3 In the Storage Template overview pane, click Create Storage Template.
4 In the Create Storage Template wizard, choose Using volumes. Click Next
Documentation addenda and errataErrata for Storage Provisioning Add-on Online Help
86
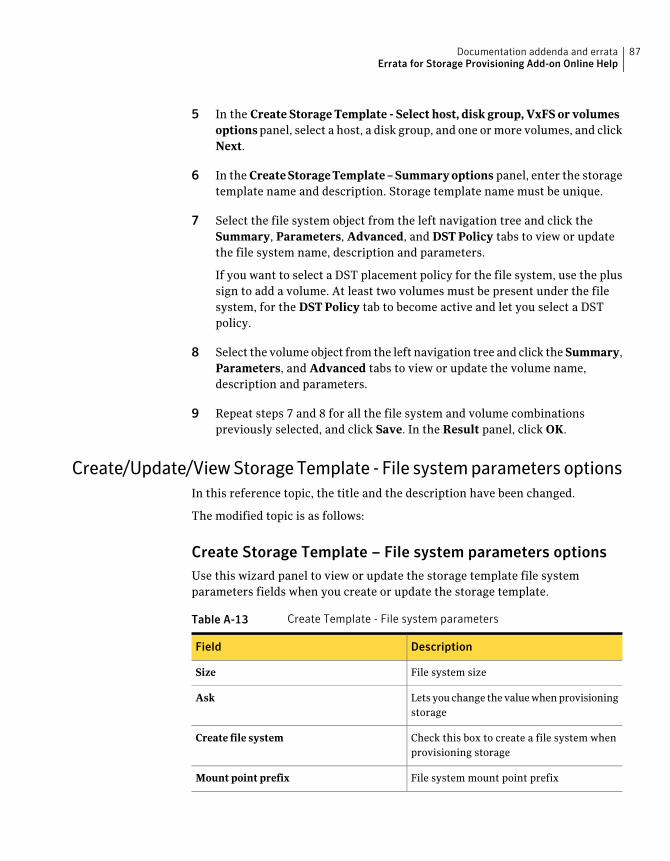
5 In the Create Storage Template - Select host, disk group, VxFS or volumesoptionspanel, select a host, a disk group, and one ormore volumes, and clickNext.
6 In the CreateStorageTemplate–Summaryoptions panel, enter the storagetemplate name and description. Storage template name must be unique.
7 Select the file system object from the left navigation tree and click theSummary, Parameters, Advanced, and DST Policy tabs to view or updatethe file system name, description and parameters.
If you want to select a DST placement policy for the file system, use the plussign to add a volume. At least two volumes must be present under the filesystem, for the DST Policy tab to become active and let you select a DSTpolicy.
8 Select the volume object from the left navigation tree and click theSummary,Parameters, and Advanced tabs to view or update the volume name,description and parameters.
9 Repeat steps 7 and 8 for all the file system and volume combinationspreviously selected, and click Save. In the Result panel, click OK.
Create/Update/View Storage Template - File system parameters optionsIn this reference topic, the title and the description have been changed.
The modified topic is as follows:
Create Storage Template – File system parameters optionsUse this wizard panel to view or update the storage template file systemparameters fields when you create or update the storage template.
Table A-13 Create Template - File system parameters
DescriptionField
File system sizeSize
Lets you change thevaluewhenprovisioningstorage
Ask
Check this box to create a file system whenprovisioning storage
Create file system
File system mount point prefixMount point prefix
87Documentation addenda and errataErrata for Storage Provisioning Add-on Online Help

Table A-13 Create Template - File system parameters (continued)
DescriptionField
File system block size in bytesBlock size
Create/Update/View Storage Template - Volume parameters optionsIn this help topic, the title and descriptions have been changed as follows:
Create Storage Template – Volume parameters optionsUse this wizard panel to view and/or update the storage template volumeparameters fields upon creation or update of the storage template.
After you select the volume(s) from the left navigation tree, you have to use theParameters tab to view and/or update the volume(s) parameters fields, describedin the following table.
Table A-14 Create Storage Template - Volume parameters
DescriptionField
Volume layout, which can beConcat,Stripe,Concat Mirror, Mirror Concat, StripeMirror, Mirror Stripe
Layout
Number of columns (for stripe volumes)# Columns
Number of mirrors (for mirrored volumes)# Mirrors
Volume size as a percentage of the filesystem size
Size
Volume name prefixName prefix
MinimumnumberofDMPpaths for thediskson which the volume is created
Minimum number of paths
Turn on/off the vxvm fast resync optionFast resync
To add enclosures, click the plus sign in the enclosures table. You can specify theenclosures to save the storage template on.
Table A-15 Enclosure parameters
DescriptionField
Enclosure vdidEnclosure ID
Documentation addenda and errataErrata for Storage Provisioning Add-on Online Help
88

Table A-15 Enclosure parameters (continued)
DescriptionField
VendorVendor
Enclosure product nameProduct
Enclosure serialSerial
A classification of enclosure from 1 to 5Tier
SSD (solid state drive) or HDD (hard diskdrive)
Media
Thin or regular diskThin
Create mirror plex on different enclosuresMirrored across enclosures
Create Storage Template - Select host, disk group, VxFS or volumesoptions
In this help topic, the table name has been added.
Create/Update/View Storage Template – File system advanced optionsIn this help topic, the field descriptionsweremodified. Thenew fields descriptionsare as follows:
Table A-16 Create Storage Template - Performance Tunables Tab
DescriptionField
Enter the size of the intent log in multiplesof size byte.
Intent log size
Select an option to control the timing offlushing the VxFS intent log and othermetadata to disk. This affects whenoperations are guaranteed persistent aftera system failure.
Intent log behavior
Select the required mount I/O feature.I/O feature
89Documentation addenda and errataErrata for Storage Provisioning Add-on Online Help
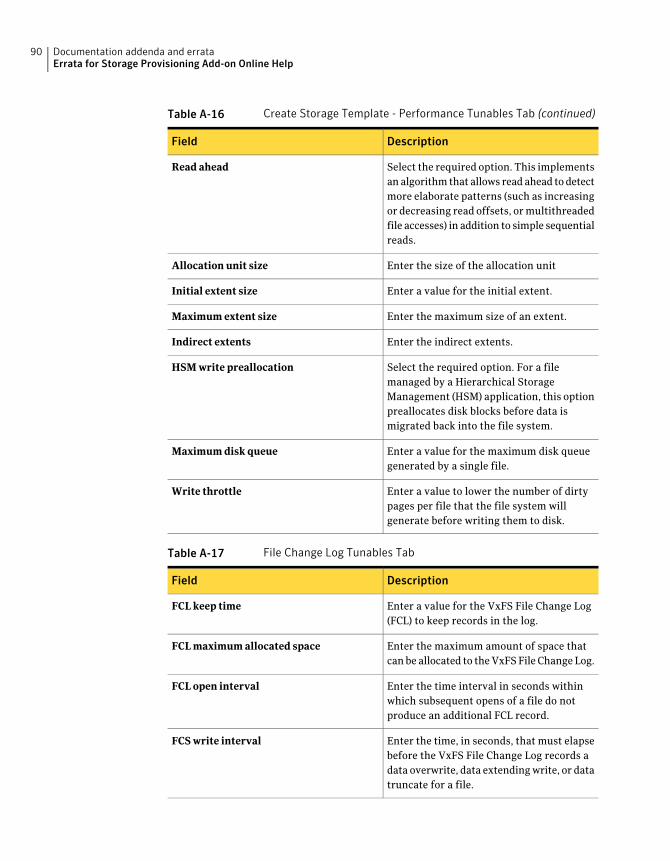
Table A-16 Create Storage Template - Performance Tunables Tab (continued)
DescriptionField
Select the required option. This implementsanalgorithmthat allows readahead todetectmore elaborate patterns (such as increasingor decreasing read offsets, ormultithreadedfile accesses) in addition to simple sequentialreads.
Read ahead
Enter the size of the allocation unitAllocation unit size
Enter a value for the initial extent.Initial extent size
Enter the maximum size of an extent.Maximum extent size
Enter the indirect extents.Indirect extents
Select the required option. For a filemanaged by a Hierarchical StorageManagement (HSM) application, this optionpreallocates disk blocks before data ismigrated back into the file system.
HSM write preallocation
Enter a value for the maximum disk queuegenerated by a single file.
Maximum disk queue
Enter a value to lower the number of dirtypages per file that the file system willgenerate before writing them to disk.
Write throttle
Table A-17 File Change Log Tunables Tab
DescriptionField
Enter a value for the VxFS File Change Log(FCL) to keep records in the log.
FCL keep time
Enter the maximum amount of space thatcanbe allocated to theVxFSFile Change Log.
FCL maximum allocated space
Enter the time interval in seconds withinwhich subsequent opens of a file do notproduce an additional FCL record.
FCL open interval
Enter the time, in seconds, that must elapsebefore the VxFS File Change Log records adata overwrite, data extendingwrite, or datatruncate for a file.
FCS write interval
Documentation addenda and errataErrata for Storage Provisioning Add-on Online Help
90
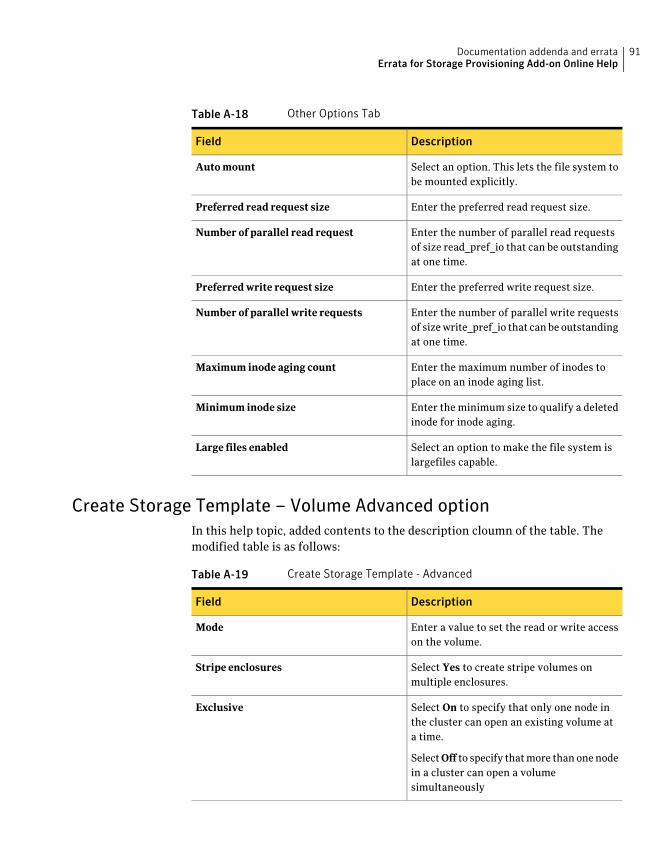
Table A-18 Other Options Tab
DescriptionField
Select an option. This lets the file system tobe mounted explicitly.
Auto mount
Enter the preferred read request size.Preferred read request size
Enter the number of parallel read requestsof size read_pref_io that can be outstandingat one time.
Number of parallel read request
Enter the preferred write request size.Preferred write request size
Enter the number of parallel write requestsof sizewrite_pref_io that can be outstandingat one time.
Number of parallel write requests
Enter the maximum number of inodes toplace on an inode aging list.
Maximum inode aging count
Enter the minimum size to qualify a deletedinode for inode aging.
Minimum inode size
Select an option to make the file system islargefiles capable.
Large files enabled
Create Storage Template – Volume Advanced optionIn this help topic, added contents to the description cloumn of the table. Themodified table is as follows:
Table A-19 Create Storage Template - Advanced
DescriptionField
Enter a value to set the read or write accesson the volume.
Mode
Select Yes to create stripe volumes onmultiple enclosures.
Stripe enclosures
Select On to specify that only one node inthe cluster can open an existing volume ata time.
SelectOff to specify thatmore thanonenodein a cluster can open a volumesimultaneously
Exclusive
91Documentation addenda and errataErrata for Storage Provisioning Add-on Online Help

Creating a new storage template designIn this help topic, the procedure has been modified. The modified topic is asfollows:
Creating a new storage template designThis section explains how to create a storage template using a new templatedesign.
To create a new storage template design
1 In the Veritas Operations Manager console, click Add-ons.
2 Under Storage Provisioning, click Manage Storage Templates.
3 In the Storage Template overview pane, click Create Storage Template.
4 In the Create Storage Template wizard, choose New template design. ClickNext.
5 Using the Summary tab, enter the storage template name and description.Storage template name must be unique.
6 Select the file systemobject from the left navigation tree.Using theSummary,Parameters, Advanced, and DST Policy tabs, enter the file system name,description, and parameters.
You must check Create file system check box on the Parameters tab for theAdvanced tab to become active.
Youmust have at least two volumes under the file system, for the DSTPolicytab to become active and let you select a DST policy placement for the filesystem. You have to use the plus sign to add a volume.
7 Select the volume object from the left navigation tree.
8 Using theSummary,Parameters, andAdvanced tabs enter thevolumename,description, and parameters.
Repeat this step for each volume object under the file system.
You can enter the following volume information on the Summary,Parameters, and Advanced tabs:
9 Click Save. In the Result panel, click OK.
Documentation addenda and errataErrata for Storage Provisioning Add-on Online Help
92

Getting help
This appendix includes the following topics:
■ Veritas Operations Manager on the Web
■ Getting help
■ Using the product documentation
■ Commenting on product documentation
Veritas Operations Manager on the WebFor comprehensive, up-to-date information about Veritas Operations Manager,visit the Symantec Web site:
www.symantec.com/vom
Getting helpIf an issue arises while you use the products, refer to the product documentationand online help. If necessary, report it to Symantec.
For technical assistance, visit
www.symantec.com/enterprise/support/index.jsp
This site provides access to resources such asTechNotes, product alerts, softwaredownloads, hardware and software compatibility lists, and the customer emailnotification service. Use the Knowledge Base Search feature to access additionalproduct information, including current and past releases of productdocumentation.
BAppendix

Using the product documentationThe following guides provide information about Veritas Operations Manager:
■ Veritas Operations Manager Administrator's Guide
■ Veritas Operations Manager Getting Started Guide
■ Veritas Operations Manager Installation Guide
For complete host operating system and system resource specifications, as wellas any known limitations or issues in this release, see the Veritas OperationsManager Release Notes.
For information about the third-party software that is used in this product, seethe Veritas Operations Manager Third-Party License Agreements.
The latest version of the product documentation is available on the SymantecTechnical Support Web site at the following URL:
http://go.symantec.com/vom
For the late breaking news that is related to this release, use the followingTechNote:
http://seer.entsupport.symantec.com/docs/346742.htm
Commenting on product documentationSubmit comments about theproductdocumentation to the followingemail address:
Please include the following information with your documentation comments:
■ The title and product version of the guide you are commenting on
■ The topic (if relevant) you are commenting on
■ Your comment
■ Your name
Getting helpUsing the product documentation
94


