104
January 2004 N09987F VERITAS ™ Storage Foundation 4.0 for Sybase Installation Guide Solaris

January 2004
N09987F
VERITAS™ Storage Foundation 4.0 for Sybase
Installation Guide
Solaris

Disclaimer
The information contained in this publication is subject to change without notice. VERITAS Software Corporation makes no warranty of any kind with regard to this manual, including, but not limited to, the implied warranties of merchantability and fitness for a particular purpose. VERITAS Software Corporation shall not be liable for errors contained herein or for incidental or consequential damages in connection with the furnishing, performance, or use of this manual.
VERITAS Legal Notice
Copyright © 1999-2004 VERITAS Software Corporation. All rights reserved. VERITAS, the VERITAS logo, and all other VERITAS product names and slogans are trademarks or registered trademarks of VERITAS Software Corporation. VERITAS, the VERITAS logo, Reg. U.S. Pat. & Tm. Off. Other product names and/or slogans mentioned herein may be trademarks or registered trademarks of theirrespective companies.
VERITAS Software Corporation350 Ellis StreetMountain View, CA 94043 USAPhone 650–527–8000 Fax 650–527–2908www.veritas.com
Third-Party Copyrights
Data Encryption Standard (DES)
Copyright© 1990 Dennis Ferguson. All rights reserved. Commercial use is permitted only if products which are derived from or include this software are made available for purchase and/or use in Canada. Otherwise, redistribution and use in source and binary forms are permitted.
Copyright© 1985, 1986, 1987, 1988, 1990 by the Massachusetts Institute of Technology. All Rights Reserved.
Export of this software from the United States of America may require a specific license from the United States Government. It is the responsibility of any person or organization contemplating export to obtain such a license before exporting. WITHIN THAT CONSTRAINT, permission to use, copy, modify, and distribute this software and its documentation for any purpose and without fee is hereby granted, provided that the above copyright notice appear in all copies and that both that copyright notice and this permission notice appear in supporting documentation, and that the name of M.I.T. not be used in advertising or publicity pertaining to distribution of the software without specific, written prior permission. M.I.T. makes no representations about the suitability of this software for any purpose. It is provided "as is" without express or implied warranty.

Contents
Preface . . . . . . . . . . . . . . . . . . . . . . . . . . . . . . . . . . . . . . . . . . . . . . . . . . . . . . . . . . . . . .vii
Scope and Audience . . . . . . . . . . . . . . . . . . . . . . . . . . . . . . . . . . . . . . . . . . . . . . . . . . . . . . .vii
Organization . . . . . . . . . . . . . . . . . . . . . . . . . . . . . . . . . . . . . . . . . . . . . . . . . . . . . . . . . . . . . viii
Related Documents . . . . . . . . . . . . . . . . . . . . . . . . . . . . . . . . . . . . . . . . . . . . . . . . . . . . . . . viii
Conventions . . . . . . . . . . . . . . . . . . . . . . . . . . . . . . . . . . . . . . . . . . . . . . . . . . . . . . . . . . . . . . . x
Typographic and Symbolic . . . . . . . . . . . . . . . . . . . . . . . . . . . . . . . . . . . . . . . . . . . . . . . . x
Notes and Cautions . . . . . . . . . . . . . . . . . . . . . . . . . . . . . . . . . . . . . . . . . . . . . . . . . . . . . xi
Getting Help . . . . . . . . . . . . . . . . . . . . . . . . . . . . . . . . . . . . . . . . . . . . . . . . . . . . . . . . . . . . . . xi
Chapter 1. Preinstallation . . . . . . . . . . . . . . . . . . . . . . . . . . . . . . . . . . . . . . . . . . . . . . . .1
General Installation Requirements . . . . . . . . . . . . . . . . . . . . . . . . . . . . . . . . . . . . . . . . . . . . 1
Obtaining a License Key . . . . . . . . . . . . . . . . . . . . . . . . . . . . . . . . . . . . . . . . . . . . . . . . . . 1
Using the VERITAS vLicense Web site . . . . . . . . . . . . . . . . . . . . . . . . . . . . . . . . . . . 2
Using the License Key Request Form . . . . . . . . . . . . . . . . . . . . . . . . . . . . . . . . . . . . 3
Operating System . . . . . . . . . . . . . . . . . . . . . . . . . . . . . . . . . . . . . . . . . . . . . . . . . . . . . . . . 3
Release Notes . . . . . . . . . . . . . . . . . . . . . . . . . . . . . . . . . . . . . . . . . . . . . . . . . . . . . . . . . . . 4
Important Preinstallation Information . . . . . . . . . . . . . . . . . . . . . . . . . . . . . . . . . . . . . . 4
Disk Space . . . . . . . . . . . . . . . . . . . . . . . . . . . . . . . . . . . . . . . . . . . . . . . . . . . . . . . . . . . . . . 4
Environment Variables . . . . . . . . . . . . . . . . . . . . . . . . . . . . . . . . . . . . . . . . . . . . . . . . . . . 6
VERITAS Volume Manager Considerations . . . . . . . . . . . . . . . . . . . . . . . . . . . . . . . . . . . . 6
Configuration Decisions . . . . . . . . . . . . . . . . . . . . . . . . . . . . . . . . . . . . . . . . . . . . . . . . . . 7
Disk Management Requirements for Encapsulation . . . . . . . . . . . . . . . . . . . . . . . . . . 7
Disk Encapsulation . . . . . . . . . . . . . . . . . . . . . . . . . . . . . . . . . . . . . . . . . . . . . . . . . . . . . . 8
Excluding Disks . . . . . . . . . . . . . . . . . . . . . . . . . . . . . . . . . . . . . . . . . . . . . . . . . . . . . . . . . 8
iii
DMP Coexistence with Alternate Pathing . . . . . . . . . . . . . . . . . . . . . . . . . . . . . . . . . . . 9
Disabling Hot-Relocation . . . . . . . . . . . . . . . . . . . . . . . . . . . . . . . . . . . . . . . . . . . . . . . . 10
Chapter 2. Installation and Uninstallation . . . . . . . . . . . . . . . . . . . . . . . . . . . . . . . . . 11
Installation Considerations . . . . . . . . . . . . . . . . . . . . . . . . . . . . . . . . . . . . . . . . . . . . . . . . . 11
VERITAS Software Configuration Considerations . . . . . . . . . . . . . . . . . . . . . . . . . . 11
Operating System Configuration Considerations . . . . . . . . . . . . . . . . . . . . . . . . . . . 12
VERITAS Enterprise Administrator Considerations . . . . . . . . . . . . . . . . . . . . . . . . . 12
Remote Installation . . . . . . . . . . . . . . . . . . . . . . . . . . . . . . . . . . . . . . . . . . . . . . . . . . . . . 13
Summary of VERITAS Storage Foundation for Sybase Installation Tasks . . . . . . . . . . 13
Installation Sequence Summary . . . . . . . . . . . . . . . . . . . . . . . . . . . . . . . . . . . . . . . . . . 14
Installing the VERITAS Storage Foundation for Sybase Software . . . . . . . . . . . . . . . . . 15
Mounting the Software Disc . . . . . . . . . . . . . . . . . . . . . . . . . . . . . . . . . . . . . . . . . . . . . 15
Installing Using the VERITAS Installation Menu . . . . . . . . . . . . . . . . . . . . . . . . . . . . 16
Installing Using the Product Installation Script . . . . . . . . . . . . . . . . . . . . . . . . . . . . . 16
Options for the Installation Script . . . . . . . . . . . . . . . . . . . . . . . . . . . . . . . . . . . . . . 17
Installing Using the pkgadd Command . . . . . . . . . . . . . . . . . . . . . . . . . . . . . . . . . . . . 20
Compressed Files . . . . . . . . . . . . . . . . . . . . . . . . . . . . . . . . . . . . . . . . . . . . . . . . . . . . 20
Preparing Packages for Installation . . . . . . . . . . . . . . . . . . . . . . . . . . . . . . . . . . . . 21
Installing the Packages . . . . . . . . . . . . . . . . . . . . . . . . . . . . . . . . . . . . . . . . . . . . . . . 21
Installing the VERITAS Enterprise Administrator Client (Windows) . . . . . . . . . . 22
Installing the VERITAS Enterprise Administrator Client (Solaris) . . . . . . . . . . . . . 23
Installing the VRTSexplorer Diagnostic Program . . . . . . . . . . . . . . . . . . . . . . . . . . . 24
VERITAS Storage Foundation for Sybase Documentation . . . . . . . . . . . . . . . . . . . . . . . 24
Verifying VERITAS Storage Foundation for Sybase Licensing . . . . . . . . . . . . . . . . . . . 25
Uninstalling VERITAS Storage Foundation for Sybase . . . . . . . . . . . . . . . . . . . . . . . . . . 25
VERITAS Volume Manager Uninstallation Considerations . . . . . . . . . . . . . . . . . . . 26
Moving Volumes from an Encapsulated Root Disk . . . . . . . . . . . . . . . . . . . . . . . 26
Moving Volumes to Disk Partitions . . . . . . . . . . . . . . . . . . . . . . . . . . . . . . . . . . . . 27
Shutting Down VERITAS Volume Manager . . . . . . . . . . . . . . . . . . . . . . . . . . . . . 33
iv VERITAS Storage Foundation for Sybase Installation Guide

Uninstalling VERITAS Storage Foundation for Sybase . . . . . . . . . . . . . . . . . . . . . . . 33
Uninstalling VERITAS Storage Foundation for Sybase Using the Uninstallation Script . . . . . . . . . . . . . . . . . . . . . . . . . . . . . . . . . . . . . . . . . . . . . . . . . 33
Uninstalling VERITAS Storage Foundation for Sybase Using pkgrm . . . . . . . . 34
Chapter 3. Upgrade Procedures . . . . . . . . . . . . . . . . . . . . . . . . . . . . . . . . . . . . . . . . . .37
Upgrade Overview . . . . . . . . . . . . . . . . . . . . . . . . . . . . . . . . . . . . . . . . . . . . . . . . . . . . . . . . 37
Determining if the Root Disk Is Encapsulated . . . . . . . . . . . . . . . . . . . . . . . . . . . . . . . 38
Solaris and Sybase Compatibility Considerations . . . . . . . . . . . . . . . . . . . . . . . . . . . . . . 38
Retaining Older VERITAS Volume Manager Releases . . . . . . . . . . . . . . . . . . . . . . . . . . 38
Upgrading the Disk Group Version Separately . . . . . . . . . . . . . . . . . . . . . . . . . . . . . . 39
Upgrading from VERITAS Database Edition 1.5 for Sybase . . . . . . . . . . . . . . . . . . . . . . 40
Upgrading to VERITAS Storage Foundation 4.0 for Sybase if the Root DiskIs Encapsulated . . . . . . . . . . . . . . . . . . . . . . . . . . . . . . . . . . . . . . . . . . . . . . . . . . . . . . . . . 40
Upgrading from VERITAS Database Edition 1.5 for Sybase if the Root Disk Is Not Encapsulated . . . . . . . . . . . . . . . . . . . . . . . . . . . . . . . . . . . . . . . . . . . . . . . . . . . . . 43
Upgrading from VxFS 3.5 and VxVM 3.5 . . . . . . . . . . . . . . . . . . . . . . . . . . . . . . . . . . . . . . 44
Upgrading from VxFS 3.5 and VxVM 3.5 on Solaris 7, 8, or 9 if the Root Disk Is Encapsulated . . . . . . . . . . . . . . . . . . . . . . . . . . . . . . . . . . . . . . . . . . . . . . . . . . . . . . . . . 45
Upgrading from VxFS 3.5 and VxVM 3.5 on Solaris 7, 8, or 9 if the Root Disk Is Not Encapsulated . . . . . . . . . . . . . . . . . . . . . . . . . . . . . . . . . . . . . . . . . . . . . . . . . . . . . 45
Upgrading from VxFS 3.5 and VxVM 3.5 on Earlier Solaris Releases if the Root Disk Is Either Encapsulated or Not Encapsulated . . . . . . . . . . . . . . . . . . . . . . . . . . . 46
Upgrading from SUNWvxvm . . . . . . . . . . . . . . . . . . . . . . . . . . . . . . . . . . . . . . . . . . . . . . . 50
Chapter 4. Configuring the VERITAS Software . . . . . . . . . . . . . . . . . . . . . . . . . . . . .53
Database Configuration Considerations . . . . . . . . . . . . . . . . . . . . . . . . . . . . . . . . . . . . . . 53
Configuring VERITAS Storage Foundation for Sybase . . . . . . . . . . . . . . . . . . . . . . . . . . 54
Setting Up VERITAS Enterprise Administrator . . . . . . . . . . . . . . . . . . . . . . . . . . . . . 54
Starting the VERITAS Enterprise Administrator Server . . . . . . . . . . . . . . . . . . . 54
Shutting Down VERITAS Enterprise Administrator Server . . . . . . . . . . . . . . . . 55
Starting the VERITAS Enterprise Administrator Client . . . . . . . . . . . . . . . . . . . . 55
vxtunefs Command Permissions and Cached Quick I/O . . . . . . . . . . . . . . . . . . . . . 56
Contents v

Configuring VERITAS Volume Manager . . . . . . . . . . . . . . . . . . . . . . . . . . . . . . . . . . . . . 56
Encapsulation and Initialization . . . . . . . . . . . . . . . . . . . . . . . . . . . . . . . . . . . . . . . . . . 58
Initialization and Encapsulation Notes . . . . . . . . . . . . . . . . . . . . . . . . . . . . . . . . . 58
Encapsulating a Boot Disk for Use in Volume Manager . . . . . . . . . . . . . . . . . . . 58
Encapsulating a Disk for Use in VERITAS Volume Manager . . . . . . . . . . . . . . . 59
Initializing a Disk for Use in Volume Manager . . . . . . . . . . . . . . . . . . . . . . . . . . . . . 61
Preventing Multipathing/Suppressing Devices from VERITAS Volume Manager’s View . . . . . . . . . . . . . . . . . . . . . . . . . . . . . . . . . . . . . . . . . . . . . . . . . . . . . . . . 64
Rebooting after vxinstall . . . . . . . . . . . . . . . . . . . . . . . . . . . . . . . . . . . . . . . . . . . . . . . . 66
Confirming that VERITAS Volume Manager Processes Are Running . . . . . . . . . . 67
Using Storage Expert . . . . . . . . . . . . . . . . . . . . . . . . . . . . . . . . . . . . . . . . . . . . . . . . . . . 67
Configuring VERITAS File System . . . . . . . . . . . . . . . . . . . . . . . . . . . . . . . . . . . . . . . . . . . 68
Upgrading VxFS Disk Layouts . . . . . . . . . . . . . . . . . . . . . . . . . . . . . . . . . . . . . . . . . . . 68
Verifying Command Installation . . . . . . . . . . . . . . . . . . . . . . . . . . . . . . . . . . . . . . . . . 69
Verifying the VERITAS Storage Foundation for Sybase Installation . . . . . . . . . . . . . . 69
Chapter 5. High Availability (HA) Products . . . . . . . . . . . . . . . . . . . . . . . . . . . . . . . . 71
HA Product Overview . . . . . . . . . . . . . . . . . . . . . . . . . . . . . . . . . . . . . . . . . . . . . . . . . . . . . 71
VERITAS Storage Foundation for Sybase/HA . . . . . . . . . . . . . . . . . . . . . . . . . . . . . . . . . 71
HA Packaging . . . . . . . . . . . . . . . . . . . . . . . . . . . . . . . . . . . . . . . . . . . . . . . . . . . . . . . . . 72
Licensing . . . . . . . . . . . . . . . . . . . . . . . . . . . . . . . . . . . . . . . . . . . . . . . . . . . . . . . . . . . . . . 73
Installing . . . . . . . . . . . . . . . . . . . . . . . . . . . . . . . . . . . . . . . . . . . . . . . . . . . . . . . . . . . . . . 73
Obtaining the VCS Enterprise Agent for Sybase . . . . . . . . . . . . . . . . . . . . . . . . . . . . 74
Appendix A. Sample Output . . . . . . . . . . . . . . . . . . . . . . . . . . . . . . . . . . . . . . . . . . . . 75
Sample Installation Output . . . . . . . . . . . . . . . . . . . . . . . . . . . . . . . . . . . . . . . . . . . . . . . . . 75
Sample Uninstallation Output . . . . . . . . . . . . . . . . . . . . . . . . . . . . . . . . . . . . . . . . . . . . . . 82
Sample Optional Package Output . . . . . . . . . . . . . . . . . . . . . . . . . . . . . . . . . . . . . . . . . . . 84
vi VERITAS Storage Foundation for Sybase Installation Guide
Preface
VERITAS Storage Foundation for Sybase, formerly called VERITAS Database Edition for Sybase, is an integrated set of system software enhancements and configuration guidelines that combine to help Sybase database administrators configure a database system with high performance, availability, manageability, and reliability. This guide provides information on installing, upgrading, configuring, and removing the components of VERITAS Storage Foundation for Sybase.
Scope and Audience The VERITAS Storage Foundation for Sybase Installation Guide is intended for database and system administrators responsible for installing the components of VERITAS Storage Foundation for Sybase, including:
◆ VERITAS Volume ManagerTM (VxVM)
◆ VERITAS File SystemTM (VxFS) with Quick I/OTM for Databases
◆ VERITAS Enterprise AdministratorTM (VEA)
This guide assumes that the administrator has a:
◆ Basic understanding of system and database administration
◆ Working knowledge of the operating system
◆ General understanding of file systems
vii
Organization
Organization This guide is organized as follows:
◆ Chapter 1, “Preinstallation” on page 1 describes the licensing, product, and system requirements for installing and using VERITAS Storage Foundation for Sybase.
◆ Chapter 2, “Installation and Uninstallation” on page 11 provides the installation and removal procedures for VERITAS Storage Foundation for Sybase.
◆ Chapter 3, “Upgrade Procedures” on page 37 describes how to upgrade VERITAS Storage Foundation for Sybase if one or more VERITAS products are already installed on your system.
◆ Chapter 4, “Configuring the VERITAS Software” on page 53 describes how to initialize and use the VERITAS software included in the VERITAS Storage Foundation for Sybase package. In particular, this chapter discusses how to initialize VxVM using vxinstall.
◆ Chapter 5, “High Availability (HA) Products” on page 71 describes the High Availability versions of VERITAS Storage Foundation for Sybase and how to install them.
◆ Appendix A, “Sample Output” on page 75 shows the installation, uninstallation, and optional installation script output.
Related Documents The following documents provide related information:
◆ Release Notes provide important, up-to-date, and release-specific information for the various products bundled with VERITAS Storage Foundation for Sybase. Reading all of the Release Notes before installing or using any VERITAS products is recommended. Portable Document Format (.pdf) versions of these notes are provided with the product on the CD.
◆ The VERITAS Storage Foundation for Sybase Database Administrator’s Guide provides system and database administrators with the information and tools for using VERITAS products to configure and maintain Sybase dataservers with optimal performance, availability, manageability, and reliability.
◆ The VERITAS File System Administrator’s Guide provides conceptual information about the VERITAS File System, describes how to use associated commands and utilities, and provides file system error message information and performance tuning guidelines. This guide also includes an appendix that describes how to perform common file system tasks with the VERITAS File System and provides examples of typical VERITAS File System operations.
viii VERITAS Storage Foundation for Sybase Installation Guide
Related Documents
◆ The VERITAS Volume Manager Administrator’s Guide describes the procedures and concepts involved with volume management and system administration using VERITAS Volume Manager. This guide includes how to take advantage of various VERITAS Volume Manager disk administration features, how to use VERITAS Volume Manager commands to create and manipulate objects, how to recover from disk failures, and how to monitor VERITAS Volume Manager performance.
◆ VERITAS Volume Manager User’s Guide - VERITAS Enterprise Administrator provides administrators with information on how to perform various VERITAS Volume Manager tasks through the VERITAS Enterprise Administrator (VEA) graphical user interface.
◆ VERITAS Volume Manager Intelligent Storage Provisioning Administrator's Guide provides information on how to use the VERITAS Intelligent Storage Provisioning (ISP) feature of VERITAS Volume Manager (VxVM).
◆ VERITAS FlashSnap Point-In-Time Copy Solutions Administrator’s Guide demonstrates how to use the VERITAS Volume Manager version of VERITAS FlashSnap to implement point-in-time copy solutions on enterprise systems. FlashSnap offers you flexible solutions for the efficient management of multiple point-in-time copies of your data, and for reducing resource contention on your business-critical servers.
◆ The VERITAS Volume Manager Cross-platform Data Sharing Administrator’s Guide describes how to use the VERITAS Cross-platform Data Sharing (CDS) product.
◆ The VERITAS Volume Manager Hardware Notes provides important VERITAS Volume Manager hardware compatibility and support information.
◆ The VERITAS Volume Manager Troubleshooting Guide provides important VERITAS Volume Manager information about how to recover from hardware failure, and how to understand and respond to VxVM error messages.
While not shipped with VERITAS Storage Foundation, the following documents provide related information if you plan to use VERITAS NetBackupTM to back up your databases:
◆ The VERITAS NetBackup Release Notes provide important, up-to-date, and release-specific information for VERITAS NetBackup. Reading all of the Release Notes before installing or using any VERITAS products is recommended.
◆ The VERITAS NetBackup BusinessServer Getting Started Guide explains how to install and configure VERITAS NetBackup.
◆ The VERITAS NetBackup User’s Guide explains how to use VERITAS NetBackup to back up, archive, and restore files and directories.
◆ The VERITAS NetBackup System Administrator’s Guide for UNIX, Volume I and VERITAS NetBackup System Administrator’s Guide for UNIX, Volume II describe how to configure and manage the operation of VERITAS NetBackup.
Preface ix

Conventions
◆ The VERITAS NetBackup BusinesServer Media Manager System Administrator’s Guide and VERITAS NetBackup DataCenter Media Manager System Administrator’s Guide describe how to use the extensive media management capabilities of VERITAS NetBackup.
Conventions
Typographic and Symbolic The following tables explain the typographic and symbolic conventions used in this guide.
Typeface Conventions
Typeface Usage Examples
monospace Computer output, files, directories, software elements such as command options, function names, and parameters
Read tunables from the /etc/vx/tunefstab file.
See the ls(1) manual page for more information.
monospace (bold)
User input # mount -F vxfs /h/filesys
italic New terms, book titles, emphasis, variables replaced with a name or value
See the User’s Guide for details.
The variable ncsize determines the value of...
Symbolic Conventions
Symbol Usage Examples
% C shell prompt
$ Bourne/Korn shell prompt
# Superuser prompt (all shells)
> Sybase isql prompt > quiesce database tag-1 release
x VERITAS Storage Foundation for Sybase Installation Guide

Getting Help
Symbolic Conventions
Symbol Usage Examples
\ Continued input on the following line; you do not type this character
[ ] In a command synopsis, brackets indicates an optional argument
| In a command synopsis, a vertical bar separates mutually exclusive arguments
blue text In PDF and HTML files, click on these active hyperlinks to move to the specified location
# mkfs -F vxfs -o largefiles \ /dev/vx/rdsk/PRODdg/db01
ls [ -a ]
mount [ suid | nosuid ]
See “Using Snapshots for Database Backup” on page 97 for more information.
Notes and Cautions
Note A Note provides information that makes it easier to use the product or helps you avoid problems.
Caution A Caution warns you about situations that can cause data loss.
Getting Help For assistance with any of the VERITAS products, contact VERITAS Technical Support:
◆ U.S. and Canadian Customers: 1-800-342-0652
◆ International: +1-650-527-8555
◆ Email: [email protected]
For license information:
◆ Phone: 1-650-527-0300
◆ Email: [email protected]
◆ Fax: 1-650-527-0952
Preface xi
Getting Help
For software updates:
◆ Email: [email protected]
For additional technical support information, such as TechNotes, product alerts, and hardware compatibility lists, visit the VERITAS Technical Support Web site at:
http://support.veritas.com
For additional information about VERITAS and VERITAS products, visit the Web site at:
http://www.veritas.com
xii VERITAS Storage Foundation for Sybase Installation Guide
Preinstallation
1 This chapter provides preinstallation information for VERITAS Storage Foundation for Sybase. Carefully review the information in this chapter before installing or upgrading VERITAS products.Topics covered in this chapter include:
◆ “General Installation Requirements” on page 1
◆ “VERITAS Volume Manager Considerations” on page 6
After reviewing the information in this chapter, see “Installation and Uninstallation” on page 11 for information on installing VERITAS Storage Foundation for Sybase for the first time. If you are already a VERITAS Storage Foundation for Sybase, VERITAS File System, or VERITAS Volume Manager customer, see “Upgrade Procedures” on page 37.
General Installation RequirementsBefore installing VERITAS Storage Foundation for Sybase, read the following sections to make sure you understand and comply with the basic requirements of the software.
Obtaining a License KeyVERITAS Storage Foundation for Sybase is a licensed product. When you purchase VERITAS products, you receive a license key, which is required during installation. VERITAS Storage Foundation for Sybase requires one license key for all the software packages included with the product and any optional features you may have purchased.
If you are upgrading from a previous version of VERITAS Storage Foundation for Sybase and did not purchase any new options, you do not need to obtain a new license. However, you will need to install the license utility package, VRTSvlic.
If you are upgrading from a previous version of VERITAS Storage Foundation for Sybase and do want to use new features, you must obtain a new license key.
1
General Installation Requirements
If you already have an evaluation license key for VERITAS Storage Foundation for Sybase, you need to obtain a permanent license key when you purchase the product.
Note You must obtain your license key before using this product.
You can obtain your license key through the VERITAS vLicense Web site or by completing a License Key Request Form.
Using the VERITAS vLicense Web site
You can obtain your license key through the VERITAS vLicense Web site. To use the Web site, you need your customer number, order number, and serial number.
▼ To obtain a license key using the Web site
1. Use a web browser to access the VERITAS vLicense Web site.
http://vlicense.veritas.com
2. Create a new login using your customer number, order number, and serial number.
If you already have an account, you can simply log in.
3. Follow the instructions on the Web site.
You should receive your license key shortly. After receiving your license key, you can install the product.
Record the license key number somewhere other than on the system where it is installed so that you can access it if the system becomes inoperable or the product requires reinstallation.
Note For more information, see the Getting Started Guide that came with your software.
2 VERITAS Storage Foundation for Sybase Installation Guide
General Installation Requirements
Using the License Key Request Form
You should have received a License Key Request Form when you purchased VERITAS Storage Foundation for Sybase. If you do not have a License Key Request Form, contact your sales channel to purchase one.
Because product Release Notes are not installed by any packages, VERITAS recommends that you copy them from the software disc to the /opt/VRTS/doc directory so that they are available for future reference.
▼ To obtain a license key using the License Key Request Form
1. Complete the License Key Request Form.
The License Key Request Form requires you to provide your system’s host ID and machine type. You can obtain the host ID using the following command:
# /usr/sbin/sysdef -h
You can obtain the machine type using the following command:
# prtconf | head -5 | tail -1
2. Fax or email the form to VERITAS.
◆ Email: [email protected]
◆ Fax: 1-925-931-2487
VERITAS will send you a license key by return fax or email.
During installation, you are prompted for the license key. If the software is already installed and you are upgrading or replacing an evaluation license with a permanent license, follow the instructions that accompany the license key to replace the old license with the new one.
Note Make a note of your license key somewhere other than on the computer, so that the key is available if the system becomes unbootable or requires reinstallation.
If you have any questions about licensing, contact VERITAS at one of the phone numbers listed in “Getting Help” on page xi in the Preface.
Operating SystemVERITAS Storage Foundation for Sybase requires Solaris 7 (32- or 64-bit), 8 (32- or 64-bit), or 9 (32- or 64-bit). Installing this product on any other Solaris release will fail. If necessary, upgrade Solaris before you install the VERITAS products. See “Upgrading from VxFS 3.5 and VxVM 3.5 on Earlier Solaris Releases if the Root Disk Is Either Encapsulated or Not Encapsulated” on page 46.
Chapter 1, Preinstallation 3

General Installation Requirements
Release NotesRead the Release Notes for all products included with this product. Portable Document Format (.pdf) versions of the Release Notes are included on the distribution CD in the release_notes directory.
Important Preinstallation InformationThe following table identifies the supported Sybase and Solaris combinations for VERITAS Storage Foundation for Sybase:
Sybase Solaris 7 Solaris 7 Solaris 8 Solaris 8 Solaris 9 Solaris 9 Release (64-bit) (32-bit) (64-bit) (32-bit) (64-bit) (32-bit)
11.9.3 Yes No No No No No
12.0 Yes Yes Yes Yes Yes Yes
12.5 No No Yes Yes Yes Yes
Refer to the appropriate Sybase installation guide that accompanied your Sybase software for additional information.
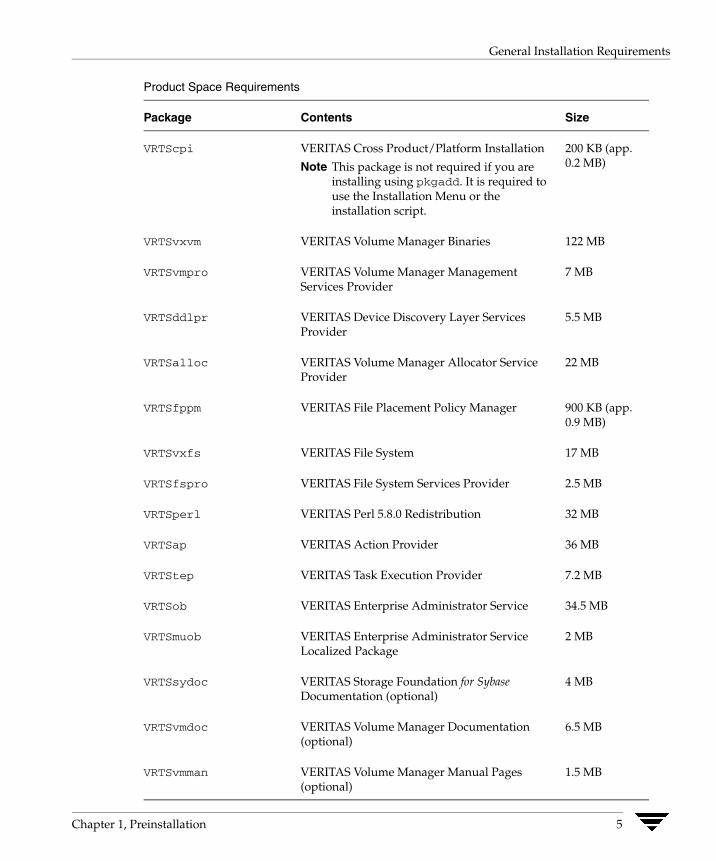
Disk SpaceBefore installing the software, confirm that there is sufficient disk space on the target systems. The following table shows the suggested minimum space requirements for each package:
Product Space Requirements
Package Contents Size
VRTSsybed VERITAS Storage Foundation for Sybase 260 KB (app. 0.3 MB)
VRTSvlic VERITAS License Utilities 3 MB
4 VERITAS Storage Foundation for Sybase Installation Guide
General Installation Requirements
Product Space Requirements
Package Contents Size
VRTScpi VERITAS Cross Product/Platform Installation 200 KB (app.
Note This package is not required if you are 0.2 MB)
installing using pkgadd. It is required to use the Installation Menu or the installation script.
VRTSvxvm VERITAS Volume Manager Binaries 122 MB
VRTSvmpro VERITAS Volume Manager Management 7 MB Services Provider
VRTSddlpr VERITAS Device Discovery Layer Services 5.5 MB Provider
VRTSalloc VERITAS Volume Manager Allocator Service 22 MB Provider
VRTSfppm VERITAS File Placement Policy Manager 900 KB (app. 0.9 MB)
VRTSvxfs VERITAS File System 17 MB
VRTSfspro VERITAS File System Services Provider 2.5 MB
VRTSperl VERITAS Perl 5.8.0 Redistribution 32 MB
VRTSap VERITAS Action Provider 36 MB
VRTStep VERITAS Task Execution Provider 7.2 MB
VRTSob VERITAS Enterprise Administrator Service 34.5 MB
VRTSmuob VERITAS Enterprise Administrator Service 2 MB Localized Package
VRTSsydoc VERITAS Storage Foundation for Sybase 4 MB Documentation (optional)
VRTSvmdoc VERITAS Volume Manager Documentation 6.5 MB (optional)
VRTSvmman VERITAS Volume Manager Manual Pages 1.5 MB (optional)
Chapter 1, Preinstallation 5

VERITAS Volume Manager Considerations
Product Space Requirements
Package Contents Size
VRTSfsdoc VERITAS File System Documentation (optional) 1.5 MB
VRTSfsman VERITAS File System Manual Pages (optional) 150 KB (app. 0.2 MB)
VRTSobgui VERITAS Enterprise Administrator (optional) 57 MB
windows/vrtsobgui.msi VERITAS Enterprise Administrator for Windows 19 MB
Total space for all packages (except 362.8 MB vrtsobgui.msi)
Total space for required packages 292.1 MB
Environment Variables
Most of the commands used in the installation are in the /sbin or /usr/sbin directory. However, there are additional variables needed in order to use VERITAS Storage Foundation for Sybase after installation. Add the following directories to your PATH environment variable:
◆ If you are using Bourne or Korn shell (sh or ksh), use the commands:
$ PATH=$PATH:/usr/sbin:/opt/VRTSvxfs/sbin:/opt/VRTSsybed/bin:\/opt/VRTSob/bin:/opt/VRTS/
$ MANPATH=/usr/share/man:/opt/VRTS/man:$MANPATH$ export PATH
◆ If you are using a C shell (csh or tcsh), use the commands:
% set path = ( $path /usr/sbin /opt/VRTSvxfs/sbin \/opt/VRTSsybed/bin /opt/VRTSob/bin )
% setenv MANPATH /usr/share/man:/opt/VRTS/man:$MANPATH
VERITAS Volume Manager ConsiderationsReview the following Volume Manager-related items before installing or upgrading VERITAS Storage Foundation for Sybase.
6 VERITAS Storage Foundation for Sybase Installation Guide
VERITAS Volume Manager Considerations
Configuration DecisionsBefore initializing VERITAS Volume Manager, make sure you are aware of the contents of each disk. During the initialization process, you must decide the following:
◆ Do you want to place all or just some of the disks on the system under VERITAS Volume Manager control?
◆ Do you want to place the system’s boot disk under VERITAS Volume Manager control?
◆ When you place disks under VERITAS Volume Manager control, do you want to preserve data in any or all existing file systems and partitions through encapsulation?
◆ For each disk, do you want to choose whether to encapsulate, initialize, or leave the disk alone? Alternatively, do you want to either encapsulate or initialize all disks on a controller together?
Note After the above steps have been completed, reboot the system to properly initialize VERITAS Volume Manager. Until you reboot, the software initialization is not complete. Refer to “VERITAS Software Configuration Considerations” on page 11 for reboot planning issues. Refer to “Rebooting after vxinstall” on page 66 for further information.
Disk Management Requirements for EncapsulationDisks to be managed by VERITAS Volume Manager must have two free partitions and a small amount of free space (2048 sectors). The free space must be at the beginning or end of the disk and must not belong to a partition. This space is used for storing disk group configurations and a disk label that enables VERITAS Volume Manager to identify the disk, even if it is moved to a different address, controller, or host. VERITAS Volume Manager allocates approximately 2048 sectors from each disk for the disk group configurations and the disk label. This space is sufficient to handle normal disk group configurations for up to approximately 100 disks. (If you have a larger configuration and need to increase the private region size, see the vxdg(1M) and vxdisk(1M) manual pages.)
The boot disk is a special case. If no other space is available, VERITAS Volume Manager attempts to allocate space usually reserved for swap by shrinking the swap partition. This process is known as swap relocation and, if necessary, happens automatically during boot disk encapsulation. Although swap relocation can provide the free space required, it does not eliminate the need for two free partitions.
Chapter 1, Preinstallation 7
VERITAS Volume Manager Considerations
Note While it is possible to put disks with no free space under VERITAS Volume Manager control, this is only used as a migration strategy. Many VxVM capabilities based on disk identity are available only for disks with the required free space. See the vxdisk(1M) manual page for information on the nopriv disk type.
Disk EncapsulationEncapsulating VERITAS Volume Manager disks retains the data on those disks, including boot information. Following are the requirements for disk encapsulation.
◆ Disks to be encapsulated must have:
● The required minimum free space (2048 sectors)
● Two free partitions
● An s2 slice that represents the full disk
This s2 slice cannot contain a file system at the beginning or at the end of the disk.
◆ Before encapsulating a mirrored boot disk, set the EEPROM variable use-nvramrc? to true to take advantage of the VERITAS Volume Manager boot disk aliases to identify the mirror of the boot disk if a replacement is needed. If use-nvramrc? is set to false, you will need to determine which disks are bootable yourself. Set this variable to true as follows:
# eeprom use-nvramrc?=true
◆ Use the prtvtoc command to record the layout of the partitions on the unencapsulated boot disk (/dev/rdsk/c0t0d0s2 in this example):
# prtvtoc /dev/rdsk/c0t0d0s2
Record the output from this command for future reference.
◆ If you plan to encapsulate and mirror the boot disk, tag the swap partition as swap so that you can dump to that partition later.
Note If the path to an aliased boot device is different from the path in the /devices directory, the alias does not function correctly.
Excluding DisksWhen you install VERITAS Volume Manager, all disks will be put under VERITAS Volume Manager control unless you choose to exclude specific disks.
8 VERITAS Storage Foundation for Sybase Installation Guide

VERITAS Volume Manager Considerations
▼ To exclude disks from VERITAS Volume Manager control
1. Log in as superuser (root).
2. Identify controllers, disks, and enclosures to exclude from being configured as VxVM devices by the vxinstall and vxdiskadm utilities.
3. To exclude one or more disks from VERITAS Volume Manager control, create or edit the /etc/vx/disks.exclude file and add the names of those disks to the file.
The vxinstall command ignores any disks listed in this file and leaves them untouched. The following is an example of the contents of the disks.exclude file:
c0t1d0c0t1d1
Similarly, you can exclude all disks on certain controllers. Create or edit the /etc/vx/cntrls.exclude file and add the name of the controller. The following is an example of the contents of the cntrls.exclude file:
c0c1
Similarly, you can exclude all disks in specific enclosures. Create or edit the /etc/vx/enclr.exclude file and add the name of the enclosures. The following is an example of the contents of the enclr.exclude file:
sena0emc1
DMP Coexistence with Alternate PathingVxVM Dynamic Multipathing (DMP) co-exists with Sun’s Alternate Pathing (AP) software. If your system uses Sun’s AP software, you must have AP version 2.3.1 and Solaris Patch 110722 (latest version). If you need to upgrade your system, upgrade to AP 2.3.1 and then install the patch before installing.
To confirm which version of the AP driver is installed, run the following command from the prompt:
# pkginfo -l SUNWapdv | grep VERSION
Note Sun Microsystems does not support AP software on Solaris 9.
Chapter 1, Preinstallation 9

VERITAS Volume Manager Considerations
Disabling Hot-RelocationThe hot-relocation feature is enabled by default and we recommend that you leave it on. However, if you need to disable it for some reason (for example, you do not want the free space on some of your disks used for relocation), you can do so by preventing the vxrelocd daemon from starting during system startup. Disable hot-relocation after you install the VERITAS Volume Manager packages.
▼ To disable hot-relocation
1. Comment out the vxrelocd line in the startup file /etc/rc2.d/S95vxvm-recover, as follows:
# vxrelocd root &
2. After editing the file, you can kill the vxrelocd process or reboot the system.
Note If you disable hot-relocation, you are not notified by electronic mail of any failures that occur. This is because vxrelocd is responsible for notifying the system administrator of failures.
For more information on hot-relocation and vxrelocd, refer to the VERITAS Volume Manager Administrator’s Guide and the vxrelocd (1M) manual page.
10 VERITAS Storage Foundation for Sybase Installation Guide

Installation and Uninstallation
2 This chapter provides an overview of the installation tasks for VERITAS Storage Foundation for Sybase and describes how to install the packages for the first time. If you already have an earlier version of any of the VERITAS products installed, see “Upgrade Procedures” on page 37 This chapter also provides instructions for removing VERITAS Storage Foundation for Sybase.Topics covered in this chapter include:
◆ “Installation Considerations” on page 11
◆ “Summary of VERITAS Storage Foundation for Sybase Installation Tasks” on page 13
◆ “Installing the VERITAS Storage Foundation for Sybase Software” on page 15
◆ “VERITAS Storage Foundation for Sybase Documentation” on page 24
◆ “Verifying VERITAS Storage Foundation for Sybase Licensing” on page 25
◆ “Uninstalling VERITAS Storage Foundation for Sybase” on page 25
Note Only users with superuser (root) privileges can install VERITAS products.
Installation ConsiderationsVERITAS software and operating system installation considerations are described in the following sections.
VERITAS Software Configuration Considerations◆ When installing major operating system components, such as VERITAS Storage
Foundation for Sybase, at least one system reboot is required. The reboot installs new kernel components and updates device entries. Because it is important to minimize system downtime, consideration and planning can reduce downtime to a single reboot after installing all components and modifying the Solaris kernel settings to support the Sybase database.
11
Installation Considerations
◆ After installing the VERITAS Volume Manager and VERITAS File System packages, a system reboot is required. Initialize VERITAS Volume Manager (using the vxinstall program) immediately after adding the VERITAS Storage Foundation for Sybase packages and before rebooting the system. See “Configuring VERITAS Volume Manager” on page 56 for more details on VERITAS Volume Manager initialization.
Note If you do not initialize VERITAS Volume Manager immediately after adding the VERITAS Storage Foundation for Sybase packages and before rebooting the system, you will still need to initialize VERITAS Volume Manager at a later time.
Operating System Configuration Considerations◆ If patches are required to the Solaris operating system, the patches should be applied
just prior to installing the VERITAS products. Patches may be required to resolve Solaris kernel, product performance, or other issues.
◆ The system should be in a quiescent state before adding patches.
Note See product Release Notes for last minute information on patches required for VERITAS, Sybase, and SUN (Solaris) software.
VERITAS Enterprise Administrator ConsiderationsVERITAS Enterprise Administrator (VEA) is required to access the graphical user interface (GUI) for VERITAS Volume Manager and VERITAS File System. You can use the GUI to administer disks, volumes, and file systems on local or remote machines.
VEA has a client/server architecture. The VEA server is supported on Solaris 7 or higher. The VEA client is supported on Solaris 7 or higher, Windows NT, Windows Me, Windows 2000, and Windows 98 machines that support the Jave Runtime Environment.
Note To install the VEA client on Solaris 7 or 8, you must install the appropriate java 1.4.1 patches for Solaris 7 or 8. See http://seer.support.veritas.com/docs/264714.htm for further information.
The following software must be installed and running on the server to be administered by VEA:
◆ VERITAS Volume Manager
◆ VERITAS File System
12 VERITAS Storage Foundation for Sybase Installation Guide

Summary of VERITAS Storage Foundation for Sybase Installation Tasks
One of the following packages needs to be installed and running on the client:
◆ VERITAS Enterprise Administrator (VRTSobgui)
This is the client package for Solaris.
◆ VERITAS Enterprise Administrator for Windows (windows/VRTSobgui.msi)
This is the client package for Windows.
The following are minimum system recommendations for the VEA client:
Solaris: SPARCstation 10 (Ultra 5 recommended) with 64 MB memory
Windows: Windows NT, Me, 2000, or 98 with a 300MHz Pentium with 256 MB memory
Remote InstallationIf you are performing a remote installation using the Installation Menu or installation script, make sure rsh works between the system from where you are initiating the installation and the remote system on which you are installing the product.
To verify that rsh is working between systems, enter the following command from the system where you are initiating the installation:
# rsh hostname "ls -l"
A list of files on remote machine should be displayed.
If rsh is not working, create a .rhosts file in the / directory on remote machine with the following entry:
#.rhosts"Machine name" root
If rsh is not working and the steps listed above do not correct the problem, rsh may have been disabled for security reasons.
Summary of VERITAS Storage Foundation for Sybase Installation Tasks
Installation of VERITAS Storage Foundation for Sybase consists of the following tasks:
◆ Reviewing preinstallation requirements (see “Preinstallation” on page 1) and making any necessary modifications
Chapter 2, Installation and Uninstallation 13
Summary of VERITAS Storage Foundation for Sybase Installation Tasks
◆ Obtaining a license key
◆ Installing or upgrading the VERITAS Storage Foundation for Sybase software packages
◆ Configuring the VERITAS software (see “Installation and Uninstallation” on page 11)
Installation Sequence Summary
▼ The recommended installation sequence is
1. Review the Release Notes.
2. Add Solaris operating system patches. Refer to the Release Notes for specific software patch information.
3. Modify the /etc/system file and include any settings required by your database software or other products. See “Database Configuration Considerations” on page 53 for more information.
4. For upgrades, determine if the root disk is encapsulated, since this affects which upgrade process you should use. See “Upgrade Procedures” on page 37 for more information.
5. For new installations, install VERITAS Storage Foundation for Sybase as described in “Installing the VERITAS Storage Foundation for Sybase Software” on page 15.
Installing VERITAS Storage Foundation for Sybase entails:
● Using the Installation Menu provided on the VERITAS disc, running the installsfsyb script from the command line, or using pkgadd to add the VERITAS Storage Foundation for Sybase packages.
● Running the vxinstall program to configure the VERITAS Volume Manager.
Note Installing VERITAS Storage Foundation for Sybase using the installsfsyb script or the Installation Menu will automatically run vxinstall.
● Rebooting the system.
14 VERITAS Storage Foundation for Sybase Installation Guide
Installing the VERITAS Storage Foundation for Sybase Software
Installing the VERITAS Storage Foundation for Sybase Software
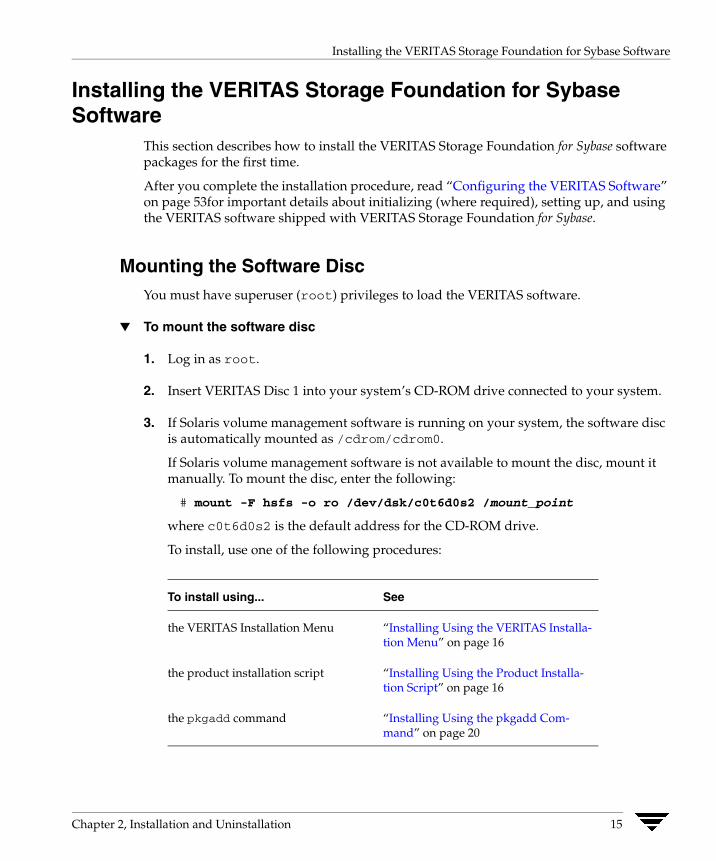
This section describes how to install the VERITAS Storage Foundation for Sybase software packages for the first time.
After you complete the installation procedure, read “Configuring the VERITAS Software” on page 53for important details about initializing (where required), setting up, and using the VERITAS software shipped with VERITAS Storage Foundation for Sybase.
Mounting the Software Disc You must have superuser (root) privileges to load the VERITAS software.
▼ To mount the software disc
1. Log in as root.
2. Insert VERITAS Disc 1 into your system’s CD-ROM drive connected to your system.
3. If Solaris volume management software is running on your system, the software disc is automatically mounted as /cdrom/cdrom0.
If Solaris volume management software is not available to mount the disc, mount it manually. To mount the disc, enter the following:
# mount -F hsfs -o ro /dev/dsk/c0t6d0s2 /mount_point
where c0t6d0s2 is the default address for the CD-ROM drive.
To install, use one of the following procedures:
To install using... See
the VERITAS Installation Menu “Installing Using the VERITAS Installation Menu” on page 16
the product installation script “Installing Using the Product Installation Script” on page 16
the pkgadd command “Installing Using the pkgadd Command” on page 20
Chapter 2, Installation and Uninstallation 15

Installing the VERITAS Storage Foundation for Sybase Software
Installing Using the VERITAS Installation MenuTo install VERITAS Storage Foundation for Sybase using the Installation Menu, see the Getting Started Guide for details. The VERITAS Storage Solutions Getting Started Guide came with the VERITAS software discs.
Installing Using the Product Installation ScriptThe VERITAS Storage Foundation for Sybase installation script ensures package compatibility and proper license installation, and is the recommended method for installation.
▼ To install VERITAS Storage Foundation for Sybase using the installation script
1. After mounting the software disc, start the installation script.
If the disc is mounted with Solaris volume management, enter:
# /cdrom/cdrom0/storage_foundation_for_sybase/installsfsyb
or
If the disc is mounted without Solaris volume management, enter:
# /mount_point/storage_foundation_for_sybase/installsfsyb
Note For information on mounting the disc, see “Mounting the Software Disc” on page 15.
Note For options available when using the installation script, see “Options for the Installation Script” on page 17.
2. The system prints out a series of status messages as the installation progresses and prompts you for any required information, such as the license key. Answer any questions asked of you during the installation. (“Sample Output” on page 75 provides sample output from the installation program.)
If you do not intend to view or print the online documentation, you can omit the VRTSsydoc, VRTSfsdoc, and VRTSvmdoc packages. If you do not intend to use the GUI, you can omit the VRTSobgui package.
Note If you choose not to make permission changes to allow database administrators access to the /opt/VRTSsybed directory during installation, you can do so at a later time.
16 VERITAS Storage Foundation for Sybase Installation Guide
Installing the VERITAS Storage Foundation for Sybase Software
Options for the Installation Script
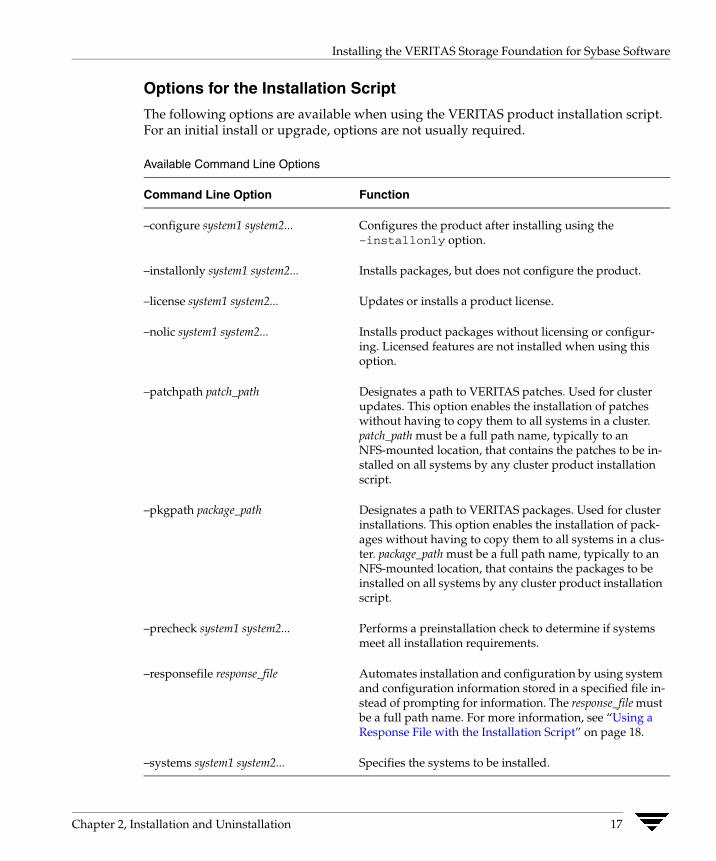
The following options are available when using the VERITAS product installation script. For an initial install or upgrade, options are not usually required.
Available Command Line Options
Command Line Option Function
–configure system1 system2...
–installonly system1 system2...
–license system1 system2...
–nolic system1 system2...
–patchpath patch_path
–pkgpath package_path
–precheck system1 system2...
–responsefile response_file
–systems system1 system2...
Configures the product after installing using the –installonly option.
Installs packages, but does not configure the product.
Updates or installs a product license.
Installs product packages without licensing or configuring. Licensed features are not installed when using this option.
Designates a path to VERITAS patches. Used for cluster updates. This option enables the installation of patches without having to copy them to all systems in a cluster. patch_path must be a full path name, typically to an NFS-mounted location, that contains the patches to be in-stalled on all systems by any cluster product installation script.
Designates a path to VERITAS packages. Used for cluster installations. This option enables the installation of pack-ages without having to copy them to all systems in a cluster. package_path must be a full path name, typically to an NFS-mounted location, that contains the packages to be installed on all systems by any cluster product installation script.
Performs a preinstallation check to determine if systems meet all installation requirements.
Automates installation and configuration by using system and configuration information stored in a specified file in-stead of prompting for information. The response_file must be a full path name. For more information, see “Using a Response File with the Installation Script” on page 18.
Specifies the systems to be installed.
Chapter 2, Installation and Uninstallation 17
Installing the VERITAS Storage Foundation for Sybase Software
Available Command Line Options
Command Line Option Function
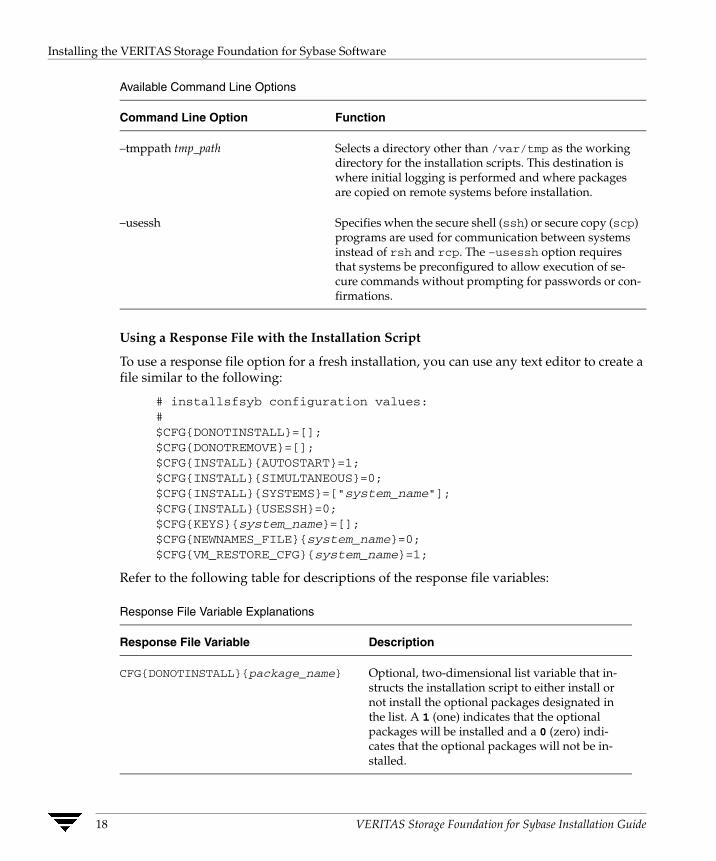
–tmppath tmp_path Selects a directory other than /var/tmp as the working directory for the installation scripts. This destination is where initial logging is performed and where packages are copied on remote systems before installation.
–usessh Specifies when the secure shell (ssh) or secure copy (scp) programs are used for communication between systems instead of rsh and rcp. The –usessh option requires that systems be preconfigured to allow execution of secure commands without prompting for passwords or confirmations.
Using a Response File with the Installation Script
To use a response file option for a fresh installation, you can use any text editor to create a file similar to the following:
# installsfsyb configuration values:# $CFG{DONOTINSTALL}=[];$CFG{DONOTREMOVE}=[];$CFG{INSTALL}{AUTOSTART}=1;$CFG{INSTALL}{SIMULTANEOUS}=0;$CFG{INSTALL}{SYSTEMS}=["system_name"];$CFG{INSTALL}{USESSH}=0;$CFG{KEYS}{system_name}=[];$CFG{NEWNAMES_FILE}{system_name}=0;$CFG{VM_RESTORE_CFG}{system_name}=1;
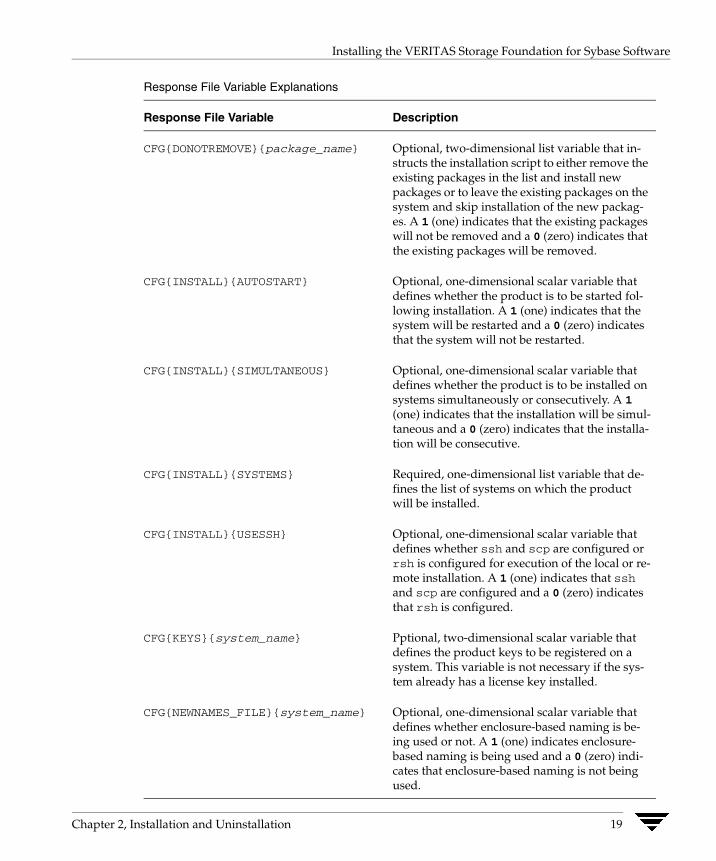
Refer to the following table for descriptions of the response file variables:
Response File Variable Explanations
Response File Variable Description
CFG{DONOTINSTALL}{package_name} Optional, two-dimensional list variable that instructs the installation script to either install or not install the optional packages designated in the list. A 1 (one) indicates that the optional packages will be installed and a 0 (zero) indicates that the optional packages will not be in-stalled.
18 VERITAS Storage Foundation for Sybase Installation Guide
Installing the VERITAS Storage Foundation for Sybase Software
Response File Variable Explanations
Response File Variable Description
CFG{DONOTREMOVE}{package_name}
CFG{INSTALL}{AUTOSTART}
CFG{INSTALL}{SIMULTANEOUS}
CFG{INSTALL}{SYSTEMS}
CFG{INSTALL}{USESSH}
CFG{KEYS}{system_name}
CFG{NEWNAMES_FILE}{system_name}
Optional, two-dimensional list variable that instructs the installation script to either remove the existing packages in the list and install new packages or to leave the existing packages on the system and skip installation of the new packages. A 1 (one) indicates that the existing packages will not be removed and a 0 (zero) indicates that the existing packages will be removed.
Optional, one-dimensional scalar variable that defines whether the product is to be started following installation. A 1 (one) indicates that the system will be restarted and a 0 (zero) indicates that the system will not be restarted.
Optional, one-dimensional scalar variable that defines whether the product is to be installed on systems simultaneously or consecutively. A 1 (one) indicates that the installation will be simultaneous and a 0 (zero) indicates that the installation will be consecutive.
Required, one-dimensional list variable that de-fines the list of systems on which the product will be installed.
Optional, one-dimensional scalar variable that defines whether ssh and scp are configured or rsh is configured for execution of the local or re-mote installation. A 1 (one) indicates that ssh and scp are configured and a 0 (zero) indicates that rsh is configured.
Pptional, two-dimensional scalar variable that defines the product keys to be registered on a system. This variable is not necessary if the system already has a license key installed.
Optional, one-dimensional scalar variable that defines whether enclosure-based naming is being used or not. A 1 (one) indicates enclosure-based naming is being used and a 0 (zero) indicates that enclosure-based naming is not being used.
Chapter 2, Installation and Uninstallation 19
Installing the VERITAS Storage Foundation for Sybase Software
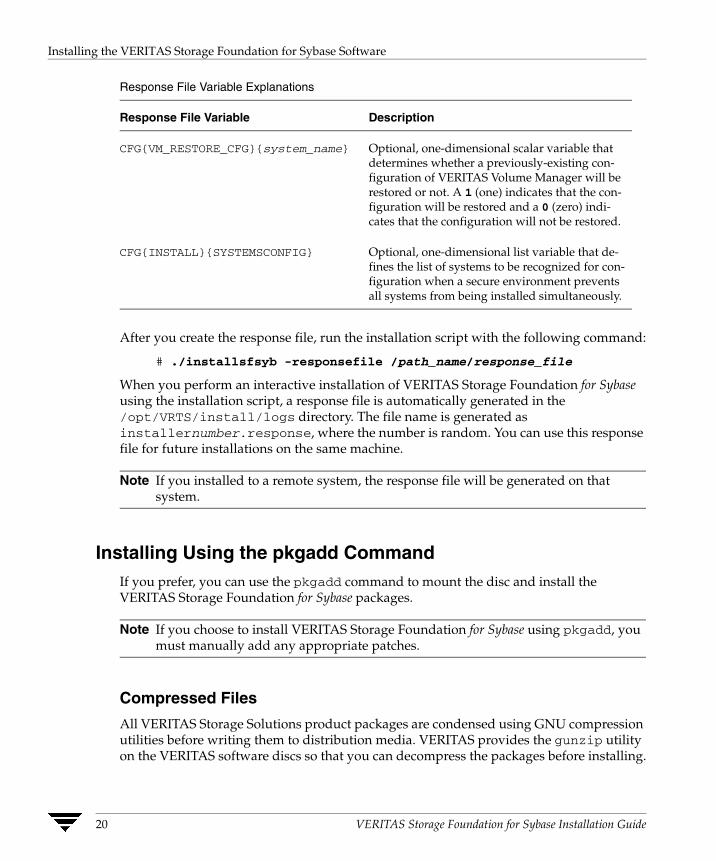
Response File Variable Explanations
Response File Variable Description
CFG{VM_RESTORE_CFG}{system_name}
CFG{INSTALL}{SYSTEMSCONFIG}
Optional, one-dimensional scalar variable that determines whether a previously-existing con-figuration of VERITAS Volume Manager will be restored or not. A 1 (one) indicates that the con-figuration will be restored and a 0 (zero) indicates that the configuration will not be restored.
Optional, one-dimensional list variable that de-fines the list of systems to be recognized for con-figuration when a secure environment prevents all systems from being installed simultaneously.
After you create the response file, run the installation script with the following command:
# ./installsfsyb -responsefile /path_name/response_file
When you perform an interactive installation of VERITAS Storage Foundation for Sybase using the installation script, a response file is automatically generated in the /opt/VRTS/install/logs directory. The file name is generated as installernumber.response, where the number is random. You can use this response file for future installations on the same machine.
Note If you installed to a remote system, the response file will be generated on that system.
Installing Using the pkgadd CommandIf you prefer, you can use the pkgadd command to mount the disc and install the VERITAS Storage Foundation for Sybase packages.
Note If you choose to install VERITAS Storage Foundation for Sybase using pkgadd, you must manually add any appropriate patches.
Compressed Files
All VERITAS Storage Solutions product packages are condensed using GNU compression utilities before writing them to distribution media. VERITAS provides the gunzip utility on the VERITAS software discs so that you can decompress the packages before installing.
20 VERITAS Storage Foundation for Sybase Installation Guide

Installing the VERITAS Storage Foundation for Sybase Software
Note The Installation Menu and product installation script decompress packages automatically. VERITAS products must be decompressed only when using the pkgadd command or the Solaris administrative interface.
GNU utilities are open source tools licensed under the GNU General Public License (GPL).
Preparing Packages for Installation
Before installing VERITAS Storage Foundation for Sybase, use the gunzip utility to decompress the packages, then extract them from the tar archive file.
▼ To prepare the packages for installation
1. Mount the appropriate software disc.
2. Change directories to a temporary empty directory on your system.
3. Copy the contents of the storage_foundation_for_sybase/pkgs directory from the software disc to the current directory on your system.
# cp -r /cdrom/cdrom0/storage_foundation_for_sybase/pkgs/* .
4. Decompress the compressed packages.
# /cdrom/cdrom0/storage_foundation_for_sybase\/scripts/install/gunzip *.gz
5. Extract the archived files.
# tar xvf *.tar
Installing the Packages
▼ To install VERITAS Storage Foundation for Sybase using pkgadd
1. Go to the directory on your system in which you extracted the VERITAS Storage Foundation for Sybase packages.
2. Use the pkgadd command to install the required VERITAS Storage Foundation for Sybase software packages as follows:
# pkgadd -d . VRTSvlic VRTSperl VRTSob VRTSmuob \VRTSvxvm VRTSvmpro VRTSfspro VRTSalloc VRTSddlpr \VRTSvxfs VRTStep VRTSap VRTSfppm VRTSsybed
Chapter 2, Installation and Uninstallation 21

Installing the VERITAS Storage Foundation for Sybase Software
Note Install the packages in the order specified to ensure proper installation.
3. Use the pkgadd command to install the optional VERITAS Storage Foundation for Sybase software packages as follows:
# pkgadd -d . VRTSsydoc VRTSvmman VRTSvmdoc VRTSfsman \VRTSfsdoc VRTSobgui
4. The system prints out a series of status messages as the installation progresses and prompts you for any required information, such as the license key. Answer all questions asked of you during the installation.
If you do not intend to use VERITAS Enterprise Administrator, you can omit the VRTSob, VRTSobgui, VRTSvmpro, and VRTSfspro packages. They are optional.
If you do not intend to view or print the online documentation, you can omit the VRTSsydoc, VRTSfsdoc, and VRTSvmdoc packages.
5. See the VERITAS Storage Foundation for Sybase Release Notes for information on installing VERITAS patches, if needed, after installing the product.
Installing the VERITAS Enterprise Administrator Client (Windows)
If you plan to run the VEA client from a Windows machine, install the optional Windows package after you have installed the VEA server software on the UNIX server on which the database runs.
Note If you plan to install the GUI client on Windows NT 4.0, Windows Installer must be upgraded to version 2.0. For more information about upgrading Windows Installer, visit http://www.microsoft.com. If you are using Windows NT 4.0, it is also recommended that you use Windows NT 4.0 Service Pack 6.
▼ To install the VEA client on a Windows machine
1. Insert the appropriate software disc into your system’s CD-ROM drive.
2. Using Windows Explorer or a DOS Command window, go to the windows directory and execute the vrtsobgui.msi program with Windows Installer.
3. Follow the instructions presented by the vrtsobgui.msi program.
22 VERITAS Storage Foundation for Sybase Installation Guide

Installing the VERITAS Storage Foundation for Sybase Software
Installing the VERITAS Enterprise Administrator Client (Solaris)
▼ To install the VEA client on a Solaris machine using pkgadd
1. Log in as root.
2. First, check to determine whether the VEA client package is already installed.
# pkginfo -l | grep VRTSobgui
This command will return VRTSobgui if VRTSobgui is already installed. It will return nothing if the package has not been installed.
3. To install the VEA client package for Solaris, insert the appropriate software disc into your system’s CD-ROM drive.
4. If you are using Solaris volume management software, go to the directory that contains the software packages.
# cd /cdrom/cdrom0/storage_foundation_for_sybase/pkgs
or
If you are not using Solaris volume management software, mount the disc and go to the directory that contains the software packages.
# mount -F hsfs -o ro /dev/dsk/c0t6d0s2 /mount_point# cd /mount_point/storage_foundation_for_sybase/pkgs
5. Copy the VRTSobgui.tar.gz package to the current working directory on your system.
# cp -r /cdrom/cdrom0/storage_foundation_for_sybase/pkgs\/VRTSobgui.tar.gz .
6. Decompress the package and then extract the contents.
# /cdrom/cdrom0/storage_foundation_for_sybase/scripts/install\/gunzip VRTSobgui.tar.gz# tar xf VRTSobgui.tar
7. Use the pkgadd command to install the package.
pkgadd -d . VRTSobgui
8. Press Return.
The VEA client package for Solaris is installed.
Chapter 2, Installation and Uninstallation 23

VERITAS Storage Foundation for Sybase Documentation
Installing the VRTSexplorer Diagnostic ProgramThe VRTSexplorer program is available to assist VERITAS Customer Support engineers in diagnosing technical problems associated with VERITAS products. You can download this program from the VERITAS FTP site or install it from the VERITAS disc. For instructions on downloading VRTSexplorer from the Web or installing it from the disc, see the VERITAS Storage Foundation for Sybase Release Notes.
VERITAS Storage Foundation for Sybase DocumentationVERITAS does not ship hardcopy documentation with its products. Adobe Portable Document Format (.pdf) files are supplied with VERITAS Storage Foundation for Sybase for the following documents:
◆ VERITAS Storage Foundation for Sybase Installation Guide
◆ VERITAS Database Edition for Sybase Database Administrator’s Guide
◆ VERITAS Storage Foundation for Sybase Release Notes
◆ VERITAS Volume Manager Administrator’s Guide
◆ VERITAS Volume Manager User’s Guide - VERITAS Enterprise Administrator
◆ VERITAS Volume Manager Intelligent Storage Provisioning Administrator's Guide
◆ VERITAS FlashSnap Point-In-Time Copy Solutions Administrator’s Guide
◆ VERITAS Volume Manager Troubleshooting Guide
◆ VERITAS Volume Manager Hardware Notes
◆ VERITAS Volume Manager Release Notes
◆ VERITAS File System Administrator’s Guide
◆ VERITAS File System Release Notes
If you are installing the documentation packages, the /opt directory must exist and be writable. See the following table for installation information:
Contents of the Documentation Packages
Documentation Package Contents Installation Location
VRTSsydoc VERITAS Storage Foundation for Sybase /opt/VRTSsydoc documentation
24 VERITAS Storage Foundation for Sybase Installation Guide

Verifying VERITAS Storage Foundation for Sybase Licensing
Contents of the Documentation Packages
Documentation Package Contents Installation Location
VRTSvmdoc VERITAS Volume Manager documentation
/opt/VRTS/docs
VRTSfsdoc VERITAS File System documentation /opt/VRTS/docs
Because product Release Notes are not installed by any packages, VERITAS recommends that you copy them from the disc to the /opt/VRTS/docs directory so that they are available for future reference.
Contents of the Documentation Packages
Documentation Package Contents
VRTSsydoc VERITAS Storage Foundation for Sybase documentation
VRTSvmdoc VERITAS Volume Manager documentation
VRTSfsdoc VERITAS File System documentation
Verifying VERITAS Storage Foundation for Sybase Licensing
After you install VERITAS Storage Foundation for Sybase, you can display a list of the licensed features by entering the following command:
# /sbin/vxlicrep
If you are upgrading from a previous version of VERITAS Storage Foundation for Sybase, your existing license will continue to work. However, you must install VRTSvlic, the new license utility package. VRTSvlic is installed automatically if you install VERITAS Storage Foundation for Sybase using the installsfsyb installation script.
Uninstalling VERITAS Storage Foundation for SybaseBefore uninstalling the VERITAS Storage Foundation for Sybase, review the VERITAS Volume Manager and VERITAS File System uninstallation considerations if the root disk is encapsulated
Chapter 2, Installation and Uninstallation 25
Uninstalling VERITAS Storage Foundation for Sybase
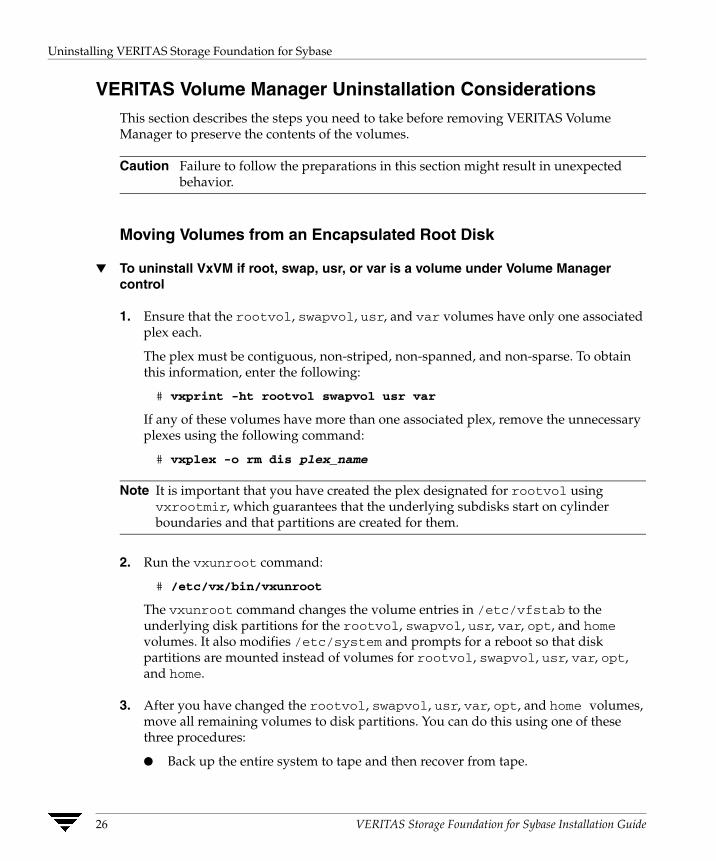
VERITAS Volume Manager Uninstallation ConsiderationsThis section describes the steps you need to take before removing VERITAS Volume Manager to preserve the contents of the volumes.
Caution Failure to follow the preparations in this section might result in unexpected behavior.
Moving Volumes from an Encapsulated Root Disk
▼ To uninstall VxVM if root, swap, usr, or var is a volume under Volume Manager control
1. Ensure that the rootvol, swapvol, usr, and var volumes have only one associated plex each.
The plex must be contiguous, non-striped, non-spanned, and non-sparse. To obtain this information, enter the following:
# vxprint -ht rootvol swapvol usr var
If any of these volumes have more than one associated plex, remove the unnecessary plexes using the following command:
# vxplex -o rm dis plex_name
Note It is important that you have created the plex designated for rootvol using vxrootmir, which guarantees that the underlying subdisks start on cylinder boundaries and that partitions are created for them.
2. Run the vxunroot command:
# /etc/vx/bin/vxunroot
The vxunroot command changes the volume entries in /etc/vfstab to the underlying disk partitions for the rootvol, swapvol, usr, var, opt, and home volumes. It also modifies /etc/system and prompts for a reboot so that disk partitions are mounted instead of volumes for rootvol, swapvol, usr, var, opt, and home.
3. After you have changed the rootvol, swapvol, usr, var, opt, and home volumes, move all remaining volumes to disk partitions. You can do this using one of these three procedures:
● Back up the entire system to tape and then recover from tape.
26 VERITAS Storage Foundation for Sybase Installation Guide

Uninstalling VERITAS Storage Foundation for Sybase
● Back up each file system individually and then recover them all after creating new file systems on disk partitions.
● Move volumes incrementally to disk partitions.
Continue to the next section if you choose this last option. Otherwise, proceed to “Shutting Down VERITAS Volume Manager” on page 33.
Moving Volumes to Disk Partitions
▼ To move volumes incrementally to disk partitions
1. Evacuate disks using vxdiskadm, the GUI, or the vxevac script.
Evacuation moves subdisks from the specified disks to target disks. The evacuated disks provide the initial free disk space for volumes to be moved to disk partitions.
2. Remove the evacuated disks from VERITAS Volume Manager control by entering:
# vxdg rmdisk diskname# vxdisk rm devname
3. Decide which volume to move first, and if the volume is mounted, unmount it.
4. If a volume is being used as a raw partition for database applications, make sure that the application is not updating the volume and that you have applied the sync command to the data on the volume.
5. Create a partition on free disk space of the same size as the volume using the format command.
If there is not enough free space for the partition, add a new disk to the system for the first volume removed. Subsequent volumes can use the free space generated by the removal of this first volume.
6. Copy the data on the volume onto the newly created disk partition using a command like the following:
# dd if=/dev/vx/dsk/diskgroup/lhome of=/dev/dsk/c2t2d2s7
where c2t2d2 is the disk outside of Volume Manager and s7 is the newly created partition.
7. Replace the entry for that volume (if present) in /etc/vfstab with an entry for the newly created partition.
8. Mount the disk partition if the corresponding volume was previously mounted.
Chapter 2, Installation and Uninstallation 27
Uninstalling VERITAS Storage Foundation for Sybase
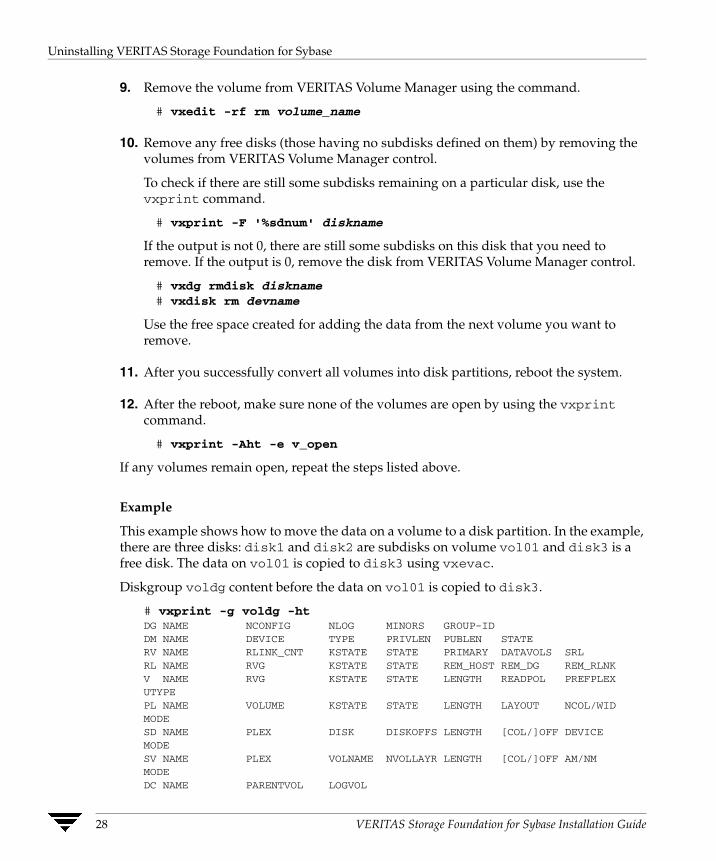
9. Remove the volume from VERITAS Volume Manager using the command.
# vxedit -rf rm volume_name
10. Remove any free disks (those having no subdisks defined on them) by removing the volumes from VERITAS Volume Manager control.
To check if there are still some subdisks remaining on a particular disk, use the vxprint command.
# vxprint -F '%sdnum' diskname
If the output is not 0, there are still some subdisks on this disk that you need to remove. If the output is 0, remove the disk from VERITAS Volume Manager control.
# vxdg rmdisk diskname# vxdisk rm devname
Use the free space created for adding the data from the next volume you want to remove.
11. After you successfully convert all volumes into disk partitions, reboot the system.
12. After the reboot, make sure none of the volumes are open by using the vxprint command.
# vxprint -Aht -e v_open
If any volumes remain open, repeat the steps listed above.
Example
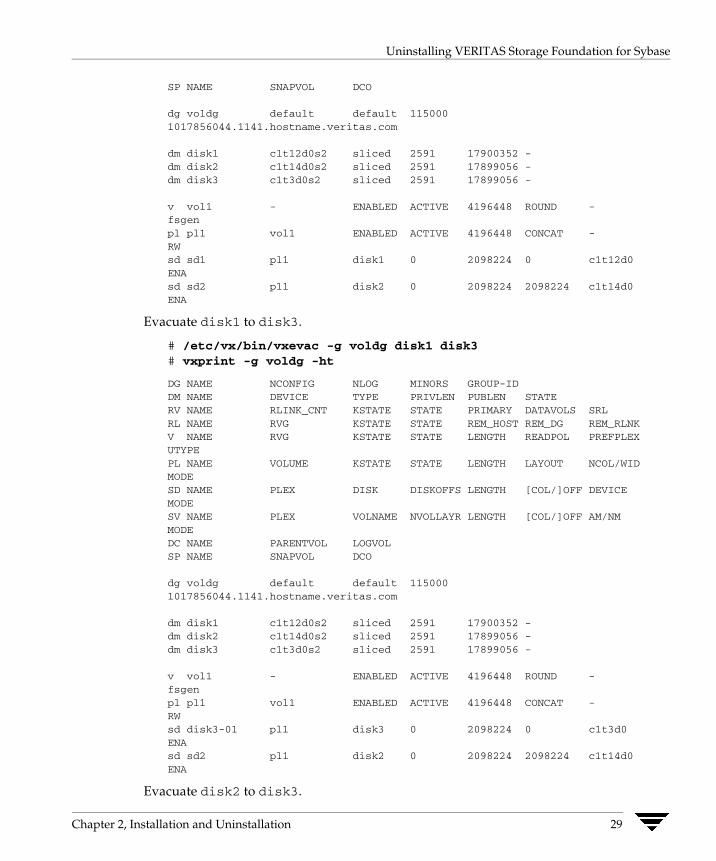
This example shows how to move the data on a volume to a disk partition. In the example, there are three disks: disk1 and disk2 are subdisks on volume vol01 and disk3 is a free disk. The data on vol01 is copied to disk3 using vxevac.
Diskgroup voldg content before the data on vol01 is copied to disk3.
# vxprint -g voldg -htDG NAME NCONFIG NLOG MINORS GROUP-IDDM NAME DEVICE TYPE PRIVLEN PUBLEN STATERV NAME RLINK_CNT KSTATE STATE PRIMARY DATAVOLS SRLRL NAME RVG KSTATE STATE REM_HOST REM_DG REM_RLNKV NAME RVG KSTATE STATE LENGTH READPOL PREFPLEXUTYPEPL NAME VOLUME KSTATE STATE LENGTH LAYOUT NCOL/WIDMODESD NAME PLEX DISK DISKOFFS LENGTH [COL/]OFF DEVICEMODESV NAME PLEX VOLNAME NVOLLAYR LENGTH [COL/]OFF AM/NMMODEDC NAME PARENTVOL LOGVOL
28 VERITAS Storage Foundation for Sybase Installation Guide
Uninstalling VERITAS Storage Foundation for Sybase
SP NAME SNAPVOL DCO
dg voldg default default 1150001017856044.1141.hostname.veritas.com
dm disk1 c1t12d0s2 sliced 2591 17900352 -dm disk2 c1t14d0s2 sliced 2591 17899056 -dm disk3 c1t3d0s2 sliced 2591 17899056 -
v vol1 - ENABLED ACTIVE 4196448 ROUND fsgenpl pl1 vol1 ENABLED ACTIVE 4196448 CONCAT -RWsd sd1 pl1 disk1 0 2098224 0 c1t12d0ENAsd sd2 pl1 disk2 0 2098224 2098224 c1t14d0ENA
Evacuate disk1 to disk3.
# /etc/vx/bin/vxevac -g voldg disk1 disk3# vxprint -g voldg -ht
DG NAME NCONFIG NLOG MINORS GROUP-IDDM NAME DEVICE TYPE PRIVLEN PUBLEN STATERV NAME RLINK_CNT KSTATE STATE PRIMARY DATAVOLS SRLRL NAME RVG KSTATE STATE REM_HOST REM_DG REM_RLNKV NAME RVG KSTATE STATE LENGTH READPOL PREFPLEXUTYPEPL NAME VOLUME KSTATE STATE LENGTH LAYOUT NCOL/WIDMODESD NAME PLEX DISK DISKOFFS LENGTH [COL/]OFF DEVICEMODESV NAME PLEX VOLNAME NVOLLAYR LENGTH [COL/]OFF AM/NMMODEDC NAME PARENTVOL LOGVOLSP NAME SNAPVOL DCO
dg voldg default default 1150001017856044.1141.hostname.veritas.com
dm disk1 c1t12d0s2 sliced 2591 17900352 -dm disk2 c1t14d0s2 sliced 2591 17899056 -dm disk3 c1t3d0s2 sliced 2591 17899056 -
v vol1 - ENABLED ACTIVE 4196448 ROUND fsgenpl pl1 vol1 ENABLED ACTIVE 4196448 CONCAT -RWsd disk3-01 pl1 disk3 0 2098224 0 c1t3d0ENAsd sd2 pl1 disk2 0 2098224 2098224 c1t14d0ENA
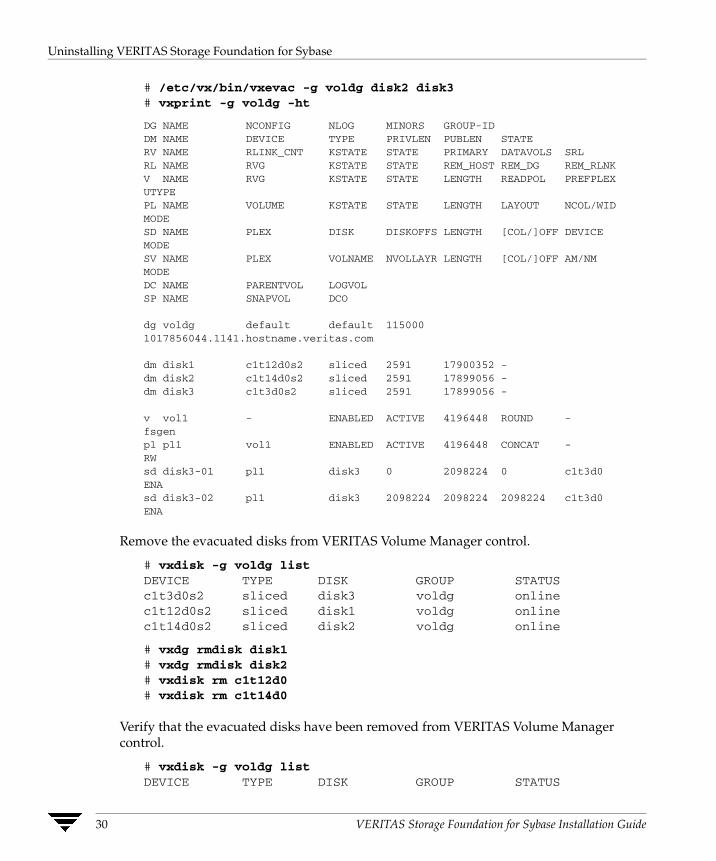
Evacuate disk2 to disk3.
Chapter 2, Installation and Uninstallation 29
Uninstalling VERITAS Storage Foundation for Sybase
# /etc/vx/bin/vxevac -g voldg disk2 disk3# vxprint -g voldg -ht
DG NAME NCONFIG NLOGDM NAME DEVICE TYPERV NAME RLINK_CNT KSTATE RL NAME RVG KSTATE V NAME RVG KSTATE UTYPEPL NAME VOLUME KSTATE MODESD NAME PLEX DISKMODESV NAME PLEX VOLNAME MODEDC NAME PARENTVOL LOGVOLSP NAME SNAPVOL DCO
dg voldg default default 1017856044.1141.hostname.veritas.com
dm disk1dm disk2dm disk3
v vol1 fsgenpl pl1 RWsd disk3-01 ENAsd disk3-02 ENA
c1t12d0s2 sliced c1t14d0s2 sliced c1t3d0s2 sliced
- ENABLED
vol1 ENABLED
pl1 disk3
pl1 disk3
MINORS GROUP-IDPRIVLEN PUBLEN STATESTATE PRIMARY DATAVOLS SRLSTATE REM_HOST REM_DG REM_RLNKSTATE LENGTH READPOL PREFPLEX
STATE LENGTH LAYOUT NCOL/WID
DISKOFFS LENGTH [COL/]OFF DEVICE
NVOLLAYR LENGTH [COL/]OFF AM/NM
115000
2591 17900352 -2591 17899056 -2591 17899056 -
ACTIVE 4196448 ROUND -
ACTIVE 4196448 CONCAT -
0 2098224 0 c1t3d0
2098224 2098224 2098224 c1t3d0
Remove the evacuated disks from VERITAS Volume Manager control.
# vxdisk -g voldg listDEVICE TYPE DISK GROUP STATUSc1t3d0s2 sliced disk3 voldg onlinec1t12d0s2 sliced disk1 voldg onlinec1t14d0s2 sliced disk2 voldg online
# vxdg rmdisk disk1# vxdg rmdisk disk2# vxdisk rm c1t12d0# vxdisk rm c1t14d0
Verify that the evacuated disks have been removed from VERITAS Volume Manager control.
# vxdisk -g voldg listDEVICE TYPE DISK GROUP STATUS
30 VERITAS Storage Foundation for Sybase Installation Guide

Uninstalling VERITAS Storage Foundation for Sybase
c1t3d0s2 sliced disk3 voldg online
Check to see whether the volume you want to move first is mounted.
# mount | grep vol1/vol1 on /dev/vx/dsk/voldg/vol1read/write/setuid/log/nolargefiles/dev=12dc138 on Wed Apr 3 10:13:11 2002
Create a partition on free disk space of the same size as the volume. In this example, a 2G partition is created on disk1 (c1t12d0s1).
# formatSearching for disks...done
AVAILABLE DISK SELECTIONS:0. c0t0d0 <SUN9.0G cyl 4924 alt 2 hd 27 sec 133>
/sbus@1f,0/SUNW,fas@e,8800000/sd@0,01. c1t3d0 <QUANTUM-ATLASIV9SCA-0808 cyl 13814 alt 2 hd 4 sec 324>
/sbus@1f,0/SUNW,fas@2,8800000/sd@3,02. c1t9d0 <QUANTUM-ATLASIV9SCA-0808 cyl 13814 alt 2 hd 4 sec 324>
/sbus@1f,0/SUNW,fas@2,8800000/sd@9,03. c1t10d0 <QUANTUM-ATLASIV9SCA-0808 cyl 13814 alt 2 hd 4 sec 324>
/sbus@1f,0/SUNW,fas@2,8800000/sd@a,04. c1t11d0 <QUANTUM-ATLASIV9SCA-0808 cyl 13814 alt 2 hd 4 sec 324>
/sbus@1f,0/SUNW,fas@2,8800000/sd@b,05. c1t12d0 <QUANTUM-ATLASIV9SCA-0808 cyl 13814 alt 2 hd 4 sec 324>
/sbus@1f,0/SUNW,fas@2,8800000/sd@c,06. c1t14d0 <QUANTUM-ATLASIV9SCA-0808 cyl 13814 alt 2 hd 4 sec 324>
/sbus@1f,0/SUNW,fas@2,8800000/sd@e,07. c1t15d0 <QUANTUM-ATLASIV9SCA-0808 cyl 13814 alt 2 hd 4 sec 324>
/sbus@1f,0/SUNW,fas@2,8800000/sd@f,0Specify disk (enter its number): 5selecting c1t12d0[disk formatted]
FORMAT MENU:disk - select a disktype - select (define) a disk typepartition - select (define) a partition tablecurrent - describe the current diskformat - format and analyze the diskrepair - repair a defective sectorlabel - write label to the diskanalyze - surface analysisdefect - defect list managementbackup - search for backup labelsverify - read and display labelssave - save new disk/partition definitionsinquiry - show vendor, product and revisionvolname - set 8-character volume name!<cmd> - execute <cmd>, then returnquit
Chapter 2, Installation and Uninstallation 31

Uninstalling VERITAS Storage Foundation for Sybase
format> p
PARTITION MENU:0 - change `0' partition1 - change `1' partition2 - change `2' partition3 - change `3' partition4 - change `4' partition5 - change `5' partition6 - change `6' partition7 - change `7' partitionselect - select a predefined tablemodify - modify a predefined partition tablename - name the current tableprint - display the current tablelabel - write partition map and label to the disk!<cmd> - execute <cmd>, then returnquit
partition> 1Part Tag Flag Cylinders Size Blocks
1 unassigned wm 0 0 (0/0/0) 0Enter partition id tag[unassigned]: Enter partition permission flags[wm]: Enter new starting cyl[0]: Enter partition size[0b, 0c, 0.00mb, 0.00gb]: 2.00gbpartition> lReady to label disk, continue? y
partition> pCurrent partition table (unnamed):Total disk cylinders available: 13814 + 2 (reserved cylinders)
Part Tag Flag Cylinders Size Blocks0 unassigned wm 0 0 (0/0/0) 01 unassigned wm 0 - 3236 2.00GB (3237/0/0) 4195152
partition> q
Copy the data on vol01 to the newly created disk partition.
# dd if=/dev/vx/dsk/voldg/vol01 of=/dev/dsk/c1t12d0s1
In the /etc/vfstab file, remove the following entry.
/dev/vx/dsk/voldg/vol1 /dev/vx/rdsk/voldg/vol1 /vol1 vxfs 4 yes rw
32 VERITAS Storage Foundation for Sybase Installation Guide
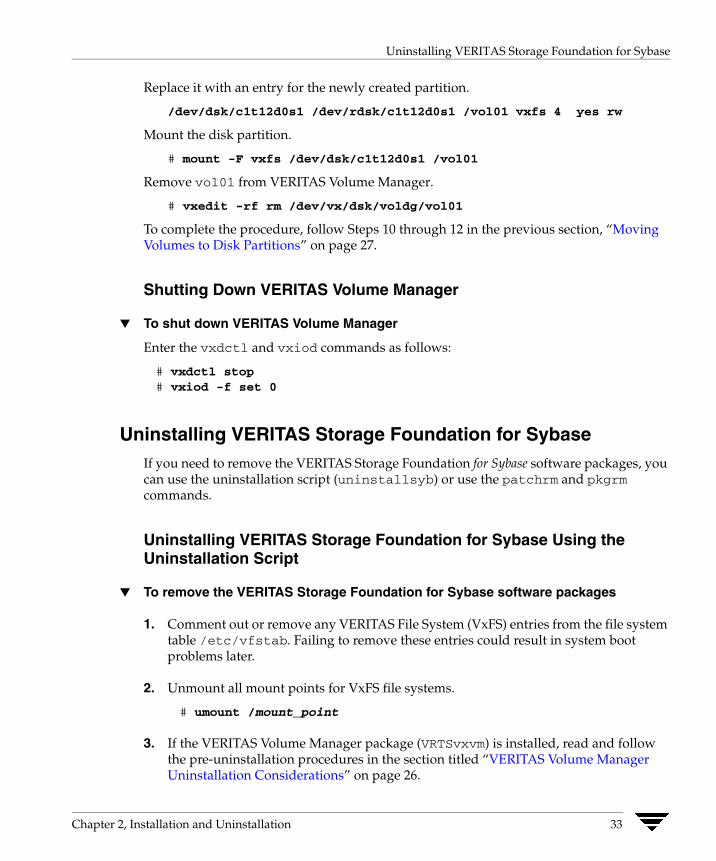
Uninstalling VERITAS Storage Foundation for Sybase
Replace it with an entry for the newly created partition.
/dev/dsk/c1t12d0s1 /dev/rdsk/c1t12d0s1 /vol01 vxfs 4 yes rw
Mount the disk partition.
# mount -F vxfs /dev/dsk/c1t12d0s1 /vol01
Remove vol01 from VERITAS Volume Manager.
# vxedit -rf rm /dev/vx/dsk/voldg/vol01
To complete the procedure, follow Steps 10 through 12 in the previous section, “Moving Volumes to Disk Partitions” on page 27.
Shutting Down VERITAS Volume Manager
▼ To shut down VERITAS Volume Manager
Enter the vxdctl and vxiod commands as follows:
# vxdctl stop# vxiod -f set 0
Uninstalling VERITAS Storage Foundation for Sybase If you need to remove the VERITAS Storage Foundation for Sybase software packages, you can use the uninstallation script (uninstallsyb) or use the patchrm and pkgrm commands.
Uninstalling VERITAS Storage Foundation for Sybase Using the Uninstallation Script
▼ To remove the VERITAS Storage Foundation for Sybase software packages
1. Comment out or remove any VERITAS File System (VxFS) entries from the file system table /etc/vfstab. Failing to remove these entries could result in system boot problems later.
2. Unmount all mount points for VxFS file systems.
# umount /mount_point
3. If the VERITAS Volume Manager package (VRTSvxvm) is installed, read and follow the pre-uninstallation procedures in the section titled “VERITAS Volume Manager Uninstallation Considerations” on page 26.
Chapter 2, Installation and Uninstallation 33

Uninstalling VERITAS Storage Foundation for Sybase
4. Place the product disc in the CD-ROM and use the uninstallation script to remove VERITAS Storage Foundation for Sybase.
If the disc is mounted with Solaris volume management, enter:
# /cdrom/cdrom0/storage_foundation_for_sybase/uninstallsfsyb
or
If the disc is mounted without Solaris volume management, enter:
# /mount_point/storage_foundation_for_sybase/uninstallsfsyb
Note Most packages in the VERITAS Storage Foundation for Sybase product have kernel components. In order to ensure complete removal, a system reboot is recommended after all packages have been removed.
5. To verify the removal of the packages, use the pkginfo command.
# pkginfo | grep VRTS
6. After running uninstallsfsyb, you need to use the pkgrm command to remove the VRTScpi, VRTSvlic, VRTSperl, VRTSobgui, and VRTSob packages. These packages are not removed by the script.
# pkgrm VRTScpi VRTSvlic VRTSperl VRTSobgui VRTSob
Uninstalling VERITAS Storage Foundation for Sybase Using pkgrm
▼ To remove the VERITAS Storage Foundation for Sybase software packages
1. Check for the packages installed on your system:
# pkginfo | grep VRTS
The pkginfo command shows the VERITAS Storage Foundation for Sybase software packages installed on your system.
2. Comment out or remove any VERITAS File System (VxFS) entries from the file system table /etc/vfstab. Failing to remove these entries could result in system boot problems later.
3. Unmount all mount points for VxFS file systems.
# umount /mount_point
34 VERITAS Storage Foundation for Sybase Installation Guide
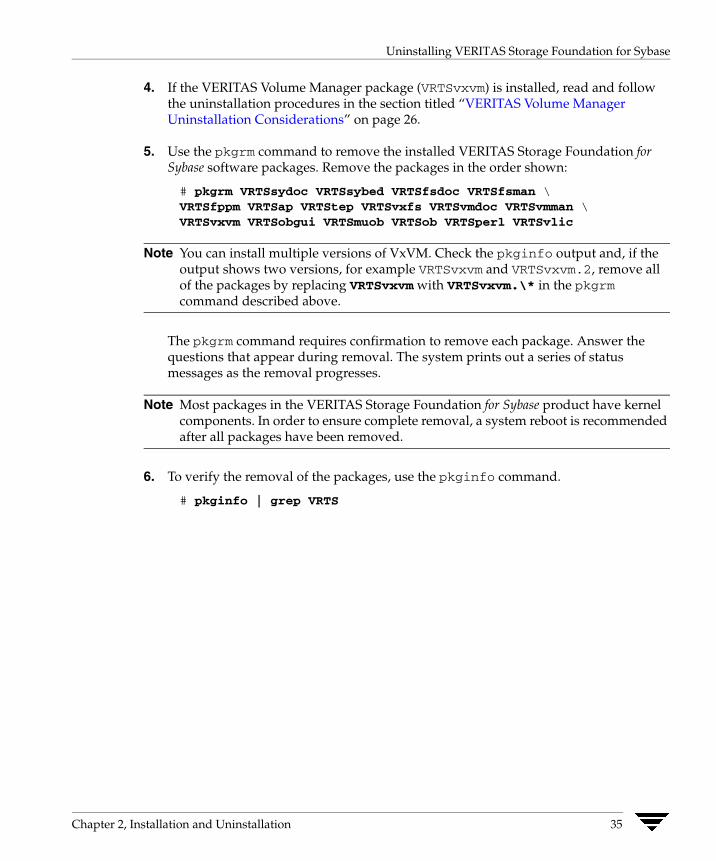
Uninstalling VERITAS Storage Foundation for Sybase
4. If the VERITAS Volume Manager package (VRTSvxvm) is installed, read and follow the uninstallation procedures in the section titled “VERITAS Volume Manager Uninstallation Considerations” on page 26.
5. Use the pkgrm command to remove the installed VERITAS Storage Foundation for Sybase software packages. Remove the packages in the order shown:
# pkgrm VRTSsydoc VRTSsybed VRTSfsdoc VRTSfsman \ VRTSfppm VRTSap VRTStep VRTSvxfs VRTSvmdoc VRTSvmman \VRTSvxvm VRTSobgui VRTSmuob VRTSob VRTSperl VRTSvlic
Note You can install multiple versions of VxVM. Check the pkginfo output and, if the output shows two versions, for example VRTSvxvm and VRTSvxvm.2, remove all of the packages by replacing VRTSvxvm with VRTSvxvm.\* in the pkgrm command described above.
The pkgrm command requires confirmation to remove each package. Answer the questions that appear during removal. The system prints out a series of status messages as the removal progresses.
Note Most packages in the VERITAS Storage Foundation for Sybase product have kernel components. In order to ensure complete removal, a system reboot is recommended after all packages have been removed.
6. To verify the removal of the packages, use the pkginfo command.
# pkginfo | grep VRTS
Chapter 2, Installation and Uninstallation 35

Uninstalling VERITAS Storage Foundation for Sybase
36 VERITAS Storage Foundation for Sybase Installation Guide

Upgrade Procedures
3 If you are running an earlier release of VERITAS Volume Manager, VERITAS File System, or VERITAS Storage Foundation for Sybase (formerly VERITAS Database Edition for Sybase), you can upgrade to the current releases using the procedures described in this chapter.Topics covered in this chapter include:
◆ “Upgrade Overview” on page 37
◆ “Solaris and Sybase Compatibility Considerations” on page 38
◆ “Retaining Older VERITAS Volume Manager Releases” on page 38
◆ “Upgrading from VERITAS Database Edition 1.5 for Sybase” on page 40
◆ “Upgrading from VxFS 3.5 and VxVM 3.5” on page 44
◆ “Upgrading from SUNWvxvm” on page 50
Note Only users with superuser (root) privileges can upgrade VERITAS products.
Upgrade Overview VERITAS Storage Foundation for Sybase consist of a set of bundled VERITAS products. These packages are tested together to ensure compatibility and maximum efficiency. When installing VERITAS Storage Foundation for Sybase on top of existing packages or upgrading from a previous version, we recommend that all packages be upgraded to the set supplied with the latest version.
Caution Upgrading incorrectly can result in data loss. Review the preinstallation requirements detailed in “Preinstallation” on page 1 and then read and follow the upgrade procedures in this chapter carefully.
After you complete the upgrade procedure, read “Configuring the VERITAS Software” on page 53for important details about initializing (where required), setting up, and using the VERITAS software shipped with VERITAS Storage Foundation for Sybase .
37

Solaris and Sybase Compatibility Considerations
Determining if the Root Disk Is Encapsulated Before you upgrade, you need to determine if the root disk is encapsulated by running the following command:
# mount | grep “/ on”
If the output from this command includes a pathname that contains vx and rootvol (as in /dev/vx/dsk/rootvol), then the root disk is encapsulated. See “Upgrading to VERITAS Storage Foundation 4.0 for Sybase if the Root Disk Is Encapsulated” on page 40.
Caution You must use the procedure in “Upgrading to VERITAS Storage Foundation 4.0 for Sybase if the Root Disk Is Encapsulated” on page 40 if you have a system with an encapsulated root disk. Be sure to use the appropriate procedure to upgrade your VERITAS software and system.
After you complete the upgrade procedure, read “Configuring the VERITAS Software” on page 53 for important details about initializing (where required), setting up, and using the VERITAS software shipped with VERITAS Storage Foundation for Sybase .
Solaris and Sybase Compatibility Considerations You must run a version of Solaris that is compatible with the version of Sybase you are using. If you are upgrading Solaris, ensure that the version of Sybase you are using supports the new Solaris version.
This chapter describes combinations of VERITAS and Solaris upgrade procedures. The details of performing an operating system upgrade are beyond the scope of this document. Refer to your Solaris documentation for these procedures.
Retaining Older VERITAS Volume Manager Releases In order to retain an older version of VERITAS Volume Manager and not upgrade to the current release shipped with VERITAS Storage Foundation for Sybase, you must set a special environment variable before starting the upgrade procedure.
◆ If you are using Bourne or Korn shell (sh or ksh), use the commands:
# NO_VXVM_UPGRADE=yes# export NO_VXVM_UPGRADE
◆ If you are using a C shell (csh or tcsh), use the command:
# setenv NO_VXVM_UPGRADE yes
38 VERITAS Storage Foundation for Sybase Installation Guide
Retaining Older VERITAS Volume Manager Releases
The installation program checks for the NO_VXVM_UPGRADE environment variable during the upgrade and displays messages similar to the following if this variable is set:
Checking existing package installation...NOTICE: Package VRTSvxvm is being skipped (NO_VXVM_UPGRADE set).NOTICE: Package VRTSvmsa is being skipped (NO_VXVM_UPGRADE set).
Upgrading the Disk Group Version Separately If you plan to implement VERITAS FastResync, you must use Disk Group Version 90 or later, which is supported in VERITAS Volume Manager 3.2 and higher. However, if you choose to retain a version of VERITAS Volume Manager older than 3.2, which does not contain Disk Group Version 90 or later, upgrade your disk group version separately.
Note You cannot return to an older disk group version after you have upgraded.
▼ To determine the disk group version you are using
Use the vxdg list command as follows:
# vxdg -q list diskgroup | grep version
where the -q option means no header is printed describing output fields.
Example
To determine the disk group version on PRODdg:
# vxdg -q list PRODdg | grep versionversion: 90
▼ To upgrade the disk group version you are using
Use the vxdg upgrade command as follows:
# vxdg -T diskgroup_version upgrade diskgroup
where the -T option means upgrading the disk group to a specific version.
Example
To upgrade the disk group to version 110 on PRODdg:
# vxdg -T 110 upgrade PRODdg
Chapter 3, Upgrade Procedures 39
Upgrading from VERITAS Database Edition 1.5 for Sybase
Upgrading from VERITAS Database Edition 1.5 for Sybase If you are upgrading from VERITAS Database Edition 1.5 for Sybase to VERITAS Storage Foundation 4.0 for Sybase, you must upgrade from VxVM 3.2 to VxVM 4.0 and from VxFS 3.4 to VxFS 4.0. This section explains the procedure for upgrading VERITAS Database Edition 1.5 for Sybase to VERITAS Storage Foundation 4.0 for Sybase when your root disk is encapsulated or unencapsulated.
Upgrading to VERITAS Storage Foundation 4.0 for Sybase if the Root Disk Is Encapsulated
This section explains how to upgrade from VERITAS Database Edition 1.5 for Sybase or from VxFS 3.5 and VxVM 3.5 to VERITAS Storage Foundation 4.0 for Sybase if the root disk is encapsulated. Refer to “Upgrade Overview” on page 37 to determine if upgrading the operating system is required.
Note If your root disk is not encapsulated and you are upgrading from VERITAS Database Edition 1.5 for Sybase, see “Upgrading from VERITAS Database Edition 1.5 for Sybase if the Root Disk Is Not Encapsulated” on page 43. If your root disk is not encapsulated and you are upgrading from VxFS 3.5 and VxVM 3.5, see “Upgrading from VxFS 3.5 and VxVM 3.5 on Solaris 7, 8, or 9 if the Root Disk Is Not Encapsulated” on page 45.
If you are upgrading VERITAS Storage Foundation for Sybase on a system with an encapsulated root disk, you must first remove the previous release of VERITAS Volume Manager.
Note It is important that you follow these steps in the specified order.
▼ To upgrade on a system with an encapsulated root disk
1. Run the upgrade_start script to prepare the previous release of VERITAS Volume Manager for removal:
● If the disc is mounted automatically, enter:
# /cdrom/cdrom0/storage_foundation_for_sybase\/scripts/upgrade_start
● If the disc is mounted manually, enter:
# /mount_point/storage_foundation_for_sybase/scripts\/upgrade_start
40 VERITAS Storage Foundation for Sybase Installation Guide

Upgrading from VERITAS Database Edition 1.5 for Sybase
The upgrade_start script looks for volumes containing file systems. If certain key file systems must be converted back to using partitions, the script indicates that a reboot is necessary. If any volumes are in use, you must either unmount those volumes or reboot to single-user mode.
If any error messages are encountered during the upgrade_start, process, run the upgrade_finish script immediately to restore the system. Examine the error messages and address them accordingly. Then, run the upgrade_start script again. Do not proceed to Step 2 until upgrade_start runs without producing any errors.
2. Reboot the machine to single-user mode (using a command such as boot -s).
3. If you are upgrading from VxFS 3.5 and the VxFS NetBackup libraries package (VRTSfsnbl) is installed, remove it before you install the new packages.
To remove the package, use the pkgrm command as follows:
# pkgrm VRTSfsnbl
Respond to any system messages as appropriate.
The libraries contained in this package are included in the VRTSvxfs package in 4.0.
4. Remove any existing VERITAS Volume Manager packages.
If you have a single version of VERITAS Volume Manager loaded, follow this sequence:
# pkgrm VRTSvmdoc VRTSvmman VRTSvmsa VRTSvxvm VRTSvmdev
or
If you have multiple versions of VERITAS Volume Manager loaded, remove the packages using this sequence:
# pkgrm VRTSvmdoc VRTSvmman VRTSvmsa VRTSvxvm.\*
Note If you have made any additional modifications or have applied any patches, remove these before removing the VRTSvxvm package. If you are using the SUNWvxvm package, see the Sun documentation for details on how to remove the SUNWvxvm patches and package.
5. If your system has a separate /opt file system, make sure it is mounted before proceeding with installation. When the system is in single user mode, /opt is not normally mounted.
Chapter 3, Upgrade Procedures 41

Upgrading from VERITAS Database Edition 1.5 for Sybase
6. Remount the disc manually.
# mount -F hsfs -o ro /dev/dsk/c0t6d0s2 /mount_point
where c0t6d0s2 is the default address for the CD-ROM drive.
7. Run the installsfsyb program:
# /mount_point/storage_foundation_for_sybase/installsfsyb
8. Depending on your existing configuration, various messages and prompts may appear. Answer the prompts appropriately.
If you do not intend to view or print the online documentation, you can omit the VRTSsydoc, VRTSfsdoc, and VRTSvmdoc packages. If you do not intend to use the GUI, you can omit the VRTSobgui package.
9. If VxFS file systems are commented out in the /etc/vfstab file, uncomment them.
10. If you want to disable the hot-relocation feature, comment out the vxrelocd line in the startup file /etc/rc2.d/S95vxvm-recover.
# vxrelocd root &
11. Complete the upgrade using the upgrade_finish script.
# /mount_point/storage_foundation_for_sybase/scripts\/upgrade_finish
12. Perform a reconfiguration reboot.
# reboot -- -r
At this point, your pre-upgrade configuration should be in effect and any file systems previously defined on volumes should be defined and mounted.
13. Importing a pre-4.0 VERITAS Volume Manager disk group does not automatically upgrade the disk group version to the VxVM 4.0 level. You may need to manually upgrade each of your disk groups following a VxVM upgrade. See “Upgrading the Disk Group Version Separately” on page 39.
14. Follow the instructions in “Setting Up VERITAS Enterprise Administrator” on page 54 to set up and start VEA.
42 VERITAS Storage Foundation for Sybase Installation Guide
Upgrading from VERITAS Database Edition 1.5 for Sybase
Upgrading from VERITAS Database Edition 1.5 for Sybase if the Root Disk Is Not Encapsulated
This section explains how to upgrade from VERITAS Database Edition 1.5 for Sybase to VERITAS Storage Foundation 4.0 for Sybase if the root disk is unencapsulated. Refer to “Upgrade Overview” on page 37 to determine if upgrading the operating system is required.
This upgrade procedure allows you to retain existing VERITAS Volume Manager and VERITAS File System configurations. After upgrading, you can resume using your file systems and volumes as before.
Note It is important that you follow these steps in the specified order.
▼ To upgrade on a system with an unencapsulated root disk
1. Unmount any mounted VxFS file systems.
2. Reboot the machine to single-user mode (using a command such as boot -s).
3. If your system has a separate /opt and /var file systems, make sure they are mounted before proceeding with installation.When the system is in single user mode, /opt and /var are not normally mounted.
4. Load and mount the disc as described in “Mounting the Software Disc” on page 15.
5. Run the upgrade_start script to prepare the previous release of the Volume Manager for upgrading:
● If the disc is mounted automatically, enter:
# /cdrom/cdrom0/storage_foundation_for_sybase\/scripts/upgrade_start
● If the disc is mounted manually, enter:
# /mount_point/storage_foundation_for_sybase\/scripts/upgrade_start
The upgrade_start script looks for volumes containing file systems. If certain key file systems must be converted back to using partitions, the script indicates that a reboot is necessary. If any volumes are in use, you must either unmount those volumes or reboot to single-user mode.
6. If you have VxFS file systems specified in the /etc/vfstab file, comment them out.
Chapter 3, Upgrade Procedures 43

Upgrading from VxFS 3.5 and VxVM 3.5
7. Reboot the machine to single-user mode (using a command such as boot -s).
8. Remount the disc manually:
# mount -F hsfs -o ro /dev/dsk/c0t6d0s2 /mount_point
where c0t6d0s2 is the default address for the CD-ROM drive.
9. Run the installsfsyb program.
# /mount_point/storage_foundation_for_sybase/installsfsyb
10. Depending on your existing configuration, various messages and prompts may appear. Answer the prompts appropriately.
If you do not intend to view or print the online documentation, you can omit the VRTSsydoc, VRTSfsdoc, and VRTSvmdoc packages. If you do not intend to use the GUI, you can omit the VRTSobgui package.
11. If you commented out VxFS File System entries in the /etc/vfstab file in step 10 on page 49 of the pre-upgrade procedures, uncomment them.
12. If you want to disable the hot-relocation feature, comment out the vxrelocd line in the startup file /etc/rc2.d/S95vxvm-recover, as follows:
# vxrelocd root &
13. Complete the upgrade by entering:
# /mount_point/storage_foundation_for_sybase/scripts\/upgrade_finish
14. Reboot the machine to multiuser mode (using a command such as shutdown).
At this point, your pre-upgrade configuration should be in effect and any file systems previously defined on volumes should be defined and mounted.
Upgrading from VxFS 3.5 and VxVM 3.5 You can upgrade to VERITAS Storage Foundation for Sybase from VxFS 3.5 and VxVM 3.5 using the standard installation program, installsfsyb, provided with the product. Because the installsfsyb program upgrades the VERITAS File System and VERITAS Volume Manager packages, we recommend that you perform this upgrade from single-user mode with no VxFS file systems in use.
44 VERITAS Storage Foundation for Sybase Installation Guide
Upgrading from VxFS 3.5 and VxVM 3.5
To upgrade from VxFS and VxVM 3.5 to VERITAS Storage Foundation 4.0 for Sybase , use one of the following procedures:
To upgrade Where See
VERITAS Storage Foundation for Sybase
VERITAS Storage Foundation for Sybase
Solaris and VERITAS Storage Foundation for Sybase
Your root disk is encapsulated “Upgrading to VERITAS Storage Foundation 4.0 for Sybase if the Root Disk Is Encapsulated” on page 40
Your root disk is unencapsulated “Upgrading from VxFS 3.5 and VxVM 3.5 on Solaris 7, 8, or 9 if the Root Disk Is Not Encapsulated” on page 45
Your root disk is either encapsulated or “Upgrading from VxFS 3.5 and unencapsulated VxVM 3.5 on Earlier Solaris Releas
es if the Root Disk Is Either Encapsulated or Not Encapsulated” on page 46
Upgrading from VxFS 3.5 and VxVM 3.5 on Solaris 7, 8, or 9 if the Root Disk Is Encapsulated
Follow the procedure in “Upgrading to VERITAS Storage Foundation 4.0 for Sybase if the Root Disk Is Encapsulated” on page 40.
Upgrading from VxFS 3.5 and VxVM 3.5 on Solaris 7, 8, or 9 if the Root Disk Is Not Encapsulated
This section describes upgrading from VxFS 3.5 and VxVM 3.5 to to the current VERITAS Storage Foundation 4.0 for Sybase if you are already running Solaris 7, 8, or 9, do not intend to upgrade your Solaris version, and your root disk is unencapsulated. If you are running SUNWvxvm, go to “Upgrading from SUNWvxvm” on page 50.
▼ To upgrade to VERITAS Storage Foundation for Sybase
1. Unmount any mounted VxFS file systems.
2. If the VxFS NetBackup libraries package (VRTSfsnbl) is installed, remove it before you install the new packages.
Chapter 3, Upgrade Procedures 45
Upgrading from VxFS 3.5 and VxVM 3.5
To remove the package, use the pkgrm command as follows:
# pkgrm VRTSfsnbl
Respond to any system messages as appropriate.
The libraries contained in this package are included in the VRTSvxfs package in 4.0.
3. Reboot the machine to single-user mode (using a command such as boot -s).
4. If your system has a separate /opt and /var file systems, make sure they are mounted before proceeding with installation.When the system is in single user mode, /opt and /var are not normally mounted.
5. Load and mount the disc as described in “Mounting the Software Disc” on page 15.
6. Run the installsfsyb program.
If the disc is mounted with Solaris volume management, enter:
# /cdrom/cdrom0/storage_foundation_for_sybase/installsfsyb
or
If the disc is mounted without Solaris volume management, enter:
# /mount_point/storage_foundation_for_sybase/installsfsyb
7. Depending on your existing configuration, various messages and prompts may appear. Answer the prompts appropriately.
If you do not intend to view or print the online documentation, you can omit the VRTSsydoc, VRTSfsdoc, and VRTSvmdoc packages. If you do not intend to use the GUI, you can omit the VRTSobgui package.
8. If you have VxFS file systems specified in the /etc/vfstab file, comment them out.
9. Shut down and halt the machine (using a command such as shutdown).
Upgrading from VxFS 3.5 and VxVM 3.5 on Earlier Solaris Releases if the Root Disk Is Either Encapsulated or Not Encapsulated
This section describes upgrading to the current VERITAS Storage Foundation for Sybase if you are not running Solaris 7, 8, or 9, and need to upgrade your Solaris version in addition to the VxFS 3.5 and VxVM 3.5 packages. If you are running SUNWvxvm, go to “Upgrading from SUNWvxvm” on page 50.
46 VERITAS Storage Foundation for Sybase Installation Guide

Upgrading from VxFS 3.5 and VxVM 3.5
This upgrade procedure allows you to retain existing VERITAS Volume Manager and VERITAS File System configurations. After upgrading, you can resume using your file systems and volumes as before (without having to run vxinstall again).
Note It is important that you follow these steps in the specified order.
▼ To prepare to upgrade the operating system
1. Ensure that if any of the file systems /, /usr, /var, or /opt are defined on volumes, at least one plex for each of those volumes is formed from a single subdisk that begins on a cylinder boundary.
This is necessary because part of the upgrade process involves temporarily converting file systems on volumes back to using direct disk partitions, and Solaris requires that disk partitions start on cylinder boundaries. Upgrade scripts (located in the /scripts directory on the disc) automatically convert file systems on volumes back to using regular disk partitions, as necessary. If the upgrade scripts detect any problems (such as lack of cylinder alignment), they display an explanation of the problem and the upgrade does not proceed.
2. Check to see if any VxFS File Systems are mounted using the df command. If so, unmount them by using the umountall command:
# df -F vxfs# umountall -F vxfs
Note You need to remove previous versions of VERITAS File System before upgrading the operating system and the VERITAS Storage Foundation for Sybase. You do not need to remove existing VxFS file systems, but all of them must remain unmounted throughout the upgrade process.
3. Check to see if any packages remain on the machine by entering:
# pkginfo | grep VRTS
If any VxFS packages, including VERITAS Quick I/O (VRTSfdd or VRTSqio)are present, remove them as shown in Step 4.
4. Remove the VxFS-related packages as follows:
# pkgrm VRTSfsdoc VRTSfdd VRTSqio VRTSvxld VRTSvxfs VRTSfsnbl
Note If the VxFS NetBackup libraries package (VRTSfsnbl) is installed, remove it before upgrading.
Chapter 3, Upgrade Procedures 47

Upgrading from VxFS 3.5 and VxVM 3.5
5. Load and mount the disc as described in “Mounting the Software Disc” on page 15.
6. Run the upgrade_start script to prepare the previous release of the Volume Manager for its removal:
● If the disc is mounted automatically, enter:
# /cdrom/cdrom0/storage_foundation_for_sybase\/scripts/upgrade_start
● If the disc is mounted manually, enter:
# /mount_point/storage_foundation_for_sybase\/scripts/upgrade_start
The upgrade_start script looks for volumes containing file systems. If certain key file systems must be converted back to using partitions, the script indicates that a reboot is necessary. If any volumes are in use, you must either unmount those volumes or reboot to single-user mode.
7. Reboot the machine to single-user mode (using a command such as boot -s).
8. If the VxFS NetBackup libraries package (VRTSfsnbl) is installed, remove it before you install the new packages.
To remove the package, use the pkgrm command as follows:
# pkgrm VRTSfsnbl
Respond to any system messages as appropriate.
The libraries contained in this package are included in the VRTSvxfs package in 4.0.
9. Remove any existing VxVM packages.
For example, if you have a single version of VxVM loaded, follow this sequence:
# pkgrm VRTSvmdoc VRTSvmman VRTSvxvm
or
If you have multiple versions of VxVM loaded, remove the packages using this sequence:
# pkgrm VRTSvmdoc VRTSvmman VRTSvxvm.\*
Note If you have made any additional modifications or have applied any patches, remove these before removing the VRTSvxvm package. If you are using the SUNWvxvm package, see the Sun documentation for details on how to remove the SUNWvxvm patches and package.
48 VERITAS Storage Foundation for Sybase Installation Guide

Upgrading from VxFS 3.5 and VxVM 3.5
10. If you have VxFS file systems specified in the /etc/vfstab file, comment them out.
11. Shut down and halt the machine (using a command such as shutdown).
▼ To upgrade the operating system
1. Upgrade the operating system to Solaris 7, 8, or 9 according to the Solaris installation documentation.
Note Instructions on upgrading the operating system are beyond the scope of this document.
2. Reboot the machine to single-user mode (using a command such as boot -s).
▼ To upgrade the VxFS 3.5 and VxVM 3.5 packages to VERITAS Storage Foundation for Sybase 4.0 after upgrading the operating system
1. If your system has separate /opt and /var file systems, make sure they are mounted before proceeding with installation. When the system is in single user mode, /opt and /var are not normally mounted.
2. Remount the disc manually:
# mount -F hsfs -o ro /dev/dsk/c0t6d0s2 /mount_point
where c0t6d0s2 is the default address for the CD-ROM drive.
3. Run the installsfsyb program.
# /mount_point/storage_foundation_for_sybase/installsfsyb
4. Depending on your existing configuration, various messages and prompts may appear. Answer the prompts appropriately.
If you do not intend to view or print the online documentation, you can omit the VRTSsydoc, VRTSfsdoc, and VRTSvmdoc packages. If you do not intend to use the GUI, you can omit the VRTSobgui package.
5. If you commented out VxFS File System entries in the /etc/vfstab file in step 10 on page 49 of the pre-upgrade procedures, uncomment them.
6. If you want to disable the hot-relocation feature, comment out the vxrelocd line in the startup file /etc/rc2.d/S95vxvm-recover, as follows:
# vxrelocd root &
Chapter 3, Upgrade Procedures 49
Upgrading from SUNWvxvm
7. Complete the upgrade by entering:
# /mount_point/storage_foundation_for_sybase/scripts\/upgrade_finish
8. Reboot the machine to multiuser mode (using a command such as shutdown).
At this point, your pre-upgrade configuration should be in effect and any file systems previously defined on volumes should be defined and mounted.
9. Importing a pre-4.0 VERITAS Volume Manager disk group does not automatically upgrade the disk group version to the VERITAS Volume Manager 4.0 level. You may need to manually upgrade each of your disk groups following a VERITAS Volume Manager upgrade. See “Upgrading the Disk Group Version Separately” on page 39.
10. Follow the instructions in “Setting Up VERITAS Enterprise Administrator” on page 54 to set up and start VEA.
Upgrading from SUNWvxvm This section provides instructions for upgrading SUNWvxvm.
1. Run the upgrade_start script to prepare the previous release of VERITAS Volume Manager for its removal:
● If the disc is mounted automatically, enter:
# /cdrom/cdrom0/storage_foundation_for_sybase\/scripts/upgrade_start
● If the disc is mounted manually, enter:
# /mount_point/storage_foundation_for_sybase\/scripts/upgrade_start
The upgrade_start script looks for volumes containing file systems. If certain key file systems must be converted back to using partitions, the script will indicate that a reboot is necessary. If so, reboot the machine to single-user mode before proceeding to the next step. If any volumes are in use, you must either unmount those volumes or reboot to single-user mode.
2. Reboot the machine to single-user mode (using a command such as boot -s).
3. If your system has separate /opt and /var file systems, make sure they are mounted before proceeding with installation. When the system is in single user mode, /opt and /var are not normally mounted.
50 VERITAS Storage Foundation for Sybase Installation Guide
Upgrading from SUNWvxvm
4. Remove all SUNWvxvm and related patches and packages.
Refer to Sun documentation for this procedure.
5. Load and mount the disc as described in “Mounting the Software Disc” on page 15.
6. Run the installsfsyb program.
● If the disc is mounted automatically, enter:
# /cdrom/cdrom0/storage_foundation_for_sybase/installsfsyb
● If the disc is mounted manually, enter:
# /mount_point/storage_foundation_for_sybase/installsfsyb
7. When you see the prompt for a license key, enter the appropriate license key. The installsfsyb program then upgrades the VERITAS Storage Foundation for Sybase to include the necessary packages on your system.
8. Depending on your existing configuration, various messages and prompts may appear. Answer the prompts appropriately.
If you do not intend to view or print the online documentation, you can omit the VRTSsydoc, VRTSfsdoc, and VRTSvmdoc packages. If you do not intend to use the GUI, you can omit the VRTSobgui package.
9. Complete the upgrade by using the upgrade_finish command:
# /cdrom/cdrom0/storage_foundation_for_sybase\/scripts/upgrade_finish
or
# /mount_point/storage_foundation_for_sybase/scripts\/upgrade_finish
10. Reboot the machine to multiuser mode (using a command such as shutdown).
At this point, your pre-upgrade configuration should be in effect and any file systems previously defined on volumes should be defined and mounted.
Chapter 3, Upgrade Procedures 51

Upgrading from SUNWvxvm
52 VERITAS Storage Foundation for Sybase Installation Guide

Configuring the VERITAS Software
4 This chapter covers important details about initializing (where required), setting up, and verifying the VERITAS software licensed with VERITAS Storage Foundation for Sybase.Topics covered in this document include:
◆ “Database Configuration Considerations” on page 53
◆ “Configuring VERITAS Storage Foundation for Sybase” on page 54
◆ “Configuring VERITAS Volume Manager” on page 56
◆ “Configuring VERITAS File System” on page 68
◆ “Verifying the VERITAS Storage Foundation for Sybase Installation” on page 69
Database Configuration ConsiderationsMost relational database management system (RDBMS) software requires operating system parameters to be set prior to operation. The Sybase database requires modifications to kernel settings in the /etc/system file before the database will run correctly. The most critical settings are normally located in the Shared Memory and Semaphore settings in Solaris. For precise settings, consult your current Sybase installation and configuration documentation.
53
Configuring VERITAS Storage Foundation for Sybase
The following list is an example of the changes that need to be made to the /etc/system file for Sybase, before a reboot, so you can use your database:
* start Sybase *set shmsys:shminfo_shmmax=0xffffffffset shmsys:shminfo_shmmin=1set shmsys:shminfo_shmseg=60
set semsys:seminfo_semmnu=60
* end Sybase *
Configuring VERITAS Storage Foundation for SybaseAfter you install and initialize all of the VERITAS software, you can take advantage of the various storage management features to ease the task of system and database administration. For detailed information on how to use the VERITAS products in an Sybase database environment, see the VERITAS Storage Foundation for Sybase Database Administrator’s Guide.
Setting Up VERITAS Enterprise Administrator
VERITAS Storage Foundation for Sybase must be installed and run on a UNIX (Solaris) machine. The VERITAS Enterprise Administrator (VEA) client can be installed and run on any Solaris, AIX, HP-UX, Windows NT, Windows Me, Windows 2000, or Windows 98 machine that supports the Java Runtime Environment.
Note To install VEA on Solaris 7 or 8, you must install the appropriate Java 1.3.1 patches for Solaris 7 or 8 from http://java.sun.com/j2se/1.3/install-solaris-patches.html.
The following are system recommendations for the GUI:
Solaris SPARCstation 5 with 64 M memory
Windows NT, Me, 2000, 300MHz Pentium with 256 M memory or 98
Starting the VERITAS Enterprise Administrator Server
If you included the VEA server packages when installing VERITAS Storage Foundation for Sybase, the VEA server (VRTSob) is started automatically. However, you may need to start the server manually if it gets shut down.
54 VERITAS Storage Foundation for Sybase Installation Guide
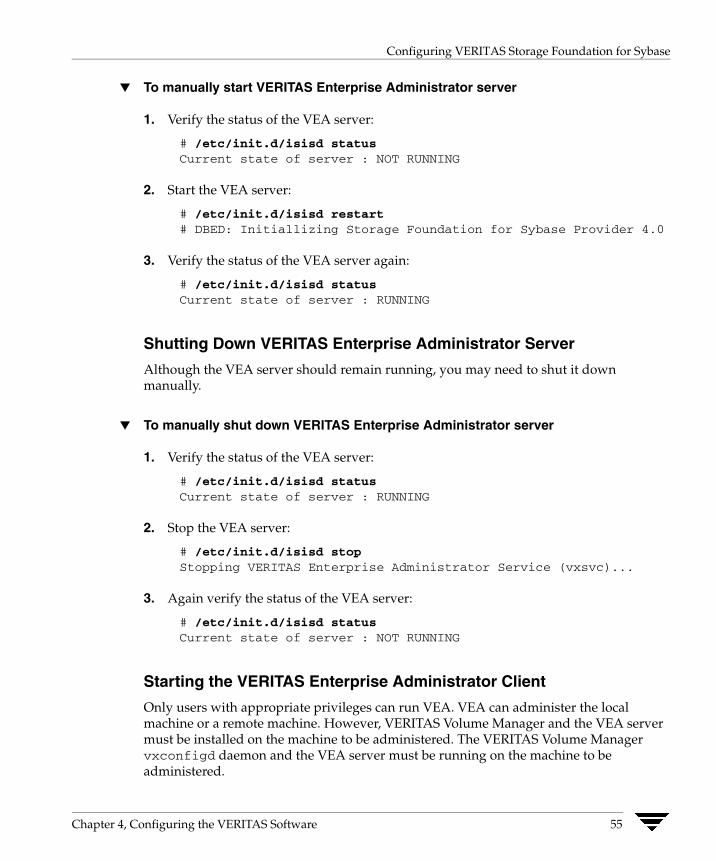
Configuring VERITAS Storage Foundation for Sybase
▼ To manually start VERITAS Enterprise Administrator server
1. Verify the status of the VEA server:
# /etc/init.d/isisd statusCurrent state of server : NOT RUNNING
2. Start the VEA server:
# /etc/init.d/isisd restart# DBED: Initiallizing Storage Foundation for Sybase Provider 4.0
3. Verify the status of the VEA server again:
# /etc/init.d/isisd statusCurrent state of server : RUNNING
Shutting Down VERITAS Enterprise Administrator Server
Although the VEA server should remain running, you may need to shut it down manually.
▼ To manually shut down VERITAS Enterprise Administrator server
1. Verify the status of the VEA server:
# /etc/init.d/isisd statusCurrent state of server : RUNNING
2. Stop the VEA server:
# /etc/init.d/isisd stopStopping VERITAS Enterprise Administrator Service (vxsvc)...
3. Again verify the status of the VEA server:
# /etc/init.d/isisd statusCurrent state of server : NOT RUNNING
Starting the VERITAS Enterprise Administrator Client
Only users with appropriate privileges can run VEA. VEA can administer the local machine or a remote machine. However, VERITAS Volume Manager and the VEA server must be installed on the machine to be administered. The VERITAS Volume Manager vxconfigd daemon and the VEA server must be running on the machine to be administered.
Chapter 4, Configuring the VERITAS Software 55

Configuring VERITAS Volume Manager
After installing VERITAS Volume Manager and VEA and starting the server, start VEA in one of the following ways.
UNIX (Solaris)
To administer the local UNIX machine, use the following command:
# /opt/VRTSob/bin/vea
To administer a remote UNIX machine, use the following command:
# /opt/VRTSob/bin/vea remote_machine_name
Windows
To administer a remote UNIX machine, select Start > Programs > VERITAS Enterprise Administrator.
vxtunefs Command Permissions and Cached Quick I/O
By default, you must have superuser (root) privileges to use the /opt/VRTSvxfs/sbin/vxtunefs command. The vxtunefs command is a tool that lets you change caching policies to enable Cached Quick I/O and change other file system options. Database administrators can be granted permission to change default file system behavior in order to enable and disable Cached Quick I/O. The system administrator must change the vxtunefs executable permissions as follows:
# chown root:sybase /opt/VRTSvxfs/sbin/vxtunefs# chmod 4550 /opt/VRTSvxfs/sbin/vxtunefs
Note Setting the permissions for /opt/VRTSvxfs/sbin/vxtunefs to 4550 allows all users in the dba group to use the vxtunefs command to modify caching behavior for Quick I/O files.
Configuring VERITAS Volume ManagerAfter you have completed the package installation, and before using the VERITAS Volume Manager software, you must initialize VERITAS Volume Manager using the vxinstall command. This section describes how to initialize VERITAS Volume Manager using vxinstall. The vxinstall command places all specified disks under VERITAS Volume Manager control.
56 VERITAS Storage Foundation for Sybase Installation Guide
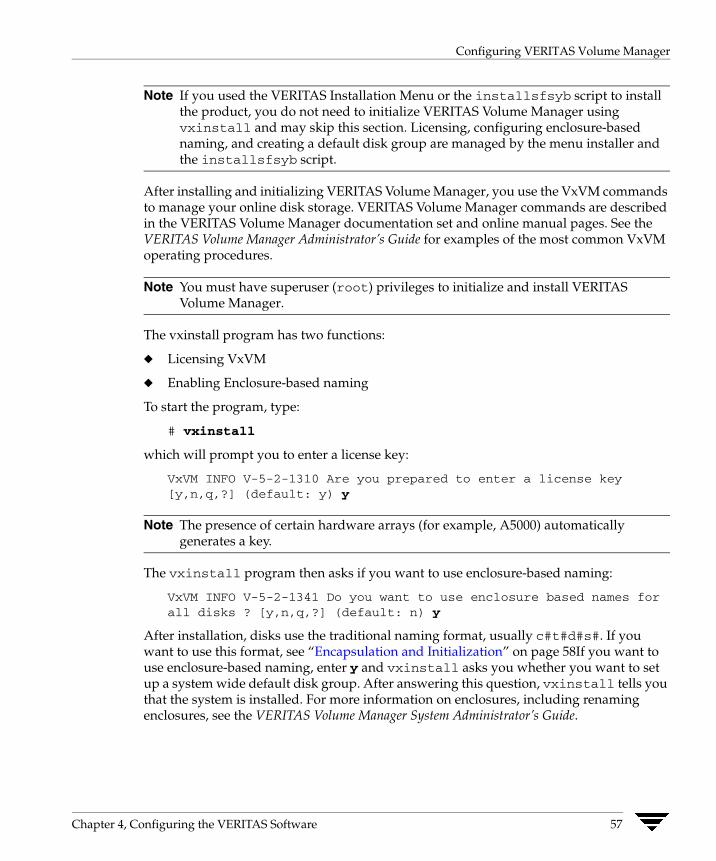
Configuring VERITAS Volume Manager
Note If you used the VERITAS Installation Menu or the installsfsyb script to install the product, you do not need to initialize VERITAS Volume Manager using vxinstall and may skip this section. Licensing, configuring enclosure-based naming, and creating a default disk group are managed by the menu installer and the installsfsyb script.
After installing and initializing VERITAS Volume Manager, you use the VxVM commands to manage your online disk storage. VERITAS Volume Manager commands are described in the VERITAS Volume Manager documentation set and online manual pages. See the VERITAS Volume Manager Administrator’s Guide for examples of the most common VxVM operating procedures.
Note You must have superuser (root) privileges to initialize and install VERITAS Volume Manager.
The vxinstall program has two functions:
◆ Licensing VxVM
◆ Enabling Enclosure-based naming
To start the program, type:
# vxinstall
which will prompt you to enter a license key:
VxVM INFO V-5-2-1310 Are you prepared to enter a license key [y,n,q,?] (default: y) y
Note The presence of certain hardware arrays (for example, A5000) automatically generates a key.
The vxinstall program then asks if you want to use enclosure-based naming:
VxVM INFO V-5-2-1341 Do you want to use enclosure based names for all disks ? [y,n,q,?] (default: n) y
After installation, disks use the traditional naming format, usually c#t#d#s#. If you want to use this format, see “Encapsulation and Initialization” on page 58If you want to use enclosure-based naming, enter y and vxinstall asks you whether you want to set up a system wide default disk group. After answering this question, vxinstall tells you that the system is installed. For more information on enclosures, including renaming enclosures, see the VERITAS Volume Manager System Administrator’s Guide.
Chapter 4, Configuring the VERITAS Software 57
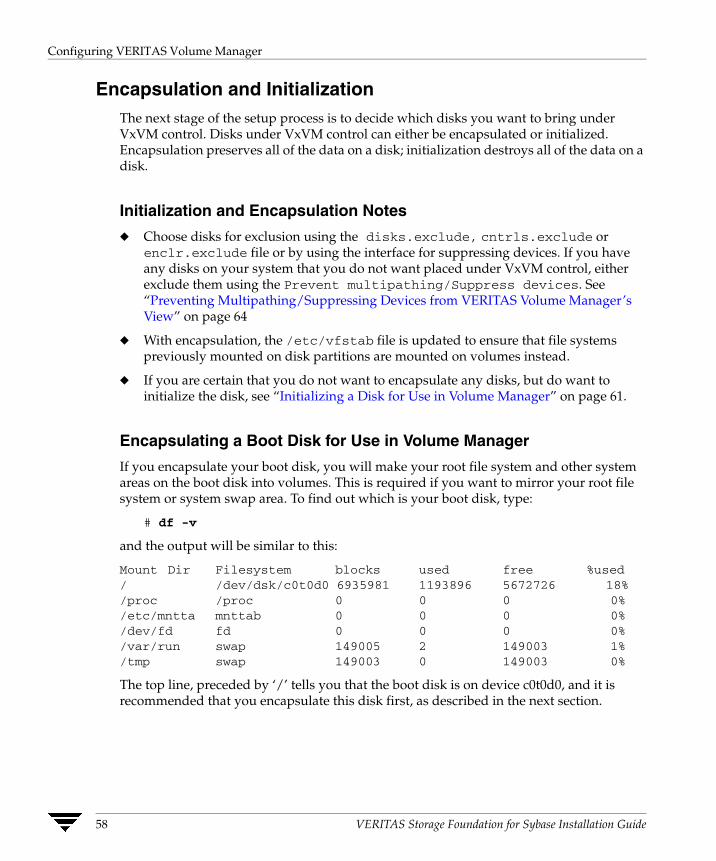
Configuring VERITAS Volume Manager
Encapsulation and Initialization The next stage of the setup process is to decide which disks you want to bring under VxVM control. Disks under VxVM control can either be encapsulated or initialized. Encapsulation preserves all of the data on a disk; initialization destroys all of the data on a disk.
Initialization and Encapsulation Notes
◆ Choose disks for exclusion using the disks.exclude, cntrls.exclude or enclr.exclude file or by using the interface for suppressing devices. If you have any disks on your system that you do not want placed under VxVM control, either exclude them using the Prevent multipathing/Suppress devices. See “Preventing Multipathing/Suppressing Devices from VERITAS Volume Manager’s View” on page 64
◆ With encapsulation, the /etc/vfstab file is updated to ensure that file systems previously mounted on disk partitions are mounted on volumes instead.
◆ If you are certain that you do not want to encapsulate any disks, but do want to initialize the disk, see “Initializing a Disk for Use in Volume Manager” on page 61.
Encapsulating a Boot Disk for Use in Volume Manager
If you encapsulate your boot disk, you will make your root file system and other system areas on the boot disk into volumes. This is required if you want to mirror your root file system or system swap area. To find out which is your boot disk, type:
# df -v
and the output will be similar to this:
Mount Dir Filesystem blocks used free %used / /dev/dsk/c0t0d0 6935981 1193896 5672726 18% /proc /proc 0 0 0 0% /etc/mntta mnttab 0 0 0 0% /dev/fd fd 0 0 0 0% /var/run swap 149005 2 149003 1% /tmp swap 149003 0 149003 0%
The top line, preceded by ‘/’ tells you that the boot disk is on device c0t0d0, and it is recommended that you encapsulate this disk first, as described in the next section.
58 VERITAS Storage Foundation for Sybase Installation Guide
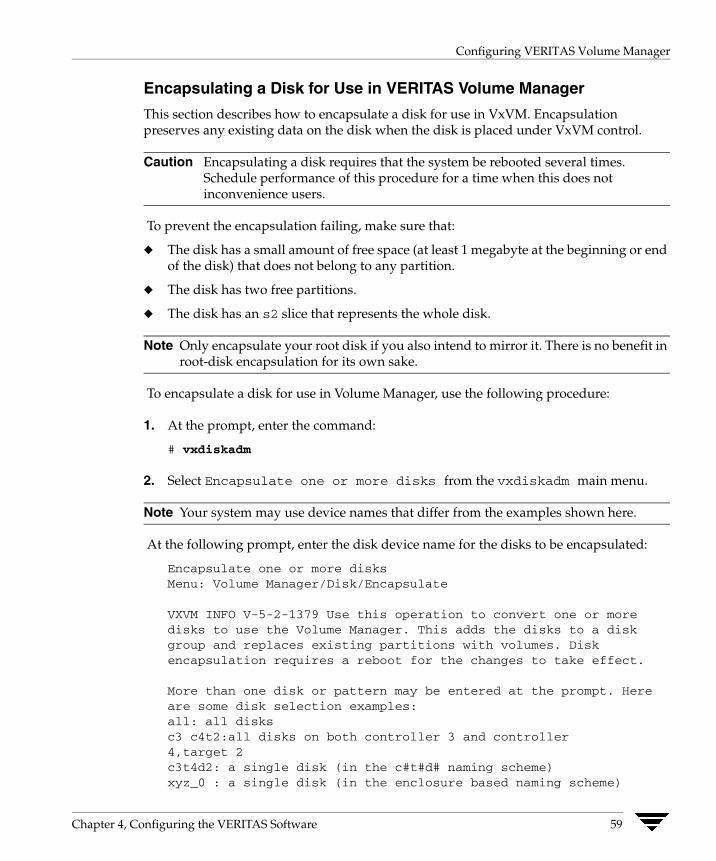
Configuring VERITAS Volume Manager
Encapsulating a Disk for Use in VERITAS Volume Manager
This section describes how to encapsulate a disk for use in VxVM. Encapsulation preserves any existing data on the disk when the disk is placed under VxVM control.
Caution Encapsulating a disk requires that the system be rebooted several times. Schedule performance of this procedure for a time when this does not inconvenience users.
To prevent the encapsulation failing, make sure that:
◆ The disk has a small amount of free space (at least 1 megabyte at the beginning or end of the disk) that does not belong to any partition.
◆ The disk has two free partitions.
◆ The disk has an s2 slice that represents the whole disk.
Note Only encapsulate your root disk if you also intend to mirror it. There is no benefit in root-disk encapsulation for its own sake.
To encapsulate a disk for use in Volume Manager, use the following procedure:
1. At the prompt, enter the command:
# vxdiskadm
2. Select Encapsulate one or more disks from the vxdiskadm main menu.
Note Your system may use device names that differ from the examples shown here.
At the following prompt, enter the disk device name for the disks to be encapsulated:
Encapsulate one or more disks Menu: Volume Manager/Disk/Encapsulate
VXVM INFO V-5-2-1379 Use this operation to convert one or moredisks to use the Volume Manager. This adds the disks to a diskgroup and replaces existing partitions with volumes. Disk encapsulation requires a reboot for the changes to take effect.
More than one disk or pattern may be entered at the prompt. Here are some disk selection examples: all: all disks c3 c4t2:all disks on both controller 3 and controller 4,target 2 c3t4d2: a single disk (in the c#t#d# naming scheme)xyz_0 : a single disk (in the enclosure based naming scheme)
Chapter 4, Configuring the VERITAS Software 59
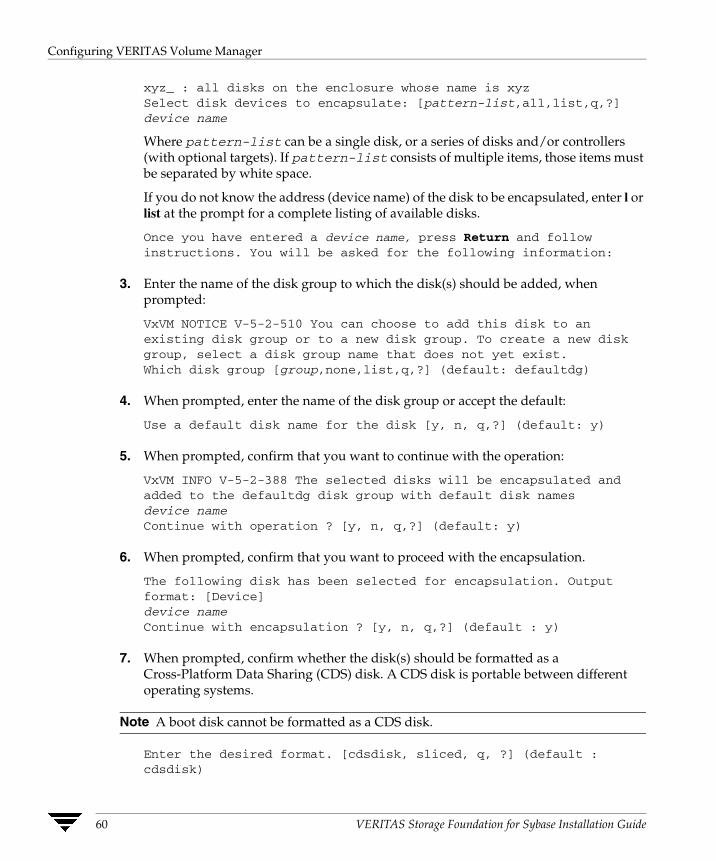
Configuring VERITAS Volume Manager
xyz_ : all disks on the enclosure whose name is xyz Select disk devices to encapsulate: [pattern-list,all,list,q,?] device name
Where pattern-list can be a single disk, or a series of disks and/or controllers (with optional targets). If pattern-list consists of multiple items, those items must be separated by white space.
If you do not know the address (device name) of the disk to be encapsulated, enter l or list at the prompt for a complete listing of available disks.
Once you have entered a device name, press Return and follow instructions. You will be asked for the following information:
3. Enter the name of the disk group to which the disk(s) should be added, when prompted:
VxVM NOTICE V-5-2-510 You can choose to add this disk to an existing disk group or to a new disk group. To create a new disk group, select a disk group name that does not yet exist. Which disk group [group,none,list,q,?] (default: defaultdg)
4. When prompted, enter the name of the disk group or accept the default:
Use a default disk name for the disk [y, n, q,?] (default: y)
5. When prompted, confirm that you want to continue with the operation:
VxVM INFO V-5-2-388 The selected disks will be encapsulated and added to the defaultdg disk group with default disk namesdevice name Continue with operation ? [y, n, q,?] (default: y)
6. When prompted, confirm that you want to proceed with the encapsulation.
The following disk has been selected for encapsulation. Outputformat: [Device]device name Continue with encapsulation ? [y, n, q,?] (default : y)
7. When prompted, confirm whether the disk(s) should be formatted as a Cross-Platform Data Sharing (CDS) disk. A CDS disk is portable between different operating systems.
Note A boot disk cannot be formatted as a CDS disk.
Enter the desired format. [cdsdisk, sliced, q, ?] (default : cdsdisk)
60 VERITAS Storage Foundation for Sybase Installation Guide
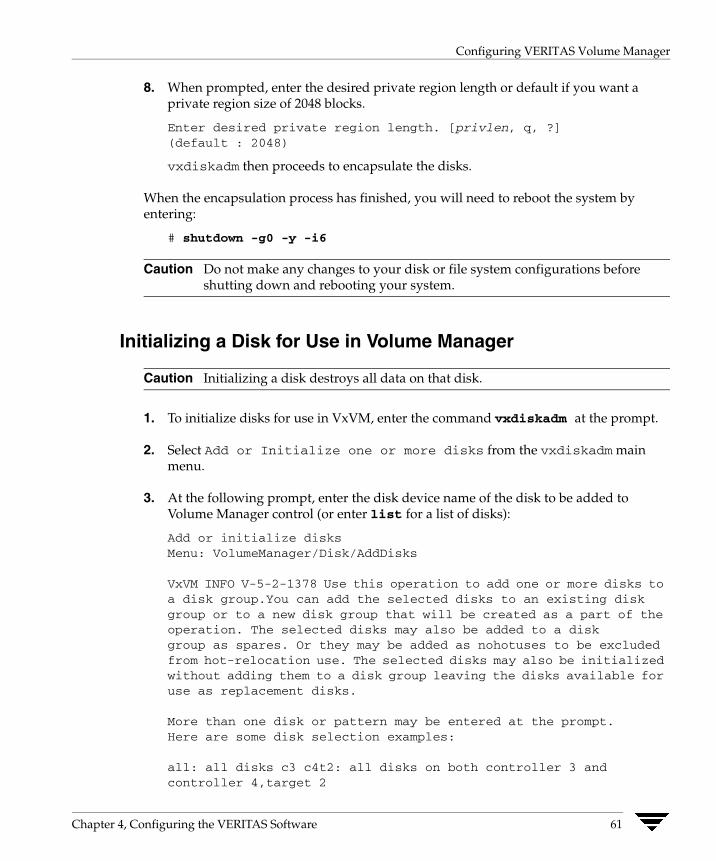
Configuring VERITAS Volume Manager
8. When prompted, enter the desired private region length or default if you want a private region size of 2048 blocks.
Enter desired private region length. [privlen, q, ?](default : 2048)
vxdiskadm then proceeds to encapsulate the disks.
When the encapsulation process has finished, you will need to reboot the system by entering:
# shutdown -g0 -y -i6
Caution Do not make any changes to your disk or file system configurations before shutting down and rebooting your system.
Initializing a Disk for Use in Volume Manager
Caution Initializing a disk destroys all data on that disk.
1. To initialize disks for use in VxVM, enter the command vxdiskadm at the prompt.
2. Select Add or Initialize one or more disks from the vxdiskadm main menu.
3. At the following prompt, enter the disk device name of the disk to be added to Volume Manager control (or enter list for a list of disks):
Add or initialize disks Menu: VolumeManager/Disk/AddDisks
VxVM INFO V-5-2-1378 Use this operation to add one or more disks to a disk group.You can add the selected disks to an existing disk group or to a new disk group that will be created as a part of the operation. The selected disks may also be added to a disk group as spares. Or they may be added as nohotuses to be excluded from hot-relocation use. The selected disks may also be initialized without adding them to a disk group leaving the disks available for use as replacement disks.
More than one disk or pattern may be entered at the prompt. Here are some disk selection examples:
all: all disks c3 c4t2: all disks on both controller 3 and controller 4,target 2
Chapter 4, Configuring the VERITAS Software 61
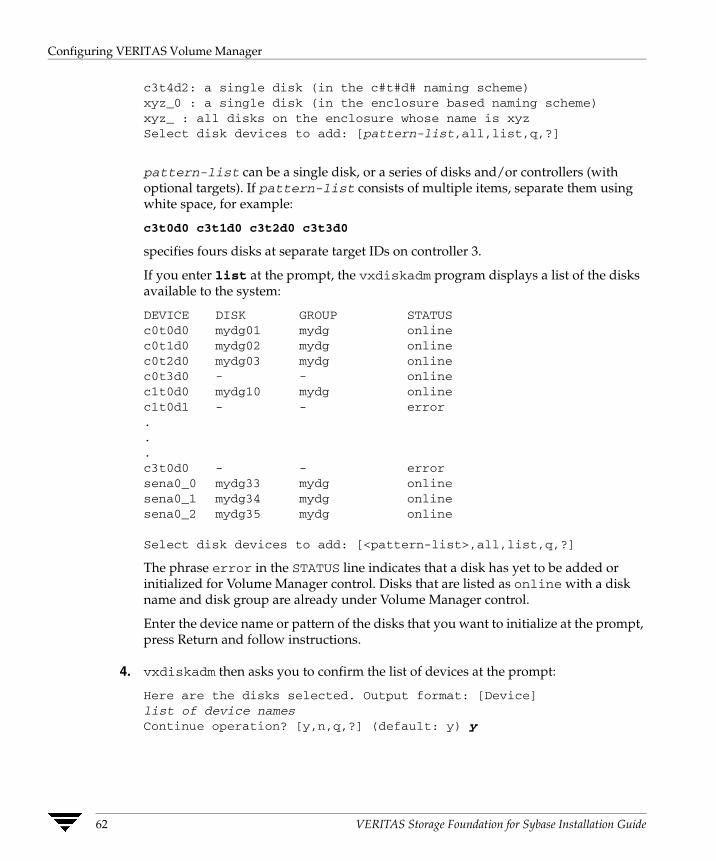
Configuring VERITAS Volume Manager
c3t4d2: a single disk (in the c#t#d# naming scheme) xyz_0 : a single disk (in the enclosure based naming scheme) xyz_ : all disks on the enclosure whose name is xyz Select disk devices to add: [pattern-list,all,list,q,?]
pattern-list can be a single disk, or a series of disks and/or controllers (with optional targets). If pattern-list consists of multiple items, separate them using white space, for example:
c3t0d0 c3t1d0 c3t2d0 c3t3d0
specifies fours disks at separate target IDs on controller 3.
If you enter list at the prompt, the vxdiskadm program displays a list of the disks available to the system:
DEVICE DISK c0t0d0 mydg01 c0t1d0 mydg02 c0t2d0 mydg03 c0t3d0 -c1t0d0 mydg10 c1t0d1 -. . . c3t0d0 -sena0_0 mydg33 sena0_1 mydg34 sena0_2 mydg35
GROUP STATUSmydg onlinemydg onlinemydg online- onlinemydg online- error
- error mydg onlinemydg onlinemydg online
Select disk devices to add: [<pattern-list>,all,list,q,?]
The phrase error in the STATUS line indicates that a disk has yet to be added or initialized for Volume Manager control. Disks that are listed as online with a disk name and disk group are already under Volume Manager control.
Enter the device name or pattern of the disks that you want to initialize at the prompt, press Return and follow instructions.
4. vxdiskadm then asks you to confirm the list of devices at the prompt:
Here are the disks selected. Output format: [Device] list of device names Continue operation? [y,n,q,?] (default: y) y
62 VERITAS Storage Foundation for Sybase Installation Guide
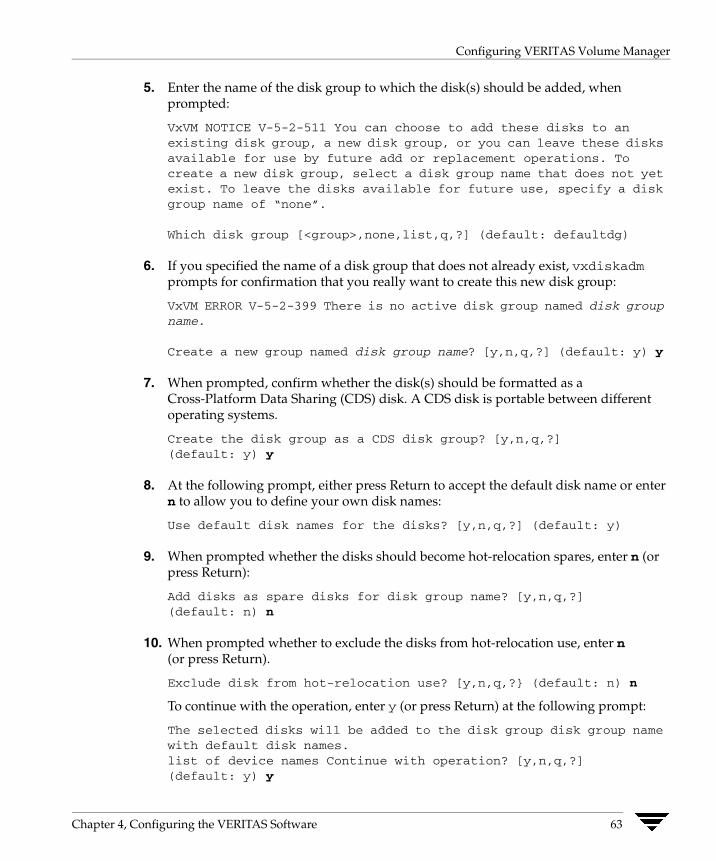
Configuring VERITAS Volume Manager
5. Enter the name of the disk group to which the disk(s) should be added, when prompted:
VxVM NOTICE V-5-2-511 You can choose to add these disks to an existing disk group, a new disk group, or you can leave these disks available for use by future add or replacement operations. To create a new disk group, select a disk group name that does not yet exist. To leave the disks available for future use, specify a disk group name of “none”.
Which disk group [<group>,none,list,q,?] (default: defaultdg)
6. If you specified the name of a disk group that does not already exist, vxdiskadm prompts for confirmation that you really want to create this new disk group:
VxVM ERROR V-5-2-399 There is no active disk group named disk group name.
Create a new group named disk group name? [y,n,q,?] (default: y) y
7. When prompted, confirm whether the disk(s) should be formatted as a Cross-Platform Data Sharing (CDS) disk. A CDS disk is portable between different operating systems.
Create the disk group as a CDS disk group? [y,n,q,?] (default: y) y
8. At the following prompt, either press Return to accept the default disk name or enter n to allow you to define your own disk names:
Use default disk names for the disks? [y,n,q,?] (default: y)
9. When prompted whether the disks should become hot-relocation spares, enter n (or press Return):
Add disks as spare disks for disk group name? [y,n,q,?] (default: n) n
10. When prompted whether to exclude the disks from hot-relocation use, enter n (or press Return).
Exclude disk from hot-relocation use? [y,n,q,?} (default: n) n
To continue with the operation, enter y (or press Return) at the following prompt:
The selected disks will be added to the disk group disk group name with default disk names. list of device names Continue with operation? [y,n,q,?] (default: y) y
Chapter 4, Configuring the VERITAS Software 63
Configuring VERITAS Volume Manager
11. At the following prompt, indicate whether you want to continue to initialize more disks (y) or return to the vxdiskadm main menu (n):
Add or initialize other disks? [y,n,q,?] (default: n)
Preventing Multipathing/Suppressing Devices from VERITAS Volume Manager’s View
This section describes how to exclude a device that is under VERITAS Volume Manager or Dynamic Multipathing control. To prevent multipathing or suppress devices, enter the command:
# vxdiskadm
1. From the vxdiskadm main menu, select Prevent Multipathing/Suppress devices from VxVM’s view.
The following message displays:
This operation might lead to some devices being suppressed from VxVM’s view or prevent them from being multipathed by vxdmp. (This operation can be reversed using the vxdiskadm command).
Do you want to continue? [y,n,q,?] (default: n) y
2. Enter y.
3. Select an operation.
● Suppress all paths through a controller from VxVM’s view:
Select Option 1.
Enter a controller name when prompted:
Enter a controller name:[ctlr_name,all,list,list-exclude,q,?]
● Suppress a path from VxVM’s view:
Select Option 2.
Enter a path when prompted.
Enter a pathname or pattern:[Pattern,all,list,list-exclude,q?]
● Suppress disks from VxVM’s view by specifying a VID:PID combination:
Select Option 3 and read the messages displayed on the screen.
Enter a VID:PID combination when prompted.
64 VERITAS Storage Foundation for Sybase Installation Guide

Configuring VERITAS Volume Manager
Enter a VID:PID combination:[Pattern,all,list,exclude,q,?]
The disks that match the VID:PID combination are excluded from VERITAS Volume Manager. Obtain the Vendor ID and Product ID from the Standard SCSI inquiry data returned by the disk.
For example, the VID:PID combination for Sun’s T3 disk array can be specified as SUN:T3. Obtain the Vendor ID and Product ID of the disk by the command /usr/lib/vxvm/diag.d/vxdmpinq.
● Suppress all but one path to a disk:
Select Option 4 and read the messages displayed on the screen before specifying a path.
Enter a path when prompted:
Enter pathgroup: [pattern,list,list-exclude,q,?]
The next three options allow you to exclude devices from vxdmp.
● Prevent multipathing of all disks on a controller by VxVM.
Select Option 5 and read the messages displayed on the screen before specifying a controller.
Enter a controller name when prompted. The controller entered is excluded from DMP control.
Enter a controller name:[ctlr-name,all,list,list-exclude,q,?]
● Prevent multipathing of a disk by VxVM.
Select Option 6 to exclude the specified path from multipathing. The corresponding disks are claimed in the OTHER_DISKS category and are not multipathed. Read the messages displayed on the screen before specifying a path.
Enter a path at the prompt:
Enter a pathname or pattern:[pattern,all,list,list-exclude,q,?]
● Prevent multipathing of disks by specifying a VID:PID combination.
Select Option 7 to exclude disks by a VIP:PID combination. All disks returning a VID:PID combination are claimed in the OTHER_DISKS category and are not multipathed. Read the messages displayed on the screen before specifying a VIP:PID.
Enter the VID:PID combination at the prompt:
Enter a VID:PIDcombination:[pattern,all,list,list-exclude,q,?]
Chapter 4, Configuring the VERITAS Software 65
Configuring VERITAS Volume Manager
If you selected any of the options, reboot the system for device exclusion to take effect and re-run vxdiskadm. After the reboot for the menu item Prevent Multipathing/Suppress devices, run vxdiskadm again to complete the installation.
Rebooting after vxinstall After you decide how you want the vxinstall program to process all of the disks attached to your system, you may have to reboot the system to make changes to your disk partitioning that cannot be made while your disks are in use. The way in which you chose to handle your disks during the vxinstall session determines whether a shutdown and reboot is required. If you chose to encapsulate any disks, you must reboot.
The vxinstall command informs you if and when a shutdown and reboot is necessary. Conduct the shutdown and reboot as soon as possible.
Note The setup you choose can require several reboots. Refer to “Database Configuration Considerations” on page 53 for reboot planning issues.
When it is necessary to shut down and reboot your system, vxinstall displays a message similar to the following:
The system now must be shut down and rebooted in order tocontinue the reconfiguration.Shutdown and reboot now [y,n,q,?] (default: n)
If this message appears, respond in either of the following ways:
◆ Enter y to begin an immediate shutdown.
◆ Enter n to cause vxinstall to exit without starting a shutdown. If you select this option, it is your responsibility to shut down and reboot as soon as possible. Refer to “Database Configuration Considerations” on page 53 for reboot planning issues.
Caution During the next one or more reboots, you may be asked several times if you wish to continue an operation. Press the Return key at all of these prompts to accept the default answer. If you select a different answer from the default for any of these prompts, or press q, the initialization can fail.
66 VERITAS Storage Foundation for Sybase Installation Guide
Configuring VERITAS Volume Manager
Confirming that VERITAS Volume Manager Processes Are Running
Once VERITAS Volume Manager is installed and you have rebooted your system, use the following command to confirm that key VxVM processes (vxconfigd, vxnotify, and vxrelocd) are running:
# ps -ef | grep vx
This command displays output similar to the following:
root 458 1 80 10:23:34 ? 0:00 vxrelocd rootroot 414 1 80 10:23:06 ? 0:03 vxconfigd -k -m enableroot 478 458 39 10:23:37 ? 0:00 vxrelocd rootroot 479 478 5 10:23:37 ? 0:00 vxnotify -f -w 15
Note If you have disabled Hot-Relocation, vxrelocd and vxnotify should not be shown as running.
Using Storage Expert System administrators often find that gathering and interpreting data about large and complex configurations can be a difficult task. VERITAS Storage Expert (vxse) is designed to help in diagnosing configuration problems with VxVM.
Storage Expert consists of a set of simple commands that collect VxVM configuration data and compare it with “best practice.” Storage Expert then produces a summary report that shows which objects do not meet these criteria and makes recommendations for VxVM configuration improvements. These user-configurable tools help you as an administrator to verify and validate systems and non-optimal configurations in both small and large VxVM installations. Storage Expert components include a set of rule scripts and a rules engine. The rules engine runs the scripts and produces ASCII output, which is organized and archived by Storage Expert’s report generator. This output contains information about areas of VxVM configuration that do not meet the set criteria. By default, output is sent to the screen, but you can redirect it to a file using standard UNIX redirection. For more information on using Storage Expert, see the VERITAS Volume Manager System Administrator’s Guide.
Chapter 4, Configuring the VERITAS Software 67

Configuring VERITAS File System
Configuring VERITAS File System After installing VERITAS File System, you can create a file system on a disk slice or VERITAS Volume Manager volume with the mkfs command. Before you can use this file system, you must mount it with the mount command. You can unmount the file system later with the umount command. A file system can be automatically mounted at system boot time if you add an entry for it in the /etc/vfstab file.
The VERITAS-specific commands are described in the VERITAS File System guides and online manual pages. See the Quick Start Guide Reference chapter of the VERITAS File System Administrator’s Guide for examples of the most common VxFS operating procedures.
VERITAS File System does not require initialization.
Upgrading VxFS Disk Layouts VERITAS 4.0 file systems employ disk layout Version 6, which allows the creation of file system sizes up to 32 terabytes. File systems created on VxFS 3.5 will by default use the new disk layout, Version 6. File systems larger than 1TB, however, necessarily use an 8 K block size.
This release is the last to support the VxFS Version 1, Version 2, and Version 3 disk layouts. You can still mount these older disk layout versions, however, you cannot create them using the VERITSAS mkfs command. You should begin upgrading any Version 1 or Version 2 disk layout file systems to Version 6 for them to be usable on future releases of VxFS.
Use the vxupgrade command to upgrade an existing VxFS disk layout to disk layout 6 while the file system remains online:
# vxupgrade -n 6 /mount_point
See the vxupgrade(1M) and fsadm(1M) manual pages for more information on upgrading VxFS file systems.
Note To use the Storage Checkpoint, Storage Rollback, cluster file system, and BLI Backup features, the database must be on VxFS file systems using a Version 4 or higher layout. Use the fstyp -v device command to determine the layout version of your file system.
68 VERITAS Storage Foundation for Sybase Installation Guide
Verifying the VERITAS Storage Foundation for Sybase Installation
Verifying Command Installation VERITAS File System commands and utilities are installed in four directories:
/opt/VRTSvxfs/sbin
/usr/lib/fs/vxfs/bin
/etc/fs/vxfs
/usr/lib/fs/vxfs
contains most VxFS-specific commands
contains additional VxFS-aware commands for manipulating files with extents
contains the VxFS mount command and QuickLog commands required to mount file systems
contains VxFS switch-out commands, used with the -F option on file system utilities (such as fsck). See fsck(1M) for more information.
These directory locations have changed from previous versions of VERITAS Storage Foundation. List these directories in your PATH environment variable to make the commands accessible. See “Environment Variables” on page 6 for the correct path settings.
Verifying the VERITAS Storage Foundation for Sybase Installation
To verify the VERITAS Storage Foundation for Sybase installation, you can look at the VERITAS File System kernel component and administrative utilities.
▼ To verify the VERITAS Storage Foundation for Sybase installation
1. Verify the kernel components installation by loading the modules using the modload command:
# modload /usr/kernel/drv/fdd
2. Verify that the modules loaded by entering:
# modinfo | egrep 'vxfs|fdd|kaio'
The modinfo command displays information about all modules loaded on the system. If vxfs is loaded, you see an entry corresponding to vxfs, for example:
184 78326000 15cc85 16 1 vxfs (VxFS 4.0 (SunOS 5.8))185 78486000 a011 202 1 fdd (VxQIO 4.0 Quick I/O d)186 78490000 3d82 178 1 kaio (kernel Async I/O)186 78490000 3d82 178 1 kaio (kernel Async I/O for 32 bit com)187 78520000 188e7 203 1 qlog (VxQLOG 4.0 QuickLog d)
Chapter 4, Configuring the VERITAS Software 69

Verifying the VERITAS Storage Foundation for Sybase Installation
If the file system module is not loaded, this indicates you are replacing an existing kernel component with another one having the same name and links. Continue with the next step to complete the process.
3. Reboot the system, using a command such as shutdown.
Note You only need to reboot the system once for all the VERITAS Storage Foundation for Sybase packages. When you have installed all the packages, you can reboot one time to complete the process, including loading the VERITAS File System modules. Refer to “Database Configuration Considerations” on page 53 for reboot planning issues.
70 VERITAS Storage Foundation for Sybase Installation Guide
High Availability (HA) Products
5 This chapter describes the High Availability (HA) version of VERITAS Storage Foundation for Sybase.Topics covered in this chapter include:
◆ “HA Product Overview” on page 71
◆ “VERITAS Storage Foundation for Sybase/HA” on page 71
HA Product Overview A High Availability (HA) version of VERITAS Storage Foundation for Sybase is available for customers who have high system-availability requirements. The HA product lets database administrators integrate multiple servers into high availability database configurations. These configurations provide continuous services if a server system or subsystem fails and significantly reduces the down time of Sybase databases caused by a system hardware or software failure.
VERITAS Storage Foundation for Sybase/HA In addition to the products contained in the standard VERITAS Storage Foundation for Sybase package, the HA version incorporates the following VERITAS products:
◆ VERITAS Cluster ServerTM (VCS)
◆ VERITAS Cluster Server (VCS) Sybase Enterprise Extension
71

VERITAS Storage Foundation for Sybase/HA
HA Packaging ◆ VERITAS Cluster Server (VCS) contains the following:
● VRTScpi: VERITAS Common Product Installer
● VRTScscm: VCS Cluster Manager (Java Console)
● VRTScscw: VCS Configuration Wizards
● VRTScspro: VCS VEA Provider
● VRTScsim: VCS Simulator
● VRTSgab: Group Membership and Atomic Broadcast
● VRTSllt: Low Latency Transport
● VRTSperl: VERITAS Perl
● VRTSvcs: VERITAS Cluster Server
● VRTSvcsag: VCS Bundled Agents
● VRTSvcsdc: VCS Documentation
● VRTSvcsjre: VCS redistribution of JRE
● VRTSvcsmg: VCS Message Catalogs
● VRTSvcsmn: VCS Manual Pages
● VRTSvcssy: VCS Enterprise Agent for Sybase
● VRTSvcsw: Cluster Manager (Web Console)
● VRTSvlic: VERITAS License Utilities
● VRTSvxfen: VCS Fencing Driver
● VRTSweb: VERITAS Web GUI Engine
● WindowsClusterManager: Cluster Manager for Windows clients
● WindowsSimulator: VCS Simulator for Windows clients
● WindowsWebConsole: VCS Web Console for Windows clients
◆ The VCS documentation set includes Portable Document Format (.pdf) versions of:
● vcs_notes.pdf, VERITAS Cluster Server Release Notes
● vcs_ig.pdf, VERITAS Cluster Server Installation Guide
● vcs_adg.pdf, VERITAS Cluster Server Agent Developer’s Guide
● vcs_barg.pdf, VERITAS Cluster Server Bundled Agents Reference Guide
72 VERITAS Storage Foundation for Sybase Installation Guide

VERITAS Storage Foundation for Sybase/HA
● vcssol_sybase.pdf, VERITAS Cluster Server Enterprise Agent for Sybase Installation and Configuration Guide
● vcs_ug.pdf, VERITAS Cluster Server User’s Guide
● vcs_appnote_f15kdr.pdf, VERITAS Cluster Server Application Note: Sun Fire 12K/15K Dynamic Reconfiguration
● vcs_appnote_s6800dr.pdf, VERITAS Cluster Server Application Note: Sun Fire 6800 Dynamic Reconfiguration
● vcs_appnote_e10kdr.pdf, VERITAS Cluster Server Application Note: Sun Enterprise 10000 Dynamic Reconfiguration
Licensing VERITAS Storage Foundation for Sybase/HA (VCS) is a licensed product. You require two separate license keys for each server when you install: one for VERITAS Storage Foundation for Sybase and one for VERITAS Cluster Server (VCS). Before you install the various components, obtain VERITAS Storage Foundation for Sybase and VCS license keys from VERITAS. For information on obtaining license keys, see “Obtaining a License Key” on page 1 of the VERITAS Storage Foundation for Sybase Installation Guide.
Note For more VCS license information, refer to your VCS documentation.
Installing
▼ To install VERITAS Storage Foundation for Sybase/HA
1. Follow the installation procedures for VERITAS Storage Foundation for Sybase on each HA server as outlined in “Installation and Uninstallation” on page 11.
2. Follow the steps outlined in the VERITAS Cluster Server Installation Guide and the VERITAS Cluster Server User’s Guide to install the VCS software and configure the VCS HA environment.
3. Follow the steps outlined in the VERITAS Cluster Server Enterprise Agent for Sybase Installation and Configuration Guide to install and configure the VCS Sybase Extension.
Note See “Obtaining the VCS Enterprise Agent for Sybase” on page 74 for more information about obtaining the VCS Enterprise Agent for Sybase.
Chapter 5, High Availability (HA) Products 73

VERITAS Storage Foundation for Sybase/HA
Obtaining the VCS Enterprise Agent for Sybase The VERITAS Cluster Server Enterprise Agent for Sybase is supplied withthe VCS agents on the appropriate media disc that came with your software. You can access it from the /cluster_server_agents/syb_agent directory.
74 VERITAS Storage Foundation for Sybase Installation Guide

Sample Output
A This appendix provides a sample of the output from installation, uninstallation, and optional package installation of VERITAS Storage Foundation for Sybase.Note Use this example for reference only—the output for each operating system version and installation environment differs slightly.
Sample Installation Output The following output is an example of a VERITAS Storage Foundation for Sybase installation on a Solaris 9 operating system.
Use the following commands to view the VERITAS Storage Foundation for Sybase packages on the CD:
# pwd/cdrom/cdrom0/storage_foundation_for_sybase/pkgs
# lsinfo VRTSfsdoc.tar.gz VRTSperl.tar.gz VRTSvmman.tar.gzVRTSalloc.tar.gz VRTSfsman.tar.gz VRTSsybed.tar.gz VRTSvmpro.tar.gzVRTSap.tar.gz VRTSfspro.tar.gz VRTSsydoc.tar.gz VRTSvxfs.tar.gzVRTScpi VRTSmuob.tar.gz VRTStep.tar.gz VRTSvxvm.tar.gzVRTSddlpr.tar.gz VRTSobgui.tar.gz VRTSvlic.tar.gzVRTSfppm.tar.gz VRTSob.tar.gz VRTSvmdoc.tar.gz
Type the VERITAS Storage Foundation for Sybase installation program name to install the software:
# /cdrom/cdrom0/storage_foundation_for_sybase/installsfsyb
VERITAS STORAGE FOUNDATION FOR SYBASE 4.0 INSTALLATION PROGRAM
Copyright (c) 2003 VERITAS Software Corporation. All rights reserved.
VERITAS, the VERITAS Logo and all other VERITAS product names andslogans are trademarks or registered trademarks of VERITAS Software
75

Sample Installation Output
Corporation. VERITAS and the VERITAS Logo Reg. U.S. Pat. & Tm. Off.Other product names and/or slogans mentioned herein may be trademarksor registered trademarks of their respective companies.
Enter the system names separated by spaces on which to install SFSYB: grouper
Checking OS version on grouper ......................... SunOS 5.8Checking VRTSsybed package ......................... not installedChecking required SunOS patch 108528-18 on grouper ... 108528-19
installedChecking required SunOS patch 108827-19 on grouper ... 108827-40
installedChecking required SunOS patch 109529-06 on grouper ... 109529-06
installedChecking required SunOS patch 111413-06 on grouper ... 111413-09
installed
Initial system check completed successfully.
Press [Return] to continue:
VERITAS STORAGE FOUNDATION FOR SYBASE 4.0 INSTALLATION PROGRAM
VERITAS Infrastructure package installation:
Installing VERITAS Infrastructure packages on grouper:
Checking VRTScpi package ........................... not installedChecking VRTSvlic package .......................... not installedChecking file system space ........... required space is availableInstalling VRTScpi 4.0.3 on grouper ......................... DoneInstalling VRTSvlic 3.02.003 on grouper ..................... Done
VERITAS Infrastructure packages installed successfully.
Press [Return] to continue:
VERITAS STORAGE FOUNDATION FOR SYBASE 4.0 INSTALLATION PROGRAM
SFSYB Licensing Verification:
Checking SFSYB license key on grouper ... Storage Foundation for Sybase Demo
Do you want to enter another license key for grouper? [y,n,q,?] (n)
76 VERITAS Storage Foundation for Sybase Installation Guide

Sample Installation Output
SFSYB licensing verified successfully.
Press [Return] to continue:
VERITAS STORAGE FOUNDATION FOR SYBASE 4.0 INSTALLATION PROGRAM
installsfsyb can install the following optional SFSYB packages:
VRTSobgui VERITAS Enterprise AdministratorVRTSvmman VERITAS Volume Manager Manual PagesVRTSvmdoc VERITAS Volume Manager DocumentationVRTStep VERITAS Task ProviderVRTSap VERITAS Action ProviderVRTSfsman VERITAS File System Manual PagesVRTSfsdoc VERITAS File System DocumentationVRTSsydoc VERITAS Storage Foundation for Sybase Documentation
1) Install all of the optional packages2) Install none of the optional packages3) View package descriptions and select optional packages
Select the optional packages to be installed on all systems? [1-3,q,?] (1)
VERITAS STORAGE FOUNDATION FOR SYBASE 4.0 INSTALLATION PROGRAM
installsfsyb will install the following SFSYB packages:VRTSperl VERITAS Perl 5.8.0 RedistributionVRTSob VERITAS Enterprise Administrator ServiceVRTSobgui VERITAS Enterprise AdministratorVRTSvxvm VERITAS Volume Manager BinariesVRTSvmman VERITAS Volume Manager Manual PagesVRTSvmdoc VERITAS Volume Manager DocumentationVRTSvmpro VERITAS Volume Manager Management Services ProviderVRTSfspro VERITAS File System Management Services ProviderVRTSalloc VERITAS Volume Manager Intelligent Storage ProvisioningVRTSddlpr VERITAS Device Discovery Layer Services ProviderVRTSvxfs VERITAS File SystemVRTStep VERITAS Task ProviderVRTSap VERITAS Action ProviderVRTSfppm VERITAS File Placement Policy ManagerVRTSfsman VERITAS File System Manual PagesVRTSfsdoc VERITAS File System DocumentationVRTSsybed VERITAS Storage Foundation for SybaseVRTSsydoc VERITAS Storage Foundation for Sybase Documentation
Appendix A, Sample Output 77
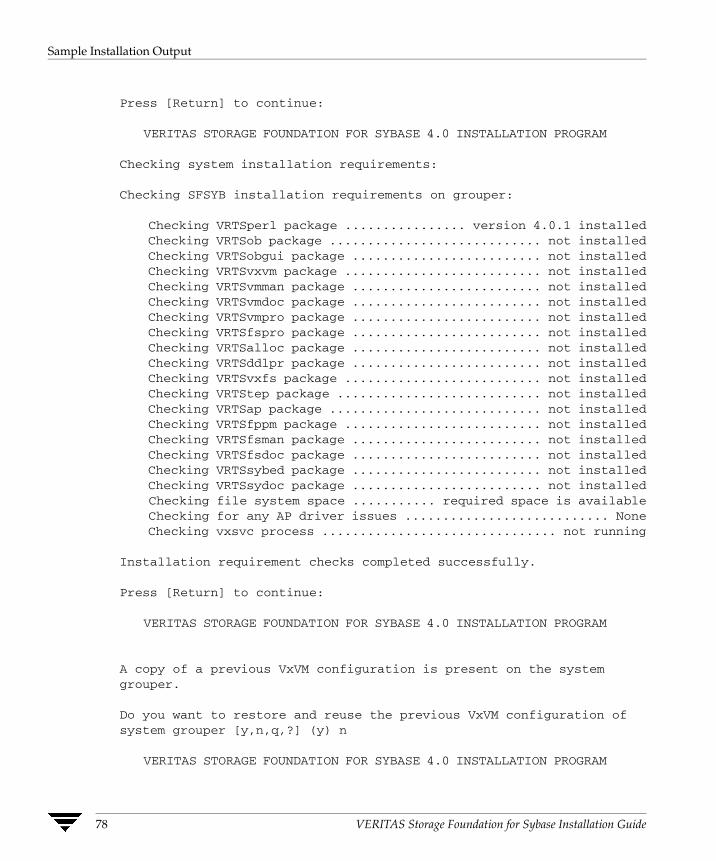
Sample Installation Output
Press [Return] to continue:
VERITAS STORAGE FOUNDATION FOR SYBASE 4.0 INSTALLATION PROGRAM
Checking system installation requirements:
Checking SFSYB installation requirements on grouper:
Checking VRTSperl package ................ version 4.0.1 installedChecking VRTSob package ............................ not installedChecking VRTSobgui package ......................... not installedChecking VRTSvxvm package .......................... not installedChecking VRTSvmman package ......................... not installedChecking VRTSvmdoc package ......................... not installedChecking VRTSvmpro package ......................... not installedChecking VRTSfspro package ......................... not installedChecking VRTSalloc package ......................... not installedChecking VRTSddlpr package ......................... not installedChecking VRTSvxfs package .......................... not installedChecking VRTStep package ........................... not installedChecking VRTSap package ............................ not installedChecking VRTSfppm package .......................... not installedChecking VRTSfsman package ......................... not installedChecking VRTSfsdoc package ......................... not installedChecking VRTSsybed package ......................... not installedChecking VRTSsydoc package ......................... not installedChecking file system space ........... required space is availableChecking for any AP driver issues ........................... NoneChecking vxsvc process ............................... not running
Installation requirement checks completed successfully.
Press [Return] to continue:
VERITAS STORAGE FOUNDATION FOR SYBASE 4.0 INSTALLATION PROGRAM
A copy of a previous VxVM configuration is present on the system grouper.
Do you want to restore and reuse the previous VxVM configuration ofsystem grouper [y,n,q,?] (y) n
VERITAS STORAGE FOUNDATION FOR SYBASE 4.0 INSTALLATION PROGRAM
78 VERITAS Storage Foundation for Sybase Installation Guide
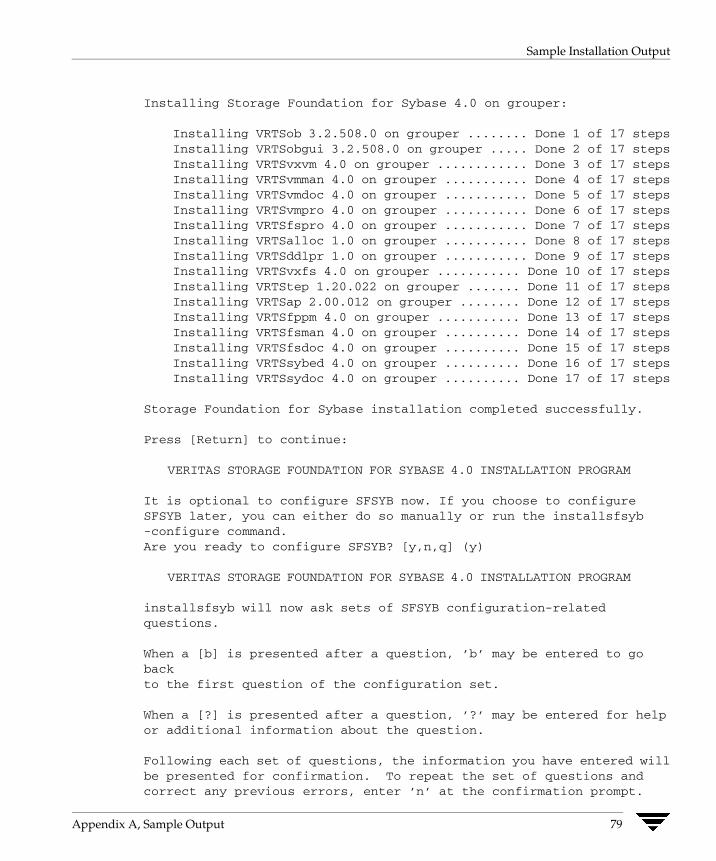
Sample Installation Output
Installing Storage Foundation for Sybase 4.0 on grouper:
Installing VRTSob 3.2.508.0 on grouper ........ Done 1 of 17 stepsInstalling VRTSobgui 3.2.508.0 on grouper ..... Done 2 of 17 stepsInstalling VRTSvxvm 4.0 on grouper ............ Done 3 of 17 stepsInstalling VRTSvmman 4.0 on grouper ........... Done 4 of 17 stepsInstalling VRTSvmdoc 4.0 on grouper ........... Done 5 of 17 stepsInstalling VRTSvmpro 4.0 on grouper ........... Done 6 of 17 stepsInstalling VRTSfspro 4.0 on grouper ........... Done 7 of 17 stepsInstalling VRTSalloc 1.0 on grouper ........... Done 8 of 17 stepsInstalling VRTSddlpr 1.0 on grouper ........... Done 9 of 17 stepsInstalling VRTSvxfs 4.0 on grouper ........... Done 10 of 17 stepsInstalling VRTStep 1.20.022 on grouper ....... Done 11 of 17 stepsInstalling VRTSap 2.00.012 on grouper ........ Done 12 of 17 stepsInstalling VRTSfppm 4.0 on grouper ........... Done 13 of 17 stepsInstalling VRTSfsman 4.0 on grouper .......... Done 14 of 17 stepsInstalling VRTSfsdoc 4.0 on grouper .......... Done 15 of 17 stepsInstalling VRTSsybed 4.0 on grouper .......... Done 16 of 17 stepsInstalling VRTSsydoc 4.0 on grouper .......... Done 17 of 17 steps
Storage Foundation for Sybase installation completed successfully.
Press [Return] to continue:
VERITAS STORAGE FOUNDATION FOR SYBASE 4.0 INSTALLATION PROGRAM
It is optional to configure SFSYB now. If you choose to configure SFSYB later, you can either do so manually or run the installsfsyb -configure command.Are you ready to configure SFSYB? [y,n,q] (y)
VERITAS STORAGE FOUNDATION FOR SYBASE 4.0 INSTALLATION PROGRAM
installsfsyb will now ask sets of SFSYB configuration-related questions.
When a [b] is presented after a question, ’b’ may be entered to go backto the first question of the configuration set.
When a [?] is presented after a question, ’?’ may be entered for helpor additional information about the question.
Following each set of questions, the information you have entered willbe presented for confirmation. To repeat the set of questions andcorrect any previous errors, enter ’n’ at the confirmation prompt.
Appendix A, Sample Output 79
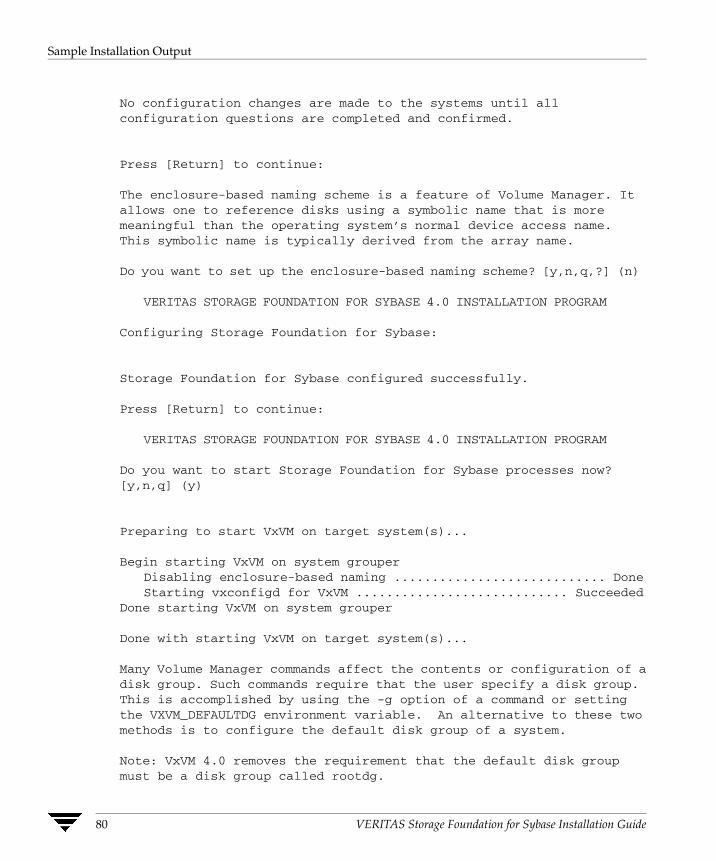
Sample Installation Output
No configuration changes are made to the systems until allconfiguration questions are completed and confirmed.
Press [Return] to continue:
The enclosure-based naming scheme is a feature of Volume Manager. It allows one to reference disks using a symbolic name that is more meaningful than the operating system’s normal device access name. This symbolic name is typically derived from the array name.
Do you want to set up the enclosure-based naming scheme? [y,n,q,?] (n)
VERITAS STORAGE FOUNDATION FOR SYBASE 4.0 INSTALLATION PROGRAM
Configuring Storage Foundation for Sybase:
Storage Foundation for Sybase configured successfully.
Press [Return] to continue:
VERITAS STORAGE FOUNDATION FOR SYBASE 4.0 INSTALLATION PROGRAM
Do you want to start Storage Foundation for Sybase processes now?[y,n,q] (y)
Preparing to start VxVM on target system(s)...
Begin starting VxVM on system grouperDisabling enclosure-based naming ............................ DoneStarting vxconfigd for VxVM ............................ Succeeded
Done starting VxVM on system grouper
Done with starting VxVM on target system(s)...
Many Volume Manager commands affect the contents or configuration of adisk group. Such commands require that the user specify a disk group. This is accomplished by using the -g option of a command or setting the VXVM_DEFAULTDG environment variable. An alternative to these twomethods is to configure the default disk group of a system.
Note: VxVM 4.0 removes the requirement that the default disk group must be a disk group called rootdg.
80 VERITAS Storage Foundation for Sybase Installation Guide

Sample Installation Output
Do you want to set up the default disk group for each system? [y,n,q,?] (n)
Storage Foundation for Sybase was started successfully.
Press [Return] to continue:
VERITAS STORAGE FOUNDATION FOR SYBASE 4.0 INSTALLATION PROGRAM
Installation of Storage Foundation for Sybase 4.0 has completedsuccessfully.
The installation summary is saved at:
/opt/VRTS/install/logs/installsfsyb702155238.summary
The installsfsyb log is saved at:
/opt/VRTS/install/logs/installsfsyb702155238.log
The installation response file is saved at:
/opt/VRTS/install/logs/installsfsyb702155238.response
All machines on which SFSYB was installed or upgraded must nowbe rebooted to ensure sane operation. Execute
shutdown -y -i6 -g0and wait for the Console Login: prompt.Please refer to the Administrator Guide for more information.
Appendix A, Sample Output 81
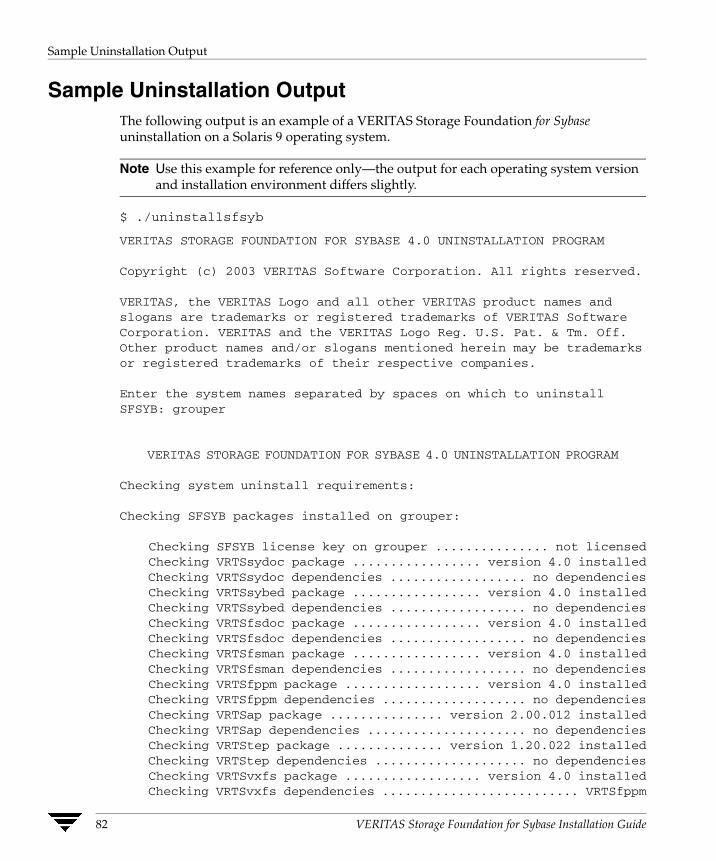
Sample Uninstallation Output
Sample Uninstallation Output The following output is an example of a VERITAS Storage Foundation for Sybase uninstallation on a Solaris 9 operating system.
Note Use this example for reference only—the output for each operating system version and installation environment differs slightly.
$ ./uninstallsfsyb
VERITAS STORAGE FOUNDATION FOR SYBASE 4.0 UNINSTALLATION PROGRAM
Copyright (c) 2003 VERITAS Software Corporation. All rights reserved.
VERITAS, the VERITAS Logo and all other VERITAS product names andslogans are trademarks or registered trademarks of VERITAS SoftwareCorporation. VERITAS and the VERITAS Logo Reg. U.S. Pat. & Tm. Off.Other product names and/or slogans mentioned herein may be trademarksor registered trademarks of their respective companies.
Enter the system names separated by spaces on which to uninstall SFSYB: grouper
VERITAS STORAGE FOUNDATION FOR SYBASE 4.0 UNINSTALLATION PROGRAM
Checking system uninstall requirements:
Checking SFSYB packages installed on grouper:
Checking SFSYB license key on grouper ............... not licensedChecking VRTSsydoc package ................. version 4.0 installedChecking VRTSsydoc dependencies .................. no dependenciesChecking VRTSsybed package ................. version 4.0 installedChecking VRTSsybed dependencies .................. no dependenciesChecking VRTSfsdoc package ................. version 4.0 installedChecking VRTSfsdoc dependencies .................. no dependenciesChecking VRTSfsman package ................. version 4.0 installedChecking VRTSfsman dependencies .................. no dependenciesChecking VRTSfppm package .................. version 4.0 installedChecking VRTSfppm dependencies ................... no dependenciesChecking VRTSap package ............... version 2.00.012 installedChecking VRTSap dependencies ..................... no dependenciesChecking VRTStep package .............. version 1.20.022 installedChecking VRTStep dependencies .................... no dependenciesChecking VRTSvxfs package .................. version 4.0 installedChecking VRTSvxfs dependencies .......................... VRTSfppm
82 VERITAS Storage Foundation for Sybase Installation Guide
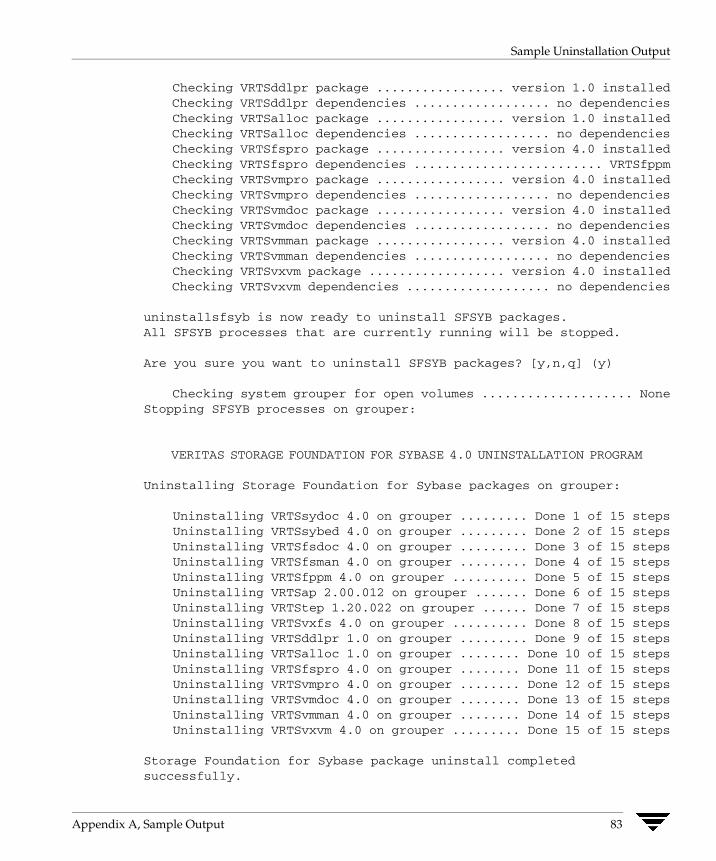
Sample Uninstallation Output
Checking VRTSddlpr package ................. version 1.0 installedChecking VRTSddlpr dependencies .................. no dependenciesChecking VRTSalloc package ................. version 1.0 installedChecking VRTSalloc dependencies .................. no dependenciesChecking VRTSfspro package ................. version 4.0 installedChecking VRTSfspro dependencies ......................... VRTSfppmChecking VRTSvmpro package ................. version 4.0 installedChecking VRTSvmpro dependencies .................. no dependenciesChecking VRTSvmdoc package ................. version 4.0 installedChecking VRTSvmdoc dependencies .................. no dependenciesChecking VRTSvmman package ................. version 4.0 installedChecking VRTSvmman dependencies .................. no dependenciesChecking VRTSvxvm package .................. version 4.0 installedChecking VRTSvxvm dependencies ................... no dependencies
uninstallsfsyb is now ready to uninstall SFSYB packages.All SFSYB processes that are currently running will be stopped.
Are you sure you want to uninstall SFSYB packages? [y,n,q] (y)
Checking system grouper for open volumes .................... NoneStopping SFSYB processes on grouper:
VERITAS STORAGE FOUNDATION FOR SYBASE 4.0 UNINSTALLATION PROGRAM
Uninstalling Storage Foundation for Sybase packages on grouper:
Uninstalling VRTSsydoc 4.0 on grouper ......... Done 1 of 15 stepsUninstalling VRTSsybed 4.0 on grouper ......... Done 2 of 15 stepsUninstalling VRTSfsdoc 4.0 on grouper ......... Done 3 of 15 stepsUninstalling VRTSfsman 4.0 on grouper ......... Done 4 of 15 stepsUninstalling VRTSfppm 4.0 on grouper .......... Done 5 of 15 stepsUninstalling VRTSap 2.00.012 on grouper ....... Done 6 of 15 stepsUninstalling VRTStep 1.20.022 on grouper ...... Done 7 of 15 stepsUninstalling VRTSvxfs 4.0 on grouper .......... Done 8 of 15 stepsUninstalling VRTSddlpr 1.0 on grouper ......... Done 9 of 15 stepsUninstalling VRTSalloc 1.0 on grouper ........ Done 10 of 15 stepsUninstalling VRTSfspro 4.0 on grouper ........ Done 11 of 15 stepsUninstalling VRTSvmpro 4.0 on grouper ........ Done 12 of 15 stepsUninstalling VRTSvmdoc 4.0 on grouper ........ Done 13 of 15 stepsUninstalling VRTSvmman 4.0 on grouper ........ Done 14 of 15 stepsUninstalling VRTSvxvm 4.0 on grouper ......... Done 15 of 15 steps
Storage Foundation for Sybase package uninstall completed successfully.
Appendix A, Sample Output 83

Sample Optional Package Output
VERITAS STORAGE FOUNDATION FOR SYBASE 4.0 UNINSTALLATION PROGRAM
Uninstallation of Storage Foundation for Sybase has completed successfully.
The uninstallation summary is saved at:
/opt/VRTS/install/logs/uninstallsfsyb702154242.summary
The uninstallsfsyb log is saved at:
/opt/VRTS/install/logs/uninstallsfsyb702154242.log
Sample Optional Package Output The following output is an example of a VERITAS Storage Foundation for Sybase package installation for optional packages on a Solaris 9 operating system. The installation is performed using installsfsyb.
Note Use this example for reference only—the output for each operating system version and installation environment differs slightly.
VERITAS STORAGE FOUNDATION FOR SYBASE 4.0 INSTALLATION PROGRAM
Copyright (c) 2003 VERITAS Software Corporation. All rights reserved.
VERITAS, the VERITAS Logo and all other VERITAS product names andslogans are trademarks or registered trademarks of VERITAS SoftwareCorporation. VERITAS and the VERITAS Logo Reg. U.S. Pat. & Tm. Off.Other product names and/or slogans mentioned herein may be trademarksor registered trademarks of their respective companies.
Enter the system names separated by spaces on which to install SFSYB: grouper
Checking OS version on grouper ......................... SunOS 5.8Checking VRTSsybed package ......................... not installedChecking required SunOS patch 108528-18 on grouper ... 108528-19
installedChecking required SunOS patch 108827-19 on grouper ... 108827-40
installedChecking required SunOS patch 109529-06 on grouper ... 109529-06
installedChecking required SunOS patch 111413-06 on grouper ... 111413-09
installed
84 VERITAS Storage Foundation for Sybase Installation Guide
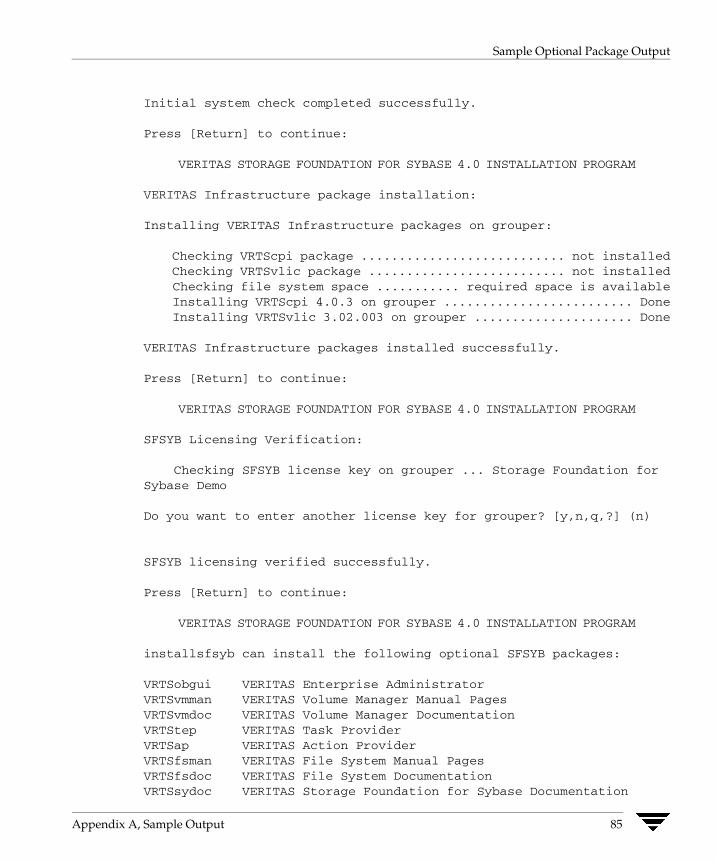
Sample Optional Package Output
Initial system check completed successfully.
Press [Return] to continue:
VERITAS STORAGE FOUNDATION FOR SYBASE 4.0 INSTALLATION PROGRAM
VERITAS Infrastructure package installation:
Installing VERITAS Infrastructure packages on grouper:
Checking VRTScpi package ........................... not installedChecking VRTSvlic package .......................... not installedChecking file system space ........... required space is availableInstalling VRTScpi 4.0.3 on grouper ......................... DoneInstalling VRTSvlic 3.02.003 on grouper ..................... Done
VERITAS Infrastructure packages installed successfully.
Press [Return] to continue:
VERITAS STORAGE FOUNDATION FOR SYBASE 4.0 INSTALLATION PROGRAM
SFSYB Licensing Verification:
Checking SFSYB license key on grouper ... Storage Foundation for Sybase Demo
Do you want to enter another license key for grouper? [y,n,q,?] (n)
SFSYB licensing verified successfully.
Press [Return] to continue:
VERITAS STORAGE FOUNDATION FOR SYBASE 4.0 INSTALLATION PROGRAM
installsfsyb can install the following optional SFSYB packages:
VRTSobgui VERITAS Enterprise AdministratorVRTSvmman VERITAS Volume Manager Manual PagesVRTSvmdoc VERITAS Volume Manager DocumentationVRTStep VERITAS Task ProviderVRTSap VERITAS Action ProviderVRTSfsman VERITAS File System Manual PagesVRTSfsdoc VERITAS File System DocumentationVRTSsydoc VERITAS Storage Foundation for Sybase Documentation
Appendix A, Sample Output 85
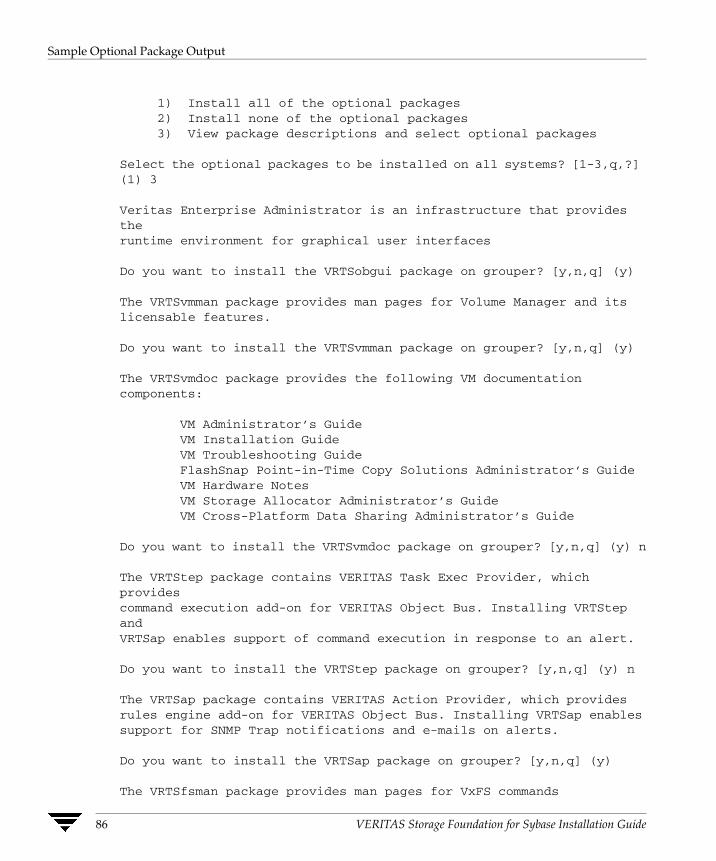
Sample Optional Package Output
1) Install all of the optional packages2) Install none of the optional packages3) View package descriptions and select optional packages
Select the optional packages to be installed on all systems? [1-3,q,?] (1) 3
Veritas Enterprise Administrator is an infrastructure that provides theruntime environment for graphical user interfaces
Do you want to install the VRTSobgui package on grouper? [y,n,q] (y)
The VRTSvmman package provides man pages for Volume Manager and itslicensable features.
Do you want to install the VRTSvmman package on grouper? [y,n,q] (y)
The VRTSvmdoc package provides the following VM documentation components:
VM Administrator’s GuideVM Installation GuideVM Troubleshooting GuideFlashSnap Point-in-Time Copy Solutions Administrator’s GuideVM Hardware NotesVM Storage Allocator Administrator’s GuideVM Cross-Platform Data Sharing Administrator’s Guide
Do you want to install the VRTSvmdoc package on grouper? [y,n,q] (y) n
The VRTStep package contains VERITAS Task Exec Provider, whichprovidescommand execution add-on for VERITAS Object Bus. Installing VRTStep andVRTSap enables support of command execution in response to an alert.
Do you want to install the VRTStep package on grouper? [y,n,q] (y) n
The VRTSap package contains VERITAS Action Provider, which providesrules engine add-on for VERITAS Object Bus. Installing VRTSap enablessupport for SNMP Trap notifications and e-mails on alerts.
Do you want to install the VRTSap package on grouper? [y,n,q] (y)
The VRTSfsman package provides man pages for VxFS commands
86 VERITAS Storage Foundation for Sybase Installation Guide
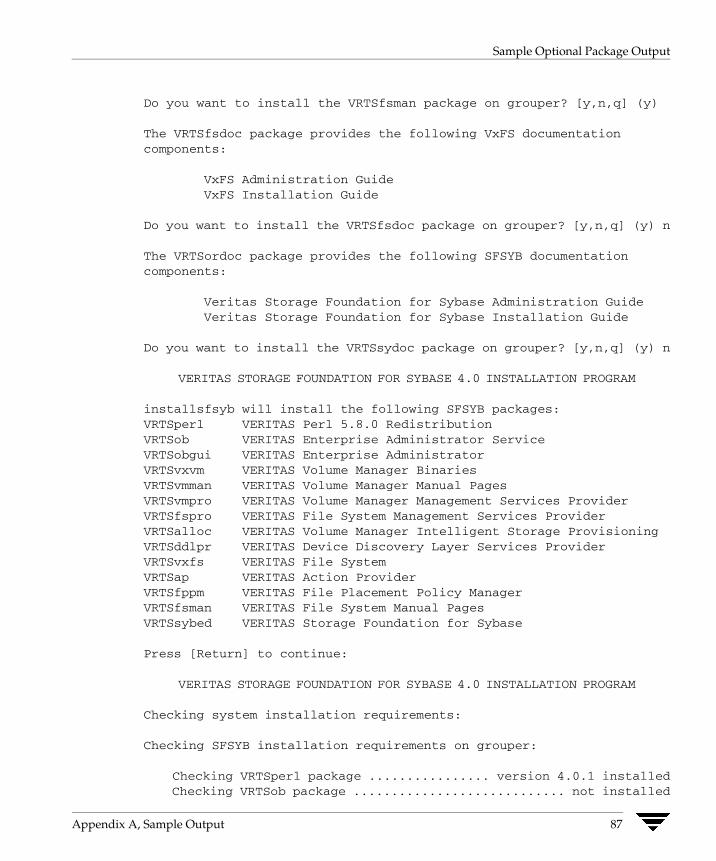
Sample Optional Package Output
Do you want to install the VRTSfsman package on grouper? [y,n,q] (y)
The VRTSfsdoc package provides the following VxFS documentation components:
VxFS Administration GuideVxFS Installation Guide
Do you want to install the VRTSfsdoc package on grouper? [y,n,q] (y) n
The VRTSordoc package provides the following SFSYB documentation components:
Veritas Storage Foundation for Sybase Administration GuideVeritas Storage Foundation for Sybase Installation Guide
Do you want to install the VRTSsydoc package on grouper? [y,n,q] (y) n
VERITAS STORAGE FOUNDATION FOR SYBASE 4.0 INSTALLATION PROGRAM
installsfsyb will install the following SFSYB packages:VRTSperl VERITAS Perl 5.8.0 RedistributionVRTSob VERITAS Enterprise Administrator ServiceVRTSobgui VERITAS Enterprise AdministratorVRTSvxvm VERITAS Volume Manager BinariesVRTSvmman VERITAS Volume Manager Manual PagesVRTSvmpro VERITAS Volume Manager Management Services ProviderVRTSfspro VERITAS File System Management Services ProviderVRTSalloc VERITAS Volume Manager Intelligent Storage ProvisioningVRTSddlpr VERITAS Device Discovery Layer Services ProviderVRTSvxfs VERITAS File SystemVRTSap VERITAS Action ProviderVRTSfppm VERITAS File Placement Policy ManagerVRTSfsman VERITAS File System Manual PagesVRTSsybed VERITAS Storage Foundation for Sybase
Press [Return] to continue:
VERITAS STORAGE FOUNDATION FOR SYBASE 4.0 INSTALLATION PROGRAM
Checking system installation requirements:
Checking SFSYB installation requirements on grouper:
Checking VRTSperl package ................ version 4.0.1 installedChecking VRTSob package ............................ not installed
Appendix A, Sample Output 87

Sample Optional Package Output
Checking VRTSobgui package ......................... not installedChecking VRTSvxvm package .......................... not installedChecking VRTSvmman package ......................... not installedChecking VRTSvmpro package ......................... not installedChecking VRTSfspro package ......................... not installedChecking VRTSalloc package ......................... not installedChecking VRTSddlpr package ......................... not installedChecking VRTSvxfs package .......................... not installedChecking VRTSap package ............................ not installedChecking VRTSfppm package .......................... not installedChecking VRTSfsman package ......................... not installedChecking VRTSsybed package ......................... not installedChecking file system space ........... required space is availableChecking for any AP driver issues ........................... NoneChecking vxsvc process ............................... not running
Installation requirement checks completed successfully.
Press [Return] to continue:
VERITAS STORAGE FOUNDATION FOR SYBASE 4.0 INSTALLATION PROGRAM
A copy of a previous VxVM configuration is present on the system grouper.
Do you want to restore and reuse the previous VxVM configuration ofsystem grouper [y,n,q,?] (y)
VERITAS STORAGE FOUNDATION FOR SYBASE 4.0 INSTALLATION PROGRAM
Installing Storage Foundation for Sybase 4.0 on grouper:
Installing VRTSob 3.2.508.0 on grouper ........ Done 1 of 13 stepsInstalling VRTSobgui 3.2.508.0 on grouper ..... Done 2 of 13 stepsInstalling VRTSvxvm 4.0 on grouper ............ Done 3 of 13 stepsInstalling VRTSvmman 4.0 on grouper ........... Done 4 of 13 stepsInstalling VRTSvmpro 4.0 on grouper ........... Done 5 of 13 stepsInstalling VRTSfspro 4.0 on grouper ........... Done 6 of 13 stepsInstalling VRTSalloc 1.0 on grouper ........... Done 7 of 13 stepsInstalling VRTSddlpr 1.0 on grouper ........... Done 8 of 13 stepsInstalling VRTSvxfs 4.0 on grouper ............ Done 9 of 13 stepsInstalling VRTSap 2.00.012 on grouper ........ Done 10 of 13 stepsInstalling VRTSfppm 4.0 on grouper ........... Done 11 of 13 stepsInstalling VRTSfsman 4.0 on grouper .......... Done 12 of 13 stepsInstalling VRTSsybed 4.0 on grouper .......... Done 13 of 13 steps
88 VERITAS Storage Foundation for Sybase Installation Guide
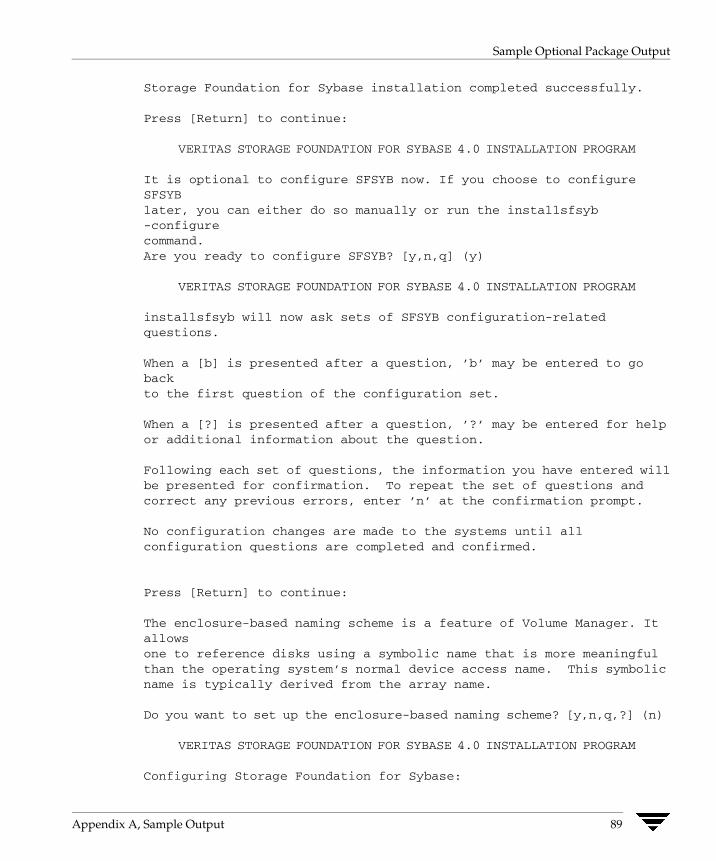
Sample Optional Package Output
Storage Foundation for Sybase installation completed successfully.
Press [Return] to continue:
VERITAS STORAGE FOUNDATION FOR SYBASE 4.0 INSTALLATION PROGRAM
It is optional to configure SFSYB now. If you choose to configure SFSYBlater, you can either do so manually or run the installsfsyb -configurecommand.Are you ready to configure SFSYB? [y,n,q] (y)
VERITAS STORAGE FOUNDATION FOR SYBASE 4.0 INSTALLATION PROGRAM
installsfsyb will now ask sets of SFSYB configuration-related questions.
When a [b] is presented after a question, ’b’ may be entered to go backto the first question of the configuration set.
When a [?] is presented after a question, ’?’ may be entered for helpor additional information about the question.
Following each set of questions, the information you have entered willbe presented for confirmation. To repeat the set of questions andcorrect any previous errors, enter ’n’ at the confirmation prompt.
No configuration changes are made to the systems until allconfiguration questions are completed and confirmed.
Press [Return] to continue:
The enclosure-based naming scheme is a feature of Volume Manager. It allowsone to reference disks using a symbolic name that is more meaningfulthan the operating system’s normal device access name. This symbolicname is typically derived from the array name.
Do you want to set up the enclosure-based naming scheme? [y,n,q,?] (n)
VERITAS STORAGE FOUNDATION FOR SYBASE 4.0 INSTALLATION PROGRAM
Configuring Storage Foundation for Sybase:
Appendix A, Sample Output 89

Sample Optional Package Output
Storage Foundation for Sybase configured successfully.
Press [Return] to continue:
VERITAS STORAGE FOUNDATION FOR SYBASE 4.0 INSTALLATION PROGRAM
Do you want to start Storage Foundation for Sybase processes now?[y,n,q] (y)
Preparing to start VxVM on target system(s)...
Begin starting VxVM on system grouperStarting vxconfigd for VxVM ............................ Succeeded
Done starting VxVM on system grouper
Done with starting VxVM on target system(s)...
Many Volume Manager commands affect the contents or configuration of adisk group. Such commands require that the user specify a disk group. This is accomplished by using the -g option of a command or setting theVXVM_DEFAULTDG environment variable. An alternative to these twomethods is to configure the default disk group of a system.
Note: VxVM 4.0 removes the requirement that the default disk group must be adisk group called rootdg.
Do you want to set up the default disk group for each system? [y,n,q,?] (n)
Storage Foundation for Sybase was started successfully.
Press [Return] to continue:
VERITAS STORAGE FOUNDATION FOR SYBASE 4.0 INSTALLATION PROGRAM
Installation of Storage Foundation for Sybase 4.0 has completedsuccessfully.
The installation summary is saved at:
/opt/VRTS/install/logs/installsfsyb702161814.summary
90 VERITAS Storage Foundation for Sybase Installation Guide
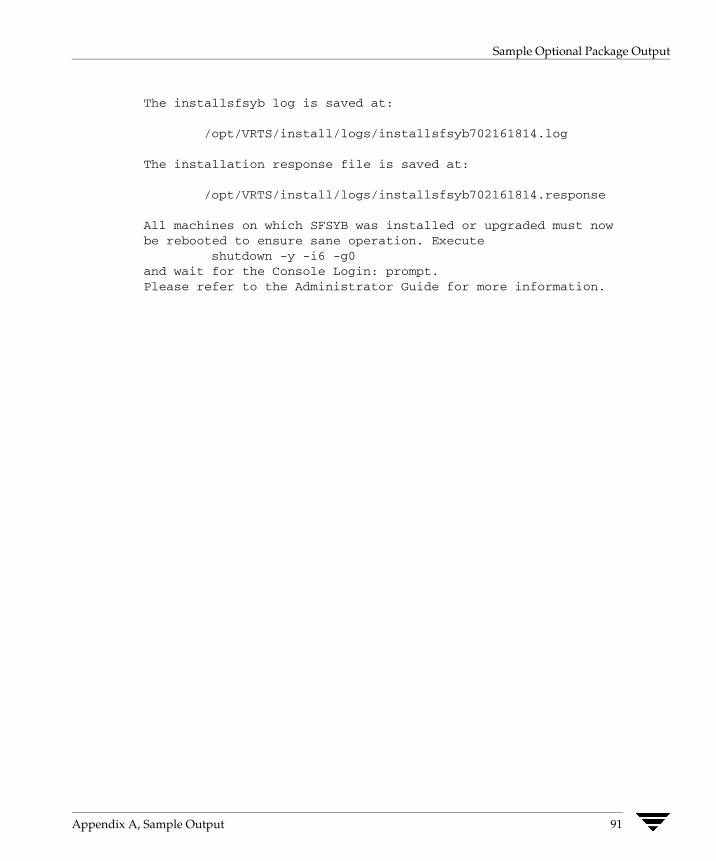
Sample Optional Package Output
The installsfsyb log is saved at:
/opt/VRTS/install/logs/installsfsyb702161814.log
The installation response file is saved at:
/opt/VRTS/install/logs/installsfsyb702161814.response
All machines on which SFSYB was installed or upgraded must nowbe rebooted to ensure sane operation. Execute
shutdown -y -i6 -g0and wait for the Console Login: prompt.Please refer to the Administrator Guide for more information.
Appendix A, Sample Output 91

Sample Optional Package Output
92 VERITAS Storage Foundation for Sybase Installation Guide


