412
Veritas Storage Foundation™ for Oracle Administrator’s Guide Solaris 5.0 N18526S
Veritas Storage
Foundation™ for Oracle
Administrator’s Guide
Solaris
5.0
N18526S
Veritas Storage Foundation™ forOracle Administrator’sGuide
The software described in this book is furnished under a license agreement and may be used
only in accordance with the terms of the agreement.
Documentation version 5.0
PN: N18526S
Legal Notice
Copyright © 2006 Symantec Corporation.
All rights reserved.
Federal acquisitions: Commercial Software - Government Users Subject to Standard License
Terms and Conditions.
Symantec, the Symantec Logo, Veritas, and Veritas Storage Foundation are trademarks or
registered trademarks of Symantec Corporation or its affiliates in the U.S. and other
countries. Other names may be trademarks of their respective owners.
Third-party software may be recommended, distributed, embedded, or bundled with this
Symantec product. Such third-party software is licensed separately by its copyright holder.
All third-party copyrights associated with this product are listed in the accompanying
release notes.
Oracle is a registered trademark of Oracle Corporation.
Solaris is a trademark of Sun Microsystems, Inc.
Windows is a registered trademark of Microsoft Corporation.
Veritas Storage Foundation™ is a licensed product. See the Veritas Storage Foundation™
Installation Guide for license installation instructions.
The product described in this document is distributed under licenses restricting its use,
copying, distribution, and decompilation/reverse engineering. No part of this document
may be reproduced in any form by any means without prior written authorization of
Symantec Corporation and its licensors, if any.
THE DOCUMENTATION IS PROVIDED "AS IS" AND ALL EXPRESS OR IMPLIED CONDITIONS,
REPRESENTATIONS AND WARRANTIES, INCLUDING ANY IMPLIED WARRANTY OF
MERCHANTABILITY, FITNESS FOR A PARTICULAR PURPOSE OR NON-INFRINGEMENT,
ARE DISCLAIMED, EXCEPT TO THE EXTENT THAT SUCH DISCLAIMERS ARE HELD TO
BE LEGALLY INVALID. SYMANTEC CORPORATION SHALL NOT BE LIABLE FOR INCIDENTAL
OR CONSEQUENTIAL DAMAGES IN CONNECTION WITH THE FURNISHING PERFORMANCE,
OR USE OF THIS DOCUMENTATION. THE INFORMATION CONTAINED IN THIS
DOCUMENTATION IS SUBJECT TO CHANGE WITHOUT NOTICE.
The Licensed Software and Documentation are deemed to be "commercial computer software"
and "commercial computer software documentation" as defined in FAR Sections 12.212 and
DFARS Section 227.7202.
Symantec Corporation 20330 Stevens Creek Blvd. Cupertino, CA 95014 USA
http://www.symantec.com
Technical Support
For technical assistance, visit http://support.veritas.com and select phone or email support.
Use the Knowledge Base search feature to access resources such as TechNotes, product
alerts, software downloads, hardware compatibility lists, and our customer email notification
service.

Chapter 1 Introducing Veritas Storage Foundation for Oracle
About Veritas Storage Foundation for Oracle ... . . . . . . . . . . . . . . . . . . . . . . . . . . . . . . . . . . 15
Components of Veritas Storage Foundation for Oracle ... . . . . . . . . . . . . . . . . 16
How Veritas Volume Manager works .... . . . . . . . . . . . . . . . . . . . . . . . . . . . . . . . . . . . . . . . . . . . . 18
About volumes .... . . . . . . . . . . . . . . . . . . . . . . . . . . . . . . . . . . . . . . . . . . . . . . . . . . . . . . . . . . . . . . . . . . . 20
About disk groups .... . . . . . . . . . . . . . . . . . . . . . . . . . . . . . . . . . . . . . . . . . . . . . . . . . . . . . . . . . . . . . . 21
About volume layouts ... . . . . . . . . . . . . . . . . . . . . . . . . . . . . . . . . . . . . . . . . . . . . . . . . . . . . . . . . . . 21
About online relayout ... . . . . . . . . . . . . . . . . . . . . . . . . . . . . . . . . . . . . . . . . . . . . . . . . . . . . . . . . . . 24
About volume resynchronization .... . . . . . . . . . . . . . . . . . . . . . . . . . . . . . . . . . . . . . . . . . . . 24
About dirty region logging .... . . . . . . . . . . . . . . . . . . . . . . . . . . . . . . . . . . . . . . . . . . . . . . . . . . . 25
About SmartSync recovery accelerator ... . . . . . . . . . . . . . . . . . . . . . . . . . . . . . . . . . . . . 25
About volume sets ... . . . . . . . . . . . . . . . . . . . . . . . . . . . . . . . . . . . . . . . . . . . . . . . . . . . . . . . . . . . . . . . 25
About volume snapshots ... . . . . . . . . . . . . . . . . . . . . . . . . . . . . . . . . . . . . . . . . . . . . . . . . . . . . . . 25
About Veritas FastResync .... . . . . . . . . . . . . . . . . . . . . . . . . . . . . . . . . . . . . . . . . . . . . . . . . . . . . 26
About disk group split and join .... . . . . . . . . . . . . . . . . . . . . . . . . . . . . . . . . . . . . . . . . . . . . . 27
About hot-relocation .... . . . . . . . . . . . . . . . . . . . . . . . . . . . . . . . . . . . . . . . . . . . . . . . . . . . . . . . . . . . 27
About DMP-supported disk arrays ... . . . . . . . . . . . . . . . . . . . . . . . . . . . . . . . . . . . . . . . . . . 28
About dynamic LUN expansion .... . . . . . . . . . . . . . . . . . . . . . . . . . . . . . . . . . . . . . . . . . . . . . 28
About Storage Expert ... . . . . . . . . . . . . . . . . . . . . . . . . . . . . . . . . . . . . . . . . . . . . . . . . . . . . . . . . . . . 28
About cluster functionality (optional) .. . . . . . . . . . . . . . . . . . . . . . . . . . . . . . . . . . . . . . . . 29
About Veritas Volume Replicator (optional) .. . . . . . . . . . . . . . . . . . . . . . . . . . . . . . . . 29
How Veritas File System works .... . . . . . . . . . . . . . . . . . . . . . . . . . . . . . . . . . . . . . . . . . . . . . . . . . . . . 29
About Veritas Quick I/O .... . . . . . . . . . . . . . . . . . . . . . . . . . . . . . . . . . . . . . . . . . . . . . . . . . . . . . . . 29
About Veritas Cached Quick I/O .... . . . . . . . . . . . . . . . . . . . . . . . . . . . . . . . . . . . . . . . . . . . . 30
About Veritas Concurrent I/O .... . . . . . . . . . . . . . . . . . . . . . . . . . . . . . . . . . . . . . . . . . . . . . . . 30
About extent-based allocation .... . . . . . . . . . . . . . . . . . . . . . . . . . . . . . . . . . . . . . . . . . . . . . . 30
About fast file system and database recovery .... . . . . . . . . . . . . . . . . . . . . . . . . . . . 31
About online system administration .... . . . . . . . . . . . . . . . . . . . . . . . . . . . . . . . . . . . . . . 31
About cross-platform data sharing .... . . . . . . . . . . . . . . . . . . . . . . . . . . . . . . . . . . . . . . . . 32
Support for multi-volume file systems .... . . . . . . . . . . . . . . . . . . . . . . . . . . . . . . . . . . . . 32
About Quality of Storage Service (optional) .. . . . . . . . . . . . . . . . . . . . . . . . . . . . . . . . 33
Support for large file systems and large files (optional) .. . . . . . . . . . . . . . . . . 33
About Storage Checkpoints and Storage Rollback .... . . . . . . . . . . . . . . . . . . . . . 34
About restoring file systems using Storage Checkpoints ... . . . . . . . . . . . . . 35
About quotas ... . . . . . . . . . . . . . . . . . . . . . . . . . . . . . . . . . . . . . . . . . . . . . . . . . . . . . . . . . . . . . . . . . . . . . . 35
About cluster functionality (optional) .. . . . . . . . . . . . . . . . . . . . . . . . . . . . . . . . . . . . . . . . 35
Contents
How Veritas Storage Mapping works .... . . . . . . . . . . . . . . . . . . . . . . . . . . . . . . . . . . . . . . . . . . . . 36
How Veritas Database FlashSnap works .... . . . . . . . . . . . . . . . . . . . . . . . . . . . . . . . . . . . . . . . . 36
How Veritas Extension for Oracle Disk Manager works .... . . . . . . . . . . . . . . . . . . . . 37
How Database Dynamic Storage Tiering works .... . . . . . . . . . . . . . . . . . . . . . . . . . . . . . . . 38
About the vxdbd daemon .... . . . . . . . . . . . . . . . . . . . . . . . . . . . . . . . . . . . . . . . . . . . . . . . . . . . . . . . . . . 38
About Veritas Storage Foundation for Oracle graphical user
interface ... . . . . . . . . . . . . . . . . . . . . . . . . . . . . . . . . . . . . . . . . . . . . . . . . . . . . . . . . . . . . . . . . . . . . . . . . . . . . 40
About Veritas NetBackup (optional) .. . . . . . . . . . . . . . . . . . . . . . . . . . . . . . . . . . . . . . . . . . . . . . . . 41
How block-level incremental backup works .... . . . . . . . . . . . . . . . . . . . . . . . . . . . . . 41
About Veritas Storage Foundation/High Availability for Oracle
(optional) .. . . . . . . . . . . . . . . . . . . . . . . . . . . . . . . . . . . . . . . . . . . . . . . . . . . . . . . . . . . . . . . . . . . . . . . . . . . . . 42
Chapter 2 Setting up databases
Tasks for setting up new databases ... . . . . . . . . . . . . . . . . . . . . . . . . . . . . . . . . . . . . . . . . . . . . . . . 43
About setting up a disk group .... . . . . . . . . . . . . . . . . . . . . . . . . . . . . . . . . . . . . . . . . . . . . . . . . . . . . . 45
Disk group configuration guidelines ... . . . . . . . . . . . . . . . . . . . . . . . . . . . . . . . . . . . . . . . 45
Creating a disk group .... . . . . . . . . . . . . . . . . . . . . . . . . . . . . . . . . . . . . . . . . . . . . . . . . . . . . . . . . . . . . . . . 46
Adding disks to a disk group .... . . . . . . . . . . . . . . . . . . . . . . . . . . . . . . . . . . . . . . . . . . . . . . . . . . . . . . . 48
About selecting a volume layout ... . . . . . . . . . . . . . . . . . . . . . . . . . . . . . . . . . . . . . . . . . . . . . . . . . . . 49
How to choose appropriate stripe unit sizes ... . . . . . . . . . . . . . . . . . . . . . . . . . . . . . . 50
How to choose between mirroring and RAID-5 .... . . . . . . . . . . . . . . . . . . . . . . . . . 50
Volume configuration guidelines ... . . . . . . . . . . . . . . . . . . . . . . . . . . . . . . . . . . . . . . . . . . . 50
Creating a volume .... . . . . . . . . . . . . . . . . . . . . . . . . . . . . . . . . . . . . . . . . . . . . . . . . . . . . . . . . . . . . . . . . . . . . 51
Creating a volume set ... . . . . . . . . . . . . . . . . . . . . . . . . . . . . . . . . . . . . . . . . . . . . . . . . . . . . . . . . . . . . . . . . . 52
Adding a volume to a volume set ... . . . . . . . . . . . . . . . . . . . . . . . . . . . . . . . . . . . . . . . . . . . . . . . . . 53
File system creation guidelines ... . . . . . . . . . . . . . . . . . . . . . . . . . . . . . . . . . . . . . . . . . . . . . . . . . . . . 53
Creating a VxFS file system .... . . . . . . . . . . . . . . . . . . . . . . . . . . . . . . . . . . . . . . . . . . . . . . . . . . . . . . . 54
Large file system and large file support ... . . . . . . . . . . . . . . . . . . . . . . . . . . . . . . . . . . . 56
Multi-volume support ... . . . . . . . . . . . . . . . . . . . . . . . . . . . . . . . . . . . . . . . . . . . . . . . . . . . . . . . . . . 56
Mounting a file system .... . . . . . . . . . . . . . . . . . . . . . . . . . . . . . . . . . . . . . . . . . . . . . . . . . . . . . . . . . . . . . 57
Unmounting a file system .... . . . . . . . . . . . . . . . . . . . . . . . . . . . . . . . . . . . . . . . . . . . . . . . . . . . . . . . . . 58
About fragmentation .... . . . . . . . . . . . . . . . . . . . . . . . . . . . . . . . . . . . . . . . . . . . . . . . . . . . . . . . . . . . . . . . . 59
How to control fragmentation .... . . . . . . . . . . . . . . . . . . . . . . . . . . . . . . . . . . . . . . . . . . . . . . . 59
Types of fragmentation .... . . . . . . . . . . . . . . . . . . . . . . . . . . . . . . . . . . . . . . . . . . . . . . . . . . . . . . . 59
How to monitor fragmentation .... . . . . . . . . . . . . . . . . . . . . . . . . . . . . . . . . . . . . . . . . . . . . . 60
Defragmenting a file system .... . . . . . . . . . . . . . . . . . . . . . . . . . . . . . . . . . . . . . . . . . . . . . . . . . 60
Resizing a file system .... . . . . . . . . . . . . . . . . . . . . . . . . . . . . . . . . . . . . . . . . . . . . . . . . . . . . . . . . . . . . . . . 62
Resizing a file system and the underlying volume .... . . . . . . . . . . . . . . . . . . . . . 63
Chapter 3 Managing the SFDB repository
About the SFDB repository .... . . . . . . . . . . . . . . . . . . . . . . . . . . . . . . . . . . . . . . . . . . . . . . . . . . . . . . . . . 65
Runtime management tasks for SFDB .... . . . . . . . . . . . . . . . . . . . . . . . . . . . . . . . . . . . . . . . . . . 66
Contents6
Starting, stopping, and checking the SFDB repository with
sfua_db_config ... . . . . . . . . . . . . . . . . . . . . . . . . . . . . . . . . . . . . . . . . . . . . . . . . . . . . . . . . . . . . . 66
Backing up and restoring the SFDB repository with
sfua_rept_adm .... . . . . . . . . . . . . . . . . . . . . . . . . . . . . . . . . . . . . . . . . . . . . . . . . . . . . . . . . . . . . . 66
Monitoring free space for the SFDB repository .... . . . . . . . . . . . . . . . . . . . . . . . . . 69
Adding a new system to an HA configuration .... . . . . . . . . . . . . . . . . . . . . . . . . . . . . . . . . . 70
Accessing an off-host repository in a non-VCS environment .... . . . . . . . . . . . . . 71
Chapter 4 Using Veritas Quick I/O
About Quick I/O .... . . . . . . . . . . . . . . . . . . . . . . . . . . . . . . . . . . . . . . . . . . . . . . . . . . . . . . . . . . . . . . . . . . . . . . . 73
How Quick I/O works .... . . . . . . . . . . . . . . . . . . . . . . . . . . . . . . . . . . . . . . . . . . . . . . . . . . . . . . . . . . 74
How Quick I/O improves database performance .... . . . . . . . . . . . . . . . . . . . . . . . 74
About Quick I/O requirements ... . . . . . . . . . . . . . . . . . . . . . . . . . . . . . . . . . . . . . . . . . . . . . . . 75
How to set up Quick I/O .... . . . . . . . . . . . . . . . . . . . . . . . . . . . . . . . . . . . . . . . . . . . . . . . . . . . . . . . 76
Creating database files as Quick I/O files using qiomkfile ... . . . . . . . . . . . . . . . . . . 77
Preallocating space for Quick I/O files using the setext command .... . . . . . . 79
Accessing regular VxFS files as Quick I/O files ... . . . . . . . . . . . . . . . . . . . . . . . . . . . . . . . . 81
Converting Oracle files to Quick I/O files ... . . . . . . . . . . . . . . . . . . . . . . . . . . . . . . . . . . . . . . . . 82
About sparse files ... . . . . . . . . . . . . . . . . . . . . . . . . . . . . . . . . . . . . . . . . . . . . . . . . . . . . . . . . . . . . . . . . . . . . . . 87
Handling Oracle temporary tablespaces and Quick I/O .... . . . . . . . . . . . . . . . . . . . . 88
Displaying Quick I/O status and file attributes ... . . . . . . . . . . . . . . . . . . . . . . . . . . . . . . . . 90
Extending a Quick I/O file ... . . . . . . . . . . . . . . . . . . . . . . . . . . . . . . . . . . . . . . . . . . . . . . . . . . . . . . . . . . . 91
Using Oracle's AUTOEXTEND with Quick I/O files ... . . . . . . . . . . . . . . . . . . . . . . . . . . . 93
Recreating Quick I/O files after restoring a database ... . . . . . . . . . . . . . . . . . . . . . . . . 95
Disabling Quick I/O .... . . . . . . . . . . . . . . . . . . . . . . . . . . . . . . . . . . . . . . . . . . . . . . . . . . . . . . . . . . . . . . . . . . 96
Chapter 5 Using Veritas Cached Quick I/O
About Cached Quick I/O .... . . . . . . . . . . . . . . . . . . . . . . . . . . . . . . . . . . . . . . . . . . . . . . . . . . . . . . . . . . . . . 99
How Cached Quick I/O works .... . . . . . . . . . . . . . . . . . . . . . . . . . . . . . . . . . . . . . . . . . . . . . . . . 99
How Cached Quick I/O improves database performance .... . . . . . . . . . . . 100
How to set up Cached Quick I/O .... . . . . . . . . . . . . . . . . . . . . . . . . . . . . . . . . . . . . . . . . . . . 101
Enabling Cached Quick I/O on a file system .... . . . . . . . . . . . . . . . . . . . . . . . . . . . . . . . . . 101
Enabling and disabling the qio_cache_enable flag ... . . . . . . . . . . . . . . . . . . . . 102
Making Cached Quick I/O settings persistent across reboots and
mounts ... . . . . . . . . . . . . . . . . . . . . . . . . . . . . . . . . . . . . . . . . . . . . . . . . . . . . . . . . . . . . . . . . . . . . . . 103
Using vxtunefs to obtain tuning information .... . . . . . . . . . . . . . . . . . . . . . . . . . 104
Determining candidates for Cached Quick I/O .... . . . . . . . . . . . . . . . . . . . . . . . . . . . . . . 105
Collecting I/O statistics ... . . . . . . . . . . . . . . . . . . . . . . . . . . . . . . . . . . . . . . . . . . . . . . . . . . . . . . . 105
About I/O statistics ... . . . . . . . . . . . . . . . . . . . . . . . . . . . . . . . . . . . . . . . . . . . . . . . . . . . . . . . . . . . . 106
Effects of read-aheads on I/O statistics ... . . . . . . . . . . . . . . . . . . . . . . . . . . . . . . . . . . 108
Other tools for analysis ... . . . . . . . . . . . . . . . . . . . . . . . . . . . . . . . . . . . . . . . . . . . . . . . . . . . . . . . 108
Enabling and disabling Cached Quick I/O for individual files ... . . . . . . . . . . . . 108
7Contents
Setting cache advisories for individual files ... . . . . . . . . . . . . . . . . . . . . . . . . . . . . 109
Making individual file settings for Cached Quick I/O
persistent ... . . . . . . . . . . . . . . . . . . . . . . . . . . . . . . . . . . . . . . . . . . . . . . . . . . . . . . . . . . . . . . . . . . . 109
Determining individual file settings for Cached Quick I/O using
qioadmin .... . . . . . . . . . . . . . . . . . . . . . . . . . . . . . . . . . . . . . . . . . . . . . . . . . . . . . . . . . . . . . . . . . . 110
Chapter 6 Using Veritas Concurrent I/O
About Concurrent I/O .... . . . . . . . . . . . . . . . . . . . . . . . . . . . . . . . . . . . . . . . . . . . . . . . . . . . . . . . . . . . . . . 113
How Concurrent I/O works .... . . . . . . . . . . . . . . . . . . . . . . . . . . . . . . . . . . . . . . . . . . . . . . . . . 114
Oracle's filesystemio_options parameter ... . . . . . . . . . . . . . . . . . . . . . . . . . . . . . . . . 114
Enabling and disabling Concurrent I/O .... . . . . . . . . . . . . . . . . . . . . . . . . . . . . . . . . . . . . . . . 114
Enabling Concurrent I/O .... . . . . . . . . . . . . . . . . . . . . . . . . . . . . . . . . . . . . . . . . . . . . . . . . . . . . 115
Disabling Concurrent I/O .... . . . . . . . . . . . . . . . . . . . . . . . . . . . . . . . . . . . . . . . . . . . . . . . . . . . 116
Chapter 7 Using Veritas Extension for Oracle Disk Manager
About Oracle Disk Manager ... . . . . . . . . . . . . . . . . . . . . . . . . . . . . . . . . . . . . . . . . . . . . . . . . . . . . . . . 117
How Oracle Disk Manager improves database performance .... . . . . . . . 118
About Oracle Disk Manager and Oracle Managed Files ... . . . . . . . . . . . . . . . . . . . 120
How Oracle Disk Manager works with Oracle Managed Files ... . . . . . . 121
Setting up Veritas extension for Oracle Disk Manager ... . . . . . . . . . . . . . . . . . . . . . 123
How to prepare existing database storage for Oracle Disk Manager
... . . . . . . . . . . . . . . . . . . . . . . . . . . . . . . . . . . . . . . . . . . . . . . . . . . . . . . . . . . . . . . . . . . . . . . . . . . . . . . . . . . . . . . . 124
Converting Quick I/O files to Oracle Disk Manager files ... . . . . . . . . . . . . . . . . . . . 125
Verifying that Oracle Disk Manager is configured .... . . . . . . . . . . . . . . . . . . . . . . . . . 126
Disabling the Oracle Disk Manager feature ... . . . . . . . . . . . . . . . . . . . . . . . . . . . . . . . . . . . 127
Chapter 8 Using Storage Mapping
About Storage Mapping .... . . . . . . . . . . . . . . . . . . . . . . . . . . . . . . . . . . . . . . . . . . . . . . . . . . . . . . . . . . . 129
Verifying Veritas Storage Mapping setup .... . . . . . . . . . . . . . . . . . . . . . . . . . . . . . . . . . . . . 131
Using vxstorage_stats ... . . . . . . . . . . . . . . . . . . . . . . . . . . . . . . . . . . . . . . . . . . . . . . . . . . . . . . . . . . . . . . 131
Displaying Storage Mapping information .... . . . . . . . . . . . . . . . . . . . . . . . . . . . . . . 132
Displaying I/O statistics information .... . . . . . . . . . . . . . . . . . . . . . . . . . . . . . . . . . . . . 134
Using dbed_analyzer ... . . . . . . . . . . . . . . . . . . . . . . . . . . . . . . . . . . . . . . . . . . . . . . . . . . . . . . . . . . . . . . . 135
Obtaining Storage Mapping information for a list of
tablespaces ... . . . . . . . . . . . . . . . . . . . . . . . . . . . . . . . . . . . . . . . . . . . . . . . . . . . . . . . . . . . . . . . . . 137
Oracle file mapping (ORAMAP) ... . . . . . . . . . . . . . . . . . . . . . . . . . . . . . . . . . . . . . . . . . . . . . . . . . . . 141
Mapping components ... . . . . . . . . . . . . . . . . . . . . . . . . . . . . . . . . . . . . . . . . . . . . . . . . . . . . . . . . . 141
Storage Mapping views .... . . . . . . . . . . . . . . . . . . . . . . . . . . . . . . . . . . . . . . . . . . . . . . . . . . . . . . 142
Verifying Oracle file mapping setup .... . . . . . . . . . . . . . . . . . . . . . . . . . . . . . . . . . . . . . 143
Enabling Oracle file mapping .... . . . . . . . . . . . . . . . . . . . . . . . . . . . . . . . . . . . . . . . . . . . . . . 143
Accessing dynamic performance views .... . . . . . . . . . . . . . . . . . . . . . . . . . . . . . . . . . 144
Contents8
Using Oracle Enterprise Manager ... . . . . . . . . . . . . . . . . . . . . . . . . . . . . . . . . . . . . . . . . . 147
About arrays for Storage Mapping and statistics ... . . . . . . . . . . . . . . . . . . . . . . . . . . . 149
Chapter 9 Converting existing database configurations to VxFS
Converting native file systems to VxFS with Quick I/O .... . . . . . . . . . . . . . . . . . . . 151
Converting native file systems to VxFS for Oracle Disk Manager ... . . . . . . 152
Upgrading from earlier VxFS version layouts ... . . . . . . . . . . . . . . . . . . . . . . . . . . . . . . . 153
Converting from raw devices ... . . . . . . . . . . . . . . . . . . . . . . . . . . . . . . . . . . . . . . . . . . . . . . . . . . . . . 154
Chapter 10 Using Storage Checkpoints and Storage Rollback
About Storage Checkpoints and Storage Rollback .... . . . . . . . . . . . . . . . . . . . . . . . . . . 157
How Storage Checkpoints and Storage Rollback work .... . . . . . . . . . . . . . . 158
Space requirements for Storage Checkpoints ... . . . . . . . . . . . . . . . . . . . . . . . . . . . . . . . . 159
Performance of Storage Checkpoints ... . . . . . . . . . . . . . . . . . . . . . . . . . . . . . . . . . . . . . . . . . . . 161
Storage Checkpoint allocation policies ... . . . . . . . . . . . . . . . . . . . . . . . . . . . . . . . . . . . . . . . . 161
Using Storage Checkpoint allocation policies ... . . . . . . . . . . . . . . . . . . . . . . . . . . 163
Backing up and recovering the database using Storage
Checkpoints ... . . . . . . . . . . . . . . . . . . . . . . . . . . . . . . . . . . . . . . . . . . . . . . . . . . . . . . . . . . . . . . . . . . . . . 172
Verifying a Storage Checkpoint using the command line .... . . . . . . . . . . 172
Backing up using a Storage Checkpoint ... . . . . . . . . . . . . . . . . . . . . . . . . . . . . . . . . . . 175
Recovering a database using a Storage Checkpoint ... . . . . . . . . . . . . . . . . . . . 176
Cloning the Oracle instance using dbed_clonedb .... . . . . . . . . . . . . . . . . . . . . . . . . . . . 177
Guidelines for Oracle recovery .... . . . . . . . . . . . . . . . . . . . . . . . . . . . . . . . . . . . . . . . . . . . . . . . . . . 182
Using the GUI to perform Storage Checkpoint-related operations .... . . . . 184
Chapter 11 Using Database Dynamic Storage Tiering
About Database Dynamic Storage Tiering .... . . . . . . . . . . . . . . . . . . . . . . . . . . . . . . . . . . . . 185
Database Dynamic Storage Tiering building blocks ... . . . . . . . . . . . . . . . . . . 186
Database Dynamic Storage Tiering in a High Availability (HA)
environment .... . . . . . . . . . . . . . . . . . . . . . . . . . . . . . . . . . . . . . . . . . . . . . . . . . . . . . . . . . . . . . . 187
Configuring Database Dynamic Storage Tiering .... . . . . . . . . . . . . . . . . . . . . . . . . . . . . 188
Database Dynamic Storage Tiering command requirements ... . . . . . . . 188
Defining database parameters ... . . . . . . . . . . . . . . . . . . . . . . . . . . . . . . . . . . . . . . . . . . . . . . 189
Setting up storage classes ... . . . . . . . . . . . . . . . . . . . . . . . . . . . . . . . . . . . . . . . . . . . . . . . . . . . . 191
Converting a VxFS file system to a VxFS multi-volume file
system .... . . . . . . . . . . . . . . . . . . . . . . . . . . . . . . . . . . . . . . . . . . . . . . . . . . . . . . . . . . . . . . . . . . . . . . 192
Classifying volumes into a storage class ... . . . . . . . . . . . . . . . . . . . . . . . . . . . . . . . . . 193
Displaying free space on your storage classes ... . . . . . . . . . . . . . . . . . . . . . . . . . . 194
Adding new volumes to a storage class ... . . . . . . . . . . . . . . . . . . . . . . . . . . . . . . . . . . . 195
Removing volumes from a storage class ... . . . . . . . . . . . . . . . . . . . . . . . . . . . . . . . . . 195
Dynamic Storage Tiering policy management ... . . . . . . . . . . . . . . . . . . . . . . . . . . . . . . . 196
9Contents
Relocating files ... . . . . . . . . . . . . . . . . . . . . . . . . . . . . . . . . . . . . . . . . . . . . . . . . . . . . . . . . . . . . . . . . . 196
Relocating tablespaces ... . . . . . . . . . . . . . . . . . . . . . . . . . . . . . . . . . . . . . . . . . . . . . . . . . . . . . . . . 197
Relocating table partitions ... . . . . . . . . . . . . . . . . . . . . . . . . . . . . . . . . . . . . . . . . . . . . . . . . . . 197
Using preset policies ... . . . . . . . . . . . . . . . . . . . . . . . . . . . . . . . . . . . . . . . . . . . . . . . . . . . . . . . . . . 198
How to use file statistics ... . . . . . . . . . . . . . . . . . . . . . . . . . . . . . . . . . . . . . . . . . . . . . . . . . . . . . . . . . . . 199
Setting up statistic collection .... . . . . . . . . . . . . . . . . . . . . . . . . . . . . . . . . . . . . . . . . . . . . . . 199
Viewing file statistics ... . . . . . . . . . . . . . . . . . . . . . . . . . . . . . . . . . . . . . . . . . . . . . . . . . . . . . . . . . 199
Running Database Dynamic Storage Tiering reports ... . . . . . . . . . . . . . . . . . . . . . . . 201
Viewing modified allocation policies ... . . . . . . . . . . . . . . . . . . . . . . . . . . . . . . . . . . . . . 201
Viewing audit reports ... . . . . . . . . . . . . . . . . . . . . . . . . . . . . . . . . . . . . . . . . . . . . . . . . . . . . . . . . 201
Load balancing in a database environment .... . . . . . . . . . . . . . . . . . . . . . . . . . . . . . . . . . . 201
Load balancing file system .... . . . . . . . . . . . . . . . . . . . . . . . . . . . . . . . . . . . . . . . . . . . . . . . . . 202
Creating a Load Balancing File System .... . . . . . . . . . . . . . . . . . . . . . . . . . . . . . . . . . . 203
Adding volumes to a Load Balancing File System .... . . . . . . . . . . . . . . . . . . . . 204
Database Dynamic Storage Tiering use cases for Oracle ... . . . . . . . . . . . . . . . . . . 205
Migrating partitioned data and tablespaces ... . . . . . . . . . . . . . . . . . . . . . . . . . . . . 205
Scheduling the relocation of archive and Flashback logs ... . . . . . . . . . . . 207
Chapter 12 Using the Space Capacity Planning Utility for StorageCheckpoints
About planning file system space for Storage Checkpoints ... . . . . . . . . . . . . . . . 211
Starting the Storage Checkpoint Capacity Planning utility ... . . . . . . . . . . . . . . . 212
Creating Capacity Planning schedules ... . . . . . . . . . . . . . . . . . . . . . . . . . . . . . . . . . . . . . . . . . 213
Displaying Capacity Planning schedules ... . . . . . . . . . . . . . . . . . . . . . . . . . . . . . . . . . . . . . . 216
Displaying file system space usage information .... . . . . . . . . . . . . . . . . . . . . . . . . . . . . 217
Removing Capacity Planning schedules ... . . . . . . . . . . . . . . . . . . . . . . . . . . . . . . . . . . . . . . . 219
Chapter 13 Using Database FlashSnap for backup and off-hostprocessing
About Veritas Database FlashSnap .... . . . . . . . . . . . . . . . . . . . . . . . . . . . . . . . . . . . . . . . . . . . . . 226
Typical database problems solved with Database FlashSnap .... . . . . . 227
About Database FlashSnap applications .... . . . . . . . . . . . . . . . . . . . . . . . . . . . . . . . . 227
Database FlashSnap .... . . . . . . . . . . . . . . . . . . . . . . . . . . . . . . . . . . . . . . . . . . . . . . . . . . . . . . . . . . 228
Database FlashSnap commands .... . . . . . . . . . . . . . . . . . . . . . . . . . . . . . . . . . . . . . . . . . . . 229
Database FlashSnap options .... . . . . . . . . . . . . . . . . . . . . . . . . . . . . . . . . . . . . . . . . . . . . . . . 230
How to plan for Database FlashSnap .... . . . . . . . . . . . . . . . . . . . . . . . . . . . . . . . . . . . . . . . . . . 231
Snapshot mode .... . . . . . . . . . . . . . . . . . . . . . . . . . . . . . . . . . . . . . . . . . . . . . . . . . . . . . . . . . . . . . . . . 231
One or two snapshot hosts ... . . . . . . . . . . . . . . . . . . . . . . . . . . . . . . . . . . . . . . . . . . . . . . . . . . 231
Hosts and storage for Database FlashSnap .... . . . . . . . . . . . . . . . . . . . . . . . . . . . . . . . . . . 231
Single-host configuration .... . . . . . . . . . . . . . . . . . . . . . . . . . . . . . . . . . . . . . . . . . . . . . . . . . . . 232
Two-host or Oracle RAC configuration .... . . . . . . . . . . . . . . . . . . . . . . . . . . . . . . . . . . 232
Host and storage requirements ... . . . . . . . . . . . . . . . . . . . . . . . . . . . . . . . . . . . . . . . . . . . . . 233
Contents10
Creating a snapshot mirror of a volume or volume set used by
the database ... . . . . . . . . . . . . . . . . . . . . . . . . . . . . . . . . . . . . . . . . . . . . . . . . . . . . . . . . . . . . . . . 234
Upgrading existing volumes to use Veritas Volume Manager
5.0 ... . . . . . . . . . . . . . . . . . . . . . . . . . . . . . . . . . . . . . . . . . . . . . . . . . . . . . . . . . . . . . . . . . . . . . . . . . . . . 245
Upgrading from Veritas Database Edition 3.5 for Oracle with
Database FlashSnap .... . . . . . . . . . . . . . . . . . . . . . . . . . . . . . . . . . . . . . . . . . . . . . . . . . . . . 251
Summary of database snapshot steps ... . . . . . . . . . . . . . . . . . . . . . . . . . . . . . . . . . . . . . . . . . . 251
Creating a snapplan (dbed_vmchecksnap) ... . . . . . . . . . . . . . . . . . . . . . . . . . . . . . . . . . . . . 255
Creating multi-mirror snapshots ... . . . . . . . . . . . . . . . . . . . . . . . . . . . . . . . . . . . . . . . . . . 261
Validating a snapplan (dbed_vmchecksnap) ... . . . . . . . . . . . . . . . . . . . . . . . . . . . . . . . . . . 263
Displaying, copying, and removing a snapplan
(dbed_vmchecksnap) ... . . . . . . . . . . . . . . . . . . . . . . . . . . . . . . . . . . . . . . . . . . . . . . . . . . . . . . . . . . 266
Creating a snapshot (dbed_vmsnap) ... . . . . . . . . . . . . . . . . . . . . . . . . . . . . . . . . . . . . . . . . . . . . 268
Backing up the database from snapshot volumes
(dbed_vmclonedb) ... . . . . . . . . . . . . . . . . . . . . . . . . . . . . . . . . . . . . . . . . . . . . . . . . . . . . . . . . . . . . . 271
Mounting the snapshot volumes and backing up .... . . . . . . . . . . . . . . . . . . . . 274
Restoring from backup .... . . . . . . . . . . . . . . . . . . . . . . . . . . . . . . . . . . . . . . . . . . . . . . . . . . . . . . 275
Cloning a database (dbed_vmclonedb) ... . . . . . . . . . . . . . . . . . . . . . . . . . . . . . . . . . . . . . . . . . 275
Using Database FlashSnap to clone a database ... . . . . . . . . . . . . . . . . . . . . . . . . 276
Shutting down the clone database and unmounting file
systems .... . . . . . . . . . . . . . . . . . . . . . . . . . . . . . . . . . . . . . . . . . . . . . . . . . . . . . . . . . . . . . . . . . . . . 280
Restarting a clone database ... . . . . . . . . . . . . . . . . . . . . . . . . . . . . . . . . . . . . . . . . . . . . . . . . . 281
Recreating Oracle tempfiles ... . . . . . . . . . . . . . . . . . . . . . . . . . . . . . . . . . . . . . . . . . . . . . . . . . 282
Resynchronizing your database to the snapshot ... . . . . . . . . . . . . . . . . . . . . . . . . . . . . 284
Resynchronizing the snapshot to your database ... . . . . . . . . . . . . . . . . . . . . . . . . . . . 288
Removing a snapshot volume .... . . . . . . . . . . . . . . . . . . . . . . . . . . . . . . . . . . . . . . . . . . . . . . . . . . . . 289
Using Database FlashSnap in an HA environment .... . . . . . . . . . . . . . . . . . . . . . . . . . 290
Chapter 14 Using Veritas NetBackup for database backup
About using Veritas NetBackup for backup and restore ... . . . . . . . . . . . . . . . . . . . 293
Using Veritas NetBackup to backup and restore Quick I/O files ... . . . . . . . . . 293
About using Veritas NetBackup to backup and restore Oracle Disk
Manager files ... . . . . . . . . . . . . . . . . . . . . . . . . . . . . . . . . . . . . . . . . . . . . . . . . . . . . . . . . . . . . . . . . . . . 295
Chapter 15 Tuning for performance
Additional documentation .... . . . . . . . . . . . . . . . . . . . . . . . . . . . . . . . . . . . . . . . . . . . . . . . . . . . . . . . . 297
About tuning VxVM ..... . . . . . . . . . . . . . . . . . . . . . . . . . . . . . . . . . . . . . . . . . . . . . . . . . . . . . . . . . . . . . . . 297
About obtaining volume I/O statistics ... . . . . . . . . . . . . . . . . . . . . . . . . . . . . . . . . . . . 298
About tuning VxFS .... . . . . . . . . . . . . . . . . . . . . . . . . . . . . . . . . . . . . . . . . . . . . . . . . . . . . . . . . . . . . . . . . . . 299
How monitoring free space works .... . . . . . . . . . . . . . . . . . . . . . . . . . . . . . . . . . . . . . . . . 299
How tuning VxFS I/O parameters works .... . . . . . . . . . . . . . . . . . . . . . . . . . . . . . . . . 301
About tunable VxFS I/O parameters ... . . . . . . . . . . . . . . . . . . . . . . . . . . . . . . . . . . . . . . 301
11Contents
About obtaining file I/O statistics using the Quick I/O
interface ... . . . . . . . . . . . . . . . . . . . . . . . . . . . . . . . . . . . . . . . . . . . . . . . . . . . . . . . . . . . . . . . . . . . . 306
About I/O statistics data ... . . . . . . . . . . . . . . . . . . . . . . . . . . . . . . . . . . . . . . . . . . . . . . . . . . . . . 306
Obtaining file I/O statistics using Veritas extension for Oracle
Disk Manager ... . . . . . . . . . . . . . . . . . . . . . . . . . . . . . . . . . . . . . . . . . . . . . . . . . . . . . . . . . . . . . 308
About I/O statistics ... . . . . . . . . . . . . . . . . . . . . . . . . . . . . . . . . . . . . . . . . . . . . . . . . . . . . . . . . . . . . 309
About tuning Oracle databases ... . . . . . . . . . . . . . . . . . . . . . . . . . . . . . . . . . . . . . . . . . . . . . . . . . . . 310
Sequential table scans .... . . . . . . . . . . . . . . . . . . . . . . . . . . . . . . . . . . . . . . . . . . . . . . . . . . . . . . . 310
Asynchronous I/O .... . . . . . . . . . . . . . . . . . . . . . . . . . . . . . . . . . . . . . . . . . . . . . . . . . . . . . . . . . . . . . 311
Tuning buffer cache .... . . . . . . . . . . . . . . . . . . . . . . . . . . . . . . . . . . . . . . . . . . . . . . . . . . . . . . . . . . 311
Setting Oracle block reads during sequential scans .... . . . . . . . . . . . . . . . . . . 311
Setting slave parameters ... . . . . . . . . . . . . . . . . . . . . . . . . . . . . . . . . . . . . . . . . . . . . . . . . . . . . . 311
Configuring memory allocation .... . . . . . . . . . . . . . . . . . . . . . . . . . . . . . . . . . . . . . . . . . . . 312
About tuning Solaris for Oracle ... . . . . . . . . . . . . . . . . . . . . . . . . . . . . . . . . . . . . . . . . . . . . . . . . . . 312
maxuprc .... . . . . . . . . . . . . . . . . . . . . . . . . . . . . . . . . . . . . . . . . . . . . . . . . . . . . . . . . . . . . . . . . . . . . . . . . . 313
shmmax .... . . . . . . . . . . . . . . . . . . . . . . . . . . . . . . . . . . . . . . . . . . . . . . . . . . . . . . . . . . . . . . . . . . . . . . . . . 313
shmmin .... . . . . . . . . . . . . . . . . . . . . . . . . . . . . . . . . . . . . . . . . . . . . . . . . . . . . . . . . . . . . . . . . . . . . . . . . . . 313
shmmni .... . . . . . . . . . . . . . . . . . . . . . . . . . . . . . . . . . . . . . . . . . . . . . . . . . . . . . . . . . . . . . . . . . . . . . . . . . . 313
shmseg .... . . . . . . . . . . . . . . . . . . . . . . . . . . . . . . . . . . . . . . . . . . . . . . . . . . . . . . . . . . . . . . . . . . . . . . . . . . . 313
semmap .... . . . . . . . . . . . . . . . . . . . . . . . . . . . . . . . . . . . . . . . . . . . . . . . . . . . . . . . . . . . . . . . . . . . . . . . . . . 313
semmni .... . . . . . . . . . . . . . . . . . . . . . . . . . . . . . . . . . . . . . . . . . . . . . . . . . . . . . . . . . . . . . . . . . . . . . . . . . . 314
semmns .... . . . . . . . . . . . . . . . . . . . . . . . . . . . . . . . . . . . . . . . . . . . . . . . . . . . . . . . . . . . . . . . . . . . . . . . . . . 314
semmnu .... . . . . . . . . . . . . . . . . . . . . . . . . . . . . . . . . . . . . . . . . . . . . . . . . . . . . . . . . . . . . . . . . . . . . . . . . . 314
semmsl ... . . . . . . . . . . . . . . . . . . . . . . . . . . . . . . . . . . . . . . . . . . . . . . . . . . . . . . . . . . . . . . . . . . . . . . . . . . . . 314
Appendix A Veritas Storage Foundation for Oracle Command LineInterface
Overview of commands .... . . . . . . . . . . . . . . . . . . . . . . . . . . . . . . . . . . . . . . . . . . . . . . . . . . . . . . . . . . . . 315
About the command line interface ... . . . . . . . . . . . . . . . . . . . . . . . . . . . . . . . . . . . . . . . . . . . . . . 318
Updating the repository using dbed_update ... . . . . . . . . . . . . . . . . . . . . . . . . . . . . 319
Checking the database configuration environment using
dbed_checkconfig ... . . . . . . . . . . . . . . . . . . . . . . . . . . . . . . . . . . . . . . . . . . . . . . . . . . . . . . . . 320
Saving the database configuration environment using
dbed_saveconfig ... . . . . . . . . . . . . . . . . . . . . . . . . . . . . . . . . . . . . . . . . . . . . . . . . . . . . . . . . . . 324
Creating Storage Checkpoints using dbed_ckptcreate ... . . . . . . . . . . . . . . . 325
Displaying Storage Checkpoints using dbed_ckptdisplay .... . . . . . . . . . . 329
Mounting Storage Checkpoints using dbed_ckptmount ... . . . . . . . . . . . . . 331
Unmounting Storage Checkpoints using dbed_ckptumount .... . . . . . . 332
Creating and working with Storage Checkpoint allocation policies
using dbed_ckptpolicy ... . . . . . . . . . . . . . . . . . . . . . . . . . . . . . . . . . . . . . . . . . . . . . . . . . . 333
Administering Storage Checkpoint quotas using
dbed_ckptquota ... . . . . . . . . . . . . . . . . . . . . . . . . . . . . . . . . . . . . . . . . . . . . . . . . . . . . . . . . . . . 336
Contents12
Performing Storage Rollback using dbed_ckptrollback .... . . . . . . . . . . . . . 338
Removing Storage Checkpoints using dbed_ckptremove .... . . . . . . . . . . . 340
Managing the Capacity Planning Utility using dbed_ckptplan .... . . . 340
Cloning the Oracle instance using dbed_clonedb .... . . . . . . . . . . . . . . . . . . . . . 341
Creating and working with snapplans using
dbed_vmchecksnap .... . . . . . . . . . . . . . . . . . . . . . . . . . . . . . . . . . . . . . . . . . . . . . . . . . . . . . 346
Creating, resynchronizing, or reverse resynchronizing a snapshot
database using dbed_vmsnap .... . . . . . . . . . . . . . . . . . . . . . . . . . . . . . . . . . . . . . . . . 356
Creating or shutting down a clone database using
dbed_vmclonedb .... . . . . . . . . . . . . . . . . . . . . . . . . . . . . . . . . . . . . . . . . . . . . . . . . . . . . . . . . 361
Managing log files using edgetmsg2 .... . . . . . . . . . . . . . . . . . . . . . . . . . . . . . . . . . . . . . 370
Displaying I/O mapping and statistics using vxstorage_stats ... . . . . . 371
Mapping tablespaces to disks using dbed_analyzer ... . . . . . . . . . . . . . . . . . . 374
Identifying VxFS files to convert to Quick I/O using
qio_getdbfiles ... . . . . . . . . . . . . . . . . . . . . . . . . . . . . . . . . . . . . . . . . . . . . . . . . . . . . . . . . . . . . . 377
Converting VxFS files to Quick I/O using qio_convertdbfiles ... . . . . . . 378
Recreating Quick I/O files using qio_recreate ... . . . . . . . . . . . . . . . . . . . . . . . . . . 381
Appendix B Using third-party software to back up files
About backing up and restoring Quick I/O files using Oracle
RMAN .... . . . . . . . . . . . . . . . . . . . . . . . . . . . . . . . . . . . . . . . . . . . . . . . . . . . . . . . . . . . . . . . . . . . . . . . . . . . . 383
About backing up and restoring Oracle Disk Manager files using
Oracle RMAN .... . . . . . . . . . . . . . . . . . . . . . . . . . . . . . . . . . . . . . . . . . . . . . . . . . . . . . . . . . . . . . . . . . . . 384
About backing up and restoring Quick I/O files using Legato
NetWorker ... . . . . . . . . . . . . . . . . . . . . . . . . . . . . . . . . . . . . . . . . . . . . . . . . . . . . . . . . . . . . . . . . . . . . . . . 385
About using backup software other than VERITAS NetBackup to back
up and restore ODM files ... . . . . . . . . . . . . . . . . . . . . . . . . . . . . . . . . . . . . . . . . . . . . . . . . . . . . . 386
Appendix C Veritas Database FlashSnap status information
Database FlashSnap snapshot status and database status ... . . . . . . . . . . . . . . . . 387
Snapshot status details ... . . . . . . . . . . . . . . . . . . . . . . . . . . . . . . . . . . . . . . . . . . . . . . . . . . . . . . . 387
Database status details ... . . . . . . . . . . . . . . . . . . . . . . . . . . . . . . . . . . . . . . . . . . . . . . . . . . . . . . . 390
Glossary
Index
13Contents

Contents14
Introducing Veritas Storage
Foundation for Oracle
This chapter includes the following topics:
■ About Veritas Storage Foundation for Oracle
■ How Veritas Volume Manager works
■ How Veritas File System works
■ How Veritas Storage Mapping works
■ How Veritas Database FlashSnap works
■ How Veritas Extension for Oracle Disk Manager works
■ How Database Dynamic Storage Tiering works
■ About the vxdbd daemon
■ About Veritas Storage Foundation for Oracle graphical user interface
■ About Veritas NetBackup (optional)
■ About Veritas Storage Foundation/High Availability for Oracle (optional)
About Veritas Storage Foundation for OracleThere are two versions of this product:
■ Veritas Storage Foundation for Oracle Standard Edition
■ Veritas Storage Foundation for Oracle Enterprise Edition
The Enterprise Edition contains everything in the Standard Edition plus Storage
Mapping, Database FlashSnap, Storage Checkpoints, and Storage Rollback.
1Chapter
Note:Veritas Storage Foundation/High Availability (HA) for Oracle is available
only with the Enterprise Edition.
Unless otherwise noted, features pertain to both the Standard and Enterprise
Edition products.
Components of Veritas Storage Foundation for Oracle
Veritas Storage Foundation for Oracle combines the strengths of the core
technology products with database-specific enhancements to offer performance,
availability, and manageability for Oracle database servers.
Veritas Storage Foundation for Oracle includes the following products:
■ Veritas Volume Manager (VxVM)
A disk management subsystem that supports disk striping, disk mirroring,
and simplified disk management for improved data availability and
performance.
■ Veritas File System (VxFS)
A high-performance, fast-recovery file system that is optimized for
business-critical database applications and data-intensive workloads. VxFS
offers online administration, letting you perform most frequently scheduled
maintenance tasks (including online backup, resizing, and file system changes)
without interrupting data or system availability. VxFS also provides support
for large file systems (of more than 8 exabytes in a 64-bit environment) and
large files (in the exabyte range in a 64-bit environment).
Veritas File System offers the following performance-enhancing features that
are of particular interest in a database environment:
■ Veritas Quick I/O is a VxFS feature that improves the throughput for Oracle
databases built on VxFS file systems. Quick I/O delivers raw device
performance to databases run on VxFS, providing the administrative
advantages of using file systems without the performance penalties.
■ Veritas Cached Quick I/O further enhances database performance by
leveraging large system memory to selectively buffer the frequently
accessed data.
■ Veritas Concurrent I/O improves the performance of regular files on a VxFS
file system without the need for extending namespaces and presenting the
files as devices. This simplifies administrative tasks and allows relational
databases (such as Oracle), which do not have a sequential read/write
requirement, to access files concurrently.
Introducing Veritas Storage Foundation for OracleAbout Veritas Storage Foundation for Oracle
16
■ A feature of the Enterprise Edition, VxFS Storage Checkpoint technology
lets you create a point-in-time image of a file system. Storage Checkpoints
are treated like any other VxFS file system and can be created, mounted,
unmounted, and removed with VxFS and Veritas Storage Foundation
administrative utilities.
■ Veritas Storage Mapping
Storage Mapping, a feature of the Enterprise Edition, lets you take full
advantage of Oracle storage mapping to map datafiles to physical devices and
display storage object I/O statistics. Oracle's file mapping (I/O topology) feature
was introduced beginning with Oracle9 Release 2.
Both storage object I/O statistics and the storage structure can be displayed
for a specific file using either the vxstorage_stats command or the Veritas
Storage Foundation GUI. In addition, mapping information showing which
tablespaces reside on which physical disks can be obtained for a specified
database using the dbed_analyzer command.
■ Veritas Database FlashSnap
Database FlashSnap, a feature of the Enterprise Edition and optionally available
in the Standard Edition, lets you create, resynchronize, and reverse
resynchronize an online point-in-time image of a database. You can use this
image to perform backup, other maintenance tasks, or off-host processing
while providing continuous data availability. Also, database administrators
can perform these tasks without root privileges. Database FlashSnap tasks
may be performed through the Veritas Storage Foundation GUI or the command
line interface.
■ Veritas Extension for Oracle Disk Manager
Veritas Extension for Oracle Disk Manager is a custom storage interface
designed specifically for Oracle9i and 10g. Oracle Disk Manager allows Oracle9i
and 10g to improve performance and manage system bandwidth through an
improved Application Programming Interface (API) that contains advanced
kernel support for file I/O.
Veritas Extension for Oracle Disk Manager supports Oracle Resilvering. With
Oracle Resilvering, the storage layer receives information from the Oracle
database as to which regions or blocks of a mirrored datafile to resync after a
system crash. When using Oracle Resilvering, you can turn off VxVM Dirty
Region Logging (DRL), which increases performance.
■ Database Dynamic Storage Tiering
Database Dynamic Storage Tiering, a feature of the Enterprise Edition, enables
you to manage your data so that less-frequently used data can be moved to
slower, less expensive disks, allowing frequently-accessed data to be stored
on the faster disks for quicker retrieval.
17Introducing Veritas Storage Foundation for OracleAbout Veritas Storage Foundation for Oracle
■ Veritas Enterprise Administrator
Veritas Enterprise Administrator (VEA) is the infrastructure that allows you
to access Veritas Storage Foundation for Oracle, Veritas Volume Manager, and
Veritas File System information and features through the GUI.
■ Veritas NetBackup for Oracle Advanced BLI Agent (optional)
The Veritas NetBackup for Oracle Advanced BLI Agent software supports
Block-Level Incremental (BLI) Backup to reduce database down time, backup
time, and backup volume, as well as CPU usage and network overhead. (Contact
your Sales Representative for information about this optional product.)
An optional High Availability (HA) version of Veritas Storage Foundation for
Oracle Enterprise Edition, which includes Veritas Cluster Server, is available for
customers who have high system-availability requirements.
How Veritas Volume Manager worksDatabases require their storage media to be robust and resilient to failure. It is
vital to protect against hardware and disk failures and to maximize performance
using all the available hardware resources. Using a volume manager provides this
necessary resilience and eases the task of management. A volume manager can
help you manage hundreds of disk devices and makes spanning, striping, and
mirroring easy.
Veritas Volume Manager (VxVM) builds virtual devices called volumes on top of
physical disks. Volumes are accessed by a file system, a database, or other
applications in the same way physical disk partitions would be accessed. Using
volumes, VxVM provides the following administrative benefits for databases:
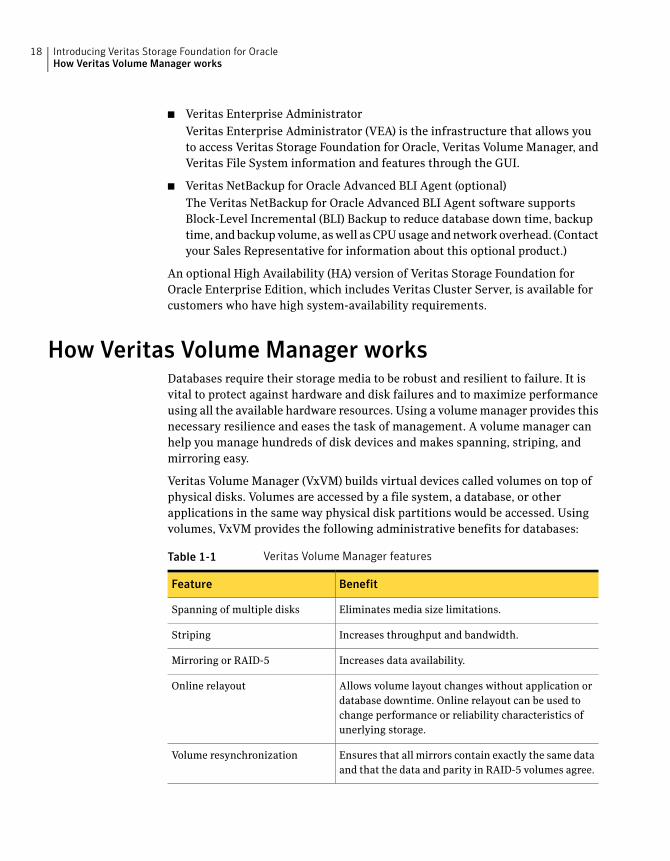
Table 1-1 Veritas Volume Manager features
BenefitFeature
Eliminates media size limitations.Spanning of multiple disks
Increases throughput and bandwidth.Striping
Increases data availability.Mirroring or RAID-5
Allows volume layout changes without application or
database downtime. Online relayout can be used to
change performance or reliability characteristics of
unerlying storage.
Online relayout
Ensures that all mirrors contain exactly the same data
and that the data and parity in RAID-5 volumes agree.
Volume resynchronization
Introducing Veritas Storage Foundation for OracleHow Veritas Volume Manager works
18
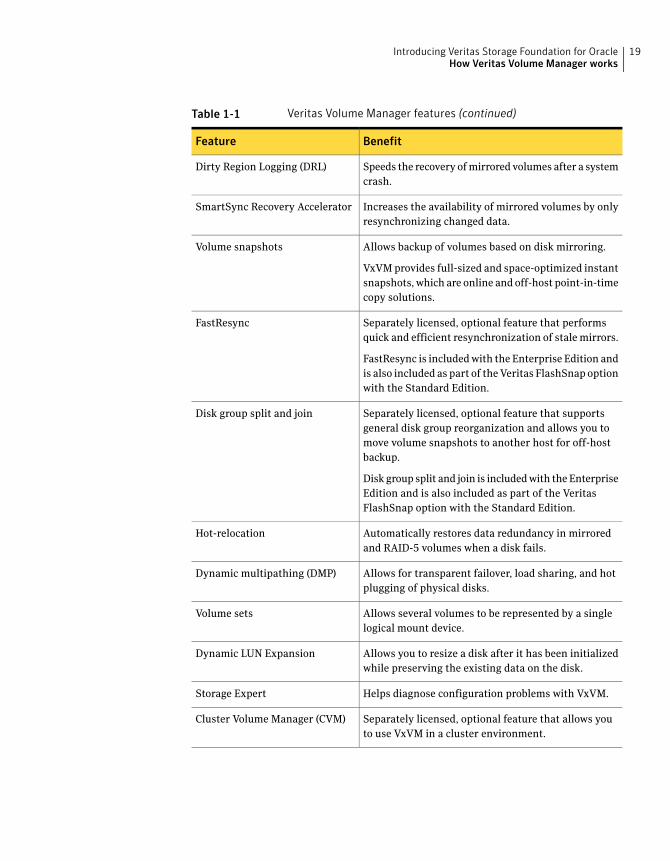
Table 1-1 Veritas Volume Manager features (continued)
BenefitFeature
Speeds the recovery of mirrored volumes after a system
crash.
Dirty Region Logging (DRL)
Increases the availability of mirrored volumes by only
resynchronizing changed data.
SmartSync Recovery Accelerator
Allows backup of volumes based on disk mirroring.
VxVM provides full-sized and space-optimized instant
snapshots, which are online and off-host point-in-time
copy solutions.
Volume snapshots
Separately licensed, optional feature that performs
quick and efficient resynchronization of stale mirrors.
FastResync is included with the Enterprise Edition and
is also included as part of the Veritas FlashSnap option
with the Standard Edition.
FastResync
Separately licensed, optional feature that supports
general disk group reorganization and allows you to
move volume snapshots to another host for off-host
backup.
Disk group split and join is included with the Enterprise
Edition and is also included as part of the Veritas
FlashSnap option with the Standard Edition.
Disk group split and join
Automatically restores data redundancy in mirrored
and RAID-5 volumes when a disk fails.
Hot-relocation
Allows for transparent failover, load sharing, and hot
plugging of physical disks.
Dynamic multipathing (DMP)
Allows several volumes to be represented by a single
logical mount device.
Volume sets
Allows you to resize a disk after it has been initialized
while preserving the existing data on the disk.
Dynamic LUN Expansion
Helps diagnose configuration problems with VxVM.Storage Expert
Separately licensed, optional feature that allows you
to use VxVM in a cluster environment.
Cluster Volume Manager (CVM)
19Introducing Veritas Storage Foundation for OracleHow Veritas Volume Manager works
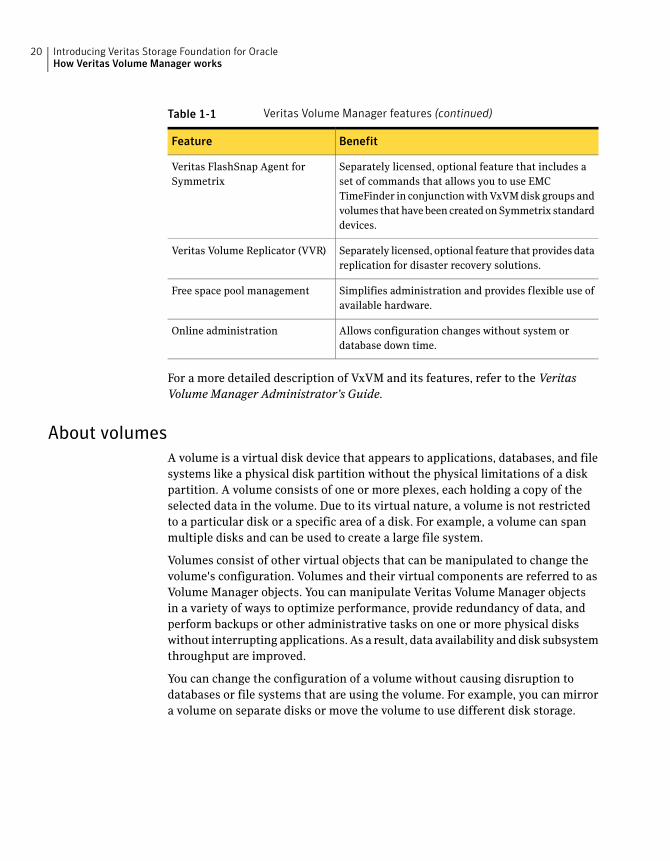
Table 1-1 Veritas Volume Manager features (continued)
BenefitFeature
Separately licensed, optional feature that includes a
set of commands that allows you to use EMC
TimeFinder in conjunction with VxVM disk groups and
volumes that have been created on Symmetrix standard
devices.
Veritas FlashSnap Agent for
Symmetrix
Separately licensed, optional feature that provides data
replication for disaster recovery solutions.
Veritas Volume Replicator (VVR)
Simplifies administration and provides flexible use of
available hardware.
Free space pool management
Allows configuration changes without system or
database down time.
Online administration
For a more detailed description of VxVM and its features, refer to the Veritas
VolumeManager Administrator’s Guide.
About volumes
A volume is a virtual disk device that appears to applications, databases, and file
systems like a physical disk partition without the physical limitations of a disk
partition. A volume consists of one or more plexes, each holding a copy of the
selected data in the volume. Due to its virtual nature, a volume is not restricted
to a particular disk or a specific area of a disk. For example, a volume can span
multiple disks and can be used to create a large file system.
Volumes consist of other virtual objects that can be manipulated to change the
volume's configuration. Volumes and their virtual components are referred to as
Volume Manager objects. You can manipulate Veritas Volume Manager objects
in a variety of ways to optimize performance, provide redundancy of data, and
perform backups or other administrative tasks on one or more physical disks
without interrupting applications. As a result, data availability and disk subsystem
throughput are improved.
You can change the configuration of a volume without causing disruption to
databases or file systems that are using the volume. For example, you can mirror
a volume on separate disks or move the volume to use different disk storage.
Introducing Veritas Storage Foundation for OracleHow Veritas Volume Manager works
20
About disk groups
A disk group is a collection of disks that share a common configuration (for
example, configuration objects that belong to a single database). We recommend
creating one disk group for each database.
You can move a disk group and its components as a unit from one host to another
host. For example, you can move volumes and file systems that belong to the same
database and are created within one disk group as a unit. You must configure a
given volume from disks belonging to one disk group.
In releases before Veritas Storage Foundation 4.0 for Oracle, the default disk
group was rootdg. For VxVM to function, the rootdg disk group had to exist and
it had to contain at least one disk. This requirement no longer exists, and VxVM
can work without any disk groups configured (although you must set up at least
one disk group before you can create any volumes of other VxVM objects).
About volume layouts
A Redundant Array of Independent Disks (RAID) is a disk array in which a group
of disks appears to the system as a single virtual disk or a single volume. VxVM
supports several RAID implementations, as well as spanning.
The following volume layouts are available to satisfy different database
configuration requirements:
■ Spanning and concatenation
■ Striping (RAID-0)
■ Mirroring (RAID-1)
■ Mirrored-Stripe Volumes (RAID-0+1)
■ Striped-Mirror Volumes (RAID-1+0)
■ RAID-5
Caution: Spanning or striping a volume across multiple disks increases the
chance that a disk failure will result in failure of that volume. Use mirroring
or RAID-5 to substantially reduce the chance of a single volume failure caused
by a single disk failure.
How spanning and concatenation work
Concatenation maps data in a linear manner onto one or more subdisks in a plex.
To access all of the data in a concatenated plex sequentially, data is first accessed
21Introducing Veritas Storage Foundation for OracleHow Veritas Volume Manager works
in the first subdisk from beginning to end. Data is then accessed in the remaining
subdisks sequentially from beginning to end, until the end of the last subdisk.
You can use concatenation with multiple subdisks when there is insufficient
contiguous space for the plex on any one disk. This form of concatenation can be
used for load balancing between disks, and for head movement optimization on
a particular disk.
Concatenation using subdisks that reside on more than one VxVM disk is called
spanning.
Warning: Spanning a plex across multiple disks increases the chance that a disk
failure results in failure of the assigned volume. Use mirroring (RAID-1) or striping
with parity (RAID-5) to reduce the risk that a single disk failure results in a volume
failure.
Spanning is useful when you need to read or write data sequentially (for example,
reading from or writing to database redo logs) and there is not sufficient contiguous
space.
How striping (RAID-0) works
Striping is a technique of mapping data so that the data is interleaved among
multiple physical disks. Data is allocated in equal-sized units (called stripe units)
that are interleaved between the disks. Each stripe unit is a set of contiguous
blocks on a disk. A stripe consists of the set of stripe units at the same position
across all columns. A column is a set of one or more subdisks within a striped
plex.
Striping is useful if you need large amounts of data written to or read from physical
disks, and performance is important. Striping is also helpful in balancing the I/O
load from multi-user applications across multiple disks. By using parallel data
transfer to and from multiple disks, striping significantly improves data-access
performance.
When striping across multiple disks, failure of any one disk will make the entire
volume unusable.
How mirroring (RAID-1) works
Mirroring is a technique of using multiple copies of the data, or mirrors, to
duplicate the information contained in a volume. In the event of a physical disk
failure, the mirror on the failed disk becomes unavailable, but the system continues
to operate using the unaffected mirrors. For this reason, mirroring increases
system reliability and availability. A volume requires at least two mirrors to
Introducing Veritas Storage Foundation for OracleHow Veritas Volume Manager works
22
provide redundancy of data. A volume can consist of up to 32 mirrors. Each of
these mirrors must contain disk space from different disks for the redundancy
to be effective.
How striping plus mirroring (mirrored-stripe or RAID-0+1)works
VxVM supports the combination of mirroring above striping. The combined layout
is called a mirrored-stripe layout. A mirrored-stripe layout offers the dual benefits
of striping to spread data across multiple disks, while mirroring provides
redundancy of data. For mirroring above striping to be effective, the striped plex
and its mirrors must be allocated from separate disks.
The layout type of the data plexes in a mirror can be concatenated or striped. Even
if only one is striped, the volume is still termed a mirrored-stripe volume. If they
are all concatenated, the volume is termed a mirrored-concatenated volume.
How mirroring plus striping (striped-mirror, RAID-1+0 orRAID-10) works
VxVM supports the combination of striping above mirroring. This combined layout
is called a striped-mirror layout and mirrors each column of the stripe. If there
are multiple subdisks per column, each subdisk can be mirrored individually
instead of each column. A striped-mirror volume is an example of a layered volume.
Compared to a mirrored-stripe volume, a striped-mirror volume offers the dual
benefits of striping to spread data across multiple disks, while mirroring provides
redundancy of data. A striped-mirror volume enhances redundancy, which makes
it more tolerant of disk failure, and reduces recovery time after disk failure.
For databases that support online transaction processing (OLTP) workloads, we
recommend either mirrored-stripe or striped-mirror volumes to improve database
performance and reliability. For highest availability, we recommend striped-mirror
volumes (RAID 1+0).
How striping with parity (RAID-5) works
RAID-5 provides data redundancy through the use of parity (a calculated value
that the system uses to reconstruct data after a failure). While data is written to
a RAID-5 volume, parity is also calculated by performing an exclusive OR (XOR)
procedure on data. The resulting parity is then written to another part of the
volume. If a portion of a RAID-5 volume fails, the data that was on that portion
of the failed volume can be recreated from the remaining data and the parity.
RAID-5 offers data redundancy similar to mirroring, while requiring less disk
space. RAID-5 read performance is similar to that of striping but with relatively
23Introducing Veritas Storage Foundation for OracleHow Veritas Volume Manager works
slow write performance. RAID-5 is useful if the database workload is read-intensive
(as in many data warehousing applications). You can snapshot a RAID-5 volume
and move a RAID-5 subdisk without losing redundancy.
About online relayout
As databases grow and usage patterns change, online relayout lets you change
volumes to a different layout, with uninterrupted data access. Relayout is
accomplished online and in place. Use online relayout to change the redundancy
or performance characteristics of the storage, such as data organization (RAID
levels), the number of columns for RAID-5 and striped volumes, and stripe unit
size.
About volume resynchronization
When storing data redundantly, using mirrored or RAID-5 volumes, Veritas
Volume Manager ensures that all copies of the data match exactly. However, if
the system crashes, small amounts of the redundant data on a volume can become
inconsistent or unsynchronized. For mirrored volumes, unsynchronized data can
cause two reads from the same region of the volume to return different results if
different mirrors are used to satisfy the read request. In the case of RAID-5
volumes, unsynchronized data can lead to parity corruption and incorrect data
reconstruction.
In the event of a system crash, Veritas Volume Manager ensures that all mirrors
contain exactly the same data and that the data and parity in RAID-5 volumes
agree. This process is called volume resynchronization. Not all volumes require
resynchronization after a system failure. VxVM notices when a volume is first
written and marks it as dirty. Only volumes that are marked dirty when the system
reboots require resynchronization.
The process of resynchronization can impact system and database performance.
However, it does not affect the availability of the database after system reboot.
You can immediately access the database after database recovery although the
performance may suffer due to resynchronization. For very large volumes or for
a very large number of volumes, the resynchronization process can take a long
time. You can significantly reduce resynchronization time by using Dirty Region
Logging (DRL) for mirrored volumes or by making sure that RAID-5 volumes have
valid RAID-5 logs. However, using logs can slightly reduce the database write
performance.
For most database configurations, we recommend using dirty region logs or the
RAID-5 logs when mirrored or RAID-5 volumes are used. It is also advisable to
evaluate the database performance requirements to determine the optimal volume
configurations for the databases.
Introducing Veritas Storage Foundation for OracleHow Veritas Volume Manager works
24
About dirty region logging
Dirty region logging (DRL), if enabled, speeds the recovery of mirrored volumes
after a system crash. DRL keeps track of the regions that have changed due to I/O
writes to a mirrored volume. DRL uses this information to recover only those
portions of the volume that need to be recovered.
Note: If a version 20 data change object (DCO) volume is associated with a volume,
a portion of the DCO volume can be used to store the DRL log. There is no need
to create a separate DRL log for a volume that has a version 20 DCO volume.
For more information on DCOs and DCO volumes, see theVeritasVolumeManager
Administrator's Guide.
About SmartSync recovery accelerator
SmartSync increases the availability of mirrored volumes by only resynchronizing
changed data. SmartSync reduces the time required to restore consistency, freeing
more I/O bandwidth for business-critical applications.
This feature is applicable only to databases that are configured on raw volumes.
If supported by the database vendor, the SmartSync feature uses an extended
interface between VxVM volumes and the database software to avoid unnecessary
work during mirror resynchronization. For example, Oracle automatically takes
advantage of SmartSync to perform database resynchronization when it is
available.
About volume sets
Volume sets are an enhancement to VxVM that allow several volumes to be
represented by a single logical mount device. All I/O from and to the underlying
volumes is directed via the I/O interfaces of the volume set. The volume set feature
supports the multi-device enhancement to Veritas File System (VxFS). This feature
allows file systems to make best use of the different performance and availability
characteristics of the underlying volumes. For example, file system metadata
could be stored on volumes with higher redundancy, and user data on volumes
with better performance.
About volume snapshots
A volume snapshot is a point-in-time image of a volume. Veritas Volume Manager
provides three volume snapshot features based on disk mirroring:
■ Full-sized instant snapshots
25Introducing Veritas Storage Foundation for OracleHow Veritas Volume Manager works
■ Space-optimized instant snapshots
■ Emulation of third-mirror snapshots
About Veritas FastResync
Veritas FastResync (previously called Fast Mirror Resynchronization or FMR) is
included with the Enterprise Edition. It is also included as part of the Veritas
FlashSnap option with the Standard Edition.
Veritas FastResync performs quick and efficient resynchronization of stale mirrors
(mirrors that are not synchronized). This increases the efficiency of the VxVM
snapshot mechanism, and improves the performance of operations such as backup
and decision support. Typically, these operations require that the volume is
quiescent, and that they are not impeded by updates to the volume by other
activities on the system. To achieve these goals, the snapshot mechanism in VxVM
creates an exact copy of a primary volume at an instant in time. After a snapshot
is taken, it can be accessed independently of the volume from which it was taken.
Veritas Storage Foundation for Oracle Enterprise Edition includes a feature called
Database FlashSnap, which takes advantage of the FastResync and disk group
split and join features. Database FlashSnap provides a quicker and easier way for
database administrators to use volume snapshots.
See “How Veritas Volume Manager works” on page 18.
See “How Veritas Database FlashSnap works” on page 36.
How non-persistent FastResync works
Non-persistent FastResync allocates its change maps in memory. If non-persistent
FastResync is enabled, a separate FastResync map is kept for the original volume
and for each snapshot volume. Unlike a dirty region log (DRL), these maps do not
reside on disk nor in persistent store. The advantage is that updates to the
FastResync map have little impact on I/O performance, as no disk updates need
to be performed. However, if a system is rebooted, the information in the map is
lost, so a full resynchronization is required when performing a snapback operation.
This limitation can be overcome for volumes in cluster-shareable disk groups,
provided that at least one of the nodes in the cluster remains running to preserve
the FastResync map in its memory.
How persistent FastResync works
Non-persistent FastResync has been augmented by the introduction of persistent
FastResync. Unlike non-persistent FastResync, Persistent FastResync keeps the
FastResync maps on disk so that they can survive system reboots and system
Introducing Veritas Storage Foundation for OracleHow Veritas Volume Manager works
26

crashes. When the disk groups are rejoined, this allows the snapshot plexes to be
quickly resynchronized. This ability is not supported by non-persistent FastResync.
If persistent FastResync is enabled on a volume or on a snapshot volume, a DCO
and a DCO log volume are associated with the volume.
The DCO object is used not only to manage FastResync maps, but also to manage
DRL recovery maps and special maps called copy maps that allow instant snapshot
operations to be resume following a system crash.
Persistent FastResync can also track the association between volumes and their
snapshot volumes after they are moved into different disk groups. When the disk
groups are rejoined, this allows the snapshot plexes to be quickly resynchronized.
This ability is not supported by non-persistent FastResync.
About disk group split and join
Disk group split and join is included with the Enterprise Edition. It is also included
as part of the Veritas FlashSnap option with the Standard Edition.
VxVM provides a disk group content reorganization feature that supports general
disk group reorganization and allows you to move volume snapshots to another
host for off-host backup. Additional options to the vxdg command enable you to
take advantage of the ability to remove all VxVM objects from an imported disk
group and move them to a newly created target disk group (split), and to remove
all VxVM objects from an imported disk group and move them to an imported
target disk group (join). The move operation enables you to move a self-contained
set of VxVM objects between the imported disk groups.
About hot-relocation
In addition to providing volume layouts that help improve database performance
and availability, VxVM offers features that you can use to further improve system
availability in the event of a disk failure. Hot-relocation is a feature that allows a
system to react automatically to I/O failures on mirrored or RAID-5 volumes and
restore redundancy and access to those volumes.
VxVM detects I/O failures on volumes and relocates the affected portions to disks
designated as spare disks or free space within the disk group. VxVM then
reconstructs the volumes that existed before the failure and makes them redundant
and accessible again.
The hot-relocation feature is enabled by default and is recommended for most
database configurations. After hot-relocation occurs, we recommend verifying
the volume configuration for any possible performance impact. It is also a good
idea to designate additional disks as spares to augment the spare pool.
27Introducing Veritas Storage Foundation for OracleHow Veritas Volume Manager works

While a disk is designated as a spare, you cannot use the space on that disk for
the creation of VxVM objects within its disk group. VxVM also lets you free a spare
disk for general use by removing it from the pool of hot-relocation disks.
About DMP-supported disk arrays
VxVM provides administrative utilities and driver support for disk arrays that
can take advantage of its Dynamic Multipathing (DMP) feature. Some disk arrays
provide multiple ports to access their disk devices. These ports, coupled with the
host bus adaptor (HBA) controller and any data bus or I/O processor local to the
array, make up multiple hardware paths to access the disk devices. Such disk
arrays are called multipathed disk arrays. This type of disk array can be connected
to host systems in many different configurations, (such as multiple ports connected
to different controllers on a single host, chaining of the ports through a single
controller on a host, or ports connected to different hosts simultaneously). DMP
is available for multiported disk arrays from various vendors and provides
improved reliability and performance by using path failover and load balancing.
See the Veritas VolumeManager Administrator's Guide.
See the Veritas VolumeManager Hardware Notes.
About dynamic LUN expansion
Dynamic LUN expansion allows you to resize a disk after it has been initialized
while preserving the existing data on the disk.
See the Veritas VolumeManager Administrator's Guide.
About Storage Expert
Storage Expert consists of a set of simple commands that collect VxVM
configuration data and compare it with “best practice.” Storage Expert then
produces a summary report that shows which objects do not meet these criteria
and makes recommendations for VxVM configuration improvements.
These user-configurable tools help you as an administrator to verify and validate
systems and non-optimal configurations in both small and large VxVM
installations.
Storage Expert components include a set of rule scripts and a rules engine. The
rules engine runs the scripts and produces ASCII output, which is organized and
archived by Storage Expert's report generator. This output contains information
about areas of VxVM configuration that do not meet the set criteria. By default,
output is sent to the screen, but you can redirect it to a file using standard UNIX
redirection.
Introducing Veritas Storage Foundation for OracleHow Veritas Volume Manager works
28
See the Veritas VolumeManager Administrator's Guide.
About cluster functionality (optional)
VxVM includes an optional, separately licensable clustering feature, known as
Cluster Volume Manager, that enables VxVM to be used in a cluster environment.
With the clustering option, VxVM supports up to 16 nodes per cluster.
See the Veritas VolumeManager Administrator's Guide.
About Veritas Volume Replicator (optional)
Veritas Volume Replicator (VVR) is an optional, separately licensable feature of
VxVM. VVR is a data replication tool designed to maintain a consistent copy of
application data at a remote site. It is built to contribute to an effective disaster
recovery plan. If the data center is destroyed, the application data is immediately
available at the remote site, and the application can be restarted at the remote
site.
VVR works as a fully integrated component of VxVM. VVR benefits from the
robustness, ease of use, and high performance of VxVM and, at the same time,
adds replication capability to VxVM. VVR can use existing VxVM configurations
with some restrictions. Any application, even with existing data, can be configured
to use VVR transparently.
See the Veritas Volume Replicator documentation.
How Veritas File System worksVeritas File System (referred to as VxFS) is an extent-based, intent logging file
system intended for use in UNIX environments that deal with large volumes of
data and that require high file system performance, availability, and manageability.
VxFS also provides enhancements that make file systems more viable in database
environments.
The following sections provide a brief overview of VxFS concepts and features
that are relevant to database administration.
See the Veritas File System Administrator's Guide.
About Veritas Quick I/O
Databases can run on either file systems or raw devices. Database administrators
often create their databases on file systems because it makes common
administrative tasks (such as moving, copying, and backing up) easier. However,
29Introducing Veritas Storage Foundation for OracleHow Veritas File System works
running databases on most file systems significantly reduces database
performance.
When performance is an issue, database administrators create their databases
on raw devices. VxFS with Quick I/O presents regular, preallocated files as raw
character devices to the application. Using Quick I/O, you can enjoy the
management advantages of databases created on file systems and achieve the
same performance as databases created on raw devices.
Quick I/O can be used on Oracle9 and Oracle 10. If you are using Oracle9 or Oracle
10, it is recommended that you use Oracle Disk Manager.
See “About Quick I/O” on page 73.
About Veritas Cached Quick I/O
Cached Quick I/O allows databases to make more efficient use of large system
memory while still maintaining the performance benefits of Quick I/O. Cached
Quick I/O provides an efficient, selective buffering mechanism to back
asynchronous I/O. Using Cached Quick I/O, you can enjoy all the benefits of Quick
I/O and achieve even better performance.
Cached Quick I/O is first enabled for the file system and then enabled on a per file
basis.
See “About Cached Quick I/O” on page 99.
About Veritas Concurrent I/O
Veritas Concurrent I/O improves the performance of regular files on a VxFS file
system without the need for extending namespaces and presenting the files as
devices. This simplifies administrative tasks and allows databases, which do not
have a sequential read/write requirement, to access files concurrently.
Veritas Concurrent I/O allows for concurrency between a single writer and multiple
readers or between multiple writers. It minimizes serialization for extending
writes and sends I/O requests directly to file systems.
See “About Concurrent I/O” on page 113.
About extent-based allocation
The UFS file system supplied with Solaris uses block-based allocation schemes
that provide good random access to files and acceptable latency on small files.
For larger files, such as database files, this block-based architecture limits
throughput. This limitation makes the UFS file system a less than optimal choice
for database environments.
Introducing Veritas Storage Foundation for OracleHow Veritas File System works
30
When storage is allocated to a file on a VxFS file system, it is grouped in extents,
as opposed to being allocated a block at a time as with the UFS file system.
By allocating disk space to files in extents, disk I/O to and from a file can be done
in units of multiple blocks. This type of I/O can occur if storage is allocated in
units of consecutive blocks. For sequential I/O, multiple block operations are
considerably faster than block-at-a-time operations. Almost all disk drives accept
I/O operations of multiple blocks.
The VxFS file system allocates disk space to files in groups of one or more extents.
VxFS also allows applications to control some aspects of the extent allocation for
a given file. Extent attributes are the extent allocation policies associated with a
file.
See “Preallocating space for Quick I/O files using the setext command” on page 79.
About fast file system and database recovery
Veritas File System begins recovery procedures within seconds after a system
failure by using a tracking feature called intent logging. This feature records
pending changes to the file system structure in a circular intent log. The intent
log recovery feature is not readily apparent to users or a system administrator
except during a system failure. During system failure recovery, the VxFS fsck
utility performs an intent log replay, which scans the intent log and nullifies or
completes file system operations that were active when the system failed. The
file system can then be mounted without completing a full structural check of the
entire file system. Replaying the intent log may not completely recover the
damaged file system structure if there was a disk hardware failure; hardware
problems may require a complete system check using the fsck utility provided
with Veritas File System.
About online system administration
The VxFS file system provides online system administration utilities to help
resolve certain problems that impact database performance. You can defragment
and resize a VxFS file system while it remains online and accessible to users.
How the defragmentation utility works
Free resources are originally aligned in the most efficient order possible and are
allocated to files in a way that is considered by the system to provide optimal
performance. When a file system is active for extended periods of time, new files
are created, old files are removed, and existing files grow and shrink. Over time,
the original ordering of free resources is lost and the file system tends to spread
across the disk, leaving unused gaps or fragments between areas that are in use.
31Introducing Veritas Storage Foundation for OracleHow Veritas File System works
This process, known as fragmentation, leads to degraded performance because
the file system has fewer choices when selecting an extent (a group of contiguous
data blocks) to assign to a file. You should analyze the degree of fragmentation
before creating new database files.
VxFS provides the online administration utility fsadm to resolve fragmentation
problems. The utility can be run on demand and should be scheduled regularly
as a cron job.
How the resizing utility works
Changes in database size can result in file systems that are too large or too small
for the current database. Without special utilities, expanding or shrinking a file
system becomes a a matter of stopping applications, offloading the contents of
the file system, rebuilding the file system to a new size, and then restoring the
data. Data is unavailable to users while these administrative tasks are performed.
The VxFS file system utility fsadm provides a mechanism to resize file systems
without unmounting them or interrupting users' productivity. Because the VxFS
file system can only be mounted on one device, expanding a file system means
that the underlying device must also be expandable while the file system is
mounted. Working with VxVM, VxFS provides online expansion capability.
About cross-platform data sharing
Veritas Cross-Platform Data Sharing allows data to be serially shared among
heterogeneous systems where each system has direct access to the physical devices
that hold the data. This feature can be used only in conjunction with Veritas
Volume Manager. Shared or parallel access is possible for read-only data.
Cross-Platform Data Sharing provides the fastest way to use Oracle's Transportable
Tablespace (TTS) feature for migrating databases to different platforms in Oracle
10g or for moving sets of tablespaces between databases on the same platform in
Oracle9.
See the Veritas Storage Foundation Cross-Platform Data Sharing Administrator's
Guide.
Support for multi-volume file systems
The multi-volume file system (MVS) feature allows several volumes to be
represented by a single logical object. All I/O to and from an underlying logical
volume is directed by way of volume sets. A volume set is a container for multiple
different volumes. This feature can be used only in conjunction with Veritas
Volume Manager.
Introducing Veritas Storage Foundation for OracleHow Veritas File System works
32
About Quality of Storage Service (optional)
The Quality of Storage Service (QoSS) feature is included with the Enterprise
Edition.
The QoSS option is built on the multi-volume support technology introduced in
this release. Using QoSS, you can map more than one device to a single file system.
You can then configure policies that automatically relocate files from one device
to another, or relocate files by running file relocation commands. Having multiple
devices lets you determine where files are located, which can improve performance
for applications that access specific types of files and reduce storage-related costs.
Database Dynamic Storage Tiering is built on top of QoSS and automates the
migration process for Oracle database objects.
Support for large file systems and large files (optional)
Support for large file systems is included with the Enterprise Edition.
In conjunction with VxVM, VxFS can support file systems up to 8 exabytes in size.
You have the option of creating a file system using:
■ Version 4 disk layout, which supports file systems up to one terabyte. The
Version 4 disk layout encompasses all file system structural information in
files, rather than at fixed locations on disk, allowing for greater scalability.
■ Version 5, which supports file systems up to 32 terabytes. Files can be a
maximum of two terabytes. File systems larger than one terabyte must be
created on a Veritas Volume Manager volume.
■ Version 6, which supports file systems up to 8 exabytes. The Version 6 disk
layout enables features such as multi-device support, Cross-Platform Data
Sharing, named data streams, file change log. File systems created on VxFS
4.1 will by default use the Version 6 disk layout. An online conversion utility,
vxupgrade, is provided to upgrade existing disk layouts to Version 6 on mounted
file systems.
For large database configurations, this eliminates the need to use multiple file
systems because of the size limitations of the underlying physical devices.
Changes implemented with the VxFS Version 4 disk layout have greatly expanded
file system scalability, including support for large files.
You can create or mount file systems with or without large files by specifying
either the largefiles or nolargefiles option in mkfs or mount commands.
See “Creating a VxFS file system ” on page 54.
33Introducing Veritas Storage Foundation for OracleHow Veritas File System works
About Storage Checkpoints and Storage Rollback
The Storage Checkpoint and Storage Rollback features are included with the
Enterprise Edition. With the Standard Edition, they can be purchased as part of
the Veritas FlashSnap option.
Veritas File System provides a Storage Checkpoint facility that allows you to create
a persistent, point-in-time image of all user files in a file system—the Storage
Checkpoint remains even after the file system is unmounted or the system is
rebooted. Storage Checkpoints present a view of a file system at a point in time,
and subsequently identifies and maintains copies of the original file system blocks.
Instead of using a disk-based mirroring method, Storage Checkpoints save disk
space and significantly reduce I/O overhead by using the free space pool available
to a file system.
The time required to create a Storage Checkpoint is typically only a couple of
seconds. After a Storage Checkpoint is created, a consistent database backup
image is made and the database can then resume its normal operation.
The Storage Rollback facility can then be used for rolling back the file system
image to the point in time when the Storage Checkpoints were taken. In addition,
Storage Checkpoints also keep track of the block change information that enables
incremental database backup at the block level.
Storage Checkpoints are writable, and can be created, mounted, and removed.
Performance enhancements in maintaining Data Storage Checkpoints (Storage
Checkpoints that are complete images of the file system) makes using the Storage
Rollback feature easier and more efficient, therefore more viable for backing up
large databases.
Multi-Volume File System (MVS) Storage Checkpoint creation allows database
backups without having to shut down the database.
MVSs provide the ability to create and administer Storage Checkpoint allocation
policies. Storage Checkpoint allocation policies specify a list of volumes and the
order in which Storage Checkpoint data is allocated to them. These allocation
policies can be used to control where a Storage Checkpoint is created, allowing
for separating Storage Checkpoint metadata and data onto different volumes.
They can also be used to isolate data allocated to a Storage Checkpoint from the
primary file system, which can help prevent the Storage Checkpoint from
fragmenting space in the primary file system.
See “About Storage Checkpoints and Storage Rollback” on page 157.
Introducing Veritas Storage Foundation for OracleHow Veritas File System works
34
About restoring file systems using Storage Checkpoints
Storage Checkpoints can be used by backup and restore applications to restore
either individual files or an entire file system. Restoring from Storage Checkpoints
can recover data from incorrectly modified files, but typically cannot be used to
recover from hardware damage or other file system integrity problems. File
restoration can be done using the fsckpt_restore(1M) command.
See the Veritas File System Administrator's Guide.
About quotas
VxFS supports quotas, which allocate per-user and per-group quotas and limit
the use of two principal resources: files and data blocks. You can assign quotas
for each of these resources.
Each quota consists of two limits for each resource:
■ The hard limit represents an absolute limit on data blocks or files. A user can
never exceed the hard limit under any circumstances.
■ The soft limit is lower than the hard limit and can be exceeded for a limited
amount of time. This allows users to temporarily exceed limits as long as they
fall under those limits before the allotted time expires.
You can use quotas to limit the amount of file system space used by Storage
Checkpoints.
With Veritas Storage Foundation for Oracle, you can enable, disable, set, and
display quota values for a single file system, for multiple file systems, or for all
file systems in a database using the dbed_ckptquota command.
See “Administering Storage Checkpoint quotas using dbed_ckptquota” on page 336.
See the Veritas File System Administrator's Guide.
About cluster functionality (optional)
File system clustering is an optional, separately licensed feature of VxFS, where
one system is configured as a primary server for the file system, and the other
members of a cluster are configured as secondaries. All servers access shared
disks for file data operations. If the primary server fails, one of the secondary
servers takes over the file system operations.
See the Veritas File System Administrator's Guide.
35Introducing Veritas Storage Foundation for OracleHow Veritas File System works
How Veritas Storage Mapping worksVeritas Storage Mapping is a feature included with Veritas Storage Foundation
for Oracle Enterprise Edition.
Veritas has defined and implemented a library called Veritas Mapping Service
(VxMS) that provides a mapping interface to VxFS file systems, VxVM volumes,
and physical disks. With Veritas Storage Foundation for Oracle , you can take full
advantage of this feature to map datafiles or containers, depending on your
database, to physical devices and display storage object I/O statistics. With the
vxstorage_stats command, you can view the complete I/O topology mapping of
datafiles or containers through intermediate layers like logical volumes down to
actual physical devices. You can also use vxstorage_stats to view statistics for
VxFS file systems, VxVM volumes, and physical devices. This information can be
used to determine the exact location of a data block on a disk and to help identify
hot spots.
In addition to vxstorage_stats, you can use the dbed_analyzer command to
obtain tablespace-to-physical disk mapping information for all the datafiles in a
specified database. The command also provides information about the amount of
disk space being used by a tablespace. Because the dbed_analyzer command
output can be long, it is written to a file for easier viewing.
This command can help you avoid I/O contention. For example, you can use the
information to avoid backing up two tablespaces that share the same physical
disk.
Both storage object statistics and the storage structure are displayed in the Veritas
Storage Foundation for Oracle GUI.
See “About Storage Mapping ” on page 129.
How Veritas Database FlashSnap worksVeritas Database FlashSnap is a feature included with Veritas Storage Foundation
Enterprise Edition. It is also a separately licensed option available with Veritas
Storage Foundation Standard Edition.
Veritas Database FlashSnap offers a flexible and efficient means of managing
business-critical data. Database FlashSnap lets you capture an online image of an
actively changing database at a given instant, called a point-in-time copy. You
can perform system backup, upgrade, or perform other maintenance tasks on
point-in-time copies while providing continuous availability of your critical data.
If required, you can offload processing of the point-in-time copies onto another
host to avoid contention for system resources on your production server.
Introducing Veritas Storage Foundation for OracleHow Veritas Storage Mapping works
36
Database FlashSnap takes advantage of the Persistent FastResync and Disk Group
Content Reorganization features of VxVM. Database FlashSnap also streamlines
database operations. Once configured, the database administrator can create
snapshots, resynchronize data, and reverse resynchronize data without involving
the system administrator.
Veritas Storage Foundation for Oracle provides three commands that can be
executed by the database administrator and do not require root privileges:
■ dbed_vmchecksnap
■ dbed_vmsnap
■ dbed_vmclonedb
These commands let database administrators take advantage of the VxVM snapshot
functionality without having to deal with storage operations in day-to-day database
uses. To use Database FlashSnap, you must configure the volumes used by the
database.
See “Hosts and storage for Database FlashSnap ” on page 231.
HowVeritas Extension forOracleDiskManagerworksVeritas Extension for Oracle Disk Manager is a custom storage interface defined
by Oracle Corporation first introduced in Oracle9. Oracle Disk Manager allows
Oracle9 and above to exploit system bandwidth through an improved Application
Programming Interface (API) that contains advanced kernel support for file I/O.
Oracle Disk Manager reduces administration overhead by providing enhanced
support for the Oracle Managed Files (OMF) infrastructure also introduced
beginning with Oracle9. Combining Veritas Extension for Oracle Disk Manager
with Oracle9 offers better database throughput for I/O intensive workloads due
to specialized I/O features that greatly improve the I/O system call profile for
such key Oracle server processes as the Log Writer and Database Writers.
With Veritas Extension for Oracle Disk Manager, Oracle9 or Oracle 10 is able to
use the same system calls for datafiles stored in the Veritas File System as they
do with raw partitions. Oracle Disk Manager files look just like ordinary file system
files and can be handled as such. Care is given within Oracle Disk Manager to
ensure files are created with contiguous disk blocks automatically for improved
sequential file access performance. Oracle Disk Manager files can be backed up
and recovered through Veritas NetBackup, Oracle Recovery Manager (RMAN), or
other backup software.
Veritas Extension for Oracle Disk Manager supports Oracle Resilvering. With
Oracle Resilvering, the storage layer receives information from the Oracle database
as to which regions or blocks of a mirrored datafile require resynchronization
37Introducing Veritas Storage Foundation for OracleHow Veritas Extension for Oracle Disk Manager works
after a system crash. When using Oracle Resilvering, you can turn off VxVM Dirty
Region Logging (DRL), which increases performance.
Oracle Resilvering is supported at the operating system and application levels.
How Database Dynamic Storage Tiering worksToday, more and more data needs to be retained. Eventually, some of the data is
no longer needed as frequently, but it still takes up a large amount of disk space.
Database Dynamic Storage Tiering matches data storage with the data's usage
requirements so that data is relocated based on requirements determined by the
database administrator (DBA). The feature enables you to manage your data so
that less-frequently used data can be moved to slower, less expensive disks,
allowing frequently-accessed data to be stored on the faster disks for quicker
retrieval.
The DBA can create a file allocation policy based on filename extension before
new files are created, which will create the datafiles on the appropriate tier during
database creation.
The DBA can also create a file relocation policy for database files, which would
relocate files based on how frequently a file is used.
See “About Database Dynamic Storage Tiering” on page 185.
About the vxdbd daemonThe vxdbd daemon handles communication to and from the Veritas Storage
Foundation for Oracle software. By default, vxdbd communicates with Veritas
Storage Foundation for Oracle over port number 3233. If there are conflicts with
this port or other port-related problems, you can change the port by changing the
VXDBD_SOCKET setting located in the /etc/vx/vxdbed/admin.properties file.
Normally the vxdbddaemon starts automatically when the host boots up. However,
if the daemon reports errors or if the daemon process dies, you may have to
manually start or stop it. There is also a status command that reports the current
state of the daemon to confirm that it is currently running.
Only the root user can stop vxdbd. Any user can start vxdbd or display its status.
Introducing Veritas Storage Foundation for OracleHow Database Dynamic Storage Tiering works
38
Note: You must have a valid HOME directory for vxdbd to work correctly with
several Veritas Storage Foundation for Oracle features. If you receive the following
error message, but you confirm that vxdbd is running (using ps -ef | grep
vxdbd rather than vxdbdctrl status), you may not have a valid HOME directory
or it may not be available to vxdbd:
VXDBA_PRODUCT exec_remote ERROR V-81-7700 Can not connect to the vxdbd.
To see the status of the vxdbd daemon
◆ Use the vxdbdctrl status command:
/opt/VRTSdbcom/bin/vxdbdctrl status
If the daemon is running you see the following output:
vxdbd is alive
To start the vxdbd daemon
◆ Use the vxdbdctrl start command:
/opt/VRTSdbcom/bin/vxdbdctrl start
To stop the vxdbd daemon
◆ As root, use the vxdbdctrl stop command:
/opt/VRTSdbcom/bin/vxdbdctrl stop
To change the communications port used by the vxdbd daemon
1 As the root user, stop the vxdbd daemon:
/opt/VRTSdbcom/bin/vxdbdctrl stop
2 In the /etc/vx/vxdbed/admin.properties file, change the value of the
VXDBD_SOCKET variable to a new port number:
VXDBD_SOCKET=3233
3 Restart the vxdbd daemon:
/opt/VRTSdbcom/bin/vxdbdctrl start
39Introducing Veritas Storage Foundation for OracleAbout the vxdbd daemon
4 If the system is part of a multi-host configuration, change the port on all
hosts involved by repeating this procedure on each host.
5 Restart the DBED agent vxpal.
See the section "Starting the DBED agent" in the Veritas Storage Foundation
for Oracle Graphical User Interface Guide.
AboutVeritas Storage Foundation forOracle graphicaluser interface
An alternative to the command line interface, the Veritas Storage Foundation for
Oracle GUI allows you to manage the storage used by databases.
In this release, Veritas Storage Foundation for Oracle offers both a Java-based
GUI and a Web-based GUI. The Web-based GUI does not contain the Database
Dynamic Storage Tiering functionality or the scheduler functionality.
You can use the GUI to:
■ Display database, tablespace, datafile, and file system information and manage
the database state.
■ Manage volume and file movement with Database Dynamic Storage Tiering.
With this feature, you can also get reports on file usage. (Java-based GUI only.)
■ Create, display, mount, unmount, and remove Storage Checkpoints.
■ Automate tasks, such as creating or cloning a database using a Storage
Checkpoint, with the scheduler. (Java-based GUI only.)
■ Roll back databases, tablespaces, or datafiles to Storage Checkpoints.
■ Collect and display statistics on file system and Oracle space usage.
■ Collect and display storage object I/O statistics and the storage structure.
■ Monitor file system and Oracle datafile space usage and automatically grow
the file system as needed.
■ Examine volumes used by the file systems and overall system configuration.
■ Start or stop instances or duplicate databases. You can duplicate a database
using Storage Checkpoints or Database FlashSnap.
■ Create or shut down a clone database.
■ Create, modify, validate, or remove snapplans.
■ Create, resynchronize, or reverse resynchronize a snapshot database.
Introducing Veritas Storage Foundation for OracleAbout Veritas Storage Foundation for Oracle graphical user interface
40
For more information, see the appropriate online help and the Veritas Storage
Foundation for Oracle Graphic User Interface Guide.
About Veritas NetBackup (optional)Veritas NetBackup provides backup, archive, and restore capabilities for database
files and directories contained on client systems in a client-server network.
NetBackup server software resides on platforms that manage physical backup
storage devices. The NetBackup server provides robotic control, media
management, error handling, scheduling, and a repository of all client backup
images.
Administrators can set up schedules for automatic, unattended full and
incremental backups. These backups are managed entirely by the NetBackup
server. The administrator can also manually back up clients. Client users can
perform backups, archives, and restores from their client system, and once started,
these operations also run under the control of the NetBackup server.
Veritas NetBackup, while not a shipped component of Veritas Storage Foundation
for Oracle, can be purchased separately.
How block-level incremental backup works
Block-Level Incremental (BLI) Backup extends the capabilities of NetBackup to
back up only changed data blocks of Oracle database files. BLI Backup accomplishes
this backup methodology using the Storage Checkpoint facility in the Veritas File
System (VxFS) available through Veritas Storage Foundation for Oracle. BLI
Backup reduces both the time required to complete a database backup and the
amount of data transferred during backups. It also allows more frequent backups,
resulting in more up-to-date backup images. When restoring from backups, the
restore time is increased only by the extra time needed for NetBackup to apply
the incremental backups after a full restore completes. However, frequent
incremental backups can speed up the database recovery by reducing the number
of redo logs to apply.
BLI Backup is particularly useful in a database environment where a database can
be hundreds of gigabytes or terabytes. Using traditional backup methods for an
offline database backup, any change in the database file—no matter how
small—requires backing up the entire database file. Using BLI Backup, only
modified data blocks need to be backed up.
41Introducing Veritas Storage Foundation for OracleAbout Veritas NetBackup (optional)
Note: To allow BLI Backups, the database must be on VxFS file systems using the
Version 4, 5, or 6 layout, and you must have a valid Veritas Storage Foundation
license. Use the fstyp -v device command to determine the layout version of
your file system. See the vxupgrade(1M) manual page for more information.
See “Upgrading from earlier VxFS version layouts ” on page 153.
For information on how to install, configure, and use Veritas NetBackup for Oracle
Advanced BLI Agent to perform Oracle database backups, see theVeritasNetBackup
for Oracle Advanced BLI Agent System Administrator's Guide.
About Veritas Storage Foundation/High Availabilityfor Oracle (optional)
Veritas Storage Foundation/High Availability (HA) (VCS) lets database
administrators integrate multiple servers into high availability database
configurations that can significantly reduce the down time of Oracle databases
caused by a system hardware or software failure.
In addition to the Veritas products included in the base Veritas Storage Foundation
for Oracle, Veritas Storage Foundation/HA for Oracle incorporates the following
products:
■ Veritas Cluster Server ™ (VCS) for Oracle
■ Veritas Cluster Server™ (VCS) Enterprise Agent for Oracle
Note: Veritas Storage Foundation/HA (VCS) for Oracle is available only for the
Enterprise Edition.
Introducing Veritas Storage Foundation for OracleAbout Veritas Storage Foundation/High Availability for Oracle (optional)
42
Setting up databases
This chapter includes the following topics:
■ Tasks for setting up new databases
■ About setting up a disk group
■ Creating a disk group
■ Adding disks to a disk group
■ About selecting a volume layout
■ Creating a volume
■ Creating a volume set
■ Adding a volume to a volume set
■ File system creation guidelines
■ Creating a VxFS file system
■ Mounting a file system
■ Unmounting a file system
■ About fragmentation
■ Resizing a file system
Tasks for setting up new databasesIf you are using Veritas Storage Foundation for Oracle to set up a new database,
complete these tasks in the order listed below:
2Chapter
See the Veritas File System Administrator's
Guide.
Determine the number and sizes of file
systems you need for the database you want
to create.
Create volumes to meet your file system
needs. You can use disk mirroring as a
safeguard against disk failures and striping
for better performance.
See “Hosts and storage for Database
FlashSnap ” on page 231.
If you plan to create volume snapshots for
the database and use them on either the
same host or a secondary one, ensure that
your volume layout is consistent with
Database FlashSnap requirements.
See “File system creation guidelines”
on page 53.
See “Creating a VxFS file system ” on page 54.
Create the VxFS file systems you need on the
volumes.
See “About Quick I/O” on page 73.Install and configure your database.
For best OLTP performance, use Oracle Disk
Manager (ODM) or Quick I/O.
You must create Quick I/O files before
creating the tablespaces.
See “About Storage Mapping ” on page 129.If you would like the ability to view detailed
storage stack topology information to ensure
your storage stack configuration is optimized
for the database, configure and use Storage
Mapping.
See the Veritas VolumeManager
Administrator's Guide.
If you want to use Database FlashSnap for
off-host processing after converting your
database files to use Quick I/O or ODM and
your volume layout is inconsistent with
Database FlashSnap requirements, you will
need to “relayout” your volume manager
configuration after your database files have
been converted.
See “Converting Oracle files to Quick I/O
files” on page 82.
If you are using Quick I/O, convert all
database files to Quick I/O files.
See “Setting up Veritas extension for Oracle
Disk Manager” on page 123.
If using ODM, link the ODM library.
Setting up databasesTasks for setting up new databases
44
See theVeritasStorageFoundation forOracle
Installation Guide.
If you are not currently running on VxVM
and VxFS, make sure Veritas Storage
Foundation for Oracle is installed and
convert your existing database
configuration.
See “About Storage Checkpoints and Storage
Rollback” on page 157.
For backup and recovery on the same host,
you can use the Storage Checkpoint facility
to create file system snapshots of the
database. A Storage Checkpoint creates an
exact image of a database instantly and
provides a consistent image of the database
from the point in time the Storage
Checkpoint was created.
For off-host processing or backup, you can
use the Database FlashSnap feature to create
a volume snapshot for the database.
Database FlashSnap lets you capture an
online image of an actively changing
database at a given instant, known as a
snapshot. You can perform backups and
off-host processing tasks on snapshots while
providing continuous availability of your
critical data.
About setting up a disk groupBefore creating file systems for a database, set up a disk group for each database.
A disk group lets you group disks, volumes, file systems, and files that are relevant
to a single database into a logical collection for easy administration. Because you
can move a disk group and its components as a unit from one machine to another,
you can move an entire database when all the configuration objects of the database
are in one disk group. This capability is useful in a failover situation.
Disk group configuration guidelines
Follow these guidelines when setting up disk groups:
■ Only disks that are online and do not already belong to a disk group can be
used to create a new disk group.
■ Create one disk group for each database.
■ The disk group name must be unique. Name each disk group using the Oracle
database instance name specified by the environment variable $ORACLE_SID
45Setting up databasesAbout setting up a disk group
and a dg suffix. The dg suffix helps identify the object as a disk group. Also,
each disk name must be unique within the disk group.
■ Never create database files using file systems or volumes that are not in the
same disk group.
In earlier releases of Veritas Volume Manager, a system installed with VxVM was
configured with a default disk group, rootdg, that had to contain at least one disk.
VxVM can now function without any disk group having been configured. Only
when the first disk is placed under VxVM control must a disk group be configured.
Note: Most VxVM commands require superuser or equivalent privileges.
See “About tuning VxVM ” on page 297.
Creating a disk groupYou can use the vxdg command to create a new disk group. A disk group must
contain at least one disk at the time it is created. You also have the option to create
a shared disk group for use in a cluster environment.
Disks must be placed in disk groups before they can be used by VxVM. You can
create disk groups to organize your disks into logical sets of disks.
Before creating a disk group, make sure the following conditions have been met:
■ Only disks that are online and do not belong to a disk group can
be used to create a disk group.
■ The disk group name must be unique in the host or cluster.
■ Creating a disk group requires at least one disk.
Prerequisites
Setting up databasesCreating a disk group
46
■ Veritas Storage Foundation for Oracle only supports single disk
groups.
■ Veritas Storage Foundation for Oracle RAC supports shared disk
groups. If you are in an Oracle RAC environment:
■ Create disk groups on the shared disks from the master node.
To determine if a node is a master or slave, run the following
command:
vxdctl -c mode
■ RAID-5 volumes are not supported for sharing in a cluster.
■ New disks must be placed under VxVM control and then added to
a dynamic disk group before they can be used for volumes.
■ When you place a disk under VxVM control, the disk is either
encapsulated or initialized. Encapsulation preserves any existing
data on the disk in volumes. Initialization destroys any existing
data on the disk.
■ If you place the root disk under VxVM control, you must
encapsulate the disk. If you want to create an alternate boot disk,
you can mirror the encapsulated root disk.
■ For information on the vxdg command, see the vxdg(1M) manual
page.
Usage notes
To create a new disk group
◆ Use the vxdg command as follows:
# /opt/VRTS/bin/vxdg init disk_group [disk_name=disk_device]
The following is an example of creating a disk group using the vxdg command:
To create a disk group named PRODdg on a raw disk partition c1t1d0s2, where the
disk name PRODdg01 references the disk within the disk group:
# /opt/VRTS/bin/vxdg init PRODdg PRODdg01=c1t1d0s2
47Setting up databasesCreating a disk group
To create a new shared disk group in an Oracle RAC environment
◆ Use the vxdg command as follows:
# /opt/VRTS/bin/vxdg -s init disk_group [disk_name=disk_device]
Where the -s option allows the disk group to be shared.
Warning: Veritas Storage Foundation for Oracle RAC supports shared disk
groups. Veritas Storage Foundation for Oracle Standard and Enterprise
editions support single disk groups.
To create a shared disk group named PRODdg on a raw disk partition c1t1d0s2,
where the disk name PRODdg01 references the disk within the disk group:
# /opt/VRTS/bin/vxdg -s init PRODdg PRODdg01=c1t1d0s2
Adding disks to a disk groupWhen a disk group is first created, it can contain only a single disk. You may need
to add more disks to the disk group. Before adding disks, make sure the following
conditions have been met:
■ When you place a disk under VxVM control, the disk is
either encapsulated or initialized. Encapsulation
preserves any existing data on the disk in volumes.
Initialization destroys any existing data on the disk.
■ If you place the boot disk under VxVM control, you must
encapsulate it. If you want to create an alternate boot
disk, you can mirror the encapsulated boot disk.
■ Boot disk encapsulation requires a system reboot.
■ Disks cannot be added to deported disk groups.
■ Disks must be under VxVM control and in a disk group
before they can be used to create volumes.
■ Disks must be online before they can be added to a disk
group.
■ Disks that already belong to a disk group cannot be added
to another disk group.
Usage notes
Setting up databasesAdding disks to a disk group
48
To add disks to a disk group
◆ Use the vxdg command as follows:
# /opt/VRTS/bin/vxdg -g disk_group adddisk \
[disk_name=disk_device]
The following is an example of adding disks to a disk group using the vxdg
command:
To add disks named PRODdg02, PRODdg03, and PRODdg04 to the disk group PRODdg:
# /opt/VRTS/bin/vxdg -g PRODdg adddisk PRODdg02=c1t2d0s2
# /opt/VRTS/bin/vxdg -g PRODdg adddisk PRODdg03=c1t3d0s2
# /opt/VRTS/bin/vxdg -g PRODdg adddisk PRODdg04=c1t4d0s2
About selecting a volume layoutVeritas Volume Manager offers a variety of layouts that allow you to configure
your database to meet performance and availability requirements. The proper
selection of volume layouts provides optimal performance for the database
workload.
An important factor in database performance is the tablespace placement on the
disks.
Disk I/O is one of the most important determining factors of your database's
performance. Having a balanced I/O load usually means optimal performance.
Designing a disk layout for the database objects to achieve balanced I/O is a crucial
step in configuring a database.
When deciding where to place tablespaces, it is often difficult to anticipate future
usage patterns. VxVM provides flexibility in configuring storage for the initial
database set up and for continual database performance improvement as needs
change. VxVM can split volumes across multiple drives to provide a finer level of
granularity in data placement. By using striped volumes, I/O can be balanced
across multiple disk drives. For most databases, ensuring that different containers
or tablespaces, depending on which database you are using, are distributed across
the available disks may be sufficient.
Striping also helps sequential table scan performance. When a table is striped
across multiple devices, a high transfer bandwidth can be achieved by setting the
Oracle parameter DB_FILE_MULTIBLOCK_READ_COUNT to a multiple of full stripe
size divided by DB_BLOCK_SIZE.
See “About tuning VxVM ” on page 297.
49Setting up databasesAbout selecting a volume layout
How to choose appropriate stripe unit sizes
When creating a striped volume, you need to decide the number of columns to
form a striped volume and the stripe unit size. You also need to decide how to
stripe the volume. You may stripe a volume across multiple disk drives on the
same controller or across multiple disks on multiple controllers. By striping across
multiple controllers, disk I/O can be balanced across multiple I/O channels. The
decision is based on the disk and controller bandwidth and the database workload.
In general, for most OLTP databases, use the default stripe unit size of 64 K or
smaller for striped volumes and 16 K for RAID-5 volumes.
How to choose between mirroring and RAID-5
VxVM provides two volume configuration strategies for data redundancy:
mirroring and RAID-5. Both strategies allow continuous access to data in the event
of disk failure. For most database configurations, we recommend using mirrored,
striped volumes. If hardware cost is a significant concern, but having higher data
availability is still important, use RAID-5 volumes.
RAID-5 configurations have certain performance implications you must consider.
Writes to RAID-5 volumes require parity-bit recalculation, which adds significant
I/O and CPU overhead. This overhead can cause considerable performance
penalties in online transaction processing (OLTP) workloads. If the database has
a high read ratio, however, RAID-5 performance is similar to that of a striped
volume.
Volume configuration guidelines
Follow these guidelines when selecting volume layouts:
■ Put the database log files on a file system created on a striped and mirrored
(RAID-0+1) volume separate from the index or data tablespaces. Stripe multiple
devices to create larger volumes if needed. Use mirroring to improve reliability.
Do not use VxVM RAID-5 for redo logs.
■ When normal system availability is acceptable, put the tablespaces on file
systems created on striped volumes for most OLTP workloads.
■ Create striped volumes across at least four disks. Try to stripe across disk
controllers. For sequential scans, do not stripe across too many disks or
controllers. The single thread that processes sequential scans may not be able
to keep up with the disk speed.
■ For most workloads, use the default 64 K stripe-unit size for striped volumes
and 16 K for RAID-5 volumes.
Setting up databasesAbout selecting a volume layout
50

■ When system availability is critical, use mirroring for most write-intensive
OLTP workloads. Turn on Dirty Region Logging (DRL) to allow fast volume
resynchronization in the event of a system crash.
■ When system availability is critical, use RAID-5 for read-intensive OLTP
workloads to improve database performance and availability. Use RAID-5 logs
to allow fast volume resynchronization in the event of a system crash.
■ For most decision support system (DSS) workloads, where sequential scans
are common, experiment with different striping strategies and stripe-unit
sizes. Put the most frequently accessed tables or tables that are accessed
together on separate striped volumes to improve the bandwidth of data transfer.
See “About tuning VxVM ” on page 297.
Creating a volumeVeritas Volume Manager uses logical volumes to organize and manage disk space.
A volume is made up of portions of one or more physical disks, so it does not have
the limitations of a physical disk.
For databases where the data storage needs to be resilient and the data layout
needs to be optimized for maximum performance, we recommend using VxVM.
The striping and mirroring capabilities offered by a volume manager will help
you achieve your manageability, availability, and performance goals.
After you decide on a volume layout, you can use the vxassist command to create
the volume.
Before creating a volume, make sure the following conditions are met:
■ Creating a volume requires a disk group name, volume name,
volume size, and volume layout. You will also need to know subdisk
names if you are creating a striped volume.
■ Striped or mirrored volumes require at least two disks.
■ Striped pro and concatenated pro volumes are mirrored by default,
so a striped pro volume requires more disks than an unmirrored
striped volume and a concatenated pro volume requires more disks
than an unmirrored concatenated volume.
■ You cannot use a striped pro or concatenated pro volume for a
root or swap volume.
■ A RAID-5 volume requires at least three disks. If RAID-5 logging
is enabled, a RAID-5 volume requires at least four disks.
RAID-5 mirroring is not supported.
Usage notes
51Setting up databasesCreating a volume
To create a volume
◆ Use the vxassist command as follows:
# /opt/VRTS/bin/vxassist -g disk_group make volume_name \
size disk_name
The following is an example of creating a volume using the vxassist
command:
To create a 1 GB mirrored volume called db01 on the PRODdg disk group:
# /opt/VRTS/bin/vxassist -g PRODdg make db01 1g PRODdg01
Creating a volume setVolume Sets enable the use of the Multi-Volume Support feature with Veritas File
System (VxFS). It is also possible to use the Veritas Enterprise Administrator
(VEA) to create and administer volumes sets. For more information, see the VEA
online help.
Before creating a volume set, make sure the following conditions are met:
■ Before creating a volume set, you must have at least one volume
created.
See “Creating a volume ” on page 51.
■ A maximum of 256 volumes may be configured in a volume set.
■ Only Veritas File System is supported on a volume set.
■ The first volume in a volume set must be larger than 20MB.
■ Raw I/O from and to a volume set is not supported.
■ Volume sets can be used instead of volumes with the following
vxsnap operations on instant snapshots: addmir, dis, make,
prepare, reattach, refresh, restore, rmmir, split,
syncpause, syncresume, syncstart, syncstop, syncwait,
and unprepare. The third-mirror break-off usage model for
full-sized instant snapshots is supported for volume sets provided
that sufficient plexes exist for each volume in the volume set.
See the Veritas VolumeManager Administrator's Guide.
■ Most VxVM commands require superuser or equivalent privileges.
■ For details regarding usage of the vxvset command, see the
vxvset(1M) manual page.
Usage notes
To create a volume set for use by Veritas file system (VxFS)
◆ Use the following command:
Setting up databasesCreating a volume set
52
# /opt/VRTS/bin/vxvset [-g diskgroup] -t vxfs make volset volume
where:
■ volset is the name of the volume set
■ volume is the name of the first volume in the volume set
■ -t defines the content handler subdirectory for the application that is to
be used with the volume. This subdirectory contains utilities that an
application uses to operate on the volume set. The operation of these
utilities is determined by the requirements of the application and not by
VxVM.
For example, to create a volume set named db01vset that contains the volume
db01, in the disk group PRODdg, you would use the following command:
# /opt/VRTS/bin/vxvset -g PRODdg -t vxfs make db01vset db01
Adding a volume to a volume setAfter creating a volume set, you can add additional volumes.
To add a volume to a volume set
◆ Use the vxvset command as follows:
# /opt/VRTS/bin/vxvset [-g diskgroup] [-f] addvol volset \
volume
Warning: The -f (force) option must be specified if the volume being added,
or any volume in the volume set, is either a snapshot or the parent of a
snapshot. Using this option can potentially cause inconsistencies in a snapshot
hierarchy if any of the volumes involved in the operation is already in a
snapshot chain.
See the Veritas VolumeManager Administrator's Guide.
For example, to add the volume db02, to the volume set db01vset, use the following
command:
# /opt/VRTS/bin/vxvset -g PRODdg addvol db01vset db02
File system creation guidelinesFollow these guidelines when creating VxFS file systems:
53Setting up databasesAdding a volume to a volume set
■ Specify the maximum block size and log size when creating file systems for
databases.
■ Except for specifying the maximum log size and support for large files as
required, use the VxFS defaults when creating file systems for databases.
■ Never disable the intent logging feature of the file system.
■ For redo logs, create a single file system using a simple (and mirrored, if
necessary) volume. Put the other tablespaces and database files on separate
file systems created on striped, striped and mirrored, or RAID-5 volumes.
■ When using the command line, use the mount points to name the underlying
volumes. For example, if a file system named /db01 is to be created on a
mirrored volume, name the volume db01 and the mirrors db01-01 and db01-02
to relate to the configuration objects. If you are using the vxassist command
or the GUI, this is transparent.
■ If Quick I/O is supported, select vxfs as the file system type to take advantage
of the Quick I/O feature, online administration, fast recovery of the VxFS file
system, and superior reliability features.
Choose a file system block size that matches or is a multiple of the block size of
your Oracle database (db_block_size).
It is possible to have a file system block size that is smaller than the database
block size because the database block-size limit can be bigger than the file system
block size. It is fine if the file system block size is smaller than the database block
size because VxFS will not perform multiple I/O operations for each database I/O
operation. VxFS is capable of performing I/Os with multiple blocks. For example,
if your database block size is 32K and your file system block size is 8k, VxFS can
put four 8K blocks together to perform one 32K database I/O operation.
When creating the file system, set the number of file system blocks in the intent
log so that the log size is 16MB. For example, if the file system block size is 8K
(that is, 8192), it will take 2000 blocks to make a 16MB log (2000 x 8192 = ~16MB).
If the file system block size is 4K (that is, 4096), then twice as many blocks as in
the 8K case would need to be allocated (4000 in this example).
Creating a VxFS file systemAlways specify vxfs as the file system type to take advantage of Quick I/O, Storage
Rollback, online administration, fast recovery of the VxFS file system, and superior
reliability features.
Before creating a file system, see the following notes:
Setting up databasesCreating a VxFS file system
54
■ See the mkfs(1M) and mkfs_vxfs(1M) manual pages for more
information about the options and variables available for use with
the mkfs command.
■ See the mount(1M) and mount_vxfs(1M) manual pages for more
information about mount settings.
Usage notes
To create a VxFS file system on an existing volume
◆ Use the mkfs command as follows:
# /usr/sbin/mkfs -F vxfs [generic_options] \
[-o specific_options] special [size]
where:
■ vxfs is the file system type
■ generic_options are the options common to most file systems
■ specific_options are options specific to the VxFS file system
■ special is the full path name of the raw character device or VxVM volume
on which to create the file system (for example, /dev/vx/rdsk/PRODdg/
db01)
■ size is the size of the new file system (optional)
If you do not specify size, the file system will be as large as the underlying
volume or device partition.
For example, to create a VxFS file system that has an 8 KB block size and
supports files larger than 2 GB on the newly created db01 volume:
# /usr/sbin/mkfs -F vxfs -o largefiles,bsize=8192,\
logsize=2000 /dev/vx/rdsk/PRODdg/db01
The -o largefiles specific option allows you to create files larger than 2
GB.
Note: Because size is not specified in this example, the size of the file system
will be calculated automatically to be the same size as the volume on which
the file system is created.
The mkfs command displays output similar to the following:
version 6 layout
20480 sectors, 10240 blocks of size 1024, log size 1024 blocks
55Setting up databasesCreating a VxFS file system
You can now mount the newly created file system.
See “Mounting a file system ” on page 57.
Large file system and large file support
In conjunction with VxVM, VxFS can support file systems up to 8 exabytes in size.
For large database configurations, this eliminates the need to use multiple file
systems because of the size limitations of the underlying physical devices.
Changes implemented with the VxFS Version 6 disk layout have greatly expanded
file system scalability, including support for large files. You can create or mount
file systems with or without large files by specifying either the largefiles or
nolargefiles option in mkfs or mount commands. If you specify the nolargefiles
option, a file system cannot contain files 2 GB or larger.
Before creating a VxFS file system, make sure the following conditions are met:
■ See the mount_vxfs (1M) and mkfs_vxfs (1M) manual pages for
detailed information on mounting and creating file systems.
■ See the fsadm_vxfs (1M) manual pages for detailed information
about large files.
Usage notes
To enable large files on a file system that was created without the largefiles option
◆ Use the fsadm command as follows:
# /opt/VRTS/bin/fsadm -F vxfs -o largefiles \
/mount_point
Note: Make sure the applications and tools you use can handle large files
before enabling the large file capability. Applications and system
administration utilities can experience problems if they are not large file
aware.
Multi-volume support
The multi-volume support feature enabled by VxFS Version 6 disk layout allows
several volumes to be represented by a single logical object, known as a volume
set. The vxvset command can be used to create and administer volume sets in
Veritas Volume Manager.
VxFS's multi-volume support feature can be used with volume sets. There are two
VxFS commands associated with multi-volume support:
Setting up databasesCreating a VxFS file system
56
■ fsapadm - VxFS allocation policy administration utility
■ fsvoladm - VxFS device administration utility
See the Veritas File System Administrator's Guide.
Mounting a file systemAfter creating a VxFS file system, mount the file system using the mount command.
By default, the command tries to enable Quick I/O. If Quick I/O is not installed or
licensed, no error messages are displayed unless you explicitly specify the mount
option. If necessary, you can turn the Quick I/O option off at mount time or you
can remount the file system with the option.
Before mounting a file system, make sure the following conditions are met:
■ A file system must exist in order to be mounted.
■ DBAs must be logged in as root to mount a file system.
Prerequisites
■ The mount point must be an absolute path name (that is, it must
begin with /).
■ See themount_vxfs (1M) manual page for more information about
mount settings.
■ See the mount (1M) manual page for more information about
generic mount options.
Usage notes
To mount a file system
◆ Use the mount command as follows:
# /usr/sbin/mount -F vxfs [generic_options] [-r] \
[-o specific_options] special /mount_point
where:
■ generic_options are the options common to most file systems
■ -r mounts the file system as read only
■ specific_options are options specific to the VxFS file system
■ special is a block special device
■ /mount_point is the directory where the file system will be mounted
For example, to mount a file system named /db01 that supports large files
on volume /dev/vx/dsk/PRODdg/db01:
# mkdir /db01
57Setting up databasesMounting a file system
# chown oracle:dba /db01
# /usr/sbin/mount -F vxfs -o largefiles /dev/vx/dsk/PRODdg/db01 \
/db01
If you would like /db01 to be mounted automatically after rebooting, add an
entry for it in /etc/vfstab as follows:
/dev/vx/dsk/PRODdg/db01 /dev/vx/rdsk/PRODdg/db01 /db01 \
vxfs 2 yes largefiles,qio 0 2
If you do not need to use Quick I/O files, set noqio instead of qio as one of
the options.
Unmounting a file systemIf you no longer need to access the data in a file system, you can unmount the file
system using the umount command.
Before unmounting a file system, make sure the following conditions have been
met:
■ A file system must exist and be mounted in order to be unmounted.Prerequisites
■ You cannot unmount a file system that is in use.
See the umount (1M) manual page for more information on
mounting file systems.
Usage notes
To unmount a file system
1 Use the fuser command to make sure that the file system is not being used:
# fuser -c /mount_point
where the -c option provides information on file system mount points and
any files within mounted file systems.
If the file system is being used and you need to unmount it, use the fuser
-ck command. See the fuser(1M) man page for more information.
2 Unmount the file system using one of the umount command options:
■ umount special
■ umount /mount_point
■ umount -f /mount_point
where:
Setting up databasesUnmounting a file system
58
■ special is a block special device
■ /mount_point is the location where the file system is mounted
■ -f forcibly unmounts the mount point
The following is an example of unmounting a file system:
To verify that the file system /db01 is not in use and then unmount the file
system:
# fuser -c /db01
/db01:
# umount /db01
About fragmentationWhen free resources are initially allocated to files in a Veritas file system, they
are aligned in the most efficient order possible to provide optimal performance.
On an active file system, the original order is lost over time as files are created,
removed, or resized. As space is allocated and deallocated from files, the available
free space becomes broken into fragments. This means that space must be assigned
to files in smaller and smaller extents. This process is known as fragmentation.
Fragmentation leads to degraded performance and availability. The degree of
fragmentation depends on file system usage and activity.
How to control fragmentation
Allocation units in VxFS are designed to help minimize and control fragmentation.
Over time, however, file systems eventually become fragmented.
VxFS provides online reporting and optimization utilities to enable you to monitor
and defragment a mounted file system. These utilities are accessible through the
file system administration command, fsadm. Using the fsadm command, you can
track and eliminate fragmentation without interrupting user access to the file
system.
Types of fragmentation
VxFS addresses two types of fragmentation:
■ Directory Fragmentation
As files are created and removed, gaps are left in directory inodes. This is
known as directory fragmentation. Directory fragmentation causes directory
lookups to become slower.
59Setting up databasesAbout fragmentation

■ Extent Fragmentation
As files are created and removed, the free extent map for an allocation unit
changes from having one large free area to having many smaller free areas.
Extent fragmentation occurs when files cannot be allocated in contiguous
chunks and more extents must be referenced to access a file. In a case of
extreme fragmentation, a file system may have free space that cannot be
allocated.
How to monitor fragmentation
You can monitor fragmentation in VxFS by running reports that describe
fragmentation levels. Use the fsadm command to run reports on directory
fragmentation and extent fragmentation. The df command, which reports on file
system free space, also provides information useful in monitoring fragmentation.
Use the following commands to report fragmentation information:
■ fsadm -D, which reports on directory fragmentation.
■ fsadm -E, which reports on extent fragmentation.
■ /opt/VRTS/bin/fsadm [-F vxfs] -o s, which prints the number of free
extents of each size.
Defragmenting a file system
You can use the online administration utility fsadm to defragment or reorganize
file system directories and extents.
The fsadm utility defragments a file system mounted for read/write access by:
■ Removing unused space from directories.
■ Making all small files contiguous.
■ Consolidating free blocks for file system.
The following options are for use with the fsadm utility:
Reorganizes directories. Directory entries are reordered to place
subdirectory entries first, then all other entries in decreasing order
of time of last access. The directory is also compacted to remove free
space.
Note: If you specify -d and -e, directory reorganization is always
completed first.
-d
Setting up databasesAbout fragmentation
60

Use in conjunction with the -d option to consider files not accessed
within the specified number of days as “aged” files. Aged files are
moved to the end of the directory. The default is 14 days.
-a
Reorganizes extents. Files are reorganized to have the minimum
number of extents.
Note: If you specify -d and -e, directory reorganization is always
completed first.
-e
Produces reports on directory and extent fragmentation, respectively.
Note: If you use both -D and -E with the -d and -e options, the
fragmentation reports are produced both before and after
reorganization.
-D -E
Specifies verbose mode and reports reorganization activity.-v
Specifies the size of a file that is considered large. The default is 64
blocks.
-l
Specifies a maximum length of time to run, in seconds.
Note: The -t and -p options control the amount of work performed
by fsadm, either in a specified time or by a number of passes. By
default,fsadm runs five passes. If both-t and-p are specified, fsadm
exits if either of the terminating conditions are reached.
-t
Specifies a maximum number of passes to run. The default is five.
Note: The -t and -p options control the amount of work performed
by fsadm, either in a specified time or by a number of passes. By
default,fsadm runs five passes. If both-t and-p are specified, fsadm
exits if either of the terminating conditions are reached.
-p
Prints a summary of activity at the end of each pass.-s
Specifies the pathname of the raw device to read to determine file
layout and fragmentation. This option is used when fsadm cannot
determine the raw device.
-r
Note: You must have superuser (root) privileges to reorganize a file system using
the fsadm command.
61Setting up databasesAbout fragmentation
To defragment a file system
◆ Run the fsadm command followed by the options specifying the type and
amount of defragmentation. Complete the command by specifying the mount
point or raw device to identify the file system.
# /opt/VRTS/bin/fsadm [-d] [-D] [-e] [-E] [-s] [-v] \
[-l largesize] [-a days] [-t time] [-p pass_number] \
[-r rawdev_path] mount_point
Refer to theVeritas File System Administrator's Guide for instructions and
information on scheduling defragmentation. Veritas File System
Administrator's Guide for instructions and information on scheduling
defragmentation.
For example, to defragment a file system:
# /opt/VRTS/bin/fsadm -d -D /oradata_qiovm
Directory Fragmentation Report
Dirs Total Immed Immeds Dirs to Blocks to
Searched Blocks Dirs to Add Reduce Reduce
total 5 1 4 0 0 0
Directory Fragmentation Report
Dirs Total Immed Immeds Dirs to Blocks to
Searched Blocks Dirs to Add Reduce Reduce
total 5 1 4 0 0 0
Resizing a file systemIf you need to extend or shrink a VxFS file system, you can use the fsadm command.
If a VxFS file system requires more space, you can use this procedure to extend
the size of the file system. If a VxFS File System is too large and you need the
space elsewhere, you can use this procedure to shrink the file system.
Remember to increase the size of the underlying device or volume before increasing
the size of the file system.
See the Veritas VolumeManager Administrator's Guide.Veritas Volume Manager
Administrator's Guide.
Before resizing a file system, the following conditions must be met:
Setting up databasesResizing a file system
62
■ This task requires a mounted file system.
You must know either the desired size or the amount of space to
add to or subtract from the file system size.
Prerequisites
■ See the format(1M) manual page.
See the fsadm_vxfs(1M) manual page.
Usage notes
To resize a file system
◆ Use fsadm command as follows:
# /opt/VRTS/bin/fsadm -F vxfs [-b newsize] \
[-r rawdev] /mount_point
where:
■ newsize is the size (in sectors) to which the file system will increase or
shrink
■ rawdev specifies the name of the raw device if there is no entry in
/etc/vfstab and fsadm cannot determine the raw device
■ /mount_point is the location where the file system is mounted
For example, to extend the file system /db01 to 2 GB:
# /opt/VRTS/bin/fsadm -F vxfs -b 2g /db01
Note: See the Veritas File SystemAdministrator's Guide and fsadm_vxfs (1M)
manual page for information on how to perform common file system tasks
using fsadm.
Resizing a file system and the underlying volume
The fsadm command resizes the file system only. If you attempt to use fsadm to
make the file system the same size or larger than the underlying volume, the
fsadm command will fail. To resize the file system and its underlying volume, use
the vxresize command instead.
Warning: Resizing a volume with a usage type other than FSGEN or RAID5 can
result in data loss. If such an operation is required, use the -f option to forcibly
resize such a volume.
63Setting up databasesResizing a file system

Before resizing a file system and the underlying volume, the following conditions
must be met:
■ You must know the new desired size of the file system.Prerequisites
■ vxresize works with VxFS and UFS file systems only.
■ If the file system is mounted and VxFS, you can grow or shrink the
size. If a VxFS file system is unmounted, you cannot grow or shrink
the size.
■ If the file system is mounted and UFS, you can grow the size only.
If the file system is unmounted and UFS, you can grow size only.
■ When resizing large volumes, vxresize may take a long time to
complete.
■ Resizing a volume with a usage type other than FSGEN or RAID5
can result in data loss. If such an operation is required, use the -foption to forcibly resize such a volume.
■ You cannot resize a volume that contains plexes with different
layout types.
■ See the vxresize (1M) manual page for more details.
Usage notes
To resize a file system and the underlying volume
◆ Use the vxresize command as follows:
# /etc/vx/bin/vxresize -g disk_group -b -F vxfs -t \
homevolresize homevol volume_size disk_name disk_name
For example, to extend a 1-gigabyte volume, homevol, that contains a VxFS
file system, to 10 gigabytes using the spare disks disk10 and disk11, enter:
# /etc/vx/bin/vxresize -b -F vxfs -t homevolresize homevol 10g \
disk10 disk11
The -boption specifies that this operation runs in the background. Its progress
can be monitored by specifying the task tag homevolresize to the vxtask
command.
Setting up databasesResizing a file system
64
Managing the SFDB
repository
This chapter includes the following topics:
■ About the SFDB repository
■ Runtime management tasks for SFDB
■ Adding a new system to an HA configuration
■ Accessing an off-host repository in a non-VCS environment
About the SFDB repositoryThe SFDB repository stores metadata information required by SFDB software.
This information includes data about user databases, snapshot databases, storage
configuration, scheduled tasks, and storage statistics.
In prior releases of Veritas Storage Foundation for Oracle, the repository was
stored on the local host as plain text files, which made the repository vulnerable
to corruption or other errors. Also, repository information could not be accessed
from a secondary host.
In this release of Veritas Storage Foundation for Oracle, the repository is stored
in a relatinal database and is managed by a lightweight embedded relational
DBMS-VxDBMS. VxDBMS is a special OEM version of a Sybase ASA (Adapative
Server Anywhere) DBMS, which is delivered and supported by Symantec. The
SFDB repository database consists of a database file, dbed_db.db, and transaction
log files, yymmddxx.log. VxDBMS supports remote client access from any host in
the network that has proper authorization and configuration.
SFDB requires only occasional interaction outside of the initial installation and
configuration of Veritas Storage Foundation for Oracle.
3Chapter
See the Veritas Storage Foundation Installation Guide for more information on
configuring the SFDB repository.
Runtime management tasks for SFDBMost interactions with the SFDB repository are handled automatically by SFDB
code. Administrators only need to handle SFDB backup and restore activites and
to monitor the hard disk space usage of the repository. A configuration file
/etc/vx/vxdbed/admin.properties is created during installation to record the
file system and volume used for the SFDB repository. The VxDBMS server starts
automatically after a system reboot via rc files.
Starting, stopping, and checking the SFDB repository withsfua_db_config
See the Veritas Storage Foundation Installation Guide for more information on
configuring the SFDB repository.
If for any reason the VxDBMS process is not running or is having problems, use
the sfua_db_config command to start, stop, and check the status of the repository
database and its server.
Backing up and restoring the SFDB repository with sfua_rept_adm
Use the sfua_rept_adm command to manage the backing up and restoring of the
SFDB repository. With this command, you can:
■ Create and configure a schedule for automatically backing up the SFDB
repository, including specifying the type of backup (full or incremental), its
start time and frequency, and the destination directory for the backed up files.
■ Restore the repository from backup files.
■ Disable or enable an existing backup schedule.
■ Create and configure a free-space monitoring schedule that emails an alert
when the free space on the file system containing the repository falls to a
specified threshhold.
■ Disable or enable an existing free-space monitoring schedule.
Note: You must be logged in as root to use the sfua_rept_adm command.
Managing the SFDB repositoryRuntime management tasks for SFDB
66
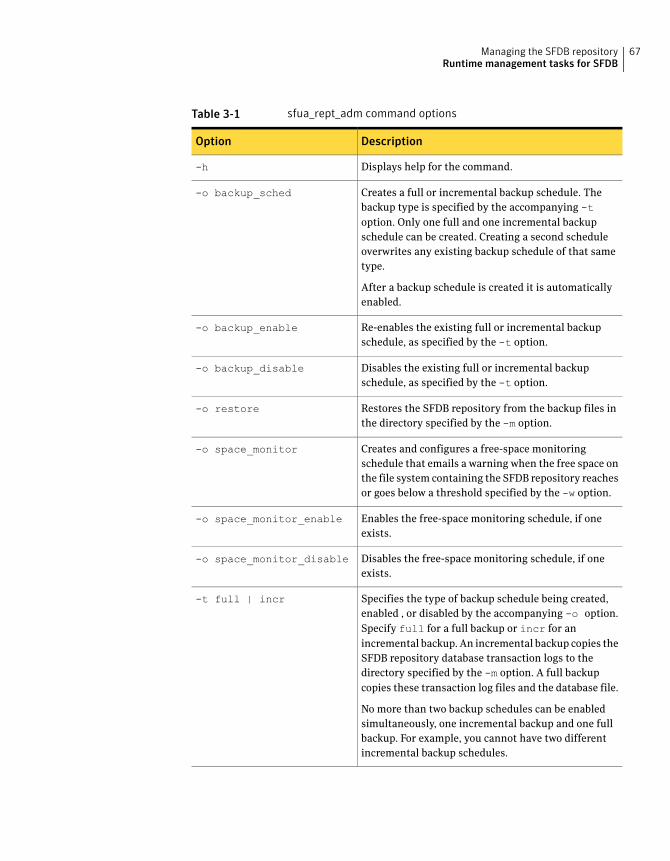
Table 3-1 sfua_rept_adm command options
DescriptionOption
Displays help for the command.-h
Creates a full or incremental backup schedule. The
backup type is specified by the accompanying -toption. Only one full and one incremental backup
schedule can be created. Creating a second schedule
overwrites any existing backup schedule of that same
type.
After a backup schedule is created it is automatically
enabled.
-o backup_sched
Re-enables the existing full or incremental backup
schedule, as specified by the -t option.
-o backup_enable
Disables the existing full or incremental backup
schedule, as specified by the -t option.
-o backup_disable
Restores the SFDB repository from the backup files in
the directory specified by the -m option.
-o restore
Creates and configures a free-space monitoring
schedule that emails a warning when the free space on
the file system containing the SFDB repository reaches
or goes below a threshold specified by the -w option.
-o space_monitor
Enables the free-space monitoring schedule, if one
exists.
-o space_monitor_enable
Disables the free-space monitoring schedule, if one
exists.
-o space_monitor_disable
Specifies the type of backup schedule being created,
enabled , or disabled by the accompanying -o option.
Specify full for a full backup or incr for an
incremental backup. An incremental backup copies the
SFDB repository database transaction logs to the
directory specified by the -m option. A full backup
copies these transaction log files and the database file.
No more than two backup schedules can be enabled
simultaneously, one incremental backup and one full
backup. For example, you cannot have two different
incremental backup schedules.
-t full | incr
67Managing the SFDB repositoryRuntime management tasks for SFDB
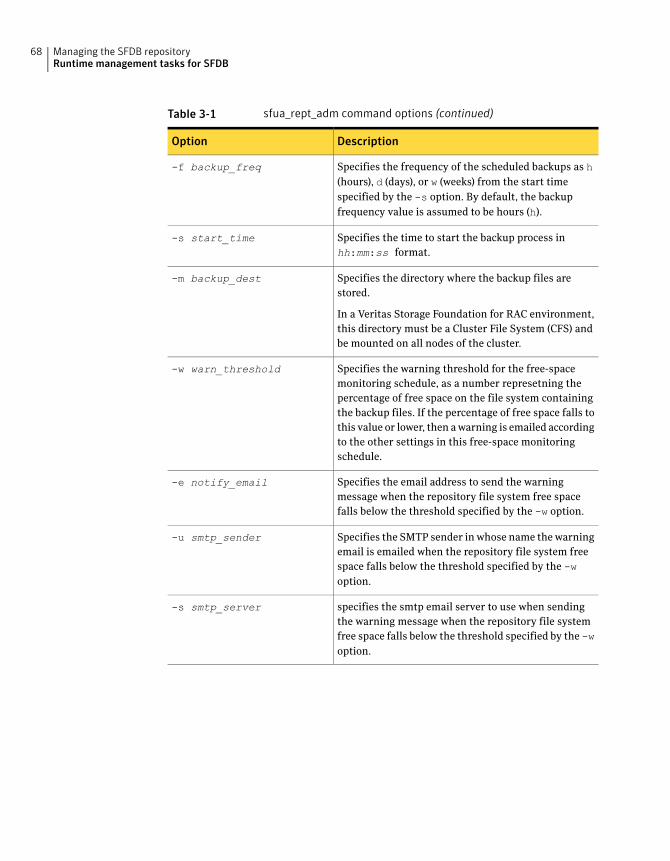
Table 3-1 sfua_rept_adm command options (continued)
DescriptionOption
Specifies the frequency of the scheduled backups as h(hours), d (days), or w (weeks) from the start time
specified by the -s option. By default, the backup
frequency value is assumed to be hours (h).
-f backup_freq
Specifies the time to start the backup process in
hh:mm:ss format.
-s start_time
Specifies the directory where the backup files are
stored.
In a Veritas Storage Foundation for RAC environment,
this directory must be a Cluster File System (CFS) and
be mounted on all nodes of the cluster.
-m backup_dest
Specifies the warning threshold for the free-space
monitoring schedule, as a number represetning the
percentage of free space on the file system containing
the backup files. If the percentage of free space falls to
this value or lower, then a warning is emailed according
to the other settings in this free-space monitoring
schedule.
-w warn_threshold
Specifies the email address to send the warning
message when the repository file system free space
falls below the threshold specified by the -w option.
-e notify_email
Specifies the SMTP sender in whose name the warning
email is emailed when the repository file system free
space falls below the threshold specified by the -woption.
-u smtp_sender
specifies the smtp email server to use when sending
the warning message when the repository file system
free space falls below the threshold specified by the -woption.
-s smtp_server
Managing the SFDB repositoryRuntime management tasks for SFDB
68
To create a backup schedule for the SFDB repository
◆ Use the sfua_rept_adm -o backup_sched command:
sfua_rept_adm -o backup_sched -t full|incr -f backup_freq \
-s start_time -m backup_dest
After a backup schedule is created, it is automatically enabled. You can create
only one of each type of backup schedule, incremental (-t incr) and full (-t
full). If you create a a new backup schedule, it automatically replaces any
currently-enabled backup schedule. You can disable the current backup
schedule with the -o backup_disable command, and re-enable it with -o
backup_enable.
In a Veritas Storage Foundation for RAC environment, the backup destination
directory -m backup_destmust be a Cluster File System (CFS) that is mounted
on all nodes of the cluster.
In an HA environment, use NFS to mount the backup destination directory
on all nodes.
To restore the SFDB repository from a backup
◆ Use the sfua_rept_adm -o restore command:
sfua_rept_adm -o restore -m backup_dest
This command restores the repository using the full backup and all
incremental backup files from the backup directory specified by -m
backup_dest.
To determine if a repository backup has failed
◆ Use either of these methods:
■ Check the system console for error messages received at the time the
backup was scheduled.
■ Verify the existence of the proper backup files in the backup directory
(specified by -m backup_dest). The type of repository backup you schedule
determines which files should be found in this directory. If an incremental
backup, only repository transaction log files (yymmddxx.log) are created
there. If a full backup, both transaction log files and a repository database
file (dbed_db.db) are created.
Monitoring free space for the SFDB repository
To gaurd against the SFDB repository failing by filling its file system, use the
sfua_rept_adm -o space_monitor command to create a monitoring schedule.
69Managing the SFDB repositoryRuntime management tasks for SFDB
Table 3-1 shows all options for the sfua_rept_adm command, including those
used for creating, disabling, and re-enabling a free space monitoring schedule.
This schedule monitors the available free space on the repository file system. If
the free space falls below a specified threshold (a percentage value), a warning is
emailed to a specified user.
Note: You must be logged in as root to use the sfua_rept_adm command.
To create a free-space monitoring schedule for the repository file system
◆ Use the sfua_rept_adm -o space_monitor command:
sfua_rept_adm -o space_monitor -w warn_threshold -e notify_email \
-u smtp_sender -s smtp_server
After a free-space monitoring schedule is created, it is automatically enabled.
When the free space on the file system containing the SFDB repository falls
below the threshold specified by -w warn_threshold, a warning is sent to
the email address specified by -e notify_email.
Adding a new system to an HA configurationWhen adding a new system to an existing HA configuration, you must also add
the system to the existing SFDB repository so that it can share the same repository
data.
To add a new system to the SFDB repository
1 After installing Veritas Storage Foundation for Oracle, add the new system
to the cluster.
See the Veritas Cluster Server User's Guide.
2 Make sure the system is running using the hasys command:
# hasys -state
Managing the SFDB repositoryAdding a new system to an HA configuration
70
3 Add the system to the Sfua_Base group by running the following command
sequence:
# haconf -makerw
# hagrp -modify Sfua_Base SystemList -add new_sys sys_id
# hares -modify sfua_ip Device new_sys_NIC -sys new_sys
# haconf -dump -makero
4 Copy the /etc/vx/vxdbed/.odbc.ini file from an existing node to the new
system using a remote file copy utility such as rcp, tcp, or scp.
For example, to use rcp:
# rcp /etc/vx/vxdbed/.odbc.ini new_sys:/etc/vx/vxdbed
Accessing an off-host repository in a non-VCSenvironment
When creating an off-host clone database in a non-VCS environment, you must
make sure that the secondary host has access to the SFDB repository located on
the primary host. Because there is no cluster file system to ensure this shared
access, you must establish access by copying the primary host's .odbc.ini file
to the secondary host.
To share an off-host SFDB repository in a non-VCS environment
◆ Copy the DSN file /etc/vx/vxdbed/.odbc.ini from the primary host (where
the repository exists and is mounted) to the corresponding location on the
secondary host. Use a remote file copy utility such as rcp, tcp, or scp to make
this copy.
For example, to use rcp from the primary host:
# rcp /etc/vx/vxdbed/.odbc.ini second_host:/etc/vx/vxdbed
71Managing the SFDB repositoryAccessing an off-host repository in a non-VCS environment

Managing the SFDB repositoryAccessing an off-host repository in a non-VCS environment
72
Using Veritas Quick I/O
This chapter includes the following topics:
■ About Quick I/O
■ Creating database files as Quick I/O files using qiomkfile
■ Preallocating space for Quick I/O files using the setext command
■ Accessing regular VxFS files as Quick I/O files
■ Converting Oracle files to Quick I/O files
■ About sparse files
■ Handling Oracle temporary tablespaces and Quick I/O
■ Displaying Quick I/O status and file attributes
■ Extending a Quick I/O file
■ Using Oracle's AUTOEXTEND with Quick I/O files
■ Recreating Quick I/O files after restoring a database
■ Disabling Quick I/O
About Quick I/OVeritas Quick I/O is a VxFS feature included in Veritas Storage Foundation for
Oracle that lets applications access preallocated VxFS files as raw character
devices. Quick I/O provides the administrative benefits of running databases on
file systems without the typically associated degradation in performance.
4Chapter
Note:Veritas recommends that you use Veritas Extension for Oracle Disk Manager.
See “Setting up Veritas extension for Oracle Disk Manager” on page 123.
How Quick I/O works
Veritas Quick I/O supports direct I/O and kernel asynchronous I/O and allows
databases to access regular files on a VxFS file system as raw character devices.
The benefits of using Quick I/O are:
■ Improved performance and processing throughput by having Quick I/O files
act as raw devices.
■ Ability to manage Quick I/O files as regular files, which simplifies
administrative tasks such as allocating, moving, copying, resizing, and backing
up datafiles.
Note: Veritas recommends using Oracle Disk Manager.
See “Converting Quick I/O files to Oracle Disk Manager files” on page 125.
How Quick I/O improves database performance
Quick I/O's ability to access regular files as raw devices improves database
performance by:
■ Supporting kernel asynchronous I/O
■ Supporting direct I/O
■ Avoiding kernel write locks on database files
■ Avoiding double buffering
Supporting kernel asynchronous I/O
Asynchronous I/O is a form of I/O that performs non-blocking system level reads
and writes, allowing the system to handle multiple I/O requests simultaneously.
Operating systems such as Solaris provide kernel support for asynchronous I/O
on raw devices, but not on regular files. As a result, even if the database server is
capable of using asynchronous I/O, it cannot issue asynchronous I/O requests
when the database runs on file systems. Lack of asynchronous I/O significantly
degrades performance. Quick I/O lets the database server take advantage of
kernel-supported asynchronous I/O on file system files accessed using the Quick
I/O interface.
Using Veritas Quick I/OAbout Quick I/O
74
Supporting direct I/O
I/O on files using read() and write() system calls typically results in data being
copied twice: once between user and kernel space, and later between kernel space
and disk. In contrast, I/O on raw devices is direct. That is, data is copied directly
between user space and disk, saving one level of copying. As with I/O on raw
devices, Quick I/O avoids extra copying.
Avoiding kernel write locks
When database I/O is performed using the write() system call, each system call
acquires and releases a write lock inside the kernel. This lock prevents multiple
simultaneous write operations on the same file. Because database systems usually
implement their own locking to manage concurrent access to files, per file writer
locks unnecessarily serialize I/O operations. Quick I/O bypasses file system per
file locking and lets the database server control data access.
Avoiding double buffering
Most database servers maintain their own buffer cache and do not need the file
system buffer cache. Database data cached in the file system buffer is therefore
redundant and results in wasted memory and extra system CPU utilization to
manage the buffer. By supporting direct I/O, Quick I/O eliminates double buffering.
Data is copied directly between the relational database management system
(RDBMS) cache and disk, which lowers CPU utilization and frees up memory that
can then be used by the database server buffer cache to further improve transaction
processing throughput.
About Quick I/O requirements
To use Quick I/O, you must:
■ Preallocate files on a VxFS file system
■ Use a special file naming convention to access the files
Preallocating files
Preallocating database files for Quick I/O allocates contiguous space for the files.
The file system space reservation algorithms attempt to allocate space for an
entire file as a single contiguous extent. When this is not possible due to lack of
contiguous space on the file system, the file is created as a series of direct extents.
Accessing a file using direct extents is inherently faster than accessing the same
data using indirect extents. Internal tests have shown performance degradation
75Using Veritas Quick I/OAbout Quick I/O
in OLTP throughput when using indirect extent access. In addition, this type of
preallocation causes no fragmentation of the file system.
You must preallocate Quick I/O files because they cannot be extended through
writes using their Quick I/O interfaces. They are initially limited to the maximum
size you specify at the time of creation.
See “Extending a Quick I/O file” on page 91.
About Quick I/O naming conventions
VxFS uses a special naming convention to recognize and access Quick I/O files as
raw character devices. VxFS recognizes the file when you add the following
extension to a file name:
::cdev:vxfs:
Whenever an application opens an existing VxFS file with the extension
::cdev:vxfs: (cdev being an acronym for character device), the file is treated as
if it were a raw device. For example, if the file temp01 is a regular VxFS file, then
an application can access temp01 as a raw character device by opening it with the
name:
.temp01::cdev:vxfs:
Note: We recommend reserving the ::cdev:vxfs: extension only for Quick I/O
files. If you are not using Quick I/O, you could technically create a regular file
with this extension; however, doing so can cause problems if you later enable
Quick I/O.
How to set up Quick I/O
Quick I/O is included in the VxFS package shipped with Veritas Storage Foundation
for Oracle. By default, Quick I/O is enabled when you mount a VxFS file system.
If Quick I/O is not available in the kernel, or the Veritas Storage Foundation for
Oracle license is not installed, a file system mounts without Quick I/O by default,
the Quick I/O file name is treated as a regular file, and no error message is
displayed. If, however, you specify the -o qio option, the mount command prints
the following error message and terminates without mounting the file system.
VxFDD: You don't have a license to run this program
vxfs mount: Quick I/O not available
Depending on whether you are creating a new database or are converting an
existing database to use Quick I/O, you have the following options:
Using Veritas Quick I/OAbout Quick I/O
76
If you are creating a new database:
■ You can use the qiomkfile command to preallocate space for database files
and make them accessible to the Quick I/O interface.
See “Creating database files as Quick I/O files using qiomkfile” on page 77.
■ You can use the setext command to preallocate space for database files and
create the Quick I/O files.
See “Preallocating space for Quick I/O files using the setext command”
on page 79.
If you are converting an existing database:
■ You can create symbolic links for existing VxFS files, and use these symbolic
links to access the files as Quick I/O files.
See “Accessing regular VxFS files as Quick I/O files” on page 81.
■ You can convert your existing Oracle database files to use the Quick I/O
interface using the qio_getdbfiles and qio_convertdbfiles commands.
See “Converting Oracle files to Quick I/O files” on page 82.
Creating database files as Quick I/O files usingqiomkfile
The best way to preallocate space for tablespace containers and to make them
accessible using the Quick I/O interface is to use the qiomkfile. You can use the
qiomkfile to create the Quick I/O files for either temprory or permanent
tablespaces.
■ You can create Quick I/O files only on VxFS file systems.
■ If you are creating database files on an existing file system, run
fsadm (or similar utility) to report and eliminate fragmentation.
■ You must have read/write permissions on the directory in which
you intend to create Oracle Quick I/O files.
Prerequisites
■ The qiomkfile command creates two files: a regular file with
preallocated, contiguous space, and a file that is a symbolic link
pointing to the Quick I/O name extension.
■ See the qiomkfile(1M) manual page for more information.
Usage notes
Creates a symbolic link with an absolute path name for a specified
file. Use the -a option when absolute path names are required.
However, the default is to create a symbolic link with a relative path
name.
-a
77Using Veritas Quick I/OCreating database files as Quick I/O files using qiomkfile
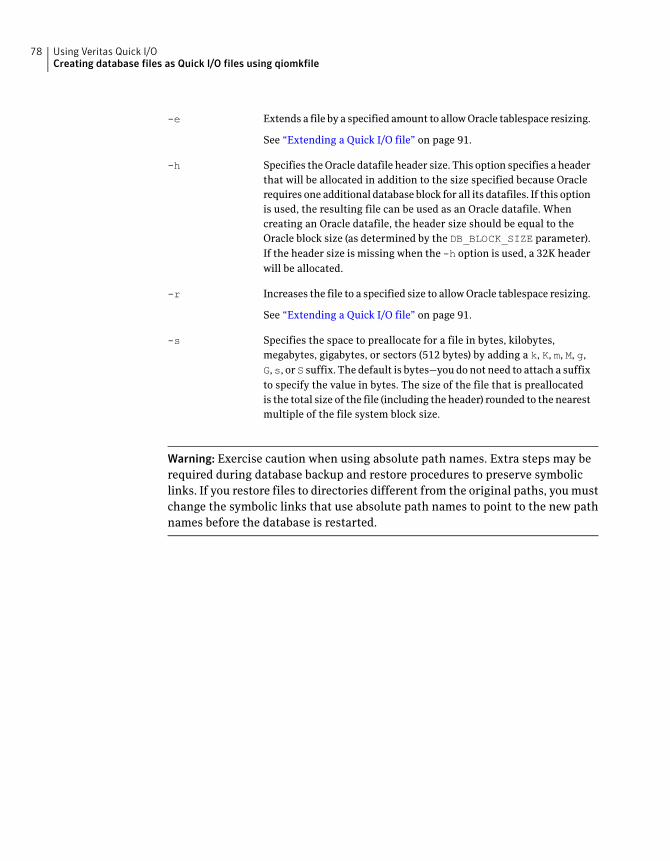
Extends a file by a specified amount to allow Oracle tablespace resizing.
See “Extending a Quick I/O file” on page 91.
-e
Specifies the Oracle datafile header size. This option specifies a header
that will be allocated in addition to the size specified because Oracle
requires one additional database block for all its datafiles. If this option
is used, the resulting file can be used as an Oracle datafile. When
creating an Oracle datafile, the header size should be equal to the
Oracle block size (as determined by the DB_BLOCK_SIZE parameter).
If the header size is missing when the -h option is used, a 32K header
will be allocated.
-h
Increases the file to a specified size to allow Oracle tablespace resizing.
See “Extending a Quick I/O file” on page 91.
-r
Specifies the space to preallocate for a file in bytes, kilobytes,
megabytes, gigabytes, or sectors (512 bytes) by adding a k, K, m, M, g,
G,s, orS suffix. The default is bytes—you do not need to attach a suffix
to specify the value in bytes. The size of the file that is preallocated
is the total size of the file (including the header) rounded to the nearest
multiple of the file system block size.
-s
Warning: Exercise caution when using absolute path names. Extra steps may be
required during database backup and restore procedures to preserve symbolic
links. If you restore files to directories different from the original paths, you must
change the symbolic links that use absolute path names to point to the new path
names before the database is restarted.
Using Veritas Quick I/OCreating database files as Quick I/O files using qiomkfile
78
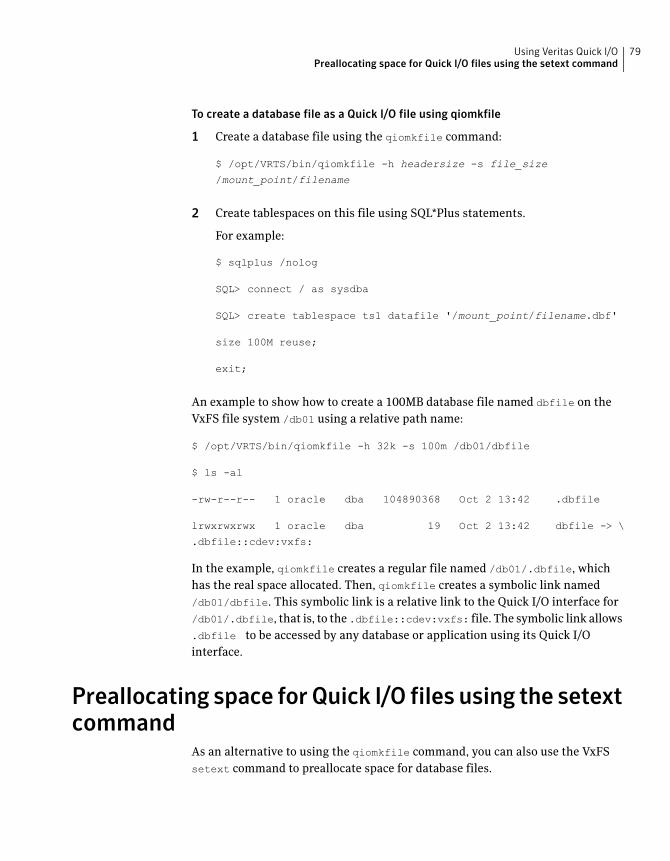
To create a database file as a Quick I/O file using qiomkfile
1 Create a database file using the qiomkfile command:
$ /opt/VRTS/bin/qiomkfile -h headersize -s file_size
/mount_point/filename
2 Create tablespaces on this file using SQL*Plus statements.
For example:
$ sqlplus /nolog
SQL> connect / as sysdba
SQL> create tablespace ts1 datafile '/mount_point/filename.dbf'
size 100M reuse;
exit;
An example to show how to create a 100MB database file named dbfile on the
VxFS file system /db01 using a relative path name:
$ /opt/VRTS/bin/qiomkfile -h 32k -s 100m /db01/dbfile
$ ls -al
-rw-r--r-- 1 oracle dba 104890368 Oct 2 13:42 .dbfile
lrwxrwxrwx 1 oracle dba 19 Oct 2 13:42 dbfile -> \
.dbfile::cdev:vxfs:
In the example, qiomkfile creates a regular file named /db01/.dbfile, which
has the real space allocated. Then, qiomkfile creates a symbolic link named
/db01/dbfile. This symbolic link is a relative link to the Quick I/O interface for
/db01/.dbfile, that is, to the .dbfile::cdev:vxfs: file. The symbolic link allows
.dbfile to be accessed by any database or application using its Quick I/O
interface.
Preallocating space forQuick I/O files using the setextcommand
As an alternative to using the qiomkfile command, you can also use the VxFS
setext command to preallocate space for database files.
79Using Veritas Quick I/OPreallocating space for Quick I/O files using the setext command
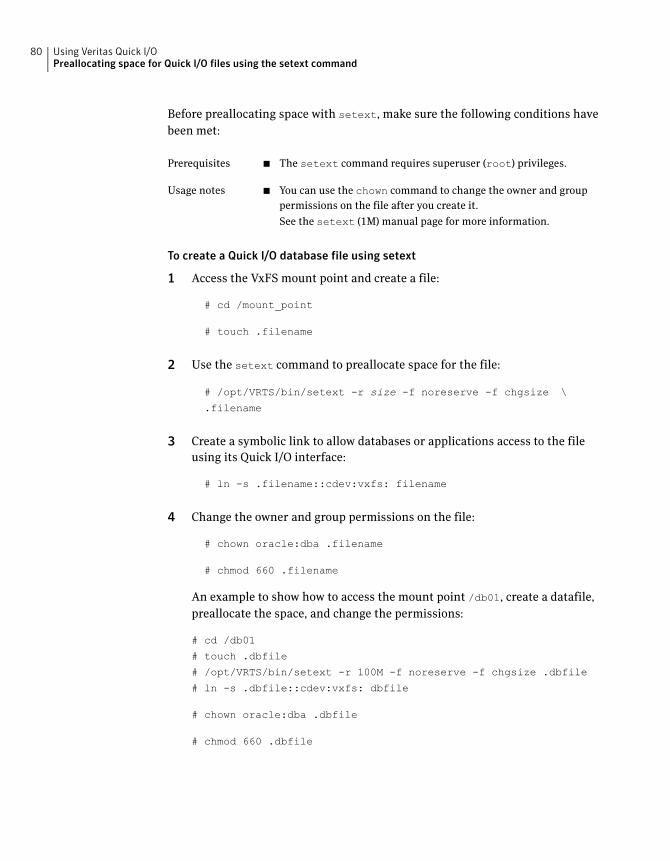
Before preallocating space with setext, make sure the following conditions have
been met:
■ The setext command requires superuser (root) privileges.Prerequisites
■ You can use the chown command to change the owner and group
permissions on the file after you create it.
See the setext (1M) manual page for more information.
Usage notes
To create a Quick I/O database file using setext
1 Access the VxFS mount point and create a file:
# cd /mount_point
# touch .filename
2 Use the setext command to preallocate space for the file:
# /opt/VRTS/bin/setext -r size -f noreserve -f chgsize \
.filename
3 Create a symbolic link to allow databases or applications access to the file
using its Quick I/O interface:
# ln -s .filename::cdev:vxfs: filename
4 Change the owner and group permissions on the file:
# chown oracle:dba .filename
# chmod 660 .filename
An example to show how to access the mount point /db01, create a datafile,
preallocate the space, and change the permissions:
# cd /db01
# touch .dbfile
# /opt/VRTS/bin/setext -r 100M -f noreserve -f chgsize .dbfile
# ln -s .dbfile::cdev:vxfs: dbfile
# chown oracle:dba .dbfile
# chmod 660 .dbfile
Using Veritas Quick I/OPreallocating space for Quick I/O files using the setext command
80
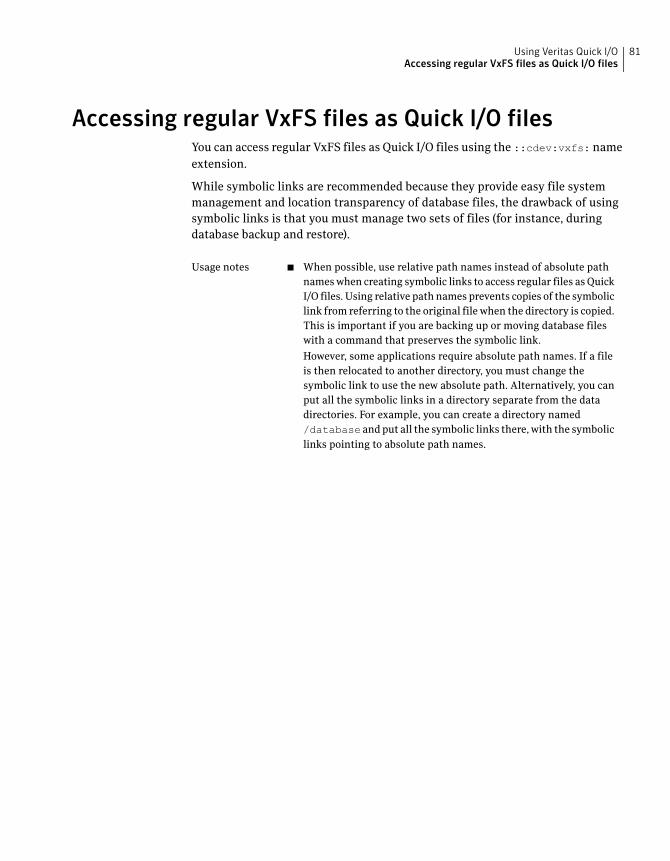
Accessing regular VxFS files as Quick I/O filesYou can access regular VxFS files as Quick I/O files using the ::cdev:vxfs: name
extension.
While symbolic links are recommended because they provide easy file system
management and location transparency of database files, the drawback of using
symbolic links is that you must manage two sets of files (for instance, during
database backup and restore).
■ When possible, use relative path names instead of absolute path
names when creating symbolic links to access regular files as Quick
I/O files. Using relative path names prevents copies of the symbolic
link from referring to the original file when the directory is copied.
This is important if you are backing up or moving database files
with a command that preserves the symbolic link.
However, some applications require absolute path names. If a file
is then relocated to another directory, you must change the
symbolic link to use the new absolute path. Alternatively, you can
put all the symbolic links in a directory separate from the data
directories. For example, you can create a directory named
/database and put all the symbolic links there, with the symbolic
links pointing to absolute path names.
Usage notes
81Using Veritas Quick I/OAccessing regular VxFS files as Quick I/O files
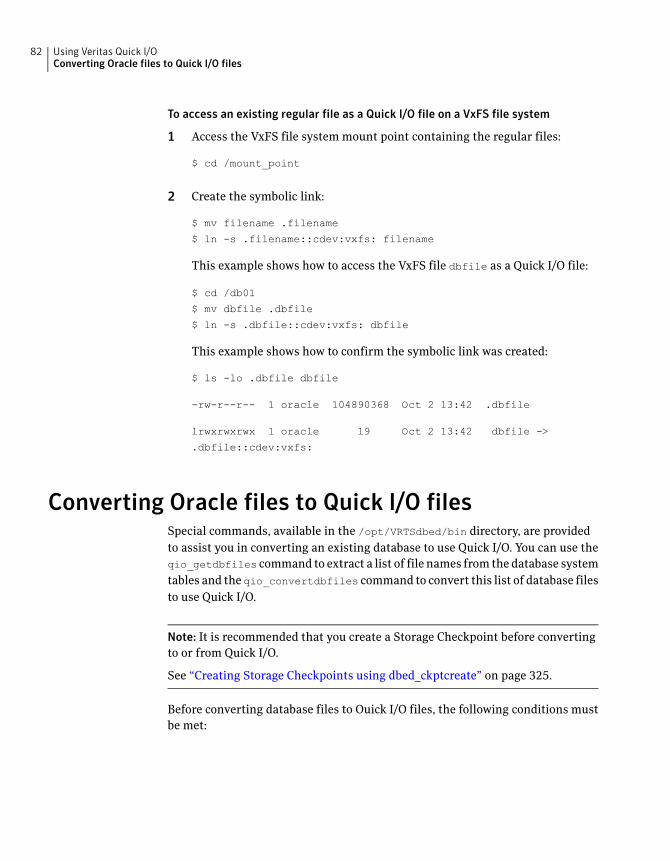
To access an existing regular file as a Quick I/O file on a VxFS file system
1 Access the VxFS file system mount point containing the regular files:
$ cd /mount_point
2 Create the symbolic link:
$ mv filename .filename
$ ln -s .filename::cdev:vxfs: filename
This example shows how to access the VxFS file dbfile as a Quick I/O file:
$ cd /db01
$ mv dbfile .dbfile
$ ln -s .dbfile::cdev:vxfs: dbfile
This example shows how to confirm the symbolic link was created:
$ ls -lo .dbfile dbfile
-rw-r--r-- 1 oracle 104890368 Oct 2 13:42 .dbfile
lrwxrwxrwx 1 oracle 19 Oct 2 13:42 dbfile ->
.dbfile::cdev:vxfs:
Converting Oracle files to Quick I/O filesSpecial commands, available in the /opt/VRTSdbed/bin directory, are provided
to assist you in converting an existing database to use Quick I/O. You can use the
qio_getdbfiles command to extract a list of file names from the database system
tables and the qio_convertdbfiles command to convert this list of database files
to use Quick I/O.
Note: It is recommended that you create a Storage Checkpoint before converting
to or from Quick I/O.
See “Creating Storage Checkpoints using dbed_ckptcreate” on page 325.
Before converting database files to Ouick I/O files, the following conditions must
be met:
Using Veritas Quick I/OConverting Oracle files to Quick I/O files
82
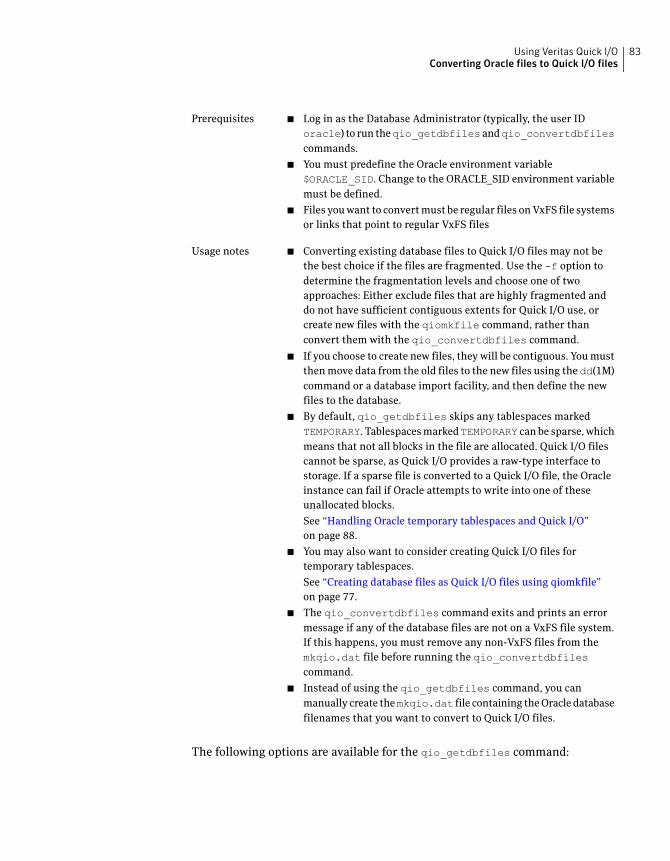
■ Log in as the Database Administrator (typically, the user ID
oracle) to run theqio_getdbfilesandqio_convertdbfilescommands.
■ You must predefine the Oracle environment variable
$ORACLE_SID. Change to the ORACLE_SID environment variable
must be defined.
■ Files you want to convert must be regular files on VxFS file systems
or links that point to regular VxFS files
Prerequisites
■ Converting existing database files to Quick I/O files may not be
the best choice if the files are fragmented. Use the -f option to
determine the fragmentation levels and choose one of two
approaches: Either exclude files that are highly fragmented and
do not have sufficient contiguous extents for Quick I/O use, or
create new files with the qiomkfile command, rather than
convert them with the qio_convertdbfiles command.
■ If you choose to create new files, they will be contiguous. You must
then move data from the old files to the new files using the dd(1M)
command or a database import facility, and then define the new
files to the database.
■ By default, qio_getdbfiles skips any tablespaces marked
TEMPORARY. Tablespaces markedTEMPORARY can be sparse, which
means that not all blocks in the file are allocated. Quick I/O files
cannot be sparse, as Quick I/O provides a raw-type interface to
storage. If a sparse file is converted to a Quick I/O file, the Oracle
instance can fail if Oracle attempts to write into one of these
unallocated blocks.
See “Handling Oracle temporary tablespaces and Quick I/O”
on page 88.
■ You may also want to consider creating Quick I/O files for
temporary tablespaces.
See “Creating database files as Quick I/O files using qiomkfile”
on page 77.
■ The qio_convertdbfiles command exits and prints an error
message if any of the database files are not on a VxFS file system.
If this happens, you must remove any non-VxFS files from the
mkqio.dat file before running the qio_convertdbfilescommand.
■ Instead of using the qio_getdbfiles command, you can
manually create themkqio.dat file containing the Oracle database
filenames that you want to convert to Quick I/O files.
Usage notes
The following options are available for the qio_getdbfiles command:
83Using Veritas Quick I/OConverting Oracle files to Quick I/O files
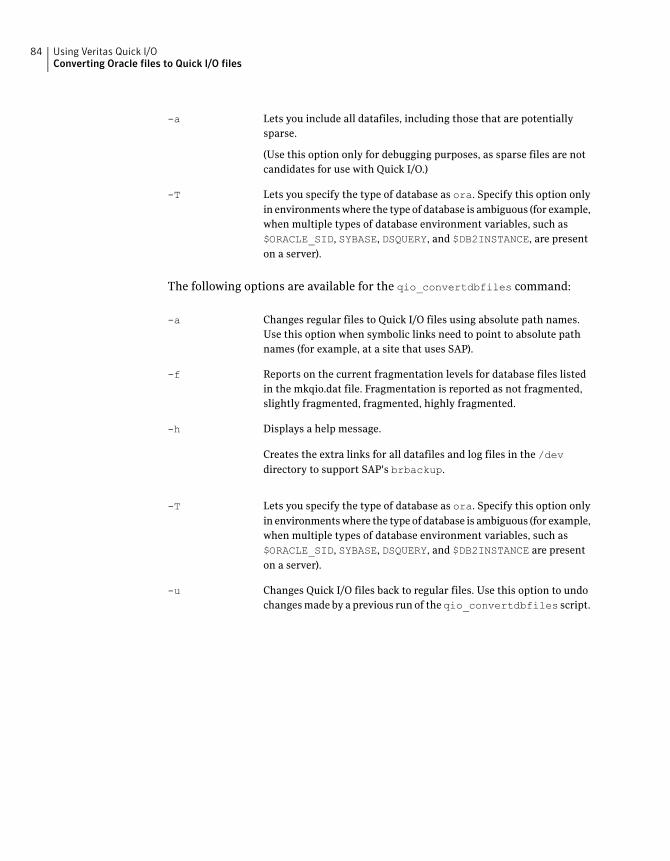
Lets you include all datafiles, including those that are potentially
sparse.
(Use this option only for debugging purposes, as sparse files are not
candidates for use with Quick I/O.)
-a
Lets you specify the type of database as ora. Specify this option only
in environments where the type of database is ambiguous (for example,
when multiple types of database environment variables, such as
$ORACLE_SID, SYBASE, DSQUERY, and $DB2INSTANCE, are present
on a server).
-T
The following options are available for the qio_convertdbfiles command:
Changes regular files to Quick I/O files using absolute path names.
Use this option when symbolic links need to point to absolute path
names (for example, at a site that uses SAP).
-a
Reports on the current fragmentation levels for database files listed
in the mkqio.dat file. Fragmentation is reported as not fragmented,
slightly fragmented, fragmented, highly fragmented.
-f
Displays a help message.-h
Creates the extra links for all datafiles and log files in the /devdirectory to support SAP's brbackup.
Lets you specify the type of database as ora. Specify this option only
in environments where the type of database is ambiguous (for example,
when multiple types of database environment variables, such as
$ORACLE_SID, SYBASE, DSQUERY, and $DB2INSTANCE are present
on a server).
-T
Changes Quick I/O files back to regular files. Use this option to undo
changes made by a previous run of theqio_convertdbfiles script.
-u
Using Veritas Quick I/OConverting Oracle files to Quick I/O files
84
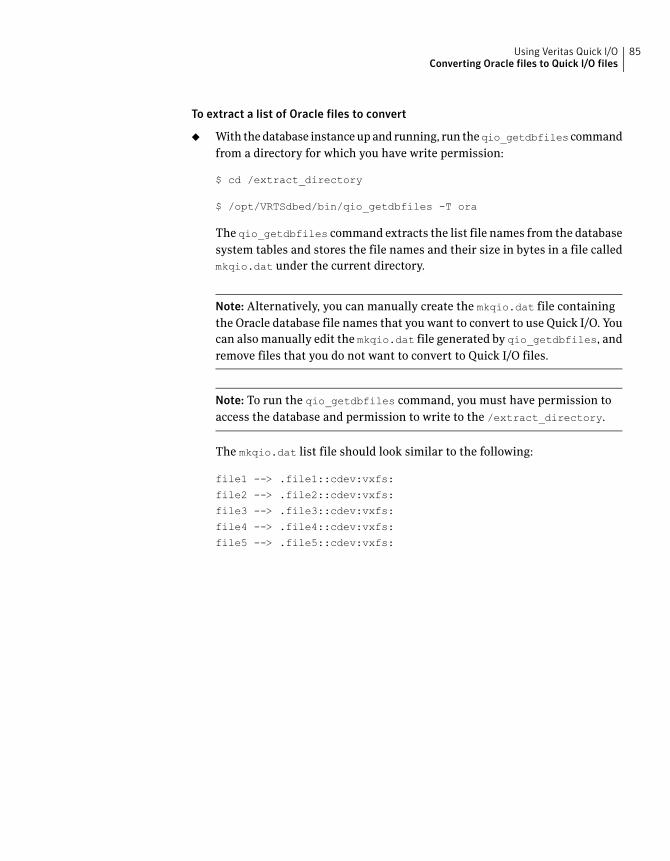
To extract a list of Oracle files to convert
◆ With the database instance up and running, run theqio_getdbfiles command
from a directory for which you have write permission:
$ cd /extract_directory
$ /opt/VRTSdbed/bin/qio_getdbfiles -T ora
The qio_getdbfiles command extracts the list file names from the database
system tables and stores the file names and their size in bytes in a file called
mkqio.dat under the current directory.
Note: Alternatively, you can manually create the mkqio.dat file containing
the Oracle database file names that you want to convert to use Quick I/O. You
can also manually edit the mkqio.dat file generated by qio_getdbfiles, and
remove files that you do not want to convert to Quick I/O files.
Note: To run the qio_getdbfiles command, you must have permission to
access the database and permission to write to the /extract_directory.
The mkqio.dat list file should look similar to the following:
file1 --> .file1::cdev:vxfs:
file2 --> .file2::cdev:vxfs:
file3 --> .file3::cdev:vxfs:
file4 --> .file4::cdev:vxfs:
file5 --> .file5::cdev:vxfs:
85Using Veritas Quick I/OConverting Oracle files to Quick I/O files

To convert the Oracle database files to Quick I/O files
1 Shut down the database.
2 Run the qio_convertdbfiles command from the directory containing the
mkqio.dat file:
$ cd /extract_directory
$ /opt/VRTSdbed/bin/qio_convertdbfiles
The list of files in the mkqio.dat file is displayed. For example:
file1 --> .file1::cdev:vxfs:
file2 --> .file2::cdev:vxfs:
file3 --> .file3::cdev:vxfs:
file4 --> .file4::cdev:vxfs:
file5 --> .file5::cdev:vxfs:
Run the qio_convertdbfiles command (with no options specified) to rename
the file filename to .filename and creates a symbolic link to .filenamewith
the Quick I/O extension. By default, the symbolic link uses a relative path
name.
The qio_convertdbfiles script exits and prints an error message if any of
the database files are not on a VxFS file system. If this happens, you must
remove any non-VxFS files from the mkqio.dat file before running the
qio_convertdbfiles command again.
3 Start up the database.
4 You can now access these database files using the Quick I/O interface.
Using Veritas Quick I/OConverting Oracle files to Quick I/O files
86
To undo the previous run of qio_convertdbfiles and change Quick I/O files back to
regular VxFS files
1 If the database is running, shut it down.
2 Run the following command from the directory containing the mkqio.dat
file:
$ cd /extract_directory
$ /opt/VRTSdbed/bin/qio_convertdbfiles -u
The list of Quick I/O files in the mkqio.dat file is displayed. For example:
.file1::cdev:vxfs: --> file1
.file2::cdev:vxfs: --> file2
.file3::cdev:vxfs: --> file3
.file4::cdev:vxfs: --> file4
.file5::cdev:vxfs: --> file5
The qio_convertdbfiles command with the undo option (-u) specified
renames the files from <.filename> to <filename> and undoes the symbolic
link to .filename that was created along with the Quick I/O files.
About sparse filesSupport for sparse files lets applications store information (in inodes) to identify
data blocks that have only zeroes, so that only blocks containing non-zero data
have to be allocated on disk.
For example, if a file is 10KB, it typically means that there are blocks on disk
covering the whole 10KB. Assume that you always want the first 9K to be zeroes.
The application can go to an offset of 9KB and write 1KB worth of data. Only a
block for the 1KB that was written is allocated, but the size of the file is still 10KB.
The file is now sparse. It has a hole from offset 0 to 9KB. If the application reads
any part of the file within this range, it will see a string of zeroes.
If the application subsequently writes a 1KB block to the file from an offset of
4KB, for example, the file system will allocate another block.
The file then looks like:
■ 0-4KB - hole
■ 4-5KB - data block
■ 5-9KB - hole
■ 9-10KB - data block
87Using Veritas Quick I/OAbout sparse files
So a 1TB file system can potentially store up to 2TB worth of files if there are
sufficient blocks containing zeroes. Quick I/O files cannot be sparse and will
always have all blocks specified allocated to them.
Handling Oracle temporary tablespaces and QuickI/O
You can create a new temporary tablespace using Quick I/O files. However, you
cannot convert existing temporary tablespaces which use regular files to Quick
I/O with the qio_getdbfiles command on Oracle9.
By default, qio_getdbfiles skips any tablespaces marked TEMPORARY because
they can be sparse, which means that not all blocks in the file are allocated. Quick
I/O files cannot be sparse, as Quick I/O provides a raw-type interface to storage.
If a sparse file is converted to a Quick I/O file, the Oracle instance can fail if Oracle
attempts to write into one of these unallocated blocks. When you initially create
a temporary tablespace on Quick I/O files, however, Oracle sees them as raw
devices and does not create sparse files.
To convert a temporary tablespace using regular files to Quick I/O files, you can
drop your existing temporary tablespaces which use regular files and recreate
them using Quick I/O files. You can also leave the temporary tablespaces as regular
files.
To obtain a list of file names that are not temporary
◆ Use the following SQL statements:
$ sqlplus /nolog
SQL> connect / as sysdba;
SQL> select file_name from dba_data_files a,
dba_tablespaces b where a.tablespace_name =
b.tablespace_name and b.contents <> 'TEMPORARY';
Using Veritas Quick I/OHandling Oracle temporary tablespaces and Quick I/O
88
To drop an existing temporary tablespace and recreate using Quick I/O files
1 Drop the temporary tablespace, including its contents:
$ sqlplus /nolog
SQL> connect / as sysdba;
SQL> drop tablespace tablespace_name including contents;
2 Create a Quick I/O file on a VxFS file system:
$ /opt/VRTS/bin/qiomkfile -h header_size -s size \
/mount_point/filename.dbf
3 Create a new temporary tablespace using the create tablespace or create
temporary tablespace command.
To use the create tablespace command:
$ sqlplus /nolog
SQL> connect / as sysdba;
SQL> create tablespace tablespace_name \
datafile '/mount_point/filename.dbf' \
size size reuse \
temporary;
To use the create temporary tablespace command:
$ sqlplus /nolog
SQL> connect / as sysdba;
SQL> create temporary tablespace tablespace_name \
tempfile '/mount_point/new_filename.dbf' size size reuse;
This example shows how to drop tablespace tempts, create a Quick I/O file
temp01.dbf, and then create a new temporary tablespace temptsusing the create
tablespace command:
$ sqlplus /nolog
SQL> connect / as sysdba;
SQL> drop tablespace tempts including contents;
Tablespace dropped.
$ /opt/VRTS/bin/qiomkfile -h 32k -s 100M /db01/temp01.dbf
$ sqlplus /nolog
SQL> connect / as dba;
SQL> create tablespace tempts \
datafile '/db01/temp01.dbf' \
89Using Veritas Quick I/OHandling Oracle temporary tablespaces and Quick I/O

size 100M reuse \
temporary;
Tablespace created.
This example shows how to drop tablespace tempts, create a Quick I/O file
temp01.dbf, and then create a new temporary tablespace temptsusing the create
temporary tablespace command:
$ sqlplus /nolog
SQL> connect / as sysdba;
SQL> drop tablespace tempts including contents;
Tablespace dropped.
$ /opt/VRTS/bin/qiomkfile -h 32k -s 100M /db01/temp01.dbf
$ sqlplus /nolog
SQL> connect / as dba;
SQL> create temporary tablespace tempts \
tempfile '/db01/temp01.dbf' \
size 100M reuse;
Tablespace created.
Displaying Quick I/O status and file attributesYou can obtain and display information about Quick I/O status and file attributes
using various options of the ls command:
Lists all files on a file system, including Quick I/O files and their links.-al
Shows if Quick I/O was successfully installed and enabled.-1L
Shows how a Quick I/O file name is resolved to that of a raw device.-a1L
Using Veritas Quick I/ODisplaying Quick I/O status and file attributes
90
To list all files on the current file system, including Quick I/O files and their links
◆ Use the ls -al command with the file names:
$ ls -al filename .filename
The following example shows how to use the -a option to display the absolute
path name created using qiomkfile:
$ ls -al d* .d*
-rw-r--r-- 1 oracle dba 104890368 Oct 2 13:42 .dbfile
lrwxrwxrwx 1 oracle dba 19 Oct 2 13:42 dbfile ->
.dbfile::cdev:vxfs:
To determine if a datafile has been converted to Quick I/O
◆ Use the ls command as follows:
$ ls -lL filename
The following example shows how to determine if Quick I/O is installed and
enabled:
$ ls -lL dbfile
crw-r--r-- 1 oracle dba 45, 1 Oct 2 13:42 dbfile
To show a Quick I/O file resolved to a raw device
◆ Use the ls command with the file names as follows:
$ ls -alL filename .filename
The following example shows how the Quick I/O file name dbfile is resolved
to that of a raw device:
$ ls -alL d* .d*
crw-r--r-- 1 oracle dba 45, 1 Oct 2 13:42 dbfile
-rw-r--r-- 1 oracle dba 104890368 Oct 2 13:42 .dbfile
Extending a Quick I/O fileAlthough Quick I/O files must be preallocated, they are not limited to the
preallocated sizes. You can grow or “extend” a Quick I/O file by a specific amount
91Using Veritas Quick I/OExtending a Quick I/O file
or to a specific size, using options to the qiomkfile command. Extending Quick
I/O files is a fast, online operation and offers a significant advantage over using
raw devices.
Before extending a Quick I/O file, make sure the following conditions have been
met:
■ You must have sufficient space on the file system to extend the
Quick I/O file.
Prerequisites
■ You can also grow VxFS file systems online (provided the
underlying disk or volume can be extended) using the fsadmcommand. You can expand the underlying volume and the
filesystem with the vxresize command.
■ You must have superuser (root) privileges to resize VxFS file
systems using the fsadm command.
■ See the fsadm_vxfs (1M) and qiomkfile (1M) manual pages for
more information.
Usage notes
The following options are available with the qiomkfile command:
Extends the file by a specified amount to allow Oracle tablespace
resizing.
-e
Increases the file to a specified size to allow Oracle tablespace resizing.-r
To extend a Quick I/O file
1 If required, ensure the underlying storage device is large enough to contain
a larger VxFS file system (see the vxassist(1M) manual page for more
information), and resize the VxFS file system using fsadm command:
where:
■ -b is the option for changing size
■ <newsize>is the new size of the file system in bytes, kilobytes, megabytes,
blocks, or sectors
Using Veritas Quick I/OExtending a Quick I/O file
92
■ <mount_point>is the file system's mount point
2 Extend the Quick I/O file using the qiomkfile command:
$ /opt/VRTS/bin/qiomkfile -e extend_amount /mount_point/filename
or
$ /opt/VRTS/bin/qiomkfile -r newsize /mount_point/filename
An example to show how to grow VxFS file system /db01 to 500MB and extend
the emp.dbf Quick I/O file by 20MB:
# /opt/VRTS/bin/fsadm -b 500M /db01
$ /opt/VRTS/bin/qiomkfile -e 20M /db01/emp.dbf
An example to show how to grow VxFS file system /db01 to 500MB and resize
the emp.dbf Quick I/O file to 300MB:
# /opt/VRTS/bin/fsadm -b 500M /db01
$ /opt/VRTS/bin/qiomkfile -r 300M /db01/emp.dbf
Using Oracle's AUTOEXTEND with Quick I/O filesOracle supports an automatic extend feature that automatically grows a database
file by a prespecified amount, up to a prespecified maximum size.
For regular file system files, AUTOEXTEND works transparently, provided the
underlying file system has enough space. For example, suppose the current size
of a database file emp.dbf is 100MB, but this file is expected to triple in size over
time. To accommodate this growth using AUTOEXTEND feature, you can specify the
next size at 20MB and maxsize at 300MB. This will automatically grow the file
by 20MB until its size reaches 300MB. For example:
alter database datafile ’emp.dbf’ autoextend on next 20m\
maxsize 300m;
(See the Oracle Server SQL Reference Guide for more information about the
Note: You must have sufficient space on the underlying file system to AUTOEXTEND
a file, and the underlying storage device must be large enough to contain the new,
larger file system.
93Using Veritas Quick I/OUsing Oracle's AUTOEXTEND with Quick I/O files
For Quick I/O files or raw devices, AUTOEXTEND does not know how to grow the
underlying Quick I/O files or devices. Therefore, the Quick I/O file size must be
large enough to accommodate the new size before AUTOEXTEND can grow the
datafile.
You can use AUTOEXTEND with Quick I/O files in the following ways:
■ Preallocate the Quick I/O file to a size at least as big as the maximum growth
size expected for this database file.
Using this method, you would need to preallocate the Quick I/O file emp.dbf
for the entire 300MB. The drawback is that this can unnecessarily lock up
excess disk space. Raw devices have a similar requirement.
■ Monitor the free space available in the Quick I/O file, and grow the file as
necessary with the qiomkfile command.
Unlike raw devices, you can easily extend Quick I/O files online. Using this
method, you can monitor the free space available in the Oracle datafiles and
use the qiomkfile command to grow the Quick I/O files online as and when
needed (typically when the file is about 80 to 90 percent full). This method
does not require you to lock out unused disk space for Quick I/O files. The free
space on the file system is available for use by other applications.
The following options are available for the qiomkfile command:
Extends the file by a specified amount to allow Oracle tablespace
resizing.
-e
Increases the file to a specified size to allow Oracle tablespace resizing.-r
You can grow underlying VxFS file systems online (provided the underlying disk
or volume can be extended) using the fsadm command. See the fsadm_vxfs(1M)
manual page for more information.
To monitor the free space available in an Oracle tablespace
◆ Check the free space currently available in the Oracle tablespace using the
following Oracle SQL command:
$ sqlplus /nolog
SQL> connect / as sysdba;
SQL> select * from dba_free_space where \
tablespace_name = ’tablespace_name’;
SQL> exit
Using Veritas Quick I/OUsing Oracle's AUTOEXTEND with Quick I/O files
94
To extend a Quick I/O file using qiomkfile
◆ If the datafile is running low on free blocks, use the qiomkfile command to
extend the Quick I/O file:
$ /opt/VRTS/bin/qiomkfile -e extend_amount \
/mount_point/filename
The following example shows how to monitor the free space on the tablespace
EMP on file system /db01:
$ sqlplus /nolog
SQL> connect / as sysdba;
SQL> select * from dba_free_space where tablespace_name = ’EMP’;
SQL> exit
The following example shows how to extend the Oracle datafile emp.dbf by
20MB (the specified next size) using the qiomkfile command:
$ /opt/VRTS/bin/qiomkfile -e 20M /db01/emp.dbf
Recreating Quick I/O files after restoring a databaseIf you need to restore your database and were using Quick I/O files, you can use
the qio_recreate command to automatically recreate the Quick I/O files after
you have performed a full database recovery. The qio_recreate command uses
the mkqio.dat file, which contains a list of the Quick I/O files used by the database
and the file sizes.
For information on recovering your database, refer to the documentation that
came with your database software.
Before recreating Quick I/O with the qio_recreate command, make sure the
following conditions have been met:
■ Recover your database before attempting to recreate the Quick I/O
files.
■ Log in as the Database Administrator (typically, the user ID
oracle) to run the qio_recreate command.
■ In the directory from which you run theqio_recreate command,
you must have an existing mkqio.dat file.
■ The ORACLE_SID environment variable must be set.
See “Converting Oracle files to Quick I/O files” on page 82.
Prerequisites
95Using Veritas Quick I/ORecreating Quick I/O files after restoring a database

■ The qio_recreate command supports only conventional Quick
I/O files.
■ Refer to the qio_recreate(1M) manual page for more
information.
Usage notes
To recreate Quick I/O files after recovering a database
◆ Use the qio_recreate command as follows:
# /opt/VRTSdbed/bin/qio_recreate
You will not see any output if the command is successful.
When you run the qio_recreate command, the following actions occur:
Then...If...
the Quick I/O file is recreated.a Quick I/O file is missing
the symbolic link is recreated.a symbolic link from a regular VxFS file to a
Quick I/O file is missing
both the link and the Quick I/O file are
recreated.
a symbolic link and its associated Quick I/O
file are missing
the Quick I/O file is not recreated and a
warning message is displayed.
a Quick I/O file is missing and the regular
VxFS file that it is symbolically linked to is
not the original VxFS file
the Quick I/O file is not recreated and a
warning message is displayed.
a Quick I/O file is smaller than the size listed
in the mkqio.dat file
Disabling Quick I/OIf you need to disable the Quick I/O feature, you first need to convert any Quick
I/O files back to regular VxFS files. Then, remount the VxFS file system using a
special mount option.
Before disabling Quick I/O, make sure the following condition has been met:
The file system you are planning to remount must be located in the
/etc/filesystems file.
Prerequisite
Using Veritas Quick I/ODisabling Quick I/O
96

To disable Quick I/O
1 If the database is running, shut it down.
2 To change Quick I/O files back to regular VxFS files, run the following
command from the directory containing the mkqio.dat list:
$ /opt/VRTSdbed/bin/qio_convertdbfiles -u
The list of Quick I/O files in the mkqio.dat file is displayed. For example:
.file1::cdev:vxfs: --> file1
.file2::cdev:vxfs: --> file2
.file3::cdev:vxfs: --> file3
.file4::cdev:vxfs: --> file4
.file5::cdev:vxfs: --> file5
The qio_convertdbfiles command with the undo option (-u) renames the
files from .filename to filename and removes the symbolic link to .filename
that was created along with the Quick I/O files.
3 To remount the file system with Quick I/O disabled, use the mount -o noqio
command as follows:
# /opt/VRTS/bin/mount -F vxfs -o remount,noqio /mount_point
97Using Veritas Quick I/ODisabling Quick I/O

Using Veritas Quick I/ODisabling Quick I/O
98
Using Veritas CachedQuick
I/O
This chapter includes the following topics:
■ About Cached Quick I/O
■ Enabling Cached Quick I/O on a file system
■ Determining candidates for Cached Quick I/O
■ Enabling and disabling Cached Quick I/O for individual files
About Cached Quick I/OVeritas Cached Quick I/O maintains and extends the database performance benefits
of Veritas Quick I/O by making more efficient use of large, unused system memory
through a selective buffering mechanism. Cached Quick I/O also supports features
that support buffering behavior, such as file system read-ahead.
How Cached Quick I/O works
Cached Quick I/O is a specialized external caching mechanism specifically suitable
to 32-bit ports of the Oracle server. Cached Quick I/O can be used on 64-bit ports
of the Oracle server, but the benefits are not as great. Cached Quick I/O can be
selectively applied to datafiles that are suffering an undesirable amount of physical
disk I/O due to insufficient Oracle System Global Area (SGA). Cached Quick I/O
works by taking advantage of the available physical memory that is left over after
the operating system reserves the amount it needs and the Oracle SGA disk block
buffers cache has been sized to the maximum capacity allowed within a 32-bit
virtual address space. This extra memory serves as a cache to store file data,
effectively serving as a second-level cache backing the SGA.
5Chapter
For example, consider a system configured with 12GB of physical memory, an
operating system using 1GB, and a total Oracle size of 3.5GB. Unless you have
other applications running on your system, the remaining 7.5GB of memory is
unused. If you enable Cached Quick I/O, these remaining 7.5GB become available
for caching database files.
Note: You cannot allocate specific amounts of the available memory to Cached
Quick I/O. When enabled, Cached Quick I/O takes advantage of available memory.
Cached Quick I/O is not beneficial for all files in a database. Turning on caching
for all database files can degrade performance due to extra memory management
overhead (double buffer copying). You must use file I/O statistics to determine
which individual database files benefit from caching, and then enable or disable
Cached Quick I/O for individual files.
If you understand the applications that generate load on your database and how
this load changes at different times during the day, you can use Cached Quick I/O
to maximize performance. By enabling or disabling Cached Quick I/O on a per-file
basis at different times during the day, you are using Cached Quick I/O to
dynamically tune the performance of a database.
For example, files that store historical data are not generally used during normal
business hours in a transaction processing environment. Reports that make use
of this historical data are generally run during off-peak hours when interactive
database use is at a minimum. During normal business hours, you can disable
Cached Quick I/O for database files that store historical data in order to maximize
memory available to other user applications. Then, during off-peak hours, you
can enable Cached Quick I/O on the same files when they are used for report
generation. This will provide extra memory resources to the database server
without changing any database configuration parameters. Enabling file system
read-ahead in this manner and buffering read data can provide great performance
benefits, especially in large sequential scans.
You can automate the enabling and disabling of Cached Quick I/O on a per-file
basis using scripts, allowing the same job that produces reports to tune the file
system behavior and make the best use of system resources. You can specify
different sets of files for different jobs to maximize file system and database
performance.
How Cached Quick I/O improves database performance
Enabling Cached Quick I/O on suitable Quick I/O files improves database
performance by using the file system buffer cache to store data. This data storage
Using Veritas Cached Quick I/OAbout Cached Quick I/O
100
speeds up system reads by accessing the system buffer cache and avoiding disk
I/O when searching for information.
Having data at the cache level improves database performance in the following
ways:
■ For read operations, Cached Quick I/O caches database blocks in the system
buffer cache, which can reduce the number of physical I/O operations and
therefore improve read performance.
■ For write operations, Cached Quick I/O uses a direct-write, copy-behind
technique to preserve its buffer copy of the data. After the direct I/O is
scheduled and while it is waiting for the completion of the I/O, the file system
updates its buffer to reflect the changed data being written out. For online
transaction processing, Cached Quick I/O achieves better than raw device
performance in database throughput on large platforms with very large
physical memories.
■ For sequential table scans, Cached Quick I/O can significantly reduce the query
response time because of the read-ahead algorithm used by Veritas File System.
If a user needs to read the same range in the file while the data is still in cache,
the system is likely to return an immediate cache hit rather than scan for data
on the disk.
How to set up Cached Quick I/O
To set up and use Cached Quick I/O, you should do the following in the order in
which they are listed:
■ Enable Cached Quick I/O on the underlying file systems used for your database.
■ Exercise the system in your production environment to generate file I/O
statistics.
■ Collect the file I/O statistics while the files are in use.
■ Analyze the file I/O statistics to determine which files benefit from Cached
Quick I/O.
■ Disable Cached Quick I/O on files that do not benefit from caching.
Enabling Cached Quick I/O on a file systemCached Quick I/O depends on Veritas Quick I/O running as an underlying system
enhancement in order to function correctly. Follow the procedures listed here to
ensure that you have the correct setup to use Cached Quick I/O successfully.
101Using Veritas Cached Quick I/OEnabling Cached Quick I/O on a file system
■ You must have permission to change file system behavior using
the vxtunefs command to enable or disable Cached Quick I/O.
By default, you need superuser (root) permissions to run the
vxtunefs command, but other system users do not. Superuser
(root) must specifically grant database administrators permission
to use this command as follows:
# chown root:dba /opt/VRTS/bin/vxtunefs
# chmod 4550 /opt/VRTS/bin/vxtunefs
where users belonging to the dba group are granted permission
to run the vxtunefs command. We recommend this selective,
more secure approach for granting access to powerful commands.
■ You must enable Quick I/O on the file system. Quick I/O is enabled
automatically at file system mount time.
If you have correctly enabled Quick I/O on your system, you can
proceed to enable Cached Quick I/O as follows:
■ Set the file system Cached Quick I/O flag, which enables Cached
Quick I/O for all files in the file system.
■ Setting the file system Cached Quick I/O flag enables caching for
all files in the file system. You must disable Cached Quick I/O on
individual Quick I/O files that do not benefit from caching to avoid
consuming memory unnecessarily. This final task occurs at the
end of the enabling process.
Prerequisites
■ Do not enable Cached Quick I/O if Oracle is using Oracle Disk
Manager.
Usage notes
Enabling and disabling the qio_cache_enable flag
As superuser (root), set the qio_cache_enable flag using the vxtunefs command
after you mount the file system.
To enable the qio_cache_enable flag for a file system
◆ Use the vxtunefs command as follows:
# /opt/VRTS/bin/vxtunefs -s -o qio_cache_enable=1 /mount_point
For example:
# /opt/VRTS/bin/vxtunefs -s -o qio_cache_enable=1 /db02
where /db02 is a VxFS file system containing the Quick I/O files and setting
the qio_cache_enable flag to “1” enables Cached Quick I/O. This command
enables caching for all the Quick I/O files on this file system.
Using Veritas Cached Quick I/OEnabling Cached Quick I/O on a file system
102

To disable the flag on the same file system
◆ Use the vxtunefs command as follows:
# /opt/VRTS/bin/vxtunefs -s -o qio_cache_enable=0 /mount_point
For example:
# /opt/VRTS/bin/vxtunefs -s -o qio_cache_enable=0 /db02
where /db02 is a VxFS file system containing the Quick I/O files and setting
the qio_cache_enable flag to “0” disables Cached Quick I/O. This command
disables caching for all the Quick I/O files on this file system.
MakingCachedQuick I/O settings persistent across reboots andmounts
You can make the Cached Quick I/O system setting persistent across reboots and
mounts by adding a file system entry in the /etc/vx/tunefstab file.
Note: The tunefstab file is a user-created file. For information on how to create
the file and add tuning parameters, see the tunefstab (4) manual page.
To enable a file system after rebooting
◆ Put the file system in the /etc/vx/tunefstab file and set the flag entry:
/dev/vx/dsk/dgname/volname qio_cache_enable=1
where:
■ /dev/vx/dsk/dgname/volname is the name of a block device
■ dgname is the name of the disk group
■ volname is the name of the volume
For example:
/dev/vx/dsk/PRODdg/db01 qio_cache_enable=1
/dev/vx/dsk/PRODdg/db02 qio_cache_enable=1
where/dev/vx/dsk/PRODdg/db01 is the block device on which the file system
resides.
The tunefstab (4) manual pages contain information on how to add tuning
parameters.
See the tunefstab (4) manual page.
103Using Veritas Cached Quick I/OEnabling Cached Quick I/O on a file system
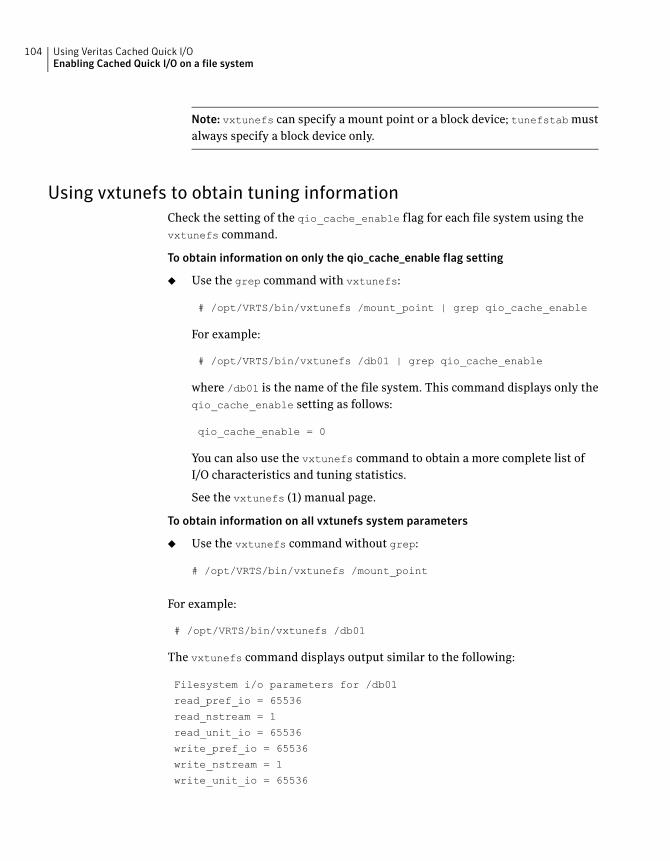
Note: vxtunefs can specify a mount point or a block device; tunefstab must
always specify a block device only.
Using vxtunefs to obtain tuning information
Check the setting of the qio_cache_enable flag for each file system using the
vxtunefs command.
To obtain information on only the qio_cache_enable flag setting
◆ Use the grep command with vxtunefs:
# /opt/VRTS/bin/vxtunefs /mount_point | grep qio_cache_enable
For example:
# /opt/VRTS/bin/vxtunefs /db01 | grep qio_cache_enable
where /db01 is the name of the file system. This command displays only the
qio_cache_enable setting as follows:
qio_cache_enable = 0
You can also use the vxtunefs command to obtain a more complete list of
I/O characteristics and tuning statistics.
See the vxtunefs (1) manual page.
To obtain information on all vxtunefs system parameters
◆ Use the vxtunefs command without grep:
# /opt/VRTS/bin/vxtunefs /mount_point
For example:
# /opt/VRTS/bin/vxtunefs /db01
The vxtunefs command displays output similar to the following:
Filesystem i/o parameters for /db01
read_pref_io = 65536
read_nstream = 1
read_unit_io = 65536
write_pref_io = 65536
write_nstream = 1
write_unit_io = 65536
Using Veritas Cached Quick I/OEnabling Cached Quick I/O on a file system
104
pref_strength = 10
buf_breakup_size = 1048576
discovered_direct_iosz = 262144
max_direct_iosz = 1048576
default_indir_size = 8192
qio_cache_enable = 1
write_throttle = 0
max_diskq = 1048576
initial_extent_size = 8
max_seqio_extent_size = 2048
max_buf_data_size = 8192
hsm_write_prealloc = 0
read_ahead = 1
inode_aging_size = 0
inode_aging_count = 0
fcl_maxalloc = 130150400
fcl_keeptime = 0
fcl_winterval = 3600
The vxtunefs(1) manual pages contain a complete description of vxtunefs
parameters and the tuning instructions.
See the vxtunefs(1) manual page.
Determining candidates for Cached Quick I/ODetermining which files can benefit from Cached Quick I/O is an iterative process
that varies with each application. For this reason, you may need to complete the
following steps more than once to determine the best possible candidates for
Cached Quick I/O.
Before determining candidate files for Quick I/O, make sure the following
conditions have been met:
■ You must enable Cached Quick I/O for the file systems.
See “Enabling Cached Quick I/O on a file system” on page 101.
Prerequisites
■ See the qiostat (1M) manual page for more information.Usage notes
Collecting I/O statistics
Once you have enabled Cached Quick I/O on a file system, you need to collect
statistics to determine and designate the files that can best take advantage of its
benefits.
105Using Veritas Cached Quick I/ODetermining candidates for Cached Quick I/O
To collect statistics needed to determine files that benefit from Cached Quick I/O
1 Reset the qiostat counters by entering:
$ /opt/VRTS/bin/qiostat -r /mount_point/filenames
2 Run the database under full normal load and through a complete cycle (24 to
48 hours in most cases) to determine your system I/O patterns and database
traffic in different usage categories (for example, OLTP, reports, and backups)
at different times of the day.
3 While the database is running, run qiostat -l to report the caching statistics
as follows:
$ /opt/VRTS/bin/qiostat -l /mount_point/filenames
or, use the -i option to see statistic reports at specified intervals:
$ /opt/VRTS/bin/qiostat -i n /mount_point/filenames
where n is time in seconds
For example:
To collect I/O statistics from all database files on file system /db01:
$ /opt/VRTS/bin/qiostat -l /db01/*.dbf
About I/O statistics
The output of the qiostat command is the primary source of information to use
in deciding whether to enable or disable Cached Quick I/O on specific files.
Statistics are printed in two lines per object.
The second line of information is defined as follows:
■ CREAD is the number of reads from the VxFS cache (or total number of reads
to Quick I/O files with cache advisory on)
■ PREAD is the number of reads going to the disk for Quick I/O files with the cache
advisory on
■ HIT RATIO is displayed as a percentage and is the number of CREADS minus
the number of PREADS times 100 divided by the total number of CREADS. The
formula looks like this:
(CREADs - PREADs) * 100/ CREADs
The qiostat -l command output looks similar to the following:
Using Veritas Cached Quick I/ODetermining candidates for Cached Quick I/O
106
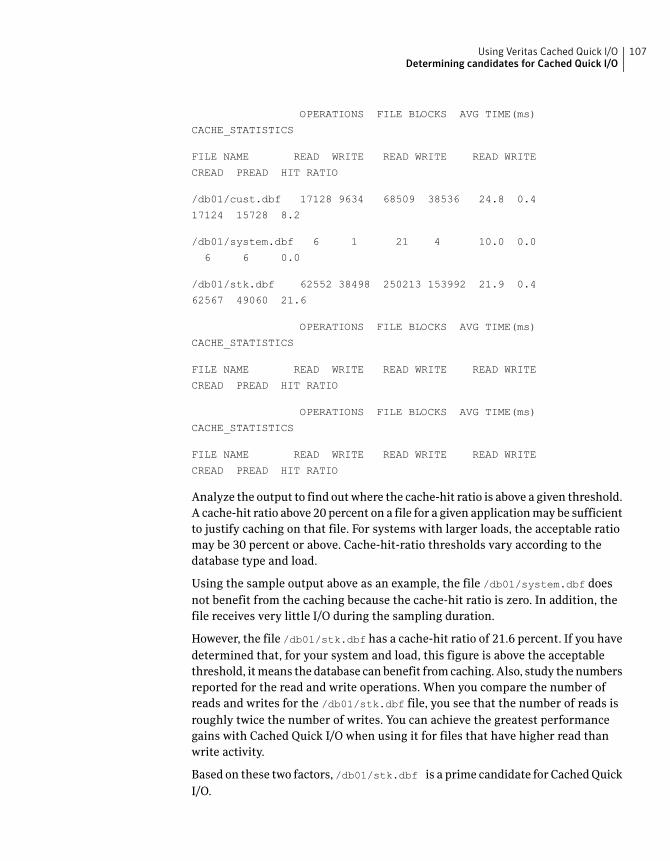
OPERATIONS FILE BLOCKS AVG TIME(ms)
CACHE_STATISTICS
FILE NAME READ WRITE READ WRITE READ WRITE
CREAD PREAD HIT RATIO
/db01/cust.dbf 17128 9634 68509 38536 24.8 0.4
17124 15728 8.2
/db01/system.dbf 6 1 21 4 10.0 0.0
6 6 0.0
/db01/stk.dbf 62552 38498 250213 153992 21.9 0.4
62567 49060 21.6
OPERATIONS FILE BLOCKS AVG TIME(ms)
CACHE_STATISTICS
FILE NAME READ WRITE READ WRITE READ WRITE
CREAD PREAD HIT RATIO
OPERATIONS FILE BLOCKS AVG TIME(ms)
CACHE_STATISTICS
FILE NAME READ WRITE READ WRITE READ WRITE
CREAD PREAD HIT RATIO
Analyze the output to find out where the cache-hit ratio is above a given threshold.
A cache-hit ratio above 20 percent on a file for a given application may be sufficient
to justify caching on that file. For systems with larger loads, the acceptable ratio
may be 30 percent or above. Cache-hit-ratio thresholds vary according to the
database type and load.
Using the sample output above as an example, the file /db01/system.dbf does
not benefit from the caching because the cache-hit ratio is zero. In addition, the
file receives very little I/O during the sampling duration.
However, the file /db01/stk.dbf has a cache-hit ratio of 21.6 percent. If you have
determined that, for your system and load, this figure is above the acceptable
threshold, it means the database can benefit from caching. Also, study the numbers
reported for the read and write operations. When you compare the number of
reads and writes for the /db01/stk.dbf file, you see that the number of reads is
roughly twice the number of writes. You can achieve the greatest performance
gains with Cached Quick I/O when using it for files that have higher read than
write activity.
Based on these two factors, /db01/stk.dbf is a prime candidate for Cached Quick
I/O.
107Using Veritas Cached Quick I/ODetermining candidates for Cached Quick I/O
See “Enabling and disabling Cached Quick I/O for individual files” on page 108.
Effects of read-aheads on I/O statistics
The number of CREADs in the qiostat output is the total number of reads
performed, including Cached Quick I/O, and the number of PREADs is the number
of physical reads. The difference between CREADs and PREADs (CREADS - PREADS) is
the number of reads satisfied from the data in the file system cache. Thus, you
expect that the number of PREADs would always be equal to or lower than the
number of CREADs.
However, the PREADs counter also increases when the file system performs
read-aheads. These read-aheads occur when the file system detects sequential
reads. In isolated cases where cache hits are extremely low, the output from
qiostat could show that the number of CREADs is lower than the number of PREADs.
The cache-hit ratio calculated against these CREAD/PREAD values is misleading
when used to determine whether Cached Quick I/O should be enabled or disabled.
Under these circumstances, you can make a more accurate decision based on a
collective set of statistics by gathering multiple sets of data points. Consequently,
you might want to enable Cached Quick I/O for all the data files in a given
tablespace, even if just one of the files exhibited a high cache-hit ratio.
Other tools for analysis
While the output of the qiostat command is the primary source of information
to use in deciding whether to enable Cached Quick I/O on specific files, we also
recommend using other tools in conjunction with qiostat. For example,
benchmarking software that measures database throughput is also helpful. If a
benchmark test in which Cached Quick I/O was enabled for a certain set of data
files resulted in improved performance, you can also use those results as the basis
for enabling Cached Quick I/O.
Enabling anddisablingCachedQuick I/O for individualfiles
After using qiostat or other analysis tools to determine the appropriate files for
Cached Quick I/O, you need to disable Cached Quick I/O for those individual files
that do not benefit from caching using the qioadmin command.
■ Enable Cached Quick I/O for the file system before enabling or
disabling Cached Quick I/O at the individual file level.
Prerequisites
Using Veritas Cached Quick I/OEnabling and disabling Cached Quick I/O for individual files
108
■ You can enable or disable Cached Quick I/O for individual files
while the database is online.
■ You should monitor files regularly using qiostat to ensure that
a file's cache-hit ratio has not changed enough to reconsider
enabling or disabling Cached Quick I/O for the file.
■ Enabling or disabling Cached Quick I/O for an individual file is also
referred to as setting the cache advisory on or off.
■ See the qioadmin (1) manual page.
Usage notes
Setting cache advisories for individual files
You can enable and disable Cached Quick I/O for individual files by changing the
cache advisory settings for those files.
To disable Cached Quick I/O for an individual file
◆ Use the qioadmin command to set the cache advisory to OFF as follows:
$ /opt/VRTS/bin/qioadmin -S filename=OFF /mount_point
For example, to disable Cached Quick I/O for the file /db01/system.dbf, set
the cache advisory to OFF:
$ /opt/VRTS/bin/qioadmin -S system.dbf=OFF /db01
To enable Cached Quick I/O for an individual file
◆ Use the qioadmin command to set the cache advisory to ON as follows:
$ /opt/VRTS/bin/qioadmin -S filename=ON /mount_point
For example, running qiostatshows the cache hit ratio for the file
/db01/system.dbfreaches a level that would benefit from caching. To enable
Cached Quick I/O for the file /db01/system.dbf, set the cache advisory to
ON:
$ /opt/VRTS/bin/qioadmin -S system.dbf=ON /db01
Making individual file settings for Cached Quick I/O persistent
You can make the enable or disable individual file settings for Cached Quick I/O
persistent across reboots and mounts by adding cache advisory entries in the
/etc/vx/qioadmin file.
Cache advisories set using theqioadmin command are stored as extended attributes
of the file in the inode. These settings persist across file system remounts and
109Using Veritas Cached Quick I/OEnabling and disabling Cached Quick I/O for individual files
system reboots, but these attributes are not backed up by the usual backup
methods, so they cannot be restored. Therefore, always be sure to reset cache
advisories after each file restore. This is not necessary if you maintain the cache
advisories for Quick I/O files in the /etc/vx/qioadmin file.
To enable or disable individual file settings for Cached Quick I/O automatically
after a reboot or mount
◆ Add cache advisory entries in the /etc/vx/qioadmin file as follows:
device=/dev/vx/dsk/<diskgroup>/<volume>
filename,OFF
filename,OFF
filename,OFF
filename,ON
For example, to make the Cached Quick I/O settings for individual files in the
/db01 file system persistent, edit the /etc/vx/qioadmin file similar to the
following:
#
# List of files to cache in /db01 file system
#
device=/dev/vx/dsk/PRODdg/db01
cust.dbf,OFF
system.dbf,OFF
stk.dbf,ON
Determining individual file settings for Cached Quick I/O usingqioadmin
You can determine whether Cached Quick I/O is enabled or disabled for individual
files by displaying the file's cache advisory setting using the qioadmin command.
Note: To verify caching, always check the setting of the flag qio_cache_enable
using vxtunefs, along with the individual cache advisories for each file.
Using Veritas Cached Quick I/OEnabling and disabling Cached Quick I/O for individual files
110
To display the current cache advisory settings for a file
◆ Use the qioadmin command with the -P option as follows:
$ /opt/VRTS/bin/qioadmin -P filename /mount_point
For example, to display the current cache advisory setting for the file
cust.dbfin the /db01file system:
$ /opt/VRTS/bin/qioadmin -P cust.dbf /db01
cust.dbf,OFF
111Using Veritas Cached Quick I/OEnabling and disabling Cached Quick I/O for individual files

Using Veritas Cached Quick I/OEnabling and disabling Cached Quick I/O for individual files
112
Using Veritas Concurrent
I/O
This chapter includes the following topics:
■ About Concurrent I/O
■ Enabling and disabling Concurrent I/O
About Concurrent I/OVeritas Concurrent I/O improves the performance of regular files on a VxFS file
system without the need for extending namespaces and presenting the files as
devices. This simplifies administrative tasks and allows databases, which do not
have a sequential read/write requirement, to access files concurrently. This chapter
describes how to use the Concurrent I/O feature.
Quick I/O is still an alternative solution for DMS tablespaces.
See “About Quick I/O” on page 73.
In some cases (for example, if the system has extra memory), Cached Quick I/O
may further enhance performance.
See “About Cached Quick I/O” on page 99.
If you are using Oracle 8 and do not need file-level tunable caching, you should
use the Concurrent I/O feature. You should use Quick I/O or Cached Quick I/O if
you need file-level tunable caching on Oracle 8. If you are using Oracle9 or Oracle
10, we recommend that you use Veritas Extension for Oracle Disk Manager.
6Chapter
How Concurrent I/O works
Traditionally, UNIX semantics require that read and write operations on a file
occur in a serialized order. Because of this, a file system must enforce strict
ordering of overlapping read and write operations. However, databases do not
usually require this level of control and implement concurrency control internally,
without using a file system for order enforcement.
The Veritas Concurrent I/O feature removes these semantics from the read and
write operations for databases and other applications that do not require
serialization.
The benefits of using Concurrent I/O are:
■ Concurrency between a single writer and multiple readers
■ Concurrency among multiple writers
■ Minimalization of serialization for extending writes
■ All I/Os are direct and do not use file system caching
■ I/O requests are sent directly to file systems
■ Inode locking is avoided
■ Concurrent I/O can be used for control files, temporary datafiles, and archive
logs
Oracle's filesystemio_options parameter
In Oracle9 Release 2 (9.2), you can use the filesystemio_optionsinit.ora
parameter to enable or disable asynchronous I/O, direct I/O, or Concurrent I/O
on file system files. This parameter is used on files that reside in JFS or JFS2 file
systems only. This parameter is not applicable to VxFS files, ODM files, or Quick
I/O files.
See your Oracle documentation for more details.
Enabling and disabling Concurrent I/OConcurrent I/O is not turned on by default and must be enabled manually. You
will also have to manually disable Concurrent I/O if you choose not to use it in
the future.
Using Veritas Concurrent I/OEnabling and disabling Concurrent I/O
114
Enabling Concurrent I/O
Because you do not need to extend name spaces and present the files as devices,
you can enable Concurrent I/O on regular files.
Before enabling Concurrent I/O, make sure the following conditions have been
met:
■ To use the Concurrent I/O feature, the file system must be a VxFS file
system.
■ Make sure the mount point on which you plan to mount the file system
exists.
■ Make sure the DBA can access the mount point.
Prerequisites
■ When a file system is mounted with the Concurrent I/O option, do not
enable ODM. If you try to enable ODM on a file system mounted with the
Concurrent I/O option, you will get an error message similar to the
following:
ORA-600: internal error code, arguments: [ksfd_odmopn2].
■ If Quick I/O is available and a file system is mounted with the Concurrent
I/O option, do not enable Quick I/O. (Quick I/O is not available on Linux.)
Oracle will not be able to open the Quick I/O files and the instance start
up will fail. If you try to enable Quick I/O on a file system mounted with
the Concurrent I/O option, you will receive an error message similar to
the following:
ORA-01157: can not identify/lock datafile filename -see DBWR \ trace file
ORA-01110: datafile filename:'/path_name/qio.f'
■ If the Quick I/O feature is availabe, do not use any Quick I/O tools if the
database is using Concurrent I/O.
■ See the (1M) manual page for more information about mount settings.
Usage notes
To enable Concurrent I/O on a file system using mount with the -o cio option
◆ Mount the file system using the mountcommand as follows:
# /usr/sbin/mount -F vxfs -o cio special /mount_point
where:
■ special is a block special device
■ /mount_point is the directory where the file system will be mounted.
115Using Veritas Concurrent I/OEnabling and disabling Concurrent I/O
For example, to mount a file system named /datavolon a mount point named
/oradata:
Disabling Concurrent I/O
If you need to disable Concurrent I/O, unmount the VxFS file system and mount
it again without the mount option.
To disable Concurrent I/O on a file system using the mount command
1 Shutdown the Oracle instance.
2 Unmount the file sytem using the umount command.
3 Mount the file system again using the mount command without using the -o
cio option.
Using Veritas Concurrent I/OEnabling and disabling Concurrent I/O
116
Using Veritas Extension for
Oracle Disk Manager
This chapter includes the following topics:
■ About Oracle Disk Manager
■ About Oracle Disk Manager and Oracle Managed Files
■ Setting up Veritas extension for Oracle Disk Manager
■ How to prepare existing database storage for Oracle Disk Manager
■ Converting Quick I/O files to Oracle Disk Manager files
■ Verifying that Oracle Disk Manager is configured
■ Disabling the Oracle Disk Manager feature
About Oracle Disk ManagerVeritas Extension for Oracle Disk Manager is specifically designed for Oracle9i
or later to enhance file management and disk I/O throughput. The features of
Oracle Disk Manager are best suited for databases that reside in a file system
contained in Veritas File System. Oracle Disk Manager allows Oracle9i or later
users to improve database throughput for I/O intensive workloads with special
I/O optimization.
Veritas Extension for Oracle Disk Manager supports Oracle Resilvering. With
Oracle Resilvering, the storage layer receives information from the Oracle database
as to which regions or blocks of a mirrored datafile to resync after a system crash.
When using Oracle Resilvering, you can turn off VxVM Dirty Region Logging
(DRL), which increases performance.
7Chapter
Oracle Disk Manager reduces administrative overhead by providing enhanced
support for Oracle Managed Files. Veritas Extension for Oracle Disk Manager has
Quick I/O-like capabilities, but is transparent to the user. Unlike Veritas Quick
I/O, files managed using Veritas Extension for Oracle Disk Manager do not require
special file naming conventions. The Oracle Disk Manager interface uses regular
database files. With Oracle9i or later, you can access both Oracle Disk Manager
and Quick I/O files so you have the option to convert or not to convert your old
Quick I/O files.
Database administrators can choose the datafile type used with the Oracle product.
Historically, choosing between file system files and raw devices was based on
manageability and performance. The exception to this is a database intended for
use with Oracle Parallel Server, which requires raw devices on most platforms. If
performance is not as important as administrative ease, file system files are
typically the preferred file type. However, while an application may not have
substantial I/O requirements when it is first implemented, I/O requirements may
change. If an application becomes dependent upon I/O throughput, converting
datafiles from file system to raw devices is often necessary.
Oracle Disk Manager was designed to work with Oracle9i or later to provide both
performance and manageability. Oracle Disk Manager provides support for Oracle's
file management and I/O calls for database storage on VxFS file systems and on
raw volumes or partitions. This feature is provided as a dynamically-loaded shared
library with which Oracle binds when it is loaded. The Oracle Disk Manager library
works with an Oracle Disk Manager driver that is loaded in the kernel to perform
its functions.
If you are upgrading to Oracle9i or later, you should convert from Quick I/O to
Oracle Disk Manager.
The benefits of using Oracle Disk Manager are:
■ True kernel asynchronous I/O for files and raw devices
■ Reduced system call overhead
■ Improved file system layout by preallocating contiguous files on a VxFS file
system
■ Performance on file system files that is equivalent to raw devices
■ Transparent to users
■ Contiguous datafile allocation
How Oracle Disk Manager improves database performance
Oracle Disk Manager improves database I/O performance to VxFS file systems
by:
Using Veritas Extension for Oracle Disk ManagerAbout Oracle Disk Manager
118

■ Supporting kernel asynchronous I/O
■ Supporting direct I/O and avoiding double buffering
■ Avoiding kernel write locks on database files
■ Supporting many concurrent I/Os in one system call
■ Avoiding duplicate opening of files per Oracle instance
■ Allocating contiguous datafiles
About kernel asynchronous I/O support
Asynchronous I/O performs non-blocking system level reads and writes, allowing
the system to perform multiple I/O requests simultaneously. Kernel asynchronous
I/O is better than library asynchronous I/O because the I/O is queued to the disk
device drivers in the kernel, minimizing context switches to accomplish the work.
About direct I/O support and avoiding double buffering
I/O on files using read() and write() system calls typically results in data being
copied twice: once between the user and kernel space, and the other between
kernel space and the disk. In contrast, I/O on raw devices is copied directly between
user space and disk, saving one level of copying. As with I/O on raw devices, Oracle
Disk Manager I/O avoids the extra copying. Oracle Disk Manager bypasses the
system cache and accesses the files with the same efficiency as raw devices.
Avoiding double buffering reduces the memory overhead on the system.
Eliminating the copies from kernel to user address space significantly reduces
kernel mode processor utilization freeing more processor cycles to execute the
application code.
About avoiding kernel write locks on database files
When database I/O is performed by way of the write() system call, each system
call acquires and releases a kernel write lock on the file. This lock prevents
simultaneous write operations on the same file. Because database systems usually
implement their own locks for managing concurrent access to files, write locks
unnecessarily serialize I/O writes. Oracle Disk Manager bypasses file system
locking and lets the database server control data access.
About supporting many concurrent I/Os in one system call
When performing asynchronous I/O, an Oracle process may try to issue additional
I/O requests while collecting completed I/Os, or it may try to wait for particular
I/O requests synchronously, as it can do no other work until the I/O is completed.
The Oracle process may also try to issue requests to different files. All this activity
119Using Veritas Extension for Oracle Disk ManagerAbout Oracle Disk Manager
can be accomplished with one system call when Oracle uses the Oracle Disk
Manager I/O interface. This interface reduces the number of system calls
performed to accomplish the same work, reducing the number of user space/kernel
space context switches.
About avoiding duplicate file opens
Oracle Disk Manager allows files to be opened once, providing a “file identifier.”
This is called “identifying” the files. The same file identifiers can be used by any
other processes in the Oracle instance. The file status is maintained by the Oracle
Disk Manager driver in the kernel. The reduction in file open calls reduces
processing overhead at process initialization and termination, and it reduces the
number of file status structures required in the kernel.
About allocating contiguous datafiles
Oracle Disk Manager can improve performance for queries, such as sort and
parallel queries, that use temporary tablespaces. Without Oracle Disk Manager,
Oracle does not initialize the datafiles for the temporary tablespaces. Therefore,
the datafiles become sparse files and are generally fragmented. Sparse or
fragmented files lead to poor query performance. When using Oracle Disk Manager,
the datafiles are initialized for the temporary tablespaces and are allocated in a
contiguous fashion, so that they are not sparse.
AboutOracle DiskManager andOracleManaged FilesOracle9i or later offers a feature known as Oracle Managed Files (OMF). OMF
manages datafile attributes such as file names, file location, storage attributes,
and whether or not the file is in use by the database. OMF is only supported for
databases that reside in file systems. OMF functionality is greatly enhanced by
Oracle Disk Manager.
The main requirement for OMF is that the database be placed in file system files.
There are additional prerequisites imposed upon the file system itself.
OMF is a file management feature that:
■ Eliminates the task of providing unique file names
■ Offers dynamic space management by way of the tablespace auto-extend
functionality of Oracle9i or later
OMF should only be used in file systems that reside within striped logical volumes,
which support dynamic file system growth. File systems intended for OMF use
must also support large, extensible files in order to facilitate tablespace
auto-extension. Raw partitions cannot be used for OMF.
Using Veritas Extension for Oracle Disk ManagerAbout Oracle Disk Manager and Oracle Managed Files
120
By default, OMF datafiles are created with auto-extend capability. This attribute
reduces capacity planning associated with maintaining existing databases and
implementing new applications. Due to disk fragmentation that occurs as the
tablespace grows over time, database administrators have been somewhat cautious
when considering auto-extensible tablespaces. Oracle Disk Manager eliminates
this concern.
When Oracle Disk Manager is used in conjunction with OMF, special care is given
within Veritas Extension for Disk Manager to ensure that contiguous disk space
is allocated to datafiles, including space allocated to a tablespace when it is
auto-extended. The table and index scan throughput does not decay as the
tablespace grows.
How Oracle Disk Manager works with Oracle Managed Files
The following example illustrates the relationship between Oracle Disk Manager
and OMF.
Note:Before building an OMF database, you need the appropriate init.oradefault
values. These values control the location of the SYSTEM tablespace, online redo
logs, and control files after the CREATE DATABASE statement is executed.
This example shows the init.ora contents and the command for starting the
database instance. To simplify Oracle UNDO management, the new Oracle9i or
later init.ora parameter UNDO_MANAGEMENT is set to AUTO. This is known as
System-Managed Undo.
$ cat initPROD.ora
UNDO_MANAGEMENT = AUTO
DB_CREATE_FILE_DEST = '/PROD'
DB_CREATE_ONLINE_LOG_DEST_1 = '/PROD'
db_block_size = 4096
db_name = PROD
$ sqlplus /nolog
SQL> connect / as sysdba
SQL> startup nomount pfile= initPROD.ora
The Oracle instance starts.
Total System Global Area 93094616 bytes
Fixed Size 279256 bytes
Variable Size 41943040 bytes
Database Buffers 50331648 bytes
Redo Buffers 540672 bytes
121Using Veritas Extension for Oracle Disk ManagerAbout Oracle Disk Manager and Oracle Managed Files
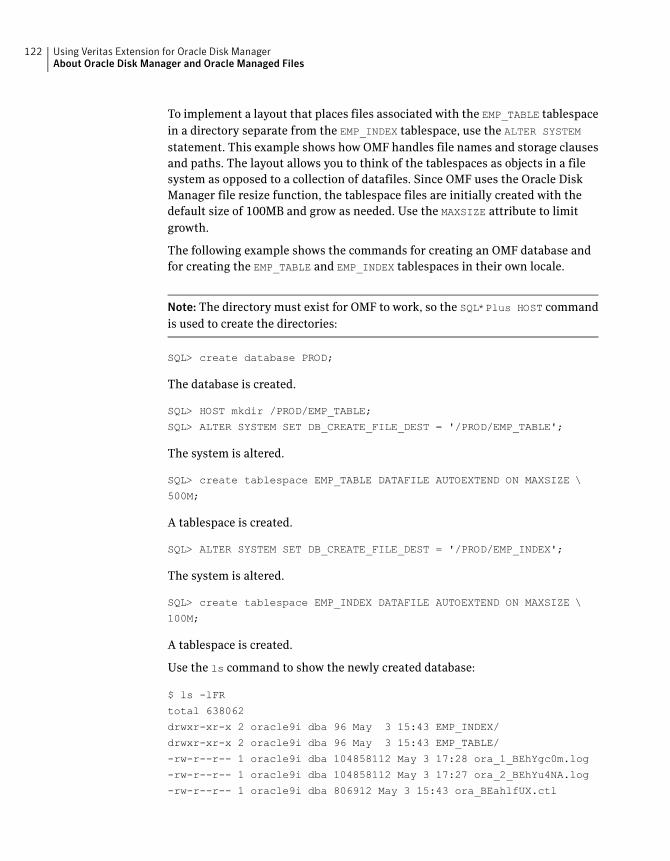
To implement a layout that places files associated with the EMP_TABLE tablespace
in a directory separate from the EMP_INDEX tablespace, use the ALTER SYSTEM
statement. This example shows how OMF handles file names and storage clauses
and paths. The layout allows you to think of the tablespaces as objects in a file
system as opposed to a collection of datafiles. Since OMF uses the Oracle Disk
Manager file resize function, the tablespace files are initially created with the
default size of 100MB and grow as needed. Use the MAXSIZE attribute to limit
growth.
The following example shows the commands for creating an OMF database and
for creating the EMP_TABLE and EMP_INDEX tablespaces in their own locale.
Note: The directory must exist for OMF to work, so the SQL*Plus HOST command
is used to create the directories:
SQL> create database PROD;
The database is created.
SQL> HOST mkdir /PROD/EMP_TABLE;
SQL> ALTER SYSTEM SET DB_CREATE_FILE_DEST = '/PROD/EMP_TABLE';
The system is altered.
SQL> create tablespace EMP_TABLE DATAFILE AUTOEXTEND ON MAXSIZE \
500M;
A tablespace is created.
SQL> ALTER SYSTEM SET DB_CREATE_FILE_DEST = '/PROD/EMP_INDEX';
The system is altered.
SQL> create tablespace EMP_INDEX DATAFILE AUTOEXTEND ON MAXSIZE \
100M;
A tablespace is created.
Use the ls command to show the newly created database:
$ ls -lFR
total 638062
drwxr-xr-x 2 oracle9i dba 96 May 3 15:43 EMP_INDEX/
drwxr-xr-x 2 oracle9i dba 96 May 3 15:43 EMP_TABLE/
-rw-r--r-- 1 oracle9i dba 104858112 May 3 17:28 ora_1_BEhYgc0m.log
-rw-r--r-- 1 oracle9i dba 104858112 May 3 17:27 ora_2_BEhYu4NA.log
-rw-r--r-- 1 oracle9i dba 806912 May 3 15:43 ora_BEahlfUX.ctl
Using Veritas Extension for Oracle Disk ManagerAbout Oracle Disk Manager and Oracle Managed Files
122
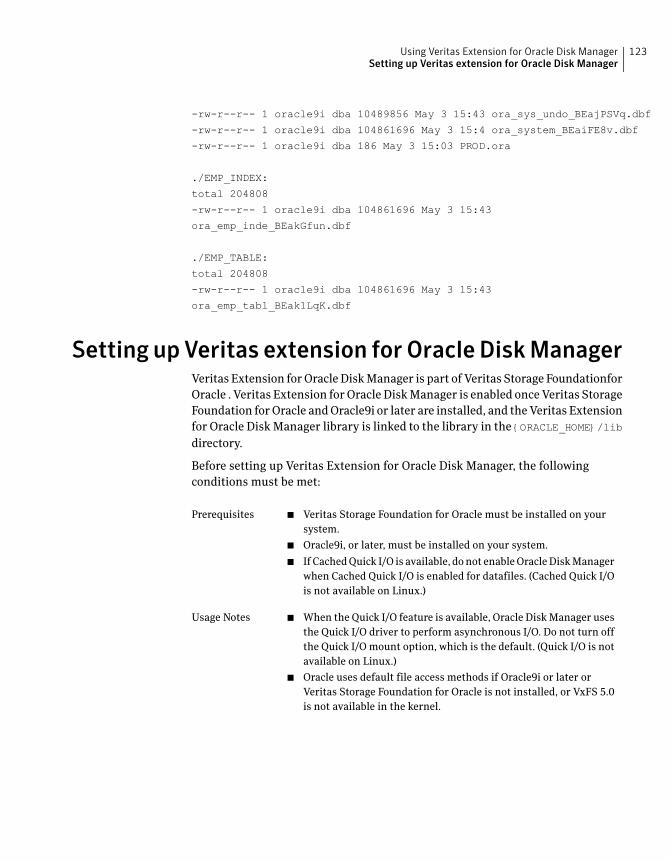
-rw-r--r-- 1 oracle9i dba 10489856 May 3 15:43 ora_sys_undo_BEajPSVq.dbf
-rw-r--r-- 1 oracle9i dba 104861696 May 3 15:4 ora_system_BEaiFE8v.dbf
-rw-r--r-- 1 oracle9i dba 186 May 3 15:03 PROD.ora
./EMP_INDEX:
total 204808
-rw-r--r-- 1 oracle9i dba 104861696 May 3 15:43
ora_emp_inde_BEakGfun.dbf
./EMP_TABLE:
total 204808
-rw-r--r-- 1 oracle9i dba 104861696 May 3 15:43
ora_emp_tabl_BEak1LqK.dbf
Setting up Veritas extension for Oracle DiskManagerVeritas Extension for Oracle Disk Manager is part of Veritas Storage Foundationfor
Oracle . Veritas Extension for Oracle Disk Manager is enabled once Veritas Storage
Foundation for Oracle and Oracle9i or later are installed, and the Veritas Extension
for Oracle Disk Manager library is linked to the library in the {ORACLE_HOME}/lib
directory.
Before setting up Veritas Extension for Oracle Disk Manager, the following
conditions must be met:
■ Veritas Storage Foundation for Oracle must be installed on your
system.
■ Oracle9i, or later, must be installed on your system.
■ If Cached Quick I/O is available, do not enable Oracle Disk Manager
when Cached Quick I/O is enabled for datafiles. (Cached Quick I/O
is not available on Linux.)
Prerequisites
■ When the Quick I/O feature is available, Oracle Disk Manager uses
the Quick I/O driver to perform asynchronous I/O. Do not turn off
the Quick I/O mount option, which is the default. (Quick I/O is not
available on Linux.)
■ Oracle uses default file access methods if Oracle9i or later or
Veritas Storage Foundation for Oracle is not installed, or VxFS 5.0
is not available in the kernel.
Usage Notes
123Using Veritas Extension for Oracle Disk ManagerSetting up Veritas extension for Oracle Disk Manager
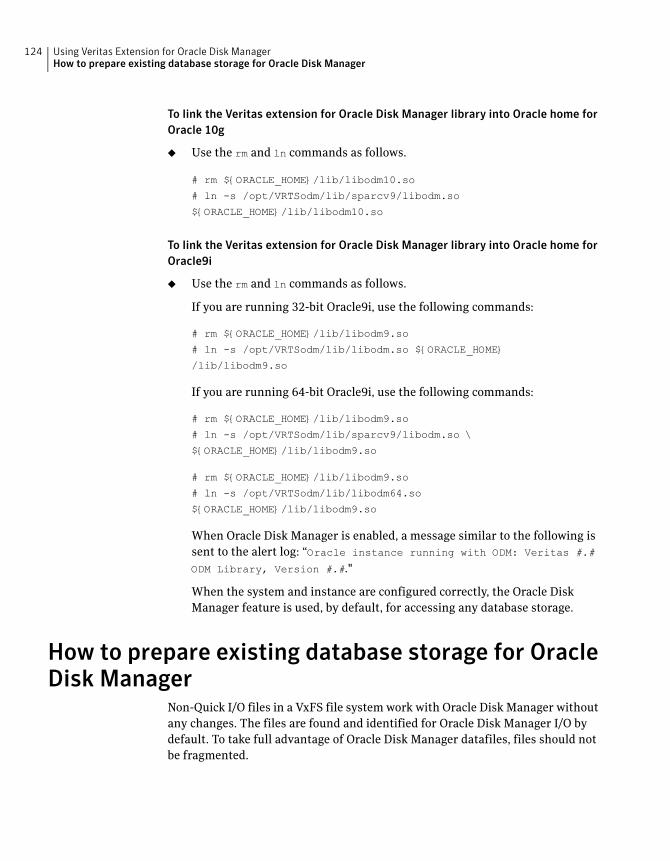
To link the Veritas extension for Oracle Disk Manager library into Oracle home for
Oracle 10g
◆ Use the rm and ln commands as follows.
# rm ${ORACLE_HOME}/lib/libodm10.so
# ln -s /opt/VRTSodm/lib/sparcv9/libodm.so
${ORACLE_HOME}/lib/libodm10.so
To link the Veritas extension for Oracle Disk Manager library into Oracle home for
Oracle9i
◆ Use the rm and ln commands as follows.
If you are running 32-bit Oracle9i, use the following commands:
# rm ${ORACLE_HOME}/lib/libodm9.so
# ln -s /opt/VRTSodm/lib/libodm.so ${ORACLE_HOME}
/lib/libodm9.so
If you are running 64-bit Oracle9i, use the following commands:
# rm ${ORACLE_HOME}/lib/libodm9.so
# ln -s /opt/VRTSodm/lib/sparcv9/libodm.so \
${ORACLE_HOME}/lib/libodm9.so
# rm ${ORACLE_HOME}/lib/libodm9.so
# ln -s /opt/VRTSodm/lib/libodm64.so
${ORACLE_HOME}/lib/libodm9.so
When Oracle Disk Manager is enabled, a message similar to the following is
sent to the alert log: “Oracle instance running with ODM: Veritas #.#
ODM Library, Version #.#."
When the system and instance are configured correctly, the Oracle Disk
Manager feature is used, by default, for accessing any database storage.
How to prepare existing database storage for OracleDisk Manager
Non-Quick I/O files in a VxFS file system work with Oracle Disk Manager without
any changes. The files are found and identified for Oracle Disk Manager I/O by
default. To take full advantage of Oracle Disk Manager datafiles, files should not
be fragmented.
Using Veritas Extension for Oracle Disk ManagerHow to prepare existing database storage for Oracle Disk Manager
124
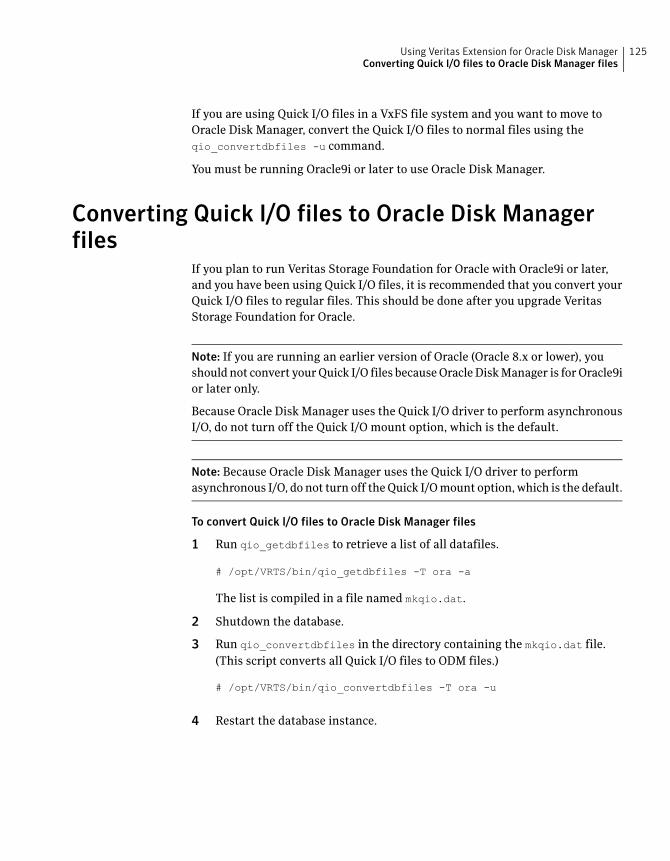
If you are using Quick I/O files in a VxFS file system and you want to move to
Oracle Disk Manager, convert the Quick I/O files to normal files using the
qio_convertdbfiles -u command.
You must be running Oracle9i or later to use Oracle Disk Manager.
Converting Quick I/O files to Oracle Disk Managerfiles
If you plan to run Veritas Storage Foundation for Oracle with Oracle9i or later,
and you have been using Quick I/O files, it is recommended that you convert your
Quick I/O files to regular files. This should be done after you upgrade Veritas
Storage Foundation for Oracle.
Note: If you are running an earlier version of Oracle (Oracle 8.x or lower), you
should not convert your Quick I/O files because Oracle Disk Manager is for Oracle9i
or later only.
Because Oracle Disk Manager uses the Quick I/O driver to perform asynchronous
I/O, do not turn off the Quick I/O mount option, which is the default.
Note: Because Oracle Disk Manager uses the Quick I/O driver to perform
asynchronous I/O, do not turn off the Quick I/O mount option, which is the default.
To convert Quick I/O files to Oracle Disk Manager files
1 Run qio_getdbfiles to retrieve a list of all datafiles.
# /opt/VRTS/bin/qio_getdbfiles -T ora -a
The list is compiled in a file named mkqio.dat.
2 Shutdown the database.
3 Run qio_convertdbfiles in the directory containing the mkqio.dat file.
(This script converts all Quick I/O files to ODM files.)
# /opt/VRTS/bin/qio_convertdbfiles -T ora -u
4 Restart the database instance.
125Using Veritas Extension for Oracle Disk ManagerConverting Quick I/O files to Oracle Disk Manager files
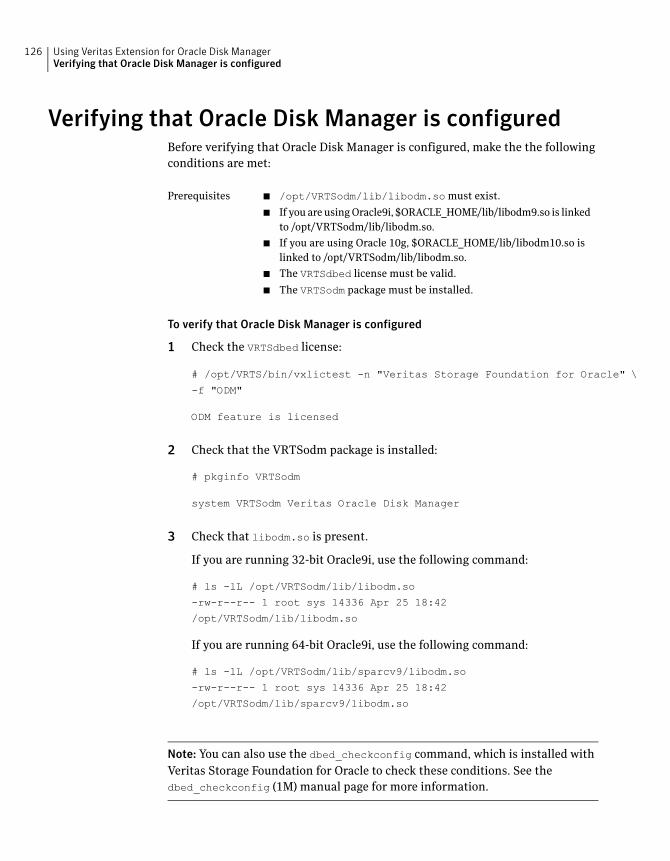
Verifying that Oracle Disk Manager is configuredBefore verifying that Oracle Disk Manager is configured, make the the following
conditions are met:
■ /opt/VRTSodm/lib/libodm.so must exist.
■ If you are using Oracle9i, $ORACLE_HOME/lib/libodm9.so is linked
to /opt/VRTSodm/lib/libodm.so.
■ If you are using Oracle 10g, $ORACLE_HOME/lib/libodm10.so is
linked to /opt/VRTSodm/lib/libodm.so.
■ The VRTSdbed license must be valid.
■ The VRTSodm package must be installed.
Prerequisites
To verify that Oracle Disk Manager is configured
1 Check the VRTSdbed license:
# /opt/VRTS/bin/vxlictest -n "Veritas Storage Foundation for Oracle" \
-f "ODM"
ODM feature is licensed
2 Check that the VRTSodm package is installed:
# pkginfo VRTSodm
system VRTSodm Veritas Oracle Disk Manager
3 Check that libodm.so is present.
If you are running 32-bit Oracle9i, use the following command:
# ls -lL /opt/VRTSodm/lib/libodm.so
-rw-r--r-- 1 root sys 14336 Apr 25 18:42
/opt/VRTSodm/lib/libodm.so
If you are running 64-bit Oracle9i, use the following command:
# ls -lL /opt/VRTSodm/lib/sparcv9/libodm.so
-rw-r--r-- 1 root sys 14336 Apr 25 18:42
/opt/VRTSodm/lib/sparcv9/libodm.so
Note: You can also use the dbed_checkconfig command, which is installed with
Veritas Storage Foundation for Oracle to check these conditions. See the
dbed_checkconfig (1M) manual page for more information.
Using Veritas Extension for Oracle Disk ManagerVerifying that Oracle Disk Manager is configured
126
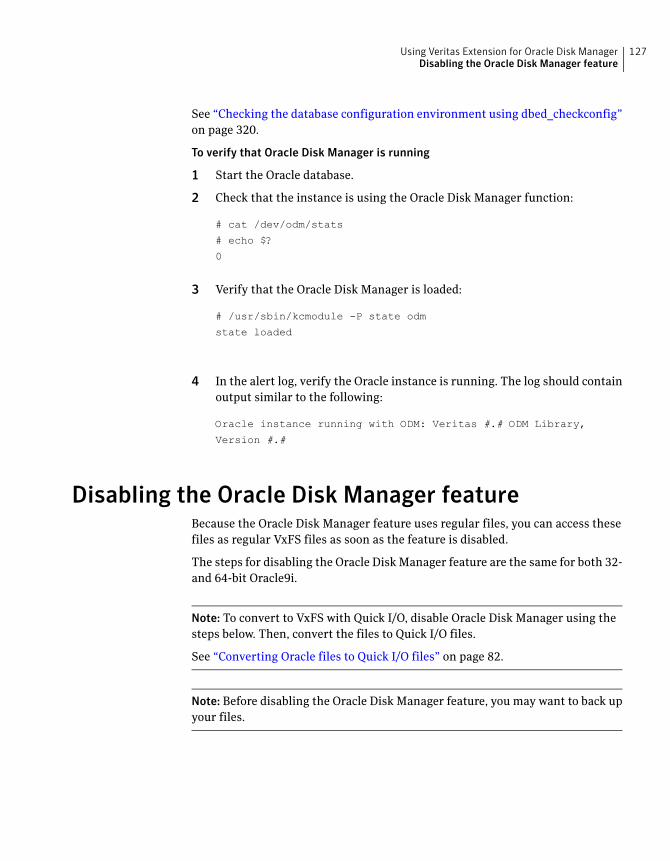
See “Checking the database configuration environment using dbed_checkconfig”
on page 320.
To verify that Oracle Disk Manager is running
1 Start the Oracle database.
2 Check that the instance is using the Oracle Disk Manager function:
# cat /dev/odm/stats
# echo $?
0
3 Verify that the Oracle Disk Manager is loaded:
# /usr/sbin/kcmodule -P state odm
state loaded
4 In the alert log, verify the Oracle instance is running. The log should contain
output similar to the following:
Oracle instance running with ODM: Veritas #.# ODM Library,
Version #.#
Disabling the Oracle Disk Manager featureBecause the Oracle Disk Manager feature uses regular files, you can access these
files as regular VxFS files as soon as the feature is disabled.
The steps for disabling the Oracle Disk Manager feature are the same for both 32-
and 64-bit Oracle9i.
Note: To convert to VxFS with Quick I/O, disable Oracle Disk Manager using the
steps below. Then, convert the files to Quick I/O files.
See “Converting Oracle files to Quick I/O files” on page 82.
Note: Before disabling the Oracle Disk Manager feature, you may want to back up
your files.
127Using Veritas Extension for Oracle Disk ManagerDisabling the Oracle Disk Manager feature
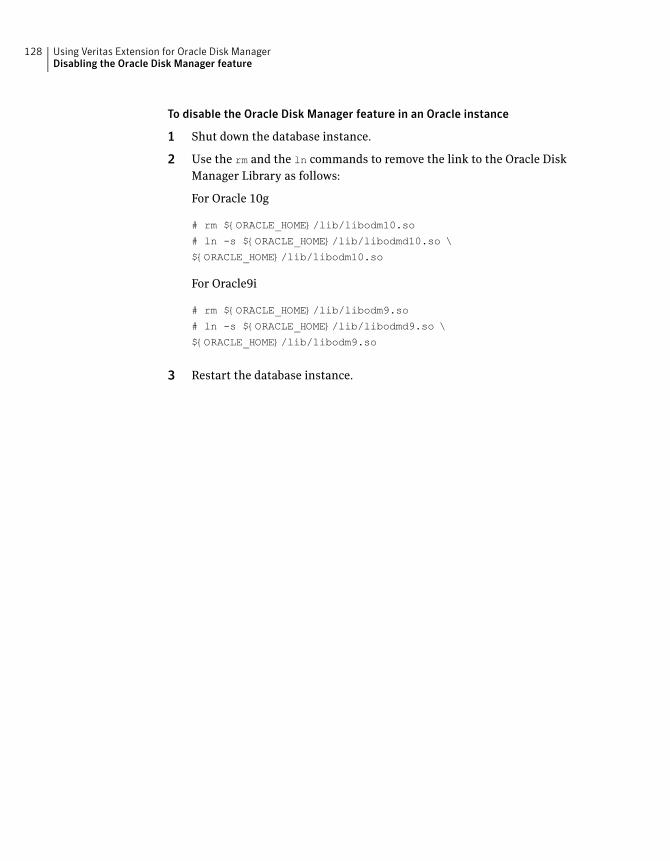
To disable the Oracle Disk Manager feature in an Oracle instance
1 Shut down the database instance.
2 Use the rm and the ln commands to remove the link to the Oracle Disk
Manager Library as follows:
For Oracle 10g
# rm ${ORACLE_HOME}/lib/libodm10.so
# ln -s ${ORACLE_HOME}/lib/libodmd10.so \
${ORACLE_HOME}/lib/libodm10.so
For Oracle9i
# rm ${ORACLE_HOME}/lib/libodm9.so
# ln -s ${ORACLE_HOME}/lib/libodmd9.so \
${ORACLE_HOME}/lib/libodm9.so
3 Restart the database instance.
Using Veritas Extension for Oracle Disk ManagerDisabling the Oracle Disk Manager feature
128
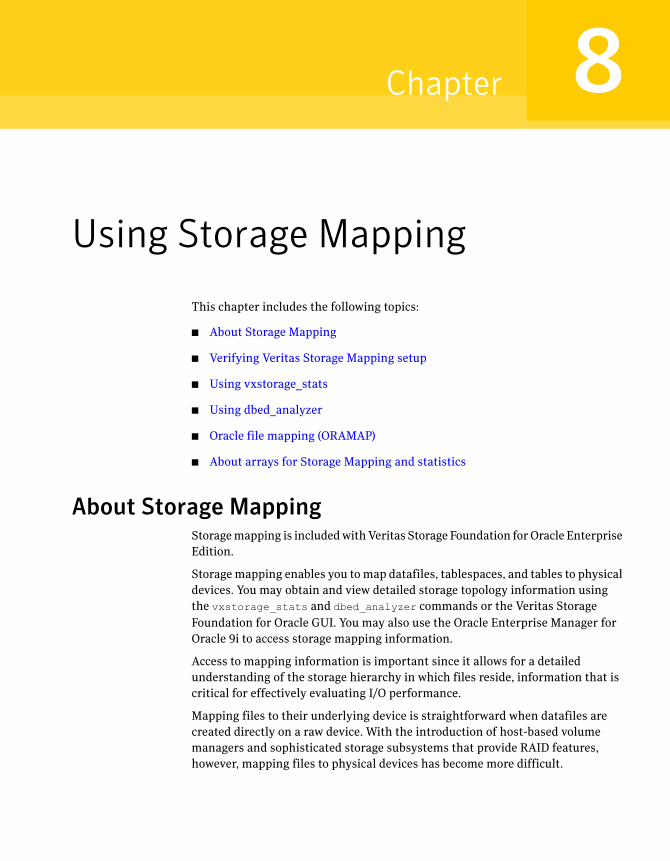
Using Storage Mapping
This chapter includes the following topics:
■ About Storage Mapping
■ Verifying Veritas Storage Mapping setup
■ Using vxstorage_stats
■ Using dbed_analyzer
■ Oracle file mapping (ORAMAP)
■ About arrays for Storage Mapping and statistics
About Storage MappingStorage mapping is included with Veritas Storage Foundation for Oracle Enterprise
Edition.
Storage mapping enables you to map datafiles, tablespaces, and tables to physical
devices. You may obtain and view detailed storage topology information using
the vxstorage_stats and dbed_analyzer commands or the Veritas Storage
Foundation for Oracle GUI. You may also use the Oracle Enterprise Manager for
Oracle 9i to access storage mapping information.
Access to mapping information is important since it allows for a detailed
understanding of the storage hierarchy in which files reside, information that is
critical for effectively evaluating I/O performance.
Mapping files to their underlying device is straightforward when datafiles are
created directly on a raw device. With the introduction of host-based volume
managers and sophisticated storage subsystems that provide RAID features,
however, mapping files to physical devices has become more difficult.
8Chapter
With the Veritas Storage Foundation for Oracle Storage Mapping option, you can
map datafiles to physical devices. Veritas Storage Mapping relies on Veritas
Mapping Service (VxMS), a library that assists in the development of distributed
SAN applications that must share information about the physical location of files
and volumes on a disk.
The Veritas Storage Mapping option supports Oracle's set of storage APIs called
Oracle Mapping (“ORAMAP” for short) that lets Oracle determine the mapping
information for files and devices.
Oracle provides a set of dynamic performance views (V$ views) that shows the
complete mapping of a file to intermediate layers of logical volumes and physical
devices. These views enable you to locate the exact disk on which any specific
block of a file resides. You can use these mappings, along with device statistics,
to evaluate I/O performance.
The Veritas Storage Foundation for Oracle Storage Mapping option supports a
wide range of storage devices and allows for “deep mapping” into EMC, Hitachi,
and IBM Enterprise Storage Server (“Shark”) arrays. Deep mapping information
identifies the physical disks that comprise each LUN and the hardware RAID
information for the LUNs.
You can view storage mapping topology information and I/O statistics using:
■ The vxstorage_stats command. This command displays the complete I/O
topology mapping of specific datafiles through intermediate layers like logical
volumes down to actual physical devices.
■ The dbed_analyzer command. This command retrieves tablespace-to-physical
and table-to-physical disk mapping information for all the datafiles in a
specified database. It also provides information about the amount of disk space
being used by a tablespace.
■ Veritas Storage Foundation for Oracle GUI. The Veritas Storage Foundation
for Oracle performs file mapping and displays both storage mapping topology
information and I/O statistics.
In addition, you can also use the Oracle Enterprise Manager GUI to display storage
mapping information after file mapping has occurred. Oracle Enterprise Manager
does not display I/O statistics information. Unlike the information displayed in
the Veritas Storage Foundation for Oracle GUI, the information displayed in Oracle
Enterprise Manager may be “stale,” that is, it may not be the latest information.
Note: For Solaris users, if you use Veritas FlashSnap Agent for Symmetrix, you
cannot use the mapping functionality for non-Symmetrix arrays.
Using Storage MappingAbout Storage Mapping
130
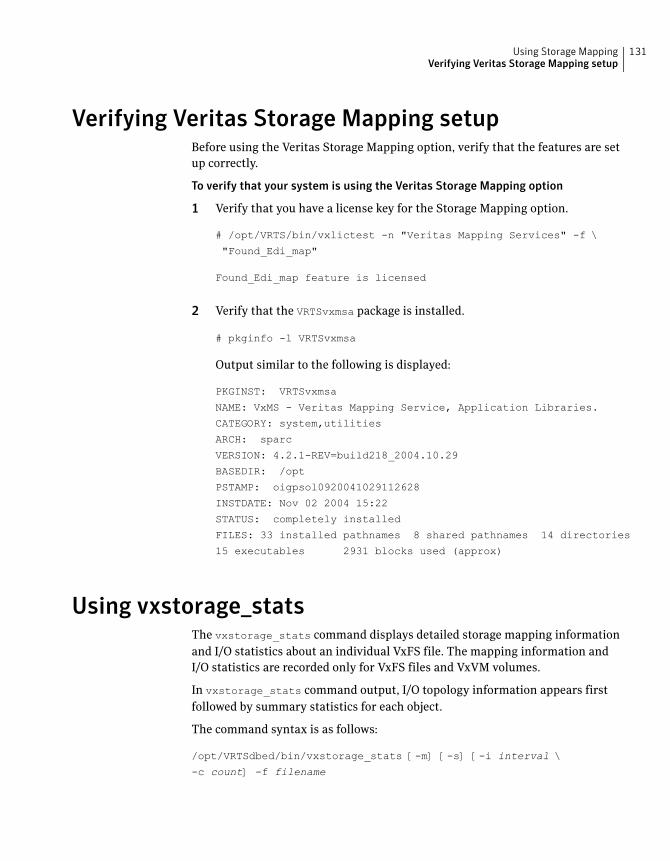
Verifying Veritas Storage Mapping setupBefore using the Veritas Storage Mapping option, verify that the features are set
up correctly.
To verify that your system is using the Veritas Storage Mapping option
1 Verify that you have a license key for the Storage Mapping option.
# /opt/VRTS/bin/vxlictest -n "Veritas Mapping Services" -f \
"Found_Edi_map"
Found_Edi_map feature is licensed
2 Verify that the VRTSvxmsa package is installed.
# pkginfo -l VRTSvxmsa
Output similar to the following is displayed:
PKGINST: VRTSvxmsa
NAME: VxMS - Veritas Mapping Service, Application Libraries.
CATEGORY: system,utilities
ARCH: sparc
VERSION: 4.2.1-REV=build218_2004.10.29
BASEDIR: /opt
PSTAMP: oigpsol0920041029112628
INSTDATE: Nov 02 2004 15:22
STATUS: completely installed
FILES: 33 installed pathnames 8 shared pathnames 14 directories
15 executables 2931 blocks used (approx)
Using vxstorage_statsThe vxstorage_stats command displays detailed storage mapping information
and I/O statistics about an individual VxFS file. The mapping information and
I/O statistics are recorded only for VxFS files and VxVM volumes.
In vxstorage_stats command output, I/O topology information appears first
followed by summary statistics for each object.
The command syntax is as follows:
/opt/VRTSdbed/bin/vxstorage_stats [-m] [-s] [-i interval \
-c count] -f filename
131Using Storage MappingVerifying Veritas Storage Mapping setup
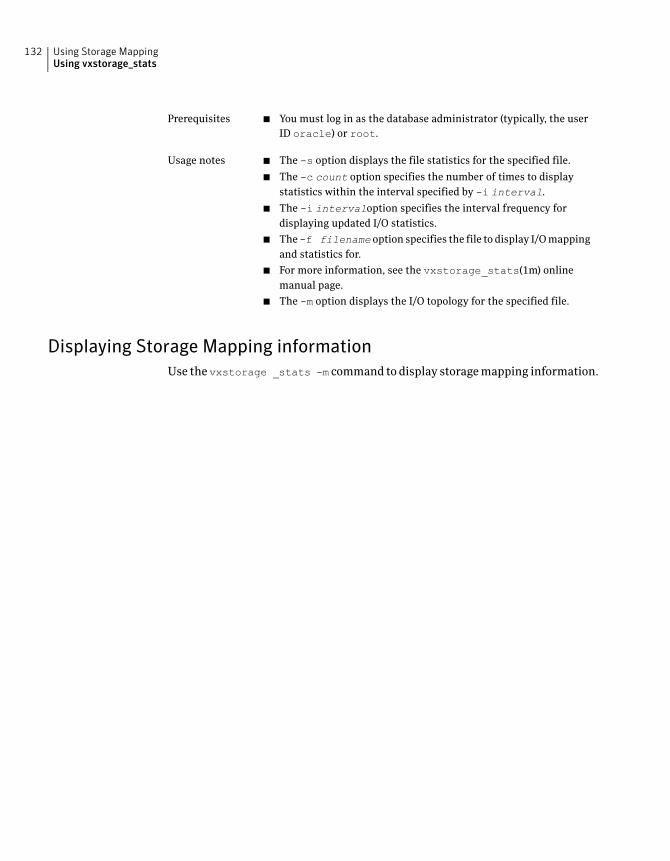
■ You must log in as the database administrator (typically, the user
ID oracle) or root.
Prerequisites
■ The -s option displays the file statistics for the specified file.
■ The -c count option specifies the number of times to display
statistics within the interval specified by -i interval.
■ The -i intervaloption specifies the interval frequency for
displaying updated I/O statistics.
■ The-f filename option specifies the file to display I/O mapping
and statistics for.
■ For more information, see the vxstorage_stats(1m) online
manual page.
■ The -m option displays the I/O topology for the specified file.
Usage notes
Displaying Storage Mapping information
Use the vxstorage _stats -m command to display storage mapping information.
Using Storage MappingUsing vxstorage_stats
132
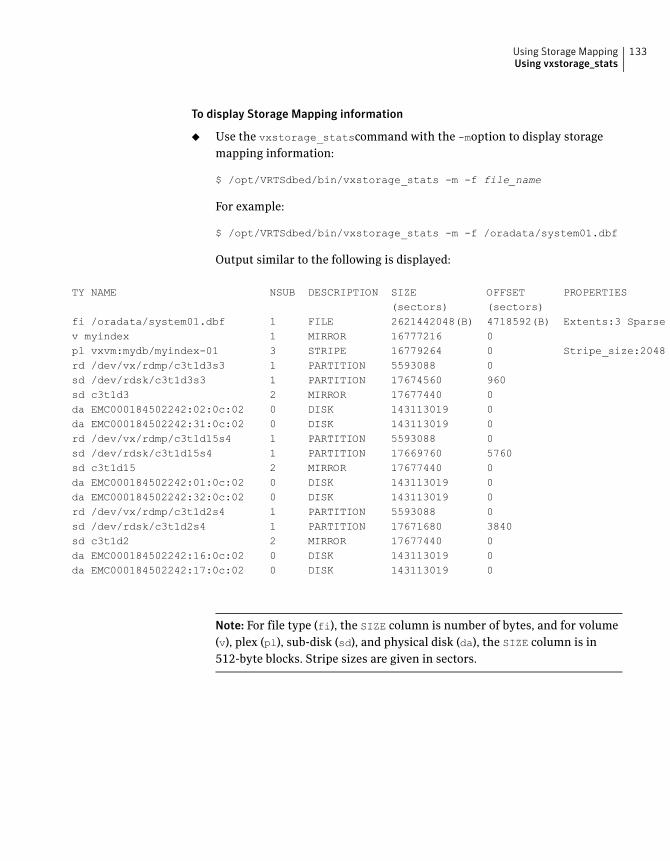
To display Storage Mapping information
◆ Use the vxstorage_statscommand with the -moption to display storage
mapping information:
$ /opt/VRTSdbed/bin/vxstorage_stats -m -f file_name
For example:
$ /opt/VRTSdbed/bin/vxstorage_stats -m -f /oradata/system01.dbf
Output similar to the following is displayed:
TY NAME NSUB DESCRIPTION SIZE OFFSET PROPERTIES(sectors) (sectors)
fi /oradata/system01.dbf 1 FILE 2621442048(B) 4718592(B) Extents:3 Sparse Extents:0v myindex 1 MIRROR 16777216 0pl vxvm:mydb/myindex-01 3 STRIPE 16779264 0 Stripe_size:2048rd /dev/vx/rdmp/c3t1d3s3 1 PARTITION 5593088 0sd /dev/rdsk/c3t1d3s3 1 PARTITION 17674560 960sd c3t1d3 2 MIRROR 17677440 0da EMC000184502242:02:0c:02 0 DISK 143113019 0da EMC000184502242:31:0c:02 0 DISK 143113019 0rd /dev/vx/rdmp/c3t1d15s4 1 PARTITION 5593088 0sd /dev/rdsk/c3t1d15s4 1 PARTITION 17669760 5760sd c3t1d15 2 MIRROR 17677440 0da EMC000184502242:01:0c:02 0 DISK 143113019 0da EMC000184502242:32:0c:02 0 DISK 143113019 0rd /dev/vx/rdmp/c3t1d2s4 1 PARTITION 5593088 0sd /dev/rdsk/c3t1d2s4 1 PARTITION 17671680 3840sd c3t1d2 2 MIRROR 17677440 0da EMC000184502242:16:0c:02 0 DISK 143113019 0da EMC000184502242:17:0c:02 0 DISK 143113019 0
Note: For file type (fi), the SIZE column is number of bytes, and for volume
(v), plex (pl), sub-disk (sd), and physical disk (da), the SIZE column is in
512-byte blocks. Stripe sizes are given in sectors.
133Using Storage MappingUsing vxstorage_stats
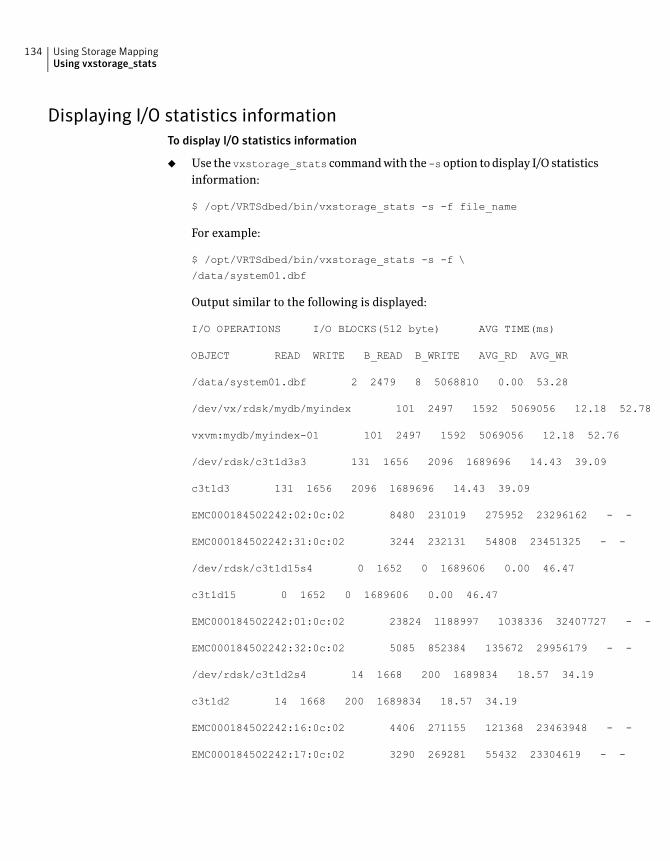
Displaying I/O statistics information
To display I/O statistics information
◆ Use the vxstorage_stats command with the -soption to display I/O statistics
information:
$ /opt/VRTSdbed/bin/vxstorage_stats -s -f file_name
For example:
$ /opt/VRTSdbed/bin/vxstorage_stats -s -f \
/data/system01.dbf
Output similar to the following is displayed:
I/O OPERATIONS I/O BLOCKS(512 byte) AVG TIME(ms)
OBJECT READ WRITE B_READ B_WRITE AVG_RD AVG_WR
/data/system01.dbf 2 2479 8 5068810 0.00 53.28
/dev/vx/rdsk/mydb/myindex 101 2497 1592 5069056 12.18 52.78
vxvm:mydb/myindex-01 101 2497 1592 5069056 12.18 52.76
/dev/rdsk/c3t1d3s3 131 1656 2096 1689696 14.43 39.09
c3t1d3 131 1656 2096 1689696 14.43 39.09
EMC000184502242:02:0c:02 8480 231019 275952 23296162 - -
EMC000184502242:31:0c:02 3244 232131 54808 23451325 - -
/dev/rdsk/c3t1d15s4 0 1652 0 1689606 0.00 46.47
c3t1d15 0 1652 0 1689606 0.00 46.47
EMC000184502242:01:0c:02 23824 1188997 1038336 32407727 - -
EMC000184502242:32:0c:02 5085 852384 135672 29956179 - -
/dev/rdsk/c3t1d2s4 14 1668 200 1689834 18.57 34.19
c3t1d2 14 1668 200 1689834 18.57 34.19
EMC000184502242:16:0c:02 4406 271155 121368 23463948 - -
EMC000184502242:17:0c:02 3290 269281 55432 23304619 - -
Using Storage MappingUsing vxstorage_stats
134
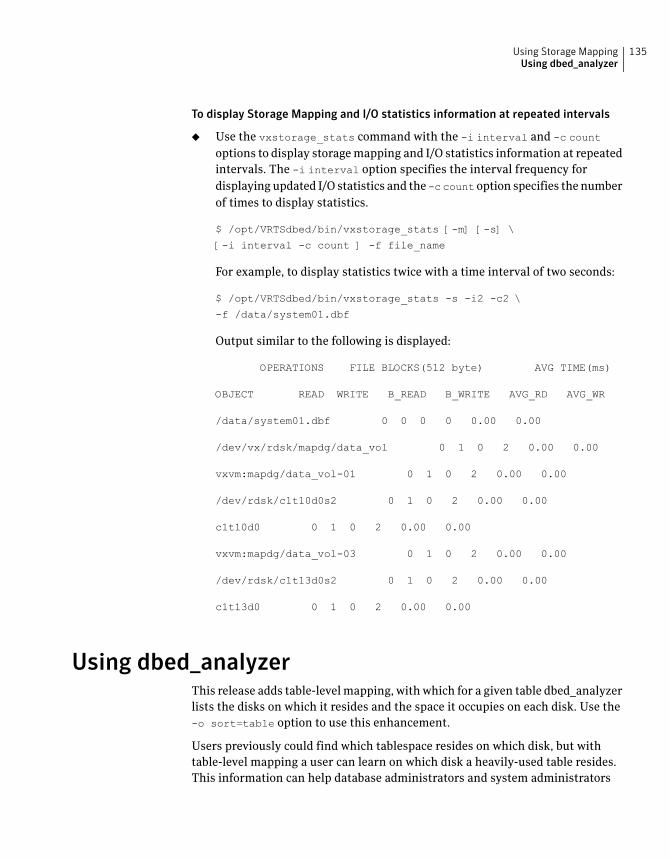
To display Storage Mapping and I/O statistics information at repeated intervals
◆ Use the vxstorage_stats command with the -i interval and -c count
options to display storage mapping and I/O statistics information at repeated
intervals. The -i interval option specifies the interval frequency for
displaying updated I/O statistics and the -c count option specifies the number
of times to display statistics.
$ /opt/VRTSdbed/bin/vxstorage_stats [-m] [-s] \
[-i interval -c count ] -f file_name
For example, to display statistics twice with a time interval of two seconds:
$ /opt/VRTSdbed/bin/vxstorage_stats -s -i2 -c2 \
-f /data/system01.dbf
Output similar to the following is displayed:
OPERATIONS FILE BLOCKS(512 byte) AVG TIME(ms)
OBJECT READ WRITE B_READ B_WRITE AVG_RD AVG_WR
/data/system01.dbf 0 0 0 0 0.00 0.00
/dev/vx/rdsk/mapdg/data_vol 0 1 0 2 0.00 0.00
vxvm:mapdg/data_vol-01 0 1 0 2 0.00 0.00
/dev/rdsk/c1t10d0s2 0 1 0 2 0.00 0.00
c1t10d0 0 1 0 2 0.00 0.00
vxvm:mapdg/data_vol-03 0 1 0 2 0.00 0.00
/dev/rdsk/c1t13d0s2 0 1 0 2 0.00 0.00
c1t13d0 0 1 0 2 0.00 0.00
Using dbed_analyzerThis release adds table-level mapping, with which for a given table dbed_analyzer
lists the disks on which it resides and the space it occupies on each disk. Use the
-o sort=table option to use this enhancement.
Users previously could find which tablespace resides on which disk, but with
table-level mapping a user can learn on which disk a heavily-used table resides.
This information can help database administrators and system administrators
135Using Storage MappingUsing dbed_analyzer
determine the allocation of storage, to assess backup priorities for the disk, and
to identify performance bottlenecks.
Effectively performing a parallel backup requires an understanding of which
tablespaces and tables reside on which disks. If two tablespaces or two tables
reside on the same disk, for example, backing them up in parallel will not reduce
their downtime.
The dbed_analyzer command provides tablespace-to-physical and
table-to-physical disk mapping information for all the datafiles in a specified
tablespace, list of tablespaces, or an entire database. (In contrast, the
vxstorage_stats command provides this information on a per-file basis only.)
In addition, dbed_analyzer provides information about the amount of disk space
they are using.
■ You must log in as the database administrator (typically, the user
ID oracle).
Prerequisites
■ The -o sort=tbs option provides the layout of the specified
tablespaces on the physical disk as well as the amount of disk space
they are using.
■ The -o sort=disk option provides the name of the disks
containing the specified tablespaces as well as the amount of disk
space the tablespaces are using.
■ The -o sort=table option identifies the disk and the space
occupied on it by the specified table or list of tables.
■ The -f filename option specifies the name of a file containing
a list of the tables, tablespaces ro disk names for which to obtain
mapping information.
■ The -t option specifies the name of a specified tablespace (when
used with -o mode=tbs) or table (when used with -omode=table) for which to obtain mapping information.
■ If -f filename or -t tablespace is not specified then all the
tablespaces in the database will be analyzed.
■ For more information, see thedbed_analyzer(1M) online manual
page.
Usage notes
Using Storage MappingUsing dbed_analyzer
136

Obtaining Storage Mapping information for a list of tablespaces
To obtain Storage Mapping information sorted by tablespace
137Using Storage MappingUsing dbed_analyzer
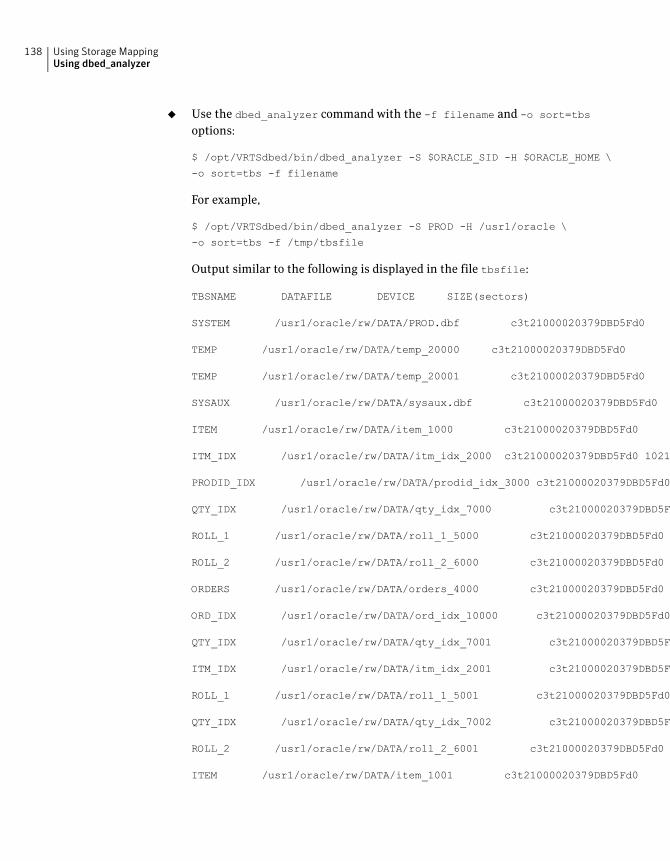
◆ Use the dbed_analyzer command with the -f filename and -o sort=tbs
options:
$ /opt/VRTSdbed/bin/dbed_analyzer -S $ORACLE_SID -H $ORACLE_HOME \
-o sort=tbs -f filename
For example,
$ /opt/VRTSdbed/bin/dbed_analyzer -S PROD -H /usr1/oracle \
-o sort=tbs -f /tmp/tbsfile
Output similar to the following is displayed in the file tbsfile:
TBSNAME DATAFILE DEVICE SIZE(sectors)
SYSTEM /usr1/oracle/rw/DATA/PROD.dbf c3t21000020379DBD5Fd0 819216
TEMP /usr1/oracle/rw/DATA/temp_20000 c3t21000020379DBD5Fd0 1021968
TEMP /usr1/oracle/rw/DATA/temp_20001 c3t21000020379DBD5Fd0 2048016
SYSAUX /usr1/oracle/rw/DATA/sysaux.dbf c3t21000020379DBD5Fd0 819216
ITEM /usr1/oracle/rw/DATA/item_1000 c3t21000020379DBD5Fd0 1021968
ITM_IDX /usr1/oracle/rw/DATA/itm_idx_2000 c3t21000020379DBD5Fd0 1021968
PRODID_IDX /usr1/oracle/rw/DATA/prodid_idx_3000 c3t21000020379DBD5Fd0 1021968
QTY_IDX /usr1/oracle/rw/DATA/qty_idx_7000 c3t21000020379DBD5Fd0 1021968
ROLL_1 /usr1/oracle/rw/DATA/roll_1_5000 c3t21000020379DBD5Fd0 1021968
ROLL_2 /usr1/oracle/rw/DATA/roll_2_6000 c3t21000020379DBD5Fd0 1021968
ORDERS /usr1/oracle/rw/DATA/orders_4000 c3t21000020379DBD5Fd0 1021968
ORD_IDX /usr1/oracle/rw/DATA/ord_idx_10000 c3t21000020379DBD5Fd0 1021968
QTY_IDX /usr1/oracle/rw/DATA/qty_idx_7001 c3t21000020379DBD5Fd0 1024016
ITM_IDX /usr1/oracle/rw/DATA/itm_idx_2001 c3t21000020379DBD5Fd0 1024016
ROLL_1 /usr1/oracle/rw/DATA/roll_1_5001 c3t21000020379DBD5Fd0 1024016
QTY_IDX /usr1/oracle/rw/DATA/qty_idx_7002 c3t21000020379DBD5Fd0 1024016
ROLL_2 /usr1/oracle/rw/DATA/roll_2_6001 c3t21000020379DBD5Fd0 1024016
ITEM /usr1/oracle/rw/DATA/item_1001 c3t21000020379DBD5Fd0 4096016
Using Storage MappingUsing dbed_analyzer
138

To obtain Storage Mapping information sorted by disk
139Using Storage MappingUsing dbed_analyzer
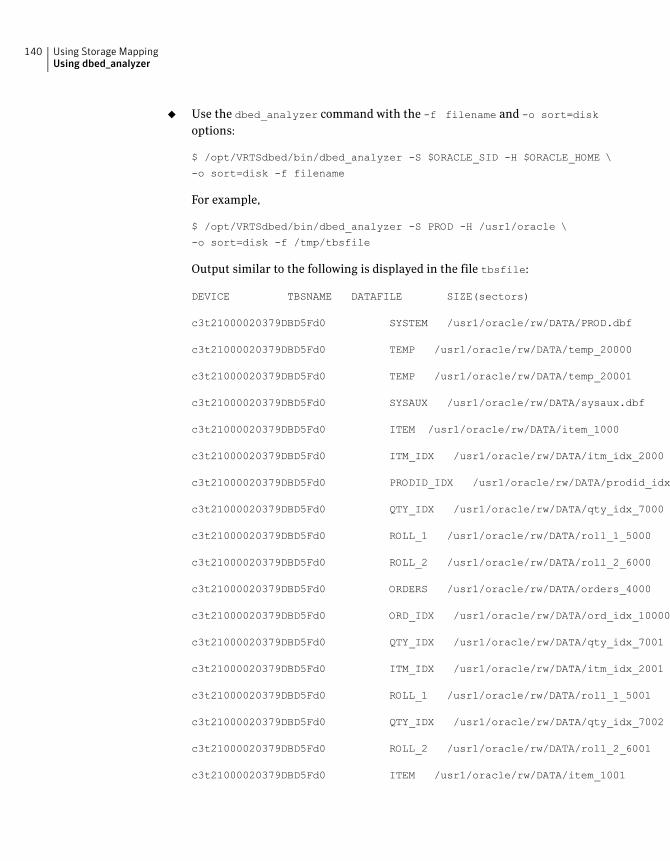
◆ Use the dbed_analyzer command with the -f filename and -o sort=disk
options:
$ /opt/VRTSdbed/bin/dbed_analyzer -S $ORACLE_SID -H $ORACLE_HOME \
-o sort=disk -f filename
For example,
$ /opt/VRTSdbed/bin/dbed_analyzer -S PROD -H /usr1/oracle \
-o sort=disk -f /tmp/tbsfile
Output similar to the following is displayed in the file tbsfile:
DEVICE TBSNAME DATAFILE SIZE(sectors)
c3t21000020379DBD5Fd0 SYSTEM /usr1/oracle/rw/DATA/PROD.dbf 819216
c3t21000020379DBD5Fd0 TEMP /usr1/oracle/rw/DATA/temp_20000 1021968
c3t21000020379DBD5Fd0 TEMP /usr1/oracle/rw/DATA/temp_20001 2048016
c3t21000020379DBD5Fd0 SYSAUX /usr1/oracle/rw/DATA/sysaux.dbf 819216
c3t21000020379DBD5Fd0 ITEM /usr1/oracle/rw/DATA/item_1000 1021968
c3t21000020379DBD5Fd0 ITM_IDX /usr1/oracle/rw/DATA/itm_idx_2000 1021968
c3t21000020379DBD5Fd0 PRODID_IDX /usr1/oracle/rw/DATA/prodid_idx_3000 1021968
c3t21000020379DBD5Fd0 QTY_IDX /usr1/oracle/rw/DATA/qty_idx_7000 1021968
c3t21000020379DBD5Fd0 ROLL_1 /usr1/oracle/rw/DATA/roll_1_5000 1021968
c3t21000020379DBD5Fd0 ROLL_2 /usr1/oracle/rw/DATA/roll_2_6000 1021968
c3t21000020379DBD5Fd0 ORDERS /usr1/oracle/rw/DATA/orders_4000 1021968
c3t21000020379DBD5Fd0 ORD_IDX /usr1/oracle/rw/DATA/ord_idx_10000 1021968
c3t21000020379DBD5Fd0 QTY_IDX /usr1/oracle/rw/DATA/qty_idx_7001 1024016
c3t21000020379DBD5Fd0 ITM_IDX /usr1/oracle/rw/DATA/itm_idx_2001 1024016
c3t21000020379DBD5Fd0 ROLL_1 /usr1/oracle/rw/DATA/roll_1_5001 1024016
c3t21000020379DBD5Fd0 QTY_IDX /usr1/oracle/rw/DATA/qty_idx_7002 1024016
c3t21000020379DBD5Fd0 ROLL_2 /usr1/oracle/rw/DATA/roll_2_6001 1024016
c3t21000020379DBD5Fd0 ITEM /usr1/oracle/rw/DATA/item_1001 4096016
Using Storage MappingUsing dbed_analyzer
140
Oracle file mapping (ORAMAP)Veritas has defined and implemented two libraries libvxoramap_64.so and
libvxoramap_64.sl.
These two libraries provide a mapping interface to Oracle9 release 2 or later. The
libvxoramap_64.so library serves as a bridge between Oracle's set of storage APIs
(known as “ORAMAP”) and Veritas Federated Mapping Service (VxMS), a library
that assists in the development of distributed SAN applications that must share
information about the physical location of files and volumes on a disk.
With Veritas Storage Foundation for Oracle Storage Mapping option, you can
view the complete I/O topology mapping of datafiles through intermediate layers
like logical volumes down to actual physical devices. This information can be used
to determine the exact location of an Oracle data block on a physical device and
to help identify hot spots.
Note: To use the mapping functionality, you must be using Oracle 9.2.0.3 or later.
Mapping components
You need to understand the mapping components in the System Global Area (SGA)
and Oracle's representation of these components before you can interpret the
mapping information in Oracle's dynamic performance views.
The mapping information in Oracle's dynamic performance views consists of:
■ File components
A mapping file component is a mapping structure describing a file. It provides
a set of attributes for a file, including the file's size, number of extents, and
type. File components are exported to the user through V$MAP_FILE.
■ File extent components
A mapping file extent component describes a contiguous group of blocks
residing on one element. The description specifies the device offset, the extent
size, the file offset, the extent type (Data or Parity), and the name of the
element where the extent resides.
■ Element components
A mapping element component is a mapping structure that describes a storage
component within the I/O stack. Elements can be mirrors, stripes, partitions,
RAID5, concatenated elements, and disks.
This component contains information about the element's mapping structure,
such as the element's size, type, number of subelements, and a brief description.
Element components are exported to the user through V$MAP_ELEMENT.
141Using Storage MappingOracle file mapping (ORAMAP)
■ Subelement components
A mapping subelement component describes the link between an element and
the next element in the I/O stack. The subelement component contains the
subelement number, size, the element name for the subelement, and the
element offset. Subelement components are exported to the user through
V$MAP_SUBELEMENT.
These mapping components completely describe the mapping information for an
Oracle instance.
Storage Mapping views
The mapping information that is captured is presented in Oracle's dynamic
performance views. Brief descriptions of these views are provided in Table 8-1.
For more detailed information refer to your Oracle documentation.
Table 8-1 Storagemapping information inOracle dynamic performamce views
DescriptionView
Contains a list of all the mapping libraries that have been
dynamically loaded by the external process.
V$MAP_LIBRARY
Contains a list of all the file mapping structures in the
shared memory of the instance.
V$MAP_FILE
Contains a list of all the file extent mapping structures in
the shared memory of the instance.
V$MAP_FILE_EXTENT
Contains a list of all the element mapping structures in
the SGA of the instance.
V$MAP_ELEMENT
Contains supplementary information for all element
mapping structures.
V$MAP_EXT_ELEMENT
Contains a list of all subelement mapping structures in
the shared memory of the instance.
V$MAP_SUBELEMENT
Describes the component list associated with the element
name.
V$MAP_COMP_LIST
Contains the hierarchical arrangement of storage
containers for the file. This information is displayed as a
series of rows. Each row represents a level in the
hierarchy.
V$MAP_FILE_IO_STACK
Using Storage MappingOracle file mapping (ORAMAP)
142
Verifying Oracle file mapping setup
Before you enable Oracle file mapping, verify that $ORACLE_HOME and ORCLfmap
directories are properly set up.
To verify that $ORACLE_HOME is set up for Oracle file mapping (ORAMAP)
1 Enter:
# cd $ORACLE_HOME/rdbms/filemap/bin
# ls -l
-r-xr-x--- 1 root system 900616 Apr 08 19:16 fmputl
-r-sr-xr-x 1 root system 14614 Apr 08 19:16 fmputlhp
2 Verify that:
■ fmputlhp is owned by root and that the setuid bit is set.
■ The permissions for fmputlhp are set to -r-sr-xr-x.
■ The permissions for fmputl are set to -r-xr-x---.
3 If any of these items is not set as specified, make the appropriate corrections.
To verify the ORCLfmap direcotries are set up properly
1 Enter:
# cd /opt/ORCLfmap
# ls -ld prot1_32 prot1_64
2 Verify that both directories are owned by root and are writable only by root
(have -rwxr-xr-x permissions).
3 If needed, change the ownership and permissions for these directories.
Enabling Oracle file mapping
You need to explicitly enable Oracle file mapping. By default it is initially disabled.
143Using Storage MappingOracle file mapping (ORAMAP)
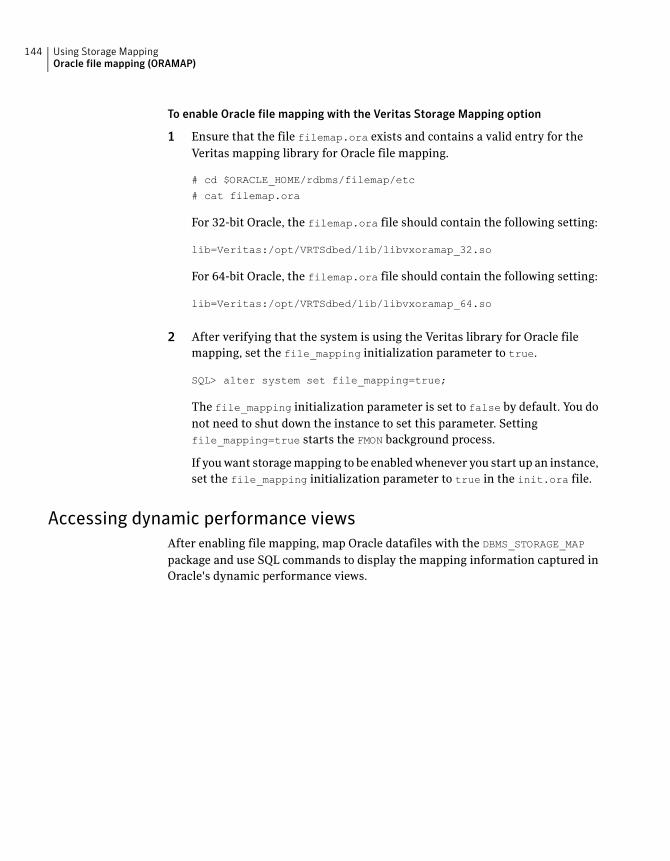
To enable Oracle file mapping with the Veritas Storage Mapping option
1 Ensure that the file filemap.ora exists and contains a valid entry for the
Veritas mapping library for Oracle file mapping.
# cd $ORACLE_HOME/rdbms/filemap/etc
# cat filemap.ora
For 32-bit Oracle, the filemap.ora file should contain the following setting:
lib=Veritas:/opt/VRTSdbed/lib/libvxoramap_32.so
For 64-bit Oracle, the filemap.ora file should contain the following setting:
lib=Veritas:/opt/VRTSdbed/lib/libvxoramap_64.so
2 After verifying that the system is using the Veritas library for Oracle file
mapping, set the file_mapping initialization parameter to true.
SQL> alter system set file_mapping=true;
The file_mapping initialization parameter is set to false by default. You do
not need to shut down the instance to set this parameter. Setting
file_mapping=true starts the FMON background process.
If you want storage mapping to be enabled whenever you start up an instance,
set the file_mapping initialization parameter to true in the init.ora file.
Accessing dynamic performance views
After enabling file mapping, map Oracle datafiles with the DBMS_STORAGE_MAP
package and use SQL commands to display the mapping information captured in
Oracle's dynamic performance views.
Using Storage MappingOracle file mapping (ORAMAP)
144
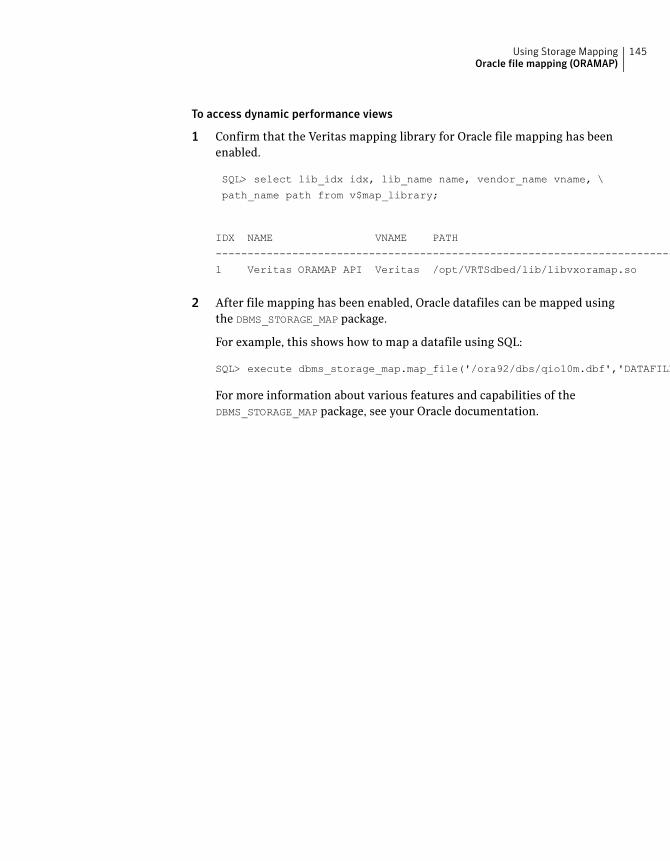
To access dynamic performance views
1 Confirm that the Veritas mapping library for Oracle file mapping has been
enabled.
SQL> select lib_idx idx, lib_name name, vendor_name vname, \
path_name path from v$map_library;
IDX NAME VNAME PATH
------------------------------------------------------------------------------
1 Veritas ORAMAP API Veritas /opt/VRTSdbed/lib/libvxoramap.so
2 After file mapping has been enabled, Oracle datafiles can be mapped using
the DBMS_STORAGE_MAP package.
For example, this shows how to map a datafile using SQL:
SQL> execute dbms_storage_map.map_file('/ora92/dbs/qio10m.dbf','DATAFILE', TRUE);
For more information about various features and capabilities of the
DBMS_STORAGE_MAP package, see your Oracle documentation.
145Using Storage MappingOracle file mapping (ORAMAP)
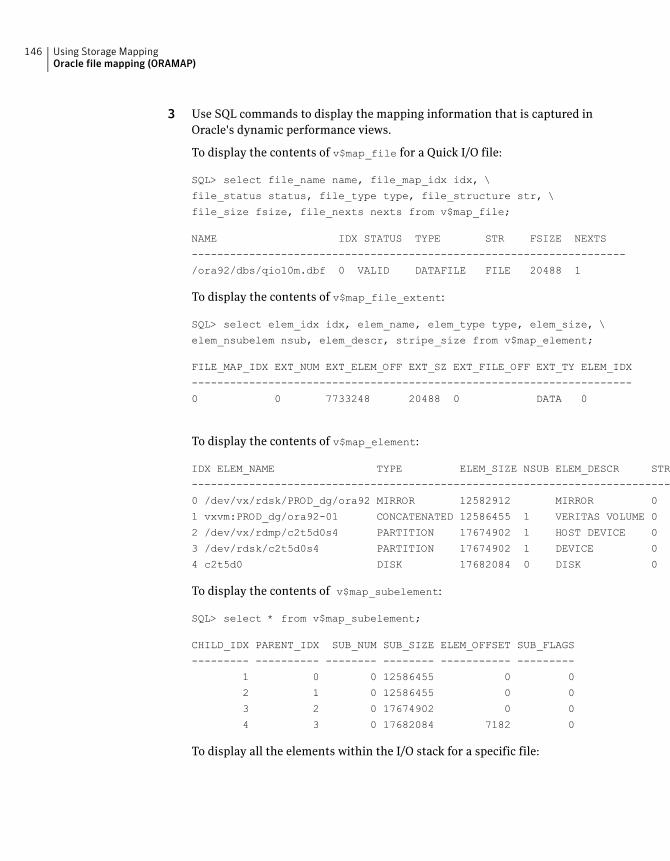
3 Use SQL commands to display the mapping information that is captured in
Oracle's dynamic performance views.
To display the contents of v$map_file for a Quick I/O file:
SQL> select file_name name, file_map_idx idx, \
file_status status, file_type type, file_structure str, \
file_size fsize, file_nexts nexts from v$map_file;
NAME IDX STATUS TYPE STR FSIZE NEXTS
--------------------------------------------------------------------
/ora92/dbs/qio10m.dbf 0 VALID DATAFILE FILE 20488 1
To display the contents of v$map_file_extent:
SQL> select elem_idx idx, elem_name, elem_type type, elem_size, \
elem_nsubelem nsub, elem_descr, stripe_size from v$map_element;
FILE_MAP_IDX EXT_NUM EXT_ELEM_OFF EXT_SZ EXT_FILE_OFF EXT_TY ELEM_IDX
---------------------------------------------------------------------
0 0 7733248 20488 0 DATA 0
To display the contents of v$map_element:
IDX ELEM_NAME TYPE ELEM_SIZE NSUB ELEM_DESCR STRIPE_SZ
---------------------------------------------------------------------------------
0 /dev/vx/rdsk/PROD_dg/ora92 MIRROR 12582912 MIRROR 0
1 vxvm:PROD_dg/ora92-01 CONCATENATED 12586455 1 VERITAS VOLUME 0
2 /dev/vx/rdmp/c2t5d0s4 PARTITION 17674902 1 HOST DEVICE 0
3 /dev/rdsk/c2t5d0s4 PARTITION 17674902 1 DEVICE 0
4 c2t5d0 DISK 17682084 0 DISK 0
To display the contents of v$map_subelement:
SQL> select * from v$map_subelement;
CHILD_IDX PARENT_IDX SUB_NUM SUB_SIZE ELEM_OFFSET SUB_FLAGS
--------- ---------- -------- -------- ----------- ---------
1 0 0 12586455 0 0
2 1 0 12586455 0 0
3 2 0 17674902 0 0
4 3 0 17682084 7182 0
To display all the elements within the I/O stack for a specific file:
Using Storage MappingOracle file mapping (ORAMAP)
146
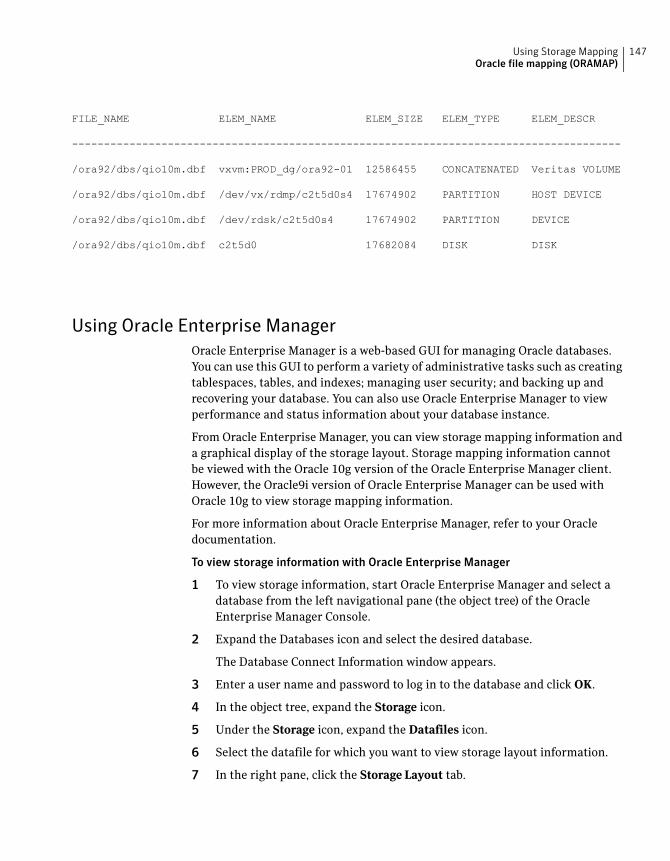
FILE_NAME ELEM_NAME ELEM_SIZE ELEM_TYPE ELEM_DESCR
--------------------------------------------------------------------------------------
/ora92/dbs/qio10m.dbf vxvm:PROD_dg/ora92-01 12586455 CONCATENATED Veritas VOLUME
/ora92/dbs/qio10m.dbf /dev/vx/rdmp/c2t5d0s4 17674902 PARTITION HOST DEVICE
/ora92/dbs/qio10m.dbf /dev/rdsk/c2t5d0s4 17674902 PARTITION DEVICE
/ora92/dbs/qio10m.dbf c2t5d0 17682084 DISK DISK
Using Oracle Enterprise Manager
Oracle Enterprise Manager is a web-based GUI for managing Oracle databases.
You can use this GUI to perform a variety of administrative tasks such as creating
tablespaces, tables, and indexes; managing user security; and backing up and
recovering your database. You can also use Oracle Enterprise Manager to view
performance and status information about your database instance.
From Oracle Enterprise Manager, you can view storage mapping information and
a graphical display of the storage layout. Storage mapping information cannot
be viewed with the Oracle 10g version of the Oracle Enterprise Manager client.
However, the Oracle9i version of Oracle Enterprise Manager can be used with
Oracle 10g to view storage mapping information.
For more information about Oracle Enterprise Manager, refer to your Oracle
documentation.
To view storage information with Oracle Enterprise Manager
1 To view storage information, start Oracle Enterprise Manager and select a
database from the left navigational pane (the object tree) of the Oracle
Enterprise Manager Console.
2 Expand the Databases icon and select the desired database.
The Database Connect Information window appears.
3 Enter a user name and password to log in to the database and click OK.
4 In the object tree, expand the Storage icon.
5 Under the Storage icon, expand the Datafiles icon.
6 Select the datafile for which you want to view storage layout information.
7 In the right pane, click the Storage Layout tab.
147Using Storage MappingOracle file mapping (ORAMAP)
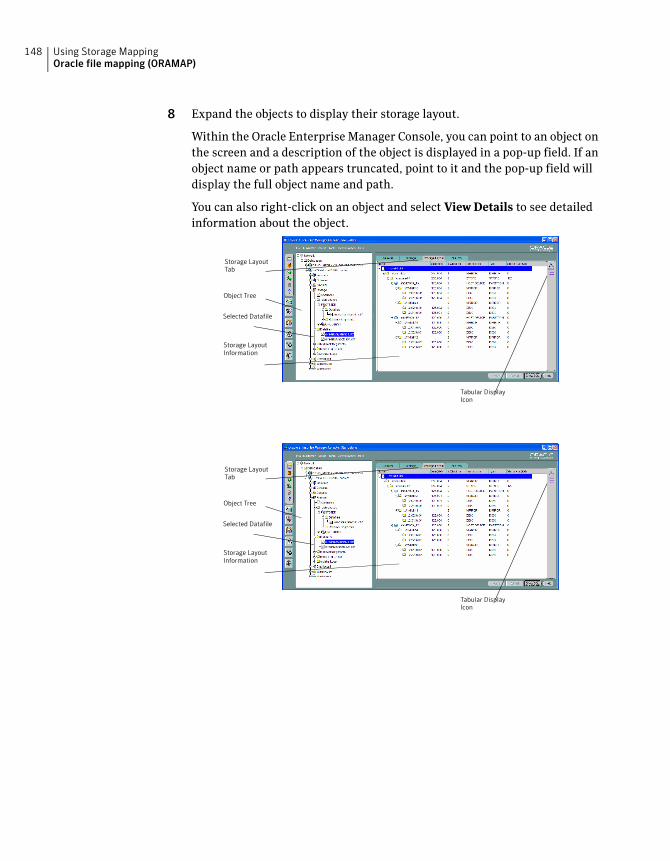
8 Expand the objects to display their storage layout.
Within the Oracle Enterprise Manager Console, you can point to an object on
the screen and a description of the object is displayed in a pop-up field. If an
object name or path appears truncated, point to it and the pop-up field will
display the full object name and path.
You can also right-click on an object and select ViewDetails to see detailed
information about the object.
Storage Layout
Tab
Object Tree
Storage Layout
Information
Selected Datafile
Tabular Display
Icon
Storage Layout
Tab
Object Tree
Storage Layout
Information
Selected Datafile
Tabular Display
Icon
Using Storage MappingOracle file mapping (ORAMAP)
148
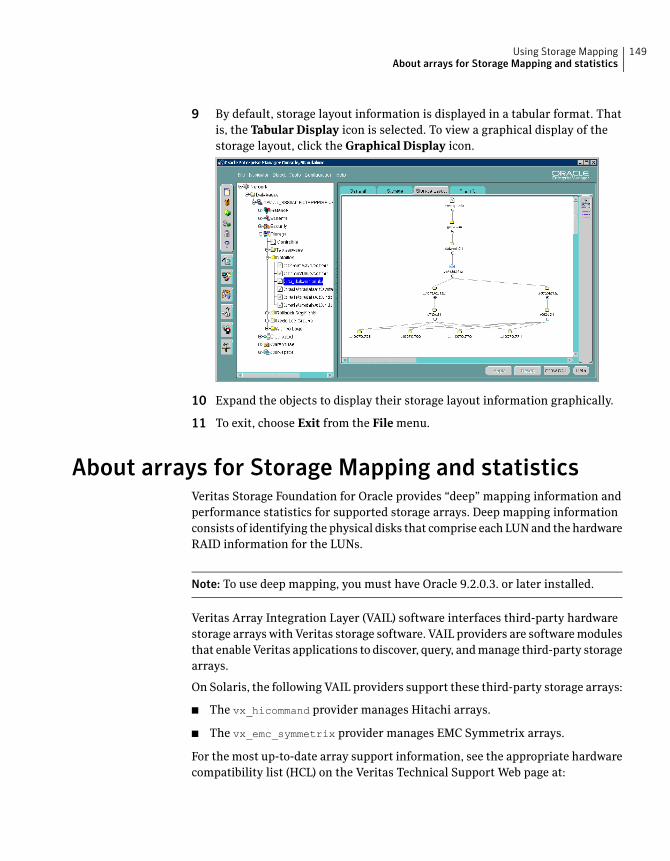
9 By default, storage layout information is displayed in a tabular format. That
is, the TabularDisplay icon is selected. To view a graphical display of the
storage layout, click the Graphical Display icon.
10 Expand the objects to display their storage layout information graphically.
11 To exit, choose Exit from the File menu.
About arrays for Storage Mapping and statisticsVeritas Storage Foundation for Oracle provides “deep” mapping information and
performance statistics for supported storage arrays. Deep mapping information
consists of identifying the physical disks that comprise each LUN and the hardware
RAID information for the LUNs.
Note: To use deep mapping, you must have Oracle 9.2.0.3. or later installed.
Veritas Array Integration Layer (VAIL) software interfaces third-party hardware
storage arrays with Veritas storage software. VAIL providers are software modules
that enable Veritas applications to discover, query, and manage third-party storage
arrays.
On Solaris, the following VAIL providers support these third-party storage arrays:
■ The vx_hicommand provider manages Hitachi arrays.
■ The vx_emc_symmetrix provider manages EMC Symmetrix arrays.
For the most up-to-date array support information, see the appropriate hardware
compatibility list (HCL) on the Veritas Technical Support Web page at:
149Using Storage MappingAbout arrays for Storage Mapping and statistics
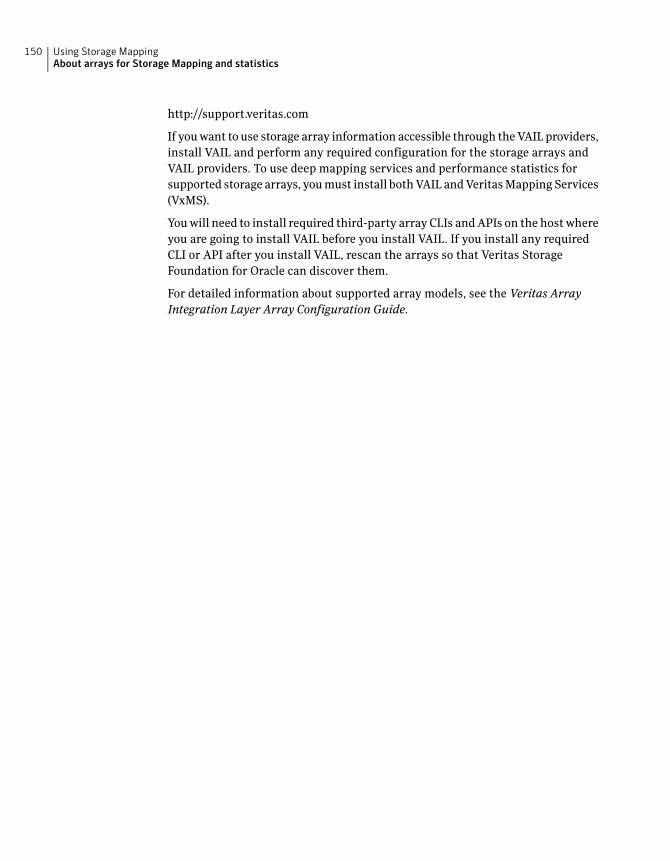
http://support.veritas.com
If you want to use storage array information accessible through the VAIL providers,
install VAIL and perform any required configuration for the storage arrays and
VAIL providers. To use deep mapping services and performance statistics for
supported storage arrays, you must install both VAIL and Veritas Mapping Services
(VxMS).
You will need to install required third-party array CLIs and APIs on the host where
you are going to install VAIL before you install VAIL. If you install any required
CLI or API after you install VAIL, rescan the arrays so that Veritas Storage
Foundation for Oracle can discover them.
For detailed information about supported array models, see the Veritas Array
Integration Layer Array Configuration Guide.
Using Storage MappingAbout arrays for Storage Mapping and statistics
150
Converting existing
database configurations to
VxFS
This chapter includes the following topics:
■ Converting native file systems to VxFS with Quick I/O
■ Converting native file systems to VxFS for Oracle Disk Manager
■ Upgrading from earlier VxFS version layouts
■ Converting from raw devices
Converting native file systems to VxFSwith Quick I/OIf you are currently using file systems native to your operating system, use the
procedure to upgrade each file system used by the database to a VxFS file system
with Quick I/O.
To convert a native file system to VxFS with Quick I/O
1 Shut down the database.
2 Create a backup of the UFS file system.
3 Unmount the UFS file system.
4 Remove the entry for the UFS file system from the /etc/vfstab directory.
9Chapter
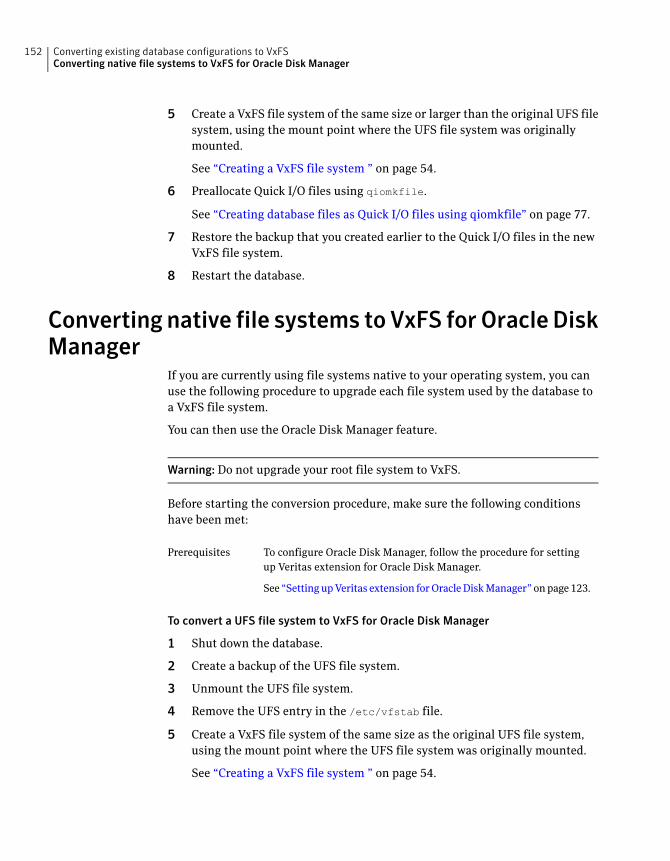
5 Create a VxFS file system of the same size or larger than the original UFS file
system, using the mount point where the UFS file system was originally
mounted.
See “Creating a VxFS file system ” on page 54.
6 Preallocate Quick I/O files using qiomkfile.
See “Creating database files as Quick I/O files using qiomkfile” on page 77.
7 Restore the backup that you created earlier to the Quick I/O files in the new
VxFS file system.
8 Restart the database.
Converting native file systems to VxFS for Oracle DiskManager
If you are currently using file systems native to your operating system, you can
use the following procedure to upgrade each file system used by the database to
a VxFS file system.
You can then use the Oracle Disk Manager feature.
Warning: Do not upgrade your root file system to VxFS.
Before starting the conversion procedure, make sure the following conditions
have been met:
To configure Oracle Disk Manager, follow the procedure for setting
up Veritas extension for Oracle Disk Manager.
See “Setting up Veritas extension for Oracle Disk Manager” on page 123.
Prerequisites
To convert a UFS file system to VxFS for Oracle Disk Manager
1 Shut down the database.
2 Create a backup of the UFS file system.
3 Unmount the UFS file system.
4 Remove the UFS entry in the /etc/vfstab file.
5 Create a VxFS file system of the same size as the original UFS file system,
using the mount point where the UFS file system was originally mounted.
See “Creating a VxFS file system ” on page 54.
Converting existing database configurations to VxFSConverting native file systems to VxFS for Oracle Disk Manager
152
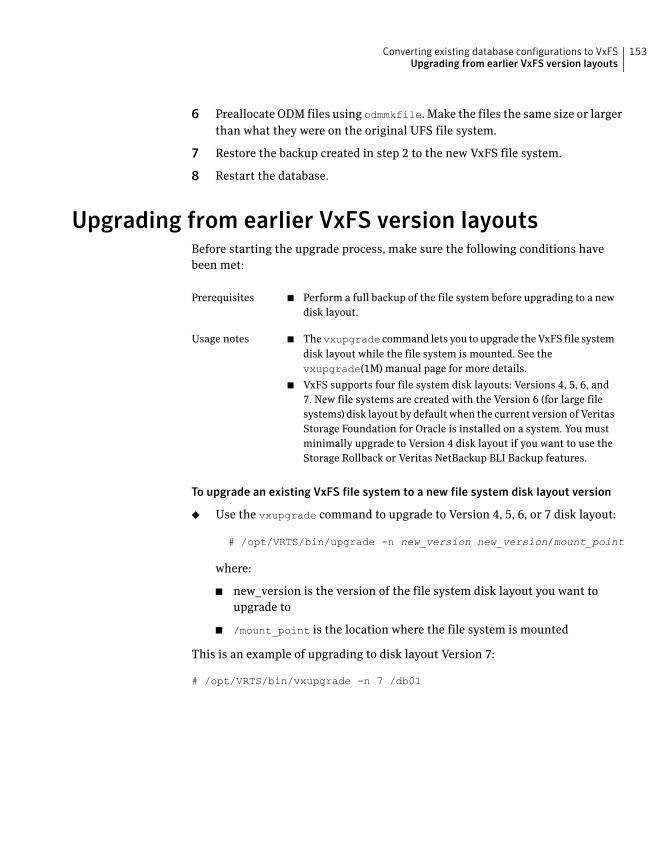
6 Preallocate ODM files using odmmkfile. Make the files the same size or larger
than what they were on the original UFS file system.
7 Restore the backup created in step 2 to the new VxFS file system.
8 Restart the database.
Upgrading from earlier VxFS version layoutsBefore starting the upgrade process, make sure the following conditions have
been met:
■ Perform a full backup of the file system before upgrading to a new
disk layout.
Prerequisites
■ Thevxupgrade command lets you to upgrade the VxFS file system
disk layout while the file system is mounted. See the
vxupgrade(1M) manual page for more details.
■ VxFS supports four file system disk layouts: Versions 4, 5, 6, and
7. New file systems are created with the Version 6 (for large file
systems) disk layout by default when the current version of Veritas
Storage Foundation for Oracle is installed on a system. You must
minimally upgrade to Version 4 disk layout if you want to use the
Storage Rollback or Veritas NetBackup BLI Backup features.
Usage notes
To upgrade an existing VxFS file system to a new file system disk layout version
◆ Use the vxupgrade command to upgrade to Version 4, 5, 6, or 7 disk layout:
# /opt/VRTS/bin/upgrade -n new_version new_version/mount_point
where:
■ new_version is the version of the file system disk layout you want to
upgrade to
■ /mount_point is the location where the file system is mounted
This is an example of upgrading to disk layout Version 7:
# /opt/VRTS/bin/vxupgrade -n 7 /db01
153Converting existing database configurations to VxFSUpgrading from earlier VxFS version layouts
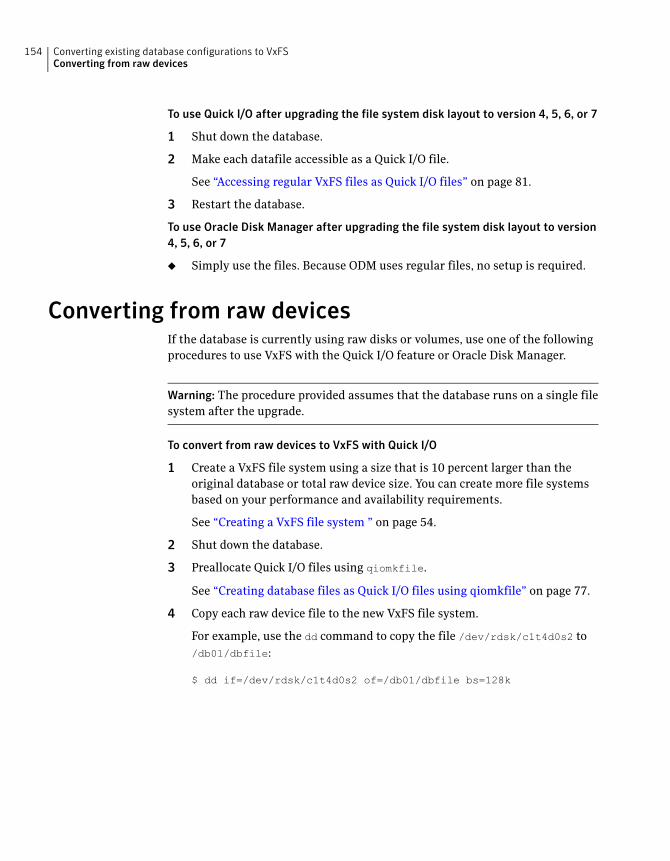
To use Quick I/O after upgrading the file system disk layout to version 4, 5, 6, or 7
1 Shut down the database.
2 Make each datafile accessible as a Quick I/O file.
See “Accessing regular VxFS files as Quick I/O files” on page 81.
3 Restart the database.
To use Oracle Disk Manager after upgrading the file system disk layout to version
4, 5, 6, or 7
◆ Simply use the files. Because ODM uses regular files, no setup is required.
Converting from raw devicesIf the database is currently using raw disks or volumes, use one of the following
procedures to use VxFS with the Quick I/O feature or Oracle Disk Manager.
Warning: The procedure provided assumes that the database runs on a single file
system after the upgrade.
To convert from raw devices to VxFS with Quick I/O
1 Create a VxFS file system using a size that is 10 percent larger than the
original database or total raw device size. You can create more file systems
based on your performance and availability requirements.
See “Creating a VxFS file system ” on page 54.
2 Shut down the database.
3 Preallocate Quick I/O files using qiomkfile.
See “Creating database files as Quick I/O files using qiomkfile” on page 77.
4 Copy each raw device file to the new VxFS file system.
For example, use the dd command to copy the file /dev/rdsk/c1t4d0s2 to
/db01/dbfile:
$ dd if=/dev/rdsk/c1t4d0s2 of=/db01/dbfile bs=128k
Converting existing database configurations to VxFSConverting from raw devices
154
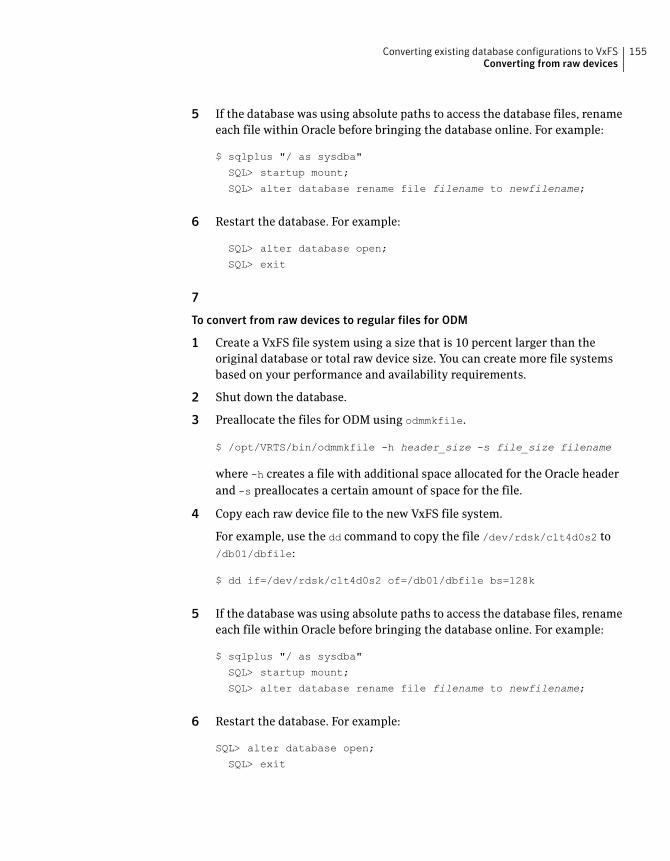
5 If the database was using absolute paths to access the database files, rename
each file within Oracle before bringing the database online. For example:
$ sqlplus "/ as sysdba"
SQL> startup mount;
SQL> alter database rename file filename to newfilename;
6 Restart the database. For example:
SQL> alter database open;
SQL> exit
7
To convert from raw devices to regular files for ODM
1 Create a VxFS file system using a size that is 10 percent larger than the
original database or total raw device size. You can create more file systems
based on your performance and availability requirements.
2 Shut down the database.
3 Preallocate the files for ODM using odmmkfile.
$ /opt/VRTS/bin/odmmkfile -h header_size -s file_size filename
where -h creates a file with additional space allocated for the Oracle header
and -s preallocates a certain amount of space for the file.
4 Copy each raw device file to the new VxFS file system.
For example, use the dd command to copy the file /dev/rdsk/clt4d0s2 to
/db01/dbfile:
$ dd if=/dev/rdsk/clt4d0s2 of=/db01/dbfile bs=128k
5 If the database was using absolute paths to access the database files, rename
each file within Oracle before bringing the database online. For example:
$ sqlplus "/ as sysdba"
SQL> startup mount;
SQL> alter database rename file filename to newfilename;
6 Restart the database. For example:
SQL> alter database open;
SQL> exit
155Converting existing database configurations to VxFSConverting from raw devices

Converting existing database configurations to VxFSConverting from raw devices
156
Using Storage Checkpoints
and Storage Rollback
This chapter includes the following topics:
■ About Storage Checkpoints and Storage Rollback
■ Space requirements for Storage Checkpoints
■ Performance of Storage Checkpoints
■ Storage Checkpoint allocation policies
■ Backing up and recovering the database using Storage Checkpoints
■ Cloning the Oracle instance using dbed_clonedb
■ Guidelines for Oracle recovery
■ Using the GUI to perform Storage Checkpoint-related operations
About Storage Checkpoints and Storage RollbackThe Veritas Storage Checkpoint feature is available with the Enterprise Edition
as part of the Veritas File System package and is used for the efficient backup and
recovery of Oracle databases. Storage Checkpoints can also be mounted, allowing
regular file system operations to be performed. This chapter describes what
Storage Checkpoints and storage rollback are and how to make use of these
technologies through Veritas Storage Foundation.
The Storage Checkpoint facility is similar to the snapshot file system mechanism;
however, a Storage Checkpoint persists after a system reboot. A Storage Checkpoint
creates an exact image of a database instantly and provides a consistent image of
the database from the point in time the Storage Checkpoint was created. The
10Chapter
Storage Checkpoint image is managed and available through the GUI, or the
Veritas Storage Foundation command line interface (CLI).
Veritas NetBackup also makes use of Storage Checkpoints to provide a very
efficient Oracle backup mechanism.
See the Veritas Storage Foundation for Oracle Graphical User Interface Guide.
A direct application of the Storage Checkpoint facility is Storage Rollback. Because
each Storage Checkpoint is a consistent, point-in-time image of a file system,
Storage Rollback is the restore facility for these on-disk backups. Storage Rollback
rolls back changed blocks contained in a Storage Checkpoint into the primary file
system for restoring the database faster.
For more information on Storage Checkpoints and Storage Rollback, see theVeritas
File System Administrator's Guide.
How Storage Checkpoints and Storage Rollback work
A Storage Checkpoint is a disk and I/O efficient snapshot technology for creating
a “clone” of a currently mounted file system (the primary file system). Like a
snapshot file system, a Storage Checkpoint appears as an exact image of the
snapped file system at the time the Storage Checkpoint was made. However, unlike
a snapshot file system that uses separate disk space, all Storage Checkpoints share
the same free space pool where the primary file system resides unless a Storage
Checkpoint allocation policy is assigned. A Storage Checkpoint can be mounted
as read-only or read-write, allowing access to the files as if it were a regular file
system. A Storage Checkpoint is created using the dbed_ckptcreate command
or the GUI.
Initially, a Storage Checkpoint contains no data—it contains only the inode list
and the block map of the primary fileset. This block map points to the actual data
on the primary file system. Because only the inode list and block map are needed
and no data is copied, creating a Storage Checkpoint takes only a few seconds and
very little space.
A Storage Checkpoint initially satisfies read requests by finding the data on the
primary file system, using its block map copy, and returning the data to the
requesting process. When a write operation changes a data block "n" in the primary
file system, the old data is first copied to the Storage Checkpoint, and then the
primary file system is updated with the new data. The Storage Checkpoint
maintains the exact view of the primary file system at the time the Storage
Checkpoint was taken. Subsequent writes to block "n" on the primary file system
do not result in additional copies to the Storage Checkpoint because the old data
only needs to be saved once. As data blocks are changed on the primary file system,
the Storage Checkpoint gradually fills with the original data copied from the
Using Storage Checkpoints and Storage RollbackAbout Storage Checkpoints and Storage Rollback
158
primary file system, and less and less of the block map in the Storage Checkpoint
points back to blocks on the primary file system.
You can set a quota to limit how much space a file system will give to all storage
checkpoints, to prevent the checkpoints from consuming all free space. See the
command dbed_ckptquota for more information.
Storage Rollback restores a database, a tablespace, or datafiles on the primary
file systems to the point-in-time image created during a Storage Checkpoint.
Storage Rollback is accomplished by copying the “before” images from the
appropriate Storage Checkpoint back to the primary file system. As with Storage
Checkpoints, Storage Rollback restores at the block level, rather than at the file
level. Storage Rollback is executed using the dbed_ckptrollback command or
the GUI.
Note:You must run the dbed_update command after upgrading to Veritas Storage
Foundation 5.0 from a previous release. This will allow you to roll back to a Storage
Checkpoint that was created with an earlier version of this product. Moreover,
whenever you change the structure of the database (for example, by adding or
deleting datafiles, converting PFILE to SPFILE, or converting SPFILE to PFILE),
you must run dbed_update.
Mountable Storage Checkpoints can be used for a wide range of application
solutions, including backup, investigations into data integrity, staging upgrades
or database modifications, and data replication solutions.
If you mount a Storage Checkpoint as read-write, the GUI will not allow you to
roll back to this Storage Checkpoint. This ensures that any Storage Checkpoint
data that has been modified incorrectly cannot be a source of any database
corruption. When a Storage Checkpoint is mounted as read-write, the
dbed_ckptmount command creates a “shadow” Storage Checkpoint of and mounts
this “shadow” Storage Checkpoint as read-write. This allows the database to still
be rolled back to the original Storage Checkpoint.
Space requirements for Storage CheckpointsTo support Block-level Incremental (BLI) Backup and storage rollback, the file
systems need extra disk space to store the Storage Checkpoints. The extra space
needed depends on how the Storage Checkpoints are used. Storage Checkpoints
that are used to keep track of the block changes contain only file system block
maps, and therefore require very little additional space (less than 1 percent of the
file system size).
159Using Storage Checkpoints and Storage RollbackSpace requirements for Storage Checkpoints
When you use Veritas NetBackup to back up your database, Veritas NetBackup
creates one set of Storage Checkpoints to provide a consistent view of the file
systems for the database backups. The space required to hold this additional set
of Storage Checkpoints depends on how busy the database load is when the backup
is running. If the database is offline during the entire backup window, there is no
additional space required.
If the database is online while the backup is running, the additional space required
by each file system for Storage Checkpoints depends on the duration of the backup
and the database workload. If workload is light during the backup or the backup
window is relatively short (for example, for incremental backups), for most
database configurations, an additional 10 percent of the file system size will be
sufficient. If the database has a busy workload while a full backup is running, the
file systems may require more space.
To support Storage Checkpoints and storage rollback, VxFS needs to keep track
of the original block contents when the Storage Checkpoints were created. The
additional space needed is proportional to the number of blocks that have been
changed since a Storage Checkpoint was taken. The number of blocks changed
may not be identical to the number of changes. For example, if a data block has
been changed many times, only the first change requires a new block to be allocated
to store the original block content. Subsequent changes to the same block require
no overhead or block allocation.
If a file system that has Storage Checkpoints runs out of space, by default VxFS
removes the oldest Storage Checkpoint automatically instead of returning an
ENOSPC error code (UNIX errno 28- No space left on device), which can cause the
Oracle instance to fail. Removing Storage Checkpoints automatically ensures the
expected I/O semantics, but at the same time, eliminates a key recovery
mechanism.
When restoring a file system that has data-full Storage Checkpoints from tape or
other offline media, you need extra free space on the file system. The extra space
is needed to accommodate the copy-on-write algorithm needed for preserving the
consistent image of the Storage Checkpoints. The amount of free space required
depends on the size of the restore and the number of Storage Checkpoints on the
file system.
If you are restoring the entire file system, in most cases, you no longer need the
existing Storage Checkpoint. You can simply re-make the file system using the
mkfs command, and then restore the file system from tape or other offline media.
If you are restoring some of the files in the file system, you should first remove
the data-full Storage Checkpoints that are no longer needed. If you have very
limited free space on the file system, you may have to remove all data-full Storage
Checkpoints in order for the restore to succeed.
Using Storage Checkpoints and Storage RollbackSpace requirements for Storage Checkpoints
160
Always reserve free disk space for growing volumes and file systems. You can also
preallocate sufficient space for each file system when the file system is first created
or manually grow the file system and logical volume where the file system resides.
See the vxassist(1) and fsadm_vxfs(1) manual pages for more information.
Performance of Storage CheckpointsVeritas File System attempts to optimize the read and write access performance
on both the Storage Checkpoint and the primary file system. Reads from a Storage
Checkpoint typically perform at nearly the throughput of reads from a normal
VxFS file system, allowing backups to proceed at the full speed of the VxFS file
system.
Writes to the primary file system are typically affected by the Storage Checkpoints
because the initial write to a data block requires a read of the old data, a write of
the data to the Storage Checkpoint, and finally, the write of the new data to the
primary file system. Having multiple Storage Checkpoints on the same file system,
however, will not make writes slower. Only the initial write to a block suffers this
penalty, allowing operations like writes to the intent log or inode updates to
proceed at normal speed after the initial write.
The performance impact of Storage Checkpoints on a database is less when the
database files are Direct I/O files. A performance degradation of less than 5% in
throughput has been observed in a typical OLTP workload when the Storage
Checkpoints only keep track of changed information. For Storage Checkpoints
that are used for Storage Rollback, higher performance degradation (approximately
10 to 20 percent) has been observed in an OLTP workload. The degradation should
be lower in most decision-support or data warehousing environments.
Reads from the Storage Checkpoint are impacted if the primary file system is
busy, because the reads on the Storage Checkpoint are slowed by all of the disk
I/O associated with the primary file system. Therefore, performing database
backup when the database is less active is recommended.
Storage Checkpoint allocation policiesThe Veritas File System provides Multi-Volume File Systems (MVS) when used in
conjunction with the Volumes Set feature in Veritas Volume Manager. A volume
set is a container for multiple different volumes. MVS enables creation of a single
file system over multiple volumes, each volume with properties of its own. This
helps administrators specify which data goes on which volume types. For more
details about MVS, see Veritas VolumeManager Administrator's Guide. Setting
161Using Storage Checkpoints and Storage RollbackPerformance of Storage Checkpoints
up a storage configuration for MVS operations is a system administrator's
responsibility and requires superuser (root) privileges.
Note: Veritas Storage Foundation for Oracle RAC does not support storage
checkpoint allocation policies.
Multi-Volume File Systems provide a database administrator, through the
checkpoint administration interface, the ability to create Storage Checkpoint
Allocation Policies.
A Storage Checkpoint Allocation policy specifies a list of volumes and the order
in which to attempt allocations. Once defined, a database administrator can use
these policies to:
■ Control where the storage checkpoint should be created, enabling separation
of metadata and data of a storage checkpoint to different volumes.
■ Separate storage checkpoints so that data allocated to a storage checkpoint is
isolated from the primary file system. This helps control the space used by
the checkpoint and prevents the checkpoint from fragmenting the space in
the primary fileset.
When policies are assigned to a storage checkpoint, the database administrator
must specify the mapping to both metadata and file data. If no policies are specified
for the storage checkpoint, the data is placed randomly within the primary file
system. Data and metadata of storage checkpoints can have different policies
assigned to them or use the same policy to be applied to data and metadata.
Multiple checkpoints can be assigned the same checkpoint allocation policy. A
partial policy is also allowed; a partial policy means that the policy does not exist
on all file systems used by the database.
Once the policy is assigned to checkpoints, the allocation mechanism attempts
to satisfy the request from each device in the policy in the order the devices are
defined. If the request cannot be satisfied from any of the devices in the policy,
the request will fail, even if other devices exist in the file system which have space.
Only those devices can provide allocation that are listed in the policy. This
implementation is the mechanism for preventing allocation requests from using
space in other devices which are not specified in the policy. It is recommended
that you allocate sufficient space for the volumes defined in the Storage Checkpoint
policy or update the policy to include additional volumes. This also helps in
retaining the old Storage Checkpoints.
Once the assigned policy is deleted, the allocation for metadata and file data for
subsequent requests of storage checkpoint will return to the no policy assigned
state.
Using Storage Checkpoints and Storage RollbackStorage Checkpoint allocation policies
162
For VxFS file systems disk layout Version 7, the volumes on the VxFS Multi-Volume
File System cvan be either one of these types: dataonly and metadataok. Only
metadataok volumes can be used to store checkpoint metadata. By default, only
the first volume that is being added to the VxVM volume set is a metadataok
volume. This means only the first volume that is being added to the VxVM volume
set can be specified in the ckpt_metadata_policy by default. Use the following
file system command to change the default setting. To check the flags of each
volume in a VxFS Multi-Volume File System, execute the following file system
command as root:
/opt/VRTS/bin/fsvoladm queryflags mountpoint
To change a dataonly volume to a metadataok volume, execute the following file
system command as root:
/opt/VRTS/bin/fsvoladm clearflags dataonly mountpoint vol-name
The following are usage notes for Storage Checkpoint allocation policies:
■ Since the Storage Checkpoint allocation policies feature is
associated with the MVS file system, it is available only on file
systems using disk layout Version 6.
■ Storage Checkpoint allocation policy requires VxVM Volume Set
and VxFS Multi-Volume File Systems features to be enabled. These
features are included in the Enterprise Edition of Storage
Foundation.
See the Multi-Volume File System chapter in theVeritas File System
Administrator's Guide for creating Volume Sets and MVS file
systems for the primary file systems used by the database datafiles.
■ Data allocation is done by the volumes in the order that was
assigned in the policy.
■ The maximum length of a Storage Checkpoint allocation policy
name is 64 characters.
Usage notes
Using Storage Checkpoint allocation policies
You can use the dbed_ckptpolicy command to manage Storage Checkpoint
allocation policies.
See “Creating and working with Storage Checkpoint allocation policies using
dbed_ckptpolicy” on page 333.
Note: You cannot administer Storage Checkpoint allocation policies through the
the GUI.
163Using Storage Checkpoints and Storage RollbackStorage Checkpoint allocation policies
The following are usage notes for the dbed_ckptpolicy and dbed_ckptcreate
commands:
■ See the dbed_ckptpolicy(1M) and dbed_ckptcreate(1M)
manual pages for more information.
■ The dbed_ckptpolicy command needs to be executed by the
Oracle database administrator.
Usage notes
In the following example, the file systems for database datafiles are set up as
follows:
■ Two MVS file systems /mvsfs/v1 and /mvsfs/v2 used for database datafiles.
■ File system /mvsfs/v1 is created on volume set mvsvset1.
■ File system /mvsfs/v2 is created on volume set mvsvset2.
■ Volume set mvsvset1 contains volumes mvsv1, mvsv2, and mvsv3.
■ Volume set mvsvset2 contains volumes mvsv4 and mvsv5.
Use the dbed_ckptpolicy command with the following options.
$ dbed_ckptpolicy -S ORACLE_SID [ -H ORACLE_HOME ] [-n] [-h] options
Where options could be any of the following parameters:
-o create|update|remove -p ckpt_sample
-o display [-c ckpt_name | -p ckpt_sample]
-o assign -c ckpt_name -p \
ckpt_data_policy[,ckpt_metadata_policy]
Creating a Storage Checkpoint allocation policy
Create a Storage Checkpoint allocation policy with the -o create option to
dbed_ckptpolicy.
Using Storage Checkpoints and Storage RollbackStorage Checkpoint allocation policies
164
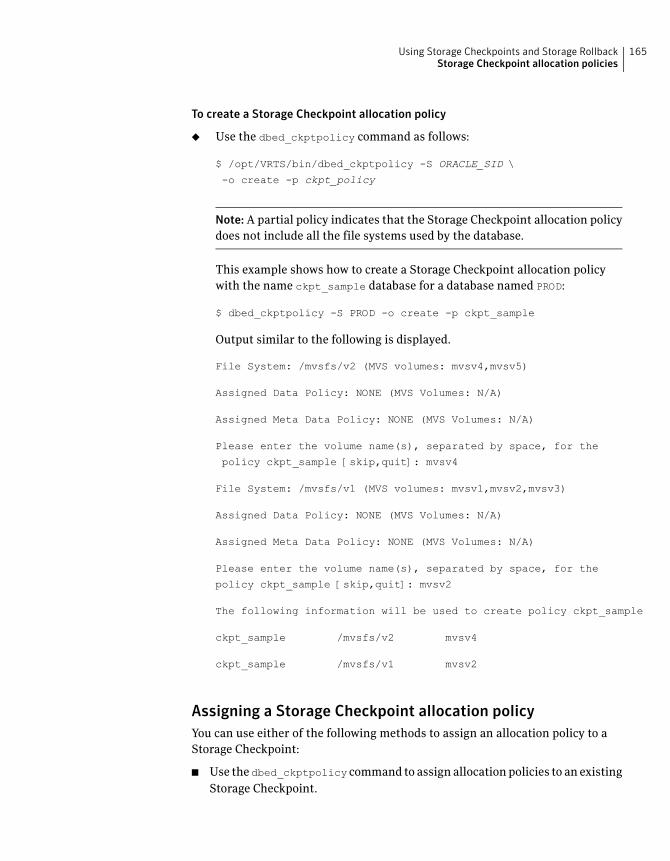
To create a Storage Checkpoint allocation policy
◆ Use the dbed_ckptpolicy command as follows:
$ /opt/VRTS/bin/dbed_ckptpolicy -S ORACLE_SID \
-o create -p ckpt_policy
Note: A partial policy indicates that the Storage Checkpoint allocation policy
does not include all the file systems used by the database.
This example shows how to create a Storage Checkpoint allocation policy
with the name ckpt_sample database for a database named PROD:
$ dbed_ckptpolicy -S PROD -o create -p ckpt_sample
Output similar to the following is displayed.
File System: /mvsfs/v2 (MVS volumes: mvsv4,mvsv5)
Assigned Data Policy: NONE (MVS Volumes: N/A)
Assigned Meta Data Policy: NONE (MVS Volumes: N/A)
Please enter the volume name(s), separated by space, for the
policy ckpt_sample [skip,quit]: mvsv4
File System: /mvsfs/v1 (MVS volumes: mvsv1,mvsv2,mvsv3)
Assigned Data Policy: NONE (MVS Volumes: N/A)
Assigned Meta Data Policy: NONE (MVS Volumes: N/A)
Please enter the volume name(s), separated by space, for the
policy ckpt_sample [skip,quit]: mvsv2
The following information will be used to create policy ckpt_sample
ckpt_sample /mvsfs/v2 mvsv4
ckpt_sample /mvsfs/v1 mvsv2
Assigning a Storage Checkpoint allocation policy
You can use either of the following methods to assign an allocation policy to a
Storage Checkpoint:
■ Use the dbed_ckptpolicy command to assign allocation policies to an existing
Storage Checkpoint.
165Using Storage Checkpoints and Storage RollbackStorage Checkpoint allocation policies
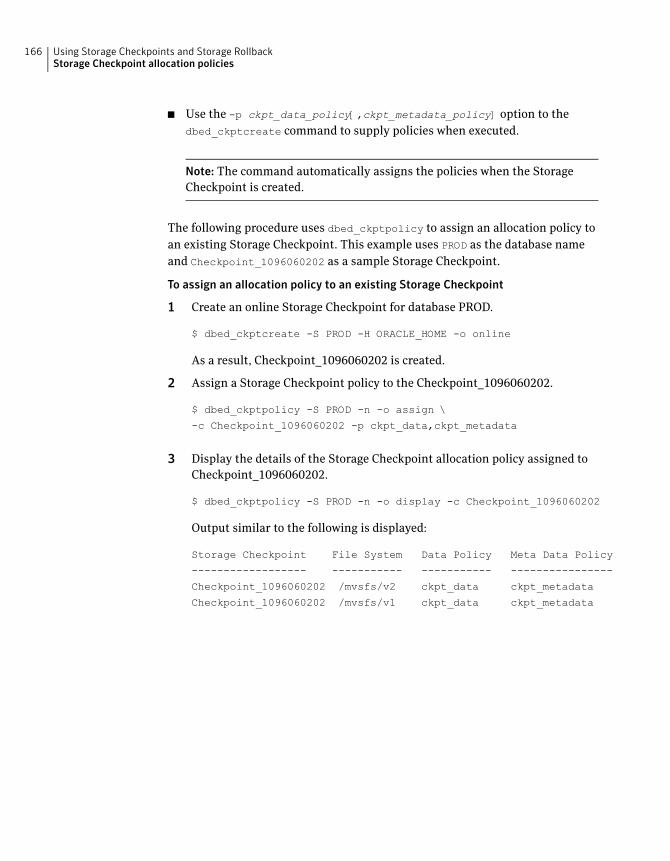
■ Use the -p ckpt_data_policy[,ckpt_metadata_policy] option to the
dbed_ckptcreate command to supply policies when executed.
Note: The command automatically assigns the policies when the Storage
Checkpoint is created.
The following procedure uses dbed_ckptpolicy to assign an allocation policy to
an existing Storage Checkpoint. This example uses PROD as the database name
and Checkpoint_1096060202 as a sample Storage Checkpoint.
To assign an allocation policy to an existing Storage Checkpoint
1 Create an online Storage Checkpoint for database PROD.
$ dbed_ckptcreate -S PROD -H ORACLE_HOME -o online
As a result, Checkpoint_1096060202 is created.
2 Assign a Storage Checkpoint policy to the Checkpoint_1096060202.
$ dbed_ckptpolicy -S PROD -n -o assign \
-c Checkpoint_1096060202 -p ckpt_data,ckpt_metadata
3 Display the details of the Storage Checkpoint allocation policy assigned to
Checkpoint_1096060202.
$ dbed_ckptpolicy -S PROD -n -o display -c Checkpoint_1096060202
Output similar to the following is displayed:
Storage Checkpoint File System Data Policy Meta Data Policy
------------------ ----------- ----------- ----------------
Checkpoint_1096060202 /mvsfs/v2 ckpt_data ckpt_metadata
Checkpoint_1096060202 /mvsfs/v1 ckpt_data ckpt_metadata
Using Storage Checkpoints and Storage RollbackStorage Checkpoint allocation policies
166
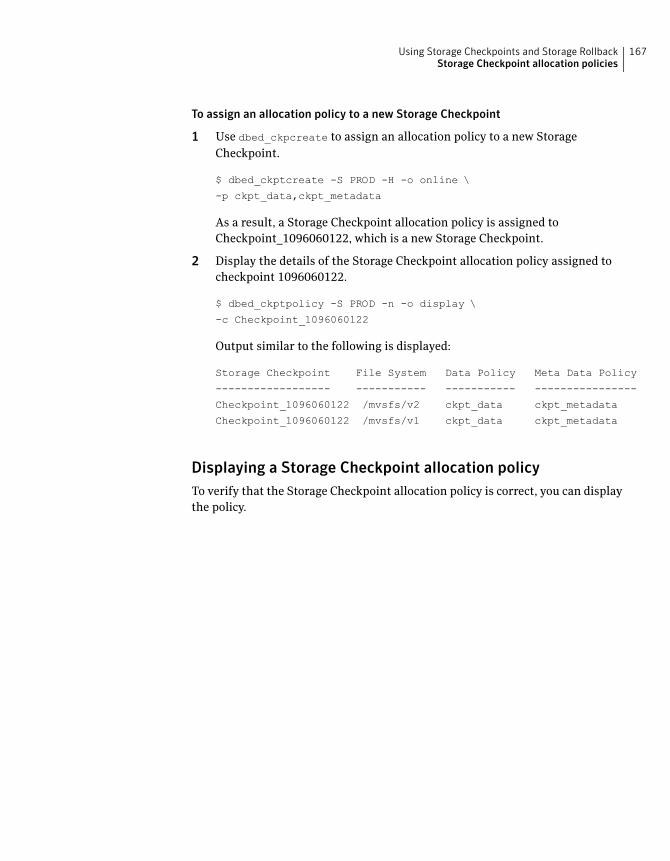
To assign an allocation policy to a new Storage Checkpoint
1 Use dbed_ckpcreate to assign an allocation policy to a new Storage
Checkpoint.
$ dbed_ckptcreate -S PROD -H -o online \
-p ckpt_data,ckpt_metadata
As a result, a Storage Checkpoint allocation policy is assigned to
Checkpoint_1096060122, which is a new Storage Checkpoint.
2 Display the details of the Storage Checkpoint allocation policy assigned to
checkpoint 1096060122.
$ dbed_ckptpolicy -S PROD -n -o display \
-c Checkpoint_1096060122
Output similar to the following is displayed:
Storage Checkpoint File System Data Policy Meta Data Policy
------------------ ----------- ----------- ----------------
Checkpoint_1096060122 /mvsfs/v2 ckpt_data ckpt_metadata
Checkpoint_1096060122 /mvsfs/v1 ckpt_data ckpt_metadata
Displaying a Storage Checkpoint allocation policy
To verify that the Storage Checkpoint allocation policy is correct, you can display
the policy.
167Using Storage Checkpoints and Storage RollbackStorage Checkpoint allocation policies
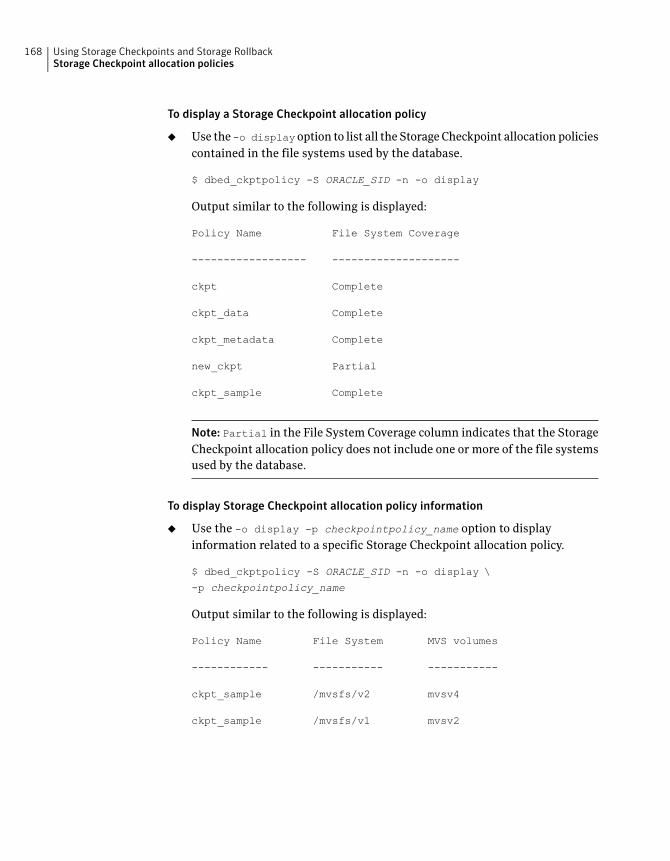
To display a Storage Checkpoint allocation policy
◆ Use the -o display option to list all the Storage Checkpoint allocation policies
contained in the file systems used by the database.
$ dbed_ckptpolicy -S ORACLE_SID -n -o display
Output similar to the following is displayed:
Policy Name File System Coverage
------------------ --------------------
ckpt Complete
ckpt_data Complete
ckpt_metadata Complete
new_ckpt Partial
ckpt_sample Complete
Note: Partial in the File System Coverage column indicates that the Storage
Checkpoint allocation policy does not include one or more of the file systems
used by the database.
To display Storage Checkpoint allocation policy information
◆ Use the -o display -p checkpointpolicy_name option to display
information related to a specific Storage Checkpoint allocation policy.
$ dbed_ckptpolicy -S ORACLE_SID -n -o display \
-p checkpointpolicy_name
Output similar to the following is displayed:
Policy Name File System MVS volumes
------------ ----------- -----------
ckpt_sample /mvsfs/v2 mvsv4
ckpt_sample /mvsfs/v1 mvsv2
Using Storage Checkpoints and Storage RollbackStorage Checkpoint allocation policies
168
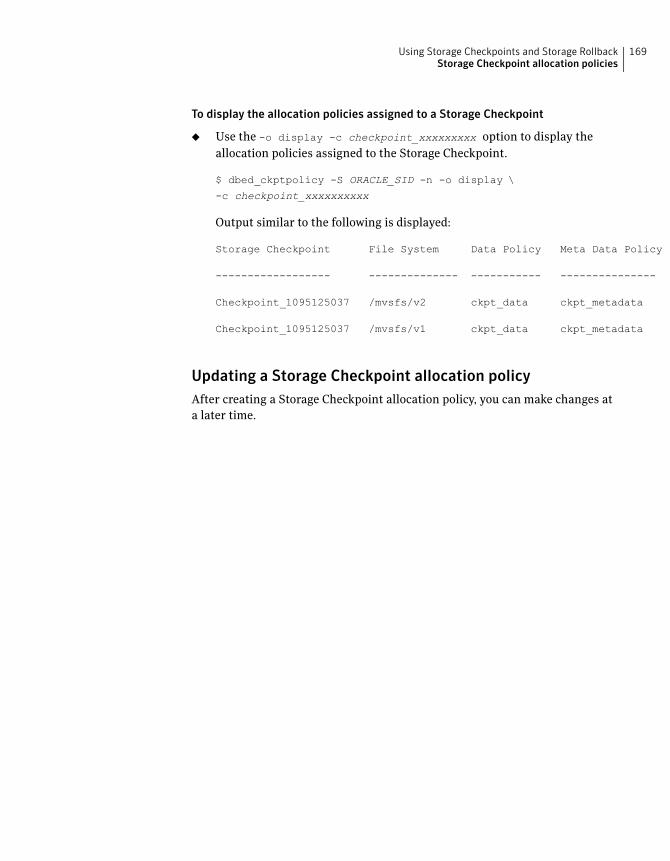
To display the allocation policies assigned to a Storage Checkpoint
◆ Use the -o display -c checkpoint_xxxxxxxxx option to display the
allocation policies assigned to the Storage Checkpoint.
$ dbed_ckptpolicy -S ORACLE_SID -n -o display \
-c checkpoint_xxxxxxxxxx
Output similar to the following is displayed:
Storage Checkpoint File System Data Policy Meta Data Policy
------------------ -------------- ----------- ---------------
Checkpoint_1095125037 /mvsfs/v2 ckpt_data ckpt_metadata
Checkpoint_1095125037 /mvsfs/v1 ckpt_data ckpt_metadata
Updating a Storage Checkpoint allocation policy
After creating a Storage Checkpoint allocation policy, you can make changes at
a later time.
169Using Storage Checkpoints and Storage RollbackStorage Checkpoint allocation policies
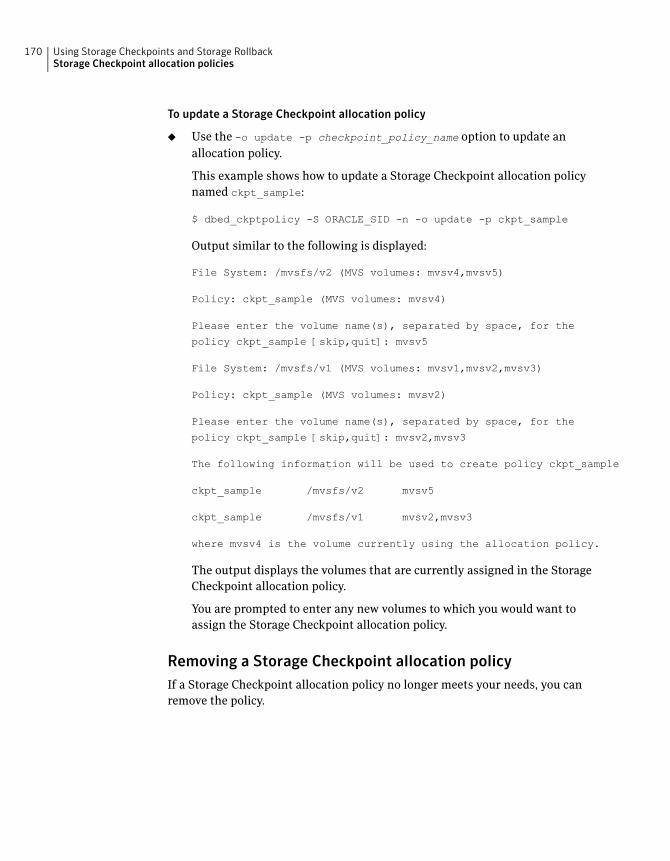
To update a Storage Checkpoint allocation policy
◆ Use the -o update -p checkpoint_policy_name option to update an
allocation policy.
This example shows how to update a Storage Checkpoint allocation policy
named ckpt_sample:
$ dbed_ckptpolicy -S ORACLE_SID -n -o update -p ckpt_sample
Output similar to the following is displayed:
File System: /mvsfs/v2 (MVS volumes: mvsv4,mvsv5)
Policy: ckpt_sample (MVS volumes: mvsv4)
Please enter the volume name(s), separated by space, for the
policy ckpt_sample [skip,quit]: mvsv5
File System: /mvsfs/v1 (MVS volumes: mvsv1,mvsv2,mvsv3)
Policy: ckpt_sample (MVS volumes: mvsv2)
Please enter the volume name(s), separated by space, for the
policy ckpt_sample [skip,quit]: mvsv2,mvsv3
The following information will be used to create policy ckpt_sample
ckpt_sample /mvsfs/v2 mvsv5
ckpt_sample /mvsfs/v1 mvsv2,mvsv3
where mvsv4 is the volume currently using the allocation policy.
The output displays the volumes that are currently assigned in the Storage
Checkpoint allocation policy.
You are prompted to enter any new volumes to which you would want to
assign the Storage Checkpoint allocation policy.
Removing a Storage Checkpoint allocation policy
If a Storage Checkpoint allocation policy no longer meets your needs, you can
remove the policy.
Using Storage Checkpoints and Storage RollbackStorage Checkpoint allocation policies
170
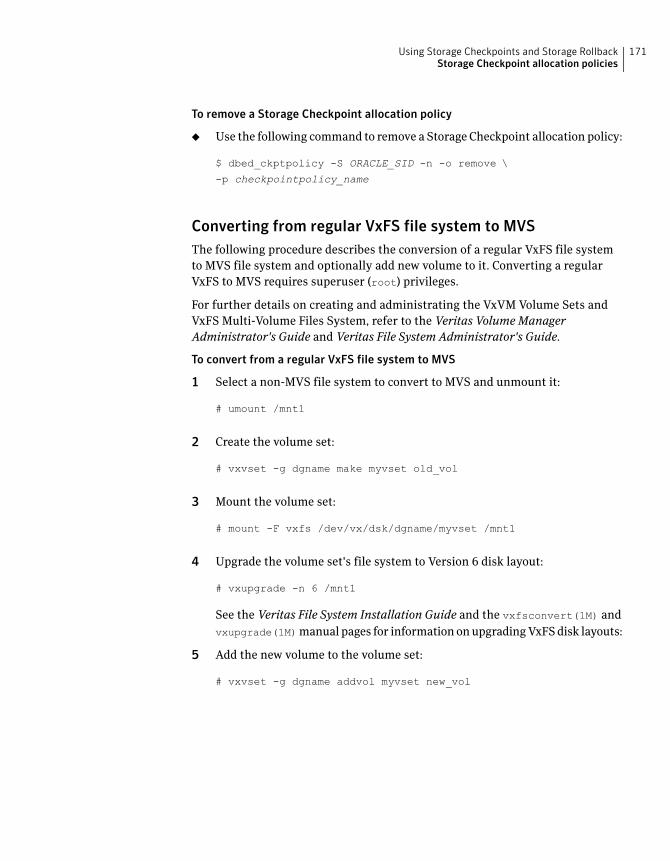
To remove a Storage Checkpoint allocation policy
◆ Use the following command to remove a Storage Checkpoint allocation policy:
$ dbed_ckptpolicy -S ORACLE_SID -n -o remove \
-p checkpointpolicy_name
Converting from regular VxFS file system to MVS
The following procedure describes the conversion of a regular VxFS file system
to MVS file system and optionally add new volume to it. Converting a regular
VxFS to MVS requires superuser (root) privileges.
For further details on creating and administrating the VxVM Volume Sets and
VxFS Multi-Volume Files System, refer to the Veritas VolumeManager
Administrator's Guide and Veritas File System Administrator's Guide.
To convert from a regular VxFS file system to MVS
1 Select a non-MVS file system to convert to MVS and unmount it:
# umount /mnt1
2 Create the volume set:
# vxvset -g dgname make myvset old_vol
3 Mount the volume set:
# mount -F vxfs /dev/vx/dsk/dgname/myvset /mnt1
4 Upgrade the volume set's file system to Version 6 disk layout:
# vxupgrade -n 6 /mnt1
See the Veritas File System Installation Guide and the vxfsconvert(1M) and
vxupgrade(1M)manual pages for information on upgrading VxFS disk layouts:
5 Add the new volume to the volume set:
# vxvset -g dgname addvol myvset new_vol
171Using Storage Checkpoints and Storage RollbackStorage Checkpoint allocation policies
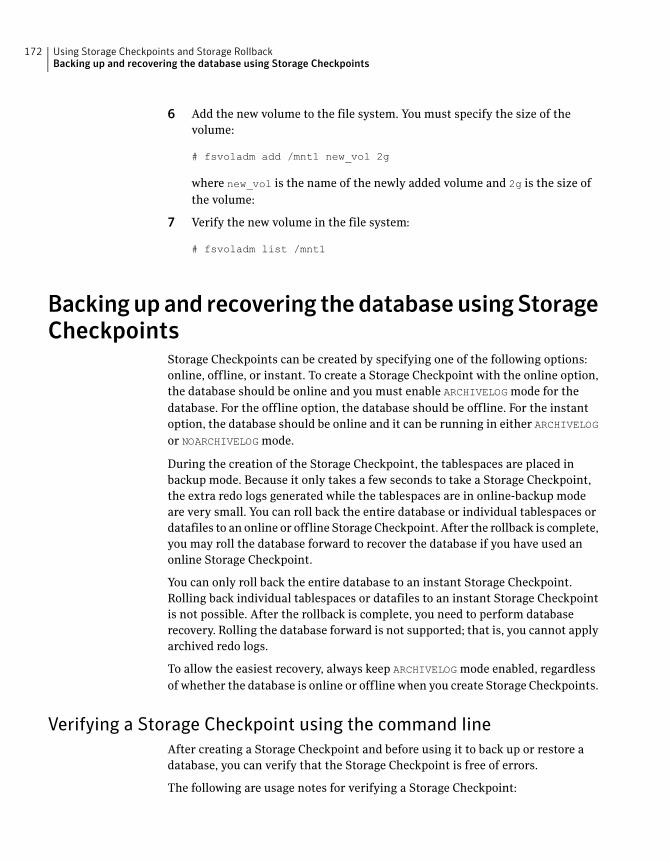
6 Add the new volume to the file system. You must specify the size of the
volume:
# fsvoladm add /mnt1 new_vol 2g
where new_vol is the name of the newly added volume and 2g is the size of
the volume:
7 Verify the new volume in the file system:
# fsvoladm list /mnt1
Backingupand recovering thedatabaseusingStorageCheckpoints
Storage Checkpoints can be created by specifying one of the following options:
online, offline, or instant. To create a Storage Checkpoint with the online option,
the database should be online and you must enable ARCHIVELOG mode for the
database. For the offline option, the database should be offline. For the instant
option, the database should be online and it can be running in either ARCHIVELOG
or NOARCHIVELOG mode.
During the creation of the Storage Checkpoint, the tablespaces are placed in
backup mode. Because it only takes a few seconds to take a Storage Checkpoint,
the extra redo logs generated while the tablespaces are in online-backup mode
are very small. You can roll back the entire database or individual tablespaces or
datafiles to an online or offline Storage Checkpoint. After the rollback is complete,
you may roll the database forward to recover the database if you have used an
online Storage Checkpoint.
You can only roll back the entire database to an instant Storage Checkpoint.
Rolling back individual tablespaces or datafiles to an instant Storage Checkpoint
is not possible. After the rollback is complete, you need to perform database
recovery. Rolling the database forward is not supported; that is, you cannot apply
archived redo logs.
To allow the easiest recovery, always keep ARCHIVELOG mode enabled, regardless
of whether the database is online or offline when you create Storage Checkpoints.
Verifying a Storage Checkpoint using the command line
After creating a Storage Checkpoint and before using it to back up or restore a
database, you can verify that the Storage Checkpoint is free of errors.
The following are usage notes for verifying a Storage Checkpoint:
Using Storage Checkpoints and Storage RollbackBacking up and recovering the database using Storage Checkpoints
172

■ See the dbed_ckptcreate(1M) and dbed_ckptmount(1M)
manual pages for more information.
Usage notes
173Using Storage Checkpoints and Storage RollbackBacking up and recovering the database using Storage Checkpoints
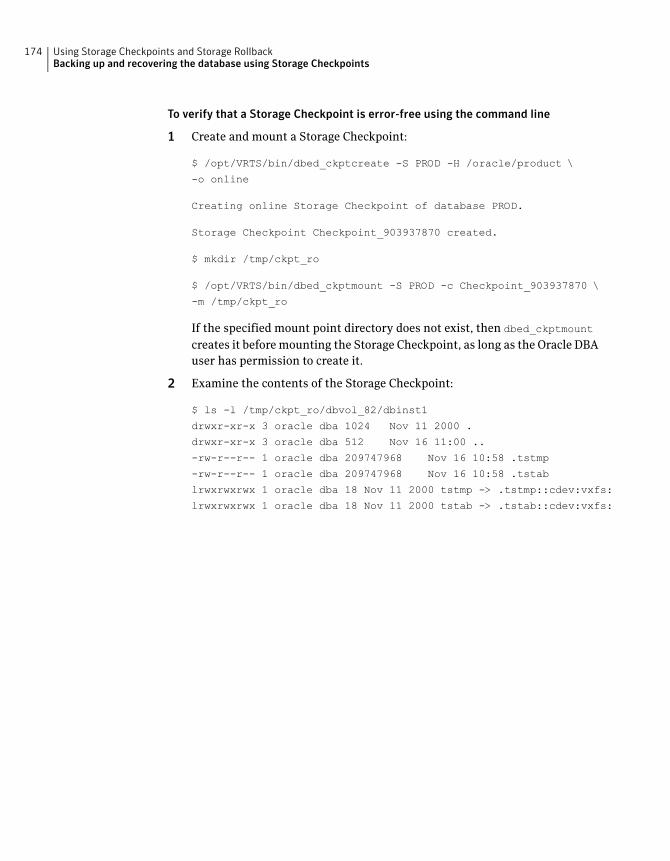
To verify that a Storage Checkpoint is error-free using the command line
1 Create and mount a Storage Checkpoint:
$ /opt/VRTS/bin/dbed_ckptcreate -S PROD -H /oracle/product \
-o online
Creating online Storage Checkpoint of database PROD.
Storage Checkpoint Checkpoint_903937870 created.
$ mkdir /tmp/ckpt_ro
$ /opt/VRTS/bin/dbed_ckptmount -S PROD -c Checkpoint_903937870 \
-m /tmp/ckpt_ro
If the specified mount point directory does not exist, then dbed_ckptmount
creates it before mounting the Storage Checkpoint, as long as the Oracle DBA
user has permission to create it.
2 Examine the contents of the Storage Checkpoint:
$ ls -l /tmp/ckpt_ro/dbvol_82/dbinst1
drwxr-xr-x 3 oracle dba 1024 Nov 11 2000 .
drwxr-xr-x 3 oracle dba 512 Nov 16 11:00 ..
-rw-r--r-- 1 oracle dba 209747968 Nov 16 10:58 .tstmp
-rw-r--r-- 1 oracle dba 209747968 Nov 16 10:58 .tstab
lrwxrwxrwx 1 oracle dba 18 Nov 11 2000 tstmp -> .tstmp::cdev:vxfs:
lrwxrwxrwx 1 oracle dba 18 Nov 11 2000 tstab -> .tstab::cdev:vxfs:
Using Storage Checkpoints and Storage RollbackBacking up and recovering the database using Storage Checkpoints
174
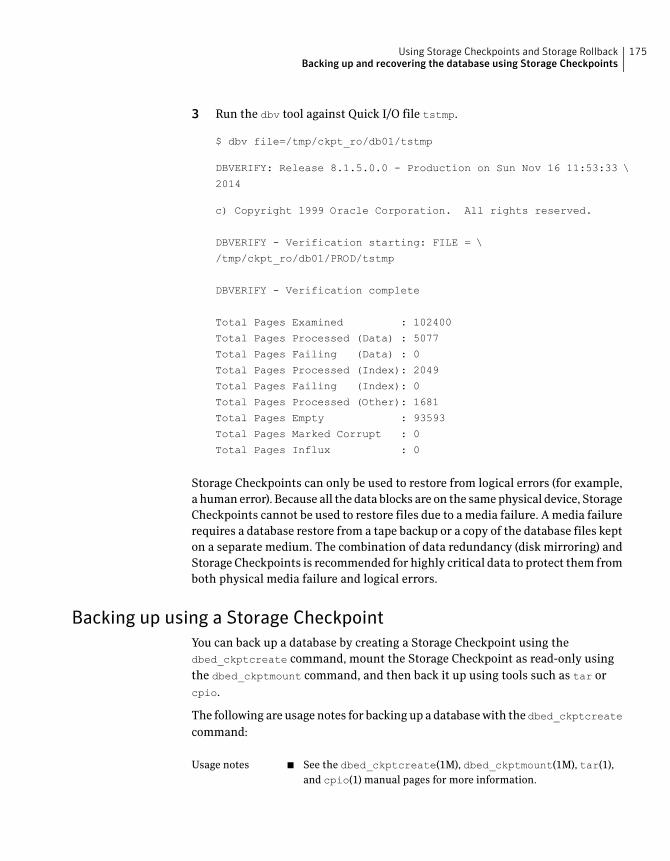
3 Run the dbv tool against Quick I/O file tstmp.
$ dbv file=/tmp/ckpt_ro/db01/tstmp
DBVERIFY: Release 8.1.5.0.0 - Production on Sun Nov 16 11:53:33 \
2014
c) Copyright 1999 Oracle Corporation. All rights reserved.
DBVERIFY - Verification starting: FILE = \
/tmp/ckpt_ro/db01/PROD/tstmp
DBVERIFY - Verification complete
Total Pages Examined : 102400
Total Pages Processed (Data) : 5077
Total Pages Failing (Data) : 0
Total Pages Processed (Index): 2049
Total Pages Failing (Index): 0
Total Pages Processed (Other): 1681
Total Pages Empty : 93593
Total Pages Marked Corrupt : 0
Total Pages Influx : 0
Storage Checkpoints can only be used to restore from logical errors (for example,
a human error). Because all the data blocks are on the same physical device, Storage
Checkpoints cannot be used to restore files due to a media failure. A media failure
requires a database restore from a tape backup or a copy of the database files kept
on a separate medium. The combination of data redundancy (disk mirroring) and
Storage Checkpoints is recommended for highly critical data to protect them from
both physical media failure and logical errors.
Backing up using a Storage Checkpoint
You can back up a database by creating a Storage Checkpoint using the
dbed_ckptcreate command, mount the Storage Checkpoint as read-only using
the dbed_ckptmount command, and then back it up using tools such as tar or
cpio.
The following are usage notes for backing up a database with the dbed_ckptcreate
command:
■ See the dbed_ckptcreate(1M), dbed_ckptmount(1M), tar(1),
and cpio(1) manual pages for more information.
Usage notes
175Using Storage Checkpoints and Storage RollbackBacking up and recovering the database using Storage Checkpoints
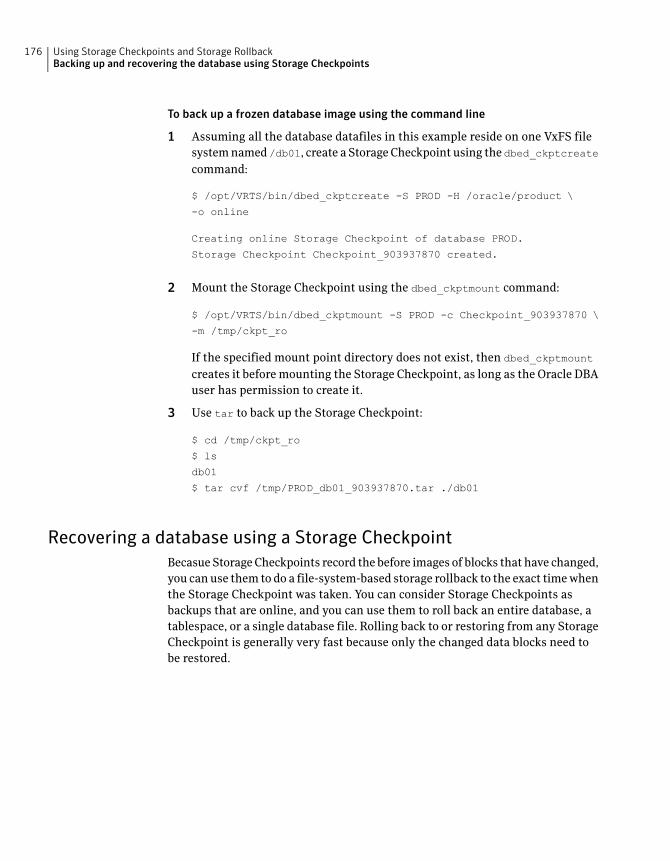
To back up a frozen database image using the command line
1 Assuming all the database datafiles in this example reside on one VxFS file
system named /db01, create a Storage Checkpoint using the dbed_ckptcreate
command:
$ /opt/VRTS/bin/dbed_ckptcreate -S PROD -H /oracle/product \
-o online
Creating online Storage Checkpoint of database PROD.
Storage Checkpoint Checkpoint_903937870 created.
2 Mount the Storage Checkpoint using the dbed_ckptmount command:
$ /opt/VRTS/bin/dbed_ckptmount -S PROD -c Checkpoint_903937870 \
-m /tmp/ckpt_ro
If the specified mount point directory does not exist, then dbed_ckptmount
creates it before mounting the Storage Checkpoint, as long as the Oracle DBA
user has permission to create it.
3 Use tar to back up the Storage Checkpoint:
$ cd /tmp/ckpt_ro
$ ls
db01
$ tar cvf /tmp/PROD_db01_903937870.tar ./db01
Recovering a database using a Storage Checkpoint
Becasue Storage Checkpoints record the before images of blocks that have changed,
you can use them to do a file-system-based storage rollback to the exact time when
the Storage Checkpoint was taken. You can consider Storage Checkpoints as
backups that are online, and you can use them to roll back an entire database, a
tablespace, or a single database file. Rolling back to or restoring from any Storage
Checkpoint is generally very fast because only the changed data blocks need to
be restored.
Using Storage Checkpoints and Storage RollbackBacking up and recovering the database using Storage Checkpoints
176
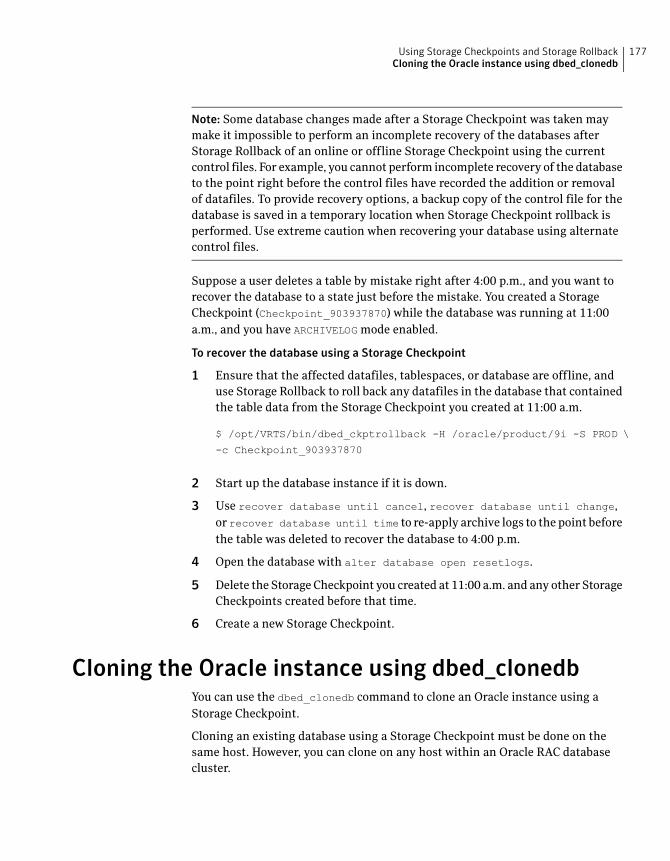
Note: Some database changes made after a Storage Checkpoint was taken may
make it impossible to perform an incomplete recovery of the databases after
Storage Rollback of an online or offline Storage Checkpoint using the current
control files. For example, you cannot perform incomplete recovery of the database
to the point right before the control files have recorded the addition or removal
of datafiles. To provide recovery options, a backup copy of the control file for the
database is saved in a temporary location when Storage Checkpoint rollback is
performed. Use extreme caution when recovering your database using alternate
control files.
Suppose a user deletes a table by mistake right after 4:00 p.m., and you want to
recover the database to a state just before the mistake. You created a Storage
Checkpoint (Checkpoint_903937870) while the database was running at 11:00
a.m., and you have ARCHIVELOG mode enabled.
To recover the database using a Storage Checkpoint
1 Ensure that the affected datafiles, tablespaces, or database are offline, and
use Storage Rollback to roll back any datafiles in the database that contained
the table data from the Storage Checkpoint you created at 11:00 a.m.
$ /opt/VRTS/bin/dbed_ckptrollback -H /oracle/product/9i -S PROD \
-c Checkpoint_903937870
2 Start up the database instance if it is down.
3 Use recover database until cancel, recover database until change,
or recover database until time to re-apply archive logs to the point before
the table was deleted to recover the database to 4:00 p.m.
4 Open the database with alter database open resetlogs.
5 Delete the Storage Checkpoint you created at 11:00 a.m. and any other Storage
Checkpoints created before that time.
6 Create a new Storage Checkpoint.
Cloning the Oracle instance using dbed_clonedbYou can use the dbed_clonedb command to clone an Oracle instance using a
Storage Checkpoint.
Cloning an existing database using a Storage Checkpoint must be done on the
same host. However, you can clone on any host within an Oracle RAC database
cluster.
177Using Storage Checkpoints and Storage RollbackCloning the Oracle instance using dbed_clonedb
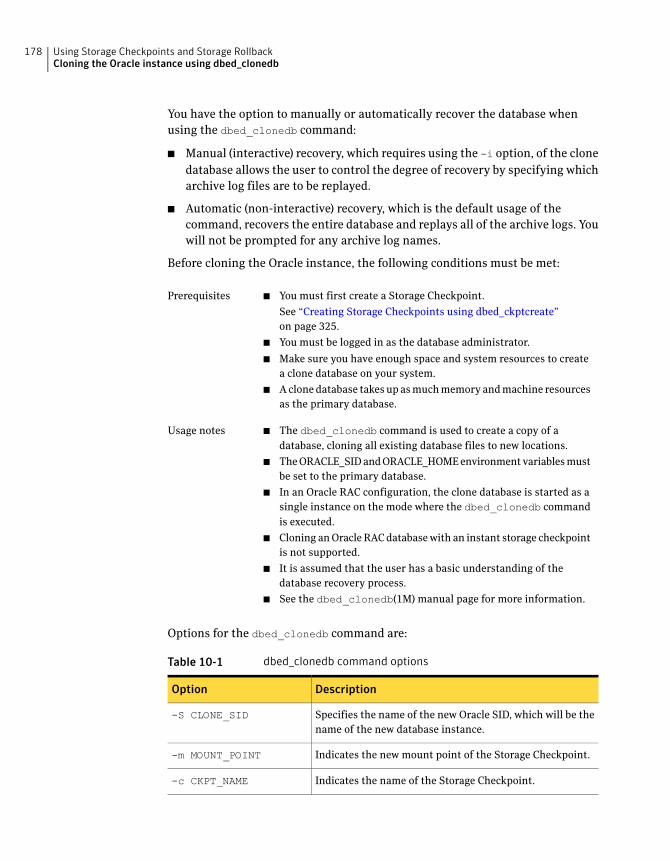
You have the option to manually or automatically recover the database when
using the dbed_clonedb command:
■ Manual (interactive) recovery, which requires using the -i option, of the clone
database allows the user to control the degree of recovery by specifying which
archive log files are to be replayed.
■ Automatic (non-interactive) recovery, which is the default usage of the
command, recovers the entire database and replays all of the archive logs. You
will not be prompted for any archive log names.
Before cloning the Oracle instance, the following conditions must be met:
■ You must first create a Storage Checkpoint.
See “Creating Storage Checkpoints using dbed_ckptcreate”
on page 325.
■ You must be logged in as the database administrator.
■ Make sure you have enough space and system resources to create
a clone database on your system.
■ A clone database takes up as much memory and machine resources
as the primary database.
Prerequisites
■ The dbed_clonedb command is used to create a copy of a
database, cloning all existing database files to new locations.
■ The ORACLE_SID and ORACLE_HOME environment variables must
be set to the primary database.
■ In an Oracle RAC configuration, the clone database is started as a
single instance on the mode where the dbed_clonedb command
is executed.
■ Cloning an Oracle RAC database with an instant storage checkpoint
is not supported.
■ It is assumed that the user has a basic understanding of the
database recovery process.
■ See the dbed_clonedb(1M) manual page for more information.
Usage notes
Options for the dbed_clonedb command are:
Table 10-1 dbed_clonedb command options
DescriptionOption
Specifies the name of the new Oracle SID, which will be the
name of the new database instance.
-S CLONE_SID
Indicates the new mount point of the Storage Checkpoint.-m MOUNT_POINT
Indicates the name of the Storage Checkpoint.-c CKPT_NAME
Using Storage Checkpoints and Storage RollbackCloning the Oracle instance using dbed_clonedb
178
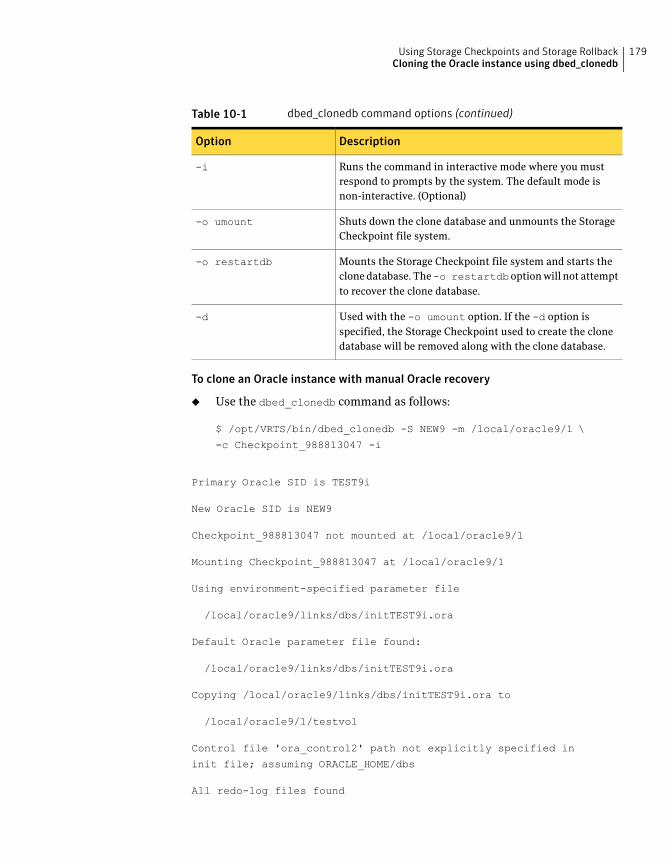
Table 10-1 dbed_clonedb command options (continued)
DescriptionOption
Runs the command in interactive mode where you must
respond to prompts by the system. The default mode is
non-interactive. (Optional)
-i
Shuts down the clone database and unmounts the Storage
Checkpoint file system.
-o umount
Mounts the Storage Checkpoint file system and starts the
clone database. The-o restartdboption will not attempt
to recover the clone database.
-o restartdb
Used with the -o umount option. If the -d option is
specified, the Storage Checkpoint used to create the clone
database will be removed along with the clone database.
-d
To clone an Oracle instance with manual Oracle recovery
◆ Use the dbed_clonedb command as follows:
$ /opt/VRTS/bin/dbed_clonedb -S NEW9 -m /local/oracle9/1 \
-c Checkpoint_988813047 -i
Primary Oracle SID is TEST9i
New Oracle SID is NEW9
Checkpoint_988813047 not mounted at /local/oracle9/1
Mounting Checkpoint_988813047 at /local/oracle9/1
Using environment-specified parameter file
/local/oracle9/links/dbs/initTEST9i.ora
Default Oracle parameter file found:
/local/oracle9/links/dbs/initTEST9i.ora
Copying /local/oracle9/links/dbs/initTEST9i.ora to
/local/oracle9/1/testvol
Control file 'ora_control2' path not explicitly specified in
init file; assuming ORACLE_HOME/dbs
All redo-log files found
179Using Storage Checkpoints and Storage RollbackCloning the Oracle instance using dbed_clonedb
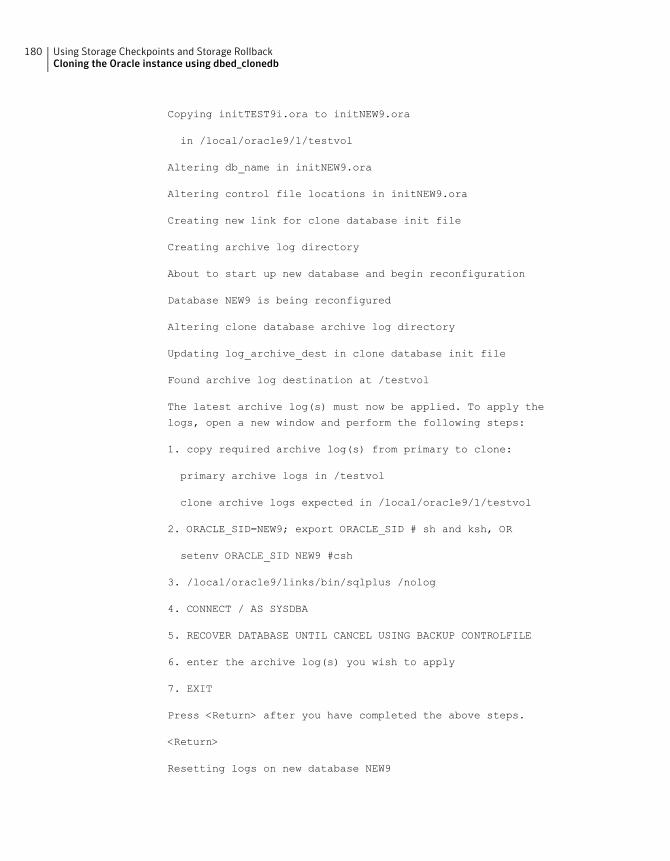
Copying initTEST9i.ora to initNEW9.ora
in /local/oracle9/1/testvol
Altering db_name in initNEW9.ora
Altering control file locations in initNEW9.ora
Creating new link for clone database init file
Creating archive log directory
About to start up new database and begin reconfiguration
Database NEW9 is being reconfigured
Altering clone database archive log directory
Updating log_archive_dest in clone database init file
Found archive log destination at /testvol
The latest archive log(s) must now be applied. To apply the
logs, open a new window and perform the following steps:
1. copy required archive log(s) from primary to clone:
primary archive logs in /testvol
clone archive logs expected in /local/oracle9/1/testvol
2. ORACLE_SID=NEW9; export ORACLE_SID # sh and ksh, OR
setenv ORACLE_SID NEW9 #csh
3. /local/oracle9/links/bin/sqlplus /nolog
4. CONNECT / AS SYSDBA
5. RECOVER DATABASE UNTIL CANCEL USING BACKUP CONTROLFILE
6. enter the archive log(s) you wish to apply
7. EXIT
Press <Return> after you have completed the above steps.
<Return>
Resetting logs on new database NEW9
Using Storage Checkpoints and Storage RollbackCloning the Oracle instance using dbed_clonedb
180
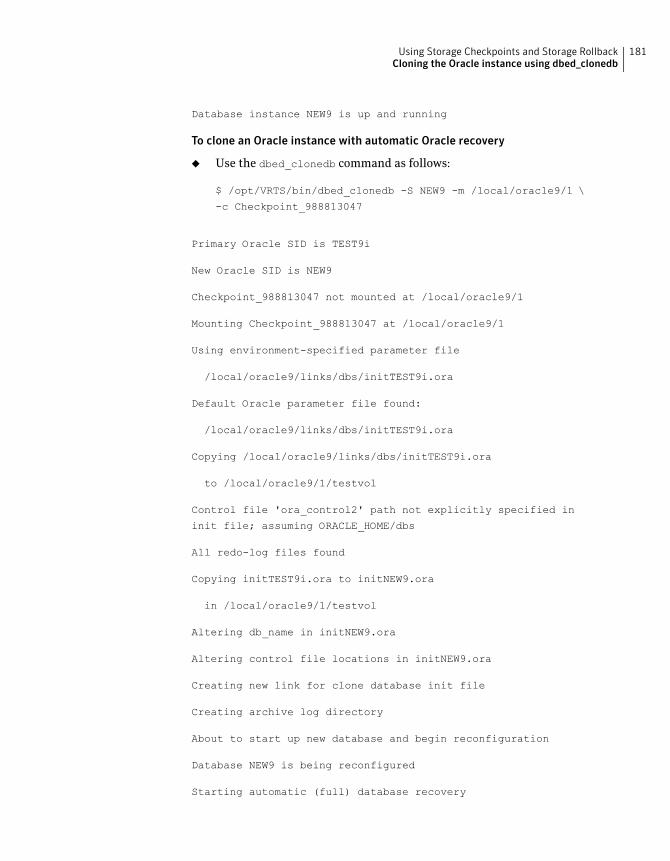
Database instance NEW9 is up and running
To clone an Oracle instance with automatic Oracle recovery
◆ Use the dbed_clonedb command as follows:
$ /opt/VRTS/bin/dbed_clonedb -S NEW9 -m /local/oracle9/1 \
-c Checkpoint_988813047
Primary Oracle SID is TEST9i
New Oracle SID is NEW9
Checkpoint_988813047 not mounted at /local/oracle9/1
Mounting Checkpoint_988813047 at /local/oracle9/1
Using environment-specified parameter file
/local/oracle9/links/dbs/initTEST9i.ora
Default Oracle parameter file found:
/local/oracle9/links/dbs/initTEST9i.ora
Copying /local/oracle9/links/dbs/initTEST9i.ora
to /local/oracle9/1/testvol
Control file 'ora_control2' path not explicitly specified in
init file; assuming ORACLE_HOME/dbs
All redo-log files found
Copying initTEST9i.ora to initNEW9.ora
in /local/oracle9/1/testvol
Altering db_name in initNEW9.ora
Altering control file locations in initNEW9.ora
Creating new link for clone database init file
Creating archive log directory
About to start up new database and begin reconfiguration
Database NEW9 is being reconfigured
Starting automatic (full) database recovery
181Using Storage Checkpoints and Storage RollbackCloning the Oracle instance using dbed_clonedb
Shutting down clone database
Altering clone database archive log directory
Updating log_archive_dest in clone database init file
Found archive log destination at /testvol
Mounting clone database
Resetting logs on new database NEW9
Database instance NEW9 is up and running
To shut down the clone database and unmount the Storage Checkpoint
◆ Use the dbed_clonedb command as follows:
$ /opt/VRTS/bin/dbed_clonedb -S NEW9 -o umount
To mount a Storage Checkpoint file system and start the clone database
◆ Use the dbed_clonedb command as follows:
$ /opt/VRTS/bin/dbed_clonedb -S NEW9 -o restartdb
Database instance NEW9 is up and running.
To delete a clone database and the Storage Checkpoint used to create it
◆ Use the dbed_clonedb command as follows:
$ /opt/VRTS/bin/dbed_clonedb -S NEW9 -o umount -d
Guidelines for Oracle recoveryFor optimal Oracle recovery, consider the following guidelines:
■ Back up all control files before Storage Rollback in case the subsequent Oracle
recovery is not successful. Oracle recommends that you keep at least two copies
of the control files for each Oracle database and that you store the copies on
different disks. It is also a good idea to back up the control files before and
after making structural changes to databases.
■ Make sure that the control files are not rolled back.
A control file is a small binary file that describes the structure of the database
and must be available to mount, open, and maintain the database. The control
file stores all necessary database files information, log file information, the
Using Storage Checkpoints and Storage RollbackGuidelines for Oracle recovery
182
name of the database, and the timestamp of database creation, as well as
synchronization information such as Storage Checkpoint and log sequence
information that is needed for recovery. Rolling back the control file will result
in an inconsistency between the physical database structure and the control
file.
Note: If your intention is to roll back the database to recover from structural
changes that you do not want to maintain, you may indeed want to roll back
control files.
■ Make sure that all archived redo logs are available.
A database backup with online and archived logs is required for a complete
database recovery. Query V$ARCHIVED_LOG to list all the archived log
information and V$ARCHIVE_DEST to list the status of archive destinations.
In Veritas Storage Foundation for Oracle RAC configurations, the archive log
destination must be on a Veritas Cluster File System.
To restore the necessary archived redo log files, you can query V$LOG_HISTORY
to list all the archived redo log history or query V$RECOVERY_LOG to list only
the archived redo logs needed for recovery. The required archived redo log
files can be restored to the destination specified in the LOG_ARCHIVE_DEST
parameter or to an alternate location. If the archived redo logs were restored
to an alternate location, use the ALTER DATABASE RECOVER ... FROM statement
during media recovery.
■ After Storage Rollback, perform Oracle recovery, applying some or all of the
archived redo logs.
To perform a complete media recovery:
◆ SET AUTORECOVERY ON;
RECOVER DATABASE;
To perform an incomplete media recovery, use one of the following:
◆ ■ RECOVER DATABASE UNTIL CANCEL;
■ RECOVER DATABASE UNTIL TIME ’yyyy-mm-dd:hh:mm:ss’;
(You can confirm the time of error by checking the
$ORACLE_HOME/rdbms/log/alert*.log file.)
■ RECOVER DATABASE UNTIL TIME \
’yyyy-mm-dd:hh:mm:ss’ using backup controlfile;
183Using Storage Checkpoints and Storage RollbackGuidelines for Oracle recovery
■ RECOVER DATABASE UNTIL CHANGE scn;
To open the database after an incomplete media recovery, use the following:
◆ ALTER DATABASE OPEN RESETLOGS;
RESETLOGS resets the log sequence. The RESETLOGS option is required after
an incomplete media recovery. After opening the database with the RESETLOGS
option, remove the Storage Checkpoint you just rolled back to as well as any
Storage Checkpoints that were taken before that one. These earlier Storage
Checkpoints can no longer be used for Storage Rollback. After removing these
Storage Checkpoints, be sure to create a new Storage Checkpoint.
Caution: Attempting to roll back to the same Storage Checkpoint more than once
can result in data corruption. After rolling back, be sure to delete the Storage
Checkpoint that you rolled back to and then create a new one.
See your Oracle documentation for complete and detailed information on recovery.
Using theGUI to performStorage Checkpoint-relatedoperations
You can use the GUI to create Storage Checkpoints and then roll back an entire
database, a single tablespace, or any set of datafiles using any of the previously
created Storage Checkpoints.
See the Veritas Storage Foundation for Oracle Graphical User Interface Guide.
Veritas Storage Foundation for Oracle RAC does not support the GUI.
Using Storage Checkpoints and Storage RollbackUsing the GUI to perform Storage Checkpoint-related operations
184
Using Database Dynamic
Storage Tiering
This chapter includes the following topics:
■ About Database Dynamic Storage Tiering
■ Configuring Database Dynamic Storage Tiering
■ Dynamic Storage Tiering policy management
■ How to use file statistics
■ Running Database Dynamic Storage Tiering reports
■ Load balancing in a database environment
■ Database Dynamic Storage Tiering use cases for Oracle
About Database Dynamic Storage TieringMore and more data is being retained. Eventually, some of the data is no longer
needed as frequently, but still takes up a large amount of disk space. Database
Dynamic Storage Tiering matches data storage with the data's usage requirements
so that data is relocated based on requirements determined by the database
administrator (DBA). The feature enables you to manage your data so that
less-frequently used data can be moved to slower, less expensive disks, allowing
frequently-accessed data to be stored on the faster disks for quicker retrieval.
Storage classes are used to designate which disks make up a particular tier.
There are two common ways of defining storage classes:
■ Performance, or storage, cost class: The most-used class consists of fast,
expensive disks. When data is no longer needed on a regular basis, the data
11Chapter
can be moved to a different class that is made up of slower, less expensive
disks.
■ Resilience class: Each class consists of non-mirrored volumes, mirrored
volumes, and n-way mirrored volumes.
For example, a database is usually made up of data, an index, and logs. The
data could be set up with a three-way mirror because data is critical. The index
could be set up with a two-way mirror because the index is important, but can
be recreated. The logs are not required on a daily basis and could be set up
with no mirroring.
Dynamic Storage Tiering (DST) policies control initial file location and the
circumstances under which existing files are relocated. These policies cause the
files to which they apply to be created and extended on specific subsets of a file
systems's volume set, known as placement classes. The files are relocated to
volumes in other placement classes when they meet specified naming, timing,
access rate, and storage capacity-related conditions.
In addition to preset policies, you can manually move files to faster or slower
storage, when necessary. You can run reports that list active policies, display file
activity, display volume usage, or show file statistics.
Database Dynamic Storage Tiering building blocks
To use Database Dynamic Storage Tiering, your storage must be managed using
the following features:
■ VxFS multi-volume file system
■ VxVM volume set
■ Volume tags
■ Dynamic Storage Tiering policies
About VxFS multi-volume file systems
Multi-volume file systems are file systems that occupy two or more virtual volumes.
The collection of volumes is known as a volume set, and is made up of disks or
disk array LUNs belonging to a single Veritas Volume Manager (VxVM) disk group.
A multi-volume file system presents a single name space, making the existence
of multiple volumes transparent to users and applications. Each volume retains
a separate identity for administrative purposes, making it possible to control the
locations to which individual files are directed. This feature is available only on
file systems using disk layout Version 6 or later.
See “Converting a VxFS file system to a VxFS multi-volume file system” on page 192.
Using Database Dynamic Storage TieringAbout Database Dynamic Storage Tiering
186
See the fsvoladm(1M) manual page.
About VxVM volume sets
Volume sets allow several volumes to be represented by a single logical object.
Volume sets cannot be empty. All I/O from and to the underlying volumes is
directed via the I/O interfaces of the volume set. The volume set feature supports
the multi-volume enhancement to Veritas File System (VxFS). This feature allows
file systems to make best use of the different performance and availability
characteristics of the underlying volumes. For example, file system metadata
could be stored on volumes with higher redundancy, and user data on volumes
with better performance.
About volume tags
You make a VxVM volume part of a placement class by associating a volume tag
with it. For file placement purposes, VxFS treats all of the volumes in a placement
class as equivalent, and balances space allocation across them. A volume may
have more than one tag associated with it. If a volume has multiple tags, the
volume belongs to multiple placement classes and is subject to allocation and
relocation policies that relate to any of the placement classes. Multiple tagging
should be used carefully.
A placement class is a Dynamic Storage Tiering attribute of a given volume in a
volume set of a multi-volume file system. This attribute is a character string, and
is known as a volume tag.
About Dynamic Storage Tiering policies
Dynamic Storage Tiering allows administrators of multi-volume VxFS file systems
to manage the placement of files on individual volumes in a volume set by defining
placement policies that control both initial file location and the circumstances
under which existing files are relocated. These placement policies cause the files
to which they apply to be created and extended on specific subsets of a file system's
volume set, known as placement classes. The files are relocated to volumes in
other placement classes when they meet the specified naming, timing, access rate,
and storage capacity-related conditions.
Database Dynamic Storage Tiering in a High Availability (HA)environment
Veritas Cluster Server does not provide a bundled agent for volume sets. If issues
arise with volumes or volume sets, the issues can only be detected at the DiskGroup
and Mount resource levels.
187Using Database Dynamic Storage TieringAbout Database Dynamic Storage Tiering
The DiskGroup agent brings online, takes offline, and monitors a Veritas Volume
Manager (VxVM) disk group. This agent uses VxVM commands. When the value
of the StartVolumes and StopVolumes attributes are both 1, the DiskGroup agent
onlines and offlines the volumes during the import and deport operations of the
disk group. When using volume sets, set StartVolumes and StopVolumes attributes
of the DiskGroup resource that contains the volume set to 1. If a file system is
created on the volume set, use a Mount resource to mount the volume set.
The Mount agent brings online, takes offline, and monitors a file system or NFS
client mount point.
If you are using any of the Database Dynamic Storage Tiering commands in a high
availability (HA) environment, the time on each system in the cluster must be
synchronized. Otherwise, the scheduled task may not be executed at the expected
time after a service group failover.
For more information, see the Veritas Cluster Server Bundled Agents Reference
Guide.
Configuring Database Dynamic Storage TieringTo use Database Dynamic Storage Tiering, you must:
■ Review Database Dynamic Storage Tiering command requirements.
■ Define database parameters.
■ Set up storage classes.
■ Convert an existing VxFS database file system to a VxFS multi-volume file
system for use with Database Dynamic Storage Tiering.
■ Classify, or tag, volumes so that the tags indicate the quality of the underlying
disk.
■ Display the free space on each class.
■ Add or remove volumes as necessary.
Database Dynamic Storage Tiering command requirements
Before defining your database parameters, review the following command
requirements:
■ An Oracle database must be up and running.
■ Only the Oracle database administrator can run Database Dynamic Storage
Tiering commands.
Using Database Dynamic Storage TieringConfiguring Database Dynamic Storage Tiering
188
■ Run the dbed_update command before running any of the Database Dynamic
Storage Tiering commands. You should also run the dbed_update command
if any of the database files change.
Because the Database Dynamic Storage Tiering commands retrieve database
information from the repository, the repository must be up to date.
■ Define the LD_LIBRARY_PATH environment variable as follows:
LD_LIBRARY_PATH=$LD_LIBRARY_PATH:/opt/VRTSdbms3/lib; \
export LD_LIBRARY_PATH
■ If you are using any of the Database Dynamic Storage Tiering commands in a
high availability (HA) environment, the time on each system in the cluster
must be synchronized.
■ Create the volumes that you want to add to the multi-volume file system in
the same disk group as the file system volume. As root, use the following
command to change the owner of each volume:
# opt/VRTS/bin/vxedit -g disk_group \
set user=oracle volume
■ Change the owner of the mount point on which you want to implement Database
Dynamic Storage Tiering to oracle.
Defining database parameters
Running the dbdst_admin command defines parameters for the entire database.
You must run this command at least once to define the database parameters for
Database Dynamic Storage Tiering. Three pre-defined storage classes will be
created (PRIMARY, SECONDARY, and BALANCE). Parameter values are stored in
the SFDB repository.
Set at least one of the parameters in maxclass, minclass, statinterval,
sweeptime,sweepinterval,purgetime, orpurgeinterval, to enable default values.
Add at least one class to enable the default classes.
Table 11-1 lists the options for the dbdst_admin command.
Table 11-1 dbdst_admin command options
DescriptionOption
Specifies the ORACLE_SID, which is the name of the Oracle
instance.
-S $ORACLE_SID
189Using Database Dynamic Storage TieringConfiguring Database Dynamic Storage Tiering
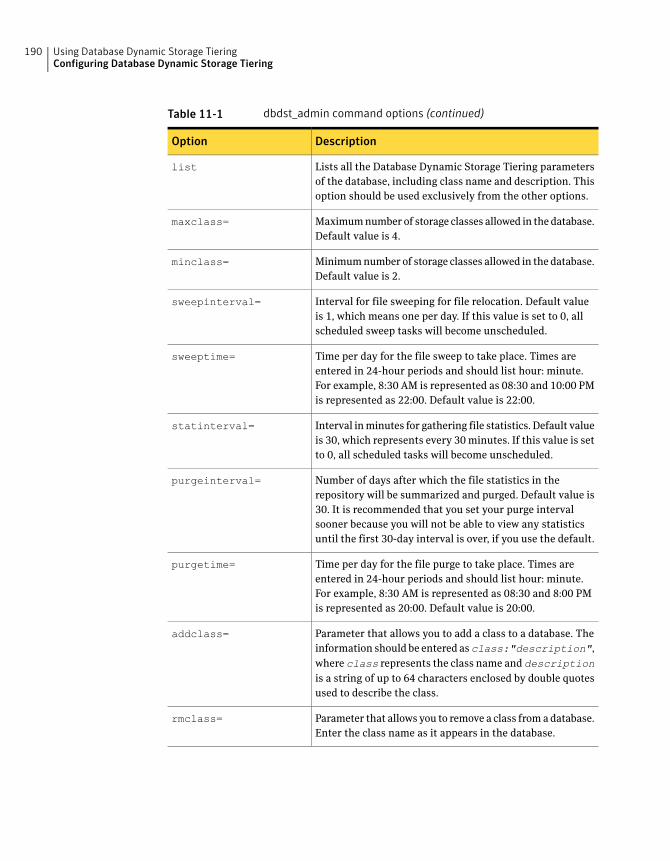
Table 11-1 dbdst_admin command options (continued)
DescriptionOption
Lists all the Database Dynamic Storage Tiering parameters
of the database, including class name and description. This
option should be used exclusively from the other options.
list
Maximum number of storage classes allowed in the database.
Default value is 4.
maxclass=
Minimum number of storage classes allowed in the database.
Default value is 2.
minclass=
Interval for file sweeping for file relocation. Default value
is 1, which means one per day. If this value is set to 0, all
scheduled sweep tasks will become unscheduled.
sweepinterval=
Time per day for the file sweep to take place. Times are
entered in 24-hour periods and should list hour: minute.
For example, 8:30 AM is represented as 08:30 and 10:00 PM
is represented as 22:00. Default value is 22:00.
sweeptime=
Interval in minutes for gathering file statistics. Default value
is 30, which represents every 30 minutes. If this value is set
to 0, all scheduled tasks will become unscheduled.
statinterval=
Number of days after which the file statistics in the
repository will be summarized and purged. Default value is
30. It is recommended that you set your purge interval
sooner because you will not be able to view any statistics
until the first 30-day interval is over, if you use the default.
purgeinterval=
Time per day for the file purge to take place. Times are
entered in 24-hour periods and should list hour: minute.
For example, 8:30 AM is represented as 08:30 and 8:00 PM
is represented as 20:00. Default value is 20:00.
purgetime=
Parameter that allows you to add a class to a database. The
information should be entered asclass:"description",
where class represents the class name and descriptionis a string of up to 64 characters enclosed by double quotes
used to describe the class.
addclass=
Parameter that allows you to remove a class from a database.
Enter the class name as it appears in the database.
rmclass=
Using Database Dynamic Storage TieringConfiguring Database Dynamic Storage Tiering
190
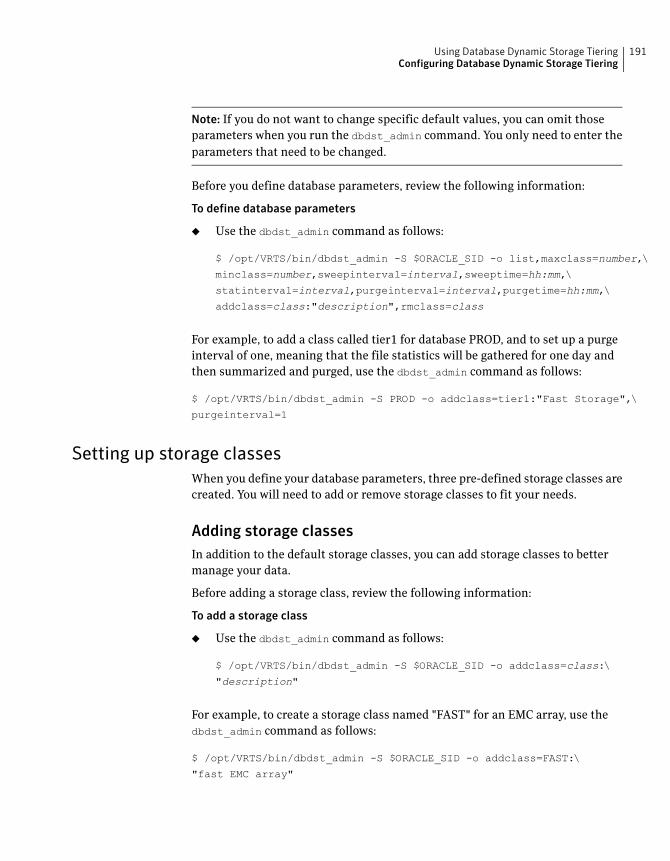
Note: If you do not want to change specific default values, you can omit those
parameters when you run the dbdst_admin command. You only need to enter the
parameters that need to be changed.
Before you define database parameters, review the following information:
To define database parameters
◆ Use the dbdst_admin command as follows:
$ /opt/VRTS/bin/dbdst_admin -S $ORACLE_SID -o list,maxclass=number,\
minclass=number,sweepinterval=interval,sweeptime=hh:mm,\
statinterval=interval,purgeinterval=interval,purgetime=hh:mm,\
addclass=class:"description",rmclass=class
For example, to add a class called tier1 for database PROD, and to set up a purge
interval of one, meaning that the file statistics will be gathered for one day and
then summarized and purged, use the dbdst_admin command as follows:
$ /opt/VRTS/bin/dbdst_admin -S PROD -o addclass=tier1:"Fast Storage",\
purgeinterval=1
Setting up storage classes
When you define your database parameters, three pre-defined storage classes are
created. You will need to add or remove storage classes to fit your needs.
Adding storage classes
In addition to the default storage classes, you can add storage classes to better
manage your data.
Before adding a storage class, review the following information:
To add a storage class
◆ Use the dbdst_admin command as follows:
$ /opt/VRTS/bin/dbdst_admin -S $ORACLE_SID -o addclass=class:\
"description"
For example, to create a storage class named "FAST" for an EMC array, use the
dbdst_admin command as follows:
$ /opt/VRTS/bin/dbdst_admin -S $ORACLE_SID -o addclass=FAST:\
"fast EMC array"
191Using Database Dynamic Storage TieringConfiguring Database Dynamic Storage Tiering

Removing storage classes
If you no longer require a specific storage class, you can remove it. You cannot
remove the pre-defined storage classes (PRIMARY, SECONDARY, and BALANCE).
Before removing a storage class, review the following information:
To remove a storage class
◆ Use the dbdst_admin command as follows:
$ /opt/VRTS/bin/dbdst_admin -S $ORACLE_SID rmclass=class
For example, to remove a storage class called "SLOW," use the dbdst_admin
command as follows:
$ /opt/VRTS/bin/dbdst_admin -S $ORACLE_SID rmclass=SLOW
Displaying storage classes
You can display a list of Database Dynamic Storage Tiering properties and storage
classes using the dbdst_admin command.
Before displaying your storage classes, review the following information:
To display existing storage classes and properties
◆ Use the dbdst_admin command as follows:
$ /opt/VRTS/bin/dbdst_admin -S $ORACLE_SID -o list
Converting a VxFS file system to a VxFS multi-volume file system
To convert your existing VxFS file system to a VxFS multi-volume file system,
you must convert a single volume to a volume set.
Converting a single volume to a volume set
When you convert to a volume set using the dbdst_convert command, the original
volume will be renamed to a new volume name. The mount device name will
become the new volume set name. Creating the new volume set name with the
mount device name nullifies the need to rename the mount device in various
locations.
Before converting to a volume set, make sure the following conditions have been
met:
Using Database Dynamic Storage TieringConfiguring Database Dynamic Storage Tiering
192
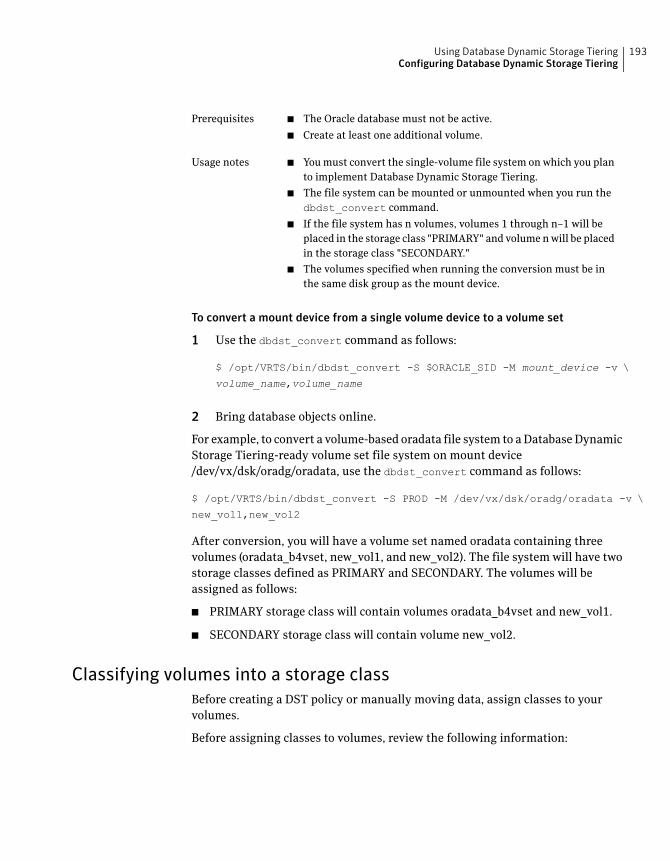
■ The Oracle database must not be active.
■ Create at least one additional volume.
Prerequisites
■ You must convert the single-volume file system on which you plan
to implement Database Dynamic Storage Tiering.
■ The file system can be mounted or unmounted when you run the
dbdst_convert command.
■ If the file system has n volumes, volumes 1 through n–1 will be
placed in the storage class "PRIMARY" and volume n will be placed
in the storage class "SECONDARY."
■ The volumes specified when running the conversion must be in
the same disk group as the mount device.
Usage notes
To convert a mount device from a single volume device to a volume set
1 Use the dbdst_convert command as follows:
$ /opt/VRTS/bin/dbdst_convert -S $ORACLE_SID -M mount_device -v \
volume_name,volume_name
2 Bring database objects online.
For example, to convert a volume-based oradata file system to a Database Dynamic
Storage Tiering-ready volume set file system on mount device
/dev/vx/dsk/oradg/oradata, use the dbdst_convert command as follows:
$ /opt/VRTS/bin/dbdst_convert -S PROD -M /dev/vx/dsk/oradg/oradata -v \
new_vol1,new_vol2
After conversion, you will have a volume set named oradata containing three
volumes (oradata_b4vset, new_vol1, and new_vol2). The file system will have two
storage classes defined as PRIMARY and SECONDARY. The volumes will be
assigned as follows:
■ PRIMARY storage class will contain volumes oradata_b4vset and new_vol1.
■ SECONDARY storage class will contain volume new_vol2.
Classifying volumes into a storage class
Before creating a DST policy or manually moving data, assign classes to your
volumes.
Before assigning classes to volumes, review the following information:
193Using Database Dynamic Storage TieringConfiguring Database Dynamic Storage Tiering
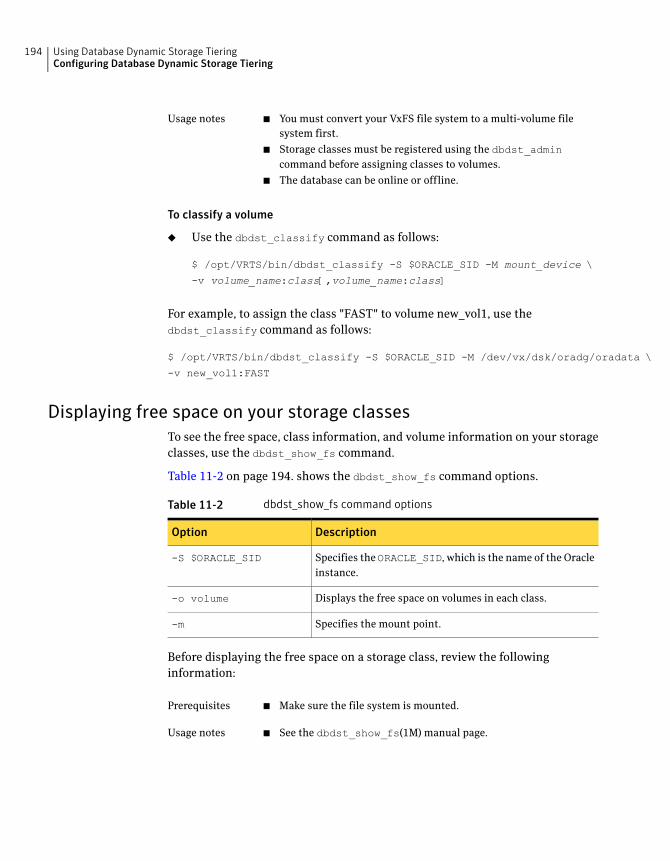
■ You must convert your VxFS file system to a multi-volume file
system first.
■ Storage classes must be registered using the dbdst_admincommand before assigning classes to volumes.
■ The database can be online or offline.
Usage notes
To classify a volume
◆ Use the dbdst_classify command as follows:
$ /opt/VRTS/bin/dbdst_classify -S $ORACLE_SID -M mount_device \
-v volume_name:class[,volume_name:class]
For example, to assign the class "FAST" to volume new_vol1, use the
dbdst_classify command as follows:
$ /opt/VRTS/bin/dbdst_classify -S $ORACLE_SID -M /dev/vx/dsk/oradg/oradata \
-v new_vol1:FAST
Displaying free space on your storage classes
To see the free space, class information, and volume information on your storage
classes, use the dbdst_show_fs command.
Table 11-2 on page 194. shows the dbdst_show_fs command options.
Table 11-2 dbdst_show_fs command options
DescriptionOption
Specifies the ORACLE_SID, which is the name of the Oracle
instance.
-S $ORACLE_SID
Displays the free space on volumes in each class.-o volume
Specifies the mount point.-m
Before displaying the free space on a storage class, review the following
information:
■ Make sure the file system is mounted.Prerequisites
■ See the dbdst_show_fs(1M) manual page.Usage notes
Using Database Dynamic Storage TieringConfiguring Database Dynamic Storage Tiering
194
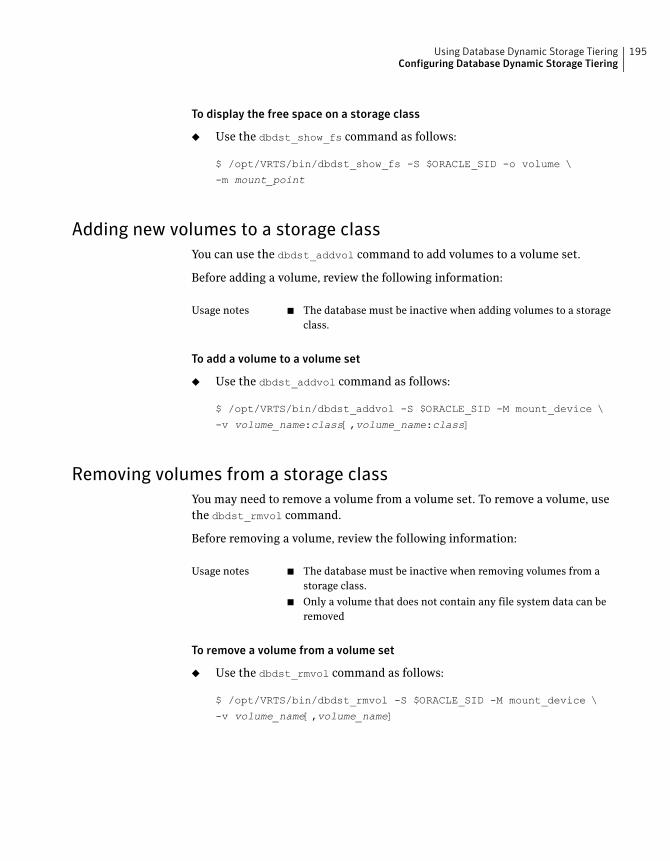
To display the free space on a storage class
◆ Use the dbdst_show_fs command as follows:
$ /opt/VRTS/bin/dbdst_show_fs -S $ORACLE_SID -o volume \
-m mount_point
Adding new volumes to a storage class
You can use the dbdst_addvol command to add volumes to a volume set.
Before adding a volume, review the following information:
■ The database must be inactive when adding volumes to a storage
class.
Usage notes
To add a volume to a volume set
◆ Use the dbdst_addvol command as follows:
$ /opt/VRTS/bin/dbdst_addvol -S $ORACLE_SID -M mount_device \
-v volume_name:class[,volume_name:class]
Removing volumes from a storage class
You may need to remove a volume from a volume set. To remove a volume, use
the dbdst_rmvol command.
Before removing a volume, review the following information:
■ The database must be inactive when removing volumes from a
storage class.
■ Only a volume that does not contain any file system data can be
removed
Usage notes
To remove a volume from a volume set
◆ Use the dbdst_rmvol command as follows:
$ /opt/VRTS/bin/dbdst_rmvol -S $ORACLE_SID -M mount_device \
-v volume_name[,volume_name]
195Using Database Dynamic Storage TieringConfiguring Database Dynamic Storage Tiering
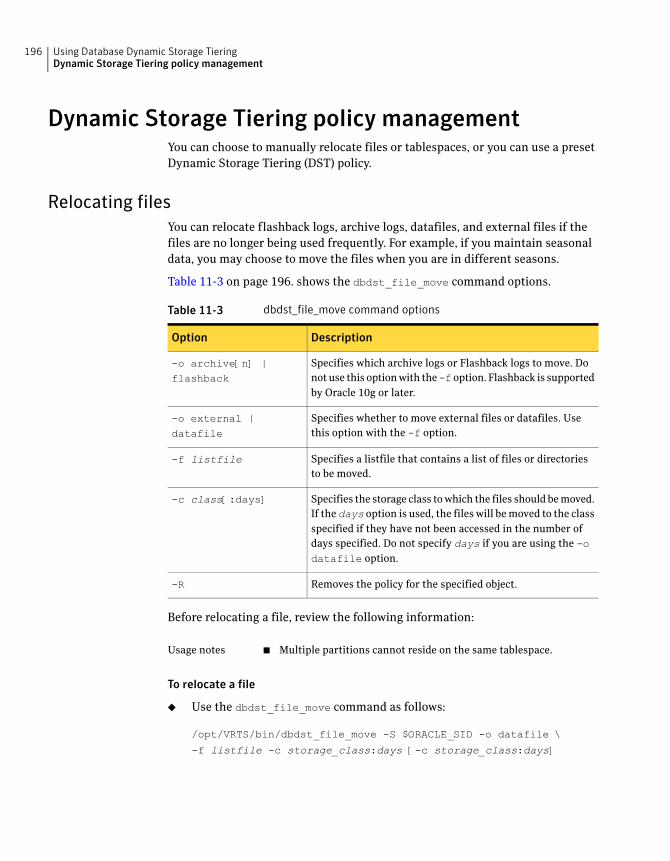
Dynamic Storage Tiering policy managementYou can choose to manually relocate files or tablespaces, or you can use a preset
Dynamic Storage Tiering (DST) policy.
Relocating files
You can relocate flashback logs, archive logs, datafiles, and external files if the
files are no longer being used frequently. For example, if you maintain seasonal
data, you may choose to move the files when you are in different seasons.
Table 11-3 on page 196. shows the dbdst_file_move command options.
Table 11-3 dbdst_file_move command options
DescriptionOption
Specifies which archive logs or Flashback logs to move. Do
not use this option with the-foption. Flashback is supported
by Oracle 10g or later.
-o archive[n] |flashback
Specifies whether to move external files or datafiles. Use
this option with the -f option.
-o external |datafile
Specifies a listfile that contains a list of files or directories
to be moved.
-f listfile
Specifies the storage class to which the files should be moved.
If the days option is used, the files will be moved to the class
specified if they have not been accessed in the number of
days specified. Do not specify days if you are using the -odatafile option.
-c class[:days]
Removes the policy for the specified object.-R
Before relocating a file, review the following information:
■ Multiple partitions cannot reside on the same tablespace.Usage notes
To relocate a file
◆ Use the dbdst_file_move command as follows:
/opt/VRTS/bin/dbdst_file_move -S $ORACLE_SID -o datafile \
-f listfile -c storage_class:days [-c storage_class:days]
Using Database Dynamic Storage TieringDynamic Storage Tiering policy management
196
Relocating tablespaces
Use the dbdst_tbs_move command to move tablespaces to the desired storage
class. The command queries the SFDB repository for the tablespace file names,
then performs a one-time move based on your immediate requirements.
To relocate a tablespace
◆ Use the dbdst_tbs_move command as follows:
$ /opt/VRTS/bin/dbdst_tbs_move -S $ORACLE_SID -t tablespace \
-c class
where
■ tablespace indicates which tablespace to move.
■ class indicates to which class the tablespace should be moved.
Relocating table partitions
Use the dbdst_partition_move to move table partitions. The command queries
the database to validate the names of the table and partition. From this
information, a list of datafiles is derived and a one-time move of the files to the
desired class is executed.
Before relocating a table partition, review the following information:
The database must be up when you run thedbdst_partition_movecommand.
Prerequisites
To relocate a table partition
◆ Use the dbdst_partition_move command as follows:
$ /opt/VRTS/bin/dbdst_partition_move -S $ORACLE_SID -T table_name \
-p partition_name -c class
where
■ -T indicates the table name.
■ -p indicates the partition name.
■ -c indicates the class to which the table partition is to be moved.
For example, to move the SALES_Q1 partition of the SALES table to storage class
SLOW, use the dbdst_partition_move as follows:
197Using Database Dynamic Storage TieringDynamic Storage Tiering policy management
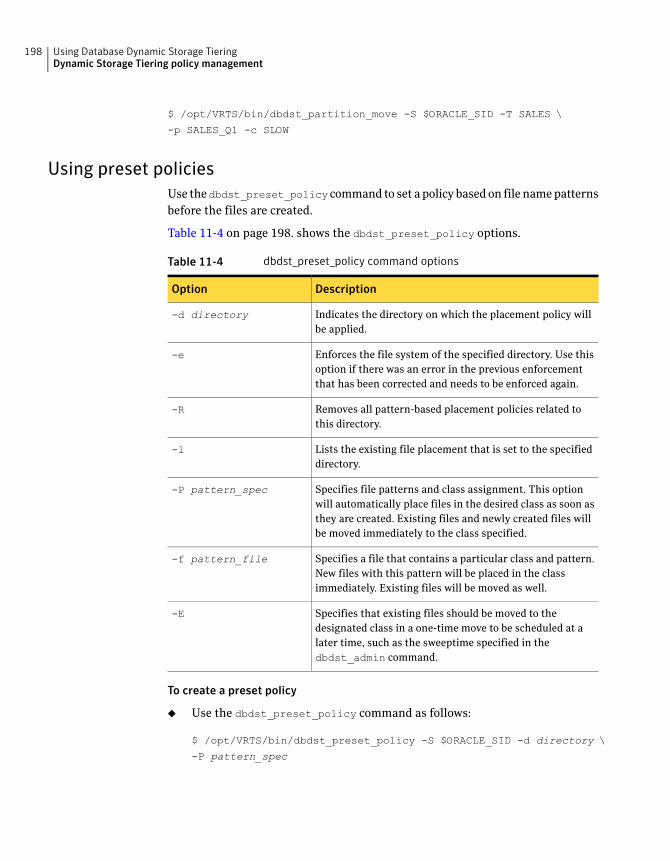
$ /opt/VRTS/bin/dbdst_partition_move -S $ORACLE_SID -T SALES \
-p SALES_Q1 -c SLOW
Using preset policies
Use thedbdst_preset_policy command to set a policy based on file name patterns
before the files are created.
Table 11-4 on page 198. shows the dbdst_preset_policy options.
Table 11-4 dbdst_preset_policy command options
DescriptionOption
Indicates the directory on which the placement policy will
be applied.
-d directory
Enforces the file system of the specified directory. Use this
option if there was an error in the previous enforcement
that has been corrected and needs to be enforced again.
-e
Removes all pattern-based placement policies related to
this directory.
-R
Lists the existing file placement that is set to the specified
directory.
-l
Specifies file patterns and class assignment. This option
will automatically place files in the desired class as soon as
they are created. Existing files and newly created files will
be moved immediately to the class specified.
-P pattern_spec
Specifies a file that contains a particular class and pattern.
New files with this pattern will be placed in the class
immediately. Existing files will be moved as well.
-f pattern_file
Specifies that existing files should be moved to the
designated class in a one-time move to be scheduled at a
later time, such as the sweeptime specified in the
dbdst_admin command.
-E
To create a preset policy
◆ Use the dbdst_preset_policy command as follows:
$ /opt/VRTS/bin/dbdst_preset_policy -S $ORACLE_SID -d directory \
-P pattern_spec
Using Database Dynamic Storage TieringDynamic Storage Tiering policy management
198
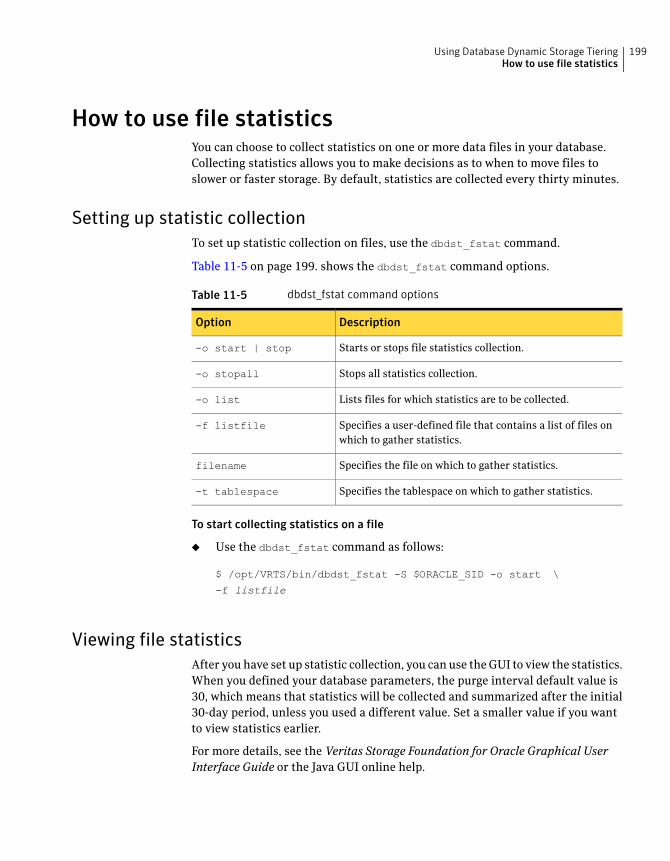
How to use file statisticsYou can choose to collect statistics on one or more data files in your database.
Collecting statistics allows you to make decisions as to when to move files to
slower or faster storage. By default, statistics are collected every thirty minutes.
Setting up statistic collection
To set up statistic collection on files, use the dbdst_fstat command.
Table 11-5 on page 199. shows the dbdst_fstat command options.
Table 11-5 dbdst_fstat command options
DescriptionOption
Starts or stops file statistics collection.-o start | stop
Stops all statistics collection.-o stopall
Lists files for which statistics are to be collected.-o list
Specifies a user-defined file that contains a list of files on
which to gather statistics.
-f listfile
Specifies the file on which to gather statistics.filename
Specifies the tablespace on which to gather statistics.-t tablespace
To start collecting statistics on a file
◆ Use the dbdst_fstat command as follows:
$ /opt/VRTS/bin/dbdst_fstat -S $ORACLE_SID -o start \
-f listfile
Viewing file statistics
After you have set up statistic collection, you can use the GUI to view the statistics.
When you defined your database parameters, the purge interval default value is
30, which means that statistics will be collected and summarized after the initial
30-day period, unless you used a different value. Set a smaller value if you want
to view statistics earlier.
For more details, see the Veritas Storage Foundation for Oracle Graphical User
Interface Guide or the Java GUI online help.
199Using Database Dynamic Storage TieringHow to use file statistics
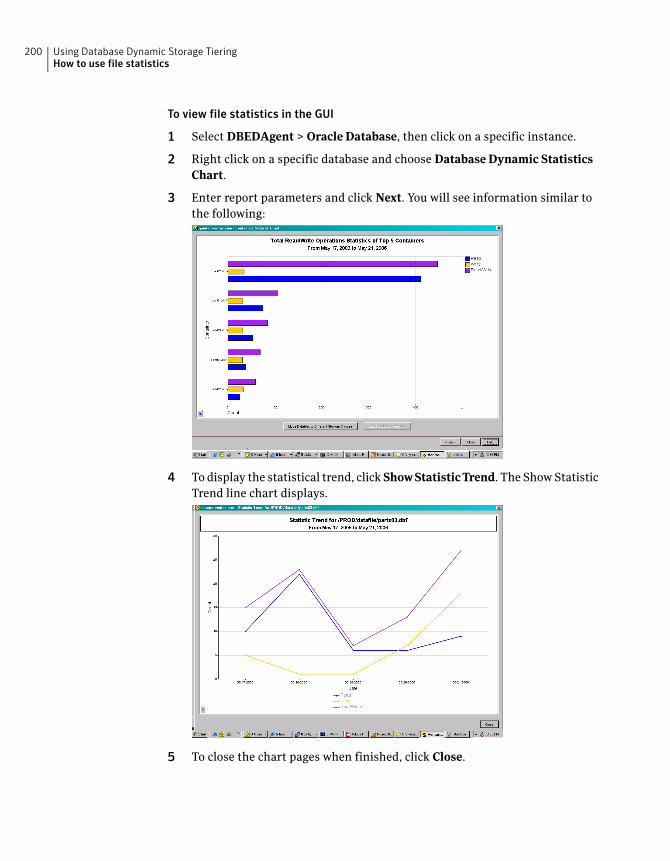
To view file statistics in the GUI
1 Select DBEDAgent > Oracle Database, then click on a specific instance.
2 Right click on a specific database and choose DatabaseDynamic Statistics
Chart.
3 Enter report parameters and click Next. You will see information similar to
the following:
4 To display the statistical trend, click ShowStatisticTrend. The Show Statistic
Trend line chart displays.
5 To close the chart pages when finished, click Close.
Using Database Dynamic Storage TieringHow to use file statistics
200
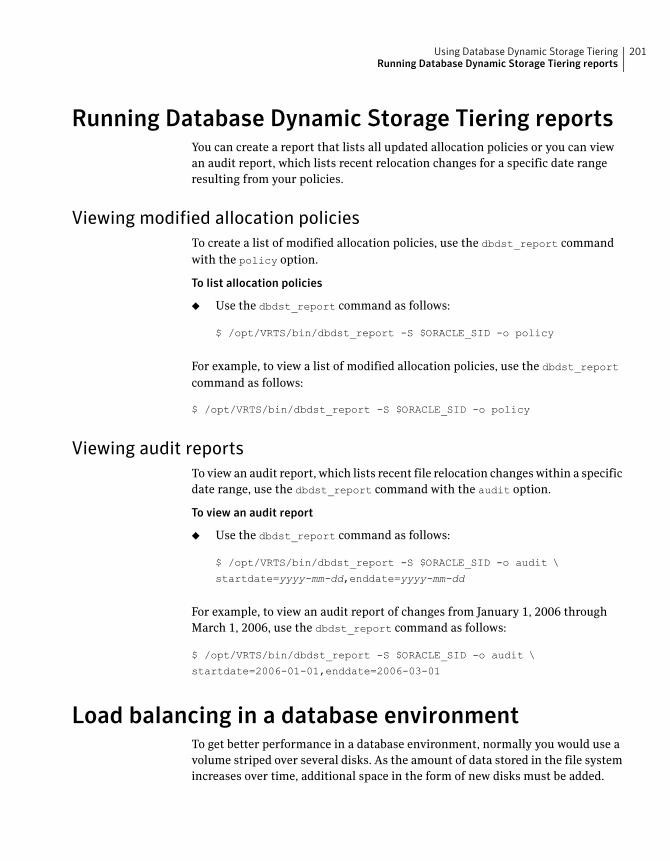
Running Database Dynamic Storage Tiering reportsYou can create a report that lists all updated allocation policies or you can view
an audit report, which lists recent relocation changes for a specific date range
resulting from your policies.
Viewing modified allocation policies
To create a list of modified allocation policies, use the dbdst_report command
with the policy option.
To list allocation policies
◆ Use the dbdst_report command as follows:
$ /opt/VRTS/bin/dbdst_report -S $ORACLE_SID -o policy
For example, to view a list of modified allocation policies, use the dbdst_report
command as follows:
$ /opt/VRTS/bin/dbdst_report -S $ORACLE_SID -o policy
Viewing audit reports
To view an audit report, which lists recent file relocation changes within a specific
date range, use the dbdst_report command with the audit option.
To view an audit report
◆ Use the dbdst_report command as follows:
$ /opt/VRTS/bin/dbdst_report -S $ORACLE_SID -o audit \
startdate=yyyy-mm-dd,enddate=yyyy-mm-dd
For example, to view an audit report of changes from January 1, 2006 through
March 1, 2006, use the dbdst_report command as follows:
$ /opt/VRTS/bin/dbdst_report -S $ORACLE_SID -o audit \
startdate=2006-01-01,enddate=2006-03-01
Load balancing in a database environmentTo get better performance in a database environment, normally you would use a
volume striped over several disks. As the amount of data stored in the file system
increases over time, additional space in the form of new disks must be added.
201Using Database Dynamic Storage TieringRunning Database Dynamic Storage Tiering reports
To increase space, you could perform a volume relayout using the vxrelayout
command. However, changing a large volume from a four-way striped volume to
six-way striped volume involves moving old block information into temporary
space and writing those blocks from the temporary space to a new volume, which
takes a long time. To solve this problem, Veritas Storage Foundation for Oracle
offers a new feature called a Load Balanced File System (LBFS).
An LBFS is created on a multi-volume file system where individual volumes are
not striped over individual disks. For data-availability, these individual volumes
can be mirrored. The file system on the LBFS has a special placement policy called
a balance policy. When the balance policy is applied, all the files are divided into
small "chunks" and the chunks are laid out on volumes so that adjacent chunks
are on different volumes. The default chunk size is 1MB and can be modified.
Since every file contains chunks on all available volumes, it is important that
individual volumes that make up the LBFS and volume set be of same size and
same access properties. Setting up the file system in this way provides the same
benefit as striping your volumes. Use the dbdst_makelbfs command to create an
LBFS file system. Note that you cannot convert an existing file system to an LBFS
file system.
Load balancing file system
You can define allocation policies with a balance allocation order and "chunk"
size to files or a file system, known as load balancing. The chunk size is the
maximum size of any extent that files or a file system with this assigned policy
can have. The chunk size can only be specified for allocation policies with a balance
allocation order.
A load balancing policy specifies the balance allocation order and a non-zero
chunk size. The balance allocation order distributes allocations randomly across
the volumes specified in the policy and limits each allocation to a maximum size
equal to the specified chunk size.
Load balancing extends the behavior of policy enforcement by rebalancing extent
allocations such that each volume in the policy is as equally used as possible.
Policy enforcement handles the following cases:
■ New volumes are added to the policy, and the extents associated with a file
need rebalancing across all volumes, including the new ones.
■ Volumes are removed from the volume set or from the policy, and the extents
for a file residing on a removed volume need to be moved to other volumes in
the policy.
■ A load balancing policy is assigned to a file and its extents have to be
reorganized to meet the chunk size requirements defined in the policy.
Using Database Dynamic Storage TieringLoad balancing in a database environment
202
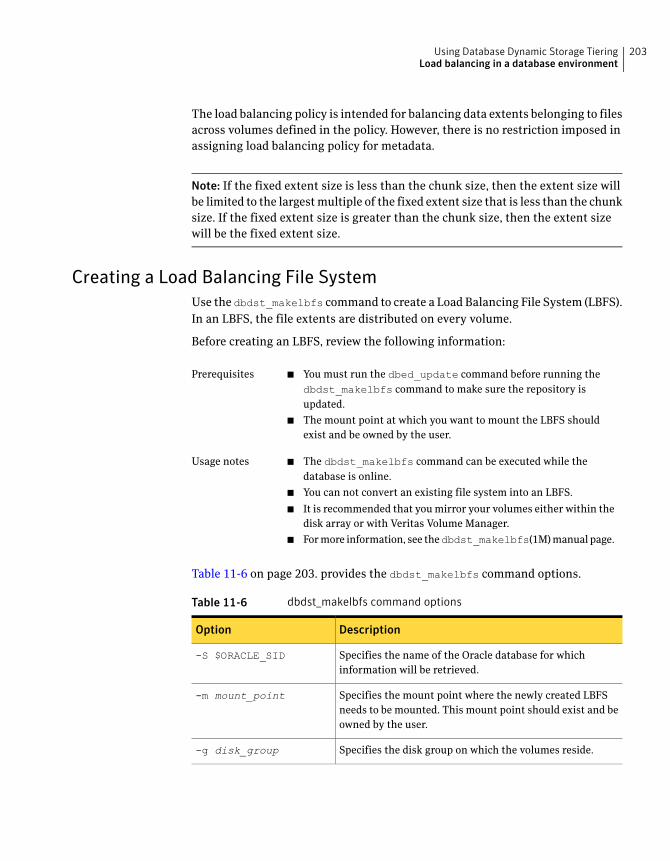
The load balancing policy is intended for balancing data extents belonging to files
across volumes defined in the policy. However, there is no restriction imposed in
assigning load balancing policy for metadata.
Note: If the fixed extent size is less than the chunk size, then the extent size will
be limited to the largest multiple of the fixed extent size that is less than the chunk
size. If the fixed extent size is greater than the chunk size, then the extent size
will be the fixed extent size.
Creating a Load Balancing File System
Use the dbdst_makelbfs command to create a Load Balancing File System (LBFS).
In an LBFS, the file extents are distributed on every volume.
Before creating an LBFS, review the following information:
■ You must run the dbed_update command before running the
dbdst_makelbfs command to make sure the repository is
updated.
■ The mount point at which you want to mount the LBFS should
exist and be owned by the user.
Prerequisites
■ The dbdst_makelbfs command can be executed while the
database is online.
■ You can not convert an existing file system into an LBFS.
■ It is recommended that you mirror your volumes either within the
disk array or with Veritas Volume Manager.
■ For more information, see thedbdst_makelbfs(1M) manual page.
Usage notes
Table 11-6 on page 203. provides the dbdst_makelbfs command options.
Table 11-6 dbdst_makelbfs command options
DescriptionOption
Specifies the name of the Oracle database for which
information will be retrieved.
-S $ORACLE_SID
Specifies the mount point where the newly created LBFS
needs to be mounted. This mount point should exist and be
owned by the user.
-m mount_point
Specifies the disk group on which the volumes reside.-g disk_group
203Using Database Dynamic Storage TieringLoad balancing in a database environment
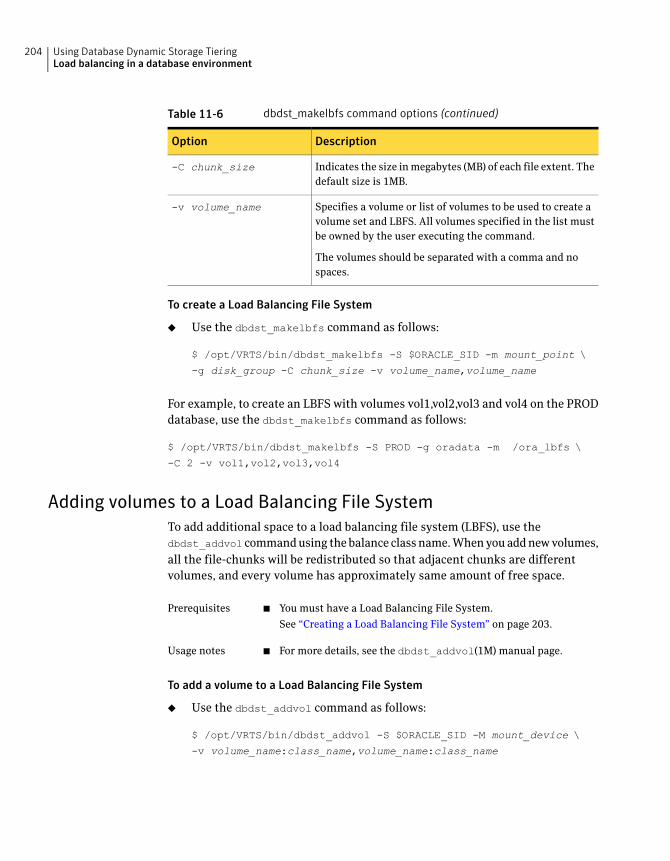
Table 11-6 dbdst_makelbfs command options (continued)
DescriptionOption
Indicates the size in megabytes (MB) of each file extent. The
default size is 1MB.
-C chunk_size
Specifies a volume or list of volumes to be used to create a
volume set and LBFS. All volumes specified in the list must
be owned by the user executing the command.
The volumes should be separated with a comma and no
spaces.
-v volume_name
To create a Load Balancing File System
◆ Use the dbdst_makelbfs command as follows:
$ /opt/VRTS/bin/dbdst_makelbfs -S $ORACLE_SID -m mount_point \
-g disk_group -C chunk_size -v volume_name,volume_name
For example, to create an LBFS with volumes vol1,vol2,vol3 and vol4 on the PROD
database, use the dbdst_makelbfs command as follows:
$ /opt/VRTS/bin/dbdst_makelbfs -S PROD -g oradata -m /ora_lbfs \
-C 2 -v vol1,vol2,vol3,vol4
Adding volumes to a Load Balancing File System
To add additional space to a load balancing file system (LBFS), use the
dbdst_addvol command using the balance class name. When you add new volumes,
all the file-chunks will be redistributed so that adjacent chunks are different
volumes, and every volume has approximately same amount of free space.
■ You must have a Load Balancing File System.
See “Creating a Load Balancing File System” on page 203.
Prerequisites
■ For more details, see the dbdst_addvol(1M) manual page.Usage notes
To add a volume to a Load Balancing File System
◆ Use the dbdst_addvol command as follows:
$ /opt/VRTS/bin/dbdst_addvol -S $ORACLE_SID -M mount_device \
-v volume_name:class_name,volume_name:class_name
Using Database Dynamic Storage TieringLoad balancing in a database environment
204
For example, to add two new volumes, new_vol1 and new_vol2, to an existing
LBFS, use the dbdst_addvol command as follows:
$ /opt/VRTS/bin/dbdst_addvol -S PROD -M /dev/vx/dsk/oradata/vol1 \
-v new_vol1:BALANCE,new_vol2:BALANCE
Database Dynamic Storage Tiering use cases forOracle
Use cases were created in order to provide examples of how and why you would
use Database Dynamic Storage Tiering.
Migrating partitioned data and tablespaces
Perhaps the simplest application of multi-tier storage to databases is relocation
of individual table partitions between different placement classes as usage
requirements change. If exact relocation times are unpredictable, or if relocation
is infrequent, administrators may wish to relocate table partitions as business
requirements surface rather than defining strict periodic relocation schedules.
Ad hoc relocation of table partitions can be useful, for example, with databases
that track sales and inventory for seasonal businesses such as sports equipment
or outdoor furniture retailing. As the selling season for one type of inventory (for
example, summer equipment or furniture) approaches, database table partitions
that represent in-season goods can be relocated to high-performance storage,
since they will be accessed frequently during the coming months. Similarly,
partitions that represent out-of-season goods can be relocated to lower-cost
storage, since activity against them is likely to be infrequent.
For example, sales are mostly catalog-driven for a large retailer specializing in
sports equipment. Product details are saved in a large database and the product
table is partitioned based on type of activity. Some of the products are seasonal
and do not sell well at other times. For example, very few snow skis are sold during
the summer. To achieve season-based migration, see the following example.
Assume the table product_tab has two partitions, summer and winter. Each of
these partitions is mapped to a separate data file.
First, you must set up your system to use Database Dynamic Storage Tiering.
205Using Database Dynamic Storage TieringDatabase Dynamic Storage Tiering use cases for Oracle
To add the fast_storage and slow_storage storage classes
◆ Use the dbdst_admin command as follows:
$ /opt/VRTS/bin/dbdst_admin -S PROD -o addclass=\
fast_storage:"Fast Storage for Production DB"
$ /opt/VRTS/bin/dbdst_admin -S PROD -o addclass=\
slow_storage:"Slow Storage for Production DB"
To convert the database's file system and add volumes for use with Database
Dynamic Storage Tiering
◆ Use the dbdst_convert command as follows:
$ /opt/VRTS/bin/dbdst_convert -S PROD \
-M /dev/vx/dsk/oradg/oradata -v new_vol1,new_vol2,new_vol3
To classify volumes into storage classes
◆ Use the dbdst_classify command as follows:
$ /opt/VRTS/bin/dbdst_classify -S PROD \
-M /dev/vx/dsk/oradg/oradata -v new_vol1:fast_storage
$ /opt/VRTS/bin/dbdst_classify -S PROD \
-M /dev/vx/dsk/oradg/oradata -v new_vol2:slow_storage,\
new_vol3:slow_storage
Once the volumes are configured, an administrator can define file placement
policy rules that specify seasonal relocation of selected tablespaces and partitions
and assign them to the database’s file system.
To move summer data to slower storage and winter data to faster storage at the
beginning of winter
◆ Use the dbdst_partition_move command as follows:
$ /opt/VRTS/bin/dbdst_partition_move -S PROD -T product_tab \
-p winter -c fast_storage
$ /opt/VRTS/bin/dbdst_partition_move -S PROD -T product_tab \
-p summer -c slow_storage
These commands relocate the files that comprise the winter partition of the
product_tab table to placement class fast_storage, and the files that comprise the
summer partition to placement class slow_storage. Database Dynamic Storage
Tiering determines which files comprise the winter and summer partitions of
Using Database Dynamic Storage TieringDatabase Dynamic Storage Tiering use cases for Oracle
206
product_tab, and uses underlying DST services to immediately relocate those files
to the fast_storage and slow_storage placement classes respectively.
To move winter data to slower storage and summer data to faster storage at the
beginning of summer
◆ Use the dbdst_partition_move command as follows:
$ /opt/VRTS/bin/dbdst_partition_move -S PROD -T product_tab \
-p summer -c fast_storage
$ /opt/VRTS/bin/dbdst_partition_move -S PROD -T product_tab \
-p winter -c slow_storage
Database Dynamic Storage Tiering formulates DST policy rules that
unconditionally relocate the files containing the target partitions to the destination
placement classes. It merges these rules into the database file system’s active
policy, assigns the resulting composite policy to the file system, and enforces it
immediately to relocate the subject files. Because the added policy rules precede
any other rules in the active policy, the subject files remain in place until the
dbdst_partition_move command is next executed, at which time the rules are
removed and replaced with others.
Scheduling the relocation of archive and Flashback logs
Because they are the primary mechanism for recovering from data corruption,
database logs are normally kept on premium storage, both for I/O performance
and data reliability reasons. Even after they have been archived, logs are normally
kept online for fast recovery, but the likelihood of referring to an archived log
decreases significantly as its age increases. This suggests that archived database
logs might be relocated to lower-cost volumes after a certain period of inactivity.
Similarly, Veritas Storage Foundation for Oracle Flashback technology creates
logs that can be used for quick recovery from database corruption by restoring a
database to its state at a previous time. Flashback logs are normally kept for a
shorter period than archived database logs, If used at all, they are typically used
within a few hours of creation. Two or three days is a typical Flashback log lifetime.
The rapidly decaying probability of use for archive and Flashback logs suggests
that regular enforcement of a placement policy that relocates them to lower-cost
storage after a period of inactivity can reduce an enterprise’s average cost of
online storage.
For example, a customer could be using a large OLTP Oracle database with
thousands of active sessions, which needs to be up and running 24 hours a day
and seven days a week with uptime of over 99%, and the database uses Flashback
207Using Database Dynamic Storage TieringDatabase Dynamic Storage Tiering use cases for Oracle
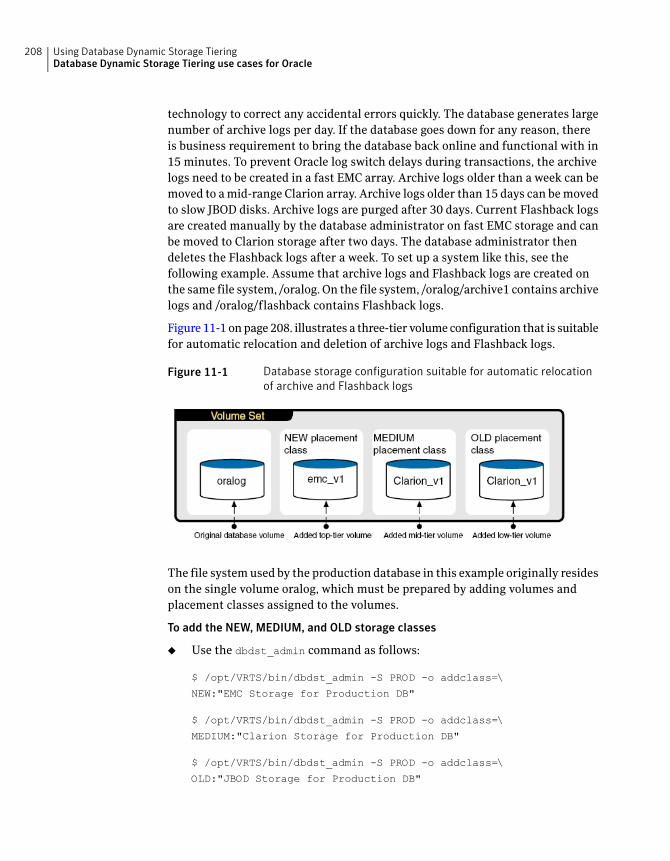
technology to correct any accidental errors quickly. The database generates large
number of archive logs per day. If the database goes down for any reason, there
is business requirement to bring the database back online and functional with in
15 minutes. To prevent Oracle log switch delays during transactions, the archive
logs need to be created in a fast EMC array. Archive logs older than a week can be
moved to a mid-range Clarion array. Archive logs older than 15 days can be moved
to slow JBOD disks. Archive logs are purged after 30 days. Current Flashback logs
are created manually by the database administrator on fast EMC storage and can
be moved to Clarion storage after two days. The database administrator then
deletes the Flashback logs after a week. To set up a system like this, see the
following example. Assume that archive logs and Flashback logs are created on
the same file system, /oralog. On the file system, /oralog/archive1 contains archive
logs and /oralog/flashback contains Flashback logs.
Figure 11-1 on page 208. illustrates a three-tier volume configuration that is suitable
for automatic relocation and deletion of archive logs and Flashback logs.
Figure 11-1 Database storage configuration suitable for automatic relocation
of archive and Flashback logs
The file system used by the production database in this example originally resides
on the single volume oralog, which must be prepared by adding volumes and
placement classes assigned to the volumes.
To add the NEW, MEDIUM, and OLD storage classes
◆ Use the dbdst_admin command as follows:
$ /opt/VRTS/bin/dbdst_admin -S PROD -o addclass=\
NEW:"EMC Storage for Production DB"
$ /opt/VRTS/bin/dbdst_admin -S PROD -o addclass=\
MEDIUM:"Clarion Storage for Production DB"
$ /opt/VRTS/bin/dbdst_admin -S PROD -o addclass=\
OLD:"JBOD Storage for Production DB"
Using Database Dynamic Storage TieringDatabase Dynamic Storage Tiering use cases for Oracle
208
To convert the database's file system and add volumes for use with Database
Dynamic Storage Tiering
◆ Use the dbdst_convert command as follows:
$ /opt/VRTS/bin/dbdst_convert -S PROD \
-M /dev/vx/dsk/oradg/oralog -v emc_v1,clarion_v1,jbod_v1
To classify volumes into storage classes
◆ Use the dbdst_classify command as follows:
$ /opt/VRTS/bin/dbdst_classify -S PROD \
-M /dev/vx/dsk/oradg/oralog -v emc_v1:NEW
$ /opt/VRTS/bin/dbdst_classify -S PROD \
-M /dev/vx/dsk/oradg/oralog -v clarion_v1:MEDIUM
$ /opt/VRTS/bin/dbdst_classify -S PROD \
-M /dev/vx/dsk/oradg/oralog -v jbod_v1:OLD
Once the volumes are configured, an administrator can define file placement
policy rules that specify access age-based relocation of selected files and assign
them to the database’s file system.
To define rules that periodically relocate Flashback and archive logs
◆ Use the dbdst_file_move command as follows:
$ /opt/VRTS/bin/dbdst_file_move -S PROD -o flashback -c MEDIUM:2
This relocates files in the Flashback directory that have not been accessed
for two days to the MEDIUM volume.
$ /opt/VRTS/bin/dbdst_file_move -S PROD -o archive1 -c MEDIUM:7 -c OLD:15
This relocates files in the archive1 directory that have not been accessed for
seven days to the MEDIUM volume, and files that have not been accessed for
15 days to the OLD volume.
Database Dynamic Storage Tiering translates these commands into DST access
age-based policy rules, merges them with the file system’s placement policy, and
assigns the resulting policy to the file system. By default, Database Dynamic
Storage Tiering enforces the active policy daily. During enforcement, the new
rules relocate qualifying files to the destination storage tiers specified in the
dbdst_file_move commands used to create the policies.
209Using Database Dynamic Storage TieringDatabase Dynamic Storage Tiering use cases for Oracle

Using Database Dynamic Storage TieringDatabase Dynamic Storage Tiering use cases for Oracle
210
Using the Space Capacity
Planning Utility for Storage
Checkpoints
This chapter includes the following topics:
■ About planning file system space for Storage Checkpoints
■ Starting the Storage Checkpoint Capacity Planning utility
■ Creating Capacity Planning schedules
■ Displaying Capacity Planning schedules
■ Displaying file system space usage information
■ Removing Capacity Planning schedules
About planning file system space for StorageCheckpoints
This is the last major release of VERITAS Storage Foundation for Oracle to support
the Space Capacity Planning utility. The Storage Checkpoint Capacity Planning
Utility helps you plan for adequate file system space needed for Storage
Checkpoints.
VxFS file systems need extra disk space to store Storage Checkpoints. Because
VxFS can remove Storage Checkpoints when a file system runs out of space, it is
important to ensure that you have adequate space for Storage Checkpoints. The
extra space needed depends on how the Storage Checkpoints are used, the number
of VxFS changed blocks recorded in the Storage Checkpoints, the frequency with
12Chapter
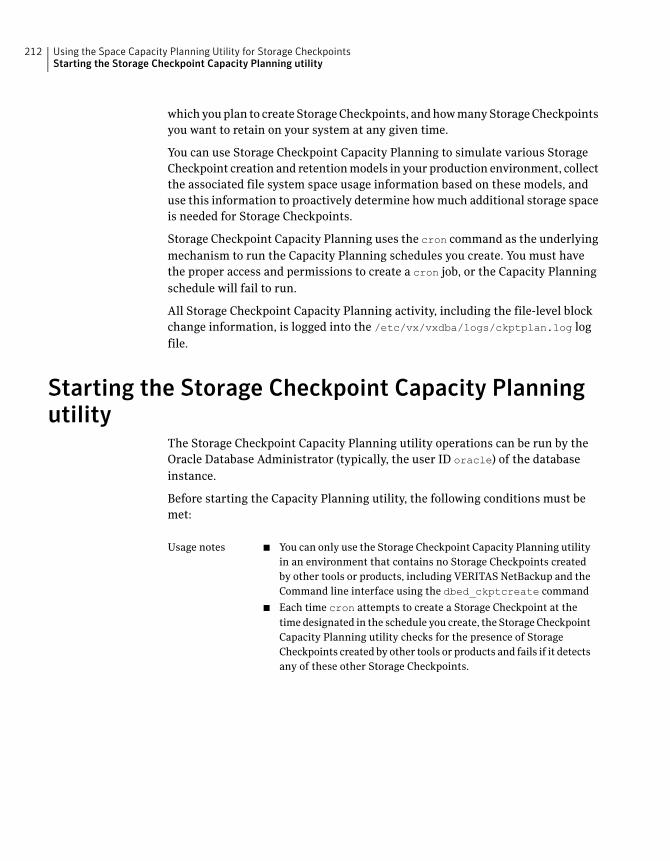
which you plan to create Storage Checkpoints, and how many Storage Checkpoints
you want to retain on your system at any given time.
You can use Storage Checkpoint Capacity Planning to simulate various Storage
Checkpoint creation and retention models in your production environment, collect
the associated file system space usage information based on these models, and
use this information to proactively determine how much additional storage space
is needed for Storage Checkpoints.
Storage Checkpoint Capacity Planning uses the cron command as the underlying
mechanism to run the Capacity Planning schedules you create. You must have
the proper access and permissions to create a cron job, or the Capacity Planning
schedule will fail to run.
All Storage Checkpoint Capacity Planning activity, including the file-level block
change information, is logged into the /etc/vx/vxdba/logs/ckptplan.log log
file.
Starting the Storage Checkpoint Capacity Planningutility
The Storage Checkpoint Capacity Planning utility operations can be run by the
Oracle Database Administrator (typically, the user ID oracle) of the database
instance.
Before starting the Capacity Planning utility, the following conditions must be
met:
■ You can only use the Storage Checkpoint Capacity Planning utility
in an environment that contains no Storage Checkpoints created
by other tools or products, including VERITAS NetBackup and the
Command line interface using the dbed_ckptcreate command
■ Each time cron attempts to create a Storage Checkpoint at the
time designated in the schedule you create, the Storage Checkpoint
Capacity Planning utility checks for the presence of Storage
Checkpoints created by other tools or products and fails if it detects
any of these other Storage Checkpoints.
Usage notes
Using the Space Capacity Planning Utility for Storage CheckpointsStarting the Storage Checkpoint Capacity Planning utility
212

To start the Storage Checkpoint Capacity Planning utility
◆ At the administrative prompt, enter:
$ /opt/VRTSdbed/bin/dbed_ckptplan
The Storage Checkpoint Capacity Planning utility starts up and displays the
associated operations:
VERITAS Storage Foundation for Oracle (ORACLE_SID 'PROD')
Menu: Storage Checkpoint Capacity Planning
1 Create Capacity Planning Schedules
2 Display Capacity Planning Schedules
3 Display Space Usage Information
4 Remove Capacity Planning Schedules
? Display Help About the Current Menu
q Exit From Current Menu
x Exit From Capacity Planning Utility
Select Operation to Perform:
Creating Capacity Planning schedulesThe VERITAS Storage Checkpoint Capacity Planning utility prompt you through
the entire schedule-creation process.
Before creating a schedule, the following conditions must be met:
■ You must have the appropriate permissions to create and execute
a cron job to create Capacity Planning schedules. For more
information on setting up and using cron, refer to the manual
pages.
See the cron(1) manual page.
See the crontab(1) manual page.
Prerequisites
213Using the Space Capacity Planning Utility for Storage CheckpointsCreating Capacity Planning schedules
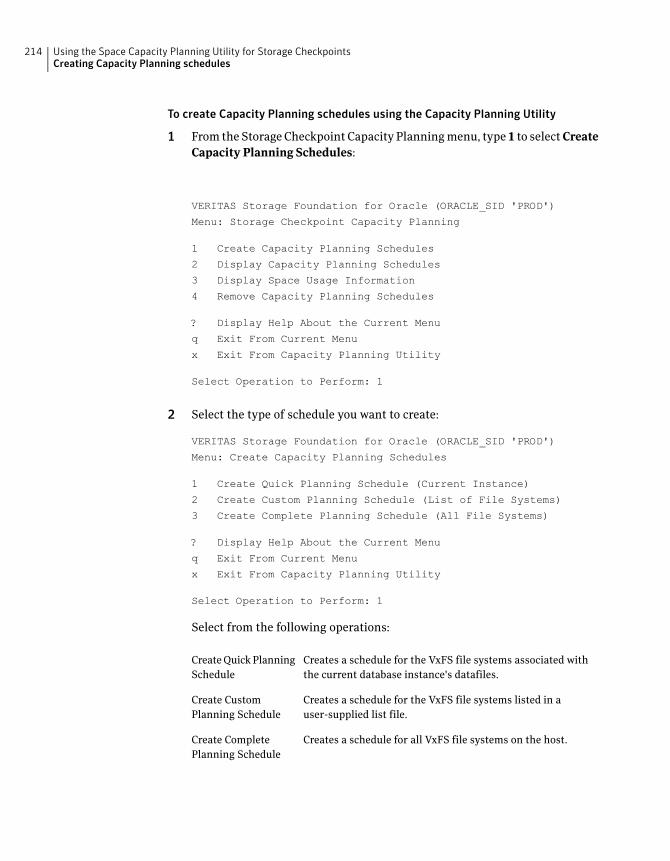
To create Capacity Planning schedules using the Capacity Planning Utility
1 From the Storage Checkpoint Capacity Planning menu, type 1 to selectCreate
Capacity Planning Schedules:
VERITAS Storage Foundation for Oracle (ORACLE_SID 'PROD')
Menu: Storage Checkpoint Capacity Planning
1 Create Capacity Planning Schedules
2 Display Capacity Planning Schedules
3 Display Space Usage Information
4 Remove Capacity Planning Schedules
? Display Help About the Current Menu
q Exit From Current Menu
x Exit From Capacity Planning Utility
Select Operation to Perform: 1
2 Select the type of schedule you want to create:
VERITAS Storage Foundation for Oracle (ORACLE_SID 'PROD')
Menu: Create Capacity Planning Schedules
1 Create Quick Planning Schedule (Current Instance)
2 Create Custom Planning Schedule (List of File Systems)
3 Create Complete Planning Schedule (All File Systems)
? Display Help About the Current Menu
q Exit From Current Menu
x Exit From Capacity Planning Utility
Select Operation to Perform: 1
Select from the following operations:
Creates a schedule for the VxFS file systems associated with
the current database instance's datafiles.
Create Quick Planning
Schedule
Creates a schedule for the VxFS file systems listed in a
user-supplied list file.
Create Custom
Planning Schedule
Creates a schedule for all VxFS file systems on the host.Create Complete
Planning Schedule
Using the Space Capacity Planning Utility for Storage CheckpointsCreating Capacity Planning schedules
214
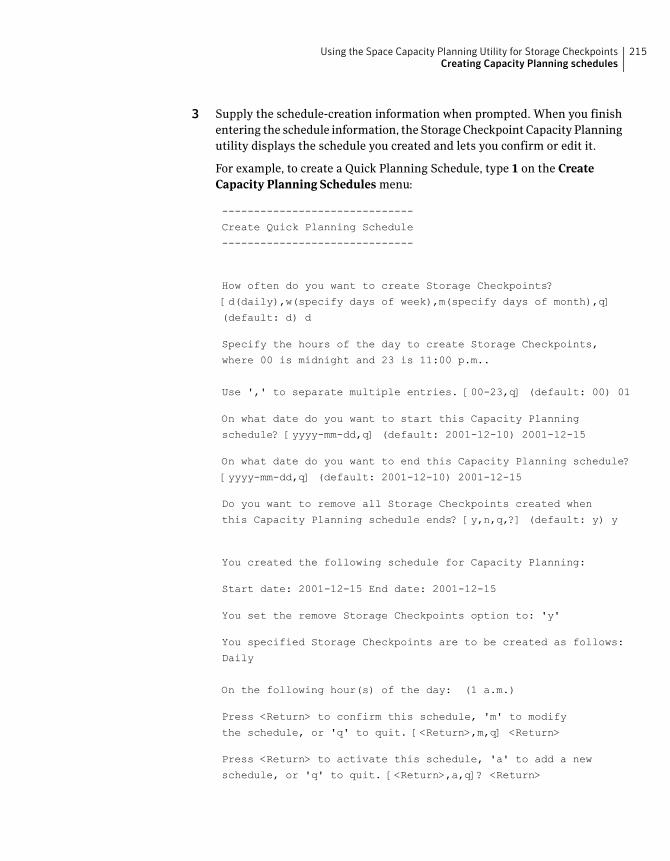
3 Supply the schedule-creation information when prompted. When you finish
entering the schedule information, the Storage Checkpoint Capacity Planning
utility displays the schedule you created and lets you confirm or edit it.
For example, to create a Quick Planning Schedule, type 1 on the Create
Capacity Planning Schedules menu:
------------------------------
Create Quick Planning Schedule
------------------------------
How often do you want to create Storage Checkpoints?
[d(daily),w(specify days of week),m(specify days of month),q]
(default: d) d
Specify the hours of the day to create Storage Checkpoints,
where 00 is midnight and 23 is 11:00 p.m..
Use ',' to separate multiple entries. [00-23,q] (default: 00) 01
On what date do you want to start this Capacity Planning
schedule? [yyyy-mm-dd,q] (default: 2001-12-10) 2001-12-15
On what date do you want to end this Capacity Planning schedule?
[yyyy-mm-dd,q] (default: 2001-12-10) 2001-12-15
Do you want to remove all Storage Checkpoints created when
this Capacity Planning schedule ends? [y,n,q,?] (default: y) y
You created the following schedule for Capacity Planning:
Start date: 2001-12-15 End date: 2001-12-15
You set the remove Storage Checkpoints option to: 'y'
You specified Storage Checkpoints are to be created as follows:
Daily
On the following hour(s) of the day: (1 a.m.)
Press <Return> to confirm this schedule, 'm' to modify
the schedule, or 'q' to quit. [<Return>,m,q] <Return>
Press <Return> to activate this schedule, 'a' to add a new
schedule, or 'q' to quit. [<Return>,a,q]? <Return>
215Using the Space Capacity Planning Utility for Storage CheckpointsCreating Capacity Planning schedules
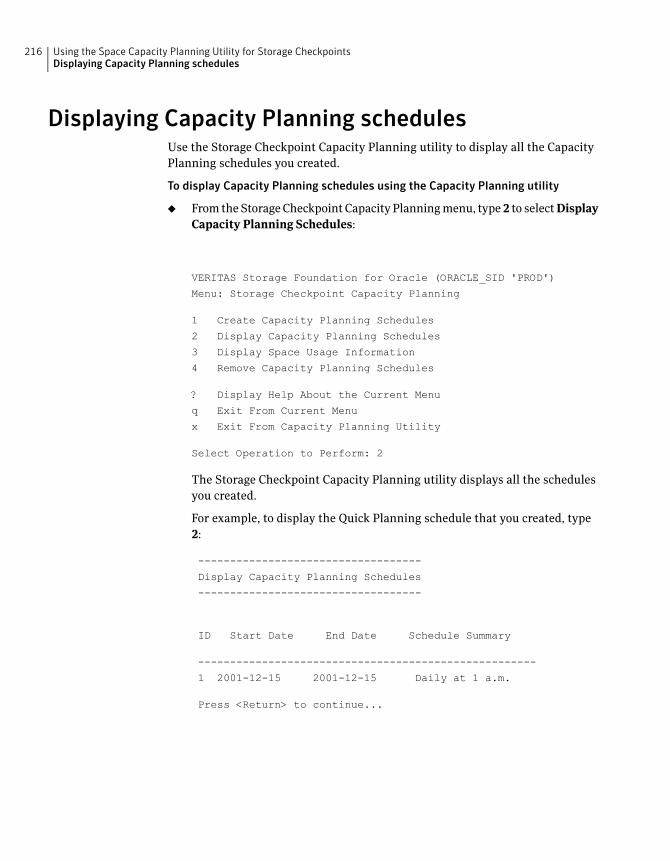
Displaying Capacity Planning schedulesUse the Storage Checkpoint Capacity Planning utility to display all the Capacity
Planning schedules you created.
To display Capacity Planning schedules using the Capacity Planning utility
◆ From the Storage Checkpoint Capacity Planning menu, type2 to selectDisplay
Capacity Planning Schedules:
VERITAS Storage Foundation for Oracle (ORACLE_SID 'PROD')
Menu: Storage Checkpoint Capacity Planning
1 Create Capacity Planning Schedules
2 Display Capacity Planning Schedules
3 Display Space Usage Information
4 Remove Capacity Planning Schedules
? Display Help About the Current Menu
q Exit From Current Menu
x Exit From Capacity Planning Utility
Select Operation to Perform: 2
The Storage Checkpoint Capacity Planning utility displays all the schedules
you created.
For example, to display the Quick Planning schedule that you created, type
2:
-----------------------------------
Display Capacity Planning Schedules
-----------------------------------
ID Start Date End Date Schedule Summary
-----------------------------------------------------
1 2001-12-15 2001-12-15 Daily at 1 a.m.
Press <Return> to continue...
Using the Space Capacity Planning Utility for Storage CheckpointsDisplaying Capacity Planning schedules
216
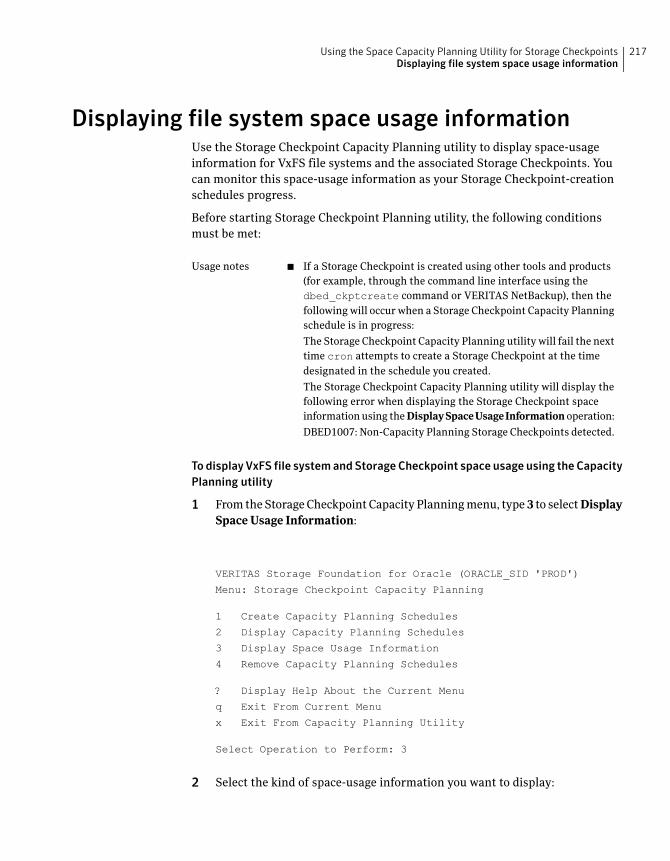
Displaying file system space usage informationUse the Storage Checkpoint Capacity Planning utility to display space-usage
information for VxFS file systems and the associated Storage Checkpoints. You
can monitor this space-usage information as your Storage Checkpoint-creation
schedules progress.
Before starting Storage Checkpoint Planning utility, the following conditions
must be met:
■ If a Storage Checkpoint is created using other tools and products
(for example, through the command line interface using the
dbed_ckptcreate command or VERITAS NetBackup), then the
following will occur when a Storage Checkpoint Capacity Planning
schedule is in progress:
The Storage Checkpoint Capacity Planning utility will fail the next
time cron attempts to create a Storage Checkpoint at the time
designated in the schedule you created.
The Storage Checkpoint Capacity Planning utility will display the
following error when displaying the Storage Checkpoint space
information using theDisplaySpaceUsageInformationoperation:
DBED1007: Non-Capacity Planning Storage Checkpoints detected.
Usage notes
To display VxFS file systemandStorage Checkpoint space usage using the Capacity
Planning utility
1 From the Storage Checkpoint Capacity Planning menu, type3 to selectDisplay
SpaceUsage Information:
VERITAS Storage Foundation for Oracle (ORACLE_SID 'PROD')
Menu: Storage Checkpoint Capacity Planning
1 Create Capacity Planning Schedules
2 Display Capacity Planning Schedules
3 Display Space Usage Information
4 Remove Capacity Planning Schedules
? Display Help About the Current Menu
q Exit From Current Menu
x Exit From Capacity Planning Utility
Select Operation to Perform: 3
2 Select the kind of space-usage information you want to display:
217Using the Space Capacity Planning Utility for Storage CheckpointsDisplaying file system space usage information
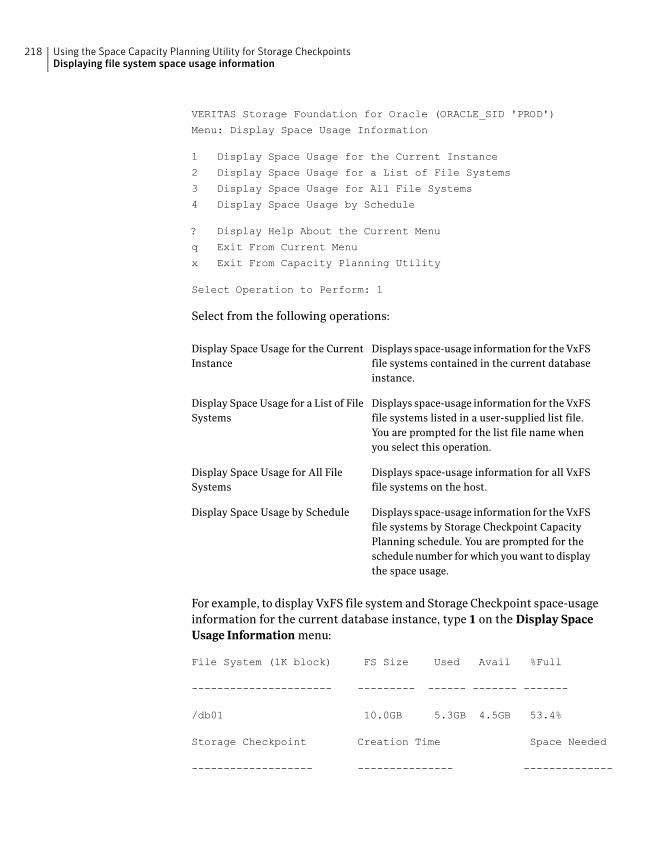
VERITAS Storage Foundation for Oracle (ORACLE_SID 'PROD')
Menu: Display Space Usage Information
1 Display Space Usage for the Current Instance
2 Display Space Usage for a List of File Systems
3 Display Space Usage for All File Systems
4 Display Space Usage by Schedule
? Display Help About the Current Menu
q Exit From Current Menu
x Exit From Capacity Planning Utility
Select Operation to Perform: 1
Select from the following operations:
Displays space-usage information for the VxFS
file systems contained in the current database
instance.
Display Space Usage for the Current
Instance
Displays space-usage information for the VxFS
file systems listed in a user-supplied list file.
You are prompted for the list file name when
you select this operation.
Display Space Usage for a List of File
Systems
Displays space-usage information for all VxFS
file systems on the host.
Display Space Usage for All File
Systems
Displays space-usage information for the VxFS
file systems by Storage Checkpoint Capacity
Planning schedule. You are prompted for the
schedule number for which you want to display
the space usage.
Display Space Usage by Schedule
For example, to display VxFS file system and Storage Checkpoint space-usage
information for the current database instance, type 1 on the Display Space
Usage Information menu:
File System (1K block) FS Size Used Avail %Full
---------------------- --------- ------ ------- -------
/db01 10.0GB 5.3GB 4.5GB 53.4%
Storage Checkpoint Creation Time Space Needed
------------------- --------------- --------------
Using the Space Capacity Planning Utility for Storage CheckpointsDisplaying file system space usage information
218

Planning_00001_956765641 Wed Oct 27 09:14:01 2001 82.0KB
Planning_00001_956762040 Wed Oct 27 08:14:00 2001 4.0KB
Planning_00001_956758441 Wed Oct 27 07:14:01 2001 4.0KB
Total space required by 3 Storage Checkpoint(s) is 90.0KB
Press <Return> to continue...
In addition to providing space-usage information for the current database
instance's underlying file systems,DisplaySpaceUsage Information for the
Current Instance shows the following information about each Storage
Checkpoint it detects:
All Storage Checkpoints created by the Storage
Checkpoints Capacity Planning utility are named using
the following conventions:
■ Prefixed with Planning_
■ Followed by the five digit schedule number, for
example 00001_
■ Followed by a timestamp sequence number, for
example 956758441
Storage Checkpoint
Creation Time is the time that cron creates the
Capacity Planning Storage Checkpoint.
Creation Time
SpaceNeeded is storage space consumed by the
Storage Checkpoint based on the changed blocks
recorded in the Storage Checkpoint.
SpaceNeeded
Removing Capacity Planning schedulesUse the Storage Checkpoint Capacity Planning utility to remove Capacity Planning
schedules at any time. You do not need to wait until the expiration date that you
supplied when creating a schedule.
Before removing the schedules, the following conditions must be met:
219Using the Space Capacity Planning Utility for Storage CheckpointsRemoving Capacity Planning schedules
■ The Storage Checkpoint Capacity Planning utility stores the
space-usage information it collects during the schedule duration
in the log file /etc/vx/vxdba/logs/planxxxxx.out (where
<xxxxx> is the schedule ID number). This space-usage information
remains available to you in the log file even after the schedule is
removed.
■ During the schedule-removal operation, you are asked if you want
to remove the Storage Checkpoints that were created by the Storage
Checkpoint Capacity Planning utility during the schedule duration.
Usage notes
Using the Space Capacity Planning Utility for Storage CheckpointsRemoving Capacity Planning schedules
220

To remove Capacity Planning schedules using the Capacity Planning Utility
221Using the Space Capacity Planning Utility for Storage CheckpointsRemoving Capacity Planning schedules

◆ From the Storage Checkpoint Capacity Planning menu, type 4 to select
Remove Capacity Planning Schedules:
VERITAS Storage Foundation for Oracle (ORACLE_SID 'PROD')
Menu: Storage Checkpoint Capacity Planning
1 Create Capacity Planning Schedules
2 Display Capacity Planning Schedules
3 Display Space Usage Information
4 Remove Capacity Planning Schedules
? Display Help About the Current Menu
q Exit From Current Menu
x Exit From Capacity Planning Utility
Select Operation to Perform: 4
The Storage Checkpoint Capacity Planning utility displays all the existing
Storage Checkpoint Capacity Planning schedules, so that you can remove a
particular schedule, a range of schedules, or all schedules.
For example, to remove the Quick Planning Schedule you created, type 4 on
the Storage Checkpoint Capacity Planning menu:
----------------------------------
Remove Capacity Planning Schedules
----------------------------------
ID Start Date End Date Schedule Summary
-- ---------- ---------- --------------
1 2001-12-15 2001-12-15 Daily at 1 a.m.
Do you want to delete any of these Capacity Planning schedules?
[y,n,q,?] (default: y) y
Enter a schedule number or a range of numbers to delete.
You can also enter 'all' to remove the entire list of
Capacity Planning schedules.[<number>,<number>-<number>,all,q] 1
ID Start Date End Date Schedule Summary
Using the Space Capacity Planning Utility for Storage CheckpointsRemoving Capacity Planning schedules
222
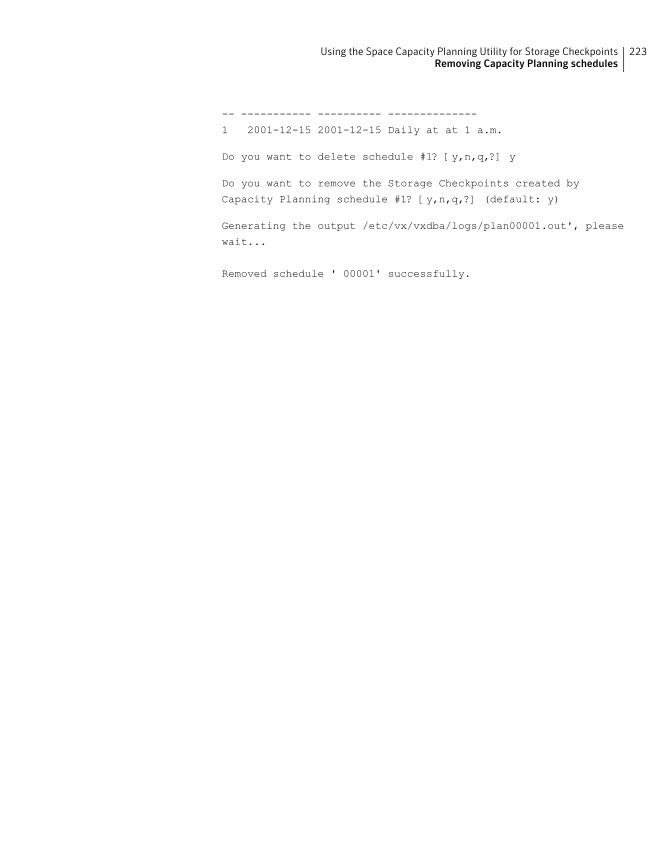
-- ----------- ---------- --------------
1 2001-12-15 2001-12-15 Daily at at 1 a.m.
Do you want to delete schedule #1? [y,n,q,?] y
Do you want to remove the Storage Checkpoints created by
Capacity Planning schedule #1? [y,n,q,?] (default: y)
Generating the output /etc/vx/vxdba/logs/plan00001.out', please
wait...
Removed schedule ' 00001' successfully.
223Using the Space Capacity Planning Utility for Storage CheckpointsRemoving Capacity Planning schedules

Using the Space Capacity Planning Utility for Storage CheckpointsRemoving Capacity Planning schedules
224
Using Database FlashSnap
for backup and off-host
processing
This chapter includes the following topics:
■ About Veritas Database FlashSnap
■ How to plan for Database FlashSnap
■ Hosts and storage for Database FlashSnap
■ Summary of database snapshot steps
■ Creating a snapplan (dbed_vmchecksnap)
■ Validating a snapplan (dbed_vmchecksnap)
■ Displaying, copying, and removing a snapplan (dbed_vmchecksnap)
■ Creating a snapshot (dbed_vmsnap)
■ Backing up the database from snapshot volumes (dbed_vmclonedb)
■ Cloning a database (dbed_vmclonedb)
■ Resynchronizing your database to the snapshot
■ Resynchronizing the snapshot to your database
■ Removing a snapshot volume
■ Using Database FlashSnap in an HA environment
13Chapter
About Veritas Database FlashSnapVeritas Database FlashSnap is included with Veritas Database Edition Enterprise
Edition.
Database FlashSnap lets you capture an online image of an actively changing
database at a given instant, known as a snapshot. You can perform backups and
off-host processing tasks on snapshots while providing continuous availability
of your critical data, with minimal interruption to users. Database FlashSnap
commands can be executed from either the command line or the GUI.
Veritas Database FlashSnap offers you a flexible way to efficiently manage multiple
point-in-time copies of your data, and reduce resource contention on your
business-critical servers. Database FlashSnap allows database administrators to
create a consistent copy of a database without root privileges by creating a
snapshot. A snapshot copy of the database is referred to as a database snapshot.
You can use a database snapshot on the same host as the production database or
on a secondary host sharing the same storage. A database snapshot can be used
for off-host processing applications, such as backup, data warehousing, and
decision-support queries. When the snapshot is no longer needed, the database
administrator can import the original snapshot back to the primary host and
resynchronize the snapshot to the original database volumes.
Database FlashSnap also allows you to resynchronize your original database
volumes from the data in the snapshot if the original volumes become corrupted.
This is referred to as reverse resynchronization.
Database FlashSnap can significantly reduce the time it takes to back up your
database, increase the availability of your production database, and still maintain
your production database's performance.
Note: To use Database FlashSnap, you must have Veritas Storage Foundation
Enterprise Edition on all systems on which you intend to use Database FlashSnap.
To use Database FlashSnap, you must first configure the volumes used by the
database.
Note: Veritas Storage Foundation for Oracle RAC does not support reverse
resynchronization, off-host operations (such as off-host database cloning), or
operation through the GUI.
Using Database FlashSnap for backup and off-host processingAbout Veritas Database FlashSnap
226
Typical database problems solved with Database FlashSnap
Database FlashSnap is designed to enable you to use database snapshots to
overcome the following types of problems encountered in enterprise database
environments:
■ In many companies, there is a clear separation between the roles of system
administrators and database administrators. Creating database snapshots
typically requires superuser (root) privileges, privileges that database
administrators do not usually have.
■ In some companies, database administrators are granted root privileges, but
managing storage is typically not central to their job function or their core
competency.
■ Creating database snapshots is a complex process, especially in large
configurations where thousands of volumes are used for the database. One
mistake can render the snapshots useless.
Because it does not require root privileges, Database FlashSnap overcomes these
obstacles by enabling database administrators to create consistent snapshots of
the database more easily. The snapshots can be utilized for repetitive use.
About Database FlashSnap applications
The following are typical applications of Veritas Database FlashSnap:
■ Database Backup and Restore
Enterprises require 24/7 online data availability. They cannot afford the
downtime involved in backing up critical data offline. By creating a clone
database or a duplicate volume snapshot of data, and then using it to back up
your data, your business-critical applications can continue to run without
extended down time or impacted performance. After a clone database or
snapshot volume is created, it can be used as a source to back up the original
database.
■ Decision-Support Analysis and Reporting
Operations such as decision-support analysis and business reporting may not
require access to real-time information. You can direct such operations to use
a clone database that you have created from snapshots using Veritas Database
FlashSnap, rather than allowing them to compete for access to the primary
volume or database. When required, you can quickly resynchronize the clone
database with the primary database to get up-to-date information.
■ Application Development and Testing
Development or service groups can use a clone database created with Database
FlashSnap as a test database for new applications. A clone database provides
227Using Database FlashSnap for backup and off-host processingAbout Veritas Database FlashSnap

developers, system testers, and quality assurance groups with a realistic basis
for testing the robustness, integrity, and performance of new applications.
■ Logical Error Recovery
Logical errors caused by an administrator or an application program can
compromise the integrity of a database. You can recover a database by restoring
the database files from a volume snapshot or by recovering logical objects
(such as tables, for example) from a clone database created from volume
snapshots using Database FlashSnap. These solutions are faster than fully
restoring database files from tape or other backup media.
Database FlashSnap
The system administrator needs to configure storage according to the requirements
specified in the snapplan.
Database FlashSnap allows you to check the storage setup against requirements
set forth in the snapplan. Depending on the results, the database administrator
may need to modify the snapplan or the system administrator may need to adjust
the storage configuration. Properly configuring storage is the only aspect of using
Database FlashSnap that requires the system administrator's participation.
Note: In Oracle RAC configurations, Database Flashsnap commands must be run
on the Veritas Cluster Volume Manager master node, and only online snapshots
are supported. Also note that off-host processing is not used in Oracle RAC
configurations.
To use Database FlashSnap, a database administrator must first define their
snapshot requirements. For example, they need to determine whether off-host
processing is required and, if it is, which host should be used for it. In addition,
it is also important to consider how much database downtime can be tolerated.
Database snapshot requirements are defined in a file called a snapplan. The
snapplan specifies snapshot options that will be used when creating a snapshot
image (such as whether the snapshot mode will be online, offline, or instant).
After creating the snapplan, the database administrator must validate it to ensure
that it is correct. During validation the snapplan is copied to the repository before
using it to create a snapshot. Depending on the validation results, the database
administrator may need to modify the snapplan or the system administrator may
need to adjust the storage configuration.
After storage is configured as specified in the snapplan and the snapplan has been
validated, the database administrator can create snapshots of the database and
create database clones based on the snapshots on either the same host or a
secondary one, or on the same host if used within Oracle RAC.
Using Database FlashSnap for backup and off-host processingAbout Veritas Database FlashSnap
228
A database clone can be used on a secondary host for off-host processing, including
decision-support analysis and reporting, application development and testing,
database backup, and logical error recovery. After a user has finished using the
clone on a secondary host, the database administrator can shut down the clone
and move the snapshot database back to the primary host. Regardless of whether
a snapshot is used on the primary or secondary host, it can be resynchronized
with the primary database using Database FlashSnap. Database FlashSnap utilizes
Veritas Volume Manager FastResync to quickly resynchronize the changed section
between the primary and snapshot.
Database FlashSnap can also be used to recover the primary copy of the database
if it becomes corrupted by overwriting it with the snapshot. You can recover the
primary database with a snapshot using the reverse resynchronization
functionality of Database FlashSnap. In an Oracle RAC configuration, reverse
resynchronization is not supported. Also in Oracle RAC, the dbed_vmsnap and
dbed_vmclonedb commands need to be executed on the CVM master node. The
dbed_vmchecksnap command can be executed at any node within the cluster except
when using -o validate option.
See the Veritas VolumeManager User's Guide.
Database FlashSnap commands
The Database FlashSnap feature consists of three commands:
■ dbed_vmchecksnap (used on the primary host)
Creates and validates the snapshot plan used to create a snapshot image of an
Oracle database. You can also use dbed_vmchecksnap to copy, list, or remove
a snapplan or make sure the storage is configured properly for the task. The
dbed_vmchecksnap command is also used on the secondary host to list the
snapplan.
In Oracle RAC, this command can be used on any node within the RAC cluster
except when validating a snapplan, when dbed_vmchecksnap must be run on
the CVM master node.
■ dbed_vmsnap (used on the primary host)
Creates a snapshot image of an Oracle database by splitting the mirror volumes
used by the database. You can also use dbed_vmsnap to resynchronize snapshot
volumes with their original volumes. The command also allows you to
resynchronize the original volumes from the data in the snapshot volumes,
which is useful if the original volumes become corrupted. Resynchronizing
the original volumes from the snapshot volumes is known as reverse
resynchronization.
In Oracle RAC, this command must be run on the CVM master node.
229Using Database FlashSnap for backup and off-host processingAbout Veritas Database FlashSnap
■ dbed_vmclonedb (used on the primary or secondary host)
Mounts and starts a clone database using snapshot volumes. It can also shut
down a clone database and deport its volumes, as well as restart a clone
database that has been shut down. The snapshot image can be brought up on
the same host running the primary database or on a secondary host.
In Oracle RAC, this command must be run on the CVM master node.
All of these commands can be executed by the Oracle database administrator and
do not require superuser (root) privileges.
Note: Database FlashSnap operations can be executed from either the command
line or the GUI.
Database FlashSnap options
Database FlashSnap offers three options for creating database snapshots. The
option you choose is specified in the snapplan.
■ online
With this option, the tablespaces are put into online backup mode before the
snapshot is created. This type of snapshot is also a valid database backup.
Select this option if you are performing a point-in-time recovery from logical
errors.
■ instant
With this option, the database can be up and running, and the tablespaces do
not need to be put into online backup mode before the snapshot is created.
However, all the file systems used by the database (including those containing
the online redo logs and control files) are temporarily frozen and the cache is
flushed before the snapshot is created. By freezing the file systems, the
snapshot will be a consistent point-in-time image of the database from which
a database clone can be created.
An instant snapshot can be used to guard against data corruption or for off-host
decision-support queries. However, it is not a valid database backup and cannot
be used to perform a point-in-time recovery or off-host backup since
tablespaces are not put into online backup mode before the snapshot is created.
The instant option is much faster than the online option.
■ offline
Use this option to clone or back up a database. With the offline option, the
database must be shut down when the snapshot is created, and online redo
logs are required.
Using Database FlashSnap for backup and off-host processingAbout Veritas Database FlashSnap
230
Note: In Oracle RAC configurations, only the online option can be used.
How to plan for Database FlashSnapBefore using Database FlashSnap, you must determine your intended application.
You then need to make the following decisions:
■ Which snapshot mode is appropriate: online, offline, or instant?
Veritas Storage Foundation for Oracle RAC uses only the online mode.
■ Will you need one or two hosts?
Snapshot mode
If your purpose is to use the snapshot for backup or to recover the database after
logical errors have occurred, choose the online option. In the event that your
production database is offline, choose offline. If you intend to use the snapshot
for decision-support analysis, reporting, development, or testing, choose instant.
An instant snapshot is not suitable for recovery because it is not necessarily an
exact copy of the primary database.
With Veritas Storage Foundation for Oracle RAC, you do not select a snapshot
mode because only the online mode is used.
One or two snapshot hosts
If maintaining the performance of your primary database is critical, you can
offload processing of the snapshots to a secondary host. For off-host processing,
storage must be shared between the primary and secondary hosts.
If cost savings is most important, you can choose to do the processing on the same
host as the primary database to save on hardware costs.
Hosts and storage for Database FlashSnapDatabase FlashSnap requires sufficient Veritas Volume Manager disk space, and
can be used on the same host that the database resides on (the primary host) or
on a secondary host.
With Veritas Storage Foundation for Oracle RAC, Database FlashSnap can be used
on the same cluster that the database resides on.
231Using Database FlashSnap for backup and off-host processingHow to plan for Database FlashSnap
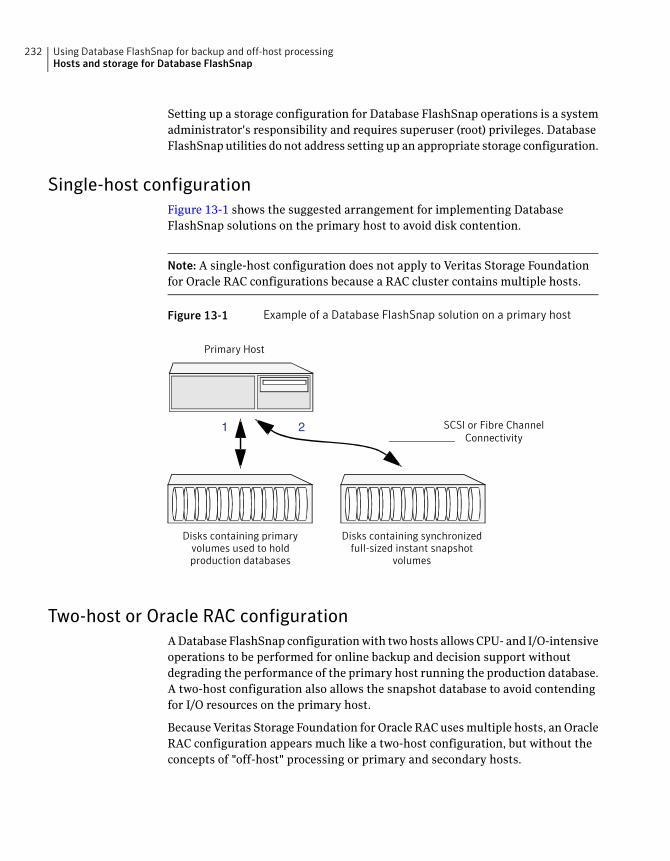
Setting up a storage configuration for Database FlashSnap operations is a system
administrator's responsibility and requires superuser (root) privileges. Database
FlashSnap utilities do not address setting up an appropriate storage configuration.
Single-host configuration
Figure 13-1 shows the suggested arrangement for implementing Database
FlashSnap solutions on the primary host to avoid disk contention.
Note: A single-host configuration does not apply to Veritas Storage Foundation
for Oracle RAC configurations because a RAC cluster contains multiple hosts.
Figure 13-1 Example of a Database FlashSnap solution on a primary host
Disks containing primary
volumes used to hold
production databases
Disks containing synchronized
full-sized instant snapshot
volumes
Primary Host
1 2 SCSI or Fibre Channel
Connectivity
Two-host or Oracle RAC configuration
A Database FlashSnap configuration with two hosts allows CPU- and I/O-intensive
operations to be performed for online backup and decision support without
degrading the performance of the primary host running the production database.
A two-host configuration also allows the snapshot database to avoid contending
for I/O resources on the primary host.
Because Veritas Storage Foundation for Oracle RAC uses multiple hosts, an Oracle
RAC configuration appears much like a two-host configuration, but without the
concepts of "off-host" processing or primary and secondary hosts.
Using Database FlashSnap for backup and off-host processingHosts and storage for Database FlashSnap
232
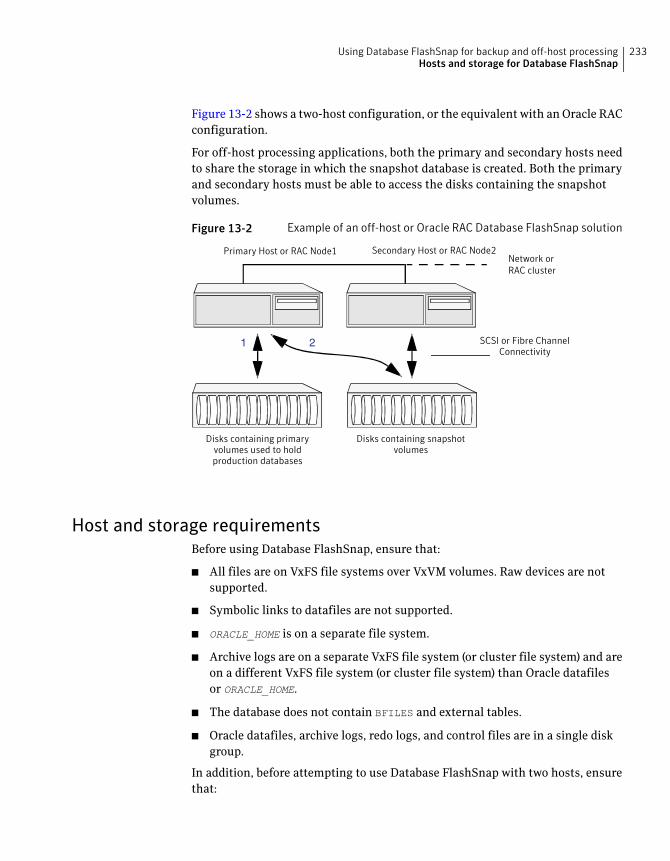
Figure 13-2 shows a two-host configuration, or the equivalent with an Oracle RAC
configuration.
For off-host processing applications, both the primary and secondary hosts need
to share the storage in which the snapshot database is created. Both the primary
and secondary hosts must be able to access the disks containing the snapshot
volumes.
Figure 13-2 Example of an off-host or Oracle RAC Database FlashSnap solution
Network or
RAC cluster
Disks containing primary
volumes used to hold
production databases
Disks containing snapshot
volumes
SCSI or Fibre Channel
Connectivity
Secondary Host or RAC Node2Primary Host or RAC Node1
1 2
Host and storage requirements
Before using Database FlashSnap, ensure that:
■ All files are on VxFS file systems over VxVM volumes. Raw devices are not
supported.
■ Symbolic links to datafiles are not supported.
■ ORACLE_HOME is on a separate file system.
■ Archive logs are on a separate VxFS file system (or cluster file system) and are
on a different VxFS file system (or cluster file system) than Oracle datafiles
or ORACLE_HOME.
■ The database does not contain BFILES and external tables.
■ Oracle datafiles, archive logs, redo logs, and control files are in a single disk
group.
In addition, before attempting to use Database FlashSnap with two hosts, ensure
that:
233Using Database FlashSnap for backup and off-host processingHosts and storage for Database FlashSnap
■ The versions of Veritas Storage Foundation for Oracle on the primary and
secondary hosts are the same.
■ The same version of Oracle is installed on both hosts.
■ The Oracle binaries and datafiles are on different volumes and disks.
■ The UNIX login for the database user and group must be the same on both
hosts.
■ You have a Veritas Storage Foundation for Oracle Enterprise Edition license
on both hosts.
Note: These two-host requirements do not apply to Veritas Storage Foundation
for Oracle RAC configurations.
Creating a snapshot mirror of a volume or volume set used by thedatabase
With Database FlashSnap, you can mirror the volumes used by the database to a
separate set of disks, and those mirrors can be used to create a snapshot of the
database. These snapshot volumes can be split and placed in a separate disk group.
This snapshot disk group can be imported on a separate host, which shares the
same storage with the primary host. The snapshot volumes can be resynchronized
periodically with the primary volumes to get recent changes of the datafiles. If
the primary datafiles become corrupted, you can quickly restore them from the
snapshot volumes. Snapshot volumes can be used for a variety of purposes,
including backup and recovery, and creating a clone database.
You must create snapshot mirrors for all of the volumes used by the database
datafiles before you can create a snapshot of the database.
Before creating a snapshot mirror, make sure the following conditions have been
met:
Using Database FlashSnap for backup and off-host processingHosts and storage for Database FlashSnap
234
■ You must be logged in as superuser (root).
■ The disk group must be version 110 or later. For more information
on disk group versions, see the vxdg(1M) online manual page.
■ Be sure that a data change object (DCO) and a DCO log volume are
associated with the volume for which you are creating the snapshot.
■ Persistent FastResync must be enabled on the existing database
volumes and disks must be assigned for the snapshot volumes.
FastResync optimizes mirror resynchronization by tracking
updates to stored data that have been missed by a mirror. When
a snapshot mirror is reattached to its primary volumes, only the
updates that were missed need to be re-applied to resynchronize
it. FastResync increases the efficiency of the volume snapshot
mechanism to better support operations such as backup and
decision support. For detailed information about FastResync, see
the Veritas VolumeManager Administrator's Guide.
■ Snapshot mirrors and their associated DCO logs should be on
different disks than the original mirror plexes, and should be
configured correctly for creating snapshots by the system
administrator.
■ When creating a snapshot mirror, create the snapshot on a separate
controller and separate disks from the primary volume.
■ Snapplan validation (dbed_vmchecksnap) fails if any volume in
the disk group is not used for the database.
■ Allocate separate volumes for archive logs.
■ Do not place any datafiles, including control files, in the
$ORACLE_HOME/dbs directory.
Prerequisites
235Using Database FlashSnap for backup and off-host processingHosts and storage for Database FlashSnap
■ Create a separate disk group for Oracle database-related files.
■ Do not share volumes between Oracle database files and other
software.
■ ORACLE_HOME cannot be included in the snapshot mirror.
■ Resynchronization speed varies based on the amount of data
changed in both the primary and snapshot volumes during the
break-off time.
■ Do not share any disks between the original mirror and the
snapshot mirror.
■ Snapshot mirrors for datafiles and archive logs should be created
so that they do not share any disks with the data of the original
volumes. If they are not created in this way, the VxVM disk group
cannot be split and, as a result, Database FlashSnap will not work.
■ In Oracle RAC configurations, use thevxdctl -c mode command
to determine the hostname of the VxVM CVM master node. Prepare
the volume for being snapshot from this CVM master node.
Note: Database FlashSnap commands support third-mirror break-off
snapshots only. The snapshot mirror must be in theSNAPDONE state.
Usage notes
To create a snapshot mirror of a volume
1 Create a volume:
vxassist -g diskgroup make volume_name size disk_name
For example:
# vxassist -g PRODdg make snapvset_1 8g data01
2 Create a DCO and enable FastResync on the volume:
vxsnap -g diskgroup prepare volume_name [alloc=storage_attribute]
For example:
# vxsnap -g PRODdg prepare snapvset [alloc="snap01"]
Using Database FlashSnap for backup and off-host processingHosts and storage for Database FlashSnap
236
3 Verify that a DCO and DCO log are attached to the volume:
vxprint -g diskgroup -F%fastresync volume_name
vxprint -g diskgroup -F%hasdcolog volume_name
This command returns on if a DCO and DCO log are attached to the specified
volume.
For example:
# vxprint -g PRODdg -F%fastresync snapdata
on
# vxprint -g PRODdg -F%hasdcolog snapdata
on
4 Create a mirror of the volume:
vxsnap -g diskgroup addmir volume_name [alloc=storage_attribute]
For example:
# vxsnap -g PRODdg addmir snapdata [alloc="data02"]
5 List the available mirrored data plex for the volume:
vxprint -g diskgroup -F%name -e"pl_v_name in \"volume_name\""
For example:
# vxprint -g PRODdg -F%name -e"pl_v_name in\"snapdata\""
snapdata-01
snapdata-02
6 Set the dbed_flashsnap tag on the break-off data plex for the volume:
vxedit -g diskgroup set putil2=dbed_flashsnap plex_name
For example:
# vxedit -g PRODdg set putil2=dbed_flashsnap snapdata-02
237Using Database FlashSnap for backup and off-host processingHosts and storage for Database FlashSnap
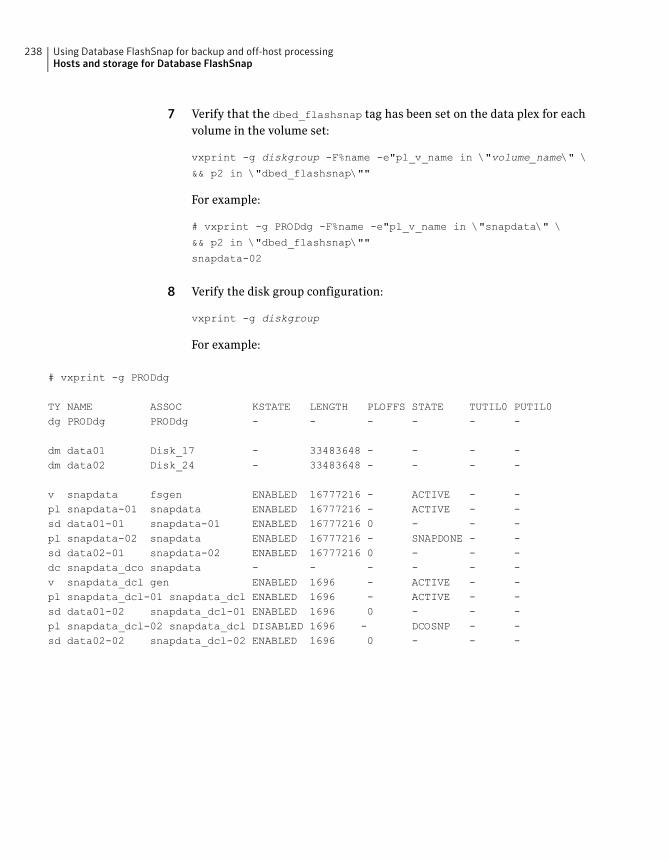
7 Verify that the dbed_flashsnap tag has been set on the data plex for each
volume in the volume set:
vxprint -g diskgroup -F%name -e"pl_v_name in \"volume_name\" \
&& p2 in \"dbed_flashsnap\""
For example:
# vxprint -g PRODdg -F%name -e"pl_v_name in \"snapdata\" \
&& p2 in \"dbed_flashsnap\""
snapdata-02
8 Verify the disk group configuration:
vxprint -g diskgroup
For example:
# vxprint -g PRODdg
TY NAME ASSOC KSTATE LENGTH PLOFFS STATE TUTIL0 PUTIL0dg PRODdg PRODdg - - - - - -
dm data01 Disk_17 - 33483648 - - - -dm data02 Disk_24 - 33483648 - - - -
v snapdata fsgen ENABLED 16777216 - ACTIVE - -pl snapdata-01 snapdata ENABLED 16777216 - ACTIVE - -sd data01-01 snapdata-01 ENABLED 16777216 0 - - -pl snapdata-02 snapdata ENABLED 16777216 - SNAPDONE - -sd data02-01 snapdata-02 ENABLED 16777216 0 - - -dc snapdata_dco snapdata - - - - - -v snapdata_dcl gen ENABLED 1696 - ACTIVE - -pl snapdata_dcl-01 snapdata_dcl ENABLED 1696 - ACTIVE - -sd data01-02 snapdata_dcl-01 ENABLED 1696 0 - - -pl snapdata_dcl-02 snapdata_dcl DISABLED 1696 - DCOSNP - -sd data02-02 snapdata_dcl-02 ENABLED 1696 0 - - -
Using Database FlashSnap for backup and off-host processingHosts and storage for Database FlashSnap
238
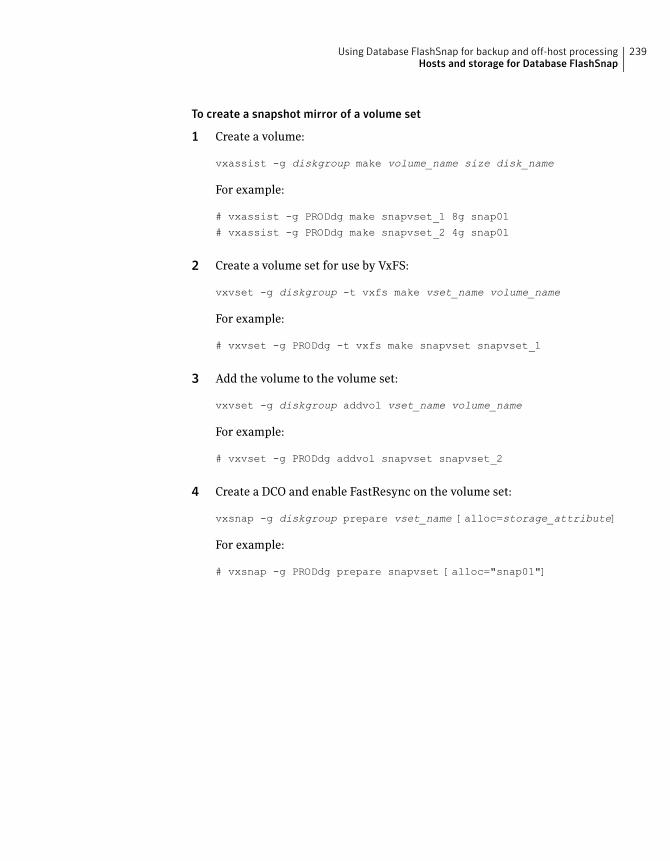
To create a snapshot mirror of a volume set
1 Create a volume:
vxassist -g diskgroup make volume_name size disk_name
For example:
# vxassist -g PRODdg make snapvset_1 8g snap01
# vxassist -g PRODdg make snapvset_2 4g snap01
2 Create a volume set for use by VxFS:
vxvset -g diskgroup -t vxfs make vset_name volume_name
For example:
# vxvset -g PRODdg -t vxfs make snapvset snapvset_1
3 Add the volume to the volume set:
vxvset -g diskgroup addvol vset_name volume_name
For example:
# vxvset -g PRODdg addvol snapvset snapvset_2
4 Create a DCO and enable FastResync on the volume set:
vxsnap -g diskgroup prepare vset_name [alloc=storage_attribute]
For example:
# vxsnap -g PRODdg prepare snapvset [alloc="snap01"]
239Using Database FlashSnap for backup and off-host processingHosts and storage for Database FlashSnap
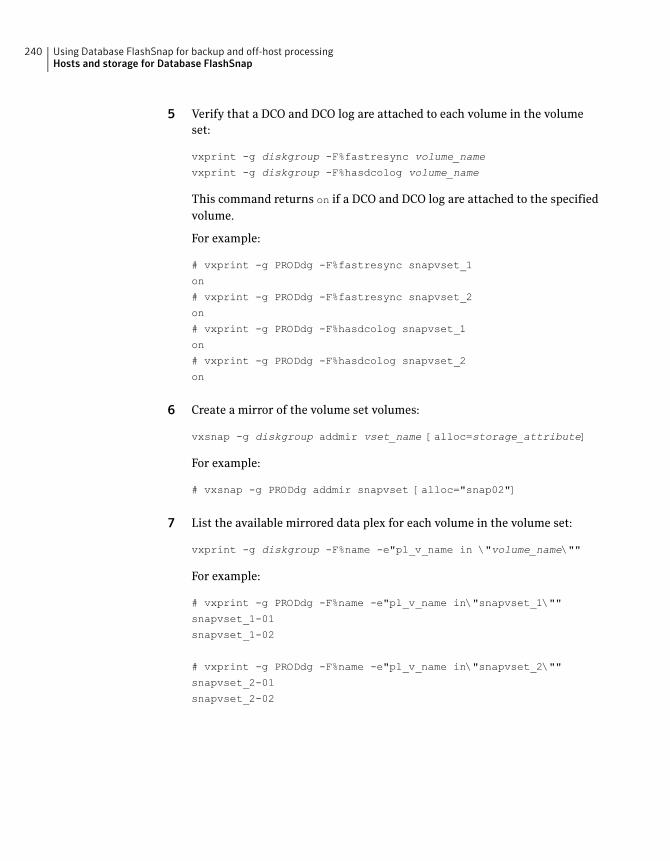
5 Verify that a DCO and DCO log are attached to each volume in the volume
set:
vxprint -g diskgroup -F%fastresync volume_name
vxprint -g diskgroup -F%hasdcolog volume_name
This command returns on if a DCO and DCO log are attached to the specified
volume.
For example:
# vxprint -g PRODdg -F%fastresync snapvset_1
on
# vxprint -g PRODdg -F%fastresync snapvset_2
on
# vxprint -g PRODdg -F%hasdcolog snapvset_1
on
# vxprint -g PRODdg -F%hasdcolog snapvset_2
on
6 Create a mirror of the volume set volumes:
vxsnap -g diskgroup addmir vset_name [alloc=storage_attribute]
For example:
# vxsnap -g PRODdg addmir snapvset [alloc="snap02"]
7 List the available mirrored data plex for each volume in the volume set:
vxprint -g diskgroup -F%name -e"pl_v_name in \"volume_name\""
For example:
# vxprint -g PRODdg -F%name -e"pl_v_name in\"snapvset_1\""
snapvset_1-01
snapvset_1-02
# vxprint -g PRODdg -F%name -e"pl_v_name in\"snapvset_2\""
snapvset_2-01
snapvset_2-02
Using Database FlashSnap for backup and off-host processingHosts and storage for Database FlashSnap
240
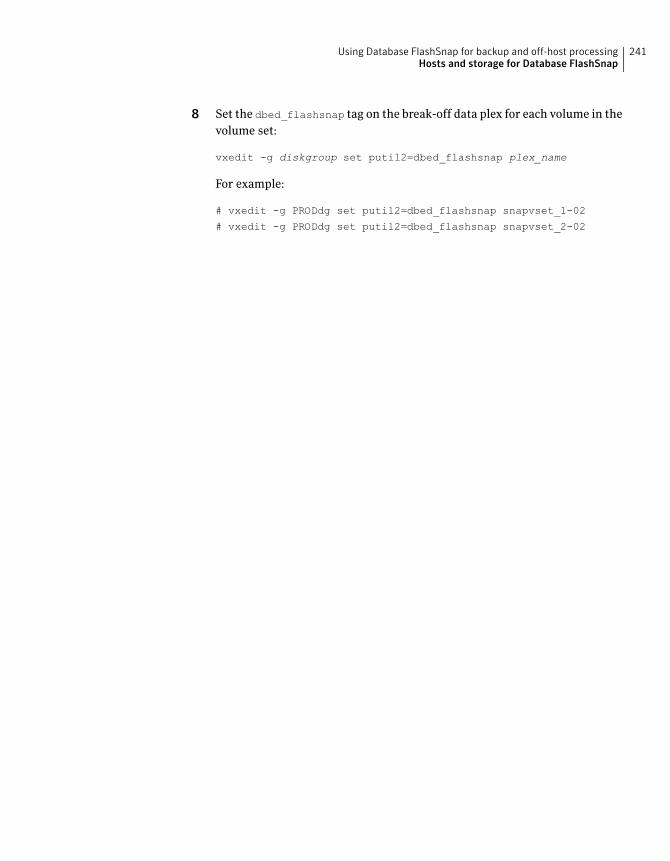
8 Set the dbed_flashsnap tag on the break-off data plex for each volume in the
volume set:
vxedit -g diskgroup set putil2=dbed_flashsnap plex_name
For example:
# vxedit -g PRODdg set putil2=dbed_flashsnap snapvset_1-02
# vxedit -g PRODdg set putil2=dbed_flashsnap snapvset_2-02
241Using Database FlashSnap for backup and off-host processingHosts and storage for Database FlashSnap
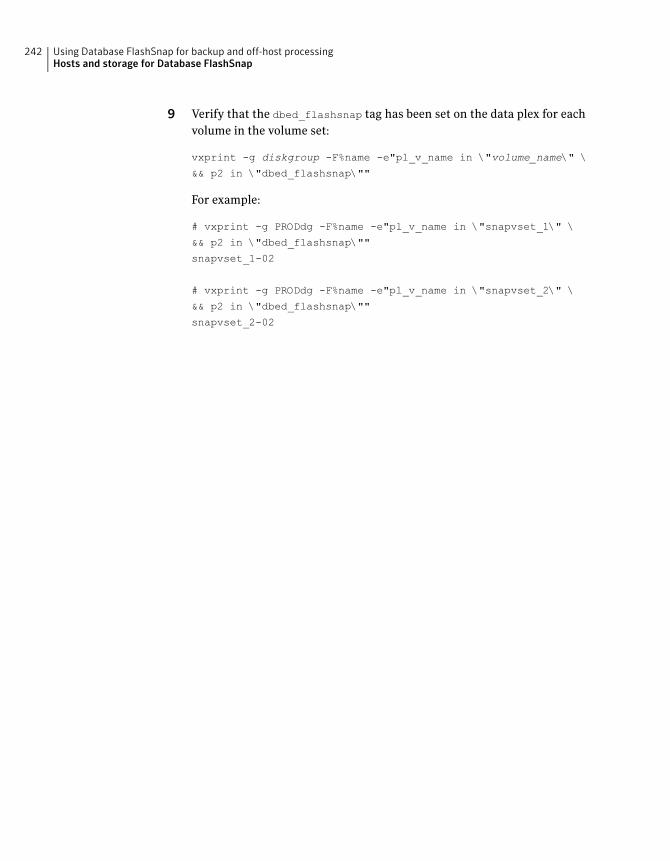
9 Verify that the dbed_flashsnap tag has been set on the data plex for each
volume in the volume set:
vxprint -g diskgroup -F%name -e"pl_v_name in \"volume_name\" \
&& p2 in \"dbed_flashsnap\""
For example:
# vxprint -g PRODdg -F%name -e"pl_v_name in \"snapvset_1\" \
&& p2 in \"dbed_flashsnap\""
snapvset_1-02
# vxprint -g PRODdg -F%name -e"pl_v_name in \"snapvset_2\" \
&& p2 in \"dbed_flashsnap\""
snapvset_2-02
Using Database FlashSnap for backup and off-host processingHosts and storage for Database FlashSnap
242
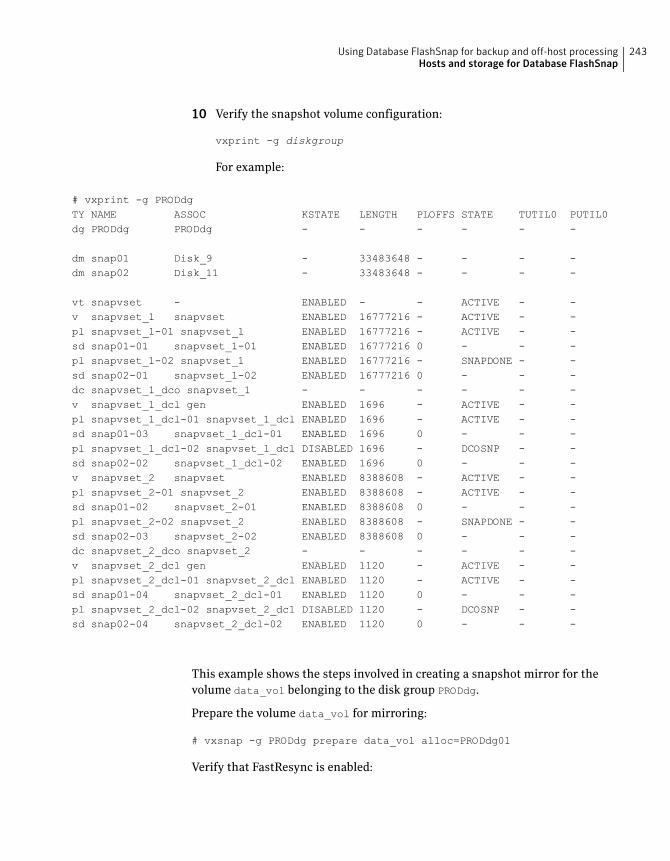
10 Verify the snapshot volume configuration:
vxprint -g diskgroup
For example:
# vxprint -g PRODdgTY NAME ASSOC KSTATE LENGTH PLOFFS STATE TUTIL0 PUTIL0dg PRODdg PRODdg - - - - - -
dm snap01 Disk_9 - 33483648 - - - -dm snap02 Disk_11 - 33483648 - - - -
vt snapvset - ENABLED - - ACTIVE - -v snapvset_1 snapvset ENABLED 16777216 - ACTIVE - -pl snapvset_1-01 snapvset_1 ENABLED 16777216 - ACTIVE - -sd snap01-01 snapvset_1-01 ENABLED 16777216 0 - - -pl snapvset_1-02 snapvset_1 ENABLED 16777216 - SNAPDONE - -sd snap02-01 snapvset_1-02 ENABLED 16777216 0 - - -dc snapvset_1_dco snapvset_1 - - - - - -v snapvset_1_dcl gen ENABLED 1696 - ACTIVE - -pl snapvset_1_dcl-01 snapvset_1_dcl ENABLED 1696 - ACTIVE - -sd snap01-03 snapvset_1_dcl-01 ENABLED 1696 0 - - -pl snapvset_1_dcl-02 snapvset_1_dcl DISABLED 1696 - DCOSNP - -sd snap02-02 snapvset_1_dcl-02 ENABLED 1696 0 - - -v snapvset_2 snapvset ENABLED 8388608 - ACTIVE - -pl snapvset_2-01 snapvset_2 ENABLED 8388608 - ACTIVE - -sd snap01-02 snapvset_2-01 ENABLED 8388608 0 - - -pl snapvset_2-02 snapvset_2 ENABLED 8388608 - SNAPDONE - -sd snap02-03 snapvset_2-02 ENABLED 8388608 0 - - -dc snapvset_2_dco snapvset_2 - - - - - -v snapvset_2_dcl gen ENABLED 1120 - ACTIVE - -pl snapvset_2_dcl-01 snapvset_2_dcl ENABLED 1120 - ACTIVE - -sd snap01-04 snapvset_2_dcl-01 ENABLED 1120 0 - - -pl snapvset_2_dcl-02 snapvset_2_dcl DISABLED 1120 - DCOSNP - -sd snap02-04 snapvset_2_dcl-02 ENABLED 1120 0 - - -
This example shows the steps involved in creating a snapshot mirror for the
volume data_vol belonging to the disk group PRODdg.
Prepare the volume data_vol for mirroring:
# vxsnap -g PRODdg prepare data_vol alloc=PRODdg01
Verify that FastResync is enabled:
243Using Database FlashSnap for backup and off-host processingHosts and storage for Database FlashSnap
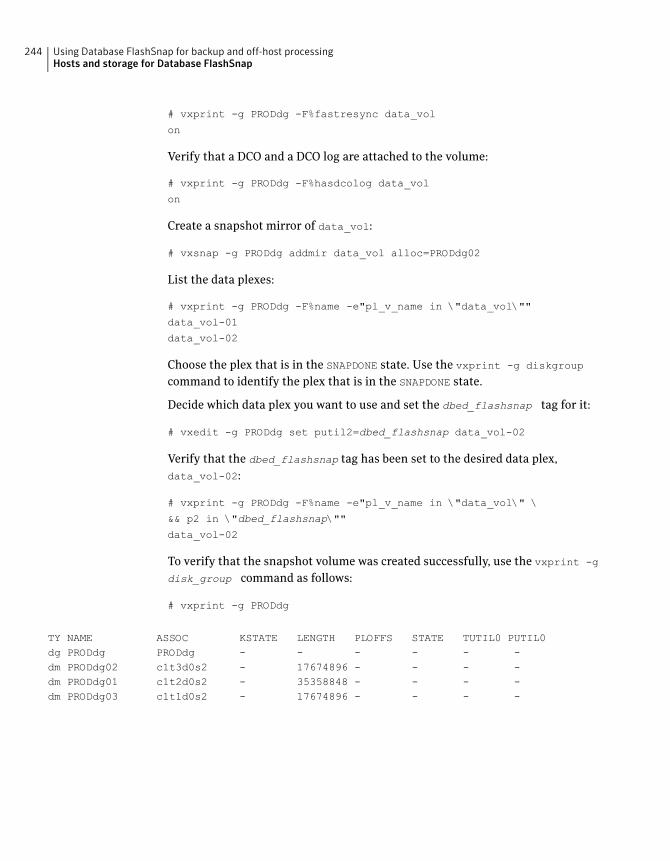
# vxprint -g PRODdg -F%fastresync data_vol
on
Verify that a DCO and a DCO log are attached to the volume:
# vxprint -g PRODdg -F%hasdcolog data_vol
on
Create a snapshot mirror of data_vol:
# vxsnap -g PRODdg addmir data_vol alloc=PRODdg02
List the data plexes:
# vxprint -g PRODdg -F%name -e"pl_v_name in \"data_vol\""
data_vol-01
data_vol-02
Choose the plex that is in the SNAPDONE state. Use the vxprint -g diskgroup
command to identify the plex that is in the SNAPDONE state.
Decide which data plex you want to use and set the dbed_flashsnap tag for it:
# vxedit -g PRODdg set putil2=dbed_flashsnap data_vol-02
Verify that the dbed_flashsnap tag has been set to the desired data plex,
data_vol-02:
# vxprint -g PRODdg -F%name -e"pl_v_name in \"data_vol\" \
&& p2 in \"dbed_flashsnap\""
data_vol-02
To verify that the snapshot volume was created successfully, use the vxprint -g
disk_group command as follows:
# vxprint -g PRODdg
TY NAME ASSOC KSTATE LENGTH PLOFFS STATE TUTIL0 PUTIL0dg PRODdg PRODdg - - - - - -dm PRODdg02 c1t3d0s2 - 17674896 - - - -dm PRODdg01 c1t2d0s2 - 35358848 - - - -dm PRODdg03 c1t1d0s2 - 17674896 - - - -
Using Database FlashSnap for backup and off-host processingHosts and storage for Database FlashSnap
244
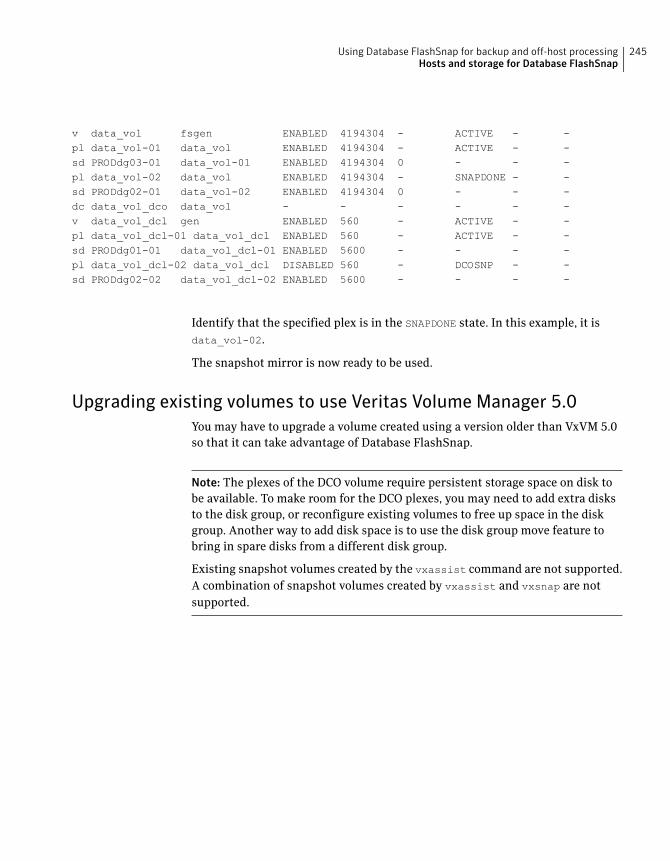
v data_vol fsgen ENABLED 4194304 - ACTIVE - -pl data_vol-01 data_vol ENABLED 4194304 - ACTIVE - -sd PRODdg03-01 data_vol-01 ENABLED 4194304 0 - - -pl data_vol-02 data_vol ENABLED 4194304 - SNAPDONE - -sd PRODdg02-01 data_vol-02 ENABLED 4194304 0 - - -dc data_vol_dco data_vol - - - - - -v data_vol_dcl gen ENABLED 560 - ACTIVE - -pl data_vol_dcl-01 data_vol_dcl ENABLED 560 - ACTIVE - -sd PRODdg01-01 data_vol_dcl-01 ENABLED 5600 - - - -pl data_vol_dcl-02 data_vol_dcl DISABLED 560 - DCOSNP - -sd PRODdg02-02 data_vol_dcl-02 ENABLED 5600 - - - -
Identify that the specified plex is in the SNAPDONE state. In this example, it is
data_vol-02.
The snapshot mirror is now ready to be used.
Upgrading existing volumes to use Veritas Volume Manager 5.0
You may have to upgrade a volume created using a version older than VxVM 5.0
so that it can take advantage of Database FlashSnap.
Note: The plexes of the DCO volume require persistent storage space on disk to
be available. To make room for the DCO plexes, you may need to add extra disks
to the disk group, or reconfigure existing volumes to free up space in the disk
group. Another way to add disk space is to use the disk group move feature to
bring in spare disks from a different disk group.
Existing snapshot volumes created by the vxassist command are not supported.
A combination of snapshot volumes created by vxassist and vxsnap are not
supported.
245Using Database FlashSnap for backup and off-host processingHosts and storage for Database FlashSnap
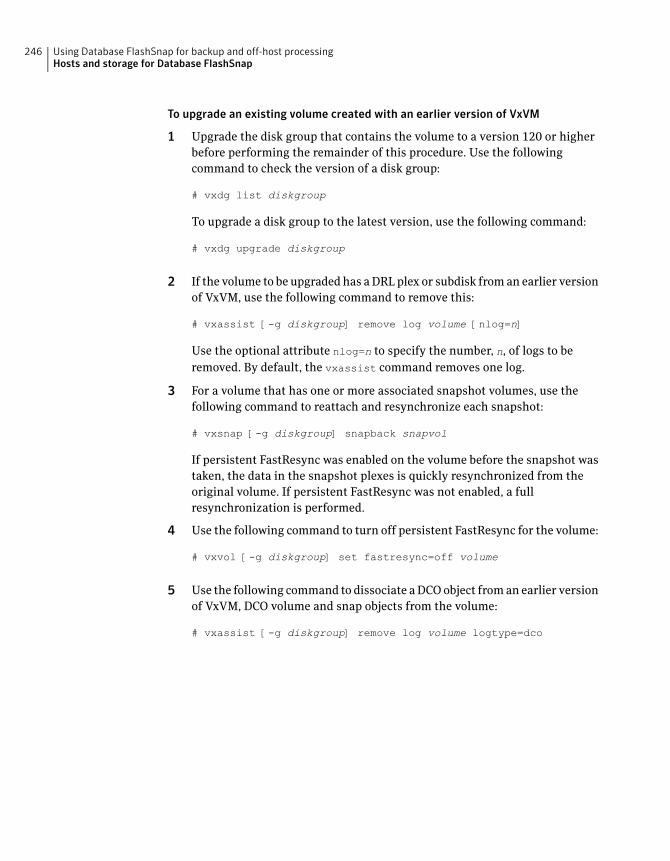
To upgrade an existing volume created with an earlier version of VxVM
1 Upgrade the disk group that contains the volume to a version 120 or higher
before performing the remainder of this procedure. Use the following
command to check the version of a disk group:
# vxdg list diskgroup
To upgrade a disk group to the latest version, use the following command:
# vxdg upgrade diskgroup
2 If the volume to be upgraded has a DRL plex or subdisk from an earlier version
of VxVM, use the following command to remove this:
# vxassist [-g diskgroup] remove log volume [nlog=n]
Use the optional attribute nlog=n to specify the number, n, of logs to be
removed. By default, the vxassist command removes one log.
3 For a volume that has one or more associated snapshot volumes, use the
following command to reattach and resynchronize each snapshot:
# vxsnap [-g diskgroup] snapback snapvol
If persistent FastResync was enabled on the volume before the snapshot was
taken, the data in the snapshot plexes is quickly resynchronized from the
original volume. If persistent FastResync was not enabled, a full
resynchronization is performed.
4 Use the following command to turn off persistent FastResync for the volume:
# vxvol [-g diskgroup] set fastresync=off volume
5 Use the following command to dissociate a DCO object from an earlier version
of VxVM, DCO volume and snap objects from the volume:
# vxassist [-g diskgroup] remove log volume logtype=dco
Using Database FlashSnap for backup and off-host processingHosts and storage for Database FlashSnap
246
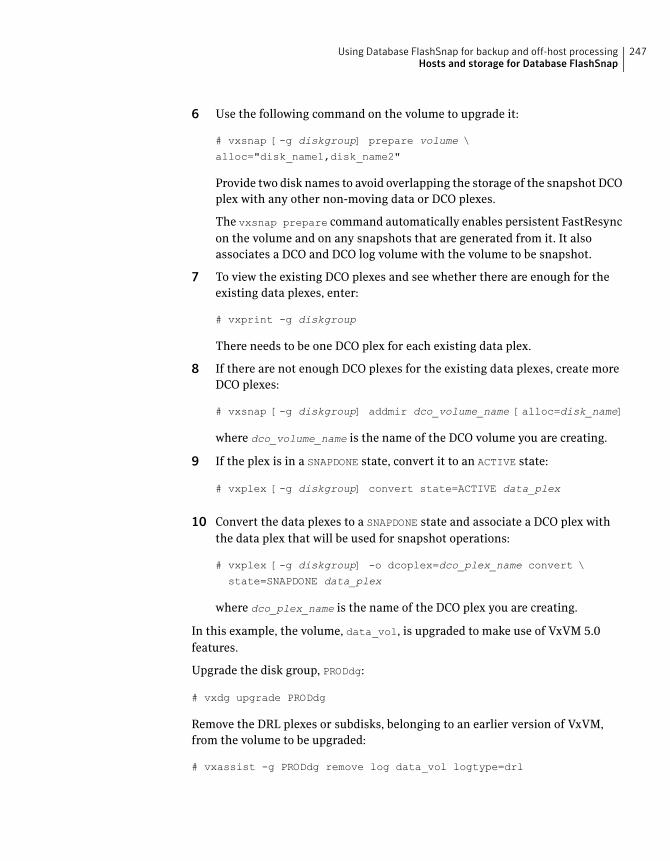
6 Use the following command on the volume to upgrade it:
# vxsnap [-g diskgroup] prepare volume \
alloc="disk_name1,disk_name2"
Provide two disk names to avoid overlapping the storage of the snapshot DCO
plex with any other non-moving data or DCO plexes.
The vxsnap prepare command automatically enables persistent FastResync
on the volume and on any snapshots that are generated from it. It also
associates a DCO and DCO log volume with the volume to be snapshot.
7 To view the existing DCO plexes and see whether there are enough for the
existing data plexes, enter:
# vxprint -g diskgroup
There needs to be one DCO plex for each existing data plex.
8 If there are not enough DCO plexes for the existing data plexes, create more
DCO plexes:
# vxsnap [-g diskgroup] addmir dco_volume_name [alloc=disk_name]
where dco_volume_name is the name of the DCO volume you are creating.
9 If the plex is in a SNAPDONE state, convert it to an ACTIVE state:
# vxplex [-g diskgroup] convert state=ACTIVE data_plex
10 Convert the data plexes to a SNAPDONE state and associate a DCO plex with
the data plex that will be used for snapshot operations:
# vxplex [-g diskgroup] -o dcoplex=dco_plex_name convert \
state=SNAPDONE data_plex
where dco_plex_name is the name of the DCO plex you are creating.
In this example, the volume, data_vol, is upgraded to make use of VxVM 5.0
features.
Upgrade the disk group, PRODdg:
# vxdg upgrade PRODdg
Remove the DRL plexes or subdisks, belonging to an earlier version of VxVM,
from the volume to be upgraded:
# vxassist -g PRODdg remove log data_vol logtype=drl
247Using Database FlashSnap for backup and off-host processingHosts and storage for Database FlashSnap
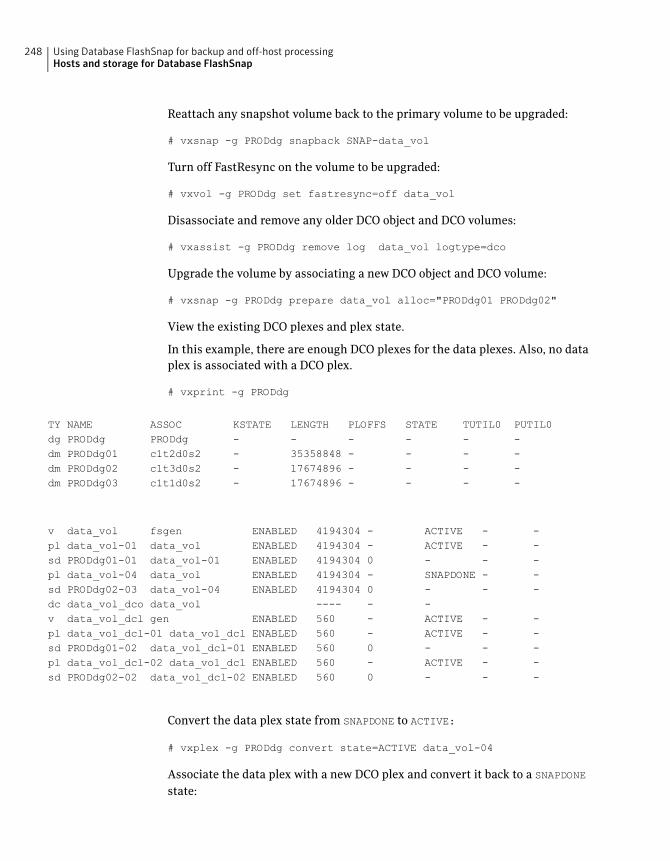
Reattach any snapshot volume back to the primary volume to be upgraded:
# vxsnap -g PRODdg snapback SNAP-data_vol
Turn off FastResync on the volume to be upgraded:
# vxvol -g PRODdg set fastresync=off data_vol
Disassociate and remove any older DCO object and DCO volumes:
# vxassist -g PRODdg remove log data_vol logtype=dco
Upgrade the volume by associating a new DCO object and DCO volume:
# vxsnap -g PRODdg prepare data_vol alloc="PRODdg01 PRODdg02"
View the existing DCO plexes and plex state.
In this example, there are enough DCO plexes for the data plexes. Also, no data
plex is associated with a DCO plex.
# vxprint -g PRODdg
TY NAME ASSOC KSTATE LENGTH PLOFFS STATE TUTIL0 PUTIL0dg PRODdg PRODdg - - - - - -dm PRODdg01 c1t2d0s2 - 35358848 - - - -dm PRODdg02 c1t3d0s2 - 17674896 - - - -dm PRODdg03 c1t1d0s2 - 17674896 - - - -
v data_vol fsgen ENABLED 4194304 - ACTIVE - -pl data_vol-01 data_vol ENABLED 4194304 - ACTIVE - -sd PRODdg01-01 data_vol-01 ENABLED 4194304 0 - - -pl data_vol-04 data_vol ENABLED 4194304 - SNAPDONE - -sd PRODdg02-03 data_vol-04 ENABLED 4194304 0 - - -dc data_vol_dco data_vol ---- - -v data_vol_dcl gen ENABLED 560 - ACTIVE - -pl data_vol_dcl-01 data_vol_dcl ENABLED 560 - ACTIVE - -sd PRODdg01-02 data_vol_dcl-01 ENABLED 560 0 - - -pl data_vol_dcl-02 data_vol_dcl ENABLED 560 - ACTIVE - -sd PRODdg02-02 data_vol_dcl-02 ENABLED 560 0 - - -
Convert the data plex state from SNAPDONE to ACTIVE:
# vxplex -g PRODdg convert state=ACTIVE data_vol-04
Associate the data plex with a new DCO plex and convert it back to a SNAPDONE
state:
Using Database FlashSnap for backup and off-host processingHosts and storage for Database FlashSnap
248
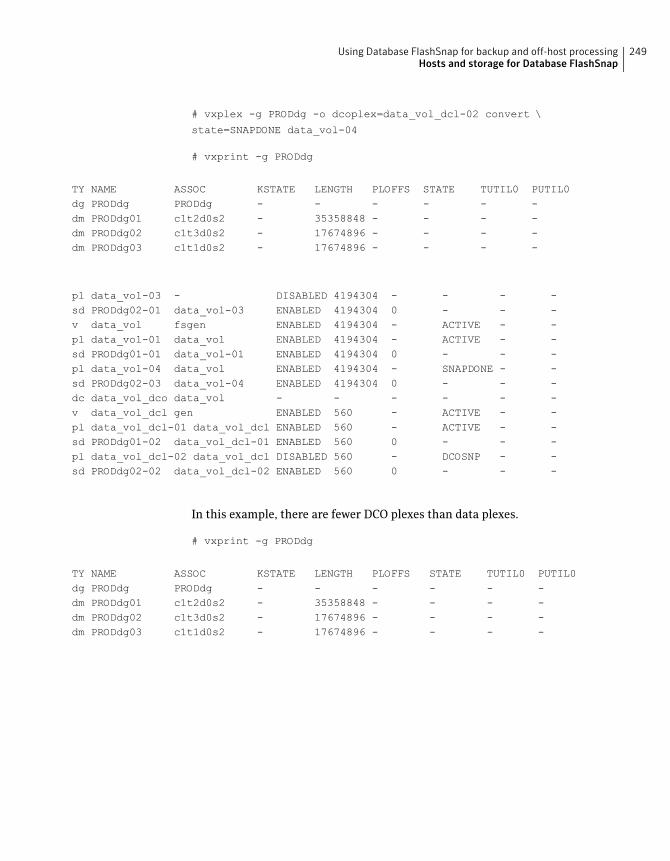
# vxplex -g PRODdg -o dcoplex=data_vol_dcl-02 convert \
state=SNAPDONE data_vol-04
# vxprint -g PRODdg
TY NAME ASSOC KSTATE LENGTH PLOFFS STATE TUTIL0 PUTIL0dg PRODdg PRODdg - - - - - -dm PRODdg01 c1t2d0s2 - 35358848 - - - -dm PRODdg02 c1t3d0s2 - 17674896 - - - -dm PRODdg03 c1t1d0s2 - 17674896 - - - -
pl data_vol-03 - DISABLED 4194304 - - - -sd PRODdg02-01 data_vol-03 ENABLED 4194304 0 - - -v data_vol fsgen ENABLED 4194304 - ACTIVE - -pl data_vol-01 data_vol ENABLED 4194304 - ACTIVE - -sd PRODdg01-01 data_vol-01 ENABLED 4194304 0 - - -pl data_vol-04 data_vol ENABLED 4194304 - SNAPDONE - -sd PRODdg02-03 data_vol-04 ENABLED 4194304 0 - - -dc data_vol_dco data_vol - - - - - -v data_vol_dcl gen ENABLED 560 - ACTIVE - -pl data_vol_dcl-01 data_vol_dcl ENABLED 560 - ACTIVE - -sd PRODdg01-02 data_vol_dcl-01 ENABLED 560 0 - - -pl data_vol_dcl-02 data_vol_dcl DISABLED 560 - DCOSNP - -sd PRODdg02-02 data_vol_dcl-02 ENABLED 560 0 - - -
In this example, there are fewer DCO plexes than data plexes.
# vxprint -g PRODdg
TY NAME ASSOC KSTATE LENGTH PLOFFS STATE TUTIL0 PUTIL0dg PRODdg PRODdg - - - - - -dm PRODdg01 c1t2d0s2 - 35358848 - - - -dm PRODdg02 c1t3d0s2 - 17674896 - - - -dm PRODdg03 c1t1d0s2 - 17674896 - - - -
249Using Database FlashSnap for backup and off-host processingHosts and storage for Database FlashSnap
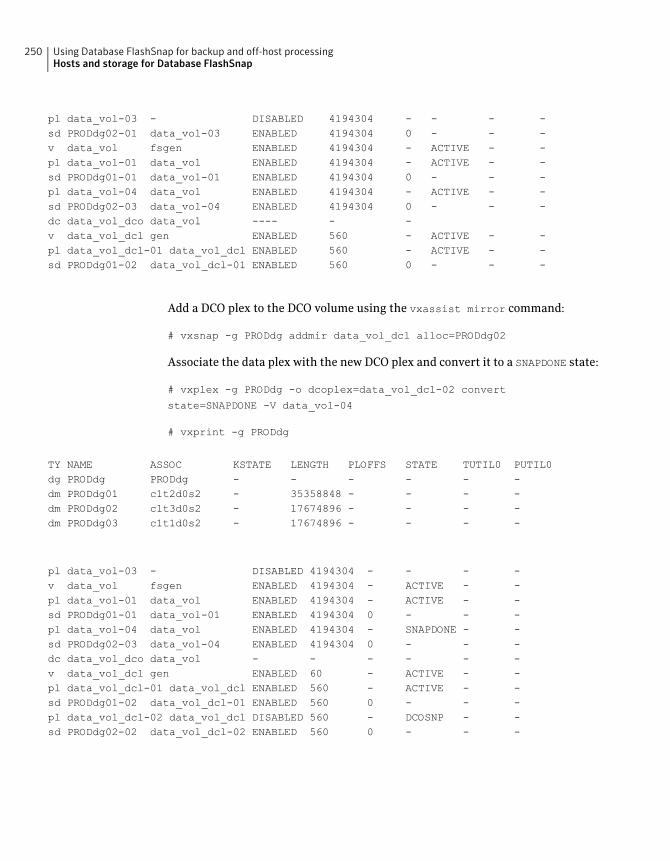
pl data_vol-03 - DISABLED 4194304 - - - -sd PRODdg02-01 data_vol-03 ENABLED 4194304 0 - - -v data_vol fsgen ENABLED 4194304 - ACTIVE - -pl data_vol-01 data_vol ENABLED 4194304 - ACTIVE - -sd PRODdg01-01 data_vol-01 ENABLED 4194304 0 - - -pl data_vol-04 data_vol ENABLED 4194304 - ACTIVE - -sd PRODdg02-03 data_vol-04 ENABLED 4194304 0 - - -dc data_vol_dco data_vol ---- - -v data_vol_dcl gen ENABLED 560 - ACTIVE - -pl data_vol_dcl-01 data_vol_dcl ENABLED 560 - ACTIVE - -sd PRODdg01-02 data_vol_dcl-01 ENABLED 560 0 - - -
Add a DCO plex to the DCO volume using the vxassist mirror command:
# vxsnap -g PRODdg addmir data_vol_dcl alloc=PRODdg02
Associate the data plex with the new DCO plex and convert it to a SNAPDONE state:
# vxplex -g PRODdg -o dcoplex=data_vol_dcl-02 convert
state=SNAPDONE -V data_vol-04
# vxprint -g PRODdg
TY NAME ASSOC KSTATE LENGTH PLOFFS STATE TUTIL0 PUTIL0dg PRODdg PRODdg - - - - - -dm PRODdg01 c1t2d0s2 - 35358848 - - - -dm PRODdg02 c1t3d0s2 - 17674896 - - - -dm PRODdg03 c1t1d0s2 - 17674896 - - - -
pl data_vol-03 - DISABLED 4194304 - - - -v data_vol fsgen ENABLED 4194304 - ACTIVE - -pl data_vol-01 data_vol ENABLED 4194304 - ACTIVE - -sd PRODdg01-01 data_vol-01 ENABLED 4194304 0 - - -pl data_vol-04 data_vol ENABLED 4194304 - SNAPDONE - -sd PRODdg02-03 data_vol-04 ENABLED 4194304 0 - - -dc data_vol_dco data_vol - - - - - -v data_vol_dcl gen ENABLED 60 - ACTIVE - -pl data_vol_dcl-01 data_vol_dcl ENABLED 560 - ACTIVE - -sd PRODdg01-02 data_vol_dcl-01 ENABLED 560 0 - - -pl data_vol_dcl-02 data_vol_dcl DISABLED 560 - DCOSNP - -sd PRODdg02-02 data_vol_dcl-02 ENABLED 560 0 - - -
Using Database FlashSnap for backup and off-host processingHosts and storage for Database FlashSnap
250
Upgrading fromVeritas Database Edition 3.5 for Oracle with DatabaseFlashSnap
In this release of Veritas Storage Foundation for Oracle, Database FlashSnap does
not support snapshots of vxdbavol and ORACLE_HOME. If you have upgraded from
Veritas Database Edition 3.5 for Oracle with Database FlashSnap, you must remove
the volume plexes for vxdbavol and ORACLE_HOME, and revalidate the snapplan
before using Database FlashSnap with this release of Veritas Storage Foundation
for Oracle.
Note: This upgrade procedure does not apply to Veritas Storage Foundation for
Oracle RAC configurations.
To remove the volume plexes for vxdbavol and ORACLE_HOME
1 As root, snapback the snapshot plexes.
# vxsnap [-g diskgroup] snapback snapvol
2 Turn off FastResync.
# vxvol [-g diskgroup] set fastresync=off volume
3 Remove the DCO object.
# vxassist [-g diskgroup] remove log volume logtype=dco
4 Remove the volume plexes for vxdbavol and ORACLE_HOME.
# vxplex -g diskgroup -o rm dis plex_name
5 Log in as the DBA user and revalidate your snapplan.
$ /opt/VRTS/bin/dbed_vmchecksnap -S ORACLE_SID -H ORACLE_HOME \
-f SNAPPLAN -o validate
Summary of database snapshot stepsYou can use Database FlashSnap commands to create a snapshot of your entire
database on the same host or on a different one. Three types of snapshots can be
created: online, offline, or instant.
251Using Database FlashSnap for backup and off-host processingSummary of database snapshot steps
If the SNAPSHOT_MODE specified in the snapplan is set to online, dbed_vmsnapfirst
puts the tablespaces to be snapshot into backup mode. After the snapshot is
created, the tablespaces are taken out of backup mode, the log files are switched
to ensure that the extra redo logs are archived, and a snapshot of the archive logs
is created.
If the SNAPSHOT_MODE is set to offline, the database must be shut down before
the snapshot is created. Online redo logs and control files are required and will
be used to ensure a full database recovery.
If the SNAPSHOT_MODE is set to instant, tablespaces are not put into and out of
backup mode. Online redo logs and control files are required and will be used to
ensure a full database recovery.
Both online and offline snapshots provide a valid backup copy of the database.
You can use the snapshot as a source for backing up the database or creating a
clone database for decision-support purposes. Instant snapshots do not represent
a valid backup copy for point-in-time recovery.
By using Database FlashSnap commands, you can create snapshots of all volumes
on a database using the snapplan. Optionally, you can use the VxVM command
(vxsnap) to create volume snapshots. However, unlike the Database FlashSnap
commands, the vxsnap command does not automate disk group content
reorganization functions.
For more information about the vxsnap command, see Veritas VolumeManager
Administrator's Guide.
Note: Make sure the volumes used by the database are configured properly before
attempting to take a snapshot. This requires superuser (root) privileges.
Anytime you change the structure of the database (for example, by adding or
deleting datafiles, converting PFILE to SPFILE, or converting SPFILE to PFILE),
you must run dbed_update.
Database FlashSnap commands must be run by the Oracle database administrator
instance owner.
To create a snapshot image of a database
1 Create a snapshot mirror of a volume or volume set.
See “Creating a snapshot mirror of a volume or volume set used by the
database” on page 234.
2 Use the dbed_vmchecksnap command to create a snapplan template and check
the volume configuration to ensure that it is valid for creating volume
snapshots of the database.
Using Database FlashSnap for backup and off-host processingSummary of database snapshot steps
252
The snapplan contains detailed database and volume configuration
information that is needed for snapshot creation and resynchronization. You
can modify the snapplan template with a text editor.
The dbed_vmchecksnap command can also be used to:
■ List all snapplans associated with a specific ORACLE_SID
(dbed_vmchecksnap -o list).
■ Remove the snapplan from the repository (dbed_vmchecksnap -o remove
-f SNAPPLAN).
■ Copy a snapplan from the repository to your local directory
(dbed_vmchecksnap -o copy -f SNAPPLAN).
3 Use the dbed_vmsnap command to create snapshot volumes for the database.
4 On the secondary host, use the dbed_vmclonedb command to create a clone
database using the disk group deported from the primary host.
The dbed_vmclonedb command imports the disk group that was deported
from the primary host, recovers the snapshot volumes, mounts the file
systems, recovers the database, and brings the database online. If the
secondary host is different, the database name can be same. You can use the
-o recoverdb option to let dbed_vmclonedb perform an automatic database
recovery, or you can use the -o mountdb option to perform your own
point-in-time recovery and bring up the database manually. For a
point-in-time recovery, the snapshot mode must be online.
You can also create a clone on the primary host. Your snapplan settings
specify whether a clone should be created on the primary or secondary host.
5 You can now use the clone database to perform database backup and other
off-host processing work.
6 The clone database can be used to reverse resynchronize the original volume
from the data in the snapshot, or can be discarded by rejoining the snapshot
volumes with the original volumes (that is, by resynchronizing the snapshot
volumes) for future use.
Figure 13-3 depicts the sequence of steps leading up to taking a snapshot using
Database FlashSnap.
253Using Database FlashSnap for backup and off-host processingSummary of database snapshot steps
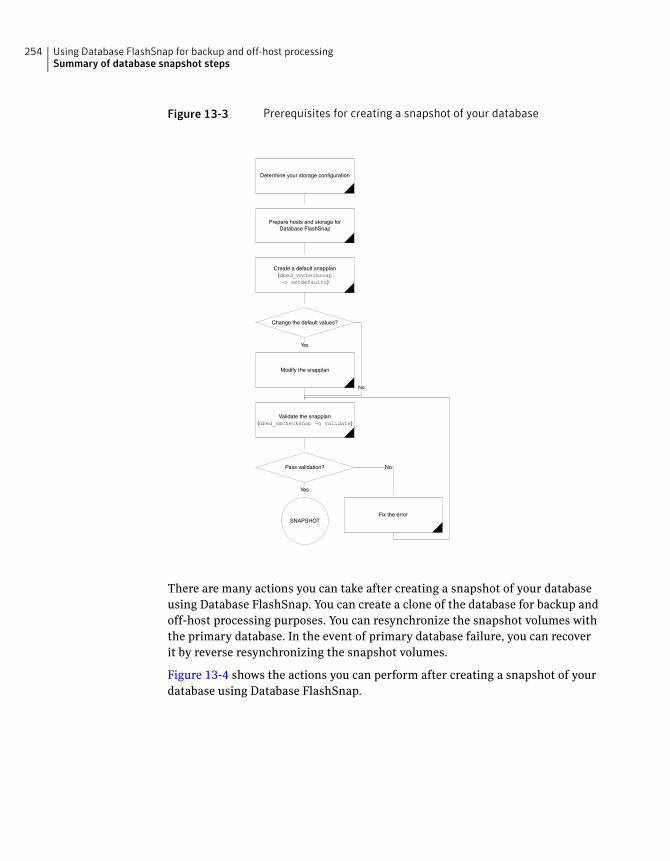
Figure 13-3 Prerequisites for creating a snapshot of your database
Create a default snapplan(dbed_vmchecksnap-o setdefaults)
Prepare hosts and storage forDatabase FlashSnap
Determine your storage configuration
Validate the snapplan(dbed_vmchecksnap -o validate)
SNAPSHOT
Change the default values?
Modify the snapplan
No
Yes
Fix the error
Pass validation?
Yes
No
There are many actions you can take after creating a snapshot of your database
using Database FlashSnap. You can create a clone of the database for backup and
off-host processing purposes. You can resynchronize the snapshot volumes with
the primary database. In the event of primary database failure, you can recover
it by reverse resynchronizing the snapshot volumes.
Figure 13-4 shows the actions you can perform after creating a snapshot of your
database using Database FlashSnap.
Using Database FlashSnap for backup and off-host processingSummary of database snapshot steps
254
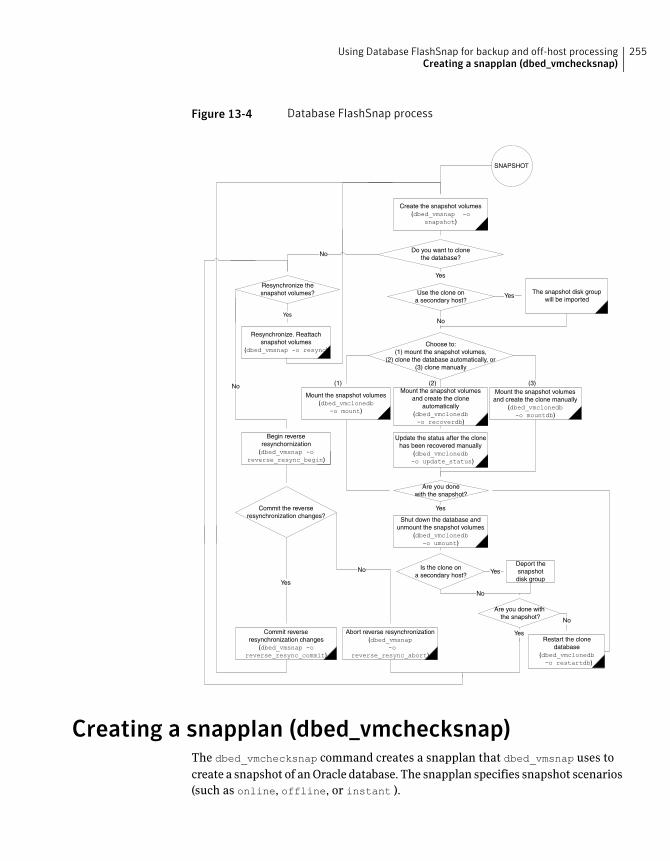
Figure 13-4 Database FlashSnap process
Create the snapshot volumes(dbed_vmsnap -o
snapshot)
Use the clone ona secondary host?
Choose to:(1) mount the snapshot volumes,
(2) clone the database automatically, or(3) clone manually
Update the status after the clonehas been recovered manually
(dbed_vmclonedb-o update_status)
Shut down the database andunmount the snapshot volumes
(dbed_vmclonedb-o umount)
Restart the clonedatabase
(dbed_vmclonedb-o restartdb)
The snapshot disk groupwill be imported
Are you donewith the snapshot?
Deport thesnapshotdisk group
Abort reverse resynchronization(dbed_vmsnap
-oreverse_resync_abort)
Resynchronize. Reattachsnapshot volumes
(dbed_vmsnap -o resync)
Do you want to clonethe database?
No
Yes
Resynchronize thesnapshot volumes?
(1) (2) (3)
Yes
No
Yes
Yes
No
No
SNAPSHOT
Are you done withthe snapshot? No
Is the clone ona secondary host?
No
Yes
Mount the snapshot volumes(dbed_vmclonedb
-o mount)
Mount the snapshot volumesand create the clone
automatically(dbed_vmclonedb-o recoverdb)
Mount the snapshot volumesand create the clone manually
(dbed_vmclonedb-o mountdb)
Begin reverseresynchornization
(dbed_vmsnap -oreverse_resync_begin)
Commit the reverseresynchronization changes?
Yes
Commit reverseresynchronization changes
(dbed_vmsnap -oreverse_resync_commit)
Yes
Creating a snapplan (dbed_vmchecksnap)The dbed_vmchecksnap command creates a snapplan that dbed_vmsnap uses to
create a snapshot of an Oracle database. The snapplan specifies snapshot scenarios
(such as online, offline, or instant ).
255Using Database FlashSnap for backup and off-host processingCreating a snapplan (dbed_vmchecksnap)
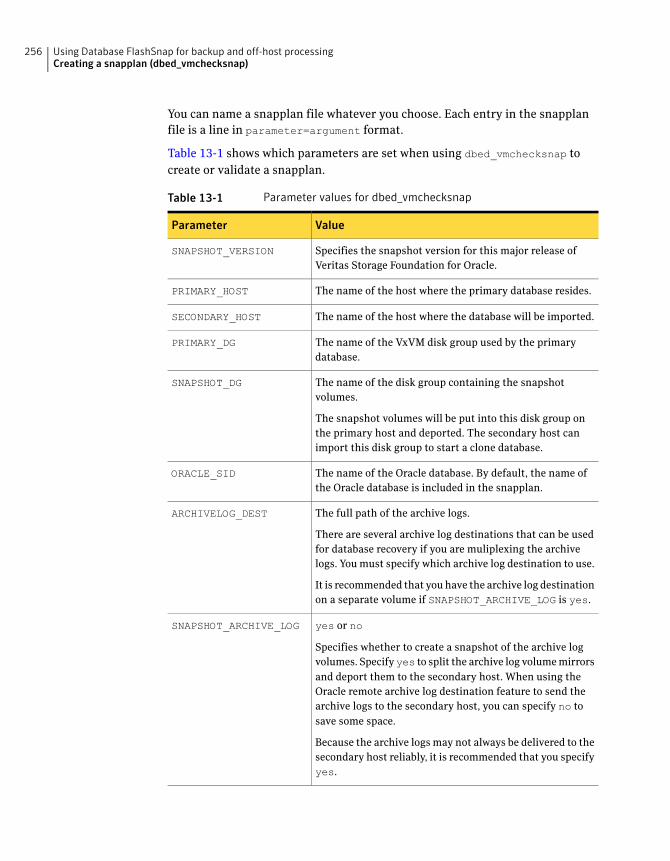
You can name a snapplan file whatever you choose. Each entry in the snapplan
file is a line in parameter=argument format.
Table 13-1 shows which parameters are set when using dbed_vmchecksnap to
create or validate a snapplan.
Table 13-1 Parameter values for dbed_vmchecksnap
ValueParameter
Specifies the snapshot version for this major release of
Veritas Storage Foundation for Oracle.
SNAPSHOT_VERSION
The name of the host where the primary database resides.PRIMARY_HOST
The name of the host where the database will be imported.SECONDARY_HOST
The name of the VxVM disk group used by the primary
database.
PRIMARY_DG
The name of the disk group containing the snapshot
volumes.
The snapshot volumes will be put into this disk group on
the primary host and deported. The secondary host can
import this disk group to start a clone database.
SNAPSHOT_DG
The name of the Oracle database. By default, the name of
the Oracle database is included in the snapplan.
ORACLE_SID
The full path of the archive logs.
There are several archive log destinations that can be used
for database recovery if you are muliplexing the archive
logs. You must specify which archive log destination to use.
It is recommended that you have the archive log destination
on a separate volume if SNAPSHOT_ARCHIVE_LOG is yes.
ARCHIVELOG_DEST
yes or no
Specifies whether to create a snapshot of the archive log
volumes. Specifyyes to split the archive log volume mirrors
and deport them to the secondary host. When using the
Oracle remote archive log destination feature to send the
archive logs to the secondary host, you can specify no to
save some space.
Because the archive logs may not always be delivered to the
secondary host reliably, it is recommended that you specify
yes.
SNAPSHOT_ARCHIVE_LOG
Using Database FlashSnap for backup and off-host processingCreating a snapplan (dbed_vmchecksnap)
256
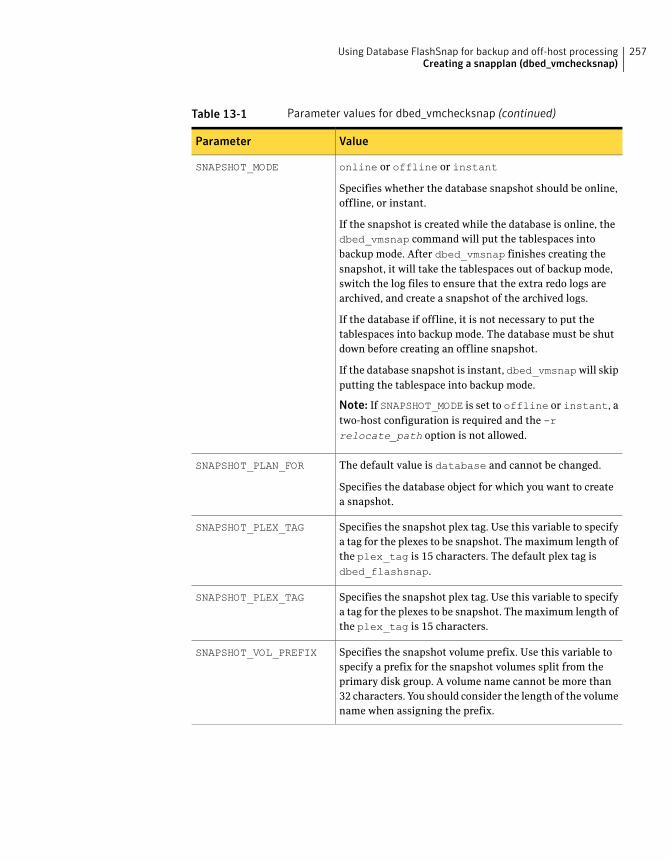
Table 13-1 Parameter values for dbed_vmchecksnap (continued)
ValueParameter
online or offline or instant
Specifies whether the database snapshot should be online,
offline, or instant.
If the snapshot is created while the database is online, the
dbed_vmsnap command will put the tablespaces into
backup mode. After dbed_vmsnap finishes creating the
snapshot, it will take the tablespaces out of backup mode,
switch the log files to ensure that the extra redo logs are
archived, and create a snapshot of the archived logs.
If the database if offline, it is not necessary to put the
tablespaces into backup mode. The database must be shut
down before creating an offline snapshot.
If the database snapshot is instant, dbed_vmsnapwill skip
putting the tablespace into backup mode.
Note: If SNAPSHOT_MODE is set to offline or instant, a
two-host configuration is required and the -rrelocate_path option is not allowed.
SNAPSHOT_MODE
The default value is database and cannot be changed.
Specifies the database object for which you want to create
a snapshot.
SNAPSHOT_PLAN_FOR
Specifies the snapshot plex tag. Use this variable to specify
a tag for the plexes to be snapshot. The maximum length of
the plex_tag is 15 characters. The default plex tag is
dbed_flashsnap.
SNAPSHOT_PLEX_TAG
Specifies the snapshot plex tag. Use this variable to specify
a tag for the plexes to be snapshot. The maximum length of
the plex_tag is 15 characters.
SNAPSHOT_PLEX_TAG
Specifies the snapshot volume prefix. Use this variable to
specify a prefix for the snapshot volumes split from the
primary disk group. A volume name cannot be more than
32 characters. You should consider the length of the volume
name when assigning the prefix.
SNAPSHOT_VOL_PREFIX
257Using Database FlashSnap for backup and off-host processingCreating a snapplan (dbed_vmchecksnap)
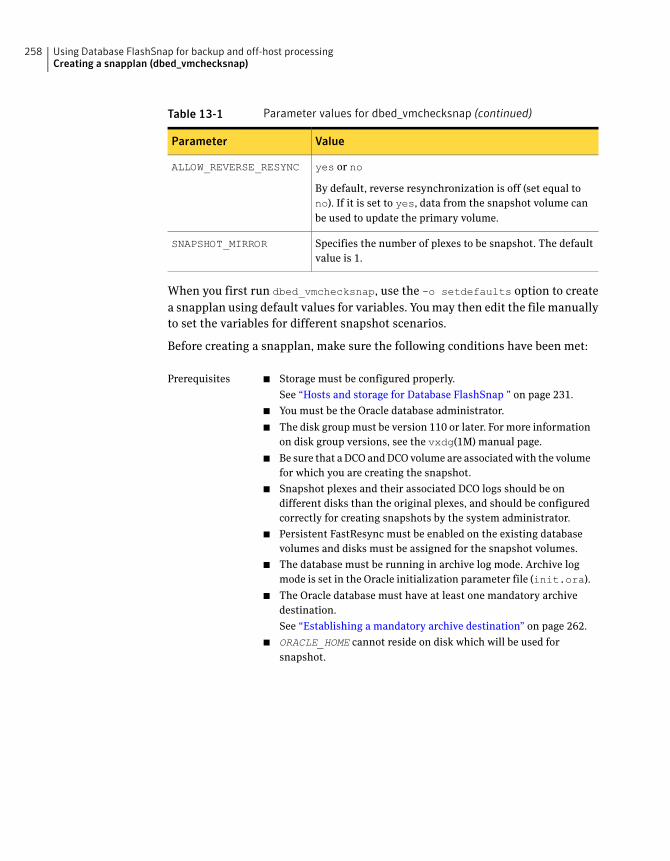
Table 13-1 Parameter values for dbed_vmchecksnap (continued)
ValueParameter
yes or no
By default, reverse resynchronization is off (set equal to
no). If it is set to yes, data from the snapshot volume can
be used to update the primary volume.
ALLOW_REVERSE_RESYNC
Specifies the number of plexes to be snapshot. The default
value is 1.
SNAPSHOT_MIRROR
When you first run dbed_vmchecksnap, use the -o setdefaults option to create
a snapplan using default values for variables. You may then edit the file manually
to set the variables for different snapshot scenarios.
Before creating a snapplan, make sure the following conditions have been met:
■ Storage must be configured properly.
See “Hosts and storage for Database FlashSnap ” on page 231.
■ You must be the Oracle database administrator.
■ The disk group must be version 110 or later. For more information
on disk group versions, see the vxdg(1M) manual page.
■ Be sure that a DCO and DCO volume are associated with the volume
for which you are creating the snapshot.
■ Snapshot plexes and their associated DCO logs should be on
different disks than the original plexes, and should be configured
correctly for creating snapshots by the system administrator.
■ Persistent FastResync must be enabled on the existing database
volumes and disks must be assigned for the snapshot volumes.
■ The database must be running in archive log mode. Archive log
mode is set in the Oracle initialization parameter file (init.ora).
■ The Oracle database must have at least one mandatory archive
destination.
See “Establishing a mandatory archive destination” on page 262.
■ ORACLE_HOME cannot reside on disk which will be used for
snapshot.
Prerequisites
Using Database FlashSnap for backup and off-host processingCreating a snapplan (dbed_vmchecksnap)
258
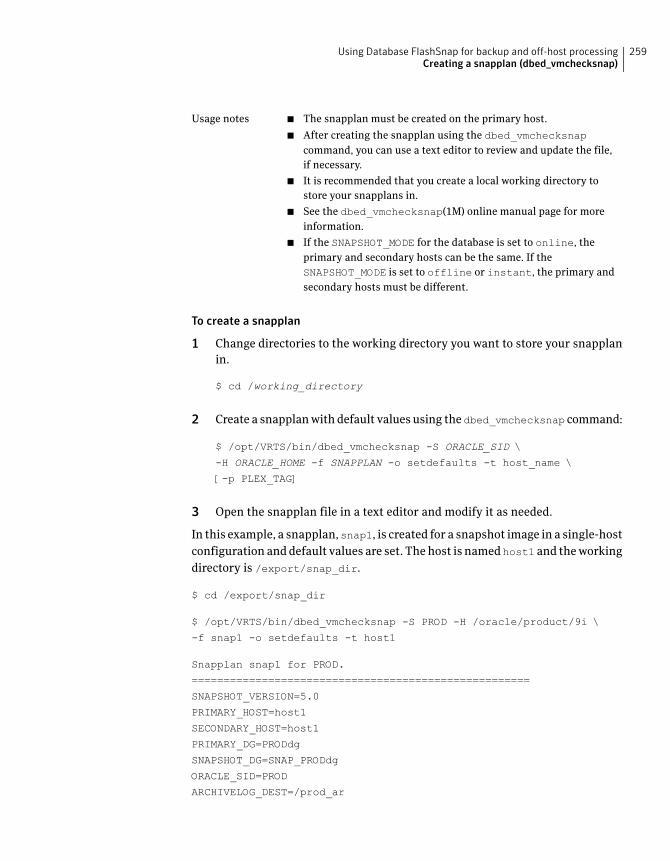
■ The snapplan must be created on the primary host.
■ After creating the snapplan using the dbed_vmchecksnapcommand, you can use a text editor to review and update the file,
if necessary.
■ It is recommended that you create a local working directory to
store your snapplans in.
■ See the dbed_vmchecksnap(1M) online manual page for more
information.
■ If the SNAPSHOT_MODE for the database is set to online, the
primary and secondary hosts can be the same. If the
SNAPSHOT_MODE is set to offline or instant, the primary and
secondary hosts must be different.
Usage notes
To create a snapplan
1 Change directories to the working directory you want to store your snapplan
in.
$ cd /working_directory
2 Create a snapplan with default values using the dbed_vmchecksnap command:
$ /opt/VRTS/bin/dbed_vmchecksnap -S ORACLE_SID \
-H ORACLE_HOME -f SNAPPLAN -o setdefaults -t host_name \
[-p PLEX_TAG]
3 Open the snapplan file in a text editor and modify it as needed.
In this example, a snapplan, snap1, is created for a snapshot image in a single-host
configuration and default values are set. The host is named host1 and the working
directory is /export/snap_dir.
$ cd /export/snap_dir
$ /opt/VRTS/bin/dbed_vmchecksnap -S PROD -H /oracle/product/9i \
-f snap1 -o setdefaults -t host1
Snapplan snap1 for PROD.
=====================================================
SNAPSHOT_VERSION=5.0
PRIMARY_HOST=host1
SECONDARY_HOST=host1
PRIMARY_DG=PRODdg
SNAPSHOT_DG=SNAP_PRODdg
ORACLE_SID=PROD
ARCHIVELOG_DEST=/prod_ar
259Using Database FlashSnap for backup and off-host processingCreating a snapplan (dbed_vmchecksnap)
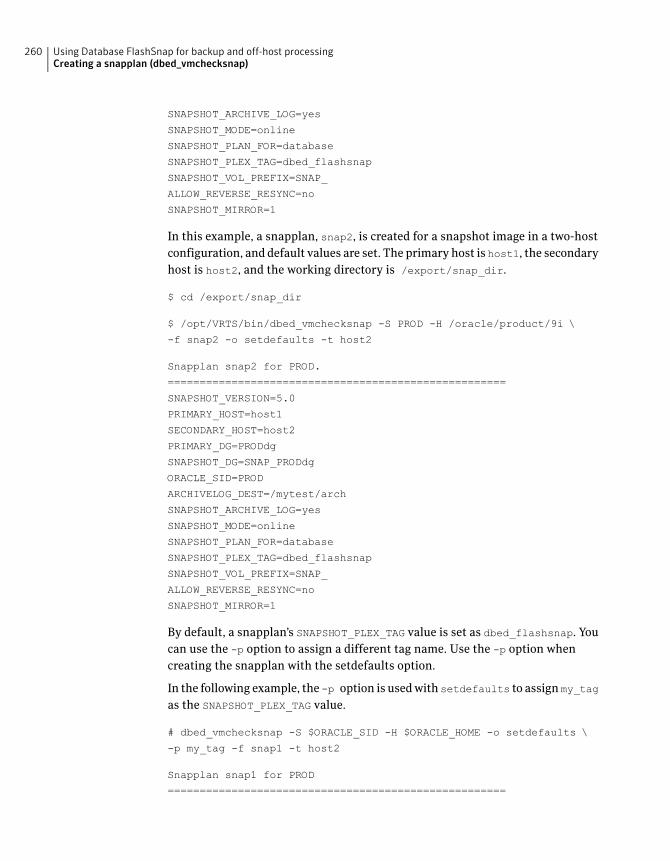
SNAPSHOT_ARCHIVE_LOG=yes
SNAPSHOT_MODE=online
SNAPSHOT_PLAN_FOR=database
SNAPSHOT_PLEX_TAG=dbed_flashsnap
SNAPSHOT_VOL_PREFIX=SNAP_
ALLOW_REVERSE_RESYNC=no
SNAPSHOT_MIRROR=1
In this example, a snapplan, snap2, is created for a snapshot image in a two-host
configuration, and default values are set. The primary host is host1, the secondary
host is host2, and the working directory is /export/snap_dir.
$ cd /export/snap_dir
$ /opt/VRTS/bin/dbed_vmchecksnap -S PROD -H /oracle/product/9i \
-f snap2 -o setdefaults -t host2
Snapplan snap2 for PROD.
=====================================================
SNAPSHOT_VERSION=5.0
PRIMARY_HOST=host1
SECONDARY_HOST=host2
PRIMARY_DG=PRODdg
SNAPSHOT_DG=SNAP_PRODdg
ORACLE_SID=PROD
ARCHIVELOG_DEST=/mytest/arch
SNAPSHOT_ARCHIVE_LOG=yes
SNAPSHOT_MODE=online
SNAPSHOT_PLAN_FOR=database
SNAPSHOT_PLEX_TAG=dbed_flashsnap
SNAPSHOT_VOL_PREFIX=SNAP_
ALLOW_REVERSE_RESYNC=no
SNAPSHOT_MIRROR=1
By default, a snapplan’s SNAPSHOT_PLEX_TAG value is set as dbed_flashsnap. You
can use the -p option to assign a different tag name. Use the -p option when
creating the snapplan with the setdefaults option.
In the following example, the -p option is used with setdefaults to assign my_tag
as the SNAPSHOT_PLEX_TAG value.
# dbed_vmchecksnap -S $ORACLE_SID -H $ORACLE_HOME -o setdefaults \
-p my_tag -f snap1 -t host2
Snapplan snap1 for PROD
=====================================================
Using Database FlashSnap for backup and off-host processingCreating a snapplan (dbed_vmchecksnap)
260
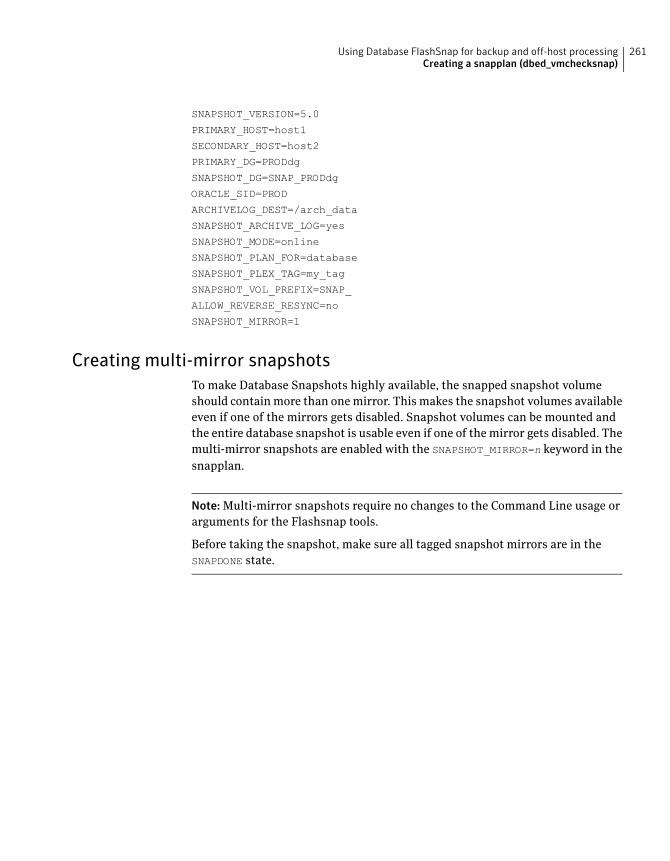
SNAPSHOT_VERSION=5.0
PRIMARY_HOST=host1
SECONDARY_HOST=host2
PRIMARY_DG=PRODdg
SNAPSHOT_DG=SNAP_PRODdg
ORACLE_SID=PROD
ARCHIVELOG_DEST=/arch_data
SNAPSHOT_ARCHIVE_LOG=yes
SNAPSHOT_MODE=online
SNAPSHOT_PLAN_FOR=database
SNAPSHOT_PLEX_TAG=my_tag
SNAPSHOT_VOL_PREFIX=SNAP_
ALLOW_REVERSE_RESYNC=no
SNAPSHOT_MIRROR=1
Creating multi-mirror snapshots
To make Database Snapshots highly available, the snapped snapshot volume
should contain more than one mirror. This makes the snapshot volumes available
even if one of the mirrors gets disabled. Snapshot volumes can be mounted and
the entire database snapshot is usable even if one of the mirror gets disabled. The
multi-mirror snapshots are enabled with the SNAPSHOT_MIRROR=n keyword in the
snapplan.
Note: Multi-mirror snapshots require no changes to the Command Line usage or
arguments for the Flashsnap tools.
Before taking the snapshot, make sure all tagged snapshot mirrors are in the
SNAPDONE state.
261Using Database FlashSnap for backup and off-host processingCreating a snapplan (dbed_vmchecksnap)
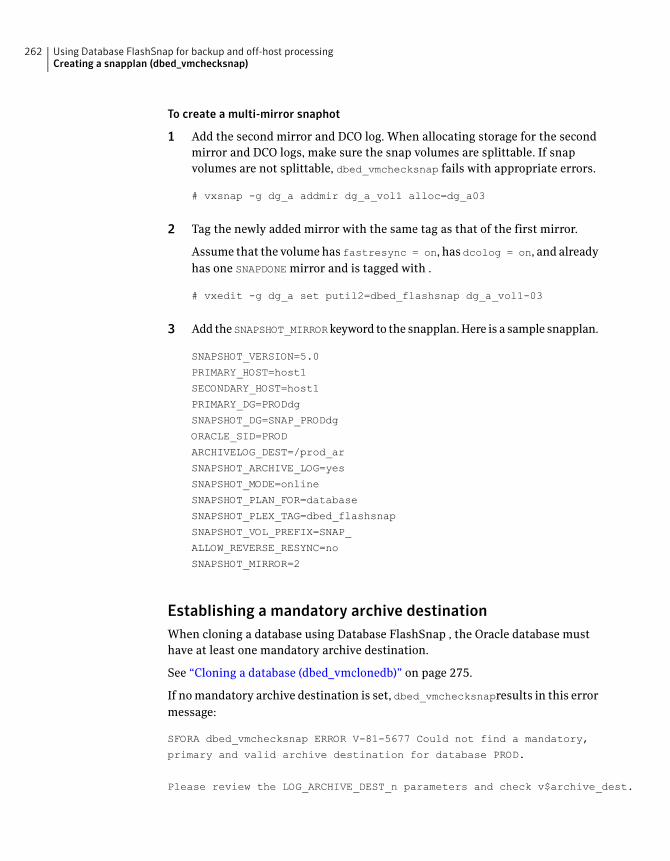
To create a multi-mirror snaphot
1 Add the second mirror and DCO log. When allocating storage for the second
mirror and DCO logs, make sure the snap volumes are splittable. If snap
volumes are not splittable, dbed_vmchecksnap fails with appropriate errors.
# vxsnap -g dg_a addmir dg_a_vol1 alloc=dg_a03
2 Tag the newly added mirror with the same tag as that of the first mirror.
Assume that the volume has fastresync = on, has dcolog = on, and already
has one SNAPDONE mirror and is tagged with .
# vxedit -g dg_a set putil2=dbed_flashsnap dg_a_vol1-03
3 Add theSNAPSHOT_MIRRORkeyword to the snapplan. Here is a sample snapplan.
SNAPSHOT_VERSION=5.0
PRIMARY_HOST=host1
SECONDARY_HOST=host1
PRIMARY_DG=PRODdg
SNAPSHOT_DG=SNAP_PRODdg
ORACLE_SID=PROD
ARCHIVELOG_DEST=/prod_ar
SNAPSHOT_ARCHIVE_LOG=yes
SNAPSHOT_MODE=online
SNAPSHOT_PLAN_FOR=database
SNAPSHOT_PLEX_TAG=dbed_flashsnap
SNAPSHOT_VOL_PREFIX=SNAP_
ALLOW_REVERSE_RESYNC=no
SNAPSHOT_MIRROR=2
Establishing a mandatory archive destination
When cloning a database using Database FlashSnap , the Oracle database must
have at least one mandatory archive destination.
See “Cloning a database (dbed_vmclonedb)” on page 275.
If no mandatory archive destination is set, dbed_vmchecksnapresults in this error
message:
SFORA dbed_vmchecksnap ERROR V-81-5677 Could not find a mandatory,
primary and valid archive destination for database PROD.
Please review the LOG_ARCHIVE_DEST_n parameters and check v$archive_dest.
Using Database FlashSnap for backup and off-host processingCreating a snapplan (dbed_vmchecksnap)
262
This example shows how to establish a mandatory archive destination using
SQL*Plus:
alter system set log_archive_dest_1 = \
'LOCATION=/ora_mnt/oracle/oradata/PROD/archivelogs MANDATORY \
[REOPEN]' [scope=both];
For more information about Oracle parameters for archiving redo logs, see your
Oracle documentation.
Validating a snapplan (dbed_vmchecksnap)After creating a snapplan, the next steps are to validate the snapplan parameters
and check whether the snapshot volumes have been configured correctly for
creating snapshots. If validation is successful, the snapplan is copied to the
repository. The snapplan is validated using the dbed_vmchecksnap command with
the -o validate option.
In Veritas Storage Foundation for Oracle RAC configurations, dbed_vmchecksnap
with the -o validate option can be executed only on the VxVM CVM master
node.
Consider the following prerequisites and notes before validating a snapplan:
■ The database must be up and running while executing the
dbed_vmchecksnap command.
Prerequisites
■ The dbed_vmchecksnap command must be run as the Oracle
database administrator.
■ The default behavior is to force validation. Use the -n option if
you want to skip validation.
■ After validating the snapplan, you have the option of modifying
the snapplan file to meet your storage configuration requirements.
■ If a snapplan is updated or modified, you must re-validate it. It is
recommended that snapplans are revalidated when changes are
made in the database disk group.
■ The dbed_vmchecksnap command can be used on the primary
or secondary host. In an Oracle RAC configuration both need to be
specified as the host name of the CVM master node.
■ See the dbed_vmchecksnap(1M) manual page for more
information.
Usage notes
263Using Database FlashSnap for backup and off-host processingValidating a snapplan (dbed_vmchecksnap)

To validate a snapplan
1 Change directories to the working directory your snapplan is stored in:
$ cd /working_directory
2 Validate the snapplan using the dbed_vmchecksnap command:
$ /opt/VRTS/bin/dbed_vmchecksnap -S ORACLE_SID \
-H ORACLE_HOME -f SNAPPLAN -o validate
In an HA environment, you must modify the default snapplan, use the virtual
host name defined for the resource group for the PRIMARY_HOST and/or
SECONDARY_HOST, and run validation. In an Oracle RAC configuration both
primary and secondary hosts need to be set to the host name of the CVM
master node.
In the following example, a snapplan, snap1, is validated for a snapshot image in
a single-host or Oracle RAC cluster configuration. The primary host is host1 and
the working directory is /export/snap_dir.
$ cd /export/snap_dir
$ /opt/VRTS/bin/dbed_vmchecksnap -S PROD -H /oracle/product/9i \
-f snap1 -o validate
PRIMARY_HOST is host1
SECONDARY_HOST is host1
The version of PRIMARY_DG-PRODdg is 140.
SNAPSHOT_DG is SNAP_PRODdg
SNAPSHOT_MODE is online
The database is running in archivelog mode.
ARCHIVELOG_DEST is /prod_ar
SNAPSHOT_PLAN_FOR is database
SNAPSHOT_ARCHIVE_LOG is yes
ARCHIVELOG_DEST=/prod_ar is mount on /dev/vx/dsk/PRODdg/prod_ar.
Examining Oracle volume and disk layout for snapshot
Volume prodvol1 on PRODdg is ready for snapshot.
Original plex and DCO log for prodvol1 is on PRODdg1.
Using Database FlashSnap for backup and off-host processingValidating a snapplan (dbed_vmchecksnap)
264
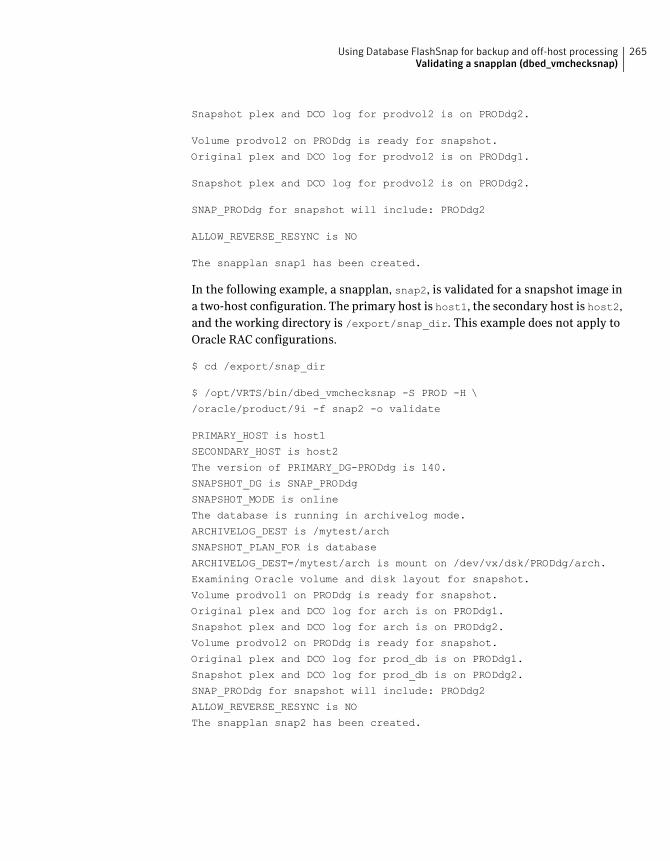
Snapshot plex and DCO log for prodvol2 is on PRODdg2.
Volume prodvol2 on PRODdg is ready for snapshot.
Original plex and DCO log for prodvol2 is on PRODdg1.
Snapshot plex and DCO log for prodvol2 is on PRODdg2.
SNAP_PRODdg for snapshot will include: PRODdg2
ALLOW_REVERSE_RESYNC is NO
The snapplan snap1 has been created.
In the following example, a snapplan, snap2, is validated for a snapshot image in
a two-host configuration. The primary host is host1, the secondary host is host2,
and the working directory is /export/snap_dir. This example does not apply to
Oracle RAC configurations.
$ cd /export/snap_dir
$ /opt/VRTS/bin/dbed_vmchecksnap -S PROD -H \
/oracle/product/9i -f snap2 -o validate
PRIMARY_HOST is host1
SECONDARY_HOST is host2
The version of PRIMARY_DG-PRODdg is 140.
SNAPSHOT_DG is SNAP_PRODdg
SNAPSHOT_MODE is online
The database is running in archivelog mode.
ARCHIVELOG_DEST is /mytest/arch
SNAPSHOT_PLAN_FOR is database
ARCHIVELOG_DEST=/mytest/arch is mount on /dev/vx/dsk/PRODdg/arch.
Examining Oracle volume and disk layout for snapshot.
Volume prodvol1 on PRODdg is ready for snapshot.
Original plex and DCO log for arch is on PRODdg1.
Snapshot plex and DCO log for arch is on PRODdg2.
Volume prodvol2 on PRODdg is ready for snapshot.
Original plex and DCO log for prod_db is on PRODdg1.
Snapshot plex and DCO log for prod_db is on PRODdg2.
SNAP_PRODdg for snapshot will include: PRODdg2
ALLOW_REVERSE_RESYNC is NO
The snapplan snap2 has been created.
265Using Database FlashSnap for backup and off-host processingValidating a snapplan (dbed_vmchecksnap)
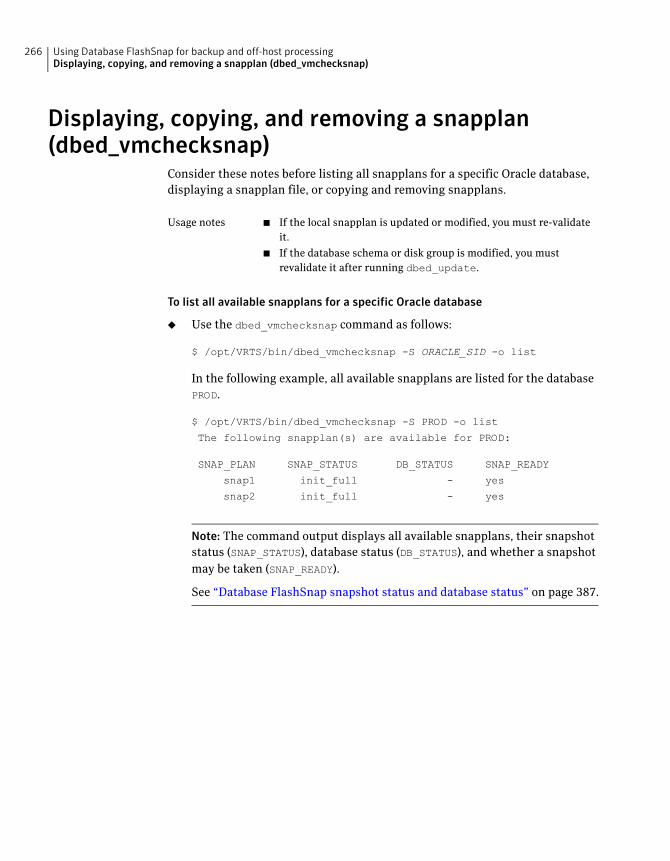
Displaying, copying, and removing a snapplan(dbed_vmchecksnap)
Consider these notes before listing all snapplans for a specific Oracle database,
displaying a snapplan file, or copying and removing snapplans.
■ If the local snapplan is updated or modified, you must re-validate
it.
■ If the database schema or disk group is modified, you must
revalidate it after running dbed_update.
Usage notes
To list all available snapplans for a specific Oracle database
◆ Use the dbed_vmchecksnap command as follows:
$ /opt/VRTS/bin/dbed_vmchecksnap -S ORACLE_SID -o list
In the following example, all available snapplans are listed for the database
PROD.
$ /opt/VRTS/bin/dbed_vmchecksnap -S PROD -o list
The following snapplan(s) are available for PROD:
SNAP_PLAN SNAP_STATUS DB_STATUS SNAP_READY
snap1 init_full - yes
snap2 init_full - yes
Note: The command output displays all available snapplans, their snapshot
status (SNAP_STATUS), database status (DB_STATUS), and whether a snapshot
may be taken (SNAP_READY).
See “Database FlashSnap snapshot status and database status” on page 387.
Using Database FlashSnap for backup and off-host processingDisplaying, copying, and removing a snapplan (dbed_vmchecksnap)
266
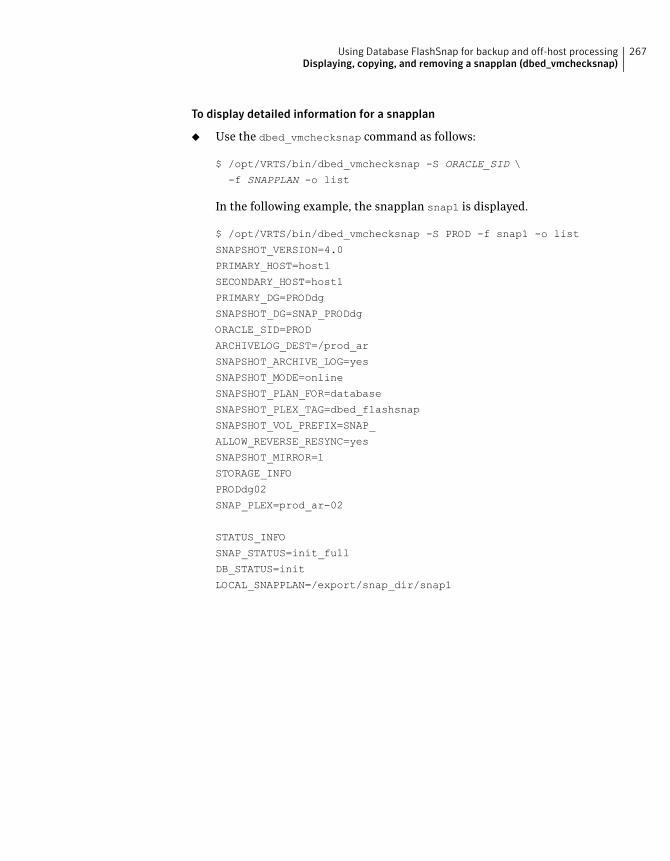
To display detailed information for a snapplan
◆ Use the dbed_vmchecksnap command as follows:
$ /opt/VRTS/bin/dbed_vmchecksnap -S ORACLE_SID \
-f SNAPPLAN -o list
In the following example, the snapplan snap1 is displayed.
$ /opt/VRTS/bin/dbed_vmchecksnap -S PROD -f snap1 -o list
SNAPSHOT_VERSION=4.0
PRIMARY_HOST=host1
SECONDARY_HOST=host1
PRIMARY_DG=PRODdg
SNAPSHOT_DG=SNAP_PRODdg
ORACLE_SID=PROD
ARCHIVELOG_DEST=/prod_ar
SNAPSHOT_ARCHIVE_LOG=yes
SNAPSHOT_MODE=online
SNAPSHOT_PLAN_FOR=database
SNAPSHOT_PLEX_TAG=dbed_flashsnap
SNAPSHOT_VOL_PREFIX=SNAP_
ALLOW_REVERSE_RESYNC=yes
SNAPSHOT_MIRROR=1
STORAGE_INFO
PRODdg02
SNAP_PLEX=prod_ar-02
STATUS_INFO
SNAP_STATUS=init_full
DB_STATUS=init
LOCAL_SNAPPLAN=/export/snap_dir/snap1
267Using Database FlashSnap for backup and off-host processingDisplaying, copying, and removing a snapplan (dbed_vmchecksnap)
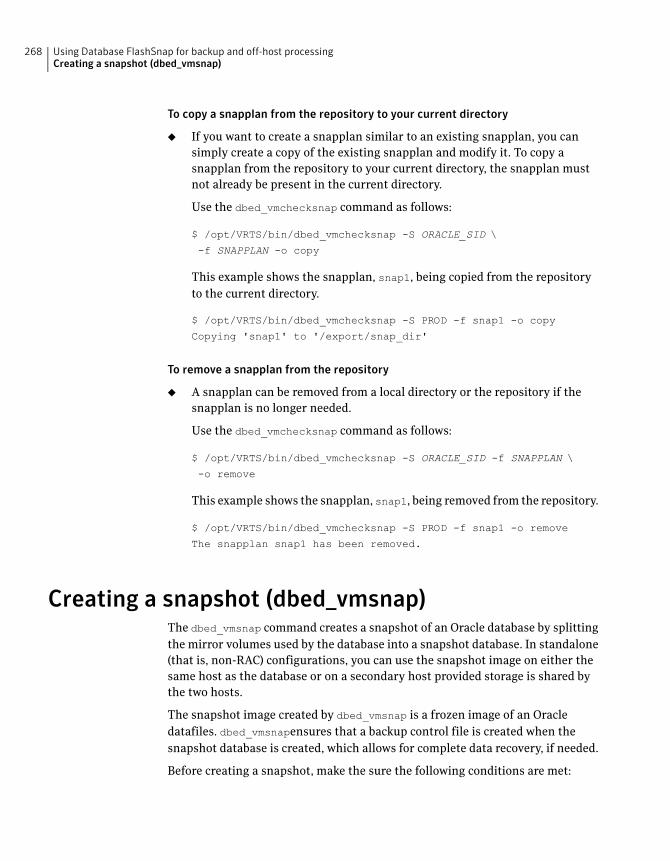
To copy a snapplan from the repository to your current directory
◆ If you want to create a snapplan similar to an existing snapplan, you can
simply create a copy of the existing snapplan and modify it. To copy a
snapplan from the repository to your current directory, the snapplan must
not already be present in the current directory.
Use the dbed_vmchecksnap command as follows:
$ /opt/VRTS/bin/dbed_vmchecksnap -S ORACLE_SID \
-f SNAPPLAN -o copy
This example shows the snapplan, snap1, being copied from the repository
to the current directory.
$ /opt/VRTS/bin/dbed_vmchecksnap -S PROD -f snap1 -o copy
Copying 'snap1' to '/export/snap_dir'
To remove a snapplan from the repository
◆ A snapplan can be removed from a local directory or the repository if the
snapplan is no longer needed.
Use the dbed_vmchecksnap command as follows:
$ /opt/VRTS/bin/dbed_vmchecksnap -S ORACLE_SID -f SNAPPLAN \
-o remove
This example shows the snapplan, snap1, being removed from the repository.
$ /opt/VRTS/bin/dbed_vmchecksnap -S PROD -f snap1 -o remove
The snapplan snap1 has been removed.
Creating a snapshot (dbed_vmsnap)The dbed_vmsnap command creates a snapshot of an Oracle database by splitting
the mirror volumes used by the database into a snapshot database. In standalone
(that is, non-RAC) configurations, you can use the snapshot image on either the
same host as the database or on a secondary host provided storage is shared by
the two hosts.
The snapshot image created by dbed_vmsnap is a frozen image of an Oracle
datafiles. dbed_vmsnapensures that a backup control file is created when the
snapshot database is created, which allows for complete data recovery, if needed.
Before creating a snapshot, make the sure the following conditions are met:
Using Database FlashSnap for backup and off-host processingCreating a snapshot (dbed_vmsnap)
268
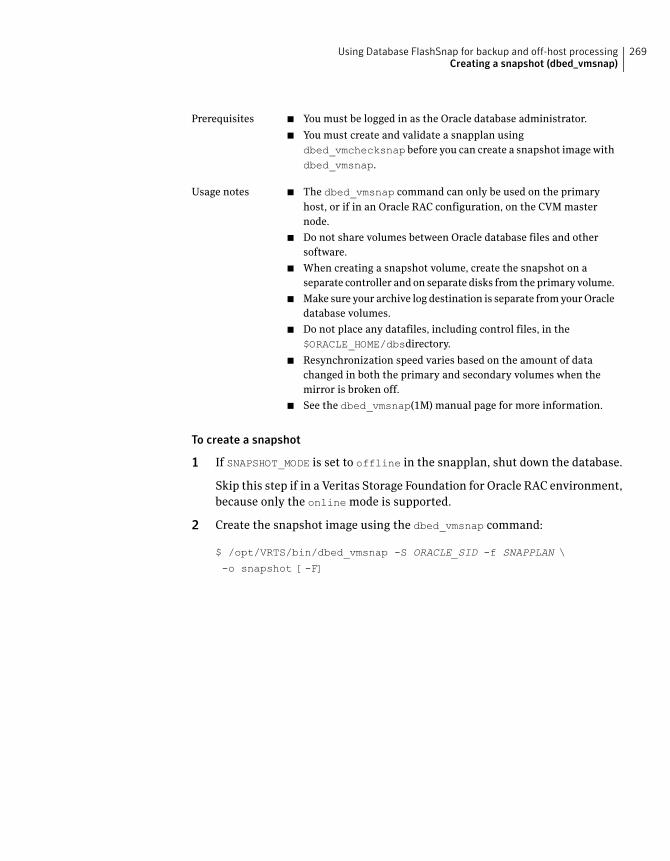
■ You must be logged in as the Oracle database administrator.
■ You must create and validate a snapplan using
dbed_vmchecksnap before you can create a snapshot image with
dbed_vmsnap.
Prerequisites
■ The dbed_vmsnap command can only be used on the primary
host, or if in an Oracle RAC configuration, on the CVM master
node.
■ Do not share volumes between Oracle database files and other
software.
■ When creating a snapshot volume, create the snapshot on a
separate controller and on separate disks from the primary volume.
■ Make sure your archive log destination is separate from your Oracle
database volumes.
■ Do not place any datafiles, including control files, in the
$ORACLE_HOME/dbsdirectory.
■ Resynchronization speed varies based on the amount of data
changed in both the primary and secondary volumes when the
mirror is broken off.
■ See the dbed_vmsnap(1M) manual page for more information.
Usage notes
To create a snapshot
1 If SNAPSHOT_MODE is set to offline in the snapplan, shut down the database.
Skip this step if in a Veritas Storage Foundation for Oracle RAC environment,
because only the online mode is supported.
2 Create the snapshot image using the dbed_vmsnap command:
$ /opt/VRTS/bin/dbed_vmsnap -S ORACLE_SID -f SNAPPLAN \
-o snapshot [-F]
269Using Database FlashSnap for backup and off-host processingCreating a snapshot (dbed_vmsnap)
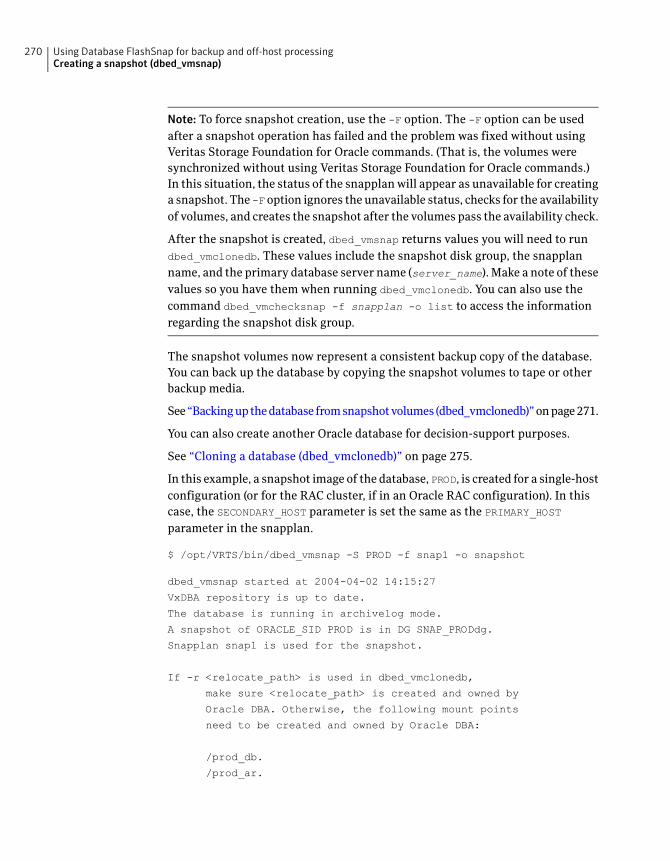
Note: To force snapshot creation, use the -F option. The -F option can be used
after a snapshot operation has failed and the problem was fixed without using
Veritas Storage Foundation for Oracle commands. (That is, the volumes were
synchronized without using Veritas Storage Foundation for Oracle commands.)
In this situation, the status of the snapplan will appear as unavailable for creating
a snapshot. The -F option ignores the unavailable status, checks for the availability
of volumes, and creates the snapshot after the volumes pass the availability check.
After the snapshot is created, dbed_vmsnap returns values you will need to run
dbed_vmclonedb. These values include the snapshot disk group, the snapplan
name, and the primary database server name (server_name). Make a note of these
values so you have them when running dbed_vmclonedb. You can also use the
command dbed_vmchecksnap -f snapplan -o list to access the information
regarding the snapshot disk group.
The snapshot volumes now represent a consistent backup copy of the database.
You can back up the database by copying the snapshot volumes to tape or other
backup media.
See “Backing up the database from snapshot volumes (dbed_vmclonedb)” on page 271.
You can also create another Oracle database for decision-support purposes.
See “Cloning a database (dbed_vmclonedb)” on page 275.
In this example, a snapshot image of the database, PROD, is created for a single-host
configuration (or for the RAC cluster, if in an Oracle RAC configuration). In this
case, the SECONDARY_HOST parameter is set the same as the PRIMARY_HOST
parameter in the snapplan.
$ /opt/VRTS/bin/dbed_vmsnap -S PROD -f snap1 -o snapshot
dbed_vmsnap started at 2004-04-02 14:15:27
VxDBA repository is up to date.
The database is running in archivelog mode.
A snapshot of ORACLE_SID PROD is in DG SNAP_PRODdg.
Snapplan snap1 is used for the snapshot.
If -r <relocate_path> is used in dbed_vmclonedb,
make sure <relocate_path> is created and owned by
Oracle DBA. Otherwise, the following mount points
need to be created and owned by Oracle DBA:
/prod_db.
/prod_ar.
Using Database FlashSnap for backup and off-host processingCreating a snapshot (dbed_vmsnap)
270
dbed_vmsnap ended at 2004-04-02 14:16:11
In this example, a snapshot image of the primary database, PROD, is created for a
two-host configuration. In this case, the SECONDARY_HOST parameter specifies a
different host name than the PRIMARY_HOST parameter in the snapplan.
Note: This example does not apply to an Oracle RAC configuration.
$ /opt/VRTS/bin/dbed_vmsnap -S PROD -f snap2 -o snapshot
dbed_vmsnap started at 2004-04-09 23:01:10
VxDBA repository is up to date.
The database is running in archivelog mode.
A snapshot of ORACLE_SID PROD is in DG SNAP_PRODdg.
Snapplan snap2 is used for the snapshot.
VxDBA repository volume is SNAP_arch.
If -r <relocate_path> is used in dbed_vmclonedb,
make sure <relocate_path> is created and owned by
Oracle DBA. Otherwise, the following mount points
need to be created and owned by Oracle DBA:
dbed_vmsnap ended at 2004-04-09 23:02:58
Backing up the database from snapshot volumes(dbed_vmclonedb)
Snapshots are most commonly used as a source for backing up a database. The
advantage of using snapshot volumes is that the backup will not contest the I/O
bandwidth of the physical devices. Making the snapshot volumes available on a
secondary host will eliminate the extra loads put on processors and I/O adapters
by the backup process on the primary host.
A clone database can also serve as a valid backup of the primary database. You
can back up the primary database to tape using snapshot volumes.
Figure 13-5 shows a typical configuration when snapshot volumes are located on
the primary host.
271Using Database FlashSnap for backup and off-host processingBacking up the database from snapshot volumes (dbed_vmclonedb)
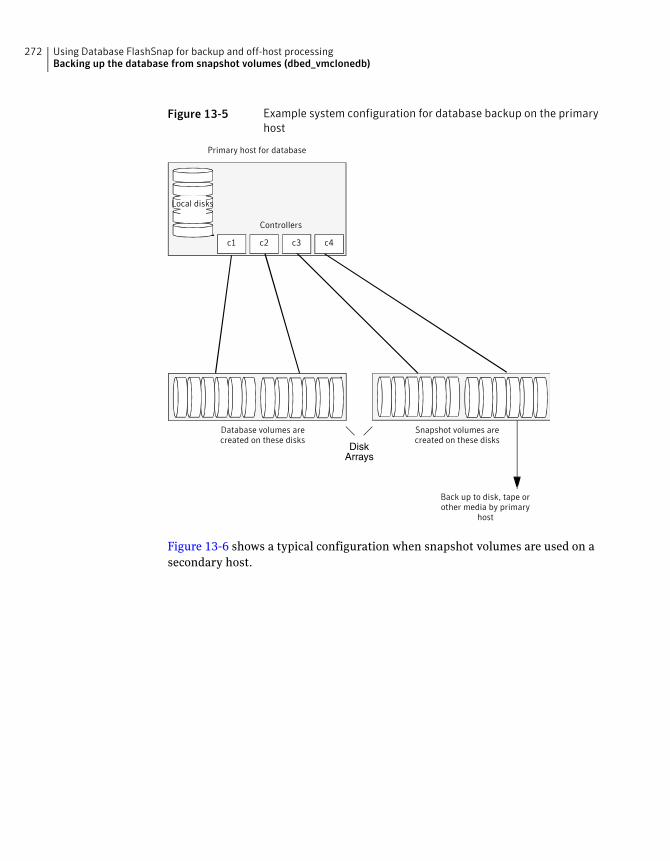
Figure 13-5 Example system configuration for database backup on the primary
host
Snapshot volumes are
created on these disks
Database volumes are
created on these disks
Primary host for database
Controllers
c1 c2 c3 c4
Back up to disk, tape or
other media by primary
host
DiskArrays
Local disks
Figure 13-6 shows a typical configuration when snapshot volumes are used on a
secondary host.
Using Database FlashSnap for backup and off-host processingBacking up the database from snapshot volumes (dbed_vmclonedb)
272
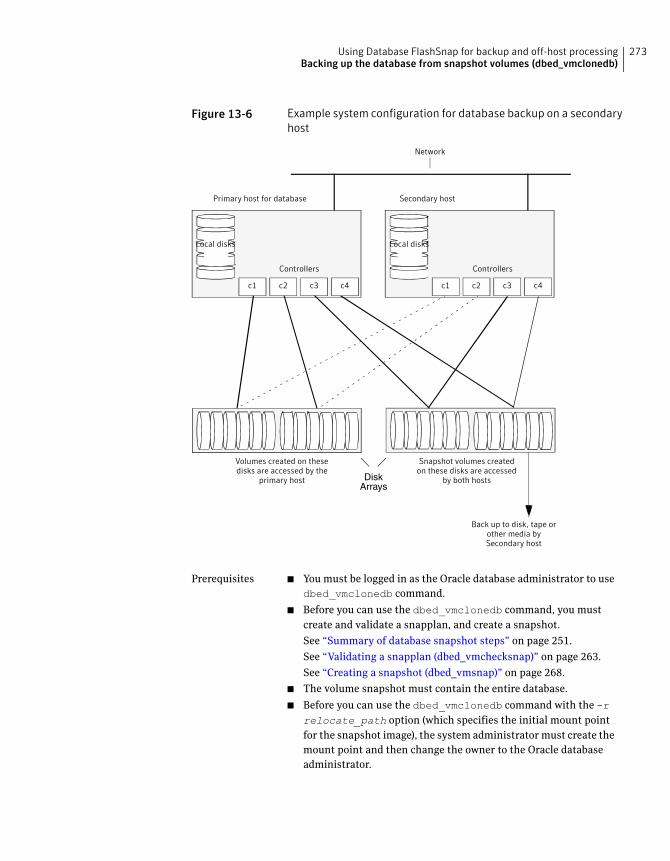
Figure 13-6 Example system configuration for database backup on a secondary
host
Snapshot volumes created
on these disks are accessed
by both hosts
Volumes created on these
disks are accessed by the
primary host
Network
Primary host for database Secondary host
Controllers
Local disks
Controllers
c1 c2 c3 c4 c4c3c2c1
Local disks
Back up to disk, tape or
other media by
Secondary host
DiskArrays
■ You must be logged in as the Oracle database administrator to use
dbed_vmclonedb command.
■ Before you can use the dbed_vmclonedb command, you must
create and validate a snapplan, and create a snapshot.
See “Summary of database snapshot steps” on page 251.
See “Validating a snapplan (dbed_vmchecksnap)” on page 263.
See “Creating a snapshot (dbed_vmsnap)” on page 268.
■ The volume snapshot must contain the entire database.
■ Before you can use the dbed_vmclonedb command with the -rrelocate_path option (which specifies the initial mount point
for the snapshot image), the system administrator must create the
mount point and then change the owner to the Oracle database
administrator.
Prerequisites
273Using Database FlashSnap for backup and off-host processingBacking up the database from snapshot volumes (dbed_vmclonedb)
■ The dbed_vmclonedb command can be used on the secondary
host.
■ In a single-host configuration, the primary and secondary hosts
are the same.
■ In a single-host configuration, -r relocate_path is required.
■ If SNAPSHOT_MODEis set to offlineor instant, a two-host
configuration is required and -r relocate_path is not allowed.
■ See thedbed_vmclonedb(1M) manual page for more information.
Usage notes
Mounting the snapshot volumes and backing up
Before using the snapshot volumes to do a backup, you must first mount them.
To mount the snapshot volumes
◆ Use the dbed_vmclonedb command as follows:
$ /opt/VRTS/bin/dbed_vmclonedb -S ORACLE_SID -g snap_dg \
-o mount,new_sid=new_sid,server_name=svr_name [-H ORACLE_HOME] \
[-r relocate_path]
You can now back up an individual file or a group of files under a directory onto
the backup media.
In this example, snapshot volumes are mounted.
$ /opt/VRTS/bin/dbed_vmclonedb -S PROD -g SNAP_PRODdg \
-o mount,new_sid=NEWPROD,server_name=kagu -f snap1 -r /clone/single
dbed_vmclonedb started at 2004-04-02 15:35:41
Mounting /clone/single/prod_db on /dev/vx/dsk/SNAP_PRODdg/SNAP_prod_db.
Mounting /clone/single/prod_ar on /dev/vx/dsk/SNAP_PRODdg/SNAP_prod_ar.
dbed_vmclonedb ended at 2004-04-02 15:35:50
To mount a Storage Checkpoint carried over from the snapshot volumes to a
secondary host
1 On the secondary host, list the Storage Checkpoints carried over from the
primary database using:
$ /opt/VRTS/bin/dbed_ckptdisplay -S ORACLE_SID -n
2 You can mount one of the listed Storage Checkpoints using:
$ /opt/VRTS/bin/dbed_ckptmount -S ORACLE_SID -c CKPT_NAME \
-m MOUNT_POINT
Using Database FlashSnap for backup and off-host processingBacking up the database from snapshot volumes (dbed_vmclonedb)
274
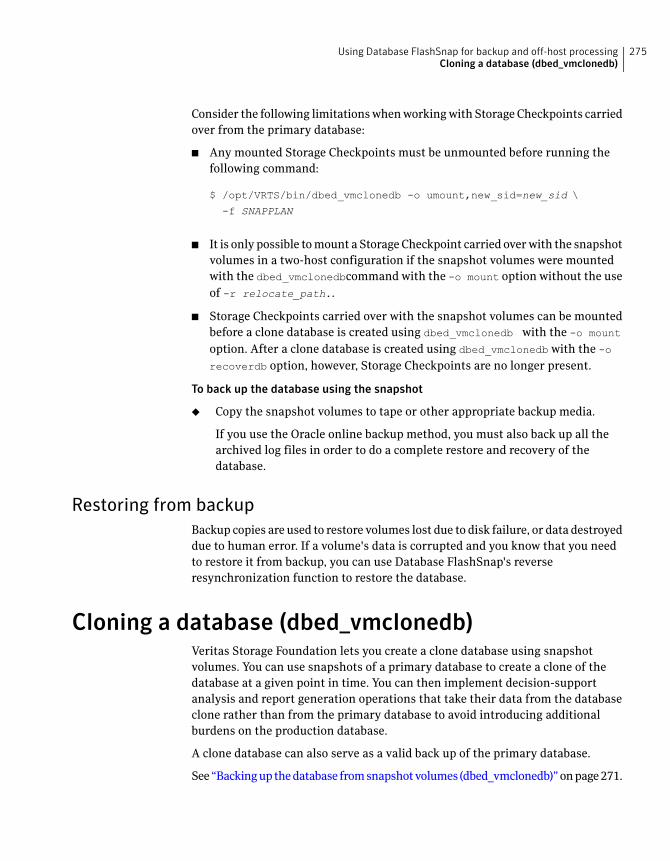
Consider the following limitations when working with Storage Checkpoints carried
over from the primary database:
■ Any mounted Storage Checkpoints must be unmounted before running the
following command:
$ /opt/VRTS/bin/dbed_vmclonedb -o umount,new_sid=new_sid \
-f SNAPPLAN
■ It is only possible to mount a Storage Checkpoint carried over with the snapshot
volumes in a two-host configuration if the snapshot volumes were mounted
with the dbed_vmclonedbcommand with the -o mount option without the use
of -r relocate_path..
■ Storage Checkpoints carried over with the snapshot volumes can be mounted
before a clone database is created using dbed_vmclonedb with the -o mount
option. After a clone database is created using dbed_vmclonedb with the -o
recoverdb option, however, Storage Checkpoints are no longer present.
To back up the database using the snapshot
◆ Copy the snapshot volumes to tape or other appropriate backup media.
If you use the Oracle online backup method, you must also back up all the
archived log files in order to do a complete restore and recovery of the
database.
Restoring from backup
Backup copies are used to restore volumes lost due to disk failure, or data destroyed
due to human error. If a volume's data is corrupted and you know that you need
to restore it from backup, you can use Database FlashSnap's reverse
resynchronization function to restore the database.
Cloning a database (dbed_vmclonedb)Veritas Storage Foundation lets you create a clone database using snapshot
volumes. You can use snapshots of a primary database to create a clone of the
database at a given point in time. You can then implement decision-support
analysis and report generation operations that take their data from the database
clone rather than from the primary database to avoid introducing additional
burdens on the production database.
A clone database can also serve as a valid back up of the primary database.
See “Backing up the database from snapshot volumes (dbed_vmclonedb)” on page 271.
275Using Database FlashSnap for backup and off-host processingCloning a database (dbed_vmclonedb)
You can also back up the primary database to tape using snapshot volumes.
The resynchronization functionality of Database FlashSnap allows you to quickly
refresh the clone database with up-to-date information from the primary database.
Reducing the time taken to update decision-support data also lets you generate
analysis reports more frequently.
Using Database FlashSnap to clone a database
In a single-host configuration, the dbed_vmclonedb command creates a clone
database on the same host. The command can also be used to shut down the clone
database and unmount its file systems. When creating or unmounting the clone
database in a single-host configuration, -r relocate_path is required so that the
clone database's file systems use different mount points than those used by the
primary database.
In an Oracle RAC cluster configuration, dbed_vmclonedb creates a clone database
on the CVM master node. Also in Oracle RAC, you must use -r relocate_path
when creating or unmounting the clone database.
When used in a two-host configuration, the dbed_vmclonedb command imports
the snapshot disk group, mounts the file systems on the snapshot volumes, and
starts a clone database. It can also reverse the process by shutting down the clone
database, unmounting the file systems, and deporting the snapshot disk group.
You must use -o server_name=svr_name when cloning a database. This also
applies to an Oracle RAC configuration.
Warning: When creating a clone database, all Storage Checkpoints in the original
database are discarded.
Using Database FlashSnap for backup and off-host processingCloning a database (dbed_vmclonedb)
276
■ You must be logged in as the Oracle database administrator.
■ Before you can use the dbed_vmclonedb command, review the
procedure for taking a snapshot of a database, especially the steps
required to validate a snapplan and to create the snapshot.
See “Summary of database snapshot steps” on page 251.
See “Validating a snapplan (dbed_vmchecksnap)” on page 263.
See “Creating a snapshot (dbed_vmsnap)” on page 268.
■ The volume snapshot must contain the entire database.
■ The system administrator must provide the database administrator
with access to the necessary volumes and mount points.
■ Before you can use the dbed_vmclonedb command with the -rrelocate_path option (which specifies the initial mount point
for the snapshot image), the system administrator must create the
mount point and then change the owner to the Oracle database
administrator.
■ If SNAPSHOT_MODE is set to offline or instant, a two-host
configuration is required and -r relocate_path is not allowed.
■ The Oracle database must have at least one mandatory archive
destination.
See “Establishing a mandatory archive destination” on page 262.
Prerequisites
■ The dbed_vmclonedb command can be used on the secondary
host.
■ In a single-host and Oracle RAC configuration, -rrelocate_path is required. This command is also needed if the
name of the clone database is different than the primary database.
■ The server_name=svr_name option is required.
■ The initialization parameters for the clone database are copied
from the primary database. This means that the clone database
takes up the same memory and machine resources as the primary
database. If you want to reduce the memory requirements for the
clone database, shut down the clone database and then start it up
again using a different init.ora file that has reduced memory
requirements. If the host wheredbed_vmclonedb is run has little
available memory, you may not be able to start up the clone
database and the cloning operation may fail.
■ See thedbed_vmclonedb(1M) manual page for more information.
Usage notes
277Using Database FlashSnap for backup and off-host processingCloning a database (dbed_vmclonedb)
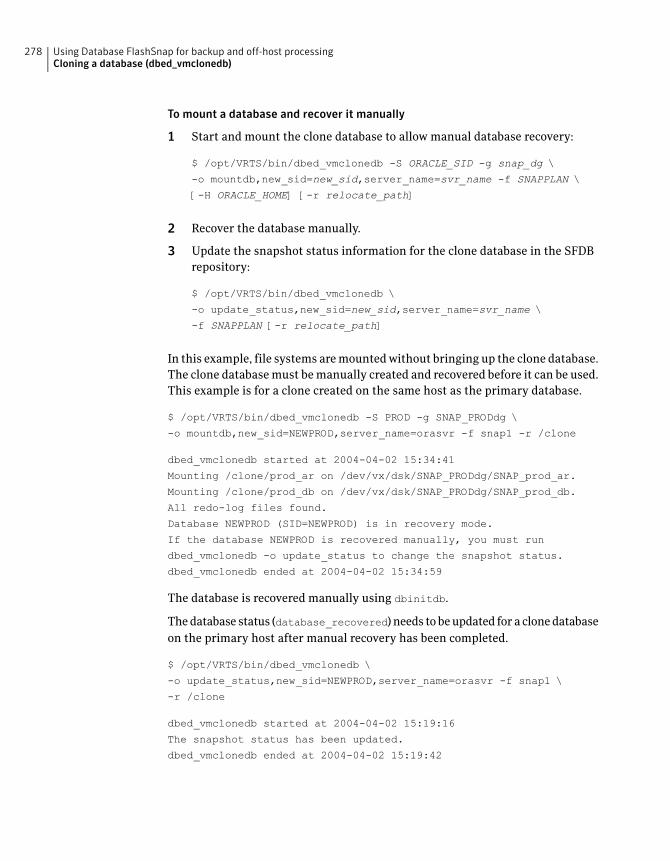
To mount a database and recover it manually
1 Start and mount the clone database to allow manual database recovery:
$ /opt/VRTS/bin/dbed_vmclonedb -S ORACLE_SID -g snap_dg \
-o mountdb,new_sid=new_sid,server_name=svr_name -f SNAPPLAN \
[-H ORACLE_HOME] [-r relocate_path]
2 Recover the database manually.
3 Update the snapshot status information for the clone database in the SFDB
repository:
$ /opt/VRTS/bin/dbed_vmclonedb \
-o update_status,new_sid=new_sid,server_name=svr_name \
-f SNAPPLAN [-r relocate_path]
In this example, file systems are mounted without bringing up the clone database.
The clone database must be manually created and recovered before it can be used.
This example is for a clone created on the same host as the primary database.
$ /opt/VRTS/bin/dbed_vmclonedb -S PROD -g SNAP_PRODdg \
-o mountdb,new_sid=NEWPROD,server_name=orasvr -f snap1 -r /clone
dbed_vmclonedb started at 2004-04-02 15:34:41
Mounting /clone/prod_ar on /dev/vx/dsk/SNAP_PRODdg/SNAP_prod_ar.
Mounting /clone/prod_db on /dev/vx/dsk/SNAP_PRODdg/SNAP_prod_db.
All redo-log files found.
Database NEWPROD (SID=NEWPROD) is in recovery mode.
If the database NEWPROD is recovered manually, you must run
dbed_vmclonedb -o update_status to change the snapshot status.
dbed_vmclonedb ended at 2004-04-02 15:34:59
The database is recovered manually using dbinitdb.
The database status (database_recovered) needs to be updated for a clone database
on the primary host after manual recovery has been completed.
$ /opt/VRTS/bin/dbed_vmclonedb \
-o update_status,new_sid=NEWPROD,server_name=orasvr -f snap1 \
-r /clone
dbed_vmclonedb started at 2004-04-02 15:19:16
The snapshot status has been updated.
dbed_vmclonedb ended at 2004-04-02 15:19:42
Using Database FlashSnap for backup and off-host processingCloning a database (dbed_vmclonedb)
278
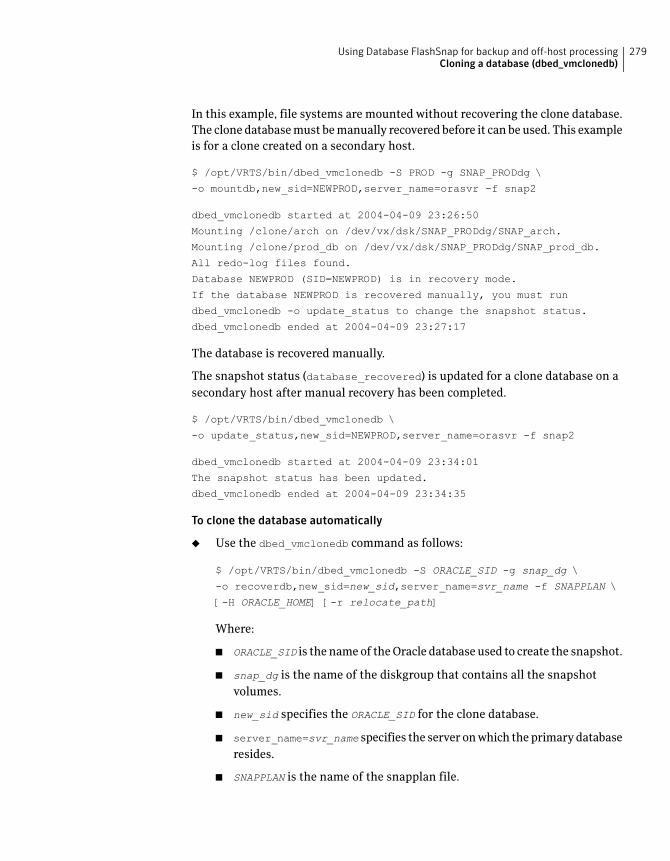
In this example, file systems are mounted without recovering the clone database.
The clone database must be manually recovered before it can be used. This example
is for a clone created on a secondary host.
$ /opt/VRTS/bin/dbed_vmclonedb -S PROD -g SNAP_PRODdg \
-o mountdb,new_sid=NEWPROD,server_name=orasvr -f snap2
dbed_vmclonedb started at 2004-04-09 23:26:50
Mounting /clone/arch on /dev/vx/dsk/SNAP_PRODdg/SNAP_arch.
Mounting /clone/prod_db on /dev/vx/dsk/SNAP_PRODdg/SNAP_prod_db.
All redo-log files found.
Database NEWPROD (SID=NEWPROD) is in recovery mode.
If the database NEWPROD is recovered manually, you must run
dbed_vmclonedb -o update_status to change the snapshot status.
dbed_vmclonedb ended at 2004-04-09 23:27:17
The database is recovered manually.
The snapshot status (database_recovered) is updated for a clone database on a
secondary host after manual recovery has been completed.
$ /opt/VRTS/bin/dbed_vmclonedb \
-o update_status,new_sid=NEWPROD,server_name=orasvr -f snap2
dbed_vmclonedb started at 2004-04-09 23:34:01
The snapshot status has been updated.
dbed_vmclonedb ended at 2004-04-09 23:34:35
To clone the database automatically
◆ Use the dbed_vmclonedb command as follows:
$ /opt/VRTS/bin/dbed_vmclonedb -S ORACLE_SID -g snap_dg \
-o recoverdb,new_sid=new_sid,server_name=svr_name -f SNAPPLAN \
[-H ORACLE_HOME] [-r relocate_path]
Where:
■ ORACLE_SID is the name of the Oracle database used to create the snapshot.
■ snap_dg is the name of the diskgroup that contains all the snapshot
volumes.
■ new_sid specifies the ORACLE_SID for the clone database.
■ server_name=svr_name specifies the server on which the primary database
resides.
■ SNAPPLAN is the name of the snapplan file.
279Using Database FlashSnap for backup and off-host processingCloning a database (dbed_vmclonedb)
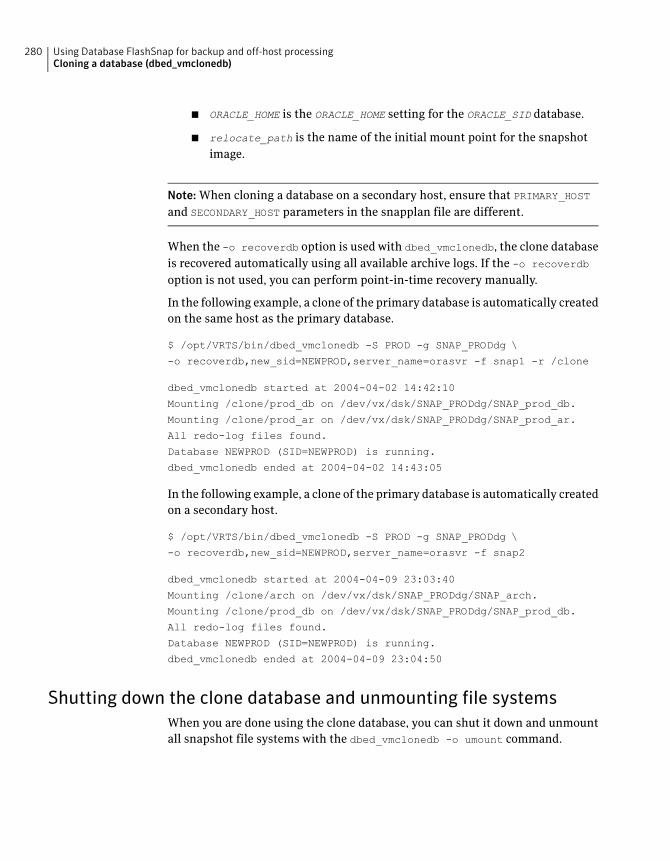
■ ORACLE_HOME is the ORACLE_HOME setting for the ORACLE_SID database.
■ relocate_path is the name of the initial mount point for the snapshot
image.
Note: When cloning a database on a secondary host, ensure that PRIMARY_HOST
and SECONDARY_HOST parameters in the snapplan file are different.
When the -o recoverdb option is used with dbed_vmclonedb, the clone database
is recovered automatically using all available archive logs. If the -o recoverdb
option is not used, you can perform point-in-time recovery manually.
In the following example, a clone of the primary database is automatically created
on the same host as the primary database.
$ /opt/VRTS/bin/dbed_vmclonedb -S PROD -g SNAP_PRODdg \
-o recoverdb,new_sid=NEWPROD,server_name=orasvr -f snap1 -r /clone
dbed_vmclonedb started at 2004-04-02 14:42:10
Mounting /clone/prod_db on /dev/vx/dsk/SNAP_PRODdg/SNAP_prod_db.
Mounting /clone/prod_ar on /dev/vx/dsk/SNAP_PRODdg/SNAP_prod_ar.
All redo-log files found.
Database NEWPROD (SID=NEWPROD) is running.
dbed_vmclonedb ended at 2004-04-02 14:43:05
In the following example, a clone of the primary database is automatically created
on a secondary host.
$ /opt/VRTS/bin/dbed_vmclonedb -S PROD -g SNAP_PRODdg \
-o recoverdb,new_sid=NEWPROD,server_name=orasvr -f snap2
dbed_vmclonedb started at 2004-04-09 23:03:40
Mounting /clone/arch on /dev/vx/dsk/SNAP_PRODdg/SNAP_arch.
Mounting /clone/prod_db on /dev/vx/dsk/SNAP_PRODdg/SNAP_prod_db.
All redo-log files found.
Database NEWPROD (SID=NEWPROD) is running.
dbed_vmclonedb ended at 2004-04-09 23:04:50
Shutting down the clone database and unmounting file systems
When you are done using the clone database, you can shut it down and unmount
all snapshot file systems with the dbed_vmclonedb -o umount command.
Using Database FlashSnap for backup and off-host processingCloning a database (dbed_vmclonedb)
280
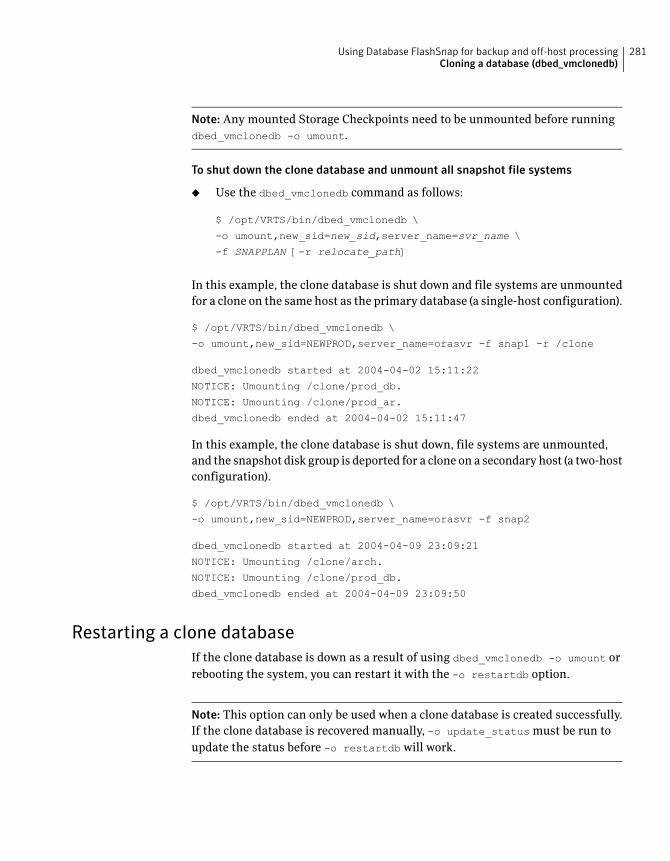
Note: Any mounted Storage Checkpoints need to be unmounted before running
dbed_vmclonedb -o umount.
To shut down the clone database and unmount all snapshot file systems
◆ Use the dbed_vmclonedb command as follows:
$ /opt/VRTS/bin/dbed_vmclonedb \
-o umount,new_sid=new_sid,server_name=svr_name \
-f SNAPPLAN [-r relocate_path]
In this example, the clone database is shut down and file systems are unmounted
for a clone on the same host as the primary database (a single-host configuration).
$ /opt/VRTS/bin/dbed_vmclonedb \
-o umount,new_sid=NEWPROD,server_name=orasvr -f snap1 -r /clone
dbed_vmclonedb started at 2004-04-02 15:11:22
NOTICE: Umounting /clone/prod_db.
NOTICE: Umounting /clone/prod_ar.
dbed_vmclonedb ended at 2004-04-02 15:11:47
In this example, the clone database is shut down, file systems are unmounted,
and the snapshot disk group is deported for a clone on a secondary host (a two-host
configuration).
$ /opt/VRTS/bin/dbed_vmclonedb \
-o umount,new_sid=NEWPROD,server_name=orasvr -f snap2
dbed_vmclonedb started at 2004-04-09 23:09:21
NOTICE: Umounting /clone/arch.
NOTICE: Umounting /clone/prod_db.
dbed_vmclonedb ended at 2004-04-09 23:09:50
Restarting a clone database
If the clone database is down as a result of using dbed_vmclonedb -o umount or
rebooting the system, you can restart it with the -o restartdb option.
Note: This option can only be used when a clone database is created successfully.
If the clone database is recovered manually, -o update_status must be run to
update the status before -o restartdb will work.
281Using Database FlashSnap for backup and off-host processingCloning a database (dbed_vmclonedb)
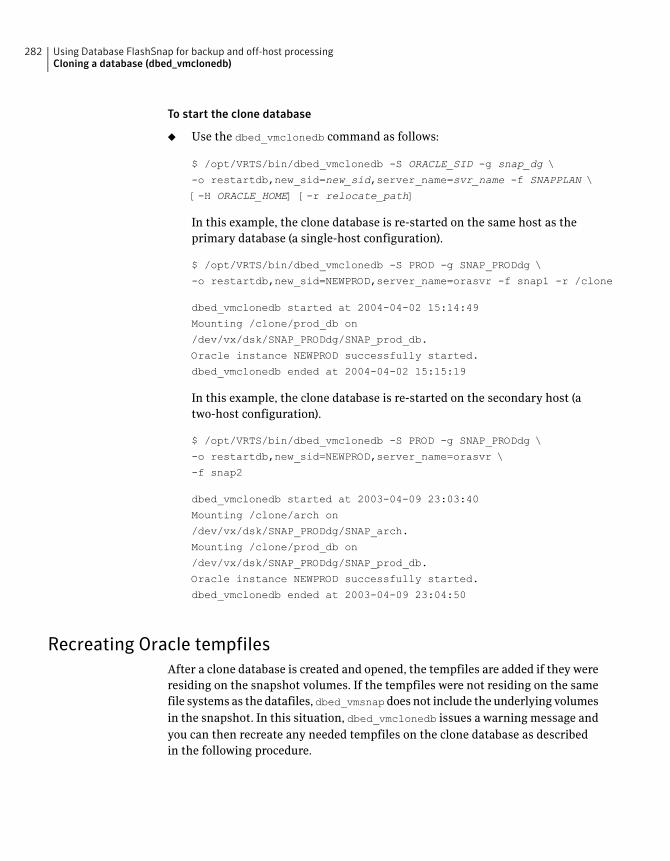
To start the clone database
◆ Use the dbed_vmclonedb command as follows:
$ /opt/VRTS/bin/dbed_vmclonedb -S ORACLE_SID -g snap_dg \
-o restartdb,new_sid=new_sid,server_name=svr_name -f SNAPPLAN \
[-H ORACLE_HOME] [-r relocate_path]
In this example, the clone database is re-started on the same host as the
primary database (a single-host configuration).
$ /opt/VRTS/bin/dbed_vmclonedb -S PROD -g SNAP_PRODdg \
-o restartdb,new_sid=NEWPROD,server_name=orasvr -f snap1 -r /clone
dbed_vmclonedb started at 2004-04-02 15:14:49
Mounting /clone/prod_db on
/dev/vx/dsk/SNAP_PRODdg/SNAP_prod_db.
Oracle instance NEWPROD successfully started.
dbed_vmclonedb ended at 2004-04-02 15:15:19
In this example, the clone database is re-started on the secondary host (a
two-host configuration).
$ /opt/VRTS/bin/dbed_vmclonedb -S PROD -g SNAP_PRODdg \
-o restartdb,new_sid=NEWPROD,server_name=orasvr \
-f snap2
dbed_vmclonedb started at 2003-04-09 23:03:40
Mounting /clone/arch on
/dev/vx/dsk/SNAP_PRODdg/SNAP_arch.
Mounting /clone/prod_db on
/dev/vx/dsk/SNAP_PRODdg/SNAP_prod_db.
Oracle instance NEWPROD successfully started.
dbed_vmclonedb ended at 2003-04-09 23:04:50
Recreating Oracle tempfiles
After a clone database is created and opened, the tempfiles are added if they were
residing on the snapshot volumes. If the tempfiles were not residing on the same
file systems as the datafiles, dbed_vmsnapdoes not include the underlying volumes
in the snapshot. In this situation, dbed_vmclonedb issues a warning message and
you can then recreate any needed tempfiles on the clone database as described
in the following procedure.
Using Database FlashSnap for backup and off-host processingCloning a database (dbed_vmclonedb)
282
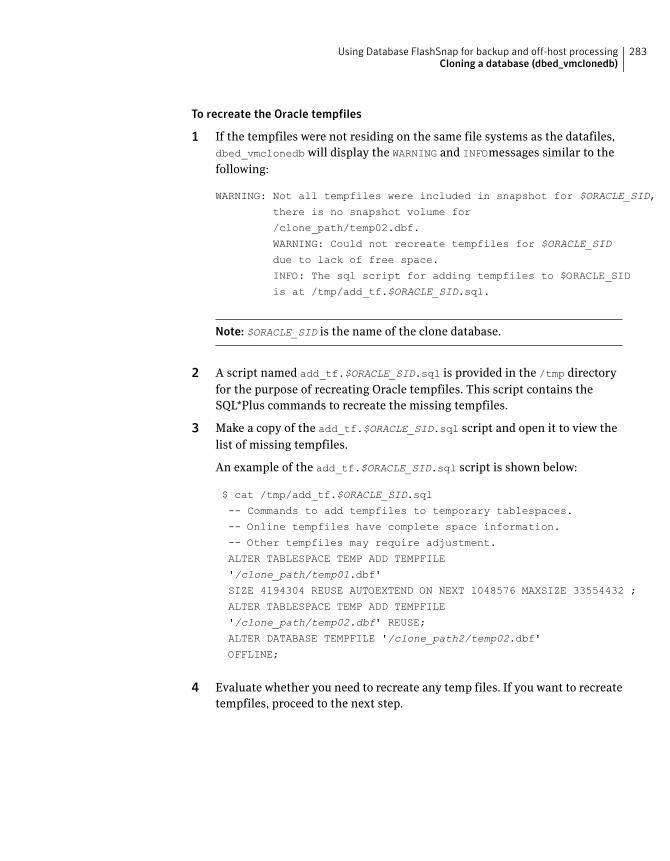
To recreate the Oracle tempfiles
1 If the tempfiles were not residing on the same file systems as the datafiles,
dbed_vmclonedb will display the WARNING and INFOmessages similar to the
following:
WARNING: Not all tempfiles were included in snapshot for $ORACLE_SID,
there is no snapshot volume for
/clone_path/temp02.dbf.
WARNING: Could not recreate tempfiles for $ORACLE_SID
due to lack of free space.
INFO: The sql script for adding tempfiles to $ORACLE_SID
is at /tmp/add_tf.$ORACLE_SID.sql.
Note: $ORACLE_SID is the name of the clone database.
2 A script named add_tf.$ORACLE_SID.sql is provided in the /tmp directory
for the purpose of recreating Oracle tempfiles. This script contains the
SQL*Plus commands to recreate the missing tempfiles.
3 Make a copy of the add_tf.$ORACLE_SID.sql script and open it to view the
list of missing tempfiles.
An example of the add_tf.$ORACLE_SID.sql script is shown below:
$ cat /tmp/add_tf.$ORACLE_SID.sql
-- Commands to add tempfiles to temporary tablespaces.
-- Online tempfiles have complete space information.
-- Other tempfiles may require adjustment.
ALTER TABLESPACE TEMP ADD TEMPFILE
'/clone_path/temp01.dbf'
SIZE 4194304 REUSE AUTOEXTEND ON NEXT 1048576 MAXSIZE 33554432 ;
ALTER TABLESPACE TEMP ADD TEMPFILE
'/clone_path/temp02.dbf' REUSE;
ALTER DATABASE TEMPFILE '/clone_path2/temp02.dbf'
OFFLINE;
4 Evaluate whether you need to recreate any temp files. If you want to recreate
tempfiles, proceed to the next step.
283Using Database FlashSnap for backup and off-host processingCloning a database (dbed_vmclonedb)
5 In the add_tf.$ORACLE_SID.sql file, edit the sizes and default path names
of the tempfiles as needed to reside on cloned volumes configured for database
storage.
Note: Do not run the script without first editing it because path names may
not exist and the specified mount points may not contain sufficient space.
6 After you have modified the add_tf.$ORACLE_SID.sql script, execute it
against your clone database.
7 After you have successfully run the script, you may delete it.
Resynchronizing your database to the snapshotIf your database becomes corrupted, you can use reverse resynchronization to
recover the database from a clone. The reverse resynchronization feature of
Veritas Database FlashSnap enables you to resynchronize the primary database
or volume with a clone database or snapshot volume.
Note: In Veritas Storage Foundation for Oracle RAC configurations, the reverse
resynchronization option is not supported.
Reverse resynchronization requires the primary database to be offline so that it
remains unchanged.
Warning:After completing a reverse resynchronization, the content of the original
database is discarded. Storage Checkpoints taken on the original database or the
clone database before or after the snapshot was created are discarded. The
dbed_vmsnap -o reverse_resync_commit command cannot be undone and should
be used with extreme caution.
Before resynchronizing a database to a snapshot, make sure the following
conditions have been met:
Using Database FlashSnap for backup and off-host processingResynchronizing your database to the snapshot
284
■ You must be logged in as the Oracle database administrator.
■ Before you can reverse resynchronize the snapshot image, review
the database snapshot procedure and create the snapshot.
See “Summary of database snapshot steps” on page 251.
See “Creating a snapshot (dbed_vmsnap)” on page 268.
■ The mount point for the primary database must be created by and
owned by the Oracle DBA user before mounting the VxFS file
system.
■ If a clone database has been created, you must shut it down and
unmount the file systems using thedbed_vmclonedb -o umountcommand before you can reverse resynchronize the snapshot
image. This command also deports the disk group if the primary
and secondary hosts are different.
See “Shutting down the clone database and unmounting file
systems” on page 280.
■ The primary database must be offline.
Prerequisites
■ The dbed_vmsnap command can only be executed on the primary
host.
■ If the Oracle authentication password is used, you need to recreate
it using the ORAPWD utility after executing dbed_vmsnap -oreverse_resync_commit.
Usage notes
285Using Database FlashSnap for backup and off-host processingResynchronizing your database to the snapshot
To begin reverse resynchronization
◆ Use the -o reverse_resync_begin option to thedbed_vmsnap command:
$ /opt/VRTS/bin/dbed_vmsnap -S ORACLE_SID -f SNAPPLAN \
-o reverse_resync_begin
Any mounted storage checkpoints must be unmounted before running
dbed_vmsnap -o reverse_resync.
After executing reverse_resync_commit, checkpoints created on the original
database will be deleted.
The -o reverse_resync_begin option imports the disk group that was
deported from the secondary host and joins it back to the original disk group.
The command unmounts the original volumes, mounts the snapshot volumes
with the file systems that are configured for the primary database, and brings
up the database snapshot image as the primary database. This operation
requires the primary database to be offline so that its contents remain
unchanged.
Mounting a storage checkpoint carried over from the volume snapshots is
allowed only in a two-host configuration without the use of relocate path.
Storage checkpoints carried over from volume snapshots can be mounted
before the clone database gets created (dbed_vmclonedb -o mount). Once the
clone database is created (dbed_vmclonedb -o recoverdb), the checkpoints
are no longer accessible since they are removed.
To abort reverse resynchronization
◆ Use the -o reverse_resync_begin option of the dbed_vmsnap command:
$ /opt/VRTS/bin/dbed_vmsnap -S ORACLE_SID -f SNAPPLAN \
-o reverse_resync_abort
The -o reverse_resync_abort option aborts -o reverse_resync_begin,
unmounts the snapshot volumes, and mounts the original volumes back with
the file systems that are configured to use the volume. This operation is only
allowed after -o reverse_resync_begin has been executed and cannot be
used after reverse resynchronization has been committed (-o
reverse_resync_commit).
Using Database FlashSnap for backup and off-host processingResynchronizing your database to the snapshot
286
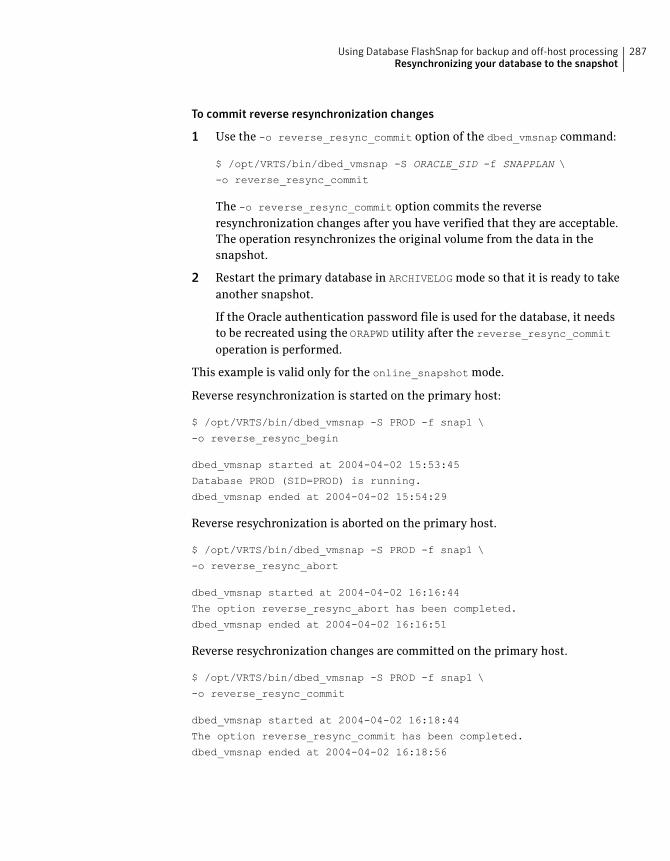
To commit reverse resynchronization changes
1 Use the -o reverse_resync_commit option of the dbed_vmsnap command:
$ /opt/VRTS/bin/dbed_vmsnap -S ORACLE_SID -f SNAPPLAN \
-o reverse_resync_commit
The -o reverse_resync_commit option commits the reverse
resynchronization changes after you have verified that they are acceptable.
The operation resynchronizes the original volume from the data in the
snapshot.
2 Restart the primary database in ARCHIVELOG mode so that it is ready to take
another snapshot.
If the Oracle authentication password file is used for the database, it needs
to be recreated using the ORAPWD utility after the reverse_resync_commit
operation is performed.
This example is valid only for the online_snapshot mode.
Reverse resynchronization is started on the primary host:
$ /opt/VRTS/bin/dbed_vmsnap -S PROD -f snap1 \
-o reverse_resync_begin
dbed_vmsnap started at 2004-04-02 15:53:45
Database PROD (SID=PROD) is running.
dbed_vmsnap ended at 2004-04-02 15:54:29
Reverse resychronization is aborted on the primary host.
$ /opt/VRTS/bin/dbed_vmsnap -S PROD -f snap1 \
-o reverse_resync_abort
dbed_vmsnap started at 2004-04-02 16:16:44
The option reverse_resync_abort has been completed.
dbed_vmsnap ended at 2004-04-02 16:16:51
Reverse resychronization changes are committed on the primary host.
$ /opt/VRTS/bin/dbed_vmsnap -S PROD -f snap1 \
-o reverse_resync_commit
dbed_vmsnap started at 2004-04-02 16:18:44
The option reverse_resync_commit has been completed.
dbed_vmsnap ended at 2004-04-02 16:18:56
287Using Database FlashSnap for backup and off-host processingResynchronizing your database to the snapshot
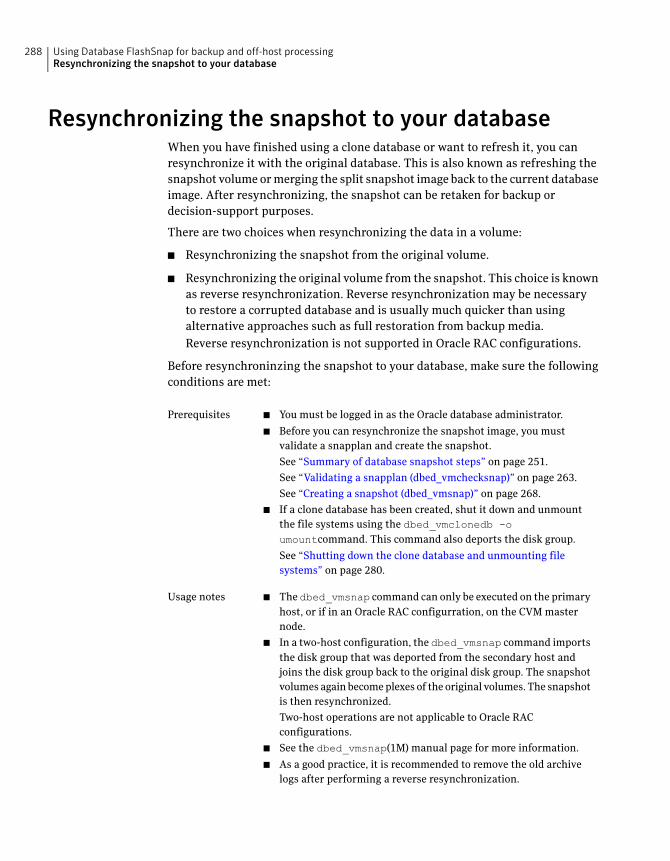
Resynchronizing the snapshot to your databaseWhen you have finished using a clone database or want to refresh it, you can
resynchronize it with the original database. This is also known as refreshing the
snapshot volume or merging the split snapshot image back to the current database
image. After resynchronizing, the snapshot can be retaken for backup or
decision-support purposes.
There are two choices when resynchronizing the data in a volume:
■ Resynchronizing the snapshot from the original volume.
■ Resynchronizing the original volume from the snapshot. This choice is known
as reverse resynchronization. Reverse resynchronization may be necessary
to restore a corrupted database and is usually much quicker than using
alternative approaches such as full restoration from backup media.
Reverse resynchronization is not supported in Oracle RAC configurations.
Before resynchroninzing the snapshot to your database, make sure the following
conditions are met:
■ You must be logged in as the Oracle database administrator.
■ Before you can resynchronize the snapshot image, you must
validate a snapplan and create the snapshot.
See “Summary of database snapshot steps” on page 251.
See “Validating a snapplan (dbed_vmchecksnap)” on page 263.
See “Creating a snapshot (dbed_vmsnap)” on page 268.
■ If a clone database has been created, shut it down and unmount
the file systems using the dbed_vmclonedb -oumountcommand. This command also deports the disk group.
See “Shutting down the clone database and unmounting file
systems” on page 280.
Prerequisites
■ The dbed_vmsnap command can only be executed on the primary
host, or if in an Oracle RAC configurration, on the CVM master
node.
■ In a two-host configuration, the dbed_vmsnap command imports
the disk group that was deported from the secondary host and
joins the disk group back to the original disk group. The snapshot
volumes again become plexes of the original volumes. The snapshot
is then resynchronized.
Two-host operations are not applicable to Oracle RAC
configurations.
■ See the dbed_vmsnap(1M) manual page for more information.
■ As a good practice, it is recommended to remove the old archive
logs after performing a reverse resynchronization.
Usage notes
Using Database FlashSnap for backup and off-host processingResynchronizing the snapshot to your database
288
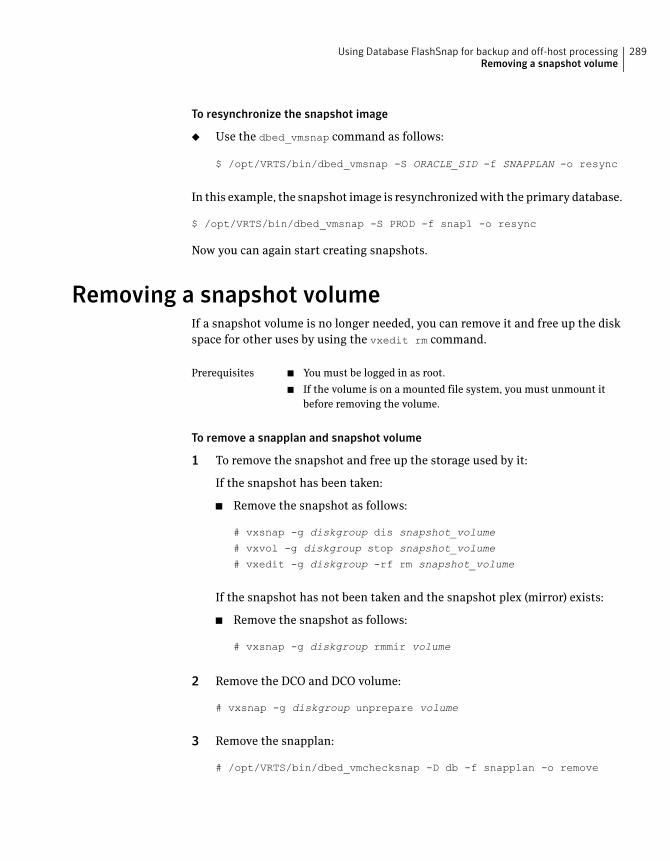
To resynchronize the snapshot image
◆ Use the dbed_vmsnap command as follows:
$ /opt/VRTS/bin/dbed_vmsnap -S ORACLE_SID -f SNAPPLAN -o resync
In this example, the snapshot image is resynchronized with the primary database.
$ /opt/VRTS/bin/dbed_vmsnap -S PROD -f snap1 -o resync
Now you can again start creating snapshots.
Removing a snapshot volumeIf a snapshot volume is no longer needed, you can remove it and free up the disk
space for other uses by using the vxedit rm command.
■ You must be logged in as root.
■ If the volume is on a mounted file system, you must unmount it
before removing the volume.
Prerequisites
To remove a snapplan and snapshot volume
1 To remove the snapshot and free up the storage used by it:
If the snapshot has been taken:
■ Remove the snapshot as follows:
# vxsnap -g diskgroup dis snapshot_volume
# vxvol -g diskgroup stop snapshot_volume
# vxedit -g diskgroup -rf rm snapshot_volume
If the snapshot has not been taken and the snapshot plex (mirror) exists:
■ Remove the snapshot as follows:
# vxsnap -g diskgroup rmmir volume
2 Remove the DCO and DCO volume:
# vxsnap -g diskgroup unprepare volume
3 Remove the snapplan:
# /opt/VRTS/bin/dbed_vmchecksnap -D db -f snapplan -o remove
289Using Database FlashSnap for backup and off-host processingRemoving a snapshot volume
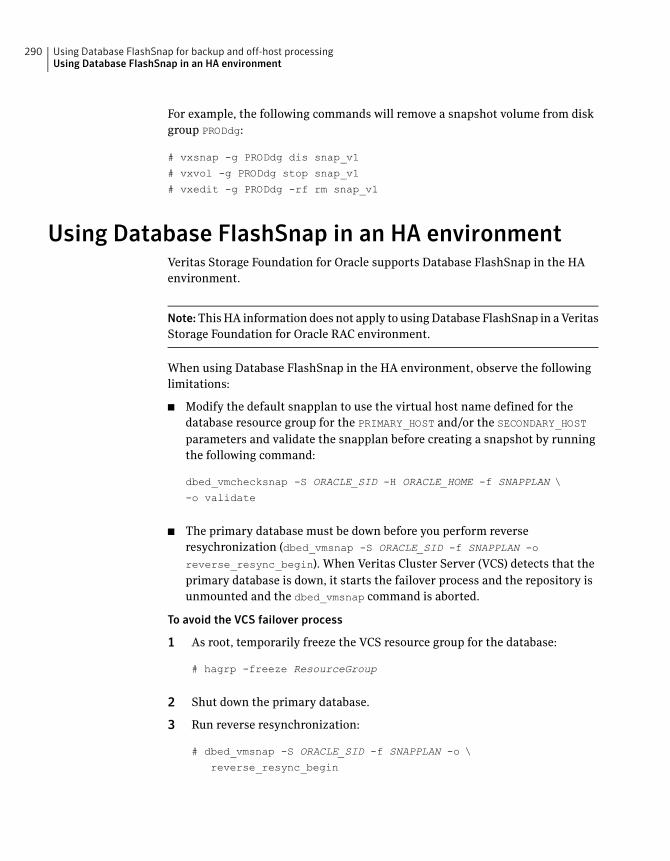
For example, the following commands will remove a snapshot volume from disk
group PRODdg:
# vxsnap -g PRODdg dis snap_v1
# vxvol -g PRODdg stop snap_v1
# vxedit -g PRODdg -rf rm snap_v1
Using Database FlashSnap in an HA environmentVeritas Storage Foundation for Oracle supports Database FlashSnap in the HA
environment.
Note:This HA information does not apply to using Database FlashSnap in a Veritas
Storage Foundation for Oracle RAC environment.
When using Database FlashSnap in the HA environment, observe the following
limitations:
■ Modify the default snapplan to use the virtual host name defined for the
database resource group for the PRIMARY_HOST and/or the SECONDARY_HOST
parameters and validate the snapplan before creating a snapshot by running
the following command:
dbed_vmchecksnap -S ORACLE_SID -H ORACLE_HOME -f SNAPPLAN \
-o validate
■ The primary database must be down before you perform reverse
resychronization (dbed_vmsnap -S ORACLE_SID -f SNAPPLAN -o
reverse_resync_begin). When Veritas Cluster Server (VCS) detects that the
primary database is down, it starts the failover process and the repository is
unmounted and the dbed_vmsnap command is aborted.
To avoid the VCS failover process
1 As root, temporarily freeze the VCS resource group for the database:
# hagrp -freeze ResourceGroup
2 Shut down the primary database.
3 Run reverse resynchronization:
# dbed_vmsnap -S ORACLE_SID -f SNAPPLAN -o \
reverse_resync_begin
Using Database FlashSnap for backup and off-host processingUsing Database FlashSnap in an HA environment
290
4 After reverse reynchronization changes are committed (-o
reverse_resync_commit), verify that the database has been started in
ARCHIVELOG mode. This information is provided in the status messages that
appear after running committing reverse resynchronization changes.
5 Unfreeze the resource group:
# hagrp -unfreeze ResourceGroup
291Using Database FlashSnap for backup and off-host processingUsing Database FlashSnap in an HA environment

Using Database FlashSnap for backup and off-host processingUsing Database FlashSnap in an HA environment
292
UsingVeritasNetBackup for
database backup
This chapter includes the following topics:
■ About using Veritas NetBackup for backup and restore
■ Using Veritas NetBackup to backup and restore Quick I/O files
■ About using Veritas NetBackup to backup and restore Oracle Disk Manager
files
AboutusingVeritasNetBackup for backupand restoreVeritas NetBackup provides for high performance, online (hot) backups of
databases that must be available on a 24x7 basis, as well as offline (cold) database
backups. Veritas NetBackup lets you back up and restore database files and
directories. You can set up schedules for automatic, unattended, online, and offline
database backup, as well as full or incremental backup. These backups are managed
entirely by the NetBackup server. You can also manually back up database files
from any of the NetBackup clients. Client users can perform database backups
and restores from their client systems on demand.
Using VeritasNetBackup to backup and restoreQuickI/O files
If you are using NetBackup for Oracle, then you should use Oracle RMAN to backup
and restore Quick I/O files.
Veritas NetBackup does not follow symbolic links when backing up files. Typical
backup management applications are designed this way to avoid backing up the
14Chapter
same data twice. This would happen if both the link and the file it points to were
included in the list of files to be backed up.
A Quick I/O file consists of two components: a hidden file with the space allocated
for it, and a link that points to the Quick I/O interface of the hidden file. Because
NetBackup does not follow symbolic links, you must specify both the Quick I/O
link and its hidden file in the list of files to be backed up.
To view all files and their attributes in the db01 directory:
$ ls -la /db01
total 2192
drwxr-xr-x 2 root root 96 Oct 20 17:39 .
drwxr-xr-x 9 root root 8192 Oct 20 17:39 ..
-rw-r--r-- 1 oracle dba 1048576 Oct 20 17:39
.dbfile
lrwxrwxrwx 1 oracle dba 22 Oct 20 17:39
dbfile ->\
.dbfile::cdev:vxfs:
In the example above, you must include both the symbolic link dbfile and the
hidden file .dbfile in the file list of the backup class.
If you want to back up all Quick I/O files in a directory, you can simplify the process
by just specifying the directory to be backed up. In this case, both components of
each Quick I/O file will be properly backed up. In general, you should specify
directories to be backed up unless you only want to back up some, but not all files,
in those directories.
Because Veritas NetBackup is integrated with Veritas Storage Foundation, Veritas
NetBackup backs up extent attributes of a Quick I/O file and restores them
accordingly. Quick I/O files can then be backed up and restored as regular files
using Veritas NetBackup, while preserving the Quick I/O file's extent reservation.
Without this feature, restoring the file could cause the loss of contiguous
reservation, which can degrade performance.
When restoring a Quick I/O file, if both the symbolic link and the hidden file
already exist, Veritas NetBackup will restore both components from the backup
image. If either one or both of the two components are missing, Veritas NetBackup
creates or overwrites as needed.
Using Veritas NetBackup for database backupUsing Veritas NetBackup to backup and restore Quick I/O files
294
Note: The Oracle backup and restore utility cannot be used to back up and restore
Quick I/O files.
Some back up software may not be able to back up and restore VxFS extent
attributes. See the qio_recreate(1M) online manual page for information on how
to restore missing Quick I/O files.
About using VeritasNetBackup to backup and restoreOracle Disk Manager files
Oracle allocates Oracle Disk Manager files with contiguous extent layouts for
good database performance. When you back up your database using Veritas
NetBackup, extent attributes are backed up automatically. When you restore
database files they are allocated using these extent attributes. If you are using
Oracle RMAN's conventional backup method with any backup software, datafiles
are also restored with the proper extent layouts.
If you are not using NetBackup or you are using RMAN's “proxy copy” backup
method with a backup software other than NetBackup, the extent attributes may
not be backed up. To ensure the restored datafiles have proper extent layouts,
preallocate the lost datafiles using the odmmkfile command. This command
preallocates contiguous space for files prior to restoring them.
See the odmmkfile(1M) manual page.
For example, to preallocate an Oracle datafile with size 100 M, assuming the Oracle
database block size is 8K, use the odmmkfile command and enter:
$ /opt/VRTS/bin/odmmkfile -h 8k -s 100m filename
295Using Veritas NetBackup for database backupAbout using Veritas NetBackup to backup and restore Oracle Disk Manager files

Using Veritas NetBackup for database backupAbout using Veritas NetBackup to backup and restore Oracle Disk Manager files
296
Tuning for performance
This chapter includes the following topics:
■ Additional documentation
■ About tuning VxVM
■ About tuning VxFS
■ About tuning Oracle databases
■ About tuning Solaris for Oracle
Additional documentationUse the tuning tips and information provided in this chapter in conjunction with
other more in-depth publications, such as:
■ Oracle Performance Tuning Tips & Techniques (Osborne McGraw-Hill)
■ Oracle9i Installation Guide (Oracle Corporation)
■ Oracle 10g Installation Guide (Oracle Corporation)
■ Oracle Performance Tuning (O'Reilly & Associates)
■ Oracle Performance Tuning and Optimization (Sams Publishing)
■ VeritasVolumeManagerAdministrator'sGuide, chapter on “VxVM Performance
Monitoring”
About tuning VxVMVeritas Volume Manager (VxVM) is tuned for most configurations ranging from
small systems to larger servers. On smaller systems with less than a hundred
drives, tuning should not be necessary and Veritas Volume Manager should be
15Chapter
capable of adopting reasonable defaults for all configuration parameters. On very
large systems, however, there may be configurations that require additional tuning
of these parameters, both for capacity and performance reasons.
For more information on tuning VxVM, see the Veritas VolumeManager
Administrator's Guide.
About obtaining volume I/O statistics
If your database is created on a single file system that is on a single volume, there
is typically no need to monitor the volume I/O statistics. If your database is created
on multiple file systems on multiple volumes, or the volume configurations have
changed over time, it may be necessary to monitor the volume I/O statistics for
the databases.
Use the vxstat command to access information about activity on volumes, plexes,
subdisks, and disks under VxVM control, and to print summary statistics to the
standard output. These statistics represent VxVM activity from the time the
system initially booted or from the last time the counters were reset to zero. If no
VxVM object name is specified, statistics from all volumes in the configuration
database are reported. Use the -g option to specify the database disk group to
report statistics for objects in that database disk group.
VxVM records the following I/O statistics:
■ count of operations
■ number of blocks transferred (one operation can involve more than one block)
■ average operation time (which reflects the total time through the VxVM
interface and is not suitable for comparison against other statistics programs)
VxVM records the preceding three pieces of information for logical I/Os, including
reads, writes, atomic copies, verified reads, verified writes, plex reads, and plex
writes for each volume. VxVM also maintains other statistical data such as read
failures, write failures, corrected read failures, corrected write failures, and so
on. In addition to displaying volume statistics, the vxstat command is capable of
displaying more detailed statistics on the components that form the volume. For
detailed information on available options, refer to the vxstat(1M) manual page.
To reset the statistics information to zero, use the -r option. You can reset the
statistics information for all objects or for only those objects that are specified.
Resetting just prior to an operation makes it possible to measure the impact of
that particular operation.
The following is an example of output produced using the vxstat command:
OPERATIONS BLOCKS AVG TIME(ms)
Tuning for performanceAbout tuning VxVM
298
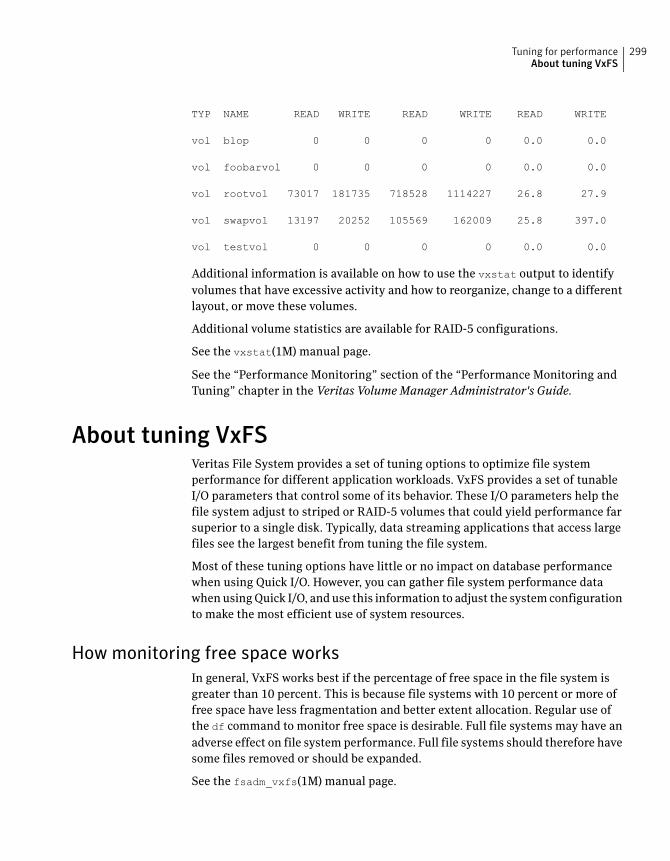
TYP NAME READ WRITE READ WRITE READ WRITE
vol blop 0 0 0 0 0.0 0.0
vol foobarvol 0 0 0 0 0.0 0.0
vol rootvol 73017 181735 718528 1114227 26.8 27.9
vol swapvol 13197 20252 105569 162009 25.8 397.0
vol testvol 0 0 0 0 0.0 0.0
Additional information is available on how to use the vxstat output to identify
volumes that have excessive activity and how to reorganize, change to a different
layout, or move these volumes.
Additional volume statistics are available for RAID-5 configurations.
See the vxstat(1M) manual page.
See the “Performance Monitoring” section of the “Performance Monitoring and
Tuning” chapter in the Veritas VolumeManager Administrator's Guide.
About tuning VxFSVeritas File System provides a set of tuning options to optimize file system
performance for different application workloads. VxFS provides a set of tunable
I/O parameters that control some of its behavior. These I/O parameters help the
file system adjust to striped or RAID-5 volumes that could yield performance far
superior to a single disk. Typically, data streaming applications that access large
files see the largest benefit from tuning the file system.
Most of these tuning options have little or no impact on database performance
when using Quick I/O. However, you can gather file system performance data
when using Quick I/O, and use this information to adjust the system configuration
to make the most efficient use of system resources.
How monitoring free space works
In general, VxFS works best if the percentage of free space in the file system is
greater than 10 percent. This is because file systems with 10 percent or more of
free space have less fragmentation and better extent allocation. Regular use of
the df command to monitor free space is desirable. Full file systems may have an
adverse effect on file system performance. Full file systems should therefore have
some files removed or should be expanded.
See the fsadm_vxfs(1M) manual page.
299Tuning for performanceAbout tuning VxFS
About monitoring fragmentation
Fragmentation reduces performance and availability. Regular use of fsadm's
fragmentation reporting and reorganization facilities is therefore advisable.
The easiest way to ensure that fragmentation does not become a problem is to
schedule regular defragmentation runs using the cron command.
Defragmentation scheduling should range from weekly (for frequently used file
systems) to monthly (for infrequently used file systems). Extent fragmentation
should be monitored with fsadm or the df -os commands.
There are three factors that can be used to determine the degree of fragmentation:
■ Percentage of free space in extents that are less than eight blocks in length
■ Percentage of free space in extents that are less than 64 blocks in length
■ Percentage of free space in extents that are 64 or more blocks in length
An unfragmented file system will have the following characteristics:
■ Less than 1 percent of free space in extents that are less than eight blocks in
length
■ Less than 5 percent of free space in extents that are less than 64 blocks in
length
■ More than 5 percent of the total file system size available as free extents that
are 64 or more blocks in length
A badly fragmented file system will have one or more of the following
characteristics:
■ More than 5 percent of free space in extents that are less than 8 blocks in
length
■ More than 50 percent of free space in extents that are less than 64 blocks in
length
■ Less than 5 percent of the total file system size available as free extents that
are 64 or more blocks in length
The optimal period for scheduling extent reorganization runs can be determined
by choosing a reasonable interval, scheduling fsadm runs at the initial interval,
and running the extent fragmentation report feature of fsadm before and after
the reorganization.
The “before” result is the degree of fragmentation prior to the reorganization. If
the degree of fragmentation approaches the percentages for bad fragmentation,
reduce the interval between fsadm. If the degree of fragmentation is low, increase
the interval between fsadm runs.
Tuning for performanceAbout tuning VxFS
300
How tuning VxFS I/O parameters works
VxFS provides a set of tunable I/O parameters that control some of its behavior.
These I/O parameters are useful to help the file system adjust to striped or RAID-5
volumes that could yield performance far superior to a single disk. Typically, data
streaming applications that access large files see the biggest benefit from tuning
the file system.
If VxFS is being used with Veritas Volume Manager, the file system queries VxVM
to determine the geometry of the underlying volume and automatically sets the
I/O parameters. VxVM is queried by mkfs when the file system is created to
automatically align the file system to the volume geometry. If the default alignment
from mkfs is not acceptable, the -o align=n option can be used to override
alignment information obtained from VxVM. The mount command also queries
VxVM when the file system is mounted and downloads the I/O parameters.
If the default parameters are not acceptable or the file system is being used without
VxVM, then the /etc/vx/tunefstab file can be used to set values for I/O
parameters. Themount command reads the/etc/vx/tunefstab file and downloads
any parameters specified for a file system. The tunefstab file overrides any values
obtained from VxVM. While the file system is mounted, any I/O parameters can
be changed using the vxtunefs command, which can have tunables specified on
the command line or can read them from the /etc/vx/tunefstab file.
The vxtunefs command can be used to print the current values of the I/O
parameters.
See the vxtunefs(1M) and tunefstab(4) manual pages.
About tunable VxFS I/O parameters
The following are tunable VxFS I/O parameters:
The preferred read request size. The file system uses this
parameter in conjunction with the read_nstream value
to determine how much data to read ahead. The default
value is 64K.
read_pref_io
The preferred write request size. The file system uses this
parameter in conjunction with the write_nstream value
to determine how to do flush behind on writes. The default
value is 64K.
write_pref_io
301Tuning for performanceAbout tuning VxFS
The number of parallel read requests of sizeread_pref_iothat you can have outstanding at one time. The file system
uses the product of read_nstream multiplied by
read_pref_io to determine its read ahead size. The default
value for read_nstream is 1.
read_nstream
The number of parallel write requests of size
write_pref_io that you can have outstanding at one time.
The file system uses the product of write_nstreammultiplied by write_pref_io to determine when to do
flush behind on writes. The default value for
write_nstream is 1.
write_nstream
On VxFS, files can have up to ten variably sized direct
extents stored in the inode. After these extents are used,
the file must use indirect extents that are a fixed size. The
size is set when the file first uses indirect extents. These
indirect extents are 8K by default. The file system does not
use larger indirect extents because it must fail a write and
return ENOSPC if there are no extents available that are the
indirect extent size. For file systems with many large files,
the 8K indirect extent size is too small. Large files that
require indirect extents use many smaller extents instead
of a few larger ones. By using this parameter, the default
indirect extent size can be increased so that large files in
indirects use fewer large extents.
Be careful using this tunable. If it is too large, then writes
fail when they are unable to allocate extents of the indirect
extent size to a file. In general, the fewer and the larger the
files on a file system, the larger thedefault_indir_sizeparameter can be. The value of this parameter is generally
a multiple of the read_pref_io parameter.
This tunable is not applicable on Version 4 disk layouts.
default_indir_ size
Any file I/O requests larger than the
discovered_direct_iosz are handled as discovered
direct I/O. A discovered direct I/O is unbuffered similar to
direct I/O, but does not require a synchronous commit of
the inode when the file is extended or blocks are allocated.
For larger I/O requests, the CPU time for copying the data
into the page cache and the cost of using memory to buffer
the I/O data becomes more expensive than the cost of doing
the disk I/O. For these I/O requests, using discovered direct
I/O is more efficient than regular I/O. The default value of
this parameter is 256K.
discovered_direct_iosz
Tuning for performanceAbout tuning VxFS
302
Changes the default initial extent size. VxFS determines the
size of the first extent to be allocated to the file based on
the first write to a new file. Normally, the first extent is the
smallest power of 2 that is larger than the size of the first
write. If that power of 2 is less than 8K, the first extent
allocated is 8K. After the initial extent, the file system
increases the size of subsequent extents (see
max_seqio_extent_size) with each allocation. Since
most applications write to files using a buffer size of 8K or
less, the increasing extents start doubling from a small
initial extent. initial_extent_size can change the
default initial extent size to be larger, so the doubling policy
will start from a much larger initial size and the file system
will not allocate a set of small extents at the start of file.
Use this parameter only on file systems that will have a very
large average file size. On these file systems, it will result
in fewer extents per file and less fragmentation.
initial_extent_size is measured in file system blocks.
initial_extent_ size
The maximum size of a direct I/O request that will be issued
by the file system. If a larger I/O request comes in, then it
is broken up into max_direct_iosz chunks. This
parameter defines how much memory an I/O request can
lock at once, so it should not be set to more than 20 percent
of memory.
max_direct_iosz
Limits the maximum disk queue generated by a single file.
When the file system is flushing data for a file and the
number of pages being flushed exceeds max_diskq,
processes will block until the amount of data being flushed
decreases. Although this doesn't limit the actual disk queue,
it prevents flushing processes from making the system
unresponsive. The default value is 1MB.
max_diskq
303Tuning for performanceAbout tuning VxFS
Increases or decreases the maximum size of an extent. When
the file system is following its default allocation policy for
sequential writes to a file, it allocates an initial extent that
is large enough for the first write to the file. When additional
extents are allocated, they are progressively larger (the
algorithm tries to double the size of the file with each new
extent) so each extent can hold several writes' worth of data.
This is done to reduce the total number of extents in
anticipation of continued sequential writes. When the file
stops being written, any unused space is freed for other files
to use. Normally, this allocation stops increasing the size
of extents at 2048 blocks, which prevents one file from
holding too much unused space.max_seqio_extent_sizeis measured in file system blocks.
max_seqio_extent_size
Enables or disables caching on Quick I/O files. The default
behavior is to disable caching. To enable caching, set
qio_cache_enable to 1. On systems with large memories,
the database cannot always use all of the memory as a cache.
By enabling file system caching as a second level cache,
performance may be improved. If the database is performing
sequential scans of tables, the scans may run faster by
enabling file system caching so the file system will perform
aggressive read-ahead on the files.
qio_cache_enable
Tuning for performanceAbout tuning VxFS
304
Warning: The write_throttle parameter is useful in
special situations where a computer system has a
combination of a lot of memory and slow storage devices.
In this configuration, sync operations (such as fsync())
may take so long to complete that the system appears to
hang. This behavior occurs because the file system is
creating dirty pages (in-memory updates) faster than they
can be asynchronously flushed to disk without slowing
system performance.
Lowering the value ofwrite_throttle limits the number
of dirty pages per file that a file system will generate before
flushing the pages to disk. After the number of dirty pages
for a file reaches the write_throttle threshold, the file
system starts flushing pages to disk even if free memory is
still available. The default value of write_throttletypically generates a lot of dirty pages, but maintains fast
user writes. Depending on the speed of the storage device,
if you lowerwrite_throttle, user write performance may
suffer, but the number of dirty pages is limited, so sync
operations will complete much faster.
Because lowering write_throttle can delay write
requests (for example, lowering write_throttle may
increase the file disk queue to the max_diskq value,
delaying user writes until the disk queue decreases), it is
recommended that you avoid changing the value of
write_throttleunless your system has a a large amount
of physical memory and slow storage devices.
write_throttle
If the file system is being used with VxVM, it is recommended that you set the
VxFS I/O parameters to default values based on the volume geometry.
If the file system is being used with a hardware disk array or volume manager
other than VxVM, align the parameters to match the geometry of the logical disk.
With striping or RAID-5, it is common to set read_pref_io to the stripe unit size
and read_nstream to the number of columns in the stripe. For striping arrays,
use the same values for write_pref_io and write_nstream, but for RAID-5 arrays,
set write_pref_io to the full stripe size and write_nstream to 1.
For an application to do efficient disk I/O, it should issue read requests that are
equal to the product of read_nstreammultiplied by read_pref_io. Generally, any
multiple or factor of read_nstream multiplied by read_pref_io should be a good
size for performance. For writing, the same rule of thumb applies to the
write_pref_io and write_nstream parameters. When tuning a file system, the
best thing to do is try out the tuning parameters under a real-life workload.
305Tuning for performanceAbout tuning VxFS

If an application is doing sequential I/O to large files, it should issue requests
larger than the discovered_direct_iosz. This causes the I/O requests to be
performed as discovered direct I/O requests, which are unbuffered like direct I/O
but do not require synchronous inode updates when extending the file. If the file
is too large to fit in the cache, then using unbuffered I/O avoids throwing useful
data out of the cache and lessons CPU overhead.
About obtaining file I/O statistics using the Quick I/O interface
The qiostatcommand provides access to activity information on Quick I/O files
on VxFS file systems. The command reports statistics on the activity levels of
files from the time the files are first opened using their Quick I/O interface. The
accumulated qiostat statistics are reset once the last open reference to the Quick
I/O file is closed.
The qiostat command displays the following I/O statistics:
■ Number of read and write operations
■ Number of data blocks (sectors) transferred
■ Average time spent on read and write operations
When Cached Quick I/O is used, qiostat also displays the caching statistics when
the -l (the long format) option is selected.
The following is an example of qiostat output:
OPERATIONS FILE BLOCKS AVG TIME(ms)
FILENAME READ WRITE READ WRITE READ WRITE
/db01/file1 0 00 0 0.0 0.0
/db01/file2 0 00 0 0.0 0.0
/db01/file3 73017 181735 718528 1114227 26.8 27.9
/db01/file4 13197 20252 105569 162009 25.8 397.0
/db01/file5 0 00 0 0.0 0.0
For detailed information on available options, see the qiostat(1M) manual page.
About I/O statistics data
Once you gather the file I/O performance data, you can use it to adjust the system
configuration to make the most efficient use of system resources.
Tuning for performanceAbout tuning VxFS
306
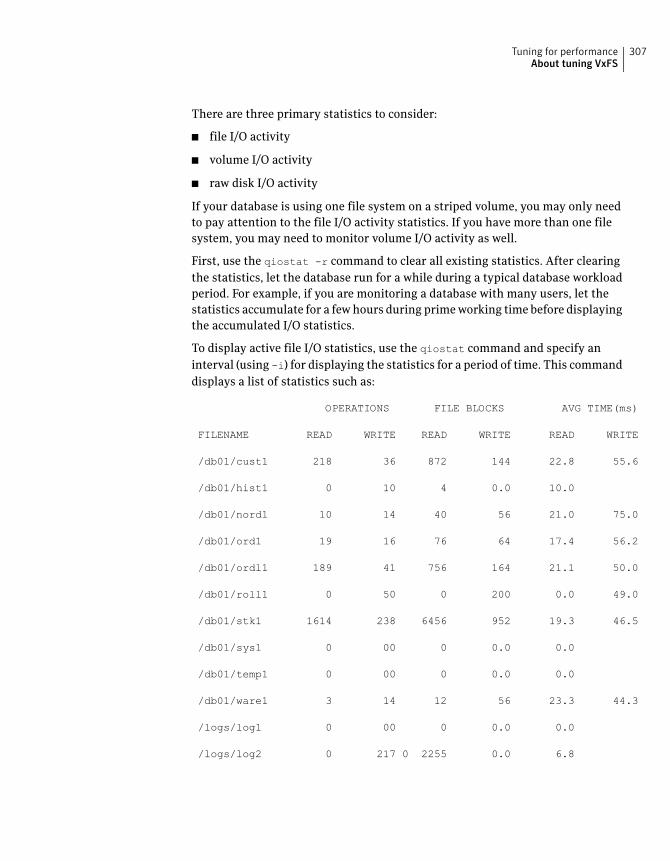
There are three primary statistics to consider:
■ file I/O activity
■ volume I/O activity
■ raw disk I/O activity
If your database is using one file system on a striped volume, you may only need
to pay attention to the file I/O activity statistics. If you have more than one file
system, you may need to monitor volume I/O activity as well.
First, use the qiostat -r command to clear all existing statistics. After clearing
the statistics, let the database run for a while during a typical database workload
period. For example, if you are monitoring a database with many users, let the
statistics accumulate for a few hours during prime working time before displaying
the accumulated I/O statistics.
To display active file I/O statistics, use the qiostat command and specify an
interval (using -i) for displaying the statistics for a period of time. This command
displays a list of statistics such as:
OPERATIONS FILE BLOCKS AVG TIME(ms)
FILENAME READ WRITE READ WRITE READ WRITE
/db01/cust1 218 36 872 144 22.8 55.6
/db01/hist1 0 10 4 0.0 10.0
/db01/nord1 10 14 40 56 21.0 75.0
/db01/ord1 19 16 76 64 17.4 56.2
/db01/ordl1 189 41 756 164 21.1 50.0
/db01/roll1 0 50 0 200 0.0 49.0
/db01/stk1 1614 238 6456 952 19.3 46.5
/db01/sys1 0 00 0 0.0 0.0
/db01/temp1 0 00 0 0.0 0.0
/db01/ware1 3 14 12 56 23.3 44.3
/logs/log1 0 00 0 0.0 0.0
/logs/log2 0 217 0 2255 0.0 6.8
307Tuning for performanceAbout tuning VxFS
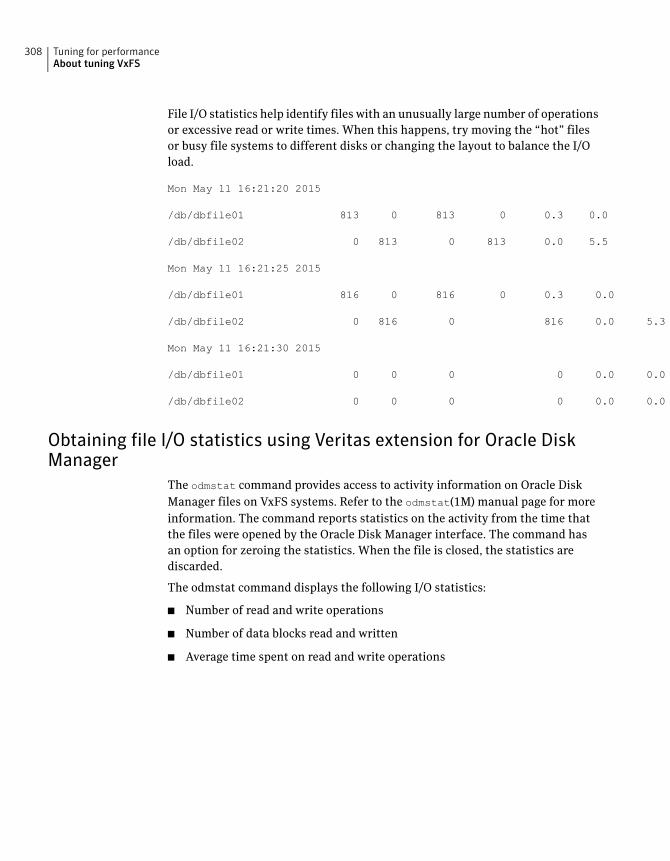
File I/O statistics help identify files with an unusually large number of operations
or excessive read or write times. When this happens, try moving the “hot” files
or busy file systems to different disks or changing the layout to balance the I/O
load.
Mon May 11 16:21:20 2015
/db/dbfile01 813 0 813 0 0.3 0.0
/db/dbfile02 0 813 0 813 0.0 5.5
Mon May 11 16:21:25 2015
/db/dbfile01 816 0 816 0 0.3 0.0
/db/dbfile02 0 816 0 816 0.0 5.3
Mon May 11 16:21:30 2015
/db/dbfile01 0 0 0 0 0.0 0.0
/db/dbfile02 0 0 0 0 0.0 0.0
Obtaining file I/O statistics using Veritas extension for Oracle DiskManager
The odmstat command provides access to activity information on Oracle Disk
Manager files on VxFS systems. Refer to the odmstat(1M) manual page for more
information. The command reports statistics on the activity from the time that
the files were opened by the Oracle Disk Manager interface. The command has
an option for zeroing the statistics. When the file is closed, the statistics are
discarded.
The odmstat command displays the following I/O statistics:
■ Number of read and write operations
■ Number of data blocks read and written
■ Average time spent on read and write operations
Tuning for performanceAbout tuning VxFS
308
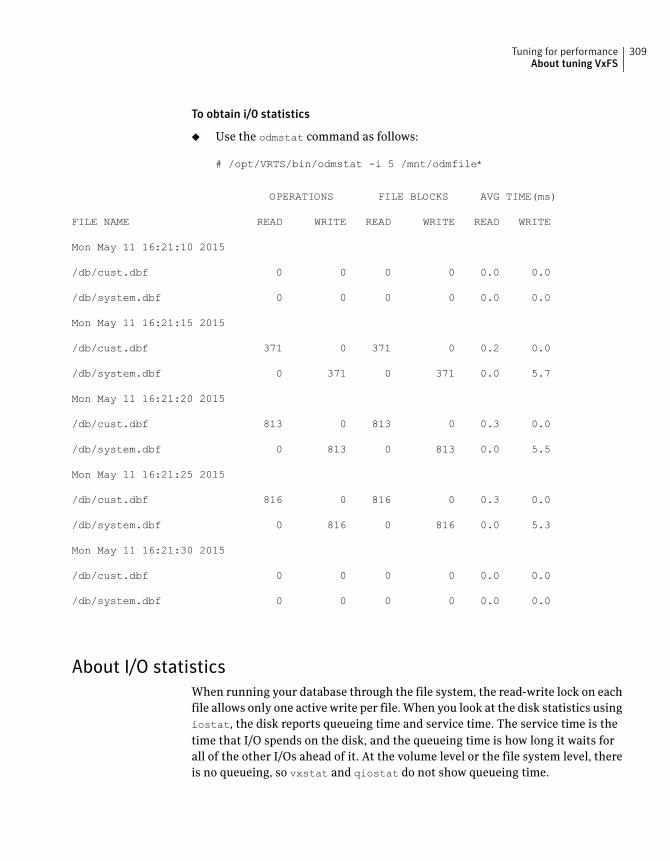
To obtain i/0 statistics
◆ Use the odmstat command as follows:
# /opt/VRTS/bin/odmstat -i 5 /mnt/odmfile*
OPERATIONS FILE BLOCKS AVG TIME(ms)
FILE NAME READ WRITE READ WRITE READ WRITE
Mon May 11 16:21:10 2015
/db/cust.dbf 0 0 0 0 0.0 0.0
/db/system.dbf 0 0 0 0 0.0 0.0
Mon May 11 16:21:15 2015
/db/cust.dbf 371 0 371 0 0.2 0.0
/db/system.dbf 0 371 0 371 0.0 5.7
Mon May 11 16:21:20 2015
/db/cust.dbf 813 0 813 0 0.3 0.0
/db/system.dbf 0 813 0 813 0.0 5.5
Mon May 11 16:21:25 2015
/db/cust.dbf 816 0 816 0 0.3 0.0
/db/system.dbf 0 816 0 816 0.0 5.3
Mon May 11 16:21:30 2015
/db/cust.dbf 0 0 0 0 0.0 0.0
/db/system.dbf 0 0 0 0 0.0 0.0
About I/O statistics
When running your database through the file system, the read-write lock on each
file allows only one active write per file. When you look at the disk statistics using
iostat, the disk reports queueing time and service time. The service time is the
time that I/O spends on the disk, and the queueing time is how long it waits for
all of the other I/Os ahead of it. At the volume level or the file system level, there
is no queueing, so vxstat and qiostat do not show queueing time.
309Tuning for performanceAbout tuning VxFS
For example, if you send 100 I/Os at the same time and each takes 10 milliseconds,
the disk reports an average of 10 milliseconds of service and 490 milliseconds of
queueing time. The vxstat, odmstat, and qiostat report an average of 500
milliseconds service time.
About tuning Oracle databasesTo achieve optimal performance on your Oracle database, the database needs to
be tuned to work with VxFS. There are a number of Oracle parameters that you
can tune to improve your Oracle database performance.
Sequential table scans
Quick I/O in its default mode performs all I/O as direct I/O. In the case of
single-threaded sequential scans (common in decision support system (DSS)
workloads), using buffered reads can yield better performance. Because the file
system detects these sequential reads and performs read-aheads, the next few
blocks that Oracle requests are readily available in the system buffer cache and
are simply copied to the Oracle system global area (SGA). Because access from
memory is inherently faster than access from disk, this achieves a significant
reduction in response time.
To handle large sequential scans when using Quick I/O, one of two methods is
available to improve performance:
■ Use the Oracle Parallel Query Option to break the single large scan into multiple
smaller scans.
Note:Consult the Oracle documentation for your system and version of Oracle,
and use the settings recommended for these parameters when provided.
■ The second method is to enable Cached Quick I/O for the files that would be
read by the Oracle sequential scan process. Cached Quick I/O enables buffered
reads, and the automatic file system read-ahead helps lower response times
by pre-loading data.
Note: Do not use this option if you are using a 64-bit version of Oracle.
Tuning for performanceAbout tuning Oracle databases
310
Asynchronous I/O
Quick I/O and Oracle Disk Manager support kernel asynchronous I/O, which
reduces CPU utilization and improves transaction throughput.
Enabling the following parameters lets Oracle take advantage of asynchronous
I/O and avoids having to configure multiple DBWR slaves:
■ If you are using Quick I/O datafiles with Oracle9, set DISK_ASYNCH_IOto TRUEin
init.ora.
■ If you are using ODM on Oracle9, you do not need to change any init.ora
parameters.
Your Oracle Installation Guide provides detailed instructions on implementing
asynchronous I/O on your system.
Tuning buffer cache
The UNIX buffer cache plays an important role in performance when using UFS
in buffered I/O mode.
When using Quick I/O, however, the database cache must be tuned as if raw devices
are being used. You can allocate more memory to the database buffer cache because
Quick I/O bypasses the file system cache to improve database performance.
Memory pages normally allocated to the file system cache can be allocated to the
database buffer cache (SGA). With Oracle9i, you can adjust the SGA size without
shutting down the database.
Setting Oracle block reads during sequential scans
TheDB_FILE_MULTIBLOCK_READ_COUNTparameter specifies the maximum number
of blocks Oracle reads in one I/O operation during a sequential scan. The
/etc/system tunable parameter maxphys establishes the maximum physical I/O
transfer size at the operating system level. To take advantage of the maximum
transfer size, the Oracle init.ora parameter DB_FILE_MULTIBLOCK_READ_COUNT
should be set to maxphys/DB_BLOCK_SIZE.
For example, if maxphys is set to 1048576 and DB_BLOCK_SIZE is set to 4096, then
DB_FILE_MULTIBLOCK_READ_COUNT should be set to 256.
Setting slave parameters
Quick I/O and ODM provide support for kernel asynchronous I/O, eliminating the
need for multiple logwriter slaves or database writer slaves. This parameter is set
to 0 by default.
311Tuning for performanceAbout tuning Oracle databases
It is not necessary to set the DBWR_IO_SLAVES settings if you are using Quick
I/O. The number of DBWR writer processes is set within DB_WRITER_PROCESSES,
which performs asynchronous I/O.
Configuring memory allocation
Never configure Oracle to make use of more memory than is physically available
on the system. Oracle may have to compete with other processes for system
memory resources, and all of these potential processes must be considered when
sizing and allocating memory. In the ideal configuration, a system that is dedicated
to Oracle simplifies the tuning and monitoring issues and ensures best
performance.
About tuning Solaris for OracleTo achieve optimal performance using Veritas Storage Foundation for Oracle,
certain Solaris parameters need to be tuned. Changing these parameters requires
modifying the Solaris kernel settings (specified in the /etc/system file) and
rebooting the system.
You can add or change these tuning parameters in the /etc/system file using a
text editor. The following example shows the contents of an /etc/system file:
* start Oracle *
set shmsys:shminfo_shmmax=0xffffffff
set shmsys:shminfo_shmmin=1
set shmsys:shminfo_shmmni=100
set shmsys:shminfo_shmseg=200
*
set semsys:seminfo_semmap=100
set semsys:seminfo_semmni=1000
set semsys:seminfo_semmns=4000
set semsys:seminfo_semmnu=800
set semsys:seminfo_semmsl=512
* end Oracle *
Note: The settings for all tunable parameters depend on such factors as the size
of your system and database, the database load, and the number of users. In some
cases, we make suggestions for setting the parameters; however, you should always
consult the Oracle Installation Guide for your system and version, and use the
settings recommended by Oracle when provided.
Tuning for performanceAbout tuning Solaris for Oracle
312
maxuprc
This parameter sets the maximum number of processes that can be run
concurrently by any one user. If you anticipate having a large number of users
accessing the database concurrently, you may need to increase this parameter.
To increase the maxuprc parameter
1 Check the current setting for maxuprc as follows:
# echo "maxuprc/D" | adb -k
2 Modify or add the maxuprc setting in the /etc/system file as follows:
# set maxuprc=some_integer
shmmax
This parameter sets the maximum size (in bytes) of a single shared memory
segment. See your database documentation for the recommended value.
shmmin
This parameter sets the minimum size (in bytes) of a single shared memory
segment. See your Oracle documentation for the recommended value.
shmmni
This parameter sets the number of shared memory identifiers. See your database
documentation for the recommended value.
shmseg
This parameter sets the maximum number of shared memory segments that can
be attached by a process. See your database documentation for the recommended
value.
semmap
This parameter sets the number of entries in semaphore map. The memory space
given to the creation of semaphores is taken from semmap, which is initialized
with a fixed number of map entries based on the value of semmap. The value of
semmap should never be larger than semmni. See your database documentation for
the recommended value.
313Tuning for performanceAbout tuning Solaris for Oracle
semmni
This parameter sets the number of semaphore set identifiers in the system. The
semmni parameter determines the number of semaphore sets that can be created
at any one time, and may need to be set higher for a large database. See your
database documentation for the recommended value.
semmns
This parameter sets the maximum number of semaphores in the system. The
semmnsparameter may need to be set higher for a large database. See your database
documentation for the recommended value.
semmnu
This parameter sets the system-wide maximum number of undo structures. Setting
this parameter value equal to semmni provides for an undo structure for every
semaphore set. Semaphore operations performed using semop(2) can be undone
if the process terminates, but an undo structure is required to guarantee it. See
your database documentation for the recommended value of semmnu.
semmsl
This parameter sets the maximum number of semaphores that can be in one
semaphore set. The semmslparameter should be equal to the maximum number
of Oracle processes. See your Oracle documentation for the recommended value.
Tuning for performanceAbout tuning Solaris for Oracle
314
Veritas Storage Foundation
for Oracle Command Line
Interface
This appendix includes the following topics:
■ Overview of commands
■ About the command line interface
Overview of commandsVeritas Storage Foundation for Oracle provides a command line interface (CLI)
to many key operations also supplied from within the GUI application. The
command line interface lets you incorporate command operations into scripts
and other administrative processes. These commands can be executed using the
CLI or the Veritas Storage Foundation for Oracle GUI.
Note: The Veritas Storage Foundation for Oracle command line interface depends
on certain tablespace, datafile, or container information (depending on your
database) that is collected and stored in the SFDB repository. Some CLI commands
update the repository by default. It is important to regularly ensure the repository
is up-to-date by using the command.
All Veritas Storage Foundation for Oracle commands supported in the command
line interface are located in the /opt/VRTS/bin directory. Online manual pages
are located in the /opt/VRTS/man directory. Follow the installation instructions
provided in the Veritas Storage Foundation Installation Guide to ensure you can
use these commands and view the online manual pages.
AAppendix
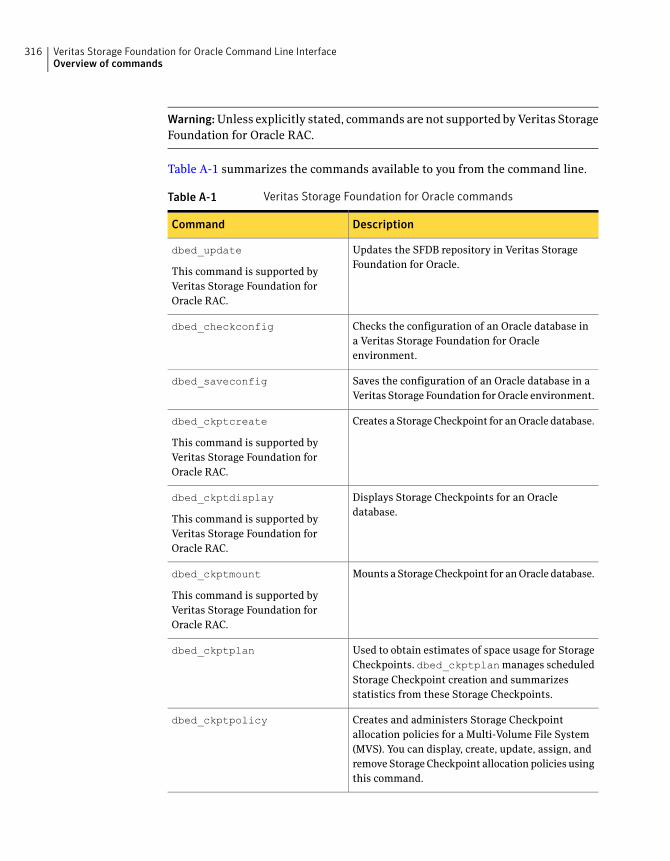
Warning:Unless explicitly stated, commands are not supported by Veritas Storage
Foundation for Oracle RAC.
Table A-1 summarizes the commands available to you from the command line.
Table A-1 Veritas Storage Foundation for Oracle commands
DescriptionCommand
Updates the SFDB repository in Veritas Storage
Foundation for Oracle.
dbed_update
This command is supported by
Veritas Storage Foundation for
Oracle RAC.
Checks the configuration of an Oracle database in
a Veritas Storage Foundation for Oracle
environment.
dbed_checkconfig
Saves the configuration of an Oracle database in a
Veritas Storage Foundation for Oracle environment.
dbed_saveconfig
Creates a Storage Checkpoint for an Oracle database.dbed_ckptcreate
This command is supported by
Veritas Storage Foundation for
Oracle RAC.
Displays Storage Checkpoints for an Oracle
database.
dbed_ckptdisplay
This command is supported by
Veritas Storage Foundation for
Oracle RAC.
Mounts a Storage Checkpoint for an Oracle database.dbed_ckptmount
This command is supported by
Veritas Storage Foundation for
Oracle RAC.
Used to obtain estimates of space usage for Storage
Checkpoints. dbed_ckptplanmanages scheduled
Storage Checkpoint creation and summarizes
statistics from these Storage Checkpoints.
dbed_ckptplan
Creates and administers Storage Checkpoint
allocation policies for a Multi-Volume File System
(MVS). You can display, create, update, assign, and
remove Storage Checkpoint allocation policies using
this command.
dbed_ckptpolicy
Veritas Storage Foundation for Oracle Command Line InterfaceOverview of commands
316
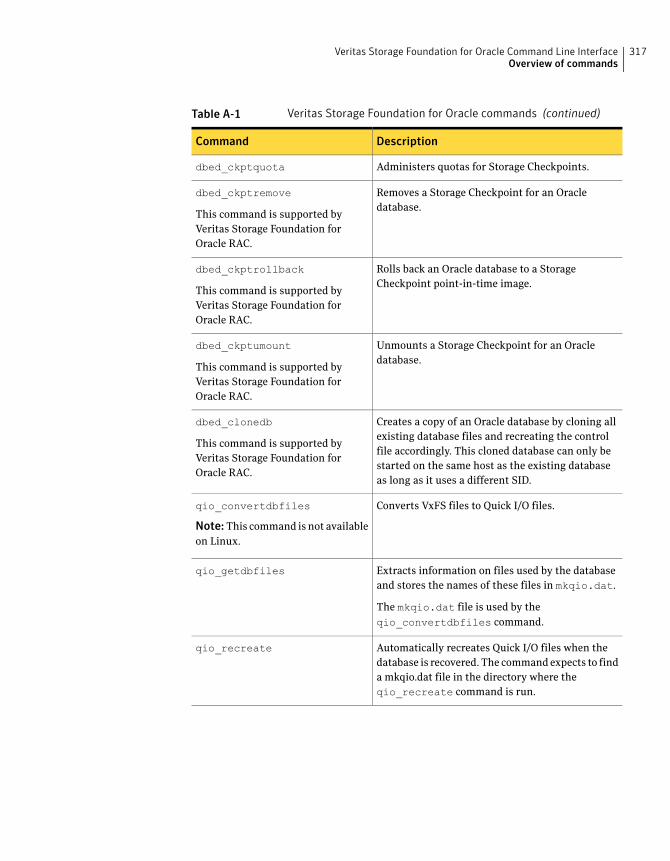
Table A-1 Veritas Storage Foundation for Oracle commands (continued)
DescriptionCommand
Administers quotas for Storage Checkpoints.dbed_ckptquota
Removes a Storage Checkpoint for an Oracle
database.
dbed_ckptremove
This command is supported by
Veritas Storage Foundation for
Oracle RAC.
Rolls back an Oracle database to a Storage
Checkpoint point-in-time image.
dbed_ckptrollback
This command is supported by
Veritas Storage Foundation for
Oracle RAC.
Unmounts a Storage Checkpoint for an Oracle
database.
dbed_ckptumount
This command is supported by
Veritas Storage Foundation for
Oracle RAC.
Creates a copy of an Oracle database by cloning all
existing database files and recreating the control
file accordingly. This cloned database can only be
started on the same host as the existing database
as long as it uses a different SID.
dbed_clonedb
This command is supported by
Veritas Storage Foundation for
Oracle RAC.
Converts VxFS files to Quick I/O files.qio_convertdbfiles
Note: This command is not available
on Linux.
Extracts information on files used by the database
and stores the names of these files in mkqio.dat.
The mkqio.dat file is used by the
qio_convertdbfiles command.
qio_getdbfiles
Automatically recreates Quick I/O files when the
database is recovered. The command expects to find
a mkqio.dat file in the directory where the
qio_recreate command is run.
qio_recreate
317Veritas Storage Foundation for Oracle Command Line InterfaceOverview of commands
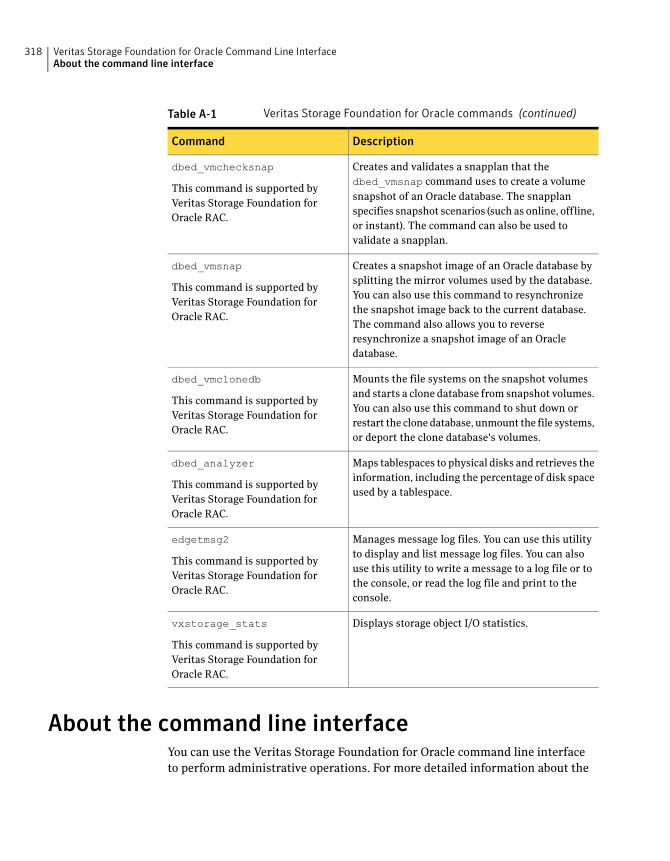
Table A-1 Veritas Storage Foundation for Oracle commands (continued)
DescriptionCommand
Creates and validates a snapplan that the
dbed_vmsnap command uses to create a volume
snapshot of an Oracle database. The snapplan
specifies snapshot scenarios (such as online, offline,
or instant). The command can also be used to
validate a snapplan.
dbed_vmchecksnap
This command is supported by
Veritas Storage Foundation for
Oracle RAC.
Creates a snapshot image of an Oracle database by
splitting the mirror volumes used by the database.
You can also use this command to resynchronize
the snapshot image back to the current database.
The command also allows you to reverse
resynchronize a snapshot image of an Oracle
database.
dbed_vmsnap
This command is supported by
Veritas Storage Foundation for
Oracle RAC.
Mounts the file systems on the snapshot volumes
and starts a clone database from snapshot volumes.
You can also use this command to shut down or
restart the clone database, unmount the file systems,
or deport the clone database's volumes.
dbed_vmclonedb
This command is supported by
Veritas Storage Foundation for
Oracle RAC.
Maps tablespaces to physical disks and retrieves the
information, including the percentage of disk space
used by a tablespace.
dbed_analyzer
This command is supported by
Veritas Storage Foundation for
Oracle RAC.
Manages message log files. You can use this utility
to display and list message log files. You can also
use this utility to write a message to a log file or to
the console, or read the log file and print to the
console.
edgetmsg2
This command is supported by
Veritas Storage Foundation for
Oracle RAC.
Displays storage object I/O statistics.vxstorage_stats
This command is supported by
Veritas Storage Foundation for
Oracle RAC.
About the command line interfaceYou can use the Veritas Storage Foundation for Oracle command line interface
to perform administrative operations. For more detailed information about the
Veritas Storage Foundation for Oracle Command Line InterfaceAbout the command line interface
318
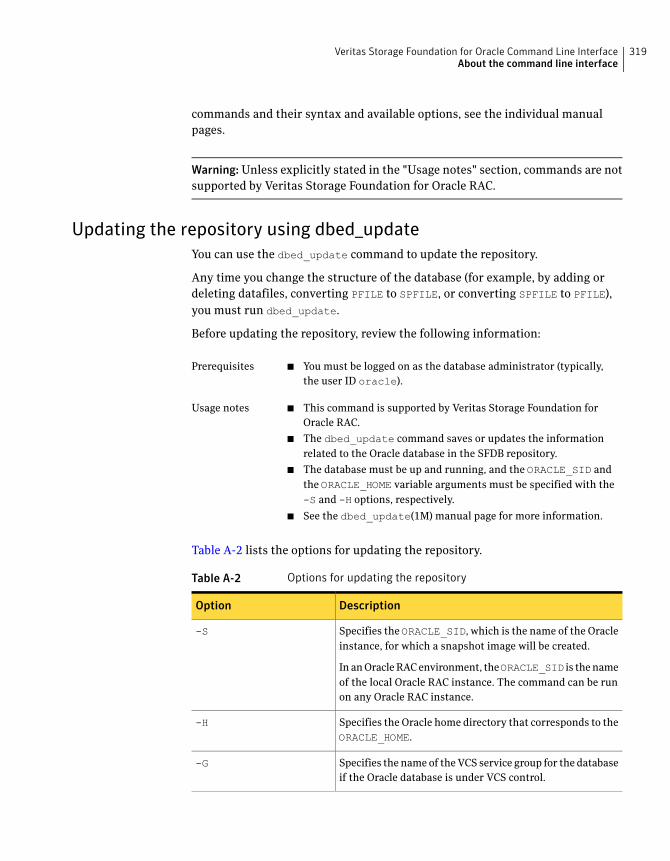
commands and their syntax and available options, see the individual manual
pages.
Warning: Unless explicitly stated in the "Usage notes" section, commands are not
supported by Veritas Storage Foundation for Oracle RAC.
Updating the repository using dbed_update
You can use the dbed_update command to update the repository.
Any time you change the structure of the database (for example, by adding or
deleting datafiles, converting PFILE to SPFILE, or converting SPFILE to PFILE),
you must run dbed_update.
Before updating the repository, review the following information:
■ You must be logged on as the database administrator (typically,
the user ID oracle).
Prerequisites
■ This command is supported by Veritas Storage Foundation for
Oracle RAC.
■ The dbed_update command saves or updates the information
related to the Oracle database in the SFDB repository.
■ The database must be up and running, and the ORACLE_SID and
the ORACLE_HOME variable arguments must be specified with the
-S and -H options, respectively.
■ See the dbed_update(1M) manual page for more information.
Usage notes
Table A-2 lists the options for updating the repository.
Table A-2 Options for updating the repository
DescriptionOption
Specifies the ORACLE_SID, which is the name of the Oracle
instance, for which a snapshot image will be created.
In an Oracle RAC environment, theORACLE_SID is the name
of the local Oracle RAC instance. The command can be run
on any Oracle RAC instance.
-S
Specifies the Oracle home directory that corresponds to the
ORACLE_HOME.
-H
Specifies the name of the VCS service group for the database
if the Oracle database is under VCS control.
-G
319Veritas Storage Foundation for Oracle Command Line InterfaceAbout the command line interface
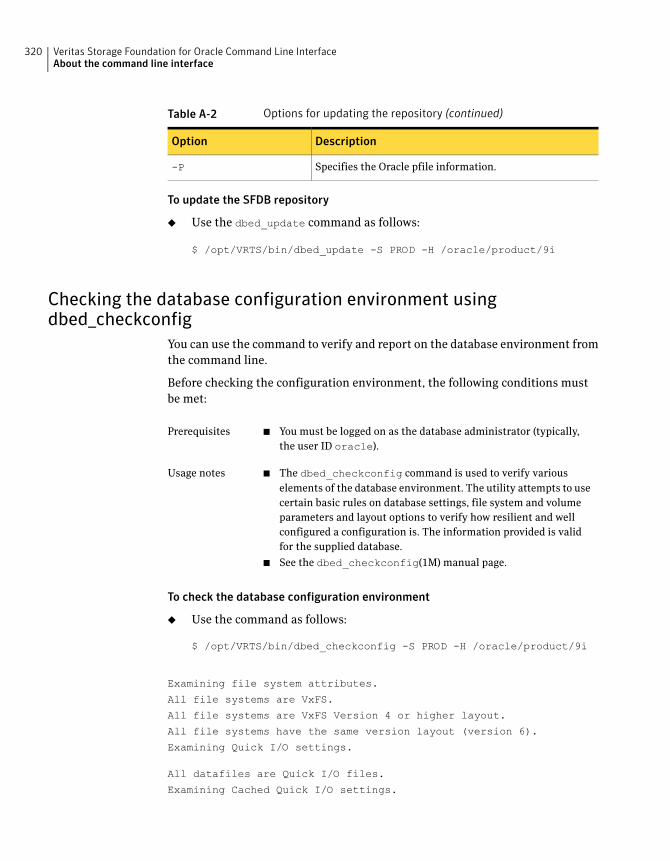
Table A-2 Options for updating the repository (continued)
DescriptionOption
Specifies the Oracle pfile information.-P
To update the SFDB repository
◆ Use the dbed_update command as follows:
$ /opt/VRTS/bin/dbed_update -S PROD -H /oracle/product/9i
Checking the database configuration environment usingdbed_checkconfig
You can use the command to verify and report on the database environment from
the command line.
Before checking the configuration environment, the following conditions must
be met:
■ You must be logged on as the database administrator (typically,
the user ID oracle).
Prerequisites
■ The dbed_checkconfig command is used to verify various
elements of the database environment. The utility attempts to use
certain basic rules on database settings, file system and volume
parameters and layout options to verify how resilient and well
configured a configuration is. The information provided is valid
for the supplied database.
■ See the dbed_checkconfig(1M) manual page.
Usage notes
To check the database configuration environment
◆ Use the command as follows:
$ /opt/VRTS/bin/dbed_checkconfig -S PROD -H /oracle/product/9i
Examining file system attributes.
All file systems are VxFS.
All file systems are VxFS Version 4 or higher layout.
All file systems have the same version layout (version 6).
Examining Quick I/O settings.
All datafiles are Quick I/O files.
Examining Cached Quick I/O settings.
Veritas Storage Foundation for Oracle Command Line InterfaceAbout the command line interface
320
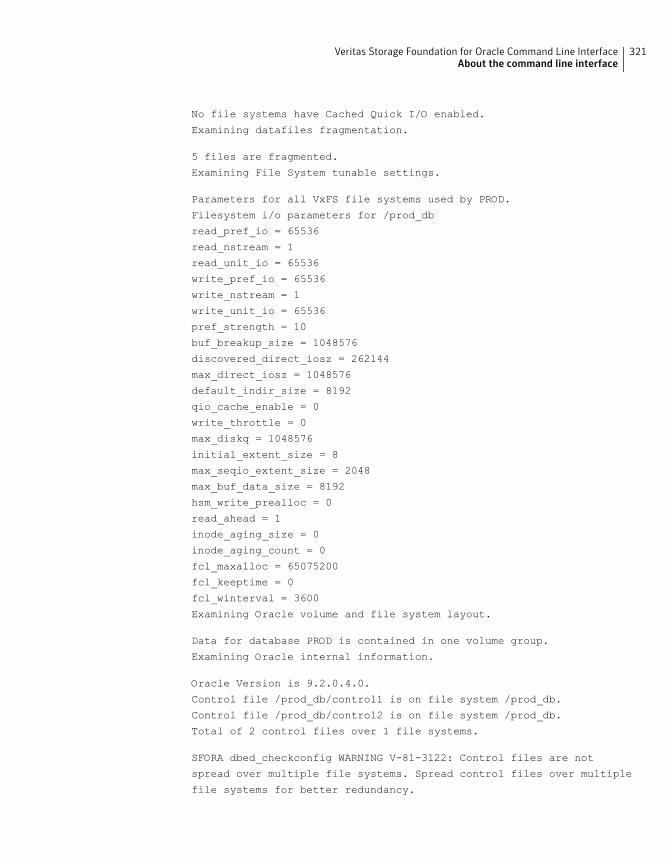
No file systems have Cached Quick I/O enabled.
Examining datafiles fragmentation.
5 files are fragmented.
Examining File System tunable settings.
Parameters for all VxFS file systems used by PROD.
Filesystem i/o parameters for /prod_db
read_pref_io = 65536
read_nstream = 1
read_unit_io = 65536
write_pref_io = 65536
write_nstream = 1
write_unit_io = 65536
pref_strength = 10
buf_breakup_size = 1048576
discovered_direct_iosz = 262144
max_direct_iosz = 1048576
default_indir_size = 8192
qio_cache_enable = 0
write_throttle = 0
max_diskq = 1048576
initial_extent_size = 8
max_seqio_extent_size = 2048
max_buf_data_size = 8192
hsm_write_prealloc = 0
read_ahead = 1
inode_aging_size = 0
inode_aging_count = 0
fcl_maxalloc = 65075200
fcl_keeptime = 0
fcl_winterval = 3600
Examining Oracle volume and file system layout.
Data for database PROD is contained in one volume group.
Examining Oracle internal information.
Oracle Version is 9.2.0.4.0.
Control file /prod_db/control1 is on file system /prod_db.
Control file /prod_db/control2 is on file system /prod_db.
Total of 2 control files over 1 file systems.
SFORA dbed_checkconfig WARNING V-81-3122: Control files are not
spread over multiple file systems. Spread control files over multiple
file systems for better redundancy.
321Veritas Storage Foundation for Oracle Command Line InterfaceAbout the command line interface
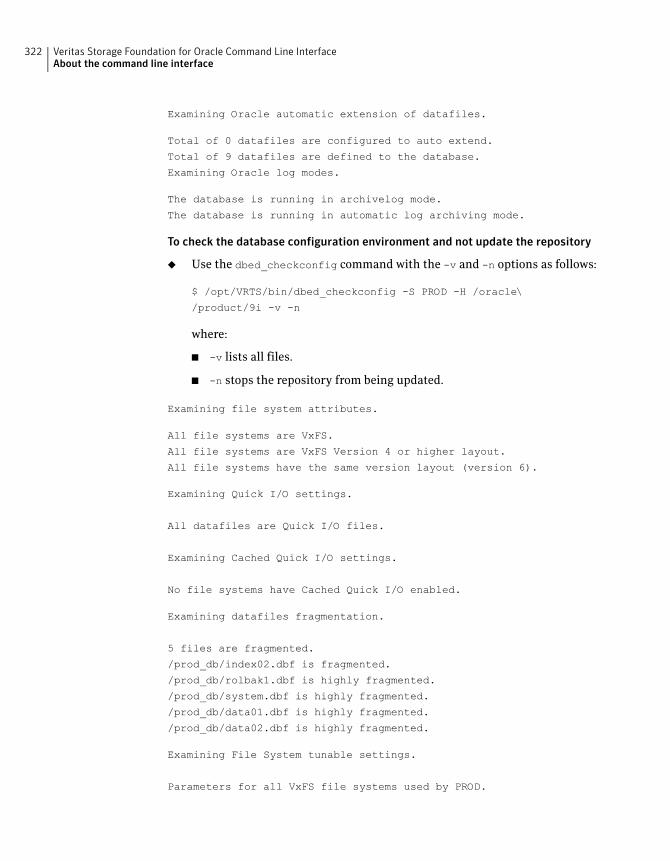
Examining Oracle automatic extension of datafiles.
Total of 0 datafiles are configured to auto extend.
Total of 9 datafiles are defined to the database.
Examining Oracle log modes.
The database is running in archivelog mode.
The database is running in automatic log archiving mode.
To check the database configuration environment and not update the repository
◆ Use the dbed_checkconfig command with the -v and -n options as follows:
$ /opt/VRTS/bin/dbed_checkconfig -S PROD -H /oracle\
/product/9i -v -n
where:
■ -v lists all files.
■ -n stops the repository from being updated.
Examining file system attributes.
All file systems are VxFS.
All file systems are VxFS Version 4 or higher layout.
All file systems have the same version layout (version 6).
Examining Quick I/O settings.
All datafiles are Quick I/O files.
Examining Cached Quick I/O settings.
No file systems have Cached Quick I/O enabled.
Examining datafiles fragmentation.
5 files are fragmented.
/prod_db/index02.dbf is fragmented.
/prod_db/rolbak1.dbf is highly fragmented.
/prod_db/system.dbf is highly fragmented.
/prod_db/data01.dbf is highly fragmented.
/prod_db/data02.dbf is highly fragmented.
Examining File System tunable settings.
Parameters for all VxFS file systems used by PROD.
Veritas Storage Foundation for Oracle Command Line InterfaceAbout the command line interface
322
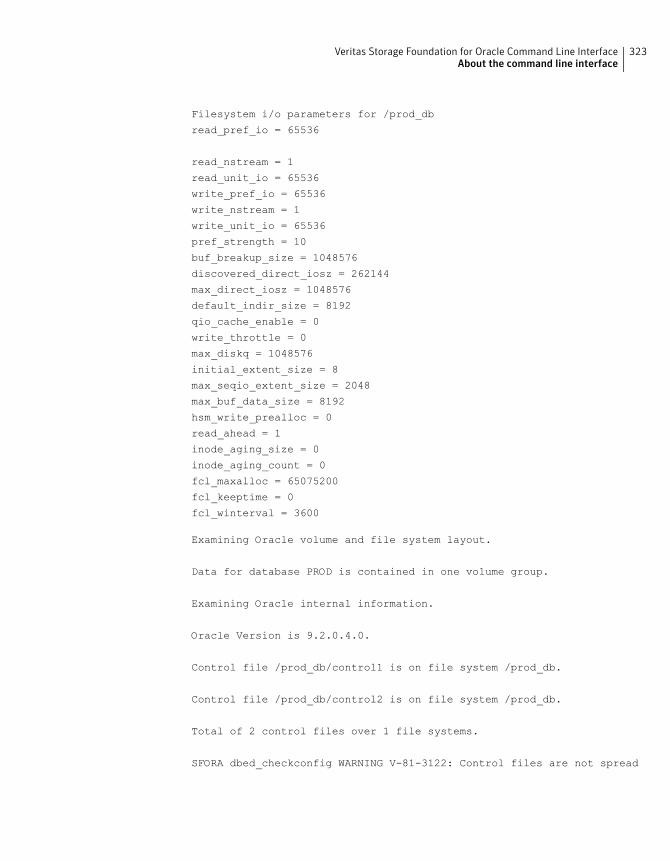
Filesystem i/o parameters for /prod_db
read_pref_io = 65536
read_nstream = 1
read_unit_io = 65536
write_pref_io = 65536
write_nstream = 1
write_unit_io = 65536
pref_strength = 10
buf_breakup_size = 1048576
discovered_direct_iosz = 262144
max_direct_iosz = 1048576
default_indir_size = 8192
qio_cache_enable = 0
write_throttle = 0
max_diskq = 1048576
initial_extent_size = 8
max_seqio_extent_size = 2048
max_buf_data_size = 8192
hsm_write_prealloc = 0
read_ahead = 1
inode_aging_size = 0
inode_aging_count = 0
fcl_maxalloc = 65075200
fcl_keeptime = 0
fcl_winterval = 3600
Examining Oracle volume and file system layout.
Data for database PROD is contained in one volume group.
Examining Oracle internal information.
Oracle Version is 9.2.0.4.0.
Control file /prod_db/control1 is on file system /prod_db.
Control file /prod_db/control2 is on file system /prod_db.
Total of 2 control files over 1 file systems.
SFORA dbed_checkconfig WARNING V-81-3122: Control files are not spread
323Veritas Storage Foundation for Oracle Command Line InterfaceAbout the command line interface
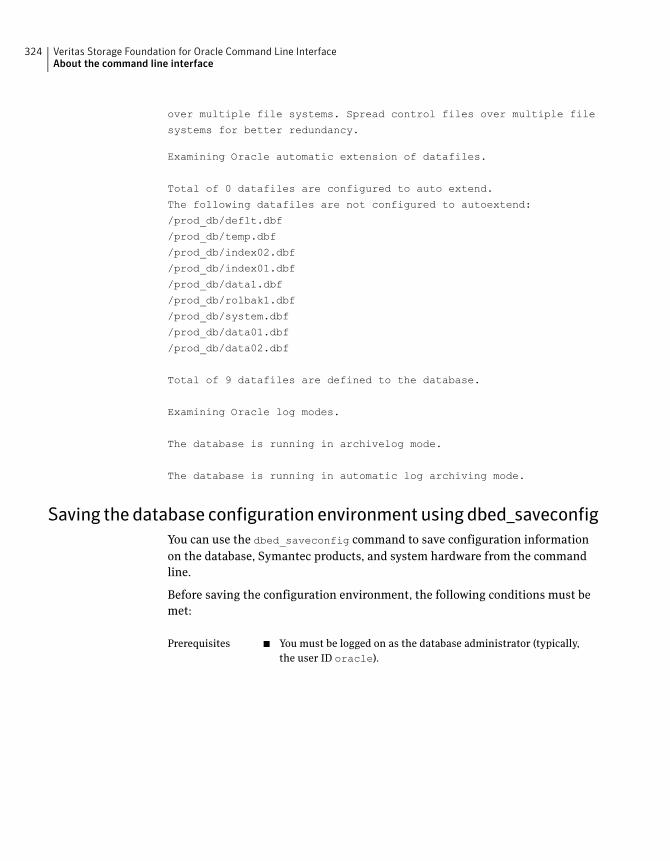
over multiple file systems. Spread control files over multiple file
systems for better redundancy.
Examining Oracle automatic extension of datafiles.
Total of 0 datafiles are configured to auto extend.
The following datafiles are not configured to autoextend:
/prod_db/deflt.dbf
/prod_db/temp.dbf
/prod_db/index02.dbf
/prod_db/index01.dbf
/prod_db/data1.dbf
/prod_db/rolbak1.dbf
/prod_db/system.dbf
/prod_db/data01.dbf
/prod_db/data02.dbf
Total of 9 datafiles are defined to the database.
Examining Oracle log modes.
The database is running in archivelog mode.
The database is running in automatic log archiving mode.
Saving the database configuration environment using dbed_saveconfig
You can use the dbed_saveconfig command to save configuration information
on the database, Symantec products, and system hardware from the command
line.
Before saving the configuration environment, the following conditions must be
met:
■ You must be logged on as the database administrator (typically,
the user ID oracle).
Prerequisites
Veritas Storage Foundation for Oracle Command Line InterfaceAbout the command line interface
324
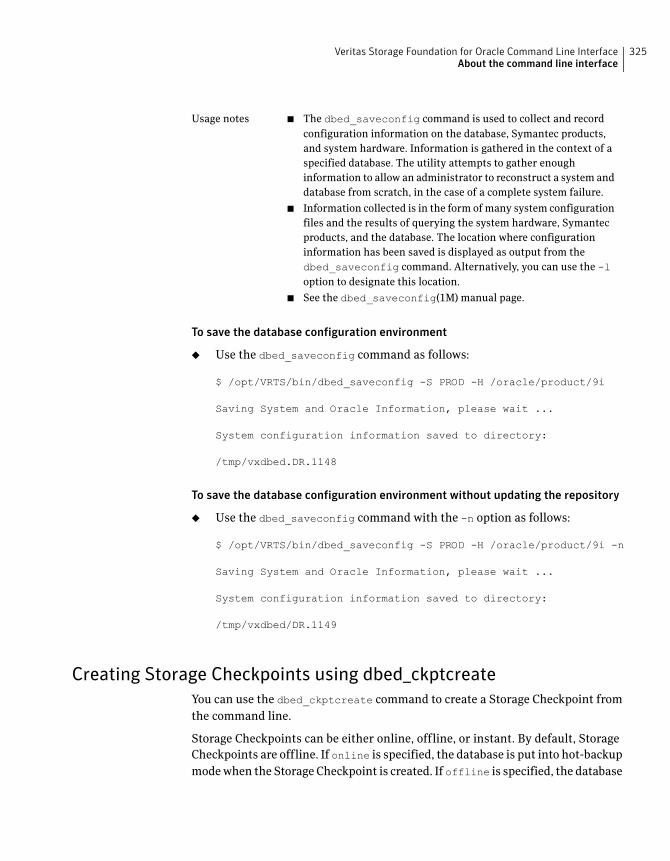
■ The dbed_saveconfig command is used to collect and record
configuration information on the database, Symantec products,
and system hardware. Information is gathered in the context of a
specified database. The utility attempts to gather enough
information to allow an administrator to reconstruct a system and
database from scratch, in the case of a complete system failure.
■ Information collected is in the form of many system configuration
files and the results of querying the system hardware, Symantec
products, and the database. The location where configuration
information has been saved is displayed as output from the
dbed_saveconfig command. Alternatively, you can use the -loption to designate this location.
■ See the dbed_saveconfig(1M) manual page.
Usage notes
To save the database configuration environment
◆ Use the dbed_saveconfig command as follows:
$ /opt/VRTS/bin/dbed_saveconfig -S PROD -H /oracle/product/9i
Saving System and Oracle Information, please wait ...
System configuration information saved to directory:
/tmp/vxdbed.DR.1148
To save the database configuration environment without updating the repository
◆ Use the dbed_saveconfig command with the -n option as follows:
$ /opt/VRTS/bin/dbed_saveconfig -S PROD -H /oracle/product/9i -n
Saving System and Oracle Information, please wait ...
System configuration information saved to directory:
/tmp/vxdbed/DR.1149
Creating Storage Checkpoints using dbed_ckptcreate
You can use the dbed_ckptcreate command to create a Storage Checkpoint from
the command line.
Storage Checkpoints can be either online, offline, or instant. By default, Storage
Checkpoints are offline. If online is specified, the database is put into hot-backup
mode when the Storage Checkpoint is created. If offline is specified, the database
325Veritas Storage Foundation for Oracle Command Line InterfaceAbout the command line interface
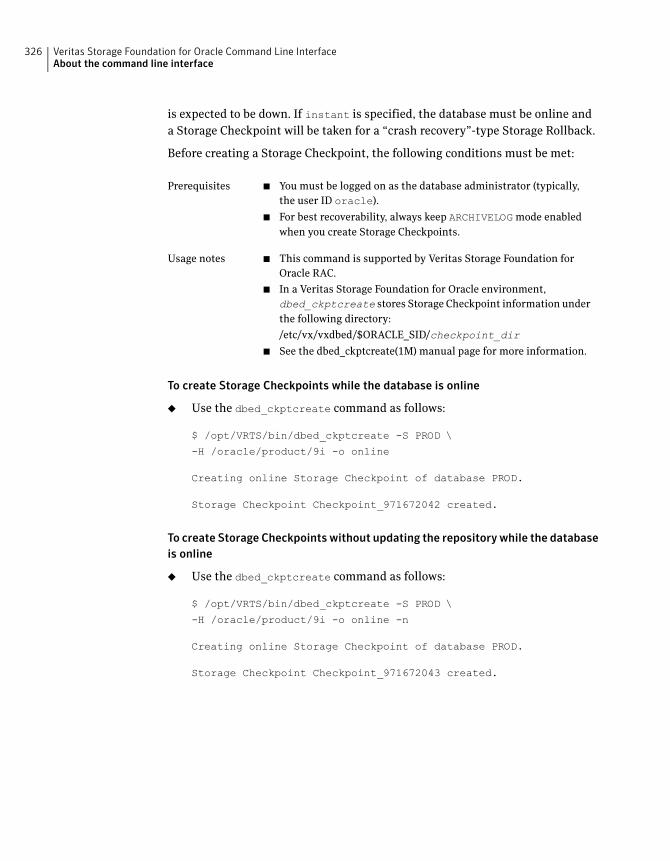
is expected to be down. If instant is specified, the database must be online and
a Storage Checkpoint will be taken for a “crash recovery”-type Storage Rollback.
Before creating a Storage Checkpoint, the following conditions must be met:
■ You must be logged on as the database administrator (typically,
the user ID oracle).
■ For best recoverability, always keep ARCHIVELOG mode enabled
when you create Storage Checkpoints.
Prerequisites
■ This command is supported by Veritas Storage Foundation for
Oracle RAC.
■ In a Veritas Storage Foundation for Oracle environment,
dbed_ckptcreate stores Storage Checkpoint information under
the following directory:
/etc/vx/vxdbed/$ORACLE_SID/checkpoint_dir
■ See the dbed_ckptcreate(1M) manual page for more information.
Usage notes
To create Storage Checkpoints while the database is online
◆ Use the dbed_ckptcreate command as follows:
$ /opt/VRTS/bin/dbed_ckptcreate -S PROD \
-H /oracle/product/9i -o online
Creating online Storage Checkpoint of database PROD.
Storage Checkpoint Checkpoint_971672042 created.
To create Storage Checkpoints without updating the repository while the database
is online
◆ Use the dbed_ckptcreate command as follows:
$ /opt/VRTS/bin/dbed_ckptcreate -S PROD \
-H /oracle/product/9i -o online -n
Creating online Storage Checkpoint of database PROD.
Storage Checkpoint Checkpoint_971672043 created.
Veritas Storage Foundation for Oracle Command Line InterfaceAbout the command line interface
326
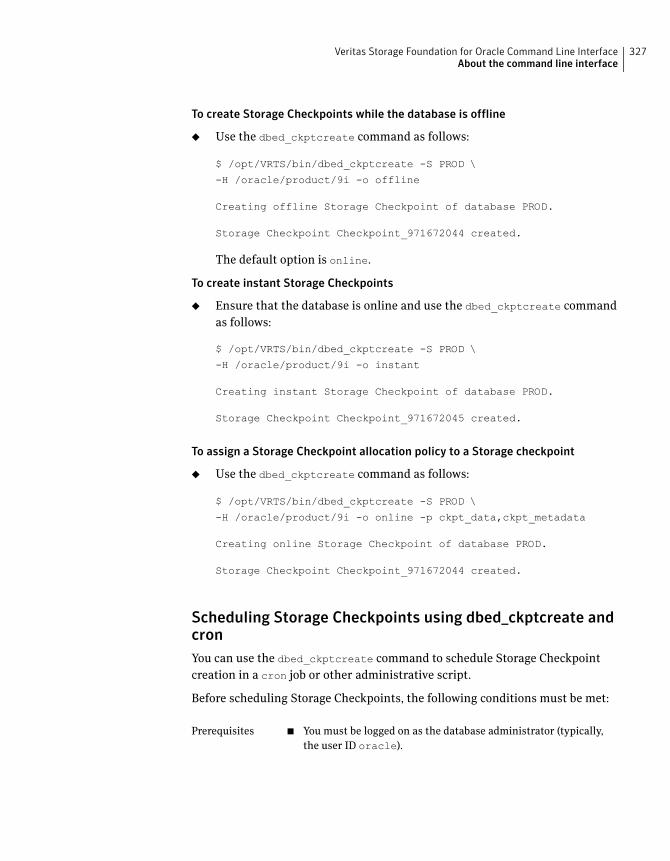
To create Storage Checkpoints while the database is offline
◆ Use the dbed_ckptcreate command as follows:
$ /opt/VRTS/bin/dbed_ckptcreate -S PROD \
-H /oracle/product/9i -o offline
Creating offline Storage Checkpoint of database PROD.
Storage Checkpoint Checkpoint_971672044 created.
The default option is online.
To create instant Storage Checkpoints
◆ Ensure that the database is online and use the dbed_ckptcreate command
as follows:
$ /opt/VRTS/bin/dbed_ckptcreate -S PROD \
-H /oracle/product/9i -o instant
Creating instant Storage Checkpoint of database PROD.
Storage Checkpoint Checkpoint_971672045 created.
To assign a Storage Checkpoint allocation policy to a Storage checkpoint
◆ Use the dbed_ckptcreate command as follows:
$ /opt/VRTS/bin/dbed_ckptcreate -S PROD \
-H /oracle/product/9i -o online -p ckpt_data,ckpt_metadata
Creating online Storage Checkpoint of database PROD.
Storage Checkpoint Checkpoint_971672044 created.
Scheduling Storage Checkpoints using dbed_ckptcreate andcron
You can use the dbed_ckptcreate command to schedule Storage Checkpoint
creation in a cron job or other administrative script.
Before scheduling Storage Checkpoints, the following conditions must be met:
■ You must be logged on as the database administrator (typically,
the user ID oracle).
Prerequisites
327Veritas Storage Foundation for Oracle Command Line InterfaceAbout the command line interface
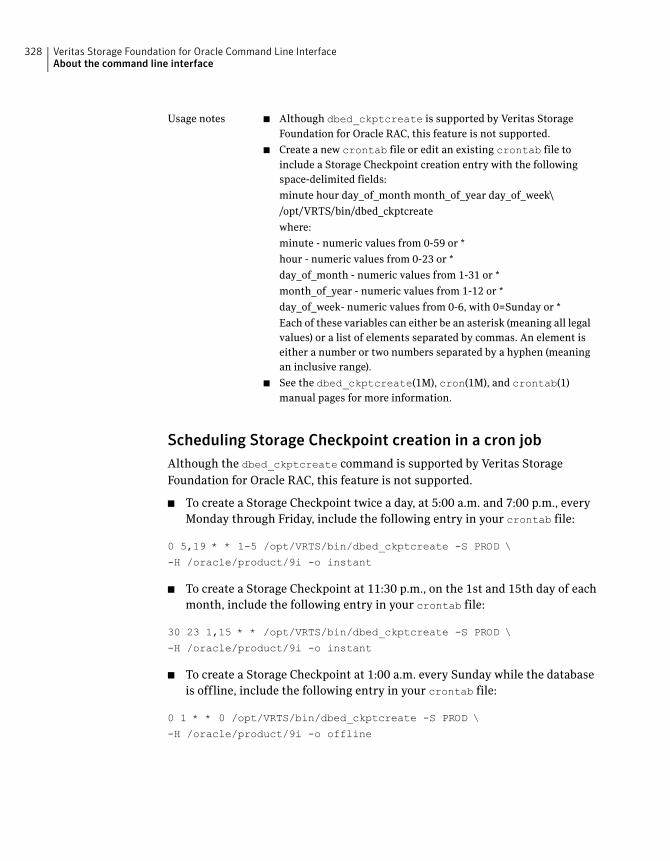
■ Although dbed_ckptcreate is supported by Veritas Storage
Foundation for Oracle RAC, this feature is not supported.
■ Create a new crontab file or edit an existing crontab file to
include a Storage Checkpoint creation entry with the following
space-delimited fields:
minute hour day_of_month month_of_year day_of_week\
/opt/VRTS/bin/dbed_ckptcreate
where:
minute - numeric values from 0-59 or *
hour - numeric values from 0-23 or *
day_of_month - numeric values from 1-31 or *
month_of_year - numeric values from 1-12 or *
day_of_week- numeric values from 0-6, with 0=Sunday or *
Each of these variables can either be an asterisk (meaning all legal
values) or a list of elements separated by commas. An element is
either a number or two numbers separated by a hyphen (meaning
an inclusive range).
■ See the dbed_ckptcreate(1M), cron(1M), and crontab(1)
manual pages for more information.
Usage notes
Scheduling Storage Checkpoint creation in a cron job
Although the dbed_ckptcreate command is supported by Veritas Storage
Foundation for Oracle RAC, this feature is not supported.
■ To create a Storage Checkpoint twice a day, at 5:00 a.m. and 7:00 p.m., every
Monday through Friday, include the following entry in your crontab file:
0 5,19 * * 1-5 /opt/VRTS/bin/dbed_ckptcreate -S PROD \
-H /oracle/product/9i -o instant
■ To create a Storage Checkpoint at 11:30 p.m., on the 1st and 15th day of each
month, include the following entry in your crontab file:
30 23 1,15 * * /opt/VRTS/bin/dbed_ckptcreate -S PROD \
-H /oracle/product/9i -o instant
■ To create a Storage Checkpoint at 1:00 a.m. every Sunday while the database
is offline, include the following entry in your crontab file:
0 1 * * 0 /opt/VRTS/bin/dbed_ckptcreate -S PROD \
-H /oracle/product/9i -o offline
Veritas Storage Foundation for Oracle Command Line InterfaceAbout the command line interface
328
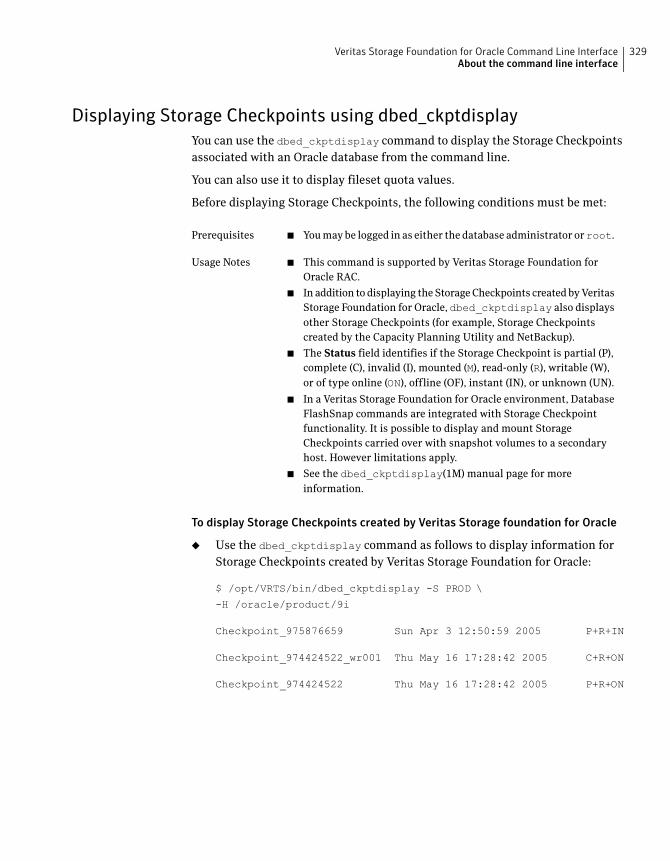
Displaying Storage Checkpoints using dbed_ckptdisplay
You can use the dbed_ckptdisplay command to display the Storage Checkpoints
associated with an Oracle database from the command line.
You can also use it to display fileset quota values.
Before displaying Storage Checkpoints, the following conditions must be met:
■ You may be logged in as either the database administrator orroot.Prerequisites
■ This command is supported by Veritas Storage Foundation for
Oracle RAC.
■ In addition to displaying the Storage Checkpoints created by Veritas
Storage Foundation for Oracle, dbed_ckptdisplay also displays
other Storage Checkpoints (for example, Storage Checkpoints
created by the Capacity Planning Utility and NetBackup).
■ The Status field identifies if the Storage Checkpoint is partial (P),
complete (C), invalid (I), mounted (M), read-only (R), writable (W),
or of type online (ON), offline (OF), instant (IN), or unknown (UN).
■ In a Veritas Storage Foundation for Oracle environment, Database
FlashSnap commands are integrated with Storage Checkpoint
functionality. It is possible to display and mount Storage
Checkpoints carried over with snapshot volumes to a secondary
host. However limitations apply.
■ See the dbed_ckptdisplay(1M) manual page for more
information.
Usage Notes
To display Storage Checkpoints created by Veritas Storage foundation for Oracle
◆ Use the dbed_ckptdisplay command as follows to display information for
Storage Checkpoints created by Veritas Storage Foundation for Oracle:
$ /opt/VRTS/bin/dbed_ckptdisplay -S PROD \
-H /oracle/product/9i
Checkpoint_975876659 Sun Apr 3 12:50:59 2005 P+R+IN
Checkpoint_974424522_wr001 Thu May 16 17:28:42 2005 C+R+ON
Checkpoint_974424522 Thu May 16 17:28:42 2005 P+R+ON
329Veritas Storage Foundation for Oracle Command Line InterfaceAbout the command line interface
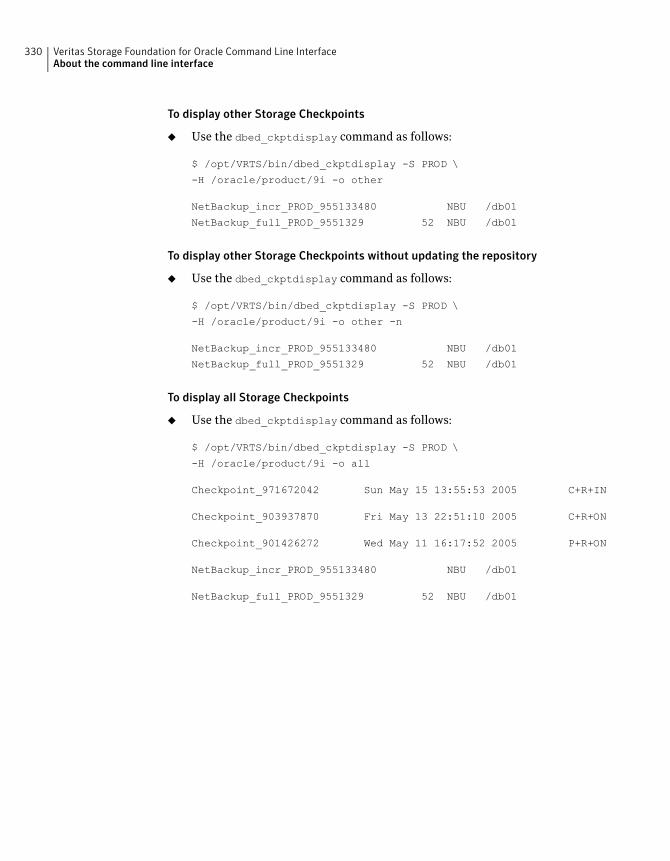
To display other Storage Checkpoints
◆ Use the dbed_ckptdisplay command as follows:
$ /opt/VRTS/bin/dbed_ckptdisplay -S PROD \
-H /oracle/product/9i -o other
NetBackup_incr_PROD_955133480 NBU /db01
NetBackup_full_PROD_9551329 52 NBU /db01
To display other Storage Checkpoints without updating the repository
◆ Use the dbed_ckptdisplay command as follows:
$ /opt/VRTS/bin/dbed_ckptdisplay -S PROD \
-H /oracle/product/9i -o other -n
NetBackup_incr_PROD_955133480 NBU /db01
NetBackup_full_PROD_9551329 52 NBU /db01
To display all Storage Checkpoints
◆ Use the dbed_ckptdisplay command as follows:
$ /opt/VRTS/bin/dbed_ckptdisplay -S PROD \
-H /oracle/product/9i -o all
Checkpoint_971672042 Sun May 15 13:55:53 2005 C+R+IN
Checkpoint_903937870 Fri May 13 22:51:10 2005 C+R+ON
Checkpoint_901426272 Wed May 11 16:17:52 2005 P+R+ON
NetBackup_incr_PROD_955133480 NBU /db01
NetBackup_full_PROD_9551329 52 NBU /db01
Veritas Storage Foundation for Oracle Command Line InterfaceAbout the command line interface
330
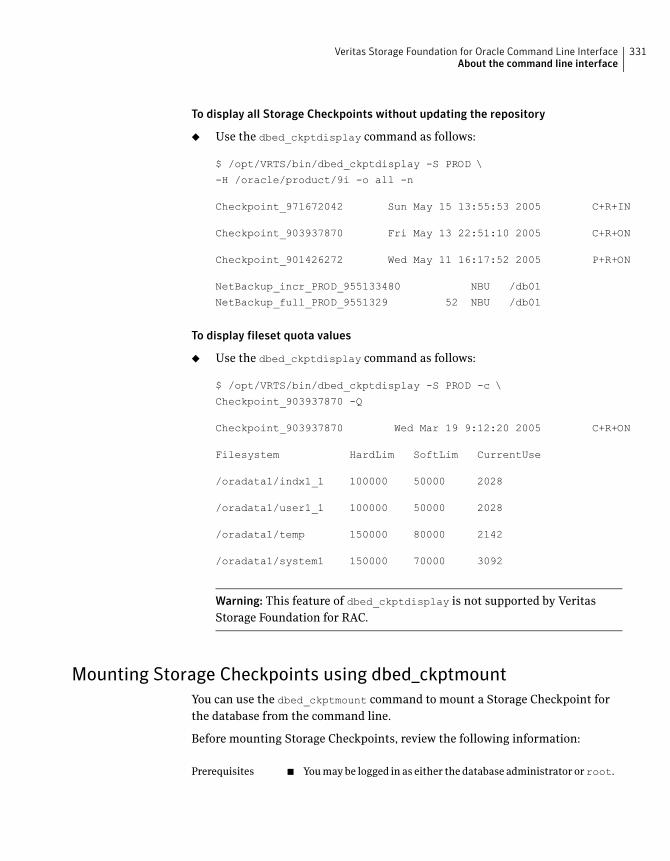
To display all Storage Checkpoints without updating the repository
◆ Use the dbed_ckptdisplay command as follows:
$ /opt/VRTS/bin/dbed_ckptdisplay -S PROD \
-H /oracle/product/9i -o all -n
Checkpoint_971672042 Sun May 15 13:55:53 2005 C+R+IN
Checkpoint_903937870 Fri May 13 22:51:10 2005 C+R+ON
Checkpoint_901426272 Wed May 11 16:17:52 2005 P+R+ON
NetBackup_incr_PROD_955133480 NBU /db01
NetBackup_full_PROD_9551329 52 NBU /db01
To display fileset quota values
◆ Use the dbed_ckptdisplay command as follows:
$ /opt/VRTS/bin/dbed_ckptdisplay -S PROD -c \
Checkpoint_903937870 -Q
Checkpoint_903937870 Wed Mar 19 9:12:20 2005 C+R+ON
Filesystem HardLim SoftLim CurrentUse
/oradata1/indx1_1 100000 50000 2028
/oradata1/user1_1 100000 50000 2028
/oradata1/temp 150000 80000 2142
/oradata1/system1 150000 70000 3092
Warning: This feature of dbed_ckptdisplay is not supported by Veritas
Storage Foundation for RAC.
Mounting Storage Checkpoints using dbed_ckptmount
You can use the dbed_ckptmount command to mount a Storage Checkpoint for
the database from the command line.
Before mounting Storage Checkpoints, review the following information:
■ You may be logged in as either the database administrator orroot.Prerequisites
331Veritas Storage Foundation for Oracle Command Line InterfaceAbout the command line interface
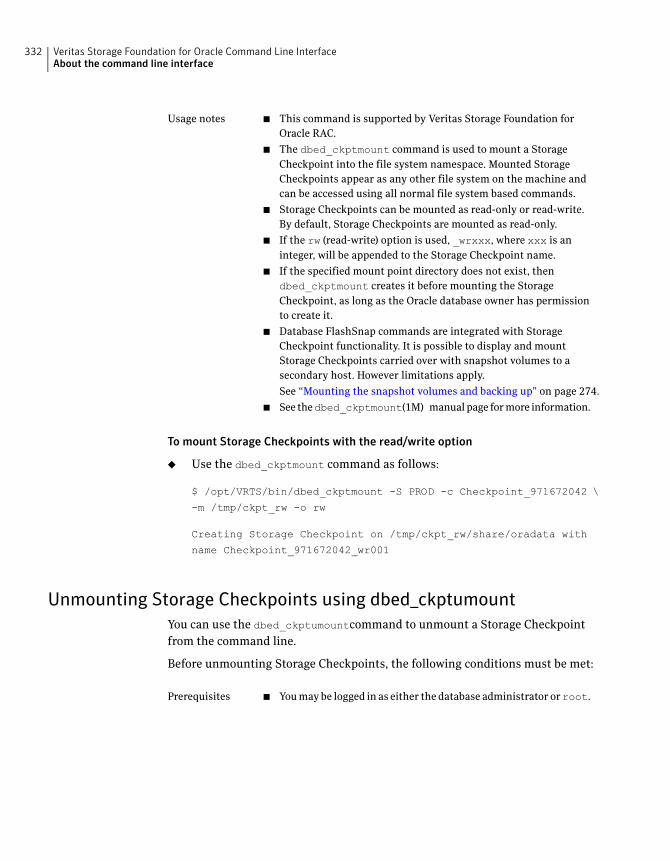
■ This command is supported by Veritas Storage Foundation for
Oracle RAC.
■ The dbed_ckptmount command is used to mount a Storage
Checkpoint into the file system namespace. Mounted Storage
Checkpoints appear as any other file system on the machine and
can be accessed using all normal file system based commands.
■ Storage Checkpoints can be mounted as read-only or read-write.
By default, Storage Checkpoints are mounted as read-only.
■ If the rw (read-write) option is used, _wrxxx, where xxx is an
integer, will be appended to the Storage Checkpoint name.
■ If the specified mount point directory does not exist, then
dbed_ckptmount creates it before mounting the Storage
Checkpoint, as long as the Oracle database owner has permission
to create it.
■ Database FlashSnap commands are integrated with Storage
Checkpoint functionality. It is possible to display and mount
Storage Checkpoints carried over with snapshot volumes to a
secondary host. However limitations apply.
See “Mounting the snapshot volumes and backing up” on page 274.
■ See thedbed_ckptmount(1M) manual page for more information.
Usage notes
To mount Storage Checkpoints with the read/write option
◆ Use the dbed_ckptmount command as follows:
$ /opt/VRTS/bin/dbed_ckptmount -S PROD -c Checkpoint_971672042 \
-m /tmp/ckpt_rw -o rw
Creating Storage Checkpoint on /tmp/ckpt_rw/share/oradata with
name Checkpoint_971672042_wr001
Unmounting Storage Checkpoints using dbed_ckptumount
You can use the dbed_ckptumountcommand to unmount a Storage Checkpoint
from the command line.
Before unmounting Storage Checkpoints, the following conditions must be met:
■ You may be logged in as either the database administrator orroot.Prerequisites
Veritas Storage Foundation for Oracle Command Line InterfaceAbout the command line interface
332
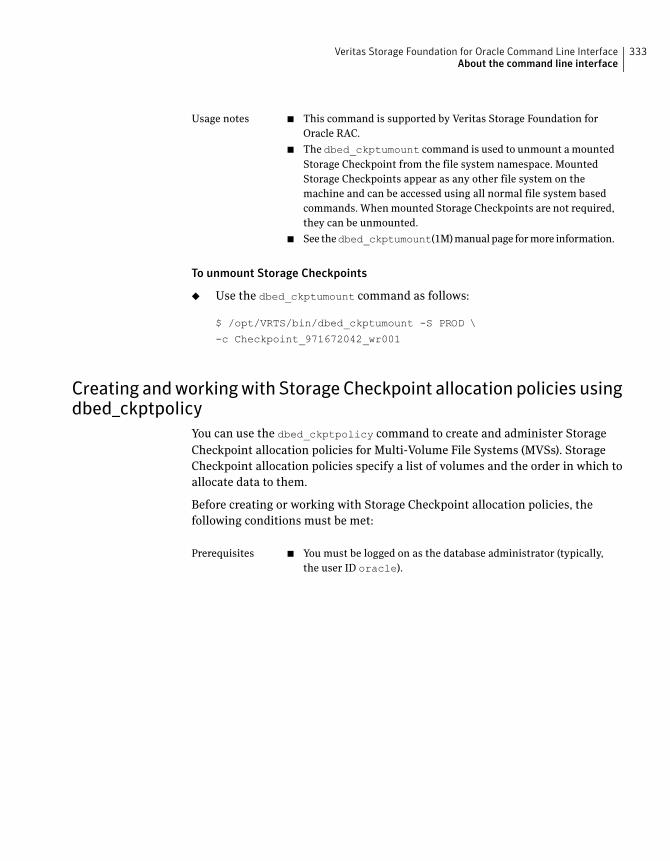
■ This command is supported by Veritas Storage Foundation for
Oracle RAC.
■ The dbed_ckptumount command is used to unmount a mounted
Storage Checkpoint from the file system namespace. Mounted
Storage Checkpoints appear as any other file system on the
machine and can be accessed using all normal file system based
commands. When mounted Storage Checkpoints are not required,
they can be unmounted.
■ See thedbed_ckptumount(1M) manual page for more information.
Usage notes
To unmount Storage Checkpoints
◆ Use the dbed_ckptumount command as follows:
$ /opt/VRTS/bin/dbed_ckptumount -S PROD \
-c Checkpoint_971672042_wr001
Creating andworkingwith StorageCheckpoint allocation policies usingdbed_ckptpolicy
You can use the dbed_ckptpolicy command to create and administer Storage
Checkpoint allocation policies for Multi-Volume File Systems (MVSs). Storage
Checkpoint allocation policies specify a list of volumes and the order in which to
allocate data to them.
Before creating or working with Storage Checkpoint allocation policies, the
following conditions must be met:
■ You must be logged on as the database administrator (typically,
the user ID oracle).
Prerequisites
333Veritas Storage Foundation for Oracle Command Line InterfaceAbout the command line interface
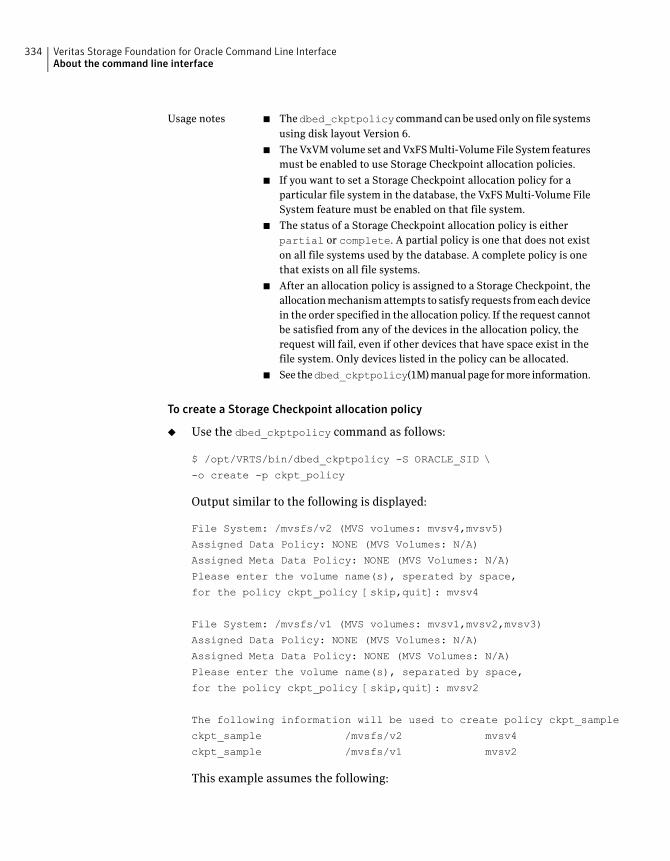
■ Thedbed_ckptpolicy command can be used only on file systems
using disk layout Version 6.
■ The VxVM volume set and VxFS Multi-Volume File System features
must be enabled to use Storage Checkpoint allocation policies.
■ If you want to set a Storage Checkpoint allocation policy for a
particular file system in the database, the VxFS Multi-Volume File
System feature must be enabled on that file system.
■ The status of a Storage Checkpoint allocation policy is either
partial or complete. A partial policy is one that does not exist
on all file systems used by the database. A complete policy is one
that exists on all file systems.
■ After an allocation policy is assigned to a Storage Checkpoint, the
allocation mechanism attempts to satisfy requests from each device
in the order specified in the allocation policy. If the request cannot
be satisfied from any of the devices in the allocation policy, the
request will fail, even if other devices that have space exist in the
file system. Only devices listed in the policy can be allocated.
■ See thedbed_ckptpolicy(1M) manual page for more information.
Usage notes
To create a Storage Checkpoint allocation policy
◆ Use the dbed_ckptpolicy command as follows:
$ /opt/VRTS/bin/dbed_ckptpolicy -S ORACLE_SID \
-o create -p ckpt_policy
Output similar to the following is displayed:
File System: /mvsfs/v2 (MVS volumes: mvsv4,mvsv5)
Assigned Data Policy: NONE (MVS Volumes: N/A)
Assigned Meta Data Policy: NONE (MVS Volumes: N/A)
Please enter the volume name(s), sperated by space,
for the policy ckpt_policy [skip,quit]: mvsv4
File System: /mvsfs/v1 (MVS volumes: mvsv1,mvsv2,mvsv3)
Assigned Data Policy: NONE (MVS Volumes: N/A)
Assigned Meta Data Policy: NONE (MVS Volumes: N/A)
Please enter the volume name(s), separated by space,
for the policy ckpt_policy [skip,quit]: mvsv2
The following information will be used to create policy ckpt_sample
ckpt_sample /mvsfs/v2 mvsv4
ckpt_sample /mvsfs/v1 mvsv2
This example assumes the following:
Veritas Storage Foundation for Oracle Command Line InterfaceAbout the command line interface
334
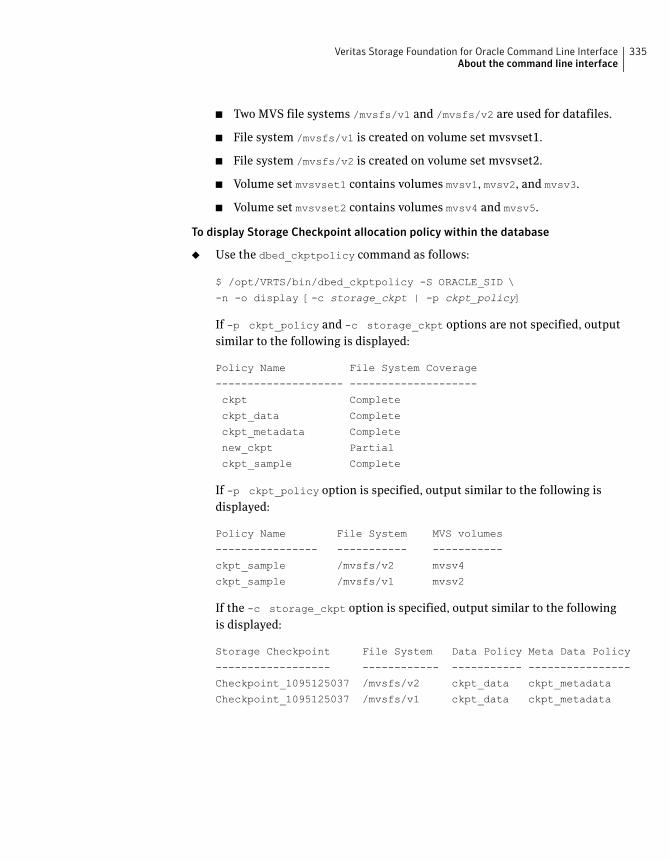
■ Two MVS file systems /mvsfs/v1 and /mvsfs/v2 are used for datafiles.
■ File system /mvsfs/v1 is created on volume set mvsvset1.
■ File system /mvsfs/v2 is created on volume set mvsvset2.
■ Volume set mvsvset1 contains volumes mvsv1, mvsv2, and mvsv3.
■ Volume set mvsvset2 contains volumes mvsv4 and mvsv5.
To display Storage Checkpoint allocation policy within the database
◆ Use the dbed_ckptpolicy command as follows:
$ /opt/VRTS/bin/dbed_ckptpolicy -S ORACLE_SID \
-n -o display [-c storage_ckpt | -p ckpt_policy]
If -p ckpt_policy and -c storage_ckpt options are not specified, output
similar to the following is displayed:
Policy Name File System Coverage
-------------------- --------------------
ckpt Complete
ckpt_data Complete
ckpt_metadata Complete
new_ckpt Partial
ckpt_sample Complete
If -p ckpt_policy option is specified, output similar to the following is
displayed:
Policy Name File System MVS volumes
---------------- ----------- -----------
ckpt_sample /mvsfs/v2 mvsv4
ckpt_sample /mvsfs/v1 mvsv2
If the -c storage_ckpt option is specified, output similar to the following
is displayed:
Storage Checkpoint File System Data Policy Meta Data Policy
------------------ ------------ ----------- ----------------
Checkpoint_1095125037 /mvsfs/v2 ckpt_data ckpt_metadata
Checkpoint_1095125037 /mvsfs/v1 ckpt_data ckpt_metadata
335Veritas Storage Foundation for Oracle Command Line InterfaceAbout the command line interface
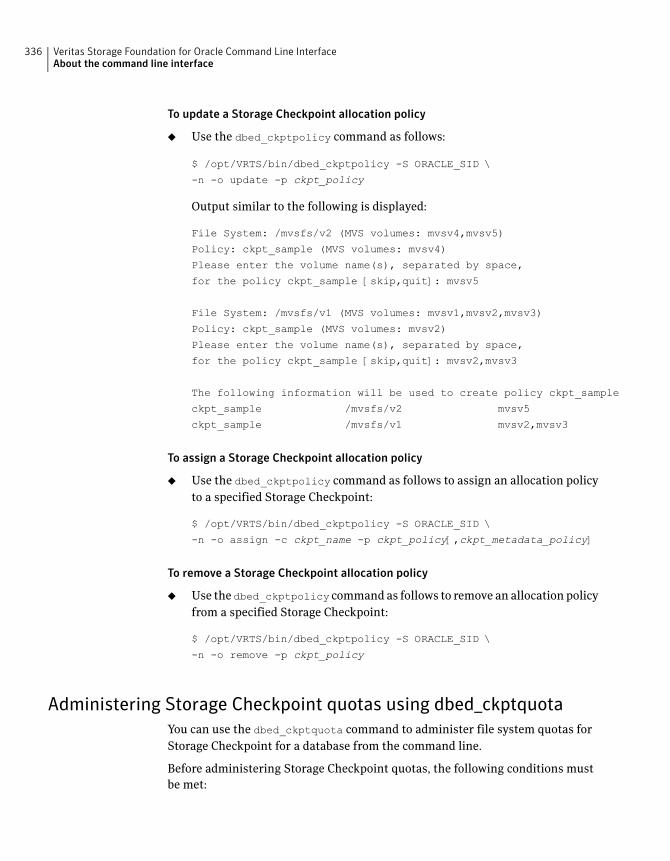
To update a Storage Checkpoint allocation policy
◆ Use the dbed_ckptpolicy command as follows:
$ /opt/VRTS/bin/dbed_ckptpolicy -S ORACLE_SID \
-n -o update -p ckpt_policy
Output similar to the following is displayed:
File System: /mvsfs/v2 (MVS volumes: mvsv4,mvsv5)
Policy: ckpt_sample (MVS volumes: mvsv4)
Please enter the volume name(s), separated by space,
for the policy ckpt_sample [skip,quit]: mvsv5
File System: /mvsfs/v1 (MVS volumes: mvsv1,mvsv2,mvsv3)
Policy: ckpt_sample (MVS volumes: mvsv2)
Please enter the volume name(s), separated by space,
for the policy ckpt_sample [skip,quit]: mvsv2,mvsv3
The following information will be used to create policy ckpt_sample
ckpt_sample /mvsfs/v2 mvsv5
ckpt_sample /mvsfs/v1 mvsv2,mvsv3
To assign a Storage Checkpoint allocation policy
◆ Use the dbed_ckptpolicy command as follows to assign an allocation policy
to a specified Storage Checkpoint:
$ /opt/VRTS/bin/dbed_ckptpolicy -S ORACLE_SID \
-n -o assign -c ckpt_name -p ckpt_policy[,ckpt_metadata_policy]
To remove a Storage Checkpoint allocation policy
◆ Use the dbed_ckptpolicy command as follows to remove an allocation policy
from a specified Storage Checkpoint:
$ /opt/VRTS/bin/dbed_ckptpolicy -S ORACLE_SID \
-n -o remove -p ckpt_policy
Administering Storage Checkpoint quotas using dbed_ckptquota
You can use the dbed_ckptquota command to administer file system quotas for
Storage Checkpoint for a database from the command line.
Before administering Storage Checkpoint quotas, the following conditions must
be met:
Veritas Storage Foundation for Oracle Command Line InterfaceAbout the command line interface
336
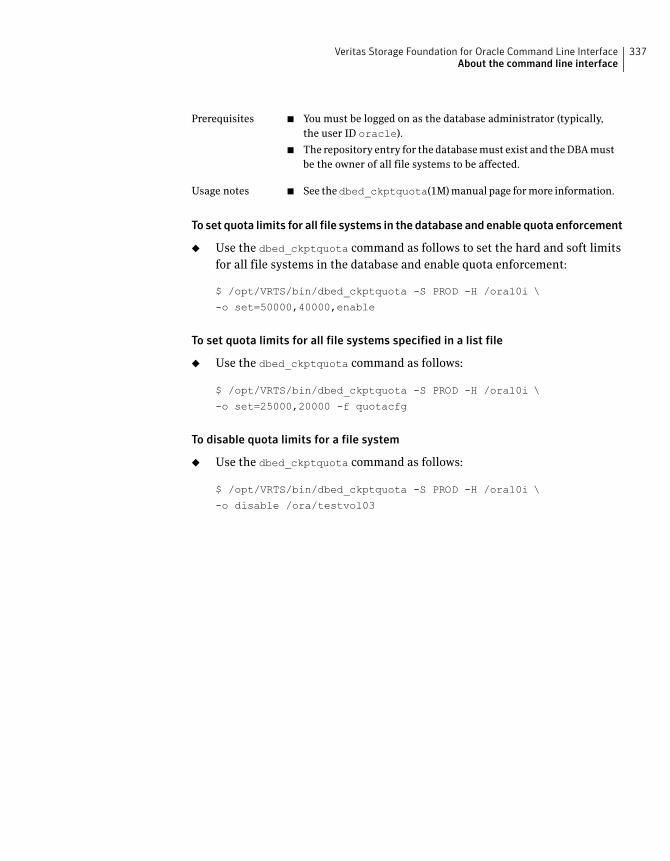
■ You must be logged on as the database administrator (typically,
the user ID oracle).
■ The repository entry for the database must exist and the DBA must
be the owner of all file systems to be affected.
Prerequisites
■ See thedbed_ckptquota(1M) manual page for more information.Usage notes
To set quota limits for all file systems in the database and enable quota enforcement
◆ Use the dbed_ckptquota command as follows to set the hard and soft limits
for all file systems in the database and enable quota enforcement:
$ /opt/VRTS/bin/dbed_ckptquota -S PROD -H /ora10i \
-o set=50000,40000,enable
To set quota limits for all file systems specified in a list file
◆ Use the dbed_ckptquota command as follows:
$ /opt/VRTS/bin/dbed_ckptquota -S PROD -H /ora10i \
-o set=25000,20000 -f quotacfg
To disable quota limits for a file system
◆ Use the dbed_ckptquota command as follows:
$ /opt/VRTS/bin/dbed_ckptquota -S PROD -H /ora10i \
-o disable /ora/testvol03
337Veritas Storage Foundation for Oracle Command Line InterfaceAbout the command line interface
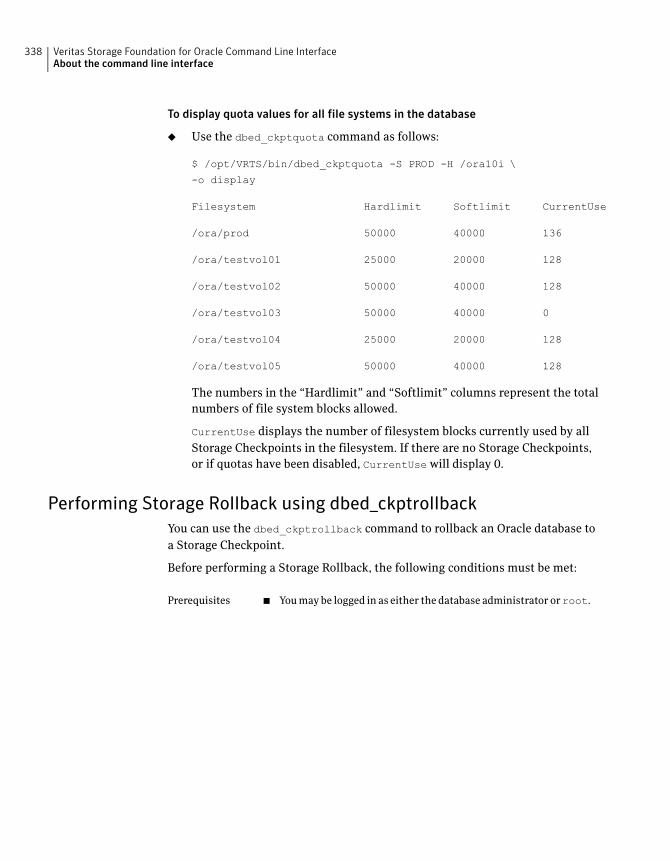
To display quota values for all file systems in the database
◆ Use the dbed_ckptquota command as follows:
$ /opt/VRTS/bin/dbed_ckptquota -S PROD -H /ora10i \
-o display
Filesystem Hardlimit Softlimit CurrentUse
/ora/prod 50000 40000 136
/ora/testvol01 25000 20000 128
/ora/testvol02 50000 40000 128
/ora/testvol03 50000 40000 0
/ora/testvol04 25000 20000 128
/ora/testvol05 50000 40000 128
The numbers in the “Hardlimit” and “Softlimit” columns represent the total
numbers of file system blocks allowed.
CurrentUse displays the number of filesystem blocks currently used by all
Storage Checkpoints in the filesystem. If there are no Storage Checkpoints,
or if quotas have been disabled, CurrentUse will display 0.
Performing Storage Rollback using dbed_ckptrollback
You can use the dbed_ckptrollback command to rollback an Oracle database to
a Storage Checkpoint.
Before performing a Storage Rollback, the following conditions must be met:
■ You may be logged in as either the database administrator orroot.Prerequisites
Veritas Storage Foundation for Oracle Command Line InterfaceAbout the command line interface
338
■ This command is supported by Veritas Storage Foundation for
Oracle RAC.
■ Thedbed_ckptrollback command rolls an Oracle database back
to a specified Storage Checkpoint. You can perform a Storage
Rollback for the entire database, a specific tablespace, or list of
datafiles.
Database rollback for the entire database requires that the database
be inactive before Storage Rollback commences. The
dbed_ckptrollback command will not commence if the Oracle
database is active. However, to perform a Storage Rollback of a
tablespace or datafile, only the tablespace or datafile to be rolled
back must be offline (not the entire database).
■ You must run the dbed_update command after upgrading to
Veritas Storage Foundation 5.0 for Oracle from a previous release.
This will allow you to roll back to a Storage Checkpoint that was
created with an earlier version of this product.
■ See the dbed_ckptrollback(1M) manual page for more
information.
Usage notes
To roll back an Oracle database to a Storage Checkpoint
◆ Use the dbed_ckptrollbackcommand as follows:
$ /opt/VRTS/bin/dbed_ckptrollback -S PROD -H \
/oracle/product/9i -c Checkpoint_903937870
To rollback a tablespace to a Storage Checkpoint
◆ Use the dbed_ckptrollback command with the -T option as follows:
$ /opt/VRTS/bin/dbed_ckptrollback -S PROD -H \
/oracle/product/9i -T DATA01 -c Checkpoint_903937870
If the Oracle database is running, you must take the tablespace offline before
running this command. If the tablespace is online, the command will fail.
In the case of an instant Storage Checkpoint, rolling back a tablespace does
not apply.
339Veritas Storage Foundation for Oracle Command Line InterfaceAbout the command line interface
To rollback datafiles to a Storage Checkpoint
◆ Use the dbed_ckptrollback command with the -F option as follows:
$ /opt/VRTS/bin/dbed_ckptrollback -S PROD -H /oracle/product/9i\
-F /share/oradata1/data01.dbf /share/oradata2/index01.dbf \
-c Checkpoint_903937870
If the Oracle database is running, you must take the datafile offline before
running this command. If the datafile is online, the command will fail.
In the case of an instant Storage Checkpoint, rolling back datafiles does not
apply.
Removing Storage Checkpoints using dbed_ckptremove
You can use the dbed_ckptremovecommand to remove a Storage Checkpoint for
an Oracle database at the command line.
Before removing Storage Checkpoints, the following conditions must be met:
■ You may be logged in as either the database administrator orroot.Prerequisites
■ This command is supported by Veritas Storage Foundation for
Oracle RAC.
■ The dbed_ckptremovecommand is used to remove a Storage
Checkpoint from the file system, or file systems, it is associated
with. The Storage Checkpoint must have been created using the
GUI or the dbed_ckptcreate(1M) command.
■ You must unmount the Storage Checkpoint before you can remove
it.
■ See thedbed_ckptremove(1M) manual page for more information.
Usage notes
To remove Storage Checkpoints
◆ Use the dbed_ckptremove command as follows:
$ /opt/VRTS/bin/dbed_ckptremove -S PROD \
-c Checkpoint_971672042_wr001
Managing the Capacity Planning Utility using dbed_ckptplan
Note: This utility is not available in Veritas Storage Foundation for Oracle on
Linux.
Veritas Storage Foundation for Oracle Command Line InterfaceAbout the command line interface
340
You can use the dbed_ckptplan command to manage the Storage Checkpoint
Capacity Planning utility at the command line.
Before using dbed_ckptplan to manage the Capacity Planning utility, note the
following:
■ The dbed_ckptplan command is used to obtain estimates on space usage for
Storage Checkpoints. It obtains estimates by managing scheduled Storage
Checkpoint creation and summarizing statistics from these Storage
Checkpoints. You can only use the Storage Checkpoint Capacity Planning
Utility in an environment that contains no Storage Checkpoints created by
other tools or products.
■ See the dbed_ckptplan(1M), cron(1M), and crontab(1M) manual pages for
more information.
To create Capacity Planning Utility schedules
◆ Use the dbed_ckptplancommand as follows:
$ /opt/VRTS/bin/dbed_ckptplan -s
To display capacity planning utility schedules
◆ Use the dbed_ckptplancommand as follows:
$ /opt/VRTS/bin/dbed_ckptplan -l
To display Storage Checkpoint space usage on a VxFS file system
◆ Use the dbed_ckptplancommand as follows:
$ /opt/VRTS/bin/dbed_ckptplan -p
To remove capacity planning utility schedules
◆ Use the dbed_ckptplancommand as follows:
$ /opt/VRTS/bin/dbed_ckptplan -r
Cloning the Oracle instance using dbed_clonedb
You can use the dbed_clonedb command to clone an Oracle instance using a
Storage Checkpoint in either a Veritas Storage Foundation for Oracle or Veritas
Storage Foundation for Oracle RAC environment.
In a Veritsa Storage Foundation for Oracle environment, cloning an existing
database using a Storage Checkpoint must be done on the same host. In a Veritas
341Veritas Storage Foundation for Oracle Command Line InterfaceAbout the command line interface
Storage Foundation for Oracle RAC environment, cloning an existing database
can be done on any node within the RAC database cluster. The clone database is
started as a single instance on the node on which the dbed_clonedb command is
executed.
You have the option to manually or automatically recover the database when
using the dbed_clonedb command:
■ Manual (interactive) recovery, which requires using the -i option, of the clone
database allows the user to control the degree of recovery by specifying which
archive log files are to be replayed.
■ Automatic (non-interactive) recovery, which is the default usage of the
command, recovers the entire database and replays all of the archive logs. You
will not be prompted for any archive log names.
Before cloning the Oracle instance, review the following information:
■ You must first create a Storage Checkpoint.
See “Creating Storage Checkpoints using dbed_ckptcreate”
on page 325.
■ You must be logged in as the database administrator.
■ Make sure you have enough space and system resources to create
a clone database on your system.
■ A clone database takes up as much memory and machine resources
as the primary database.
■ In a Veritas Storage Foundation for Oracle RAC environment, the
archive log destination is required to be on a Veritsa Cluster File
System file system.
Prerequisites
■ This command is supported by Veritas Storage Foundation for
Oracle RAC.
■ In a Veritas Storage Foundation for Oracle RAC environment,
cloning an Oracle database with an instant Storage Checkpoint is
not supported.
■ The dbed_clonedb command is used to create a copy of a
database, cloning all existing database files to new locations.
■ The ORACLE_SID and ORACLE_HOME environment variables must
be set to the primary database.
■ It is assumed that the user has a basic understanding of the
database recovery process.
■ See the dbed_clonedb(1M) manual page for more information.
Usage notes
Table A-3 lists the options for cloning the Oracle database.
Veritas Storage Foundation for Oracle Command Line InterfaceAbout the command line interface
342
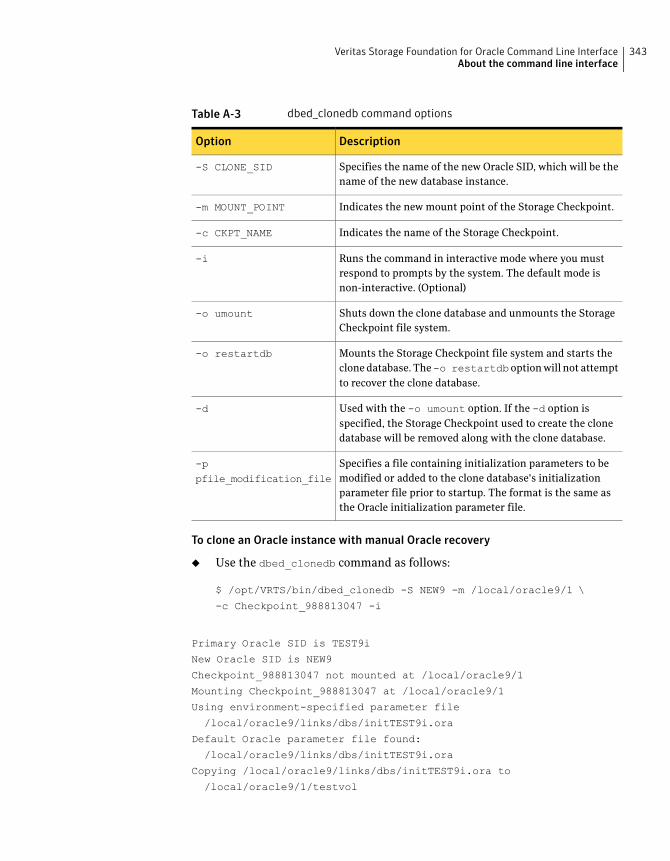
Table A-3 dbed_clonedb command options
DescriptionOption
Specifies the name of the new Oracle SID, which will be the
name of the new database instance.
-S CLONE_SID
Indicates the new mount point of the Storage Checkpoint.-m MOUNT_POINT
Indicates the name of the Storage Checkpoint.-c CKPT_NAME
Runs the command in interactive mode where you must
respond to prompts by the system. The default mode is
non-interactive. (Optional)
-i
Shuts down the clone database and unmounts the Storage
Checkpoint file system.
-o umount
Mounts the Storage Checkpoint file system and starts the
clone database. The-o restartdboption will not attempt
to recover the clone database.
-o restartdb
Used with the -o umount option. If the -d option is
specified, the Storage Checkpoint used to create the clone
database will be removed along with the clone database.
-d
Specifies a file containing initialization parameters to be
modified or added to the clone database's initialization
parameter file prior to startup. The format is the same as
the Oracle initialization parameter file.
-ppfile_modification_file
To clone an Oracle instance with manual Oracle recovery
◆ Use the dbed_clonedb command as follows:
$ /opt/VRTS/bin/dbed_clonedb -S NEW9 -m /local/oracle9/1 \
-c Checkpoint_988813047 -i
Primary Oracle SID is TEST9i
New Oracle SID is NEW9
Checkpoint_988813047 not mounted at /local/oracle9/1
Mounting Checkpoint_988813047 at /local/oracle9/1
Using environment-specified parameter file
/local/oracle9/links/dbs/initTEST9i.ora
Default Oracle parameter file found:
/local/oracle9/links/dbs/initTEST9i.ora
Copying /local/oracle9/links/dbs/initTEST9i.ora to
/local/oracle9/1/testvol
343Veritas Storage Foundation for Oracle Command Line InterfaceAbout the command line interface
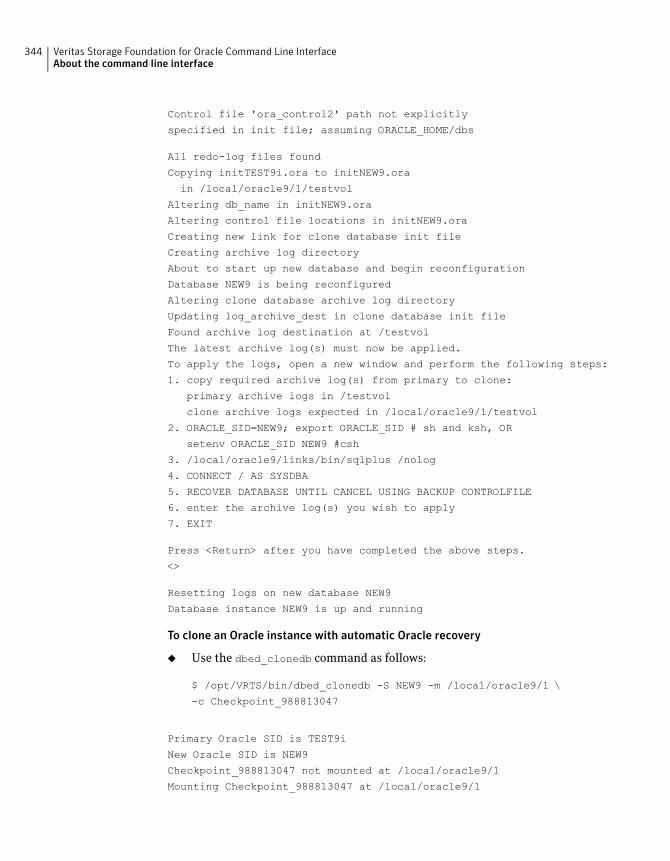
Control file 'ora_control2' path not explicitly
specified in init file; assuming ORACLE_HOME/dbs
All redo-log files found
Copying initTEST9i.ora to initNEW9.ora
in /local/oracle9/1/testvol
Altering db_name in initNEW9.ora
Altering control file locations in initNEW9.ora
Creating new link for clone database init file
Creating archive log directory
About to start up new database and begin reconfiguration
Database NEW9 is being reconfigured
Altering clone database archive log directory
Updating log_archive_dest in clone database init file
Found archive log destination at /testvol
The latest archive log(s) must now be applied.
To apply the logs, open a new window and perform the following steps:
1. copy required archive log(s) from primary to clone:
primary archive logs in /testvol
clone archive logs expected in /local/oracle9/1/testvol
2. ORACLE_SID=NEW9; export ORACLE_SID # sh and ksh, OR
setenv ORACLE_SID NEW9 #csh
3. /local/oracle9/links/bin/sqlplus /nolog
4. CONNECT / AS SYSDBA
5. RECOVER DATABASE UNTIL CANCEL USING BACKUP CONTROLFILE
6. enter the archive log(s) you wish to apply
7. EXIT
Press <Return> after you have completed the above steps.
<>
Resetting logs on new database NEW9
Database instance NEW9 is up and running
To clone an Oracle instance with automatic Oracle recovery
◆ Use the dbed_clonedb command as follows:
$ /opt/VRTS/bin/dbed_clonedb -S NEW9 -m /local/oracle9/1 \
-c Checkpoint_988813047
Primary Oracle SID is TEST9i
New Oracle SID is NEW9
Checkpoint_988813047 not mounted at /local/oracle9/1
Mounting Checkpoint_988813047 at /local/oracle9/1
Veritas Storage Foundation for Oracle Command Line InterfaceAbout the command line interface
344
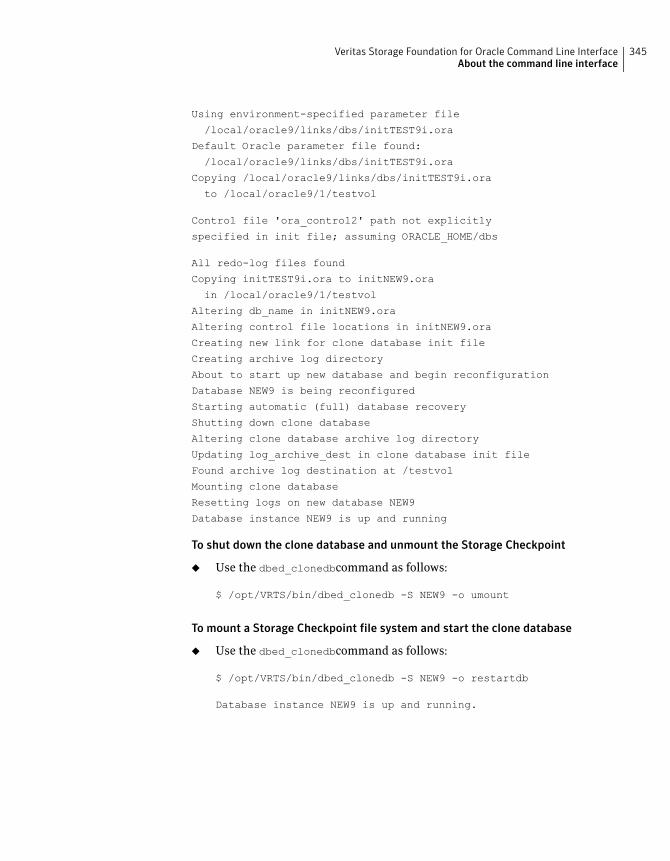
Using environment-specified parameter file
/local/oracle9/links/dbs/initTEST9i.ora
Default Oracle parameter file found:
/local/oracle9/links/dbs/initTEST9i.ora
Copying /local/oracle9/links/dbs/initTEST9i.ora
to /local/oracle9/1/testvol
Control file 'ora_control2' path not explicitly
specified in init file; assuming ORACLE_HOME/dbs
All redo-log files found
Copying initTEST9i.ora to initNEW9.ora
in /local/oracle9/1/testvol
Altering db_name in initNEW9.ora
Altering control file locations in initNEW9.ora
Creating new link for clone database init file
Creating archive log directory
About to start up new database and begin reconfiguration
Database NEW9 is being reconfigured
Starting automatic (full) database recovery
Shutting down clone database
Altering clone database archive log directory
Updating log_archive_dest in clone database init file
Found archive log destination at /testvol
Mounting clone database
Resetting logs on new database NEW9
Database instance NEW9 is up and running
To shut down the clone database and unmount the Storage Checkpoint
◆ Use the dbed_clonedbcommand as follows:
$ /opt/VRTS/bin/dbed_clonedb -S NEW9 -o umount
To mount a Storage Checkpoint file system and start the clone database
◆ Use the dbed_clonedbcommand as follows:
$ /opt/VRTS/bin/dbed_clonedb -S NEW9 -o restartdb
Database instance NEW9 is up and running.
345Veritas Storage Foundation for Oracle Command Line InterfaceAbout the command line interface
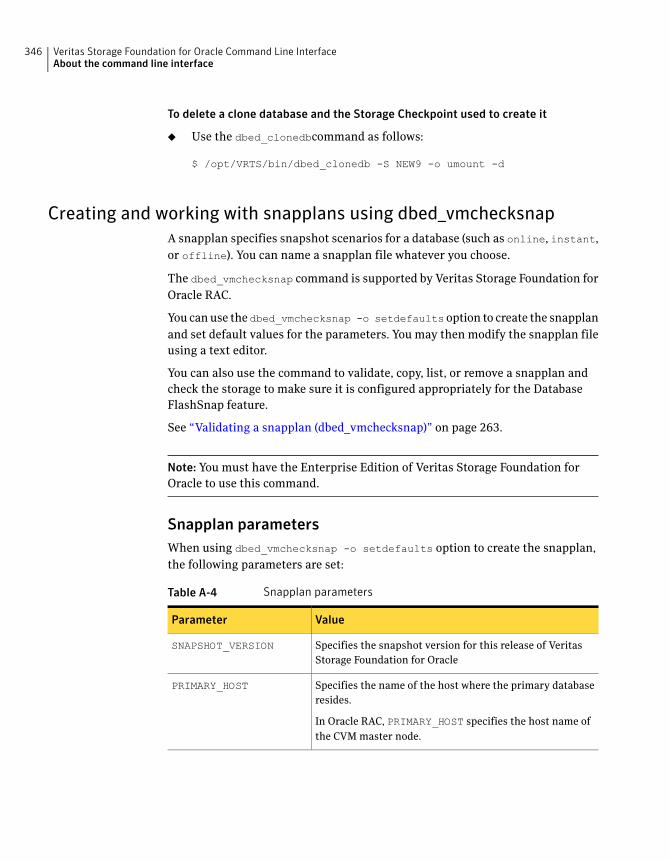
To delete a clone database and the Storage Checkpoint used to create it
◆ Use the dbed_clonedbcommand as follows:
$ /opt/VRTS/bin/dbed_clonedb -S NEW9 -o umount -d
Creating and working with snapplans using dbed_vmchecksnap
A snapplan specifies snapshot scenarios for a database (such as online, instant,
or offline). You can name a snapplan file whatever you choose.
The dbed_vmchecksnap command is supported by Veritas Storage Foundation for
Oracle RAC.
You can use the dbed_vmchecksnap -o setdefaults option to create the snapplan
and set default values for the parameters. You may then modify the snapplan file
using a text editor.
You can also use the command to validate, copy, list, or remove a snapplan and
check the storage to make sure it is configured appropriately for the Database
FlashSnap feature.
See “Validating a snapplan (dbed_vmchecksnap)” on page 263.
Note: You must have the Enterprise Edition of Veritas Storage Foundation for
Oracle to use this command.
Snapplan parameters
When using dbed_vmchecksnap -o setdefaults option to create the snapplan,
the following parameters are set:
Table A-4 Snapplan parameters
ValueParameter
Specifies the snapshot version for this release of Veritas
Storage Foundation for Oracle
SNAPSHOT_VERSION
Specifies the name of the host where the primary database
resides.
In Oracle RAC, PRIMARY_HOST specifies the host name of
the CVM master node.
PRIMARY_HOST
Veritas Storage Foundation for Oracle Command Line InterfaceAbout the command line interface
346
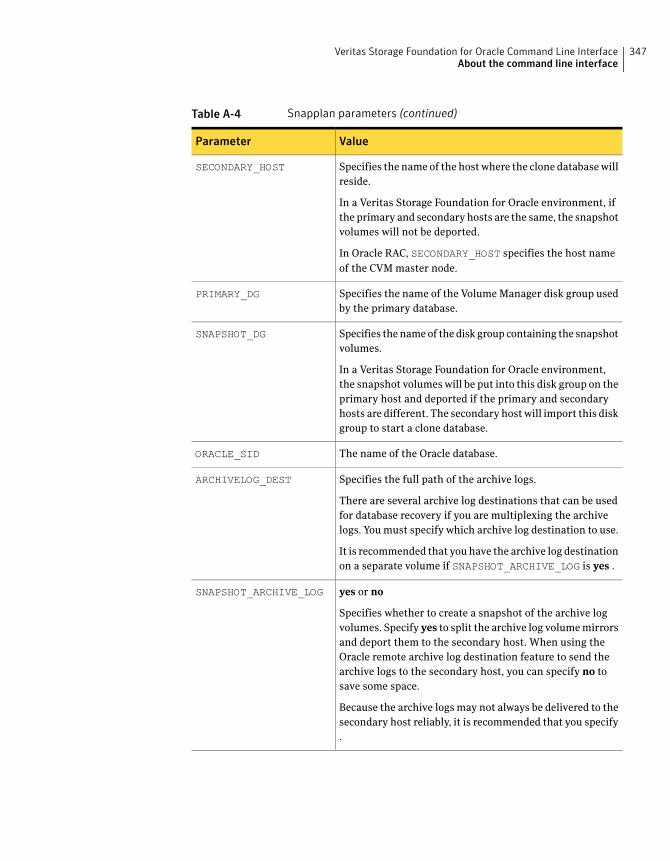
Table A-4 Snapplan parameters (continued)
ValueParameter
Specifies the name of the host where the clone database will
reside.
In a Veritas Storage Foundation for Oracle environment, if
the primary and secondary hosts are the same, the snapshot
volumes will not be deported.
In Oracle RAC, SECONDARY_HOST specifies the host name
of the CVM master node.
SECONDARY_HOST
Specifies the name of the Volume Manager disk group used
by the primary database.
PRIMARY_DG
Specifies the name of the disk group containing the snapshot
volumes.
In a Veritas Storage Foundation for Oracle environment,
the snapshot volumes will be put into this disk group on the
primary host and deported if the primary and secondary
hosts are different. The secondary host will import this disk
group to start a clone database.
SNAPSHOT_DG
The name of the Oracle database.ORACLE_SID
Specifies the full path of the archive logs.
There are several archive log destinations that can be used
for database recovery if you are multiplexing the archive
logs. You must specify which archive log destination to use.
It is recommended that you have the archive log destination
on a separate volume if SNAPSHOT_ARCHIVE_LOG is yes .
ARCHIVELOG_DEST
yes or no
Specifies whether to create a snapshot of the archive log
volumes. Specify yes to split the archive log volume mirrors
and deport them to the secondary host. When using the
Oracle remote archive log destination feature to send the
archive logs to the secondary host, you can specify no to
save some space.
Because the archive logs may not always be delivered to the
secondary host reliably, it is recommended that you specify
.
SNAPSHOT_ARCHIVE_LOG
347Veritas Storage Foundation for Oracle Command Line InterfaceAbout the command line interface
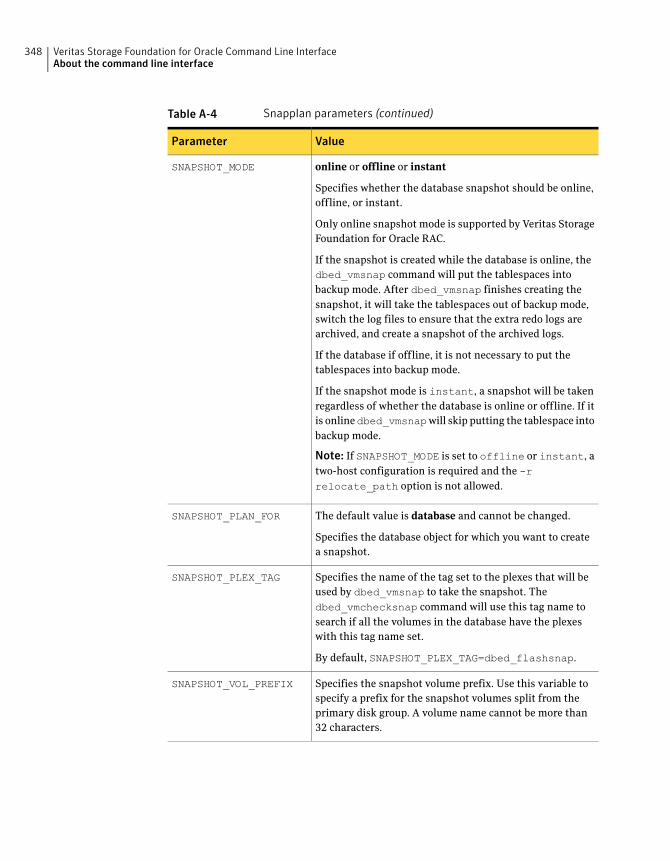
Table A-4 Snapplan parameters (continued)
ValueParameter
online or offline or instant
Specifies whether the database snapshot should be online,
offline, or instant.
Only online snapshot mode is supported by Veritas Storage
Foundation for Oracle RAC.
If the snapshot is created while the database is online, the
dbed_vmsnap command will put the tablespaces into
backup mode. After dbed_vmsnap finishes creating the
snapshot, it will take the tablespaces out of backup mode,
switch the log files to ensure that the extra redo logs are
archived, and create a snapshot of the archived logs.
If the database if offline, it is not necessary to put the
tablespaces into backup mode.
If the snapshot mode is instant, a snapshot will be taken
regardless of whether the database is online or offline. If it
is onlinedbed_vmsnapwill skip putting the tablespace into
backup mode.
Note: If SNAPSHOT_MODE is set to offline or instant, a
two-host configuration is required and the -rrelocate_path option is not allowed.
SNAPSHOT_MODE
The default value is database and cannot be changed.
Specifies the database object for which you want to create
a snapshot.
SNAPSHOT_PLAN_FOR
Specifies the name of the tag set to the plexes that will be
used by dbed_vmsnap to take the snapshot. The
dbed_vmchecksnap command will use this tag name to
search if all the volumes in the database have the plexes
with this tag name set.
By default, SNAPSHOT_PLEX_TAG=dbed_flashsnap.
SNAPSHOT_PLEX_TAG
Specifies the snapshot volume prefix. Use this variable to
specify a prefix for the snapshot volumes split from the
primary disk group. A volume name cannot be more than
32 characters.
SNAPSHOT_VOL_PREFIX
Veritas Storage Foundation for Oracle Command Line InterfaceAbout the command line interface
348
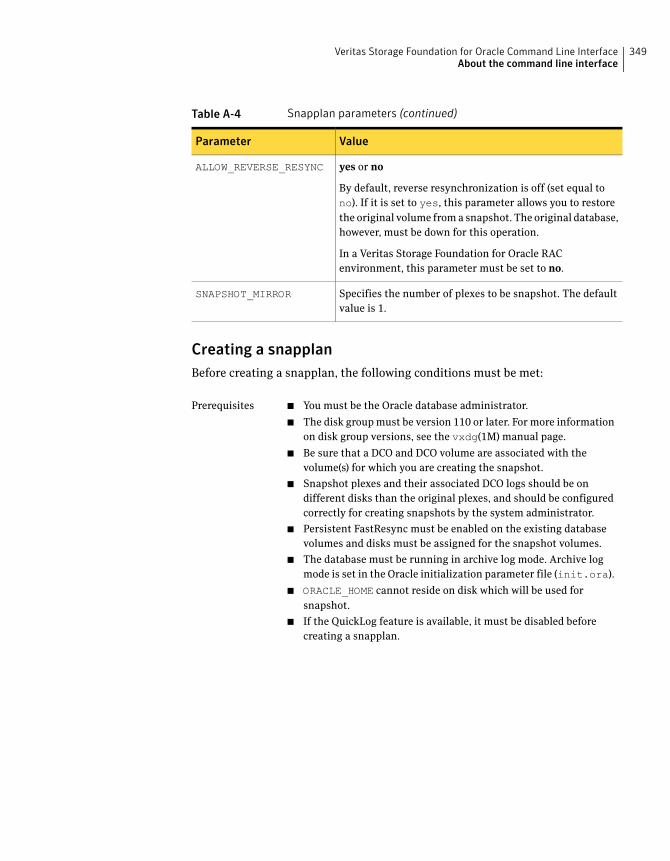
Table A-4 Snapplan parameters (continued)
ValueParameter
yes or no
By default, reverse resynchronization is off (set equal to
no). If it is set to yes, this parameter allows you to restore
the original volume from a snapshot. The original database,
however, must be down for this operation.
In a Veritas Storage Foundation for Oracle RAC
environment, this parameter must be set to no.
ALLOW_REVERSE_RESYNC
Specifies the number of plexes to be snapshot. The default
value is 1.
SNAPSHOT_MIRROR
Creating a snapplan
Before creating a snapplan, the following conditions must be met:
■ You must be the Oracle database administrator.
■ The disk group must be version 110 or later. For more information
on disk group versions, see the vxdg(1M) manual page.
■ Be sure that a DCO and DCO volume are associated with the
volume(s) for which you are creating the snapshot.
■ Snapshot plexes and their associated DCO logs should be on
different disks than the original plexes, and should be configured
correctly for creating snapshots by the system administrator.
■ Persistent FastResync must be enabled on the existing database
volumes and disks must be assigned for the snapshot volumes.
■ The database must be running in archive log mode. Archive log
mode is set in the Oracle initialization parameter file (init.ora).
■ ORACLE_HOME cannot reside on disk which will be used for
snapshot.
■ If the QuickLog feature is available, it must be disabled before
creating a snapplan.
Prerequisites
349Veritas Storage Foundation for Oracle Command Line InterfaceAbout the command line interface
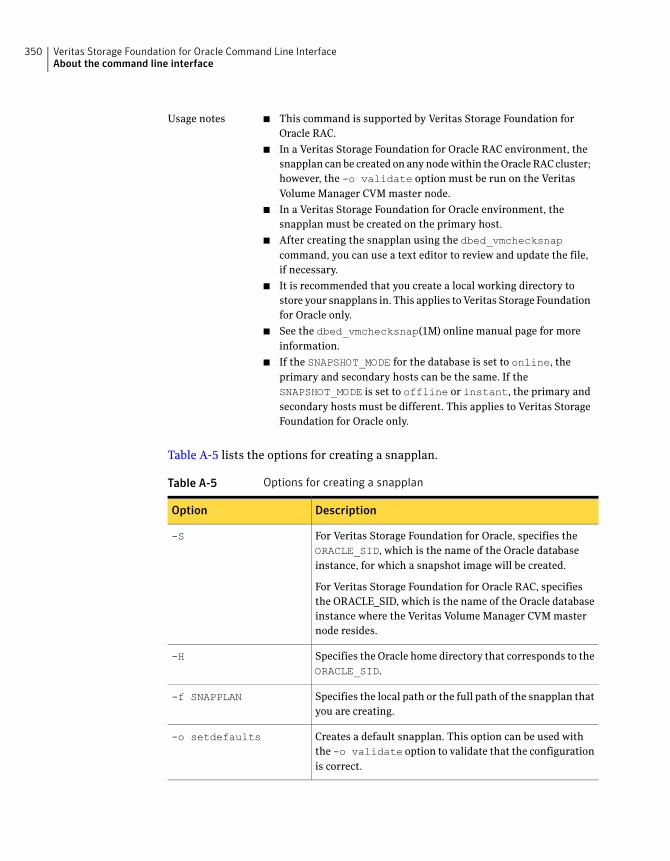
■ This command is supported by Veritas Storage Foundation for
Oracle RAC.
■ In a Veritas Storage Foundation for Oracle RAC environment, the
snapplan can be created on any node within the Oracle RAC cluster;
however, the -o validate option must be run on the Veritas
Volume Manager CVM master node.
■ In a Veritas Storage Foundation for Oracle environment, the
snapplan must be created on the primary host.
■ After creating the snapplan using the dbed_vmchecksnapcommand, you can use a text editor to review and update the file,
if necessary.
■ It is recommended that you create a local working directory to
store your snapplans in. This applies to Veritas Storage Foundation
for Oracle only.
■ See the dbed_vmchecksnap(1M) online manual page for more
information.
■ If the SNAPSHOT_MODE for the database is set to online, the
primary and secondary hosts can be the same. If the
SNAPSHOT_MODE is set to offline or instant, the primary and
secondary hosts must be different. This applies to Veritas Storage
Foundation for Oracle only.
Usage notes
Table A-5 lists the options for creating a snapplan.
Table A-5 Options for creating a snapplan
DescriptionOption
For Veritas Storage Foundation for Oracle, specifies the
ORACLE_SID, which is the name of the Oracle database
instance, for which a snapshot image will be created.
For Veritas Storage Foundation for Oracle RAC, specifies
the ORACLE_SID, which is the name of the Oracle database
instance where the Veritas Volume Manager CVM master
node resides.
-S
Specifies the Oracle home directory that corresponds to the
ORACLE_SID.
-H
Specifies the local path or the full path of the snapplan that
you are creating.
-f SNAPPLAN
Creates a default snapplan. This option can be used with
the -o validate option to validate that the configuration
is correct.
-o setdefaults
Veritas Storage Foundation for Oracle Command Line InterfaceAbout the command line interface
350
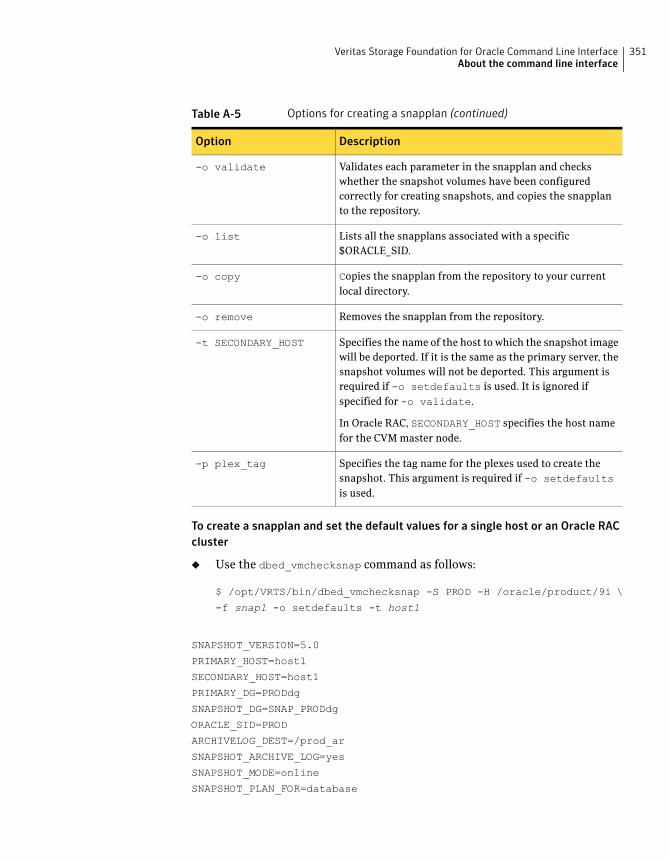
Table A-5 Options for creating a snapplan (continued)
DescriptionOption
Validates each parameter in the snapplan and checks
whether the snapshot volumes have been configured
correctly for creating snapshots, and copies the snapplan
to the repository.
-o validate
Lists all the snapplans associated with a specific
$ORACLE_SID.
-o list
Copies the snapplan from the repository to your current
local directory.
-o copy
Removes the snapplan from the repository.-o remove
Specifies the name of the host to which the snapshot image
will be deported. If it is the same as the primary server, the
snapshot volumes will not be deported. This argument is
required if -o setdefaults is used. It is ignored if
specified for -o validate.
In Oracle RAC, SECONDARY_HOST specifies the host name
for the CVM master node.
-t SECONDARY_HOST
Specifies the tag name for the plexes used to create the
snapshot. This argument is required if -o setdefaultsis used.
-p plex_tag
To create a snapplan and set the default values for a single host or an Oracle RAC
cluster
◆ Use the dbed_vmchecksnap command as follows:
$ /opt/VRTS/bin/dbed_vmchecksnap -S PROD -H /oracle/product/9i \
-f snap1 -o setdefaults -t host1
SNAPSHOT_VERSION=5.0
PRIMARY_HOST=host1
SECONDARY_HOST=host1
PRIMARY_DG=PRODdg
SNAPSHOT_DG=SNAP_PRODdg
ORACLE_SID=PROD
ARCHIVELOG_DEST=/prod_ar
SNAPSHOT_ARCHIVE_LOG=yes
SNAPSHOT_MODE=online
SNAPSHOT_PLAN_FOR=database
351Veritas Storage Foundation for Oracle Command Line InterfaceAbout the command line interface
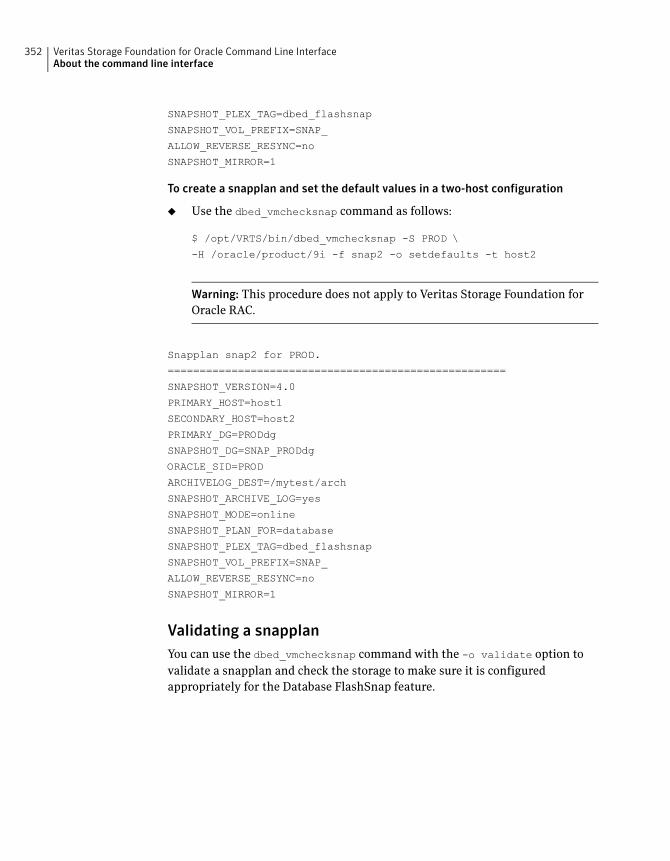
SNAPSHOT_PLEX_TAG=dbed_flashsnap
SNAPSHOT_VOL_PREFIX=SNAP_
ALLOW_REVERSE_RESYNC=no
SNAPSHOT_MIRROR=1
To create a snapplan and set the default values in a two-host configuration
◆ Use the dbed_vmchecksnap command as follows:
$ /opt/VRTS/bin/dbed_vmchecksnap -S PROD \
-H /oracle/product/9i -f snap2 -o setdefaults -t host2
Warning: This procedure does not apply to Veritas Storage Foundation for
Oracle RAC.
Snapplan snap2 for PROD.
=====================================================
SNAPSHOT_VERSION=4.0
PRIMARY_HOST=host1
SECONDARY_HOST=host2
PRIMARY_DG=PRODdg
SNAPSHOT_DG=SNAP_PRODdg
ORACLE_SID=PROD
ARCHIVELOG_DEST=/mytest/arch
SNAPSHOT_ARCHIVE_LOG=yes
SNAPSHOT_MODE=online
SNAPSHOT_PLAN_FOR=database
SNAPSHOT_PLEX_TAG=dbed_flashsnap
SNAPSHOT_VOL_PREFIX=SNAP_
ALLOW_REVERSE_RESYNC=no
SNAPSHOT_MIRROR=1
Validating a snapplan
You can use the dbed_vmchecksnap command with the -o validate option to
validate a snapplan and check the storage to make sure it is configured
appropriately for the Database FlashSnap feature.
Veritas Storage Foundation for Oracle Command Line InterfaceAbout the command line interface
352
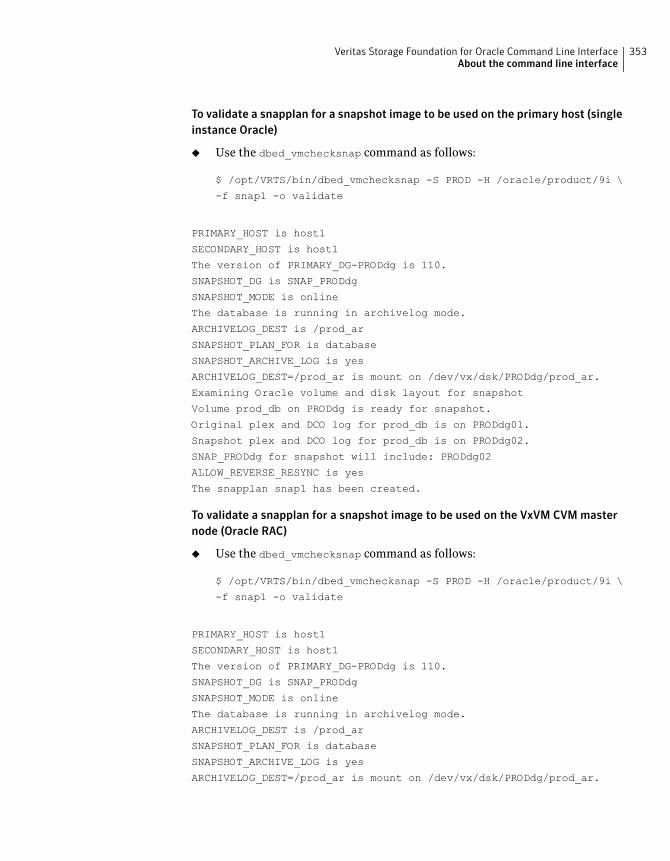
To validate a snapplan for a snapshot image to be used on the primary host (single
instance Oracle)
◆ Use the dbed_vmchecksnap command as follows:
$ /opt/VRTS/bin/dbed_vmchecksnap -S PROD -H /oracle/product/9i \
-f snap1 -o validate
PRIMARY_HOST is host1
SECONDARY_HOST is host1
The version of PRIMARY_DG-PRODdg is 110.
SNAPSHOT_DG is SNAP_PRODdg
SNAPSHOT_MODE is online
The database is running in archivelog mode.
ARCHIVELOG_DEST is /prod_ar
SNAPSHOT_PLAN_FOR is database
SNAPSHOT_ARCHIVE_LOG is yes
ARCHIVELOG_DEST=/prod_ar is mount on /dev/vx/dsk/PRODdg/prod_ar.
Examining Oracle volume and disk layout for snapshot
Volume prod_db on PRODdg is ready for snapshot.
Original plex and DCO log for prod_db is on PRODdg01.
Snapshot plex and DCO log for prod_db is on PRODdg02.
SNAP_PRODdg for snapshot will include: PRODdg02
ALLOW_REVERSE_RESYNC is yes
The snapplan snap1 has been created.
To validate a snapplan for a snapshot image to be used on the VxVM CVM master
node (Oracle RAC)
◆ Use the dbed_vmchecksnap command as follows:
$ /opt/VRTS/bin/dbed_vmchecksnap -S PROD -H /oracle/product/9i \
-f snap1 -o validate
PRIMARY_HOST is host1
SECONDARY_HOST is host1
The version of PRIMARY_DG-PRODdg is 110.
SNAPSHOT_DG is SNAP_PRODdg
SNAPSHOT_MODE is online
The database is running in archivelog mode.
ARCHIVELOG_DEST is /prod_ar
SNAPSHOT_PLAN_FOR is database
SNAPSHOT_ARCHIVE_LOG is yes
ARCHIVELOG_DEST=/prod_ar is mount on /dev/vx/dsk/PRODdg/prod_ar.
353Veritas Storage Foundation for Oracle Command Line InterfaceAbout the command line interface
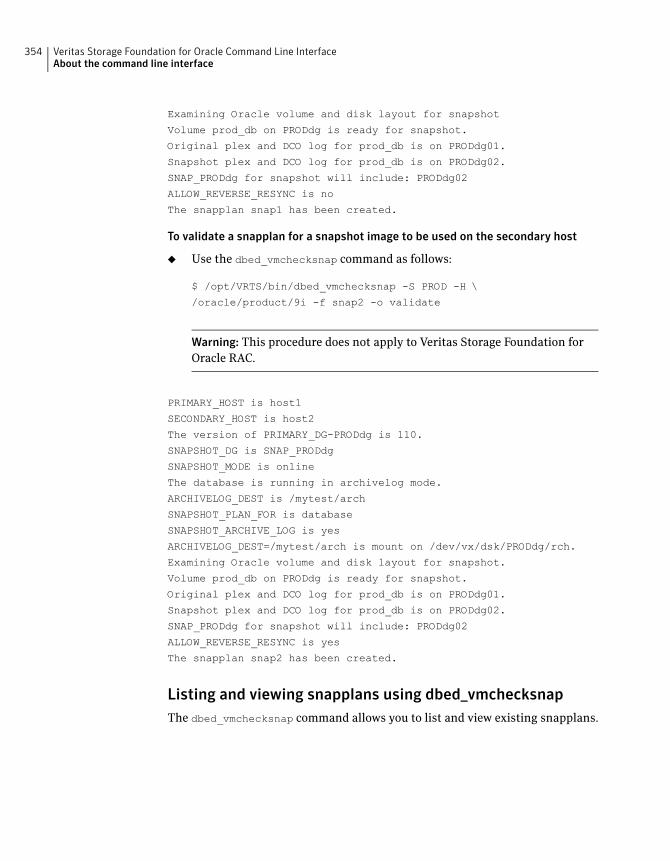
Examining Oracle volume and disk layout for snapshot
Volume prod_db on PRODdg is ready for snapshot.
Original plex and DCO log for prod_db is on PRODdg01.
Snapshot plex and DCO log for prod_db is on PRODdg02.
SNAP_PRODdg for snapshot will include: PRODdg02
ALLOW_REVERSE_RESYNC is no
The snapplan snap1 has been created.
To validate a snapplan for a snapshot image to be used on the secondary host
◆ Use the dbed_vmchecksnap command as follows:
$ /opt/VRTS/bin/dbed_vmchecksnap -S PROD -H \
/oracle/product/9i -f snap2 -o validate
Warning: This procedure does not apply to Veritas Storage Foundation for
Oracle RAC.
PRIMARY_HOST is host1
SECONDARY_HOST is host2
The version of PRIMARY_DG-PRODdg is 110.
SNAPSHOT_DG is SNAP_PRODdg
SNAPSHOT_MODE is online
The database is running in archivelog mode.
ARCHIVELOG_DEST is /mytest/arch
SNAPSHOT_PLAN_FOR is database
SNAPSHOT_ARCHIVE_LOG is yes
ARCHIVELOG_DEST=/mytest/arch is mount on /dev/vx/dsk/PRODdg/rch.
Examining Oracle volume and disk layout for snapshot.
Volume prod_db on PRODdg is ready for snapshot.
Original plex and DCO log for prod_db is on PRODdg01.
Snapshot plex and DCO log for prod_db is on PRODdg02.
SNAP_PRODdg for snapshot will include: PRODdg02
ALLOW_REVERSE_RESYNC is yes
The snapplan snap2 has been created.
Listing and viewing snapplans using dbed_vmchecksnap
The dbed_vmchecksnap command allows you to list and view existing snapplans.
Veritas Storage Foundation for Oracle Command Line InterfaceAbout the command line interface
354
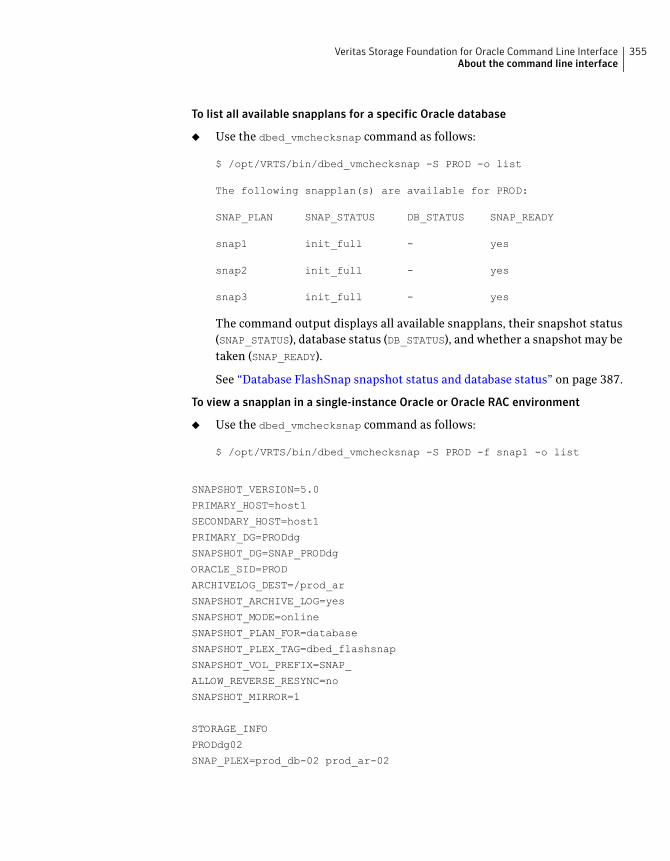
To list all available snapplans for a specific Oracle database
◆ Use the dbed_vmchecksnap command as follows:
$ /opt/VRTS/bin/dbed_vmchecksnap -S PROD -o list
The following snapplan(s) are available for PROD:
SNAP_PLAN SNAP_STATUS DB_STATUS SNAP_READY
snap1 init_full - yes
snap2 init_full - yes
snap3 init_full - yes
The command output displays all available snapplans, their snapshot status
(SNAP_STATUS), database status (DB_STATUS), and whether a snapshot may be
taken (SNAP_READY).
See “Database FlashSnap snapshot status and database status” on page 387.
To view a snapplan in a single-instance Oracle or Oracle RAC environment
◆ Use the dbed_vmchecksnap command as follows:
$ /opt/VRTS/bin/dbed_vmchecksnap -S PROD -f snap1 -o list
SNAPSHOT_VERSION=5.0
PRIMARY_HOST=host1
SECONDARY_HOST=host1
PRIMARY_DG=PRODdg
SNAPSHOT_DG=SNAP_PRODdg
ORACLE_SID=PROD
ARCHIVELOG_DEST=/prod_ar
SNAPSHOT_ARCHIVE_LOG=yes
SNAPSHOT_MODE=online
SNAPSHOT_PLAN_FOR=database
SNAPSHOT_PLEX_TAG=dbed_flashsnap
SNAPSHOT_VOL_PREFIX=SNAP_
ALLOW_REVERSE_RESYNC=no
SNAPSHOT_MIRROR=1
STORAGE_INFO
PRODdg02
SNAP_PLEX=prod_db-02 prod_ar-02
355Veritas Storage Foundation for Oracle Command Line InterfaceAbout the command line interface
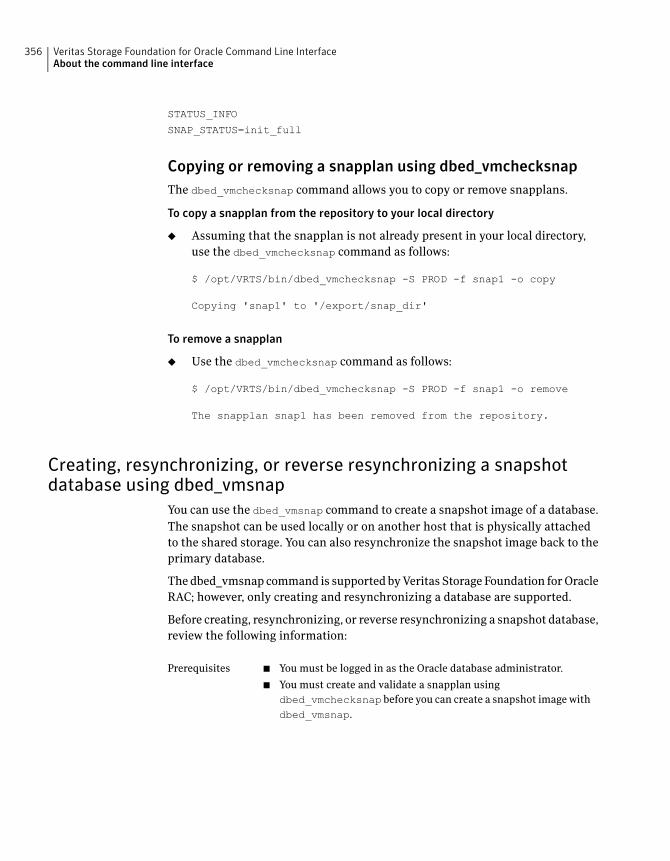
STATUS_INFO
SNAP_STATUS=init_full
Copying or removing a snapplan using dbed_vmchecksnap
The dbed_vmchecksnap command allows you to copy or remove snapplans.
To copy a snapplan from the repository to your local directory
◆ Assuming that the snapplan is not already present in your local directory,
use the dbed_vmchecksnap command as follows:
$ /opt/VRTS/bin/dbed_vmchecksnap -S PROD -f snap1 -o copy
Copying 'snap1' to '/export/snap_dir'
To remove a snapplan
◆ Use the dbed_vmchecksnap command as follows:
$ /opt/VRTS/bin/dbed_vmchecksnap -S PROD -f snap1 -o remove
The snapplan snap1 has been removed from the repository.
Creating, resynchronizing, or reverse resynchronizing a snapshotdatabase using dbed_vmsnap
You can use the dbed_vmsnap command to create a snapshot image of a database.
The snapshot can be used locally or on another host that is physically attached
to the shared storage. You can also resynchronize the snapshot image back to the
primary database.
The dbed_vmsnap command is supported by Veritas Storage Foundation for Oracle
RAC; however, only creating and resynchronizing a database are supported.
Before creating, resynchronizing, or reverse resynchronizing a snapshot database,
review the following information:
■ You must be logged in as the Oracle database administrator.
■ You must create and validate a snapplan using
dbed_vmchecksnap before you can create a snapshot image with
dbed_vmsnap.
Prerequisites
Veritas Storage Foundation for Oracle Command Line InterfaceAbout the command line interface
356
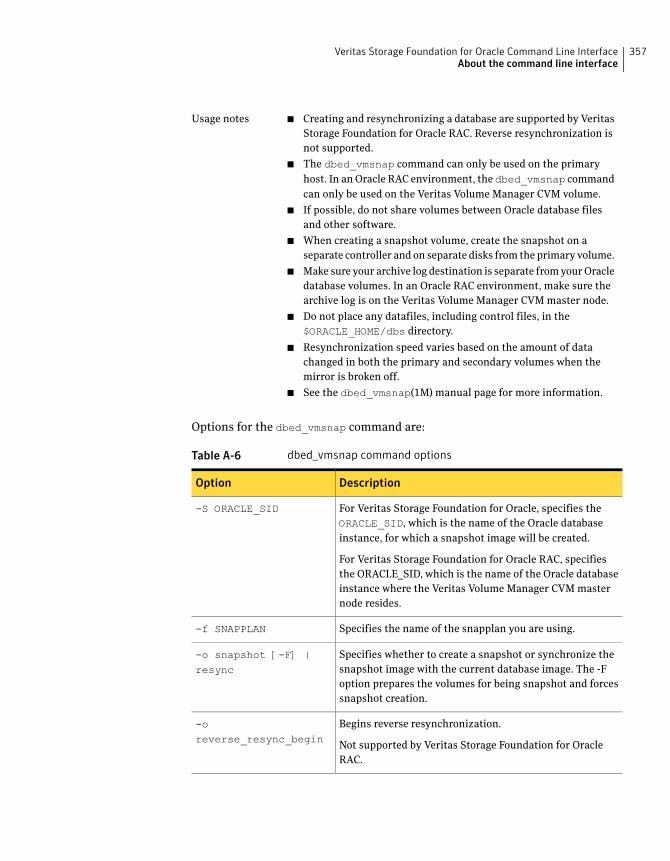
■ Creating and resynchronizing a database are supported by Veritas
Storage Foundation for Oracle RAC. Reverse resynchronization is
not supported.
■ The dbed_vmsnap command can only be used on the primary
host. In an Oracle RAC environment, the dbed_vmsnap command
can only be used on the Veritas Volume Manager CVM volume.
■ If possible, do not share volumes between Oracle database files
and other software.
■ When creating a snapshot volume, create the snapshot on a
separate controller and on separate disks from the primary volume.
■ Make sure your archive log destination is separate from your Oracle
database volumes. In an Oracle RAC environment, make sure the
archive log is on the Veritas Volume Manager CVM master node.
■ Do not place any datafiles, including control files, in the
$ORACLE_HOME/dbs directory.
■ Resynchronization speed varies based on the amount of data
changed in both the primary and secondary volumes when the
mirror is broken off.
■ See the dbed_vmsnap(1M) manual page for more information.
Usage notes
Options for the dbed_vmsnap command are:
Table A-6 dbed_vmsnap command options
DescriptionOption
For Veritas Storage Foundation for Oracle, specifies the
ORACLE_SID, which is the name of the Oracle database
instance, for which a snapshot image will be created.
For Veritas Storage Foundation for Oracle RAC, specifies
the ORACLE_SID, which is the name of the Oracle database
instance where the Veritas Volume Manager CVM master
node resides.
-S ORACLE_SID
Specifies the name of the snapplan you are using.-f SNAPPLAN
Specifies whether to create a snapshot or synchronize the
snapshot image with the current database image. The -F
option prepares the volumes for being snapshot and forces
snapshot creation.
-o snapshot [-F] |resync
Begins reverse resynchronization.
Not supported by Veritas Storage Foundation for Oracle
RAC.
-oreverse_resync_begin
357Veritas Storage Foundation for Oracle Command Line InterfaceAbout the command line interface
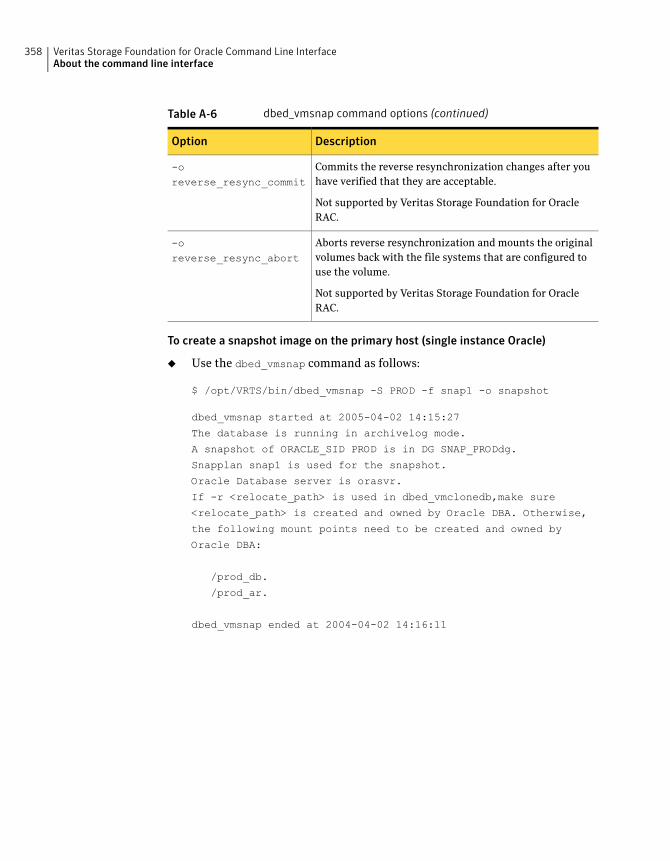
Table A-6 dbed_vmsnap command options (continued)
DescriptionOption
Commits the reverse resynchronization changes after you
have verified that they are acceptable.
Not supported by Veritas Storage Foundation for Oracle
RAC.
-oreverse_resync_commit
Aborts reverse resynchronization and mounts the original
volumes back with the file systems that are configured to
use the volume.
Not supported by Veritas Storage Foundation for Oracle
RAC.
-oreverse_resync_abort
To create a snapshot image on the primary host (single instance Oracle)
◆ Use the dbed_vmsnap command as follows:
$ /opt/VRTS/bin/dbed_vmsnap -S PROD -f snap1 -o snapshot
dbed_vmsnap started at 2005-04-02 14:15:27
The database is running in archivelog mode.
A snapshot of ORACLE_SID PROD is in DG SNAP_PRODdg.
Snapplan snap1 is used for the snapshot.
Oracle Database server is orasvr.
If -r <relocate_path> is used in dbed_vmclonedb,make sure
<relocate_path> is created and owned by Oracle DBA. Otherwise,
the following mount points need to be created and owned by
Oracle DBA:
/prod_db.
/prod_ar.
dbed_vmsnap ended at 2004-04-02 14:16:11
Veritas Storage Foundation for Oracle Command Line InterfaceAbout the command line interface
358
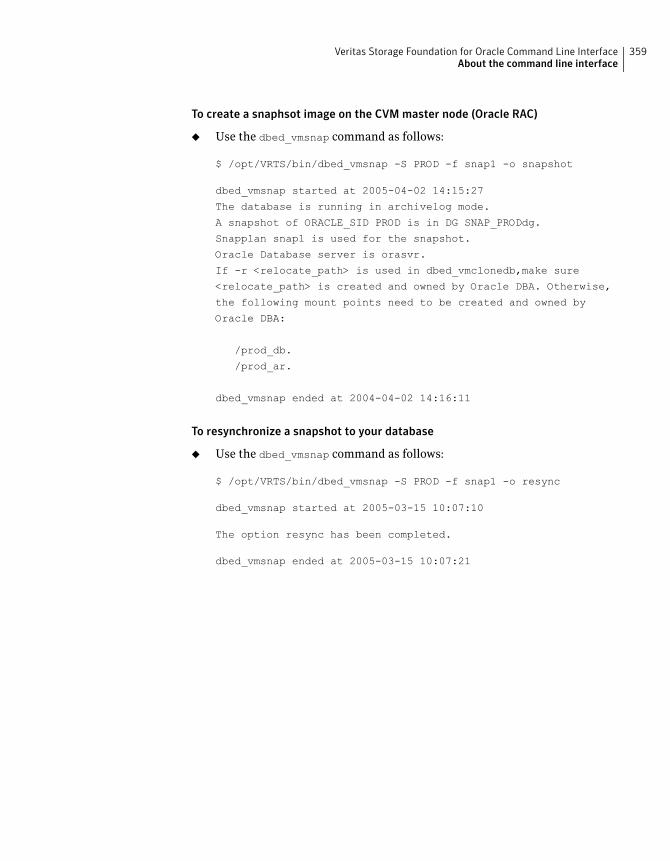
To create a snaphsot image on the CVM master node (Oracle RAC)
◆ Use the dbed_vmsnap command as follows:
$ /opt/VRTS/bin/dbed_vmsnap -S PROD -f snap1 -o snapshot
dbed_vmsnap started at 2005-04-02 14:15:27
The database is running in archivelog mode.
A snapshot of ORACLE_SID PROD is in DG SNAP_PRODdg.
Snapplan snap1 is used for the snapshot.
Oracle Database server is orasvr.
If -r <relocate_path> is used in dbed_vmclonedb,make sure
<relocate_path> is created and owned by Oracle DBA. Otherwise,
the following mount points need to be created and owned by
Oracle DBA:
/prod_db.
/prod_ar.
dbed_vmsnap ended at 2004-04-02 14:16:11
To resynchronize a snapshot to your database
◆ Use the dbed_vmsnap command as follows:
$ /opt/VRTS/bin/dbed_vmsnap -S PROD -f snap1 -o resync
dbed_vmsnap started at 2005-03-15 10:07:10
The option resync has been completed.
dbed_vmsnap ended at 2005-03-15 10:07:21
359Veritas Storage Foundation for Oracle Command Line InterfaceAbout the command line interface
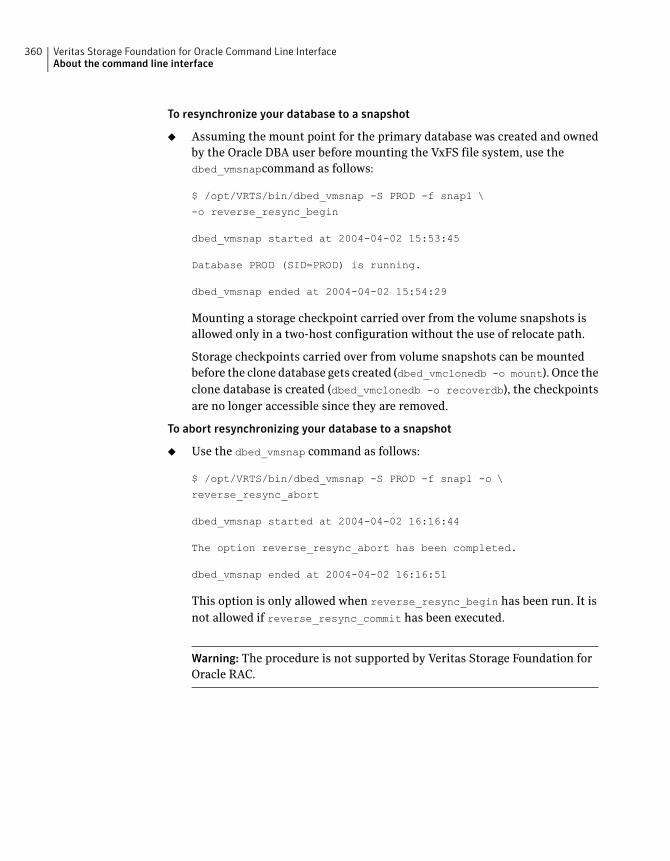
To resynchronize your database to a snapshot
◆ Assuming the mount point for the primary database was created and owned
by the Oracle DBA user before mounting the VxFS file system, use the
dbed_vmsnapcommand as follows:
$ /opt/VRTS/bin/dbed_vmsnap -S PROD -f snap1 \
-o reverse_resync_begin
dbed_vmsnap started at 2004-04-02 15:53:45
Database PROD (SID=PROD) is running.
dbed_vmsnap ended at 2004-04-02 15:54:29
Mounting a storage checkpoint carried over from the volume snapshots is
allowed only in a two-host configuration without the use of relocate path.
Storage checkpoints carried over from volume snapshots can be mounted
before the clone database gets created (dbed_vmclonedb -o mount). Once the
clone database is created (dbed_vmclonedb -o recoverdb), the checkpoints
are no longer accessible since they are removed.
To abort resynchronizing your database to a snapshot
◆ Use the dbed_vmsnap command as follows:
$ /opt/VRTS/bin/dbed_vmsnap -S PROD -f snap1 -o \
reverse_resync_abort
dbed_vmsnap started at 2004-04-02 16:16:44
The option reverse_resync_abort has been completed.
dbed_vmsnap ended at 2004-04-02 16:16:51
This option is only allowed when reverse_resync_begin has been run. It is
not allowed if reverse_resync_commit has been executed.
Warning: The procedure is not supported by Veritas Storage Foundation for
Oracle RAC.
Veritas Storage Foundation for Oracle Command Line InterfaceAbout the command line interface
360
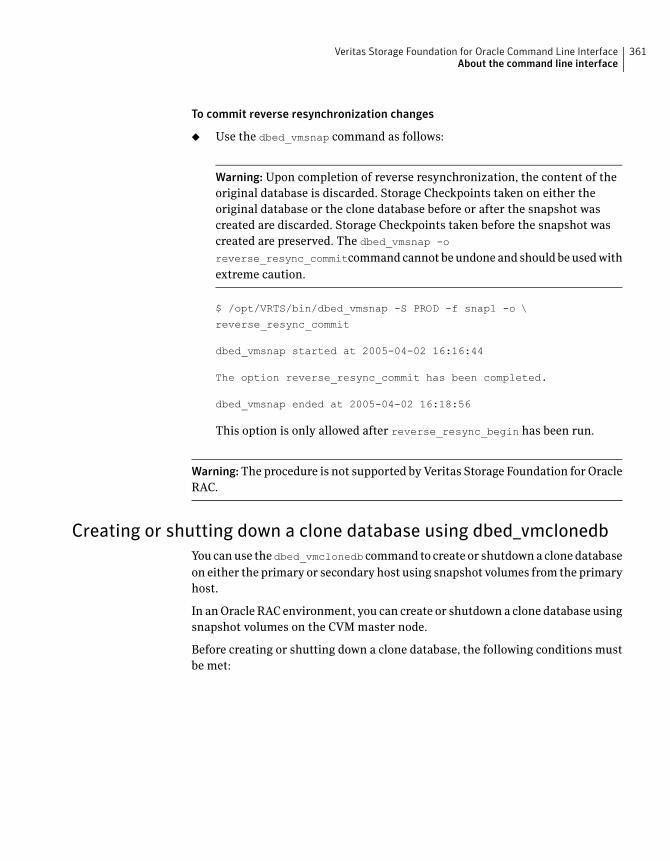
To commit reverse resynchronization changes
◆ Use the dbed_vmsnap command as follows:
Warning: Upon completion of reverse resynchronization, the content of the
original database is discarded. Storage Checkpoints taken on either the
original database or the clone database before or after the snapshot was
created are discarded. Storage Checkpoints taken before the snapshot was
created are preserved. The dbed_vmsnap -o
reverse_resync_commitcommand cannot be undone and should be used with
extreme caution.
$ /opt/VRTS/bin/dbed_vmsnap -S PROD -f snap1 -o \
reverse_resync_commit
dbed_vmsnap started at 2005-04-02 16:16:44
The option reverse_resync_commit has been completed.
dbed_vmsnap ended at 2005-04-02 16:18:56
This option is only allowed after reverse_resync_begin has been run.
Warning:The procedure is not supported by Veritas Storage Foundation for Oracle
RAC.
Creating or shutting down a clone database using dbed_vmclonedb
You can use thedbed_vmclonedb command to create or shutdown a clone database
on either the primary or secondary host using snapshot volumes from the primary
host.
In an Oracle RAC environment, you can create or shutdown a clone database using
snapshot volumes on the CVM master node.
Before creating or shutting down a clone database, the following conditions must
be met:
361Veritas Storage Foundation for Oracle Command Line InterfaceAbout the command line interface
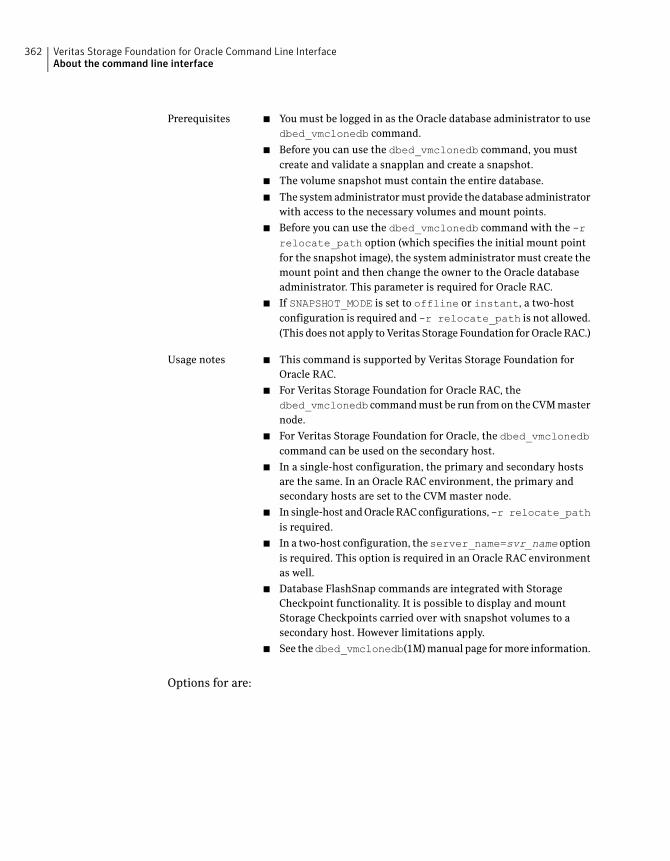
■ You must be logged in as the Oracle database administrator to use
dbed_vmclonedb command.
■ Before you can use the dbed_vmclonedb command, you must
create and validate a snapplan and create a snapshot.
■ The volume snapshot must contain the entire database.
■ The system administrator must provide the database administrator
with access to the necessary volumes and mount points.
■ Before you can use the dbed_vmclonedb command with the -rrelocate_path option (which specifies the initial mount point
for the snapshot image), the system administrator must create the
mount point and then change the owner to the Oracle database
administrator. This parameter is required for Oracle RAC.
■ If SNAPSHOT_MODE is set to offline or instant, a two-host
configuration is required and -r relocate_path is not allowed.
(This does not apply to Veritas Storage Foundation for Oracle RAC.)
Prerequisites
■ This command is supported by Veritas Storage Foundation for
Oracle RAC.
■ For Veritas Storage Foundation for Oracle RAC, the
dbed_vmclonedb command must be run from on the CVM master
node.
■ For Veritas Storage Foundation for Oracle, the dbed_vmclonedbcommand can be used on the secondary host.
■ In a single-host configuration, the primary and secondary hosts
are the same. In an Oracle RAC environment, the primary and
secondary hosts are set to the CVM master node.
■ In single-host and Oracle RAC configurations,-r relocate_pathis required.
■ In a two-host configuration, theserver_name=svr_name option
is required. This option is required in an Oracle RAC environment
as well.
■ Database FlashSnap commands are integrated with Storage
Checkpoint functionality. It is possible to display and mount
Storage Checkpoints carried over with snapshot volumes to a
secondary host. However limitations apply.
■ See thedbed_vmclonedb(1M) manual page for more information.
Usage notes
Options for are:
Veritas Storage Foundation for Oracle Command Line InterfaceAbout the command line interface
362
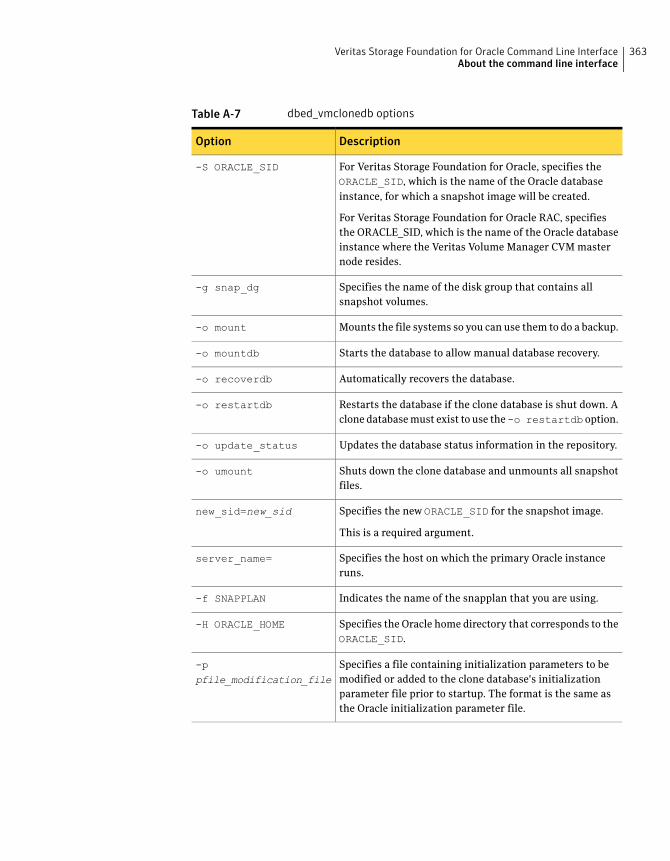
Table A-7 dbed_vmclonedb options
DescriptionOption
For Veritas Storage Foundation for Oracle, specifies the
ORACLE_SID, which is the name of the Oracle database
instance, for which a snapshot image will be created.
For Veritas Storage Foundation for Oracle RAC, specifies
the ORACLE_SID, which is the name of the Oracle database
instance where the Veritas Volume Manager CVM master
node resides.
-S ORACLE_SID
Specifies the name of the disk group that contains all
snapshot volumes.
-g snap_dg
Mounts the file systems so you can use them to do a backup.-o mount
Starts the database to allow manual database recovery.-o mountdb
Automatically recovers the database.-o recoverdb
Restarts the database if the clone database is shut down. A
clone database must exist to use the-o restartdb option.
-o restartdb
Updates the database status information in the repository.-o update_status
Shuts down the clone database and unmounts all snapshot
files.
-o umount
Specifies the new ORACLE_SID for the snapshot image.
This is a required argument.
new_sid=new_sid
Specifies the host on which the primary Oracle instance
runs.
server_name=
Indicates the name of the snapplan that you are using.-f SNAPPLAN
Specifies the Oracle home directory that corresponds to the
ORACLE_SID.
-H ORACLE_HOME
Specifies a file containing initialization parameters to be
modified or added to the clone database's initialization
parameter file prior to startup. The format is the same as
the Oracle initialization parameter file.
-ppfile_modification_file
363Veritas Storage Foundation for Oracle Command Line InterfaceAbout the command line interface
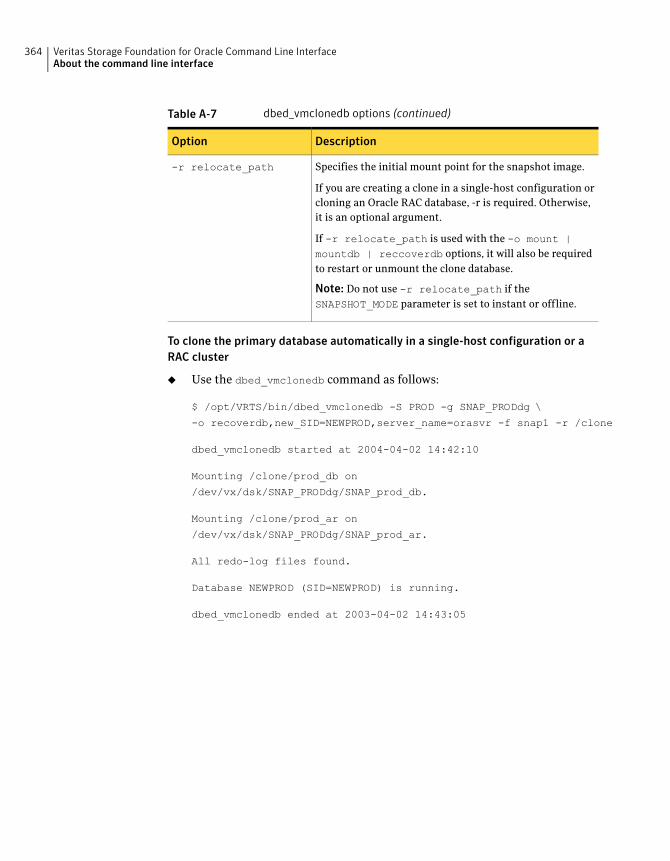
Table A-7 dbed_vmclonedb options (continued)
DescriptionOption
Specifies the initial mount point for the snapshot image.
If you are creating a clone in a single-host configuration or
cloning an Oracle RAC database, -r is required. Otherwise,
it is an optional argument.
If -r relocate_path is used with the -o mount |mountdb | reccoverdb options, it will also be required
to restart or unmount the clone database.
Note: Do not use -r relocate_path if the
SNAPSHOT_MODE parameter is set to instant or offline.
-r relocate_path
To clone the primary database automatically in a single-host configuration or a
RAC cluster
◆ Use the dbed_vmclonedb command as follows:
$ /opt/VRTS/bin/dbed_vmclonedb -S PROD -g SNAP_PRODdg \
-o recoverdb,new_SID=NEWPROD,server_name=orasvr -f snap1 -r /clone
dbed_vmclonedb started at 2004-04-02 14:42:10
Mounting /clone/prod_db on
/dev/vx/dsk/SNAP_PRODdg/SNAP_prod_db.
Mounting /clone/prod_ar on
/dev/vx/dsk/SNAP_PRODdg/SNAP_prod_ar.
All redo-log files found.
Database NEWPROD (SID=NEWPROD) is running.
dbed_vmclonedb ended at 2003-04-02 14:43:05
Veritas Storage Foundation for Oracle Command Line InterfaceAbout the command line interface
364
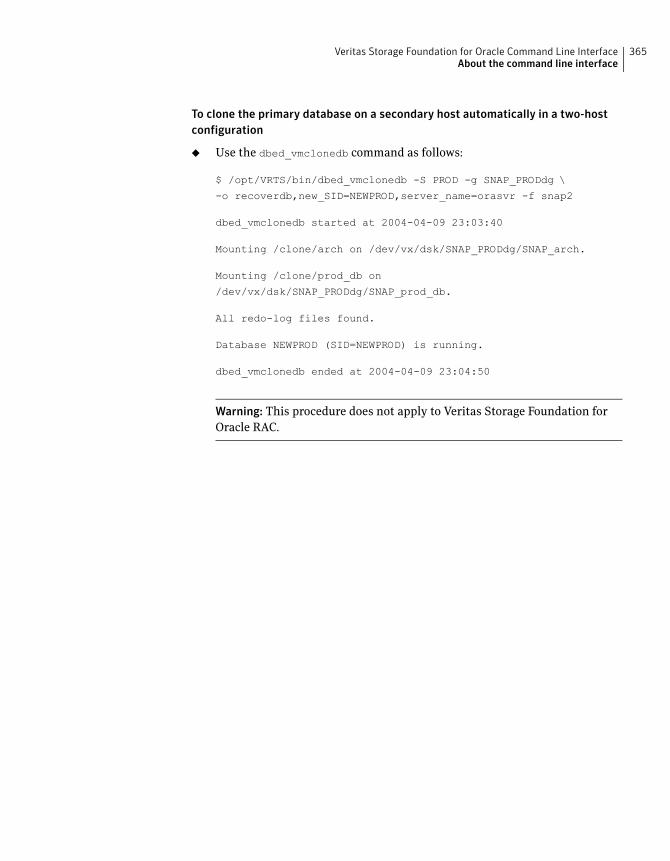
To clone the primary database on a secondary host automatically in a two-host
configuration
◆ Use the dbed_vmclonedb command as follows:
$ /opt/VRTS/bin/dbed_vmclonedb -S PROD -g SNAP_PRODdg \
-o recoverdb,new_SID=NEWPROD,server_name=orasvr -f snap2
dbed_vmclonedb started at 2004-04-09 23:03:40
Mounting /clone/arch on /dev/vx/dsk/SNAP_PRODdg/SNAP_arch.
Mounting /clone/prod_db on
/dev/vx/dsk/SNAP_PRODdg/SNAP_prod_db.
All redo-log files found.
Database NEWPROD (SID=NEWPROD) is running.
dbed_vmclonedb ended at 2004-04-09 23:04:50
Warning: This procedure does not apply to Veritas Storage Foundation for
Oracle RAC.
365Veritas Storage Foundation for Oracle Command Line InterfaceAbout the command line interface
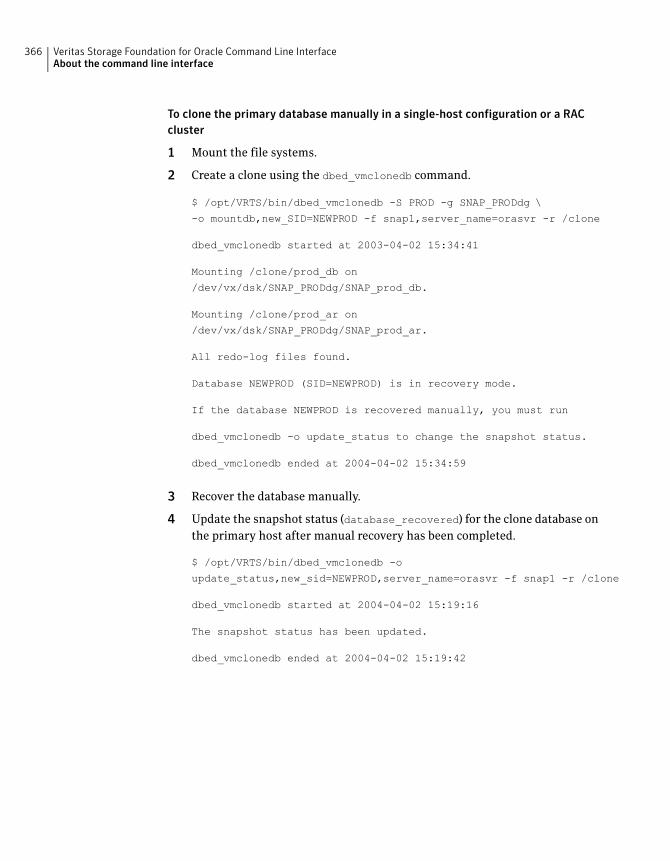
To clone the primary database manually in a single-host configuration or a RAC
cluster
1 Mount the file systems.
2 Create a clone using the dbed_vmclonedb command.
$ /opt/VRTS/bin/dbed_vmclonedb -S PROD -g SNAP_PRODdg \
-o mountdb,new_SID=NEWPROD -f snap1,server_name=orasvr -r /clone
dbed_vmclonedb started at 2003-04-02 15:34:41
Mounting /clone/prod_db on
/dev/vx/dsk/SNAP_PRODdg/SNAP_prod_db.
Mounting /clone/prod_ar on
/dev/vx/dsk/SNAP_PRODdg/SNAP_prod_ar.
All redo-log files found.
Database NEWPROD (SID=NEWPROD) is in recovery mode.
If the database NEWPROD is recovered manually, you must run
dbed_vmclonedb -o update_status to change the snapshot status.
dbed_vmclonedb ended at 2004-04-02 15:34:59
3 Recover the database manually.
4 Update the snapshot status (database_recovered) for the clone database on
the primary host after manual recovery has been completed.
$ /opt/VRTS/bin/dbed_vmclonedb -o
update_status,new_sid=NEWPROD,server_name=orasvr -f snap1 -r /clone
dbed_vmclonedb started at 2004-04-02 15:19:16
The snapshot status has been updated.
dbed_vmclonedb ended at 2004-04-02 15:19:42
Veritas Storage Foundation for Oracle Command Line InterfaceAbout the command line interface
366
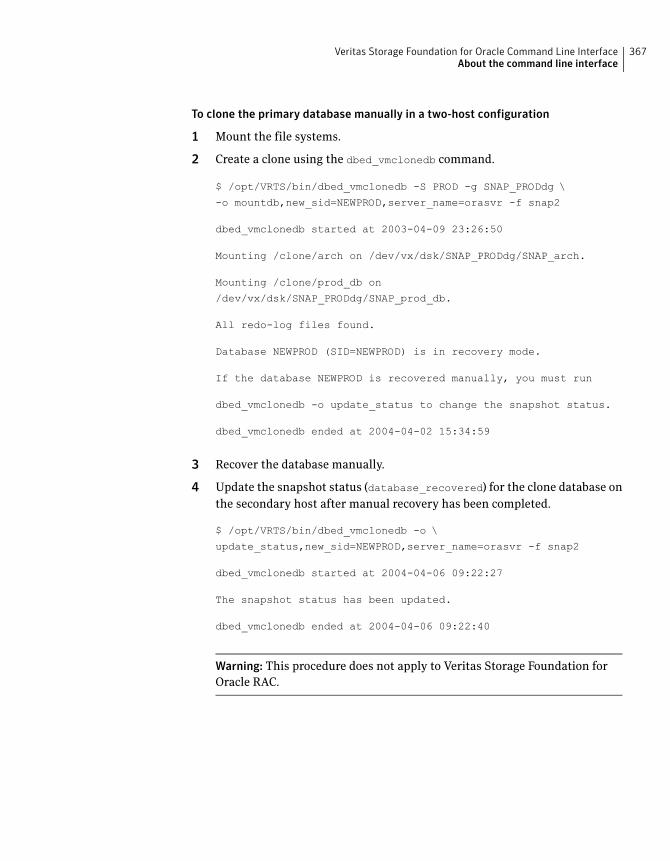
To clone the primary database manually in a two-host configuration
1 Mount the file systems.
2 Create a clone using the dbed_vmclonedb command.
$ /opt/VRTS/bin/dbed_vmclonedb -S PROD -g SNAP_PRODdg \
-o mountdb,new_sid=NEWPROD,server_name=orasvr -f snap2
dbed_vmclonedb started at 2003-04-09 23:26:50
Mounting /clone/arch on /dev/vx/dsk/SNAP_PRODdg/SNAP_arch.
Mounting /clone/prod_db on
/dev/vx/dsk/SNAP_PRODdg/SNAP_prod_db.
All redo-log files found.
Database NEWPROD (SID=NEWPROD) is in recovery mode.
If the database NEWPROD is recovered manually, you must run
dbed_vmclonedb -o update_status to change the snapshot status.
dbed_vmclonedb ended at 2004-04-02 15:34:59
3 Recover the database manually.
4 Update the snapshot status (database_recovered) for the clone database on
the secondary host after manual recovery has been completed.
$ /opt/VRTS/bin/dbed_vmclonedb -o \
update_status,new_sid=NEWPROD,server_name=orasvr -f snap2
dbed_vmclonedb started at 2004-04-06 09:22:27
The snapshot status has been updated.
dbed_vmclonedb ended at 2004-04-06 09:22:40
Warning: This procedure does not apply to Veritas Storage Foundation for
Oracle RAC.
367Veritas Storage Foundation for Oracle Command Line InterfaceAbout the command line interface
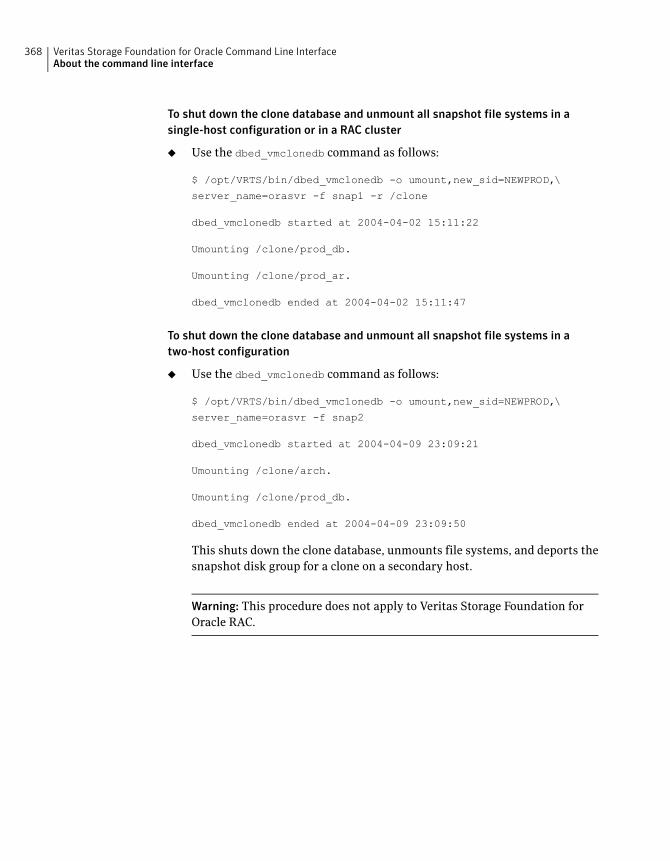
To shut down the clone database and unmount all snapshot file systems in a
single-host configuration or in a RAC cluster
◆ Use the dbed_vmclonedb command as follows:
$ /opt/VRTS/bin/dbed_vmclonedb -o umount,new_sid=NEWPROD,\
server_name=orasvr -f snap1 -r /clone
dbed_vmclonedb started at 2004-04-02 15:11:22
Umounting /clone/prod_db.
Umounting /clone/prod_ar.
dbed_vmclonedb ended at 2004-04-02 15:11:47
To shut down the clone database and unmount all snapshot file systems in a
two-host configuration
◆ Use the dbed_vmclonedb command as follows:
$ /opt/VRTS/bin/dbed_vmclonedb -o umount,new_sid=NEWPROD,\
server_name=orasvr -f snap2
dbed_vmclonedb started at 2004-04-09 23:09:21
Umounting /clone/arch.
Umounting /clone/prod_db.
dbed_vmclonedb ended at 2004-04-09 23:09:50
This shuts down the clone database, unmounts file systems, and deports the
snapshot disk group for a clone on a secondary host.
Warning: This procedure does not apply to Veritas Storage Foundation for
Oracle RAC.
Veritas Storage Foundation for Oracle Command Line InterfaceAbout the command line interface
368
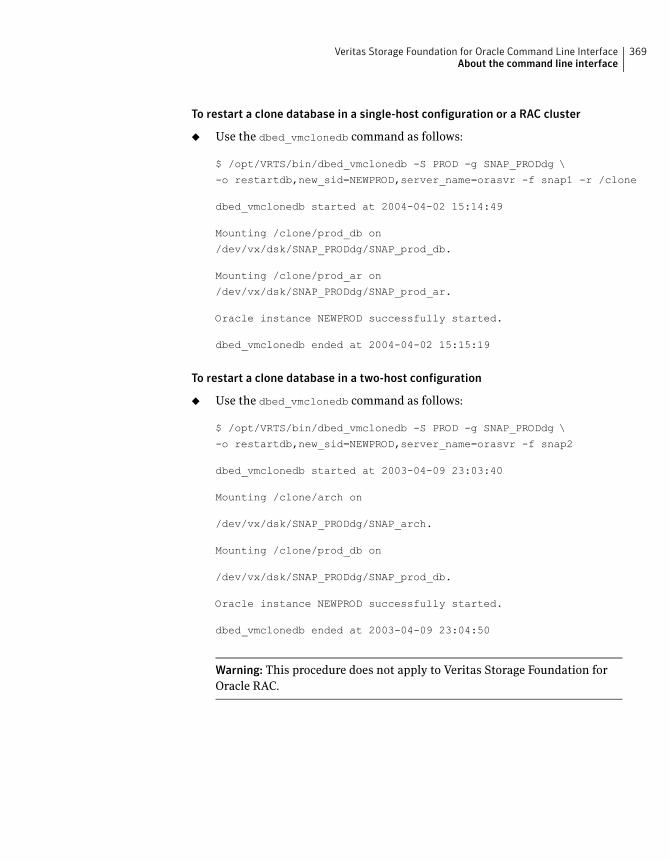
To restart a clone database in a single-host configuration or a RAC cluster
◆ Use the dbed_vmclonedb command as follows:
$ /opt/VRTS/bin/dbed_vmclonedb -S PROD -g SNAP_PRODdg \
-o restartdb,new_sid=NEWPROD,server_name=orasvr -f snap1 -r /clone
dbed_vmclonedb started at 2004-04-02 15:14:49
Mounting /clone/prod_db on
/dev/vx/dsk/SNAP_PRODdg/SNAP_prod_db.
Mounting /clone/prod_ar on
/dev/vx/dsk/SNAP_PRODdg/SNAP_prod_ar.
Oracle instance NEWPROD successfully started.
dbed_vmclonedb ended at 2004-04-02 15:15:19
To restart a clone database in a two-host configuration
◆ Use the dbed_vmclonedb command as follows:
$ /opt/VRTS/bin/dbed_vmclonedb -S PROD -g SNAP_PRODdg \
-o restartdb,new_sid=NEWPROD,server_name=orasvr -f snap2
dbed_vmclonedb started at 2003-04-09 23:03:40
Mounting /clone/arch on
/dev/vx/dsk/SNAP_PRODdg/SNAP_arch.
Mounting /clone/prod_db on
/dev/vx/dsk/SNAP_PRODdg/SNAP_prod_db.
Oracle instance NEWPROD successfully started.
dbed_vmclonedb ended at 2003-04-09 23:04:50
Warning: This procedure does not apply to Veritas Storage Foundation for
Oracle RAC.
369Veritas Storage Foundation for Oracle Command Line InterfaceAbout the command line interface

Managing log files using edgetmsg2
You can use the edgetmsg2 utility to manage message log files. You can use the
edgetmsg2 utility to write a message to a log file or to the console, read the log
file and print to the console, and display the available log files.
Before managing log files with the edgetmsg2 command, review the following
information:
■ You must be logged in as the Database Administrator or root to
use this command.
Prerequisites
■ The default log file for a database is located in the following
directory:
/etc/vx/vxdbed/logs/sfua_database.log
where database is the ORACLE_SID.
■ By default, only messages with a severity equal to or greater than
ERROR will be logged.
■ See the edgetmsg2(1M) manual page for more information.
Usage notes
Table A-8 lists options for edgetmsg2.
Table A-8 edgetmsg2 options
DescriptionOption
Specifies the message catalogue set number. The default is
1.
-s set_num
Specifies the message ID and severity to be printed.-M msgid[:severity]
Specifies the message catalogue path, log file, or log
directory.
-f msg_catalog |logfile |log_directory
Overwrites the minimum log severity or creates a severity
filter. The severity values are either 0-8 or 100-108.
-v severity | severity
Pauses the cursor at the end of a display message. By default,
a line feed is added to each display message. Use the -poption to indicate that no line feed is to be added.
-p
Displays the content of a log file. You can specify
,suppress_time to exclude time information in the utility
output.
-o list[,suppress_time]
Displays the available log files. You can specify ,no_archive
to exclude log files from the utility output.
-o report[,no_archive]
Veritas Storage Foundation for Oracle Command Line InterfaceAbout the command line interface
370
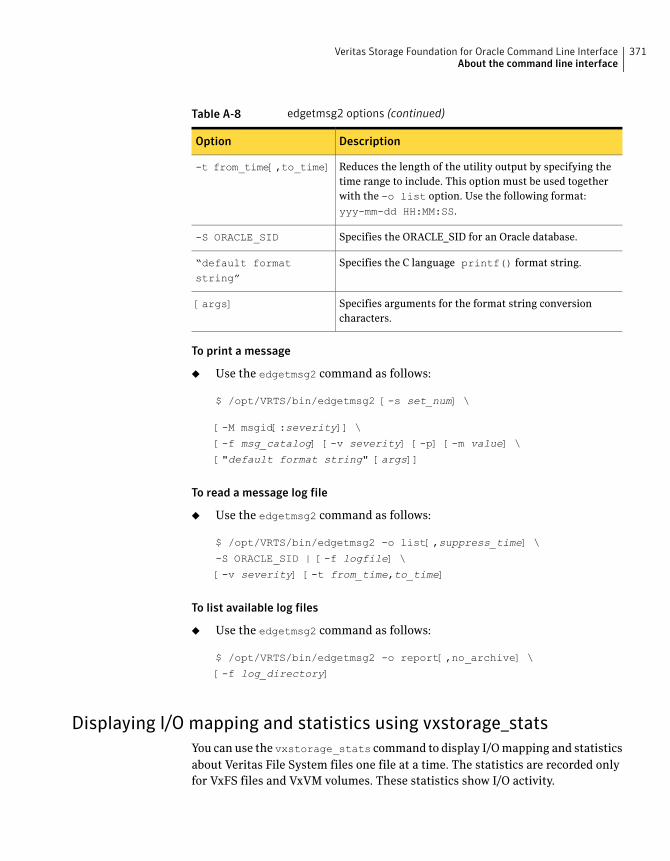
Table A-8 edgetmsg2 options (continued)
DescriptionOption
Reduces the length of the utility output by specifying the
time range to include. This option must be used together
with the -o list option. Use the following format:
yyy-mm-dd HH:MM:SS.
-t from_time[,to_time]
Specifies the ORACLE_SID for an Oracle database.-S ORACLE_SID
Specifies the C language printf() format string.“default formatstring”
Specifies arguments for the format string conversion
characters.
[args]
To print a message
◆ Use the edgetmsg2 command as follows:
$ /opt/VRTS/bin/edgetmsg2 [-s set_num] \
[-M msgid[:severity]] \
[-f msg_catalog] [-v severity] [-p] [-m value] \
["default format string" [args]]
To read a message log file
◆ Use the edgetmsg2 command as follows:
$ /opt/VRTS/bin/edgetmsg2 -o list[,suppress_time] \
-S ORACLE_SID | [-f logfile] \
[-v severity] [-t from_time,to_time]
To list available log files
◆ Use the edgetmsg2 command as follows:
$ /opt/VRTS/bin/edgetmsg2 -o report[,no_archive] \
[-f log_directory]
Displaying I/O mapping and statistics using vxstorage_stats
You can use the vxstorage_stats command to display I/O mapping and statistics
about Veritas File System files one file at a time. The statistics are recorded only
for VxFS files and VxVM volumes. These statistics show I/O activity.
371Veritas Storage Foundation for Oracle Command Line InterfaceAbout the command line interface
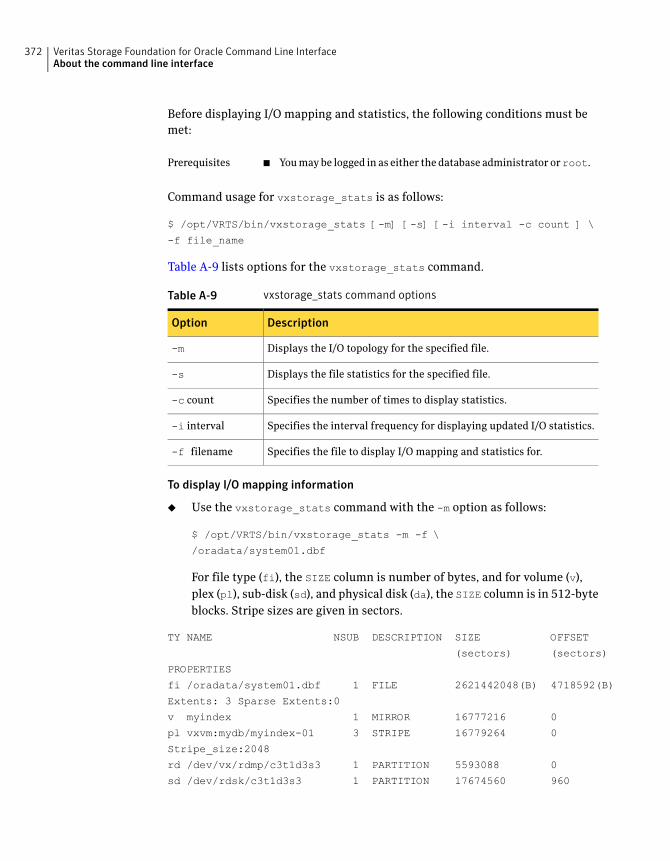
Before displaying I/O mapping and statistics, the following conditions must be
met:
■ You may be logged in as either the database administrator orroot.Prerequisites
Command usage for vxstorage_stats is as follows:
$ /opt/VRTS/bin/vxstorage_stats [-m] [-s] [-i interval -c count ] \
-f file_name
Table A-9 lists options for the vxstorage_stats command.
Table A-9 vxstorage_stats command options
DescriptionOption
Displays the I/O topology for the specified file.-m
Displays the file statistics for the specified file.-s
Specifies the number of times to display statistics.-c count
Specifies the interval frequency for displaying updated I/O statistics.-i interval
Specifies the file to display I/O mapping and statistics for.-f filename
To display I/O mapping information
◆ Use the vxstorage_stats command with the -m option as follows:
$ /opt/VRTS/bin/vxstorage_stats -m -f \
/oradata/system01.dbf
For file type (fi), the SIZE column is number of bytes, and for volume (v),
plex (pl), sub-disk (sd), and physical disk (da), the SIZE column is in 512-byte
blocks. Stripe sizes are given in sectors.
TY NAME NSUB DESCRIPTION SIZE OFFSET
(sectors) (sectors)
PROPERTIES
fi /oradata/system01.dbf 1 FILE 2621442048(B) 4718592(B)
Extents: 3 Sparse Extents:0
v myindex 1 MIRROR 16777216 0
pl vxvm:mydb/myindex-01 3 STRIPE 16779264 0
Stripe_size:2048
rd /dev/vx/rdmp/c3t1d3s3 1 PARTITION 5593088 0
sd /dev/rdsk/c3t1d3s3 1 PARTITION 17674560 960
Veritas Storage Foundation for Oracle Command Line InterfaceAbout the command line interface
372
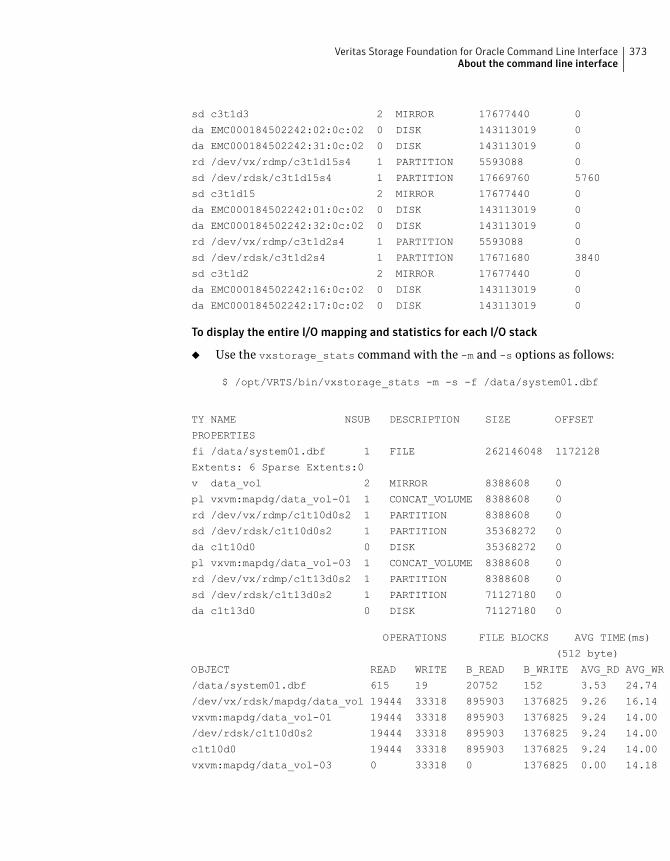
sd c3t1d3 2 MIRROR 17677440 0
da EMC000184502242:02:0c:02 0 DISK 143113019 0
da EMC000184502242:31:0c:02 0 DISK 143113019 0
rd /dev/vx/rdmp/c3t1d15s4 1 PARTITION 5593088 0
sd /dev/rdsk/c3t1d15s4 1 PARTITION 17669760 5760
sd c3t1d15 2 MIRROR 17677440 0
da EMC000184502242:01:0c:02 0 DISK 143113019 0
da EMC000184502242:32:0c:02 0 DISK 143113019 0
rd /dev/vx/rdmp/c3t1d2s4 1 PARTITION 5593088 0
sd /dev/rdsk/c3t1d2s4 1 PARTITION 17671680 3840
sd c3t1d2 2 MIRROR 17677440 0
da EMC000184502242:16:0c:02 0 DISK 143113019 0
da EMC000184502242:17:0c:02 0 DISK 143113019 0
To display the entire I/O mapping and statistics for each I/O stack
◆ Use the vxstorage_stats command with the -m and -s options as follows:
$ /opt/VRTS/bin/vxstorage_stats -m -s -f /data/system01.dbf
TY NAME NSUB DESCRIPTION SIZE OFFSET
PROPERTIES
fi /data/system01.dbf 1 FILE 262146048 1172128
Extents: 6 Sparse Extents:0
v data_vol 2 MIRROR 8388608 0
pl vxvm:mapdg/data_vol-01 1 CONCAT_VOLUME 8388608 0
rd /dev/vx/rdmp/c1t10d0s2 1 PARTITION 8388608 0
sd /dev/rdsk/c1t10d0s2 1 PARTITION 35368272 0
da c1t10d0 0 DISK 35368272 0
pl vxvm:mapdg/data_vol-03 1 CONCAT_VOLUME 8388608 0
rd /dev/vx/rdmp/c1t13d0s2 1 PARTITION 8388608 0
sd /dev/rdsk/c1t13d0s2 1 PARTITION 71127180 0
da c1t13d0 0 DISK 71127180 0
OPERATIONS FILE BLOCKS AVG TIME(ms)
(512 byte)
OBJECT READ WRITE B_READ B_WRITE AVG_RD AVG_WR
/data/system01.dbf 615 19 20752 152 3.53 24.74
/dev/vx/rdsk/mapdg/data_vol 19444 33318 895903 1376825 9.26 16.14
vxvm:mapdg/data_vol-01 19444 33318 895903 1376825 9.24 14.00
/dev/rdsk/c1t10d0s2 19444 33318 895903 1376825 9.24 14.00
c1t10d0 19444 33318 895903 1376825 9.24 14.00
vxvm:mapdg/data_vol-03 0 33318 0 1376825 0.00 14.18
373Veritas Storage Foundation for Oracle Command Line InterfaceAbout the command line interface
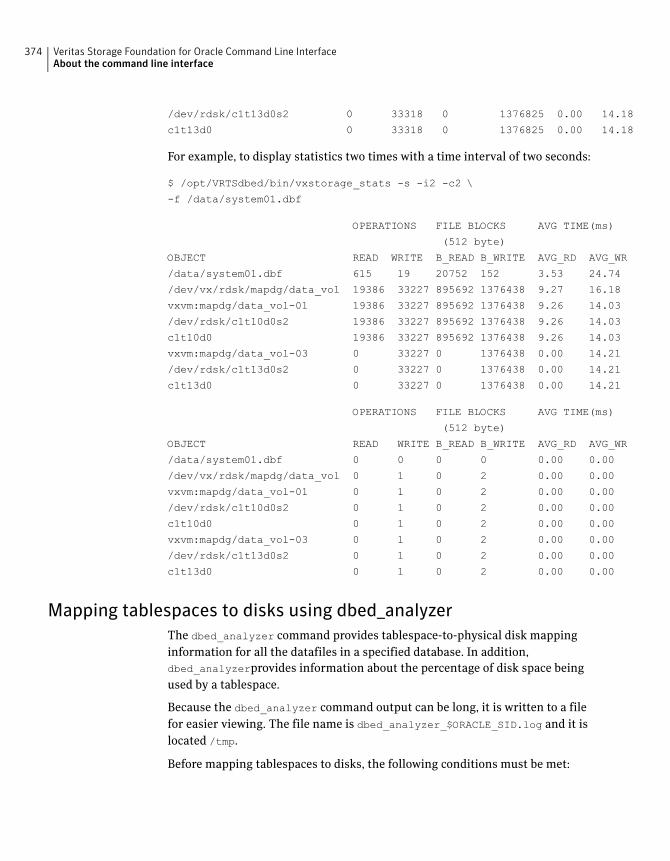
/dev/rdsk/c1t13d0s2 0 33318 0 1376825 0.00 14.18
c1t13d0 0 33318 0 1376825 0.00 14.18
For example, to display statistics two times with a time interval of two seconds:
$ /opt/VRTSdbed/bin/vxstorage_stats -s -i2 -c2 \
-f /data/system01.dbf
OPERATIONS FILE BLOCKS AVG TIME(ms)
(512 byte)
OBJECT READ WRITE B_READ B_WRITE AVG_RD AVG_WR
/data/system01.dbf 615 19 20752 152 3.53 24.74
/dev/vx/rdsk/mapdg/data_vol 19386 33227 895692 1376438 9.27 16.18
vxvm:mapdg/data_vol-01 19386 33227 895692 1376438 9.26 14.03
/dev/rdsk/c1t10d0s2 19386 33227 895692 1376438 9.26 14.03
c1t10d0 19386 33227 895692 1376438 9.26 14.03
vxvm:mapdg/data_vol-03 0 33227 0 1376438 0.00 14.21
/dev/rdsk/c1t13d0s2 0 33227 0 1376438 0.00 14.21
c1t13d0 0 33227 0 1376438 0.00 14.21
OPERATIONS FILE BLOCKS AVG TIME(ms)
(512 byte)
OBJECT READ WRITE B_READ B_WRITE AVG_RD AVG_WR
/data/system01.dbf 0 0 0 0 0.00 0.00
/dev/vx/rdsk/mapdg/data_vol 0 1 0 2 0.00 0.00
vxvm:mapdg/data_vol-01 0 1 0 2 0.00 0.00
/dev/rdsk/c1t10d0s2 0 1 0 2 0.00 0.00
c1t10d0 0 1 0 2 0.00 0.00
vxvm:mapdg/data_vol-03 0 1 0 2 0.00 0.00
/dev/rdsk/c1t13d0s2 0 1 0 2 0.00 0.00
c1t13d0 0 1 0 2 0.00 0.00
Mapping tablespaces to disks using dbed_analyzer
The dbed_analyzer command provides tablespace-to-physical disk mapping
information for all the datafiles in a specified database. In addition,
dbed_analyzerprovides information about the percentage of disk space being
used by a tablespace.
Because the dbed_analyzer command output can be long, it is written to a file
for easier viewing. The file name is dbed_analyzer_$ORACLE_SID.log and it is
located /tmp.
Before mapping tablespaces to disks, the following conditions must be met:
Veritas Storage Foundation for Oracle Command Line InterfaceAbout the command line interface
374
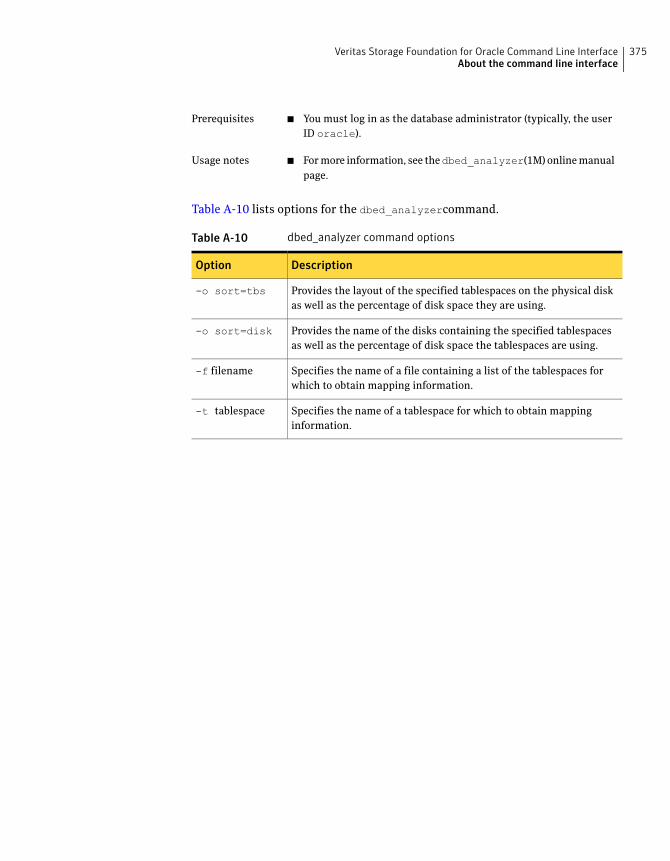
■ You must log in as the database administrator (typically, the user
ID oracle).
Prerequisites
■ For more information, see thedbed_analyzer(1M) online manual
page.
Usage notes
Table A-10 lists options for the dbed_analyzercommand.
Table A-10 dbed_analyzer command options
DescriptionOption
Provides the layout of the specified tablespaces on the physical disk
as well as the percentage of disk space they are using.
-o sort=tbs
Provides the name of the disks containing the specified tablespaces
as well as the percentage of disk space the tablespaces are using.
-o sort=disk
Specifies the name of a file containing a list of the tablespaces for
which to obtain mapping information.
-f filename
Specifies the name of a tablespace for which to obtain mapping
information.
-t tablespace
375Veritas Storage Foundation for Oracle Command Line InterfaceAbout the command line interface

To obtain storage mapping information sorted by tablespace
◆ Use the dbed_analyzercommand with the -f filenameand -o sort=tbs
options:
$ /opt/VRTS/bin/dbed_analyzer -S $ORACLE_SID -H $ORACLE_HOME \
-o sort=tbs -f filename
Output similar to the following is displayed in the file filename:
TBSNAME DATAFILE DEVICE SIZE(sectors)SYSTEM /usr1/oracle/rw/DATA/PROD.dbf c3t21000020379DBD5Fd0 819216TEMP /usr1/oracle/rw/DATA/temp_20000 c3t21000020379DBD5Fd0 1021968TEMP /usr1/oracle/rw/DATA/temp_20001 c3t21000020379DBD5Fd0 2048016SYSAUX /usr1/oracle/rw/DATA/sysaux.dbf c3t21000020379DBD5Fd0 819216ITEM /usr1/oracle/rw/DATA/item_1000 c3t21000020379DBD5Fd0 1021968ITM_IDX /usr1/oracle/rw/DATA/itm_idx_2000 c3t21000020379DBD5Fd0 1021968PRODID_IDX /usr1/oracle/rw/DATA/prodid_idx_3000 c3t21000020379DBD5Fd0 1021968QTY_IDX /usr1/oracle/rw/DATA/qty_idx_7000 c3t21000020379DBD5Fd0 1021968ROLL_1 /usr1/oracle/rw/DATA/roll_1_5000 c3t21000020379DBD5Fd0 1021968ROLL_2 /usr1/oracle/rw/DATA/roll_2_6000 c3t21000020379DBD5Fd0 1021968ORDERS /usr1/oracle/rw/DATA/orders_4000 c3t21000020379DBD5Fd0 1021968ORD_IDX /usr1/oracle/rw/DATA/ord_idx_10000 c3t21000020379DBD5Fd0 1021968TY_IDX /usr1/oracle/rw/DATA/qty_idx_7001 c3t21000020379DBD5Fd0 1024016ITM_IDX /usr1/oracle/rw/DATA/itm_idx_2001 c3t21000020379DBD5Fd0 1024016ROLL_1 /usr1/oracle/rw/DATA/roll_1_5001 c3t21000020379DBD5Fd0 1024016QTY_IDX /usr1/oracle/rw/DATA/qty_idx_7002 c3t21000020379DBD5Fd0 1024016ROLL_2 /usr1/oracle/rw/DATA/roll_2_6001 c3t21000020379DBD5Fd0 1024016ITEM /usr1/oracle/rw/DATA/item_1001 c3t21000020379DBD5Fd0 4096016
Veritas Storage Foundation for Oracle Command Line InterfaceAbout the command line interface
376
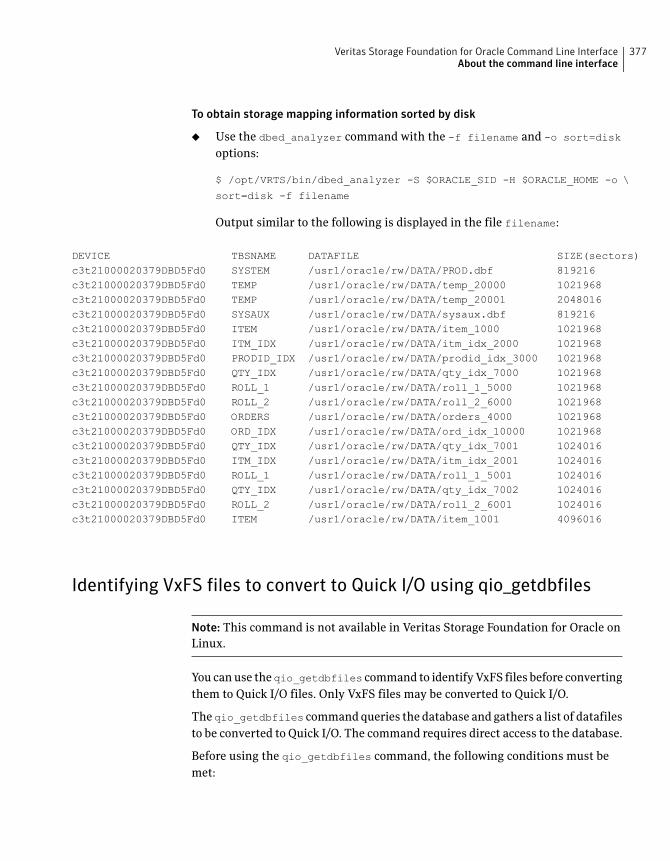
To obtain storage mapping information sorted by disk
◆ Use the dbed_analyzer command with the -f filename and -o sort=disk
options:
$ /opt/VRTS/bin/dbed_analyzer -S $ORACLE_SID -H $ORACLE_HOME -o \
sort=disk -f filename
Output similar to the following is displayed in the file filename:
DEVICE TBSNAME DATAFILE SIZE(sectors)c3t21000020379DBD5Fd0 SYSTEM /usr1/oracle/rw/DATA/PROD.dbf 819216c3t21000020379DBD5Fd0 TEMP /usr1/oracle/rw/DATA/temp_20000 1021968c3t21000020379DBD5Fd0 TEMP /usr1/oracle/rw/DATA/temp_20001 2048016c3t21000020379DBD5Fd0 SYSAUX /usr1/oracle/rw/DATA/sysaux.dbf 819216c3t21000020379DBD5Fd0 ITEM /usr1/oracle/rw/DATA/item_1000 1021968c3t21000020379DBD5Fd0 ITM_IDX /usr1/oracle/rw/DATA/itm_idx_2000 1021968c3t21000020379DBD5Fd0 PRODID_IDX /usr1/oracle/rw/DATA/prodid_idx_3000 1021968c3t21000020379DBD5Fd0 QTY_IDX /usr1/oracle/rw/DATA/qty_idx_7000 1021968c3t21000020379DBD5Fd0 ROLL_1 /usr1/oracle/rw/DATA/roll_1_5000 1021968c3t21000020379DBD5Fd0 ROLL_2 /usr1/oracle/rw/DATA/roll_2_6000 1021968c3t21000020379DBD5Fd0 ORDERS /usr1/oracle/rw/DATA/orders_4000 1021968c3t21000020379DBD5Fd0 ORD_IDX /usr1/oracle/rw/DATA/ord_idx_10000 1021968c3t21000020379DBD5Fd0 QTY_IDX /usr1/oracle/rw/DATA/qty_idx_7001 1024016c3t21000020379DBD5Fd0 ITM_IDX /usr1/oracle/rw/DATA/itm_idx_2001 1024016c3t21000020379DBD5Fd0 ROLL_1 /usr1/oracle/rw/DATA/roll_1_5001 1024016c3t21000020379DBD5Fd0 QTY_IDX /usr1/oracle/rw/DATA/qty_idx_7002 1024016c3t21000020379DBD5Fd0 ROLL_2 /usr1/oracle/rw/DATA/roll_2_6001 1024016c3t21000020379DBD5Fd0 ITEM /usr1/oracle/rw/DATA/item_1001 4096016
Identifying VxFS files to convert to Quick I/O using qio_getdbfiles
Note: This command is not available in Veritas Storage Foundation for Oracle on
Linux.
You can use the qio_getdbfiles command to identify VxFS files before converting
them to Quick I/O files. Only VxFS files may be converted to Quick I/O.
The qio_getdbfiles command queries the database and gathers a list of datafiles
to be converted to Quick I/O. The command requires direct access to the database.
Before using the qio_getdbfiles command, the following conditions must be
met:
377Veritas Storage Foundation for Oracle Command Line InterfaceAbout the command line interface
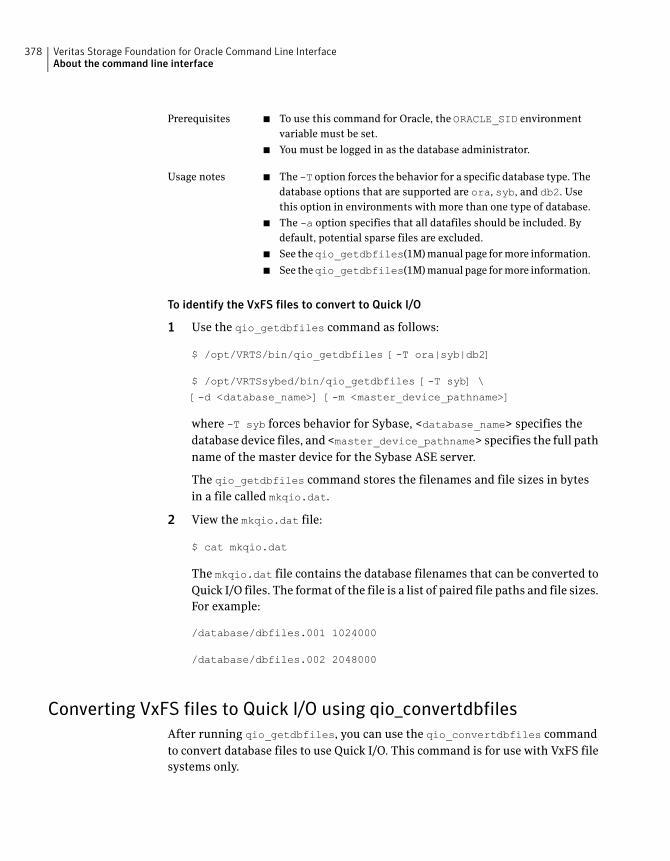
■ To use this command for Oracle, the ORACLE_SID environment
variable must be set.
■ You must be logged in as the database administrator.
Prerequisites
■ The -T option forces the behavior for a specific database type. The
database options that are supported are ora, syb, and db2. Use
this option in environments with more than one type of database.
■ The -a option specifies that all datafiles should be included. By
default, potential sparse files are excluded.
■ See theqio_getdbfiles(1M) manual page for more information.
■ See theqio_getdbfiles(1M) manual page for more information.
Usage notes
To identify the VxFS files to convert to Quick I/O
1 Use the qio_getdbfiles command as follows:
$ /opt/VRTS/bin/qio_getdbfiles [-T ora|syb|db2]
$ /opt/VRTSsybed/bin/qio_getdbfiles [-T syb] \
[-d <database_name>] [-m <master_device_pathname>]
where -T syb forces behavior for Sybase, <database_name> specifies the
database device files, and <master_device_pathname> specifies the full path
name of the master device for the Sybase ASE server.
The qio_getdbfiles command stores the filenames and file sizes in bytes
in a file called mkqio.dat.
2 View the mkqio.dat file:
$ cat mkqio.dat
The mkqio.dat file contains the database filenames that can be converted to
Quick I/O files. The format of the file is a list of paired file paths and file sizes.
For example:
/database/dbfiles.001 1024000
/database/dbfiles.002 2048000
Converting VxFS files to Quick I/O using qio_convertdbfiles
After running qio_getdbfiles, you can use the qio_convertdbfiles command
to convert database files to use Quick I/O. This command is for use with VxFS file
systems only.
Veritas Storage Foundation for Oracle Command Line InterfaceAbout the command line interface
378
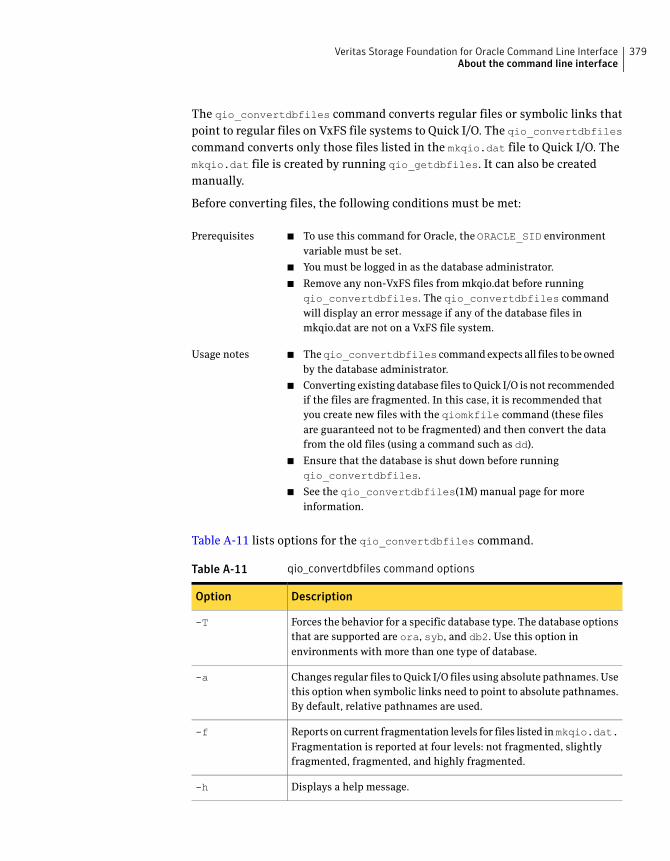
The qio_convertdbfiles command converts regular files or symbolic links that
point to regular files on VxFS file systems to Quick I/O. The qio_convertdbfiles
command converts only those files listed in the mkqio.dat file to Quick I/O. The
mkqio.dat file is created by running qio_getdbfiles. It can also be created
manually.
Before converting files, the following conditions must be met:
■ To use this command for Oracle, the ORACLE_SID environment
variable must be set.
■ You must be logged in as the database administrator.
■ Remove any non-VxFS files from mkqio.dat before running
qio_convertdbfiles. The qio_convertdbfiles command
will display an error message if any of the database files in
mkqio.dat are not on a VxFS file system.
Prerequisites
■ Theqio_convertdbfiles command expects all files to be owned
by the database administrator.
■ Converting existing database files to Quick I/O is not recommended
if the files are fragmented. In this case, it is recommended that
you create new files with the qiomkfile command (these files
are guaranteed not to be fragmented) and then convert the data
from the old files (using a command such as dd).
■ Ensure that the database is shut down before running
qio_convertdbfiles.
■ See the qio_convertdbfiles(1M) manual page for more
information.
Usage notes
Table A-11 lists options for the qio_convertdbfiles command.
Table A-11 qio_convertdbfiles command options
DescriptionOption
Forces the behavior for a specific database type. The database options
that are supported are ora, syb, and db2. Use this option in
environments with more than one type of database.
-T
Changes regular files to Quick I/O files using absolute pathnames. Use
this option when symbolic links need to point to absolute pathnames.
By default, relative pathnames are used.
-a
Reports on current fragmentation levels for files listed inmkqio.dat.Fragmentation is reported at four levels: not fragmented, slightly
fragmented, fragmented, and highly fragmented.
-f
Displays a help message.-h
379Veritas Storage Foundation for Oracle Command Line InterfaceAbout the command line interface
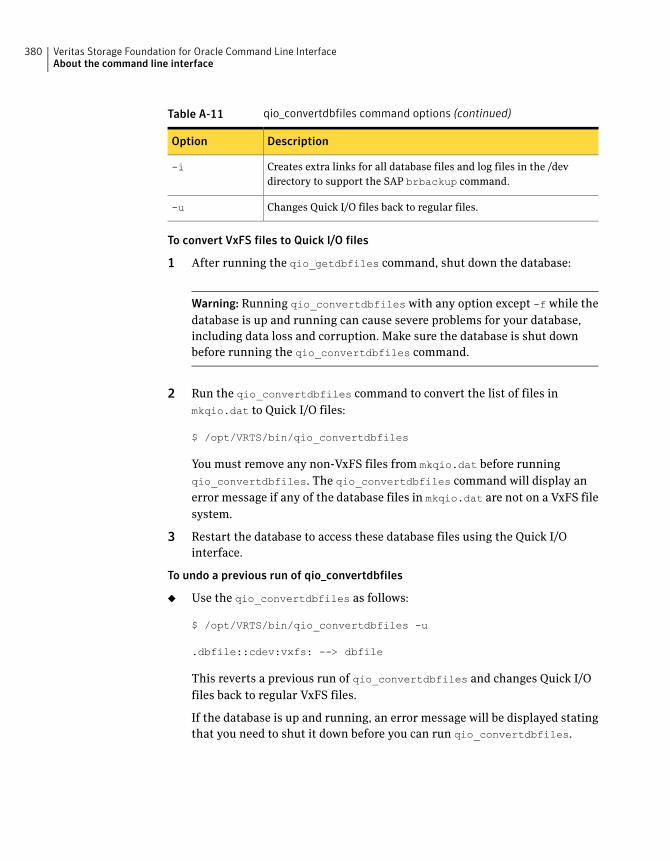
Table A-11 qio_convertdbfiles command options (continued)
DescriptionOption
Creates extra links for all database files and log files in the /dev
directory to support the SAP brbackup command.
-i
Changes Quick I/O files back to regular files.-u
To convert VxFS files to Quick I/O files
1 After running the qio_getdbfiles command, shut down the database:
Warning: Running qio_convertdbfiles with any option except -f while the
database is up and running can cause severe problems for your database,
including data loss and corruption. Make sure the database is shut down
before running the qio_convertdbfiles command.
2 Run the qio_convertdbfiles command to convert the list of files in
mkqio.dat to Quick I/O files:
$ /opt/VRTS/bin/qio_convertdbfiles
You must remove any non-VxFS files from mkqio.dat before running
qio_convertdbfiles. The qio_convertdbfiles command will display an
error message if any of the database files in mkqio.dat are not on a VxFS file
system.
3 Restart the database to access these database files using the Quick I/O
interface.
To undo a previous run of qio_convertdbfiles
◆ Use the qio_convertdbfiles as follows:
$ /opt/VRTS/bin/qio_convertdbfiles -u
.dbfile::cdev:vxfs: --> dbfile
This reverts a previous run of qio_convertdbfiles and changes Quick I/O
files back to regular VxFS files.
If the database is up and running, an error message will be displayed stating
that you need to shut it down before you can run qio_convertdbfiles.
Veritas Storage Foundation for Oracle Command Line InterfaceAbout the command line interface
380
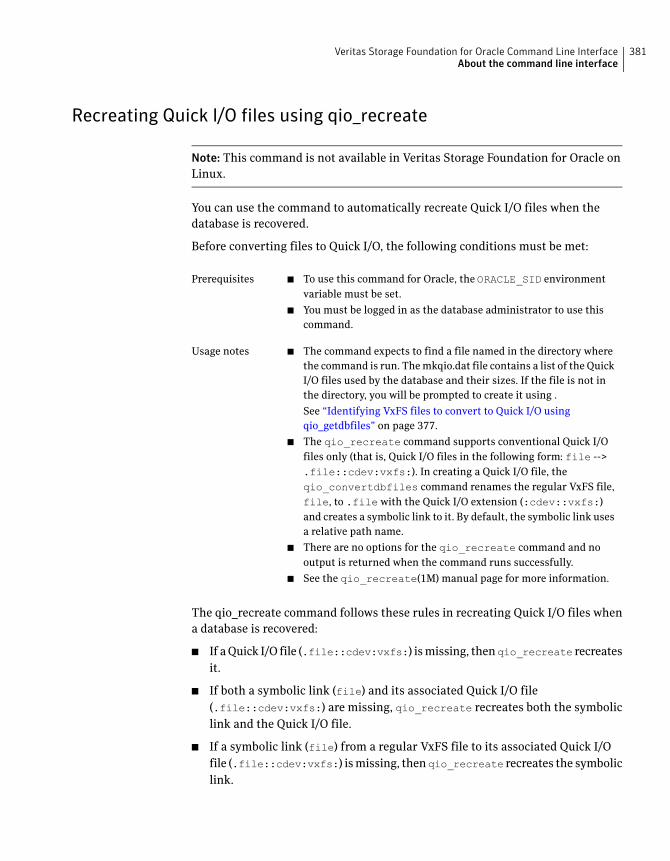
Recreating Quick I/O files using qio_recreate
Note: This command is not available in Veritas Storage Foundation for Oracle on
Linux.
You can use the command to automatically recreate Quick I/O files when the
database is recovered.
Before converting files to Quick I/O, the following conditions must be met:
■ To use this command for Oracle, the ORACLE_SID environment
variable must be set.
■ You must be logged in as the database administrator to use this
command.
Prerequisites
■ The command expects to find a file named in the directory where
the command is run. The mkqio.dat file contains a list of the Quick
I/O files used by the database and their sizes. If the file is not in
the directory, you will be prompted to create it using .
See “Identifying VxFS files to convert to Quick I/O using
qio_getdbfiles” on page 377.
■ The qio_recreate command supports conventional Quick I/O
files only (that is, Quick I/O files in the following form: file -->
.file::cdev:vxfs:). In creating a Quick I/O file, the
qio_convertdbfiles command renames the regular VxFS file,
file, to .file with the Quick I/O extension (:cdev::vxfs:)
and creates a symbolic link to it. By default, the symbolic link uses
a relative path name.
■ There are no options for the qio_recreate command and no
output is returned when the command runs successfully.
■ See the qio_recreate(1M) manual page for more information.
Usage notes
The qio_recreate command follows these rules in recreating Quick I/O files when
a database is recovered:
■ If a Quick I/O file (.file::cdev:vxfs:) is missing, thenqio_recreate recreates
it.
■ If both a symbolic link (file) and its associated Quick I/O file
(.file::cdev:vxfs:) are missing, qio_recreate recreates both the symbolic
link and the Quick I/O file.
■ If a symbolic link (file) from a regular VxFS file to its associated Quick I/O
file (.file::cdev:vxfs:) is missing, then qio_recreate recreates the symbolic
link.
381Veritas Storage Foundation for Oracle Command Line InterfaceAbout the command line interface
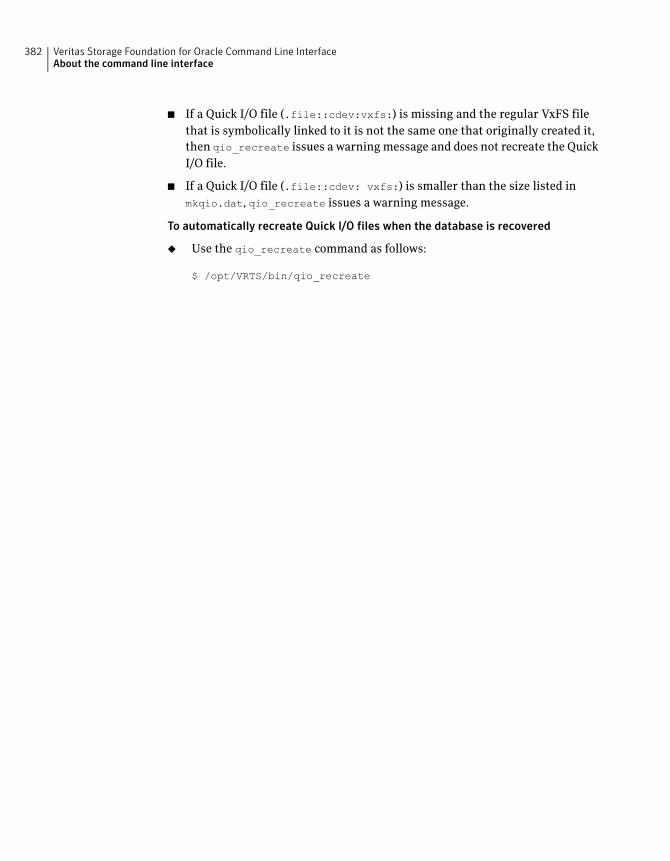
■ If a Quick I/O file (.file::cdev:vxfs:) is missing and the regular VxFS file
that is symbolically linked to it is not the same one that originally created it,
then qio_recreate issues a warning message and does not recreate the Quick
I/O file.
■ If a Quick I/O file (.file::cdev: vxfs:) is smaller than the size listed in
mkqio.dat, qio_recreate issues a warning message.
To automatically recreate Quick I/O files when the database is recovered
◆ Use the qio_recreate command as follows:
$ /opt/VRTS/bin/qio_recreate
Veritas Storage Foundation for Oracle Command Line InterfaceAbout the command line interface
382
Using third-party software
to back up files
This appendix includes the following topics:
■ About backing up and restoring Quick I/O files using Oracle RMAN
■ About backing up and restoring Oracle Disk Manager files using Oracle RMAN
■ About backing up and restoring Quick I/O files using Legato NetWorker
■ About using backup software other than VERITAS NetBackup to back up and
restore ODM files
About backing up and restoring Quick I/O files usingOracle RMAN
Quick I/O files are treated as raw devices by Oracle Recovery Manager (RMAN)
and must be backed up and restored the same way as raw devices. A Quick I/O file
consists of two components: a regular file with space allocated to it and a link
pointing to the Quick I/O interface for the file.
When a Quick I/O file is created with the qiomkfile command, the regular file
with the preallocated space is a hidden file. For example, dbfile points to
.dbfile::cdev:vxfs: and .dbfile is the hidden file with the space allocated.
(These names are used in the examples throughout this section.)
For backup, RMAN reads the Oracle datafile using the Quick I/O interface, but
does not process or store the special link between the hidden file with the allocated
space (.dbfile) and the link to its Quick I/O interface (dbfile, which points to
.dbfile::cdev:vxfs:). This has implications for the restore operation, as
described in the rest of this section.
BAppendix
Because Quick I/O files are treated as raw devices, the Quick I/O file must exist
and have the necessary space preallocated to it before the file is restored using
RMAN. Space can be preallocated to the file when the file is created using the
qiomkfile command. In this case, the file can be restored using RMAN with no
other special handling, and the file can be accessed after the restore as a
Quick I/O file:
■ If both the Quick I/O link name and the hidden file are missing, use qiomkfile
to preallocate and set up the Quick I/O file.
■ If either the Quick I/O link name or the hidden file alone exist, delete these
files and recreate the Quick I/O file of the required size using qiomkfile.
■ If both the Quick I/O link name and the hidden file are intact, you may proceed
to restoring the file.
■ If you attempt to restore a Quick I/O file and the original is smaller than the
required size, the restore will fail with an Oracle error ORA-27069 (I/O attempt
beyond the range of the file). The failure results because Quick I/O does not
allow extending writes (in other words, attempts to increase the size of a file
by writing beyond the end of the file). This same behavior is encountered when
attempting to restore Oracle datafiles built on raw devices. If the restore fails
with the above error, delete the Quick I/O link and its hidden file, then recreate
or extend the file using qiomkfile.
Note: The space needed for the Oracle datafile is the size of the datafile plus
one Oracle block (as specified by the init.ora parameter, db_block_size).
About backing up and restoring Oracle Disk Managerfiles using Oracle RMAN
Oracle allocates Oracle Disk Manager files with contiguous extent layouts for
good database performance. When you restore database files they are allocated
using these extent attributes. If you are using Oracle RMAN's conventional backup
method with any backup software, datafiles are also restored with the proper
extent layouts.
If you are using RMAN's “proxy copy” backup method with a backup software
other than NetBackup, the extent attributes may not be backed up. To ensure the
restored datafiles have proper extent layouts, preallocate the lost datafiles using
the odmmkfile command. This command preallocates contiguous space for files
prior to restoring them.
Using third-party software to back up filesAbout backing up and restoring Oracle Disk Manager files using Oracle RMAN
384
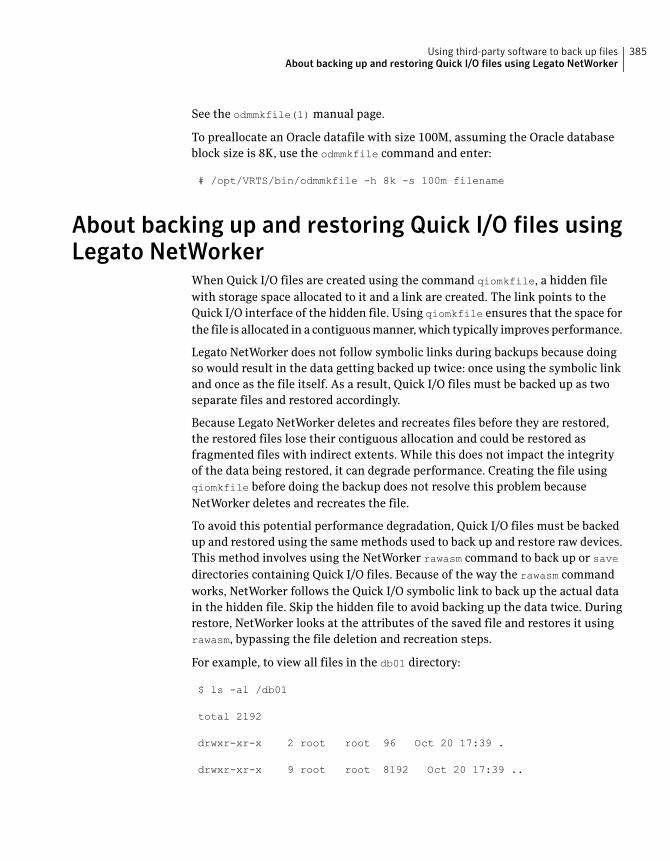
See the odmmkfile(1) manual page.
To preallocate an Oracle datafile with size 100M, assuming the Oracle database
block size is 8K, use the odmmkfile command and enter:
# /opt/VRTS/bin/odmmkfile -h 8k -s 100m filename
About backing up and restoring Quick I/O files usingLegato NetWorker
When Quick I/O files are created using the command qiomkfile, a hidden file
with storage space allocated to it and a link are created. The link points to the
Quick I/O interface of the hidden file. Using qiomkfile ensures that the space for
the file is allocated in a contiguous manner, which typically improves performance.
Legato NetWorker does not follow symbolic links during backups because doing
so would result in the data getting backed up twice: once using the symbolic link
and once as the file itself. As a result, Quick I/O files must be backed up as two
separate files and restored accordingly.
Because Legato NetWorker deletes and recreates files before they are restored,
the restored files lose their contiguous allocation and could be restored as
fragmented files with indirect extents. While this does not impact the integrity
of the data being restored, it can degrade performance. Creating the file using
qiomkfile before doing the backup does not resolve this problem because
NetWorker deletes and recreates the file.
To avoid this potential performance degradation, Quick I/O files must be backed
up and restored using the same methods used to back up and restore raw devices.
This method involves using the NetWorker rawasm command to back up or save
directories containing Quick I/O files. Because of the way the rawasm command
works, NetWorker follows the Quick I/O symbolic link to back up the actual data
in the hidden file. Skip the hidden file to avoid backing up the data twice. During
restore, NetWorker looks at the attributes of the saved file and restores it using
rawasm, bypassing the file deletion and recreation steps.
For example, to view all files in the db01 directory:
$ ls -al /db01
total 2192
drwxr-xr-x 2 root root 96 Oct 20 17:39 .
drwxr-xr-x 9 root root 8192 Oct 20 17:39 ..
385Using third-party software to back up filesAbout backing up and restoring Quick I/O files using Legato NetWorker
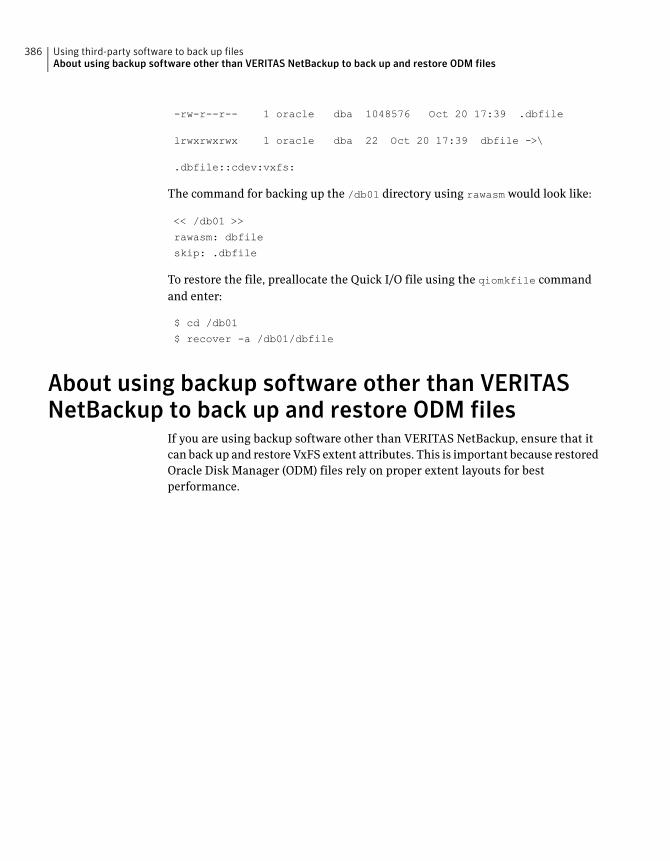
-rw-r--r-- 1 oracle dba 1048576 Oct 20 17:39 .dbfile
lrwxrwxrwx 1 oracle dba 22 Oct 20 17:39 dbfile ->\
.dbfile::cdev:vxfs:
The command for backing up the /db01 directory using rawasm would look like:
<< /db01 >>
rawasm: dbfile
skip: .dbfile
To restore the file, preallocate the Quick I/O file using the qiomkfile command
and enter:
$ cd /db01
$ recover -a /db01/dbfile
About using backup software other than VERITASNetBackup to back up and restore ODM files
If you are using backup software other than VERITAS NetBackup, ensure that it
can back up and restore VxFS extent attributes. This is important because restored
Oracle Disk Manager (ODM) files rely on proper extent layouts for best
performance.
Using third-party software to back up filesAbout using backup software other than VERITAS NetBackup to back up and restore ODM files
386
VeritasDatabase FlashSnap
status information
This appendix includes the following topics:
■ Database FlashSnap snapshot status and database status
Database FlashSnap snapshot status and databasestatus
The Veritas Database FlashSnap functionality provides both snapshot status
information and snapshot database status information for various stages of
snapplan and snapshot procedures. You can view the status information through
the CLI and through the GUI.
For more information about Database FlashSnap GUI functionality, see theVeritas
Storage Foundation for Oracle Graphical User Interface Guide.
You can obtain both the snapshot status and the database status from the command
line using the dbed_vmchecksnap command with the -o list option. The snapshot
status and database status information may also appear in error messages.
Snapshot status details
To view snapshot status information from the command line, use the
dbed_vmchecksnap command with the-o listoption to list all available snapplans
for a specified database. Snapshot status information is displayed in the command
output under the column heading SNAP_STATUS.
Table C-1 shows detailed information about each snapshot status (SNAP_STATUS)
value.
CAppendix
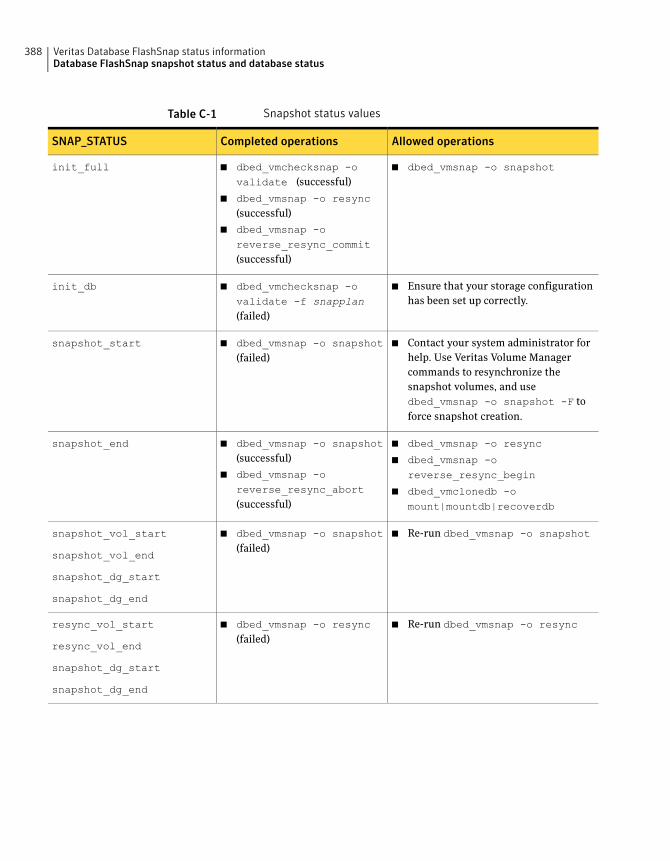
Table C-1 Snapshot status values
Allowed operationsCompleted operationsSNAP_STATUS
■ dbed_vmsnap -o snapshot■ dbed_vmchecksnap -ovalidate (successful)
■ dbed_vmsnap -o resync(successful)
■ dbed_vmsnap -oreverse_resync_commit(successful)
init_full
■ Ensure that your storage configuration
has been set up correctly.
■ dbed_vmchecksnap -ovalidate -f snapplan(failed)
init_db
■ Contact your system administrator for
help. Use Veritas Volume Manager
commands to resynchronize the
snapshot volumes, and use
dbed_vmsnap -o snapshot -F to
force snapshot creation.
■ dbed_vmsnap -o snapshot(failed)
snapshot_start
■ dbed_vmsnap -o resync
■ dbed_vmsnap -oreverse_resync_begin
■ dbed_vmclonedb -omount|mountdb|recoverdb
■ dbed_vmsnap -o snapshot(successful)
■ dbed_vmsnap -oreverse_resync_abort(successful)
snapshot_end
■ Re-run dbed_vmsnap -o snapshot■ dbed_vmsnap -o snapshot(failed)
snapshot_vol_start
snapshot_vol_end
snapshot_dg_start
snapshot_dg_end
■ Re-run dbed_vmsnap -o resync■ dbed_vmsnap -o resync(failed)
resync_vol_start
resync_vol_end
snapshot_dg_start
snapshot_dg_end
Veritas Database FlashSnap status informationDatabase FlashSnap snapshot status and database status
388
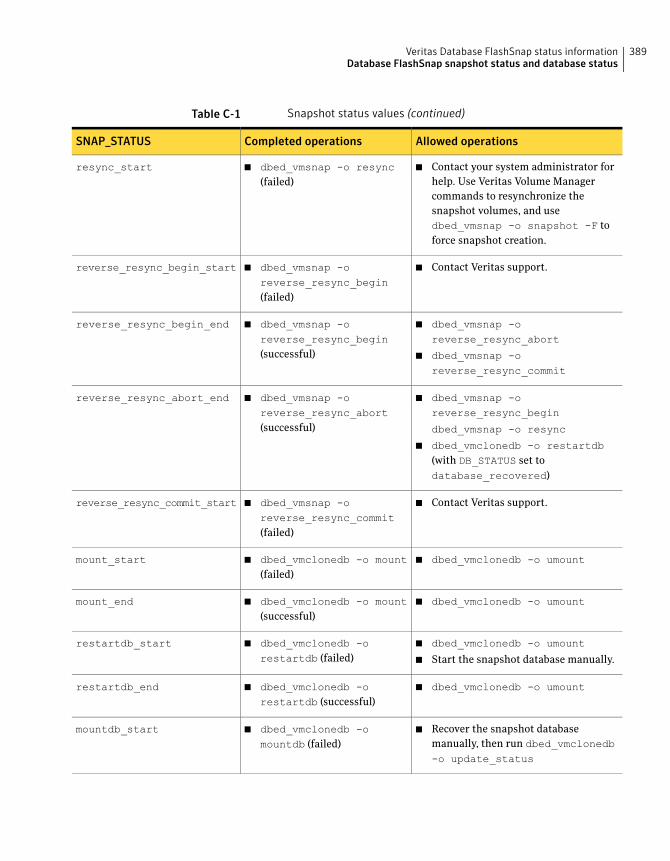
Table C-1 Snapshot status values (continued)
Allowed operationsCompleted operationsSNAP_STATUS
■ Contact your system administrator for
help. Use Veritas Volume Manager
commands to resynchronize the
snapshot volumes, and use
dbed_vmsnap -o snapshot -F to
force snapshot creation.
■ dbed_vmsnap -o resync(failed)
resync_start
■ Contact Veritas support.■ dbed_vmsnap -oreverse_resync_begin(failed)
reverse_resync_begin_start
■ dbed_vmsnap -oreverse_resync_abort
■ dbed_vmsnap -oreverse_resync_commit
■ dbed_vmsnap -oreverse_resync_begin(successful)
reverse_resync_begin_end
■ dbed_vmsnap -oreverse_resync_begin
dbed_vmsnap -o resync
■ dbed_vmclonedb -o restartdb(with DB_STATUS set to
database_recovered)
■ dbed_vmsnap -oreverse_resync_abort(successful)
reverse_resync_abort_end
■ Contact Veritas support.■ dbed_vmsnap -oreverse_resync_commit(failed)
reverse_resync_commit_start
■ dbed_vmclonedb -o umount■ dbed_vmclonedb -o mount(failed)
mount_start
■ dbed_vmclonedb -o umount■ dbed_vmclonedb -o mount(successful)
mount_end
■ dbed_vmclonedb -o umount
■ Start the snapshot database manually.
■ dbed_vmclonedb -orestartdb (failed)
restartdb_start
■ dbed_vmclonedb -o umount■ dbed_vmclonedb -orestartdb (successful)
restartdb_end
■ Recover the snapshot database
manually, then run dbed_vmclonedb-o update_status
■ dbed_vmclonedb -omountdb (failed)
mountdb_start
389Veritas Database FlashSnap status informationDatabase FlashSnap snapshot status and database status
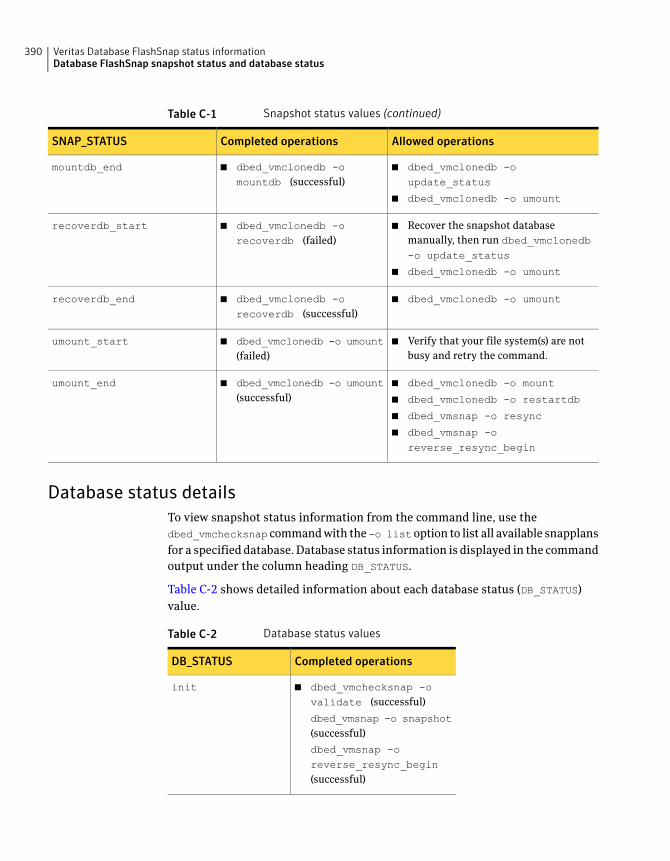
Table C-1 Snapshot status values (continued)
Allowed operationsCompleted operationsSNAP_STATUS
■ dbed_vmclonedb -oupdate_status
■ dbed_vmclonedb -o umount
■ dbed_vmclonedb -omountdb (successful)
mountdb_end
■ Recover the snapshot database
manually, then run dbed_vmclonedb-o update_status
■ dbed_vmclonedb -o umount
■ dbed_vmclonedb -orecoverdb (failed)
recoverdb_start
■ dbed_vmclonedb -o umount■ dbed_vmclonedb -orecoverdb (successful)
recoverdb_end
■ Verify that your file system(s) are not
busy and retry the command.
■ dbed_vmclonedb -o umount(failed)
umount_start
■ dbed_vmclonedb -o mount
■ dbed_vmclonedb -o restartdb
■ dbed_vmsnap -o resync
■ dbed_vmsnap -oreverse_resync_begin
■ dbed_vmclonedb -o umount(successful)
umount_end
Database status details
To view snapshot status information from the command line, use the
dbed_vmchecksnap command with the-o listoption to list all available snapplans
for a specified database. Database status information is displayed in the command
output under the column heading DB_STATUS.
Table C-2 shows detailed information about each database status (DB_STATUS)
value.
Table C-2 Database status values
Completed operationsDB_STATUS
■ dbed_vmchecksnap -ovalidate (successful)
dbed_vmsnap -o snapshot(successful)
dbed_vmsnap -oreverse_resync_begin(successful)
init
Veritas Database FlashSnap status informationDatabase FlashSnap snapshot status and database status
390

Table C-2 Database status values (continued)
Completed operationsDB_STATUS
■ dbed_vmclonedb -orecoverdb (successful)
database_recovered
391Veritas Database FlashSnap status informationDatabase FlashSnap snapshot status and database status

Veritas Database FlashSnap status informationDatabase FlashSnap snapshot status and database status
392
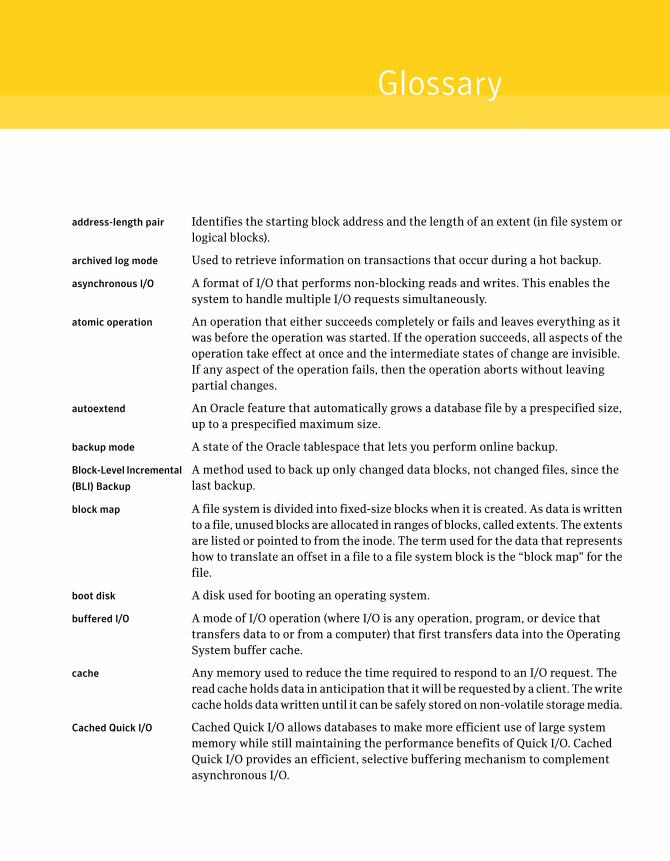
address-length pair Identifies the starting block address and the length of an extent (in file system or
logical blocks).
archived log mode Used to retrieve information on transactions that occur during a hot backup.
asynchronous I/O A format of I/O that performs non-blocking reads and writes. This enables the
system to handle multiple I/O requests simultaneously.
atomic operation An operation that either succeeds completely or fails and leaves everything as it
was before the operation was started. If the operation succeeds, all aspects of the
operation take effect at once and the intermediate states of change are invisible.
If any aspect of the operation fails, then the operation aborts without leaving
partial changes.
autoextend An Oracle feature that automatically grows a database file by a prespecified size,
up to a prespecified maximum size.
backup mode A state of the Oracle tablespace that lets you perform online backup.
Block-Level Incremental
(BLI) Backup
A method used to back up only changed data blocks, not changed files, since the
last backup.
block map A file system is divided into fixed-size blocks when it is created. As data is written
to a file, unused blocks are allocated in ranges of blocks, called extents. The extents
are listed or pointed to from the inode. The term used for the data that represents
how to translate an offset in a file to a file system block is the “block map” for the
file.
boot disk A disk used for booting an operating system.
buffered I/O A mode of I/O operation (where I/O is any operation, program, or device that
transfers data to or from a computer) that first transfers data into the Operating
System buffer cache.
cache Any memory used to reduce the time required to respond to an I/O request. The
read cache holds data in anticipation that it will be requested by a client. The write
cache holds data written until it can be safely stored on non-volatile storage media.
Cached Quick I/O Cached Quick I/O allows databases to make more efficient use of large system
memory while still maintaining the performance benefits of Quick I/O. Cached
Quick I/O provides an efficient, selective buffering mechanism to complement
asynchronous I/O.
Glossary
cluster A set of hosts that share a set of disks.
cluster-shareable disk
group
A disk group in which the disks are shared between more than one host.
cold backup The process of backing up a database that is not in active use.
command launcher A graphical user interface (GUI) window that displays a list of tasks that can be
performed by Veritas Volume Manager or other objects. Each task is listed with
the object type, task (action), and a description of the task. A task is launched by
clicking on the task in the Command Launcher. concatenation A Veritas Volume
Manager layout style characterized by subdisks that are arranged sequentially
and contiguously.
concurrent I/O A form of Direct I/O that does not require file-level write locks when writing to a
file. Concurrent I/O allows the relational database management system (RDBMS)
to write to a given file concurrently.
configuration database A set of records containing detailed information on existing Veritas Volume
Manager objects (such as disk and volume attributes). A single copy of a
configuration database is called a configuration copy.
control file An Oracle control file specifies the physical structure of an Oracle database,
including such things as the database name, names and locations of the datafiles
and redo log files, and the timestamp of when the database was created. When
you start an Oracle database, the control file is used to identify the database
instance name redo log files that must be opened for transaction recording and
recovery and datafiles where data is stored.
copy-on-write A technique for preserving the original of some data. As data is modified by a
write operation, the original copy of data is copied.
Applicable to Storage Checkpoint technology, where original data, at the time of
the Storage Checkpoint, must be copied from the file system to the Storage
Checkpoint when it is to be overwritten. This preserves the frozen image of the
file system in the Storage Checkpoint.
data block A logical database data storage unit. Blocks contain the actual data. When a
database is created, a data block size is specified. The database then uses and
allocates database space in data blocks.
data change object
(DCO)
A Veritas Volume Manager object used to manage FastResync map information
in the DCO log volume. A DCO and a DCO log volume must be associated with a
volume in order to implement persistent FastResync on that volume.
Data Storage
Checkpoint
A Storage Checkpoint that is a complete image of a file system. For more
information, see "Storage Checkpoint."
database A database is a collection of information that is organized in a structured fashion.
Two examples of databases are Relational Databases (such as Oracle, Sybase, or
Glossary394
DB2), where data is stored in tables and generally accessed by one or more keys
and Flat File Databases, where data is not generally broken up into tables and
relationships. Databases generally provide tools and/or interfaces to retrieve data.
datafile A physical database attribute that contains database data. An Oracle datafile can
only be associated with a single database. One or more datafiles form a logical
database storage unit called a tablespace.
DCO See "data change object (DCO)."
DCO log volume A volume used to hold persistent FastResync change maps.
Decision Support
Systems
Decision Support Systems (DSS) are computer-based systems used to model,
identify, and solve problems, and make decisions.
defragmentation The act of reorganizing data to reduce fragmentation. Data in file systems become
fragmented over time.
device file A block- or character-special file located in the /dev directory representing a
device.
device name The name of a device file, which represents a device. AIX syntax is Disk_#; HP-UX
syntax is c#t#d#; Linux syntax is sda, where "a" could be any alphabetical letter;
Solaris syntax is c#t#d#s#.
direct I/O An unbuffered form of I/O that bypasses the kernel’s buffering of data. With direct
I/O, data is transferred directly between the disk and the user application.
Dirty Region Logging The procedure by which the Veritas Volume Manager monitors and logs
modifications to a plex. A bitmap of changed regions is kept in an associated
subdisk called a log subdisk.
disk access name The name used to access a physical disk, such as Disk_1 on an AIX system, c1t1d1
on an HP-UX system, sda on a Linux system, or c0t0d0s0 on a Solaris system. The
term device name can also be used to refer to the disk access name.
disk array A collection of disks logically and physically arranged into an object. Arrays
provide benefits including data redundancy and improved performance.
disk cache A section of RAM that provides a cache between the disk and the application. Disk
cache enables the computer to operate faster. Because retrieving data from hard
disk can be slow, a disk caching program helps solve this problem by placing
recently accessed data in the disk cache. Next time that data is needed, it may
already be available in the disk cache; otherwise a time-consuming operation to
the hard disk is necessary.
disk group A collection of disks that share a common configuration.
A disk group configuration is a set of records containing detailed information on
existing Veritas Volume Manager objects (such as disk and volume attributes) and
their relationships. Each disk group has an administrator-assigned name and an
395Glossary
internally defined unique ID. The root disk group (rootdg) is a special private disk
group
disk name A Veritas Volume Manager logical or administrative name chosen for the disk,
such as disk03. The term disk media name is also used to refer to the disk name.
DMP See “Dynamic Multipathing.”
DSS See “Decision Support Systems.”
Dynamic Multipathing Dynamic Multipathing (DMP) is a Veritas Volume Manager feature that allows
the use of multiple paths to the same storage device for load balancing and
redundancy.
error handling Routines in a program that respond to errors. The measurement of quality in
error handling is based on how the system informs the user of such conditions
and what alternatives it provides for dealing with them.
evacuate Moving subdisks from the source disks to target disks.
exabyte A measure of memory or storage. An exabyte is approximately
1,000,000,000,000,000,000 bytes (technically 2 to the 60th power, or
1,152,921,504,606,846,976 bytes). Also EB.
extent A logical database attribute that defines a group of contiguous file system data
blocks that are treated as a unit. An extent is defined by a starting block and a
length.
extent attributes The extent allocation policies associated with a file and/or file system. For example,
see “address-length pair.”
failover The act of moving a service from a failure state back to a running/available state.
Services are generally applications running on machines and failover is the process
of restarting these applications on a second system when the first has suffered a
failure.
file system A collection of files organized together into a structure. File systems are based
on a hierarchical structure consisting of directories and files.
file system block The fundamental minimum size of allocation in a file system.
fileset A collection of files within a file system.
fixed extent size An extent attribute associated with overriding the default allocation policy of the
file system.
fragmentation Storage of data in non-contiguous areas on disk. As files are updated, new data is
stored in available free space, which may not be contiguous. Fragmented files
cause extra read/write head movement, slowing disk accesses.
Glossary396

gigabyte A measure of memory or storage. A gigabyte is approximately 1,000,000,000 bytes
(technically, 2 to the 30th power, or 1,073,741,824 bytes). Also GB, Gbyte, and
G-byte.
high availability (HA) The ability of a system to perform its function continuously (without significant
interruption) for a significantly longer period of time than the combined
reliabilities of its individual components. High availability is most often achieved
through failure tolerance and inclusion of redundancy; from redundant disk to
systems, networks, and entire sites.
hot backup The process of backing up a database that is online and in active use.
hot pluggable To pull a component out of a system and plug in a new one while the power is still
on and the unit is still operating. Redundant systems can be designed to swap disk
drives, circuit boards, power supplies, CPUs, or virtually anything else that is
duplexed within the computer. Also known as hot swappable.
hot-relocation A Veritas Volume Manager technique of automatically restoring redundancy and
access to mirrored and RAID-5 volumes when a disk fails. This is done by relocating
the affected subdisks to disks designated as spares and/or free space in the same
disk group.
inode list An inode is an on-disk data structure in the file system that defines everything
about the file, except its name. Inodes contain information such as user and group
ownership, access mode (permissions), access time, file size, file type, and the
block map for the data contents of the file. Each inode is identified by a unique
inode number in the file system where it resides. The inode number is used to find
the inode in the inode list for the file system. The inode list is a series of inodes.
There is one inode in the list for every file in the file system.
instance When you start a database, a system global area (SGA) is allocated and the Oracle
processes are started. The SGA is the area of memory used for database
information shared by all database users. The Oracle processes and the SGA create
what is called an Oracle instance.
intent logging A logging scheme that records pending changes to a file system structure. These
changes are recorded in an intent log.
interrupt key A way to end or break out of any operation and return to the system prompt by
pressing Ctrl-C.
kernel asynchronous I/O A form of I/O that performs non-blocking system level reads and writes. This
enables the system to handle multiple I/O requests simultaneously.
kilobyte A measure of memory or storage. A kilobyte is approximately a thousand bytes
(technically, 2 to the 10th power, or 1,024 bytes). Also KB, Kbyte, kbyte, and K-byte.
397Glossary
large file A file more than two gigabytes in size. An operating system that uses a 32-bit
signed integer to address file contents will not support large files; however, the
Version 4 disk layout feature of VxFS supports file sizes of up to two terabytes.
large file system A file system more than two gigabytes in size. VxFS, in conjunction with VxVM,
supports large file systems.
latency The amount of time it takes for a given piece of work to be completed. For file
systems, this typically refers to the amount of time it takes a given file system
operation to return to the user. Also commonly used to describe disk seek times.
load balancing The tuning of a computer system, network tuning, or disk subsystem in order to
more evenly distribute the data and/or processing across available resources. For
example, in clustering, load balancing might distribute the incoming transactions
evenly to all servers, or it might redirect them to the next available server.
load sharing The division of a task among several components without any attempt to equalize
each component’s share of the load. When several components are load sharing,
it is possible for some of the shared components to be operating at full capacity
and limiting performance, while others components are under utilized.
Logical Unit Number A method of expanding the number of SCSI devices that can be placed on one SCSI
bus. Logical Unit Numbers address up to seven devices at each SCSI ID on an 8-bit
bus or up to 15 devices at each ID on a 16-bit bus.
logical volume See “volume.”
LUN See “Logical Unit Number.”
master node A computer which controls another computer or a peripheral.
megabyte A measure of memory or storage. A megabyte is approximately 1,000,000 bytes
(technically, 2 to the 20th power, or 1,048,576 bytes). Also MB, Mbyte, mbyte, and
K-byte.
metadata Data that describes other data. Data dictionaries and repositories are examples
of metadata. The term may also refer to any file or database that holds information
about another database's structure, attributes, processing, or changes.
mirror A duplicate copy of a volume and the data therein (in the form of an ordered
collection of subdisks). Each mirror is one copy of the volume with which the
mirror is associated. The terms mirror and plex can be used synonymously.
mirroring A layout technique that mirrors the contents of a volume onto multiple plexes.
Each plex duplicates the data stored on the volume, but the plexes themselves
may have different layouts.
mount point The directory path name at which a file system attaches to the file system
hierarchy.
Glossary398

multithreaded Having multiple concurrent or pseudo-concurrent execution sequences. Used to
describe processes in computer systems. Multithreaded processes are one means
by which I/O request-intensive applications can use independent access to volumes
and disk arrays to increase I/O performance.
NBU See “Veritas NetBackup (NBU).”
node One of the hosts in a cluster.
object (VxVM) An entity that is defined to and recognized internally by the Veritas Volume
Manager. The VxVM objects include volumes, plexes, subdisks, disks, and disk
groups. There are two types of VxVM disk objects—one for the physical aspect of
the disk and the other for the logical aspect of the disk.
OLTP See “Online Transaction Processing.”
online administration An administrative feature that allows configuration changes without system or
database down time.
Online Transaction
Processing
A type of system designed to support transaction-oriented applications. OLTP
systems are designed to respond immediately to user requests and each request
is considered to be a single transaction. Requests can involve adding, retrieving,
updating or removing data.
paging The transfer of program segments (pages) into and out of memory. Although
paging is the primary mechanism for virtual memory, excessive paging is not
desirable.
parity A calculated value that can be used to reconstruct data after a failure. While data
is being written to a RAID-5 volume, parity is also calculated by performing an
exclusive OR (XOR) procedure on data. The resulting parity is then written to the
volume. If a portion of a RAID-5 volume fails, the data that was on that portion
of the failed volume can be recreated from the remaining data and the parity.
partition The logical areas into which a disk is divided.
persistence Information or state that will survive a system reboot or crash.
petabyte A measure of memory or storage. A petabyte is approximately 1,000 terabytes
(technically, 2 to the 50th power).
plex A duplicate copy of a volume and its data (in the form of an ordered collection of
subdisks). Each plex is one copy of a volume with which the plex is associated.
The terms mirror and plex can be used synonymously.
preallocation Prespecifying space for a file so that disk blocks will physically be part of a file
before they are needed. Enabling an application to preallocate space for a file
guarantees that a specified amount of space will be available for that file, even if
the file system is otherwise out of space.
399Glossary
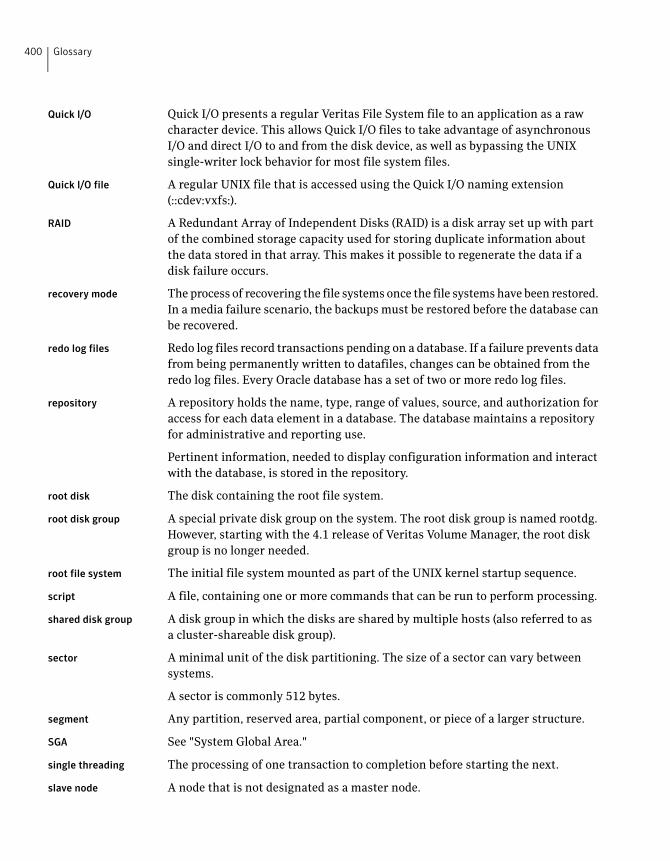
Quick I/O Quick I/O presents a regular Veritas File System file to an application as a raw
character device. This allows Quick I/O files to take advantage of asynchronous
I/O and direct I/O to and from the disk device, as well as bypassing the UNIX
single-writer lock behavior for most file system files.
Quick I/O file A regular UNIX file that is accessed using the Quick I/O naming extension
(::cdev:vxfs:).
RAID A Redundant Array of Independent Disks (RAID) is a disk array set up with part
of the combined storage capacity used for storing duplicate information about
the data stored in that array. This makes it possible to regenerate the data if a
disk failure occurs.
recovery mode The process of recovering the file systems once the file systems have been restored.
In a media failure scenario, the backups must be restored before the database can
be recovered.
redo log files Redo log files record transactions pending on a database. If a failure prevents data
from being permanently written to datafiles, changes can be obtained from the
redo log files. Every Oracle database has a set of two or more redo log files.
repository A repository holds the name, type, range of values, source, and authorization for
access for each data element in a database. The database maintains a repository
for administrative and reporting use.
Pertinent information, needed to display configuration information and interact
with the database, is stored in the repository.
root disk The disk containing the root file system.
root disk group A special private disk group on the system. The root disk group is named rootdg.
However, starting with the 4.1 release of Veritas Volume Manager, the root disk
group is no longer needed.
root file system The initial file system mounted as part of the UNIX kernel startup sequence.
script A file, containing one or more commands that can be run to perform processing.
shared disk group A disk group in which the disks are shared by multiple hosts (also referred to as
a cluster-shareable disk group).
sector A minimal unit of the disk partitioning. The size of a sector can vary between
systems.
A sector is commonly 512 bytes.
segment Any partition, reserved area, partial component, or piece of a larger structure.
SGA See "System Global Area."
single threading The processing of one transaction to completion before starting the next.
slave node A node that is not designated as a master node.
Glossary400
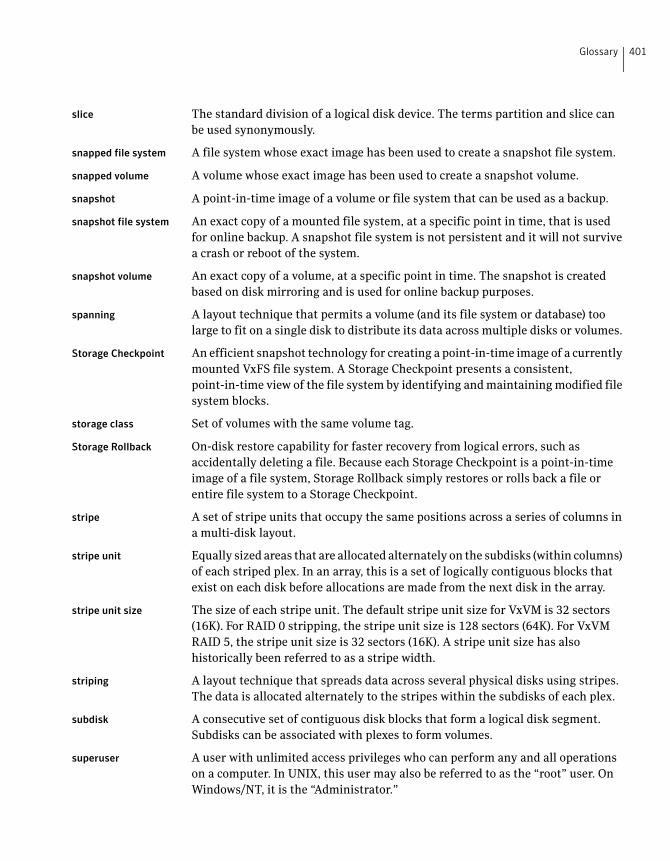
slice The standard division of a logical disk device. The terms partition and slice can
be used synonymously.
snapped file system A file system whose exact image has been used to create a snapshot file system.
snapped volume A volume whose exact image has been used to create a snapshot volume.
snapshot A point-in-time image of a volume or file system that can be used as a backup.
snapshot file system An exact copy of a mounted file system, at a specific point in time, that is used
for online backup. A snapshot file system is not persistent and it will not survive
a crash or reboot of the system.
snapshot volume An exact copy of a volume, at a specific point in time. The snapshot is created
based on disk mirroring and is used for online backup purposes.
spanning A layout technique that permits a volume (and its file system or database) too
large to fit on a single disk to distribute its data across multiple disks or volumes.
Storage Checkpoint An efficient snapshot technology for creating a point-in-time image of a currently
mounted VxFS file system. A Storage Checkpoint presents a consistent,
point-in-time view of the file system by identifying and maintaining modified file
system blocks.
storage class Set of volumes with the same volume tag.
Storage Rollback On-disk restore capability for faster recovery from logical errors, such as
accidentally deleting a file. Because each Storage Checkpoint is a point-in-time
image of a file system, Storage Rollback simply restores or rolls back a file or
entire file system to a Storage Checkpoint.
stripe A set of stripe units that occupy the same positions across a series of columns in
a multi-disk layout.
stripe unit Equally sized areas that are allocated alternately on the subdisks (within columns)
of each striped plex. In an array, this is a set of logically contiguous blocks that
exist on each disk before allocations are made from the next disk in the array.
stripe unit size The size of each stripe unit. The default stripe unit size for VxVM is 32 sectors
(16K). For RAID 0 stripping, the stripe unit size is 128 sectors (64K). For VxVM
RAID 5, the stripe unit size is 32 sectors (16K). A stripe unit size has also
historically been referred to as a stripe width.
striping A layout technique that spreads data across several physical disks using stripes.
The data is allocated alternately to the stripes within the subdisks of each plex.
subdisk A consecutive set of contiguous disk blocks that form a logical disk segment.
Subdisks can be associated with plexes to form volumes.
superuser A user with unlimited access privileges who can perform any and all operations
on a computer. In UNIX, this user may also be referred to as the “root” user. On
Windows/NT, it is the “Administrator.”
401Glossary
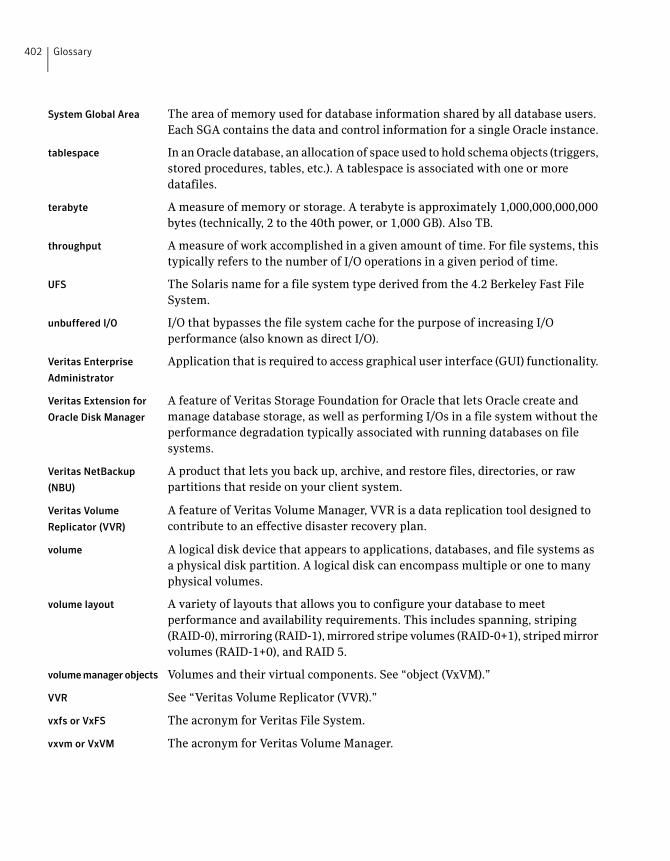
System Global Area The area of memory used for database information shared by all database users.
Each SGA contains the data and control information for a single Oracle instance.
tablespace In an Oracle database, an allocation of space used to hold schema objects (triggers,
stored procedures, tables, etc.). A tablespace is associated with one or more
datafiles.
terabyte A measure of memory or storage. A terabyte is approximately 1,000,000,000,000
bytes (technically, 2 to the 40th power, or 1,000 GB). Also TB.
throughput A measure of work accomplished in a given amount of time. For file systems, this
typically refers to the number of I/O operations in a given period of time.
UFS The Solaris name for a file system type derived from the 4.2 Berkeley Fast File
System.
unbuffered I/O I/O that bypasses the file system cache for the purpose of increasing I/O
performance (also known as direct I/O).
Veritas Enterprise
Administrator
Application that is required to access graphical user interface (GUI) functionality.
Veritas Extension for
Oracle Disk Manager
A feature of Veritas Storage Foundation for Oracle that lets Oracle create and
manage database storage, as well as performing I/Os in a file system without the
performance degradation typically associated with running databases on file
systems.
Veritas NetBackup
(NBU)
A product that lets you back up, archive, and restore files, directories, or raw
partitions that reside on your client system.
Veritas Volume
Replicator (VVR)
A feature of Veritas Volume Manager, VVR is a data replication tool designed to
contribute to an effective disaster recovery plan.
volume A logical disk device that appears to applications, databases, and file systems as
a physical disk partition. A logical disk can encompass multiple or one to many
physical volumes.
volume layout A variety of layouts that allows you to configure your database to meet
performance and availability requirements. This includes spanning, striping
(RAID-0), mirroring (RAID-1), mirrored stripe volumes (RAID-0+1), striped mirror
volumes (RAID-1+0), and RAID 5.
volumemanagerobjects Volumes and their virtual components. See “object (VxVM).”
VVR See “Veritas Volume Replicator (VVR).”
vxfs or VxFS The acronym for Veritas File System.
vxvm or VxVM The acronym for Veritas Volume Manager.
Glossary402
Numerics/etc/vx/vxdba/logs/ckptplan.log 212
Aabsolute path names
using with Quick I/O 84
absolute pathnames
use with symbolic links 81
accessing
Quick I/O files with symbolic links 81
allocating
memory to buffer cache 311
allocating file space 78
allocation policies
block-based 30
UFS 30
ALTER DATABASE 183
analyzing I/O statistics 106
ARCHIVELOG mode 172
archiving
using NetBackup 41
arrays
configuring 149
asynchronous I/O 74
autoextend
using with Quick I/O files 94
automatic backups 41
availability
using mirroring for 23
Bbacking up
using NetBackup 41
using Storage Checkpoints 172
using Storage Checkpoints and Storage
Rollback 157
backing up a database 271
balancing I/O load 308
benefits of Concurrent I/O 114
benefits of Quick I/O 74
BLI Backup. See Block-Level Incremental Backup
Block-Level Incremental Backup
overview 41
buffer cache 311
Ccache advisory
checking setting for 111
cache hit ratio
calculating 107
Cached Quick I/O
caching statistics 306
customizing 109
determining files to use 106
disabling individual files 109
enabling individual files 109
making settings persistent 109
overview 30
prerequisite for enabling 102
calculating cache hit ratio 107
Capacity Planning
creating schedules 214
dbed_ckptplan command 340
displaying schedules 216
displaying space usage 217
log file 212, 220
managing 340
overview 212
removing schedules 221
starting 213
changing file sizes 78
Checkpoints . See Storage Checkpoints
chgrp command 80
chmod command
commands
chmod 102
chown command 80
commands
chown 102
clone databases
creating 177, 275, 341, 361
Index
clone databases (continued)
restarting 281
shutting down 280, 361
unmounting file systems 280
clone databases, creating 177, 275, 341, 361
cloning a database. See clone databases
Cluster Volume Manager 29
collecting I/O statistics 106
command line interface 315
commands 131
chgrp 80
chown 80
cron 212
dbed_analyzer 135, 318
dbed_checkconfig 316, 320
dbed_ckptcreate 316, 325
dbed_ckptdisplay 316, 329
dbed_ckptmount 316
dbed_ckptplan 340
dbed_ckptquota 317
dbed_ckptremove 317, 340
dbed_ckptrollback 316–317, 338
dbed_ckptumount 317, 332
dbed_clonedb 177, 317, 341
dbed_saveconfig 316, 324
dbed_update 316, 319
dbed_vmchecksnap 318, 346, 354, 356
dbed_vmclonedb 318, 361
dbed_vmsnap 318, 356
edgetmsg2 318
fsadm 32, 62
fsadm command 92
fstyp 42
grep 104
ls 90
mkfs 33, 55–56
mount 33, 56, 76
overview 315
qio_convertdbfiles 82, 86, 317, 378
qio_getdbfiles 82, 85, 317, 377
qio_recreate 317, 370, 381
qioadmin 108
qiomkfile 92–94, 385
qiostat 106, 306–307
setext 79
umount 58
vxstorage_stats 318, 371
vxtunefs 110
vxupgrade 153
concatenation 21–22
Concurrent I/O
benefits 114
disabling 116
enabling 115
configuration environment
checking 320
control files
Oracle recovery 182
converting
Quick I/O files back to regular filesQuick I/O
converting back to regular files 84
regular files to Quick I/O files 86
CREADs 108
creating
a volume 51
Capacity Planning schedules 214
Quick I/O files 79
Storage Checkpoints 40
symbolic links to access Quick I/O files 77
creating a snapplan 255
cron 300, 327
scheduling Storage Checkpoints 328
cron command 212
crontab file 328
cross-platform data sharing 32
customizing Cached Quick I/O 109
Ddata change object 27
data redundancy 23
data warehousing 24
database
specifying type for Quick I/O 84
tuning 310, 312
Database Dynamic Storage Tiering
using 40
Database FlashSnap
applications 227
backing up
databases 271
cloning a database 275
commands 229
copying a snapplan 266
creating a snapplan 255
creating a snapshot 268
creating a snapshot mirror 234
dbed_vmchecksnap 255, 263, 266
dbed_vmclonedb 271
Index404
Database FlashSnap (continued)
dbed_vmsnap 268, 284
dbed_vmsnap -o resync 288
displaying a snapplan 266
host and storage requirements 233
options 230
Oracle RAC configuration 232
overview 36, 226, 251
planning considerations 231
removing a snapplan 266
removing a snapshot volume 289
removing a snapshotis the rest of the text in this
index term supposed to be a separate index
term?--mb volumesnapshot volumes
removing 289
resynchronizing 288
reverse resynchronizing 284
selecting the snapshot mode 231
setting up hosts 231
single-host configuration 232
two-host configuration 232
upgrading from Veritas Database Edition 3.5 for
Oracle 251
validating a snapplan 263
database performance
using Quick I/O 74
database snapshots
creating 268
databases
backing up using BLI Backup 41
managing the state of 40
resynchronizing to a snapshot 284
DB_FILE_MULTIBLOCK_READ_COUNT 311
dbed_analyzer command 135, 318
dbed_checkconfig command 316, 320
dbed_ckptcreate command 316, 325
dbed_ckptdisplay command 316, 329
dbed_ckptmount command 316
dbed_ckptplan command 340
dbed_ckptquota command 317
dbed_ckptremove command 317, 340
dbed_ckptrollback command 316–317, 338
dbed_ckptumount command 317, 332
dbed_clonedb command 177, 317, 341
dbed_saveconfig command 324
dbed_update command 316, 319
dbed_vmchecksnap command 255, 263, 266, 318,
346, 354, 356
dbed_vmclonedb command 271, 275, 318, 361
dbed_vmsnap -o resync command 288
dbed_vmsnap command 268, 284, 318, 356
-o reverse_resync_abort 286
-o reverse_resync_begin 286
-o reverse_resync_commit 287
DBWR processes 311
DCO 27
log volume 27
deep mapping 149
default_indir_size tunable parameter 302
defragmentation 32
extent 300
scheduling 300
utility 31
determining
if Quick I/O installed and enabled 91
device interface 28
direct I/O 75, 310
direct-write
copy-behind 101
Dirty Region Logging 24
dirty region logging 25, 51
dirty volumes 24
disabling Cached Quick I/O for a file 109
disabling Concurrent I/O 116
disabling qio_cache_enable flag 103
disabling Quick I/O 96
discovered_direct_iosize tunable parameter 302
disk arrays 21
DMP-supported 28
disk group
naming a disk group 46
disk groups
about 21
adding disks 49
configuration guidelines 45
creating
using the command line 47
defined 21
split and join 27
disk space allocation 31
disks
adding to a disk group 49
failure and hot-relocation 27
displaying
Capacity Planning schedules 216
database 40
datafile 40
file system and Oracle space usage statistics 40
405Index
displaying (continued)
file system information 40
file system space usage 217
Storage Checkpoint space usage 217
Storage Checkpoints 40
tablespace 40
DMP 28
DMP-supported disk arrays 28
double buffering 75, 100
DRL 24, 51. See Dirty Region Logging
dropping temporary tablespaces 89
DSS workloads
guidelines 51
dynamic LUN expansion 28
Dynamic Multipathing 28
Eedgetmsg2 command 318
enabling
Quick I/O 76
enabling Cached Quick I/O for a file 109
enabling Concurrent I/O 115
enabling qio_cache_enable flag 102
examining system configuration 40
examining volumes 40
excessive reads or writes 308
exclusive OR 23
expansion
file system 299
extending a file 78
extending Quick I/O files 92
extent-based allocation 30
extracting file list for Quick I/O conversion 85
Ffast file system 31
fast recovery 51
FastResync
non-persistent 26
persistent 26
use with snapshots 26
FastReysnc 26
file
space allocation 78
file fragmentation
reporting on 84
file system locking 75
file systems
configuration guidelines 53
growing to accommodate Quick I/O files 92
increasing the size 62
mounting 57
overview 29
requirements 42
resizing 32, 62
running databases on 30
unmounting 58
fragmentation 32, 59
controlling 59
monitoring 60, 300
reorganization facilities 300
reporting 300
types 59
fragmented file system
characteristics 300
free space 27, 299
monitoring 299
fsadm
reporting extent fragmentation 300
scheduling 300
fsadm command 32, 62, 92
largefiles option 56
fsadm utility 32, 63
fsapadm command 56
fstyp command 42
fsvoladm command 56
full backups 41
Ggrep command 104
growing
file systems 92
Quick I/O files 92
guidelines
creating file systems 53
disk groups 45
for DSS workloads 51
for OLTP workloads 50
striped volumes 50
volumes 50
HHigh Availability (HA)
overview 18
hot-relocation 27
Index406
II/O
asynchronous 74
Cached Quick I/O 30, 37
direct 75
displaying Storage Mapping statistics 134
kernel asynchronous 74
load balancing 308
mapping and statistics 371
performance data 307
Quick I/O 29
sequential 31
statistics
obtaining 298
improving
database performance 74
incremental backups 41
initial_extent_size tunable parameter 303
Kkernel asynchronous I/O 74
kernel settings
modifying 312
kernel write locks 75
Llarge file systems 33
support for 56
large files
enabling 56
support for 33, 56
largefiles option 56
Legato NetWorker 385
license requirements 42
list file for Quick I/O conversion 85
log file
for Capacity Planning 212, 220
LOG_ARCHIVE_DEST 183
ls command 90
Mmanaging
database state 40
Storage Checkpoints 40
volume and file movement 40
max_direct_iosize tunable parameter 303
max_diskq tunable parameter 303
max_seqio_extent_size tunable parameter 304
maxuprc 313
media recovery 183
memory
persistence of FastResync in 26
mirrored volume snapshots 26
mirrored-stripe volumes 23
mirroring 18, 22
choosing 50
defined 23
mirroring and striping data 23
mkfs command 33, 55–56
mkqio.dat file 85–87, 97
mkqio.sh script options
create extra links in SAP 84
monitoring fragmentation 300
mount command 33, 56, 76
mounting
file systems 33
Storage Checkpoints 40
mounting file systems 57
moving hot files or busy file systems 308
multi-volume support 32, 56
fsvoladm command 56
mutli-volume support
fsapadm command 56
Nnaming convention
for Quick I/O files 76
NetBackup
overview 41
NetBackup BLI Extension
overview 41
NetWorker 385
nolargefiles option 33, 56
non-persistent FastResync 26
OOLTP. See online transaction processing
OLTP workloads
guidelines 50
OMF 120
working with Oracle Disk Manager 121
online relayout 24
online transaction processing 23, 76
options
largefiles and nolargefiles 33
407Index
Oracle
autoextend feature 94
media recovery 183
recovery 182
Recovery Manager (RMAN) 383
Oracle configuration environment
saving 324
Oracle datafile header size 78
Oracle Disk Manager 117
benefits 118
converting Quick I/O files 125
disabling 128
migrating files to 125
preparing existing databases for use with 124
restoring files using NetBackup 295, 384
setting up 123
Oracle Enterprise Manager 147
Oracle Managed Files 120
working with Oracle Disk Manager 121
Oracle tempfiles
recreating 282
overview
of Quick I/O 29
Pparallel data transfer
using striping for 22
parameters
default 301
tunable 301
tuning 301
parity 23
performance
obtaining statistics for volumes 298
RAID-5 23
tuning
for databases 310
performance data
using 307
performance tuning
for databases 312
list of guides 297
persistence
for Cached Quick I/O settings 109
persistent FastResync 26
persistent snapshot 34
planning space for Storage Checkpoints 212
PREADs 108
preallocating space for Quick I/O files 76, 79
Qqio_cache_enable flag
disabling 103
enabling 102
qio_cache_enable tunable parameter 304
qio_convertdbfiles command 82, 86, 317, 378
qio_getdbfiles command 82, 85, 317, 377
qio_recreate command 317, 370, 381
qioadmin command 108
qiomkfile command 92–94, 385
options for creating files
symbolic links 77
qiostat
output of 106
qiostat command 106, 306–307
QoSS. See quality of storage service
quality of storage service 33
Quick I/O
accessing regular VxFS files as 81
benefits 74
converting files to 86
converting files to Oracle Disk Manager 125
converting VxFS files to 377–378
determining file fragmentation before
converting 84
determining status 91
disabling 96
enabling 76
extending files 92
extending files with autoextend 94
extracting file list for conversion 85
improving database performance with 74
list file for conversion 85
naming convention for files 76
overview 29
performance improvements 101
preallocating space for files 76, 79
recreating files 370, 381
requirements 75
showing resolution to a raw device 91
using relative and absolute pathnames 81
quotas 35
RRAID 21
RAID-0 22
RAID-0+1 23
RAID-1 22–23
RAID-1+0 23
Index408
RAID-5 23, 50
choosing 50
performance 50
RAID-5 log 51
raw devices
running databases on 30
rawasm directive 385
read-ahead algorithm
for Cached Quick I/O 101
read_nstream tunable parameter 302
read_pref_io tunable parameter 301
recovering
using Storage Checkpoints 172
recreating
data using RAID-5 23
recreating temporary tablespaces 89
redo logs 41
configuration guidelines 54
creating a file system 54
for Oracle recovery 183
relative pathnames
use with symbolic links 81
relayout 24
reliability
using mirroring for 23
removing
Capacity Planning schedules 221
non-VxFS files from mkqio.dat file 86
Storage Checkpoints 40
removing non-VxFS files from mkqio.dat 83
removing snapshot volumes 289
report
extent fragmentation 300
requirements
file systems 42
license 42
requirements of Quick I/O 75
resizing a file 78
resizing file systems 62
resizing utility 32
restoring
using NetBackup 41
using Storage Checkpoints and Storage
Rollback 157
resynchronization
using DRL logs 51
using RAID-5 logs 51
resynchronizing
volumes 24
resynchronizing a snapshot 288
reverse resynchronizing 284
RMAN 383
Rollback. See Storage Rollback
Sscheduling Storage Checkpoints 328
SCSI devices 28
selecting volume layouts 49
semmap 313
semmni 314
semmns 314
semmnu 314
semmsl 314
sequential I/O
using extent-based allocation 31
sequential read/writes
using spanning for 22
sequential scans 310
setext command 79
settings
making Cached Quick I/O persistent 103
SGA. See System Global Area
shmmax 313
shmmin 313
shmmni 313
shmseg 313
showing
Quick I/O file resolved to raw device 91
single-threaded sequential scans 310
SmartSync Recovery Accelerator 25
snapplans
copying 266
creating 255, 346, 354, 356
displaying 266
removing 266, 356
validating 263, 346, 354, 356
viewing 355
snapshot volume sets
creating
using the command line 239
snapshot volumes
backing up a database 271
creating
using the command line 236
mounting 274
removing 289
resynchronizing 288
409Index
snapshots
aborting resynchronization 360
aborting reverse resynchronization 360
and FastResync 26
commiting reverse resynchronization
changes 361
creating 268, 356, 358
resynchronizing 356, 359
reverse resynchronizing 356, 360
space usage
displaying statistics and monitoring 40
spanning 18, 21
defined 22
spare disks 27
sparse files 83, 87–88
starting
Capacity Planning utility 213
statistics
volume I/O 298
Storage Checkpoint Capacity Planning. SeeCapacity
Planning
Storage Checkpoints 157–158
backing up and recovering 172
creating 325
defined 34
displaying 329
displaying space usage 217
file system restores 35
managing 40
operations 184
overview 34
performance 161
planning space for 212
removing 340
scheduling 328
space requirements 159
unmounting 332
verifying 172
Storage Expert 28
Storage Mapping
configuring arrays 149
dbed_analyzer command 135
displaying I/O statistics 134
displaying information 132
displaying information for a list of
tablespaces 137
enabling Oracle file mapping 143
mapping components 141
Oracle Enterprise Manager 147
Storage Mapping (continued)
Oracle file mapping 141
verifying Oracle file mapping setup 143
verifying setup 131
views 142, 144
vxstorage_stats 131
Storage Mapping, overview 36
Storage Rollback 157–158, 338
datafiles 40
defined 34
guidelines for recovery 182
of databases 40
overview 34
tablespaces 40
stripe unit sizes
choosing 50
stripe units 22
striped volumes 50
configuration guidelines 50
striping 18, 22
defined 22
striping and mirroring data 23
support for large files 33
symbolic links
advantages and disadvantages 81
to access Quick I/O files 81
system buffer cache 101
system configuration
examining 40
system global area (SGA) 310
Ttablespaces
dropping and recreating 89
temporary 83, 88
temporary tablespaces 83, 88
tunable I/O parameters 301
default_indir_size 302
discovered_direct_iosize 302
initial_extent_size 303
max_direct_iosize 303
max_diskq 303
max_seqio_extent_size 304
qio_cache_enable 304
read_nstream 302
read_pref_io 301
write_nstream 302
write_pref_io 301
write_throttle 305
Index410
tunefstab file
adding tuning parameters to 103
Tuning
file I/O statistics 306
VxFS 299
VxFS I/O parameters 301
tuning
for database performance 310, 312
vxfs 299
VxVM 297
tuning I/O parameters 301
tuning parameters
adding to tunefstab file 103
Uumount command 58
unattended backups 41
unmounting
a file system 58
Storage Checkpoints 40
unmounting file systems 58
upgrade
from raw devices 126, 154
from UFS 152
upgrading
from earlier VxFS layout versions 153
from UFS 151
using Database Dynamic Storage Tiering 40
using performance data 307
utilities. See commands
fsadm 32, 63
See also commands
online administration 31
VV$ARCHIVE_DEST 183
V$ARCHIVED_LOG 183
V$LOG_HISTORY 183
V$RECOVERY_LOG 183
validating a snapplan 263
verifying caching using vxfstune parameters 104
verifying vxtunefs system parameters 104
Veritas extension for Oracle Disk Manager
overview 37
Veritas FastResync. See FastResync
Veritas File System
cluster functionality 35
cross-platfrom data sharing 32
Veritas File System (continued)
defragmentation utility 31
fast file system 31
multi-volume support 32
online administration utilities 31
overview 29
quality of storage service 33
quotas 35
resizing utility 32
support for large file systems 33
Veritas Storage Foundation
license 42
Veritas Volume Manager 18
and RAID 21
objects 20
overview 18
Veritas Volume Replicator 29
volume layouts 21
changing 24
concatenation 21
mirrored-stripe 23
mirroring 22
RAID-5 23
selecting 49
spanning 21
striping 22
volume resynchronization 24
volume snapshots. See snapshots
volumes
about 20
configuration guidelines 50
creating 51
using the command line 52
definition 20
examining 40
layouts 21
marked as dirty 24
obtaining performance statistics 298
resynchronizing 24
vxassist
used to remove DCOs from volumes 246
VxFS
performance tuning 310
resizing utility 32
tuning 299
VxFS files
converting to Quick I/O 378
VxFS files,converting to Quick I/O 377
VxFS.. See Veritas File System
411Index
vxstat
used to obtain volume performance
statistics 298
vxstorage_stat command 131
vxstorage_stats 131
vxstorage_stats command 318, 371
vxtunefs command 110
commands
vxtunefs 104
vxupgrade command 153
VxVM . See Veritas Volume Manager
overview 18
tuning 297
Wworkloads
write-intensive 51
write_nstream tunable parameter 302
write_pref_io tunable parameter 301
write_throttle tunable parameter 305
XXOR . See exclusive OR
Index412


