107
August 2002 N08837F VERITAS Volume Manager ™ 3.5 Troubleshooting Guide Solaris

VERITAS Volume Manager™ 3.5
Troubleshooting Guide
Solaris
August 2002N08837F

Disclaimer
The information contained in this publication is subject to change without notice.VERITAS Software Corporation makes no warranty of any kind with regard to thismanual, including, but not limited to, the implied warranties of merchantability andfitness for a particular purpose. VERITAS Software Corporation shall not be liable forerrors contained herein or for incidental or consequential damages in connection with thefurnishing, performance, or use of this manual.
Copyright
Copyright © 2000-2002 VERITAS Software Corporation. All rights reserved. VERITAS,VERITAS SOFTWARE, the VERITAS logo, and all other VERITAS product names andslogans are trademarks or registered trademarks of VERITAS Software Corporation in theUSA and/or other countries. Other product names and/or slogans mentioned herein maybe trademarks or registered trademarks of their respective companies.
VERITAS Software Corporation350 Ellis StreetMountain View, CA 94043Phone 650–527–8000Fax 650-527-2908www.veritas.com

Contents
Preface . . . . . . . . . . . . . . . . . . . . . . . . . . . . . . . . . . . . . . . . . . . . . . . . . . . . . . . . . . . . . .vii
Introduction . . . . . . . . . . . . . . . . . . . . . . . . . . . . . . . . . . . . . . . . . . . . . . . . . . . . . . . . . . . . . .vii
Audience and Scope . . . . . . . . . . . . . . . . . . . . . . . . . . . . . . . . . . . . . . . . . . . . . . . . . . . . . . .vii
Organization . . . . . . . . . . . . . . . . . . . . . . . . . . . . . . . . . . . . . . . . . . . . . . . . . . . . . . . . . . . . . viii
Related Documents . . . . . . . . . . . . . . . . . . . . . . . . . . . . . . . . . . . . . . . . . . . . . . . . . . . . . . . viii
Conventions . . . . . . . . . . . . . . . . . . . . . . . . . . . . . . . . . . . . . . . . . . . . . . . . . . . . . . . . . . . . . . ix
Getting Help . . . . . . . . . . . . . . . . . . . . . . . . . . . . . . . . . . . . . . . . . . . . . . . . . . . . . . . . . . . . . . . x
Using VRTSexplorer . . . . . . . . . . . . . . . . . . . . . . . . . . . . . . . . . . . . . . . . . . . . . . . . . . . . . x
Chapter 1. Recovery from Hardware Failure . . . . . . . . . . . . . . . . . . . . . . . . . . . . . . . . .1
Introduction . . . . . . . . . . . . . . . . . . . . . . . . . . . . . . . . . . . . . . . . . . . . . . . . . . . . . . . . . . . . . . . 1
Understanding the Plex State Cycle . . . . . . . . . . . . . . . . . . . . . . . . . . . . . . . . . . . . . . . . . . . 2
Listing Unstartable Volumes . . . . . . . . . . . . . . . . . . . . . . . . . . . . . . . . . . . . . . . . . . . . . . . . . 4
Restarting a Disabled Volume . . . . . . . . . . . . . . . . . . . . . . . . . . . . . . . . . . . . . . . . . . . . . . . . 4
Recovering a Mirrored Volume . . . . . . . . . . . . . . . . . . . . . . . . . . . . . . . . . . . . . . . . . . . . . . . 4
Reattaching Disks . . . . . . . . . . . . . . . . . . . . . . . . . . . . . . . . . . . . . . . . . . . . . . . . . . . . . . . . . . . 5
Failures on RAID-5 Volumes . . . . . . . . . . . . . . . . . . . . . . . . . . . . . . . . . . . . . . . . . . . . . . . . . 6
System Failures . . . . . . . . . . . . . . . . . . . . . . . . . . . . . . . . . . . . . . . . . . . . . . . . . . . . . . . . . . 6
Disk Failures . . . . . . . . . . . . . . . . . . . . . . . . . . . . . . . . . . . . . . . . . . . . . . . . . . . . . . . . . . . . 7
Default Startup Recovery Process for RAID-5 . . . . . . . . . . . . . . . . . . . . . . . . . . . . . . . 8
Recovering a RAID-5 Volume . . . . . . . . . . . . . . . . . . . . . . . . . . . . . . . . . . . . . . . . . . . . . 9
Recovery After Moving RAID-5 Subdisks . . . . . . . . . . . . . . . . . . . . . . . . . . . . . . . . . . 12
Starting RAID-5 Volumes . . . . . . . . . . . . . . . . . . . . . . . . . . . . . . . . . . . . . . . . . . . . . . . . 12
Recovering from Incomplete Disk Group Moves . . . . . . . . . . . . . . . . . . . . . . . . . . . . . . . 15
iii

Recovery from DCO Volume Failure . . . . . . . . . . . . . . . . . . . . . . . . . . . . . . . . . . . . . . . . . 16
Chapter 2. Recovery from Boot Disk Failure . . . . . . . . . . . . . . . . . . . . . . . . . . . . . . . 19
Introduction . . . . . . . . . . . . . . . . . . . . . . . . . . . . . . . . . . . . . . . . . . . . . . . . . . . . . . . . . . . . . . 19
Possible root, swap, and usr Configurations . . . . . . . . . . . . . . . . . . . . . . . . . . . . . . . . . . 19
Booting from Alternate Boot Disks . . . . . . . . . . . . . . . . . . . . . . . . . . . . . . . . . . . . . . . . . . . 20
The Boot Process on SPARC Systems . . . . . . . . . . . . . . . . . . . . . . . . . . . . . . . . . . . . . . . . . 21
Hot-Relocation and Boot Disk Failure . . . . . . . . . . . . . . . . . . . . . . . . . . . . . . . . . . . . . . . . 22
Unrelocating Subdisks to a Replacement Boot Disk . . . . . . . . . . . . . . . . . . . . . . . . . 22
Recovery from Boot Failure . . . . . . . . . . . . . . . . . . . . . . . . . . . . . . . . . . . . . . . . . . . . . . . . . 23
Boot Device Cannot be Opened . . . . . . . . . . . . . . . . . . . . . . . . . . . . . . . . . . . . . . . . . . 23
Cannot Boot From Unusable or Stale Plexes . . . . . . . . . . . . . . . . . . . . . . . . . . . . . . . . 24
Invalid UNIX Partition . . . . . . . . . . . . . . . . . . . . . . . . . . . . . . . . . . . . . . . . . . . . . . . . . . 26
Incorrect Entries in /etc/vfstab . . . . . . . . . . . . . . . . . . . . . . . . . . . . . . . . . . . . . . . . . . 26
Missing or Damaged Configuration Files . . . . . . . . . . . . . . . . . . . . . . . . . . . . . . . . . . 28
Repairing Root or /usr File Systems on Mirrored Volumes . . . . . . . . . . . . . . . . . . . . . . 30
Recovering a Root Disk and Root Mirror from Backup Tape . . . . . . . . . . . . . . . . . . 30
Re-Adding and Replacing Boot Disks . . . . . . . . . . . . . . . . . . . . . . . . . . . . . . . . . . . . . . . . 33
Re-Adding a Failed Boot Disk . . . . . . . . . . . . . . . . . . . . . . . . . . . . . . . . . . . . . . . . . . . 34
Replacing a Failed Boot Disk . . . . . . . . . . . . . . . . . . . . . . . . . . . . . . . . . . . . . . . . . . . . . 35
Recovery by Reinstallation . . . . . . . . . . . . . . . . . . . . . . . . . . . . . . . . . . . . . . . . . . . . . . . . . 36
General Reinstallation Information . . . . . . . . . . . . . . . . . . . . . . . . . . . . . . . . . . . . . . . 36
Reinstalling the System and Recovering VxVM . . . . . . . . . . . . . . . . . . . . . . . . . . . . . 37
Chapter 3. Error Messages . . . . . . . . . . . . . . . . . . . . . . . . . . . . . . . . . . . . . . . . . . . . . 47
Introduction . . . . . . . . . . . . . . . . . . . . . . . . . . . . . . . . . . . . . . . . . . . . . . . . . . . . . . . . . . . . . . 47
Logging Error Messages . . . . . . . . . . . . . . . . . . . . . . . . . . . . . . . . . . . . . . . . . . . . . . . . . . . . 47
Configuring Logging in the Startup Script . . . . . . . . . . . . . . . . . . . . . . . . . . . . . . . . . . . . 48
Understanding Error Messages . . . . . . . . . . . . . . . . . . . . . . . . . . . . . . . . . . . . . . . . . . . . . . 49
Kernel Panic Messages . . . . . . . . . . . . . . . . . . . . . . . . . . . . . . . . . . . . . . . . . . . . . . . . . . . . . 49
Kernel Warning Messages . . . . . . . . . . . . . . . . . . . . . . . . . . . . . . . . . . . . . . . . . . . . . . . . . . 49
iv VERITAS Volume Manager Troubleshooting Guide

Kernel Notice Messages . . . . . . . . . . . . . . . . . . . . . . . . . . . . . . . . . . . . . . . . . . . . . . . . . . . . 54
vxassist Error Messages . . . . . . . . . . . . . . . . . . . . . . . . . . . . . . . . . . . . . . . . . . . . . . . . . . . . 55
vxassist Warning Messages . . . . . . . . . . . . . . . . . . . . . . . . . . . . . . . . . . . . . . . . . . . . . . . . . 56
vxconfigd Fatal Error Messages . . . . . . . . . . . . . . . . . . . . . . . . . . . . . . . . . . . . . . . . . . . . . . 56
vxconfigd Error Messages . . . . . . . . . . . . . . . . . . . . . . . . . . . . . . . . . . . . . . . . . . . . . . . . . . 57
vxconfigd Warning Messages . . . . . . . . . . . . . . . . . . . . . . . . . . . . . . . . . . . . . . . . . . . . . . . 70
vxconfigd Notice Messages . . . . . . . . . . . . . . . . . . . . . . . . . . . . . . . . . . . . . . . . . . . . . . . . . 76
vxdg Error Messages . . . . . . . . . . . . . . . . . . . . . . . . . . . . . . . . . . . . . . . . . . . . . . . . . . . . . . . 79
vxdmp Notice Messages . . . . . . . . . . . . . . . . . . . . . . . . . . . . . . . . . . . . . . . . . . . . . . . . . . . . 81
vxdmpadm Error Messages . . . . . . . . . . . . . . . . . . . . . . . . . . . . . . . . . . . . . . . . . . . . . . . . . 83
vxplex Error Messages . . . . . . . . . . . . . . . . . . . . . . . . . . . . . . . . . . . . . . . . . . . . . . . . . . . . . 84
Cluster Error Messages . . . . . . . . . . . . . . . . . . . . . . . . . . . . . . . . . . . . . . . . . . . . . . . . . . . . . 84
Index . . . . . . . . . . . . . . . . . . . . . . . . . . . . . . . . . . . . . . . . . . . . . . . . . . . . . . . . . . . . . . . .91
Contents v

vi VERITAS Volume Manager Troubleshooting Guide

Preface
IntroductionThe VERITAS Volume ManagerTM Troubleshooting Guide provides information about how torecover from hardware failure, and how to understand and deal with VERITAS VolumeManager (VxVM) error messages during normal operation.
For detailed information about VERITAS Volume Manager and how to use it, refer to theVERITAS Volume Manager Administrator’s Guide. Details on how to use the VERITASEnterprise AdministratorTM graphical user interface can be found in the VERITAS VolumeManager (UNIX) User’s Guide. For a description of VERITAS Volume ReplicatorTM errormessages, see the VERITAS Volume Replicator Administrator’s Guide.
Audience and ScopeThis guide is intended for system administrators responsible for installing, configuring,and maintaining systems under the control of VERITAS Volume Manager.
This guide assumes that the user has a:
◆ working knowledge of the UNIX operating system
◆ basic understanding of UNIX system administration
◆ basic understanding of volume management
The purpose of this guide is to help the system administrator recover from the failure ofdisks and other hardware upon which virtual software objects such as subdisks, plexesand volumes are constructed in VERITAS Volume Manager. Guidelines are also includedon how to understand and react to the variousVxVM error messages that you may see.
vii

Organization
OrganizationThis guide is organized as follows:
◆ Recovery from Hardware Failure
◆ Recovery from Boot Disk Failure
◆ Error Messages
Related DocumentsThe following documents provide information related to the Volume Manager:
◆ VERITAS Volume Manager Installation Guide
◆ VERITAS Volume Manager Release Notes
◆ VERITAS Volume Manager Hardware Notes
◆ VERITAS Volume Manager Administrator’s Guide
◆ VERITAS Volume Manager (UNIX) User’s Guide — VEA
◆ VERITAS Volume Manager manual pages
viii VERITAS Volume Manager Troubleshooting Guide

Conventions
ConventionsThe following table describes the typographic conventions used in this guide.
Typeface Usage Examples
monospace Computer output, file contents,files, directories, softwareelements such as commandoptions, function names, andparameters
Read tunables from the/etc/vx/tunefstab file.
See the ls(1) manual page for moreinformation.
italic New terms, book titles,emphasis, variables to bereplaced by a name or value
See the User’s Guide for details.
The variable ncsize determines thevalue of...
monospace(bold)
User input; the “#” symbolindicates a command prompt
# mount -F vxfs /h/filesys
monospace(bold and italic)
Variables to be replaced by aname or value in user input
# mount -F fstype mount_point
Symbol Usage Examples
% C shell prompt
$ Bourne/Korn/Bash shellprompt
# Superuser prompt (all shells)
\ Continued input on thefollowing line
# mount -F vxfs \/h/filesys
[] In a command synopsis, bracketsindicates an optional argument
ls [ -a ]
| In a command synopsis, avertical bar separates mutuallyexclusive arguments
mount [suid | nosuid ]
Preface ix

Getting Help
Getting HelpIf you have any comments or problems with VERITAS products, contact VERITASTechnical Support:
◆ U.S. and Canadian Customers: 1-800-342-0652
◆ International Customers: +1 (650) 527-8555
◆ Email: [email protected]
For license information (U.S. and Canadian Customers):
◆ Phone: 1-925-931-2464
◆ Email: [email protected]
◆ Fax: 1-925-931-2487
For software updates:
◆ Email: [email protected]
For information on purchasing VERITAS products:
◆ Phone: 1-800-258-UNIX (1-800-258-8649) or 1-650-527-8000
◆ Email: [email protected]
For additional technical support information, such as TechNotes, product alerts, andhardware compatibility lists, visit the VERITAS Technical Support Web site at:
◆ http://support.veritas.com
For additional information about VERITAS and VERITAS products, visit the Web site at:
◆ http://www.veritas.com
Using VRTSexplorerThe VRTSexplorer program can help VERITAS Technical Support engineers diagnosethe cause of technical problems associated with VERITAS products. You can downloadthis program from the VERITAS FTP site or install it from the VERITAS Installation CD.For more information, consult the VERITAS Volume Manager Release Notes and theREADME file in the preface directory on the VERITAS Installation CD.
x VERITAS Volume Manager Troubleshooting Guide

Recovery from Hardware Failure
1 IntroductionVERITAS Volume Manager (VxVM) protects systems from disk and other hardwarefailures and helps you to recover from such events. This chapter describes recoveryprocedures and information to help you prevent loss of data or system access due to diskand other hardware failures.
If a volume has a disk I/O failure (for example, because the disk has an uncorrectableerror), VxVM can detach the plex involved in the failure. I/O stops on that plex butcontinues on the remaining plexes of the volume.
If a disk fails completely, VxVM can detach the disk from its disk group. All plexes on thedisk are disabled. If there are any unmirrored volumes on a disk when it is detached,those volumes are also disabled.
Note Apparent disk failure may not be due to a fault in the physical disk media or thedisk controller, but may instead be caused by a fault in an intermediate or ancillarycomponent such as a cable, host bus adapter, or power supply.
The hot-relocation feature in VxVM automatically detects disk failures, and notifies thesystem administrator and other nominated users of the failures by electronic mail.Hot-relocation also attempts to use spare disks and free disk space to restore redundancyand to preserve access to mirrored and RAID-5 volumes. For more information, see the“Administering Hot-Relocation” chapter in the VERITAS Volume Manager Administrator’sGuide.
Recovery from failures of the boot (root) disk requires the use of the special proceduresdescribed in “Recovery from Boot Disk Failure” on page 19. The chapter also includesprocedures for repairing the root (/) and usr file systems.
1

Understanding the Plex State Cycle
Understanding the Plex State CycleChanging plex states are part of normal operations, and do not necessarily indicateabnormalities that must be corrected. A firm understanding of the various plex states andtheir interrelationship is necessary if you want to be able to perform the recoveryprocedure described in this chapter.
The figure “Main Plex State Cycle” shows the main transitions that take place betweenplex states in VxVM. (For more information about plex states, see the chapter “Creatingand Administering Plexes” in the VERITAS Volume Manager Administrator’s Guide.)
Main Plex State Cycle
At system startup, volumes are started automatically and the vxvol start task makesall CLEAN plexes ACTIVE. At shutdown, the vxvol stop task marks all ACTIVE plexesCLEAN. If all plexes are initially CLEAN at startup, this indicates that a controlledshutdown occurred and optimizes the time taken to start up the volumes.
The next figure “Additional Plex State Transitions” shows additional transitions that arepossible between plex states as a result of hardware problems, abnormal systemshutdown, and intervention by the system administrator.
When first created, a plex has state EMPTY until the volume to which it is attached isinitialized. Its state is then set to CLEAN. Its plex kernel state remains set to DISABLEDand is not set to ENABLED until the volume is started.
PS: CLEAN
PKS: DISABLED
PS: ACTIVE
PKS: ENABLED
Start up
(vxvol start)
Shut down
(vxvol stop)
PS = Plex State
PKS = Plex Kernel State
2 VERITAS Volume Manager Troubleshooting Guide

Understanding the Plex State Cycle
Additional Plex State Transitions
After a system crash and reboot, all plexes of a volume are ACTIVE but marked with plexkernel state DISABLED until their data is recovered by the vxvol resync task.
A plex may be taken offline with the vxmend off command, made available again usingvxmend on, and its data resynchronized with the other plexes when it is reattached usingvxplex att. A failed resynchronization or uncorrectable I/O failure places the plex inthe IOFAIL state.
The following section, “Listing Unstartable Volumes,” describes the actions that you cantake if a system crash or I/O error leaves no plexes of a mirrored volume in a CLEAN orACTIVE state.
For information on the recovery of RAID-5 volumes, see “Failures on RAID-5 Volumes”on page 6 and subsequent sections.
Recover data(vxvol resync)
Initialize plex(vxvol init clean) Take plex offline
(vxmend off)
Shut down(vxvol stop)
After crashand reboot(vxvol start)
UncorrectableI/O failure
Put plex online(vxmend on)
Resync data(vxplex att)
Resyncfails
Create plex
PS: EMPTYPKS: DISABLED
PS: ACTIVEPKS: DISABLED
Start up(vxvol start)
PS: CLEANPKS: DISABLED
PS: ACTIVEPKS: ENABLED
PS: OFFLINEPKS: DISABLED
PS: IOFAILPKS: DETACHED
PS: STALEPKS: DETACHEDPS = Plex State
PKS = Plex Kernel State
Chapter 1, Recovery from Hardware Failure 3

Listing Unstartable Volumes
Listing Unstartable VolumesAn unstartable volume can be incorrectly configured or have other errors or conditionsthat prevent it from being started. To display unstartable volumes, use the vxinfocommand. This displays information about the accessibility and usability of volumes:
# vxinfo [-g diskgroup] [volume ...]
The following example output shows one volume, mkting, as being unstartable:
home fsgen Startedmkting fsgen Unstartablesrc fsgen Startedrootvol root Startedswapvol swap Started
Restarting a Disabled VolumeIf a disk failure caused a volume to be disabled, you must restore the volume from abackup after replacing the failed disk. Any volumes that are listed as Unstartable mustbe restarted using the vxvol command before restoring their contents from a backup. Forexample, to restart the volume mkting so that it can be restored from backup, use thefollowing command:
# vxvol -o bg -f start mkting
The -f option forcibly restarts the volume, and the -o bg option resynchronizes plexes asa background task.
Recovering a Mirrored VolumeA system crash or an I/O error can corrupt one or more plexes of a mirrored volume andleave no plex CLEAN or ACTIVE. You can mark one of the plexes CLEAN and instruct thesystem to use that plex as the source for reviving the others as follows:
1. Place the desired plex in the CLEAN state using the following command:
# vxmend fix clean plex
For example, to place the plex vol01-02 in the CLEAN state:
# vxmend fix clean vol01-02
4 VERITAS Volume Manager Troubleshooting Guide

Reattaching Disks
2. To recover the other plexes in a volume from the CLEAN plex, the volume must bedisabled, and the other plexes must be STALE. If necessary, make any other CLEAN orACTIVE plexes STALE by running the following command on each of these plexes inturn:
# vxmend fix stale plex
3. To enable the CLEAN plex and to recover the STALE plexes from it, use the followingcommand:
# vxvol start volume
For example, to recover volume vol01:
# vxvol start vol01
For more information about the vxmend and vxvol command, see the vxmend(1M) andvxvol(1M) manual pages.
Note Following severe hardware failure of several disks or other related subsystemsunderlying all the mirrored plexes of a volume, it may be impossible to recover thevolume using vxmend. In this case, remove the volume, recreate it on hardware thatis functioning correctly, and restore the contents of the volume from a backup orfrom a snapshot image.
Reattaching DisksYou can perform a reattach operation if a disk fails completely and hot-relocation is notpossible, or if VxVM is started with some disk drivers unloaded and unloadable (causingdisks to enter the failed state). If the underlying problem has been fixed, you can use thevxreattach command to reattach the disks without plexes being flagged as STALE.However, the reattach must occur before any volumes on the disk are started.
The vxreattach command is called as part of disk recovery from the vxdiskadmmenus and during the boot process. If possible, vxreattach reattaches the failed diskmedia record to the disk with the same device name. Reattachment places a disk in thesame disk group as it was located in before and retains its original disk media name.
After reattachment takes place, recovery may not be necessary. Reattachment can fail ifthe original (or another) cause for the disk failure still exists.
You can use the command vxreattach -c to check whether reattachment is possible,without performing the operation. Instead, it displays the disk group and disk medianame where the disk can be reattached.
See the vxreattach(1M) manual page for more information on the vxreattachcommand.
Chapter 1, Recovery from Hardware Failure 5

Failures on RAID-5 Volumes
Failures on RAID-5 VolumesFailures are seen in two varieties: system failures and disk failures. A system failure meansthat the system has abruptly ceased to operate due to an operating system panic or powerfailure. Disk failures imply that the data on some number of disks has become unavailabledue to a system failure (such as a head crash, electronics failure on disk, or disk controllerfailure).
System FailuresRAID-5 volumes are designed to remain available with a minimum of disk spaceoverhead, if there are disk failures. However, many forms of RAID-5 can have data lossafter a system failure. Data loss occurs because a system failure causes the data and parityin the RAID-5 volume to become unsynchronized. Loss of synchronization occurs becausethe status of writes that were outstanding at the time of the failure cannot be determined.
If a loss of sync occurs while a RAID-5 volume is being accessed, the volume is describedas having stale parity. The parity must then be reconstructed by reading all the non-paritycolumns within each stripe, recalculating the parity, and writing out the parity stripe unitin the stripe. This must be done for every stripe in the volume, so it can take a long time tocomplete.
Caution While the resynchronization of a RAID-5 volume without log plexes is beingperformed, any failure of a disk within the volume causes its data to be lost.
Besides the vulnerability to failure, the resynchronization process can tax the systemresources and slow down system operation.
RAID-5 logs reduce the damage that can be caused by system failures, because theymaintain a copy of the data being written at the time of the failure. The process ofresynchronization consists of reading that data and parity from the logs and writing it tothe appropriate areas of the RAID-5 volume. This greatly reduces the amount of timeneeded for a resynchronization of data and parity. It also means that the volume neverbecomes truly stale. The data and parity for all stripes in the volume are known at alltimes, so the failure of a single disk cannot result in the loss of the data within the volume.
6 VERITAS Volume Manager Troubleshooting Guide

Failures on RAID-5 Volumes
Disk FailuresDisk failures can cause the data on a disk to become unavailable. In terms of a RAID-5volume, this means that a subdisk becomes unavailable.
This can occur due to an uncorrectable I/O error during a write to the disk. The I/O errorcan cause the subdisk to be detached from the array or a disk being unavailable when thesystem is booted (for example, from a cabling problem or by having a drive powereddown).
When this occurs, the subdisk cannot be used to hold data and is considered stale anddetached. If the underlying disk becomes available or is replaced, the subdisk is stillconsidered stale and is not used.
If an attempt is made to read data contained on a stale subdisk, the data is reconstructedfrom data on all other stripe units in the stripe. This operation is called areconstructing-read. This is a more expensive operation than simply reading the data andcan result in degraded read performance. When a RAID-5 volume has stale subdisks, it isconsidered to be in degraded mode.
A RAID-5 volume in degraded mode can be recognized from the output of the vxprint-ht command as shown in the following display:
V NAME RVG KSTATE STATE LENGTH READPOL PREFPLEX UTYPEPL NAME VOLUME KSTATE STATE LENGTH LAYOUT NCOL/WID MODESD NAME PLEX DISK DISKOFFSLENGTH [COL/]OFF DEVICE MODESV NAME PLEX VOLNAME NVOLLAYRLENGTH [COL/]OFF AM/NM MODE...v r5vol - ENABLED DEGRADED204800 RAID - raid5pl r5vol-01 r5vol ENABLED ACTIVE 204800 RAID 3/16 RWsd disk01-01 r5vol-01disk01 0 102400 0/0 c2t9d0 ENAsd disk02-01 r5vol-01disk02 0 102400 1/0 c2t10d0 dSsd disk03-01 r5vol-01disk03 0 102400 2/0 c2t11d0 ENApl r5vol-02 r5vol ENABLED LOG 1440 CONCAT - RWsd disk04-01 r5vol-02disk04 0 1440 0 c2t12d0 ENApl r5vol-03 r5vol ENABLED LOG 1440 CONCAT - RWsd disk05-01 r5vol-03disk05 0 1440 0 c2t14d0 ENA
The volume r5vol is in degraded mode, as shown by the volume state, which is listed asDEGRADED. The failed subdisk is disk02-01, as shown by the MODE flags; d indicatesthat the subdisk is detached, and S indicates that the subdisk’s contents are stale.
Note Do not run the vxr5check command on a RAID-5 volume that is in degradedmode.
A disk containing a RAID-5 log plex can also fail. The failure of a single RAID-5 log plexhas no direct effect on the operation of a volume provided that the RAID-5 log is mirrored.However, loss of all RAID-5 log plexes in a volume makes it vulnerable to a complete
Chapter 1, Recovery from Hardware Failure 7

Failures on RAID-5 Volumes
failure. In the output of the vxprint -ht command, failure within a RAID-5 log plex isindicated by the plex state being shown as BADLOG rather than LOG. This is shown in thefollowing display, where the RAID-5 log plex r5vol-11 has failed:
V NAME RVG KSTATE STATE LENGTH READPOL PREFPLEX UTYPEPL NAME VOLUME KSTATE STATE LENGTH LAYOUT NCOL/WID MODESD NAME PLEX DISK DISKOFFSLENGTH [COL/]OFF DEVICE MODESV NAME PLEX VOLNAME NVOLLAYRLENGTH [COL/]OFF AM/NM MODE...v r5vol RAID-5 ENABLED ACTIVE 204800 RAID - raid5pl r5vol-01 r5vol ENABLED ACTIVE 204800 RAID 3/16 RWsd disk01-01 r5vol-01disk01 0 102400 0/0 c2t9d0 ENAsd disk02-01 r5vol-01disk02 0 102400 1/0 c2t10d0 ENAsd disk03-01 r5vol-01disk03 0 102400 2/0 c2t11d0 ENApl r5vol-02 r5vol DISABLEDBADLOG 1440 CONCAT - RWsd disk04-01 r5vol-11disk04 0 1440 0 c2t12d0 ENApl r5vol-03 r5vol ENABLED LOG 1440 CONCAT - RWsd disk05-01 r5vol-12disk05 0 1440 0 c2t14d0 ENA
Default Startup Recovery Process for RAID-5VxVM may need to perform several operations to restore fully the contents of a RAID-5volume and make it usable. Whenever a volume is started, any RAID-5 log plexes arezeroed before the volume is started. This prevents random data from being interpreted asa log entry and corrupting the volume contents. Also, some subdisks may need to berecovered, or the parity may need to be resynchronized (if RAID-5 logs have failed).
VxVM takes the following steps when a RAID-5 volume is started:
1. If the RAID-5 volume was not cleanly shut down, it is checked for valid RAID-5 logplexes.
- If valid log plexes exist, they are replayed. This is done by placing the volume inthe DETACHED volume kernel state and setting the volume state to REPLAY, andenabling the RAID-5 log plexes. If the logs can be successfully read and the replayis successful, move on to Step 2.
- If no valid logs exist, the parity must be resynchronized. Resynchronization isdone by placing the volume in the DETACHED volume kernel state and setting thevolume state to SYNC. Any log plexes are left in the DISABLED plex kernel state.
The volume is not made available while the parity is resynchronized because anysubdisk failures during this period makes the volume unusable. This can beoverridden by using the -o unsafe start option with the vxvol command. If anystale subdisks exist, the RAID-5 volume is unusable.
8 VERITAS Volume Manager Troubleshooting Guide

Failures on RAID-5 Volumes
Caution The -o unsafe start option is considered dangerous, as it can make thecontents of the volume unusable. Using it is not recommended.
2. Any existing log plexes are zeroed and enabled. If all logs fail during this process, thestart process is aborted.
3. If no stale subdisks exist or those that exist are recoverable, the volume is put in theENABLED volume kernel state and the volume state is set to ACTIVE. The volume isnow started.
Recovering a RAID-5 VolumeThe types of recovery that may typically be required for RAID-5 volumes are thefollowing:
◆ Parity Resynchronization; see page 10.
◆ Log Plex Recovery; see page 11.
◆ Stale Subdisk Recovery; see page 11.
Parity resynchronization and stale subdisk recovery are typically performed when theRAID-5 volume is started, or shortly after the system boots. They can also be performedby running the vxrecover command.
For more information on starting RAID-5 volumes, see “Starting RAID-5 Volumes” onpage 12.
If hot-relocation is enabled at the time of a disk failure, system administrator interventionis not required unless no suitable disk space is available for relocation. Hot-relocation istriggered by the failure and the system administrator is notified of the failure by electronicmail.
Hot relocation automatically attempts to relocate the subdisks of a failing RAID-5 plex.After any relocation takes place, the hot-relocation daemon (vxrelocd) also initiate aparity resynchronization.
In the case of a failing RAID-5 log plex, relocation occurs only if the log plex is mirrored;the vxrelocd daemon then initiates a mirror resynchronization to recreate the RAID-5log plex. If hot-relocation is disabled at the time of a failure, the system administrator mayneed to initiate a resynchronization or recovery.
Chapter 1, Recovery from Hardware Failure 9
Failures on RAID-5 Volumes
Note Following severe hardware failure of several disks or other related subsystemsunderlying a RAID-5 plex, it may be impossible to recover the volume using themethods described in this chapter. In this case, remove the volume, recreate it onhardware that is functioning correctly, and restore the contents of the volume from abackup.
Parity Resynchronization
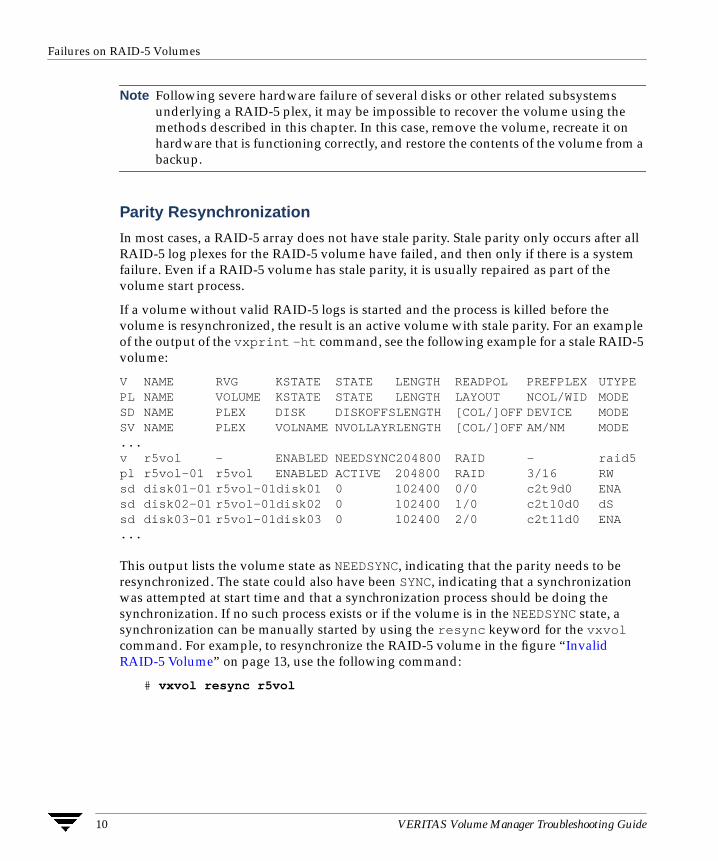
In most cases, a RAID-5 array does not have stale parity. Stale parity only occurs after allRAID-5 log plexes for the RAID-5 volume have failed, and then only if there is a systemfailure. Even if a RAID-5 volume has stale parity, it is usually repaired as part of thevolume start process.
If a volume without valid RAID-5 logs is started and the process is killed before thevolume is resynchronized, the result is an active volume with stale parity. For an exampleof the output of the vxprint -ht command, see the following example for a stale RAID-5volume:
V NAME RVG KSTATE STATE LENGTH READPOL PREFPLEX UTYPEPL NAME VOLUME KSTATE STATE LENGTH LAYOUT NCOL/WID MODESD NAME PLEX DISK DISKOFFSLENGTH [COL/]OFF DEVICE MODESV NAME PLEX VOLNAME NVOLLAYRLENGTH [COL/]OFF AM/NM MODE...v r5vol - ENABLED NEEDSYNC204800 RAID - raid5pl r5vol-01 r5vol ENABLED ACTIVE 204800 RAID 3/16 RWsd disk01-01 r5vol-01disk01 0 102400 0/0 c2t9d0 ENAsd disk02-01 r5vol-01disk02 0 102400 1/0 c2t10d0 dSsd disk03-01 r5vol-01disk03 0 102400 2/0 c2t11d0 ENA...
This output lists the volume state as NEEDSYNC, indicating that the parity needs to beresynchronized. The state could also have been SYNC, indicating that a synchronizationwas attempted at start time and that a synchronization process should be doing thesynchronization. If no such process exists or if the volume is in the NEEDSYNC state, asynchronization can be manually started by using the resync keyword for the vxvolcommand. For example, to resynchronize the RAID-5 volume in the figure “InvalidRAID-5 Volume” on page 13, use the following command:
# vxvol resync r5vol
10 VERITAS Volume Manager Troubleshooting Guide

Failures on RAID-5 Volumes
Parity is regenerated by issuing VOL_R5_RESYNC ioctls to the RAID-5 volume. Theresynchronization process starts at the beginning of the RAID-5 volume andresynchronizes a region equal to the number of sectors specified by the -o iosize option. Ifthe -o iosize option is not specified, the default maximum I/O size is used. The resyncoperation then moves onto the next region until the entire length of the RAID-5 volumehas been resynchronized.
For larger volumes, parity regeneration can take a long time. It is possible that the systemcould be shut down or crash before the operation is completed. In case of a systemshutdown, the progress of parity regeneration must be kept across reboots. Otherwise, theprocess has to start all over again.
To avoid the restart process, parity regeneration is checkpointed.This means that the offsetup to which the parity has been regenerated is saved in the configuration database. The-o checkpt=size option controls how often the checkpoint is saved. If the option is notspecified, the default checkpoint size is used.
Because saving the checkpoint offset requires a transaction, making the checkpoint sizetoo small can extend the time required to regenerate parity. After a system reboot, aRAID-5 volume that has a checkpoint offset smaller than the volume length starts a parityresynchronization at the checkpoint offset.
Log Plex Recovery
RAID-5 log plexes can become detached due to disk failures. These RAID-5 logs can bereattached by using the att keyword for the vxplex command. To reattach the failedRAID-5 log plex, use the following command:
# vxplex att r5vol r5vol-l1
Stale Subdisk Recovery
Stale subdisk recovery is usually done at volume start time. However, the process doingthe recovery can crash, or the volume may be started with an option such as -odelayrecover that prevents subdisk recovery. In addition, the disk on which thesubdisk resides can be replaced without recovery operations being performed. In suchcases, you can perform subdisk recovery using the vxvol recover command. Forexample, to recover the stale subdisk in the RAID-5 volume shown in the figure “InvalidRAID-5 Volume” on page 13, use the following command:
# vxvol recover r5vol disk01-00
A RAID-5 volume that has multiple stale subdisks can be recovered in one operation. Torecover multiple stale subdisks, use the vxvol recover command on the volume, asfollows:
# vxvol recover r5vol
Chapter 1, Recovery from Hardware Failure 11

Failures on RAID-5 Volumes
Recovery After Moving RAID-5 SubdisksWhen RAID-5 subdisks are moved and replaced, the new subdisks are marked as STALEin anticipation of recovery. If the volume is active, the vxsd command may be used torecover the volume. If the volume is not active, it is recovered when it is next started. TheRAID-5 volume is degraded for the duration of the recovery operation.
Any failure in the stripes involved in the move makes the volume unusable. The RAID-5volume can also become invalid if its parity becomes stale. To avoid this occurring, vxsddoes not allow a subdisk move in the following situations:
◆ a stale subdisk occupies any of the same stripes as the subdisk being moved
◆ the RAID-5 volume is stopped but was not shut down cleanly; that is, the parity isconsidered stale
◆ the RAID-5 volume is active and has no valid log areas
Only the third case can be overridden by using the -o force option.
Subdisks of RAID-5 volumes can also be split and joined by using the vxsd splitcommand and the vxsd join command. These operations work the same way as thosefor mirrored volumes.
Note RAID-5 subdisk moves are performed in the same way as subdisk moves for othervolume types, but without the penalty of degraded redundancy.
Starting RAID-5 VolumesWhen a RAID-5 volume is started, it can be in one of many states. After a normal systemshutdown, the volume should be clean and require no recovery. However, if the volumewas not closed, or was not unmounted before a crash, it can require recovery when it isstarted, before it can be made available. This section describes actions that can be takenunder certain conditions.
Under normal conditions, volumes are started automatically after a reboot and anyrecovery takes place automatically or is done through the vxrecover command.
Unstartable RAID-5 Volumes
A RAID-5 volume is unusable if some part of the RAID-5 plex does not map the volumelength:
◆ the RAID-5 plex cannot be sparse in relation to the RAID-5 volume length
◆ the RAID-5 plex does not map a region where two subdisks have failed within astripe, either because they are stale or because they are built on a failed disk
12 VERITAS Volume Manager Troubleshooting Guide

Failures on RAID-5 Volumes
When this occurs, the vxvol start command returns the following error message:
vxvm:vxvol: ERROR: Volume r5vol is not startable; RAID-5 plex doesnot map entire volume length.
At this point, the contents of the RAID-5 volume are unusable.
Another possible way that a RAID-5 volume can become unstartable is if the parity is staleand a subdisk becomes detached or stale. This occurs because within the stripes thatcontain the failed subdisk, the parity stripe unit is invalid (because the parity is stale) andthe stripe unit on the bad subdisk is also invalid. The situation shown in “Invalid RAID-5Volume” illustrates a RAID-5 volume that has become invalid due to stale parity and afailed subdisk.
Invalid RAID-5 Volume
This example shows four stripes in the RAID-5 array. All parity is stale and subdiskdisk05-00 has failed. This makes stripes X and Y unusable because two failures haveoccurred within those stripes.
This qualifies as two failures within a stripe and prevents the use of the volume. In thiscase, the output display from the vxvol start command is as follows:
vxvm:vxvol: ERROR: Volume r5vol is not startable; some subdisks areunusable and the parity is stale.
This situation can be avoided by always using two or more RAID-5 log plexes in RAID-5volumes. RAID-5 log plexes prevent the parity within the volume from becoming stalewhich prevents this situation (see “System Failures” on page 6 for details).
disk00-00 disk01-00 disk02-00
disk03-00 disk04-00 disk05-00
RAID-5 Plex
W
X
Y
Z
W
X
Y
Z
Data
Data
Data
Data
Data
Data
Data
DataParity
Parity
Parity
Parity
Chapter 1, Recovery from Hardware Failure 13

Failures on RAID-5 Volumes
Forcibly Starting RAID-5 Volumes
You can start a volume even if subdisks are marked as stale. For example, if a stoppedvolume has stale parity and no RAID-5 logs and a disk becomes detached and thenreattached.
The subdisk is considered stale even though the data is not out of date (because thevolume was in use when the subdisk was unavailable) and the RAID-5 volume isconsidered invalid. To prevent this case, always have multiple valid RAID-5 logsassociated with the array whenever possible.
To start a RAID-5 volume with stale subdisks, you can use the -f option with the vxvolstart command. This causes all stale subdisks to be marked as non-stale. Marking takesplace before the start operation evaluates the validity of the RAID-5 volume and what isneeded to start it. Also, you can mark individual subdisks as non-stale by using thefollowing command:
# vxmend fix unstale subdisk
◆ If some subdisks are stale and need recovery, and if valid logs exist, the volume isenabled by placing it in the ENABLED kernel state and the volume is available for useduring the subdisk recovery. Otherwise, the volume kernel state is set to DETACHEDand it is not available during subdisk recovery.
This is done because if the system were to crash or the volume was ungracefullystopped while it was active, the parity becomes stale, making the volume unusable. Ifthis is undesirable, the volume can be started with the -o unsafe start option.
Caution The -o unsafe start option is considered dangerous, as it can make thecontents of the volume unusable. It is therefore not recommended.
◆ The volume state is set to RECOVER and stale subdisks are restored. As the data oneach subdisk becomes valid, the subdisk is marked as no longer stale.
If any subdisk recovery fails and there are no valid logs, the volume start is abortedbecause the subdisk remains stale and a system crash makes the RAID-5 volumeunusable. This can also be overridden by using the -o unsafe start option.
Caution The -o unsafe start option is considered dangerous, as it can make thecontents of the volume unusable. It is therefore not recommended.
If the volume has valid logs, subdisk recovery failures are noted but they do not stopthe start procedure.
◆ When all subdisks have been recovered, the volume is placed in the ENABLED kernelstate and marked as ACTIVE. It is now started.
14 VERITAS Volume Manager Troubleshooting Guide

Recovering from Incomplete Disk Group Moves
Recovering from Incomplete Disk Group MovesIf the system crashes or a subsystem fails while a disk group move, split or join operationis being performed, VxVM attempts either to reverse or to complete the operation whenthe system is restarted or the subsystem is repaired. Whether the operation is reversed orcompleted depends on how far it had progressed.
Automatic recovery depends on being able to import both the source and target diskgroups. If this is not possible (for example, if one of the disk groups has been imported onanother host), perform the following steps to recover the disk group:
1. Use the vxprint command to examine the configuration of both disk groups. Objectsin disk groups whose move is incomplete have their TUTIL0 fields set to MOVE.
2. Enter the following command to attempt completion of the move:
# vxdg recover sourcedg
This operation fails if one of the disk groups cannot be imported because it has beenimported on another host or because it does not exist:
vxvm: vxdg: ERROR: diskgroup: Disk group does not exist
If the recovery fails, perform one of the following steps as appropriate.
❖ If the disk group has been imported on another host, export it from that host, andimport it on the current host. If all the required objects already exist in either thesource or target disk group, use the following command to reset the MOVE flags inthat disk group:
# vxdg -o clean recover diskgroup1
Use the following command on the other disk group to remove the objects that haveTUTIL0 fields marked as MOVE:
# vxdg -o remove recover diskgroup2
❖ If only one disk group is available to be imported, use the following command to resetthe MOVE flags on this disk group:
# vxdg -o clean recover diskgroup
Chapter 1, Recovery from Hardware Failure 15

Recovery from DCO Volume Failure
Recovery from DCO Volume FailurePersistent FastResync uses a data change object (DCO) log volume to perform tracking ofchanged regions in a volume. If an error occurs while reading or writing a DCO volume, itis detached and the badlog flag is set on the DCO. (You can use one of the options -a,-F or -m to vxprint to check if the badlog flag is set on a DCO.) All further writes tothe volume are not tracked by the DCO.
To recover the DCO volume, perform the following steps:
1. Correct the problem that caused the I/O failure.
2. Use the following command to remove the badlog flag from the DCO:
# vxdco -g diskgroup -o force enable dco
3. Restart the DCO volume using the following command:
# vxvol -g diskgroup start dco_log_vol
4. Use the vxassist snapclear command to clear the FastResync maps for theoriginal volume and for all its snapshots. This ensures that potentially staleFastResync maps are not used when the snapshots are snapped back (a fullresynchronization is performed). FastResync tracking is re-enabled for anysubsequent snapshots of the volume.
Caution You must use the vxassist snapclear command on all the snapshots of thevolume after removing the badlog flag from the DCO. Otherwise, data may belost or corrupted when the snapshots are snapped back.
If a volume and its snapshot volume are in the same disk group, the followingcommand clears the FastResync maps for both volumes:
# vxassist -g diskgroup snapclear volume snap_obj_to_snapshot
Here snap_obj_to_snapshot is the name of the snap object associated with volumethat points to the snapshot volume.
If a snapshot volume and the original volume are in different disk groups, you mustperform a separate snapclear operation on each volume:
# vxassist -g diskgroup1 snapclear volume snap_obj_to_snapshot# vxassist -g diskgroup2 snapclear snapvol snap_obj_to_volume
Here snap_obj_to_volume is the name of the snap object associated with the snapshotvolume, snapvol, that points to the original volume.
16 VERITAS Volume Manager Troubleshooting Guide

Recovery from DCO Volume Failure
5. To snap back the snapshot volume on which you performed a snapclear in theprevious step, use the following command (after using the vxdg move command tomove the snapshot volume back to the original disk group, if necessary):
# vxplex -f -g diskgroup snapback volume snapvol_plex
Note You cannot use vxassist snapback because the snapclear operation removesthe snapshot association information.
The following command sequence demonstrates how to recover the DCO volume thattracks the top-level volume vol1 in the disk group egdg, and also how to snap back thesnapshot volume, SNAP-vol1, with vol1:
# vxdco -g egdg -o force enable vol1_dco# vxvol -g egdg start vol1_dco# vxassist -g egdg snapclear vol1 SNAP-vol1_snp# vxplex -g egdg snapback vol1 SNAP-vol1-01
Here vol1_dco is the DCO associated with vol1, SNAP-vol1_snp is the snap objectassociated with vol1 that points to the snapshot SNAP-vol1, and SNAP-vol1-01 is thesnapshot plex that is snapped back with vol1.
For more information, see the vxassist(1M) and vxdco(1M) manual pages.
Chapter 1, Recovery from Hardware Failure 17

Recovery from DCO Volume Failure
18 VERITAS Volume Manager Troubleshooting Guide

Recovery from Boot Disk Failure
2 IntroductionVERITAS Volume Manager (VxVM) protects systems from disk and other hardwarefailures and helps you to recover from such events. This chapter describes recoveryprocedures and information to help you prevent loss of data or system access due to thefailure of the boot (root) disk. It also includes procedures for repairing the root (/) andusr file systems.
For information about recovering volumes and their data on non-boot disks, see“Recovery from Hardware Failure” on page 1.
For more information about protecting your system, see the VERITAS Volume ManagerInstallation Guide.
Possible root, swap, and usr ConfigurationsDuring installation, it is possible to set up a variety of configurations for the root (/) andusr file systems, and for swap. The following cases are possible:
◆ usr is a directory under / and no separate partition is allocated for it. In this case,usr becomes part of the rootvol volume when the root disk is encapsulated and putunder VERITAS Volume Manager control.
◆ usr is on a separate partition from the root partition on the root disk . In this case, aseparate volume is created for the usr partition. vxmirror mirrors the usr volumeon the destination disk.
◆ usr is on a disk other than the root disk. In this case, a volume is created for the usrpartition only if you use VxVM to encapsulate the disk. Note that encapsulating theroot disk and having mirrors of the root volume is ineffective in maintaining theavailability of your system if the separate usr partition becomes inaccessible for anyreason. For maximum availablility of the system, it is recommended that youencapsulate both the root disk and the disk containing the usr partition, and havemirrors for the usr, rootvol, and swapvol volumes.
19

Booting from Alternate Boot Disks
The rootvol volume must exist in the rootdg disk group. See “Boot-time VolumeRestrictions” in the “Administering Disks” chapter of the VERITAS Volume ManagerAdministrator’s Guide for information on rootvol and usr volume restrictions.
VxVM allows you to put swap partitions on any disk; it does not need an initial swap areaduring early phases of the boot process. By default, the VERITAS Volume Managerinstallation chooses partition 0 on the selected root disk as the root partition, andpartition 1 as the swap partition. However, it is possible to have the swap partition on apartition not located on the root disk. In such cases, you are advised to encapsulate thatdisk and create mirrors for the swap volume. If you do not do this, damage to the swappartition eventually causes the system to crash. It may be possible to boot the system, buthaving mirrors for the swapvol volume prevents system failures.
Booting from Alternate Boot DisksIf the root disk is encapsulated and mirrored, you can use one of its mirrors to boot thesystem if the primary boot disk fails. To boot the system after failure of the primary bootdisk on a SPARC system, follow these steps:
1. Check that the EEPROM variable use-nvramrc? is set to true by entering thefollowing command at the boot prompt:
ok printenv use-nvramrc?
If set to true, this variable allows the use of alternate boot disks. To set the value ofuse-nvramrc? to true, enter the following command at the boot prompt:
ok setenv use-nvramrc? true
If use-nvramrc? is set to false, the system fails to boot from the devalias anddisplays an error message such as the following:
Rebooting with command: boot vx-mirdiskBoot device: /pci@1f,4000/scsi@3/disk@0,0 File and args:vx-mirdiskboot: cannot open vx-mirdiskEnter filename [vx-mirdisk]:
2. Check for available boot disk aliases using the following command at the bootprompt:
ok devalias
Suitable mirrors of the root disk are listed with names of the form vx-diskname.
20 VERITAS Volume Manager Troubleshooting Guide

The Boot Process on SPARC Systems
3. Enter this command:
ok boot alias
where alias is the name of an alternate root mirror found from the previous step.
If a selected disk contains a root mirror that is stale, vxconfigd displays an errorstating that the mirror is unusable and lists any non-stale alternate bootable disks.
More information about the boot process may be found in “The Boot Process on SPARCSystems” on page 21
The Boot Process on SPARC SystemsA Sun SPARC system prompts for a boot command unless the autoboot flag has been setin the nonvolatile storage area used by the firmware. Machines with older PROMs havedifferent prompts than that for the newer V2 and V3 versions. These newer versions ofPROM are also known as OpenBoot PROMs (OBP). The boot command syntax for thenewer types of PROMs is:
ok boot [OBP names] [filename] [boot-flags]
OBP names specify the OpenBoot PROM designations. For example, on Desktop SPARCsystems, the designation sbus/esp@0,800000/sd@3,0:a indicates a SCSI disk (sd) attarget 3, lun 0 on the SCSI bus, with the esp host bus adapter plugged into slot 0.
Note You can use VERITAS Volume Manager boot disk alias names instead of OBPnames. Example aliases are vx-rootdisk or vx-disk01. To list the available bootdevices, use the devalias command at the OpenBoot prompt.
filename is the name of a file that contains the kernel. The default is /kernel/unix in theroot partition. If necessary, you can specify another program (such as /stand/diag) byspecifying the -a flag. (Some versions of the firmware allow the default filename to besaved in the nonvolatile storage area of the system.)
Note Do not boot a system running VxVM with rootability enabled using all the defaultspresented by the -a flag. See “Restoring a Copy of /etc/system on the Root Disk”on page 28 for the correct responses.
Boot flags are not interpreted by the boot program. The boot program passes allboot-flags to the file identified by filename. See the kernel (1) and kadb (1M) manualpages for information on the options available with the default standalone program,/kernel/unix.
Chapter 2, Recovery from Boot Disk Failure 21

Hot-Relocation and Boot Disk Failure
Hot-Relocation and Boot Disk FailureIf the boot (root) disk fails and it is mirrored, hot-relocation automatically attempts toreplace the failed root disk mirror with a new mirror. To achieve this, hot-relocation usesa surviving mirror of the root disk to create a new mirror, either on a spare disk, or on adisk with sufficient free space. This ensures that there are always at least two mirrors ofthe root disk that can be used for booting. The hot-relocation daemon also calls thevxbootsetup utility to configure the disk with the new mirror as a bootable disk.
Hot-relocation can fail for a root disk if the rootdg disk group does not containsufficient spare or free space to fit the volumes from the failed root disk. The rootvoland swapvol volumes require contiguous disk space. If the root volume and othervolumes on the failed root disk cannot be relocated to the same new disk, each of thesevolumes may be relocated to different disks.
Mirrors of rootvol and swapvol volumes must be cylinder-aligned. This means thatthey can only be created on disks that have enough space to allow their subdisks to beginand end on cylinder boundaries. Hot-relocation fails to create the mirrors if these disks arenot available.
Unrelocating Subdisks to a Replacement Boot DiskWhen a boot disk is encapsulated, the root file system and other system areas, such asthe swap partition, are made into volumes. VxVM creates a private region using part ofthe existing swap area, which is usually located in the middle of the disk. However, whena disk is initialized as a VM disk, VxVM creates the private region at the beginning of thedisk.
If a mirrored encapsulated boot disk fails, hot-relocation creates new copies of its subdiskson a spare disk. The name of the disk that failed and the offsets of its component subdisksare stored in the subdisk records as part of this process. After the failed boot disk isreplaced with one that has the same storage capacity, it is “initialized” and added back tothe disk group. vxunreloc can be run to move all the subdisks back to the disk.However, the difference of the disk layout between an initialized disk and anencapsulated disk affects the way the offset into a disk is calculated for each unrelocatedsubdisk. Use the -f option to vxunreloc to move the subdisks to the disk, but not to thesame offsets. For this to be successful, the replacement disk should be at least 2 megabyteslarger than the original boot disk.
vxunreloc makes the new disk bootable after it moves all the subdisks to the disk.
Note The system dump device is usually configured to be the swap partition of the rootdisk. Whenever a swap subdisk is moved (by hot-relocation, or using vxunreloc)from one disk to another, the dump device must be re-configured on the new disk.
22 VERITAS Volume Manager Troubleshooting Guide

Recovery from Boot Failure
In Solaris 2.6 and earlier releases, the name of the dump device is stored in the dumpfilestructure. Use the following command to discover its setting:
# echo dumpfile+0x10/s | adb -k /dev/ksyms /dev/mem
This displays output similar to the following:
physmem 3d24dumpfile+0x10: /dev/dsk/c0t0d0s1
In this example, the dump device is configured to be /dev/dsk/c0t0d0s1. To changethis setting, shut down and reboot the system. This configures the first swap partition asthe dump device.
In Solaris 7, and later releases, use the dumpadm command to view and set the dumpdevice. For details, see the dumpadm(1M) manual page.
Recovery from Boot FailureWhile there are many types of failures that can prevent a system from booting, the samebasic procedure can be taken to bring the system up. When a system fails to boot, youshould first try to identify the failure by the evidence left behind on the screen and thenattempt to repair the problem (for example, by turning on a drive that was accidentallypowered off). If the problem is one that cannot be repaired (such as data errors on the bootdisk), boot the system from an alternate boot disk that contains a mirror of the rootvolume, so that the damage can be repaired or the failing disk can be replaced.
The following sections outline some possible failures and provides instructions on thecorrective actions:
◆ “Boot Device Cannot be Opened”
◆ “Cannot Boot From Unusable or Stale Plexes” on page 24
◆ “Invalid UNIX Partition” on page 26
◆ “Incorrect Entries in /etc/vfstab” on page 26
◆ “Missing or Damaged Configuration Files” on page 28
Boot Device Cannot be OpenedEarly in the boot process, immediately following system initialization, there may bemessages similar to the following:
SCSI device 0,0 is not respondingCan’t open boot device
Chapter 2, Recovery from Boot Disk Failure 23

Recovery from Boot Failure
This means that the system PROM was unable to read the boot program from the bootdrive. Common causes for this problem are:
◆ The boot disk is not powered on.
◆ The SCSI bus is not terminated.
◆ There is a controller failure of some sort.
◆ A disk is failing and locking the bus, preventing any disks from identifyingthemselves to the controller, and making the controller assume that there are no disksattached.
The first step in diagnosing this problem is to check carefully that everything on the SCSIbus is in order. If disks are powered off or the bus is unterminated, correct the problemand reboot the system. If one of the disks has failed, remove the disk from the bus andreplace it.
If no hardware problems are found, the error is probably due to data errors on the bootdisk. In order to repair this problem, attempt to boot the system from an alternate bootdisk (containing a mirror of the root volume). If you are unable to boot from an alternateboot disk, there is still some type of hardware problem. Similarly, if switching the failedboot disk with an alternate boot disk fails to allow the system to boot, this also indicateshardware problems.
Cannot Boot From Unusable or Stale PlexesIf a disk is unavailable when the system is running, any mirrors of volumes that reside onthat disk become stale. This means that the data on that disk is inconsistent relative to theother mirrors of that volume. During the boot process, the system accesses only one copyof the root volume (the copy on the boot disk) until a complete configuration for thisvolume can be obtained.
If it turns out that the plex of this volume that was used for booting is stale, the systemmust be rebooted from an alternate boot disk that contains non-stale plexes. This problemcan occur, for example, if the system was booted from one of the disks made bootable byVxVM with the original boot disk turned off. The system boots normally, but the plexesthat reside on the unpowered disk are stale. If the system reboots from the original bootdisk with the disk turned back on, the system boots using that stale plex.
Another possible problem can occur if errors in the VERITAS Volume Manager headers onthe boot disk prevent VxVM from properly identifying the disk. In this case, VxVM doesnot know the name of that disk. This is a problem because plexes are associated with disknames, so any plexes on the unidentified disk are unusable.
24 VERITAS Volume Manager Troubleshooting Guide

Recovery from Boot Failure
A problem can also occur if the root disk has a failure that affects the root volume plex. Atthe next boot attempt, the system still expects to use the failed root plex for booting. If theroot disk was mirrored at the time of the failure, an alternate root disk (with a valid rootplex) can be specified for booting.
If any of these situations occur, the configuration daemon, vxconfigd, notes it when it isconfiguring the system as part of the init processing of the boot sequence. vxconfigddisplays a message describing the error and what can be done about it, and then halts thesystem. For example, if the plex rootvol-01 of the root volume rootvol on diskrootdisk is stale, vxconfigd may display this message:
vxvm:vxconfigd: Warning Plex rootvol-01 for root volume is stale orunusable.vxvm:vxconfigd: Error: System boot disk does not have a valid rootplexPlease boot from one of the following disks:Disk: disk01 Device: c0t1d0s2vxvm:vxconfigd: Error: System startup failedThe system is down.
This informs the administrator that the alternate boot disk named disk01 contains ausable copy of the root plex and should be used for booting. When this message isdisplayed, reboot the system from the alternate boot disk as described in “Booting fromAlternate Boot Disks” on page 20.
Once the system has booted, the exact problem needs to be determined. If the plexes onthe boot disk were simply stale, they are caught up automatically as the system comes up.If, on the other hand, there was a problem with the private area on the disk or the diskfailed, you need to re-add or replace the disk.
If the plexes on the boot disk are unavailable, you should receive mail from VERITASVolume Manager utilities describing the problem. Another way to determine the problemis by listing the disks with the vxdisk utility. In the above example, if the problem is afailure in the private area of root disk (such as due to media failures or accidentallyoverwriting the VERITAS Volume Manager private region on the disk, vxdisk listshows this display:
DEVICE TYPE DISK GROUP STATUS- - rootdisk rootdg failed was: c0t3d0s2c0t1d0s2 sliced disk01 rootdg ONLINE
Chapter 2, Recovery from Boot Disk Failure 25

Recovery from Boot Failure
Invalid UNIX PartitionOnce the boot program has loaded, it attempts to access the boot disk through the normalUNIX partition information. If this information is damaged, the boot program fails withan error such as:
File just loaded does not appear to be executable
If this message appears during the boot attempt, the system should be booted from analternate boot disk. While booting, most disk drivers display errors on the console aboutthe invalid UNIX partition information on the failing disk. The messages are similar tothis:
WARNING: unable to read labelWARNING: corrupt label_sdo
This indicates that the failure was due to an invalid disk partition. You can attempt tore-add the disk as described in “Re-Adding a Failed Boot Disk” on page 34. However, ifthe reattach fails, then the disk needs to be replaced as described in “Replacing a FailedBoot Disk” on page 35.
Incorrect Entries in /etc/vfstabWhen the root disk is encapsulated and put under VERITAS Volume Manager control, aspart of the normal encapsulation process, volumes are created for all of the partitions onthe disk. VxVM modifies the /etc/vfstab to use the corresponding volumes instead ofthe disk partitions. Care should be taken while editing the /etc/vfstab file manually,and you should always make a backup copy before committing any changes to it. Themost important entries are those corresponding to / and /usr. The vfstab that existedprior to VERITAS Volume Manager installation is saved in /etc/vfstab.prevm.
Damaged Root (/) Entry in /etc/vfstab
If the entry in /etc/vfstab for the root file system (/) is lost or is incorrect, the systemboots in single-user mode. Messages similar to the following are displayed on booting thesystem:
INIT: Cannot create /var/adm/utmp or /var/adm/utmpxINIT: failed write of utmpx entry:" "
It is recommended that you first run fsck on the root partition as shown in this example:
# fsck -F ufs /dev/rdsk/c0t0d0s0
26 VERITAS Volume Manager Troubleshooting Guide

Recovery from Boot Failure
At this point in the boot process, / is mounted read-only, not read/write. Since the entryin /etc/vfstab was either incorrect or deleted, mount / as read/write manually, usingthis command:
# mount -o remount /dev/vx/dsk/rootvol /
After mounting / as read/write, exit the shell. The system prompts for a new run level.For multi-user mode, enter run level 3:
ENTER RUN LEVEL (0-6,s or S): 3
Restore the entry in /etc/vfstab for / after the system boots.
Damaged /usr Entry in /etc/vfstab
The /etc/vfstab file has an entry for /usr only if /usr is located on a separate diskpartition. After encapsulation of the disk containing the /usr partition, VxVM changesthe entry in /etc/vfstab to use the corresponding volume.
In the event of loss of the entry for /usr from /etc/vfstab, the system cannot bebooted (even if you have mirrors of the /usr volume). In this case, boot the system fromthe CD-ROM and restore /etc/vfstab using the following procedure:
1. Boot the operating system into single-user mode from its installation CD-ROM usingthe following command at the boot prompt:
ok boot cdrom -s
2. Mount/dev/dsk/c0t0d0s0 on a suitable mount point such as /a or /mnt:
# mount /dev/dsk/c0t0d0s0 /a
3. Edit /a/etc/vfstab, and ensure that there is an entry for the /usr file system, suchas the following:
/dev/vx/dsk/usr /dev/vx/rdsk/usr /usr ufs 1 yes -
4. Shut down and reboot the system from the same root partition on which the vfstabfile was restored.
Chapter 2, Recovery from Boot Disk Failure 27

Recovery from Boot Failure
Missing or Damaged Configuration Files
Note VxVM no longer maintains entries for tunables in /etc/system as was the case forVxVM 3.2 and earlier releases. All entries for VERITAS Volume Manager devicedriver tunables are now contained in files named /kernel/drv/vx*.conf, suchas /kernel/drv/vxio.conf. For more information, see the “PerformanceMonitoring and Tuning” chapter of the VERITAS Volume Manager Administrator’sGuide.
Caution If you need to modify configuration files such as /etc/system, make a copy ofthe file in the root file system before editing it.
If your changes to the /etc/system file are incorrect, the saved copy can be specified tothe boot program. To specify the saved system file to the boot program, follow theprocedure in the next section.
Restoring a Copy of /etc/system on the Root Disk
If the /etc/system file is damaged and a saved copy of the /etc/system file isavailable, the system can be booted as follows:
1. Boot the system with the following command:
ok boot -a
2. Press Return to accept the default for all prompts except the following:
a. The default pathname for the kernel program, /kernel/unix, may not beappropriate for your system’s architecture. If this is so, enter the correctpathname, such as /platform/sun4u/kernel/unix, at the following prompt:
Enter filename [/kernel/unix]:/platform/sun4u/kernel/unix
b. Enter the name of the saved system file, such as /etc/system.save at thefollowing prompt:
Name of system file [/etc/system]:/etc/system.save
c. Enter /pseudo/vxio@0:0 as the physical name of the root device at thefollowing prompt:
Enter physical name of root device[...]:/pseudo/vxio@0:0
28 VERITAS Volume Manager Troubleshooting Guide
Recovery from Boot Failure
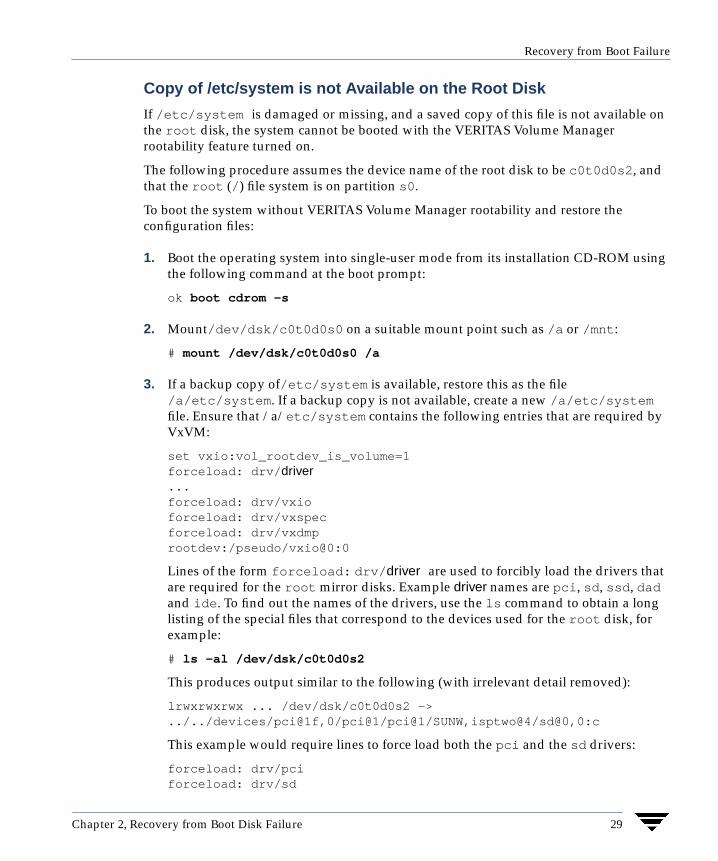
Copy of /etc/system is not Available on the Root Disk
If /etc/system is damaged or missing, and a saved copy of this file is not available onthe root disk, the system cannot be booted with the VERITAS Volume Managerrootability feature turned on.
The following procedure assumes the device name of the root disk to be c0t0d0s2, andthat the root (/) file system is on partition s0.
To boot the system without VERITAS Volume Manager rootability and restore theconfiguration files:
1. Boot the operating system into single-user mode from its installation CD-ROM usingthe following command at the boot prompt:
ok boot cdrom -s
2. Mount/dev/dsk/c0t0d0s0 on a suitable mount point such as /a or /mnt:
# mount /dev/dsk/c0t0d0s0 /a
3. If a backup copy of/etc/system is available, restore this as the file/a/etc/system. If a backup copy is not available, create a new /a/etc/systemfile. Ensure that /a/etc/system contains the following entries that are required byVxVM:
set vxio:vol_rootdev_is_volume=1forceload: drv/driver...forceload: drv/vxioforceload: drv/vxspecforceload: drv/vxdmprootdev:/pseudo/vxio@0:0
Lines of the form forceload: drv/driver are used to forcibly load the drivers thatare required for the root mirror disks. Example driver names are pci, sd, ssd, dadand ide. To find out the names of the drivers, use the ls command to obtain a longlisting of the special files that correspond to the devices used for the root disk, forexample:
# ls -al /dev/dsk/c0t0d0s2
This produces output similar to the following (with irrelevant detail removed):
lrwxrwxrwx ... /dev/dsk/c0t0d0s2 ->../../devices/pci@1f,0/pci@1/pci@1/SUNW,isptwo@4/sd@0,0:c
This example would require lines to force load both the pci and the sd drivers:
forceload: drv/pciforceload: drv/sd
Chapter 2, Recovery from Boot Disk Failure 29

Repairing Root or /usr File Systems on Mirrored Volumes
4. Shut down and reboot the system from the same root partition on which theconfiguration files were restored.
Repairing Root or /usr File Systems on Mirrored VolumesIf the root or /usr file system is defined on a mirrored volume, errors in the partitionthat underlies one of the mirrors can result in data corruption or system errors at boottime (when VxVM is started and assumes that the mirrors are synchronized).
Two alternate workarounds exist for this situation:
◆ Mount one plex of the root or /usr file system, repair it, unmount it, and use dd tocopy the fixed plex to all other plexes. This procedure is not recommended as it can beerror prone.
◆ Restore the system from a valid backup tape. This procedure is described in thefollowing section. It does not require the operating system to be re-installed from thebase CD-ROM. It provides a simple, efficient, and reliable means of recovery whenboth the root disk and its mirror are damaged.
Recovering a Root Disk and Root Mirror from Backup TapeThis procedure assumes that you have:
◆ A listing of the partition table for the original root disk before you encapsulated it.
◆ A current full backup of all the file systems on the original root disk that was underVERITAS Volume Manager control. If the root file system is of type ufs, you canback it up using the ufsdump command. See the ufsdump(1M) manual page for moreinformation.
◆ A new boot disk installed to replace the original failed boot disk if the original bootdisk was physically damaged.
This procedure requires the reinstallation of the root disk. To prevent the loss of data ondisks not involved in the reinstallation, only involve the root disk in the reinstallationprocedure.
Several of the automatic options for installation access disks other than the root diskwithout requiring confirmation from the administrator. Therefore, disconnect all otherdisks containing volumes from the system prior to starting this procedure. This willensure that these disks are unaffected by the reinstallation. Reconnect the disks aftercompleting the procedure.
30 VERITAS Volume Manager Troubleshooting Guide

Repairing Root or /usr File Systems on Mirrored Volumes
The following procedure assumes the device name of the new root disk to be c0t0d0s2,and that you need to recover both the root (/) file system on partition s0, and the /usrfile system on partition s6. If your system does not have a separate /usr file system, omitsteps 7 and 8.
1. Boot the operating system into single-user mode from its installation CD-ROM usingthe following command at the boot prompt:
ok boot cdrom -s
2. Use the format command to create partitions on the new root disk (c0t0d0s2).These should be identical in size to those on the original root disk beforeencapsulation unless you are using this procedure to change their sizes. If you changethe size of the partitions, ensure that they are large enough to store the data that isrestored to them. See the format(1M) manual page for more information.
Note A maximum of five partitions may be created for file systems or swap areas asencapsulation reserves two partitions for VERITAS Volume Manager private andpublic regions.
3. Use the mkfs command to make new file systems on the root and usr partitions thatyou created in the previous step. For example, to make a ufs file system on the rootpartition, enter:
# mkfs -F ufs /dev/rdsk/c0t0d0s0
See the mkfs(1M) and mkfs_ufs(1M) manual pages for more information.
4. Mount/dev/dsk/c0t0d0s0 on a suitable mount point such as /a or /mnt:
# mount /dev/dsk/c0t0d0s0 /a
5. Restore the root file system from tape into the /a directory hierarchy. For example, ifyou used ufsdump to back up the file system, use the ufsrestore command torestore it. See the ufsrestore(1M) manual page for more information.
6. Use the installboot command to install a bootblock device on /a.
7. Use the mkdir command to create a suitable mount point, such as /a/usr/, andmount/dev/dsk/c0t0d0s6 on it:
# mkdir -p /a/usr# mount /dev/dsk/c0t0d0s6 /a/usr
8. Restore the /usr file system from tape into the /a/usr directory hierarchy.
Chapter 2, Recovery from Boot Disk Failure 31

Repairing Root or /usr File Systems on Mirrored Volumes
9. Disable startup of VxVM by modifying files in the restored root file system asfollows:
a. Create the file /a/etc/vx/reconfig.d/state.d/install-db to preventthe configuration daemon, vxconfigd, from starting:
# touch /a/etc/vx/reconfig.d/state.d/install-db
b. Copy /a/etc/system to a backup file such as /a/etc/system.old.
c. Comment out the following lines from /a/etc/system by putting a * characterin front of them:
set vxio:vol_rootdev_is_volume=1rootdev:/pseudo/vxio@0:0
These lines should then read:
* set vxio:vol_rootdev_is_volume=1* rootdev:/pseudo/vxio@0:0
d. Copy /a/etc/vfstab to a backup file such as /a/etc/vfstab.old.
e. Edit /a/etc/vfstab, and replace the volume device names (beginning with/dev/vx/dsk) for the / and /usr file system entries with their standard diskdevices, /dev/dsk/c0t0d0s0 and /dev/dsk/c0t0d0s6. For example, replacethe following lines:
/dev/vx/dsk/rootvol /dev/vx/rdsk/rootvol / ufs 1 no -/dev/vx/dsk/usrvol /dev/vx/rdsk/usrvol /usr ufs 1 yes -
with this line:
/dev/dsk/c0t0d0s0 /dev/rdsk/c0t0d0s0 / ufs 1 no -/dev/dsk/c0t0d0t6 /dev/rdsk/c0t0d0s6 /usr ufs 1 yes -
10. Shut down the system cleanly using the init 0 command, and reboot from the newroot disk. The system comes up thinking that VxVM is not installed.
The next step in the procedure depends on whether there are root disk mirrors in the oldrootdg:
◆ If there are other disks in the old rootdg that are not used as root disk mirrors,perform only step 11.
◆ If there are only root disk mirrors in the old rootdg, perform only step 12.
11. If there are other disks in the old rootdg that are not used as root disk mirrors,follow these steps to bring in the old rootdg (minus the boot disk which VxVM willthink has failed) and set up the new boot disk.
32 VERITAS Volume Manager Troubleshooting Guide

Re-Adding and Replacing Boot Disks
a. Remove files involved with the installation that are no longer needed:
# rm -r /etc/vx/reconfig.d/state.d/install-db
b. Start the VERITAS Volume Manager I/O daemons:
# vxiod set 10
c. Start the VERITAS Volume Manager configuration daemon in disabled mode:
# vxconfigd -m disable
d. Initialize the volboot file:
# vxdctl init
e. Enable vxconfigd:
# vxdctl enable
Steps a through e enable the old rootdg excluding the root disk which VxVMinterprets as failed.
f. Use the vxedit command (or the VERITAS Enterprise Administrator (VEA)) toremove the old root disk volumes and the root disk itself from VERITASVolume Manager control.
g. Use the vxdiskadm command to encapsulate the new root disk and initializeany disks that are to serve as root disk mirrors. After the required reboot, mirrorthe root disk onto the root disk mirrors.
12. If there are only root disk mirrors in the old rootdg:
a. Run the vxinstall command to encapsulate the new boot disk, and initializethe root disk mirrors.
b. After the required reboot, mirror the root disk onto the root disk mirrors.
Re-Adding and Replacing Boot DisksData that is not critical for booting the system is only accessed by VxVM after the systemis fully operational, so it does not have to be located in specific areas. VxVM can find it.However, boot-critical data must be placed in specific areas on the bootable disks for theboot process to find it.
On some systems, the controller-specific actions performed by the disk controller in theprocess and the system BIOS constrain the location of this critical data.
Chapter 2, Recovery from Boot Disk Failure 33

Re-Adding and Replacing Boot Disks
If a boot disk fails, one of the following procedures can be used to correct the problem:
◆ If the errors are transient or correctable, re-use the same disk. This is known asre-adding a disk. In some cases, reformatting a failed disk or performing a surfaceanalysis to rebuild the alternate-sector mappings are sufficient to make a disk usablefor re-addition.
◆ If the disk has failed completely, replace it.
The following sections describe how to re-add or replace a failed boot disk.
Re-Adding a Failed Boot DiskRe-adding a disk is the same procedure as replacing the disk, except that the samephysical disk is used. Normally, a disk that needs to be re-added has been detached. Thismeans that VxVM has detected the disk failure and has ceased to access the disk.
Note Your system may use a device name or path that differs from the examples. See “DiskDevices” in the “Administering Disks” chapter of the VERITAS Volume ManagerAdministrator’s Guide for more information on device names.
For example, consider a system that has two disks, disk01 and disk02, which arenormally mapped into the system configuration during boot as disks c0t0d0s2 andc0t1d0s2, respectively. A failure has caused disk01 to become detached. This can beconfirmed by listing the disks with the vxdisk utility with this command:
# vxdisk list
vxdisk displays this (example) list:
DEVICE TYPE DISK GROUP STATUSc0t0d0s2 sliced - - errorc0t1d0s2 sliced disk02 rootdg online- - disk01 rootdg failed was:c0t0d0s2
Note that the disk disk01 has no device associated with it, and has a status of failedwith an indication of the device that it was detached from. It is also possible for the device(such as c0t0d0s2 in the example) not to be listed at all should the disk fail completely.
In some cases, the vxdisk list output can differ. For example, if the boot disk hasuncorrectable failures associated with the UNIX partition table, a missing root partitioncannot be corrected but there are no errors in the VERITAS Volume Manager private area.The vxdisk list command displays a listing such as this:
DEVICE TYPE DISK GROUP STATUSc0t0d0s2 sliced disk01 rootdg onlinec0t1d0s2 sliced disk02 rootdg online
34 VERITAS Volume Manager Troubleshooting Guide

Re-Adding and Replacing Boot Disks
However, because the error was not correctable, the disk is viewed as failed. In such acase, remove the association between the failing device and its disk name using thevxdiskadm “Remove a disk for replacement” menu item. (See the vxdiskadm (1M)manual page for more information.) You can then perform any special procedures tocorrect the problem, such as reformatting the device.
To re-add the disk, select the vxdiskadm “Replace a failed or removed disk” menu itemto replace the disk, and specify the same device as the replacement. For the example above,you would replace disk01 with the device c0t0d0s2.
If hot-relocation is enabled when a mirrored boot disk fails, an attempt is made to create anew mirror and remove the failed subdisks from the failing boot disk. If a re-add succeedsafter a successful hot-relocation, the root and other volumes affected by the disk failureno longer exist on the re-added disk. Run vxunreloc to move the hot-relocated subdisksback to the newly replaced disk.
Replacing a Failed Boot DiskThe replacement disk must have at least as much storage capacity as was in use on thedisk being replaced. It must be large enough to accommodate all subdisks of the originaldisk at their current disk offsets.
To estimate the size of the replacement disk, use this command:
# vxprint -st -e ’sd_disk=”diskname”’
where diskname is the name of the disk that failed or of one of its mirrors. From theresulting output, add the DISKOFFS and LENGTH values for the last subdisk listed for thedisk. This size is in 512-byte sectors. Divide this number by 2 for the size in kilobytes.
Note Disk sizes reported by manufacturers do not usually represent usable capacity.Also, many disk manufacturers use the term “megabyte” to mean a million bytesrather than the usual meaning of 1,048,576 bytes.
To replace a boot disk:
1. Boot the system from an alternate boot disk (see “Booting from Alternate Boot Disks”on page 20).
2. Remove the association between the failing device and its disk name using the“Remove a disk for replacement” function of vxdiskadm. (See the vxdiskadm (1M)manual page for more information.)
3. Shut down the system and replace the failed hardware.
Chapter 2, Recovery from Boot Disk Failure 35
Recovery by Reinstallation
4. After rebooting from the alternate boot disk, use the vxdiskadm “Replace a failed orremoved disk” menu item to notify VxVM that you have replaced the failed disk.
5. Use vxdiskadm to mirror the alternate boot disk to the replacement boot disk.
6. When the volumes on the boot disk have been restored, shut down the system, andtest that the system can be booted from the replacement boot disk.
Recovery by ReinstallationReinstallation is necessary if all copies of your boot (root) disk are damaged, or if certaincritical files are lost due to file system damage.
If these types of failures occur, attempt to preserve as much of the original VxVMconfiguration as possible. Any volumes that are not directly involved in the failure do notneed to be reconfigured. You do not have to reconfigure any volumes that are preserved.
General Reinstallation InformationThis section describes procedures used to reinstall VxVM and preserve as much of theoriginal configuration as possible after a failure.
Note System reinstallation destroys the contents of any disks that are used forreinstallation.
All VxVM-related information is removed during reinstallation. Data removed includesdata in private areas on removed disks that contain the disk identifier and copies of theVxVM configuration. The removal of this information makes the disk unusable as a VMdisk.
The system root disk is always involved in reinstallation. Other disks can also beinvolved. If the root disk was placed under VxVM control, either during VERITASVolume Manager installation or by later encapsulation, that disk and any volumes ormirrors on it are lost during reinstallation. Any other disks that are involved in thereinstallation, or that are removed and replaced, can lose VxVM configuration data(including volumes and mirrors).
If a disk, including the root disk, is not under VxVM control prior to the failure, no VxVMconfiguration data is lost at reinstallation. For information on replacing disks, see“Removing and Replacing Disks” in the “Administering Disks” chapter of the VERITASVolume Manager Administrator’s Guide.
36 VERITAS Volume Manager Troubleshooting Guide

Recovery by Reinstallation
Although it simplifies the recovery process after reinstallation, not having the root diskunder VERITAS Volume Manager control increases the possibility of a reinstallation beingnecessary. By having the root disk under VxVM control and creating mirrors of the rootdisk contents, you can eliminate many of the problems that require system reinstallation.
When reinstallation is necessary, the only volumes saved are those that reside on, or havecopies on, disks that are not directly involved with the failure and reinstallation. Anyvolumes on the root disk and other disks involved with the failure or reinstallation are lostduring reinstallation. If backup copies of these volumes are available, the volumes can berestored after reinstallation.
Reinstalling the System and Recovering VxVMTo reinstall the system and recover the VERITAS Volume Manager configuration, use thefollowing procedure. These steps are described in detail in the sections that follow:
1. “Prepare the System for Reinstallation” on page 37.
Replace any failed disks or other hardware, and detach any disks not involved in thereinstallation.
2. “Reinstall the Operating System” on page 38.
Reinstall the base system and any other unrelated Volume Manager packages.
3. “Reinstall VxVM” on page 38.
Add the Volume Manager package, but do not execute the vxinstall command.
4. “Recover the VERITAS Volume Manager Configuration” on page 38.
5. “Clean up the System Configuration” on page 40.
Restore any information in volumes affected by the failure or reinstallation, andrecreate system volumes (rootvol, swapvol, usr, and other system volumes).
6. “Start up Hot-Relocation” on page 45.
Prepare the System for Reinstallation
To prevent the loss of data on disks not involved in the reinstallation, involve only the rootdisk and any other disks that contain portions of the operating system in the reinstallationprocedure. For example, if the /usr file system is configured on a separate disk, leavethat disk connected. Several of the automatic options for installation access disks otherthan the root disk without requiring confirmation from the administrator.
Chapter 2, Recovery from Boot Disk Failure 37

Recovery by Reinstallation
Disconnect all other disks containing volumes (or other data that should be preserved)prior to reinstalling the operating system. For example, if you originally installed theoperating system with the home file system on a separate disk, disconnect that disk toensure that the home file system remains intact.
Reinstall the Operating System
Once any failed or failing disks have been replaced and disks not involved with thereinstallation have been detached, reinstall the operating system as described in youroperating system documentation. Install the operating system prior to installing VxVM.
Ensure that no disks other than the root disk are accessed in any way while the operatingsystem installation is in progress. If anything is written on a disk other than the root disk,the VERITAS Volume Manager configuration on that disk may be destroyed.
Note During reinstallation, you can change the system’s host name (or host ID). It isrecommended that you keep the existing host name, as this is assumed by theprocedures in the following sections.
Reinstall VxVM
To reinstall VERITAS Volume Manager, follow these steps:
1. Load VERITAS Volume Manager from CD-ROM. Follow the instructions in theVERITAS Volume Manager Installation Guide.
Caution To reconstruct the Volume Manager configuration that remains on the non-rootdisks, do not use vxinstall to initialize VxVM after loading the software fromCD-ROM.
2. Use the vxlicinst command to install the VERITAS Volume Manager license key(see the vxlicinst(1) manual page for more information).
Recover the VERITAS Volume Manager Configuration
Once the VERITAS Volume Manager packages have been loaded, and you have installedthe license for VxVM, recover the VERITAS Volume Manager configuration using thefollowing procedure:
1. Touch /etc/vx/reconfig.d/state.d/install-db.
2. Shut down the system.
38 VERITAS Volume Manager Troubleshooting Guide

Recovery by Reinstallation
3. Reattach the disks that were removed from the system.
4. Reboot the system.
5. When the system comes up, bring the system to single-user mode using the followingcommand:
# exec init S
6. When prompted, enter the password and press Return to continue.
7. Remove files involved with installation that were created when you loaded VxVM butare no longer needed using the following command:
# rm -rf /etc/vx/reconfig.d/state.d/install-db
8. Start some VERITAS Volume Manager I/O daemons using the following command:
# vxiod set 10
9. Start the VERITAS Volume Manager configuration daemon, vxconfigd, in disabledmode using the following command:
# vxconfigd -m disable
10. Initialize the vxconfigd daemon using the following command:
# vxdctl init
11. Initialize the DMP subsystem using the following command:
# vxdctl initdmp
12. Enable vxconfigd using the following command:
# vxdctl enable
The configuration preserved on the disks not involved with the reinstallation has nowbeen recovered. However, because the root disk has been reinstalled, it does not appear toVxVM as a VM disk. The configuration of the preserved disks does not include the rootdisk as part of the VxVM configuration.
If the root disk of your system and any other disks involved in the reinstallation were notunder VxVM control at the time of failure and reinstallation, then the reconfiguration iscomplete at this point. For information on replacing disks, see “Removing and Replacing
Chapter 2, Recovery from Boot Disk Failure 39

Recovery by Reinstallation
Disks” in the “Administering Disks” chapter of the VERITAS Volume ManagerAdministrator’s Guide. There are several methods available to replace a disk; choose themethod that you prefer.
If the root disk (or another disk) was involved with the reinstallation, any volumes ormirrors on that disk (or other disks no longer attached to the system) are now inaccessible.If a volume had only one plex contained on a disk that was reinstalled, removed, orreplaced, then the data in that volume is lost and must be restored from backup.
Clean up the System Configuration
To clean up the configuration of your system after reinstallation of VxVM, you mustaddress the following issues:
◆ Clean up Rootability
◆ Clean up Volumes
◆ Clean up Disk Configuration
◆ Reconfigure Rootability
◆ Final Volume Reconfiguration
Clean up Rootability
To begin the cleanup of the VERITAS Volume Manager configuration, remove anyvolumes associated with rootability. This must be done if the root disk (and any other diskinvolved in the system boot process) was under VERITAS Volume Manager control. Thevolumes to remove are:
◆ rootvol, that contains the root file system
◆ swapvol, that contains the swap area
◆ (on some systems) standvol, that contains the stand file system
◆ usr, that contains the /usr file system
To remove the root volume, use the vxedit command:
# vxedit -fr rm rootvol
Repeat this command, using swapvol and usr (standvol) in place of rootvol, toremove the swap, stand, and usr volumes.
40 VERITAS Volume Manager Troubleshooting Guide

Recovery by Reinstallation
Clean up Volumes
After completing the rootability cleanup, you must determine which volumes need to berestored from backup. The volumes to be restored include those with all mirrors (allcopies of the volume) residing on disks that have been reinstalled or removed. Thesevolumes are invalid and must be removed, recreated, and restored from backup. If onlysome mirrors of a volume exist on reinitialized or removed disks, these mirrors must beremoved. The mirrors can be re-added later.
To restore the volumes, perform these steps:
1. Establish which VM disks have been removed or reinstalled using the followingcommand:
# vxdisk list
This displays a list of system disk devices and the status of these devices. Forexample, for a reinstalled system with three disks and a reinstalled root disk, theoutput of the vxdisk list command is similar to this:
DEVICE TYPE DISK GROUP STATUSc0t0d0s2 sliced - - errorc0t1d0s2 sliced disk02 rootdg onlinec0t2d0s2 sliced disk03 rootdg online- - disk01 rootdg failed was:c0t0d0s2
The display shows that the reinstalled root device, c0t0d0s2, is not associated with aVM disk and is marked with a status of error. The disks disk02 and disk03 werenot involved in the reinstallation and are recognized by VxVM and associated withtheir devices (c0t1d0s2 and c0t2d0s2). The former disk01, which was the VMdisk associated with the replaced disk device, is no longer associated with the device(c0t0d0s2).
If other disks (with volumes or mirrors on them) had been removed or replacedduring reinstallation, those disks would also have a disk device listed in error stateand a VM disk listed as not associated with a device.
2. Once you know which disks have been removed or replaced, locate all the mirrors onfailed disks using the following command:
# vxprint -sF “%vname” -e’sd_disk = “disk”’
where disk is the name of a disk with a failed status. Be sure to enclose the diskname in quotes in the command. Otherwise, the command returns an error message.The vxprint command returns a list of volumes that have mirrors on the failed disk.Repeat this command for every disk with a failed status.
Chapter 2, Recovery from Boot Disk Failure 41
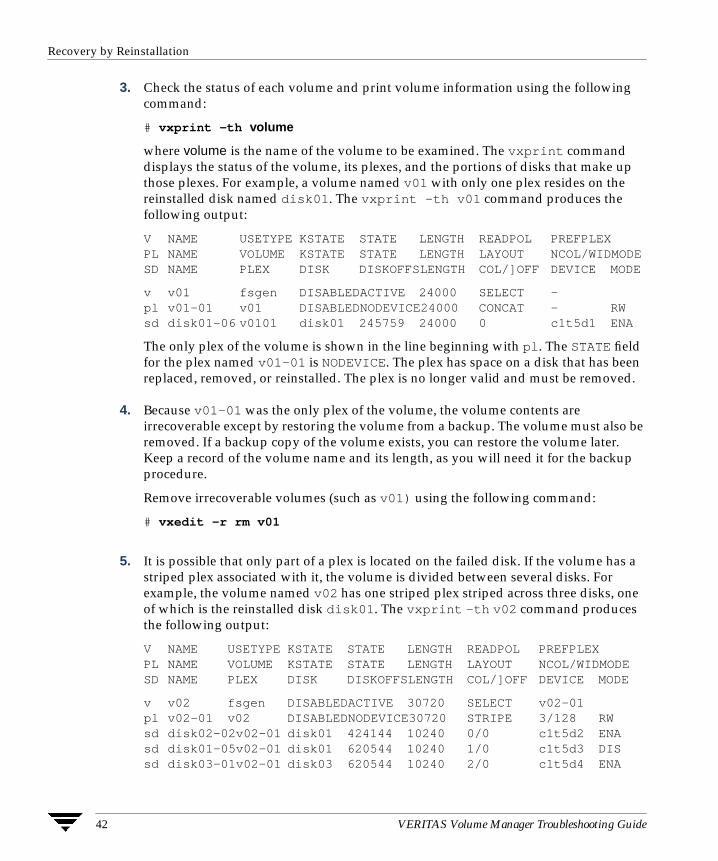
Recovery by Reinstallation
3. Check the status of each volume and print volume information using the followingcommand:
# vxprint -th volume
where volume is the name of the volume to be examined. The vxprint commanddisplays the status of the volume, its plexes, and the portions of disks that make upthose plexes. For example, a volume named v01 with only one plex resides on thereinstalled disk named disk01. The vxprint -th v01 command produces thefollowing output:
V NAME USETYPE KSTATE STATE LENGTH READPOL PREFPLEXPL NAME VOLUME KSTATE STATE LENGTH LAYOUT NCOL/WIDMODESD NAME PLEX DISK DISKOFFSLENGTH COL/]OFF DEVICE MODE
v v01 fsgen DISABLEDACTIVE 24000 SELECT -pl v01-01 v01 DISABLEDNODEVICE24000 CONCAT - RWsd disk01-06 v0101 disk01 245759 24000 0 c1t5d1 ENA
The only plex of the volume is shown in the line beginning with pl. The STATE fieldfor the plex named v01-01 is NODEVICE. The plex has space on a disk that has beenreplaced, removed, or reinstalled. The plex is no longer valid and must be removed.
4. Because v01-01 was the only plex of the volume, the volume contents areirrecoverable except by restoring the volume from a backup. The volume must also beremoved. If a backup copy of the volume exists, you can restore the volume later.Keep a record of the volume name and its length, as you will need it for the backupprocedure.
Remove irrecoverable volumes (such as v01) using the following command:
# vxedit -r rm v01
5. It is possible that only part of a plex is located on the failed disk. If the volume has astriped plex associated with it, the volume is divided between several disks. Forexample, the volume named v02 has one striped plex striped across three disks, oneof which is the reinstalled disk disk01. The vxprint -th v02 command producesthe following output:
V NAME USETYPE KSTATE STATE LENGTH READPOL PREFPLEXPL NAME VOLUME KSTATE STATE LENGTH LAYOUT NCOL/WIDMODESD NAME PLEX DISK DISKOFFSLENGTH COL/]OFF DEVICE MODE
v v02 fsgen DISABLEDACTIVE 30720 SELECT v02-01pl v02-01 v02 DISABLEDNODEVICE30720 STRIPE 3/128 RWsd disk02-02v02-01 disk01 424144 10240 0/0 c1t5d2 ENAsd disk01-05v02-01 disk01 620544 10240 1/0 c1t5d3 DISsd disk03-01v02-01 disk03 620544 10240 2/0 c1t5d4 ENA
42 VERITAS Volume Manager Troubleshooting Guide

Recovery by Reinstallation
The display shows three disks, across which the plex v02-01 is striped (the linesstarting with sd represent the stripes). One of the stripe areas is located on a faileddisk. This disk is no longer valid, so the plex named v02-01 has a state of NODEVICE.Since this is the only plex of the volume, the volume is invalid and must be removed.If a copy of v02 exists on the backup media, it can be restored later. Keep a record ofthe volume name and length of any volume you intend to restore from backup.
Remove invalid volumes (such as v02) using the following command:
# vxedit -r rm v02
6. A volume that has one mirror on a failed disk can also have other mirrors on disksthat are still valid. In this case, the volume does not need to be restored from backup,since the data is still valid on the valid disks.
The output of the vxprint -th command for a volume with one plex on a failed disk(disk01) and another plex on a valid disk (disk02) is similar to the following:
V NAME USETYPE KSTATE STATE LENGTH READPOL PREFPLEXPL NAME VOLUME KSTATE STATE LENGTH LAYOUT NCOL/WIDMODESD NAME PLEX DISK DISKOFFSLENGTH COL/]OFF DEVICE MODE
v v03 fsgen DISABLEDACTIVE 0720 SELECT -pl v03-01 v03 DISABLEDACTIVE 30720 CONCAT - RWsd disk02-01 v03-01 disk01 620544 30720 0 c1t5d5 ENApl v03-02 v03 DISABLEDNODEVICE30720 CONCAT - RWsd disk01-04 v03-02 disk03 262144 30720 0 c1t5d6 DIS
This volume has two plexes, v03-01 and v03-02. The first plex (v03-01) does notuse any space on the invalid disk, so it can still be used. The second plex (v03-02)uses space on invalid disk disk01 and has a state of NODEVICE. Plex v03-02 mustbe removed. However, the volume still has one valid plex containing valid data. If thevolume needs to be mirrored, another plex can be added later. Note the name of thevolume to create another plex later.
To remove an invalid plex, use the vxplex command to dissociate and then removethe plex from the volume. For example, to dissociate and remove the plex v03-02,use the following command:
# vxplex -o rm dis v03-02
7. Once all the volumes have been cleaned up, clean up the disk configuration asdescribed in the following section, “Clean up Disk Configuration.”
Chapter 2, Recovery from Boot Disk Failure 43

Recovery by Reinstallation
Clean up Disk Configuration
Once all invalid volumes and plexes have been removed, the disk configuration can becleaned up. Each disk that was removed, reinstalled, or replaced (as determined from theoutput of the vxdisk list command) must be removed from the configuration.
To remove the disk, use the vxdg command. To remove the failed disk disk01, use thefollowing command:
# vxdg rmdisk disk01
If the vxdg command returns an error message, some invalid mirrors exist. Repeat theprocesses described in “Clean up Volumes” on page 41 until all invalid volumes andmirrors are removed.
Reconfigure Rootability
Once all the invalid disks have been removed, the replacement or reinstalled disks can beadded to VERITAS Volume Manager control. If the root disk was originally underVERITAS Volume Manager control or you now wish to put the root disk under VERITASVolume Manager control, add this disk first.
To add the root disk to VERITAS Volume Manager control, use the vxdiskadm command:
# vxdiskadm
From the vxdiskadm main menu, select menu item 2 (Encapsulate a disk). Followthe instructions and encapsulate the root disk for the system.
When the encapsulation is complete, reboot the system to multi-user mode.
Final Volume Reconfiguration
Once the root disk is encapsulated, any other disks that were replaced should be addedusing the vxdiskadm command. If the disks were reinstalled during the operatingsystem reinstallation, they should be encapsulated; otherwise, they can be added.
Once all the disks have been added to the system, any volumes that were completelyremoved as part of the configuration cleanup can be recreated and their contents restoredfrom backup. The volume recreation can be done by using the vxassist command or thegraphical user interface.
For example, to recreate the volumes v01 and v02, use the following command:
# vxassist make v01 24000# vxassist make v02 30720 layout=stripe nstripe=3
Once the volumes are created, they can be restored from backup using normalbackup/restore procedures.
44 VERITAS Volume Manager Troubleshooting Guide

Recovery by Reinstallation
Recreate any plexes for volumes that had plexes removed as part of the volume cleanup.To replace the plex removed from volume v03, use the following command:
# vxassist mirror v03
Once you have restored the volumes and plexes lost during reinstallation, recovery iscomplete and your system is configured as it was prior to the failure.
The final step is to start up hot-relocation, if this is required.
Start up Hot-Relocation
To start up the hot-relocation service, either reboot the system or manually start therelocation watch daemon, vxrelocd (this also starts the vxnotify process).
Note Hot-relocation should only be started when you are sure that it will not interferewith other reconfiguration procedures.
See “Modifying the Behavior of Hot-Relocation” in the “Administering Hot-Relocation”chapter of the VERITAS Volume Manager Administrator’s Guide for more information aboutrunning vxrelocd and about modifying its behavior.
To determine if hot-relocation has been started, use the following command to search forits entry in the process table:
# ps -ef | grep vxrelocd
Chapter 2, Recovery from Boot Disk Failure 45

Recovery by Reinstallation
46 VERITAS Volume Manager Troubleshooting Guide

Error Messages
3 IntroductionThis chapter provides information on error messages associated with the VERITASVolume Manager (VxVM) configuration daemon (vxconfigd), the kernel, and otherutilities. It covers most informational, failure, and error messages displayed on theconsole by vxconfigd, and by the VERITAS Volume Manager kernel driver, vxio. Theseinclude some errors that are infrequently encountered and difficult to troubleshoot.
Note Some error messages described here may not apply to your system.
Clarifications are included to elaborate on the situation or problem that generated aparticular message. Wherever possible, a recovery procedure (Action) is provided to helpyou to locate and correct the problem.
Logging Error MessagesVxVM provides the option of logging console output to a file. This logging is useful in thatany messages output just before a system crash will be available in the log file (presumingthat the crash does not result in file system corruption). vxconfigd controls whethersuch logging is turned on or off. If enabled, the default log file is/var/vxvm/vxconfigd.log.
vxconfigd also supports the use of syslog to log all of its regular console messages.When this is enabled, all console output is directed through the syslog interface.
syslog and log file logging can be used together to provide reliable logging to a privatelog file, along with distributed logging through syslogd.
Note Both syslog and log file logging are disabled by default.
To enable logging of console output to the file /var/vxvm/vxconfigd.log, edit thestartup script for vxconfigd as described in “Configuring Logging in the StartupScript,” or invoke vxconfigd under the C locale as shown here:
# vxconfigd [-x [1-9]] -x log
47

Configuring Logging in the Startup Script
There are 9 possible levels of debug logging; 1 provides the least detail, and 9 the most.
To enable syslog logging of console output, specify the option -x syslog tovxconfigd as shown here:
# vxconfigd [-x [1-9]] -x syslog
Messages with a priority higher than Debug are written to/var/adm/syslog/syslog.log, and all other messages are written to/var/vxvm/vxconfigd.log.
If you do not specify a debug level, only Error, Fatal Error, Warning, and Notice messagesare logged. Debug messages are not logged.
Configuring Logging in the Startup ScriptTo enable log file or syslog logging, you can edit the following portion of the/etc/init.d/vxvm-sysboot script that starts the VxVM configuration daemon,vxconfigd:
# comment-out or uncomment any of the following lines to enable or# disable the corresponding feature in vxconfigd.
#opts=”$opts -x syslog” # use syslog for console messages#opts=”$opts -x log” # messages to vxconfigd.log#opts=”$opts -x logfile=/foo/bar”# specify an alternate log file#opts=”$opts -x timestamp” # timestamp console messages
# to turn on debugging console output, uncomment the following line.# The debug level can be set higher for more output. The highest# debug level is 9.
#debug=1 # enable debugging console output
Uncomment the lines corresponding to the features that you want enabled at startup. Forexample, to set up vxconfigd to use syslog logging, uncomment the opts=”$opts -xsyslog” string.
For more information on logginf options for vxconfigd, refer to the vxconfigd(1M)manual page.
48 VERITAS Volume Manager Troubleshooting Guide

Understanding Error Messages
Understanding Error MessagesVxVM is fault-tolerant and resolves most problems without system administratorintervention. If the configuration daemon (vxconfigd) recognizes the actions that arenecessary, it queues up the transactions that are required. VxVM provides atomic changesof system configurations; either a transaction completes fully, or the system is left in thesame state as though the transaction was never attempted. If vxconfigd is unable torecognize and fix system problems, the system administrator needs to handle the task ofproblem solving using the diagnostic messages that are returned from the software. Thefollowing sections list error messages that may be seen along with a more detaileddescription of the likely cause of the problem and suggestions for any actions that can betaken.
Kernel Panic MessagesA panic is a severe event as it halts a system during its normal operation. A panic messagefrom the kernel indicates the nature of the hardware problem or software inconsistencythat is so severe that the system cannot continue. The operating system may also providea dump of the CPU register contents and a stack trace to aid in identifying the cause of thepanic.
vxvm:vxio:PANIC: Object association depth overflow
◆ Description: This internal error should not occur unless there is a bug in VxVM.
◆ Action: Contact Customer Support.
For full information about saving system crash information, see the Solaris SystemAdministation Guide.
Kernel Warning MessagesA warning message from the kernel indicates that a non-critical operation has failed,possibly because some resource is not available. Corrective action should be takenimmediately.
vxvm:vxio:WARNING: Cannot find device number for boot_path
◆ Description: The boot path retrieved from the system PROMs cannot be converted to avalid device number.
◆ Action: Check your PROM settings for the correct boot string.
Chapter 3, Error Messages 49

Kernel Warning Messages
vxvm:vxio:WARNING: check_ilocks: overlapping ilocks: offset for length,offset for lengthvxvm:vxio:WARNING: check_ilocks: stranded ilock on object_name startoffset len length
◆ Description: These internal errors do not occur unless there is a bug in VxVM.
◆ Action: Contact Customer Support.
vxvm:vxio:WARNING: detaching RAID-5 volume
◆ Description: Either a double-failure condition in the RAID-5 volume has been detectedin the kernel or some other fatal error is preventing further use of the array.
◆ Action: If two or more disks have been lost due to a controller or power failure, use thevxrecover utility to recover them once they have been re-attached to the system.Check for other console error messages that may provide additional informationabout the failure.
vxvm:vxio:WARNING: Device major, minor: Received spurious close
◆ Description: A close was received for an object that was not open. This can onlyhappen if the operating system is not correctly tracking opens and closes.
◆ Action: No action is necessary; the system will continue.
vxvm:vxio:WARNING: Double failure condition detected on RAID-5 volume
◆ Description: I/O errors have been received in more than one column of a RAID-5volume. This could be caused by:
- a controller failure making more than a single drive unavailable
- the loss of a second drive while running in degraded mode
- two separate disk drives failing simultaneously (unlikely)
◆ Action: Correct the hardware failures if possible. Then recover the volume using thevxrecover command.
vxvm:vxio:WARNING: DRL volume volume is detached
◆ Description: A Dirty Region Logging volume became detached because a DRL logentry could not be written. If this is due to a media failure, other errors may have beenlogged to the console.
◆ Action: The volume containing the DRL log continues in operation. If the system failsbefore the DRL has been repaired, a full recovery of the volume’s contents may benecessary and will be performed automatically when the system is restarted. Torecover from this error, use the vxassist addlog command add a new DRL log tothe volume.
50 VERITAS Volume Manager Troubleshooting Guide

Kernel Warning Messages
vxvm:vxio:WARNING: Failed to log the detach of the DRL volume volume
◆ Description: An attempt failed to write a kernel log entry indicating the loss of a DRLvolume. The attempted write to the log failed either because the kernel log is full, orbecause of a write error to the drive. The volume becomes detached.
◆ Action: Messages about log failures are usually fatal, unless the problem is transient.However, the kernel log is sufficiently redundant that such errors are unlikely tooccur.
If the problem is not transient (that is, the drive cannot be fixed and brought backonline without data loss), recreate the disk group from scratch and restore all of itsvolumes from backups. Even if the problem is transient, reboot the system aftercorrecting the problem.
If error messages are seen from the disk driver, it is likely that the last copy of the logfailed due to a disk error. Replace the failed drive in the disk group. The logre-initializes on the new drive. Finally force the failed volume into an active state andrecover the data.
vxvm:vxio:WARNING: Failure in RAID-5 logging operationvxvm:vxio:WARNING: log object object_name detached from RAID-5 volume
◆ Description: Together, these errors indicate that a RAID-5 log has failed.
◆ Action: To restore RAID-5 logging to a RAID-5 volume, create a new log plex andattach it to the volume.
vxvm:vxio:WARNING: Illegal vminor encountered
◆ Description: An attempt was made to open a volume device other than the rootvolume device before vxconfigd loaded the volume configuration.
◆ Action: None; under normal startup conditions, this message should not occur. Ifnecessary, start VxVM and re-attempt the operation.
vxvm:vxio:WARNING: Kernel log full: volume detached
◆ Description: A plex detach failed because the kernel log was full. As a result, themirrored volume will become detached.
◆ Action: It is unlikely that this condition ever occurs. The only corrective action is toreboot the system.
vxvm:vxio:WARNING: Kernel log update failed: volume detached
◆ Description: Detaching a plex failed because the kernel log could not be flushed todisk. As a result, the mirrored volume became detached. This may be caused by allthe disks containing a kernel log going bad.
◆ Action: Repair or replace the failed disks so that kernel logging can once againfunction.
Chapter 3, Error Messages 51

Kernel Warning Messages
vxvm:vxio:WARNING: mod_install returned errno
◆ Description: A call made to the operating system mod_install function to load thevxio driver failed.
◆ Action: Check for additional console messages that may explain why the load failed.Also check the console messages log file for any additional messages that were loggedbut not displayed on the console.
vxvm:vxio:WARNING: object plex detached from volume volume
◆ Description: An uncorrectable error was detected by the mirroring code and a mirrorcopy was detached.
◆ Action: To restore redundancy, it may be necessary to add another mirror. The disk onwhich the failure occurred should be reformatted or replaced.
vxvm:vxio:WARNING: object subdisk detached from RAID-5 volume at columncolumn offset offset
◆ Description: A subdisk was detached from a RAID-5 volume because of the failure of adisk or an uncorrectable error occurring on that disk.
◆ Action: Check for other console error messages indicating the cause of the failure.Replace a failed disk as soon as possible.
vxvm:vxio:WARNING: object_type object_name block offset:Uncorrectable readerror ...vxvm:vxio:WARNING: object_type object_name block offset:Uncorrectable writeerror ...
◆ Description: A read or write operation from or to the specifiedVERITAS VolumeManager object failed. An error is returned to the application.
◆ Action: These errors may represent lost data. Data may need to be restored and failedmedia may need to be repaired or replaced. Depending on the type of object failingand on the type of recovery suggested for the object type, an appropriate recoveryoperation may be necessary.
vxvm:vxio:WARNING: Overlapping mirror plex detached from volume volume
◆ Description: An error has occurred on the last complete plex in a mirrored volume.Any sparse mirrors that map the failing region are detached so that they cannot beaccessed to satisfy that failed region inconsistently.
◆ Action: The message indicates that some data in the failing region may no longer bestored redundantly.
52 VERITAS Volume Manager Troubleshooting Guide

Kernel Warning Messages
vxvm:vxio:WARNING: RAID-5 volume entering degraded mode operation
◆ Description: An uncorrectable error has forced a subdisk to detach. At this point, notall data disks exist to provide the data upon request. Instead, parity regions are usedto regenerate the data for each stripe in the array. Consequently, access takes longerand involves reading from all drives in the stripe.
◆ Action: Check for other console error messages that indicate the cause of the failure.Replace any failed disks as soon as possible.
vxvm:vxio:WARNING: read error on mirror plex of volume volume offsetoffset length length
◆ Description: An error was detected while reading from a mirror. This error may lead tofurther action shown by later error messages.
◆ Action: If the volume is mirrored, no further action is necessary since the alternatemirror’s contents will be written to the failing mirror; this is often sufficient to correctmedia failures. If this error occurs often, but never leads to a plex detach, there may bea marginally defective region on the disk at the position indicated. It may eventuallybe necessary to remove data from this disk (see the vxevac(1M) manual page) andthen to reformat the drive.
If the volume is not mirrored, this message indicates that some data could not be read.The file system or other application reading the data may report an additional error,but in either event, data has been lost. The volume can be partially salvaged andmoved to another location if desired.
vxvm:vxio:WARNING: Root volumes are not supported on your PROMversion.
◆ Description: If your system’s PROMs are not a recent OpenBoot PROM type, rootvolumes are unusable.
◆ Action: If you have set up a root volume, undo the configuration by runningvxunroot or removing the rootdev line from /etc/system as soon as possible.Contact your hardware vendor for an upgrade to your PROM level.
vxvm:vxio:WARNING: subdisk subdisk failed in plex plex in volume volume
◆ Description: The kernel has detected a subdisk failure, which may mean that theunderlying disk is failing.
◆ Action: Check for obvious problems with the disk (such as a disconnected cable). Ifhot-relocation is enabled and the disk is failing, recovery from subdisk failure ishandled automatically.
Chapter 3, Error Messages 53

Kernel Notice Messages
vxvm:vxio:WARNING: write error on mirror plex of volume volume offsetoffset length length
◆ Description: An error was detected while writing to a mirror. This error will generallybe followed by a detach message, unless the volume is not mirrored.
◆ Action: The disk reporting the error is failing to correctly store written data. If thevolume is not mirrored, consider removing the data and reformatting the disk. If thevolume is mirrored, it will become detached and you should replace or reformat thedisk.
If this error occurs often, but never leads to a plex detach, there may be a marginallydefective region on the disk at the position shown. It may eventually be necessary toremove data from this disk (see the vxevac(1M) manual page) and then to reformatthe drive.
Kernel Notice MessagesA notice message indicates that an error has occurred that should be monitored. Shuttingdown the system is unnecessary, although you may need to take action to remedy thefault at a later date.
vxvm:vxio:NOTICE: Can’t close disk disk in group disk_group. If it isremovable media (like a floppy), it may have been removed. Otherwise,there may be problems with the drive. Kernel error codepublic_region_error/private_region_error
◆ Description: This is unlikely to happen; closes should not fail.
◆ Action: None.
vxvm:vxio:NOTICE: Can’t open disk disk in group disk_group. If it isremovable media (like a floppy), it may not be mounted or ready.Otherwise, there may be problems with the drive. Kernel error codenumber
◆ Description: The named disk cannot be accessed in the named disk group.
◆ Action: Ensure that the disk exists, is connected and powered on, and is visible to thesystem.
vxvm:vxio:NOTICE: read error on object subdisk of mirror plex in volumevolume (start offset, length length) corrected.
◆ Description: A read error occurred, which caused a read of an alternate mirror and awriteback to the failing region. This writeback was successful and the data wascorrected on disk.
54 VERITAS Volume Manager Troubleshooting Guide

vxassist Error Messages
◆ Action: None; the problem was corrected automatically. Note the location of the failurefor future reference. If the same region of the subdisk fails again, this may indicate amore insidious failure and the disk should be reformatted at the next reasonableopportunity.
vxvm:vxio:NOTICE: string on volume device_# (device_name) in disk groupgroup_name
◆ Description: An application running on top of VxVM has requested the output of themessage string.
◆ Action: Refer to the application documentation for more information.
vxassist Error MessagesAn error message from the vxassist command indicates that the requested operationcannot be performed. Follow the recommended course of action given below.
vxvm:vxassist: ERROR: Insufficient number of active snapshot mirrorsin snapshot_volume.
◆ Description: An attempt to snap back a specified number of snapshot mirrors to theiroriginal volume failed.
◆ Action: Specify a number of snapshot mirrors less than or equal to the number in thesnapshot volume.
vxvm:vxassist: ERROR: Volume record id rid is not found in theconfiguration.
◆ Description: An error was detected while reattaching a snapshot volume usingsnapback. This happens if a volume’s record identifier (rid) changes as a result of adisk group split that moved the original volume to a new disk group. The snapshotvolume is unable to recognize the original volume because its record identifier haschanged.
◆ Action: Use the following command to perform the snapback:
# vxplex [-g diskgroup] -f snapback volume plex
Chapter 3, Error Messages 55

vxassist Warning Messages
vxassist Warning MessagesA warning message from the vxassist command indicates a problem with its operation.Action should be taken to correct the problem as soon as possible. Follow therecommended course of action given below.
vxvm:vxassist: WARNING: volume volume already has at least onesnapshot plexSnapshot volume created with these plexes will have a dco volume withno associated dco plex.
◆ Description: An error was detected while adding a DCO object and DCO volume to amirrored volume. There is at least one snapshot plex already created on the volume.Because this snapshot plex was created when no DCO was associated with thevolume, there is no DCO plex allocated for it.
◆ Action: See the section “Enabling Persistent FastResync on Existing Volumes withAssociated Snapshots” in the chapter “Administering Volumes” of the VERITASVolume Manager Administrator’s Guide.
vxconfigd Fatal Error MessagesA fatal error message from the configuration daemon, vxconfigd, indicates a severeproblem with the operation of VxVM that prevents it from running.
vxvm:vxconfigd: FATAL ERROR: Disk group rootdg: Inconsistency -- Notloaded into kernelvxvm:vxconfigd: FATAL ERROR: Group group: Cannot update kernelvxvm:vxconfigd: FATAL ERROR: Interprocess communication failure:reasonvxvm:vxconfigd: FATAL ERROR: Invalid status stored in kernel
◆ Description: These internal errors should not occur unless there is a bug in VxVM.
◆ Action: Contact Customer Support.
vxvm:vxconfigd: FATAL ERROR: Memory allocation failure during startup
◆ Description: This implies that there is insufficient memory to start up VxVM and to getthe volumes for the root and /usr file systems running.
◆ Action: This error should not normally occur, unless your system has very smallamounts of memory. Adding swap space probably will not help, because this error ismost likely to occur early in the boot sequence, before swap areas have been added.
vxvm:vxconfigd: FATAL ERROR: Rootdg cannot be imported during boot
◆ Description: This internal error should not occur unless there is a bug in VxVM.
◆ Action: Contact Customer Support.
56 VERITAS Volume Manager Troubleshooting Guide

vxconfigd Error Messages
vxvm:vxconfigd: FATAL ERROR: Unexpected threads failure: reason
◆ Description: This unexpected operating system error should not occur unless there is abug in VxVM or in the operating system multithreading libraries.
◆ Action: Contact Customer Support.
vxconfigd Error MessagesAn error message from the configuration daemon, vxconfigd, indicates a problem withthe operation of VxVM that may prevent it from running effectively. Action should betaken to correct the problem immediately.
vxvm:vxconfigd: ERROR: Cannot get all disks from the kernel: reasonvxvm:vxconfigd: ERROR: Cannot get all disk groups from the kernel:reasonvxvm:vxconfigd: ERROR: Cannot get kernel transaction state: reasonvxvm:vxconfigd: ERROR: Cannot get private storage from kernel: reasonvxvm:vxconfigd: ERROR: Cannot get private storage size from kernel:reasonvxvm:vxconfigd: ERROR: Cannot get record record_name from kernel: reason
◆ Description: These internal errors should not occur unless there is a bug in VxVM.
◆ Action: Contact Customer Support.
vxvm:vxconfigd: ERROR: Cannot kill existing daemon, pid=process_ID
◆ Description: The -k (kill existing vxconfigd process) option was specified, but arunning configuration daemon process could not be killed. A configuration daemonprocess, for purposes of this discussion, is any process that opens the/dev/vx/config device (only one process can open that device at a time). If there isa configuration daemon process already running, then the -k option causes aSIGKILL signal to be sent to that process. If, within a certain period of time, there isstill a running configuration daemon process, the above error message is displayed.
◆ Action: This error can result from a kernel error that has made the configurationdaemon process unkillable, from some other kind of kernel error, or from some otheruser starting another configuration daemon process after the SIGKILL signal. Thislast condition can be tested for by running vxconfigd -k again. If the error messageappears again, contact Customer Support.
vxvm:vxconfigd: ERROR: Cannot make directory directory_path: reason
◆ Description: vxconfigd failed to create a directory that it expects to be able to create.Directories that vxconfigd might try to create are: /dev/vx/dsk,/dev/vx/rdsk, and /var/vxvm/tempdb. Also, for each disk group,/dev/vx/dsk/diskgroup and /dev/vx/rdsk/diskgroup directories are created.
Chapter 3, Error Messages 57

vxconfigd Error Messages
The system error related to the failure is given in reason. A system error of “No suchfile or directory” indicates that one of the prefix directories (for example,/var/vxvm) does not exist.
This type of error normally implies that the VERITAS Volume Manager packageswere installed incorrectly. Such an error can also occur if alternate file or directorylocations are specified on the command line, using the -x option. The_VXVM_ROOT_DIR environment variable may also relocate to a directory that lacks avar/vxvm subdirectory.
◆ Action: Try to create the directory manually and then issue the command vxdctlenable. If the error is due to incorrect installation of the VERITAS Volume Managerpackages, try to add the packages again.
vxvm:vxconfigd: ERROR: cannot open /dev/vx/config: reason
◆ Description: The /dev/vx/config device could not be opened. vxconfigd uses thisdevice to communicate with the VERITAS Volume Manager kernel drivers. The mostlikely reason is “Device is already open.” This indicates that some process (most likelyvxconfigd) already has /dev/vx/config open. Less likely reasons are “No suchfile or directory” or “No such device or address.” For either of these reasons, likelycauses are:
- The VERITAS Volume Manager package installation did not complete correctly.
- The device node was removed by the administrator or by an errant shell script.
◆ Action: If the reason is “Device is already open,” stop or kill the old vxconfigd byrunning the command:
# vxdctl -k stop
For other failure reasons, consider re-adding the base VERITAS Volume Managerpackage. This will reconfigure the device node and re-install the VERITAS VolumeManager kernel device drivers. See the VERITAS Volume Manager Installation Guide forinformation on how to add the package. If you cannot re-add the package, contactCustomer Support for more information.
vxvm:vxconfigd: ERROR: Cannot open /etc/vfstab: reason
◆ Description: vxconfigd could not open the /etc/vfstab file, for the reason given.The /etc/vfstab file is used to determine which volume (if any) to use for the /usrfile system.
◆ Action: This error implies that your root file system is currently unusable. You maybe able to repair the root file system by mounting it after booting from a network orCD-ROM root file system. If the root file system is defined on a volume, then seethe procedures defined for recovering from a failed root file system in “Recoveryfrom Boot Disk Failure” on page 19.
58 VERITAS Volume Manager Troubleshooting Guide

vxconfigd Error Messages
vxvm:vxconfigd: ERROR: Cannot recover operation in progressFailed to get group group from the kernel: error
◆ Description: This internal error should not occur unless there is a bug in VxVM.
◆ Action: Contact Customer Support.
vxvm:vxconfigd: ERROR: Cannot reset VxVM kernel: reason
◆ Description: The -r reset option was specified to vxconfigd, but the VxVM kerneldrivers could not be reset. The most common reason is “A virtual disk device isopen.” This implies that a VxVM tracing or volume device is open.
◆ Action: If you want to reset the kernel devices, track down and kill all processes thathave a volume or VERITAS Volume Manager tracing device open. Also, if anyvolumes are mounted as file systems, unmount those file systems.
Any reason other than “A virtual disk device is open” does not normally occur unlessthere is a bug in the operating system or in VxVM.
vxvm:vxconfigd: ERROR: Cannot start volume volume, no valid plexesvxvm:vxconfigd: ERROR: Cannot start volume volume, no valid completeplexes
◆ Description: These errors indicate that the volume cannot be started because thevolume contains no valid plexes. This can happen, for example, if disk failures havecaused all plexes to be unusable. It can also happen as a result of actions that causedall plexes to become unusable (for example, forcing the dissociation of subdisks ordetaching, dissociation, or offlining of plexes).
◆ Action: It is possible that this error results from a drive that failed to spin up. If so,rebooting may fix the problem. If that does not fix the problem, then the only recourseis to repair the disks involved with the plexes and restore the file system from abackup. Restoring the root or /usr file system requires that you have a validbackup. See “Repairing root or /usr File Systems on Mirrored Volumes” on page 30for information on how to fix problems with root or /usr file system volumes.
vxvm:vxconfigd: ERROR: Cannot start volume volume, volume state isinvalid
◆ Description: The volume for the root or /usr file system is in an unexpected state(not ACTIVE, CLEAN, SYNC or NEEDSYNC). This should not happen unless thesystem administrator circumvents the mechanisms used by VxVM to create thesevolumes.
◆ Action: The only recourse is to bring up VxVM on a CD-ROM or NFS-mounted rootfile system and to fix the state of the volume. See“Repairing root or /usr File Systemson Mirrored Volumes” on page 30 for further information.
Chapter 3, Error Messages 59

vxconfigd Error Messages
vxvm:vxconfigd: ERROR: Cannot store private storage into the kernel:error
◆ Description: This internal error should not occur unless there is a bug in VxVM.
◆ Action: Contact Customer Support.
vxvm:vxconfigd: ERROR: /dev/vx/info: reason
◆ Description: The /dev/vx/info device could not be opened, or did not respond to aVERITAS Volume Manager kernel request. This error most likely indicates one of thefollowing:
- The VERITAS Volume Manager package installation did not complete correctly.
- The device node was removed by the administrator or by an errant shell script.
◆ Action: Consider re-adding the base VERITAS Volume Manager package. This willreconfigure the device node and re-install the VERITAS Volume Manager kerneldevice drivers. See the VERITAS Volume Manager Installation Guide for information onhow to add the package.
vxvm:vxconfigd: ERROR: DG move: can’t import diskgroup, giving up
◆ Description: The specified disk group cannot be imported during a disk group moveoperation. (The disk group ID is obtained from the disk group that could beimported.)
◆ Action: The disk group may have been moved to another host. One option is to locateit and use the vxdg recover command on both the source and target disk groups.Specify the -o clean option with one disk group, and the -o remove option with theother disk group. See “Recovering from Incomplete Disk Group Moves” on page 15for more information.
vxvm:vxconfigd: ERROR: dg_move_recover: can’t locate disk(s), givingup
◆ Description: Disks involved in a disk group move operation cannot be found, and oneof the specified disk groups cannot be imported.
◆ Action: Manual use of the vxdg recover command may be required to clean thedisk group to be imported. See “Recovering from Incomplete Disk Group Moves” onpage 15 for more information.
vxvm:vxconfigd: ERROR: Differing version of vxconfigd installed
◆ Description: A vxconfigd daemon was started after stopping an earlier vxconfigdwith a non-matching version number. This can happen, for example, if you upgradeVxVM and then run vxconfigd without first rebooting.
◆ Action: To fix, reboot the system.
60 VERITAS Volume Manager Troubleshooting Guide

vxconfigd Error Messages
vxvm:vxconfigd: ERROR: Disk disk, group group, device device: not updatedwith new host IDError: reason
◆ Description: This can result from using vxdctl hostid to change the VERITASVolume Manager host ID for the system. The error indicates that one of the disks in adisk group could not be updated with the new host ID. Most likely, this indicates thatthe given disk has become inaccessible or has failed in some other way.
◆ Action: Try running the following command to determine whether the disk is stilloperational:
# vxdisk check device
If the disk is no longer operational, vxdisk should print a message such as:
device: Error: Disk write failure
This will result in the disk being taken out of active use in its disk group, if it has notalready been taken out of use. If the disk is still operational, which should not be thecase, vxdisk prints:
device: Okay
If the disk is listed as “Okay,” try running vxdctl hostid again. If it still results inan error, contact Customer Support.
vxvm:vxconfigd: ERROR: Disk group group: Cannot recover temp database:reasonConsider use of "vxconfigd -x cleartempdir" [see vxconfigd(1M)].
◆ Description: This can happen if you kill and restart vxconfigd, or if you disable andenable it with vxdctl disable and vxdctl enable. This error indicates a failurerelated to reading the file /var/vxvm/tempdb/group. This is a temporary fileused to store information that is used when recovering the state of an earliervxconfigd. The file is recreated on a reboot, so this error should never survive areboot.
◆ Action: If you can reboot, do so. If you do not want to reboot, then do the following:
a. Ensure that no vxvol, vxplex, or vxsd processes are running.
Use ps -e to search for such processes, and use kill to kill any that you find.You may have to run kill twice to make these processes go away. Killing utilitiesin this way may make it difficult to make administrative changes to somevolumes until the system is rebooted.
b. Recreate the temporary database files for all imported disk groups using thefollowing command:
# vxconfigd -x cleartempdir 2> /dev/console
Chapter 3, Error Messages 61

vxconfigd Error Messages
The vxvol, vxplex, and vxsd commands make use of these tempdb files tocommunicate locking information. If the file is cleared, then locking informationcan be lost. Without this locking information, two utilities can end up makingincompatible changes to the configuration of a volume.
vxvm:vxconfigd: ERROR: Disk group group: Disabled by errors
◆ Description: This message indicates that some error condition has made it impossiblefor VxVM to continue to manage changes to a disk group. The major reason for this isthat too many disks have failed, making it impossible for vxconfigd to continue toupdate configuration copies. There should be a preceding error message that indicatesthe specific error that was encountered.
If the disk group that was disabled is the rootdg disk group, then the followingadditional error is displayed:
vxvm:vxconfigd: ERROR: All transactions are disabled
This additional message indicates that vxconfigd has entered the disabled state,which makes it impossible to change the configuration of any disk group, not justrootdg.
◆ Action: If the underlying error resulted from a transient failure, such as a disk cablingerror, then you may be able to repair the situation by rebooting. Otherwise, the diskgroup may have to be recreated and restored from a backup. Failure of the rootdgdisk group may require reinstallation of the system if your system uses a root or/usr file system defined on a volume.
vxvm:vxconfigd: ERROR: Disk group group,Disk disk:Cannot auto-importgroup: reason
◆ Description: On system startup, vxconfigd failed to import the disk group associatedwith the named disk. A message related to the specific failure is given in reason.Additional error messages may be displayed that give more information on thespecific error. In particular, this is often followed by:
vxvm:vxconfigd: ERROR: Disk group group: Errors in someconfiguration copies:Disk device, copy number: Block bno: error ...
The most common reason for auto-import failures is excessive numbers of diskfailures, making it impossible for VxVM to find correct copies of the disk groupconfiguration database and kernel update log. Disk groups usually have enoughcopies of this configuration information to make such import failures unlikely.
62 VERITAS Volume Manager Troubleshooting Guide

vxconfigd Error Messages
A more serious failure is indicated by errors such as:
Format error in configuration copyInvalid magic numberInvalid block numberDuplicate record in configurationConfiguration records are inconsistent
These errors indicate that all configuration copies have become corrupt (due to diskfailures, writing on the disk by an application or the administrator, or bugs in VxVM).
Some correctable errors may be indicated by other error messages that appear inconjunction with the auto-import failure message. Look up those other errors formore information on their cause.
Failure of an auto-import implies that the volumes in that disk group will not beavailable for use. If there are file systems on those volumes, then the system may yieldfurther errors resulting from inability to access the volume when mounting the filesystem.
◆ Action: If the error is clearly caused by excessive disk failures, then you may have torecreate the disk group and restore contents of any volumes from a backup. Theremay be other error messages that appear which provide further information. Seethose other error messages for more information on how to proceed. If those errors donot make it clear how to proceed, contact Customer Support.
vxvm:vxconfigd: ERROR: Disk group group, Disk disk: Group namecollides with record in rootdg
◆ Description: The name of a disk group that is being imported conflicts with the nameof a record in the rootdg disk group. VxVM does not allow this kind of conflictbecause of the way the /dev/vx/dsk directory is organized: devices correspondingto records in the root disk group share this directory with subdirectories for each diskgroup.
◆ Action: Either remove or rename the conflicting record in the root disk group, orrename the disk group on import. See the vxdg(1M) manual page for information onhow to use the import operation to rename a disk group.
vxvm:vxconfigd: ERROR: Disk group group, Disk disk: Skip disk groupwith duplicate name
◆ Description: Two disk groups with the same name are tagged for auto-importing bythe same host. Disk groups are identified both by a simple name and by a long uniqueidentifier (disk group ID) assigned when the disk group is created. Thus, this errorindicates that two disks indicate the same disk group name but a different disk groupID.
Chapter 3, Error Messages 63

vxconfigd Error Messages
VxVM does not allow you to create a disk group or import a disk group from anothermachine, if that would cause a collision with a disk group that is already imported.Therefore, this error is unlikely to occur under normal use. However, this error canoccur in the following two cases:
- A disk group cannot be auto-imported due to some temporary failure. If youcreate a new disk group with the same name as the failed disk group and reboot,the new disk group is imported first. The auto-import of the older disk group failsbecause more recently modified disk groups have precedence over older diskgroups.
- A disk group is deported from one host using the -h option to cause the diskgroup to be auto-imported on reboot from another host. If the second host wasalready auto-importing a disk group with the same name, then reboot of that hostwill yield this error.
◆ Action: If you want to import both disk groups, then rename the second disk group onimport. See the vxdg(1M) manual page for information on how to use the importoperation to rename a disk group.
vxvm:vxconfigd: ERROR: Disk group group: Errors in some configurationcopies: Disk disk, copy number: [Block number]: reason ...
◆ Description: During a failed disk group import, some of the configuration copies in thenamed disk group were found to have format or other types of errors which makethose copies unusable. This message lists all configuration copies that haveuncorrected errors, including any appropriate logical block number. If no otherreasons are displayed, then this may be the cause of the disk group import failure.
◆ Action: If some of the copies failed due to transient errors (such as cable failures), thena reboot or reimport may succeed in importing the disk group. Otherwise, the diskgroup may have to be recreated from scratch.
vxvm:vxconfigd: ERROR: Disk group group: Reimport of disk group failed:reason
◆ Description: After vxconfigd was stopped and restarted (or disabled and thenenabled), VxVM failed to recreate the import of the indicated disk group. The reasonfor failure is specified. Additional error messages may be displayed that give furtherinformation describing the problem.
◆ Action: A major cause for this kind of failure is disk failures that were not addressedbefore vxconfigd was stopped or disabled. If the problem is a transient disk failure,then rebooting may take care of the condition.
64 VERITAS Volume Manager Troubleshooting Guide
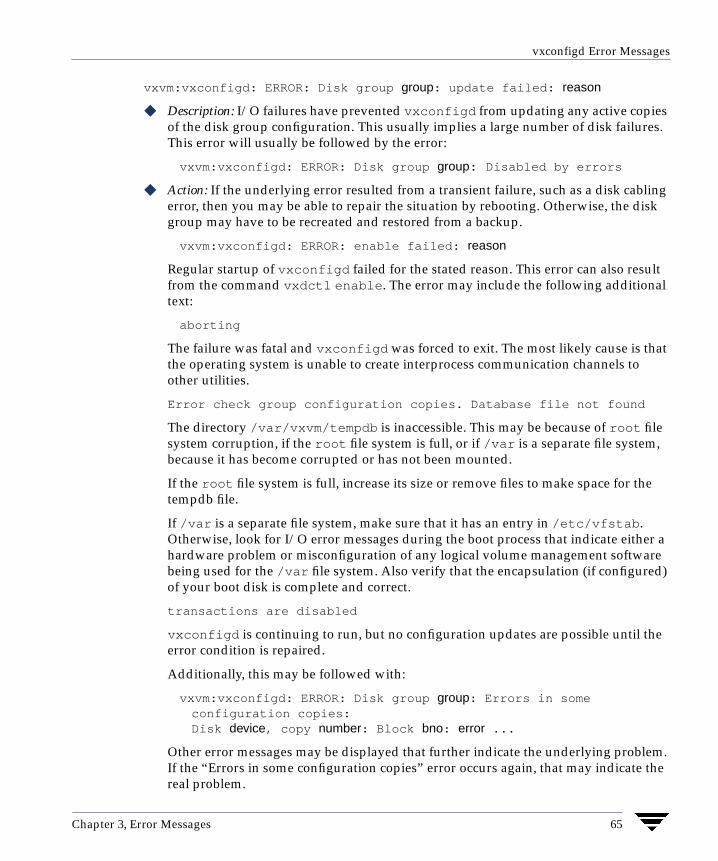
vxconfigd Error Messages
vxvm:vxconfigd: ERROR: Disk group group: update failed: reason
◆ Description: I/O failures have prevented vxconfigd from updating any active copiesof the disk group configuration. This usually implies a large number of disk failures.This error will usually be followed by the error:
vxvm:vxconfigd: ERROR: Disk group group: Disabled by errors
◆ Action: If the underlying error resulted from a transient failure, such as a disk cablingerror, then you may be able to repair the situation by rebooting. Otherwise, the diskgroup may have to be recreated and restored from a backup.
vxvm:vxconfigd: ERROR: enable failed: reason
Regular startup of vxconfigd failed for the stated reason. This error can also resultfrom the command vxdctl enable. The error may include the following additionaltext:
aborting
The failure was fatal and vxconfigd was forced to exit. The most likely cause is thatthe operating system is unable to create interprocess communication channels toother utilities.
Error check group configuration copies. Database file not found
The directory /var/vxvm/tempdb is inaccessible. This may be because of root filesystem corruption, if the root file system is full, or if /var is a separate file system,because it has become corrupted or has not been mounted.
If the root file system is full, increase its size or remove files to make space for thetempdb file.
If /var is a separate file system, make sure that it has an entry in /etc/vfstab.Otherwise, look for I/O error messages during the boot process that indicate either ahardware problem or misconfiguration of any logical volume management softwarebeing used for the /var file system. Also verify that the encapsulation (if configured)of your boot disk is complete and correct.
transactions are disabled
vxconfigd is continuing to run, but no configuration updates are possible until theerror condition is repaired.
Additionally, this may be followed with:
vxvm:vxconfigd: ERROR: Disk group group: Errors in someconfiguration copies:Disk device, copy number: Block bno: error ...
Other error messages may be displayed that further indicate the underlying problem.If the “Errors in some configuration copies” error occurs again, that may indicate thereal problem.
Chapter 3, Error Messages 65

vxconfigd Error Messages
Evaluate the error messages to determine the root cause of the problem. Makechanges suggested by the errors and then try rerunning the command.
vxvm:vxconfigd: ERROR: Failed to store commit status list into kernel:reasonvxvm:vxconfigd: ERROR: GET_VOLINFO ioctl failed: reasonvxvm:vxconfigd: ERROR: Get of current rootdg failed: reason
◆ Description: These internal errors should not occur unless there is a bug in VxVM.
◆ Action: Contact Customer Support.
vxvm:vxconfigd: ERROR: Memory allocation failure
◆ Description: This implies that there is insufficient memory to start VxVM and to get thevolumes for the root and /usr file systems running.
◆ Action: This error should not normally occur, unless your system has very smallamounts of memory. Adding swap space will probably not help because this error ismost likely to occur early in the boot sequence, before swap areas have been added.
vxvm:vxconfigd: ERROR: mode: Unrecognized operating mode
◆ Description: An invalid string was specified as an argument to the -m option. Validstrings are: enable, disable, and boot.
◆ Action: Supply a correct option argument.
vxvm:vxconfigd: ERROR: Mount point path: volume not in rootdg diskgroup
◆ Description: The volume device listed in the /etc/vfstab file for the givenmount-point directory (normally /usr) is listed as in a disk group other thanrootdg. This error should not occur if the standard VERITAS Volume Managerprocedures are used for encapsulating the disk containing the /usr file system.
◆ Action: Boot VxVM from a network or CD-ROM mounted root file system. Then, startup VxVM using fixmountroot on a valid mirror disk of the root file system. Afterstarting VxVM, mount the root file system volume and edit the /etc/vfstab file.Change the file to use a direct partition for the file system. There should be a commentin the /etc/vfstab file that indicates which partition to use.
vxvm:vxconfigd: ERROR: No convergence between root disk group and disklistDisks in one version of rootdg: device type=device_type info=devinfo ...Disks in alternate version of rootdg: device type=device_type info=devinfo...
◆ Description: This message can appear when vxconfigd is not running inautoconfigure mode (see the vxconfigd(1M) manual page) and after several retriesit cannot resolve the set of disks belonging to the root disk group. The algorithm fornon-autoconfigure disks scans disks listed in the /etc/vx/volboot file and then
66 VERITAS Volume Manager Troubleshooting Guide

vxconfigd Error Messages
examines the disks to find a database copy for the rootdg disk group. It next readsthe database copy to find the list of disk access records for disks contained in thegroup. These disks are then examined to ensure that they contain the same databasecopy. The algorithm expects to gain convergence on the set of disks and on thedatabase copies that they contain. If a loop is entered and convergence cannot bereached, this message is displayed and the root disk group importation fails.
◆ Action: Reorganize the physical locations of the devices attached to the system to tryand break the deadlock. If this does not succeed, contact Customer Support.
vxvm:vxconfigd: ERROR: Open of directory directory failed: reason
◆ Description: An open failed for /dev/vx/dsk, /dev/vx/rdsk, or one of theirsubdirectories. The only likely cause of such a failure is that the directory wasremoved by the administrator or by an errant program. If this is the case, the reasonshould be “No such file or directory.” An alternate possible cause is an I/O failure.
◆ Action: If the reason was “No such file or directory,” use mkdir to recreate thedirectory. Then run the command vxdctl enable.
If the error was an I/O error, there may be other serious damage to the root filesystem. You may need to reformat your root disk and restore the root file systemfrom backup. Contact your system vendor or consult your system documentation.
vxvm:vxconfigd: ERROR: Read of directory directory failed: reason
◆ Description: There was a failure in reading /dev/vx/dsk, /dev/vx/rdsk, or one oftheir subdirectories. The only likely cause of this error is an I/O failure on the root filesystem.
◆ Action: If the error was an I/O error, then there may be other serious damage to theroot file system. You may need to reformat your root disk and restore the root filesystem from backup. Contact your system vendor or consult your systemdocumentation.
vxvm:vxconfigd: ERROR: signal [ - core dumped ]
◆ Description: The vxconfigd daemon encountered an unexpected signal whilestarting up. If the signal caused the vxconfigd process to dump core, then that willbe indicated. This could be caused by a bug in vxconfigd, particularly if signal is“Segmentation fault.” Alternately, this could have been caused by a user sendingvxconfigd a signal with the kill utility.
◆ Action: Contact Customer Support.
Chapter 3, Error Messages 67

vxconfigd Error Messages
vxvm:vxconfigd: ERROR: System boot disk does not have a valid rootvolplexPlease boot from one of the following disks:DISK MEDIA DEVICE BOOT COMMANDdiskname device boot vx-diskname...
◆ Description: The system is configured to use a volume for the root file system, butwas not booted on a disk containing a valid mirror of the root volume. Diskscontaining valid root mirrors are listed as part of the error message. A disk is usableas a boot disk if there is a root mirror on that disk which is not stale or offline.
◆ Action: Try to boot from one of the named disks using the associated boot commandthat is listed in the message.
vxvm:vxconfigd: ERROR: System startup failed
◆ Description: Either the root or the /usr file system volume could not be started,rendering the system unusable. The error that resulted in this condition shouldappear prior to this error message.
◆ Action: Look up other error messages appearing on the console and take the actionssuggested in the descriptions of those messages.
vxvm:vxconfigd: ERROR: There is no volume configured for the rootdevice
◆ Description: The system is configured to boot from a root file system defined on avolume, but there is no root volume listed in the configuration of the rootdg diskgroup.
There are two possible causes of this error:
- Case 1: The /etc/system file was erroneously updated to indicate that the rootdevice is /pseudo/vxio@0:0. This can happen only as a result of directmanipulation by the administrator.
- Case 2: The system somehow has a duplicate rootdg disk group, one of whichcontains a root file system volume and one of which does not, and vxconfigdsomehow chose the wrong one. Since vxconfigd chooses the more recentlyaccessed version of rootdg, this error can happen if the system clock wasupdated incorrectly at some point (reversing the apparent access order of the twodisk groups). This can also happen if some disk group was deported and renamedto rootdg with locks given to this host.
◆ Action: In case 1, boot the system on a CD-ROM or networking-mounted root filesystem, directly mount the disk partition of the root file system, and remove thefollowing lines from /etc/system:
rootdev:/pseudo/vxio@0:0set vxio:vol_rootdev_is_volume=1
68 VERITAS Volume Manager Troubleshooting Guide

vxconfigd Error Messages
In case 2, either boot with all drives in the offending version of rootdg turned off, orimport and rename (see vxdg(1M)) the offending rootdg disk group from anotherhost. If you turn off the drives, run the following command after booting:
# vxdg flush rootdg
This updates time stamps on the imported version of rootdg, which should make thecorrect version appear to be the more recently accessed. If this does not correct theproblem, contact Customer Support.
vxvm:vxconfigd: ERROR: Unexpected configuration tid for group groupfound in kernelvxvm:vxconfigd: ERROR: Unexpected error during volume volumereconfiguration: reasonvxvm:vxconfigd: ERROR: Unexpected error fetching disk for disk volume:reasonvxvm:vxconfigd: ERROR: Unexpected values stored in the kernel
◆ Description: These internal errors should not occur unless there is a bug in VxVM.
◆ Action: Contact Customer Support.
vxvm:vxconfigd: ERROR: Version number of kernel does not matchvxconfigd
◆ Description: The release of vxconfigd does not match the release of the VERITASVolume Manager kernel drivers. This should happen only as a result of upgradingVxVM, and then running vxconfigd without a reboot.
◆ Action: Reboot the system. If that does not cure the problem, re-add the VxVMpackages.
vxvm:vxconfigd:ERROR:volume_name:vxconfigd cannot boot-start RAID-5volumes
◆ Description: A volume that vxconfigd should start immediately upon booting thesystem (that is, the volume for the /usr file system) has a RAID-5 layout. The /usrfile system should never be defined on a RAID-5 volume.
◆ Action: It is likely that the only recovery for this is to boot VxVM from anetwork-mounted root file system (or from a CD-ROM), and reconfigure the /usr filesystem to be defined on a regular non-RAID-5 volume.
vxvm:vxconfigd: ERROR: Volume volume for mount point /usr not found inrootdg disk group
◆ Description: The system is configured to boot with /usr mounted on a volume, butthe volume associated with /usr is not listed in the configuration of the rootdg diskgroup. There are two possible causes of this error:
Chapter 3, Error Messages 69

vxconfigd Warning Messages
- Case 1: The /etc/vfstab file was erroneously updated to indicate the device forthe /usr file system is a volume, but the volume named is not in the rootdg diskgroup. This should happen only as a result of direct manipulation by theadministrator.
- Case 2: The system somehow has a duplicate rootdg disk group, one of whichcontains the /usr file system volume and one of which does not (or uses adifferent volume name), and vxconfigd somehow chose the wrong rootdg.Since vxconfigd chooses the more recently accessed version of rootdg, thiserror can happen if the system clock was updated incorrectly at some point(causing the apparent access order of the two disk groups to be reversed). Thiscan also happen if some disk group was deported and renamed to rootdg withlocks given to this host.
◆ Action: In case 1, boot the system on a CD-ROM or networking-mounted root filesystem. If the root file system is defined on a volume, then start and mount the rootvolume. If the root file system is not defined on a volume, mount the root file systemdirectly. Edit the /etc/vfstab file to correct the entry for the /usr file system.
In case 2, either boot with all drives in the offending version of rootdg turned off, orimport and rename (see vxdg(1M)) the offending rootdg disk group from anotherhost. If you turn off drives, run the following command after booting:
# vxdg flush rootdg
This updates time stamps on the imported version of rootdg, which should make thecorrect version appear to be the more recently accessed. If this does not correct theproblem, contact Customer Support.
vxconfigd Warning MessagesA warning message from the configuration daemon, vxconfigd, indicates a problemthat may affect the operation of VxVM. Action should be taken to correct the problem assoon as possible.
vxvm:vxconfigd: WARNING: Bad request number: client number, portal[REQUEST|DIAG], size number
◆ Description: This diagnostic message indicates that a utility sent an invalid request tovxconfigd.
◆ Action: If you are developing a new utility, this error indicates a bug in your code.Otherwise, it indicates a bug in VxVM. Contact Customer Support.
70 VERITAS Volume Manager Troubleshooting Guide

vxconfigd Warning Messages
vxvm:vxconfigd: WARNING: Cannot change disk group record in kernel:reason
◆ Description: This internal error should not occur unless there is a bug in VxVM.
◆ Action: Contact Customer Support.
vxvm:vxconfigd: WARNING: Cannot create device device_path: reason
◆ Description: vxconfigd cannot create a device node either under /dev/vx/dsk orunder /dev/vx/rdsk. This should happen only if the root file system has run outof inodes.
◆ Action: Remove some unwanted files from the root file system. Then, regenerate thedevice node using the command:
# vxdctl enable
vxvm:vxconfigd: WARNING: Cannot exec /usr/bin/rm to remove directory:reason
◆ Description: The given directory could not be removed because the /usr/bin/rmutility could not be executed by vxconfigd. This is not a serious error. The only sideeffect of a directory not being removed is that the directory and its contents continueto use space in the root file system. However, this does imply that the /usr filesystem is not mounted, or on some systems, that the rm utility is missing or is not inits usual location. This may be a serious problem for the general running of yoursystem.
◆ Action: If the /usr file system is not mounted, you need to determine how to get itmounted. If the rm utility is missing, or is not in the /usr/bin directory, restore it.
vxvm:vxconfigd: WARNING: Cannot fork to remove directory directory:reason
◆ Description: The given directory could not be removed because vxconfigd could notfork in order to run the rm utility. This is not a serious error. The only side effect of adirectory not being removed is that the directory and its contents will continue to usespace in the root file system. The most likely cause for this error is that your systemdoes not have enough memory or paging space to allow vxconfigd to fork.
◆ Action: If your system is this low on memory or paging space, your overall systemperformance is probably substantially degraded. Consider adding more memory orpaging space.
vxvm:vxconfigd: WARNING: Cannot issue internal transaction: reason
◆ Description: This problem usually occurs only if there is a bug in VxVM. However, itmay also occur if memory is low.
◆ Action: Contact Customer Support.
Chapter 3, Error Messages 71

vxconfigd Warning Messages
vxvm:vxconfigd: WARNING: Cannot open log file log_filename: reason
◆ Description: The vxconfigd console output log file could not be opened for the givenreason.
◆ Action: Create any needed directories, or use a different log file path name asdescribed in “Logging Error Messages” on page 47.
vxvm:vxconfigd: WARNING: cannot remove group group from kernel: reasonvxvm:vxconfigd: WARNING: client number not recognized by VxVM libraryvxvm:vxconfigd: WARNING: client number not recognized
◆ Description: These internal errors should not occur unless there is a bug in VxVM.
◆ Action: Contact Customer Support.
vxvm:vxconfigd: WARNING: Detaching plex plex from volume volume
◆ Description: This error only happens for volumes that are started automatically byvxconfigd at system startup (that is, for the root and /usr file system volumes).The plex is being detached as a result of I/O failure, disk failure during startup orprior to the last system shutdown or crash, or disk removal prior to the last systemshutdown or crash.
◆ Action: To ensure that the root or /usr file system retains the same number of activemirrors, remove the given plex and add a new mirror using the vxassist mirroroperation. Also consider replacing any bad disks before running this command.
vxvm:vxconfigd: WARNING: Disk disk in group group flagged as shared;Disk skipped
◆ Description: The given disk is listed as shared, but the running version of VxVM doesnot support shared disk groups.
◆ Action: This message can usually be ignored. If you want to use the disk on thissystem, use vxdiskadd to add the disk. Do not do this if the disk really is sharedwith other systems.
vxvm:vxconfigd: WARNING: Disk disk in group group locked by host hostidDisk skipped
◆ Description: The given disk is listed as locked by the host with the VERITAS VolumeManager host ID (usually the same as the system hostname).
◆ Action: This message can usually be ignored. If you want to use the disk on thissystem, use vxdiskadd to add the disk. Do not do this if the disk really is sharedwith other systems.
vxvm:vxconfigd: WARNING: Disk disk in group group: Disk device not found
◆ Description: No physical disk can be found that matches the named disk in the givendisk group. This is equivalent to failure of that disk. (Physical disks are located bymatching the disk IDs in the disk group configuration records against the disk IDs
72 VERITAS Volume Manager Troubleshooting Guide

vxconfigd Warning Messages
stored in the VERITAS Volume Manager header on the physical disks.) This errormessage is displayed for any disk IDs in the configuration that are not located in thedisk header of any physical disk. This may result from a transient failure such as apoorly-attached cable, or from a disk that fails to spin up fast enough. Alternately, thismay happen as a result of a disk being physically removed from the system, or from adisk that has become unusable due to a head crash or electronics failure.
Any RAID-5 plexes, DRL log plexes, RAID-5 subdisks or mirrored plexes containingsubdisks on this disk are unusable. Such disk failures (particularly on multiple disks)may cause one or more volumes to become unusable.
◆ Action: If hot-relocation is enabled, VERITAS Volume Manager objects affected by thedisk failure are taken care of automatically. Mail is sent to root indicating whatactions were taken by VxVM and what further actions the administrator should take.
vxvm:vxconfigd: WARNING: Disk disk in kernel is not a recognized type
◆ Description: This internal error should not occur unless there is a bug in VxVM.
◆ Action: Contact Customer Support.
vxvm:vxconfigd: WARNING: Disk disk names group group, but group IDdiffers
◆ Description: As part of a disk group import, a disk was discovered that had amismatched disk group name and disk group ID. This disk is not imported. This canonly happen if two disk groups have the same name but have different disk group IDvalues. In such a case, one group is imported along with all its disks and the othergroup is not. This message appears for disks in the un-selected group.
◆ Action: If the disks should be imported into the group, this must be done by addingthe disk to the group at a later stage, during which all configuration information forthe disk is lost.
vxvm:vxconfigd: WARNING: Disk group group: Disk group log may be toosmallLog size should be at least number blocks
◆ Description: The log areas for the disk group have become too small for the size ofconfiguration currently in the group. This message only occurs during disk groupimport; it can only occur if the disk was inaccessible while new database objects wereadded to the configuration, and the disk was then made accessible and the systemrestarted. This should not normally happen without first displaying a message aboutthe database area size.
◆ Action: Reinitialize the disks in the group with larger log areas. Note that this requiresthat you restore data on the disks from backups. See the vxdisk(1M) manual page.To reinitialize all of the disks, detach them from the group with which they areassociated, reinitialize and re-add them. Then deport and re-import the disk group toeffect the changes to the log areas for the group.
Chapter 3, Error Messages 73

vxconfigd Warning Messages
vxvm:vxconfigd: WARNING: Disk group group: Errors in some configurationcopies: Disk disk, copy number: [Block number]: reason ...
◆ Description: During a disk group import, some of the configuration copies in thenamed disk group were found to have format or other types of errors which makethose copies unusable. This message lists all configuration copies that haveuncorrected errors, including any appropriate logical block number.
◆ Action: There are usually enough configuration copies in any disk group to ensurethat such errors do not become a serious problem. No action is usually necessary.
vxvm:vxconfigd: WARNING: Disk group group is disabled, disks notupdated with new host ID
◆ Description: As a result of failures, the named disk group has become disabled. Earliererror messages should indicate the cause. This message indicates that disks in thatdisk group were not updated with a new VERITAS Volume Manager host ID. Thiswarning message should result only from a vxdctl hostid operation.
◆ Action: Typically, unless a disk group was disabled due to transient errors, there is noway to repair a disabled disk group. The disk group may have to be reconstructedfrom scratch. If the disk group was disabled due to a transient error such as a cablingproblem, then a future reboot may not automatically import the named disk group,due to the change in the system’s VERITAS Volume Manager host ID. In such a case,import the disk group directly using vxdg import with the -C option.
vxvm:vxconfigd: WARNING: Error in volboot file: reason Entry: diskdevice disk_type disk_info
◆ Description: The /etc/vx/volboot file includes an invalid disk entry. This errorshould occur only if the file was edited directly.
◆ Action: Correct the offending entry, or remove it using the following command:
# vxdctl rm disk device
vxvm:vxconfigd: WARNING: Failed to store commit status list intokernel: reasonvxvm:vxconfigd: WARNING: Failed to update voldinfo area in kernel:reason
◆ Description: These internal errors should not occur unless there is a bug in VxVM.
◆ Action: Contact Customer Support.
vxvm:vxconfigd: WARNING: Field too long in volboot file: Entry: diskdevice disk_type disk_info
◆ Description: The /etc/vx/volboot file includes a disk entry with a field that islarger than the size supported by VxVM. This error should occur only if the file wasedited directly.
74 VERITAS Volume Manager Troubleshooting Guide

vxconfigd Warning Messages
◆ Action: Correct the offending entry, or remove it using the command:
# vxdctl rm disk device
vxvm:vxconfigd: WARNING: Get of record record_name from kernel failed:reason
◆ Description: This internal error should not occur unless there is a bug in VxVM.
◆ Action: Contact Customer Support.
vxvm:vxconfigd: WARNING: Group group: Duplicate virtual devicenumber(s):Volume volume remapped from major,minor to major,minor ...
◆ Description: The configuration of the named disk group includes conflicting devicenumbers. A disk group configuration lists the recommended device number to use foreach volume in the disk group. If two volumes in two disk groups happen to list thesame device number, then one of the volumes must use an alternate device number.This is called device number remapping. Remapping is a temporary change to avolume. If the other disk group is deported and the system is rebooted, then thevolume that was remapped may no longer be remapped. Also, volumes that areremapped once are not guaranteed to be remapped to the same device number infurther reboots.
◆ Action: Use the vxdg reminor command to renumber all volumes in the offendingdisk group permanently. See the vxdg(1M) manual page for more information.
vxvm:vxconfigd: WARNING: Internal transaction failed: reason
◆ Description: This problem usually occurs only if there is a bug in VxVM. However, itmay also occur if memory is low.
◆ Action: Contact Customer Support.
vxvm:vxconfigd: WARNING: library and vxconfigd disagree on existenceof client number
◆ Description: This warning may safely be ignored.
◆ Action: None required.
vxvm:vxconfigd: WARNING: library specified non-existent client numbervxvm:vxconfigd: WARNING: response to client number failed: reasonvxvm:vxconfigd: WARNING: vold_turnclient(number) failed: reason
◆ Description: These internal errors do not occur unless there is a bug in VxVM.
◆ Action: Contact Customer Support.
Chapter 3, Error Messages 75

vxconfigd Notice Messages
vxconfigd Notice MessagesA notice message from the configuration daemon, vxconfigd, indicates that VxVM hastaken some action that you may wish to monitor. Action should be taken to correct anyassociated hardware problem as soon as possible.
vxvm:vxconfigd: NOTICE: Detached disk disk
◆ Description: The named disk appears to have become unusable and was detachedfrom its disk group. Additional messages may appear to indicate other recordsdetached as a result of the disk detach.
◆ Action: If hot-relocation is enabled, VERITAS Volume Manager objects affected by thedisk failure are taken care of automatically. Mail is sent to root indicating whatactions were taken by VxVM and what further actions the administrator should take.
vxvm:vxconfigd: NOTICE: Detached log for volume volume
◆ Description: The DRL or RAID-5 log for the named volume was detached as a result ofa disk failure, or as a result of the administrator removing a disk with vxdg -krmdisk. A failing disk is indicated by a “Detached disk” message.
◆ Action: If the log is mirrored, hot-relocation tries to relocate the failed logautomatically. Use either vxplex dis or vxsd dis to remove the failing logs. Then,use vxassist addlog (see the vxassist(1M) manual page) to add a new log to thevolume.
vxvm:vxconfigd: NOTICE: Detached plex plex in volume volume
◆ Description: The specified plex was disabled as a result of a disk failure, or as a resultof the administrator removing a disk with vxdg -k rmdisk. A failing disk isindicated by a “Detached disk” message.
◆ Action: If hot-relocation is enabled, VERITAS Volume Manager objects affected by thedisk failure are taken care of automatically. Mail is sent to root indicating whatactions were taken by VxVM and what further actions the administrator should take.
vxvm:vxconfigd: NOTICE: Detached subdisk subdisk in volume volume
◆ Description: The specified subdisk was disabled as a result of a disk failure, or as aresult of the administrator removing a disk with vxdg -k rmdisk. A failing disk isindicated by a “Detached disk” message.
◆ Action: If hot-relocation is enabled, VERITAS Volume Manager objects affected by thedisk failure are taken care of automatically. Mail is sent to root indicating whatactions were taken by VxVM and what further actions the administrator should take.
76 VERITAS Volume Manager Troubleshooting Guide

vxconfigd Notice Messages
vxvm:vxconfigd: NOTICE: Detached volume volume
◆ Description: The specified volume was detached as a result of a disk failure, or as aresult of the administrator removing a disk with vxdg -k rmdisk. A failing disk isindicated by a “Detached disk” message. Unless the disk error is transient and can befixed with a reboot, the contents of the volume should be considered lost.
◆ Action: Contact Customer Support.
vxvm:vxconfigd: NOTICE: Offlining config copy number on disk disk:Reason: reason
◆ Description: An I/O error caused the indicated configuration copy to be disabled. Thisis a notice only, and does not normally imply serious problems, unless this is the lastactive configuration copy in the disk group.
◆ Action: Consider replacing the indicated disk, since this error implies that the disk hasdeteriorated to the point where write errors cannot be repaired automatically. Theerror can also result from transient problems with cabling or power.
vxvm:vxconfigd: NOTICE:Unable to resolve duplicate diskid.
◆ Description: When VxVM detects disks with duplicate disk IDs (unique internalidentifiers), VxVM attempts to select the appropriate disk (using logic that is specificto an array). If a disk can not be selected, VxVM does not import any of the duplicateddisks into a disk group. In the rare case when VxVM cannot make the choice, youmust choose which duplicate disk to use.
Note In releases prior to 3.5, VxVM selected the first disk that it found if the selectionprocess failed. In VxVM 3.5, the default behavior is to avoid the selection of thewrong disk as this could lead to data corruption. Arrays with mirroring capabilityin hardware are particularly susceptible to such data corruption.
◆ Action: User intervention is required in the following cases:
- Case 1: When DMP is disabled to an array that has multiple paths, then each pathto the array is claimed as a unique disk.
If DMP is suppressed, VxVM does not know which path to select as the true path.You must choose which path to use. Decide which path to exclude, and theneither edit the file /etc/vx/vxvm.exclude,or, if vxconfigd is running, selectitem 1 (suppress all paths through a controller from VxVM’sview) or item 2 (suppress a path from VxVM’s view) from vxdiskadmoption 17 (Prevent multipathing/Suppress devices from VxVM’sview).
Chapter 3, Error Messages 77

vxconfigd Notice Messages
The following example shows a vxvm.exclude file with paths c6t0d0s2,c6t0d1s2, and c6t0d2s2 excluded from VxVM:
exclude_all 0pathsc6t0d0s2 /pci@1f,4000/SUNW,ifp@2/ssd@w50060e8003275705,0c6t0d1s2 /pci@1f,4000/SUNW,ifp@2/ssd@w50060e8003275705,1c6t0d2s2 /pci@1f,4000/SUNW,ifp@2/ssd@w50060e8003275705,2#controllers#product#pathgroups
- Case 2: Some arrays such as EMC and HDS provide mirroring in hardware. Whena LUN pair is split, depending on how the process is performed, this may result intwo disks with the same disk ID.
Check with your array vendor to make sure that you are using the correct splitprocedure. If you know which LUNs you want to use, choose which path toexclude, and then either edit the file /etc/vx/vxvm.exclude, or, ifvxconfigd is running, select item 1 (suppress all paths through acontroller from VxVM’s view) or item 2 (suppress a path fromVxVM’s view) from vxdiskadm option 17 (Preventmultipathing/Suppress devices from VxVM’s view).
- Case 3: If disks have become duplicated using the dd command or any other diskcopying utility, choose which set of duplicate disks you want to exclude, and theneither edit the file /etc/vx/vxvm.exclude, or, if vxconfigd is running,select item 1 (suppress all paths through a controller fromVxVM’s view) or item 2 (suppress a path from VxVM’s view) fromvxdiskadm option 17 (Prevent multipathing/Suppress devices fromVxVM’s view).
vxvm:vxconfigd: NOTICE: Volume volume entering degraded mode
◆ Description: Detaching a subdisk in the named RAID-5 volume has caused the volumeto enter “degraded” mode. While in degraded mode, performance of the RAID-5volume is substantially reduced. More importantly, failure of another subdisk mayleave the RAID-5 volume unusable. Also, if the RAID-5 volume does not have anactive log, then failure of the system may leave the volume unusable.
◆ Action: If hot-relocation is enabled, VERITAS Volume Manager objects affected by thedisk failure are taken care of automatically. Mail is sent to root indicating whatactions were taken by VxVM and what further actions the administrator should take.
78 VERITAS Volume Manager Troubleshooting Guide

vxdg Error Messages
vxdg Error MessagesAn error message from the vxdg command indicates that the requested operation cannotbe performed. Follow the recommended course of action given below.
vxvm: vxdg: ERROR: diskgroup: Cannot remove last disk groupconfiguration copy
◆ Description: The requested disk group move, split or join operation would leave thedisk group without any configuration copies.
◆ Action: None. The operation is not supported.
vxvm: vxdg: ERROR: diskgroup: Configuration too large for configurationcopies
◆ Description: The disk group’s configuration database is too small to hold the expandedconfiguration after a disk group move or join operation.
◆ Action: None.
vxvm: vxdg: ERROR: diskgroup: Disk group does not exist
◆ Description: The disk group does not exist or is not imported
◆ Action: Use the correct name, or import the disk group and try again.
vxvm: vxdg: ERROR: diskgroup: Disk group version doesn’t supportfeature; see the vxdg upgrade command
◆ Description: The version of the specified disk group does not support disk groupmove, split or join operations.
◆ Action: Use the vxdg upgrade diskgroup command to update the disk groupversion.
vxvm: vxdg: ERROR: diskname: Disk is not usable
◆ Description: The specified disk has become unusable.
◆ Action: Do not include the disk in any disk group move, split or join operation until ithas been replaced or repaired.
vxvm: vxdg: ERROR: object: Name conflicts with imported diskgroup
◆ Description: The target disk group of a split operation already exists as an importeddisk group.
◆ Action: Choose a different name for the target disk group.
vxvm: vxdg: ERROR: object: Operation is not supported
◆ Description: DCO and snap objects dissociated by Persistent FastResync, and VVRobjects cannot be moved between disk groups.
Chapter 3, Error Messages 79

vxdg Error Messages
◆ Action: None. The operation is not supported.
vxvm: vxdg: ERROR: object: Record already exists in disk group
◆ Description: The target disk group already contains an object with the same name.
◆ Action: Rename one of the objects, or correct the request.
vxvm: vxdg: ERROR: subdisk: Record is associated
◆ Description: The named subdisk is not a top-level object.
◆ Action: Objects specified for a disk group move, split or join must be either disks ortop-level volumes.
vxvm: vxdg: ERROR: diskdevice: Request crosses disk group boundary
◆ Description: The specified disk device is not configured in the source disk group for adisk group move or split operation.
◆ Action: Correct the name of the disk object specified in the disk group move or splitoperation.
vxvm: vxdg: ERROR: diskgroup: split failed: Error in cluster processing
◆ Description: The host is not the master node in the cluster.
◆ Action: Perform the operation from the master node.
vxvm: vxdg: ERROR: Transaction already in progress
◆ Description: One of the disk groups specified in a disk group move, split or joinoperation is currently involved in another unrelated disk group move, split or joinoperation (possibly as the result of recovery from a system failure).
◆ Action: Use the vxprint command to display the status of the disk groups involved.If vxprint shows that the TUTIL0 field for a disk group is set to MOVE, and you arecertain that no disk group move, split or join should be in progress, use the vxdgcommand to clear the field as described in “Recovering from Incomplete Disk GroupMoves” on page 15. Otherwise, retry the operation.
vxvm: vxdg: ERROR: volume: Volume or plex device is open or mounted
◆ Description: An attempt was made to perform a disk group move, split or join on adisk group containing an open volume.
◆ Action: It is most likely that a file system configured on the volume is still mounted.Stop applications that access volumes configured in the disk group, and unmount anyfile systems configured in the volumes.
vxvm: vxdg: ERROR: vxdg join sourcedg targetdg failedvxvm: vxdg: ERROR: object: Record already exists in disk group
80 VERITAS Volume Manager Troubleshooting Guide

vxdmp Notice Messages
◆ Description: A disk group join operation failed because the name of an object in onedisk group is the same as the name of an object in the other disk group. Such nameclashes are most likely to occur for snap objects and snapshot plexes.
◆ Action: Use the following command to change the object name in either one of the diskgroups:
# vxedit -g diskgroup rename old_name new_name
For more information about using the vxedit command, see the vxedit(1M)manual page.
vxvm: vxdg: ERROR: vxdg listmove sourcedg targetdg failedvxvm:vxdg: ERROR: diskname : Disk not moving, but subdisks on it are
◆ Description: Some volumes have subdisks that are not on the disks implied by thesupplied list of objects.
◆ Action: Use the -o expand option to vxdg listmove to produce a self-contained listof objects.
vxdmp Notice MessagesA notice message from the Dynamic Multipathing (DMP) driver, vxdmp, indicates that ithas taken some action that you may wish to monitor. Action should be taken to correctany associated hardware problem as soon as possible.
vxvm:vxdmp:NOTICE:added disk array disk_array_serial_number
◆ Description: A new disk array has been added to the host.
◆ Action: None.
vxvm:vxdmp:NOTICE:Attempt to disable controller controller_name failed.Rootdisk has just one enabled path.
◆ Description: An attempt is being made to disable the one remaining active path to theroot disk controller.
◆ Action: The path cannot be disabled.
vxvm:vxdmp:NOTICE: Could not install sd drivervxvm:vxdmp:NOTICE: Could not install ssd drivervxvm:vxdmp:NOTICE: Could not load sd drivervxvm:vxdmp:NOTICE: Could not load ssd driver
◆ Description: During initialization, the vxdmp driver failed to load or install the sd orssd driver.
◆ Action: None.
vxvm:vxdmp:NOTICE: Could not lock sd driver
Chapter 3, Error Messages 81

vxdmp Notice Messages
vxvm:vxdmp:NOTICE: Could not lock ssd driver
◆ Description: The sd or ssd driver could not be locked during vxdmp driverinitialization to avoid unloading of the driver.
◆ Action: None.
vxvm:vxdmp:NOTICE:disabled controller controller_name connected to diskarray disk_array_serial_number
◆ Description: All paths through the controller connected to the disk array are disabled.This usually happens if a controller is disabled for maintenance.
◆ Action: None.
vxvm:vxdmp:NOTICE:disabled dmpnode dmpnode_device_number
◆ Description: A DMP node has been marked disabled in the DMP database. It will nolonger be accessible for further IO requests. This occurs when all paths controlled by aDMP node are in the disabled state, and therefore inaccessible.
◆ Action: Check hardware or enable the appropriate controllers to enable at least onepath under this DMP node.
vxvm:vxdmp:NOTICE:disabled path path_device_number belonging to dmpnodedmpnode_device_number
◆ Description: A path has been marked disabled in the DMP database. This path iscontrolled by the DMP node indicated by the specified device number. This may bedue to a hardware failure.
◆ Action: Check the underlying hardware if you want to recover the desired path.
Note vxvm:vxdmp:NOTICE:enabled controller controller_name connected todisk array disk_array_serial_number
◆ Description: All paths through the controller connected to the disk array are enabled.This usually happens if a controller is enabled after maintenance.
◆ Action: None.
vxvm:vxdmp:NOTICE:enabled dmpnode dmpnode_device_number
◆ Description: A DMP node has been marked enabled in the DMP database. Thishappens when at least one path controlled by the DMP node has been enabled.
◆ Action: None.
82 VERITAS Volume Manager Troubleshooting Guide

vxdmpadm Error Messages
vxvm:vxdmp:NOTICE:enabled path path_device_number belonging to dmpnodedmpnode_device_number
◆ Description: A path has been marked enabled in the DMP database. This path iscontrolled by the DMP node indicated by the specified device number. This happensif a previously disabled path has been repaired, the user has reconfigured the DMPdatabase using the vxdctl(1M) command, or the DMP database has been reconfiguredautomatically.
◆ Action: None.
vxvm:vxdmp:NOTICE: Path failure on major/minor
◆ Description: A path under the control of the DMP driver failed. The device major andminor numbers of the failed device is supplied in the message.
◆ Action: None.
vxvm:vxdmp:NOTICE:removed disk array disk_array_serial_number
◆ Description: A disk array has been disconnected from the host, or some hardwarefailure has resulted in the disk array becoming inaccessible to the host.
◆ Action: Replace disk array hardware if this has failed.
vxdmpadm Error MessagesAn error message from the Dynamic Multipathing (DMP) administration utility,vxdmpadm, indicates a problem with the requested DMP operation.
vxvm:vxdmpadm: ERROR: Attempt to disable controller failed. One (ormore) devices can be accessed only through this controller. Use the -foption if you still want to disable this controller.
◆ Description: Disabling the controller could lead to some devices becominginaccessible.
◆ Action: To disable the only path connected to a disk, use the -f option.
vxvm:vxdmpadm:ERROR:Attempt to enable a controller that is notavailable
◆ Description: This message is returned by the vxdmpadm utility when an attempt ismade to enable a controller that is not working or is not physically present.
◆ Action: Check hardware and see if the controller is present and whether I/O can beperformed through it.
Chapter 3, Error Messages 83

vxplex Error Messages
vxvm:vxdmpadm: ERROR:The VxVM restore daemon is already running. Youcan stop and restart the restore daemon with desired arguments forchanging any of its parameters.
◆ Description: The vxdmpadm start restore command has been executed while therestore daemon is already running.
◆ Action: Stop the restore daemon and restart it with the required set of parameters.
vxplex Error MessagesAn error message from the plex administration utility, vxplex, indicates a problem withthe requested operation.
vxvm:vxplex: ERROR: Plex plex not associated with a snapshot volume.
◆ Description: An attempt was made to snap back a plex that is not from a snapshotvolume.
◆ Action: Specify a plex from a snapshot volume.
vxvm:vxplex: ERROR: Plex plex not attached.
◆ Description: An attempt was made to snap back a detached plex.
◆ Action: Reattach the snapshot plex to the snapshot volume.
vxvm:vxplex: ERROR: Plexes do not belong to the same snapshot volume.
◆ Description: An attempt was made to snap back plexes that belong to differentsnapshot volumes.
◆ Action: Specify the plexes in separate invocations of vxplex snapback.
vxvm:vxplex: ERROR: Record volume is in disk group diskgroup1 plex isin group diskgroup2.
◆ Description: An attempt was made to snap back a plex from a different disk group.
◆ Action: Move the snapshot volume into the same disk group as the original volume.
Cluster Error MessagesThis section lists error messages that may occur with VxVM in a cluster environment.Some of these messages may appear on the console; others are returned by vxclust.
Cannot assign minor minor
◆ Description: A slave attempted to join, but an existing volume on the slave has thesame minor number as a shared volume on the master.
84 VERITAS Volume Manager Troubleshooting Guide

Cluster Error Messages
This message should be accompanied by the following console message:
vxvm:vxconfigd minor number minor disk group group in use
◆ Action: Before retrying the join, use vxdg reminor (see the vxdg(1M) manual page)to choose a new minor number range either for the disk group on the master or for theconflicting disk group on the slave. If there are open volumes in the disk group, thereminor operation will not take effect until the disk group is deported and updated(either explicitly or by rebooting the system).
Cannot find disk on slave node
◆ Description: A slave node in a cluster cannot find a shared disk. This is accompaniedby the syslog message:
vxvm:vxconfigd cannot find disk disk
◆ Action: Make sure that the same set of shared disks is online on both nodes. Examinethe disks on both the master and the slave with the command vxdisk list andmake sure that the same set of disks with the shared flag is visible on both nodes. Ifnot, check the connections to the disks.
Clustering license restricts operation
◆ Description: An operation requiring a full clustering license was attempted, and such alicense is not available.
◆ Action: If the error occurs when a disk group is being activated, dissociate all but oneplex from mirrored volumes before activating the disk group. If the error occursduring a transaction, deactivate the disk group on all nodes except the master.
CVM protocol version out of range
◆ Description: When a node joins a cluster, it tries to join at the protocol version that isstored in its volboot file. If the cluster is running at a different protocol version, themaster rejects the join and sends the current protocol version to the slave. The slavere-tries with the current version (if that version is supported on the joining node), orthe join fails.
◆ Action: Make sure that the joining node has a VERITAS Volume Manager releaseinstalled that supports the current protocol version of the cluster.
Disk in use by another cluster
◆ Description: An attempt was made to import a disk group whose disks are stampedwith the ID of another cluster.
◆ Action: If the disk group is not imported by another cluster, retry the import using the-C (clear import) flag.
Disk reserved by other host
Chapter 3, Error Messages 85

Cluster Error Messages
◆ Description: An attempt was made to online a disk whose controller has been reservedby another host.
◆ Action: No action is necessary. The cluster manager frees the disk and VxVM puts itonline when the node joins the cluster.
Error in cluster processing
◆ Description: This may be due to an operation inconsistent with the current state of acluster (such as an attempt to import or deport a shared disk group to or from theslave). It may also be caused by an unexpected sequence of commands fromvxclust.
◆ Action: Make sure that the operation can be performed in the current environment.
ERROR: upgrade operation failed: Already at highest version
◆ Description: An upgrade operation has failed because a cluster is already running atthe highest protocol version supported by the master.
◆ Action: No further action is possible as the master is already running at the highestprotocol version it can support.
Incorrect protocol version number in volboot file
◆ Description: A node attempted to join a cluster where VxVM software was incorrectlyupgraded or the volboot file is corrupted.
◆ Action: Verify the supported cluster protocol versions using vxdctl protocol version,and reinstall VxVM if necessary.
Incorrect protocol version (number) in volboot file
◆ Description: The volboot file contains an incorrect protocol version. It has beencorrupted, possibly by being edited manually. The volboot file should contain asupported protocol version before trying to bring the node into the cluster.
◆ Action: Run vxdctl init. This writes a valid protocol version to the volboot file.Restart vxconfigd and retry the join.
Insufficient DRL log size: logging is disabled.
◆ Description: A volume with an insufficient DRL log size was started successfully, butDRL logging is disabled and a full recovery is performed.
◆ Action: Create a new DRL of sufficient size.
Join in progress
◆ Description: An attempt was made to import or deport a shared disk group during acluster reconfiguration.
◆ Action: Retry when the cluster reconfiguration has completed.
86 VERITAS Volume Manager Troubleshooting Guide

Cluster Error Messages
Join not allowed now
◆ Description: A slave attempted to join a cluster when the master was not ready. Theslave will retry automatically. If the retry succeeds, the following message appears:
vxclust: slave join complete
◆ Action: No action is necessary if the join eventually completes. Otherwise, investigatethe cluster monitor on the master.
Master sent no data
◆ Description: During the slave join protocol, a message without data was received fromthe master. This message is only likely to be seen in the case of a programming error.
◆ Action: Contact Customer Support.
Missing vxconfigd
◆ Description: The vxconfigd daemon is not running.
◆ Action: Restart the vxconfigd daemon.
Node activation conflict
◆ Description: The disk group could not be activated because it is activated in aconflicting mode on another node in a cluster.
◆ Action: Retry later, or deactivate the disk group on conflicting nodes.
Not in cluster
◆ Description: Checking for the current protocol version (using vxdctl protocolversion) makes sense only if the node is in the cluster.
◆ Action: Bring the node in the cluster and retry.
NOTICE: commit: NOTE: Reason found for abort: code=2
◆ Description: This message may appear during a plex detach operation on the master ina cluster.
◆ Action: None required.
NOTICE: commit: NOTE: Reason found for abort: code=6
◆ Description: This message may appear during a plex detach operation on a slave in acluster.
◆ Action: None required.
NOTICE: ktcvm_check: sent to slave node: node=1 mid=196
◆ Description: This message may appear during a plex detach operation on the master ina cluster.
◆ Action: None required.
Chapter 3, Error Messages 87

Cluster Error Messages
NOTICE: vol_kmsg_send_wait_callback: got error 22
◆ Description: This message may appear during a plex detach operation on a slave in acluster.
Action: None required.
Retry rolling upgrade
◆ Description: An attempt was made to upgrade the cluster to a higher protocol versionwhen a transaction was in progress.
◆ Action: Retry at a later time.
Return from cluster_establish is Configuration daemon error 242
◆ Description: A node failed to join a cluster, or a cluster join is taking too long. If the joinfails, the node retries the join automatically.
◆ Action: No action is necessary if the join is slow or a retry eventually succeeds.
This node was running different CM. Please Reboot.
◆ Description: VxVM supports clustering under the control of various cluster managers.However, once a node joins the cluster under a particular cluster manager, it cannotbe restarted under a different cluster manager until it is rebooted.
◆ Action: Reboot the host machine if the cluster must be started under a different clustermanager.
Unable to add portal for cluster
◆ Description: vxconfigd was not able to create a portal for communication with thevxconfigd on the other node. This may happen in a degraded system that isexperiencing shortages of system resources such as memory or file descriptors.
◆ Action: If the system does not appear to be degraded, stop and restart vxconfigd,and try again.
Upgrade operation failed: Error in cluster processing
◆ Description: The cluster protocol upgrade must be done on the master. It cannot bedone from a slave node.
◆ Action: Retry the vxdctl upgrade command on the master node.
Upgrade operation failed: Retry rolling upgrade
◆ Description: No transactions should be in progress when an upgrade is tried.
◆ Action: Retry the upgrade at a later time.
88 VERITAS Volume Manager Troubleshooting Guide

Cluster Error Messages
Upgrade operation failed: Version out of range for at least one node
◆ Description: Before trying to upgrade a cluster by running vxdctl upgrade, all nodesshould be able to support the new protocol version. An upgrade can fail if at least oneof them does not support the new protocol version.
◆ Action: Make sure that the VERITAS Volume Manager package that supports the newprotocol version is installed on all nodes and retry the upgrade.
Version out of range for at least one node
◆ Description: One or more nodes in the cluster do not support the protocol version thatwould result from a protocol upgrade.
◆ Action: Make sure that the latest version of VxVM is installed on all nodes in thecluster.
Vol recovery in progress
◆ Description: A node that crashed attempted to rejoin the cluster before its DRL mapwas merged into the recovery map.
◆ Action: Retry the join when the merge operation has completed.
vxconfigd not readynode number: vxconfigd is not communicating properly
◆ Description: The vxconfigd daemon is not responding properly.
◆ Action: Stop and restart the vxconfigd daemon.
vxclust not there
◆ Description: An error during an attempt to join the cluster caused vxclust to fail.This may be caused by the failure of another node during a join or by the failure ofvxclust.
◆ Action: Retry the join. An error message on the other node may clarify the problem.
vxiod count must be above number to join cluster
◆ Description: The number of VERITAS Volume Manager kernel daemons (vxiod) isless than the minimum number needed to join the cluster.
◆ Action: Increase the number of daemons using vxiod.
vxvm:vxconfigd: group group exists
◆ Description: A slave tried to join a cluster, but a shared disk group already exists in thecluster with the same name as one of its private disk groups.
◆ Action: Use the vxdg newname operation to rename either the shared disk group onthe master, or the private disk group on the slave.
Chapter 3, Error Messages 89

Cluster Error Messages
WARNING: vxvm:vxio: Plex plex detached from volume volume
◆ Description: This message may appear during a plex detach operation in a cluster.
◆ Action: None required.
WARNING: vxvm:vxio: read error on plex plex of shared volume volumeoffset offset length length
◆ Description: This message may appear during a plex detach operation on the master ina cluster.
◆ Action: None required.
90 VERITAS Volume Manager Troubleshooting Guide

Index
Symbols/etc/system file
missing or damaged 28restoring 28, 29
/etc/vfstab filedamaged 26purpose 26
/var/adm/configd.log file 47/var/adm/syslog/syslog.log file 48
AACTIVE plex state 2ACTIVE volume state 9aliased disks 20
Bbackup tapes, recovery 30badlog flag
clearing for DCO 16BADLOG plex state 8boot command
-a flag 21, 28-s flag 29, 31syntax 21
boot diskusing aliases 20
boot disksalternate 20configurations 19hot-relocation 22listing aliases 20re-adding 33, 34recovering from backup tape 30recovery 19relocating subdisks 22replacing 33
boot failurecannot open altboot_disk 20cannot open boot device 23
damaged /usr entry 27due to stale plexes 24due to unusable plexes 24invalid partition 26
booting systemaliased disks 20recovery from failure 23using CD-ROM 31
CCD-ROM, booting 31CLEAN plex state 2clusters
ERROR messages 84NOTICE messages 87WARNING messages 90
Ddata loss, RAID-5 6DCO
recovering volumes 16removing badlog flag from 16
degraded mode, RAID-5 7DEGRADED volume state 7detached RAID-5 log plexes 11detached subdisks 7DETACHED volume kernel state 8devalias command 20devices, dump 23DISABLED plex kernel state 2, 8disabling VxVM 32disk group
recovery from failed move, split orjoin 15
disk group errorsname conflict 63new host ID 61
disk IDsfixing duplicate 77
91

disksaliased 20causes of failure 1cleaning up configuration 44failures 7fixing duplicated IDs 77invalid partition 26reattaching 5
DMPfixing duplicated disk IDs 77
dumpadm command 23
Eeeprom
used to allow boot disk aliases 20EEPROM variables
use-nvramrc? 20EMPTY plex state 2ENABLED plex kernel state 2ENABLED volume kernel state 9error messages
/dev/vx/info error message 60A virtual disk device is open 59aborting 65All transactions are disabled 62Already at highest version 86Attempt to disable controller failed 83Attempt to enable a controller that is notavailable 83can’t import diskgroup 60Can’t locate disk(s) 60Can’t open boot device 23Cannot assign minor 84Cannot auto-import group 62Cannot create /var/adm/utmp or/var/adm/utmpx 26Cannot find disk on slave node 85Cannot get all disk groups from thekernel 57Cannot get all disks from the kernel 57Cannot get kernel transaction state 57Cannot get private storage from thekernel 57Cannot get private storage size from thekernel 57Cannot get record from the kernel 57Cannot kill existing daemon 57Cannot make directory 57cannot open /dev/vx/config 58
Cannot open /etc/vfstab 58cannot open altboot_disk 20Cannot recover operation in progress 59Cannot recover temp database 61Cannot remove last disk groupconfiguration copy 79Cannot reset VxVM kernel 59Cannot start volume 59Cannot store private storage into thekernel 60Clustering license restricts operation 85Configuration records areinconsistent 63Configuration too large forconfiguration copies 79core dumped 67CVM protocol version out of range 85Database file not found 65default log file 47Device is already open 58Differing version of vxconfigdinstalled 60Disabled by errors 62Disk group does not exist 15, 79Disk group errors
multiple disk failures 62Disk group version doesn’t supportfeature 79Disk in use by another cluster 85Disk is not usable 79Disk not moving, but subdisks on itare 81Disk reserved by another host 85Disk write failure 61Duplicate record in configuration 63enable failed 65Error check group configurationcopies 65Error in cluster processing 80, 86, 88Errors in some configuration copies 62,64, 65Failed to get group from the kernel 59Failed to store commit status list intokernel 66failed write of utmpx entry 26File just loaded does not appear to beexecutable 26Format error in configuration copy 63Get of current rootdg failed 66
92 VERITAS Volume Manager Troubleshooting Guide

GET_VOLINFO ioctl failed 66group exists 89Group name collides with record inrootdg 63Incorrect protocol version in volbootfile 86Insufficient DRL log size, logging isdisabled 86Insufficient number of active snapshotmirrors in snapshot_volume 55Invalid block number 63Invalid magic number 63Join in progress 86Join not allowed now 87logging 47Master sent no data 87Memory allocation failure 66Missing vxconfigd 87Name conflicts with importeddiskgroup 79No convergence between root diskgroup and disk list 66No such device or address 58No such file or directory 58, 67no valid complete plexes 59no valid plexes 59Node activation conflict 87Not in cluster 87not updated with new host ID 61Open of directory failed 67Operation is not supported 79Plex plex not associated with a snapshotvolume 84Plex plex not attached 84Plexes do not belong to the samesnapshot volume 84RAID-5 plex does not map entire volumelength 13Read of directory failed 67Record already exists in disk group 80Record is associated 80Record volume is in disk groupdiskgroup1 plex in in groupdiskgroup2 84Reimport of disk group failed 64Request crosses disk group boundary 80Retry rolling upgrade 88Return from cluster_establish isConfiguration daemon error 88
Segmentation fault 67Skip disk group with duplicate name 63slave join complete 87some subdisks are unusable and theparity is stale 13split failed 80startup script 48System boot disk does not have a validroot plex 25System boot disk does not have a validrootvol plex 68System startup failure 25, 68The VxVM restore daemon is alreadyrunning 84There is no volume configured for theroot device 68This node was running different CM 88Transaction already in progress 80transactions are disabled 65Unable to add portal for cluster 88Unexpected configuration tid for groupfound in kernel 69Unexpected error during volumereconfiguration 69Unexpected error fetching disk for diskvolume 69Unexpected values stored in kernel 69Unrecognized operating mode 66update failed 65Upgrade operation failed 88upgrade operation failed 86Version number of kernel does notmatch vxconfigd 69Version out of range for at least onenode 89Vol recovery in progress 89Volume for mount point /usr not foundin rootdg disk group 69Volume is not startable 13volume not in rootdg disk group 66Volume or plex device is open ormounted 80Volume record id is not found in theconfiguration 55volume state is invalid 59vxclust not there 89vxconfigd cannot boot-start RAID-5volumes 69vxconfigd is not communicating
Index 93

properly 89vxconfigd minor number in use 85vxconfigd not ready 89vxdg join sourcedg targetdg failed 80vxdg listmove failed 81vxiod count must be above number tojoin cluster 89
Ffailures
disk 7system 6
fatal error messagesCannot update kernel 56Inconsistency -- Not loaded intokernel 56Interprocess communication failure 56Invalid status stored in kernel 56Memory allocation failure duringstartup 56Rootdg cannot be imported duringboot 56Unexpected threads failure 57
Hhardware failure, recovery from 1hot-relocation
boot disks 22defined 1RAID-5 9root disks 22starting up 45
Iinstall-db file 32, 39IOFAIL plex state 3
Kkernel
NOTICE messages 54PANIC messages 49WARNING messages 49
Llisting
alternate boot disks 20unstartable volumes 4
log filedefault 47syslog error messages 48vxconfigd 47
LOG plex state 8log plexes
importance for RAID-5 6recovering RAID-5 11
Mmirrored volumes, recovering 4MOVE flag
set in TUTIL0 field 15
NNEEDSYNC volume state 10notice messages
added disk array 81Attempt to disable controller failed 81Can’t close disk 54Can’t open disk 54Could not install sd driver 81Could not install ssd driver 81Could not load sd driver 81Could not load ssd driver 81Could not lock sd driver 81Could not lock ssd driver 82Detached disk 76Detached log for volume 76Detached plex in volume 76Detached subdisk in volume 76Detached volume 77disabled controller connected to diskarray 82disabled dmpnode 82disabled path belonging to dmpnode 82enabled controller connected to diskarray 82enabled dmpnode 82enabled path belonging to dmpnode 83ktcvm_check sent to slave node 87Offlining config copy 77Path failure 83read error on object 54Reason found for abort 87removed disk array 83Rootdisk has just one enabled path 81Unable to resolve duplicate diskid 77vol_kmsg_sent_wait_callback goterror 88Volume entering degraded mode 78
OOpenBoot PROMs (OPB) 21
94 VERITAS Volume Manager Troubleshooting Guide

Ppanic messages
Object association depth overflow 49parity
regeneration checkpointing 11resynchronization for RAID-5 10stale 6
partitions, invalid 26plex kernel states
DISABLED 2, 8ENABLED 2
plex statesACTIVE 2BADLOG 8CLEAN 2EMPTY 2IOFAIL 3LOG 8STALE 5
plexesdefined 2mapping problems 12recovering mirrored volumes 4
primary boot disk failure 20PROMs, boot 21
RRAID-5
detached subdisks 7failures 6hot-relocation 9importance of log plexes 6parity resynchronization 10recovering log plexes 11recovering stale subdisk 11recovering volumes 9recovery process 8stale parity 6starting forcibly 14starting volumes 12startup recovery process 8subdisk move recovery 12unstartable volumes 12
reattaching disks 5reconstructing-read mode, stale subdisks 7recovery
disk 5reinstalling entire system 36replacing
boot disks 33REPLAY volume state 8restarting disabled volumes 4resynchronization
RAID-5 parity 10root disks
booting alternate 20configurations 19hot-relocation 22re-adding 33, 34recovering from backup tape 30recovery 19repairing 30replacing 33
root file systembacking up 30configurations 19restoring 31
root file system, damaged 36rootability
cleaning up 40reconfiguring 44
Sstale parity 6stale subdisks 7subdisks
detached 7marking as non-stale 14recovering after moving for RAID-5 12recovering stale RAID-5 11stale, starting volume 14unrelocating to replaced boot disk 22
swap spaceconfigurations 19
SYNC volume state 8, 10syslog
error log file 48system
reinstalling 36system failures 6
TTUTIL0 field
clearing MOVE flag 15
Uufsdump 30ufsrestore
used to restore UFS file system 31
Index 95

use-nvramrc? 20usr file system
backing up 30configurations 19repairing 30restoring 31
VVM disks, aliased 20volume kernel states
DETACHED 8ENABLED 9
volume statesACTIVE 9DEGRADED 7NEEDSYNC 10REPLAY 8SYNC 8, 10
volumescleaning up 41listing unstartable 4RAID-5 data loss 6reconfiguring 44recovering for DCO 16recovering mirrors 4recovering RAID-5 9restarting disabled 4stale subdisks, starting 14
VRTSexplorer xvxassist
ERROR messages 55WARNING messages 56
vxconfigdERROR messages 57FATAL ERROR messages 56log file 47NOTICE messages 76WARNING messages 70
vxconfigd.log file 47vxdco
used to remove badlog flag fromDCO 16
vxdgERROR messages 79used to recover from failed disk groupmove, split or join 15
vxdmpNOTICE messages 81
vxdmpadm
ERROR messages 83vxinfo command 4vxmend command 4vxplex
ERROR messages 84vxplex command 11vxreattach command 5vxunreloc command 22VxVM
disabling 32obtaining system information xRAID-5 recovery process 8recovering configuration of 38reinstalling 38
vxvol recover command 11vxvol resync command 10vxvol start command 5
Wwarning messages
Bad request 70Cannot change disk group record inkernel 71Cannot create device 71Cannot exec /bin/rm to removedirectory 71Cannot exec /usr/bin/rm to removedirectory 71Cannot find device number 49Cannot fork to remove directory 71Cannot issue internal transaction 71Cannot open log file 72Cannot remove group from kernel 72check_ilocks 50client not recognized 72client not recognized by VxVM 72corrupt label_sdo 26Detaching plex from volume 72detaching RAID-5 50Disk device not found 72Disk group is disabled 74Disk group log may be too small 73Disk in group flagged as shared 72Disk in group locked by host 72Disk in kernel is not a recognized type 73Disk names group but group IDdiffers 73Disk skipped 72disks not updated with new host ID 74
96 VERITAS Volume Manager Troubleshooting Guide

Double failure condition detected onRAID-5 50Duplicate virtual device number(s) 75Error in volboot file 74Errors in some configuration copies 74Failed to log the detach of the DRLvolume 51Failed to store commit status list intokernel 74Failed to update voldinfo area inkernel 74Failure in RAID-5 logging operation 51Field too long in volboot file 74Get of record from kernel failed 75Illegal vminor encountered 51Internal transaction failed 75Kernel log full 51Kernel log update failed 51library and vxconfigd disagree onexistence of client 75library specified non-existent client 75log object detached from RAID-5volume 51Log size should be at least 73mod_install returned errno 52object detached from RAID-5 volume 52
object plex detached from volume 52overlapping ilocks 50Overlapping mirror plex detached fromvolume 52Plex detached from volume 90Plex for root volume is stale orunusable 25RAID-5 volume entering degradedmode operation 53read error on mirror plex of volume 53read error on plex of shared volume 90Received spurious close 50response to client failed 75Root volumes are not supported on yourPROM version 53stranded ilock 50subdisk failed in plex 53unable to read label 26Uncorrectable read error 52Uncorrectable write error 52vold_turnclient failed 75volume already has at least one snapshotplex 56volume is detached 50Volume remapped 75write error on mirror plex of volume 54
Index 97


