16
User Manual Version-1.0 January-2011 Easy step by step instruction for online tax payment e-Payment through DTI Portal Directorate of Treasuries & Inspection, Orissa
User Manual
Version-1.0 January-2011
Easy step by step instruction for online tax payment
e-Payment through DTI Portal
Directorate of Treasuries & Inspection, Orissa
Directorate of Treasuries & Inspection Page 2
Foreward
This user manual on the e-Payment has been prepared for online payment of Government taxes through DTI web portal. This document describes step by step procedure with relevant screen shots to make successful online tax payment.
The intended audience of this user manual are the tax payers of the state who will pay their government taxes by availing the facility of “e-Payment” available in the portal of Directorate of Treasuries & Inspection (DTI). Tax payers willing to avail this facility must have an internet banking account. At present the facility of e-Payment is limited to Commercial Taxes, however, shortly this facility will be extended to other Governmental receipts.
This document is revised periodically; comments and suggestions on all aspects of this manual will be encouraged and appreciated. I thank our technical partner CMC LTD for their cooperation in preparation of the manual.
( Sri P. K. Das ) Director of Treasuries & Inspection,
Orissa, Bhubaneswar

Directorate of Treasuries & Inspection Page 3
Table of Contents
Pre requisite: ................................................................................................................................................... 4
Step 1: How to initiate on-line challan submission process .............................................................................. 4
Step 2: Challan Type Selection ......................................................................................................................... 5
Step 3: Filling Challan-Type Specific Information............................................................................................. 6
Step 4: Filling Common Challan Information .................................................................................................... 8
Step 5: Verification of entered information ................................................................................................... 10
Step 6: Generation of challan reference ID .................................................................................................... 11
Step 7: Make payment using bank payment gateway. ................................................................................... 11
Step 8: Print of Cyber Receipt generated from bank site ................................................................................ 12
Step 9: Print of e-Challan from DTI portal ...................................................................................................... 13
Challan Status Query & Reprint of Challan ..................................................................................................... 14

Directorate of Treasuries & Inspection Page 4
Pre requisite:
Internet enabled machine like desktop, laptop etc
Internet browser
Net banking facility
Step 1: How to initiate on-line challan submission process To submit challan on-line, user has to open the web portal of Directorate of Treasuries and
Inspection (DTI) using any internet browser. The URL of DTI’s web portal is
https://www.orissatreasury.gov.in
Open any internet browser and type the above URL in the address bar of the
browser and press ENTER key. It will open the DTI’s web portal as shown below:
Fig1: DTI Web Portal
Click e-Payment link under the CYBER TREASURY block to proceed to the next step.
Directorate of Treasuries & Inspection Page 5
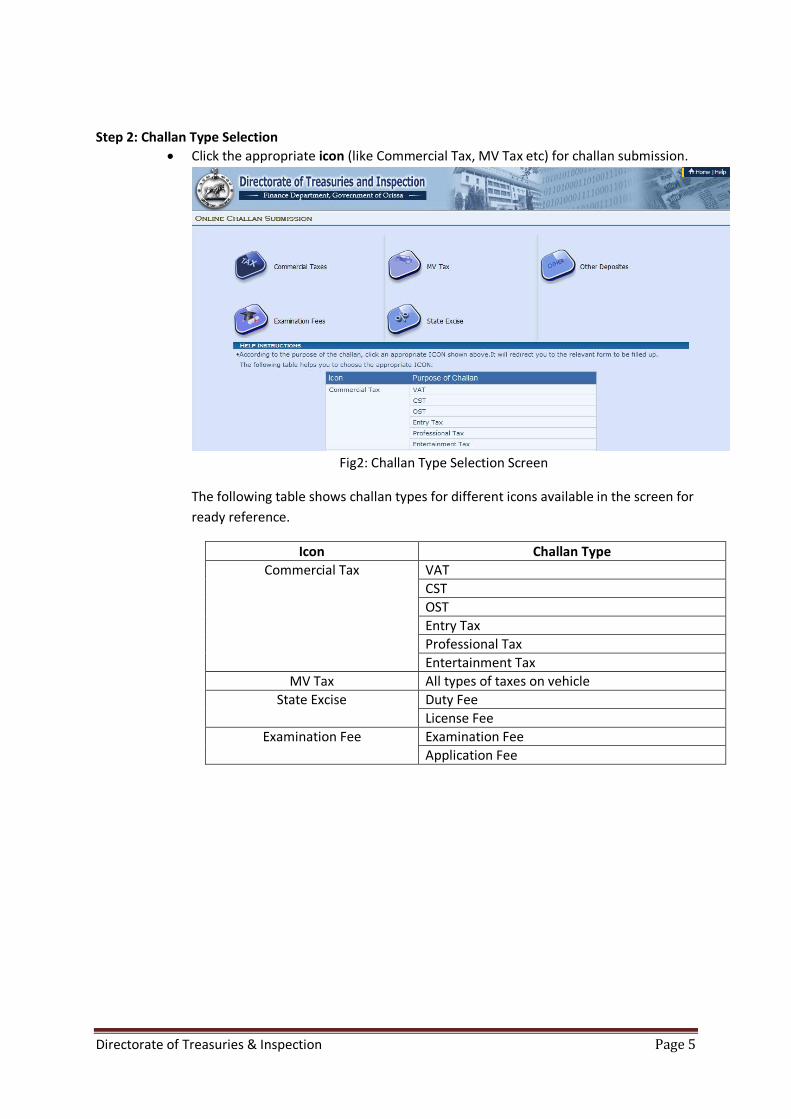
Step 2: Challan Type Selection
Click the appropriate icon (like Commercial Tax, MV Tax etc) for challan submission.
Fig2: Challan Type Selection Screen
The following table shows challan types for different icons available in the screen for
ready reference.
Icon Challan Type
Commercial Tax VAT
CST
OST
Entry Tax
Professional Tax
Entertainment Tax
MV Tax All types of taxes on vehicle
State Excise Duty Fee
License Fee
Examination Fee Examination Fee
Application Fee
Directorate of Treasuries & Inspection Page 6
Filling Challan Information
Depending upon the challan type, user has to fill some challan-type specific information in addition
of common challan information. This is explained in the subsequent steps.
Note: * mark in the screen indicates mandatory field.
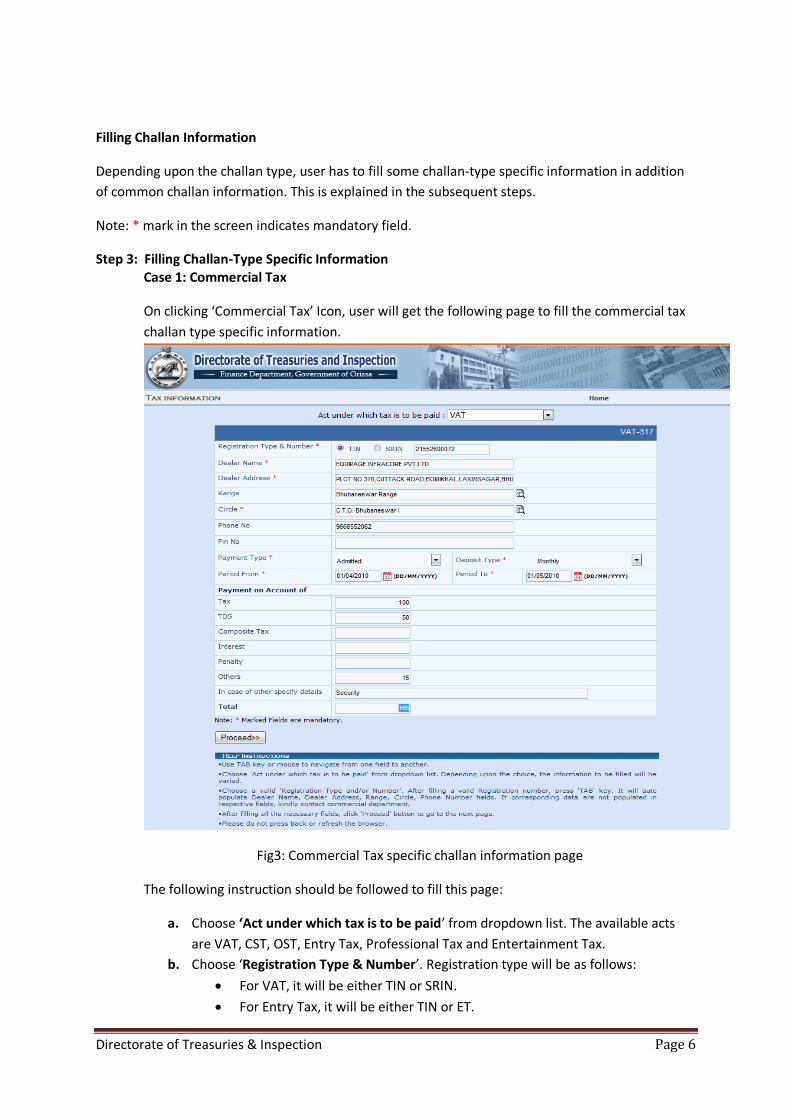
Step 3: Filling Challan-Type Specific Information Case 1: Commercial Tax
On clicking ‘Commercial Tax’ Icon, user will get the following page to fill the commercial tax
challan type specific information.
Fig3: Commercial Tax specific challan information page
The following instruction should be followed to fill this page:
a. Choose ‘Act under which tax is to be paid’ from dropdown list. The available acts
are VAT, CST, OST, Entry Tax, Professional Tax and Entertainment Tax.
b. Choose ‘Registration Type & Number’. Registration type will be as follows:
For VAT, it will be either TIN or SRIN.
For Entry Tax, it will be either TIN or ET.
Directorate of Treasuries & Inspection Page 7
For Other Act of Taxes, Registration Type is not required
User has to click the appropriate one. Then the user will put a valid registration
number in the Registration Number text box.
c. In case of VAT, CST and Entry Tax, if the provided registration number is not found
by the system, then the system will not allow users to proceed. Otherwise system
will auto populate the following fields:
Dealer Name
Dealer Address
Range
Circle
Phone Number
Range and Circle can be chosen from the available list which can be displayed by
clicking on the LOV (List of Values) attached with the fields ( ).
In other cases, user has to fill all the information manually. System will not validate
the registration number.
d. Put PIN umber in the corresponding PIN Number field.
e. Choose Payment Type and Deposit Type from the dropdown list. The available
payment types are Admitted, Demand and Any Other. The available Deposit type are
Monthly, Quarterly, Yearly and Any Other.
f. Enter the period for which the tax has to be paid. System will auto populate the
Period To Field on entering the Period From field in case of Monthly, Quarterly, and
Yearly deposit type. In case of Any Other deposit type, user has to fill both the fields
manually.
g. Fill the amounts in the applicable payment fields. Available payment fields are
TAX
TDS
Interest
Penalty
Composite Tax
Others
If an applicable payment field is not available then user will put the amount
corresponding to the unavailable payment field in the Others field and then user
must specify the unavailable payment field name in ‘In case of other specify details’
field.
h. After filling the above payment amounts, system will show the total challan amount
in the Total field.
i. Click ‘Proceed’ button to go to the next page to fill the common challan information
which is explained in step 4.
Note: There is a quick help instruction, written at the bottom of every page, to guide the
user to fill up that particular page.
Directorate of Treasuries & Inspection Page 8
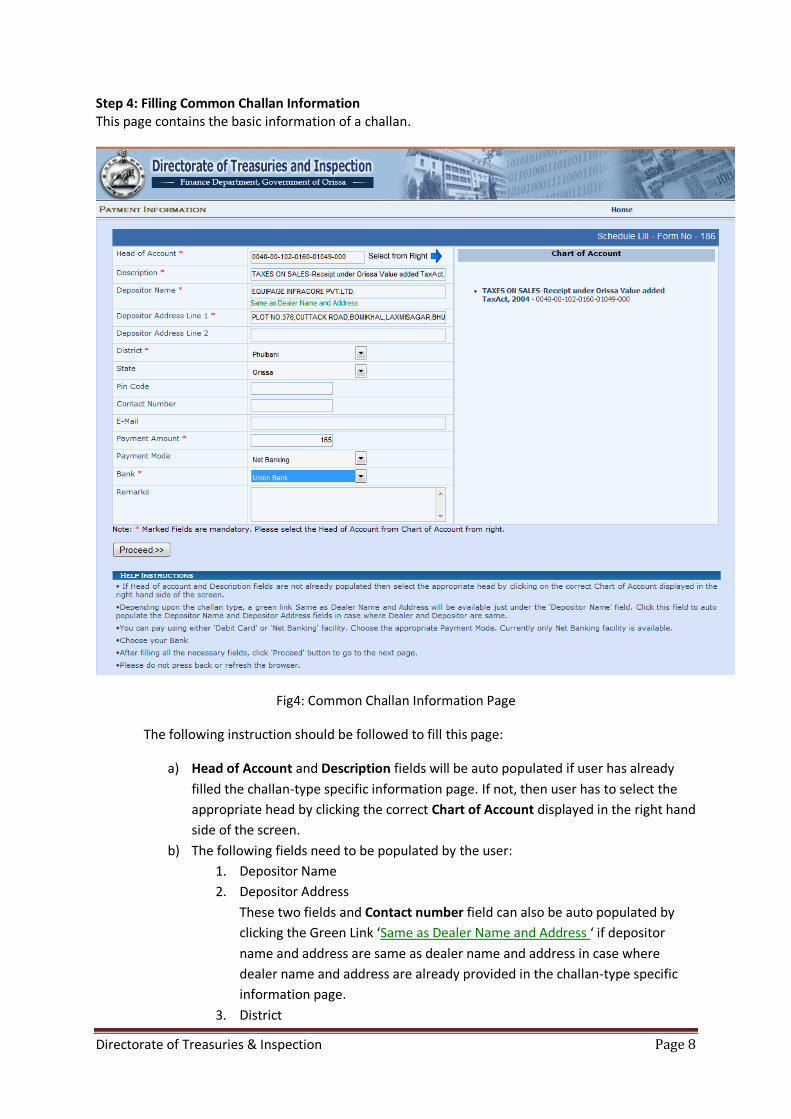
Step 4: Filling Common Challan Information This page contains the basic information of a challan.
Fig4: Common Challan Information Page
The following instruction should be followed to fill this page:
a) Head of Account and Description fields will be auto populated if user has already
filled the challan-type specific information page. If not, then user has to select the
appropriate head by clicking the correct Chart of Account displayed in the right hand
side of the screen.
b) The following fields need to be populated by the user:
1. Depositor Name
2. Depositor Address
These two fields and Contact number field can also be auto populated by
clicking the Green Link ‘Same as Dealer Name and Address ‘ if depositor
name and address are same as dealer name and address in case where
dealer name and address are already provided in the challan-type specific
information page.
3. District
Directorate of Treasuries & Inspection Page 9
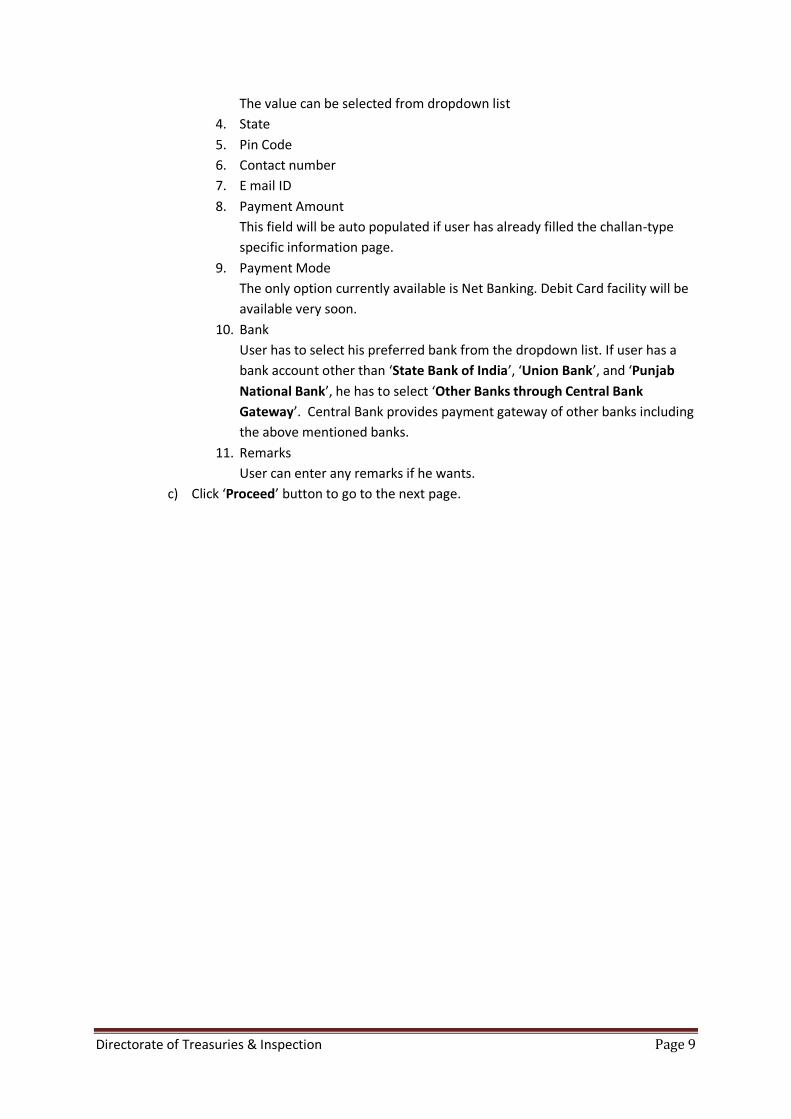
The value can be selected from dropdown list
4. State
5. Pin Code
6. Contact number
7. E mail ID
8. Payment Amount
This field will be auto populated if user has already filled the challan-type
specific information page.
9. Payment Mode
The only option currently available is Net Banking. Debit Card facility will be
available very soon.
10. Bank
User has to select his preferred bank from the dropdown list. If user has a
bank account other than ‘State Bank of India’, ‘Union Bank’, and ‘Punjab
National Bank’, he has to select ‘Other Banks through Central Bank
Gateway’. Central Bank provides payment gateway of other banks including
the above mentioned banks.
11. Remarks
User can enter any remarks if he wants.
c) Click ‘Proceed’ button to go to the next page.

Directorate of Treasuries & Inspection Page 10
Step 5: Verification of entered information This page provides a facility to change any information that is already entered by the user.
Fig5: Challan Verification page
System will show the mandatory information, entered by the user. User will check the information. If
any changes required, user will click ‘Change Information’ button. Otherwise he will click the
‘Proceed’ button to move to the next step.
Directorate of Treasuries & Inspection Page 11
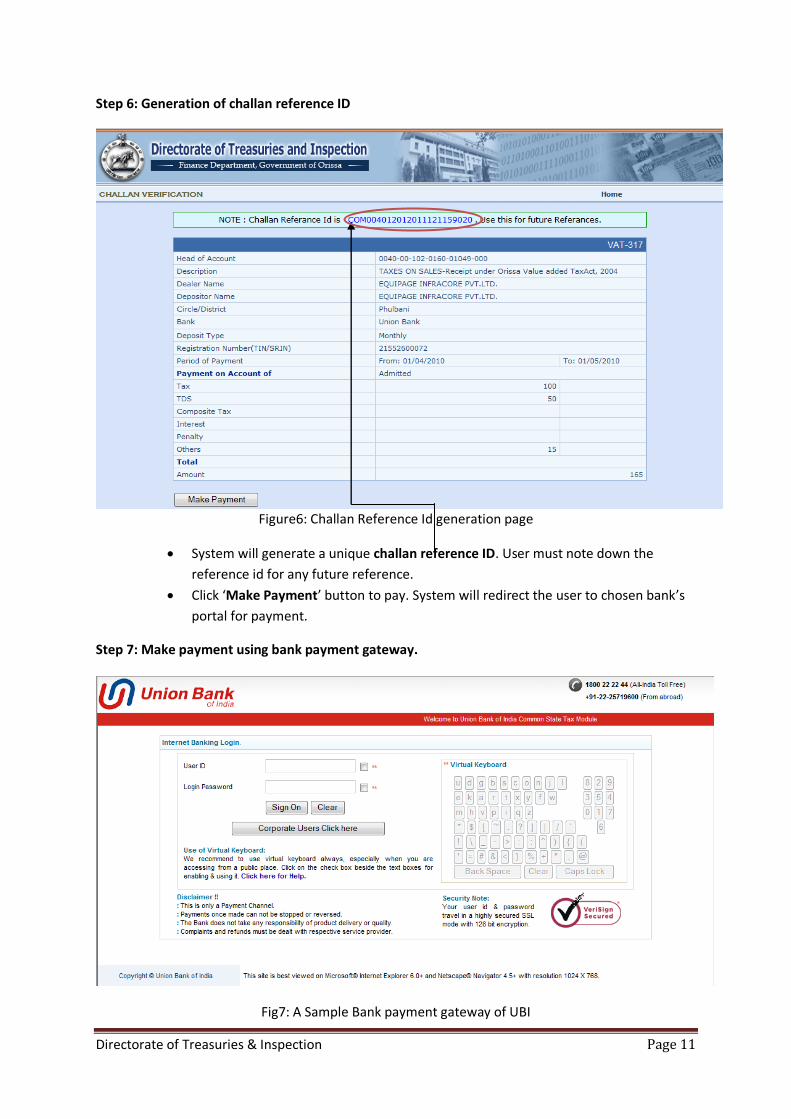
Step 6: Generation of challan reference ID
Figure6: Challan Reference Id generation page
System will generate a unique challan reference ID. User must note down the
reference id for any future reference.
Click ‘Make Payment’ button to pay. System will redirect the user to chosen bank’s
portal for payment.
Step 7: Make payment using bank payment gateway.
Fig7: A Sample Bank payment gateway of UBI
Directorate of Treasuries & Inspection Page 12
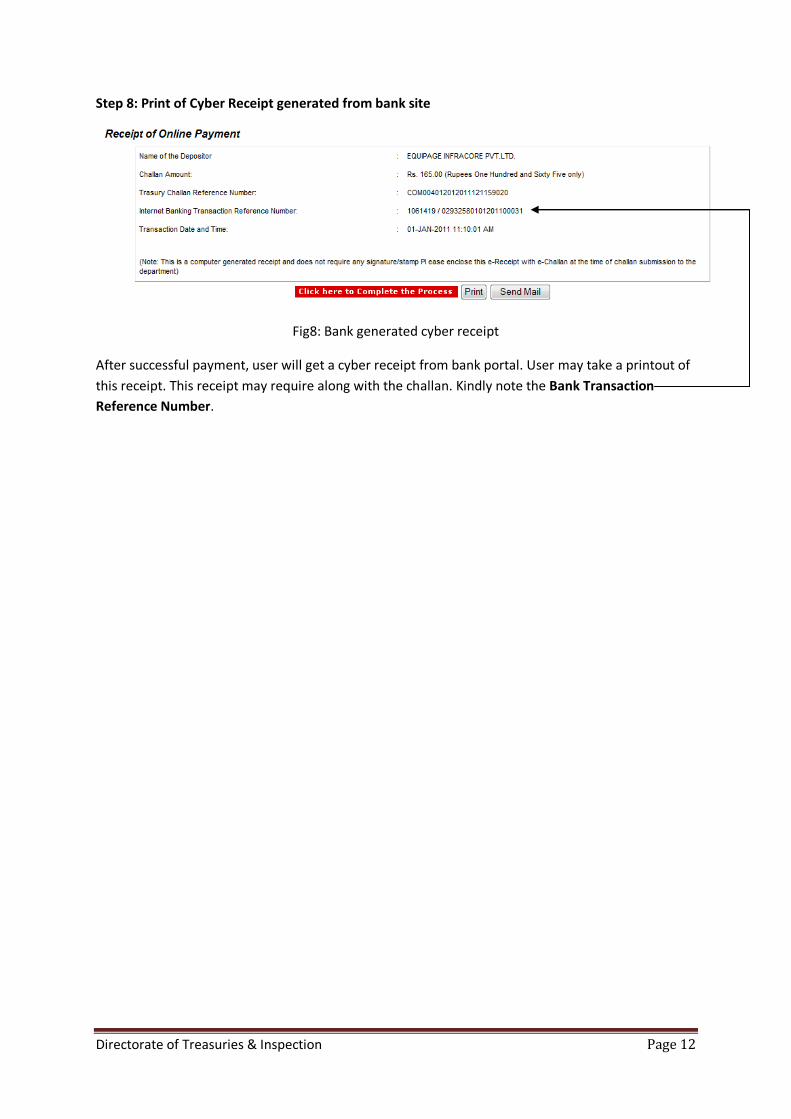
Step 8: Print of Cyber Receipt generated from bank site
Fig8: Bank generated cyber receipt
After successful payment, user will get a cyber receipt from bank portal. User may take a printout of
this receipt. This receipt may require along with the challan. Kindly note the Bank Transaction
Reference Number.

Directorate of Treasuries & Inspection Page 13
Step 9: Print of e-Challan from DTI portal
After cyber receipt generation, bank redirects the user to DTI portal again. Here, user will get e-
challan. User must take a printout of this challan for submission purpose. User has to click Print
button at the bottom of the screen to take the printout.
At the time of challan submission, user has to submit this printout along with the cyber receipt
generated at bank end.
Directorate of Treasuries & Inspection Page 14
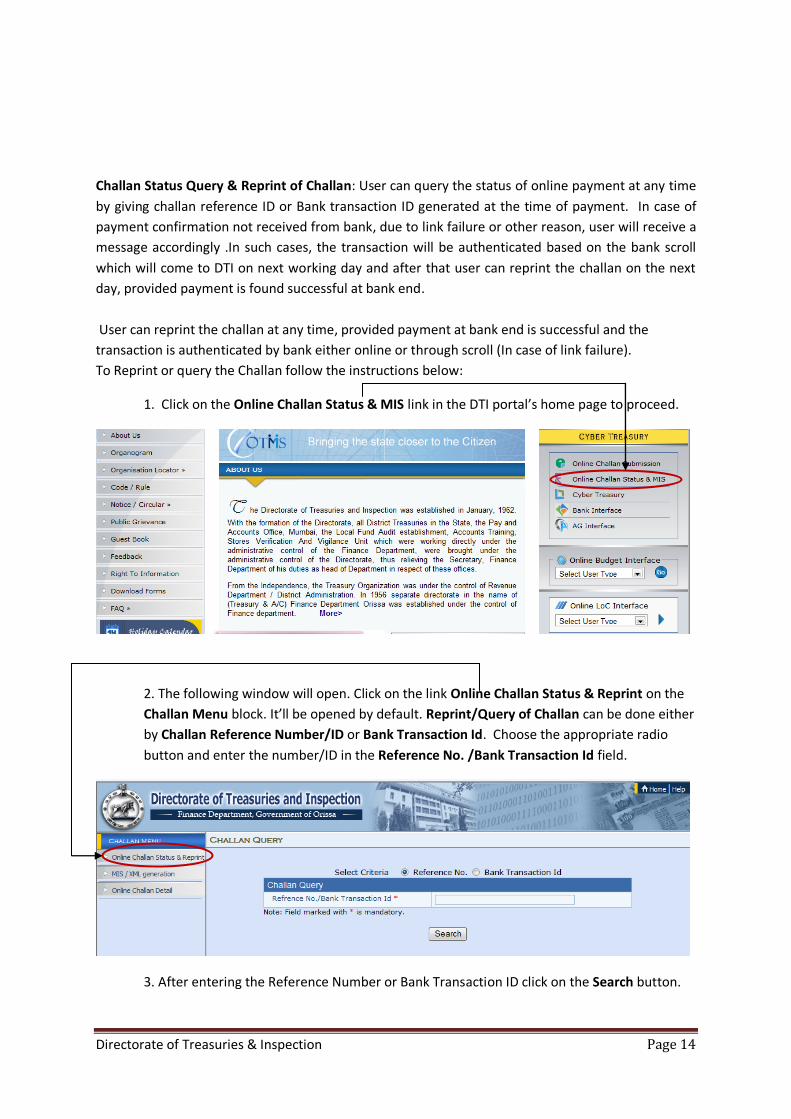
Challan Status Query & Reprint of Challan: User can query the status of online payment at any time
by giving challan reference ID or Bank transaction ID generated at the time of payment. In case of
payment confirmation not received from bank, due to link failure or other reason, user will receive a
message accordingly .In such cases, the transaction will be authenticated based on the bank scroll
which will come to DTI on next working day and after that user can reprint the challan on the next
day, provided payment is found successful at bank end.
User can reprint the challan at any time, provided payment at bank end is successful and the
transaction is authenticated by bank either online or through scroll (In case of link failure).
To Reprint or query the Challan follow the instructions below:
1. Click on the Online Challan Status & MIS link in the DTI portal’s home page to proceed.
2. The following window will open. Click on the link Online Challan Status & Reprint on the
Challan Menu block. It’ll be opened by default. Reprint/Query of Challan can be done either
by Challan Reference Number/ID or Bank Transaction Id. Choose the appropriate radio
button and enter the number/ID in the Reference No. /Bank Transaction Id field.
3. After entering the Reference Number or Bank Transaction ID click on the Search button.
Directorate of Treasuries & Inspection Page 15
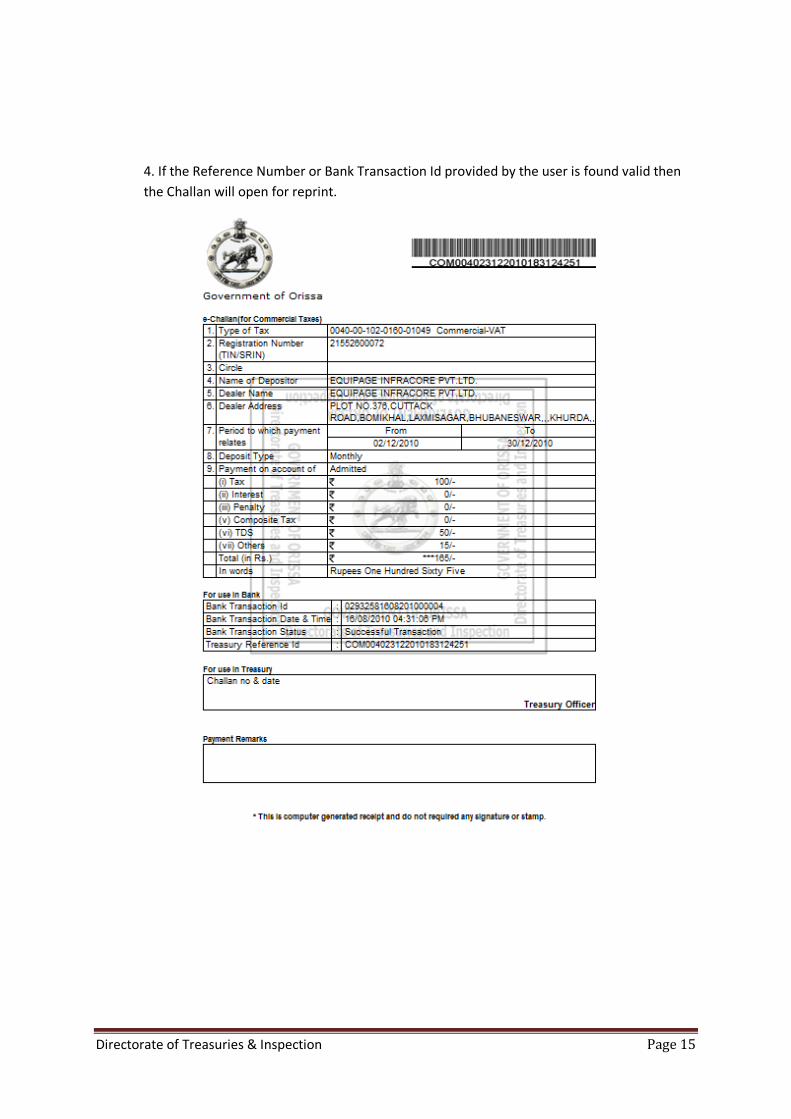
4. If the Reference Number or Bank Transaction Id provided by the user is found valid then
the Challan will open for reprint.

Directorate of Treasuries & Inspection Page 16
Otherwise user will get either of the following messages:
Invalid Challan Reference Id, Please Check it:- In this case the given reference id is not a valid one.
User has to put a valid ID and retry.
Payment confirmation not yet received from bank, please try after some time: In this case, user
will get the challan after the transaction will be authenticated based on the bank scroll which
will come to DTI on next working day.


