152
Version 5.4 [ Create DI Solutions ] ] https://help.pentaho.com/Draft_Content/Version_5.4 Updated: Wed, 27 May 2015 15:24:43 GMT 1/152
Version 5.4
[ Create DI Solutions ]
]
https://help.pentaho.com/Draft_Content/Version_5.4Updated: Wed, 27 May 2015 15:24:43 GMT
1/152
Copyright Page
This document supports Pentaho Business Analytics Suite 5.4 GA and Pentaho Data Integration 5.4 GA,
documentation revision June 9th, 2015, copyright © 2015 Pentaho Corporation. No part may be reprinted
without written permission from Pentaho Corporation. All trademarks are the property of their respective
owners.
Help and Support Resources
To view the most up-to-date help content, visit https://help.pentaho.com.
If you do not find answers to your questions here, please contact your Pentaho technical support
representative.
Support-related questions should be submitted through the Pentaho Customer Support Portal at
http://support.pentaho.com.
For information about how to purchase support or enable an additional named support contact, please
contact your sales representative, or send an email to [email protected].
For information about instructor-led training, visit http://www.pentaho.com/training.
Liability Limits and Warranty Disclaimer
The author(s) of this document have used their best efforts in preparing the content and the programs
contained in it. These efforts include the development, research, and testing of the theories and programs to
determine their effectiveness. The author and publisher make no warranty of any kind, express or implied,
with regard to these programs or the documentation contained in this book.
The author(s) and Pentaho shall not be liable in the event of incidental or consequential damages in
connection with, or arising out of, the furnishing, performance, or use of the programs, associated instructions,
and/or claims.
Trademarks
The trademarks, logos, and service marks ("Marks") displayed on this website are the property of Pentaho
Corporation or third party owners of such Marks. You are not permitted to use, copy, or imitate the Mark, in
whole or in part, without the prior written consent of Pentaho Corporation or such third party. Trademarks of
Pentaho Corporation include, but are not limited, to "Pentaho", its products, services and the Pentaho logo.
https://help.pentaho.com/Draft_Content/Version_5.4/Copyright_PageUpdated: Wed, 27 May 2015 15:24:43 GMT
2/152

Trademarked names may appear throughout this website. Rather than list the names and entities that own the
trademarks or inserting a trademark symbol with each mention of the trademarked name, Pentaho
Corporation states that it is using the names for editorial purposes only and to the benefit of the trademark
owner, with no intention of infringing upon that trademark.
Third-Party Open Source Software
For a listing of open source software used by each Pentaho component, navigate to the folder that contains
the Pentaho component. Within that folder, locate a folder named licenses. The licenses folder contains
HTML.files that list the names of open source software, their licenses, and required attributions.
Contact Us
Global Headquarters Pentaho Corporation Citadel International, Suite 460
5950 Hazeltine National Drive Orlando, FL 32822
Phone: +1 407 812-OPEN (6736)
Fax: +1 407 517-4575
http://www.pentaho.com
Sales Inquiries: [email protected]
https://help.pentaho.com/Draft_Content/Version_5.4/Copyright_PageUpdated: Wed, 27 May 2015 15:24:43 GMT
3/152
Introduction
Pentaho Data Integration (PDI) is a flexible tool that allows you to collect data from disparate sources such as
databases, files, and applications, and turn the data into a unified format that is accessible and relevant to end
users. PDI provides the Extraction, Transformation, and Loading (ETL) engine that facilitates the process of
capturing the right data, cleansing the data, and storing the data using a uniform and consistent format.
PDI provides support for slowly changing dimensions, and surrogate key for data warehousing, allows data
migration between databases and application, is flexible enough to load giant datasets, and can take full
advantage of cloud, clustered, and massively parallel processing environments. You can cleanse your data
using transformation steps that range from very simple to very complex. Finally, you can leverage ETL as the
data source for Pentaho Reporting.Note: Dimension is a data warehousing term that refers to logical groupings of data such as product,customer, or geographical information. Slowly Changing Dimensions (SCD) are dimensions that contain datathat changes slowly over time. For example, in most instances, employee job titles change slowly over time.
Common Uses of Pentaho Data Integration Include:
Data migration between different databases and applications
Loading huge data sets into databases taking full advantage of cloud, clustered and massively parallel processingenvironments
Data Cleansing with steps ranging from very simple to very complex transformations
Data Integration including the ability to leverage real-time ETL as a data source for Pentaho Reporting
Data warehouse population with built-in support for slowly changing dimensions and surrogate key creation (asdescribed above)
Audience and AssumptionsThis section is written for IT managers, database administrators, and Business Intelligence solution architects
who have intermediate to advanced knowledge of ETL and Pentaho Data Integration Enterprise Edition
features and functions.
You must have installed Pentaho Data Integration to examine some of the step-related information included in
this document.
If you are novice user, Pentaho recommends that you start by following the exercises in Getting Started with
Pentaho Data Integration available in the Pentaho InfoCenter. You can return to this document when you have
mastered some of the basic skills required to work with Pentaho Data Integration.
https://help.pentaho.com/Documentation/5.4/0L0/0Y0/000Updated: Wed, 27 May 2015 15:24:43 GMT
4/152

What this Section CoversThis document provides you with information about the most commonly used steps. For more information
about steps, see Matt Caster's blog and the Pentaho Data Integration wiki.
Refer to Administer DI Server for information about administering PDI and configuring security.
https://help.pentaho.com/Documentation/5.4/0L0/0Y0/000Updated: Wed, 27 May 2015 15:24:43 GMT
5/152
Terminology and Basic Concepts
It is helpful to understand basic terminology and concepts before you use PDI. For an overview of PDI
components, see the Data Integration Components article.
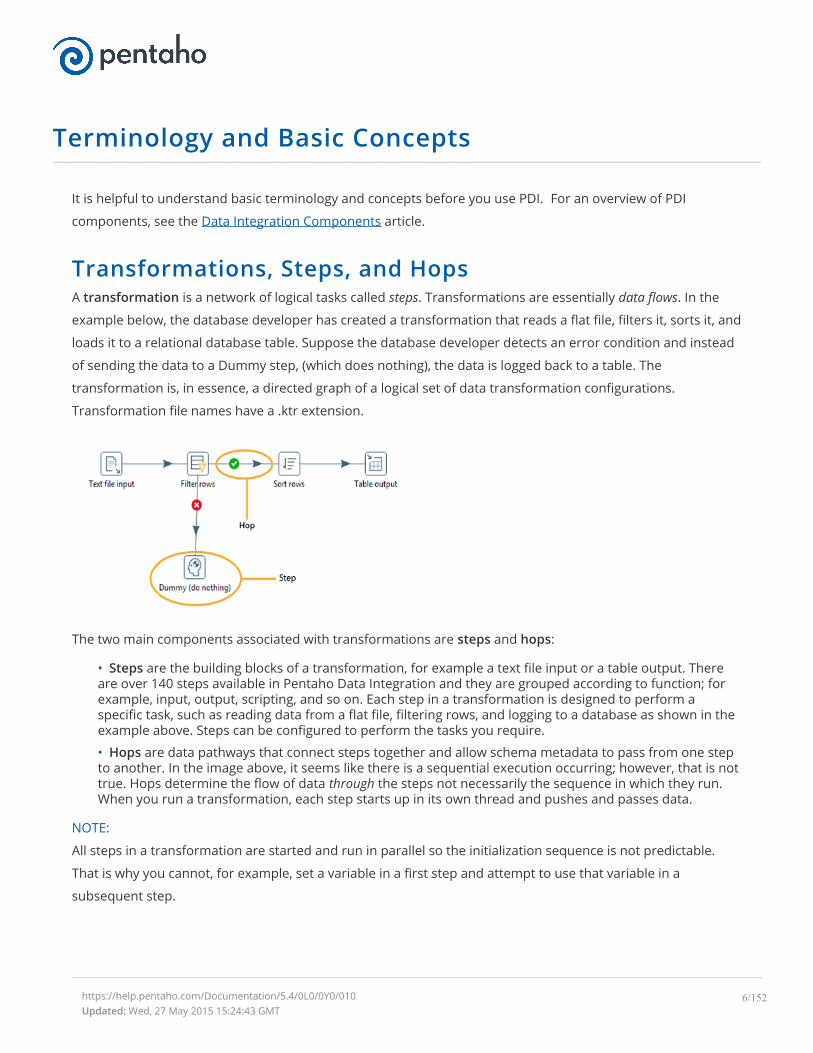
Transformations, Steps, and HopsA transformation is a network of logical tasks called steps. Transformations are essentially data flows. In the
example below, the database developer has created a transformation that reads a flat file, filters it, sorts it, and
loads it to a relational database table. Suppose the database developer detects an error condition and instead
of sending the data to a Dummy step, (which does nothing), the data is logged back to a table. The
transformation is, in essence, a directed graph of a logical set of data transformation configurations.
Transformation file names have a .ktr extension.
The two main components associated with transformations are steps and hops:
• Steps are the building blocks of a transformation, for example a text file input or a table output. Thereare over 140 steps available in Pentaho Data Integration and they are grouped according to function; forexample, input, output, scripting, and so on. Each step in a transformation is designed to perform aspecific task, such as reading data from a flat file, filtering rows, and logging to a database as shown in theexample above. Steps can be configured to perform the tasks you require.
• Hops are data pathways that connect steps together and allow schema metadata to pass from one stepto another. In the image above, it seems like there is a sequential execution occurring; however, that is nottrue. Hops determine the flow of data through the steps not necessarily the sequence in which they run.When you run a transformation, each step starts up in its own thread and pushes and passes data.
NOTE:
All steps in a transformation are started and run in parallel so the initialization sequence is not predictable.
That is why you cannot, for example, set a variable in a first step and attempt to use that variable in a
subsequent step.
https://help.pentaho.com/Documentation/5.4/0L0/0Y0/010Updated: Wed, 27 May 2015 15:24:43 GMT
6/152
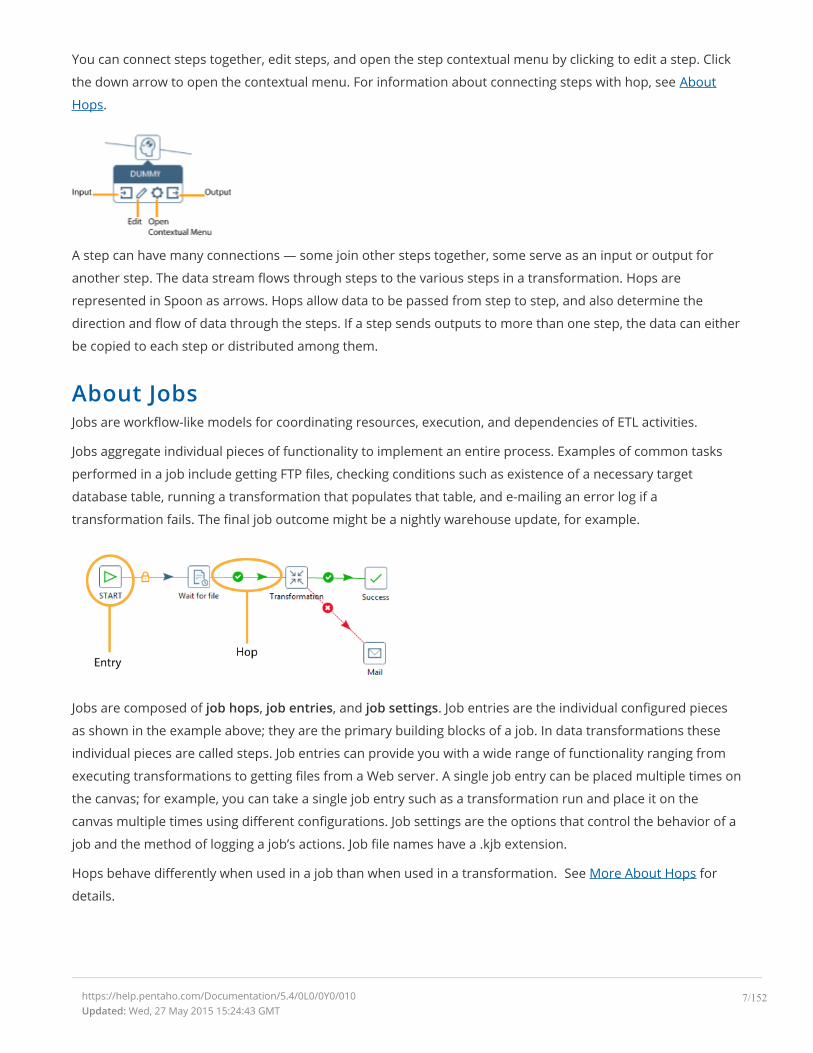
You can connect steps together, edit steps, and open the step contextual menu by clicking to edit a step. Click
the down arrow to open the contextual menu. For information about connecting steps with hop, see About
Hops.
A step can have many connections — some join other steps together, some serve as an input or output for
another step. The data stream flows through steps to the various steps in a transformation. Hops are
represented in Spoon as arrows. Hops allow data to be passed from step to step, and also determine the
direction and flow of data through the steps. If a step sends outputs to more than one step, the data can either
be copied to each step or distributed among them.
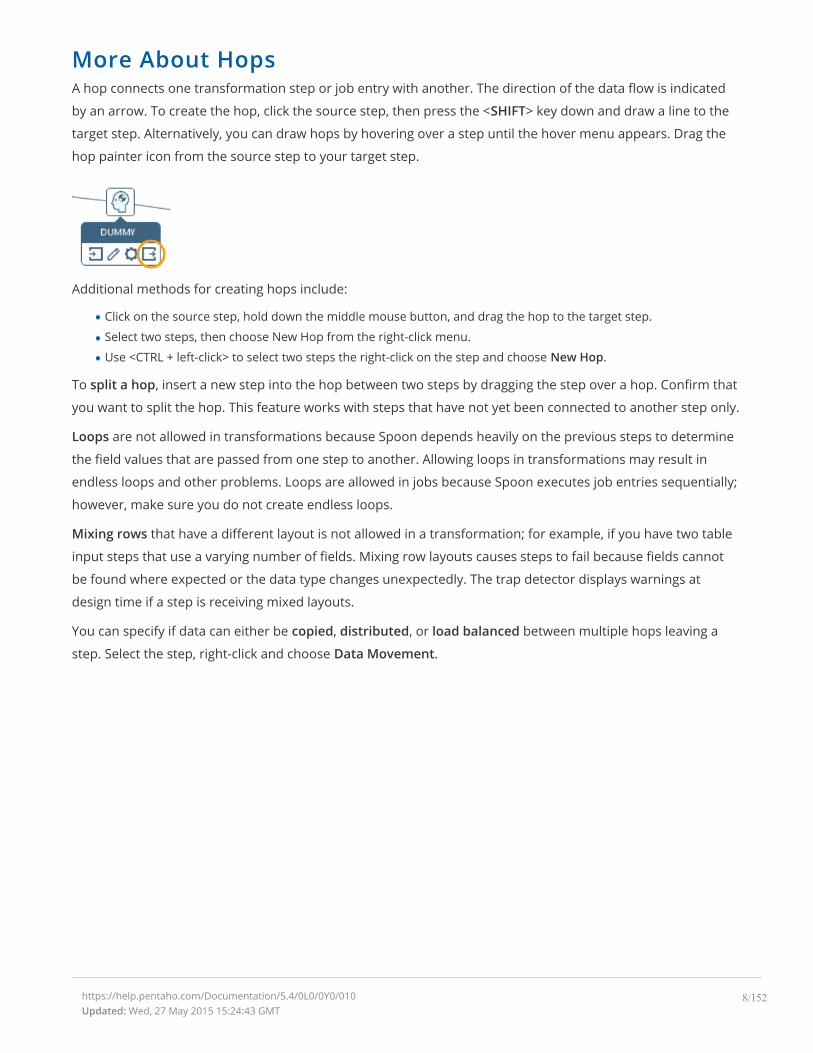
About JobsJobs are workflow-like models for coordinating resources, execution, and dependencies of ETL activities.
Jobs aggregate individual pieces of functionality to implement an entire process. Examples of common tasks
performed in a job include getting FTP files, checking conditions such as existence of a necessary target
database table, running a transformation that populates that table, and e-mailing an error log if a
transformation fails. The final job outcome might be a nightly warehouse update, for example.
Jobs are composed of job hops, job entries, and job settings. Job entries are the individual configured pieces
as shown in the example above; they are the primary building blocks of a job. In data transformations these
individual pieces are called steps. Job entries can provide you with a wide range of functionality ranging from
executing transformations to getting files from a Web server. A single job entry can be placed multiple times on
the canvas; for example, you can take a single job entry such as a transformation run and place it on the
canvas multiple times using different configurations. Job settings are the options that control the behavior of a
job and the method of logging a job’s actions. Job file names have a .kjb extension.
Hops behave differently when used in a job than when used in a transformation. See More About Hops for
details.
https://help.pentaho.com/Documentation/5.4/0L0/0Y0/010Updated: Wed, 27 May 2015 15:24:43 GMT
7/152
More About HopsA hop connects one transformation step or job entry with another. The direction of the data flow is indicated
by an arrow. To create the hop, click the source step, then press the <SHIFT> key down and draw a line to the
target step. Alternatively, you can draw hops by hovering over a step until the hover menu appears. Drag the
hop painter icon from the source step to your target step.
Additional methods for creating hops include:
Click on the source step, hold down the middle mouse button, and drag the hop to the target step.
Select two steps, then choose New Hop from the right-click menu.
Use <CTRL + left-click> to select two steps the right-click on the step and choose New Hop.
To split a hop, insert a new step into the hop between two steps by dragging the step over a hop. Confirm that
you want to split the hop. This feature works with steps that have not yet been connected to another step only.
Loops are not allowed in transformations because Spoon depends heavily on the previous steps to determine
the field values that are passed from one step to another. Allowing loops in transformations may result in
endless loops and other problems. Loops are allowed in jobs because Spoon executes job entries sequentially;
however, make sure you do not create endless loops.
Mixing rows that have a different layout is not allowed in a transformation; for example, if you have two table
input steps that use a varying number of fields. Mixing row layouts causes steps to fail because fields cannot
be found where expected or the data type changes unexpectedly. The trap detector displays warnings at
design time if a step is receiving mixed layouts.
You can specify if data can either be copied, distributed, or load balanced between multiple hops leaving a
step. Select the step, right-click and choose Data Movement.
https://help.pentaho.com/Documentation/5.4/0L0/0Y0/010Updated: Wed, 27 May 2015 15:24:43 GMT
8/152

A hop can be enabled or disabled (for testing purposes for example). Right-click on the hop to display the
options menu.
Job HopsBesides the execution order, a hop also specifies the condition on which the next job entry will be executed.
You can specify the Evaluation mode by right clicking on the job hop. A job hop is just a flow of control. Hops
link to job entries and, based on the results of the previous job entry, determine what happens next.
Option Description
Unconditional Specifies that the next job entry will be executed regardless of the result of the originating job
entry
Follow when
result is true
Specifies that the next job entry will be executed only when the result of the originating job entry
is true; this means a successful execution such as, file found, table found, without error, and so on
Follow when
result is
false
Specifies that the next job entry will only be executed when the result of the originating job entry
was false, meaning unsuccessful execution, file not found, table not found, error(s) occurred, and
so on
What's with all the Culinary Terms?If you are new to Pentaho, you may sometimes see or hear Pentaho Data Integration referred to as, "Kettle."
To avoid confusion, all you must know is that Pentaho Data Integration began as an open source project called.
"Kettle." The term, K.E.T.T.L.E is a recursive that stands for Kettle Extraction Transformation Transport Load
https://help.pentaho.com/Documentation/5.4/0L0/0Y0/010Updated: Wed, 27 May 2015 15:24:43 GMT
9/152

Environment. When Pentaho acquired Kettle, the name was changed to Pentaho Data Integration. Other PDI
components such as Spoon, Pan, and Kitchen, have names that were originally meant to support a "restaurant"
metaphor of ETL offerings.
https://help.pentaho.com/Documentation/5.4/0L0/0Y0/010Updated: Wed, 27 May 2015 15:24:43 GMT
10/152
Interface Perspectives
Pentaho Data Integration (PDI) provides you with tools that include ETL, modeling, and visualization in one
unified environment — the Spoon interface. This integrated environment allows you to work in close
cooperation with business users to build business intelligence solutions more quickly and efficiently.
When you are working in Spoon you can change perspectives, or switch from designing ETL jobs and
transformations to modeling your data, and visualizing it. As users provide you with feedback about how the
data is presented to them, you can quickly make iterative changes to your data directly in Spoon by changing
perspectives. The ability to quickly respond to feedback and to collaborate with business users is part of the
Pentaho Agile BI initiative.
From within Spoon you can change perspectives using the Perspective toolbar located in the upper-right
corner.
The perspectives in PDI enable you to focus how you work with different aspects of data.
The Welcome Page—Contains useful links to documentation, community links for getting involved in the PentahoData Integration project, and links to blogs from some of the top contributors to the Pentaho Data Integrationproject. .
Data Integration Perspective—Connect to data sources and extract, transform, and load your data
Model Perspective—Create a metadata model to identify the relationships within your data structure
Visualize Perspective—Create charts, maps, and diagrams based on your data
Instaview Perspective—Create a data connection, a metadata model, and analysis reports all at once
with a dialog-guided, template-based reporting tool
Schedule Perspective—Plan when to run data integration jobs and set timed intervals to automatically
send the output to your preferred destinations
https://help.pentaho.com/Documentation/5.4/0L0/0Y0/020Updated: Wed, 27 May 2015 15:24:43 GMT
11/152
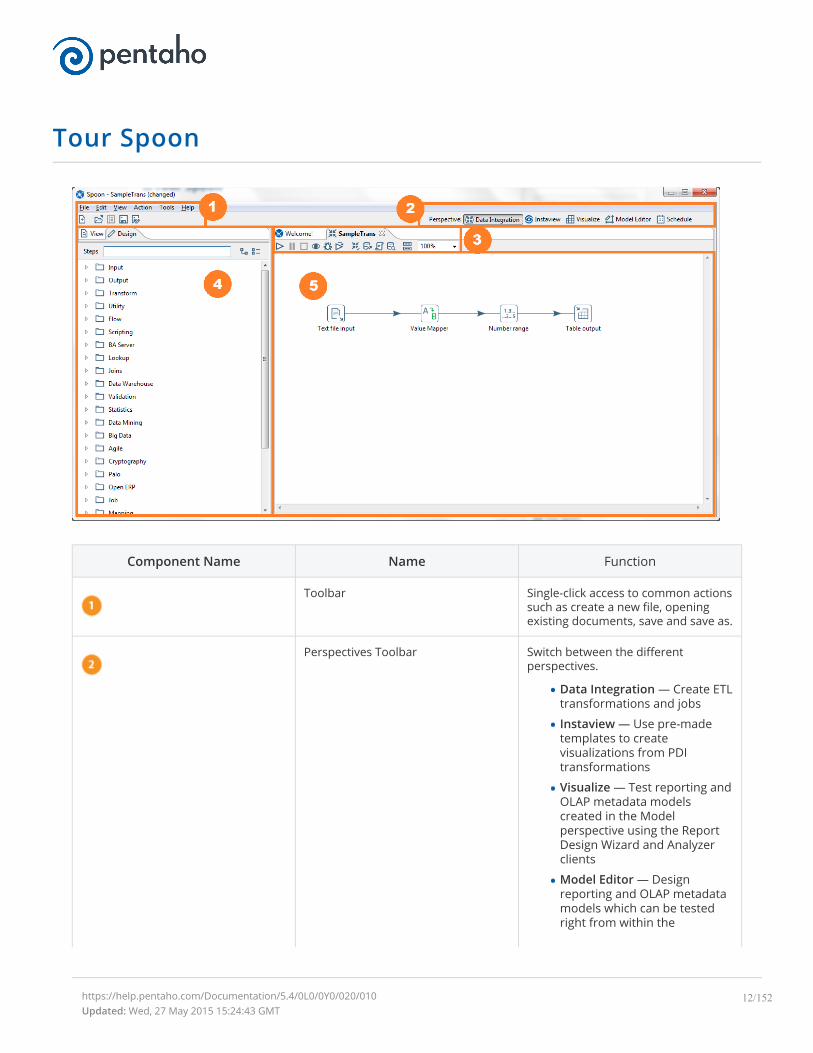
Tour Spoon
Component Name Name Function
Toolbar Single-click access to common actionssuch as create a new file, openingexisting documents, save and save as.
Perspectives Toolbar Switch between the differentperspectives.
Data Integration — Create ETLtransformations and jobs
Instaview — Use pre-madetemplates to createvisualizations from PDItransformations
Visualize — Test reporting andOLAP metadata modelscreated in the Modelperspective using the ReportDesign Wizard and Analyzerclients
Model Editor — Designreporting and OLAP metadatamodels which can be testedright from within the
https://help.pentaho.com/Documentation/5.4/0L0/0Y0/020/010Updated: Wed, 27 May 2015 15:24:43 GMT
12/152
Component Name Name Function
Visualization perspective orpublished to the Pentaho BAServer
Schedule — Managescheduled ETL activities on theData Integration Server
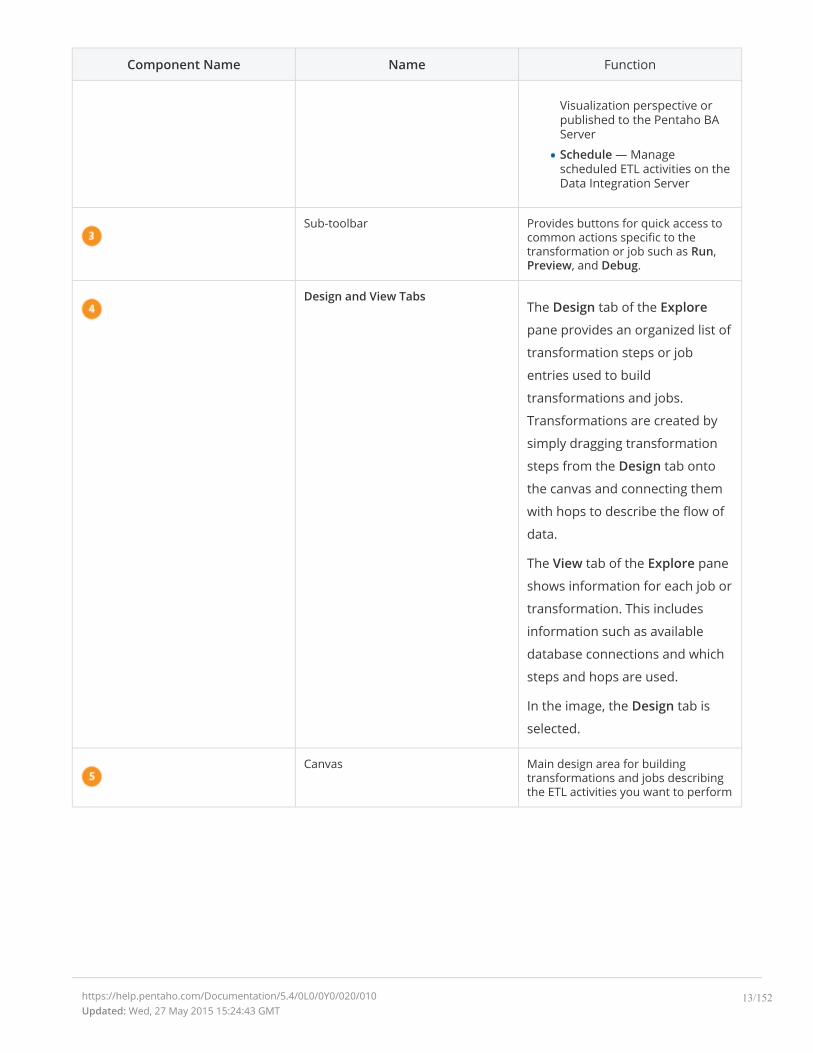
Sub-toolbar Provides buttons for quick access tocommon actions specific to thetransformation or job such as Run,Preview, and Debug.
Design and View TabsThe Design tab of the Explore
pane provides an organized list of
transformation steps or job
entries used to build
transformations and jobs.
Transformations are created by
simply dragging transformation
steps from the Design tab onto
the canvas and connecting them
with hops to describe the flow of
data.
The View tab of the Explore pane
shows information for each job or
transformation. This includes
information such as available
database connections and which
steps and hops are used.
In the image, the Design tab is
selected.
Canvas Main design area for buildingtransformations and jobs describingthe ETL activities you want to perform
https://help.pentaho.com/Documentation/5.4/0L0/0Y0/020/010Updated: Wed, 27 May 2015 15:24:43 GMT
13/152
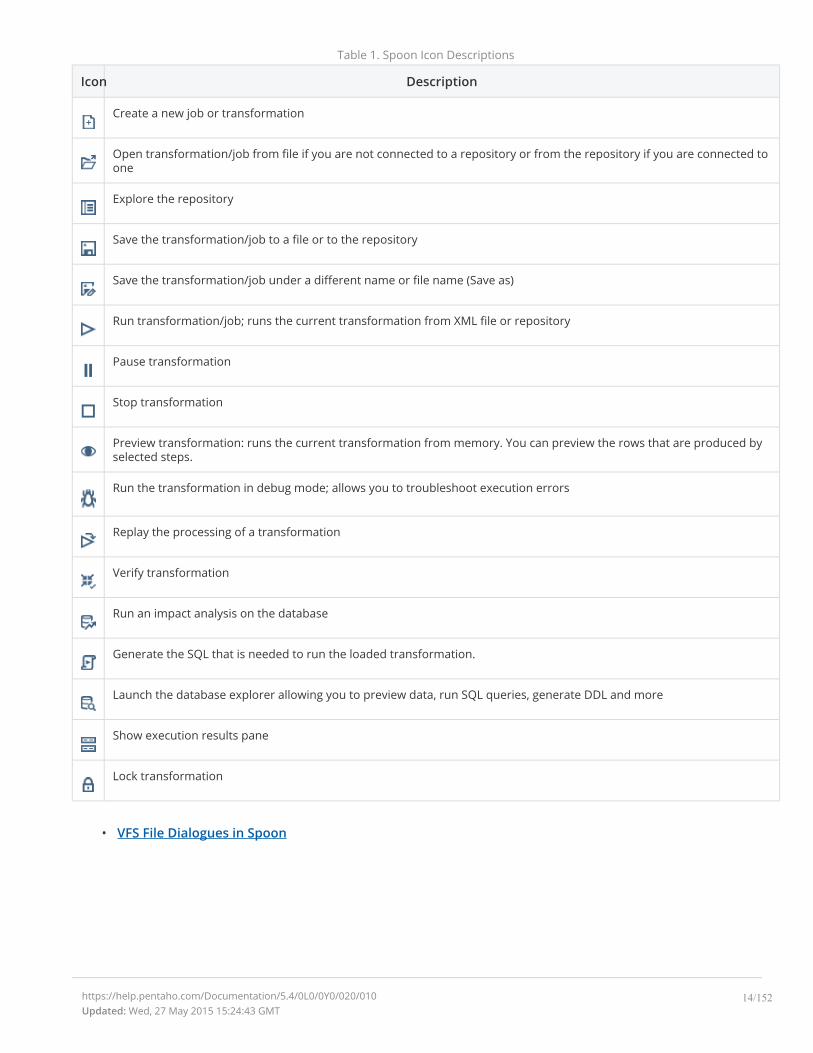
Table 1. Spoon Icon Descriptions
Icon Description
Create a new job or transformation
Open transformation/job from file if you are not connected to a repository or from the repository if you are connected toone
Explore the repository
Save the transformation/job to a file or to the repository
Save the transformation/job under a different name or file name (Save as)
Run transformation/job; runs the current transformation from XML file or repository
Pause transformation
Stop transformation
Preview transformation: runs the current transformation from memory. You can preview the rows that are produced byselected steps.
Run the transformation in debug mode; allows you to troubleshoot execution errors
Replay the processing of a transformation
Verify transformation
Run an impact analysis on the database
Generate the SQL that is needed to run the loaded transformation.
Launch the database explorer allowing you to preview data, run SQL queries, generate DDL and more
Show execution results pane
Lock transformation
• VFS File Dialogues in Spoon
https://help.pentaho.com/Documentation/5.4/0L0/0Y0/020/010Updated: Wed, 27 May 2015 15:24:43 GMT
14/152
VFS File Dialogues in Spoon
Some job and transformation steps have virtual filesystem (VFS) dialogues in place of the traditional local
filesystem windows. VFS file dialogues enable you to specify a VFS URL in lieu of a typical local path. The
following PDI and PDI plugin steps have such dialogues:
File Exists
Mapping (sub-transformation)
ETL Meta Injection
Hadoop Copy Files
Hadoop File Input
Hadoop File Output
Note: VFS dialogues are configured through certain transformation parameters. Refer to Configure SFTP VFSfor more information on configuring options for SFTP.
https://help.pentaho.com/Documentation/5.4/0L0/0Y0/020/010/000Updated: Wed, 27 May 2015 15:24:43 GMT
15/152
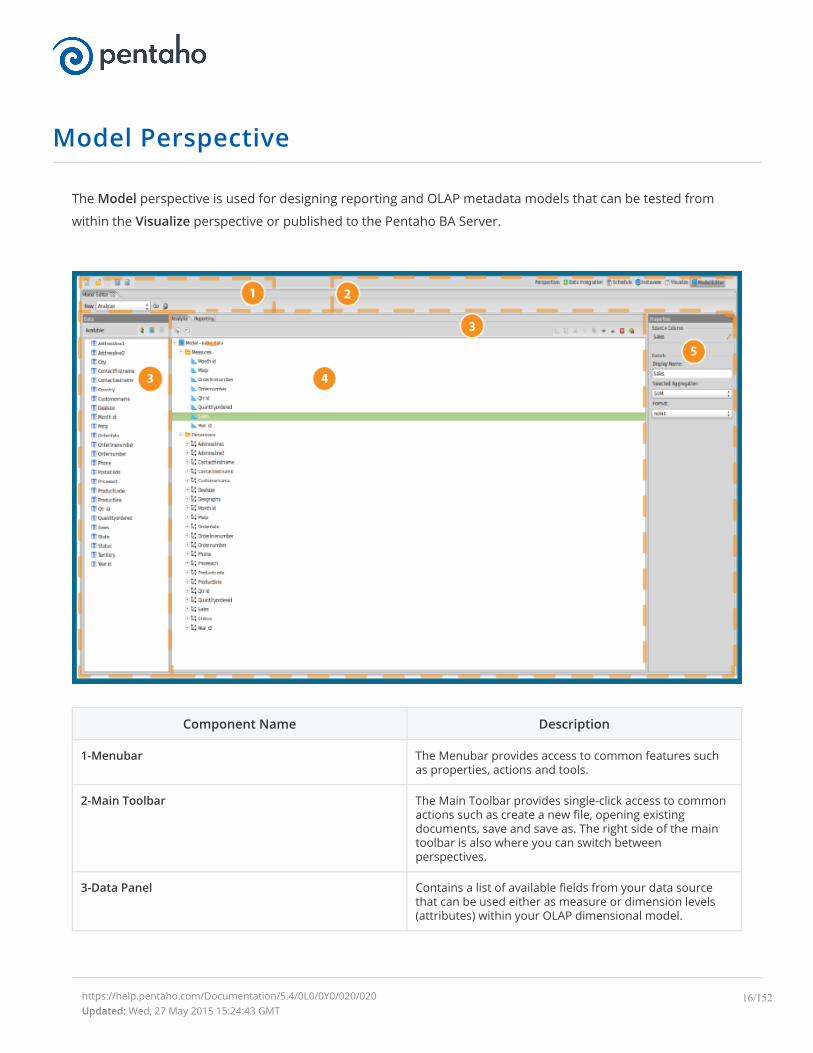
Model Perspective
The Model perspective is used for designing reporting and OLAP metadata models that can be tested from
within the Visualize perspective or published to the Pentaho BA Server.
Component Name Description
1-Menubar The Menubar provides access to common features suchas properties, actions and tools.
2-Main Toolbar The Main Toolbar provides single-click access to commonactions such as create a new file, opening existingdocuments, save and save as. The right side of the maintoolbar is also where you can switch betweenperspectives.
3-Data Panel Contains a list of available fields from your data sourcethat can be used either as measure or dimension levels(attributes) within your OLAP dimensional model.
https://help.pentaho.com/Documentation/5.4/0L0/0Y0/020/020Updated: Wed, 27 May 2015 15:24:43 GMT
16/152

Component Name Description
4- Model Panel Used to create measures and dimensions of your AnalysisCubes from the fields in the data panel. Create a newmeasure or dimension by dragging a field from the datapanel over onto the Measures or Dimension folder in theModel tree.
5-Properties Panel Used to modify the properties associated with theselection in the Model Panel tree.
https://help.pentaho.com/Documentation/5.4/0L0/0Y0/020/020Updated: Wed, 27 May 2015 15:24:43 GMT
17/152

Visualization Perspective
The Visualize perspective allows you to test reporting and OLAP metadata models created in the Model
perspective using the Report Design Wizard and Analyzer clients respectively.
Component Name Description
1-Menubar The Menubar provides access to common features suchas properties, actions, and tools.
2-Main Toolbar The Main Toolbar provides single-click access to commonactions such as create a new file, opening existingdocuments, save and save as. The right side of the maintoolbar is also where you can switch betweenperspectives.
3-Field List Contains the list of measures and attributes as defined inyour model. These fields can be dragged into the ReportArea to build your query.
https://help.pentaho.com/Documentation/5.4/0L0/0Y0/020/030Updated: Wed, 27 May 2015 15:24:43 GMT
18/152

Component Name Description
4-Layout Allows you to drag Measures and Levels into the Row,Column, and Measures area so you can control how itappears in the workspace.
5-Canvas Drag fields from the field list into the Report Area to buildyour query. Right click on a measure or level to furthercustomize your report with sub-totals, formatting, andmore.
https://help.pentaho.com/Documentation/5.4/0L0/0Y0/020/030Updated: Wed, 27 May 2015 15:24:43 GMT
19/152
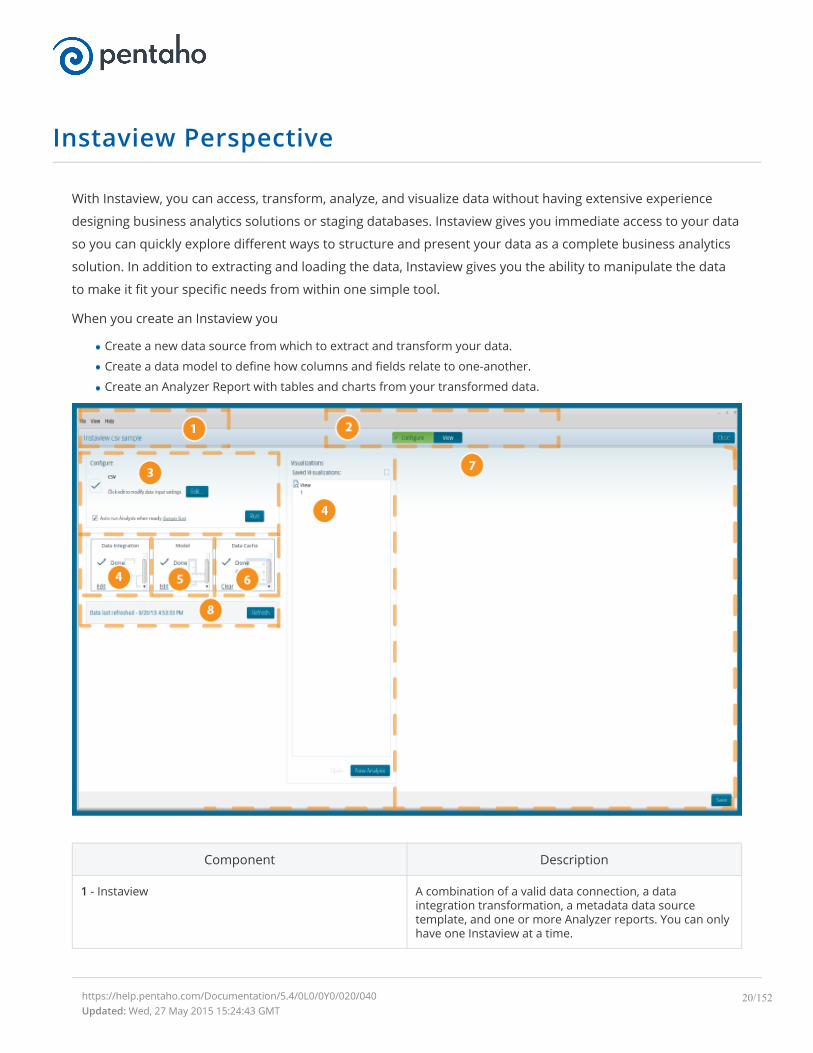
Instaview Perspective
With Instaview, you can access, transform, analyze, and visualize data without having extensive experience
designing business analytics solutions or staging databases. Instaview gives you immediate access to your data
so you can quickly explore different ways to structure and present your data as a complete business analytics
solution. In addition to extracting and loading the data, Instaview gives you the ability to manipulate the data
to make it fit your specific needs from within one simple tool.
When you create an Instaview you
Create a new data source from which to extract and transform your data.
Create a data model to define how columns and fields relate to one-another.
Create an Analyzer Report with tables and charts from your transformed data.
Component Description
1 - Instaview A combination of a valid data connection, a dataintegration transformation, a metadata data sourcetemplate, and one or more Analyzer reports. You can onlyhave one Instaview at a time.
https://help.pentaho.com/Documentation/5.4/0L0/0Y0/020/040Updated: Wed, 27 May 2015 15:24:43 GMT
20/152
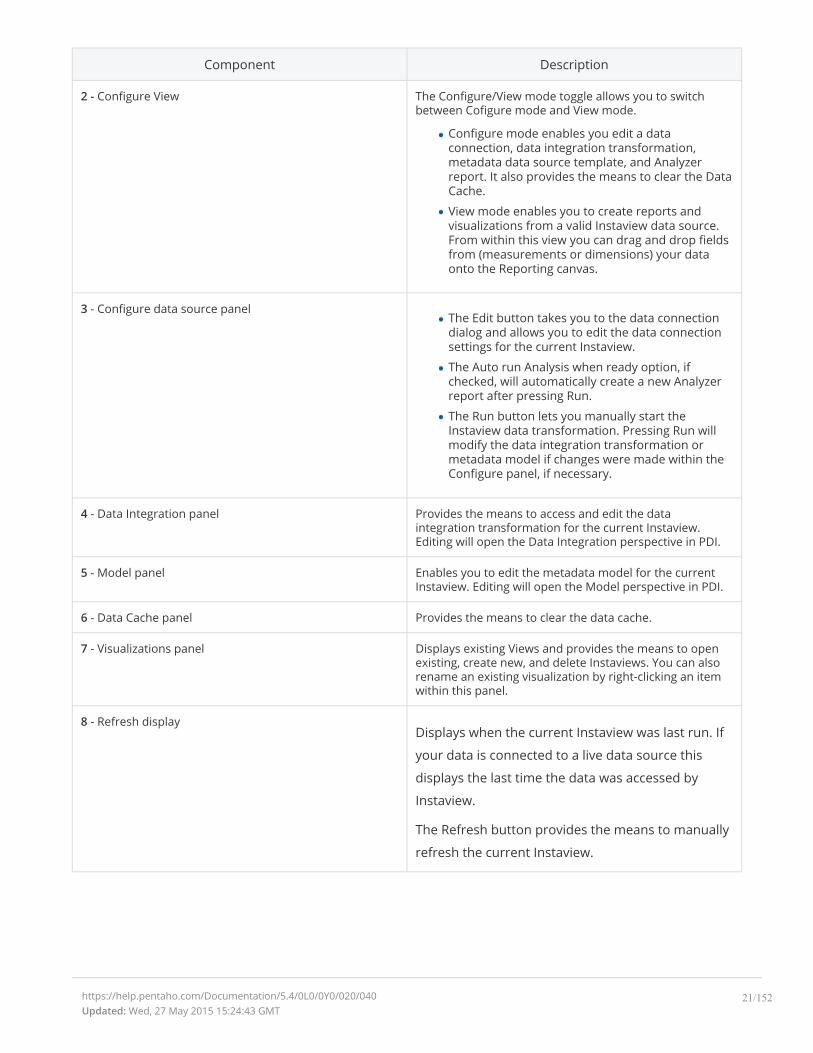
Component Description
2 - Configure View The Configure/View mode toggle allows you to switchbetween Cofigure mode and View mode.
Configure mode enables you edit a dataconnection, data integration transformation,metadata data source template, and Analyzerreport. It also provides the means to clear the DataCache.
View mode enables you to create reports andvisualizations from a valid Instaview data source.From within this view you can drag and drop fieldsfrom (measurements or dimensions) your dataonto the Reporting canvas.
3 - Configure data source panelThe Edit button takes you to the data connectiondialog and allows you to edit the data connectionsettings for the current Instaview.
The Auto run Analysis when ready option, ifchecked, will automatically create a new Analyzerreport after pressing Run.
The Run button lets you manually start theInstaview data transformation. Pressing Run willmodify the data integration transformation ormetadata model if changes were made within theConfigure panel, if necessary.
4 - Data Integration panel Provides the means to access and edit the dataintegration transformation for the current Instaview.Editing will open the Data Integration perspective in PDI.
5 - Model panel Enables you to edit the metadata model for the currentInstaview. Editing will open the Model perspective in PDI.
6 - Data Cache panel Provides the means to clear the data cache.
7 - Visualizations panel Displays existing Views and provides the means to openexisting, create new, and delete Instaviews. You can alsorename an existing visualization by right-clicking an itemwithin this panel.
8 - Refresh displayDisplays when the current Instaview was last run. If
your data is connected to a live data source this
displays the last time the data was accessed by
Instaview.
The Refresh button provides the means to manually
refresh the current Instaview.
https://help.pentaho.com/Documentation/5.4/0L0/0Y0/020/040Updated: Wed, 27 May 2015 15:24:43 GMT
21/152

Item Name Function
Opened view Displays quick access buttons across the top to create and save new Analysisreports, Interactive reports, and Dashboards. Opened reports and files showas a series of tabs across the page.
Available Fields and Layoutpanels
Use the Available Fields and Layout panels to drag levels and measures intoa report.
Your report displays changes in the Report Canvas as you drag items
onto the Layout panel.
Delete a level or measure from your report by dragging it from the
Layout panel to the trashcan that appears in the lower right corner of
the Report Canvas.
Report Canvas Shows a dynamic view of your report as you work to build it. The look of yourreport changes constantly as you work with Available Fields and Layoutpanels to refine it.
The Report Canvas shows different fields based on the chart type
selected.
Analyzer Toolbar and Filters Use the Analyzer Toolbar functions to undo or redo actions, hide lists offields, add or hide filters, disable the auto-refresh function, adjust settings,and change the view of your report.
https://help.pentaho.com/Documentation/5.4/0L0/0Y0/020/040Updated: Wed, 27 May 2015 15:24:43 GMT
22/152
Item Name Function
Use the Filters panel to display a list of filters applied to the active
report, or edit or delete filters.
https://help.pentaho.com/Documentation/5.4/0L0/0Y0/020/040Updated: Wed, 27 May 2015 15:24:43 GMT
23/152
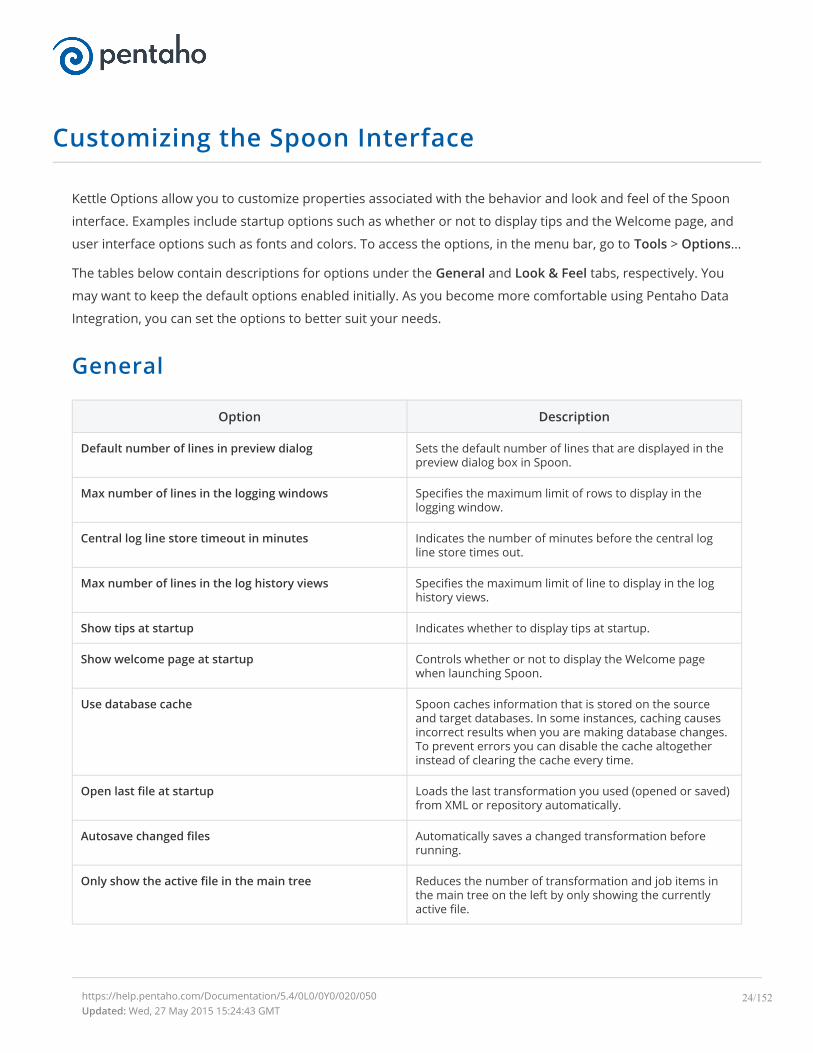
Customizing the Spoon Interface
Kettle Options allow you to customize properties associated with the behavior and look and feel of the Spoon
interface. Examples include startup options such as whether or not to display tips and the Welcome page, and
user interface options such as fonts and colors. To access the options, in the menu bar, go to Tools > Options...
The tables below contain descriptions for options under the General and Look & Feel tabs, respectively. You
may want to keep the default options enabled initially. As you become more comfortable using Pentaho Data
Integration, you can set the options to better suit your needs.
General
Option Description
Default number of lines in preview dialog Sets the default number of lines that are displayed in thepreview dialog box in Spoon.
Max number of lines in the logging windows Specifies the maximum limit of rows to display in thelogging window.
Central log line store timeout in minutes Indicates the number of minutes before the central logline store times out.
Max number of lines in the log history views Specifies the maximum limit of line to display in the loghistory views.
Show tips at startup Indicates whether to display tips at startup.
Show welcome page at startup Controls whether or not to display the Welcome pagewhen launching Spoon.
Use database cache Spoon caches information that is stored on the sourceand target databases. In some instances, caching causesincorrect results when you are making database changes.To prevent errors you can disable the cache altogetherinstead of clearing the cache every time.
Open last file at startup Loads the last transformation you used (opened or saved)from XML or repository automatically.
Autosave changed files Automatically saves a changed transformation beforerunning.
Only show the active file in the main tree Reduces the number of transformation and job items inthe main tree on the left by only showing the currentlyactive file.
https://help.pentaho.com/Documentation/5.4/0L0/0Y0/020/050Updated: Wed, 27 May 2015 15:24:43 GMT
24/152
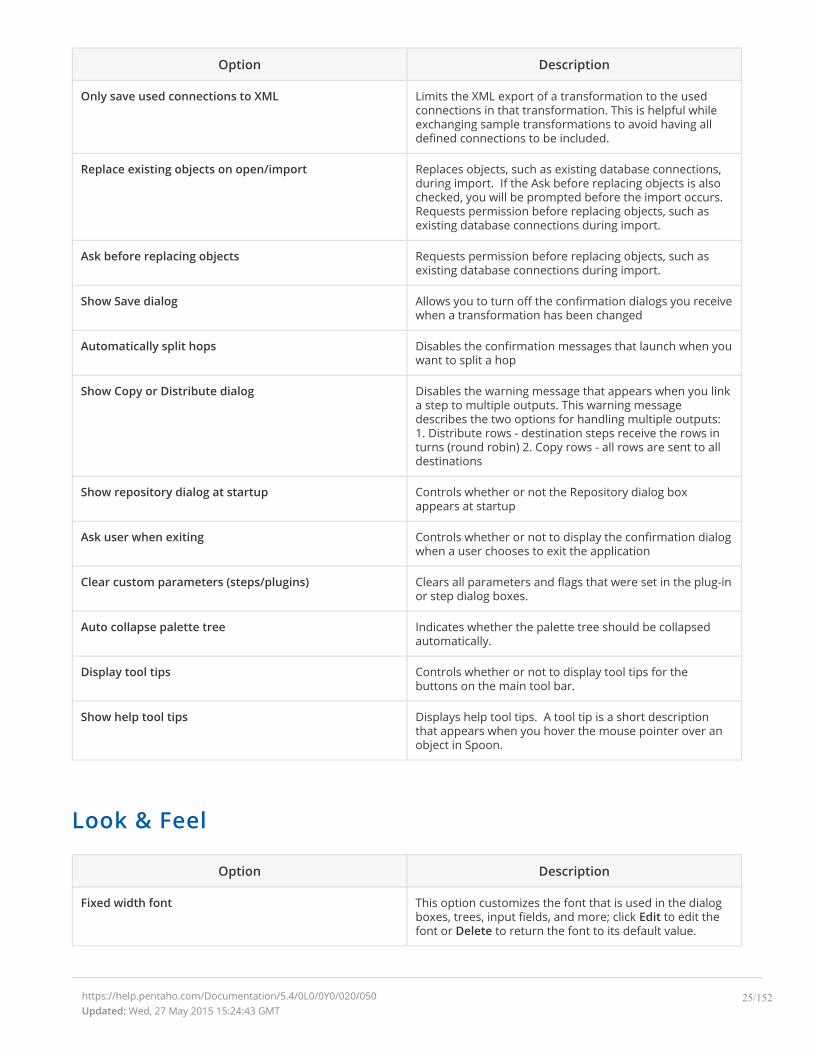
Option Description
Only save used connections to XML Limits the XML export of a transformation to the usedconnections in that transformation. This is helpful whileexchanging sample transformations to avoid having alldefined connections to be included.
Replace existing objects on open/import Replaces objects, such as existing database connections,during import. If the Ask before replacing objects is alsochecked, you will be prompted before the import occurs.Requests permission before replacing objects, such asexisting database connections during import.
Ask before replacing objects Requests permission before replacing objects, such asexisting database connections during import.
Show Save dialog Allows you to turn off the confirmation dialogs you receivewhen a transformation has been changed
Automatically split hops Disables the confirmation messages that launch when youwant to split a hop
Show Copy or Distribute dialog Disables the warning message that appears when you linka step to multiple outputs. This warning messagedescribes the two options for handling multiple outputs:1. Distribute rows - destination steps receive the rows inturns (round robin) 2. Copy rows - all rows are sent to alldestinations
Show repository dialog at startup Controls whether or not the Repository dialog boxappears at startup
Ask user when exiting Controls whether or not to display the confirmation dialogwhen a user chooses to exit the application
Clear custom parameters (steps/plugins) Clears all parameters and flags that were set in the plug-inor step dialog boxes.
Auto collapse palette tree Indicates whether the palette tree should be collapsedautomatically.
Display tool tips Controls whether or not to display tool tips for thebuttons on the main tool bar.
Show help tool tips Displays help tool tips. A tool tip is a short descriptionthat appears when you hover the mouse pointer over anobject in Spoon.
Look & Feel
Option Description
Fixed width font This option customizes the font that is used in the dialogboxes, trees, input fields, and more; click Edit to edit thefont or Delete to return the font to its default value.
https://help.pentaho.com/Documentation/5.4/0L0/0Y0/020/050Updated: Wed, 27 May 2015 15:24:43 GMT
25/152

Option Description
Font on workspace This option customizes font that is used in the Spooninterface; click Edit to edit the font or Delete to return thefont to its default value.
Font for notes This option customizes the font used in notes that aredisplayed in Spoon; click Edit to edit the font or Delete toreturn the font to its default value.
Background color This option sets the background color in Spoon andaffects all dialog boxes; click Edit to edit the color orDelete to return the background color to its default value.
Workspace background color This option sets the background color in the graphicalview of Spoon; click Edit to edit the background color orDelete to return the background color to its default value.
Tab color This option customizes the color that is being used toindicate tabs that are active/selected; click Edit to edit thetab color or Delete to return the color to its default value.
Icon size in workspace Affects the size of the icons in the graph window. Theoriginal size of an icon is 32x32 pixels. The best results(graphically) are probably at sizes 16,24,32,48,64 andother multiples of 32.
Line width on workspace Affects the line width of the hops in the Spoon graphicalview and the border around the step.
Shadow size on workspace If this size is larger then 0, a shadow of the steps, hops,and notes is drawn on the canvas, making it look like thetransformation floats above the canvas.
Dialog middle percentage By default, a parameter is drawn at 35% of the width ofthe dialog box, counted from the left. You can changeusing this option in instances where you use unusuallylarge fonts.
Grid size Indicates the size of the grid on the Spoon canvas.
Canvas anti-aliasing Some platforms like Windows, OSX and Linux supportanti-aliasing through GDI, Carbon or Cairo. Enable thisoption for smoother lines and icons in your graph view. Ifyou enable the option and your environment does notwork, change the value for option "EnableAntiAliasing" to"N" in file $HOME/.kettle/.spoonrc (C:\Documents andSettings\<user>\.kettle\.spoonrc on Windows).
Show bottleneck transformation steps If a step in the transformation is processing slowly and isbecomes a bottleneck, displays a graphic that surroundsthat step to make the bottleneck visible. This is helpfulbecause you can focus your optimization efforts on"bottleneck" steps.
Use look of OS Enabling this option on Windows allows you to use thedefault system settings for fonts and colors in Spoon. Onother platforms, the default is always enabled.
https://help.pentaho.com/Documentation/5.4/0L0/0Y0/020/050Updated: Wed, 27 May 2015 15:24:43 GMT
26/152
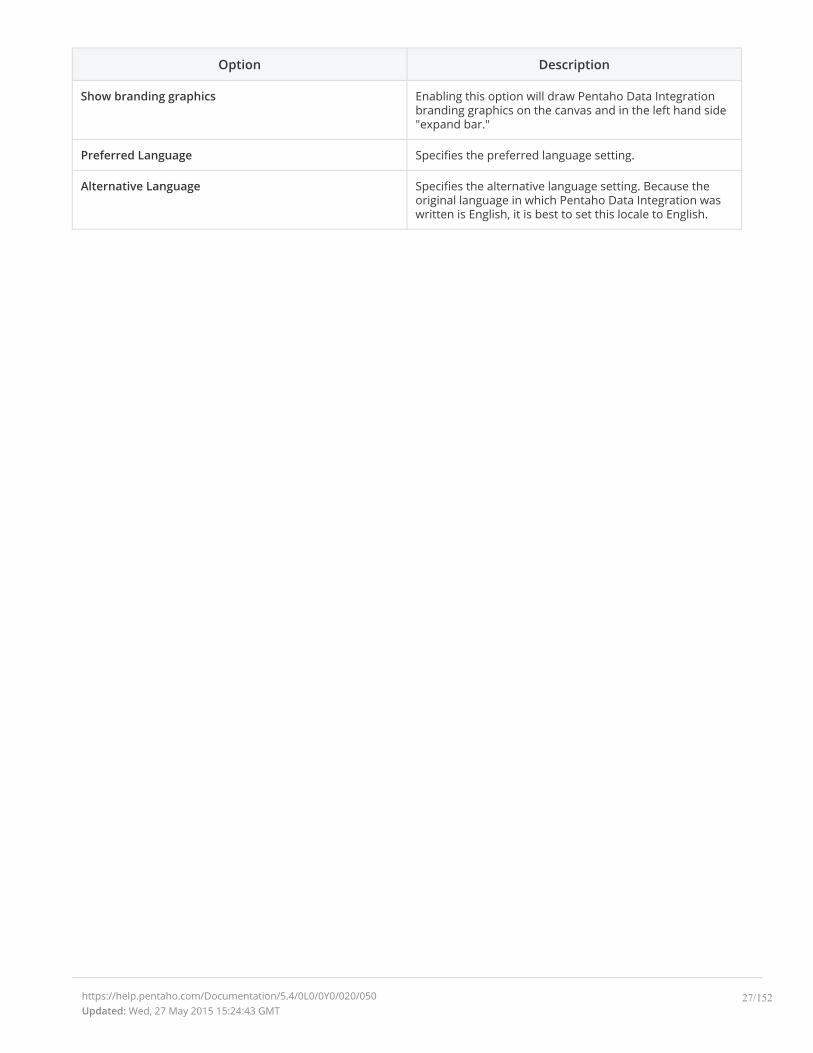
Option Description
Show branding graphics Enabling this option will draw Pentaho Data Integrationbranding graphics on the canvas and in the left hand side"expand bar."
Preferred Language Specifies the preferred language setting.
Alternative Language Specifies the alternative language setting. Because theoriginal language in which Pentaho Data Integration waswritten is English, it is best to set this locale to English.
https://help.pentaho.com/Documentation/5.4/0L0/0Y0/020/050Updated: Wed, 27 May 2015 15:24:43 GMT
27/152

Working with Transformations
This section explains how to create, save, and run a transformation. See Getting Started with PDI for a
comprehensive, "real world" exercise for creating, running, and scheduling transformations and jobs.
Create a TransformationFollow these instructions to create your transformation.
1. Click File > New > Transformation or hold down the CTRL+N keys.
2. Click the Design tab. Expand the folders or use the Steps field to view the steps.
3. Either drag the step to the Spoon canvas or double-click it.
4. Double-click the step to open its properties window. For help on filling out the window, clickthe Help button that is available in each step.
5. To add another step either drag the step to the Spoon canvas or double-click it.
• If you dragged the step to the canvas, add a hop by pressing the SHIFT key and drawing a hopfrom one step to the other.
• If you double-click it, a hop also appears that connects it to the previous step.
1. When finished, save the transformation. See Save Your Transformation for more details.
Adjust Transformation PropertiesYou can adjust the parameters, logging options, dates, dependencies, monitoring, settings, and data services
for transformations. To view the transformation properties, click the CTRL+T or right-click on the canvas and
select Transformation settings from the menu that appears.
Save a Transformation LocallyFollow these instructions to save a transformation locally on your file system.
1. In Spoon, select File > Save.
2. Enter the transformation name in the Save As window and select the location.
3. Click OK. The transformation is saved.
Save a Transformation RemotelyFollow these instructions to save a transformation remotely on the DI Server.
1. Connect to a database repository.
2. In Spoon, click File > Save As. The Transformation Properties window appears.
3. In the Transformation Name field, enter the transformation name.
https://help.pentaho.com/Documentation/5.4/0L0/0Y0/030Updated: Wed, 27 May 2015 15:24:43 GMT
28/152

4. In the Directory field, click the Folder Icon to select a repository folder where you will save yourtransformation.
5. Click OK to exit the Transformation Properties dialog box. The Enter Comment dialog box appears.
6. Enter a comment, then click OK. The transformation is saved.
Run a TransformationWhen you are done modifying a transformation, you can run it by clicking the Run button from the main menu
toolbar, or by pressing F9. There are three options that allow you to decide where you want your
transformation to be executed:
Local Execution — The transformation executes on the machine you are currently using.
Execute remotely — Allows you to specify a remote server where you want the execution to take place. Thisfeature requires that you have the Data Integration Server running or Data Integration installed on a remotemachine and running the Carte service. To use remote execution you first must set up a slave server (see SettingUp a Slave Server) .
Execute clustered — Allows you to execute a transformation in a clustered environment.
https://help.pentaho.com/Documentation/5.4/0L0/0Y0/030Updated: Wed, 27 May 2015 15:24:43 GMT
29/152

Implement Data Services with the Thin Kettle JDBCDriver
The Thin Kettle JDBC Driver provides a means for a Java-based client to query the results of a transformation.
Any Java-based, JDBC-compliant tool, including third-party reporting systems, can use this driver to query a
Kettle transformation by using a SQL string via JDBC. With the Thin Kettle JDBC Driver, you can blend, enrich,
clean, and transform data from multiple sources to create a single data federation source. You can also
seamlessly integrate with Enterprise Service Buses (ESB).
Details on how to use the Thin Kettle JDBC Driver appear on the wiki.
Configuration of the Kettle JDBC Driver
Example of How to Use the Kettle JDBC Driver
JDBC Driver and SQL Reference
https://help.pentaho.com/Documentation/5.4/0L0/0Y0/030/Implement_Data_Services_with_the_Thin_Kettle_JDBC_DriverUpdated: Wed, 27 May 2015 15:24:43 GMT
30/152
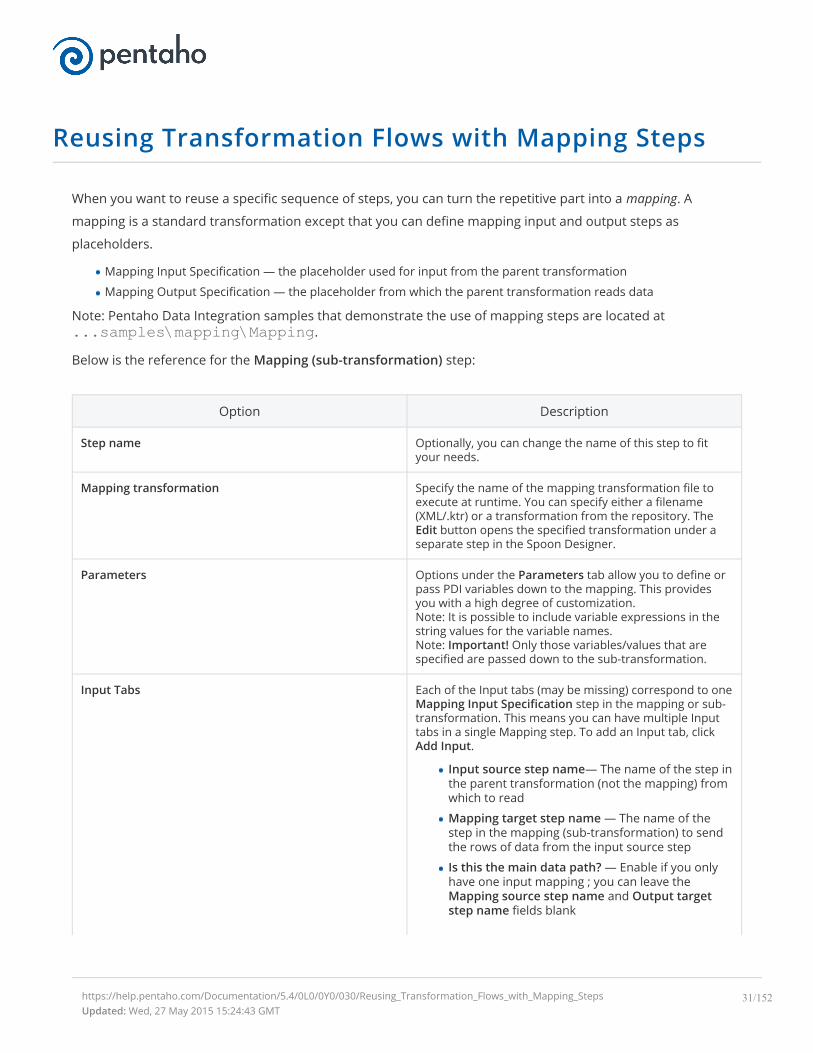
Reusing Transformation Flows with Mapping Steps
When you want to reuse a specific sequence of steps, you can turn the repetitive part into a mapping. A
mapping is a standard transformation except that you can define mapping input and output steps as
placeholders.
Mapping Input Specification — the placeholder used for input from the parent transformation
Mapping Output Specification — the placeholder from which the parent transformation reads data
Note: Pentaho Data Integration samples that demonstrate the use of mapping steps are located at...samples\mapping\Mapping.
Below is the reference for the Mapping (sub-transformation) step:
Option Description
Step name Optionally, you can change the name of this step to fityour needs.
Mapping transformation Specify the name of the mapping transformation file toexecute at runtime. You can specify either a filename(XML/.ktr) or a transformation from the repository. TheEdit button opens the specified transformation under aseparate step in the Spoon Designer.
Parameters Options under the Parameters tab allow you to define orpass PDI variables down to the mapping. This providesyou with a high degree of customization.Note: It is possible to include variable expressions in thestring values for the variable names.Note: Important! Only those variables/values that arespecified are passed down to the sub-transformation.
Input Tabs Each of the Input tabs (may be missing) correspond to oneMapping Input Specification step in the mapping or sub-transformation. This means you can have multiple Inputtabs in a single Mapping step. To add an Input tab, clickAdd Input.
Input source step name— The name of the step inthe parent transformation (not the mapping) fromwhich to read
Mapping target step name — The name of thestep in the mapping (sub-transformation) to sendthe rows of data from the input source step
Is this the main data path? — Enable if you onlyhave one input mapping ; you can leave theMapping source step name and Output targetstep name fields blank
https://help.pentaho.com/Documentation/5.4/0L0/0Y0/030/Reusing_Transformation_Flows_with_Mapping_StepsUpdated: Wed, 27 May 2015 15:24:43 GMT
31/152

Option Description
Ask these values to be renamed back on output?— Fields get renamed before they are transferredto the mapping transformationNote: Enabling this option renames the valuesback to their original names once they move to theMapping output step. This option makes your sub-transformations more transparent and reusable.
Step mapping description — Add a description ofthe mapping step
Source - mapping transformation mapping Enterthe required field name changes
Output Tabs Each of the Output tabs (may be missing) correspond toone Mapping Output Specification step in the mappingor sub-transformation. This means you can have multipleOutput tabs in a single Mapping step. To add an Outputtab, click Add Output.
Mapping source step — the name of the step inthe mapping transformation (sub-transformation)where that will be read
Output target step name — the name of the stepin the current transformation (parent) to send thedata from the mapping transformation step to.
Is this the main data path? — Enable if you onlyhave one output mapping and you can leave theMapping source step and Output target stepname fields above blank.
Step mapping description — Add a description tothe output step mapping
Mapping transformation - target step fieldmapping — Enter the required field name changes
Add input / Add output Add an input or output mapping for the specified sub-transformation
https://help.pentaho.com/Documentation/5.4/0L0/0Y0/030/Reusing_Transformation_Flows_with_Mapping_StepsUpdated: Wed, 27 May 2015 15:24:43 GMT
32/152
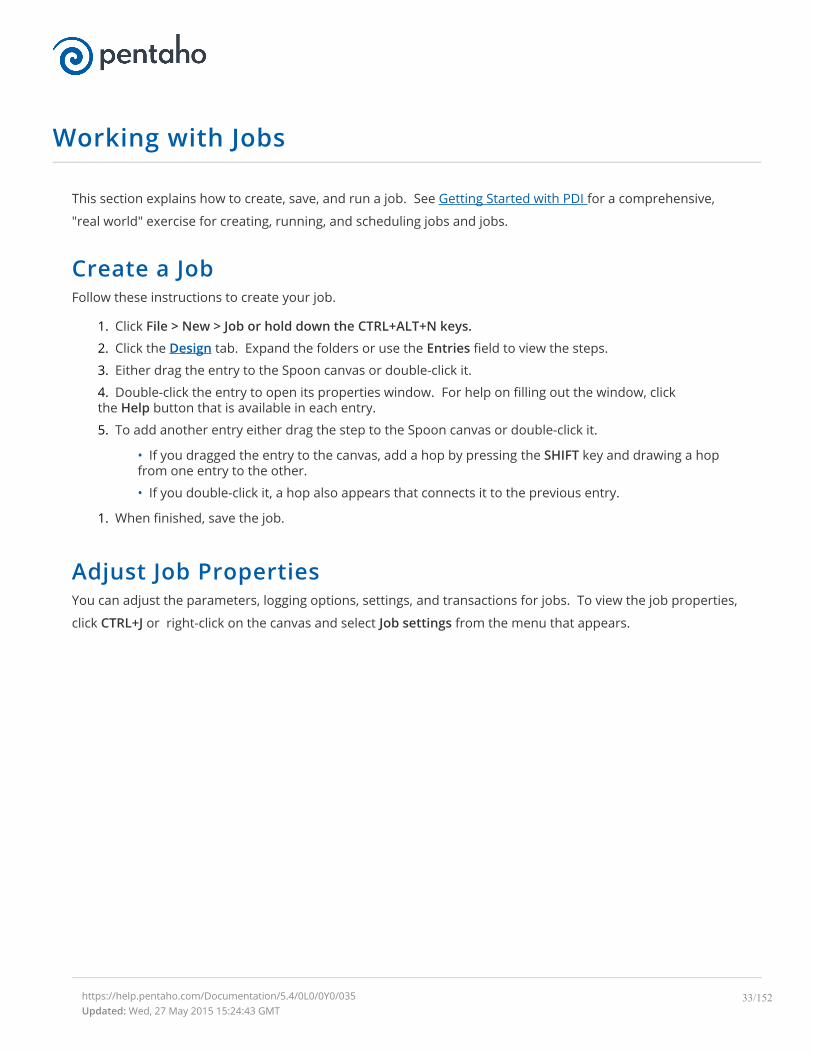
Working with Jobs
This section explains how to create, save, and run a job. See Getting Started with PDI for a comprehensive,
"real world" exercise for creating, running, and scheduling jobs and jobs.
Create a JobFollow these instructions to create your job.
1. Click File > New > Job or hold down the CTRL+ALT+N keys.
2. Click the Design tab. Expand the folders or use the Entries field to view the steps.
3. Either drag the entry to the Spoon canvas or double-click it.
4. Double-click the entry to open its properties window. For help on filling out the window, clickthe Help button that is available in each entry.
5. To add another entry either drag the step to the Spoon canvas or double-click it.
• If you dragged the entry to the canvas, add a hop by pressing the SHIFT key and drawing a hopfrom one entry to the other.
• If you double-click it, a hop also appears that connects it to the previous entry.
1. When finished, save the job.
Adjust Job PropertiesYou can adjust the parameters, logging options, settings, and transactions for jobs. To view the job properties,
click CTRL+J or right-click on the canvas and select Job settings from the menu that appears.
https://help.pentaho.com/Documentation/5.4/0L0/0Y0/035Updated: Wed, 27 May 2015 15:24:43 GMT
33/152
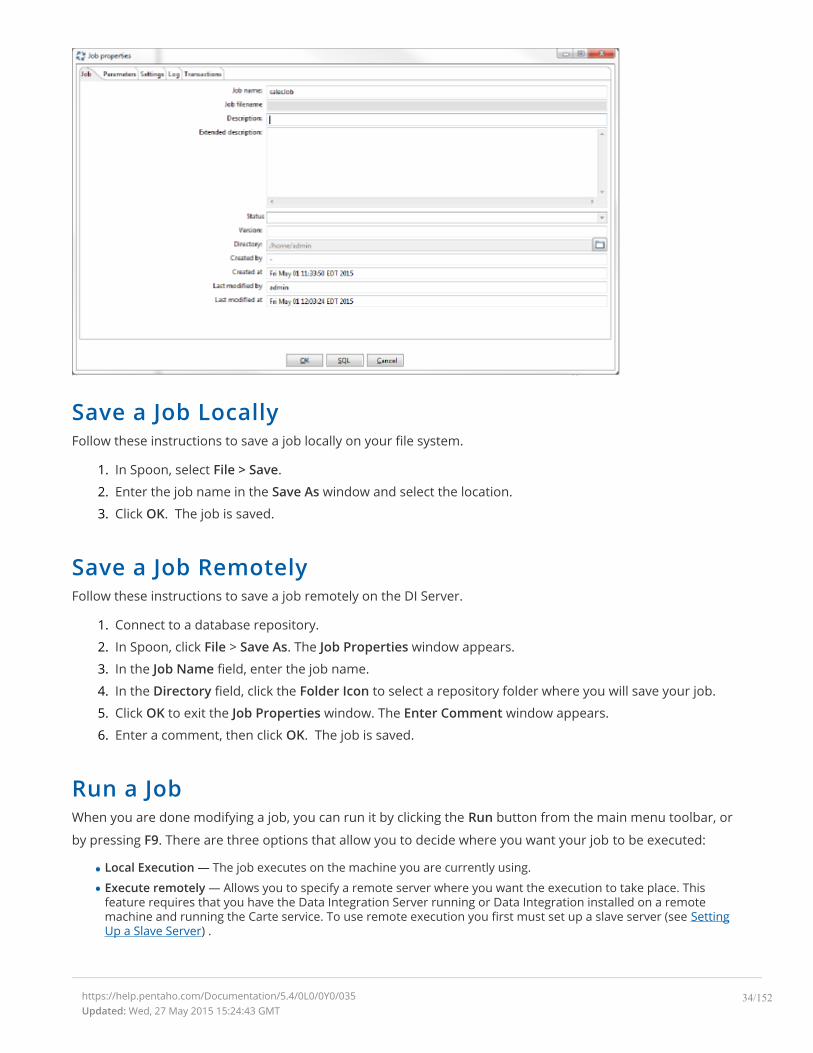
Save a Job LocallyFollow these instructions to save a job locally on your file system.
1. In Spoon, select File > Save.
2. Enter the job name in the Save As window and select the location.
3. Click OK. The job is saved.
Save a Job RemotelyFollow these instructions to save a job remotely on the DI Server.
1. Connect to a database repository.
2. In Spoon, click File > Save As. The Job Properties window appears.
3. In the Job Name field, enter the job name.
4. In the Directory field, click the Folder Icon to select a repository folder where you will save your job.
5. Click OK to exit the Job Properties window. The Enter Comment window appears.
6. Enter a comment, then click OK. The job is saved.
Run a JobWhen you are done modifying a job, you can run it by clicking the Run button from the main menu toolbar, or
by pressing F9. There are three options that allow you to decide where you want your job to be executed:
Local Execution — The job executes on the machine you are currently using.
Execute remotely — Allows you to specify a remote server where you want the execution to take place. Thisfeature requires that you have the Data Integration Server running or Data Integration installed on a remotemachine and running the Carte service. To use remote execution you first must set up a slave server (see SettingUp a Slave Server) .
https://help.pentaho.com/Documentation/5.4/0L0/0Y0/035Updated: Wed, 27 May 2015 15:24:43 GMT
34/152

Execute clustered — Allows you to execute a job in a clustered environment.
https://help.pentaho.com/Documentation/5.4/0L0/0Y0/035Updated: Wed, 27 May 2015 15:24:43 GMT
35/152
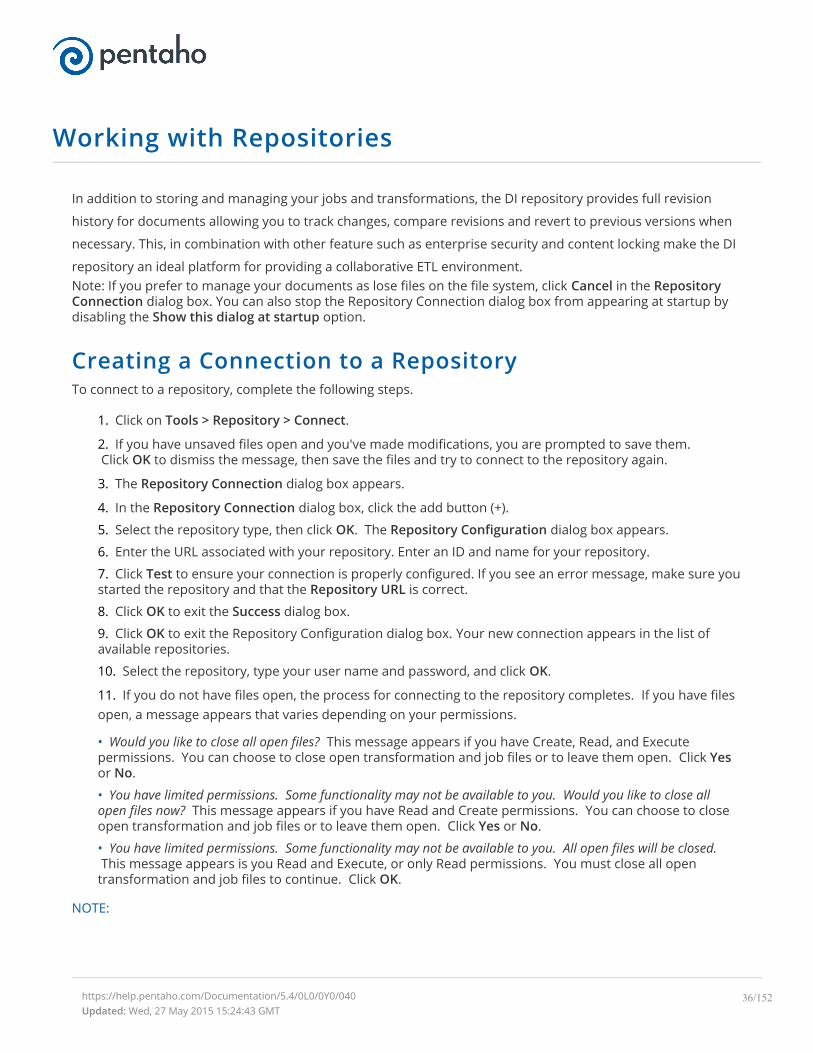
Working with Repositories
In addition to storing and managing your jobs and transformations, the DI repository provides full revision
history for documents allowing you to track changes, compare revisions and revert to previous versions when
necessary. This, in combination with other feature such as enterprise security and content locking make the DI
repository an ideal platform for providing a collaborative ETL environment.Note: If you prefer to manage your documents as lose files on the file system, click Cancel in the RepositoryConnection dialog box. You can also stop the Repository Connection dialog box from appearing at startup bydisabling the Show this dialog at startup option.
Creating a Connection to a RepositoryTo connect to a repository, complete the following steps.
1. Click on Tools > Repository > Connect.
2. If you have unsaved files open and you've made modifications, you are prompted to save them.Click OK to dismiss the message, then save the files and try to connect to the repository again.
3. The Repository Connection dialog box appears.
4. In the Repository Connection dialog box, click the add button (+).
5. Select the repository type, then click OK. The Repository Configuration dialog box appears.
6. Enter the URL associated with your repository. Enter an ID and name for your repository.
7. Click Test to ensure your connection is properly configured. If you see an error message, make sure youstarted the repository and that the Repository URL is correct.
8. Click OK to exit the Success dialog box.
9. Click OK to exit the Repository Configuration dialog box. Your new connection appears in the list ofavailable repositories.
10. Select the repository, type your user name and password, and click OK.
11. If you do not have files open, the process for connecting to the repository completes. If you have filesopen, a message appears that varies depending on your permissions.
• Would you like to close all open files? This message appears if you have Create, Read, and Executepermissions. You can choose to close open transformation and job files or to leave them open. Click Yesor No.
• You have limited permissions. Some functionality may not be available to you. Would you like to close allopen files now? This message appears if you have Read and Create permissions. You can choose to closeopen transformation and job files or to leave them open. Click Yes or No.
• You have limited permissions. Some functionality may not be available to you. All open files will be closed.This message appears is you Read and Execute, or only Read permissions. You must close all open
transformation and job files to continue. Click OK.
NOTE:
https://help.pentaho.com/Documentation/5.4/0L0/0Y0/040Updated: Wed, 27 May 2015 15:24:43 GMT
36/152
For more information on permissions, including what functionality is available for each, see Use Pentaho
Security on the DI Server.
Disconnect from a RepositoryTo disconnect from the DI Repository, complete these steps.
1. Save all open files.
2. Select Tools > Repository > Disconnect Repository.
3. If you have any unsaved, modified files open, you are prompted to save them.
4. A message appears. The content of the message depends on the permissions that you have.
• Would you like to close all open files? This message appears if you have Create, Read, and Executepermissions. You can choose to close open transformation or jobs files, or to leave them open. Click Yesor No.
• All open files will be closed. This message appears if you do not have all of the permissions (Create, Read,and Execute). Clicking the OK button closes all open files.
Delete a RepositoryWhen necessary, you can delete a DI repository or Kettle Database repository. Follow these instructions
1. In the Repository Connection dialog box, select the repository you want to delete from the list ofavailable repositories.
2. Click Delete. A confirmation dialog appears.
3. Click Yes to delete the repository.
https://help.pentaho.com/Documentation/5.4/0L0/0Y0/040Updated: Wed, 27 May 2015 15:24:43 GMT
37/152
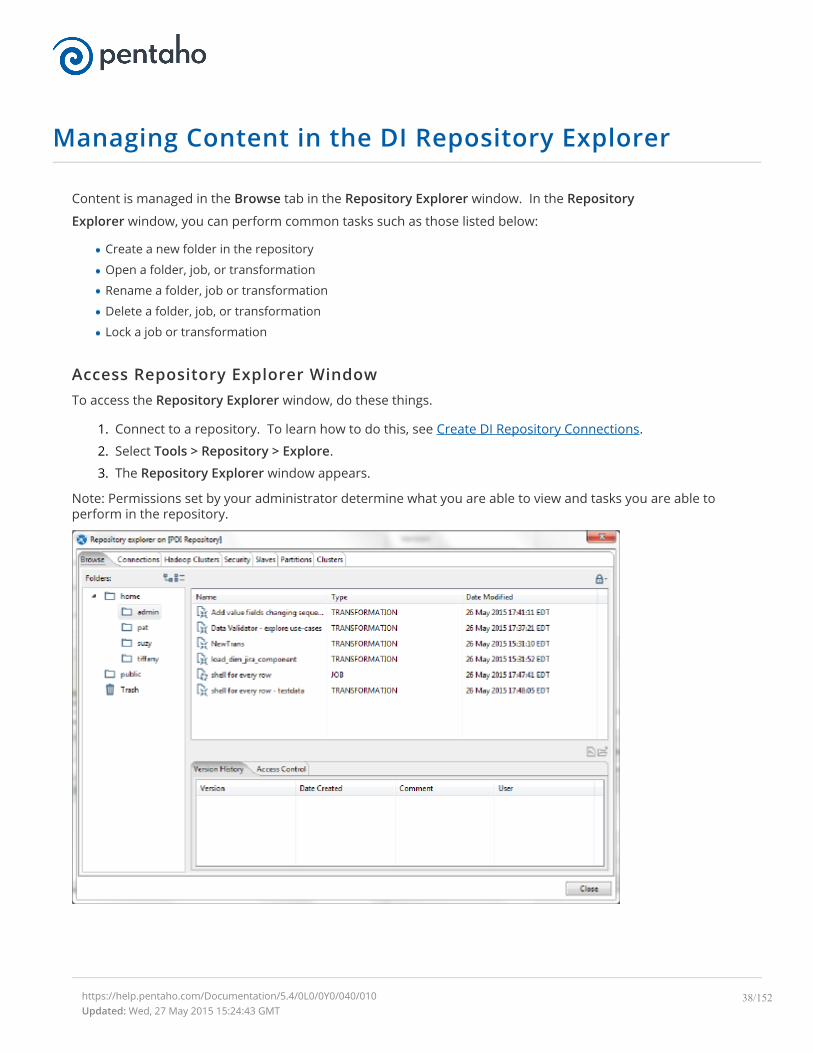
Managing Content in the DI Repository Explorer
Content is managed in the Browse tab in the Repository Explorer window. In the Repository
Explorer window, you can perform common tasks such as those listed below:
Create a new folder in the repository
Open a folder, job, or transformation
Rename a folder, job or transformation
Delete a folder, job, or transformation
Lock a job or transformation
Access Repository Explorer WindowTo access the Repository Explorer window, do these things.
1. Connect to a repository. To learn how to do this, see Create DI Repository Connections.
2. Select Tools > Repository > Explore.
3. The Repository Explorer window appears.
Note: Permissions set by your administrator determine what you are able to view and tasks you are able toperform in the repository.
https://help.pentaho.com/Documentation/5.4/0L0/0Y0/040/010Updated: Wed, 27 May 2015 15:24:43 GMT
38/152
Create a New Folder in the RepositoryTo create a new folder in the repository, perform these steps.
1. In the Browse tab in the Repository Explorer window, right-click on the folder that you want to createthe new folder under. For example, if you want to create a new folder under public, right-click thepublic folder.
2. Select New Folder.
3. Enter the name for the new folder in the Name New Folder window.
4. Click OK.
Open a Folder, Job, or TransformationTo open a folder, job, or transformation. right-click on the folder, job, or transformation and select Open.
NOTE:
To select more than one file, hold down the CTRL or SHIFT keys as you select the folders, jobs, or
transformations, then right-click and select Open.
Rename a Folder, Job or TransformationTo rename a folder, job, or transformation, in the Repository Explorer window do these things.
1. In the Browse tab in the Repository Explorer window, right-click the folder, job, or transformation andselect Rename.
2. Enter the new name in the Name window that appears.
3. Click OK.
4. Enter a comment when prompted.
5. Click the OK button.
In the Version History tab, a comment appears that indicates that the file has been renamed.
Move ObjectsTo move objects, such as folders, jobs, or transformations, in the repository, select the object, then click-and-
drag it to the desired location in the navigation pane on the left. You can move an object in your folder to the
folder of another repository user.
NOTE:
To select more than one file, hold down the CTRL or SHIFT keys as you select the folders, jobs, or
transformations, then right-click and select Move.
Restore ObjectsTo restore an object you deleted, double-click the Trash icon. The object(s) you deleted appear in the right
pane. Right-click on the object you want restored, and select Restore from the menu.
Delete a Folder, Job, or TransformationTo delete a folder, job, or transformation, in the Repository Explorer window do these things.
https://help.pentaho.com/Documentation/5.4/0L0/0Y0/040/010Updated: Wed, 27 May 2015 15:24:43 GMT
39/152
1. In the Browse tab in the Repository Explorer window, right-click the folder, job, or transformation andselect Delete.
2. Click Yes when the warning message appears.
3. Click OK.
NOTE:
To select more than one file, hold down the CTRL or SHIFT keys as you select the folders, jobs, or
transformations, then right-click and select Delete.
Lock and Unlock Jobs and TransformationsYou can lock or unlock jobs and transformations. Locking and unlocking jobs and transformations protect
them from being edited by other users.
Lock a Job or Transformation
To lock a job or transformation, complete these steps.
1. In the Browse tab in the Repository Explorer window, right-click the job, or transformation and selectLock.
2. Enter the notes in the Lock Notes window that appears.
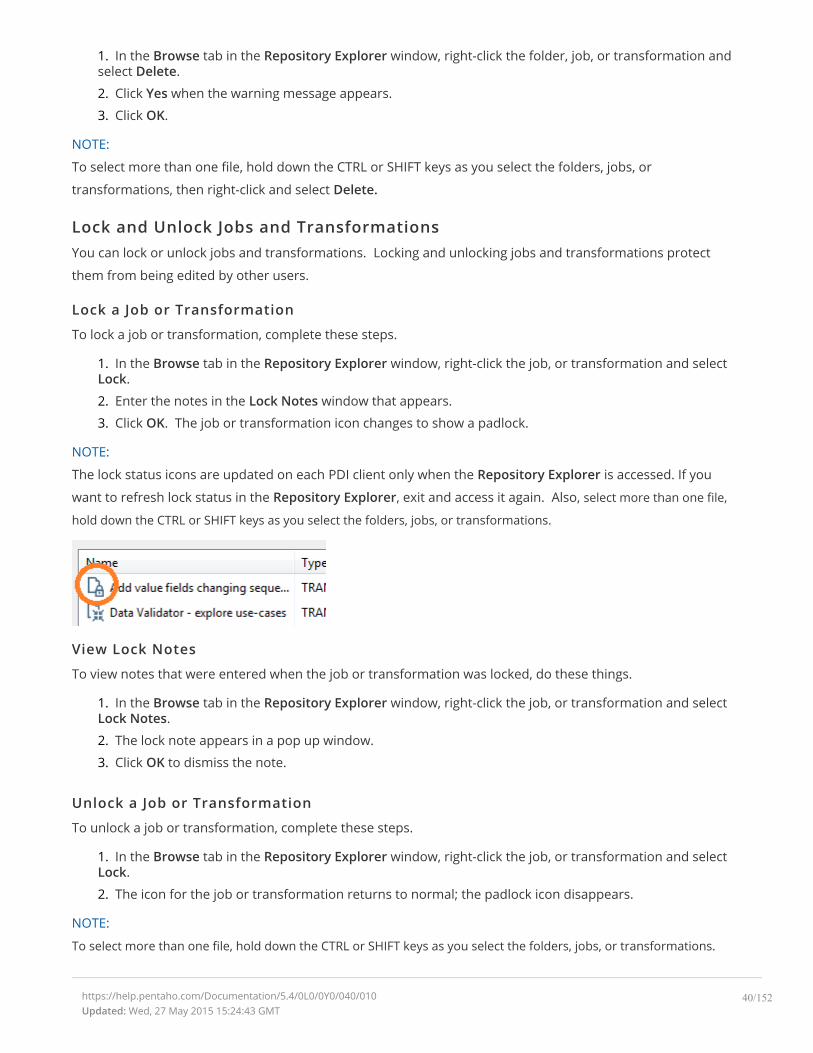
3. Click OK. The job or transformation icon changes to show a padlock.
NOTE:
The lock status icons are updated on each PDI client only when the Repository Explorer is accessed. If you
want to refresh lock status in the Repository Explorer, exit and access it again. Also, select more than one file,
hold down the CTRL or SHIFT keys as you select the folders, jobs, or transformations.
View Lock Notes
To view notes that were entered when the job or transformation was locked, do these things.
1. In the Browse tab in the Repository Explorer window, right-click the job, or transformation and selectLock Notes.
2. The lock note appears in a pop up window.
3. Click OK to dismiss the note.
Unlock a Job or Transformation
To unlock a job or transformation, complete these steps.
1. In the Browse tab in the Repository Explorer window, right-click the job, or transformation and selectLock.
2. The icon for the job or transformation returns to normal; the padlock icon disappears.
NOTE:
To select more than one file, hold down the CTRL or SHIFT keys as you select the folders, jobs, or transformations.
https://help.pentaho.com/Documentation/5.4/0L0/0Y0/040/010Updated: Wed, 27 May 2015 15:24:43 GMT
40/152
Access Connection, Security, and Cluster InformationIn addition to managing content such as jobs and transformations, click the Connections tab to manage (create, edit,
and delete) your database connections in the DI Repository. See Managing Connections for more information about
connecting to a database.
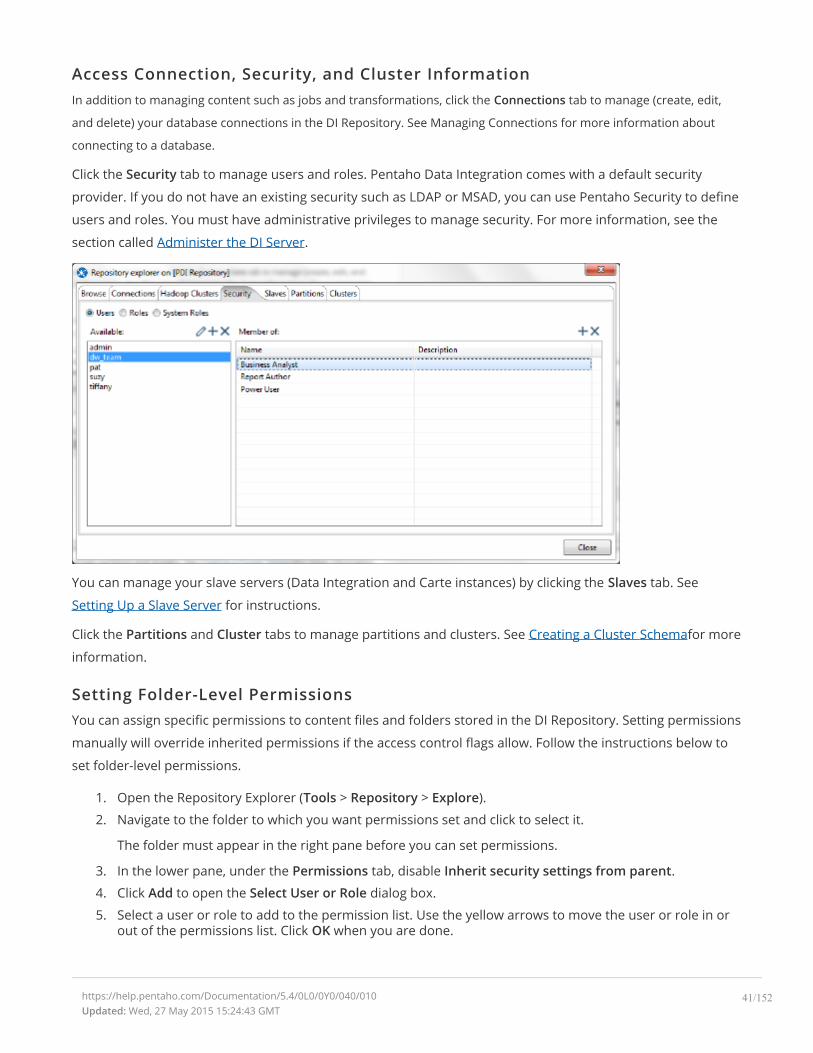
Click the Security tab to manage users and roles. Pentaho Data Integration comes with a default security
provider. If you do not have an existing security such as LDAP or MSAD, you can use Pentaho Security to define
users and roles. You must have administrative privileges to manage security. For more information, see the
section called Administer the DI Server.
You can manage your slave servers (Data Integration and Carte instances) by clicking the Slaves tab. See
Setting Up a Slave Server for instructions.
Click the Partitions and Cluster tabs to manage partitions and clusters. See Creating a Cluster Schemafor more
information.
Setting Folder-Level PermissionsYou can assign specific permissions to content files and folders stored in the DI Repository. Setting permissions
manually will override inherited permissions if the access control flags allow. Follow the instructions below to
set folder-level permissions.
1. Open the Repository Explorer (Tools > Repository > Explore).
2. Navigate to the folder to which you want permissions set and click to select it.
The folder must appear in the right pane before you can set permissions.
3. In the lower pane, under the Permissions tab, disable Inherit security settings from parent.
4. Click Add to open the Select User or Role dialog box.
5. Select a user or role to add to the permission list. Use the yellow arrows to move the user or role in orout of the permissions list. Click OK when you are done.
https://help.pentaho.com/Documentation/5.4/0L0/0Y0/040/010Updated: Wed, 27 May 2015 15:24:43 GMT
41/152

6. In the lower pane, under the Access Control tab, enable the appropriate Permissions granted to yourselected user or role.
If you change your mind, use Delete to remove users or roles from the list.
7. Click Apply to apply permissions.
https://help.pentaho.com/Documentation/5.4/0L0/0Y0/040/010Updated: Wed, 27 May 2015 15:24:43 GMT
42/152
Exporting Content from Solutions Repositories withCommand-Line Tools
To export repository objects into XML format, using command-line tools instead of exporting repository
configurations from within Spoon, use named parameters and command-line options when calling Kitchen or
Pan from a command-line prompt.
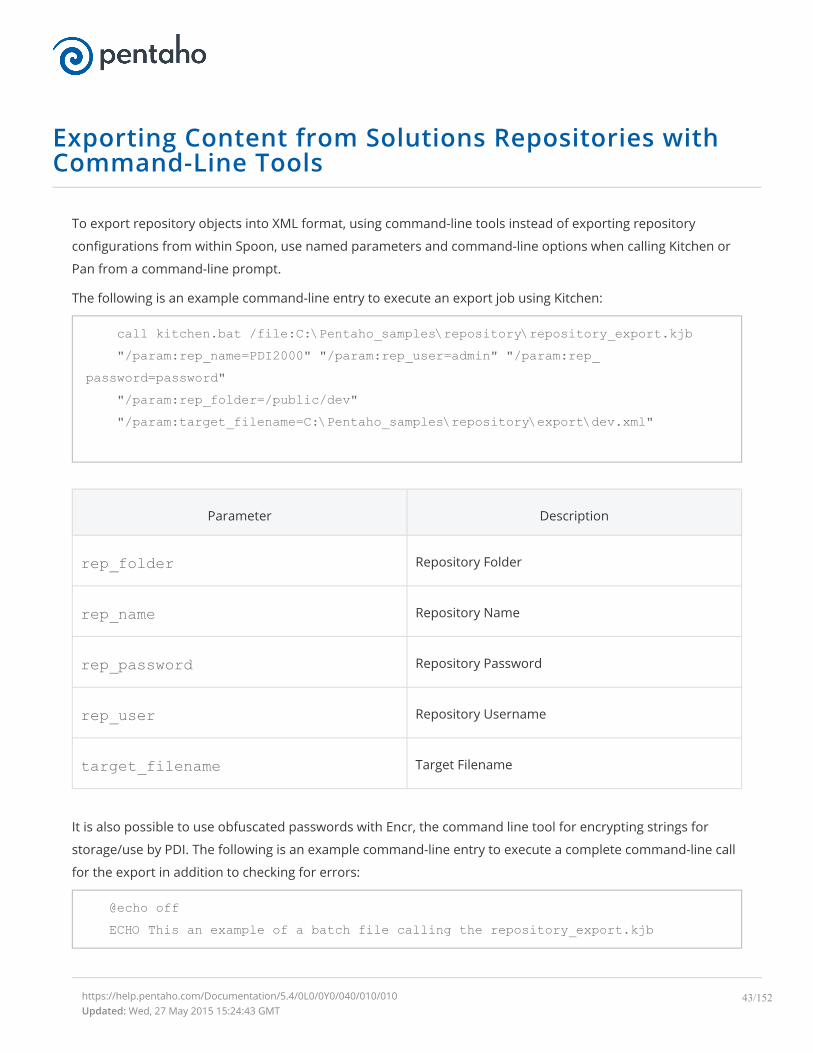
The following is an example command-line entry to execute an export job using Kitchen:
call kitchen.bat /file:C:\Pentaho_samples\repository\repository_export.kjb"/param:rep_name=PDI2000" "/param:rep_user=admin" "/param:rep_
password=password""/param:rep_folder=/public/dev""/param:target_filename=C:\Pentaho_samples\repository\export\dev.xml"
Parameter Description
rep_folder Repository Folder
rep_name Repository Name
rep_password Repository Password
rep_user Repository Username
target_filename Target Filename
It is also possible to use obfuscated passwords with Encr, the command line tool for encrypting strings for
storage/use by PDI. The following is an example command-line entry to execute a complete command-line call
for the export in addition to checking for errors:
@echo offECHO This an example of a batch file calling the repository_export.kjb
https://help.pentaho.com/Documentation/5.4/0L0/0Y0/040/010/010Updated: Wed, 27 May 2015 15:24:43 GMT
43/152

cd C:\Pentaho\pdi-ee-<filepath>--check--</filepath>{{contentVars.PDIvernum3}}>\data-integration
call kitchen.bat /file:C:\Pentaho_samples\repository\repository_export.kjb"/param:rep_name=PDI2000"
"/param:rep_user=admin" "/param:rep_password=password" "/param:rep_folder=/public/dev"
"/param:target_filename=C:\Pentaho_samples\repository\export\dev.xml"
if errorlevel 1 goto errorecho Export finished successful.goto finished
:errorecho ERROR: An error occurred during repository export.:finishedREM Allow the user to read the message when testing, so having a pausepause
https://help.pentaho.com/Documentation/5.4/0L0/0Y0/040/010/010Updated: Wed, 27 May 2015 15:24:43 GMT
44/152
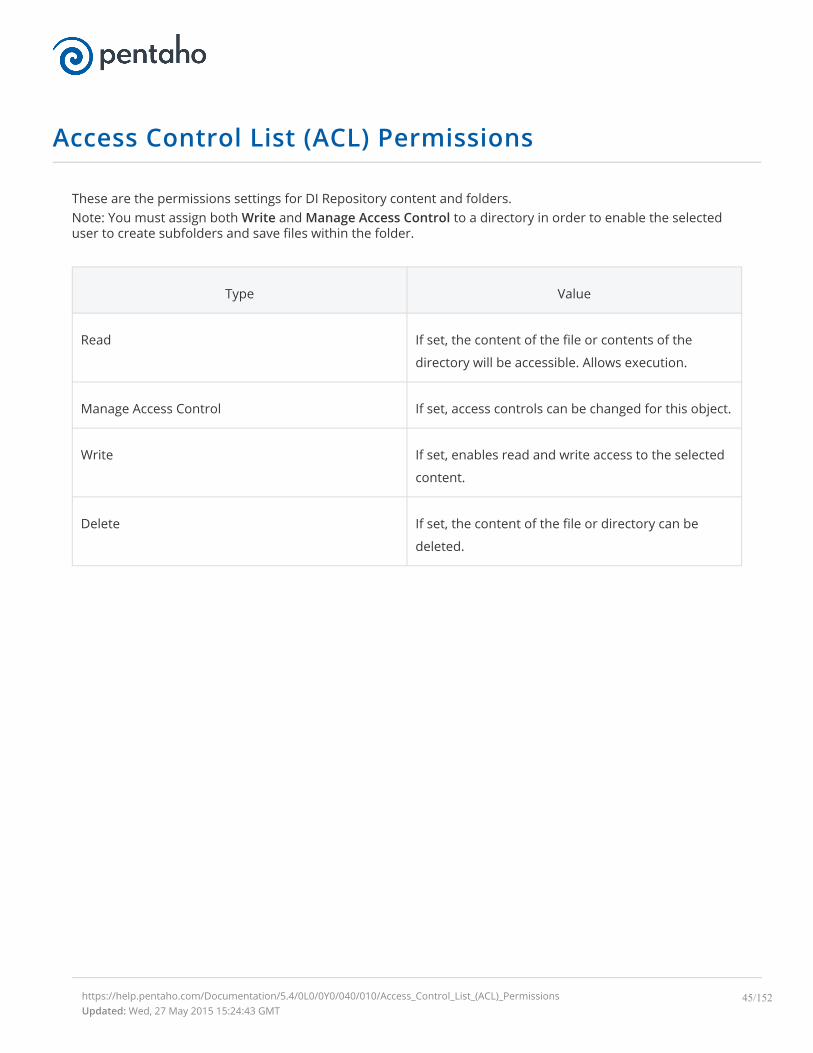
Access Control List (ACL) Permissions
These are the permissions settings for DI Repository content and folders.Note: You must assign both Write and Manage Access Control to a directory in order to enable the selecteduser to create subfolders and save files within the folder.
Type Value
Read If set, the content of the file or contents of the
directory will be accessible. Allows execution.
Manage Access Control If set, access controls can be changed for this object.
Write If set, enables read and write access to the selected
content.
Delete If set, the content of the file or directory can be
deleted.
https://help.pentaho.com/Documentation/5.4/0L0/0Y0/040/010/Access_Control_List_(ACL)_PermissionsUpdated: Wed, 27 May 2015 15:24:43 GMT
45/152
Working with Version Control
Whenever you save a job or transformation in the DI Repository, you are prompted to provide a comment.
Your comments are saved along with your job or transformation so that you can keep track of changes you
make. If you have made a change to a transformation or job that you do not like, you can choose to restore a
specific version of that job or transformation. It is important to provide descriptive version control comments,
so that you can make good decisions when reverting to a version of a job or transformation.
Examining Revision HistoryTo examine revision history for a job or transformation...
1. In Spoon menubar, go to Tools > Repository > Explore. The Repository Explorer window opens.
2. In the navigation pane on the left, locate and double-click the folder that contains your job ortransformation.
3. Click on a transformation or job from the list to select it. The Version History associated withtransformation or job appears in the lower pane.
Administrative users see the home folders of all users on the system. If you are not logged in as an
administrator, you see your home and public folders. Your home folder is where you manage private
content, such as transformations and jobs that are in progress. The public folder is where you store
content that you want to share with others.Right-click on the line under Version History that contains the transformation or job you want to examine.Choose Opento open the transformation or job in Spoon.
Restoring a Previously Saved Version of a Job orTransformationTo restore a version of a job or transformation.
1. In Spoon menubar, go to Tools > Repository > Explore. The Repository Explorer window opens.
2. Browse through the folders to locate the transformation or job that has multiple versions associatedwith it.
3. Right-click on a transformation or job from the list to select it.
4. Select Restore.
5. Write a meaningful comment in the Commit Comment dialog box and click OK. The version is restored.The next time you open the transformation or job, the restored version is what you will see.
https://help.pentaho.com/Documentation/5.4/0L0/0Y0/040/020Updated: Wed, 27 May 2015 15:24:43 GMT
46/152
Transactional Databases and Job Rollback
By default, when you run a job or transformation that makes changes to a database table, changes are
committed as the transformation or job executes. Sometimes, this can cause an issue if a job or
transformation fails. For example, if you run a job that updates then syncs two tables, but the job fails before
you can write to the second table, the first table might be updated and the other might not, rendering them
both out of sync. If this is a concern, consider implementing job rollback by making the transformation or job
databases (or both) transactional. When you do this, changes to a data source occur only if a transformation or
job completes successfully. Otherwise, the information in both data sources remain unchanged.
The following links provide general information on how to make databases transactional. The wiki provides
more detail.
Make a Transformation Database Transactional
Make a Job Database Transactional
Make a Transformation Database TransactionalTo make a transformation database transactional, complete these steps.
1. In Spoon, open a transformation.
2. Right-click an empty space in the transformation's tab and select Transformation Settings from themenu that appears.
3. Click the Miscellaneous tab.
4. Enable the Make the transformation database transactional checkbox.
5. Click OK to close the window.
Make a Job Database TransactionalTo make a job database transactional, complete these steps.
1. In Spoon, open a job.
2. Right-click in an empty space in the job’s tab. Select Job Settings from the menu that appears.
3. Click the Transactions tab.
4. Enable the Make the job database transactional checkbox.
5. Click OK to close the window.
https://help.pentaho.com/Documentation/5.4/0L0/0Y0/040/Transactional_Databases_and_Job_RollbackUpdated: Wed, 27 May 2015 15:24:43 GMT
47/152
Unsupported Databases
It may be possible to read from unsupported databases by using the generic database driver through an ODBC
or JDBC connection. Contact Pentaho if you want to access a database type that is not yet in our list of
supported components.
You can add or replace a database driver files in the lib directory located under ...\design-tools\data-integration.
https://help.pentaho.com/Documentation/5.4/0L0/0Y0/040/Unsupported_DatabasesUpdated: Wed, 27 May 2015 15:24:43 GMT
48/152
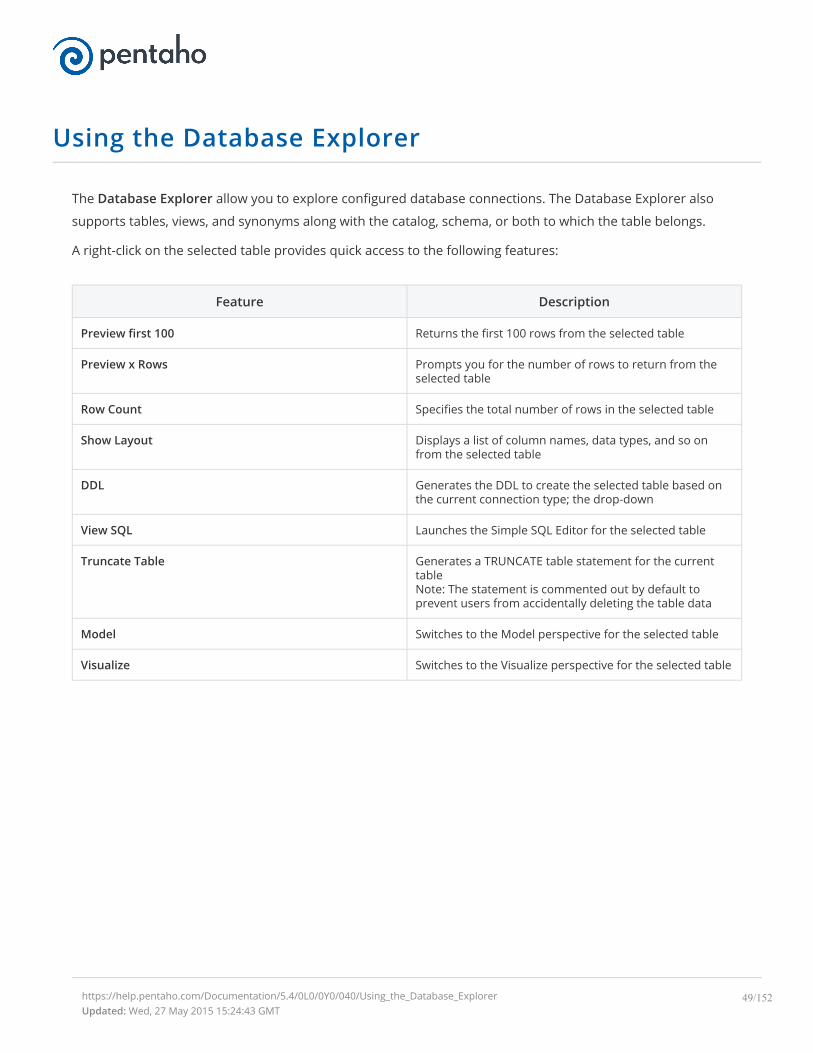
Using the Database Explorer
The Database Explorer allow you to explore configured database connections. The Database Explorer also
supports tables, views, and synonyms along with the catalog, schema, or both to which the table belongs.
A right-click on the selected table provides quick access to the following features:
Feature Description
Preview first 100 Returns the first 100 rows from the selected table
Preview x Rows Prompts you for the number of rows to return from theselected table
Row Count Specifies the total number of rows in the selected table
Show Layout Displays a list of column names, data types, and so onfrom the selected table
DDL Generates the DDL to create the selected table based onthe current connection type; the drop-down
View SQL Launches the Simple SQL Editor for the selected table
Truncate Table Generates a TRUNCATE table statement for the currenttableNote: The statement is commented out by default toprevent users from accidentally deleting the table data
Model Switches to the Model perspective for the selected table
Visualize Switches to the Visualize perspective for the selected table
https://help.pentaho.com/Documentation/5.4/0L0/0Y0/040/Using_the_Database_ExplorerUpdated: Wed, 27 May 2015 15:24:43 GMT
49/152
Using Carte Clusters
Carte is a simple web server that allows you to execute transformations and jobs remotely. It receives XML
(using a small servlet) that contains the transformation to execute and the execution configuration. It allows
you to remotely monitor, start and stop the transformations and jobs that run on the Carte server.
You can set up an individual instance of Carte to operate as a standalone execution engine for a job or
transformation. In Spoon you can define one or more Carte servers and send jobs and transformations to
them. If you want to improve PDI performance for resource-intensive transformations and jobs, use a Carte
cluster.
NOTE:
You can cluster the DI Server to provide failover support. If you decide to use the DI Server, you must enable
the proxy trusting filter as explained in Execute Scheduled Jobs on a Remote Carte Server, then set up your
dynamic Carte slaves and define the DI Server as the master.
https://help.pentaho.com/Documentation/5.4/0L0/0Y0/045Updated: Wed, 27 May 2015 15:24:43 GMT
50/152

Execute Scheduled Jobs on a Remote Carte Server
Follow the instructions below if you need to schedule a job to run on a remote Carte server. Without making
these configuration changes, you will be unable to remotely execute scheduled jobs.Note: This process is also required for using the DI Server as a load balancer in a dynamic Carte cluster.
1. Stop the DI Server and remote Carte server.
2. Copy the repositories.xml file from the .kettle directory on your workstation to the same location onyour Carte slave. Without this file, the Carte slave will be unable to connect to the DI Repository toretrieve PDI content.
3. Open the /pentaho/server/data-integration-server/tomcat/webapps/pentaho-di/WEB-INF/web.xml file with a text editor.
4. Find the Proxy Trusting Filter filter section, and add your Carte server's IP address to the param-valueelement.
<filter><filter-name>Proxy Trusting Filter</filter-name><filter-class>org.pentaho.platform.web.http.filters.
ProxyTrustingFilter</filter-class><init-param>
<param-name>TrustedIpAddrs</param-name><param-value>127.0.0.1,192.168.0.1</param-value><description>Comma separated list of IP addresses of a trusted hosts.
</description></init-param><init-param>
<param-name>NewSessionPerRequest</param-name><param-value>true</param-value><description>true to never re-use an existing IPentahoSession in the
HTTP session; needs to be true to work around code put in for BISERVER-2639</description>
</init-param></filter>
5. Uncomment the proxy trusting filter-mappings between the <!-- begin trust --> and <!-- end trust -->markers.
<!-- begin trust --><filter-mapping>
<filter-name>Proxy Trusting Filter</filter-name>
https://help.pentaho.com/Documentation/5.4/0L0/0Y0/045/050Updated: Wed, 27 May 2015 15:24:43 GMT
51/152

<url-pattern>/webservices/authorizationPolicy</url-pattern></filter-mapping>
<filter-mapping><filter-name>Proxy Trusting Filter</filter-name><url-pattern>/webservices/roleBindingDao</url-pattern>
</filter-mapping>
<filter-mapping><filter-name>Proxy Trusting Filter</filter-name><url-pattern>/webservices/userRoleListService</url-pattern>
</filter-mapping>
<filter-mapping><filter-name>Proxy Trusting Filter</filter-name><url-pattern>/webservices/unifiedRepository</url-pattern>
</filter-mapping>
<filter-mapping><filter-name>Proxy Trusting Filter</filter-name><url-pattern>/webservices/userRoleService</url-pattern>
</filter-mapping>
<filter-mapping><filter-name>Proxy Trusting Filter</filter-name><url-pattern>/webservices/Scheduler</url-pattern>
</filter-mapping>
<filter-mapping><filter-name>Proxy Trusting Filter</filter-name><url-pattern>/webservices/repositorySync</url-pattern>
</filter-mapping><!-- end trust -->
6. Save and close the file, then edit the carte.sh or Carte.bat startup script on the machine that runs yourCarte server.
7. Add -Dpentaho.repository.client.attemptTrust=true to the java line at the bottom of the file.
java $OPT -Dpentaho.repository.client.attemptTrust=true org.pentaho.di.www.Carte "${1+$@}"
8. Save and close the file.
https://help.pentaho.com/Documentation/5.4/0L0/0Y0/045/050Updated: Wed, 27 May 2015 15:24:43 GMT
52/152

9. Start your Carte and DI Server
You can now schedule a job to run on a remote Carte instance.
https://help.pentaho.com/Documentation/5.4/0L0/0Y0/045/050Updated: Wed, 27 May 2015 15:24:43 GMT
53/152
Execute Transformations and Jobs on a Carte Cluster
There are two types of Carte clusters. Static Carte cluster has a fixed schema that specifies one master node
and two or more slave nodes. In a static cluster, you specify the nodes in a cluster at design-time, before you
run the transformation or job.
A Dynamic Carte cluster has a schema that specifies one master node and a varying number of slave nodes.
Unlike a static cluster, slave nodes are not known until runtime. Instead, you register the slave nodes, then at
runtime, PDI monitors the slave nodes every 30 seconds to see if it is available to perform transformation and
job processing tasks.
Static clusters are a good choice for smaller environments where you don't have a lot of machines (virtual or
real) to use for PDI transformations. Dynamic clusters work well if nodes are added or removed often, such as
in a cloud computing environment. Dynamic clustering is also more appropriate in environments where
transformation performance is extremely important, or if there can potentially be multiple concurrent
transformation executions.
https://help.pentaho.com/Documentation/5.4/0L0/0Y0/045/060Updated: Wed, 27 May 2015 15:24:43 GMT
54/152
Configure Static and Dynamic Carte Clusters
If you want to speed the processing of your transformations, consider setting up a Carte cluster. A Carte
cluster consists of two or more Carte slave servers and a Carte master server. When you run a transformation,
the different parts of it are distributed across Carte slave server nodes for processing, while the Carte master
server node tracks the progress.
Configure a Static Carte ClusterFollow the directions below to set up static Carte slave servers.
1. Copy over any required JDBC drivers and PDI plugins from your development instances of PDI to theCarte instances.
2. Run the Carte script with an IP address, hostname, or domain name of this server, and the port numberyou want it to be available on.
./carte.sh 127.0.0.1 8081
3. If you will be executing content stored in a DI Repository, copy the repositories.xml file from the.kettle directory on your workstation to the same location on your Carte slave. Without this file, theCarte slave will be unable to connect to the DI Repository to retrieve content.
4. Ensure that the Carte service is running as intended, accessible from your primary PDI developmentmachines, and that it can run your jobs and transformations.
5. To start this slave server every time the operating system boots, create a startup or init script to runCarte at boot time with the same options you tested with.
NOTE:
Configure a Dynamic Carte ClusterThis procedure is only necessary for dynamic cluster scenarios in which one Carte server will control multipleslave Carte instances.
NOTE:
The following instructions explain how to create carte-master-config.xml and carte-slave-config.xml files. You can rename these files if you want, but you must specify the content in the files as
per the instructions.
Configure Carte Master Server
Follow the process below to configure the Carte Master Server.
1. Copy over any required JDBC drivers from your development instances of PDI to the Carte instances.
2. Create a carte-master-config.xml configuration file using the following example as a template:
https://help.pentaho.com/Documentation/5.4/0L0/0Y0/045/060/010Updated: Wed, 27 May 2015 15:24:44 GMT
55/152
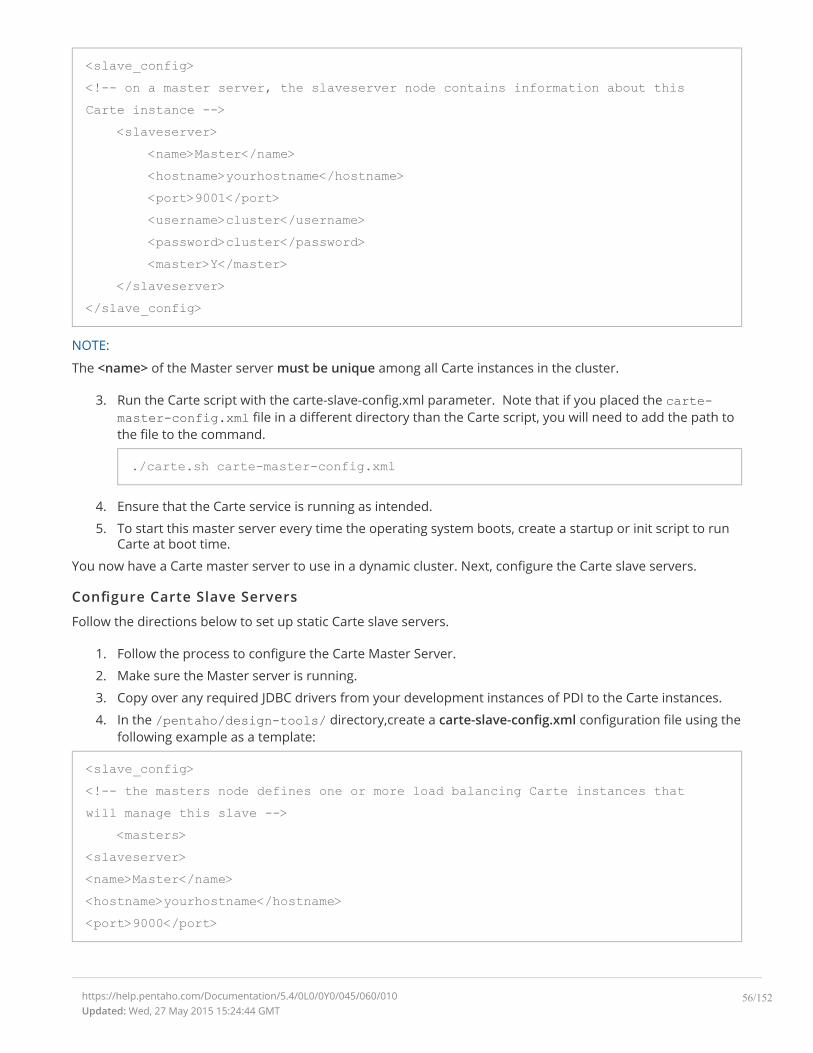
<slave_config><!-- on a master server, the slaveserver node contains information about thisCarte instance -->
<slaveserver><name>Master</name><hostname>yourhostname</hostname><port>9001</port><username>cluster</username><password>cluster</password><master>Y</master>
</slaveserver></slave_config>
NOTE:
The <name> of the Master server must be unique among all Carte instances in the cluster.
3. Run the Carte script with the carte-slave-config.xml parameter. Note that if you placed the carte-master-config.xml file in a different directory than the Carte script, you will need to add the path tothe file to the command.
./carte.sh carte-master-config.xml
4. Ensure that the Carte service is running as intended.
5. To start this master server every time the operating system boots, create a startup or init script to runCarte at boot time.
You now have a Carte master server to use in a dynamic cluster. Next, configure the Carte slave servers.
Configure Carte Slave Servers
Follow the directions below to set up static Carte slave servers.
1. Follow the process to configure the Carte Master Server.
2. Make sure the Master server is running.
3. Copy over any required JDBC drivers from your development instances of PDI to the Carte instances.
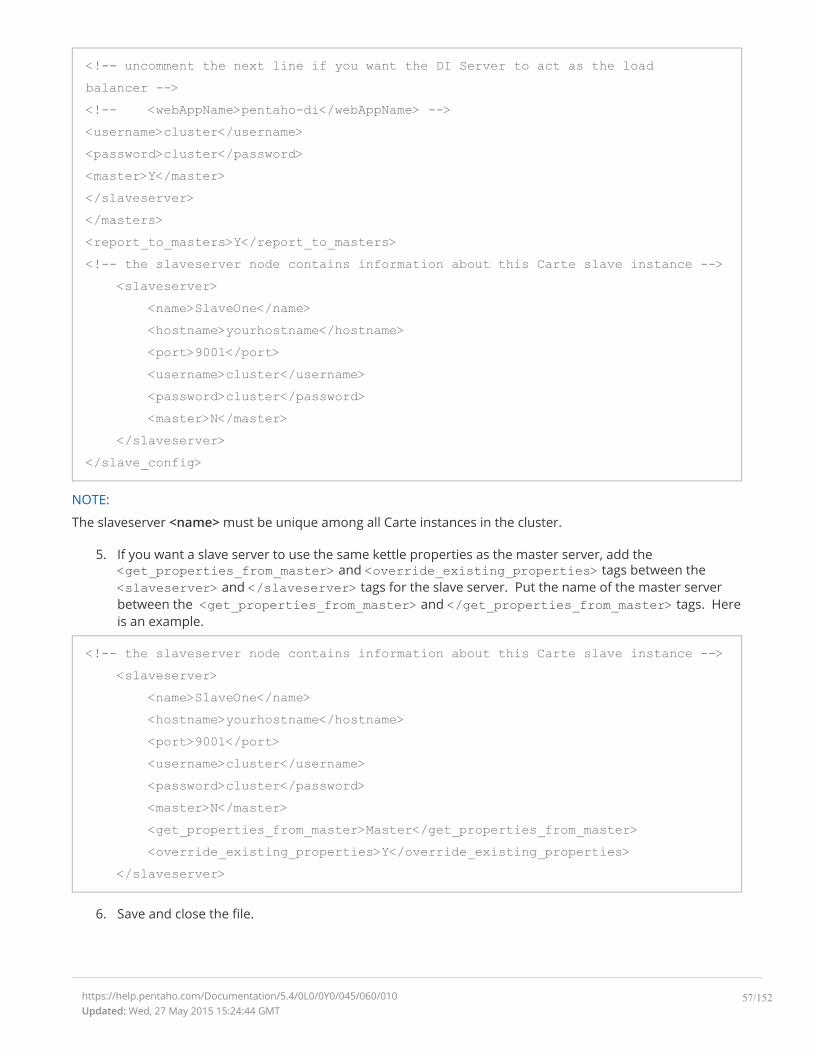
4. In the /pentaho/design-tools/ directory,create a carte-slave-config.xml configuration file using thefollowing example as a template:
<slave_config><!-- the masters node defines one or more load balancing Carte instances thatwill manage this slave -->
<masters><slaveserver><name>Master</name><hostname>yourhostname</hostname><port>9000</port>
https://help.pentaho.com/Documentation/5.4/0L0/0Y0/045/060/010Updated: Wed, 27 May 2015 15:24:44 GMT
56/152
<!-- uncomment the next line if you want the DI Server to act as the loadbalancer --><!-- <webAppName>pentaho-di</webAppName> --><username>cluster</username><password>cluster</password><master>Y</master></slaveserver></masters><report_to_masters>Y</report_to_masters><!-- the slaveserver node contains information about this Carte slave instance -->
<slaveserver><name>SlaveOne</name><hostname>yourhostname</hostname><port>9001</port><username>cluster</username><password>cluster</password><master>N</master>
</slaveserver></slave_config>
NOTE:
The slaveserver <name> must be unique among all Carte instances in the cluster.
5. If you want a slave server to use the same kettle properties as the master server, add the<get_properties_from_master> and <override_existing_properties> tags between the<slaveserver> and </slaveserver> tags for the slave server. Put the name of the master serverbetween the <get_properties_from_master> and </get_properties_from_master> tags. Hereis an example.
<!-- the slaveserver node contains information about this Carte slave instance --><slaveserver>
<name>SlaveOne</name><hostname>yourhostname</hostname><port>9001</port><username>cluster</username><password>cluster</password><master>N</master><get_properties_from_master>Master</get_properties_from_master><override_existing_properties>Y</override_existing_properties>
</slaveserver>
6. Save and close the file.
https://help.pentaho.com/Documentation/5.4/0L0/0Y0/045/060/010Updated: Wed, 27 May 2015 15:24:44 GMT
57/152

7. Run the Carte script with the carte-slave-config.xml parameter. Note that if you placed thecarte-slave-config.xml file in a different directory than the Carte script, you will need to add thepath to the file to the command.
./carte.sh carte-slave-config.xml
8. If you will be executing content stored in a DI Repository, copy the repositories.xml file from the.kettle directory on your workstation to the same location on your Carte slave. Without this file, theCarte slave will be unable to connect to the DI Repository to retrieve PDI content.
9. Stop, then start the master and slave servers.
10. Stop, then start the DI Server.
11. Ensure that the Carte service is running as intended. If you want to start this slave server every timethe operating system boots, create a startup or init script to run Carte at boot time.
Changing Jetty Server ParametersCarte runs on a Jetty server. You do not need to do anything to configure the Jetty server for Carte to work. Butif you want to make changes to the default connection parameters, complete the steps in one of thesubsections that follow.
Jetty Server Parameters Definition
acceptorsThe number of thread dedicated to accepting incomingconnections. The number of acceptors should be below or equalto the number of CPUs.
acceptQueueSize Number of connection requests that can be queued up before theoperating system starts to send rejections.
lowResourcesMaxIdleTime This allows the server to rapidly close idle connections in order togracefully handle high load situations.
NOTE:
If you want to learn more about these options, check out the Jetty documentation here: http://wiki.eclipse.org/
Jetty/Howto/Configure_Connectors#Configuration_Options. For more information about a high load setup
read this article: https://wiki.eclipse.org/Jetty/Howto/High_Load.
Setting the Jetty Server Parameters in the carte-slave-config.xml fileTo change the Jetty Server parameters in the carte-slave-config.xml file, complete these steps.
1. In the /pentaho/design-tools/ directory, open the carte-slave-config.xml and add these linesbetween the <slave_config> </slave_config> tags.
<slave_config>...
<!-- Carte uses an embedded jetty server. Include this next section only ifyou want to change the default jetty configuration options.-->
<jetty_options>
https://help.pentaho.com/Documentation/5.4/0L0/0Y0/045/060/010Updated: Wed, 27 May 2015 15:24:44 GMT
58/152

<acceptors>2</acceptors><acceptQueueSize>2</acceptQueueSize><lowResourcesMaxIdleTime>2</lowResourcesMaxIdleTime>
</jetty_options></slave_config>
2. Adjust the values for the parameters as necessary, then save and close the file.
Setting the Jetty Server Parameters in the kettle.properties fileTo change the Jetty Server parameters in the kettle.properties file, configure the following parameters tothe numeric value you want. See Set Kettle Variables if you need more information on how to do this.
Kettle Variable in kettle.properties Jetty Server Parameter
KETTLE_CARTE_JETTY_ACCEPTORS acceptors
KETTLE_CARTE_JETTY_ACCEPT_QUEUE_SIZE acceptQueueSize
KETTLE_CARTE_JETTY_RES_MAX_IDLE_TIME lowResourcesMaxIdleTime
https://help.pentaho.com/Documentation/5.4/0L0/0Y0/045/060/010Updated: Wed, 27 May 2015 15:24:44 GMT
59/152
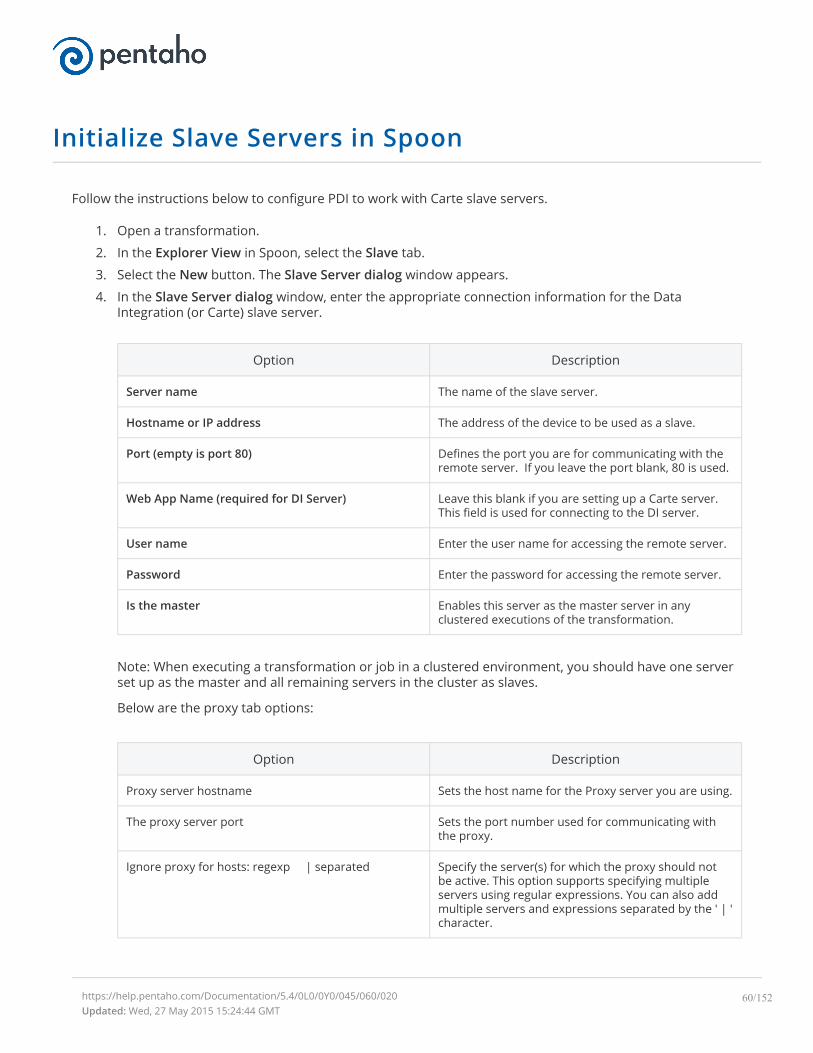
Initialize Slave Servers in Spoon
Follow the instructions below to configure PDI to work with Carte slave servers.
1. Open a transformation.
2. In the Explorer View in Spoon, select the Slave tab.
3. Select the New button. The Slave Server dialog window appears.
4. In the Slave Server dialog window, enter the appropriate connection information for the DataIntegration (or Carte) slave server.
Option Description
Server name The name of the slave server.
Hostname or IP address The address of the device to be used as a slave.
Port (empty is port 80) Defines the port you are for communicating with theremote server. If you leave the port blank, 80 is used.
Web App Name (required for DI Server) Leave this blank if you are setting up a Carte server.This field is used for connecting to the DI server.
User name Enter the user name for accessing the remote server.
Password Enter the password for accessing the remote server.
Is the master Enables this server as the master server in anyclustered executions of the transformation.
Note: When executing a transformation or job in a clustered environment, you should have one serverset up as the master and all remaining servers in the cluster as slaves.
Below are the proxy tab options:
Option Description
Proxy server hostname Sets the host name for the Proxy server you are using.
The proxy server port Sets the port number used for communicating withthe proxy.
Ignore proxy for hosts: regexp | separated Specify the server(s) for which the proxy should notbe active. This option supports specifying multipleservers using regular expressions. You can also addmultiple servers and expressions separated by the ' | 'character.
https://help.pentaho.com/Documentation/5.4/0L0/0Y0/045/060/020Updated: Wed, 27 May 2015 15:24:44 GMT
60/152
5. Click OK to exit the dialog box. Notice that a plus sign (+) appears next to Slave Server in the ExplorerView.
https://help.pentaho.com/Documentation/5.4/0L0/0Y0/045/060/020Updated: Wed, 27 May 2015 15:24:44 GMT
61/152
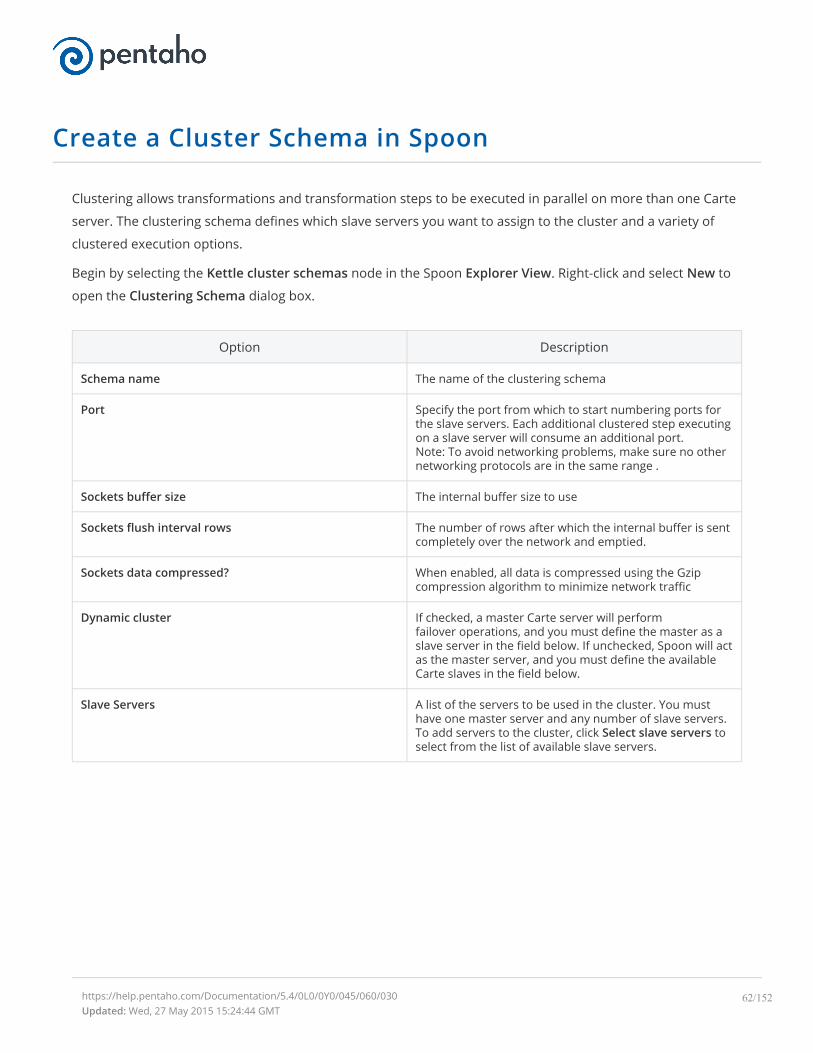
Create a Cluster Schema in Spoon
Clustering allows transformations and transformation steps to be executed in parallel on more than one Carte
server. The clustering schema defines which slave servers you want to assign to the cluster and a variety of
clustered execution options.
Begin by selecting the Kettle cluster schemas node in the Spoon Explorer View. Right-click and select New to
open the Clustering Schema dialog box.
Option Description
Schema name The name of the clustering schema
Port Specify the port from which to start numbering ports forthe slave servers. Each additional clustered step executingon a slave server will consume an additional port.Note: To avoid networking problems, make sure no othernetworking protocols are in the same range .
Sockets buffer size The internal buffer size to use
Sockets flush interval rows The number of rows after which the internal buffer is sentcompletely over the network and emptied.
Sockets data compressed? When enabled, all data is compressed using the Gzipcompression algorithm to minimize network traffic
Dynamic cluster If checked, a master Carte server will performfailover operations, and you must define the master as aslave server in the field below. If unchecked, Spoon will actas the master server, and you must define the availableCarte slaves in the field below.
Slave Servers A list of the servers to be used in the cluster. You musthave one master server and any number of slave servers.To add servers to the cluster, click Select slave servers toselect from the list of available slave servers.
https://help.pentaho.com/Documentation/5.4/0L0/0Y0/045/060/030Updated: Wed, 27 May 2015 15:24:44 GMT
62/152
Execute Transformations in a Cluster
To run a transformation on a cluster, access the Execute a transformation screen and select Execute
clustered.
To run a clustered transformation via a job, access the Transformation job entry details screen and select the
Advanced tab, then select Run this transformation in a clustered mode?.
To assign a cluster to an individual transformation step, right-click on the step and select Clusterings from
the context menu. This will bring up the cluster schema list. Select a schema, then click OK.
When running transformations in a clustered environment, you have the following options:
Post transformation — Splits the transformation and post it to the different master and slave servers
Prepare execution — Runs the initialization phase of the transformation on the master and slave servers
Prepare execution — Runs the initialization phase of the transformation on the master and slave servers
Start execution — Starts the actual execution of the master and slave transformations.
Show transformations — Displays the generated (converted) transformations that will be executed on the cluster
https://help.pentaho.com/Documentation/5.4/0L0/0Y0/045/060/040Updated: Wed, 27 May 2015 15:24:44 GMT
63/152

Stop Carte from the Command Line Interface or URL
These instructions and examples show you how to stop Carte either from the CLI or URL.
1. Open the command line interface by clicking Start and typing cmd. Press Enter.
2. In the command line interface, enter the location of the Carte server.
3. Enter a space, then type the arguments for stopping the server.
4. Press Enter after the arguments are typed.
Arguments:
Carte <Interface address> <Port> [-s] [-p <arg>] [-u <arg>]
Example:
Carte 127.0.0.1 8080 -s -p amidala4ever -u dvader
You can also now use a URL to stop Carte:
http://localhost:9080/kettle/stopCarte
Parameters
Command Description Type
-h, --help Help text. n/a
-p,--password <arg> The administrator password.Required only if stopping theCarte server.
Alphanumeric
-s,--stop Stop the running Carte server.This is only allowed when usingthe hostname/port form of thecommand.
Alphanumeric
-u,--username <arg> The administrator user name.Required only if stopping theCarte server.
Alphanumeric
https://help.pentaho.com/Documentation/5.4/0L0/0Y0/045/070Updated: Wed, 27 May 2015 15:24:44 GMT
64/152
Executing Jobs and Transformations from theRepository on the Carte Server
To execute a job or transformation remotely on a Carte server, you first need to copy the local
repositories.xml from the user's .kettle directory to the Carte server's $HOME/.kettle directory. The
Carte service also looks for the repositories.xml file in the directory from which Carte was started.
For more information about locating or changing the .kettle home directory, see Changing the Pentaho Data
Integration Home Directory Location (.kettle folder).
https://help.pentaho.com/Documentation/5.4/0L0/0Y0/045/Executing_Jobs_and_Transformations_from_the_Repository_on_the_Carte_ServerUpdated: Wed, 27 May 2015 15:24:44 GMT
65/152
Arguments, Parameters, and Variables
PDI has three paradigms for storing user input: arguments, parameters, and variables. Each is defined below,
along with specific tips and configuration information.
• Arguments
• Parameters
• Variables
https://help.pentaho.com/Documentation/5.4/0L0/0Y0/050Updated: Wed, 27 May 2015 15:24:44 GMT
66/152
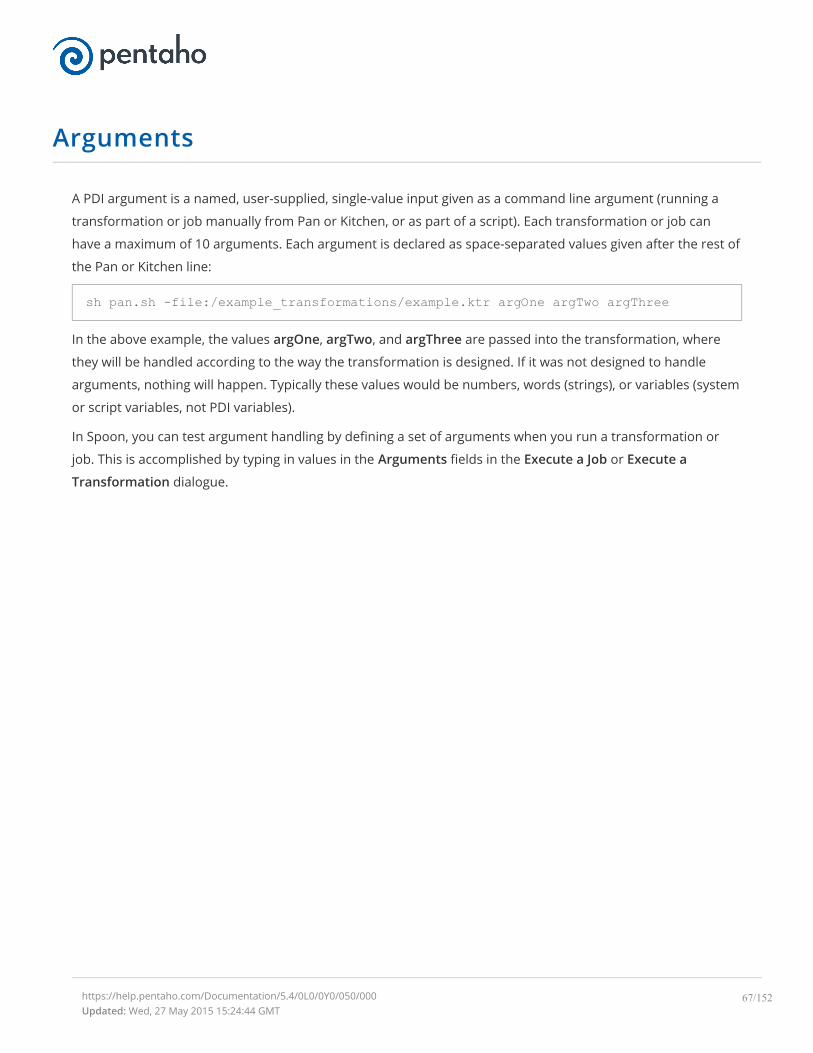
Arguments
A PDI argument is a named, user-supplied, single-value input given as a command line argument (running a
transformation or job manually from Pan or Kitchen, or as part of a script). Each transformation or job can
have a maximum of 10 arguments. Each argument is declared as space-separated values given after the rest of
the Pan or Kitchen line:
sh pan.sh -file:/example_transformations/example.ktr argOne argTwo argThree
In the above example, the values argOne, argTwo, and argThree are passed into the transformation, where
they will be handled according to the way the transformation is designed. If it was not designed to handle
arguments, nothing will happen. Typically these values would be numbers, words (strings), or variables (system
or script variables, not PDI variables).
In Spoon, you can test argument handling by defining a set of arguments when you run a transformation or
job. This is accomplished by typing in values in the Arguments fields in the Execute a Job or Execute a
Transformation dialogue.
https://help.pentaho.com/Documentation/5.4/0L0/0Y0/050/000Updated: Wed, 27 May 2015 15:24:44 GMT
67/152
Parameters
Parameters are like local variables; they are reusable inputs that apply only to the specific transformation that
they are defined in. When defining a parameter, you can assign it a default value to use in the event that one is
not fetched for it. This feature makes it unique among dynamic input types in PDI.Note: If there is a name collision between a parameter and a variable, the parameter will take precedence.
To define a parameter, right-click on the transformation workspace and select Transformation settings from
the context menu (or just press Ctrl-T), then click on the Parameters tab.
• VFS Properties
https://help.pentaho.com/Documentation/5.4/0L0/0Y0/050/010Updated: Wed, 27 May 2015 15:24:44 GMT
68/152
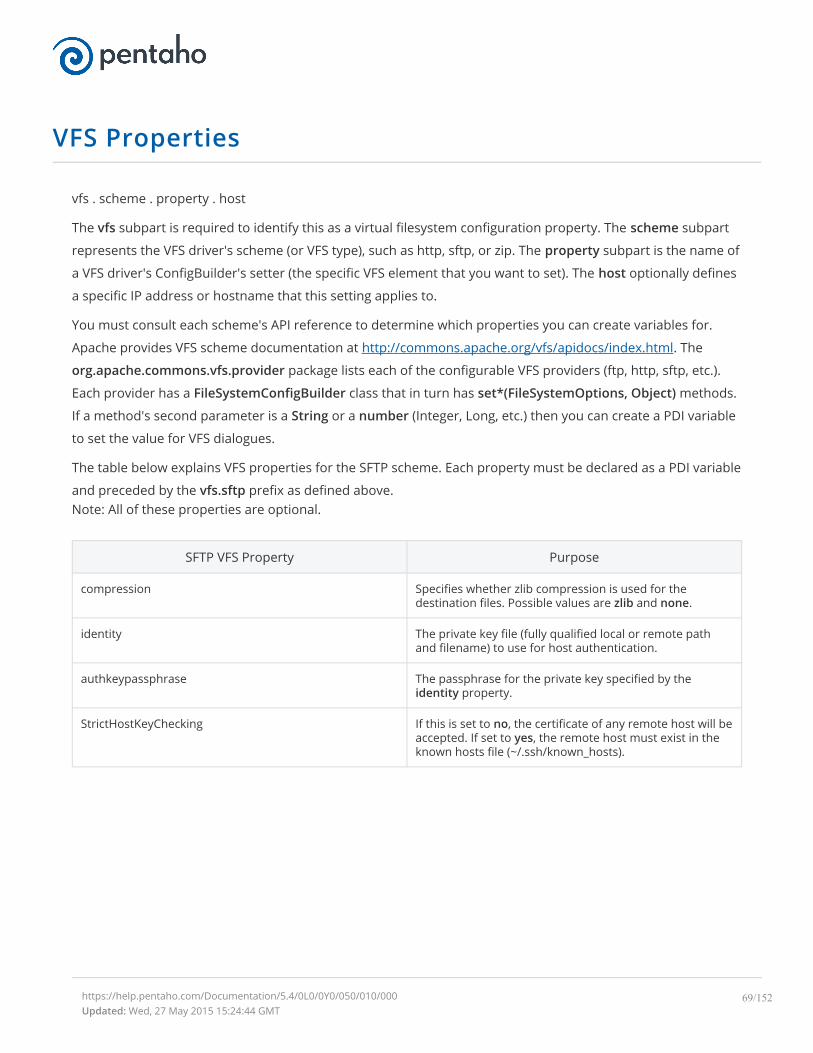
VFS Properties
vfs . scheme . property . host
The vfs subpart is required to identify this as a virtual filesystem configuration property. The scheme subpart
represents the VFS driver's scheme (or VFS type), such as http, sftp, or zip. The property subpart is the name of
a VFS driver's ConfigBuilder's setter (the specific VFS element that you want to set). The host optionally defines
a specific IP address or hostname that this setting applies to.
You must consult each scheme's API reference to determine which properties you can create variables for.
Apache provides VFS scheme documentation at http://commons.apache.org/vfs/apidocs/index.html. The
org.apache.commons.vfs.provider package lists each of the configurable VFS providers (ftp, http, sftp, etc.).
Each provider has a FileSystemConfigBuilder class that in turn has set*(FileSystemOptions, Object) methods.
If a method's second parameter is a String or a number (Integer, Long, etc.) then you can create a PDI variable
to set the value for VFS dialogues.
The table below explains VFS properties for the SFTP scheme. Each property must be declared as a PDI variable
and preceded by the vfs.sftp prefix as defined above.Note: All of these properties are optional.
SFTP VFS Property Purpose
compression Specifies whether zlib compression is used for thedestination files. Possible values are zlib and none.
identity The private key file (fully qualified local or remote pathand filename) to use for host authentication.
authkeypassphrase The passphrase for the private key specified by theidentity property.
StrictHostKeyChecking If this is set to no, the certificate of any remote host will beaccepted. If set to yes, the remote host must exist in theknown hosts file (~/.ssh/known_hosts).
https://help.pentaho.com/Documentation/5.4/0L0/0Y0/050/010/000Updated: Wed, 27 May 2015 15:24:44 GMT
69/152
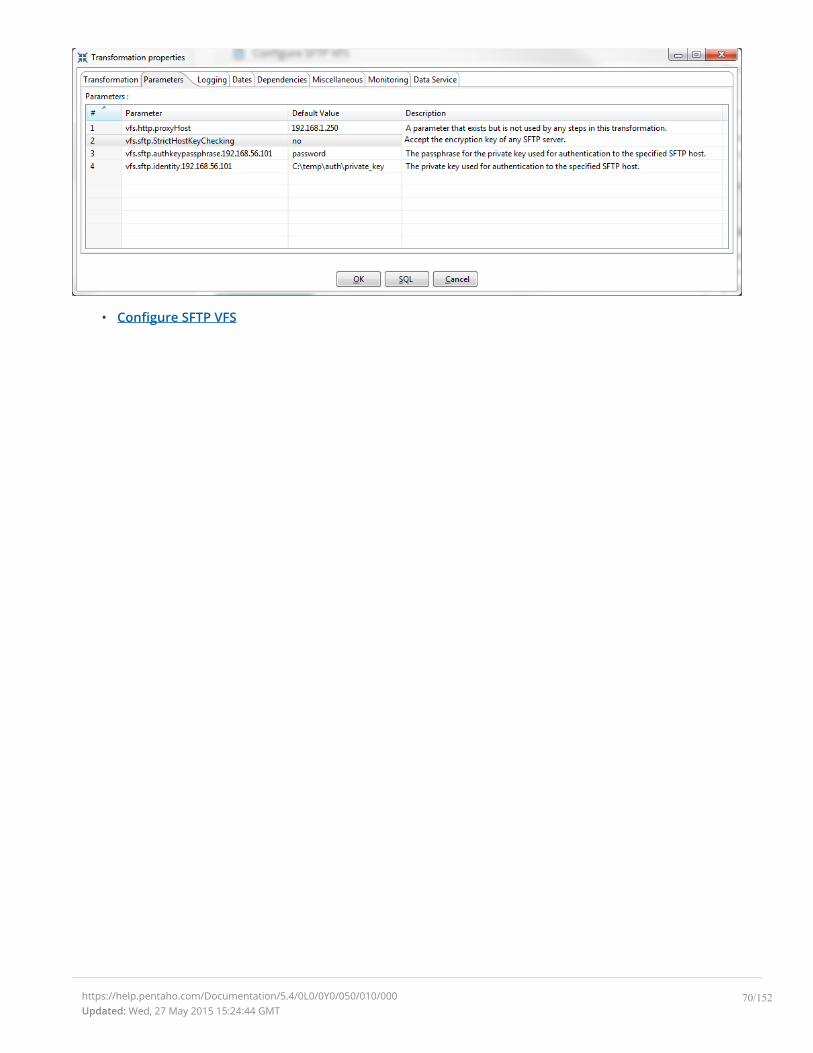
• Configure SFTP VFS
https://help.pentaho.com/Documentation/5.4/0L0/0Y0/050/010/000Updated: Wed, 27 May 2015 15:24:44 GMT
70/152
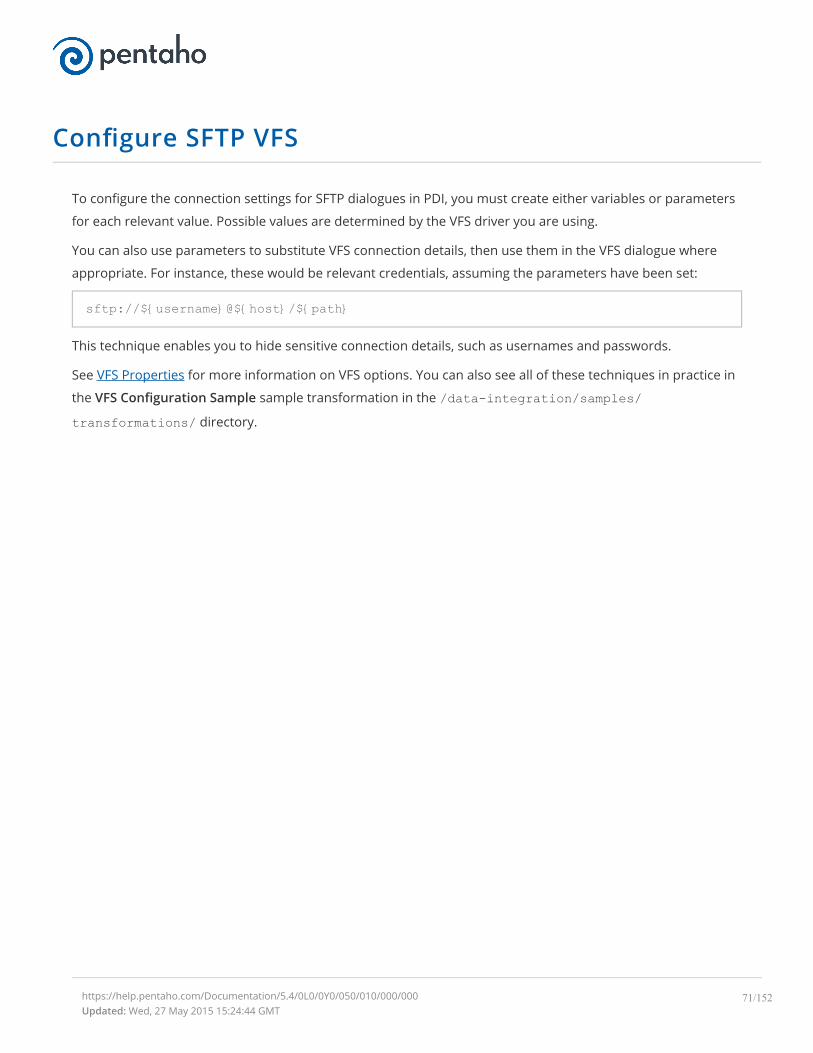
Configure SFTP VFS
To configure the connection settings for SFTP dialogues in PDI, you must create either variables or parameters
for each relevant value. Possible values are determined by the VFS driver you are using.
You can also use parameters to substitute VFS connection details, then use them in the VFS dialogue where
appropriate. For instance, these would be relevant credentials, assuming the parameters have been set:
sftp://${username}@${host}/${path}
This technique enables you to hide sensitive connection details, such as usernames and passwords.
See VFS Properties for more information on VFS options. You can also see all of these techniques in practice in
the VFS Configuration Sample sample transformation in the /data-integration/samples/transformations/ directory.
https://help.pentaho.com/Documentation/5.4/0L0/0Y0/050/010/000/000Updated: Wed, 27 May 2015 15:24:44 GMT
71/152
Variables
A variable in PDI is a piece of user-supplied information that can be used dynamically and programmatically in
a variety of different scopes. A variable can be local to a single step, or be available to the entire JVM that PDI is
running in.
PDI variables can be used in steps in both jobs and transformations. You define variables with the Set Variable
step and Set Session Variables step in a transformation, by hand through the kettle.properties file, or through
the Set Environment Variables dialog box in the Edit menu.
The Get Variable and Get Session Variables steps can explicitly retrieve a value from a variable, or you can use
it in any PDI text field which has the diamond dollar sign
icon next to it by using a metadata string in either the Unix or Windows formats:
${VARIABLE}%%VARIABLE%%
Both formats can be used and even mixed. In fact, you can create variable recursion by alternating between
the Unix and Windows syntaxes. For example, if you wanted to resolve a variable that depends on another
variable, then you could use this example: ${%%inner_var%%}.Note: If there is a name collision with a parameter or argument, variables will defer.
You can also use ASCII or hexidecimal character codes in place of variables, using the same format: $[hex
value]. This makes it possible to escape the variable syntax in instances where you need to put variable-like
text into a variable. For instance if you wanted to use ${foobar} in your data stream, then you can escape it like
this: $[24]{foobar}. PDI will replace $[24] with a $ without resolving it as a variable.
• Variable Scope
• Internal Variables
https://help.pentaho.com/Documentation/5.4/0L0/0Y0/050/020Updated: Wed, 27 May 2015 15:24:44 GMT
72/152
Variable Scope
The scope of a variable is defined by the location of its definition. There are two types of variables: global
environment variables, and Kettle variables. Both are defined below.
• Environment Variables
• Kettle Variables
https://help.pentaho.com/Documentation/5.4/0L0/0Y0/050/020/000Updated: Wed, 27 May 2015 15:24:44 GMT
73/152

Environment Variables
This is the traditional variable type in PDI. You define an environment variable through the Set Environment
Variables dialogue in the Edit menu, or by hand by passing it as an option to the Java Virtual Machine (JVM)
with the -D flag.
Environment variables are an easy way to specify the location of temporary files in a platform-independent
way; for example, the ${java.io.tmpdir} variable points to the /tmp/ directory on Unix/Linux/OS X
and to the C:\Documents and Settings\<username\Local Settings\Temp\ directory on
Windows.
The only problem with using environment variables is that they cannot be used dynamically. For example, if
you run two or more transformations or jobs at the same time on the same application server, you may get
conflicts. Changes to the environment variables are visible to all software running on the virtual machine.
https://help.pentaho.com/Documentation/5.4/0L0/0Y0/050/020/000/000Updated: Wed, 27 May 2015 15:24:44 GMT
74/152
Kettle Variables
Kettle variables provide a way to store small pieces of information dynamically in a narrower scope than
environment variables. A Kettle variable is local to Kettle, and can be scoped down to the job or transformation
in which it is set, or up to a related job. The Set Variable and Set Session Variables steps in a transformation
allows you to specify the related job that you want to limit the scope to; for example, the parent job,
grandparent job, or the root job.
https://help.pentaho.com/Documentation/5.4/0L0/0Y0/050/020/000/010Updated: Wed, 27 May 2015 15:24:44 GMT
75/152
Set Kettle Variables
Kettle variables configure various PDI-specific options such as the location of the shared object file for
transformations and jobs or the log size limit. You can set Kettle variables using two methods.
• Set Kettle Variables in Spoon
• Set Kettle Variables Manually
If you are running a Pentaho MapReduce job, you can also set Kettle and environment variables in the Pentaho
MapReduce job entry.
Set Kettle Variables in SpoonTo set Kettle variables in Spoon, complete these steps.
1. In Spoon, select Edit > Edit the kettle.properties file.
2. In the Kettle Properties window, modify the variable value.
3. If you want to add a variable, complete these steps.
c. A. Right-click on a line number, then select Insert before this row or Insert after this row.
d. B. Enter the variable name and value.
e. C. If you want to reposition the variable, right-click on the row number again, then select Move Up orMove Down.
4. Click the OK button.
Set Kettle Variables ManuallyTo edit Kettle variables manually, complete these steps.
1. Open the kettle.properties file in a text editor. By default, the kettle.properties file is typicallystored in your home directory or the .pentaho directory.
2. Edit the file.
3. When complete, close and save the file.
Set Kettle or Java Environment Variables in the PentahoMapReduce Job EntryPentaho MapReduce jobs are typically run in distributed fashion, with the mapper, combiner, and reducer run
on different nodes. If you need to set a Java or Kettle environment variable for the different nodes, such as the
KETTLE_MAX_JOB_TRACKER_SIZE, set them in the Pentaho MapReduce job entry window.
NOTE:
https://help.pentaho.com/Documentation/5.4/0L0/0Y0/050/020/000/010/010Updated: Wed, 27 May 2015 15:24:44 GMT
76/152
Values for Kettle environment variables set in the Pentaho MapReduce window override the Kettle
environment variable values in the kettle.properties file. To view the list of variable names, descriptions, see
the Set Kettle Variables in Spoon section of this document.
To set kettle or java environment variables, complete these steps.
1. In Spoon, double-click the Pentaho MapReduce job entry, then click the User Defined tab.
2. In the Name field, set the environment or Kettle variable you need.For Kettle environment variables, type the name of the variable in the Name field, like this:KETTLE_SAMPLE_VAR.For Java environment variables, preface the value with the java.system. prefix, like this:java.system.SAMPLE_PATH_VAR.
3. Enter the value of the variable in the Value field.
4. Click the OK button.
https://help.pentaho.com/Documentation/5.4/0L0/0Y0/050/020/000/010/010Updated: Wed, 27 May 2015 15:24:44 GMT
77/152

Internal Variables
The following variables are always defined:
Variable Name Sample Value
Internal.Kettle.Build.Date 2010/05/22 18:01:39
Internal.Kettle.Build.Version 2045
Internal.Kettle.Version 4.3
These variables are defined in a transformation:
Variable Name Sample Value
Internal.Transformation.Filename.Directory D:\Kettle\samples
Internal.Transformation.Filename.Name Denormaliser - 2 series of key-value pairs.ktr
Internal.Transformation.Name Denormaliser - 2 series of key-value pairs sample
Internal.Transformation.Repository.Directory /
These are the internal variables that are defined in a job:
Variable Name Sample Value
Internal.Job.Filename.Directory file:///home/matt/jobs
Internal.Job.Filename.Name Nested jobs.kjb
Internal.Job.Name Nested job test case
Internal.Job.Repository.Directory /
These variables are defined in a transformation running on a slave server, executed in clustered mode:
Variable Name Sample Value
Internal.Slave.Transformation.Number 0..<cluster size-1> (0,1,2,3 or 4)
https://help.pentaho.com/Documentation/5.4/0L0/0Y0/050/020/010Updated: Wed, 27 May 2015 15:24:44 GMT
78/152

Variable Name Sample Value
Internal.Cluster.Size <cluster size> (5)
Note: In addition to the above, there are also System parameters, including command line arguments. Thesecan be accessed using the Get System Info step in a transformation.Note: Additionally, you can specify values for variables in the Execute a transformation dialog box. If youinclude the variable names in your transformation they will appear in this dialog box.
https://help.pentaho.com/Documentation/5.4/0L0/0Y0/050/020/010Updated: Wed, 27 May 2015 15:24:44 GMT
79/152

Scheduling Transformations and Jobs
Once you're finished designing your PDI jobs and transformations, you can arrange to run them at certain time
intervals through the DI Server, or through your own scheduling mechanism (such as cron on Linux, and the
Task Scheduler or the at command on Windows). The methods of operation for scheduling and scripting are
different; scheduling through the DI Server is done through the Spoon graphical interface, whereas scripting
using your own scheduler or executor is done by calling the pan or kitchen commands. This section explains
all of the details for scripting and scheduling PDI content.
You can schedule jobs and transformations to execute automatically on a recurring basis by following the
directions below.
1. Open a job or transformation, then go to the Action menu and select Schedule.
2. In the Schedule window, enter the date and time that you want the schedule to begin in the Start area,or click the calendar icon (circled in red) to display the calendar. To run the transformationimmediately, enable the Now radio button.
3. Set up the End date and time. If applicable, enable the No end radio button or click on the calendar andinput the date and time to end the transformation.
4. If applicable, set up a recurrence under Repeat.
https://help.pentaho.com/Documentation/5.4/0L0/0Y0/060Updated: Wed, 27 May 2015 15:24:44 GMT
80/152

End date and time are disabled unless you select a recurrence. From the list of schedule options select
the choice that is most appropriate: Run Once, Seconds, Minutes, Hourly, Daily, Weekly, Monthly,
Yearly.
5. Make sure you set parameters, arguments and variables, if available. Click OK.
6. In the Spoon button bar, click the Schedule perspective.
From the Schedule perspective, you can refresh, start, pause, stop and delete a transformation or job
using the buttons on the upper left corner of the page.
https://help.pentaho.com/Documentation/5.4/0L0/0Y0/060Updated: Wed, 27 May 2015 15:24:44 GMT
81/152

Command-Line Scripting with Pan and Kitchen
You can use PDI's command line tools to execute PDI content from outside of Spoon. Typically you would use
these tools in the context of creating a script or a cron job to run the job or transformation based on some
condition outside of the realm of Pentaho software.
Pan is the PDI command line tool for executing transformations.
Kitchen is the PDI command line tool for executing jobs.
Both of these programs are explained in detail below.
• Pan Options and Syntax
• Kitchen Options and Syntax
• Importing KJB or KTR Files From a Zip Archive
• Connecting to a DI Solution Repositories with Command-Line Tools
• Exporting Content from Solutions Repositories with Command-Line Tools
https://help.pentaho.com/Documentation/5.4/0L0/0Y0/065Updated: Wed, 27 May 2015 15:24:44 GMT
82/152

Pan Options and Syntax
Pan runs transformations, either from a PDI repository (database or enterprise), or from a local file. The syntax
for the batch file and shell script are shown below. All Pan options are the same for both.
pan.sh - option = value arg1 arg2
pan.bat / option : value arg1 arg2
Switch Purpose
rep Enterprise or database repository name, if you areusing one
user Repository username
pass Repository password
trans The name of the transformation (as it appears in therepository) to launch
dir The repository directory that contains thetransformation, including the leading slash
file If you are calling a local KTR file, this is the filename,including the path if it is not in the local directory
level The logging level (Basic, Detailed, Debug, Rowlevel,Error, Nothing)
logfile A local filename to write log output to
listdir Lists the directories in the specified repository
listtrans Lists the transformations in the specified repositorydirectory
listrep Lists the available repositories
exprep Exports all repository objects to one XML file
https://help.pentaho.com/Documentation/5.4/0L0/0Y0/065/000Updated: Wed, 27 May 2015 15:24:44 GMT
83/152

norep Prevents Pan from logging into a repository. If youhave set the KETTLE_REPOSITORY, KETTLE_USER,and KETTLE_PASSWORD environment variables,then this option will enable you to prevent Pan fromlogging into the specified repository, assuming youwould like to execute a local KTR file instead.
safemode Runs in safe mode, which enables extra checking
version Shows the version, revision, and build date
param Set a named parameter in a name=value format.For example: -param:FOO=bar
listparam List information about the defined namedparameters in the specified transformation.
maxloglines The maximum number of log lines that are keptinternally by PDI. Set to 0 to keep all rows (default)
maxlogtimeout The maximum age (in minutes) of a log line whilebeing kept internally by PDI. Set to 0 to keep all rowsindefinitely (default)
sh pan.sh -rep=initech_pdi_repo -user=pgibbons -pass=lumburghsux -trans=TPS_reports_2011
pan.bat /rep:initech_pdi_repo /user:pgibbons /pass:lumburghsux /trans:TPS_reports_2011
• Pan Status Codes
https://help.pentaho.com/Documentation/5.4/0L0/0Y0/065/000Updated: Wed, 27 May 2015 15:24:44 GMT
84/152

Pan Status Codes
When you run Pan, there are seven possible return codes that indicate the result of the operation. All of them
are defined below.
Status code Definition
0 The transformation ran without a problem.
1 Errors occurred during processing
2 An unexpected error occurred during loading / running ofthe transformation
3 Unable to prepare and initialize this transformation
7 The transformation couldn't be loaded from XML or theRepository
8 Error loading steps or plugins (error in loading one of theplugins mostly)
9 Command line usage printing
https://help.pentaho.com/Documentation/5.4/0L0/0Y0/065/000/000Updated: Wed, 27 May 2015 15:24:44 GMT
85/152

Kitchen Options and Syntax
Kitchen runs jobs, either from a PDI repository (database or enterprise), or from a local file. The syntax for the
batch file and shell script are shown below. All Kitchen options are the same for both.
kitchen.sh - option = value arg1 arg2
kitchen.bat / option : value arg1 arg2
Switch Purpose
rep Enterprise or database repository name, if you areusing one
user Repository username
pass Repository password
job The name of the job (as it appears in the repository)to launch
dir The repository directory that contains the job,including the leading slash
file If you are calling a local KJB file, this is the filename,including the path if it is not in the local directory
level The logging level (Basic, Detailed, Debug, Rowlevel,Error, Nothing)
logfile A local filename to write log output to
listdir Lists the directories in the specified repository
listjob Lists the jobs in the specified repository directory
listrep Lists the available repositories
export Exports all linked resources of the specified job. Theargument is the name of a ZIP file.
norep Prevents Kitchen from logging into a repository. Ifyou have set the KETTLE_REPOSITORY,KETTLE_USER, and KETTLE_PASSWORD environmentvariables, then this option will enable you to prevent
https://help.pentaho.com/Documentation/5.4/0L0/0Y0/065/010Updated: Wed, 27 May 2015 15:24:44 GMT
86/152
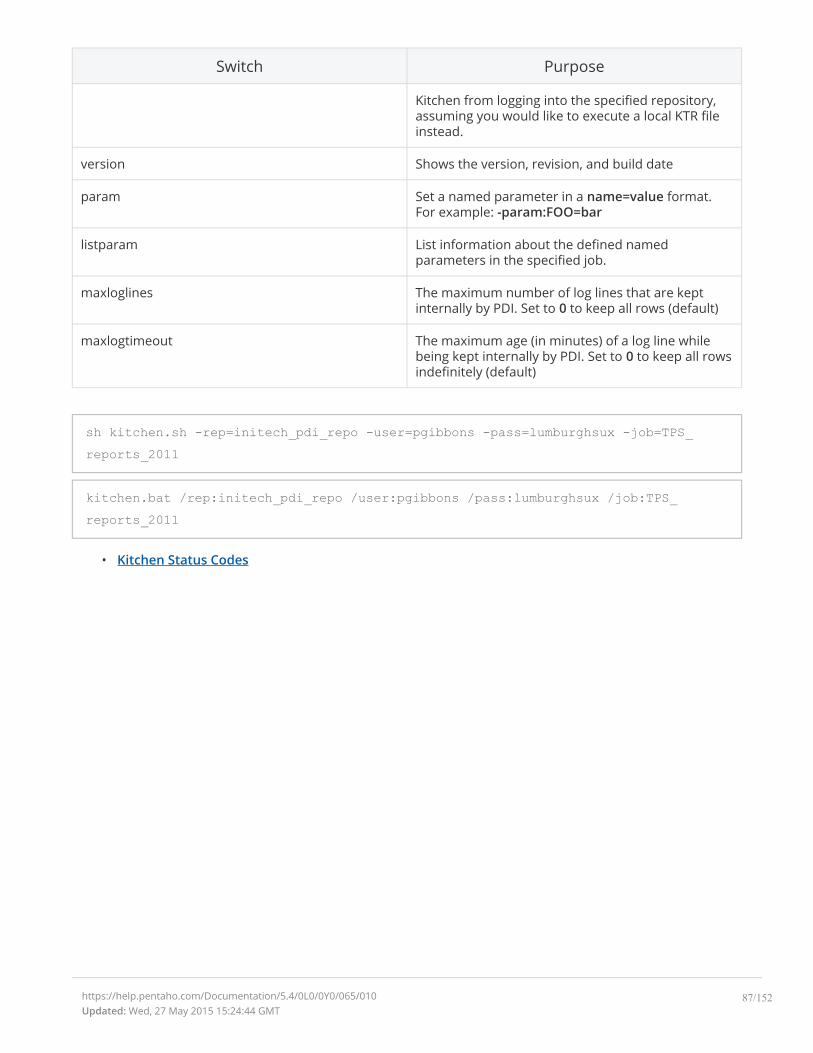
Switch Purpose
Kitchen from logging into the specified repository,assuming you would like to execute a local KTR fileinstead.
version Shows the version, revision, and build date
param Set a named parameter in a name=value format.For example: -param:FOO=bar
listparam List information about the defined namedparameters in the specified job.
maxloglines The maximum number of log lines that are keptinternally by PDI. Set to 0 to keep all rows (default)
maxlogtimeout The maximum age (in minutes) of a log line whilebeing kept internally by PDI. Set to 0 to keep all rowsindefinitely (default)
sh kitchen.sh -rep=initech_pdi_repo -user=pgibbons -pass=lumburghsux -job=TPS_reports_2011
kitchen.bat /rep:initech_pdi_repo /user:pgibbons /pass:lumburghsux /job:TPS_reports_2011
• Kitchen Status Codes
https://help.pentaho.com/Documentation/5.4/0L0/0Y0/065/010Updated: Wed, 27 May 2015 15:24:44 GMT
87/152

Kitchen Status Codes
When you run Kitchen, there are seven possible return codes that indicate the result of the operation. All of
them are defined below.
Status code Definition
0 The job ran without a problem.
1 Errors occurred during processing
2 An unexpected error occurred during loading orrunning of the job
7 The job couldn't be loaded from XML or theRepository
8 Error loading steps or plugins (error in loading oneof the plugins mostly)
9 Command line usage printing
https://help.pentaho.com/Documentation/5.4/0L0/0Y0/065/010/000Updated: Wed, 27 May 2015 15:24:44 GMT
88/152
Importing KJB or KTR Files From a Zip Archive
Both Pan and Kitchen can pull PDI content files from out of Zip files. To do this, use the ! switch, as in this
example:
Kitchen.bat /file:"zip:file:///C:/Pentaho/PDI Examples/Sandbox/linked_executable_job_and_transform.zip!Hourly_Stats_Job_Unix.kjb"
If you are using Linux or Solaris, the ! must be escaped:
./kitchen.sh -file:"zip:file:////home/user/pentaho/pdi-ee/my_package/linked_executable_job_and_transform.zip\!Hourly_Stats_Job_Unix.kjb"
https://help.pentaho.com/Documentation/5.4/0L0/0Y0/065/020Updated: Wed, 27 May 2015 15:24:44 GMT
89/152
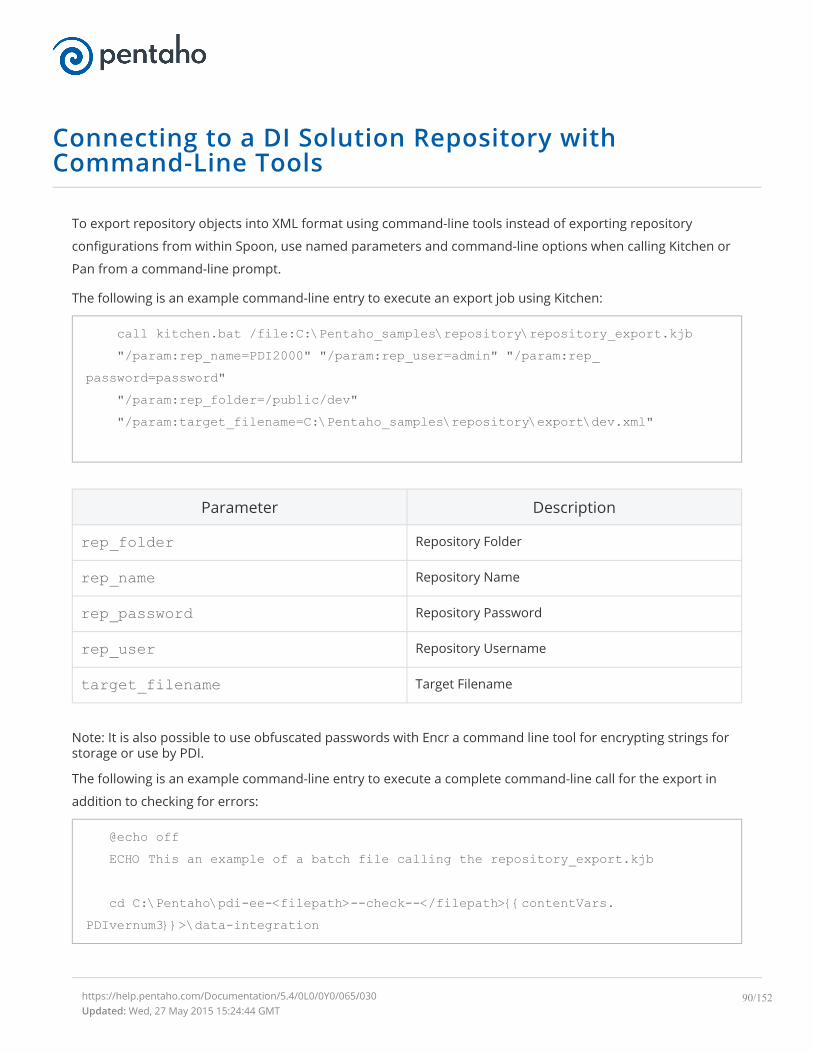
Connecting to a DI Solution Repository withCommand-Line Tools
To export repository objects into XML format using command-line tools instead of exporting repository
configurations from within Spoon, use named parameters and command-line options when calling Kitchen or
Pan from a command-line prompt.
The following is an example command-line entry to execute an export job using Kitchen:
call kitchen.bat /file:C:\Pentaho_samples\repository\repository_export.kjb"/param:rep_name=PDI2000" "/param:rep_user=admin" "/param:rep_
password=password""/param:rep_folder=/public/dev""/param:target_filename=C:\Pentaho_samples\repository\export\dev.xml"
Parameter Description
rep_folder Repository Folder
rep_name Repository Name
rep_password Repository Password
rep_user Repository Username
target_filename Target Filename
Note: It is also possible to use obfuscated passwords with Encr a command line tool for encrypting strings forstorage or use by PDI.
The following is an example command-line entry to execute a complete command-line call for the export in
addition to checking for errors:
@echo offECHO This an example of a batch file calling the repository_export.kjb
cd C:\Pentaho\pdi-ee-<filepath>--check--</filepath>{{contentVars.PDIvernum3}}>\data-integration
https://help.pentaho.com/Documentation/5.4/0L0/0Y0/065/030Updated: Wed, 27 May 2015 15:24:44 GMT
90/152

call kitchen.bat /file:C:\Pentaho_samples\repository\repository_export.kjb"/param:rep_name=PDI2000"
"/param:rep_user=admin" "/param:rep_password=password" "/param:rep_folder=/public/dev"
"/param:target_filename=C:\Pentaho_samples\repository\export\dev.xml"
if errorlevel 1 goto errorecho Export finished successfull.goto finished
:errorecho ERROR: An error occured during repository export.:finishedREM Allow the user to read the message when testing, so having a pausepause
https://help.pentaho.com/Documentation/5.4/0L0/0Y0/065/030Updated: Wed, 27 May 2015 15:24:44 GMT
91/152
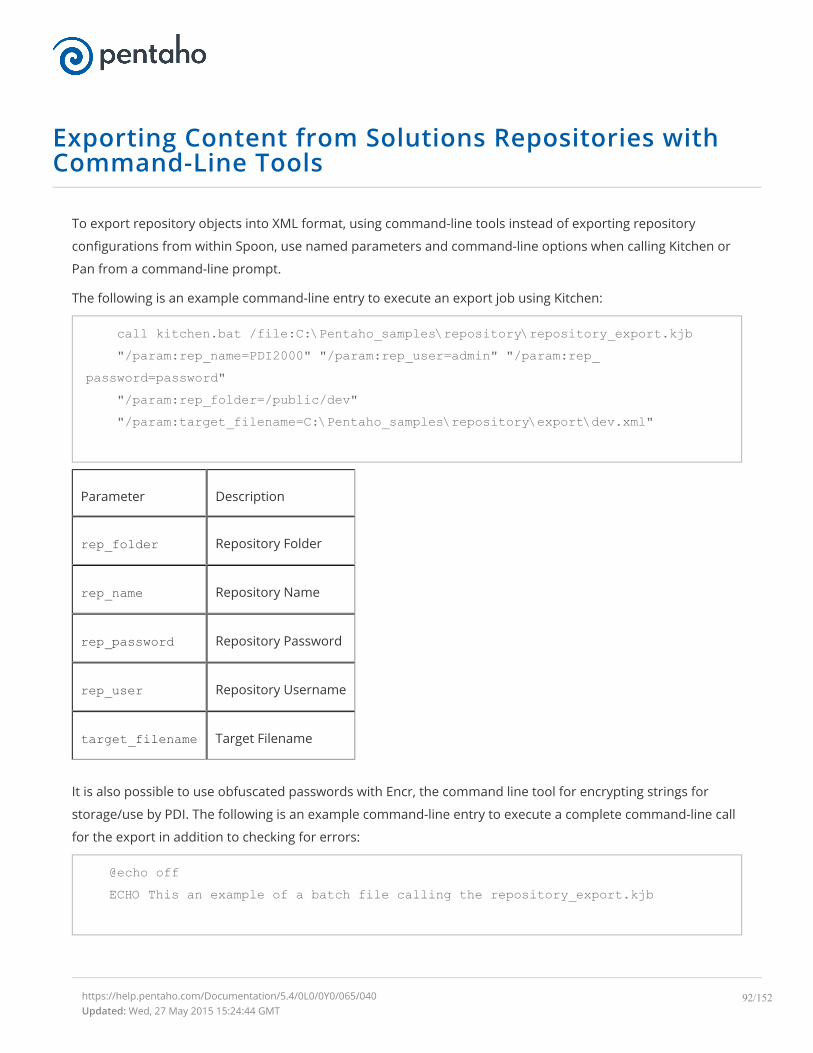
Exporting Content from Solutions Repositories withCommand-Line Tools
To export repository objects into XML format, using command-line tools instead of exporting repository
configurations from within Spoon, use named parameters and command-line options when calling Kitchen or
Pan from a command-line prompt.
The following is an example command-line entry to execute an export job using Kitchen:
call kitchen.bat /file:C:\Pentaho_samples\repository\repository_export.kjb"/param:rep_name=PDI2000" "/param:rep_user=admin" "/param:rep_
password=password""/param:rep_folder=/public/dev""/param:target_filename=C:\Pentaho_samples\repository\export\dev.xml"
Parameter Description
rep_folder Repository Folder
rep_name Repository Name
rep_password Repository Password
rep_user Repository Username
target_filename Target Filename
It is also possible to use obfuscated passwords with Encr, the command line tool for encrypting strings for
storage/use by PDI. The following is an example command-line entry to execute a complete command-line call
for the export in addition to checking for errors:
@echo offECHO This an example of a batch file calling the repository_export.kjb
https://help.pentaho.com/Documentation/5.4/0L0/0Y0/065/040Updated: Wed, 27 May 2015 15:24:44 GMT
92/152
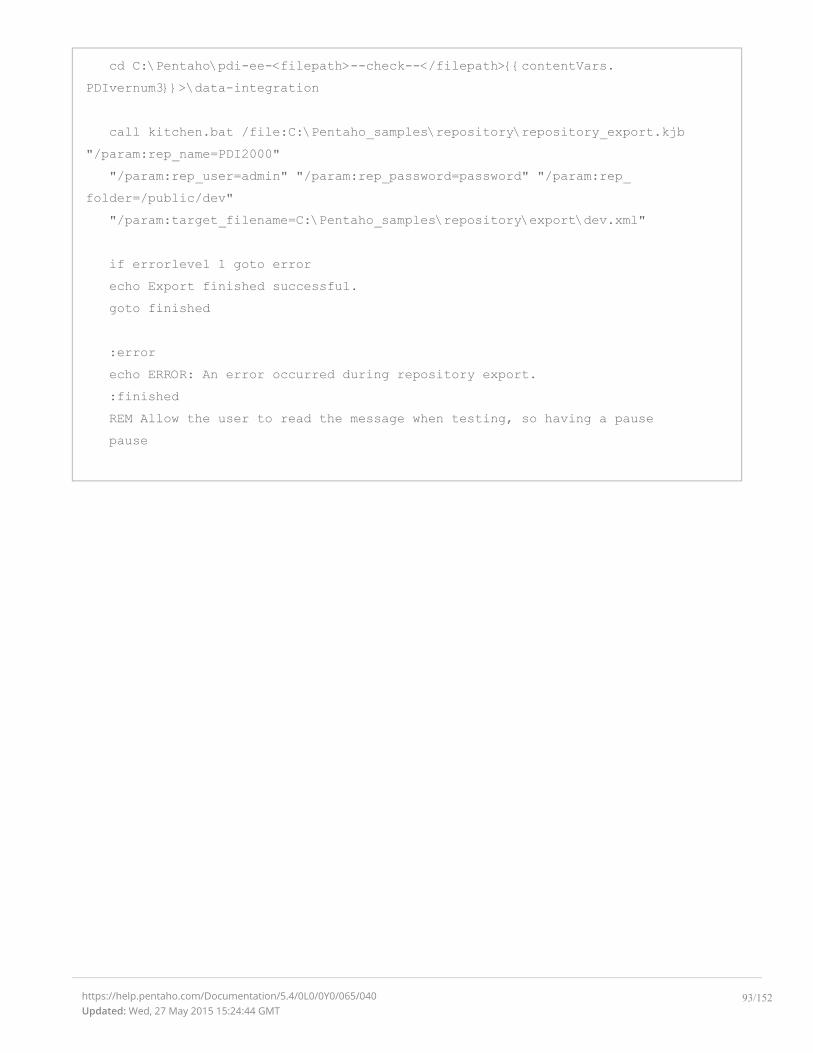
cd C:\Pentaho\pdi-ee-<filepath>--check--</filepath>{{contentVars.PDIvernum3}}>\data-integration
call kitchen.bat /file:C:\Pentaho_samples\repository\repository_export.kjb"/param:rep_name=PDI2000"
"/param:rep_user=admin" "/param:rep_password=password" "/param:rep_folder=/public/dev"
"/param:target_filename=C:\Pentaho_samples\repository\export\dev.xml"
if errorlevel 1 goto errorecho Export finished successful.goto finished
:errorecho ERROR: An error occurred during repository export.:finishedREM Allow the user to read the message when testing, so having a pausepause
https://help.pentaho.com/Documentation/5.4/0L0/0Y0/065/040Updated: Wed, 27 May 2015 15:24:44 GMT
93/152
Performance Monitoring and Logging
Pentaho Data Integration provides you with several methods in which to monitor the performance of jobs and
transformations. Logging offers you summarized information regarding a job or transformation such as the
number of records inserted and the total elapsed time spent in a transformation. In addition, logging provides
detailed information about exceptions, errors, and debugging details.
Reasons you may want to enable logging and step performance monitoring include: determining if a job
completed with errors or to review errors that were encountered during processing. In headless environments,
most ETL in production is not run from the graphical user interface and you need a place to watch initiated job
results. Finally, performance monitoring provides you with useful information for both current performance
problems and capacity planning.
If you are an administrative user and want to monitor jobs and transformations, you must first set up logging
and performance monitoring in Spoon. For more information about monitoring jobs and transformations, see
the section Administer the DI Server.
• Monitoring Step Performance
• Logging Steps
• Logging Transformations
• Pentaho Data Integration Performance Tuning Tips
https://help.pentaho.com/Documentation/5.4/0L0/0Y0/070Updated: Wed, 27 May 2015 15:24:44 GMT
94/152
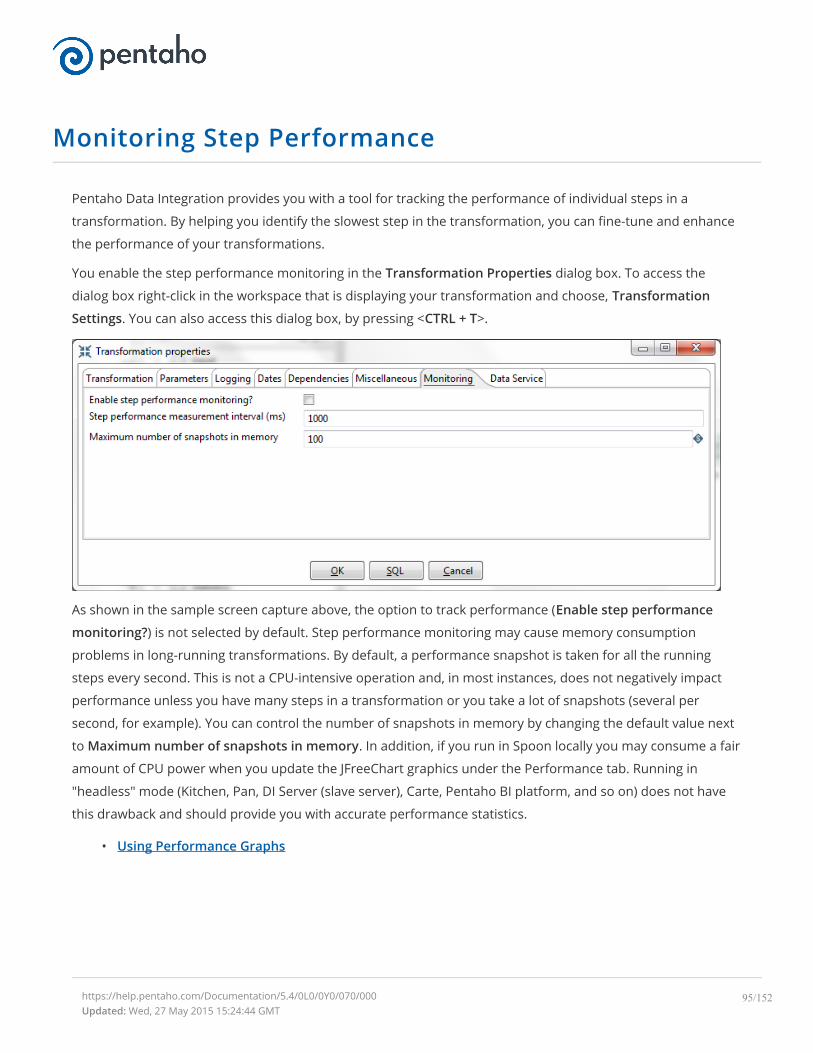
Monitoring Step Performance
Pentaho Data Integration provides you with a tool for tracking the performance of individual steps in a
transformation. By helping you identify the slowest step in the transformation, you can fine-tune and enhance
the performance of your transformations.
You enable the step performance monitoring in the Transformation Properties dialog box. To access the
dialog box right-click in the workspace that is displaying your transformation and choose, Transformation
Settings. You can also access this dialog box, by pressing <CTRL + T>.
As shown in the sample screen capture above, the option to track performance (Enable step performance
monitoring?) is not selected by default. Step performance monitoring may cause memory consumption
problems in long-running transformations. By default, a performance snapshot is taken for all the running
steps every second. This is not a CPU-intensive operation and, in most instances, does not negatively impact
performance unless you have many steps in a transformation or you take a lot of snapshots (several per
second, for example). You can control the number of snapshots in memory by changing the default value next
to Maximum number of snapshots in memory. In addition, if you run in Spoon locally you may consume a fair
amount of CPU power when you update the JFreeChart graphics under the Performance tab. Running in
"headless" mode (Kitchen, Pan, DI Server (slave server), Carte, Pentaho BI platform, and so on) does not have
this drawback and should provide you with accurate performance statistics.
• Using Performance Graphs
https://help.pentaho.com/Documentation/5.4/0L0/0Y0/070/000Updated: Wed, 27 May 2015 15:24:44 GMT
95/152
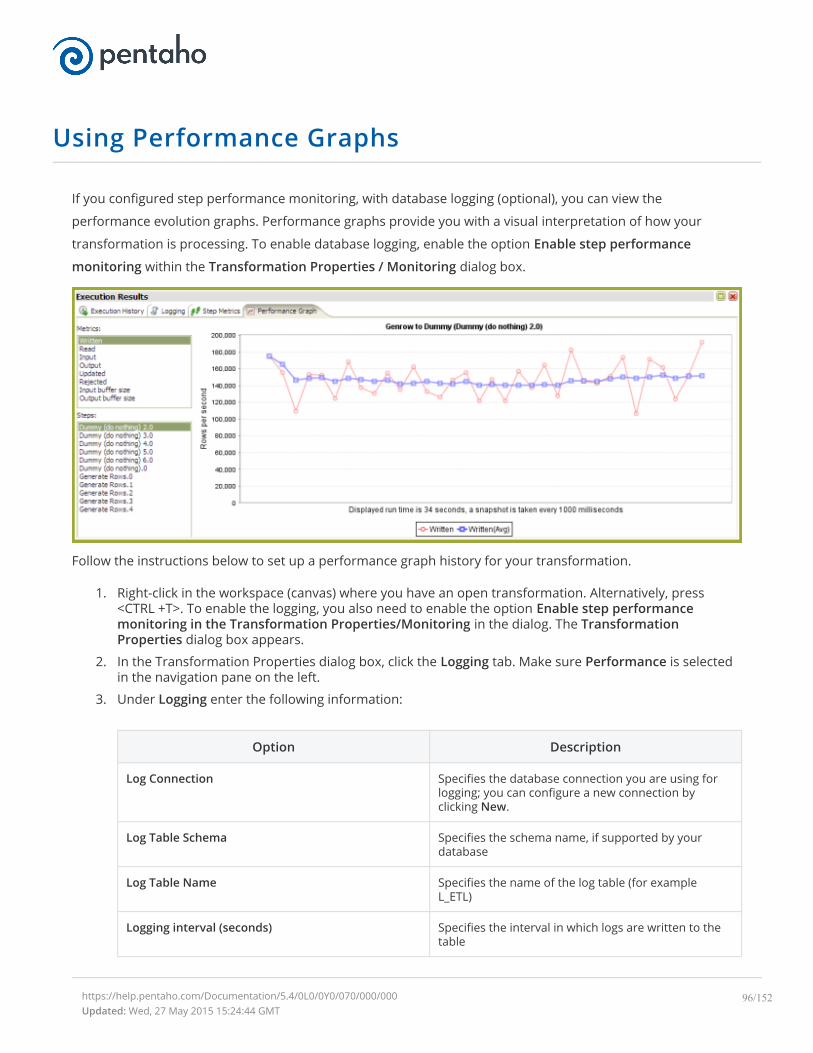
Using Performance Graphs
If you configured step performance monitoring, with database logging (optional), you can view the
performance evolution graphs. Performance graphs provide you with a visual interpretation of how your
transformation is processing. To enable database logging, enable the option Enable step performance
monitoring within the Transformation Properties / Monitoring dialog box.
Follow the instructions below to set up a performance graph history for your transformation.
1. Right-click in the workspace (canvas) where you have an open transformation. Alternatively, press<CTRL +T>. To enable the logging, you also need to enable the option Enable step performancemonitoring in the Transformation Properties/Monitoring in the dialog. The TransformationProperties dialog box appears.
2. In the Transformation Properties dialog box, click the Logging tab. Make sure Performance is selectedin the navigation pane on the left.
3. Under Logging enter the following information:
Option Description
Log Connection Specifies the database connection you are using forlogging; you can configure a new connection byclicking New.
Log Table Schema Specifies the schema name, if supported by yourdatabase
Log Table Name Specifies the name of the log table (for exampleL_ETL)
Logging interval (seconds) Specifies the interval in which logs are written to thetable
https://help.pentaho.com/Documentation/5.4/0L0/0Y0/070/000/000Updated: Wed, 27 May 2015 15:24:44 GMT
96/152

Option Description
Log record timeout (in days) Specifies the number of days old log entries in thetable will be kept before they are deleted
4. Enable the fields you want to log or keep the defaults.
5. Click SQL to create your log table. The Simple SQL Editor appears.
6. Click Execute to execute the SQL code for your log table, then click OK to exit the Results dialog box.Note: You must execute the SQL code to create the log table.
7. Click Close to exit the Simple SQL Editor.
8. Click OK to exit the Transformation Properties dialog box.
https://help.pentaho.com/Documentation/5.4/0L0/0Y0/070/000/000Updated: Wed, 27 May 2015 15:24:44 GMT
97/152
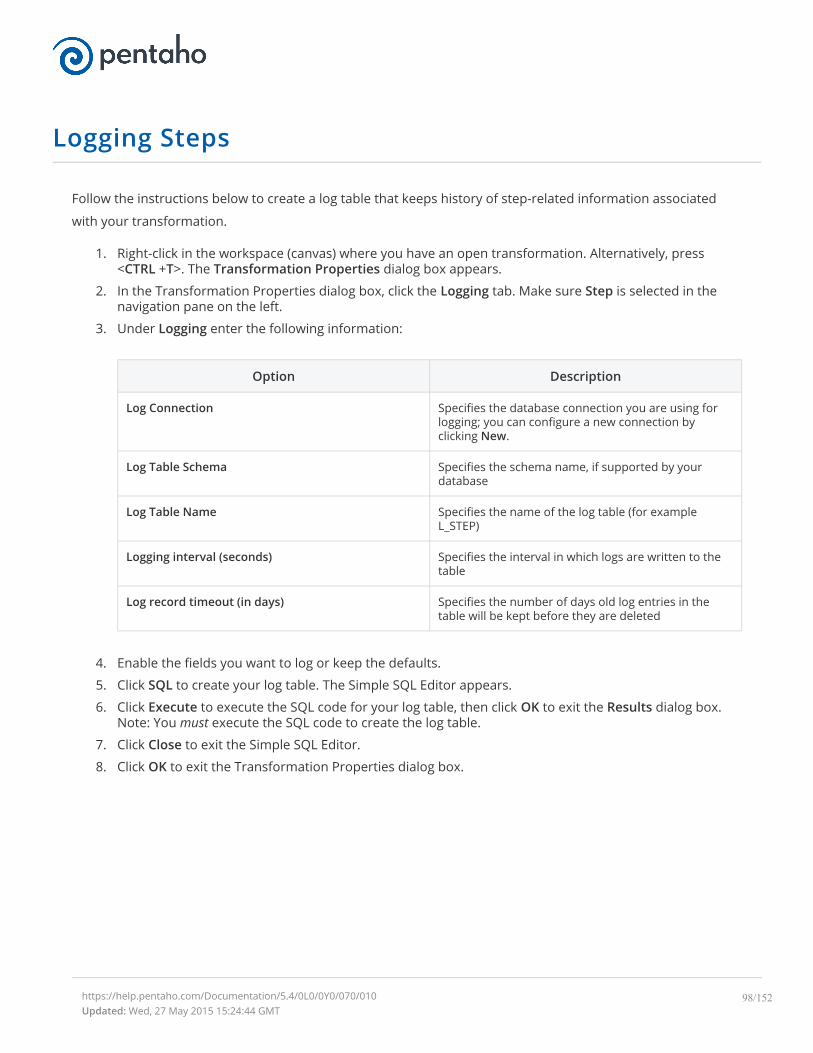
Logging Steps
Follow the instructions below to create a log table that keeps history of step-related information associated
with your transformation.
1. Right-click in the workspace (canvas) where you have an open transformation. Alternatively, press<CTRL +T>. The Transformation Properties dialog box appears.
2. In the Transformation Properties dialog box, click the Logging tab. Make sure Step is selected in thenavigation pane on the left.
3. Under Logging enter the following information:
Option Description
Log Connection Specifies the database connection you are using forlogging; you can configure a new connection byclicking New.
Log Table Schema Specifies the schema name, if supported by yourdatabase
Log Table Name Specifies the name of the log table (for exampleL_STEP)
Logging interval (seconds) Specifies the interval in which logs are written to thetable
Log record timeout (in days) Specifies the number of days old log entries in thetable will be kept before they are deleted
4. Enable the fields you want to log or keep the defaults.
5. Click SQL to create your log table. The Simple SQL Editor appears.
6. Click Execute to execute the SQL code for your log table, then click OK to exit the Results dialog box.Note: You must execute the SQL code to create the log table.
7. Click Close to exit the Simple SQL Editor.
8. Click OK to exit the Transformation Properties dialog box.
https://help.pentaho.com/Documentation/5.4/0L0/0Y0/070/010Updated: Wed, 27 May 2015 15:24:44 GMT
98/152
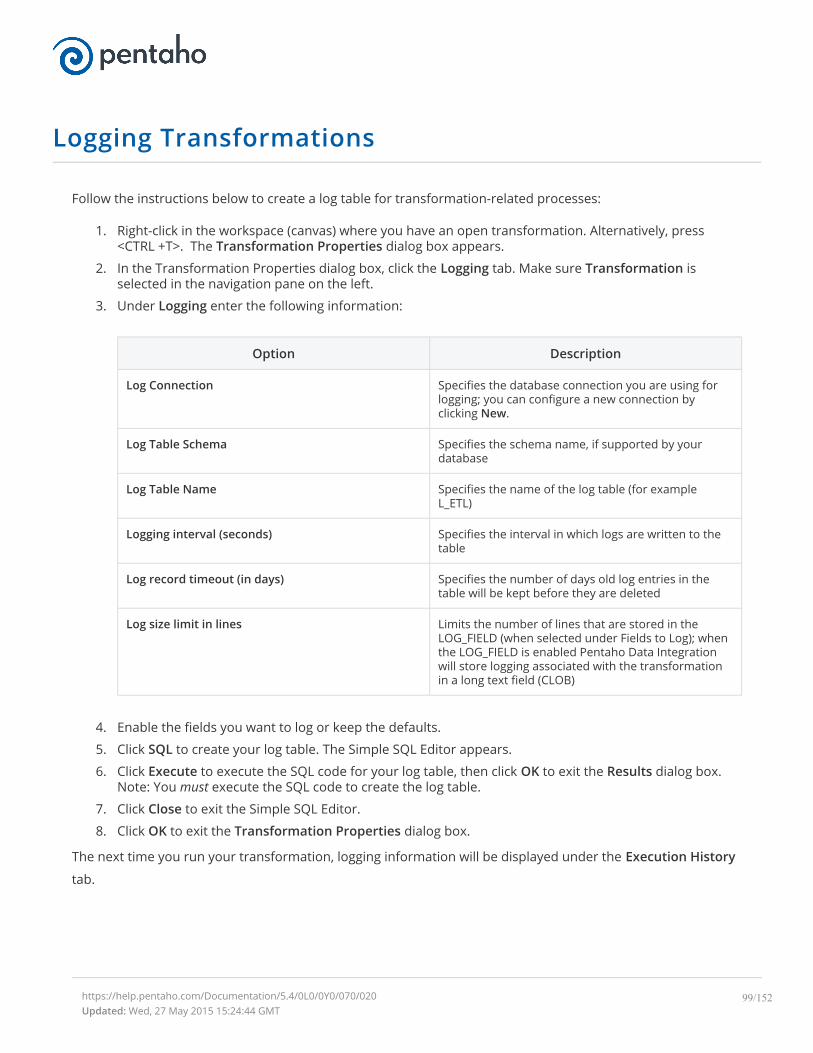
Logging Transformations
Follow the instructions below to create a log table for transformation-related processes:
1. Right-click in the workspace (canvas) where you have an open transformation. Alternatively, press<CTRL +T>. The Transformation Properties dialog box appears.
2. In the Transformation Properties dialog box, click the Logging tab. Make sure Transformation isselected in the navigation pane on the left.
3. Under Logging enter the following information:
Option Description
Log Connection Specifies the database connection you are using forlogging; you can configure a new connection byclicking New.
Log Table Schema Specifies the schema name, if supported by yourdatabase
Log Table Name Specifies the name of the log table (for exampleL_ETL)
Logging interval (seconds) Specifies the interval in which logs are written to thetable
Log record timeout (in days) Specifies the number of days old log entries in thetable will be kept before they are deleted
Log size limit in lines Limits the number of lines that are stored in theLOG_FIELD (when selected under Fields to Log); whenthe LOG_FIELD is enabled Pentaho Data Integrationwill store logging associated with the transformationin a long text field (CLOB)
4. Enable the fields you want to log or keep the defaults.
5. Click SQL to create your log table. The Simple SQL Editor appears.
6. Click Execute to execute the SQL code for your log table, then click OK to exit the Results dialog box.Note: You must execute the SQL code to create the log table.
7. Click Close to exit the Simple SQL Editor.
8. Click OK to exit the Transformation Properties dialog box.
The next time you run your transformation, logging information will be displayed under the Execution History
tab.
https://help.pentaho.com/Documentation/5.4/0L0/0Y0/070/020Updated: Wed, 27 May 2015 15:24:44 GMT
99/152

Pentaho Data Integration Performance Tuning Tips
The tips described here may help you to identify and correct performance-related issues associated with PDI
transformations.
Step Tip Description
JS Turn off compatibilitymode
Rewriting JavaScript to use a format that is not compatible with previousversions is, in most instances, easy to do and makes scripts easier to work withand to read. By default, old JavaScript programs run in compatibility mode. Thatmeans that the step will process like it did in a previous version. You may see asmall performance drop because of the overload associated with forcingcompatibility. If you want make use of the new architecture, disablecompatibility mode and change the code as shown below:
intField.getInteger() > intFieldnumberField.getNumber() > numberFielddateField.getDate() > dateFieldbigNumberField.getBigNumber() > bigNumberFieldand so on...
Instead of Java methods, use the built-in library. Notice that the resultingprogram code is more intuitive. For example :
checking for null is now: field.isNull() > field==nullConverting string to date: field.Clone().str2dat() >str2date(field)and so on...
If you convert your code as shown above, you may get significant performancebenefits.Note: It is no longer possible to modify data in-place using the value methods.This was a design decision to ensure that no data with the wrong type wouldend up in the output rows of the step. Instead of modifying fields in-place,create new fields using the table at the bottom of the Modified JavaScripttransformation.
JS Combine steps One large JavaScript step runs faster than three consecutive smaller steps.Combining processes in one larger step helps to reduce overhead.
JS Avoid the JavaScriptstep or write a customplug in
Remember that while JavaScript is the fastest scripting language for Java, it is stilla scripting language. If you do the same amount of work in a native step orplugin, you avoid the overhead of the JS scripting engine. This has been knownto result in significant performance gains. It is also the primary reason why theCalculator step was created — to avoid the use of JavaScript for simplecalculations.
JS Create a copy of afield
No JavaScript is required for this; a "Select Values" step does the trick. You canspecify the same field twice. Once without a rename, once (or more) with arename. Another trick is to use B=NVL(A,A) in a Calculator step where B is forced
https://help.pentaho.com/Documentation/5.4/0L0/0Y0/070/030Updated: Wed, 27 May 2015 15:24:44 GMT
100/152
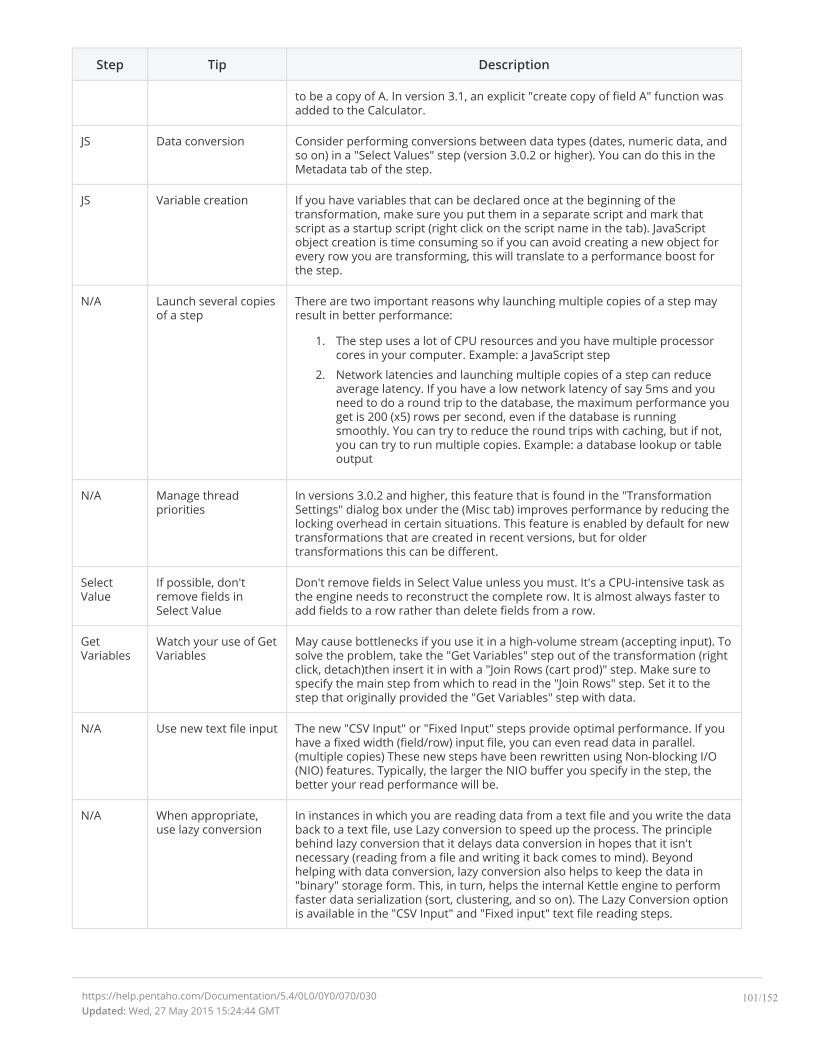
Step Tip Description
to be a copy of A. In version 3.1, an explicit "create copy of field A" function wasadded to the Calculator.
JS Data conversion Consider performing conversions between data types (dates, numeric data, andso on) in a "Select Values" step (version 3.0.2 or higher). You can do this in theMetadata tab of the step.
JS Variable creation If you have variables that can be declared once at the beginning of thetransformation, make sure you put them in a separate script and mark thatscript as a startup script (right click on the script name in the tab). JavaScriptobject creation is time consuming so if you can avoid creating a new object forevery row you are transforming, this will translate to a performance boost forthe step.
N/A Launch several copiesof a step
There are two important reasons why launching multiple copies of a step mayresult in better performance:
1. The step uses a lot of CPU resources and you have multiple processorcores in your computer. Example: a JavaScript step
2. Network latencies and launching multiple copies of a step can reduceaverage latency. If you have a low network latency of say 5ms and youneed to do a round trip to the database, the maximum performance youget is 200 (x5) rows per second, even if the database is runningsmoothly. You can try to reduce the round trips with caching, but if not,you can try to run multiple copies. Example: a database lookup or tableoutput
N/A Manage threadpriorities
In versions 3.0.2 and higher, this feature that is found in the "TransformationSettings" dialog box under the (Misc tab) improves performance by reducing thelocking overhead in certain situations. This feature is enabled by default for newtransformations that are created in recent versions, but for oldertransformations this can be different.
SelectValue
If possible, don'tremove fields inSelect Value
Don't remove fields in Select Value unless you must. It's a CPU-intensive task asthe engine needs to reconstruct the complete row. It is almost always faster toadd fields to a row rather than delete fields from a row.
GetVariables
Watch your use of GetVariables
May cause bottlenecks if you use it in a high-volume stream (accepting input). Tosolve the problem, take the "Get Variables" step out of the transformation (rightclick, detach)then insert it in with a "Join Rows (cart prod)" step. Make sure tospecify the main step from which to read in the "Join Rows" step. Set it to thestep that originally provided the "Get Variables" step with data.
N/A Use new text file input The new "CSV Input" or "Fixed Input" steps provide optimal performance. If youhave a fixed width (field/row) input file, you can even read data in parallel.(multiple copies) These new steps have been rewritten using Non-blocking I/O(NIO) features. Typically, the larger the NIO buffer you specify in the step, thebetter your read performance will be.
N/A When appropriate,use lazy conversion
In instances in which you are reading data from a text file and you write the databack to a text file, use Lazy conversion to speed up the process. The principlebehind lazy conversion that it delays data conversion in hopes that it isn'tnecessary (reading from a file and writing it back comes to mind). Beyondhelping with data conversion, lazy conversion also helps to keep the data in"binary" storage form. This, in turn, helps the internal Kettle engine to performfaster data serialization (sort, clustering, and so on). The Lazy Conversion optionis available in the "CSV Input" and "Fixed input" text file reading steps.
https://help.pentaho.com/Documentation/5.4/0L0/0Y0/070/030Updated: Wed, 27 May 2015 15:24:44 GMT
101/152

Step Tip Description
Join Rows Use Join Rows You need to specify the main step from which to read. This prevents the stepfrom performing any unnecessary spooling to disk. If you are joining with a setof data that can fit into memory, make sure that the cache size (in rows of data)is large enough. This prevents (slow) spooling to disk.
N/A Review the bigpicture: database,commit size, row setsize and other factors
Consider how the whole environment influences performance. There can belimiting factors in the transformation itself and limiting factors that result fromother applications and PDI. Performance depends on your database, yourtables, indexes, the JDBC driver, your hardware, speed of the LAN connection tothe database, the row size of data and your transformation itself. Testperformance using different commit sizes and changing the number of rows inrow sets in your transformation settings. Change buffer sizes in your JDBCdrivers or database.
N/A Step PerformanceMonitoring
Step Performance Monitoring is an important tool that allows you identify theslowest step in your transformation.
https://help.pentaho.com/Documentation/5.4/0L0/0Y0/070/030Updated: Wed, 27 May 2015 15:24:44 GMT
102/152

Impact Analysis
To see what effect your transformation will have on the data sources it includes, go to the Action menu and
click on Impact. PDI will perform an impact analysis to determine how your data sources will be affected by the
transformation if it is completed successfully.
https://help.pentaho.com/Documentation/5.4/0L0/0Y0/070/Impact_AnalysisUpdated: Wed, 27 May 2015 15:24:44 GMT
103/152

Using the SQL Editor
The SQL Editor is good tool to use when you must execute standard SQL commands for tasks such as creating
tables, dropping indexes and modifying fields. The SQL Editor is used to preview and execute DDL (Data
Definition Language) generated by Spoon such as "create/alter table, "create index," and "create sequence"
SQL commands. For example, if you add a Table Output step to a transformation and click the SQL button at
the bottom of the Table Input dialog box, Spoon automatically generates the necessary DDL for the output
step to function properly and presents it to the end user through the SQL Editor.
Below are some points to consider:
Multiple SQL Statements must be separated by semi-colons.
Before SQL Statements are sent to the database to be executed, Spoon removes returns, line-feeds, andseparating semi-colons.
Pentaho Data Integration clears the database cache for the database connection on which you launch DDLstatements.
The SQL Editor does not recognize the dialects of all supported databases. That means that creating stored
procedures, triggers, and other database-specific objects may pose problems. Consider using the tools that
came with the database in these instances.
https://help.pentaho.com/Documentation/5.4/0L0/0Y0/080Updated: Wed, 27 May 2015 15:24:44 GMT
104/152

Interacting With Web Services
PDI jobs and transformations can interact with a variety of Web services through specialized steps. How you
use these steps, and which ones you use, is largely determined by your definition of "Web services." The most
commonly used Web services steps are:
Web Service Lookup
Modified Java Script Value
RSS Input
HTTP Post
The Web Service Lookup Step is useful for selecting and setting input and output parameters via WSDL, but
only if you do not need to modify the SOAP request. You can see this step in action in the Web Services - NOAA
Latitude and Longitude.ktr sample transformation included with PDI in the /data-integration/samples/transformations/ directory.
There are times when the SOAP message generated by the Web Services Lookup step is insufficient. Many Web
services require the security credentials be placed in the SOAP request headers. There may also be a need to
parse the response XML to get more information than the response values provide (such as namespaces). In
cases like these, you can use the Modified Java Script Value step to create whatever SOAP envelope you need.
You would then hop to an HTTP Post step to accept the SOAP request through the input stream and post it to
the Web service, then hop to another Modified Java Script Value to parse the response. The General -
Annotated SOAP Web Service call.ktr sample in the /data-integration/samples/transformations/directory shows this theory in practice.
https://help.pentaho.com/Documentation/5.4/0L0/0Y0/090Updated: Wed, 27 May 2015 15:24:44 GMT
105/152
Rapid Analysis Schema Prototyping
Data Integration offers rapid prototyping of analysis schemas through a mix of processes and tools known as
Agile BI. The Agile BI functions of Pentaho Data Integration are explained in this section, but there is no further
instruction here regarding PDI installation, configuration, or use beyond OLAP schema creation. If you need
information related to PDI in general, consult the section on installing PDI and/or the section on working with
PDI in the Pentaho InfoCenter.Note: Agile BI is for prototyping only. It is extremely useful as an aid in developing OLAP schemas that meetthe needs of BI developers, business users, and database administrators. However, it should not be used forproduction. Once your Agile BI schema has been refined, you will have to either hand-edit it in SchemaWorkbench to optimize it for performance, or completely re-implement the entire model with SchemaWorkbench.
• Creating a Prototype Schema With a Non-PDI Data Source
• Creating a Prototype Schema With a PDI Data Source
• Prototypes in Production
https://help.pentaho.com/Documentation/5.4/0L0/0Y0/0A0Updated: Wed, 27 May 2015 15:24:44 GMT
106/152

Creating a Prototype Schema With a Non-PDI DataSource
Your data sources must be configured, running, and available before you can proceed with this step.
Follow the below procedure to create a OLAP schema prototype from an existing database, file, or data
warehouse.Note: If you are already using PDI to create your data source, skip these instructions and refer to Creating aPrototype Schema With a PDI Data Source instead.
1. Start Spoon and connect to your repository, if you are using one.
cd ~/pentaho/design-tools/data-integration/ && ./spoon.sh
2. Go to the File menu, then select the New sub-menu, then click on Model. The interface will switch overto the Model perspective.
3. In the Properties pane on the right, click Select. A data source selection window will appear.
4. Click the round green + icon in the upper right corner of the window. The Database Connectiondialogue will appear.
5. Enter in and select the connection details for your data source, then click Test to ensure that everythingis correct. Click OK when you're done.
6. Select your newly-added data source, then click OK. The Database Explorer will appear.
7. Traverse the database hierarchy until you get to the table you want to create a model for. Right-clickthe table, then select Model from the context menu. The Database Explorer will close and bring youback to the Model perspective.
8. Drag items from the Data pane on the left and drop them into either the Measures or Dimensionsgroups in the Model pane in the center. The Measures and Dimensions groups will expand to includethe items you drag into them.
9. Select each new measure and dimension item, and modify its details accordingly in the Propertiespane on the right.
10. Save your model through the File menu, or publish it to the BA Server using the Publish icon above theModel pane.
You now have a basic OLAP schema. You should test it yourself before putting it into production. To do this,continue on to Testing With Pentaho Analyzer and Report Wizard.
https://help.pentaho.com/Documentation/5.4/0L0/0Y0/0A0/000Updated: Wed, 27 May 2015 15:24:44 GMT
107/152
Creating a Prototype Schema With a PDI Data Source
1. Start Spoon and connect to your repository, if you are using one.
cd ~/pentaho/design-tools/data-integration/ && ./spoon.sh
2. Open the transformation that produces the data source you want to create a OLAP schema for.
3. Right-click your output step, then select Model from the context menu.
4. Drag items from the Data pane on the left and drop them into either the Measures or Dimensionsgroups in the Model pane in the center. The Measures and Dimensions groups will expand to includethe items you drag into them.
5. Select each new measure and dimension item, and modify its details accordingly in the Propertiespane on the right.
6. Save your model through the File menu, or publish it to the BA Server using the Publish icon above theModel pane.
You now have a basic OLAP schema. You should test it yourself before putting it into production. To do this,continue on to Testing With Pentaho Analyzer and Report Wizard.
https://help.pentaho.com/Documentation/5.4/0L0/0Y0/0A0/010Updated: Wed, 27 May 2015 15:24:44 GMT
108/152

Testing With Pentaho Analyzer and Report Wizard
You must have an analysis schema with at least one measure and one dimension, and it must be currentlyopen and focused on the Model perfective in Spoon.
This section explains how to use the embedded Analyzer and Report Design Wizard to test a prototype analysis
schema.
1. While in the Model perspective, select your visualization method from the drop-down box above theData pane (it has a New: to its left), then click Go. The two possible choices are: Pentaho Analyzer andReport Wizard. You do not need to have license keys for Pentaho Analysis or Pentaho Reporting inorder to use these preview tools.
2. Either the Report Design Wizard will launch in a new sub-window, or Pentaho Analyzer will launch in anew tab. Use it as you would in Report Designer or the Pentaho User Console.
3. When you have explored your new schema, return to the Model perspective by clicking Model in theupper right corner of the Spoon toolbar, where all of the perspective buttons are. Do not close the tab;this will close the file, and you will have to reopen it in order to adjust your schema.
4. If you continue to refine your schema in the Model perspective, you must click the Go button againeach time you want to view it in Analyzer or Report Wizard; the Visualize perspective does notautomatically update according to the changes you make within the Model perspective.
You now have a preview of what your model will look like in production. Continue to refine it through theModel perspective, and test it through the Visualize perspective, until you meet your initial requirements.
https://help.pentaho.com/Documentation/5.4/0L0/0Y0/0A0/020Updated: Wed, 27 May 2015 15:24:44 GMT
109/152

Prototypes in Production
Once you're ready to test your OLAP schema on a wider scale, use the Publish button above the Model pane in
the Model perspective, and use it to connect to your test or development BA Server.
You can continue to refine your schema if you like, but it must be republished each time you want to redeploy
it.Note: Agile BI is for prototyping only. It is extremely useful for developing OLAP schemas that meet the needsof business analytics developers, business users, and database administrators. However, it should not be usedfor production. Rather, once your Agile BI schema has been refined, you will have to either hand-edit it inSchema Workbench to optimize it for performance, or completely re-implement the entire model with SchemaWorkbench.
https://help.pentaho.com/Documentation/5.4/0L0/0Y0/0A0/030Updated: Wed, 27 May 2015 15:24:44 GMT
110/152
About PDI Marketplace
Use Marketplace to share, download, and install plugins developed by members of the user community or
Pentaho. The Marketplace presents a list of plugins, indicates whether they have been installed, and displays
other information about the plugin, such as where to obtain technical support. Access Marketplace from the
Help menu in Spoon. To learn how to use Marketplace to install a plugin, see the Install Only DI Tools article.To learn more about Marketplace, visit our wiki.
https://help.pentaho.com/Documentation/5.4/0L0/0Y0/0B0Updated: Wed, 27 May 2015 15:24:44 GMT
111/152
Transformation Step Reference
This section contains reference documentation for transformation steps.Note: Many steps are not completely documented in this section, but have rough definitions in the PentahoWiki: http://wiki.pentaho.com/display/EAI/Pentaho+Data+Integration+Steps.
• Agile
• Big Data
• Input
• Output
• Transform
• Utility
• Flow
• Scripting
• BA Server
• Lookup
• Joins
• Data Warehouse
• Validation
• Statistics
• Palo
• Job
• Mapping
• Bulk Loading
• Inline
• Data Mining Steps
• Experimental
• Deprecated
https://help.pentaho.com/Documentation/5.4/0L0/0Y0/0K0Updated: Wed, 27 May 2015 15:24:44 GMT
112/152
Agile
The PDI transformation steps in this section pertain to Agile Mart.
MonetDB Agile Mart
Table Agile Mart
https://help.pentaho.com/Documentation/5.4/0L0/0Y0/0K0/000Updated: Wed, 27 May 2015 15:24:45 GMT
113/152
Big Data
The PDI transformation steps in this section pertain to Big Data operations.Note: PDI is configured by default to use the Apache Hadoop distribution. If you are working with a Cloudera orMapR distribution instead, you must install the appropriate patch before using any Hadoop functions in PDI.Patch installation is covered in Select DI Installation Options and Getting Started with PDI and Hadoop.
Avro Input
Cassandra Input
Cassandra Output
CouchDB
Hadoop File Input
Hadoop File Output
HBase Input
HBase Output
HBase Row Decoder
MapReduce Input
MapReduce Output
MongoDB Input
MongoDB Output
Splunk Input
Splunk Output
SSTable Output
https://help.pentaho.com/Documentation/5.4/0L0/0Y0/0K0/010Updated: Wed, 27 May 2015 15:24:45 GMT
114/152
Input
The PDI transformation steps in this section pertain to various methods of data input.
CSV file input
Data Grid
De-serialize from file
Email messages input
ESRI Shapefile Reader
Fixed file input
Generate random credit card numbers
Generate random value
Generate Rows
Get data from XML
Get File Names
Get File Rows Count
Get repository names
Get SubFolder names
Get System Info
Get tables names
Google Analytics
Google Docs Input
GZIP CSV Input
HL7 Input
IBM Websphere MQ Consumer
JMS Consumer
JSON Input
LDAP Input
LDIF Input
https://help.pentaho.com/Documentation/5.4/0L0/0Y0/0K0/020Updated: Wed, 27 May 2015 15:24:45 GMT
115/152

Load file content in memory
Microsoft Access Input
Microsoft Excel Input
Mondrian Input
OLAP Input
Property Input
RSS Input
S3 CSV Input
Salesforce Input
SAP Input
SAS Input
Table input
Text file input
XBase Input
XML Input Stream (StAX)
Yaml Input
https://help.pentaho.com/Documentation/5.4/0L0/0Y0/0K0/020Updated: Wed, 27 May 2015 15:24:45 GMT
116/152

Output
The PDI transformation steps in this section pertain to various methods of data output.
Automatic Documentation Output
Delete
IBM Websphere MQ Producer
Insert - Update
JMS Producer
Json Output
LDAP Output
Microsoft Access Output
Microsoft Excel Output
Microsoft Excel Writer
RSS Output
OpenERP Object Output
Properties Output
RSS Output
S3 File Output
Salesforce Delete
Salesforce Insert
Salesforce Update
Salesforce Upsert
Serialize to file
SQL File Output
Synchronize after merge
Table Output
Text File Output
Update
https://help.pentaho.com/Documentation/5.4/0L0/0Y0/0K0/030Updated: Wed, 27 May 2015 15:24:45 GMT
117/152

XML Output
https://help.pentaho.com/Documentation/5.4/0L0/0Y0/0K0/030Updated: Wed, 27 May 2015 15:24:45 GMT
118/152
Transform
The PDI transformation steps in this section pertain to various data modification tasks.
Add a checksum
Add constants
Add sequence
Add value fields changing sequence
Add XML
Calculator
Closure Generator
Concat Fields
Example Plugin
Get ID from slave server
Number range
Replace in string
Row denormaliser
Row flattener
Row Normaliser
Select values
Set field value
Set field value to a constant
Sort rows
Split field to rows
Split Fields
String operations
Strings cut
Unique rows
Unique rows (HashSet)
https://help.pentaho.com/Documentation/5.4/0L0/0Y0/0K0/040Updated: Wed, 27 May 2015 15:24:45 GMT
119/152

Value Mapper
XSL Transformation
https://help.pentaho.com/Documentation/5.4/0L0/0Y0/0K0/040Updated: Wed, 27 May 2015 15:24:45 GMT
120/152
Utility
The PDI transformation steps in this section pertain to various conditional and data processing tasks.
Change file encoding
Clone row
Delay row
Edi to XML
Execute a process
If field value is null
Metadata structure of stream
Null if
Process files
Run SSH commands
Send message to Syslog
Table Compare
Write to log
Zip file
https://help.pentaho.com/Documentation/5.4/0L0/0Y0/0K0/050Updated: Wed, 27 May 2015 15:24:45 GMT
121/152

Flow
The PDI transformation steps in this section pertain to various process control tasks.
Abort
Append Streams
Block this step until steps finish
Blocking Step
Detect empty stream
Dummy (do nothing)
ETL Metadata Injection
Filter rows
Identify last row in a stream
Java Filter
Job Executor
Prioritize streams
Single Threader
Switch / Case
Transformation Executor
https://help.pentaho.com/Documentation/5.4/0L0/0Y0/0K0/060Updated: Wed, 27 May 2015 15:24:45 GMT
122/152
Scripting
The PDI transformation steps in this section pertain to formula and script execution.
Execute row SQL script
Execute SQL script
Formula
Modified Java Script Value
R Script Executor
Regex Evaluation
Rule Accumulator
Rule Executor
User Defined Java Class
User Defined Java Expression
https://help.pentaho.com/Documentation/5.4/0L0/0Y0/0K0/070Updated: Wed, 27 May 2015 15:24:45 GMT
123/152
Lookup
The PDI transformation steps in this section pertain to status checking and remote service interaction.
Call DB Procedure
Check if the a column exists
Check if file is locked
Check if webservice is available
Database join
Database lookup
Dynamic SQL row
File exists
Fuzzy match
HTTP client
HTTP Post
MaxMind GeoIP Lookup
REST Client
Stream lookup
Table exists
Web services lookup
https://help.pentaho.com/Documentation/5.4/0L0/0Y0/0K0/080Updated: Wed, 27 May 2015 15:24:45 GMT
124/152
Joins
The PDI transformation steps in this section pertain to database and file join operations.
Join Rows (Cartesian product)
Merge Join
Merge Rows (diff)
Multiway Merge Join
Sorted
XML Join
https://help.pentaho.com/Documentation/5.4/0L0/0Y0/0K0/090Updated: Wed, 27 May 2015 15:24:45 GMT
125/152
Data Warehouse
The PDI transformation steps in this section pertain to data warehouse functions.
Combination Lookup/Update
Dimension Lookup/Update
https://help.pentaho.com/Documentation/5.4/0L0/0Y0/0K0/0A0Updated: Wed, 27 May 2015 15:24:45 GMT
126/152

Validation
The PDI transformation steps in this section pertain to data validation.
Credit Card Validator
Data Validator
Mail Validator
XSD Validator
https://help.pentaho.com/Documentation/5.4/0L0/0Y0/0K0/0B0Updated: Wed, 27 May 2015 15:24:45 GMT
127/152

Statistics
The PDI transformation steps in this section pertain to statistics and analysis.
Analytic Query
Group By
Memory Group by
Output Steps Metrics
R script executor
Reservoir Sampling
Sample Rows
Univariate Statistics
https://help.pentaho.com/Documentation/5.4/0L0/0Y0/0K0/0C0Updated: Wed, 27 May 2015 15:24:45 GMT
128/152
Palo
The PDI transformation steps in this section pertain to interactivity with Palo business intelligence software.
Palo Cell Input
Palo Cell Output
Palo Dim Input
Palo Dim Output
https://help.pentaho.com/Documentation/5.4/0L0/0Y0/0K0/0D0Updated: Wed, 27 May 2015 15:24:45 GMT
129/152

Job
The PDI transformation steps in this section pertain to interactivity with a PDI job that is calling this
transformation (a parent job).
Copy rows to result
Get files from result
Get rows from result
Get Variables
Set files in result
Set Variables
https://help.pentaho.com/Documentation/5.4/0L0/0Y0/0K0/0E0Updated: Wed, 27 May 2015 15:24:45 GMT
130/152
Mapping
The PDI transformation steps in this section pertain to value mapping.
Mapping Input Specification
Mapping Output Specification
Mapping (sub-transformation)
Simple Mapping (sub-transformation)
https://help.pentaho.com/Documentation/5.4/0L0/0Y0/0K0/0F0Updated: Wed, 27 May 2015 15:24:45 GMT
131/152
Bulk Loading
The PDI transformation steps in this section pertain to bulk loading of data.
Infobright Loader
ElasticSearch Bulk Insert
Greenplum Bulk Loader
Greenplum Load
Ingres VectorWise Bulk Loader
LucidDB Streaming Loader
MonetDB Bulk Loader
MySQL Bulk Loader
Oracle Bulk Loader
PostgreSQL Bulk Loader
Teradata Fastload Bulk Loader
Vertica Bulk Loader
https://help.pentaho.com/Documentation/5.4/0L0/0Y0/0K0/0G0Updated: Wed, 27 May 2015 15:24:45 GMT
132/152
Inline
The PDI transformation steps in this section pertain to inline data modification.
Injector
Socket reader
Socket writer
https://help.pentaho.com/Documentation/5.4/0L0/0Y0/0K0/0H0Updated: Wed, 27 May 2015 15:24:45 GMT
133/152

Data Mining Steps
The PDI transformation steps in this section pertain to using Data Mining (Weka) plugins.
ARFF Output
Knowledge Flow
WEKA Forecasting
WEKA Scoring
https://help.pentaho.com/Documentation/5.4/0L0/0Y0/0K0/0I0Updated: Wed, 27 May 2015 15:24:45 GMT
134/152
Experimental
The PDI transformation steps in this section are experimental steps.
Script
SFTP Put
https://help.pentaho.com/Documentation/5.4/0L0/0Y0/0K0/0J0Updated: Wed, 27 May 2015 15:24:45 GMT
135/152
Deprecated
The PDI transformation steps in this section pertain to steps which have been deprecated.
Aggregate Rows
Get previous row fields
Google Analytics Input
LucidDB Bulk Loader
Streaming XML Input
XML Input
https://help.pentaho.com/Documentation/5.4/0L0/0Y0/0K0/0K0Updated: Wed, 27 May 2015 15:24:45 GMT
136/152

BA Server
These are steps for creating a session with your BA Server to call APIs in your transformation.
• Call Endpoint
• Get Session Variables
• Set Session Variables
https://help.pentaho.com/Documentation/5.4/0L0/0Y0/0K0/BA_ServerUpdated: Wed, 27 May 2015 15:24:45 GMT
137/152

Job Entry Reference
This section contains reference documentation for job entries.Note: Many entries are not completely documented in this section, but have rough definitions in the PentahoWiki: http://wiki.pentaho.com/display/EAI/Pentaho+Data+Integration+Job+Entries.
• File Encryption
• Big Data
• General
• File Management
• Conditions
• Scripting
• Bulk Loading
• XML
• Utility
• Repository
• File Transfer
• Palo
• Deprecated
https://help.pentaho.com/Documentation/5.4/0L0/0Y0/0L0Updated: Wed, 27 May 2015 15:24:45 GMT
138/152
File Encryption
The PDI job entries in this section pertain to file encryption operations.
Decrypt files with PGP
Encrypt files with PGP
Verify file signature with PGP
https://help.pentaho.com/Documentation/5.4/0L0/0Y0/0L0/000Updated: Wed, 27 May 2015 15:24:45 GMT
139/152

Big Data
The PDI job entries in this section pertain to Hadoop functions.Note: PDI is configured by default to use the Apache Hadoop distribution. If you are working with a Cloudera orMapR distribution instead, you must install the appropriate patch before using any Hadoop functions in PDI.Patch installation is covered in Data Integration Installation and Work with Big Data.
Amazon EMR Job Executor
Amazon Hive Job Executor
Hadoop Copy Files
Hadoop Job Executor
Oozie Job Executor
Pentaho MapReduce
Pig Script Executor
Sqoop Export
Sqoop Import
https://help.pentaho.com/Documentation/5.4/0L0/0Y0/0L0/010Updated: Wed, 27 May 2015 15:24:45 GMT
140/152
General
The PDI job entries in this section pertain to general data integration functions.
DUMMY
Example Plugin
Job
Set variables
START
Success
Transformation
https://help.pentaho.com/Documentation/5.4/0L0/0Y0/0L0/020Updated: Wed, 27 May 2015 15:24:45 GMT
141/152
The PDI job entries in this section pertain to email operations.
Get mails (POP3/IMAP)
Mail Validator
https://help.pentaho.com/Documentation/5.4/0L0/0Y0/0L0/030Updated: Wed, 27 May 2015 15:24:45 GMT
142/152
File Management
The PDI job entries in this section pertain to file input/output operations.
Add filenames to result
Compare folders
Convert file between Windows and UNIX
Copy Files
Create a folder
Create a file
Delete a file
Delete filenames from result
Delete files
Delete folders
File Compare
HTTP
Move Files
Process result filenames
Unzip file
Wait for file
Write to file
Zip file
https://help.pentaho.com/Documentation/5.4/0L0/0Y0/0L0/040Updated: Wed, 27 May 2015 15:24:45 GMT
143/152

Conditions
The PDI job entries in this section pertain to conditional functions.
Check DB Connections
Check Files Locked
Check if a folder is empty
Check webservice availability
Checks if files exist
Columns exist in a table
Evaluate files metrics
Evaluate rows number in a table
File exists
Simple evaluation
Table exists
Wait for
https://help.pentaho.com/Documentation/5.4/0L0/0Y0/0L0/050Updated: Wed, 27 May 2015 15:24:45 GMT
144/152
Scripting
The PDI job entries in this section pertain to script execution.
JavaScript
Shell
SQL
https://help.pentaho.com/Documentation/5.4/0L0/0Y0/0L0/060Updated: Wed, 27 May 2015 15:24:45 GMT
145/152
Bulk Loading
The PDI job entries in this section pertain to bulk loading of data.
BulkLoad from MySQL into File
BulkLoad into MSSQL
BulkLoad into MySQL
MS Access Bulk Load
https://help.pentaho.com/Documentation/5.4/0L0/0Y0/0L0/070Updated: Wed, 27 May 2015 15:24:45 GMT
146/152
XML
The PDI job entries in this section pertain to XML validation and XSL execution.
Check if XML file is well formed
DTD Validator
XSD Validator
XSL Transformation
https://help.pentaho.com/Documentation/5.4/0L0/0Y0/0L0/080Updated: Wed, 27 May 2015 15:24:45 GMT
147/152

Utility
The PDI job entries in this section pertain to a variety of special-case job operations.
Abort job
Display Msgbox Info
HL7 MLLP Acknowledge
HL7 MLLP Input
Ping a host
Send information using Syslog
Send SNMP trap
Talend Job Execution
Truncate tables
Wait for SQL
Write to Log
https://help.pentaho.com/Documentation/5.4/0L0/0Y0/0L0/090Updated: Wed, 27 May 2015 15:24:45 GMT
148/152
Repository
The PDI job entries in this section pertain to PDI database or solution repository functions.
Check if connected to repository
Export repository to XML file
https://help.pentaho.com/Documentation/5.4/0L0/0Y0/0L0/0A0Updated: Wed, 27 May 2015 15:24:45 GMT
149/152
File Transfer
The PDI job entries in this section pertain to file transfer operations.
FTP Delete
Get a file with FTP
Get a file with FTPS
Get a file with SFTP
Put a file with FTP
Put a file with SFTP
Upload files to FTPS
https://help.pentaho.com/Documentation/5.4/0L0/0Y0/0L0/0B0Updated: Wed, 27 May 2015 15:24:45 GMT
150/152
Palo
The PDI job entries in this section pertain to Palo databases.
Palo Cube Create
Palo Cube Delete
https://help.pentaho.com/Documentation/5.4/0L0/0Y0/0L0/0C0Updated: Wed, 27 May 2015 15:24:45 GMT
151/152

Deprecated
The PDI job entries in this section pertain to job entries which have been deprecated.
SSH2 Get
SSH2 Put
https://help.pentaho.com/Documentation/5.4/0L0/0Y0/0L0/0D0Updated: Wed, 27 May 2015 15:24:45 GMT
152/152


![Chapter 01: Getting Started with Pentaho Data Integration · [ 157 ] Chapter 16: Best Practices for Designing and Deploying a PDI Project](https://static.documents.pub/doc/80x56/5aea3a587f8b9ac3618d7f6c/chapter-01-getting-started-with-pentaho-data-integration-157-chapter-16-best.jpg)


![[ Getting Acquainted with Pentaho Components ]reportes.fuxionbiotech.com/pentaho/docs/components.pdf · [ Getting Acquainted with Pentaho Components ]] ... Pentaho BA Suite helps](https://static.documents.pub/doc/80x56/5ad7ac027f8b9a991b8c5bad/-getting-acquainted-with-pentaho-components-getting-acquainted-with-pentaho-components.jpg)


