178
Version 6.5 Users Guide

Version 6.5 Users Guide

Layton Technology Page 2 of 178 Layton ServiceDesk v6 User Manual v2.0
INTRODUCTION 9
HOW TO USE THIS GUIDE 9
INSTALLATION PROCEEDURE 10
SYSTEM OVERVIEW 12
SYSTEM CONCEPTS AND TERMINOLOGY 12
Requests 12
Problems 13
Changes 13
System Access and Menu Structure 13
End Users 14
Analysts 15
Analyst Groups 16
Request Ownership 16
Request Assignment 16
Comments 17
Tasks or Actions 17
Priority and Service Level Agreements 18
Request and Problem Escalation Process 18
Change Advisory Board (CAB) 19
Request Types 19
Solutions 20
Company 20
Site 21
Asset 21
Whiteboard 22
Survey 22
Layton ServiceDesk Process Flow Diagram http://laytonsupport.com/index.php?oldid=1345 22
CONFIGURING THE SYSTEM 23
MANAGE COMPANY, SITE & DEPARTMENT 24

Layton Technology Page 3 of 178 Layton ServiceDesk v6 User Manual v2.0
Manage Company 24
Manage Site 25
Manage Department 25
ANALYSTS, ANALYST GROUPS AND CAB GROUPS 25
Manage Analyst 26
Analyst Request Classes 26
Analyst Skills 26
Analyst Sites 27
Analyst Settings 27
Manage Analyst Groups 28
Manage CAB Group 28
Manage Analyst Absence Type 29
END USERS 35
Import End Users via Active Directory (LDAP) 36
Import End Users (from a text file) 36
Manage End User – Manual Entry 36
End User Self Registration 37
Add End Users “on the fly” 37
CREATE AND DEFINE LIBRARIES 37
Request Classes 38
Request Type 38
Request Statuses 41
Request Templates 41
Task Types 42
Recurring Tasks 42
Priority / SLA 43
Problem Statuses 47
Change Types 48
Change Statuses 48
Services 48

Layton Technology Page 4 of 178 Layton ServiceDesk v6 User Manual v2.0
Impact 48
Urgency 49
Email Key Words 49
Cost (Catalogue) Items 49
Email Bodies 49
Drop Down Lists 50
Brands 51
DATA DESIGN 51
Table Definitions 51
FORM DESIGN 52
Using the Form Design Toolbar 55
Defining a new field 56
Editing Objects 57
Adding Images 57
Adding Hyperlinks 58
HTML Editor 59
Web Tab 60
Summary of Form Objects 63
QUICK INFO DESIGN 65
GLOBAL LIST VIEWS / ANALYST LIST VIEWS 65
Heading & Position Changes 67
Adding Data Fields. 68
Editing & Deleting Data Fields 68
Setting The List View Properties 68
SOLUTIONS BASE 69
New Solutions 69
Self Service 70
Solution Pop-Ups 70
ANALYST SETTINGS 71
My Password 71

Layton Technology Page 5 of 178 Layton ServiceDesk v6 User Manual v2.0
Home Screen 71
List View Settings 72
Quick Action 72
SURVEYS 74
TASK SCHEDULING 76
Adding a Task 76
Viewing and Progressing Tasks 77
SEARCHING 80
DASHBOARD 81
REPORTING 82
Creating a New Report 83
Creating a Grid Report 84
Applying Filters & Summaries 85
Grouping, Sorting & Filtering Grid Reports on the Fly 87
Creating Charts 87
CALENDAR 90
The Calendar View 93
Viewing Call Backs, Tasks and Appointments 95
Analyst Availability View 96
ASSETS (AuditWizard Connection) 97
Viewing an Asset 98
Searching for an Asset 100
USING LAYTON SERVICEDESK (ANALYST) 101
SYSTEM ACCESS AND MENU 101
Logon Page 101
Analyst Menu 101
Whiteboard & Analyst Group Queues 102
LOGGING A NEW REQUEST (ANALYST) 103
Request Number & Time Stamp 104
End User Details 104

Layton Technology Page 6 of 178 Layton ServiceDesk v6 User Manual v2.0
Asset Information 104
Site 105
Request Type, Problem Summary & Description 105
Request Assignment & Ownership 106
Priority & Service Level Agreements 107
Service, Impact & Urgency 108
Linking Requests and the Parent/Child relationship 108
Finding and Entering Solutions 109
Additional Analyst Request Functions 110
Converting an Incoming Email into a Request 113
VIEWING AND EDITING REQUESTS 113
Comments 116
Request Attachments 116
Spawned Request 117
Request Costs 117
LOGGING A NEW PROBLEM 119
Problem ID Number & Time Stamp 120
Problem Assignment 120
Priority, Urgency & Impact 121
Services Affected 122
Assets Affected 123
Problem Type, Problem Summary & Description 124
Finding and Entering Solutions 124
Additional Problem Functions 125
Converting an Incoming Email into a Problem 126
Closing the Problem and linked Requests 127
LOGGING A NEW CHANGE 127
Change ID Number & Time Stamp 129
Change Requested By & Assigned To 129
Scheduled Start, Finish and Completion 130

Layton Technology Page 7 of 178 Layton ServiceDesk v6 User Manual v2.0
Change Types & Change Statuses 130
Change Approval Status 131
Change Urgency & Impact 131
Services Affected 131
Assets Affected 132
Change Summary, Description, Impact, Implementation & Rollback 132
Change Approval Process 132
Additional Change Functions 135
Converting an Incoming Email into a Change 136
USING LAYTON SERVICEDESK (END USER) 136
Login Page 137
Menu Structure 138
LOGGING A NEW REQUEST (END USER) 141
Request Number & Time Stamp 142
End User Details 142
Asset Information 142
Request Type & Problem Details 143
Other End User Fields 143
Viewing and Editing Requests 144
UTILITIES 146
LDAP (Active Directory) - IMPORT END USERS 146
Setting up the LDAP (Active Directory) Connection 146
Setting up Active Directory Mappings & Filters 147
Active Directory Attribute Mapping 148
LDAP (Active Directory) IMPORT ANALYST 149
IMPORT END USER (.CSV, .TXT) 149
PURGING 150
EXPORT DATA 151
CLEAR DOWN DATABASE 151
SYSTEM SETTINGS 151

Layton Technology Page 8 of 178 Layton ServiceDesk v6 User Manual v2.0
Application Settings 151
Application Database Connection 152
Application Terms 152
Application Appearance 154
Email Server Settings 154
AuditWizard 157
License Information 159
GENERAL SETTINGS 160
Request Settings 160
Problem Settings 165
Change Settings 165
General Auto Assignment Settings 166
Business Rules 168
Security 168
Survey 171
Closed Periods 172
Default Working Hours 172
APPENDIX A – MS SQL Server Database Connection 172
Database Backup Method 172
Connecting Using NT Authentication (Trusted Connection) 173
Connecting Using SQL Server Authentication 174
END USER LICENSE AGREEMENT 176

Layton Technology Page 9 of 178 Layton ServiceDesk v6 User Manual v2.0
INTRODUCTION
Layton ServiceDesk™ is a total Web based help desk solution providing access for both support personnel
and end users from anywhere with Web access. Layton ServiceDesk™ has been developed to be
uncomplicated and easy to use and most of all, extremely flexible and configurable. Screens or pages can be
modified to suit particular needs; data fields can be added, re‐labelled, modified and re‐positioned as
required. The system has been set with default fields and values, which may well suffice, however the
system provides the tools to make it easy to change the fields and appearance, as required.
HOW TO USE THIS GUIDE
This User Guide is intended for all help desk or support personnel in order for them to record, progress and
resolve End User requests as well as problem and changes. Although End Users may be given instructions
from help desk support personnel on how to operate and use Layton ServiceDesk™, they could be given
access to this User Guide for their relevant information.
System Administrators should read Chapter 2 System Overview to understand the system architecture and
then Chapter 1 Introduction for installation instructions and procedures. They should use Chapter 3
Configuring the System as the guide to the set‐up and configuration of Layton ServiceDesk™ and to
implement the system defaults and options required.
It would be advisable for ALL support staff to read Chapter 2 System Overview, which details the system
concepts, terminology and process flow, to gain a good understanding of how the system works.
Once the system is implemented, all help desk support personnel should use Chapter 4 Using Layton
ServiceDesk™ (Analyst), to assist and guide them in the practical use of Layton ServiceDesk™.
Also End Users could use Chapter 5 Using Layton ServiceDesk™ (End User), although the End User Forms will
probably differ from the examples shown.
Throughout the document any cross-references to other chapters or sections is indicated by hyperlinked text.
To jump to cross referenced section hover above the text and then press Ctrl + Click. Figures throughout the
document are also cross referenced and you can jump to a figure by pressing Ctrl + Click on the figure
reference.

Layton Technology Page 10 of 178 Layton ServiceDesk v6 User Manual v2.0
INSTALLATION PROCEEDURE
1. Run the MSI installation file. This will take you through the setup procedure for Layton ServiceDesk™.
The installation procedure will create the program folder as Layton ServiceDesk v6.0 in the selected
program location during installation.
Note: You may need to stop your IIS Services first in order to get a successful installation. Then re-start all
IIS Services when installation is completed to access the application.
2. The web site LaytonServiceDesk will be created under the default web site in IIS unless you specify a
different location during installation. The Default Web Site is recommended.

Layton Technology Page 11 of 178 Layton ServiceDesk v6 User Manual v2.0
3. During the installation you will be prompted with the Database Tool to Connect to the SQL Server.
You will have the option to Install New Database to create the database for the Layton ServiceDesk™
application. If you have an already existing database, you can select Connect to Existing Database.
4. Specify the path to the SQL instance that will host the Layton ServiceDesk™ database (ex:
ServerName\ SQLInstance). Click Install Database. If you chose to connect to an existing database,
click Connect to Database. You will need to select the authentication method to connect to your SQL
server and may need to provide an authenticated admin account for connection.

Layton Technology Page 12 of 178 Layton ServiceDesk v6 User Manual v2.0
5. Once the database is successfully installed and connected to, the Database tool can be cl osed. This
will complete the Layton ServiceDesk™ installation process. You can now access the Layton
ServiceDesk™ system from any web browser with access to the server. To test this launch a web
browser on the server and enter the following URL address
http://localhost/LaytonServiceDesk/login.aspx where “localhost” is the name/IP address of your
server. The default Analyst login is “Admin” with the password “mib”.
Note: It is recommended that you change this password during user account configuration for security
reasons and do not forget your new password as it is encrypted and cannot be recovered or changed if
forgotten.
SYSTEM OVERVIEW
SYSTEM CONCEPTS AND TERMINOLOGY
It is advisable to read and understand the system concepts and terminology before proceeding with the
installation and configuration in order to obtain a good understanding of the system terms and functionality.
The general system terms can all be renamed, but are referred to in all documentation in their original
terminology.
Requests
The core of the system is based around creating, progressing, tracking and reporting Requests (or Incidents using ITIL Terminology). A Request is an End User or Customer submitted call, request or incident which can relate to any area that the End User or Customer requires support or assistance. A Request can therefore be an incident, a request for information or training, a request for new hardware, software or other services, etc. The types of Requests are categorized or predefined by the Administrator.
See the Request Types section. Requests can be created using any or a combination of the following methods;
o Manually created by the support Analyst
o Entered directly by the End User / Customer o Created automatically by email o Notified by email but created by the support Analyst

Layton Technology Page 13 of 178 Layton ServiceDesk v6 User Manual v2.0
Problems
Problem Management is a key component of ITIL (IT Infrastructure Library). The purpose of Problem
Management is to identify and resolve the root causes of problems in the IT infrastructure and therefore
eliminate future incidents relating to this problem.
The Problem & Change Management functions in Layton ServiceDesk are enabled by default, however if your
ServiceDesk is not IT based or does not require this function it can be disabled by going to Administration |
System Settings | Application Settings | Enable Problem & Change.
Problems can be created using one of the following methods;
o Manually created by the support Analyst
o A support Analyst can generate a Problem from a Request
o A support Analyst can convert an incoming email into a Problem
Changes
Change Management is another key ITIL component. The main objective of Change Management is to
ensure standardized procedures for the handling of changes to the IT infrastructure. This will help to
minimize the impact on services and prevent or reduce the impact of related incidents.
Requests for Change may result from Problems that have been identified in the IT infrastructure which
requires a Change to resolve the underling root cause or they may arise from initiatives seeking to improve
services and efficiencies.
The Problem & Change Management functions in Layton ServiceDesk are enabled by default, however if your
service desk is not IT based or does not require this function it can be disabled by going to Administration |
System Settings | Application Settings | Enable Problem & Change.
Changes can be created using one of the following methods;
o Manually created by the support Analyst
o A support Analyst can generate a Change from a Request
o A support Analyst can generate a Change from a Problem
o A Support Analyst can convert an incoming email into a Change
System Access and Menu Structure
Layton ServiceDesk™ supports two types of user access, Analyst and End User (see below for definitions). In
addition, Analysts have another level of security or system access known as their “Security Group”. There are

Layton Technology Page 14 of 178 Layton ServiceDesk v6 User Manual v2.0
two “Security Group” options, Administrator and Standard, and depending which level is used determines
the Menu structure displayed and functionality available to the Analyst. The Standard level will not provide
access to the Administration Menu options. Analysts in the Administrator group can access the
Administration menu by clicking the administration icon in the main menu.
The main system processing is conducted on the Main Menu Home Tab, where new Requests, Problems and
Changes are created, appropriate actions defined, solutions provided and list views and searches performed.
The type of List Views; Requests, Problems, Changes, Actions and Select End User (display and select), can be
defined globally for all Analysts using Administration | Global List Views | Default List Views. Individual
Analysts can also create their own custom list views using Main Menu | Settings | List View Settings.
The system can be configured to automatically display the required list view or screen required on entry to
the system, e.g. Open Requests assigned for the Analyst logged on. The Analyst’s Home Page settings can be
accessed using Main Menu | Settings | Home Screen. Global list views can also be copied down to all
Analysts. If needed, you can enforce the list view so individual analysts cannot change the view you create.
For more information see GLOBAL LIST VIEWS / ANALYST LIST VIEWS.
End Users
The End User is the person or user of equipment or services who will log or submit a Request to th e
ServiceDesk. End Users can be given access to log and progress their Requests or alternatively Requests can
be logged on their behalf. End Users can also log Requests via email.
If End Users are given access then the following will apply:
The End User is given access to the ServiceDesk to log and progress their own Requests through screens or
pages designed by the ServiceDesk Administrators. End Users have simple Menu options which provide them
with the ability to log and progress their own Requests.
End Users can also be given access to the “Self Service” feature where they can search the Solutions Base in
order to solve their own problems without necessarily having to log a Request. Providing your End Users
with access to the “Self Service” feature can help to reduce the number of Requests logged in the system
which will reduce the workload of the ServiceDesk staff.
Once an End User logs a Request it can be recorded on the system as an ”Unassigned Request”, i.e. no
Analyst has been assigned to the Request, or it can be automatically assigned to an Analyst or Analyst Group
depending on skills and/or work load. If auto assignment is switched off using Administration | General
Settings | Auto Assignment Options, then the Unassigned Request will appear in the Main Menu |Home|
View Request | Unassigned Request drop down filter. The number of Unassigned Requests in the system
will also be displayed in the Requests Statistics section of the Dashboard.
Layton Technology Page 15 of 178 Layton ServiceDesk v6 User Manual v2.0
Any Analyst can then view the Unassigned Requests and take assignment of any Request by selecting the
“Take Assignment” icon under the Assignee column. Otherwise, with the auto assignment option on, the
Request will appear in the relevant Analyst list view or Analyst Group Que ue.
End User Requests logged by email will follow the same procedure as above in that they can be created as
unassigned or automatically assigned depending on work load and skills using key words in the email.
Alternatively, Email Requests can be viewed first ( in the Email Pending queue) and created manually by the
support Analyst. The Email Pending queue is accessed by clicking on the e mail icon in the main menu.
For an Analyst to be able to view the Email Pending queue they first need to be given access via
Administration | Company Structure | Manage Analyst | Analyst Settings | Site Access | Analyst Incoming
Mail Access.
Also, Analysts can be notified by email when new End User Requests have been logged. For information on
configuring the emails please see the Email Server Settings section. Once the Email Server Settings have been
configured the individual emails that can be sent out of the system can be enabled and modified in
Administration | Libraries | Email Bodies.
End Users can register themselves when they access the ServiceDesk for first time providing the option is
switched on using Administration | General Settings | Security | Global End User Security | Allow End User
Self Registration. Alternatively End Users can be initially set up one at time or imported from Active
Directory or added as Requests are logged. For more information on importing End User from Active
Directory please see the LDAP (Active Directory) - IMPORT END USERS section.
Analysts
The Analyst is the ServiceDesk technician or Support Analyst or engineer who will be processing or
responding to Requests as well as logging and resolving Problems and Changes. The Analyst can either have
Standard or Administrator system access, defined as a Security Group within Administration | Company
Structure | Manage Analyst. The Standard Group allows only access to the Main Menu whereas
Administrator Group provides access to the Administration Menu as well.
Only Administrative users have the ability to change the system configuration and design forms.
All system configurations, settings, screen and reports design are performed through the Administration
Menu however the Main Menu does provide the ability to define Analyst settings and personal l ist views. A
typical ServiceDesk may consist of the first line ServiceDesk analysts all of whom may or may not have
Administration access and the support analyst, who would probably not have Administration access.
Layton Technology Page 16 of 178 Layton ServiceDesk v6 User Manual v2.0
Analyst Groups
The system provides the ability to record and assign Requests to Analyst Groups as well as individual
Analysts. Therefore, the first level or ServiceDesk Team could be defined as a Group such as “ServiceDesk
Group” and additional or second level support areas could have a number of Groups defined, i.e. Hardware
Support, Software Support or Networking Team. Analysts can belong to more than one Group and Skills can
be allocated to the Analyst Groups so that requests can be auto assigned based on the Request Type of the
request being logged.
Although called Analyst Group, a Group could be defined as an external supplier or Third Party Maintenance
Company and calls assigned to them accordingly.
See the Manage Analyst Groups section for more information on defining Analyst Groups.
Request Ownership
Request ownership and assignment is very flexible but it is important to understand and define the working
method required. A Request is "owned" by an Analyst, which can be initially defaulted to the logged on
ServiceDesk Analyst and although subsequently the Request can be assigned to another Analyst and/or
Group, the ownership can stay with the original ServiceDesk Analyst. This way the Analyst is in control of the
Requests he has received or processed and he can be the one point of contact for the End User. The Request
owners can also be the only person with authority to close Requests, providing the option is switched on
using Administration | General Settings | Security | Global Analyst Security |Close By Owner Only.
Alternatively, the ownership of a Request can be transferred to another Analyst, who may or may not be in
the ServiceDesk Team, and who may or may not have the Request assigned to them.
Request Assignment
Request Assignment is where a Request is assigned to an Analyst or Analyst Group to resolve or respond. A
Request can be assigned to any individual Analyst, whether a member of a Group or not, or assigned to a
Group with or without also assigning to a specific Analyst.
If the Request is assigned to a Group without also assigning to a specific Analyst, then the Request will appear
in the Analyst Group Queue waiting for an Analyst in the Group to “Take Assignment” by selecting the Take
Assignment icon under the Assignee column in the Request List view.
Requests can be automatically assigned or the Analyst or Group suggested by the system, based on either
Skills and/or Load Balancing. The system will auto assign to either Analysts or Analyst Groups but not both at
the same time. In addition Requests can be automatically assigned to particular Analysts depending on
individual Request Types. These can be Site or Department managers or specified Analysts who can be

Layton Technology Page 17 of 178 Layton ServiceDesk v6 User Manual v2.0
responsible for certain issues which will override any general skills assignment.
Additional Auto Assignment options can be configured using the Business Rules feature which can override
other auto assignment options. For example, you may want to create a Business Rule so that if your CFO
logs a request, then it is automatically assigned to the ServiceDesk manager.
Requests submitted by End Users can be automatically assigned as detailed previously in End Users. See the
General Auto Assignment Settings section for further details on the auto assignment settings.
Comments
Comments are updates or notes that can be appended to a Request, Problem or Change as it progresses
through the system. Comments can be added to a Request by both the Analyst and the End User. Analysts
may post Comments with a Public or Private status to either allow (Public) or disallow (Private) End Users
from seeing the Comment.
When an Analyst adds a public Comment to a request Layton ServiceDesk can send an email notification to
the End User which contains the details of the Comment. Conversely if the End User adds a Comment Layton
ServiceDesk will send an email to the Analyst that is assigned to the Request.
The Analysts also have an option to add a Comment and select additional Analysts who will be sent an email
notification with the details of the Comment.
If an End User replies to a Comment from an Analyst via email, Layton ServiceDesk can automatically convert
this email into a Comment on the related request. Layton ServiceDesk will then email the Analyst with the
details of the End User’s Comment and send an acknowledgment to the End User.
Tasks or Actions
Tasks or Actions are activities that are either required in order to progress or complete a Request , Problem or
Change. Alternatively, Tasks can also be free standing without any association. Tasks can be assigned to an
Analyst and scheduled for completion by a certain date.
Tasks can also be automatically generated as part of a workflow process related to specific Request Types.
This feature is called the Request Type Task Template feature, for more details on this feature please see the
Request Type section.
There is also a Recurring Task facility which will automatically create Tasks on a regular schedule. This is a
great feature for routine maintenance tasks. The Recurring Tasks also allow for a task work flow if required.

Layton Technology Page 18 of 178 Layton ServiceDesk v6 User Manual v2.0
For more information please see the Recurring Tasks section.
Priority and Service Level Agreements
Priorities can be set for Requests and Problems and the priority level will be used determine the order in
which they are resolved, based on their importance or impact on the Company. Priorities belong to a Service
Level Agreement (SLA), and although SLA’s may not be required, if Priorities are used then a standard or
implied Service Level will exist. Any number of SLA’s can be defined with different Priorities to suit various
needs.
Priorities can also be assigned to specific Request Types and they can also be applied to specific Sites. For
example a different SLA could be used for a Request placed on a third party, i.e. PC supplier.
A Priority will have a time to resolution and up to three levels of escalation or times when the Request or
Problem will escalate. On any escalation level an email can be sent and/or the Request can be reassigned.
For more information on defining Priorities and SLA’s see the Priority / SLA section.
Request and Problem Escalation Process
The escalation process is set against the Priority within an SLA and is defined using Administration | Libraries
| Priority / SLA. A resolve time, or expected time in hours the Request or Problem should be completed by,
is defined together with up to three levels of escalation. The three levels define the time in hours after the
time that the Request or Problem was logged. The escalation process will be initiated when the resolve time
or any escalation level is exceeded.
At the point of escalation an automatic email can be sent to a specified address(s) and/or the Request or
Problem can be automatically re-assigned to another Analyst. Also, the Request or Problem itself as
displayed in the list views can change color. The color settings are defined using Administration | General
Settings | Request Settings.
The working hours of the ServiceDesk should be defined before setting any Priorities and escalation details
using Administration |General Settings | Default Working Hours and Closed Periods. Note ‐ When
configuring the working hours for Layton ServiceDesk, you may want to consider how the system will run. It
is important to know how the working hours will impact the Priority/SLA (escalation process).
You can typically ask yourself the following questions to determine how the working hours will affect the
Priority/SLA. Will your ServiceDesk run 24 hours a day or only from standard office hours (e.g., 8 AM‐5 PM)?
If standard office hours are to be used then the Priority/SLA’s can be set to count total working hours, as
opposed to a 24 hour process. For example, if you run standard office hours (based on 8 AM‐5 PM), and you
want a specific Priority to expire within 3 days, then you would only count the total working hours for 3 days,

Layton Technology Page 19 of 178 Layton ServiceDesk v6 User Manual v2.0
which is 27 hours (would be 72 hours if the Layton ServiceDesk is configured to run 24 hours a day).
Working hours can also be defined on a Company, Site or Department basis under Administration |
Company Structure | Manage Company, Site or Department.
Change Advisory Board (CAB)
Change advisory boards (CAB) assist in the assessment, prioritization and approval of Requests for Change
(RFC). The CAB group is generally made up of Analysts that are chosen to ensure that the change request is
assessed from both technical and business points of view.
The type of Change and services or assets affected will dictate the required CAB members. CAB groups should
offer the different perspectives necessary to ensure proper decision making. A CAB is an integral part of a
defined Change Management process designed to balance the need for change with the need to mini mize
inherent risks.
The Change Management and CAB features can also be used for systems that are not just IT focused as the
Change Process can be applied to any system.
The Layton ServiceDesk Change Approval process can involve one or more CAB groups as well as individual
Approvers. The approval process can also involve a workflow process which requires the approval of one
Analyst before approval is requested by the next Analyst in the workflow. For more information on Change
Approval please see the Change Approval Process section.
Request Types
Request Types or Problem types are the method of categorizing Requests and therefore providing statistics
and analysis of issues or requirements raised. They are also used as the basis for the Skills profile of Analysts
and Analyst Groups (for auto assignment, or suggestion of assignment). In addition, Request Types can
define Site or Department managers or specified Analysts who can be responsible for certain issues which
will override any general skills assignment rules.
Request Types are also used to link directly to the Solutions Base, so for particular Requests or Problems a
Solution can be automatically suggested.
Request Types can also be linked to Request Classes, which are used to define multiple Request Forms, so
depending on the Request Class or Request Form only certain Request Types will be displayed. This is
achieved when defining the Request Classes.
Layton Technology Page 20 of 178 Layton ServiceDesk v6 User Manual v2.0
Request Types are user defined and can either appear as a tree structure with no limit to the number of
levels or as inter dependent drop down lists. Also, when a Request is logged any Request Type level can be
selected or used to categorize the Request, i.e. a Request Type could be specified as PC Hardware Fault only
or a specific problem within PC Hardware Fault, such as CD Drive Failure.
Request Types are defined using Administration | Libraries | Request Types and should be set up before
implementing the system although they can be added by Administrators at any time.
The administration of the Request Types tree structure features a simple drag and drop function which allows
for the easy maintenance and re-arrangement the Request Type structure. For more information on creating
and managing Request Types please see the Request Type section.
*note – Once a Request Type has been used in a request, you cannot remove that Request Type until you
have purged all requests (opened or closed) that have used that Request Type.
Solutions
A Solutions Base (or Knowledge Base) is provided for the customer to create solutions for particular Requests
so when the same issue arises again a solution can be quickly identified. Solutions can be associated with the
Request Type so when a Request is logged the Request Type is automatically used to search the Solutions
Base and identify a predefined solution for the Request. Alternatively, all Solutions can be viewed or any text
string can be used as the search criteria. Solutions can be added as Requests are logged.
End Users can also be given access to the Solutions Base through the Self Service feature. Providing your End
Users with the ability to search for Solutions to their problems is a great way of helping to reduce the number
of calls that are logged in the system.
Also, when Solutions are created there is an option which determines whether the End Users will have access
to this Solution article via the Self Service feature. This option is called “Self Service” with a Yes/No selection.
If the option is set to No then only Analysts will have access to this Solution article. This allows the Analysts
to add technical or other articles to the Solutions base that the End Users will not have access to.
Company
Layton ServiceDesk has the ability to support End Users or Clients from multiple companies. This feature was
designed primarily for Managed Service Providers or other ServiceDesk situations where support is being
provided to external or third party customers. The Company feature provides you with the ability to produce
meaningful reports on a company by company basis.
By default the Company feature is disabled. To turn on the Company feature go to Administration | System
Settings |Application Settings | Company Level.

Layton Technology Page 21 of 178 Layton ServiceDesk v6 User Manual v2.0
If the Company feature is enabled you can use the LDAP (Active Directory) End User Import feature to create
multiple Active Directory connections and map the connection to a specific Company which will assign the
End Users to this Company.
Site
Layton ServiceDesk™ supports multi sites. The site is a place where your Layton ServiceDesk™ services end
users. This is generally the case for multiple geographical locations. Multi-site support allows you to create
sites at which your Analysts operate and by turning on the Constrain to Site option in the General Auto
Assignment Settings any auto assignment or auto suggestion will take into account the sites that analysts are
at. In addition you can put a site against an End User so that this data is automatically known when a request
is logged for an End User.
If you have enabled the Company level as mentioned in the Company section above then Sites can be
assigned to a particular Company.
Asset
The Assets Tab connects to the AuditWizard database and provides a complete inventory of the PC’s and
other IT assets on the network. The Assets Tab in Layton ServiceDesk provides a mirror image of the Network
View tab in Layton Technology’s AuditWizard Application. The Assets Tab is enabled by default however if
this feature is not required, particularly for ServiceDesks that are not providing IT based support services ,
then this can be disabled by going to Administration| System Settings | AuditWizard | AW Link Enabled.
Assets are displayed in a tree structure and can be grouped according to their location through the
AuditWizard application interface. Expanding an Asset will allow you to view the asset’s specifications
including the OS, network information, hardware specifications and installed software. On the asset’s
summary page you can also view the Requests, Problems and Changes that have been logged against th is
Asset.
When a Request, Problem or Change is logged the Asset Name of the equipment or source of the Request
can be specified in the Asset field. Once an asset has been associated with an End User Layton ServiceDesk
can remember this association in the future and automatically link this asset to any Requests logged by this
End User. Alternatively the field can be left blank and the End User or Analyst can manually select which
asset is the source of request.
Once an Asset has been linked to a Request, Problem or Change the Analyst can quickly view the inventory
details of the asset by clicking the “Quick Info on Asset” button next to the asset field. This will launch a

Layton Technology Page 22 of 178 Layton ServiceDesk v6 User Manual v2.0
pop up window where the asset inventory details can be viewed.
An Asset Name is not mandatory and can be left blank or other another identity can be entered, i.e. User
Training would not require an Asset Name.
Whiteboard
The Whiteboard Ticker allows you publish messages on the system that will scroll across the top of the screen
in the banner. This message can be scheduled for a certain date and time and can also have a termination
date. The message can be displayed for all users including End Users (Publ ic) or just Analysts (Private).
Analysts who have been given permission to compose Whiteboard messages can do so from the Main Menu
| Home Menu.
The Whiteboard is a very effective way to communicate important information about the current status of
services and outages and also to provide details of upcoming scheduled maintenance and other activities.
Effective communication can help to reduce unnecessary Requests being logged in the system.
Survey
Surveys can be generated by the system for the End User to complete when their request is closed. There is a
list of user defined questions and responses provided using a pre-determined value rate, i.e. 100, so the user
responds with their opinion mark out of 100. The survey can be issued at any frequency, i.e. every closed
request or every 10th or whatever is preferred. An email notification and a Whiteboard notice reminder can
be sent to End Users for any incomplete surveys.
The survey and questions can be modified from Administration | Form Design | Survey and any number of
additional questions can be added.
Layton ServiceDesk Process Flow Diagram
http://laytonsupport.com/index.php?oldid=1345

Layton Technology Page 23 of 178 Layton ServiceDesk v6 User Manual v2.0
CONFIGURING THE SYSTEM
This Chapter describes how to configure Layton ServiceDesk™ and although you can follow the sections in
order, there is no real need. Because the system is highly configurable you should spend some time to assess
and decide the best method of operation and system settings that will best suit your requirements. A little
more care and thought now could save time and effort later on. Decide on the structure or how the system
will operate. Consider the following questions and then follow the basic steps to implement:
1. How will the support staff be organized?
2. Will Analyst Groups be implemented and to what level?
3. Who will “own” or mange and be responsible for Requests?
4. Who will be allowed to close Requests?
5. How will Requests or calls be recorded and processed?
6. How do you want the Request screens to look for the Analysts and End Users?
7. Will support be provided to internal End Users only or will support also be provided to external
clients or customers?
8. Will you be providing support to multiple locations? Do you need to create Company, Site and
Department locations?
9. How will End User Requests be processed, manual or automatic assignment?
10. What will be the assignment process?
11. Will Requests be suggested for assignment to a Group or Analyst based on workload or skills and
workload?
12. What will be the escalation process?
13. What are the different Priorities / SLA’s that will be required, if any?
14. What will be the working hours and holidays of the help desk?
15. How will Requests be categorized?
16. Do want to create standard Solutions to before implementing?
17. What Tasks will be required and do you want to create a schedule of recurring tasks?
18. Will you be implementing the Problem & Change Management module?
19. Will Change Requests require an approval process?
20. Will Change Advisory Boards (CAB) be required?

Layton Technology Page 24 of 178 Layton ServiceDesk v6 User Manual v2.0
21. Reporting, do you need to create new or modify existing reports?
Once you have answered the above questions you are ready to configure Layton ServiceDesk™.
Remember, all screens or pages are configurable so data fields and labels can be changed, deleted and new
data fields added. System Terms or terminology can also be changed, see the Application Terms section,
however, you may decide the default values are fine.
Note – There are some specific ‘System’ fields defined on certain forms that cannot be removed. This is to
protect the integrity and operation of the system. These fields will not have the ‘Trash can’ icon to delete
the field.
First, login to Layton ServiceDesk™ as the Analyst “Admin” and password of “mib”. This is the default system
Administrator or Analyst with a Security Group of Administrator. You can now access all the functions to set
up the system within the Administration Menu item.
o Product Registration
The first step is to input the Customer Registration details and license key. Enter the details sent to you using
Administration | System Settings | License Information. You can activate your product by entering your
Registered Company Name & ID details in the spaces provided, and then click on ‘Get Key’. This will connect
you to the Layton Technology website and allow you to generate a key for your product. You are now ready
to start the configuration of Layton ServiceDesk™.
MANAGE COMPANY, SITE & DEPARTMENT
Most ServiceDesks generally provide support services for End Users within their own organization only.
However if your ServiceDesk will be providing support services to external or third party companies Layton
ServiceDesk has the ability to create multiple Company identities and End Users can be assigned to their
company. The default Layton ServiceDesk installation has the Company feature turned off by default. If
your ServiceDesk will be providing support to external or third party companies then you can turn on the
Company feature by going to Administration| System Settings | Application Settings |Company Level.
Manage Company
If your Layton ServiceDesk™ implementation will be used to support external or third party companies you
will want to turn on the Company Level option in Administration| System Settings | Application Settings
|Company Level. Once this is turned on you can define the Companies under Administration | Company
Structure | Manage Company. You define a Company by a single identifier that must be unique.
Layton Technology Page 25 of 178 Layton ServiceDesk v6 User Manual v2.0
Manage Site
If your Layton ServiceDesk™ implementation is to support multiple sites then you will need to define them
under Administration | Company Structure | Manage Site. You define a Site by a single identifier that must
be unique.
Sites can also be created automatically as part of the LDAP (Active Directory) End User Import Feature. If an
End User is imported into Layton ServiceDesk and their Site is not already listed in the Manage Site section it
will automatically create this Site.
If you have enabled the Company Level option as mentioned in the Manage Company section above then you
can add the Company ID system filed to the Site form so that you can assign a Site to a Company. The Site
form can be modified by going to Administration | Form Design | Site. For more information about adding
system and user defined fields to the forms see the FORM DESIGN section.
Manage Department
Departments are associated with the End Users and can be defined by going to Administration | Company
Structure | Manage Department.
Departments can also be created automatically as part of the LDAP (Active Directory) End User Import
Feature. If an End User is imported into Layton ServiceDesk and their Department is not listed in the Manage
Department section it will automatically create this Department.
If you have enabled the Company Level option as mentioned in the Manage Company section above then you
can add the Department ID system field (sys_eclient_id) to the Department form so that you can assign a
Department to a Company. The Department form can be modified by going to Administration | Form Design
| Department. For more information about adding system and user defined fields to the forms see the
FORM DESIGN section.
ANALYSTS, ANALYST GROUPS AND CAB GROUPS
The first step is to decide how the support staff will be organized and whether Analyst Groups will be
implemented.
A simple system may well have only one level of support staff and no Analysts Groups. Therefore, you may
choose to not use any Groups at all or simply classify all Analysts against one Group, e.g. Hel p Desk. Requests
can still be assigned to other Analysts and escalation procedures used, as required.

Layton Technology Page 26 of 178 Layton ServiceDesk v6 User Manual v2.0
Alternatively, you may choose to use Groups, such as Network Group, Hardware Support Group, Software
Support Group, Training Group, and even a third party or Supplier Group(s), etc. Any number of Groups can
be defined and then Analysts assigned against their relative Groups.
Manage Analyst
Define the Support Analysts that will require access to the system. These can be front line help desk
personnel or second line support or any level of support staff, as required. Analysts are defined using
Administration | Company Structure | Manage Analyst where their Name, Password and Security Group or
level of system access is defined. The two levels of Group Security provide Administrator access (All system
functions available) and Standard access (Administration function not available). Support Analysts or second
line support who have Requests assigned to them are normally given Standard access.
Other system fields are “Manual Assign” and “Allow Auto Assign”, which define whether the Analyst is
available or allowed to receive assignment, either manually or automatically assigned to him/her. This is
where Analysts can be selected as absent, i.e. on holiday, etc., but generally are both set to ‘yes’
Although you may be content with the default data fields and design, the screen and data content is
configurable, so you can add, delete or change fields as required. You must always define new data fields
before adding them to the form. See the DATA DESIGN section for information on how to add data fields, and
the FORM DESIGN section for details on how to design or change forms.
The Manage Analyst section has a range of settings and access restrictions which are defined below:
Analyst Request Classes
This Analyst setting determines which Request Classes the Analyst will have access to. Request Classes are a
powerful feature which provides the ability to define multiple request forms for different types of Requests
such as IT Incident, Service Request, New User Requests etc. See the Request Classes section for more
information.
Analyst Skills
Analyst skills or job responsibilities are directly linked to the Request Types used for categorizing Requests
and one of the methods that Layton ServiceDesk can use to automatically assign requests. They are also used
to automatically prompt and assign which Analyst is best suited or have the appropriate skills for a particular
Request. These can be entered later when the Request Types are completed, or at any time.
To input Skills select the edit button under the Skills column for the Analyst. A pop up screen will display the
Request Types hierarchy and you can simply select the appropriate Skill (Request Types) for this Analyst. An
Layton Technology Page 27 of 178 Layton ServiceDesk v6 User Manual v2.0
Analyst can have any number of skills or Request Types but use the highest level in the tree structure possible
to cover their skills. For example, a network specialist would probably have all network issues assigned to
him so the Request Type “Network Issues” would be selected although there may be a number of sub levels
or specific Request Types in the structure below “Network Issues”. See the Request Type section for further
details.
Analyst Sites
If you have defined multiple sites then you may specify at which sites analysts are by clicking the edit button
in the Sites column from the Manage Analyst page. These are the sites at which the Analyst works or is
responsible for manage requests from End Users at these Sites. They can be added and removed as Skills are.
Analyst Settings
Each Analyst has a number of individual settings which are categorized in a Tab view. These are accessed
through the Manage Analyst screen by clicking the Edit button in the Settings column for the Analyst
required. A summary of the Analyst Settings is details below:
General Settings
This section has settings which can Disable the Analyst, set their Home Screen and page Refresh Interval
which can also be set by the Analyst in the Main Menu | Settings section. Any settings changes will not take
effect until they log in again.
Access Restrictions
This area defines access restrictions pertaining to the Analyst, for viewing requests, running Reports and
viewing Statistics, allowing Request Ownership & Assignment, as well as other options.
Site Access
This area defines Site access restrictions for the Analyst. For example, you may want to restrict Analysts to
only access Requests and Statistics at their Site. This also controls access to White Board Messaging and
Incoming Email access.
Comment
This area defines Comment privileges, whether Analysts have the ability to edit, delete, make and view
public/private.
Escalation & Overflow

Layton Technology Page 28 of 178 Layton ServiceDesk v6 User Manual v2.0
You can enter email addresses here to send out escalation notifications based on the individual analyst which
are separate from the general Priority/SLA escalation configuration emails. If you enter the Analyst’s own
email address or that of their manager’s, when a request that is assigned to this Analyst escalates it will send
an email notification to this email address, in addition to the email that is sent out based on the Priority
escalation email settings.
Manage Analyst Groups
If Analyst Groups are not required then proceed to the next section. Otherwise, define any Analyst Groups
that are required by using Administration | Company Structure | Manage Analyst Groups. Then add the
required Analysts for each Group by selecting the edit button on the Analyst column on the Manage Analyst
Group form. An Analyst can belong to more than one Group but one of these groups can be the default
group that will be automatically filled in when the user is assigned a request.
Analyst Group Skills
Analyst Group Skills are used in the same way as Analyst Skills and are only really necessary if Requests will
be assigned to Groups as opposed to individual Analysts.
See the Analyst Groups and Request Assignment sections of the System Concepts chapter for details on how
they are used. To define Group Skills select the edit button under the Skills column on the Manage Analyst
Groups form and proceed as above for Analyst Skills.
Manage CAB Group
If your Layton ServiceDesk system does not require the Problem & Change Management feature you can
proceed to the next section. Change Advisory Boards (CAB) are similar to Analyst Groups whose function is
to assist in the assessment, prioritization and approval of Requests for Change. The CAB Group is generally
made up of Analysts that are chosen to ensure that the change request is assessed from both technical and
business points of view.
CAB Groups can be created and Analysts assigned to the groups in Administration | Company Structure |
Manage CAB Group. Analysts can be assigned to more than one CAB Group if necessary.

Layton Technology Page 29 of 178 Layton ServiceDesk v6 User Manual v2.0
Manage Analyst Absence Type
The Analyst Calendar and Availability Schedules are used to show the Analysts’ availability and
schedule of appointments, Tasks and Call Back Reminders. For more information see the
Grouping, Sorting & Filtering Grid Reports on the Fly
While Grid Reports can have pre-defined filtering and grouping settings this can also be done on the fly after
a report has been generated.
To group by a particular field simply drag the column header into the section above and this will group by
that column. If required you can create sub-groupings by dragging additional column headers into the
grouping section. To undo a grouping click on the “x” button in the grouped by field or drag it back down with
the other column headings.
Data can be sorted by clicking on the field column headers. Clicking once will sort the data in ascending order,
a second click will sort in descending order and a third click will clear the sorting. Data can be filtered very
quickly using the filter fields under each column header. Enter the required value i n the desired filter field
and click on the filter icon. This will then display the filter options available. To remove the filter click on the
filter icon and select the “NoFilter” option at the top of the list.
Reports generated from the Request, Problem, Change and Action (Tasks) master tables will display a link
field in the left hand column. The link field will display a Request, Problem, Change or Task icon depending on
the type of report. This icon allows you to click through and view the details of an individual Request,
Problem, Change or Task.
Creating Charts
If a Pie or Column chart report type has been selected the “Available Fields” and “Selected Fields” windows
will be removed as they are not applicable to these types of reports.
An additional option for the Pie and Column Charts will be to “Show Summary Grid”. A summary grid displays
the same information that is represented in the Pie or Column chart in a grid format along with a grand total.
Select the Master Table from the drop down list. The drop down list will display all of the tables in the
database. The most common reports will involve Requests, Problems, Changes & Tasks and the relevant
master tables for these reports are listed below.
Report On Master Table to Select
Requests Request
Problems Problem

Layton Technology Page 30 of 178 Layton ServiceDesk v6 User Manual v2.0
Changes Change
Tasks Action
Select a “Grouped By” field from the drop down list. All of the data fields from the master table will be
displayed in the drop down list.
The final step is to apply any filters to the report. Please see the Applying Filters section in the grid report
section above.
Once the report has been completed click the save button and the report will be added to the list of reports
in the selected category. After the report has been saved the design layout can be modified by selecting the
design layout button next in the report category list. See below for details on the design layout.

Layton Technology Page 31 of 178 Layton ServiceDesk v6 User Manual v2.0
Creating a Trend Chart
Select the Master Table from the drop down list. The drop down list will display all of the tables in the
database. The most common reports will involve Requests, Problems, Changes & Tasks and the relevant
master tables for these reports are listed below.
Report On Master Table to Select
Requests Request
Problems Problem
Changes Change
Tasks Action
Unlike the Pie & Column charts the Trend Chart has a “No Grouping” option available for the Group By
selection. If No Grouping is selected there will be a single trend line or bar based on the trend field.
As Trends are linear timelines the list of available trend fields are the date type fields within the master table.
The most commonly used trend fields would be the Request Date (sys_requestdate), Problem Date
(sys_problemdate) etc.
The Time Period is the interval been each data series and the options available are Day, Week, Month,
Quarter and Year.
There are additional options to select whether the trend chart will be a Line or Bar chart and whether the
orientation is vertical or horizontal.
The final step is to apply any filters to the report. Please see the Applying Filters section above in the grid
report section.
Once the report has been completed click the save button and the report will be added to the list of reports
in the selected category. After the report has been saved the design layout of the report can be modified by
selecting the design layout button next to the report in the report category list. See below for details on the
design layout.

Layton Technology Page 32 of 178 Layton ServiceDesk v6 User Manual v2.0
Report Design Layout
The report design page allows you to modify the layout of each report using the same user friendly drag and
drop feature which is used throughout the application. The floating toolbar is used to add labels, images and
set the page properties. For more information on form design please see the form design section.
To change the position of the grid or chart, using the handle in the top left hand corner of the grid, drag the
grid to the desired position on the page. You can also click on the grid or chart link next to the handle to set
the left and top pixel positions.
To resize a report data field or change the field properties click on the field link. You can change the heading
of the field, font type, size, field size, field color etc. You can also resize the field width by hovering between
the field headings until you see the left and right arrows which will allow you to drag the field to the left or
right to resize.

Layton Technology Page 33 of 178 Layton ServiceDesk v6 User Manual v2.0
Images and labels can be added to the reports using the add label and add images button on the floating
toolbar. For more information please see the main form design section.
Exporting Reports
The Layton ServiceDesk reports can be exported in the following formats, PDF, XLS or CSV. Once a report has
been run the PDF, XLS and CSV icons will be displayed in the reports sub-menu. Please note that when
exporting the report in XLS format Excel will prompt you that the file is in a different format to the file
extension and to verify the source. Click “Yes” to this prompt and the report will be displayed as an XLS file.
Quick Tip: When you export a report to PDF or schedule the report, the data grid and charts are automatically
scaled to fit the PDF perfectly, you do not need to worry about how wide or long the grid size is on the screen
as Layton ServiceDesk will scale the grid to best fit the page layout, however, you may wish to change the
page orientation if you have many columns and the grid is quite wide so maximze the amount of data you can
get across the page.
PDF Reports
In report design mode on the floating toolbar there is a PDF icon which allows you to see the report PDF
Settings. Each Layton ServiceDesk report can have its own PDF setting. The PDF settings include many options
such page format (E.g. US Letter, A4, etc.), page orientation (Portrait or Landscape), margin settings along
with header and footer options. You can even create passwords and security settings for the PDF.

Layton Technology Page 34 of 178 Layton ServiceDesk v6 User Manual v2.0
In the PDF footer or header text field you can use the system value of {{Datetime}} and this will show the date
and time that the report was generated.
PDF Security Settings
The PDF Security Settings allow you to protect sensitive reports from either being viewed, printed, copied
once the PDF is created. This is adds an extra level of security and peace of mind when emailing or
distributing reports. There are two password options:
1. Owner
2. User
The Owner password is the administrator that has set the PDF settings and will have full access control to the
PDF document when it is created and the correct Owner (admin) password entered.
The User setting is the password you would supply to the end user where the PDF restrictions are set and
what the end user can do with the PDF, eg Print, Copy text etc.
Scheduling Reports
Reports can be generated automatically on a scheduled basis and sent via email in a PDF format. The
scheduled reports are processed by the LaytonServiceDesk service which is running on the Layton
ServiceDesk IIS server. The process to create a schedule a report works in a same manner as scheduling a
recurring Task.
To schedule a report click on the Schedule Report icon in the Reports sub-menu. You will then be presented
with a list of the currently scheduled reports. This will show the report name, last run time, next run time,
scheduling details and icons to set the email information and a delete button.
Click on the add new icon to add a new schedule. You will then receive a pop up window which will allow you
to select the report that you want to schedule from the drop down list of reports. Once you have selected the
report you can create the schedule. Once the schedule is saved the email message page will be displayed.
Enter the email address that the report is to be emailed to; you can enter multiple email addresses separated
by a semi colon. Once the email message is completed and saved you will be returned you to the list of
scheduled reports.
Access Control
By default all Analysts have access to run the reports and statistics. Only Administrators will have access to
create, modify, schedule or delete reports.
To turn off Analyst Access to the Reports and Statistics go to Administration | Company Structure | Manage
Analyst | Settings | Access Restrictions. Options in this section are; Reports Access, Statistics Access &

Layton Technology Page 35 of 178 Layton ServiceDesk v6 User Manual v2.0
Statistics Group Access. There are also additional options in Administration | Company Structure | Manage
Analyst | Settings |Site Access | Statistics Access.
If an Analyst is denied access to the Reports and Statistics the main Reporting menu will not be available for
this Analyst.
Security can also be applied on an individual report by report basis. To restrict analyst access to a particular
report click on the edit report icon and then click on the security icon on the report builder page. A new page
will be displayed showing the current security settings. By default all of the reports have the access
restriction turned off. To turn on the security simply select the “Restrict Access” button and select the
Analysts which are to have access to this report.
Copying a Report
The Copy report button allows you to create a copy of an existing report and is quite helpful if you need a
new report which is very similar to an existing report. To copy an existing report click on the edit report icon
for the report that you want to copy. Then in the main report builder page rename the report and then sel ect
the category that you would like the report to appear under and then click the copy button.
Restore Default Reports This feature allows you to restore the default reports to their original settings.
Restoring a report will overwrite any existing report with the same name.
CALENDAR chapter.
Absence Types can be set up using Administration |Company Structure | Manage Analyst Absence Type .
Any Absence Type can be defined, including work related absences such as Site Visits, Conference, Training
etc. Absence Types can also be color coded which provides for easy visual representation in the Analyst
Availability view.
END USERS
End Users can be pre-defined or input before the system is implemented or input as required or “on the fly”
as Requests are received. Also, if End Users are given direct access to the system and the option is switched
on, then they can register themselves as and when they connect to the ServiceDesk for the first time.
All methods can be used in combination with each other but whichever method(s) you decide on first you
must define the End User data structure and forms. You may find the default data and forms satisfactory but
if not you can add or delete data fields as required by using Administration | Data Design | End User Data

Layton Technology Page 36 of 178 Layton ServiceDesk v6 User Manual v2.0
and then modify the End User form by using Administration | Form Design | End User. For more
information see the DATA DESIGN and FORM DESIGN sections.
The five methods of defining End Users are:
1. Import End Users via Active Directory (LDAP) 2. Import End Users (from a text file) 3. Manage End User – Manual Entry 4. End User Self Registration 5. Add End Users “on the fly”
Import End Users via Active Directory (LDAP)
End Users can be imported through the Active Directory LDAP protocol. Layton ServiceDesk also provides the
ability to connect to multiple LDAP servers. For more information see the LDAP (Active Directory) - IMPORT
END USERS section.
Import End Users (from a text file)
End User information can be imported using a tab separated text file. An example import file is located in the
Layton ServiceDesk™ installation directory in the Import sub folder, i.e. LaytonServiceDesk\Import. This can
be used as the basis for importing end users.
Once the import file has been created then the data can be imported into Layton ServiceDesk™. If you create
your own import file that was exported from another program, ensure it is in a tab delimited format. The
import file will be displayed so simply select the file and user data will be automatically imported. See the
IMPORT END USER (.CSV, .TXT) section for more information.
Manage End User – Manual Entry
End Users can also be created, deleted or their details amended at any time using the function
Administration | Company Structure | Manage End User. On selection of this menu item all End Users will
be displayed. End User details can be amended by selecting the End User name. The End User form will be
displayed so any information can be changed, as required. On selecting the Add New button a blank End
User form will enable you to enter details of a new End User. Remember to select the Save icon to create the
new End User. Using the Cancel icon will close the form without saving any details. If Layton ServiceDesk™
has exceeded your license limit you will not be able to add new end users.
The Request Classes column on the Manage End User page allows you to provide or restrict End User access

Layton Technology Page 37 of 178 Layton ServiceDesk v6 User Manual v2.0
to different Request Classes if they have been created. For more information see the Request Classes
section.
End User Self Registration
End Users can register themselves when they first connect to the system, provided End User access is allowed
and the system is configured to provide the End User Registration. This is done by selecting Administration |
General Settings | Security | Global End User Security | and turning the setting for “Allow End User Reg” to
“On”. If the option is set to “Off” then the End User Registration button on the Layton ServiceDesk™ logon
screen will not appear.
Also, in the Global End User Security Section you can set whether End Users are allowed to change their user
details by setting the option “Allow End User Maint” to “On” or “Off”, as required. If this option is set to
“Off” then the Menu option “My Details” will not appear for End Users. If Layton ServiceDesk™ has exceeded
your license limit end users will not be able to self register as the Registration button will be removed.
Add End Users “on the fly”
This is where End User details are input “on the fly” or immediately when new End Users are calling the help
desk for the first time and are not known or registered on the system. When a new Request is being logged,
by using the “Select End User” icon and then the search option, the Add New icon is made available. Then
new End User details can then be entered. If Layton ServiceDesk™ has exceeded your license limit you will
not be able to add new end users.
CREATE AND DEFINE LIBRARIES
The next stage is to define the library information. Libraries are user-defined and provide pre-determined
information or structures needed for creating and progressing Requests, Problems & Changes.
Although it is advisable to create the Libraries before implementing the system, they can always be added to
or changed at any time by Analysts with Administration access. Any changes will be cascaded through the
system so all records will be amended accordingly.
All menu options are located using Administration | Libraries.
o Request Classes o Request Type o Request Statuses

Layton Technology Page 38 of 178 Layton ServiceDesk v6 User Manual v2.0
o Request Templates o Task Types o Recurring Tasks o Priority / SLA o Problem Statuses o Change Types o Change Statuses o Services o Impact o Urgency o Email Key Words o Cost (Catalogue) Items o Email Bodies o Drop Down Lists o Brands
Request Classes
Request Classes are used to define multiple Request forms, for example; Incident Request or Service Request
or New User Requests. Different forms can be designed for Request, Spawned Request and End User
Request for each Request Class. See the FORM DESIGN section for more details. When a new Request Class is
initially created, the newly created Request Class will inherit its associated Forms from the (Default) Request
Class. By default Layton ServiceDesk™ ships with one default Request Class.
Request Classes can also be linked to Request Types so only certain Request Types are displayed for a
particular Request Class. Simply select the edit button in the Request Type column and a pop up window will
display the full list of available Request Types. Apply a check next to the Request Types that are to be
displayed when logging a request for this Request Class.
When creating a Request Class there are two options available for “Add to New End User” and “Close
Request When Tasks Completed”. If the “Add to New End User” option is selected any new End Users that
are added to the system will automatically be given access to this Request Class. If “Close Request When
Tasks Completed” is selected then a Request will be automatically closed once any Tasks associated with the
Request have been completed.
Request Type
The Request Types are the user-defined method of categorizing or grouping Requests and Problems. They are
used as the basis for assigning individual Analysts and Groups according to Skills and they also link to the
Solutions Base.
Layton Technology Page 39 of 178 Layton ServiceDesk v6 User Manual v2.0
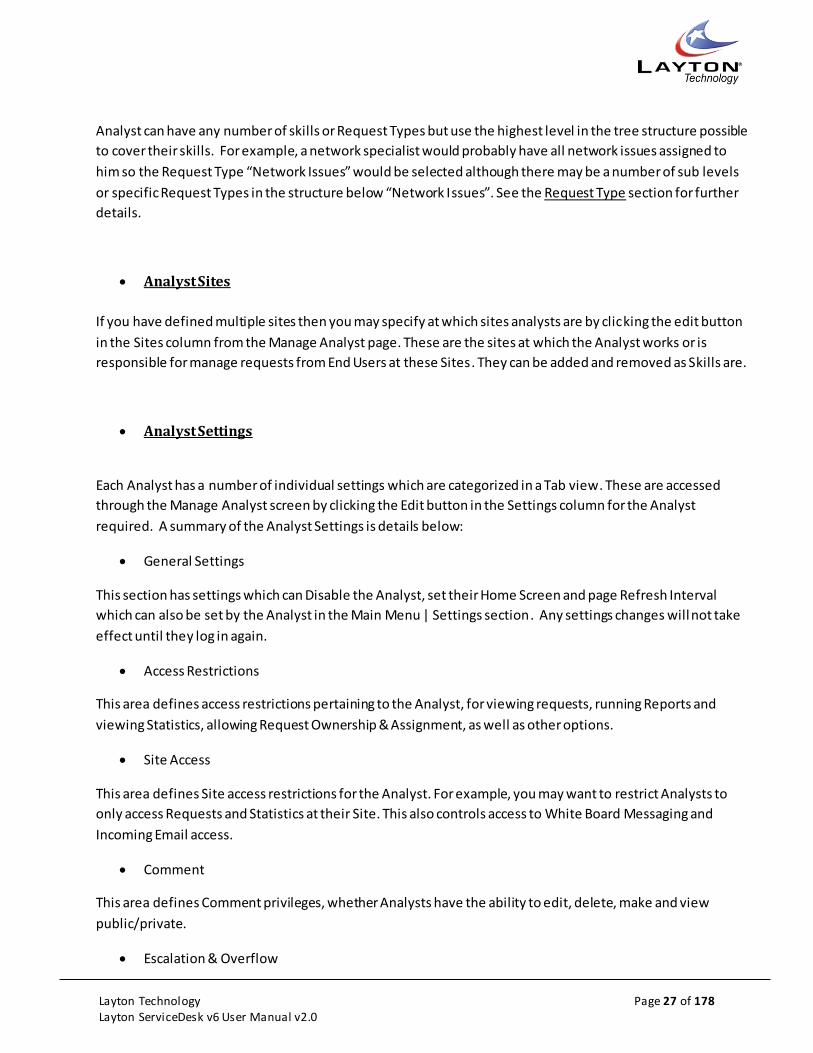
Request Types can either appear as a tree structure with no limit to the number of levels or as inter
dependent drop down lists. Any level in the structure can be used when logging a Request or Problem. For
example a Request Type could be specified as PC Hardware Fault only or a specific problem within PC
Hardware Fault structure, such as CD Drive Failure.
Figure 1 - Manage Request Types
Request Types can also be linked to Request Classes where only certain Request Types will be displayed or
made available to a Request Class or form selected.
So, careful thought must used to define the Request Type structure that will support your particul ar business
and operations.
To set up Request Types go to Administration | Libraries | Request Types. Then simply select the Request
Type or name at the tree level above the level you require to insert a Request Type and click the Add New
button. A new sub level can then be defined. To create a new top level Request Type click on the Request
Type name at the top of the tree structure and click the Add New button. To edit an existing Request Type
simply click on the Request Type and the options will be di splayed.

Layton Technology Page 40 of 178 Layton ServiceDesk v6 User Manual v2.0
To relocate a Request Type within the tree structure, simply drag the request type to the desired parent
location. You will then be given the option of making the Request Type a “Sub -Category” of the parent
request type or merging it.
When defining a Request Type you can specify a default Priority to place against it. For example, you might
want to define a Request Type such as “Server Down”. This might be a high priority Request Type, so you can
specify a Priority to put against it. This means that when selected on a Request the Request Type Priority will
be applied to that Request where the specific Request Type is chosen. Note; this will override the default
system priority.
You can also define a Site or Department Manager or specific Analyst responsible for a particular Request
Type. The Request will be automatically assigned on this basis and will override any other assignment rules
(except for any Business Rules). For example, a certain type of Service Request may have to be authorized by
a manager before being assigned based on skills.
A Request can be defined as an “Incident” which means the Request will be automatically measured against
the ServiceDesk available time. The Request Statistics by Incident Report will show the “down time” as a
percentage of the available time. This is useful for measuring availability of business critical Hardware or
Software Systems.
To display Request Types as inter dependent drop down lists instead of the tree view when processing
Requests, the Request Type field is simply added to the Request Form (using Form Design and adding the
sys_requesttype_id), as many times as there are levels in the structure. Then by selecting a category from
the top level drop down list only the sub categories of that category will appear in the next drop down list.
If you are using Analyst Skills or Group Skills to prompt for assignment, once you have completed the Request
Types you can now add Skills to the appropriate Analysts or Groups. See the previous sections Manage
Analyst and Manage Analyst Groups.
Also, remember the Request types are used as the main or automatic link to identify a Solution within the
Solutions Base. See the SOLUTIONS BASE section for details.
Request Type Task Templates
The Request Type Task Template feature provides the ability to create a number of pre -defined Tasks that
will be automatically created when an Analyst logs a Request and selects this particular Request Type. The
Tasks can be dependent on other Tasks if required. All Tasks will be created simultaneously and arranged in
order of dependency. If a task is dependent on another Task then it will not start until the dependent Task is
completed. It is also possible to have a Request with multiple simultaneous Tasks.
To create a Request Type Task Template select the desired Request Type in the Request Type tree structure
and then click on the Manage Task Template icon . If two or more Tasks are added to the Task Template
and dependencies are required, then the Dependency column should be selected for the appropriate Task.

Layton Technology Page 41 of 178 Layton ServiceDesk v6 User Manual v2.0
Tasks that are dependent will have the Task Date or Date Placed set to blank. Also in the list view of Tasks
the Completed Date will show as “Dependent on other Tasks”. The Request can also be automatically closed
upon completion of the final task and this is defined when creating / editing Request Classes within Admin |
Libraries |Request Classes.
Request Statuses
The Request Status identifies the stage or status of a Request. The normal stages are open or closed however
you can add any others such as, “suspended” or “on hold”, etc.
To add, delete or change a Request Status use Administration | Libraries | Request Statuses.
To add or delete select the appropriate action and to modify simply select the Request Status and rename as
required. You may also set the “Suspend” flag on a status that allows you to make that status f reeze the
escalation process.
Note: You cannot delete the Closed Status.
The default Status for all Requests is set to “Open” but can be changed using Administration | General
Settings |Request Settings and set the Default Status.
Once a Request is recorded you can change the Request Status by using the “Change Status” icon on any
of the Request List Views, or from the “Change Status” icon on the request form.
You can also edit specific properties of the status (other than the “closed” status). Properties such as if the
End user can use the status, forcing the status color, and choosing the color to force. The Force status color
option is useful for when a request is put on hold and changing the default color to something other than
white, to easily identify from the home screen list views which requests are on hold.
Request Templates
Request Templates allow you to pre-define Request information that can be dropped into the Request form
by using the apply templates icon when entering a Request or via the QuickAction menu. The Request
Template uses the same form definition as the Analyst Request form and any information specified in the
Template will drop in over the same fields when applied. Any blank fields in the Template will leave any
information in the request un-touched.
To create a new Request Template go to Administration | Libraries | Request Templates and click the Add
New Icon. If you are using Request Classes you will be presented with a pop up which allows you to choose
the required Request Class. You are then presented with the Analyst Request Form. Simply f ill out all of the
information in the Template and click the Save icon.

Layton Technology Page 42 of 178 Layton ServiceDesk v6 User Manual v2.0
A new template is saved with a Default Template name such as Template X. You can rename the Template by
clicking the Edit Icon in the manage Request Templates screen. The Templates are very useful for common
Requests that are logged several times daily. This will expedite the call logging process when Templates are
used to pre-define the Request Type, problem description, and solution fields.
Task Types
Tasks or Actions are activities that are required in order to progress or complete a Request , Problem or
Change. Alternatively, they can be free standing without any association and could include planned
maintenance activities (See Recurring Tasks below). Actions can be scheduled for completion on a certain
date and assigned to any Analyst with the current assigned Analyst as the default.
Tasks are added by selecting the Task icon on the Analyst Request, Problem and Change forms or via the
Quick Action menu or the Log New menu on the Analyst Home tab.
Task Types are user defined and use a tree structure similar to the Request Type tree structure.
To set up Task Types use Administration | Libraries | Task Types. Select the Task Type or name at the tree
level above the level you require to insert a Task Type and click the Add New button. A new sub-level can
then be defined. To create a new top level Task Type click on the Task Type name at the top of the tree
structure and click the Add button. To rename a Task Type simply click on the Task Type and the option will
be displayed.
To relocate a Task Type within the tree structure, simply drag the Task Type to the desired parent location.
You will then be given the option of making the Task Type a “Sub-Category” of the parent Task Type or
merging it.
Recurring Tasks
Recurring Tasks are Tasks that are created automatically according to a pre-defined schedule and are typically
used for routine maintenance activities. A Recurring Task can be an individual task or a number of Tasks with
a dependency workflow.
To create a Recurring Task go to Administration | Libraries |Recurring Tasks. Click on the Add New button
and in the pop up window specify the name and schedule. When this window is saved the Task Form will be
presented. Complete the Task template and then when you click save it will add the Task to the schedule.
Please note that the following system fields on the Task form will not be available for selection as they we be
automatically generated when the Task is created; Date Placed, Status, Scheduled Date, Completed Date.
Also the Request ID, Problem ID & Change ID fields are not editable as the Recurring Task will not be linked to
a Request, Problem or Change.

Layton Technology Page 43 of 178 Layton ServiceDesk v6 User Manual v2.0
Once you have added a Task if you would like to add further Tasks to this Recurring Task schedule simply click
on the Add button and create another Task. If a dependency workflow is required click on the Dependency
column and specify the require dependence.
To view, edit or add another Task for an existing Recurring Task schedule, click on the Tasks icon for the
relevant Recurring Task.
The Recurring Tasks are managed from the Administration |Libraries | Recurring Task section, however if
required the Recurring Tasks can also be displayed on a separate tab next to an Analysts View My Tasks list in
the Main Menu | Home | View My Tasks. This option is an Analyst Security Setting which can be found at
Administration | Company Structure | Manage Analyst | Settings |Recurring Task Access.
Priority / SLA
Priorities dictate the importance of Requests and escalation times and routes. They are user configurable and
are defined within a SLA, and although SLA’s as such may not be required, in order to set any Priority, an SLA
name or title is defined.
Generally the Priority of a Request (or Incident) is determined by the Impact and Urgency of the issue. For
example an issue that is affecting a single user and has a high urgency would be given a lower Priority than an
issue that is affecting the whole company and has a high urgency.
A Priority / SLA can be implemented using predefined resolution and escalation details. Alternatively, the
resolution time and any escalation details can be set manually or the predefined values amended when
logging a Request.
Even if no escalation or resolution times are needed, the Priority is still defined within a SLA title (but could
be blank) but with no escalation parameters set. Priorities and SLA’s are defined using Administration |
Libraries | Priority / SLA.
Priorities and escalation details are defined against each SLA as follows:
First set the Priority identity. If you are not using SLA or escalation times or you only have one SLA, then this
could simply be “A”, or “B”, etc. Alternatively, for multiple SLA’s this should include the name of the SLA, i.e.
“SLA1 – A”.
SLA Information:
If SLA information (resolution and escalation details) is not required to be pre-set for the Priority then leave
all fields blank. Then decide whether any escalation or expiry details will be entered manually at Request
logging.

Layton Technology Page 44 of 178 Layton ServiceDesk v6 User Manual v2.0
If “Allow Escalation Edits (At Request)” is set to “No” then no expiry or escalation times will be set and the
Priority will only be used for identification and reporting. If set to “Yes”, then resolution and escalation times
can be entered when saving the Request. To save the Priority / SLA details, select the “Save” icon, then
continue to create additional Priorities as defined below. Setting the option to Yes allows all analysts to alter
the escalation times when the request is to expire.
SLA Information Required:
If SLA information (resolution and escalation details) is required to be pre-set, then you can enter any field as
they are all optional. The resolution time is the number of hours from when the Request was opened. You
can then enter from none to three levels of escalation times in hours. Again, this is the number of hours from
when the Request is opened. Please note that the escalation and resolution times take the Default Working
Hours into account.
You can select to email any Analyst and re-assign the request to a different Analyst for each level of
escalation.
Adding Additional Priorities:
To continue adding more Priorities to an SLA select “Add New” on the Manage Priority / SLA form and then
enter the same SLA name as previous. Otherwise, to define a new SLA, select “Add New” as above but enter
a new SLA Name.
See Figure 2 below for an example Priority /SLA and the table in Figure 4 for SLA / Priority requirements and
appropriate actions.

Layton Technology Page 45 of 178 Layton ServiceDesk v6 User Manual v2.0
Figure 2 - Priority / SLA
Manual Setting
In addition to pre-setting escalation and resolution times against a Priority / SLA, there is also the option to
override these times or just set any escalation or resolution time manually. This is achieved by first setting
the 'Allow Escalation Edits (At Request)' field to 'Yes' in the Administration | Library | Priority / SLA form.
Then any Requests using that priority will prompt the Analyst or user to enter, edit or confirm the resolution
and escalation times when the Request is saved.
The confirmation screen is displayed below in Figure 3. Simply input or amend any escalation times or the
expiry time and select Save. To use or revert to any predefined values for the Priority select the “Use Default”
button. This button then changes to “Use Store” which if selected will then revert the settings to those
manually selected for the Request.

Layton Technology Page 46 of 178 Layton ServiceDesk v6 User Manual v2.0
Figure 3 - Set Manual Escalations
Summary of Priority / SLA Requirements:
Priority Requirement Actions
No SLA needed, no expiry time or
escalation details required but need
to set Priorities
Define SLA with Name and Priorities only.
“Allow Escalation Edits” set to “No”
No SLA needed but need to set
expiry time and/or escalation details
manually at Request logging
As above but set “Allow Escalation Edits” to
“Yes”
SLA / Priority details required as pre
set, but also allow manual editing at
Request logging
Define SLA name with Priorities and enter
resolution and any escalation times. Also
enter any Email notification and auto
assignment of Requests. Set “Allow
Escalation Edits” to “Yes”
SLA / Priority details required as pre
set, but do not allow manual editing
at Request logging
As above, but set “Allow Escalation Edits”
to “No”
Figure 4 - Priority / SLA Requirements
Summary of Escalation Process:

Layton Technology Page 47 of 178 Layton ServiceDesk v6 User Manual v2.0
The escalation process will be initiated when the resolve time or any escalation level is exceeded. The
following processes can be invoked using the Priority / SLA form:
o An automatic email can be sent to a specified address
o The Request can be automatically assigned to another Analyst
o The Request itself as displayed in the list views, will change color
The color setting is defined using Administration | General Settings | Request Settings. By default the
Priority escalation color will only be applied to the Priority field in the list views, however if p referred this can
be changed so that it colors the whole row. This color setting is found in Administration | General Settings |
Request Settings | Color Whole Row.
Note: If a Request has a “Suspend” status all escalation is frozen until that status is changed to a status that
does not have a “suspend status on it”
Problem Statuses
Problem Statuses are used to identify the stage or status of a problem. Typical Problem Statuses would
include Open, Pending Change, Known Error, Closed or Resolved. Problem Statuses are user defined and can
be created in Administration | Libraries | Problem Statuses.
To add or delete select the appropriate action and to modify simply select the Problem Status and rename as
required. You may also set the “Suspend” flag on a status that allows you to make that status freeze the
escalation process.
Note: You cannot delete the Closed or Open Status.
The default Status for all Problems is set to “Open” but can be changed using Administration | General
Settings |Problem Settings and set the Default Status.
Once a Problem is recorded you can change the Problem Status by using the “Change Status” icon on any
of the Problem List Views or from the “Change Status” icon on the Problem form.
You can also edit specific properties of the status (other than the “closed” status), properties such as forcing
the status color and choosing the color to force. The Force status color option is useful for when a Problem is
put on hold and changing the default color to something other than white, to easily identify from the home
screen list views which Problems are on hold.

Layton Technology Page 48 of 178 Layton ServiceDesk v6 User Manual v2.0
Change Types
Change Types are user defined and are used to categorize Changes. Typical Change Types include, Standard,
Normal and Emergency, however any number of Change Types can be created.
To set up the Change Types go to Administration | Libraries | Change Types.
Change Statuses
The Change Status will identify the stage or status of a Change. Typical Change Statuses may include;
Reviewing, Testing, In Progress, Cancelled, Failed and Completed.
To add or delete select the appropriate action and to modify simply select the Change Status and rename as
required.
The “On Status” selection options of Continue or Closed determine whether the status is considered to be
open or closed. The Change Statuses can be color coded for easy visual identification within the Change List
View.
The default Status for all Changes is set to “Open” but can be changed using Administration | General
Settings |Change Settings and set the Default Status.
Once a Change is recorded you can change the Change Status by using the “Change Status” icon on any
of the Change List Views or from the “Change Status” icon on the Change form.
Services
Services are a list of Business or IT Services that the ServiceDesk will be required to support. Services can be
added in Administration | Libraries | Services.
Impact
The Impact is a measure of the effect of an Incident (Request), Problem or Change on a business service or
process. Impact is typically used on conjunction with Urgency to determine the Priority. Impacts are user
defined and can be created in Administration | Libraries | Impact.

Layton Technology Page 49 of 178 Layton ServiceDesk v6 User Manual v2.0
Urgency
The Urgency is a measure of business criticality of an Incident (Request), Problem or Change. The Urgency
reflects the time available for resolution or avoidance before the impact is felt by the business. Urgency in
conjunction with Impact is used to determine a Priority. Urgencies are user defined and can be created in
Administration | Libraries | Urgency.
Email Key Words
Email Keywords allow you to set up Keywords that are used to assign Request Types to incoming emails that
are processed as requests (see Converting an Incoming Email into a Request). Email Keywords help to
simplify the processing of incoming emails for commonly requested issues.
For example you can set up the keyword “Network” against the Request Type “Network Issue” and if an
incoming email arrives with the keyword “Network” in the subject line it will match the keyword to the
Request Type “Network Issue” and create the Request with the “Network Issue” Request Type. The Request
can then be automatically assigned to an Analyst or Analyst Group with the appropriate Skills and given a
Priority if one is pre-defined for the Network Issue Request Type.
Cost (Catalogue) Items
Cost Items are a list of items or services that may be requested or fulfilled in the process of completing a
Request, Problem or Change. Catalogue Items a categorized in a tree structure like the Request and Task
Types. Catalogue Items can be assigned a cost value and cost items can be applied to Requests, Problems
and Changes through the Cost Sheet along with Labor Charges (see Request Costs).
Cost Items can be added in Administration | Libraries | Cost Items. Select the Item at the tree level above
the level you require to insert a Item and click the Add button. A new sub level can then be defined. To
create a new top level request type click on the Cost Item name at the top of the tree structure and click the
Add button. To rename an Item simply click on the Item and the option will be displayed. To relocate an
Item within the tree structure, simply drag the Item to the desired parent location.
Email Bodies
Email Bodies allow you to modify the text that is in an automated emai l notification. In order for the
automatic email notifications to be sent the Email Server Settings will need to be configured in
Administration | System Settings | Mail Server Settings (see Email Server Settings for details).
The various automatic email notifications can be enabled and the Email Bodies modified by going to

Layton Technology Page 50 of 178 Layton ServiceDesk v6 User Manual v2.0
Administration | Libraries | Email Bodies. To enable an email select the “Enable” checkbox next to the
desired email notification (Note that all of the “Escalation” Emails are grouped together with one “Enable”
section which will apply to all Escalation emails). To edit the Email Body click on the “Edit” icon.
To insert system or user fields into the email bodies select the desired field in the field selection list which is
displayed on the right of the email body and click the Add button. When the email is generated it will insert
the data from this field into the email body. For example in the Email Body for “Request is Assigned – Notify
Analyst” you may want to include the Request Type (sys_requesttype_id) and the Problem Description
(sys_problemdesc) field. See Figure 5 below for a sample email body.
Figure 5 - Email Bodies
Drop Down Lists
Drop Down Lists are pre-defined lists that can be applied to forms through the Form Design Section (see
FORM DESIGN). Drop Down Lists are managed under Administration | Libraries | Drop Down Lists. After
creating a Drown List and entering the name select “Items” then continue to add new items to the list by
selecting “Add New List Item”. In order for the Drop Down List to be used on any form, say the Request form,
a user defined data field should also be added to the Request table structure in the Data Design section (see

Layton Technology Page 51 of 178 Layton ServiceDesk v6 User Manual v2.0
DATA DESIGN) and then the Drop Down List will be linked to that data field in the Form Design using the Add
Drop Down List icon on the floating Toolbar.
Brands
The purpose of Brands is for situations where Layton ServiceDesk will be used in an environment supporting
multiple external customers. For example, as you learn to customize Layton ServiceDesk™, you will see you
can also customize the Banners, and Admin Banners with a different logo or text. Typically the new logo will
be that of the customer who is logging in to the system.
When adding a Brand name, which is the identifier, a Description is required. It is recommended to keep the
name short and simple but clear enough to know what it is for. For example, creating a brand called
“Microsoft” or “MS”, and description of “Microsoft Brand” and then saving will allow you to use the form
design to make further changes to the Brand. Now going to Administration | Form Design | Banner – you
will see there are choices for the different Brands. The default is the one provided by the system, where the
new one will allow you to customize the banner image, or text to show that of Microsoft’s in this example.
Once a Brand has been defined you can provide the users with this Brand a specific URL address to log into
Layton ServiceDesk and this will then display their own personalized Banner. For example using the “MS”
Brand used above the login URL would be:
http://servername/LaytonServiceDesk/Login.aspx?brand=MS
DATA DESIGN
The Data design function provides users with the ability to add user defined field fields to data tables in the
Layton ServiceDesk™ database.
Table Definitions
Layton ServiceDesk™ allows Administrative users to modify the data structures or add and delete data user
defined fields from the database tables, although system fields (fields prefixed “sys_”) cannot be deleted.
The default data structures may be adequate, and therefore there will be no requirement to add any user
defined fields. Examination of each table under Administration | Data Design will allow decisions to be
made on any changes.
You must create any new data fields before completing any Form Designs otherwise the data fields will not
be available. The following data tables can be viewed and edited (Note that the Problem, Change & Company

Layton Technology Page 52 of 178 Layton ServiceDesk v6 User Manual v2.0
data tables will only be available if these features have been turned on in Administration | System Settings |
Application Settings):
Request Action (Tasks) Problem Change Analyst (User) Eusers (End User) Eclient (Department) Site Company Solutions Priority Survey
All data tables are displayed in the same format, showing the Field Name, Type and Size. The option to
“Delete” fields will not be available against system fields, prefixed “sys_”.
To add a data field select the Add New icon. You are then presented with a form to enter the Field Name,
Type (Text, Integer, Currency, Date, etc) and Size and when completed select “Save”.
The Field Names do not have to the same as the Form name or label as these are defined using. Any field you
do add in data design must be prefixed “usr_”.
Once a user defined data filed has been added to the data table the field can be added to the forms by
selecting the “Add User Field” icon on the floating Toolbar in the FORM DESIGN section.
FORM DESIGN
All key forms or screens displayed by the system are user configurable. This means that field names or labels
can be changed, fields moved around using “drag and drop” technique and database fields removed or added
as required.
New data fields you wish to add to a form should have been created previously using DATA DESIGN. The
following is the list of all forms that can be amended using Administration | Form Design and what they are
used for:

Layton Technology Page 53 of 178 Layton ServiceDesk v6 User Manual v2.0
FORM DESCRIPTION
Copy Request Forms Allows you to copy a form from another Request Class to expedite the form
designing process.
Banner Defines the Banner as shown at the top of the screen
Admin Banner Defined the Banner as shown at the top of the Administration screen
Survey Defines the Survey form
Task Defines the Task form for actions either associated with Requests, Problems,
Changes, Recurring Tasks or freestanding.
End User Request Used by the End User to log Requests.
N.B. If you have multiple request classes defined. A separate form is designable
for each Request Class that is defined.
Analyst Request Request form used by the Analyst to log and progress Requests. N.B. If you have multiple request classes defined. A separate form is designable
for each Request Class that is defined.
Spawned Request Spawned Request form used by the Analyst to log and progress Spawned Requests. N.B. If you have multiple request classes defined. A separate form is designable for each Request Class that is defined.
Problem Defines the Problem form used by Analysts for logging and processing Problems. N.B. The Problem form will only be available if the Problem & Change function is enabled in Administration | System Settings | Application Settings.
Change Defines the Change form used by Analysts for logging and processing Change
Requests. N.B. The Change form will only be available if the Problem & Change function is enabled in Administration | System Settings | Application Settings
Analyst Defines the Analysts Attributes for creating / amending Analysts.
End User Defines the End User attributes for creating/amending End Users.
Company Defines the Company form. N.B. The Company form will only be available if the Company Level option is enabled in Administration | System Settings | Application Settings.
Site Defines the Site form
Department Defines the Department form
Solutions Defines the Solution form used when creating and displaying Solutions
Login Allows you to change the format of the Layton ServiceDesk™ logon screen
Login End User Allows you to change the format of the Layton ServiceDesk™ End User logon screen

Layton Technology Page 54 of 178 Layton ServiceDesk v6 User Manual v2.0
Login Analyst Allows you to change the format of the Layton ServiceDesk™ Analyst logon screen
Priority / SLA Used for defining the Priority / SLA details: times and escalation process
Register End User Details of what the End User should enter to Register themselves
Search Request Search parameters for finding and displaying Requests
Search Task Search parameters for finding and displaying Tasks
Search Problem Search parameters for finding and di splaying Problems
Search Change Search parameters for finding and displaying Changes
Search Survey Search parameters for finding and displaying Surveys
Search End Users Used to search for End Users when logging a new Request or editing
Search End User Req Search parameters for finding and displaying End User Requests to the End Users
Figure 6 - List of Designable Forms
Each form is edited in the same way. Dragging the small square handle at the top left of each object moves
the location of field labels, field positions, buttons and icons. Any object; label, field, drop down list or image,
can be displayed and amended by selecting the object and amending the properties of that object. The
example in Figure 7 shows the Analyst Request form as displayed in the form design mode.
Figure 7 - Analyst Request Form Design

Layton Technology Page 55 of 178 Layton ServiceDesk v6 User Manual v2.0
A Toolbar is provided to define new objects for the form by adding labels, new user defined fields, drop down lists, system fields, read only fields, hyperlinks and images. Additional Toolbar icons provide Page Properties, Preview Mode, Snap to Grid and Exit. The Toolbar is originally positioned on the right side of all forms but can be moved to anywhere on the form by dragging the top of the Toolbar. Position the mouse over each Toolbar icon to see the various options. See Figure 8 for details. Note: The form is automatically saved immediately each time you make a change, so there is no Save
button for changes to any form.
Please also note that any changes to the forms take immediate effect and are visible to users of the system
as and when the changes are made.
Using the Form Design Toolbar
Toolbar Overview
Select the form you wish to modify from the Form Design menu. The floating Toolbar (see Error! Reference
ource not found.) provides you with access to the different form elements and properties.
User Field, System Field and Drop Down Lists are all data bound elements that input data to fields in the
bound table. Labels are static text on the form. Images allow static images to be placed on the form and
Page properties affect the back color of the form.
Figure 8 - Design Toolbar
System fields and Buttons are special reserved fields that are required by the ServiceDesk system. Some of them must be held on the form and the user is prevented from deleting them.

Layton Technology Page 56 of 178 Layton ServiceDesk v6 User Manual v2.0
Label Elements Although static text, label elements can be made to display system terms as defined in the Application Terms section. To make a label display a system term specify the term inside {{ }} in the label value property of the label. When displayed on the form the bracketed term will be replaced with the system term. For example: {{user}} ‐ Analyst {{enduser}} ‐ End User {{request}} ‐ Request {{requesttype}} ‐ Request Type A full list of system terms are defined in the Application Terms section.
Defining a new field
To add a new field label, select the Add Label icon from the toolbar and set the properties and press
“Save”. The field label will now appear at the top left corner of the screen. Simply grab the small square
handle at the top left corner of the label and drag the label to the required position on the form.
The “Snap to Grid” icon on the Toolbar is used to define the number of pixels between position settings
on the form and helps with the alignment of fields and labels. The pixel setting is defined in Administration |
Form Design | Settings.
Now select one of the icons to add the required data field, either:
Add User Data Field ‐ user defined fields, must previously have been added using DATA DESIGN.
Add System Field – pre defined system fields available for this form.
Add Drop Down List – any pre defined Drop Down List which is then applied to a user data field.
Whichever option is selected they all act in the same way. Select the required data field from the DB Field
pick list and set the required properties (see Figure 12 - Summary of Form Objects). Then select “Save” to
return the form design screen.
Add Read‐Only – provides support for adding display only fields from other tables on the form being
designed. Read-Only fields will appear as labels on the form.
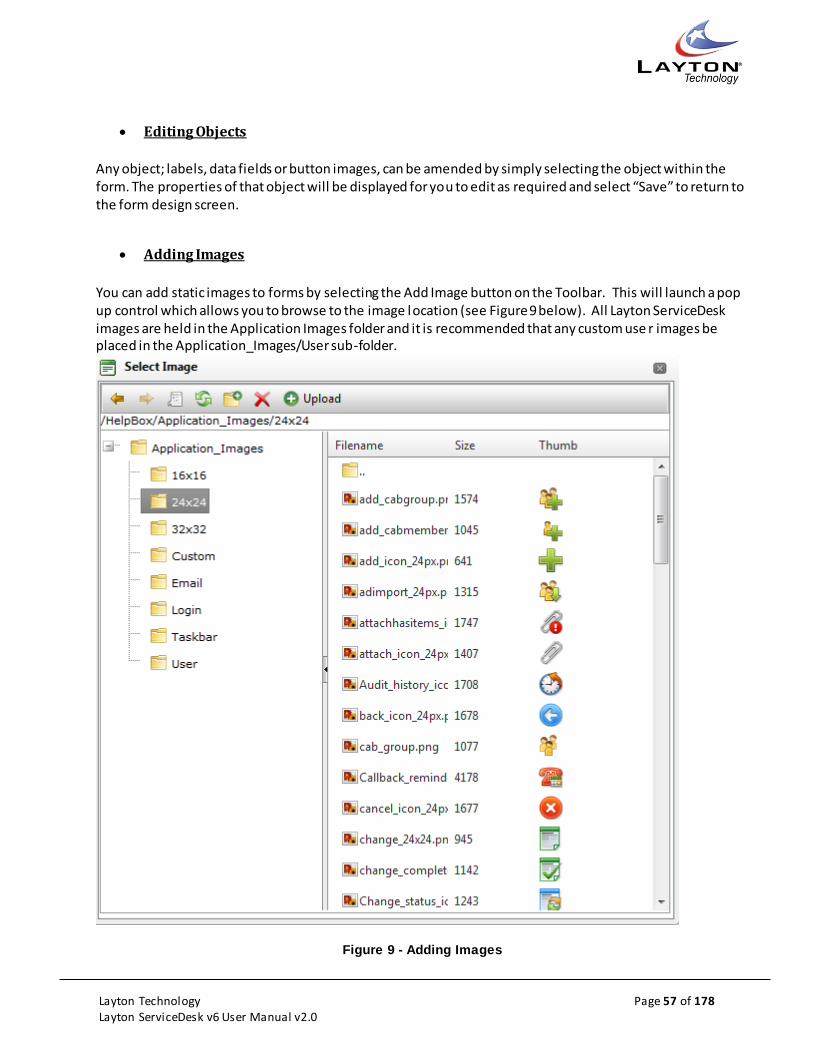
Layton Technology Page 57 of 178 Layton ServiceDesk v6 User Manual v2.0
Editing Objects
Any object; labels, data fields or button images, can be amended by simply selecting the object within the form. The properties of that object will be displayed for you to edit as required and select “Save” to return to the form design screen.
Adding Images
You can add static images to forms by selecting the Add Image button on the Toolbar. This will launch a pop up control which allows you to browse to the image location (see Figure 9 below). All Layton ServiceDesk images are held in the Application Images folder and it is recommended that any custom use r images be placed in the Application_Images/User sub-folder.
Figure 9 - Adding Images

Layton Technology Page 58 of 178 Layton ServiceDesk v6 User Manual v2.0
To add upload an image to the User images folder click on the User folder location and then click on the Upload button in the menu. This will display another window where you can browse to the image locati on. Once the image location has been specified click the upload button and the image will be uploaded into the User folder. To select the image double click on the image name. Each element on the Form has a layer order. You have the ability with images to bring them to the front of the layer or send them to the back of the layer. Sending them to back will cause the image to appear behind other elements. Bringing it to the front will cause the image to appear in front of other elements. By using the Maintain Layer option the image layer is left where it is. To change the layer details click on the image to view the image properties.
Adding Hyperlinks
Hyperlinks can be added to any form by clicking the Add Hyperlink icon . Hyperlinks allow you to create
links to external documents or applications and also be able to pass the values of form fields as a querystring
in the URL. For example a hyperlink in the request form can be made to link to an external web application
and pass in the value of the sys_request_id field in its querystring. Hyperlinks can be made to display in three
ways; in a new window, replacing the entire Layton ServiceDesk™ view or display the linked document in the
current frame.
Although static text by default, hyperlinks can be made to display system terms as defined in the system
configuration section. To make a hyperlink display a system term specify the term inside {{ }} in the hyperlink
caption property. When displayed, the bracketed term will be replaced with the system term.
Available Terms Are:
{{user}} ‐ Analyst
{{enduser}} ‐ End User
{{request}} ‐ Request
{{requesttype}} ‐ Request Type
{{solution}} ‐ Solution
{{eclient}} ‐ Department
{{action}} - Action
{{actiontype}} ‐ Action Type
{{priority}} ‐ Priority
{{site}} ‐ Site
{{company}} - Company
The hyperlink URL property tells the hyperlink the document to link to. The Target property tells the system
how to display it.

Layton Technology Page 59 of 178 Layton ServiceDesk v6 User Manual v2.0
By setting the target to "New Window", the document will be displayed in a new window. "Replace" will
cause the linked document to replace the Layton ServiceDesk™ Application. "In Frame" will display the linked
document in the current frame.
The hyperlink URL property can be specified to pass dynamic querystrings to the linked document. This can
be very powerful as it can allow Layton ServiceDesk™ to talk to external applications. To make a hyperlink
URL carry Layton ServiceDesk™ form values specify the fieldname inside [[]] in the hyperlink URL property.
When linked, the bracketed field will be replaced with the field value. For Example the URL property of a
hyperlink put onto the Analyst’s Request form: myownwebapp.asp?request=[[sys_request_id]] Might be
passed as: myownwebapp.asp?request=77
HTML Editor
The HTML editor tool provides for easy WYSIWYG HTML formatting and includes a range of functions such as
Spell Checking and adding Hyperlinks. The HTML editor control is designed to be used with large text fields
such as the Problem Description and Solution Description fields. If you have created your own user defined
text field and would like to apply the HTML editor control to your field then in the Form Design section click
on your user defined field and in the field properties section select the HTML Editor radio button and specify
the Editor Width and Height (in pixels). The minimum recommended size is 600 x 300 pixels.
Once the HTML editor has been added to the form it can be dragged to the required position on the form like
any other field by selecting the handle on the top left of the field.

Layton Technology Page 60 of 178 Layton ServiceDesk v6 User Manual v2.0
See Figure 10 below for a sample of the HTML editor control.
Figure 10 - HTML Editor Control
Web Tab
The Web Tab feature provides for the quick and easy viewing of items such as Tasks, Comments and
Attachments, without having to click through to another page. The Web Tab is available on the following
forms:
Analyst Request
End user Request
Spawn Request
Problem
Change
Solution
End User Solution.
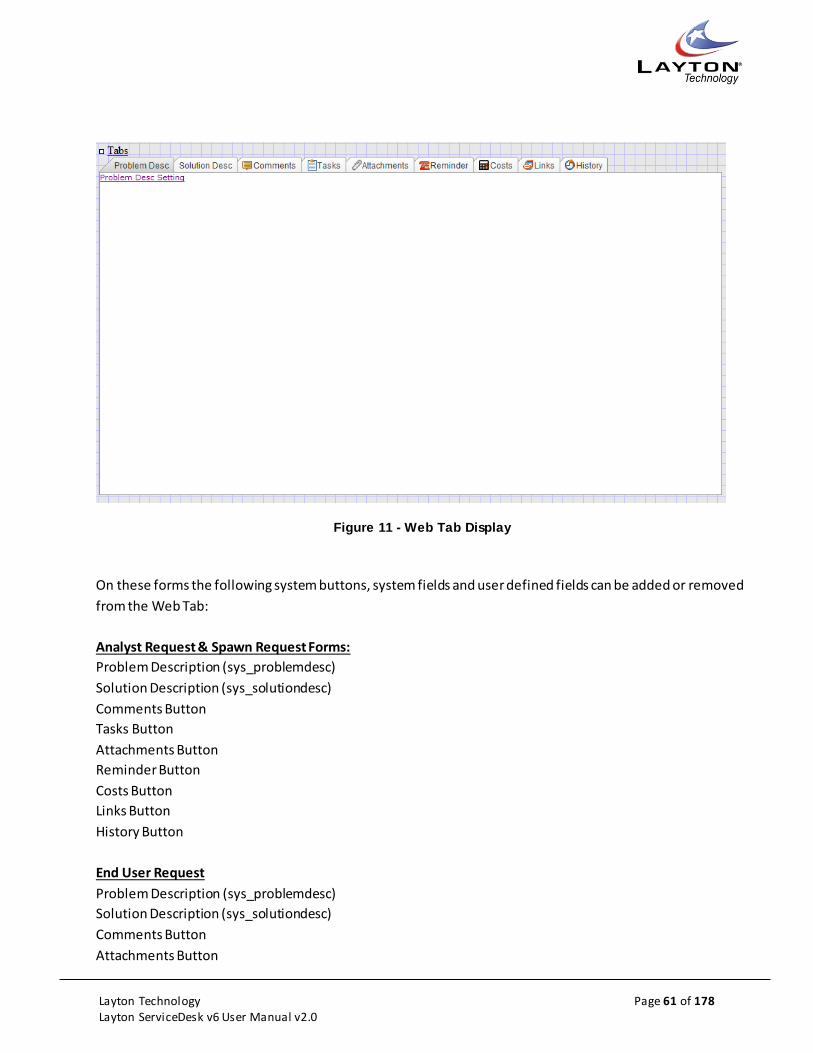
Layton Technology Page 61 of 178 Layton ServiceDesk v6 User Manual v2.0
Figure 11 - Web Tab Display
On these forms the following system buttons, system fields and user defined fields can be added or removed
from the Web Tab:
Analyst Request & Spawn Request Forms:
Problem Description (sys_problemdesc)
Solution Description (sys_solutiondesc)
Comments Button
Tasks Button
Attachments Button
Reminder Button
Costs Button
Links Button
History Button
End User Request
Problem Description (sys_problemdesc)
Solution Description (sys_solutiondesc)
Comments Button
Attachments Button

Layton Technology Page 62 of 178 Layton ServiceDesk v6 User Manual v2.0
Problem Form
Problem Description (sys_problem_description)
Problem Cause (sys_problem_cause)
Solution Description (sys_solution_description)
Comments Button
Tasks Button
Attachments Button
Reminder Button
Costs Button
Links Button
History Button
Change Form
Change Description (sys_change_description)
Change Impact (sys_change_impact)
Change Implementation (sys_change_implementation)
Change Rollback (sys_change_rollback)
Comments Button
Tasks Button
Attachments Button
Reminder Button
Costs Button
Links Button
History Button
Solution Form
Problem Description (sys_problemdesc)
Solution Description (sys_solutiondesc)
Items can be removed from the web tab by selecting the settings link under the relevant tab an un-checking
the “Show on Tab” check box. Once removed from the Web Tab the item can be moved to the required
location on the form by dragging the handle of the field in the top left corner. If the field is not visible on the
form after removing it from the web tab it may be hidden behind the Web Tab. Simply drag the whole Web
Tab aside to reveal the field which you can then move to the required location.
To set the properties of the Web Tab click on the “Tabs” text in the top left hand corner of the Web Tab. You
can set the font and font size of the tab labels and the height and width of the Web Tab.
If you do not wish to use the Web Tab and would prefer to have all buttons and fields displayed
independently on the form, remove all fields from the Web Tab as described above and then click on the

Layton Technology Page 63 of 178 Layton ServiceDesk v6 User Manual v2.0
Page Properties icon and un-check the Show Tab option.
Summary of Form Objects
Toolbar Icon Properties Description
Add Label
Label Value:
Label Font:
Label Font Size:
Label Color:
Label or name of the Field
Font on the label
Font size of the Label
Color of the Label
Add Hyperlink
Hyperlink Caption:
Hyperlink Font:
Hyperlink Font Size:
Hyperlink Target:
Hyperlink URL:
Hyperlink Color
Hyperlink Image:
Hyperlink Image Text:
Caption for the Hyperlink
Font of the Hyperlink
Font size of the Hyperlink
Hyperlink Target (New Window, Replace or In
Frame)
Hyperlink URL for the document to l ink to
Color of the Hyperlink caption
Image for Hyperlink (Supersedes all other display
properties) Invalid image paths are shown as broken
image placeholders.
Hyperlink Image pop up text
Add User Field
DB Field:
Caption:
Field Font:
Field Font Size:
Field Color:
Field Size:
Field Height:
Field Tab Index:
Add to Tab:
Field Required:
Field Required at Close:
Edit Only:
HTML Editor
Show on Tab
The User Defined Field
Identity of field user on the design
Font type to be used for the field
Font size to be used for the field
Color to be applied to the field
Field size or length in characters
Field height in characters
Tab index or Tabbing order on form
Adds the field to web tab control (only available on
the Request, Problem or Change forms)
Mandatory field
Mandatory field before closing
Allows write access to the field by the selected
Analysts only.
Uses the HTML editor control for the field
Adds the field to the Web Tab

Layton Technology Page 64 of 178 Layton ServiceDesk v6 User Manual v2.0
Add Drop Down List
DB Field:
Drop Down List
Caption:
Field Font:
Field Font Size:
Field Color:
Field Tab Index:
Field Required:
Field Required at Close:
Edit Only:
Name of the user field the Drop Down List will be
applied to.
The name of the Drop Down List selected.
Identity or name of the Drop Down list on form.
Font of the Drop Down List
Font size of the Drop Down List
Color of the text in the Drop Down Li st
Tab Index or Tabbing order on form
Mandatory field
Mandatory field before closing.
Allows write access to the field by the selected
Analysts only.
Add System Field
DB Field:
Caption:
Field Font:
Field Font Size:
Field Color:
Field Size:
Field Height:
Field Tab Index:
Field Required:
Field Required at Close:
Edit Only:
HTML Editor
Show on Tab
Name of the system field
Identity of the field used on the design
Font used for the field
Font size used for the field
Field text color
Field size of length in characters
Field height in characters
Tab index or tabbing order on form
Mandatory field
Mandatory field before closing
Allows write access to the field by the selected
Analysts only.
Uses the HTML editor control for the field
Adds the field to the Web Tab
Add Image
Select Image Source Location of an image source fi le, i .e. *.gif. All images
are located within the
LaytonServiceDesk\Application_Images folder
See the Adding Images section for further details.
Page Properties
Color:
Page Background:
Show Tab
Sets the background color for a particular form. Select the search icon and then click on the required color and press Select. Select “Save” to use the color
and return to the form. Note: Background color for all forms is set using
Administration | System Settings |Application
Settings.
Sets a form specific background image.
Displays the Web-Tab on the form. See the Web
Tab section for further details.
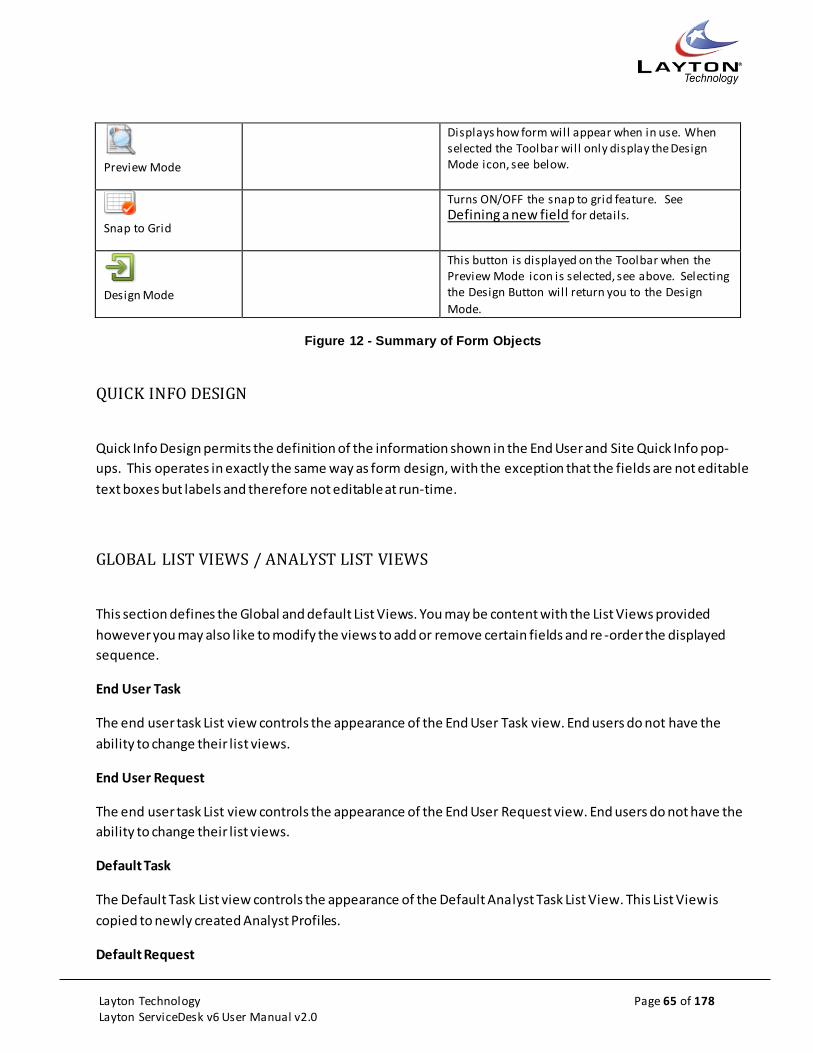
Layton Technology Page 65 of 178 Layton ServiceDesk v6 User Manual v2.0
Preview Mode
Displays how form will appear when in use. When selected the Toolbar will only display the Design Mode icon, see below.
Snap to Grid
Turns ON/OFF the snap to grid feature. See Defining a new field for details.
Design Mode
This button is displayed on the Toolbar when the Preview Mode icon is selected, see above. Selecting the Design Button will return you to the Design
Mode.
Figure 12 - Summary of Form Objects
QUICK INFO DESIGN
Quick Info Design permits the definition of the information shown in the End User and Site Quick Info pop‐
ups. This operates in exactly the same way as form design, with the exception that the fields are not editable
text boxes but labels and therefore not editable at run‐time.
GLOBAL LIST VIEWS / ANALYST LIST VIEWS
This section defines the Global and default List Views. You may be content with the List Views provided
however you may also like to modify the views to add or remove certain fields and re -order the displayed
sequence.
End User Task
The end user task List view controls the appearance of the End User Task view. End users do not have the
ability to change their list views.
End User Request
The end user task List view controls the appearance of the End User Request view. End users do not have the
ability to change their list views.
Default Task
The Default Task List view controls the appearance of the Default Analyst Task List View. This List View is
copied to newly created Analyst Profiles.
Default Request

Layton Technology Page 66 of 178 Layton ServiceDesk v6 User Manual v2.0
The Default Request List view controls the appearance of the Default Analyst Request List View. This List View
is copied to newly created Analyst Profiles.
Default Problem
The default Problem List View controls the appearance of the Default Analyst Problem List View. This List
View is copied to newly created Analyst Profiles. N.B. The Default Problem & Change List Views are only
available if the Problem & Change feature is enabled in Administration | System Settings | Application
Settings.
Default Change
The default Change List View controls the appearance of the Default Analyst Change List View. This List View
is copied to newly created Analyst Profiles. N.B. The Default Problem & Change List Views are only available
if the Problem & Change feature is enabled in Administration | System Settings | Application Settings.
Default Survey
The Default Survey List view controls the appearance of the Default Survey List View.
Default Select End User
The Default Select End User List view controls the appearance of the Default Select End User List View. This
List View is copied to newly created Analyst Profiles.
Copy List Views (From Default)
This allows your list view changes to be pushed out to the Analysts List Views from the Default List View.
Copy List Views (To Default)
This allows you to copy list views back to the Default Profile.
In addition, List Views can be customized by each individual Analyst enabling them to have their own list
views. This is achieved in the Main Menu | My Settings | List View Settings. Individual Analysts can be
prevented from changing their List views by changing the settings through Administration | Company
Structure | Manage Analyst and clicking on Settings, then the various edit list view options.
The List Views relate to Tasks, Requests, Problems, Changes and Select End User details, as follows:
Requests: Whenever a view or search of Requests is required this will be the default system view
Problems: Whenever a view or search of Problems is required this will be the default system view

Layton Technology Page 67 of 178 Layton ServiceDesk v6 User Manual v2.0
Changes: Whenever a view of search of Changes is required this will be the default system view
Tasks: Whenever a view or search of Tasks or actions is required this will be the default system view
Survey: Whenever a view or search of Surveys this will be the default system view
Select End User: Whenever the “Select End User” icon is used to view and select End Users from the Log
New Request form, this will be the default view
Copy List Views (From Default)
In addition to the above functions you can copy the Default List Views over the list view s of Analysts through
the Copy List Views Function. This can be used to restore list views for individual analysts.
To restore a list view from the default simply check the list views you wish to restore against each user and
click the save icon. This will copy the default List View to each checked user.
Copy List Views (To Default)
This is useful if you desire to change the Default List View to one of the Analysts list view, however, care
should be taken as this cannot be easily reversed.
Heading & Position Changes
The form title and the position of the whole form can be moved by dragging the small square handle at the
top left corner of each object. Selecting the title will display the title properties so you can amend any details,
as required. However, care should be taken if the actual form title is being amended as this has been already
defined as an Application Term within the Application Terms section in Administration | System Settings |
Application Terms. The special brackets “{{ }}” around the title denote that the title is being obtained from
the. See Error! Reference source not found. below for a sample of the default Request List View.

Layton Technology Page 68 of 178 Layton ServiceDesk v6 User Manual v2.0
Figure 13 - Request List View Design Mode
Adding Data Fields.
To add a data field to the list view click the Add Column link in the top left of the l ist view. Then from the
field properties page you can select the data field from the DB Field drop down list and set the other
properties of the field such as the font type, size and color.
Editing & Deleting Data Fields
To edit or delete any existing data fields from the List View select any link in one of the rows beneath the
required column. You are then presented with the Field Properties form. Delete or set any property details
as required; Heading, Field Font, Field Font Size, Field Color, Column Width (in pixels or %), Field and Heading
Alignment. Select “Save” to preserve your settings or changes and return to the Results Set form.
The Toolbar also provides the ability to add a label or image anywhere onto the List View form or change the
page background color.
Setting The List View Properties
The list view properties allow you to set the width, height and page size (number of rows) in the list view. To

Layton Technology Page 69 of 178 Layton ServiceDesk v6 User Manual v2.0
set the list view properties click the “List View” link in the top left corner. The width and height are set in
pixels and the page size is set in the number of rows. If the height is left blank then the list view will display
the number of rows specified in the page size. If the height is set to a pixel value that is less than will be
required to display the number of rows specified in the page size then a scroll bar will be displayed.
SOLUTIONS BASE
Accessed through Main Menu | Solutions, the Solutions Base is a user-defined knowledge base or store of
known problems or requirements and associated resolutions or responses. The Solutions Base is organized in
a tree structure so any number of levels can be defined and solutions defined at any level.
Solutions are normally associated or linked directly to Request Types or specific problems or requirements so
they can be easily located when logging a new Request. However, they can be input without a Request Type
but would then rely only on viewing the full Solutions structure or word searching to retrieve the Solution.
Figure 14 - Solutions Base
New Solutions
Solutions can be created at any time and by any Analyst with Standard security access. You may wish to

Layton Technology Page 70 of 178 Layton ServiceDesk v6 User Manual v2.0
predefine a number of Solutions when implementing your system or you may prefer to create Solutions on
the fly as Requests are logged. When Requests are logged and a Solution does not exist then you can create
and link a Solution to the Request immediately.
To predefine Solutions you should have already created your Request Types so you can define any known
Solutions or responses and link them to their respective Request Types.
To create new Solutions select Main Menu | Solution. You will then see a tree folder structure of your
Request Types. To add a Solution beneath a Request Type folder location click on the folder and then click on
the Add New button. This will then display a blank solution form with the selected Request Type pre -
populated. Once the Solution is completed click save and the Solution will be added to the tree structure. To
add a Solution to the root of the tree structure click on the Solutions tree structure “Solutions” header and
then click the Add button.
The Solution form is configurable in the Form Design section and the only mandatory field is the Solution ID
(name). It is advisable to link the Solutions to Request Types (although general or stock Solutions do not
necessarily need to be linked) as this will make it easier for Analysts and End Users to browse and search
Solutions.
Self Service
By default the Layton ServiceDesk Solution form has a system field called “Self Service” (sys_selfservice). This
field is used to determine whether the solution will be available to End Users via the Self Service menu. If
End Users are given access the Self Service feature they will be able to view solutions that are marked “Yes”
for self service. For the self service option to be available for End Users you must have it switched on in
Admin | General Settings | Security | Global End User Security | Allow End User Self Service.
Solution Pop-Ups
On the default Layton ServiceDesk Solution form there is a system field called “Solution Pop Up”
(sys_solution_popup). This field is used to determine if Layton ServiceDesk will prompt an Analyst when a
Request is being logged that there is a possible solution to the Request Type that they have selected.
When the Analyst logs the Request and selects the Request Type, if there is a Solution(s) linked to this
Request Type that has the Solution Pop-Up set to “Yes” then these Solutions will be displayed to the Analyst.
If a Solution is applicable the Analyst can select the Solution and it will apply the Solution to the Request, if
not then they can select “No Solution” and the pop up will close.
The Solution Pop Up feature has three different configuration options which can be found in Admin |
General Settings | Request Settings | Solution Pop Up. The options are:

Layton Technology Page 71 of 178 Layton ServiceDesk v6 User Manual v2.0
o None - Turns OFF the Solutions Pop Ups, irrespective of whether individual Solutions have the
Solution Pop up field set to Yes.
o Specified Only – Will only pop up Solutions linked to the Request Type that have the Solution Pop Up
field set to YES.
o All – Will pop up all Solutions linked to the Request Type, irrespective of whether the individual
Solutions have the Solution Pop Up field set to YES or NO.
ANALYST SETTINGS
Individual Analyst settings are defined using the Main Menu | My Settings. There are four sub menu items
available to set; Home Screen, List View Settings and QuickAction Menu and Password.
While these settings are related to the Analysts’ views there is a much greater range of Analyst settings, such
as security and Skill settings, which are accessed through Administration | Company Structure | Manage
Analyst.
My Password
This allows the Analyst to change their password. Enter the existing or “Old Password” and then the “New
Password” and re-enter this in the next field and click Save to update the password.
Home Screen
This function defines the Home Screen or the page displayed for each Analyst on entering the system. This
allows each Analyst to have a different home screen. This screen is also displayed when Home is selected
from the Main Menu. There are five different options available:
o Auto Refresh Interval - The interval in which the system will refresh the Analysts’ screen. The time
variations are from Never to 30 Minutes.
o Home Screen – This defines the page displayed when the Analyst logs into the system or clicks on the
Home menu.
o View Requests Home Screen – This defines the view displayed when the Analyst selects the Home |
View Requests sub-menu item. This can be the same as or different to the Home Screen selection.
o View Problems Home Screen – This option will be displayed if the Problem & Change function is
enabled. This defines the view displayed when the Analyst selects the Home | View Problems sub-
menu item. This can be the same as or different to the Home Screen selection.

Layton Technology Page 72 of 178 Layton ServiceDesk v6 User Manual v2.0
o View Changes Home Screen – This option will be displayed if the Problem & Change function is
enabled. This defines the view displayed when the Analyst selects the Home | View Changes sub-
menu item. This can be the same as or different to the Home Screen selection.
List View Settings
This allows each individual Analyst to personalise their list view settings, provided they have been given
permission to do so. The permission settings are found in Administration | Company Structure | Manage
Analyst | Settings | Access Restrictions.
For more information on how to modify list views please refer to GLOBAL LIST VIEWS / ANALYST LIST VIEWS.
Quick Action
The QuickAction menu has been designed to provide Analysts with quick and easy access to the most
common actions, irrespective of where they are within the application at any point in time. The items
displayed within the QuickAction menu can be defined by each Analyst. See Figure 15 below with a sample
QuickAction drop down list displayed.
Figure 15 - QuickAction Menu

Layton Technology Page 73 of 178 Layton ServiceDesk v6 User Manual v2.0
To customize the QuickAction list select the Customize menu option and you will then be presented with the
QuickAction menu page where items can be added or removed from the QuickAction list. See Figure 16
below. The left hand selection panel contains the items available for section and the right hand panel
contains the items that have been selected.
To add an item to the QuickStart menu select it in the left hand panel and click the single arrow button which
will add the item to the QuickAction list. Selecting the double arrow will move all items from one list to the
other. Items can be moved up or down in the list by selecting the up or down arrows or by dragging the item
to the desired location.
Once the QuickAction list has been selected click the Save button to save the setting.
Figure 16 - Quick Action Selection

Layton Technology Page 74 of 178 Layton ServiceDesk v6 User Manual v2.0
SURVEYS
Layton ServiceDesk™ has the ability to survey End Users when a request is closed. This allows statistics to be
produced to show how satisfied End Users are with the service they are receiving.
The survey process is triggered by closing a Request. When a survey is issued a blank survey record is created
against the closed Request and the End User receives an email asking them to log in and complete the survey.
The survey takes the form of a designable form that can be designed in the FORM DESIGN section. The
survey allows the use of up to 20 ratings (called sys_survey_rating_1 to sys_survey_rating_20) that can be
placed on the form next to labels asking the End User questions. Additional comments fields can be created
as standard user defined fields. These fields can be added to the Survey table using DATA DESIGN, as normal.
Figure 17 below shows the process of survey creation:
Figure 17 - Survey Creation Diagram

Layton Technology Page 75 of 178 Layton ServiceDesk v6 User Manual v2.0
Layton ServiceDesk™ makes a decision on whether or not to issue a survey on a closed request based on
configuration settings in Administration | General Settings | Survey. There are five different settings which
are outlined below:
o Enable End User Survey.
This setting simply turns On or OFF the Survey feature.
o Sample Survey Every X Request
Setting the “Sample Survey Every X Request” to 5 Requests will cause a survey to be created for every 5th
request closed. In addition to this the setting can be set to (Manually at Close). This causes Layton
ServiceDesk™ to ask the Analyst closing the call if it is to be surveyed. If the Sample Every setting is set to a
numeric request value (such as 5 Requests), before surveying, Layton ServiceDesk™ will look to ensure that
the sys_blocksurvey field is not set on the request being closed. If this field is set (it can be placed on the
request form in the form design section) Layton ServiceDesk™ will not survey it. Similarly Layton
ServiceDesk™ will look to ensure that the sys_blocksurvey field is not set on the End User of the Request
being closed. If this field is set (it can be placed on the End User form in the form design section) Layton
ServiceDesk™ will not survey it either.
This provides the facility to allow certain End Users or Requests not to be included in a survey.
o Show Incomplete End User Surveys in Whiteboard
The “Show Incomplete End User Surveys in Whiteboard” tells Layton ServiceDesk™ to remind the End User of
any incomplete surveys in their whiteboard when they log on, in addition to any email notification.
o Rate Out Of and Rate Increment
The “Rate Out Of and Rate Increment” controls the available values to the End User when completing the
survey. For example Rate Of setting of 100 and a Rate Increment of 5 would make the following values
available: 0, 5, 10, 15, 20, 25, 30, 35, 40, 45, 50, 55, 60, 65, 70, 75, 80, 85, 90, 95 and 100.
o End User Interaction
When issued an End User will receive an email telling them a survey is waiting for them in the system. They
may then log in and complete it, by clicking on Surveys in their menu.
o Statistics
A statistics report can then be run to compare ratings for each ratings question, on a daily, weekly or monthly
comparative basis.

Layton Technology Page 76 of 178 Layton ServiceDesk v6 User Manual v2.0
TASK SCHEDULING
Tasks or actions are scheduled activities that are required to be performed by an Analyst. They are normally
allocated to a Request, Problem or Change at the time that it is logged however they can also be linked later
or can be free standing and not linked to a Request, Problem or Change. Therefore, a Task cou ld be a
planned maintenance event or action required at any time in the future. For more information on Recurring
Tasks please see the Recurring Tasks section.
Adding a Task
A Task can only be allocated to a new Request, Problem or Change once it has been created or Saved. A Task
would normally be added using the VIEWING AND EDITING REQUESTS options outlined below. From any of
the Request, Problem or Change list views select the Tasks icon to display the linked Tasks. Select “Add
Task” to display the Task form as defined using Administration | Form Design | Task and enter the required
details. The system and default values of the Task form are defined below in Figure 18 below.
Field Description
Task Task Identity Number. Incremented by one starting from
zero.
Date Placed Date Task allocated. Defaults to current date. Use
“Select” icon to choose another date
Task Type Use “Select” icon to choose Task Type required from
predefined tree view
Analyst
Analyst assigned to the Task. Defaults to logged on
Analyst. Use “Select” icon to choose another Analyst
Request ID Auto populates with Request Identity number from
Request selected. Use “Select” icon to choose another
Request
Problem ID: Auto populates with the Problem ID number from the
Problem Selected. Use the “select” icon to choose
another Problem.

Layton Technology Page 77 of 178 Layton ServiceDesk v6 User Manual v2.0
Change ID: Auto populates with the Change ID number from the
Change Selected. Use the “select” icon to choose
another Change.
Status
Status of Task, select either Scheduled or Completed.
Defaults to Scheduled
Scheduled Date Use “Select” icon to choose date for Task to be done
Completed Date Use “Select” icon to choose date Task completed
Task Description Full description of Task
Figure 18 - Task Data Fields
Additional icons provided:
Cancel Task Changes - Task will not be created or all changes ignored
Complete Task - The Task will be listed as completed
Save Task - A new Task is created or changes saved After selecting any of the above icons, the Task list view is displayed.
Viewing and Progressing Tasks
Outstanding or uncompleted Tasks that have been scheduled for the logged on Analyst are viewed using the
Home tab | View Tasks sub-menu item. The Tasks will be displayed in order of ascending Scheduled Date
but can be reordered by selecting any column heading to sort ascending and selecting again for descending.
See Figure 19 below.

Layton Technology Page 78 of 178 Layton ServiceDesk v6 User Manual v2.0
Figure 19 - Task List View
Any Task can be viewed or updated by selecting any data field against the Task. The Task form will then be
displayed and fields updated as required. Here a Task could be assigned to another Analyst. See Figure 20.

Layton Technology Page 79 of 178 Layton ServiceDesk v6 User Manual v2.0
Figure 20 - Task Form
To complete the Task click on the “Complete Task” icon on the task form. This will then prompt with a
pop up to confirm that you wish to complete the task. Once confirmed this will set the status to completed
and set the complete date to the current time. To set the complete date to a different time use the date
selector drop down on the completed date field. Once Tasks have been completed they will not appear in
the “View Tasks” list view.
All Tasks, whether scheduled or completed, can be viewed when selecting the Tasks icon from any of the
Request, Problem or Change list views.
The Tasks icon identifies whether any tasks or actions exist for the Request, Problem or Change. The Task
icon will have ticks against it if Tasks are present and positioning the mouse over the Task icon will display

Layton Technology Page 80 of 178 Layton ServiceDesk v6 User Manual v2.0
the number of Tasks. Selecting the Task icon will display a list of Tasks associated with that Request, Prob lem
or Change.
SEARCHING
Requests, Problems, Changes, Tasks and Surveys can all be searched for using Main Menu | Search. The
Search sub-menu will have different Search icons for the Requests, Problems, Changes, Tasks and Surveys. If
the Problem & Change function is disabled the Search icons for these two items will not be displayed.
Each Search screen will show the default form however the criteria and screen can be modified using
Administration | Form Design. Figure 21 shows an example Search Requests form.
The Search Request screen displayed will allow you to search for Requests on any criteria or combination but
if none is entered then all Requests will be displayed. The list view of Requests can be sorted by selecting the
appropriate column headings. Requests are selected to view in detail or by selecting any data field against a
Request.
If a Memo/ Large Text type field is placed on the search form the system will perform a “fuzzy” match of that
field rather than an exact match.
Figure 21 - Search Requests

Layton Technology Page 81 of 178 Layton ServiceDesk v6 User Manual v2.0
DASHBOARD
The Layton ServiceDesk Dashboard provides ServiceDesk Managers and Analysts with a quick and easy visual
overview of the current state of the ServiceDesk.
The Dashboard charts and statistical data provide all the critical information you need at your fi ngertips,
making the task of monitoring the performance and workload of ServiceDesk that much easier. With the
information displayed on the Dashboard you can quickly identify any trends or changes to the service levels
and take proactive action.
The charts have a range of filter options which allow you to quickly change views, for example you can see
the number of Requests that are open by Analyst, Analyst Group, Priority, Status or Site. All chart
components are drillable and by clicking a data component you will provided with a list view of that data.
Figure 22 – Dashboard
By default all Analysts have access to the Dashboard. To turn off Dashboard access for an individual Analyst
go to Administration | Company Structure | Manage Analyst | Analyst Settings | Access Restrictions |
Dashboard Access.
The two charts at the top of the Dashboard will display data based on Open Requests. The grouping is based
on the filter section above the chart. The chart grouping options are by Analyst, Analyst Group, Company,
Site, Department, Priority and Status.
Layton Technology Page 82 of 178 Layton ServiceDesk v6 User Manual v2.0
The chart in the bottom left hand corner will display data based on Open Problems. The grouping is based on
the filter section about the chart. The chart grouping options are by Analyst, Analyst Group, Site, Priority,
Status, Impact and Urgency.
The chart in the bottom right hand corner will display data based on Open Change. The grouping is based on
the filter section about the chart. The chart grouping options are by Analyst, Analyst Group, Change Type,
Status, Impact and Urgency.
By default the Layton ServiceDesk system has the Problem & Change management functions enabled. If your
service desk system does not require the Problem & Change management functions they can be d isabled by
going to Administration | System Settings | Application Settings | Enable Problem and Change.
If the Problem & Change management functions have been disabled the Problem & Change charts will be
converted into additional Request charts.
The Statics Panels in the left hand pane provide a range of data grouped into five sections; My Stats,
Requests, Problems, Changes and System Stats. The Problem & Change management function has been
disabled then the Problem & Change panels will not be displayed.
To display a list view of any statistic or chart data component simply click on the chart component or link
displaying the number of items.
REPORTING
Layton ServiceDesk includes a powerful reporting and analytics engine with the ability to create and
customize your own reports, including the ability to export to CSV, XLS and PDF.
Layton ServiceDesk includes over 100 predefined reports and charts out of the box. Each report provides
ServiceDesk Analysts and Management with key data at their fingertips. While the canned reports will be
more than adequate for most users, Layton ServiceDesk provides a powerful Report Builder tool which
enables you to create any report you need using the intuitive report builder interface. You can very quickly
create detailed data grid reports with Pie, Column and Line charts. A number of Trend charts are also include
and you can create your own trend reports, which are particularly useful to spot spikes in your help desk
data.
This guide defines how to create, copy, modify, schedule and delete reports and also how to restore the
system default reports that are supplied with the Layton ServiceDesk. All the Layton ServiceDesk Reports are
stored as XML files in the Reports table in the Layton ServiceDesk database.

Layton Technology Page 83 of 178 Layton ServiceDesk v6 User Manual v2.0
Creating a New Report
To create a new report, select Reports, then click on the New Report sub menu item and you will then be
presented with the Report builder page. See below for a screen shot.
Give the report a name and select the report category. The reports categories are displayed in the left hand
panel of the reports page and the reports are sorted alphabetically within each category. You can move
reports to different categories, simply by changing the Category they are saved in from the drop down list.
The next step is to select the type of report you and the available options are Grid, Pie Chart, Column Chart
and Trend Chart. If you select a Chart type as your option, there is an additional check box so you can add the
data grid to also be displayed. Instructions for each type of report are detailed below:
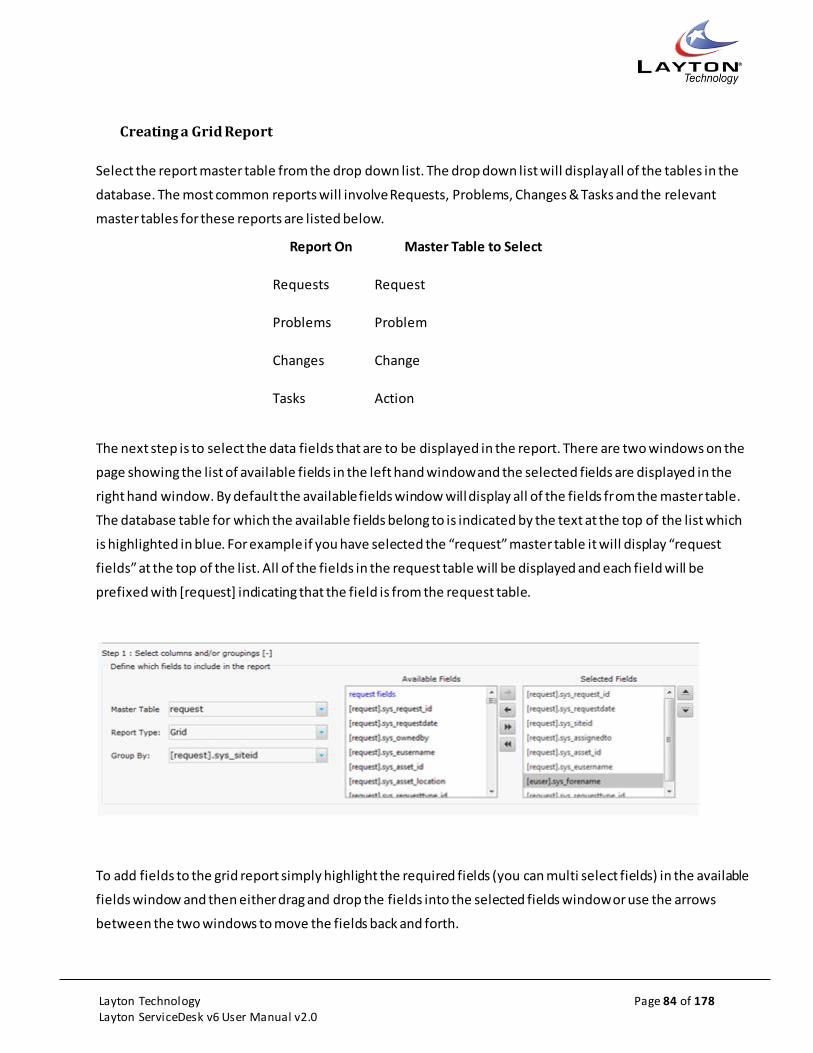
Layton Technology Page 84 of 178 Layton ServiceDesk v6 User Manual v2.0
Creating a Grid Report
Select the report master table from the drop down list. The drop down list will display all of the tables in the
database. The most common reports will involve Requests, Problems, Changes & Tasks and the relevant
master tables for these reports are listed below.
Report On Master Table to Select
Requests Request
Problems Problem
Changes Change
Tasks Action
The next step is to select the data fields that are to be displayed in the report. There are two windows on the
page showing the list of available fields in the left hand window and the selected fields are displayed in the
right hand window. By default the available fields window will display all of the fields from the master table.
The database table for which the available fields belong to is indicated by the text at the top of the list which
is highlighted in blue. For example if you have selected the “request” master table it will display “request
fields” at the top of the list. All of the fields in the request table will be displayed and each field will be
prefixed with [request] indicating that the field is from the request table.
To add fields to the grid report simply highlight the required fields (you can multi select fields) in the available
fields window and then either drag and drop the fields into the selected fields window or use the arrows
between the two windows to move the fields back and forth.
Layton Technology Page 85 of 178 Layton ServiceDesk v6 User Manual v2.0
In addition to adding fields from the master table you can also add fields from other linked tables where
there is a link via a foreign key in the master table. For example the sys_eusername (End User) field is a
foreign key in the request table and the primary key in the euser (End user) table. This will allow you to add
fields from the euser table such as the end user’s forename ( [euser].sys_forename ) into your report.
Any foreign key fields in the master table will be displayed at the bottom of the list of available fields and will
be indicated by their green color, eg. sys_eusername.
To view the fields in this linked table double click on the green field and the fields from the linked table will
now be available for selection. The new table name will be highlighted in blue underneath the master table
name at the top of the list and the new fields will be prefixed with their table name. e.g
[euser].sys_forename.
To return back to the list of the master table fields double click on the blue text of the master table, e.g.
request fields.
Once you have selected the fields for the grid report if you wish to group the data by a particular field you
can do this by selecting the field from the “Group By” drop down list. Please note that reports can also be
grouped, sorted and filtered on the fly after the report has been generated.
Applying Filters & Summaries
After the fields have been selected filters can be applied by clicking on the filter icon. A drop down list will
appear which contains a list of the fields from the master table. This list works in the same manner as the
available fields window as described above, allowing you to drill down to linked tables.
Once a filter field has been selected the filter operator options will be available for selection. The filter
operators will be determined by the type of data field that has been selected. For example if the field is an
integer field the operator values will include =,<, >, >=, etc. For variable character or text fields the operator
values will include; starts with, ends with, contains, is, is not, etc. Date fields operators include; on/within,
before, after, between.
For date filters there is also a pre-populated list of values available such as Today, Last Week, Last Month,
Next Month, Next 60 days etc. These options are particularly useful when you want to schedule reports. For
example you can schedule a report to show you all high priority requests logged in the past 30 days. This
report can be automatically generated on the 1st of the month and be sent via email.
Once the operator has been selected the value can entered. There is a small search icon next to the value
field and selecting the search option will display a drop down list of all values for this field that are in the
database. Clicking on the search icon a second time will remove the drop down list and display the manual
entry field. If a date filter field has been selected there will be a select icon which will pop up a calendar
window where you can select a date.

Layton Technology Page 86 of 178 Layton ServiceDesk v6 User Manual v2.0
Multiple filters can be added by clicking the “And” or “Or” buttons.
Summary values can be added to any fields in the grid report by selecting the field in the summary options
drop down list. Integer fields will have summary options for Count, Sum, Average, Max & Min. Date/Time and
variable character fields will only have the Count option. Summary values can be added to multiple fields in a
grid report if required.
Once the report has been completed click the save button and the report will be added to the list of reports
in the selected category. Once the report has been saved the design layout can be modified by selecting the
design layout button next to the report in the report category list. See below for details on the design layout.

Layton Technology Page 87 of 178 Layton ServiceDesk v6 User Manual v2.0
Grouping, Sorting & Filtering Grid Reports on the Fly
While Grid Reports can have pre-defined filtering and grouping settings this can also be done on the fly after
a report has been generated.
To group by a particular field simply drag the column header into the section above and this will group by
that column. If required you can create sub-groupings by dragging additional column headers into the
grouping section. To undo a grouping click on the “x” button in the grouped by field or drag it back down with
the other column headings.
Data can be sorted by clicking on the field column headers. Clicking once will sort the data in ascending order,
a second click will sort in descending order and a third click will clear the sorting. Data can be filtered very
quickly using the filter fields under each column header. Enter the required value i n the desired filter field
and click on the filter icon. This will then display the filter options available. To remove the filter click on the
filter icon and select the “NoFilter” option at the top of the list.
Reports generated from the Request, Problem, Change and Action (Tasks) master tables will display a link
field in the left hand column. The link field will display a Request, Problem, Change or Task icon depending on
the type of report. This icon allows you to click through and view the details of an individual Request,
Problem, Change or Task.
Creating Charts
If a Pie or Column chart report type has been selected the “Available Fields” and “Selected Fields” windows
will be removed as they are not applicable to these types of reports.
An additional option for the Pie and Column Charts will be to “Show Summary Grid”. A summary grid displays
the same information that is represented in the Pie or Column chart in a grid format along with a grand total.
Select the Master Table from the drop down list. The drop down list will display all of the tables in the
database. The most common reports will involve Requests, Problems, Changes & Tasks and the relevant
master tables for these reports are listed below.
Report On Master Table to Select
Requests Request
Problems Problem
Changes Change
Tasks Action

Layton Technology Page 88 of 178 Layton ServiceDesk v6 User Manual v2.0
Select a “Grouped By” field from the drop down list. All of the data fields from the master table will be
displayed in the drop down list.
The final step is to apply any filters to the report. Please see the Applying Filters section in the grid report
section above.
Once the report has been completed click the save button and the report will be added to the list of reports
in the selected category. After the report has been saved the design layout can be modified by selecting the
design layout button next in the report category list. See below for details on the design layout.

Layton Technology Page 89 of 178 Layton ServiceDesk v6 User Manual v2.0
Creating a Trend Chart
Select the Master Table from the drop down list. The drop down list will display all of the tables in the
database. The most common reports will involve Requests, Problems, Changes & Tasks and the relevant
master tables for these reports are listed below.
Report On Master Table to Select
Requests Request
Problems Problem
Changes Change
Tasks Action
Unlike the Pie & Column charts the Trend Chart has a “No Grouping” option available for the Group By
selection. If No Grouping is selected there will be a single trend line or bar based on the trend field.
As Trends are linear timelines the list of available trend fields are the date type fields within the master table.
The most commonly used trend fields would be the Request Date (sys_requestdate), Problem Date
(sys_problemdate) etc.
The Time Period is the interval been each data series and the options available are Day, Week, Month,
Quarter and Year.
There are additional options to select whether the trend chart will be a Line or Bar chart and whether the
orientation is vertical or horizontal.
The final step is to apply any filters to the report. Please see the Applying Filters section above in the grid
report section.
Once the report has been completed click the save button and the report will be added to the list of reports
in the selected category. After the report has been saved the design layout of the report can be modified by
selecting the design layout button next to the report in the report category list. See below for details on the
design layout.

Layton Technology Page 90 of 178 Layton ServiceDesk v6 User Manual v2.0
Report Design Layout
The report design page allows you to modify the layout of each report using the same user friendly drag and
drop feature which is used throughout the application. The floating toolbar is used to add labels, images and
set the page properties. For more information on form design please see the form design section.
To change the position of the grid or chart, using the handle in the top left hand corner of the grid, drag the
grid to the desired position on the page. You can also click on the grid or chart link next to the handle to set
the left and top pixel positions.
To resize a report data field or change the field properties click on the field link. You can change the heading
of the field, font type, size, field size, field color etc. You can also resize the field width by hovering between
the field headings until you see the left and right arrows which will allow you to drag the field to the left or
right to resize.

Layton Technology Page 91 of 178 Layton ServiceDesk v6 User Manual v2.0
Images and labels can be added to the reports using the add label and add images button on the floating
toolbar. For more information please see the main form design section.
Exporting Reports
The Layton ServiceDesk reports can be exported in the following formats, PDF, XLS or CSV. Once a report has
been run the PDF, XLS and CSV icons will be displayed in the reports sub-menu. Please note that when
exporting the report in XLS format Excel will prompt you that the file is in a different format to the file
extension and to verify the source. Click “Yes” to this prompt and the report will be displayed as an XLS file.
Quick Tip: When you export a report to PDF or schedule the report, the data grid and charts are automatically
scaled to fit the PDF perfectly, you do not need to worry about how wide or long the grid size is on the screen
as Layton ServiceDesk will scale the grid to best fit the page layout, however, you may wish to change the
page orientation if you have many columns and the grid is quite wide so maximze the amount of data you can
get across the page.
PDF Reports
In report design mode on the floating toolbar there is a PDF icon which allows you to see the report PDF
Settings. Each Layton ServiceDesk report can have its own PDF setting. The PDF settings include many options
such page format (E.g. US Letter, A4, etc.), page orientation (Portrait or Landscape), margin settings along
with header and footer options. You can even create passwords and security settings for the PDF.

Layton Technology Page 92 of 178 Layton ServiceDesk v6 User Manual v2.0
In the PDF footer or header text field you can use the system value of {{Datetime}} and this will show the date
and time that the report was generated.
PDF Security Settings
The PDF Security Settings allow you to protect sensitive reports from either being viewed, printed, copied
once the PDF is created. This is adds an extra level of security and peace of mind when emailing or
distributing reports. There are two password options:
1. Owner
2. User
The Owner password is the administrator that has set the PDF settings and will have full access control to the
PDF document when it is created and the correct Owner (admin) password entered.
The User setting is the password you would supply to the end user where the PDF restrictions are set and
what the end user can do with the PDF, eg Print, Copy text etc.
Scheduling Reports
Reports can be generated automatically on a scheduled basis and sent via email in a PDF format. The
scheduled reports are processed by the LaytonServiceDesk service which is running on the Layton
ServiceDesk IIS server. The process to create a schedule a report works in a same manner as scheduling a
recurring Task.
To schedule a report click on the Schedule Report icon in the Reports sub-menu. You will then be presented
with a list of the currently scheduled reports. This will show the report name, last run time, next run time,
scheduling details and icons to set the email information and a delete button.
Click on the add new icon to add a new schedule. You will then receive a pop up window which will allow you
to select the report that you want to schedule from the drop down list of reports. Once you have selected the
report you can create the schedule. Once the schedule is saved the email message page will be displayed.
Enter the email address that the report is to be emailed to; you can enter multiple email addresses separated
by a semi colon. Once the email message is completed and saved you will be returned you to the list of
scheduled reports.
Access Control
By default all Analysts have access to run the reports and statistics. Only Administrators will have access to
create, modify, schedule or delete reports.
To turn off Analyst Access to the Reports and Statistics go to Administration | Company Structure | Manage
Analyst | Settings | Access Restrictions. Options in this section are; Reports Access, Statistics Access &

Layton Technology Page 93 of 178 Layton ServiceDesk v6 User Manual v2.0
Statistics Group Access. There are also additional options in Administration | Company Structure | Manage
Analyst | Settings |Site Access | Statistics Access.
If an Analyst is denied access to the Reports and Statistics the main Reporting menu will not be available for
this Analyst.
Security can also be applied on an individual report by report basis. To restrict analyst access to a particular
report click on the edit report icon and then click on the security icon on the report builder page. A new page
will be displayed showing the current security settings. By default all of the reports have the access
restriction turned off. To turn on the security simply select the “Restrict Access” button and select the
Analysts which are to have access to this report.
Copying a Report
The Copy report button allows you to create a copy of an existing report and is quite helpful if you need a
new report which is very similar to an existing report. To copy an existing report click on the edit report icon
for the report that you want to copy. Then in the main report builder page rename the report and then sel ect
the category that you would like the report to appear under and then click the copy button.
Restore Default Reports This feature allows you to restore the default reports to their original settings.
Restoring a report will overwrite any existing report with the same name.
CALENDAR
The Layton ServiceDesk Analyst Calendar and Availability Schedules are used to show the Analysts’ availability
and schedule of appointments, Tasks and Call Back Reminders. The Calendar view has options for Daily,
Weekly and Monthly views. Depending on an Analyst’s permissions they can be given access to see their
schedule only or those of other Analysts within their Group, or they can be given full access to the schedule
for all Analysts.
There are two main views, the Calendar View and the Availability View.
The Calendar View
The Calendar View provides options for Daily, Weekly and Monthly views. See Figure 23 below for a sample
of the Monthly Calendar view.

Layton Technology Page 94 of 178 Layton ServiceDesk v6 User Manual v2.0
Figure 23 - Analyst Calendar
By default the view will be set to the current logged on Analyst’s Calendar. If the Analyst has permissions to
view the Calendar of other Analysts they can select a different Analyst from the drop down list on the left
hand side of the page. The Analyst setting that determines if an Analyst can view the Calendar of other
Analyst can be found in Administration | Company Structure | Manage Analyst | Analyst Settings | Restrict
Analyst Calendar. There are four restriction settings:
No Access:
The Analyst does not have access to the Calendar and the Calendar menu item will not be available for this
Analyst.
Own Access:
The Analyst will only have access to his own calendar.
Own Group Access:
The Analyst will be able to view the Calendar of any Analyst that belongs to the same Analyst Groups as this
Analyst.

Layton Technology Page 95 of 178 Layton ServiceDesk v6 User Manual v2.0
Full Access:
The Analyst will be able to view the Calendars of all Analysts in the system.
Viewing Call Backs, Tasks and Appointments.
Any existing Callbacks, Tasks or Appointments that have been scheduled for the Analyst will be displayed in
the appropriate day and timeslot. Any Tasks listed will be identified with the “Task” subject line along with
the Task ID number and the Task Type, e.g. “Task (775) – Install Upgrade”. Any Callbacks listed will be
identified with the Callback subject line along with the related Request, Problem or Change ID number, e.g.
“Callback – Request (5564)”.
To view the details of an existing item double click it and you will receive a pop up window with the item
details. See Figure 24 below for an example. If required any details can be modified and a reminder alert
scheduled. If a reminder is schedule and the Analyst is logged into the system they will receive a pop up
reminder alert where they can choose to view the details or Snooze or Dismiss the item. If the Analyst is not
logged into the system at the time of the reminder it will send them an email notification instead.
The item can be Saved or Deleted by selecting the save or delete button at the top of the window. There are
additional options to print the item or mark it as import or less important.
Figure 24 - Appointment Scheduler

Layton Technology Page 96 of 178 Layton ServiceDesk v6 User Manual v2.0
To add a new Appointment to the calendar double click in the desired timeslot and a blank appointment will
be displayed which can be completed and closed. Cal lbacks and Tasks cannot be scheduled from within the
Calendar and must be scheduled through the related Request, Problem or Change or from the main menu
Log New drop down.
Analyst Availability View
The Analyst Availability View provides a simple, easy to view two week timeline displaying any Analyst
Absences which are scheduled for the period. Each Analyst is listed in the left hand column and the Absences
will be displayed in the corresponding date columns. Multiple Absences can be scheduled for the same
Analyst and they can overlap if required. Analyst Absence Types are user defined and can be color coded for
easy visual identification. Analyst Absence Types can be created in Administration | Company Structure |
Manage Analyst Absence Types.
See Figure 25 below for a sample of the Analyst Availability View.
Figure 25 - Analyst Availability View
To add an Analyst Absence double click in the required day for the Analyst and you will be presented with a
small window where you can enter the details along with options to Save, Cancel or select further Options. If
the Absence entry does not require specific information such as the Absence Type or a start and finish time,
once you enter the text information and click save it will create an Absence that will cover the whole day.

Layton Technology Page 97 of 178 Layton ServiceDesk v6 User Manual v2.0
To enter the Absence Type along with the start and finish times select the Options button and you will be
presented with the Edit Absence page where the full details can be added, see Figure 26 below. Once the
details have been added click the save button to return to the Analyst Availability View.
Figure 26 - Creating an Analyst Absence
If an Analyst Absence period needs to be extended, shortened or moved from one day to another, this can be
achieved quickly using drag ‘n drop on the main Analyst Availability View calendar. To extend or shorten the
Absence simply hover over the right hand end of the Absence until the right and left arrows appear, then
click and hold and drag the Absence to the right or left. To move the whole Absence from one day or period
to another, click and hold on the Absence and drag it to the required location.
Note that when an Analyst has an Absence scheduled HelpBox will not automatically assign Requests to this
Analyst. Any Analyst Absences will also be indicated in the select Analyst popup windows when a Request,
Problem or Change is being manually assigned. If an Analyst is Absent the Available column next to their
name will not display a tick.
ASSETS (AuditWizard Connection)
The Asset information displayed in the Layton ServiceDesk Assets Tab is provided by AuditWizard, Layton
Technology’s Asset Management software. For more information on AuditWizard please visit our website
www.laytontechnology.com
To configure the AuditWizard connection please see the AuditWizard settings section.
The Assets Tab provides a list of assets in a tree structure which are displayed the left hand panel. The Layton
ServiceDesk Assets Tab view mirrors the Network View within AuditWizard and is based on the location
structure configured in the AuditWizard administration section. Please see Figure 27 below.
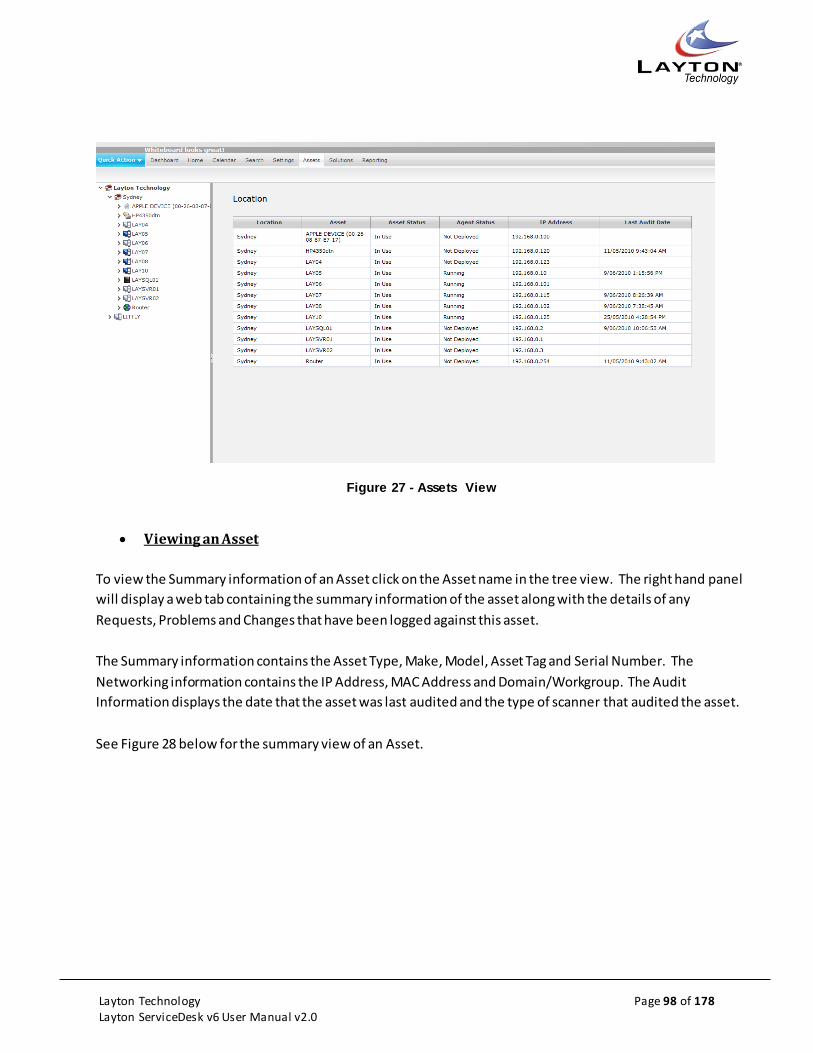
Layton Technology Page 98 of 178 Layton ServiceDesk v6 User Manual v2.0
Figure 27 - Assets View
Viewing an Asset
To view the Summary information of an Asset click on the Asset name in the tree view. The right hand panel
will display a web tab containing the summary information of the asset along with the details of any
Requests, Problems and Changes that have been logged against this asset.
The Summary information contains the Asset Type, Make, Model, Asset Tag and Serial Number. The
Networking information contains the IP Address, MAC Address and Domain/Workgroup. The Audit
Information displays the date that the asset was last audited and the type of scanner that audited the asset.
See Figure 28 below for the summary view of an Asset.

Layton Technology Page 99 of 178 Layton ServiceDesk v6 User Manual v2.0
Figure 28 - Asset Summary View
To view the history details of any Requests, Problems or Changes that have been logged against this asset
simply click on the relevant tab. The details of a particular Request, Problem or Change can be viewed by
clicking on the link in the list.
To view more detailed information on the asset you can expand the asset in the tree structure to view the
different audit categories such as Applications, Hardware and System. Each category can then be expanded
further to reveal specific inventory information. To view the details of the inventory component simply click
on the item and the information will be displayed in the right hand panel. See Figure 29 below for an
example.
Figure 29 - Asset Detail View

Layton Technology Page 100 of 178 Layton ServiceDesk v6 User Manual v2.0
A Request, Problem or Change can be logged against an Asset by clicking on the Add New Request, Problem
or Change icons on the asset summary page. This will open a new Request, Problem or Change form
according to the default settings and will automatically populate the asset in the Asset ID field.
If your ServiceDesk does not require the Assets Tab this can be disabled by going to Administration | System
Settings | AuditWizard.
By default all Analysts are given access to the Assets Tab. To turn off access for an individuatl Analyst go to
Administration | Company Structure | Manage Analyst | Analyst Settings | Access Restrictions | Assets
Access.
Searching for an Asset
To search for an asset click on the Search Asset icon in the Asset Tab sub menu and you will presented with
the Search Asset page, please see Figure 30 below. A search can be conducted based on a range of different
criteria such as the Asset Name and IP address along with the search scope which is the asset locations. Once
the search criteria has been entered click the Find button and any matching assets will be listed and details of
the asset can be viewed by double clicking the asset.
Figure 30 - Searching Assets

Layton Technology Page 101 of 178 Layton ServiceDesk v6 User Manual v2.0
USING LAYTON SERVICEDESK (ANALYST)
Having configured Layton ServiceDesk™ to your requirements, or maybe you are using the default settings,
this Chapter will now show you how to use Layton ServiceDesk™. You should have already read the SYSTEM
CONCEPTS AND TERMINOLOGY section.
SYSTEM ACCESS AND MENU
As discussed in the System Access and Menu Structure section there are two types of system access, Analyst
and End User. The Analyst then has a further level of security or system access depending on their “Security
Group” setting. This setting will either be Administrator or Standard where the Administrator Menu item
will not be made available.
Any Menu item can be selected at any time but when creating or editing data unless the “Save” icon or
button (if available) is selected then details entered will not be saved.
Logon Page
After selecting the Layton ServiceDesk™ shortcut or web connection you will then be presented with the
Logon screen to enter your user name and password. Then select the type of system access required, in this
case, “Analyst Login”.
The login screen is also configurable so if you do not require End Users to have access to the system you can
change the login screen option by using the Administration | General Settings | Security | General Security
and “Allow End User login”. With this option turned off there will be no fields for the End user to login. End
Users can register themselves when first accessing the system, but this facility can be removed by using
Administration | General Settings | Security | Global End User Security and “Allow End User Reg”.
If you have not set any system users up then user of “Admin” and Password of “mib” will provides initial
entry to the system.
Analyst Menu
When accessing Layton ServiceDesk™ as an Analyst you will be presented with the Menu structure at the top
of the screen and your “Home” screen or view as you have specified using My Settings | Home Screen.
Otherwise you see the system default screen, which is “My Assigned Requests” or Requests that have been
assigned to you.

Layton Technology Page 102 of 178 Layton ServiceDesk v6 User Manual v2.0
Figure 31 - Request List View
The example in Figure 31 shows the Menu structure and a sample default list view of “My Assigned
Requests” or having logged into Layton ServiceDesk™ the screen that the Analyst is presented with.
The main Analyst activities are grouped under the Home menu item. This is where all new Requests, Tasks,
Problems and Changes are logged and existing ones viewed, amended or progressed. The following sections
define the activities of the Menu but in order of Layton ServiceDesk™ functions and not Menu order.
Whiteboard & Analyst Group Queues
Whiteboard:
The Whiteboard allows an Analyst to place messages on the scrolling banner at the top of the screen.
Messages can be edited by clicking on them or added by clicking the “Add New” icon. You can specify a start
and end date between which the message will appear, a subject and who the message was created by. In
addition you may specify a public/private flag that allows the message to be shown only to Analysts (private)
or to both End Users & Analysts (public). There are also filters that allow you to post Whiteboard messages
that are only visible to specific Analyst Groups, Site, Departments or Companies.

Layton Technology Page 103 of 178 Layton ServiceDesk v6 User Manual v2.0
Analyst Group Queues:
The Analyst Group Queues display the current number of Assigned and Unassigned requests for each Analyst
Group. If the Problem & Change Management feature has been enabled then there will be columns
displaying the number of Assigned and Unassigned Problems & Changes for each Analyst Group.
LOGGING A NEW REQUEST (ANALYST)
New Requests are created or logged by Analysts using Home | New | Request or by using the QuickAction
Menu or by converting an incoming email into a request. The Analyst Request form is displayed allowing you
to enter Request details as required or as you have defined using Administration | Form Design | Analyst
Request.
All data fields can be made mandatory for entry before a Request can be saved and also compulsory before a
Request can be closed. This is achieved by setting the appropriate field properties when using the Form
Design.
Although the Analyst Request form is very configurable and fields can be added, deleted or amended, certain
system fields will normally always be present. The example defined in Figure 32 below shows the system
default areas and data fields for the Analyst Request form.
Figure 32 - Analyst Request Form

Layton Technology Page 104 of 178 Layton ServiceDesk v6 User Manual v2.0
Request Number & Time Stamp
Request ID:
A new Request ID number is automatically generated sequentially but is not created until the Request is
saved.
Request Date:
Populated with Today’s date and time and can be amended depending on the security setting in
Administration | General Settings | Security | General Security | “Allow Request Date Edit by”
End User Details
End User:
The End User is obtained by selecting the Select End User icon next to the End User field. The “Search End
User” screen will then be displayed showing various search options; End User Name, Forename, Surname or
department. The search criteria can be a specific name or any number of characters and all End Users
starting with the characters specified will be displayed.
Alternatively, by selecting the Search End User Icon, all End Users will be displayed. The required End User is
selected by clicking on any field against an End User.
Another quick way to search for the End User is to click into the End User field and type the first couple of
letters of the End User’s username and then click the tab key on the keyboard. This will automat ically bring
back a list of End Users with the username beginning with these letters.
If the End User does not exist then an End User can be created by using the Add icon displayed under the End
User selection list. The End User form can now be completed and by selecting save the details are stored.
The End User is then automatically populated as the End User fie ld on the Analyst Request form.
By selecting the Quick Info on End User icon situated next to the Select End User icon, more End User
details can be displayed, such as telephone number and email address along with a list or requests that this
End User has logged in the past. The End User Quick info form is configurable in Administration | Form
Design | End User Quick Info.
Asset Information
Asset: An Asset can be a PC or any item that is supported and can be entered as free format text or left blank.

Layton Technology Page 105 of 178 Layton ServiceDesk v6 User Manual v2.0
If the AuditWizard™ link is implemented then the Asset can be entered or searched for within the AuditWizard™ inventory database by using the Select Asset icon. The Find Asset screen is now displayed allowing you to enter search criteria for the Asset Name, IP Address or User Name, Asset Tag or Site. You can select the required Asset or perform another search. However, if the End User has previously logged a Request then the Asset used previously will be sugge sted as “the End User’s last known Asset”. This can then be selected and populated as the Asset provided the option has been set as defined in Administration | System Settings |AuditWizard | “AW Get Last Asset”.
Once an Asset has been selected the Quick Info on Asset icon next to the Asset field can be selected to display all the Asset information along with a history of the Request, Problems & Changes that have been logged against this request. Asset Location:
The Asset Location will be automatically populated if the Asset has been selected from the AuditWizard™
database and the option set as defined in Administration | System Settings | AuditWizard |Auto Location.
In addition the Location can be input directly or reselected by using the Select Asset Location icon.
Site
The site at which the request is logged is defaulted when the End User is selected if the End User has a
default Site specified against them. This field will affect the options available when selecting the “Assigned
To” Analyst if the Constrain Auto Assign / Suggest To Site Option is turned on in Administration | General
Settings | Auto Assignment Options.
Request Type, Problem Summary & Description
Request Type:
The Request Type can be selected form the predefined structure by using the Select Request Type button.
Any level in the tree structure can be selected.
Problem Summary:
An optional text field which can used to give a summary of the Problem or Request. If the request has been
created by converting an incoming email this field will be automatically populated by the Subject Line of the
email.
Problem Description:
This is a full description of the Request and any amount of text can be entered. If the request has been
created by converting an incoming email this field will be automatically populated by the Body of the email.

Layton Technology Page 106 of 178 Layton ServiceDesk v6 User Manual v2.0
Request Assignment & Ownership
Owned By:
This is the Analyst that owns or is responsible for the Request. This can be automatically populated if
configured. The owner would probably be defaulted to the Analyst logging the Request. See CONFIGURING
THE SYSTEM and the Request Settings section. Alternatively, an Analyst can be selected by using the Select
Analyst icon next to the Owner field.
Note: Requests can be assigned to either Analysts OR Groups, but not both at the same time, by the Analyst
or Group being suggested for assignment using Skills or/and Loading. See CONFIGURING THE SYSTEM and
the General Auto Assignment Settings.
Assigned To:
This is the Analyst who is assigned to the Request and can be automatically populated, if configured. Using
the Select Analyst icon next to the Assigned To field, the Request can be assigned to another Analyst. If the
Skills option for Analysts is used and matches the Request Type entered, then the appropriate Analyst will be
suggested for assignment. See Figure 33.
Once assigned to another Analyst then the Request will disappear from the ‘My Assigned Requests’ list view
for the current or logged on Analyst and appear for the Assigned Analyst within their ‘My Assigned Requests’.
Figure 33 - Analyst Assignment

Layton Technology Page 107 of 178 Layton ServiceDesk v6 User Manual v2.0
The Analyst Selection window displays Analysts available for assignment. If the “Constrain Auto
Assign/Suggest to site” option is turned on and a Site is specified on the request, Analysts who are at that site
will have a tick displayed in the “At Site” column.
If an Analyst is on leave or has an “Absence” currently scheduled then there will not be a tick in the
“Available” column. However the Analyst can still be manually selected if required. For more information on
please see the Analyst Availability View section.
Assign To Group:
The Analyst Group, if required, can be automatically populated providing Analysts have been associated with
Groups, see CONFIGURING THE SYSTEM and Manage Analyst Groups sections. However, if the Analyst
belongs to more than one Group, then the Group cannot be auto populated so the Sel ect Group screen will
be presented to choose a Group.
However, if the Request is to be assigned to a Group and not an individual Analyst then on selecting the icon
Select Group, the Analyst Groups will be displayed.
If the Skills / Loading is used then the appropriate Group will be suggested for assignment otherwise select a
Group for assignment. Once assigned to a Group in this way (and an Analyst is not assigned) then the Request
will appear as an unassigned Request within the Group and viewed through the Analyst Group Queues.
Priority & Service Level Agreements
Priority / SLA:
Here the Priority can be selected from a predefined list of Priorities. The escalation and expiry time will be
calculated when the Request is saved.
If the Priority has been defined so the expiry and escalation details are entered manually or can be edited,
then when the Request is saved; another screen will appear, Confirm Request Escalations. This will enable
you to input or change any details but ensure you select the Save icon.
The “Default” button allows you to change or restore any escalation values as defined against the Priority /
SLA within Administration. Once selected the button will change to “Store” which will allow you to revert to
values manually set for the Request.
Although the Request has been created, the expiry and escalation details will not be changed unless the
“Save” icon is selected.

Layton Technology Page 108 of 178 Layton ServiceDesk v6 User Manual v2.0
Service, Impact & Urgency
Service:
The Business or IT Service can be selected from the drop down list. This list of Services is defined under
Administration | Libraries | Services.
Impact:
The Impact of the Request/Incident can be selected from the drop down list. This list of Impacts is defined
under Administration | Libraries | Impact.
Urgency:
The Urgency of the Request can be selected from the drop down list. The urgency list can be defined under
Administration | Libraries | Urgency.
Linking Requests and the Parent/Child relationship
The Linked To field on the Request form allows the request to be linked to another Request which is referred
to as the Parent Request. This function is useful in situations where you have received a request for a
particular issue and then other requests are subsequently logged by other End Users or Analysts for the same
issue.
These subsequent requests can be linked to the Parent Request and then once the Parent Request is resolved
and closed the linked Child Requests can be automatically closed. The setting which determines if this
automatic closure of Child Requests is turned on can be found in Administration | General Settings |
Request Settings | Spawn Closure. For more information on this setting see the Request Settings section.
When a request is Spawned from another Request using the Spawn icon this will automatically create
the link between the two Requests.
Clicking on the select Request button next to the “Linked To” field will display a pop up showing any current
“Linked To” Requests (Parent Requests) and a list of all other open un-linked requests. To link to a request
simply click on the link of the relevant request. See Figure 34.

Layton Technology Page 109 of 178 Layton ServiceDesk v6 User Manual v2.0
Figure 34 - Linked To Requests
Finding and Entering Solutions
Solution Base:
This function provides the ability to link to the Solutions Base and obtain a Solution or answer to a Request.
By selecting the Select Solution icon next to the Solution field, the Search Solutions Base screen will be
displayed.
This screen provides the ability to search for a Solution using a Keyword Search or simply by browsing
through the folder structure which is based on the Request Type structure. The number of Solutions in each
folder location is displayed in brackets. The Solution tree structure will be automatically expanded to show
the Request Type folder corresponding to the Request Type that was selected on the Request Form.
Request Types are linked directly to Solutions and so this type of search can obtain a single or number of
Solutions depending in the Request level entered. See Figure 35 below.

Layton Technology Page 110 of 178 Layton ServiceDesk v6 User Manual v2.0
Figure 35 - Solutions
The Keyword Search will search the Solutions Base using a fuzzy matching method on ANY Solution Base field;
Solution, Solution Description or Problem Description. Once selected, the Solution will populate the Solution
field and the Solution Description on the Request form.
If the Solution was not found then a new Solution can be added by using Add button on the Solution screen.
Alternatively, a Solution Description can be entered manually without using or adding to the Solution Base.
Additional Analyst Request Functions
The other icons on the Analyst Request form are listed below along with a description of their functions:
Change Request Class:
The change Request Class icon will only be available if additional Request Classes have been created. For
more information please see the Request Classes section. The Change Request Class button allows you to
move a Request from one Class to another or create a new Request using another Request Class. The options
available for section are:

Layton Technology Page 111 of 178 Layton ServiceDesk v6 User Manual v2.0
o Request Class - A drop down list of Request Classes available for section
o Move Only – Selecting this option will move the existing request to the Request Class selected
o Close Only – Creates a new Request in the selected Request Class and closes the existing Request
o Leave Open – Creates a new Request in the selected Request Class and leaves the existing Request
open.
Copy Request to New:
This icon will only be visible if it is turned on in Administration | General Settings |Request Settings |Show
Copy Request Button.
Selecting the Copy Request to New button will enable you to create a new request based on the same data.
There are also additional options to copy any Tasks, Comments or Attachments to the new request.
Spawn Request:
The Spawn Request button will only be visible if it is switched on in Administration | General Settings |
Request Settings | Allow Spawning. Spawning allows you to create a Request that is a Child of the existing
Request. For example if you had a Request related to a piece of equipment, you may want to raise a Request
to the manufacturer of that equipment. A spawned call will allow you to do this. For more information
please see the Spawned Request section below.
Applying Templates:
Request Templates are pre-defined Request Forms which provide the Analysts with a quick method of logging
and closing common Requests. When a Template is selected the data from the template is applied to the
request form. For more information please see the Request Templates section.
Create Problem:
This button will only be available if you have enabled Problem & Changes in Administration | System
Settings | Enable Problem & Change. Selecting the Create Problem button will create a new Problem and
will copy the Request Type, Problem Summary and Problem Description data to the new Problem. A link will
be created between the Request and the Problem which can be viewed in the Links section.
Create Change:
This button will only be available if you have enabled Problem & Changes in Administration | System
Settings | Enable Problem & Change. Selecting the Create Change button will create a new Change and will
copy the Problem Summary and Problem Description data to the new Change. A link will be created between
the Request and the Change which can be viewed in the Links section.
Request History:

Layton Technology Page 112 of 178 Layton ServiceDesk v6 User Manual v2.0
Shows details of all changes made to the Request. The date and time stamped changes show Analyst, End
User, Type of Change and Field changed.
Links:
Shows if the request is linked to any Problems or Changes. To link the request to an existing Problem or
Change click on the Add icon above the link list. The next page will display a list of currently open Problems &
Changes and the two lists will be displayed in different tabs. If any Problems or Changes are already linked to
this Request they will be displayed at the top of the list and will have the linked check box selected. To link to
a Problem or Change simple check the box of the required Problem or Change.
Comments:
This will allow the analyst to view or create comments against the request. For more information see the
Comments section.
Tasks:
Shows the Tasks associated with the Request and allows you to update as required. New Tasks can also be
added. For more information see TASK SCHEDULING section.
Attachments:
Request Attachments allow the End User or Analyst to Upload files to a Request to act as an attachment. For
more information see the Request Attachments section.
Request Costs:
Shows any costs that have been charged to this Request. For more information see the Request Costs
section.
Call Back Reminders:
Call Back Reminders enable Analysts to set reminders for themselves or other Analysts. The reminder is set
for a specific day and time along and can be assigned to any Analyst.
Change Request Status:
The Change Status screen is displayed allowing you to change the Status of a Request. Either to Close,
Reopen or any other Status you may have defined.
Cancel Request Changes:
A new Request will not be created or any changes saved and you are returned to your Home page.

Layton Technology Page 113 of 178 Layton ServiceDesk v6 User Manual v2.0
Save Request:
A new Request is created and the Analyst Request form is closed and the Home list view is displayed (unless
the Priority / SLA confirmation screen has been requested, see above Priority and Service Level Selection).
Note: The “Save” option MUST be selected otherwise the Request details will not be saved and the
Request not created.
In addition to the above default system fields any other User Defined data fields can be added to the Analyst
Request form as outlined in the CONFIGURING THE SYSTEM section.
Converting an Incoming Email into a Request
An incoming email request can be manually converted into a Request through the Email Pending Queue. To
configure the Incoming Email settings please see the Email Server Settings section. If there are any incoming
emails pending this will be indicated by the number of emails on the incoming email icon in the top right
of the menu. Analyst access to the Email Pending queue can be turned on or off in Administration |
Company Structure | Manage Analyst | Analyst Settings | Site Access | Incoming Mail Access.
Click on the incoming email icon to view a list of the pending emails. To view and email and convert it into a
Request (or Comment, Problem or Change) click on the link. The details of the email will then be displayed
and if there is an End User that has a matching email address it will display this End User’s information.
To convert the email into a request click on the Convert to Request icon . This will then display the
Analyst Request form with the End User details automatically populated and the email subject will be
mapped to the problem summary field and the email body will be mapped to the problem description field.
To complete the conversion click on the save button and this will save the request and delete the email from
the email pending queue. If you cancel without saving this will take you back to the Email Pending Queue
and will not covert the email into a request.
VIEWING AND EDITING REQUESTS
When entering the system as a support Analyst you have various options or Menu items to display Request
List Views so you can edit and progress Requests. The Analyst’s default Request List View can be set by going
to My Settings | Home Screen | View Requests Home Screen. By default the Request List View home screen
is set to “My Assigned Requests”. All Request list views display the same data field columns and a summary
of the most common views is described below:

Layton Technology Page 114 of 178 Layton ServiceDesk v6 User Manual v2.0
My Assigned Requests: Open Requests that have been assigned to you
My Owned Requests: Open Requests that are “Owned By” you.
Unassigned Requests: Any Open Unassigned Requests
Analyst Group Queues: Lists of Assigned and Unassigned Requests per Analyst Group
All Open Requests: All Open Requests in the system
You may have your default or Home screen set to view your outstanding Requests or those assigned to you,
(My Assigned Requests), so you can quickly see your current workload. The Request List View display can be
changed quickly and easily simply by selecting the required view from the drop down filter at the top of the
Request List View page.
By selecting the column headings, the list view can be sorted by ascending sequence on that column and by
selecting again, the order changed to descending. See Figure 36 for an example of a Requests list view.
Figure 36 - Request List View
The Comments icon identifies whether any comments exist for a request and by selecting the Comments
icon the list of Comments associated with that Request will be displayed. The Comments icon will display a

Layton Technology Page 115 of 178 Layton ServiceDesk v6 User Manual v2.0
tick if any Comments are present and on hovering over the icon the number of Comments will be
displayed. If an End User has added a Comment to a Request that has yet to be read by an Analyst then there
will be a red exclamation mark on the Comments icon indicating that there is an un-read Comment.
The Tasks icon identifies whether any tasks or actions exist for a Request and by Selecting the Task icon,
the list of Tasks associated with that Request will be displayed. If there are Tasks present for that Request
there will be a tick against the Task icon and on positioning over the icon, the number of Tasks will be
displayed.
The Status icon shows whether the Request is open or closed , although other open Request Statuses
can be defined, see the Request Statuses section. By selecting the Status icon you can change the Request
Status, i.e. close the Request.
In any of the views above, you can select a Request to view, edit or progress by selecting any data field for a
particular Request, e.g. the Request ID, Date, etc. Now the Analyst Request form will be displayed showing
all the Request details. Any data field, depending on configuration, can be amended. The Request can be
assigned to another Analyst or Group, or completed and closed by selecting the “Change Request Status”
icon .
See the LOGGING A NEW REQUEST (ANALYST) section above for details on individual fields and reassigning.
Additional icons to Cancel and Save will now appear on the Analyst Request form to provide the following
functions:
Cancel Request Changes Cancels all changes made to the form and returns to the List View
Request History Shows details of all changes made to the Request. The date and time
stamped changes show Analyst, End User, Type of Change and Field
changed.
View Tasks Shows the Tasks associated with Request and allows you to update as
required.
Change Request Status The Change Status screen is displayed allowing you to change the Status of a
Request. Either to Close, Reopen or any other Status you may have defined.
Save Request Saves the Request changes and unless selected no amendments to the
Request will be made. The Analyst Request form is closed and the Home list
view is displayed.
Layton Technology Page 116 of 178 Layton ServiceDesk v6 User Manual v2.0
Comments
Request Comments can be added to the request by clicking on the Comment icon on the request screen.
This will allow the analyst to view or create comments against the request. To add a new comment, simply
click on the Add New button.
Analysts may post comments with a Public or Private status to either allow (Public) or disallow (Private) End
Users from seeing the comment. The default Comment status of either Public or Private can be set in
Administration | General Settings | Security | Global Analyst Security | Default Comment Status . There are
also individual Analyst Settings which can determine if the Analyst can change the default Comment status
and this setting can be found in Administration | Company Structure | Manage Analyst | Analyst Settings |
Comment | Make Public/Private.
When an Analyst adds a public comment to a request Layton ServiceDesk can send an email notification to
the End User which contains the details of the comment. Conversely if the End User adds a comment Layton
ServiceDesk will send an email to the Analyst that is assigned to the Request.
The Analysts also have an option to add a Comment and select additional Analysts who will be sent an email
notification with the details of the comment.
If an End User replies to a comment from an Analyst via email, Layton ServiceDesk can automatically convert
this email into a comment on the related request. Layton ServiceDesk will then email the Analyst with the
details of the End User’s comment. Please see the Email Server Settings for further details.
Request Attachments
Request Attachments allow the End User or Analyst to upload files to a Request to act as an attachment. For
Example this may be a screen shot of a problem or a copy of a file such as the autoexec.bat file. The End
Users access to attachments can be restricted in the system configuration, see Administration | General
Settings | Security | Global End User Security.
To attach a file to a Request click on the Request Attachment icon . This will then display the list of
attachments on the Request and then click the Add New icon. Clicking the Add New icon will allow you to
specify the file location and submit it. It will then appear in the list of attachments.
The Attachment can then be viewed or downloaded by clicking on it. Files that can be opened by the
browser are opened in a separate window. Files that can’t be opened by the browser are downloaded and
saved to the client PC. Attachments can be deleted by clicking on the Delete Link.

Layton Technology Page 117 of 178 Layton ServiceDesk v6 User Manual v2.0
Spawned Request
Spawned request (if it is switched on in Administration | General Settings | Request Settings | Allow
Spawning) allows you to create a Request that is a child of the existing request. For example if you had a
request related to a piece of equipment, you may want to raise a request to the manufacturer of that
equipment. A spawned call will allow you to do this.
The default system setting will not allow the Parent request to be closed unless the spawned request is
closed first. If required this setting can be changed by going to Administration | General Settings | Request
Settings | Spawn Closure.
To created a Spawned Request click on the Spawn Request icon . This will then display the Spawned
Request form which can be completed and assigned as any other Request. The Request ID number of the
Parent Request will be automatically populated in the “Spawned From” field.
Parent Requests with Spawned Child requests under them are marked with a “SP” (the Parent) under the
Request ID in the Requests List View. Spawned Child Requests with Parents above them are marked with an
“sp” (the child) under the Request ID in the Requests List View. Clicking on the “SP” or “sp” link in the
Request List View screen will produce a pop-up window which will display the Parent and Child relationship.
Request Costs
The Request Cost feature can be used to record any costs or charges that have been incurred or will be
billable as a result of the Request. Costs can be added for Analysts’ time spent or for other billable Items.
Items in the Request Cost list can be added in Administration | Libraries | Cost Items.
Analysts’ can be assigned hourly charge rates which will automatically calculate the total cost based on the
Analyst’s charge rate and the start and finish times entered. To set the Analyst Charge Rates go to
Administration | Company Structure | Manage Analyst. Click on the Analyst’s name or username and you
will be presented with the Analyst form. By default the Analyst Cost Rate field (sys_requestcost_rate) is
displayed on the form where you can enter the Analyst’s default charge rate. If the Analyst Cost Rate field is
not displayed on the form see Defining a new field in the form design section for details on how to add this
field to the form.
By default the system uses the dollar currency symbol $, however if you use a different currency symbol you
can change this in Administration | General Settings | Request Settings | Currency.
To add a new cost transaction or to edit an existing transaction click on the Request Cost icon and you
we see a list of current transactions for this Request. To edit an existing transaction click on the appropriate
link and to add a new transaction click the Add New button. You are then presented with the cost

Layton Technology Page 118 of 178 Layton ServiceDesk v6 User Manual v2.0
transaction form; see Figure 37 below for an example.
Figure 37 - Cost Transaction Form
To add a Labor Charge select the appropriate Analyst from the Analyst drop down list, by default this will be
set to current logged in Analyst. When the Analyst is selected the Analyst’s default charge rate is populated
in the Hour Rate field. A description of the Labor change can be added to the descript ion field.
Once the duration start and end times are entered the total cost will be automatically calculated based on
the Analyst’s hourly rate. Once all the details have been entered click the Add button and this will be added
to the labor charge list. Multiple labor charges can be added if required along with one or more item
changes.
To add an Item charges select the required item from the drop down list. The item description and cost value
we be automatically populated based on the valued defined in the Administration | Libraries | Cost Items
section. Add the quantity required and then select the Add button to add the item to the Item Charge List.
When the Labor and /or Item Charges have been completed click on the save button and this will take y ou
back to the request form.

Layton Technology Page 119 of 178 Layton ServiceDesk v6 User Manual v2.0
LOGGING A NEW PROBLEM
Problem Management is a key component of ITIL (IT Infrastructure Library). The purpose of Problem
Management is to identify and resolve the root causes of problems in the IT infrastructure and therefore
eliminate future incidents or requests relating to this problem.
The Problem & Change Management functions in Layton ServiceDesk are enabled by default, however if your
service desk is not IT based or does not require this function it can be disabled by going to Administration |
System Settings | Application Settings | Enable Problem & Change .
There are four ways in which a New Problem can be created or logged by an Analyst.
1. By using Home | New | Problem.
2. By using the QuickAction Menu if you have added Log New Problem to your QuickAction list.
3. By creating a Problem from within an existing Request.
4. By converting an incoming email into a Problem.
By selecting any of the above options the Problem form is displayed allowing you to enter Problem details as
required or as you have defined using Administration | Form Design | Problem.
All data fields can be made mandatory for entry before a Problem can be saved and also compulsory before a
Problem can be closed. This is achieved by setting the appropriate field properties when using the Form
Design.
Although the Problem form is very configurable and fields can be added, deleted or amended, certain system
fields will normally be present. The example defined in Figure 38 below shows the system default areas and
data fields for Problem Form.

Layton Technology Page 120 of 178 Layton ServiceDesk v6 User Manual v2.0
Figure 38 - Problem Form
Problem ID Number & Time Stamp
Problem Id:
A new Problem ID Number is automatically generated sequentially but is not created until the Problem is
saved.
Date Logged:
Populated with Today’s date and time and can be amended depending on the security setting in
Administration | General Settings | Security | General Security | “Allow Request Date Edit by”
Problem Assignment
The Assignment & Ownership or Problems uses the same principles as outlined above in the Request
Assignment & Ownership section above for logging a new request.
Logged By:
This is the Analyst who has logged the Problem and this can be automatically populated if configured. See
the CONFIGURING THE SYSTEM and Problem Settings sections. Alternatively, an Analyst can be selected by
using the Select Analyst icon next to the “Logged By” field.

Layton Technology Page 121 of 178 Layton ServiceDesk v6 User Manual v2.0
Assigned To:
This is the Analyst who is assigned to the Problem and this can be automatically populated if configured. The
Assignee is usually defaulted to the Analyst logging the Problem. See the Problem Settings section for details.
Using the Select Analyst icon next to the “Assigned To” field the Problem can be assigned to another Analyst.
If the Skills option for Analysts is used and matches the Problem Type entered, then the appropriate Analyst
will be suggested for assignment.
If an Analyst is on leave or has an “Absence” currently scheduled then there will not be a tick in the
“Available” column. However the Analyst can still be selected if required. For more information on “Analyst
Absence” please see sections Error! Reference source not found..
Assign To Group:
The Analyst Group, if required, can be automatically populated providing Analysts have been associated with
Groups, see System Configuration and Manage Analyst Groups. However, if the Analyst belongs to more
than one Group, then the Group cannot be auto populated so the Select Group screen will be presented to
choose a Group.
However, if the Problem is to be assigned to a Group and not an individual Analyst then on selecting the icon
Select Group, the Analyst Groups will be displayed.
If the Skills / Loading is used then the appropriate Group will be suggested for assignment otherwise select a
Group for assignment. Once assigned to a Group in this way (and an Analyst is not assigned) then the
Problem will appear as an unassigned Problem within the Group and viewed through the Analyst Group
Queues.
Priority, Urgency & Impact
Priority / SLA:
Here the Priority can be selected from a predefined list of Priorities. The escalation and expiry time will be
calculated when the Problem is saved.
If the Priority has been defined so the expiry and escalation details are entered manually or can be edited,
then when the Problem is saved; another screen will appear, Confirm Problem Escalations. This will enable
you to input or change any details but ensure you select the Save icon.
The “Default” button allows you to change or restore any escalation values as defined against the Priority /
SLA within Administration. Once selected the button will change to “Store” which will allow you to revert to
values manually set for the Problem.
Although the Problem has been created, the expiry and escalation details will not be changed unless the
“Save” icon is selected.

Layton Technology Page 122 of 178 Layton ServiceDesk v6 User Manual v2.0
Impact:
The Impact of the Problem can be selected from the drop down list. This list of Impacts is de fined under
Administration | Libraries | Impact.
Urgency:
The Urgency of the Problem can be selected from the drop down list. The urgency list can be defined under
Administration | Libraries | Urgency.
Services Affected
The Services Affected field allows you to enter one or more IT or Business Services that are affected by the
Problem. To add or remove items click on the select icon next to the “Services Affected” field and this will
display a pop up window with a list of Services which can be added in the left hand column and a list of the
selected Services in the right hand column. See Figure 39. To add a Service select it in the left hand column
and then click the arrow pointing right that is in between the two columns. To remove an item that has been
selected reverse the process. Click the green OK icon to save the selections.
Figure 39 - Select Services Form

Layton Technology Page 123 of 178 Layton ServiceDesk v6 User Manual v2.0
Assets Affected
If the AuditWizard™ link is implemented, then one or more Assets that are affected by the Problem can be selected. To enable the AuditWizard link please see the AuditWizard section.
To select an Asset click on the Select Asset icon and this will then display a pop up window showing the asset tree structure in the left hand panel and any assets that have already been associated with the Problem in
the right hand panel. Please see Figure 40.
Figure 40 - Select Assets Form
To select an Asset simply drag the asset from the tree structure into the panel on the right and then click the
green OK button . To remove or delete an Asset that has been selected simply drag the Asset back into the tree structure. Note that it does not matter where you drag the Asset back to in the tree structure as it will not affect the assets location. To search for an Asset click on the Search Icon and the Find Asset screen is now displayed allowing you to enter search criteria for the Asset Name, IP Address or User Name, Asset Tag or Site. You can select the required Asset or perform another search.
Once an Asset or multiple Assets have been selected and the window closed, the Quick Info on Asset icon next to the Asset field can be selected to display all the Asset information along with a history of the Request,

Layton Technology Page 124 of 178 Layton ServiceDesk v6 User Manual v2.0
Problems & Changes that have been logged against this Asset.
Problem Type, Problem Summary & Description
Problem Type:
The Problem Type can be selected form the predefined structure by using the Select Problem Type button.
Any level in the tree structure can be selected. The Problem Types use the same structure as the Request
Types and can be fined in Administration | Libraries | Request Types.
Problem Summary:
An optional text field which can used to provide a summary of the Problem. If the Problem has been created
by the converting an incoming email this field will be automatically populated by the Subject Line of the
email.
Problem Description:
This is a full description of the Problem and any amount of text can be entered. If the Problem has been
created by converting an incoming email this field will be automatically populated by the Body of the email.
Finding and Entering Solutions
This function provides the ability to link to the Solutions Base and obtain a Solution to a Problem or create a
new Solution which can be added to the Solutions Base. By selecting the Select Solution icon next to the
Solution field, the Search Solutions Base screen will be displayed.
This screen provides the ability to search for a Solution using a Keyword Search or simply by browsing
through the folder structure which is based on the Problem Type structure. The number of Solutions in each
folder location is displayed in brackets. The Solution tree structure will be automatically expanded to show
the Problem Type folder corresponding to the Problem Type that was selected on the Problem Form.
Problem Types are linked directly to Solutions and so this type of search can obtain a single or numbe r of
Solutions depending in the Problem level entered.
The Keyword Search will search the Solutions Base using a fuzzy matching method on ANY Solution Base field;
Solution, Solution Description or Problem Description. Once selected, the Solution will populate the Solution
field and the Solution Description on the Problem form.
If the Solution was not found then a new Solution can be added by using Add button on the Solution screen.
Alternatively, a Solution Description can be entered manually without using or adding to the Solution Base.

Layton Technology Page 125 of 178 Layton ServiceDesk v6 User Manual v2.0
Additional Problem Functions
The other icons on the Analyst Request form are listed below along with a description of their functions:
Create Change:
This button will only be available if you have enabled Problem & Changes in Administration | System
Settings | Enable Problem & Change. Selecting the Create Change button will create a new Change and will
copy the Problem Summary and Problem Description data to the new Change. A link will be created between
the Problem and the Change which can be viewed in the Links section.
Problem History:
Shows details of all changes made to the Problem. The date and time stamped changes show Analyst, End
User, Type of Change and Field changed.
Links:
Shows if the request is linked to any Requests or Changes. To link the Problem to an existing Request or
Change click on the Add icon above the link list. The next page will display a list of currently open Requests &
Changes and the two lists will be displayed in different tabs. If any Requests or Changes are already linked to
this request they will be displayed at the top of the list and will have the linked check box selected. To link to
a Request or Change simple check the box of the required item.
Comments:
This will allow the analyst to view or create comments against the Problem. For more information on
Comments see the Request Comments .
Tasks:
Shows the Tasks associated with the Problem and allows you to update as required. New Tasks can also be
added. For more information see the TASK SCHEDULING section.
Attachments:
Problem Attachments allow the End User or Analyst to Upload files to a Problem to act as an attachment. For
more information see the Request Attachments section.
Call Back Reminders:
Call Back Reminders enable Analysts to set reminders for themselves or other Analysts. The reminder is set
for a specific day and time along and can be assigned to any Analyst.

Layton Technology Page 126 of 178 Layton ServiceDesk v6 User Manual v2.0
Problem Costs:
Any Costs as a result of the problem, either Analysts’ Time or chargeable Items can be logged against the
Problem. For more information on costs see the Request Costs section.
Change Problem Status:
The Change Status screen is displayed allowing you to change the Status of the Problem. Either to Close,
Reopen or any other Status you may have defined.
Cancel Request Changes:
A new Problem will not be created and you are returned to your Home page
Save Request:
A new Problem is created and the Problem form is closed and the Home list view is displayed (unless the
Priority / SLA confirmation screen has been requested, see above Priority and Service Level Selection).
Note: The “Save” option MUST be selected otherwise the Problem details will not be saved and the
Problem will not be created.
In addition to the above default system fields any other User Defined data fields can be added to the Problem
form as outlined in the System Configuration.
Converting an Incoming Email into a Problem
An incoming email can be manually converted into a Problem through the Email Pending Queue. To
configure the Incoming Emails please see the Email Server Settings. If there are any incoming emails pending
this will be indicated by the number of emails on the incoming email icon in the top right of the menu.
Analyst access to the Email Pending queue can be turned on or off in Administration | Company Structure |
Manage Analyst | Analyst Settings | Site Access | Incoming Mail Access.
Click on the incoming email icon to view a list of the pending emails. To view and email and convert it into a
Problem (or a Request , Comment or Change) click on the link and the details of the email will then be
displayed. To convert the email into a Problem click on the Convert to Problem icon . This will then
display the Problem form and the email subject will be mapped to the problem summary field and the email
body will be mapped to the problem description field. To complete the conversion click on the save button
and this will save the Problem and delete the email from the email pending queue. If you cancel without
saving this will return you to the Email Pending queue without converting the email into a Problem.

Layton Technology Page 127 of 178 Layton ServiceDesk v6 User Manual v2.0
Closing the Problem and linked Requests
Open closing a Problem if there are any open Requests that are linked to this Problem a pop up dialog box
will prompt the Analyst as to what action should be taken regarding these open Linked Requests. There are
three options available:
Leave Open:
This option will close the Problem and leave open any linked Requests. If enabled in the Email Bodies section
the following email notifications will be triggered:
Problem has been Closed (Notify Analyst who logged Problem)
Problem has been Closed (Notify Analyst Assigned to Linked Requests)
Problem has been Closed (Notify Analyst Group Assigned to Linked Requests)
Close:
This option will close the Problem and close any linked Requests. If enabled in the Email Bodies section the
following email notifications will be triggered:
Problem has been Closed (Notify Analyst who logged Problem)
Problem has been Closed (Notify Analyst Assigned to Linked Requests)
Problem has been Closed (Notify Analyst Group Assigned to Linked Requests)
Request has been Closed (Notify End User)
Close and Copy Solution:
This option will close the Problem and copy the Problem Solution information to the Problem Solution field in
the linked Requests and then close those Requests. If enabled in the Email Bodies section the following email
notifications will be triggered:
Problem has been Closed (Notify Analyst who logged Problem)
Problem has been Closed (Notify Analyst Assigned to Linked Requests)
Problem has been Closed (Notify Analyst Group Assigned to Linked Requests)
Request has been Closed (Notify End User)
LOGGING A NEW CHANGE
Change Management is a key ITIL (IT Infrastructure Library) component. The main objective of Change
Management is to ensure standardized procedures for the handling of changes to the IT infrastructure. This

Layton Technology Page 128 of 178 Layton ServiceDesk v6 User Manual v2.0
will help to minimize the impact on services and prevent or reduce the impact of related incidents.
Requests for Change may result from Problems that have been identified in the IT infrastructure which
requires a Change to resolve the underling root cause or they may arise from initiatives seeking to improve
services and efficiencies.
The Problem & Change Management functions in Layton ServiceDesk are enabled by default, however if your
service desk is not IT based or does not require this function it can be disabled by going to Administration |
System Settings | Application Settings | Enable Problem & Change.
There are four ways in which a New Change can be created or logged by an Analyst.
1. By using Home | New | Change.
2. By using the QuickAction Menu if you have added Log New Change to your QuickAction list.
3. By creating a Change from within an existing Request or Problem
4. By converting an incoming email into a Change.
By selecting any of the above options the Change form is displayed allowing you to enter Change details as
required or as you have defined using Administration | Form Design | Change.
All data fields can be made mandatory for entry before a Change can be saved and also compulsory before a
Change can be closed. This is achieved by setting the appropriate field propertie s when using the Form
Design.
Although the Change form is very configurable and fields can be added, deleted or amended, certain system
fields will normally be present. The example defined Figure 41 below shows the system default areas and
data fields for Change Form.

Layton Technology Page 129 of 178 Layton ServiceDesk v6 User Manual v2.0
Figure 41 - Change Form
Change ID Number & Time Stamp
Change Id:
A new Change ID Number is automatically generated sequentially but is not created until the Change is
saved.
Date Logged:
Populated with Today’s date and time and can be amended depending on the security setting in
Administration | General Settings | Security | General Security | “Allow Request Date Edit by”
Change Requested By & Assigned To
Requested By:
A Change can be requested by an Analyst or an End User. This is the Analyst or End User that has requested
the Change. This can be automatically populated if configured, see Change Settings. Alternatively an Analyst
or End User can be selected by using the Select icon next to the Requested By field. This will display the list
of Analysts and End Users in two separate tabs.

Layton Technology Page 130 of 178 Layton ServiceDesk v6 User Manual v2.0
Assigned To:
This is the Analyst who is assigned to the Change and can be automatically populated if configured, see
Change Settings. Using the Select Analyst icon next to the “Assigned To” field the Change can be assigned to
another Analyst.
If an Analyst is on leave or has an “Absence” currently scheduled then there will not be a tick in the
“Available” column. However the Analyst can still be selected if required. For more information on “Analyst
Absence” please see sections Error! Reference source not found..
Assign To Group:
The Analyst Group, if required, can be automatically populated providing Analysts have been associated with
Groups, see CONFIGURING THE SYSTEM and Manage Analyst Groups. However, if the Analyst belongs to
more than one Group, then the Group cannot be auto populated so the Select Group screen will be
presented to choose a Group.
However, if the Change is to be assigned to a Group and not an individual Analyst then on selecting the
Analyst Group selection icon the Analyst Groups will be displayed.
Once assigned to a Group in this way (and an Analyst is not assigned) then the Change will appear as an
unassigned Change within the Group and viewed through the Analyst Group Queues.
Scheduled Start, Finish and Completion
Scheduled Start:
This is the date/time that work on the Change is due to begin. The date and time can be manually entered
directly into the field or you can use the date selector button on the right hand side of the date field.
Scheduled Finish:
This is the date/time that work on the Change is scheduled to be completed.
Completed On:
This is the actual date/time that the Change was completed.
Change Types & Change Statuses
Change Type:
The Change Types are user defined and can be configured in Administration | Libraries | Change Types.
Examples of Change Types may include; Routine, Minor, Major, Emergency. For more information see
Change Types.

Layton Technology Page 131 of 178 Layton ServiceDesk v6 User Manual v2.0
Change Statuses:
By default there are two Change Statuses, Open and Completed. However any number of user defined
Change Statuses can be created in Administration | Libraries | Change Statuses. For more information see
Change Statuses.
Change Approval Status
There are three Change Approval Statuses, Pending, Approved and Rejected. When a Change is created the
default Change Approval Status will be set to Pending.
If the Change requires approval from one or more Analysts or CAB Groups then the required approvers can
be added using the Change Approval icon . See the Change Approval Process section below for further
information.
Depending on the Change settings configured in Administration | General Settings | Change Settings, the
Change Status can be automatically changed to Approved or Rejected depending on the outcome of the
Change Approval process. For more information on these Change settings please see the Change Settings
section.
If the Change does not require approval from additional Analysts or CAB groups then the Change Status can
be manually changed from Pending to Approved (or Rejected) by any Analyst who was been given permission
to change the Approval Status. This Analyst Setting can be found in Administration | Company Structure |
Manage Analyst | Analyst Settings | Access Restrictions | Can Set Change Approval Status.
Change Urgency & Impact
Urgency:
The Urgency of the Change can be selected from the drop down list. The urgency list can be defined under
Administration | Libraries | Urgency.
Impact:
The Impact of the Problem can be selected from the drop down list. This list of Impacts is defined under
Administration | Libraries | Impact.
Services Affected
The Services Affected field allows you to enter one or more IT or Business Services that are affected by the

Layton Technology Page 132 of 178 Layton ServiceDesk v6 User Manual v2.0
Change. The selection of the Services Affected works in the same manner as outlined in the Logging New
Problem section and the details can be viewed in the Services Affected section.
Assets Affected
If the AuditWizard™ link is implemented, then one or more Assets that are affected by the Change can be selected. To enable the AuditWizard link please see the AuditWizard section. The selection of the Assets Affected works in the same manner as outlined in the Logging New Problem section and the details can be viewed in the Assets Affected section.
Change Summary, Description, Impact, Implementation & Rollback
Change Summary:
This field is used to enter a brief summary of the change. If the Change has been created by converting an
incoming email then this field will be automatically populated with the subject line of the email. If the
Change was created from an existing Request or Problem then this field will be automatically populated with
the Summary field from the Request or Problem.
Description:
This field is used to enter a detailed description of the Change. If the Change has been created by converting
an incoming email then this field will be automatically populated with the body of the email. If the Change
was created from an existing Request or Problem then this field will be populated with the Description field
from the Request or Problem.
Impact:
This field is used to enter a detailed description of the expected impact of the Change on any users, groups,
services, assets, business, etc.
Implementation:
This field is used to enter a detailed description of the Change Implementation plan.
Rollback:
This field is used to enter a detailed description of the Change Rollback Plan.
Change Approval Process
Changes can be approved either manually by any authorised Analyst or by a Change Approval workflow
process which can involve one or more Analysts or CAB Groups.

Layton Technology Page 133 of 178 Layton ServiceDesk v6 User Manual v2.0
Change advisory boards (CAB) assist in the assessment, prioritization and approval of requests for change.
The CAB group is generally made up of Analysts that are chosen to ensure that the change request is assessed
from both technical and business points of view.
The type of Change and services or assets affected will dictate the required CAB members. CAB groups should
offer the different perspectives necessary to ensure proper decision making. A CAB is an integral part of a
defined change management process designed to balance the need for Change with the need to minimize
inherent risks.
The Change Approval process can automatically update the Change Approval Status field based on the
configuration settings in the Change Settings section. For example you can configure the system to
automatically set the Change Approval Status to “Approved” if all Change Approvers recommend the change.
If a Change requires one or more Analysts or CAB Groups’ approval before the Change can proceed the
Analyst or CAB Groups can be added to the approvals list by clicking the Change Approval icon . You will
then be presented with the Change Approvals list page. Please see Figure 42 below which shows a sample
Change Approval list which has one individual approver and two members of the IT Procurement CAB Group.
Figure 42 - Manage Change Approvals
Only Analysts that have permission to manage Change Approvals can add or delete approvers from the list.
This Analyst settings is found in Administration | Company Structure | Manage Analyst | Analyst Settings |
Access Restrictions | Can Manage Change Approver List.
To add an individual approver click on the add approver icon . A pop up list of Analysts will then appear
and the required Analyst can be selected. To add a CAB Group click on the add CAB Group icon and a
pop up list showing the CAB Groups will be displayed. CAB Groups can be created in Administration |
Libraries | CAB Group.
Once the approvers have been added to the approvals list it will automatically set the Approval State for each
approver to “Not Yet Request”. To request approval for the approver(s) click on the link in their approval
state column and a pop up will appear and the approval state can be changed to “Requested”. This will
trigger an email which is sent to the approver notifying them that the Change requires their approval. The
Layton Technology Page 134 of 178 Layton ServiceDesk v6 User Manual v2.0
Approval State will then be set to “Requested” and the date that it was requested will be displayed in the
requested column.
Once the approving Analyst has assessed the Change they can make their recommendation by selecting the
Approval State column and the pop up will appear where they can change the state to “Approved” or
“Rejected”. If the approving Analyst would like to add a recommendation note they can click on the “click to
add” link and they can enter the details. Once the recommendation has been made the date of the
recommendation will be added to the “Received” column.
The Change approval process also has the ability to create a workflow whereby approval from a specific
Analyst is required before approval can be requested by the next Analyst in the approval workflow. Multiple
approvals can be dependent on a single approval if required, for example in Figure 42 above approval ID
numbers 58 & 58 are both dependent on approval ID 56. Once approval 56 has been received approvals 58 &
59 will be automatically requested at the same time.
To set an approval workflow click on the “Click to Select” link of the approval that is to be dependent on
another approval. A pop up window will then display a list of the other approvals and the required approval
can be selected.
Once the approval workflow has been defined the first approval in the process can be set to “Requested”.
This will trigger the email to the approving Analyst and once they have made their recommendation it will
automatically change the approval state for the dependent approvals to “Requested”.
There are three Change Settings which will determine how the system processes the approval workflow.
These settings can be found in Administration | General Settings | Change Settings.
Auto Set Approval Status to Approved on Unanimous Approval:
If turned ON when all Change Approvers have approved the Change it will automatically set the Change
Approval Status to “Approved”. If this setting is turned Off the Change Approval Status will need to be set
manually by an approved Analyst by selecting the Approval Status drop down list on the Change form.
Stop Approval Workflow Process on First Rejection:
If turned ON the Change Approval workflow process will stop when an approver rejects the approval. If
turned Off the Change Approval workflow process will complete each step in the workflow, even if rejected
by one or more of the approvers.
Auto Set Approval Status to Rejected on First Rejection:
If this setting is turned ON the Change Approval Status will be automatically set to “Rejected” when any
approver rejects the Change.

Layton Technology Page 135 of 178 Layton ServiceDesk v6 User Manual v2.0
Additional Change Functions
The other icons on the Change request form are listed below along with a description of their functions:
Change History:
Shows details of all changes made to the Change. The date and time stamped changes show Analyst, End
User, Type of Change and Field changed.
Links:
Shows if the request is linked to any Problems or Requests. To link the Change to an existing Problem or
Request click on the Add icon above the link list. The next page will display a list of currently open Requests
& Problems and the two lists will be displayed in different tabs. If any Requests or Prob lems are already
linked to this Change they will be displayed at the top of the list and will have the linked check box selected.
To link to a Request or Problem simply check the box of the required item.
Comments:
This will allow the analyst to view or create comments against the Change. For more information on
Comments see the Comments section.
Tasks:
Shows the Tasks associated with the Change and allows you to update as required. New Tasks can also be
added. For more information see the TASK SCHEDULING section.
Attachments:
Change Attachments allow the Analysts to Upload files to a Change to act as an attachment. For more
information see the Request Attachments section.
Call Back Reminders:
Call Back Reminders enable Analysts to set reminders for themselves or other Analysts. The reminder is set
for a specific day and time along and can be assigned to any Analyst.
Change Costs:
Any Costs as a result of the Change, either Analysts’ Time or chargeable Items can be logged against the
Change. For more information on costs see the Request Costs section.

Layton Technology Page 136 of 178 Layton ServiceDesk v6 User Manual v2.0
Change Change Status:
The Change Status screen is displayed allowing you to change the Status of the Change. Either to Close or
any other Status you may have defined.
Cancel Request Changes:
A new Change will not be created and you are returned to your Home page
Save Request:
A new Change is created and the Change form is closed and the Home list view is displayed
Note: The “Save” option MUST be selected otherwise the Change details will not be saved and the Change
will not be created.
In addition to the above default system fields any other User Defined data fields can be added to the Change
form as outlined in the CONFIGURING THE SYSTEM section.
Converting an Incoming Email into a Change
An incoming email can be manually converted into a Change through the Email Pending Queue. To configure
the Incoming Emails please see the Email Server Settings. If there are any incoming emails pending this will
be indicated by the number of emails on the incoming email icon in the top right of the menu. Analyst
access to the Email Pending queue can be turned on or off in Administration | Company Structure | Manage
Analyst | Analyst Settings | Site Access | Incoming Mail Access.
Click on the incoming email icon to view a list of the pending emails. To view and email and convert it into a
Change (or a Request , Comment or Change) click on the link and the details of the email will then be
displayed. To convert the email into a Change click on the Convert to Change icon . This will then display
the Change form and the email subject will be mapped to the Change summary field and the email body will
be mapped to the Change description field. To complete the conversion click on the save button and this will
save the Change and delete the email from the email pending queue. If you cancel without saving this will
return you to the Email Pending queue without converting the email into a Change.
USING LAYTON SERVICEDESK (END USER)
This Chapter focuses on how the End User will use Layton ServiceDesk™ to log and progress their own
Requests. If End Users are not to be given access to the system then the Login screen can be modified using
Administration | Form Design | Login to remove End User login and Registration details and this Chapter can

Layton Technology Page 137 of 178 Layton ServiceDesk v6 User Manual v2.0
be ignored.
Layton ServiceDesk also has an NTLM Auto Logon (Single Sign On) feature which can authenticate with the
current logged on user and automatically log them into their home screen without having to enter their
username and password. For more information on the Auto Logon feature please see SYSTEM ACCESS AND
MENU.
Login Page
After selecting the Layton ServiceDesk™ shortcut or web connection you are then be presented with the
Logon screen to enter your user name and password. If you are using the system for the first time and the
“Register End User” option is displayed, you can immediately register as a user by selecting that button.
Complete the registration details as defined, you may need to enter all fields or only some, and select the
“Save” icon.
Figure 43 - Login Page

Layton Technology Page 138 of 178 Layton ServiceDesk v6 User Manual v2.0
Figure 44 - End User Self Registration
Menu Structure
When accessing Layton ServiceDesk™ as an End User you will be presented with the Menu structure at the
top of the screen with your default home screen or list view set to “My Open Requests” or the view as
defined by the system administrator. The Menu structure is a “cut down” version of the normal Analyst
ServiceDesk Menu. The format and content of the screens or pages will have been previously defined by the
systems administrator in the FORM DESIGN and GLOBAL LIST VIEWS / ANALYST LIST VIEWS sections.
The Global End User Security settings which determine which menu items will be available to the End User as
well as the default End User Home Screen View can be found in Administration | General Settings | Security
| Global End User Security.

Layton Technology Page 139 of 178 Layton ServiceDesk v6 User Manual v2.0
Any Menu item can be selected at any time but when creating or editing data unless the “Save” icon or
button (if available) is selected then details entered will not be saved. The Menu wi ll contain the following
items:
Figure 45 - End User Request List View

Layton Technology Page 140 of 178 Layton ServiceDesk v6 User Manual v2.0
TOP MENU SUB MENU Description
Home Log New Request Form to submit a new Request.
* If multiple Request Classes are being used and the End
User has access to multiple Request Classes, these will
appear in a drop down menu when the hover on Log
New Request. The End User can then select which
Request Class they would like to select.
My Open Requests List view of all Open Requests for the End User
My Closed Requests List view of all closed Requests for the End User
All My Requests List view of all Requests for the End User
Search Requests Allows End User to Search End User Requests
Self Service Allows End User to Search the Solutions Database
My Details My Password Allows the End User to Change their password
My Details Allows the End User to update their details.
Survey Allows End User to Access and Complete Surveys
Help
Help page for each form, available when each form
opened and Help selected.
Log Off
Logs off the End User
Figure 46 - End User Menu Items
Note – All or some menu options for End Users can be disabled by changing the settings in the
Administration | General Settings | Security | Global End User Security.

Layton Technology Page 141 of 178 Layton ServiceDesk v6 User Manual v2.0
LOGGING A NEW REQUEST (END USER)
New Requests are created or logged by End Users using Log New Request. The End User Request form is
displayed allowing Request details to be entered as previously defined by the Administrator using
Administration | Form Design | End User Request.
The amount and type of information to be entered by End Users is completely configurable. This can be a
limited view allowing basic or just enough information to record a Request, or the same format as for
Analysts providing full End User empowerment. The latter would enable End Users to log, maybe prioritize,
search the Solutions Base and even close their own Requests. Although the End User Request form is
configurable, certain system fields will normally be required. The example in Figure 47 shows the standard
out of the box End User Request form.
Figure 47 - End User Request Form

Layton Technology Page 142 of 178 Layton ServiceDesk v6 User Manual v2.0
Request Number & Time Stamp
Request ID:
A new Request ID number is automatically generated, sequentially starting from one, when a request is
created. Until a new request is saved the Request ID field will be displayed as (New Request). Once the new
Request is saved the Request ID number will be displayed.
Request Date:
Automatically populated with the date and time that the Request was created. The date and time can be
amended if the security setting is enabled in Administration | General Settings | Security | General Security
| Allow Request Date Edit By.
End User Details
End User:
The End User name will be automatically populated with those of the End User logging the Request.
Asset Information
Asset: An Asset can be a PC or any item that is support and can be entered as free format text or left blank. If the AuditWizard™ link is implemented then the Asset can be entered or searched for by using the Select Asset icon. The Find Asset screen will pop up allowing you to enter search criteria based on Asset Name, IP Address, Asset Tag, User Name or Site. When the search results are returned you can select the required Asset or perform another search. If the setting “AW Get Last Asset” is turned ON in Administration | System Settings | AuditWizard | AW Get Last Asset, then when the End User logs a new Request it will automatically populate the Asset field with the last Asset that they logged a call against. If the setting “End User View Asset” is turned ON in Administration | System Settings | AuditWizard | End
User View Asset, then once the asset has been selected the End User can click Quick Info on Asset icon next to the Asset field which will display all the Asset inventory information. Asset Location: The Asset location will be automatically populated if the asset has been selected from the AuditWizard database and the “Auto Location” option is turned on in Administration | System Settings | AuditWizard | Auto Location. The Location can also be input directly or by using the Select Asset Location button.

Layton Technology Page 143 of 178 Layton ServiceDesk v6 User Manual v2.0
Request Type & Problem Details
Request Type:
The Request Type can be selected from the predefined structure by using the Select Request Type button.
Any level in the tree structure can be selected.
Problem Summary:
This is a summary of the End User’s request or problem. If the End User logs a request by email then the
email Subject line will populate this field.
Problem Description:
This is a full description of the request or problem, and any amount of text can be entered. If the End User
logs a request by email then the email body will populate this field.
Solution Description
This is a full description of the Solution and will be completed by the Analyst prior to closing the Request.
Other End User Fields
Any other system or data fields may need to be completed depending on what has been defined on the End
User Request form. See section LOGGING A NEW REQUEST (ANALYST) for examples on additional fields.
There are five icons available on the End User request forms which have the following functions:
Cancel:
If you had selected log new request and you click the Cancel button before clicking the Save button this will
return you to the Home page without creating a new request. If an existing request was being edited the
changes will not be saved and you will be returned to the Home page.
Save:
A new Request will be created or if changes were made to an existing request the changes will be saved and
you will be returned to the Home page.
Note: The “Save” option MUST be selected when logging a new request otherwise the Request details will
not be saved and the Request will not be created.
Attachments:
Attachments provide the ability to upload files, screenshots or any other documentation that may be

Layton Technology Page 144 of 178 Layton ServiceDesk v6 User Manual v2.0
relevant to the request. It also allows the End Users to download any files that may have been added to the
Request by the Analysts.
To upload a file click on the Attachment icon and then a list of any existing attachments wi ll be displayed. To
download an existing attachment simply click on the link. To upload a new attachment click on the add icon
and then a pop up dialog window will appear which allows the End User to browse to the file location. Once
the file has been selected click the Save button and this will upload the attachment.
If End user Attachments are not required the icon can be disabled by going to Administration | General
Settings | Security | Global End User Security | End User Attachments.
Comments:
Comments allow the End Users and Analysts to add notes to the Request which are then recorded with a
date stamp and the author details. The Comments feature is a great way for the Analysts and End Users to
communicate with one another. When an End User adds a comment this will email the details of the
Comment to the Analyst that has been assigned the request and if an Analyst adds a Public Comment this will
email the details of the Comment to the End User.
If an End User or Analyst replies to a Comment that they have received via email their reply can be
automatically added as a Comment to the Request. To turn on the automatic processing of emailed
Comments go to Administration | System Settings | Email Server Settings | Auto Import Email Comments.
If this option is turned Off the emailed Comments will appear in the Email Pending queue where they can be
viewed and manually converted into a Comment.
For more information about configuring the Email Notifications please see Email Server Settings.
Change Status:
The Change Status icon will allow the End User to close the request or change the status of the Request to
another Status, provided that the End Users have been given permission to do so. The ability for End User to
be able to close their own requests is a global security setting in Administration | General Settings | Security
| Global End User Security | Allow End User to Close Requests.
To give End Users the ability to select other Request Statuses go to Administration | Libraries | Request
Statuses. Select the Request Status and turn the “Allow End User” option to Yes.
Viewing and Editing Requests
When entering the system as an End User there are various options or Menu items to display Request List
Views so you can edit and progress Requests. All Request views display the same information and so the
following Menu items can be described together:
Layton Technology Page 145 of 178 Layton ServiceDesk v6 User Manual v2.0
My Open Requests - Requests logged by the End User which are still open
My Closed Requests - Requests logged by the End User which are closed
All My Requests - All End User Requests whether open or closed
If required any of these menu items can be disabled by going to Administration | General Settings | Security
| Global End User Security.
By selecting the column headings, the list view can be sorted by ascending sequence on that column and by
selecting again, the order changed to descending.
The Tasks icon identifies whether any tasks or actions exist for a Request and by Selecting the Task icon,
the list of Tasks associated with that Request will be displayed. The Task icon will have a tick displayed if
there are Tasks present for that Request and on positioning over the icon, the number of Tasks will be
displayed.
The Comments Icon identifies whether any Comments exist for the Request. If there are any Comments a
tick will be displayed and hovering above the icon will display the number of Comments. If an Analyst has
added a Comment to the Request that the End User has not yet viewed there will be a red exclamation mark
on the icon indicating to the End User that there is an unread Comment on the Request. Click the
Comments icon will show the comments listed and the Comment details can be viewed by clicking the
expand icon >.
The Status icon shows whether the Request is open or closed although as mentioned above other open
Request Statuses can be defined, see Request Statuses. By selecting the Status icon the status of the Request
can be changed, providing the End User option has been set accordingly.
In any of the above views the Request can be selected to view or amend, if allowed, by selecting any data
field for a particular Request, e.g. the Request ID, Date, etc. The End User Request form will be displayed
showing all the Request details.
See the LOGGING A NEW REQUEST (END USER) section above for details on individual fields.

Layton Technology Page 146 of 178 Layton ServiceDesk v6 User Manual v2.0
UTILITIES
LDAP (Active Directory) - IMPORT END USERS
The LDAP End User import function allows you to connect to an Active Directory server or multiple servers
and pull back user information.
The import can be processed manually or can be configured to allow Layton ServiceDesk™ to automatically
create and update (but not remove) end users from information captured from Active Directory.
Field mappings (Map Fields icon ) can be specified to ensure that all required data is captured and filters
(Filter Users icon ) provide the ability to select which OU’s or Users are imported .
Setting up the LDAP (Active Directory) Connection
To set up an LDAP connection go to Administration | Utilities | LDAP (Active Directory) Import End User.
Any existing LDAP connections will be displayed in the list. To create a new connection click the Add icon and
then a pop up dialog will appear with the following configuration settings:
Server Name:
This is simply a name used to identify this LDAP connection. It is not mandatory and any value can be
entered.
LDAP Active Directory:
This setting contains the type of LDAP connection. At this stage only Active Directory is supported and so the
two options are Active Directory of none.
LDAP Server:
This contains the LDAP Server to connect to. An example string is as follows:
LDAP://SERVER1
Where SERVER1 is the LDAP server name to connect to.
LDAP User:
Specify the user account that will be used to access the LDAP server. The account used will need to have
permission to access the LDAP server.

Layton Technology Page 147 of 178 Layton ServiceDesk v6 User Manual v2.0
LDAP Password:
The password for the LDAP User account above.
Filter End Users with Empty Email:
If turned on Layton ServiceDesk will not import any Active Directory users if they do not have an email
address.
LDAP End User Auto Import:
This contains the frequency at which the import is run. Settings are Never, Hourly and Daily at a specified
hour. If you are only to run manual imports, you should specify Never. The automatic import is run by the
Layton ServiceDesk background process and does not require any Analyst intervention or an Analyst to be
logged in the system.
Import AD End User Default Password
This allows you to specify a default Password used by all End Users imported from AD. This is useful for new
End Users so that the same password can be given out and then changed by the End User if allowed for
subsequent logins.
Company
This field will only be displayed if you have turned on the Company Level feature in Administration > System
Settings > Application Settings. See the Company section for more information. If you are supporting End
Users from multiple companies then you can assign the End Users from this LDAP connection to a particular
company. You will need to have created the Companies first in Administration > Users & Groups > Manage
Company.
Once the LDAP connection has been saved it will be displayed in the list of LDAP connections along with
options to Map fields, Filter Users & Groups, view the log file and manually run the import.
Setting up Active Directory Mappings & Filters
To complete the setup of the Active Directory connection the field mappings and filters need to be
configured. Once the LDAP connection has been configured as outlined in the above section the Mappings
and Filters can then be applied by clicking on Map Fields icon or Filter icon in the LDAP connection
list.

Layton Technology Page 148 of 178 Layton ServiceDesk v6 User Manual v2.0
Active Directory Attribute Mapping
Selecting the Map Fields icon will allow you to select an End User field and map this to an Active Directory
Attribute.
If the sys_eusername field is not mapped it will be mapped by default to the login name of the directory user.
The Active Directory attribute is a free type field as Versions of Active Directory are extensible and can have
custom attributes attached to them. A list of standard Active Directory Attributes for 2000/2003 domains are
shown below:
2000 Server Domain 2003 Server Domain Layton ServiceDesk fields to map to
mail mail sys_email
name samaccountname sys_eusername
givenname givenname sys_forename
sn sn sys_surname
department department sys_eclient_id
DisplayName DisplayName Map to user defined field
To obtain a complete list of LDAP attribute names we recommend using the LDP.exe tool which is included in
the support tools kit from the server Operating System CD.
If you would like to map additional Active Directory attributes to new user defined End User fields then these
fields will first need to be created in Administration | Data Design | End User Data.
Filtering Users & Organizational Units
Selecting the Filter icon in the LDAP connection list will allow you to select which OU’s and/or Users are to be
imported. The Active Directory tree structure will be displayed with OU’s indicated by a folder icon and
Users represented by a user icon . Simply select which OU’s and/or Users you wish to import. Click the
save button to save the filter settings.
Running the Import
The LDAP Active Directory import will run automatically according to the setting specified in the “LDAP End
User Import” section of the LDAP configuration settings. If this field was set to “Never” the import can be run
manually by clicking the Import Users icon . This runs the Import in three steps and outputs the results to a
log file.

Layton Technology Page 149 of 178 Layton ServiceDesk v6 User Manual v2.0
Step 1:
The import checks for all End Users in Layton ServiceDesk™ that are not in Active Directory. These users are
written to the Log file. They can be dealt with by the Layton ServiceDesk™ Administrator at a later time.
Step 2:
The import checks for all End Users in Layton ServiceDesk™ that are present in Active Directory. If they are
included in the Filter then these users are updated with data from Active Directory and written to the Log file.
Step 3:
The import checks for all users in Active Directory that are not listed as End Users in Layton ServiceDesk™. If
they are selected in the filter then Layton ServiceDesk™ will create these End Users from Active Directory.
These users are also written to the Log file.
The log files can be viewed by clicking the View Log icon .
LDAP (Active Directory) IMPORT ANALYST
The LDAP (Active Directory) Import Analyst function allows you to connect to an Active Directory server and
import Analysts into Layton ServiceDesk.
The import can be processed manually or scheduled process can be configured to allow Layton ServiceDesk™
to automatically create and update (but not remove) Analysts from information captured from Active
Directory.
Field mappings can be specified to ensure that all required data is captured and filters provide the ability to
select which OU’s or Users are imported.
To configure the import please see the LDAP (Active Directory) - IMPORT END USERS section above as the
process is the same with the exception that only one LDAP server connection can be specified.
IMPORT END USER (.CSV, .TXT)
The Import End User (.CSV, .TXT) utility provides a means to import a large number of end users from a Tab
Delimited Text file or a CSV file. This is an alternative to the LDAP (Active Directory) import and allows you to
import the end users from whatever system you have them in.

Layton Technology Page 150 of 178 Layton ServiceDesk v6 User Manual v2.0
To import the End Users you must copy the file into the HB_Data/Import sub folder in Layton
ServiceDesk™(LaytonServiceDesk\HB_Data\Import). You can then start the import process by clicking
Administration | Utilities | Import End User .CSV. TXT
This will display all the files you have in the import folder. Click on the one you wish to import. You will be
shown a screen that allows you map each column to a field in the End User table. This includes any user
defined fields that have been created. Click Import to import the End Users.
The importing utility requires that the first row of the data file contains the column header and that the
column you map to the field sys_eusername is unique.
When the import runs, the system will give a report on how many rows were processed and how many rows
were omitted and how many rows were imported. If the License Limit is exceeded the import will not be
permitted. You will need to contact Layton Technology for a new license key to increase the number of end
user licenses. A sample import file is located in the program’s Import folder to give an example of how the
file should be structured.
PURGING
Purging permits the user to purge selected records from the database. The purging options are as follows:
If you check the Purge Requests tick box, you may either:
o Purge all Requests Closed before a certain date
o Purge all closed Requests
o Purge a Specific Request ID number.
If you check the Purge Tasks tick box, you may either:
o Purge all tasks completed before a certain date
o Purge all completed tasks.
If you check the Purge Problems tick box, you may either:
o Purge all Problems Closed before a certain date
o Purge all closed Problems
o Purge a Specific Problem ID number.
If you check the Purge Change tick box, you may either:
o Purge all Changes Closed before a certain date
o Purge all closed Changes
o Purge a Specific Change ID number.

Layton Technology Page 151 of 178 Layton ServiceDesk v6 User Manual v2.0
If you check the Purge Solutions tick box, you may choose Delete Dormant Solution to purge all solutions not
in use. A dormant Solution is a Solution that has not been applied or linked to any Requests or Problems.
If you check the Purge End Users tick box, you may Purge Dormant End Users who have never logged a
request.
EXPORT DATA
The Export Data function provides the facility to export the contents of each database table to a .CSV file. The
.CSV file will include all table fields including the user defined ones. The file can be down loaded by simply
clicking on the table name. A file download dialog box will prompt you to open or save the file.
CLEAR DOWN DATABASE
The clear down database function clears out all data in the database so that the system can be started afresh.
This is intended to be used when the system has been evaluated and the user wishes to start again for a live
system. This will delete all Requests, Tasks, Problems, Changes, al l Company Structure data such as Sites,
Companies, Departments, Analysts (Except for the Admin Account) and End Users. It will also delete all the
Library items.
Any Form Designs and Global List Views that have been configured will not be affected.
The Analyst must be logged in as the “Admin” account. A confirmation prompt will appear asking if you are
sure you want to do this.
SYSTEM SETTINGS
This chapter defines the system settings and default values to be used and covers Application Settings,
Database Connection, Application Terms & Appearance, Email Server Settings, AuditWizard connection and
the License information. All menu items are accessed using Administration | System Settings. Any changes
will not take effect until the “Save” button located at the bottom of the page, is selected.
Application Settings

Layton Technology Page 152 of 178 Layton ServiceDesk v6 User Manual v2.0
Application Title
The application title will be displayed in the web browser’s window or tab title.
Application Background Color
The background color sets the color for all the background pages within Layton ServiceDesk except for the
backgrounds for the forms that can be configured in the Form Design section. Each form in the Form Design
section can have its own individual background color or image.
Application Background Image
Used to display an image as the background for pages within Layton ServiceDesk except for the form
backgrounds as mentioned above as these can be individually defined.
Company Level
This feature is designed for ServiceDesks that will be providing technical support to End Users or customers
from multiple companies or external organizations. If turned ON you will be able to assign End Users to a
particular company. Companies can be defined and managed in Administration | Company Structure |
Manage Company.
The Company Level setting is turned OFF by default.
Enable Problem & Change
This feature will turn ON or OFF the Problem & Change Management functions in Layton ServiceDesk. For
more information see Problems and Changes.
If Problem & Change Management is not required this can be turned OFF and all pages, links and references
to Problem & Change Management will be disabled. The Problem & Change Management feature can be
enabled at any stage.
Application Database Connection
This area contains the database connection information. Layton ServiceDesk has the Connection (database
server), Database, User ID and Password Fields.
There is also an option to manually backup the database. Specify the desired location in the backup path and
then click on the Backup Database icon .
Application Terms
This area contains the key system terms, which are also used within the menu structure and then wherever
referred to. Any Term displayed can be renamed by simply entering the new name against the Term. All

Layton Technology Page 153 of 178 Layton ServiceDesk v6 User Manual v2.0
instances of that Term will be amended throughout the system to the new name as specified. See Figure 48
for details of all system terms.
Application Term Default Setting Description
User Term Analyst Any support personnel using the system.
End User Term End User The person or user of equipment or
services who will log or submit a
Request to the ServiceDesk.
Request Term Request End User or customer submitted call
which can take any form, i.e. an
incident, request for information or
training, etc.
Request Type Term Request Type Term used to categorize Requests &
Problems into user-defined groups. Links
to Skills and Solutions.
Solution Term Solution Term used to identify the answer or
resolution to a Request as stored in a
Solutions Base.
End Client Term Department Identifies a separate user-defined table
linked to End User. Can be used for any
purpose.
Action Term Task Actions or activities that can be
scheduled for a Request or not.
Action Term Type Task Type Identifies type or grouping of actions
Site Term Site Identifies a separate user defined table
of sites
Company Term Company Identifies a separate user defined table
of companies
Comment Term Comment Term used for request updates either by
analyst or end user providing audit trail
of request updates or events.

Layton Technology Page 154 of 178 Layton ServiceDesk v6 User Manual v2.0
Application Appearance
Color theme:
Layton ServiceDesk has a range of color Themes or Skins which provide another method of tailoring the
application to suit your corporate image or color scheme. The default theme is the “Layton Theme” however
any theme can be selected which will then propagate through the system. The color themes will affect the
color and appearance Menus, Data grids, Web Tabs, Drop Down list and other control colors.
Theme Font:
For screens that are not designable you can set the font appearance of those screens through the application
fonts settings. There are 4 settings:
Font: Sets the default Font Style
Font Color: Sets the default Font Color
Font Size: Sets the default Font Size
Title Font Color: Sets the Size of Heading text, E.G. “Application Appearance”
Email Server Settings
Layton ServiceDesk™ contains the facility to automatically send email notifications to Analysts and End Users
when certain conditions are met within the system.
Email notifications are sent using SMTP and incoming emails are received using POP3. The outgoing and
incoming emails are processed automatically by the Layton ServiceDesk background process which runs on
the Layton ServiceDesk IIS Server.
When an outgoing email is triggered, Layton ServiceDesk writes the email into the “Mail” table in the Layton
ServiceDesk database. The Layton ServiceDesk background process will periodically scan this table and send
the mail using the SMTP service.
Incoming emails are collected from the POP3 mail server and added to the “Mai lin” table in the Layton
ServiceDesk database. If the mail configuration settings are set to process the incoming emails automatically
Priority Term Priority / SLA Priority of the Request linked to an SLA
with time to resolve with escalation as
required
Survey Term Survey Identifies the term to be used for End
User Request Surveys
Figure 48 - Application Terms

Layton Technology Page 155 of 178 Layton ServiceDesk v6 User Manual v2.0
the Layton ServiceDesk Background process will convert the emails into requests or comments according to
the settings.
When automatically processed, emails with a numeric value in subject line matching a request number will
create a new Comment against that request. If the subject does not contain an existing request number then
the email is processed into a new request record.
Also, requests can be automatically assigned to Analysts or Groups, depending on the Auto Assign End User
Request setting under General Settings | Auto Assignment Options. Once an incoming email is identified as
a new request the email subject is checked to see if it matches a defined request type. If it does, the system
assigns that request type and processes the new request accordingly. If not it will try to use a request type as
defined by Email Key Words defined within Libraries, using first the text in the subject and then the body of
the email.
If the option “Create Unassigned Request” is set to “Off” any incoming emails that do not have a subject line
or Keyword match with a Request Type will not be automatically processed as they will not be able to be
automatically assigned. They will stay in the Email Pending Queue and can be manually converted into
Requests, Comments, Problems or Changes. The Email Pending Queue icon in the main menu will only be
visible to Analyst that have been given access to the incoming email in Administration | Manage Company |
Manage Analyst | Settings | Site Access | Incoming Mail Access.
If the “Create Unassigned Request” option is set to “Yes” incoming emails with subject lines that do not
match a Keyword or Request Type will be created as Unassigned Requests and appear in Home | View
Requests | Unassigned Requests. Depending on the Analyst’s home screen view setting the Unassigned
Requests would also appear in any lists of open requests. If the Analyst has access to the Dashboard the
number of Unassigned Requests will also be displayed in the Requests Stats section.
Email that does not come from a recognized end user email address will remain in the email pending queue
and this mail can be processed manually. To view the Email Pending queue click on the mail icon on the
right hand side of the main menu.
See Figure 49 below showing details of the email server settings

Layton Technology Page 156 of 178 Layton ServiceDesk v6 User Manual v2.0
Figure 49 - Email Server Settings
Incoming
o POP3 Server: Specify the POP3 Mail Server (E.G. [email protected])
o Account: Specify the incoming mail account
o Password: Specify the password for the incoming mail account
o Port: The port used (the default port for POP3 is 995)
o SSL: Select if the POP3 Mail Server uses SSL (Secure Sockets Layer)
Outgoing
o SMTP Server: Specify the SMTP Server that the mail is to be sent to for
forwarding
o User: Specify the outgoing mail account
o Password: Specify the outgoing mail account password
o Display Name: Specify the outgoing mail account display name
o Port: Specify the SMTP Server Port (the default port for SMTP is 25)
o Email: Specify the email address of the outgoing email account
o Reply Address: Specify the reply email address of the outgoing email account
o SSL: Select if the SMTP Server uses SSL (Secure Sockets Layer)

Layton Technology Page 157 of 178 Layton ServiceDesk v6 User Manual v2.0
Auto Import Email Requests:
If set to “On” any incoming email will be automatic converted into requests (providing that the senders email
address matches the email address of a registered End User). Emails that do not have a matching End User
will sit in the Email Pending queue where they can be processed manually. Set to “Off” emails will remain in
the email pending queue where they can be viewed and processed manually.
Auto Import Email Comments:
If set to “On” any incoming email Comments will be automatically updated otherwise they will remain in the
Email Pending queue where they will await manual processing. Emails with a numeric value in subject line
matching a request number will create a new Comment against that request.
Email Additional Analysts on Email Comment:
If set to “On” Analysts will have the ability to email (cc) addition Analysts when adding a comment to a
Request, Problem or Change.
AuditWizard
One of the key advantages of Layton ServiceDesk is its ability to connect directly to an existing AuditWizard
database. For more information on the Assets tab please see the ASSETS (AuditWizard Connection) section.
See Figure 50 below showing the AuditWizard settings.
Figure 50 - AuditWizard Settings

Layton Technology Page 158 of 178 Layton ServiceDesk v6 User Manual v2.0
AuditWizard Link Enabled
This will enable the AuditWizard link and should be set to ON. If turned Off the Assets Tab in the main menu
will not be displayed.
End User View Asset
If turned ON the End User will be able to view the asset inventory information by clicking the Asset Quick Info
button next to the Asset ID field on the Request form.
AuditWizard SQL Server
Enter the name of the SQL Server where the AuditWizard database is located. If a SQL Server Instance is used
specify the instance name: E.G. Server\Instance
AW Database Name
Specify the AuditWizard Database name.
AW SQL Server User
User account to access the SQL Server. Please note that if your AuditWizard database is located on a
different server to Layton ServiceDesk the AuditWizard SQL Server will need to be configured to allow for
Remote Connections and SQL Server Authentication.
AW Get Last Asset
When enabled, Layton ServiceDesk™ will automatically populate the last asset that was linked to a request
logged by the End User. For example, if a request had previously been logged by user John Smith and at that
time the asset JOHNSALES was associated with that request, the next time that a request is logged for John
Smith it will automatically populate the JOHNSALES asset in the asset field. If a search of assets is conducted
it will suggest that JOHNSALES was the End User’s last known asset was JOHNSALES.
Linking an asset to a Request
Once the AuditWizard settings have been configured an Asset can be linked to a call by clicking on the select
button to the right of the asset name; this will display the ‘Search for Asset’ window. Here you can enter a
full or partial asset name, IP Address or username and search for matching assets in the AuditWizard™
database. Select the appropriate asset and close the window.
See Figure 51 below displaying the End User, Asset and Asset Location fields.
Figure 51 - Asset ID & Location Fields

Layton Technology Page 159 of 178 Layton ServiceDesk v6 User Manual v2.0
The Quick Info button to the right of the asset allows you to view the Audit data for that asset in a new
window. The asset data is displayed in a tree view similar to that displayed within AuditWizard™ and allows
you to drill down through the asset data. For more information please see the ASSETS (AuditWizard
Connection) section.
Troubleshooting
If you are unable to either search for or expand on an asset please check the log file. The log file can be
found in LaytonServiceDesk\HB_Data\Export.
License Information
This area contains the Layton ServiceDesk license information and customer details. The product name and
version are displayed together with the Customer Name, Customer ID and License Key. It will also display the
number of End Users and Analysts that you are licensed for.
Without a valid license key the system will operate in evaluation mode. If you are a Registered Customer
you can use the Get License Key link to generate a product key from our web site. You will need to enter
your Registered Company Name & ID details before clicking the Get License Key link as it will use these details
to login to the customer support section of the Layton Technology website.

Layton Technology Page 160 of 178 Layton ServiceDesk v6 User Manual v2.0
GENERAL SETTINGS
Request Settings
This section contains settings that will determine the default values when a new Request is logged, such as
the assignment & ownership, default Status, Priority and other fields along with the escalation colors and a
number of other configurations settings. Descriptions of each setting are detailed below:
Owned by Default & Owned by Specified.
This Specifies the default value for the Request “Owned By” field when a new request is logged or a new End
User Request is logged.
Decide who and how Request Ownership will operate and what or whether a default should be used. The
normal practice would probably use the Help Desk first line Analysts as always owning a Request, even when
the Request is assigned on to a Support Analyst or Group. However, this is totally configurable and you can
decide to manually set or transfer ownership at any time, even after a de fault owner has been specified.
Alternatively you may decide not to use Request Ownership and therefore the Analyst Request form will not
include “Owned By” and the default “Owned By Default” will be set to “off”.
The “Owned By Default “options are shown in the table in Figure 52.
Owned By Default Settings Resulting Action
Off Ownership not automatically set
Logged in Analyst Ownership defaults to Analyst logging the
Request
Use Specified Ownership defaults to the Analyst Specified.
The specified Analyst can be selected by
clicking the select button next to the “Owned
by Specified” field.
Figure 52 - Owned By Settings

Layton Technology Page 161 of 178 Layton ServiceDesk v6 User Manual v2.0
Assigned to Default & Assigned to Specified
Specifies the default value for the request “Assigned To” field when a new Request is logged or a new End
User Request is logged. There are three options: “Off” which turns off the feature , “Logged in Analyst” that
uses the logged in Analyst and “Use Specified” where the value used is the one specified in the Assigned To
Specified Setting.
Default Status
This defines the default Status for newly created Requests. Requests Statuses are defined in Administration
| Libraries | Request Statuses. For more information see the Request Statuses section.
Default Priority
This defines the default Priority for newly created requests. Requests Priorities are defined in Administration
| Libraries | Priority / SLA. For more information see the Priority / SLA section.
Default Urgency
This defines the default Urgency for newly created requests. Urgencies are defined in Administration |
Libraries | Urgency. For more information please see the Urgency section.
Default Impact
This defines the default Impact for newly created requests. Impacts are defined in Administration | Libraries
| Impact. For more information please see the Impact section.
Default Service
This defines the default Service for newly created requests. Services are defined in Administration |
Libraries | Services. For more information see the Services section.
Allow Spawning
This option determines whether Request Spawning will be allowed. For more please see the Spawned
Request section. If turned off the Spawn Request icon will not be displayed on the Analyst Request From.

Layton Technology Page 162 of 178 Layton ServiceDesk v6 User Manual v2.0
Spawn Closure
Spawn closure determines how Spawned or Linked Requests are handled when the parent Request is closed.
The options are:
Spawn Closure Setting Resulting Action
Allow (Only after Children are
closed)
The parent Request can only be closed once
any Spawned or Linked child requests are
closed.
Allow (Close Children) When the parent Request is closed any
Spawned or Linked Child requests will be
automatically closed.
Allow (Do not close Children) If the parent request is closed any Spawned or
Linked child requests will be left open.
Figure 53 - Spawn Closure Settings
Show Copy Request Button
Allows the Copy Request icon to appear on the request form. This feature was designed to copy and
duplicate a request entirely, including the comments, tasks, and attachments. If set to OFF the copy request
button will be completely hidden from the Analyst Request forms.
Statistics Duration & Display
Determines how the HD Mins (sys_hdmins) and 24 HR Mins (sys_24hrmins) fields are displayed on the
request forms. The HD Mins field will display the amount of time that a request has been open, taking into
account the Working Hours and any closed periods or suspensions. The 24 HR Mins shows the amount of
time that a request has been open on a full 24 hour basis. The display options are Hrs & Mins (1hr 30m) or
Decimal (1.5).
Pop Up Solution
This field is used to determine if Layton ServiceDesk will prompt an Analyst when a request is bei ng logged
that there is a possible solution to the Request Type that they have selected. For more information on
Solution Pop Ups please see the Solution Pop-Ups section. The options are:

Layton Technology Page 163 of 178 Layton ServiceDesk v6 User Manual v2.0
None Turns OFF the Solutions Pop Ups, irrespective of whether individual Solutions have the
Solution Pop up field set to Yes.
Specified Only Will only pop up Solutions linked to the Request Type that have the Solution Pop Up fi eld set
to YES.
All Will pop up all Solutions linked to the Request Type, irrespective of whether the individual
Solutions have the Solution Pop Up field set to YES or NO.
Mark Request Responded When
This setting determines when a request is considered to have been responded to. For more information on
Request Response please see the Priority / SLA section.
If this is set to “On Assignment”, when a request is assigned to an Analyst it is marked as responded. If this is
set to “On First Public Comment” the request will only be marked as responded when an Analyst adds a
Public Comment. A Public Comment is a comment that the End User can view and a copy of the comment
will be emailed to them.
Enable Request Class Tabs
If Request Classes are being used this setting determines if the list views for the different Request Classes are
displayed in different tabs or if they will be displayed in a single list. Figure 54 and Figure 55 below show the
result of the two settings (Please note that Request Class Tabs are only applicable to the Analyst’s request list
views not End Users). For more information on Request Classes please see the Request Classes section.
Request Class Tabs turned ON:
Figure 54 - Request Class Tabs ON

Layton Technology Page 164 of 178 Layton ServiceDesk v6 User Manual v2.0
Figure 55 - Request Class Tabs OFF
o Missed Response Request Color
o Escalated Level 1 Color
o Escalated Level 2 Color
o Escalated Level 3 Color
o Expired Request Color
This will determine the color indicator that will be applied to any Requests, Tasks (Actions) or Problems that
have reached that particular level of escalation. The system provides up to three levels of escalation before
expiry. You can select a color against any level (or none) and as a Request, Task or Problem reaches each
level the color in the list views will change color to that specified. The escalation and expiry parameters are
set against a Priority or Service Level Agreement. See the Priority and Service Level Agreements section for
further details.
Color Whole Row
This setting determines if the escalation color settings as described above will be applied to the whole row in
the list view or just applied to the Priority cell.
Currency Symbol
Determines the currency symbol used in the Request Cost sheets and reports.

Layton Technology Page 165 of 178 Layton ServiceDesk v6 User Manual v2.0
Problem Settings
This menu item will only be displayed if the Problem & Change feature is turned on in Administration |
System Settings | Application Settings | Enable Problem & Change .
This section contains settings that will determine the default values when a new Problem is logged, such as
the assignment & ownership, default Status, Priority and other fields along with the escalation colors and a
number of other configurations settings. These settings work in exactly the same manner as described above
in the Request Settings section.
o Owned by Default & Owned by Specified.
o Assigned to Default & Assigned to Specified
o Default Status
o Default Priority
o Default Urgency
o Default Impact
o Default Service
Change Settings
This menu item will only be displayed if the Problem & Change feature is turned on in Administration |
System Settings | Application Settings | Enable Problem & Change .
This section contains settings that will determine the default values when a new Change is logged, such as
the Requested by Default, Assigned to Default, Default Status and other default values along with settings
that determine how the change approval process is handled.
The following settings work in the same manner as described in the Request Settings section above.
o Requested by Default & Requested by Specified.
o Assigned to Default & Assigned to Specified
o Default Status
o Default Urgency
o Default Impact
o Default Service
The following Change settings define how Change approval workflows are handled:
Auto Set Approval Status to Approved on Unanimous Approval
If turned ON when all Change Approvers have approved the Change it will automatically set the Change
Approval Status to Approved. If this setting is turned Off the Change Approval Status can be changed

Layton Technology Page 166 of 178 Layton ServiceDesk v6 User Manual v2.0
manually by approved Analysts by selecting the Approval Status drop down list on the Change form. For
more information please see the Change Approval Process section.
Stop Approval Workflow Process on First Rejection
If turned ON the Change Approval workflow process will stop when an approver rejects the Change. If this
setting is turned Off the Change Approval workflow process will continue through each step in the workflow
until completed, even if it is rejected by one or more of the approvers.
Auto Set Approval Status to Rejected on First Rejection
If this setting is turned ON the Change Approval Status will be automatically set to Rejected when any
approver rejects the Change.
General Auto Assignment Settings
This section details how and on what basis Requests will be automatically assigned or suggested for default
assignment.
Auto Suggest Assignment
The Auto Suggest Assignment option controls the mechanism by which the system suggests or automatically
assigns Requests logged by support Analysts. The suggested Analyst or Group is displayed at the top of the
assignment pop up when selecting the appropriate assignment button on the Request or Problem form.
Assignment Default Settings Resulting Action
Off No Analyst or Group is suggested for
assignment or assigned.
Load Balancing (Analyst) Analyst with the lowest number of open
Requests is suggested for assignment.
Skill Load Balancing (Analyst) Analyst with matched skills and least number
of open Requests is suggested for
assignment.
Load Balancing (Analyst Group) Analyst Group with the least number of open
Requests is suggested for assignment.
Skill Load Balancing (Analyst
Group)
Analyst Group with matching skills and the
least number of open Requests is suggested
for assignment.

Layton Technology Page 167 of 178 Layton ServiceDesk v6 User Manual v2.0
Auto Pop: Load Balancing
(Analyst)
Analyst with the lowest number of open
Requests will auto populate when the
Request is logged.
Auto Pop: Skill Load Balancing
(Analyst)
Analyst with matching skills and the least
number of open Requests will auto populate
when the Request is logged.
Auto Pop: Load Balancing
(Analyst Group)
Analyst Group with the least number of open
Requests will auto populate when the
Request is logged.
Auto Pop: Skill Load Balancing
(Analyst Group)
Analyst Group with matching skills and the
least number of open Requests will auto
populate when the Request is logged by
anyone.
Figure 56 - Auto Assignment Settings
The Skills are the actual Request Types (see the Request Type section) and are defined for Groups and
Analysts within Administration | Company Structure | Manage Analyst and Manage Analyst Groups.
Decide how Requests will normally be assigned, to whom and on what basis. A Request can be assigned to
any individual Analyst, whether a member of a Group or not, or assigned to a Group. Requests can be
automatically assigned or the Analyst or Group suggested by the system, based on either Load Balancing or
Skills and Load Balancing.
The system will suggest or auto populate the Analyst or Group, depending on the configuration for
assignment, but this can be changed to another Analyst or Group provided the Analyst has permission.
Although these settings define the default configuration for assignment of Requests, this assignment can be
overruled by specific Request Type rules. For instance you can also define a Site or Department Manager or
specific Analyst responsible for a particular Request Type. These are defined when creating or editing
Request Types. Business Rules can also provide additional assignment options which will override the
general Auto Assignment options.
Auto Assign End User Request
The Auto Assign End User Request controls the mechanism by which incoming End User Requests are
automatically assigned. This works in the same way as above for Analysts apart from there is no “suggested”
option and incoming Requests are automatically assigned according to the option selected. If no automatic

Layton Technology Page 168 of 178 Layton ServiceDesk v6 User Manual v2.0
assignment is selected (option set to Off) then Requests will be logged under “Unassigned Requests”.
Constrain Auto Assign / Suggest Skill
If a Skill Load Balancing option is set in the Auto Suggest Assignment or Auto Assign End User Request fields,
the Constrain Auto Assign / Suggest Skill switch prevents the system falling back to pure load balancing if it
cannot assign on Skills. If a Skill match is not found and unassigned request will be created.
Constrain Auto Assign / Suggest to Site
By switching on the Constrain Auto Assign / Suggest to Site option, the system will take into account Analysts
Sites and only auto assign or suggest assignment to Analysts or Analyst Groups that are at the same Site as
the End User.
Business Rules
To be completed.
Security
This section contains a range of system wide security settings. For individual Analyst security settings please
see the Analyst Settings section.
The security settings are grouped into three sections; General Security, Global Analyst Security and Global
End User Security. Details of each setting are outlined below:
General Security Description
Audit Full Problem Description The “Audit Full Problem Description” specifies whether
the full request problem description is captured and can
then be viewed under request history. Otherwise, if the
option is set to “Off” the description will be limited to
255 characters.
Allow Request Date Edit by Determines who can change the date that a request was
logged.

Layton Technology Page 169 of 178 Layton ServiceDesk v6 User Manual v2.0
Close with Incomplete Tasks Determines if an Analyst can close a Request, Problem or
Change if there are incomplete Tasks.
Allow End User Login Turns on or off the ability for End Users to login to Layton
ServiceDesk
Global End User Security Description
End User Page Refresh Determines the how often the End User’s page will auto
refresh
Confine End User Request
Search or own Requests
If turned ON any Request search conducted by the End
Users will only return results related to their own
Requests. If turned off they can search through all
Requests in the system
End Users Attachments Delete Determines whether End Users can delete attachments
that have been uploaded to their requests
Allow End User Self Service Determines whether the End Users can use the Self
Service menu. If turned Off the Self Service menu will not
be visible to the End Users
Allow End User Maintain
Details
This turns on or off the ability for End Users to maintain
their own account details. If turned off this menu item
will not be visible to the End Users
Min End User Password Sets the minimum password length the End Users can use
Allow End User Log New
Requests
Turns on or off the End User menu option for Log New
Request
Allow End User View Closed
Requests
Turns on or off the End User menu option for My Closed
Requests
Allow End Users Search
Requests
Turns on or off the End User menu option for Search
Requests
End User Home Screen Specifies the screen that the End User is delivered to
when logged in
Prevent End User Edit Open
Requests
Turns on or off the ability for End Users to edit their
Requests once they have been saved.

Layton Technology Page 170 of 178 Layton ServiceDesk v6 User Manual v2.0
Restrict End User Request
Classes
Turns on or off the ability for End Users to access Request
Classes. For more see Request Classes. If turned Off all
End Users will have access to all Request Classes. If
turned On the Request Class access for the End Users can
be defined in Administration | Company Structure |
Mange End User.
End User Default Login
End User Attachments Turns on or off the ability of End Users to view
attachments
End User Attachments
Overwrite
Turns on or off the ability of End Users to upload and
overwrite an existing attachment
Hide End User Logoff Menu Removes the End User’s logoff button. Usually used in
conjunction with the NTLM auto logon feature
Allow End User Self
Registration
Turns on or off the ability for End Users to self register
and therefore create their own account. If turned ON a
“Register End User” button will be displayed on the main
Layton ServiceDesk logon page.
Allow End User Change
Password
Turns on or off the ability of End Users to change their
password in Layton ServiceDesk. If turned Off the My
Password menu item will not be visible.
Allow End Users View Open
Requests
Turns on or off the End User menu option for My Open
Requests
Allow End User Help Turns on or off the Help button on the menu
Prevent End User Edit Closed
Requests
Turns on or off the ability for End Users to edit their
Requests after they are closed
Allow End Users to Close
Requests
This option controls whether End Users are allowed to
close Requests themselves or not.
End User Read Comments
Notify
If set to ON and an Analyst has added a public comment
to the End User’s request that they have not read, a red
exclamation mark will display on the comment icon
indicating to the end user that there is an unread
comment.

Layton Technology Page 171 of 178 Layton ServiceDesk v6 User Manual v2.0
Figure 57 - Security Setting Descriptions
Survey
This section determines whether End User surveys will be used and at what frequency they will be sent out
and the rating system to be used. For more information see the SURVEYS section.
Enable End User Survey.
This setting simply turns On or OFF the Survey feature.
Sample Survey Every X Request
Setting the “Sample Survey Every X Request” to 5 Requests will cause a survey to be created for every 5th
request closed. In addition to this the setting can be set to (Manually at Close). This causes Layton
ServiceDesk™ to ask the Analyst closing the call if it is to be surveyed. If the Sample Every setting is set to a
numeric requests value (such as 5 Requests), before surveying, Layton ServiceDesk™ will look to ensure that
the sys_blocksurvey field is not set on the request being closed. If this field is set (it can be placed on the
request form in form design) Layton ServiceDesk™ will not survey it. Similarly Layton ServiceDesk™ will look
to ensure that the sys_blocksurvey field is not set on the End User of the request being closed. If this field is
set (it can be placed on the End User form in form design) Layton ServiceDesk™ will not survey it either.
This provides the facility to allow certain End Users or requests not to be included in a survey.
Show Incomplete End User Surveys in Whiteboard
The “Show Incomplete End User Surveys in Whiteboard” tells Layton ServiceDesk™ to remind the End User of
any incomplete surveys in their whiteboard when they log on in addition to any email notification.
Rate Out Of and Rate Increment
The “Rate Out Of” and “Rate Increment” controls the available values to the End User when completing the
survey. For example Rate Of setting of 100 and a Rate Increment of 5 would make the following values
available: 0, 5, 10, 15, 20, 25, 30, 35, 40, 45, 50, 55, 60, 65, 70, 75, 80, 85, 90, 95 and 100.

Layton Technology Page 172 of 178 Layton ServiceDesk v6 User Manual v2.0
Closed Periods
This option allows you to specify the days that the ServiceDesk will not be working. These will be Public or
Bank Holidays or specific days that the ServiceDesk will be closed. This ensures that Request escalation does
not occur over closed periods. Weekends should not be specified here as they are more efficiently accounted
for in the Working Hours section below.
To create closed periods go to Administration | General Settings | Closed Periods and click the Add icon. A
new Closed Period pop up dialog will appear with a blank start and end date/time. Enter the start and end
date/time and save.
Default Working Hours
The Layton ServiceDesk™ working hours can be configured using this form to specify the opening and closing
time of the ServiceDesk for each day.
The hours are stated using the 24 hour clock basis, so simply type in the open and close hours, e.g. 09.00 to
17.30 and then save. The ServiceDesk working hours are important to set especially when Request escalation
or SLA’s are implemented.
APPENDIX A – MS SQL Server Database Connection
Layton ServiceDesk™ uses MS SQL Server for the data storage. HelpBox can connect to the MS SQL Server by
either NT Authentication or SQL Server Authentication. This technical note is a detailed explanation of what
needs to be done to establish a database connection by either method.
Database Backup Method
It is advised that you make a backup of the entire LaytonHelpBox program folder by Right clicking on the
C:\LaytonServiceDesk folder and select “Copy”, then “Paste” it to a new folder on the production server (e.g.
‘C:\LaytonServiceDesk backup’).
To make a backup of the HelpBox SQL database you can use a SQL DB manager such as “Enterprise Manager”
or “MS Management Studio” as this is the most reliable method of backing up a SQL database. Under the
“Databases” directory, locate the LaytonServiceDesk database and right click on it. Under “All Tasks” select
the “Backup” option on the “LaytonServiceDesk’ Database. You can give the back up a file name such as
“LaytonServiceDesk.bak’, then once the backup is completed, save this in a safe location.
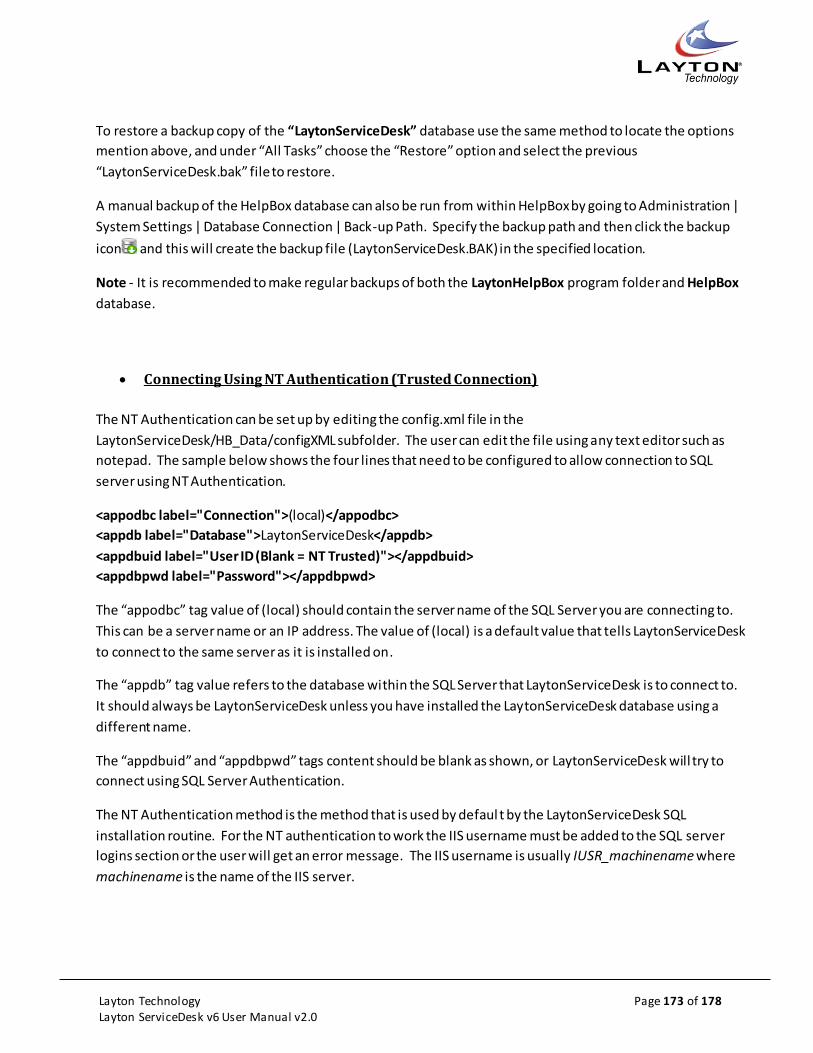
Layton Technology Page 173 of 178 Layton ServiceDesk v6 User Manual v2.0
To restore a backup copy of the “LaytonServiceDesk” database use the same method to locate the options
mention above, and under “All Tasks” choose the “Restore” option and select the previous
“LaytonServiceDesk.bak” file to restore.
A manual backup of the HelpBox database can also be run from within HelpBox by going to Administration |
System Settings | Database Connection | Back-up Path. Specify the backup path and then click the backup
icon and this will create the backup file (LaytonServiceDesk.BAK) in the specified location.
Note - It is recommended to make regular backups of both the LaytonHelpBox program folder and HelpBox
database.
Connecting Using NT Authentication (Trusted Connection)
The NT Authentication can be set up by editing the config.xml file in the
LaytonServiceDesk/HB_Data/configXML subfolder. The user can edit the file using any text editor such as
notepad. The sample below shows the four lines that need to be configured to allow connection to SQL
server using NT Authentication.
<appodbc label="Connection">(local)</appodbc>
<appdb label="Database">LaytonServiceDesk</appdb>
<appdbuid label="User ID (Blank = NT Trusted)"></appdbuid>
<appdbpwd label="Password"></appdbpwd>
The “appodbc” tag value of (local) should contain the server name of the SQL Server you are connecting to.
This can be a server name or an IP address. The value of (local) is a default value that tells LaytonServiceDesk
to connect to the same server as it is installed on.
The “appdb” tag value refers to the database within the SQL Server that LaytonServiceDesk is to connect to.
It should always be LaytonServiceDesk unless you have installed the LaytonServiceDesk database using a
different name.
The “appdbuid” and “appdbpwd” tags content should be blank as shown, or LaytonServiceDesk will try to
connect using SQL Server Authentication.
The NT Authentication method is the method that is used by defaul t by the LaytonServiceDesk SQL
installation routine. For the NT authentication to work the IIS username must be added to the SQL server
logins section or the user will get an error message. The IIS username is usually IUSR_machinename where
machinename is the name of the IIS server.

Layton Technology Page 174 of 178 Layton ServiceDesk v6 User Manual v2.0
Figure 58 above shows the IUSR_JHAL_SERVER1 username added to the Windows NT Security Logins
IMPORTANT !
When added to the logins, the IIS username must be given full owner access to the Layton ServiceDesk
database.
Connecting Using SQL Server Authentication
The SQL Server Authentication can be set up by editing the config.xml file in the
LaytonServiceDesk/HB_Data/configXML subfolder. The user can edit the file using any text editor such as
notepad.
Layton ServiceDesk can be configured to connect using SQL Server Authentication by inserting a SQL server
User Id between the “appdbuid” tags, and the password between the “appdbpwd” tags as in the sample
below.
Figure 58 - MS Enterprise Manager

Layton Technology Page 175 of 178 Layton ServiceDesk v6 User Manual v2.0
Figure 59 - SQL Server Login Properties
<appodbc label="Connection">(local)</appodbc>
<appdb label="Database">LaytonServiceDesk</appdb>
<appdbuid label="User ID (Blank = NT Trusted)">LaytonUser1</appdbuid>
<appdbpwd label="Password">LaytonUser1</appdbpwd>
sa is the default system admin password for SQL server and as such has full access to all databases on the SQL
Server. It is recommended that you create a separate login other than sa with owner access to just the
Layton ServiceDesk Database and specify this username between the appdbuid tags. By default, Layton
ServiceDesk will create an account for you called “LaytonUser1” with a password of “LaytonUser1”. This was
done to simplify the installation however you may wish to change the password to this account to increase
security in the database.
If you clear the contents of the appdbuid tag the system will attempt to connect using NT Authentication (See
Above).
Layton Technology Page 176 of 178 Layton ServiceDesk v6 User Manual v2.0
END USER LICENSE AGREEMENT
PLEASE READ THIS CAREFULLY BEFORE YOU OPEN THE DISK PACKAGE, or if obtained electronically, BEFORE
YOU CONTINUE INSTALLATION.
LaytonServiceDesk Software License Agreement
=============================
PLEASE READ THIS CAREFULLY BEFORE YOU OPEN THE DISK PACKAGE, or if obtained electronically, BEFORE
YOU CONTINUE INSTALLATION.
THIS LICENSE AGREEMENT SUPERSEDES THE LICENSE AGREEMENT CONTAINED IN THE SOFTWARE
INSTALLATION AND DOCUMENTATION.
CAREFULLY READ THE TERMS AND CONDITIONS OF THIS END USER LICENSE AGREEMENT ("AGREEMENT")
BEFORE OPENING THIS PACKAGE. BY OPENING THIS PACKAGE, YOU ARE ACCEPTING AND AGREEING TO
THESE TERMS AND CONDITIONS.
IF YOU ARE NOT WILLING TO ACCEPT AND AGREE TO THESE TERMS AND CONDITIONS, YOU SHOULD RETURN
THIS PACKAGE IN UNOPENED FORM WITHIN 7 DAYS OF RECEIPT FOR A FULL REFUND OF THE LICENSE FEE
YOU PAID.
This Software (which term where appropriate shall be deemed to include all materials, associated with the
Software including, but not limited to, all documentation, user manuals, training materials, and media) is
Copyright (c) 1998 - 2006 by Layton Technology, Inc. All rights are reserved.
1. License
Layton Technology, Inc, ("Layton Technology") hereby grants to you, and you accept, a limited nonexclusive
license to use the Layton ServiceDesk computer software program contained on the enclosed in machine-
readable, object code form only, along with the accompanying User Manual (collectively, the "Software"),
only as authorized in this License agreement.
Except for the rights specifically granted in this Agreement, Layton Technology retains all right, title and
interest (including without limitation, copyright and other intellectual property rights) in and to the software.
2. Use
Installation and use of the software is strictly limited to the following terms and conditions.
a) The software may only be used where the number of End Users registered within the system does not
exceed the number of End Users referred to by the License Pack purchased and as indicated on the Layton
Technology invoice. End Users are classified as users or customers that are supported using Layton
ServiceDesk.

Layton Technology Page 177 of 178 Layton ServiceDesk v6 User Manual v2.0
b) All License Packs are provided strictly for the use of a single production system of Layton ServiceDesk, or
installation of a single database. For security copies see Copies and Security.
c) All of the above users must reside domestically within the country where the license was purchased and
maintain a single HelpBox database unless an International license is purchased.
Transferring a license between organizations and countries is prohibited.
Definition of Licenses:
Starter Pack/Business Pack/Corporate Pack/Enterprise Pack; This license(s) enables you to have the licensed
number of users while maintaining one single database, controlled by you domestically within the country
where the license was purchased.
3. Restrictions
You agree that you will not modify, alter, reverse engineer, de-compile or otherwise translate the software.
You agree that you will not sell, distribute, load, assign, sublicense, pledge, lease, rent, share or otherwise
transfer the software (or any copy thereof) or your rights and obligations under this agreement.
4. Copies and Security
You may make copies of the software solely for testing, security, backup and archival purposes, provided that
such a copy contains all of the original Software Copyright information and other proprietary notices.
5. Terms; Termination
This license agreement is effective upon your opening of this package and shall continue until terminated.
You may terminate this license agreement at any time by destroying the software (and all copies thereof) and
erasing any copies residing on computer equipment.
In addition, this agreement shall be terminated automatically if you fail to comply with any of the terms and
conditions of this Agreement. Upon such termination, you agree to destroy the software (and all of its copies
thereof) and erase any copies residing on computer equipment.
Layton Technology reserves the right to change this EULA at any time. For a current copy of the EULA visit
www.laytontechnology.com.
6. Limited Warranty/Remedy
Layton Technology warrants for your benefit alone, for a period of 14 days from the date of your receipt of
the software (the "Warranty Period") that (i) the disk in which the software is contained is free from defects
in material and workmanship, and (ii) the software will operate substantially in accordance w ith material
functional specifications in the User's Manual. Layton Technology's entire liability and your sole and exclusive
remedy for any breach of this limited warranty shall be, at Layton Technology's option, either (a) return of
the license fee you paid, or (b) repair or replacement of the software; provided that you return the software

Layton Technology Page 178 of 178 Layton ServiceDesk v6 User Manual v2.0
to Layton Technology within the warranty period along with a detailed descripti on of the problem
encountered.
The limited warranty provided in this section shall be void if the problem encountered has resulted from
improper use, neglect, abuse, accident or unauthorized modification.
EXCEPT FOR THE LIMITED WARRANTY SE FORTH IN THIS SECTION, THE SOFTWARE IS LICENSED "AS IS" AND
LAYTON TECHNOLOGY DISCLAIMS ANY AND ALL OTHER WARRANTIES WITH REGARDS TO THE SOFTWARE
(WHETHER EXPRESS OR IMPLIED), INCLUDING WITHOUT LIMITATION ANY IMPLIED WARRANTIES OF
MERCHANTABILITY, FITNESS FOR A PARTICULAR PURPOSE, INFRINGEMENT OR TITLE, OR ANY WARRANTY OF
THE QUALITY FUNCTIONALITY, OPERABILITY, USE OR PERFORMANCE OF THE SOFTWARE.
7. Limitation of Liability
UNDER NO CIRCUMSTANCES AND UNDER NO LEGAL THEORY (WHETHER TORT, CONTRACT OR OTHERWISE)
SHALL LAYTON TECHNOLOGY BE LIABLE FOR ANY SPECIAL, INCIDENTAL OR CONSEQUENTIAL DAMAGES
WHATSOEVER (INCLUDING WITHOUT LIMITATION DAMAGES FOR BUSINESS INTERRUPTION, COMPUTER
FAILURE OR MALFUNCTION, LOSS OF BUSINESS PROFITS GOODWILL OR INFORMATION, OR ANY OTHER
PECUNIARY LOSS OF DAMAGE) ARISING OUT OF OR RELATING TO THE SOFTWARE (INCLUDING WITHOUT
LIMITATION USE OR INABILITY TO USE THE SOFTWARE), EVEN IF LAYTON TECHNOLOGY HAS BEEN ADVISED
OF THE POSSIBILITY OF SUCH DAMAGES, UNDER NO CIRCUMSTANCES SHALL LAYTON TECHNOLOGY`S
CUMULATIVE LIABILITY TO YOU EXCEED THE LICENSE FEE PAID BY YOU FOR THE SOFTWARE.
8. Qualification
Some jurisdictions do not allow the limited warranty and remedy provisions described in section 6, or the
limitation provisions described in section 7, so those limitations may not apply to you. This Agreement gives
you specific legal rights and you may also have different or additional legal rights, depending on the
applicable law in your jurisdiction.
9. Government
The software is provided to the U.S. government only with restricted and limited rights. Use, duplications, or
disclosure by the Government is subject to restrictions set forth in FAR sections 52-227-14 and 52-227-19 or
DFARS Section 52.227-7013 (c)(l)(ii), as applicable. Manufacturer is Layton Technology,
www.laytontechnology.com.
10. Governing Law
This agreement and any dispute or controversy arising out of or relating thereto shall in all respects be
governed by and construed in the accordance with the laws of the State of Florida, excluding its conflicts of
laws principles.


