72
Installation manual VF4 VF5 VF4.140E VF4.170E VF4.190E VF5.220E VF5.250E

Installation manualVF4 VF5 VF4.140E
VF4.170EVF4.190EVF5.220EVF5.250E

vetus®Installation manual VF4 VF5 400202.01
Copyr ight © 2012 Vetus n.v. Schiedam Hol land

400202.01 1vetus®Installation manual VF4 VF5
1 Preface . . . . . . . . . . . . . . . . . . . . . . . . . . . . . . . . . . . . . . . . . . . . . . . . . . . . . . . . . . . . . . . . . . . . . 3
1.1 Engine ID Plates . . . . . . . . . . . . . . . . . . . . . . . . . . . . . . . . . . . . . . . . . . . . . . . . . . . . . . . . . . 3
1.2 Engine storage, before use . . . . . . . . . . . . . . . . . . . . . . . . . . . . . . . . . . . . . . . . . . . . . . . . . . 4
1.3 First engine start . . . . . . . . . . . . . . . . . . . . . . . . . . . . . . . . . . . . . . . . . . . . . . . . . . . . . . . . . . 4
1.4 Long engine storage – Inactivity . . . . . . . . . . . . . . . . . . . . . . . . . . . . . . . . . . . . . . . . . . . . . 6
2 Technical data . . . . . . . . . . . . . . . . . . . . . . . . . . . . . . . . . . . . . . . . . . . . . . . . . . . . . . . . . . . . . . 8
2.1 Engine specifications . . . . . . . . . . . . . . . . . . . . . . . . . . . . . . . . . . . . . . . . . . . . . . . . . . . . . . 8
2.2 Engine cylinder numbering . . . . . . . . . . . . . . . . . . . . . . . . . . . . . . . . . . . . . . . . . . . . . . . . . 10
2.3 Engine coat paint RAL . . . . . . . . . . . . . . . . . . . . . . . . . . . . . . . . . . . . . . . . . . . . . . . . . . . . . 10
2.4 Tightening torque . . . . . . . . . . . . . . . . . . . . . . . . . . . . . . . . . . . . . . . . . . . . . . . . . . . . . . . . 10
2.5 Operation / duty cycle . . . . . . . . . . . . . . . . . . . . . . . . . . . . . . . . . . . . . . . . . . . . . . . . . . . . . 11
2.6 Engine bed . . . . . . . . . . . . . . . . . . . . . . . . . . . . . . . . . . . . . . . . . . . . . . . . . . . . . . . . . . . . . 11
2.7 Overall dimensions . . . . . . . . . . . . . . . . . . . . . . . . . . . . . . . . . . . . . . . . . . . . . . . . . . . . . . . 12
2.8 Raw water circuit . . . . . . . . . . . . . . . . . . . . . . . . . . . . . . . . . . . . . . . . . . . . . . . . . . . . . . . . 16
3 Safety Information . . . . . . . . . . . . . . . . . . . . . . . . . . . . . . . . . . . . . . . . . . . . . . . . . . . . . . . . . 17
3.1 Safety rules . . . . . . . . . . . . . . . . . . . . . . . . . . . . . . . . . . . . . . . . . . . . . . . . . . . . . . . . . . . . . 17
3.2 Engine lifting . . . . . . . . . . . . . . . . . . . . . . . . . . . . . . . . . . . . . . . . . . . . . . . . . . . . . . . . . . . . 19
4 Engine’s requirements . . . . . . . . . . . . . . . . . . . . . . . . . . . . . . . . . . . . . . . . . . . . . . . . . . . . . 21
4.1 Engine Compartment . . . . . . . . . . . . . . . . . . . . . . . . . . . . . . . . . . . . . . . . . . . . . . . . . . . . . 21
4.1.1 Engine Compartment Ventilation . . . . . . . . . . . . . . . . . . . . . . . . . . . . . . . . . . . . . . 214.1.2 Intake air requirement . . . . . . . . . . . . . . . . . . . . . . . . . . . . . . . . . . . . . . . . . . . . . . 224.1.3 Compartment temperature indications. . . . . . . . . . . . . . . . . . . . . . . . . . . . . . . . . . 22
4.2 Fuel connection . . . . . . . . . . . . . . . . . . . . . . . . . . . . . . . . . . . . . . . . . . . . . . . . . . . . . . . . . 23
4.2.1 Fuel Delivery System . . . . . . . . . . . . . . . . . . . . . . . . . . . . . . . . . . . . . . . . . . . . . . . 234.2.2 Fuel connections . . . . . . . . . . . . . . . . . . . . . . . . . . . . . . . . . . . . . . . . . . . . . . . . . . . 244.2.3 Shut off valve. . . . . . . . . . . . . . . . . . . . . . . . . . . . . . . . . . . . . . . . . . . . . . . . . . . . . . 244.2.4 Diesel fuel Pre-filter and fuel additives. . . . . . . . . . . . . . . . . . . . . . . . . . . . . . . . . . 24
4.3 Sea water circuit . . . . . . . . . . . . . . . . . . . . . . . . . . . . . . . . . . . . . . . . . . . . . . . . . . . . . . . . . 25
4.3.1 Sea cock . . . . . . . . . . . . . . . . . . . . . . . . . . . . . . . . . . . . . . . . . . . . . . . . . . . . . . . . 254.3.2 Seawater pickup hose . . . . . . . . . . . . . . . . . . . . . . . . . . . . . . . . . . . . . . . . . . . . . . 254.3.3 Seawater strainer . . . . . . . . . . . . . . . . . . . . . . . . . . . . . . . . . . . . . . . . . . . . . . . . . . 254.3.4 Stern drives sea water pick up circuit. . . . . . . . . . . . . . . . . . . . . . . . . . . . . . . . . . . 264.3.5 Fittings . . . . . . . . . . . . . . . . . . . . . . . . . . . . . . . . . . . . . . . . . . . . . . . . . . . . . . . . . . 26
4.4 Exhaust system . . . . . . . . . . . . . . . . . . . . . . . . . . . . . . . . . . . . . . . . . . . . . . . . . . . . . . . . . . 26
4.4.1 Wet exhaust systems installation. . . . . . . . . . . . . . . . . . . . . . . . . . . . . . . . . . . . . . . 264.4.2 Sea water intrusion through the intake sea-cock . . . . . . . . . . . . . . . . . . . . . . . . . . 284.4.3 Cranking the starter: draining the muffler . . . . . . . . . . . . . . . . . . . . . . . . . . . . . . . . 28
Contents

2 400202.01 vetus®Installation manual VF4 VF5
4.5 Exhaust system for stern drive version . . . . . . . . . . . . . . . . . . . . . . . . . . . . . . . . . . . . . . . 29
4.6 Propeller selection . . . . . . . . . . . . . . . . . . . . . . . . . . . . . . . . . . . . . . . . . . . . . . . . . . . . . . . . 30
4.7 Gearbox version: propeller shaft alignment . . . . . . . . . . . . . . . . . . . . . . . . . . . . . . . . . . . . 31
4.8 Engine bed mounting . . . . . . . . . . . . . . . . . . . . . . . . . . . . . . . . . . . . . . . . . . . . . . . . . . . . . 32
5 Electric/electronic system . . . . . . . . . . . . . . . . . . . . . . . . . . . . . . . . . . . . . . . . . . . . . . . . . . 33
5.1 Electrical system . . . . . . . . . . . . . . . . . . . . . . . . . . . . . . . . . . . . . . . . . . . . . . . . . . . . . . . . . 33
5.1.1 Battery connection . . . . . . . . . . . . . . . . . . . . . . . . . . . . . . . . . . . . . . . . . . . . . . . . . 335.1.2 Diagrams . . . . . . . . . . . . . . . . . . . . . . . . . . . . . . . . . . . . . . . . . . . . . . . . . . . . . . . . . 335.1.3 Connecting the battery cable . . . . . . . . . . . . . . . . . . . . . . . . . . . . . . . . . . . . . . . . . 385.1.4 Battery cable size . . . . . . . . . . . . . . . . . . . . . . . . . . . . . . . . . . . . . . . . . . . . . . . . . . 395.1.5 Battery specification . . . . . . . . . . . . . . . . . . . . . . . . . . . . . . . . . . . . . . . . . . . . . . . . 405.1.6 Fuses and relays indications . . . . . . . . . . . . . . . . . . . . . . . . . . . . . . . . . . . . . . . . . 41
5.2 Elements that constitute the electronic control of the Vetus VF series engines . . . . . . . . 42
5.2.1 Engine installation wirings . . . . . . . . . . . . . . . . . . . . . . . . . . . . . . . . . . . . . . . . . . . 435.2.2 Engine harness . . . . . . . . . . . . . . . . . . . . . . . . . . . . . . . . . . . . . . . . . . . . . . . . . . . . 44
5.3 Electronic command system: . . . . . . . . . . . . . . . . . . . . . . . . . . . . . . . . . . . . . . . . . . . . . . . 46
5.3.1 Maximum specifications of the system . . . . . . . . . . . . . . . . . . . . . . . . . . . . . . . . . . 465.3.2 Command station – Pilot instruction . . . . . . . . . . . . . . . . . . . . . . . . . . . . . . . . . . . . 475.3.3 Friction adjustment . . . . . . . . . . . . . . . . . . . . . . . . . . . . . . . . . . . . . . . . . . . . . . . . . 475.3.4 Control keypad . . . . . . . . . . . . . . . . . . . . . . . . . . . . . . . . . . . . . . . . . . . . . . . . . . . . 475.3.5 Taking over control . . . . . . . . . . . . . . . . . . . . . . . . . . . . . . . . . . . . . . . . . . . . . . . . . 495.3.6 Warming up the engine (Warm-up) . . . . . . . . . . . . . . . . . . . . . . . . . . . . . . . . . . . . 495.3.7 Synchro mode operation . . . . . . . . . . . . . . . . . . . . . . . . . . . . . . . . . . . . . . . . . . . . 495.3.8 Mechanical installation . . . . . . . . . . . . . . . . . . . . . . . . . . . . . . . . . . . . . . . . . . . . . . 505.3.9 Connection of push-pull cable . . . . . . . . . . . . . . . . . . . . . . . . . . . . . . . . . . . . . . . . 515.3.10 Installation of power supply . . . . . . . . . . . . . . . . . . . . . . . . . . . . . . . . . . . . . . . . . . 545.3.11 Power supply . . . . . . . . . . . . . . . . . . . . . . . . . . . . . . . . . . . . . . . . . . . . . . . . . . . . . 545.3.12 Outgoing cables from the control box . . . . . . . . . . . . . . . . . . . . . . . . . . . . . . . . . . 555.3.13 Trim cable . . . . . . . . . . . . . . . . . . . . . . . . . . . . . . . . . . . . . . . . . . . . . . . . . . . . . . . . 565.3.14 Programming keypad . . . . . . . . . . . . . . . . . . . . . . . . . . . . . . . . . . . . . . . . . . . . . . . 585.3.15 Setting the parameters . . . . . . . . . . . . . . . . . . . . . . . . . . . . . . . . . . . . . . . . . . . . . 605.3.16 Mechanical setting of the stroke of the gearbox . . . . . . . . . . . . . . . . . . . . . . . . . . 615.3.17 Trim command . . . . . . . . . . . . . . . . . . . . . . . . . . . . . . . . . . . . . . . . . . . . . . . . . . . . 625.3.18 Emergency lever . . . . . . . . . . . . . . . . . . . . . . . . . . . . . . . . . . . . . . . . . . . . . . . . . . . 625.3.19 Unexpected switching off of the engines . . . . . . . . . . . . . . . . . . . . . . . . . . . . . . . 62
6 Optional . . . . . . . . . . . . . . . . . . . . . . . . . . . . . . . . . . . . . . . . . . . . . . . . . . . . . . . . . . . . . . . . . . 63
6.1 Fly bridge station installation . . . . . . . . . . . . . . . . . . . . . . . . . . . . . . . . . . . . . . . . . . . . . . . 63
6.2 Water Heater Installation . . . . . . . . . . . . . . . . . . . . . . . . . . . . . . . . . . . . . . . . . . . . . . . . . . 64
7 Checks . . . . . . . . . . . . . . . . . . . . . . . . . . . . . . . . . . . . . . . . . . . . . . . . . . . . . . . . . . . . . . . . . . . 67
7.1 Diagnosis . . . . . . . . . . . . . . . . . . . . . . . . . . . . . . . . . . . . . . . . . . . . . . . . . . . . . . . . . . . . . . . 67
7.2 Check the engine oil level . . . . . . . . . . . . . . . . . . . . . . . . . . . . . . . . . . . . . . . . . . . . . . . . . . 67

400202.01 3vetus®Installation manual VF4 VF5
1 Preface
The reliability of the total propulsion unit is dependent on the quality of the installation.Nearly all the problems are caused by faults or inaccuracies which occur during the installation. It is
most important therefore to follow during installation the recommendations mentioned in this manual.
1.1 Engine ID Plates
The ID labels are placed on the engine as shown in the pictures below:
The engine number is marked on the engine where indicated in the picture below:

4 400202.01 vetus®Installation manual VF4 VF5
1.2 Engine storage, before use
If the engine is stored for a prolonged period, check the possible conditions of conservation in relation to the storage environment and the type of packaging.The engine is supplied with a protection treatment which is valid for 6 months from delivery date.
1 Check for the coolant (coolant circuit). The engine supplied with a mixture to withstand storage temperature of -15 °C (5 °F).
2 Attention: The raw water circuit could contain engine test bed water. Drain completely the raw water circuit if the storage temperature is lower than 0°C (32°F).
3 Grease the turbocharger operating mechanism after this period.
4 Verify the packages integrity.
5 Humidity and salt corrosion could damages the engines during their storage.
1.3 First engine start
1 Read the owner’s manual.
2 Verify the fuel feed line for possible leaks. Take care to avoid restrictions in the fuel line pipes.
3 Verify and if required grease all the couplings, the turbocharger operating mechanism.
4 Check and verify the electrical connections. Important: Wrong connection of positive and negative could provoke short circuit and damage the engine.
5 Check the battery condition and state of charge.
6 Check the raw water circuit, the connection and open the sea cock.
7 Check the belt and belt tensioner.
8 Check coolant level and oil levels of both engine and gearbox, verify if fuel is available in the tank. Fuel tank must be clean!
9 Turn ON the red button on the ECU box and verify that the fuse LED’s light-up.
10 Verify the position of the control lever and make sure it is in Neutral position.
11 Verify the gearbox – stern drive oil level.

400202.01 5vetus®Installation manual VF4 VF5
12 Make engine diagnosis. Important: Compile and send the installation form data request.
13 Verify the engine – propulsion alignment, grease the mechanical connections.
14 Start the engine, lets warm up the engine for few minutes at minimum RPM idle. 15 Verify for any leaks, verify the sea water pump, and verify the flush of water on exhaust system, verify that all
warning lights on the instrument panel are OFF and no alarm buzzer sounds and verify if oil pressure – water temperature and charge current are OK *.
Important: If you hear a strange noise, or vibration of the engine is extreme or black smoke is coming out of the exhaust stop the engine immediately and ask for assistance.
When the temperature of the engine stabilizes at a temperature higher than normal it might be neces-sary to bleed the coolant circuit.
Bleeding the coolant circuit:
• Opentheexpansiontankcaptolettheairescape.
• IncreasetheRPMto2000anddecreasefewtimeswithoutengagingthegearbox.
• Addwatertothecoolantcircuitifnecessary.
• Closethecap.
• Verifytheenginecoolanttemperatureagain.
16 Take the command on the levers.
17 Never exceed the first time 3/4 of maximum rpm.
18 Verify all person are on board and engage the gear to test the gearbox – stern drive and carry bout the sea trial.

6 400202.01 vetus®Installation manual VF4 VF5
1.4 Long engine storage – Inactivity
If the engine remains inactive for a period of time exceeding 6 months, you need to protect it from oxidation and breakdowns in accordance with the following instructions:
1 Let the engine run for 15 minutes at 800 rpm; stop the engine and drain the oil.
2 Put oil (according to the specifications MIL-60B-type 2) into the oil sump until the oil sump reaches at least ‘Min’ on the oil dipstick.
3 After emptying the fuel filters, disconnect the pipes of the feeding of the injection system at the top of the feeding pump, and connect it with the proper tank containing oil CFB (ISO 4113).
4 Let the engine run for 15 min. at 800 rpm; then, by using an oil gun, slowly atomize (nebulize) for about one minute 60 grams of oil MIL-60B-type-2 into the intake manifold.
5 Disconnect the pipes of the feeding of the injection system from the tank containing the oil CFB and re-connect it to the fuel tank.
6 Seal with tape, on both the engine and exhaust pipe, the access lights, aeration lights and breather pipe lights.
7 Put a very visible paper on the engine where it is clearly stated that the engine is ‘WITHOUT OIL’.
8 Disconnect the batteries and put them in a dry place, always making sure that they are charged.
9 Drain the cooling water in case it does not have anti-freezing liquid or anti-corrosion liquid
10 If the engine is connected with the propulsion system verify for the oil level.
11 Clean the engine from salt and eventual rust. Paint rusted parts. Spray the engine with CRC 6-66 marine lubricant spray to avoid corrosion.
After a period of inactivity, it is necessary to carry out a some maintenance work before starting the engine again to ensure its efficiency conditions.
1 Check the battery charge level conditions. Assure that the battery voltage is over 12.5 V.
2 Make sure the electric contacts are intact. Assure the correct electrical connections.
3 Carry out the engine diagnosis.
4 Check the oil level-conditions, and if necessary, top- up or replace.
5 Verify and if necessary replace the oil filter.
6 Check the coolant level an mixture, and if necessary top – up.
7 Replace / Clean the fuel filter.
8 Clean the air filter.
9 Verify the belts status and tighteners.
10 Verify the integrity of the sea water pump impeller.

400202.01 7vetus®Installation manual VF4 VF5
11 Check the integrity of electrolytic zincs.
12 Verify and if is necessary grease: starter pinion, turbocharger leverages mechanical propulsion couplings.
13 Start the engine and run at minimum speed for few minutes.
14 If no anomalies bring the engine to its operating temperature, 70 - 80 °C (158 - 176 °F). Verify that there is no air in the coolant circuit – bleed the air from coolant circuit if necessary.
15 Turn off the engine and check again the engine oil level and coolant level.
16 Verify for tightening.

8 400202.01 vetus®Installation manual VF4 VF5
2 Technical data
2.1 Engine specifications
Model : VF4.140E VF4.170E VF4.190E VF5.220E VF5.250E
General Make : Vetus C.M.D.Number of cylinders : 4 4 4 5 5Type : 4-stroke diesel, in-line, DOHCInjection : Direct injection, common railAspiration : Turbo-charged with variable geometryBore : 82 mm 82 mm 82 mm 82 mm 82 mmStroke : 90,4 mm 90,4 mm 90,4 mm 90,4 mm 90,4 mm
Total displacement :1910 cm3
(116 cu.inch)1910 cm3
(116 cu.inch)1910 cm3
(116 cu.inch)2387 cm3
(146 cu.inch)2387 cm3
(146 cu.inch)Idling speed : 800 rpm 800 rpm 800 rpm 750 rpm 750 rpmMax. no. of revolutions at no load
: 4700 rpm 4700 rpm 4700 rpm 4700 rpm 4700 rpm
Max. no. of revolutions at max. load
: 4000 rpm 4000 rpm 4000 rpm 4200 rpm 4200 rpm
Direction of rotation counter clockwise, viewed from the flywheel sideWeight (with standard gearbox)
:320 kg
(705 lbs)320 kg
(705 lbs)320 kg
(705 lbs)333 kg
(734 lbs)333 kg
(734 lbs)
Engine installationMax. installation angle : 10 degrees backwardsMax. athwartships angle : 20 degrees continuously, 30 degrees intermittend
Maximum Output
at the flywheel (ISO 3046-1) :103 kW (140 hp)
125 kW (170 hp)
140 kW (190 hp)
162 kW (220 hp)
184 kW (250 hp)
at the prop shaft(ISO 3046-1)
:99.9 kW
(135.8 hp)121.2 kW(164.9 hp)
135.8 kW (184.3 hp)
157.1 kW(213.4 hp)
178.5 kW (242.5hp)
at no. of revolutions of : 4000 rpm 4000 rpm 4000 rpm 4000 rpm 4200 rpm
Torque, :310 Nm
(31.6 kgm, 2441 ft.lb)
345 Nm (35.1 kgm, 254 ft.lb)
370 Nm (37.7 kgm, 273 ft.lb)
416 Nm (42.4 kgm, 307 ft.lb)
450 Nm (45.9 kgm, 332 ft.lb)
at no. of revolutions : 2400 rpm 2200 rpm 2400 rpm 2500 rpm 2600 rpm
Fuel consumption :215 g/kW.h(158 g/hp.h)(5.6 oz/hp.h)
237 g/kW.h(174 g/hp.h)(6.1 oz/hp.h)
231 g/kW.h (170 g/hp.h) (6.0 oz/hp.h)
236 g/kW.h(173 g/hp.h)(6.1 oz/hp.h)
260 g/kW.h(191 g/hp.h)(6.7 oz/hp.h)
at no. of revolutions : 4000 rpm 4000 rpm 4000 rpm 4000 rpm 4000 rpm
Fuel System (Self-bleeding)Fuel lift pump : Suction height max. 1,5 m (5 ft)Fuel supply connection : 8 mm (5/16") I.D.Fuel return connection : 8 mm (5/16") I.D.

400202.01 9vetus®Installation manual VF4 VF5
Model : VF4.140E VF4.170E VF4.190E VF5.220E VF5.250E
Oil lubrication systemOil capacity, max. without oil filter : 4 l (7 UK pt, 8.5 US pt) 4.5 l (7.9 UK pt, 9.5 US pt) with oil filter : 4.5 l (7.9 UK pt, 9.5 US pt) 5 l (8.8 UK pt, 10.6 US pt)
Cooling system
Capacity,7.6 litres
(1 gal - 5.4 pt UK) (2 US gal)
8.5 litres(1 gal - 7 pt UK) (2 gal - 2 pt
US)Thermostat : opening at 65°C ± 1.5°C (149°F ±3°F), fully opened at 76°C (169°F)Coolant pump, Flow at max. engine rpm : 90 l/min (19.8 UK gal/min, 23.8 US gal/min)Raw water pump, Flow at max. engine rpm : 100 l/min (22 UK gal/min, 26.4 US gal/min) Total head at max. flow : 1.5 bar (21 psi)Inlet connection for hose : 32 mm (1 1/4") I.D.Heater supply connection : 32 mm (1 1/4") I.D.Heater return connection : 32 mm (1 1/4") I.D.
Exhaust system
Exhaust diameter : for gear box 90 mmfor stern drive 76 mm (3")
Exhaust back pressure : at specified output max. 300 mbar
Electrical System
Voltage : 12 Volt
Alternator : 14 Volt, 105 A 14 Volt, 140 A
Startmotor : 14 Volt, 2.3 kW
Capacity, starter battery : min. 70 Ah, max. 200 Ah
Protection : Fuse 'ATO' 10 Amp
Gearbox Gear ratio
Technodrive: type TM345 : 1.54 : 1 — —
type TM345A : 1.54 : 1 — —
type TM485A : 2.09 / 2.40 / 2.51 : 1 2.09 / 2.40 / 2.51 : 1
ZF Hurth: type ZF25 : 1.97 : 1 — — — —
type ZF25A : 2.03 : 1 — — — —
type ZF45 : 2.20 / 2.51 : 1 2.20 / 2.51 / 3.03 : 1
type ZF45A : 1.26 / 1.51 / 2.03 / 2.43 : 1 1.26 / 1.51 / 2.03 / 2.43 : 1
type ZF63 IV : 2.00 / 2.48 : 1 2.00 / 2.48 : 1

10 400202.01 vetus®Installation manual VF4 VF5
2.2 Engine cylinder numbering
2.3 Engine coat paint RAL
SIKKENS LV AUTCOAT 450 RAL 1007
2.4 Tightening torque
Tightening torque for vital connections, which should be tightened with a torque wrench are indicated in the pictures.The torque readings refer to lightly oiled or dry thread, screw heads and mating surfaces. For connections where special torque denotations are not indicated, the general tightening torque is applicable according to the table below. The torque readings are guide values, and connections do not need to be tightened with a torque wrench.The screws and nuts divided into different class. It is therefore important when a screw connection is dismantled to return the screw to their original positions. The table refer to 8.8 class screws.
Size Tightening torque (Nm )
M5 6
M6 10
M8 25
M10 50
M12 80
M14 100
1234 12345

400202.01 11vetus®Installation manual VF4 VF5
2.5 Operation / duty cycle
With respect to operation and duty cycle VF4 and VF5 diesel engines are rated for PLEASURE CRAFT DUTy ONLy!
Maximum RPM:
Model Max. RPM (under load)
VF4 series 4000
VF5 series 4200
Wide open throttle operation is limited to short periods of time.
Important: Damage caused by improper application or failure to operate within the operational capability or duty cycle, will not be covered by the Vetus Warranty.
2.6 Engine bed
The engine bed should have sufficient stiffness and strength: it must be bonded or connected over its total length to the bottom of the boat and in addition must have sufficient transverse reinforcement either by its own method of construction or alternatively by the use of straightening ribs.
An engine which is easily accessible will be inexpensive to work on is terms of both time and money, for example the water pump situated on the rear side required a sufficient distance from bulkheads.It is particularly important that both sides of the engine are easily accessible.
The engine inclination should never exceed 15° backwards.

12 400202.01 vetus®Installation manual VF4 VF5
2.7 Overall dimensions
700 (27 35/64”)
350 (13 49/64”) 350 (13 49/64”)
315 (12 3/8”) 305 (12”)
min
. 82
(3 1
/ 4”)
max
. 110
(4
5 /16
”)
VF4.140E
TM345A
120 (4 3/4”) 515 (20 1/4”)
700 (27 9/16”)
960 (37 13/16”)
260 (10 1/4”)
190
(7 1
/ 2”)
505
(19
7 /8”
)
695
(27
3 /8”
)
111
(4 3
/ 8”)
192
(7 9
/ 16”
)
224 (8 13/16”)
8˚
VF4.140E
VF4.170EVF4.190E
ZF45
700 (27 35/64”)
350 (13 49/64”) 350 (13 49/64”)
315 (12 3/8”) 305 (12”)
min
. 82
(3 1
/ 4”)
max
. 110
(4
5 /16
”)
120 (4 3/4”) 515 (20 1/4”)
700 (27 9/16”)
1010 (39 3/4”)
310 (12 3/16”)
190
(7 1
/ 2”)
505
(19
7 /8”
)
695
(27
3 /8”
)
150
(5 7
/ 8”)
290
(11
7 /16
”)
260 (10 1/4”)
230 (9 1/16”)
VF4.170E, VF4.190E

400202.01 13vetus®Installation manual VF4 VF5
700 (27 35/64”)
350 (13 49/64”) 350 (13 49/64”)
315 (12 3/8”) 305 (12”)
min
. 82
(3 1
/ 4”)
max
. 110
(4
5 /16
”)
VF4.140E
TM345A
120 (4 3/4”) 515 (20 1/4”)
700 (27 9/16”)
960 (37 13/16”)
260 (10 1/4”)
190
(7 1
/ 2”)
505
(19
7 /8”
)
695
(27
3 /8”
)
111
(4 3
/ 8”)
192
(7 9
/ 16”
)
224 (8 13/16”)
81̊ : 10
VF4.170EVF4.190E
ZF45
700 (27 35/64”)
350 (13 49/64”) 350 (13 49/64”)
315 (12 3/8”) 305 (12”)
min
. 82
(3 1
/ 4”)
max
. 110
(4
5 /16
”)
120 (4 3/4”) 515 (20 1/4”)
700 (27 9/16”)
1010 (39 3/4”)
310 (12 3/16”)
190
(7 1
/ 2”)
505
(19
7 /8”
)
695
(27
3 /8”
)
150
(5 7
/ 8”)
290
(11
7 /16
”)
260 (10 1/4”)
230 (9 1/16”)
1 : 10

14 400202.01 vetus®Installation manual VF4 VF5
710 (27 61/64”)
350 (13 49/64”) 360 (14 11/64”)
305 (12”) 305 (12”)
VF5.220E
ZF45
VF5.250E
120 (4 3/4”) 600 (23 5/8”)
720 (28 3/8”)
1030 (40 9/16”)
230 (9 3/32”)
150
(5 1
5 /16
”)
290
(11
7 /16
”)
195
(7 4
3 /64
”)50
5 (1
9 7 /
8”)
705
(27
3 /4”
)
min
. 82
(3 1
/ 4”)
max
. 110
(4
5 /16
”)
VF5.220E, VF5.250E
710 (27 61/64”)
350 (13 49/64”) 360 (14 11/64”)
260 (10 1/4”)
559 (22”)
820 (32 9/32”)
1695 (66 47/64”)
776
(30
35/ 6
4”)
VF5.220EVF5.250E
BRAVO ONE
195
(7 4
3 /64
”)51
0 (2
0 5 /
64”)
705
(27
3 /4”
)
265 (10 7/16”)
94(3 11/16”)
min
. 82
(3 1
/ 4”)
max
. 110
(4
5 /16
”)
VF5.220EB1, VF5.250EB1

400202.01 15vetus®Installation manual VF4 VF5
710 (27 61/64”)
350 (13 49/64”) 360 (14 11/64”)
305 (12”) 305 (12”)
VF5.220E
ZF45
VF5.250E
120 (4 3/4”) 600 (23 5/8”)
720 (28 3/8”)
1030 (40 9/16”)
230 (9 3/32”)
150
(5 1
5 /16
”)
290
(11
7 /16
”)
195
(7 4
3 /64
”)50
5 (1
9 7 /
8”)
705
(27
3 /4”
)
min
. 82
(3 1
/ 4”)
max
. 110
(4
5 /16
”)
1 : 10
710 (27 61/64”)
350 (13 49/64”) 360 (14 11/64”)
260 (10 1/4”)
559 (22”)
820 (32 9/32”)
1695 (66 47/64”)
776
(30
35/ 6
4”)
VF5.220EVF5.250E
BRAVO ONE
195
(7 4
3 /64
”)51
0 (2
0 5 /
64”)
705
(27
3 /4”
)
265 (10 7/16”)
94(3 11/16”)
min
. 82
(3 1
/ 4”)
max
. 110
(4
5 /16
”)
1 : 10

16 400202.01 vetus®Installation manual VF4 VF5
2.8 Raw water circuit
The engine heat exchange circuit is represented in the block diagram below:
The sequence is as follows:
1 the raw water cools the power steering oil or the gearbox oil and the fuel feed circuit;
2 then the air compressed air from the turbo is cooled (After cooler);
3 then the internal coolant circuit is cooled;
4 then the exhaust elbow is cooled
5 the the raw water is injected into the exhaust gasses and mixed with the exhaust gasses it goes overboard.
Sea water pump
GearboxOil Cooler
Exhaust Gas
Sea water IN
FuelCooler
Engine CoolantHeat Exchanger
Charge AirHeat Exchanger
ExhaustElbow
To ExhaustTransom Fitting

400202.01 17vetus®Installation manual VF4 VF5
3 Safety Information
The operation manual contains technical data and maintenance instructions for the designated Vetus engines.Read the instruction and information before starting service works.
WARNING - Hazards or unsafe practices which could result in severe personal injury or serious product damages.
CAUTION - Hazards or unsafe practices which could result in minor personal injury or product damages-malfunctions.
3.1 Safety rules
• Themanufacturercannotbeheldresponsibleforanydamageresultingfrommisuseoftheengine,fromthefailure to follow the indications contained in this manual and for every tampering with or change made without the manufacturer’ s authorization.
• Referonlytoatechnicianstaff,withprecisetechnicalskills,specificabilitiesandexperiences.The lack of these requirements could provoke damages to people’s safety.
• Usetheengineonlyforthetaskauthorizedbythemanufacturer,donotmanipulateanythingtoobtaindiffer-ent performances.
• Whenliftandduringthetransportofunpackedengineusemeansofappropriateloadcapacity.
• Whenliftpackedenginepayattentiononloadindicationprintedonbox!
• During the installation the installer had to follow the designer’s indications. Do notmake changes to theengine components for any reason.
• Ifappropriate,beforeusingtheengineforthefirsttimesimulateafewtrialmanoeuvrestoidentifythecontrolsand their main functions, especially those related to start -stop operations and emergency operations.
• Donotkeepusingtheengineifanomaliesaredetected.
• Incaseofanomaly,stopimmediatelytheengineorreducethespeedasmuchaspossible.Startagainonlywhen normal condition are restored.
• Replaceonlyoriginalspareparts.Useoilsandgreasesrecommendedbymanufacturer.
• Stoptheengineandswitchof thepowerwith themainswitch(switches)beforeworkingontheelectricalsystem.
• Neverstarttheenginewithoutairfilter,turbocompressorrotorcouldprovokedamages.Dirtycoulddamagethe engine.
• Don’t smoke near the battery pack ! The battery release flammable gases. Wrong battery connection could provoke sparks and explosion.
• Neverconfusetheplusandminusterminalwhenfittingsthebatteries.

18 400202.01 vetus®Installation manual VF4 VF5
• Usecorrectprotection(clothesetc.)duringmaintenanceoperations!
• Switchingthegearboxshouldbeconductedonlywhentheengineisatidlespeed.
• Alwaysclosetherawwaterinletvalvewhenyoudismountthecoolantsystem!
• Neverusestartersprayorsimilar.Topreventtheriskofexplosionintheairinletpipe.
• Avoid to opening the coolant filler capwhen the engine is hot.Steamor hot coolant can sprayout, andbuilt up pressure will be lost. Open the filler cap slowly and release the overpressure if the filler cap must be opened.
• Hotoilcancauseburntinjuries.Avoidskincontactwithhotoil.Makesurethattheoilsystemisnotpressu-rized before working on it. Never start the engine with the oil filter cap removed!
• During maintenance operation make sure that the engine room is well ventilated.
• Donotthrowawayanypollutingmaterial.Followthelocalrulesoflegislation.
• Ifyouwashtheenginewithhighpressurewash,observethefollowing:- never point the jet of water at seals, rubber hoses or electrical components. - never use high pressure function when washing the engine.
• Usethecorrectfuel,seethefuelindications.
• Keep the equipment asmuch efficient as possible and carry out the scheduledmaintenance operationsestablished with the manufacturer.
Important
This installation manual has been published by VETUS to aid the boat manufacturer involved in the application and installation of the products described herein.
It is assumed that these personnel are familiar with marine product application and the installation procedures of these products, or like or similar products manufactured and marketed by VETUS. furthermore, it is assumed that they are familiar with, if not trained in, the recommended installation procedures of these products.It is the responsibility of the purchaser (whether boat builder or dealer) of a VETUS propulsion engine to select the appropriate package (including sufficient horsepower, appropriate drive unit, correct gear ratio and appro-priate propeller) for a given boat. Making such a selection requires knowledge of the boat, including the boat weight, length, hull design, intended use, intended duty cycle, and desired speed, all of which is in the exclusive possession of the purchaser.
All information, illustrations, and specifications contained in this manual are based on the latest product informa-tion available at time of publication. Vetus reserves the right to make changes at any time without obligation.

400202.01 19vetus®Installation manual VF4 VF5
3.2 Engine lifting
WARNING - The lifting hooks are engineered only to lift the engine without any extra weights!
When you install the engine on your boat after opening the engine packages always use the spacer rod as is show in the figure to lift the engine.Assure that the spacer rod is in ‘good condition‘ and strong enough to withstand the weight.For complete indications see the ‘danger‘ label on the engine cover carter.
WARNING - The weight of the gearbox will shift the engine centre of gravity astern; take care when lifting the engine.

20 400202.01 vetus®Installation manual VF4 VF5

400202.01 21vetus®Installation manual VF4 VF5
4 Engine’s requirements
4.1 Engine Compartment
IMPORTANT: Boating standards and Coast Guard regulations must be adhered to when construct-ing the engine compartment.
Care must be exercised in the design and construction of the engine compartment. Seams must be located so that any rain water that may leak through the seams is directed away from the air intake system. Water that runs onto the air intake may enter the engine and cause serious damage to internal engine and/or turbocharger parts.
IMPORTANT: Vetus will not honour any warranty claim for engine damage as a result of water entry.
WARNING - RISK OF FIRE! Turbocharger became hot during the engine use.
Take care during installation. The turbocharger should be kept away not less than 30 cm (12 inch) from bulk-heads or VTR structure. Use thermal protection.
4.1.1 Engine Compartment VentilationThis section does not cover the design of the ventilation system as it pertains to ventilation of fumes from the engine compartment. The requirements for ventilation of fumes varies considerably from one boat design to the next, as well as from country to country, and therefore, the boat manufacturer is responsible for ensuring their application is in compliance with the appropriate industry regulations and standards.According to boating standards and Coast Guard regulations the engine compartment ventilation system has multiple tasks. Included the following:
• Tosupplytheenginewithcombustionair.
• Tomaintainalowtemperatureintheenginecompartment.
Fresh air should enter the engine compartment as low as possible and the heated air should be discharged from the highest point.If a separate air shaft (or similar) is used to provide engine compartment ventilation, or additional ventilation, care must be taken to prevent seawater and spray from entering it.
WARNING
Ventilating air is required to clear the bilges, as well as the compartment in which the engine is located, of poten-tially toxic and flammable vapours.

22 400202.01 vetus®Installation manual VF4 VF5
4.1.2 Intake air requirement Engine compartments with natural draft ventilation must have vent openings of sufficient size and location to accomplish the tasks previously outlined.
IMPORTANT: The size of ventilation openings must be increased if any auxiliary equipment is located in the engine compartment.
The combustion air requirement (per engine) for the specified engines at wide open throttle are shown in the table below:
Combustion Air Requirements (single engine)
Model Engine Air requirements at maximum speed
VF4 7 m3/min (250 cu.ft /min)
VF5 8.5 m3/min ( 300 cu.ft /min)
In order to guarantee the optimum engine temperature, 30 - 40°C (86 - 104°F), it is necessary to make sure that the engine compartment ventilation meets the following requirements:
• Inlet(combustionair):thesurfacemustnotbelowerthan230cm2 (35 sq.in.) (per engine). We recommend that the air inlets are positioned in such a way as to favour a continuous air flow towards the engine’s air filter.
• Hotairoutlet:thesurfacemustnotbelessthan100cm2 (16 sq.in.) per engine and the air outlets must be positioned in the upper part of the engine compartment. Favourite the correct ventilation of turbocharger.
For all those applications that do not allow for these requirements to be fully met, it is required that the air inlets must be connected directly from the outside of the engine compartment with an appropriate water system and also we require that a ventilation system must be installed so that the hot air flow is forced from the engine com-partment to the outside. All the components must meet the European Community standards and regulations.
WARNING
If the temperature at the engine air inlet exceeds 40°C (104°F), the engine may be seriously damaged.
4.1.3 Compartment temperature indications.Too high an inlet air temperature lowers the engine performance. Engine compartment temperature shall not exceed outside air temperature by more than 15 °C (59°F).Since many factors influence engine compartment temperature, temperature measurements should always be carried out.Observe the following:
• Theboatbeingtestedshallbeastandardproductionboatfittedasitwouldbefordeliverytoadealer.
• Temperaturetestmeterusedshallbeofthetypethatcanbereadwithoutopeningtheenginecover.
• Duringthetest,inStep1.,enginecompartmentsaretoremainclosed.Nooutsideairistobeforcedintotheengine compartment during the test and the bilge blower should not be running.

400202.01 23vetus®Installation manual VF4 VF5
Engine Running and Heat Soak Test:Use 1 meter and 1 thermocouple. Position the thermo couple at the engine air inlet(air filter).Start engine to warm it up. After engine is at its normal operating temperature, run engine at WOT for 20 minutes. Record temperature readings at 5 minute intervals.
IMPORTANT: If the temperature at the engine air inlet (air filter) exceeds specifications, the engine compartment will need additional engine combustion air openings, or an increase in engine compartment ventilation area, until the temperature remains within specifica-tion.
4.2 Fuel connection
4.2.1 Fuel Delivery System
IMPORTANT! Boating standards (CE-AByC) and Coast Guard regulations must be adhered to when installing fuel delivery system.
The main concern of a boat’s fuel system is safety; this must be achieved through a technically sound installa-tion and constant inspection.The fuel system, from the filler pipe to the fuel pump is the same, in principle, for all boats.The fuel tank is an integrated component of the boat. Refer to the special information on service and mainte-nance from the tank manufacturer.Only a few points related to function and safety are listed here:
• Allconnectionsshouldbeontheuppersideofthetank.
• The drain plug at the lowest point on the tank serves to permit the removal of water and sediment.
• Thefillertankpipeouterdiametershouldbeatleast50mm(2in.).
• The tank breather pipe must have an inner diameter (I.D.) of at least 13 mm (1/2 in.) and must be fitted with a goose neck to prevent water from entering the tank.
It is recommended that the exact route and length of the fuel lines be established at the first installation of the engine to prevent problems later in connecting them to the engine.
ATTENTION! All fuel lines must be well secured. The holes where the lines run through the bulk-heads should be carefully rounded off, or protected with rubber grommets. This prevents damage to the lines from abrasion.
ATTENTION! The max. fuel pump suction pressure head is around 1.5 m (60 inches) take care when install the fuel line.
ATTENTION! Air leaks or narrow needs on fuel line could provoke engine stop.

24 400202.01 vetus®Installation manual VF4 VF5
4.2.2 Fuel connectionsThe following, but not limited to the following, additional fuel connection related points, applying to all engines unless otherwise stated, must be considered.
• Fuel pickup should be at least 25 mm (1 in.) from the bottom of fuel tank, to prevent picking up impurities.
• Fuelinletfittingisan8mm(5/16in.)barbedfittingattachedtothefuelsupplypump.
• Aflexiblefuellinemustbeusedtoconnectfuelsupplylinetofuelinletfittingontheenginetoabsorbdeflec-tion when engine is running. Injection pump fuel return line must also have a flexible rubber hose segment.
• Fuelsupplylinesmustnotbesmallerthan8mm(5/16in.)I.D.tube.Afuelreturnlinebetweenengineandfuel tank is required, having the same size I.D. as the supply line.
• OnMulti-EngineDieselInstallations:Useaseparatetubeforthefuelsupplylineandfuelreturnline,foreachengine.
• Largerdiameter(thanpreviouslyspecified)linesandfittingsmustbeusedoninstallationsrequiringlonglinesor numerous fittings.
• Fuelline(s)shouldbeinstalledfreeofstressandfirmlysecuredtopreventvibrationand/orchafing.
• Sharpbendsinfuellinesshouldbeavoided.
4.2.3 Shut off valve.Make sure your fuel system has positive shut-off valves; know their locations and how they operate.
4.2.4 Diesel fuel Pre-filter and fuel additives. There is the possibility that contamination of diesel fuel and algae growth in the diesel fuel could block the lift pump resulting in poor performance.
IMPORTANT: The engine is provided with an element type fuel filter, but to help eliminate water and dirty it is recommended to use an additional 10 micron, 230 l/h (50 Imp. gph, 60 US gph) flow rated filter that has a water separator.
It is recommended to install an additional fuel filter equipped with a water separator before the fuel lift pump. We recommend a 10 micron, 230 l/h (50 Imp. gph, 60 US gph) per hour rated filter (single or double installation). This will help to filter out contami-nants in diesel fuel.Select a suitable position in the fuel system between the fuel sup-ply pump and the fuel tank for the additional filter The position selected must be free from vibrations, and allow for easy inspec-tion and replacement. It is also recommended that a diesel fuel additive be used to combat algae growth, particularly in warmer climates. Additives reduce the chances of algae growth in the die-sel fuel in warmer clime.
IMPORTANT: See the certification data on the filter i.e CE,AByC or Solas
Fromfuel tank
To enginefuel filter

400202.01 25vetus®Installation manual VF4 VF5
4.3 Sea water circuit
4.3.1 Sea cock Sea cock must provide minimum restriction to water flow. A ball or gate valve is rec-ommended. The ball valve is most common and is typically equipped with a lever type handle that operates in a 90 degree arc. This design gives a clear indication of whether the valve is open or shut. Industry standards/requirements typically require that the sea cock be rigidly attached to the hull at the water pickup. Sea cock location should be readily accessible for quick, easy operation.
4.3.2 Seawater pickup hoseSeawater inlet hose connections must be made with wire reinforced hose of adequate wall thickness to prevent it from collapsing from pump suction. Be sure to secure hose connections with hose clamps. Secure hose to prevent contact with any moving parts of the engine. Select the proper hose from the following table.
Seawater Pickup Hose Inner Diameter
All Models 32 mm (1 1/4”)
IMPORTANT: For sea water fittings use only MARINE WATER HOSE steel reinforced and 2.5 bar (35 psi) max pressure for suction or pressure use.
IMPORTANT: Take care for the hose temperatures working range.
4.3.3 Seawater strainer Seawater strainer used must be of sufficient size to ensure that an adequate supply of water will be maintained for cooling the engine. Select a proper seawater strainer based on the following chart:
Seawater Strainer Minimum Flow Rate
All Models 100 l /min (22 Imp. gal/min, 26.5 US gal/min)
Install seawater strainer in an area where it will be easily acces-sible for inspection and cleaning. Strainer should be installed in water inlet hose after the sea cock (water inlet valve) to allow operator to shut off water when cleaning strainer.
A through-hull fitting that is completely flush with the surface of the boat’s hull and without an external strainer may be necessary for the engine raw water intake on very high-speed boats. The protrusion of a standard type through hull fitting and a strainer can cause a Venturi effect on the intake of a high speed boat, creating a suction which works against the raw water pump causing an inadequate supply of cooling water to the engine.

26 400202.01 vetus®Installation manual VF4 VF5
4.3.4 Stern drives sea water pick up circuit.For Mercruiser stern drives we suggest to use the sea water circuit diagram pictured alongside.
4.3.5 Fittings All pipe and fittings should be of bronze. Use sealing compound or tape at all connections to prevent air leaks. The neoprene impeller in the raw water pump should never be run dry. All hose joints should be double clamped with 304/316 stainless-steel hose clamps. T-bolt clamps are even better but must be 304/316 stainless.
IMPORTANT: For sea water fittings use only MARINE WATER HOSE steel reinforced and 2.5 bar (35 psi) max. pressure for suction or pressure use.
IMPORTANT: Follow the instructions for the hose temperatures range.
IMPORTANT: For fuel hose use A1 quality tube for petrol and diesel with NBR inside.
IMPORTANT: Exhaust tube Lloyd’s register or shipping approval or R.I.N.A approved.
4.4 Exhaust system
4.4.1 Wet exhaust systems installation.Beyond conveying exhaust gases and cooling system sea water out of the boat, the other purpose of the exhaust system is to prevent sea water intrusion into the engine (at the exhaust outlet) under all conceivable conditions of boat trim, boat operation, sea conditions, and heel angle while not exceeding the manufacturer’s back pressure recommendations. Seawater intrusion is usually catastrophic to turbocharger and engine.
IMPORTANT!: The engine supplier is not in a position to judge what installation characteristics will prevent water intrusion in all conceivable circumstances. That judgment is the responsibility of the engine installer.
What we as the manufacturer can do is advise the best practice.
We need to define the water line for exhaust installation purposes. By water line we mean the highest point the water level can reach, at the location of the exhaust through hull fitting, from all conceivable causes - other than passing waves of a duration of not more than a second or two. This worst case water level could be caused by any of the following: backing down aggressively, turning aggressively, coming up onto a plane, decelerating off a plane, extreme boat trim, high seas, wallowing in following seas, heeling, etc. Here after these instructions will refer exclusively to this worst case water level as the relevant water level to plan a good installation.
Sea water pump
Sea water filter
Sea water valve
Sea waterintake
Tee piece
Sea water intakefrom the stern drive
Stern drive
Connection inequipment
with stern drive
Engine

400202.01 27vetus®Installation manual VF4 VF5
Dimension A is the height between worst case water level and transom fitting. A should be minimal 5 cm (2”).
Dimension B is the height of the exhaust loop or goose neck. This is to prevent the ingress of water in case the transom fitting dips below the water level. B should be minimal 45 cm (19”), but not more than 150 cm (60”).
Dimension C depends on the space available.
Dimension D should be kept as minimal as possible. The steeper this part of the exhaust hose the lesser the risk of ingress of water in case waves are coming from behind into the transom fitting.
Dimension F, the length of the exhaust hose from water lift muffler to the highest point of the goose neck, should be kept as short as possible.The shorter this length, the lower the back pressure and the greater will be the reserve capacity inside a given water lift muffler. The shorter the better, but it is much more important to minimize A than to minimize F.
The water lift muffler should be sized to hold multiples of the volume of water that spills back from the exhaust highest point when the engine shuts off. The actual amount of normal spill back at shut down is a function of length F, the exhaust hose inside diameter, E, and the sea water pump flow rate (about 100 litres/min - 22 Imp. gal/min - 26.5 gal/min at maximum speed). The larger the water lift the better. Remember - when all else fails and water comes pouring over the high point, only reserve capacity in the water lift can contain it and will prevent it from entering the engine.
H is the height of the engine’s water injected exhaust elbow outlet above the top of the water lift muffler. This should be maximized. This length of hose is additional reserve capacity to contain both intruding water and splashing inside the water lift muffler.
G is the total height engine exhaust gas pressure must move water up hill – from the bottom of the muffler to the spillover point at the exhaust run high point. G is driven by other installation dimensions. It results from a conservative installation, rather than being a driving factor.
C
B
A
D
E
F
G
H
WATERLINE

28 400202.01 vetus®Installation manual VF4 VF5
4.4.2 Sea water intrusion through the intake sea-cockAnother means of water intrusion is through the sea water intake sea-cock. This can occur when any part of the sea water system or exhaust system are below the worst case water level (other than the sea-cock itself which is already below the water level, of course). What happens is that, upon engine shutdown, sea water siphons from the intake sea-cock, up through the sea water cooling circuit containing the sea water pump, heat exchanger, and water injected exhaust elbow, into the water lift muffler. This seawater will siphon past the impeller of the sea water pump and fill the muffler and all hoses attached to the muffler until the outside water level is reached. If the engine exhaust manifold is below the worst-case water level, seawater will simply pour into the cylinders, destroying the engine. This form of water intrusion is avoided by the proper installation of an anti siphon valve in the sea water circuit between the sea water pump outlet and the water injected exhaust elbow inlet. The anti siphon valve must be well above the worst case water level under all conceivable conditions of boat trim, boat operation, sea conditions, and heel angle. The anti-siphon break and the exhaust hose point should be located as near to the boats centre-line as possible; especially on sailboats due to large and steady healing. The siphon must be accessible for maintenance.
System with water injection point 15 cm (6 in.) or more above the waterline
1 Water injection point2 Waterlift3 Muffler4 Exhaust hose5 Goose neck6 Transom fitting
System with water injection point below or less than 15 cm (6 in.) above the waterline
1 Water injection point2 Waterlift3 Muffler4 Exhaust hose5 Goose neck6 Transom fitting7 Air vent
4.4.3 Cranking the starter: draining the muffler
WARNING!
Prolonged cranking of the starter may cause excessive sea water to build up between the engine and the high point.
Each time cranking is interrupted additional water may spill back into the muffler. In time this cumulative spill back can flood the engine. Unusual cranking and/or cranking interruptions must be monitored and the muffler drained before excessive water buildup occurs. This may be made more convenient by installing a suitable, non-corrosive valve at the muffler drain fitting.
5
4
6
23
1
WATERLINE
5
4
6
23
1
7
WATERLINE

400202.01 29vetus®Installation manual VF4 VF5
4.5 Exhaust system for stern drive version
IMPORTANT: It is the responsibility of the boat manufacturer or installing dealer to properly locate the engine and install the exhaust system.
Improper installation may allow water to enter the exhaust manifolds and combustion chambers and severely damage the engine. Damage caused by water in the engine will not be covered by Warranty, unless this dam-age is the result of defective part(s).Verify that the riser provides the required dimension “c,” or a distance greater than “c,” as indicated.
Model
VF5-VF4 “c” Must be at least 580 mm (23 inches)
Engine With Standard Riser a - From Waterline To Top Of Transomb - From Highest Point On Exhaust Riser To Top Of Transomc - From “a” Minus “b” (from water line to the highest point of the riser ) d - Waterline At Rest

30 400202.01 vetus®Installation manual VF4 VF5
4.6 Propeller selection
IMPORTANT: Installed propeller must allow engine to run at the upper end of the specified wide open throttle operating revolutions per minute (rpm) range, with a normal load aboard the boat. Use an accurate service tachometer to verify engine operating rpm.
It is the responsibility of the boat manufacturer and/or the selling dealer to equip the power package with the correct propellers.
The type and size of propeller varies with the gear ratio and must be selected to fit the application, based upon boat tests. To utilize the full power of the engine and to achieve ideal loading conditions, use a propeller which will permit the engine to reach its full rated rpm at full throttle while under a normal load and while the boat is moving forward through the water.The following information is needed to calculate and match a marine propeller to a boat:
• TheengineoutputinHP.
• ThemaximumRPMoftheengine.
• Thereductionofthetransmission.
• Themaximumhullspeedoftheboat.
• Thetypeofboatanditsdisplacement.
• Thewaterlinelength(LWL).
High rpm, caused by an excessive trim angle, should not be used in determining correct propeller selection.If full throttle operation is below the specified range, the propeller must be changed to prevent loss of performance and possible engine damage. On the other hand, operating an engine above the specified operating rpm range will cause higher than normal wear and/or damage.After initial propeller selection, the following common problems may require that the propeller be changed to a lower pitch:
• Warmer weather and greater humidity cause an RPM loss (not as significant on EDI models).
• Operatingwithincreasedload(additionalpassengers,pullingskiers).
For better acceleration, such as is needed for water skiing, use the next lower pitch propeller. Do not operate at full throttle when using the lower pitch propeller but not pulling skiers.Because of the many variables of boat design, only testing will determine the best propeller for a particular application.
D
0.1 - 0.2 x D
0.1 D
0.15 x D
0.3 x D
0.25 x D
400202.01 31vetus®Installation manual VF4 VF5
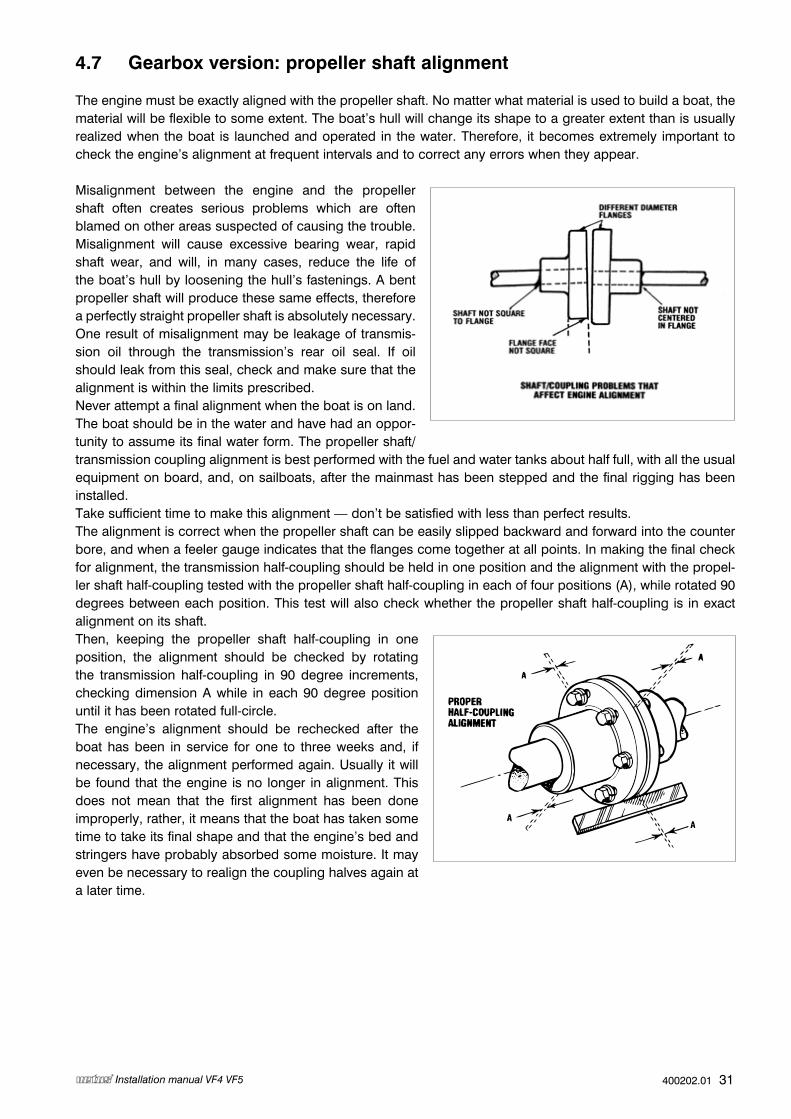
4.7 Gearbox version: propeller shaft alignment
The engine must be exactly aligned with the propeller shaft. No matter what material is used to build a boat, the material will be flexible to some extent. The boat’s hull will change its shape to a greater extent than is usually realized when the boat is launched and operated in the water. Therefore, it becomes extremely important to check the engine’s alignment at frequent intervals and to correct any errors when they appear.
Misalignment between the engine and the propeller shaft often creates serious problems which are often blamed on other areas suspected of causing the trouble. Misalignment will cause excessive bearing wear, rapid shaft wear, and will, in many cases, reduce the life of the boat’s hull by loosening the hull’s fastenings. A bent propeller shaft will produce these same effects, therefore a perfectly straight propeller shaft is absolutely necessary. One result of misalignment may be leakage of transmis-sion oil through the transmission’s rear oil seal. If oil should leak from this seal, check and make sure that the alignment is within the limits prescribed.Never attempt a final alignment when the boat is on land. The boat should be in the water and have had an oppor-tunity to assume its final water form. The propeller shaft/ transmission coupling alignment is best performed with the fuel and water tanks about half full, with all the usual equipment on board, and, on sailboats, after the mainmast has been stepped and the final rigging has been installed.Take sufficient time to make this alignment — don’t be satisfied with less than perfect results.The alignment is correct when the propeller shaft can be easily slipped backward and forward into the counter bore, and when a feeler gauge indicates that the flanges come together at all points. In making the final check for alignment, the transmission half-coupling should be held in one position and the alignment with the propel-ler shaft half-coupling tested with the propeller shaft half-coupling in each of four positions (A), while rotated 90 degrees between each position. This test will also check whether the propeller shaft half-coupling is in exact alignment on its shaft. Then, keeping the propeller shaft half-coupling in one position, the alignment should be checked by rotating the transmission half-coupling in 90 degree increments, checking dimension A while in each 90 degree position until it has been rotated full-circle.The engine’s alignment should be rechecked after the boat has been in service for one to three weeks and, if necessary, the alignment performed again. Usually it will be found that the engine is no longer in alignment. This does not mean that the first alignment has been done improperly, rather, it means that the boat has taken some time to take its final shape and that the engine’s bed and stringers have probably absorbed some moisture. It may even be necessary to realign the coupling halves again at a later time.

32 400202.01 vetus®Installation manual VF4 VF5
4.8 Engine bed mounting
For the distance between starboard and port engine mount read the installation drawings. Engine bed must position engine so that a minimum of 6 mm (1/4 in.) up and down adjustment still exists on mounts after perform-ing final engine alignment. This is necessary to allow for realigning engine in the future.
IMPORTANT! For the engine instal-lation don’t exceed the 15 degrees astern alignment angle.

400202.01 33vetus®Installation manual VF4 VF5
5 Electric/electronic system
5.1 Electrical system
5.1.1 Battery connectionHere below you will find a series of diagrams how to connect the batteries in case that it is necessary to use an auxiliary battery or in case of a twin engine installation.The alternator should charge also the auxiliary battery without having the auxiliary battery getting discharged by transferring power to the engine battery. Use either a battery selector switch or a diode splitter to achieve this.
5.1.2 Diagrams
Diagram Engines BatteriesBattery selec-tor switches
Diode splitters
Remarks
1 1 1 Reference diagram, Engine wiring as supplied
2Ground connections; all ground connections together must be tied together to one ground point.
3 1 2 1
4 1 2 1
5 1 2 1 Connection of battery charger
6 1 2 1 1 One starter battery, one domestic battery
7 2 2 1
8 2 2 2
9 2 3 2 Two starter batteries, one domestic battery
10 2 2 1 2
11 2 2 1 2 Connection of battery charger
12 2 3 2 Two starter batteries, one domestic battery
1 Battery selector switch2 Diode splitter3 Starter battery4 Domestic battery
5 Alternator6 Starter motor7 Domestic consumers8 Battery charger
9 Preheating timer relay 10 Fuse glow plugs 11 Alternator start-up assistance
3
5
6
9
10
1 As a reference a diagram of the engine wiring as supplied
3 3 3
3 3 3
2 Use one ground point to tie all ground connections together.

34 400202.01 vetus®Installation manual VF4 VF5
5
6
9
10
1
7
3/4 3/4
2
3 4
5
6
7
9
10
11
See Note 1 See Note 2
Note 1: Disconnect the supply for the preheating relay / glow plugs from the alternator B+ and reconnect to starter motor battery + termi-nal.
Note 2: To speed up the start of the charging process of the alternator a start-up circuitry should be installed on to the diode splitter.
2
3 4
5
6
7
9
10
11
See Note 1
See Note 2
8
6 1
7
3 4
2
5
9
10
11
See Note 1See Note 2
3 One engine - two batteries - one battery selector switch
4 One engine - two batteries - one diode splitter
5 Connection of battery charger to one engine - two batteries - one diode splitter
6 One engine - two batteries - one battery selector switch - one diode splitter

400202.01 35vetus®Installation manual VF4 VF5
1 Battery selector switch2 Diode splitter3 Starter battery4 Domestic battery
5 Alternator6 Starter motor7 Domestic consumers8 Battery charger
9 Preheating timer relay 10 Fuse glow plugs 11 Alternator start-up assistance
5
6
9
10
1 7
3/4 3/4
5
6
9
10
7 Two engines - two batteries - one battery selector switch
8 Two engines - two batteries - two diode splitters
2
3 4
5
6
7
9
10
11
See Note 1 See Note 2
2
5
6
9
10
11
See Note 1
5
6
9
10
1
3/4 3/4
1
73/4
5
6
9
10
9 Two engines - two starter batteries - one domestic battery - two battery selector switches

36 400202.01 vetus®Installation manual VF4 VF5
1 Battery selector switch2 Diode splitter3 Starter battery4 Domestic battery
5 Alternator6 Starter motor7 Domestic consumers8 Battery charger
9 Preheating timer relay 10 Fuse glow plugs 11 Alternator start-up assistance
6 1
7
3 4
2
5
9
10
11
See Note 1
6
5
9
10
11
See Note 1See Note 2
2
6 1
7
3 4
2
5
9
10
11
See Note 1
6
5
9
10
11
See Note 1See Note 2
2
8
10 Two engines - one starter battery - one domestic battery - one battery selector switch - two splitters
11 Connection of battery charger to two engines - one starter battery - one domestic battery - one battery selector switch - two splitters
Note 1: Disconnect the supply for the preheating relay / glow plugs from the alternator B+ and reconnect to starter motor battery + termi-nal.
Note 2: To speed up the start of the charging process of the alternator a start-up circuitry should be installed on to the diode splitter.

400202.01 37vetus®Installation manual VF4 VF5
2 2
See Note 2
5
6
9
10See Note 1
3
5
6
9
10See Note 1
4
7
3
For the connections of the cables carrying the charging current use at least 25 mm2 (AWG 4), for cables longer than 1 m (3 ft) use at least 35 mm2 (AWG 2).
WARNING! Heavy current through wiring that is too thin, or resistance provoked by bad connec-tion, can generate excessive heat and could cause fire.
WARNING! For Vetus splitter model 1252-1253.Maximum current: the battery splitter can be used for a continuous current up to a maximum of 125 Amps. Make sure that the maximum total current of alternator and battery charger not exceed the maximum specify current.
12 Two engines - two starter batteries - one domestic battery - two splitters

38 400202.01 vetus®Installation manual VF4 VF5
5.1.3 Connecting the battery cableConnect battery cables to engine. Be sure to observe the following:
• Makesurethatgroundingstudandstartersolenoidterminalarefreeofpaintoranyothermaterialthatcouldcause a poor electrical connection.
•Ensurethepositivebatterycableisinsertedthroughtheprotectiverubberbootbeforeattachment.
•Afterbatterycablesareconnected,applyathincoatofliquidneoprenetotheterminals.
•Besuretosliderubberbootoverpositive(+)terminalaftermakingconnection.
VF4 series VF5 series
1 Engine Starter2 Positive battery cable connections3 Negative battery cable connections
IMPORTANT: Remove the paint from connections when installing the engine !
121
3
3

400202.01 39vetus®Installation manual VF4 VF5
5.1.4 Battery cable sizeSelect proper size positive (+) and negative (-) battery cables, using chart. Battery should be located as close to engine as possible.IMPORTANT: Terminals must be soldered to cable ends to ensure good electrical contact. Use electrical grade (resin flux) solder only. Do not use acid flux solder, as it may cause corrosion and a subsequent failure.
Battery Cable Length Minimum Cable Cross-section
Up to 0.9 m (3 ft) 35 mm2 2
0.9- 1.2 m (3 - 4 ft) 50 mm2 1
1.2 - 1.5 m (4 - 5 ft) 50 mm2 0
1.5 - 1.8 m (5 - 6 ft) 70 mm2 00
1.8 - 2.4 m (6 - 8 ft) 95 mm2 000
2.4 - 3 m (8 - 10 ft) 120 mm2 0000

40 400202.01 vetus®Installation manual VF4 VF5
5.1.5 Battery specification
IMPORTANT: Standards and regulations must be adhered to when installing battery. Be sure battery cable installation meets the pull test requirements and that positive battery terminal is properly insulated in accordance with regulations.
IMPORTANT: It is recommended (required in some states) that the battery be installed in an enclosed case. Refer to regulations for your area.
IMPORTANT: Engine electrical system is negative (-) ground.
1) Select an starter battery that meets all of the following specifications:• 12Voltmarinetype.• ColdCrankingAmps(CCA):notlowerthan850A.• Taperedpostconnectorsorsideterminalconnectors.Donotuseabatterywithwingnutconnectors.• Batterycapacityratingofatleast:110Ah.• Goodresistancetocharge/dischargecycles.Deepcycle.
2) Select a service battery that meets all of the following specifications:• Batterycapacity:notlowerthan200Ah.• ColdCrankingAmps(CCA):notlowerthan850A.• Optimumresistancetocharge/dischargecycles.Deepcycle.
IMPORTANT: Even use a service battery if you need other board services ! Avoid to use only one battery to feed services and engine !

400202.01 41vetus®Installation manual VF4 VF5
5.1.6 Fuses and relays indications
The ECU box is equipped with a panel LED indicators to see the state of the fuses.
The fuses on the printed circuit board have been inserted on eyelet connectors on the circuit in order to make the replacement procedure easier. In order to replace the fuses, please refer to the following table:
Fuse ColorCurrent
protection (A)Protected Device
F1 Red 10 Not used
F2 Red 10 Not used
F3 Red 10 DIRECT-EOBD diagnosis
F4 Red 10 KEYON-(KEYON ECU )
F5 Brown 25 DIRECT-Main relay
F6 Blue 15 DIRECT-Fuel pump
F7 Transparent 25 DIRECT-Fuel Pre-heating resistor
F9 Blue 15 OUT MAIN RELAYS -Glow-plug pre-heating RELAY
F10 Yellow 25 OUT MAIN RELAYS -Pin 5 ECU/PRE – Heating RELAY
F11 Brown 10 OUT MAIN RELAYS -Pin 4 ECU/FUEL – Fuel pump RELAY
Relay Code TyCO Characteristics Description
J4
46520432
12V/30A Main Relay
J5 12V/30A Fuel pump
J6 12V/30A Fuel pre-heating
J8 12V/30A Battery alarm light
J7 12V/70A Engine starter
WARNING
Take care at the rubber O-Ring gasket when dismount the transparent panel over the fuses to warrant a good IP protection.
The ECU box is sealed IP65:• The lengthof theenginecableallowsattachmentof theECUboxon thewallof theboatandnoton the
engine.• TheboxisequippedwithapanelLEDindicatorstoseethestateofthefuses.• AtKEYONallLEDsmustbeON.

42 400202.01 vetus®Installation manual VF4 VF5
5.2 Elements that constitute the electronic control of the Vetus VF series engines
The parts that constitute the electric system of the engine are as following:
• WaterproofboxinsteelfeaturingtheECU;
• Engineharness;
• Instrumentpanel.
Here below you will find a description of the parts:
Waterproof ECU box
1 Emergency RED Button
2 Connector for instrument panel
3 Anti-vibration mounting set
4 Fuses
Instrument panel cable
121
14
3

400202.01 43vetus®Installation manual VF4 VF5
5.2.1 Engine installation wirings
Trim Indic
Transm.oil level signal
Trim sign. Extension harness
12V
Gro
und
ECUBOX
Engine
Gea
rbox
Instr .Panel

44 400202.01 vetus®Installation manual VF4 VF5
5.2.2 Engine harness
A13
C9
D8
D16
D15
D7
C7
D1
D2
C2
B2
A2
A3
A1
A6
A8
C8
B8
B14
A14
C11
D12
D11
C12
B12
A12
B11A11
A7
B3
C3
D14
D13
A10
B10
C10
D10
A9
B9
B13
B5
B6
A5
B1
A16
B16
C16
C1
A4
C4
C5
D5
C6
1
2
3
1
2
1
2
1
2
1
2
1
2
1
2
3
4
5
6
+
−
+
−
+
−
+
−
+
−
1
2
B
A
1
2
3
1
2
3
1
2
3
1
2
3
+
−
+
−
+ 5 V
−
+ 5 V
−
High Side (PWM)
Low Side (−)
−
CID/KESS
+12 V
K-line
+12 V
−
+12 V
−
64 PIN
1
2
3
4
5
1
2
3
4
5
−
+12 V
−
+12 V
−
D + + 12 V
4
D5
C14
6
STARTERMOTOR
COOLANTTEMPERATURE
SENDER 1
COOLANTTEMPERATURE
SENDER 2
RPMSENDER
INJECTOR 1
INJECTOR 2
INJECTOR 3
INJECTOR 4
OIL PRESSURESENDER
POTENTIO-METER
ALTERNATOR
Signal
Signal
Warning light
GROUND(-)
FUEL FILTER-TEMPERATURE
SENDER
FUELPRE-HEATING
FUEL PUMP
TURBO PRESSURESENDER
‘RAIL’ PRESSURE SENDER
FUEL PRESSUREREGULATOR
OBD DIAGNOSE
‘TIMING’ SENDER
GLOW PLUGS
Fuse80 A
Glowplugs
WATER IN FUELSENDING UNIT
Signal
Warning light
Sender 1 −
Sender 2 signal
Sender 1 signal
Sender 1 +
Sender 2 −
Sender 2 +
Signal
Signal
Signal
Signal
Warning light
Diagnose
Signal
Signal
OIL PRESSURESWITCH
Warning lightEXHAUST
TEMPERATURESWITCH
B4Pre-heating
VF 4 SERIES

400202.01 45vetus®Installation manual VF4 VF5
VF 5 SERIES
A13
C9
D8
D16
D15
D7
C7
D1
D2
C2
B2
A2
A3
A1
A6
A8
C8
B8
B14
A14
C11
D12
D11
C12
B12
A12
B11A11
A7
B3
C3
D14
D13
A10
B10
C10
D10
A9
B9
B13
B5
B6
A5
B1
A16
B16
C16
C1
A4
C4
C5
D5
C6
1
2
3
1
2
1
2
1
2
1
2
1
2
1
2
3
4
5
6
+
−
+
−
+
−
+
−
+
−
1
2
B
A
1
2
3
1
2
3
1
2
3
1
2
3
+
−
+
−
+ 5 V
−
+ 5 V
−
High Side (PWM)
Low Side (−)
−
CID/KESS
+12 V
K-line
+12 V
−
+12 V
−
64 PIN
1
2
3
4
5
1
2
3
4
5
−
+12 V
−
+12 V
−
D + + 12 V
4
D5
C14
6
STARTERMOTOR
COOLANTTEMPERATURE
SENDER 1
COOLANTTEMPERATURE
SENDER 2
RPMSENDER
INJECTOR 1
INJECTOR 2
INJECTOR 3
INJECTOR 4
OIL PRESSURESENDER
POTENTIO-METER
ALTERNATOR
Signal
Signal
Warning light
GROUND(-)
FUEL FILTER-TEMPERATURE
SENDER
FUELPRE-HEATING
FUEL PUMP
TURBO PRESSURESENDER
‘RAIL’ PRESSURE SENDER
FUEL PRESSUREREGULATOR
OBD DIAGNOSE
‘TIMING’ SENDER
GLOW PLUGS
Fuse80 A
Glowplugs
WATER IN FUELSENDING UNIT
Signal
Warning light
Sender 1 −
Sender 2 signal
Sender 1 signal
Sender 1 +
Sender 2 −
Sender 2 +
Signal
Signal
Signal
Signal
Warning light
Diagnose
Signal
Signal
OIL PRESSURESWITCH
Warning lightEXHAUST
TEMPERATURESWITCH
1
2
+
−D3
D4
B4
INJECTOR 5
Pre-heating

46 400202.01 vetus®Installation manual VF4 VF5
5.3 Electronic command system:The electronic engine remote control couples mechanical-electronic solutions to digital communication technol-ogy so that flexible, reliable and easy to install modular systems can be achieved. Only a few pieces of equip-ment are required to compose a complete electronic engine remote control.
• operatinglevers• controlboxes• datatransfercablesthatconnecttheoperatingcontrolstothecontrolboxes
5.3.1 Maximum specifications of the system
Maximum configuration of the system: Actuators ; The maximum number of engines that the system can control is 2 Command stations : The maximum number of operating levers in the installation is 3
Operating temperature : From -10 to 85°C Storage temperature : From -40 to 90°C
Mechanical features: Nominal load when control box is providing a pushing force : 150 N (15 kgf) with power consumption 1.5 A Max load when control box is providing pushing force : 450 N (45 kgf) with power consumption 5 A (with time <1 s) Stroke of gearbox - forward : The stroke can be set to between 5 and 40 mm Stroke of gearbox – reverse : The stroke can be set to between 5 and 40 mm
Electrical features: Power supply : 9,0 to 16 V dc Max. current taken : 5 A Current taken when not loaded : 0,5 A

400202.01 47vetus®Installation manual VF4 VF5
5.3.2 Command station – Pilot instructionThe electronic control lever permit to command the boat from different positions.
Each station can be programmed for the control either of one or of two engines. Each lever repeats the functionality of a traditional mechanical lever.
Moving the lever from the neutral position, after 15° for-ward or reverse automatically the electronic system clutch in respectively the forward or reverse gear.The accelerator has a stroke of 67° both in forwards or reverse mode
5.3.3 Friction adjustmentTo adjust the inner fiction of the control lever is sufficient to remove the PVC cap (A) and unscrew the control lever fixing screw. It is possible to adjust the friction screwing and unscrewing the inner screw placed into the hole B. When the regulation will be done, mount the screw and the plastic cap. IMPORTANT: In case of command station for
one engine, the friction is placed under the right command lever
5.3.4 Control keypadOn the command station is mounted an electronic keypad with 4 push-buttons and 4 LEDs.
Name Colour of LED
Engine *) Green
Warm/Sync Orange
Command Red
Engine *) Green
*): In installations with single engine, both the green LED are referring to the same engine. In systems with 2 engines the push button and the green LED on the right are referring to the starboard engine while the push button and the green LED on the left side are referring to the port engine.
Max. Max.
Min
.Min.
16°16°
67°67°
NeutralIdle forwardIdle reverse
Full speed
Full
spee
dA
B
C
vetus

48 400202.01 vetus®Installation manual VF4 VF5
The meaning of the LEDs and the buttons is shown in the table.
Button LED Meaning
(Operating) (Reporting)
Engine
- The left LED is for the port (left) engine, while the right LED is for the star-board (right) engine. If the LED is fixed light on (green), the engine which it corresponds is in neutral condition.
- If the LED is blinking (green), the lever on the Led side is synchronised with the lever of the station that at the moment has the Command.
Command- If the LED is off the station does not have control over the installation\.
- If the LED is on the station has control over the installation.
Warm/Sync
- If the LED flashes it is busy with the WARM-UP, i.e. the engine/engines can run at increased speed because the gearbox is still in neutral.
- If the LED is on the installation is functioning in synchronous mode. Both engines are controlled by the right-hand lever and the right-hand trim appli-ance controls both trims (if present).
Warm/Sync- After setting both levers of the operating station in neutral hold the warm/
sync key pressed in for at least three seconds; the WARM-UP function will now operate.
Command- Control of the installation is gained by holding the Command key pressed
in for at least three seconds, provided that the operating lever is in neutral.
All LEDs flash - The installation is malfunctioning.

400202.01 49vetus®Installation manual VF4 VF5
5.3.5 Taking over control Control of the installation can be taken over at any operating station by carrying out one of the following actions.
• Whenvesselisnotmoving
1 Position all operating levers in neutral.
2 Hold the Command key pressed in for at least three seconds.
3 The LED Command will come on and the LED Warm/Sync begin to flash.
4 The installation is now busy with the warm-up, that is the gearboxes are deactivated. It is only possible to use the throttle to carry out engine warming up actions.
5 In order to definitely take over control at the station it is sufficient to position the levers in neutral and hold the Warm/Sync key pressed in for at least three seconds.
6 The operating lever will now be released and ready for use.
• Whilesailing
1 Position both levers of the station that is to take over control synchronous relative to the levers of the station that is to relinquish control.
2 The LED Engine begins to flash as soon as the lever of the asking station is set correctly relative to the station that is to relinquish control (with a margin of 10°).
3 When both levers are synchronous (and therefore the corresponding LEDs Engine flash) it is possible to take over control by holding the Command key pressed in for three seconds.
IMPORTANT: Once the takeover procedure has been carried out the station is ready for operating the engine.
IMPORTANT: Before taking the command, check that all the passengers are safely on board.
5.3.6 Warming up the engine (Warm-up)If both levers are in neutral, by pressing for 3 seconds the button Warm/Sync of station which has the command you enter in Warm-up mode. If you move the each lever it is only affected the accelerator but not the gear. In Warm-up mode the LED Warm/Sync is blinking. After positioning again both lever in neutral and pressing for 3 seconds the Warm/Sync the system comes back to the normal operation mode.
5.3.7 Synchro mode operationIt is possible to command both engine at the same speed and direction with only one lever. This function can be activated only by the Station which has the command.With both levers in neutral position, press at the same time for 3 seconds engine push-buttons. The command of both engines is now on the right lever. In synchro mode operation LEDs ‘Warm/Sync’ and ‘Command’ are lighted on. Position both lever in neutral, press for 3 seconds Engine push buttons at the same time and the command of each engine is again assigned to the respective lever and LED ‘Warm/Sync’ is switched off.

50 400202.01 vetus®Installation manual VF4 VF5
5.3.8 Mechanical installation
CO
MM
AN
D
EN
GIN
E 2
WA
RM
/S
EN
GIN
E 1
132
(5 3
/ 16”
)43
(1 1
1 /16
”)
4 x M5
35 (1
3/ 8
”)
20 (1
3 /16
”)
114 (4 1/2”)
174
(6 7
/ 8”)
155 (6 1/8”) 155 (6 1/8”)
130 (5 1/8”)
32
(1 1
/ 4”)
35
(1 3
/ 8”)
300
(11
13/ 1
6”)
350 (13 3/4”)280 (11”)
332
(13
1 /16
”)
210(8 1/4”)
25 (1”)ø
20(3
/ 4”)
Flexible mounts
Connections
Install the control box at least 25 cm (10 in) from the wall. Do not install the control box with the plugs upwards.
Dimensions of the command station
Dimensions of the control box
Installation of the control box

400202.01 51vetus®Installation manual VF4 VF5
System for one engine
Description• With trim, cable connection for the push-
pull cable outgoing from the Mercruiser® stern drive.
• Without trim, connection for the standardcable (for inboard engine).
System for two engines
Description• With trim, cable connection for the push-
pull cable outgoing from the Mercruiser® stern drive.
• Without trim, connection for the standardcable (for inboard engine).
5.3.9 Connection of push-pull cableThe cable kit selected must be used for connecting the push-pull cable. A choice of 2 suitable kits is available depending on the type of push-pull cable that is to be used for the gear-box. These kits are: standard cable and the outgoing cable from Mercruiser-outdrive®.
Connection kit
Standard cable kit
Mercruiser cable kit®
Each kit is sufficient to connect two push-pull cables.
CO
MM
AND
ENG
INE
2
WAR
M/S
ENG
INE
1E
NGIN
E 1
WAR
M/S
ENG
INE
2
CO
MM
AND
2x
2x
2x
2x

52 400202.01 vetus®Installation manual VF4 VF5
• Standardpush-pullcables
IMPORTANT: Before the mounting, the throttle must be in minimum position and the clutch must be in neutral position.
How to mount it:
1 Tighten the eyelet on the thread of the cable;
2 Screw the emergency knob placed on the actuator until the emergency lever will be free to move;
3 Insert the stainless steel plate into the aluminium device locking the cable between them as shown in the picture;
4 Insert the push-pull cable into the bracket on the actuator and connect the eyelet to the pin and lock it using the segeer. Use the emergency lever to help the operations;
5 Lock the aluminium device with the corresponding screw, the brass spacer and the washer at the distance indicated into the picture;
6 Loosen the emergency knob and move the emergency lever until the device will reach the correct position (it will be automatically locked)
ca. 5
0 (2
”)

400202.01 53vetus®Installation manual VF4 VF5
• Push-pullcableoutgoingfromtheMercruiser®sterndrive
This is the cable that comes out directly from the Mercruiser-outdrive®. If this type of coupling is chosen it is not necessary to fit the Mercruiser turning plate®.
IMPORTANT: Before the mounting, the throttle must be in minimum position and the clutch must be in neutral position.
How to mount it:
1 Screw the eyelet on the thread of the cable;
2 Insert the plastic glass into the aluminium device placing the push-pull cable between them as shown into the picture;
3 Insert the push-pull cable into the bracket on the actuator;
4 Put the brass spacer on the pin and fix the plastic eyelet on the cable on it. Lock the eyelet with the Seeger. Use the emergency lever to help the operations;
5 Lock the aluminium device with the screw, the brass spacer and the washer at the distance indicated into the picture;
6 Loosen the emergency knob and move the emergency lever until the device will reach the correct position (it will be automatically locked)
ca. 5
0 (2
”)

54 400202.01 vetus®Installation manual VF4 VF5
5.3.10 Installation of power supply
Starter motors: the cables that run from the battery to the starter motors must have a cross-section of at least 50 mm2 (AWG 0)(both the plus and the minus cable).
Electrical installation: the earth poles of the batteries must be connected with a cable with a cross-section of at least 50 mm2. (AWG 0) The earth line from the con-trol box must come directly from the batteries.
Control box: each control box must be powered by the batteries. The power cables (plus) must be fitted with a 10 A decoupling diode.
In this way the control box is always powered by the battery which is high-est charged. The minimum cross-section for the cable is 2.5 mm2 (AWG 12).
‘R1’ is a relay that is acti-vated by the key of the port engine, while ‘R2’ is a relay that is activated by the key of the starboard engine.
5.3.11 Power supplyThe system works on 12 V battery power supply. The table gives the breaking current for the fuses used to protect the electronic cards in the control box.
Voltage 12 V
Internal fuse (on card) 3.15 A
Fuse in panel 6.15 A
No load current t 0.5 A
CO
MM
AND
ENG
INE
2
WAR
M/S
ENG
INE
1
BatteryBattery
Portside engine Starboard engine
Control lever
Actuator
From Portsidekey switch
From Starboardkey switch

400202.01 55vetus®Installation manual VF4 VF5
5.3.12 Outgoing cables from the control box
Card in control box, Version rev. 2
Card in control box, Version rev. 3
Terminal board Terminal DescriptionColour of wire
Outgoing cableRev. 2 Rev. 3
JP8 Power.1 Vdc Brown
2 poles, white outer jacket
2 GND Blue
JP9 Engine SX
1 V_out CH1 Yellow/Green
4 poles, black outer jacket
2 V_out CH2 Grey
3 - Brown
4 GND Black + Brown Black
JP10 Engine DX
1 V_out CH1 Yellow/Green
4 poles, black outer jacket
2 V_out CH2 Grey
3 - Black
4 GND Black + Brown Brown
The outgoing cables are 2.5 m (8 ft) in length.
The throttle lever has an AMP SuperSeal plug with 6 poles for coupling to Vetus VF series engines. Should the model of the engine be different take off the plug and follow the pin-out as shown in the table above.
JP 8JP 3 JP 5 JP 9 JP 10JP 12
JP 11
JP 13
JP 7
JP4
JP2
1 2 3 4 5 6 654321 1 2 3 4 43211 2
Fusi
bile
21 1 2 3 4 5 6654321
JP 12JP 5JP 3JP 8
Fusi
bile
JP 7
JP 13
DOWNENTER UP
JP2
JP4
JP 11
JP 14
JP 15
JP 9
43211 2 3 4
JP 10

56 400202.01 vetus®Installation manual VF4 VF5
When the command station and the control box have been fixed, it is possible to plug the outgoing cables from the actuatorIn case of a system with trim command, please refer to’ Trim installation’ part of this manual.
Note 1: In case of system for 1 engine, the cables outgoing from ‘Left engine’ section, will be not present
Note 2: In case of system without trim, the cables outgoing from Trim sections, will be not present
5.3.13 Trim cableIn case of actuator for two engines, will be present no. 2 trim cables.
+12 VFuse
ThrottleTrimGearbox CANbus
Sta
rboa
rd
engi
neP
orts
ide
engi
ne
ThrottleTrimGearbox
Yellow
Blue
Red Mercruiser®
pump Actuator side

400202.01 57vetus®Installation manual VF4 VF5
Trim
+ (g
rey)
Trim
+ /
Tra
iler
(blu
e)
Trim
– (y
ello
w)
Supp
ly (r
ed)
Trim
– (g
reen
)
Trim
+ /
Tra
iler
(blu
e)
Supp
ly (r
ed)
Fast-on F
Mercruiser® pump
Vetus Actuator
Fast-on F
Fast-on M
Fast-on M
Female Plug
Male plug
Mercuiser side (*)
Vet
us
(*) = not supplied by Vetus
(blu
e)
(vio
let)

58 400202.01 vetus®Installation manual VF4 VF5
5.3.14 Programming keypad
IMPORTANT: The control boxes and the operating levers must be set to neutral in order to be able to access the programming of the installation and thus also in order to set the parameters.
Note: The control boxes are already programmed in the factory and it should not be neces-sary to make changes to the parameters of the installation, even in particular condi-tions.
The keyboard has a display with two figures and three programming keys.
Colour of key Reference
Red 1 (-)
Yellow 2 (+)
Grey 3 (↵)
The display can show three different texts depending on the programme mode: - MENU (display is on constantly) - PROGRAMMING (display flashes) - DISPLAY (display is on constantly)
Menu – Specific parametersIn mode MENU the display is on constantly and it is possible to move from one parameter to the other using the keys ‘1’ and ‘2’. Pressing keys ‘1’ and ‘2’ switches to mode MENU from mode DISPLAY. Pressing key ‘3’ when in mode PARAMETERS also switches to mode MENU.
For the setting of the specific parameters follow this procedure:1 With the actuator turned on (the display shows _ _) pressed both keys ‘1’ and ‘2’ and the first parameter will
appear on the display;2 Pressing the key ‘3’ the display will start to flash. Now it is possible to tune the parameter using the keys ‘1’
and ‘2’;3 When the parameter has been set use the key ‘3’ to store this parameter;4 To set the other parameters, scroll the menu using the keys ‘1’ and ‘2’ and when the parameter that you would
like to change will be reached, follow this procedure starting from the point 3.
Program modeThe display flashes when in mode PROGRAMMING and the value of the selected parameter can be changed by using the keys ‘1’ en ‘2’.
Pressing ‘3’ when in mode PROGRAMMING reverts the system to mode MENU and saves the value given to the parameter.
If key ‘3’ is not pressed within one minute to confirm a change to a parameter then mode PROGRAMMING will be exited and the parameter retains the value from before the change. Mode PROGRAMMING is accessed by holding keys ‘1’ and ‘2’ pressed in while switching the system on.
The procedure is the following:1 Turn on the actuator keeping pressed both keys ‘1’ and ‘2’;2 On the display will appear the first parameter to be set;

400202.01 59vetus®Installation manual VF4 VF5
3 Pressing the key ‘3’ the parameter will start to flash and with the keys ‘1’ and ‘2’ you can set the parameter. In case of parameters in relation to push-pull cable position, the pressing of the keys ‘1’ and ‘2’ will generate a physical moving of the push-pull cable to the position to set;
4 When the parameter has been set use the key ‘3’ to store this parameter;5 To set the other parameters, scroll the menu using the keys ‘1’ and ‘2’ and when the parameter that you would
like to change will be reached, follow this procedure starting from the point 3.6 When the setting of all parameters is finished, turn off the actuator.
Display modeThe viewer automatically goes to mode DISPLAY (_ _) if no key is pressed for two minutes. The functioning of the installation is shown in mode DISPLAY. Mode Display consists of a series that repeats one or two series of data continuously. It is possible to access mode DISPLAY at any time by pressing keys ‘1’ and ‘2’ simultaneously.
After power up, the display shows a sequence of 2 codes: ‘FI’ and ‘XX’:- ‘FI’ means FIRMWARE;- ‘XX’ is the firmware version.

60 400202.01 vetus®Installation manual VF4 VF5
5.3.15 Setting the parameters It is necessary to set the outgoing minimum and maximum voltage values for installations with an electronically operated engine. The stroke of the gearbox requires mechanical setting.
Parameters to be set for installations with one engine.
Parameters to be set Display ValuesFactory values
Value on display
Reverse 0L Positions to be set for the push-pull cable in accordance with the procedure
in Chapter 10.2.1Neutral (*) 0F
Forward 0H
Throttle lever – minimum channel 1 L1
0 - 5 Vdc
0.9 9
Throttle lever – maximum channel 1 H1 4.3 43
Begin point of acceleration channel 1 C1 00 00
Throttle lever – minimum channel 2 L2 0.5 5
Throttle lever – maximum channel 2 H2 2.1 21
Begin point of acceleration channel 2 C2 00 00
Parameters to be set for installations with two engines.
Parameters to be set Display ValuesFactory values
Value on display
Right-hand engine - Reverse 0L
Positions to be set for the push-pull cable in accordance with the procedure
in Chapter 10.2.1
Right-hand engine – Neutral (*) 0F
Right-hand engine – Forward 0H
Left-hand engine- Reverse IL
Left-hand engine – Neutral (*) IF
Left-hand engine - Forward IH
Left-hand engine - Throttle lever – minimum channel 1 L1
0 - 5 Vdc
0.9 9
Left-hand engine - Throttle lever – maximum channel 1 H1 4.3 43
Begin point of acceleration channel 1 C1 00 00
Left-hand engine - Throttle lever – minimum channel 2 L2 0.5 5
Left-hand engine - Throttle lever – maximum channel 2 H2 2.1 21
Begin point of acceleration channel 2 C2 00 00
Right-hand engine - Throttle lever – minimum channel 3 L3 0.9 9
Right-hand engine - Throttle lever – maximum channel 3 H3 4.3 43
Begin point of acceleration channel 3 C3 00 00
Right-hand engine - Throttle lever – minimum channel 4 L4 0.5 5
Right-hand engine - Throttle lever – maximum channel 4 H4 2.1 21
Begin point of acceleration channel 4 C4 00 00
(*) factory values that cannot be changed
NB: it is advisable to check that the gearbox can be engaged for forward before setting the stroke of the control box, so that you can check whether forward is engaged when the push-pull cable is pushed or pulled.

400202.01 61vetus®Installation manual VF4 VF5
5.3.16 Mechanical setting of the stroke of the gearbox
IMPORTANT: Check before switching on for the first time that the power supply to the control box is connected after the engine key switch.
Notes on the strokes setting:
1: The procedure described has an operational nature and must therefore be carried out while the engine is run-ning and the vessel is sailing. It is important to pay the greatest attention to the settings for forward and reverse in order to prevent sudden or uncontrolled movements of the vessel. If necessary ask for help from a second person who can switch the engine on and off as required.
2: Stern drive and outboard engines: if it is not possible to set the strokes when the engine is running so that this has to be done when the vessel is not in the water, then simulate the rotation of the screws manually to make coupling the gearbox easier.
3: If the strokes of the gearbox are known it is sufficient to physically measure the movement of the cursor on the control box in the various positions to be set.
Specific parameters
IMPORTANT: changing factory values could cause the system to malfunction. Therefore, it is advisable not to change them unless our technician advises this.
IMPORTANT: on the system with two engines, the strokes of the stern driver (in case of stern driver engines) has to be set checking if it is request a contro-rotation functioning of the propellers. The parameter A0 has the function to invert the movement of both push-pull cables.

62 400202.01 vetus®Installation manual VF4 VF5
A
B
5.3.17 Trim commandThe trim command can be done directly from the command station toward the push-buttons ‘+’ and ‘-’ placed on the rear side. The signals are transferred from the command station to the actuator. The relais card mounted into the actuator provides the activation on the trim up and trim down. In case of system with two engines, in Syncro mode the right device on the command station commands both trim pumps.
Version for one engine Version for two engines
5.3.18 Emergency leverIn case of emergency, you can rapidly deactivate the electronic system and command the engines directly through the mechanical levers which are mounted on the actuators. In order to activate the mechanical levers you have to rotate clock wise the taps A on the actuator’s levers and then you can command the engine directly from the lever B. In order to come back to normal mode, you have to unscrew the tap A and then move the command station. After the first using, the lever B will engage automatically the position before the emergency operation.
IMPORTANT: In a emergency situation with a faulty electrical system the vessel can be controlled by using the levers fitted on the control box.
5.3.19 Unexpected switching off of the engines In all situations when the engines switch off without the operating levers being in neutral position the system will behave as follows the next time that it is switched on.
• Thecontrolboxwillsetthegearboxtothesafeposition,thatisthegearboxwillbesettoneutralandthethrot-tle will be minimum.
• Theoperatingstationthatcontrolledthevesselwillbeswitchedoff.

400202.01 63vetus®Installation manual VF4 VF5
1) Dismount the water temperature sen-sor from the thermostat house.
Mount the water temperature sensor adapter and new sensor.
2) Dismount the oil pressure sensor.
Mount the adapter and new sensor.
3) Connect the new harness (double sta-tion) from ECU BOX to panels.
4) Connect the engine cable to new sen-sors.
6 Optional
6.1 Fly bridge station installation
For the installation of second command station follow the instruction below:

64 400202.01 vetus®Installation manual VF4 VF5
6.2 Water Heater Installation
IMPORTANT: When connecting a cabin heater or hot water heater, certain requirements must be met, including but not limited to the following:
• Supplyhose(fromenginetoheater)andreturnhose(fromheatertoengine)MUST NOT EXCEED 16 mm (5/8 in.) I.D. (inside diameter).
• Makeheaterconnectionsonlyatlocationsindicatedinthefollowinginformation.
• Refertomanufacturer’sinstructionsforcompleteinstallationinformationandprocedures.
• Donotrepositionenginetemperatureswitch;itmustremainasinstalledbyfactory.
• Thewaterheatermustbeplacedwithitshighestpointbelowtheexpansiontanktoavoidairblockingofthecirculation of the coolant.
WARNING
Avoid a performance loss and/or possible engine damage. Engine coolant must flow continuously from the engine intake manifold to the engine water circulating pump. NEVER close-off or block the coolant flow to or from a heater. All heater installations must be plumbed in series with the supply and return connectors.
CAUTION
Avoid engine overheating which could result in engine damage. On models equipped with Closed Cooling, an air pocket may form in the closed cooling system if some coolant is lost from the system and the cabin heater or hot water is mounted higher than the filler cap on the expansion tank.
IMPORTANT: Make sure to add coolant to compensate for the added volume in the cooling sys-tem.

400202.01 65vetus®Installation manual VF4 VF5
For the installation follow the instruction below:
1) Cut the hose below the expansion tank (first remove the air filter and drain the coolant circuit), as showed in the picture and insert the T pipe fitting (clamp).
2) Unscrew the plug from thermostat housing and replace it with the brass pipe (use the copper ring).
3) Follow the instruction below how to connect the fittings.
Fill the circuit and take care to drain air.
IMPORTANT: Take care to avoid engine overheating.
Expansion tank
Exhaustmanifold
T pipe fitting
Valve
WATER HEATER
Min: 200 mm(8 inch)
COOLANT LIQUID LEVEL
Thermostathousing

66 400202.01 vetus®Installation manual VF4 VF5

400202.01 67vetus®Installation manual VF4 VF5
7 Checks
7.1 DiagnosisIn case of a fault the engine is equipped with a plug for electronic diagnosis. See the picture below.Refer only to Vetus assistance to make engine diagnosis.
7.2 Check the engine oil levelThe engines are delivered complete with oil, therefore it is not necessary to refill the lubrication system before starting the engine for the first time in the most case. Sometimes in particular engine installation could be pos-sible to refill in function of the installation itself !VETUS advises Multigrade Synthetic Oil viscosity SAE 10W40, ACEA: A3/B3, B3/B4, API: SL, CF.E.g.: Vetus Marine Diesel Synthetic Engine Oil 10W40 or Shell Helix Plus 10W-40.
Sometimes on particular conditions it could be necessary to use a different viscosity grade oil. Please refer to VETUS assistance for other informations.
• Please,avoidmixingthisoilwithotheroilsbecauseinthatcasetheconditionsrelatedtotheassistanceinter-vals are no longer guaranteed to be the right ones.
• IncaseyouarenotabletofindtheVETUSoil,makesureyouuseoilwiththesamecharacteristicsandspeci-fications as the above-mentioned oil (ACEA: A3/B3, B3/B4, API: SL, CF), totally synthetic 10W40.
Recommended lubricating oil viscosity
Starting temperature °C (deg F)
-30(-22)
-20(-4)
-10(14)
0(32)
10(50)
20(68)
30(86)
40(104)
Lubricating oilviscosity
SAE 10W-40
SAE 20W-40
SAE 15W-40
SAE 10W-30
SAE 5W-20
To check the engine oil level: • Make sure that the engine is stopped for at least 5minutes to get a
complete drain of oil into the pan.
• Removetheoildipstick,cleanitbyblottingpaperorsimilar.
• Reinserttheoildipstick,takeoutagainandchecktheoillevel:

68 400202.01 vetus®Installation manual VF4 VF5
A If the oil level is at level A on the dipstick, you don’t need to refill.
B If the oil is at level B, the you may refill. In this case, you may see the oil reach level A. C If the oil is at level C or lower than that, then you must refill as soon as possible. Then, it
will be enough to take the oil back to at least level B. The oil level must never exceed level A.
If the engine is to be used under severe conditions, for instance being used for many operating hours (10 – 12 hours), the oil level should be at least in the middle of the two signs (min/max).
• Refilltheoilthroughtheoilrefillgateasshownbelowifisrequired.
IMPORTANT: Make sure that when you check the oil level that the engine is as level as possible, inclination backwards maximum 15 degrees! A correct weight distribution of the boat helps to read the correct value.

400202.01 69vetus®Installation manual VF4 VF5

340401.01 12-07 NederlandsPrinted in the Netherlands
vetus n.v.
400202.01 2012-02 Printed in the Netherlands
FOKKERSTRAAT 571 - 3125 BD SCHIEDAM - HOLLAND - TEL.:+31(10) 4377700 FAX:+31 (10) 4372673 - 4621286 - E-MAIL: [email protected] - INTERNET: http://www.vetus.com
Vet
us D
iese
l VF4
V
F5
N
eder
land
s


![U[GL 5wWlT !$ T[6[ VF5[, ZFCTM45ZlD8 S[ VlWS'T D[/JGFZGL ...!5 jlhf6] ~5[ p5](https://static.documents.pub/doc/80x56/60eb134614352f2ea2561430/-ugl-5wwlt-t6-vf5-zfctm45zld8-s-vlwst-djgfzgl-5-jlhf6-5-p5.jpg)


