164 In this chapter, you will learn how to: CHAPTER 6 In this chapter, you will learn how to: Consider the implications ■ ■ of using digital video in multimedia Discuss video analog and ■ ■ digital technologies and displays Work with digital video ■ ■ containers and codecs to select the best video record- ing formats for multimedia projects Find and acquire video clips ■ ■ Shoot and edit video for use ■ ■ in multimedia Video S ince the first silent film movie flickered to life, people have been fascinated with “motion” pictures. To this day, motion video is the element of multimedia that can draw gasps from a crowd at a trade show or firmly hold a student’s interest in a computer-based learning project. Digital video is the most engaging of multimedia venues, and it is a powerful tool for bringing computer users closer to the real world. It is also an excel- lent method for delivering multimedia to an audience raised on televi- sion. With video elements in your project, you can effectively present your messages and reinforce your story, and viewers tend to retain more of what they see. But take care! Video that is not thought out or well produced can degrade your presentation. Using Video Carefully planned, well-executed video clips can make a dramatic differ- ence in a multimedia project. A clip of John F. Kennedy proclaiming “Ich bin ein Berliner” in video and sound is more compelling than a scrolling text field containing that same speech. Before deciding whether to add video to your project, however, it is essential to have an understanding of the medium, its limitations, and its costs. is chapter provides a founda- tion to help you understand how video works, the different formats and standards for recording and playing video, and the differences between computer and television video. e equipment needed to shoot and edit video, as well as tips for adding video to your project, are also covered. Video standards and formats are still being refined as transport, stor- age, compression, and display technologies take shape in laboratories and in the marketplace and while equipment and post-processing evolves from its analog beginnings to become fully digital, from capture to display. Working with multimedia video today can be like a Mojave Desert camp- ing trip: you may pitch your tent on comfortable high ground and find that overnight the shifting sands have buried both your approach and your investment. Of all the multimedia elements, video places the highest perfor- mance demand on your computer or device—and its memory and storage.
Transcript
164
In this chapter, you will learn how to:
Vaughan / Multimedia: Making It Work / 0071748466 / Chapter 6 blind folio pg 164
C H A P T E R 6
In this chapter, you will learn how to:
Consider the implications ■■
of using digital video in multimedia
Discuss video analog and ■■
digital technologies and displays
Work with digital video ■■
containers and codecs to select the best video record-ing formats for multimedia projects
Find and acquire video clips■■
Shoot and edit video for use ■■
in multimedia
Video
Since the first silent film movie flickered to life, people have been fascinated with “motion” pictures. To this day, motion video is the element of multimedia that can draw gasps from a crowd at a trade show or firmly hold a student’s interest in a computer-based learning project. Digital video is the most engaging of multimedia venues, and it is a powerful tool for bringing computer users closer to the real world. It is also an excel-lent method for delivering multimedia to an audience raised on televi-sion. With video elements in your project, you can effectively present your messages and reinforce your story, and viewers tend to retain more of what they see. But take care! Video that is not thought out or well produced can degrade your presentation.
Using VideoCarefully planned, well-executed video clips can make a dramatic differ-ence in a multimedia project. A clip of John F. Kennedy proclaiming “Ich bin ein Berliner” in video and sound is more compelling than a scrolling text field containing that same speech. Before deciding whether to add video to your project, however, it is essential to have an understanding of the medium, its limitations, and its costs. This chapter provides a founda-tion to help you understand how video works, the different formats and standards for recording and playing video, and the differences between computer and television video. The equipment needed to shoot and edit video, as well as tips for adding video to your project, are also covered.
Video standards and formats are still being refined as transport, stor-age, compression, and display technologies take shape in laboratories and in the marketplace and while equipment and post-processing evolves from its analog beginnings to become fully digital, from capture to display. Working with multimedia video today can be like a Mojave Desert camp-ing trip: you may pitch your tent on comfortable high ground and find that overnight the shifting sands have buried both your approach and your investment.
Of all the multimedia elements, video places the highest perfor-mance demand on your computer or device—and its memory and storage.
165
Vaughan / Multimedia: Making It Work / 0071748466 / Chapter 6
Chapter 6 Video
Consider that a high-quality color still image on a computer screen could require as much as a megabyte or more of storage memory. Multiply this by 30—the number of times per second that the picture is replaced to pro-vide the appearance of motion—and you would need at least 30 megabytes of storage to play your video for one second, more than 1.8 gigabytes of storage for a minute, and 108 gigabytes or more for an hour. Just mov-ing all this picture data from computer memory to the screen at that rate would challenge the processing capability of a supercomputer. Some of the hottest and most arcane multimedia technologies and research efforts have dealt with compressing digital video image data into manageable streams of information. Compression (and decompression), using special software called a codec, allows a massive amount of imagery to be squeezed into a comparatively small data file, which can still deliver a good viewing experi-ence on the intended viewing platform during playback.
If you control the delivery platform for your multimedia project, you can specify special hardware and software enhancements that will allow you to work with high-definition, full-motion video, and sophisti-cated audio for high-quality surround sound. Or you can design a project to meet a specific compression standard, such as MPEG2 for Digital Versatile Disc (DVD) playback or MPEG4 for home video. You can install a superfast RAID (Redundant Array of Independent Disks) system that will support high-speed data transfer rates. You can include instructions in your authoring system that will spool video clips into RAM, ready for high-speed playback before they need to play. Having control of the playback platform is always good, but it is seldom available in the real world, so as you develop your video elements, you will need to make many choices and compromises based upon your assessment of the “lowest common denominator” playback platform where your project will be used.
How Video Works and Is DisplayedWhen light reflected from an object passes through a video camera lens, that light is converted into an electronic signal by a special sensor called a charge-coupled device (CCD). Top-quality broadcast cameras and even camcorders may have as many as three CCDs (one for each color of red, green, and blue) to enhance the resolution of the camera and the quality of the image.
It’s important to understand the difference between analog and digi-tal video. Analog video has a resolution measured in the number of hori-zontal scan lines (due to the nature of early cathode-tube cameras), but each of those lines represents continuous measurements of the color and brightness along the horizontal axis, in a linear signal that is analogous
Since multimedia gives you the ability to present infor-mation in a variety of ways,
let the content drive the selection of media for each chunk of information to be presented. Use traditional text and graphics where
appropriate; add animation when “still life” won’t get your message across; add
audio when further explana-tion is required; resort to video only when all other
methods pale by comparison.
David A. Ludwig, Interactive Learning Designs
166
Vaughan / Multimedia: Making It Work / 0071748466 / Chapter 6
Multimedia: Making It Work
to an audio signal. Digital video signals consist of a discrete color and brightness (RGB) value for each pixel. Digitizing analog video involves reading the analog signal and breaking it into separate data packets. This process is similar to digitizing audio, except that with video the vertical resolution is limited to the number of horizontal scan lines.
For some multimedia projects you may need to digitize legacy analog video. The following discussion will help you understand the differences between analog and digital video and the old and new standards for hori-zontal lines, aspect ratios, and interlacing.
Analog VideoIn an analog system, the output of the CCD is processed by the camera into three channels of color information and synchronization pulses (sync) and the signals are recorded onto magnetic tape. There are several video standards for managing analog CCD output, each dealing with the amount of separation between the components—the more separation of the color information, the higher the quality of the image (and the more expensive the equipment). If each channel of color information is transmitted as a separate signal on its own conductor, the signal output is called component (separate red, green, and blue channels), which is the preferred method for higher-quality and professional video work. Lower in quality is the signal that makes up Separate Video (S-Video), using two channels that carry luminance and chrominance information. The least separation (and thus the lowest quality for a video signal) is composite, when all the signals are mixed together and carried on a single cable as a composite of the three color channels and the sync signal. The composite signal yields less-precise color definition, which cannot be manipulated or color-corrected as much as S-Video or component signals.
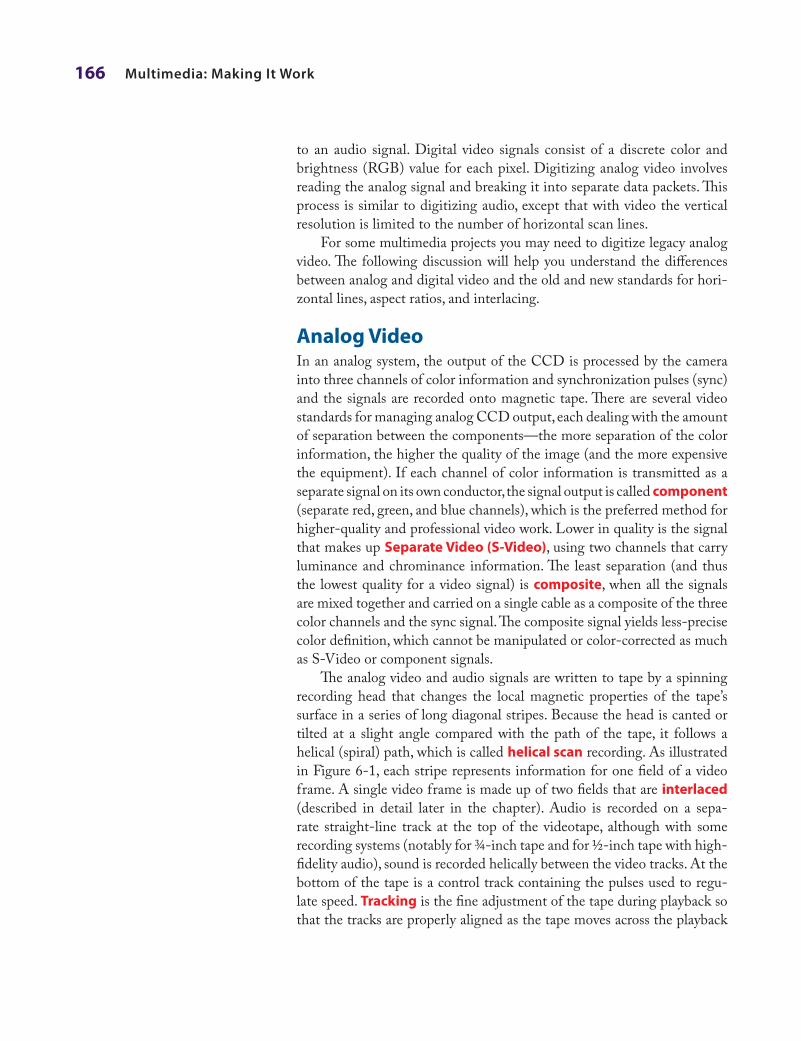
The analog video and audio signals are written to tape by a spinning recording head that changes the local magnetic properties of the tape’s surface in a series of long diagonal stripes. Because the head is canted or tilted at a slight angle compared with the path of the tape, it follows a helical (spiral) path, which is called helical scan recording. As illustrated in Figure 6-1, each stripe represents information for one field of a video frame. A single video frame is made up of two fields that are interlaced (described in detail later in the chapter). Audio is recorded on a sepa-rate straight-line track at the top of the videotape, although with some recording systems (notably for ¾-inch tape and for ½-inch tape with high-fidelity audio), sound is recorded helically between the video tracks. At the bottom of the tape is a control track containing the pulses used to regu-late speed. Tracking is the fine adjustment of the tape during playback so that the tracks are properly aligned as the tape moves across the playback
167
Vaughan / Multimedia: Making It Work / 0071748466 / Chapter 6
Chapter 6 Video
head. These are the signals your grandmother’s VCR reads when you rent Singing in the Rain (on video cassette) for the weekend.
Helical scan tape path
Video head
Half-inch videotapeAudio track
Video track
Control track
Figure 6-1 Diagram of tape path across the video head for analog recording
Many consumer set-top devices like video cassette recorders (VCRs) and satellite receivers add the video and sound signals to a sub-carrier and modulate them into a radio frequency (RF) in the FM broad-cast band. This is the NTSC, PAL, or SECAM signal available at the Antenna Out connector of a VCR. Usually the signal is modulated on either Channel 3 or Channel 4, and the resulting signal is demodulated by the TV receiver and displayed on the selected channel. Many television sets today also provide a composite signal connector, a S-Video connec-tor, and a High- Definition Multimedia Interface (HDMI) connector for purely digital input. Video displays for computers typically provide analog component (red, green, blue) input through a 15-pin VGA connector and also a purely digital Digital Visual Interface (DVI) and/or an HDMI connection.
Three analog broadcast video standards are commonly in use around the world: NTSC, PAL, and SECAM. In the United States, the NTSC standard has been phased out, replaced by the ATSC Digital Television Standard. Because these standards and formats are not easily interchange-able, it is important to know where your multimedia project will be used. A video cassette recorded in the United States (which uses NTSC) will not play on a television set in any European country (which uses either PAL or SECAM), even though the recording method and style of the cassette is “VHS.” Likewise, tapes recorded in European PAL or SECAM formats will not play back on an NTSC video cassette recorder. Each system is
168
Vaughan / Multimedia: Making It Work / 0071748466 / Chapter 6
Multimedia: Making It Work
based on a different standard that defines the way information is encoded to produce the electronic signal that ultimately creates a television pic-ture. Multiformat VCRs can play back all three standards but typically cannot dub from one standard to another. Dubbing between standards still requires high-end, specialized equipment.
NTSCThe United States, Canada, Mexico, Japan, and many other countries used a system for broadcasting and displaying video that is based upon the specifications set forth by the 1952 National Television Standards Committee (NTSC). These standards defined a method for encoding information into the electronic signal that ultimately created a televi-sion picture. As specified by the NTSC standard, a single frame of video was made up of 525 horizontal scan lines drawn onto the inside face of a phosphor-coated picture tube every 1/30th of a second by a fast-moving electron beam. The drawing occurred so fast that your eye would perceive the image as stable. The electron beam actually made two passes as it drew a single video frame—first it laid down all the odd-numbered lines, and then all the even-numbered lines. Each of these passes (which happen at a rate of 60 per second, or 60 Hz) painted a field, and the two fields were then combined to create a single frame at a rate of 30 frames per second (fps). (Technically, the speed is actually 29.97 Hz.)
PALThe Phase Alternate Line (PAL) system was used in the United Kingdom, Western Europe, Australia, South Africa, China, and South America. PAL increased the screen resolution to 625 horizontal lines, but slowed the scan rate to 25 frames per second. As with NTSC, the even and odd lines were interlaced, each field taking 1/50 of a second to draw (50 Hz).
SECAMThe Sequential Color and Memory (SECAM) (taken from the French name, reported variously as Système Électronic pour Couleur Avec Mémoire or Séquentiel Couleur Avec Mémoire) system was used in France, Eastern Europe, the former USSR, and a few other countries. Although SECAM is a 625-line, 50 Hz system, it differed greatly from both the NTSC and the PAL color systems in its basic technology and broadcast method. Often, however, TV sets sold in Europe utilized dual components and could handle both PAL and SECAM systems.
Digital VideoIn digital systems, the output of the CCD is digitized by the camera into a sequence of single frames, and the video and audio data are compressed
Sometimes we define “NTSC” as “Never The Same
Color.”
Richard Santalesa, R&D Technologies
169
Vaughan / Multimedia: Making It Work / 0071748466 / Chapter 6
Chapter 6 Video
before being written to a tape (see Figure 6-2) or digitally stored to disc or flash memory in one of several proprietary and competing formats. Digital video data formats, especially the codec used for compressing and decom-pressing video (and audio) data, are important; more about them later in this chapter.
Figure 6-2 Diagram of tape path across the video head for digital recording
In 1995, Apple’s FireWire technology was standardized as IEEE 1394, and Sony quickly adopted it for much of its digital camera line under the name i.Link. FireWire and i.Link (and USB 2) cable connec-tions allow a completely digital process, from the camera’s CCD to the hard disk of a computer; and camcorders store the video and sound data on an onboard digital tape, writable mini-DVD, mini–hard disk, or flash memory.
HDTVWhat started as the High Definition Television (HDTV) initiative of the Federal Communications Commission in the 1980s changed first to the Advanced Television (ATV) initiative and then finished as the Digital Television (DTV) initiative by the time the FCC announced the change in 1996. This standard, which was slightly modified from both the Digital Television Standard (ATSC Doc. A/53) and the Digital Audio Compression Standard (ATSC Doc. A/52), moved U.S. television from an analog to a digital standard. It also provided TV stations with sufficient bandwidth to present four or five Standard Television (STV, providing the NTSC’s resolution of 525 lines with a 3:4 aspect ratio, but in a digital sig-nal) signals or one HDTV signal (providing 1,080 lines of resolution with a movie screen’s 16:9 aspect ratio).
170
Vaughan / Multimedia: Making It Work / 0071748466 / Chapter 6
Multimedia: Making It Work
HDTV provides high resolution in a 16:9 aspect ratio (see Figure 6-3). This aspect ratio allows the viewing of Cinemascope and Panavision movies. There was contention between the broadcast and computer industries about whether to use interlacing or progressive-scan technologies. The broadcast industry promulgated an ultra-high-resolu-tion, 1920 × 1080 interlaced format (1080i) to become the cornerstone of the new generation of high-end entertainment centers, but the com-puter industry wanted a 1280 × 720 progressive-scan system (720p) for HDTV. While the 1920 × 1080 format provides more pixels than the 1280 × 720 standard, the refresh rates are quite different. The higher-resolution interlaced format delivers only half the picture every 1/60 of a second, and because of the interlacing, on highly detailed images there is a great deal of screen flicker at 30 Hz. The computer people argue that the picture quality at 1280 × 720 is superior and steady. Both formats have been included in the HDTV standard by the Advanced Television Systems Committee (ATSC), found at www.atsc.org.
Safe title area512 x 384 (4:3)
Monitor 640x480 (4:3)
NTSC television overscanapprox. 648 x 486 (4:3) 35mm slide / photo
768 x 512 (3:2)
HDTV1280 x 720 (16:9)
Figure 6-3 Here you can see the difference between VGA and HDTV aspect ratios.
DisplaysColored phosphors on a cathode ray tube (CRT) screen glow red, green, or blue when they are energized by an electron beam. Because the intensity of the beam varies as it moves across the screen, some colors glow brighter
171
Vaughan / Multimedia: Making It Work / 0071748466 / Chapter 6
Chapter 6 Video
than others. Finely tuned magnets around the picture tube aim the elec-trons precisely onto the phosphor screen, while the intensity of the beam is varied according to the video signal. This is why you needed to keep speakers (which have strong magnets in them) away from a CRT screen. A strong external magnetic field can skew the electron beam to one area of the screen and sometimes caused a permanent blotch that cannot be fixed by degaussing—an electronic process that readjusts the magnets that guide the electrons. If you had the misfortune to forget and wear a watch, the degausser might stop it permanently and then, if you are particularly unlucky, erase the magnetic strips on the credit cards in your wallet as well. If a computer displays a still image or words onto a CRT for a long time without changing, the phosphors will permanently change, and the image or words can become visible, even when the CRT is powered down. Screen savers were invented to prevent this from happening.
Flat screen displays are all-digital, using either liquid crystal display (LCD) or plasma technologies, and have supplanted CRTs for computer use. Some professional video producers and studios, however, prefer CRTs to flat screen displays, claiming colors are brighter and more accurately reproduced.
Full integration of digital video in cameras and on computers elimi-nates the analog television form of video, from both the multimedia pro-duction and the delivery platform. If your video camera generates a digital output signal, you can record your video direct-to-disk, where it is ready for editing. If a video clip is stored as data on a hard disk, CD-ROM, DVD, or other mass-storage device, that clip can be played back on a computer’s monitor without special hardware.
Interlacing and Progressive ScanThe process of building a single frame from two fields is called interlacing, a technique that helps to prevent flicker on CRT screens. Computer moni-tors use a different progressive-scan technology, and draw the lines of an entire frame in a single pass, without interlacing them and without flicker. In television, the electron beam actually makes two passes on the screen as it draws a single video frame, first laying down all the odd-numbered lines, then all the even-numbered lines, as they are interlaced. On a computer monitor, lines are painted one-pixel thick and are not interlaced. Single-pixel lines displayed on a computer monitor look fine; on a television, these thin lines flicker brightly because they only appear in every other field. To prevent this flicker on CRTs, make sure your lines are greater than two pixels thick and that you avoid typefaces that are very thin or have elabo-rate serifs. If you are capturing images from a video signal, you can filter them through a de-interlacing filter provided by image-editing applica-tions such as Photoshop and Fireworks. With typefaces, interlacing flicker
172
Vaughan / Multimedia: Making It Work / 0071748466 / Chapter 6
Multimedia: Making It Work
can often be avoided by anti-aliasing the type to slightly blur the edges of the characters. The term “interlacing” has a different meaning on the Web, where it describes the progressive display of lines of pixels as image data is downloaded, giving the impression that the image is coming from blurry into focus as increasingly more data arrives (see Chapter 13).
Most computers today provide video outputs to CRT, LCD, or plasma monitors at greater than 1024 × 768 resolution. Table 6-1 describes the various aspect ratios and width/heights in pixels used by computer displays since IBM’s VGA standard was adopted in 1987. The VGA’s once ubiqui-tous 640 × 480 screen resolution is again becoming common for handheld and mobile device displays.
Table 6-1 Screen Resolutions for Computer Monitors
In the realm of digital television displays, Table 6-2 shows the most common screen resolutions. Note that the highest resolution, 1080p, does not include a 60-per-second frame refresh rate. When the ATSC standard was written in the early 1990s, that was simply too fast for the broadcast digital signal to keep up. Not shown is the 720 × 576 resolution used in PAL systems.
173
Vaughan / Multimedia: Making It Work / 0071748466 / Chapter 6
Chapter 6 Video
Scan Lines from Top to Bottom
Pixels from Left to Right
Aspect Ratio Display Rate in Frames per Second
1080p (progressive) 1920 16:9 30, 24
1080i (interlaced) 1920 16:9 30
720p (progressive) 1280 16:9 60, 30, 24
480p (progressive) 704 or 640 16:9 or 4:3 60, 30, 24
480i (interlaced) 704 or 640 16:9 or 4:3 30
Table 6-2 Common Digital Television Resolutions
Overscan and the Safe Title AreaAs illustrated earlier in Figure 6-3, it is common practice in the televi-sion industry to broadcast an image larger than will fit on a standard TV screen so that the “edge” of the image seen by a viewer is always bounded by the TV’s physical frame, or bezel. This is called overscan. In contrast, computer monitors display a smaller image on the monitor’s picture tube ( underscan), leaving a black border inside the bezel. Consequently, when a digitized video image is displayed on a CRT, there is a border around the image; and, when a computer screen is converted to video, the outer edges of the image will not fit on a TV screen. Only about 360 of the 480 lines of the computer screen will be visible. Video editing software often will show you the safe areas while you are editing.
TIP Avoid using the outer 15 percent of the screen when producing computer-generated graphics and titles for use in television video. The safe title area, where your image will not be affected by overscanning, even in the worst condi-tions, is illustrated in Figure 6-3.
Digital Video ContainersA digital video architecture is made up of an algorithm for compressing and encoding video and audio, a container in which to put the compressed data, and a player that can recognize and play back those files. Common containers for video are Ogg (.ogg, Theora for video, Vorbis for audio), Flash Video (.flv), MPEG (.mp4), QuickTime (.mov), Windows Media Format (.wmv), WebM (.webm), and RealMedia (.rm). Containers may include data compressed by a choice of codecs, and media players may recognize and play back more than one video file container format.
Container formats may also include metadata—important informa-tion about the tracks contained in them—and even additional media
174
Vaughan / Multimedia: Making It Work / 0071748466 / Chapter 6
Multimedia: Making It Work
besides audio and video. The QuickTime container, for example, allows inclusion of text tracks, chapter markers, transitions, and even interactive sprites. Totally Hip’s LiveStage Pro (www.totallyhip.com) is an authoring tool that can produce interactive multimedia self-contained within a single QuickTime .mov container.
CodecsTo digitize and store a 10-second clip of full-motion video in your computer requires the transfer of an enormous amount of data in a very short amount of time. Reproducing just one frame of digital video component video at 24 bits requires almost 1MB of computer data; 30 seconds of full-screen, uncompressed video will fill a gigabyte hard disk. Full-size, full-motion uncompressed video requires that the computer deliver data at about 30MB per second. This overwhelming technological bottleneck is overcome using digital video compression schemes or codecs (coders/decoders). A codec is the algorithm used to compress a video for delivery and then decode it in real time for fast playback. Different codecs are optimized for different methods of delivery (for example, from a hard drive, from a DVD, or over the Web). Codecs such as Theora and H.264 compress digital video infor-mation at rates that range from 50:1 to 200:1. Some codecs store only
Captain’s Log: We received some excellent design tips from Bernice T. Glenn:
As intermedia applications con-tinue to proliferate, producers and designers need to know how to float between print and color pigment, digital color and RGB as viewed on a monitor, and analog color as viewed on a television screen. Color formulas for multi-media, especially when it is interac-tive, depend heavily on human factors. Contrast—or the degree of tonal difference between one color and another—is often more
important when working with color on a computer screen. A combina-tion of pure yellow with pure violet, or blue and orange, for example, will vibrate when viewed in RGB. On video, disturbing flickers, extra-neous colors, and other artifacts usually appear on the borders between pure complementary colors. On top of that, colors that look great on your computer moni-tor may not even show up when transferred to video. Important elements can be emphasized by using fully saturated colors against a neutral background, whose color
may complement as a grayed-down tint of the color.
When readability is important, con-trast in color saturation and value between the type and its back-ground really works, using almost any color combination.
Red or green may need to be avoided as cue colors [for menu but-tons and icons] because eight per-cent of the population is color blind to some extent and cannot see reds or greens in their true color value.
From “Ask the Captain,” a monthly column written by Tay Vaughan for NewMedia magazine
First Person
175
Vaughan / Multimedia: Making It Work / 0071748466 / Chapter 6
Chapter 6 Video
the image data that changes from frame to frame instead of the data that makes up each and every individual frame. Other codecs use computation-intensive methods to predict what pixels will change from frame to frame and store the predictions to be deconstructed during playback. These are all lossy codecs where image quality is (somewhat) sacrificed to significantly reduce file size.
MPEGThe MPEG standards were developed by the Moving Picture Experts Group (MPEG, www.mpeg.org), a working group convened by the Inter-national Organization for Standardization (ISO) and the International Electro-technical Commission (IEC), which created standards for the digital representation of moving pictures as well as associated audio and other data. Using MPEG-1 (specifications released in 1992), you could deliver 1.2 Mbps (megabits per second) of video and 250 Kbps (kilobits per second) of two-channel stereo audio using CD-ROM technology. MPEG-2 (specifications released in 1994), a completely different system from MPEG-1, required higher data rates (3 to 15 Mbps) but also deliv-ered higher image resolution, improved picture quality, interlaced video formats, multiresolution scalability, and multichannel audio features. MPEG-2 became the video compression standard required for digital television (DTV) and for making DVDs.
The MPEG specifications since MPEG-2 include elements beyond just the encoding of video. As a container, MPEG-4 (specifications released in 1998 and 1999) provides a content-based method for assimilating mul-timedia elements. It offers indexing, hyperlinking, querying, browsing, uploading, downloading, and deleting functions, as well as “hybrid natural and synthetic data coding,” which will enable harmonious integration of natural and synthetic audiovisual objects. With MPEG-4, multiple views, layers, and multiple sound tracks of a scene, as well as stereoscopic and 3-D views, are available, making virtual reality workable. MPEG-4 can adjust to varied download speeds, making it an attractive option for delivery of video on the Web. The MPEG-4 AVC standard (Advanced Video Cod-ing, Part 10) requires the H.264 codec for Blu-ray discs.
Because the software behind MPEG-4 is patented by more than two dozen companies, developers who build video editors and players that read and write MPEG-4 files must purchase licenses and make royalty payments.
The Codec WarsThe high bit rate requirements of video and the (relatively) low bit rates available from CD-ROMs, and later from the Web, have led to a long and occasionally confusing progression in the development of codecs.
176
Vaughan / Multimedia: Making It Work / 0071748466 / Chapter 6
Multimedia: Making It Work
Generally, the greater the compression, the more processing “horse-power” (and waiting time) is needed to compress and decompress the video. So only relatively new computers are capable of decompressing highly compressed video at a rate that can keep up with the video data stream. Using the best or “latest” codecs in your project is a good idea, but it must be balanced by ensuring that the video will play on the widest range of computers.
Unencumbered by licensing and royalty fees, and supported by many but not all implementations of the HTML5 browsers’ <VIDEO> tag (see Chapter 13), the Theora video codec and the Vorbis audio codec in an Ogg container is both platform independent and widely avail-able, particularly within free and open-source video editing software. At one point in the development of the HTML5 specification, Ogg (using Theora and Vorbis codecs) was the video container required to be avail-able in all compliant browsers, thus providing a single video format web developers could count on. But some manufacturers complained that their own favored (but proprietary and patented) codecs worked bet-ter and no container should be specified at all. To the consternation of the open-source and web developer community, midway through the evolution of the draft HTML5 spec the language was changed from effectively requiring all compliant browsers to support at minimum Ogg Theora video and Ogg Vorbis audio, as well as the Ogg container format, to simply suggesting that browsers support the same codecs, thus leaving standardization of the <VIDEO> containers and codecs in limbo (see Table 6-3).
The Flash video container, which uses the older VP6 and a newer H.263 codec (depending upon version), is used by YouTube and at many web sites but requires the Flash plug-in to be installed in the user’s browser. For playing WMV containers, Macintosh computers require installing the Silverlight plug-in, a Microsoft development framework similar to Flash. The H.264 codec was developed by the Moving Picture Experts Group, is patented and proprietary, and is required on Blu-ray discs and used by YouTube, iTunes, and some broadcast services. Google’s open-source VP8 codec works within the WebM container (www.webmproject.org), and was launched as an effort to replace Flash and H.264 on the Web. Google is re-encoding all its Flash holdings at YouTube to work with WebM and VP8 as well as with the H.264 codec.
Because of this codec and container war, for web developers wish-ing to place video elements onto their pages, programming with the HTML5 <VIDEO> tag (which was supposed to simplify and standard-ize inclusion of video at web sites) remains as complicated as ever (see Table 6-3). This is a constantly changing area of development, so check these browsers from time to time to see which codecs and containers are currently supported:
My client had just completed a production run of 5,000
CDs containing my project for them. I was pretty proud
of it: it had a 3D fly-in opening, integrated testing,
Flash elements, customizable printing, the ability to save paths through the program. I thought I had thoroughly tested the golden master. But late in development I had changed the audio
codec in three of the video clips and, sure enough, the audio wouldn’t play on the Macintosh on those three clips. The client tossed the
production run. I was a victim of the killer codec.
Brad Borch, Activa Design
177
Vaughan / Multimedia: Making It Work / 0071748466 / Chapter 6
Chapter 6 Video
Internet Explorer 9
Firefox 4.0+
Safari 3.0+
Chrome 6+
Opera 11.0+
Apple iPhone/iPad
Android Devices
MP4 Container with H.264 video and ACC audio codecs
yes yes yes yes yes
MOV Container with H.264 video and ACC audio codecs
yes yes
OGG Container with Theora video and Vorbis audio codecs
yes yes yes
WebM Container with VP8 video and Vorbis audio codecs
yes yes yes yes yes yes
Flash FLV Container with VP6 video and MP3 audio codecs
plug-in required
plug-in required
plug-in required
plug-in required
plug-in required
Flash FLV Container with H.263 video and MP3 audio codecs
plug-in required
plug-in required
plug-in required
plug-in required
plug-in required
Flash MP4 Container with H.264 video and AAC audio codecs
plug-in required
plug-in required
plug-in required
plug-in required
plug-in required
Table 6-3 Not All HTML5 Video Containers and Their Codecs Are Recognized as Playable by All Browsers
A discussion of the HTML5 <VIDEO> tag can be found in Chapter 13 along with snippets of code for launching your video using HTML5.
178
Vaughan / Multimedia: Making It Work / 0071748466 / Chapter 6
Multimedia: Making It Work
Video Format ConvertersBe prepared to produce more than one version of your video (codecs in a container) to ensure that the video will play on all the devices and in all the browsers necessary for your project’s distribution. DVD video uses MPEG-2 compression. Blu-ray video uses MPEG-4 AVC compression. These are known standards and few choices are necessary: simply click “Save for DVD” or “Save for Blu-ray.” But if you need to prepare a video file that will run on an iPod, a Droid, and an Atom-based netbook, as well as in all web browsers, you will need to convert your material into multiple formats. There are many free, shareware, and inexpensive file format con-verters available for multiple platforms. Figure 6-4 shows a menu of video format selections and profiles available in the free converter Handbrake for Mac and Windows (http://handbrake.fr).
Figure 6-4 Working with many
video formats (containers and codecs) is made
simpler with conver-sion software.
179
Vaughan / Multimedia: Making It Work / 0071748466 / Chapter 6
Chapter 6 Video
Obtaining Video ClipsAfter you’ve decided that your project should and will include video, consider whether you should shoot new “footage” (a legacy term from the film and analog world) or acquire preexisting content for your video clips. There are many sources for film and video clips: a friend’s home movies may suffice, or you can go to a “stock” footage house or a television station or movie studio. But acquiring footage that you do not own outright can be a nightmare—it is expensive, and licensing rights and permissions may be difficult, if not impossible, to obtain. Each second of video could cost $50 to $100 or more to license. Even material from a “public domain clip” from the National Archives must be researched:
Generally, materials produced by Federal agencies are in the public domain and may be reproduced without permission. However, not all materials appearing on this web site are in the public domain... Items found in our holdings may be copy-righted. Please note that it is your responsibility to identify the copyright owner and to obtain permission before making use of this material in any way.
NOTE Many companies sell royalty-free video stock specifically for multi-media productions—these are lower resolution than broadcast quality and typi-cally less than full-frame video.
On some projects, you will have no choice but to pay the price for required footage. If it is absolutely essential that your project include a clip of Elvis Presley crooning “You Ain’t Nothing But a Hound Dog,” and an Elvis impersonator just won’t do, you will have to negotiate for rights to use the real thing. If your budget can’t cover the cost of licensing a particu-lar video clip, you may want to consider using other alternatives. You could try locating a less expensive archival video source, using a series of still images rather than video, or shooting your own video. If you shoot your own video for a project, make sure you have talent releases from all persons who appear or speak and permission to use the audio effects and music you weave into it. Licensing, permissions, and legal issues are discussed more fully in Chapter 11.
For projects that are focused on training, particularly training peo-ple to use software applications, video screen capture of mouse and key activity is widely used along with a voice-over sound track. Video screen capture tools for both PC and Macintosh systems will generate video files that can then be edited and integrated with audio. One eLearning
180
Vaughan / Multimedia: Making It Work / 0071748466 / Chapter 6
Multimedia: Making It Work
and courseware authoring program, Adobe’s Captivate (www.adobe.com/products/captivate/), will not only capture your own screen activity but allow you to import video in a wide variety of formats (AVI, MOV, FLV, MPEG) and edit it into your final project.
TIP Before nonlinear video editing suites became commonplace in televi-sion studios, video was edited into a master using two tape decks (A and B). The A deck contained video of an event or the reporter doing an interview; the B deck contained ancillary and supporting material and scenery. “B-roll” is what editors call the collection of general footage that supports the main theme or narration. Locating and integrating B-roll, especially using royalty-free or public domain footage, can greatly enhance your project while keeping your costs down.
Shooting and Editing VideoBefore you head out to the field with your camcorder in hand, it is impor-tant to understand at least the basics of video recording and editing, as well as the constraints of using video in a multimedia project.
Setting up a production environment for making digital video requires hardware that meets minimum specifications for processing speed, data transfer, and storage. There are many considerations to keep in mind when setting up your production environment, depending on the capabilities of your camcorder:
Fast processor(s)■■
Plenty of RAM■■
Computer with FireWire (IEEE 1394 or i.Link) or USB connection ■■
and cablesFast and big hard disk(s)■■
A second display to allow for more real estate for your editing ■■
softwareExternal speakers■■
Nonlinear editing (NLE) software■■
Expensive professional video equipment and services may not yield proportionately greater benefits than if you used consumer-grade equip-ment and nonlinear editors. As with audio equipment, you need to make balancing decisions using Vaughan’s Law of Multimedia Minimums (see Chapter 4). Most likely, your goal is to expend resources without dimin-ishing returns—in other words, to produce multimedia that is adequate and does its job, but doesn’t break your bank. If you can, experiment with
181
Vaughan / Multimedia: Making It Work / 0071748466 / Chapter 6
Chapter 6 Video
various combinations of video recording and playback devices hooked to your computer, and test the results using your multimedia-authoring plat-form. You can do a great deal of satisfactory work with consumer-grade video cameras and recording equipment if you understand the limitations of the technology.
The Shooting PlatformNever underestimate the value of a steady shooting platform. A classic symbol of amateur home movies is shaky camera work. Using a tripod or even placing the camera on a stable platform, such as a rolled-up sweater on the hood of a car, can improve a shot. With a little care, and careful adjustment of the lockdown screws, a sturdy conventional tripod can do wonders. If you must shoot handheld, try to use a camera with an elec-tronic image stabilization feature for static shots, use a “steady-cam” bal-ancing attachment, or use camera moves and a moving subject to mask your lack of steadiness. Even using a rolling office chair and sitting facing the back with the camera balanced on the chair-back makes a convenient, stable dolly. If you must shoot handheld, set the camera’s lens to the widest angle: at a wide angle, camera motion becomes smaller relative to the field of view and is thus less apparent.
And invest in an external microphone, like a Lavaliere. It will give you better audio than the on-camera microphone during interviews, and you can easily hide it in the scene during general use. Or use a “shotgun” mic on a boom, with an operator who can “ride levels” by monitoring the recorded volume.
Most important, learn the features and controls of your camera—there are many tiny icons and menu selections! Study the manual. Experiment and practice. Stay organized—keep your extra batteries, spare memory cards and tapes, your charger and cables, and even your manual (in case you haven’t studied it hard enough) in a good camera bag. Learn how to connect the camera to your computer and how to access your video footage with nonlinear editing software. Learn how to use the editing software. If you are new to video, this is a steep learning curve with many small annoyances, but it is forgiving: if you mess up your video, there is often something from it that can be recovered and used.
Many digital camcorders will allow you to choose 4:3 or 16:9 aspect ratios for your recording, one or the other. Unfortunately, there is no easy way to convert between these aspect ratios, so you should decide up front which to use in your multimedia project. As shown in Figure 6-5, there are three ways to convert from a 4:3 aspect ratio for display on a 16:9 aspect ratio screen: you can stretch the 4:3 image to fill the 16:9 frame
182
Vaughan / Multimedia: Making It Work / 0071748466 / Chapter 6
Multimedia: Making It Work
(this distortion can make people look fat), you can zoom the width of the image to fit the 16:9 frame (you lose part of the top and bottom of the image), or you can place the image into the center of the 16:9 frame (leaving empty pillars right and left). There are two ways to convert from 16:9 to 4:3. The Letterbox or hard matte method produces blank bars at top and bottom, but leaves the original image untouched; Pan and Scan, on the other hand, loses both sides of the original image. When using the Pan and Scan method for conversion, editors will carefully pan across wide scenes to capture the best area to show. Videographers and wide-screen moviemakers often consider a 4:3 “safe frame” area when setting up their wide shots, knowing that their work will be converted to 4:3 for the DVD aftermarket. Some DVDs use an anamorphic widescreen coding system to squeeze 16:9 widescreen image data into a DVD’s stan-dard 4:3 aspect ratio format; with a compatible player, these “Enhanced for Widescreen Televisions” discs will play the original video properly on a 16:9 screen.
Converting 16:9 to 4:3
Original Letterbox Pan and Scan
Converting 4:3 to 16:9
Original Zoom StretchPillars
O i i l L b P d S
O i i l Pill Z S h
Figure 6-5 Methods for converting 4:3 and 16:9 aspect ratios in video production
TIP If your camera is HD-capable, it is a good idea to shoot your footage in HD. While it may be difficult to deploy HD video in your project due to bandwidth and memory constraints, you will have archived the footage at the highest resolution available to you. You can easily convert the high-definition
183
Vaughan / Multimedia: Making It Work / 0071748466 / Chapter 6
Chapter 6 Video
source video to standard definition, but you cannot convert the other way without enhancer software that attempts to increase the resolution and make the video “good looking.”
StoryboardingPreplanning a video project is a factor that cannot be ignored without costing time loss, lots of unnecessary aggravation, and money that would be better spent elsewhere. Successful video production, of any sort, deserves the time it takes to make a plan to carry it out. It may take a little time at first, but you’ll find it to be very helpful in the long run. Storyboards are like any sequential comic you read daily. Every day there are three or four panels showing a progression of story or information. Take the time to structure your production by writing it down and then engineer a sequential group of drawings showing camera and scene, shooting angles, lighting, action, special effects, and how objects move through from start to finish. A storyboard can get everyone on one page quickly.
LightingPerhaps the greatest difference between professional camcorders and consumer camcorders is their ability to perform at low light levels. With proper lighting, however, it may be difficult for uninitiated viewers to differentiate between shots taken with an expensive studio-grade video camera and an inexpensive camcorder. Using a simple floodlight kit, or even just being sure that daylight illuminates the room, can improve your image. Onboard battery lights for camcorders can be useful, but only in conditions where the light acts as a “fill light” to illuminate the details of a subject’s face. As in photography, good lighting techniques separate amateurs from professionals in video shoots.
Illustrated in Figure 6-6 is a screen from The Lighting Lab. The stan-dard lighting arrangement of a studio is displayed with fill, key, rim, and background lights. Changing any of these lights can make a dramatic dif-ference in the shot. This project originally used a QuickTime container of several hundred single-frame images of the model as she is lighted by every permutation of lamp and intensity; clicking a light switch instantly shows the effect of that combination. If you are not convinced that lighting is critical to the success of a photo or video shoot, it will become immedi-ately clear with this exercise! Try it at www.tayvaughan.com/multimedia/stuff/lightinglab.html.
184
Vaughan / Multimedia: Making It Work / 0071748466 / Chapter 6
Multimedia: Making It Work
Chroma KeysChroma keys allow you to choose a color or range of colors that become transparent, allowing the video image to be seen “through” the computer image. This is the technology used by a newscast’s weather person, who is shot against a blue background that is made invisible when merged with the electronically generated image of the weather map. The weath-erman controls the computer part of the display with a small handheld controller.
A useful tool easily implemented in most digital video editing applications is blue screen, green screen, Ultimatte, or chroma key editing. When Captain Picard of Star Trek fame walks on the surface of the moon, it is likely that he is actually walking on a studio set in front of a screen or wall painted blue. Actually placing Picard on the moon was, no doubt, beyond the budget of the shoot, but it could be faked using blue screen techniques. After shooting the video of Picard’s walk against a blue background and shooting another video consisting of the desired background moonscape, the two videos were mixed together: wherever there was blue in the Picard shot, it was replaced by the background image, frame by frame.
Blue screen is a popular technique for making multimedia titles because expensive sets are not required. Incredible backgrounds can be generated using 3-D modeling and graphic software, and one or more actors, vehicles, or other objects can be neatly layered onto that back-ground. Video editing applications provide the tools for this.
When you are shooting blue screen, be sure that the lighting of the screen is absolutely even; fluctuations in intensity will make this “key”
Figure 6-6 Good lighting is essential for
quality video results.
When I worked in live video at KCAL in Los Angeles, one of our anchor women wore a blouse that was the same chroma-key blue that we could program into our
Ultimatte. Actually, the anchor should have known
better. We, being the naughty guys we were, keyed a closeup
of two big eyes from one of the other anchors onto her blouse and fed it into
the stage floor monitor and waited to see how long it
would take before she noticed it. It was a couple of minutes, while everyone was trying to keep a straight face, before she saw what we had done. She threw her script at us,
and we all broke up laughing.
Joe Silverthorn, Integrated Multimedia Professor,
Olympic College
185
Vaughan / Multimedia: Making It Work / 0071748466 / Chapter 6
Chapter 6 Video
appear choppy or broken. Shooting in daylight, and letting the sun illuminate the screen, will mitigate this problem. Also be careful about “color spill.” If your actors stand too close to the screen, the colored light reflecting off the screen will spill onto them, and parts of their body will key out. While adjustments in most applications can compensate for this, the adjustments are limited. Beware of fine detail, such as hair or smoke, that wisps over the screen; this does not key well.
Figure 6-7 shows frames taken from a video of an actor shot against blue screen on a commercial stage. The blue background was removed from each frame, and the actor himself was turned into a photo-realistic animation that walked, jumped, pointed, and ran from a dinosaur.
Figure 6-7 This walking, jumping, and pointing actor was videotaped against a blue screen.
CompositionThe general rules for shooting quality video for broadcast use also apply to multimedia. When shooting video for playback in a small window, it is best to avoid wide panoramic shots, as the sweeping majesty will be lost. Use close-ups and medium shots, head-and-shoulders or even tighter. Depending upon the compression algorithm used (see the discussion on
186
Vaughan / Multimedia: Making It Work / 0071748466 / Chapter 6
Multimedia: Making It Work
video codecs earlier in the chapter), consider also the amount of motion in the shot: the more a scene changes from frame to frame, the more “delta” information needs to be transferred from the computer’s memory to the screen. Keep the camera still instead of panning and zooming; let the subject add the motion to your shot, walking, turning, talking.
Beware of excessive backlighting—shooting with a window or a bright sky in the background—is a common error in amateur video production. Many cameras can be set to automatically compensate for backlighting. If you adjust for this, the background may be “blown out” (so bright the video signal peaks), but at least the foreground image you’re focusing on will be visible. Of course, the best choice in this situ-ation is to light the foreground.
Non-professional cameras are set to always adjust the iris (the open-ing in the lens) to keep the image’s overall exposure at a constant level. When you go from a dark to light setting the camera will adjust, and you can often see this shift. Pro cameras allow the iris setting to be locked down to avoid this.
In different situations, white may not be white, depending on the color temperature (warmth or coolness) of the light source. White balance cor-rects for bluish, orange, or greenish color casts resulting from an uneven distribution of colors in the spectrum your eye tells you is white, but your less forgiving digital camera says is not quite white. Many cameras auto-matically set white balance with best guesses, but they also offer adjustable settings for daylight, shady, cloudy, tungsten, and fluorescent lighting con-ditions. Try to get the white balance correct when shooting; then you won’t be spending time with your editing software to remove the greenish tinge from your client’s white wedding dress.
Titles and TextTitles and text are often used to introduce a video and its content. They may also finish off a project and provide credits accompanied by a sound track. Titles can be plain and simple, or they can be storyboarded and highly designed. For plain and simple, you can use templates (see Figure 6-8) in an image editor and then sequence those images into your video using your video editing software. Or you can create your own imagery or anima-tions and sequence them. More elaborate titles, typical for feature films and commercial videos, can become multimedia projects in themselves. Upasana Nattoji Roy’s title design for Director Indrajit Nattoji’s “Aagey Se Right,” for example, began with creative ideas (see Chapter 10), transi-tioned into a detailed storyboard and animations (see Chapter 7), and was finally rendered using AfterEffects (see Figure 6-9).
187
Vaughan / Multimedia: Making It Work / 0071748466 / Chapter 6
Chapter 6 Video
Figure 6-9 Elaborate titles are storyboarded, animated, and rendered to video using many multimedia tools. This title sequence was designed for a short film and stitched together using AfterEffects at Switch! Check out http://theswitchsite.wordpress.com/ to view the finished title sequence.
Figure 6-8 Title templates are avail-able for downloading. This template from “Westie” is at www.mediacollege.com/downloads/video/titles/.
188
Vaughan / Multimedia: Making It Work / 0071748466 / Chapter 6
Multimedia: Making It Work
If you make your own, here are some suggestions for creating good titles:
Fonts for titles should be plain, sans serif, and bold enough to be ■■
easily read.When you are laying text onto a dark background, use white or a light ■■
color for the text.Use a drop shadow to help separate the text from the background ■■
image.Do not kern your letters too tightly.■■
If you use underlining or drawn graphics, always make your lines at ■■
least two pixels wide. If you use a one-pixel-wide line (or a width mea-sured in an odd number of pixels), the line may flicker when trans-ferred to video due to interlacing.Use parallel lines, boxes, and tight concentric circles sparingly. When ■■
you use them, draw them large and with thick lines.Avoid colors like bright reds and magenta that are too “hot”; they ■■
might twinkle and buzz.Neighboring colors should be markedly different in intensity. For ■■
example, use a light blue and a dark red, but not a medium blue and a medium red.Keep your graphics and titles within the safe area of the screen. Remem-■■
ber that CRT televisions overscan (see the earlier section “Overscan and the Safe Title Area”).Bring titles on slowly, keep them on screen for a sufficient time, and ■■
then fade them out.Avoid making busy title screens; use more pages or a longer sequence ■■
instead.
Nonlinear Editing (NLE)Top-of-the-line nonlinear editing (NLE) software includes Adobe’s Premiere, Apple’s Final Cut, and Avid’s Media Composer, the “A Team” of professional video editors. These are feature-packed and expensive pack-ages designed to work hand-in-hand with fast and powerful computers (six gigabytes of RAM recommended) and dedicated file servers. Many hours of training and many days of experience are needed before users become proficient.
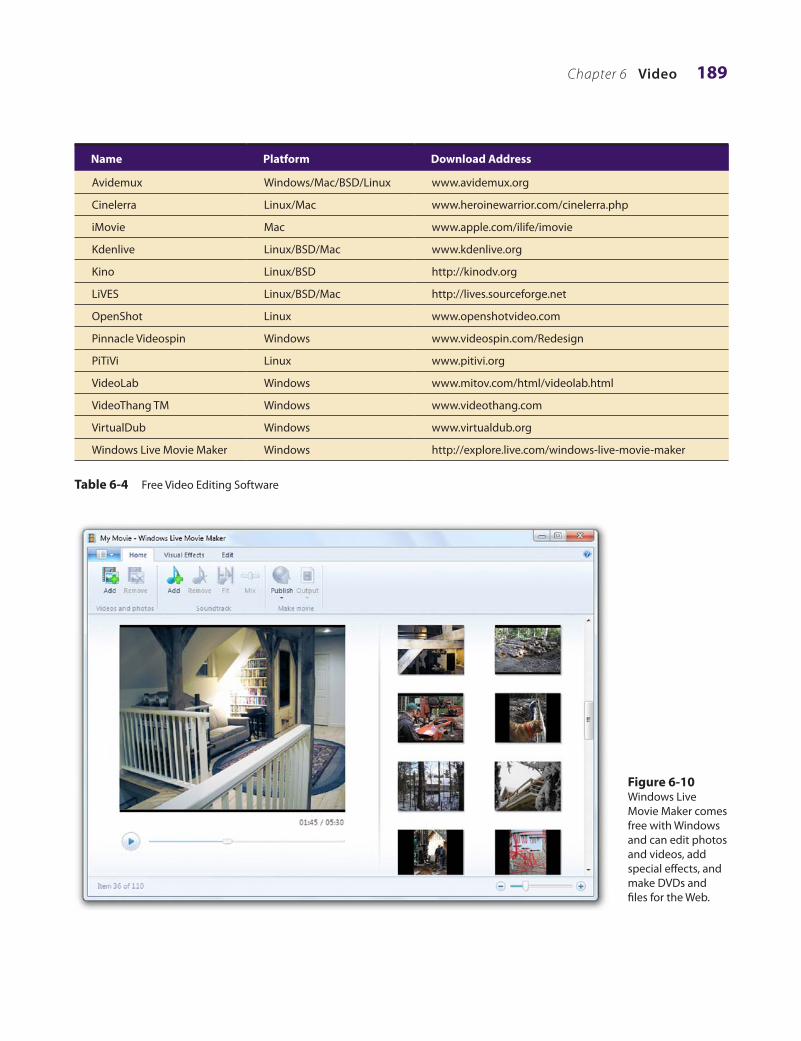
If your project involves simple cutting and editing of footage, with a few transitions and titles thrown in, then you may be satisfied with simpler software such as Microsoft’s Windows Live Movie Maker (see Figure 6-10) or Apple’s iMovie for Macs (see Figure 6-11) that come free with the operating system. Table 6-4 contains a list of free video editing software applications to choose from.
189
Vaughan / Multimedia: Making It Work / 0071748466 / Chapter 6
Pinnacle Videospin Windows www.videospin.com/Redesign
PiTiVi Linux www.pitivi.org
VideoLab Windows www.mitov.com/html/videolab.html
VideoThang TM Windows www.videothang.com
VirtualDub Windows www.virtualdub.org
Windows Live Movie Maker Windows http://explore.live.com/windows-live-movie-maker
Table 6-4 Free Video Editing Software
Figure 6-10 Windows Live Movie Maker comes free with Windows and can edit photos and videos, add special effects, and make DVDs and files for the Web.
190
Vaughan / Multimedia: Making It Work / 0071748466 / Chapter 6
Multimedia: Making It Work
Figure 6-11 iMovie is a robust video editor that comes free with Macintosh computers and provides full libraries of title templates, video effects, and transitions.
Remember not to edit and re-edit and re-edit again. The video codecs used are lossy, so each time you finalize a file, it will be less true than the original material—this is called generation loss. Because NLE software works with EDLs (edit decision lists) based upon the raw source video, be sure you have sufficient disk space to store your original footage.
Vaughan / Multimedia: Making It Work / 0071748466 / Chapter 6
191
For your review, here’s a summary of the important concepts discussed in this chapter.
Consider the implications of using digital video in multimedia
Video places the highest performance demand on ■■
any computer system.
A massive amount of imagery must be squeezed ■■
into a comparatively small data file using compression (and decompression) software called a codec.
You will need to make many choices and compro-■■
mises based upon your assessment of the “lowest common denominator” playback platform where your project will be used.
Discuss video analog and digital technologies and displays
A charge-coupled device (CCD) converts the light ■■
that has been reflected from an object through the camera’s lens.
Four broadcast and video standards and recording ■■
formats are commonly in use around the world: NTSC, PAL, SECAM, and HDTV.
HDTV provides high resolution in a 16:9 ■■
aspect ratio.
Flat screen displays are all-digital, using ■■
either liquid crystal display (LCD) or plasma technologies, and have supplanted CRTs for computer use.
The process of building a single frame from two ■■
fields is called interlacing, a technique that helps to prevent flicker.
Progressive-scan technology draws the lines of an ■■
entire video frame in a single pass, without inter-lacing them and without flicker.
Don’t place critical information such as text in the ■■
outer 15 percent of the screen. Keep it within the “safe title area.”
Work with digital video containers and codecs to select the best video recording formats for multi-media projects
Codecs are digital video and audio compression ■■
schemes that compress a video into a container for delivery and then decode it during playback.
Video containers may include data compressed ■■
by a choice of codecs, and media players may recognize and play back more than one video file container format.
The MPEG standards were developed by the ■■
Moving Picture Experts Group.
The HTML5 <VIDEO> tag was supposed to ■■
simplify and standardize inclusion of video at web sites, but it remains embroiled in a codec and container war.
Find and acquire video clips
There are many sources for digital video, but ■■
getting the rights can be difficult, time-consuming, and expensive.
eLearning projects often employ screen capture ■■
programs to record mouse and keyboard activities to teach about a software application.
Shoot and edit video for use in multimedia
Always shoot using a steady shooting platform.■■
Storyboards are a useful exercise when planning ■■
a shoot.
Good, even lighting is extremely important.■■
Expensive stages are not required when using blue ■■
screen or matte techniques.
Chapter 6 Review■■■Chapter Summary
Vaughan / Multimedia: Making It Work / 0071748466 / Chapter 6
192
16:9 (170)Advanced Television Systems Committee
(ATSC) (170)anamorphic widescreen (182)ATSC Digital Television Standard (167)B-roll (180)blue screen (184)cathode ray tube (CRT) (170)charge-coupled device (CCD) (165)chroma key (184)chroma key editing (184)codec (165)component (166)composite (166)degaussing (171)Digital Television (DTV) (169)Digital Visual Interface (DVI) (167)dubbing (168)DVD (Digital Versatile Disc) (165)EDL (edit decision list) (190)footage (179)generation loss (190)green screen (184)helical scan (166)High Definition Television (HDTV) (169)High-Definition Multimedia Interface (HDMI) (167)
interlacing (166)liquid crystal display (LCD) (171)Moving Picture Experts Group (MPEG) (175)National Television Standards Committee
(NTSC) (168)MPEG-1 (175)MPEG-2 (175)MPEG-4 (175)nonlinear editing (NLE) (188)overscan (173)Phase Alternate Line (PAL) (168)pillar (182)plasma (171)progressive-scan (171)RAID (Redundant Array of Independent
Disks) (165)safe title area (173)Separate Video (S-Video) (166)Sequential Color and Memory (SECAM) (168)Theora (174)tracking (166)Ultimatte (184)underscan (173)VGA connector (167)video cassette recorder (VCR) (167)white balance (186)
Avoid wide panoramic shots and camera motion ■■
when shooting for a small computer window on CD-ROM or the Web.
Fonts for titles should be plain, sans serif, and bold ■■
enough to be easily read.
Most editing is now being done on computers ■■
using nonlinear editing (NLE) software such as Avid, Premiere, and Final Cut.
Key Terms■■
Key Term Quiz■■
A redundant hard-disk system that will support high-speed data transfer rates is called a 1. ________________.The television signal format used in the United States, Japan, and many other countries is known as 2. ________________.
193
Vaughan / Multimedia: Making It Work / 0071748466 / Chapter 6
Television screens use a process of building a single frame from two fields to help prevent flicker on CRTs 3. in a technique called ________________.When creating graphics for conversion to video, do not place any critical information such as text in the 4. outside 15 percent of the image. Instead, keep it within the ________________ (three words).High-Definition Television (HDTV) is displayed in a(n) ________________ aspect ratio.5.
The television signal format used in France, Russia, and a few other countries is known as ____________.6.
The digital video and audio compression schemes that compress a video for delivery and then decode it 7. during playback are called ________________.When reformatting a 4:3 aspect ratio video to fit in the center of a HDTV screen, leaving the sides empty, 8. the effect is called ________________.The video compression/decompression scheme used in an Ogg container is called _____________.9.
MPEG is an acronym for ________________.10.
Multiple-Choice Quiz■■
In a video camera, the sensor that picks up light 1. is called a CCD. CCD stands for:
A computer’s output on a CRT is calibrated to 2. display an image:
smaller than the actual monitor’s capabilitya. larger than the actual monitor’s capabilityb. exactly the same size as the actual monitor’s c. capabilitythat adjusts automatically to the monitor’s d. capabilityof a fixed size; whether it is larger or smaller e. than the monitor’s capability depends on the monitor
Removing a residual magnetic field that distorts 3. the colors on a television screen is called:
Vaughan / Multimedia: Making It Work / 0071748466 / Chapter 6
194
The video technique that allows you to choose a 7. color or range of colors that become transparent, allowing the video image to be visible behind those colors in the overlying image, is known by all of the following except:
blue screena. Ultimatteb. chroma keyc. interlacingd. green screene.
Which of the following is a multimedia container 8. format?
JPEGa. DVD-RWb. ComponentYc. Hi-8d. Ogge.
Red or green should be avoided as cue colors 9. because:
they represent negative ideas in some a. culturesthey do not blend well with other colorsb. color-blind individuals cannot see them c. correctlythey are associated with “stop” and “go”d. they remind people of Christmase.
Which of the following is 10. not a good idea when creating titles (text) to be used in video?
Fonts for titles should be plain, sans serif, a. and bold enough to be easily read.When you are laying text onto a dark b. background, use white or a light color for the text.Do not kern your letters too tightly.c. If you use underlining or drawn graphics, d. make sure your lines are only one pixel wide.Use a drop shadow to help separate the text e. from the background.
Which of the following is 11. not a typical studio light?
rim lighta. fill lightb. key lightc. background lightd. focal lighte.
Which of the following is 12. not a codec?H.264a. Theorab. NTSCc. VP6d. VP8e.
Generation loss occurs when:13. an analog tape is copied to another analog a. tapea digital file is copied to another hard diskb. a digital file is copied to another hard drivec. a digital file is compressed with a lossy d. codecyour teenage son gets his tongue piercede.
Which of the following HTML5 tags is used in 15. the display of multimedia video?
<LOAD>a. <ANIMATE>b. <FORWARD>c. <PLAY>d. None of the abovee.
195
Vaughan / Multimedia: Making It Work / 0071748466 / Chapter 6
Essay Quiz■■
List the steps involved in capturing video, compressing the video, and preparing it for DVD. Briefly discuss 1. the decisions you need to make with each step regarding compromises on image quality and other limiting factors.
Discuss how the computer monitor image differs from a television image. List the limitations in creating 2. images on the computer destined for a television screen.
Discuss several considerations in shooting and editing video for multimedia. What techniques would you 3. use to produce the best possible video, at a reasonable cost? Which of these techniques apply to all video, and which apply specifically to multimedia?
Briefly discuss what defines the quality of a video signal. What factors affect this quality? How do the 4. various analog television signal formats differ in quality? How does the recording format affect this quality? What about digital format? How can you ensure that your video is of the best possible quality? If the end result is going to be a postage-stamp-sized streaming video clip at 10 frames per second, why would quality matter?
Define codec and list an example of a codec.5.
Lab Projects
Project 6.1■■■
Go to a local electronics superstore. What kinds of video cameras are available? What capabilities do the “prosumer” cameras have? What features do they have that would be useful in multimedia? Document your findings.
Project 6.2■■■
Locate three web sites that include video clips. What format are they served in? Examine the HTML source code to discover what method of video delivery is used. Make a note of your findings. Some clips are available in a streaming format and are not easily downloadable. Others can be downloaded. Download the clips you can and open them in QuickTime or Windows Media Player. List the codecs that were used to compress the clips.
Project 6.3■■■
Prepare five graphic images using a paint or drawing program. Be sure to include a variety of colors and contrasts. Add text to the images. Use small text, large text, text with serifs, bold text, and text in contrasting and similar colors. Add drop shadows. Add boxes and other shapes to the images, in various weights.
Locate a computer with video-out capabilities, and view the images on a digital display and on a CRT. Note your findings:
Which color combinations worked well? Which did not?■■
Were any colors distracting?■■
What about the text and graphics? Which looked best?■■
What about the safe title area? What percentage of the image was clipped? (Note that some computers ■■
have video outputs that underscan rather than overscan. Remember, such a setup does not accurately reflect the image size that would result from a computer-to-video conversion.)