WORK INSTRUCTION Warning: HARD COPIES OF THIS DOCUMENT MAY NOT BE THE LATEST VERSION. The most up-to-date document is located on the Intranet. Page 1 of 53 View Connection Request Details and Manage a Connection Request in eConnect. <Document Id.> Purpose This work instruction describes the steps required for a Registered Electrical Contractor (REC) or a Licenced Electrical Worker (LEW) to manage a Connection Request in eConnect. It will detail the process for the following actions: 1. View Connection Request details 2. Update a submitted Connection Request 3. Cancel a Connection Request 4. Clone a Connection Request 5. Make an enquiry Contents Section 1: View Connection Request Detail Section 2: Update a Submitted Connection Request Section 3: Update a Draft Connection Request Section 4: Manage Appointments Section 5: Make an Enquiry Section 6: Clone a Connection Request Section 7: Cancel a Connection Request
Transcript
WORK INSTRUCTION
Warning: HARD COPIES OF THIS DOCUMENT MAY NOT BE THE LATEST VERSION. The most up-to-date document is located on the Intranet.
Page 1 of 53
View Connection Request Details and Manage a Connection Request in eConnect.
<Document Id.>
Purpose This work instruction describes the steps required for a
Registered Electrical Contractor (REC) or a Licenced Electrical Worker (LEW) to manage a Connection Request in eConnect. It
will detail the process for the following actions: 1. View Connection Request details
2. Update a submitted Connection Request 3. Cancel a Connection Request 4. Clone a Connection Request
WORK INSTRUCTION CitiPower Pty Powercor Australia Ltd
Warning: HARD COPIES OF THIS DOCUMENT MAY NOT BE THE LATEST VERSION. The most up-to-date document is located on the Intranet.
Page 2 of 53
Task Detail: View Connection Request Details and Manage a Connection Request in eConnect.
Section 1: View Connection Request Details.
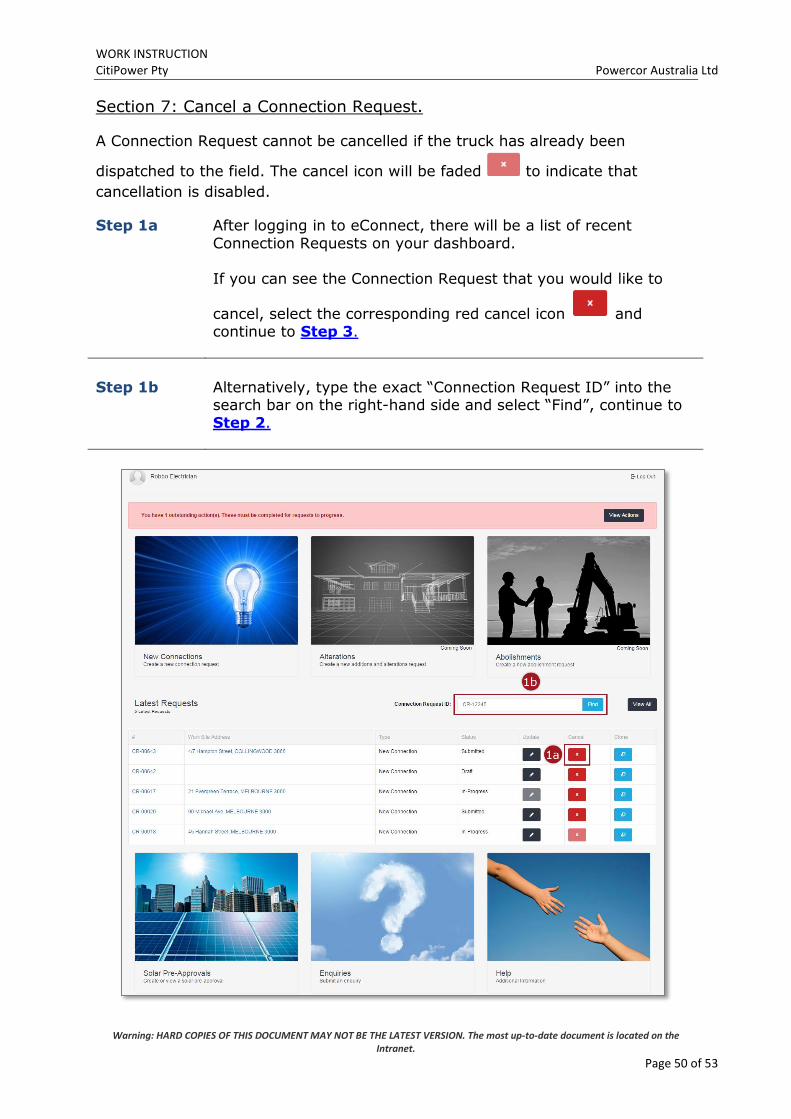
Step 1a After logging in to eConnect, there will be a list of recent Connection Requests on your dashboard.
If you can see the Connection Request that you would like to view, select the text in blue in the “#” or “Work Site Address”
fields.
Step 1b Alternatively, type the exact “Connection Request ID” into the
search bar on the right-hand side and select “Find”.
WORK INSTRUCTION CitiPower Pty Powercor Australia Ltd
Warning: HARD COPIES OF THIS DOCUMENT MAY NOT BE THE LATEST VERSION. The most up-to-date document is located on the Intranet.
Page 3 of 53
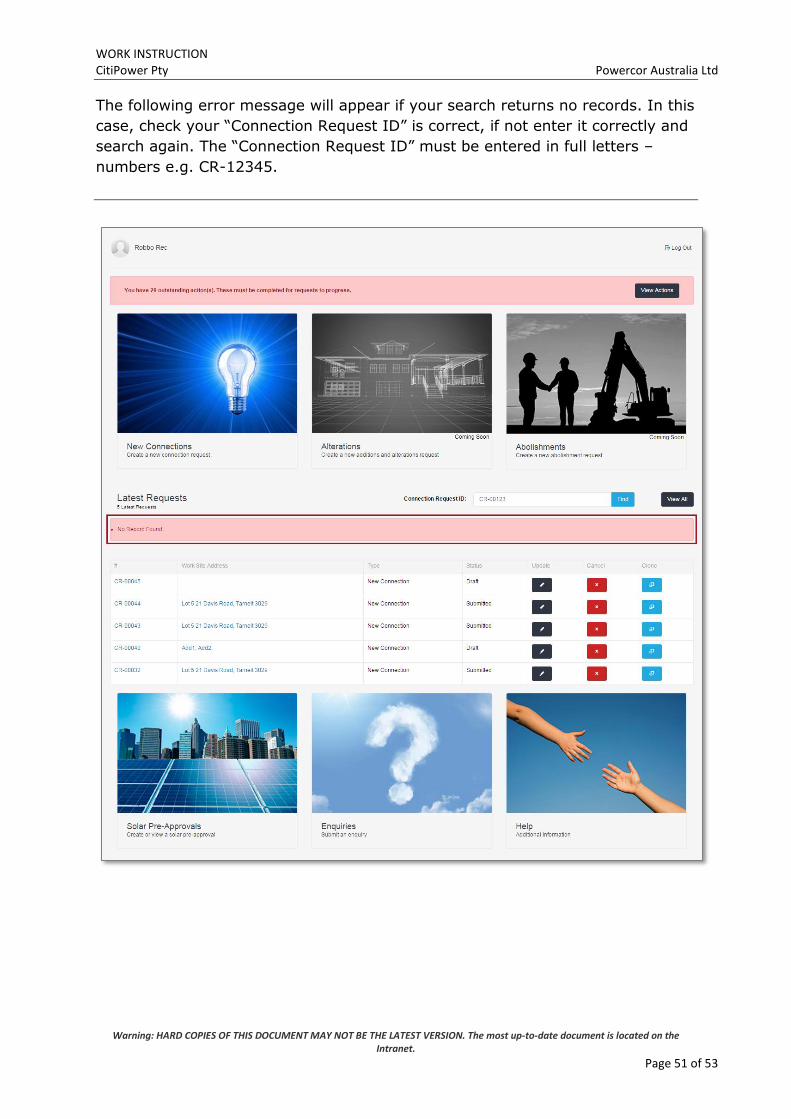
The following error message will appear if your search returns no records. In this
case, check your “Connection Request ID” is correct, if not enter it correctly and
search again. The “Connection Request ID” must be entered in full letters –
numbers e.g. CR-12345.
WORK INSTRUCTION CitiPower Pty Powercor Australia Ltd
Warning: HARD COPIES OF THIS DOCUMENT MAY NOT BE THE LATEST VERSION. The most up-to-date document is located on the Intranet.
Page 4 of 53
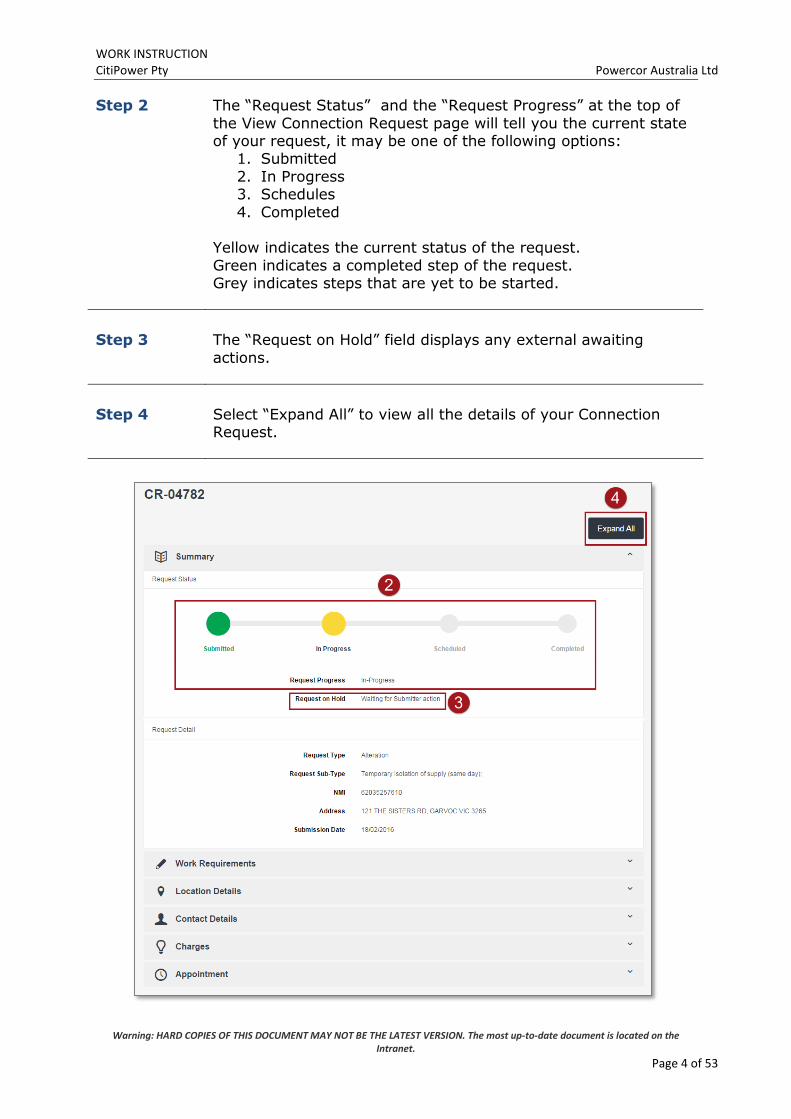
Step 2 The “Request Status” and the “Request Progress” at the top of
the View Connection Request page will tell you the current state of your request, it may be one of the following options:
1. Submitted
2. In Progress 3. Schedules
4. Completed Yellow indicates the current status of the request.
Green indicates a completed step of the request. Grey indicates steps that are yet to be started.
Step 3 The “Request on Hold” field displays any external awaiting
actions.
Step 4 Select “Expand All” to view all the details of your Connection Request.
WORK INSTRUCTION CitiPower Pty Powercor Australia Ltd
Warning: HARD COPIES OF THIS DOCUMENT MAY NOT BE THE LATEST VERSION. The most up-to-date document is located on the Intranet.
Page 5 of 53
Step 5 Under the “Appointments” banner are the details of any
appointments associated with the connection request. Note: This appointment timeslot is indicative only. The truck may
arrive on site anytime within two hours after the time selected. Exact arrival time will be confirmed at least a 1 prior to the
appointment and you will be notified via email and/or SMS.
WORK INSTRUCTION CitiPower Pty Powercor Australia Ltd
Warning: HARD COPIES OF THIS DOCUMENT MAY NOT BE THE LATEST VERSION. The most up-to-date document is located on the Intranet.
Page 6 of 53
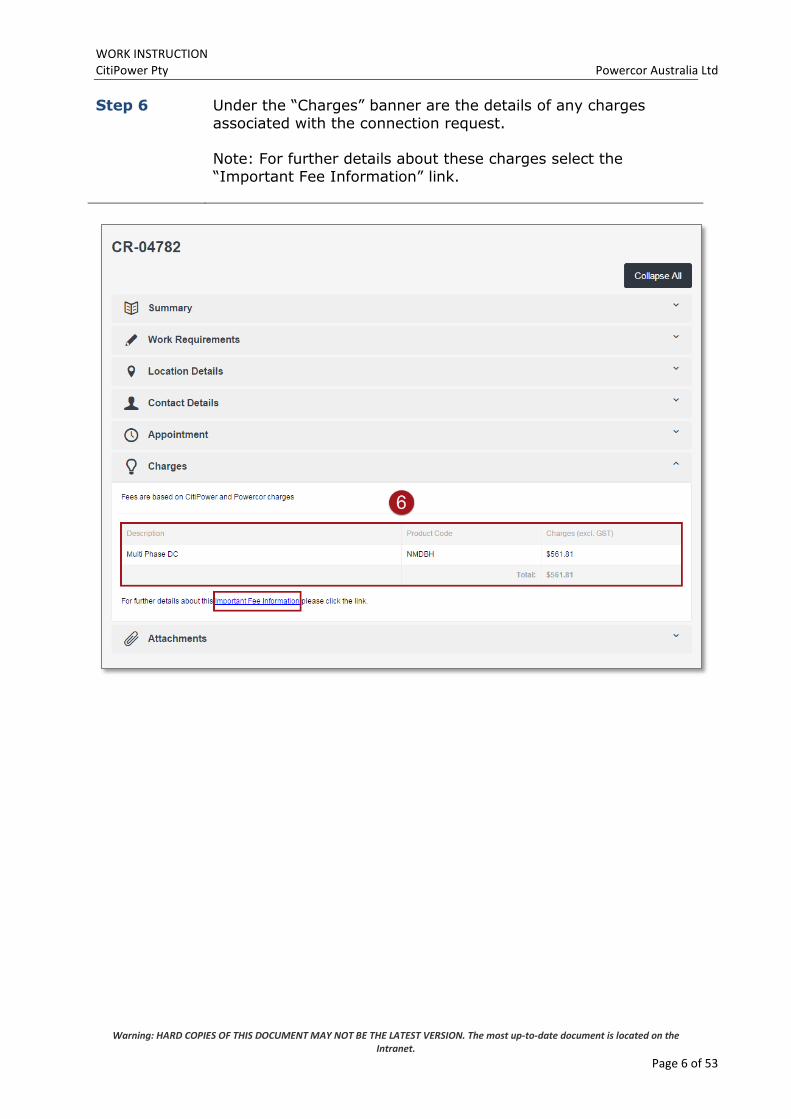
Step 6 Under the “Charges” banner are the details of any charges
associated with the connection request. Note: For further details about these charges select the
“Important Fee Information” link.
WORK INSTRUCTION CitiPower Pty Powercor Australia Ltd
Warning: HARD COPIES OF THIS DOCUMENT MAY NOT BE THE LATEST VERSION. The most up-to-date document is located on the Intranet.
Page 7 of 53
Step 7 To view your CES or any other attachments, select the grey
“Attachments” banner at the bottom of the page. Select the file name you wish to view.
WORK INSTRUCTION CitiPower Pty Powercor Australia Ltd
Warning: HARD COPIES OF THIS DOCUMENT MAY NOT BE THE LATEST VERSION. The most up-to-date document is located on the Intranet.
Page 8 of 53
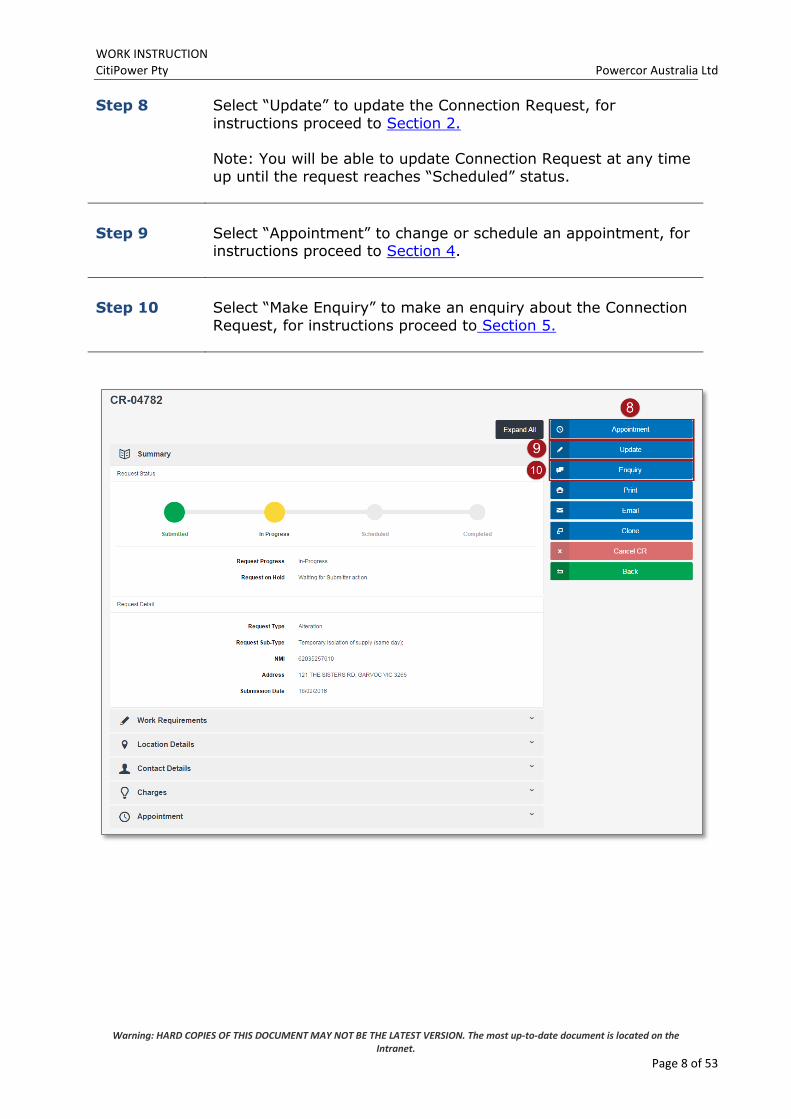
Step 8 Select “Update” to update the Connection Request, for
instructions proceed to Section 2. Note: You will be able to update Connection Request at any time
up until the request reaches “Scheduled” status.
Step 9 Select “Appointment” to change or schedule an appointment, for instructions proceed to Section 4.
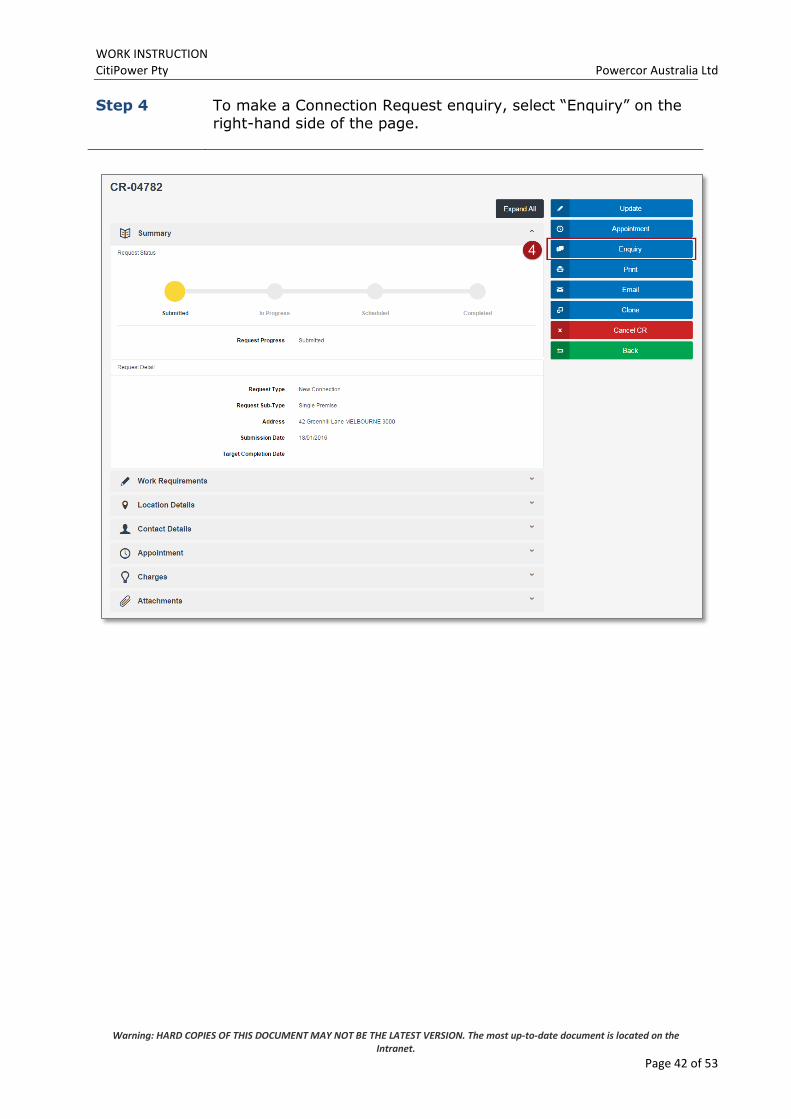
Step 10 Select “Make Enquiry” to make an enquiry about the Connection
Request, for instructions proceed to Section 5.
WORK INSTRUCTION CitiPower Pty Powercor Australia Ltd
Warning: HARD COPIES OF THIS DOCUMENT MAY NOT BE THE LATEST VERSION. The most up-to-date document is located on the Intranet.
Page 9 of 53
Step 11 Select “Clone” to clone the Connection Request, for instructions
proceed to Section 6.
Step 12 Select “Cancel Request” to cancel the Connection Request, for instructions proceed to Section 7.
Note: You will be able to cancel Connection Request at any time
up until the request reaches “Completed” status.
Step 13 Select “Back” to return to your dashboard.
WORK INSTRUCTION CitiPower Pty Powercor Australia Ltd
Warning: HARD COPIES OF THIS DOCUMENT MAY NOT BE THE LATEST VERSION. The most up-to-date document is located on the Intranet.
Page 10 of 53
Section 2: Update a Submitted Connection Request.
Once the Connection Request has been submitted, some fields cannot be
updated while others will still be configurable to users. This section details how
to update these configurable fields.
Important Note: You will be able to update a Connection Request at any
time unless the “Request Progress” is at either “Cancelled” or
“Completed”.
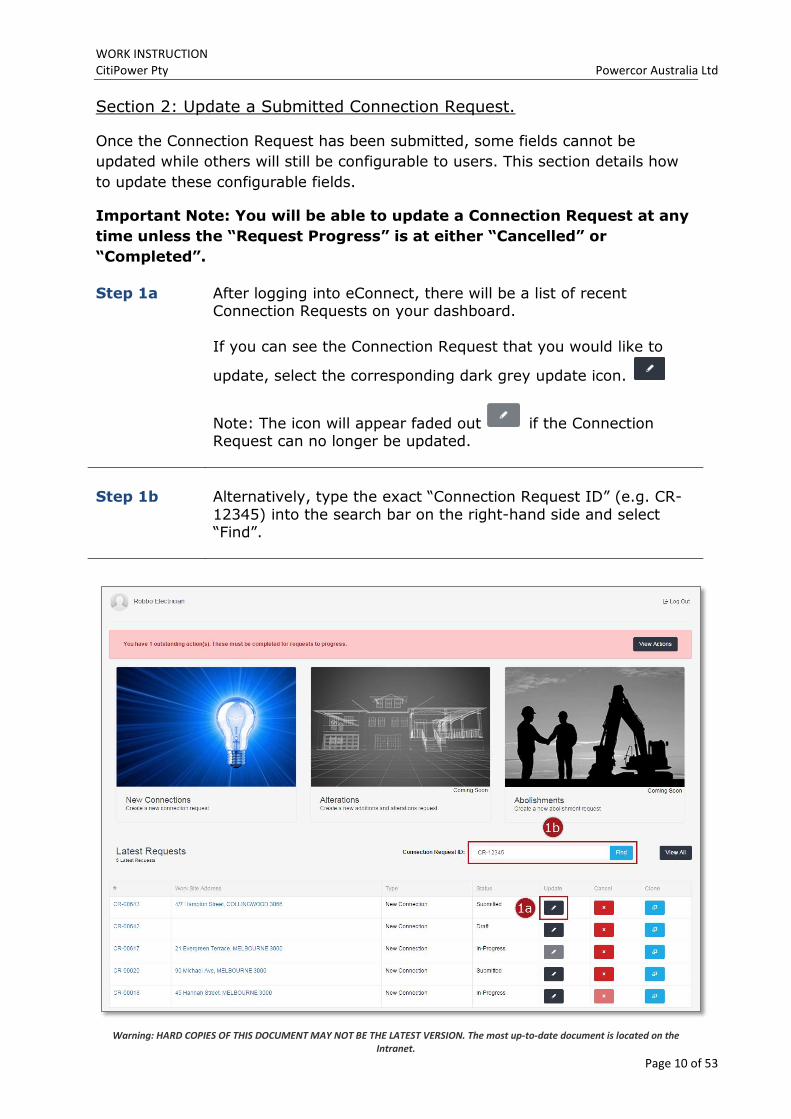
Step 1a After logging into eConnect, there will be a list of recent Connection Requests on your dashboard.
If you can see the Connection Request that you would like to
update, select the corresponding dark grey update icon.
Note: The icon will appear faded out if the Connection Request can no longer be updated.
Step 1b Alternatively, type the exact “Connection Request ID” (e.g. CR-
12345) into the search bar on the right-hand side and select “Find”.
WORK INSTRUCTION CitiPower Pty Powercor Australia Ltd
Warning: HARD COPIES OF THIS DOCUMENT MAY NOT BE THE LATEST VERSION. The most up-to-date document is located on the Intranet.
Page 11 of 53
The following error message will appear if your search returns no records. In this
case, check your “Connection Request ID” is correct, if not enter it correctly and
search again. The “Connection Request ID” must be entered in full letters –
numbers e.g. CR-12345.
WORK INSTRUCTION CitiPower Pty Powercor Australia Ltd
Warning: HARD COPIES OF THIS DOCUMENT MAY NOT BE THE LATEST VERSION. The most up-to-date document is located on the Intranet.
Page 12 of 53
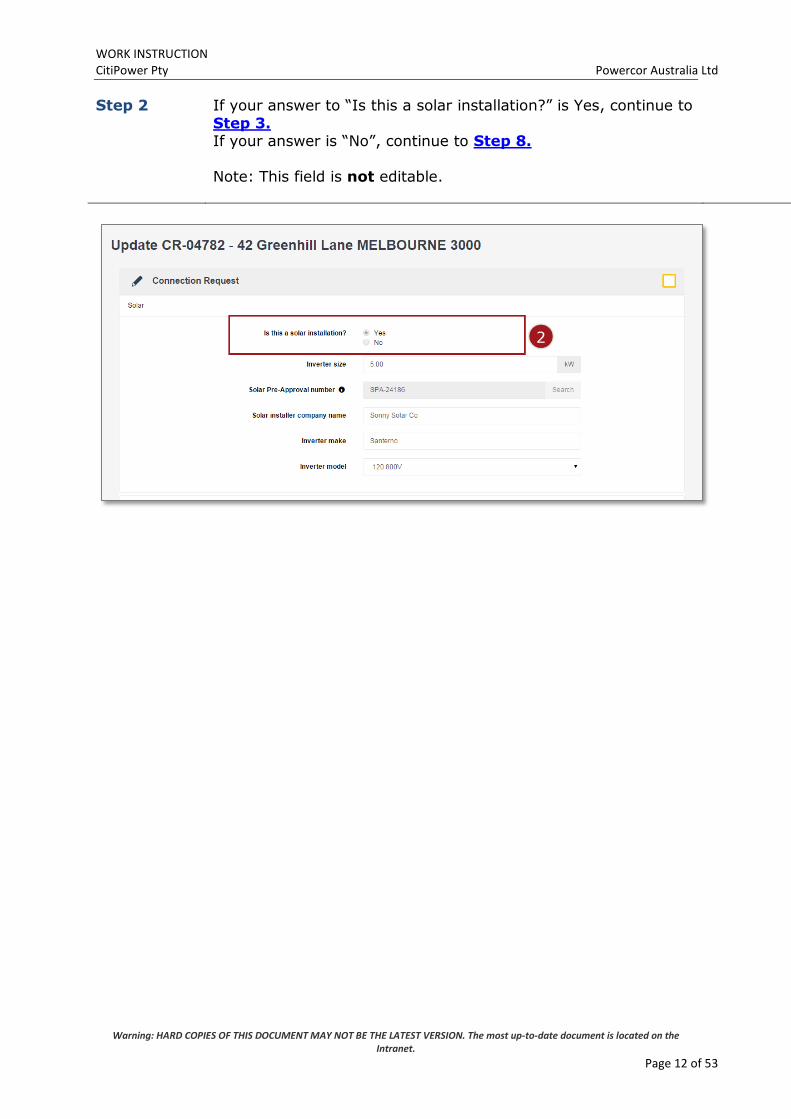
Step 2 If your answer to “Is this a solar installation?” is Yes, continue to
Step 3. If your answer is “No”, continue to Step 8.
Note: This field is not editable.
WORK INSTRUCTION CitiPower Pty Powercor Australia Ltd
Warning: HARD COPIES OF THIS DOCUMENT MAY NOT BE THE LATEST VERSION. The most up-to-date document is located on the Intranet.
Page 13 of 53
Step 3 The “Inverter size” field is editable.
Note: This field must match inverter size entered on the Solar Pre-Approval (SPA) Request.
Step 4 If the inverter size is less than 30 kW, you must enter the SPA reference number, and then select “Search”.
Note: You are given an SPA reference number when you submit an SPA Request.
If the inverter size is greater than 30 kW then the SPA Request
number field is disabled and you are unable to enter one.
WORK INSTRUCTION CitiPower Pty Powercor Australia Ltd
Warning: HARD COPIES OF THIS DOCUMENT MAY NOT BE THE LATEST VERSION. The most up-to-date document is located on the Intranet.
Page 14 of 53
An error message will appear if the SPA number does not meet the approval
criteria. Error message (a) appears if the inverter size entered on the New Connection
Request form is greater than the approved inverters size from the SPA request.
Error message (b) appears if outcome of the SPA reference number is invalid or the SPA Request is being processed offline or requires a technical assessment.
WORK INSTRUCTION CitiPower Pty Powercor Australia Ltd
Warning: HARD COPIES OF THIS DOCUMENT MAY NOT BE THE LATEST VERSION. The most up-to-date document is located on the Intranet.
Page 15 of 53
Step 5 The “Solar installer company name” field is editable.
Step 6 To edit “Inverter make”, begin to enter its name. The search will
return a list of results that match the information you have entered.
Select the correct result.
Note: Predictive search based on what the text starts with rather than contains.
WORK INSTRUCTION CitiPower Pty Powercor Australia Ltd
Warning: HARD COPIES OF THIS DOCUMENT MAY NOT BE THE LATEST VERSION. The most up-to-date document is located on the Intranet.
Page 16 of 53
Step 7 Select the “Inverter model” from a drop-down list, the options
available are dependent on the “Inverter make” selected.
WORK INSTRUCTION CitiPower Pty Powercor Australia Ltd
Warning: HARD COPIES OF THIS DOCUMENT MAY NOT BE THE LATEST VERSION. The most up-to-date document is located on the Intranet.
Page 17 of 53
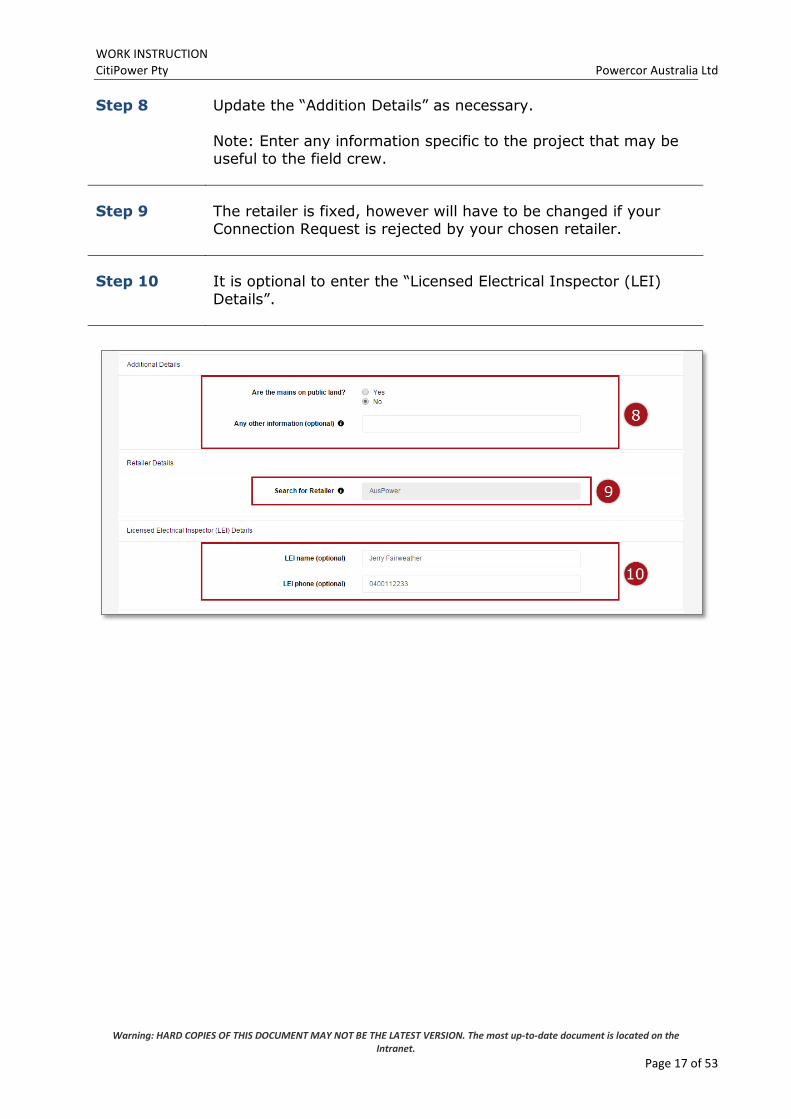
Step 8 Update the “Addition Details” as necessary.
Note: Enter any information specific to the project that may be useful to the field crew.
Step 9 The retailer is fixed, however will have to be changed if your Connection Request is rejected by your chosen retailer.
Step 10 It is optional to enter the “Licensed Electrical Inspector (LEI)
Details”.
WORK INSTRUCTION CitiPower Pty Powercor Australia Ltd
Warning: HARD COPIES OF THIS DOCUMENT MAY NOT BE THE LATEST VERSION. The most up-to-date document is located on the Intranet.
Page 18 of 53
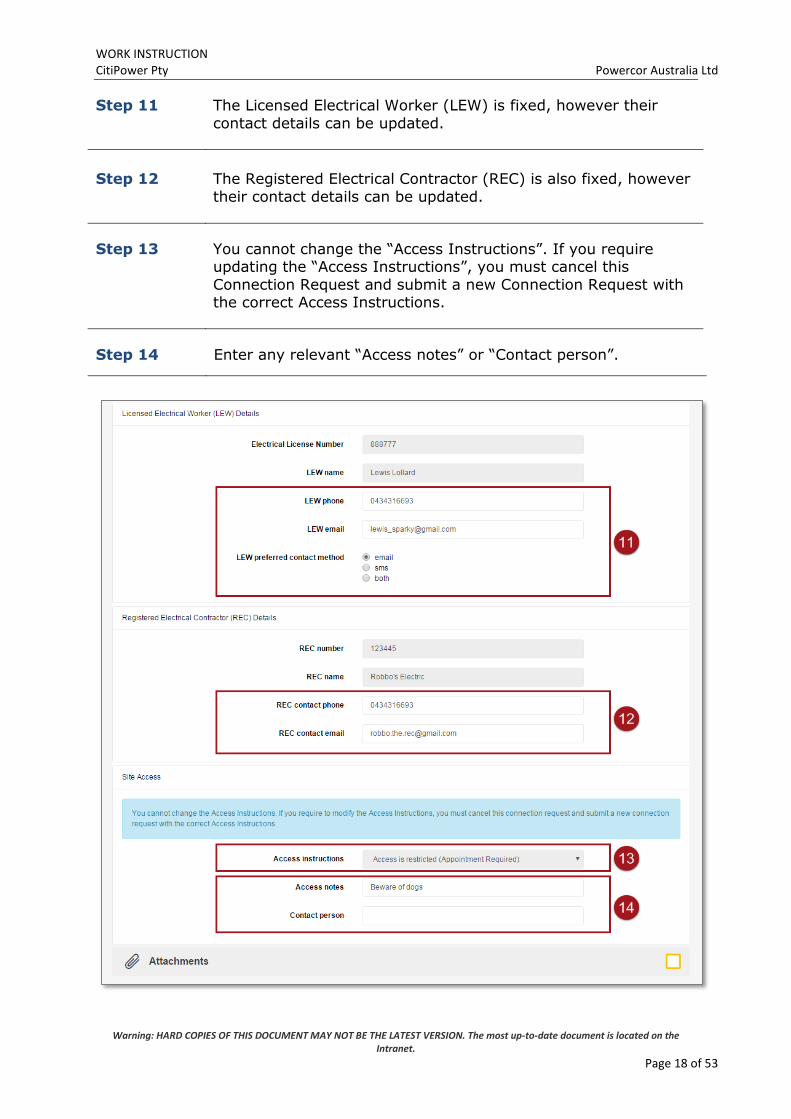
Step 11 The Licensed Electrical Worker (LEW) is fixed, however their
contact details can be updated.
Step 12 The Registered Electrical Contractor (REC) is also fixed, however
their contact details can be updated.
Step 13 You cannot change the “Access Instructions”. If you require updating the “Access Instructions”, you must cancel this
Connection Request and submit a new Connection Request with the correct Access Instructions.
Step 14 Enter any relevant “Access notes” or “Contact person”.
WORK INSTRUCTION CitiPower Pty Powercor Australia Ltd
Warning: HARD COPIES OF THIS DOCUMENT MAY NOT BE THE LATEST VERSION. The most up-to-date document is located on the Intranet.
Page 19 of 53
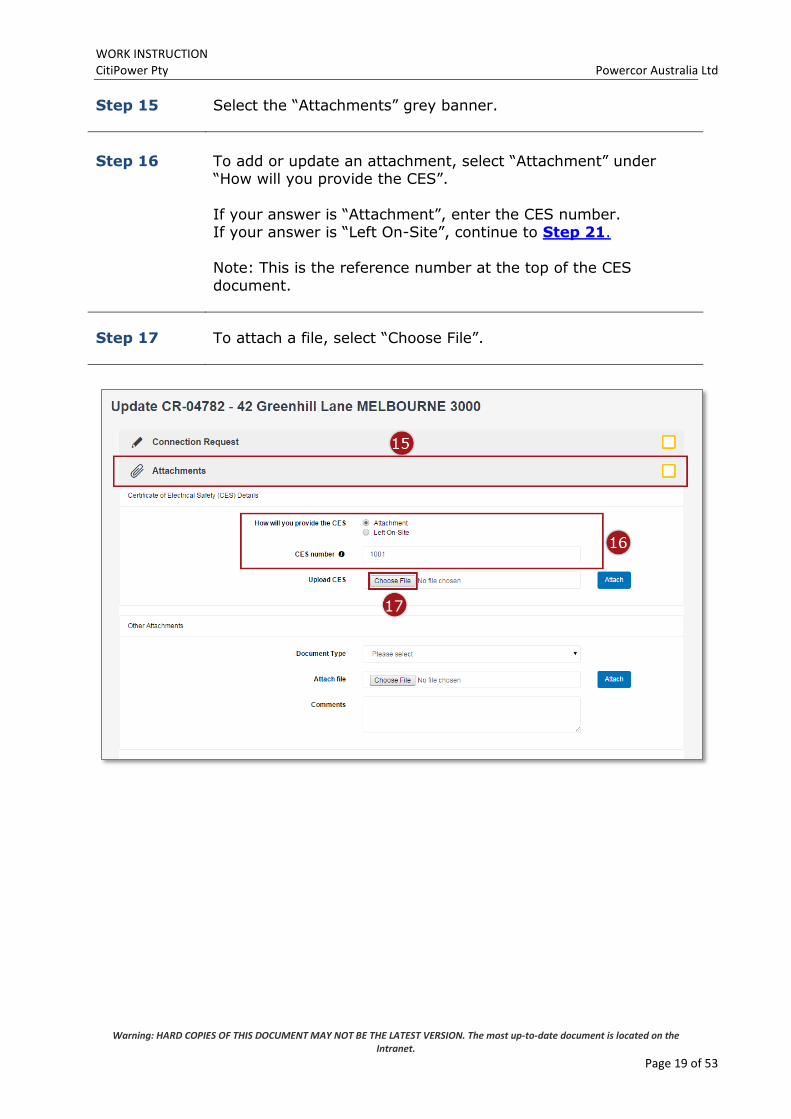
Step 15 Select the “Attachments” grey banner.
Step 16 To add or update an attachment, select “Attachment” under
“How will you provide the CES”.
If your answer is “Attachment”, enter the CES number. If your answer is “Left On-Site”, continue to Step 21.
Note: This is the reference number at the top of the CES
document.
Step 17 To attach a file, select “Choose File”.
WORK INSTRUCTION CitiPower Pty Powercor Australia Ltd
Warning: HARD COPIES OF THIS DOCUMENT MAY NOT BE THE LATEST VERSION. The most up-to-date document is located on the Intranet.
Page 20 of 53
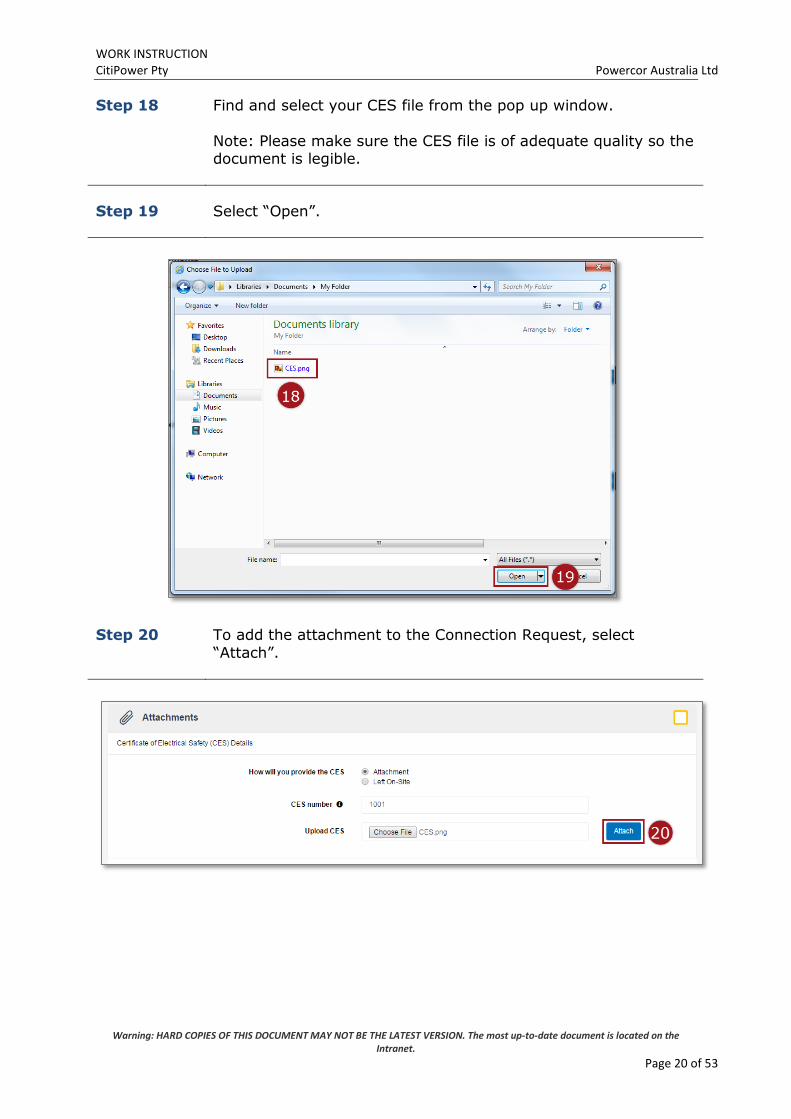
Step 18 Find and select your CES file from the pop up window.
Note: Please make sure the CES file is of adequate quality so the document is legible.
Step 19 Select “Open”.
Step 20 To add the attachment to the Connection Request, select
“Attach”.
WORK INSTRUCTION CitiPower Pty Powercor Australia Ltd
Warning: HARD COPIES OF THIS DOCUMENT MAY NOT BE THE LATEST VERSION. The most up-to-date document is located on the Intranet.
Page 21 of 53
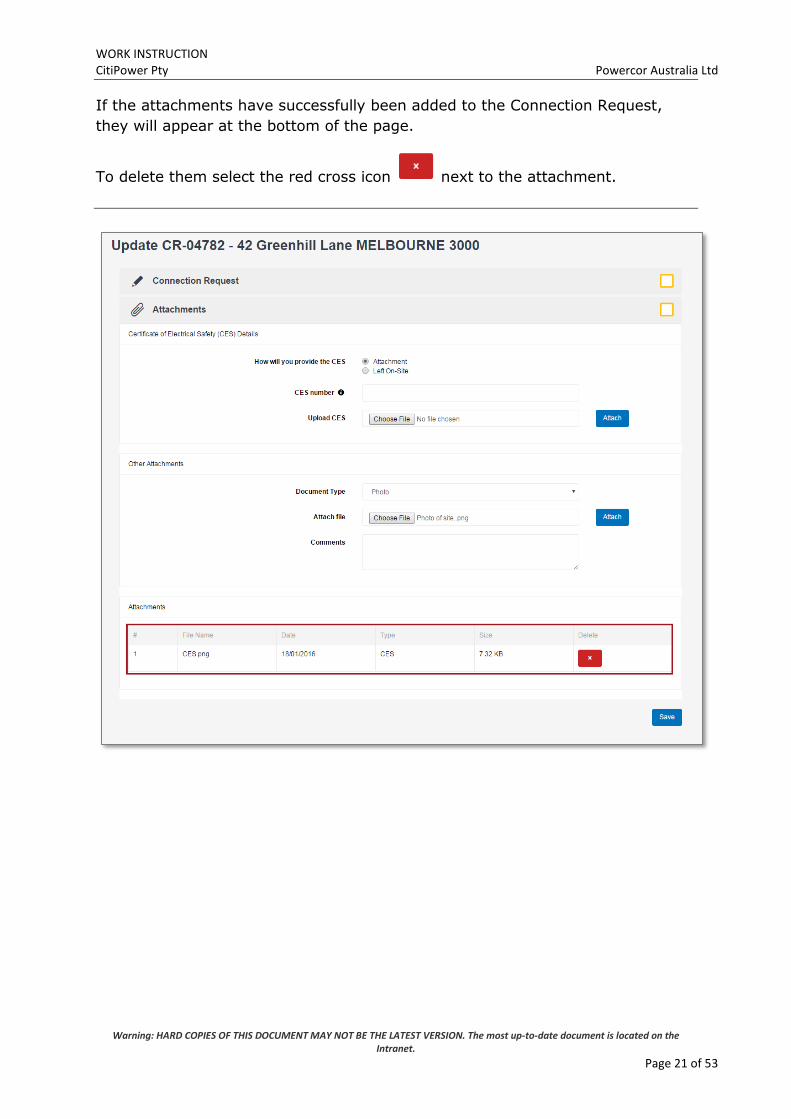
If the attachments have successfully been added to the Connection Request,
they will appear at the bottom of the page.
To delete them select the red cross icon next to the attachment.
WORK INSTRUCTION CitiPower Pty Powercor Australia Ltd
Warning: HARD COPIES OF THIS DOCUMENT MAY NOT BE THE LATEST VERSION. The most up-to-date document is located on the Intranet.
Page 22 of 53
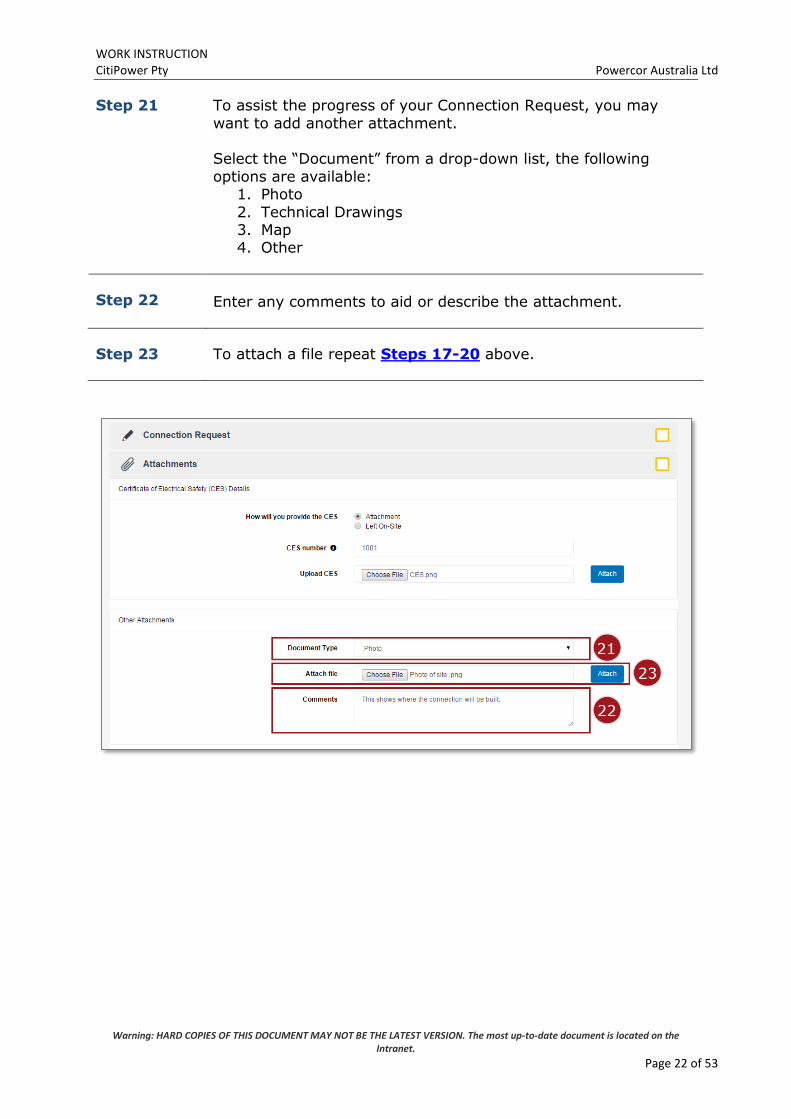
Step 21 To assist the progress of your Connection Request, you may
want to add another attachment. Select the “Document” from a drop-down list, the following
options are available: 1. Photo
2. Technical Drawings 3. Map 4. Other
Step 22
Enter any comments to aid or describe the attachment.
Step 23 To attach a file repeat Steps 17-20 above.
WORK INSTRUCTION CitiPower Pty Powercor Australia Ltd
Warning: HARD COPIES OF THIS DOCUMENT MAY NOT BE THE LATEST VERSION. The most up-to-date document is located on the Intranet.
Page 23 of 53
If the attachments have successfully been added to the Connection Request,
they will appear at the bottom of the page.
To delete them select the red cross icon next to the attachment.
WORK INSTRUCTION CitiPower Pty Powercor Australia Ltd
Warning: HARD COPIES OF THIS DOCUMENT MAY NOT BE THE LATEST VERSION. The most up-to-date document is located on the Intranet.
Page 24 of 53
Step 24 Select “Save” to complete the Connection Request update.
The following error message icon will appear if there are mandatory fields
that have not been completed.
The red text will highlight the fields that have to be completed before you can
save your changes.
WORK INSTRUCTION CitiPower Pty Powercor Australia Ltd
Warning: HARD COPIES OF THIS DOCUMENT MAY NOT BE THE LATEST VERSION. The most up-to-date document is located on the Intranet.
Page 25 of 53
Section 3: Update a Draft Connection Request.
A Connection Request can be saved as a draft at any point when completing the
request form.
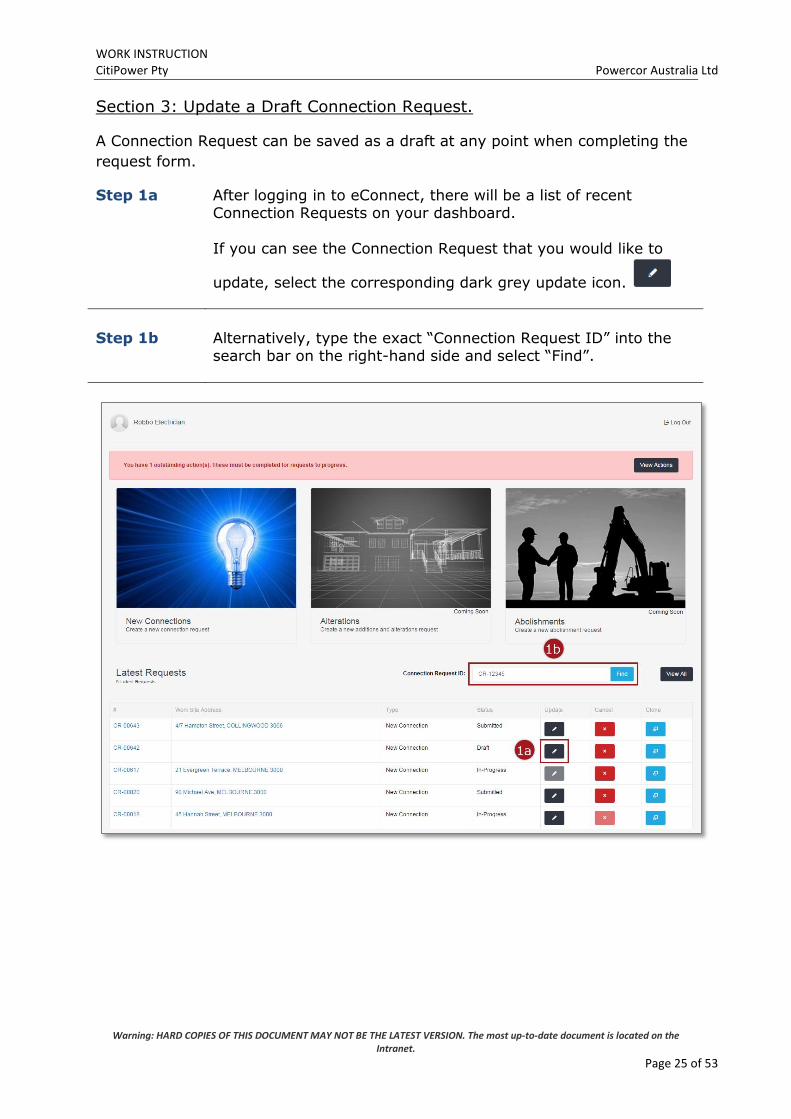
Step 1a After logging in to eConnect, there will be a list of recent Connection Requests on your dashboard.
If you can see the Connection Request that you would like to
update, select the corresponding dark grey update icon.
Step 1b Alternatively, type the exact “Connection Request ID” into the
search bar on the right-hand side and select “Find”.
WORK INSTRUCTION CitiPower Pty Powercor Australia Ltd
Warning: HARD COPIES OF THIS DOCUMENT MAY NOT BE THE LATEST VERSION. The most up-to-date document is located on the Intranet.
Page 26 of 53
The following error message will appear if your search returns no records. In this
case, check your “Connection Request ID” is correct, if not enter it correctly and
search again. The “Connection Request ID” must be entered in full letters –
numbers e.g. CR-12345.
WORK INSTRUCTION CitiPower Pty Powercor Australia Ltd
Warning: HARD COPIES OF THIS DOCUMENT MAY NOT BE THE LATEST VERSION. The most up-to-date document is located on the Intranet.
Page 27 of 53
Step 2 To update a draft Connection Request you will be directed back
to the original New Connection Request submission page. For instructions on how to submit a Connection Request, please
refer to the appropriate work instructions.
Submit a New Connection Request for a Single Premise Site. Submit an Alternation Connection Request.
WORK INSTRUCTION CitiPower Pty Powercor Australia Ltd
Warning: HARD COPIES OF THIS DOCUMENT MAY NOT BE THE LATEST VERSION. The most up-to-date document is located on the Intranet.
Page 28 of 53
Section 4: Manage Appointments.
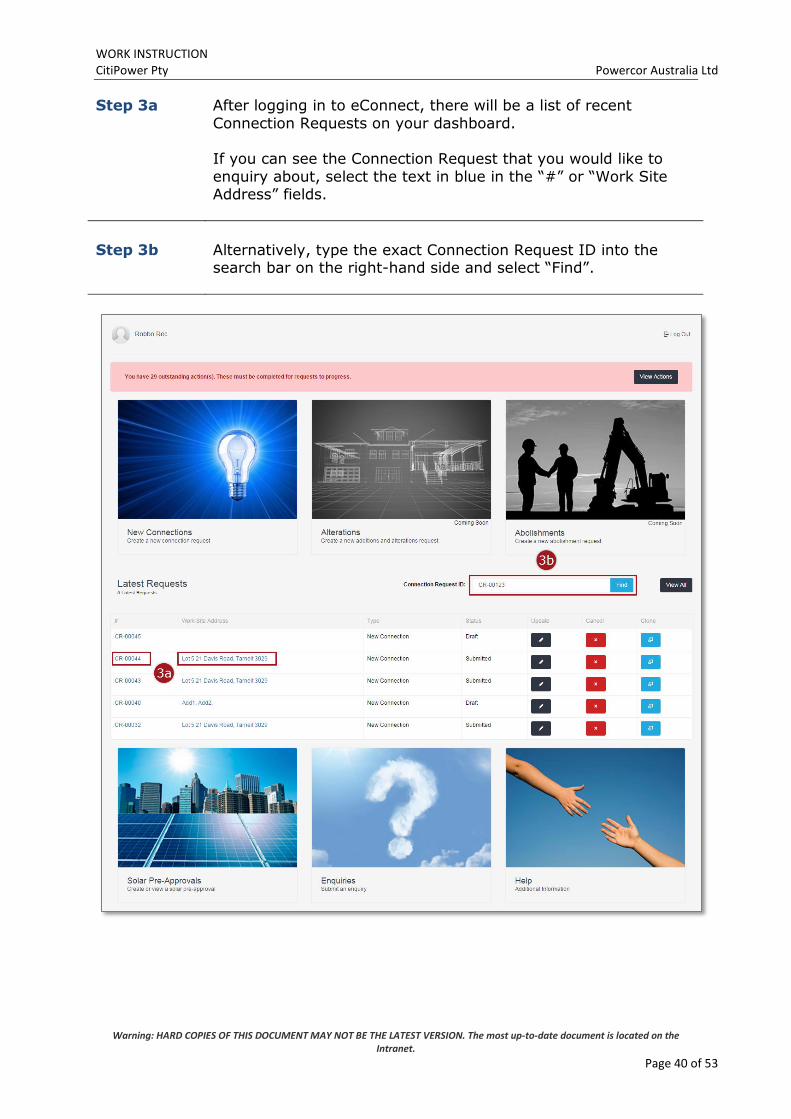
Step 1a After logging in to eConnect, there will be a list of recent
Connection Requests on your dashboard.
If you can see the Connection Request that you would like to enquiry about, select the text in blue in the “#” or “Work Site Address” fields.
Step 1b Alternatively, type the exact Connection Request ID into the
search bar on the right-hand side and select “Find”.
WORK INSTRUCTION CitiPower Pty Powercor Australia Ltd
Warning: HARD COPIES OF THIS DOCUMENT MAY NOT BE THE LATEST VERSION. The most up-to-date document is located on the Intranet.
Page 29 of 53
The following error message will appear if your search returns no records. In this
case, check your “Connection Request ID” is correct, if not enter it correctly and
search again. The “Connection Request ID” must be entered in full letters –
numbers e.g. CR-12345.
WORK INSTRUCTION CitiPower Pty Powercor Australia Ltd
Warning: HARD COPIES OF THIS DOCUMENT MAY NOT BE THE LATEST VERSION. The most up-to-date document is located on the Intranet.
Page 30 of 53
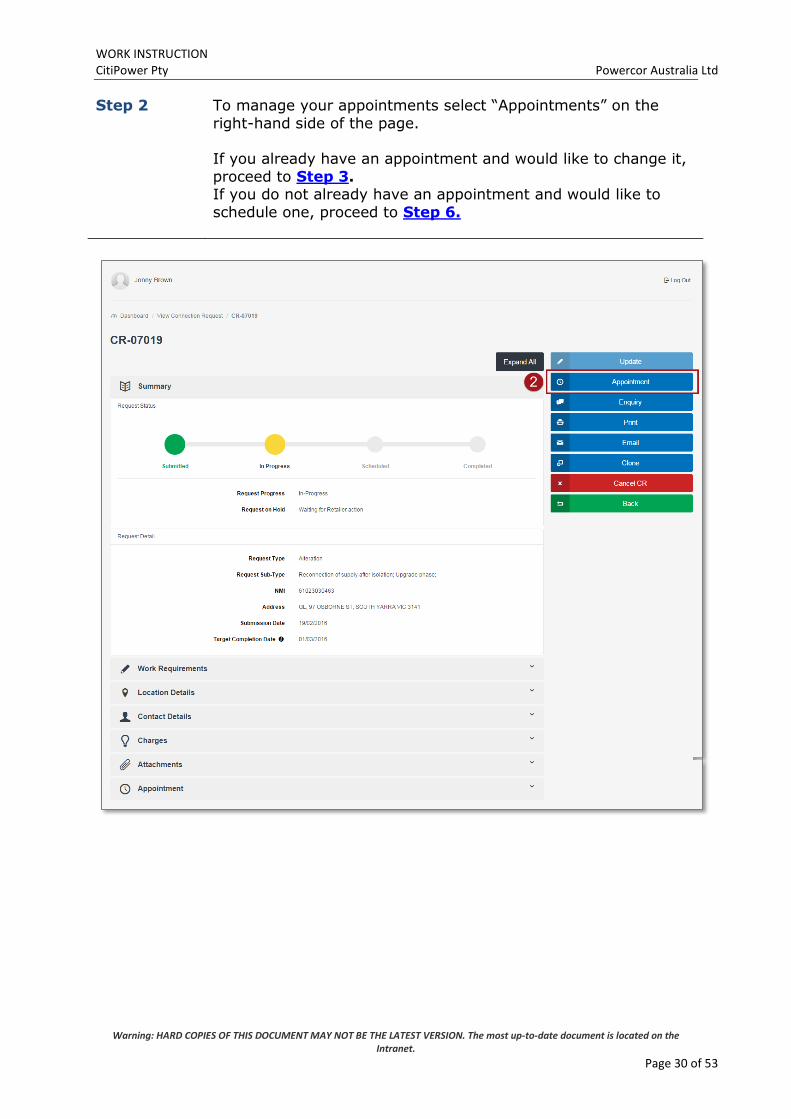
Step 2 To manage your appointments select “Appointments” on the
right-hand side of the page. If you already have an appointment and would like to change it,
proceed to Step 3. If you do not already have an appointment and would like to
schedule one, proceed to Step 6.
WORK INSTRUCTION CitiPower Pty Powercor Australia Ltd
Warning: HARD COPIES OF THIS DOCUMENT MAY NOT BE THE LATEST VERSION. The most up-to-date document is located on the Intranet.
Page 31 of 53
Step 3 If you would like to update the appointment time select “Change
your appointment”.
Step 4 Select the date and time for your preferred time for the
appointment, then select “Confirm”. Note: Your appointment time will be within the hour
You will not be able to book an appointment within 5 days of the current date.
WORK INSTRUCTION CitiPower Pty Powercor Australia Ltd
Warning: HARD COPIES OF THIS DOCUMENT MAY NOT BE THE LATEST VERSION. The most up-to-date document is located on the Intranet.
Page 32 of 53
Step 5 You will receive the following message confirming your
appointment date and time. If this is correct select “Finish”. Alternatively, select “Change your appointment” to choose another
date/time.
WORK INSTRUCTION CitiPower Pty Powercor Australia Ltd
Warning: HARD COPIES OF THIS DOCUMENT MAY NOT BE THE LATEST VERSION. The most up-to-date document is located on the Intranet.
Page 33 of 53
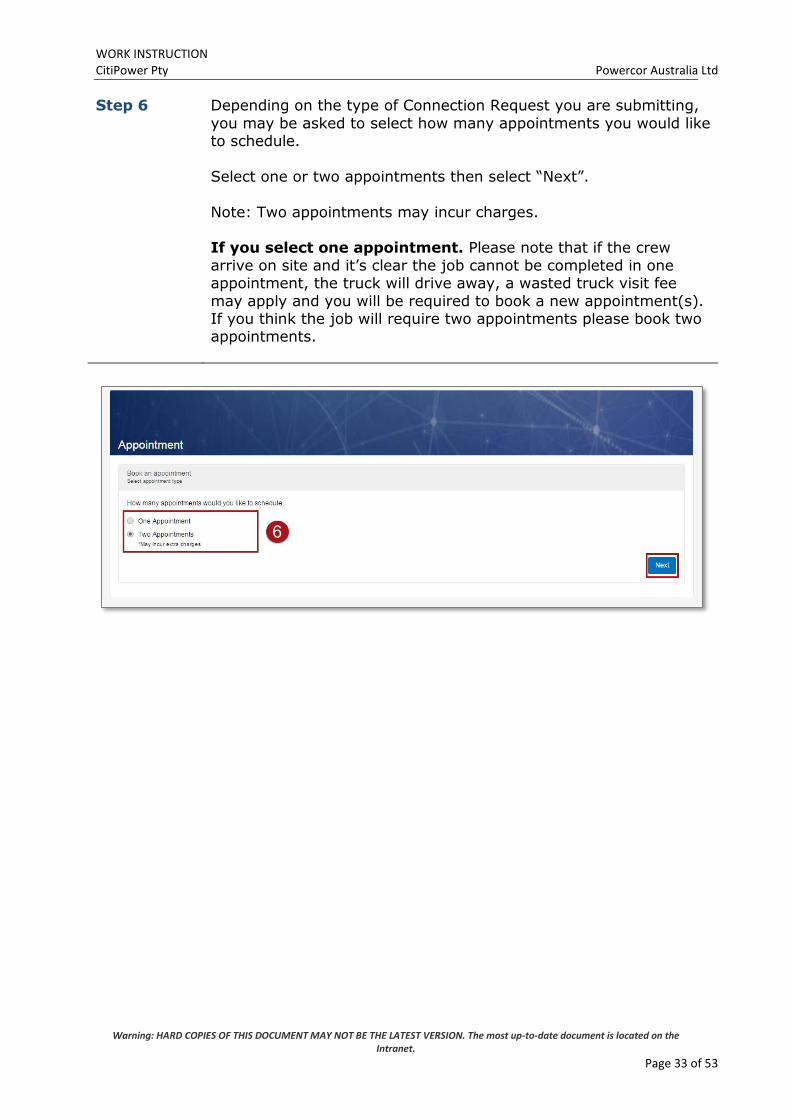
Step 6 Depending on the type of Connection Request you are submitting,
you may be asked to select how many appointments you would like to schedule.
Select one or two appointments then select “Next”.
Note: Two appointments may incur charges. If you select one appointment. Please note that if the crew
arrive on site and it’s clear the job cannot be completed in one appointment, the truck will drive away, a wasted truck visit fee
may apply and you will be required to book a new appointment(s). If you think the job will require two appointments please book two appointments.
WORK INSTRUCTION CitiPower Pty Powercor Australia Ltd
Warning: HARD COPIES OF THIS DOCUMENT MAY NOT BE THE LATEST VERSION. The most up-to-date document is located on the Intranet.
Page 34 of 53
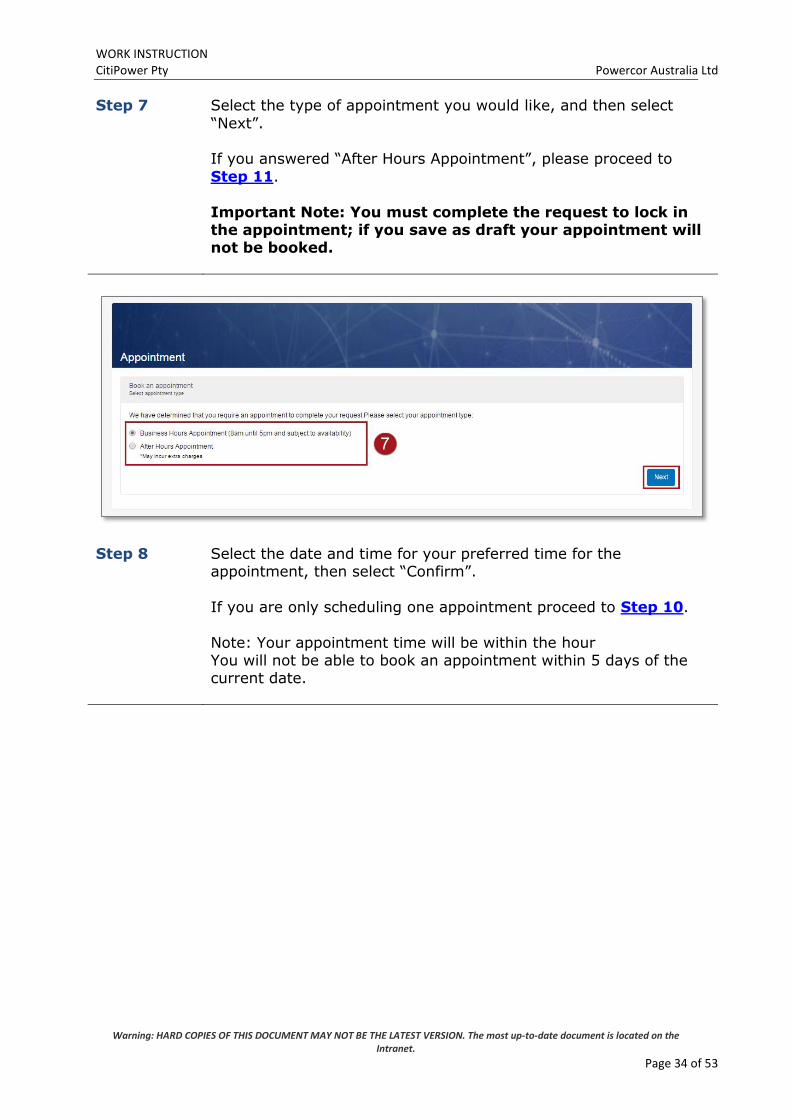
Step 7 Select the type of appointment you would like, and then select
“Next”. If you answered “After Hours Appointment”, please proceed to
Step 11.
Important Note: You must complete the request to lock in the appointment; if you save as draft your appointment will not be booked.
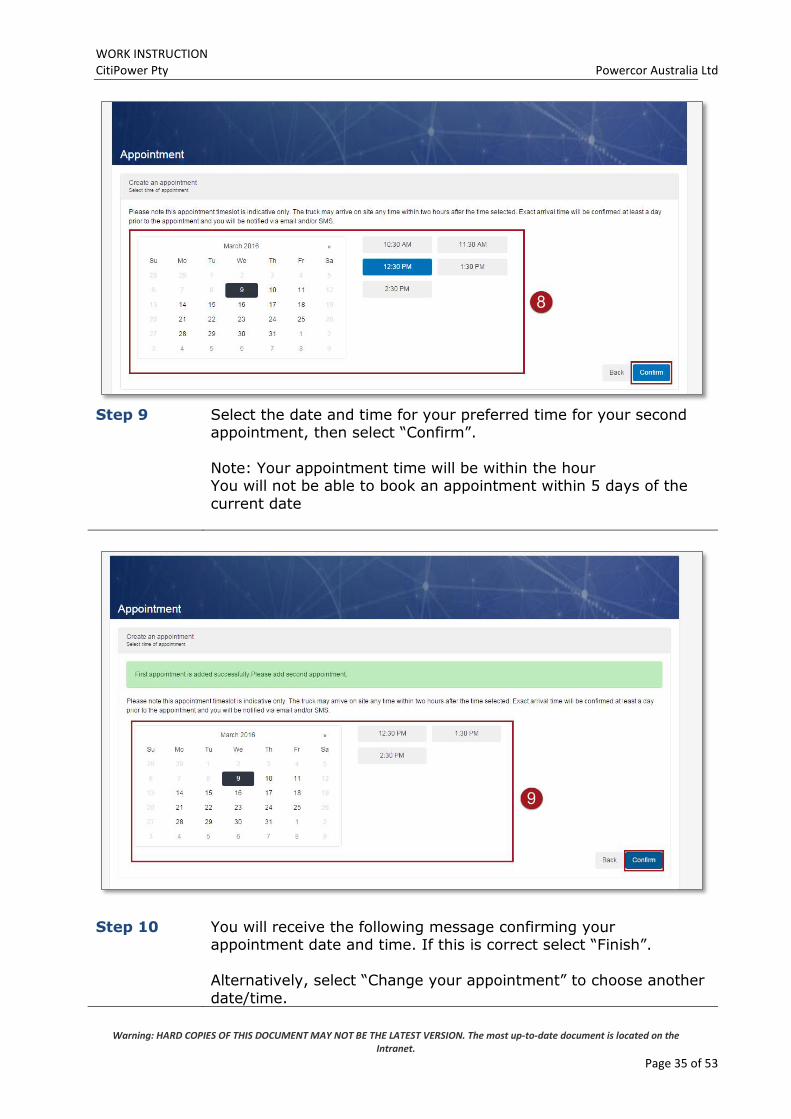
Step 8 Select the date and time for your preferred time for the appointment, then select “Confirm”.
If you are only scheduling one appointment proceed to Step 10.
Note: Your appointment time will be within the hour You will not be able to book an appointment within 5 days of the current date.
WORK INSTRUCTION CitiPower Pty Powercor Australia Ltd
Warning: HARD COPIES OF THIS DOCUMENT MAY NOT BE THE LATEST VERSION. The most up-to-date document is located on the Intranet.
Page 35 of 53
Step 9 Select the date and time for your preferred time for your second
appointment, then select “Confirm”.
Note: Your appointment time will be within the hour You will not be able to book an appointment within 5 days of the
current date
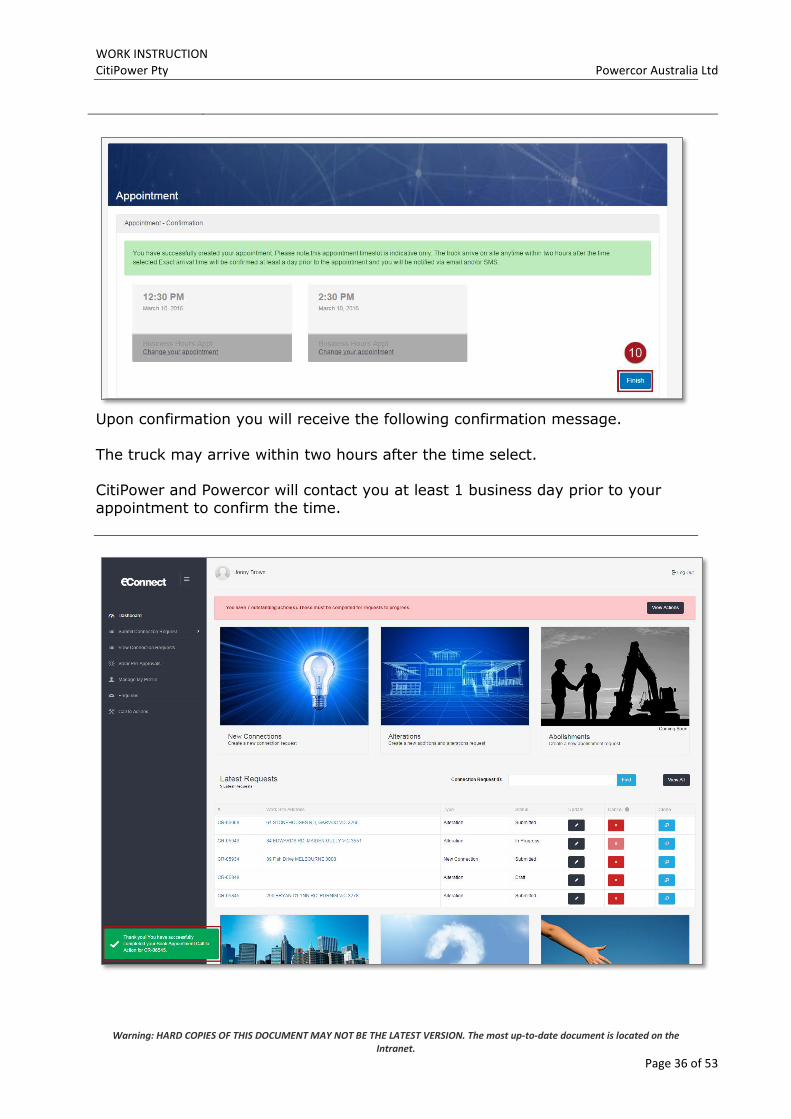
Step 10
You will receive the following message confirming your appointment date and time. If this is correct select “Finish”.
Alternatively, select “Change your appointment” to choose another
date/time.
WORK INSTRUCTION CitiPower Pty Powercor Australia Ltd
Warning: HARD COPIES OF THIS DOCUMENT MAY NOT BE THE LATEST VERSION. The most up-to-date document is located on the Intranet.
Page 36 of 53
Upon confirmation you will receive the following confirmation message.
The truck may arrive within two hours after the time select. CitiPower and Powercor will contact you at least 1 business day prior to your
appointment to confirm the time.
WORK INSTRUCTION CitiPower Pty Powercor Australia Ltd
Warning: HARD COPIES OF THIS DOCUMENT MAY NOT BE THE LATEST VERSION. The most up-to-date document is located on the Intranet.
Page 37 of 53
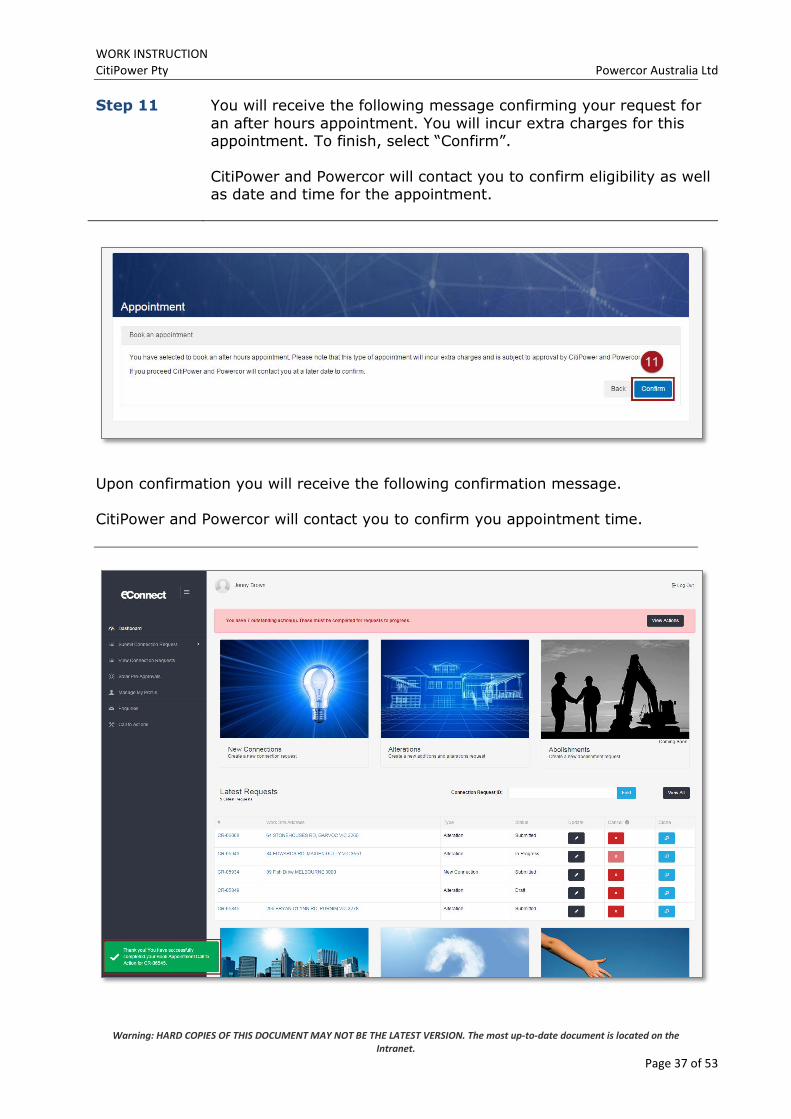
Step 11 You will receive the following message confirming your request for
an after hours appointment. You will incur extra charges for this appointment. To finish, select “Confirm”.
CitiPower and Powercor will contact you to confirm eligibility as well as date and time for the appointment.
Upon confirmation you will receive the following confirmation message.
CitiPower and Powercor will contact you to confirm you appointment time.
WORK INSTRUCTION CitiPower Pty Powercor Australia Ltd
Warning: HARD COPIES OF THIS DOCUMENT MAY NOT BE THE LATEST VERSION. The most up-to-date document is located on the Intranet.
Page 38 of 53
Section 5: Make an Enquiry.
Continue for general enquiry instructions.
Proceed to Step 3 for Connection Request enquiry instructions.
Step 1a After logging in to eConnect, select “Enquiry” from the left-hand
side of the page.
Step 1b Alternatively, select the “Enquiries”
Note: You can select the picture or the text.
WORK INSTRUCTION CitiPower Pty Powercor Australia Ltd
Warning: HARD COPIES OF THIS DOCUMENT MAY NOT BE THE LATEST VERSION. The most up-to-date document is located on the Intranet.
Page 39 of 53
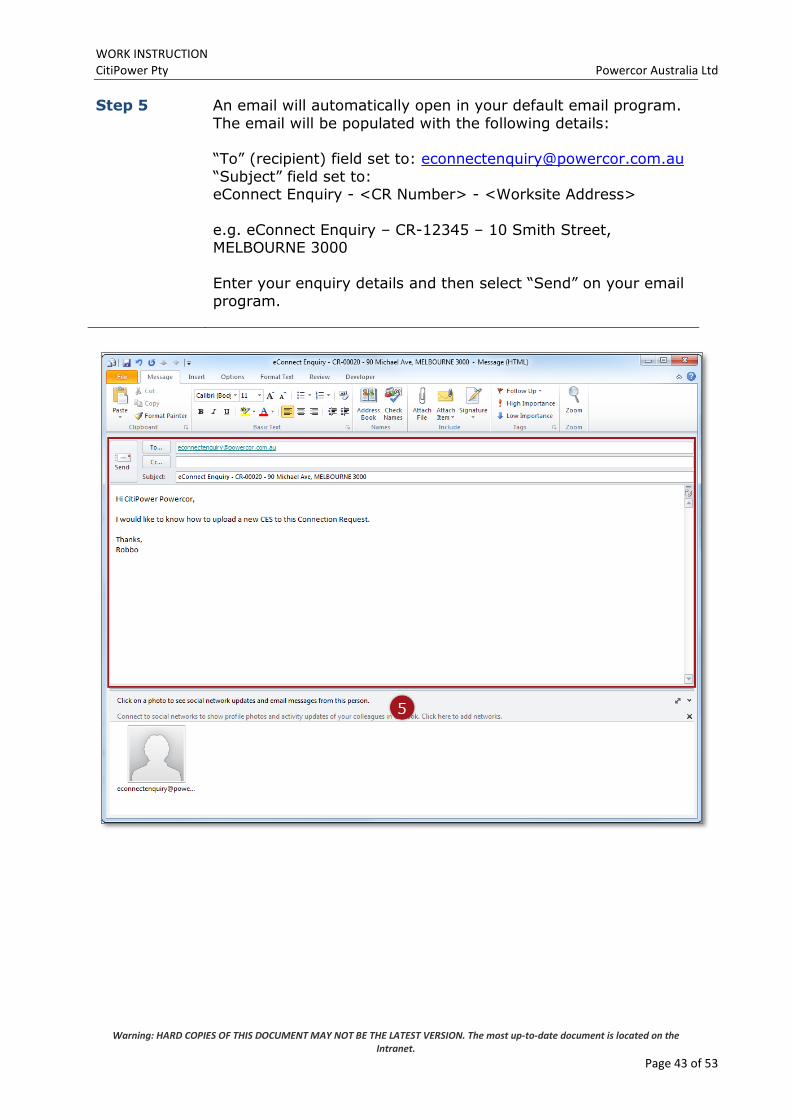
Step 2 An email will automatically open in your default email program.
The email will be populated with the following details: “To” (recipient) field set to: [email protected]
Enter your enquiry details and then select “Send” on your email