WINONA STATE UNIVERSITY Elementary Health Education Teaching Module For Dental Health- Fourth Grade By Jake Halloran Submitted to Dr. Gail A. Grimm in Partial Fulfillment of the Requirements for the Course HERS 320: Teaching Health in the Elementary Schools
Transcript
WINONA STATE UNIVERSITY
Elementary Health Education Teaching ModuleFor
Dental Health- Fourth Grade
By
Jake Halloran
Submitted to Dr. Gail A. Grimmin Partial Fulfillment
of the Requirements for the Course HERS 320:Teaching Health in the Elementary Schools
Department of Health, Exercise & Rehabilitative Sciences
May 28, 2008
Description
In this module you will see a focus on dental health, which is a sub category of the Personal Health and Physical Activity content area. For the greater portion of a week I had the opportunity and privilege to teach at an elementary school here in Winona, Minnesota. Jefferson Elementary allowed me and my partner to come into Mr. Schultz’s fourth grade classroom and teach dental health to 22 very intelligent nine and ten year old students! Due to time constraints, we had to teach our lessons rather quickly and very close to each other. If I had the chance to teach this my own way, I would teach it for 2 times a week for 3 weeks for an hour at a time.
Standards:
Although there are plenty of National Health Education Standards (NHES) that could be twisted and applicable to this specific content area, I spent a lot of time and focused on the two that I felt best suited this specific topic. Those two NHES are the following:*Students will comprehend concepts related to health promotion and disease prevention.*Students will demonstrate the ability to use goal-setting and decision-making skills that enhance health.
Overall Broad Objectives:
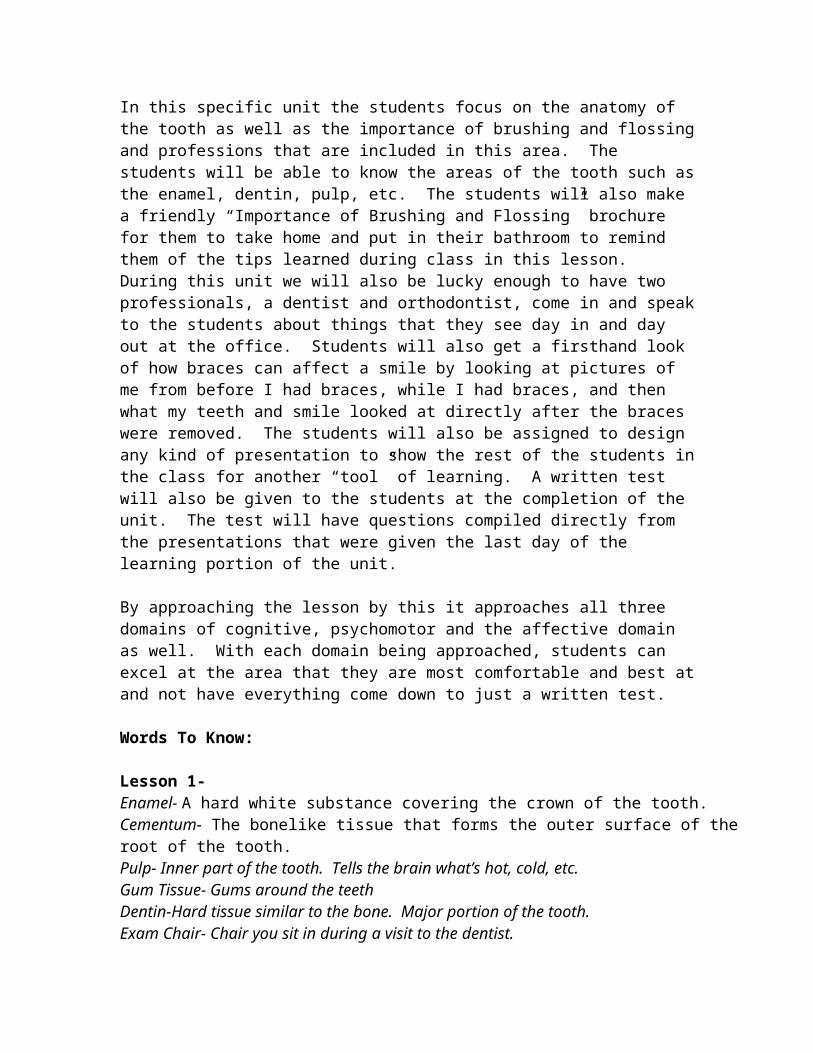
In this specific unit the students focus on the anatomy of the tooth as well as the importance of brushing and flossing and professions that are included in this area. The students will be able to know the areas of the tooth such as the enamel, dentin, pulp, etc. The students will also make a friendly “Importance of Brushing and Flossing” brochure for them to take home and put in their bathroom to remind them of the tips learned during class in this lesson. During this unit we will also be lucky enough to have two professionals, a dentist and orthodontist, come in and speak to the students about things that they see day in and day out at the office. Students will also get a firsthand look of how braces can affect a smile by looking at pictures of me from before I had braces, while I had braces, and then what my teeth and smile looked at directly after the braces were removed. The students will also be assigned to design any kind of presentation to show the rest of the students in the class for another “tool” of learning. A written test will also be given to the students at the completion of the unit. The test will have questions compiled directly from the presentations that were given the last day of the learning portion of the unit.
By approaching the lesson by this it approaches all three domains of cognitive, psychomotor and the affective domain as well. With each domain being approached,
students can excel at the area that they are most comfortable and best at and not have everything come down to just a written test.
Words To Know:
Lesson 1-Enamel- A hard white substance covering the crown of the tooth.Cementum- The bonelike tissue that forms the outer surface of the root of the tooth.Pulp- Inner part of the tooth. Tells the brain what’s hot, cold, etc.Gum Tissue- Gums around the teethDentin-Hard tissue similar to the bone. Major portion of the tooth.Exam Chair- Chair you sit in during a visit to the dentist.Special Light- A bright light a dentist will use to better see in your mouth.Cleaning Tool- A tool used by the dentist to clean your teeth.Mirror- A piece of glass that you can see yourself in, easier to see inside your mouth.X-Ray Machine-A machine that takes a picture of just the bones/teeth.Water-Spray Hose- Used at the dentist office after cleaning of the teeth to rinse.Mask- Worn by the dentist to prevent any bacteria to enter his mouth.Crown- Visible portion of the tooth.Root- The portion of the tooth that plants itself in the gums. Keeps the tooth in place.
Lesson 2-Enamel: a hard white substance covering the crown of the tooth.Cementum: the bonelike tissue that forms the outer surface of the root of the tooth.Pulp: inner part of the tooth. Tells the brain what’s hot, cold, etc.Gum Tissue: gums around the teethDentin: hard tissue similar to the bone. Major portion of the tooth.Exam Chair: Chair you sit in during a visit to the dentistSpecial Light: a bright light a dentist will use to better see in your mouth.Cleaning Tool: a tool used by the dentist to clean your teeth.Mirror: a piece of glass that you can see yourself in, easier to see inside your mouth.X-Ray Machine: a machine that takes a picture of just the bones/teeth.Water-Spray Hose: used at the dentist office after cleaning of the teeth to rinse.Mask: Worn by the dentist to prevent any bacteria to enter his mouth.
Lesson 3-Enamel: a hard white substance covering the crown of the tooth.Cementum: the bonelike tissue that forms the outer surface of the root of the tooth.Pulp: inner part of the tooth. Tells the brain what’s hot, cold, etc.Gum Tissue: gums around the teethDentin: hard tissue similar to the bone. Major portion of the tooth.Exam Chair: Chair you sit in during a visit to the dentistSpecial Light: a bright light a dentist will use to better see in your mouth.Cleaning Tool: a tool used by the dentist to clean your teeth.
Mirror: a piece of glass that you can see yourself in, easier to see inside your mouth.X-Ray Machine: a machine that takes a picture of just the bones/teeth.Water-Spray Hose: used at the dentist office after cleaning of the teeth to rinse.Mask: Worn by the dentist to prevent any bacteria to enter his mouth.
Lesson 4-Dentist- An individual who excels in dentistry.Periodontal Diseases- Any of various mixed bacterial infections that affect the soft tissues and bones supporting the teeth.
Lesson 5-Orthodontist- A special type of dentist that specializes in prevention and correction of teeth, as by means of braces.Braces- A round or flat metal wire placed against the surfaces of the teeth for straightening irregularly arranged teeth.Retainer- A fixed or removable device worn in the mouth to hold the teeth in their new position during the adaptive period after straightening appliances have been removed.
Lesson 6-Enamel- A hard white substance covering the crown of the tooth.Cementum- The bonelike tissue that forms the outer surface of the root of the tooth.Pulp- Inner part of the tooth. Tells the brain what’s hot, cold, etc.Gum Tissue- Gums around the teethDentin-Hard tissue similar to the bone. Major portion of the tooth.Exam Chair- Chair you sit in during a visit to the dentist.Special Light- A bright light a dentist will use to better see in your mouth.Cleaning Tool- A tool used by the dentist to clean your teeth.Mirror- A piece of glass that you can see yourself in, easier to see inside your mouth.X-Ray Machine-A machine that takes a picture of just the bones/teeth.Water-Spray Hose- Used at the dentist office after cleaning of the teeth to rinse.Mask- Worn by the dentist to prevent any bacteria to enter his mouth.Crown- Visible portion of the tooth.Root- The portion of the tooth that plants itself in the gums. Keeps the tooth in place.Dentist- An individual who excels in dentistry.Periodontal Diseases- Any of various mixed bacterial infections that affect the soft tissues and bones supporting the teeth.Orthodontist- A special type of dentist that specializes in prevention and correction of teeth, as by means of braces.Braces- A round or flat metal wire placed against the surfaces of the teeth for straightening irregularly arranged teeth.Retainer- A fixed or removable device worn in the mouth to hold the teeth in their new position during the adaptive period after straightening appliances have been removed.Material, Equipment, and Supply List:
Lesson 1-Pencil, handouts, overhead pictures, overhead projector, apple, and a paper (lunch) bag.
Lesson 2-25 “How to Brush” worksheet packet, 25 “How to Brush” worksheets, 25 “Old & New Toothbrushes” worksheets, 25 “How to Floss” worksheets, 25 containers of floss, 1 old toothbrush, 1 new toothbrush, 25 sheets of blank white paper, Markers, Pencils, 25 “My Teeth Are Healthy” worksheets, Example brochure.
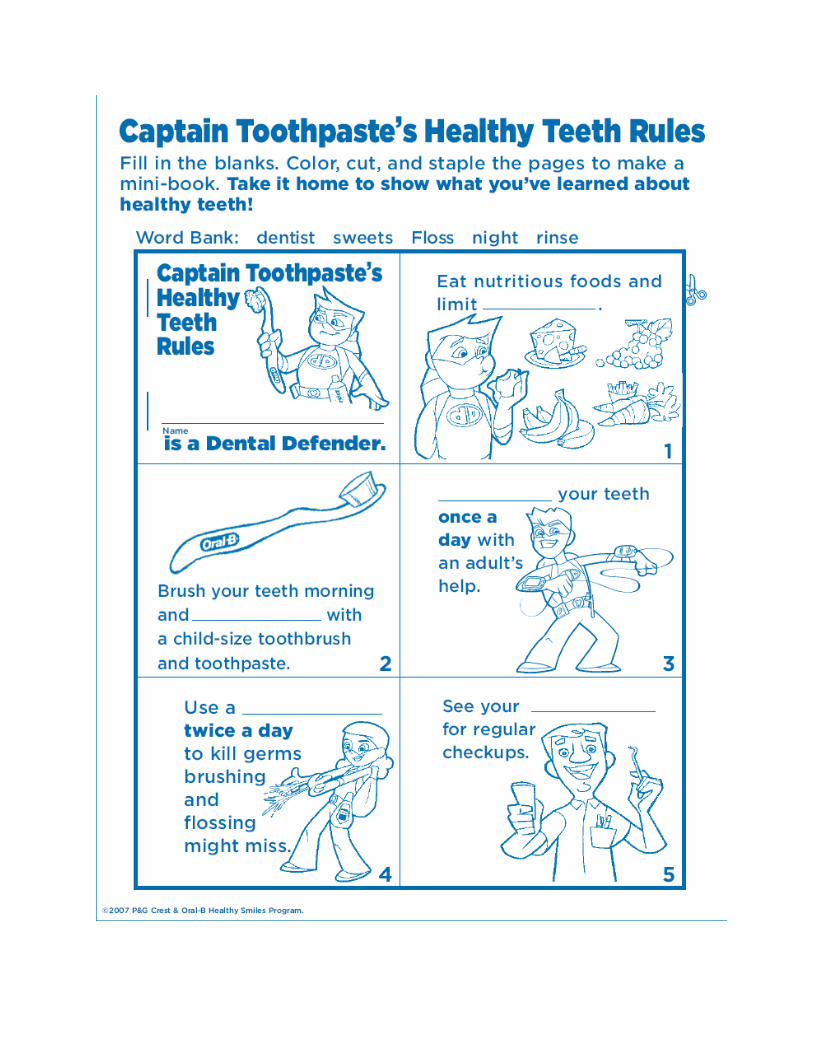
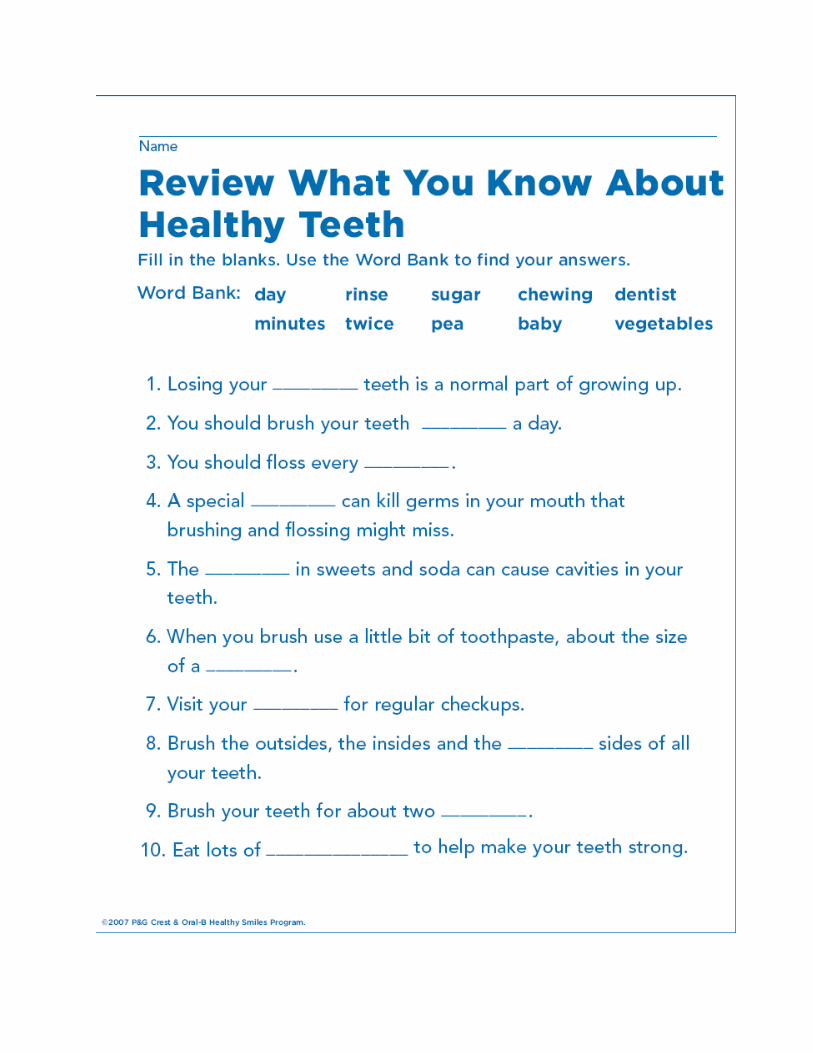
Lesson 3-Rotting apple, lunch bag, 25 worksheet packets containing (25 “Captain Toothpaste’s Healthy Teeth Rules”, 25 “Princess Rinse’s Healthy Teeth Word Search”, 25 “Review What You Know About Healthy Teeth”), Tobacco brochures, “Tooth Anatomy Quiz” worksheets, “Tooth Anatomy” transparency, “Whole Mouth” transparency, overhead projector, contract/letter home
Lesson 4-Pencil, a second different writing utensil (pen, crayon, marker, etc.) and paper for writing the questions and answers for the dentist. Local Dentist
Lesson 5-Pencil, 2nd writing utensil for answers, paper, and materials they may have for their presentation, an orthodontist, overhead projections of pictures of self, overhead projector.
Lesson 6-The materials needed won’t be decided until each group informs me of their presentation. Some equipment may be the following:VCR/DVD Player, Overhead, Poster boardsMaterials that WILL be needed by the students:Pencil, Paper
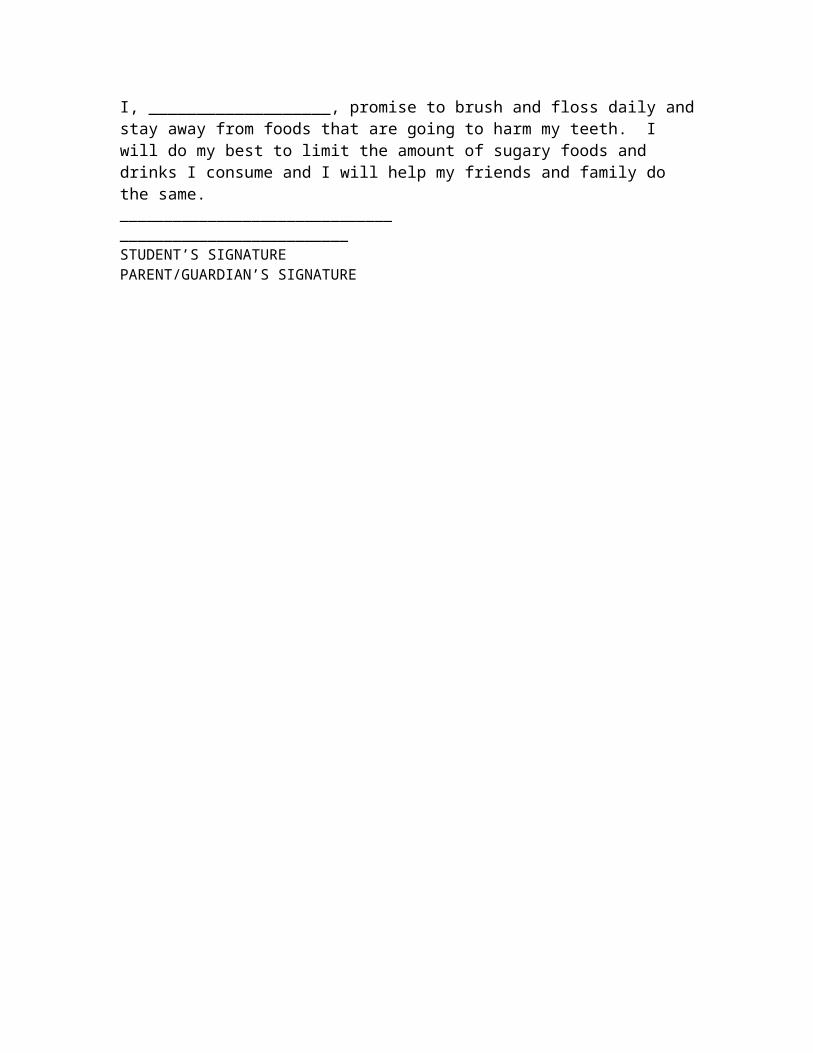
Dear Fourth Grade Parents and Guardians,For the past three days we have had the opportunity through Jefferson Elementary and Winona State University to come in and speak to your children about dental health. They are a great group of children and we are glad that we got the opportunity to work with them. What we would like to ask of you as parents and guardians, is that you make sure that these students continue to progress and continue to use the skills and information learned this week throughout the summer and as they grow up. Their dentists will thank you!The lower half of this letter is a personal contract that we ask the students to fill out, with your help, and return to Mr. Schultz by Tuesday, May 27, 2008. Thank you again for the chance to teach your children!
Student Dentist Information-My Dentist’s Name:__________________________My Dentist’s Number:___________________________My Dental Office Location:_________________________My Next Dentist Check-Up:__________________________I, ___________________, promise to brush and floss daily and stay away from foods that are going to harm my teeth. I will do my best to limit the amount of sugary foods and drinks I consume and I will help my friends and family do the same._______________________________ __________________________STUDENT’S SIGNATURE PARENT/GUARDIAN’S SIGNATURE
Personal Health and Physical Activity (Dental Health) Jake HalloranFourth Grade HERS 320 Jefferson Elementary School [email protected]. Matt Schultz05/21/08
“Dental Health: Introduction, Rotten Apple beginning”
Lesson Goal: To teach the fourth grade students the parts of the mouth including the individual parts of the tooth. Comparing the tooth to an apple and the effects of decay on the tooth by demonstration on the apple.
Major Objectives: Inform the students of the anatomy of the tooth as well as some of the common ways that teeth can get damaged. Start project that will be looked at again on Friday. Students will also complete the worksheet titled “Parts of a Tooth/ Tools at the Dentist Office” to 90% accuracy. This will help them when it comes to the terminology used for the remainder of the unit.
Total Time Needed: 30 minutes
Materials Needed: Pencil, handouts, overhead pictures, overhead projector, apple, and a paper (lunch) bag.
Special Preparation: Have apple ready for demonstration, overheads printed out, over head projector ready and enough handouts for the entire class and Mr. Schultz (26 copies).
Vocabulary:Enamel- A hard white substance covering the crown of the tooth.Cementum- The bonelike tissue that forms the outer surface of the root of the tooth.Pulp- Inner part of the tooth. Tells the brain what’s hot, cold, etc.Gum Tissue- Gums around the teethDentin-Hard tissue similar to the bone. Major portion of the tooth.Exam Chair- Chair you sit in during a visit to the dentist.Special Light- A bright light a dentist will use to better see in your mouth.Cleaning Tool- A tool used by the dentist to clean your teeth.Mirror- A piece of glass that you can see yourself in, easier to see inside your mouth.X-Ray Machine-A machine that takes a picture of just the bones/teeth.Water-Spray Hose- Used at the dentist office after cleaning of the teeth to rinse.Mask- Worn by the dentist to prevent any bacteria to enter his mouth.Crown- Visible portion of the tooth.Root- The portion of the tooth that plants itself in the gums. Keeps the tooth in place
Curriculum Integration Ideas: Math, Critical Thinking, Communication Skills, Language Arts, Problem Solving.
Procedure:1. Introduction of myself and why I am teaching dental health. (Approximately 3 minutes)2. Introduce the dental health unit and a brief overview of what is to come. (Approximately 3 minutes) a.) Tooth Anatomy and Apple Experiment
b.) Brushing and Flossingc.) Effects of Tobacco and Soda on teeth and Finishing the Apple Experimentd.) Dentist visit to speak about their profession and Introduce Final Presentation Assignmente.) Orthodontist visit to speak about their profession and what they coverf.) Class presentations
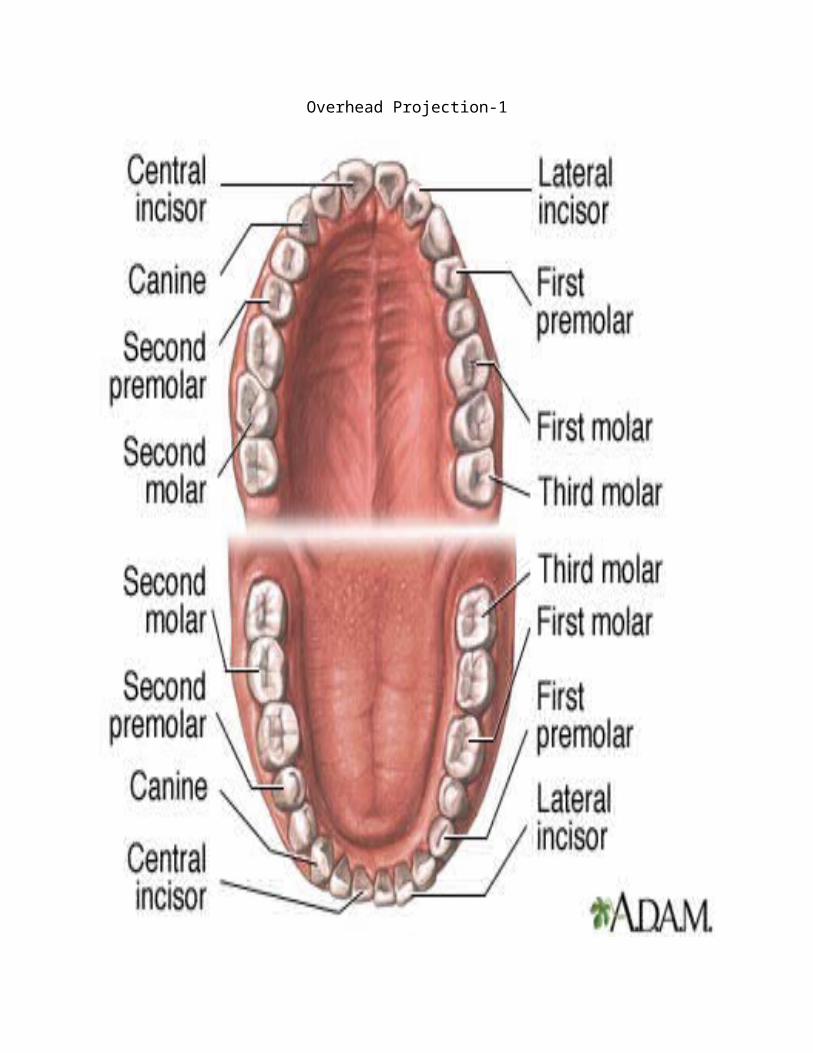
2. Start the class by showing the overhead of the “Anatomy of the Tooth” and pointing out specific areas for them to start to remember. (Approximately 5 minutes). a.) Enamel b.) Dentin c.) Pulp d.) Cementum e.) Gums f.) Crown g.) Root2. Show the overhead of the entire mouth to help point out certain teeth and their individual names. (Approximately 5 minutes) a.) Have the students take their tongues and move it around their mouths as you read the names of the teeth. At this portion of the lesson, it is not important for the students to remember the names of the teeth.3. Discuss what foods the students already know of that can harm the teeth in their mouths. (Approximately 1 minute) a.) Any food that the students can name that has high sugar content. Candy, soda, sports drinks are very common. Emphasize at the end of the discussion that sugar harms their teeth.4. Discuss the foods the students already know that can help the teeth in their mouths. (Approximately 1 minute) a.) Any food that does NOT have a lot of sugar in it. Fruits, vegetables, water, milk are all foods that will more than likely come up.5. Start to explain the “Tooth Decay” experiment and discuss what the students think may happen. (Approximately 5 minutes) a.) The experiment consists of an apple that gets poked with a pencil to demonstrate the effects of sugar on a tooth. Some discussions will be that the inner part of the tooth, dentin, will begin to rot.
CONCLUSION/ASSESSMENT6. Go over the “Anatomy of the Tooth” overhead and the “Entire Mouth” overhead and the terms one more time. (Approximately 5 minutes) a.) Recap the terms such as enamel, dentin, root, cementum, etc. b.) Have the students run their tongues across their teeth again as you read the names of the teeth.7. Have the students take out a piece of paper to write a question or questions on it if they have any. Collect the papers and answer the questions before the next class period begins. (Approximately 5 minutes)8. Students will complete the worksheet titled “Parts of the Tooth/Tools at the Dentist’s Office” to 90% accuracy and have the students work on it for the remaining amount of time (Approximately 3 minutes).
Homework and Family Involvement:After the hand outs have been completed and graded, have the students take the handout home to inform the parents about dental health that they’ve learned today. If the worksheets aren’t completed, complete by Thursday. Have the class also work on the new vocabulary learned so they don’t need to go over it the next lesson.
Resources: Meeks, L. and Heit, P. (2003). Totally Awesome Strategies for Teaching Health. New York, NY: McGraw-Hill Companies, Inc. page 157.
P&G Crest & Oral-B Healthy Smiles Program. (2007). The Dental Defenders. Retrieved on May 19, 2008 from: http://www.pgschoolprograms.com/images/oral_care/oral_prog_pdfs/EDPGM-3978-3_EducatorsGuide2007_FA.pdf. Page 7, 13.
Enchanted Learning. (2008). Tooth Anatomy. Retrieved on May 20, 2008 from: http://www.enchantedlearning.com/subjects/anatomy/teeth/toothanatomy.shtml
Medline Plus Medical Encyclopedia: Dental Anatomy. (2008). Dental Anatomy. Retrieved on May 20, 2008 from: http://www.nlm.nih.gov/medlineplus/ency/imagepages/9445.htm
National Health Education Standard(s):Students will comprehend concepts related to health promotion and disease preventionStudents will demonstrate the ability to use goal-setting and decision-making skills that enhance health.
Performance Indicator(s): *Students will know the anatomy of the tooth.*Students will know what can help and harm the teeth in their mouths.*Students will be able to take information home to their parents to inform them of what they learned.
*Students will know how to properly brush and floss their teeth.
Overhead Projection-1
Overhead Projection 2
Dental Health Melissa SandquistFourth Grade HERS 320 Jefferson Elementary mlsandqu9037@ winona.eduMr. Matt SchultzMay 22, 2008
How to Brush and Floss
Lesson Goal:- The students will learn how to correctly brush and floss your teeth. - The students will also learn the difference between a new and old toothbrush.
Behavioral Objective:- After a discussion on how to keep your teeth clean, the students will create a brochure
identifying at least three steps of how to keep your teeth clean and two reasons as to why they need to brush their teeth.
Time:- 25 minutes
Integration:- Art- Communication Skills
Materials:- 25 “How to Brush” worksheet packet
o 25 “How to Brush” worksheetso 25 “Old & New Toothbrushes” worksheetso 25 “How to Floss” worksheets
- 25 containers of floss- 1 old toothbrush- 1 new toothbrush- 25 sheets of blank white paper- Markers- Pencils- 25 “My Teeth Are Healthy” worksheets- Example brochure
Vocabulary:- Enamel: a hard white substance covering the crown of the tooth.- Cementum: the bonelike tissue that forms the outer surface of the root of the tooth.- Pulp: inner part of the tooth. Tells the brain what’s hot, cold, etc.- Gum Tissue: gums around the teeth- Dentin: hard tissue similar to the bone. Major portion of the tooth.
- Exam Chair: Chair you sit in during a visit to the dentist- Special Light: a bright light a dentist will use to better see in your mouth.- Cleaning Tool: a tool used by the dentist to clean your teeth.- Mirror: a piece of glass that you can see yourself in, easier to see inside your mouth.- X-Ray Machine: a machine that takes a picture of just the bones/teeth.- Water-Spray Hose: used at the dentist office after cleaning of the teeth to rinse.- Mask: Worn by the dentist to prevent any bacteria to enter his mouth.
Procedure:1. Review the vocabulary from the day before. (3 minutes)
a. See vocabulary words above2. Explain to the students we will be learning how to take care of our teeth today. (30
seconds)3. Ask the students what they do to take care of their teeth. (30 seconds)
a. Brushb. Flossc. Go to the dentistd. Eat healthy foods
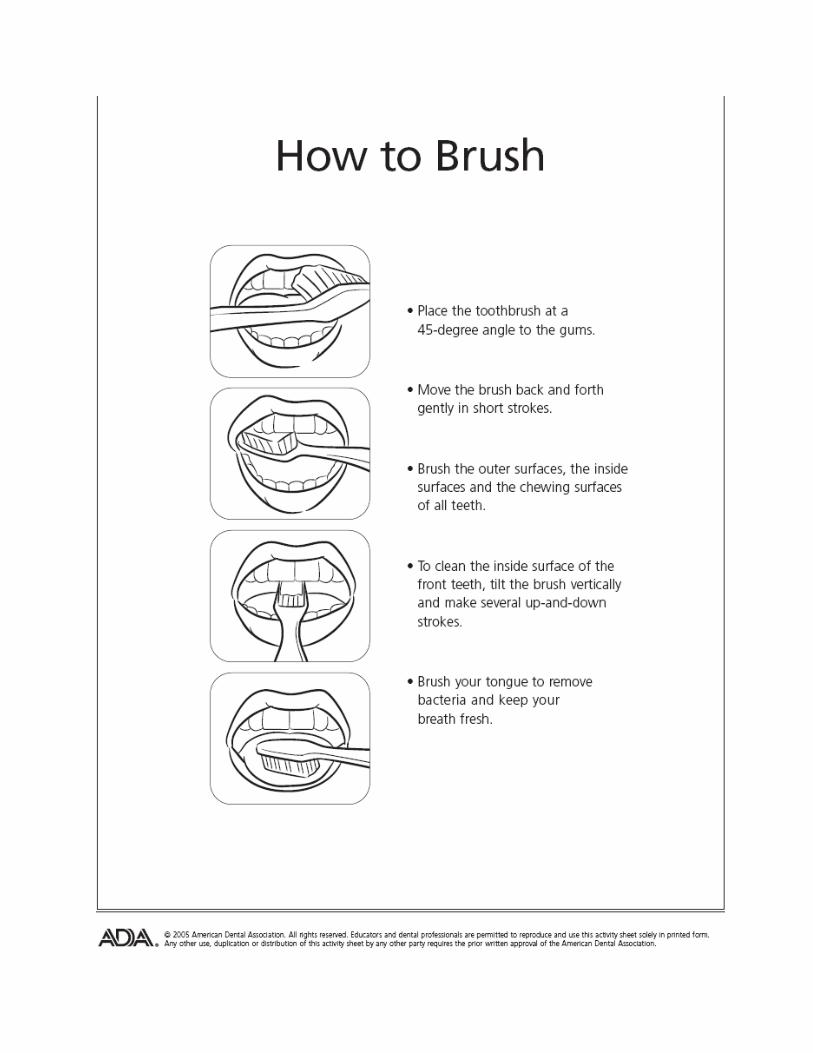
4. Explain we will discuss how to correctly brush your teeth. Handout “Brush Your Teeth” worksheet packet. (1 minute)
5. Read the worksheet and discuss with the students. (4 minutes)a. How many times do they brush their teeth?b. Why it is important to brush their teeth?
6. Tell the students to turn to the next page in their packet. (“Old and New Toothbrushes”) (30 seconds)
7. Walk around with an old and new toothbrush. Ask the students to write down 3 things that are different between the old and new toothbrush. (3 minutes)
8. Ask the students which toothbrush they would rather use: the old or new one. 9. Explain and discuss why it is important to change your toothbrush on a regular basis. (2
minutes)a. Change it every 3 monthsb. It becomes worn out and not effectivec. Bacteria will stay in the bristles d. Worn toothbrushes can damage gum tissue
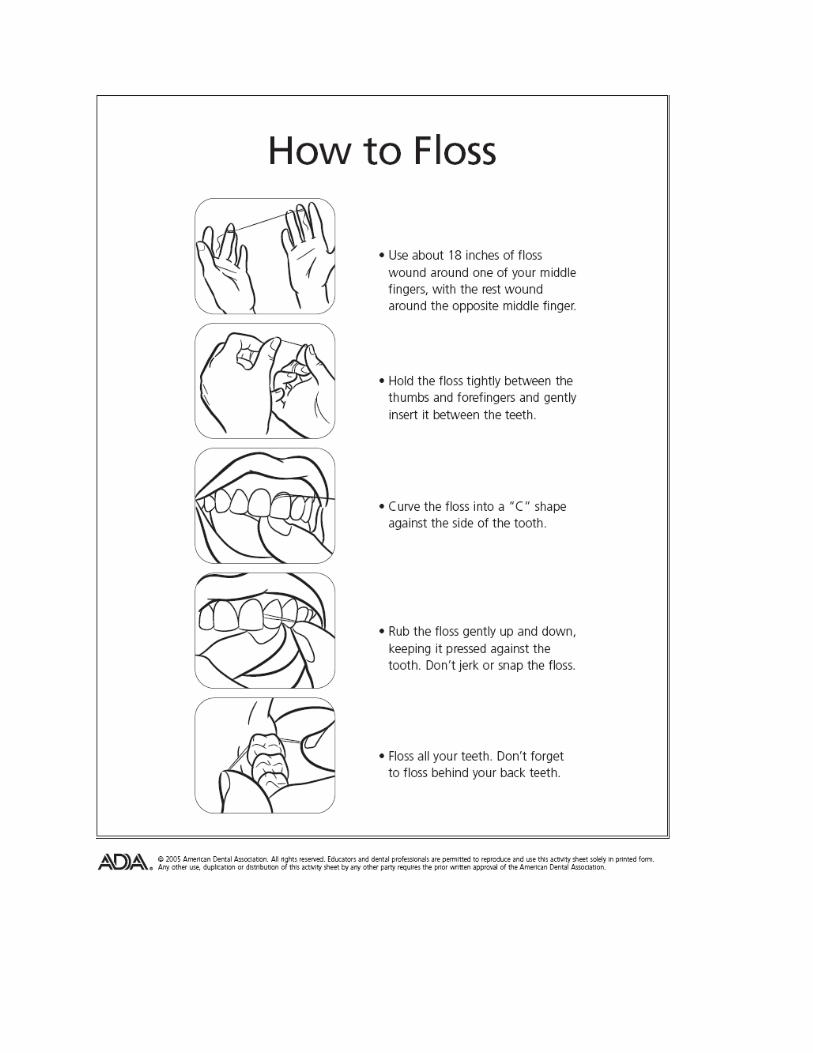
10. Tell the students to turn to the last page of their packet. (“How to Floss”). (30 seconds) Hand out containers of floss to every student.
11. Ask students if they floss on a regular basis. (30 seconds)12. Read “How to Floss” worksheet and discuss with the students. (4 minutes)
a. How often do you floss?b. Why is it important to floss your teeth?
13. Explain to the students they will be making a brochure on how to keep your mouth/teeth clean. (30 seconds)
14. Show an example and explain. (3 minutes)
a. The students must write at least 3 steps on both how to brush and floss our teeth.
b. The students must write at least two reasons why it is important to brush your teeth.
15. Handout markers and white paper. (30 seconds)16. Tell the students they will bring their brochures home to share with their families once
they are graded. Tell the students they will also be getting another sheet (“My Teeth Are Healthy”) to fill out at home and turn in tomorrow. (30 seconds) Hand out worksheets when working on brochures.
17. Give the students time to work on their brochures until the class period is over.18. If the students complete their brochures on time, have the students share their
brochures with the class.
Assessment:- The students will create a brochure with at least three steps on both how to brush and
floss your teeth and with two reasons why brushing your teeth is important.- The students will fill out “My Teeth Are Healthy” worksheet.
Home/Family Involvement and Extensions:- The students will bring their brochure home and explain it to their parents. - The students will fill out “My Teeth Are Healthy” worksheet at home.
Resources:American Dental Association. (2008). How to Brush. Retrieved on May 20, 2008 from
American Dental Association. (2008). How to Floss. Retrieved on May 20, 2008 from http://www.ada.org/public/education/teachers/smilesmarts/teeth_materials_floss.pdf
American Dental Association. (2008). Old and New Toothbrushes. Retrieved on May 20, 2008 from http://www.ada.org/public/education/teachers/smilesmarts/teeth_materials_toothbrushes_old.pdf
American Dental Association. (2008). Protect Your Prized Possession!. Retrieved on May 20, 2008 from http://www.ada.org/public/education/teachers/smilesmarts/teeth_module01_protect.pdf
(J. Halloran, personal communication, May 20, 2008).
P&G Crest & Oral-B Healthy Smiles Program. (2007). The Dental Defenders. Retrieved on May 20, 2008 from http://phschoolprograms.com/images/oralcare/oralpropdfs/EDPGM-3978-3EducatorsGuide2007FA.pdf. Page 10.
The University of Texas Health Science Center at San Antonio. (2007-2008). Activity 3B: Brushing and Flossing. Retrieved on May 20, 2008 from http://teachhealthk-12.uthscsa.edu/curriculum/oralhealth/oralhealth03b-brush.htm
Health Education Standard:- Students will comprehend health promotion and disease prevention concept.- Students will demonstrate the ability to become a health advocate for others.
Performance Indicators:- Students will identify how to properly brush and floss teeth.- Students will identify why brushing your teeth is important.- Students will talk with their parents/guardians why keeping your teeth/mouth clean is
o 25 “Captain Toothpaste’s Healthy Teeth Rules” worksheetso 25 “Princess Rinse’s Healthy Teeth Word Search” worksheets
o 25 “Review What You Know About Healthy Teeth” worksheets- Tobacco brochures- “Tooth Anatomy Quiz” worksheets- “Tooth Anatomy” transparency (see Lesson 1)- “Whole Mouth” transparency (see Lesson 1)- Overhead projector- Contract/Letter home
Vocabulary:- Enamel: a hard white substance covering the crown of the tooth.- Cementum: the bonelike tissue that forms the outer surface of the root of the tooth.- Pulp: inner part of the tooth. Tells the brain what’s hot, cold, etc.- Gum Tissue: gums around the teeth- Dentin: hard tissue similar to the bone. Major portion of the tooth.- Exam Chair: Chair you sit in during a visit to the dentist- Special Light: a bright light a dentist will use to better see in your mouth.- Cleaning Tool: a tool used by the dentist to clean your teeth.- Mirror: a piece of glass that you can see yourself in, easier to see inside your mouth.- X-Ray Machine: a machine that takes a picture of just the bones/teeth.- Water-Spray Hose: used at the dentist office after cleaning of the teeth to rinse.- Mask: Worn by the dentist to prevent any bacteria to enter his mouth.
Procedure:19. Review vocabulary words with the students. (3 minutes)
a. See above vocabulary wordsb. Use overheads from lesson 1 to review with the students.
20. Tell the students to take out their “My Teeth Are Healthy” worksheets from the day before. (3 minutes)
a. Ask the students what they put down for their answers. 21. Hand out “Tooth Anatomy Quiz” to the students. (2 minutes)
a. Explain and discuss the directions to the quiz.b. Tell the students to refer to the diagram to answer the questions.
22. Give students time to complete the quiz. Remind students to try and do their best. (7 minutes)
a. Go over answers with the students when they have all completed the quiz.b. Tell the students to correct their own quiz and put the number right on the top
with a circle around it. 23. Look over apple experiment with the students. (2 minutes)
a. Walk around and show the students how the apple rotted.24. Explain and discuss how the apple relates to the tooth. (1 minute)
a. The skin of the apple is the enamelb. The inside of the apple in the pulp which contains the seeds (nerves)
c. Explain how the pencil (sugar) caused rotting in the pulp, exactly how sugar would rot the pulp and nerves in real teeth if not taken care of.
25. Talk about tobacco and the effects it has on the mouth/teeth/dental area. (4 minutes)a. Walk around discussing the different brochuresb. Show the students the brochuresc. Causes gum decayd. Can cause oral cancer in the mouth
26. Discuss how soda affects the mouth/teeth/dental area. (3 minutes)a. Sugar stays on the teeth and causes cavities.b. They should brush their teeth after eating/drinking a sugary meal
27. Explain and pass out the letter/contract that will be sent home with the students. (1 minute)
a. Read it the contract over with the students.b. Tell the students they will bring it home and read it over with their parents and
then returned the bottom half signed from their parent/guardian.28. Handout worksheet packet. Go through each page and explain directions on each page.
Tell the students they must complete this for homework and turn it into the next class period. (2 minutes)
a. Students may work on this for the remaining time of class.
Assessment:- The students will complete the worksheet packet with 95% accuracy.- Students will also be able to look at a picture of the teeth and be able to tell us what
each part of the tooth is.- Brochures will be left in the classroom for further information. - The students will complete the “Tooth Anatomy” quiz with 85% accuracy.
Home/Family Involvement and Extensions:- The students will bring their packets home to show their parents what they’ve learned.- The students will also have to bring the letter/contract home to their parents and have
their parents sign the bottom of the letter and send back to Mr. Schultz by Tuesday.
Resources:Wisconsin Dental Association, Inc. (2002). Sip All Day, Get Deca. Retrieved from: www.wda.org
U.S. Department of Health and Human Services. (1994). Spitting into the Wind. Washington D.C.. National Institutes of Health (Publication No. 94-3880).
Enchanted Learning. (2008). Tooth Anatomy. Retrieved on May 20, 2008 from: http://www.enchantedlearning.com/subjects/anatomy/teeth/toothanatomy.shtml
Medline Plus Medical Encyclopedia: Dental Anatomy. (2008). Dental Anatomy. Retrieved on May 20, 2008 from: http://www.nlm.nih.gov/medlineplus/ency/imagepages/9445.htm
P&G Crest & Oral-B Healthy Smiles Program. (2007). The Dental Defenders. Retrieved on May 20, 2008 from http://phschoolprograms.com/images/oralcare/oralpropdfs/EDPGM-3978-3EducatorsGuide2007FA.pdf. Page 7,10-15.
Health Education Standard:- Students will comprehend health promotion and disease prevention concept.- Students will demonstrate the ability to become a health advocate for others.
Performance Indicators:- Students will identify terms of the tooth.- Students will know the side effects of tobacco.- Students will know the side effects of drinking soda.- Students will know how the tooth can rot by demonstration of the apple.- Students will identify the tooth by the parts of the apple.- Students will communicate with friends/family about dental health.
“Local Dentist Visit, Introduction of Unit Presentations”Day 4
Lesson Goal:To have the fourth grade class get a firsthand look at an individual who has made a career in the area we have been studying (Dental Health). The students will also begin the processes of their presentations that will be given to the rest of the class the final day of the unit.
Major Objectives:I will have the dentist come in and inform the students on the things that he/she does on a day in, day out, routine. I will also have him talk in more depth about some of the first hand things he’s seen with tobacco/soda cases as well as some other diseases such as periodontal disease. The students will need to ask 3 appropriate questions to the dentist by the end of the class period to get credit for this portion of the unit. They will need to write the correct answers under their questions and turn them into me so I know that they have been asked. Answers will also need to be in a different color so it is easy to tell that the questions were written out before the dentist begins to answer the questions.
The students will also begin to brainstorm how they can present a highlight of the information that is being learned throughout the unit in a way that will help the other students get ready for the end of the unit test. Inform the students that the test questions will come directly from the presentations that they give.
Total Time Needed:60 Minutes
Materials Needed:Pencil, a second different writing utensil (pen, crayon, marker, etc.) and paper for writing the questions and answers for the dentist. Local Dentist
Special Preparation:Making sure that the dentist is going to be able to come in and speak.Mention to the kids previous to the dentist coming in that there will be a special guest and what is expected of them as far as good behavior, “good” questions, and how busy a dentist schedule so they need to be on their best behavior!
Vocabulary: Same Vocabulary as Lesson Plan 1. Plus the following:Dentist- An individual who excels in dentistry.Periodontal Diseases- Any of various mixed bacterial infections that affect the soft tissues and bones supporting the teeth.
Curriculum Integration Ideas:Communication Skills, Language Arts, Problem Solving, Critical Thinking
Procedure:1. Welcome the students to class and tell them what is going to be happening in class today. (2 minutes)2. Inform the students that we have a guest speaker coming into class and that they need to be on their best behavior. (3 minutes)
a.) Not talking when the speaker is talkingb.) Listening with their earsc.) Not fooling around with their neighbord.) Participating if the speaker asks a questione.) Writing down the question if they have one and saving it until the end of the speech.
3. Ask the students to take out a piece of paper and pencil and explain the assignment for the day before the dentist comes. (5 minutes)
a.) Their assignment will be to write down the 3 questions that they have come to mind while the dentist is talking to the class, the questions must be related to dentistry and teeth and MUST BE APPROPRIATE.
b.) The students at the completion of writing their 3 questions they will have to switch from writing with a pencil to something else (marker, crayon, pen, etc.) and when the dentist answers a question on their sheet, they write down the correct answers to turn in after class.4. Introduce the dentist to the class (3 minutes)-WHAT THE DENTIST WILL COVER-5. The dentist will be asked to talk about what his/her daily routines are and the things that he does and operations that he performs. (10 minutes)
a.) Cavitiesb.) Pulling teethc.) Root Canalsd.) Check-Ups
6. The dentist will also be asked to talk about personal experiences with children who come in who haven’t been checked on for a while, soda drinkers, chewing tobacco users, etc. (10 minutes)7. The dentist will also speak about what other diseases and problems can happen if they do not remember to floss and brush regularly, drink a lot of sugary drinks, candy, etc. (10 minutes)
a.) Periodontal DiseaseASSESSMENT8. At the conclusion of the dentist speaking about his profession and the things that he/she feels is most important for the students to know, I will open the class to ask the questions that they have written down for the dentist to answer. (15 minutes)
a.) This is when the students will use a different writing utensil to answer the questions that they’ve asked to hand in for credit for the day.CONCLUSION9. Thank the dentist for coming in and sharing his experience and profession with our students. (1 minute)
10. Have the students say goodbye to the family dentist and pass their answered questions in for my inspection and grading. (1 minute)
Homework and Home Involvement:Handout assignment for final presentations due before the final day of the unit. The students will be paired up in groups of no more than 3 to begin to brainstorm and think of ideas that they will do to show their knowledge of all of the areas to the best of their abilities. The students will also be informed that the final unit test questions will come directly from their presentations so it’s vitally important that their presentations are accurate and contain a good portion of the information
The students will also be asked to prepare themselves for the guest speaker the following class period. They will be asked to find out what an orthodontist is and have an idea of what they do for a profession and how they typically work in cooperation with a dentist. The students will then have to write this down on a piece of paper to be turned in the following class period.
a.) Both professionals deal with teeth and making other people dentally healthy
Resources:Dictionary.com. (2008). Periodontal Disease. May 27, 2008. Retrieved from
Enchanted Learning. (2008). Tooth Anatomy. Retrieved on May 20, 2008 from: http://www.enchantedlearning.com/subjects/anatomy/teeth/toothanatomy.shtml
P&G Crest & Oral-B Healthy Smiles Program. (2007). The Dental Defenders. Retrieved on May 19, 2008 from: http://www.pgschoolprograms.com/images/oral_care/oral_prog_pdfs/EDPGM-3978-3_EducatorsGuide2007_FA.pdf. Page 13. (Bottom half of the sheet about the items in the dentist office).
Local Dentist. (2008). Guest Speaker. Winona, MN. Spoke to the Fourth Grade class May, 2008.National Health Education Standard(s): Students will comprehend concepts related to health promotion and disease prevention.Students will demonstrate the ability to use goal-setting and decision-making skills that enhance health.
Performance Indicator(s):*Students will know what the dentist does when he is at work.*Students will know more ways to help keep their teeth healthy.*Students will be able to get answers to their questions that they had for the dentist
*Students will begin to brainstorm about what their final presentation is going to cover and how to cover it.
Final DentalPresentation Assignment
~For this assignment, you will be in groups of 3, one of 4, to be assigned to you by Mr. Halloran. Your task will be to think of a creative way to recap the information learned throughout the class
period. Your group will be required to include all persons equally and each is expected to do their fair share of work, be good team members!
~Your presentation MUST include the following:-Tooth Anatomy
-Brushing and Flossing-Tobacco and Soda’s effects on the teeth and mouth
- Dentistry-Orthodontist
~I DO NOT want to see all of the information given to you from those class periods, include the most important items from each area. ~The material must be smoothly transitioned from one to another and if you can tie them all together without informing the students what area you are talking about then that is fine too!An idea must be given to Mr. Halloran ASAP, if you need help thinking of ideas stop in before or after school.Good luck, have fun, BE CREATIVE!!
Signed,
Mr. Halloran
“Orthodontist Visit, Presentation Work Day”Day 5
Lesson Goal:To have the students get a look at dental health from another professional’s eyes and perspective. The students will also get time in class to work on their presentations and inform me how they are progressing.
a) I will also be able to make sure they are improving everything that we’ve covered as well as accurately.The students will also get a hand out of the grading rubric so they know exactly what I am looking for out of their presentations due to be given the following class period.
Major Objectives:I will have an orthodontist come in and inform the students on his or her profession as well as what miracles they have done as far as making people emotionally and mentally healthier because they are happier with their smile/appearances. I will also be telling them a story and showing pictures of my progress from when I had braces to now.The students will also get a chance to work on their presentations in class and the opportunity to ask me questions.The students will also get the questions that they had asked the dentist back at this time.
Total Time Needed:60 Minutes
Materials Needed:Pencil, 2nd writing utensil for answers, paper, and materials they may have for their presentation, an orthodontist, overhead projections of pictures of self, overhead projector.
Special Preparation:Making sure that the orthodontist can come in and speak.Remind the students about behavior when there is a guest in the classroom. Also remind the students that they are taking precious time out of their busy schedule to come in and talk to us so make sure they are polite and focused. Make sure that they overhead are not rented out.Make sure overhead projections are made and have good quality.
Vocabulary:Same Vocabulary as Lesson Plan 1. Plus the following:
Orthodontist- A special type of dentist that specializes in prevention and correction of teeth, as by means of braces.Braces- A round or flat metal wire placed against the surfaces of the teeth for straightening irregularly arranged teeth.Retainer- A fixed or removable device worn in the mouth to hold the teeth in their new position during the adaptive period after straightening appliances have been removed.
Curriculum Integration Ideas:Communication Skills, Language Arts, Problem Solving, Critical Thinking
Procedure:1. Welcome the students to class and tell them about what is going to happen in class today. Students will be asked to turn in their homework that was dealing with the question of “What do the dentist and orthodontist have in common?” (2 minutes)2. Inform the students once again that there will be a guest speaker and that they need to be on their best behavior. (3 minutes)
a.) Not talking when the speaker is talking.b.) Listening with their ears.c.) Not fooling around with their neighbor.d.) Participating if the speaker asks a question.e.) Writing down the question if they have one and saving it until the end of the speech.
3. Ask the students to take out a piece of paper and a pencil to write down the questions they may have while the speaker is giving his/her presentation. (5 minutes)
a.) There assignment will actually be to think of 3 appropriate questions to ask the orthodontist by the end of the presentation.
i.) Appropriate questions are those that are focused on the topic at hand and something that only an orthodontist can answer.
b.) When the students have their 3 questions written down, they will need to switch writing utensils and will then use that when the orthodontist answers their question.
i.) Must be something other than a pencil.4. Ask the students to take out the worksheet from the first day that has the tools that are found at a dentist’s office.5. Introduce the orthodontist to the class. (3 minutes)-WHAT THE ORTHODONTIST WILL COVER-6. The orthodontist will be asked to speak about his/her typical appointments are like and the equipment that the students will typically see at the orthodontist office. (10 minutes)
a.) Braces, Retainers, etc.b.) the tools that are on the worksheet handed out on day 1.
7. The dentist will also speak about cases of really “bad teeth” that have needed a lot of changes and how they are doing now (5 minutes)8. The orthodontist will be asked to tell the class the difference between his occupation and a normal dentist that you would see about every 6 months. (5 minutes)
a.) Orthodontists deal with correction of teeth, placement/appearance wiseb.) Dentists deal with bacteria, cleaning, maintaining health of the teeth.
ASSESSMENT8. At the conclusion of the orthodontist speaking of his profession, and things that an orthodontist would do. I will open the class up for the 3 questions they have been asked to fill ask the orthodontist and write their answers down. (15 minutes)
a.) The students will need to have 3 questions and they need to all be answered either by them asking or another student having the same question and the student writing the answers down.
b.) the students will have to write their answers in a different color writing tool and will be asked to turn in at the completion of the asking session.CONCLUSION9. Thank the orthodontist for coming in and sharing his profession (1 minute).10. Have the students say farewell to the orthodontist and turn in their questions for me to grade and return the following class period. (1 minute)11. I will at this time, to show a visual of how orthodontics can help, show them pictures of myself when I was going through this stage and show them the changes between pre-braces, braces, and post-braces. (5 minutes)12. I will then have a representative for each group come and tell me their idea for their presentation due by the next period. (5 minutes)
Homework and Home Involvement:Have the groups get together and finish their presentations due by the following class period. The students will be asked to make sure that if they need any special equipment to ask before they come to class that day so I can arrange it for them, or help think of a different plan (Plan B).
Resources:Dictionary.com (2008). Orthodontist. May 27, 2008. Retrieved from
Dictionary.com (2008). Braces. May 27, 2008. Retrieved from http://dictionary.reference.com/browse/Braces.
Dictionary.com (2008). Retainer. May 27,2008. Retrieved from http://dictionary.reference.com/browse/Retainer.
G Crest & Oral-B Healthy Smiles Program. (2007). The Dental Defenders. Retrieved on May 19, 2008 from: http://www.pgschoolprograms.com/images/oral_care/oral_prog_pdfs/EDPGM-3978-3_EducatorsGuide2007_FA.pdf. Page 13. (Bottom half of the sheet about the items in the dentist office).
Local Orthodontist. (2008). Guest Speaker. Winona, MN. Spoke to the Fourth Grade class May, 2008.Jake Halloran (2008). Pre-Braces, Braces, Post-Braces Pictures. Retrieved May 27, 2008.National Health Education Standard(s):Students will comprehend concepts related to health promotion and disease prevention.
Students will demonstrate the ability to use goal-setting and decision-making skills that enhance health.
Performance Indicator(s):*Students will know what the orthodontist does as a profession.*Students will know ways that the orthodontist can help make a person feel happier and healthier emotionally by “fixing” their smile*Students will get questions answered by a professional orthodontist.*Students will have a very firm grasp on what they need to do to finish their projects for their presentation for the next class.
Overhead #1 (Pre-Braces)
Overhead #2 (Braces)
Overhead #3 (Post Braces)
“Presentation Day”Day 6
Lesson Goal:To have the fourth grade students learn the information that I have been teaching them for the past couple weeks. The students will also get a chance to show their creative side and give the other students another teaching tool.The students will also get a preview of what the test will cover because all test questions will be coming from the presentations given in class.
Major Objectives:The students will need to be able to pay attention to other students in the class and prepare themselves for the test that will be the following day in class. The students will need to take at least 1 page of notes from each presentation and they will have to prove to me that they have that many.
a.) Since there are 7 groups, and the student will not take notes for their own group, they should have 6 pages of notes
The students will be responsible for participating in their displaying of their presentation. Every group member must speak.
The students must turn in their presentation along with ONE copy of the rubric that was sent home with them the class period before.
Total Time Needed:60 Minutes
Materials Needed:The materials needed won’t be decided until each group informs me of their presentation. Some equipment may be the following:VCR/DVD Player, Overhead, Poster boardsMaterials that WILL be needed by the students:Pencil, Paper
Special Preparation:The Special Preparation for this day would have to wait to see what the student’s creativity asks for! If they need any of the equipment that is owned by the school the special preparation would be getting it in the class and ready prior to class time starting so we can go right away.
Vocabulary:All of the vocabulary from the previous lessons should be used in their presentations
Curriculum Integration Ideas:Communication Skills, Language Arts, Problem Solving, Critical Thinking, Art, Math
Procedure:1.) Welcome the students to class and return the graded questions that were asked to the orthodontist (5 minutes)2.) Inform the students of the procedure of the order of presenting and how I want the presentations to be turned in. (5 minutes)
a) I will have two equal decks and each group will get one card from a deck.b) I will then pull a card from the other deck and its match will be the first group to go.c) I will ask the group brings me their rubric so I can grade it while they are presenting.d) The group will present, open the classroom for questions and then turn in their
presentation at the completion of their presentation.3.) Presentations will be given (approximately 35 minutes)
Each group will present for approximately 5 minutesASSESSMENT4.) The students who are not presenting at the time will be required to write notes, each group should have total of 1 page of notes from each student.
a.) At the completion of the presentations I will take a look at everyone’s notes to make sure this task was being completed and grade accordingly. (5 minutes)CONCLUSION5.) Close the unit by informing the students that they need to study their notes that they took today because test questions will come directly from the presentations that were just given in class.
a.) I will keep all presentations until after the test and make the test from them.
Homework and Home Involvement:The notes that the students completed during class will be theirs to take home because I will have checked them all to make sure of the 6 pages. These are their study guides for the test that I will make at the completion of the day. All of the test questions will come directly from the presentations so the better the notes the students took, the better they will do.
Resources:Student Presentations. (2008). Dental Health Presentations. May 2008. Presentations given in class to be prepared into a written test for the following class period by Mr. Halloran.
National Health Education Standard(s): Students will comprehend concepts related to health promotion and disease prevention.Students will demonstrate the ability to use goal-setting and decision-making skills that enhance health.
Performance Indicator(s):*Students will take good notes to help themselves prepare for the test that is to come.*Students will show good listening skills to help them learn dental health from their peers.
*Students will show their creativity through their presentation style and the manner it was given to the class.