24
BAR DUO 48 Oct 2016
| Date post: | 16-Apr-2018 |
| Category: |
Documents |
| Upload: | trinhkhanh |
| View: | 214 times |
| Download: | 2 times |

BAR DUO 48Oct 2016
IMPORTANT SAFETY 1. Read the instructions of this manual. 2. Keep these instructions in a safety place. 3. Heed all warnings. 4. Follow all instructions. 5. When the installation of this device, please, respect your country safety regulations. 6. Don’t use this device close to the water or high humidity places. Clean only with dry cloth.7. Don’t install near any heat sources such as radiators, heat registers, stoves, or other apparatus (including amplifiers) that produce heat. Make certain that the equipment is always installed so that is cooled and can’t overheat.8. Don’t block any ventilation openings. Install in accordance with the manufacturer’s instructions. 9. Protect the power cord from being walked on or pinched, particularly at plugs, convenience receptacles, and the point where they exit from the apparatus. 10. Use only with the cart, stand, tripod, bracket, or table specified by the manufacturer, or sold with the apparatus. When a cart is used, use caution when moving the cart/ device combination to avoid injury from tip-over. 11. Only use attachments/accessories specified by the manufacturer. 12. Unplug this device during lightning storms or when unused for long periods of time. 13. The technical service is required when the device has been damaged in any way, such as power supply cord or plug is damaged, liquid has been spilled or objects have fallen into the device, doesn’t operate normally or has been dropped. 14. To completely disconnect this apparatus from the AC mains, disconnect the power supply cord plug from the AC receptacle. 15. The mains plug of the power supply cord shall remain readily operable.16. WARNING – to reduce the risk of fire or electric shock, don’t expose this device to rain or humidity. 17. Don’t expose this equipment to dripping or splashing and ensure that no objects filled with liquids, such as vases, are placed on the equipment.
1

2
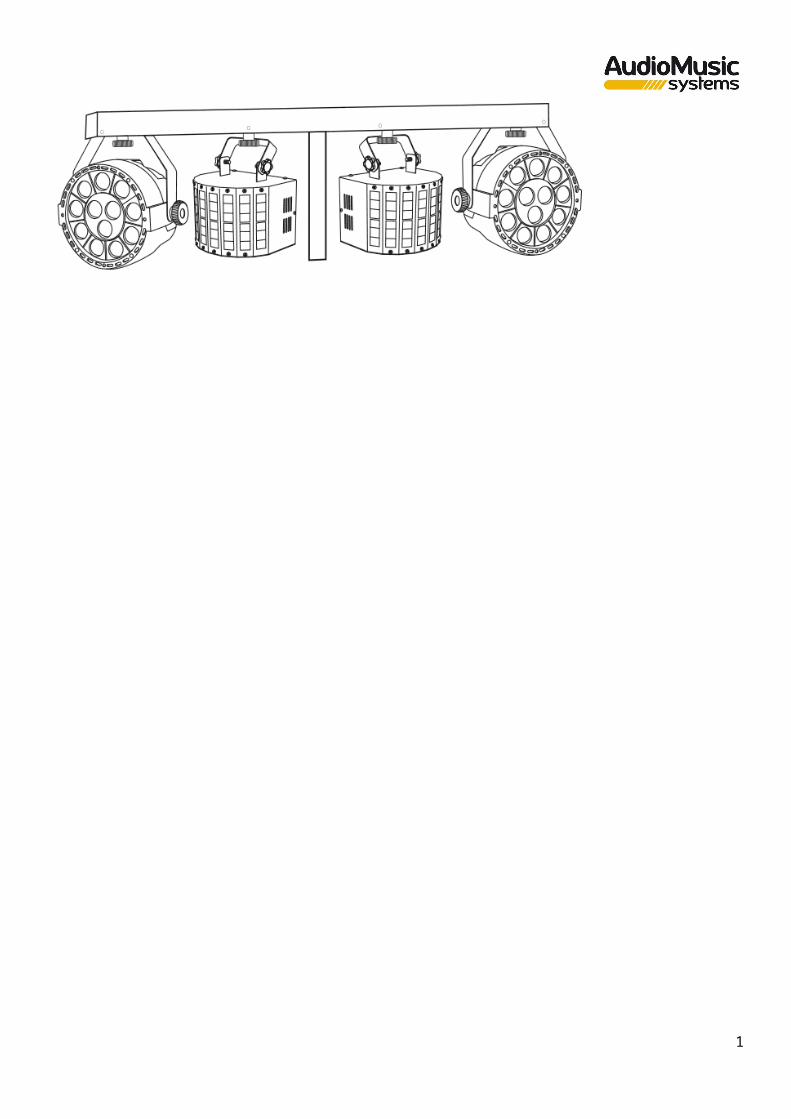
OVERVIEWBAR DUO 48 is a DMX 3/6/15 channels lighting bar designed to control 4 units, 2 of them LED PAR 12x1W RGBW and the other 2 effects units LED of 4x3W RGBW. It is perfect for small installations where is required either soft light or big shows.The rear part of the unit has a screen and navigation controls for the manual configuration from where will be possible select the programs and the channels.BAR DUO 48 includes output/input DMX 512 connections (3 pins XLR) making possible connect different units to each other, in addition includes a built-in microphone for sound-to-light operation.BAR DUO 48 includes a remote control to easily operate the unit.Technical Data:Mains Power/ Rated power
AC 220V-240 V, 50/60 Hz 60W
Control modes 3-6-15 DMX channels / AUTO / Sound / Master-Slave / Remote control
Light source 2 PAR 12x1W RGBW LEDs can light + 2 LED 4x3W RGBW LEDs effects
Operating temperature -20ºC / 40ºCDMX 512 connection 3 pins XLR male/femaleDimensions (WxDxH) 660 x 150 x 80 mm (stand not included)Weight 5.5 KgMaximum Height 2.10 meters
Features: BAR DUO 48 also includes a remote control to switch the unit functions like color selection, effects or motor and transition speed.
3

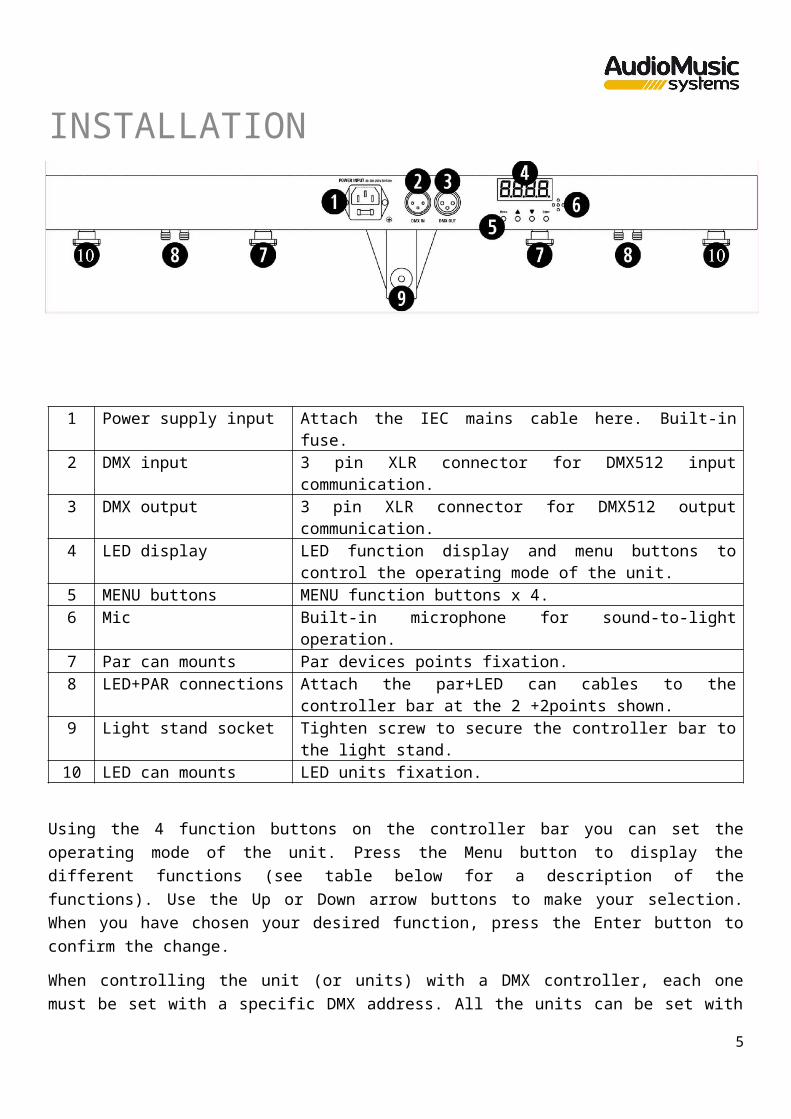
INSTALLATION
1 Power supply input Attach the IEC mains cable here. Built-in fuse.2 DMX input 3 pin XLR connector for DMX512 input
communication.3 DMX output 3 pin XLR connector for DMX512 output
communication.4 LED display LED function display and menu buttons to control the
operating mode of the unit.5 MENU buttons MENU function buttons x 4.6 Mic Built-in microphone for sound-to-light operation.7 Par can mounts Par devices points fixation.8 LED+PAR connections Attach the par+LED can cables to the controller bar
at the 2 +2points shown.9 Light stand socket Tighten screw to secure the controller bar to the light
stand.10 LED can mounts LED units fixation.
Using the 4 function buttons on the controller bar you can set the operating mode of the unit. Press the Menu button to display the different functions (see table below for a description of the functions). Use the Up or Down arrow buttons to make your selection. When you have chosen your desired function, press the Enter button to confirm the change.When controlling the unit (or units) with a DMX controller, each one must be set with a specific DMX address. All the units can be set with the same DMX address or it can be use different DMX address for each unit. If all the units are set with the same DMX address, all units will be synchronized and operate in the same way.
4
ADVANCED USEBAR DUO 48 is easy to set up using the manual configuration through the menu and the followed panel thanks to its 4 control buttons (MENU, UP, DOWN, ENTER):AUTO
AUTP Par Light Auto
AUTF LED Effect Light Auto
AUTN Light Set Auto
AP01-AP13 PAR Light Effect
AF01-AF13 LED Effect Light Effect
AN01-AN13 Light set effect
S01-S32 PAR Light Speed
S01-S32 LED Effect Light Speed
S01-S32 Light set Speed
N00-N09 Motor Speed
N00-N09 Motor Speed
SOU SOUP Par Light Sound-activated
SOUF LED Effect Light Sound-activated
SOUN Light set Sound-activated
SP01-SP13 PAR Light effect
SF01-SF07 LED Effect Light Effect
SN01-SN10 Light set Sound-activated
COL COLOR R 0-255G 0-255B 0-255W 0-255S00-32N001-32
RedGreenBlueWhiteStrobeSpeed
DMX D001-D512 3 Channel6 Channel15 Channel
ChannelsChannelsChannels
SLA SLANSYS ASEN SN01-SN04 Sound-activated sensitivity
5

DMX Mode for 3 Channels:
Channel 1
0-910-4950-8990-129130-169170-209210-255
Black OutAPXXALXXANXXSPXXSLXXSNXX
Channel 2
APXX/SPXX
0-1920-3940-5960-7980-99100-119120-139140-159160-179180-199
AP-01AP-02AP-03AP-04AP-05AP-06AP-07AP-08AP-09AP-10
Channel 2
ALXX/SLXX
20-3940-5960-7980-99100-119120-255
AF-02AF-03AF-04AF-05AF-06AF-07
Channel 2 ANXX/SNXX
0-1920-3940-5960-7980-99100-119120-139140-159160-179180-255
AN-01AN-02AN-03AN-04AN-05AN-06AN-07AN-08AN-09AN-10
Channel 3
Cambio Velocidad
0-255
DMX Mode for 6 Channels:Channel 1
0-255 Red
Channel 2
0-255 Green
Channel 3
0-255 Blue
Channel 4
0-255 White
6

Channel 5
0-255 Strobe
Channel 6
0-255 Motor
DMX Mode for 15 Channels:Channel 1
0-255 Red
LED Effect LightChannel 2
0-255 Green
Channel 3
0-255 Blue
Channel 4
0-255 White
Channel 5
0-255 Motor
Channel 6
0-255 RedLED PAR Light
Channel 7
0-255 Green
Channel 8
0-255 Blue
Channel 9
0-255 White
Channel 10
0-255 Red LED Effect light
Channel 15
0-255 Strobe
7

TROUBLESHOOTINGThis short guide is meant to help and try to solve simple problems, if they continue and the device can not operate, please, don’t try to repair it by yourself, return the device to your AMS dealer.If a problem occurs, carry out the following steps in sequence until find solve the problem. If finally the unit operates properly, don’t continue with this next steps.If the light effect does not operate properly, refer servicing to a technician.No LightResponse: Suspect two potential problem areas: the power supply or the LEDs.
1- Power supply. Check that the unit is plugged into an appropriate power supply.2- The LEDs. Return the device to your AudioMusic Systems dealer.3- If all of the above appears to be OK, plug the unit in again.4- If you are unable to determine the cause of the problem, do not open the
device, as this may damage the unit and the warranty will become void.5- Return the device to your AudioMusic Systems dealer.
No DMXResponse: Suspect the DMX cable or connector, a controller wrong function, a light effect DMX card error.
1- Check the DMX setting. Make sure that DMX addresses are correct.2- Check the DMX cable: Unplug the unit; change the DMX cable; then reconnect
to electrical power. Try your DMX control again.3- Determine whether the controller or light effect is at fault. Does the controller
operate properly with other DMX products? If not, take the controller in for repair. If so, take the DMX cable and the light effect to a qualified technician.
DMX ConnectionWhen fabricating your own cables, always observe the illustrations on this page. Never connect the shielding of the cable to the ground contact of the plug, and always make certain that the shielding does not come into contact with the housing of the XLR plug. If the shielding is connected to the ground, this can lead to short-circuiting and system malfunctions.To prevent system errors, the last device in a DMX chain needs to be equipped with a terminating resistor (120 ohm, 1/4 Watt).
8

9
INDICACIONES DE SEGURIDAD1. Lea detenidamente las siguientes instrucciones y preste atención a estas. 2. Guarde en un lugar seco y seguro este manual. 3. Siga una a una todas estas instrucciones. 4. Respete las instrucciones de seguridad de su país cuando instales este dispositivo. 5. No use este dispositivo cerca del agua o zonas altamente húmedas. A la hora de limpiarlo, utilice un paño seco.6. No instale el dispositivo cerca de ninguna fuente de calor o fuego tales como calefactores, estufas o incluso amplificadores que produzcan calor. Asegúrese de que una vez instalado el dispositivo, esté en un lugar fresco y seco.7. No obstruya ninguna de las salidas. Cuando instale el dispositivo hágalo tal y como lo indican estas instrucciones.8. Proteja el cable de alimentación para no ser pisado o manipulado. 9. Instale y sitúe el dispositivo con garras, abrazaderas o de forma soldada entre su base y la sujeción.10. Únicamente utilice accesorios especificados por AudioMusic Systems.11. Desenchufe el dispositivo si no va a ser utilizado en largos periodos de tiempo.12. El dispositivo será reparado por el servicio técnico oficial cuando esté dañado, tal como el cable este deteriorado o el conector esté estropeado, así como si el dispositivo ha sufrido contacto con líquidos o no opera correctamente.13. No exponga este equipo a líquidos, gotas, ni salpicaduras, así como su ubicación cerca de recipientes o posibles fuentes de líquidos.14. Para desconectar totalmente la unidad de la red eléctrica principal, desconecte el cable de la propia red eléctrica. 15. El conector principal debe poder conectarse y desconectarse de la red eléctrica de manera fácil, si no es así, no intente manipular ni el cable ni la conexión bajo la red eléctrica.16. ATENCIÓN. Para reducir el riesgo de fuego o shock eléctrico, no exponga este dispositivo bajo la lluvia o la humedad.
10
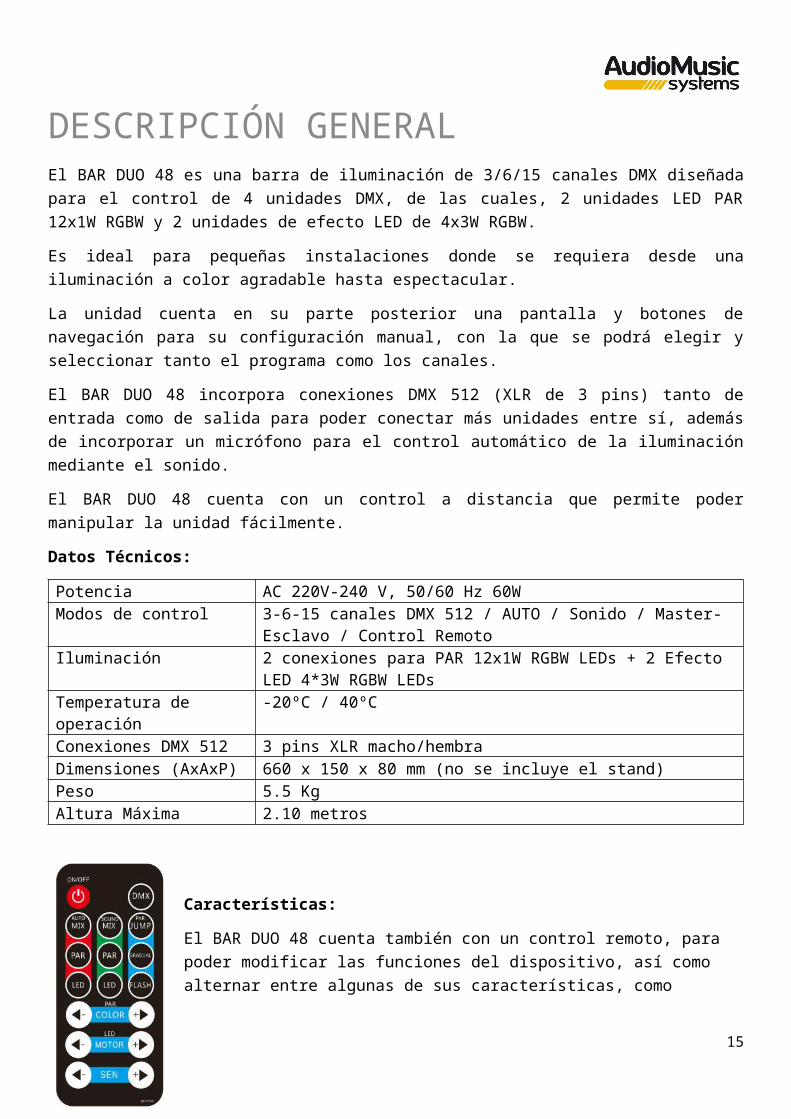
DESCRIPCIÓN GENERALEl BAR DUO 48 es una barra de iluminación de 3/6/15 canales DMX diseñada para el control de 4 unidades DMX, de las cuales, 2 unidades LED PAR 12x1W RGBW y 2 unidades de efecto LED de 4x3W RGBW.Es ideal para pequeñas instalaciones donde se requiera desde una iluminación a color agradable hasta espectacular.La unidad cuenta en su parte posterior una pantalla y botones de navegación para su configuración manual, con la que se podrá elegir y seleccionar tanto el programa como los canales.El BAR DUO 48 incorpora conexiones DMX 512 (XLR de 3 pins) tanto de entrada como de salida para poder conectar más unidades entre sí, además de incorporar un micrófono para el control automático de la iluminación mediante el sonido.El BAR DUO 48 cuenta con un control a distancia que permite poder manipular la unidad fácilmente.Datos Técnicos:Potencia AC 220V-240 V, 50/60 Hz 60WModos de control 3-6-15 canales DMX 512 / AUTO / Sonido / Master-Esclavo /
Control RemotoIluminación 2 conexiones para PAR 12x1W RGBW LEDs + 2 Efecto LED
4*3W RGBW LEDsTemperatura de operación
-20ºC / 40ºC
Conexiones DMX 512 3 pins XLR macho/hembraDimensiones (AxAxP) 660 x 150 x 80 mm (no se incluye el stand)Peso 5.5 KgAltura Máxima 2.10 metros
Características:El BAR DUO 48 cuenta también con un control remoto, para poder modificar las funciones del dispositivo, así como alternar entre algunas de sus características, como selección de color, efectos o la velocidad tanto del motor como de transición.
11

USO E INSTALACIÓN
1 Conexión de alimentación del dispositivo
Conecte el cable para su puesta en marcha. Lleva incluido el fusible.
2 Entrada DMX Conexión XLR de 3 pin para DMX 5123 Salida DMX Conexión XLR de 3 pin para DMX 5124 Pantalla LED Pantalla LED para el control de la unidad5 Botones del menú Botones para la navegación del menú y control de la
unidad6 Micrófono Micrófono incluido7 Montura para PAR Fijación para unidades PAR8 Conexiones LED+PAR Conexiones para PAR + LED con las que controlar el
dispositivo9 Socket para la
colocación en trípodeRosca para el tornillo para una máxima seguridad del controlador al trípode
10 Montura para LED Fijaciones para unidades LED
Utilizando las cuatro funciones a través de los botones del controlador puede configurar los modos del dispositivo. Presione el botón MENU para acceder a las distintas funciones (tabla adjunta). Utilice los botones UP y DOWN para realizar la selección de la función.Cuando se conecten varias unidades BAR DUO 48 entre ellas, cada una deberá tener una dirección DMX asignada individual en el caso de querer controlarlas por separado o una misma dirección DMX para poder controlarlas todas a la vez. Si se desea configurar cada unidad por separado, cada unidad, recibirá la dirección DMX asignada a través de la señal DMX, una vez asignada, cada unidad será controlada de manera individual. La dirección DMX que se elija para cada unidad debe estar determinada por un número concreto de canales. La BAR DUO 48 tiene 8 canales DMX, por lo tanto, debe empezar la dirección de la unidad por 1 hasta el 8 canal, la segunda unidad debe empezar en el canal 9 (1+8), la tercera (9+8), la cuarta en el 25 (17+8) y así sucesivamente.
12

AJUSTE Y USO AVANZADOLa unidad es fácil de configurar de manera manual a través de su menú con las siguientes tablas y gracias a sus 4 botones de control (MENU, UP, DOWN, ENTER):AUTO
AUTP Iluminación Automática PAR
AUTF Efecto Automático LED
AUTN Configuración Automática Iluminación
AP01-AP13 Efecto de iluminación PAR
AF01-AF13 LED Efecto de iluminación
AN01-AN13 Configuración Efecto Iluminación
S01-S32 Velocidad Iluminación PAR
S01-S32 Configuración velocidad LED
S01-S32 Configuración Velocidad Iluminación
N00-N09 Velocidad Motor
N00-N09 VelocidadMotor
SOU SOUP Sonido Activado
SOUF LED Efecto Sonido Activado
SOUN Configuración Iluminación Sonido Activado
SP01-SP13 Efecto de iluminación PAR
SF01-SF07 LED Efecto de iluminación
SN01-SN10 Configuración de iluminación con el sonido activado
COL COLOR R 0-255G 0-255B 0-255W 0-255S00-32N001-32
RojoVerdeAzulBlancoEstroboVelocidad
DMX
D001-D512 3 Canal6 Canal15 Canal
CanalesCanalesCanales
SLA SLANSYS ASEN SN01-SN04 Activación sensibilidad Sonido
Modo DMX para 3 Canales:0-910-49
Black OutAPXX
13

Canal 1
50-8990-129130-169170-209210-255
ALXXANXXSPXXSLXXSNXX
Canal 2
APXX/SPXX
0-1920-3940-5960-7980-99100-119120-139140-159160-179180-199
AP-01AP-02AP-03AP-04AP-05AP-06AP-07AP-08AP-09AP-10
Canal 2
ALXX/SLXX
20-3940-5960-7980-99100-119120-255
AF-02AF-03AF-04AF-05AF-06AF-07
Canal 2
ANXX/SNXX
0-1920-3940-5960-7980-99100-119120-139140-159160-179180-255
AN-01AN-02AN-03AN-04AN-05AN-06AN-07AN-08AN-09AN-10
Canal 3
Cambio Velocidad
0-255
Modo DMX para 6 Canales:Canal 1 0-255 RojoCanal 2 0-255 VerdeCanal 3 0-255 AzulCanal 4 0-255 Blanc
oCanal 5 0-255 Strob
oCanal 6 0-255 Motor
Modo DMX para 15 Canales:Canal 1 0-255 Rojo Efecto Iluminación
LEDCanal 2 0-255 Verde14
Canal 3 0-255 AzulCanal 4 0-255 BlancoCanal 5 0-255 MotorCanal 6 0-255 Rojo Efecto iluminación
PARCanal 7 0-255 VerdeCanal 8 0-255 AzulCanal 9 0-255 BlancoCanal 10 0-255 Rojo Efecto Iluminación
LEDCanal 15 0-255 Strobo
POSIBLES PROBLEMAS Y SOLUCIÓNSi no funciona la luzEsta guía pretende ayudar en resolver problemas simples y comunes que pueden aparecer en el uso del dispositivo, si los problemas persisten, no intente abrir y reparar la unidad por sí solo, contacte con su distribuidor AudioMusic Systems más cercano y devuélvalo para su reparación.Si el dispositivo tiene un problema, siga los siguientes puntos de manera hasta que encuentre el problema y pueda solucionarlo, si el producto funciona correctamente, no siga con estos pasos. Si la iluminación no funciona correctamente, envíe el dispositivo al servicio técnico de AudioMusic Systems.Posibles problemas: Fuente de alimentación del sistema LED
1- Fuente de alimentación: Asegúrese de que la unidad esté correctamente conectada.
2- LEDs. Si los LEDs presentan un mal funcionamiento de manera independiente, contacte al servicio técnico de AudioMusic Systems.
3- Si todo lo anterior parece que no está dañado, puede conectar la unidad a la red eléctrica.
4- Si usted no puede determinar la causa de los problemas que presenta la unidad, no la desmonte o intente reparar por sí mismo ya que perderá la garantía.
6- Devuelva la unidad a servicio técnico de AudioMusic Systems.
Si no responde el protocolo DMXPosibles problemas: Verifique que el cable de conexión DMX está correctamente insertado en el dispositivo, verifique que el propio cable no está defectuoso, que el controlador funciona correctamente.
1- Verifique las características DMX y que la dirección asignada es correcta.2- Verifique el cable DMX: Desinstale la unidad, cambie el cable DMX y vuelva a
conectar el dispositivo a la red eléctrica, verifique de nuevo el control DMX.
15
3- Determine si el control está defectuoso. ¿El dispositivo opera correctamente con otras unidades DMX? Si no es así, lleve la unidad a ser reparada al servicio técnico oficial o a un técnico cualificado.
Conexionado DMXSi fabrica sus propios cables, tenga en cuenta las figuras de esta página. No conecte la malla del cable al contacto de masa del conector ni permita que la malla entre en contacto con la carcasa del conector XLR. Si se produce un contacto de la malla con la masa, puede producir un funcionamiento inestable del equipo. Para evitar errores de sistema, debe conectarse una resistencia de terminación (120 ohmios, 1/4 W) en el
último equipo de la cadena DMX.
Av. Saler nº6 Poligono. Ind. L’Alteró. Silla 46460 VALENCIA-SPAINTel: +34 963124088 Fax: +34963219645
16

www.audiomusic.es
17


![[Spanish] Suplemento al manual de instrucciones: …En el caso del micrófono Modelo 4950, la sensibilidad nominal es la sensibilidad de circuito abierto del micrófono (50,00 mV/Pa),](https://static.documents.pub/doc/80x56/5e9f6a6dee5ad7437b579087/spanish-suplemento-al-manual-de-instrucciones-en-el-caso-del-micrfono-modelo.jpg)
