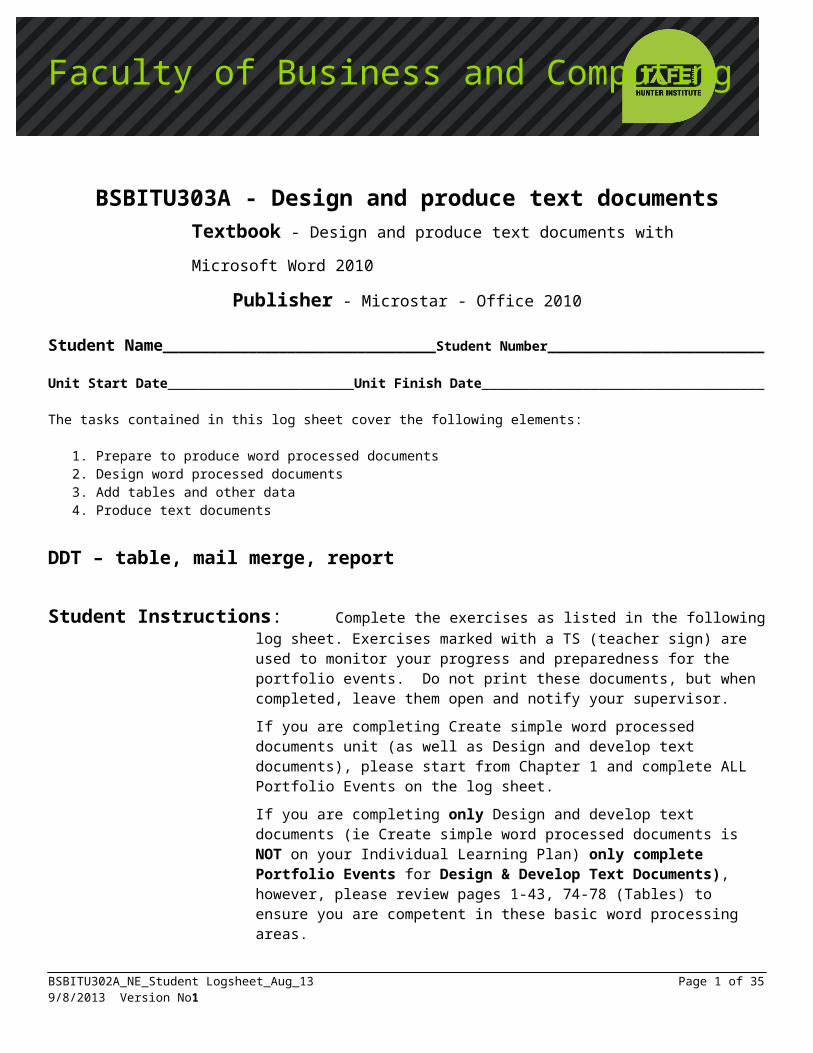
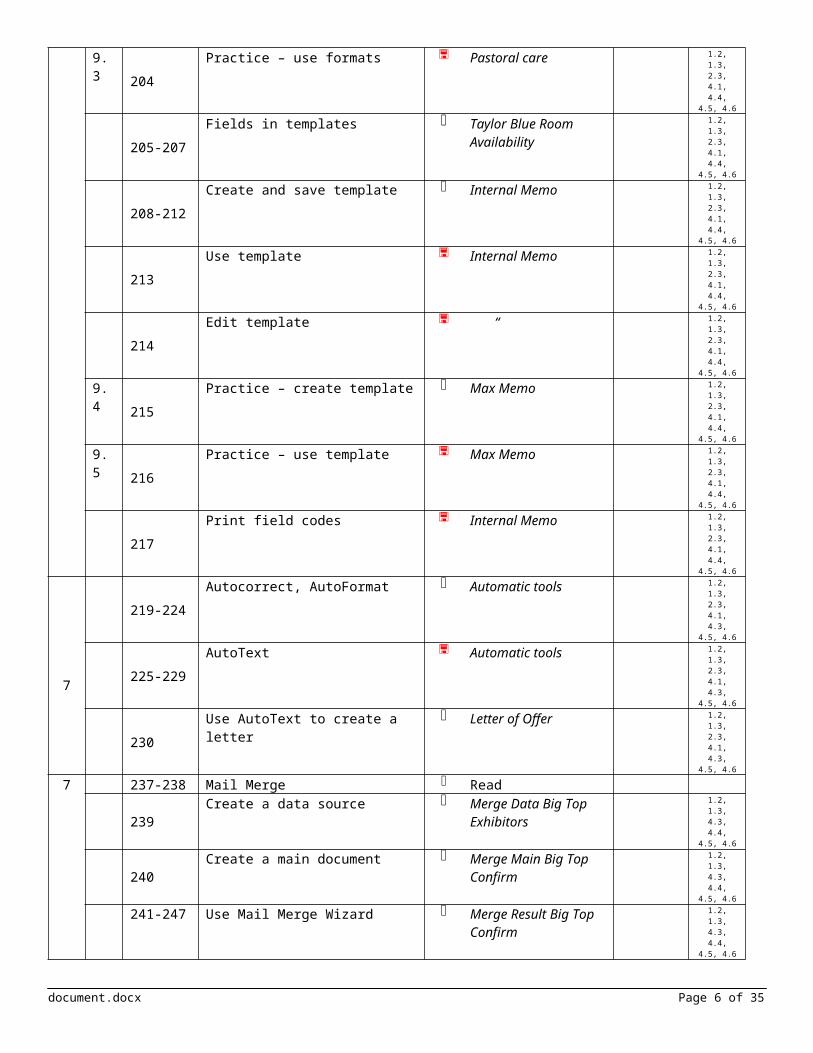
Faculty of Business and Computing BSBITU303A - Design and produce text documents Textbook - Design and produce text documents with Microsoft Word 2010 Publisher - Microstar - Office 2010 Student Name___________________________________Student Number____________________________ Unit Start Date________________________Unit Finish Date____________________________________ The tasks contained in this log sheet cover the following elements: 1. Prepare to produce word processed documents 2. Design word processed documents 3. Add tables and other data 4. Produce text documents DDT – table, mail merge, report Student Instructions: Complete the exercises as listed in the following log sheet. Exercises marked with a TS (teacher sign) are used to monitor your progress and preparedness for the portfolio events. Do not print these documents, but when completed, leave them open and notify your supervisor. If you are completing Create simple word processed documents unit (as well as Design and develop text documents), please start from Chapter 1 and complete ALL Portfolio Events on the log sheet. If you are completing only Design and develop text documents (ie Create simple word processed documents is NOT on your Individual Learning Plan) only complete Portfolio Events for Design & Develop Text Documents), however, please review pages 1-43, 74-78 (Tables) to ensure you are competent in these basic word processing areas. BSBITU302A_NE_Student Logsheet_Aug_13 Page 1 of 35 9/8/2013 Version No1
Transcript
Faculty of Business and Computing
BSBITU303A - Design and produce text documents Textbook - Design and produce text documents with Microsoft Word 2010
Unit Start Date_________________________________Unit Finish Date_______________________________________
The tasks contained in this log sheet cover the following elements:
1. Prepare to produce word processed documents2. Design word processed documents3. Add tables and other data4. Produce text documents
DDT – table, mail merge, report
Student Instructions: Complete the exercises as listed in the following log sheet. Exercises marked with a TS (teacher sign) are used to monitor your progress and preparedness for the portfolio events. Do not print these documents, but when completed, leave them open and notify your supervisor.
If you are completing Create simple word processed documents unit (as well as Design and develop text documents), please start from Chapter 1 and complete ALL Portfolio Events on the log sheet.
If you are completing only Design and develop text documents (ie Create simple word processed documents is NOT on your Individual Learning Plan) only complete Portfolio Events for Design & Develop Text Documents), however, please review pages 1-43, 74-78 (Tables) to ensure you are competent in these basic word processing areas.
Location of files As advised by your teacher
Meaning of symbols: Read the relevant information Key in the task Recall the activity fileTS Show your teacher
BSBITU302A_NE_Student Logsheet_Aug_13 Page 1 of 239/8/2013 Version No1
Sess
ion
Act
ivity
Page Instructions and required files Description
Com
plet
e da
te
Elem
ent
Map
ping
Portfolio Event 1 Work safely and sustainably 1.1
As a reference and introduction, you can access the Hunter TAFE Online Moodle, via the following link: https://online.huntertafe.edu.au/login/index.php Select the green Student Support Hub, Microsoft Office, WordMSWord2010 Quick Access Guide – Appendix ACommon Proofreading Symbols – Appendix BSIMPLE WORD PROCESSING.
1 1 2-6 Access Word, familiarisation7-8 Create a document, select style 1.2, 1.3,
4.1, 4.4
9-11 Save a document MSWord1 1.2, 1.3, 4.1, 4.4
12-13 Use Save As, close a document MSWord2 1.2, 1.3, 4.1, 4.4
1.1 13 Practice - create a document Golden Goods 1.2, 1.3, 4.1, 4.4
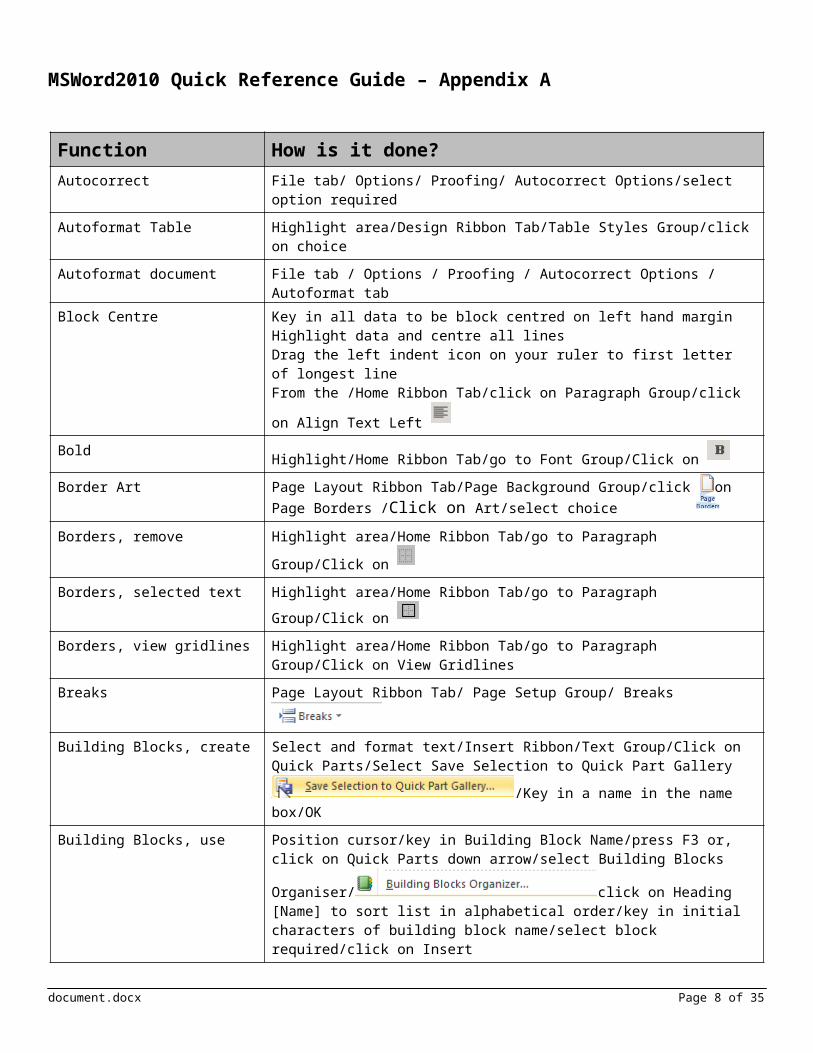
Block Centre Key in all data to be block centred on left hand marginHighlight data and centre all linesDrag the left indent icon on your ruler to first letter of longest line
From the /Home Ribbon Tab/click on Paragraph Group/click on Align Text Left
BoldHighlight/Home Ribbon Tab/go to Font Group/Click on
Border Art Page Layout Ribbon Tab/Page Background Group/click on Page Borders /Click on Art/select choice
Borders, removeHighlight area/Home Ribbon Tab/go to Paragraph Group/Click on
Borders, selected text Highlight area/Home Ribbon Tab/go to Paragraph Group/Click on
Borders, view gridlines Highlight area/Home Ribbon Tab/go to Paragraph Group/Click on View Gridlines
Building Blocks, create Select and format text/Insert Ribbon/Text Group/Click on Quick Parts/Select Save
Selection to Quick Part Gallery /Key in a name in the name box/OK
Building Blocks, use Position cursor/key in Building Block Name/press F3 or, click on Quick Parts down
arrow/select Building Blocks Organiser/click on Heading [Name] to sort list in alphabetical order/key in initial characters of building block name/select block required/click on Insert
Building Blocks, modify Edit text as required/Highlight all text/|Select [Save selection to Quick Part Gallery] from Quick Parts/Click on OK/When prompted with [Do you want to redefine the
building block entry?] /Click on Yes
Bullets, design your own Highlight listHome Ribbon Tab - Paragraph Group
Click on drop down list and Define New BulletClick on SymbolClick on Font/Look in WingdingsDouble click on your choice and select OK
Bullets, turn onHighlight/Home Ribbon Tab/Paragraph Group and click on
document.docx Page 5 of 23
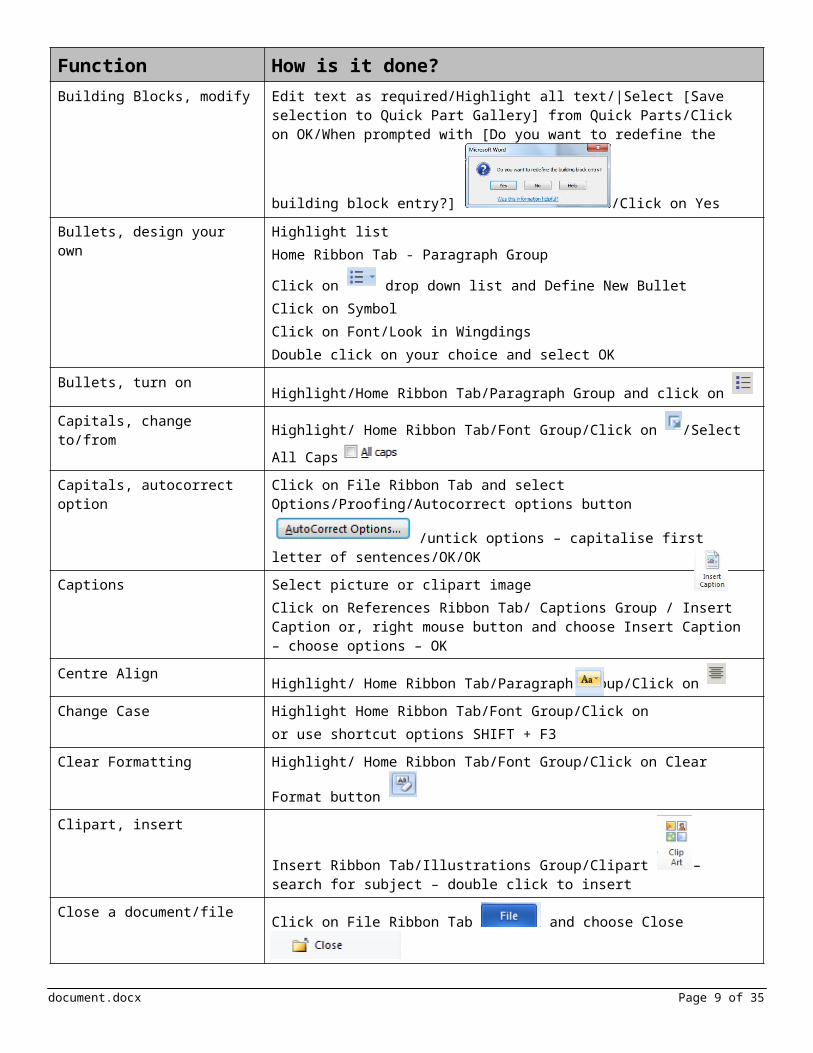
Function How is it done?Capitals, change to/from
Highlight/ Home Ribbon Tab/Font Group/Click on /Select All Caps
Capitals, autocorrect option Click on File Ribbon Tab and select Options/Proofing/Autocorrect options button
/untick options – capitalise first letter of sentences/OK/OK
Captions Select picture or clipart imageClick on References Ribbon Tab/ Captions Group / Insert Caption or, right mouse button and choose Insert Caption – choose options – OK
Centre AlignHighlight/ Home Ribbon Tab/Paragraph Group/Click on
Change Case Highlight Home Ribbon Tab/Font Group/Click onor use shortcut options SHIFT + F3
Clear FormattingHighlight/ Home Ribbon Tab/Font Group/Click on Clear Format button
Clipart, insert
Insert Ribbon Tab/Illustrations Group/Clipart – search for subject – double click to insert
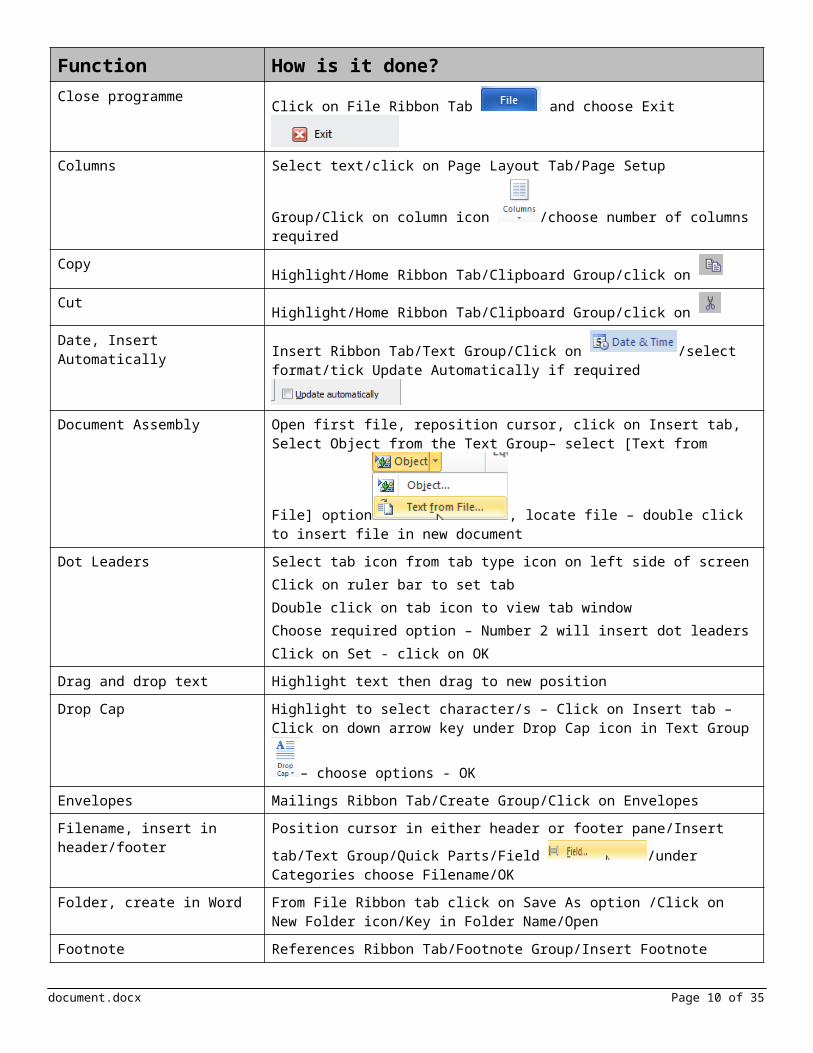
Close a document/fileClick on File Ribbon Tab and choose Close
Close programmeClick on File Ribbon Tab and choose Exit
Columns
Select text/click on Page Layout Tab/Page Setup Group/Click on column icon /choose number of columns required
CopyHighlight/Home Ribbon Tab/Clipboard Group/click on
CutHighlight/Home Ribbon Tab/Clipboard Group/click on
Date, Insert AutomaticallyInsert Ribbon Tab/Text Group/Click on /select format/tick Update
Automatically if required
Document Assembly Open first file, reposition cursor, click on Insert tab, Select Object from the Text
Group– select [Text from File] option , locate file – double click to insert file in new document
document.docx Page 6 of 23
Function How is it done?Dot Leaders Select tab icon from tab type icon on left side of screen
Click on ruler bar to set tabDouble click on tab icon to view tab windowChoose required option – Number 2 will insert dot leadersClick on Set - click on OK
Drag and drop text Highlight text then drag to new position
Drop Cap Highlight to select character/s – Click on Insert tab – Click on down arrow key under
Drop Cap icon in Text Group – choose options - OK
Envelopes Mailings Ribbon Tab/Create Group/Click on Envelopes
Filename, insert in header/footer Position cursor in either header or footer pane/Insert tab/Text Group/Quick Parts/Field
/under Categories choose Filename/OK
Folder, create in Word From File Ribbon tab click on Save As option /Click on New Folder icon/Key in Folder Name/Open
Font, change sizeHighlight/ Home Ribbon Tab/go to Font Group/click on or type in size or use CTRL + ] or CTRL + [
Font, change style Highlight text to be changed/ Home Ribbon Tab/go to Font Group/click on
Footers
Insert Ribbon Tab/Header and Footer Group/click on Select from options or Edit Footer orPosition cursor at bottom left of screen/ Double Click/ Footer pane is activated
Format Painter Select formatted data, from mini toolbar select Format Painter icon and drag over data to be updated – double click on Format Painter to use more than once – click again to turn off feature
Hard Space Delete space first, then hold down CONTROL + SHIFT + SPACEBAR
Headers
Insert Ribbon Tab/Header and Footer Group/click on Select from options or Edit Header
Help Press F1 or Help icon at top right of screen
Insert, a text file into another document
Open first file, reposition cursor, click on Insert tab, Select Object from the Text Group – select [Text from File] option, locate file – double click to insert file in new document
Insert, a picture file Position cursor, click on Insert tab, Select Picture from File icon – locate file – press Insert
ItalicsHighlight/ Home Ribbon Tab/go to Font Group/click on
document.docx Page 7 of 23
Function How is it done?Justify (both sides of document)
Highlight/ Home Ribbon Tab/click on Paragraph Group/click on
Labels Mailings Ribbon Tab/Create Group/Click on Labels
Landscape
Page Layout Ribbon Tab/Page Setup Group/click on arrow and Landscape
Leader Lines/Dots Select tab icon from tab type icon on left side of screenClick on ruler bar to set tabDouble click on tab icon to view tab windowChoose required option – Number 2 will insert dot leadersClick on Set - click on OK
Left AlignHighlight Text / Home Ribbon Tab/click on Paragraph Group/click on
Line Spacing Highlight Text/ Home Ribbon Tab/click on Paragraph Group/click on Line and Paragraph Spacing button
Mail Merge, create data file Create a table in either Excel, Access or Word First row contains field names Enter data for all records under field name categories Save Print Close file
Mail Merge, edit data file Open your data file in either Excel, Access or Word – Edit to make changes - Save the fileor Click on the Mailings Ribbon Tab Click on Select Recipients icon and choose Use Existing List from the [Start
Mail Merge] Group Navigate to file required and double click – this inserts this file to the background
of your Word document
Select Edit Recipient List Click on filename under Data Source option Click on Edit Navigate through forms to make required changes to data Click on Close and then click on OK If a new record is required – from Edit – click on [Add New] – enter new data -
click on Close and then click on OK
document.docx Page 8 of 23
Function How is it done?Mail Merge, create letter/main file New document screen
Click on Mailings Ribbon Tab Click on Start Mail Merge Click on Step by Step Mail Merge Wizard Select Letters Click on Select Recipients Select Use Existing List Navigate to file required and double click to add to the background of your Word
document Position cursor when a field is required and from [Write and Insert Fields]
Group on [Mailings Ribbon] Tab click on [Insert Merge Field] icon down arrow key and choose appropriate field name
Continue until all fields required have been inserted Save file Print main document file with merge codes Leave open to merge
Mail Merge, merge With main file on screen Click on Finish and Merge from [Finish Group] on [Mailings Ribbon] Tab Choose [Edit Individual Documents] Choose All OK All letters will be merged on screen Print what is required or print an individual letter only (Microsoft Office
Button/Print/Print – Current Page – OK) Close file [Letters1] without saving Close main file without saving
Mail Merge, show field shading Click on File Tab – select Options/Advanced – under [Show Document
Content] group to the right of Field Shading select [Always] - OK
Mail Merge, print merge codes Merge document showing field codes on screen – File Ribbon tab – select Options/Advanced – under Print – tick the check box [Print field codes instead of their values] – click on OK
NB – Remember to untick this box when you have finished printing
document.docx Page 9 of 23
Function How is it done?Mail Merge, create labels New document screen
Click on Mailings Ribbon Tab Click on Start Mail Merge Select Labels Choose an option from Label Information and Product Number OK Click on Select Recipients Select Use Existing List Navigate to file required and double click to add to the background of your Word
document Position cursor when a field is required and from Write and Insert Fields Group
on Mailings Ribbon Tab click on Insert Merge Field icon down arrow key and choose appropriate field name
Continue until all fields required have been inserted Click on Update Labels Save label file Click on [Finish and Merge] Choose [Edit Individual Documents] Choose All OK Print labels Close file without saving
Mail Merge, ‘fillin’ codes, insert Position cursor in document/ Insert Ribbon Tab/ Quick Parts from Text Group/ Choose Field/ Choose ‘fillin’ code/ key in prompt/ OK/ Save file
Mail Merge, ‘fillin’ codes, use Main file on screen/ CONTROL + A/ Press F9/ key in text when promptedPrint only – do not save
Margins, change size
Page Layout Ribbon Tab/Page Setup Group/Page Setup/click on Select from options or Custom Margins
Move textHighlight/Home Ribbon Tab/Clipboard Group/click on
New DocumentClick on File Ribbon Tab /New/Blank Document/Create or CTRL + N
Newspaper Columns Select text/click on Page Layout Tab/Page Setup Group/Click on column icon/ choose number of columns required
Numbering, turn on Highlight list/ Home Ribbon Tab/ Paragraph Group
Click on drop down list
Click on your option or Define New Number Format
Numbering, delete separator Highlight list/Home Ribbon Tab/Paragraph Group/Click on Numbering Icon arrow at side/Define New Number Format/in Number Format textbox delete the full stop/OK then click on Decrease Indent icon to take numbered list back to left hand margin
document.docx Page 10 of 23
Function How is it done?Numbering, multi-level Highlight list/Home Ribbon Tab/Paragraph Group/Click on Multilevel List
Icon/Choose option required or Define New List Style
Open a fileClick on File Ribbon tab Choose from Recent option or choose location/double click on filename or CRTL + O
OvertypePress Insert key on keyboard – if not turned on – File Ribbon tab / Options/Advanced/Editing Options/tick option [Use the Insert key to control overtype mode] OK
Page Borders, fancy
Page Layout Ribbon Tab/Page Background Group/click on Click on Art
Page Break, insert Position cursor and then press CTRL + ENTER
Page Break, delete Ensure your document is in Print Layout View – turn on Show/Hide icon from Paragraph Group of Home Ribbon – position cursor on Page Break line – press DELETE
Page Break, to viewTurn on Show/Hide icon from Paragraph Group of Home Ribbon
Page Numbers, insert
Insert Ribbon Tab/Header and Footer Group/click on Select from option from drop down list
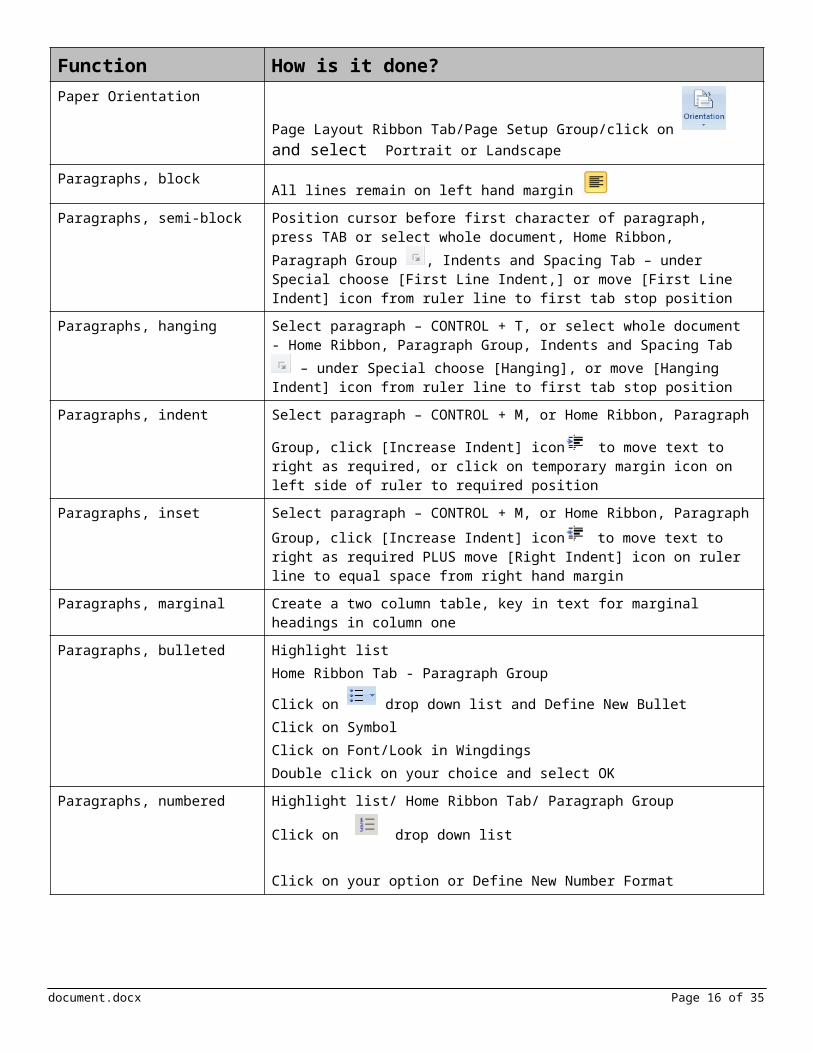
Paper Orientation
Page Layout Ribbon Tab/Page Setup Group/click on and select Portrait or Landscape
Paragraphs, blockAll lines remain on left hand margin
Paragraphs, semi-block Position cursor before first character of paragraph, press TAB or select whole document, Home Ribbon, Paragraph Group , Indents and Spacing Tab – under Special choose [First Line Indent,] or move [First Line Indent] icon from ruler line to first tab stop position
Paragraphs, hanging Select paragraph – CONTROL + T, or select whole document - Home Ribbon, Paragraph Group, Indents and Spacing Tab – under Special choose [Hanging], or move [Hanging Indent] icon from ruler line to first tab stop position
Paragraphs, indent Select paragraph – CONTROL + M, or Home Ribbon, Paragraph Group, click
[Increase Indent] icon to move text to right as required, or click on temporary margin icon on left side of ruler to required position
Paragraphs, inset Select paragraph – CONTROL + M, or Home Ribbon, Paragraph Group, click
[Increase Indent] icon to move text to right as required PLUS move [Right Indent] icon on ruler line to equal space from right hand margin
Paragraphs, marginal Create a two column table, key in text for marginal headings in column one
document.docx Page 11 of 23
Function How is it done?Paragraphs, bulleted Highlight list
Home Ribbon Tab - Paragraph Group
Click on drop down list and Define New BulletClick on SymbolClick on Font/Look in WingdingsDouble click on your choice and select OK
Paragraphs, numbered Highlight list/ Home Ribbon Tab/ Paragraph Group
Click on drop down list
Click on your option or Define New Number Format
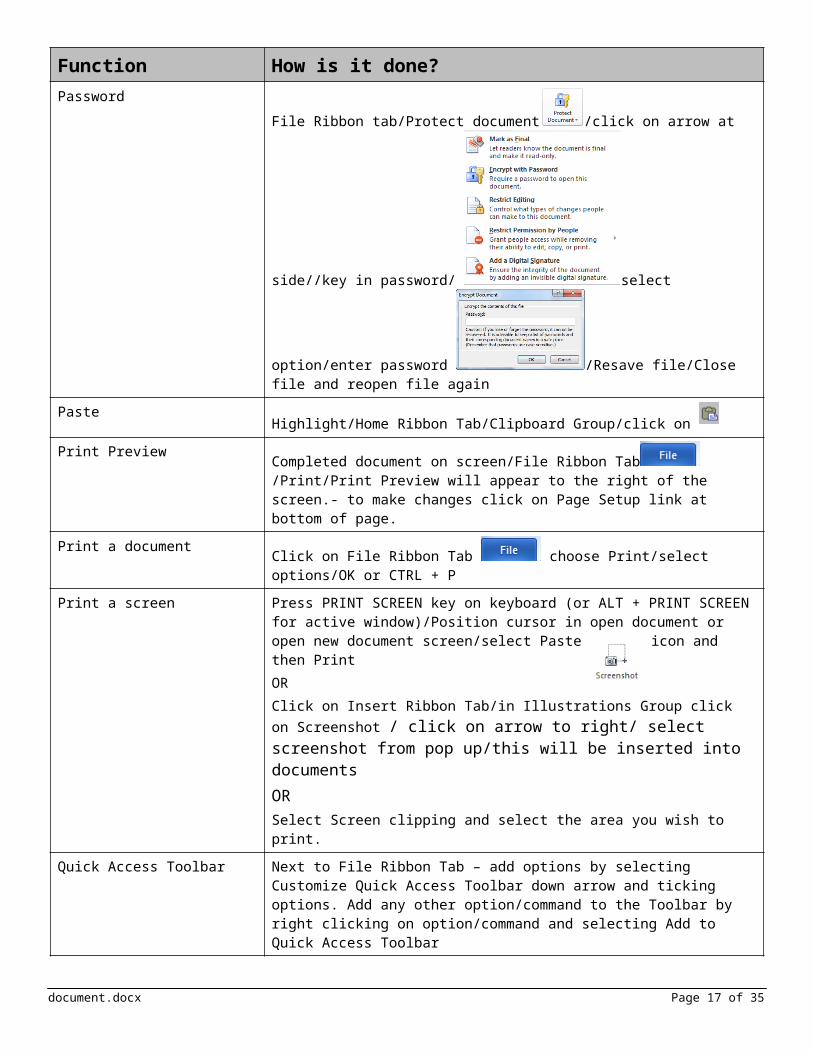
Password
File Ribbon tab/Protect document /click on arrow at side//key in password/
select option/enter password /Resave file/Close file and reopen file again
PasteHighlight/Home Ribbon Tab/Clipboard Group/click on
Print PreviewCompleted document on screen/File Ribbon Tab /Print/Print Preview will appear to the right of the screen.- to make changes click on Page Setup link at bottom of page.
Print a documentClick on File Ribbon Tab choose Print/select options/OK or CTRL + P
Print a screen Press PRINT SCREEN key on keyboard (or ALT + PRINT SCREEN for active window)/Position cursor in open document or open new document screen/select Paste icon and then PrintORClick on Insert Ribbon Tab/in Illustrations Group click on Screenshot / click on arrow to right/ select screenshot from pop up/this will be inserted into documentsORSelect Screen clipping and select the area you wish to print.
Quick Access Toolbar Next to File Ribbon Tab – add options by selecting Customize Quick Access Toolbar down arrow and ticking options. Add any other option/command to the Toolbar by right clicking on option/command and selecting Add to Quick Access Toolbar
Quick Parts Insert Ribbon Tab/ Text Group/ Quick Parts – see Building Blocks – create, use and modify
document.docx Page 12 of 23
Function How is it done?Recently used Documents
File Ribbon tab /Recent/select Document from list
Redo Click on Redo Icon on Quick Access Toolbar
ReplaceHome Ribbon Tab/Editing Group/Click on
Reverse Colour Highlight text/Home Ribbon Tab/Shading /Choose Black
Read Only Go to File Ribbon Tab/Information/Permissions/ Click on Protect Document button
/Mark as Final – Save the file
Ribbon Tabs Click on Ribbon Tab type on left hand side of ruler/click on Ruler position/double click for options
Ribbon Tabs, with Leaders Click on Ribbon Tab type on left hand side of ruler/select Right Ribbon Tab/click on Ruler position/double click for options/select type of leader required
Ribbon Table of ContentsReferences Ribbon Tab/Ribbon Table of Contents Group/
Right AlignHighlight/ Home Ribbon Tab/Paragraph Group/click on
Ruler, turn on Click on View Ruler button on top of vertical scroll bar
Save a fileClick on File Ribbon tab Click on Save As/choose location/choose type of file/key in filename/Save or CTRL + S
ShadingHighlight/ Home Ribbon Tab/Paragraph Group/click on and select a colour or more colours
SpellcheckClick on Quick Access Toolbar/ or Right Mouse Button on underlined word and choose option or Review Tab/Proofing Group
document.docx Page 13 of 23
Function How is it done?Styles (for Headings, etc)
Highlight/click on Styles Group/click on style of your choice eg
SubscriptHighlight/go to Font Group/Click on /Select Subscript
SuperscriptHighlight/go to Font Group/Click on /Select Superscript
Resave a File Document on screen/Click on Save icon on Quick Access Toolbar or CONTROL + S
Table, insert Click on Insert Ribbon Tab/Choose Table/click and drag number of columns and rows required, or choose Insert Table, key in number of columns and rows required and select OK
Table, insert borders Select table - Click on border icon from Paragraph Group of Home Ribbon - Click on outside border
Table, clear borders Select table/Home Ribbon Tab/Paragraph Group/click on Border icon/choose No Border
Table, show or hide gridlines Select table/Home Ribbon Tab/Paragraph Group/click on Border icon/choose Show or Hide Gridlines
Table, delete Select table/Insert Ribbon Tab/under Table Tools Tab/Layout/click on Delete or Select Table in Print Layout View and print Backspace
Tables, adjust column width Position mouse pointer on vertical line between columns (changes to double-headed arrow) click and drag to left or right or double click
Tables, selecting text Select a cell by clicking to left of cell Select a row by clicking in selection bar at side of row or double click in the
selection bar at edge of cell Select a column by positioning the mouse pointer on top grid line above column
until small black arrow appears then click Select whole table clicking on select all icon top left of table, or position cursor
in the selection bar and triple click Click and drag to select a number of cells, rows or columns
Tables, adjust row height In Print Layout View, rest the pointer on the row boundary to be moved unit it becomes a two-headed arrow and then drag the boundary to required position, or
Select cell/row Click right mouse button – choose Table/Properties/Row - Specify row height OK
Table, centre horizontally Select whole table From Home Ribbon, Paragraph Group, click on Centre, or Choose Layout tab from under Table Tools Tab, click on Properties, select
Table tab and choose Centre – click on OK
Table, centre vertically Click on Page Layout Tab/Page Setup Group/Layout Tab Click on centre in vertical alignment list box OK
Table, merge cells Select row or cells Click with right mouse button and select Merge, or under Layout Tab of
Table Tools – click on Merge
document.docx Page 14 of 23
Function How is it done?Tables, format Select column or row
Choose any formatting feature through Design Tab or Layout Tab under Table Tools or click on any features on the Home Ribbon
Tables, text alignment Select column or row and click on left, right, centre alignment from Paragraph Group on the Home Ribbon
Money columns are always right-aligned
Table, autoformat Select table Click on Design Tab under Table Tools Highlight a predefined option in the Table Styles Group
Table, sorting Select text excluding column headings - (make sure selection remains in table only)
From Layout tab under Table Tools Tab select - Sort Choose options - column 1/2/3, text or number, ascending or descending OK
Table, adding rows Select the row below where the new row/rows will appear Right mouse button - Click on Insert Select row above or row below, orAdding row/rows at the end of the table Position cursor in last cell and press TAB
Tables, adding columns Select the column to the right of where the new column is to be inserted Right mouse button and choose Insert Click on columns Select column to left or column to right
Tables, deleting columns/rows Select row or column to be deleted Right mouse click in selected area Choose Delete Column or Delete Row
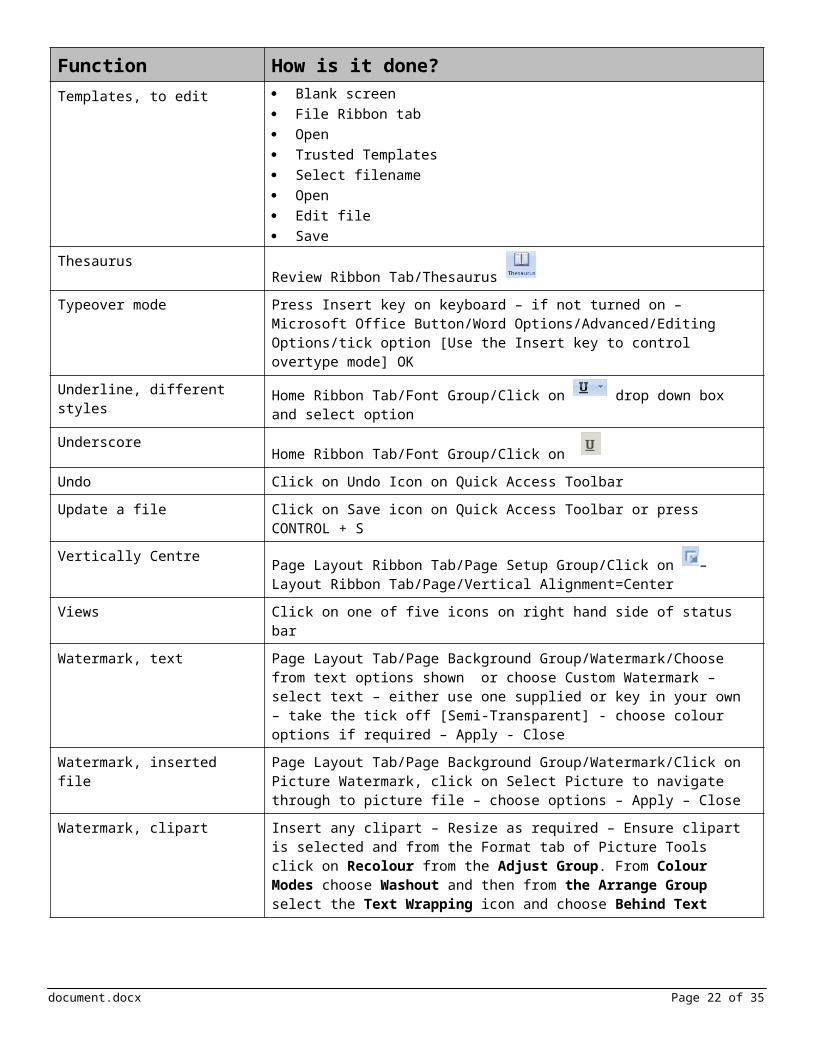
Templates, create Document on screen Click on Save As from the File Ribbon tab Choose [Trusted Templates] Key in filename Select template from [Save as type] Save
Templates, to use Blank screen File Ribbon tab New My templates Click on filename OK
document.docx Page 15 of 23
Function How is it done?Templates, to edit Blank screen
File Ribbon tab Open Trusted Templates Select filename Open Edit file Save
ThesaurusReview Ribbon Tab/Thesaurus
Typeover mode Press Insert key on keyboard – if not turned on – Microsoft Office Button/Word Options/Advanced/Editing Options/tick option [Use the Insert key to control overtype mode] OK
Underline, different styles Home Ribbon Tab/Font Group/Click on drop down box and select option
UnderscoreHome Ribbon Tab/Font Group/Click on
Undo Click on Undo Icon on Quick Access Toolbar
Update a file Click on Save icon on Quick Access Toolbar or press CONTROL + S
Views Click on one of five icons on right hand side of status bar
Watermark, text Page Layout Tab/Page Background Group/Watermark/Choose from text options shown or choose Custom Watermark – select text – either use one supplied or key in your own – take the tick off [Semi-Transparent] - choose colour options if required – Apply - Close
Watermark, inserted file Page Layout Tab/Page Background Group/Watermark/Click on Picture Watermark, click on Select Picture to navigate through to picture file – choose options – Apply – Close
Watermark, clipart Insert any clipart – Resize as required – Ensure clipart is selected and from the Format tab of Picture Tools click on Recolour from the Adjust Group. From Colour Modes choose Washout and then from the Arrange Group select the Text Wrapping icon and choose Behind Text
Widow/Orphan Home Ribbon/Paragraph Group/Line and Page Breaks tab – ensure there is a tick beside the option Widow/Orphan control – click on OK
WordArt Insert Ribbon/WordArt
Word CountReview Ribbon Tab/Proofing Group Word Count button or check left hand side of status bar at bottom of screen
Word – Exit ProgramClick on File Ribbon tab and choose Exit or Close icon on top right of screen
Word – Start Program Click on Start/All Programs/Microsoft Office/Microsoft Word 2010
Zoom Drag zoom slider on right hand side of status bar
document.docx Page 16 of 23
Common Proofreading Symbols- Appendix B
Instruction Symbol / margin mark Result
Change to single line spacing (D/S double OR 1 1/2 spacing)
This text should be single spaced
Insert a character The product has a guarantee
Insert a wordDevelop your speaking skills
Insert space between words
Suggestions are included
Insert space between paragraphs
Length of course
Enrolment period
Delete letters OR words The box is full...
Do not change / leave as isThe students will be assessed
Change to capital letters ORDear Sir
USE BLOCK LETTERS
Change to lower case Yours sincerely
Change to italics An issue of Health Today
Change to bold An issue of Health Today
Start a new paragraph These are now available.
Please place...
Run on (not a new paragraph)
Place your order now by fax or phone.
document.docx Page 17 of 23
Sample Business Letter – Appendix C
THIS IS WHERE YOU WILL NORMALLY FIND A LETTERHEADBalance your letter so it sits nicely on the page and is pleasing to the eye
12 February 20XX (enter 3-6 times – use this space to adjust the letter to fit onto one page)
The ManagerWilson & Wiseman48 Beach RoadEDGECLIFF NSW 2483 (two spaces between – enter twice - one blank line)
ATTENTION Mr J WISEMAN (optional – not in every letter) (enter twice – one blank line)
Dear Sir (enter twice – one blank line)
FULLY BLOCKED OPEN PUNCTUATION STYLE LETTER (subject line – optional – bold and or caps to emphasise) (enter twice – one blank line)
This sample letter contains all the basic letter parts and in the order that they should appear. All paragraphs are blocked at the left margin. (enter twice – one blank line)
The lines above and below the paragraphs contain no punctuation. The paragraphs contain only functional punctuation. All capitals are used for the attention line and subject lines which are additional letter parts. You may prefer to bold these lines.
The enclosure notation is used only when a document is to accompany the letter.
Yours faithfully (complimentary close – note lowercase f for faithfully)(enter 3-6 times – use this space to adjust the letter to fit onto one page)
Alexandra TurnerTeam Leader (enter twice – one blank line)
at.nc (authors initials followed by typist initials) (enter twice – one blank line)
enc (if enclosing something with letter).
document.docx Page 18 of 23
9 March 20XX
Mr C Wadley39 Fortune StreetTIGHES HILL NSW 2297
Dear Mr Wadley
CONTRIBUTION CONFIRMATIONMEMBER NUMBER 9039912
MoneySuper can confirm that your Member Lump Sum contribution of $500.00 was allocated to your account as a non concessional contribution on 5 March 20XX.
This contribution will appear on your next Benefit Statement. Please keep a copy of this letter for your records.
If you require any further assistance, please contact us on 1800 000 123.
Yours sincerelyMoneySuper
Peter WatsonExecutive Manager.pw.your initials
document.docx Page 19 of 23
Capitals & bold
Multi Page Letter and Memo Instructions – Appendix D
Each continuation page must have a heading to identify it with the letter or memo to which it belongs.
CONTINUATION PAGES – MULTI-PAGE LETTERSThe heading should contain: The page number The addressee (company name or if none, name letter addressed to) Today’s date
Example
2(Enter twice)Mr J Smith30 May 2013
CONTINUATION PAGES – MULTI-PAGE MEMOSThe heading should contain: The page number The subject of the memo Today’s date
Example
2(enter twice)Financial Procedures30 May 2013(enter three times)
METHODEnter text for the letter or memo, allowing the text to automatically wrap to the new page/s.Select “Insert”,” Header”, choose 1st option, Different First Page, Key in the following:
Example:
2(Enter twice)ABC Corporation Pty Ltd30 May 2013
Close Header and Footer
document.docx Page 20 of 23
Creating Labels – Appendix E
When doing a mail merge you may wish to create mailing labels to attach to the envelopes. You can purchase self-adhesive labels from stationery suppliers for this purpose. You will get the label size to use from the package of labels.
1 Open a new document. Click on Mailings Ribbon tab. Click on Start Mail Merge. Step by Step Mail Merge Wizard. Select Labels. Next – Starting Document. Label Options, choose an option from Label Information and Product Number. (Avery A4/A5, L7160 or other product number). Click on OK.
2 Click on Select Recipients, Select Use and Existing List.
3 Find the file required (this is your data table, usually filename data) to add to the background of your Word document. It will show the first label as blank and others with <next records>. This is normal.
4 In the first label position the cursor when a field is required and from the Write and Insert Fields Group on the Mailings Ribbon Tab click on Insert Merge Field icon down arrow key and choose appropriate field name (eg Title, Lastname)
5 Continue until all fields required have been inserted.6 Click on Update Labels
7 Save the Label file
8 Click on Finish and Merge, Choose Edit individual documents, Choose All, click on OK. Your labels will appear as they are to be printed.
9 Print the labels
10 Close the file without saving.
document.docx Page 21 of 23
Multi Page Merge Letter and Labels – Appendix F
LETTERHEAD
Create a letterhead template with the following details and display attractively including logo/clipart. Insert the filename, your name and today’s date in the footer. Save as Lowndes Letterhead.
Prepare a data file with the following records. Insert the filename, your name and today’s date in the footer. Save as After School Data. Don’t forget to proofread.
Fields:
TitleFnameSnameAddressCityStatePcodeChild
Record details:
Ms Karen Walker, 27 June St, Bury, NSW 2778, KateMrs Rowena Small, 89 Smith Avenue, Lowndes NSW 2789, TylerMrs Everlyn Nguyen, 10/3 Fern Street, Lowndes NSW 2789, Ruby
Type the following letter, using your Lowndes Letterhead template. This is a multi-page letter, so remember to insert appropriate details in the second page header. Refer to Appendix C - Sample Business Letter Layout and D - Multi Page Letter Instructions in your logsheet before starting. Notify your facilitator when complete – DO NOT PRINT. Don’t forget to proofread. Insert the filename, your name and today’s date in the footer. Save as After School Main Letter.
Date
Dear
AFTER-SCHOOL EDUCATION PROGRAM
You wrote to me a few weeks ago asking for information about the After-School Education Program for your child <Child>. The program for next year is now settled and a brochure is being designed and printed. In the meantime, I am writing with advance info to you and other parents who have enquired about our program.
Insert Music file here
Insert Art file here
Insert Computer Studies file here
ENROLMENTEnrolment for all courses is Monday 3 February. You should enrol at Bury High School, Swan Street, between 9:00 am and 3:30pm on that day. Alternatively you may enrol online.
Yours sincerely
Susan GageCoordinator
Reference initials
MERGE
Complete your merge. . Notify your facilitator when complete – DO NOT PRINT
LABELS
Create labels for your letters. Refer to Appendix E, Creating Labels handout if needed. Notify your facilitator when complete – DO NOT PRINT